DONATION DRIVE - SUPPORT MSW - DO YOUR PART TO KEEP THIS GREAT FORUM GOING!
×
ClipperFan
-
Posts
2,171 -
Joined
-
Last visited
Content Type
Profiles
Forums
Gallery
Events
Everything posted by ClipperFan
-
 Vladimir, your overall shots confirm the impressive beauty of your build as well as your dedication to reproducing a very accurate representation of Glory herself. Michael Mjelde likes my proposal of writing an NRG article describing how we are carefully recreating "GLORY of the SEAS" through our introspective evaluation of the many rare, unseen photos he's shared with us. In light of this, I think having comparison shots where the models are in identical positions as the historic photos, so observers can see how accurately your work has been done.
 -
Rob, Happy 37th Anniversary!!!! Definitely have an epic celebration!!!!
-
Rob, nice start. From the overview you've shared, it's clear that this was a very large structure. I'm going by memory. As far I can recall this long house was 54' long × 24' wide and 8'3" high. From the few pictures available, this structure was far more plain than the more ornate Carriage House. There were similar embellishments between the upper windows but the lower section was unadorned. The same roof treatment is apparent as the Rear House. The doors definitely appear to be all sliders.
-
Vladimir, your model is shaping up quite nicely. I agree with Rob, your coppering job is first rate! That you did anything different with the sidelong Carriage House rail stanchions isn't even noticeable. My only bone of contention is the rear Companionway is too short. I'm sure you agree. Maybe you could lop of the top, insert a section and reattach the top to make it just high enough for the rear rail to attach to it. Of course, this is just a suggestion, it's your model, not mine, so you decide what you feel most comfortable with. The rest of your Glory is top shelf. I particularly appreciate the over all scenes of her busy deck. As for the chicken coop over the main hatch. I've read that as soon as a vessel was underway, the ship's carpenter would raise structures over all the hatches to store livestock, sometimes including even cows! Rob's right that at launch the structure wouldn't be on yet. Again it depends on what you feel comfortable with as it's nobody's model but yours and it's already a beauty.
-
Rob, nicely done!
-
Rob, I don't think anyone is trying to fault you. It's more about reassuring observers that the actual vessel is correct vs a modeler's efforts to duplicate it. Besides that though, did you ever think, when you began this project over a year ago now, that anyone would be so interested that they would be questioning ladder risers?
-
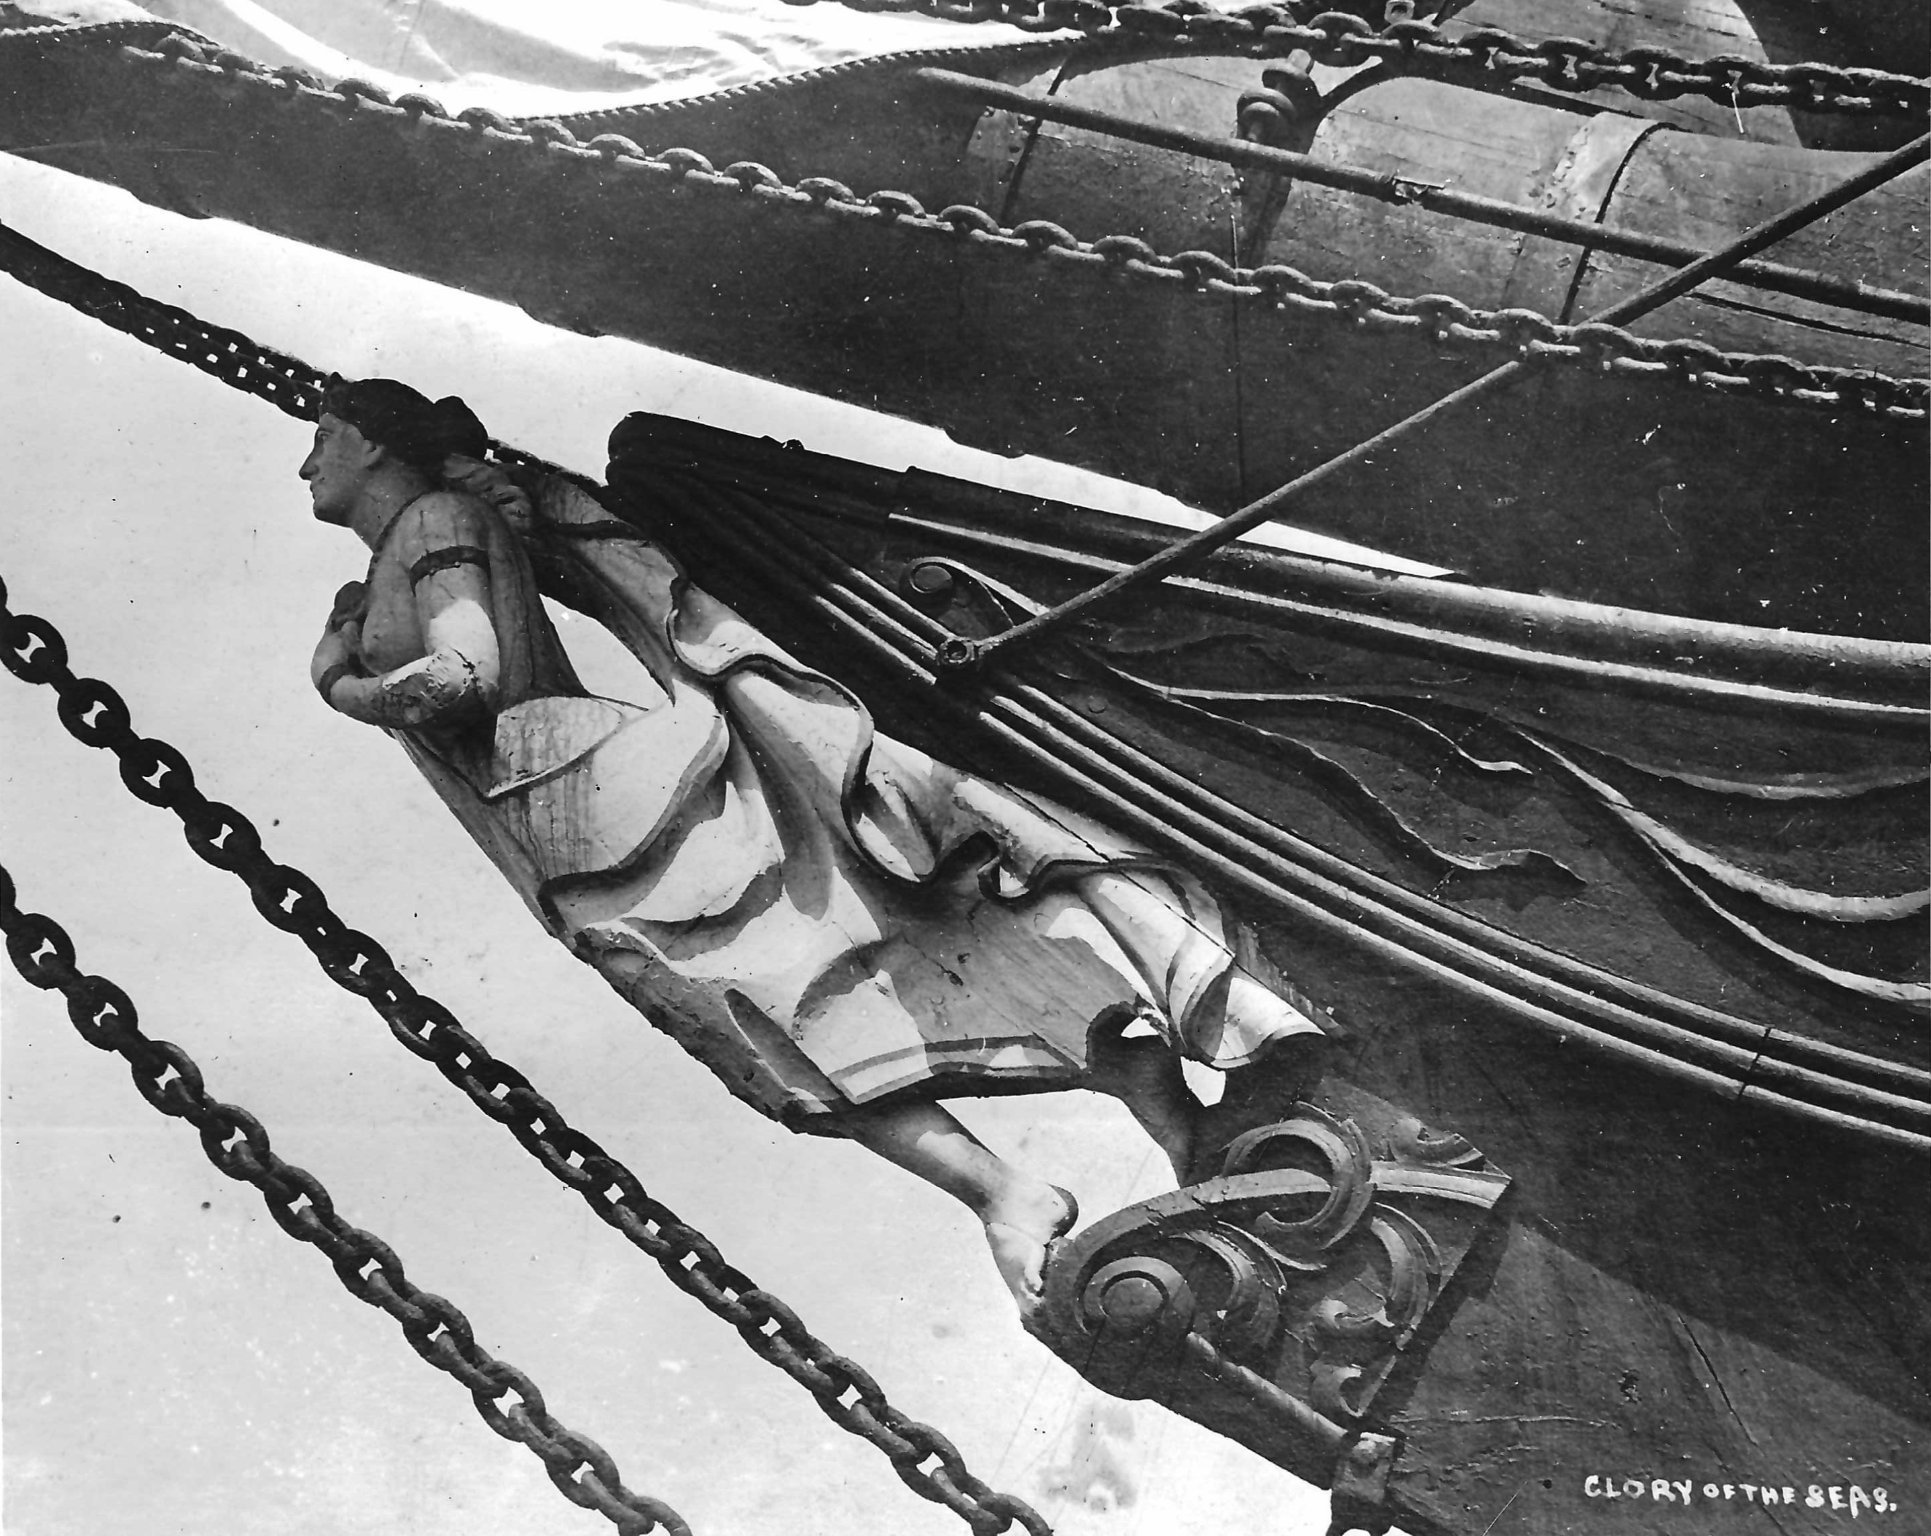
Vladimir, when you noticed how tiny your figurehead was you were right. Comparing where the head of your model ends with these two images of the Athene figurehead on Glory herself shows that yours is much too small. On your model, your figure's head is still below the tips of the naval hoods above her. On the actual vessel, Glory's head of the Grecian Goddess is ahead of and slightly above those naval hoods. Observe closely, you can see her forehead aligns neatly between band #3 & #4 on the bowsprit above. Also, it's hard to tell from her missing right arm but originally she held the top of her toga in her down turned right hand which causes a loop in the formation of the figurehead herself. This is a critical section of your model, deserving extra attention as it's the lovely figurehead gracing the bow which completes Glory's beautiful look.


-
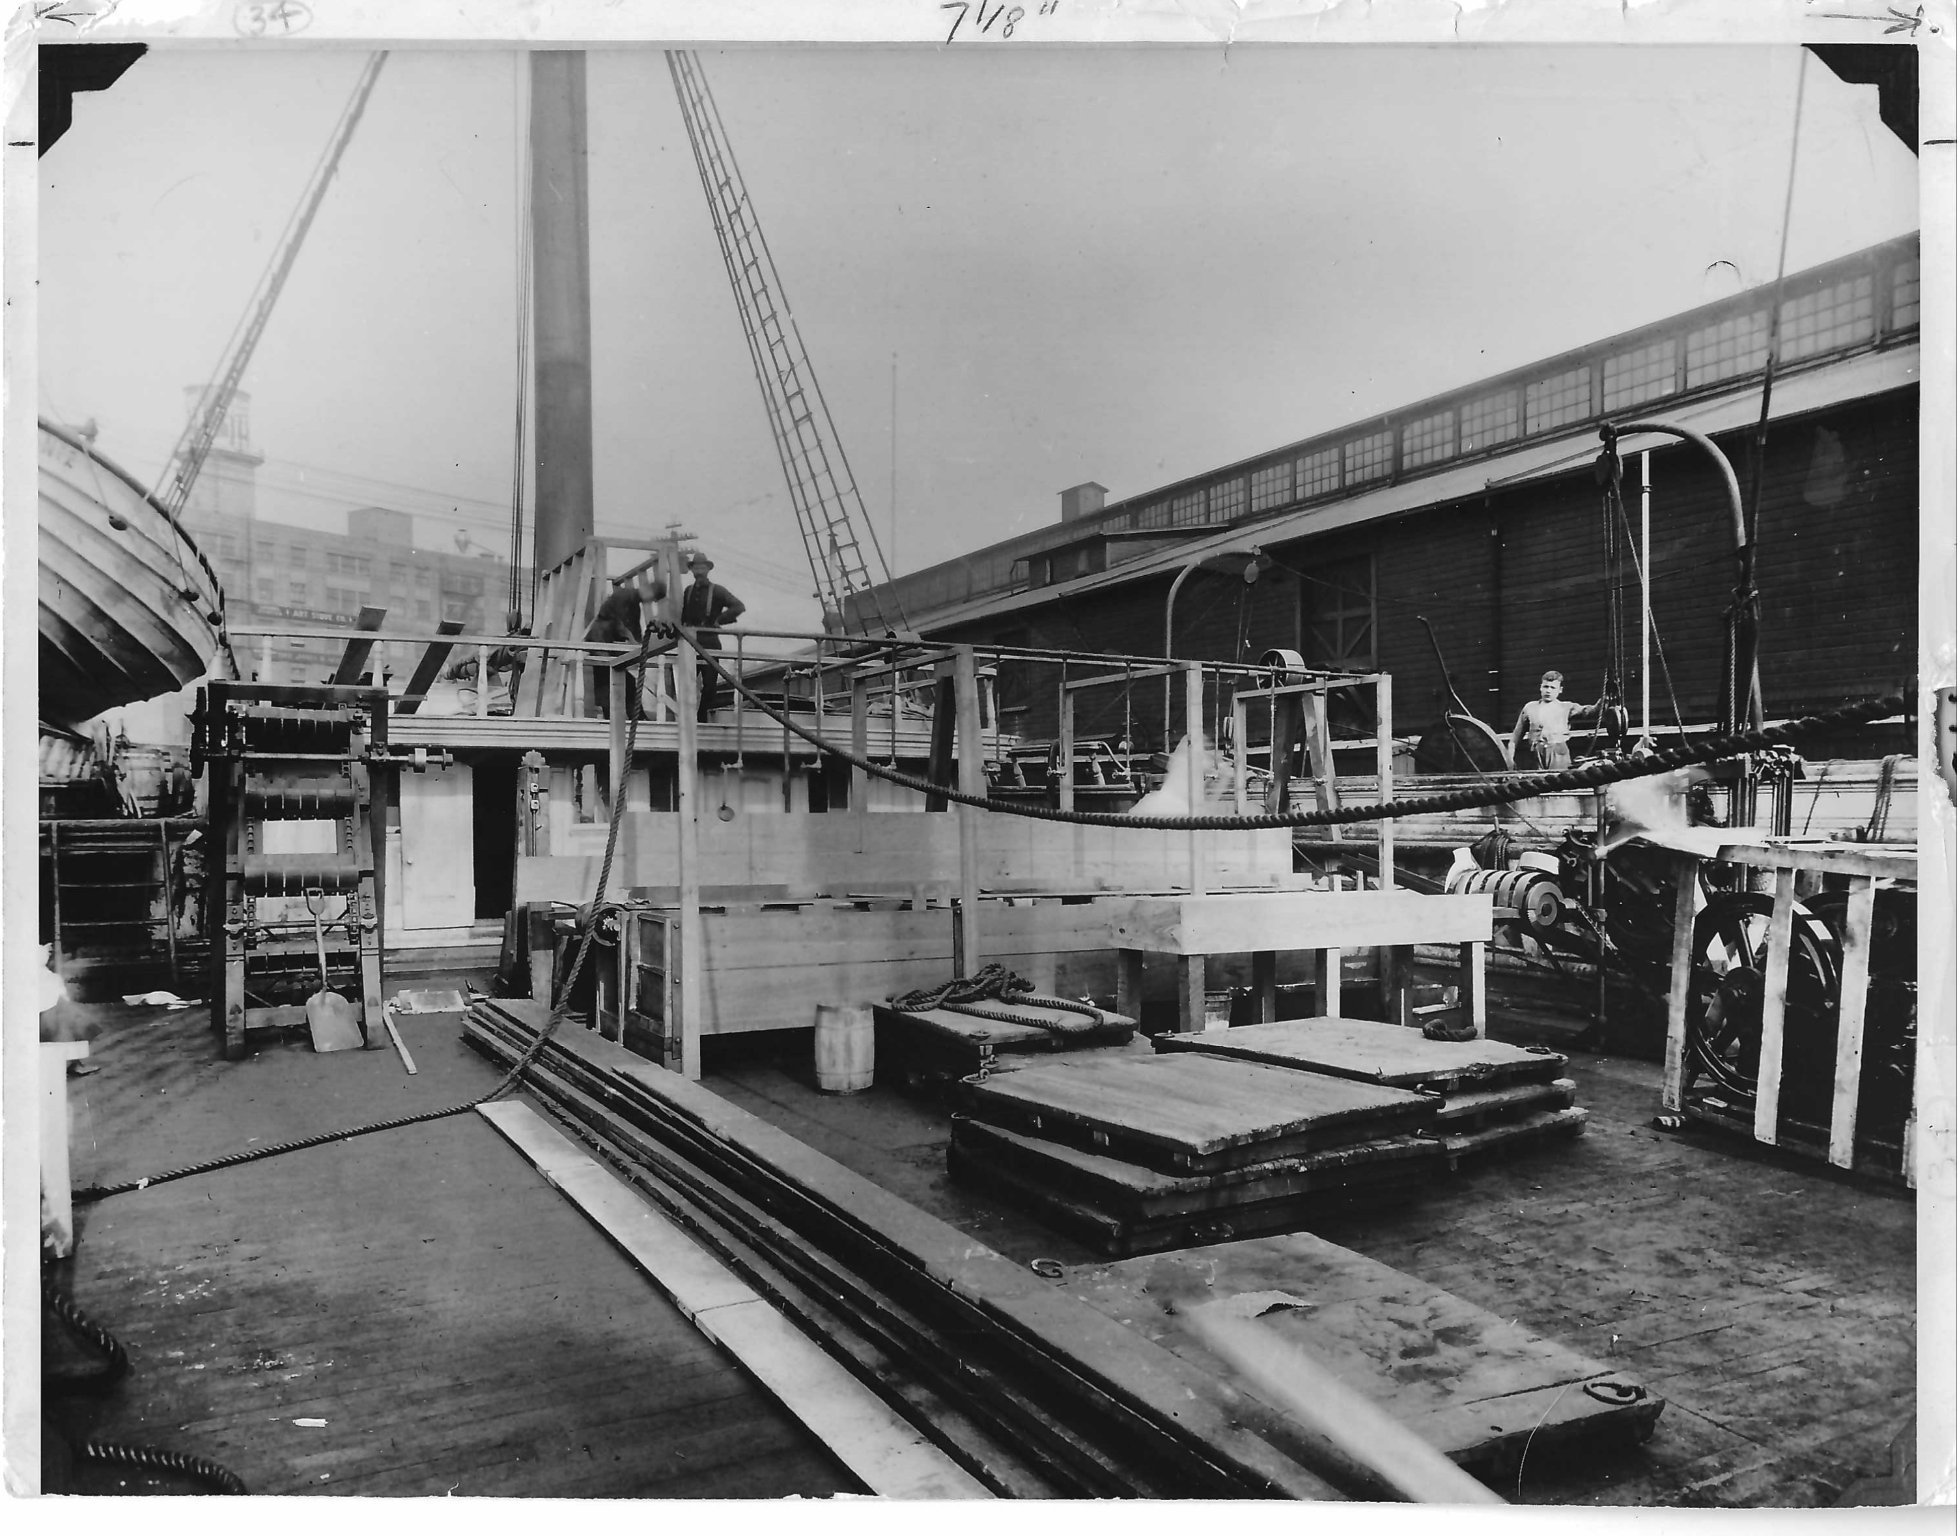
Dowmer, of course photographic evidence is correct. In the busy image of Glory's main deck undergoing conversion to being a factory vessel, it's clear that, while the highest step is just below, both rungs of Starboard steps actually attach to the upper poop deck itself. I guess a downside to having so much photographic, verifiable evidence available is that intrepid modelers like Rob and Vladimir are open to stricter scrutiny than ever before.
-
Rob, I passed on your compliment to my wife. She replied that your amazing and that she wishes she had the talent you do. Yes, I was pleased to see you managed to get the corner posts in that tight area. Well done.
-
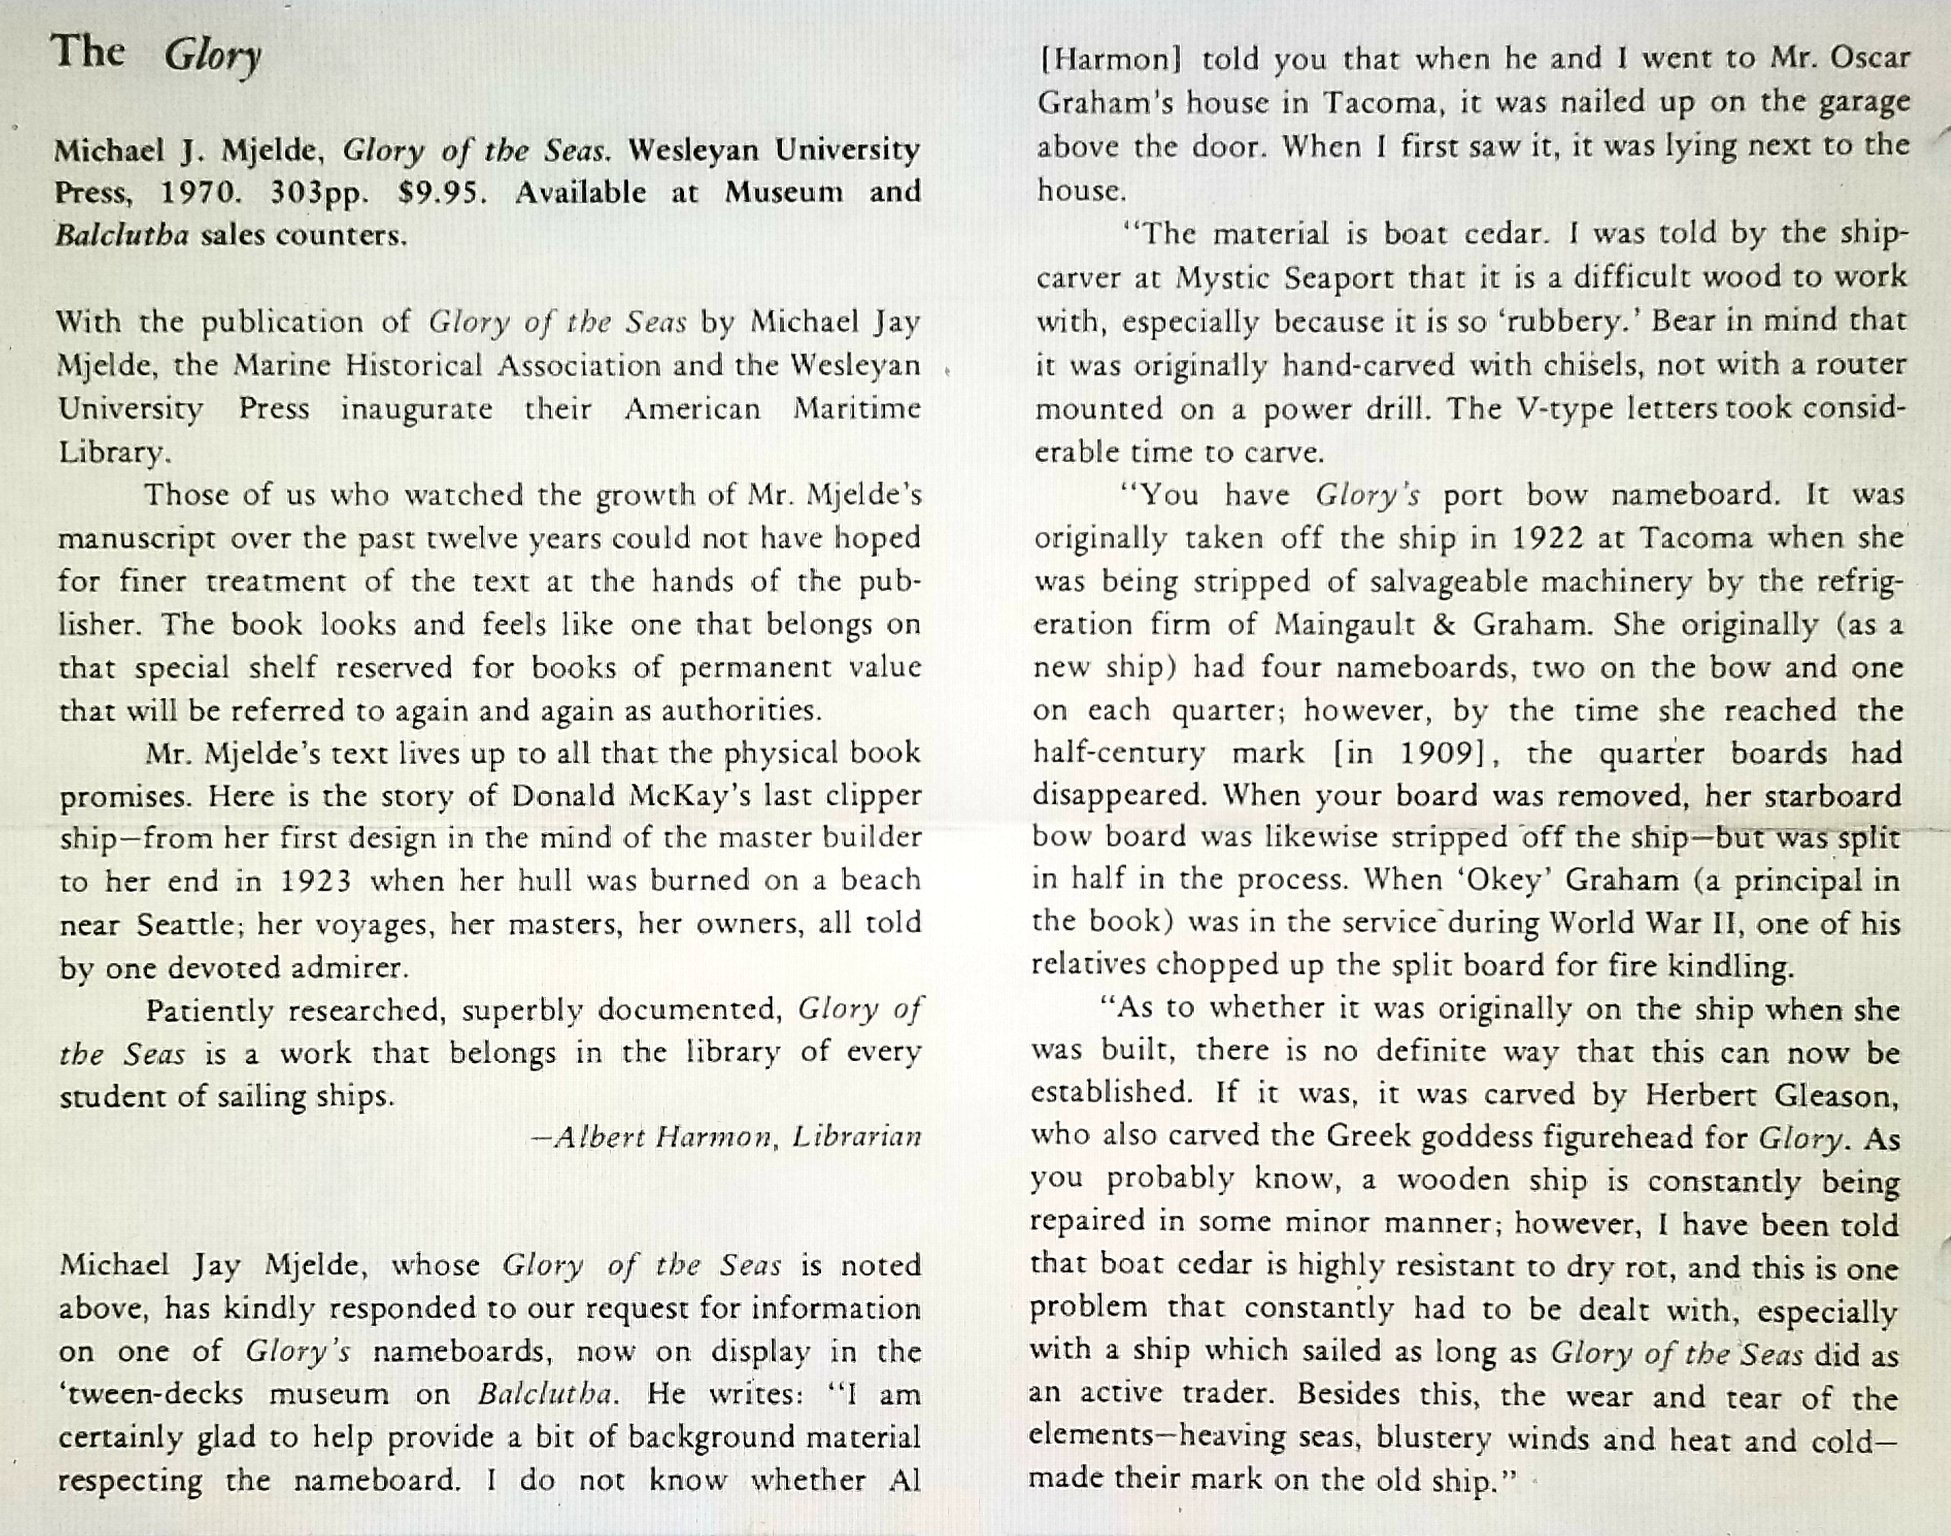
Rob, Vladimir months ago, back when we were learning about Glory's nameboard, Michael Mjelde shared a pdf file of an August 1970 San Francisco Maritime Museum News Letter. In it he discusses discovery of the Port Bow nameboard which fortunately survived being extracted from the vessel as well as being stored mounted to a garage wall in Tacoma. It's a fascinating read.
-
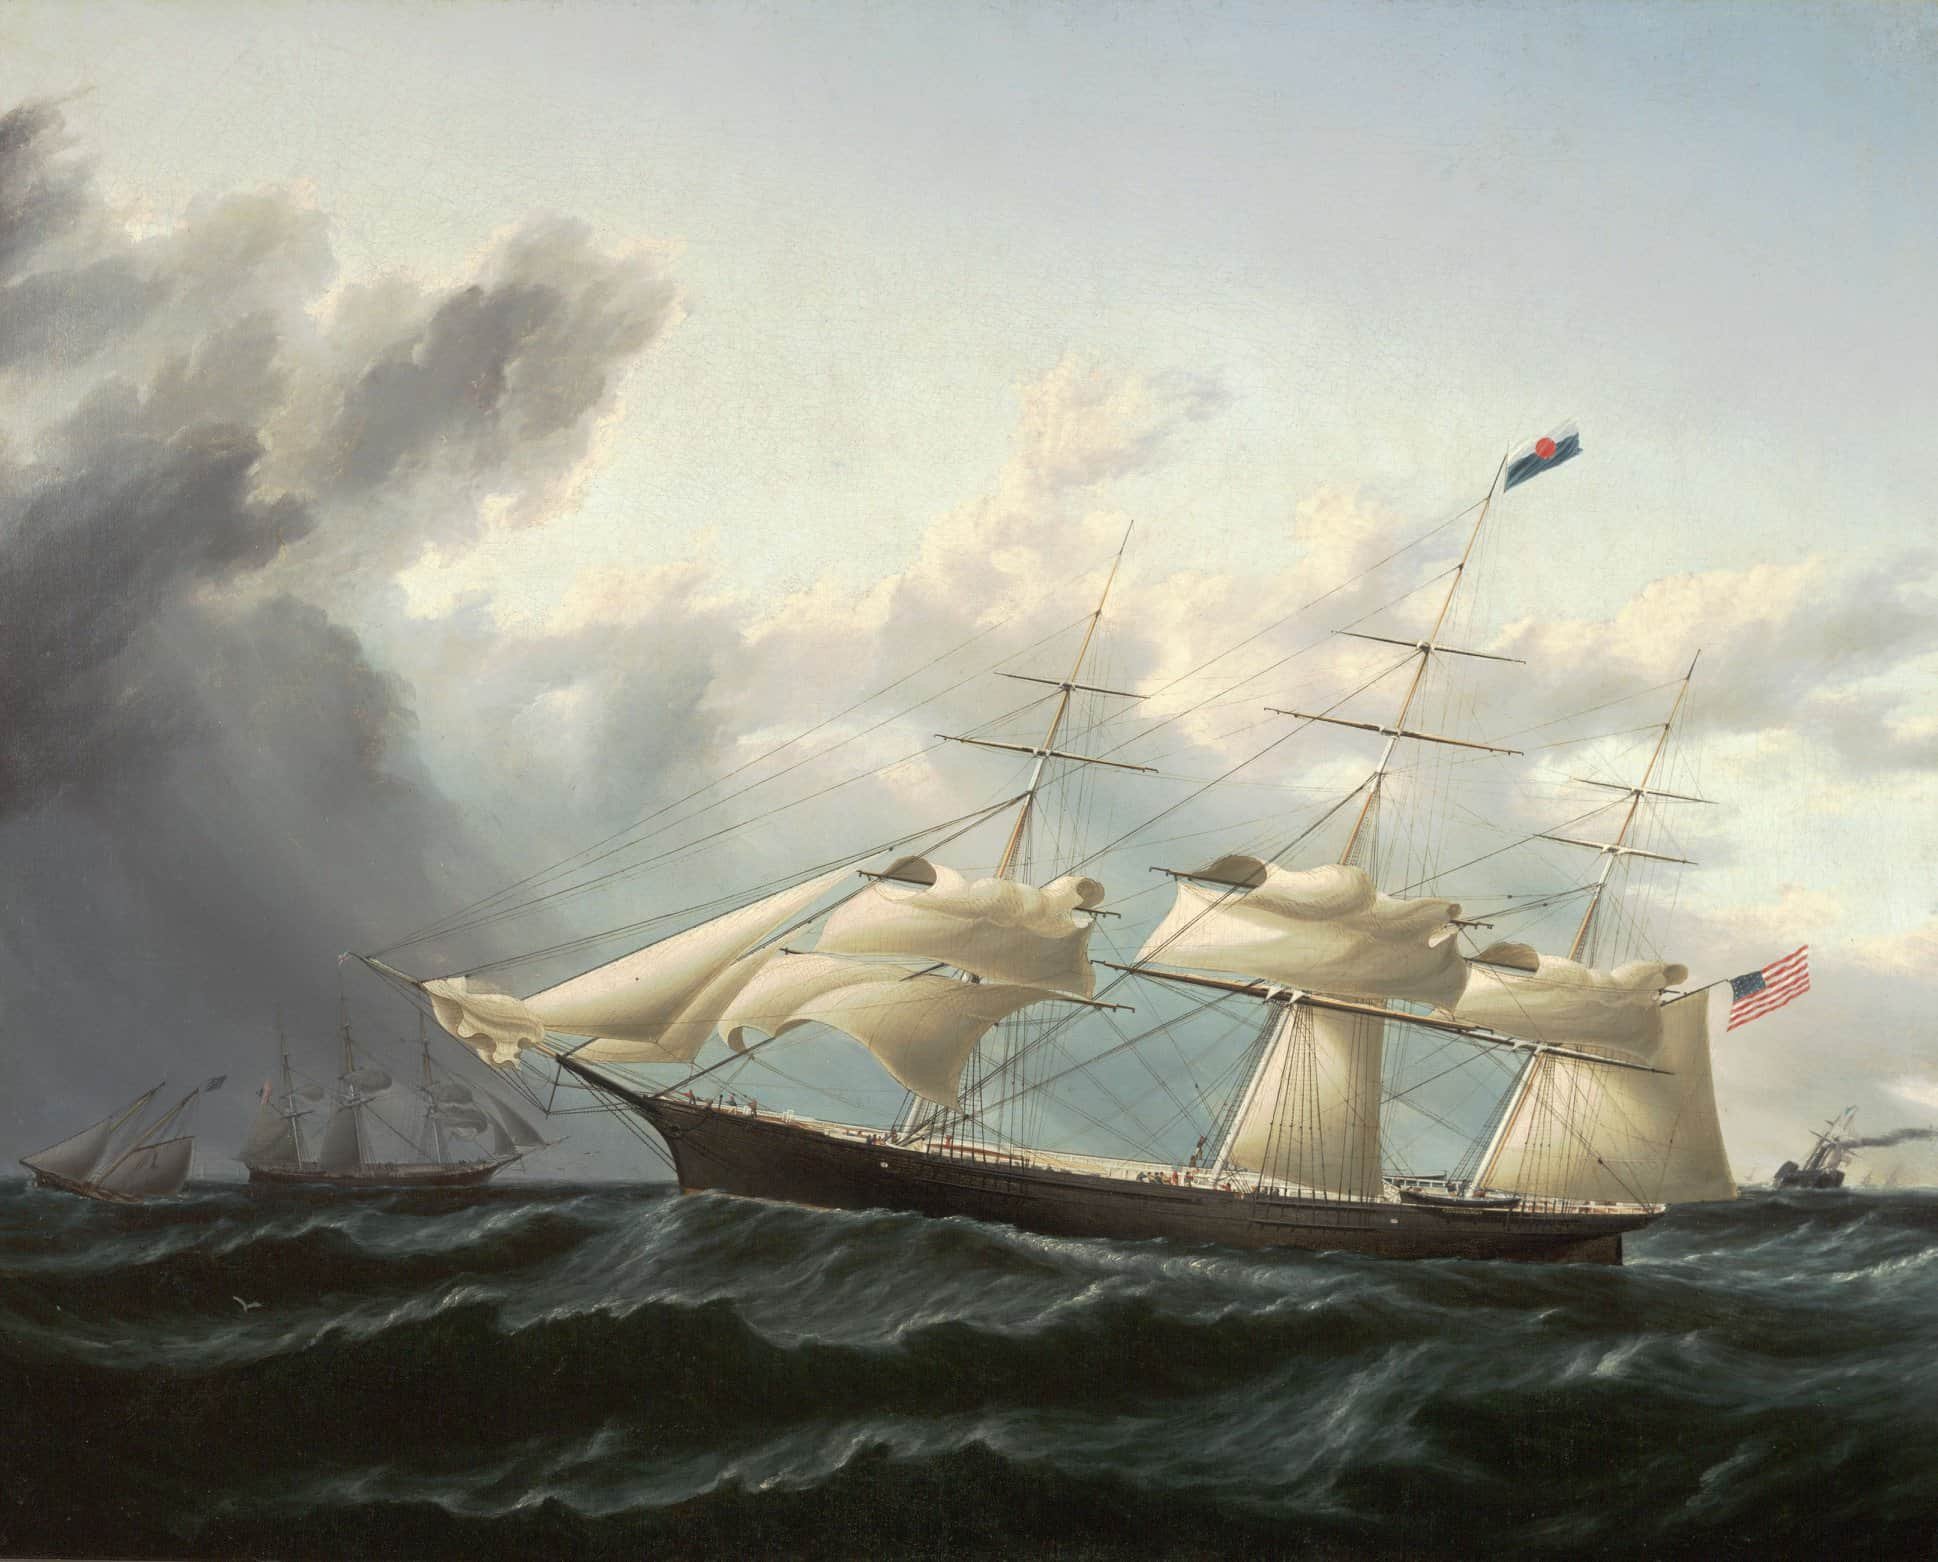
Rob, once again my wife Peg has the best reactions, just one sentence "Oh wow, that's awesome!" She did follow up teasingly with a silly question. "Ask him if he'd like to build a little house for me?" Honestly, adding the Carriage House surrounding rail with a fresh coat of white paint really ties the entire Stern area together nicely. As for the Walters' painting, I also noticed the missing vent structure and inaccurate iron rail shape. I have no good answer for why that fascinating item is missing. At least the addition of the rail proves it was there. Photos are more accurate, which is why we have focused so much of our efforts in diagnosing them as our main means of reconstructing Glory.
-
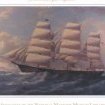
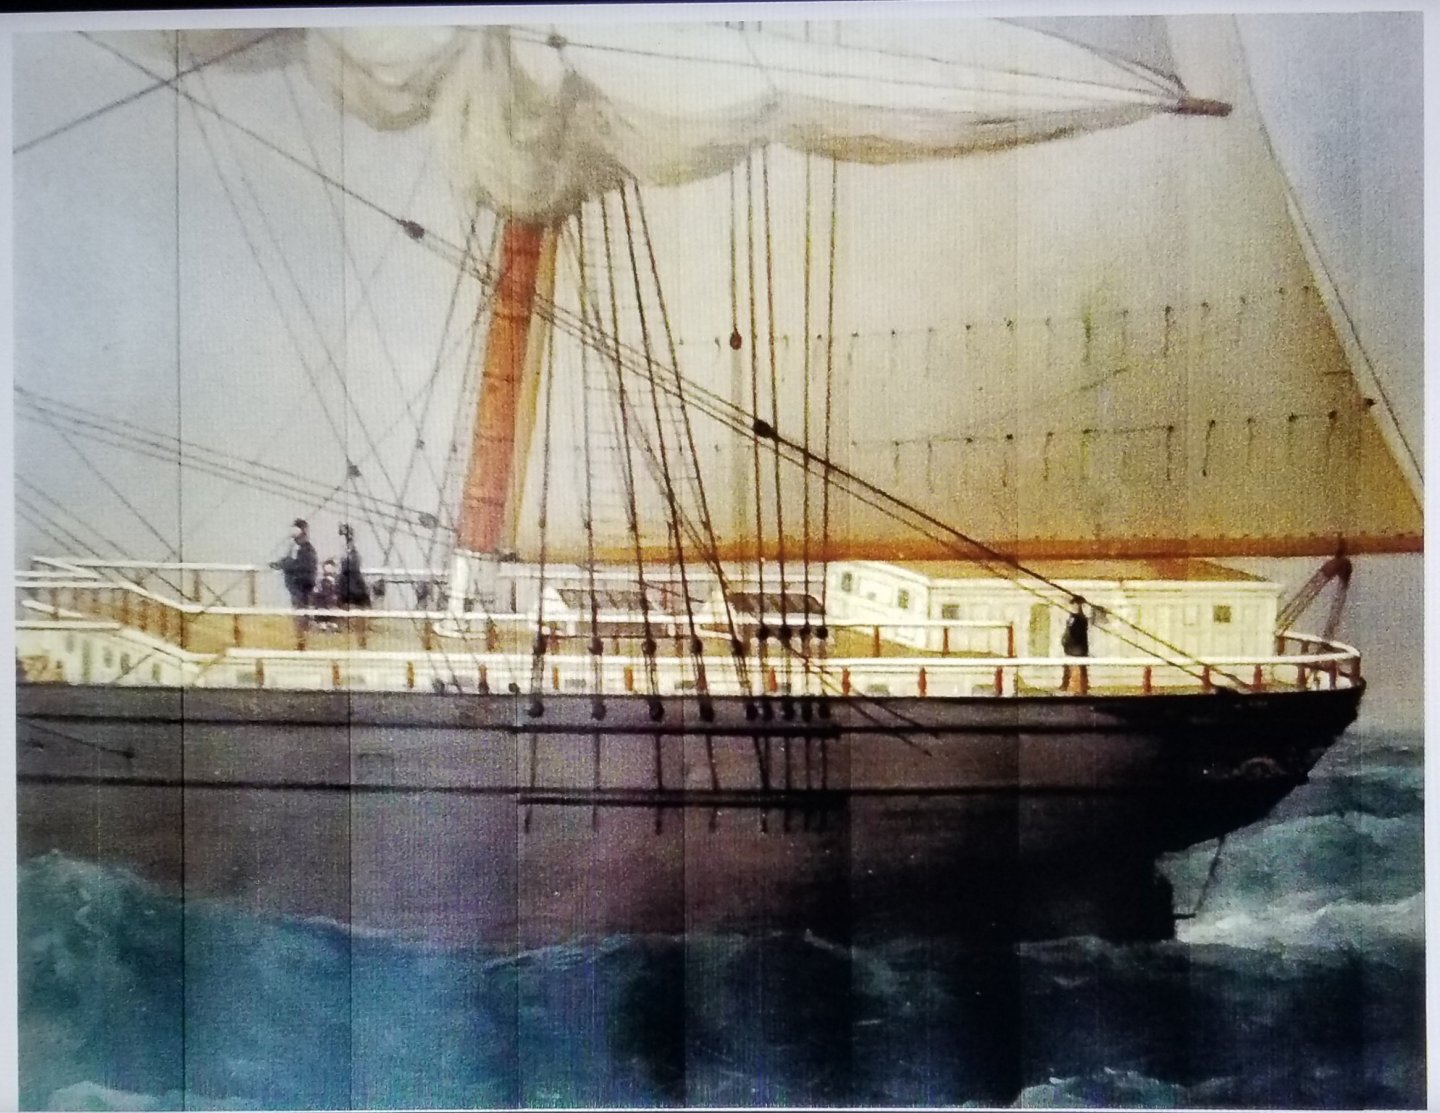
Rob, Vladimir, I just received this lovely detail shot of the Stern from my favorite oil by Samuel Walters. Per Michael Mjelde's specific instructions, credit for this image belongs to San Francisco Maritime NHP. Besides being a beautiful close up, this image confirms a wealth of Glory's details. At the time of the painting , her stanchions were all left natural varnished wood while rails themselves were White. Meanwhile all along the sides of the Rear Carriage House, the fine sculpted raised surfaces are depicted, matching a similar pattern on the extended wheelhouse. Twin skylights appear to have 6 upper roof segments instead of the 8 which I erroneously depicted in my initial sketch. Incidentally, I have a topic idea for our pending NRG article with this suggested headline "Rediscovering the glory in 'GLORY of the SEAS' (with a subheading of) "a culmination of Michael Mjelde's over six decades of exhaustive research into Donald McKays last, longest lived Clipper Ship". Let me know what you think.
-
Snug Harbor Johnny, as far as I know, all Clippers had scuppers (on Glory they appear as oval outlets) and freeing ports, which could swing outward to allow water to flow out from the deck. From the San Pedro dock scene, it's apparent the first Starboard freeing port is triced open.
- 3,560 replies
-
- 1
-

-
- clipper
- hull model
- (and 2 more)
-
Rob, the fact that we were able to discover it at all, I feel was serendipitous. You're right that the shape of this fascinating rail is softer on Glory herself. Yours look just fine and in my opinion adds just another distinctive detail that further delineates the uniqueness of this McKay Clipper. As for not being seen in later images, it wouldn't surprise me that the rugged work she was involved in most likely cost her this sharp little detail...
- 3,560 replies
-
- 2
-
-
- clipper
- hull model
- (and 2 more)
-
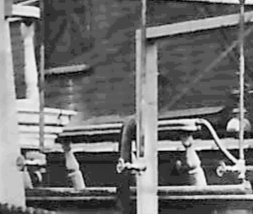
Rob, nicely done. Just this tiny detail reveals how substantially our good friend and author Michael Mjelde's contributions to this reconstruction effort has been. It was this remarkable image, that at least I had never seen before that contained the wrought iron bar end rail. I've posted the image and an edited close up to show this neat, distinctive detail.

- 3,560 replies
-
- 1
-
-
- clipper
- hull model
- (and 2 more)
-
Rob, I bet if I were to take a survey from just those who are following your inspirational build, that you would be pleasantly surprised how many would confirm that you are being very precise in your continuing attempts to replicate "GLORY of the SEAS" in faithful detail. After all Arina "TheAuthorsDaughter" herself just shared with you that Michael Mjelde is impressed with your progress.
- 3,560 replies
-
- 2
-
-
- clipper
- hull model
- (and 2 more)
-
Vladimir, beautiful work on detailing your Carriage House, it really gives an impression of how elaborately detailed Glory was. An immediate issue I noticed is that your Companionway is too short. The total height is 6 feet, equally divided above and below the 3 foot height of the Carriage House. My estimate for the turned rails which surround the Carriage House roof is 2 & 1/2 feet, or 30 inches. At that height, the rails would be 6 inches below the Companionway. As it sits now, the rails appear to go right over it, which makes no sense from a constructional viewpoint. Otherwise your work is continually impressive.
-
Rob, the only item that you referred to which is vague to me was your reference to "transcription errors." To me that usually refers to either translating from one language to another or when a transcriber is reproducing spoken communication into written word. Since we've constantly referred to actual photos in order to reconstruct Glory's true dimensions, I feel like a fascinating NRG article would bring our readers along, as we relive this joy of discovery with each new revelation which leads us to evermore specifically accurate recreations of Glory's true appearance. Taking pictures of your and Vladimir's models in exact same positions as the images which helped us achieve these exacting dimensions will also benefit readers in being able to realize what we've discovered.
-
George K, that's very impressive work. I especially appreciate the fact that you're following the authentic vessel by narrowing the rear house as it approaches the stern. The one significant revision I would encourage you to make, is to adopt the more ornate front fascia as depicted in the Buttersworth painting. Narrow oblong windows make sense on sides but not in front. There also seems to be a little bit of a sculptural aspect to the twin front facing windows. Now that we've had a chance to view how ornate McKay's Clippers really were from seeing actual pictures of the front fascia of Glory's rear house, the plans for "Flying Fish" look sparse indeed.
- 602 replies
-
- 1
-
-
- Flying Fish
- Model Shipways
- (and 2 more)
-
George K, while it won't give the same impression as seeing a comparison of real vessels side by side, once Rob completes his 1:96 scale "GLORY of the SEAS" replica, she can be placed next to his completed 1:96 scale "Cutty Sark." Few people today realize how gargantuan Donald McKay's Clippers really were. For instance, "Cutty Sark's" keel was 203' while Glory's was 240'! While it may not sound like much, Glory's keel was 15% longer than Cutty's. Both of these vessels were launched in the same year too, 1869. One of the things that stunned the British Shipping Community was the towering sizes of American built Clippers. I'm sure Glory would have dwarfed Cutty and "Flying Fish" would still probably be larger too.
- 602 replies
-
- 1
-
-
- Flying Fish
- Model Shipways
- (and 2 more)
-
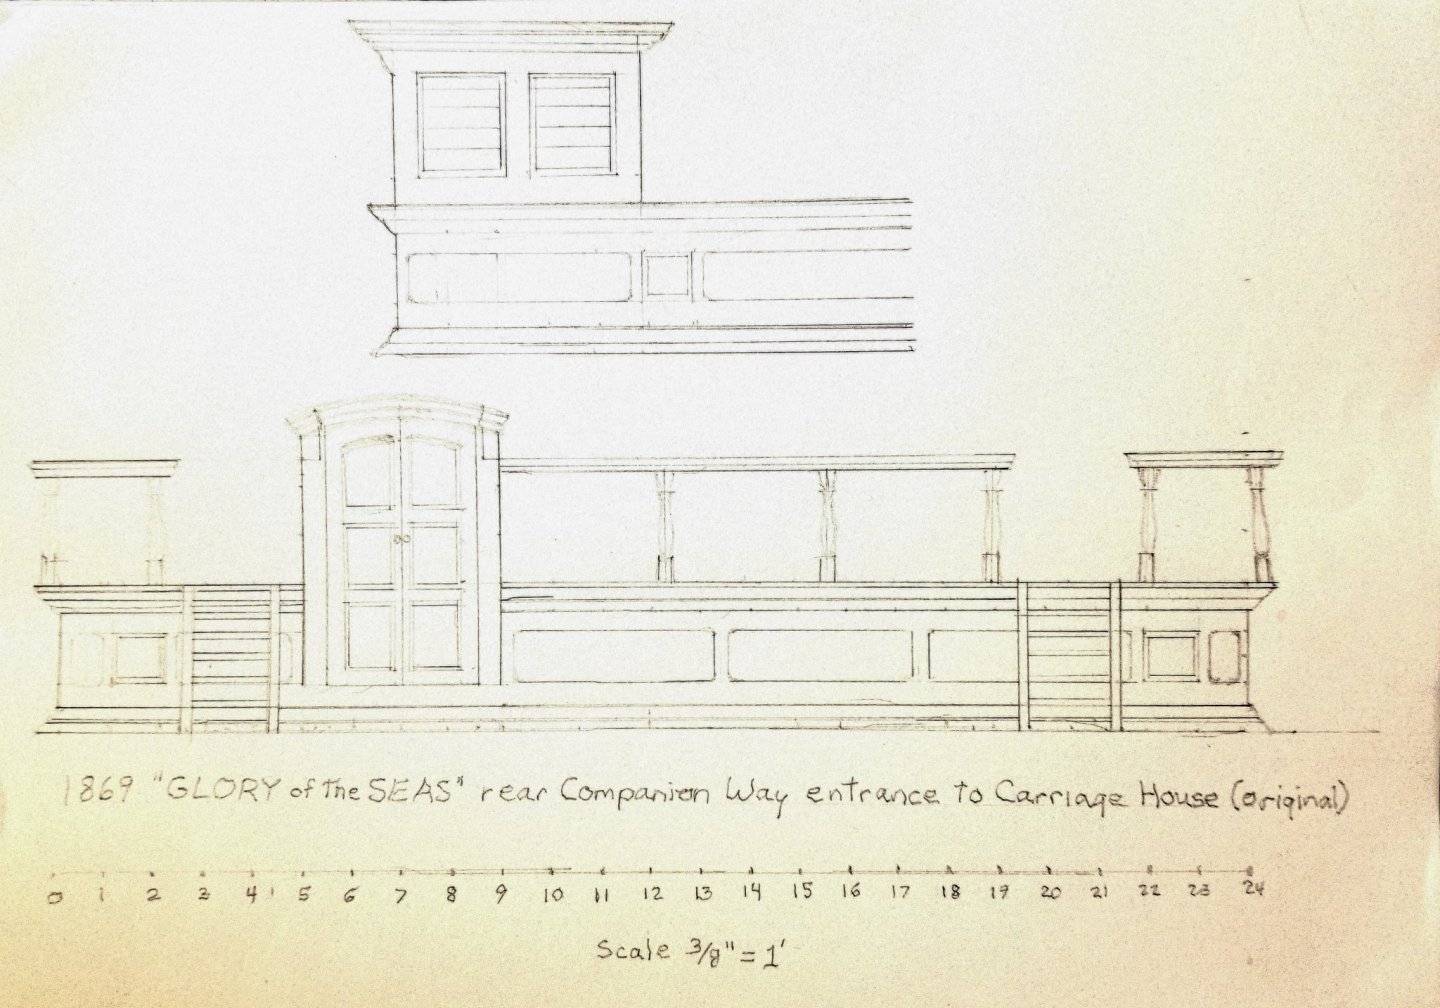
Vladimir, here's my sketch of the rear companion way entrance to the Rear Carriage House. It's still in process but only since the final shape of the turned pedastals isn't quite satisfactory yet. Since there's no photographic evidence of this particular structure, I've gone with a style that echoes that of her front fascia. Most companions had duel opening doors and the top would slide up and back. Like the skylights, I figure this structure too would offer benefit of glass behind venetian blind type natural wood. Since I saw the lower embellishment on the rear of the House, I've included them on the entire back of the house as well.
-
Rob, a laudable effort, nicely done. Unfortunately it also highlighted the limitations of the Revell Cutty Sark hull filling in for the far more substantial Glory one. You get an A+ for innovative thinking. I don't believe anyone else has ever tried modifying the CS Hull for an American Clipper before. This effort is what first led me to you also.
-
Rob, perfectly said. I believe that concept, of seeking to recreate Glory as accurately as possible through the use of Michael Mjelde's rare and beautifully clear photos can be the basis for our NRG article. We can walk readers through the step by step process we have taken to literally "reverse engineer" McKay's last, longest lived Clipper.
-
Rob, my annual licensing studies have kept me from being able to participate as much as preferred. Your bumpkin work details are just beautiful.
-
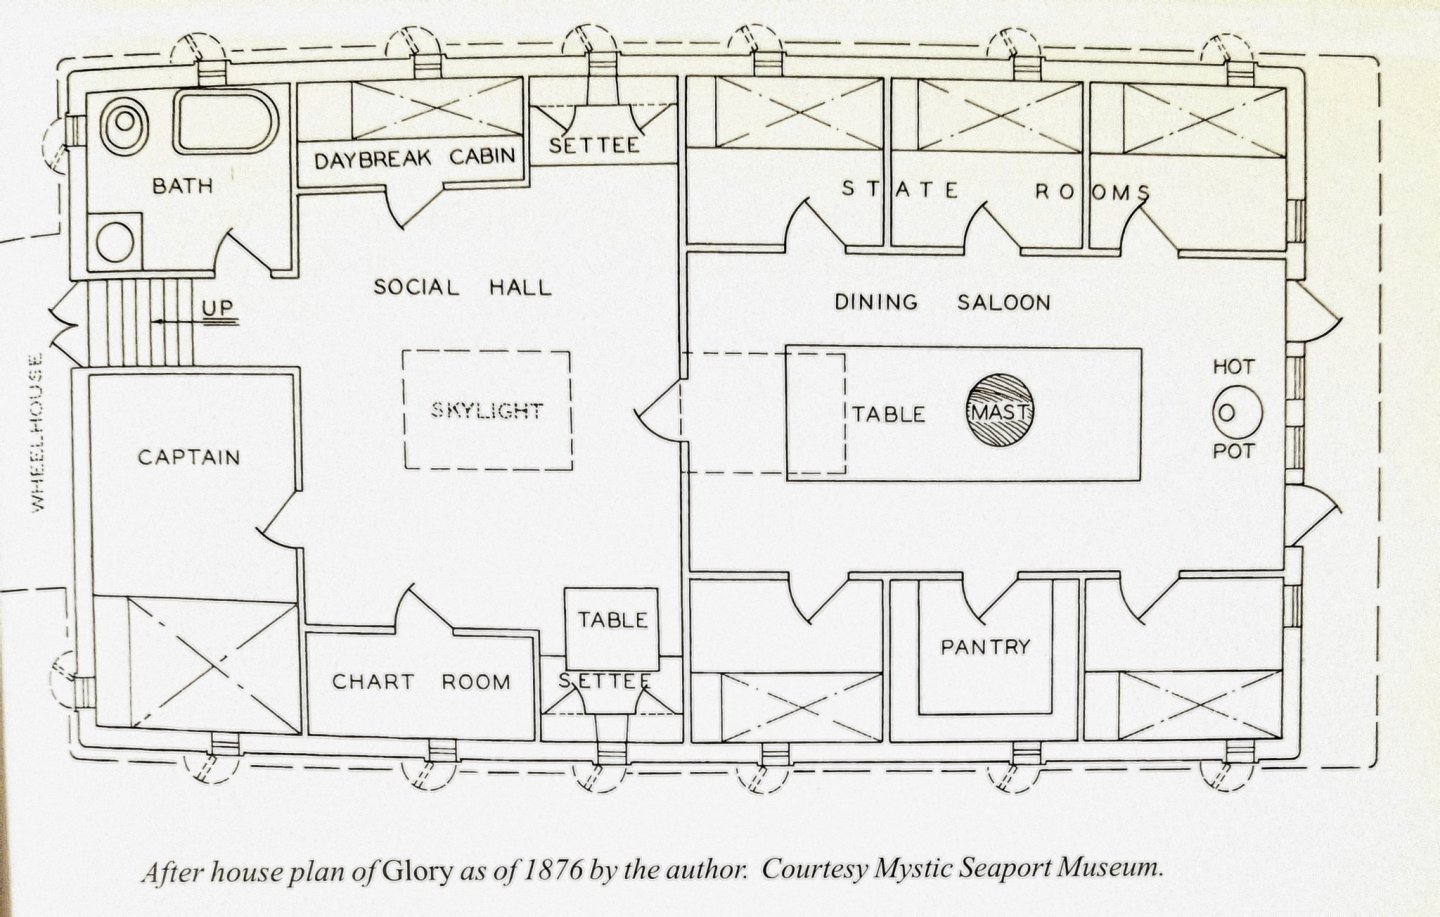
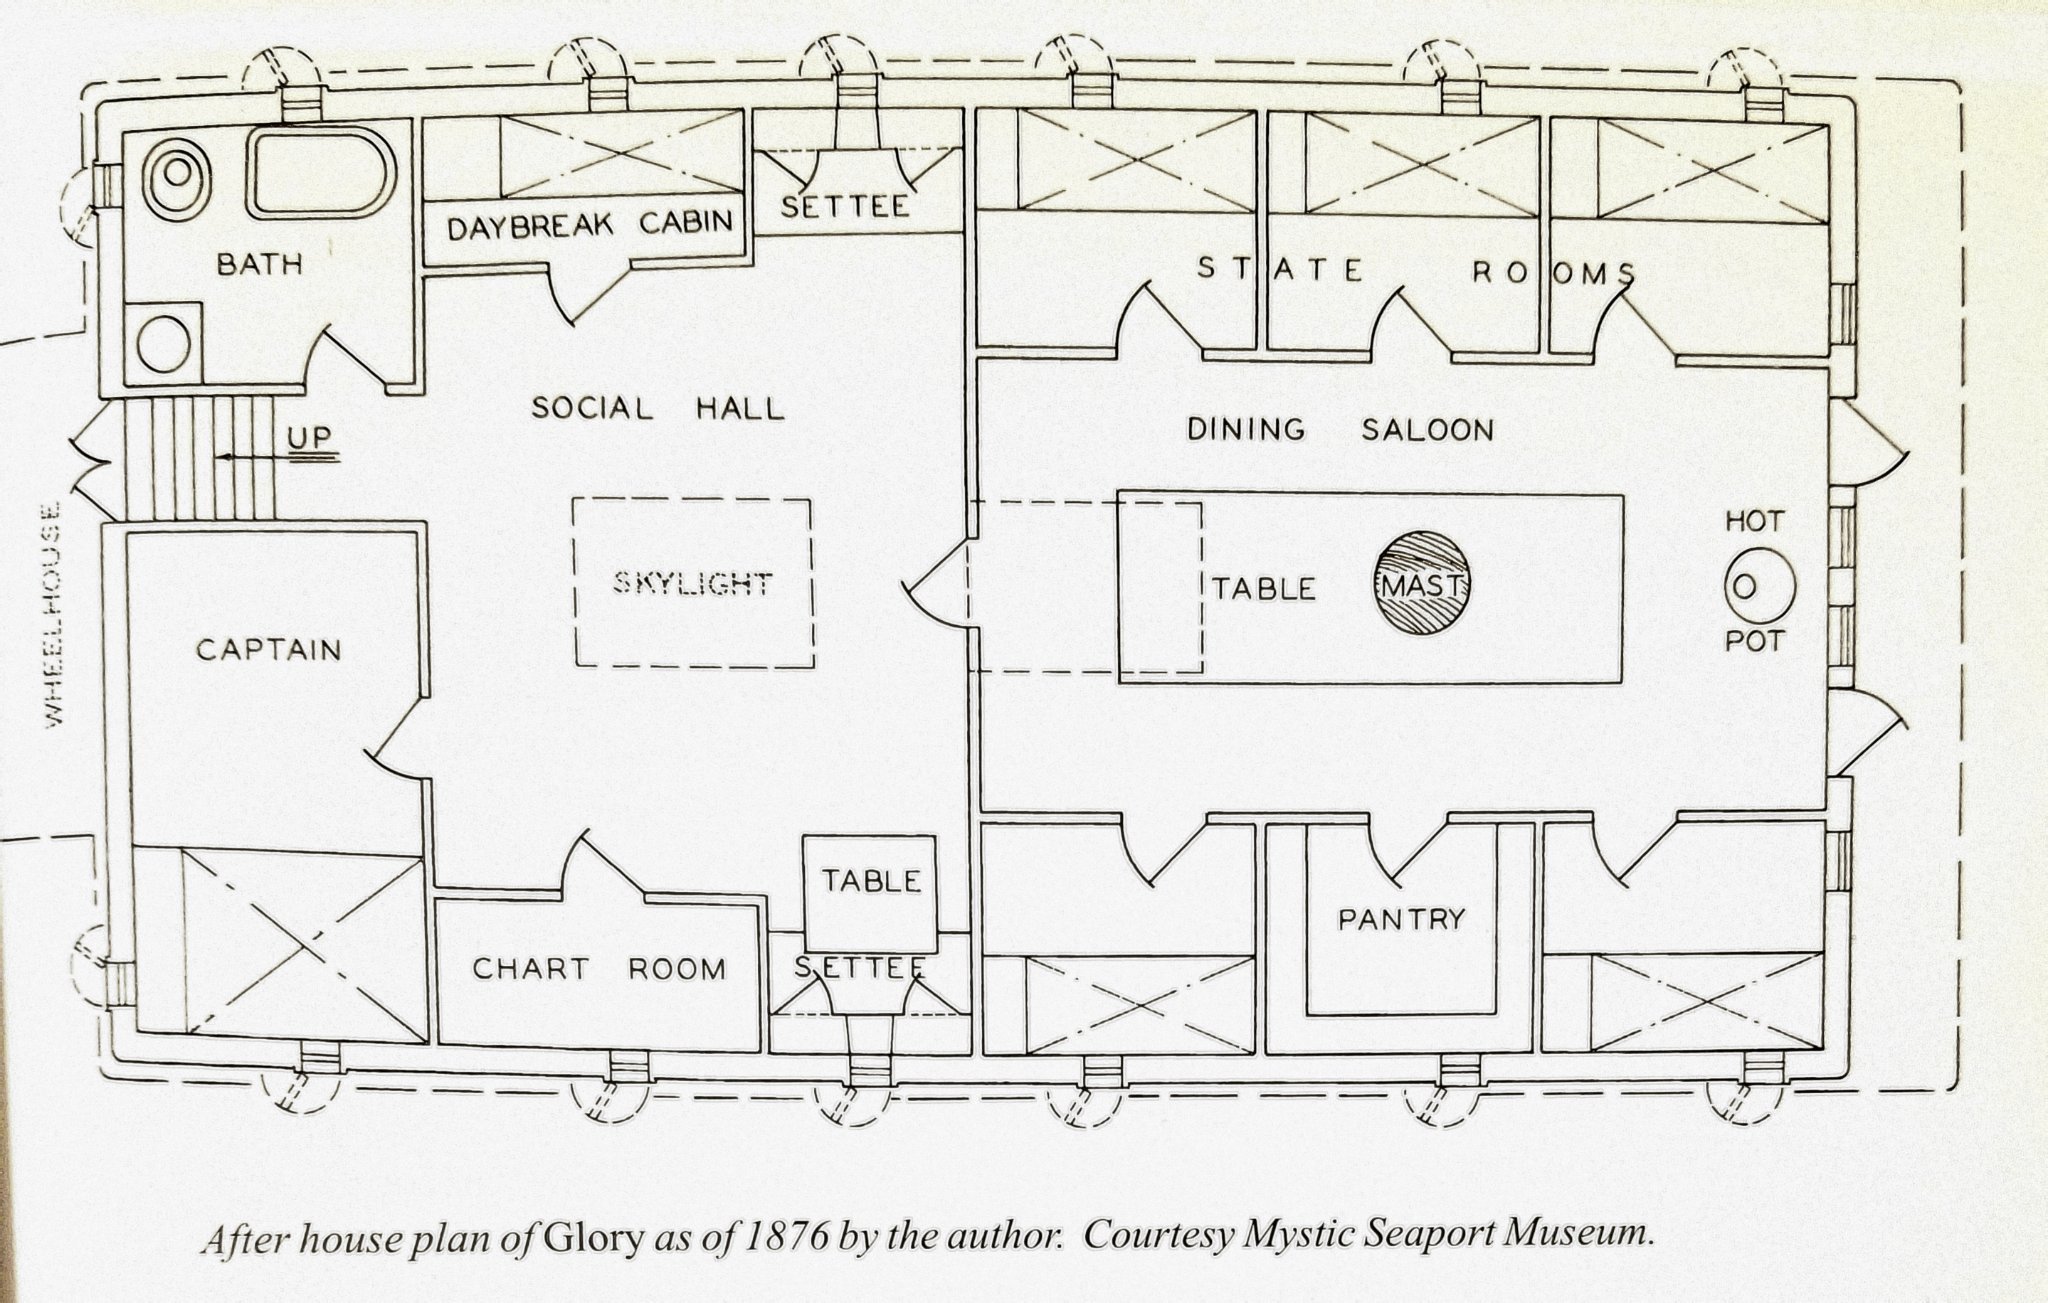
Vladimir, it's truly amazing how two models, in two different scales end looking so remarkably similar to each other. It's a tribute to the modeling skills of you and Rob. Before you pop the bubbly for the completion of your Hull build, there's the little matter of a companion way entrance to the rear of the Carriage House. From Mike's floor plan layout, you can see where the original companion way would have been. Located on the Port rear, from his other ship's lines, it appears to be 5' deep, probably 3' high above the Carriage House deck by 3' wide. It most likely would have had thin double doors and an angled sliding top too.