HOLIDAY DONATION DRIVE - SUPPORT MSW - DO YOUR PART TO KEEP THIS GREAT FORUM GOING! (89 donations so far out of 49,000 members - C'mon guys!)
×


modeller_masa
-
Posts
950 -
Joined
-
Last visited
Content Type
Profiles
Forums
Gallery
Events
Everything posted by modeller_masa
-
Domanoff ropewalk PL4-4 modification
modeller_masa replied to modeller_masa's topic in Masting, rigging and sails
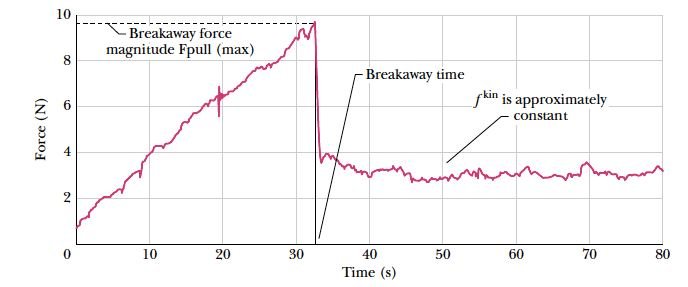
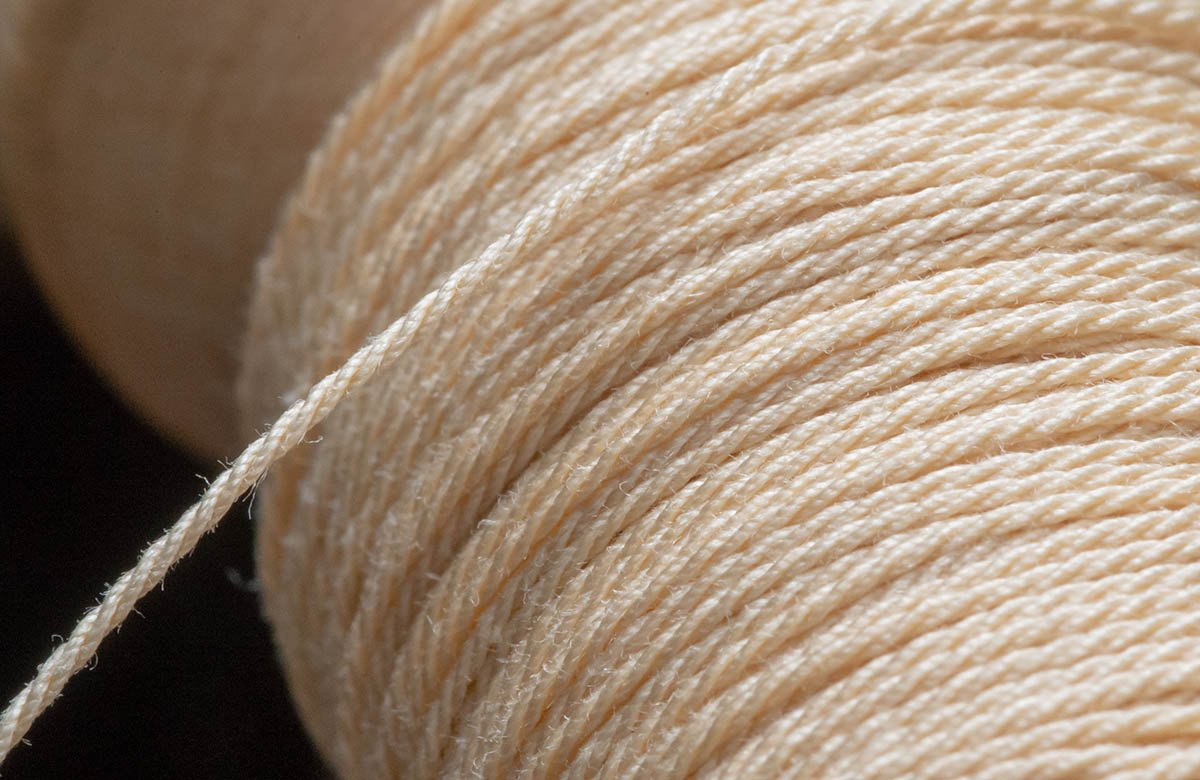
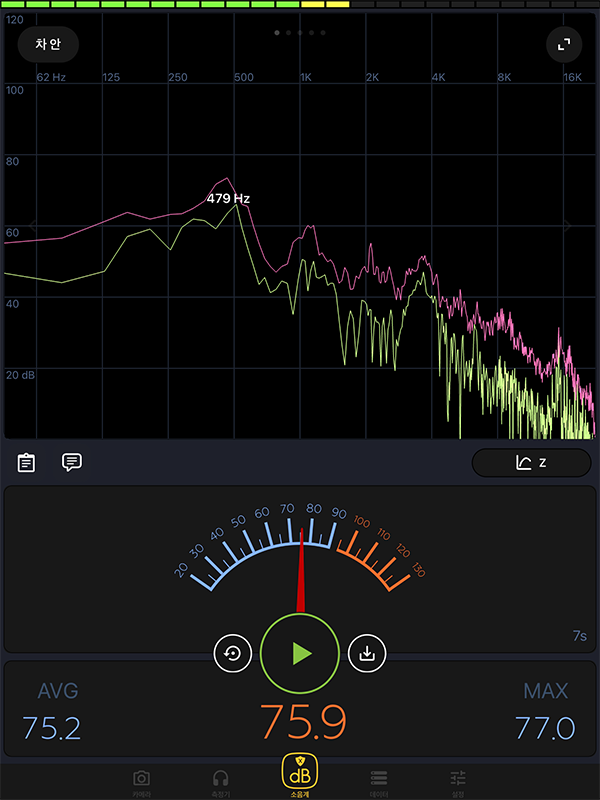
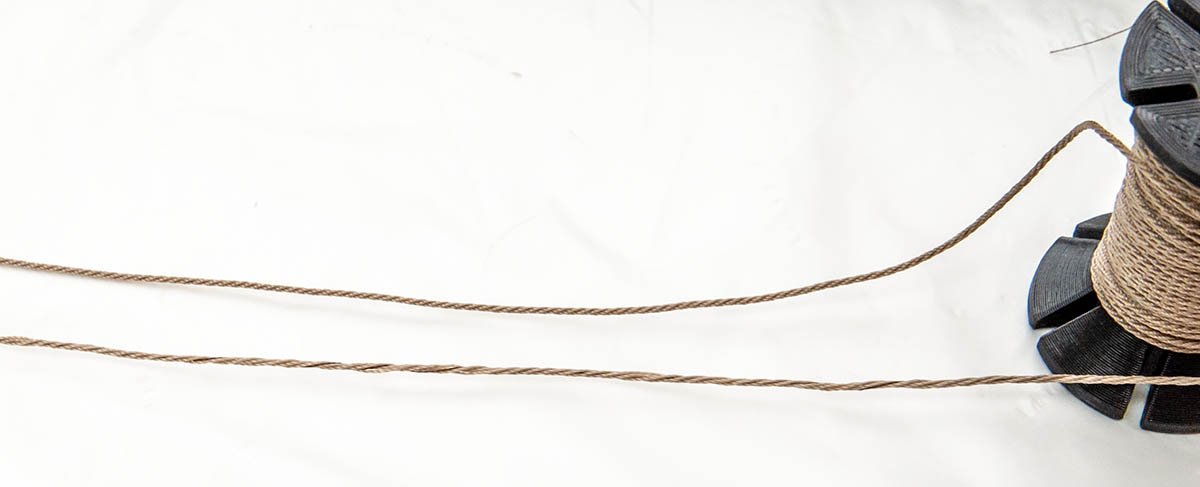
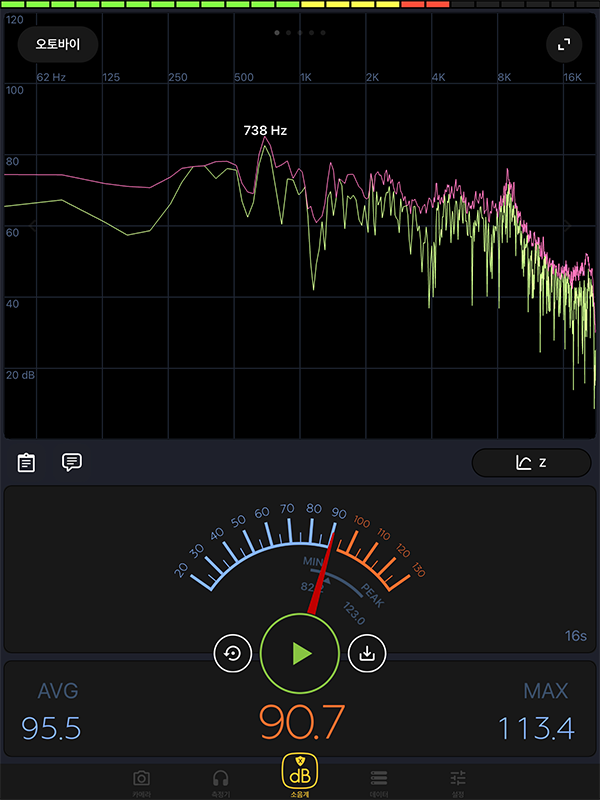
As Cleek said, it has felt inside to give smooth friction, but I would say that it is mechanically insufficient. Since I added screw tension on supply bobbin, it rotates like a jammed roller. (source: https://www.compadre.org/nexusph/course/Friction ) It can be explained by static and kinnetic friction. Threads have elasticity like rubber band, so cohesive force breaks the maximum static friction point. Unfortunately, it can't continue to draw following thread at low speed and stop again. I would say that the bumpy bobbin happens remarkably at lower speed. As I increase winding speed, it runs much smoother and makes better ropes. Running Domanoff's machine at slow speed with silence may cause worse result than at faster speed. Sometimes small businesses don't update minor changes on product manual. Samething happened when I bought the Domanoff SM4 and PL4-4. It is true that I neglected official manuals because I thought the instruction movies are outdated. Now i'm in trouble, so I take your advice and will read all the manuals from the beginning. In addition, I'm a shy person that usually don't ask to manufacturer, but I'll try. 😖 The vibration problem is not significant and Domanoff managed it well. The biggest noise comes from the green box according to my experience. If I change the gear to timing belt, I may be able to decrease 10 dB noise. 1. I think I assembled well when I received demounted gears. I'm sure that your machine is more quiter than mine because it is rubber band driven machine. I have long term plan to replace all the gears into pulley and timing belts. 2. You're correct. I misread a manual at first and surprised at bumping vibration. All 4 bobbins and bolts must be mounted when 4 or 3 strands works. But omitting with 2 strands works is ok. 😉 (Filled- ( ) - Filled - ( ) ) 3. I need more words to emphasize the importance of tension control on supply bobbin... 4. I saw that Domanoff's sample thread has the core thread, and its function is kind of adhesive to make a shape as you said. Interesting and difficult concept. 😂 5. Thanks for great link! It is great to know that I can move the bars. I was always curious why he made the 'windpoints'. I planned to remove them and make new solid post at first. 🤨 6. Yes. Only one thread I own is right twist thread, so I don't mix it with other threads. I hope 'real' ropes use only left twist threads. You gave me huge helps! I'm sorry I made you leave long answer. I should have asked to Alexey. (DMC deltelles 80, Cotton 100%, Ecru color, 3 strands) It is still far from the art of rope, but barely acceptable condition in my opinion, so I go back to la recouvrance for now. I'll update a modification log when I add more functions in near future. Thanks very much for useful comments, wefalck, Cleek.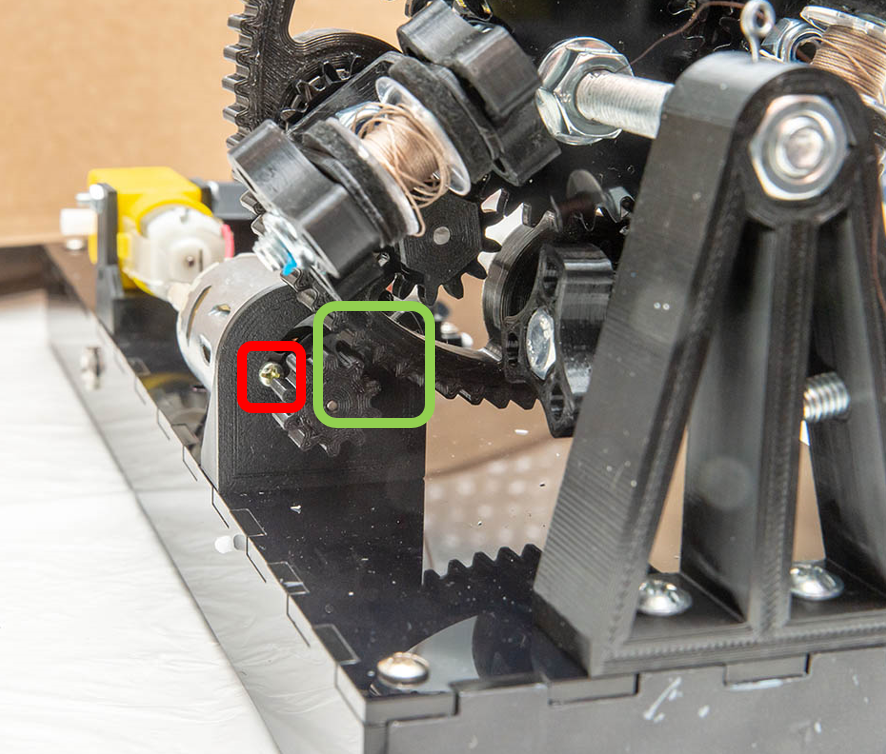
-
Domanoff ropewalk PL4-4 modification
modeller_masa replied to modeller_masa's topic in Masting, rigging and sails
You got a point. It was my next trouble immediately encountered, and it almost drove me to despair. It is very difficult to maintain same tension with the bolt tension system. Here are some tips I found. (1) Tighten all the bolts as much as possible. (Just below the cutting level) It usually works well with strong threads such as serafil polyester thread. (2) Do a massage after rope making is done. The massage means twist and untwist all the wire slightly. It spreads the 'waves' evenly. Domanoff's system is only half meter size while conventional ropewalk requires several meters of railway, so the finished rope may needs to be massaged separately while the other ropes made by different ropewalks may be massaged simultaneously. I'm still fighting with the issue. It is a bit frustrating - especially the massage takes too much time. I started to make pretty good ropes, but want to make them more flawlessly. I'll upload a post when I find better way or modify the feed bobbins to get even tension.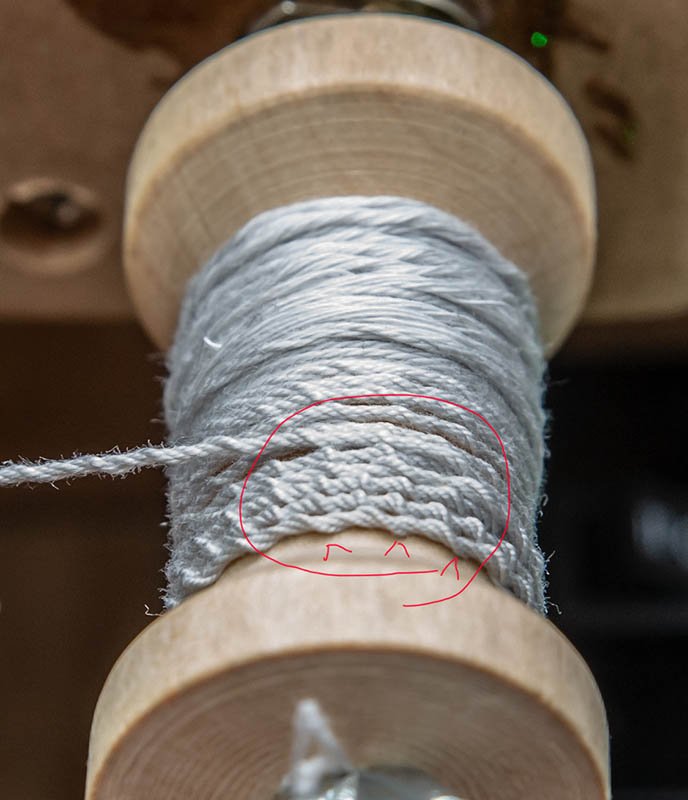
-
Domanoff ropewalk PL4-4 modification
modeller_masa replied to modeller_masa's topic in Masting, rigging and sails
While I was investigating malfuntioning, I found that I missed key factor to run ropewalk. Tension must be tight to get a firm result. I planned to add tension control system to the right direction only, but it had to be bidirectional strong tensions... At first, I tried to reinforce the wood bolt R-clip with washer, but it didn't help because the bobbins need delicate tension control. They should have not tight and not loose tension. Probably the best tension control device is this. However, I can't add it to Domanoffs' because it needs extra space. Domanoff's bolts save spaces and relatively simple. I decided to use another bolts to get tension for now and postponed additional (huge) modification till next months. Looks like I finally read Domanoff's manual correctly. I'm running it at 0.5 Drive speed which is very slow and quiet. (The threads are Amann Serafil 300(200/2), 10 Tex, poly 100%.)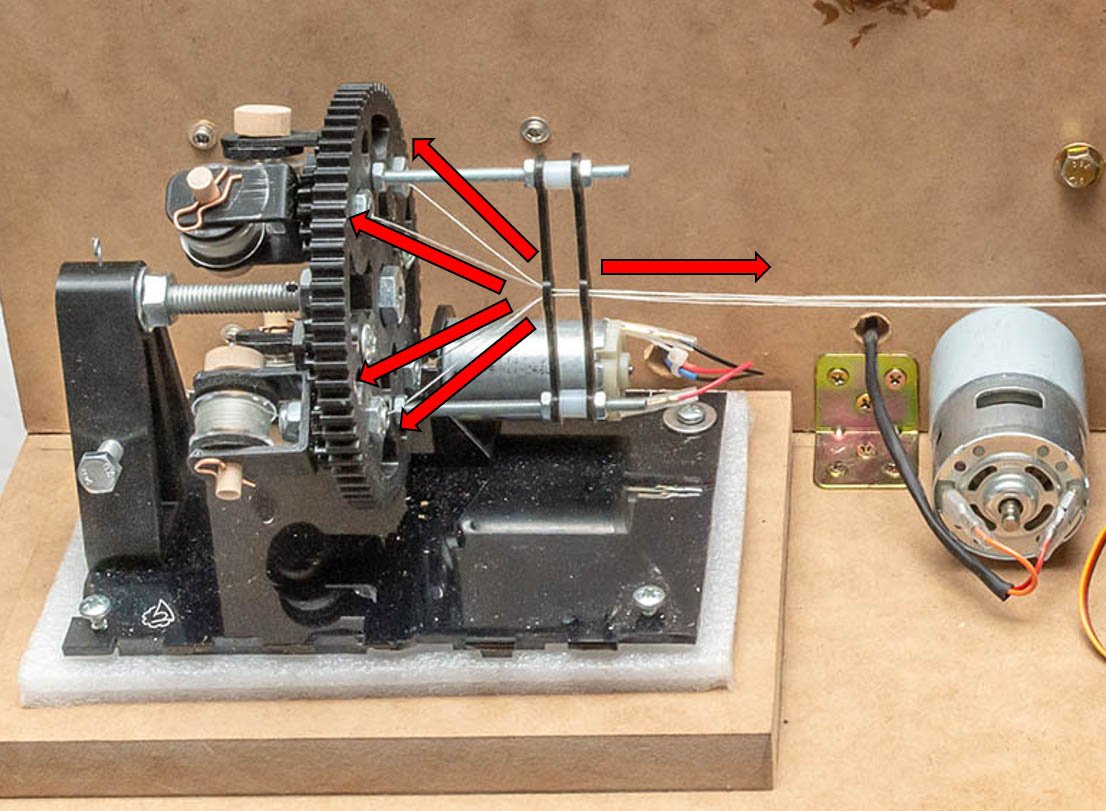
-
Domanoff ropewalk PL4-4 modification
modeller_masa replied to modeller_masa's topic in Masting, rigging and sails
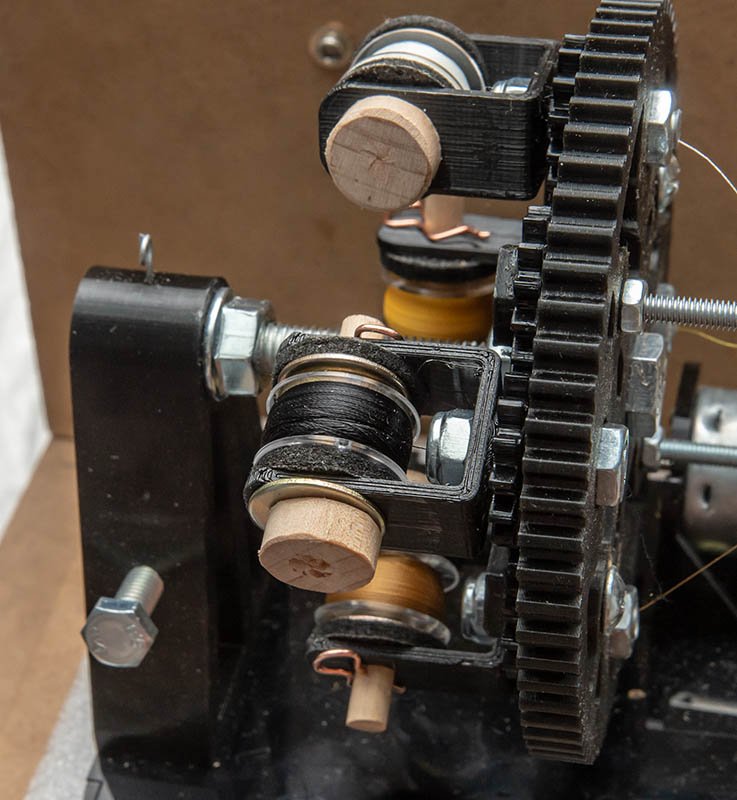
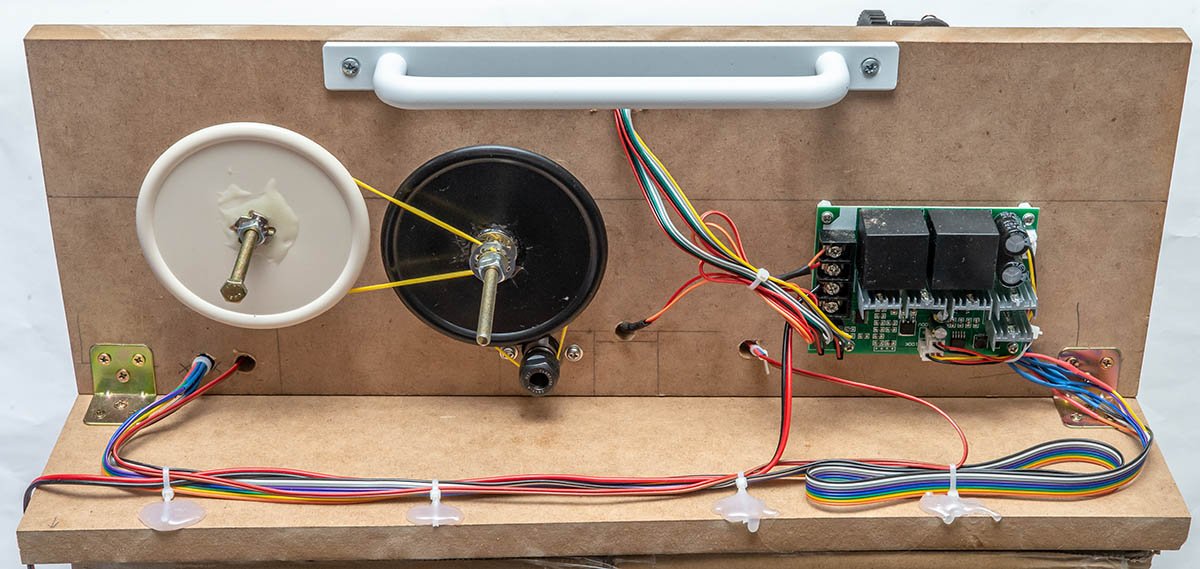
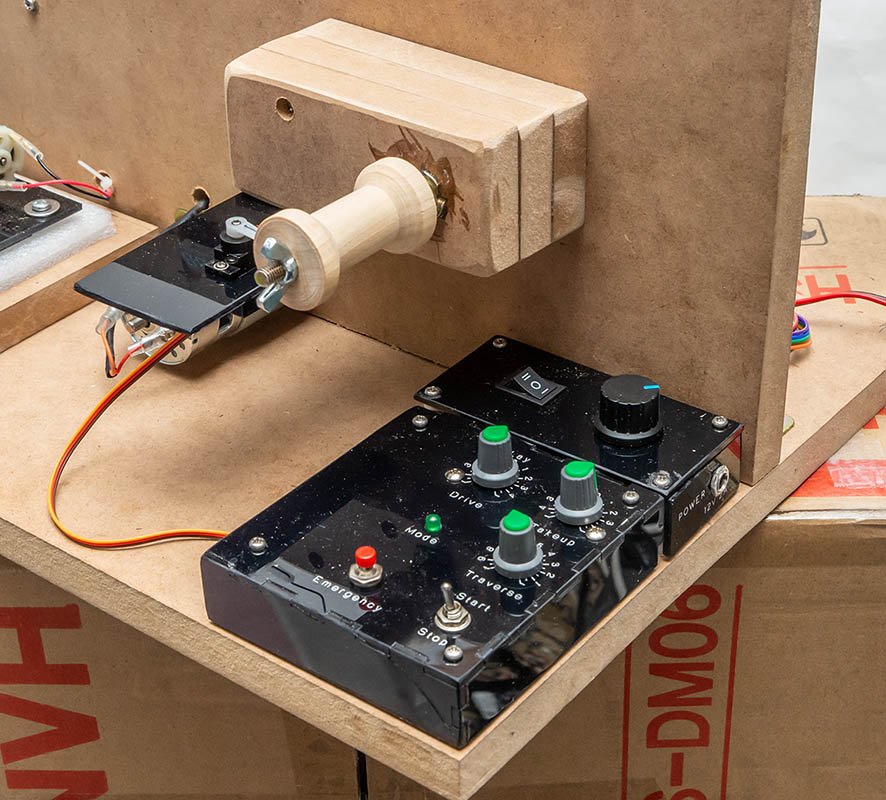
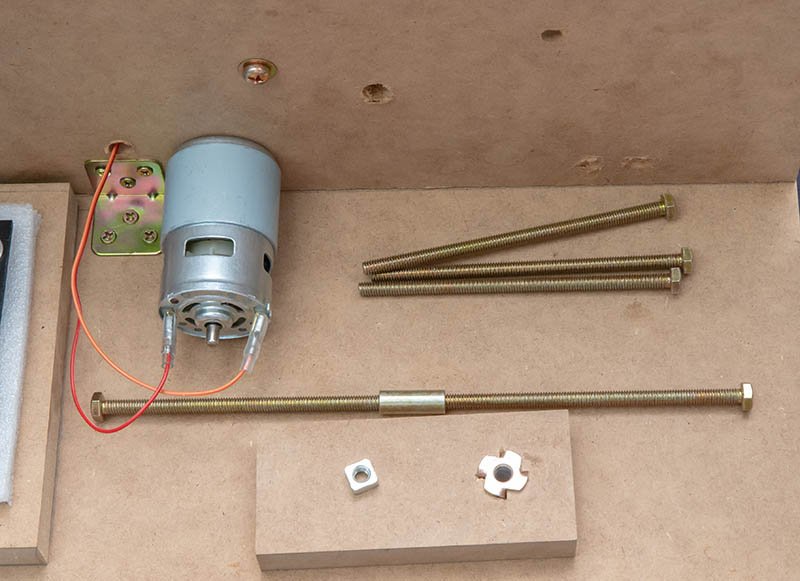
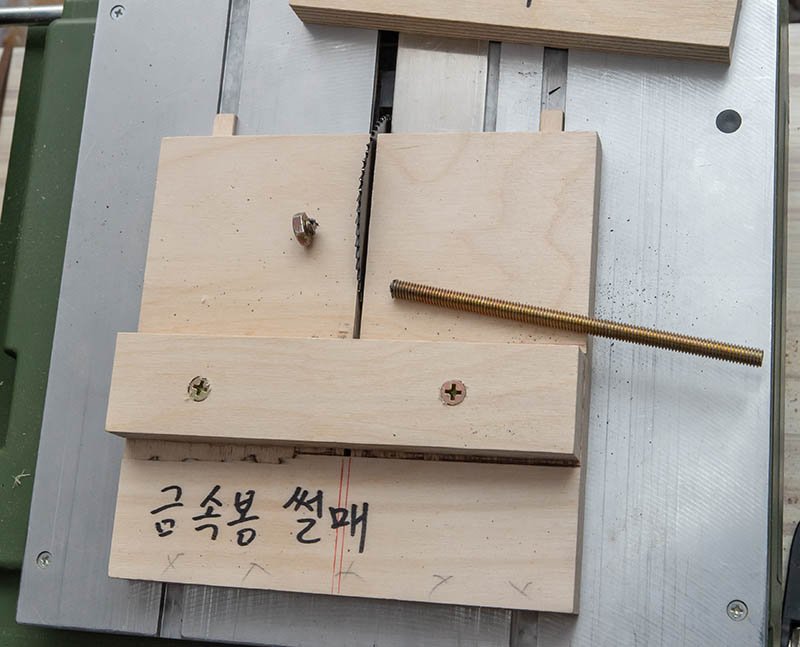
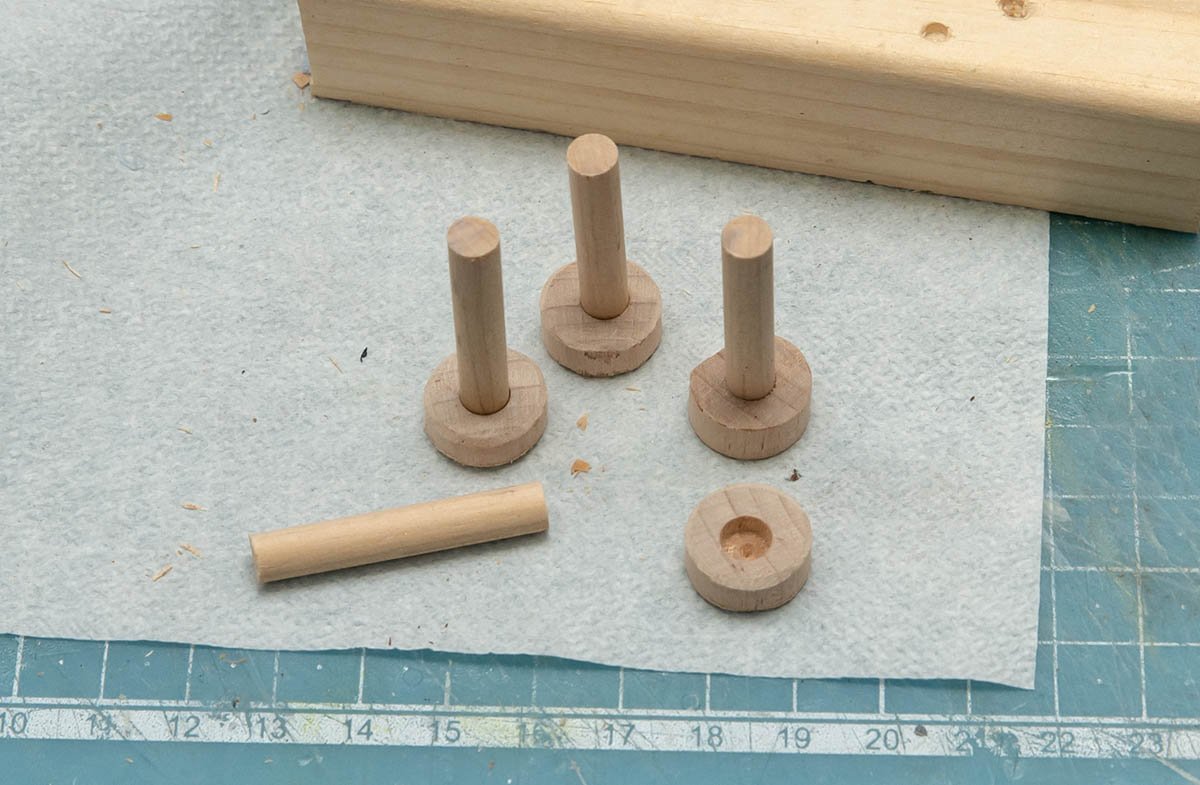
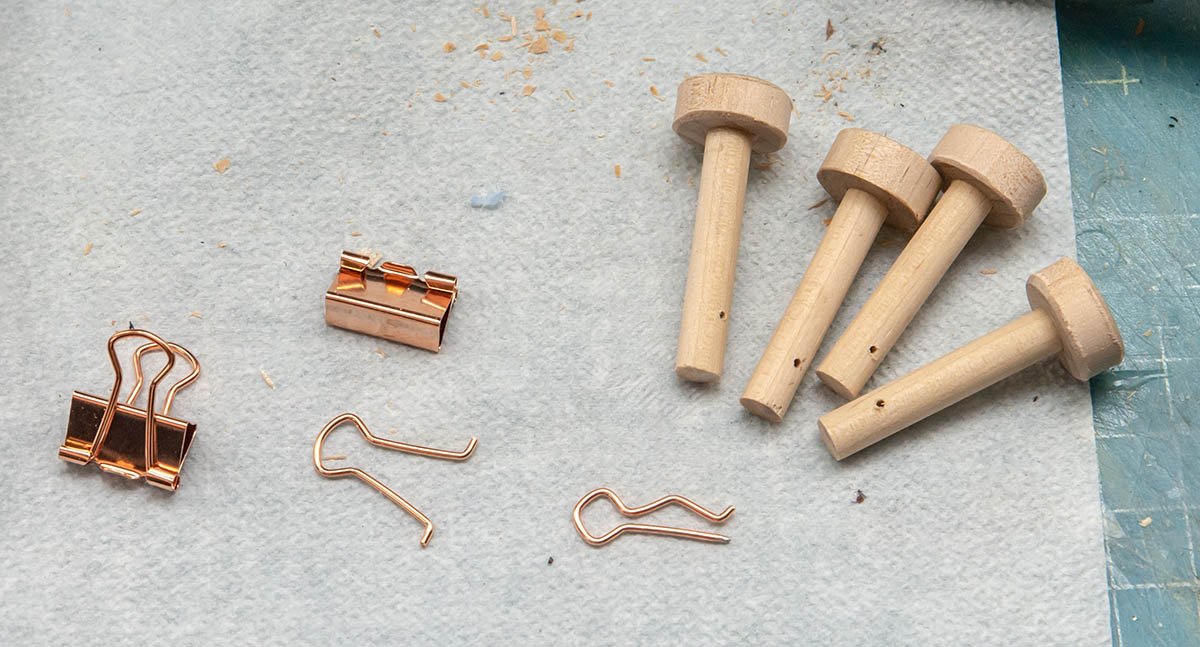
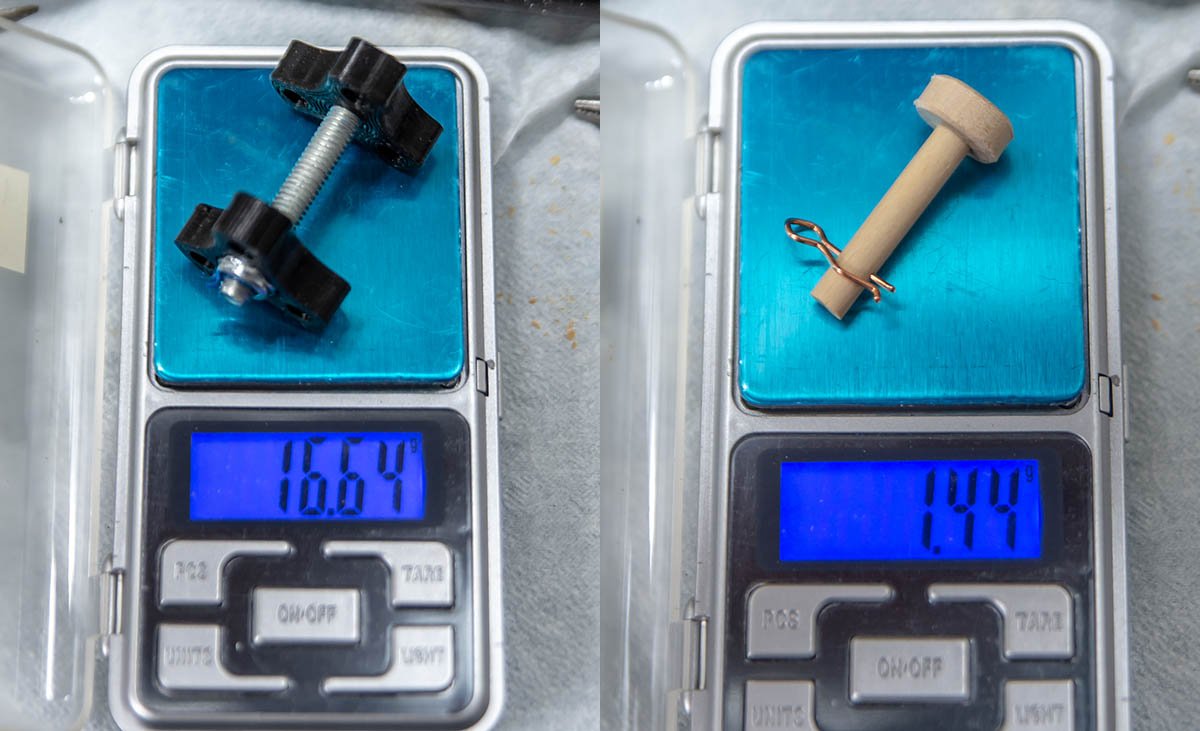
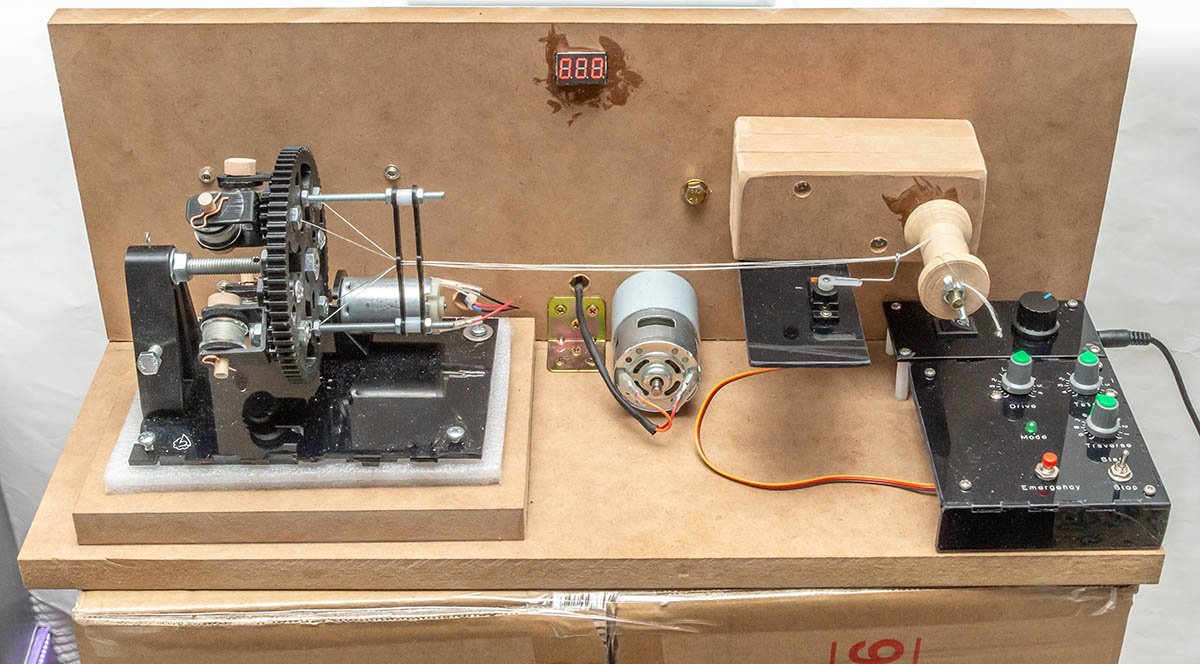
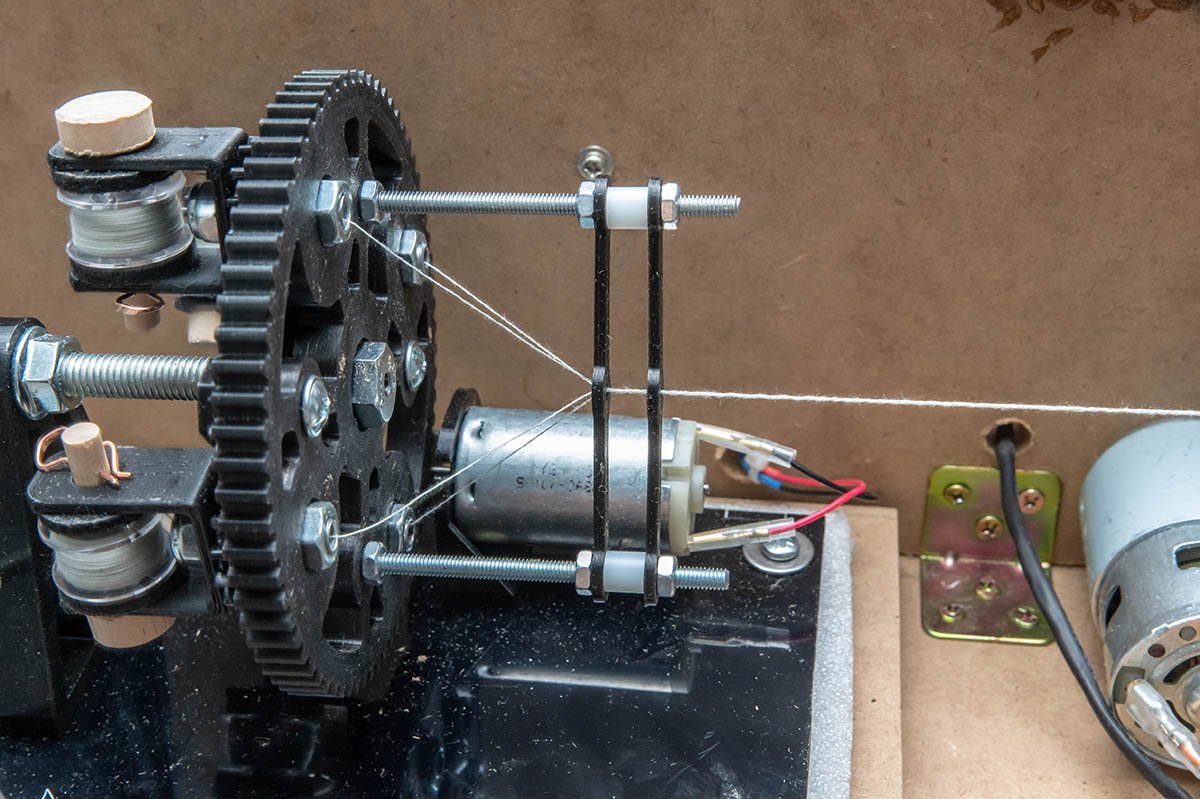
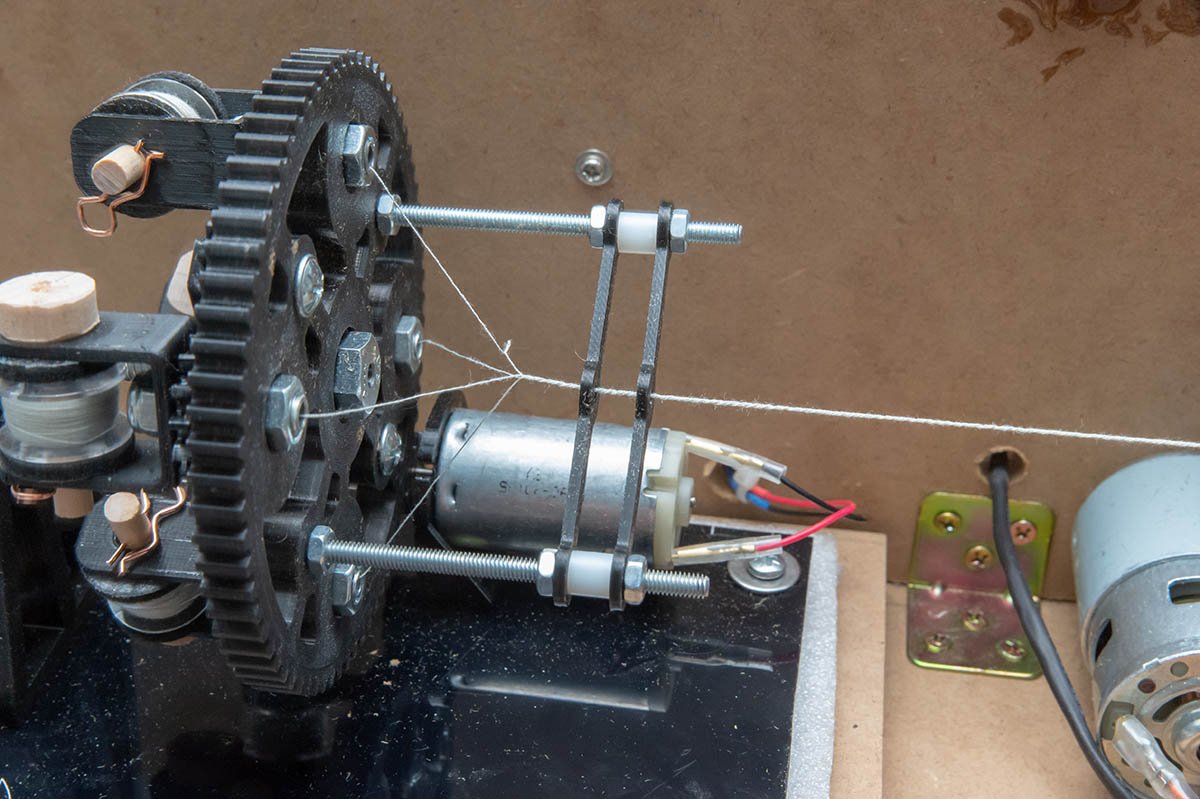
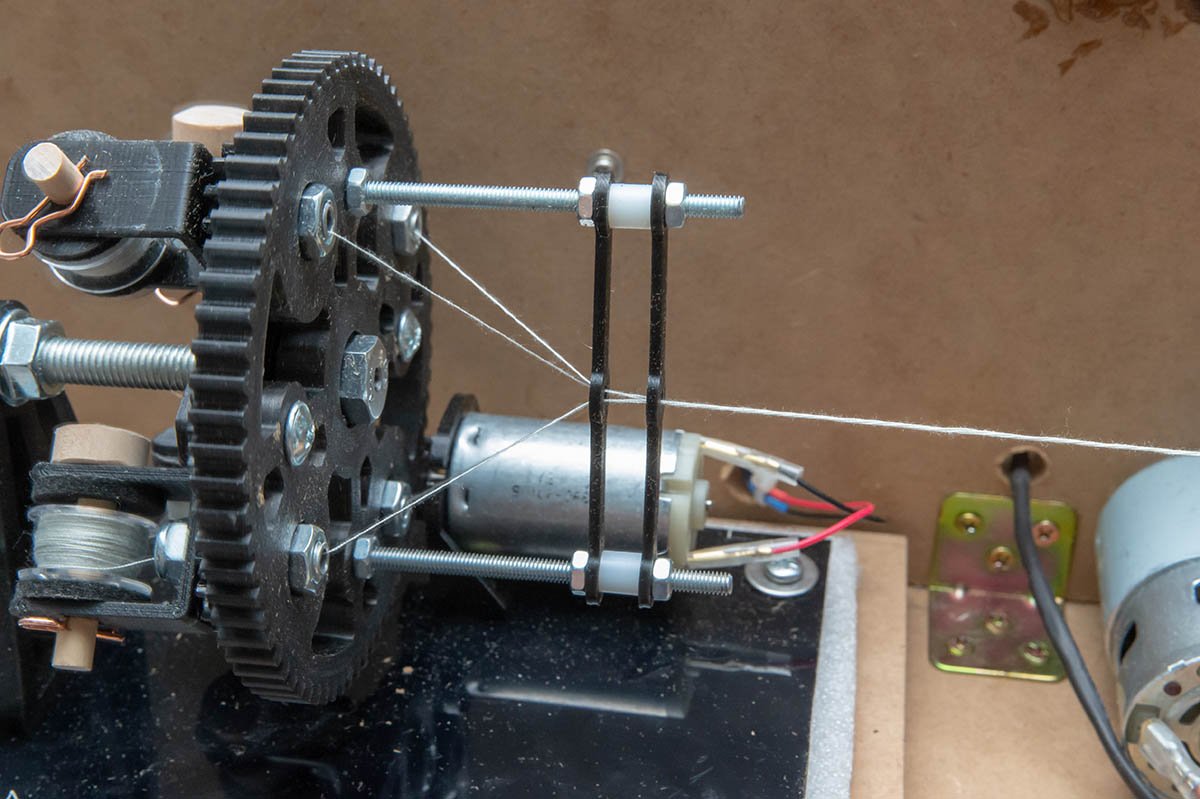
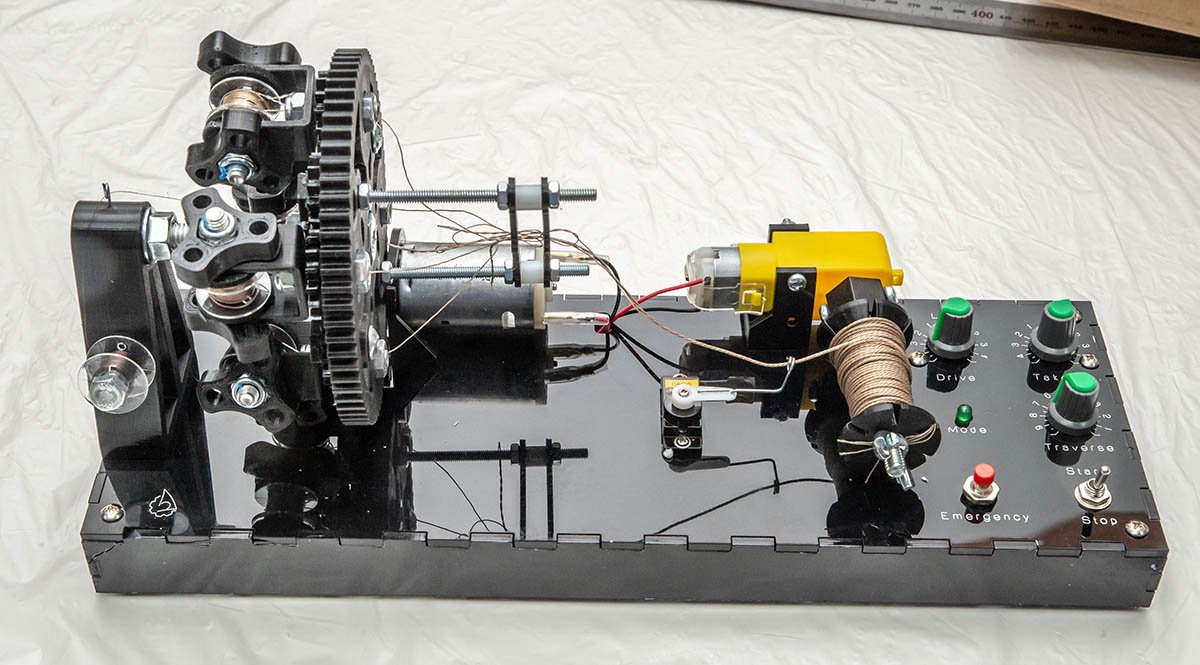
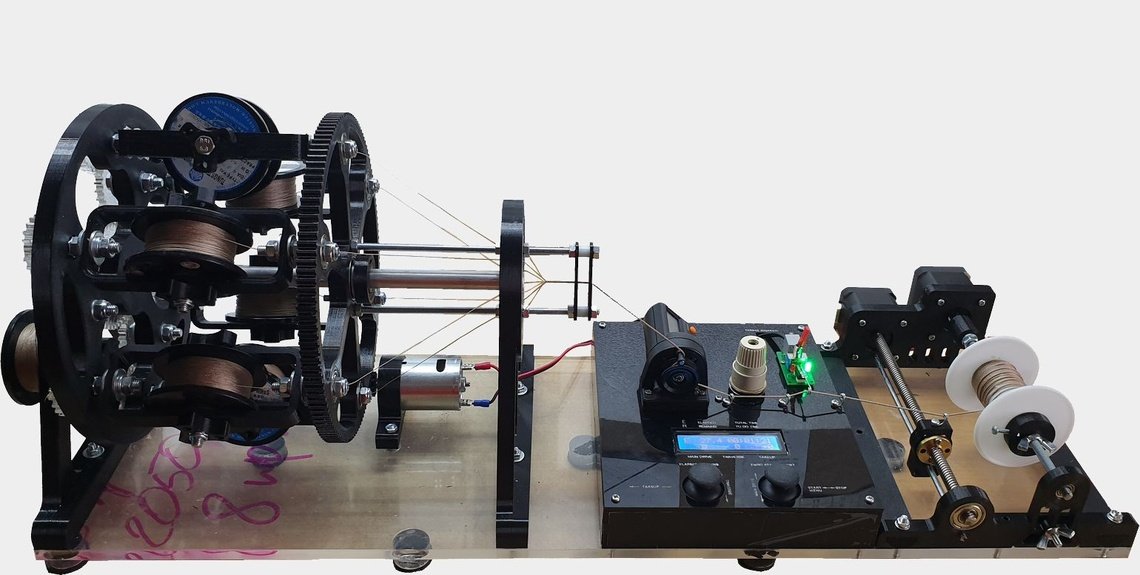
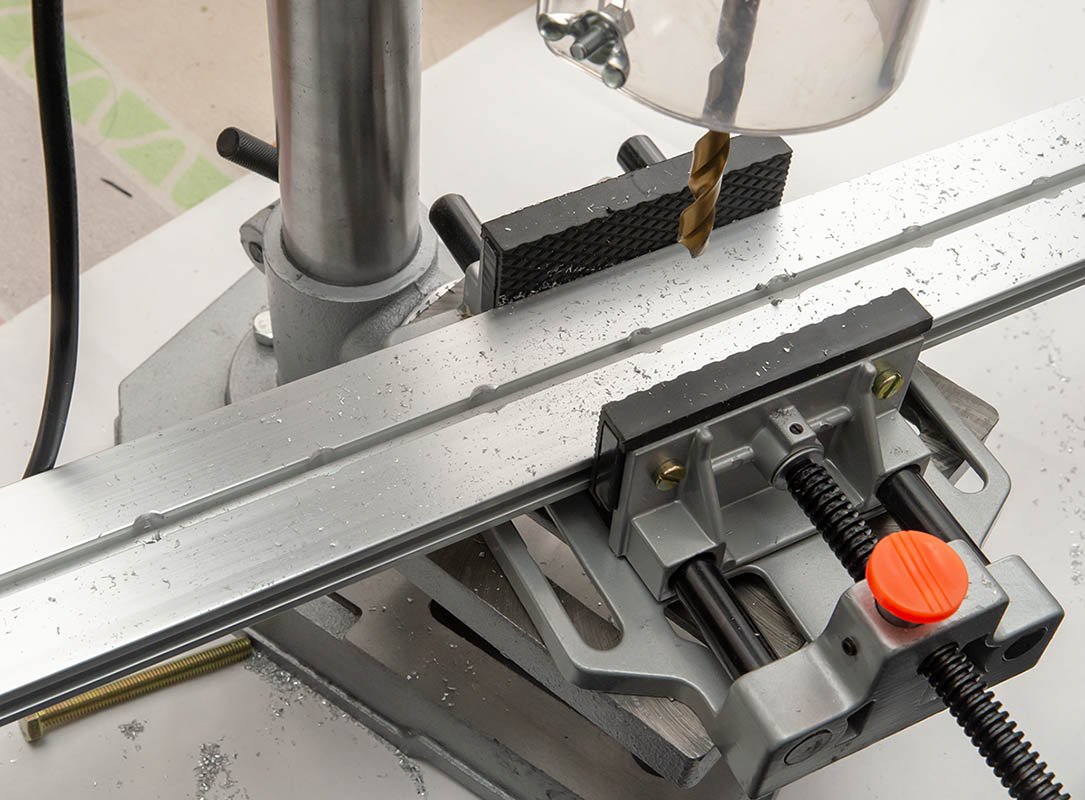
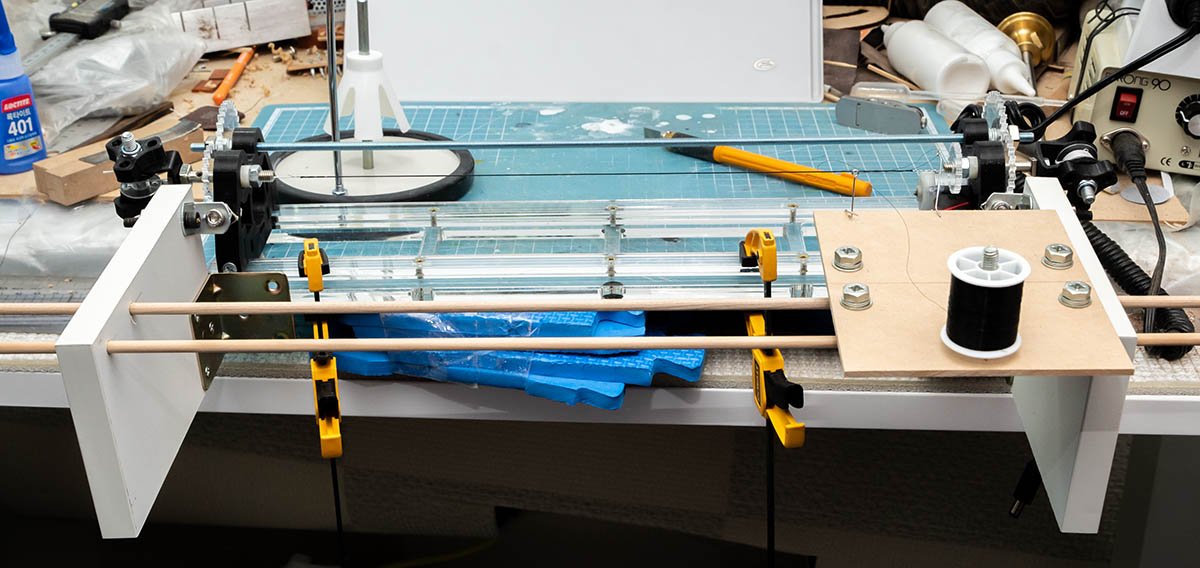
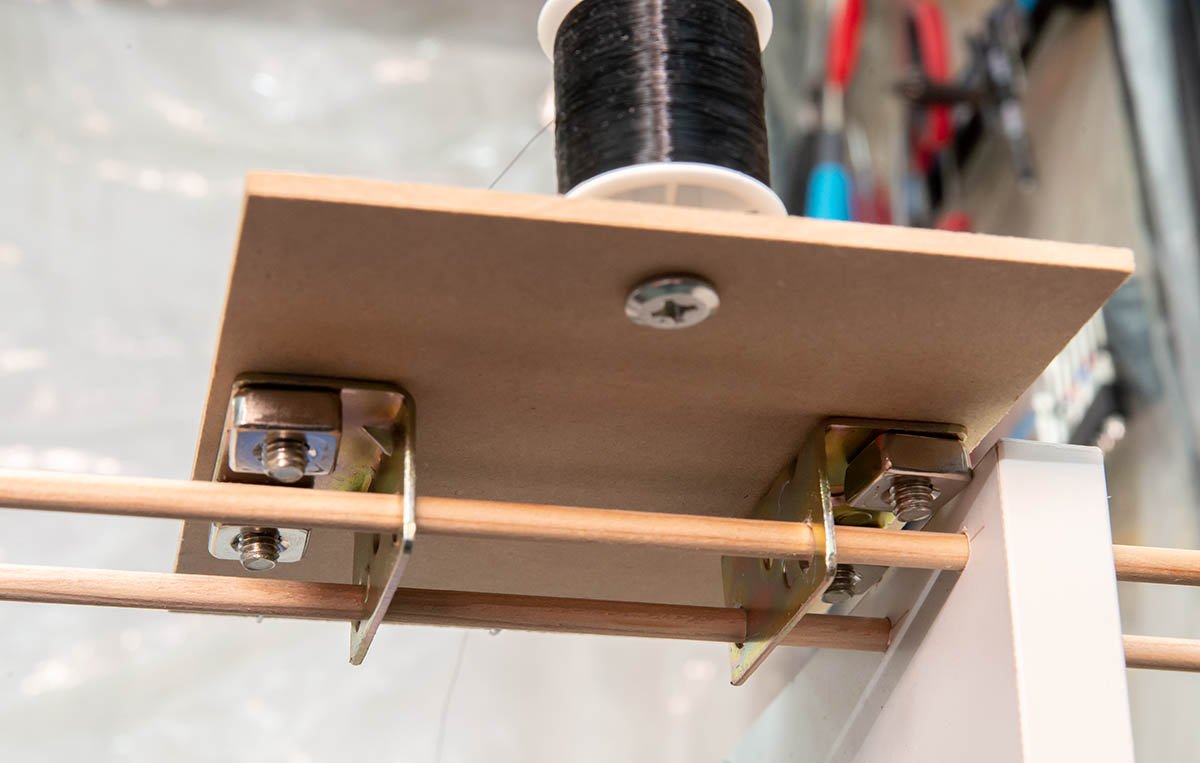
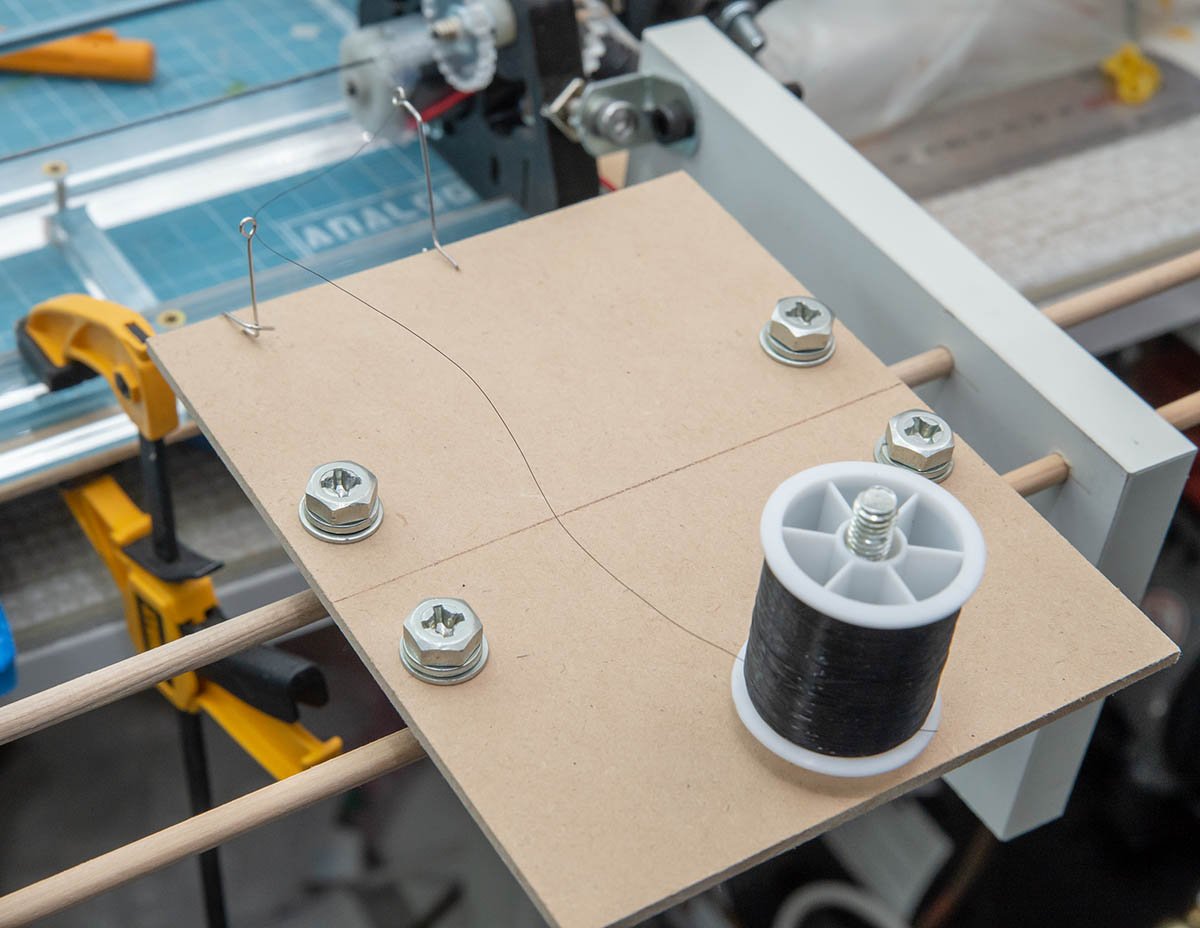
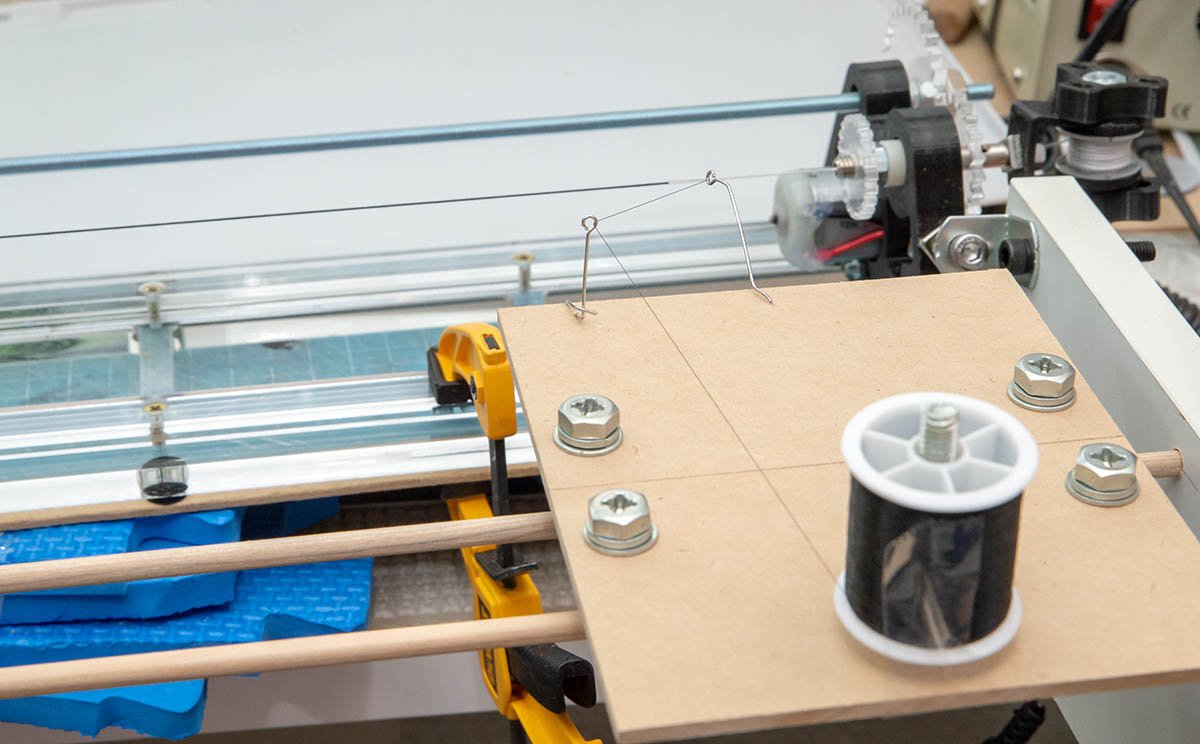
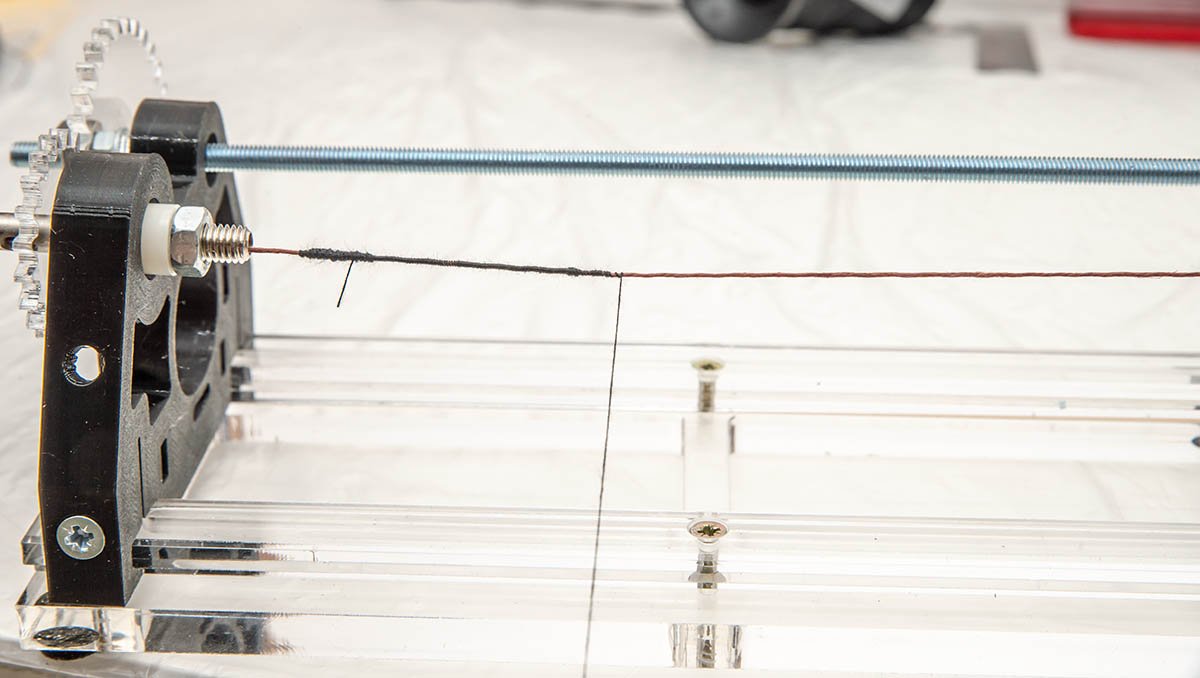
I finished to modify PL4-4. I reused most parts from stock and spares, so it didn't cost a lot. I can control all the system with one hand. Some parts like this long screw thread were hard to get, so I connected two common bolts. To use the bolts, I cut the bolt head with Proxxon table saw and HSS metal blade. It was extremely difficult and dangerous. It scattered sparks all over the places and it literally melted down. 😨 In addition, I changed the problematic stock bobbin holding mechanism to my new idea. I made wood bolts and R-clips with fun. 😉 The stock metal bolts had many issues. (1) 11.5 times heavy weight (2) screw thread causes jam frequently. (3) It takes long time to load and release bobbins. (About 30 seconds.) (4) A bit difficult. New wood bolt with R-clip solved all the problems. (1) Reduced weight stress (2) Much less jam (3) 5 seconds quick release and lock. (4) Super easy. (5) Cheap. I ran a test with cheap cotton thread. I added long middle area to check working thread easier and to prepare additional tension control system in the future. This is a desirable condition according to a manual... If a left drive rotates too fast or right bobbin stops to wind, the thread will cut within seconds. In this case, a left drive rorates too slow or a right bobbin runs too fast. It is making useless loose rope. Thanks to a slow bobbin speed mod, I can run a left drive 10 times slower than before which means I can run ropewalk at night without fear. Also, I can set and record bobbin winding speed from 8 to 100 which is clearer than previous analog knob. I'll replace the left drive motor to digital system like the bobbin. I finally satisfy with my new gadget and can be sure that it will produce any kind of rope. It's time to go back...... What was I making? 🤔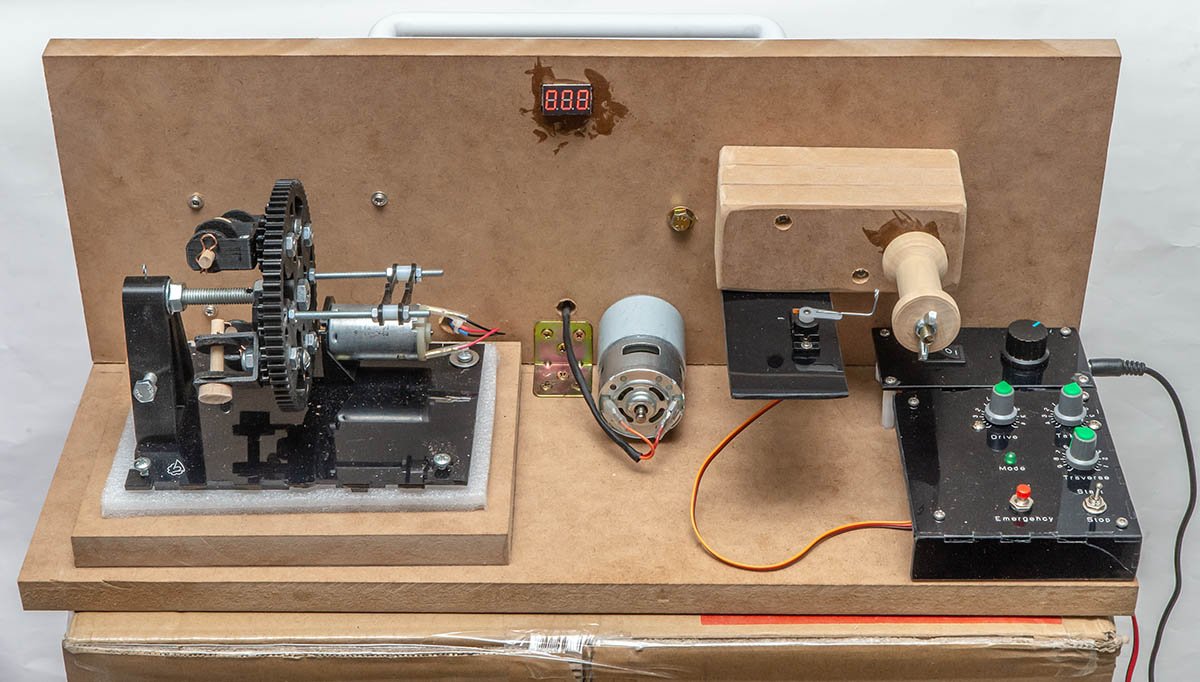
-
Domanoff ropewalk PL4-4 modification
modeller_masa replied to modeller_masa's topic in Masting, rigging and sails
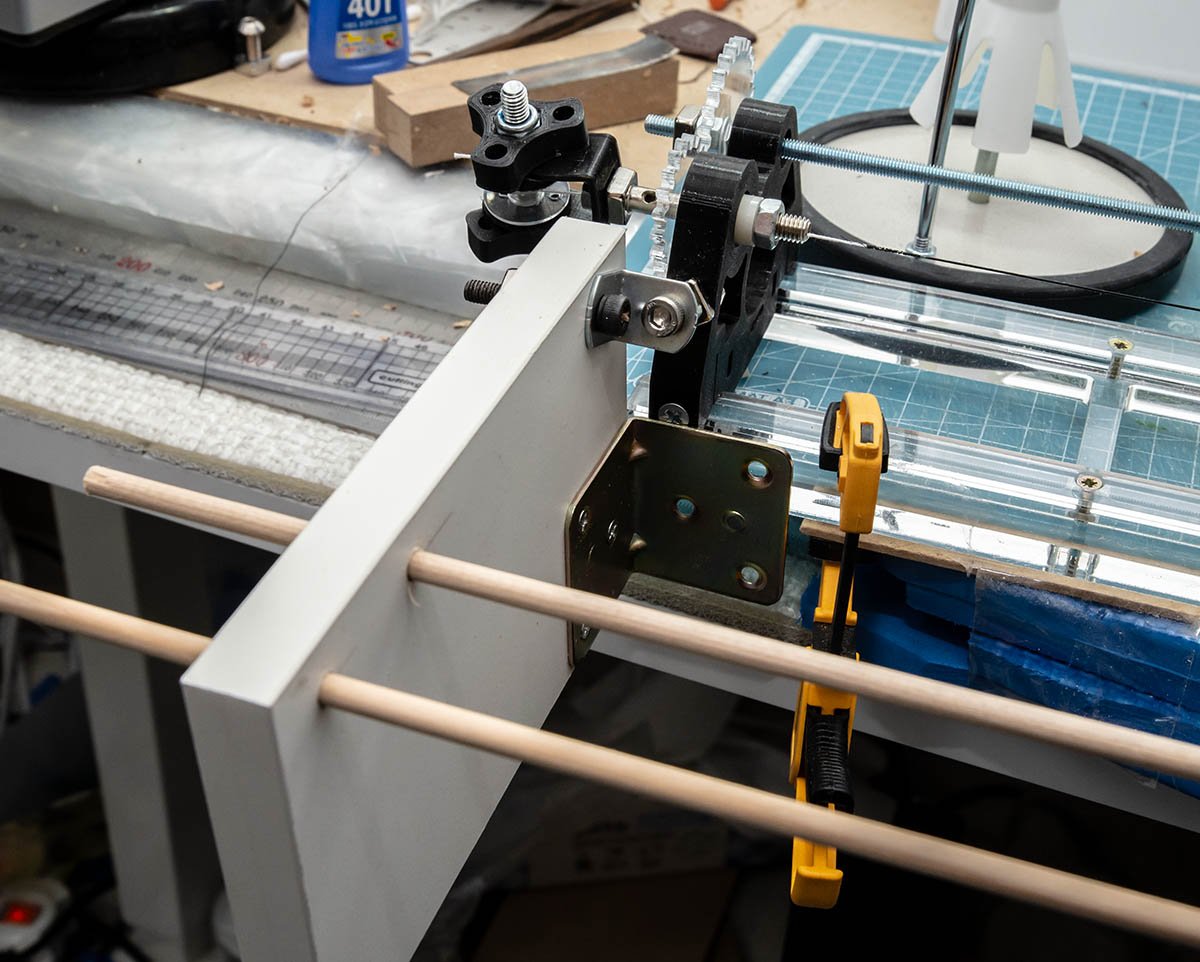
I designed new frame to install the new bobbin winding system. It needs more space. Also, I added space for soundproof shelter It is all I can do for now. I need some bolts to finish the mod.
-
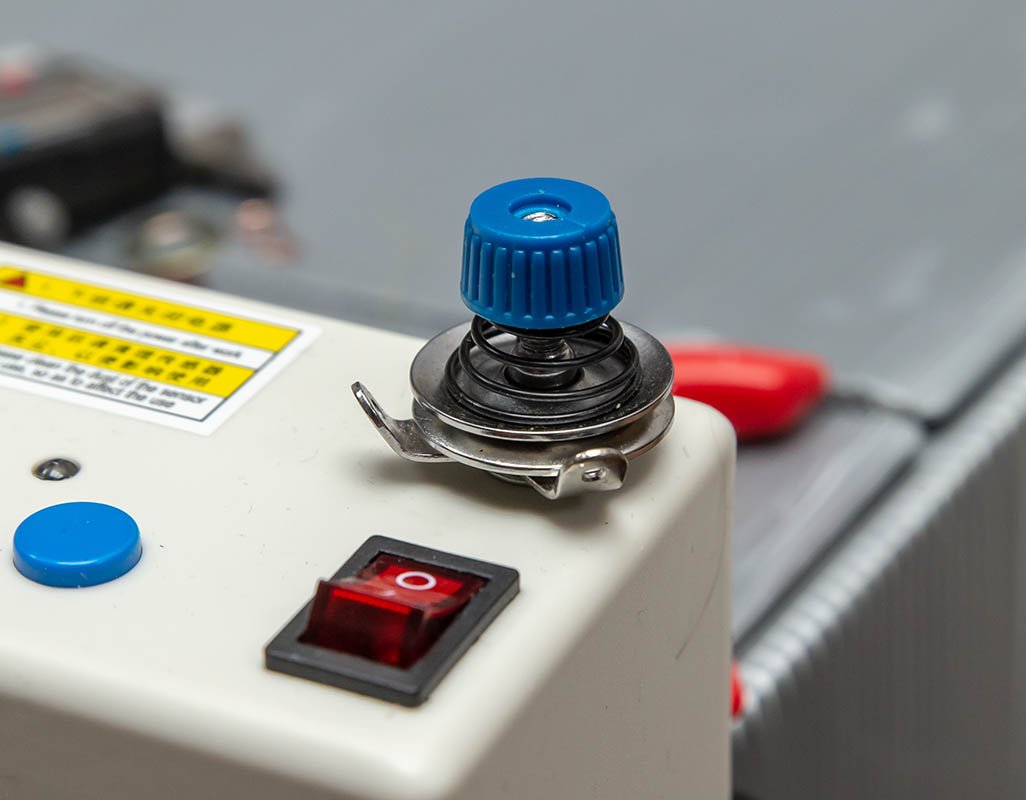
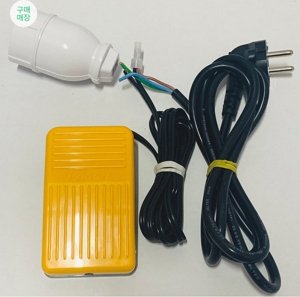
I learned new word that my pedal switch is called momentary switch. I may need non-momentary knee switch for longer work.
-
You're absolutely right. I'm using foot pedal switch, and it is 100 times better than controlling knob.
-
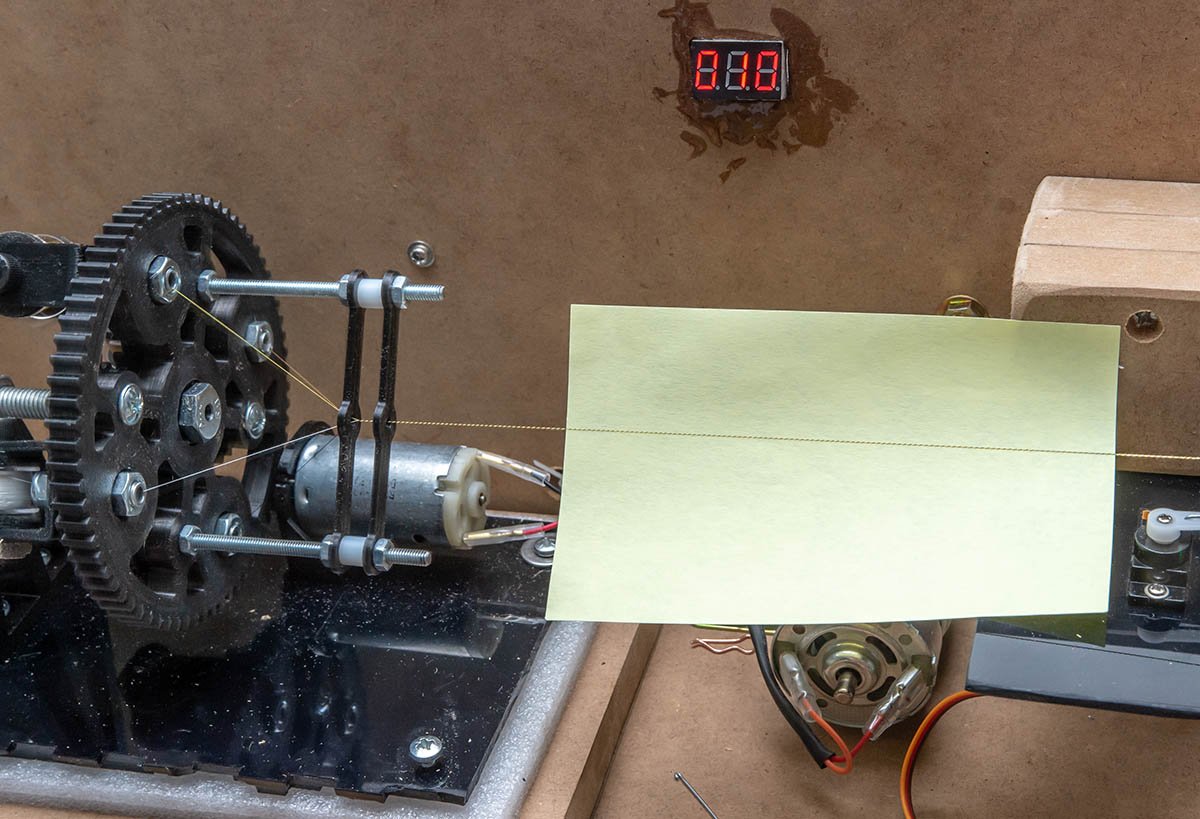
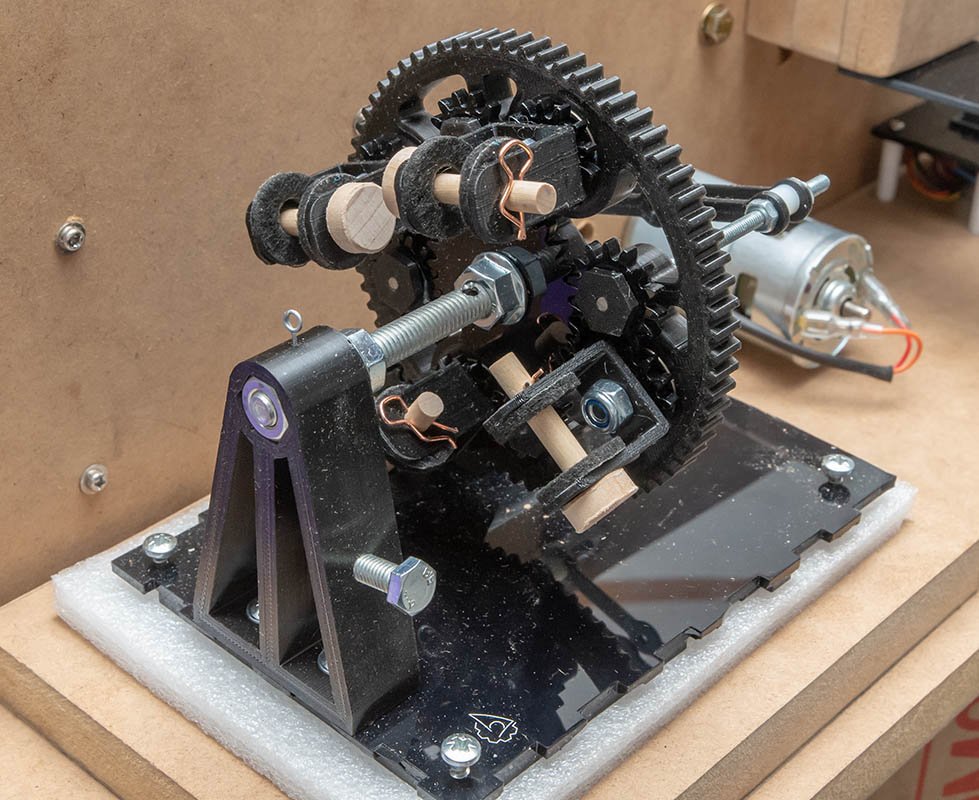
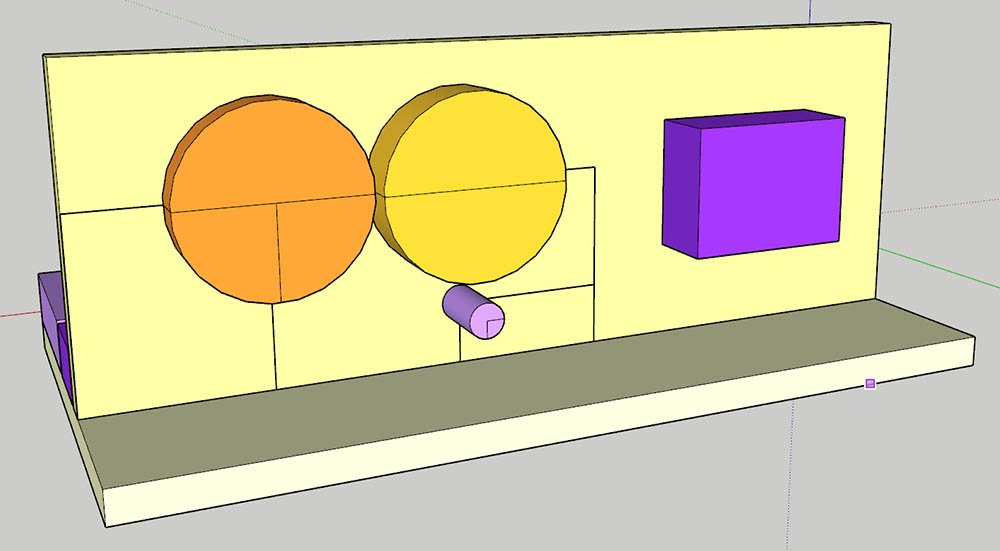
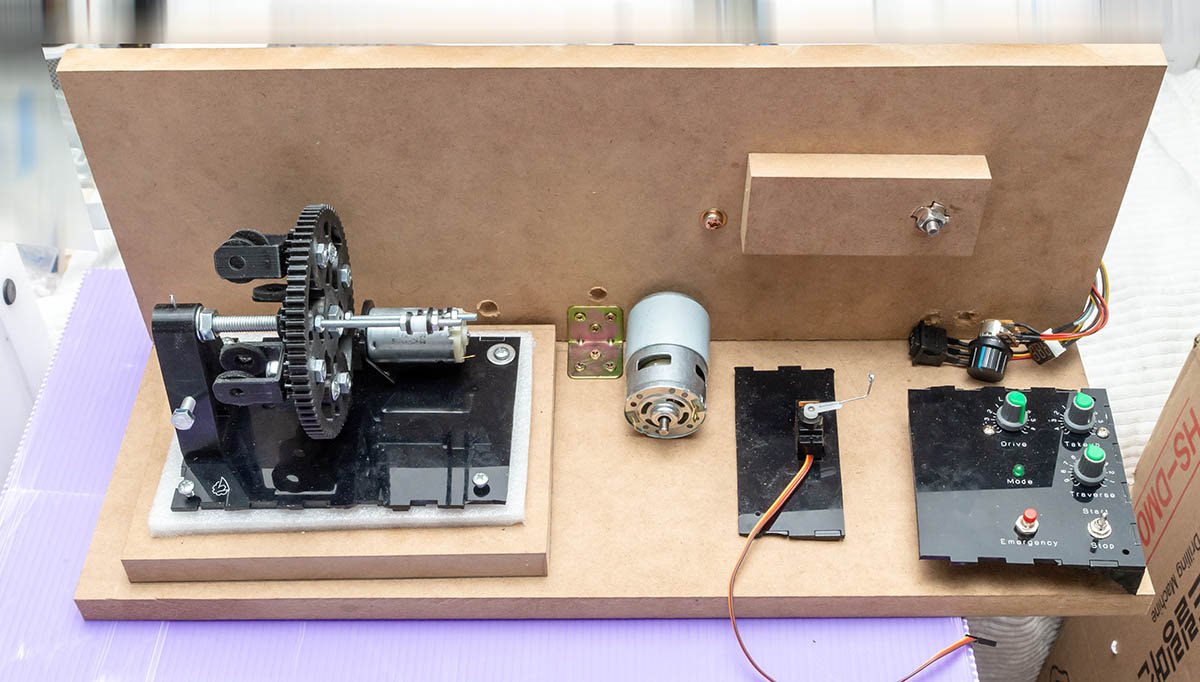
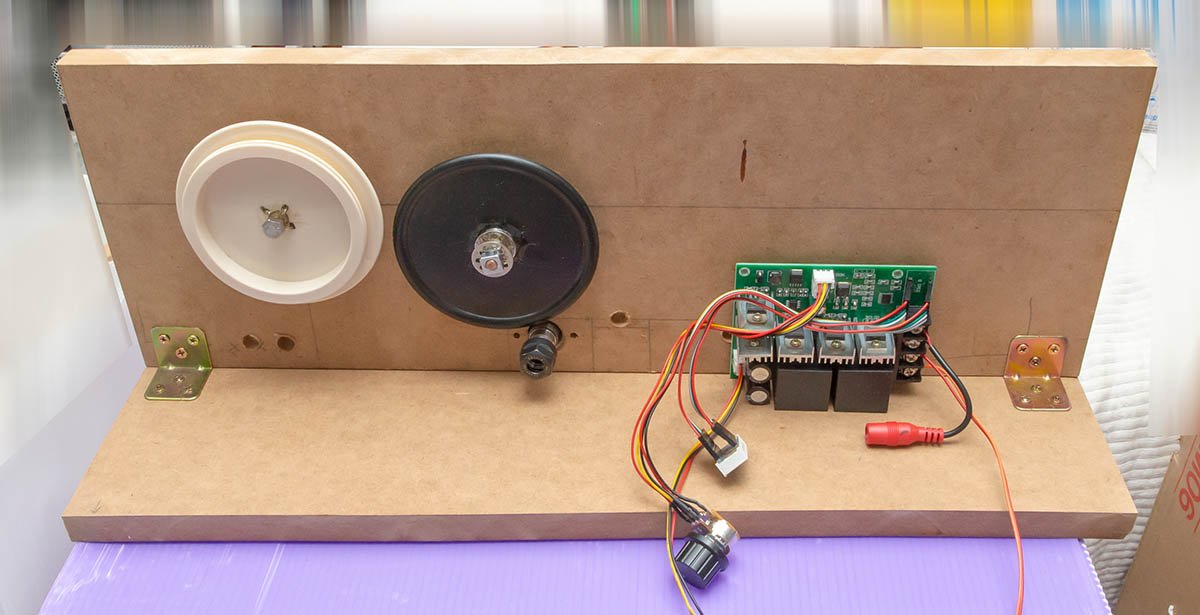
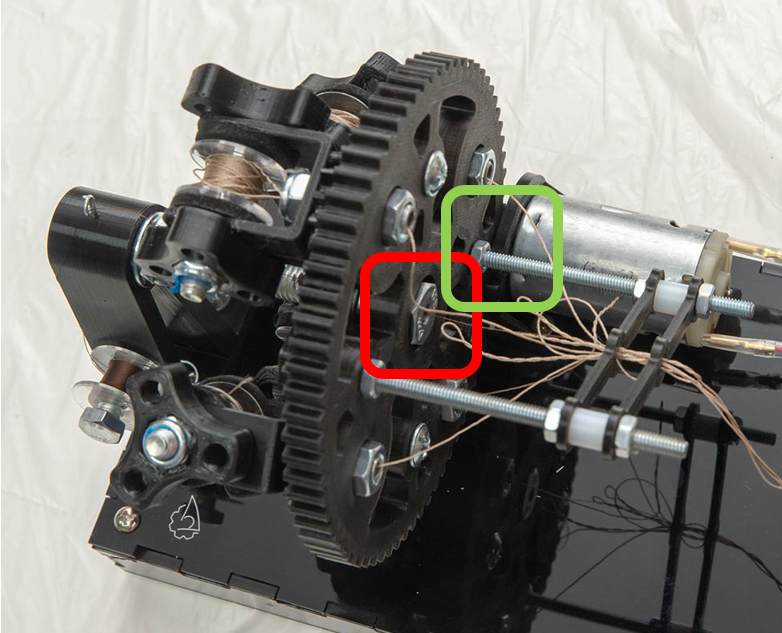
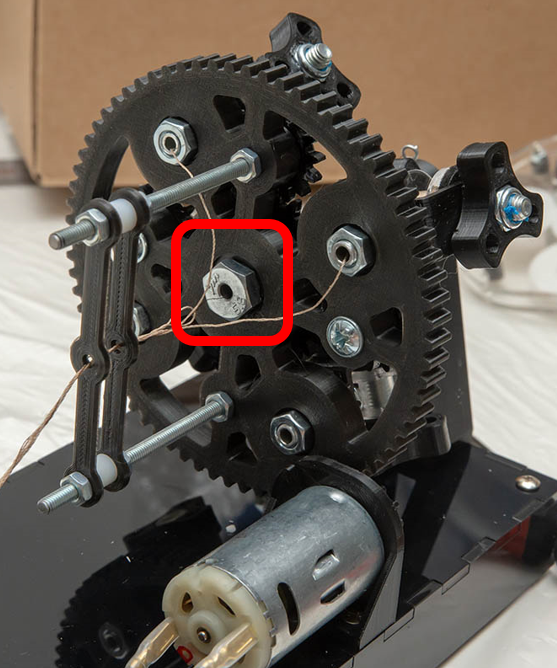
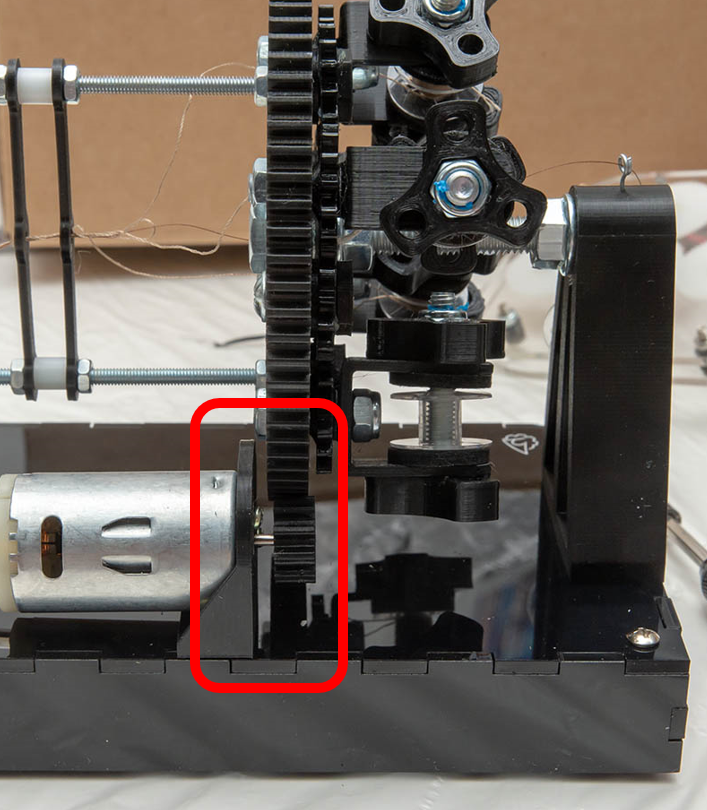
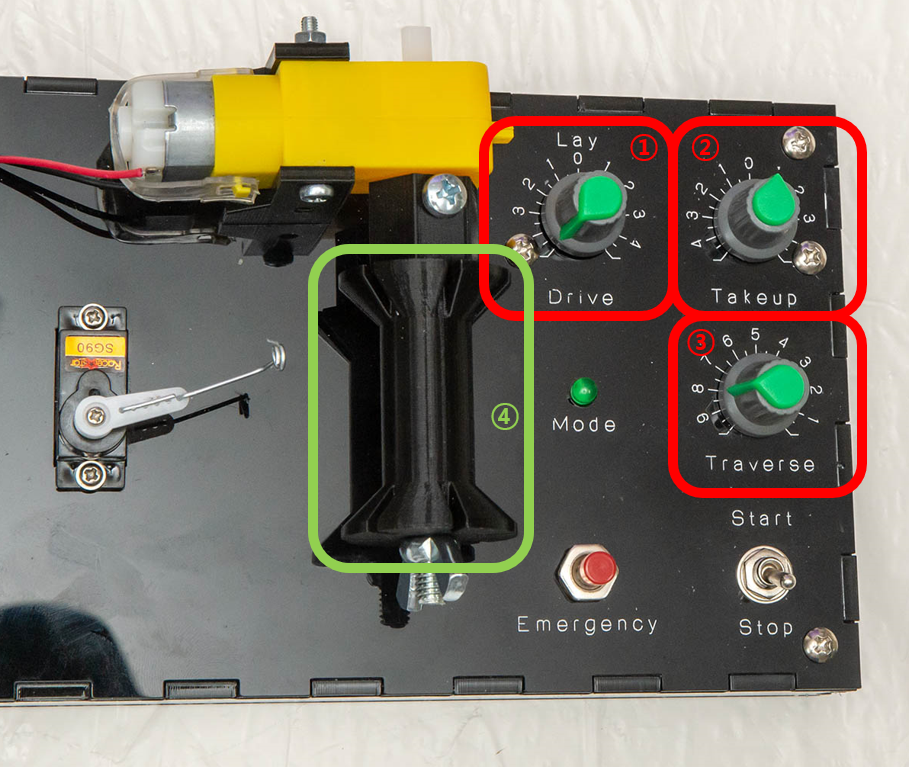
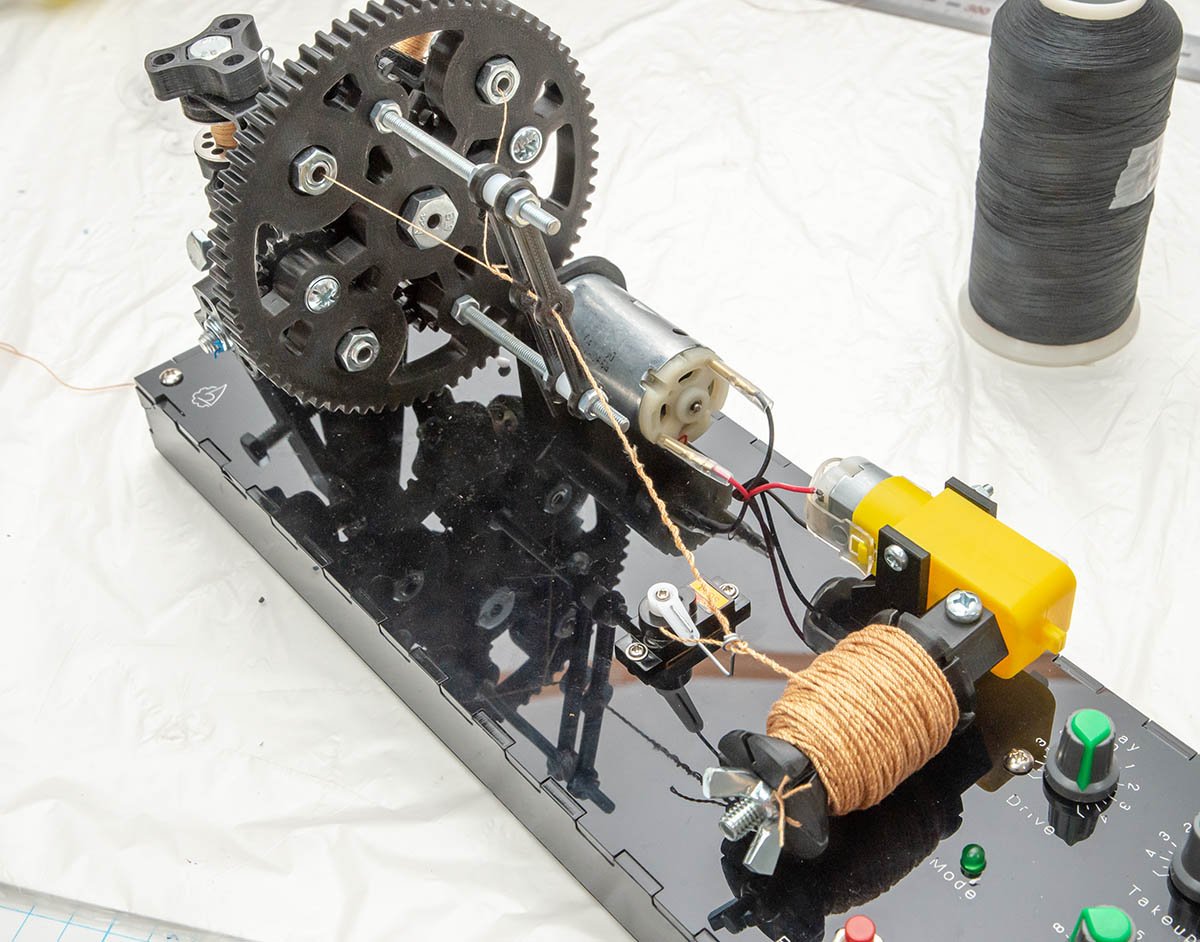
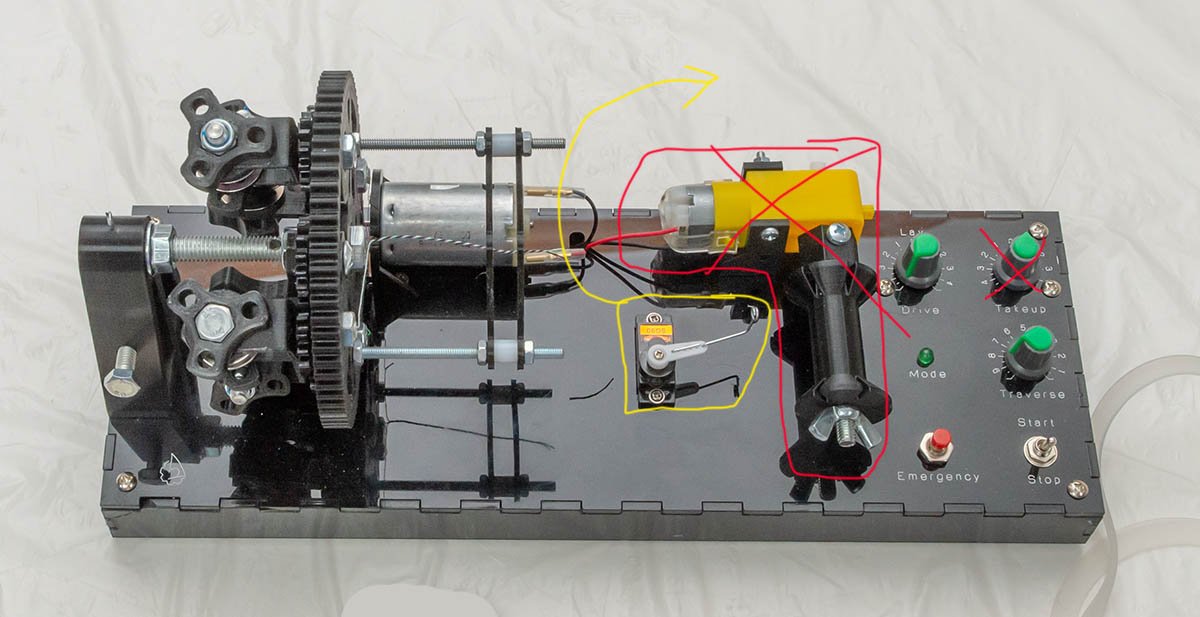
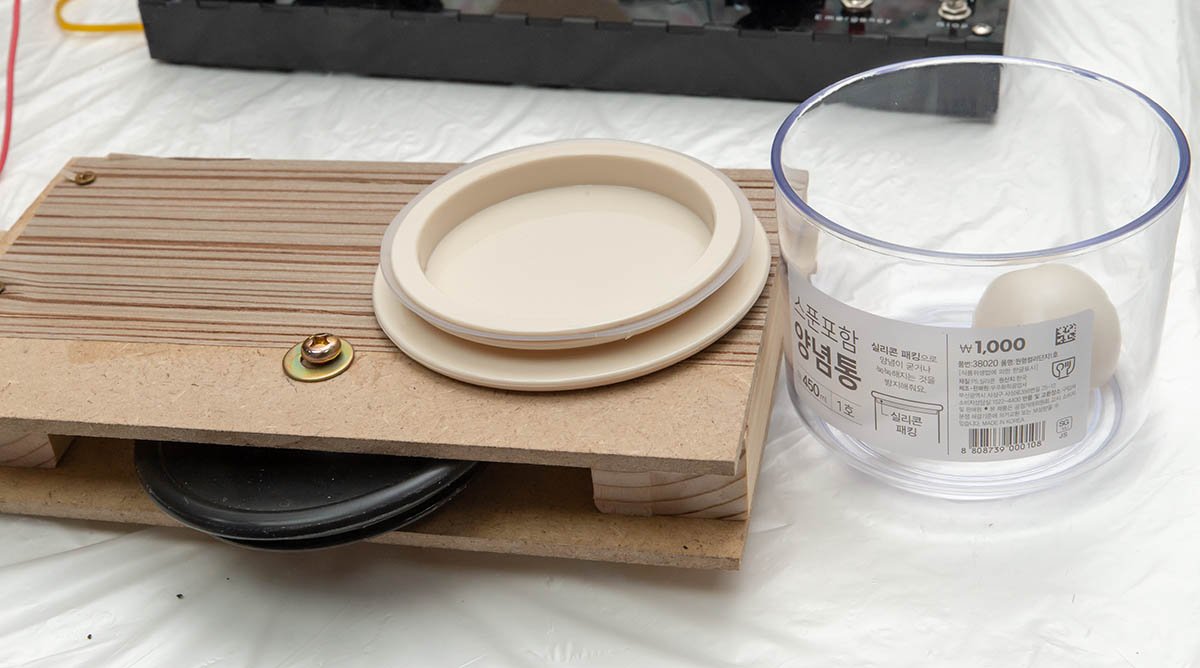
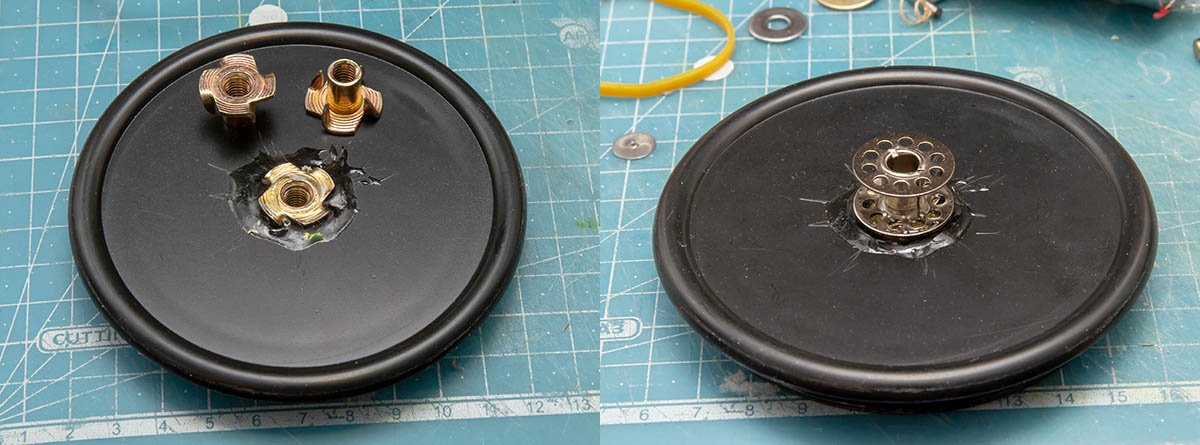
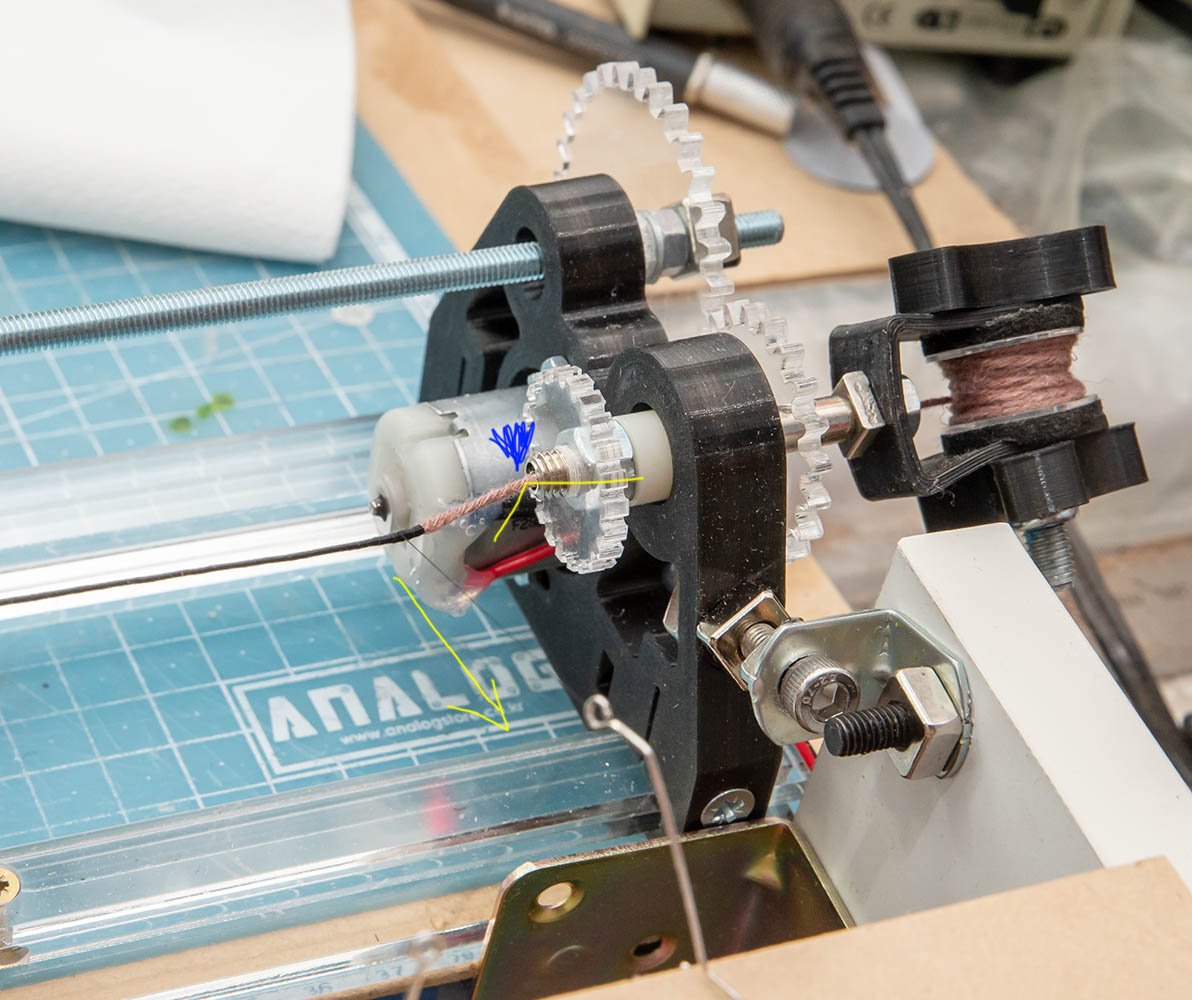
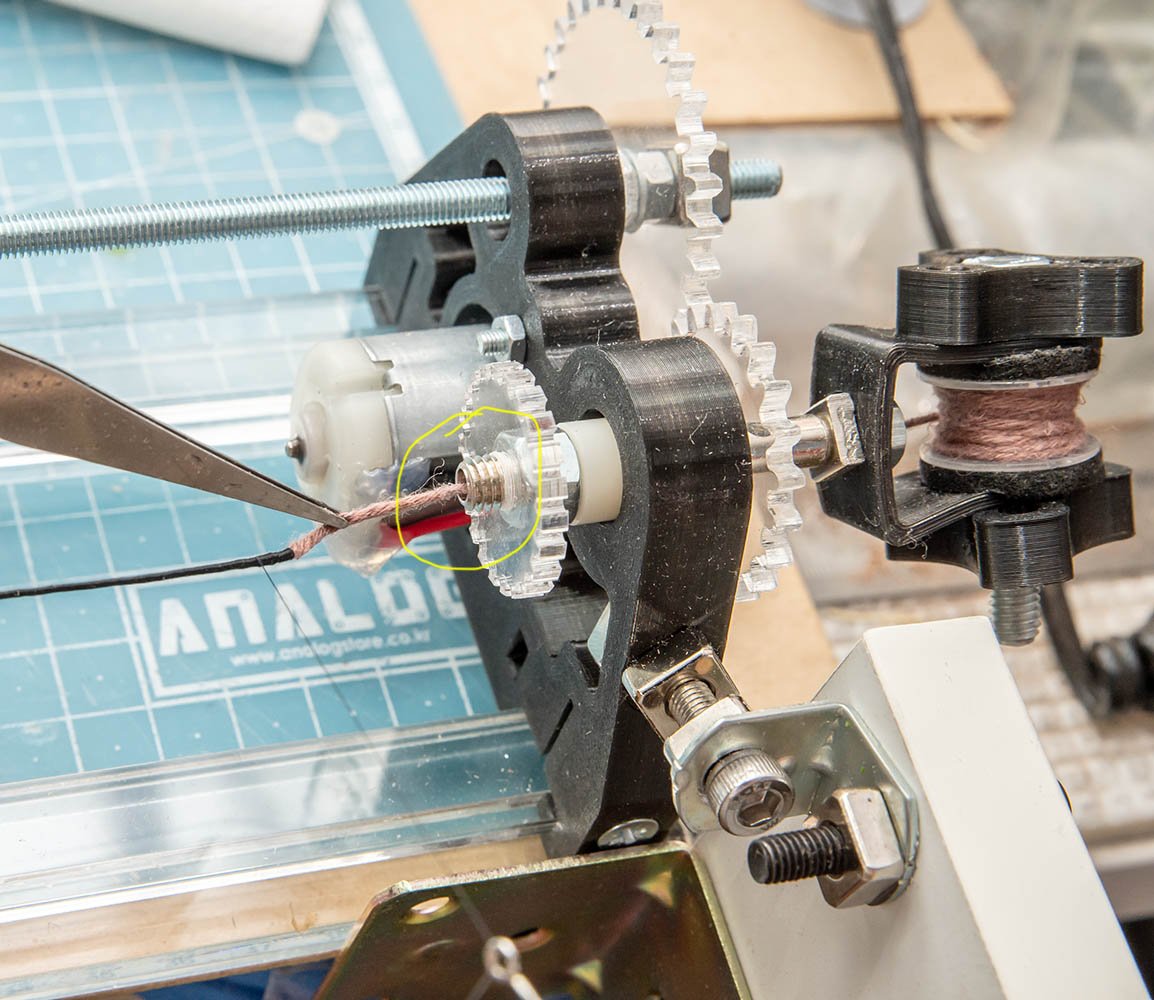
Hello, I received Domanoff rope making machine PL4-4 yesterday. It was busy day to learn new machine and run some tests. Unfortunately, the package was shocked during shipment, so I had to fix it before use. The biggest gear (red) was removed, so it interfered with motor unit (green). Fortunately, the gear wasn't damaged, so I just pushed and fixed it like this. It doesn't touch the motor unit. In addition, you may need to adjust the motor position using bolt. (red box) The sample thread Domanoff might made is super better than my first job. I felt that this machine is 10 times difficult than Domanoff serving rope machine SM4. Here is small tip. You can replace the ④ middle size bobbin (green box) to common wood bobbins. The size must be smaller than 55mm long and 35mm diameter. This machine can be adjusted traverse area in case of different bobbins. This machine is extremely noisy machine. This is the loudest noise at 0 distance. It is 100 times louder than serving rope machine, and slightly quiter than 10 inch table saw. However, I need more noise and speed. The reason I need faster speed (① Drive: 4~5) is that winding speed of ④ bobbin is too fast. I can control the bobbin speed with ② Takeup knob, but it is not stable when it goes under +1 speed. Even +1 speed is so fast that I can't make tight rope than stock thread. When I slow down the bobbin speed to 0.5 or 0.75, the motor becomes unstable, and eventually stops. The bobbin speed is a key to control tension, so when it stops, supply thread cut within a second. Only way I can run it with +1.0 bobbin speed is driving faster than +4.0 which causes 100 dB monstorous noise. It's hacking time! I decided to remove the bobbin control system and make more reliable system at lower speed. I used most parts of modification from spare parts, so I was able to minimize expense. The main motor to rotate bobbin is 775 motor with PWM controller. It was so fast and difficult to control at slow speed... I bought $1 bowls, and used the sealing cap as pulley. 🙂 The smaller pulley is bobbin. 😆 The ratio is about 11:1. I used two pulley and succeed to slow down the fast 775 motor 1/120 times. It is ideal speed I planned. (The picture's speed is 10% power input.) I need longer M6 bolts to complete the bobbin motor modification and it will be the next week. https://shipworkshop.com/products/other-tools/61-rope-making-machine Did Alexey Domanoff know the issue? I think so. His new prototype machine uses stepping motor what I considered at the very beginning stage. It looks like his new machine is significantly better than PL4-4, and it can be quiter than before because of accurate bobbin winding speed. Only regretful thing is that it still uses jam-friendly bobbin holding mechanism. I would say that it must be replaced to quicker and easier clamp mechanism. My next modification will be replacing the bobbin holding mechanism and minimizing noise. I'll upgrade my PL4-4 to new 6+1 machine by myself. 😆
-
Thanks, Henry. I would say that this overkilling method is good for newbies or babies because of easy of use. I've never imagined the super simple idea that using drill. 😖 It may need some trial and errors, but it costs almost zero to compare with my method. (about $200.) 0.038mm is thinner size than I calculated. Also, I found that the serafil fine 420 series has only two colour options - black and white. Both of them cost a lot, so I'll open my subjective chart when there are more than 100 lists. (not in near future) Thanks for interesting information, wefalck.
-
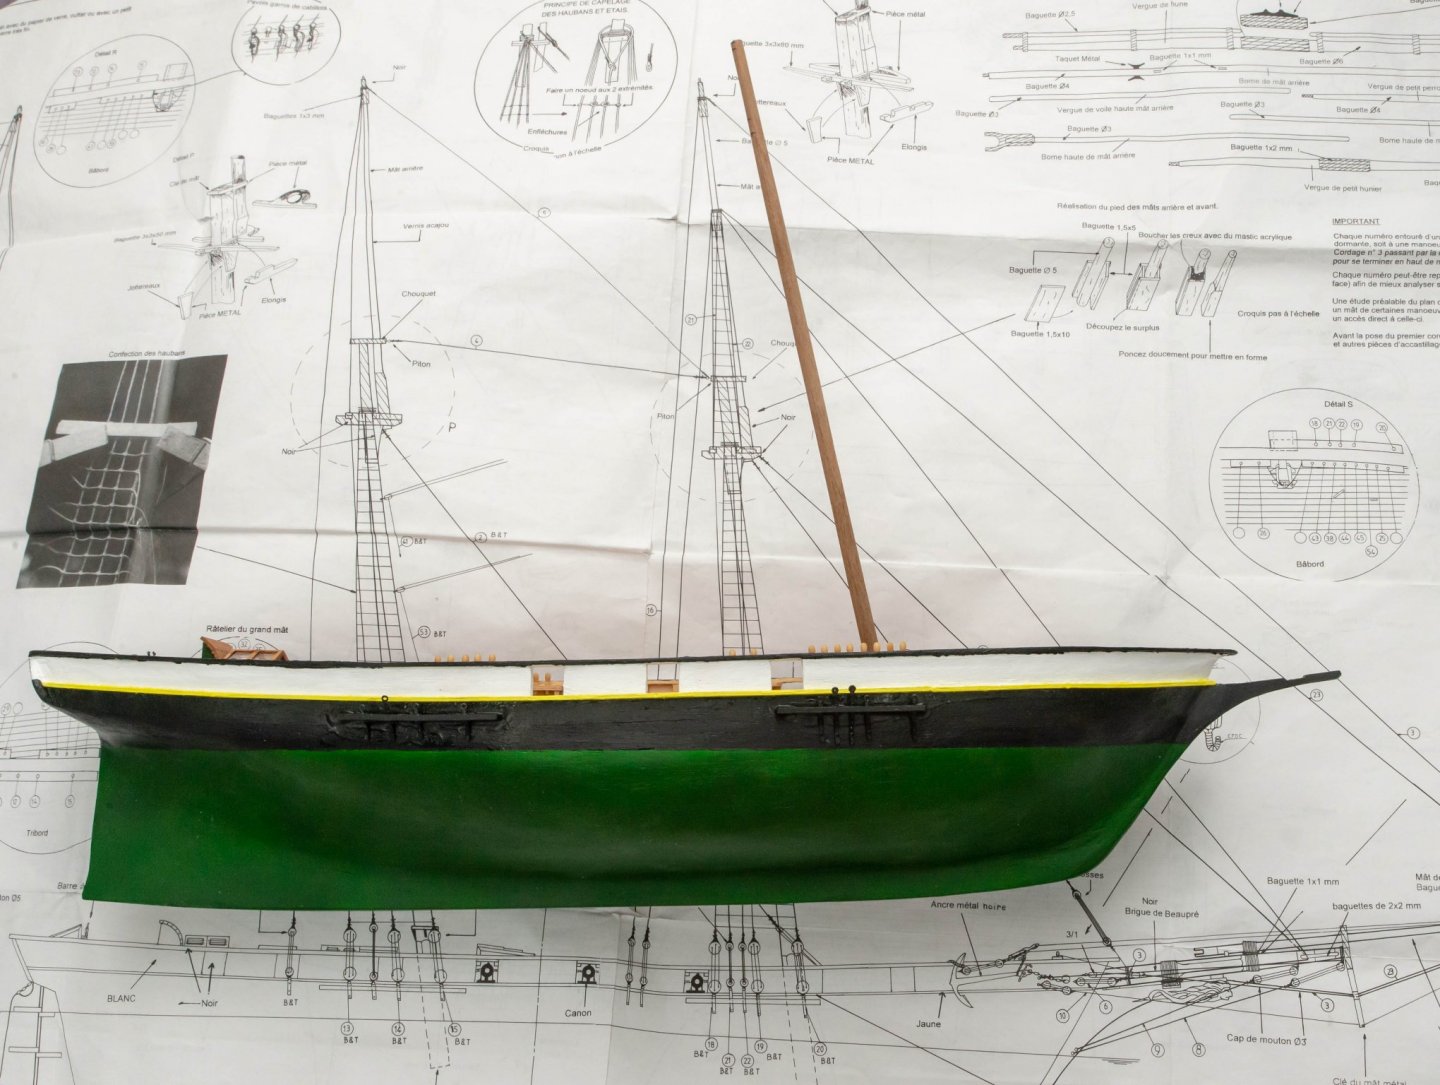
An American Baltimore schooner? I guess you are making La Recouvrance which is same Baltimore schooner style in early 19th century. I'm refering this model. I'm not sure this will help you, but it gives a lot of hints to me. https://modelexpo-online.com/assets/images/documents/MS2120-Pride_of_Baltimore-Instructions.pdf https://modelexpo-online.com/assets/images/MS2003 DapperTom_instructions.pdf
-
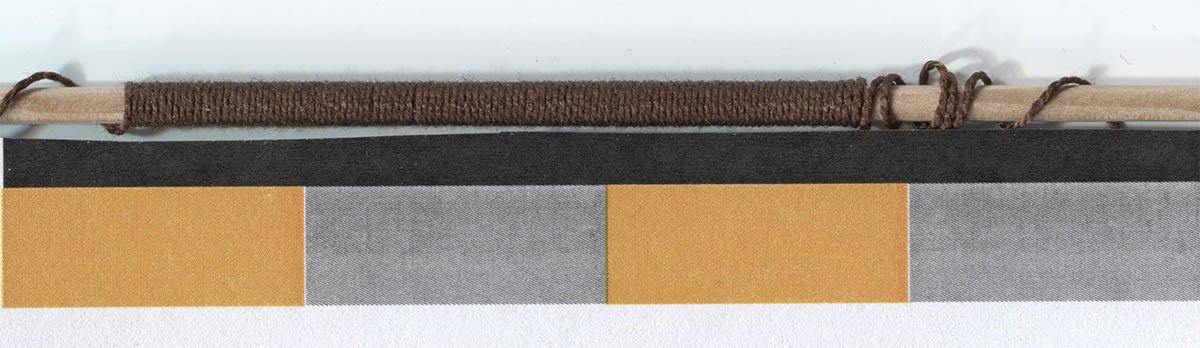
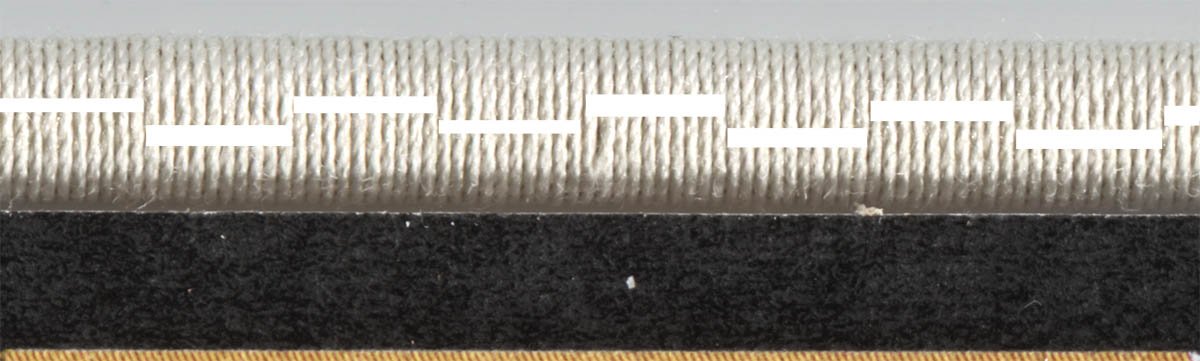
Hello Henry. It is not difficult to wrap one more inch with SM4 + motor option because it takes only 2~3 seconds. Also, I used flatbed scanner with ruler to measure an inch length as you see. The grey and orange blocks are inch length paper ruler I'm using. I need 2~3 inch to measure it. In addition, I used Epson V37 CCD flatbed scanner which scans up to 4800 DPI. It is not hard to count each revolutions of the serafil 300 super fine thread with 4800 DPI resolution. I would say TEX no.5 thread also won't be a problem, and such high resolution and enough error margin gives 'overkill' objective accuracy as valuable information we can share. There may be more efficient and simple way we can share WPI numbers. (I think WPI or WPC is the best way to measure thickness of thread used in wood model ship.)
-
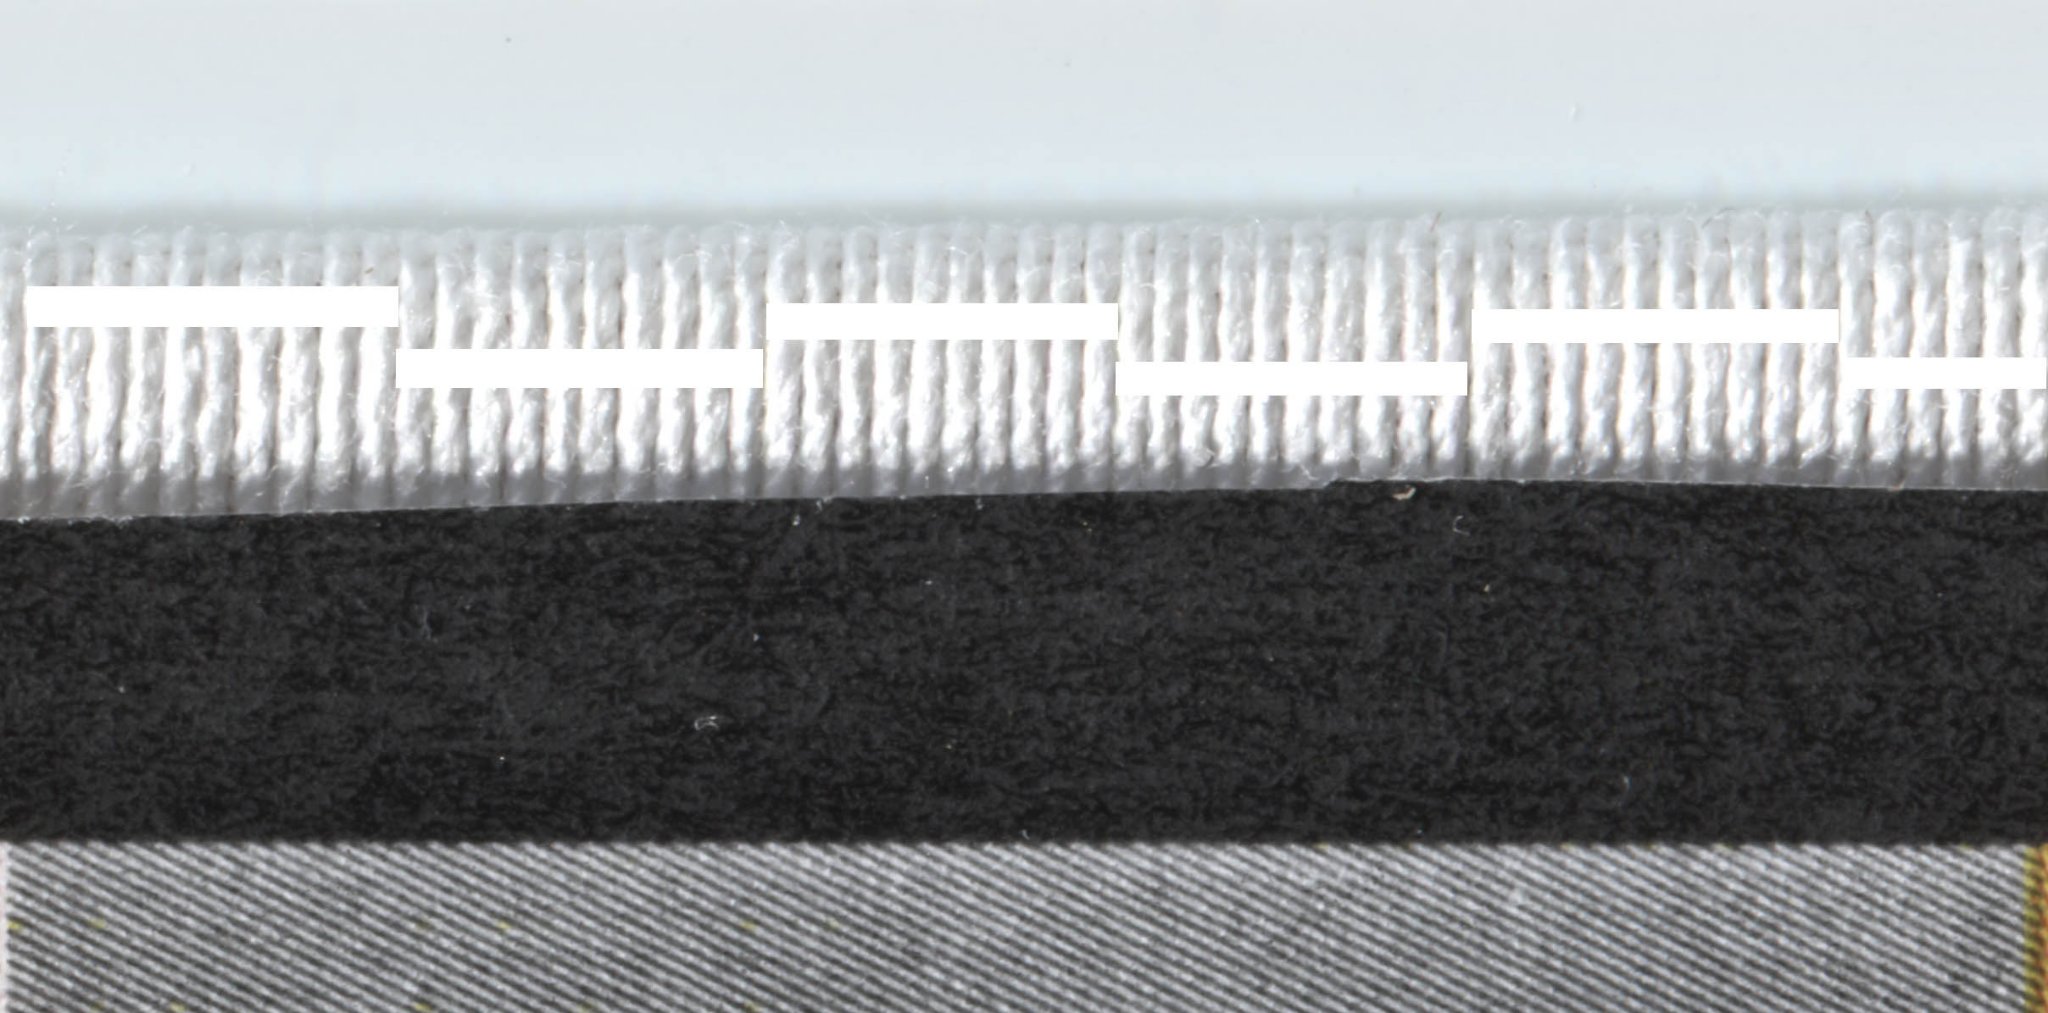
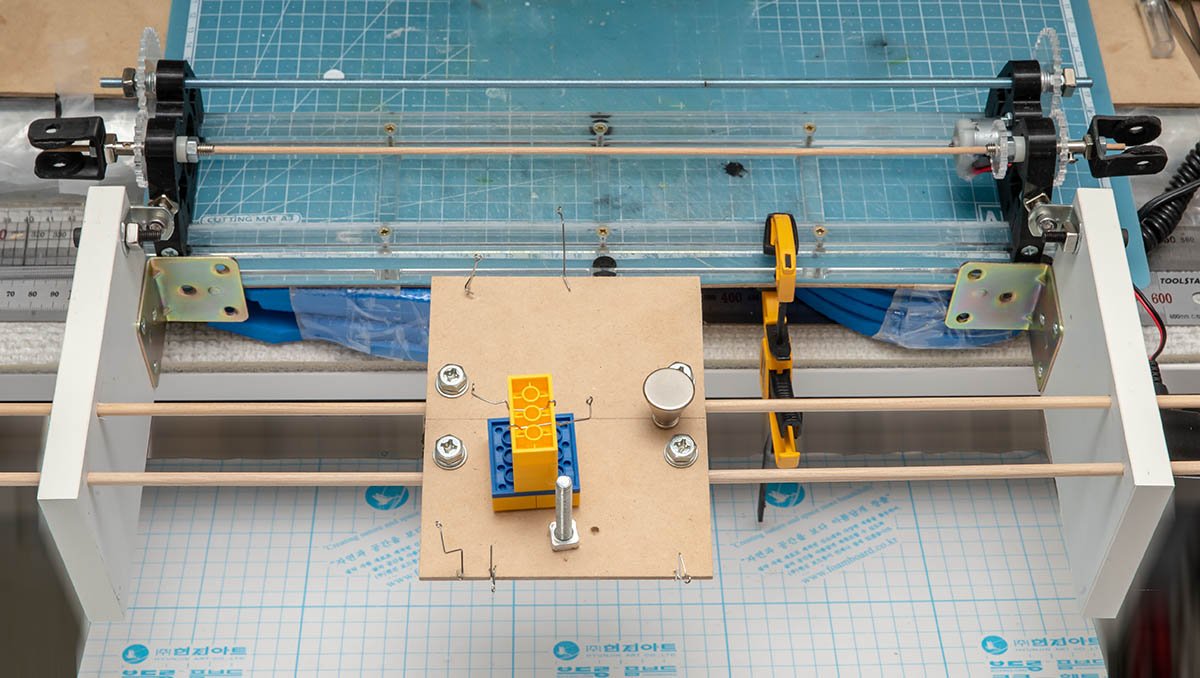
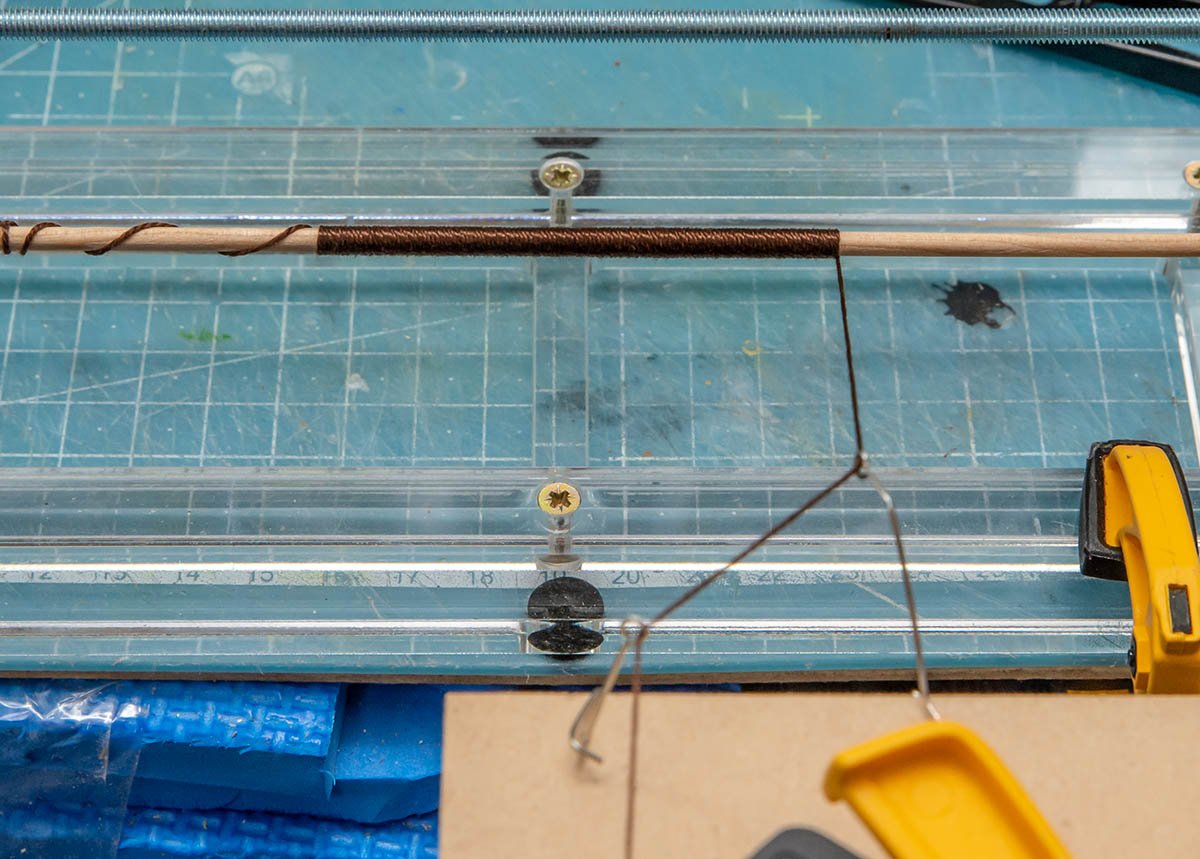
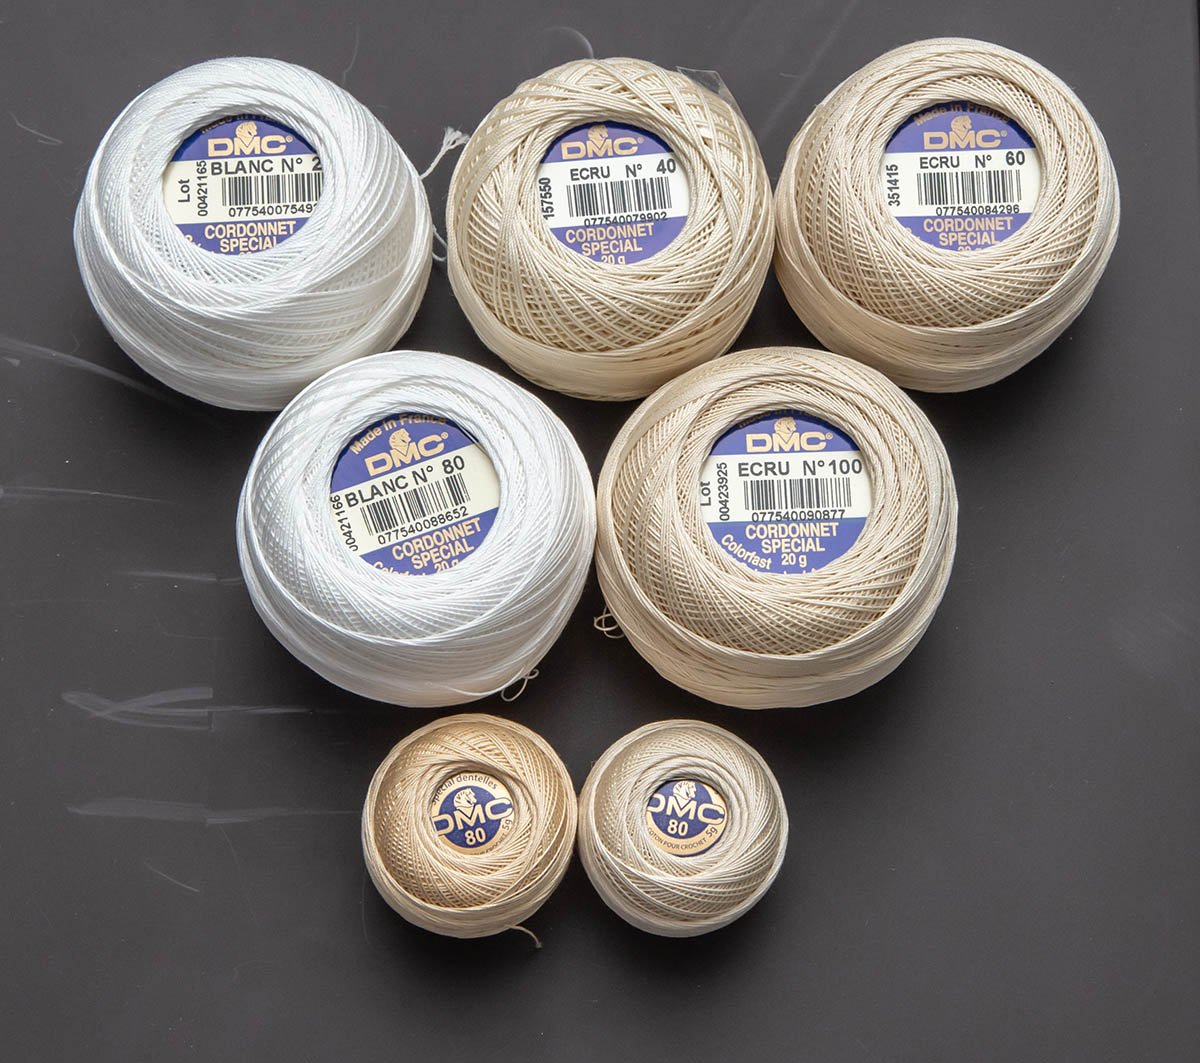
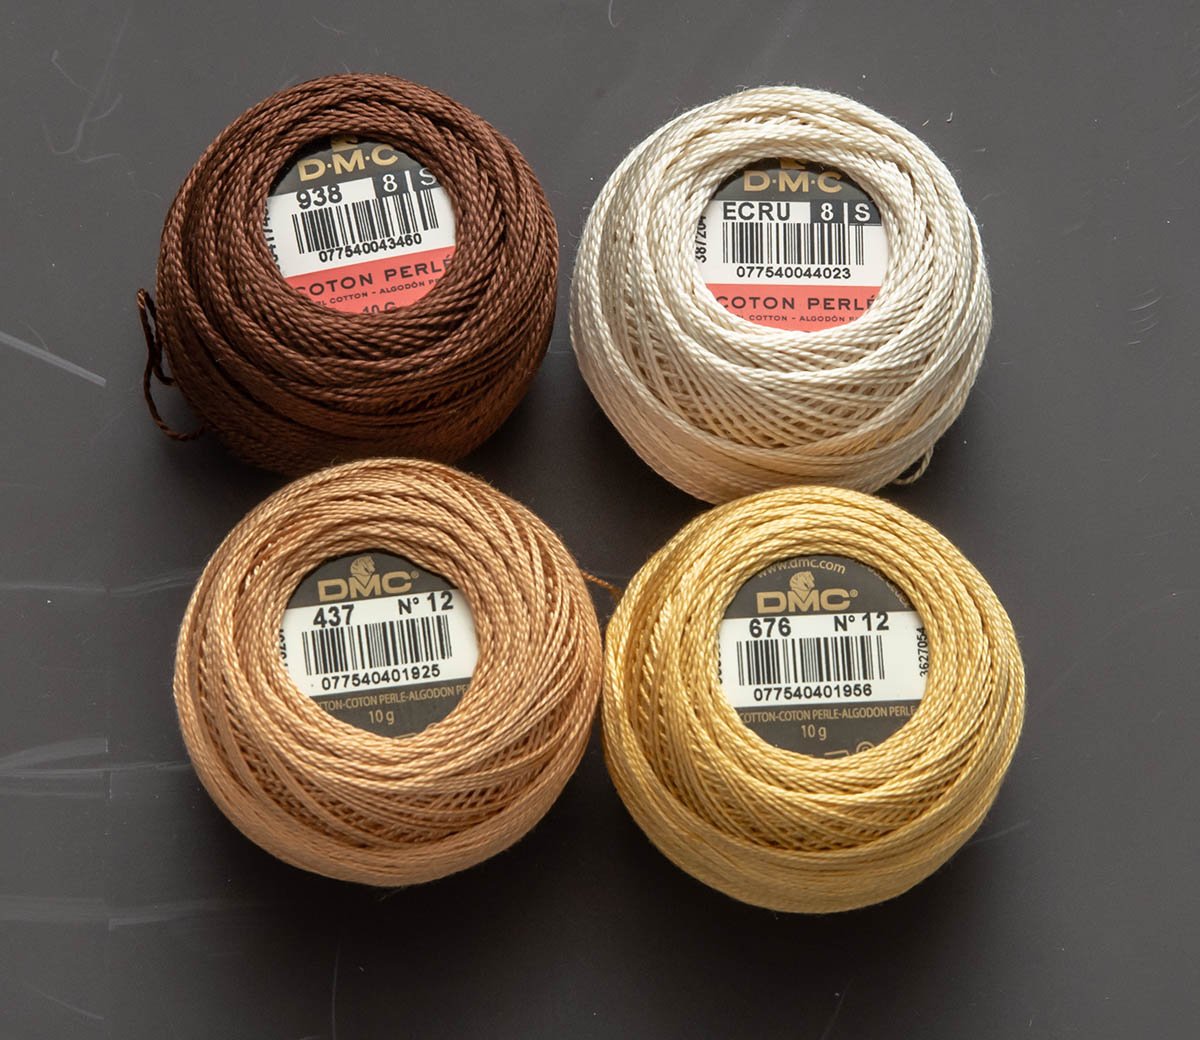
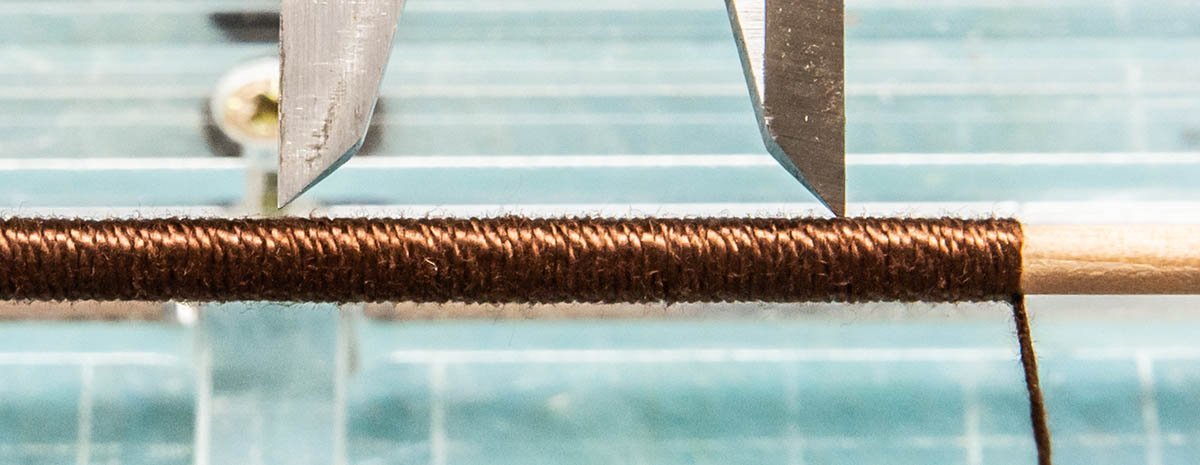
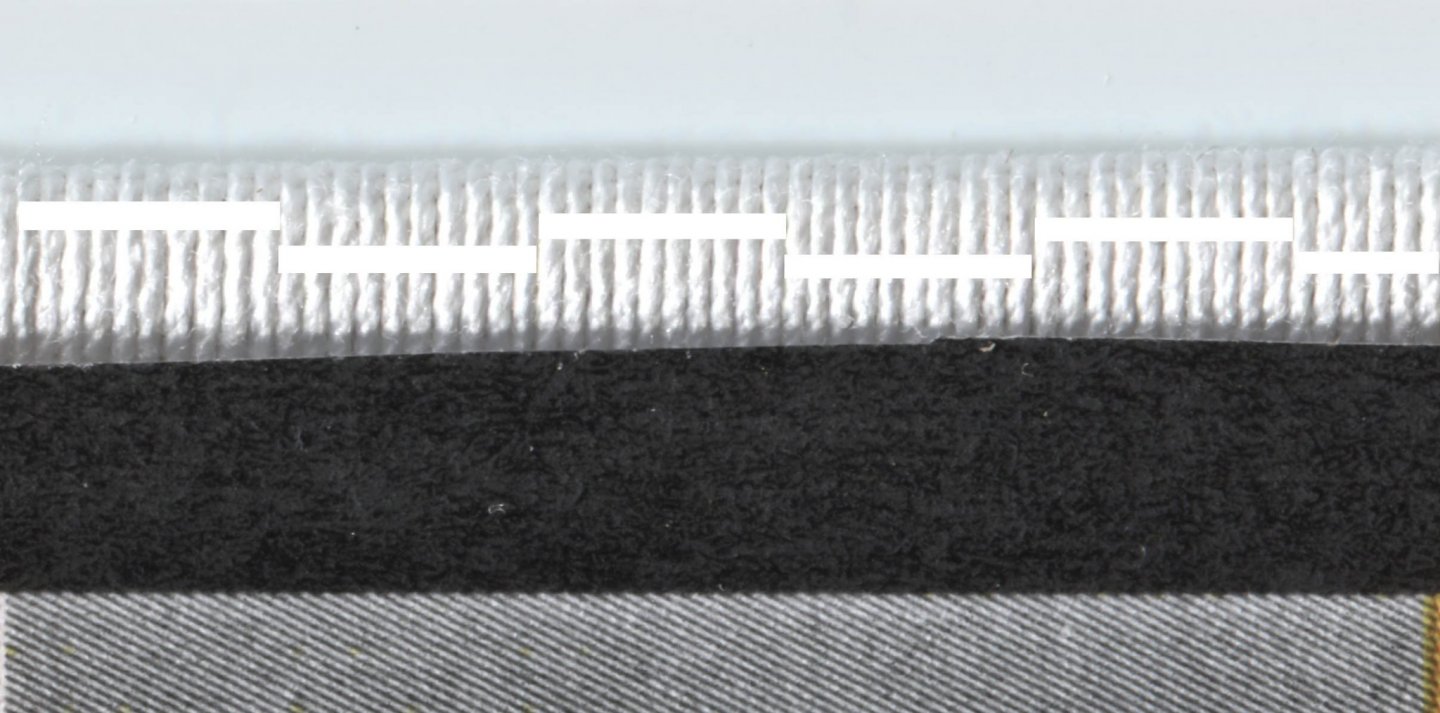
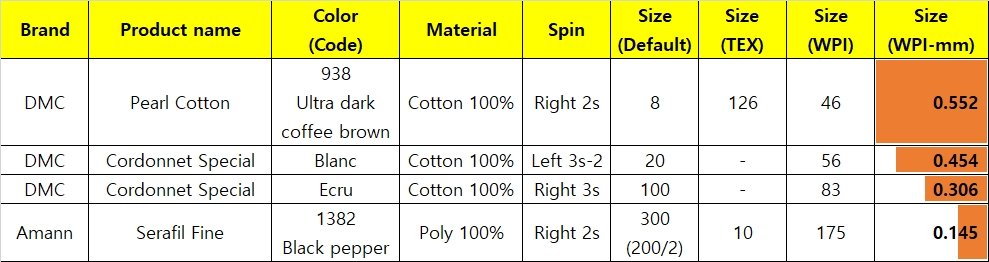
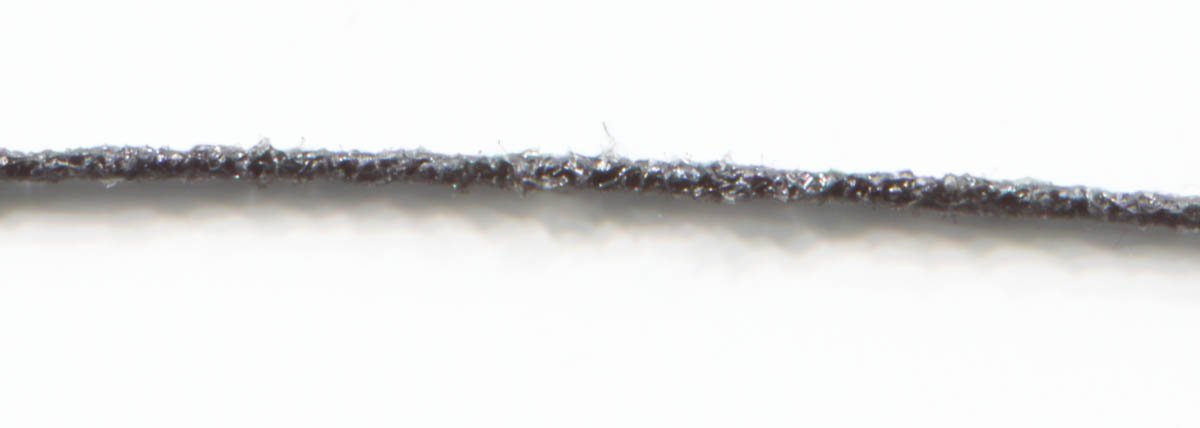
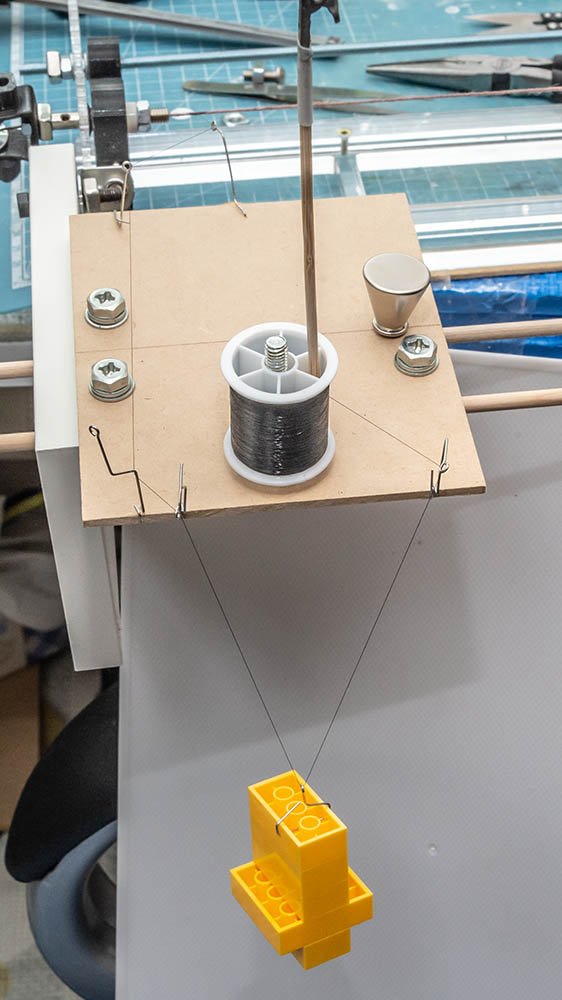
Hello, I've read some posts regarding thickness of thread and ropes, and found that thickness of thread is variable number in multiple circumstances. Most posts recommend to make a personal subjective chart, so I made a thickness measurement system using Domanoff's SM4 serving rope machine. This is my current setting of SM4 serving rope machine. Sub-thread's tension is controlled by LEGO weight, so I don't touch neither tension stress nor width of revolutions. It makes much better and consistent result. Only thing I need to measure thickness of thread is 3.00mm wood rod. I've tested some of my favorite threads. This is my best cotton thread ever seen. The DMC cordonnet special or dentelles series are cotton with almost zero pills, and used as lace thread or tatting. I'm newbie, so it is difficult to remove dirty pills of ordinary cotton or poly threads. This is an 'ordinary' cotton thread. The DMC pearl cotton 5, 8, 12 has tons of dirty pills, and its spin is so loose. wefalck said that most conventional threads for clothes are not suitable for model work, and ropewalk is mandatory to get tight rope. I'm planning to unravel cotton threads and rewind them using automated ropewalk - Domanoff PL4-4 which I'll receive this week. Amann's serafil fine thread is one of the finest thread. This is polyester filament thread. It has zero pills, so sometimes it looks like a plastic. You may be familiar with Gutterman's Mara series, but in South Korea, Amann is dominant brand in this segment. Gutterman is the best company in global market, and has more variable colors. Amann is second biggest company in Germany and has less color, but Amann has thinner threads. While Gutterman's Mara 220 is TEX no.13, this serafil 300(200/2s) is TEX no.10. Also, you can buy more thinner serafil 420(300/2s) which has TEX no.7. Moreover, if you unravel the serafil 420, you'll get TEX no.5 mono filament which has 240 colors with economic price. (TEX no.5 = 50 Denier) https://www.servicethread.com/tools (Thread conversion calculator) Some threads are hard to notify each revolutions, so I used flatbed scanner. Much better and easy to calculate revolutions. It is DMC pearl cotton No.8. Its WPI (wraps per inch) is 46. It can be converted to millimeters - 0.552mm (= 25.4mm/WPI) It is still subjective number and can be changed in different situation, but it is important to make personal references to compare various threads. DMC Cordonnet special 20 (Blanc color) : 56 revolutions DMC Cordonnet special 100 (Ecru color) : 83 revolutions Amann Serafil fine 300(200/2) (1382 Black pepper color) : 175 revolutions Final result. I'll update my personal reference chart as I buy new threads. I'm using rope serving machine to get consistent result in the future. I hope we make better objective way to share thread specs each other.


-
The pride of Baltimore is almost identical to my model! I had many difficulties due to lack of build logs of similar ship type. This sister ship will be a really good source for better result. 🤩 I already solved some mysteries regarding end tip of masts. 😆
-
Worx Makerx Tools
modeller_masa replied to rhephner's topic in Modeling tools and Workshop Equipment
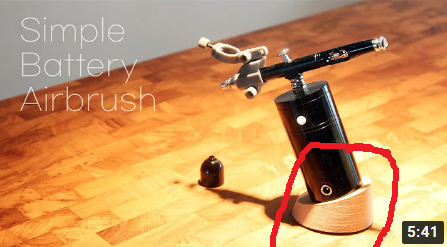
I heard that it is quite useful device. Its noise level is approx. electric shaver which means no problem in midnight. It has some weakness such as fixed air pressure and non-tilted airbrush. It is not the best airbrush compressor, but moderate device for most model works at the price. This is much viable way of use. Also, the battery time of this picture's device is about 30 minutes and 2h charging time. It is not same as WORX makerx tools. Also, prices are very different. (Its price is $25.) + The stock airbrush is single action which means it blows air always when the compressor turns on. If you use regular airbrush such as the Harder and Steenbeck Infinity and block the air while the compressor is working, it can be broken soon. If you already bought it, I recommend to make this simple stand for preventing back flow.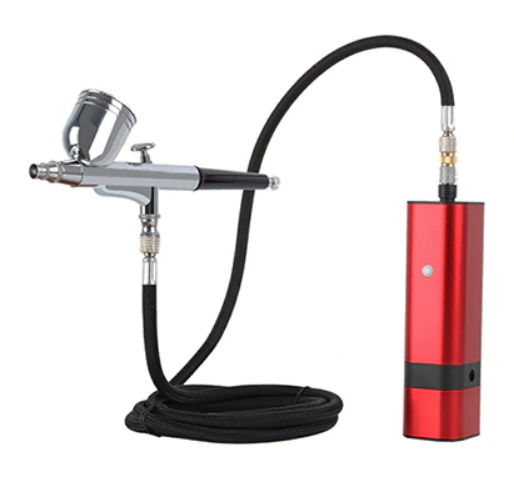
-
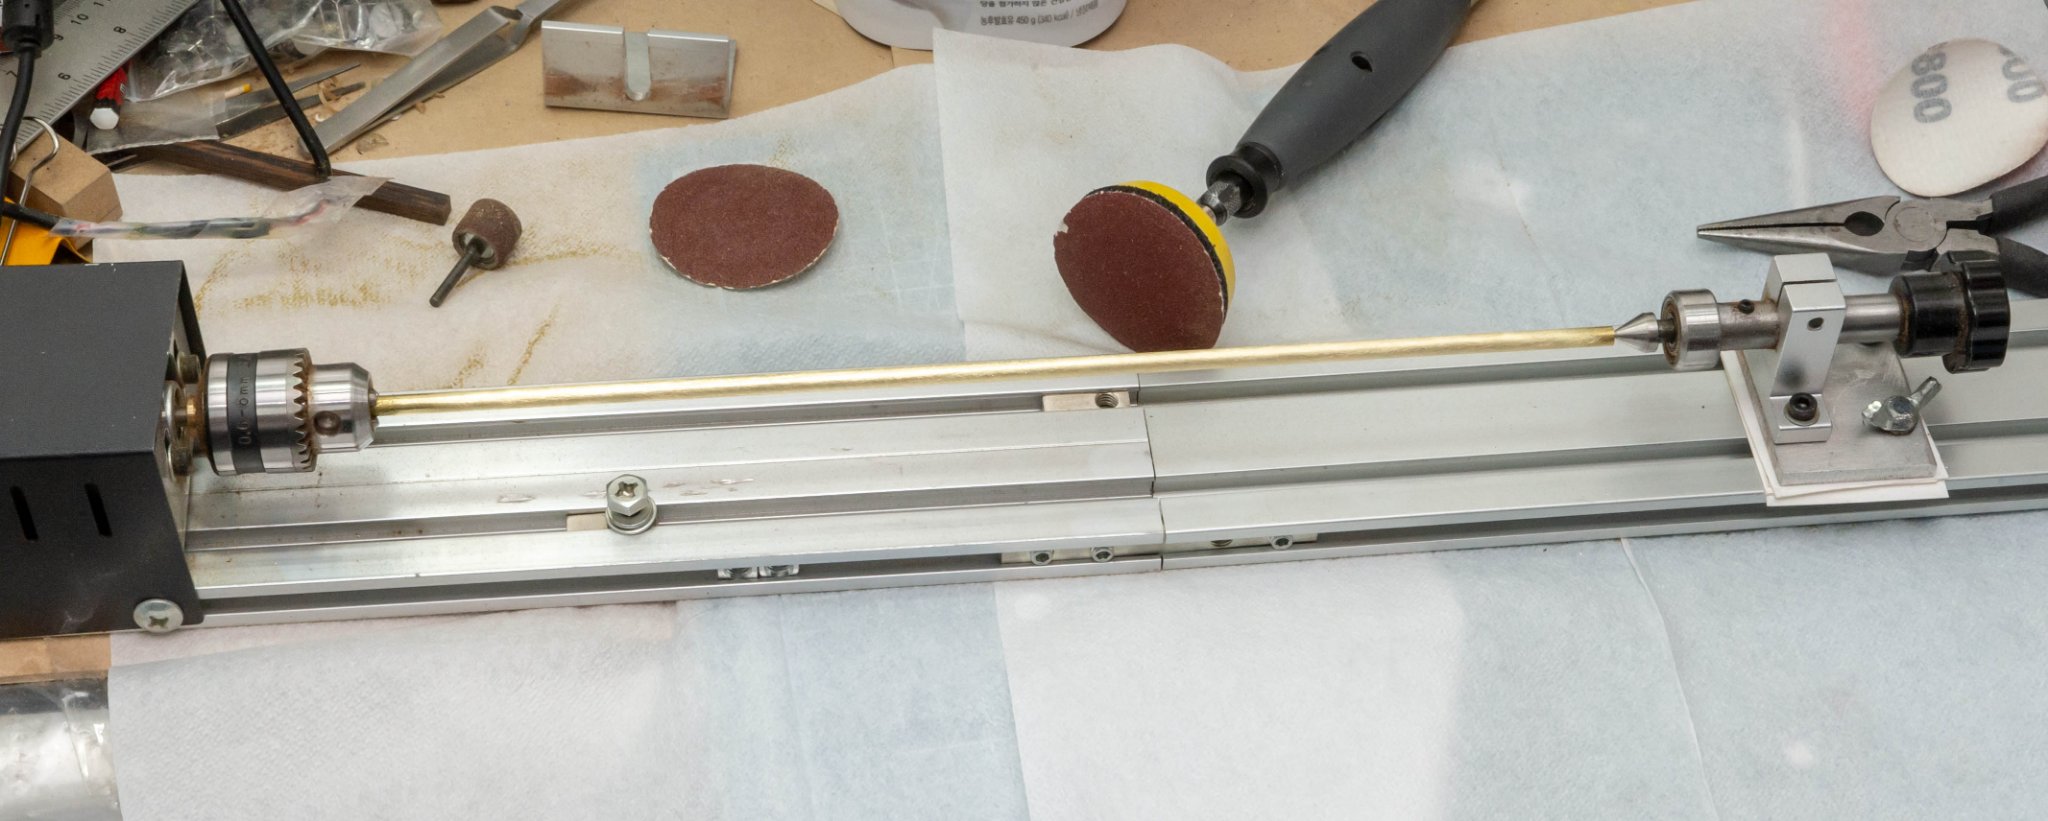
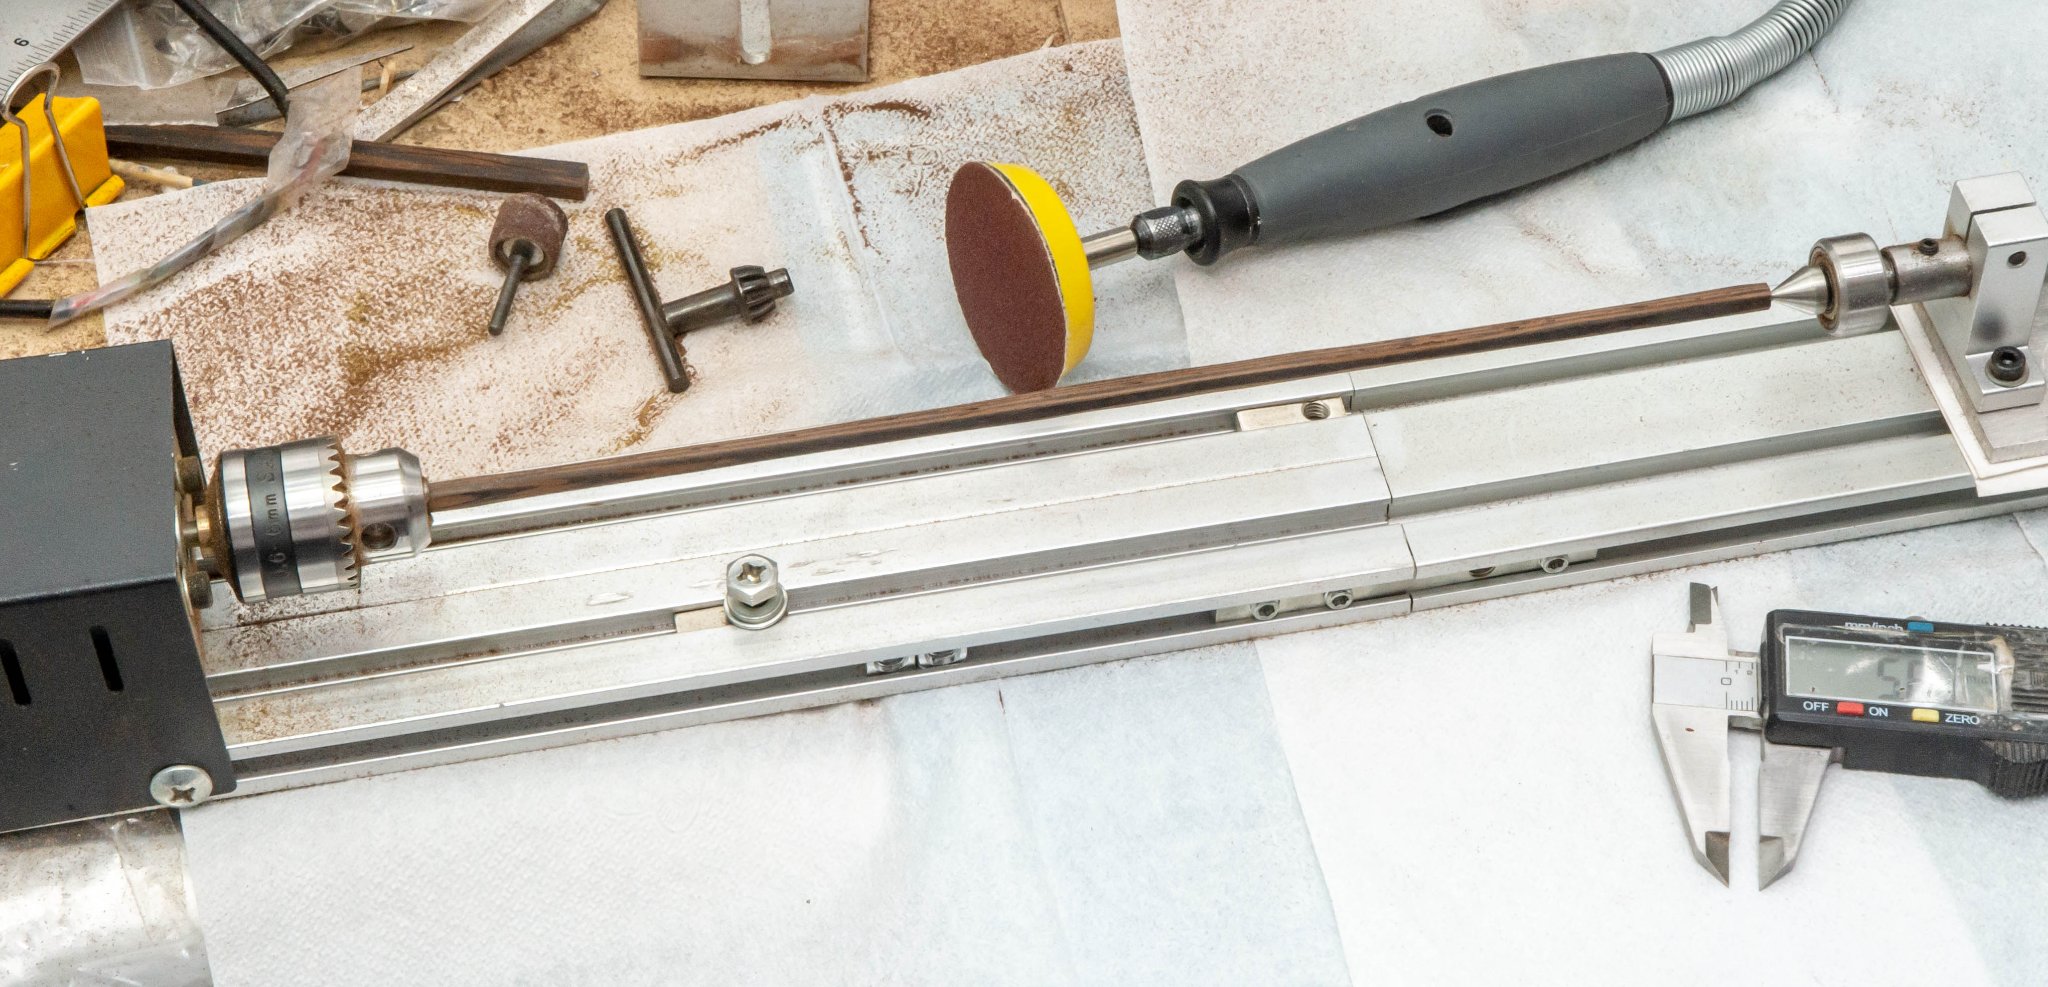
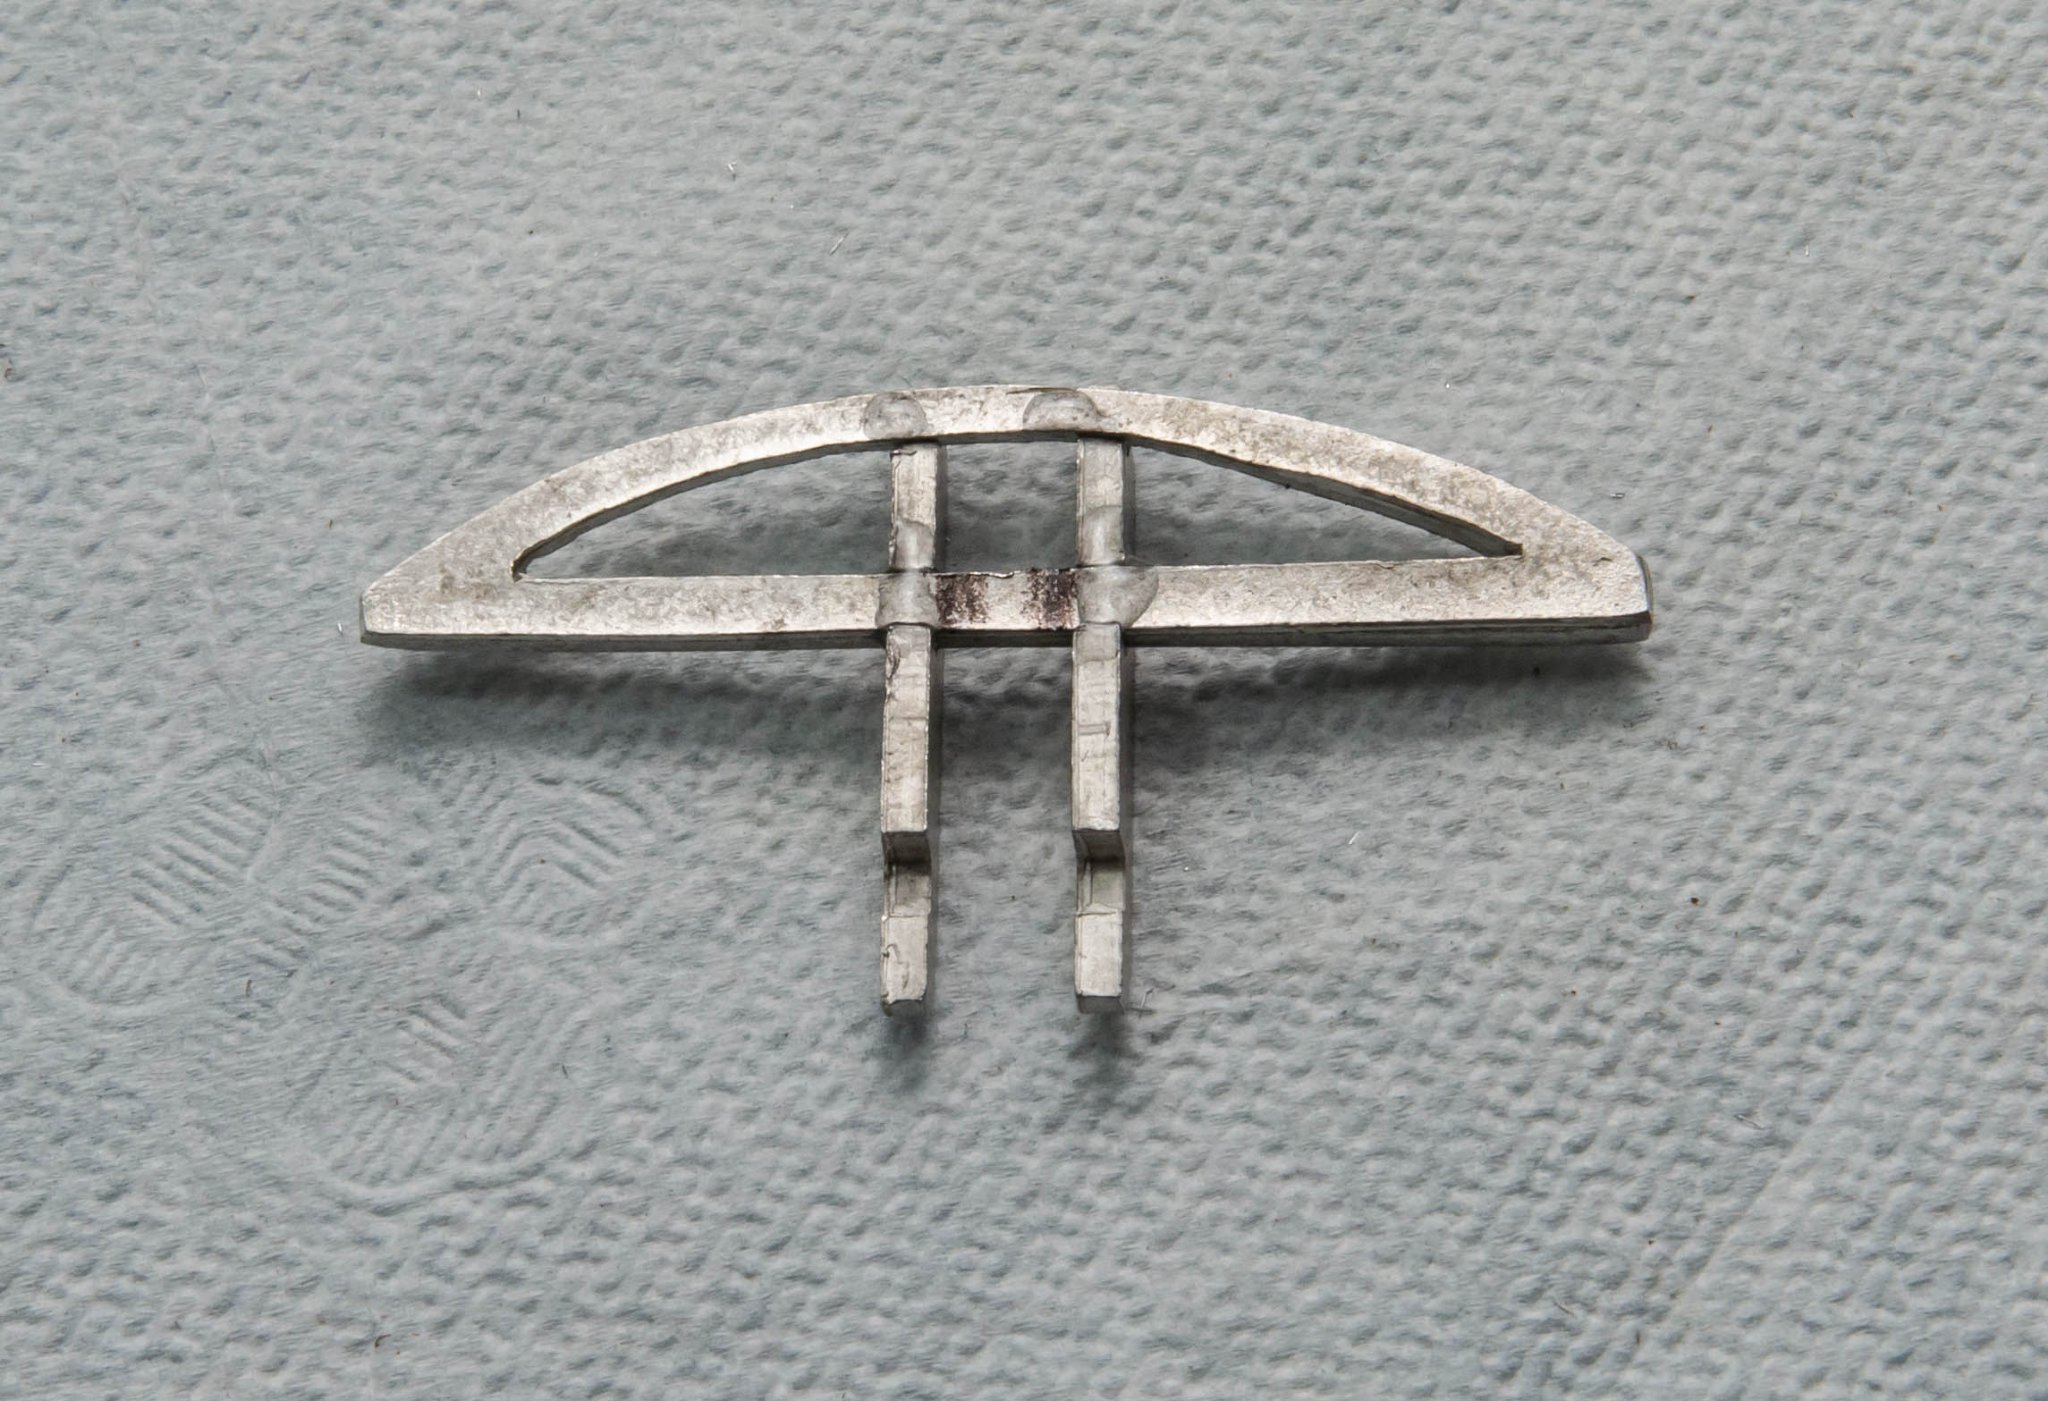
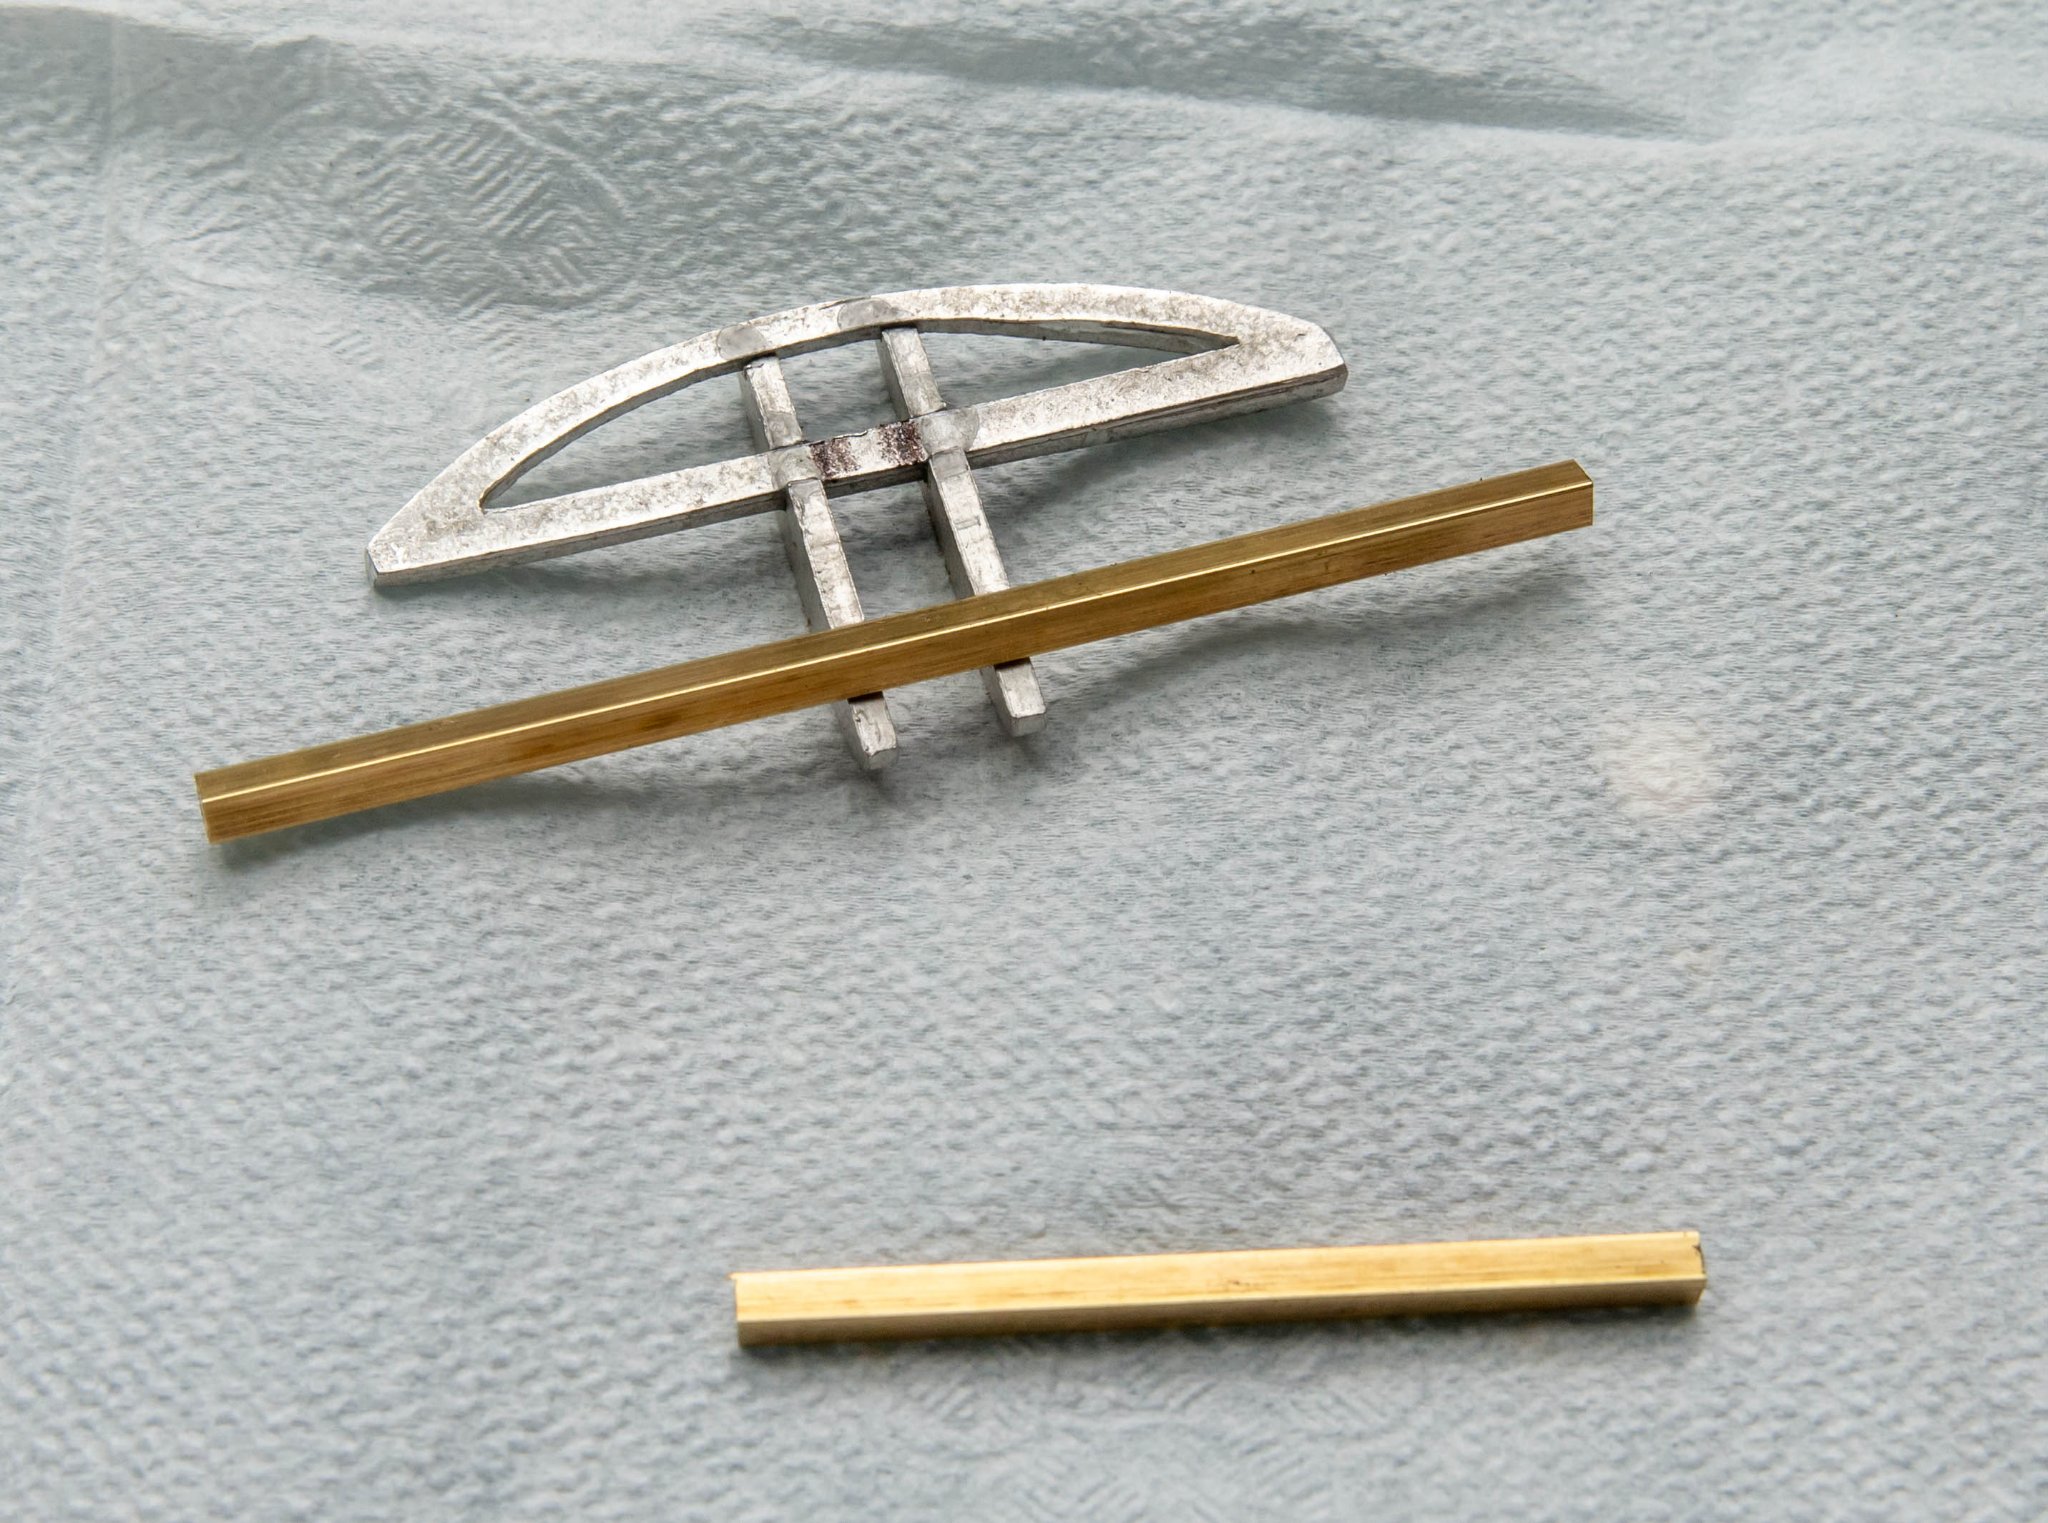
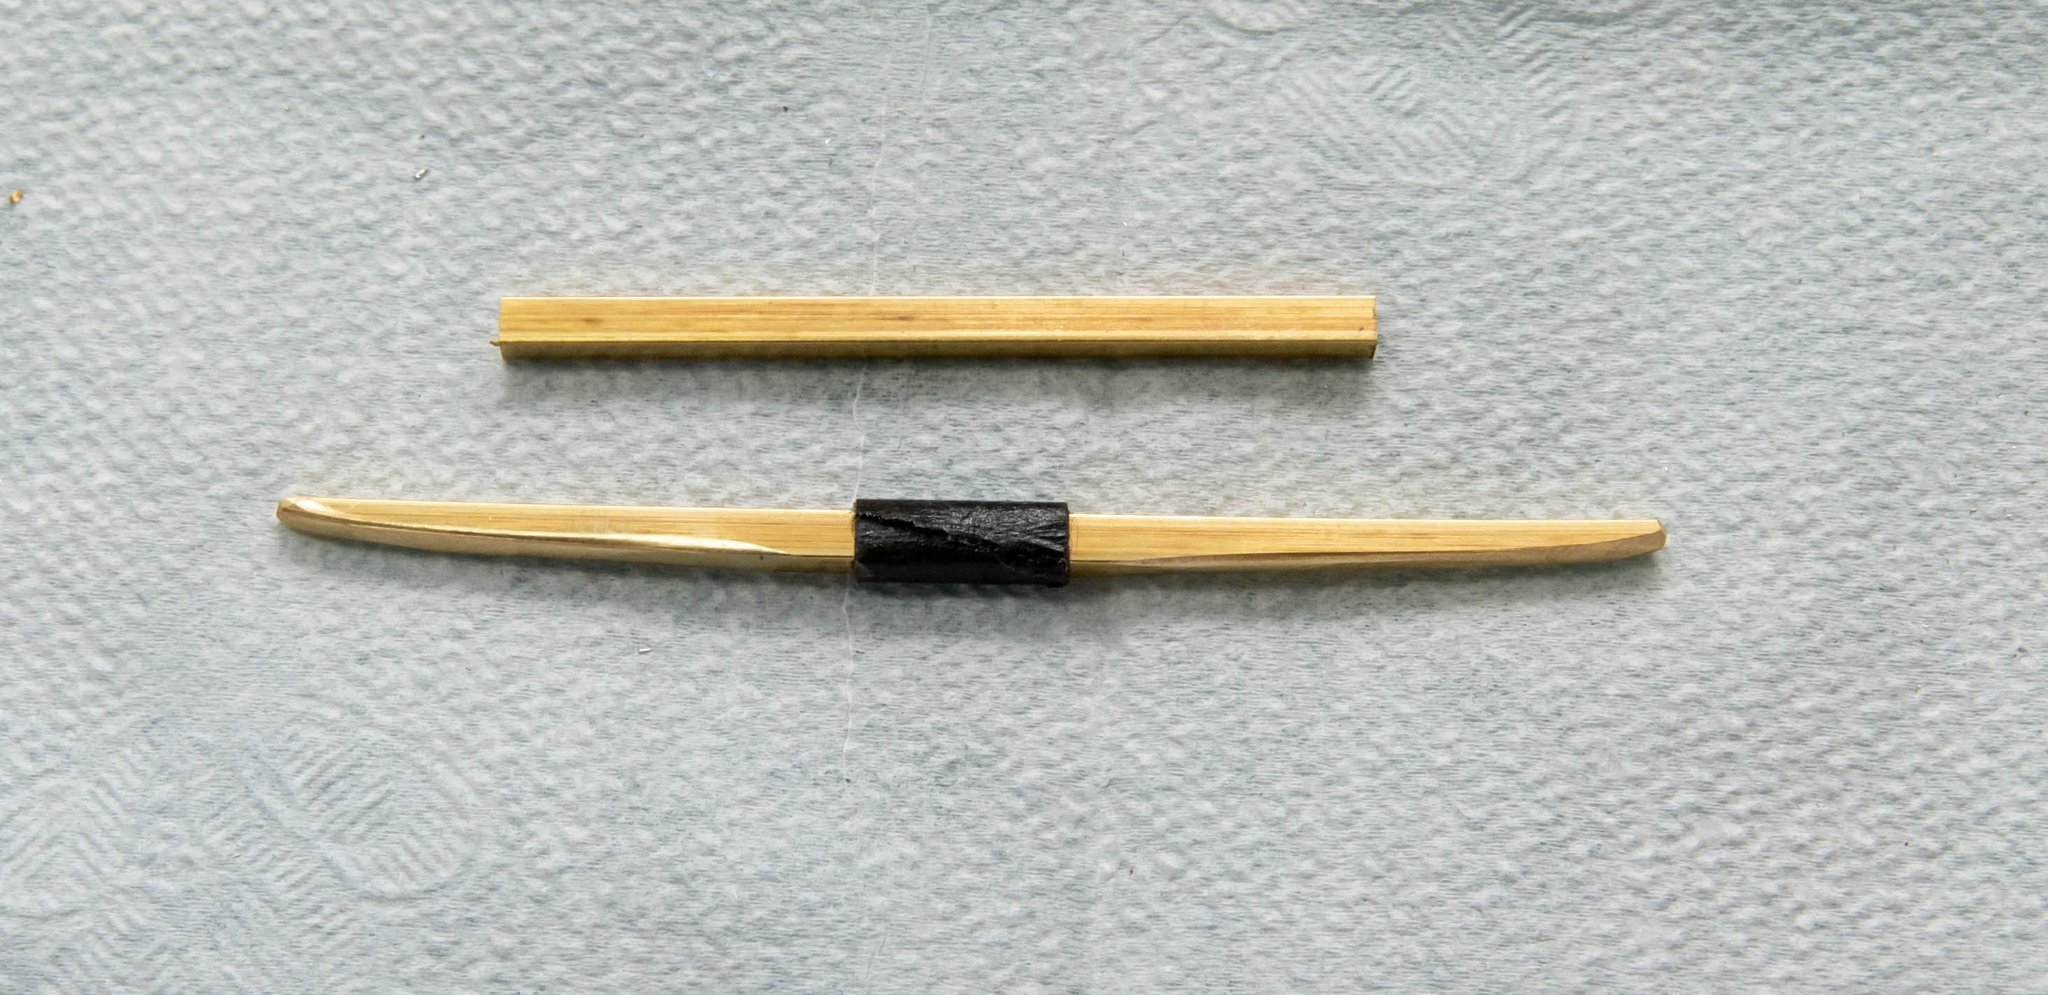
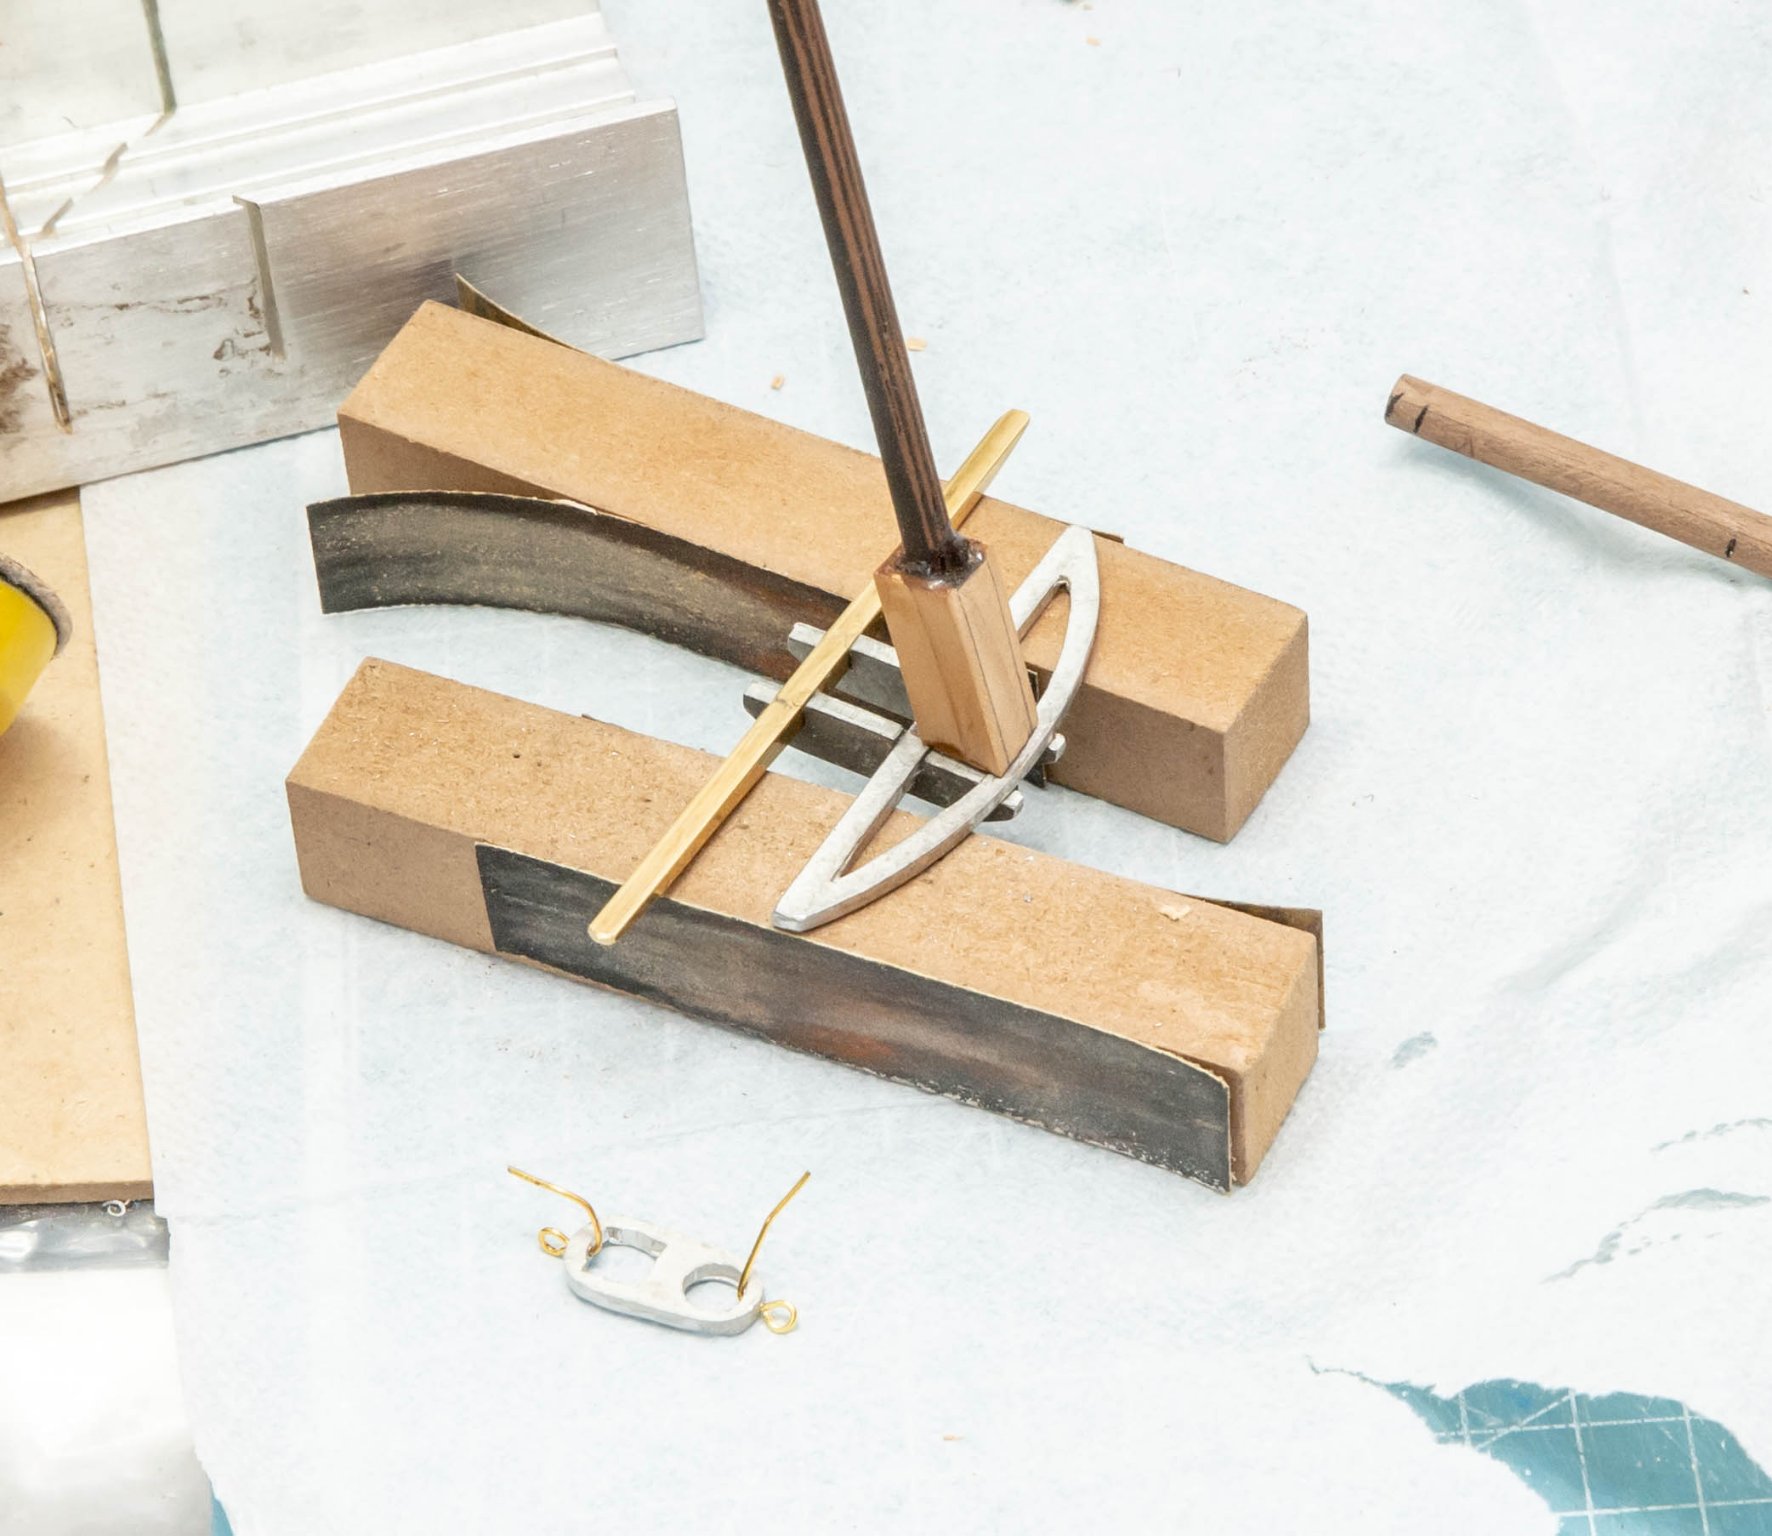
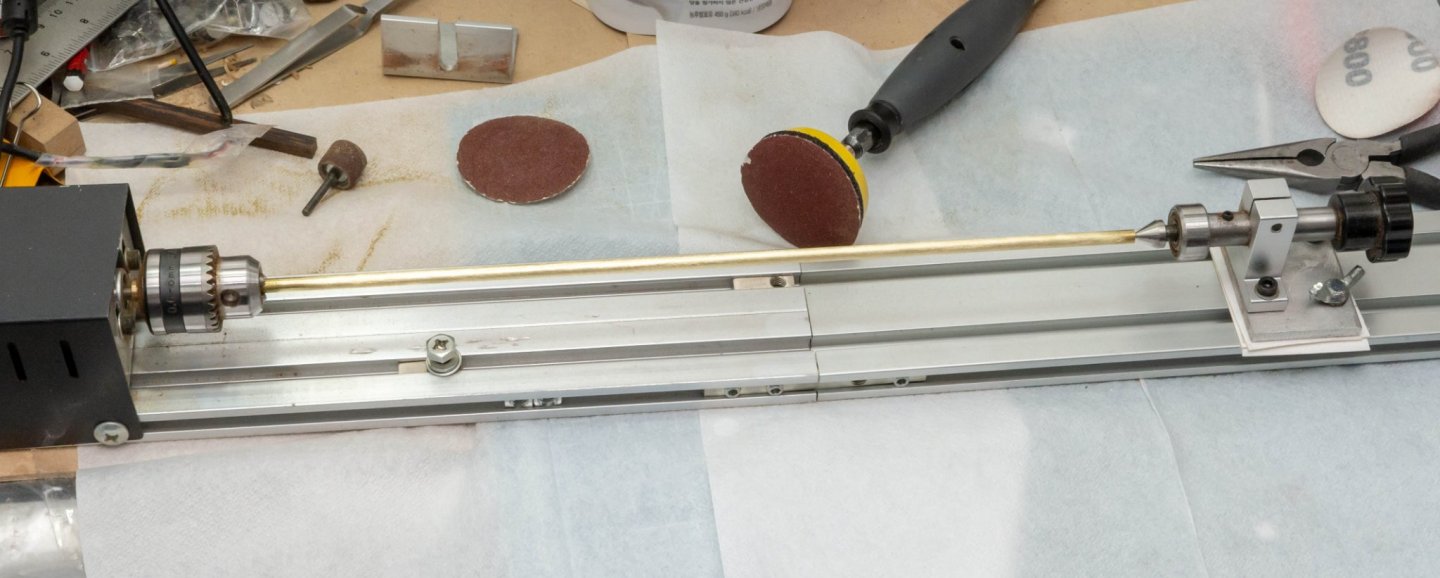
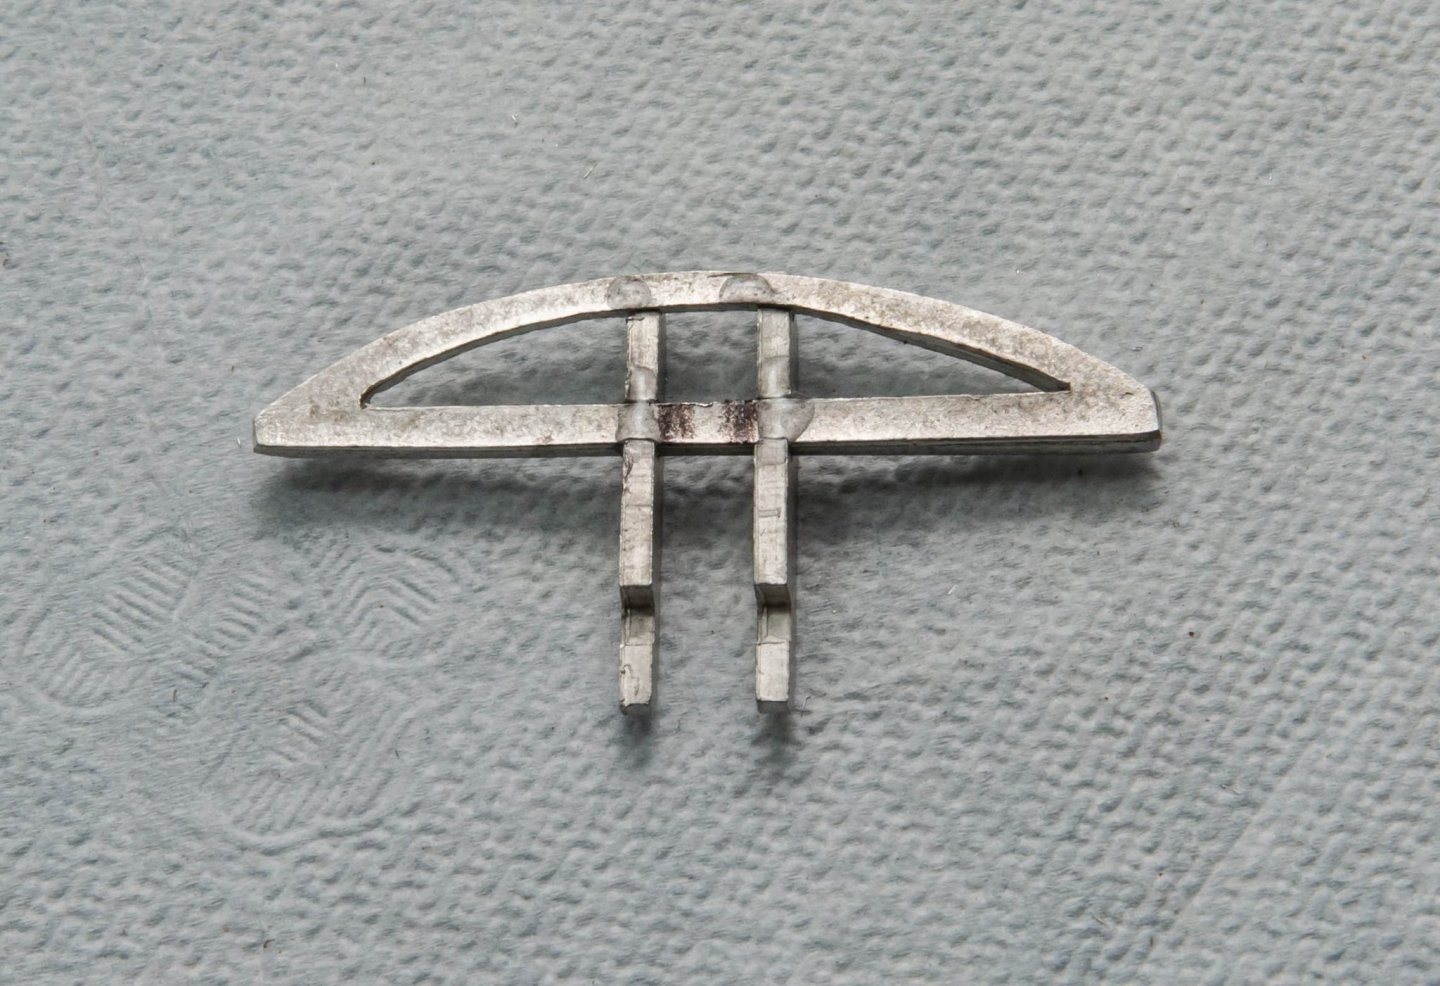
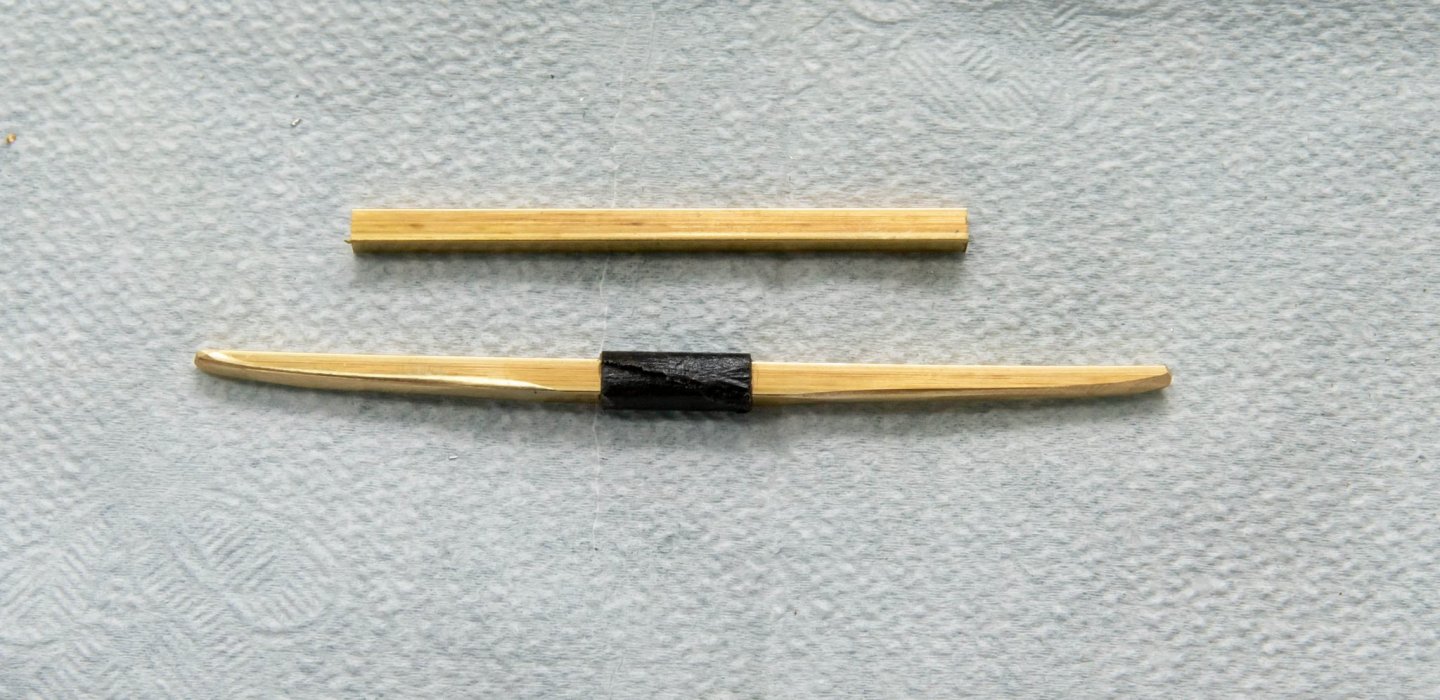
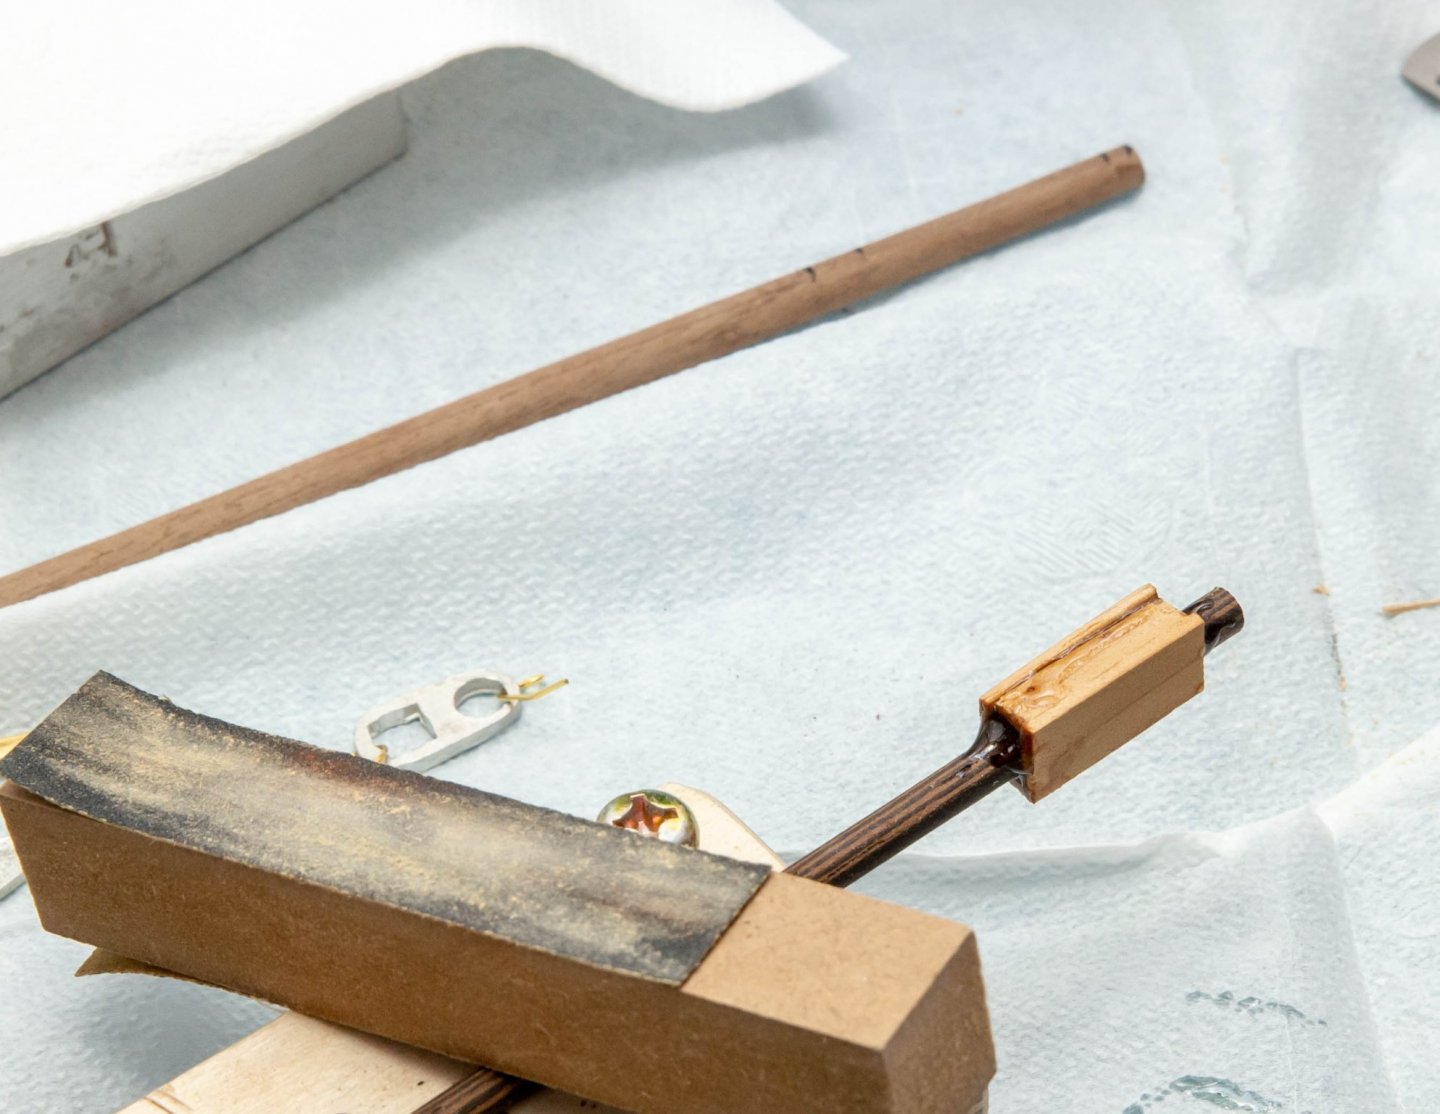
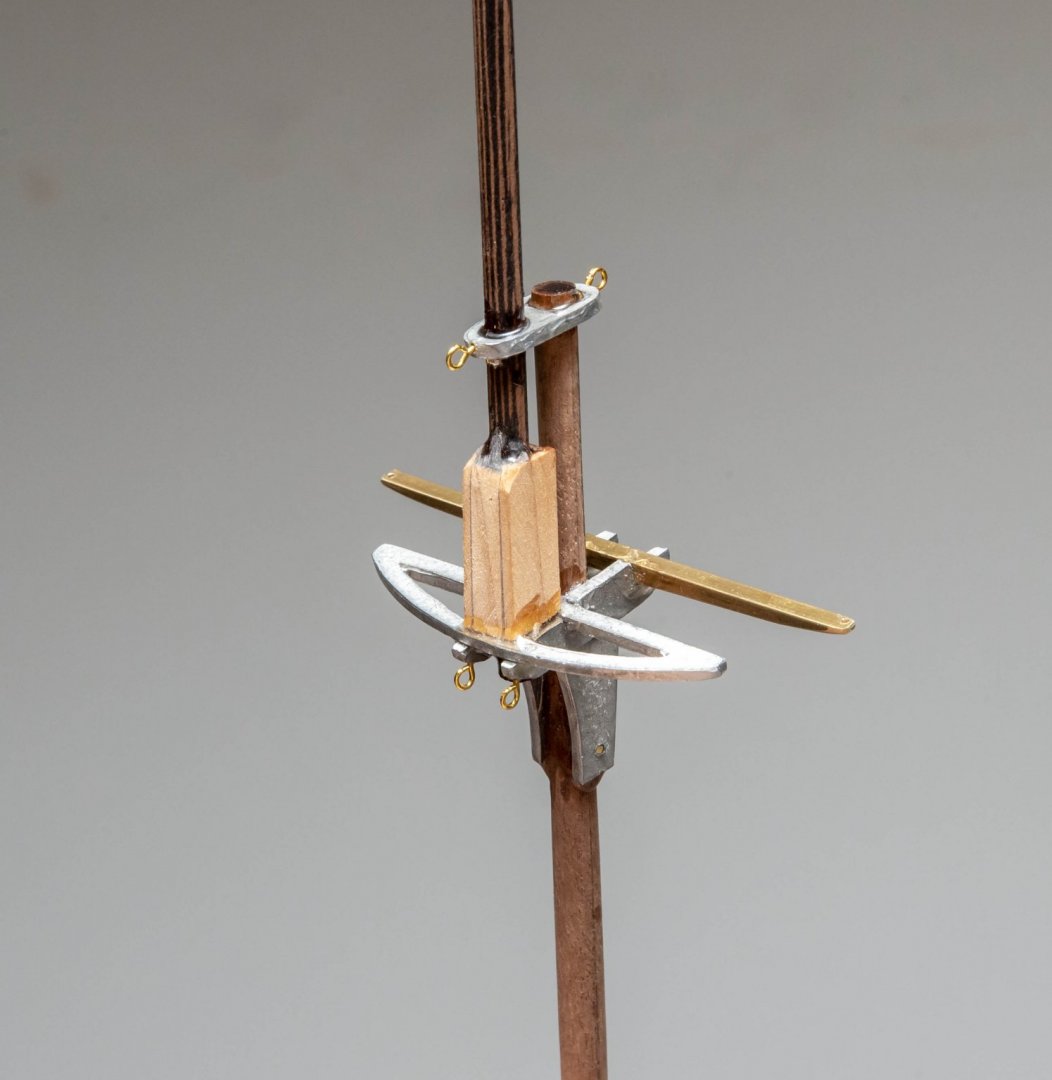
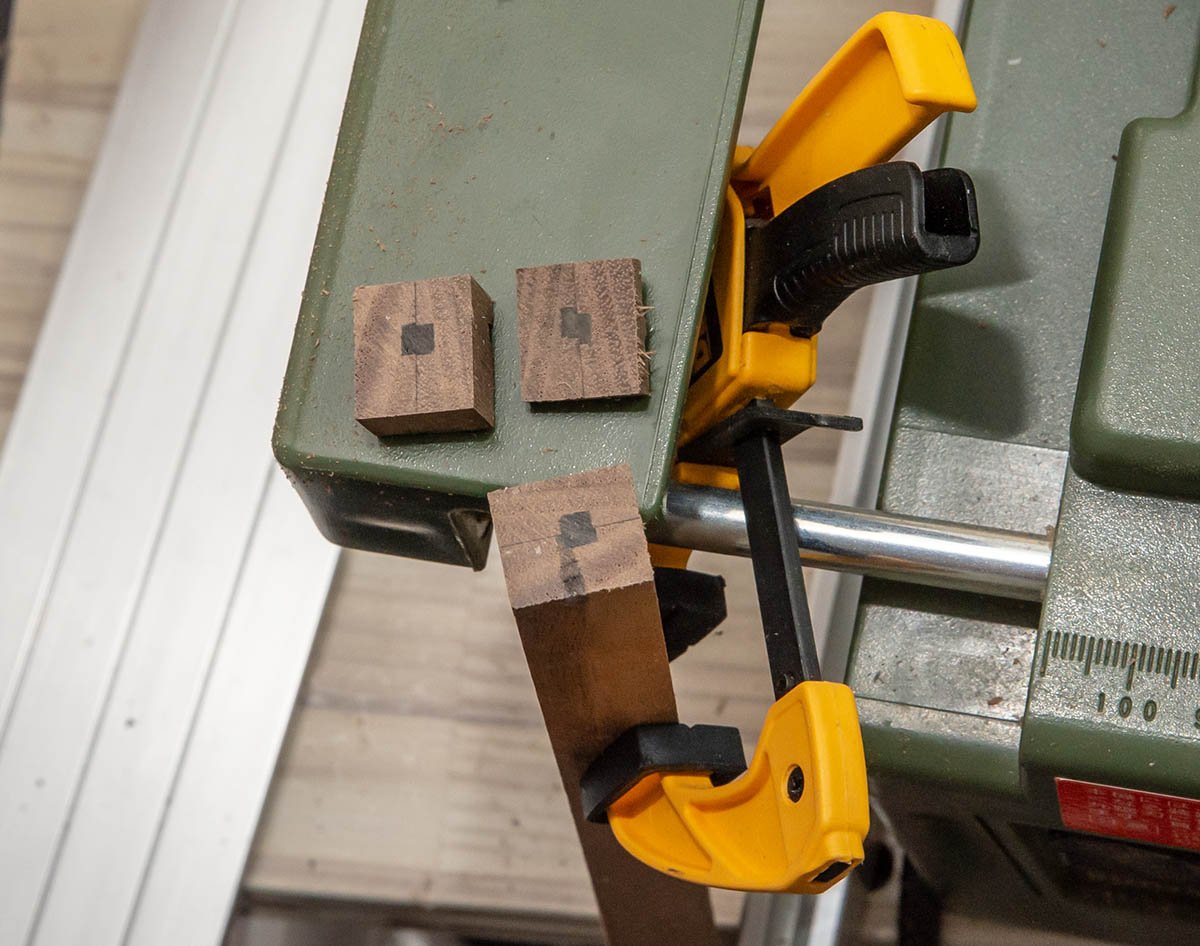
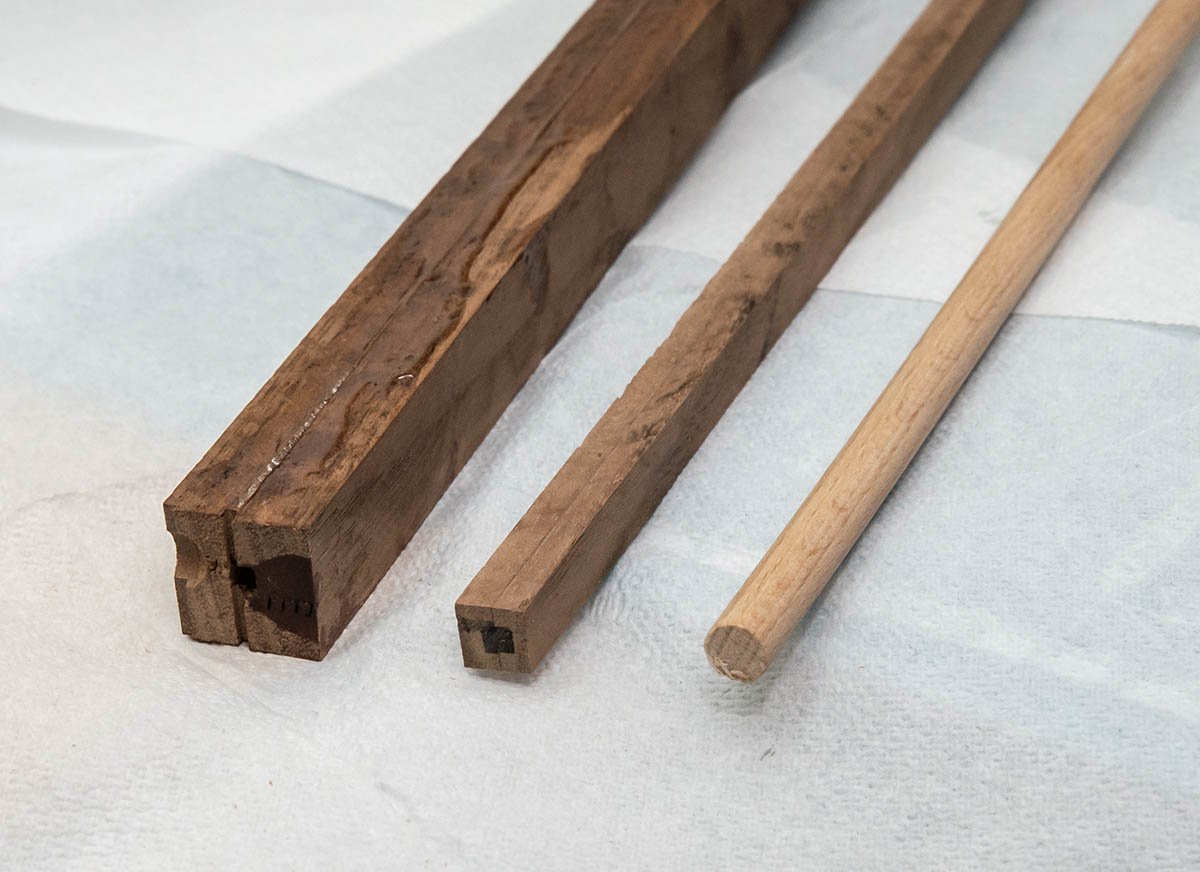
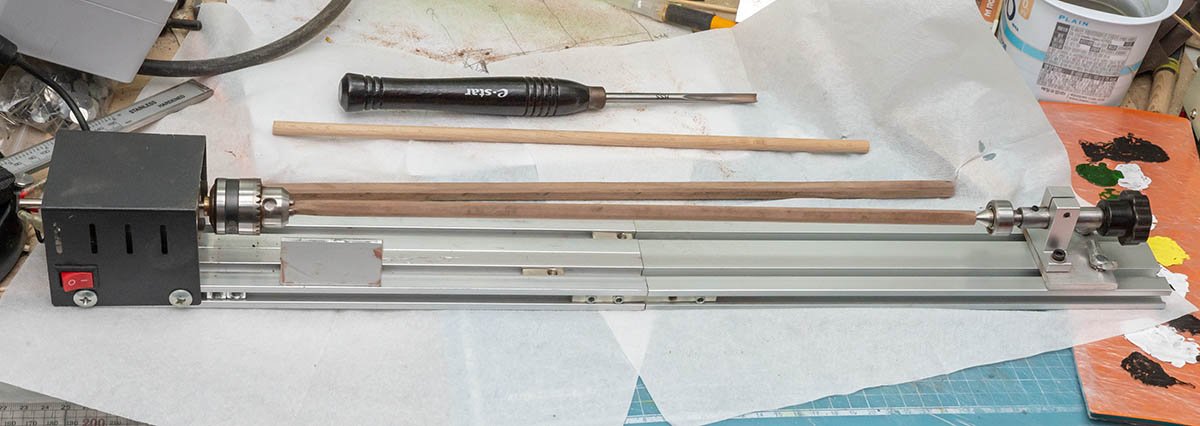
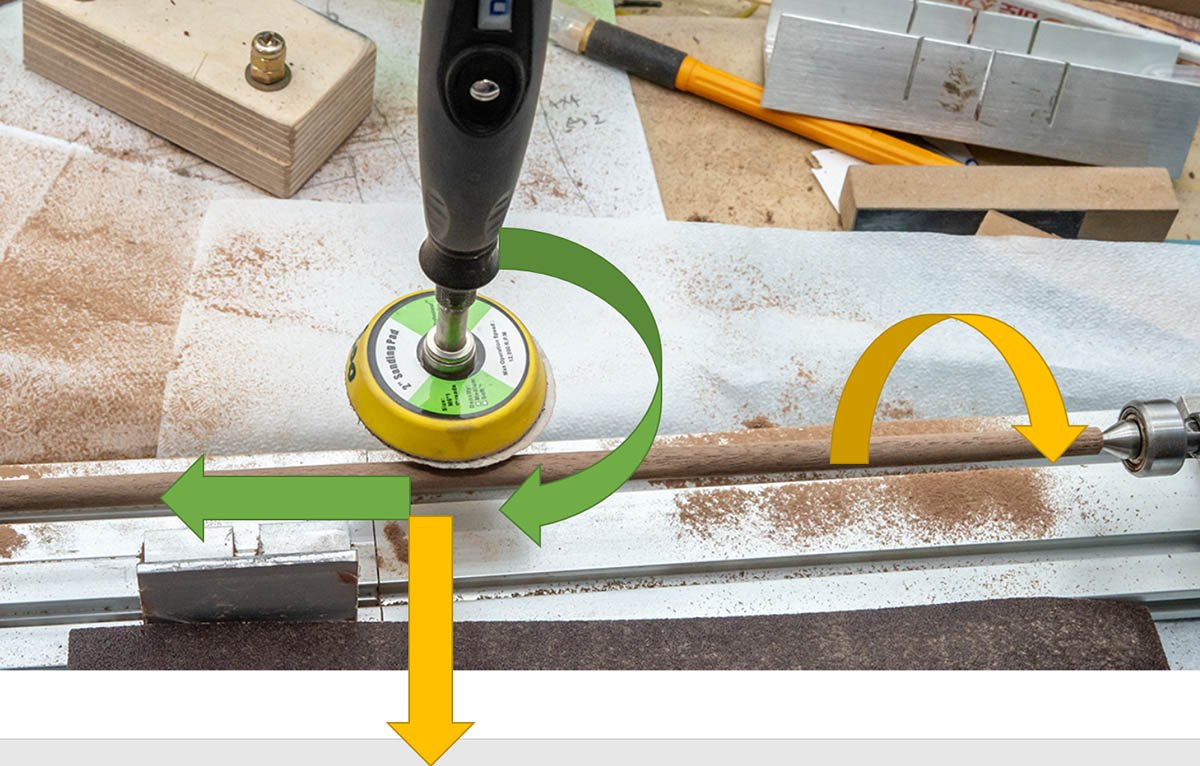
I found my mistake that angles of ankers are wrong. 🤔 (Source : https://www.modelerscentral.com/blog/rigging-tips-for-building-a-model-ship/ ) I tried to make upper masts using brass rod. (5.00mm) I found that I need steady rest for appropriate metal lathe work. Instead of both brass rod or metal cored wood rods, I decided to use wenge wood for thinner masts. It is 2 times stronger than finewood and very easy to work. Jointer between upper and lower mast. The manual said wood stick, so I used brass stick. Not difficult with dremel sanding pad. I used to use epoxy bond as permanent adhesive. I'm using very different types of woods and metals. This is a semi-assembly with temporary CA glue. Alignment with masking tape. And epoxy glue again. Finished. I'll paint it and go to the next work.


-
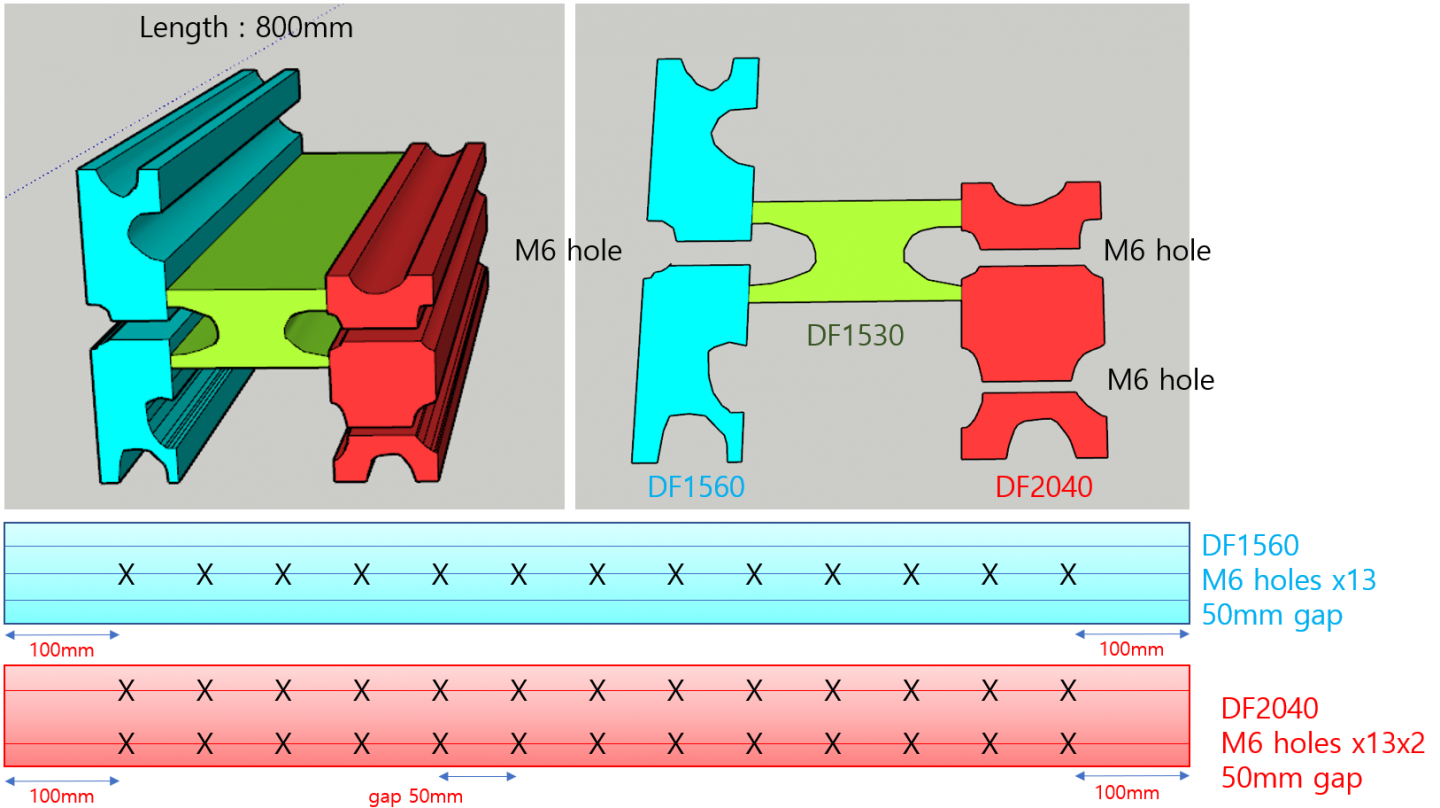
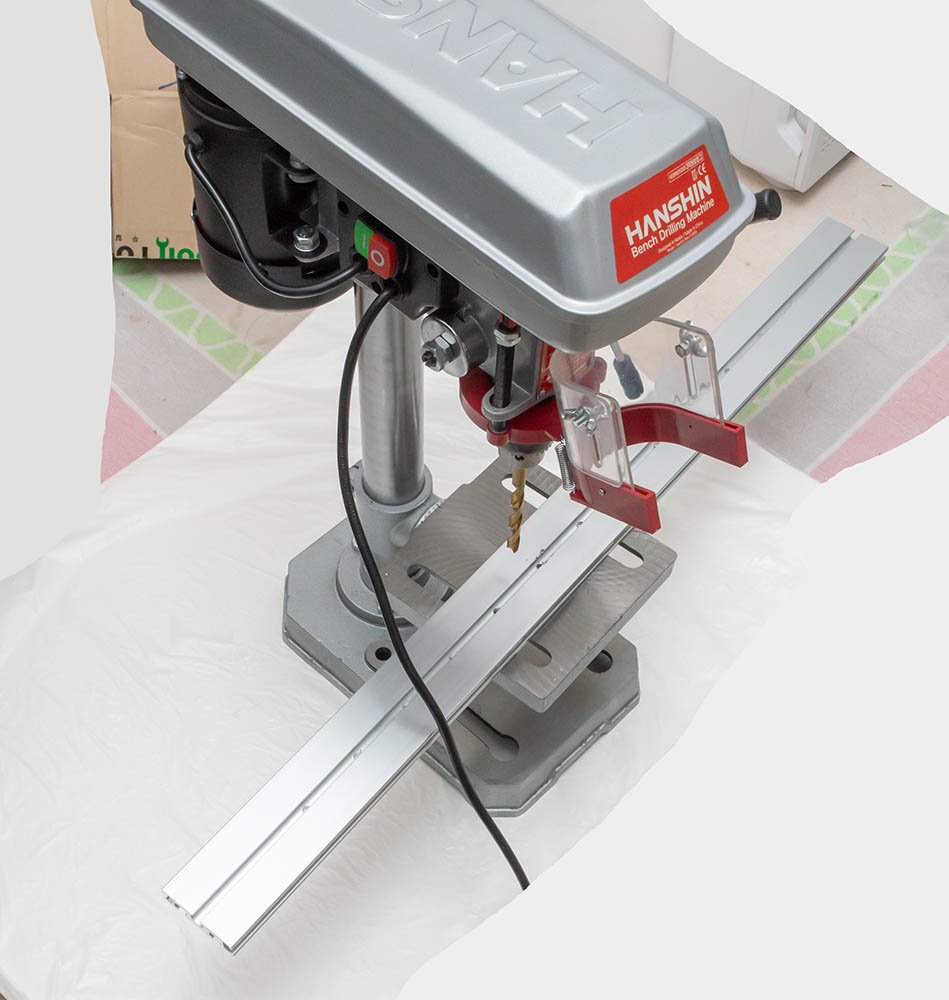
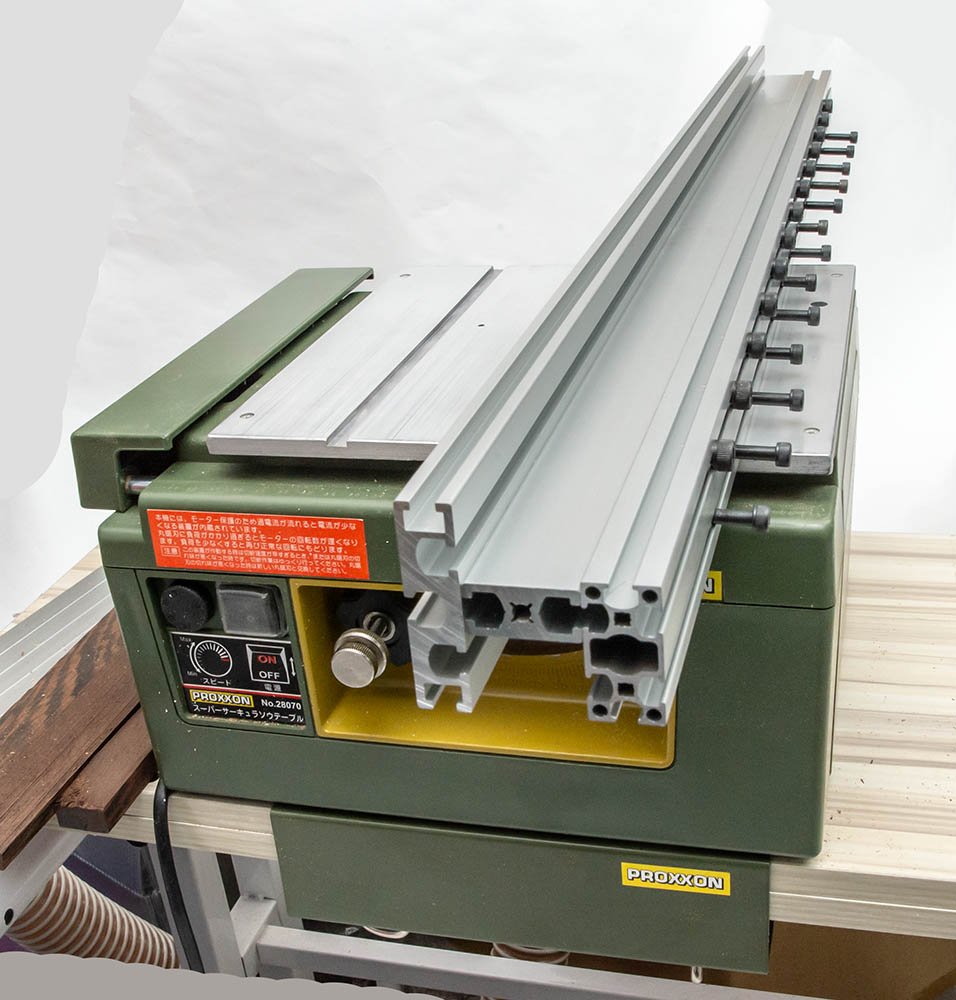
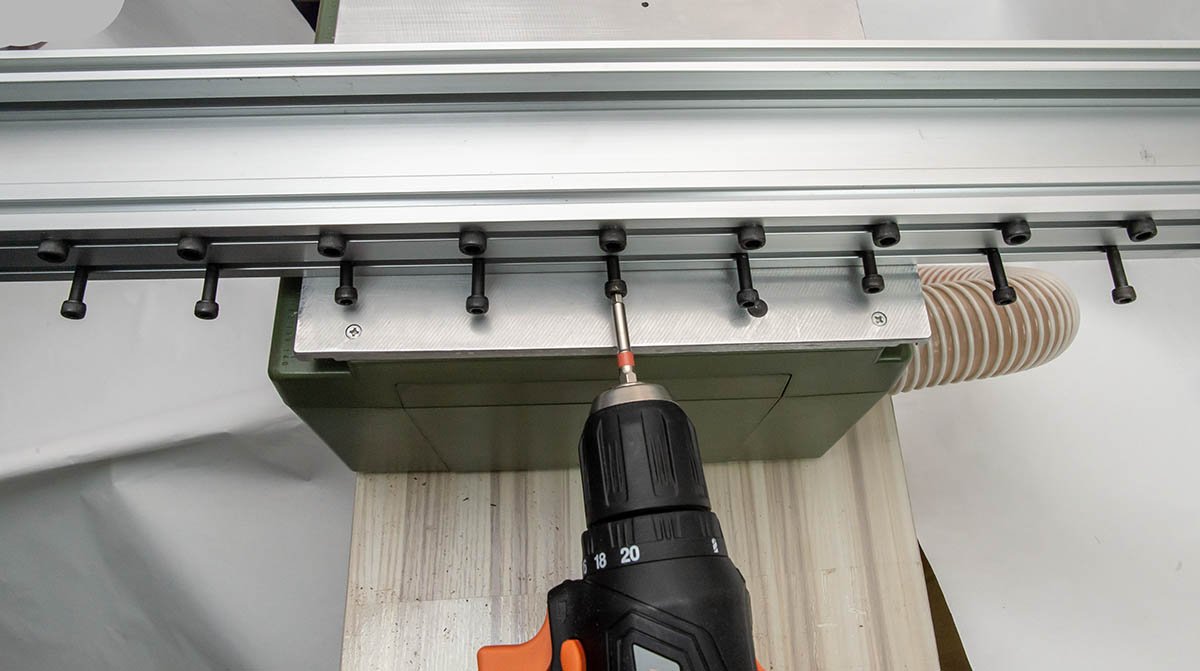
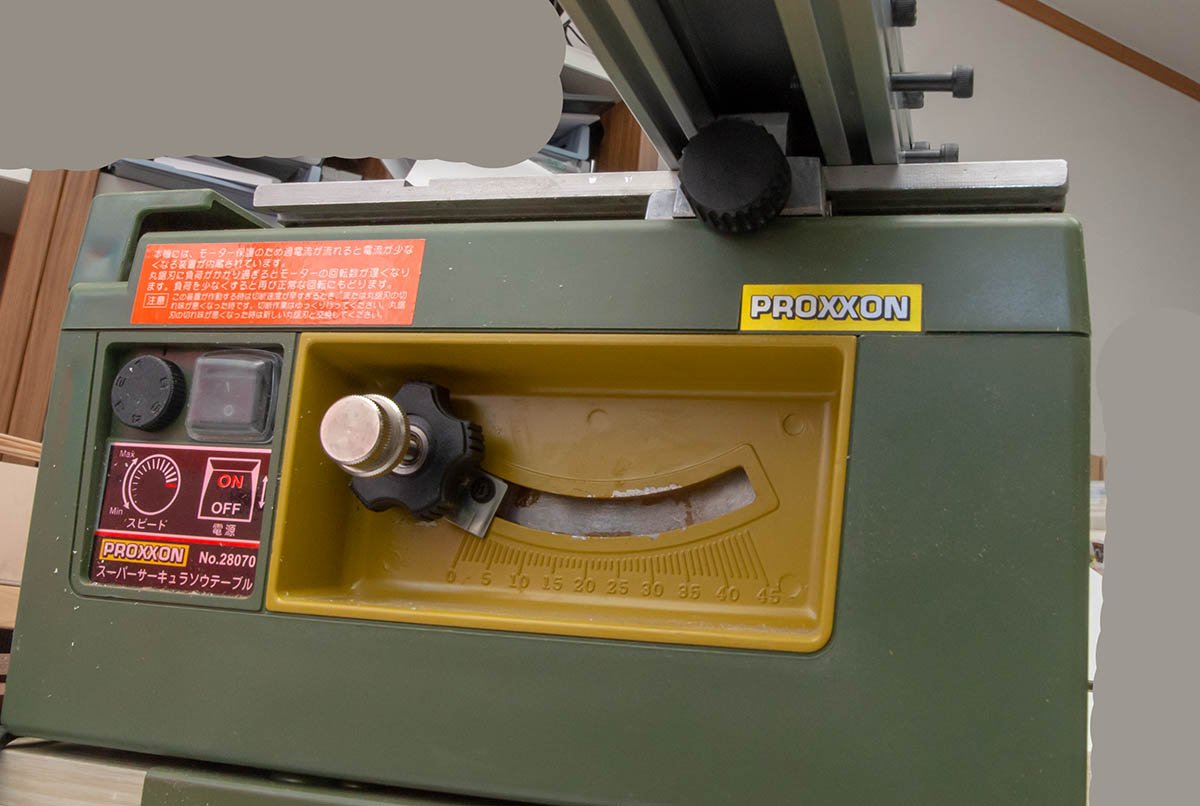
Newcomer may know that the new Proxxon table saw from Japan is $100 cheaper and worse than previous germany version. It has too many issue to compare with an old version, so I would recommend to buy the top class Byrnes table saw if you really don't need small size full function table saw. Yes. Most of the problems of the new Proxxon table saw comes from smaller size. Its fence is smaller than before, and deleted some functions. Also, its track is too shallow that very hard to make DIY wood sled for safer work. As a result, I always took a risk when I cut long strips. I used 800mm aluminium profile. The metal rod was not fixed, so it could be a big accident like a jam anytime. I felt that it would eventually happen in the future soon, so I decided to make a fence extension. https://www.micromark.com/Featherboard-Fence-for-80463 First of all, Micromark sells same table saw, and they invented useful accessories such as rip fence. Go to the link and check the aluminium fence. It is the thing exactly what I want. Unfortunately, Micromark cut the fence and only sell 10 inch long fences. I need 800mm = 30 inch long fence. I designed and ordered aluminium profiles to CNC processing company. Total cost was about $35 excluding bolts and nuts. I found that I didn't make spaces for bolt heads. I bought the cheapest bench drilling machine with 9mm metal drill bit. It costed about $80. 😒 Its tip twists quite big, so I can't use it for precision model work... I've heard about terrible stories regarding bench drill machine accidents... 😖 It's done without any accident! I finished assembly. It has very simple structure. To hold fence extension, I use drill with hexa bit. For a regular work, I tighten three screws. For a heavy work, I'll tighten five screws. It looks good. It works good. I'm happy. 😆 No problem to rotate front and rear knobs. These are scratches on fences. Not a big deal and replaceable part. I hope this tip helps people who want fence extension. 😉


-
- 6
-

-
The travelling steady system is definitely better than this because it can be developed to a full automatic system like a factory machine. However, it may need different (new) design. On the contrary, if I fix and modify this machine a little bit, I may be able to complete semi-auto machine. (That's what I expected when I opened this machine.) I think new design is out of my ability for now, so I'll stick to modify SM4. Good luck and please show me when you complete the innovative machine, wefalck. (Don't forget to register patent. 😉) - Tension mechanism on thinner thread. (Difficulty:5) - Easier and reliable main thread transfer holder. (Diff:2 → 7) - Adjustable automatic main thread transfer mechanism with motor and tension control. (Diff:10)
-
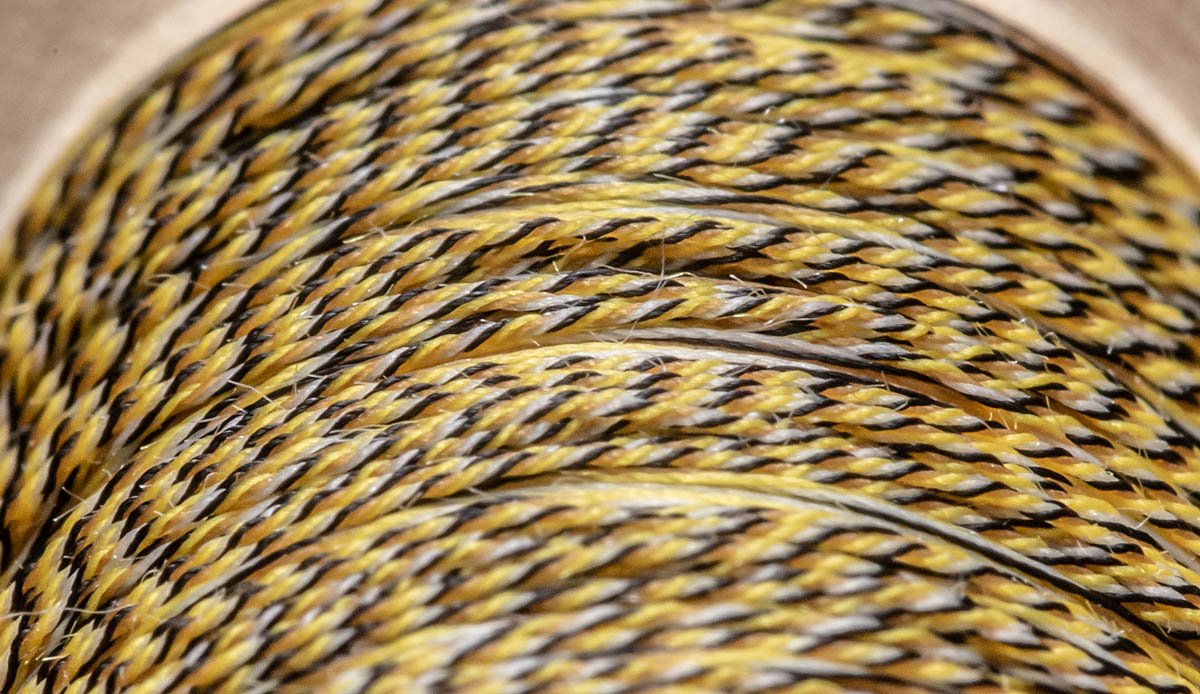
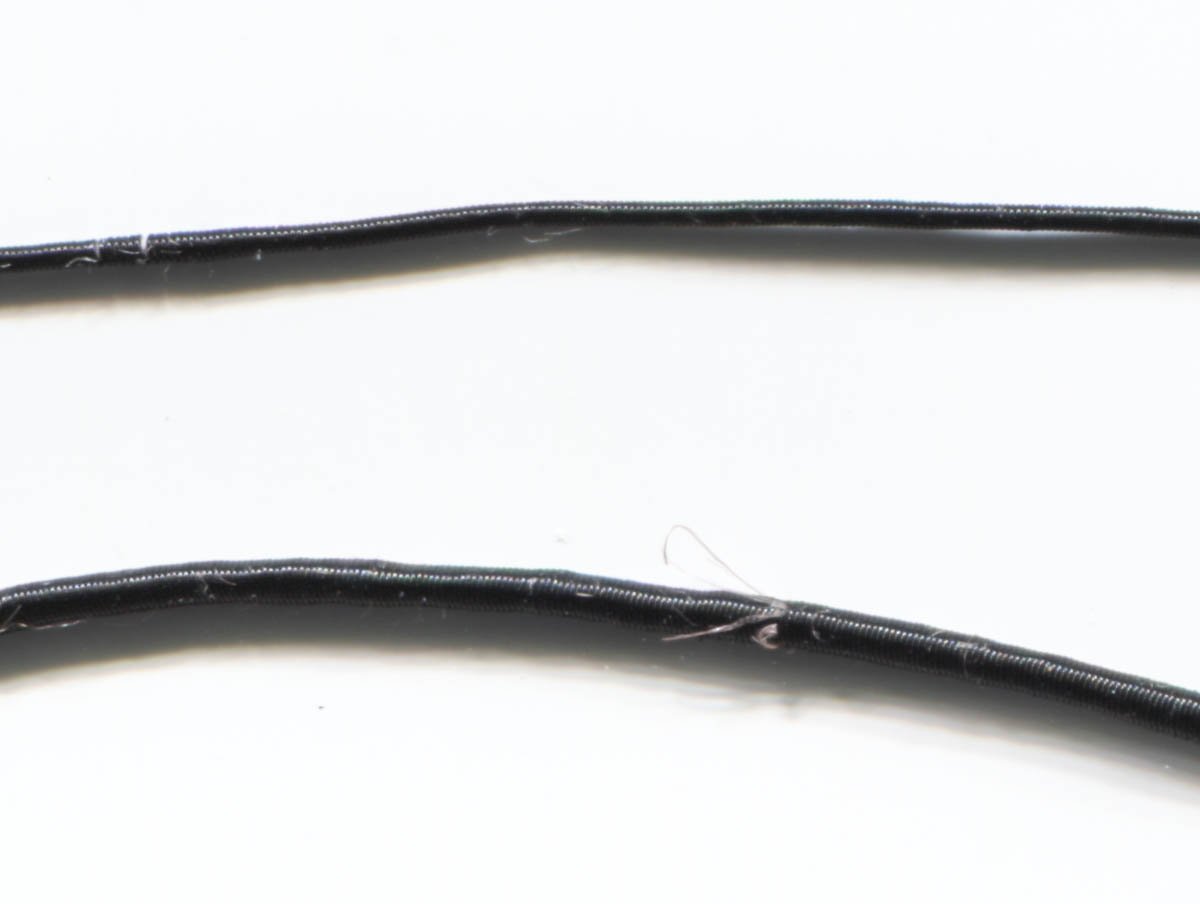
I found an another point should be fixed. With high tension from sub thread, main thread can be cut while in progress. The blue point is sharp, so it breaks thread and eventually cut it without notification. It happens frequently when I use thin cotton thread, and this thick linen thread on the picture also began to break up. I'll sand it down or paste epoxy bond to make sharp edge smooth. I made very simple tension control system powered by Lego. It really works well. It keeps tension constantly, so it minimize mistakes, makes work easy, and produces remarkable result than human hand. Also, it doesn't give huge tension on main thread, so it prevent cutting failure I explained. I would say that this mechanism can be applied to full auto production machine in the future I'm planning. Here are results. The first result is made of polyester thread. it was looking good at first, but it got heavy dusts while I was applying shellac as adhesive... Also, it is hard to notify each knots. NOT realistic. The second approach is nylon thread. Much better and satisfying results. First one is 0.65mm with cotton thread and second one is 0.90mm with linen thread. The white and brown pills are from inner core thread which has different color intentionally. https://www.cargos-paquebots.net/Reportages_divers/LA_RECOUVRANCE_19-09-2014/Images/LR_5644.jpg ( https://www.cargos-paquebots.net/Reportages_divers/LA_RECOUVRANCE_19-09-2014/La_Recouvrance_09-2014-01.htm ) This is a picture from real ship. My serving rope looks so real... 🤤
-
I found that tension is big problem in case of nylon thread. It wasn't big issue when I used polyester thread, but nylon thread definitely needs tension to keep flat feeding line. I made feeding guide inspired from Hornet's work. This is very simple feeding table, so I made it almost instantly. Locking mechanism is very simple. I used two 5.00mm pinewood rods. I'm testing serving rope machine with cotton thread as main thread and 0.10mm nylon mono filament thread as sub thread. I gave up to use regular polyester thread as sub thread due to huge pills and ugly appearance. However, nylon thread requires accurate tension control. My new option helps hands free, but doesn't help that much as I said it has no tension control. I may be able to add tension control mechanism by weights and friction. https://shipworkshop.com/products/tools/pl4 I found that Domanoff reused the troublesome endless option part from his PL4 machine. It may work great at the machine, but the machine didn't need to tighten bobbins that much like SM4 case. Also, I need to pull and push it 100 times until I complete one serving rope while PL4 needs only once. It is definitely different situation compared to the PL4 case. I agree Henry that the endless option actually works, but it is not ready to sell commercially. I would say that Domanoff needs to redesign the part. It is vulnerable and cumbersome. Here are assignments. - Tension mechanism on thinner thread. (Difficulty:5) - Easier and reliable main thread transfer holder. (Diff:2) - Adjustable automatic main thread transfer mechanism with motor and tension control. (Diff:10) Replacing bobbin holder is the most urgent mission before it breaks soon. Many thanks to Hornet, Henry and wefalck. By the way, I purchased various nylon mono filaments from 0.12 to 0.33mm. I'm tired of pills from polyester thread...
-
I gotcha and understood what you said. This SM4 kit can perform most of work Johann made, but his machine is more advanced and accurate for specific cases. It will be really good reference for the next step. Thanks, wefalck.
-
I totally agree that this machine needs an improved endless mechanism. In addition, I would say that tension of serving rope is enough in this case. This machine has motor, so I can concentrate on handling thinner thread that covers surface while traditional serving machine requires to turn a handle. Actually, I don't need to take an effort to feed thinner thread correctly. After some trials, I found that this motorized machine performs self-aligning function. Without any effort, thinner thread covers surface of serving rope with zero gap like a magic. It looks really nice and professional. It is the reason I said this machine is valuable. With applying shellac that you posted great tip in the past, now I have perfect 1.00mm diameter serving rope on the palm of my hand. I hope it lasts long. Low tension means more freedom of design. An auto? advancing function idea you commented also preferable. Making a new endless option with auto advancing function is challanging but interesting. Hmm... I need time to investigate other types of serving machines.
-
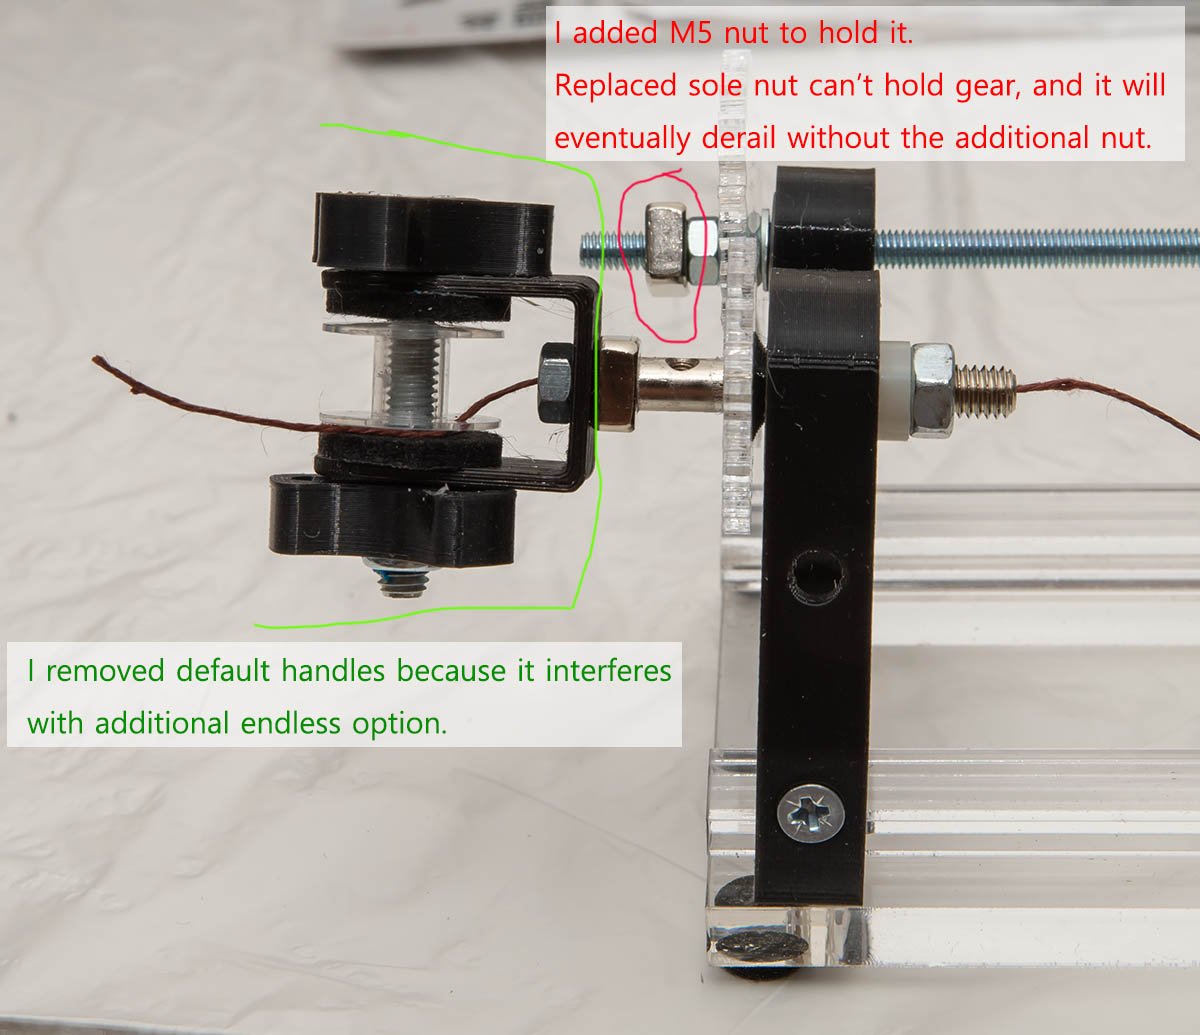
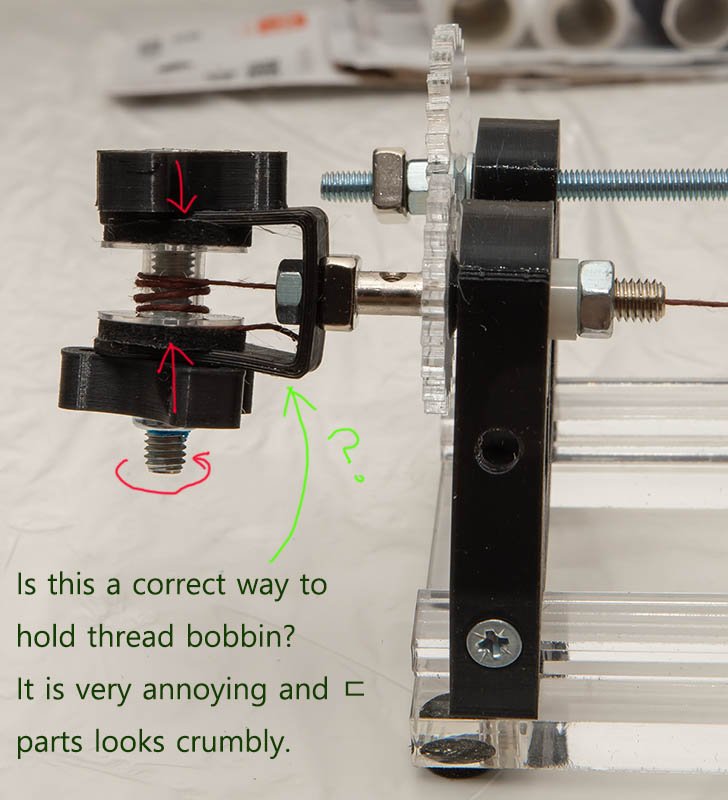
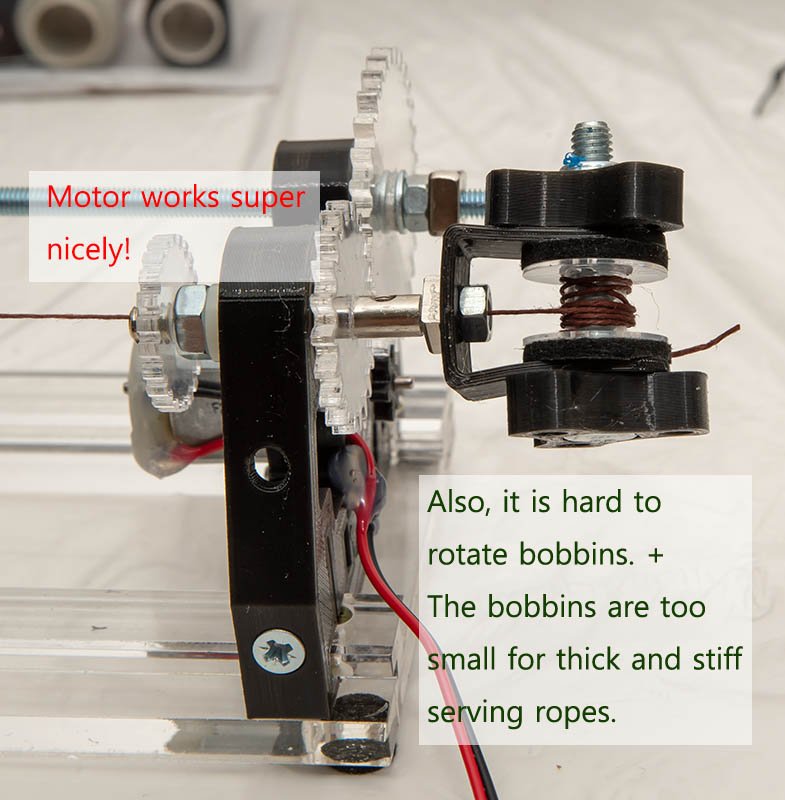
Hi, I got a Domanoff rope serving machine SM4 with full option today. I have question about this great rope serving machine. An assembly of the most recent version of SM4 is slightly different from the Domanoff's guide, but I had no big problem. This is my modification on current SM4 kit with endless option. I use motor, so I don't need handles. However, it seems the endless option is not fully evaluated its purpose and usage. It is very hard to use the bobbins, and the part looks easily breakable. I would say that the endless option is roughly impractical and experimental function, and SM5 or SM6 may be significantly better than now. The other functions such as motor driving serving machine work super well. I would say that the SM4 with motor option worths every penny, but endless option is not. Did I understand this machine correctly? Is this a right way to use an endless option? If I'm using it incorrectly, please let me know how to use it. I can't find any guide for SM4 rope serving machine with endless option. By the way, I purchased SM4 because it is cheaper than PL4...... I didn't know difference between rope making machine and serving machine. 🤪 I ordered PL4-4 today... 😂

-
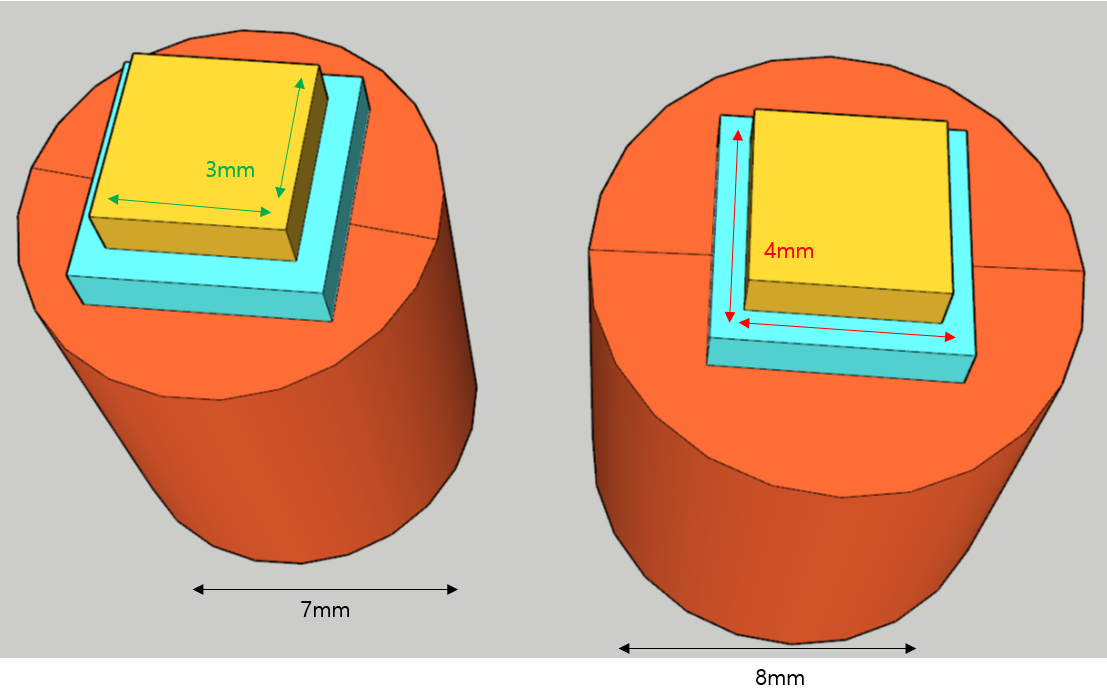
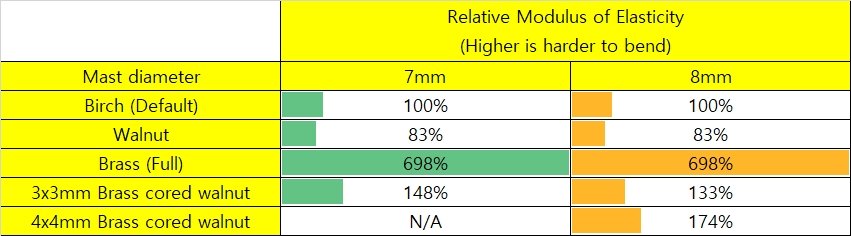
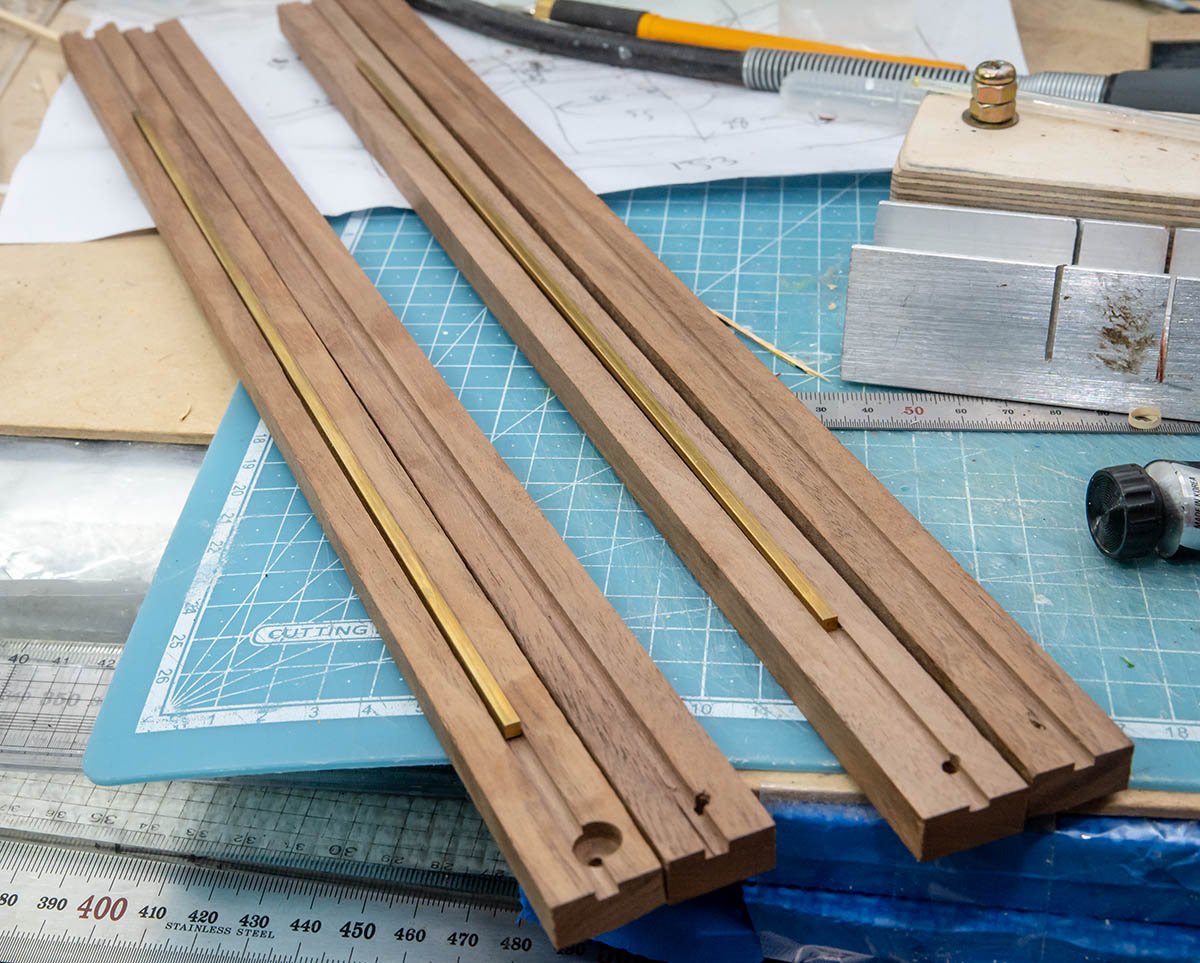
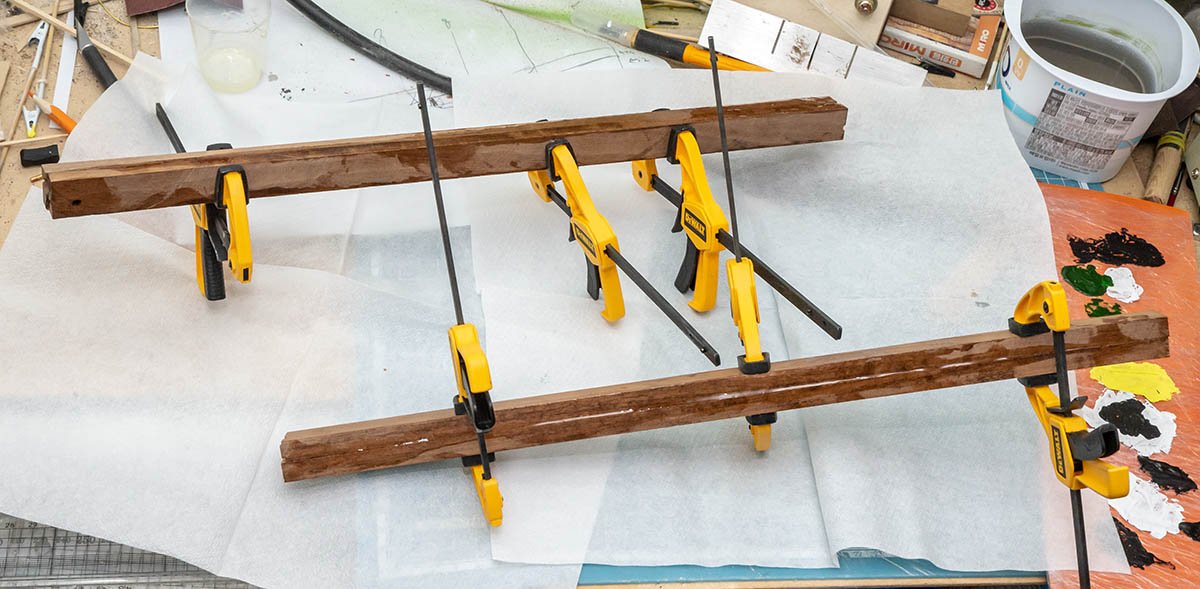
As I said earlier, I didn't give up to use metal cored mast. I made slightly changed version of metal cored masts which are easier and weaker than before. I used walnut wood and 3x3mm square brass rods instead of default birch wood rods. The CA glue I used last time was not durable, so I changed wood-metal adhesive to epoxy glue. Sliced. Ready to turn lathe. During a slow and boring lathe work, I found more efficient and safer way to make a rod using dremel sanding pad. This method is much quiter than before and took only 2~3 minutes to finish with significantly better result. 🤩 The first mast is done. It starts from 7.00mm to 5.00mm. While I was doing bending test, an original birch wood mast was broken by force while my metal cored walnut mast is ok. I felt that my one is stronger than older one, but not that significant. I calculated a specific modulus of elasticity. This is a diagram of my metal cored masts. The yellow is 3x3mm squar brass rod. The blue color is space for epoxy glue. The brown color is walnut wood. After calculation, I found that my masts are slightly stronger than stock masts. It was pretty easy to make this kind of metal cored masts, but my final goal is 250~300%. (If I used S45C carbon steel square bar, I would have achieved 239% of Rel. MoE. ) If I have huge metal CNC lathe, I would have made full brass mast without question. I would say that this is temporary solution and still has lots of improvement points. Anyway, lower masts are done.
-
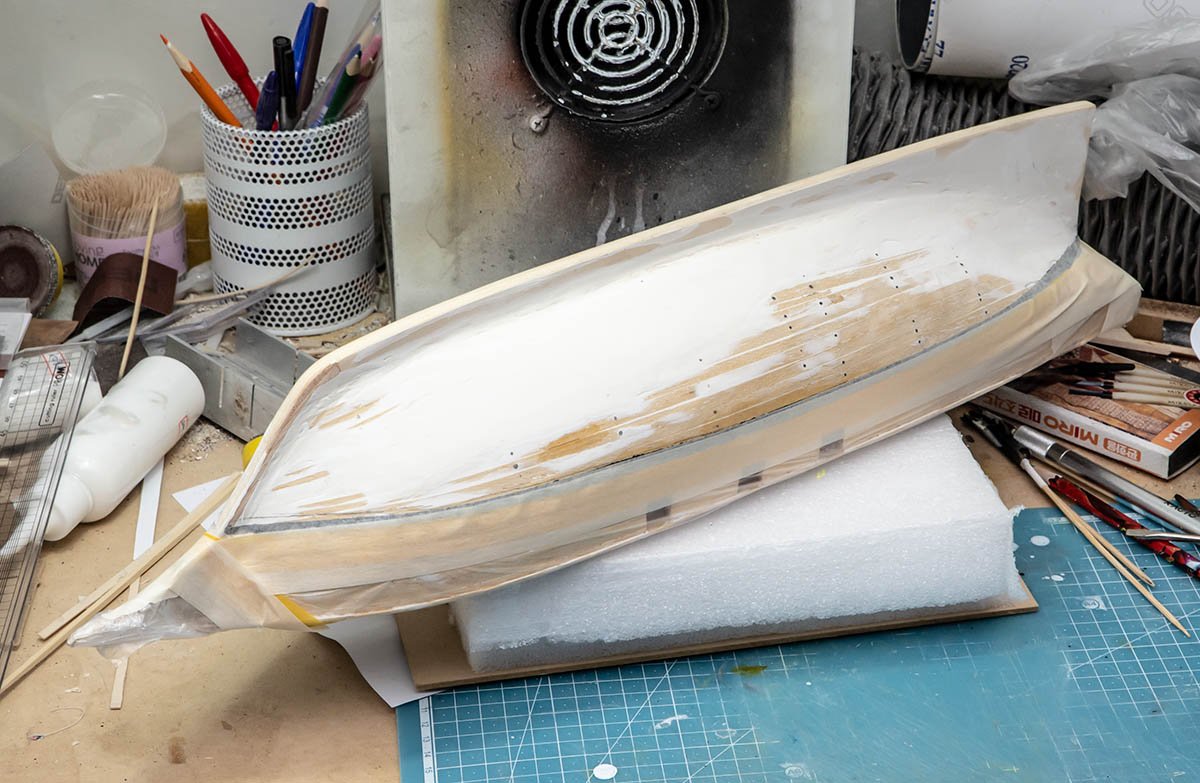
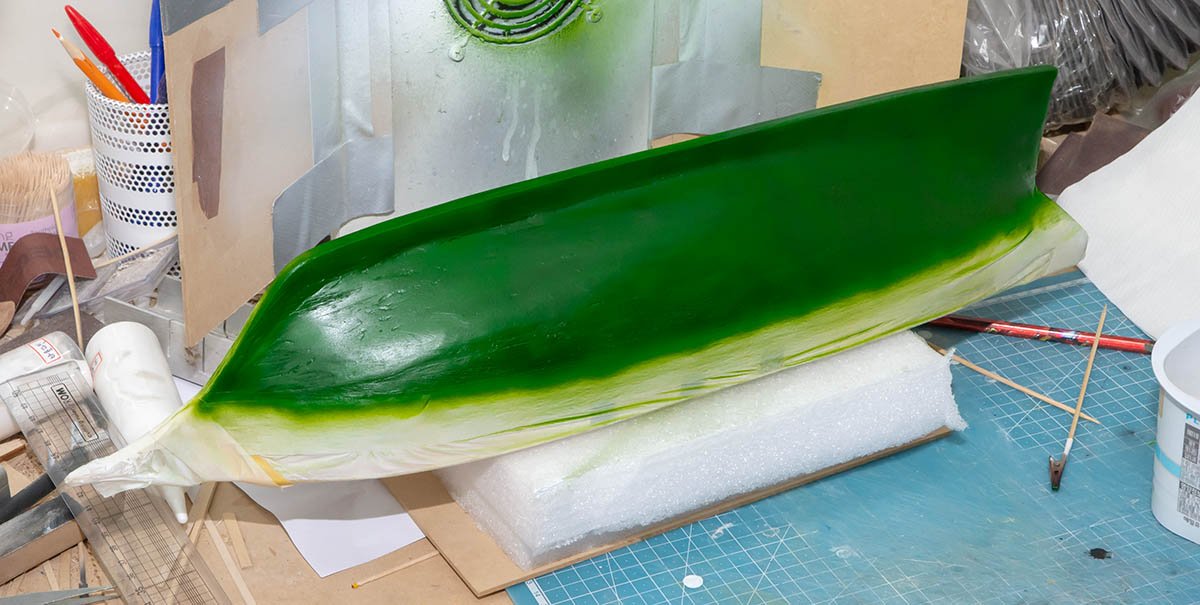
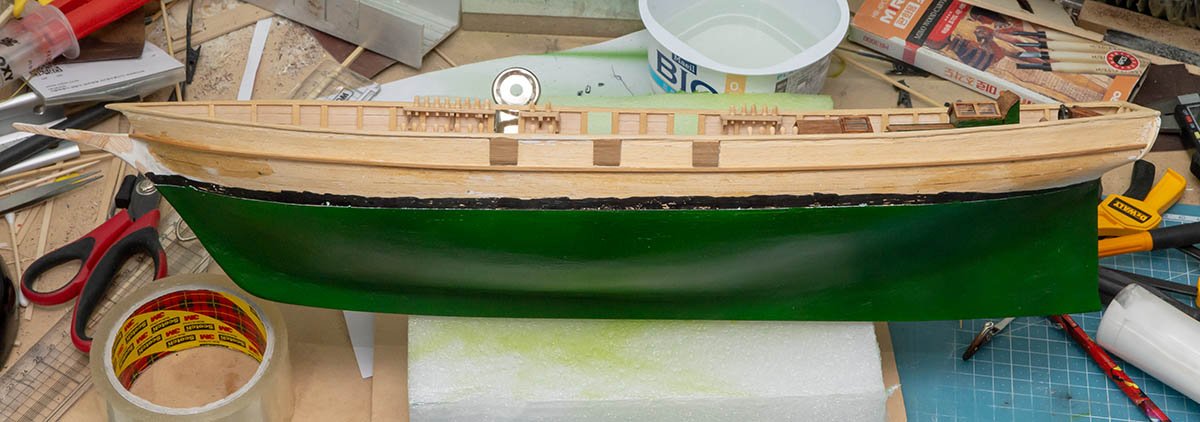
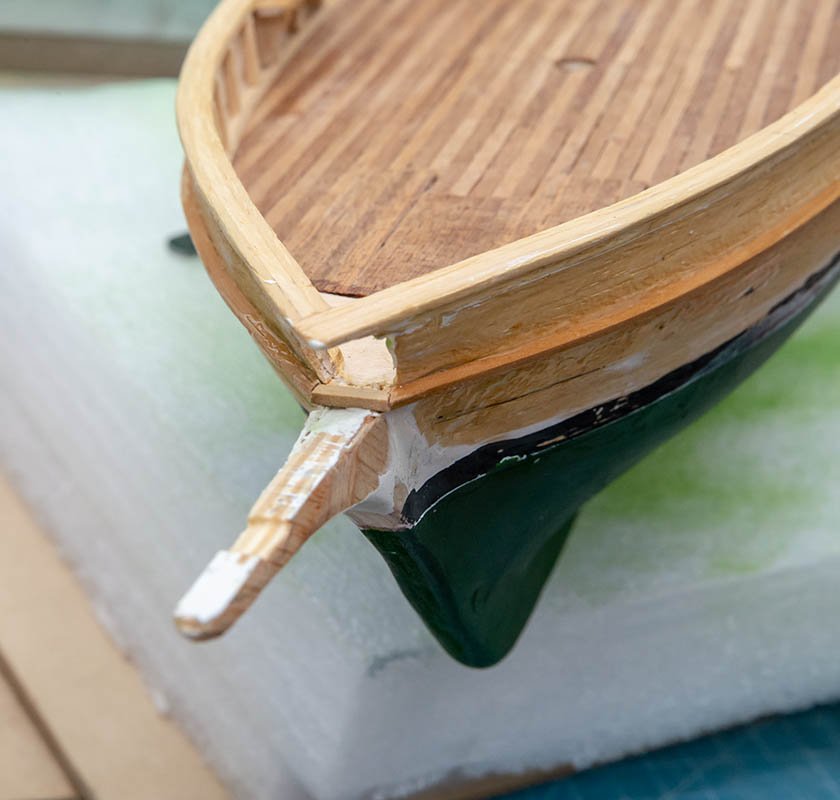
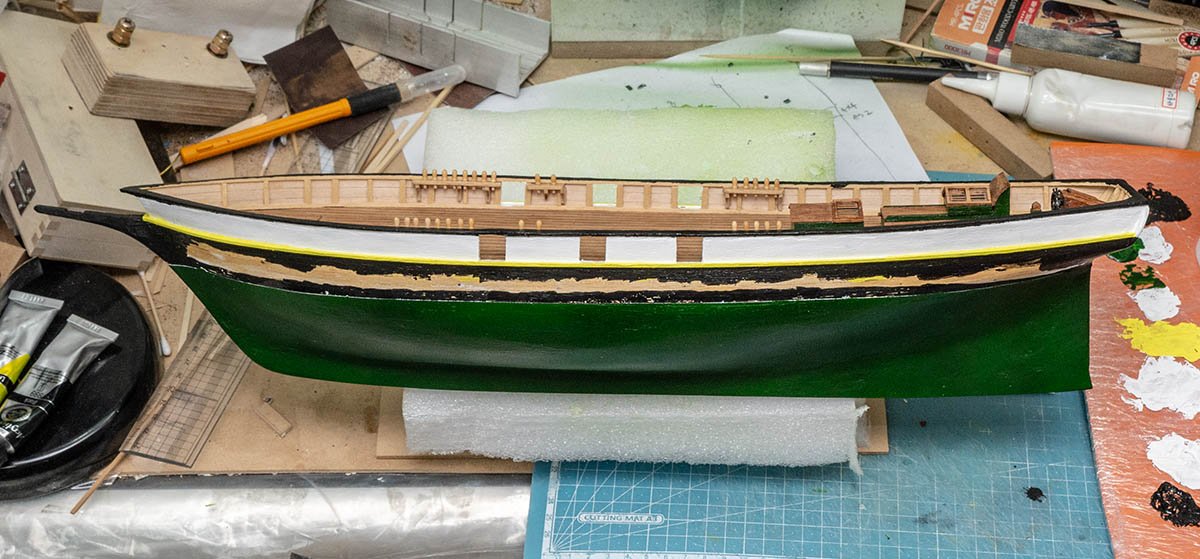
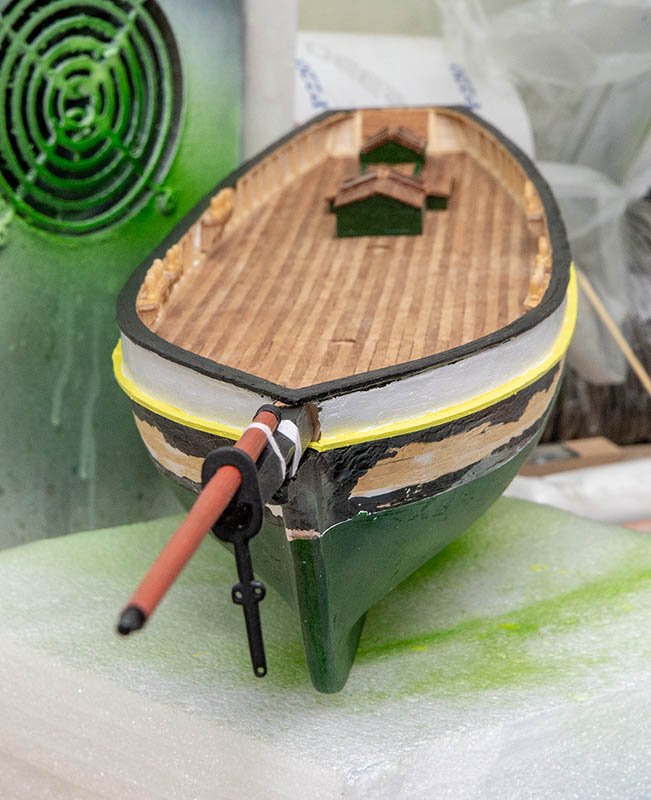
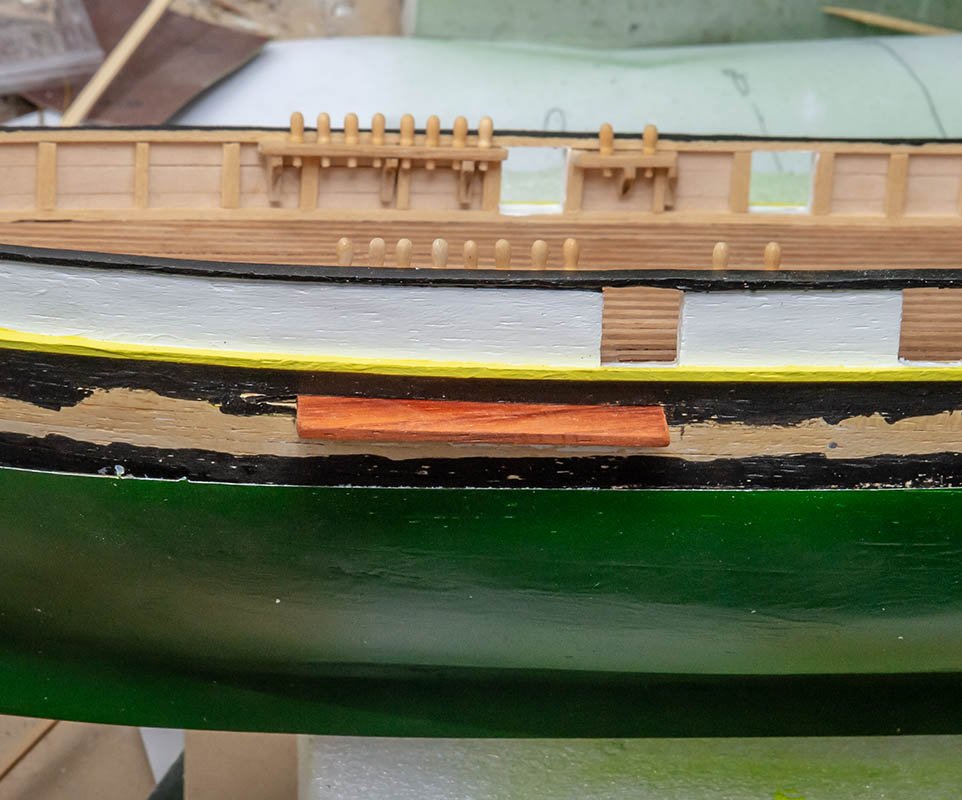
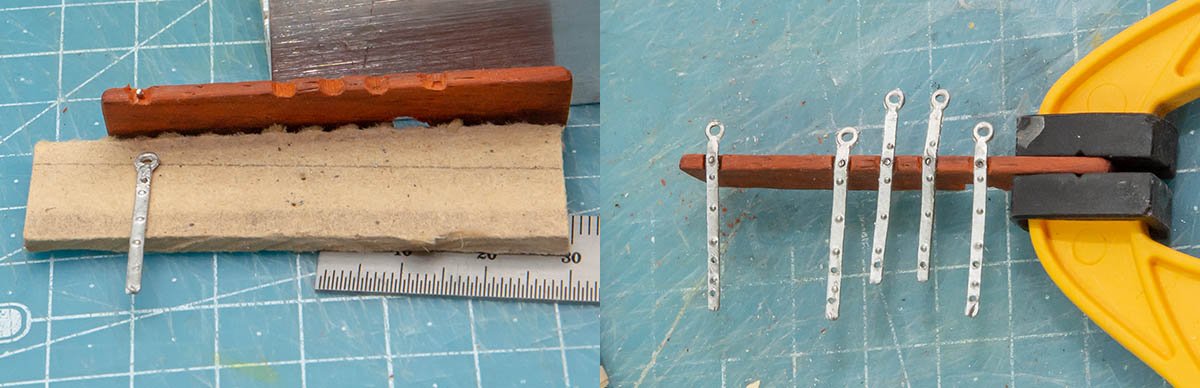
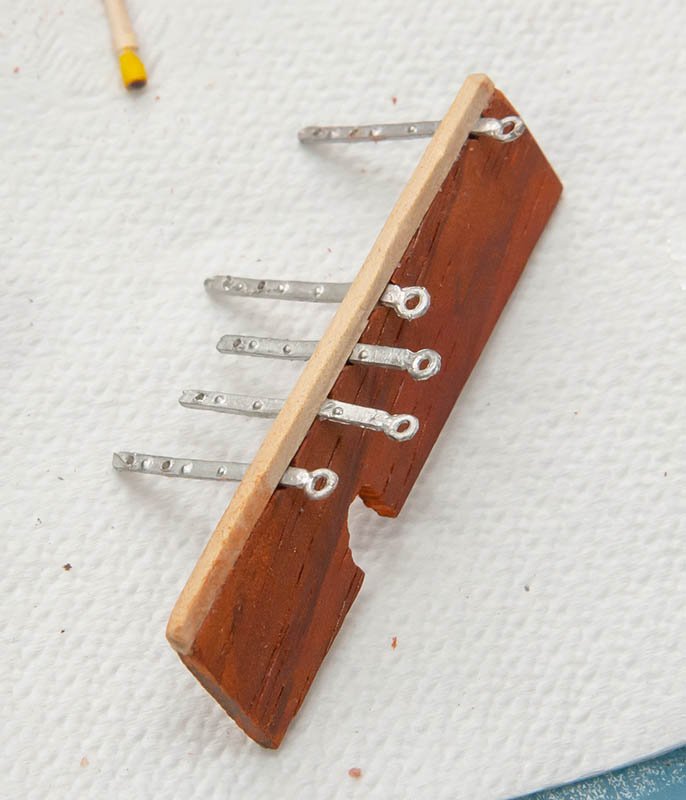
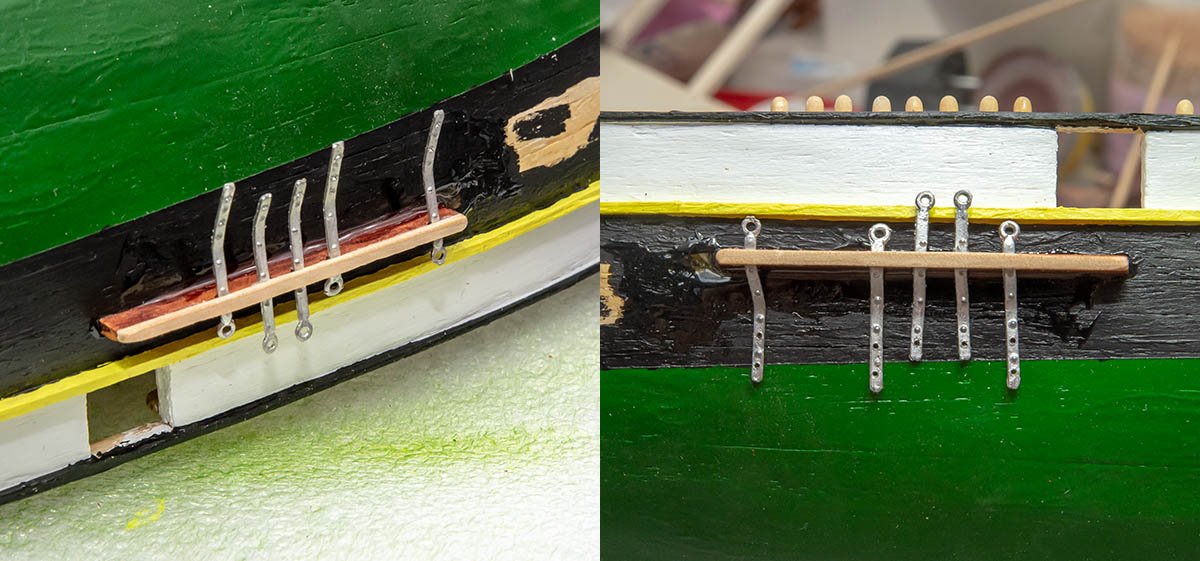
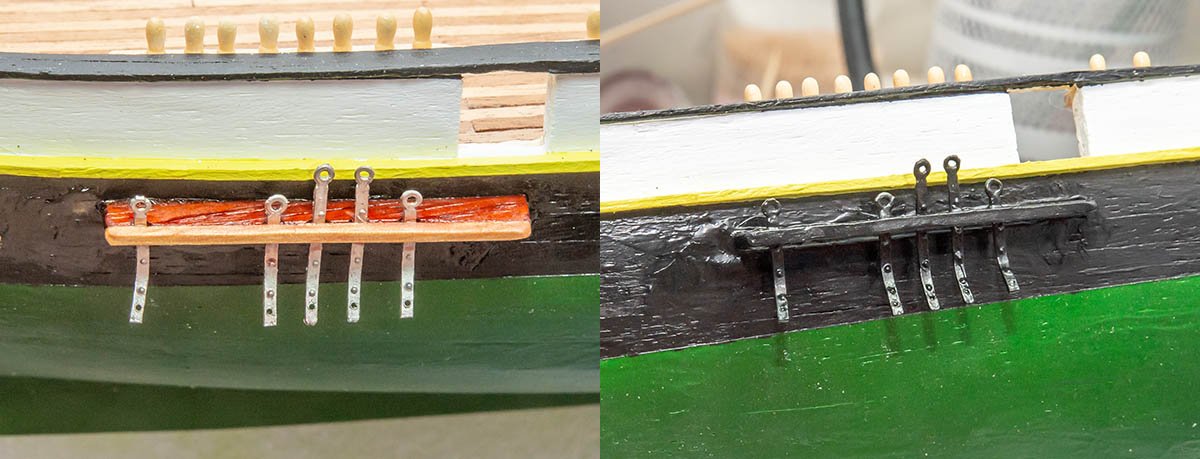
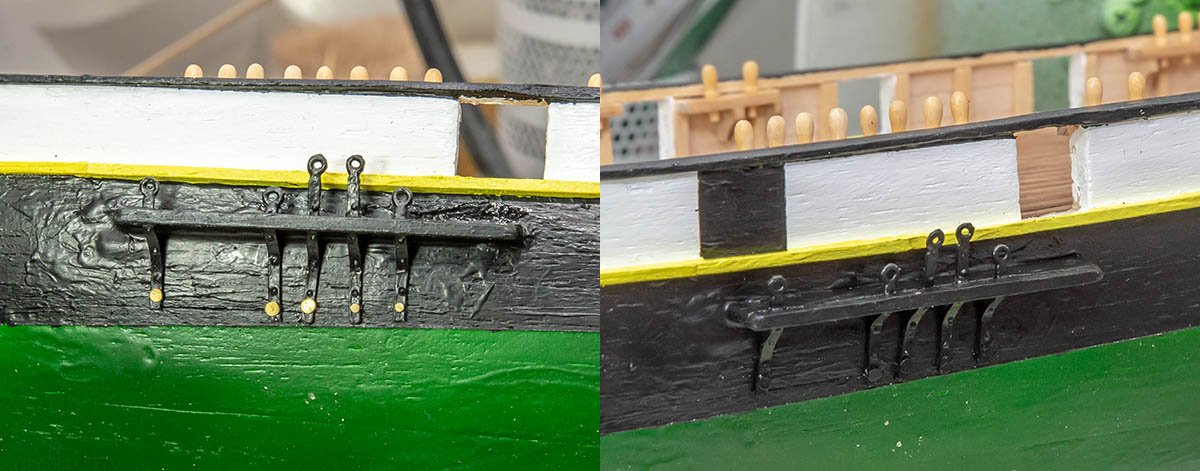
To fit a figurehead, I narrowed the tip of forekeel from 8.00mm to 5.00mm. I did another mistake. The thicker bowsprit should have 1.00mm gap with slimmer bowsprit. I didn't cut it enough. It doesn't look good, but I decided to skip it because it is functionally correct size at least. 😫 Finally time to hide my huge mistake-planking. Doesn't it look like a cucumber? I spent lots of time to remove spot stains and uneven paintings. I painted it with acrylic green paints and matt transparent lacquer as varnish multiple times. She got very strong coating surface. It is ok to go to the next work... I attached rails. This part is not real. I couldn't get any information about connection between bowsprit and deck. I added this part because of external uniformity. Painted. I'll make a new temporary drydock to protect painted area. This part is the last part before I come back to interesing and funny deck accessory part. I chose 'Padauk' wood because it is hard wood like walnut. Also, I cut the planking to get an additional durability. This is what I intended. Epoxy glue is best for this scenario. I added wire to hold anchors tightly. That wood is regular finewood. I glued it with epoxy glue. I found that anchors' length is a bit oversized. Shellaced and painted. I nailed anchors to hold them tightly. I'll do three more rails during this week and come back to deck work. 😍


-
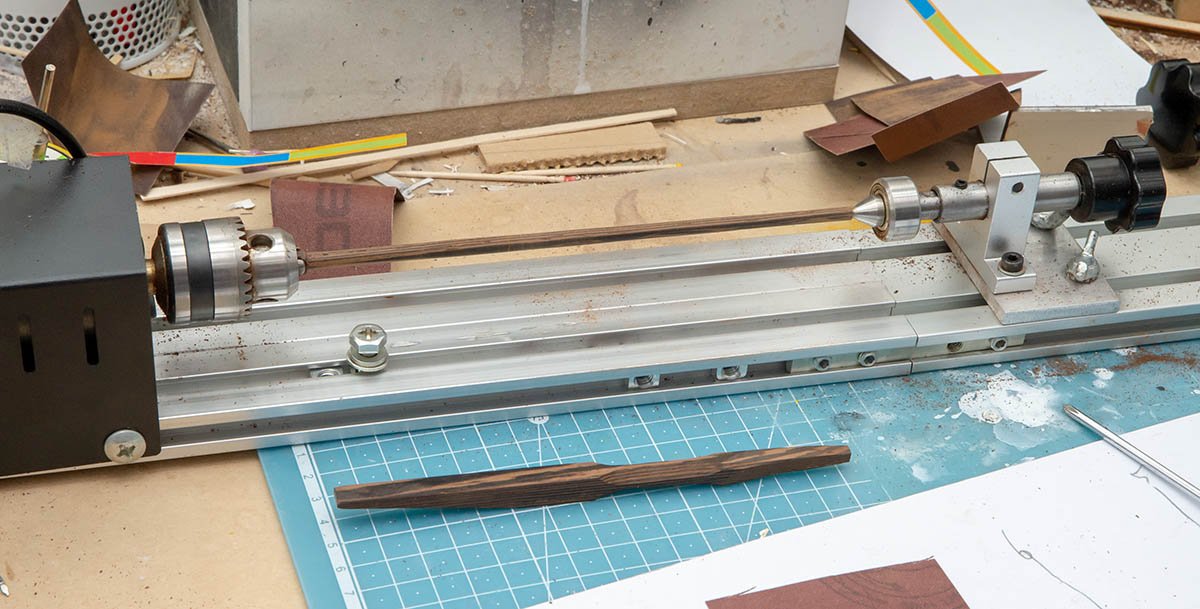
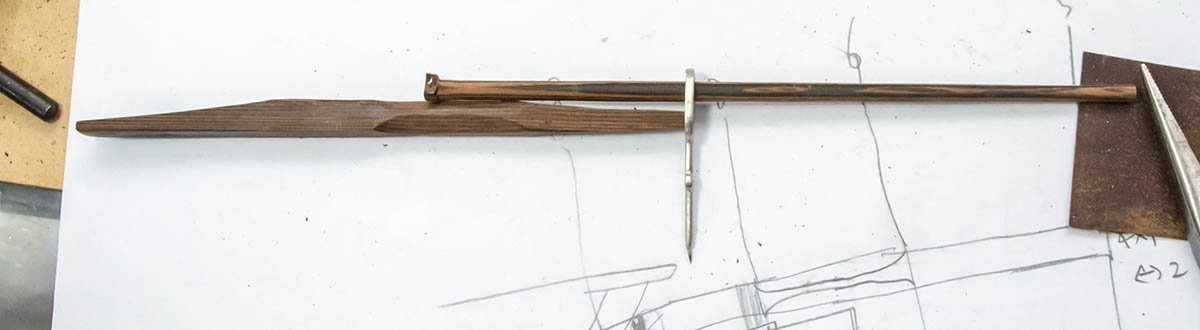
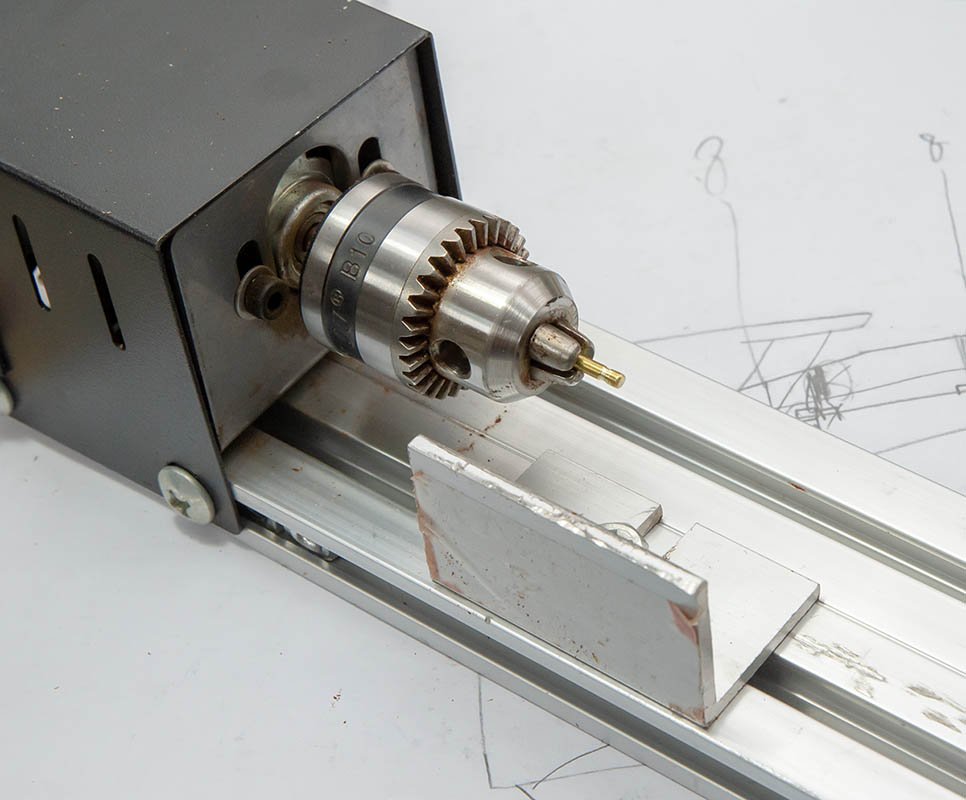
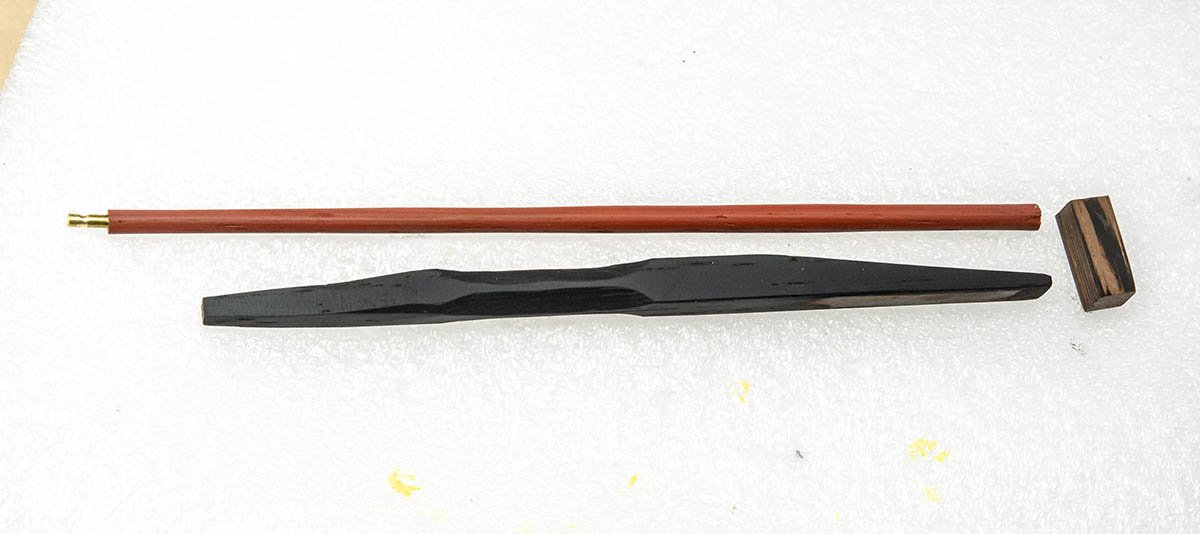
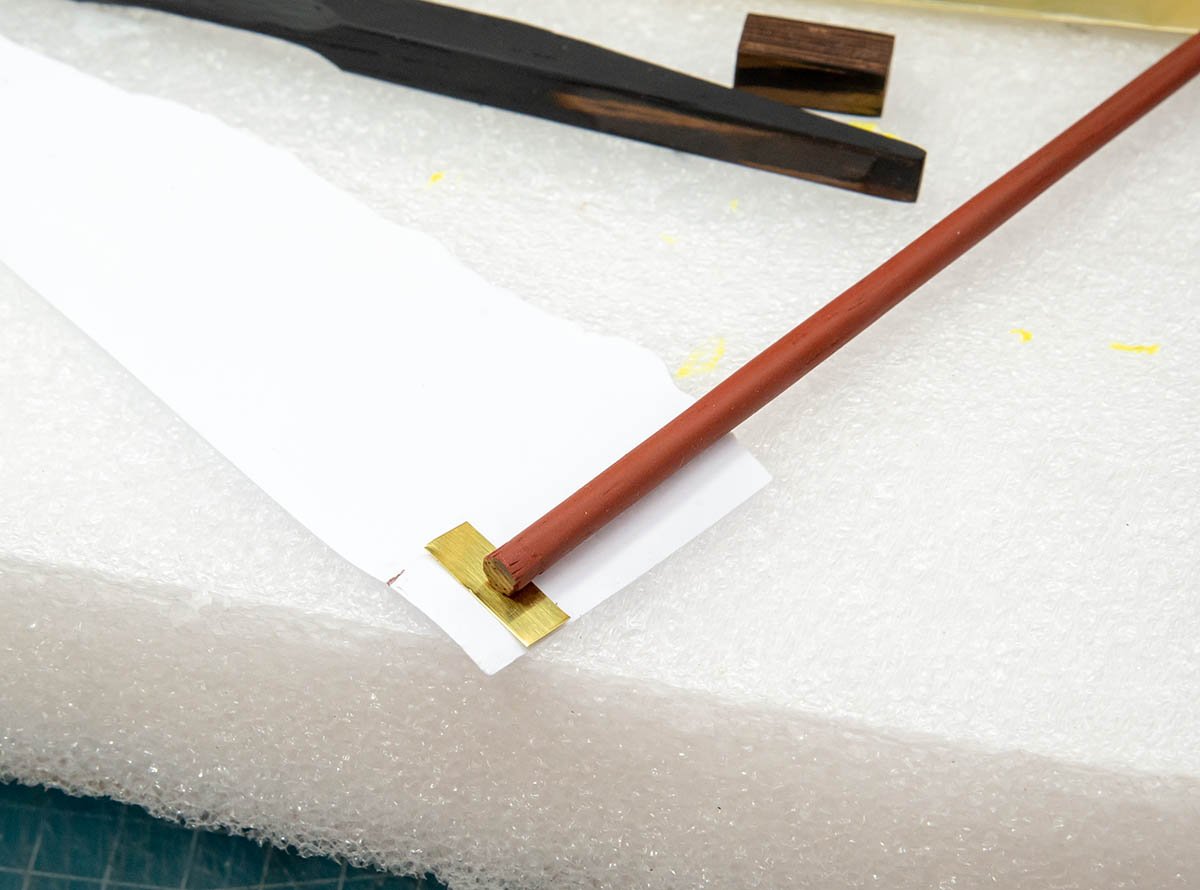
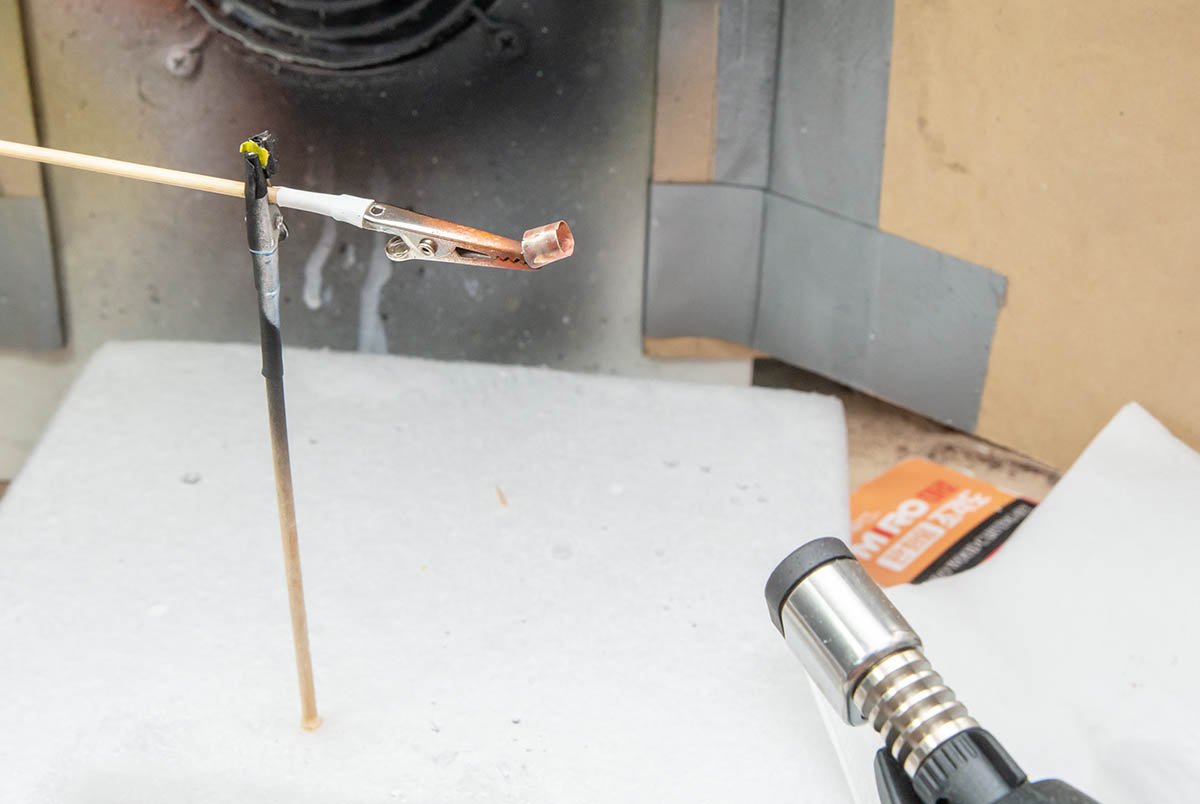
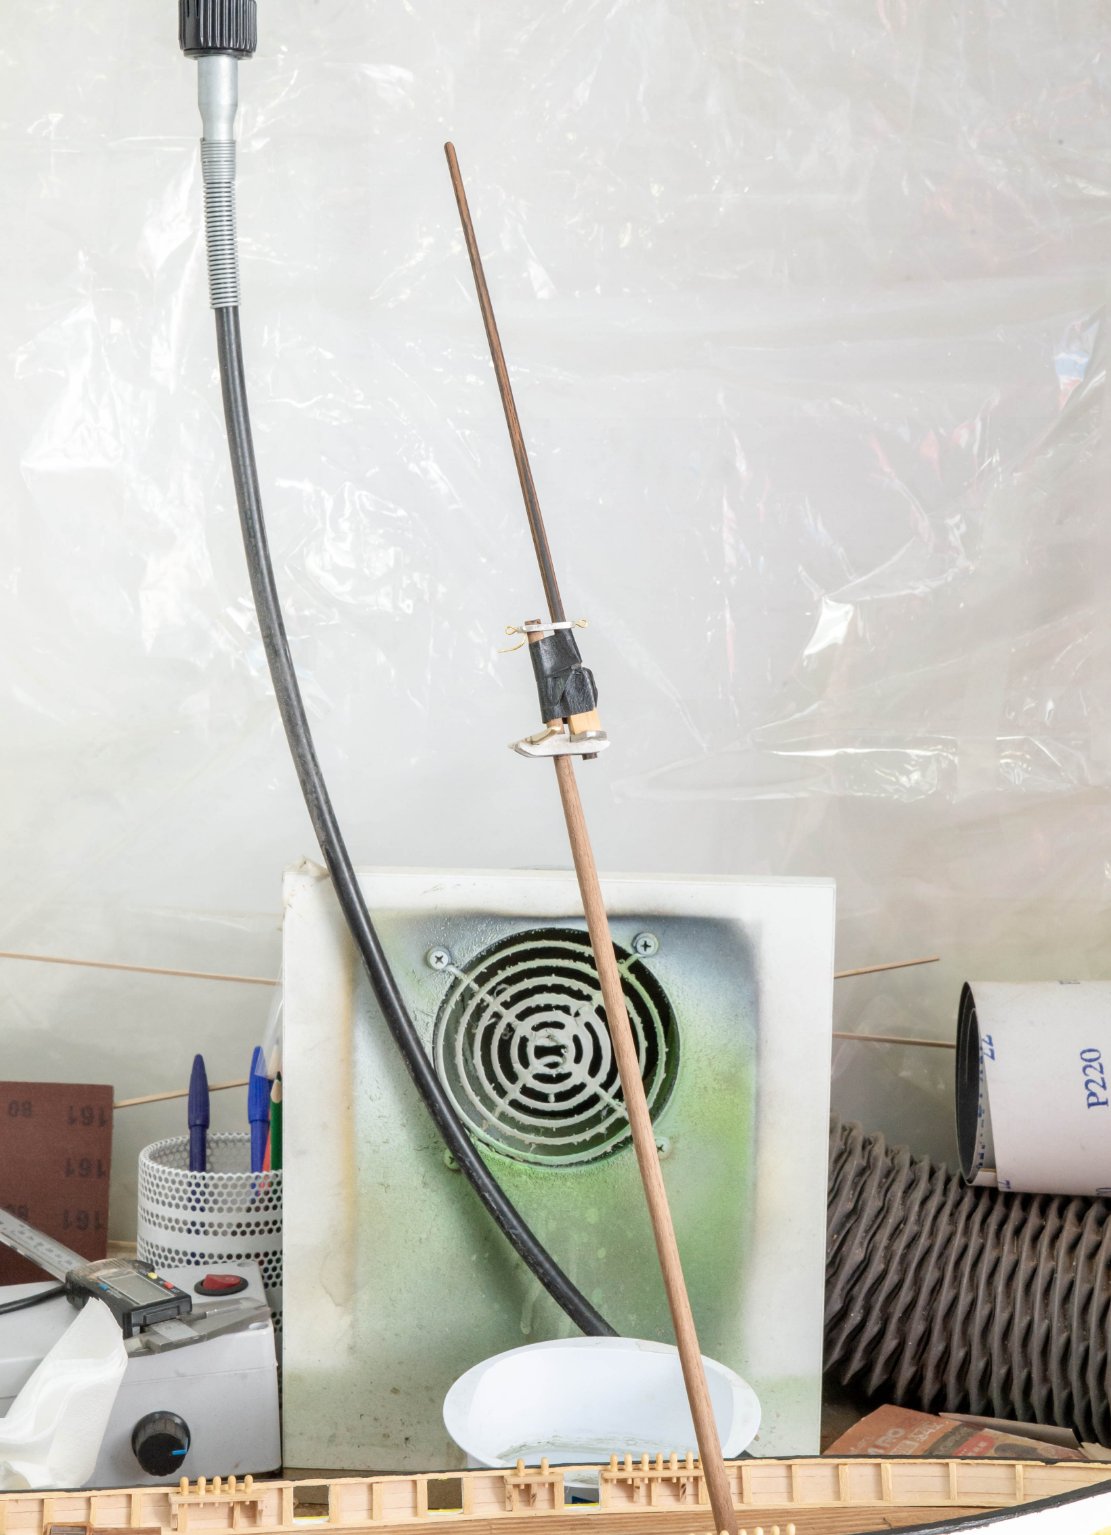
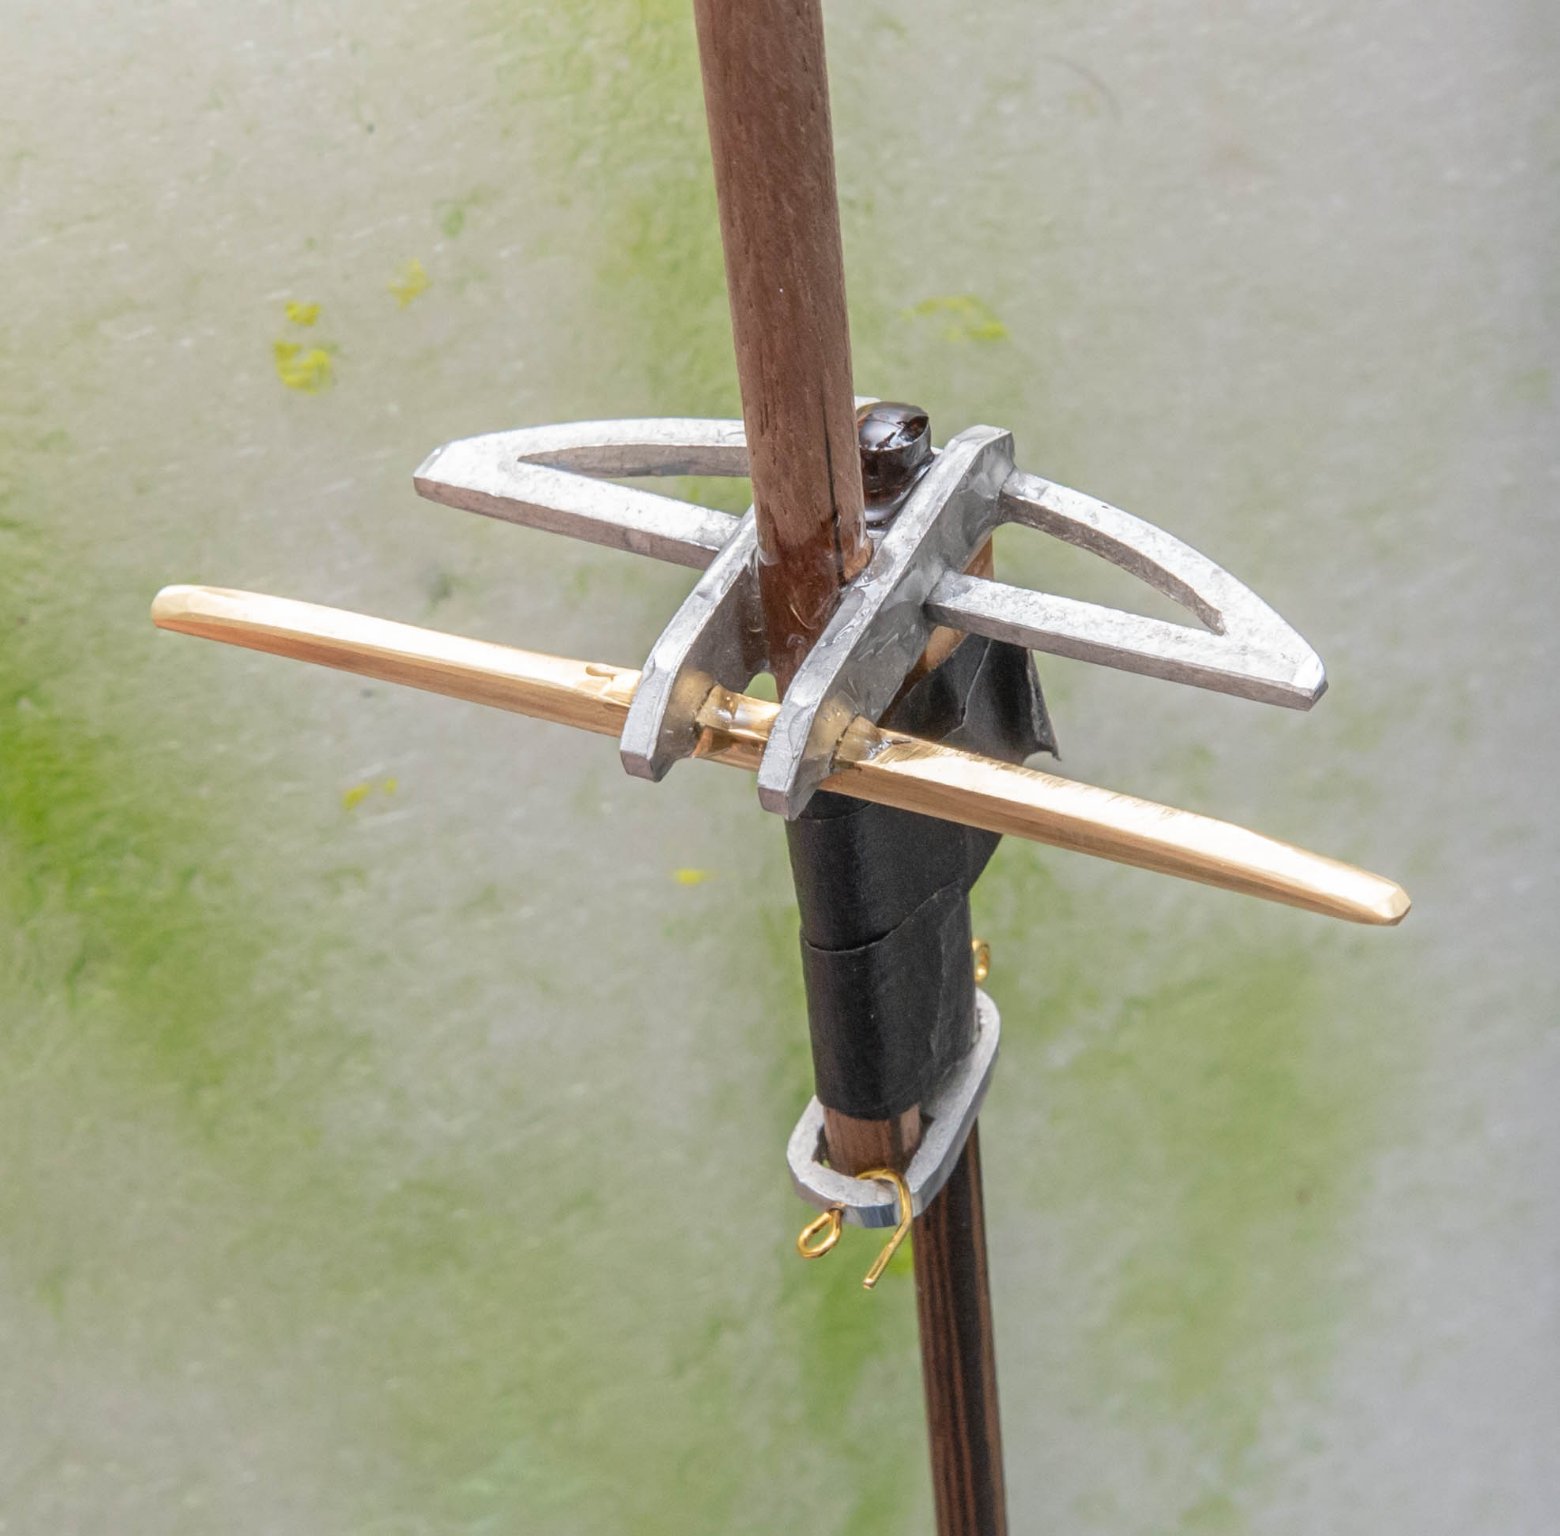
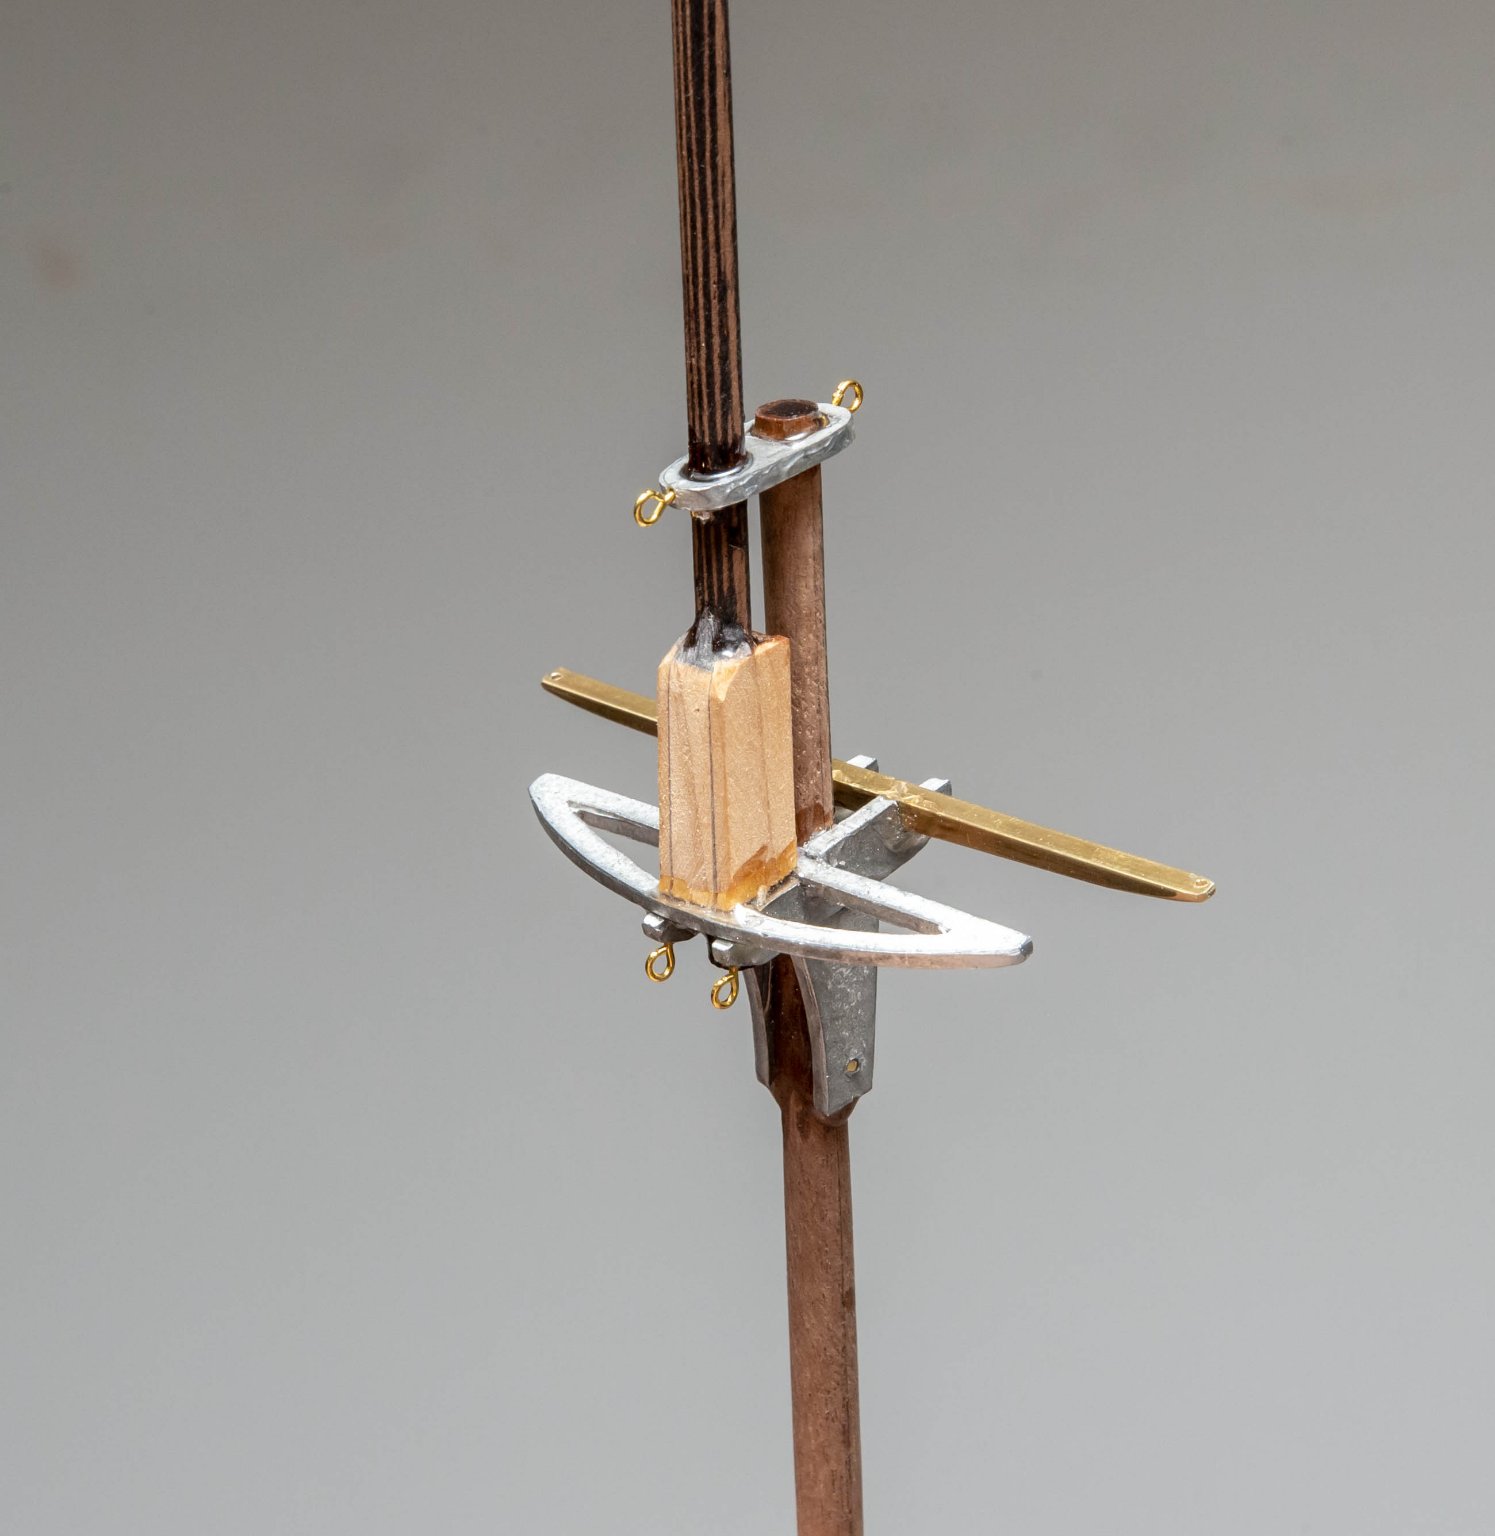
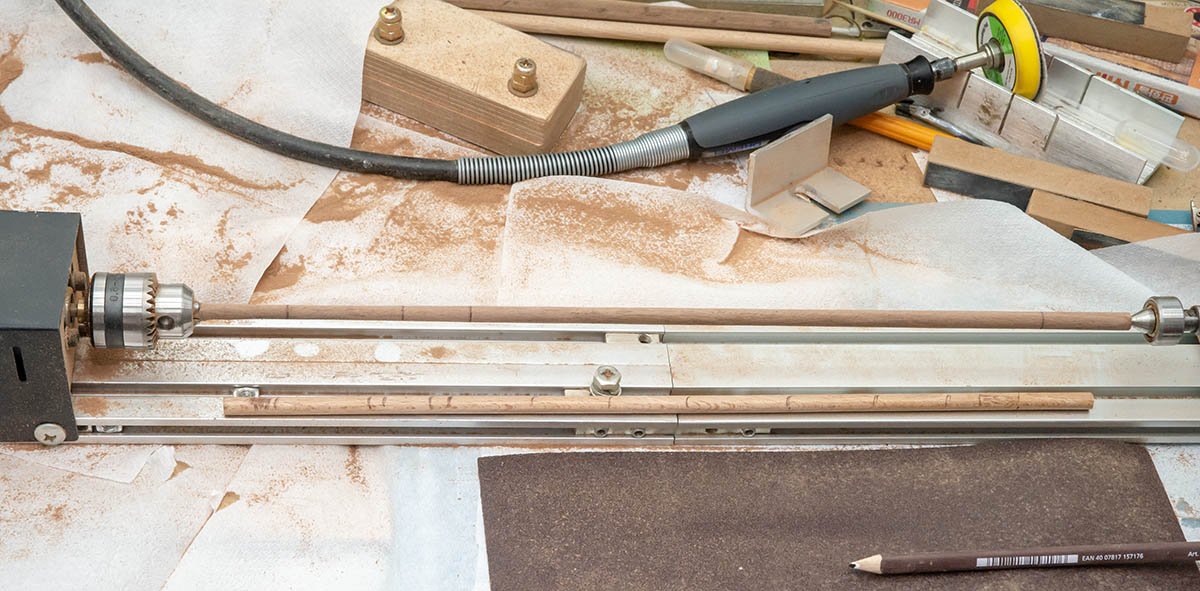
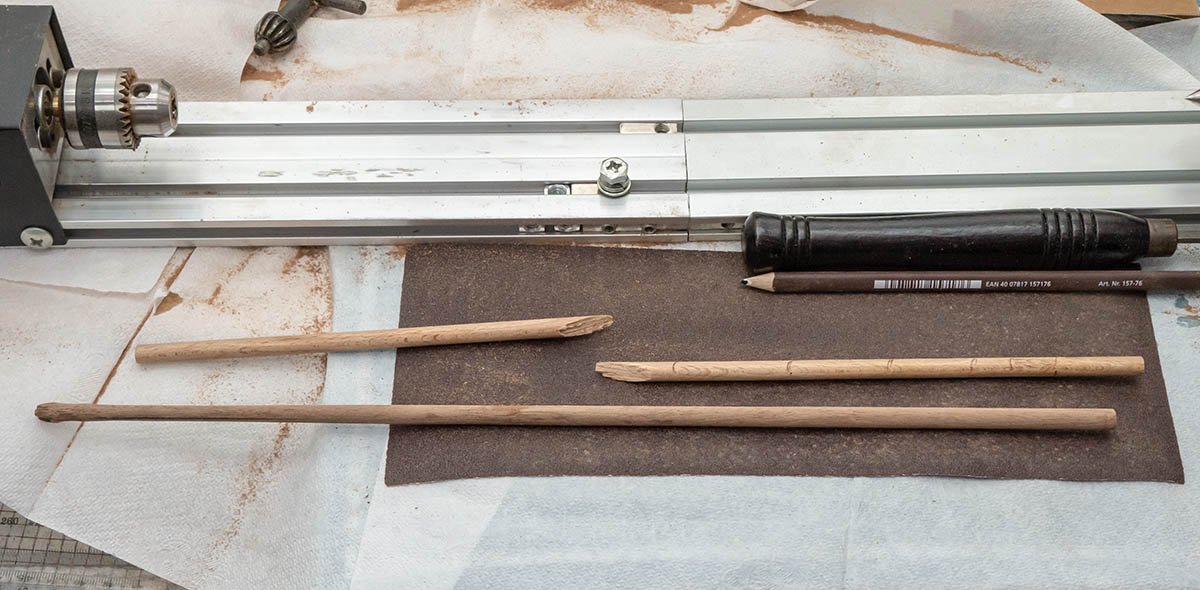
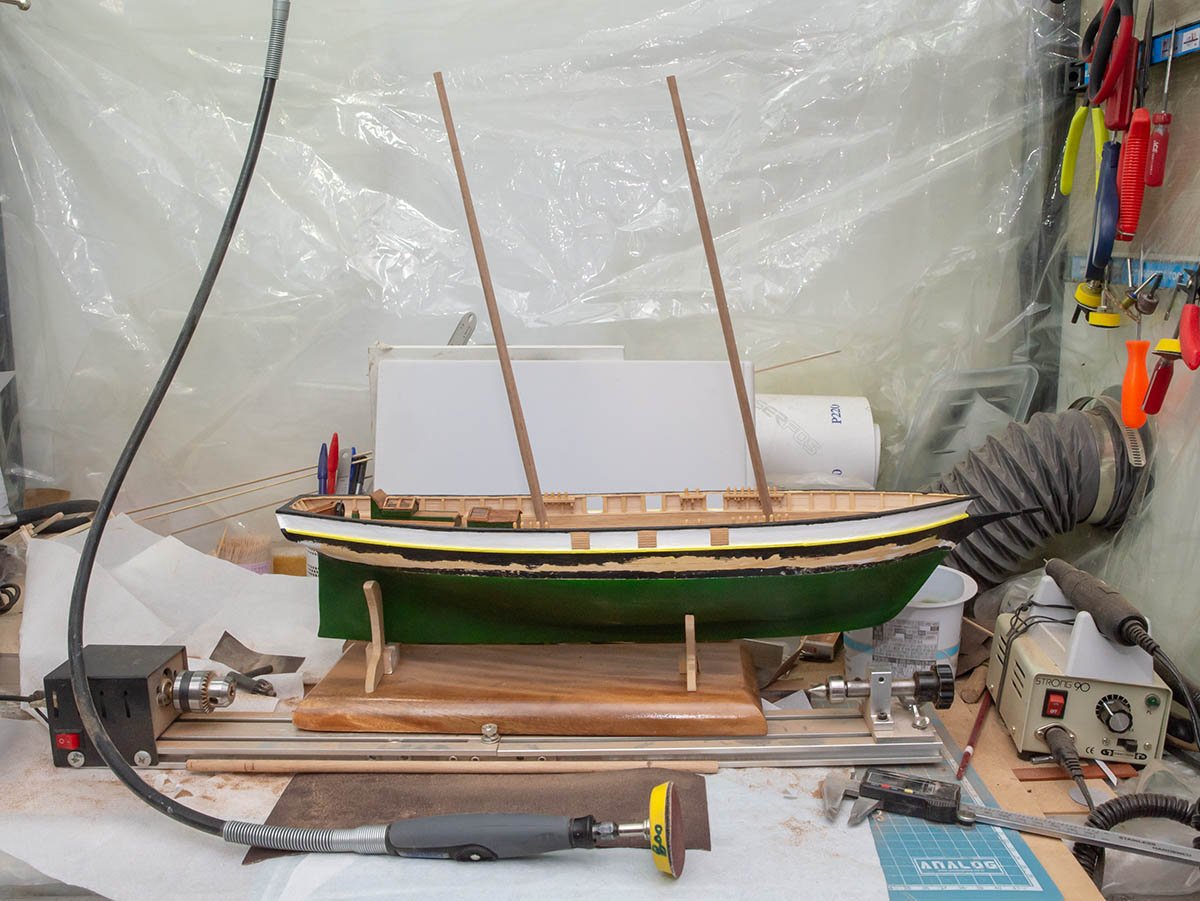
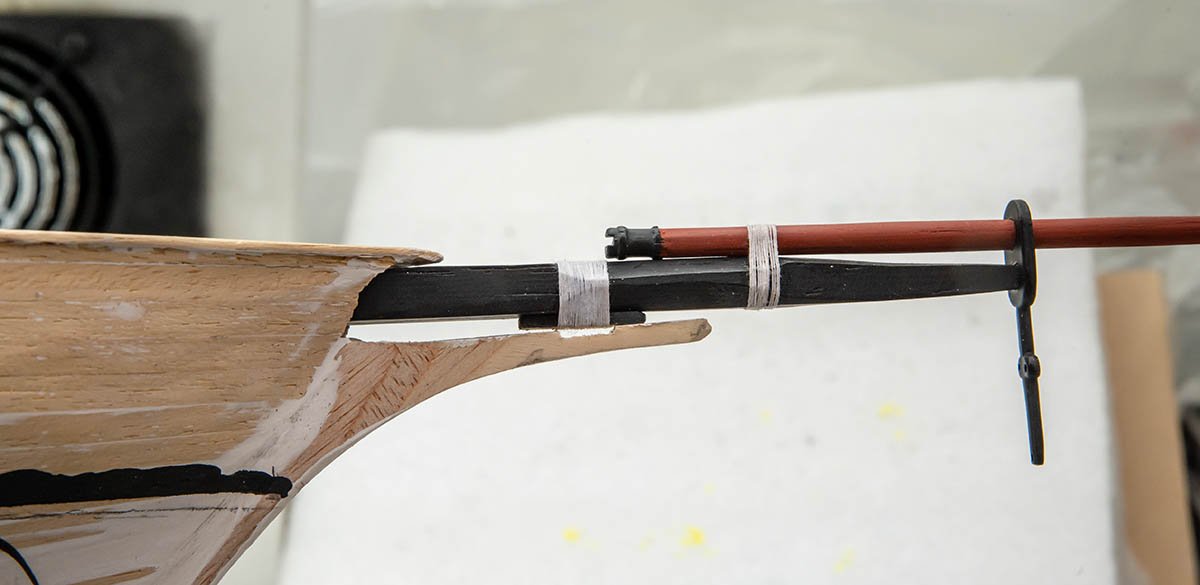
What I'm feeling these days. (Not sarcasm. Only joke. 😂) This is a thiner and taller bowspirit. It starts from 5.00mm to 4.00mm. The wenge wood is pretty thick. It is almost identical to an 3mm copper rod, so the lathe work was pretty easy and safe. (no vibration unlike basswood or walnut rods.) However, this is also super tough wood. I wasted two lathe chisels. I'll paint it, so I didn't sand it too much. (Wenge is one of tropical oily wood.) It looks good. I cut the holding tip after I took a picture. https://www.cargos-paquebots.net/Reportages_divers/LA_RECOUVRANCE_19-09-2014/La_Recouvrance_09-2014-01.htm This is one of my reference site. A kit's manual and drawings have several questionable points. This site's pictures solve most of my questions. I extended the very end of the bowsprit's tip and added rope holder using mini lathe. (It's 2.40mm brass rod.) The black color is a lacquer paint. The second bowsprit is Burnt Sienna + Vermilion(Hue) 1:1 acrylic paint and Vallejo Matt Varnish. I wanted to make a brass cap at the end of second bowsprit. Unfortunately, poor brass soldering skill didn't let me complete a brass ring... The 0.10mm brass sheet shrinks when I point a gas touch... I'll stick to a lathe and make an end cap using 6.00mm wood rod. 😉