modeller_masa
-
Posts
950 -
Joined
-
Last visited
Content Type
Profiles
Forums
Gallery
Events
Everything posted by modeller_masa
-
Hello Oldsalt1950, Isn't it a bit difficult to remove? It may leave torn pieces of paper or sticky adhesive residues. I researched rubber cement and it looks promising.
-
Hello, I made a template for lining off the hull. It is exactly the same as the usage of the planking fan template (https://modelshipworld.com/topic/23950-planking-tutorials-pdfs/), and I optimized the sequence a little bit faster and more convenient in my own way. Download links planking stripe template v1.pdf planking stripe template v1 instruction.pdf I have only built a few ships, so I don't know any other usage of the fan template or may misunderstand it. If you think this isn't better and quicker than the planking fan template, please let me know and I'll delete the download links. Any ideas that improve this template are also welcome. (ex: mm → inch unit) Have a happy planking!
-
Thanks for the compliment, starlight. It may look like a student teaching a student. Who will enjoy the scene best? Teacher! I appreciate your kind advice, Peter. As an 'open' project, I both value my personal satisfaction and audience's enjoyment. I hope you have a little break when you visit again. 😉 The finish line of a marathon isn't far off. 😎
- 77 replies
-
- 5
-

-
- Santa Maria
- Artesania Latina
- (and 1 more)
-
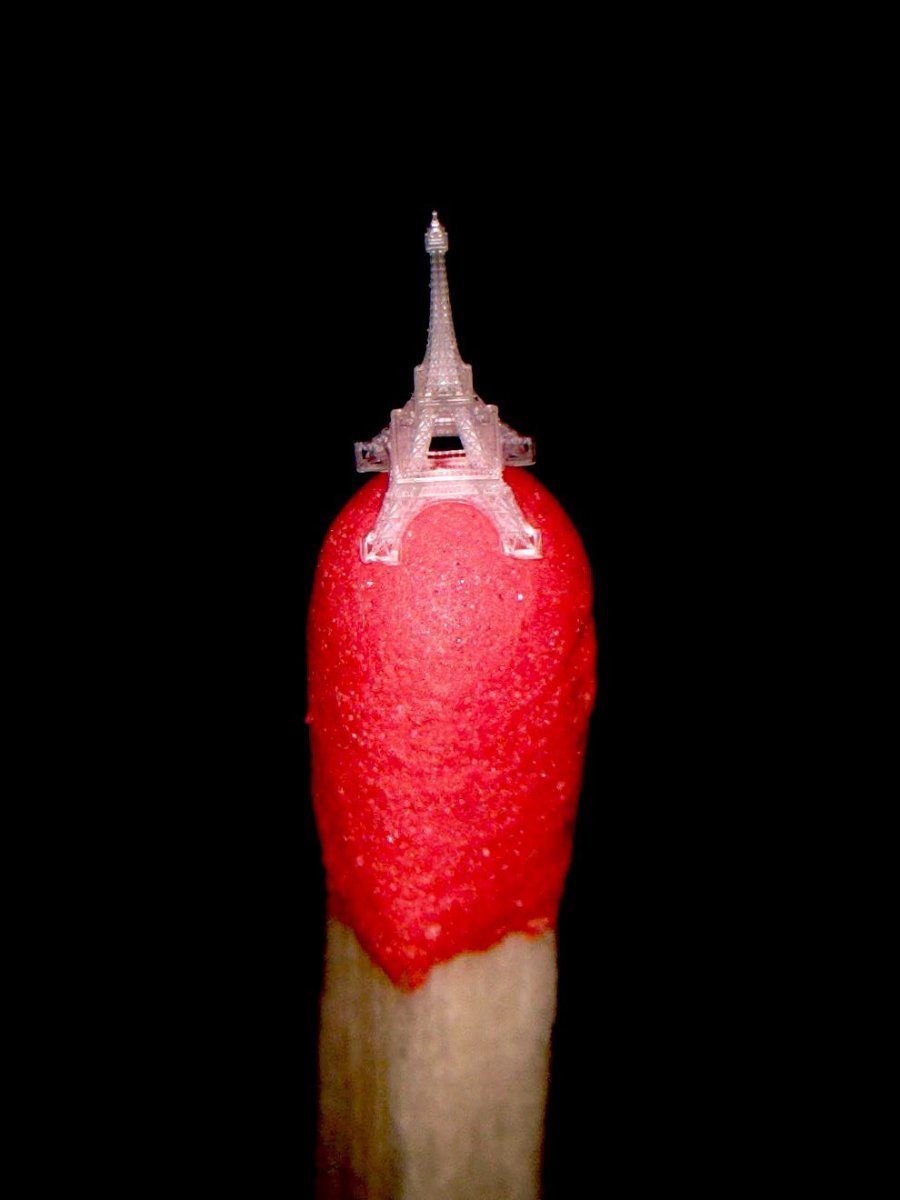
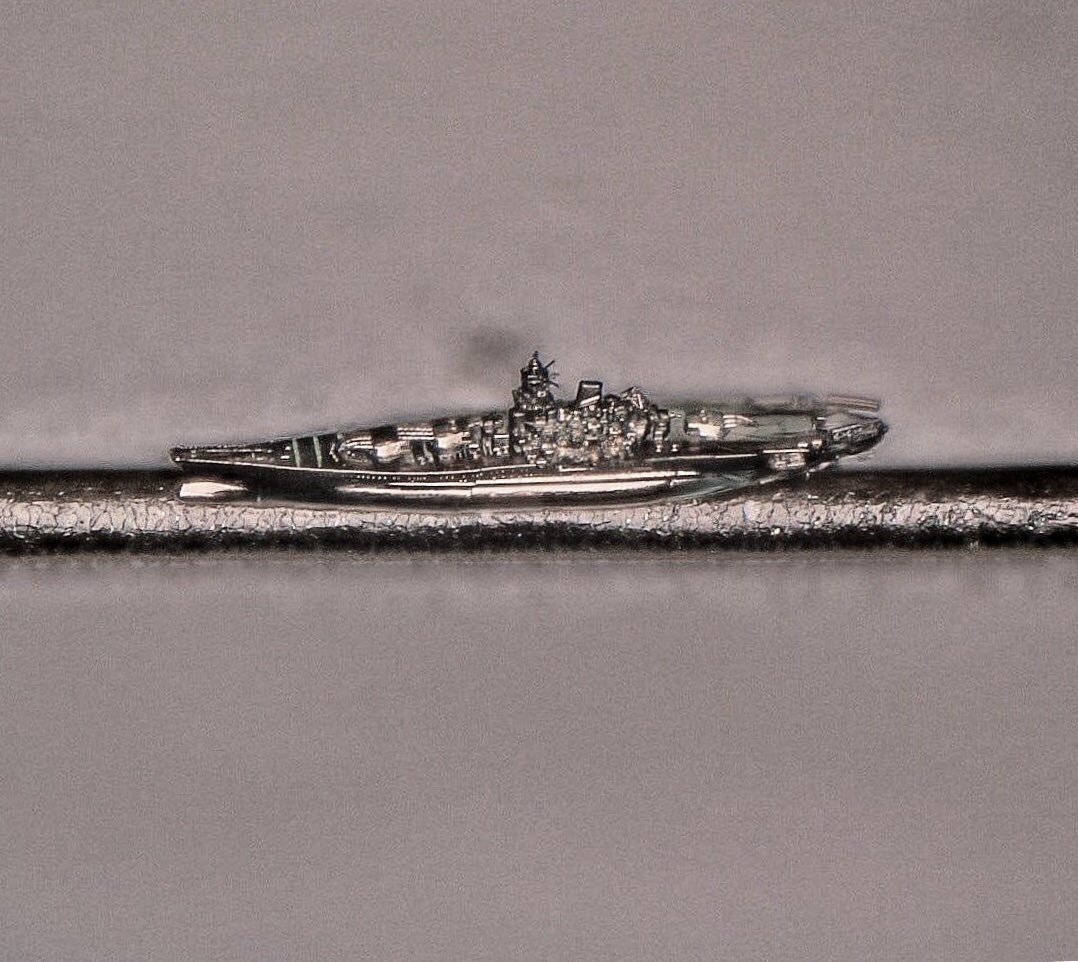
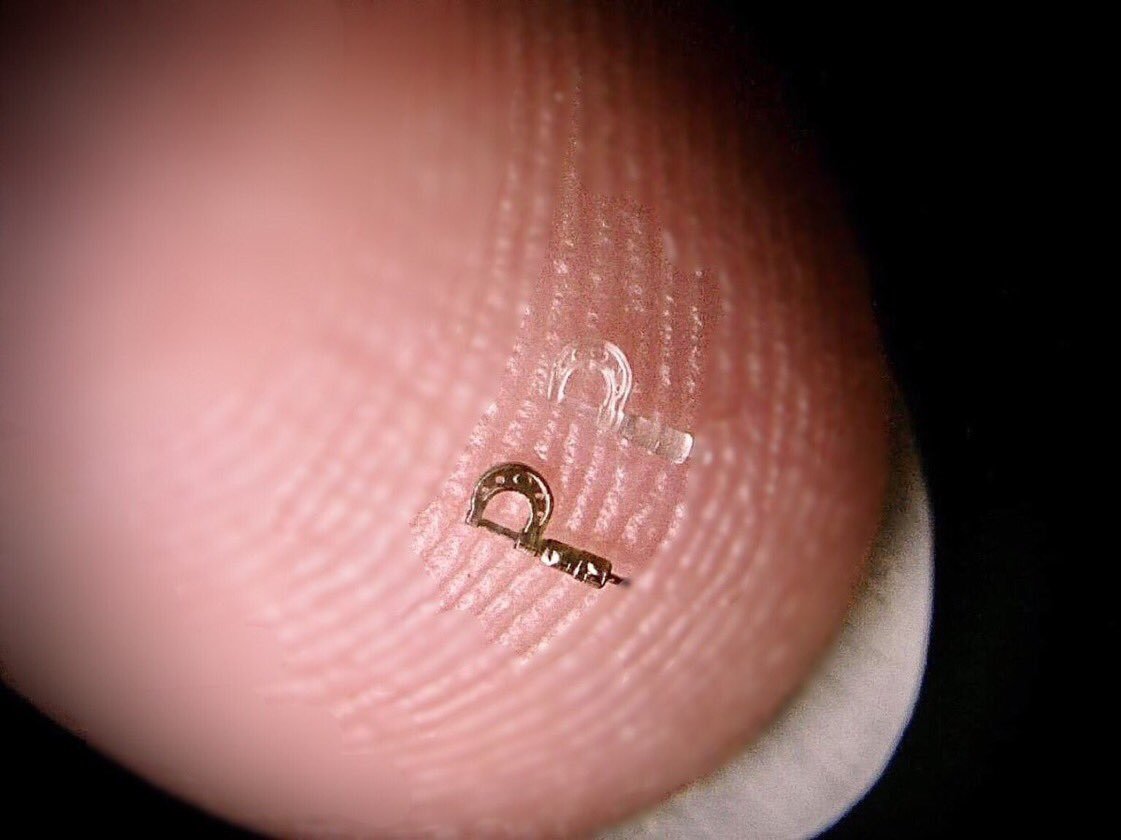
0.5mm (= 500,000nm) Battleship Yamato Image source : https://twitter.com/hashtag/ナノ3Dプリンタ?src=hashtag_click Method : Kind of SLA 3D printer Material : UV-curing acrylic epoxy resin Companies https://www.optoscience.com/maker/upnano/ https://www.nanoscribe.com/jp/products/photonic-professional-gt2 https://www.optoscience.com/maker/upnano/pdf/NanoOne_DataSheet_jpA4_ver3_2008_L.pdf Horizontal resolution : 170nm (=0.00017 mm) Vertical resolution : 550nm (=0.00055 mm) Bed size : 100 x 120 x 40mm Weight : 124 Kg I definitely want the 1,000 times higher resolution 3D printer, but the price tag is over $350,000. 😲


-
I chosed any power meter image from Google that appears to be very similar to my own. I have both a 110v AC and a 220v AC power meter to measure any devices here. (SK is one of the countries that uses both AC plugs.) I tested them with a 220v power meter because they support free volts. I searched for the modified irons, and the articles were interesting. The iron for the modification has a temperature sensor in it, so the modification should work. I thought common iron, which are the cheapest, so I didn't get the idea. Sorry about that. By the way, I ordered a digital temperature control iron for $15. I'll update my experience if the new gadget seems helpful. 😆
-
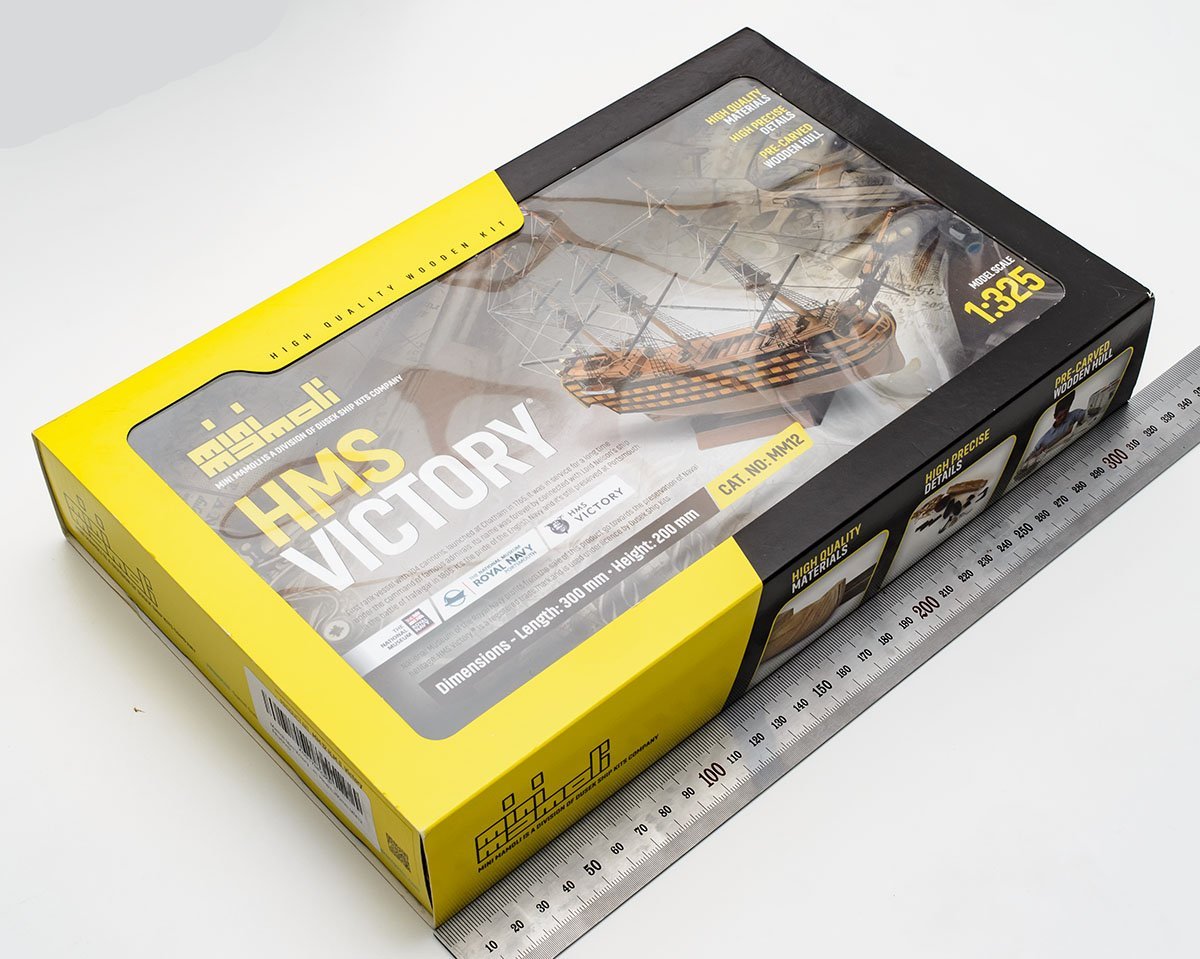
Hello, Peter. It's my pleasure to invite both you and Moonbug, who wrote my best references for this build! From your speed of building and skillful results, I guess you're an expert modeler, and you may get nothing impressive from my buildlog. I'll summarize any differences between the old SM kit and this new kit I find, so please visit again if you're interested in it when I finish. Thank you again for writing the great build log again, Peter.
- 77 replies
-
- 3
-
-
- Santa Maria
- Artesania Latina
- (and 1 more)
-
Hello, Roger pellett. Thanks for the kind explanation. I understood what Jagger was talking about. I imagined plugging the AL's cylinder tip into the Dremel router, so I thought he expected another unique idea from me. 😅 I doubt its functionality to keep a constant temperature in the case of the simple power output control with variable nob. When I tested the power consumption level of the digital leatherwork irons, I saw that the power consumption fluctuated from 0W to 80W very quickly. Without a temperature sensor and a digitally controlled power supply, I believe the temperature at the tip will rise, even though the power level is set to the lowest.

-
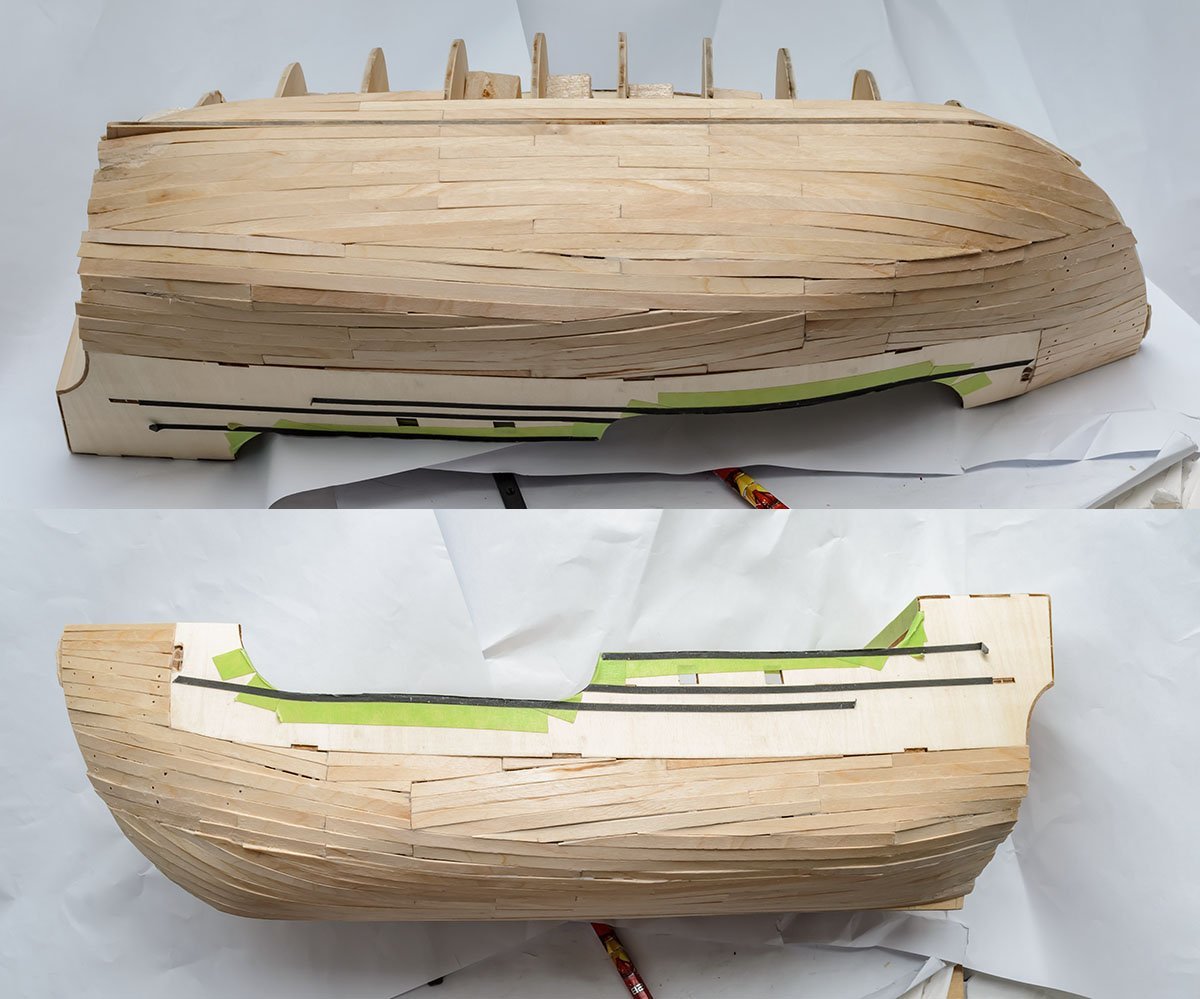
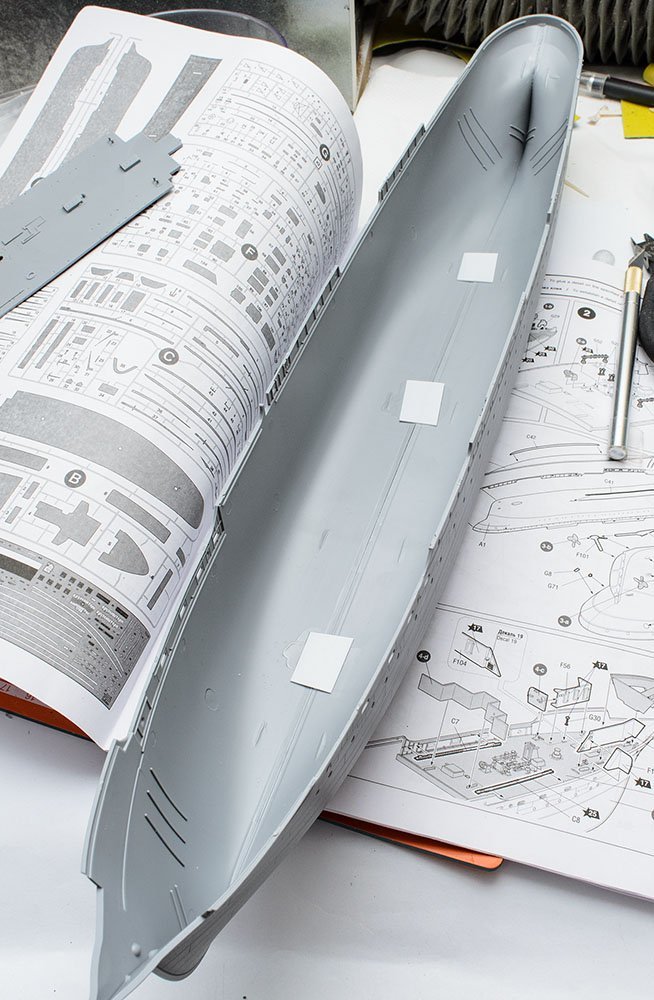
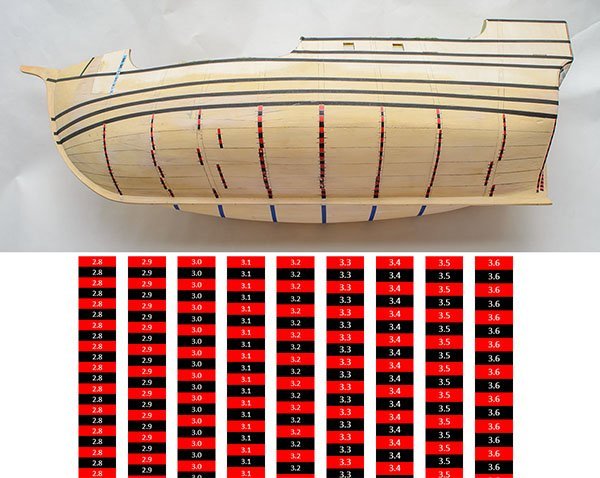
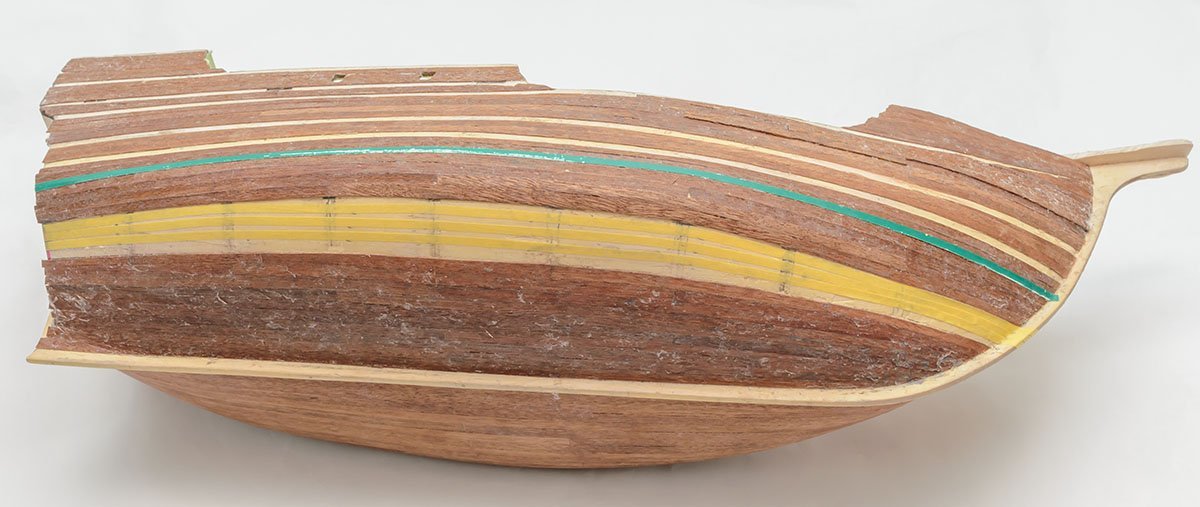
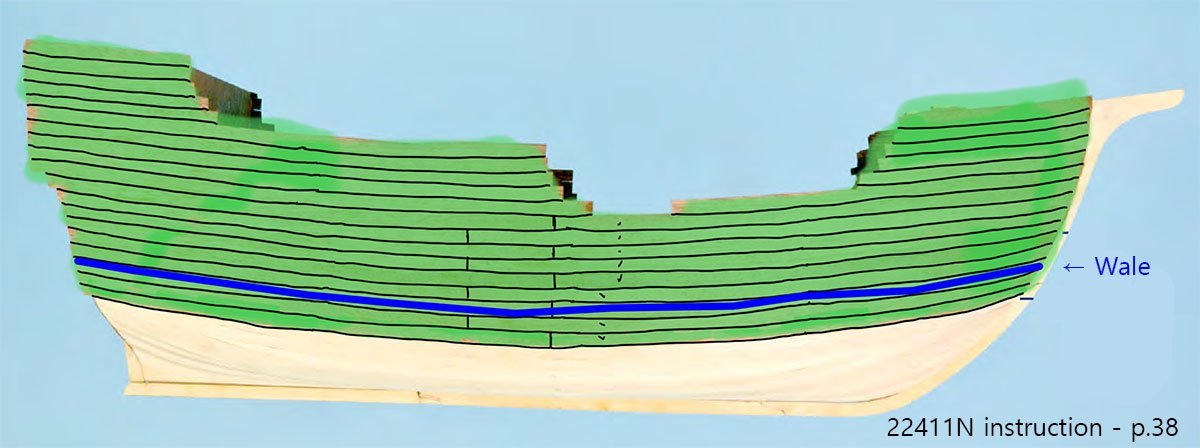
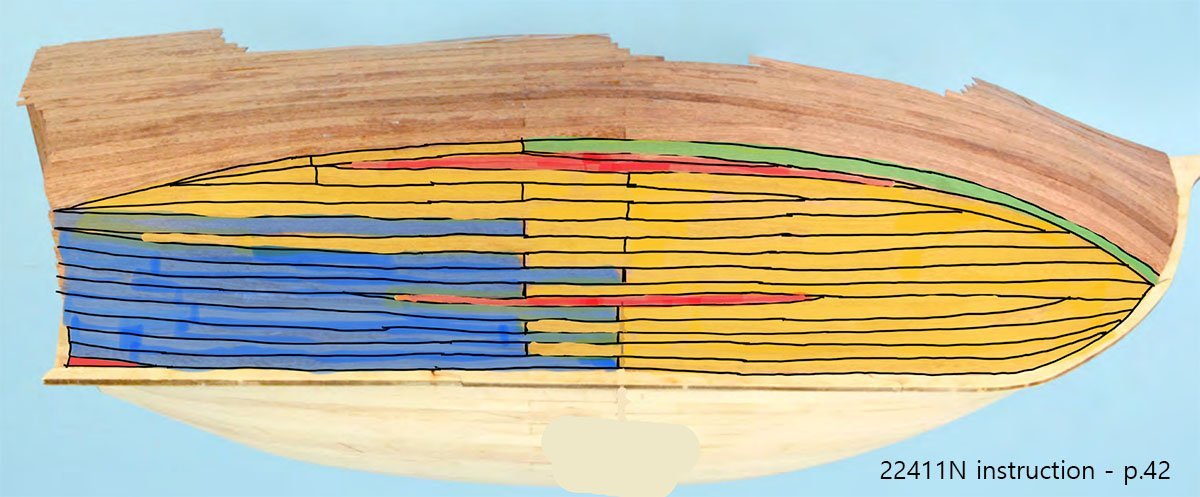
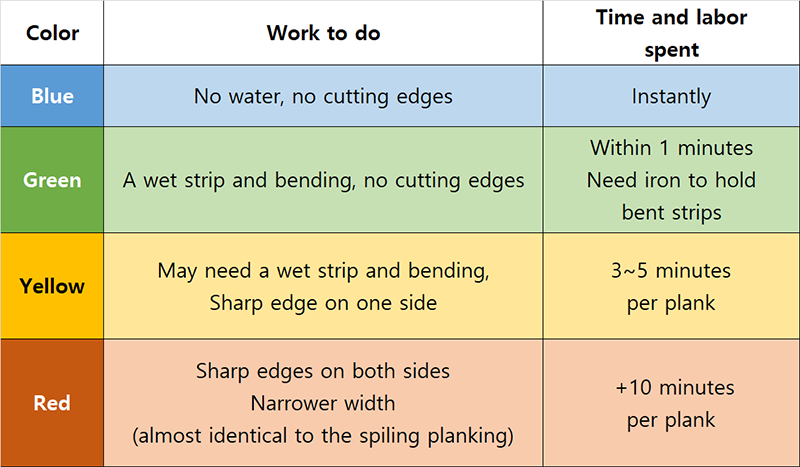
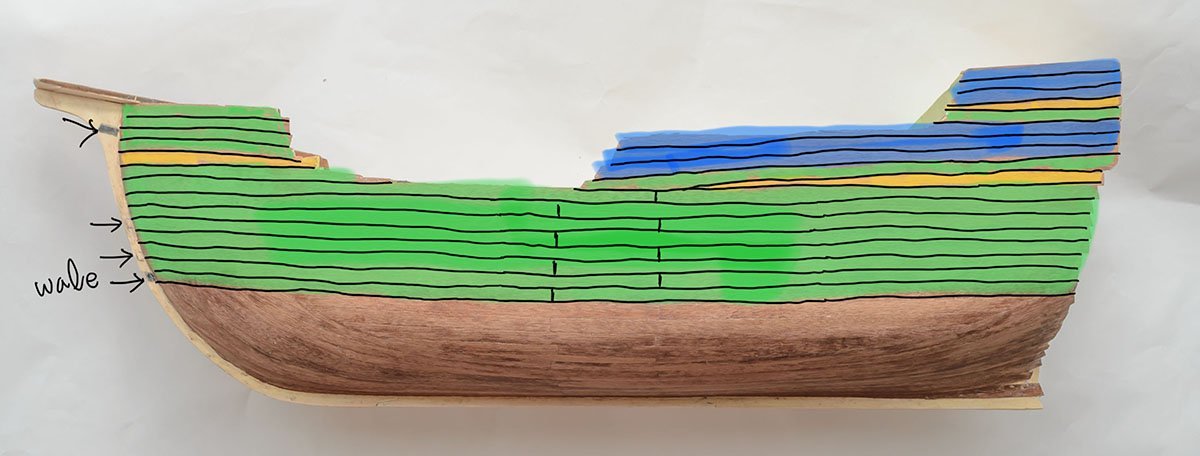
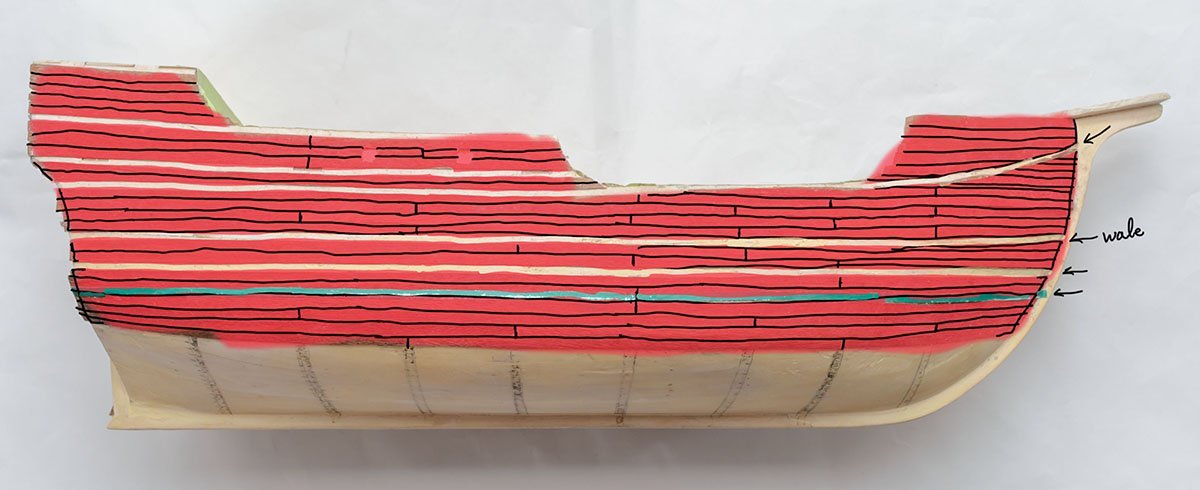
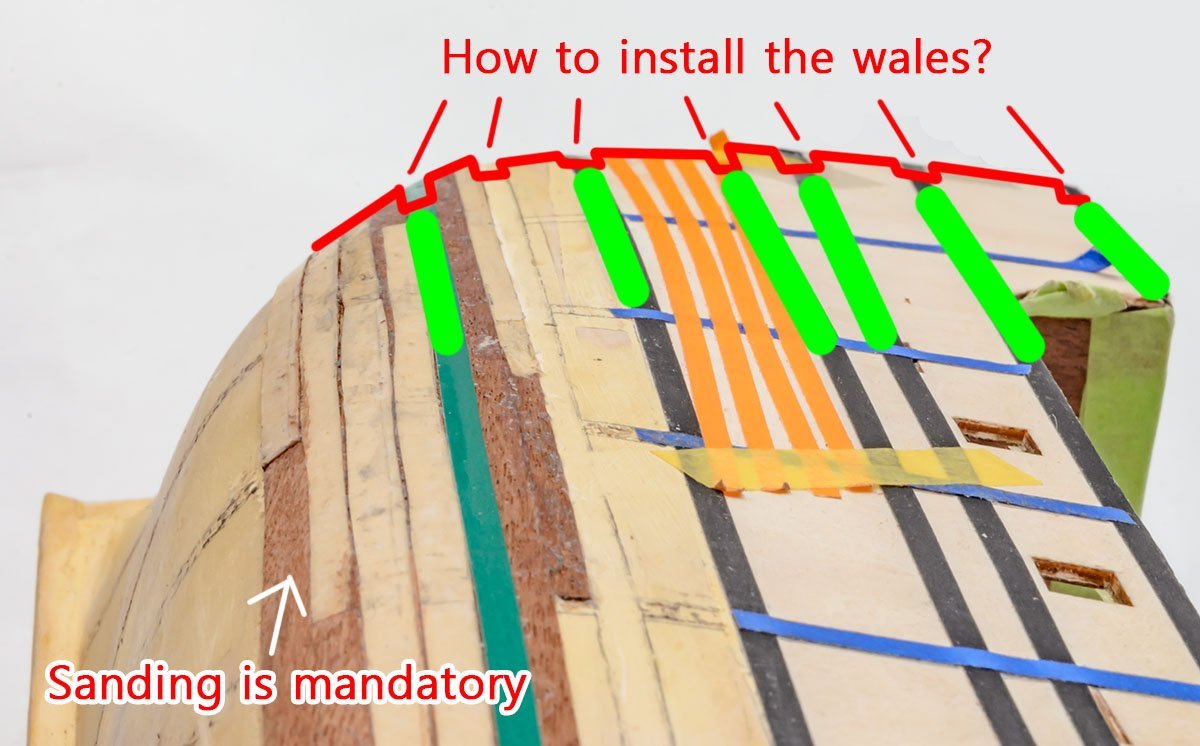
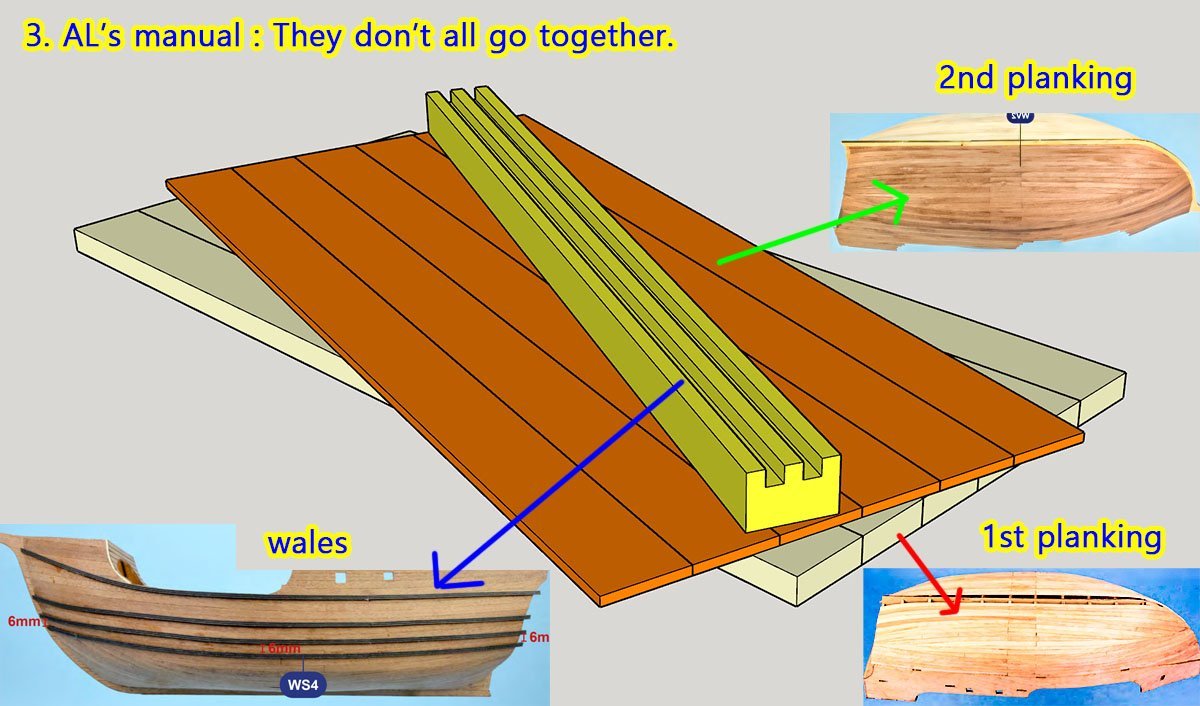
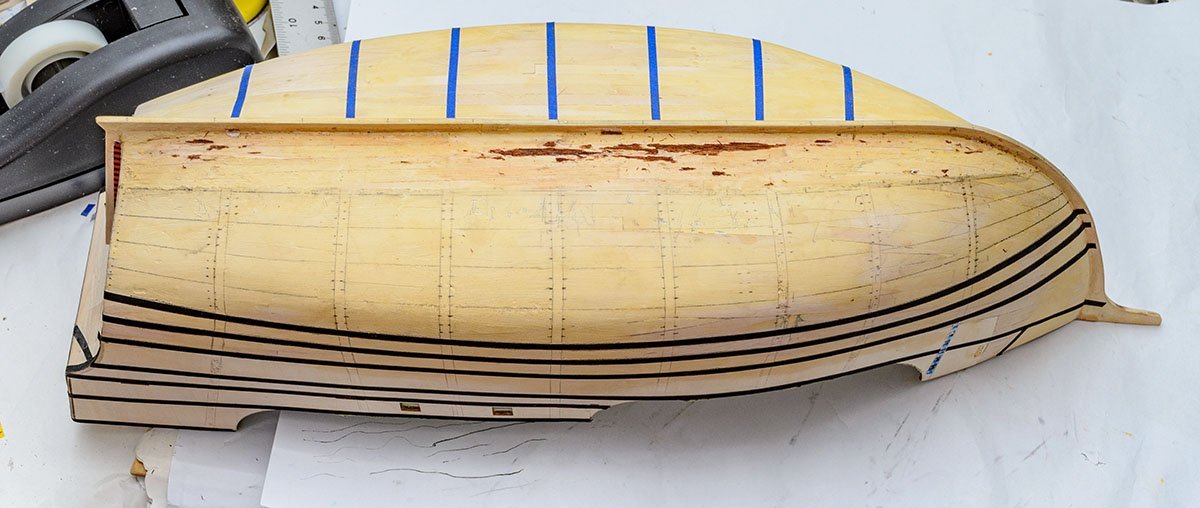
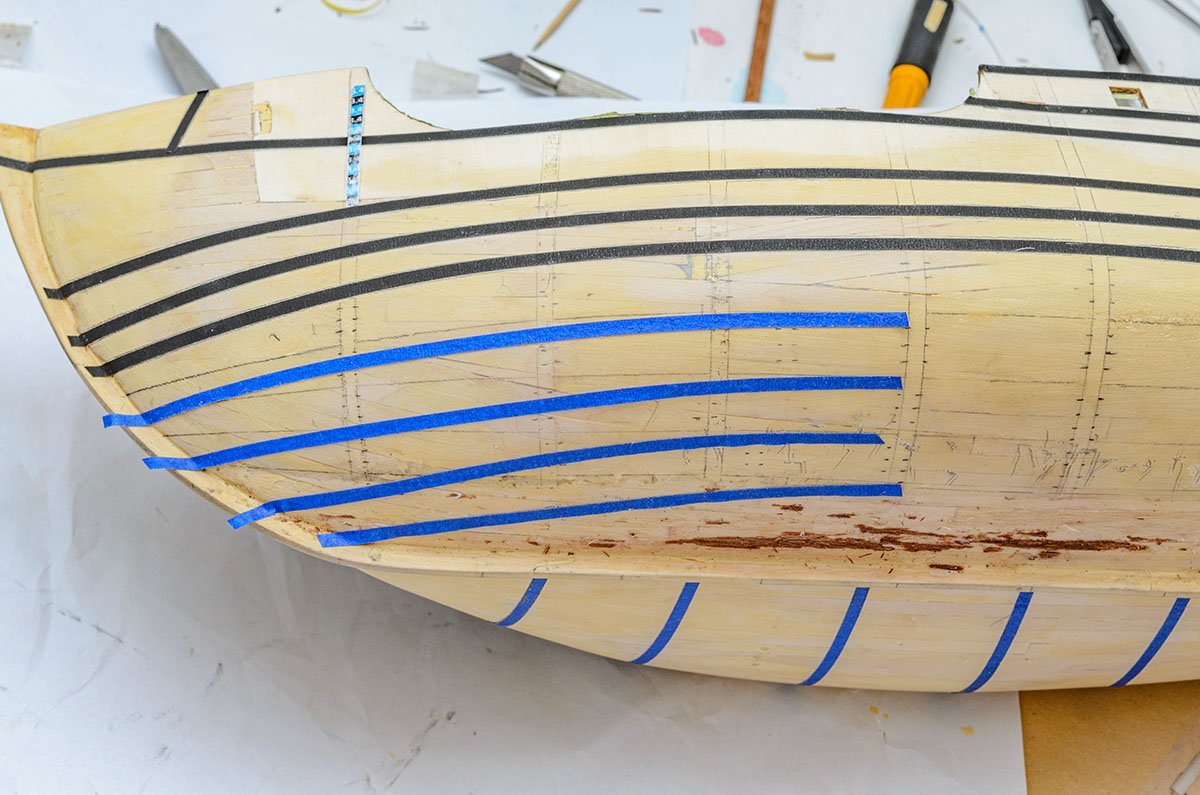
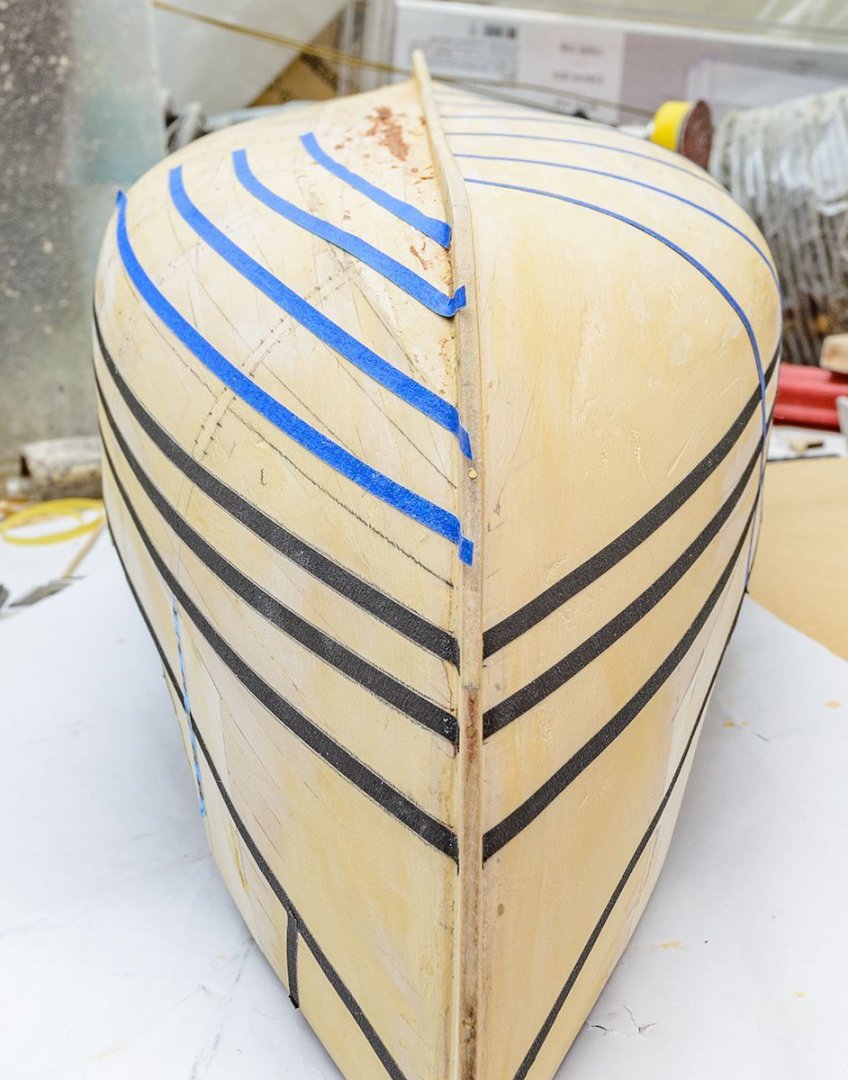
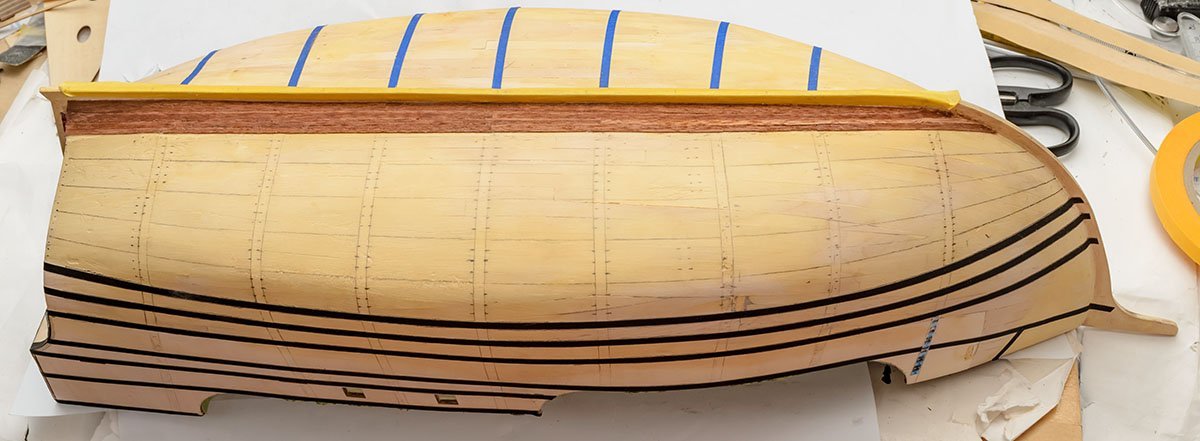
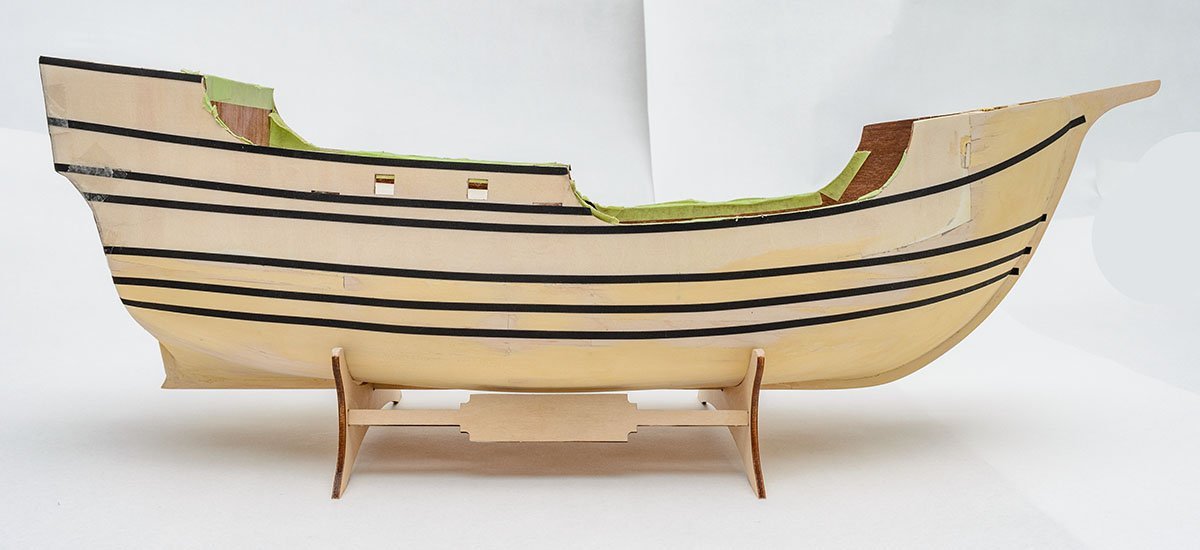
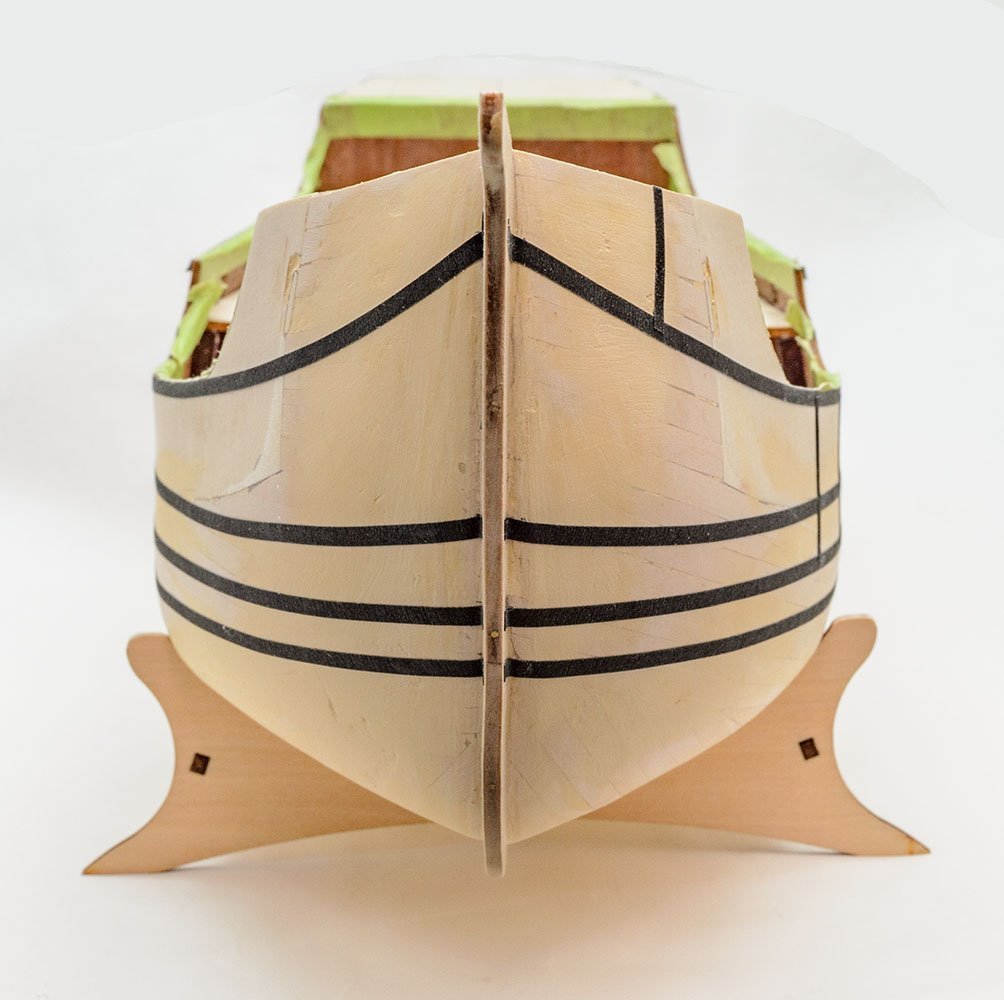
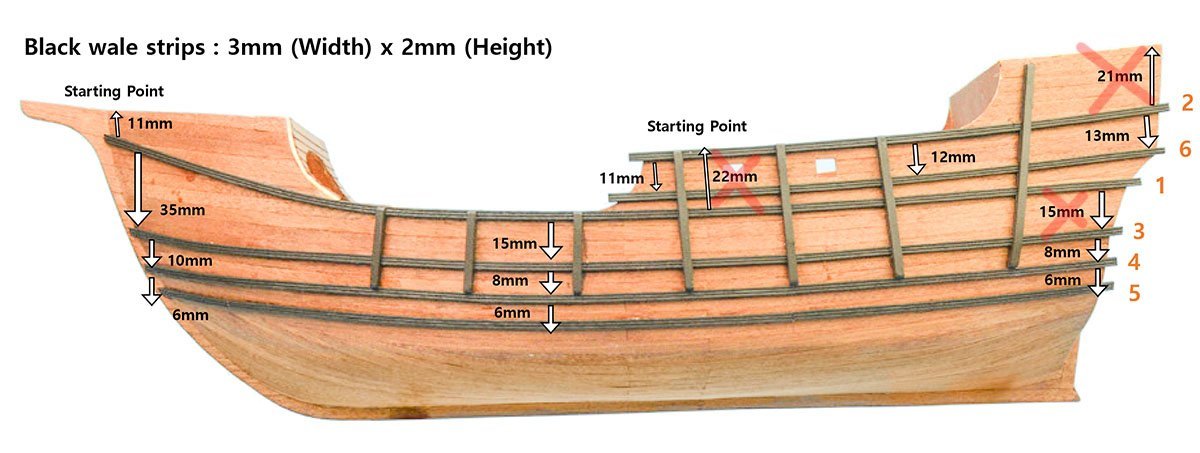
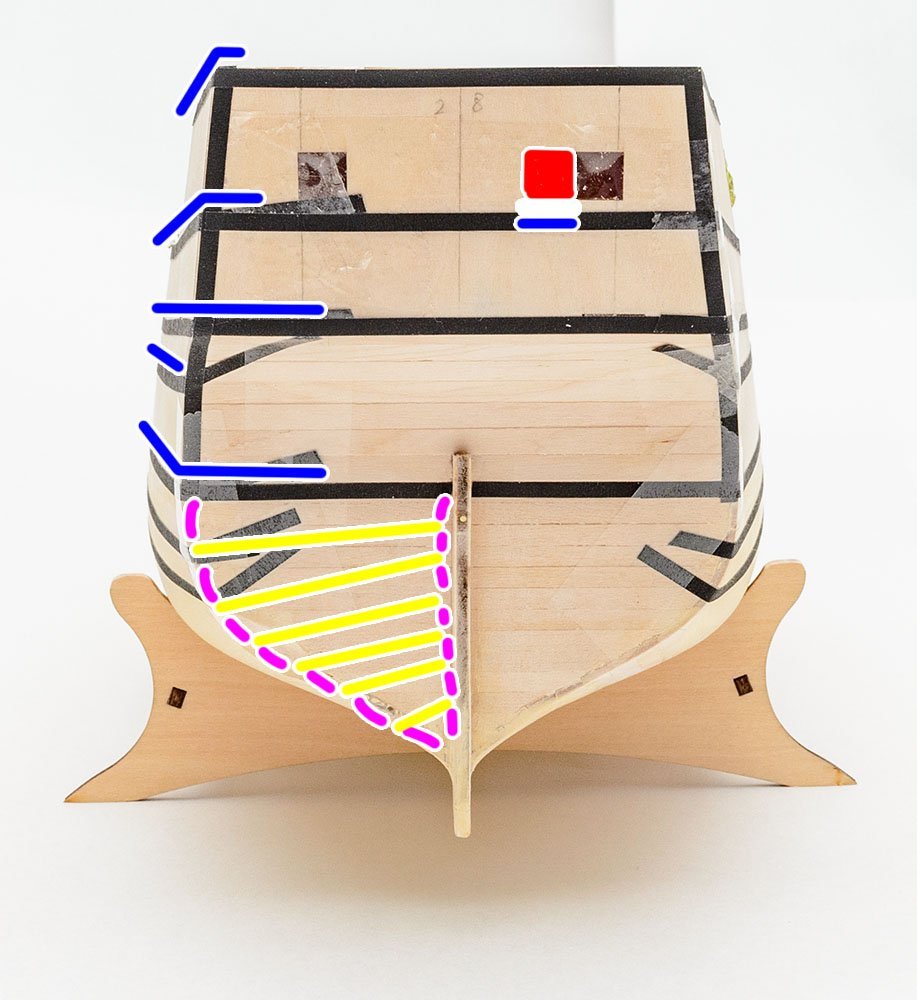
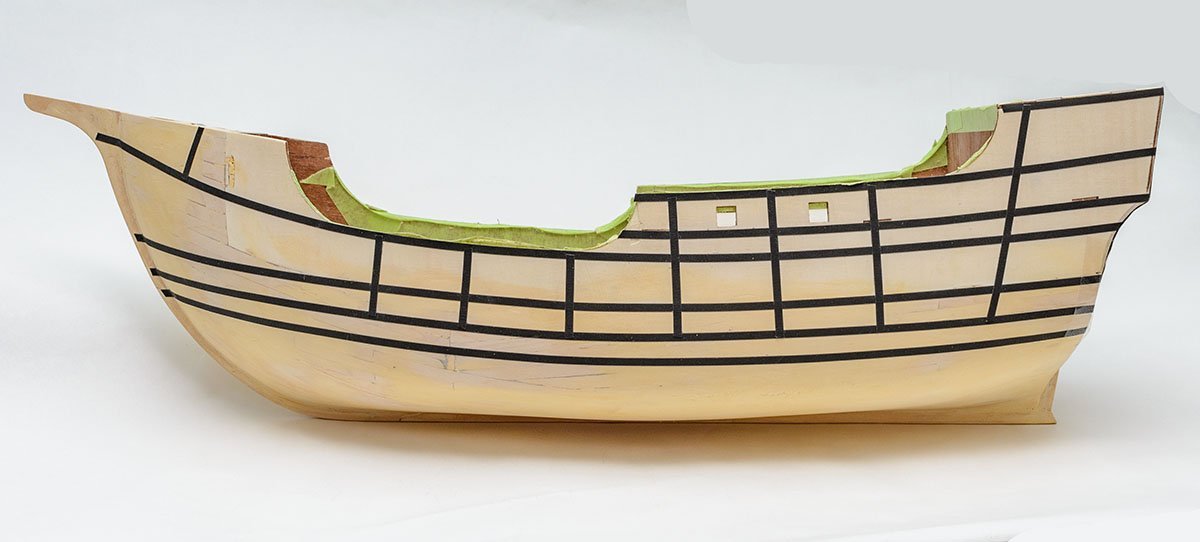
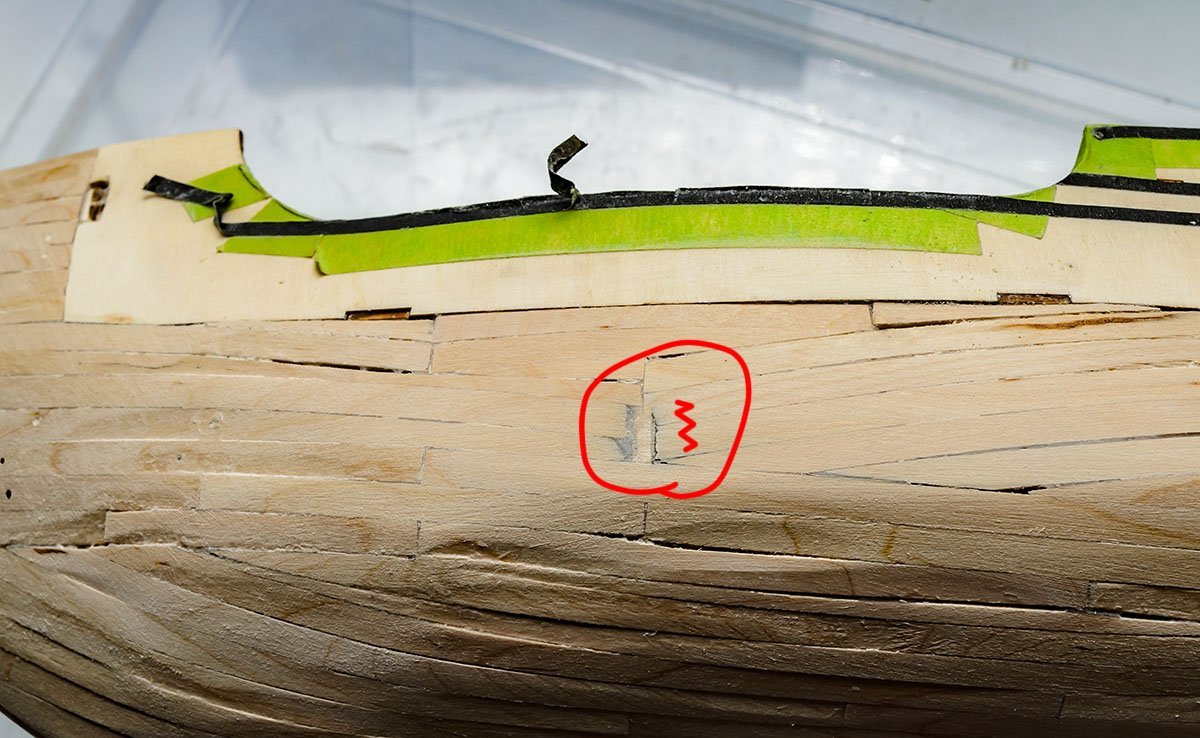
Thanks for the surprising comment, Artesania Latina. https://thenrg.org/resource/articles/ship-models-that-should-not-be-built https://modelshipworld.com/topic/31503-on-ship-models-that-should-not-be-built-chapelle-h-i-an-article-review/ The recent discussion regarding historical accuracy and freedom of expression led me to better understand this forum and the NRG's stance. Although the discussion left me stranded for a week, the slump made my goal clear. I'm a casual modeller who is easily satisfied with the model ship's exterior. I haven't worked any kind of maritime job, and my motivation is driven by the 30 years old classic video game, which sails the sea and trades merchandise in the 16th centuries. It was a kind of trading simulation where players handled only facial numbers of merchandise and the specs of various ships rather than real sailing. The 80x60 pixel ships contained only a few details, such as the number of crews, food, and supplies. My primary goal is to build thiry ship models in the game. The original ships in the game were only 80x60 dot pixels. After I started this hobby, I added some sub-goals for myself, such as building a museum-quality HMS Victory or the Columbus fleet (Oh!). The list will grow as I understand the structure and function of a ship. Therefore, I would say that all my projects came from a chain of questions derived from the 80x60 dot pixels. I understood that my rough opinions and questions I wrote could have made someone uncomfortable who lived on the sea. I am less motivated to build model ships whereas other hobbies fascinate me. The reason is probably that I don't have their professional pride and vast knowledge. I need a pleasure to build and make something rather than jump into deep knowledge to get a shipyard job. Will I regret my 30 projects after I finish them? Of course, yes. With the regret that I could have made them better, I'll show my collection to friends proudly. "These ships were in a game I played 60 years ago. It began with curiosity about 80x60 dot pixels." My projects may be centered on crafting models rather than recreating historic ships academically. The overall stance may look like the AL, but I'll dig into specific parts if curious things draw my attention. I can't make everything perfect at once because I don't have overall maritime knowledge. My overall skills will grow as time goes by, but they will never reach the level of the professional marine engineers or crews. I think it's fine for me. My small wish is that more modellers in SK build wooden model ships and discuss ship models together. (The total number of wooden model ship builders in SK may be less than the current real-time login members of this forum. ) I don't mean to push you to have the same goal. I believe that every member here visits this forum in order to achieve each member's goal and have fun. With respect, I also want everyone to accomplish each individual's goal and enjoy their unique hobby. Okay, let's return to the build log. I spent half a month on starboard and haven't finished it yet. Some members finish similar work within 3–7 days, and I have a reason to delay. I'm writing this build log to attract new builders. One of my efforts in this build log is to use fewer tools. The various tools and their high cost are a big obstacle to newcomers who are familiar with very advanced modern plastic kits, and any kind of "water" is a good reason to divert their attention from the "difficult" hobby. Many young and new modelers want to build quick and easy models with superior quality. I couldn't believe my eyes when I saw some comments posted by young modellers. They are scared of the 'scale models', such as cars or tanks, because they think the plastic runner's default color isn't good, and additional painting is too difficult. They love characters or fancy plastic kits like the 'Gundam', which has an easy snap-tight design with colorful runners and dry stickers. I don't deny their trend, and also agree that traditional wooden modelling is relatively difficult for them. To attract the new builders to the world of wooden model ships, I make things easier for them; I select and limit the tools they need to get started, or introduce more easy and useful techniques for each step. One of my failed attempts was the dry hull planking, which never uses water. I am satisfied with its quality, but I would say that newcomers may not like its slow speed. After the slump, I tried the AL's method on the other side. I finished the portside within 3 days! I guess expert modellers may finish hull planking within 2 days, and complete an entire kit within a week. What is the AL's method? Thanks to the high resolution PDF manual, I confirmed that the AL's sample ship is built with wet planking. The manual's example ship can't be done without water, but the manual doesn't explain it clearly. I didn't know this before because the old kits from AL didn't have the high resolution manual. As I said, I don't want to make a long -must buy- tool list, but I have to add crafting irons in case of using water. It works like a CA glue accelerator and makes your life more comfortable. I put sapele strips in the water and waited for an hour. Without the water, hard wood strips such as sapele (= an alternative to mahogani) and walnut will be broken. The black lines on the picture are the borders of each plank. In addition, I highlighted every plank by difficulty rate. In short, the blue planks mean very easy, and the red planks mean super hard and time consuming. According to the color chart, you can estimate that the green planks above the lowest wale are super easy with water and an electric iron. Without water and iron? You will see soon. 😅 This is a planking line below the wales. It seems pretty unpredictable and hard to follow. Of course, I concluded that I don't need to use the AL's planking. This is my project. Forget the blue and yellow planks. I placed dry planks (blue planks) first, then gave up to refuse water. Planking in a green area was so easy and a lot of fun. 😆 On the contray, I made more simple planking lines under wales. Although the planking pattern is far from a real ship, (A real ship means a similar ship exists in reality, academically.) I would say that new builders should use this planking pattern at least once. It is so easy and fast that new builders will be fascinated by building wooden model ships. Of course, they will find a better choice soon at last. 😉 How about the starboard planking? It was terrible. I love the result, but the 'dry' spiling planking consumed too much time. I concluded that the 'dry' spiling planking isn't good for new builders. I began to use water and iron, so the rest of the work won't be tougher than it. Before I sanded the portside planking, I washed the PVA coated surface with wet tissue. The glossy surface blocks applying varnish, so I have to remove the PVA gum on the second planking. I repeated rubbing the surface with wet tissue and 120 grid sanding paper. As I made a surface clean, I found many gaps between strips. Low resolution pictures can't show the defects, but everyone who watches real model will know the crevasse because the light yellow background is very conspicuous. I filled the defects with spare strips, and sanded the surface again. Experts who take a closer look with a magnifier may notice the small defects, but the overall appearance will be much better. I think I can finish hull planking this month! 😎


- 77 replies
-
- 5
-
-
- Santa Maria
- Artesania Latina
- (and 1 more)
-
Hello, Jagger. I'm not sure I understood your comment well, but I have a future plan to build a ship that has RGB LED planks and illuminates like a Christmas tree.
-
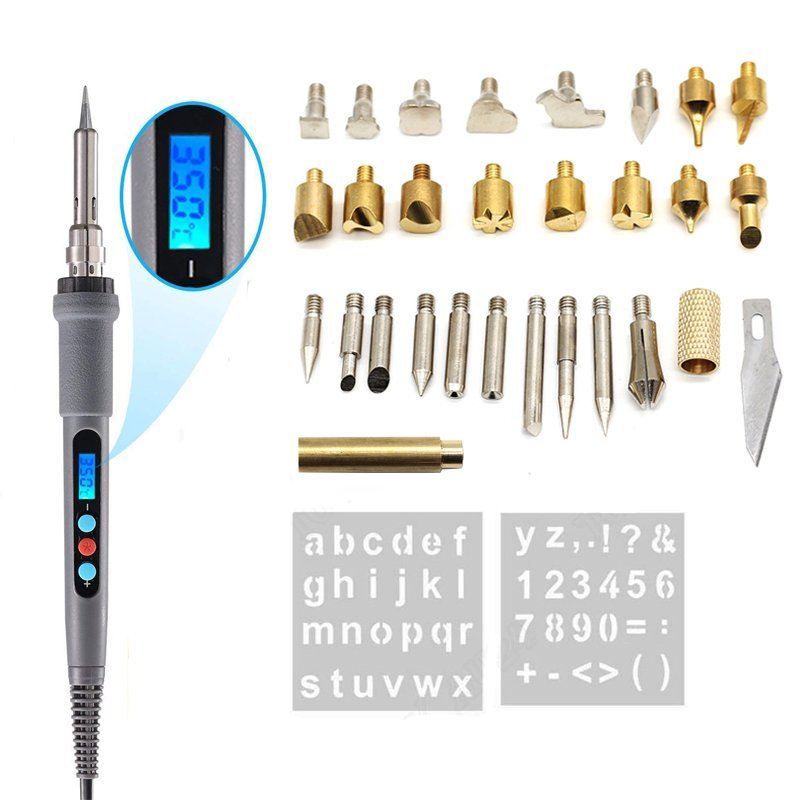
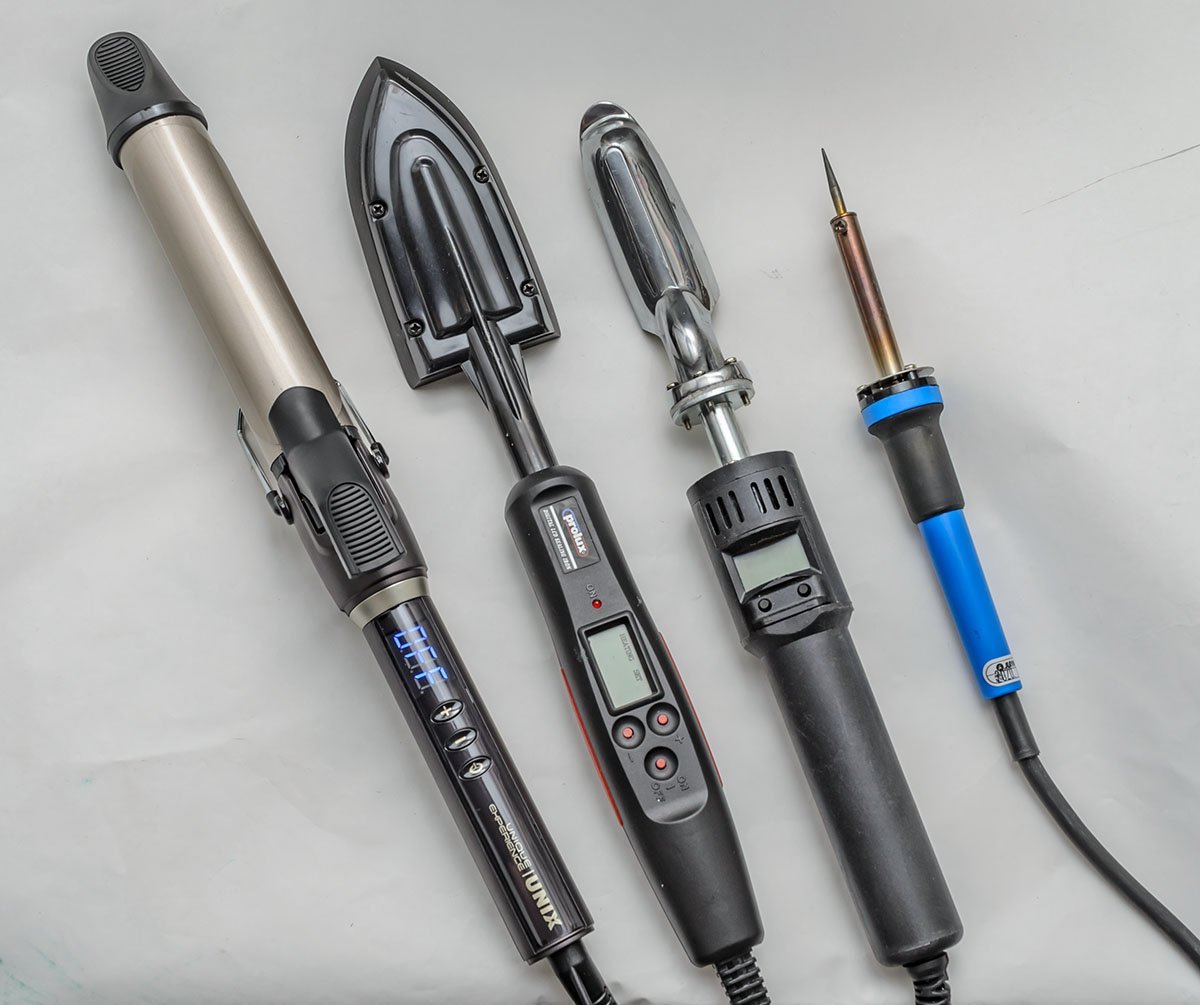
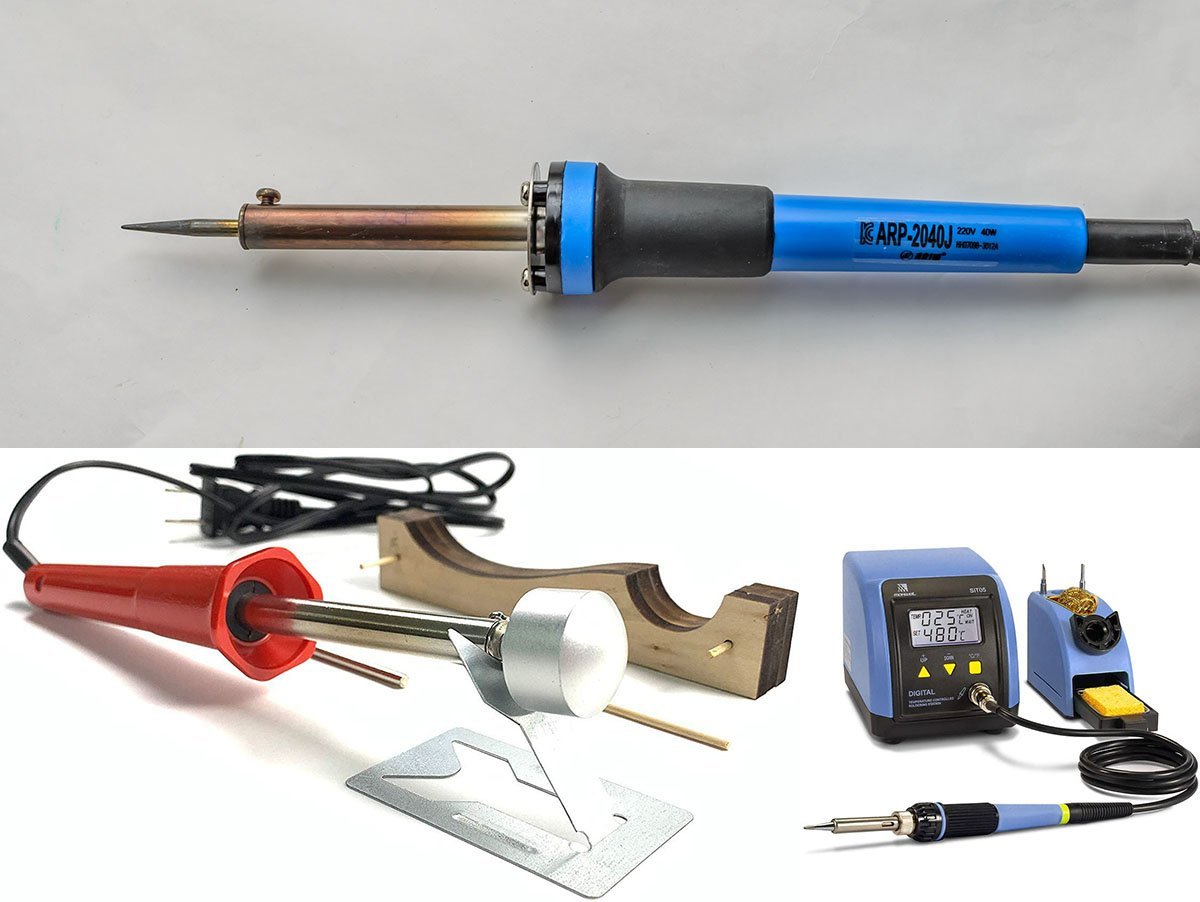
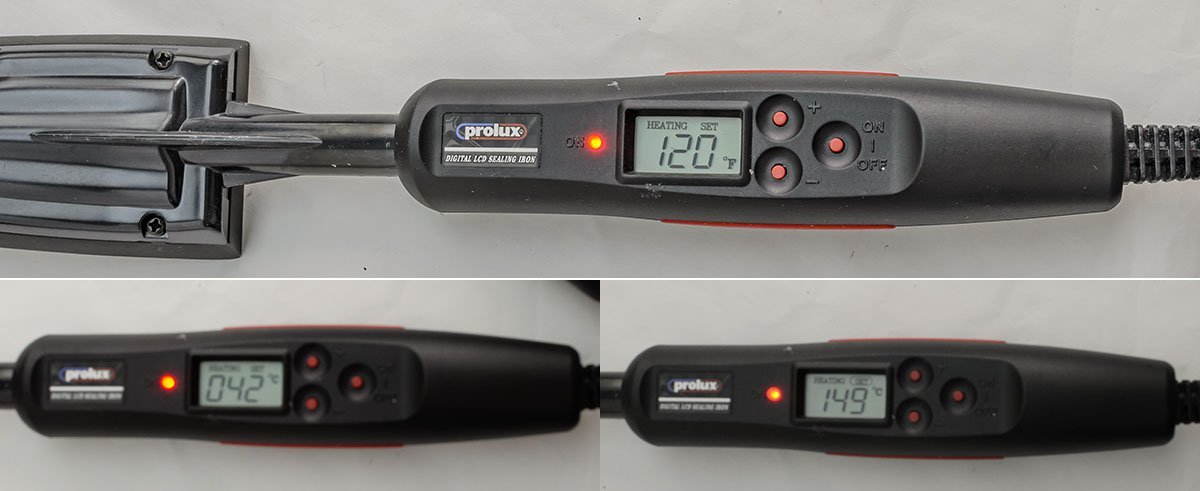
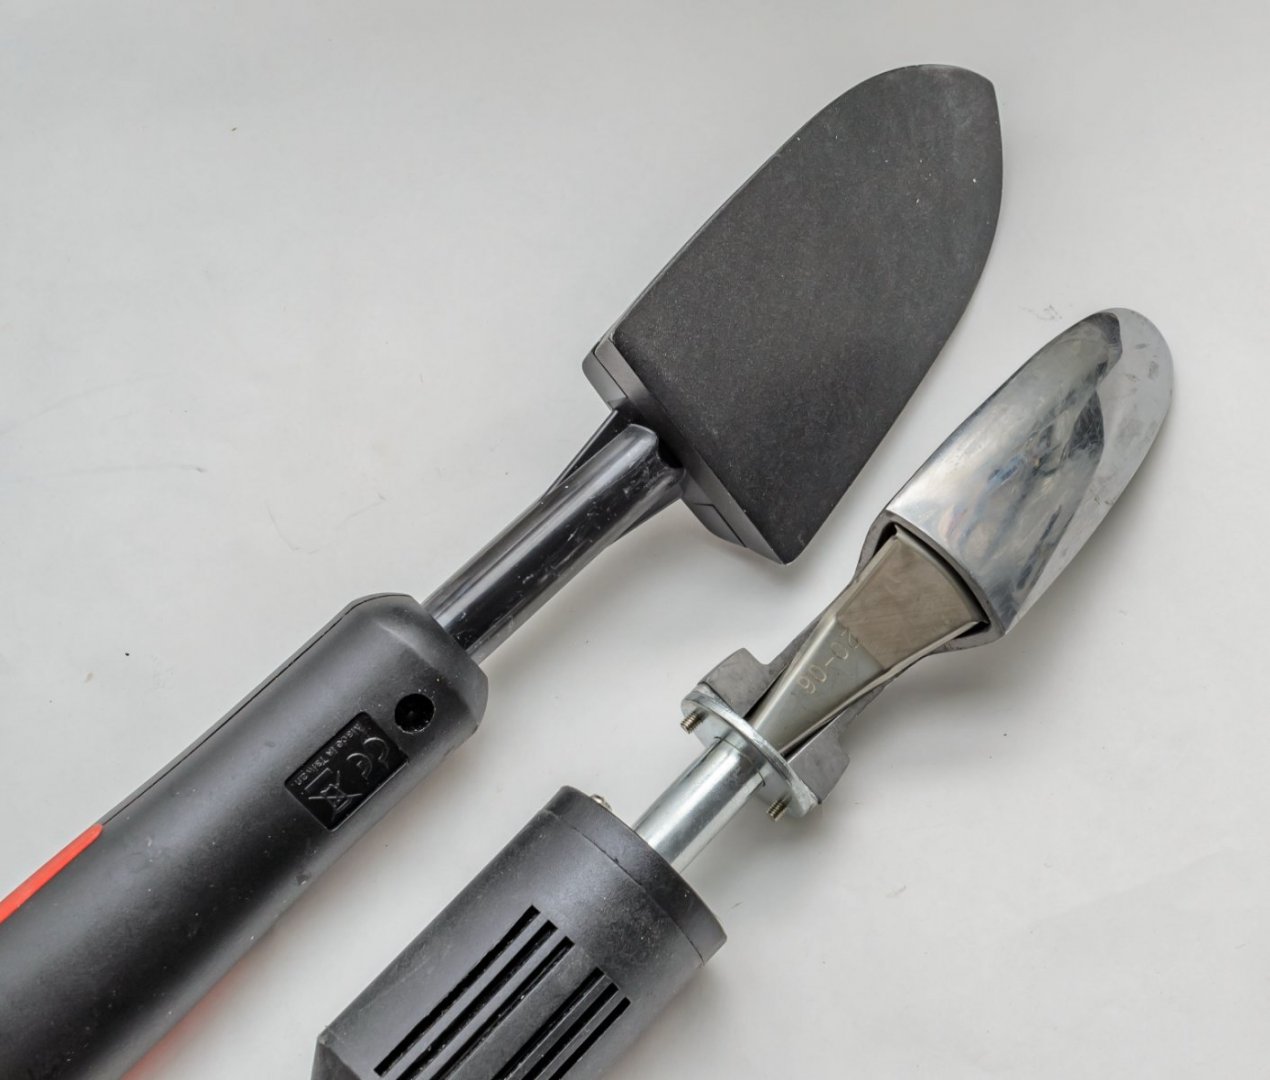
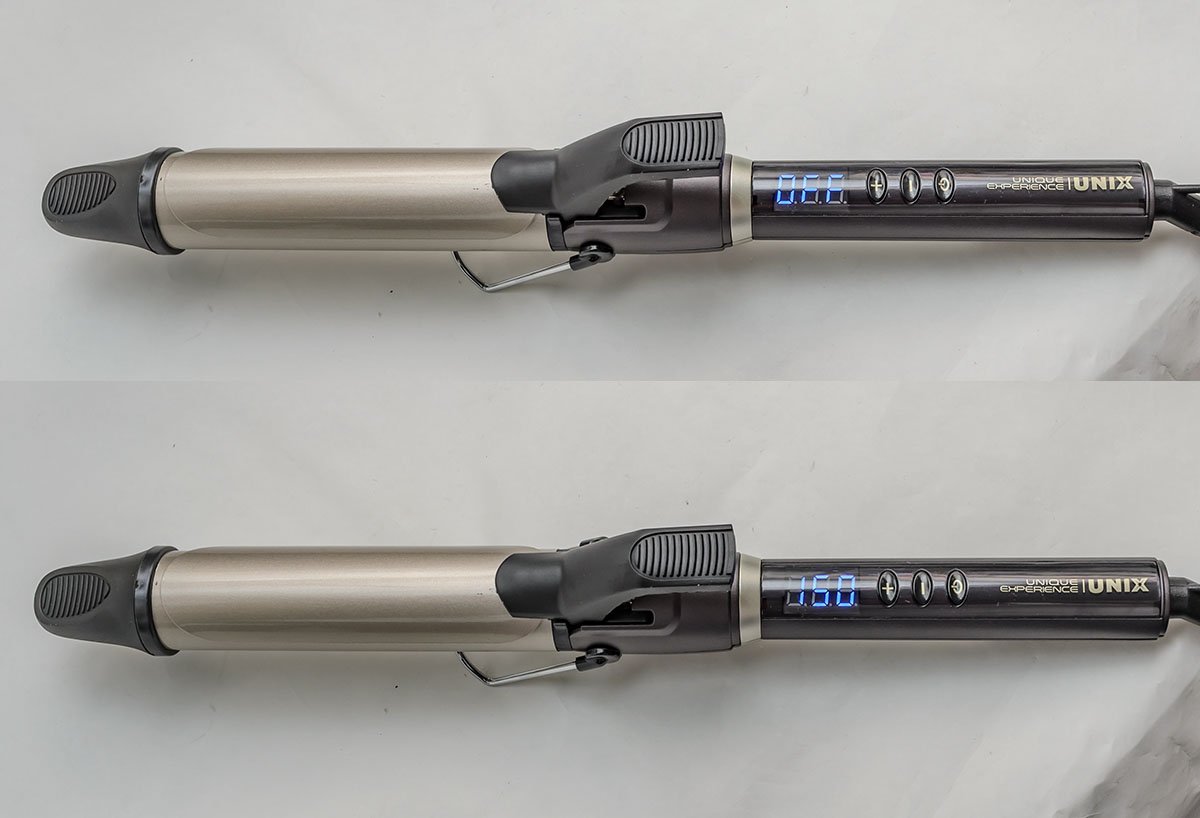
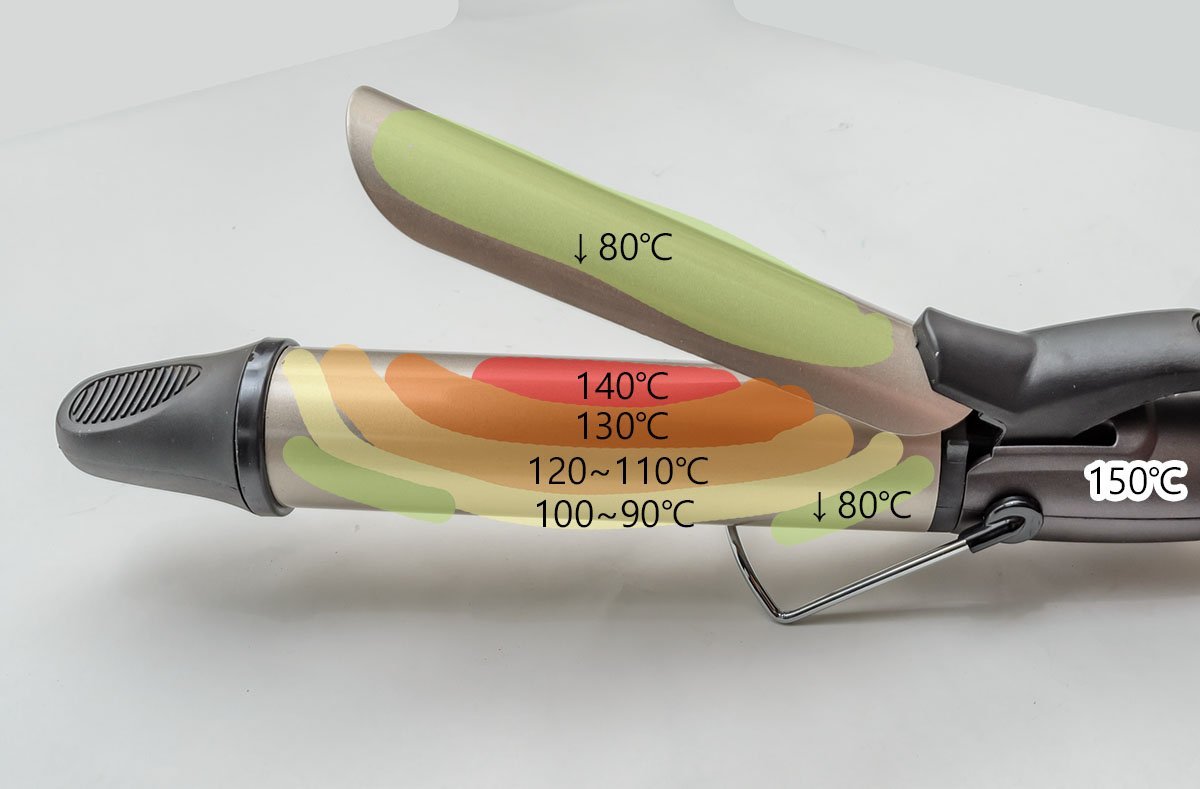
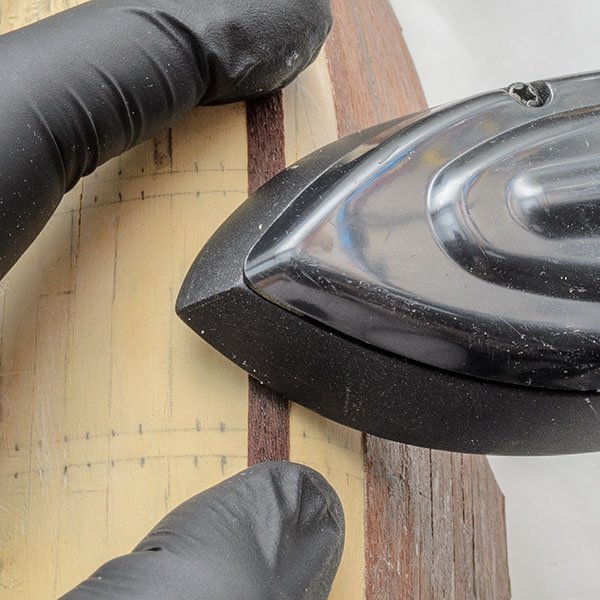
Hello, I would like to share my personal experience with using different kinds of irons for bending planks. I purchased a curling iron (left) after reading some advice. I compare the irons and pick the best one for me. The first iron I purchased and built for bending planks was from Artesania Latina. It is basically a large cylinder-shaped head soldering iron. I coulnd't get used to it because it burns basswood to a brown color too fast. The issue is a temperature control. It would be fine if I could use digital temperature control soldering station and replace the tip with the AL's iron. The next irons I purchased were digital temperature control leatherwork irons. I set the temperature at 150℃ (=300℉), and got the best result without a burning mark. I was so satisfied that I purchased a curved iron, too. Both flat and curved head irons are useful for any kind of hull. This is the last iron I purchased. I thought it could be a cheap alternative to the leatherwork irons. It costs only $20, and the digital control meter gives me trust. However, the curling iron was so big that the temperature didn't spread well. I checked the surface temperature with a non-contact type thermometer and found that the heat source is fairly limited. In addition, the curved lid covers the heat source, so I can't use it as plank bender before I remove it. I saw many modellers didn't touch the iron on the hull directly. The design of the curling iron will fit the usage. In my case, I place a wet plank on the hull and sear it with the leatherwork iron. The curling iron's head isn't good for my usage. So, which one is the best? For me, I use leatherwork irons only. They control the temperature so as not to burn wood, and the weights are half the curling iron. However, I had to purchase two irons for every surface on the hull, including the curved stern. The curling iron is cheap, but I won't use it. I would say that a soldering iron with a digital temperature control soldering station should be the best. I didn't try to replace the tip of my soldering station with AL's cylinder head, but its lighter weight and small size should make my hobby more enjoyable. By the way, it is the most expensive solution. I hope you find the best tool to suit your workshop.
-
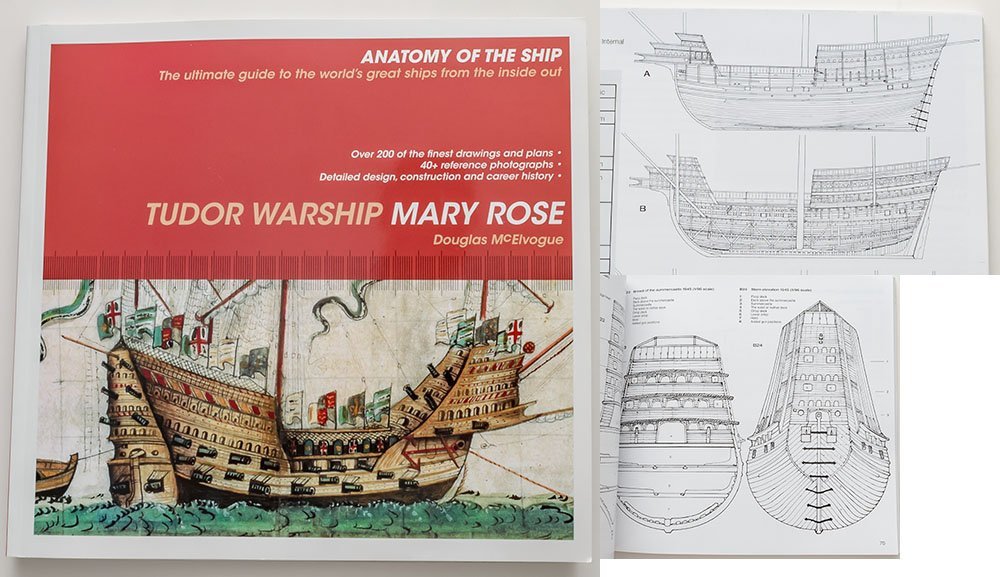
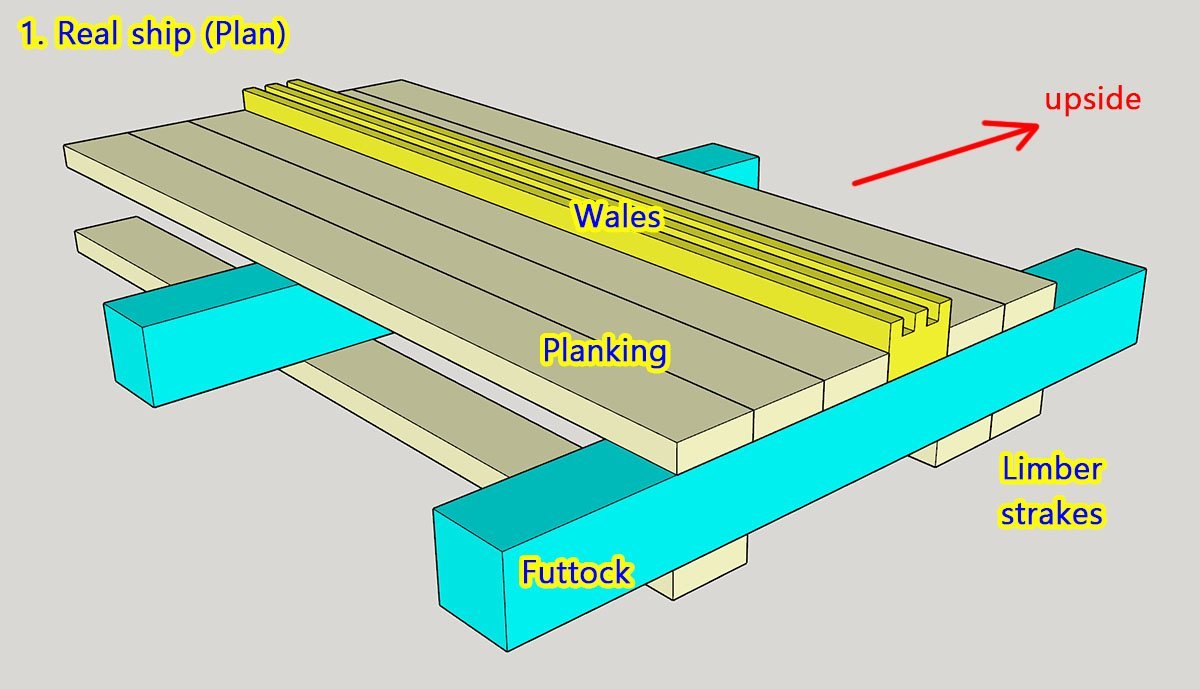
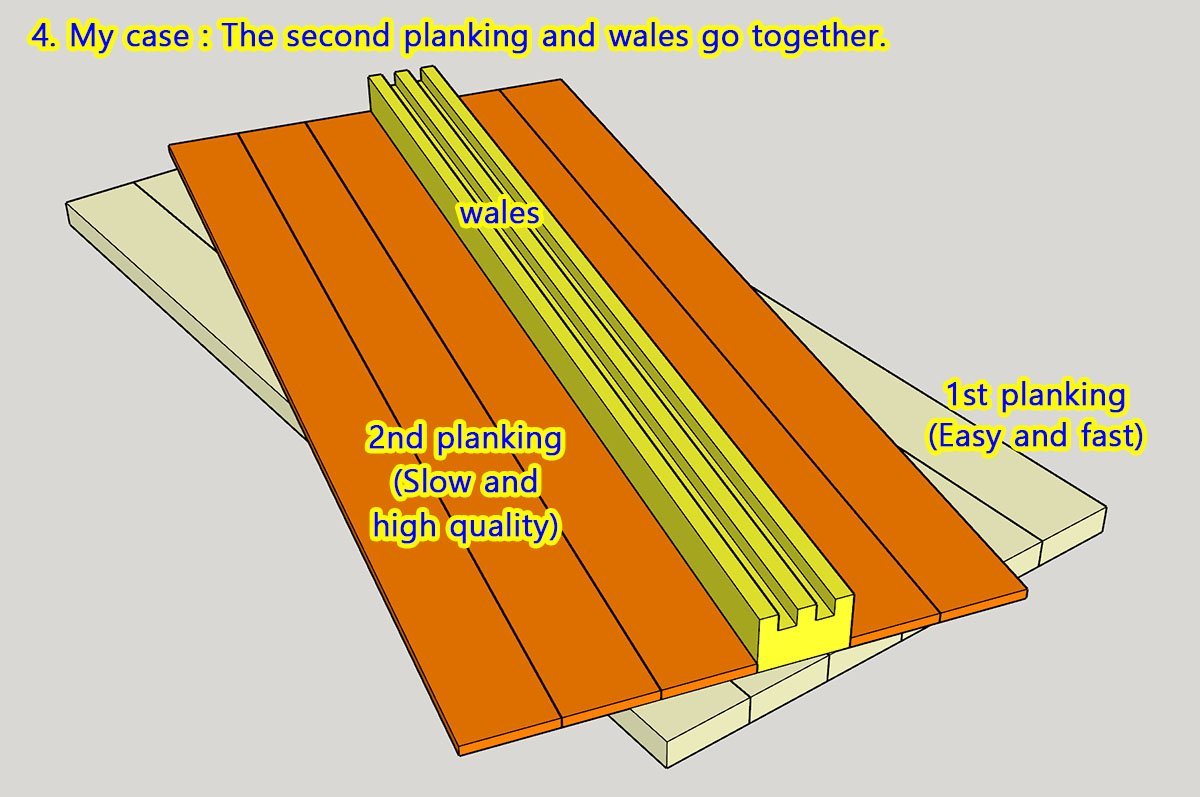
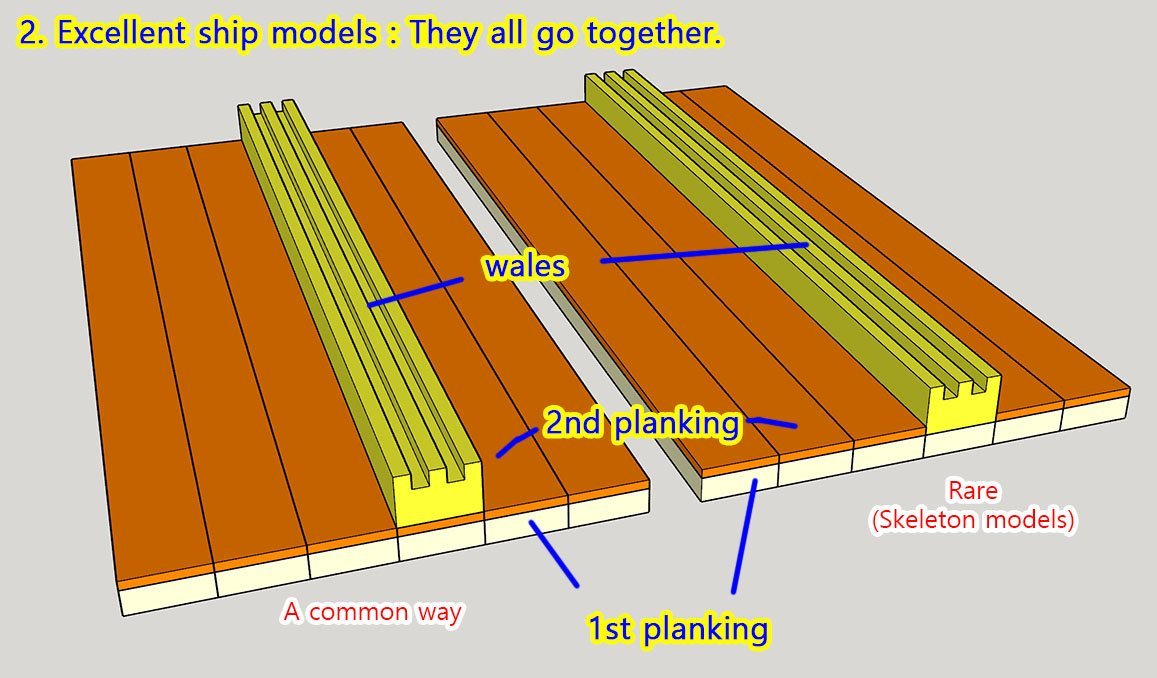
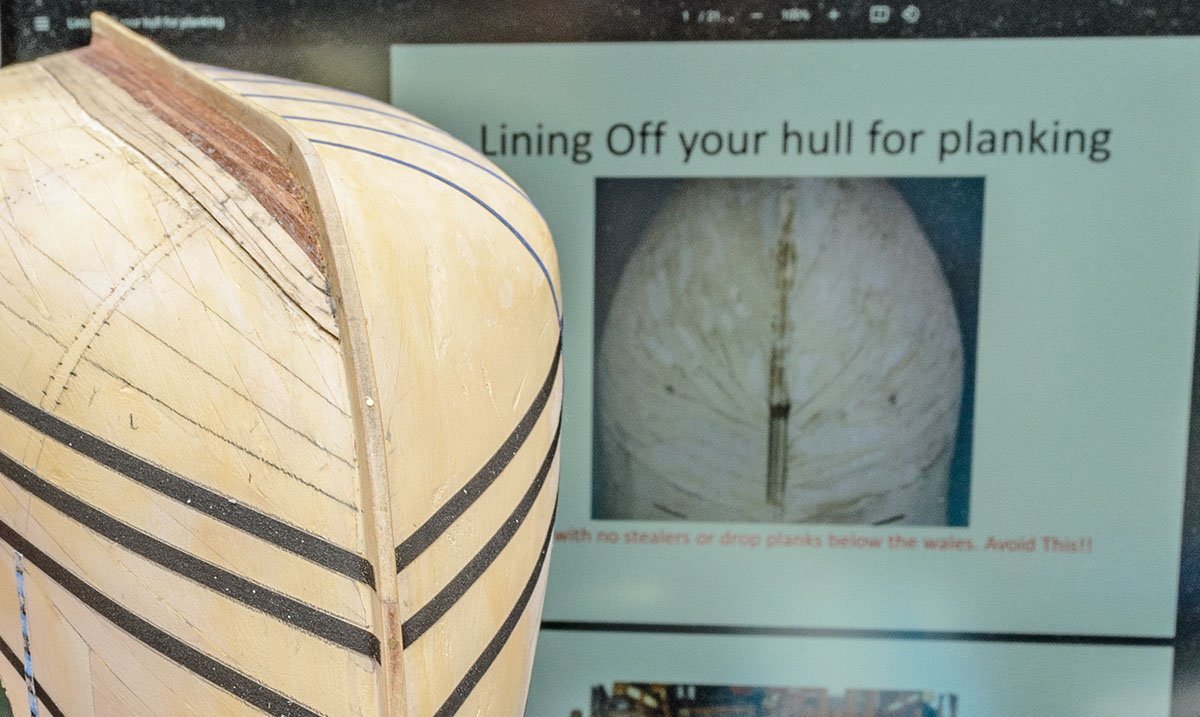
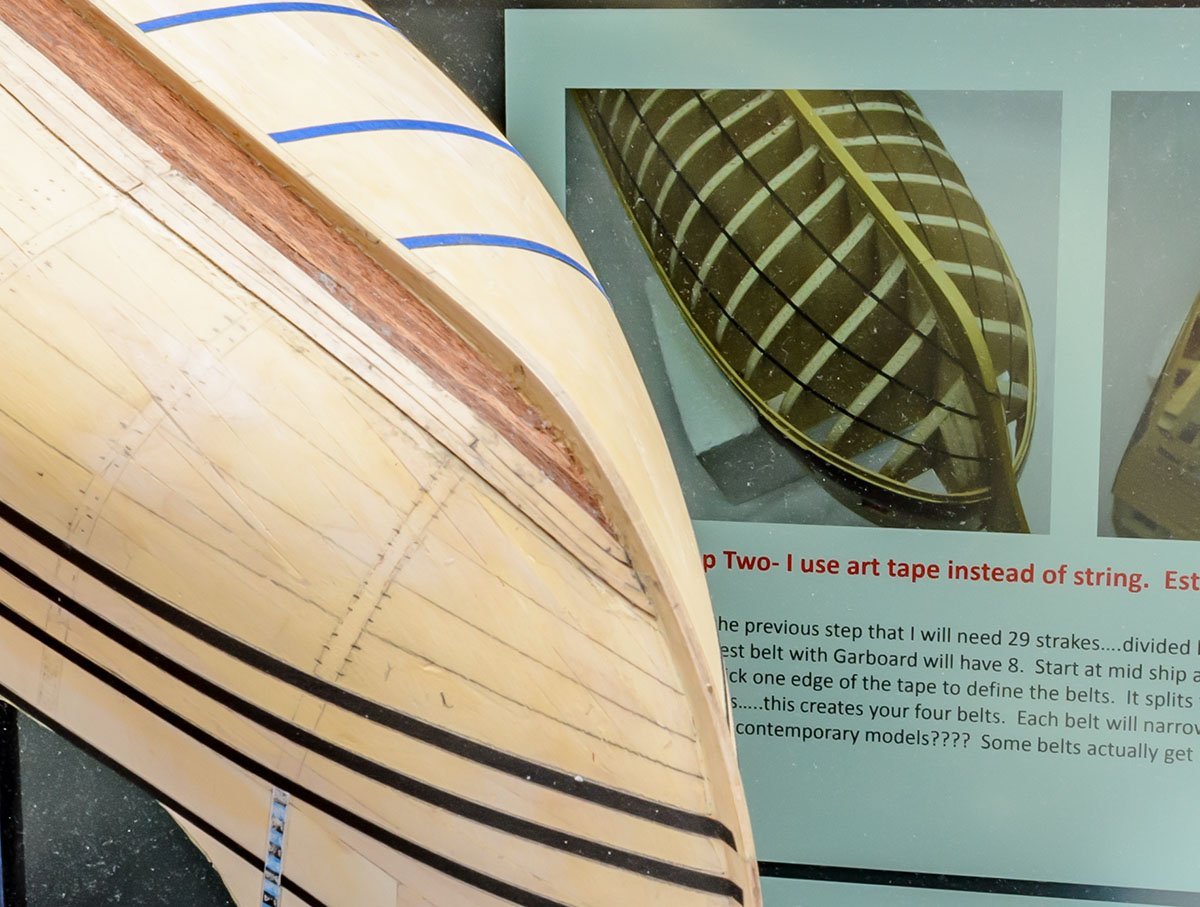
I remembered another great reference book. I had previously purchased it, but I didn't realize that the Mary Rose was a contemporary carrack ship. Fortunately, the book has a detailed hull lining based on the real wrecked ship. Although she was a warship type carrack, which has several differences, such as no wales on the back, the book definitely helped me because I couldn't find many Portuguese models on the UK's museum site. I didn't use Excel this time, instead relying on my eyes and example pictures. I haven't decide on all the hull lining yet, so I'll write my plan when I finish hull planking. I was a bit tired of planking on the lower hull, so I challanged the wales and planking between the wales. It made me have questions immediately. (1) When should I install the wales? After I install the second planking, I must sand the surface. The wales are higher than the others, so I have to install them later. Otherwise, slow masking work is waiting for me... (2) How do I install the wales? It depends on the structure of the model ship. This is a diagram based on my reference book. As you see, the real ship might be a single planking, and the wales and planking attached on same Futtocks. Based on my personal search of excellent build logs here, many expert modellers are in favor of the single planking hull. If they built a double planking hull, they also worked hard on the first planking's hull lining. I'm not sure why, but I'm guessing the border line is a hint for the second planking. Difficulty : ★★★★★ Labor : ★★★★★ Time : ★★★★★ Reality : ★★★★★ By the way, isn't it interesting that model ships have different structure from the real ships? Despite their similar exteriors, many models, including plastic model kits, omit details and interiors due to productivity and physical constraints. One of the surprising impressions when I became a member here was that there were so many experts like retired captains, crews and ship carpenters here. I liked an appearance of a sailing ship, but had no knowledge of details like the structure of a capstan. The gap happens in every scale model field, so I would say that the virtue of modesty and honesty to accept one's own limitations is necessary. The AL's manual shows how scale model simplify the real world. This method omit lots of details, but it is very handy and easy. Although the hull lining is a stereotype of the 'avoid', most people who haven't sailed on the ships won't know it. Difficulty : ★★★ Labor : ★★★ Time : ★★ Reality : ★★★ Please consider that this rating is personal and relative. 😅 This is my method. I attached the first planking without patterns, so it was relatively faster work than the No.2 . After that, I drew hull lining and am parallelly installing the second planking and wales. The result may be similar to the No.2, but the juryman is you. Today's post is a bit subjective, so please don't consider my opinion serious. 😘

- 77 replies
-
- 2
-
-
- Santa Maria
- Artesania Latina
- (and 1 more)
-
My metal ruler was wrong.
modeller_masa replied to modeller_masa's topic in Modeling tools and Workshop Equipment
I would say that 0.01mm or 0.0005 inch (=0.0125mm) digital calipers are enough for wooden models. There must be more accurate tools, but I would say that the digital calipers are cheap and convenient tools for wooden model. If it is a plastic or metal model, where the materials can be more detailed, the huddle increases astronomically. Please consider my opinion as a newcomer's short idea. I don't know the world of the expert modellers. If you were asking about the measuring accuracy of rulers, I use gage blocks. In my experience, I really don't need it frequently. When the zero digit is jumping, I press the zero button. When I tested my 0.01mm accuracy digital calipers with a gage block, I saw less than 0.02mm of errors and I was satisfied at that level. It was a reason I returned 0.1mm accuracy digital calipers. It revealed 0.1~0.2mm errors! In addition, I don't trust 0.001mm accuracy digital micrometers. It was the cheapest ruler, and it revealed 0.010~0.020mm errors... There is no reason to buy the cheapest one. This is the best (and the worst) ruler I used. I'm sorry I couldn't answer you. -
My metal ruler was wrong.
modeller_masa replied to modeller_masa's topic in Modeling tools and Workshop Equipment
Argh... I can read replies regarding measurable rulers, but it is hard to read replies regarding unmeasurable ruler literature. I can't partipate in all replies, but thanks to all for very useful and interesting posts. -
My metal ruler was wrong.
modeller_masa replied to modeller_masa's topic in Modeling tools and Workshop Equipment
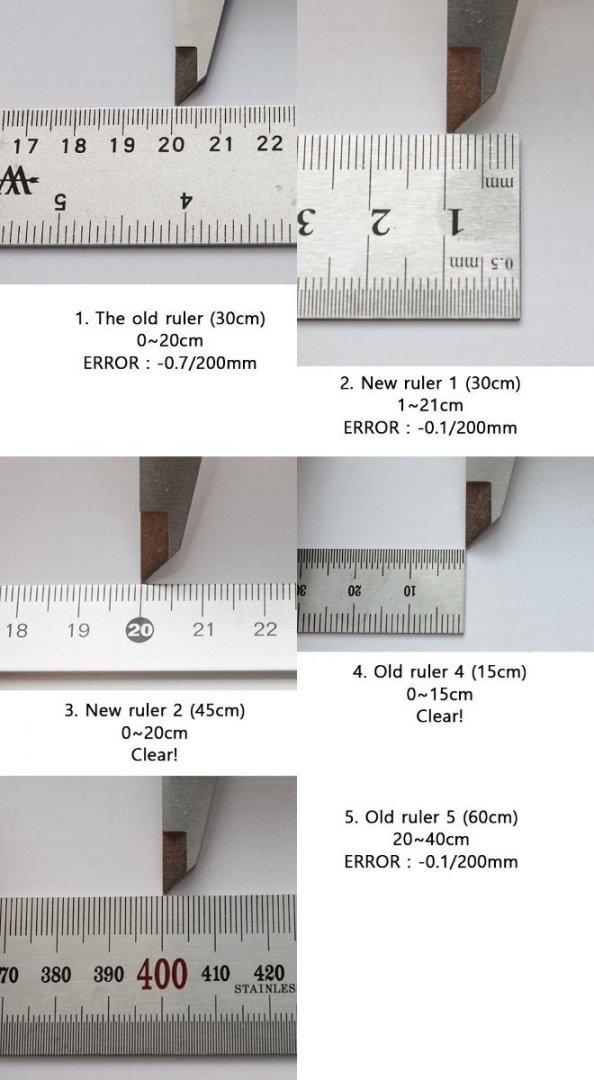
I added test results.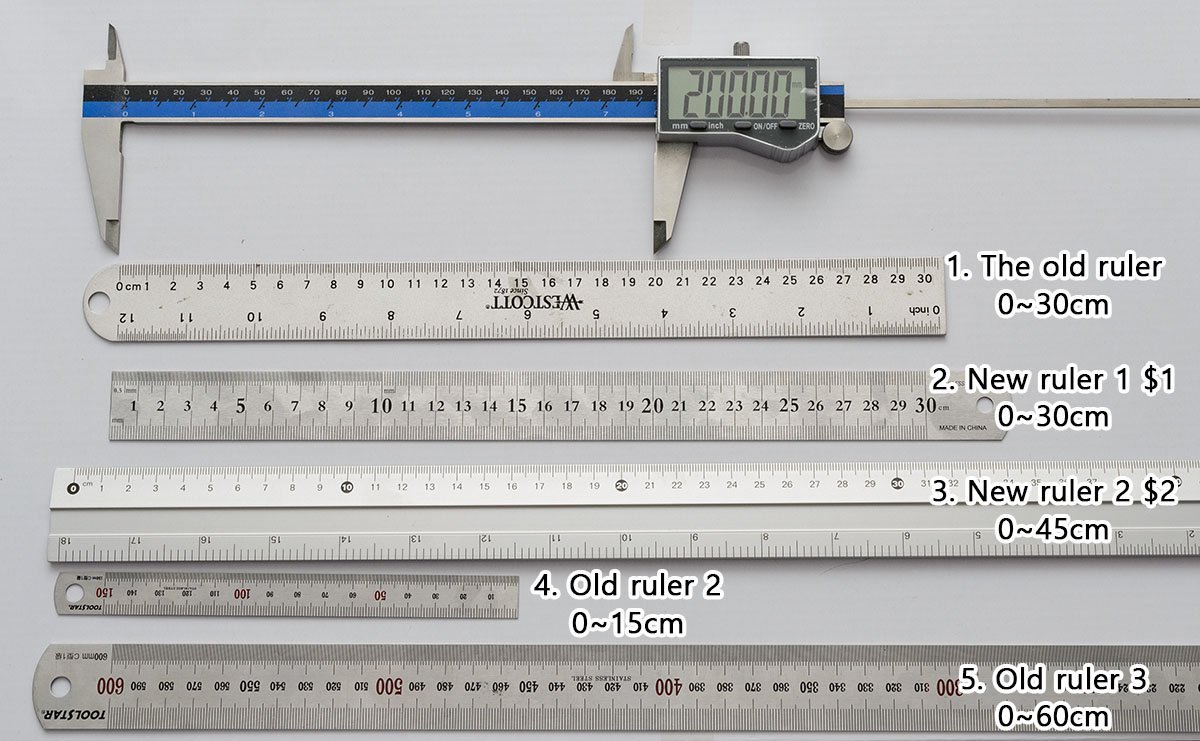
-
My metal ruler was wrong.
modeller_masa replied to modeller_masa's topic in Modeling tools and Workshop Equipment
Hello, starlight. The Lego blocks are also the best reference gauge blocks under no pressure. Hello, Dziadeczek. I moved the line of sight vertically both 0cm and 30cm. I'm sorry that the pictures I took may be confusing. I checked rulers manually, and only the old ruler was noticeably wrong. -
My metal ruler was wrong.
modeller_masa replied to modeller_masa's topic in Modeling tools and Workshop Equipment
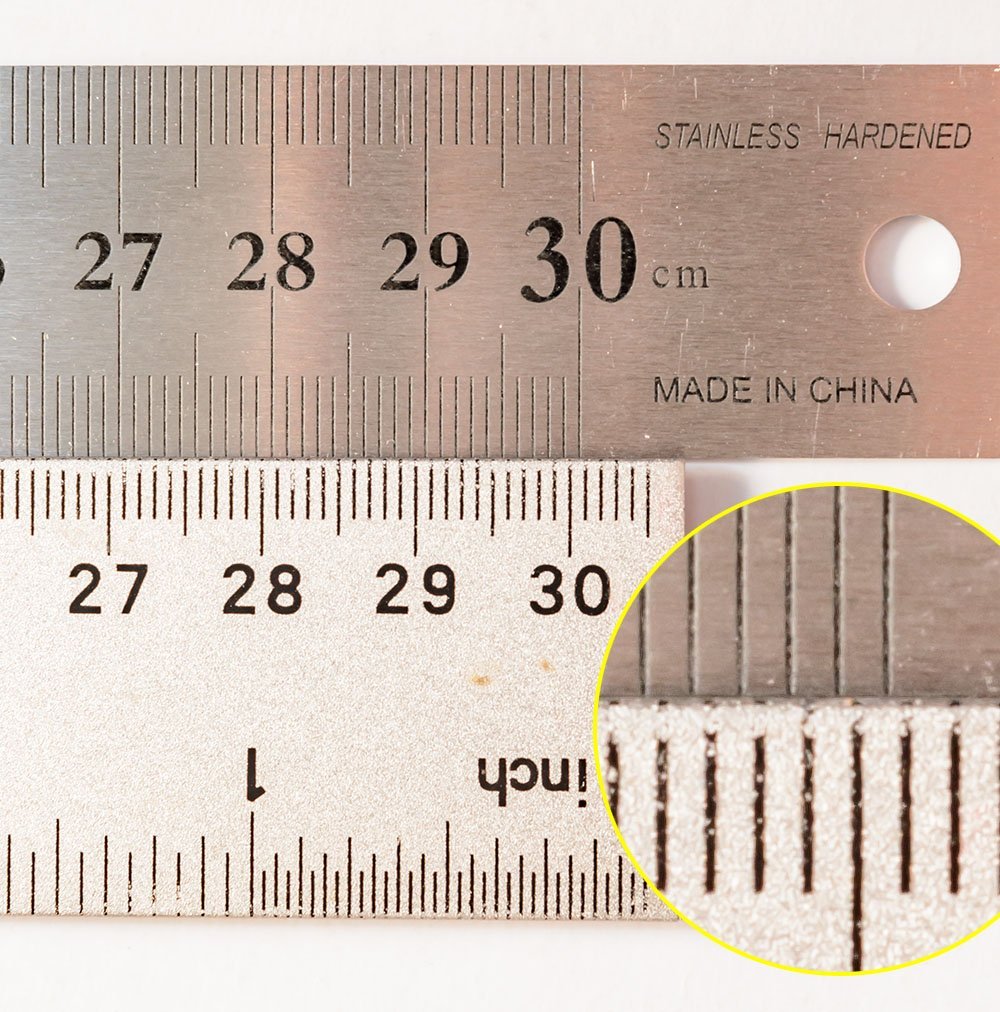
Hello, John Lea. I would say that the digital vernier calipers are the best way to scale models. Gregory. It is a trick of the angle of the camera lens. I just compared every ruler I have, and the old ruler's error was only noticeable. By the way, I found and know that the 10 years old ruler has a +1mm error at 30cm, and your question led me to examine the new ruler (the above ruler) again. I found an error of -0.2~0.3mm at 30cm. It is barely noticeable, but from now on, I can't resist caring about the error. 😂 -
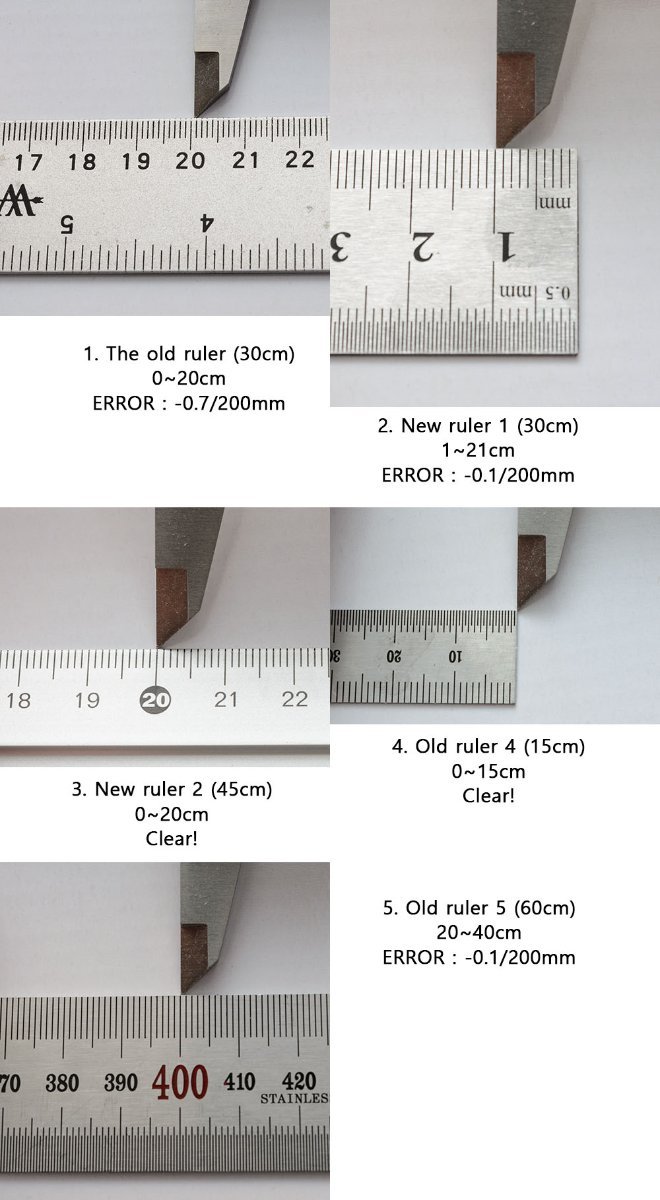
I bought several metal rulers (Up) $1 each. I wasn't surr of the accuracy of them, so I tested them with my stock rulers (Down). Surprisingly, my favorite metal ruler, which has been used for 10 years, was wrong. 🤪 I examined every rulers I own and discovered that only this old ruler has a different scale... I've used it since I was an international student. It was a bit of an awkward truth... I'll check every ruler I buy. 😆

-
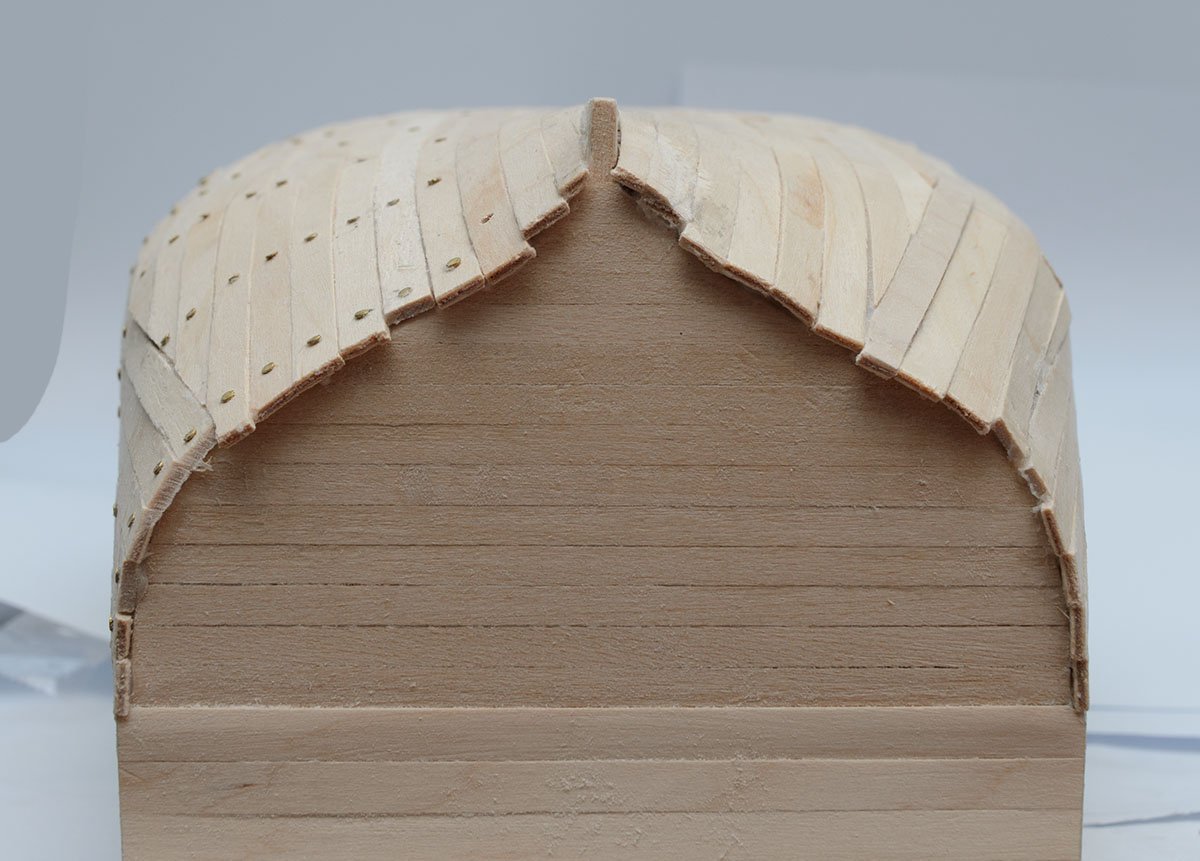
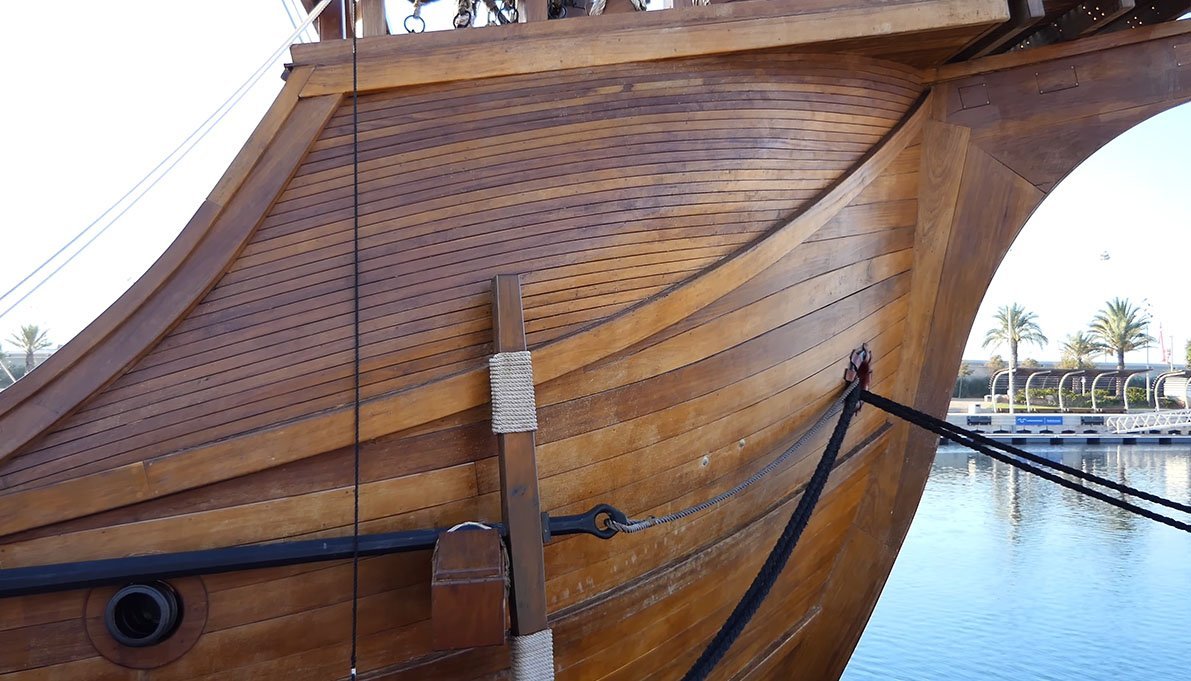
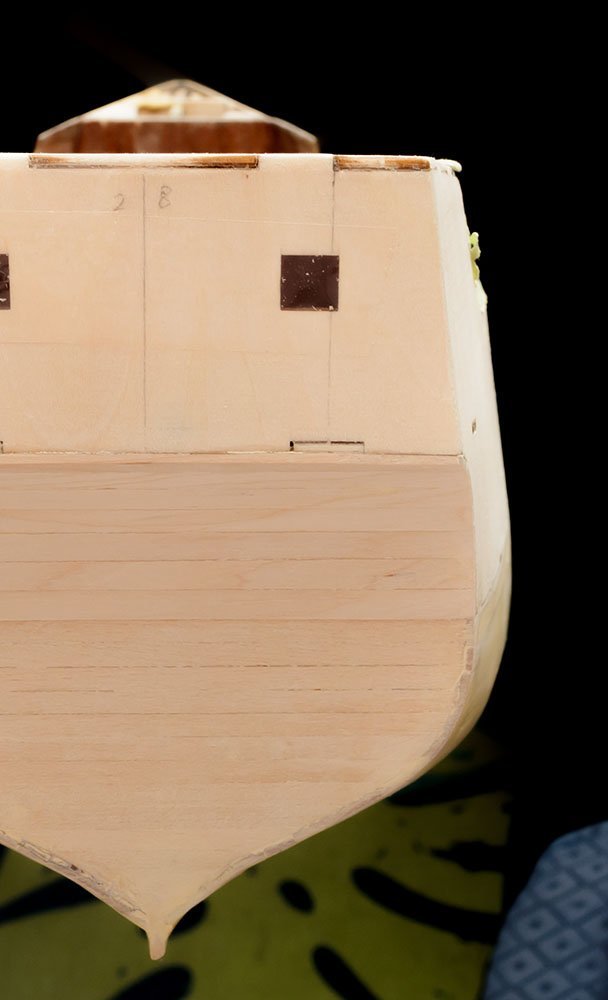
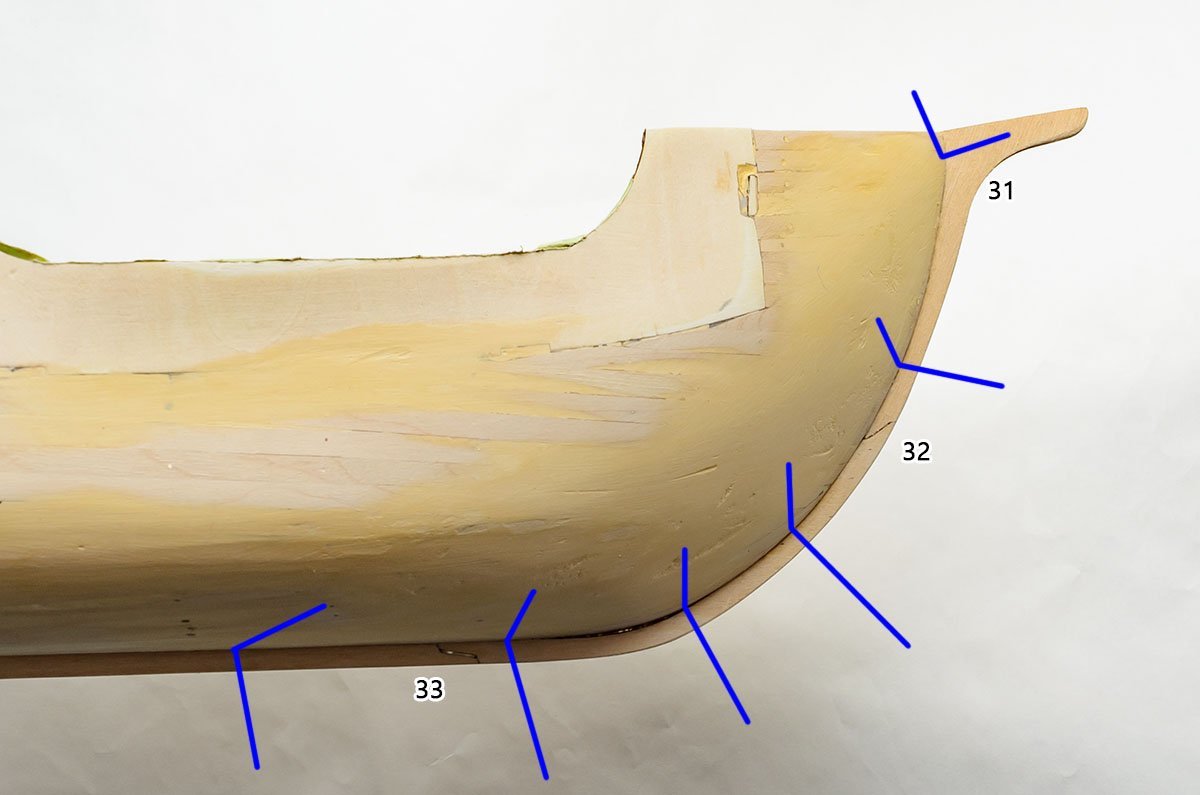
While I was planking each section, I felt the planking line was not appropriate. I checked the lines today, and... Oh my... I said that experience is the key determining the planking line. I should have checked my ship at the front... https://www.rmg.co.uk/collections/objects/rmgc-object-386365 It seems a bit late, but I searched museum examples for similar hull types. I couldn't stand my mistake. It was fortunate that I only finished two sections. I removed them all. I'll draw new planking lines and restart everything. According to the museum ships, my new lines would likely be this. In order to work faster, I'll reduce the sections from 6 to 5. I would like to share my mistake with everyone who doesn't have experience.
- 77 replies
-
- 5
-
-
- Santa Maria
- Artesania Latina
- (and 1 more)
-
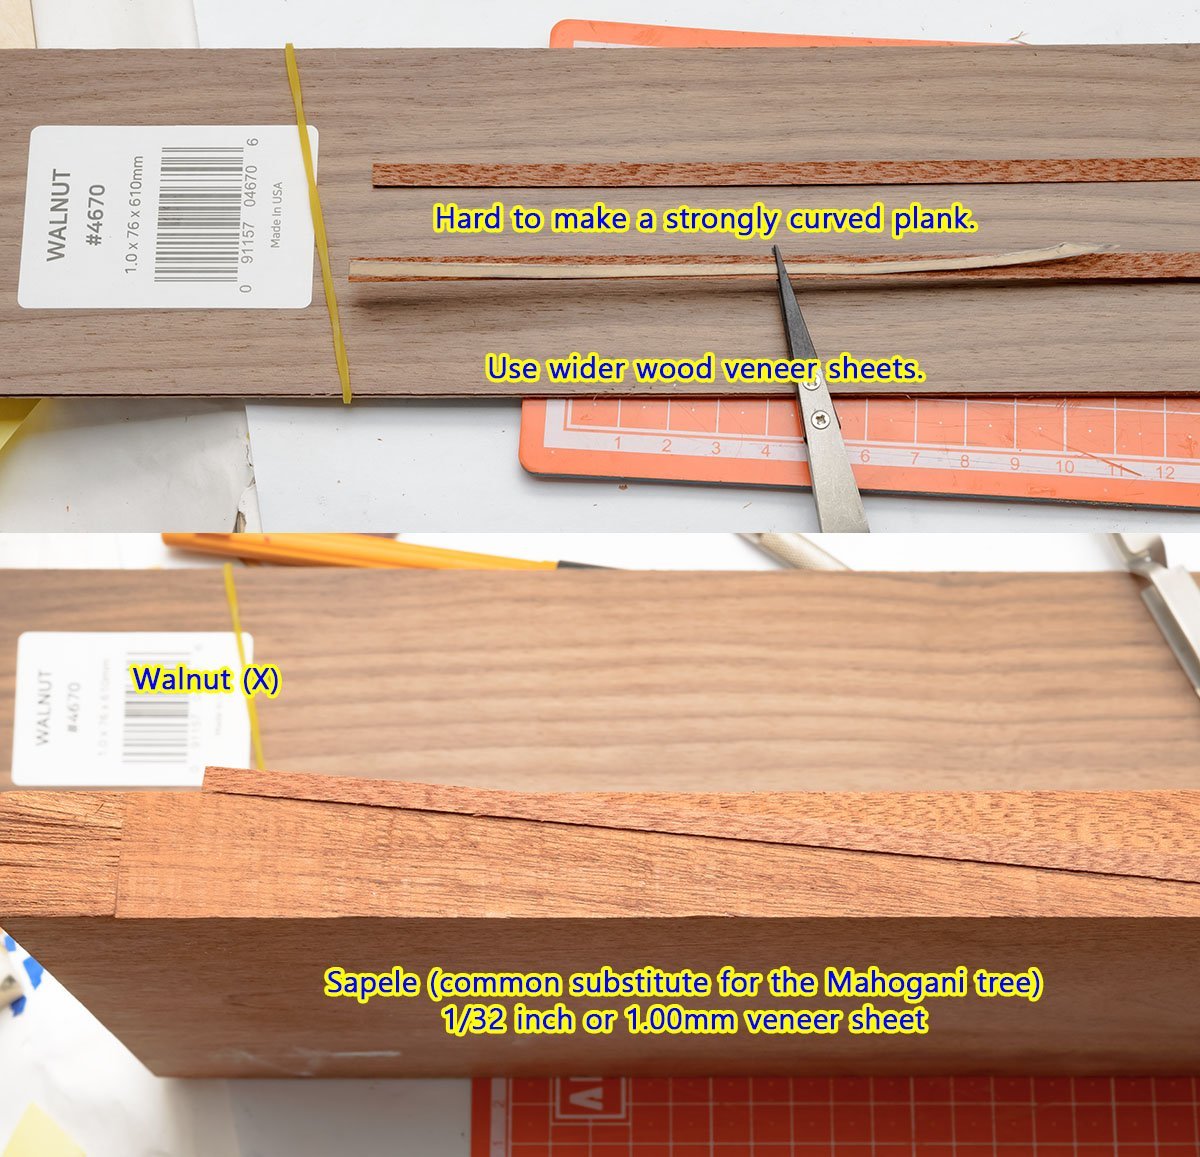
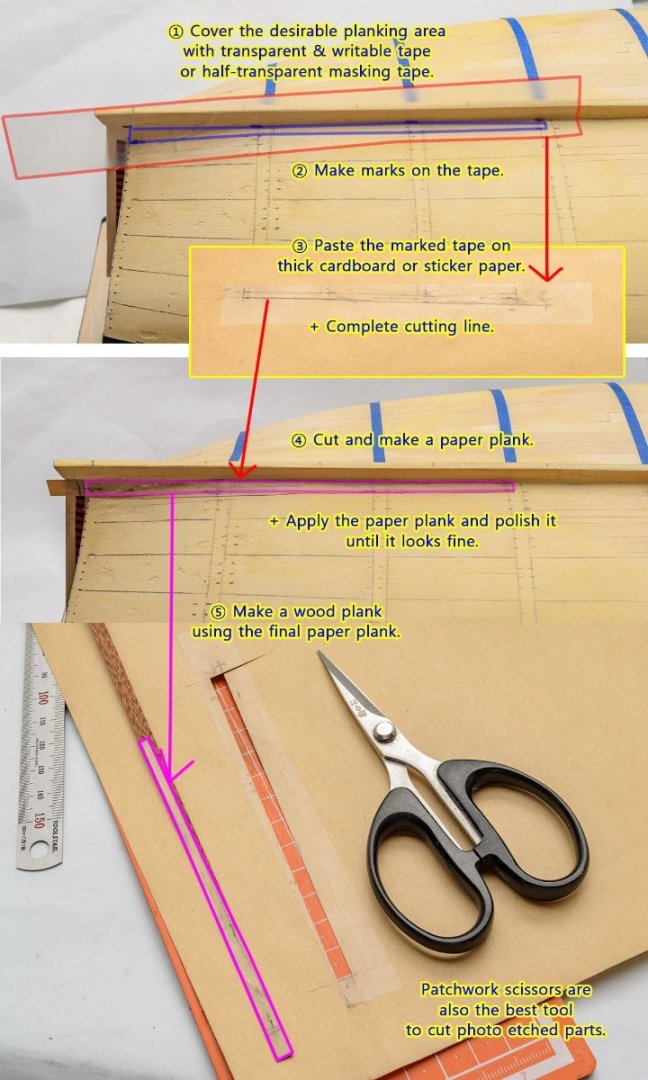
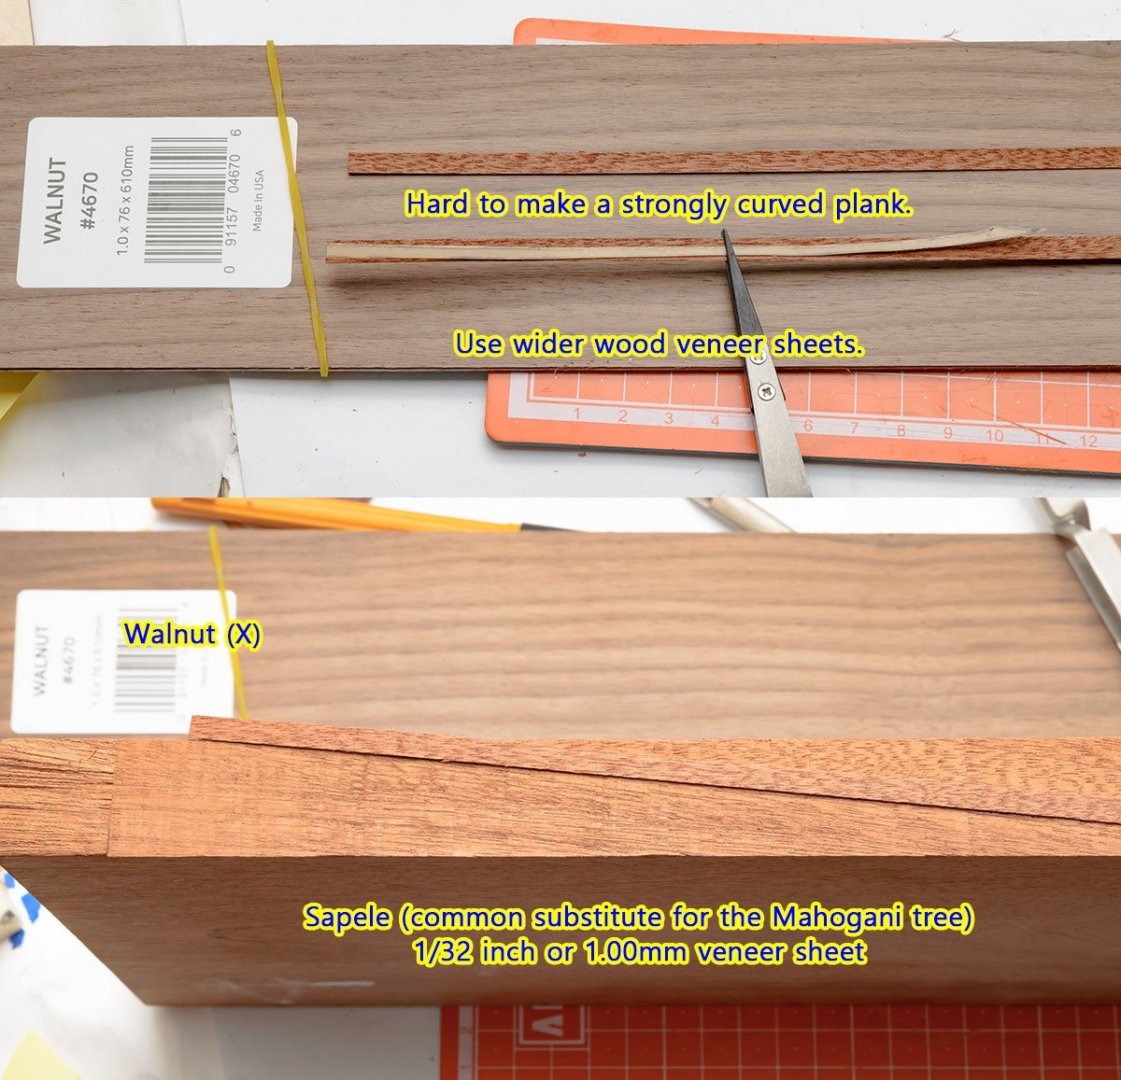
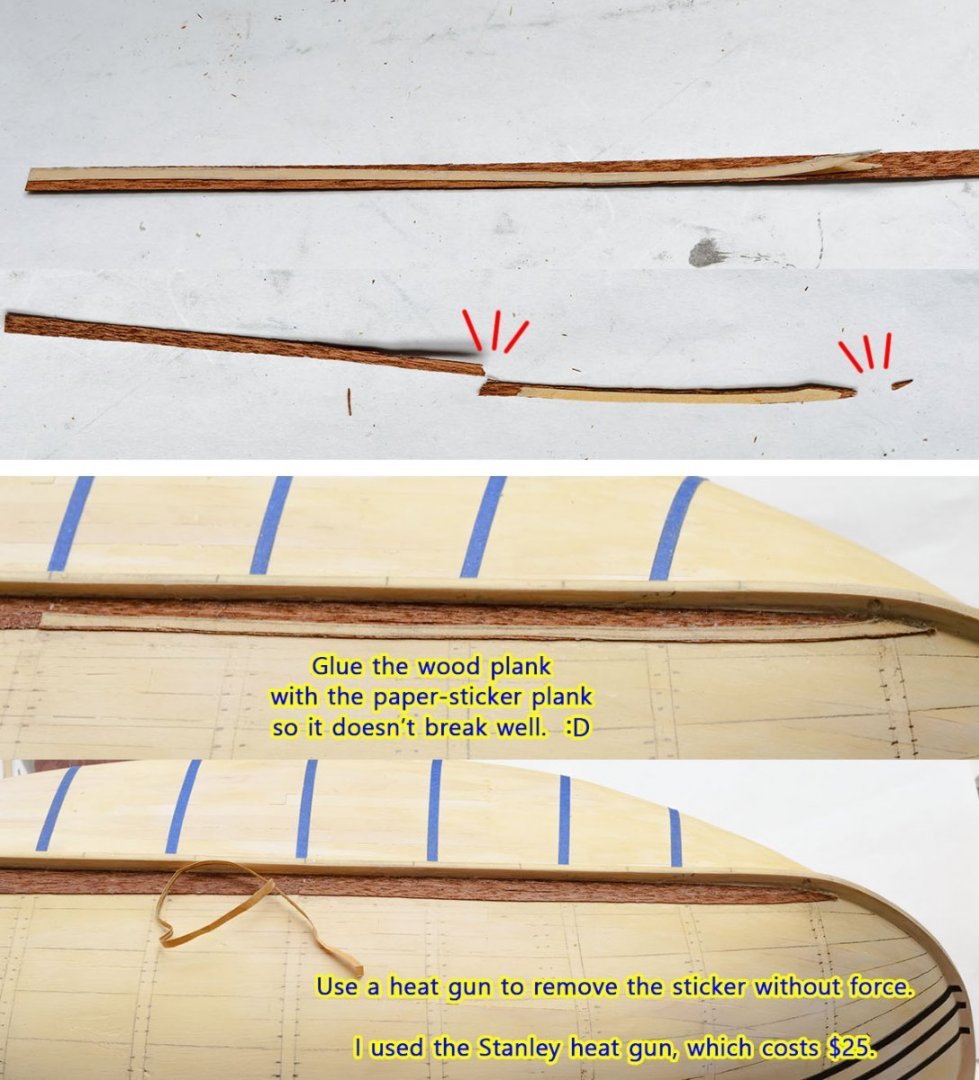
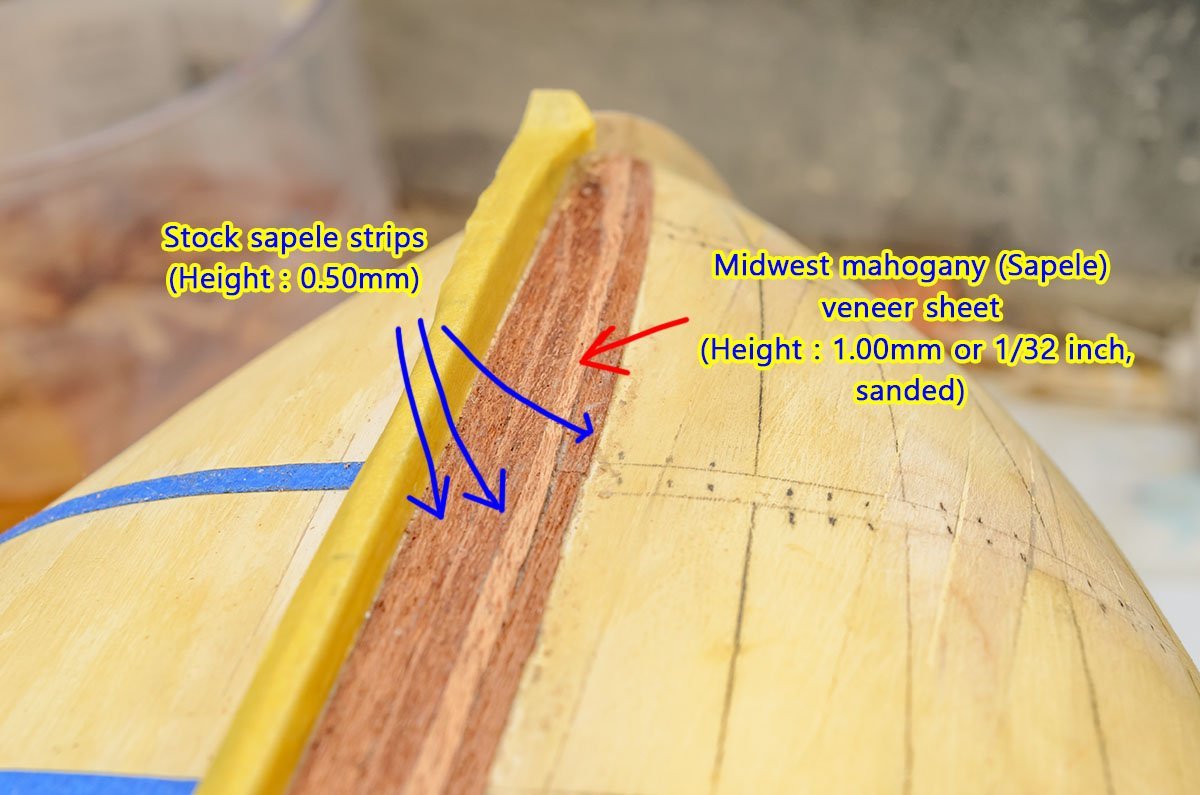
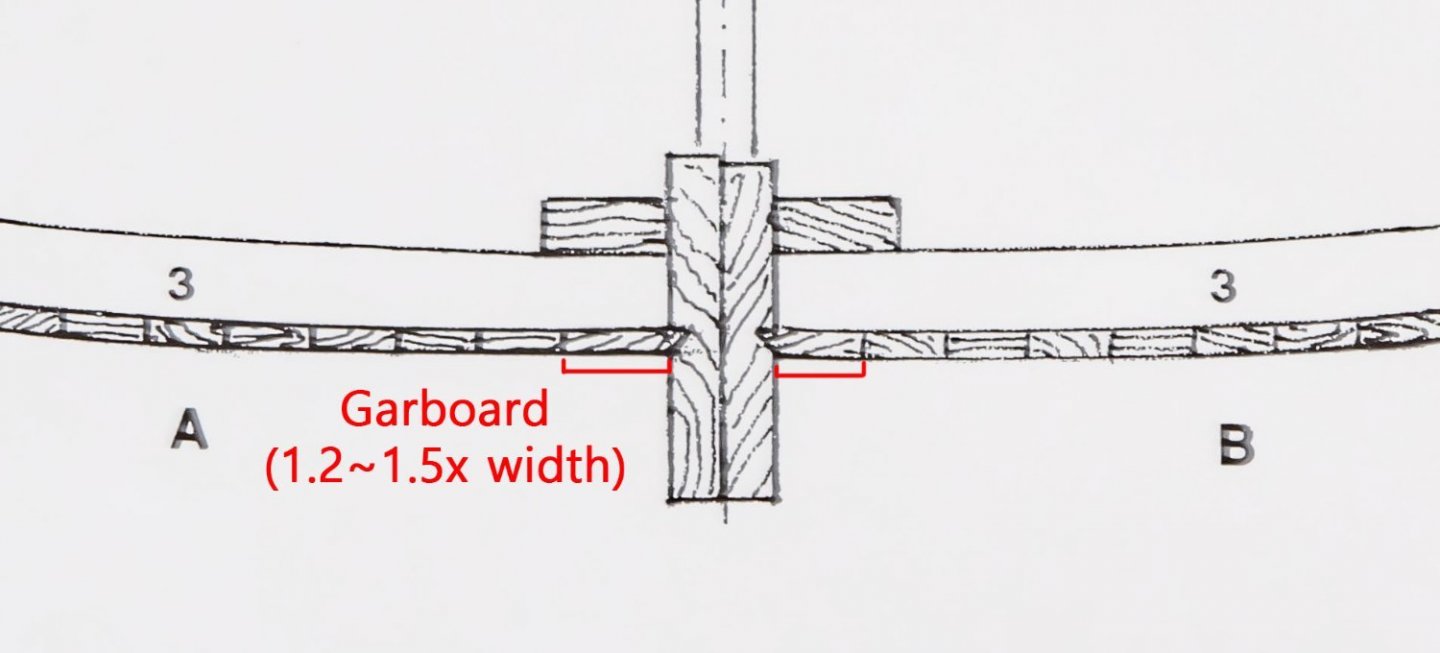
I finished the first section of the second planking. At first, I wasn't sure if the spiling planking was suitable for this hull or not. I double checked similar build logs, and found that the modellers had similar worries and got beautiful results. It is a brief summary of the spiling planking method. You may find lots of spiling tutorials on Youtube. Don't forget the garboard is the widest plank of a ship. The longer the curved planks, the harder I felt cutting the 4.0mm wide stock strip. In that case, it is better to change the strip to a wood veneer sheet. I purchased sapele veneer sheets, which are thicker than the stock strips. Shorter planks reduce the extra expense. By the way, walnut and sapele are hard wood that are considered fragile and easily broken due to their cell structure. I used sticker paper to prevent damage when I was installing them, and I glued it with the sticker. I would say that it works well, and I'll sand the rough surface anyway. I found a staining problem. As you see, the extra plank from a veneer sheet (Red) and stock strips (Blue) look different, although they are the same 'sapele' trees. https://www.wood-database.com/?s=sapele There are hundreds of thousands of subspecies, and each subspecy may have a different color. Moreover, a same tree has various wood colors depending on the parts, such as heartwood and sapwood. There are tons of variables to determine wood colors, so it is best to prepare the same materials at once when you build a new ship. If you buy wood strips separately, you may have this staining problem. I still have a few questions about spiling planking method, but I was mostly satisfied with my result from the first section. I'll keep this method and repeat the job. See you in 1~2 weeks. 😉

- 77 replies
-
- 2
-
-
- Santa Maria
- Artesania Latina
- (and 1 more)
-
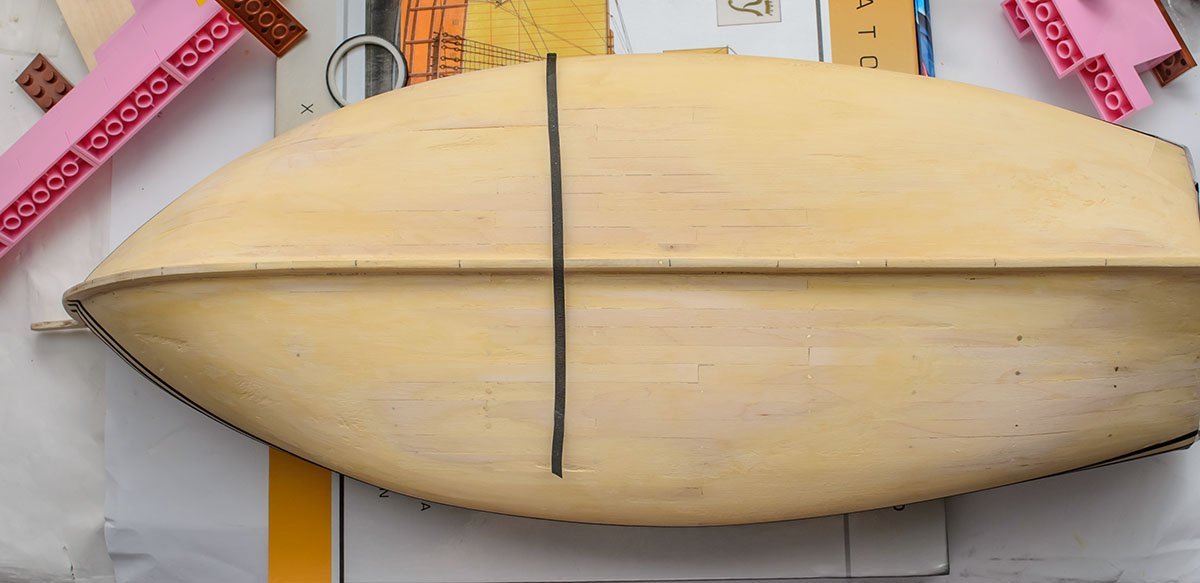
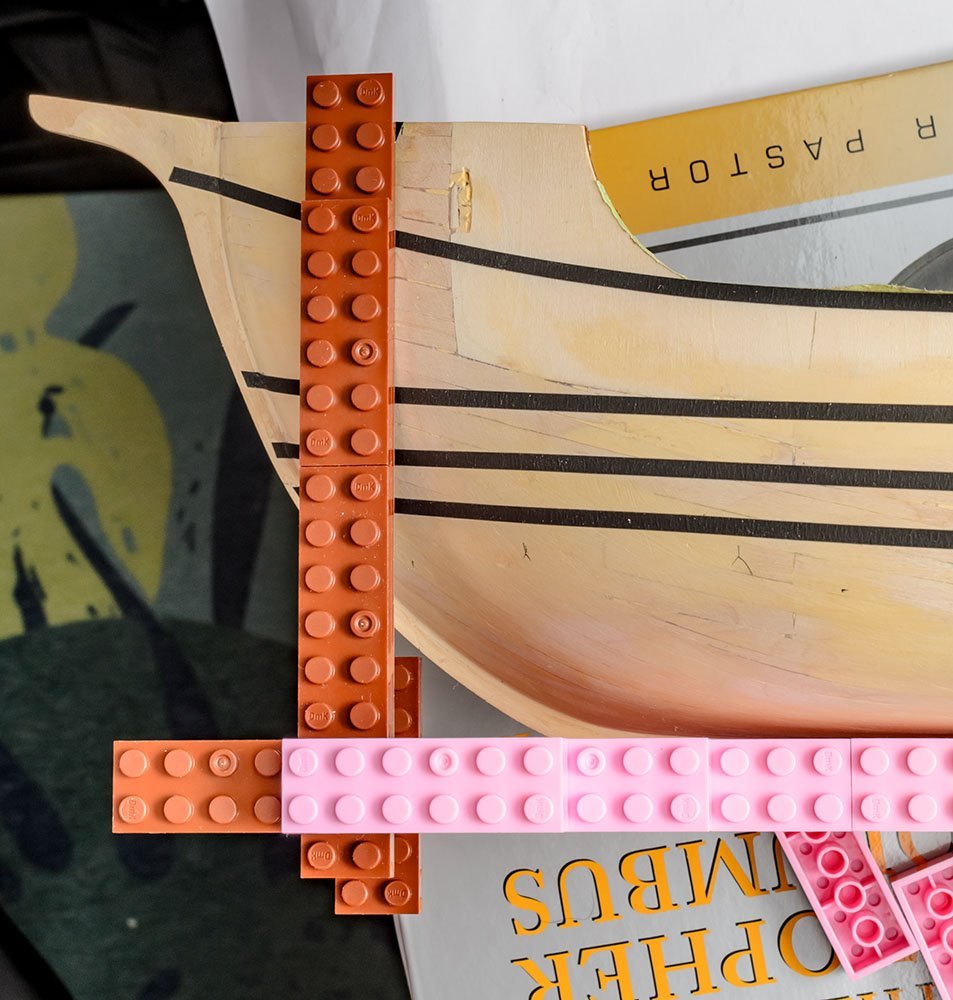
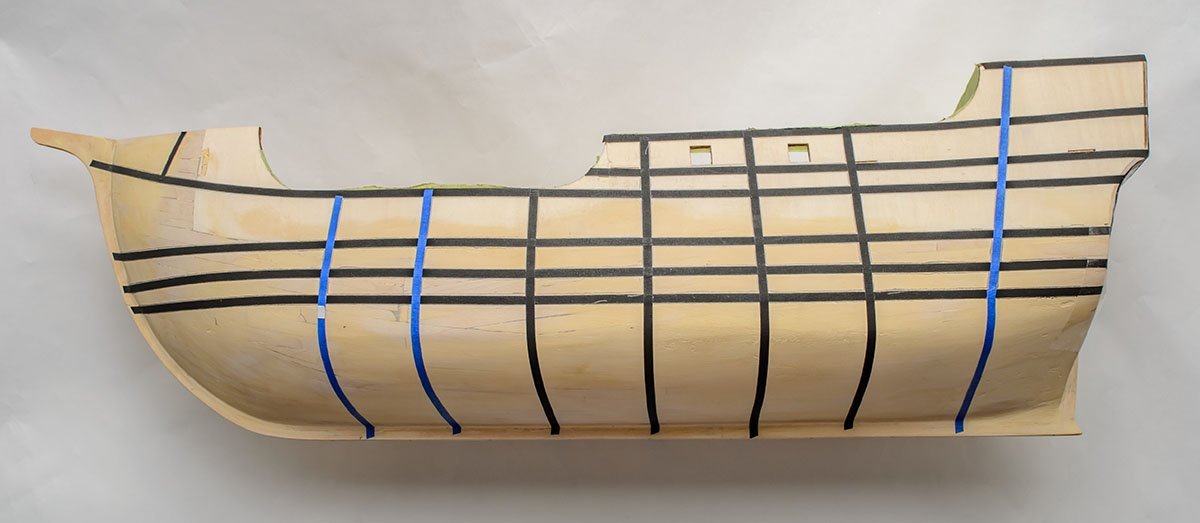
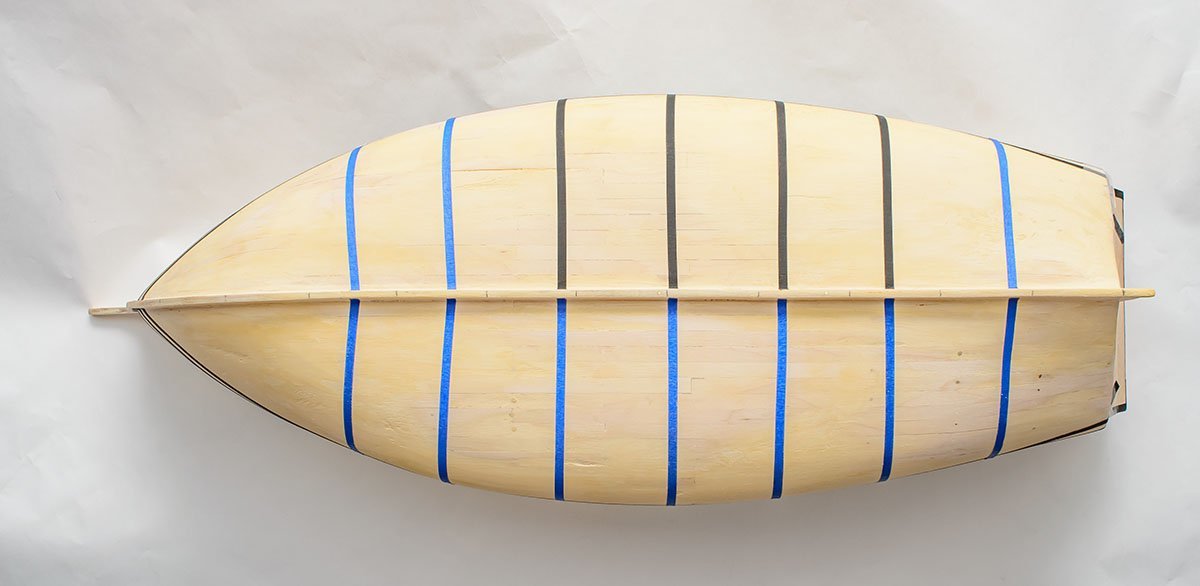
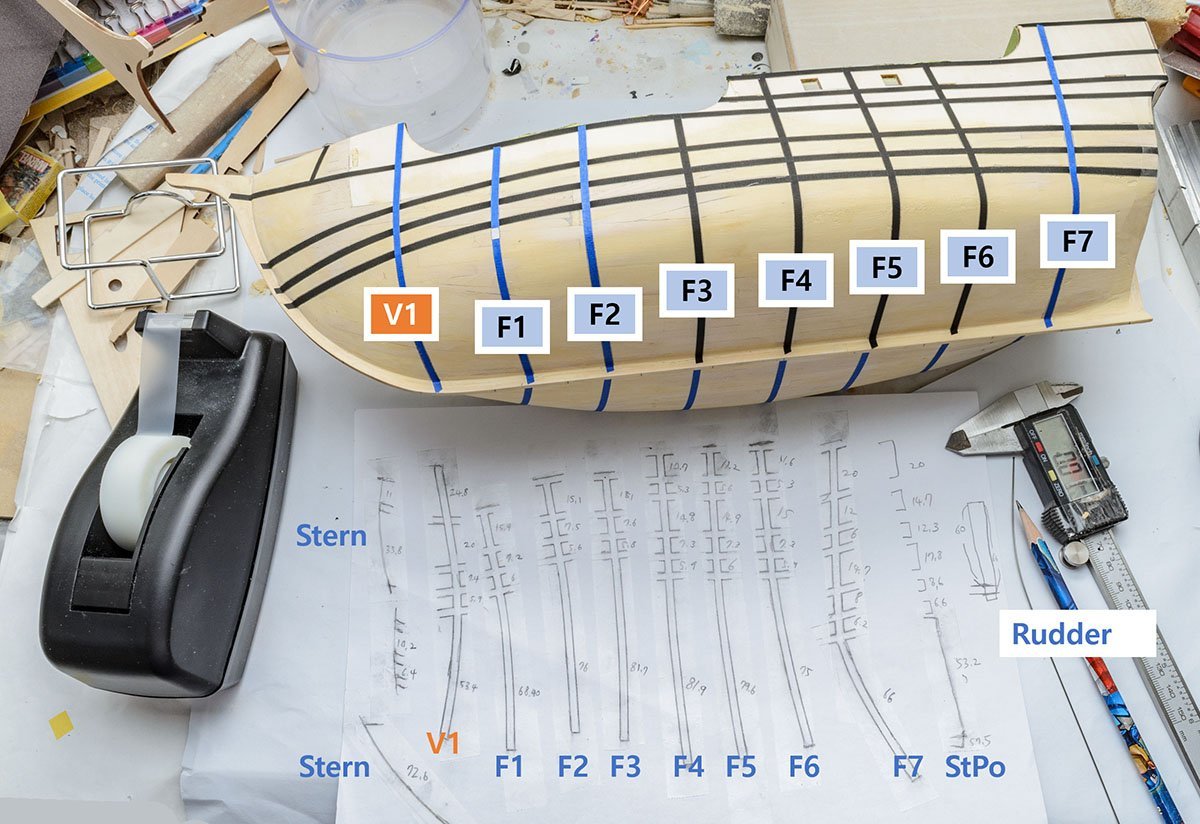
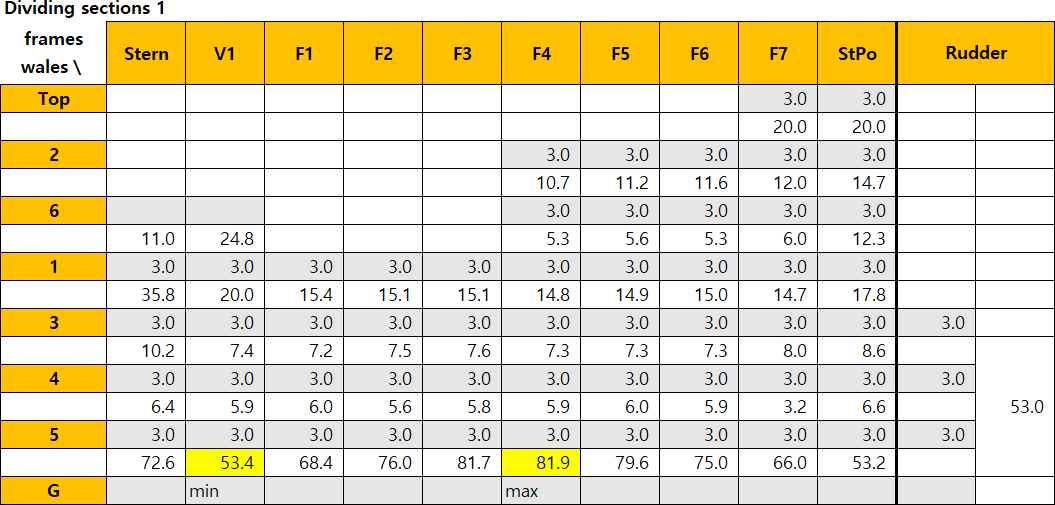
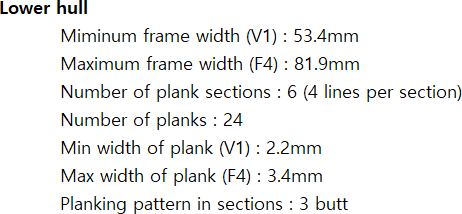
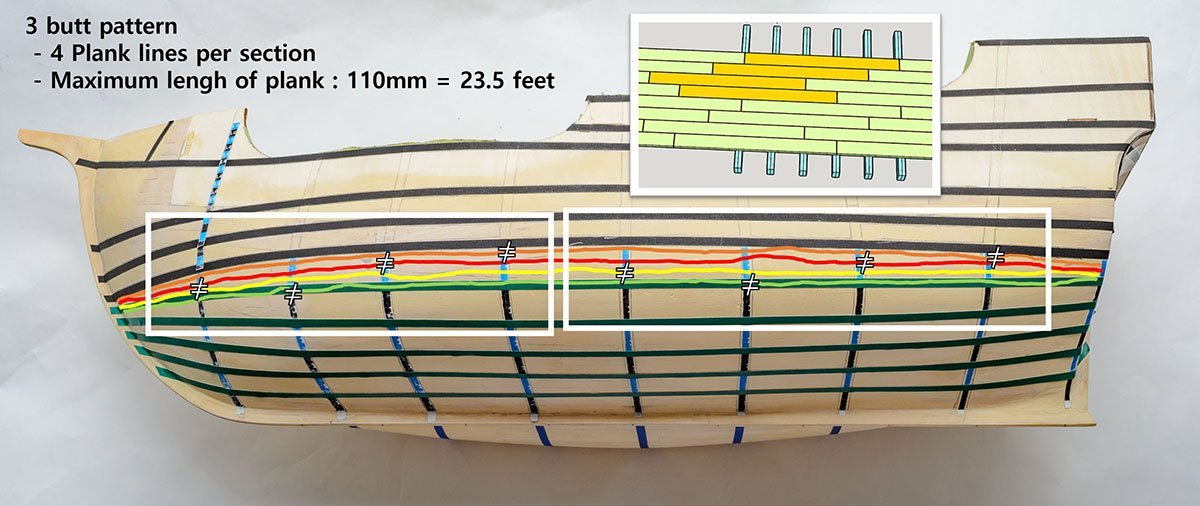
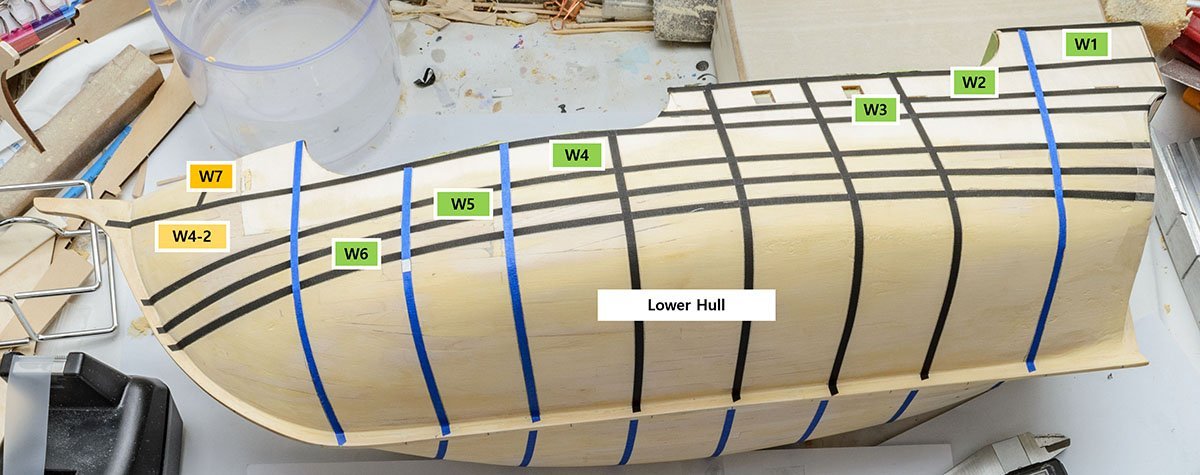
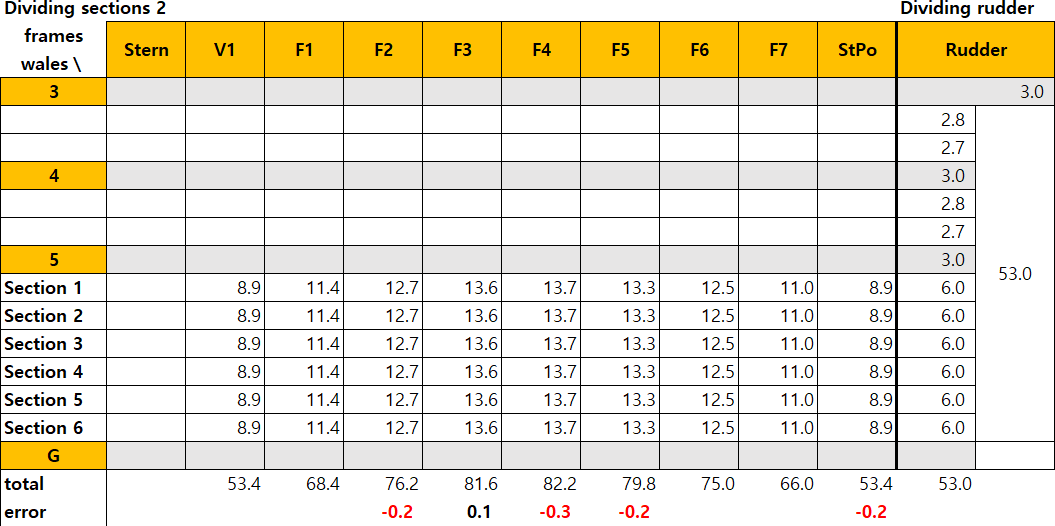
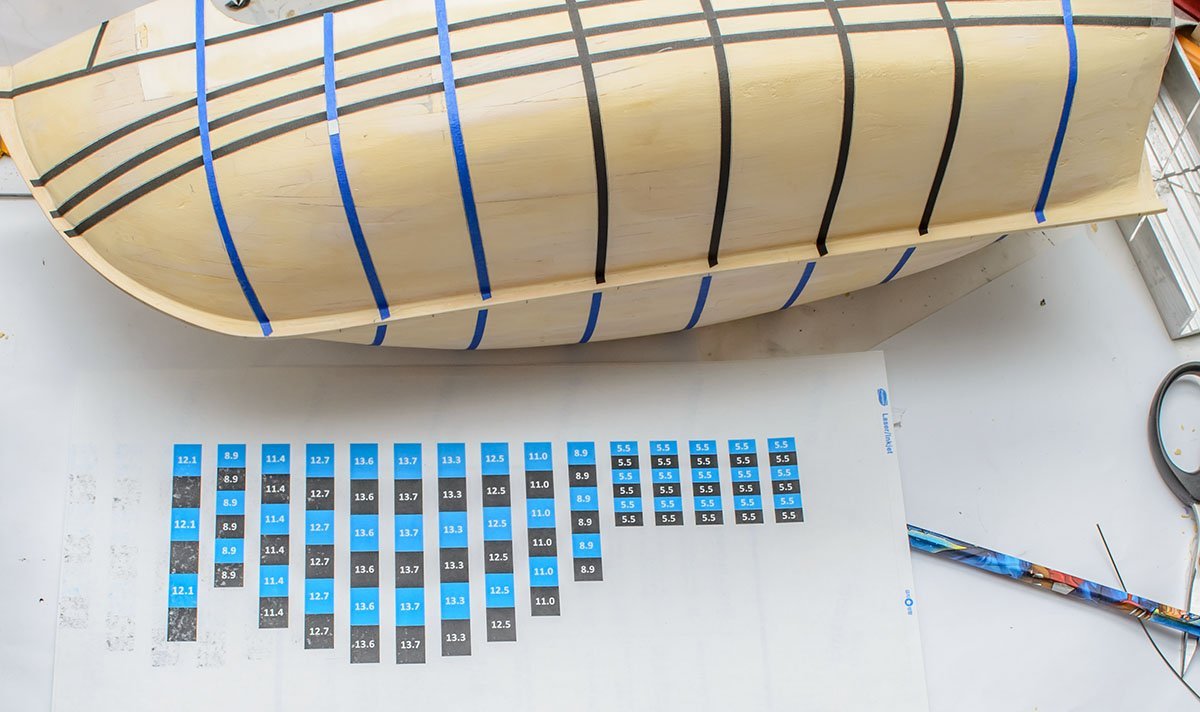
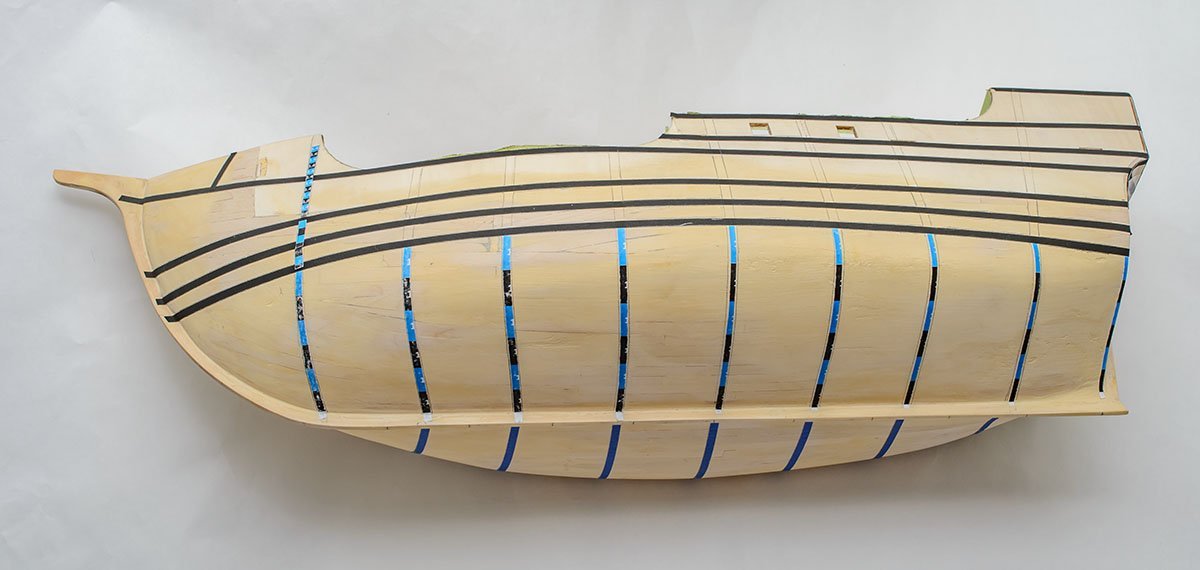
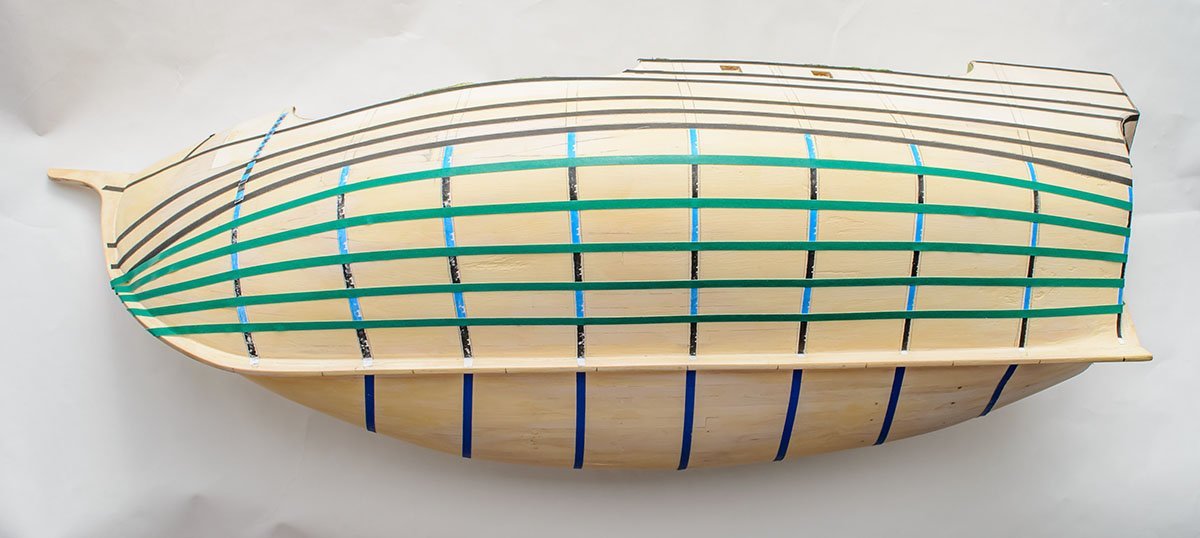
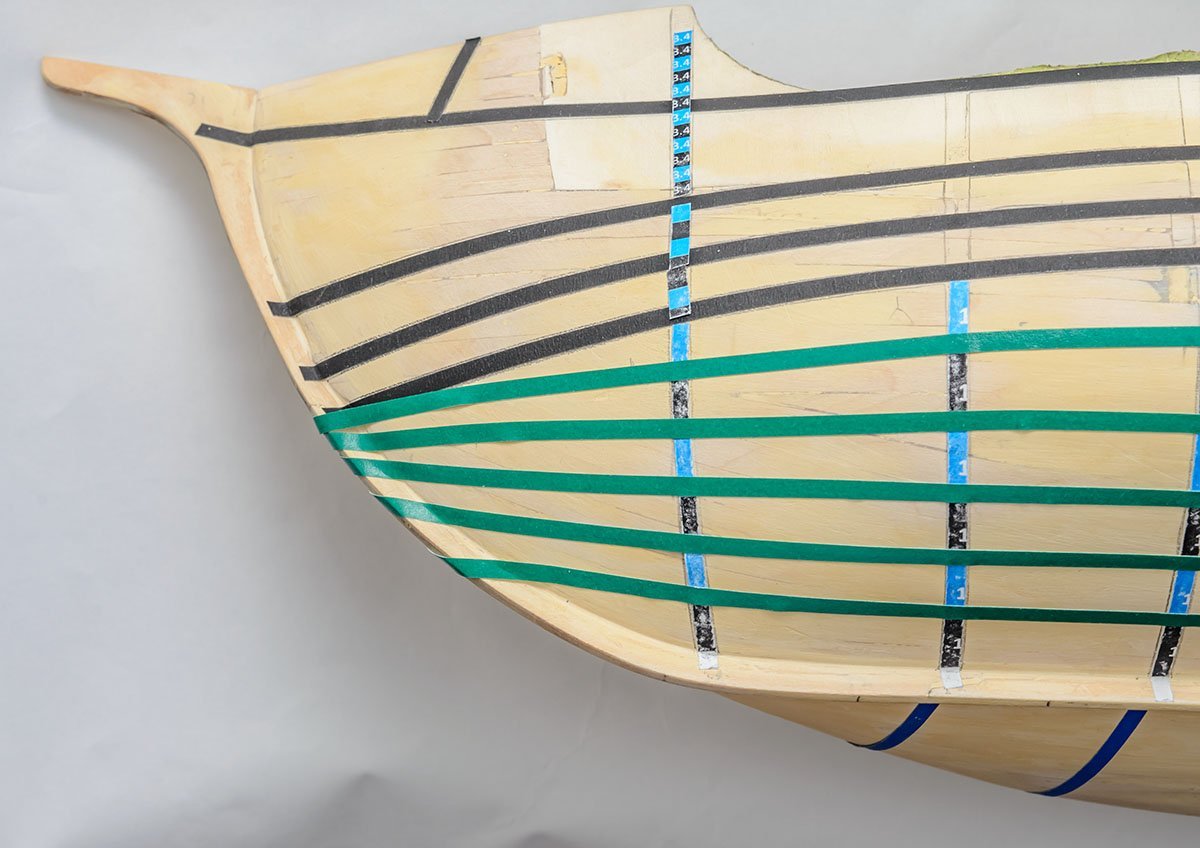
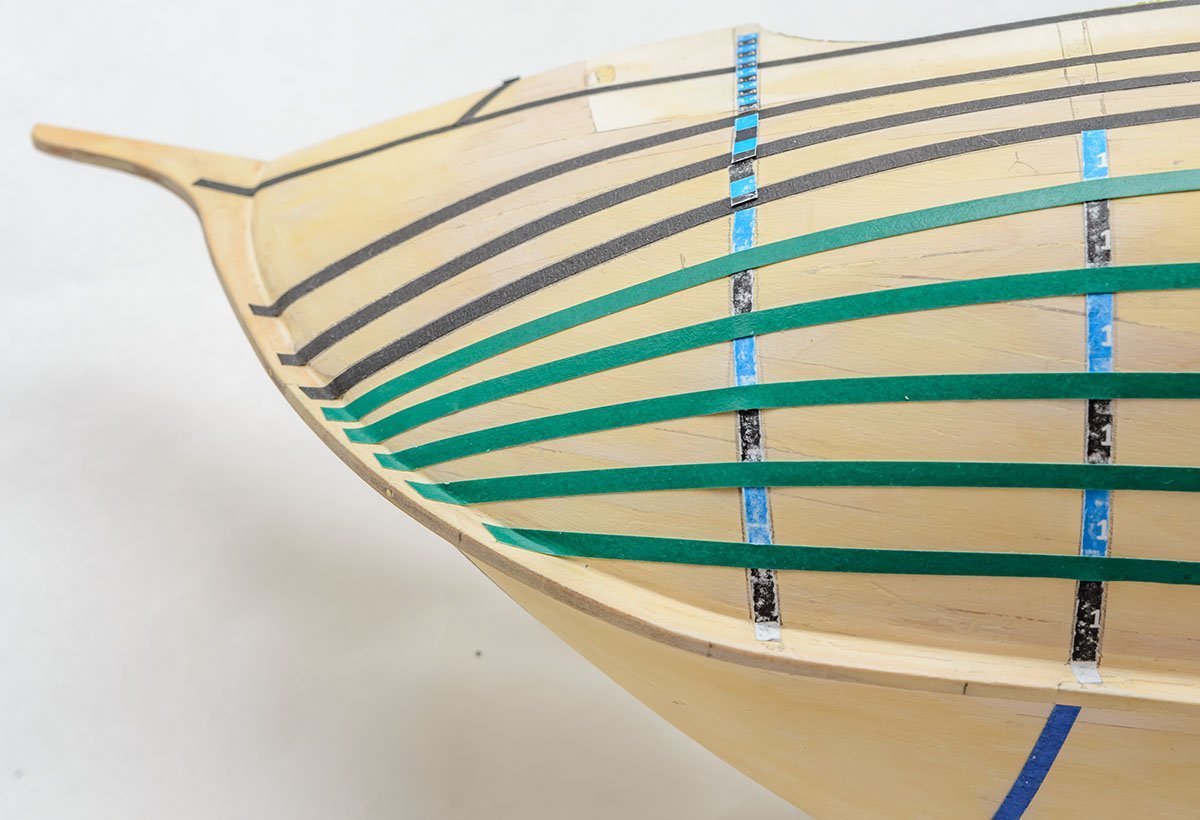
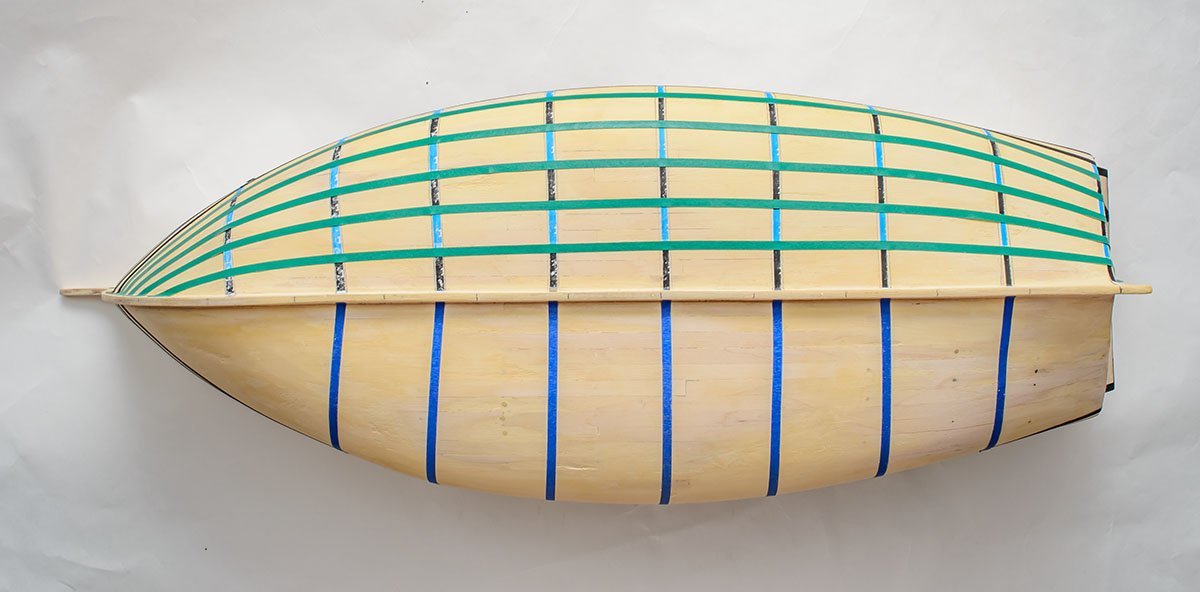
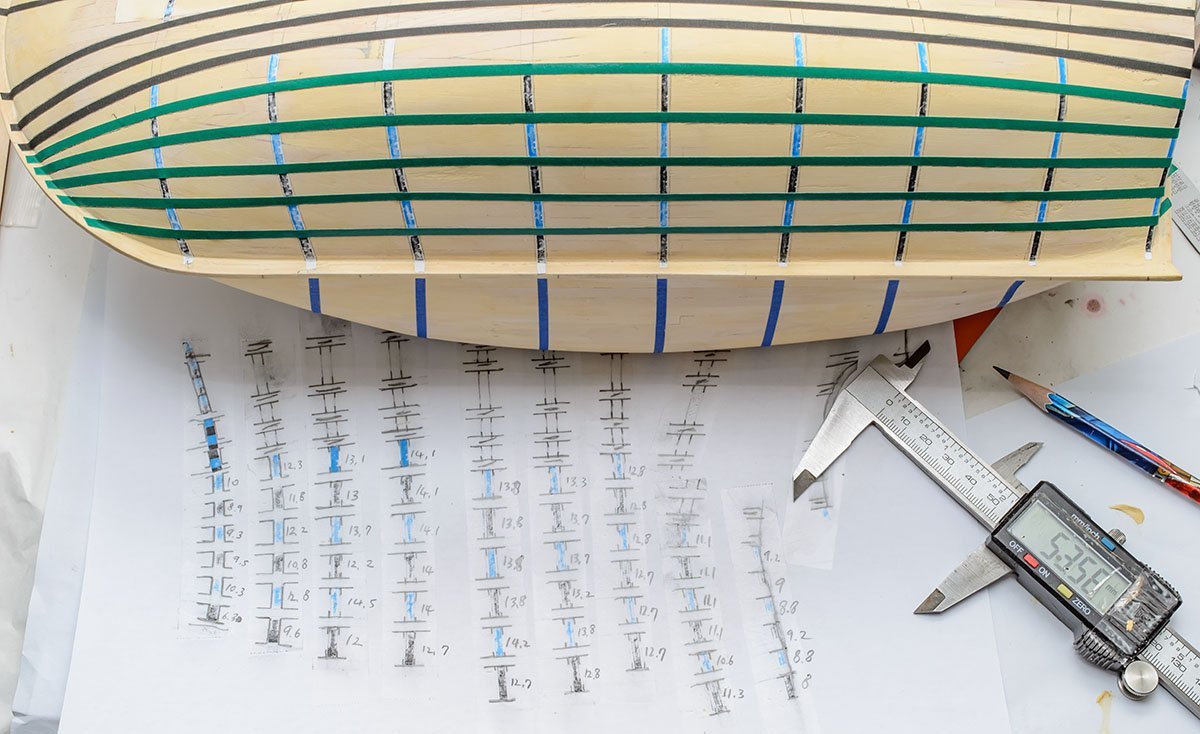
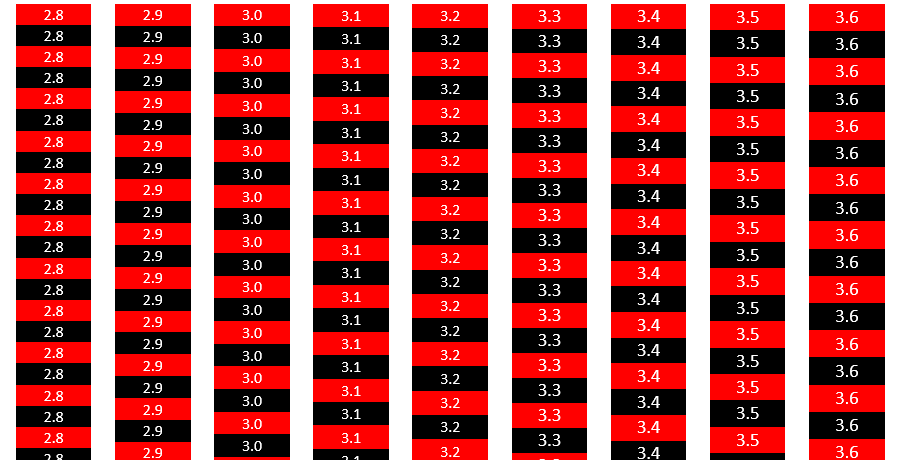
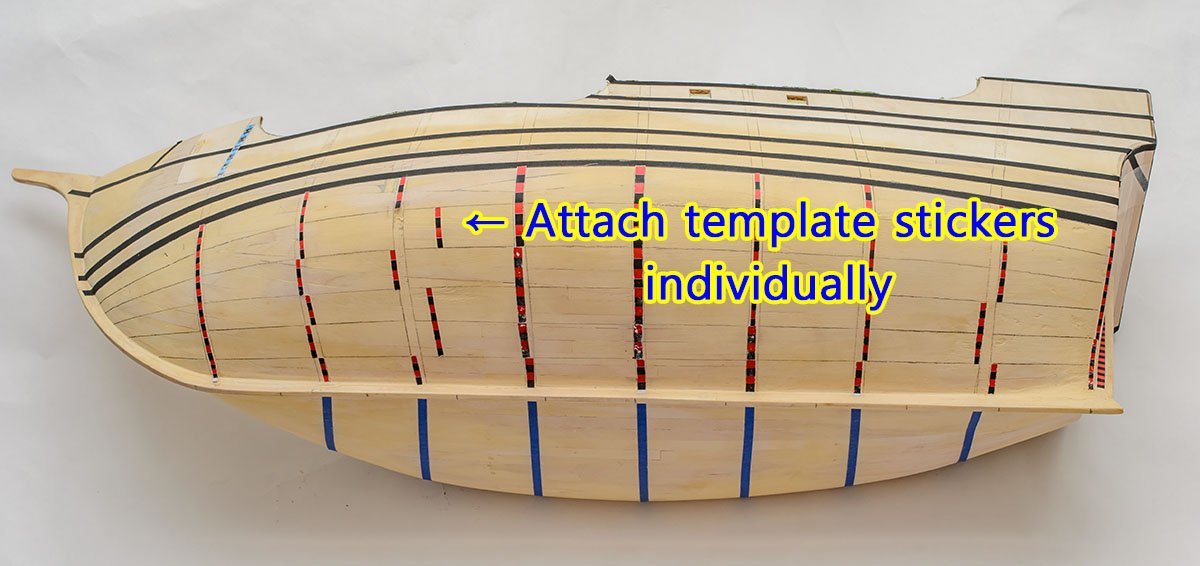
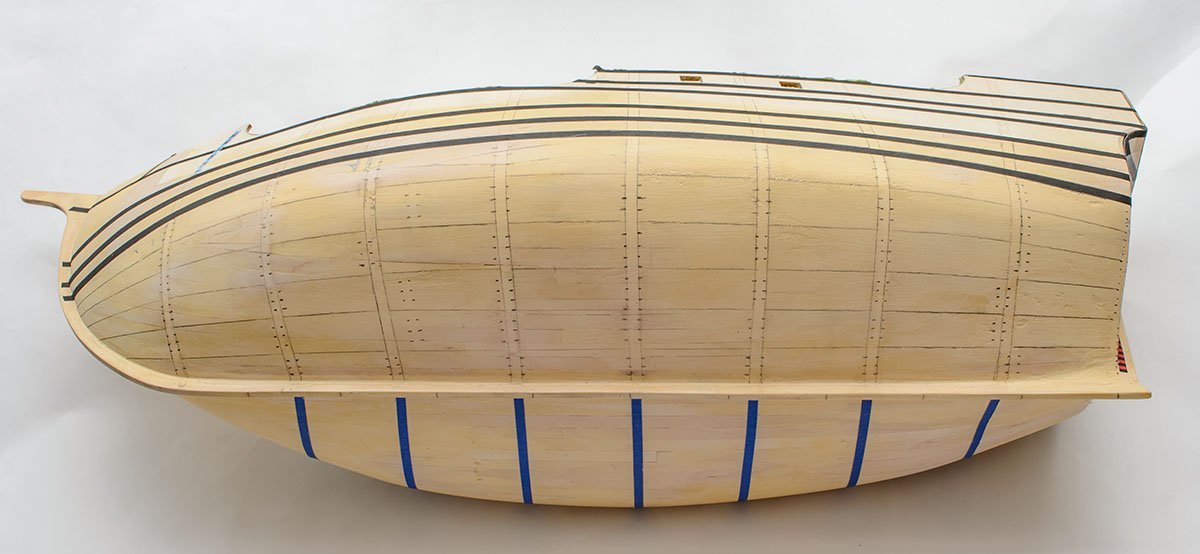
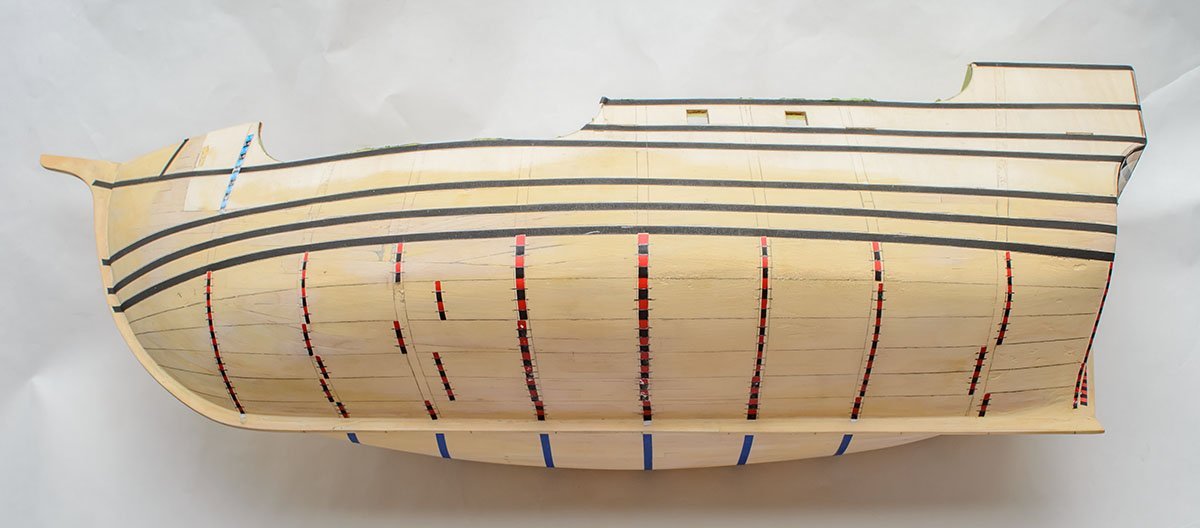
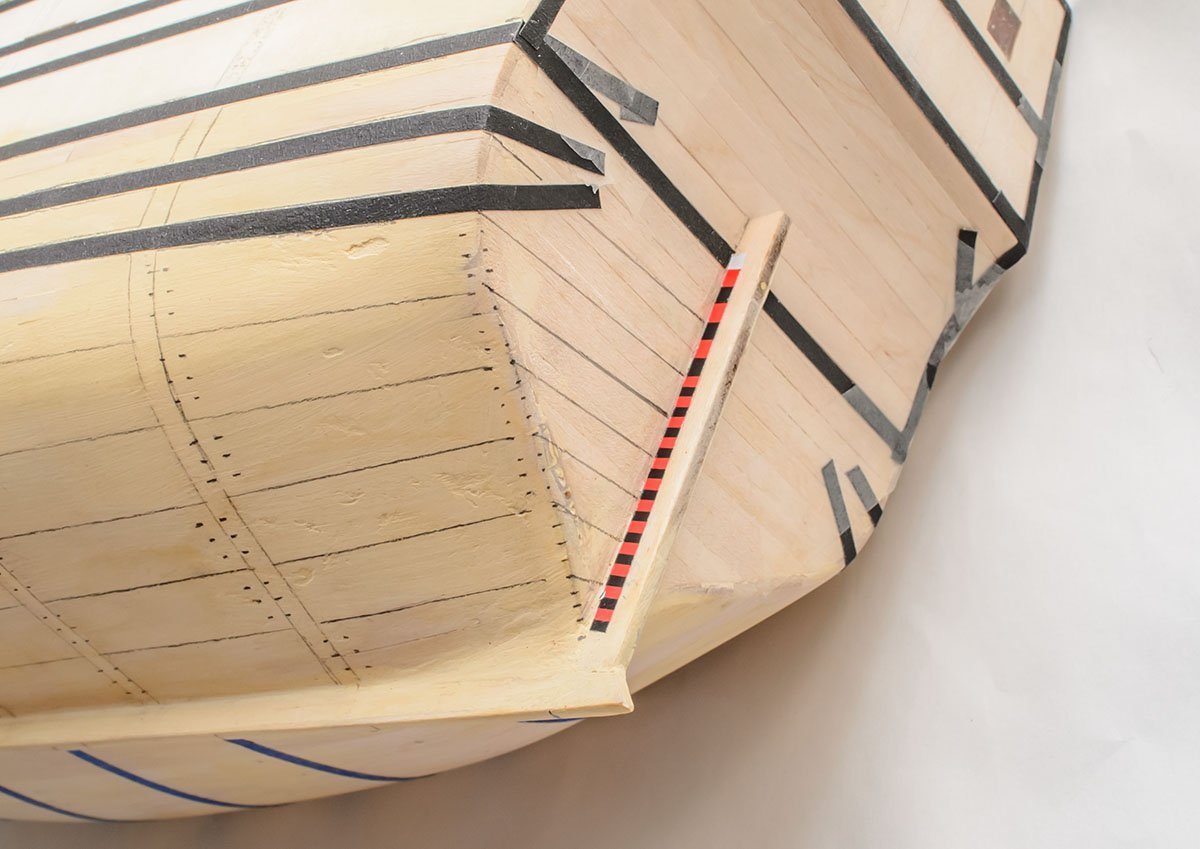
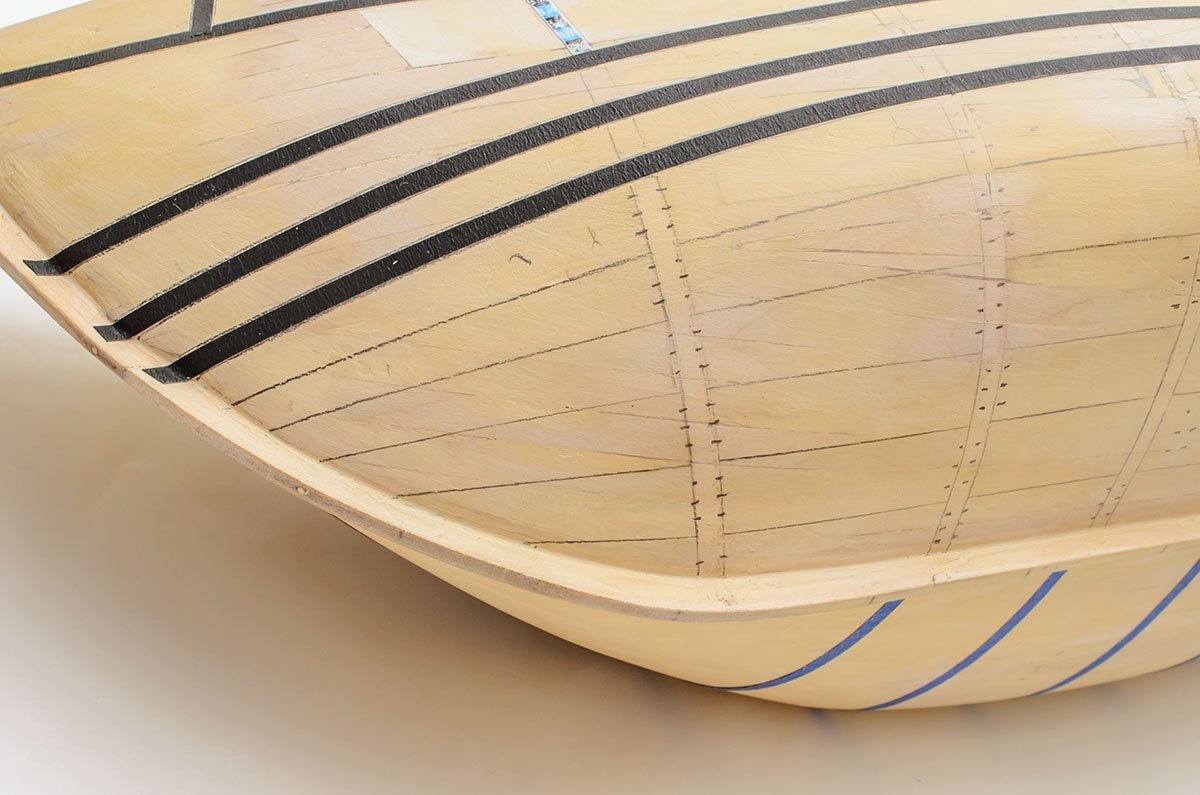
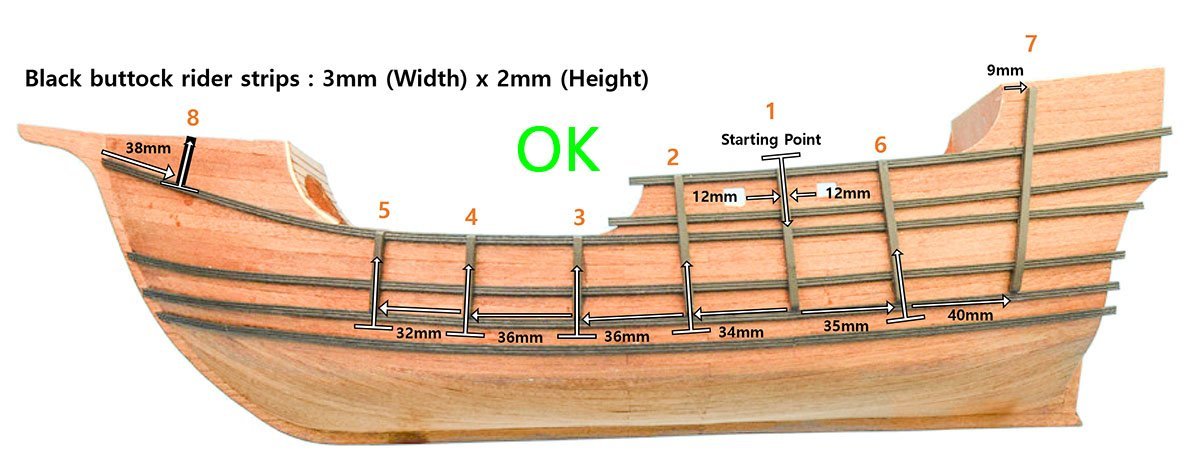
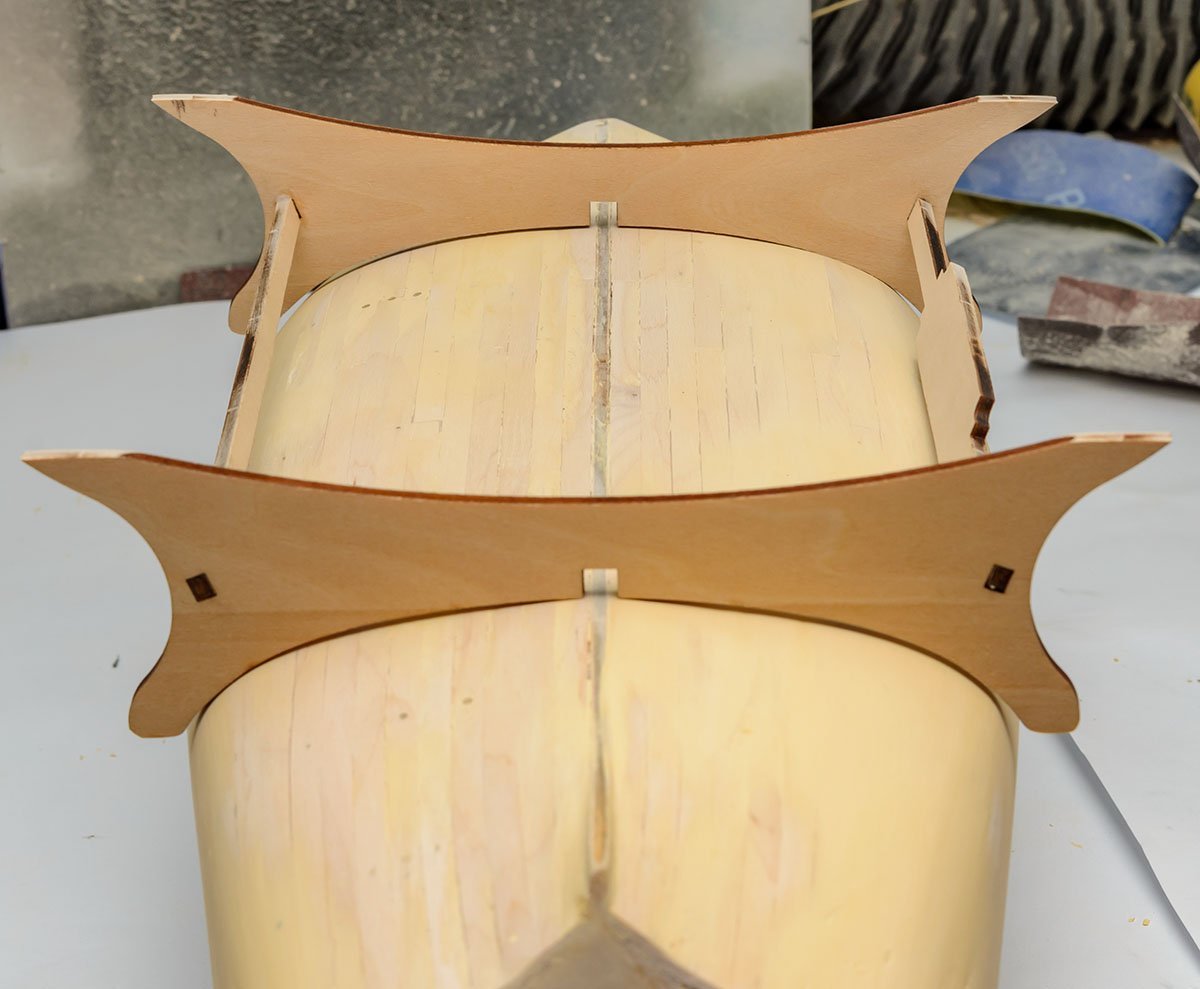
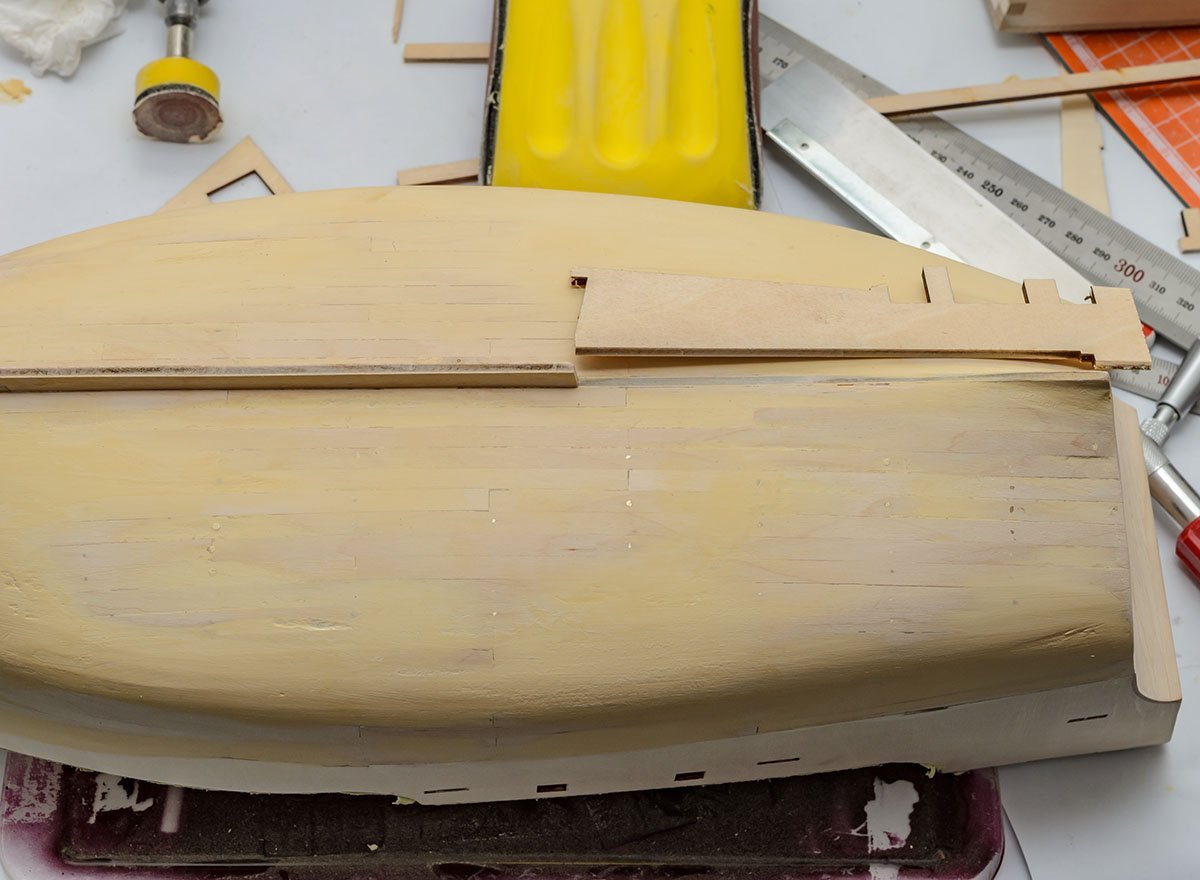
Your pleasure is my happiness, Moonbug. Thank you, Steven. 👍 I started the second planking. I realized that it is hard to see frames. The frames work as vertical base lines for the spiling planking method and planking patterning. I applied too much wood putty and forgot to leave a frame marking... I tried to make virtual frames that have 30mm gaps. I used the Lego blocks to make an exact angle. The Legos are very accurate angled blocks, and are cheap and versatile under no pressure. However, it didn't work because the sailing ship's hull shape is a complex curve. I felt that I needed boring time to draw virtual frame lines on both sides. I changed my plan, and extended the futtock raiders a little bit. They don't connected to the keel vertically, but it's not important because I'll split the lower hull by ratio. Even if the frame lines are fake, I set the frame lines of both sides parallely. Because the frame lines also serve as joint points for the second planks, the differences of both sides are instantly noticeable. OK. I measured the length of each virtual frame. (I added one more fake frame, V1.) I prefer the 3M magic tape to masking tape. The Tamiya masking tape can be sagged and twisted. Excel chart again. You may be familiar with this sheet. At first, I found the maximum width frame. The kit prepared 4.00mm walnut strips for the second planking, so I needed at least 21 lines to cover the frame. I want to divide the 21 lines into several sections, and each section will have the same pattern. I don't know any planking patterns with more than 6 lines, so I split 81.9mm into 24 lines and 6 sections. In conclusion, I'll divide the lower hull into 6 sections and 24 planks, and the maximum width of a plank at the frame F4 is 3.4mm and the minimum width of a plank at the frame V1 is 2.2mm. It seems good because the minimum width of one planking line should be more than 1/3 of the maximum width of itself (about 1.1mm). Moreover, each plank section will have the 3 butt pattern. The 7 meter plank is a little out of reality... The planking lines between wales are different from the AL's manual. (Green) They'll follow the wale lines. To get a balance with planks in the lower hull, the maximum width of planks cannot be wider than 3.4mm. However, I'll follow the 2018 Nao Santa Maria replica and the AL manual at the stern. (W4-2 and W7) Based on the measured numbers, I split the lower hull into 6 sections. Because the powerpoint's smallest unit is 0.1mm, the division made small errors that didn't cause big mistakes for now... I printed out the numbers using Powerpoint, and attached the band on the hull to determine the 6 sections. It looks fine, but the hull has a complex curved line. We can't determine the 6 sections by dividing lower hull eqaully. See what happens next. The hull isn't a simple cylinder. I felt the green lines were very weird and not beautiful. The next task is adjusting the green lines based on my experience. It seems a bit subjective and centerless, but there are only a few references. The best planking line is rarely included in the series of the anatomy of ships. Unfortunately, the Santa Maria doesn't. The museum models built at the same ages are great sample. You can download pictures from the UK museum site. However, as we know, we don't know the fate of the Santa Maria. 🤔 There are still some clues to determine a good planking line. As I said, the thinnest width of a plank shouldn't be less than 1/3 of the thickest width of the same plank. The stern's thinnest section, including the 4 planks, must be thicker than 4.5~5.0mm. Therefore, I increased the distances among section lines like this. It seems much better and more natural. 😎 I did the same thing in the other area. In the middle of the hull, I didn't move the lines much, and fixed only a few weird looking curves. I also rotated the hull and saw it from many different angles to find any weird looking lines. It is a reason why I need experience. 🤔 It is good if sections have equal width, but it is not mandatory. The width heavily depends on the curve derived from the hull fairing and the first planking. 😂 And... I measured the new planking line, made an excel sheet, powerpoint band, realized that some bands were wrong, and measured again. I wasted a day. 😱 I was losing concentration. I suddenly found that I didn't need to complete the whole band for each frame at this step. Instead of it, I made a simple and reusable template. My goal is to divide each planking section into 4 plank lines. I pasted the template stickers on the hull. It worked perfectly, and is much faster than editing and printing one long band. I added marks and removed all the stickers. It is crystal clear to see the planking lines. 🧐 I also added wale and planking lines on the back. I may use only 2 planks for each plank section. I didn't leave any marks at the stern. This area is so complex that I can't determine the curve before I start the second planking. By the way, I didn't comment on the garboard plank. The garboard is the first plank next to the keel, and the widest plank of the hull. In general, plank sections don't include the garboard. However, because the kit didn't inlude wide walnut sheet, I skipped the garboard. I'm writing this post for new and intermediate builders like me. 👶


- 77 replies
-
- 2
-
-
- Santa Maria
- Artesania Latina
- (and 1 more)
-
I attached wale lines to calculate planking sections. I found that some numbers in the manual are wrong. Because some wales connect to the back side, I had to manipulate the width among some wales. By the way, wales are basically thicker planks, so they don't cross planks frequently in general. I'll lay the second planks with wale lines, and also on the back. I may divide the lower hull into 5 plank sections, so that the back planks (yellow bars) should go like this. I added futtock raiders to verify AL's manual, although it's not important at this stage. The manual looks nice and valid. See you again~


- 77 replies
-
- 3
-
-
- Santa Maria
- Artesania Latina
- (and 1 more)
-
Hello, and thanks for the kind advice, Steven. I'll use the spiling planking method that I've learned from the Half Hull Planking project. The second planking lines will follow the wale lines and won't be severed, unlike the AL's manual. There will be a lot more to cut walnut strips than the kit prepared, so I bought additional walnut sheets. It will be the first time I apply the method to the second planks, but I'll do my best.
- 77 replies
-
- 1
-
-
- Santa Maria
- Artesania Latina
- (and 1 more)
-
Hello, I have a question about debris in the hull. After I finished the first planking and putty work, I realized that something is in the hull and was making the crystal bell sound. I guess it is a wood piece, and I don't know where it is and how it went in. A museum curator may not like it, but I don't care because I won't move it frequently when it's done. However, I would like to know how to eliminate such unexpected particles next time. How do you deal with the debris in the closed hull?
-
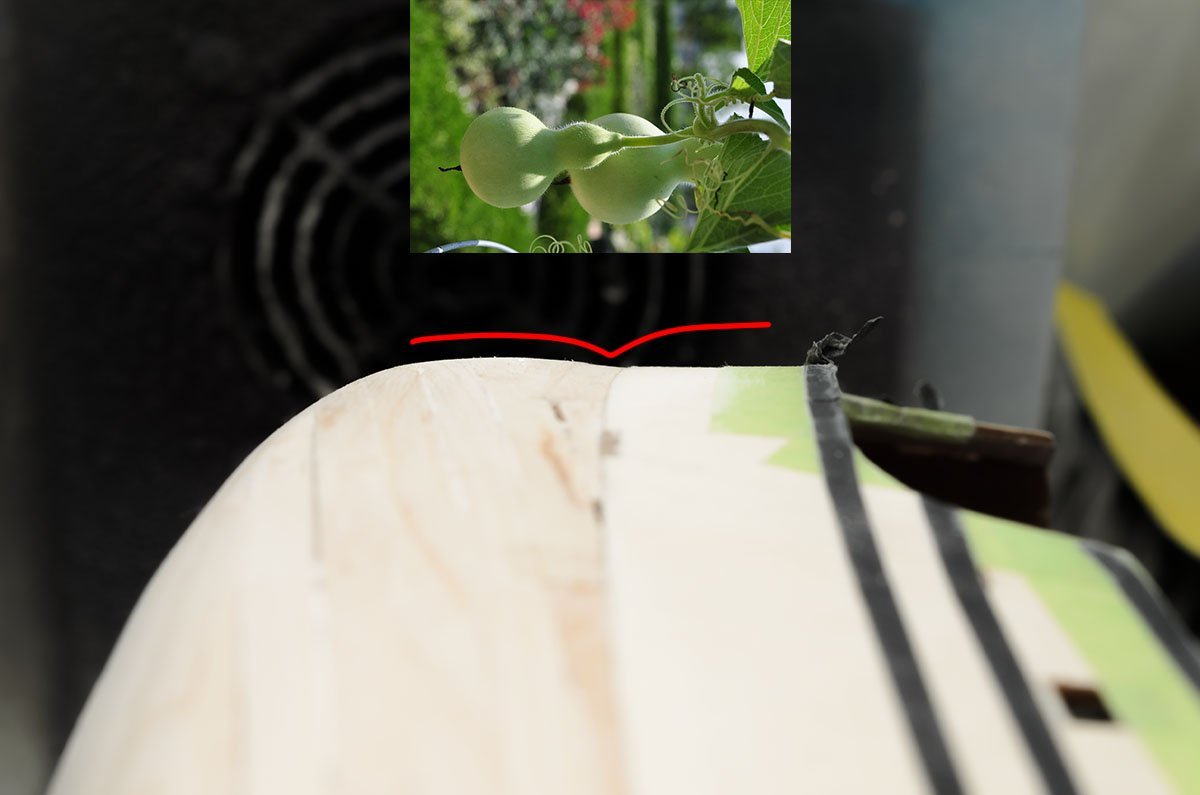
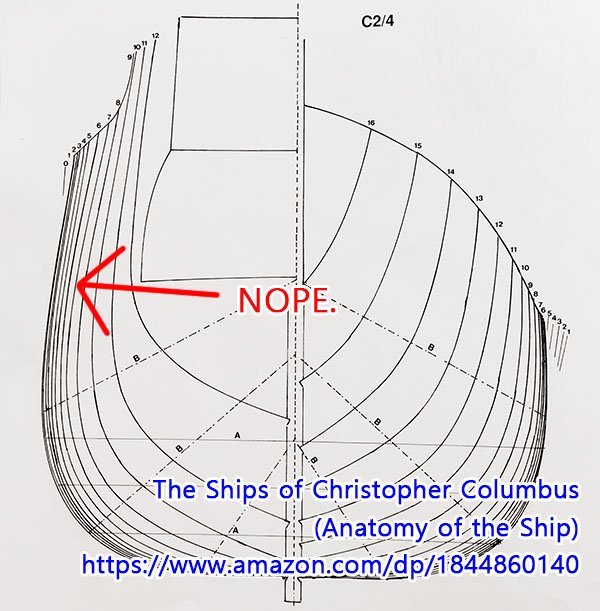
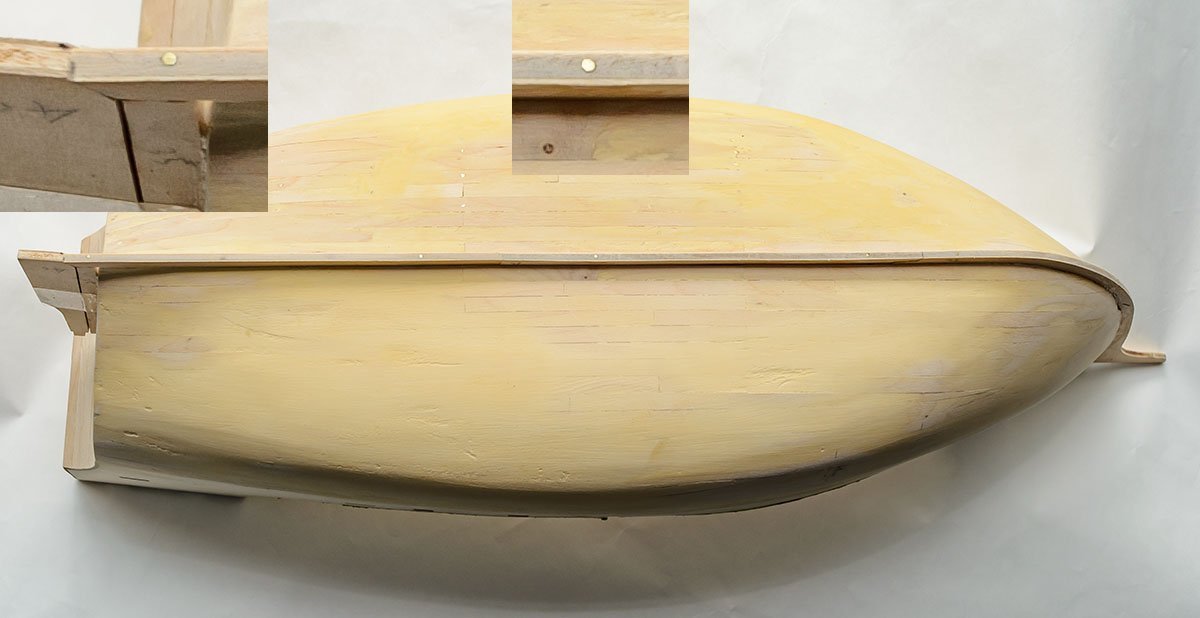
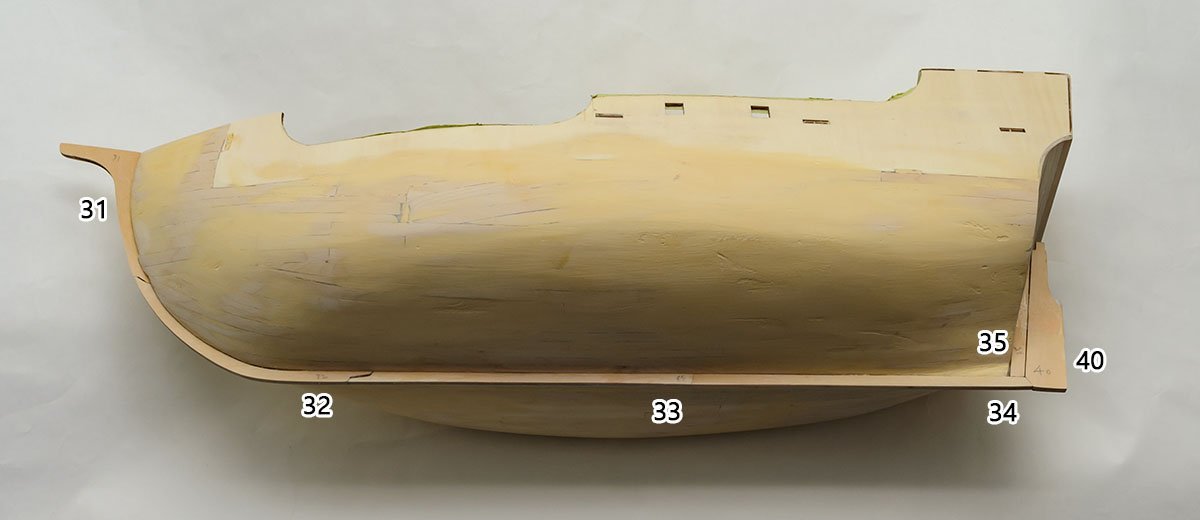
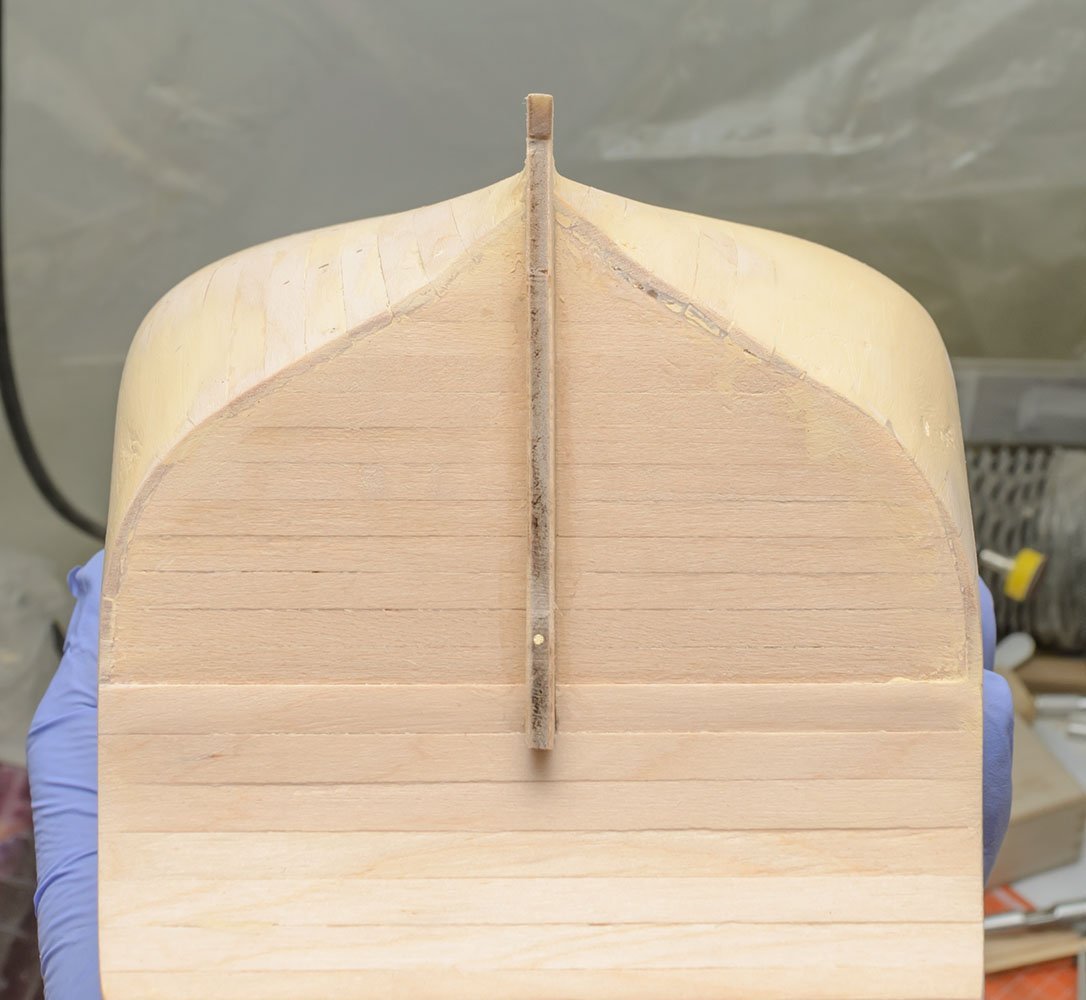
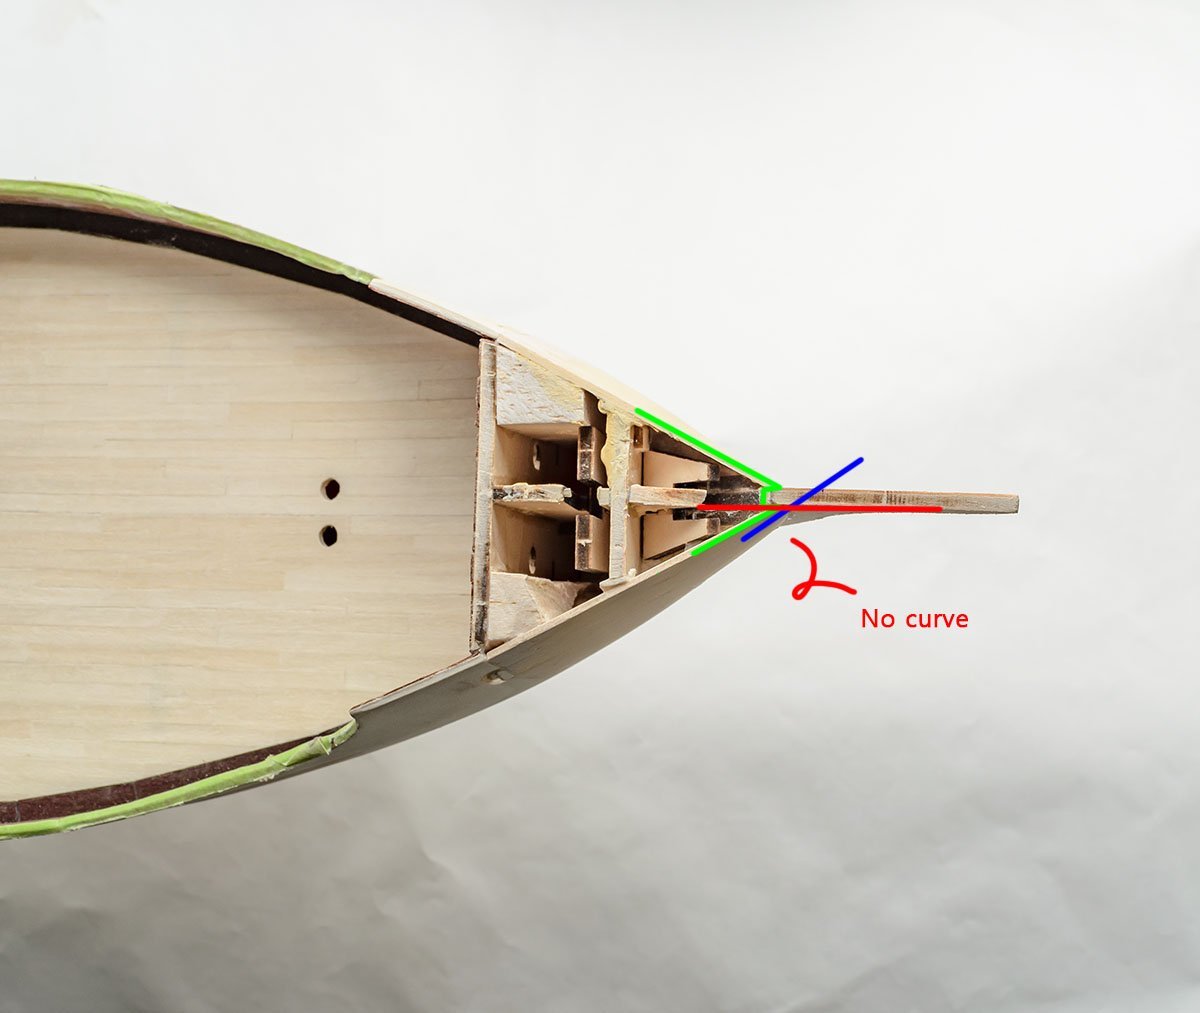
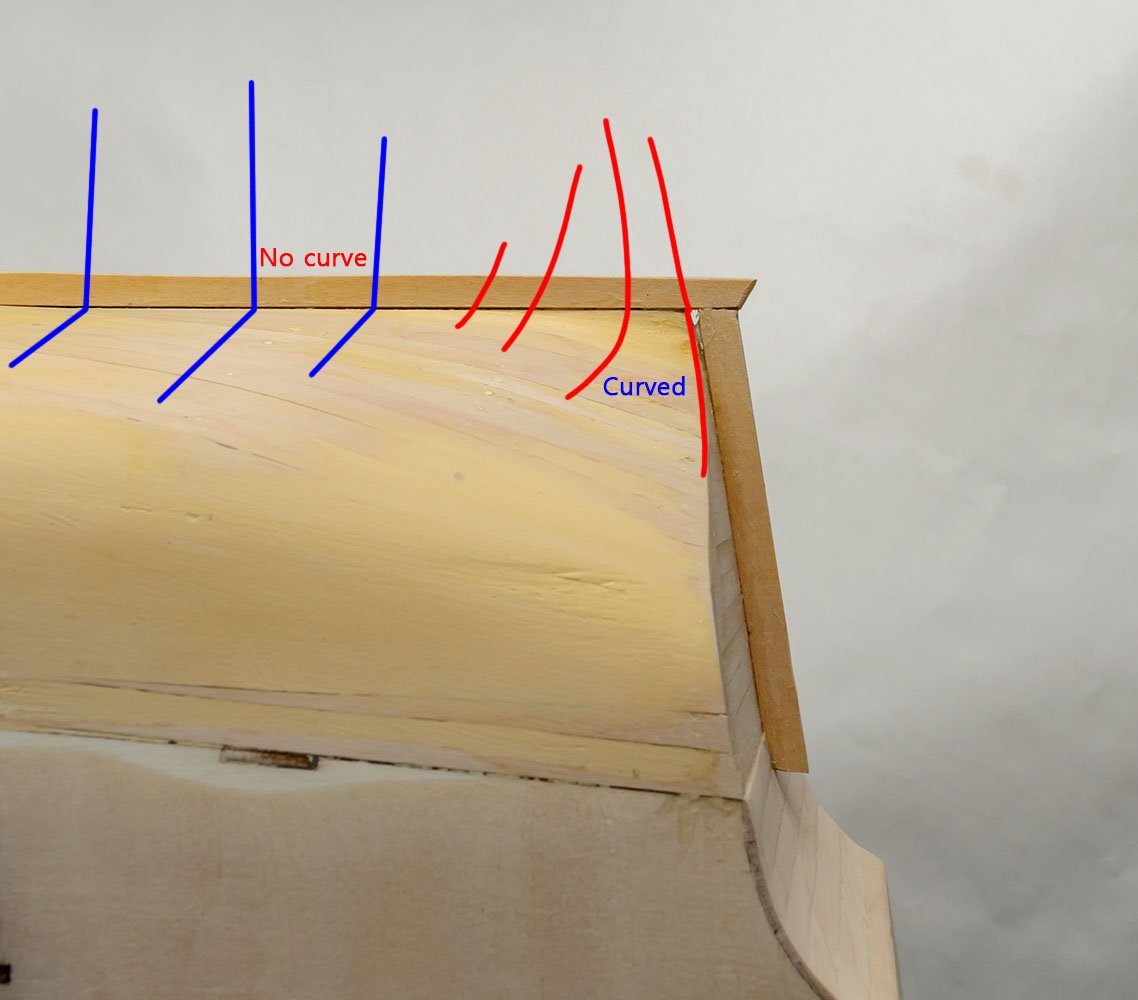
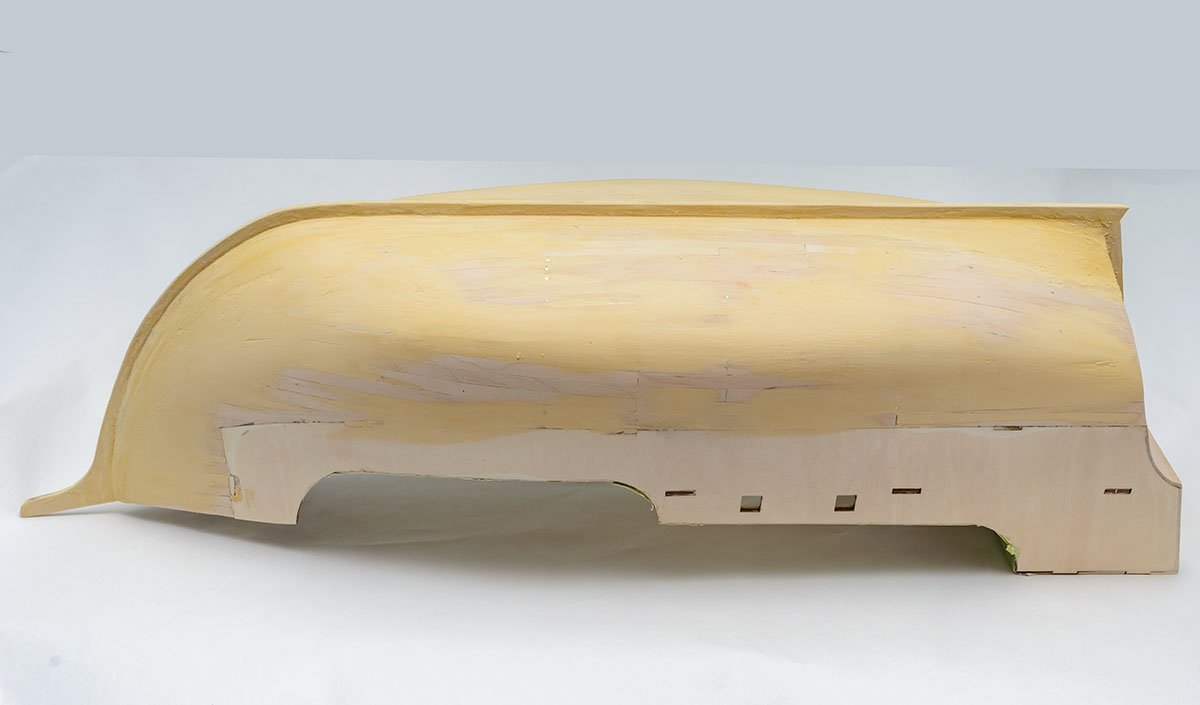
After I sanded the first planking, I found some suspicious areas. It is true that some wooden sailing ships were calabash shapes vertically like the HMS Victory, but this is a relatively old ship... I checked a reference book. Nope. That's an error. I sanded the torpedo bulge. Unfortunately, the first planks couldn't burden the error, and they began to show an internal frame. I stopped sanding and applied wood filler to the nearby area. I used Elmer's wood filler. It is super easy and more fun than I thought. I applied a small amount of water, and the wood filler became like mud and worked like magic. Look at the line after I sanded the wood filler. Isn't it nice? It is a lot of fun. >.< When I attached the keels, I found a part had disappeared. I replaced it with the other wood piece. I finished attaching the keels, stern, and stern post. From my previous experience, I know the stern, keel, and stern posts are easily broken in case of a drop or accident, and the broken keels hurt the dropped ship. 🤔 I reinforced the keels with 1.00mm brass wire. Well, I don't like the curve of the dead wood... I'll apply wood filler and fix it once again. This is my plan to apply wood filler finally. At the stern, I'll keep angled edges and make no curves. Rounded edges will make the ship's second planking unclear. On the contrary, I should make a curved edge at the stern post. I should apply enough wood filler to make a neat curve line. Another 24 hours waiting. See you again. 😎
-
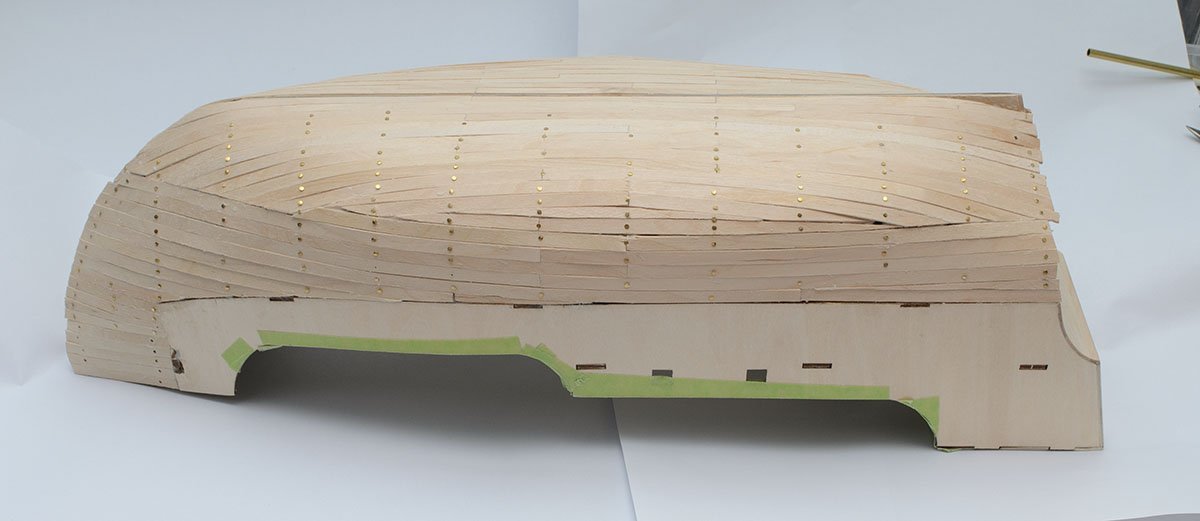
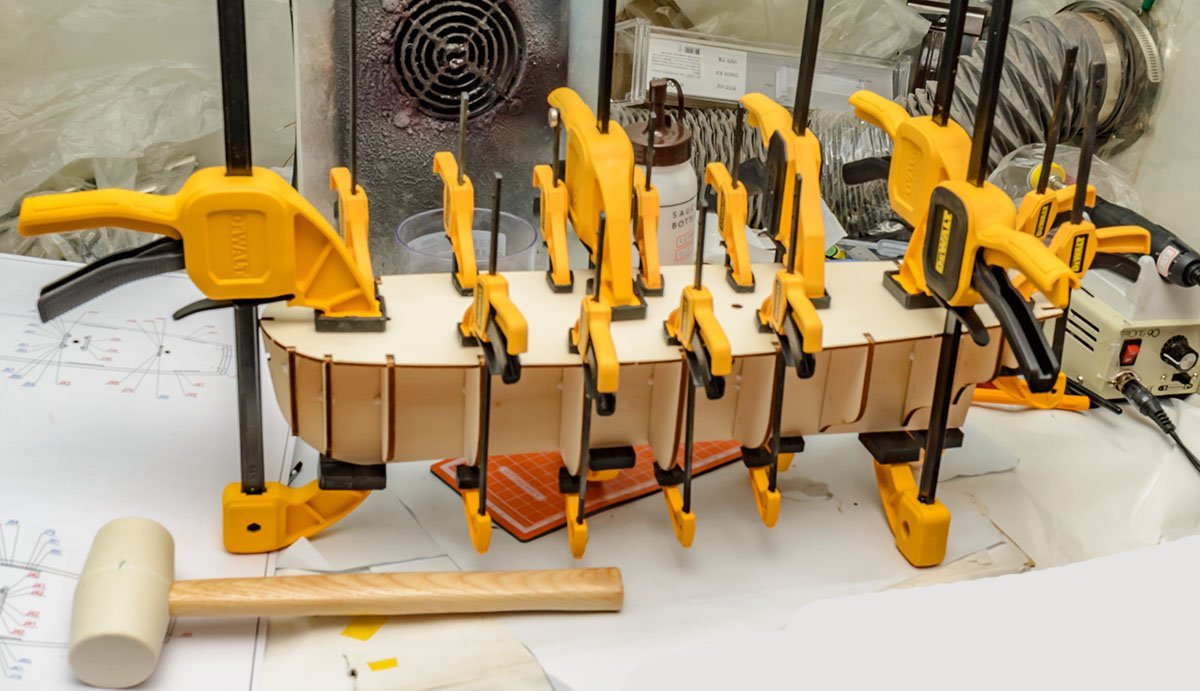
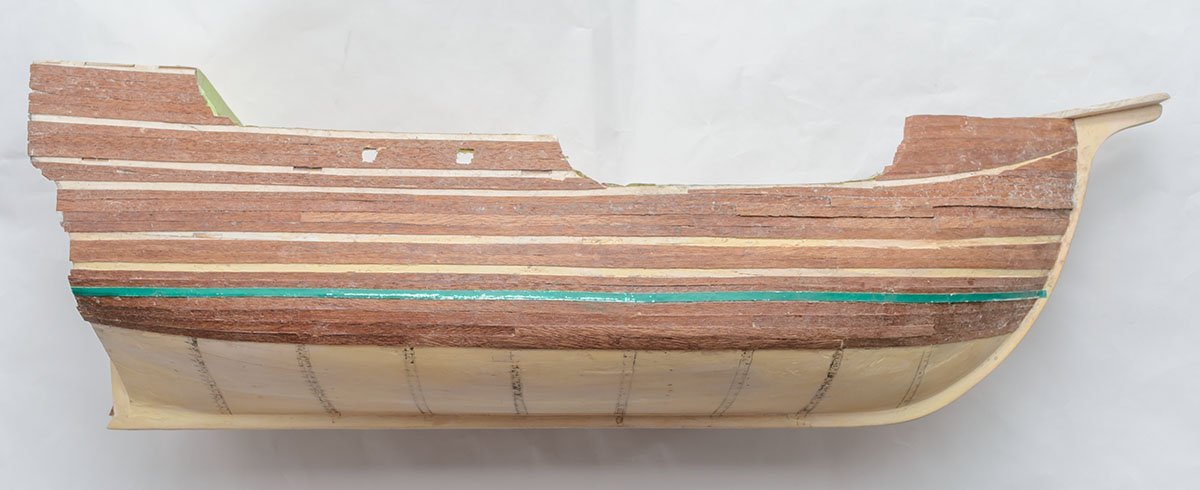
It's been a while. I just completed the first planking. I learned many things from this stage, so I would like to review my results. I spent approx. 20 hours on the port side only. It doesn't include waiting time for bond hardening, so the total work day is about 20 days. 😂 While I was waiting for bond hardening, I made some other models, which means this method isn't productive. 🤪 I realized the limitations of my previous method and decided to return to the nailing method. HMS Terror from Occre ↓ Too much clamping caused bending. 😱 Kruzenshtern from Zvezda. I used conventional nails for the wooden model ship. I completed the starboard side within 2 days. I spent 6 hours with no waiting time. 😲 These are summaries of each method I applied. Port side o Laying strips through wale lines. (Similar to the spilling planking method) o Only fast glue and woodworking clamps used + No holes (less putty work) + This could be an only option for the first planking model. - Too much lost time. - Can't continue planking work until the glue hardens due to large clamp sizes. - Working hours = 20 hours, waiting hours = 20 hours+ - A risk of losing interest. - Hard to clamp strips at various places - May cause loose planking which distorts the hull fairing. (See above picture) - Need to polish many planks narrower, which may cause a lack of strips. Starboard side o As is (AL manual's method) o Used fast glue and brass nails + Continuous work. No delay. + The nail head size is 1.20mm, so that it doesn't interrupt nearby planks, unlike clamps or push pins. + fewer polished planks means fewer wasted strips. + Tightly bond strips to frames as hull fairing was planned. - May not be appropriate for the first planking only model. - Tons of unnailing. Hard and uncomfortable. In some cases, it is negligible by sanding, but the rust may cause some trouble. - Many small holes. Not a big issue after putty work. - More gaps among planks. Not a big issue. I would say that both methods are OK, and the nailing method is more suitable for new builders to keep interest and save a lot of time. By the way, I found an interesting idea that reduces the disadvantage of the nailing method. The larger nail head makes unnailing easier. I'll slightly change the Techtonic' method, and apply it to the next build. It's not the end of the first planking. I'll sand the surface, apply wood filler, and sand again to get a very fine surface for the second planking. The wood filler requires 24 hours of drying time at least. I made a video for those who want a closer look of my first planking work.