modeller_masa
-
Posts
950 -
Joined
-
Last visited
Content Type
Profiles
Forums
Gallery
Events
Everything posted by modeller_masa
-
Although the Aliexpress removed some pirate items such as ZHL ships this year, there are many similar items that don't have enough quality original has. I also ordered another belt sander at first, and then cancelled it soon due to bad feedbacks. This is one of the caution points when you purchase something from the biggest Chinese store. - Find the best, not the cheapest item on the list. All the items may not be same. Some cheap items can be a lower quality item that couldn't pass QC or copied item by the other shops. - Read feedbacks carefully. If no feedback, avoid the item if you can. - Buy the reliable item as someone recommended. However, don't estimate that the seller sell the same item in the next time. - Be patient. the shipping speed from them is always terribly slow before and after COVID-19. It will take 2~3 months. You can cancel it after 3 months.
-
Oops. I turned off a notification setting. Thank you for many replies! After I read replies, I gained enough confidence and got much clearer plan to replace broken masts. Thanks again to your advices!
-
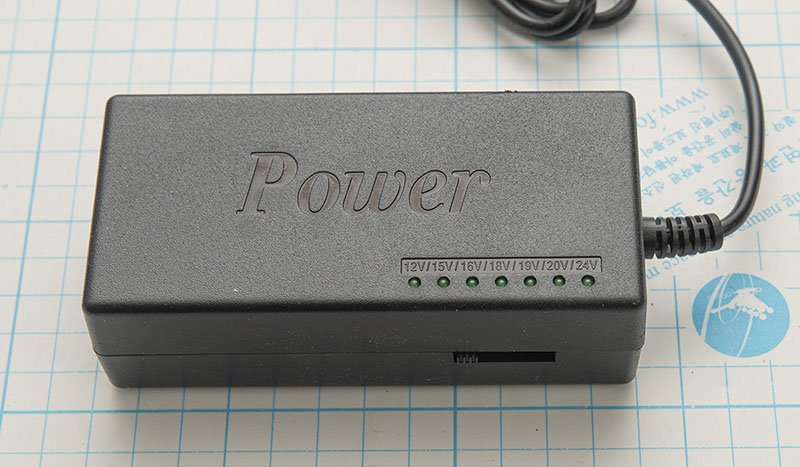
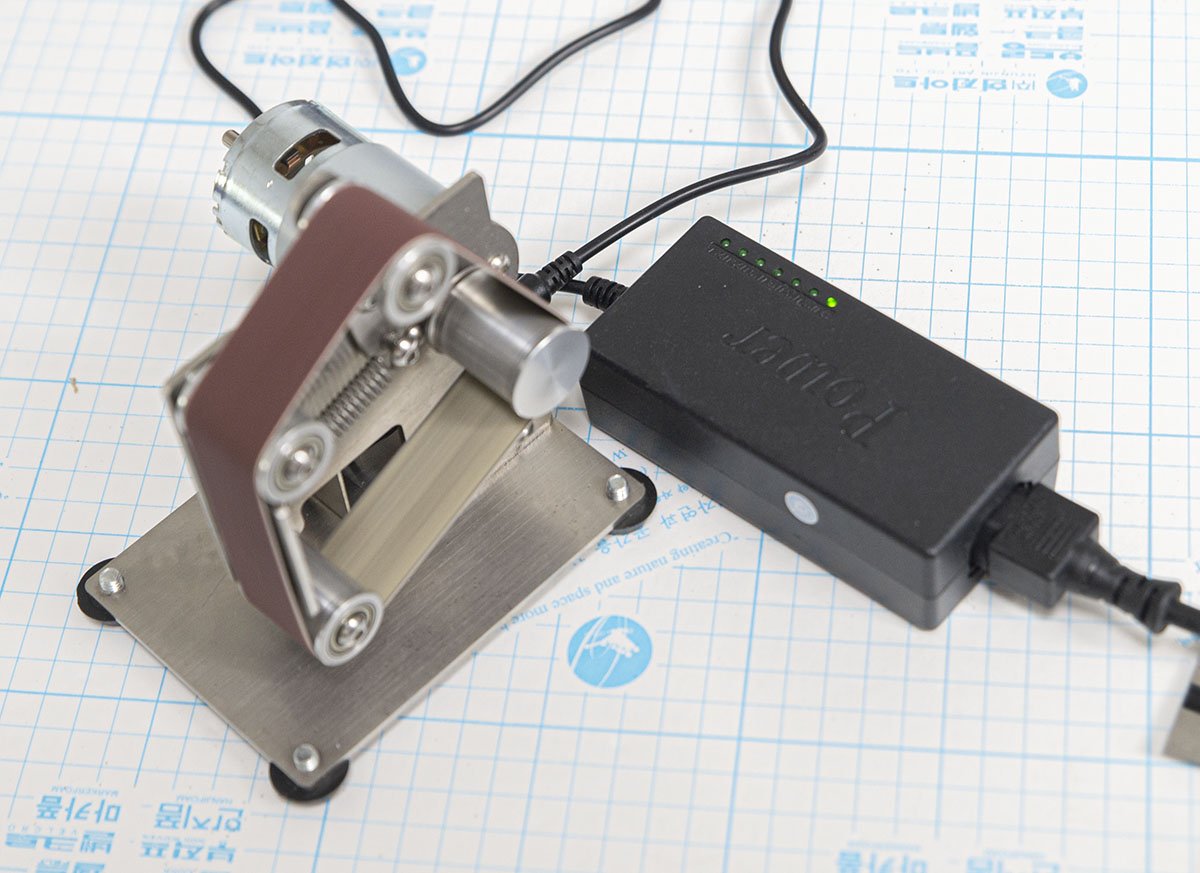
Wow, the page went to 2 page. I didn't notice your comments. Sorry. Popeye the sailor : Exactly. But, I think I didn't need to care about leveling if I drew horizontal lines on the MDF. If I used the original cardboard paper, the leveling would have been 100 times easier than now. I should have to draw the lines when I made CNC MDFs. mtaylor : Here is the link I ordered. https://www.aliexpress.com/item/33014864680.html?spm=2114.13010708.0.0.60d44c4dmqrYLv In your case, the type 6 is the best one. (Type 1~3 : 15mm width, Type 4~6 : 25mm width) If you choose the 25mm belt sander, you can purchase additional 25mm width sanding belts from here. https://www.aliexpress.com/item/4000510159483.html?spm=2114.13010708.0.0.60d44c4dmqrYLv Also, I recommend you to buy this speed controller. https://www.aliexpress.com/item/32945884969.html?spm=a2g0s.9042311.0.0.67964c4dyI7vVg This one makes the mini belt sander perfect. When I tested it with the sander, I was able to slow down the speed to make it less aggressive and more slience. I think the sander with this speed controller will be very useful for my next wooden model ship project.
-
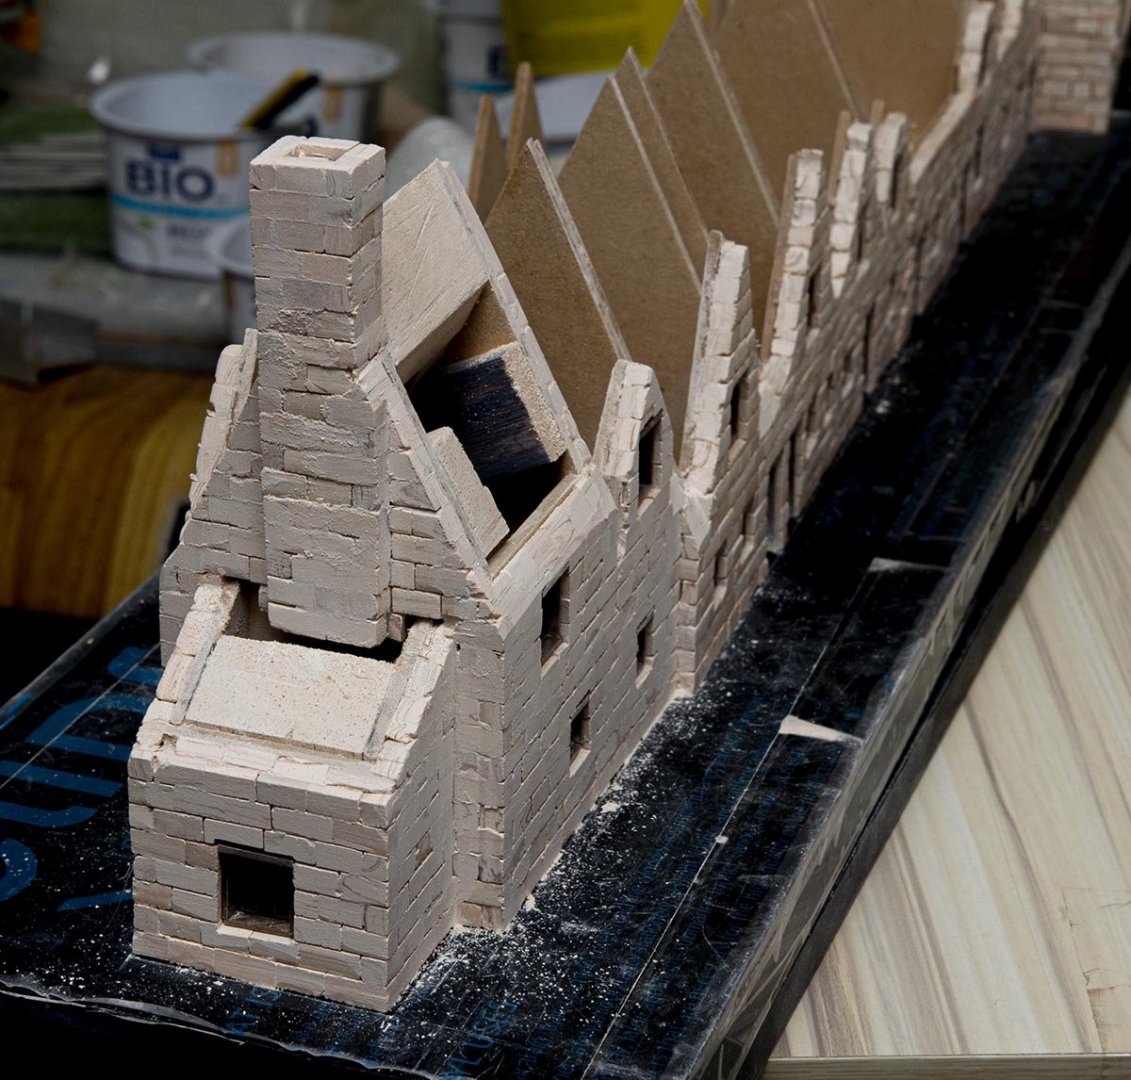
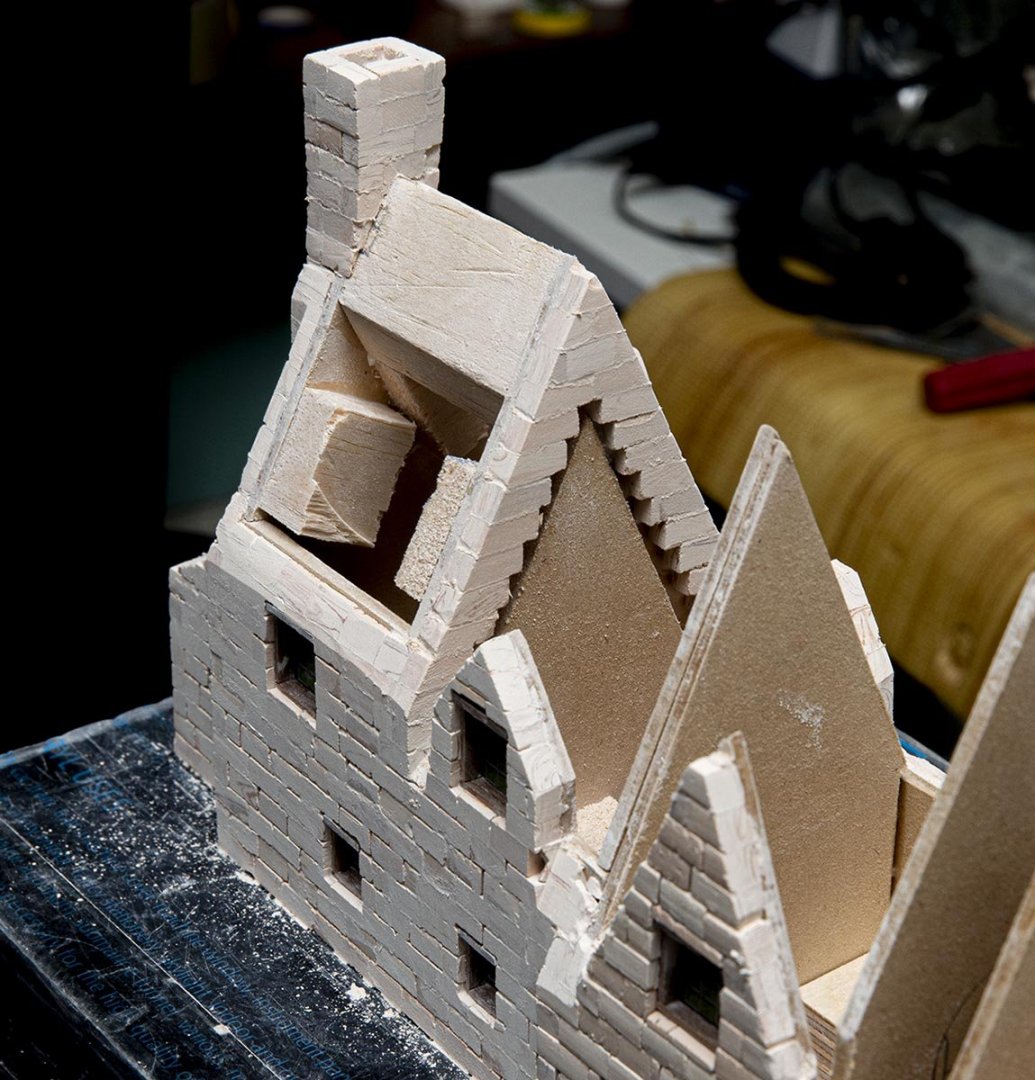
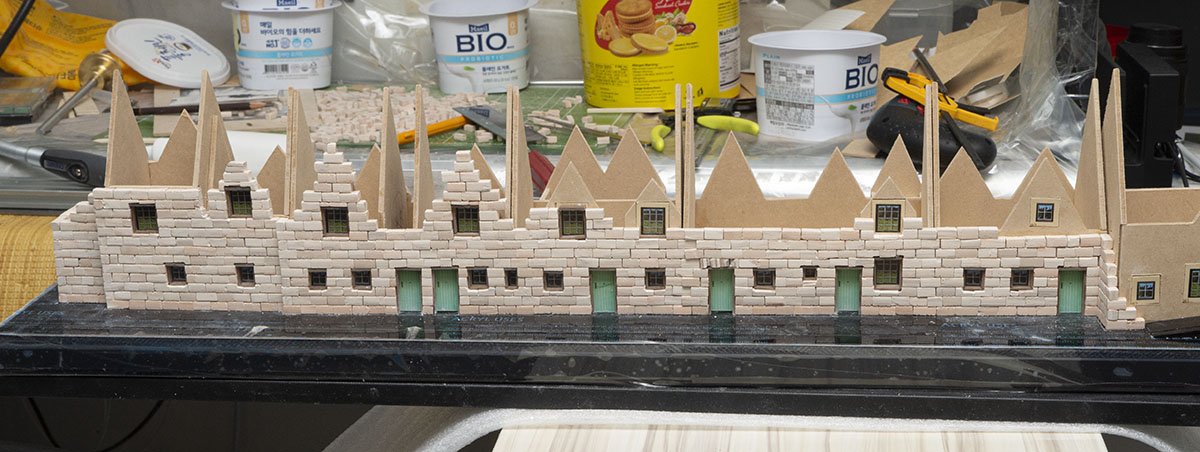
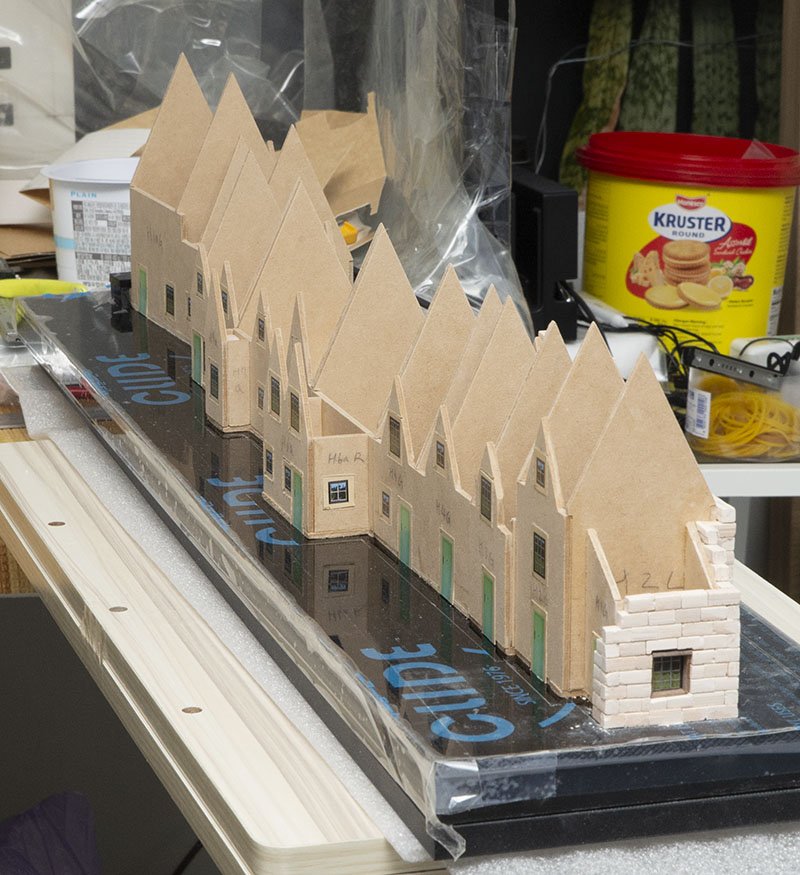
I fixed them. All things are connected, so I had to finish rest of wall parts to fix it. By the way, I have only a few days until the birthday. No time to rest and sleep. The walls are almost done (90%), but placing a rooftop takes lots of time to fit tightly. The wood blocks are balsa wood. I'm running out of sanding paper.
-
Hello. I have a picky question about lead free soldering. Today, I purchased a Revell 1:450 HMS Victory. Unfortunately, the masts in the kit are broken due to under 1.00mm thickness. I want to replace them to brass rod with soldering. The only thing I worry about soldering is a lead corrosion. https://www.navsea.navy.mil/Home/Warfare-Centers/NSWC-Carderock/Resources/Curator-of-Navy-Ship-Models/Lead-Corrosion-in-Exhibition-Ship-Models/ According to the NAVSEA, the lead corrosion is caused by lead parts. I have soldeing station and have experiences on lead free solderding. However, when I checked the compositions of the "lead free wire', I found that the wire has a very tiny lead. http://www.almit.com/dloads/Specs/leadfree/spec_kr19sh lfm48.pdf There is 0.09% of lead in the 'lead free' wire. This is a SAC (Sn, Ag, Cu) solder wire. Do you think the 0.09% of lead component will cause a lead corrosion in the future? Do you think it is considerably or strictly ok for 'Museum grade model'? I want to use the solder wire in the future if it is ok. It is scary to handle torch for silver soldering. If it is not a 'proven' issue, I'll wait for a conclusion. Thank you for reading.
-
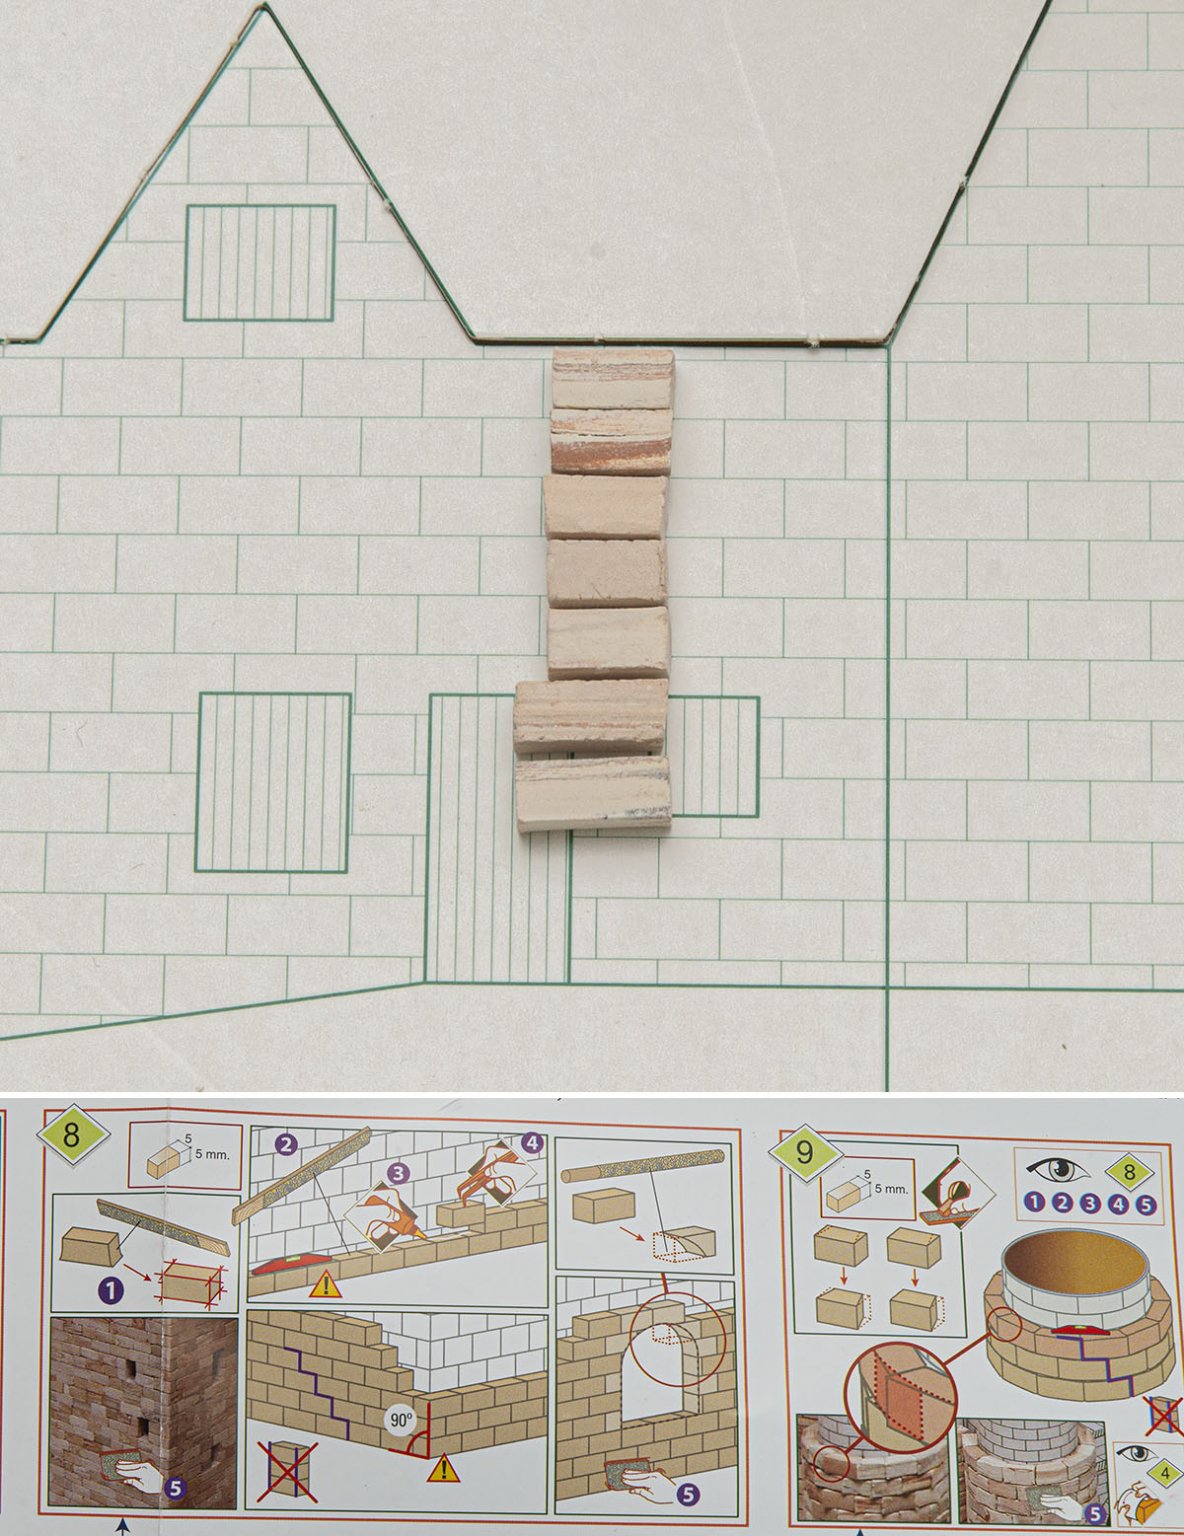
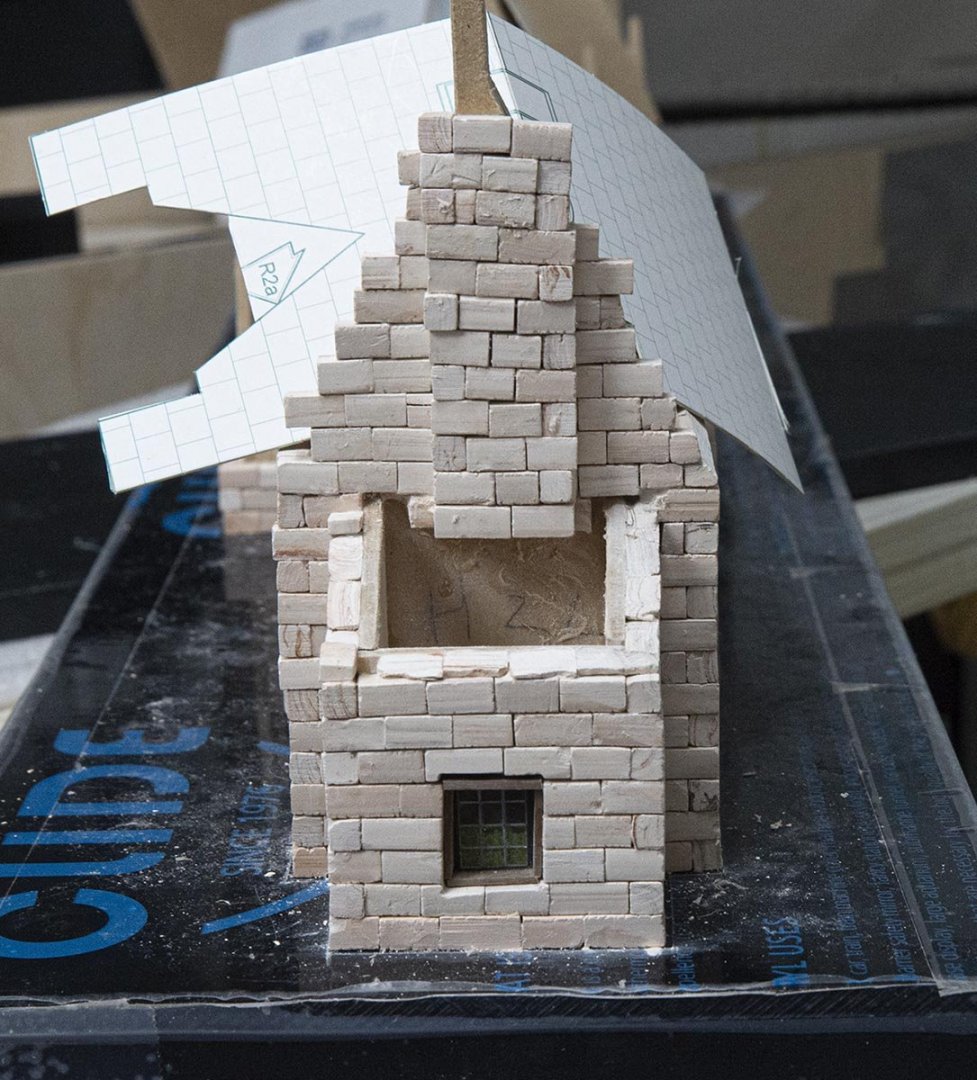
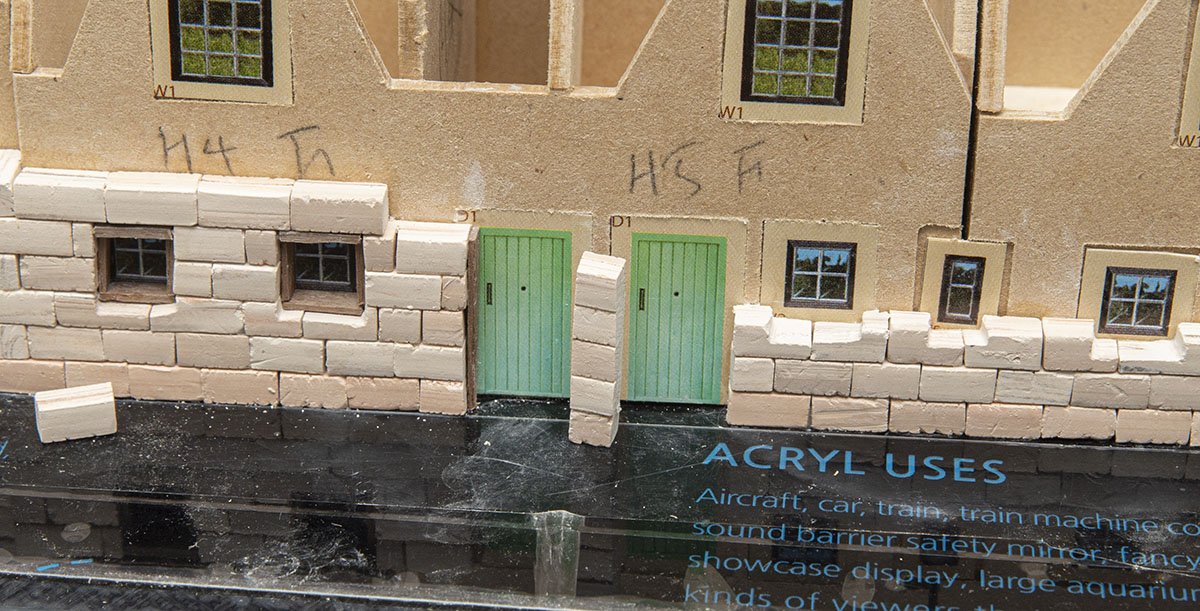
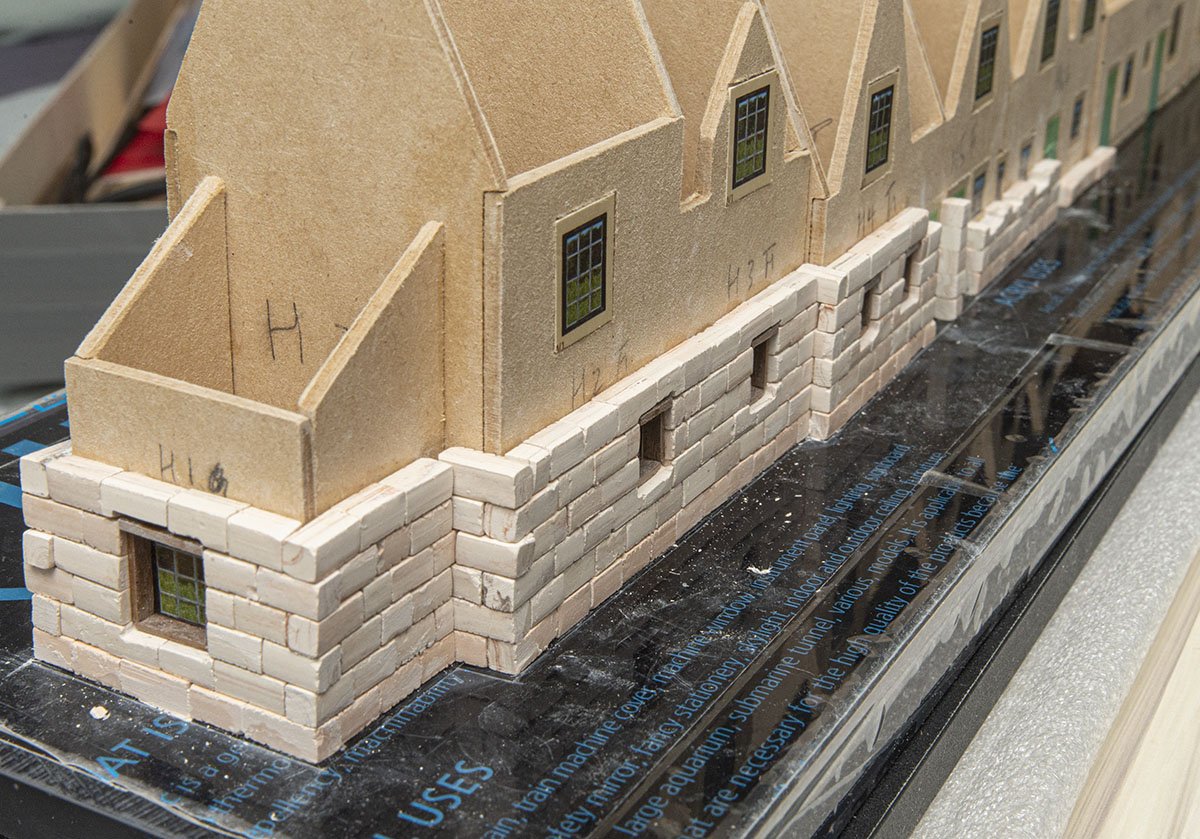
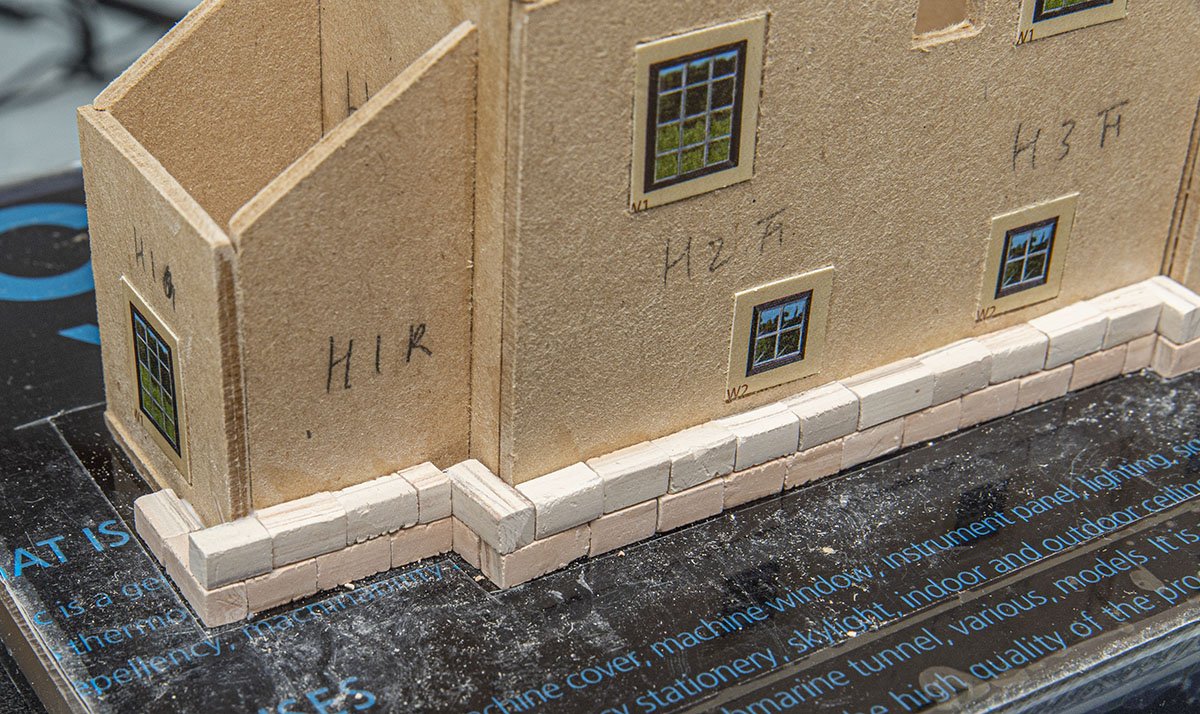
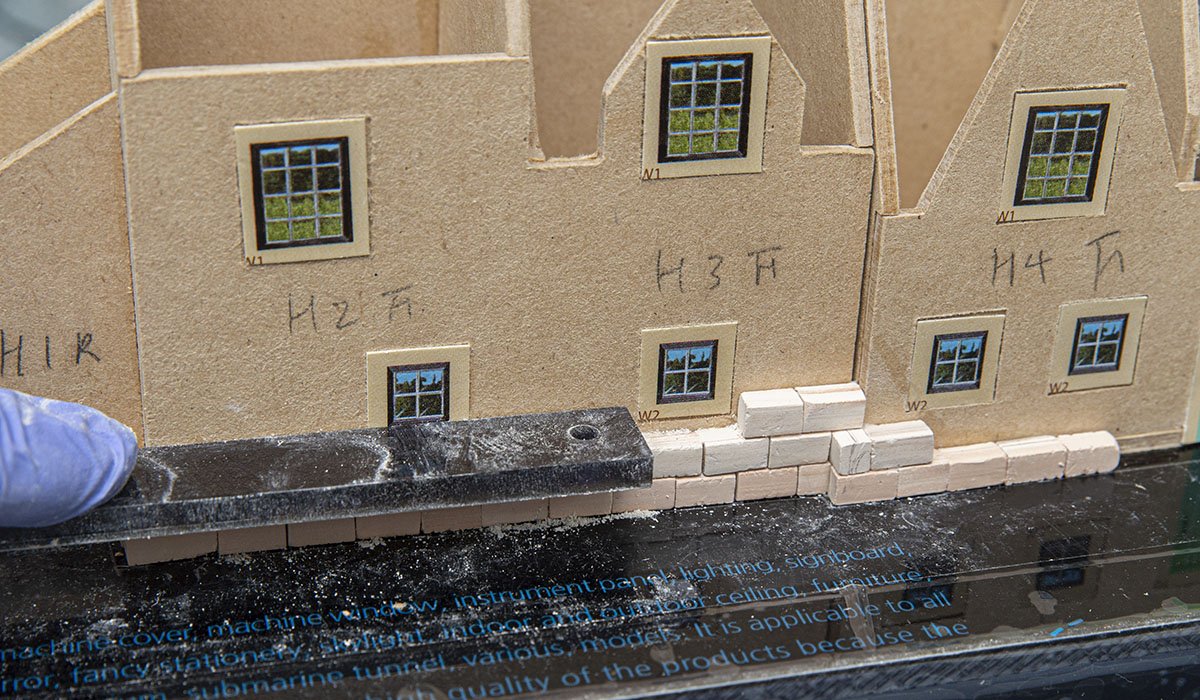
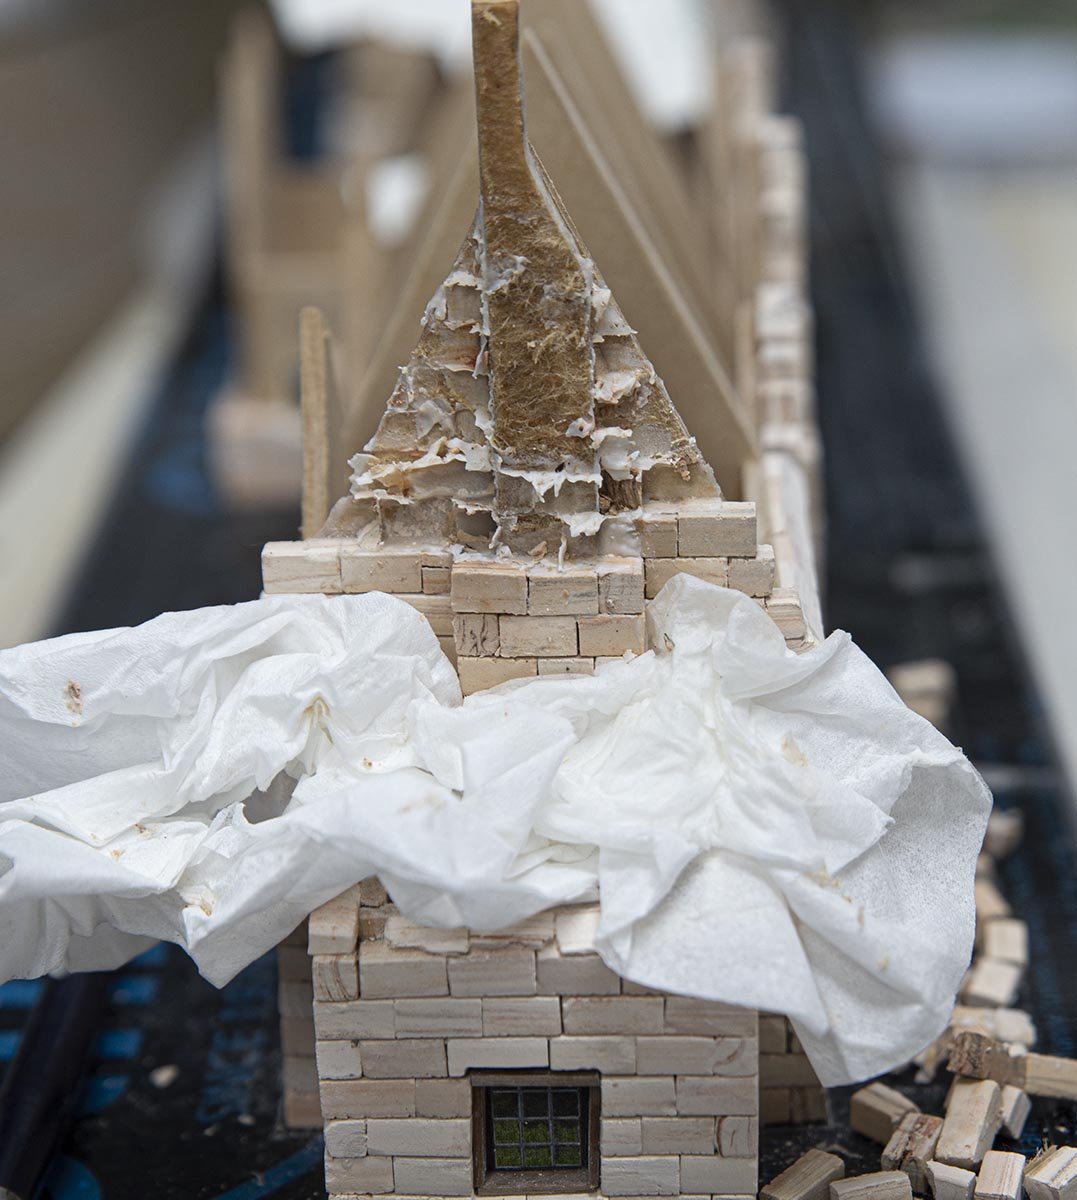
Sorry about late post. I was been busy with care of child. When I finished the first chimney and tried to place the first roof, I realized that the tiles don't maintain level! The biggest reason is that I made the part at side direction. (Couldn't check out the level with my eyes.) Also, I became careless after long time same work. Fixing the trouble was really horrible. It is super sturdy, and not possible removing blocks without breaking it. I used brush with water and art knife. Fortunately, I was able to remove the wrong blocks roughly without structural destruction. I don't want to imagine if I didn't use the MDF inner skeleton instead of original paper cardboard.... If you have same problem, I would recommend to bash the part with hammer, and buy additional blocks. 🙂 Most of removed tiles are not usable... It is a kind of boring job, but needs great attention on leveling each stage for the finest result. Lesson 256.

-
WHAT? 1/10 ? ARE YOU KIDDING?! By the way, no Korean will go to the museum by historical reason... The company or the artist is looking for investors. If everything goes well, he will sell the full kit to western area inlcuding the US and Europe. As you expected, we Korean don't have enough market for hobby, so he will sell it to Korean by custom order unlike yours. 😂 I think you should wait for a long time until the kit is completed. (I don't know him personally, so it is up to you to send him an e-mail directly. The e-mail address is in the link.) This gun part is made by 3D printer and resins. He said that he will use several manufacturing methods for each parts to lower the final price.
-
(source : https://mmzone.co.kr:40004/mms_tool/mt_view.php?mms_db_name=mmz_media&no=5913 ) One of South Korea hobby company is designing a 1/35 fletcher class destroyer model. This prototype is a part of the ship, and the price of this gun is 90,000 won which is equivalent to $73.44. I have no space to display it...
.thumb.jpg.f05f0df989e4b69115a43d4f9adc8795.jpg)
.thumb.jpg.6b1cba9888b7bd49ae79fa326062b4da.jpg)
.thumb.jpg.a4d13ddc1b4204ae158086a3caabc518.jpg)
-
Thank popeye worrying about our family. The answer is no. A few days ago, I've read about post that grandfa was looking for good basic wooden model ship kit for working together with his grandchild. The post made me to think about the best kit for family-cooperation work. In my opinion, this easy and simple stone block construction kit is much more friendlier than conventional wooden model ship kit for kindergarten students. Wooden model ship is relatively complex, and use various and dangerous tools for preschoolers. However, this kit requires only PVA glues and sanding sticks when parents or grand parents take charge of making blocks with that mini belt sander machine. Of course, I don't say this is the best kit for both of parents and children. I just compared this kit with wooden model ship kit only . Probably, the best kit for cooperation with preschoolers should be the Lego or plastic kits for juniors. I don't want to expand discussion to that, so I conclude it like this. "When you consider cooperation with your children, this stone model kit is relatively safer than making wooden model ship kit. Also, you won't need time to educate children how to use knives and motor tools properly."
-
Thank Mark. If I worn about the virus more explicitly from my experiences a month ago, could it help people in this forum? What I can say now is that you should wear a facemask or scarf when talk with any people out of your house, and stay away from people who don't equip any protective gears. It is a valid method proved by many cases. The only problem is that many countries doesn't have enough masks for people and doctors. It is the biggest reason some governments don't recommend it, and only time with more product lines will solve it. I hope you are well, and hope this pandemic will come to an end very soon. It is not fun that hobbies I can enjoy became only one.
-
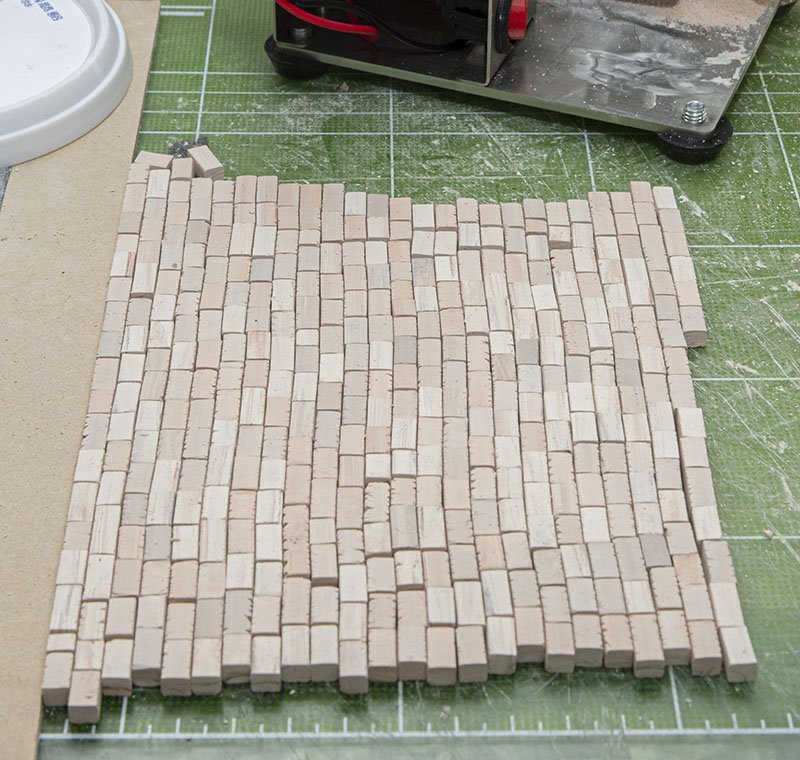
Hello. Today is the last day of march. It's been busy days, so I had no chance to touch the stones. My parents came back from the US after a month of journey last week. I planned a schedule to move them from airport to home safely. It was so detailed like a military operation. We used a private car instead of public transportation, and we wore face masks in a car and nobody didn't take off it until we arrived at home. 😷 Now my parents are doing self isolation. It's not regulated by government because they didn't have any explicit symptoms when they passed quarantine office. However, the COVID-19 is really good at hiding. Therefore, they won't go outside for two weeks voluntarily. For the self isolation, I've already purchased and filled storages with lots of frozen foods and a bundle of toilet paper. Because of the reason, I'm doing my parent's errands and delivering fresh foods to in front of door. (I don't go indoors.) Fortunately, they said that they have no symptoms such as fever or cough yet. Anyway, The mini belt sander proved its usability. I was able to sand 360 blocks in an hour. Honestly, it was not a fun job. I spent 2 hours and accomplished about 15% of all work of wall. I stopped today's work earlier than before because of lack of blocks. The new process is several times faster than previous process, but it also consumes several times more polished blocks at once. If you have will to make this kind of stone kit with your tiny children, you should distribute tasks into two parts. When you sand tons of blocks tediously, your children will ask for more blocks with a joyful scream. 😂
-
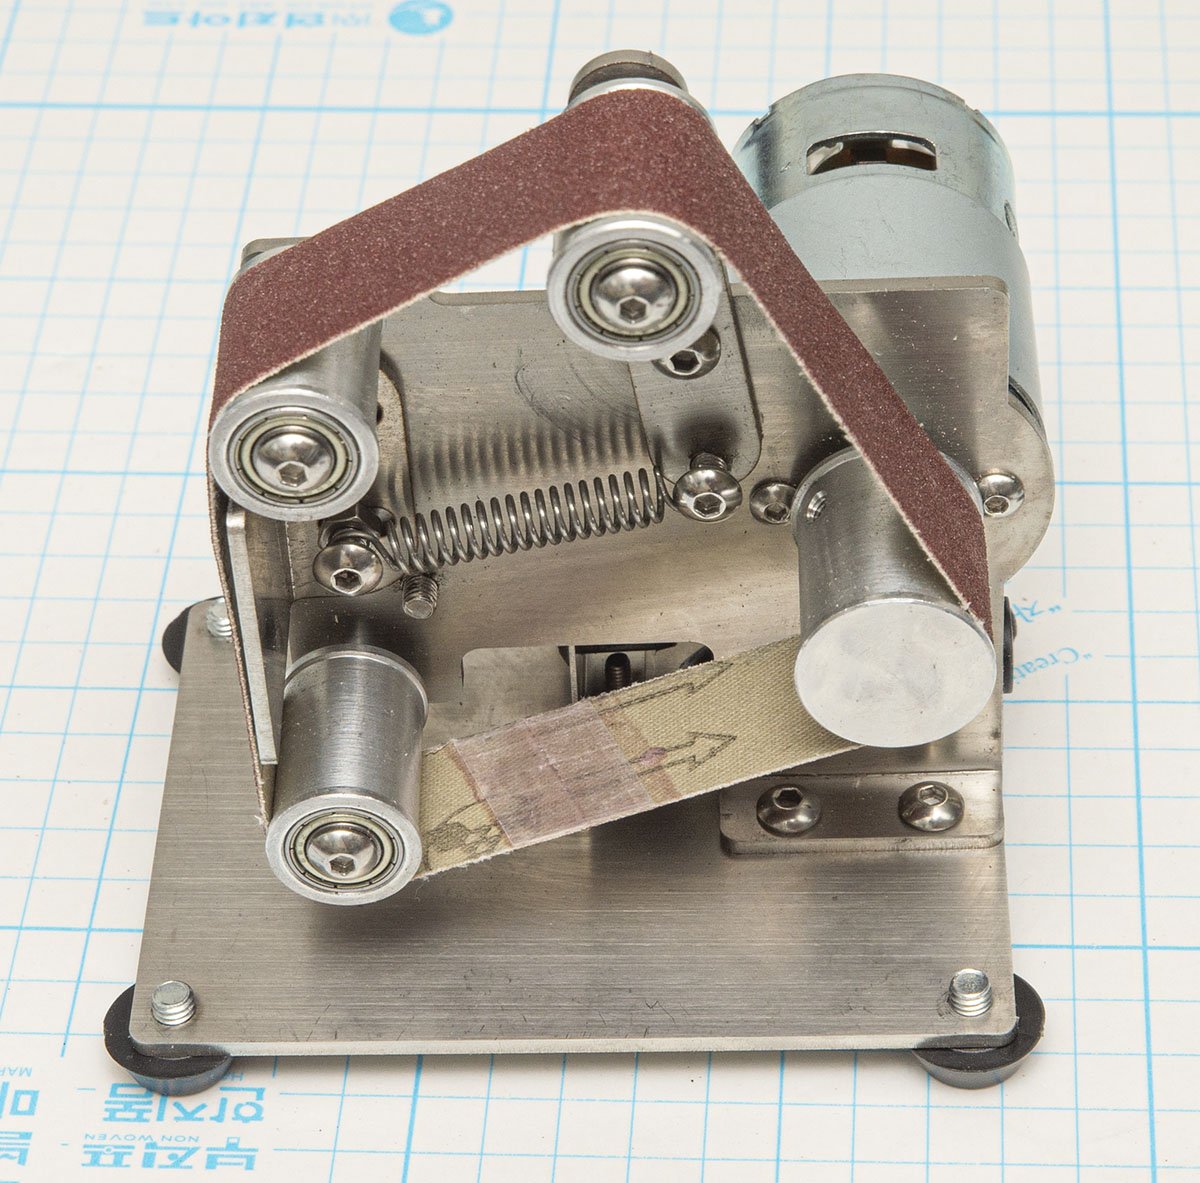
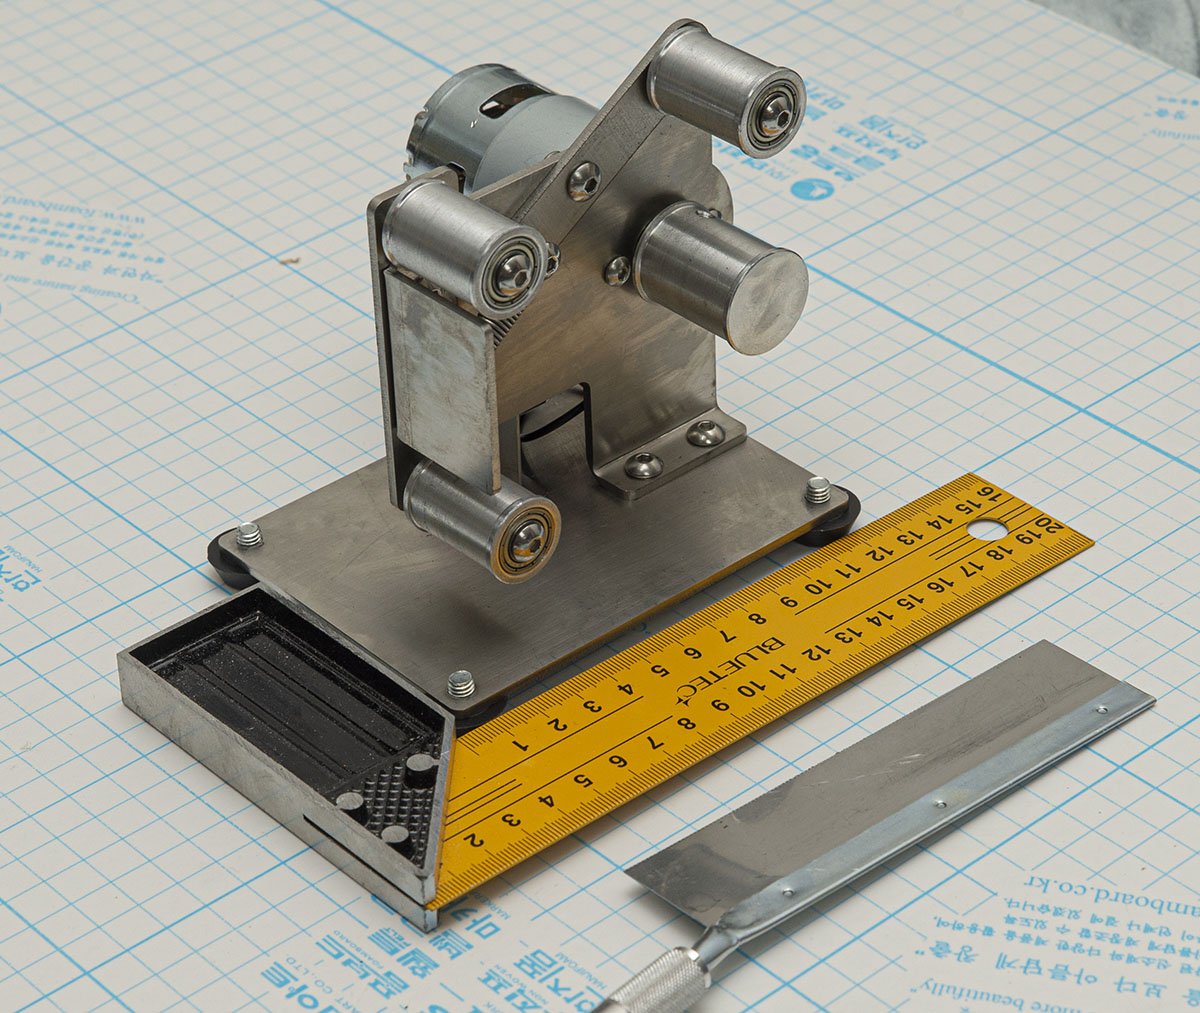
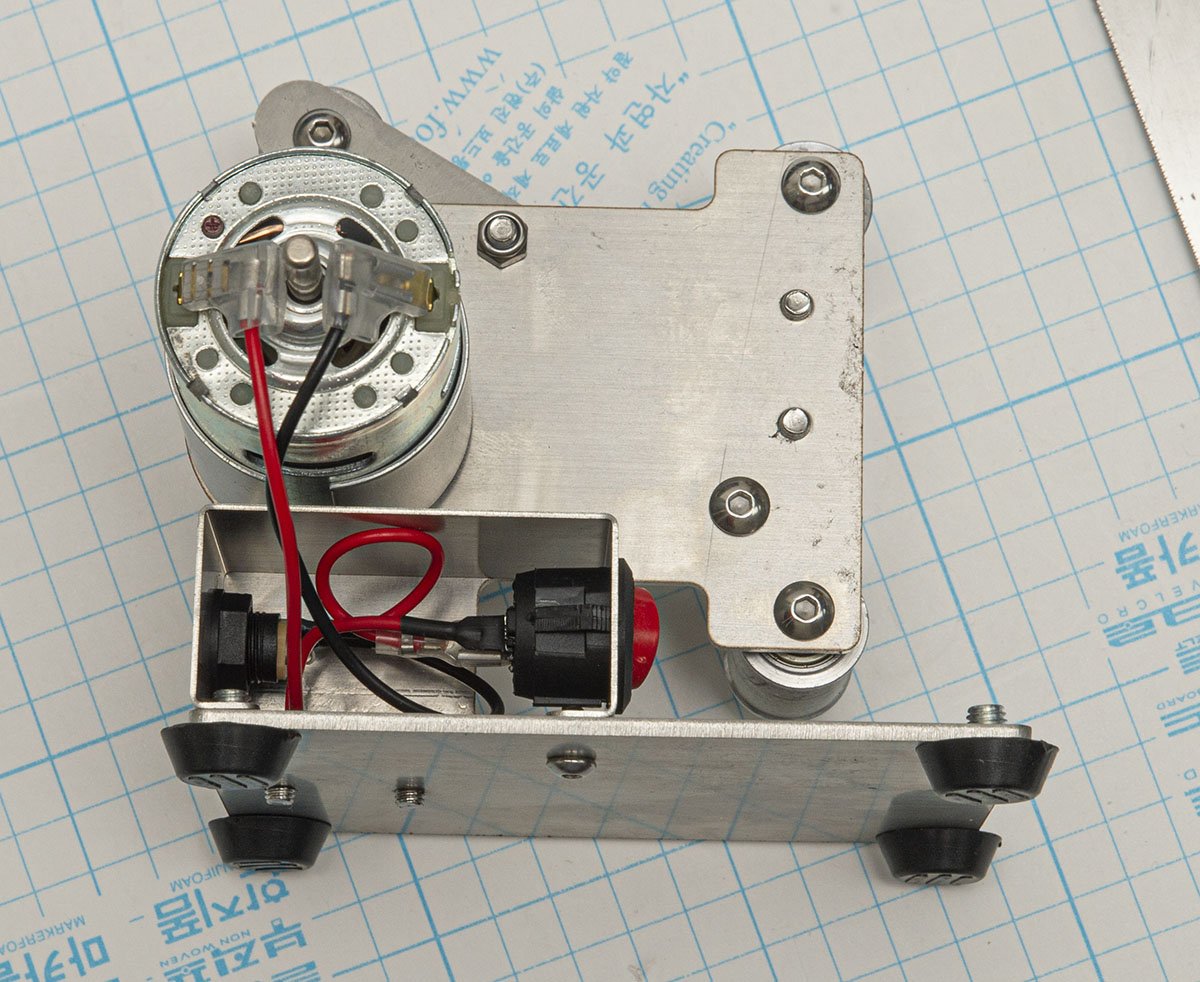
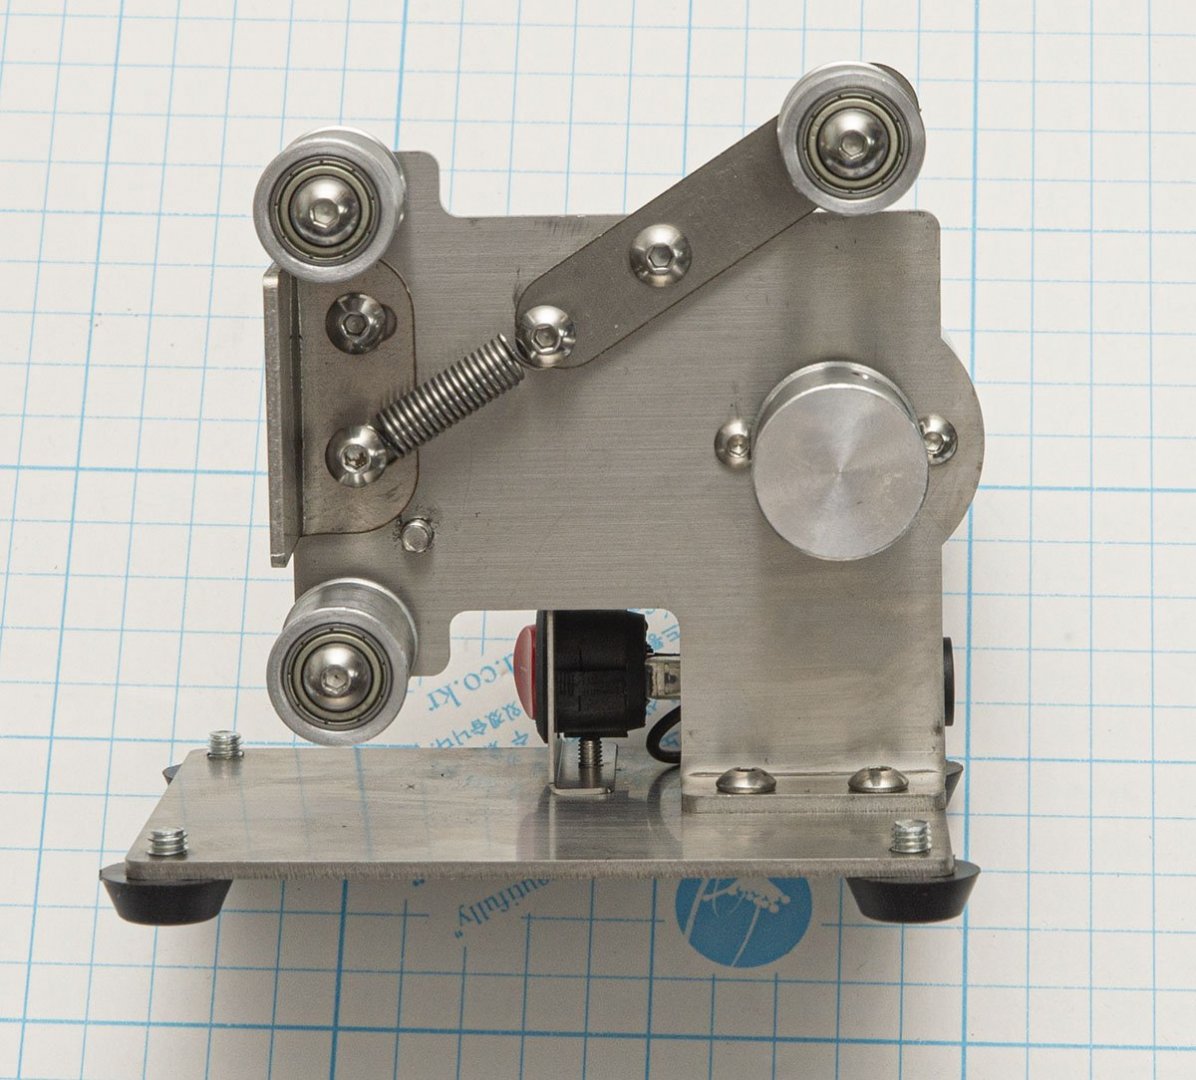
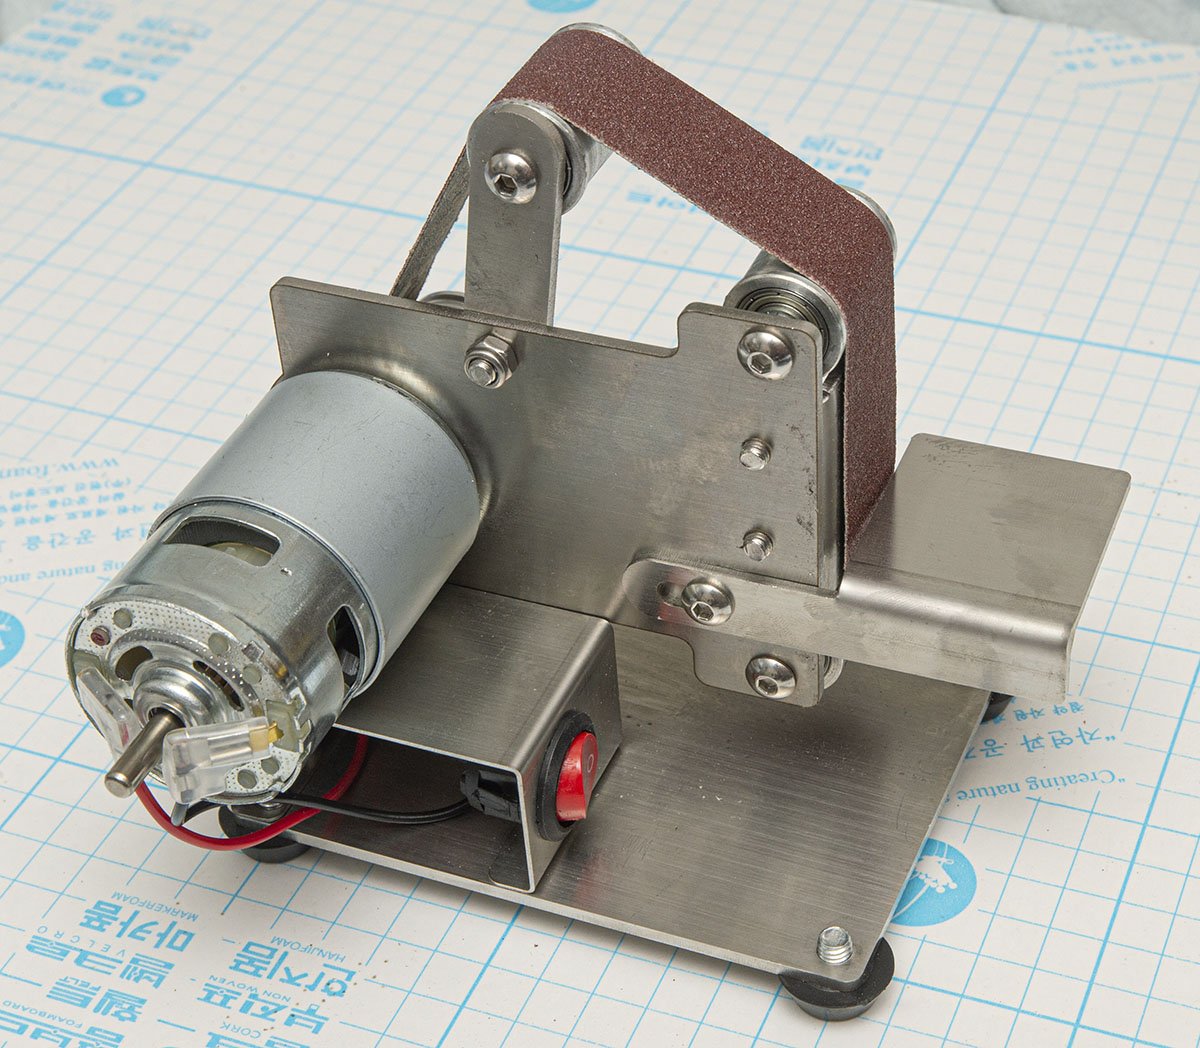
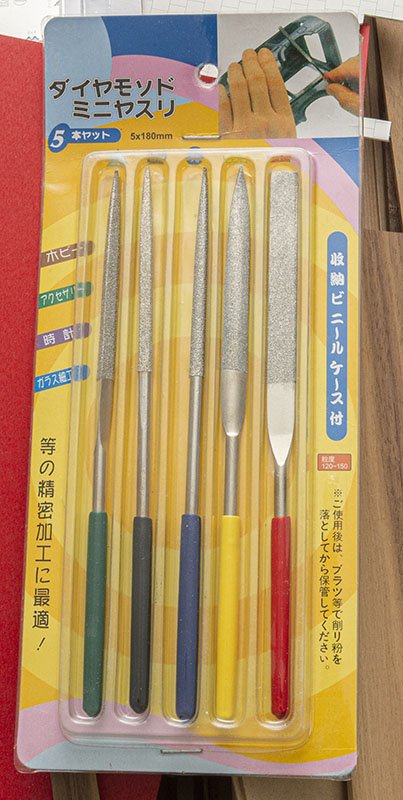
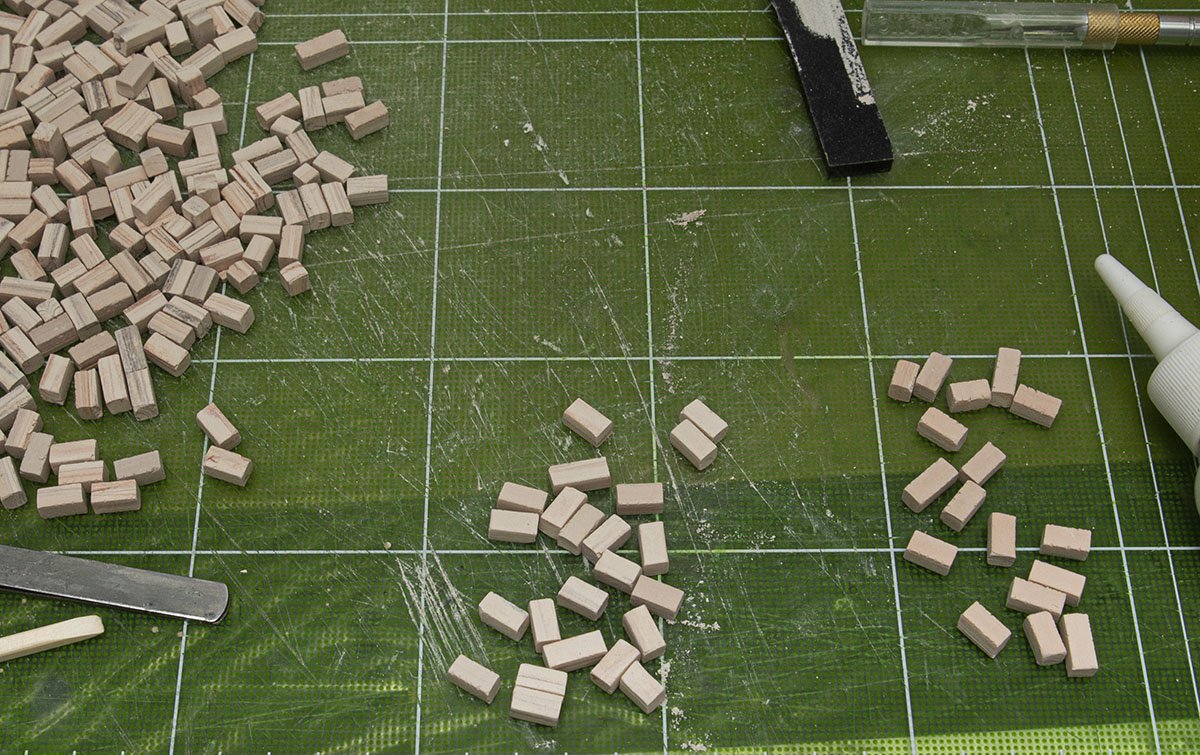
Day 6... Approx 40% of wall completed. (4~5 hours) I bought some tools for the next process. Theses are niddle piles. I also bought mini belt sander to optimize sanding work. This is really small and tiny belt sander. 120 x 100 x 150mm. It uses 775 RC motor. The motor speed is variable, but it is controlled by power adapter as most of chinese cheap tool does. The structure is too simple, so I don't worry about quality of it. It is a durable piece of steel. I attached 120 sandpaper belt. I was scared by huge noise and too fast speed at the lowest setting. It sounds like a band saw. I finished installation. After some trials, I concluded that this is a must have item for sanding blocks! I used to spent 10 seconds to pick up neat block ready for gluing. However, if I couldn't find neat block and had to sand askewed blocks, I had to spend 60 seconds to sand the block. This machine makes perfect cuboid at 5 seconds! It will really save my time and increase productivity dramatically! The mini belt sander's price is $41.83 including shipping cost. It uses 330mm x 25mm sanding belt. Here are downsides. - No dust removal system. It scatters stone chips everywhere. It is the reason I use it just under air duct. - Noisy. However, if you use it just under ventilation duct, the exhaust sound will exceed the noise from the belt sander. - Default minimum speed is too fast. You may need PWM speed controller to get lower noise and suitable sanding speed. - The edge of steel is very sharp. It cut my finger slightly. I highly recommend to sand sharp edges before use. I hope the remaining half side will be done faster than now... 🤪

- 75 replies
-
- 11
-

-
Intellectual property
modeller_masa replied to woodrat's topic in CAD and 3D Modelling/Drafting Plans with Software
In case of special contract such as license between a book writer and an owner of a ship, it can be a problem indirectly. It is common when it is a commercial building by famous architecturer. In the US, werk der baukunst was established in 1990. Also, license between model kit maker and original maker is very common like gun and car models. However, they are 18~19th century ships. You don't need to get any permission from Queen Victoria. -
Thank you for comments. Posting progress is not an entire reason I build, but your interests definitely accelerate my work. I've never been in Europe before. I added the Bibury to my bucket list for tour to Europe sometime. This 'masonry' work is completely different from wooden model ship work in my opinion. It doesn't need deep and various knowledge about each parts. The most important thing of this kit is patience with the greatest care for each blocks. It feels like a meditation. 🙂 It is very flat work and takes lots of time, but very new experience for me and would have made me ease if I don't have due date. In addition, this kit's price per time is exceptional! Maybe it is the best kit when you are in a shelter and want to waste time. 😉
-
Day 3, 4, and 5... approx. 20% of wall completed. (6~7 hours) I'm pretty sure that I can finish entire kit at the end of this month if I don't sleep and eat.

- 75 replies
-
- 11
-
-
Basic but Good kit recommendations for granddaughter and I
modeller_masa replied to glbarlow's topic in Wood ship model kits
Wow... I can't believe she was 6 years old when started. Her way of using sander and power tools is very skilled. Probably I have too underestimated children's ability. It is time to change from gifting plastic kits to wooden model kit! -
Miniature Desk-Top Laser-Cutter
modeller_masa replied to wefalck's topic in Modeling tools and Workshop Equipment
I've never seen such detailed and comprehensive review. Thank you. -
Day 2. I made a pre-made pillar because of too narrow space. This way is a lot easier. Well... I spent 3 hours today, and not a big difference... I calculated total amount of work by surface area. The total surface area of wall is approx. 1,800㎠, and these are my work area per day. Day 1 - 55㎠ (3.1%) Day 2 - 58㎠ (3.2%), 3 hours spent. Based on my calculation... I need 30 days or 90 hours for completing the wall only. ...... 🤪
- 75 replies
-
- 12
-
-
Wow. The giant's hand is really big.
-
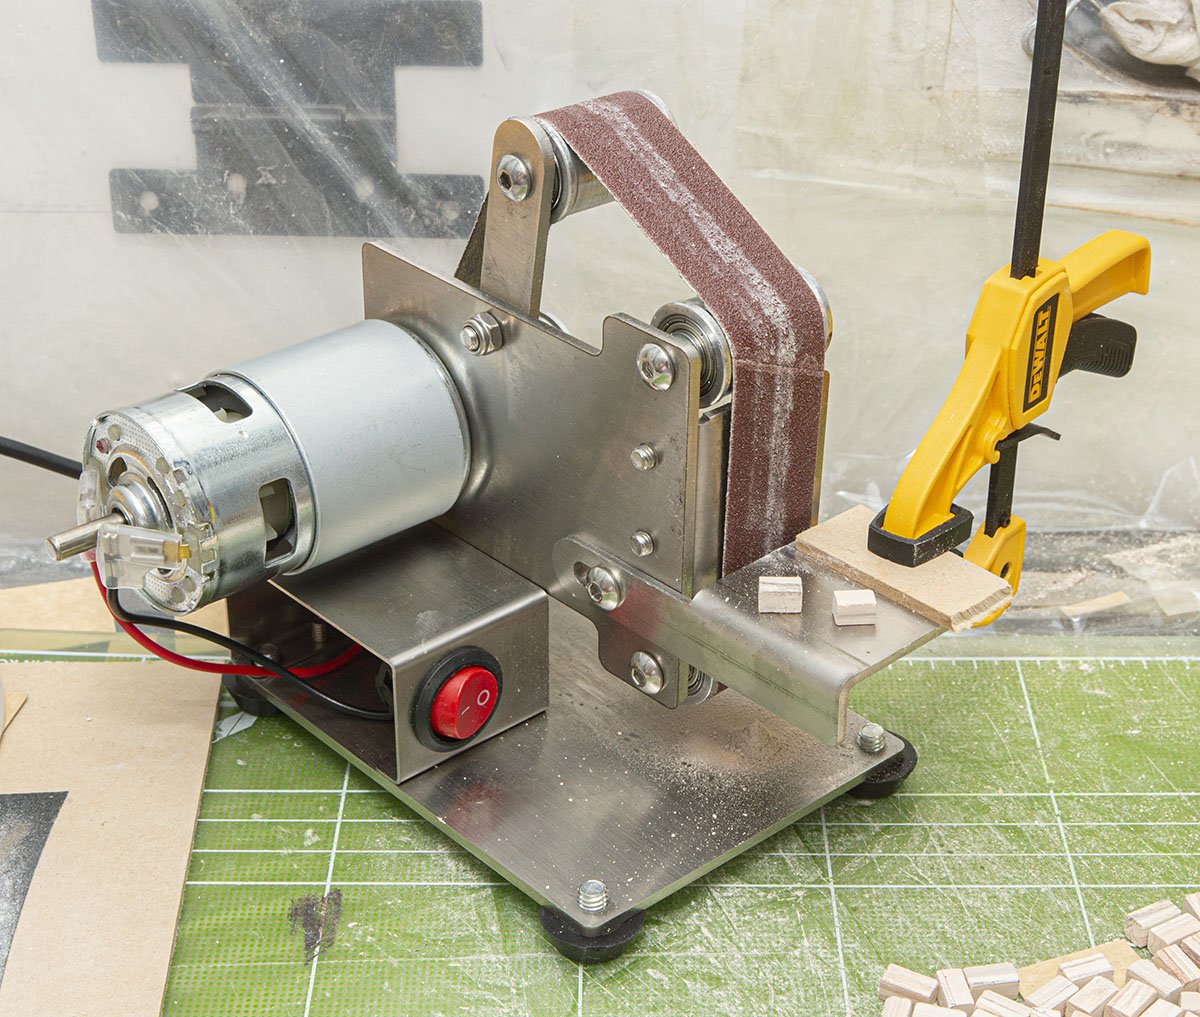
That's the exact same reaction when I saw this kind of kit. If you want to build one of the Aedes ars kit, I highly recommend you to equip these devices. (1) Good ventilation system. Tons of sanding works are waiting, pile of stone dust will make your hand pale. (2) Any kind of belt sander, disc sander or electric sander. The stone blocks are not perfect cubics. You need to adjust each blocks one by one. I use a dremel 3000 with 2 inch sanding disk bit.
-
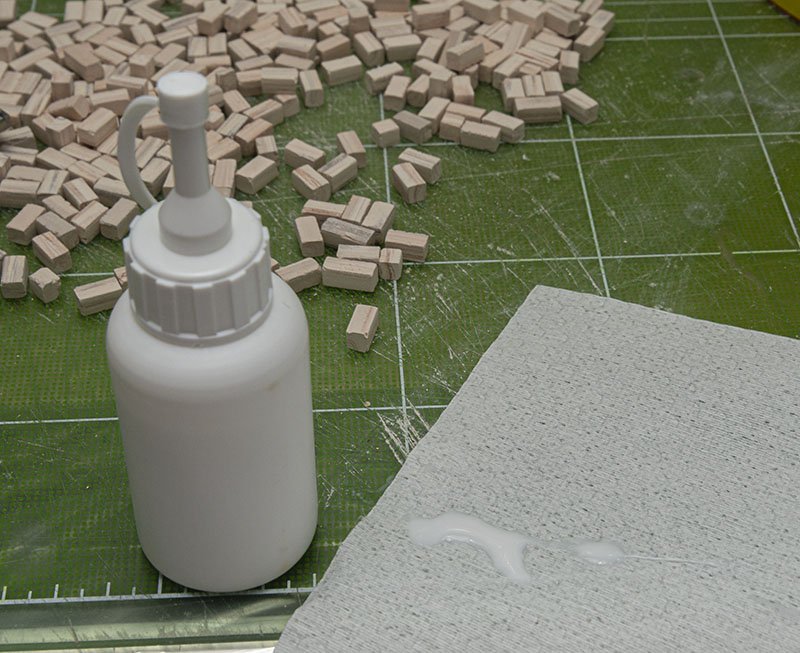
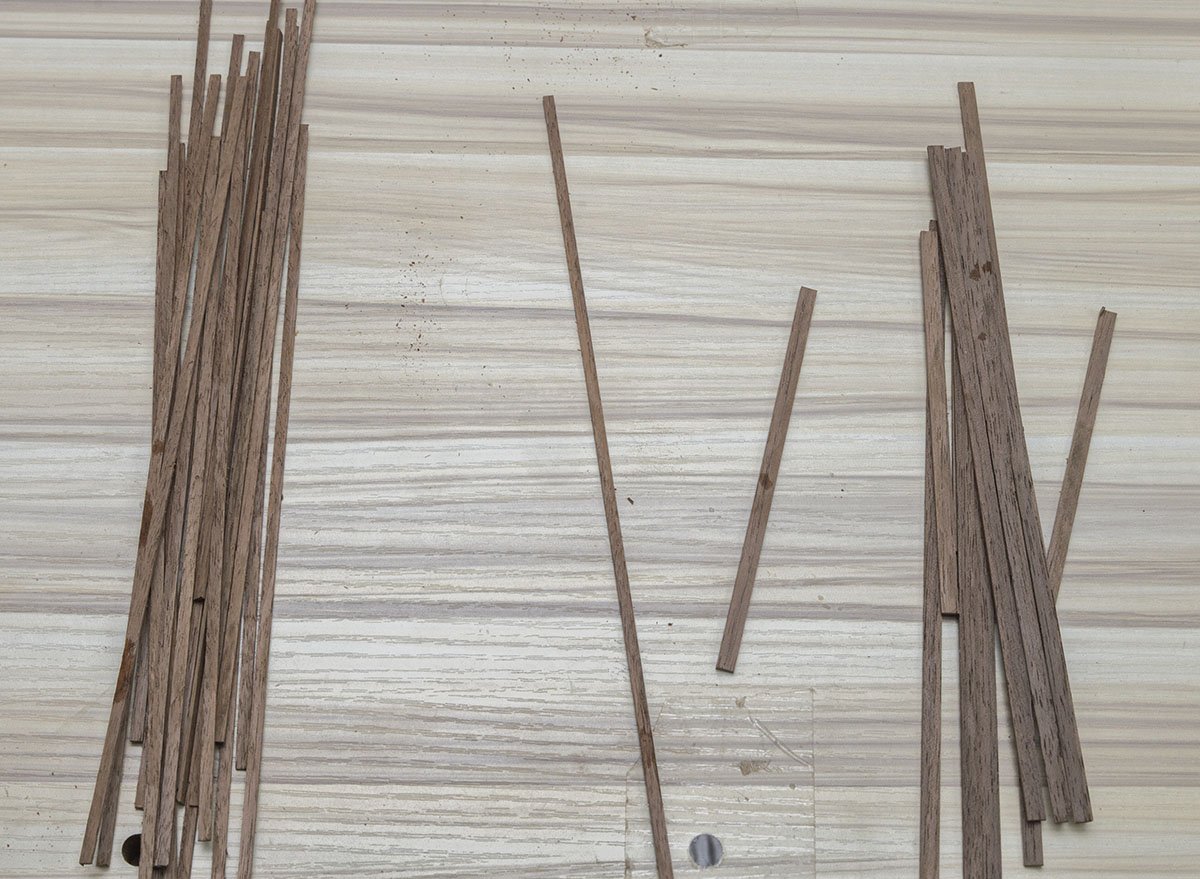
I expected the kit has kind of tar glue which has volume, but the bond was just a regular PVA glue. Of course, the titebond is much better than this. I have to use modeling paste to fill gaps between blocks later. I didn't want to sort blocks, but sorted some blocks to make a kit nice. The center is regular whity blocks, and the right is more pinky blocks. I laid the pinky blocks on the bottom of wall. The upper blocks will be whity one. From here, everything is pretty much repeatitive work. Sanding, gluing, laying, and sanding again. I added some detailed on windows and doors because manual's example is too boring. I made two kind of walnut strips. (1.0 x 2.4mm, 1.5 x 4.8mm) The day 1 finished. I hope I finish the walls within a week. I can't finish all in a week. It is pretty much boring job more than I expected. However, if you are interested in carving work, you will find plenty of attractive spots for additional details such as window sill.

- 75 replies
-
- 12
-
-
Thank you for advice, Mark. This is the second project I'm digging in. The first project was a La Recouvrance from last year. The first project is locked down due to technical barrier. I packed the hull and won't open it until I solve issues regarding metal cored mast. The next project will be the half-hull planking kit, and I wont't start it before I finish this kit and get a rest.
-
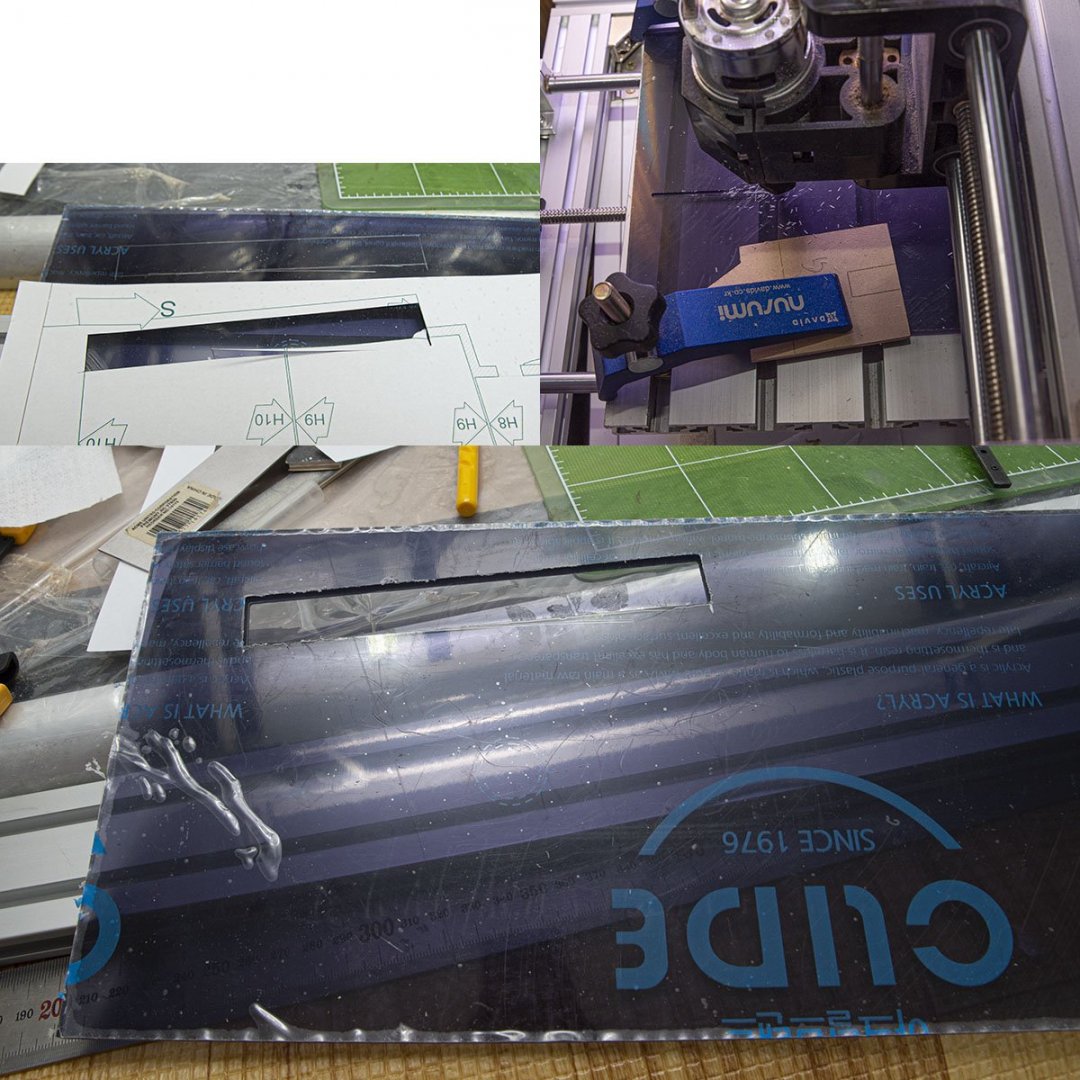
MDF is the best for making jigs. When I tried to make a rectangle hole, I realized that it is almost impossible by hand. Therefore, I had to cut it by CNC again. Nice and sharp cut. I decided to use CA for permanent fixation. There are some reasons that I used acrylic panel and high glossy film coated MDF. I gave up some of features because...... um... because of lots of reasons. One of my plan was LED light. I had to determine which one is my main hobby. My choice is wooden model ship rather than construction model. Therefore, I decided to skip many ideas I intended at first. I decided to run fast, so I skipped some details that may hurt level of completion. I don't like diorama. I decided to delete surroundings, and replaced the hill terrain to the transparent floor. Ok. Finally the stone work. I need to make some standards to make the block wall looks nice. Unfortunately, all of the blocks are inconsistent on size and color. If I sort 5,500 pieces of blocks properly, then I will be able to get the best result. However, there is more important thing I really want to do now. I received the half-hull planking kit from the NRG! I really want to go to the kit, so I'll finish this stone kit ASAP regardless of quality!


-
Don't forget the alex snodgrass' adjustment method! When I was discouraged by the $139 cheapest bandsaw, his method gave a new life to my band saw, and I was able to do resawing 90mm cherry woodsheet properly by the troublesome band saw! However, I definitely recommend you to buy 14 inch bandsaw if you need serious resawing work as someone said above.
-
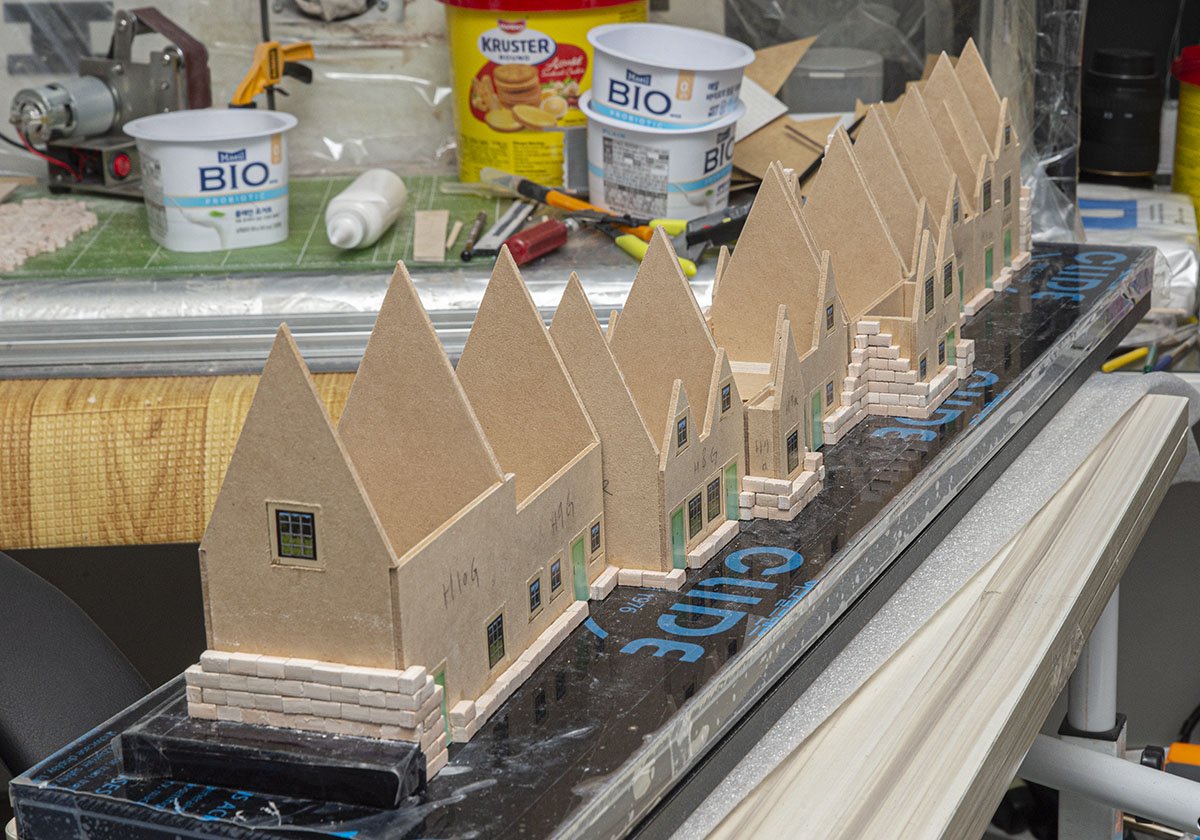
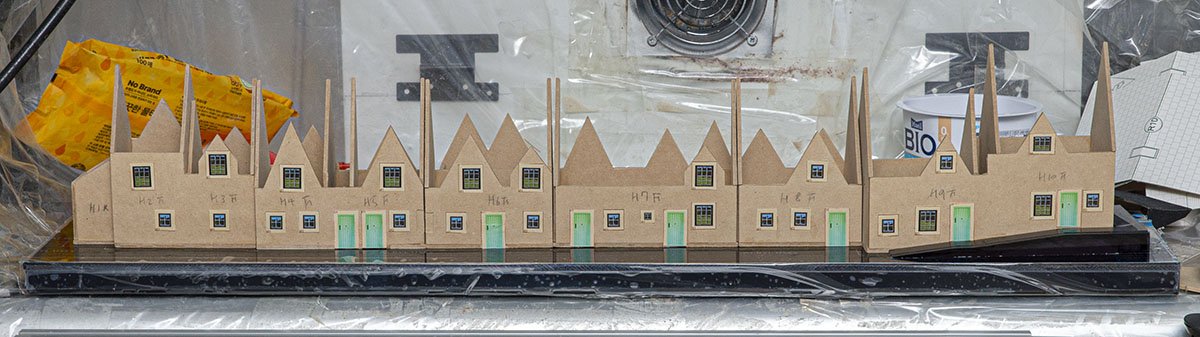
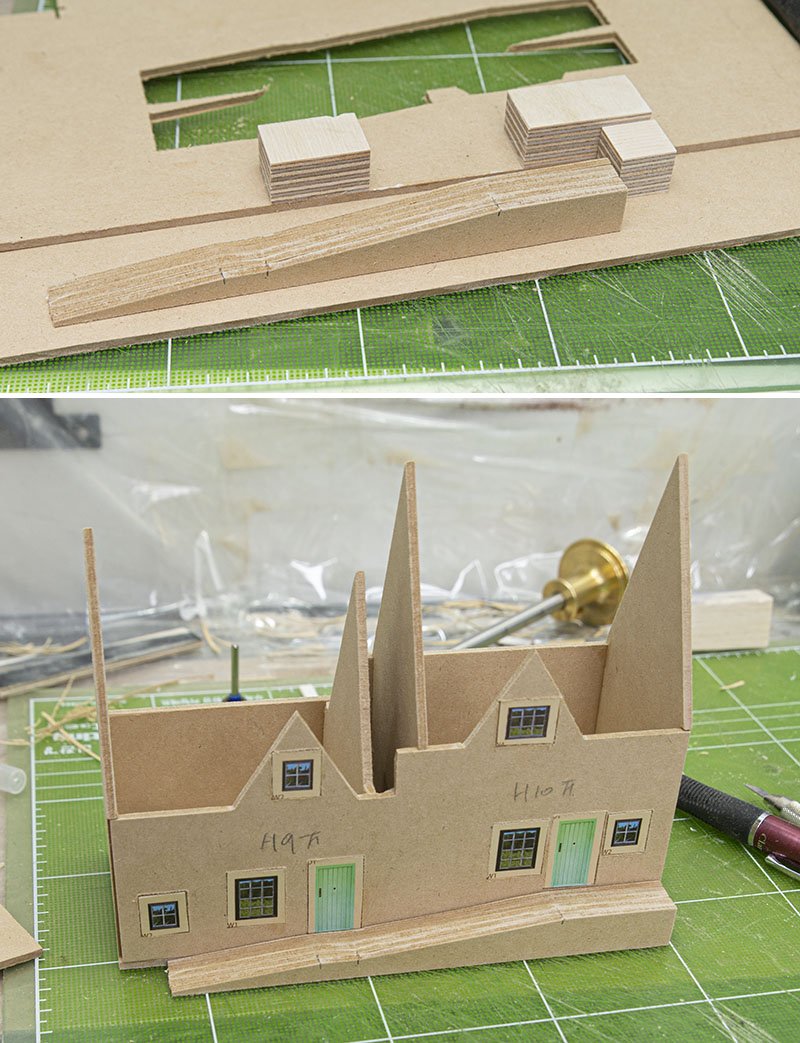
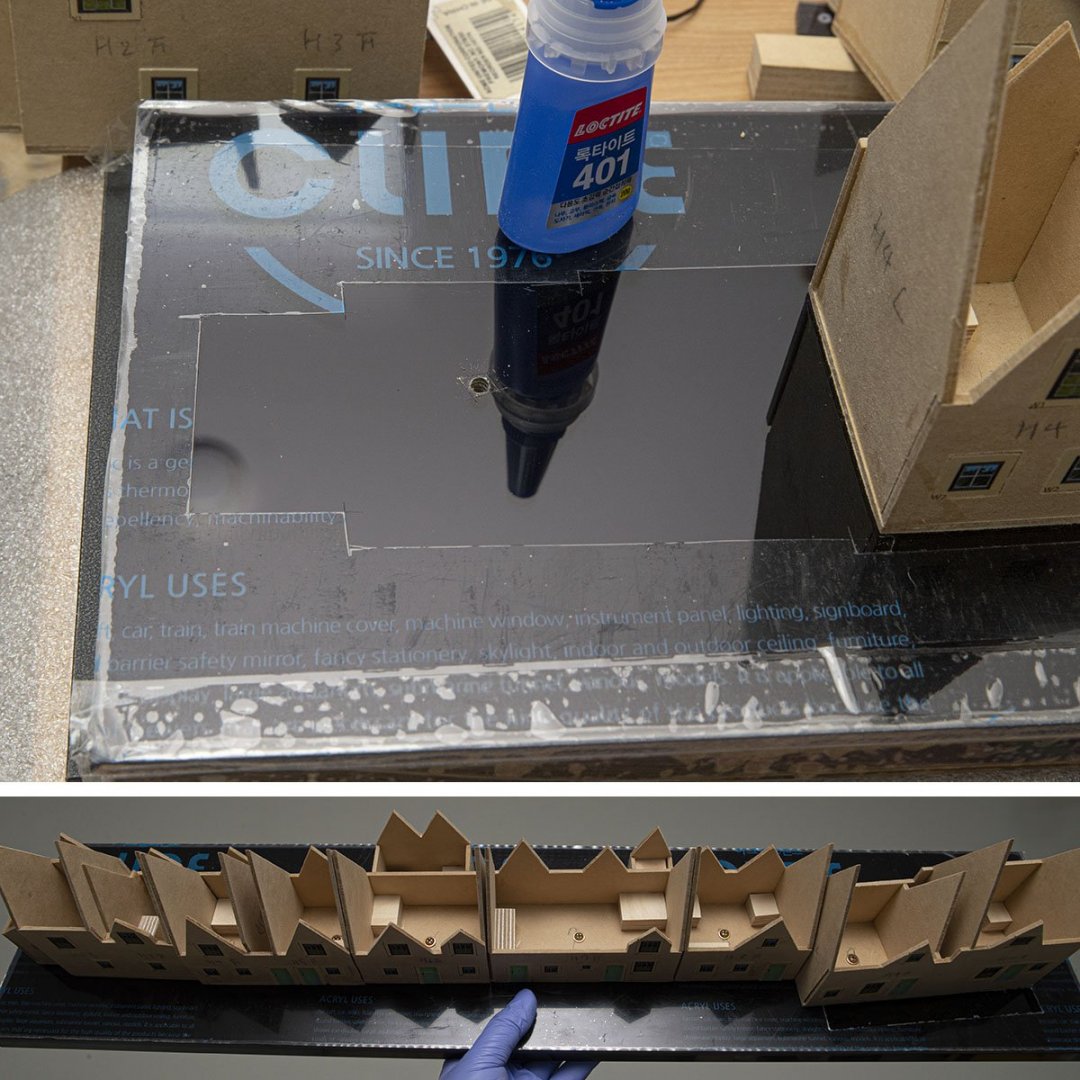
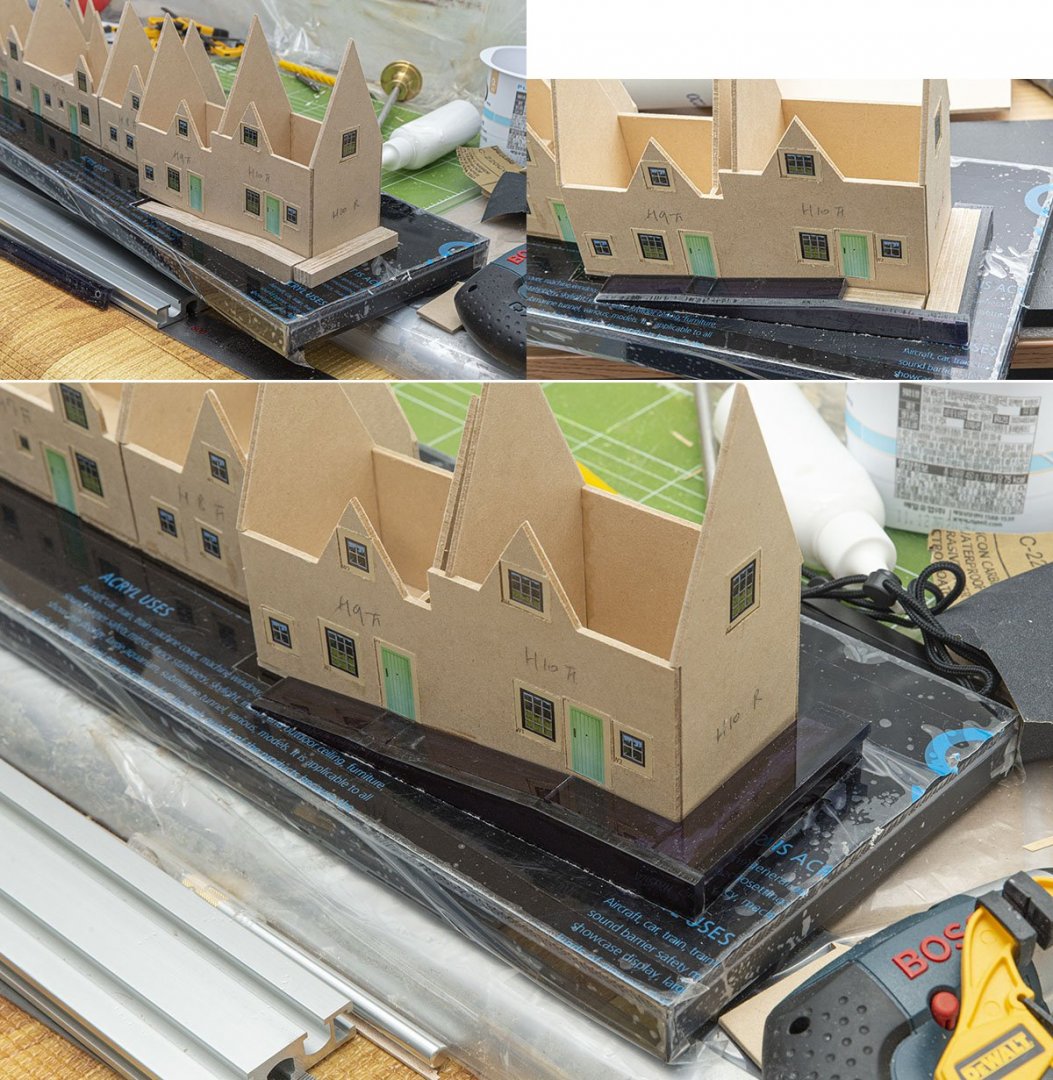
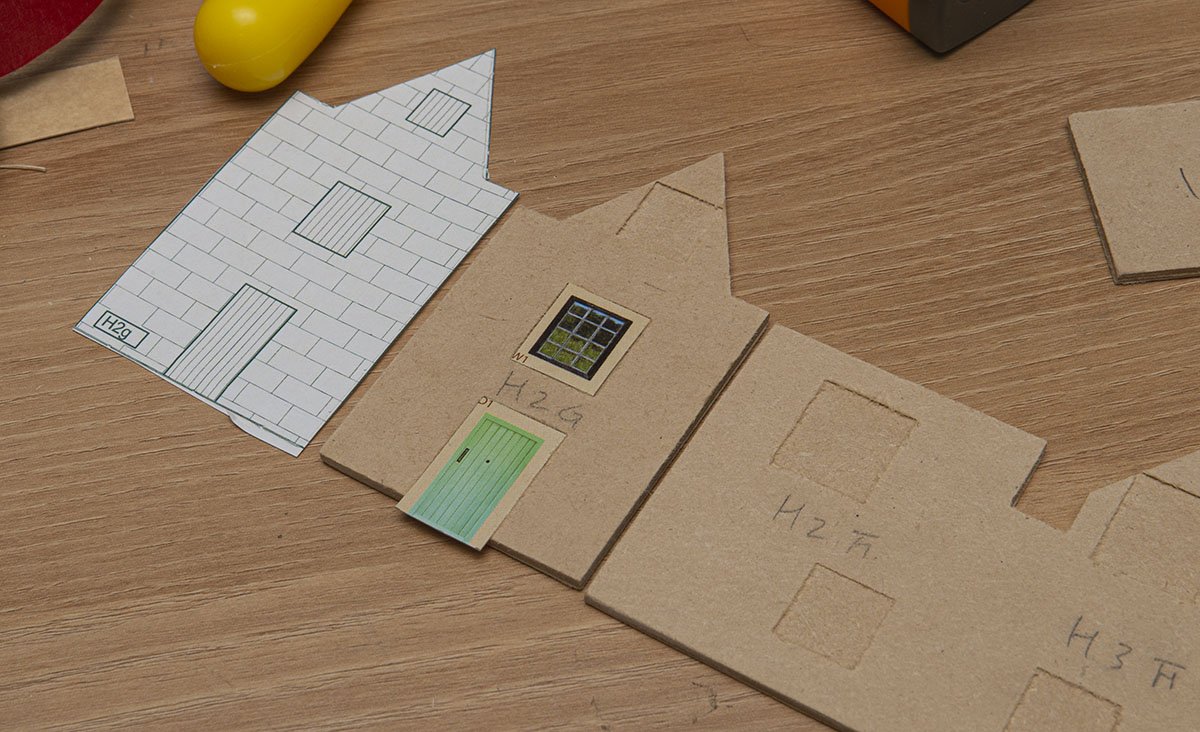
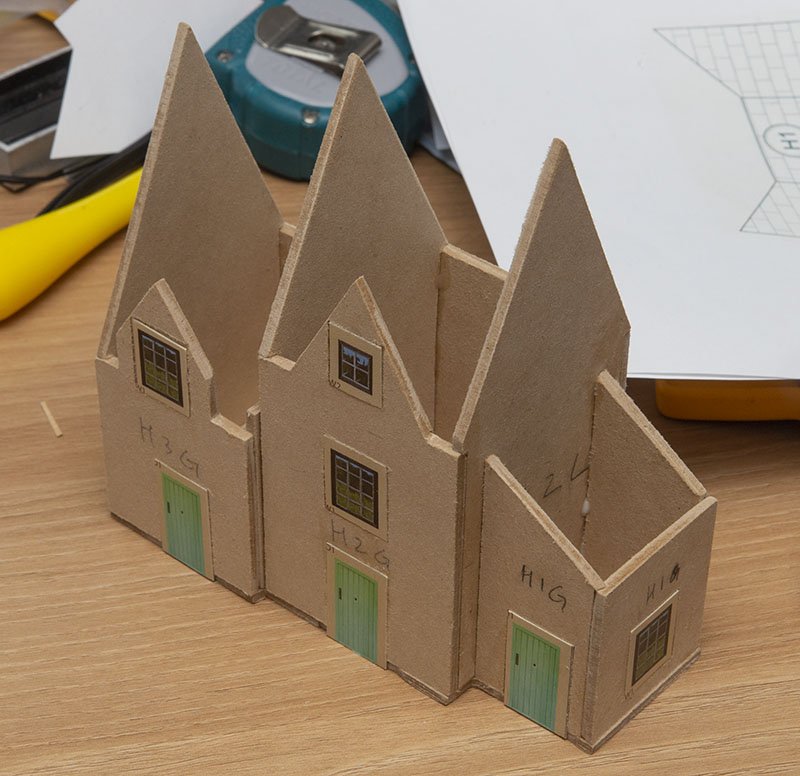
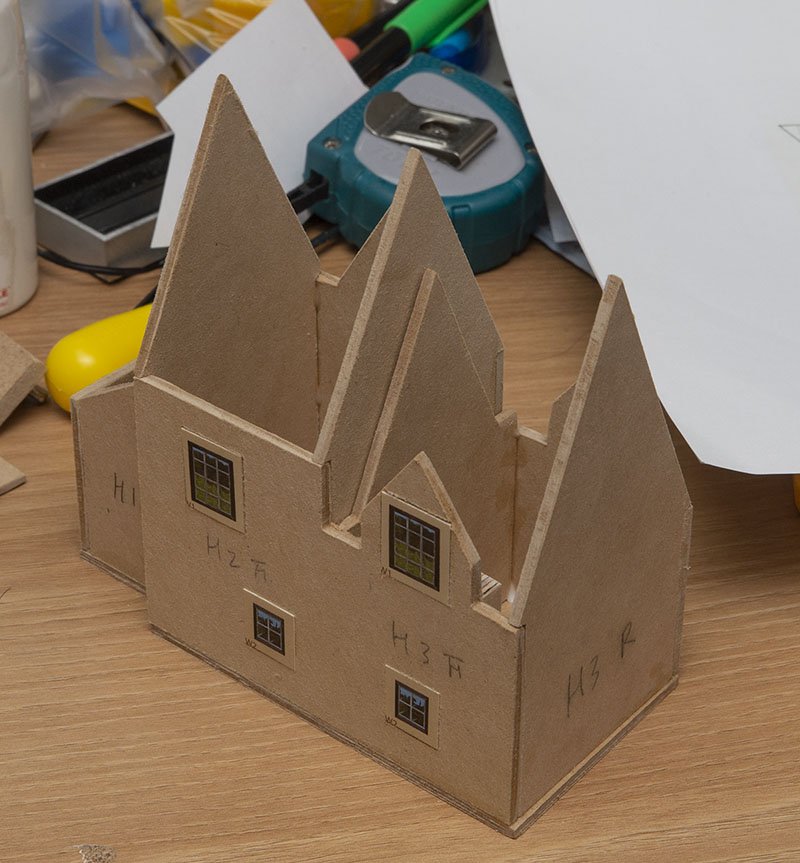
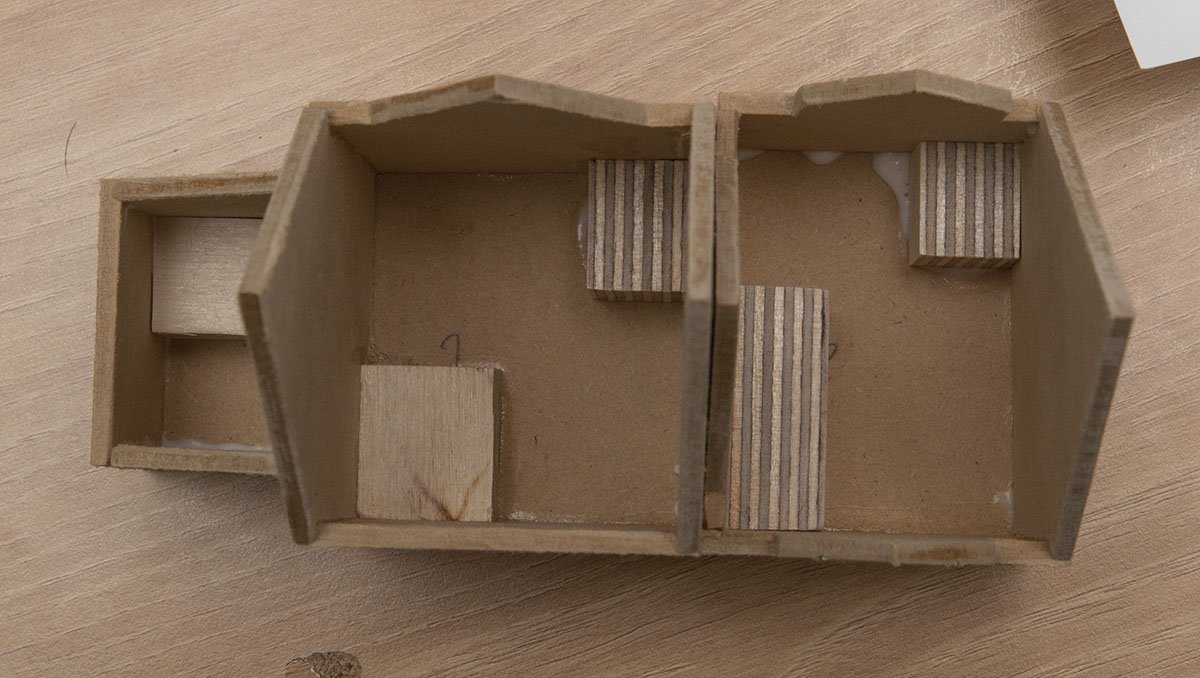
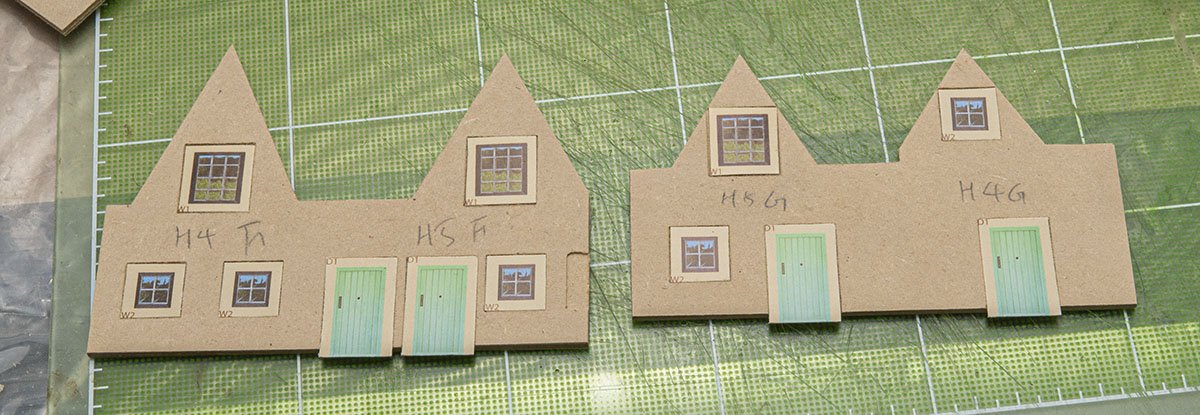
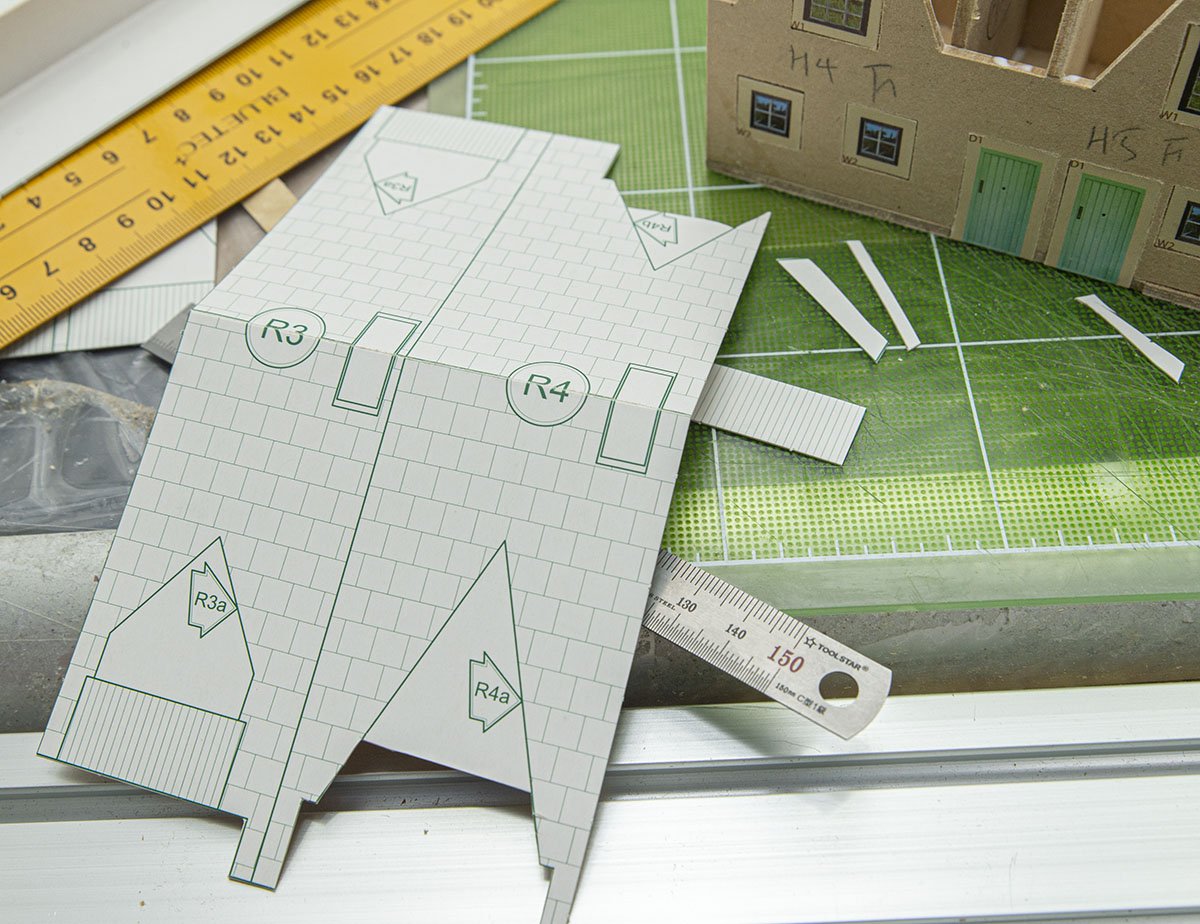
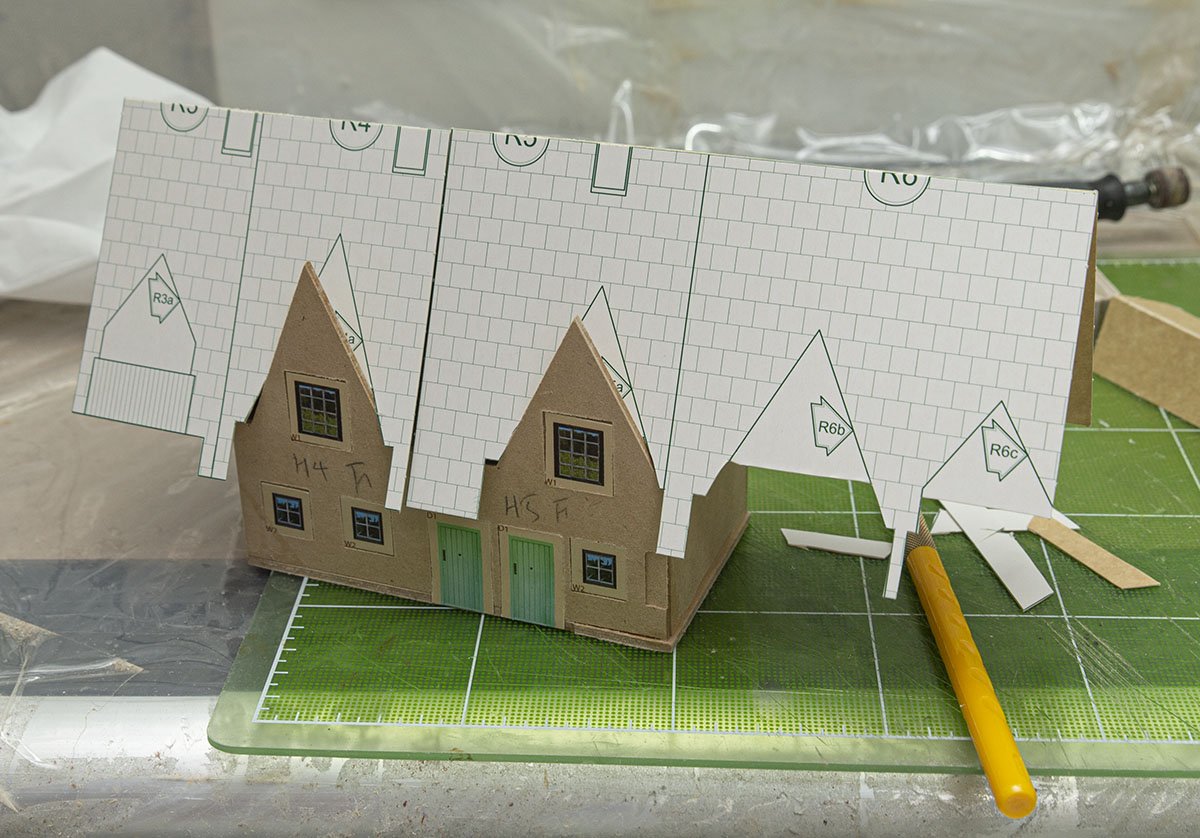
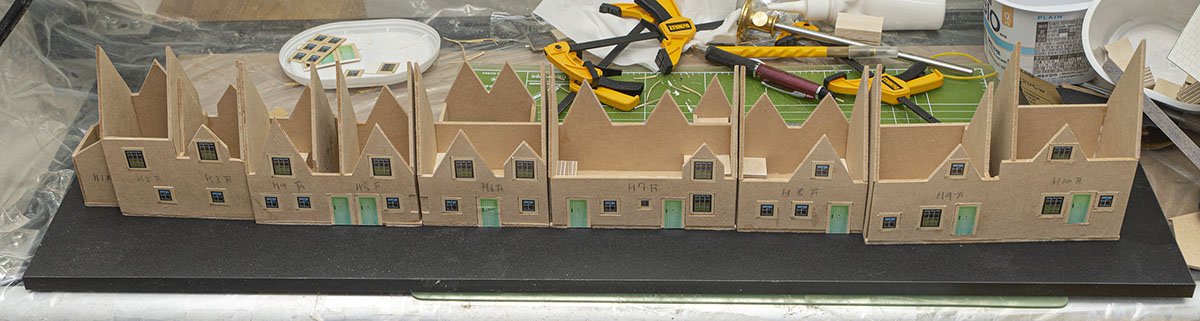
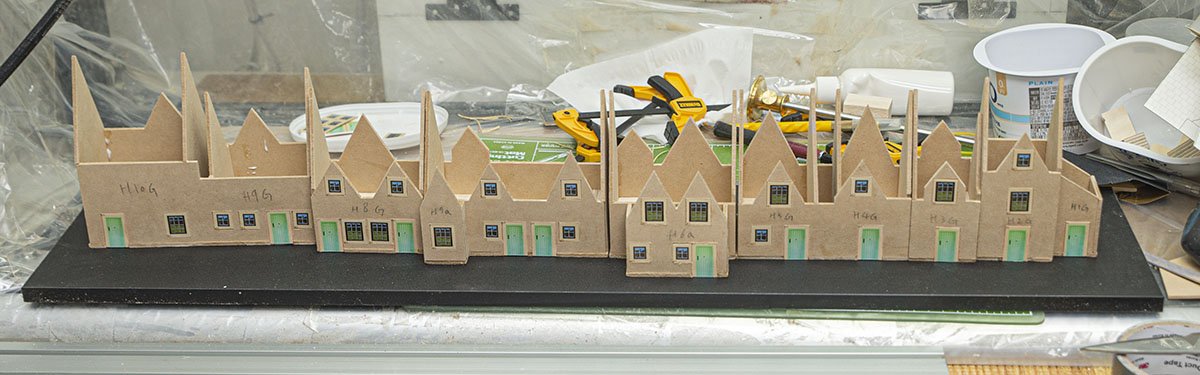
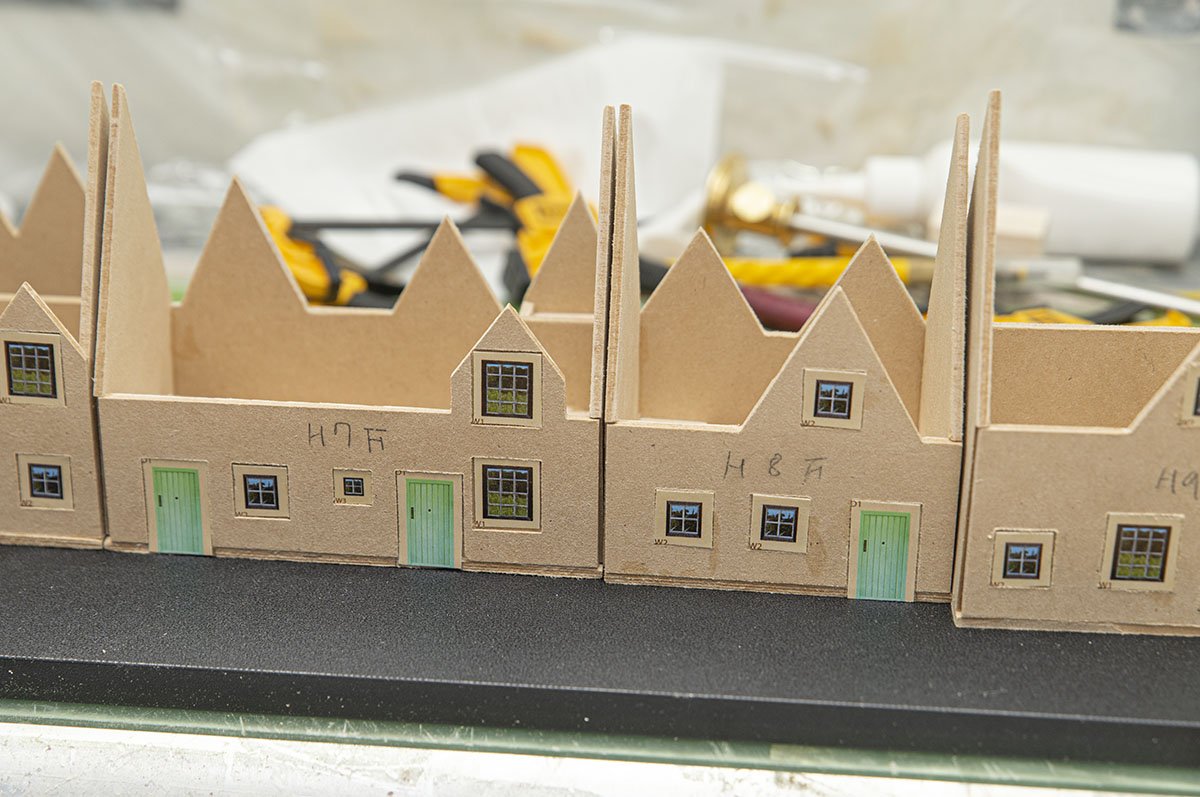
This is the first parts using CNC machine. After several trials and errors, I decided to make the spaces of windows and doors. When I tried to trace the windows, I realized that I need OHP film and I don't have it. The thickness of the cardboard is about 0.50mm, so I applied the depth to CAD file. The first part is done. Not everything is perfect, but acceptable level of error. If I made rails at the edges of bottom plate, assembly would have been a lot easier than I did. I made birch plywood blocks to support them. I didn't know I'm out of balsa wood. I ordered new balsa for the next ship. Mass production! From House 4 to 10. It is normal that the door trims poked up due to a thickness of MDF. While I was testing the roof parts, I found that I need to cut more than the plan designated. The bottom side of R3a is designed to cut, but I cut more than it like the bottom of the R4a. Works perfectly. All done. it is a front side or street side. Back side or garden side. I decided to use original cardboard roofs. It is much more difficult to convert them to MDF because of the thickness of MDF. The base plate is a film coated MDF. I won't use it because it is a spare part for the next process. The next process is a making display cabinet. I bought 5mm dark tinted transparent acryl plate and 18mm black high glossy film coated MDF to make the bottom of display cabinet. I'll do plaster work on it directly. The stone work won't start in the next post.


.jpg.60b4d6cfe85e717357f6a03d56d4c3e8.jpg)
.jpg.2a3702c6771e959136f9bcf5d742e920.jpg)
.jpg.46abcb9a7a39ab1f1c775a6f5f1058f2.jpg)