


Egilman
-
Posts
4,379 -
Joined
-
Last visited
Content Type
Profiles
Forums
Gallery
Events
Everything posted by Egilman
-
 That would be natural, P-40's delivered after Sept of '39 generally carried RAF camo... Didn't matter who they went to they were painted to RAF spec... I know for a fact the AVG's were part of a RAF order that were diverted to them in China... Planes built and painted to USAAF spec would be overall OD Green.... They were selling these so fast that they included stick on decals of various National Insignia's for when they arrived at their final destination... It's interesting to see these painted in RAF desert scheme sporting the Stars and Bars...
 -
For the prices they charge they had better be.... (I get their catalogue on a regular basis, but only buy if absolutely needed and they are the only source)
-
Well done my friend.... And for the most part without filler... Which in my book is a step above what some of the supposed paper modeling "Greats" do... (some of them can't build without using filler everywhere) Your skills surpass those by far IMHO....
-
Keeping my head in the game.....
Egilman replied to Egilman's topic in 3D-Printing and Laser-Cutting.
Short update Brothers, Very Short... Since I used the old wheels and just modified their position, I went ahead and added a detail that I forgot when I did them before... The Speedo Gear mounted to the right Wheel... Seems like a minor thing, but it's a detail that is readily viewable and no other model out there has this detail to my knowledge.... Now on the her rear end.... {chuckle} Onwards!!!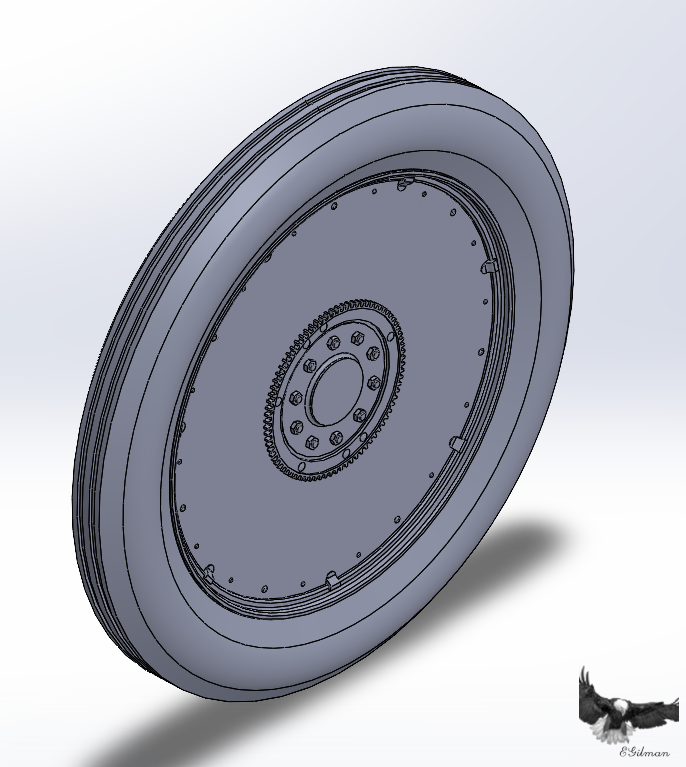
-
Impressive!!! Very nice job on the kit tracks, Never could stand those vinyl tracks cause I could never get them to look right... But you seem to have done it well.... Very well done!!!!
-
Keeping my head in the game.....
Egilman replied to Egilman's topic in 3D-Printing and Laser-Cutting.
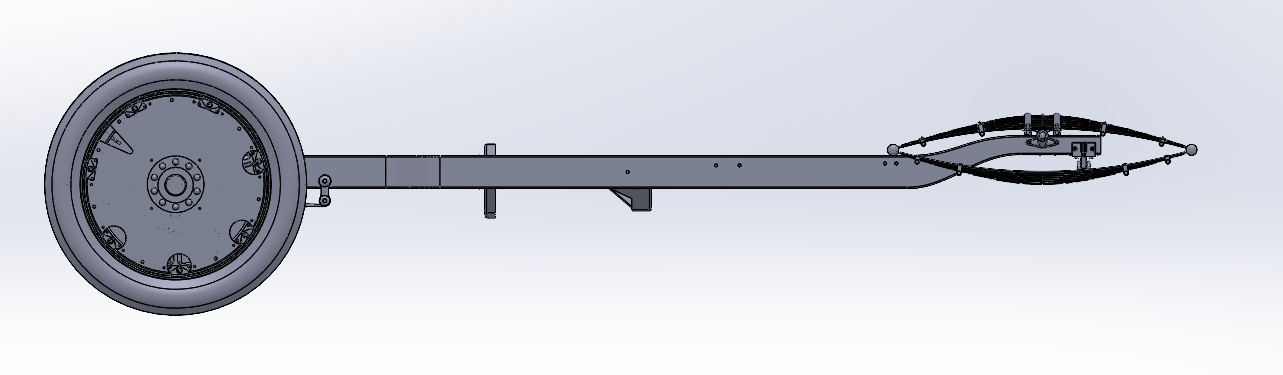
Very short update, I went ahead and added the front wheels and tires, there really isn't any improvement I can make on what was designed before so I when ahead and used those.... Here is the result... There is one thing I did do, I added the camber to the wheels that the original car had... This was a simple matter of tilting the wheels outwards at the top.... The state of automobile steering engineering was almost complete at the time the Wasp was built Proportional Steering, Toe, and Camber had been figured out, the only thing left was Castor.... It would be the early 30's before castoring was understood and universally applied... Until then, steering took actual effort on the part of the driver and needed constant monitoring, one moments distraction and you would find yourself heading in a different direction than you intended... Camber.... Combined with Toe-In and Proportional Steering, Camber allowed the centrifugal sideways force of turning to be applied to downward force as the car turned when the wheels turned, the sideway lean of the inside wheel would become greater in the direction of the turn and less on the wheel outside of the turn... This had the effect of the inside tire pulling the car into the turn against centrifugal force while the outer tire holds the line of the turn.... (this is why in a high speed car making a turn has the outside tire blow out, the car makes an immediate turn in the direction of the blowout, the outer tire is no longer there to hold the line of the turn) Simple applied geometry is all steering is... And Camber was the final part to steering being an advantage in holding the road... I guess I'll head to the rear of the car, I need her to be on all four wheels now..... Onwards...
-
Keeping my head in the game.....
Egilman replied to Egilman's topic in 3D-Printing and Laser-Cutting.
Thank you Richard... I was trained in paper and pencil a few decades ago when computers were something engineers only dreamed about, CNC had just arrived in the form of punched tape and I was introduced to doing indexed drawing... (dimensioning a drawing from a single base point) to make it easier to program the tape puncher/reader.... The software is actually easy to learn, it just takes practice to get used to it... When doing paper you really have to have the gift of visualization to truly understand what your designing, be able to visualize your part in 3-D... With software that takes the need for visualization skills to the screen, which eliminates the only real natural drawing talent one needs... All 3D is directly visualized on the screen immediately... The other part is figuring out what type of 3-D drawing you need to learn... the artsy side or the numbers side... I do the numbers, (engineering) side... There are all kinds of 3D artsy websites out there where the artists display their creations, not too many on the numbers side... But then the artsy side is faster, you don't need the accuracy the numbers side does... Like any software in this field, the initial learning curve is tall, but it doesn't take that long to learn the basics.. I'm absolutely convinced that if someone has an interest and a need for computer 3-D drawing, it's relatively easy to learn and anyone with the aforementioned interest can learn it fairly quickly... (just make sure you got the right software to fit your interest, engineering or artsy they are not the same, modelers generally fare better with the engineering side, but the artsy side can do it as well, just takes more work) Again thank you and welcome to the Log... -
Hey brother, looks like you went aftermarket on the tracks? Excellent choice... (does a lot for the look) Fine job, looks like it was just issued.... Take care of yourself my friend, we will still be here when you get back to it...
-
Last year's Indy winner got me.... {chuckle} Lots of newer companies giving the old standby's a run for the money....
-
Keeping my head in the game.....
Egilman replied to Egilman's topic in 3D-Printing and Laser-Cutting.
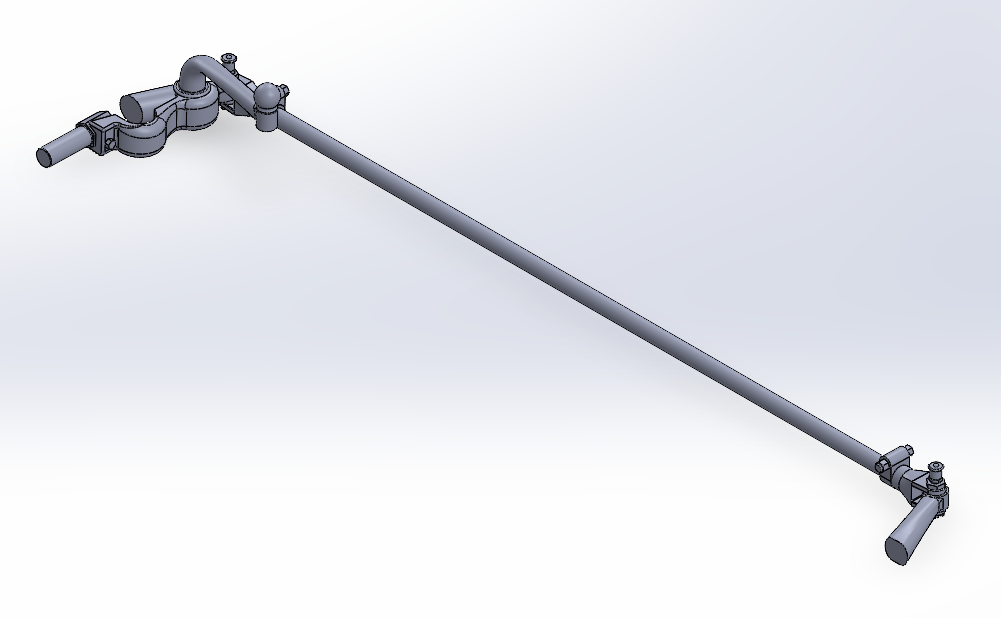
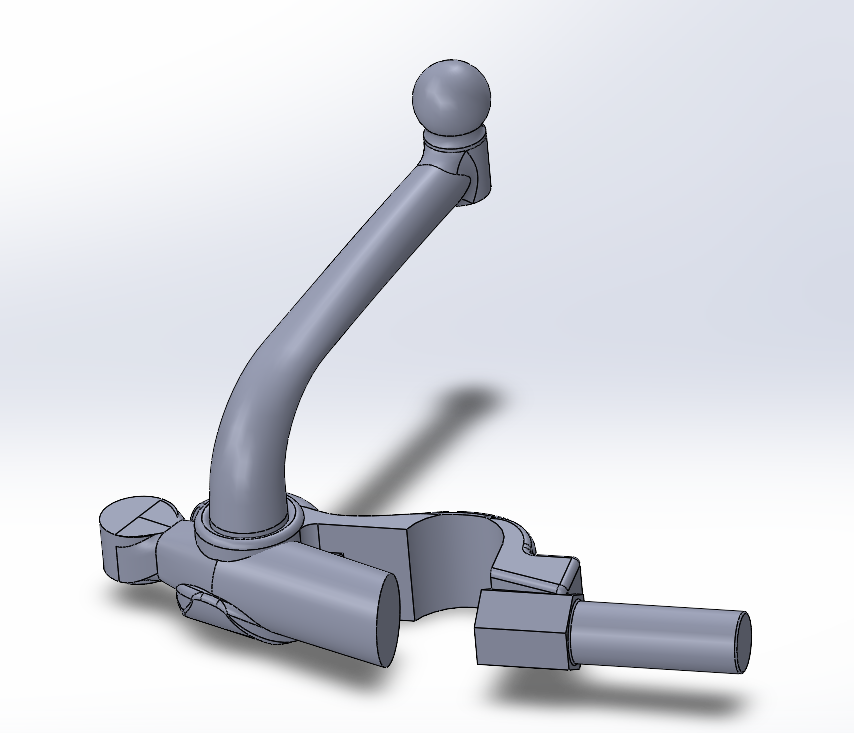
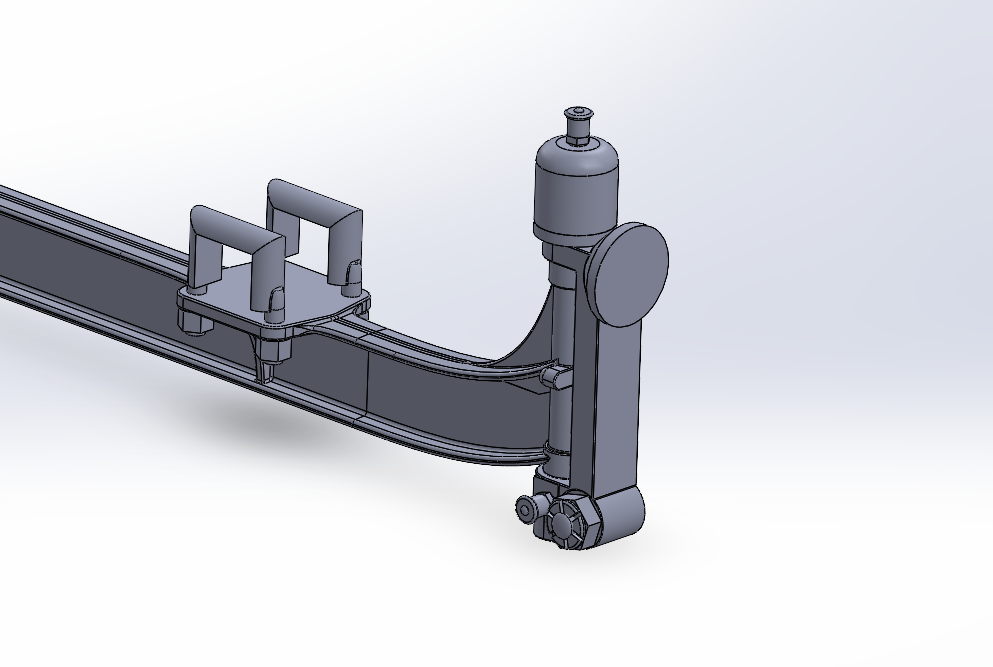
And another update.... Phew that was intense.... You will probably recognize the speedo mounting post, this is the Steering Arm that slips over the right steering knuckle and bolts to the hex portion of the Speedo post.... Below is the Right Steering Knuckle with this part in place.... A very ingenious bit of design there.... Was a bear to draw though.... {chuckle} It's probably not exact, but close.... Very close.... And this belongs to the Steering group along with the Left Steering Knuckle and Center link.... And of course it mounts to the front Axel's Spindle carriers.... Glad that one is done.... And finally the overall look... Well more detail take more time... (and I get more practice) This one was a brain burner.... I'm sure someone more experienced in Solidworks would have done it easier, cleaner and faster... But for now, I'm calling it done... Onwards... Probably ready for Front Wheels and Tires....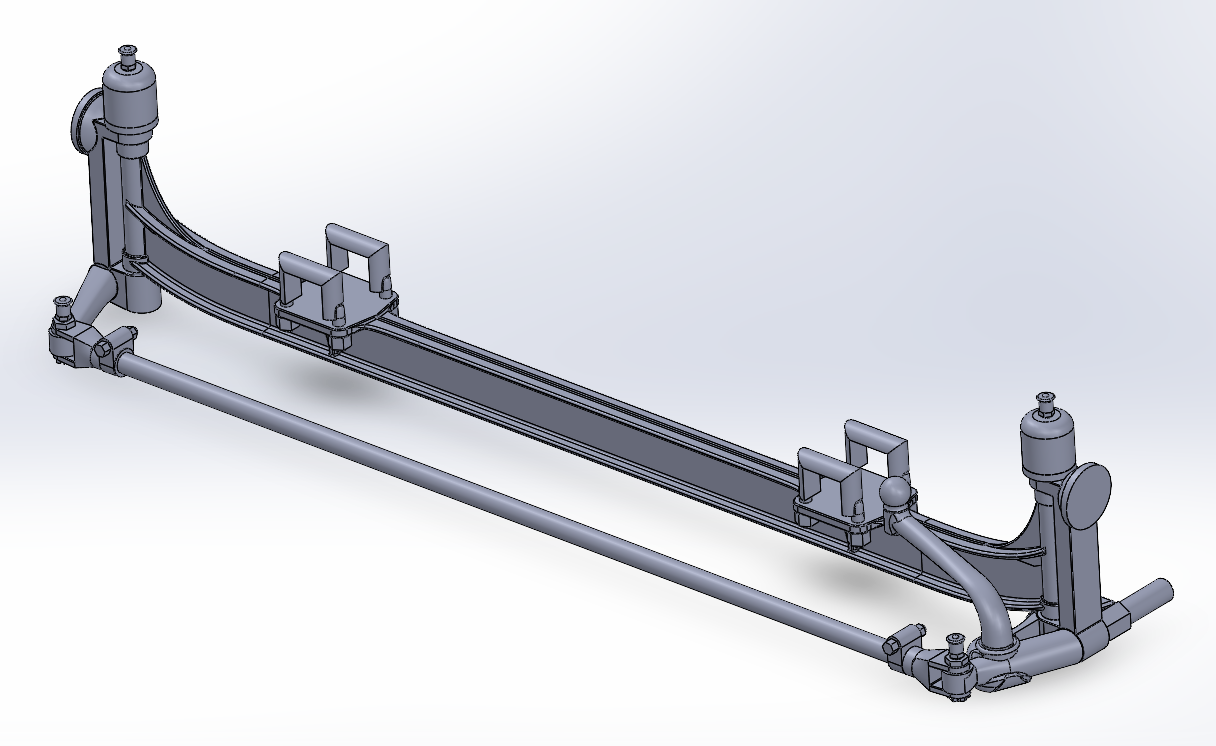
-
Lots of skills on display here...
-
Yep, that is exactly what the WPB decided... If they had placed one of the first Packard Merlin's into a P-40 when they first acquired one, it may have been decided differently... But, by the time they became available in sufficient quantities to mount in a P-40 in a production environment, the potential of the Mustang was beginning to be realized... Under 25k ft, the Mustang was still a slightly superior airplane to the P-40... And in wartime, sentimentality and old friends in high places does not help the war effort... That is what Roosevelt created the WPB for.... Heck I would have chose the Mustang over the P-40 family for the same reasons.... It's a no brainer... The Mustang could deliver the same bomb load as the P-40, it has 6 guns all .50's, was 10 knots faster at 25k ft, which made it a better aircraft than the P-40 under 25k ft altitude, then you add in the ability to combat maneuver at 36k ft and an extra 800 miles of range... Like I said, no brainer...
-
Nope, when Japan attacked Pearl, it was said that Winston Churchill danced a little bit of a jig, he was elated... Cause he knew, like Roosevelt did, that once we were fully integrated in the war, the war was over for the Axis, the only question was how long it was going to take... (it took 18-24 months for the US to get to full industrial production, once that happened, it was a done deal)
-
Yeah, a lot of great airplanes took the same hit immediately postwar, the P-47 to name the most recent one.... The best version of the P-40 was the Packard-Merlin engined one... It's performance up to 25k feet was almost equal to the P-51's and the USAAF put in a large order for them.. But right after that, the WPB put a stop to it, declaring all Packard Merlin's were strictly dedicated to Mustang production... So after a few Curtiss had to go back to the Allison engine which wasn't a bad engine, they just never put the resources into producing a two stage supercharger for it, that was it's major drawback... (besides the Mustang was the superior aircraft, it's laminar flow wing was leading the way to understanding airflow around an airfoil and was the first step to conquering the compressibility issue in the future) By the end of the war, under 20k feet the P-40 was the equal of anything in the air... (when flown within it's envelope, and so was the F4F Wildcat with a 50% more powerful engine) Prewar engineering compared to wartime engineering... Nothing moves engineering advancement faster than warfare.... The P-40 suffers from being the first out there so it's deficiencies are highlighted more than all the rest....
-
At the start of WWII this aircraft was the equal of the Me109, not quite as good as the A6M2 Zero... The RAF pilots were the first to use it in combat and began to experience it's tendency to go into control lock in a high speed dive... The AVG in China flying it against the Zero figured out the tactics that needed to be used to make it a winner.... But also reported it's tendency to control lock.... In the US this was being investigated by all the aircraft manufacturers as the problem appeared with the P-38 and the P-51 as well... (eventually appearing in the F4U Corsair as well) It's was the beginnings of recognizing the main problem of high speed flight, compressibility..... The aircraft is going so fast that the air at the leading edges of the control surfaces would "Pile" up causing a pressure wave to travel along the surface until it reached the rudder or elevator locking them in the straight position.... The only resolution at the time was to slow down the aircraft till the pressure buildup against the surfaces abated... A partial solution was to move the pivot point of one of the control surfaces away from the other... On the P-40 this was the Rudder, they moved it behind the elevators, On the P-51 they extended the vertical stabilizer and rudder behind the elevator, on the P-38 they used another device, counterweights to forward load the elevator giving it greater mass... (a very weak solution, the high speed dive issue was never fully resolved in the P-38) And the F4U corsair was resolved by moving the elevator back behind the rudder... These were the best they could do when they really didn't understand the problem and what was causing it.... The Germans encountered it with the jet aircraft they were designing and resolved that swept leading edges were the solution... (yes, for sub 600kt aircraft) Today these physical flight problems have been overcome, and understanding the engineering history is one of the fun parts of modeling these aircraft, (besides the unit and action histories) I'm in brother, The P-40 represents the first American designed and built fighter aircraft to see significant combat service in WWII... And started us on the path to where we are today....
- 53 replies
-
- 11
-

-

-
Keeping my head in the game.....
Egilman replied to Egilman's topic in 3D-Printing and Laser-Cutting.
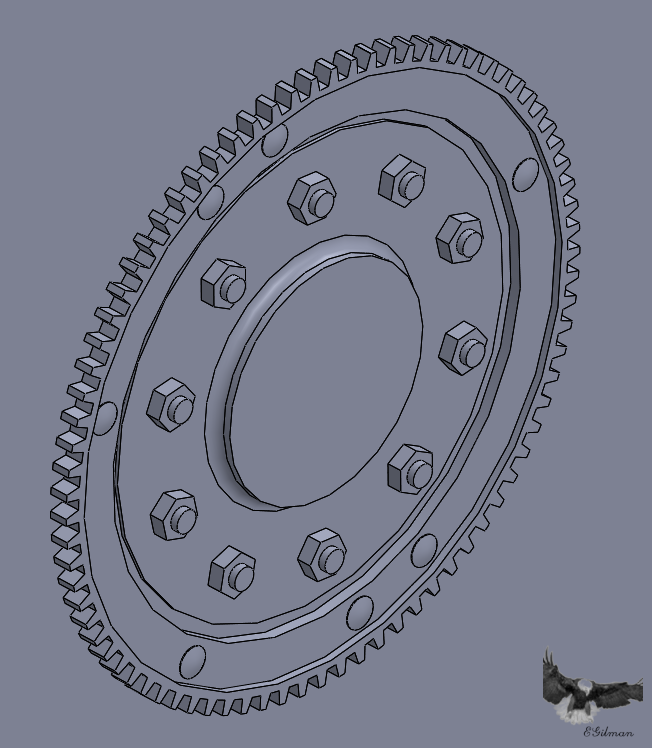
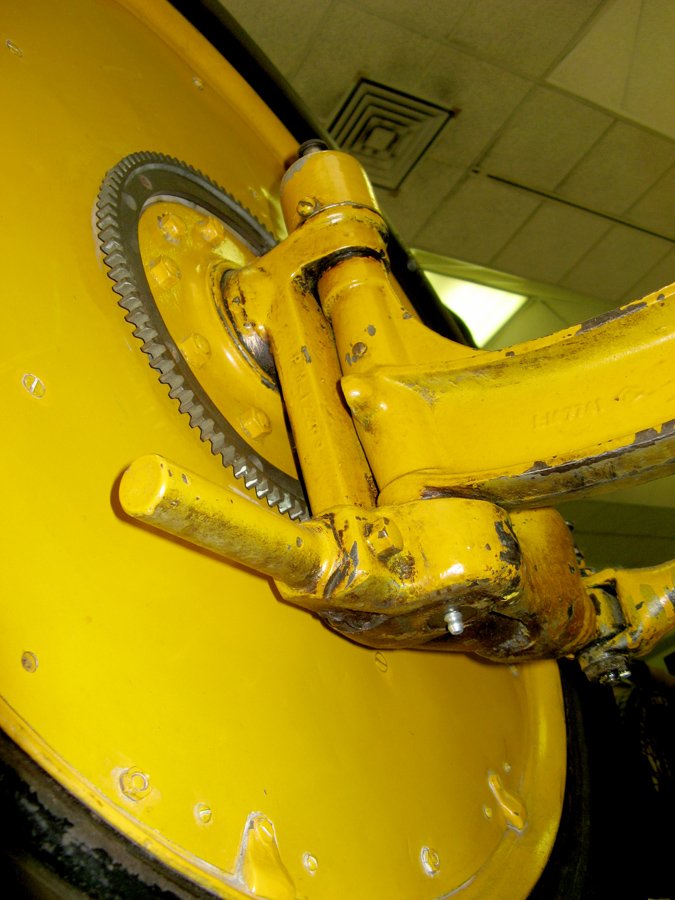
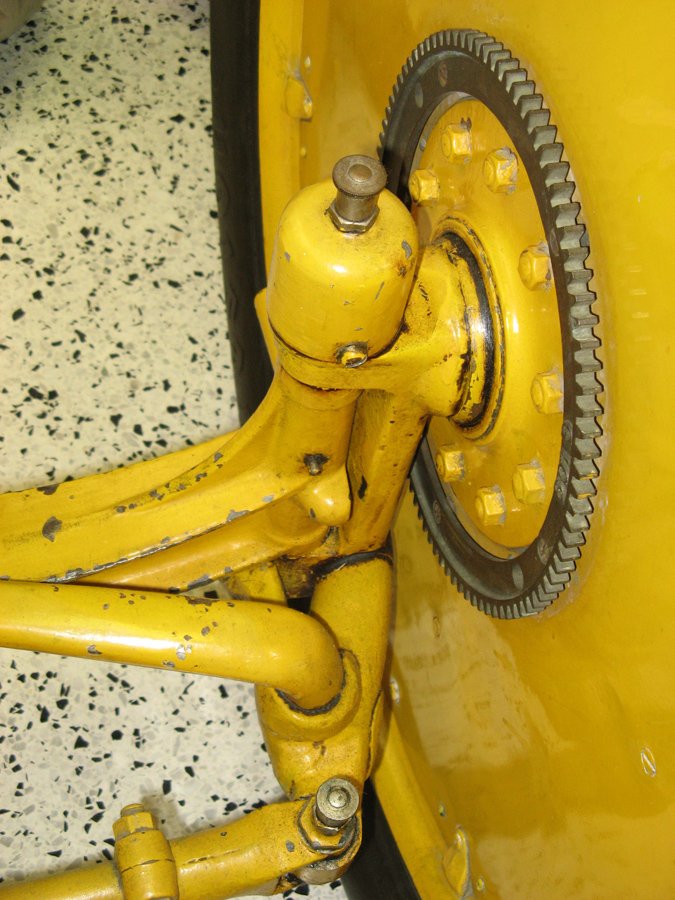
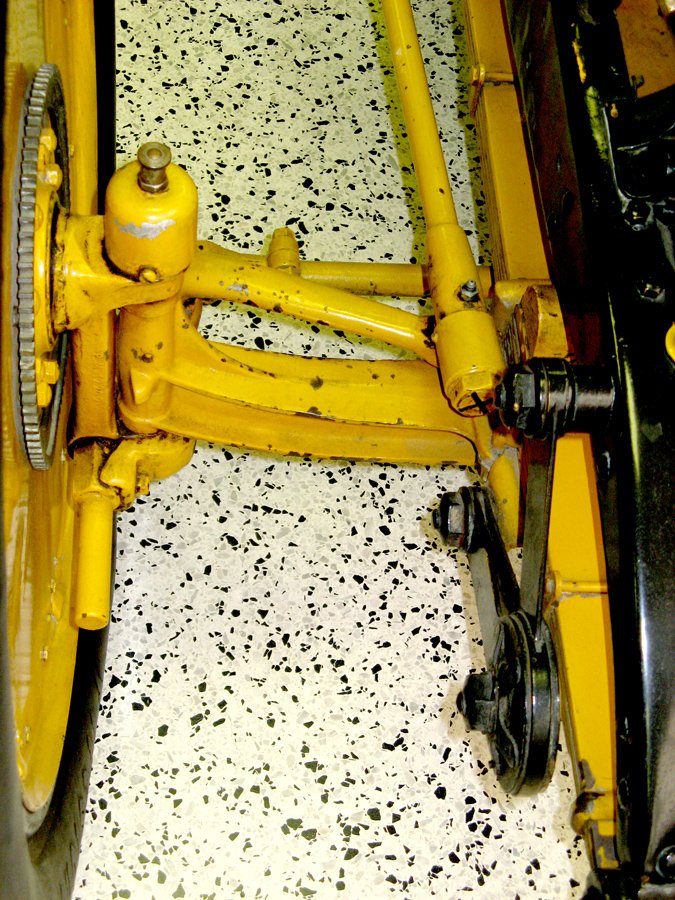
Why thanks Vad.... Yep strong.. that's the Marmon way.... the post was heavy cause it held the bracket which held the spur gear up for the ring gear mounted to the wheel to engage, on the other side it held the end of the speedometer cable.... Here is an image of it from the Marmon advertising manuals of the day.... When originally designed, built and raced, (the1909-10 season) it had a speedo... When they brought it out of retirement for the first 500, (it's only race in 1911) it was left off.....jpg.8c51500aeaf34defecd4411956e53170.jpg)
-
Keeping my head in the game.....
Egilman replied to Egilman's topic in 3D-Printing and Laser-Cutting.
Thanks Ken and welcome to the thread, I try to keep it interesting.... Engineering, it's as simple and complicated as one could want... It's why I enjoy it so much... {chuckle} -
Keeping my head in the game.....
Egilman replied to Egilman's topic in 3D-Printing and Laser-Cutting.
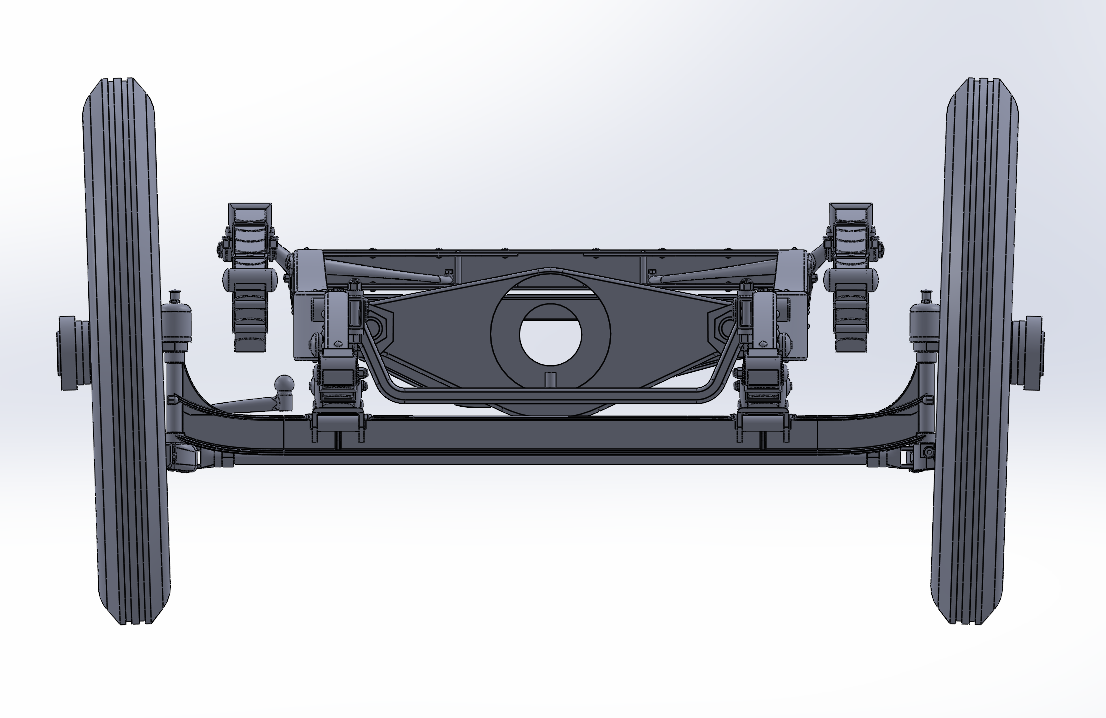
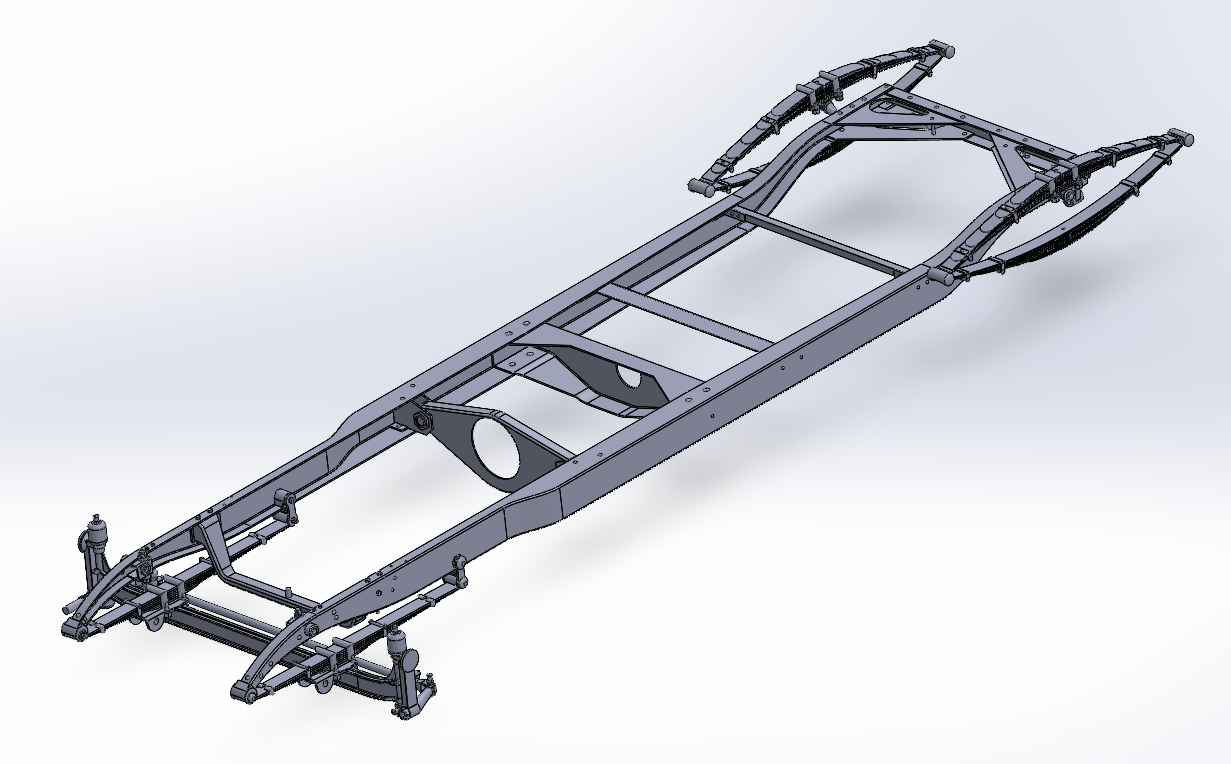
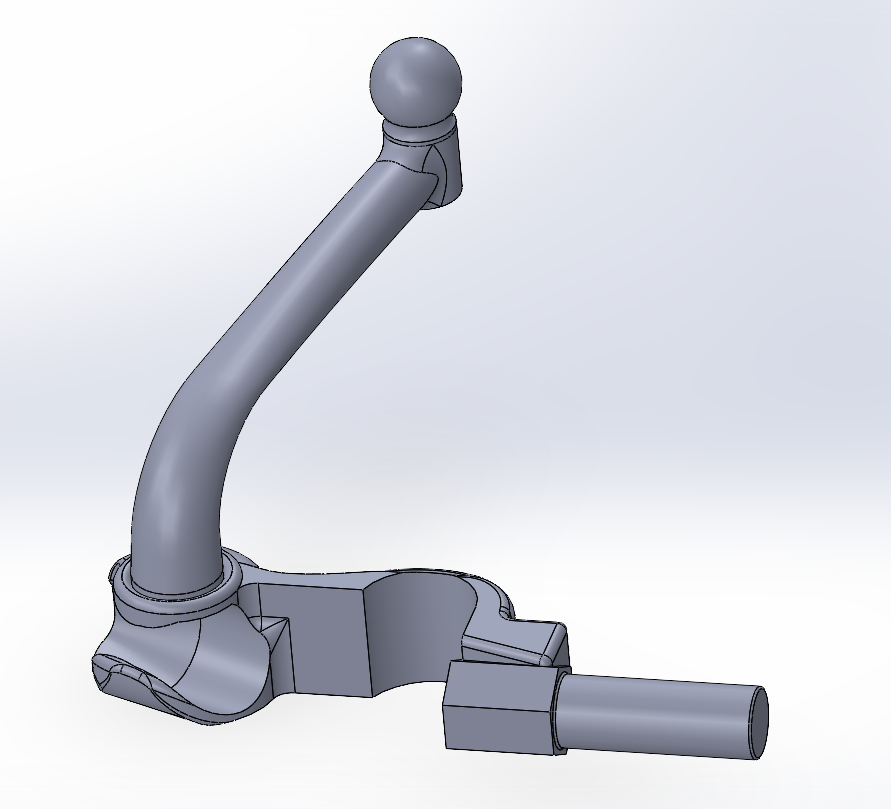
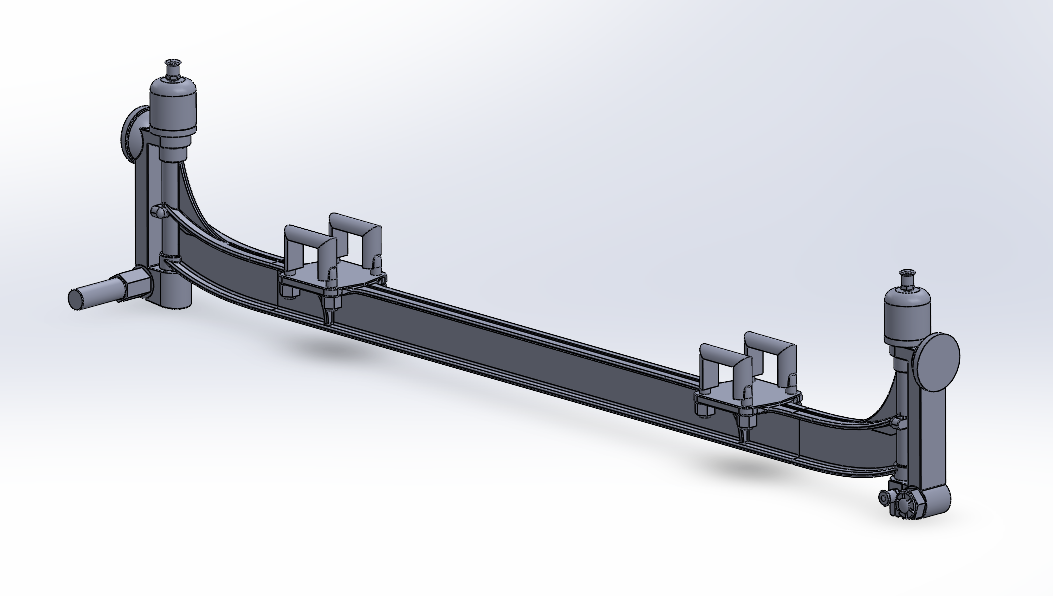
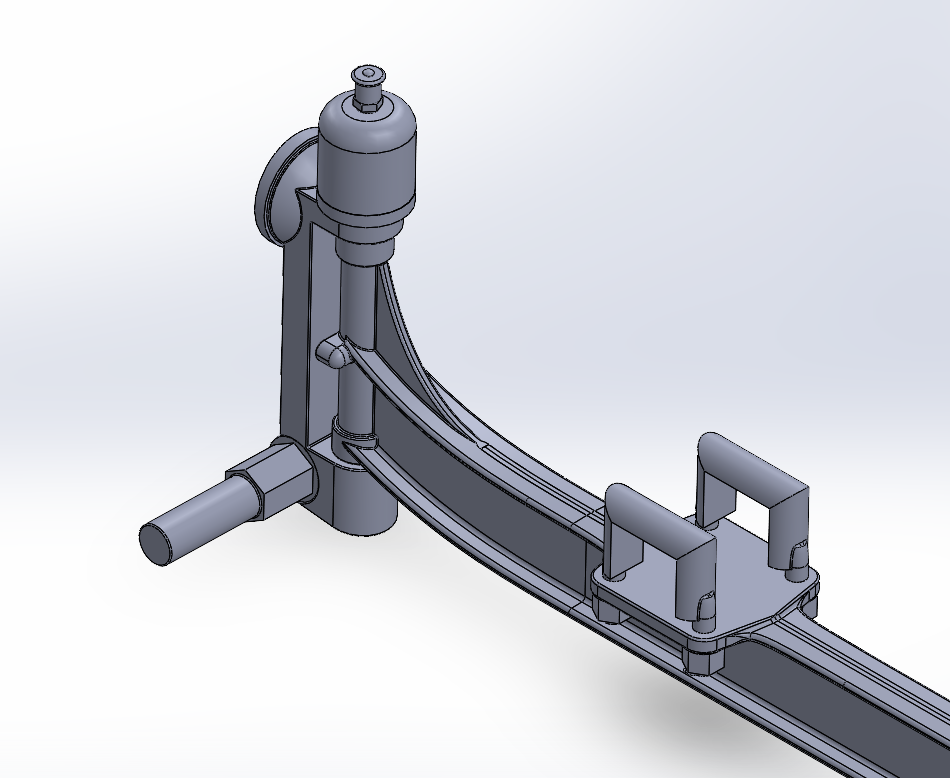
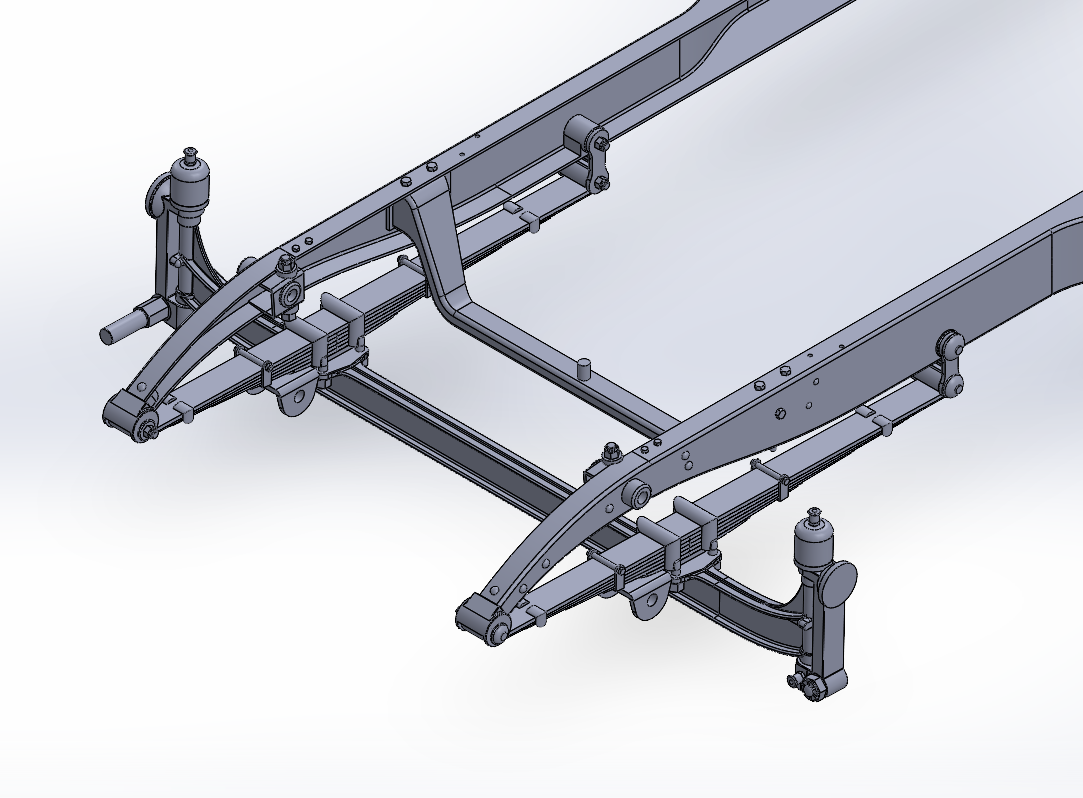
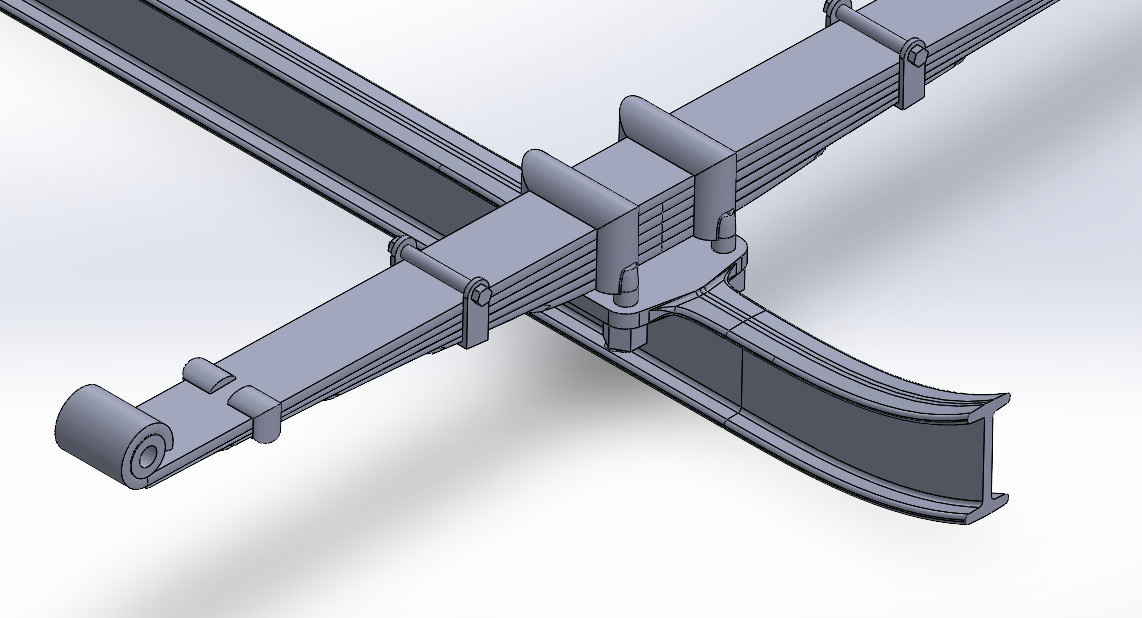
Well another short update.... Front Axle.... Been adding the spindles carriers... Left side... Right side As you can see I've started adding the details, the Grease Cups and the nuts for the steering knuckles which on the right side has the Cap Nut with the post for the Speedometer gear... (not present on race day) Rear side... Here you can see the round bosses for the steering knuckles which were identical left to right... Once those are designed I will then have to add a very special part, the steering arm... On the first front Axle, I designed what would be on the standard Marmon Speedster, I had no other reference... But in reality, it was a part unique to the Marmon Wasp..... For Example.... Front, low and away and the back side.... it is bolted to the Speedometer cap nut on the front, (which locks it in place) loops around the spindle carrier the over the steering knuckle back near the steering cross link... And it's one part... Time to experiment.... May take a while.... But I'm still making progress.... The ubiquitous overall view... Onwards....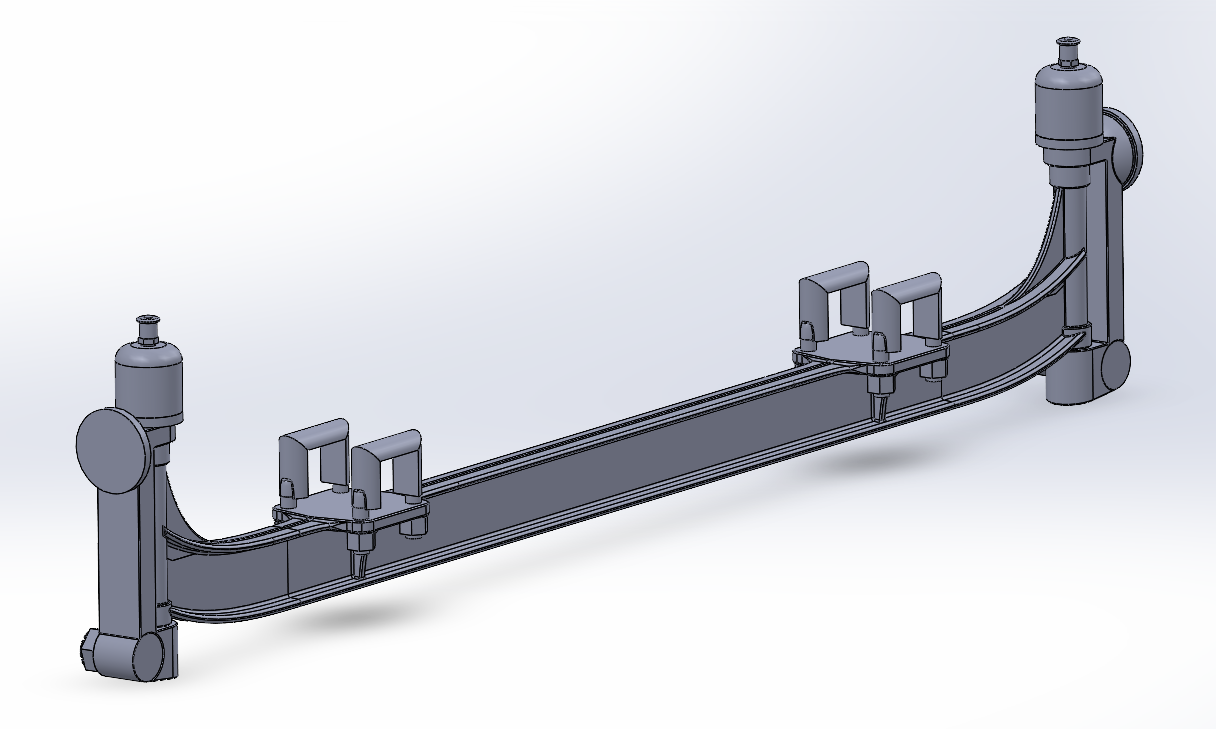
-
Excellent Job! Well done.... I see a lot of aircraft engineering in this one, especially things that haven't changed yet from when originally engineered... An unskinned aircraft is a compendium of the history of aircraft engineering.... (as long as you know what your looking at) Very nice....
-
Keeping my head in the game.....
Egilman replied to Egilman's topic in 3D-Printing and Laser-Cutting.
Short update... Front Axle... (not complete just a progress update) And an overall shot.... Working out the spindle pivot tubes now.... Onwards...
-
Oh, she's named "brenda" although those letters don't make it easy to read....
-
Nice photos of an M-60A1....
-
B-25J Mitchell by Chadwijm6 - HK Models - 1/32
Egilman replied to chadwijm6's topic in Non-ship/categorised builds
Uh, Pilot, Co-pilot and Bombardier are clearly in box cover pic..... I'm in for this one as well.. -
That is one beautiful camo job brother... Very effective.... Excellent photographing job as well....
-
Derrick Cope used to run at Spanaway and Evergreen till he graduated to the big time.... Cope Bros Machine is where I would get my heads shaved & blocks bored....
