


Egilman
-
Posts
4,379 -
Joined
-
Last visited
Content Type
Profiles
Forums
Gallery
Events
Everything posted by Egilman
-

Keeping my head in the game.....
Egilman replied to Egilman's topic in 3D-Printing and Laser-Cutting.
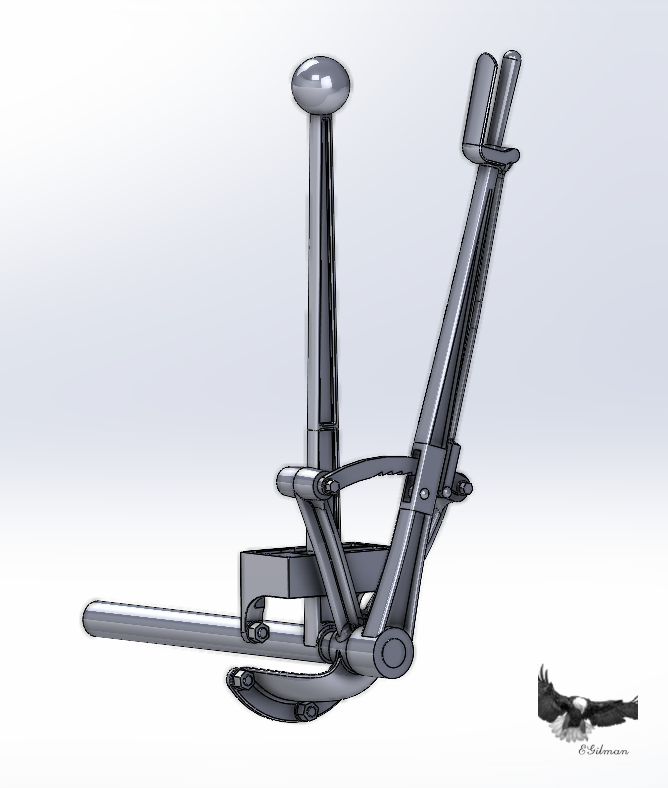
Another short update brothers... Brake and Shift levers.... This required a complete redesign of the ratchet mechanism once I got a good look at what it actually is... Where it resides.... And it's shaft is connected to the Thrust Collar where it is supposed to be... Making progress brothers... I think I'm going to change the arc of development here, right now, it is easy to develop the forward firewall as everything is open with nothing to interfere with the design process... If I start putting the clutch pedal and steering gear in now, then the firewall has to be built around them... It adds a whole lot of complications... Right now I can build the Firewalls with an essentially clear slate and adjust them later if I need to for fitting the accessories.... And the clutch is anything period that look the part, as I still have absolutely no info on what it looked like except for it being a tapered clutch... The clutch throwout mechanism is a mystery, I know where it goes, (well where it's cross shaft goes) but what it looks like is anyone's guess... I do have a mechanical cut-away drawing of the Marmon 32 1914 clutch mechanism from the flywheel to first universal... Was thinking of adapting it to this so at least something that looks like a clutch mechanism is present when built... But I'm not sure if I want to do that.... It may be the only way to go.... And the firewalls are essential to laying out the body in the future...., It's easier to put it in place now... anyways Onwards!!!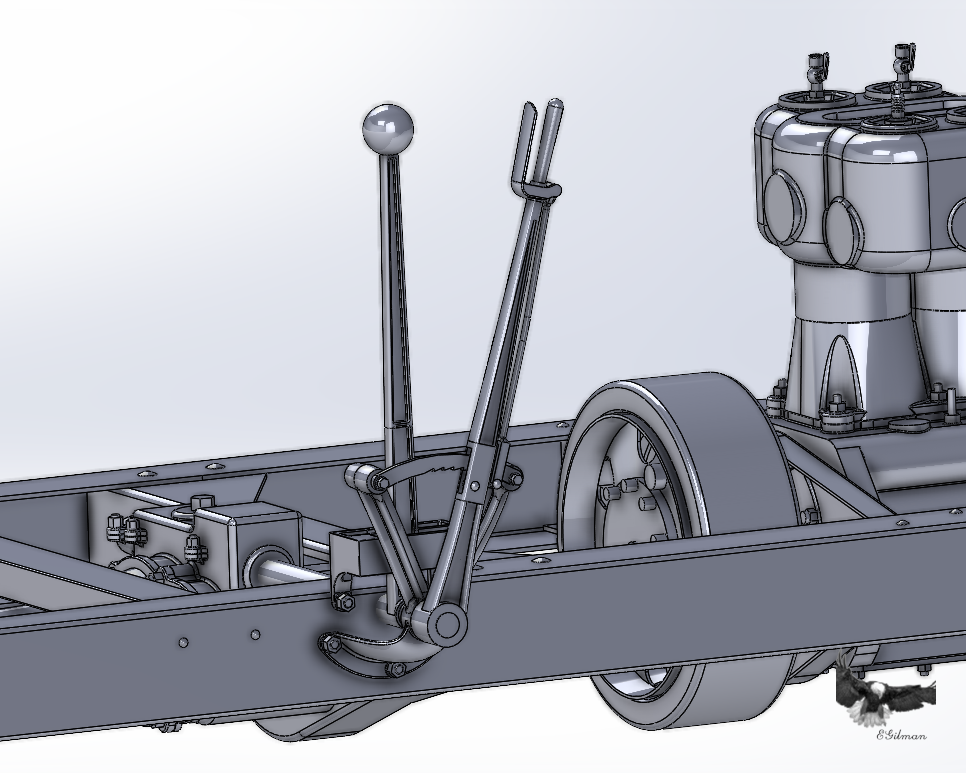
-
We are going to see pics correct? Pretty Please.... {chuckle}
-
Yury, (St George's Models) does make some beautiful kits Doesn't he... I need to get a Durkopp and a Bussing as well for my 150mm K16 Gun.... (nice to see I'm not the only artillery nut around)
-
Keeping my head in the game.....
Egilman replied to Egilman's topic in 3D-Printing and Laser-Cutting.
Thank you Gary, And welcome aboard... Was looking for something I could do while under medical issues... This is working out well I think... Certainly... I'm currently using Solidworks 2023 for this, I won't upgrade to 2024 until the year passes.... I will use Rhino for doing ship hulls when I get that far.... Not that it can't be done in SW, it's just that Rhino is better for ship hulls... Yes as detailed as I can make it, I'm designing in 1/1 scale right now, a virtual copy of the full sized car... Most models are initially designed this way on the computer, its easier and you can scale it to any scale you want when the basic design is finished... Yes this very detailed model is intended for 3D printing and yes I will have to adjust the model for it... as you scale it down for printing you will lose some detail, as it will scale so small as to be invisible some of the details will have to be oversized so they will show... you also have to decide how the parts will fit together and an assembly sequence that doesn't change the model in any appreciable way... Like on this model the 1/2 inch truss rods when scaled to 1/12th scale will be .042 inch in diameter a 1/8th" thick panel will be slightly thicker than a piece of paper.... (and you won't be able to print a .030 thick body skin panel, it will have to be thickened) So yeah, the model for printing will have to be adjusted so it's capable of being built... Unfortunately you will lose fine detail when the developments for scale printing are complete... The good model designers do it this way, it's the only way.... Otherwise you miss things that should be there but because you didn't design it at the start it isn't there on the model... Now I've chosen a specific model at a specific point in it's life, most of it's life it had a belly pan to keep dirt and debris out of the running gear, but when it ran the first Indy 500, it wasn't on the car, so I'm not designing it, this is a model of the first Indy Winner... (as it was raced, not like it is today) Takes a bit more work to do it this way which is what makes it even more fun... I have no illusions, there are several thousand people following this on the net, I'm sure a few of them are taking my images and doing exactly what I'm doing but using my work instead of their own...... It goes with the territory... -
Keeping my head in the game.....
Egilman replied to Egilman's topic in 3D-Printing and Laser-Cutting.
Thanks Ken, Yep it's a lot of back and forth, you do the best you can and go back and fix things when you have to... Yeah the intent is to carry it through to a completed model, right now just getting it designed is the immediate goal... Yes there is more and more coming out and the big companies are reading the handwriting on the wall, with PE in kits now and some 3D printed parts resin... the real switch is when they formulate a styrene plastic that can be laser printed, at that point you will see the injection molding go away... The future is now my friend... The real question is will we as modelers be able to afford it.... {chuckle} As 3D printing develops, we are seeing more and more startups and accessories coming out.... It's a good thing.... -
Keeping my head in the game.....
Egilman replied to Egilman's topic in 3D-Printing and Laser-Cutting.
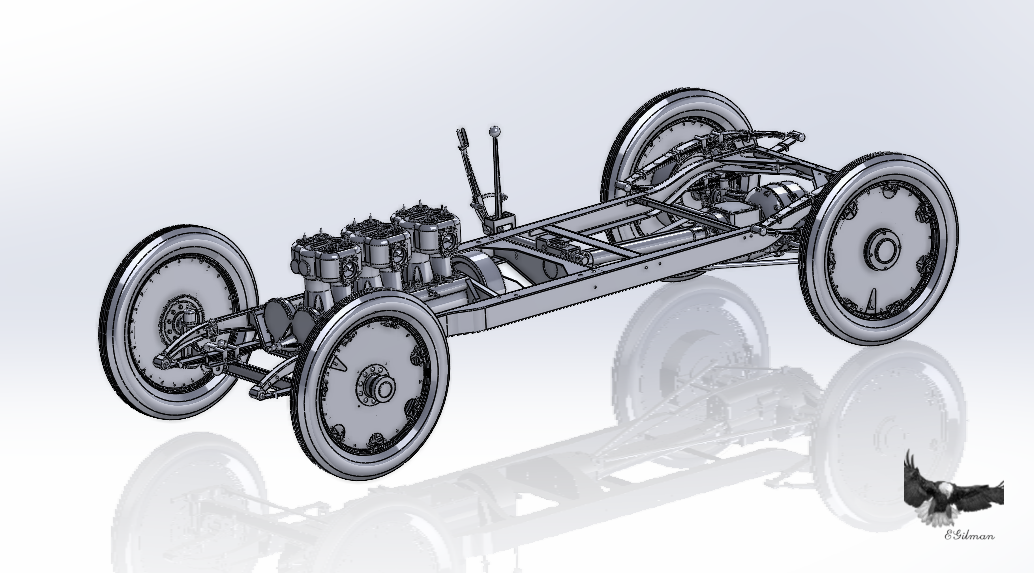
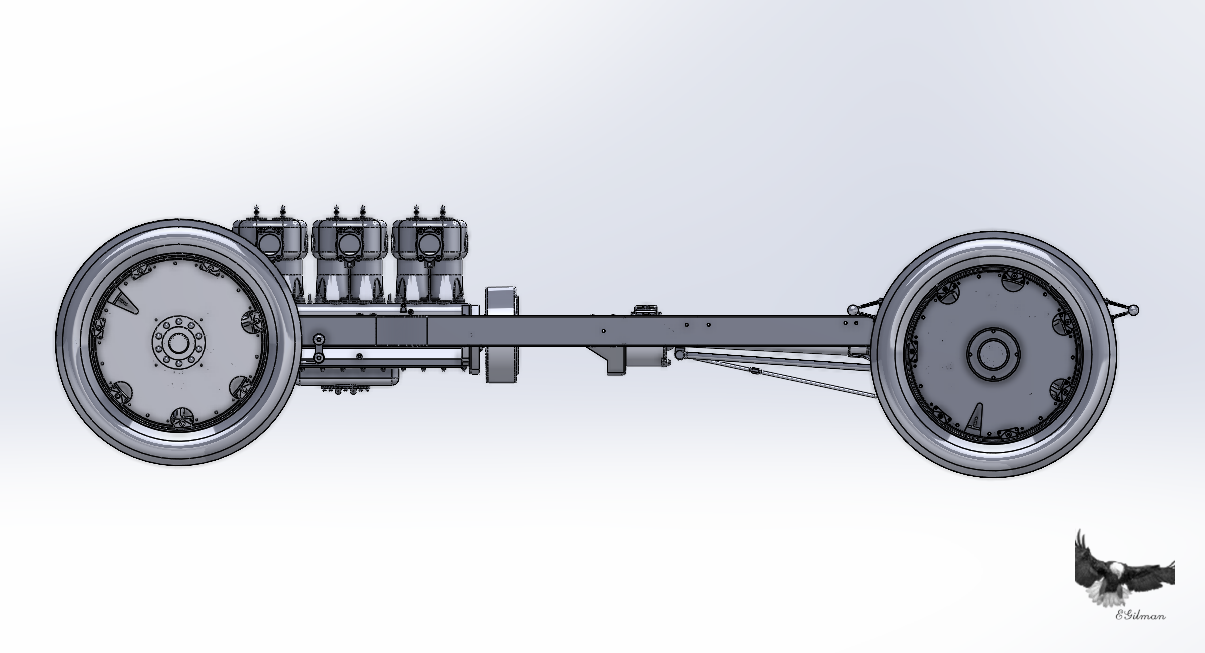
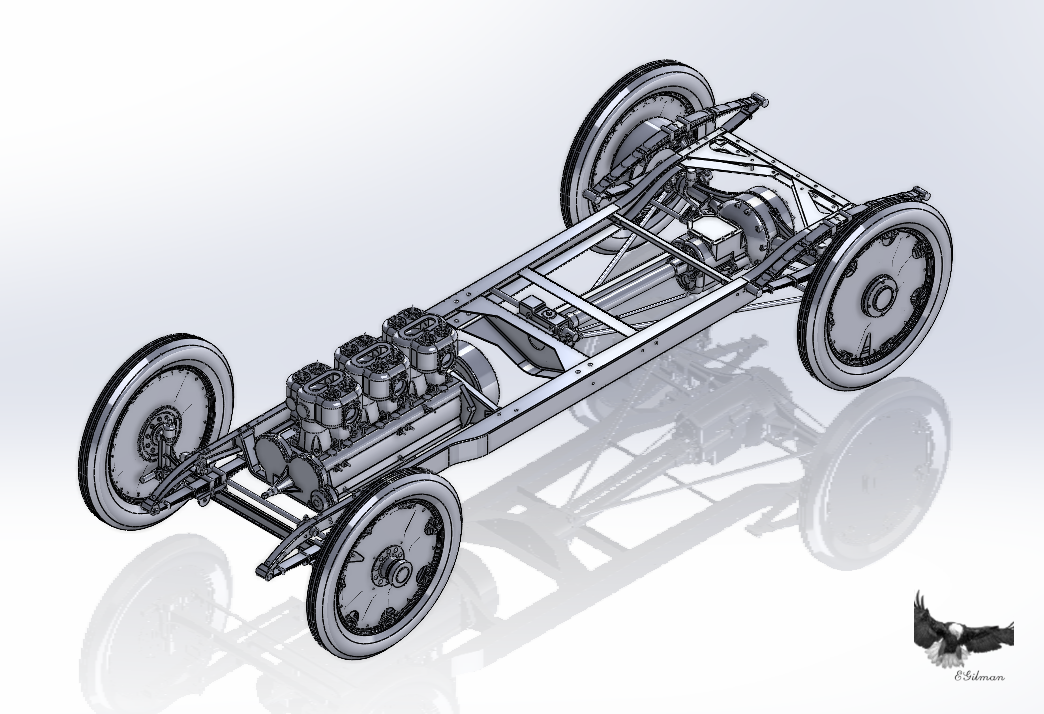
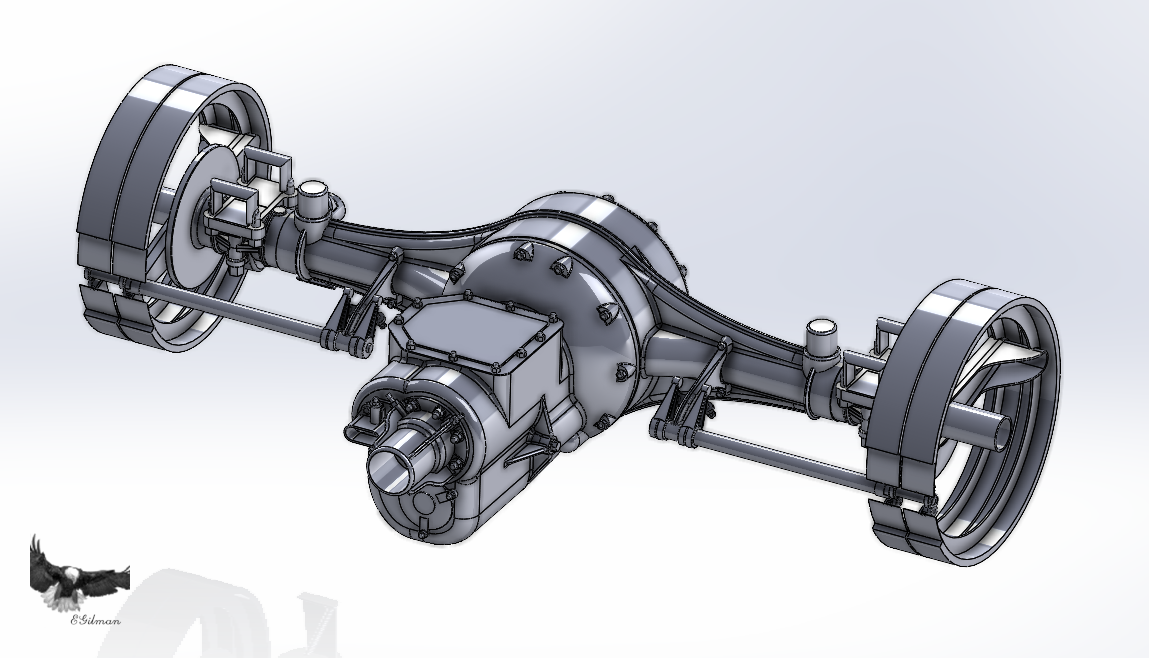
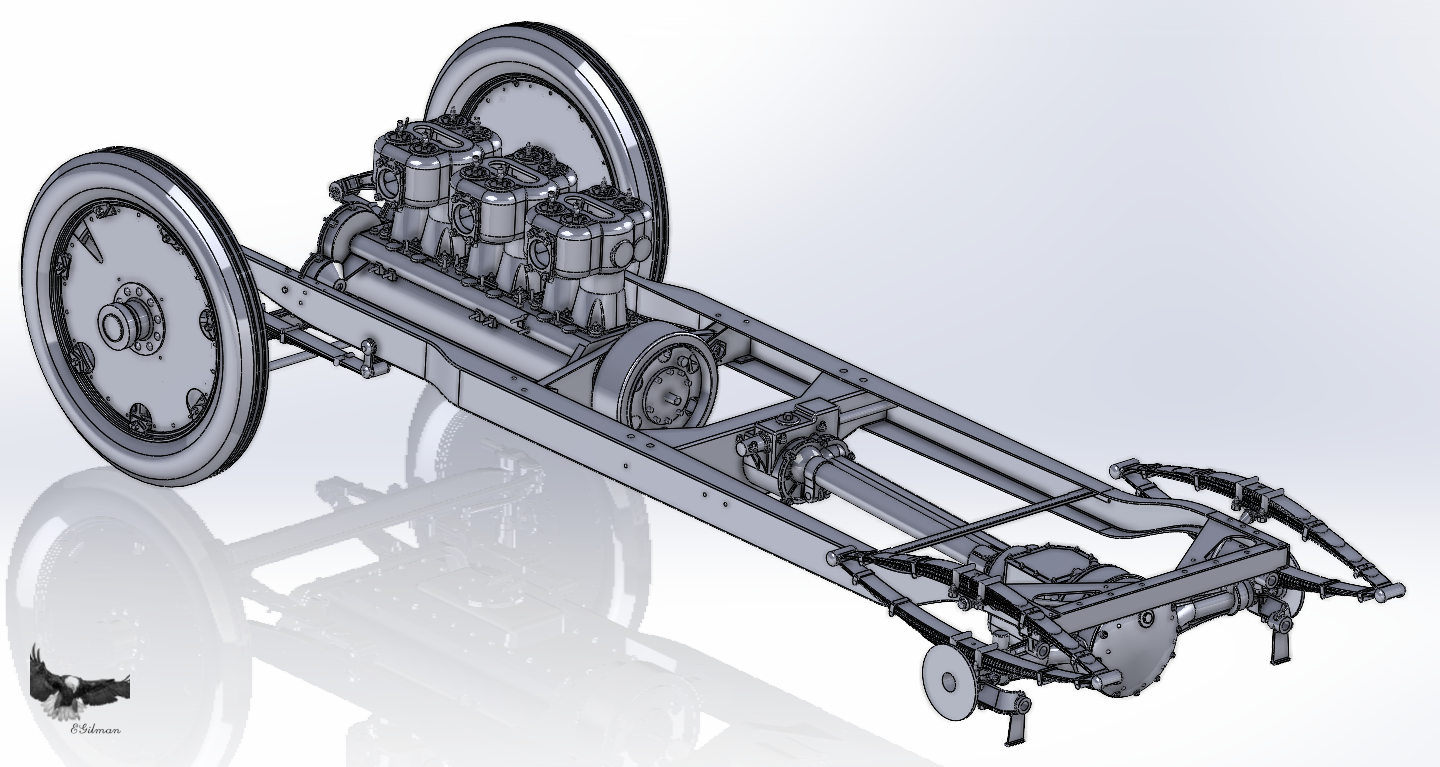
Why thank you Brother.... Yeah it's been a long road but I'm getting there.... the transfer to software is daunting at first but quickly learned as you try new things, then it becomes an experience of learning the fine points of the tool and how to use them... Believe it or not most models are designed exactly this way today, you collect as many images as you can and hopefully some documentation as well to go along with the pics, then you start drawing ibn 1/1 scale... Once you get to the end of the design process, a scale is decided upon then you revise the model for production in the scale you chose... The whole process can take well over a year from start to finish and that is with experienced researchers, designers and manufacturing people involved... A lot goes into producing a workable model.... Not surprised at all that MFH does some of it this way....... Today I put her rear wheels on, had to tweak the Differential carrier/Rear Axle and brakes to make them work with the Wheels but it's all good... will probably have to do more tweaking eventually... Here are the pics.... Left side, Front... Rear... And 3D... Now it's beginning to look like something.... EG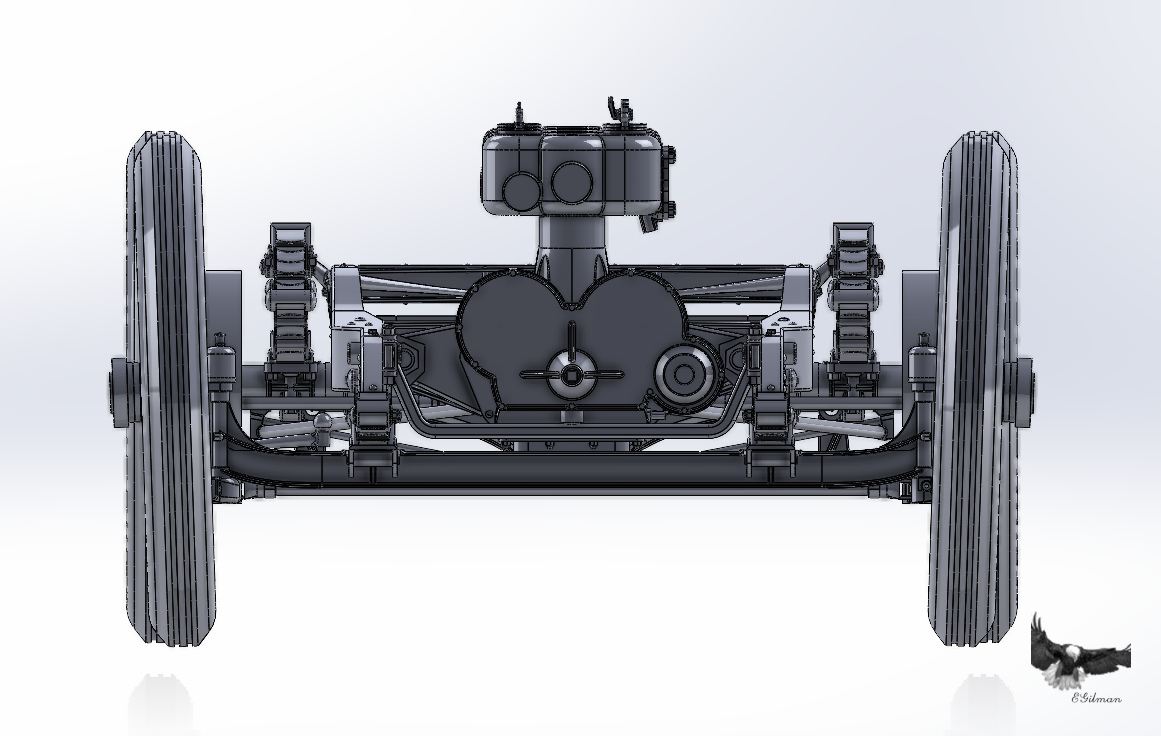
- 85 replies
-
- 10
-

-

-
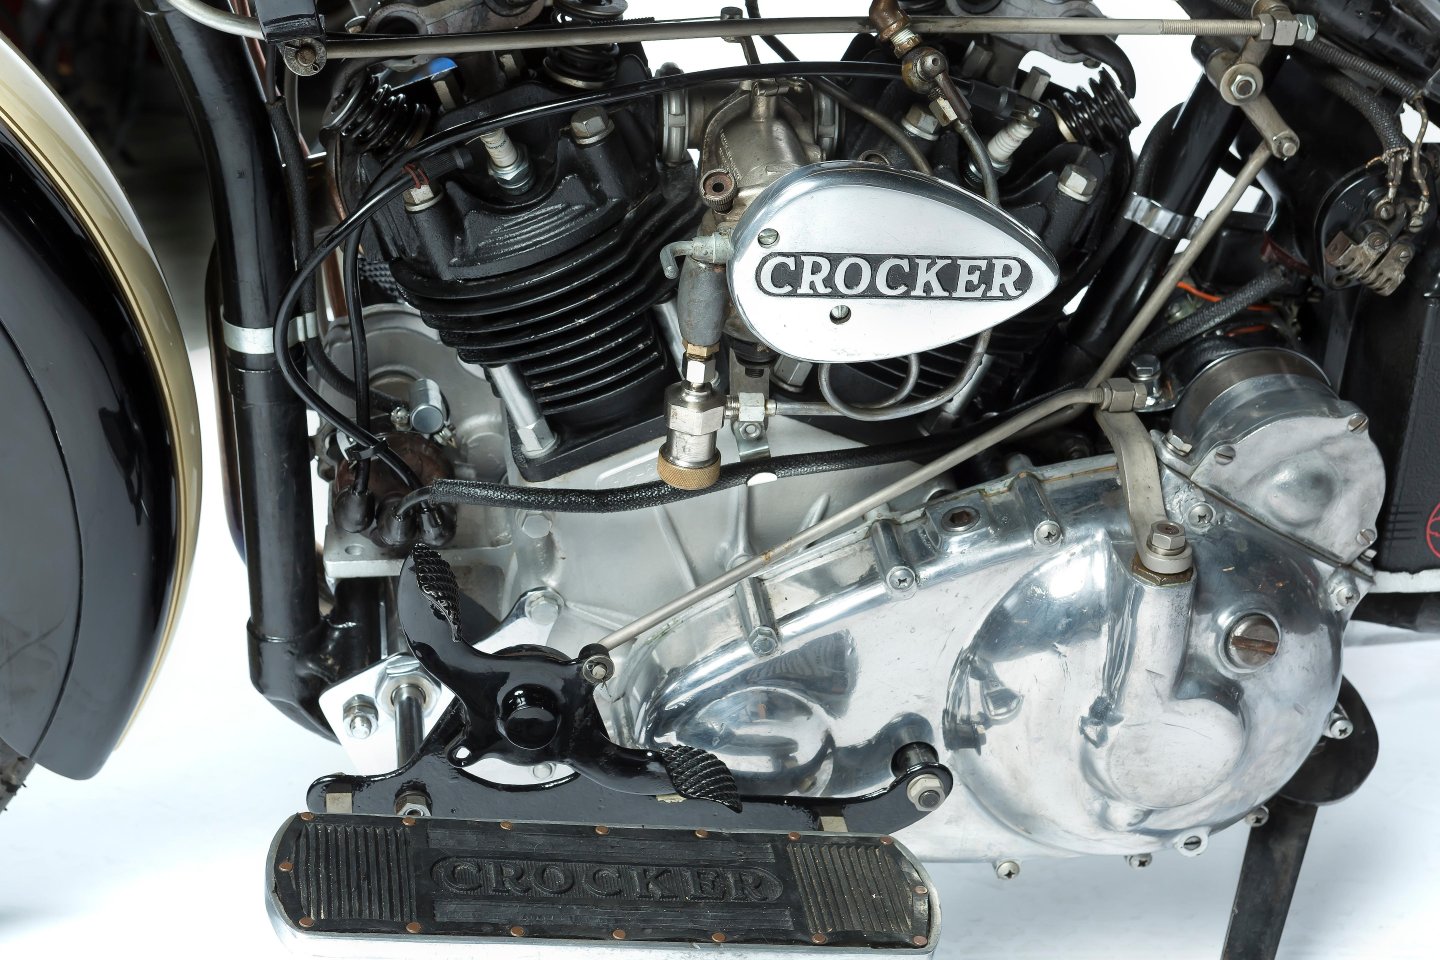
Another update... Haven't a clue where the original coil is located, I"ve seen a lot of these in pics where the coil is all over the place, but those are not original, they have been updated with modern ignition components... Here is a real scale exemplar of the MFH Model... https://www.mecum.com/lots/380383/1940-crocker-big-tank-big-twin/ A 1939/40 model, and yes the coil wire goes up under the tank and then disappears there... No coil behind the seat post either... Although there is a voltage regulator there,,, The only thing I can think of, they were hand built one off machines, it was part of their advertising that each one was different.... The base engine was a stock 61ci but it could be ordered at up to 81ci.... (only way to tell is to take it apart, no real records survive) Although the engine size was stamped into the block when manufactured, it reads as three numbers, year, (first two digits) ci displacement, second two digits) and serial number... (up to three digits) Also, there were just a few of them built between 1936 and 1942 no more than 150, they ceased building them when they contracted to build airplane parts for the US government during WWII... Shortly after WWII they built a few more from leftover parts, and that was it, they quit manufacturing them in favor of aircraft parts... Essentially, they made no real money off production of these bikes, it was considered an "Enthusiast's" bike where the Harley's and Indians were considered an everyperson's bike, ie. very thin profits for Crocker.... So they were never real profitable and WWII killed them off...
-
Triumph 3HW by Tim Moore - Italeri - 1/9
Egilman replied to Tim Moore's topic in Non-ship/categorised builds
Hey a postwar civilianized version is just as historically accurate.... {chuckle} (and this one looks so accurate I would like to go ride one myself) -
Here is a pic of the left side of Crocker engine # 36 61 8, a 61ci with hemi heads built in 1936 and recently restored... it is the eighth engine manufactured by Crocker... Point/coil ignition it clearly shows where the original coil is located and where the shielded coil wire runs on the original bike... Clearly it is mounted as far away from the plugs as it can get... to the rear of the seat post below the seat, in front and above the battery... You can even see the ignition wire that runs down from the tank mounted switch.... I have a few more pics of this bike, it is a small tank early version but the engine is the same... There was only 33 of these engines built before they changed the design to something visibly different... MFH probably ran that wire to the closest point to make it disappear rather than to it's correct point... Or what they modeled is a different engine than the 61.... the only thing I can think of... Hope it helps.. UPDATE: I started a search on this kit and the various examples of it being built, unfortunately the stock builds of the kit do not show an ignition coil in the kit.... there were two versions of the coil used on the Crocker ignition bikes,,, the early small tank versions, 2 gal gas tank) show a sideways coil like the above pic and the later large tank versions, (3 gal tank) show a coil that is shorter and fatter facing fore and aft in orientation... All mounted to the seat post above the battery.... I guess MFH missed it....
-
Sorry, Cubic Inches... not cubic centimeters... And it is definitely a point/condenser/coil engine, it's the reason for the center wire, Magneto's don't use a center wire...
-
It's a Crocker 60cc engine, late model, it carried a point/condenser ignition, the center wire is a coil wire.... The coils of that era were usually a box mounted somewhere on the frame usually above the spark plugs.... Up under the wings of the gas tank was a common spot... And yes the Crocker had a mechanical spark advance on the magneto mounted engines... It was controlled by the left handgrip and needed constant adjustment, ie. there was no "zero" point you kick started it in full retard and adjusted it on the fly... It took some skill to ride a Crocker... But they were the fastest thing on two wheels of that era... Crocker had an open offer to pay anyone that was beat by a Harley or Indian on the race track, he never had to make any payments to anyone....
-
You mean this one... https://www.ebay.com/itm/303785714104 Of course that is the Orel Kit # 291 Out of the Ukraine... Looks fairly reasonable to me there should be some Swedish 1/33rd scale decals around to build the J-20....
-
Pardon me askin, just WHAT is a J-2000 anyway? It certainly doesn't show up as any aircraft known to man in my internet searches.... AH, you mean the Swedish J-20 ie. the Italian Reggiane 2000 Falco I... Duh... My eyes must be getting bad.... {chuckle} the MSModels website doesn't show either aircraft just two, not the ones your looking for, they make and sell mostly eastern european Railroad and Truck stuff and seem to be switching to resin aftermarket parts on the way to making resin models... Unless I'm looking at the wrong place...
-
Keeping my head in the game.....
Egilman replied to Egilman's topic in 3D-Printing and Laser-Cutting.
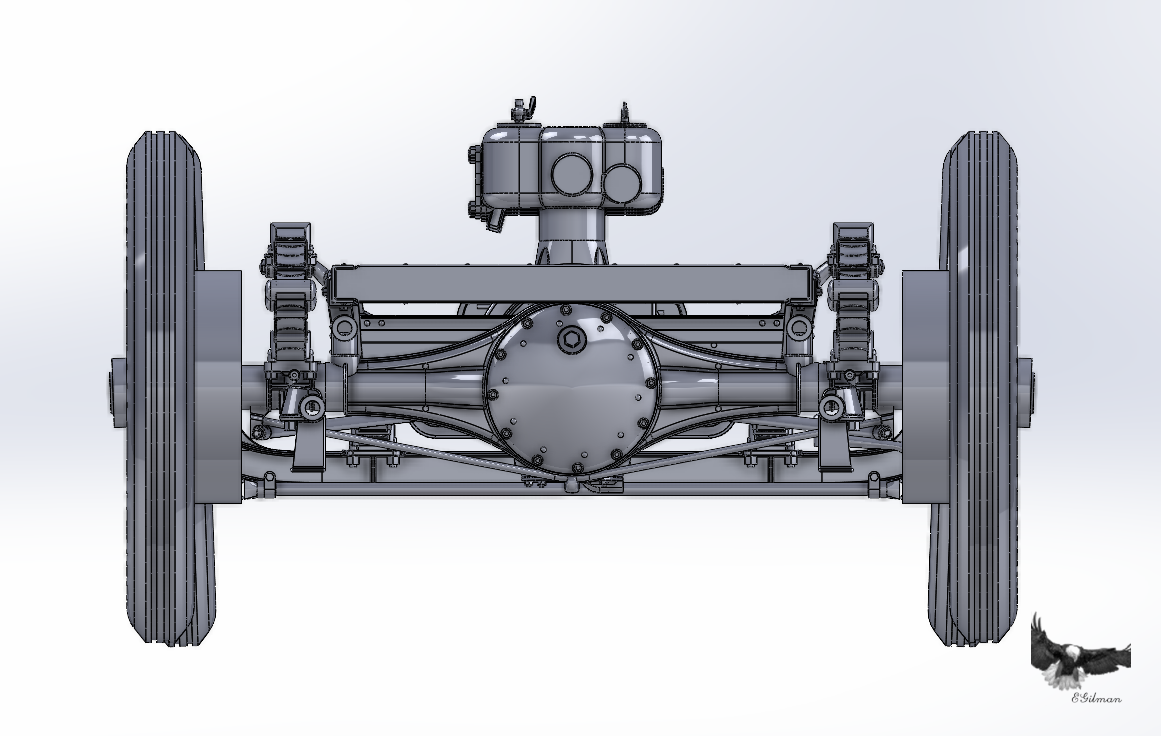
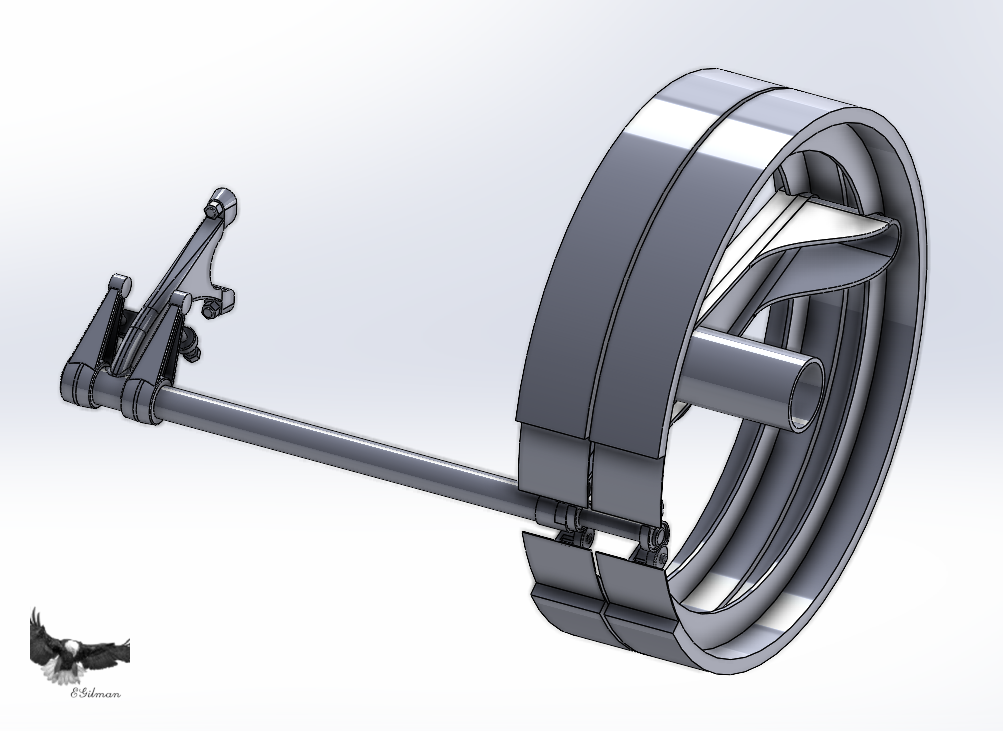
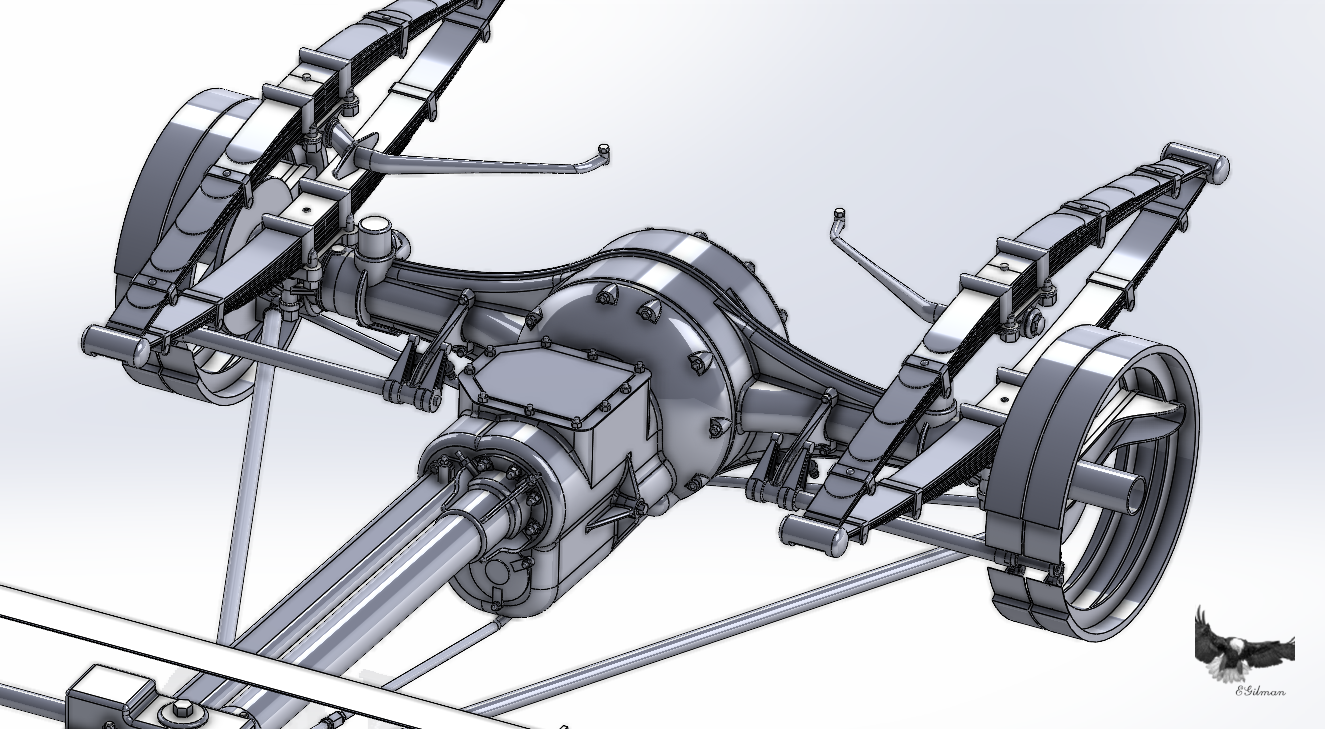
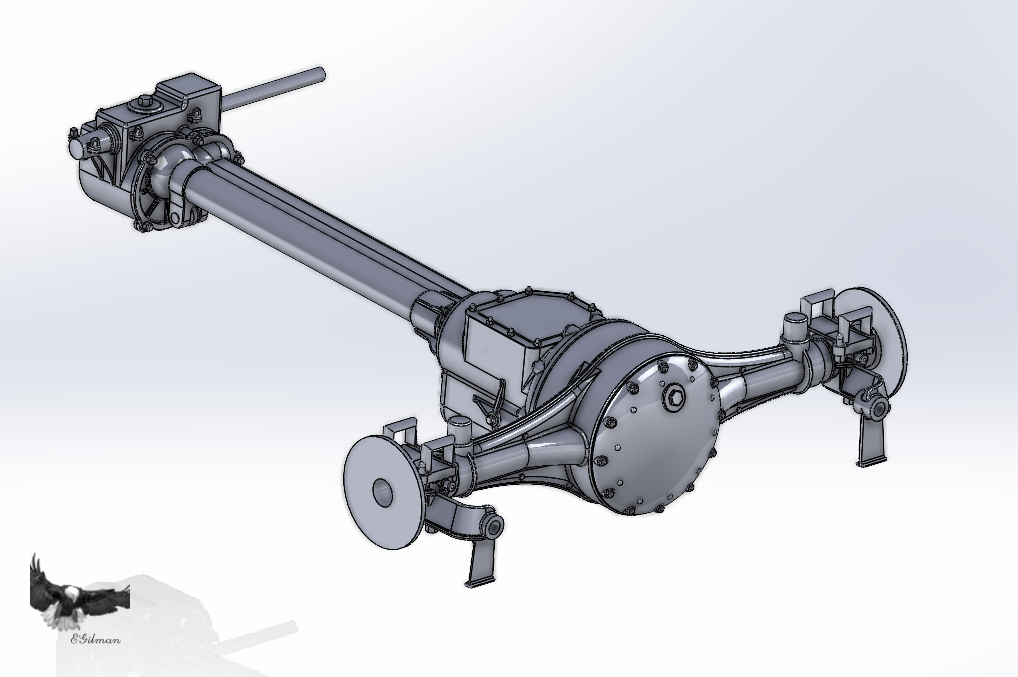
Ok, another update.... Slowly getting back to where I was... Truss Rods and diagonal braces.... Brakes... I had to redesign the cam rod support arm.... That cross piece with the bolts and locknuts was missing before, it is the stop to prevent the brake arms from going overcenter and locking the brakes in the off position... (a very important feature) And mounted to the Differential carrier... And as part of the rear suspension.... I guess I can mount the rear wheels now and get her to a rolling chassis state... Onwards!!!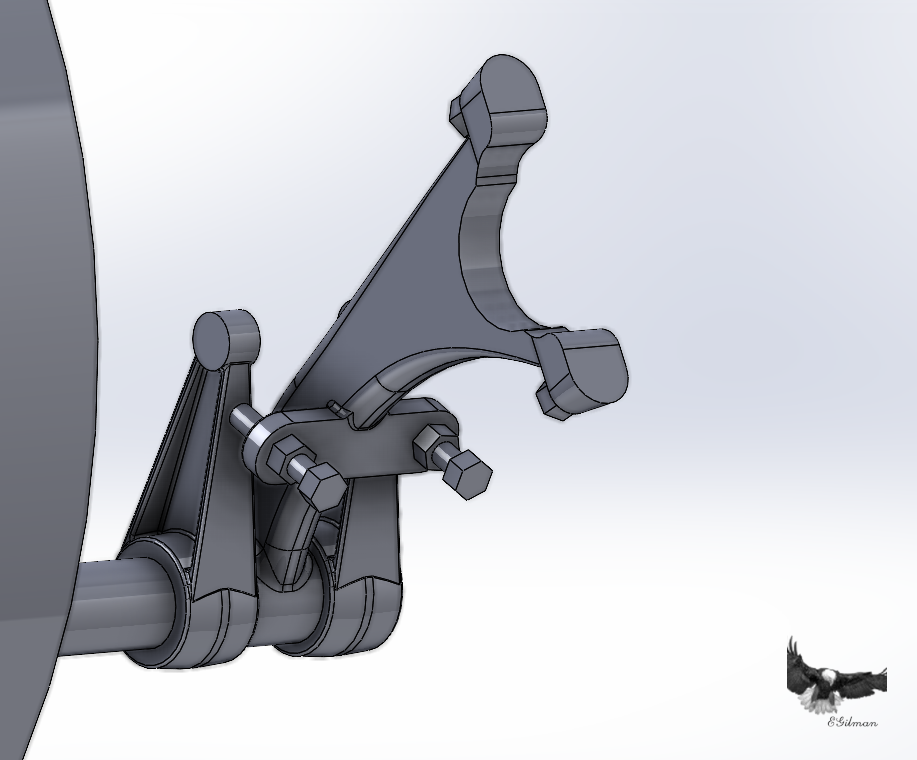
-
I don't doubt it either, in fact, they go one farther... once they are fully dried and they collect the drippings, they crunch up the residue and cook it to extract EVERYTHING they can get.... Then they cook it down into a very powerful concentrate and allow it to steep.... Then they soak specially formulated rice paper with the solution for a few days to allow the paper to take up as much tobacco solution as they can, then they dry it again and shred the paper... That is the "Tabacco" that they stuff into cigarettes'... The only thing left from the tobacco plant are the chemicals that make up the nicotine, and the residuals from all the pesticides and growth compounds they use... (of course as highly concentrated as possible, once hooked they don't want you getting away) The fastest way to get drugs into the body without access to the human vascular system, (needles) is through the lungs... Is there any doubt as to why the illegal drug makers worked ceaselessly for 30 years to develop a form of cocaine/morphine that is smokable? (known as crack?) Yeah, I was a red and white, cowboy hat customer for a long time... Probably too long...
- 62 replies
-
- 10
-
-
-
Old school, and I'm sure it will come out fine,... I'm also sure you've done it before... {chuckle} You knew the solution right away.... Just a little more work... I have faith in you...
-
M1A1 ABRAMS by mikegr - FINISHED - Revell - 1:72 - PLASTIC
Egilman replied to mikegr's topic in Non-ship/categorised builds
Well the same way they make race cars go fast is the way they make tanks go fast... HP to Weight ratio... You can get anything to fly with a liberal application of horsepower.... Well the future of aircraft carriers is good as long as there isn't solar powered remote control aircraft.... (survivability is the issue, but you have to have the carrier to support the pilots) Tanks have reached a plateau in development, like cars, they are beginning to look all alike, and the anti-tank weapons have improved so much, (at least ours have) that armor is junk on the battlefield as soon as they are spotted... But then again wars of conquest are passe' as well... Large scale wars ala WWII will result in total world destruction... But the contents of museums like this are impressive none the less... Man's ingenuity for destruction knows no bounds... -
And that make it accurate to history.... Even if it isn't how it is remembered.... And shows us that things that were very popular in the past might not be so popular in the future... Such are the vagaries of history when its created by human beings... I distinctly remember when the swastika of Nazi Germany was very highly admired around the world, now it is universally held as evil incarnate... (with good reason) Humans being a self-aware social species, tends to whitewash there bad history by removing it from the books... But thankfully, (unfortunately maybe) that doesn't change the truths of history... Tobacco money helped build one of the best and most beautiful race cars that was ever built....
-
It's an ok rendition of probably the greatest racing engine ever built... but there were three that came before it, the Offenhauser, the Miller, and the Peugeot... All considered the greatest of all time... All 4 valves per cylinder DOHC... The Cosworth is legendary... Today, Honda is trying to make it up on that podium... I'm in...
-
Triumph 3HW by Tim Moore - Italeri - 1/9
Egilman replied to Tim Moore's topic in Non-ship/categorised builds
And the Next "Honey I shrunk the Bike" Award goes to..... TIM!!!! Congratulations Sir!!! Fantastic result..... Anyone in pics would be hard pressed to tell the difference between model and real... VERY VERY well done.... -
Keeping my head in the game.....
Egilman replied to Egilman's topic in 3D-Printing and Laser-Cutting.
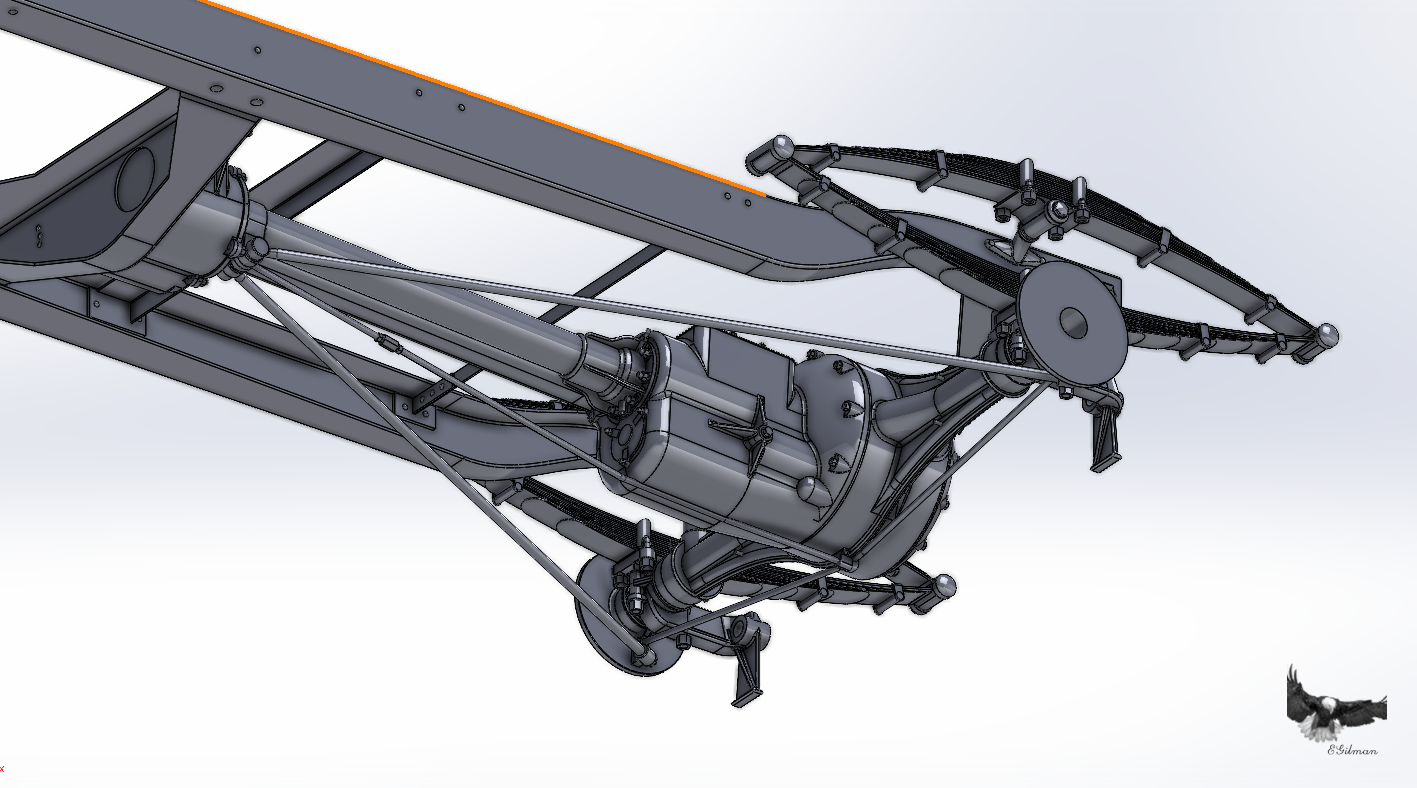
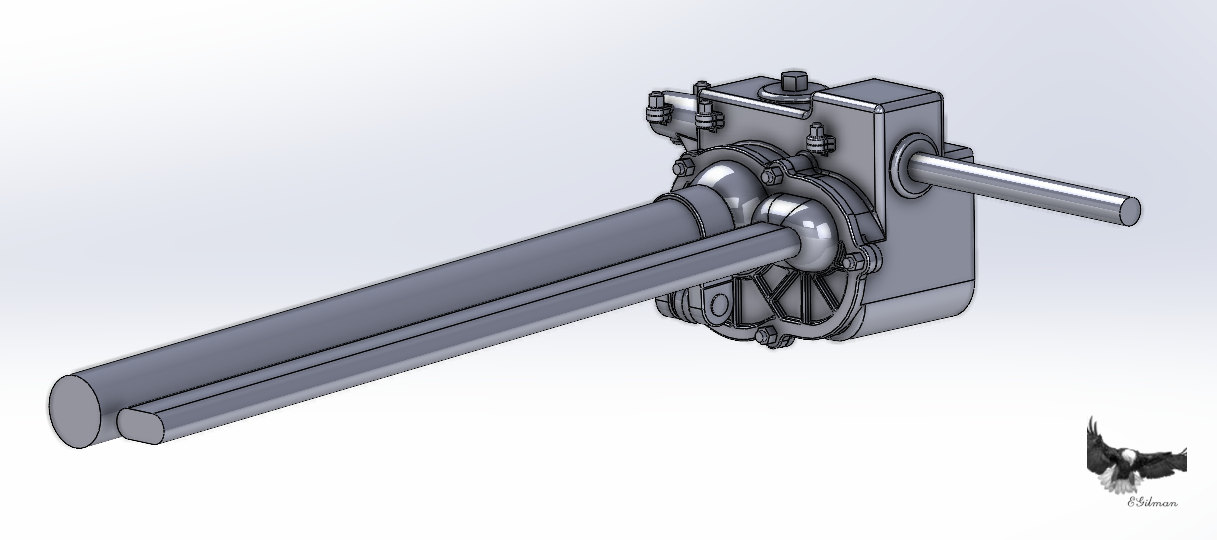
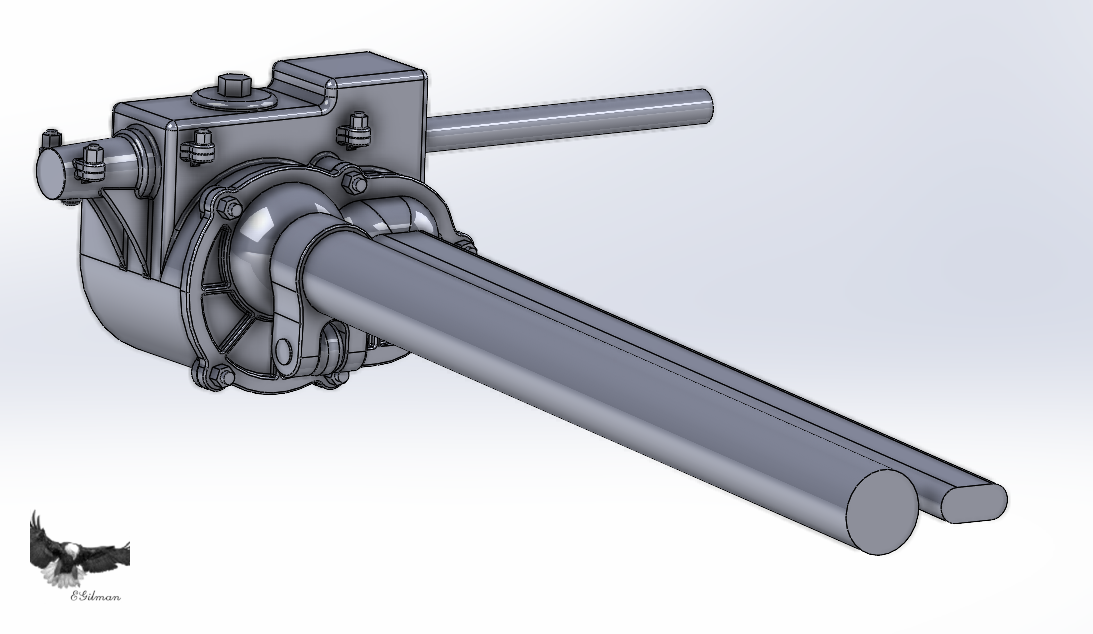
Well I finally wound up redesigning most of it... The part that shows in the cockpit was pretty much right on the money, it's the part underneath the floor and seat was what need work... Here is the redesigned part.... And the driveline assembly.... And mounted in the frame... This wasn't an easy part to redesign, it's obvious that the previous part was wrong, and even with the shots of the rear of it from either side helped, the oilskin cover obscured the greater portion of the thrust collar... But from the bits I could glean, this is what I cane up with, yes the retainer is a light one with reinforcing ribs, that is known but the configuration of those ribs was hidden, so I drew it up how I would have done it if I was the designer... I would say the Thrust Collar is 85-90% accurate the only info missing is what is actually under the oilskin dust cover... Next up is the Truss Rods and Diagonal Braces, then the Brakes and Rear Wheels... only a few more parts to a complete rear suspension... But I'm gonna take a day or two... Onwards...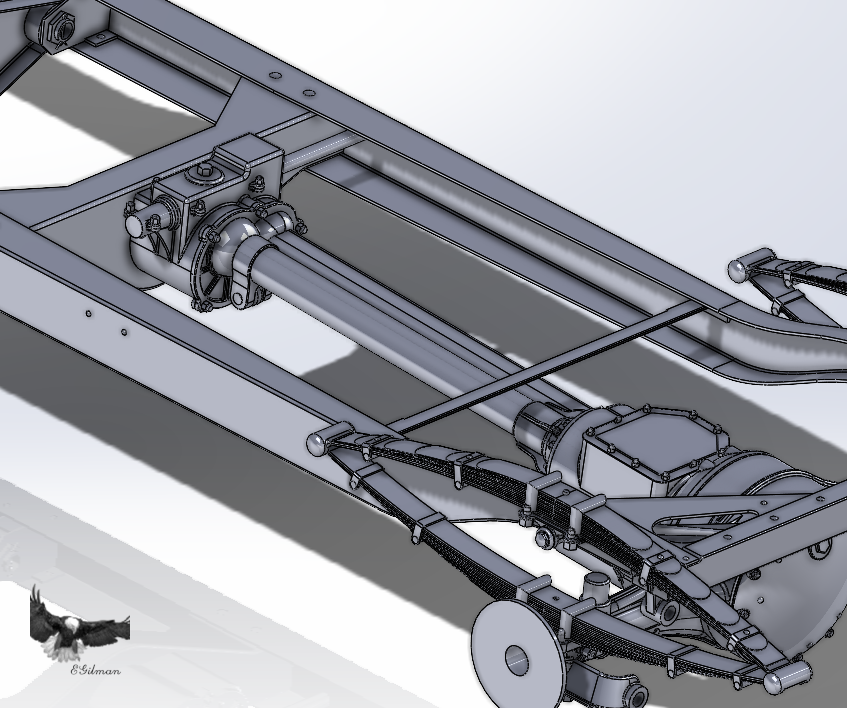
-
F-14D Super Tomcat by CDW - AMK - 1:48 Scale
Egilman replied to CDW's topic in Non-ship/categorised builds
Cool! You gonna put her USS Langley stripes on her? (VF-2 was the first squadron to fly off a carrier, hence the first assigned to the Langley, carrying the stripes was definitely a point of pride) -
Gorgeous Kit, MFH has been at the top of the kit engineering world for a couple of years now, the only problem for me is the price... Ordering even one tends to deplete the bank account for quite a while.... I'm down for this, we seldom see the classic american stuff even scratchbuilt, to have someone actually producing kits... This has to be modeling heaven....
-
Yeah, since they run around 170-180 new... I wouldn't regret it either... (even if I haven't a clue on how to use one)
-
F-14D Super Tomcat by CDW - AMK - 1:48 Scale
Egilman replied to CDW's topic in Non-ship/categorised builds
They will once the technology comes down in price from being more widespread...

