Egilman
-
Posts
4,382 -
Joined
-
Last visited
Content Type
Profiles
Forums
Gallery
Events
Everything posted by Egilman
-
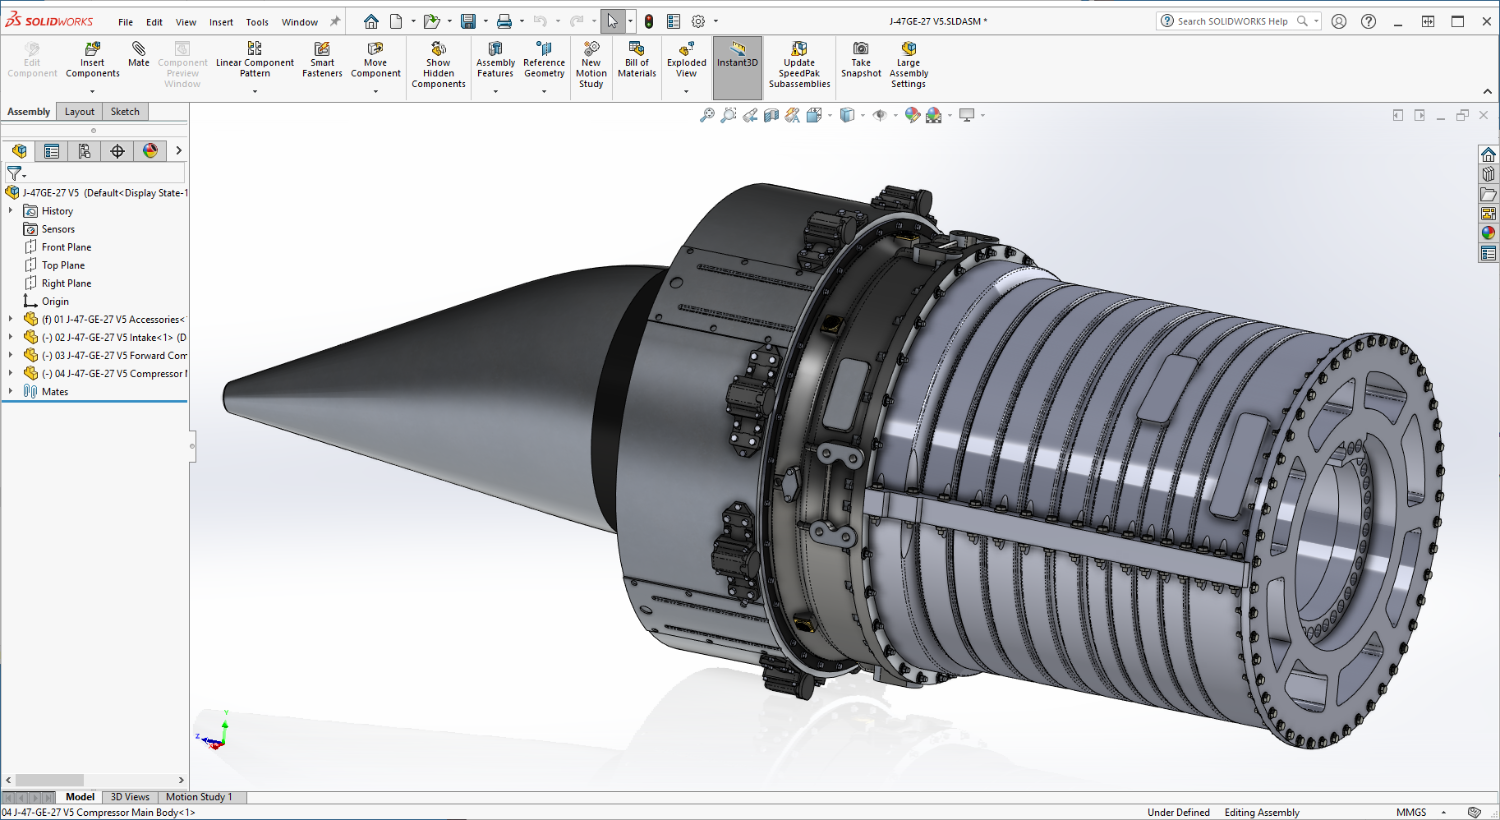
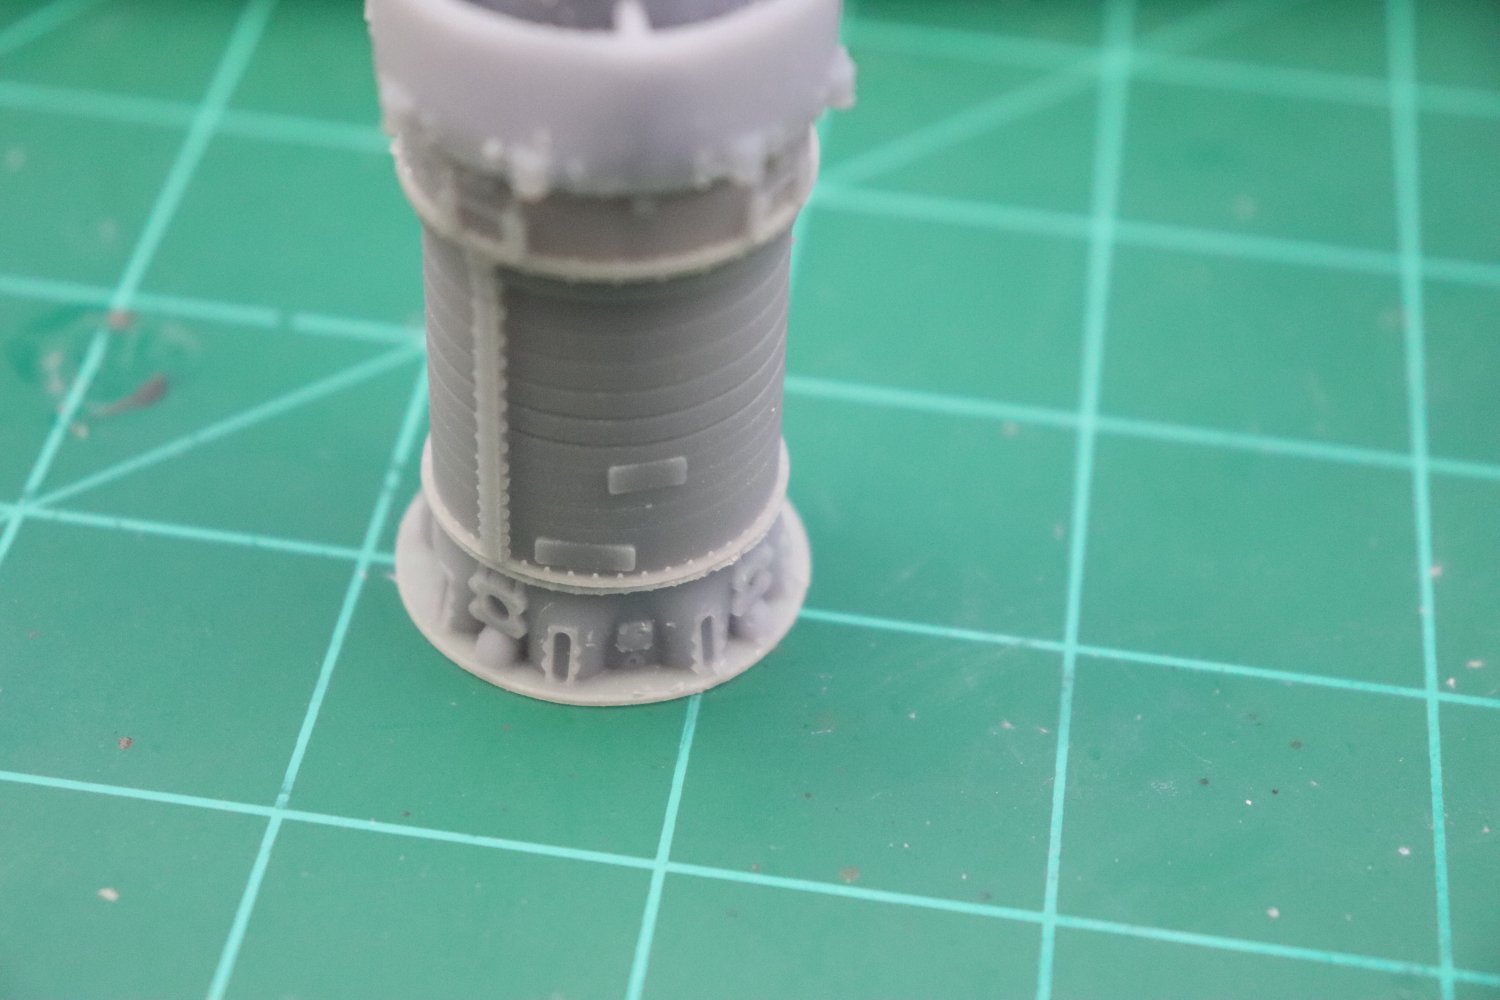
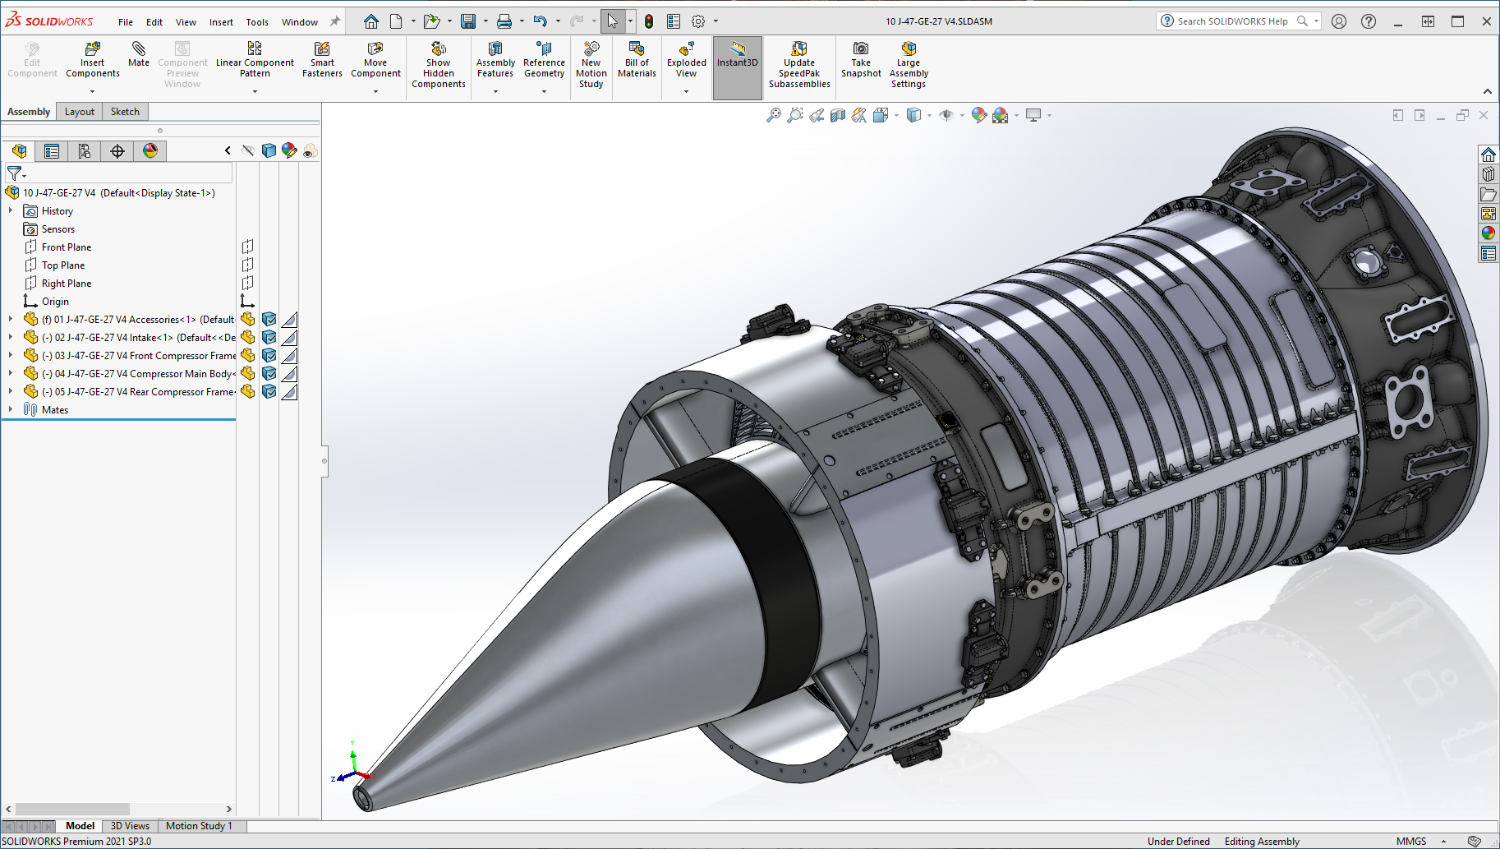
 Another small update.... Final basic details on the Main Compressor Body... Flange Bolts and Air Bleed Bosses.... On to the Aft Compressor Frame... EG
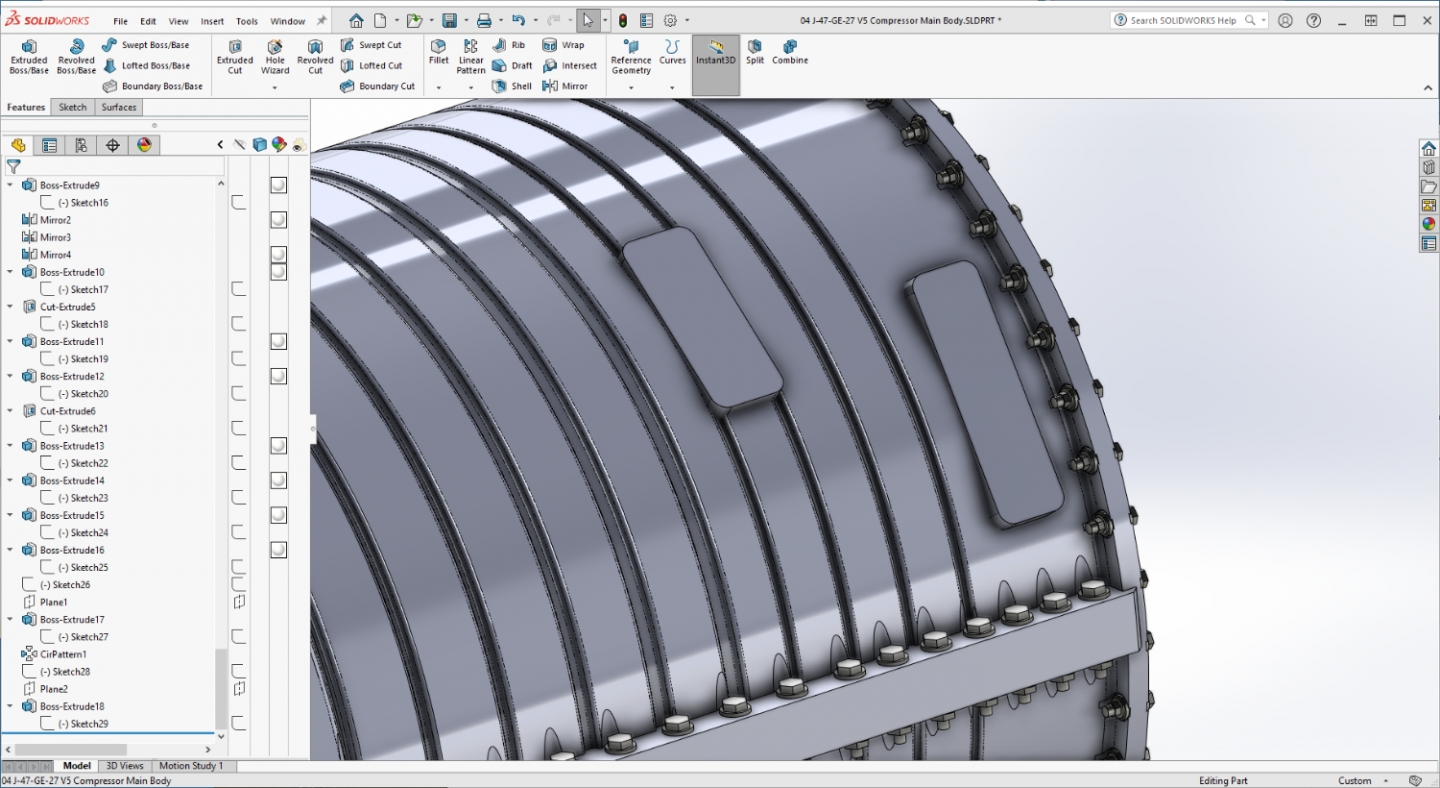

-
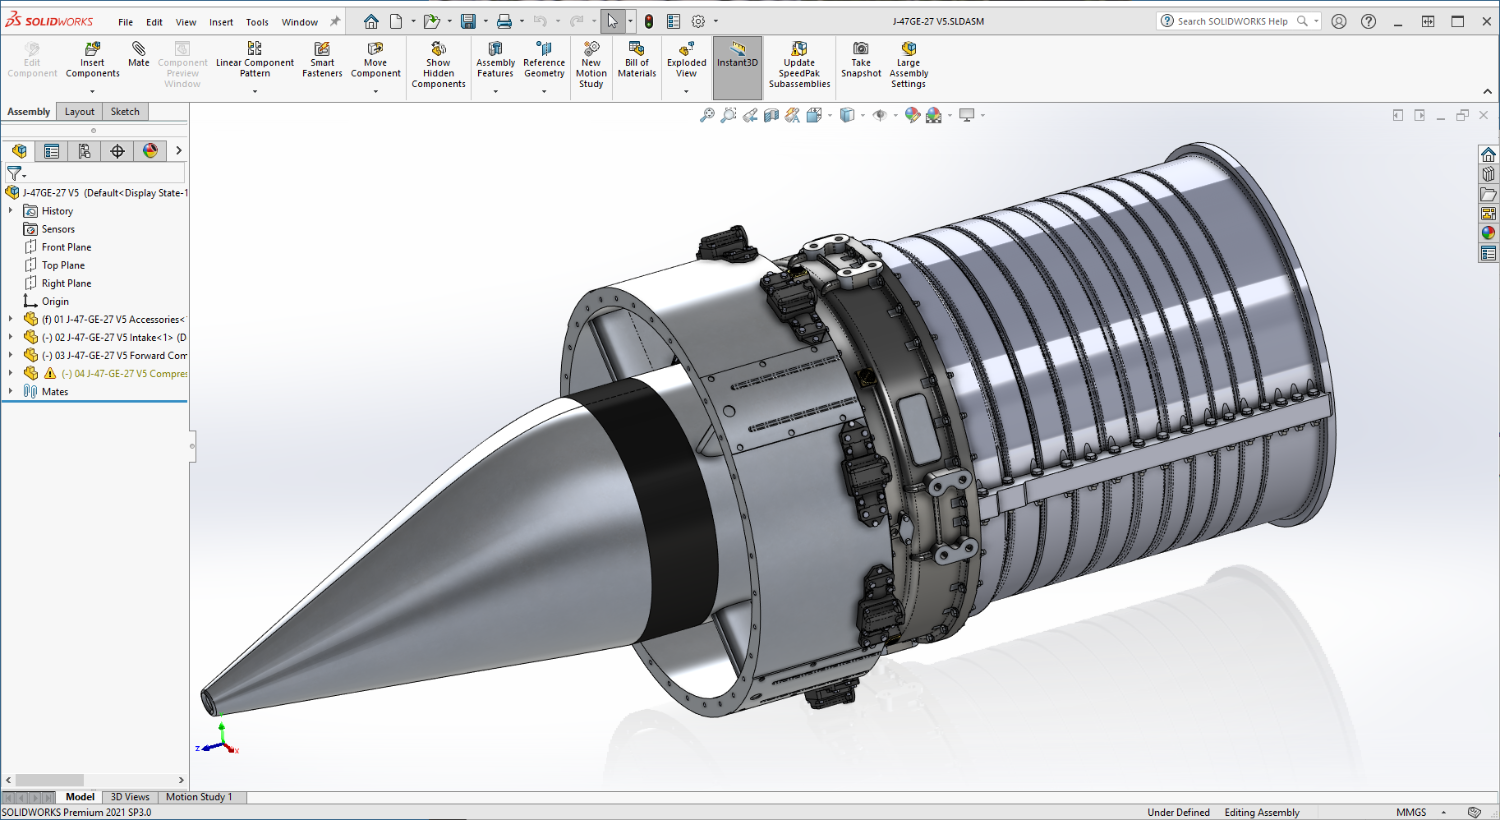
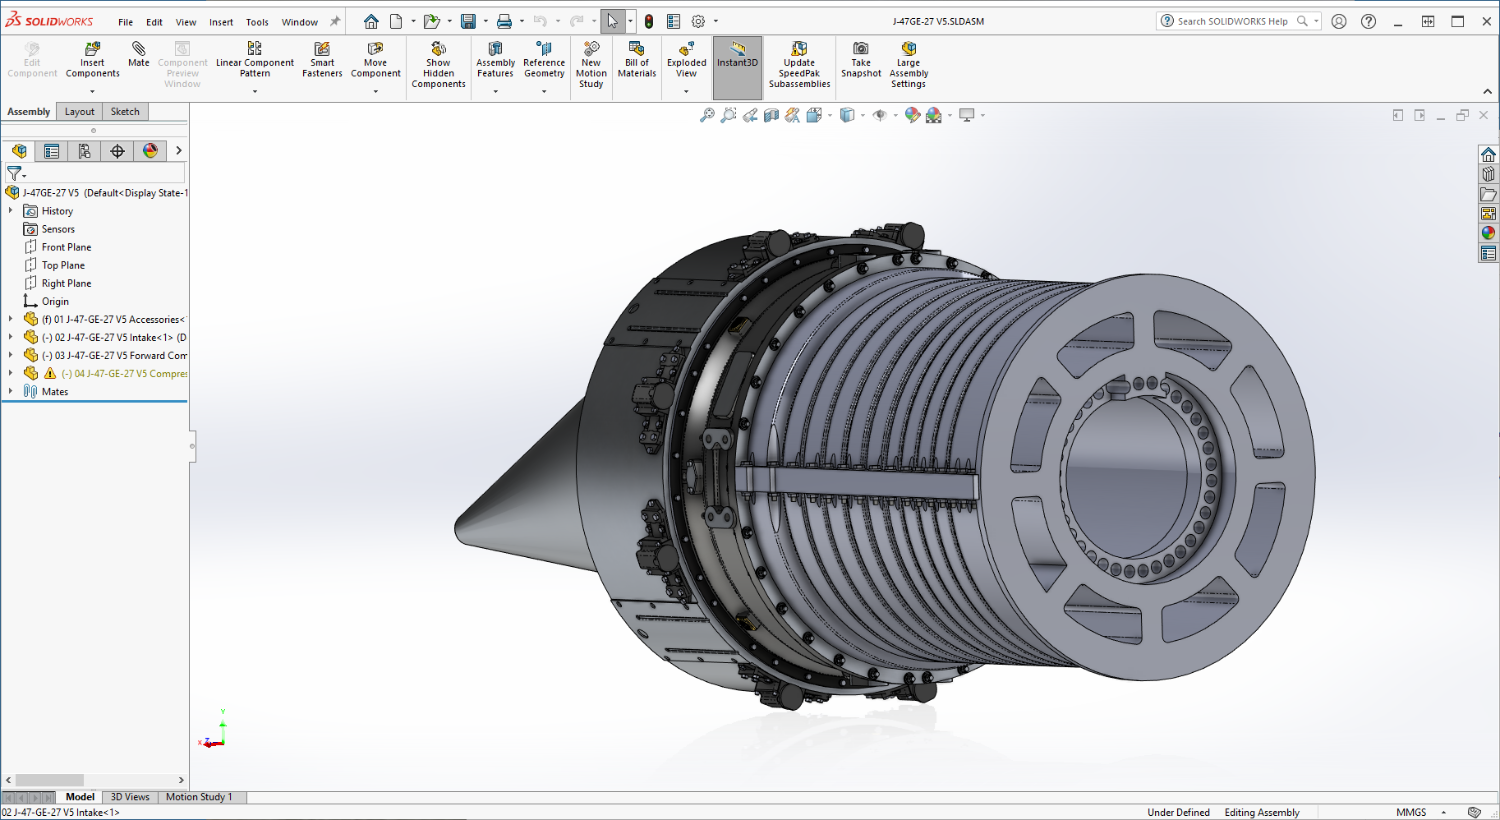
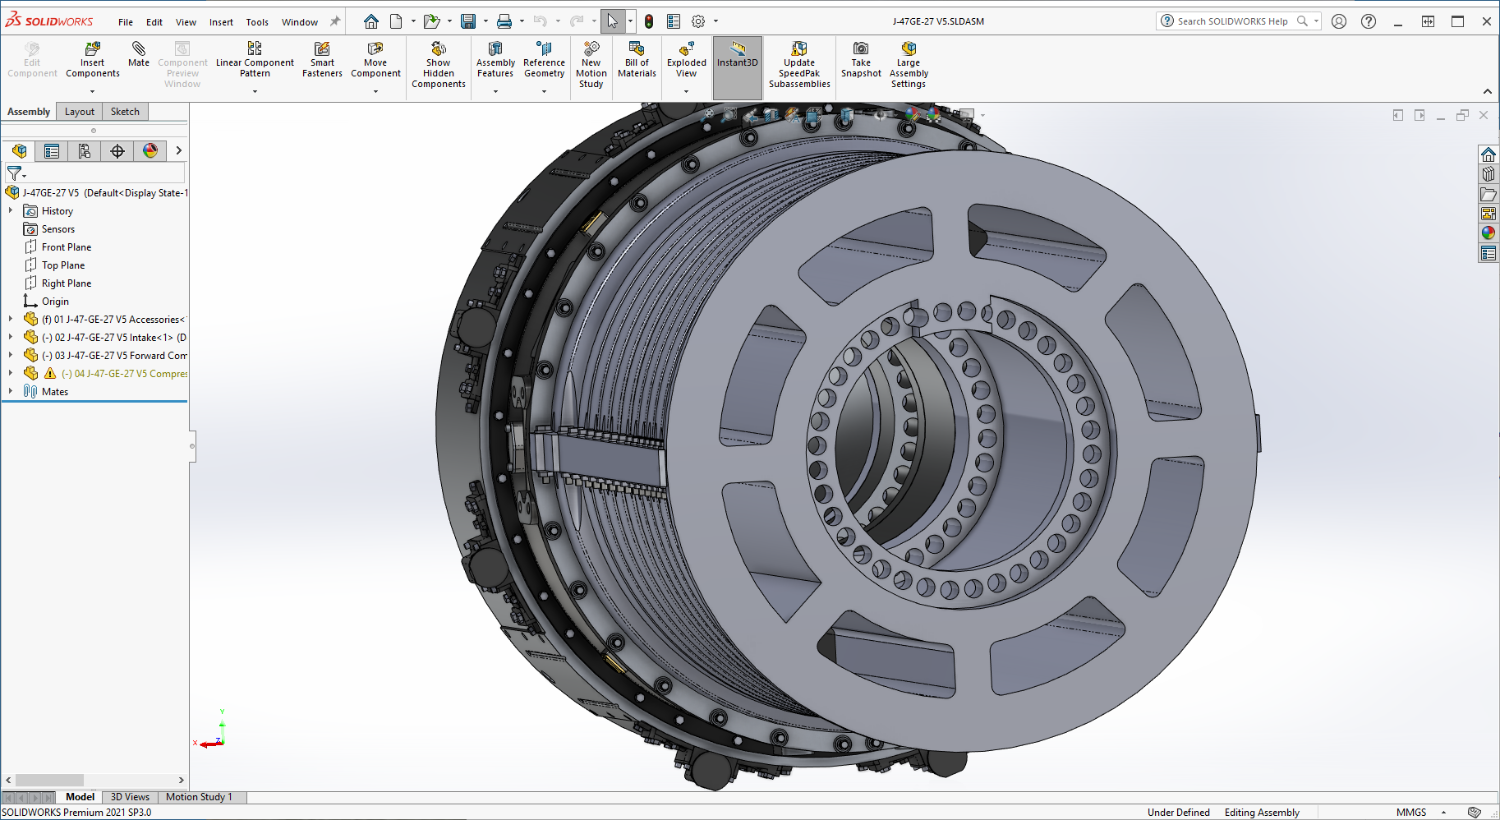
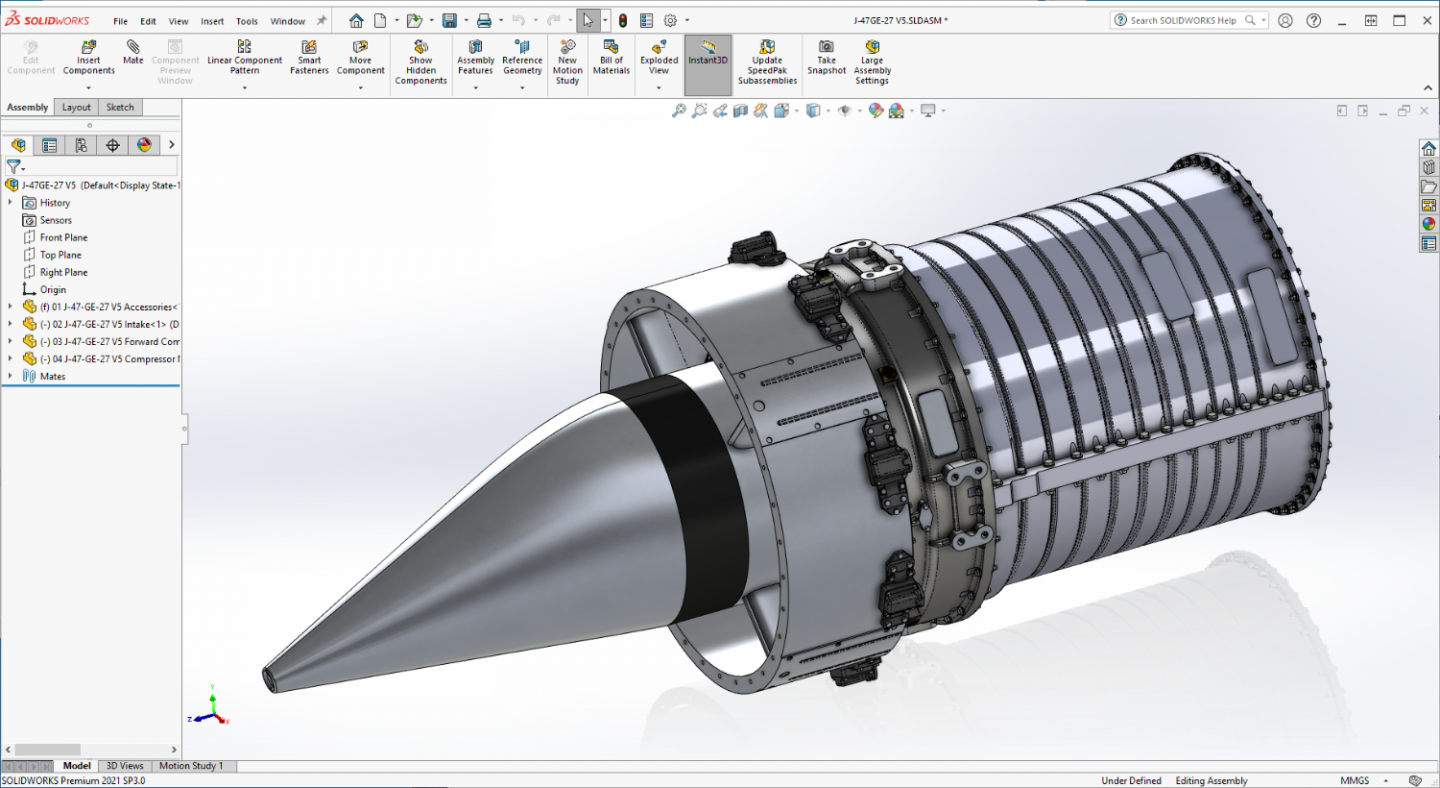
A short update showing progress on the Main Compressor Body.... She's coming along.... Onwards! EG

-
It's an issue I've seen on several GPM kits, the only resolution I've seen done is a complete re-color/draw of the skins in one of the illustrator programs... Adobe Illustrator or Inkscape.... Not an easy task... Sad....
- 150 replies
-
- 11
-

-
Another small update, I added the bolts for the main compressor body flanges.... That's a detail that will show.... Next up the Main Compressor Body.... Onwards....
-
My Pleasure! My second hobby is doing research, I think it adds to the build experience to know what is being modeled more than just a name.... I'm very happy you are enjoying it.... Thank you...
-
Update: I went ahead and pushed the holes thru.... That will work much better for spreading the glue around... Thank you for following... EG
-
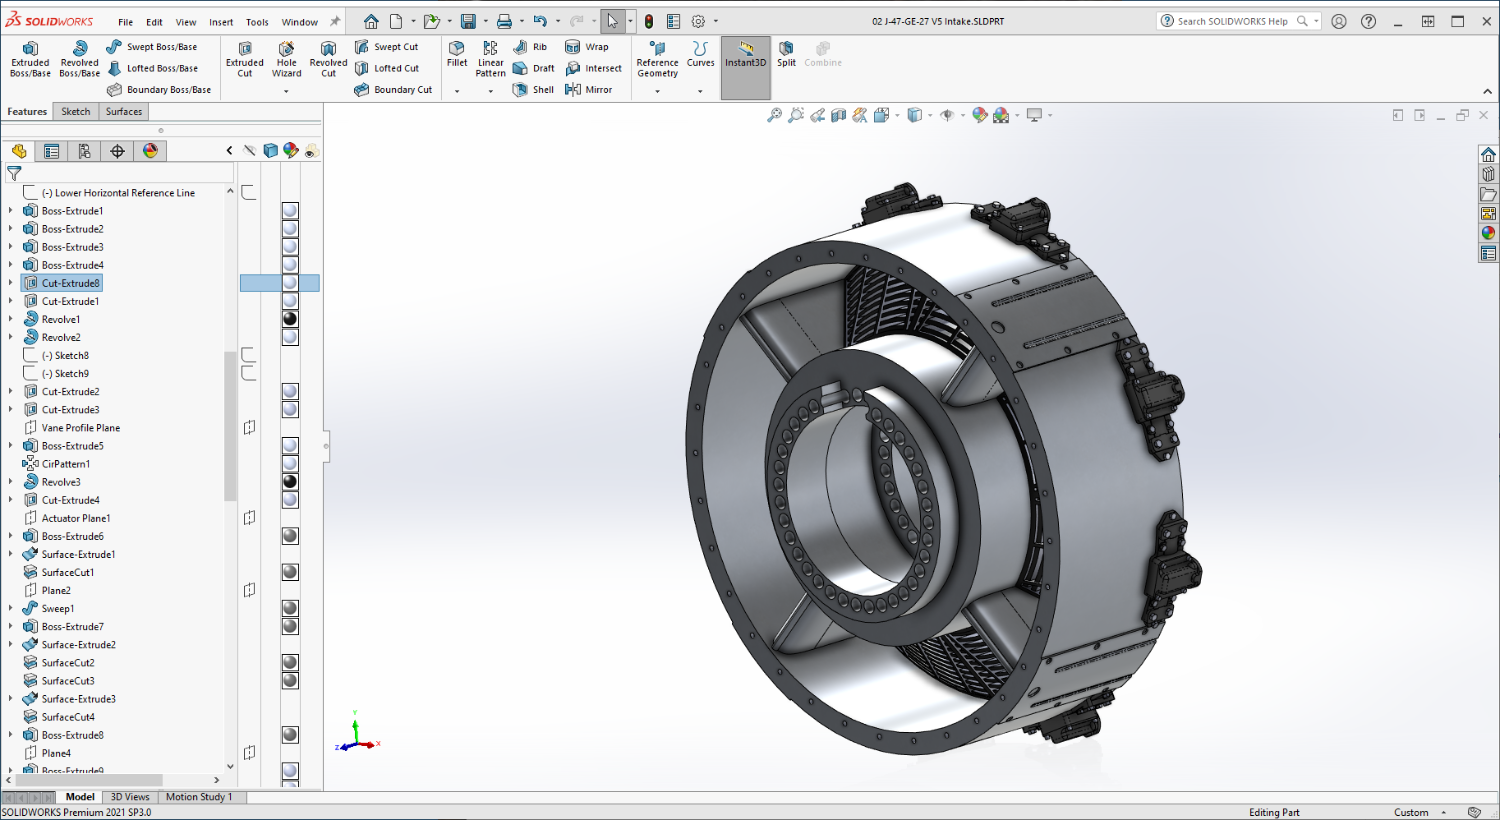
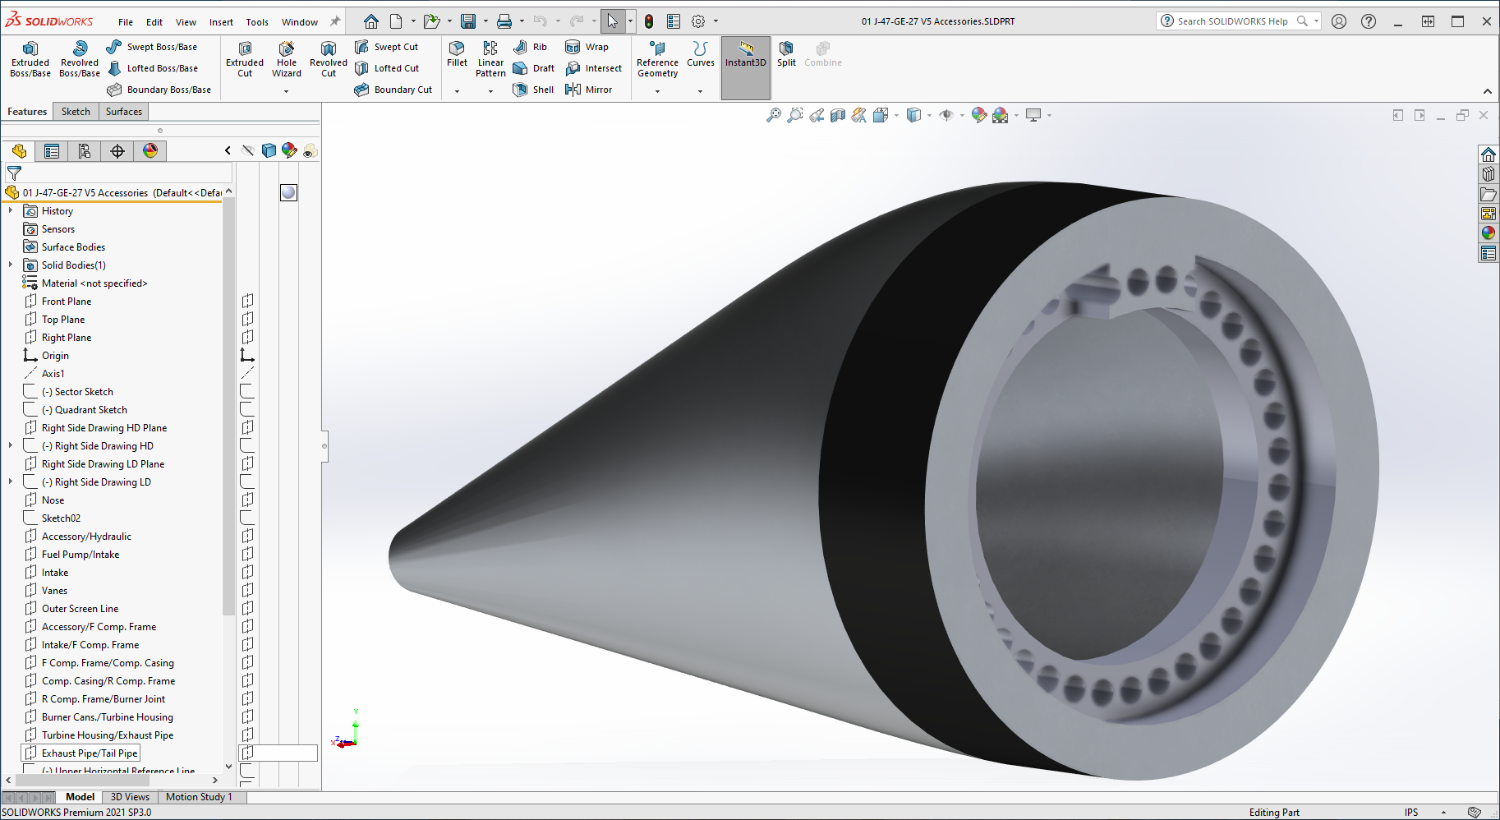
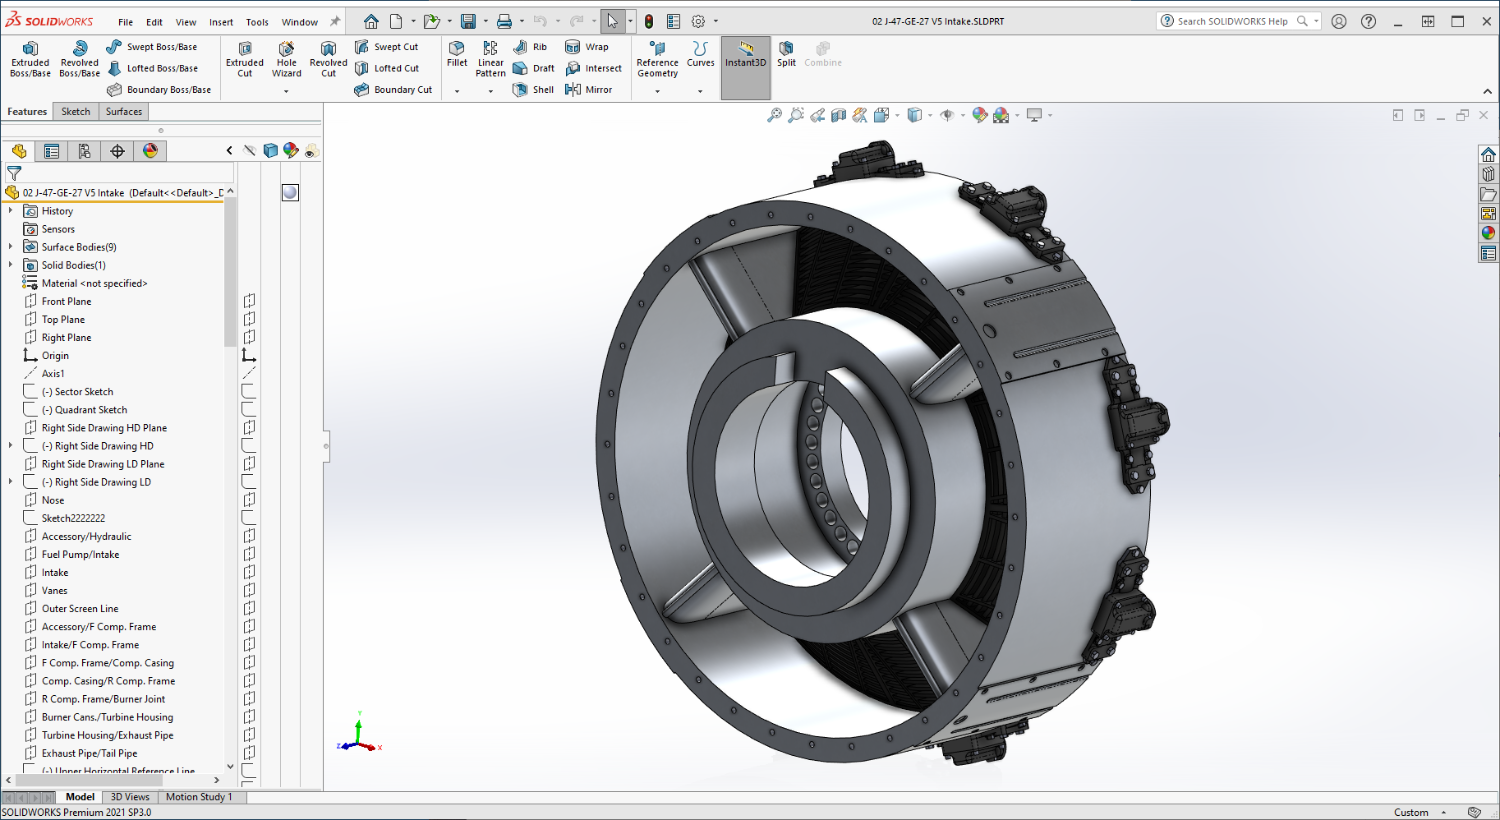
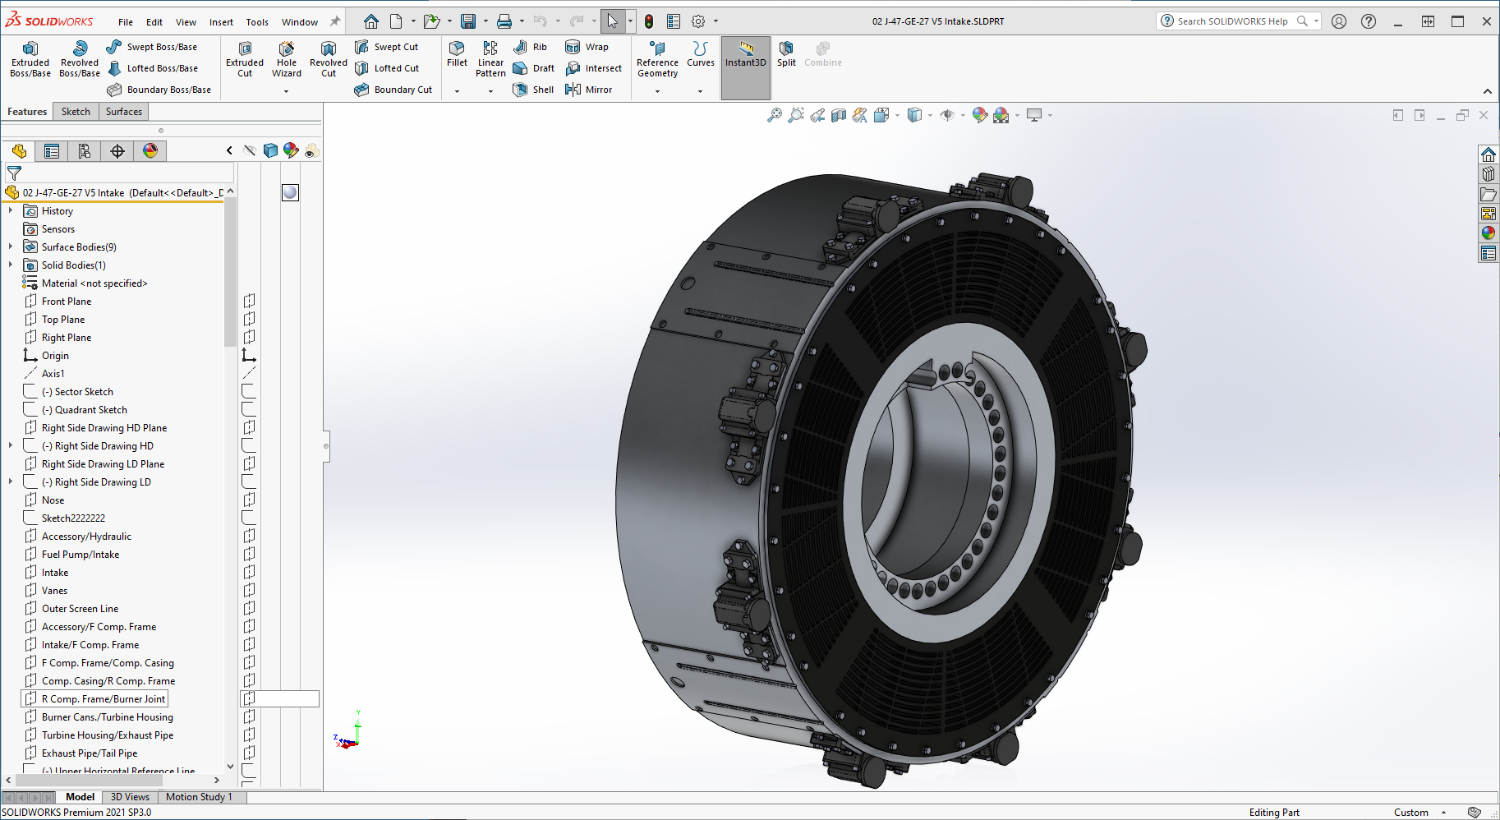
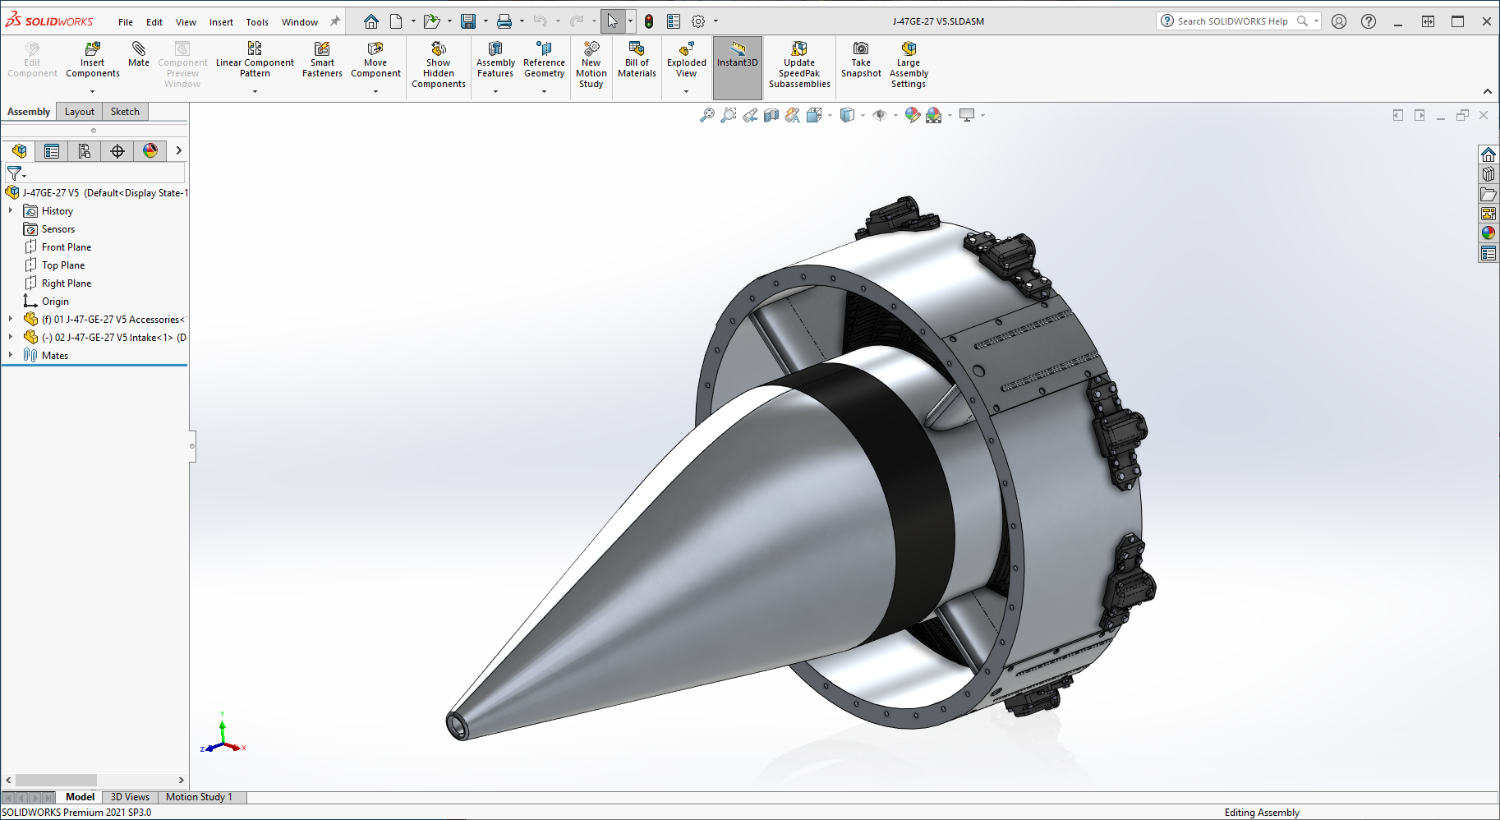
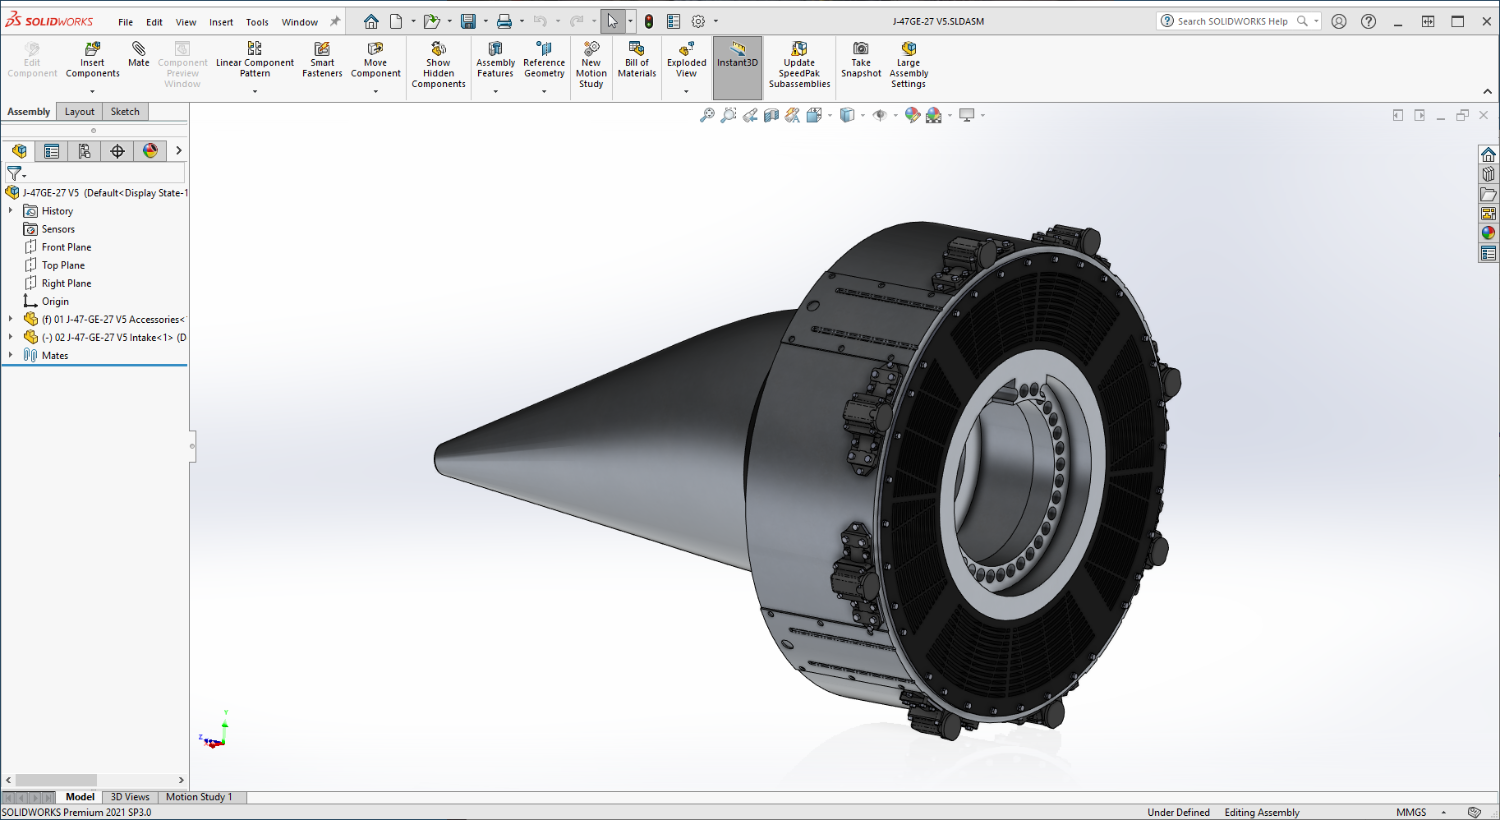
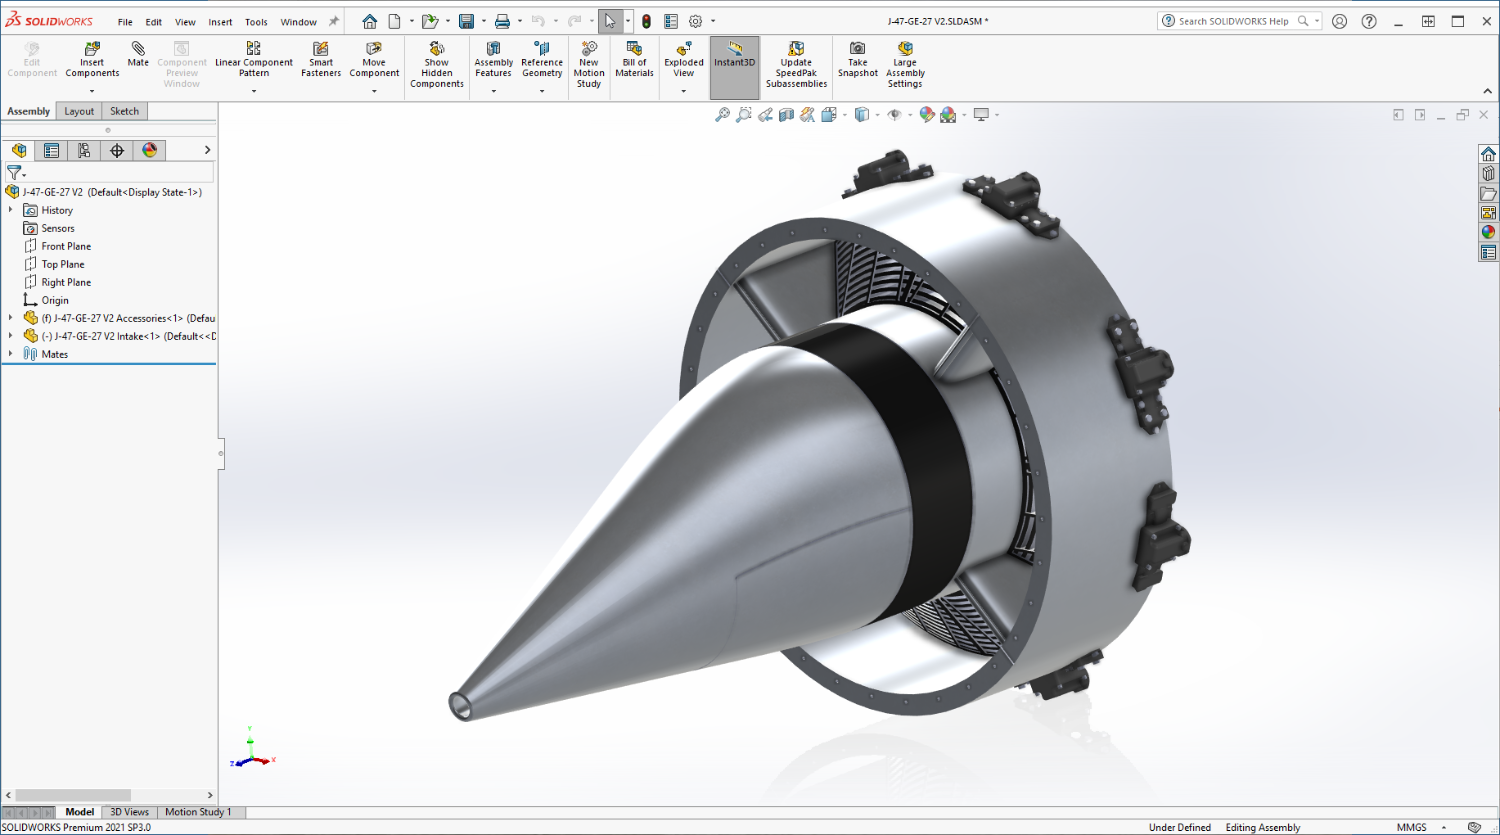
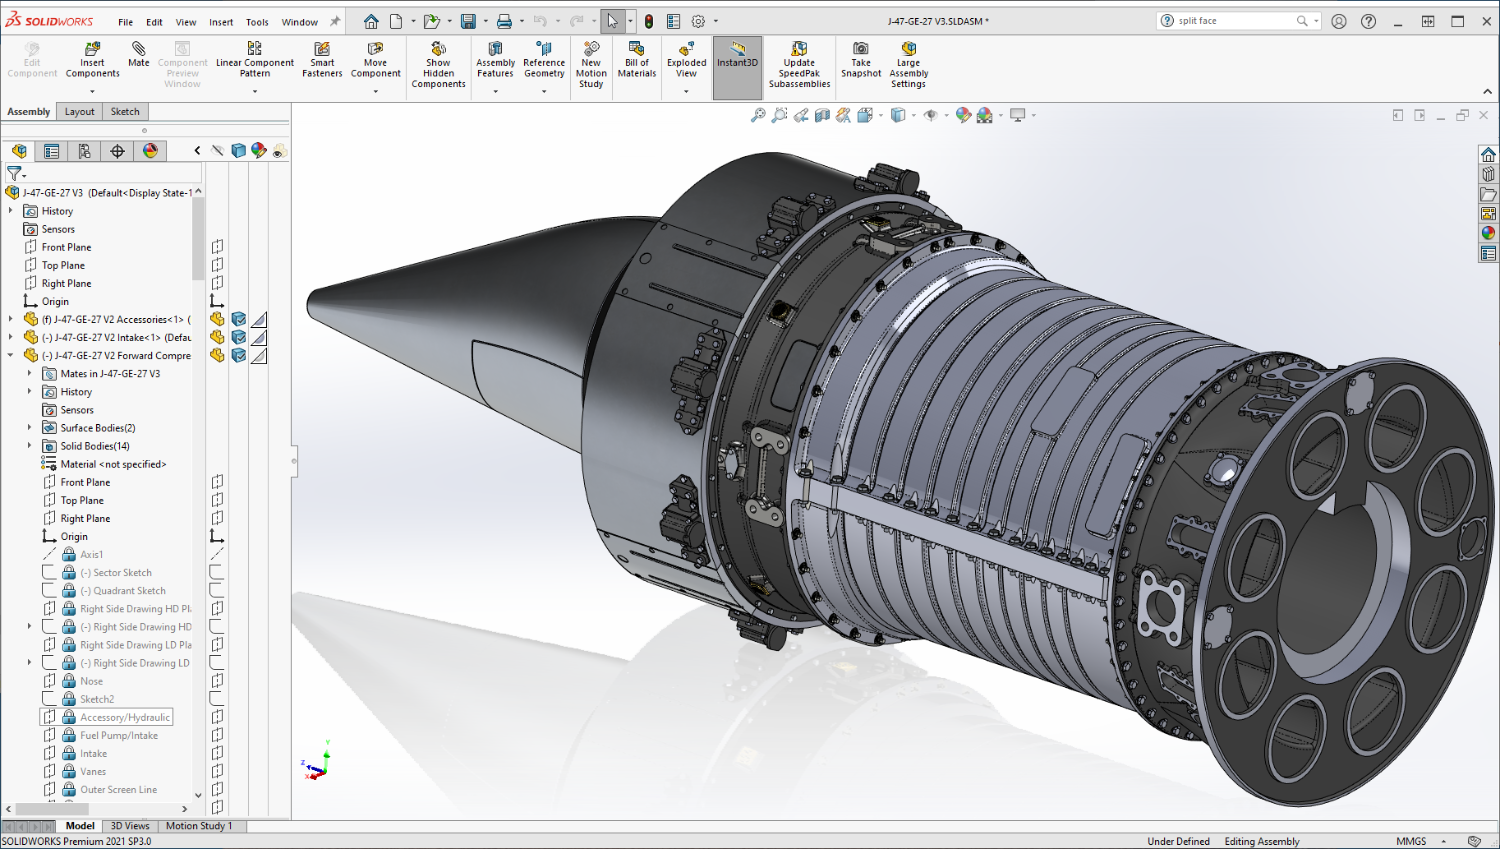
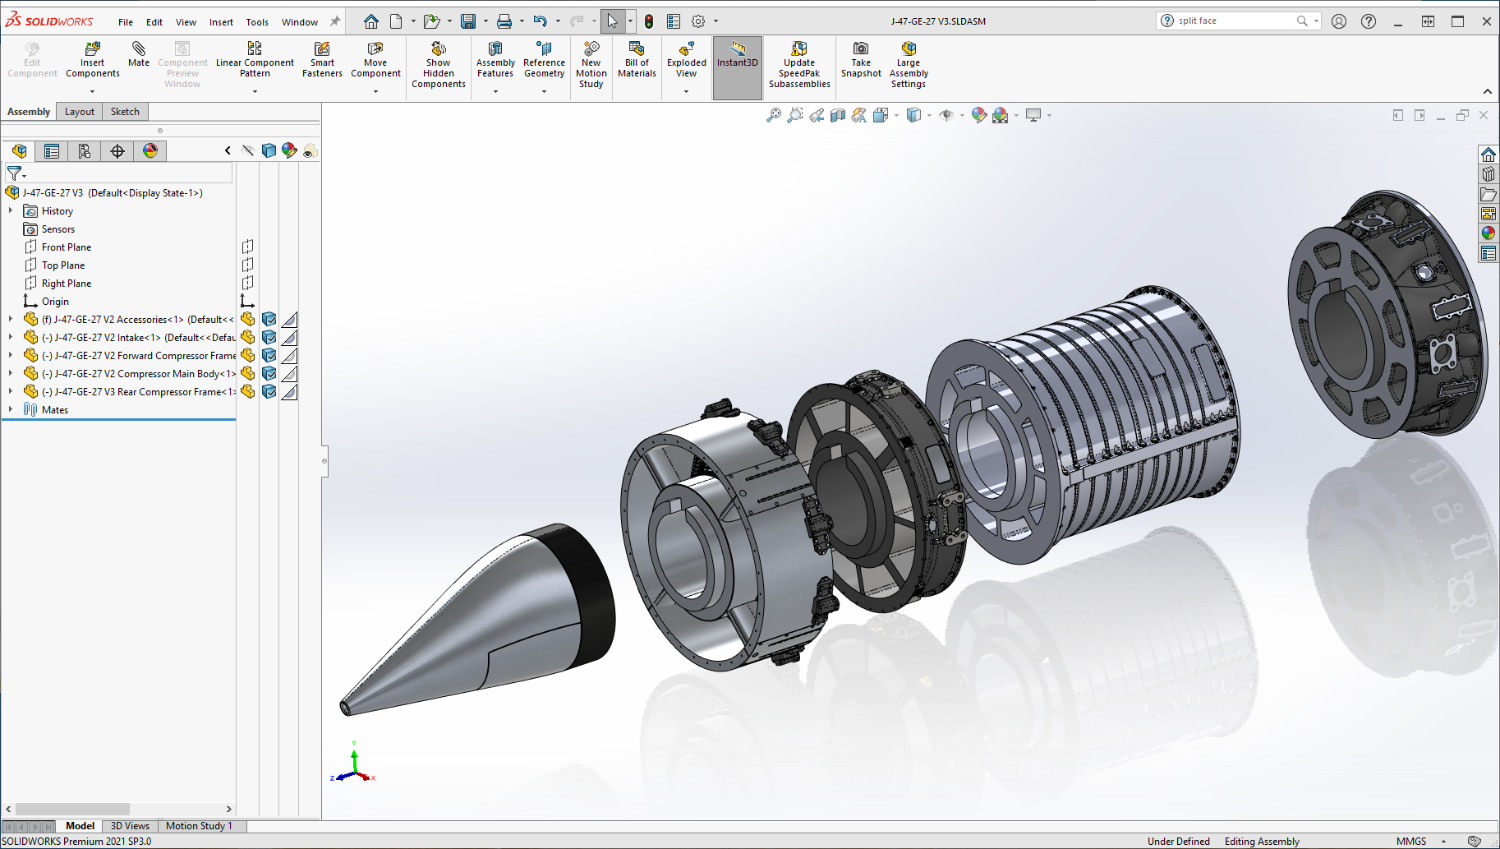
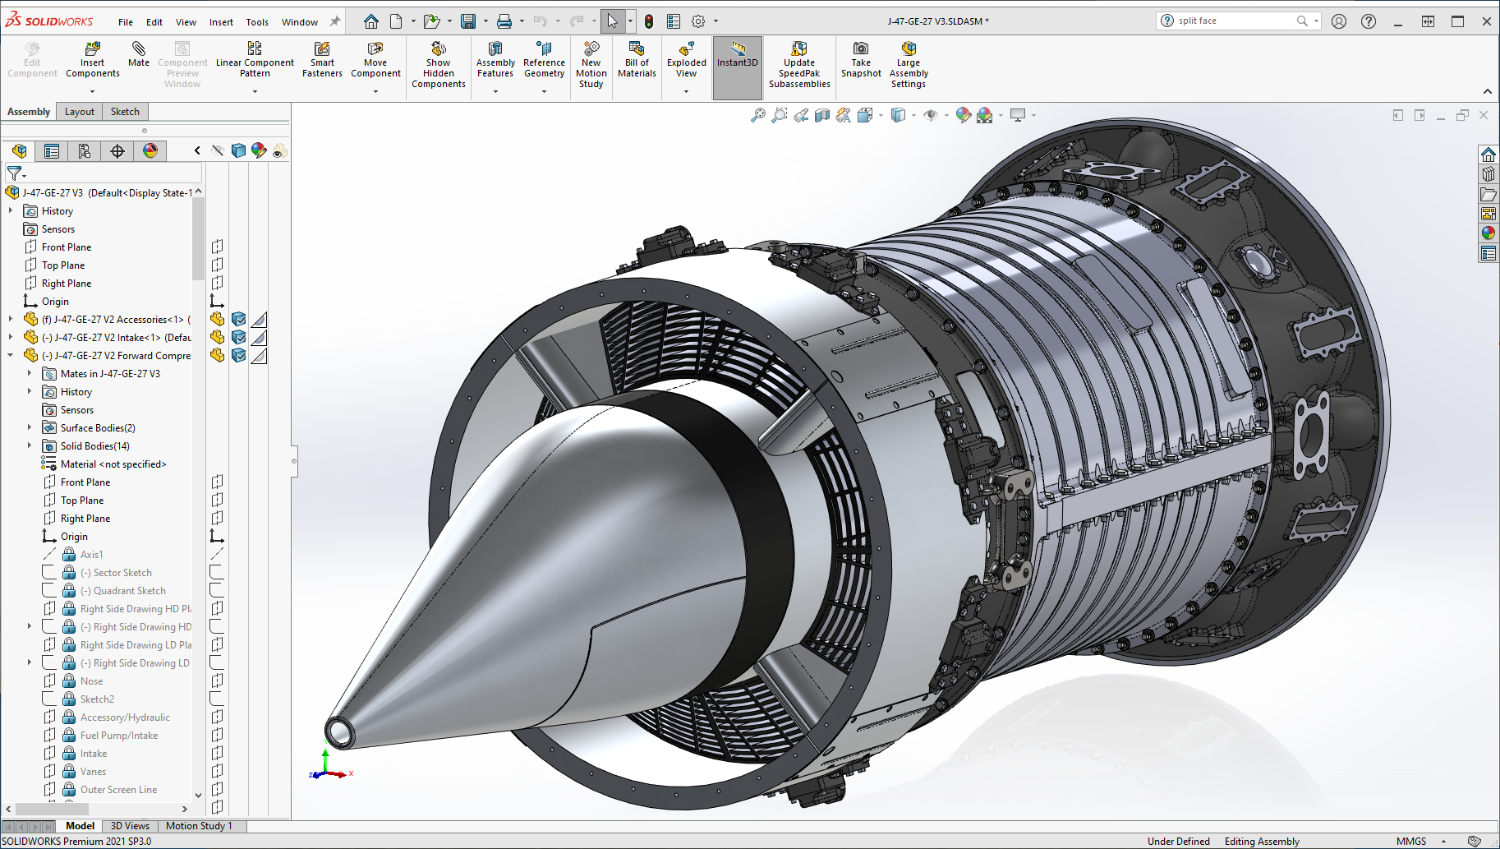
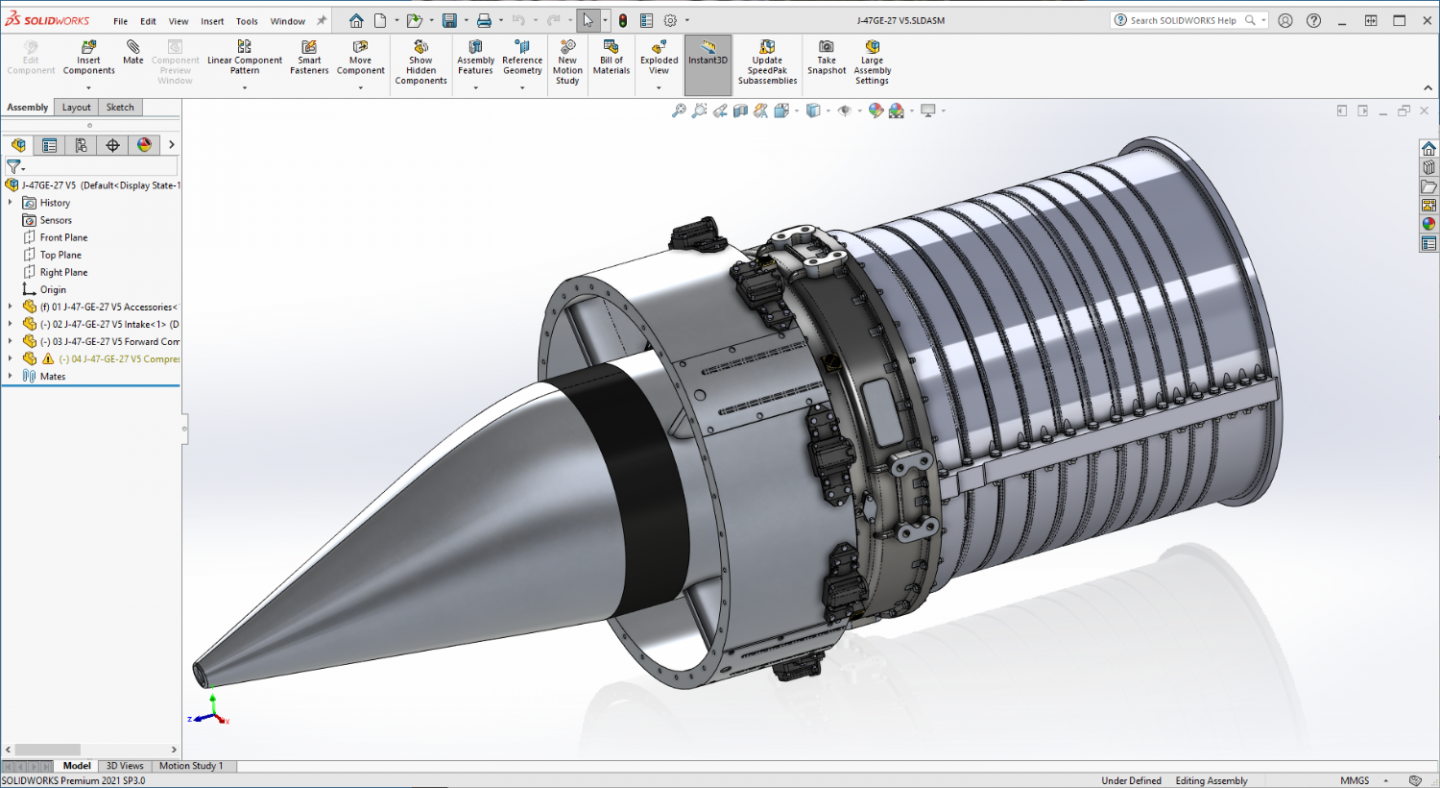
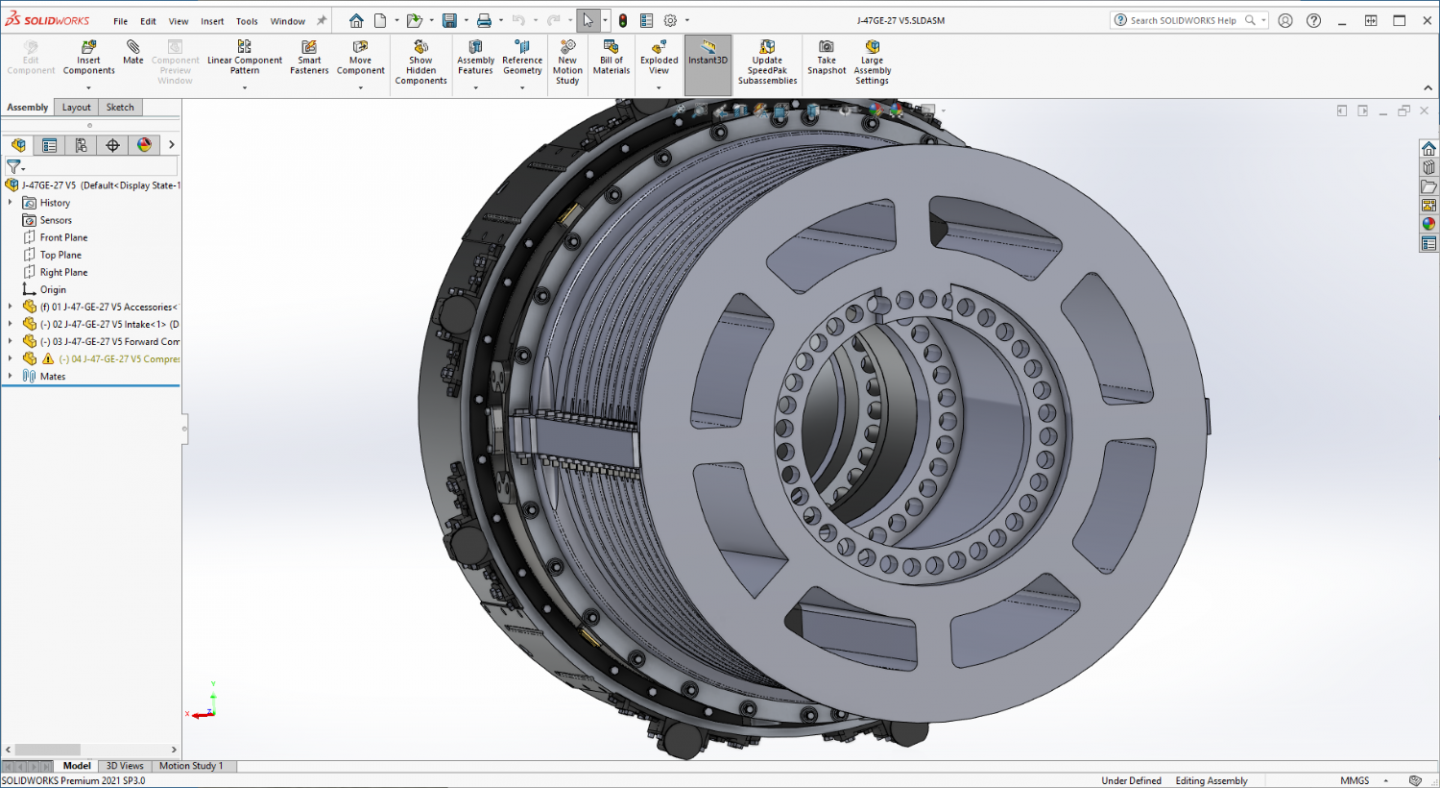
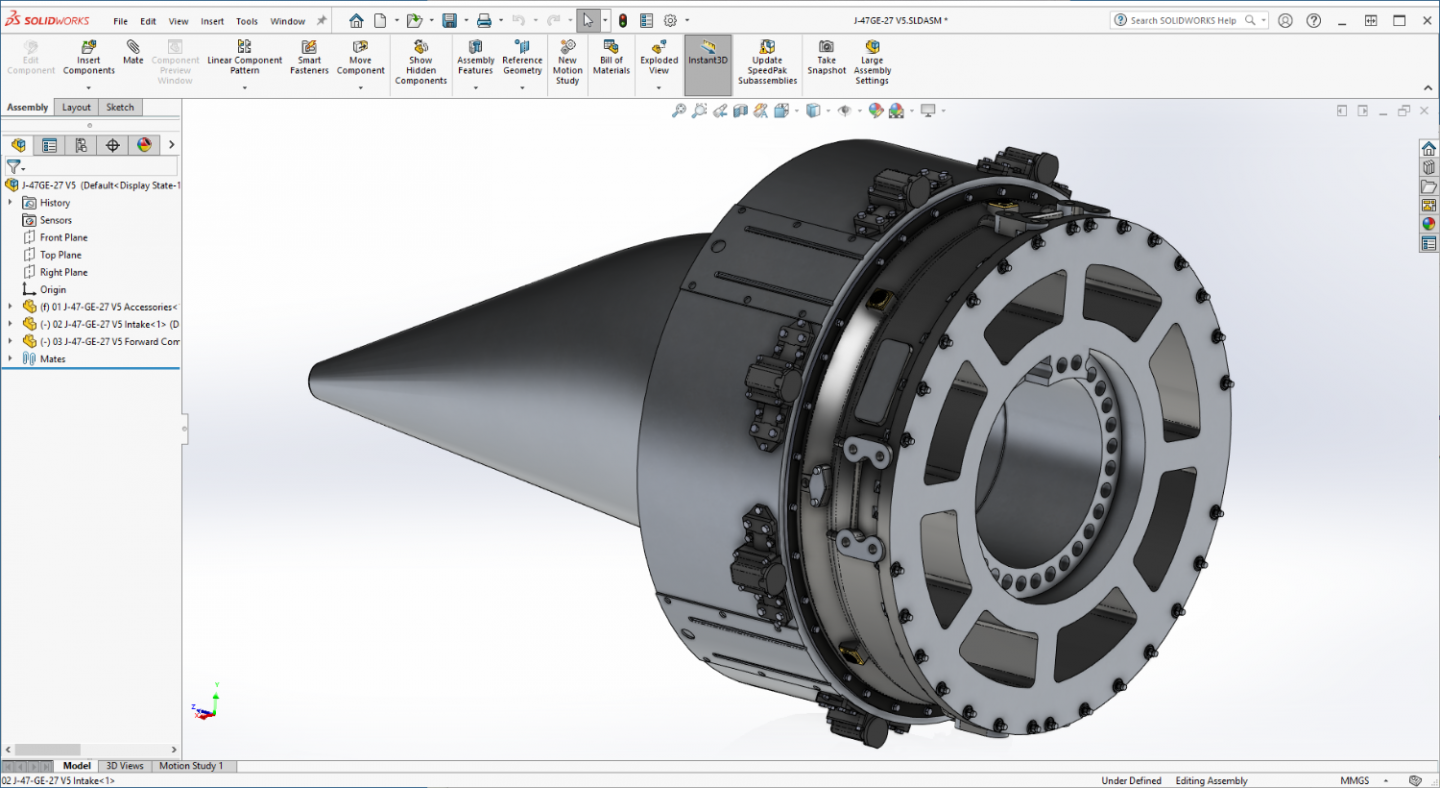
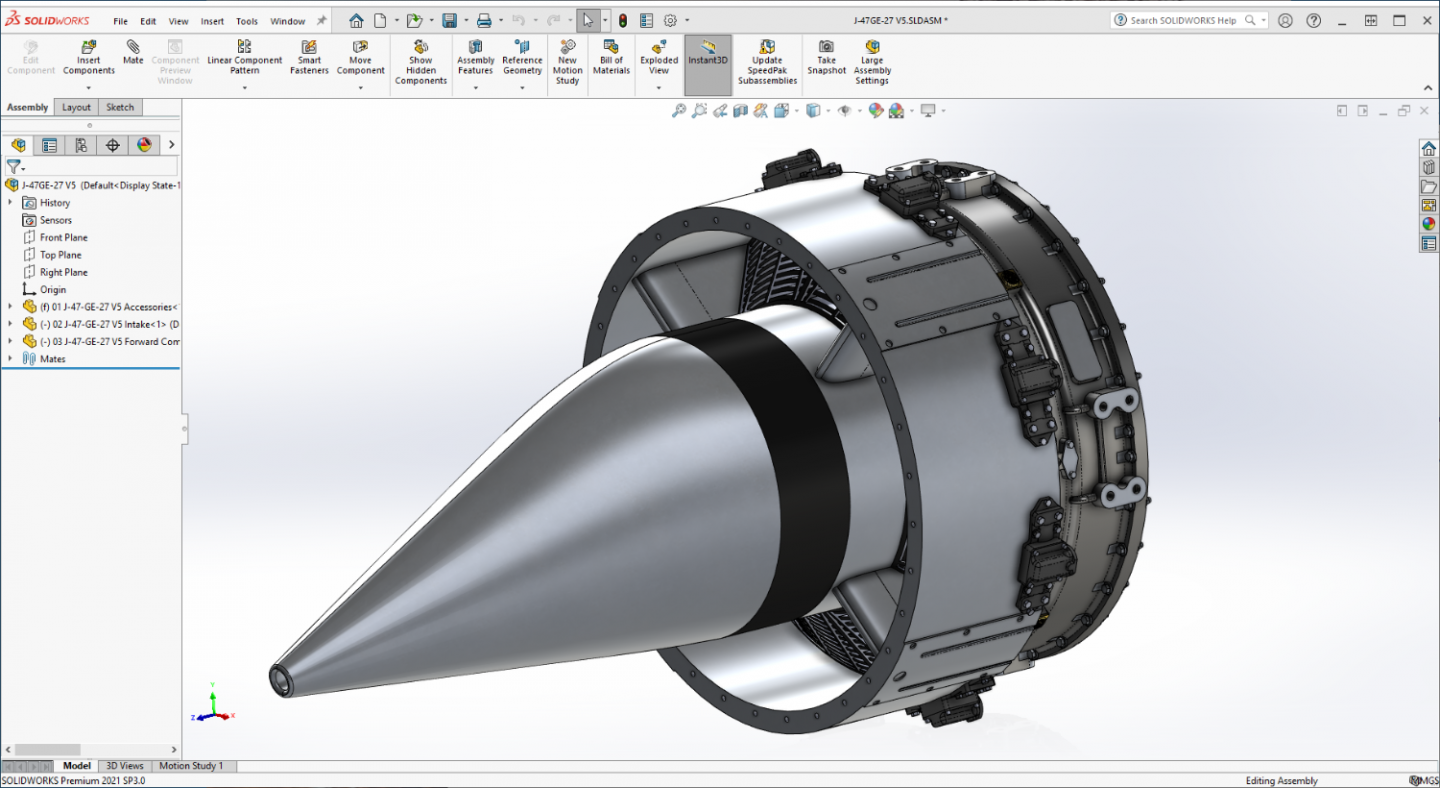
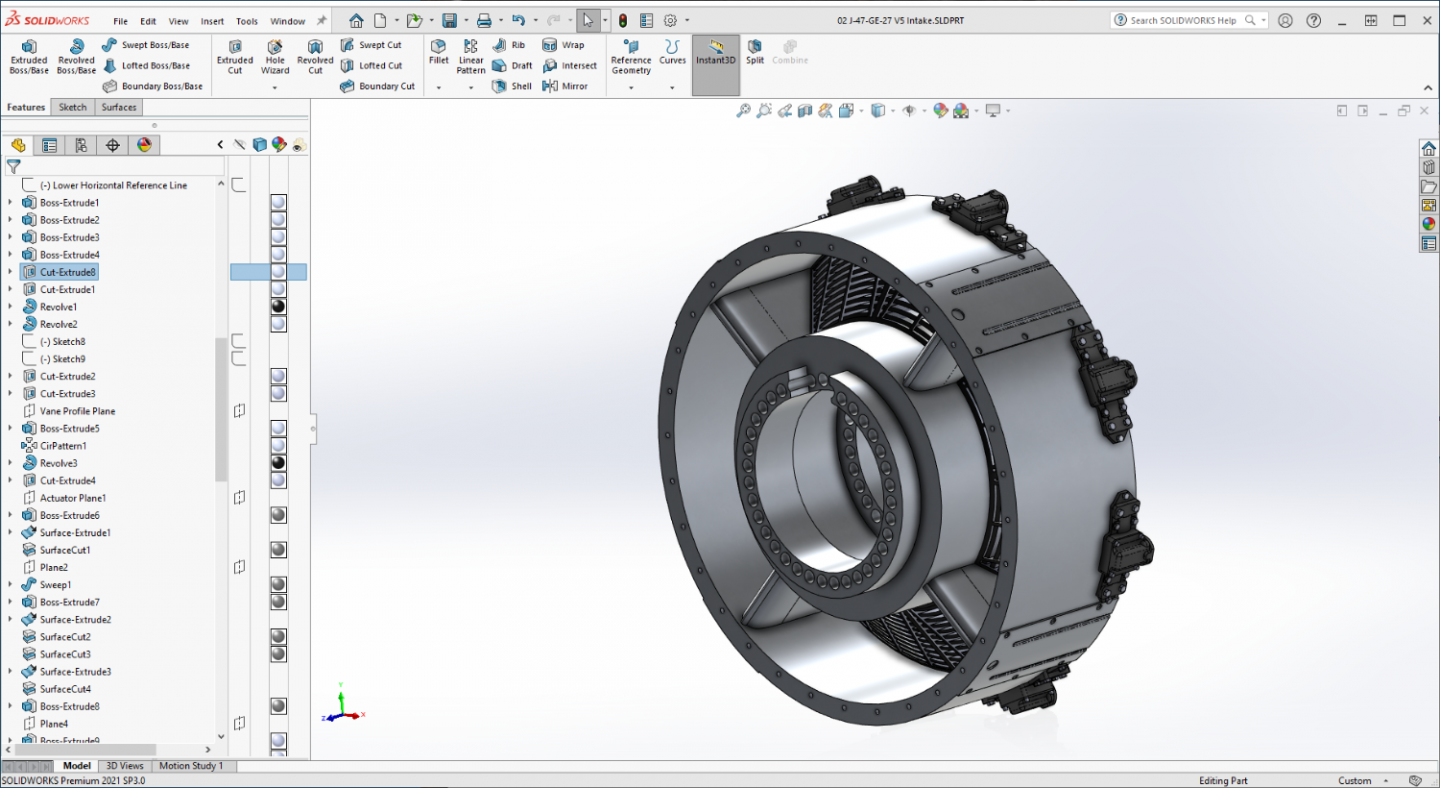
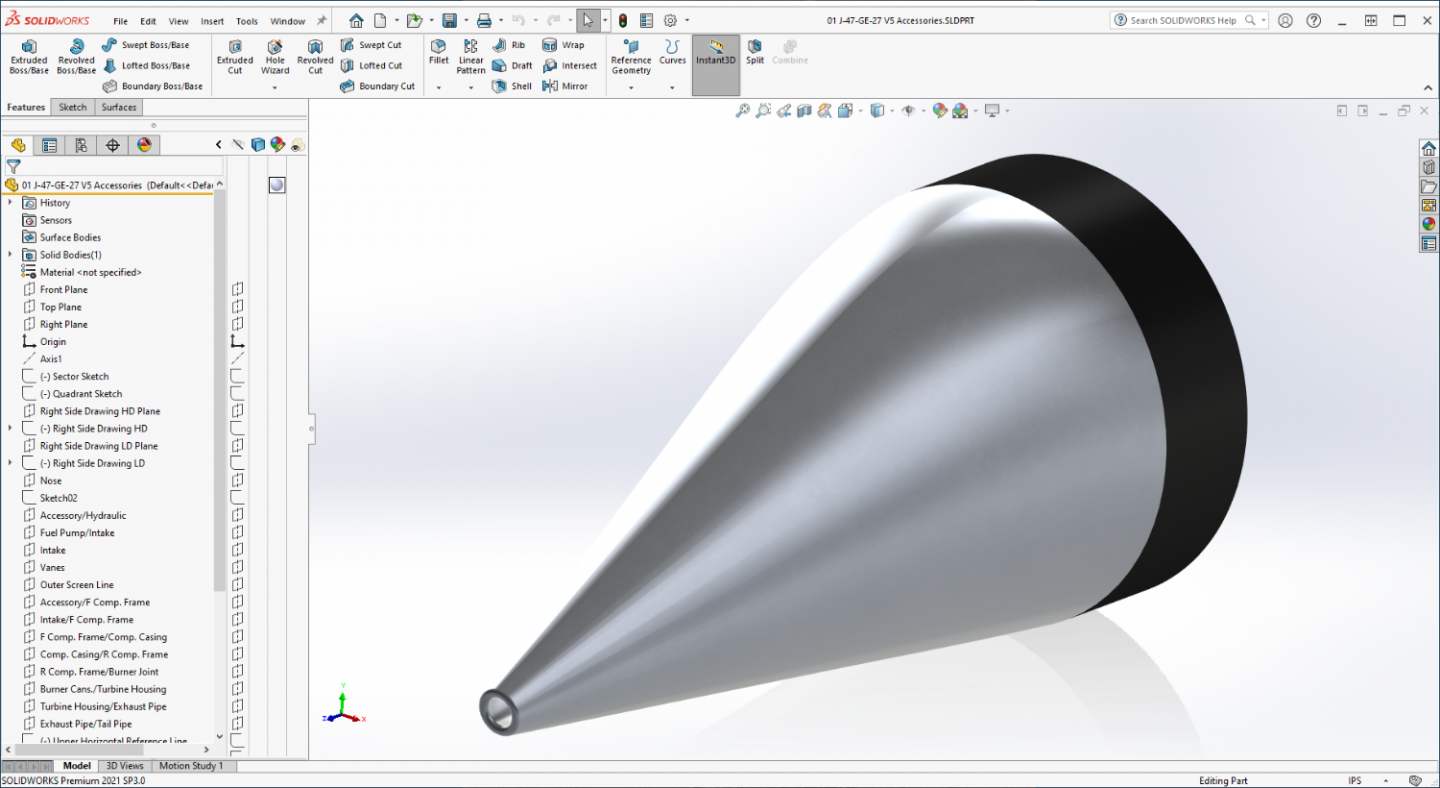
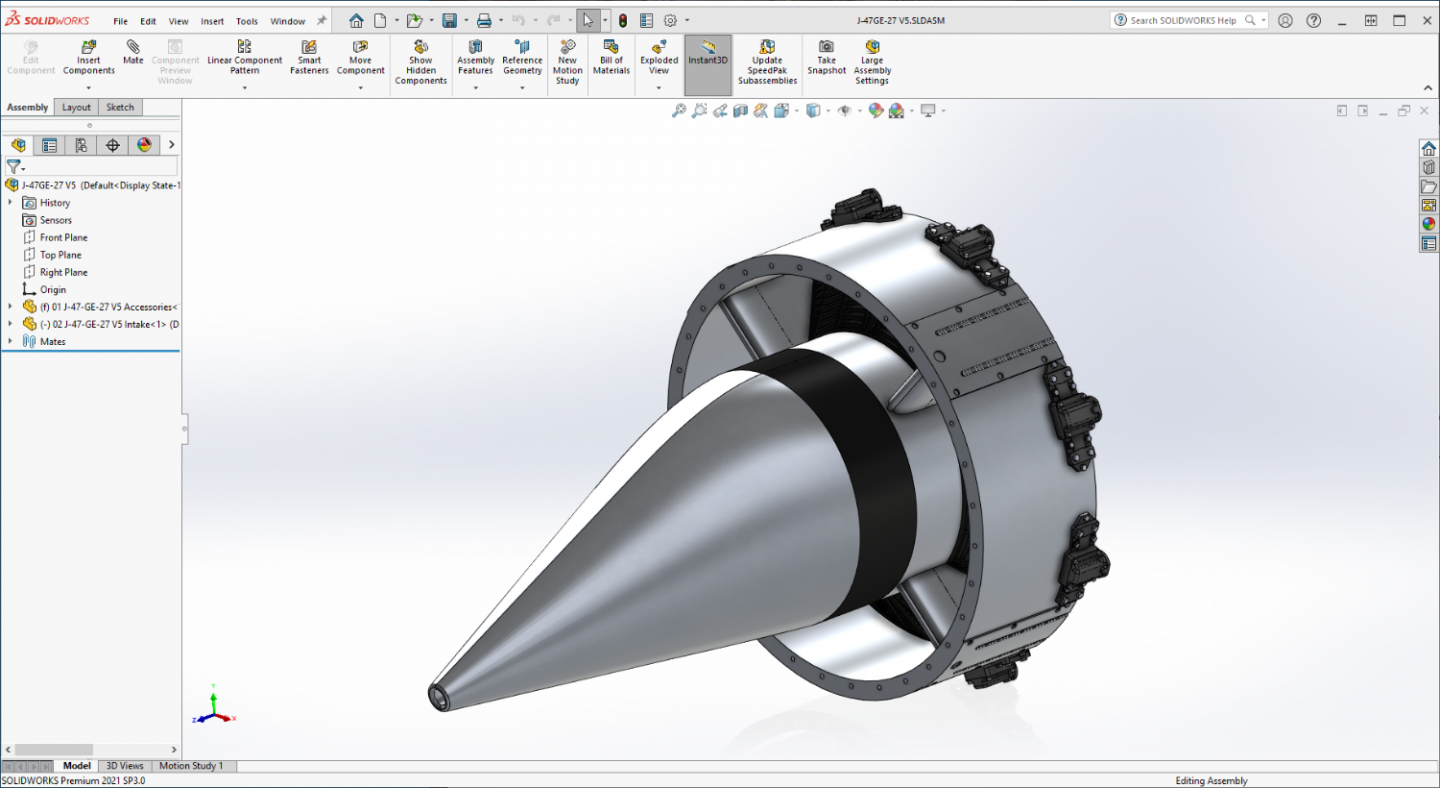
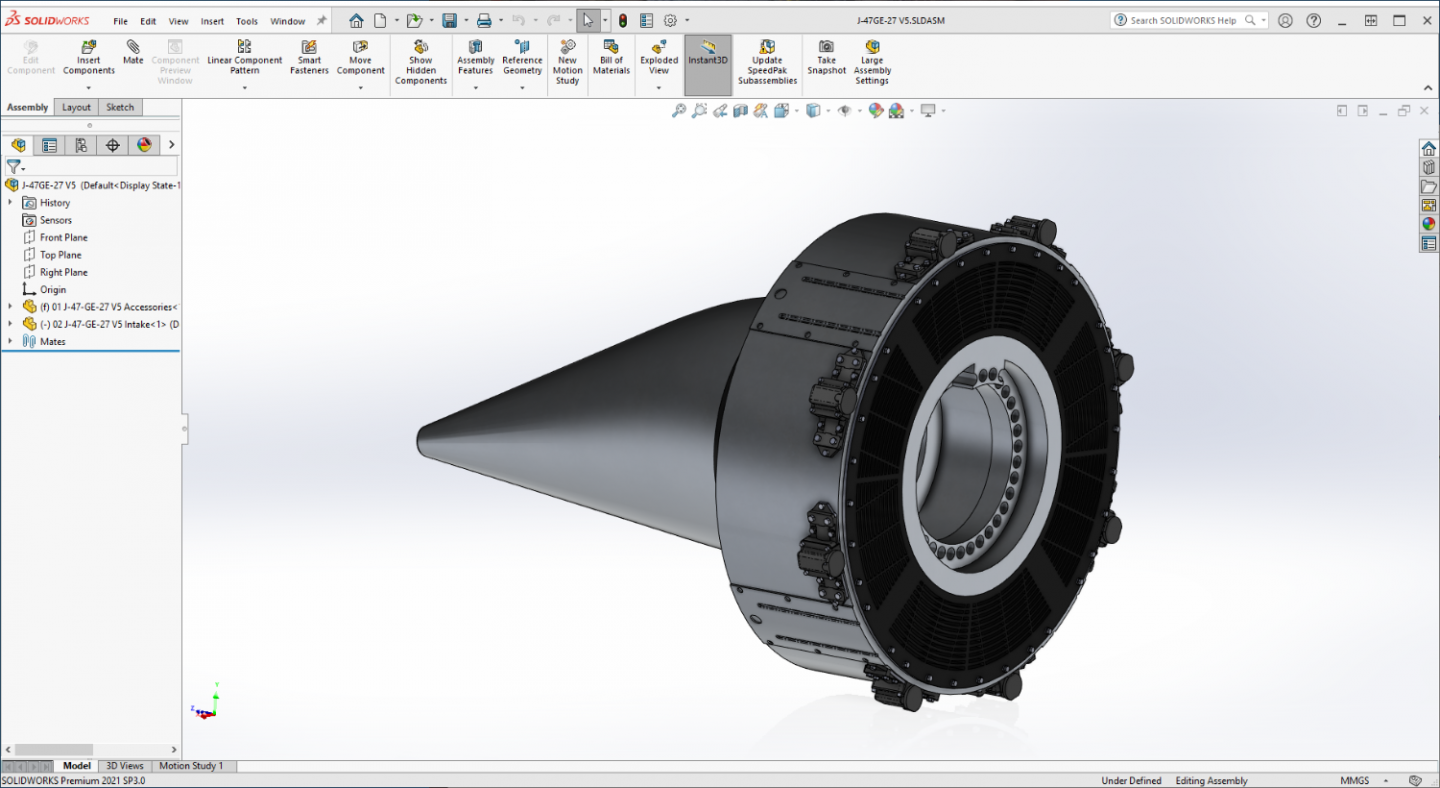
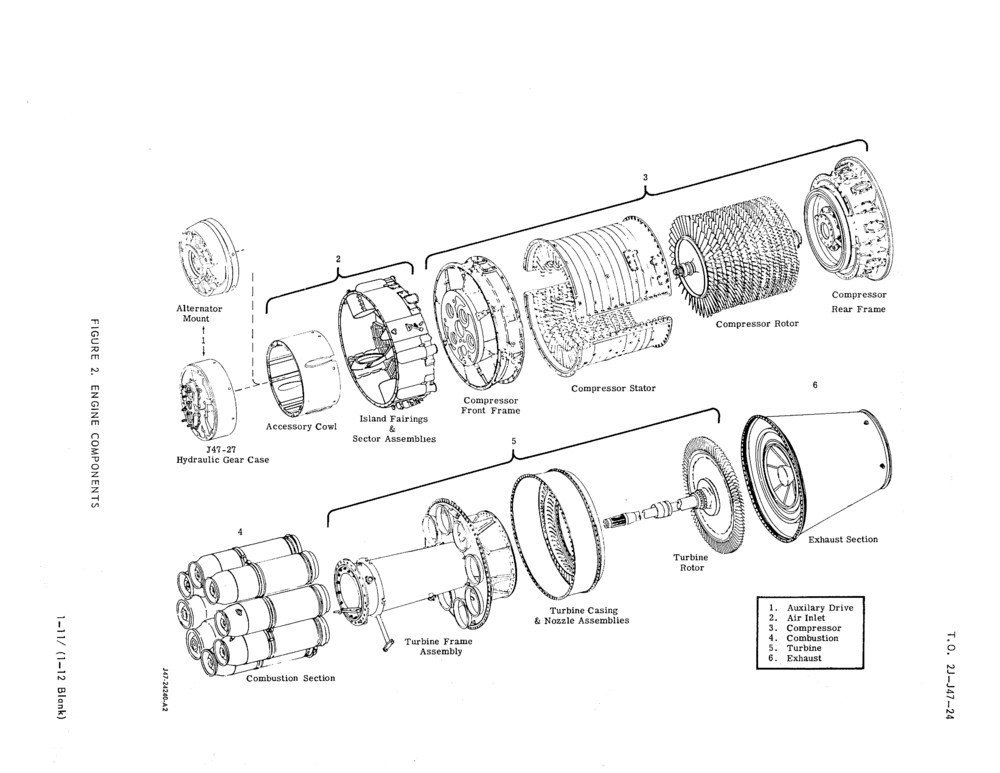
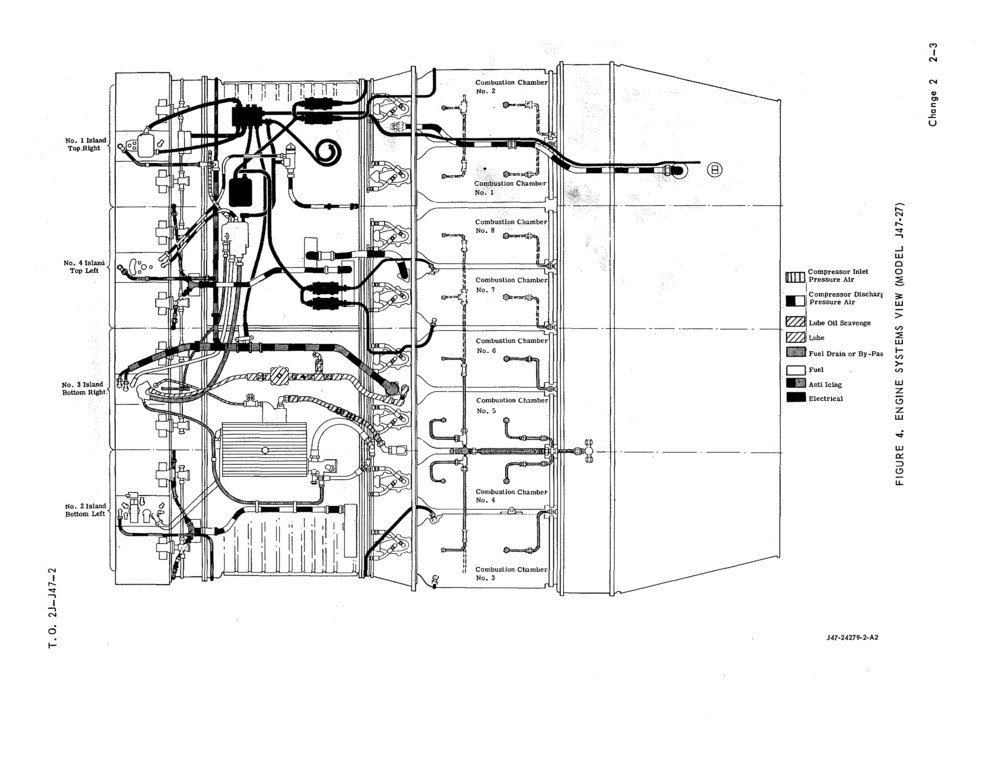
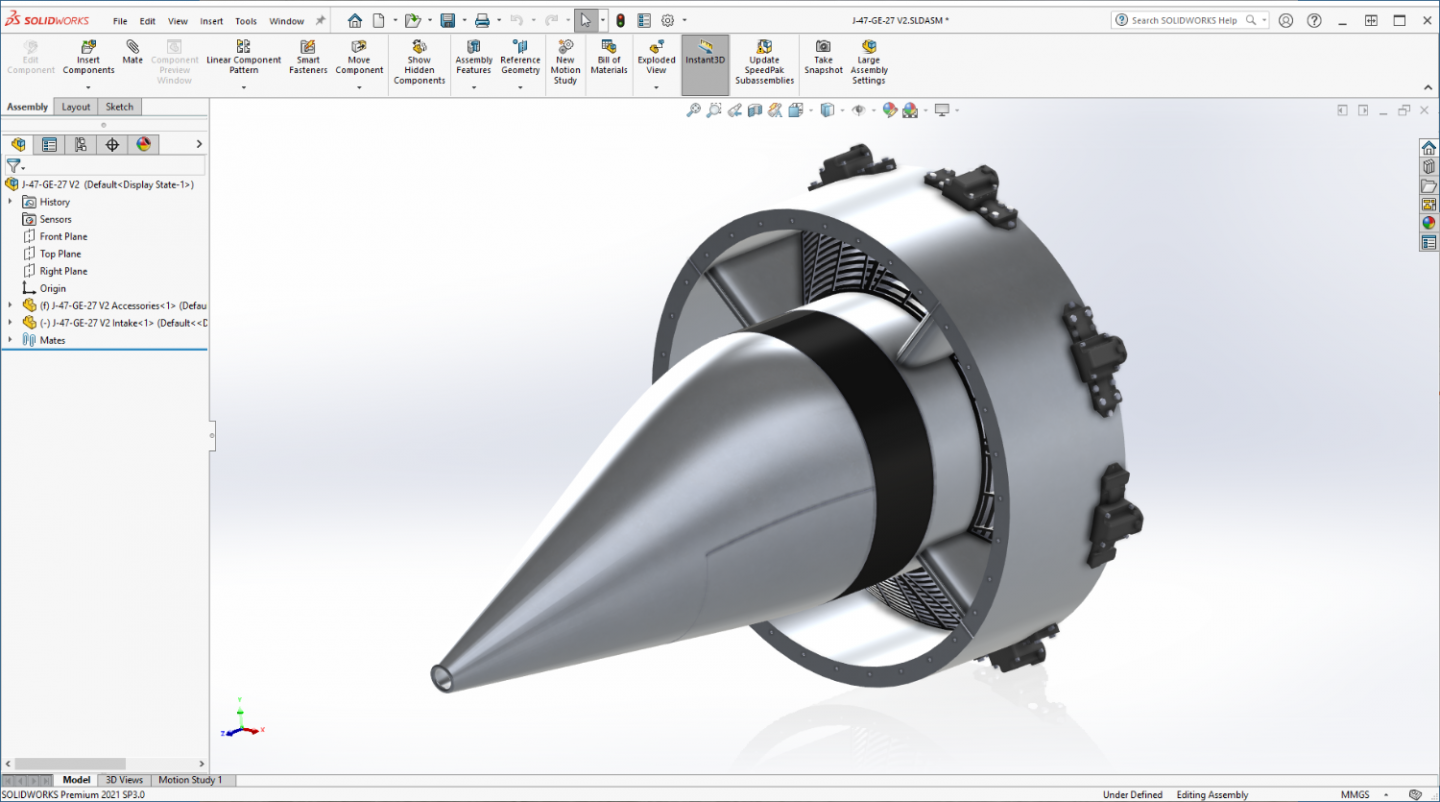
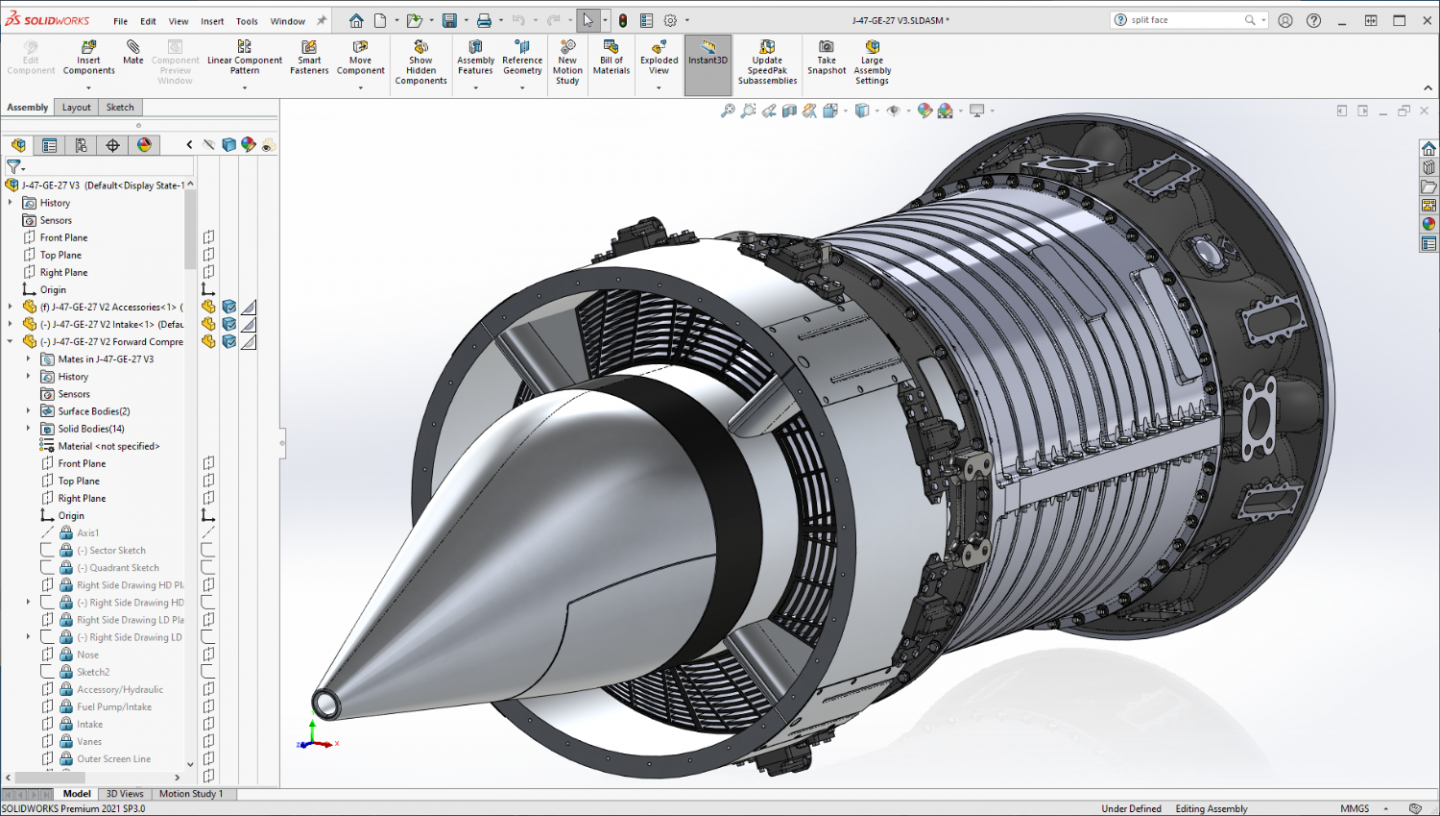
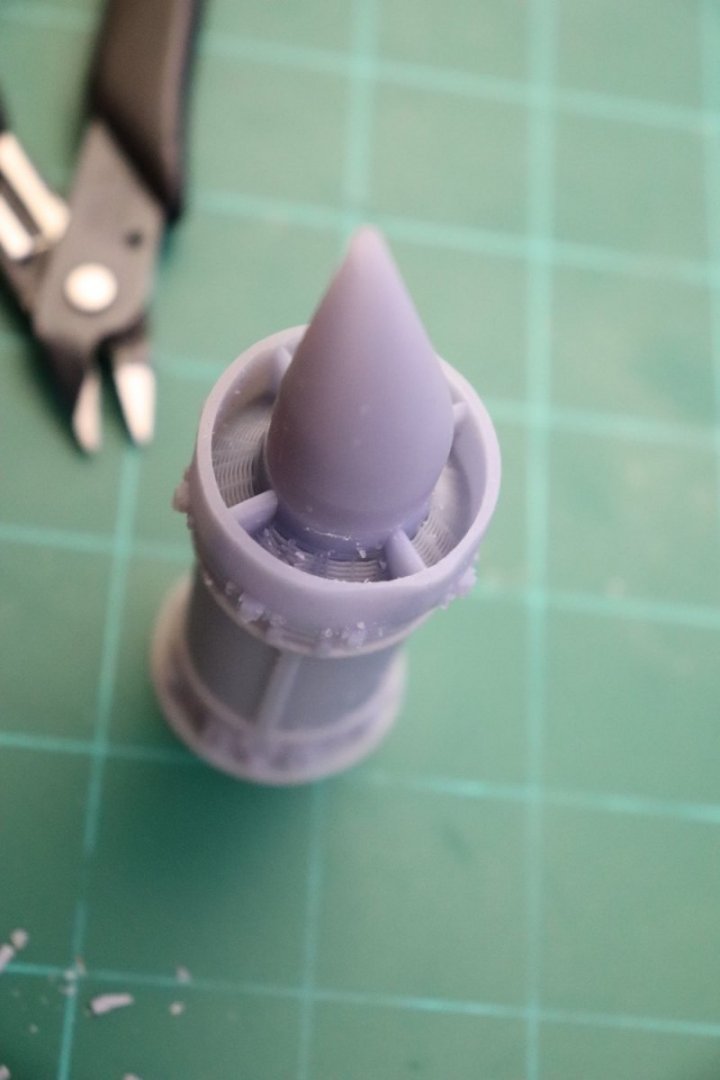
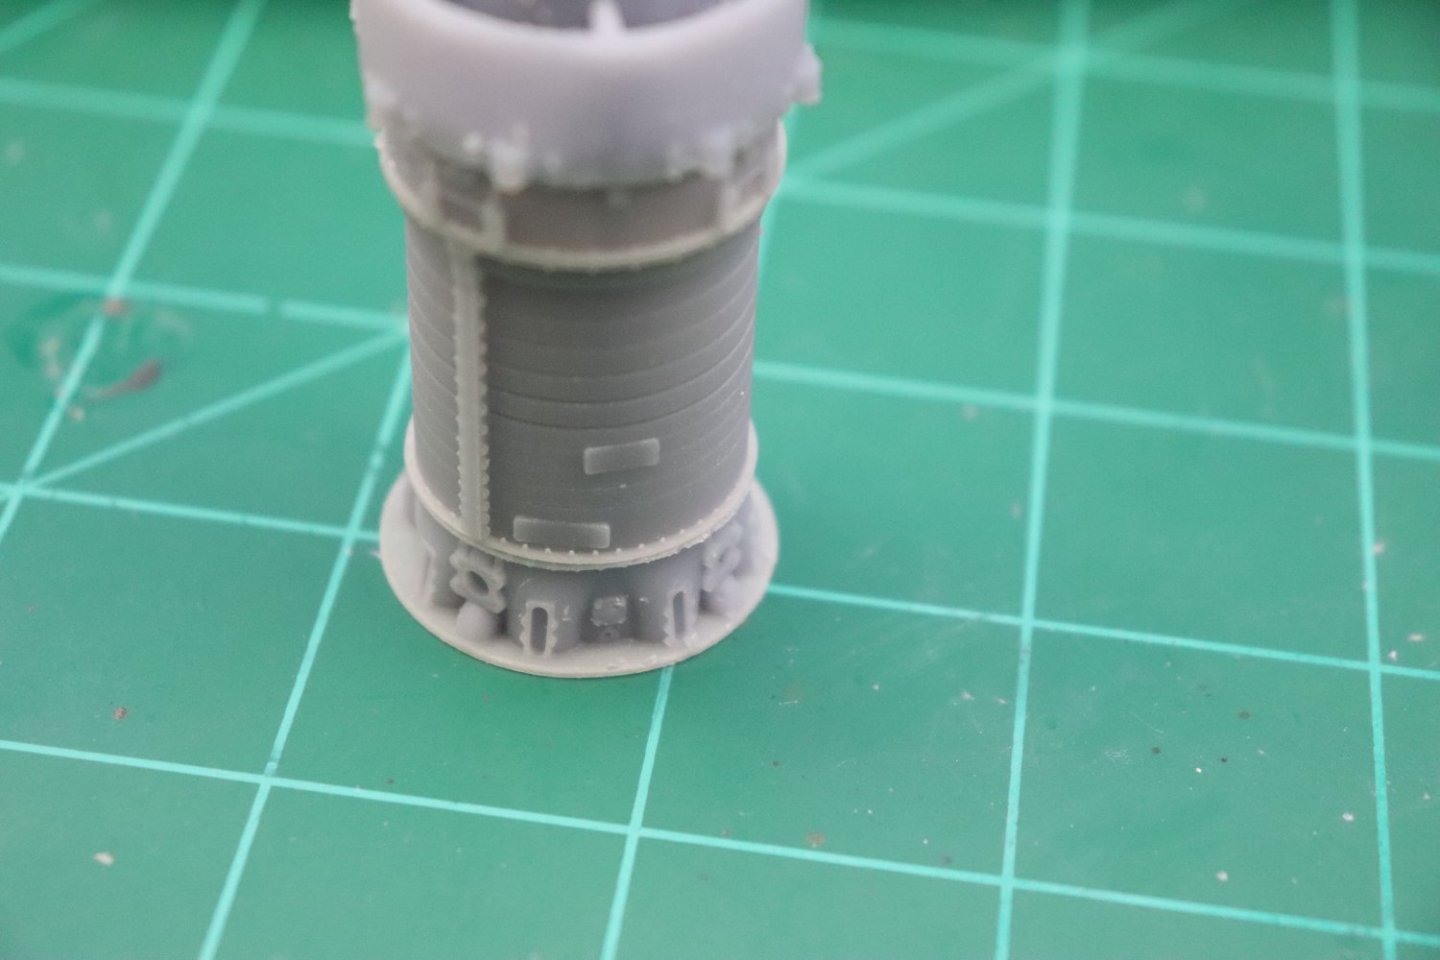
Ok brothers an update here... Progress has been made on Version 5... (a bit slow still dealing with RL here so please bear with me) This is being designed in full scale 1/1 size, so I've had to adjust to the scaling issue 1" in 1/32 scale = .03125" in the model so things I would normally model like fillets and chamfers and the like aren't going to be modeled cause you will not perceive them on the printed model.. Much like designing a plastic injection kit you have to adjust for the medium and tools being used.. So, if it looks a bit plain that is why... The engine is broken into sections the first being the accessory section... This is where all the little bits that start it and keep it running are located... (generator/starter, compressors, pumps and such small stuff) I know it doesn't look like much It is covered with a fairing that bends downward to accommodate the air flow ducting in an F-86... (the airflow runs under the pilots seat so the duct comes up to the engine from the bottom) The fairing is shaped to keep the airflow smooth as it enters the Intake Plenum.... The hole in the tip permits cold air to flow to the Starter/Generator to keep it cool... Backside... This is where you see the major change to the design.... I originally used 4" as the wall thickness, (4" = 1/8th", .125" in scale) this was causing adhesion problems during printing as when the part is angled it increases the area under exposure beyond the ability of the plate and supports to hold it, hence print failures.... So I reduced the wall thickness down to 2" ( 2" = 1/16th", .0625" in scale which is smaller than the 2mm, (.0787") wall thickness that the slicer software uses when hollowing out models) The flange holes are 1" in dia, and give a place for excess glue to run when gluing together... They will also help with preventing resin capture while printing... The next section is the intake portion of the engine.... It consists of the center hub which carries the transmission to drive all the accessories off the main shaft and also provides the support for the 4 intake vanes... The Vanes carry the external hose, tubing and wiring connections to the aircraft and other parts of the engine, they also provide heated air to the compressor of the engine for anti-icing purposes... Around the outside of the Vanes is the Intake Plenum itself this consists of eight sheet metal parts bolted together into a single part... There are four sector sections and four of what are called "Air Islands" which serve as the pass thru panels for all the external connections... And last but not least are the FOD screens, below is a better image of them from an earlier version... They are moveable on the real aircraft and automatically open when all risk of ingesting foreign matter is past, they are mounted to the Intake Sectors in pairs on the quadrants between the vanes and around the outside are the mechanical actuators that make them open and close... The back side... The slots you see in the screens actually cut all the way thru to the back side, this provides resin drainage and suction prevention while printing with the same flange holes for glue relief... (I'm probably going to push those holes all the way through the front as well, cause more surface area is better for gluing... I'm probably going to be using Gators Grip when the time comes to glue it together.. It's a PVA glue that operates on space filling friction for it's hold on parts, it is a favorite of the PE gluing modelers cause it's hold in my opinion is superior to CA's, the typical superglues.. So, more surface area is better... The assembly currently looks like this.... Will be proceeding on with the redesign of the third section the Compressor Forward Frame.... Onwards.... EG


-
Very well done for a first card model my friend... My first never got finished... A very demanding medium and a new road to travel when the muse strikes.... Bravo!
-
It's gotta be good, even the Kitty Kibbutz approves....
-
F-86F-30 Sabre by Egilman - Kinetic - 1/32nd scale
Egilman replied to Egilman's topic in Non-ship/categorised builds
I went ahead and did that Mark, get the engine development out of the modeling thread... Linkage.. It will make it easier to keep the two processes separate so I can concentrate on one or the other as needs arise.... Thank you for the suggestion... Thanks Dan... Starting on Version 5 of the design now, specifically designing for 1/32nd scale... this will help keep this thread cleaner and more modeling related...- 585 replies
-
- 10
-
-

-
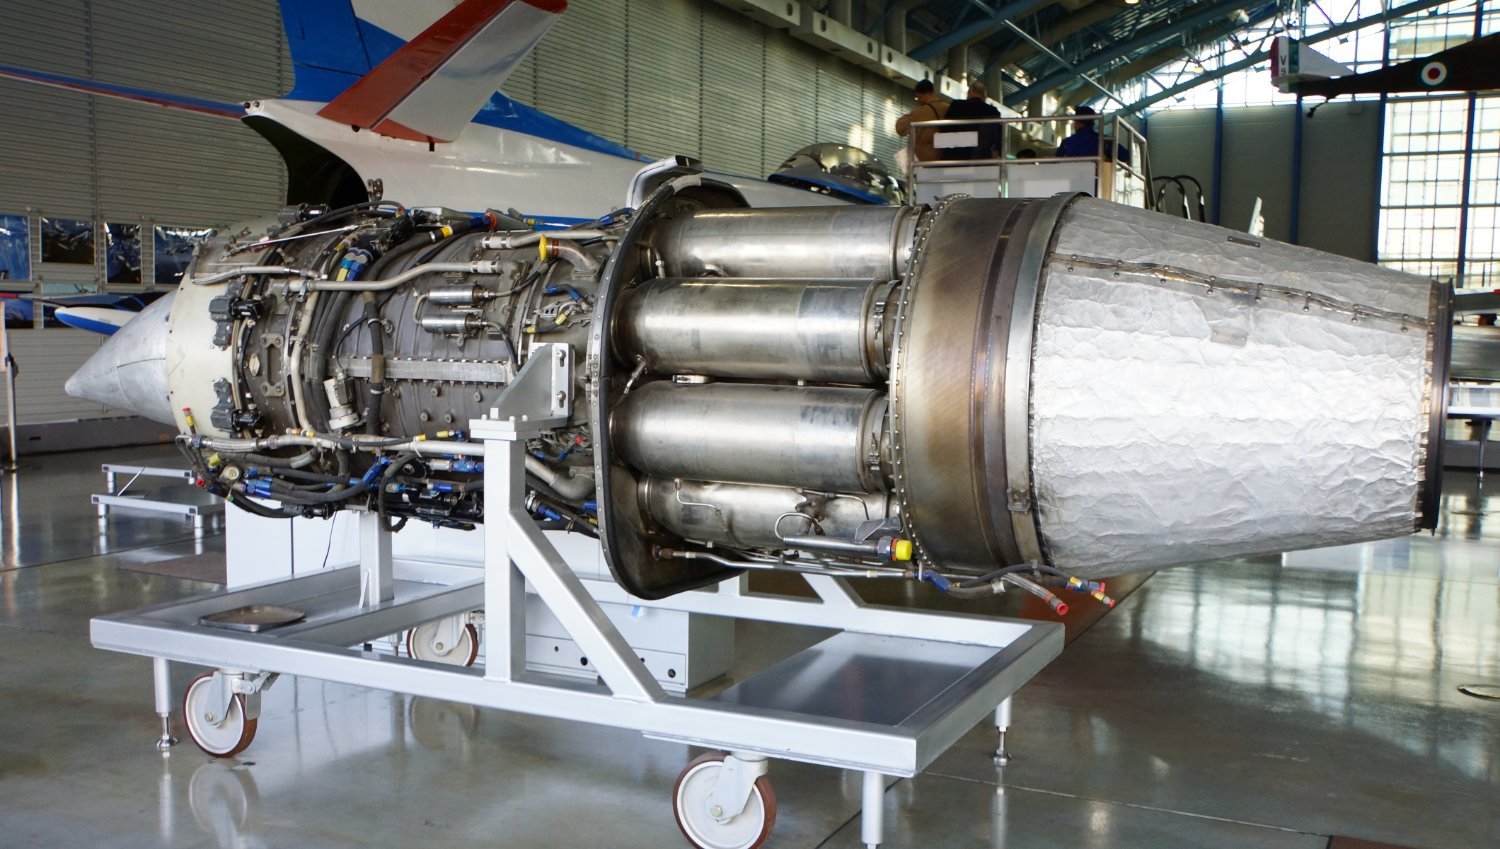
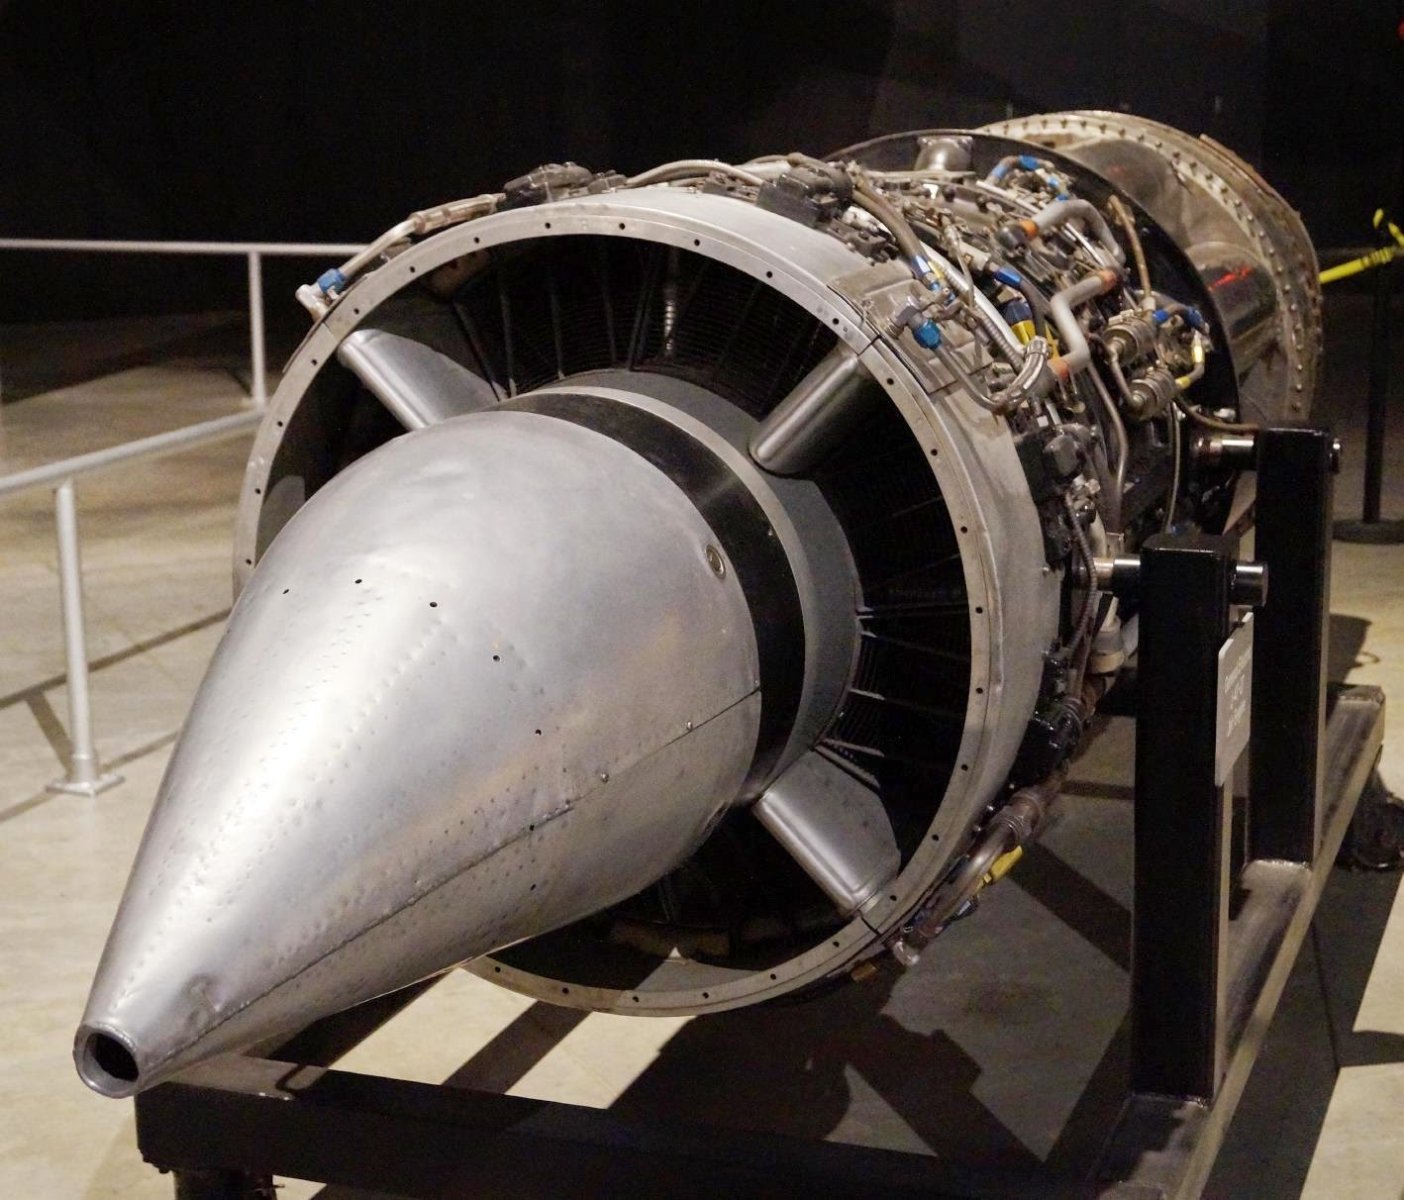
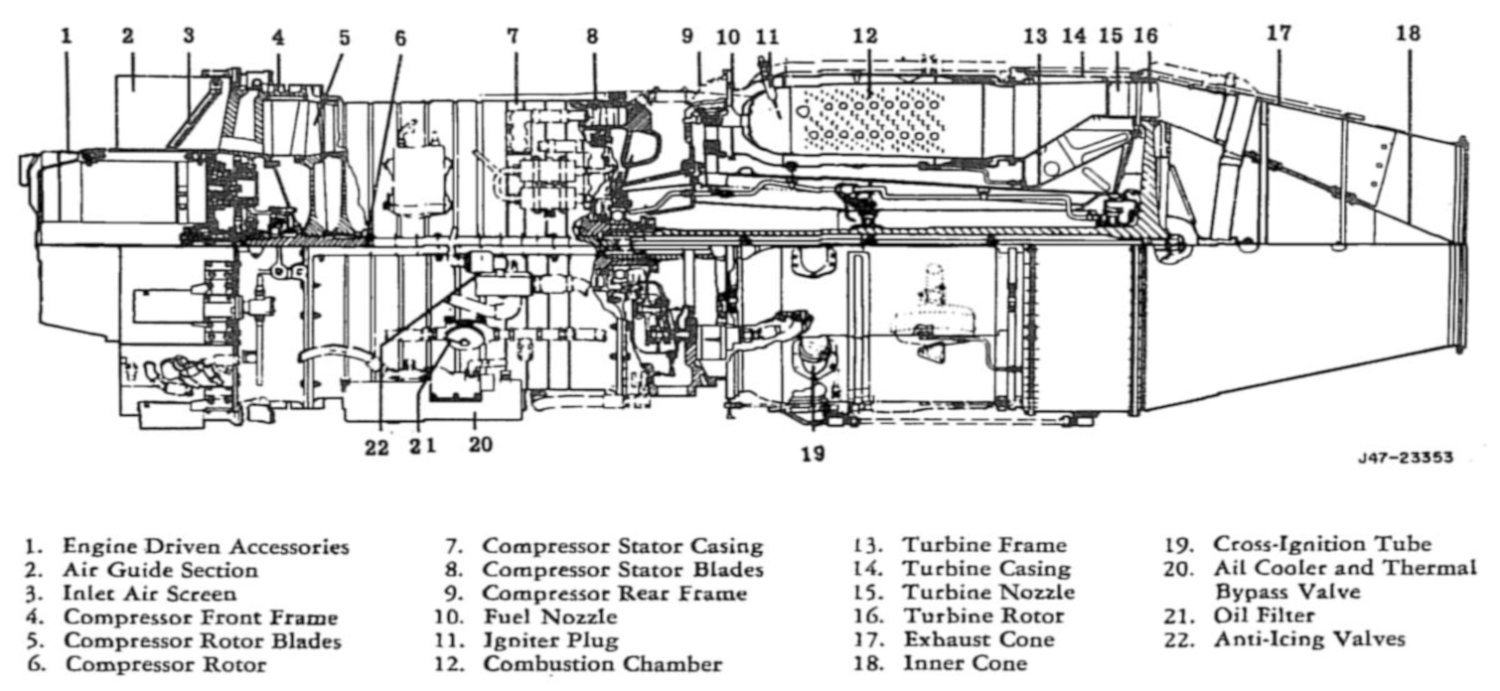
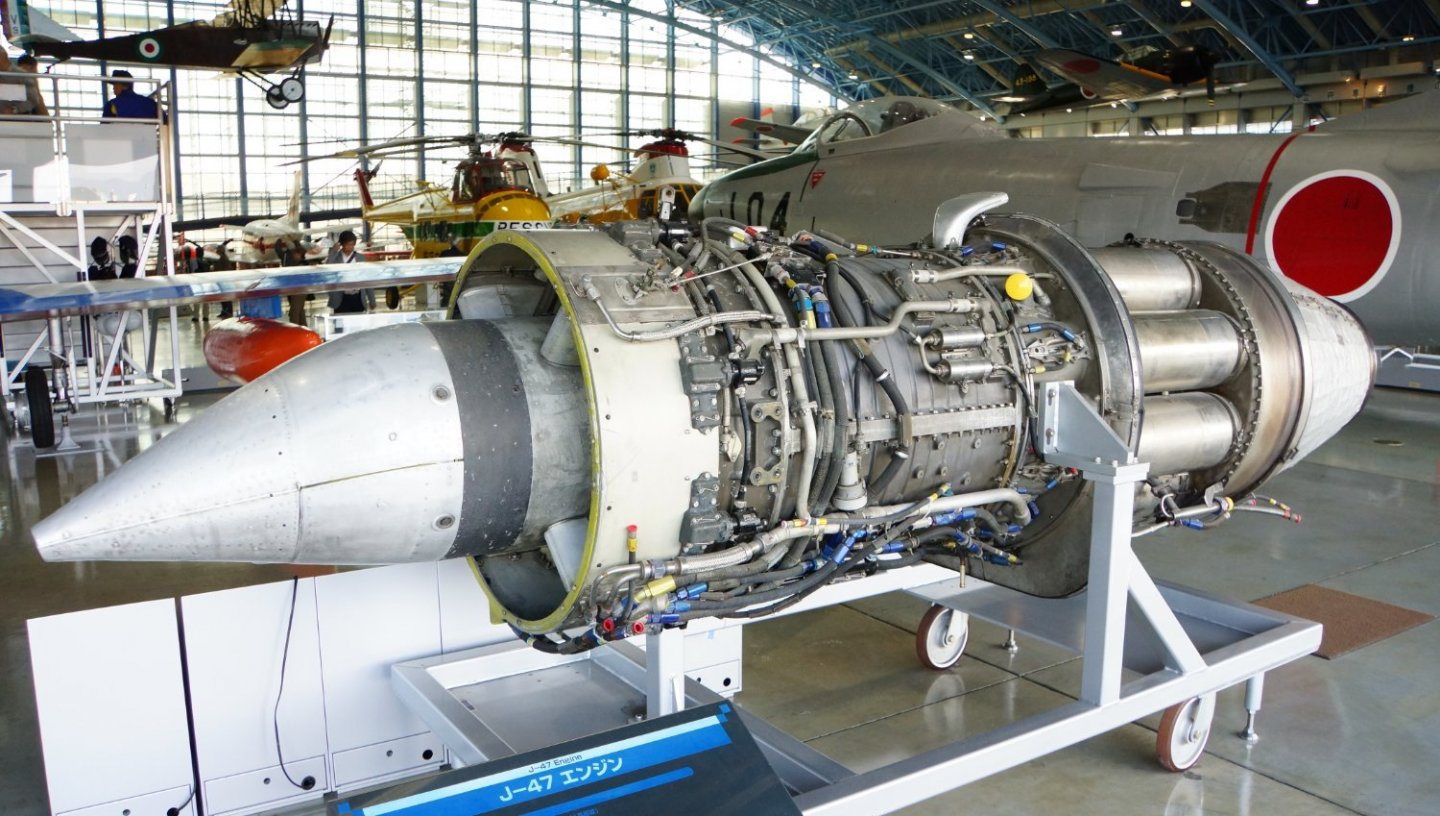
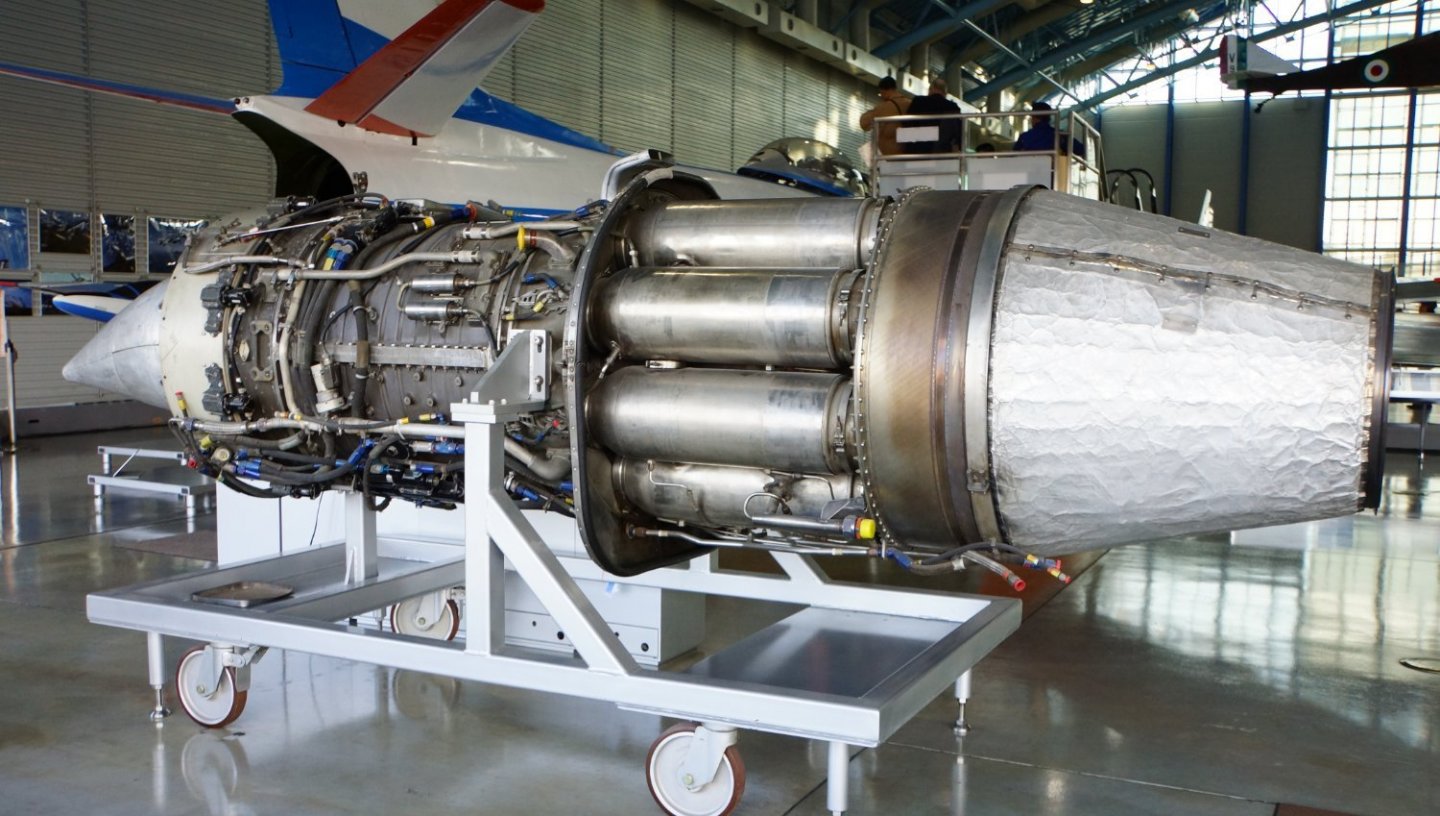
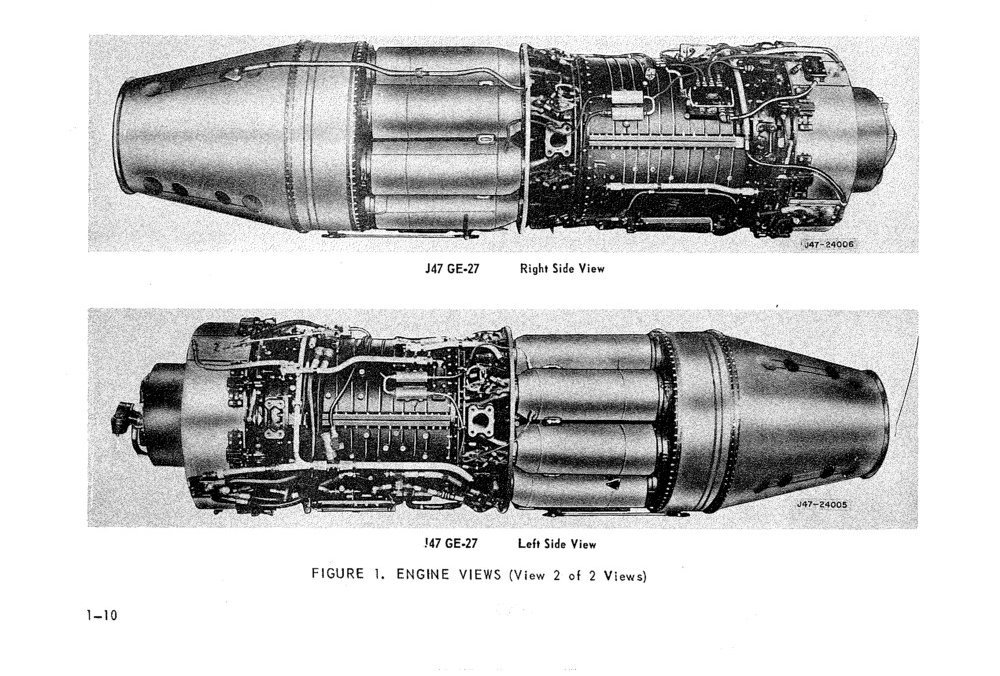
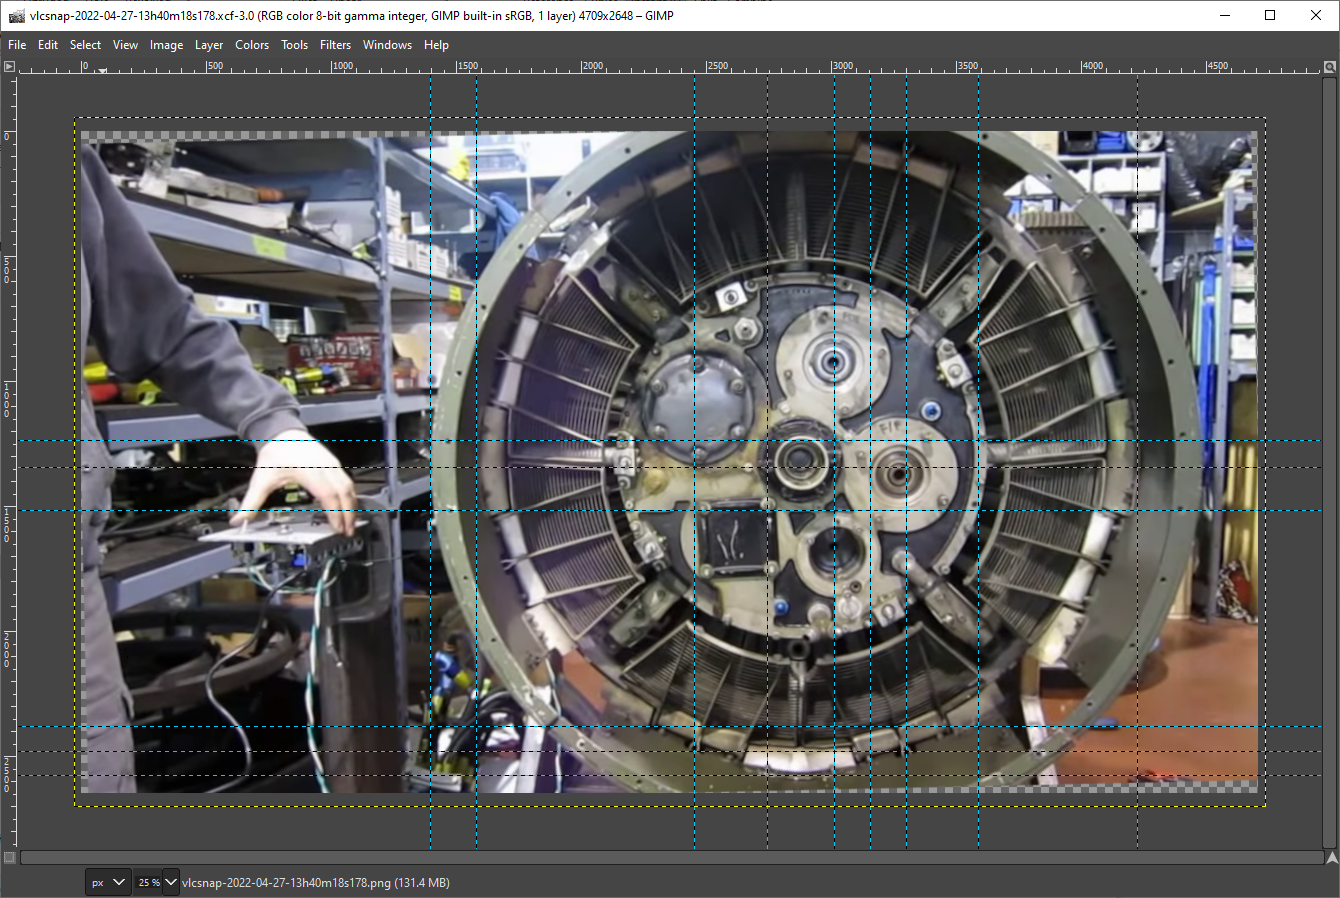
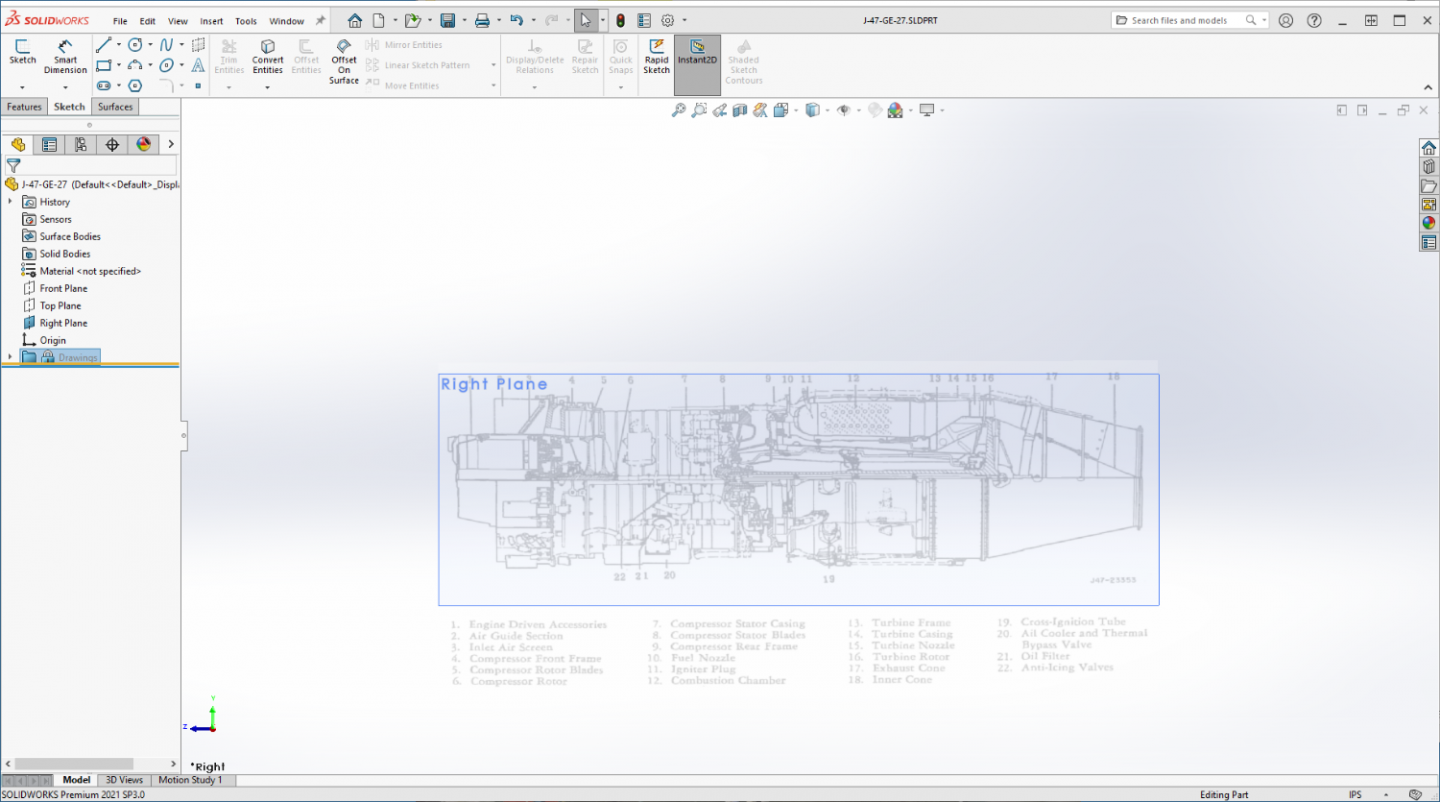
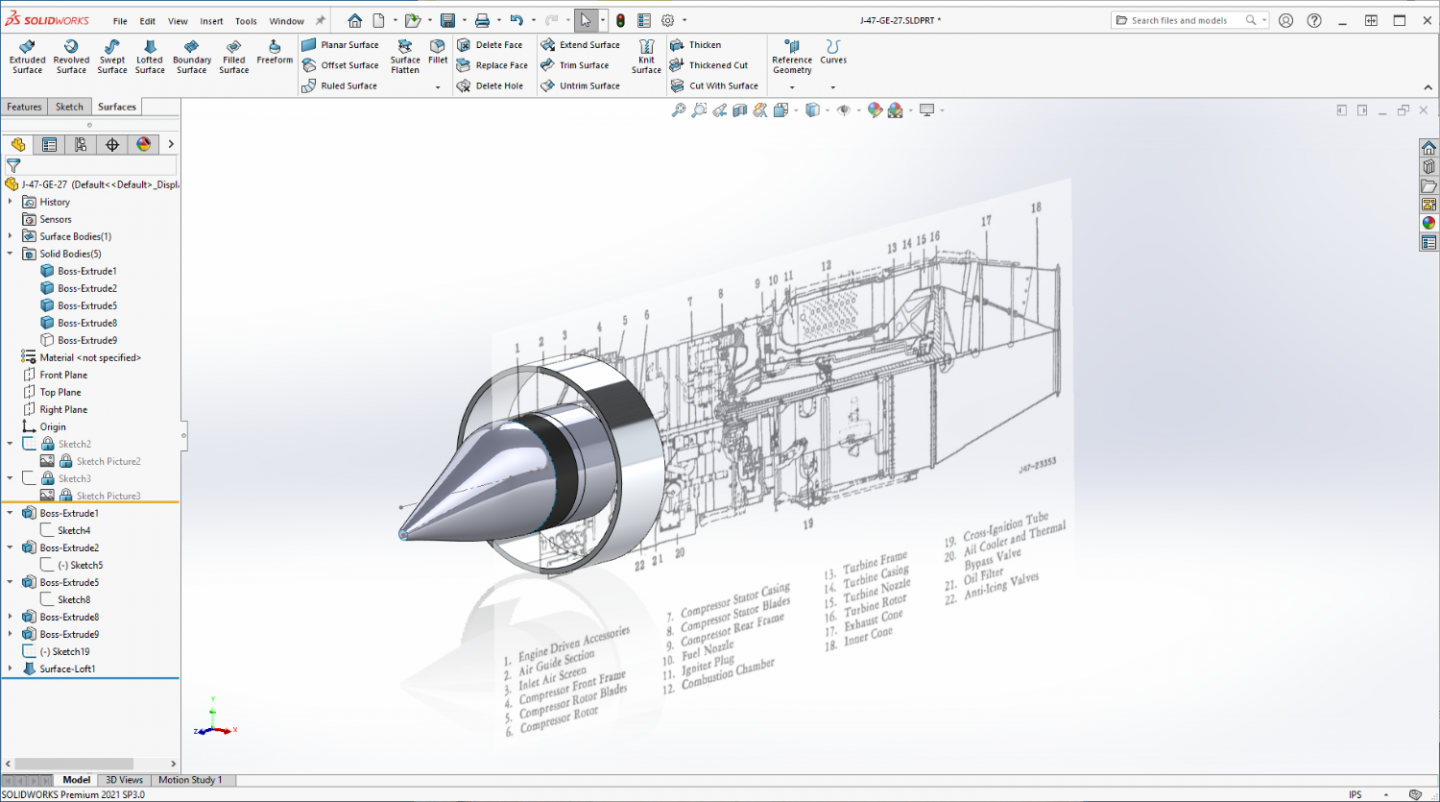
Hi Brothers... It was suggested that I post this here to bring it to a more appropriate forum for it all cad work and 3D test printing... I've been at it for five weeks now over in my F-86F thread.... Essentially I've learned enough that I've just embarked on version 5 of the design.. Currently it is only half designed, the forward half.... So what is a J-47GE-27? A J-47GE-27 is the engine that powered the F-86F day fighter, the plane that took the Mig 15 to task over China/North Korea during the Korean War... My sources of info are of course the US Airforce tech manuals and HD videos from the company that refurbishes them today... It is the most produced Turbojet engine in history with well over 30,000 of them produced... And powered everything from the F-86 to the pylon engines of the B-36 & B-47.... Today, they are being used in race boats and land speed record cars, with a healthy industry of rebuilding them for aircraft restorations... Of course, HD video snapshots help a great deal as well... I'm using two pieces of software for this, Solidworks for the 3D modeling, and Gimp for the HD image scaling/measuring .... The Image above in Gimp has been leveled and enlarged to full size, (yes the intake diameter is really 3 ft across) the blue dashed lines are index lines I use to measure various sections... In Solidworks, I use the cutaway drawing and basic dimensions from the TO's & TM's to scale the drawing to full size and set it as a locked background image to start the process... and I model from there.... This is as far as I've gotten... At this point I started 3D printing to test if it is going to come together correctly.... And I learned a few of the limitations of scaling and 3D printing... 1/32 scale is a scale in which the item cannot be an identical representation of the real thing... Allowances in both look and design need to be made to get something that will closely resemble a J-47... A larger scale will be easier to do not so much compensation has to be made... Anyway this is where I'm at at this point in the journey... Starting the 5th generation of iterative design... Essentially to get the 3D print requirements satisfied and still produce a good scale model.... EG Everyone is welcome to follow along and offer your suggestions or condolences.. All are welcome...


- 94 replies
-
- 12
-
-

-
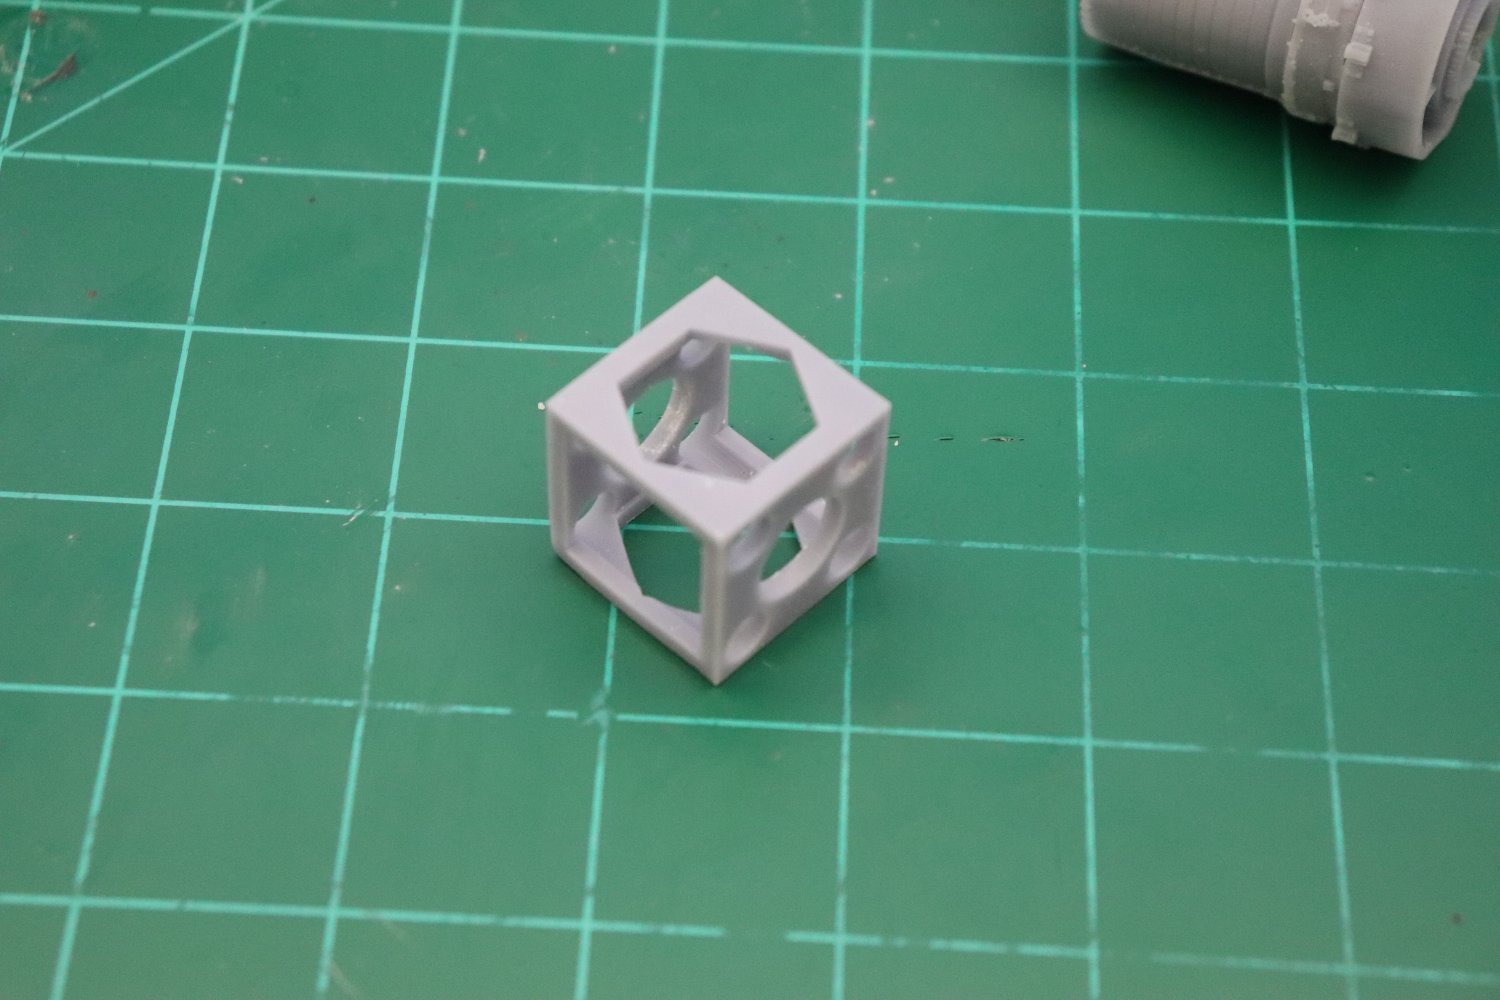
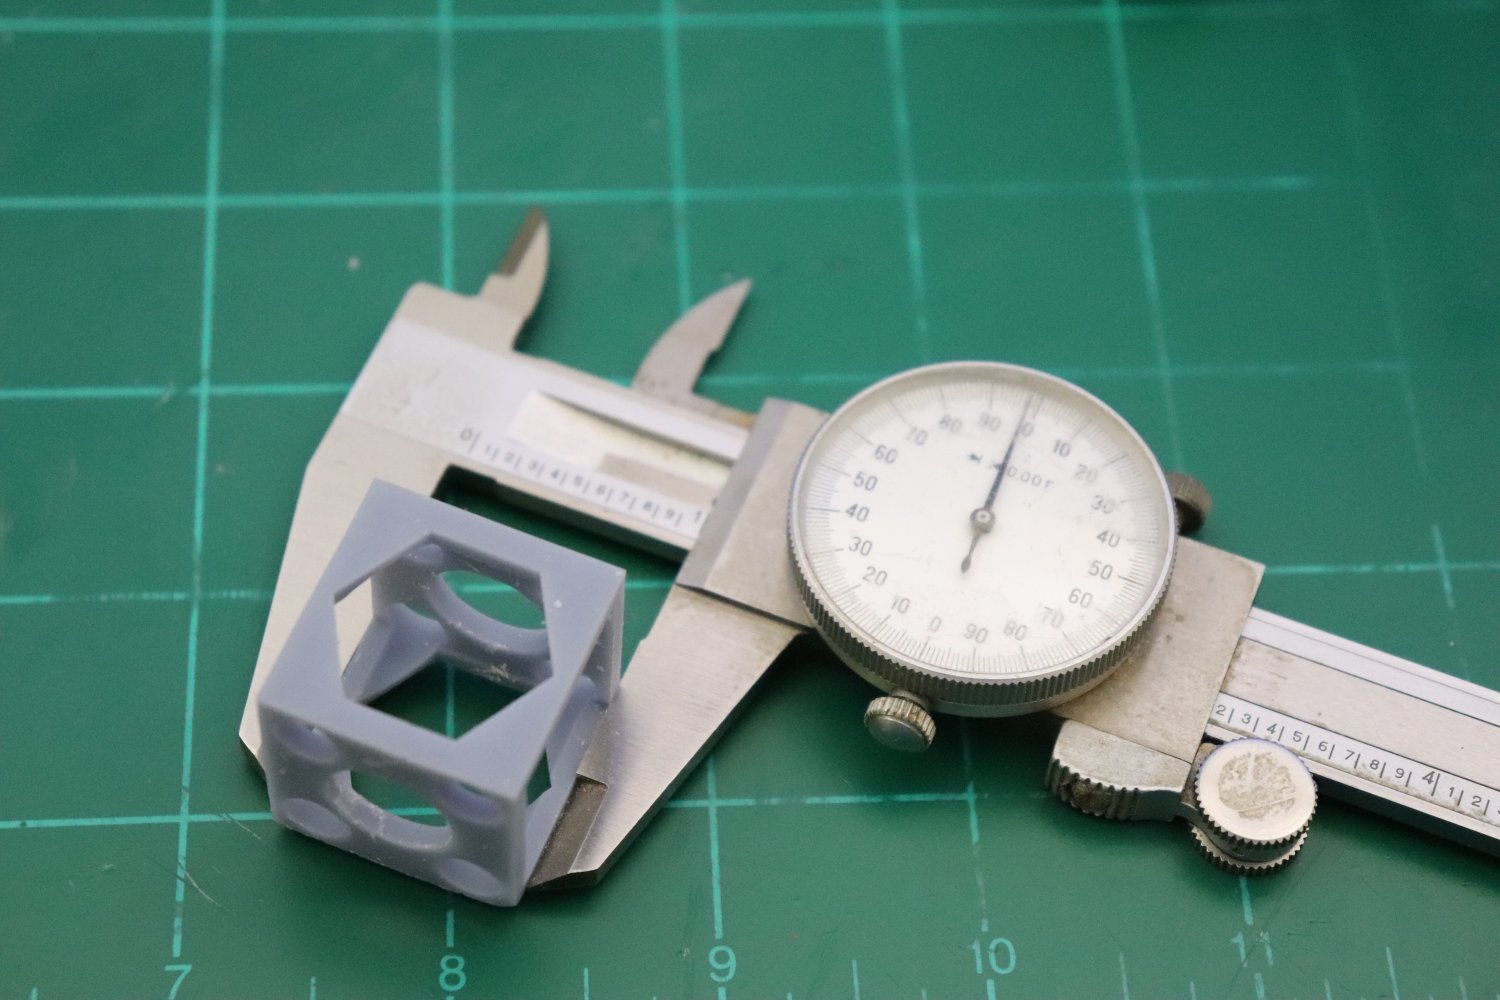
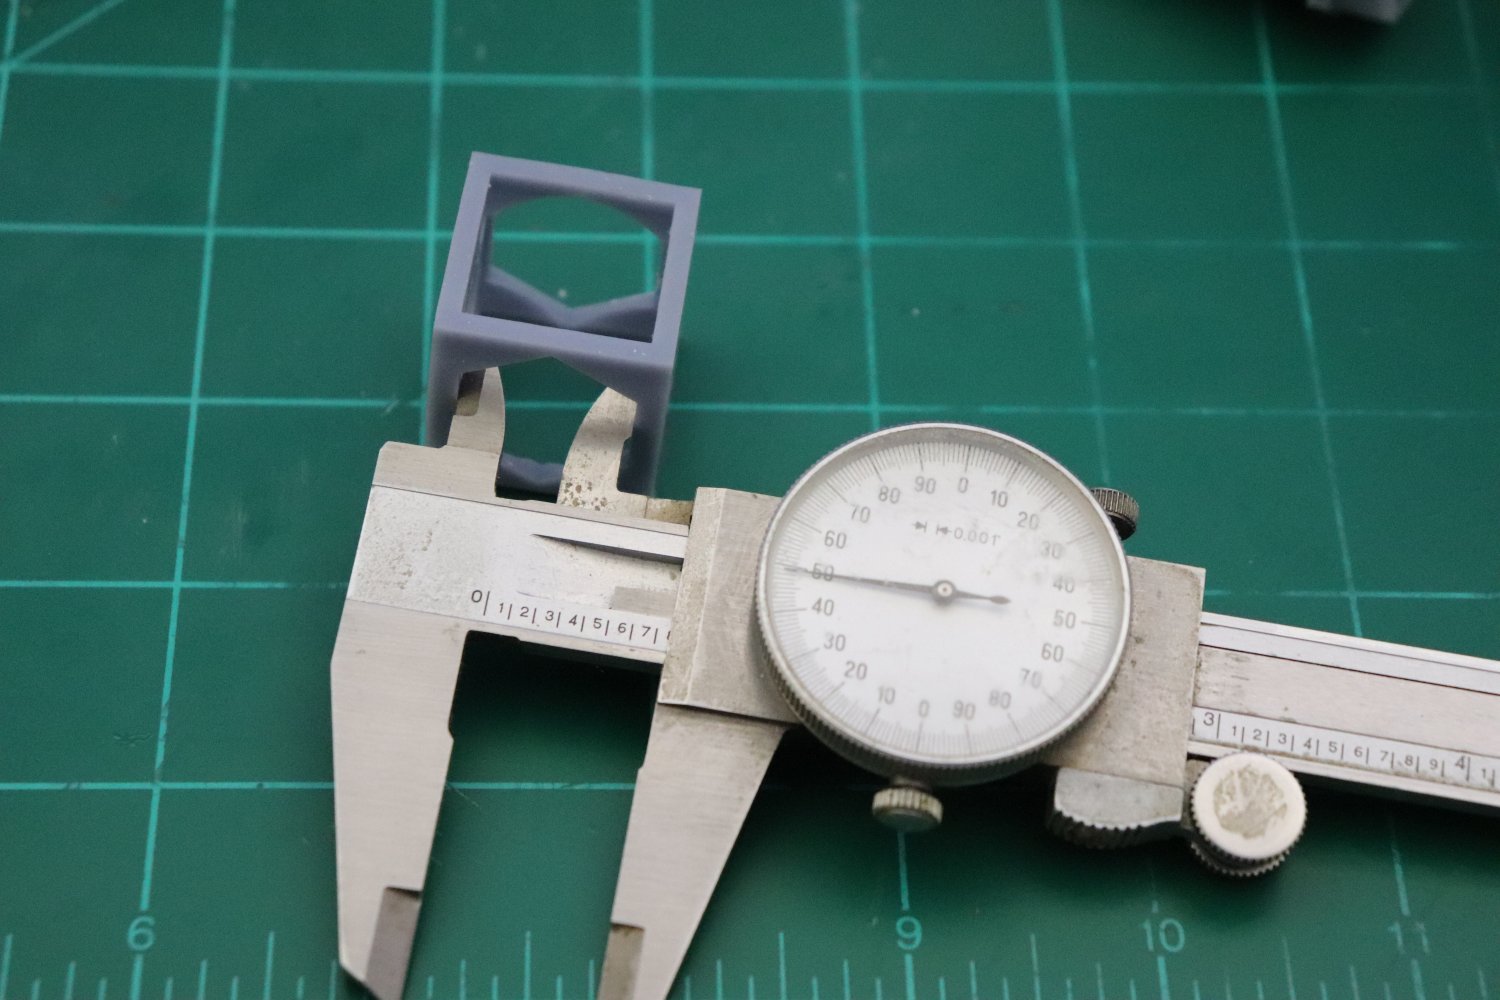
Alright.... Three successful prints in a row, the last one my own creation... 1" print scale test cube... (And yes a 45deg print angle give a great smooth finish) She measures 1" on a side and the cut-throughs are at 1/4 and 1/2 for the round holes 3/4 for the hexagon and .800 for the square.... Overall.. Hex ID size... It prints spot on.... less than .01% variation.... That's well within the tolerances I had to cut to in the toolroom in my younger days.... Most acceptable.... The Mono X is a great tool... now lets make it actually do something... EG


-
Ok I ran the Arc-Tan test piece... the Anycubic Mono X has .050 x .050um pixels and I'm using a .050 layer height so the calculation is simple, 45 deg. is the optimal print angle... This will change of course if I use a different layer height, but I probably won't at least not in the near future.... Anyway I'm now printing up a 1" test cube for checking scaling... So we will see how close it is to accurate... Now, I feel like I'm getting somewhere...
-
I haven't seen a presentation model yet of any aircraft that had moved control surfaces... Clean is the usual look... with typical accessories, (drop tanks and the like)
-
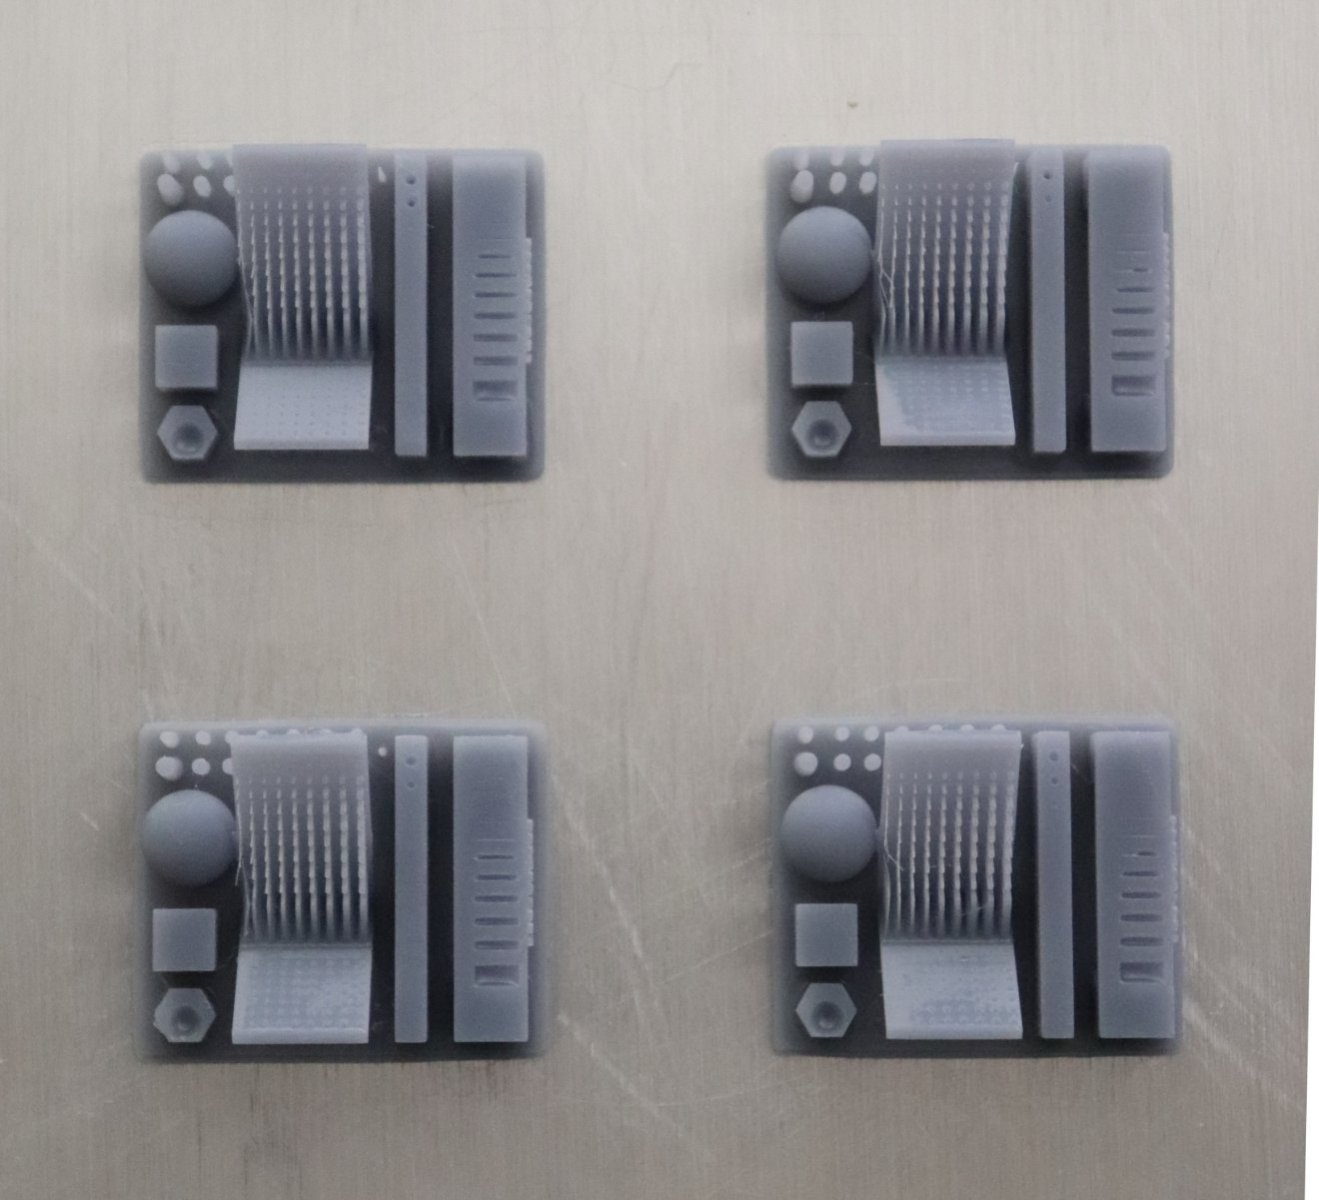
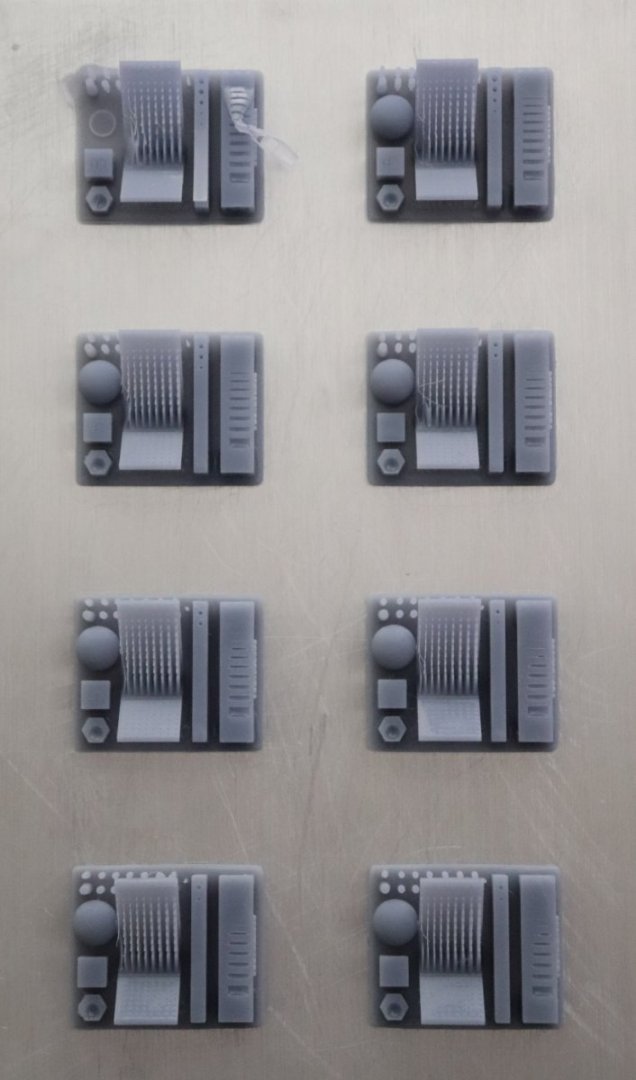
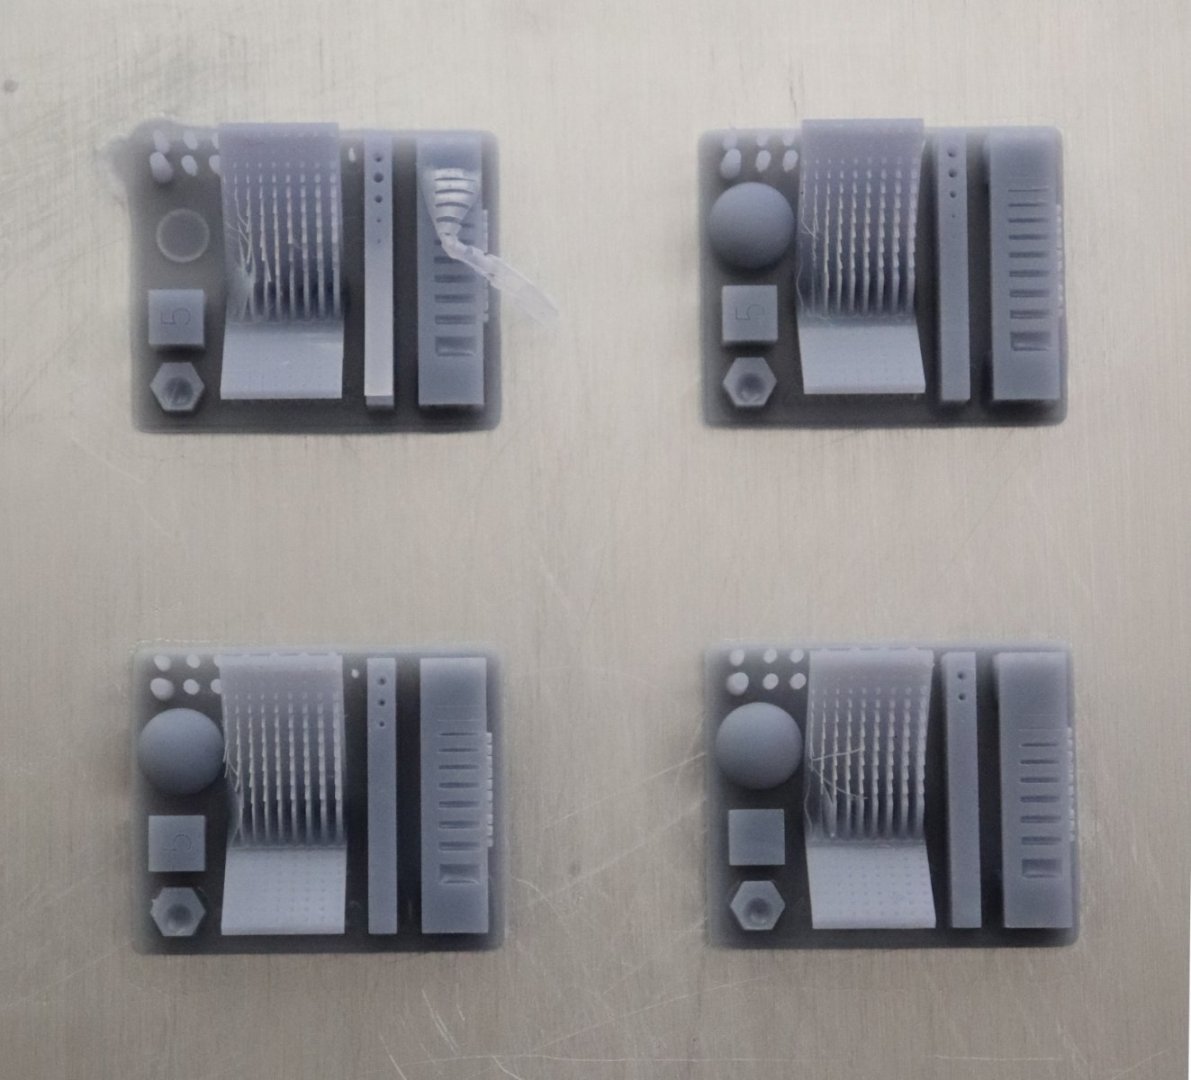
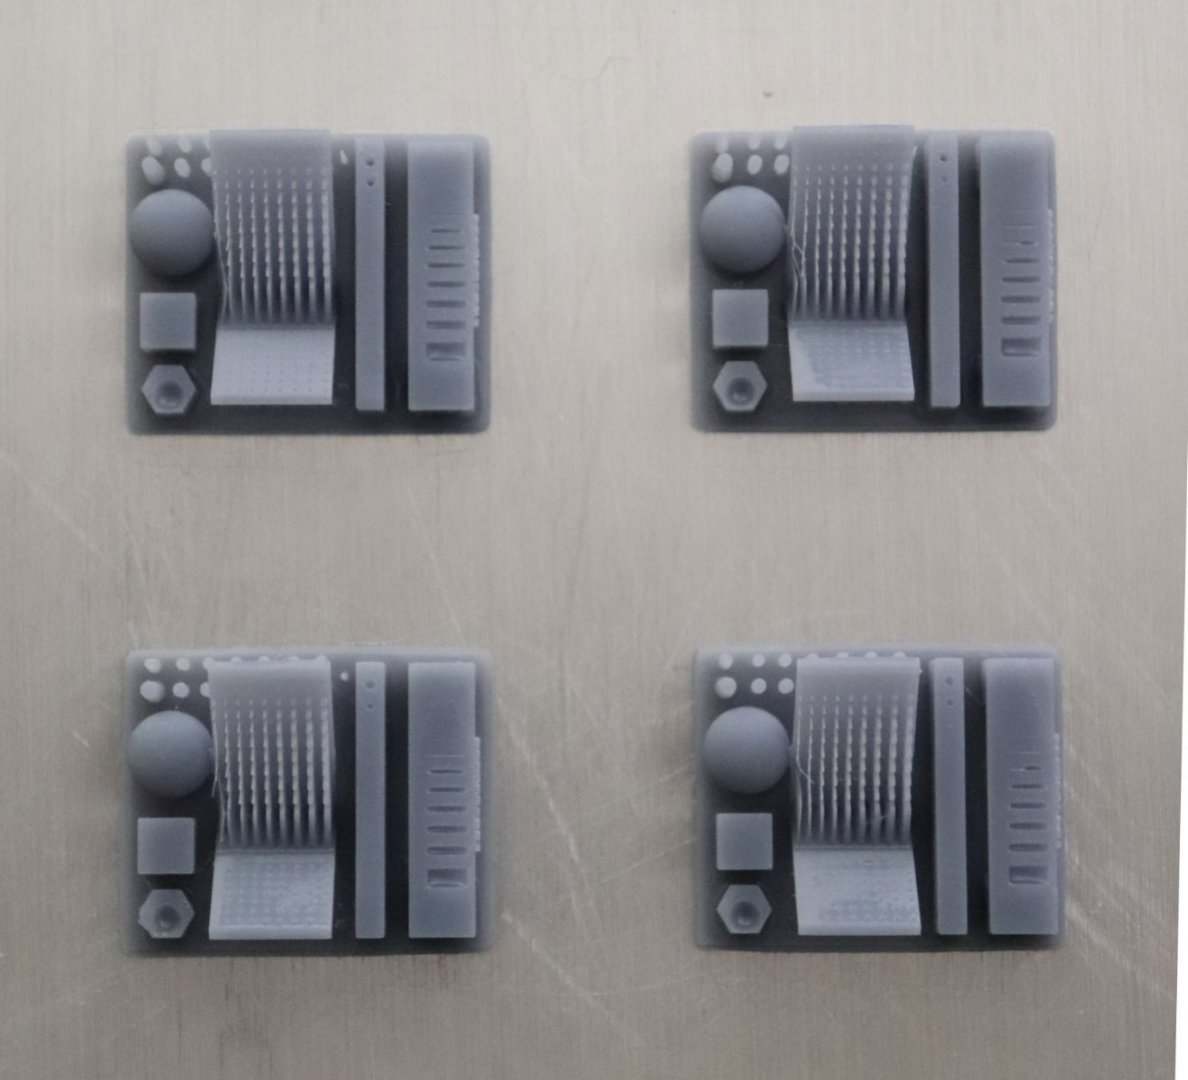
Hey Brothers, I went ahead and cleaned everything well, and ran the RERF Exposure Test pattern... (using anycubic basic grey resin) As explained by Ron, it prints 8 test patterns at different exposure steps...... the first #1 is at .8 sec the last, #8 is at 3.6 sec. so they step up at .4 seconds a plate..... The entire plate as printed.... Clearly #1, (upper left corner) has an issue with layer adhesion and #8 has an issue with detail definition (overexposure) The first four plates.... Clearly #1 at .8 sec. (upper left) is not going to cut it, the sphere did not stay attached and the final layer did not adhere to the layer below.... #2 at 1.2 sec (upper right) everything adhered but some features did not print well.. Namely the needle on the angled plate seem to have wandered all over the place like they were being stretched... #3 at 1.6 sec. (lower left) is much more defined and although the needles on the angle still show some deformity and we lost a few very small holes the definition appears a lot more solid with properly formed squares and the sphere appears smooth and good square hole pattern showing on the lower angle plate... #4 at 2 sec. (Mono X default) shows everything printed solid there is some stretching on the needles but the holes in the lower angle are much clearer we lost another small hole and a couple of the rectangular boxes are beginning to disappear.... The lower four... #5 2.4 sec. (upper left corner) We've lost the tiny holes and rectangles but the needles are at their best definition we are seeing hints of overexposure... #6 2.8 sec (upper right corner) Definitive signs of overexposure especially on the rectangles where we have lost quite a few of the smaller ones and the middle ones are showing partial fill ins... #7 3.2 sec. (lower left corner) serious over exposure, we are down to two holes and one is barely visible, the hexagon in the lower left corner is showing signs of light bleed causing ragged edges and the smaller rectangles are either filled in or are filling in.. The edges are beginning to take a less crisp appearance as well.... #8 3.6 sec. (lower right corner) the needles are at their most solid shape we have almost lost all the small holes and almost down to half the rectangles the square holes on the bottom angle are filming over as the overexposure activates some of the resin in the middle... The default is set at #4 2 sec., but in my opinion #3 1.6 sec., is just as good with less stretching of the needles on the lower angle... #5 shows the best overall definition but we lose the very small holes and rectangles.... The rest aren't worth it in my opinion... In my chasing around the web I've read great many people using 1.8 sec and having great results looks like a splitting of the difference between #3 & #4... I now see why they are advocating that setting... This is how this test is run and considered, it should be run on all resins as it is dependent on the resin being used, different resins have different reactions and curing rates and different levels of exposure... Lychee slicer has the ability to index different resins and their settings so when your setting up a file to be printed you can select the resin and the correct settings for that resin will be installed in the file to tell the printer how to process the file most optimally... Anycubic Basic Grey, I'll be using 1.8 seconds exposure on the next print which will be that angle test that ron so graciously posted.... Also another thing, LCD Power Level, Anycubic recommends 80% for the Mono X... I checked mine and as shipped it's at 100% power..... There may be occasions where you will want to use 100% power but for most according to many sources should not.... Next up, the angle test.... EG
-
Yep I checked at Walmart today, they were out of 91% IPA in the Qt. bottles... 3.49/bottle was the price here, 14.00 a gallon +tax and you should have seen the Fred Meyers price for it, 1.99 a Pt. in the medical aisle.... Didn't have enough in stock to fill my needs... So I went ahead and bought the industrial grade 99% IPA from the local hardware store at 24.99/gal., and I will be looking for a good washable resin in the near future.... The admiral told me to buy the good stuff, the equipment is too costly to use the cheap stuff.... {chuckle} She then told me that I can have the old 24 cup coffee maker to filter the stuff through... (she is cooperative in this way most of the time) So was I for the last week or so, wondering why my prints are failing, and doing some research into why and not finding answers... I'll probably open up a thread on my project here, (designing and printing a 1/32 scale J-47GE-27 Engine to go along with my Kinetic F-86F build) Currently I've had enough success to know that I need to redesign it to better fit the scale... But I think it would look great at 1/16th or 1/8th scale... And maybe some of the wealth of experience here will help... That's been the project for the last five weeks or so... But a lot of this.... Has kept me seriously frustrated for a while.... Anyway, reading this article with it's plethora of great resources and info as rejuvenated my mense for this... It's great to see friends who have resolved the same issues I've been having... (and willing to share... Thank you, Thank you all... EG


-
Thanks Ron for this, I've been going through some of these same issues with my Mono X trying to print a J-47 replacement for my F-86F... (except for the clean-up part) The explanation of what is happening with the RERF file, I've printed one, but couldn't find a thing online on what it represents... Now I know.... Thank You.... Yeah it's time to change the IPA... Pricy, very Pricy... 25.00 a gallon and I need 2.5 gallons... I think I've got 6 successful prints and about a dozen failures on this batch... the Wash N Cure makes doing cleaning easy, but I think Water Washable is in my future.... (still have 3/4ths a liter of basic grey to go)... And I don't know why I forgot about this thread and forum area... I should have started posting here five weeks ago and I probably wouldn't have run into all my recent frustrations with print failures....... Yech, live and learn... Again thanks EG
-
F-86F-30 Sabre by Egilman - Kinetic - 1/32nd scale
Egilman replied to Egilman's topic in Non-ship/categorised builds
Hello Brothers, Very short update... I finally got a partially successful print with the adjusted parts... (after 4 print failures) I guess I need to learn more about 3D printing supports... I lost the accessories section (the nose part) but the rest confirm that moving the flanges to the end helps a lot on keeping the errors to a minimum... bumping everything up to .125 helped a very small bit but in reality the air islands still didn't show up in any practical way... But I've got enough info to go to version 5 the redesign and this does confirm that to do a more detailed version I will have to go larger with the final model at least 1/16th scale, which would be designed different than this one...... Anyway I'm going to be taking a break from the engine and getting back to the airframe for a bit... I need for the 3D printing lessons learned to stew awhile in the slow computer upstairs and come out with another plan... Not giving up on the engine, just need to take a break... I'm on the right track just need for the experience to soak in so I can adjust the approach.... Thank you for all the support my friends... I may take this engine thing to a new thread all by itself but I don't know yet... so many options.... Anyway, I need some hacking of plastic to rejuvenate my mense and the F-86F is right there... the learning process can be draining... EG
- 585 replies
-
- 12
-
-
F-86F-30 Sabre by Egilman - Kinetic - 1/32nd scale
Egilman replied to Egilman's topic in Non-ship/categorised builds
Just in case you ever wondered what a failed print look like.... Now you know... the only problem is, you can't see if it's failed until the plate is above the vat and in this case, the print is almost 60% done.... Starting print #4 now after beefing up the supports a bit... I'll eventually find a repeatable support system but right now it's hit or miss... Learning new things sometimes is a frustrating process... EG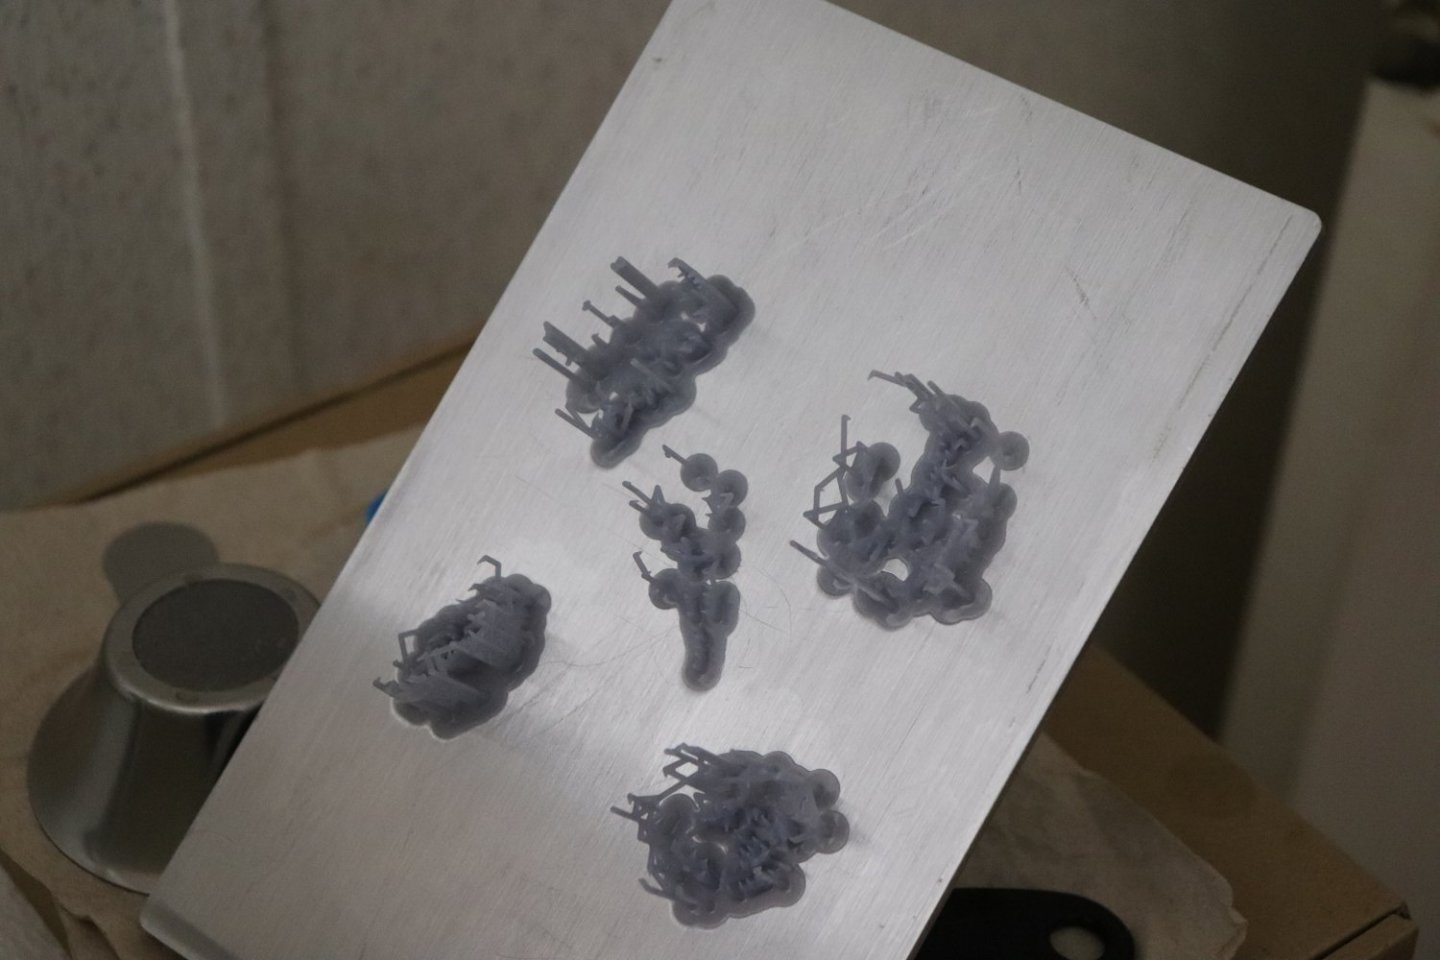
- 585 replies
-
- 10
-
-

-
Martini Porsche 935 by kpnuts - FINISHED - Tamiya - 1/12
Egilman replied to kpnuts's topic in Non-ship/categorised builds
I got dibs on the first ride..... -
F-86F-30 Sabre by Egilman - Kinetic - 1/32nd scale
Egilman replied to Egilman's topic in Non-ship/categorised builds
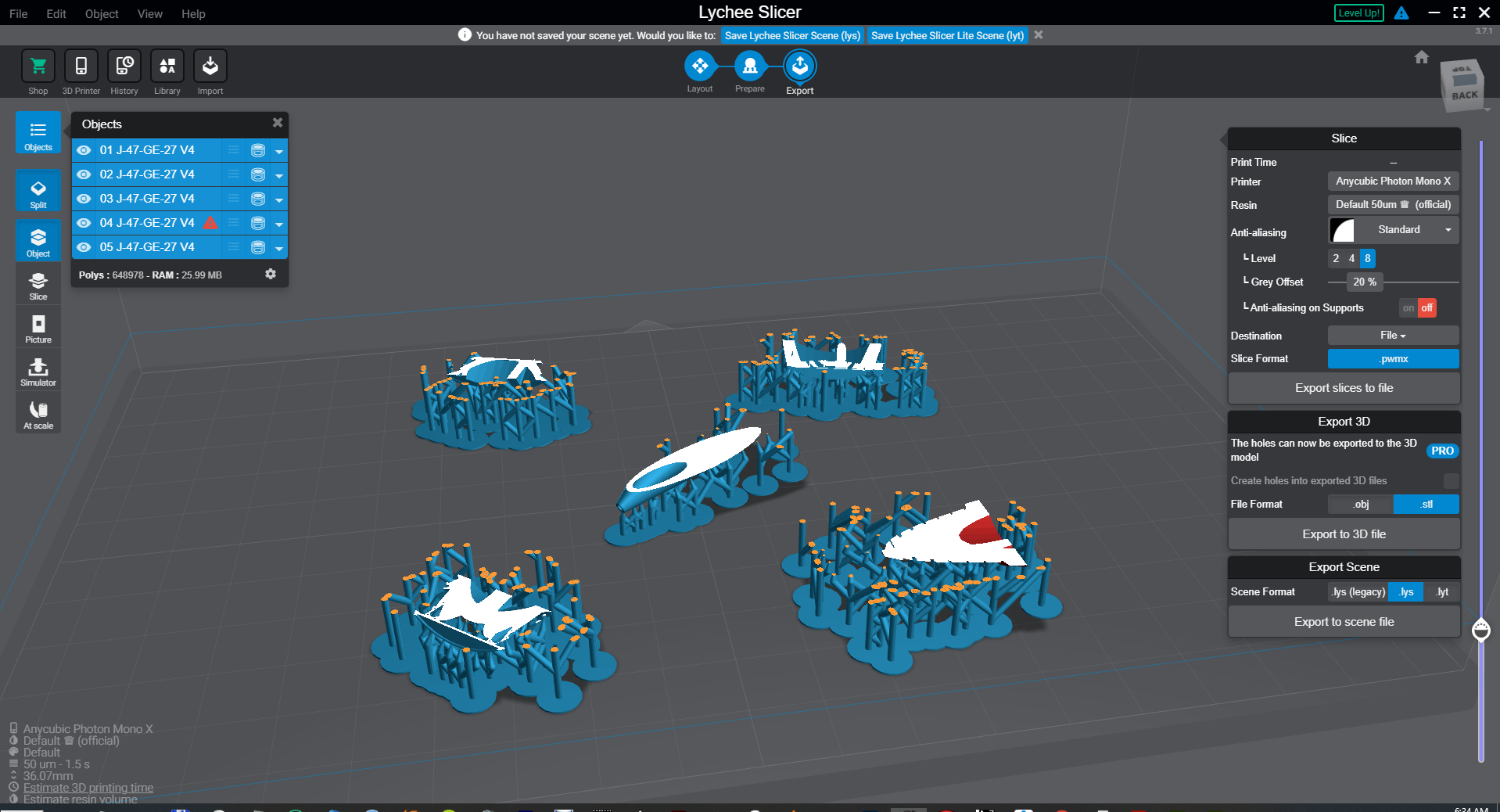
I've always been a believer in getting back into life as quickly as possible... It's already started the healing process, as the visiting nurse taught us 55 years ago, when it starts itching, it's healing... Well now the fight is to not scratch the itch... {chuckle} Anyway, in the process of doing the third test print, (the second failed) this is what Lychee says it's doing... And yeah the main compressor body still has structural errors, (that's why it's in red) but no holes so it will print... That's primarily why I have to rebuild this into a version 5 to correct that and optimize for the 1/32 version.... Anyway in another two or three hours or so I'll have another update... Thanks fellas... Recovery is going well... EG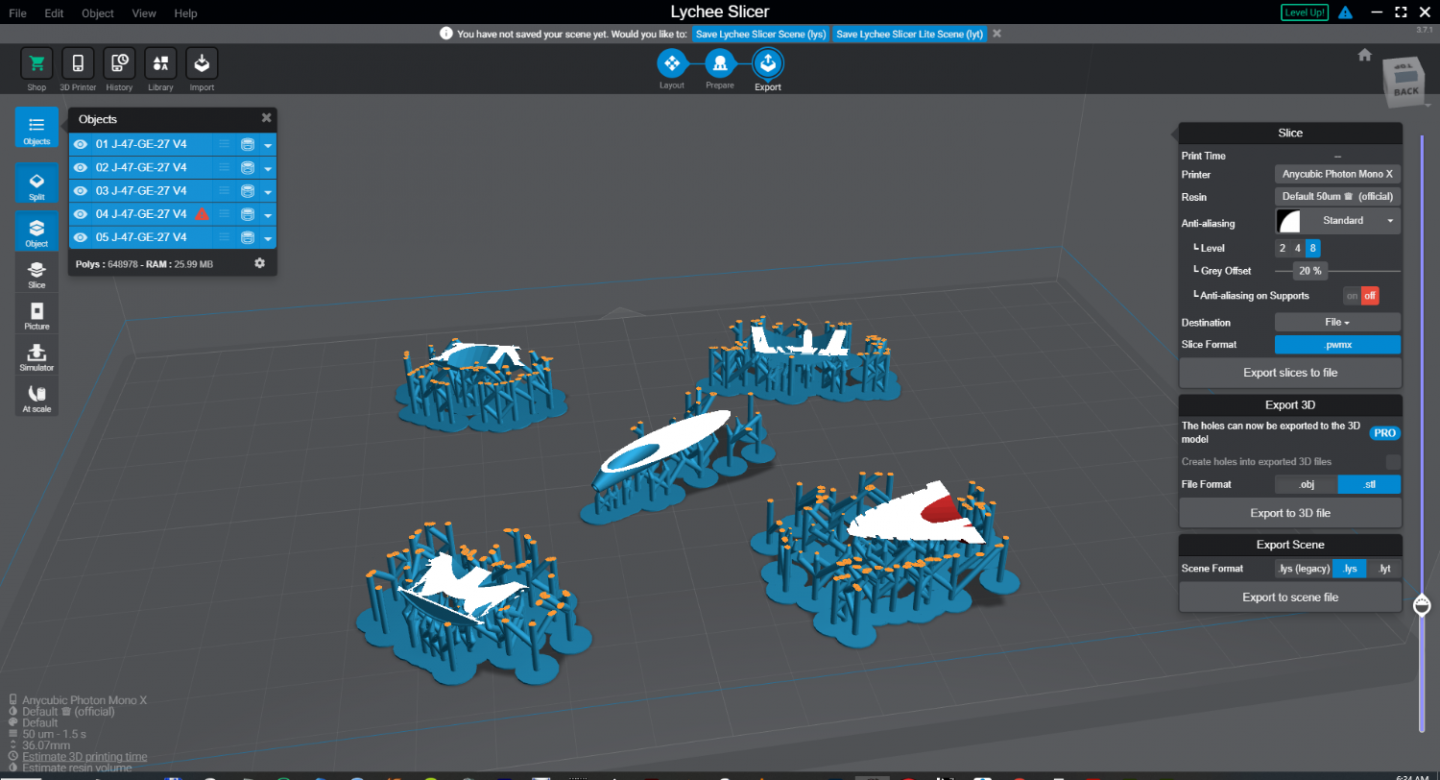
- 585 replies
-
- 10
-
-
F-86F-30 Sabre by Egilman - Kinetic - 1/32nd scale
Egilman replied to Egilman's topic in Non-ship/categorised builds
Absolutely! But most of the time the dessert makes up for it when she's ready.... {chuckle} -
F-86F-30 Sabre by Egilman - Kinetic - 1/32nd scale
Egilman replied to Egilman's topic in Non-ship/categorised builds
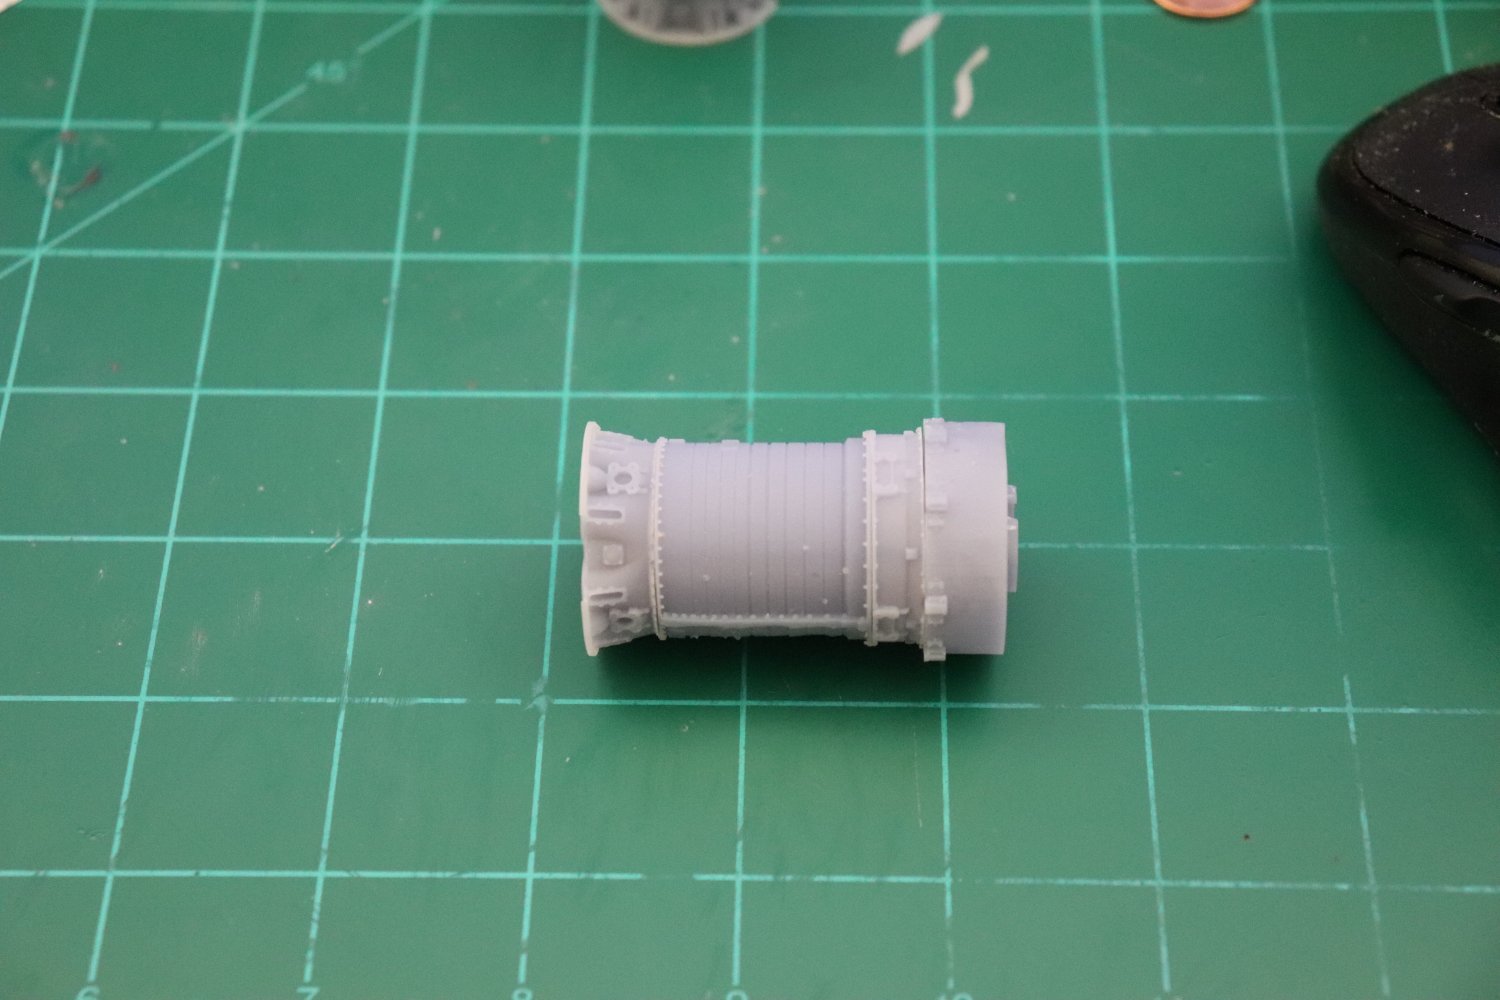
Absolutely, have to be that way or the Admiral invokes the war powers act... And we all know where that leads.... Anyway the best thing in my experience is to get back into the routine within reasonable limitations... So here we go.... Computers are real non intensive work {chuckle}.... So here is Version 4, prepped and ready for scaling for a second test print... This print is just to make sure the flanges are fixed and don't warp cause they are too thin.... This comes out right, and I'll start the re-draw process in Version 5 to clean up the hacked up mess these parts have become... Then we finish off the aft end out to the Exhaust Cone/Tail Pipe... Getting thru the design process... One thing I do know, Version 6 will have the exterior details designed integral with the eight basic parts cause in 1/32 they will just be too small to print as separate parts... If I decide to do a version 7 it will be designed to print large enough so the exterior parts are separate probably somewhere up in at least 1/16th scale (about 2.25" in dia.) 1/8th scale would make her really impressive at about 7" in Dia... Don't know if I want to go that far with it as I do have an F-86F and F-104C to finish.... Anyway this is the current state...
-
F-86F-30 Sabre by Egilman - Kinetic - 1/32nd scale
Egilman replied to Egilman's topic in Non-ship/categorised builds
Well brothers I'm back home from my excursion to get the pipes rooted out... A bit tired and sore and will probably be under the weather for a couple of days... but still here.... Thank you all for the support...- 585 replies
-
- 12
-
-
Mitsubishi A6M2b by CDW - Tamiya - 1:72 scale - Finished
Egilman replied to CDW's topic in Non-ship/categorised builds
Very Very nice Craig!!! Well done....