HOLIDAY DONATION DRIVE - SUPPORT MSW - DO YOUR PART TO KEEP THIS GREAT FORUM GOING! (Only 24 donations so far out of 49,000 members - C'mon guys!)
×


Egilman
-
Posts
4,377 -
Joined
-
Last visited
Content Type
Profiles
Forums
Gallery
Events
Everything posted by Egilman
-
Another success!!! Klingon K'Tinga class battle cruiser... The STL file was at 1/2000, I increased it by 50%...... Images of the washed and not cured print.... I'm printing another, I switched it around to print vertically to maximize the size the printer can print..... If this comes out good, I think I'm good to go..... Many Thanks, Thanks for all the help my friends.... EG PS: finners are still crossed {chuckle}
-
 Both aircraft used the Sperry Ball for the belly turret... here's the info... Sperry 250SH-1 (vintage Sperry pamphlet on the ball turret) Sorry Brother, the B-17's flight manual also specifies the ball turret gunners access was from inside the aircraft after takeoff...
 -
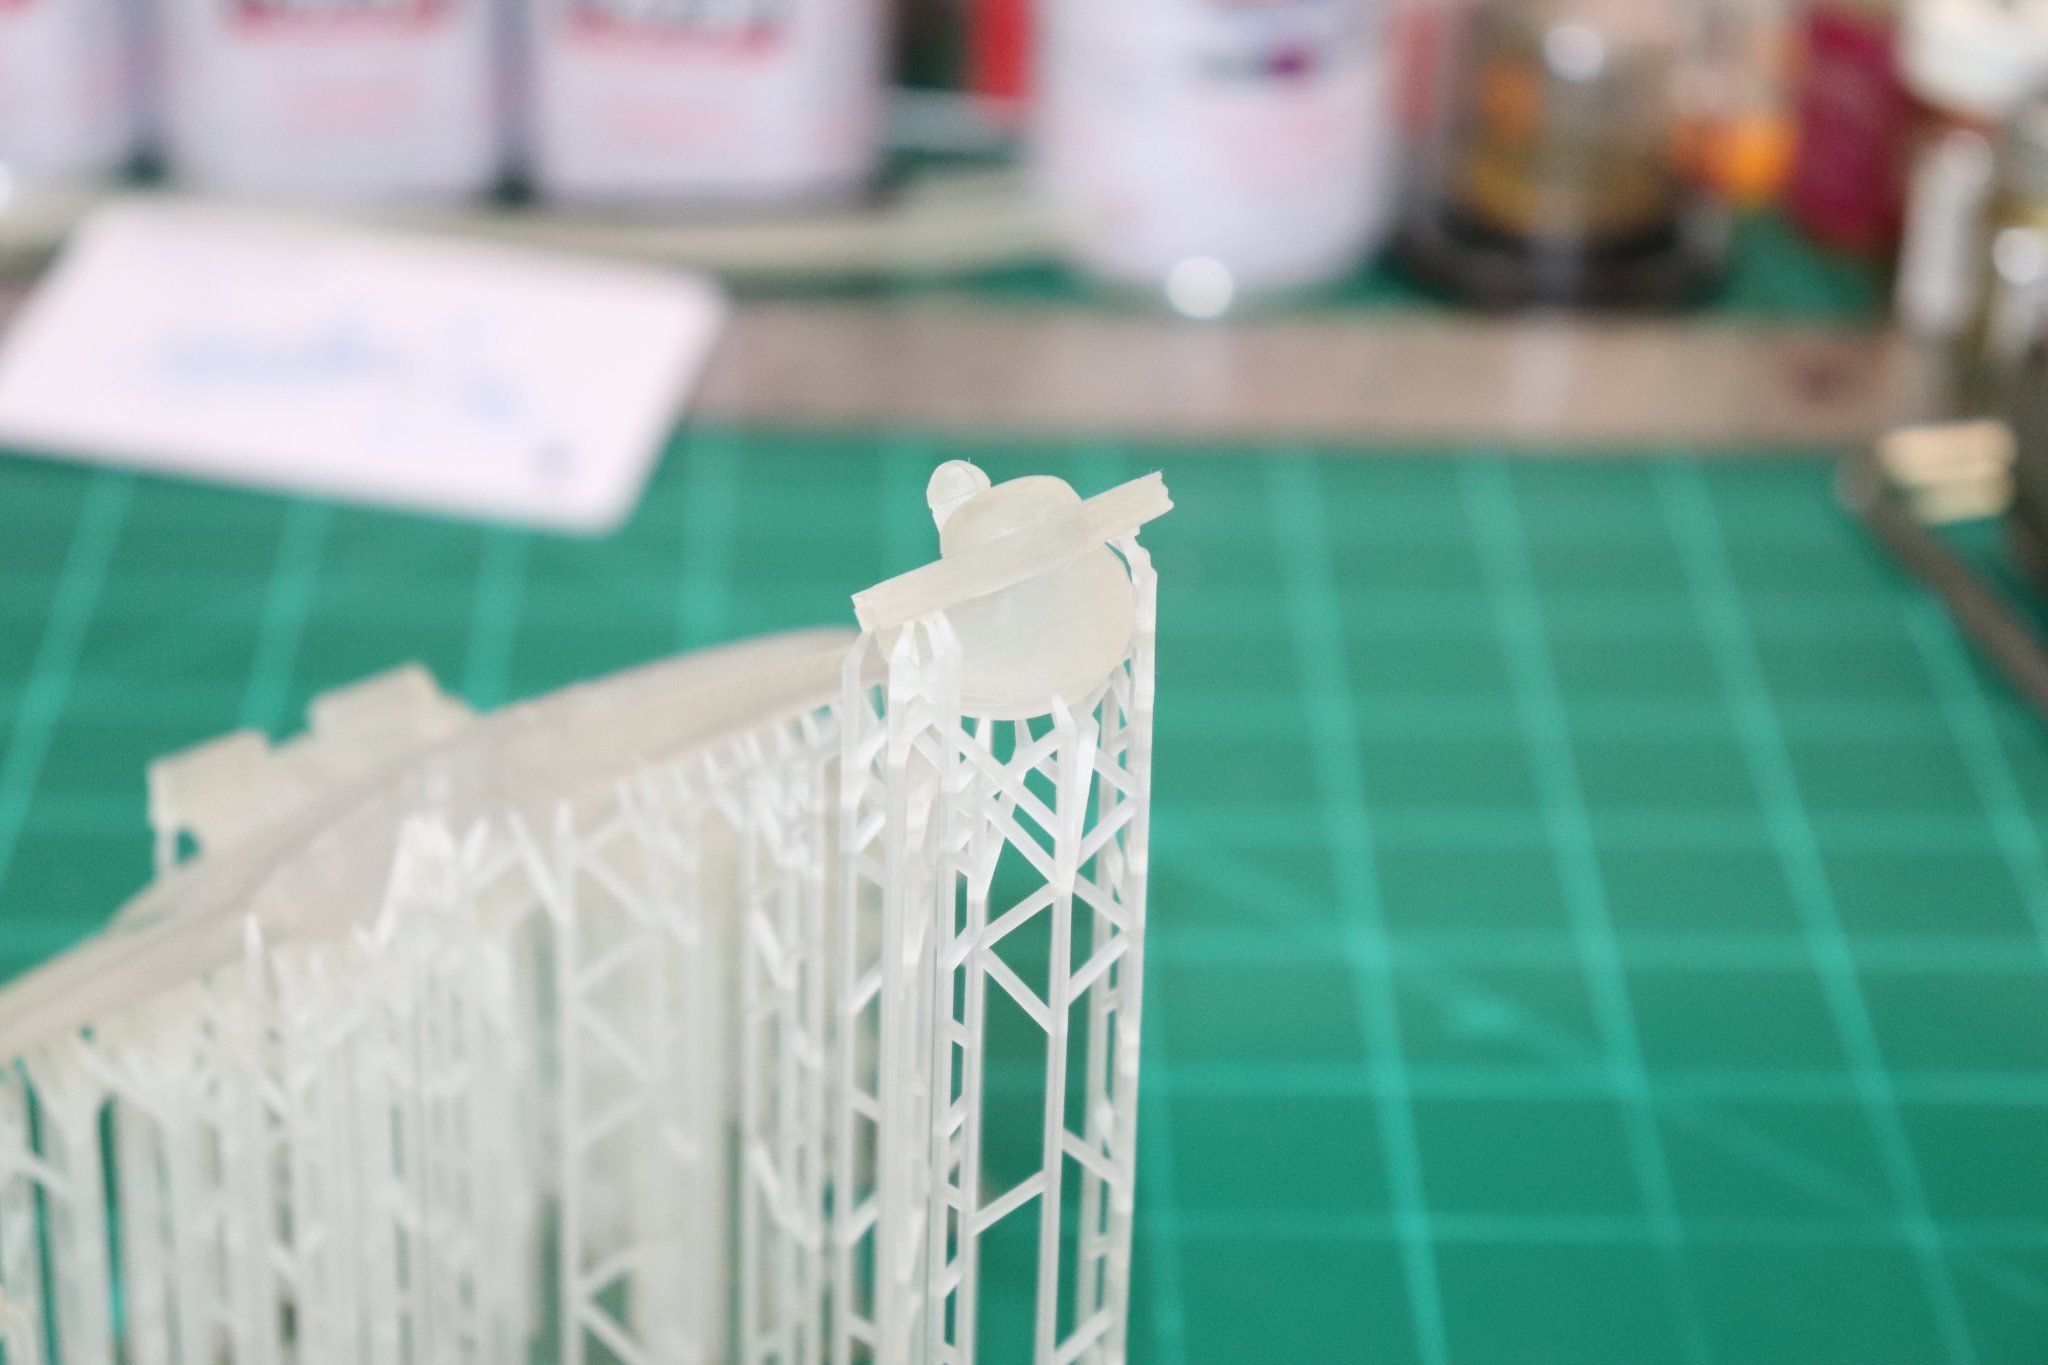
Thanks Henry, The model is the Battlestar Galactica, the original one, at about 3 feet long...... Extremely impressive... Just the nose section almost fills the build volume of the Mono X.... It's in 10 pieces and they report 8 builds.... They also report two revisions by others.... with successful builds, all FDM printed.... If this can be printed SLA, at this size/scale, then there is nothing we build as models that can't be SLA printed on a Mono X... it might have to be rescaled/re-cut to fit a Photon S though... I'm figuring that if I can make this, my Saturn V launch umbilical tower and crawler in 1/72nd scale can be easily printed off the Mono X... That is my dream.... there is only one digital model of it that has the detail I'm going to be printing, several paper models of it at much lower detail levels, and only one 3D print that's not accurate at all... Anyway, I'm seeing where it can be done.... The parts for the process are out there, (I have the structural, mechanical and equipment layout print sets for it) Now it's time for someone to actually do it... it will be over 6' tall when done.... probably take a year to print assemble and finish properly.... I'm gonna need some luck..... It's like hiking the Appalachia trail of model building, long but one heck of an adventure.... EG PS: the Klingon cruiser is printing beautifully, it's about half done, at a 150% size increase, I think I'm gonna flip it around to better fit the build volume and test it again at 200%..... No thumping noises.... I'll report the settings I used here when it's finished... Fingers crossed... {chuckle}
-
Oh I don't mean to sound like a frustrated artist Brother, it's just the learning curve I've chosen for myself seems to be defeatist at the start like I'm a glutton for punishment or sum such dunderfunk... Especially to outsiders looking in... No worries, by the time I reach the top of the curve, I'll be doing anything I want with it... Keeping the Admiral happy and fulfilling requests is always good policy, {chuckle} Besides, I take this path and report on it here openly, it will probably save a bunch of people the headaches of having to figure out this stuff on their own... EG
-
RFM 1/35 Panzerkampfwagen IV Ausf.G-Finished
Egilman replied to Javlin's topic in Non-ship/categorised builds
I wouldn't miss this for the world! -
Thanks Henry, This mesh flatly has Fusion 360 lagging like a passed out sailor.... Running the reduce mesh triangles function leaves it all blobby, I lose the sharp edges.... (this thing is mostly sharp edges) Repair does the same thing... The analyze function on most of the software I've loaded this thing into reports errors in the thousands.... It like they built it with a lot of solid separate parts and failed to merge them into a single object before they converted it to a mesh... There are over 300 double faces occupying the same space alone it's a beautiful model when assembled and rendered, but the creator is the only one that claims it as a successful print, there are two revisions of it, (by others) to correct errors, but I see no prints of them. In this case I think it would probably just be best if I use the mesh as a template and manually rebuild it in something like Fusion or Solidworks to make a proper solid model out of it... Just simply too many things wrong with it..... I'm gonna try a smaller model as a revised test, a 1/2000 scale klingon cruiser, the creator specifically states it's designed to print on an SLA printer with several confirmed prints on it.... I'm pretty sure the reduction of resin in the vat as it prints is not helping, thanks for the confirmation... I'm going to hold off on the lube job and try the reduced settings to see if it fares any better.... I'd like to get a couple of successful prints on this thing to get the settings correct before I have to buy more resin.... I always add holes to the model during the hollowing out setup process, large holes and then raise the surface off the build plate, (it's a joining surface with the next part) I shouldn't be having any suction issues... In the meanwhile, while that is printing, I'll start rebuilding the big one.... Before I start, I'll reset the zero again just to make sure.... I was wondering about dressing the plate with sandpaper, I've only heard of one other recommending it, outside of a few tiny scratches made from the knife used to remove prints it is clean and still has the grind texture like new... This does have a learning curve associated with it, not as steep as some curves I've climbed, but a hill that will give you a workout.... Again thank you, all advise is welcome.... EG
-
Hi Neal, Thanks for the links they are immensely helpful, very helpful..... I currently have Autocad, Inventor, and Solidworks loaded on the machine, (all 2021 version) I have to check the requirements of Fusion 360 pro and I'm also looking at the Alias rapid prototyping software which integrates directly into the Fusion 360 workflow.... Interesting stuff there... The Resin I'm using is Anycubic Basic, Clear is what I got from them with the printer order and Grey is what I got from Amazon.... In the settings file, the first listing for clear are the default Mono X settings, the second set shows a reduced exposure time right off the bat, in fact most of the listing show a reduced exposure time and several other changes... I think once I get the vat taken care of, I'm going to try a large print with the reduced settings and see what happens... It has been bouncing around in my head that my exposure is too high but I haven't been able to find any competent source that says it directly.... This is just such a source that points directly at such as being the right direction... My house is temp controlled at 74 degrees, It doesn't fluctuate more than a degree in either direction, right in the middle of the supposed sweet spot for temps.... Many thanks.... EG
-
I mentions a few posts ago that I would report on my current crop of print failures and why I think I'm getting them.... Well the issue is the print layers sticking to the FEP sheet in the vat bottom..... Without doing anything to the FEP, my experiences lead me to believe that there are two things that cause this... #1 being low resin volume in the vat..... This comes from the initial raft that is printed doesn't stick at all but when it get to printing the model even with thin walls the area encompassing the model becomes too large for the flexible FEP film to release.... The tension becomes so great that the layer separates from the build plate or the model itself before it has a chance to separate from the film.... This takes a while to build up before the failure actually take place... (there is an answer for it) To understand how I've reasoned this out I need to explain the resin printing process in detail... Everyone who has seen a video of a resin printer understands the basic operation.... The build plate sinks into the resin just a few mils off the bottom of the vat which is a film of clear FEP plastic.... the LED screen flashed on for a few seconds hardening the resin between the film and build plate which is stuck to the coarser surface of the build plate... When the plate raises it lifts off the FEP film and resin floods the space between them... Then after a few seconds the build plate descends back to the FEP film just a few mils higher that the last layer and the process repeats..... Layer after layer..... The FEP film is made of PETG plastic and is very very tough, it is also flexible and when mounted to the bottom of the vat, it is mounted drumhead tight... You can flip your vat over and tap your finger on it and it sounds just like a drumhead.... It needs this flexibility cause that is how it releases the layer that has just been hardened by the UV light... The plate doesn't flex the bottom of the vat does.... as long as there is sufficient resin in the vat to flood the surface under the part when it rises the cured layer has a more difficult time sticking to the FEP plastic.... This is why the flat expanse of a raft doesn't stick, and later on the smaller area of a part does.... Insufficient resin in the vat is the main cause I believe.... the less resin in the tank, the longer it takes to back fill when the part is raised.... This leads to condition #2 Without sufficient resin, the layer of resin between the FEP film and the last part layer is too thin meaning that the amount of UV light curing the thinner amount of resin cures it a little bit harder than the last layer... causing a sticky condition to develop between the film and part..... the new layer keeps getting harder and harder and starts sticking to the FEP... this is manifested in a condition where when the printer raises the part, you hear a thump as the part releases from the FEP film and stays with the plate.... Yes this is what it is supposed to be doing and why it is a flexible film on the bottom of the vat rather than a solid glass plate... but that thump you hear will get louder and louder each time the printer creates a new layer..... Eventually the tension between FEP film and the layer becomes greater than the tension between the new layer and the part and it separates from the part rather than the film and you have a failed print.... Now I've heard this thumping on every print I have done, (it was really bad just before the failure of test print #2, you could hear it half way across the room about 6 feet away) and from that, what I've been able to discern is we need to either increase the distance between the build plate and film, reduce the exposure time, or lubricate the film..... I'm using the OEM settings and haven't explored any changes yet, I'm not far enough along to really understand what I'm doing in that area yet, so what I'm going to do is try lubricating the FEP film.... The suggested product to do this is 3-n-1 PETG lubricant... It works much like the stuff you put on your windshield that prevents anything from sticking to it... it's designed for use on PETG plastic windows and it dries completely clear and hard, no oily residue.... It won't harm your FEP film.... There are people who strongly recommend this, there are those who don't, most say it's something to try but it really shouldn't be necessary.... To me trying to do large parts like I'm going to be doing, am going to give it a try.... So far printing large parts on this largest volume resin printer has been a complete bust.... That's the truth of it... I'm going to be using that larger volume for my future prints, it's better to learn this now rather than later.... EG
-
Great, I hope you will report on your 3d Resin journey experiences here as well Brother.... Keeping the Admiral happy and involved in the process is #1..... EG
-
Ok, I went ahead and tested 4 more programs that tout mesh repair as one of their features using NetFabb's analyzer to test the repairs to see if they are viable... What I discovered? None of them satisfy NetFabb's analyzing routine..... so I tried in reverse, see if Netfabb's repair satisfies any of the other software repair functions available... And I'm sure you can guess the results.... NONE of them repair a mesh to the satisfaction of any of the others... So my only resolution will be to re-draw the model in a solidmodeling software, using the mesh as a pattern which is a very nice model except for the damaged mesh... The process should be a simple one albeit tedious, but it should result in a completely closed solid body model... And, just a note, your better off using a solid body modeling software to create SLA models to print... Mesh modeling software can make some beautiful models, but they need to be physically closed models for SLA printing which they don't need to be for FDM or for virtual rendering images.... Evidently, 3D modeling hasn't caught up to the requirements of SLA printing in the hobby world just yet... In searching for another model to make my second test with, I've seen several modelers on Cult 3D specifically creating models for SLA with an FDM version in the package as well... so some are realizing the issue and are taking steps... But currently, most of the 3D models out there on the various depositories are designed to FDM tolerances and would be hit or miss for successful printing in an SLA environment.... But there is indication that this is about to change, and that is a good thing.... Meanwhile the search for a second test model continues.... EG
-
I'm here brother....
-
Beautiful job on the model Dennis... But a note: the ball turret on the B-24 retracted completely into the fuselage, the skid there was to prevent over-rotation on takeoff... You could easily bend the tail beyond flyability if you hit it hard on a takeoff.... The skid was attached to the lower main keel of the aircraft and prevented that from happening.... Notice where it is located? it makes a perfect square with the nose wheel and main gear... equidistant from each other so the force of hitting would be taken up by the main structure of the airframe... The B-17 didn't have a retractable ball turret.... The gunner entered the turret after take off.... If battle damage prevented the gunner from exiting the turret before landing, well that's some of the issues they had to face.... It did happen from time to time.....
-
I thought it was, {chuckle} yeah they put out some amazing work....
-
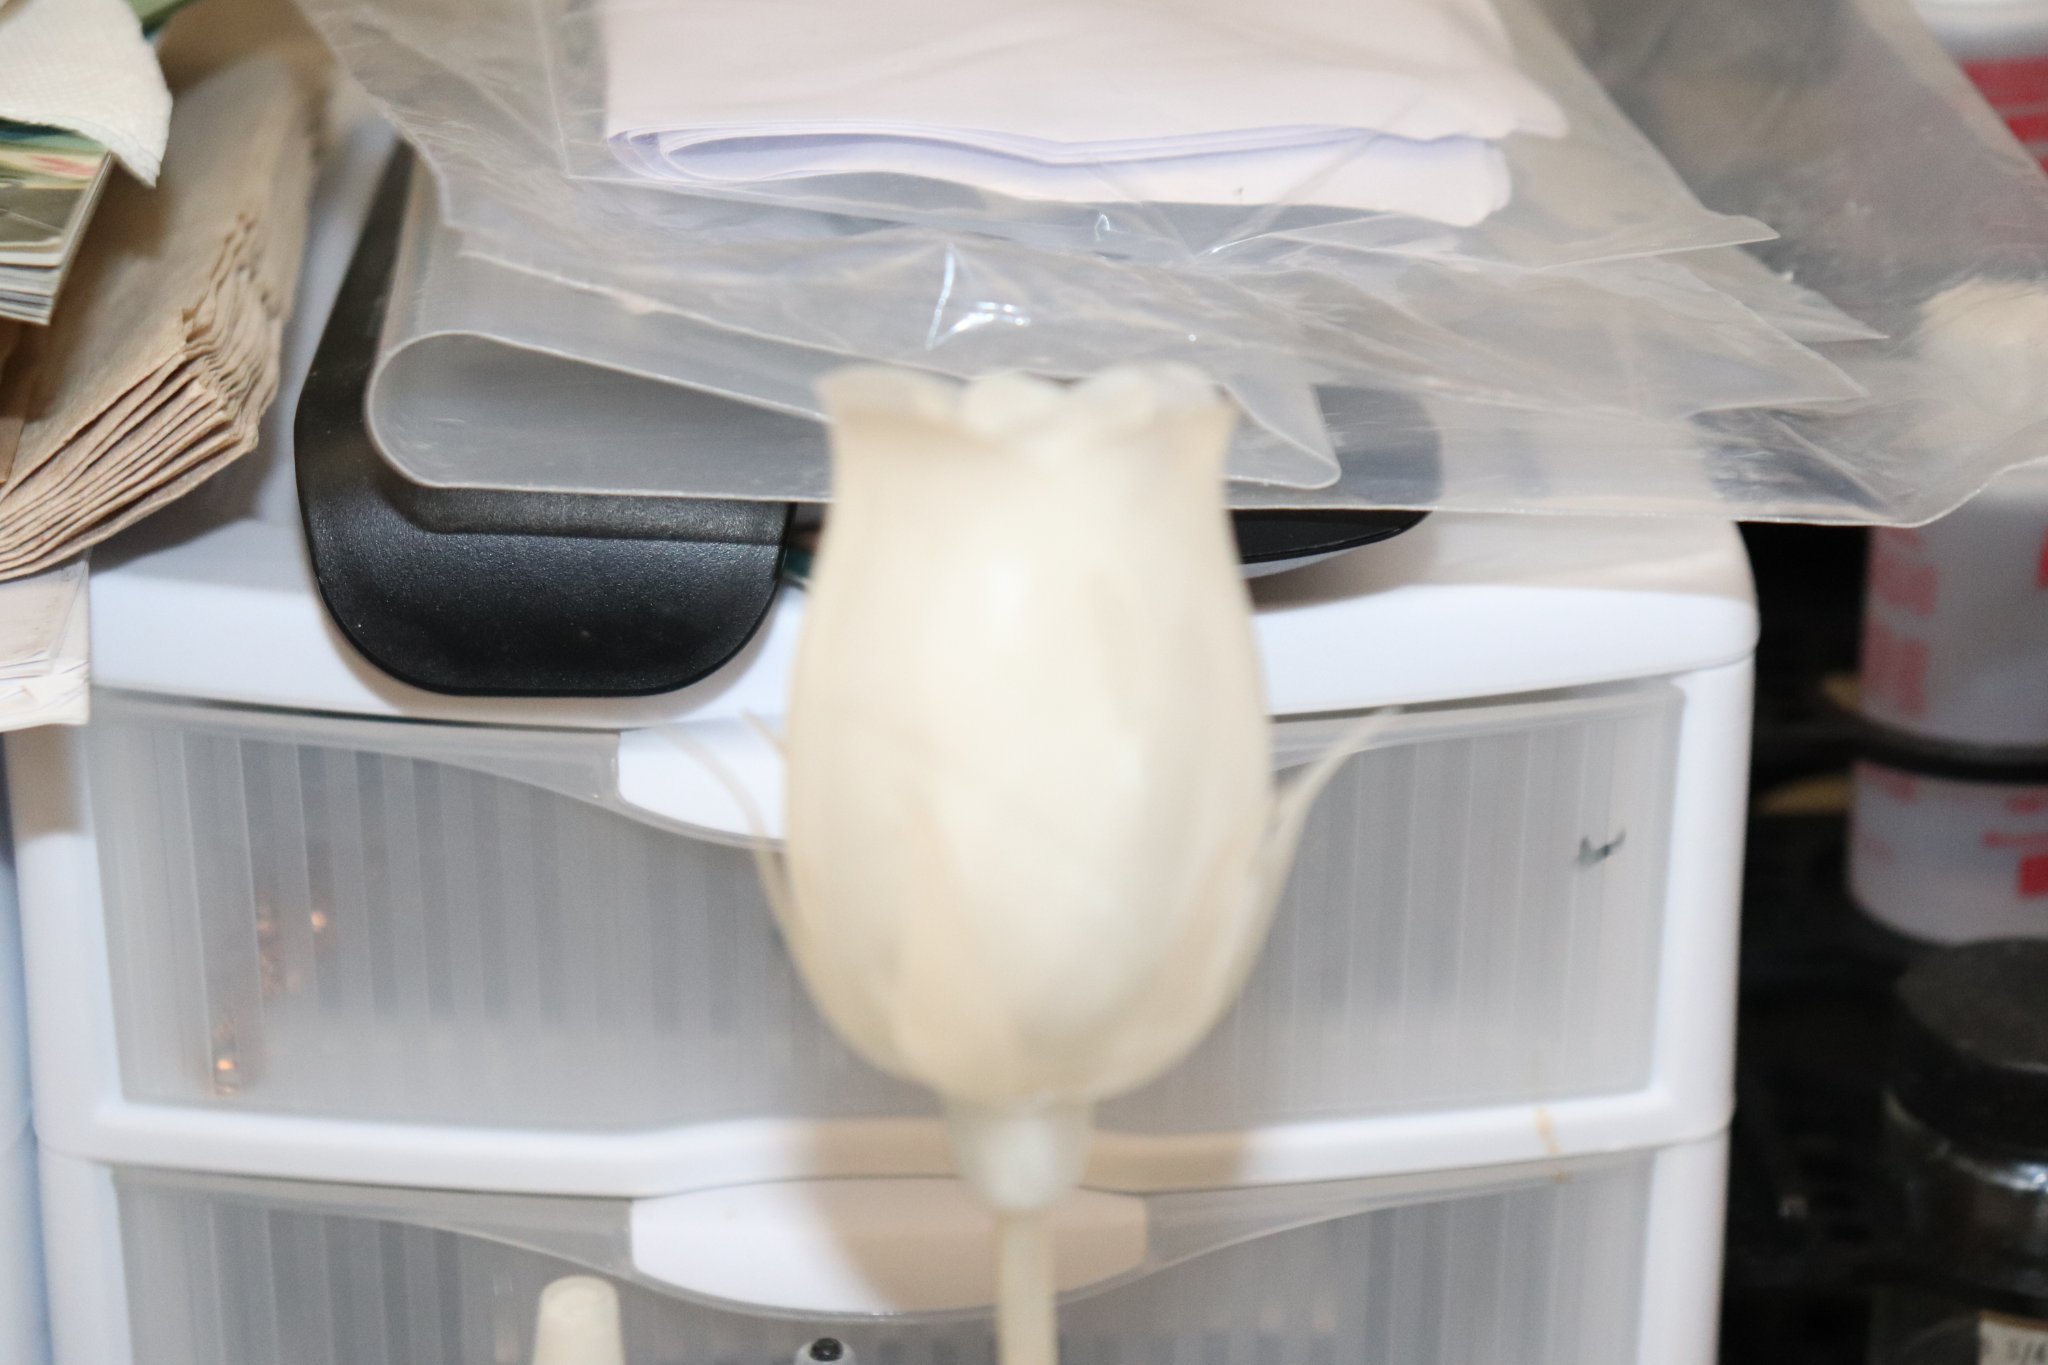
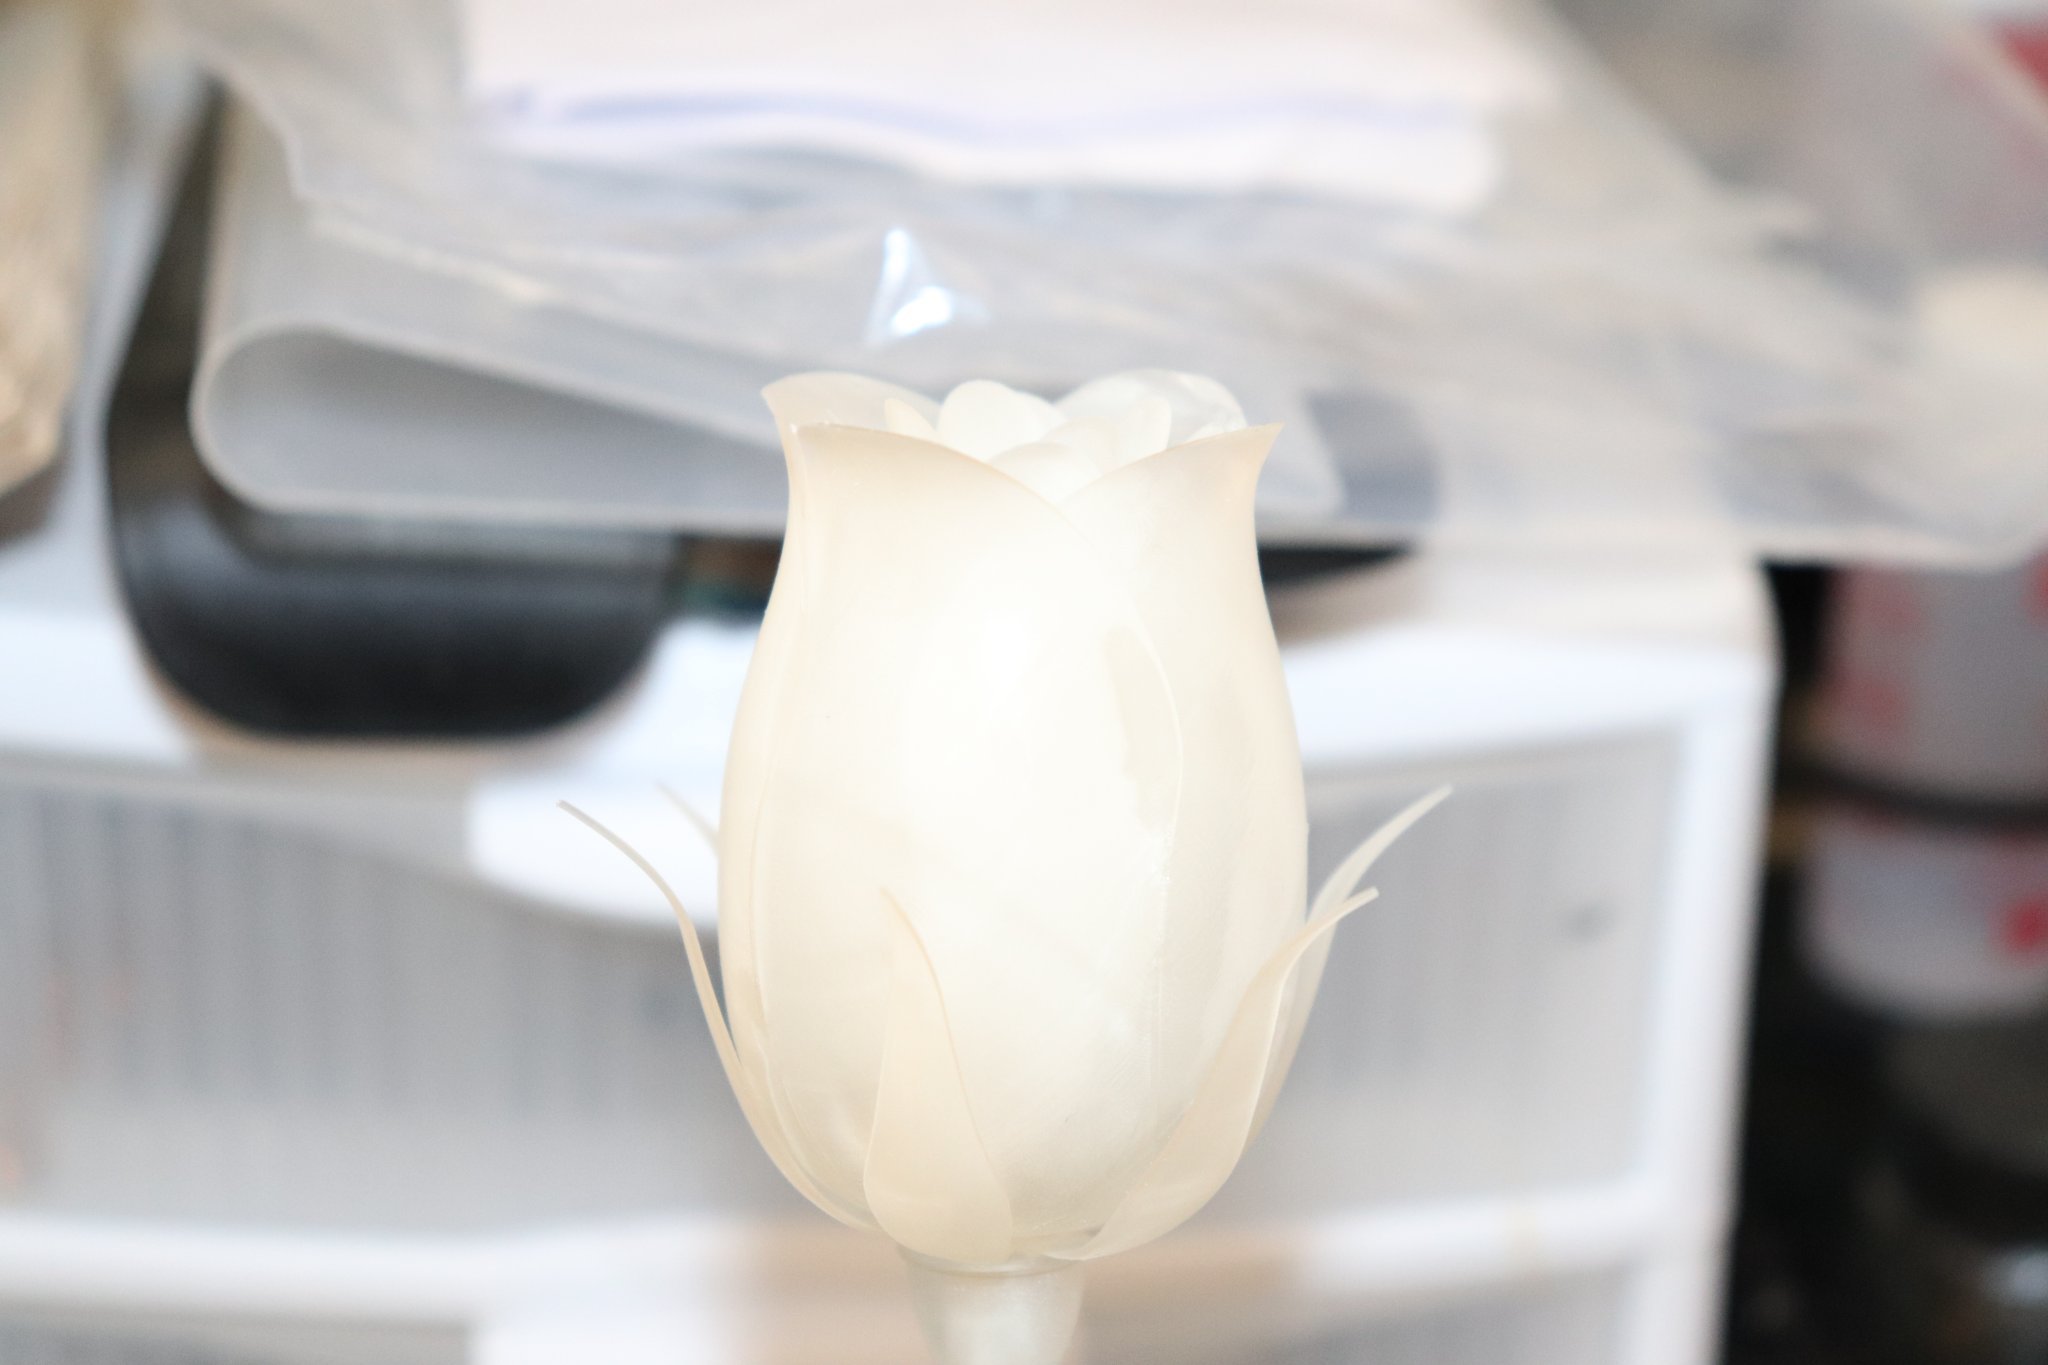
I checked today with our local glass company and explained what I wanted.. they don't stock the type of glass required... (optically clear, no diffraction) Common tempered glass is simply plain glass that has been hardened and diffracts light.... It was a shot.... Thanks for the suggestion... And the Admiral loves her roses...
-
I took a look at both... Meshmixer is owned by Autodesk, I guess they purchased it back about 2018 or so... It is no longer in development nor is it supported... Netfabb is also owned by Autodesk, it it's current evolution it is only available under subscription and attached to Fusion 360.... (I guess that is why Lychee dropped it's integration with Netfabb) Autodesk is integrating it into their 3D production environment for large commercial enterprises, it is available at reduced subscription for students and educators but it is not free, the commercial version is into 5 figures for an annual subscription, the student version in low 4 figures You can still download Meshmixer, and there are still some youtube videos attempting to explain how to use it but nothing real recent.... The interface is real cryptic with no real indications of what something does... The program was designed to mesh two different 3D models together into one... I guess repairing broken 3D files was something it also was capable of doing but that's not what it was aiming for... The last update removed the slicing routine citing software copyrite issues.... You can also still download Netfabb Studio Basic.... The last "Free" version before it was acquired by Autodesk... Of course there is no support and since it was an integrated web active program, there is no server to access and no pro version.... But I'm giving the free version a spin simply for it's repair function... Right now there is nothing free that is current for repairing STL files.... Lychee is stating that they are looking for an alternative.... There is another option out there from Microsoft, but it requires a microsoft account to access.... (that's as far as I went in that direction) If I can't get Netfabb studio basic to work on these files, I'll save them away for later and find another model to test....
-
A solid model is not necessarily a solid model... That's a revelation right there... I don't know what software was used to create the STL file, and it is too large to load into Solidworks as anything other than a mesh which is uneditable in Solidworks..... I guess I could use it as a template and draw one of my own.... Which might take a bit of time, but it is a subject I like and at a size and detail level where it would be impressive on the shelf... Please don't go too far away my friend, I'm no means an expert and am just reporting on my journey down the path... The ideals of the processes are similar, and many of the issues crop up in both processes, although the mechanical ways of doing it are different.... File integrity is one of them.... All contributions and discussions are welcome I hope... This isn't my thread and I don't want to take it over.... A round robin discussion would be best...
-
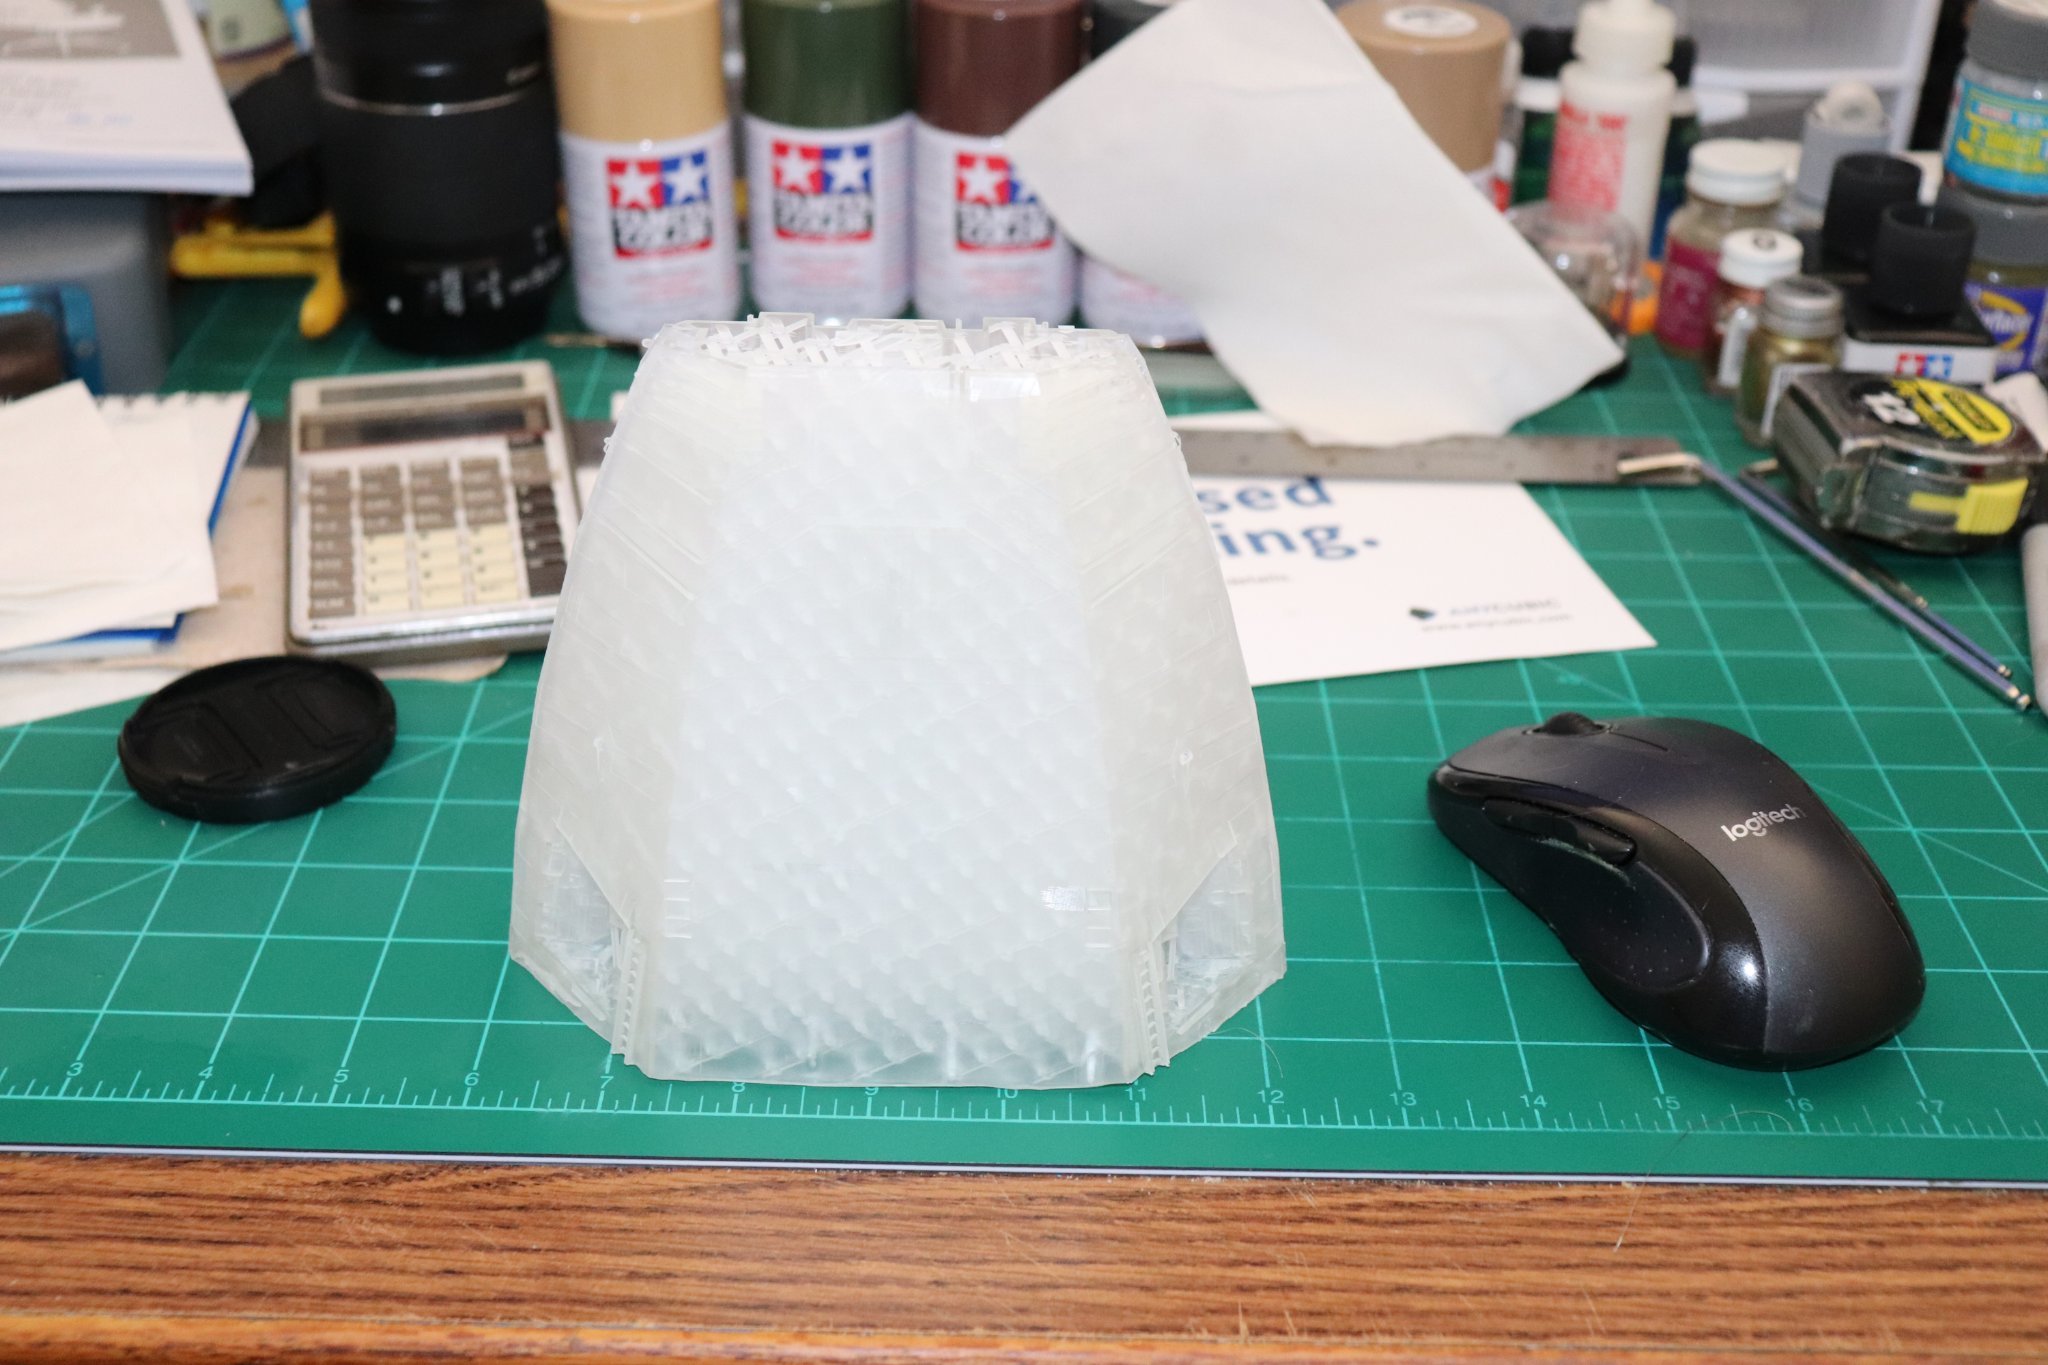
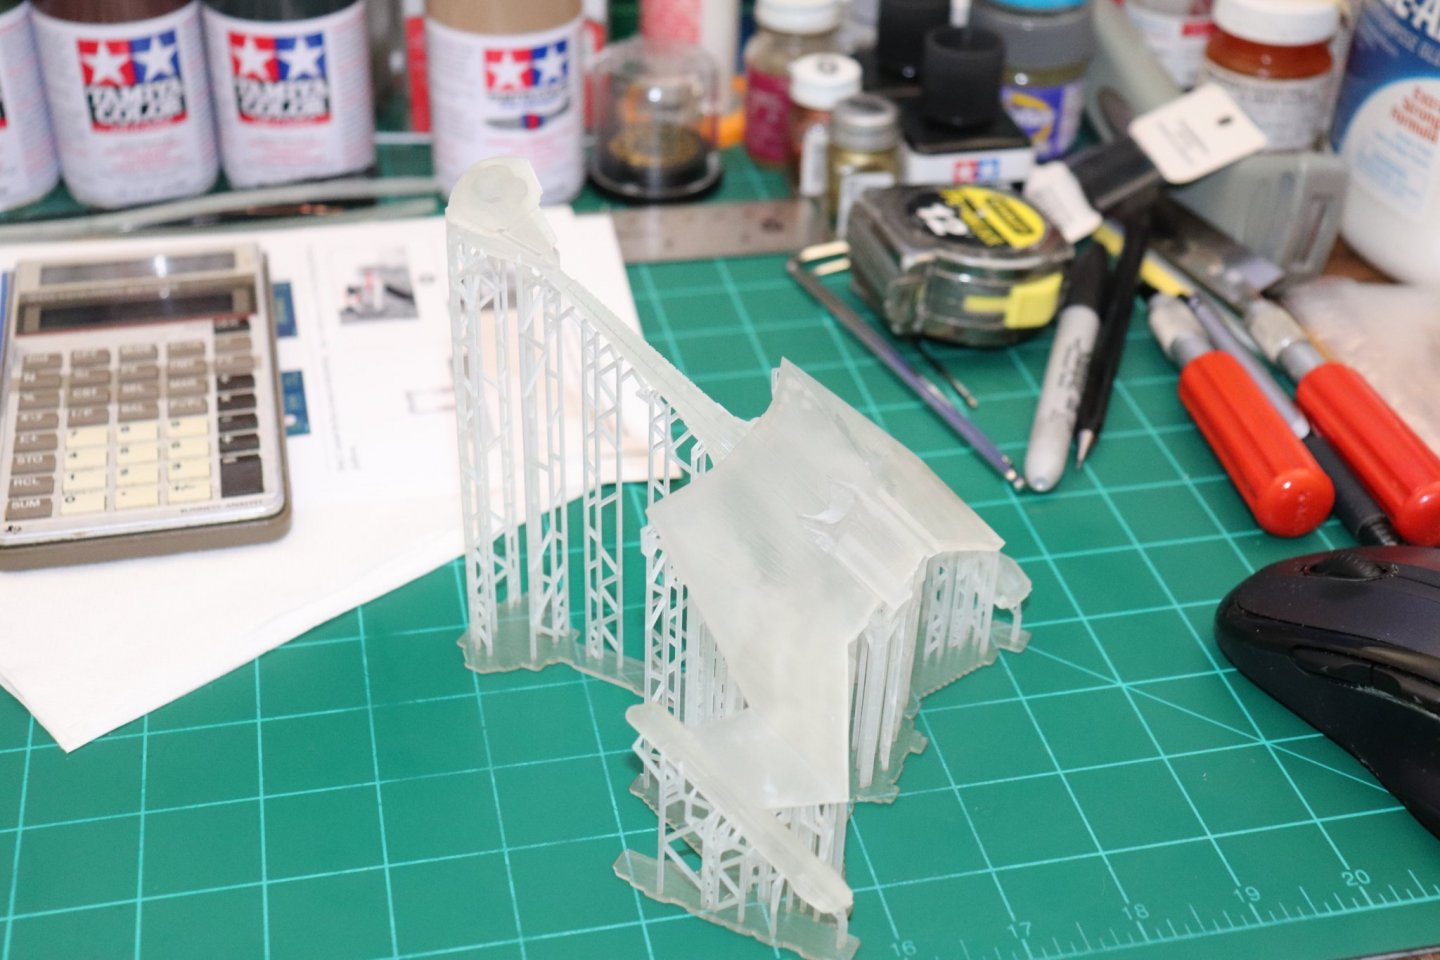
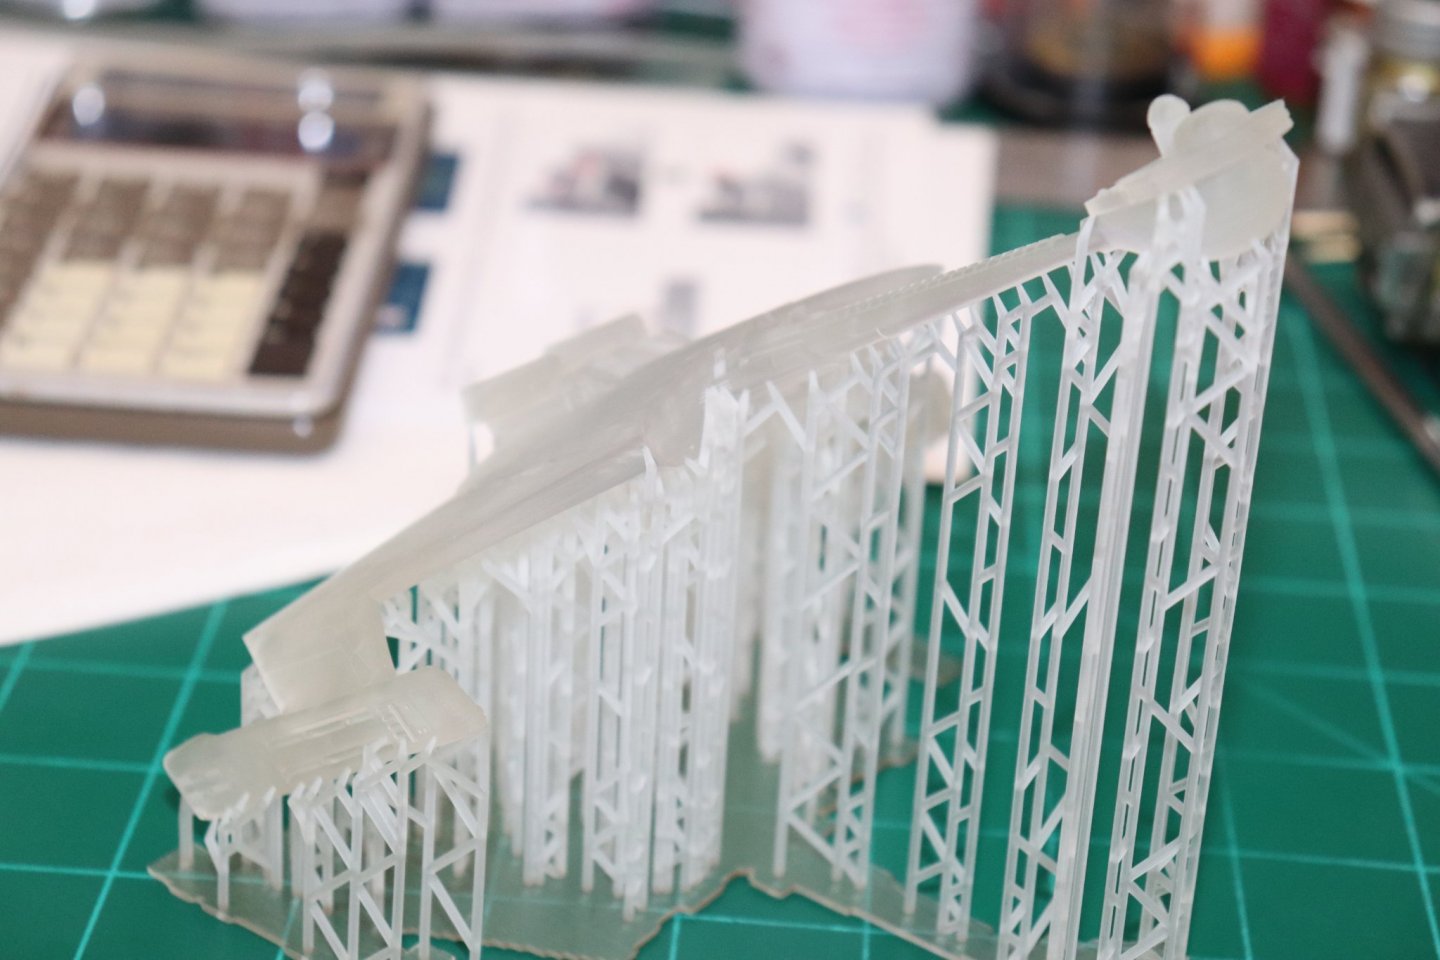
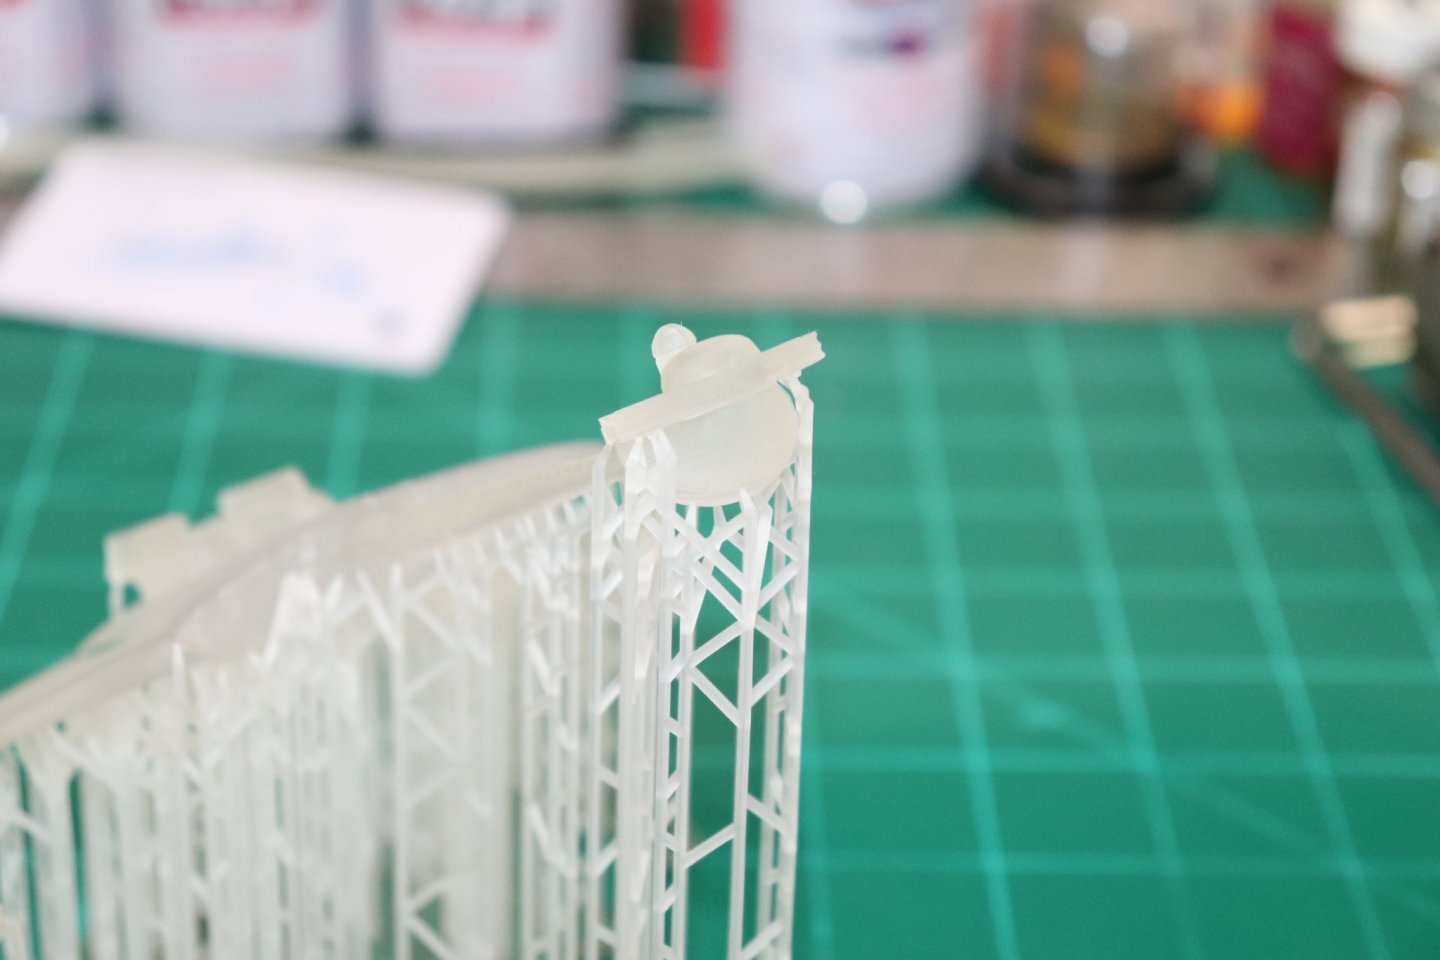
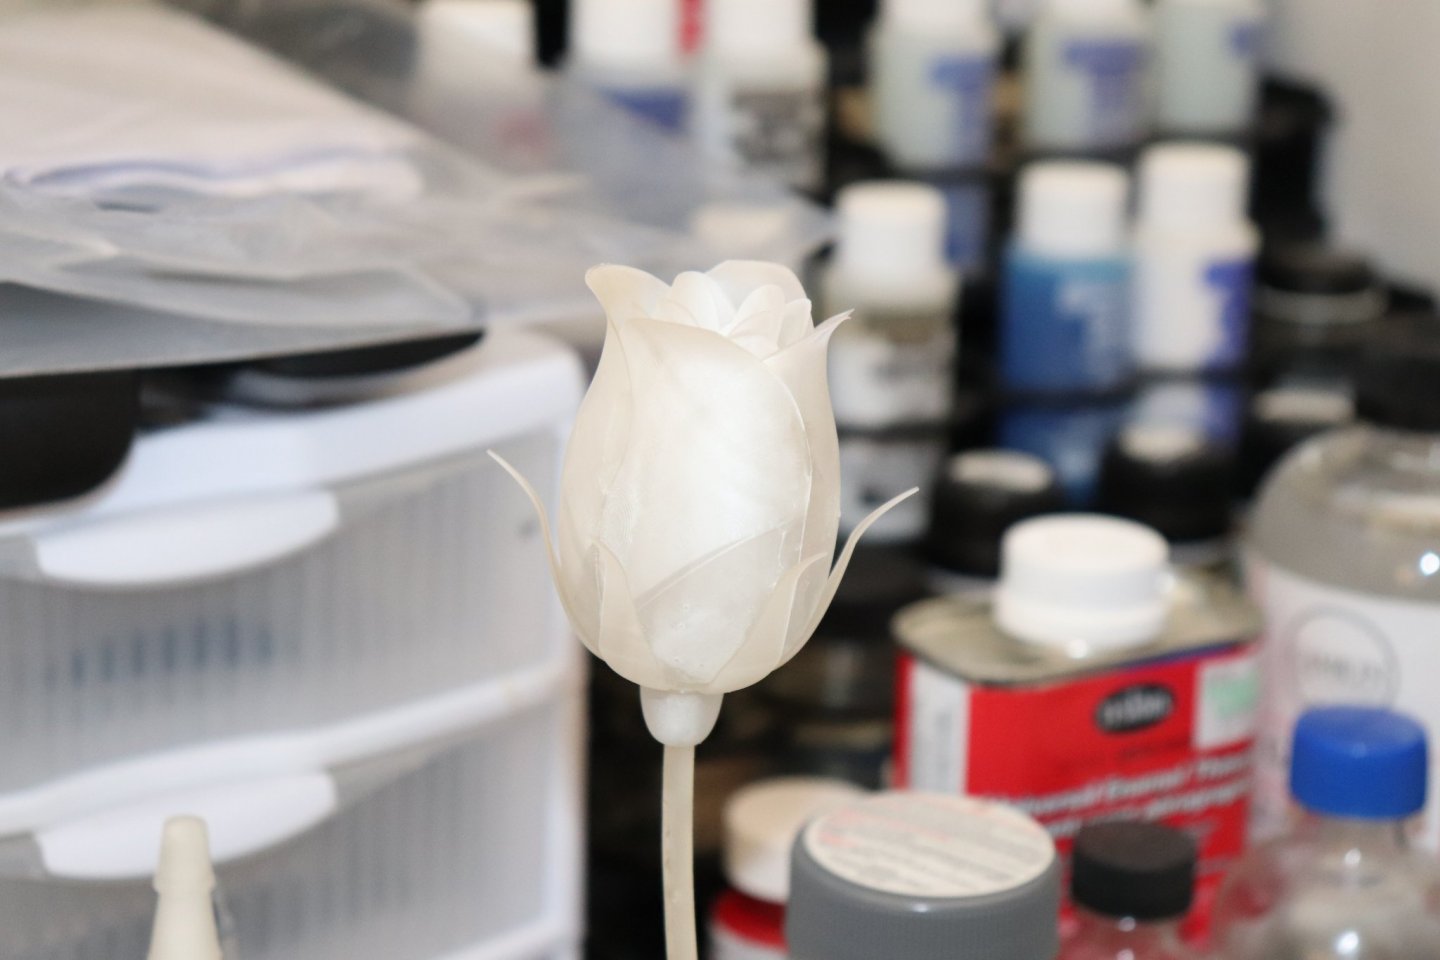
Well, my series of failures is getting longer... Like I said I didn't pick easy test pieces, I wanted the difficult ones so when I come out the other side of the learning process I'll be much happier.... I started with a rose a very delicate rose and failed a couple of times before I finally made a passable print.... They could be better, but they served their purpose... That is actually two different roses, and I learned about Slicers, and resin settings and how good the Wash & Cure actually is and yes you can print multiple parts in one pass.... I'm fairly confident in my abilities to print a few small simple pieces.... But that is not what I bought this thing for, I'm going to need to print LARGE pieces stretching almost to the maximum capacity of the Anycubic Photon Mono X.... Now the process is the same whether large or small parts, but the way you set them up is different... Large vs Small... You run into different issues.... Here is my second test part..... It is a multi part model, the size is about the same as the Trumpy Nimitz..... It would probably be clearer as to what it is if it was in grey resin The bottom was the build plate end the top is where it separated contact from the FEP film and stopped creating layers... As you can easily see it is 6.25 inches wide and if it finished it would have been just over 8" long... Now this model has been successfully printed on FDM printers... In the current state of the file this CANNOT be successfully printed on an SLA printer... I learned this when it quit printing and I washed it and examined it closely after removing it from the build plate..... It is not a true closed solid.... it projects in slicer software as a closed solid so it will output a slice file and you can send it to the printer.... But the SLA printers work to a much tighter tolerance that FDM printers do... If all your faces do not connect like they should in a true closed solid model, they will print as separate parts..... And you cannot tell until you get it off the printer... Be aware of this, not all downloaded models are of the same quality... In a little bit later today I'll get into my thoughts on why I'm getting print separation.... More later... EG


-
Thanks for the question Jacek, Yeah I've read about them and seen some videos, simple engineering, what ever you sheet the build plate with will take the shape of the plate... So as far as plate curvature, it may alleviate the problem somewhat but it won't eliminate it.... And elevating the part off the build plate eliminates the curvature problem altogether... The purpose of the magnetic plates is to eliminate part separation in the middle of a print... (part sticking to the vat and being yanked off the build plate) Reviews are mixed about them, some users wont print without one and others won't touch them with a ten foot pole... I'm not far enough along in the learning process yet to see the advantage at this time... So my lack of experience prevents me from judging one way or the other... Maybe a more experienced printer will chime in here.... I just haven't been at it long enough to come to any conclusions on plate magnets at this point...
-
It happens occasionally, it's all part of the learning experience with these machines.... Thankfully, replacements are readily available.. (although pricey)
-
Yeah I can see that, but at the scales we work in if your doing multiple parts that need to be glued together? it could be an issue... one thing I do is raise the part off the build plate 5mm and use large supports underneath, this eliminates the potential issue of multiple parts being joined together on the print line.... The FEP on the resin vat is tough, but it has a lifespan and having to change it will happen eventually.... that's why they give you the wrenches for it.... Two build plates are a given for me, I will be getting another one soon... There is also a tempered glass screen protector that is made for the surface of the screen available.... That is another required accessory I will be getting... At $179.00 a screen, I wouldn't want to be replacing them before absolutely needed... The Wash & Cure Plus is a great machine, for me, a requirement, this process would be much more difficult and messy without it.... The ability to go straight from the printer to the wash tub without removing the part from the build plate is an inestimable benefit to the process... I just cleaned my resin tub for the second time, for some reason I dripped a bit of resin onto my screen, I got it cleaned off immediately with IPA but it's given me pause to think.... {chuckle} I just had a 9 and a half hour print failure.. (will go into that more later) Fairly large part, takes up most of the built plate at the start... What I learned is to turn off the cover kill switch, the part will take all the resin you initially start with so resin needs to be added to the job while it is printing.... The vat doesn't hold enough resin to finish the print in one filling... so removing the cover in the middle of a print for a resin refill is a requirement of these large printers.... What is touted as a feature is actually an impediment to printing large parts.... I've read that Anycubic is working on a autofill feature for the resin vat... Another consideration for the large format SLP printers.... There is a lot of considerations one needs to make to use one of these.....
-
Yeah there are a few of them out there, a number of them in Germany are of note and several online... Papermodelers.com is the best english speaking one IMHO..... Lots of experience there....
-
If it fits under the LED's and on the plastic rotary plate without breaking when filled sounds like a good deal.... I need to wait a bit for the extra replacement films, a second build plate, a second resin vat and the metal clamp screws, the wallet needs a bit of recovery.... {chuckle} I'm just hoping I don't screw it up before that day arrives....
-
Hi HG, I checked mine on my surface stone the moment it arrived, flatter than a pancake! (fortunately) Yeah, I've read quite a few stories about non flat build plates.... Most of them are only a few mils out and can be sanded flat with little effort, but some there is nothing that can be done except direct replacement like yours... 203 mils? that is easily visible to the naked eye... I wonder how it got past QC? I hear that the same issue strikes the Elegoo Saturn from time to time as well... You get one of these check your hardware before you fire it up Ladies & Gents..... The flat build plate is critical to it doing it's thing.... Thanks for the question HG, makes me feel like all this research I've done into these was worth it....
-
Jacek, I wouldn't use the washing vat, (it's white opaque plastic anyway, won't work) find a wide mouthed clear plastic bottle at about half gallon size... The Admiral likes her V8 juice, a perfectly clear bottle, with a sealed tight fitting cap, holds a half gallon.... That's what I'm going to try... The Wash & Cure would be the perfect device to cure and settle the resin out of the IPA... Cleaning the vat... I saw that same video I think, and I have read about it as well... The idea is that once you have drained off the resin you hit the vat with the full screen test pattern for about 10 - 20 seconds, this partially hardens the remaining resin allowing it to be lifted out of the vat without damaging the plastic bottom.... Not so sure about that one yet, as I have to get this thing paid for before I can buy any accessories, (or replacement parts) so I'll do it the old fashioned way... As soon as this industrial resin runs out I'll be switching to waterbased biodegradable resin so I won't have to worry about most of this stuff... Another issue I read about is the handles of the hold down bolts for the resin vat, they are plastic and if you get resin on them they melt... For the amount of money you pay for this I would think they could have included metal handled bolts.... Not to worry, Orange Made Products makes replacements, stainless steel screws with aluminum handles for both the resin vat and the build plate clamp... Well I'm about 50 minutes away from my first batch of parts for my second modeling test coming off the printer..... Not going to reveal what it is until I have all the parts printed... Trust me, it is a real modeling test, making a real model..... I'll post it as a build in the appropriate section when I have them ready to assemble.... Currently researching what is the best glue for assembling them.... I've been told that the best glue is the UV resin itself, still researching this though.... Will be revealing what I find out in the build thread.... That's all for now... Continuing the research... EG
-
Someday, when I grow up, I'll get that good with painting.... (ya right!) Very Very nice....