
Geam
-
Posts
67 -
Joined
-
Last visited
Content Type
Profiles
Forums
Gallery
Events
Everything posted by Geam
-
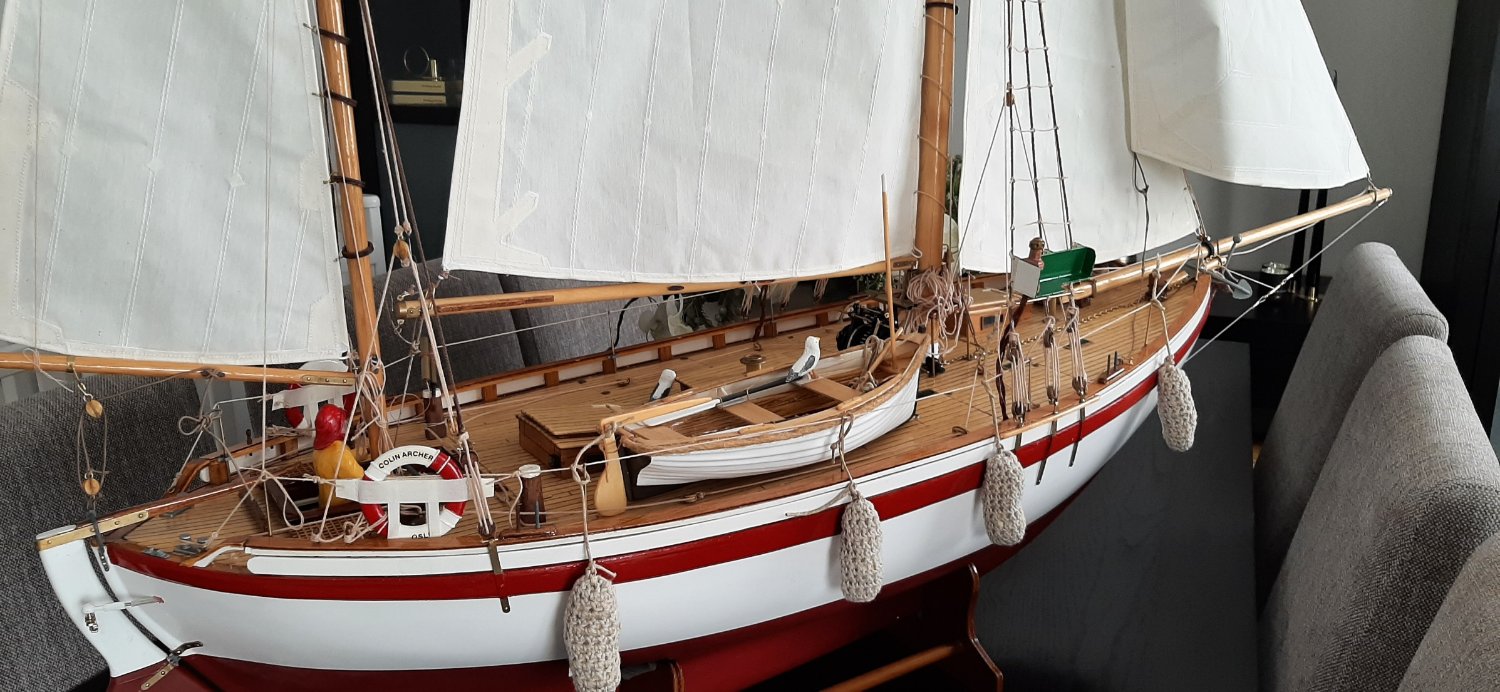
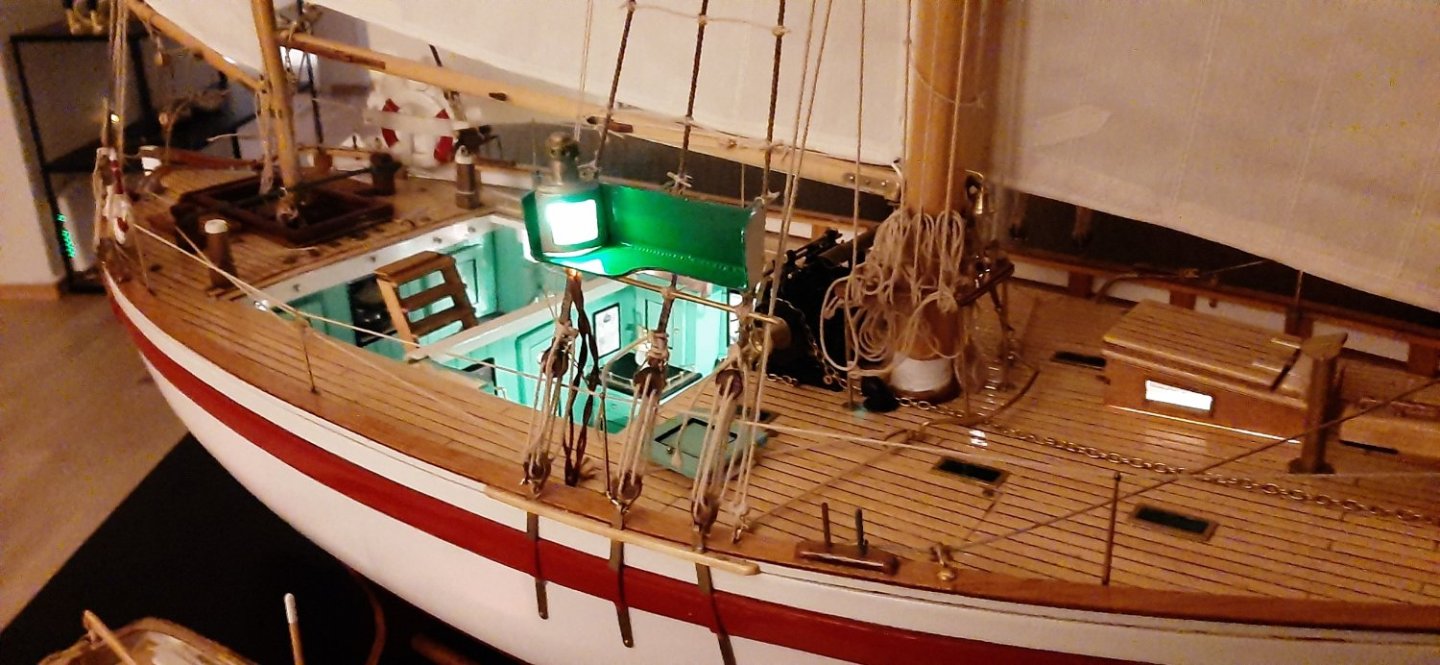
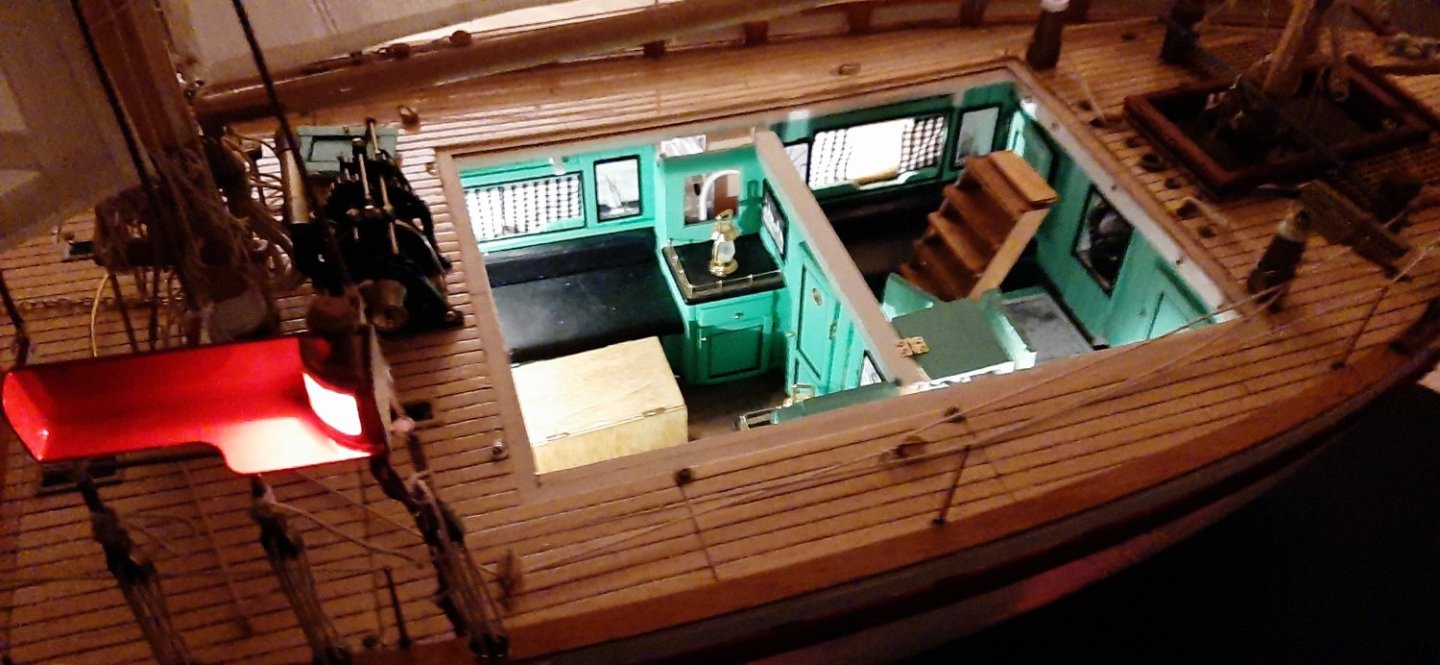
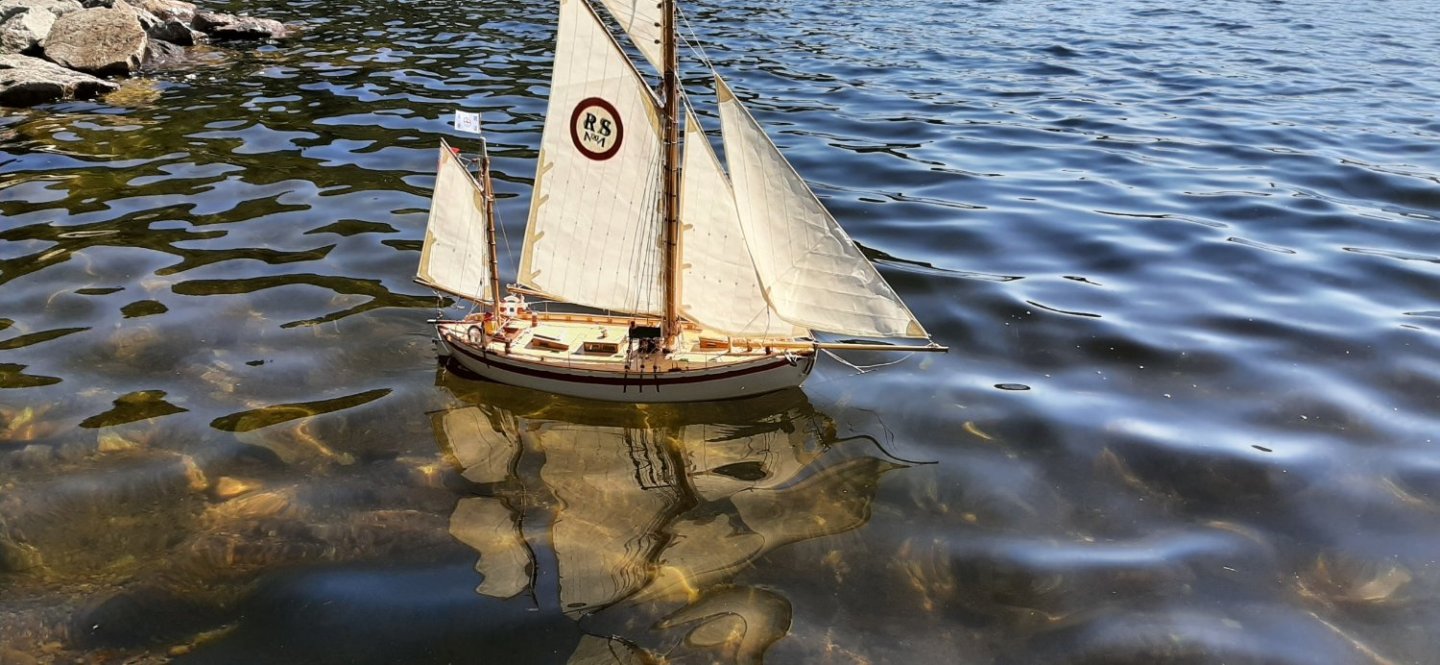
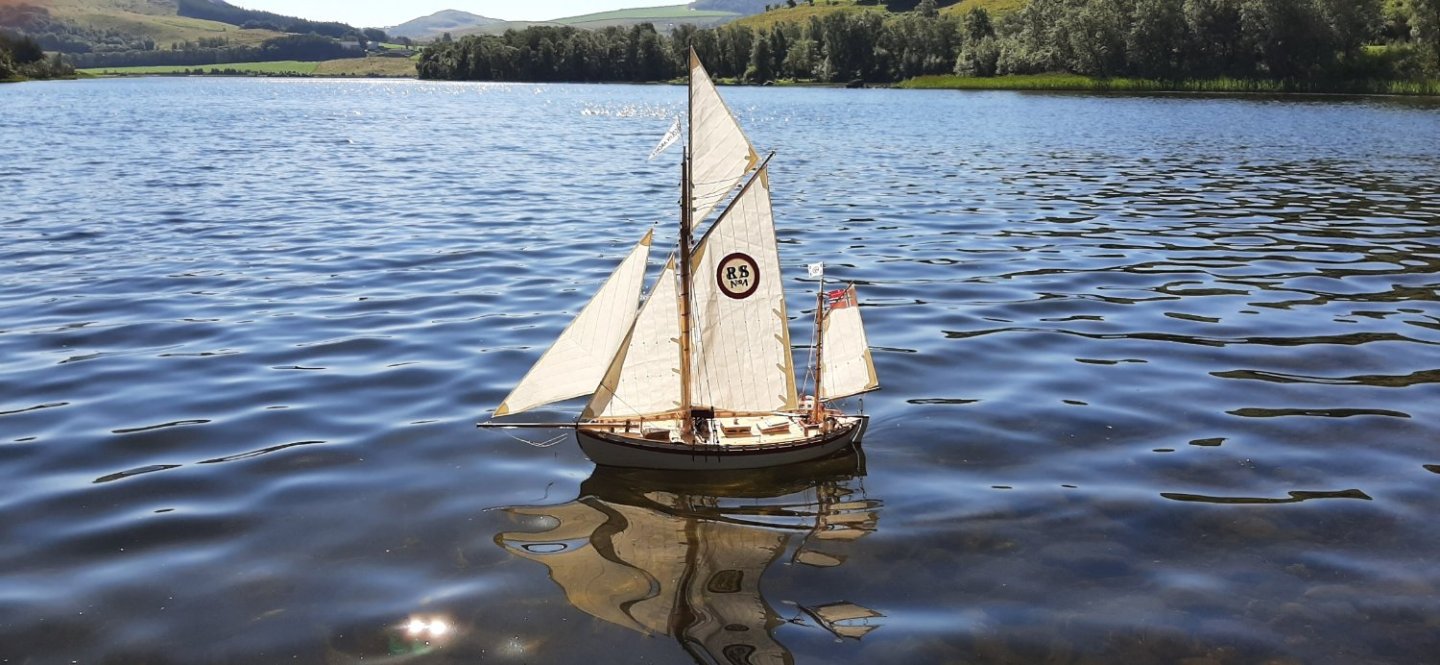
Took some "Colin Archer-by-night" photos on Wednesday evening, and lauched her yesterday, Thursday. Sailed very well indeed. I was actually very surprised. The interior lighting and nav-lights look more impressive in real life than in the photos.
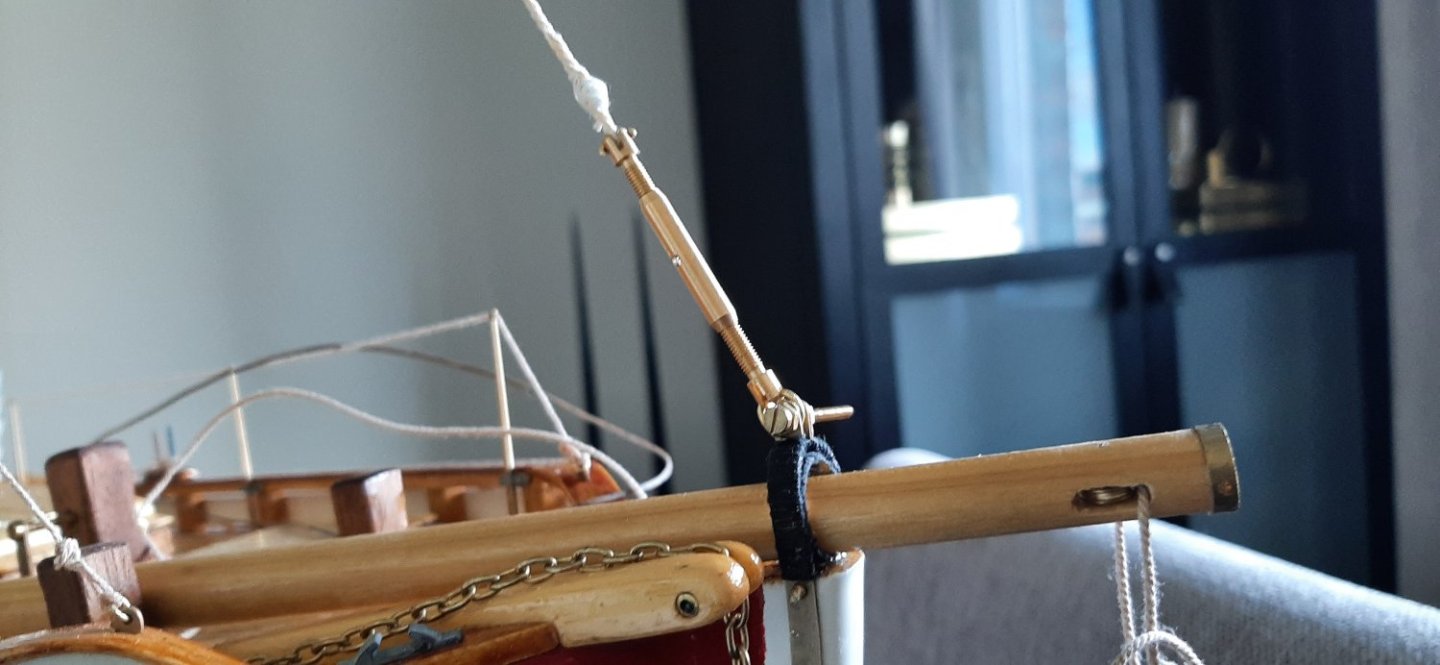
There are one or two small items to be added before she's 100% finished. The above mentioned 1mm dia. bolts are to be fitted to the dead-eyes. New name-transfers are in the post from Billing Boats, Denmark. The original ones are so old, they are yellow around the edges and they also self-distruct when dipped in water!


-
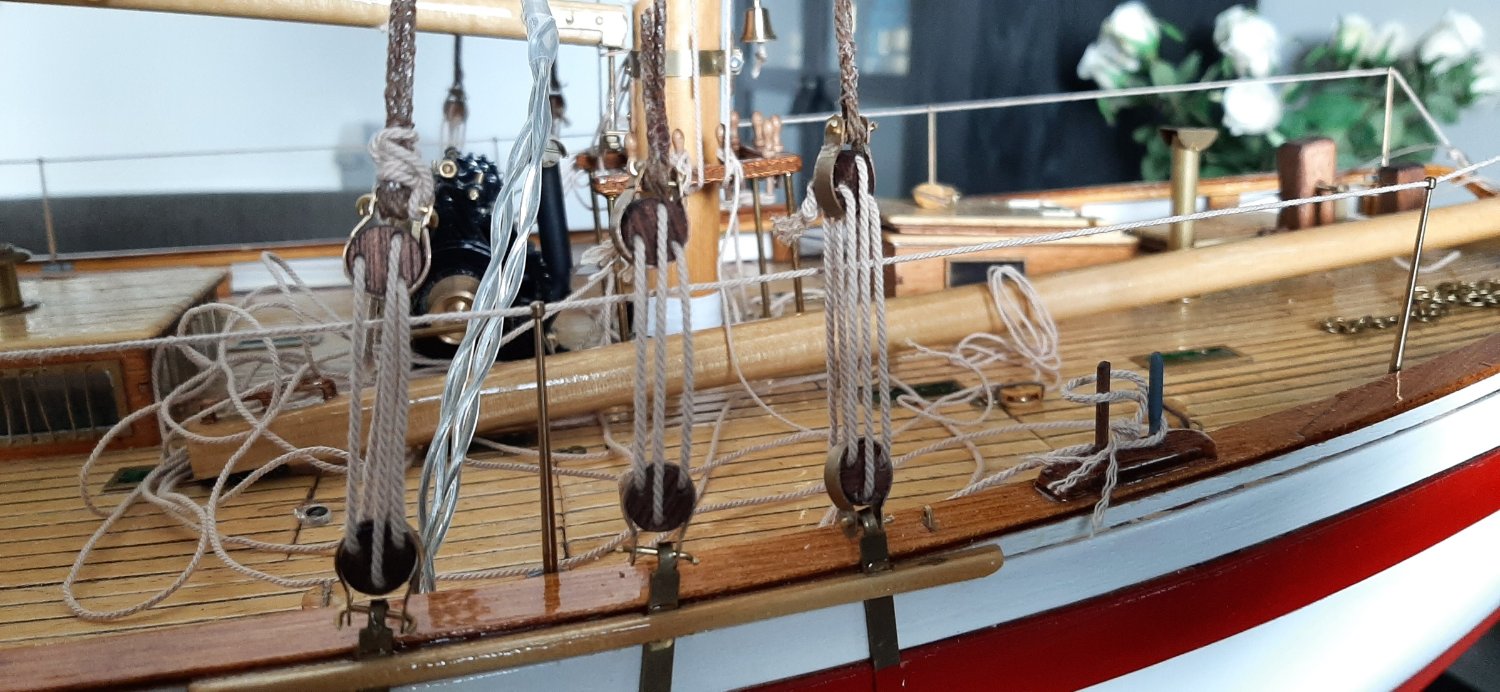
I have sourced some 1mm brass bolts and nuts to replace the 1mm brass rod which (almost) joins the lugs of the dead-eye straps. I know this looks bad, but the wire was all I had at the time. The brass bolts should make it look better and provide a better engineering solution.
George
-
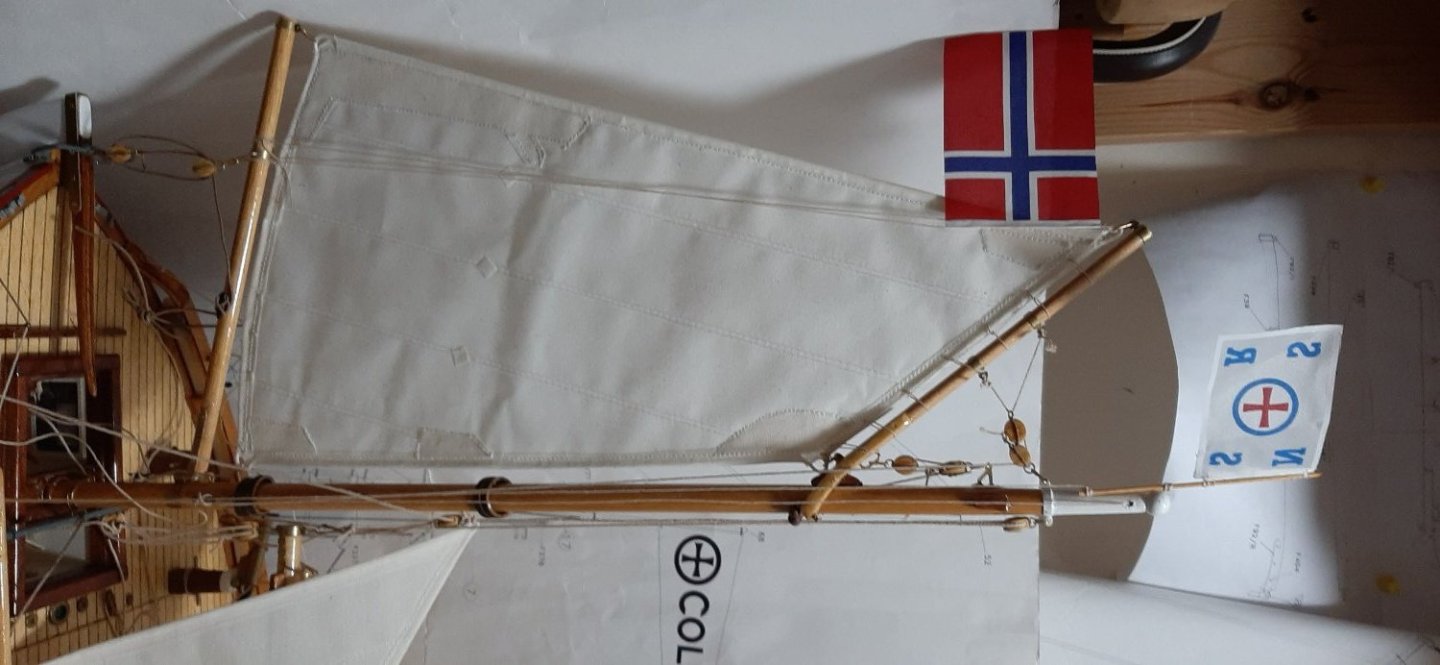
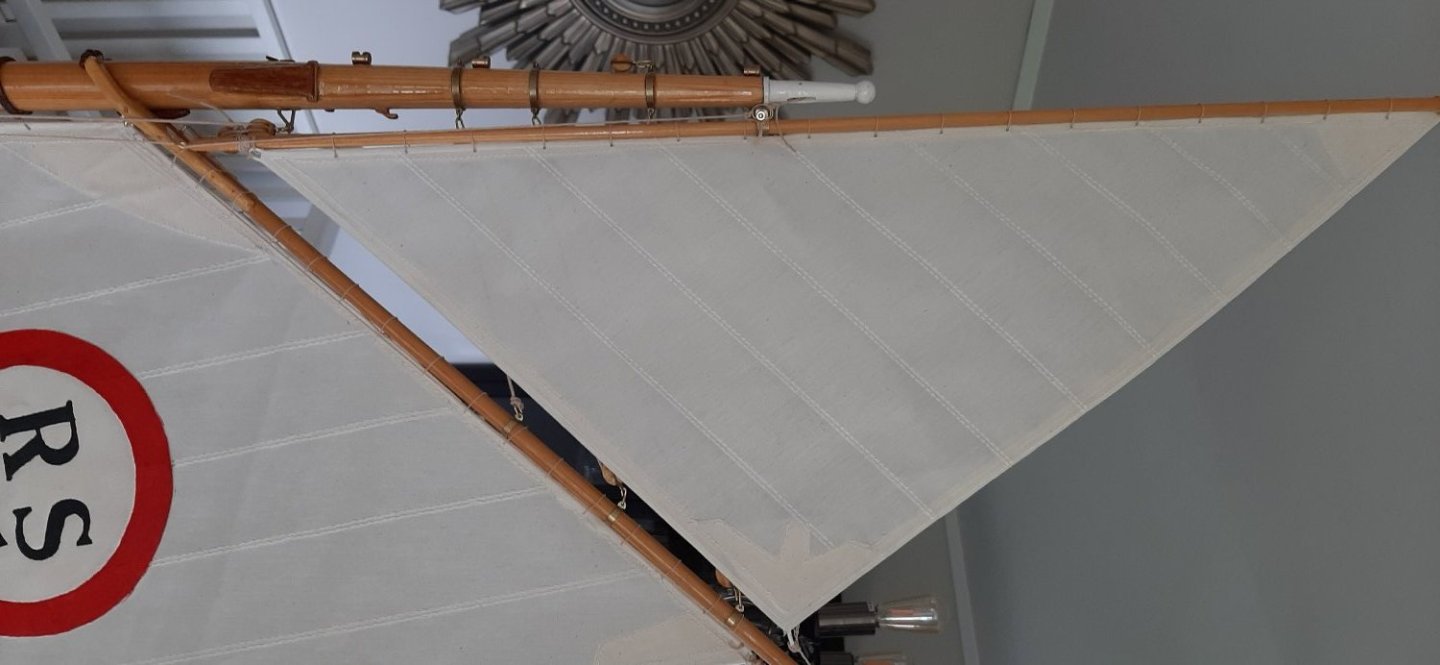
A bit delayed as usual due to non-hobby related matters but have hoisted yet another sail and threaded a few dead-eyes for the main mast shrouds. The flying headsail and mizzen shrouds are on the list for this weekend as are 'ratlines' on the starboard shrouds.
Nav-light boxes have to be lashed to the shrouds too.
I wish a good weekend to all.
George

-
A boatspeed indicator is fitted to the aft companionway -as on the present fullsize version.
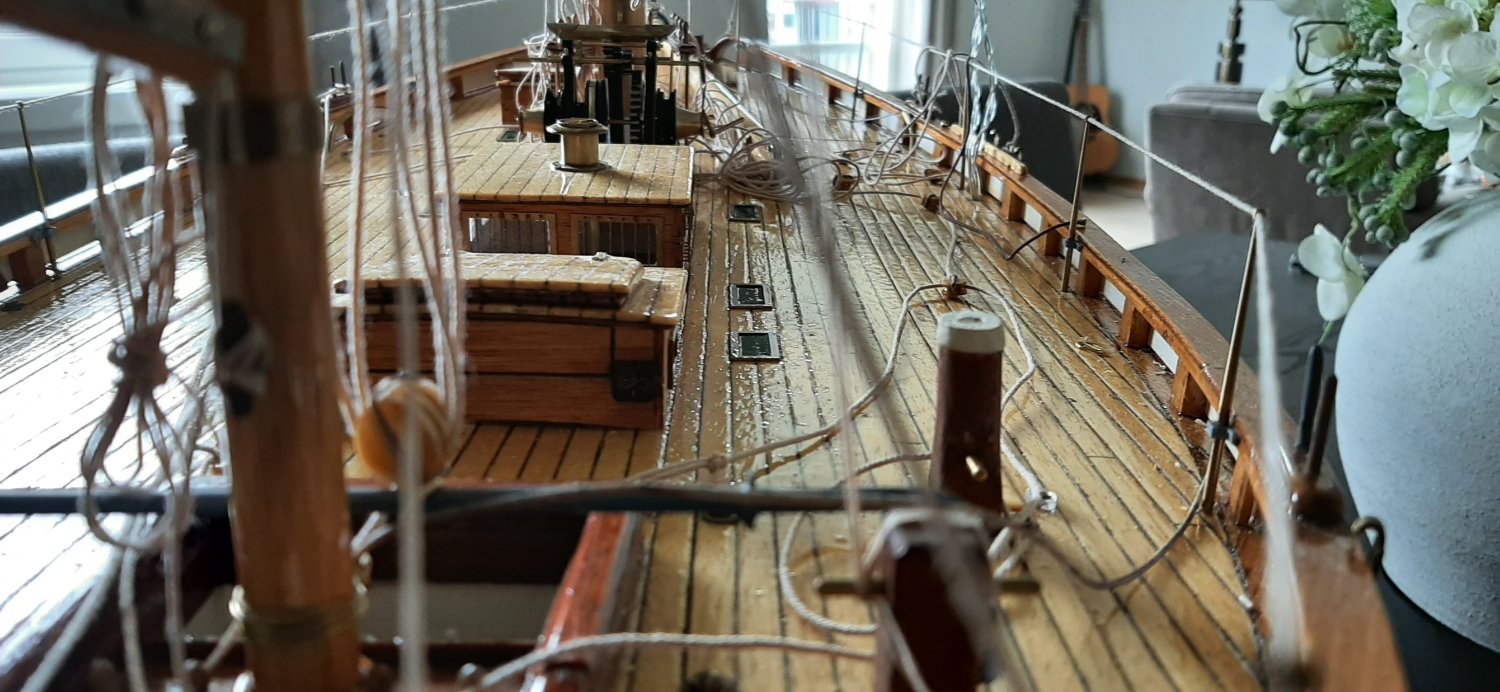
View from the helm shows the deck becoming cluttered with sheets and halyard ends. It will take a while to get all the 'ropework' properly stowed.
This weekend should see all the sails attached and hoisted. Then the standing rigging/shrouds etc. will be on the list for next week.
I'm hoping for a launch day sometime in August.
George

-
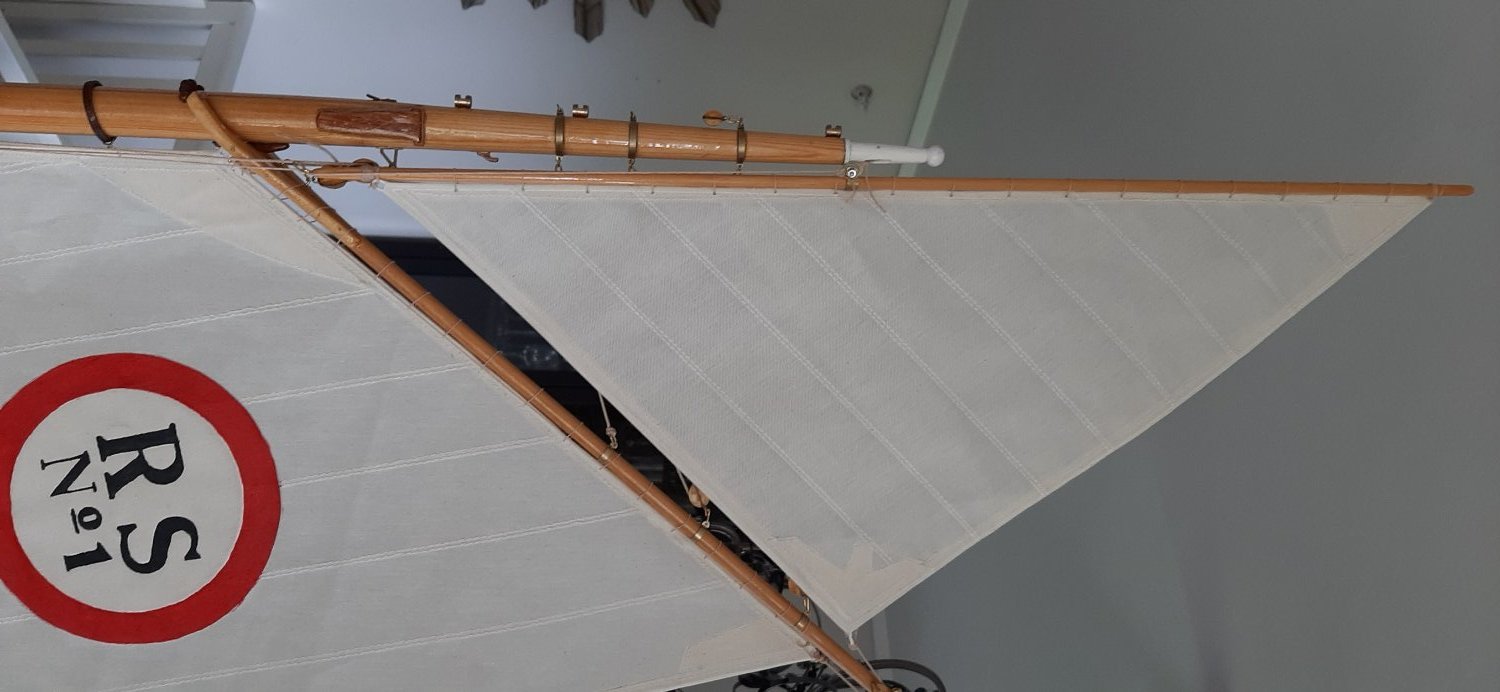
Many detail items completed recently, not quite certain which photos are of interest to others, but rigging and sails are being fitted all over the place! Mizzen mast and sail more or less complete now. Logo painted onto the mainsail and sail fitted to the mast. Topsail 'sewn' onto the spire and spire hoisted. The inner forestay is attached from mast to stemhead with a brass bottlescrew.
George

-
Started work on attaching sails and rigging. Takes some focus to work out the routing of all the 'rope'. Almost finished attaching the mizzen sail. Some rigging fitted to the main mast too. Some mast photos ended up sideways!
George


-
Hi Andreas, Jeg savner innslag og bilder fra deg og Carsten. Hvordan går det med CA RS1 bygging? George
-
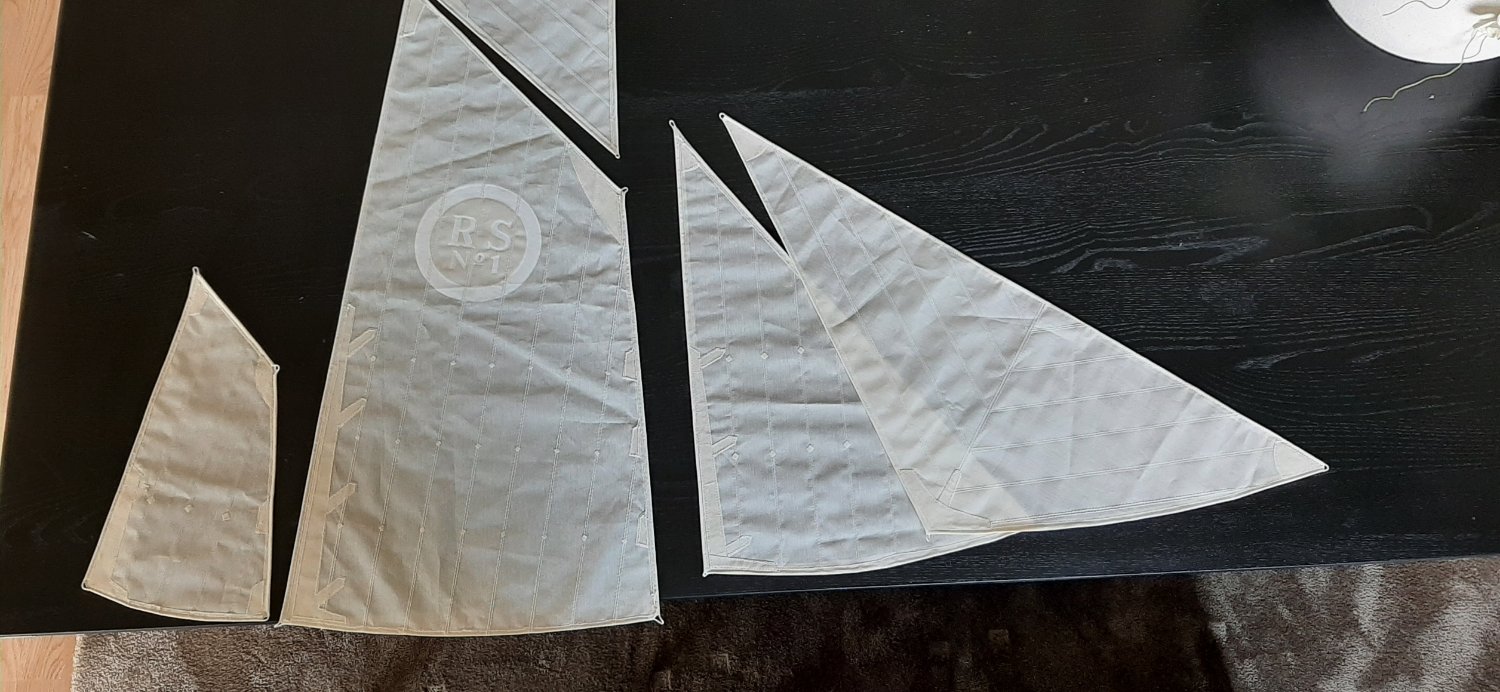
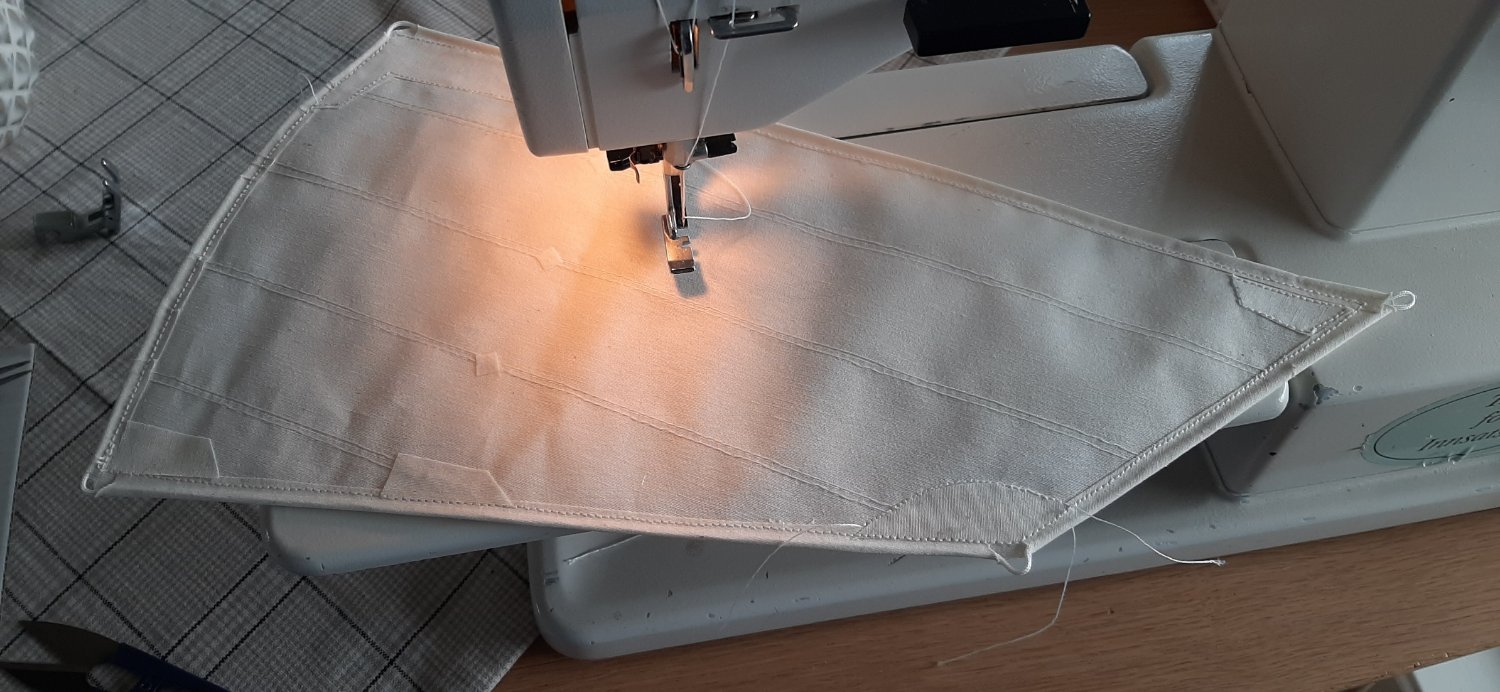
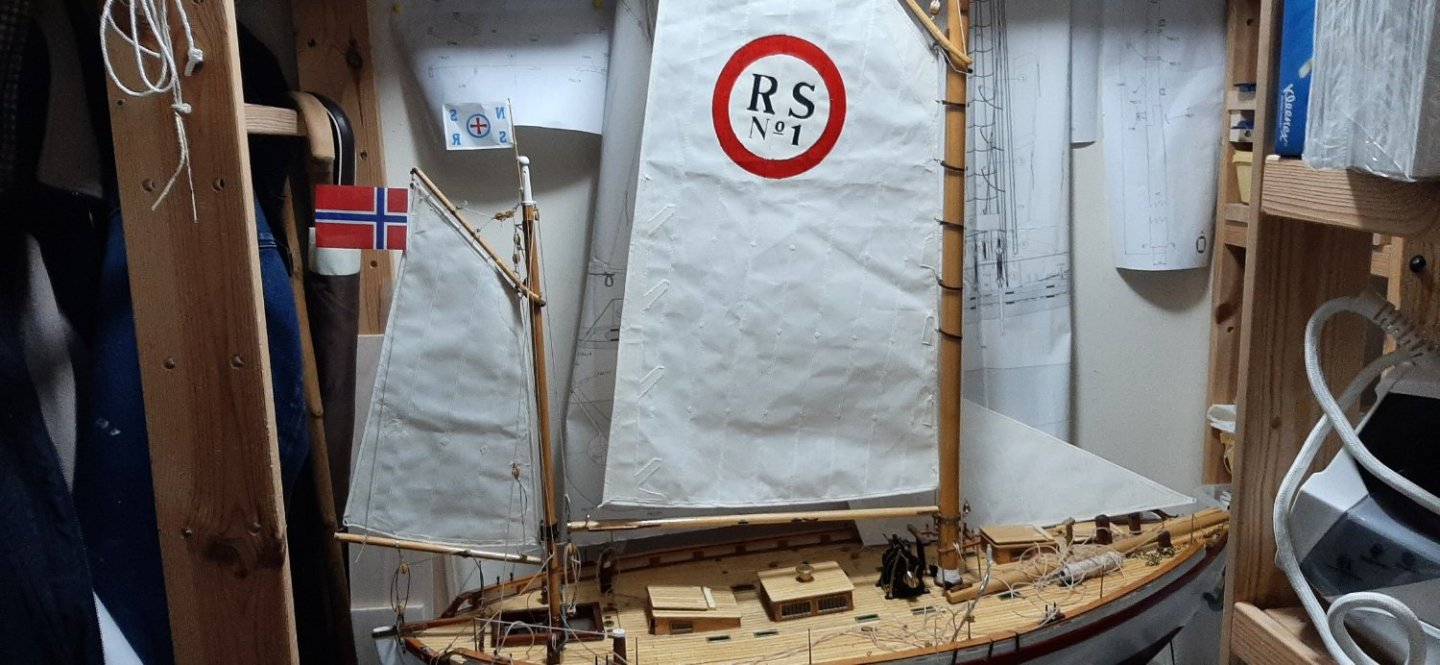
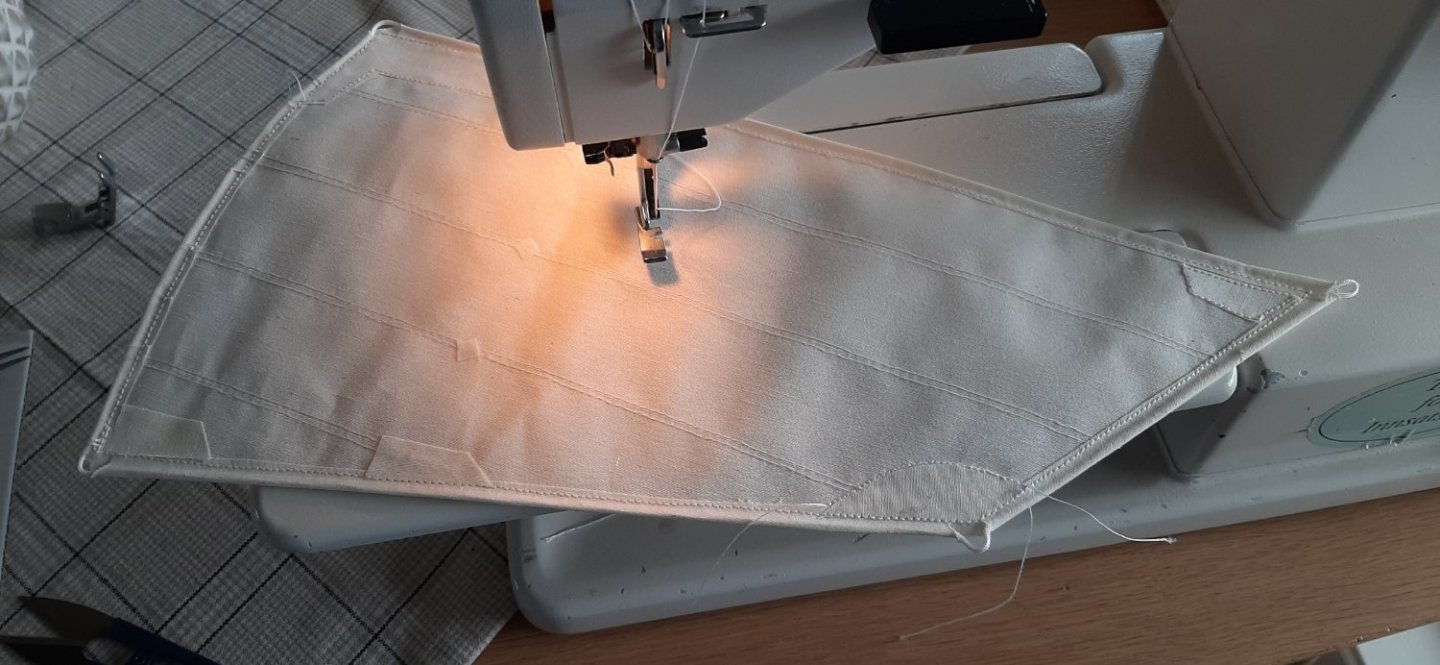
Sail-sewing session now completed. Not a perfect result, but looks good from 1 metre away! Didn't always have full control of the compass heading of the sewing-machine needle you understand🥴
George

-
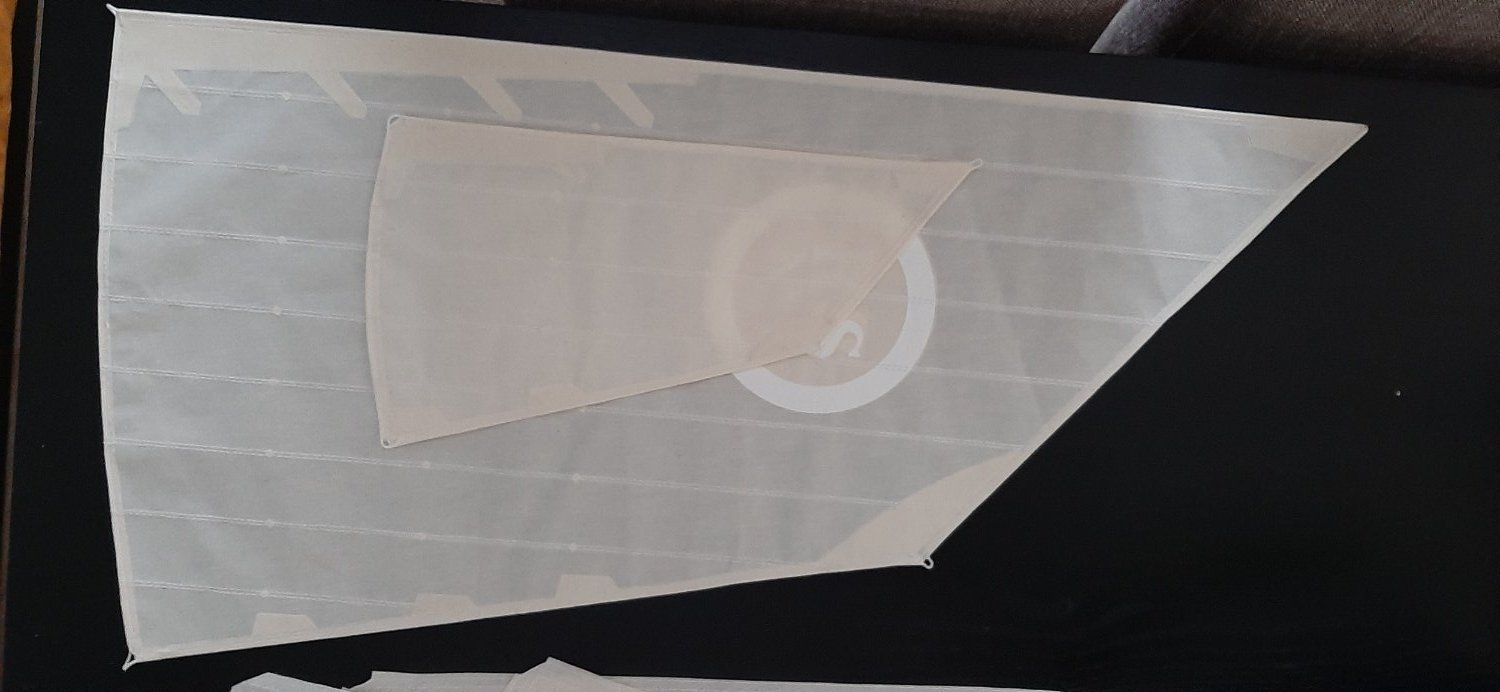
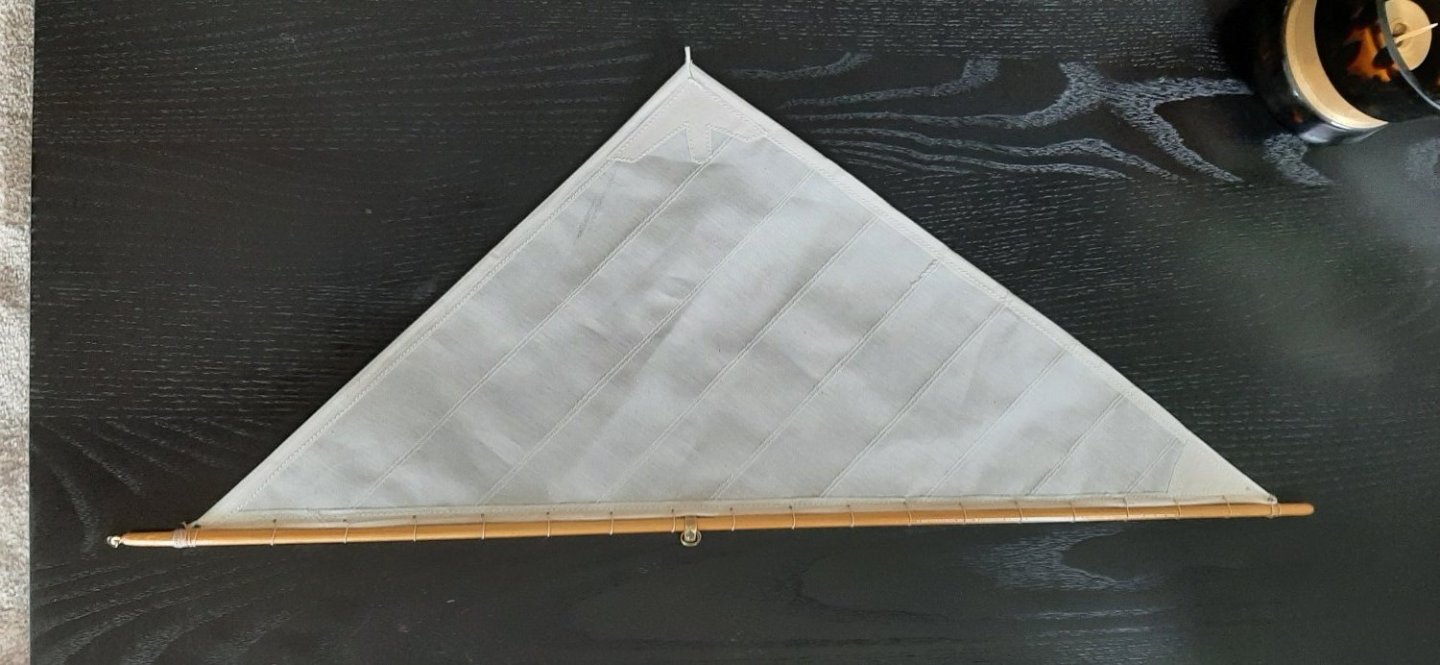
I've been given an intensive sewing course by the Admiralty. Started on the sails last tuesday. Had a delay due to a lever failure on the side of the sewing machine. Took all day thursday to fix it with epoxy, aluminium strip and a bolt! Mizzen sail has been produced and almost finished the mainsail. Some of the stitching is a bit below standard but looks OK from 1 metre away! Mizzen is much smaller than the mainsail as -shown in the photo,
George

-
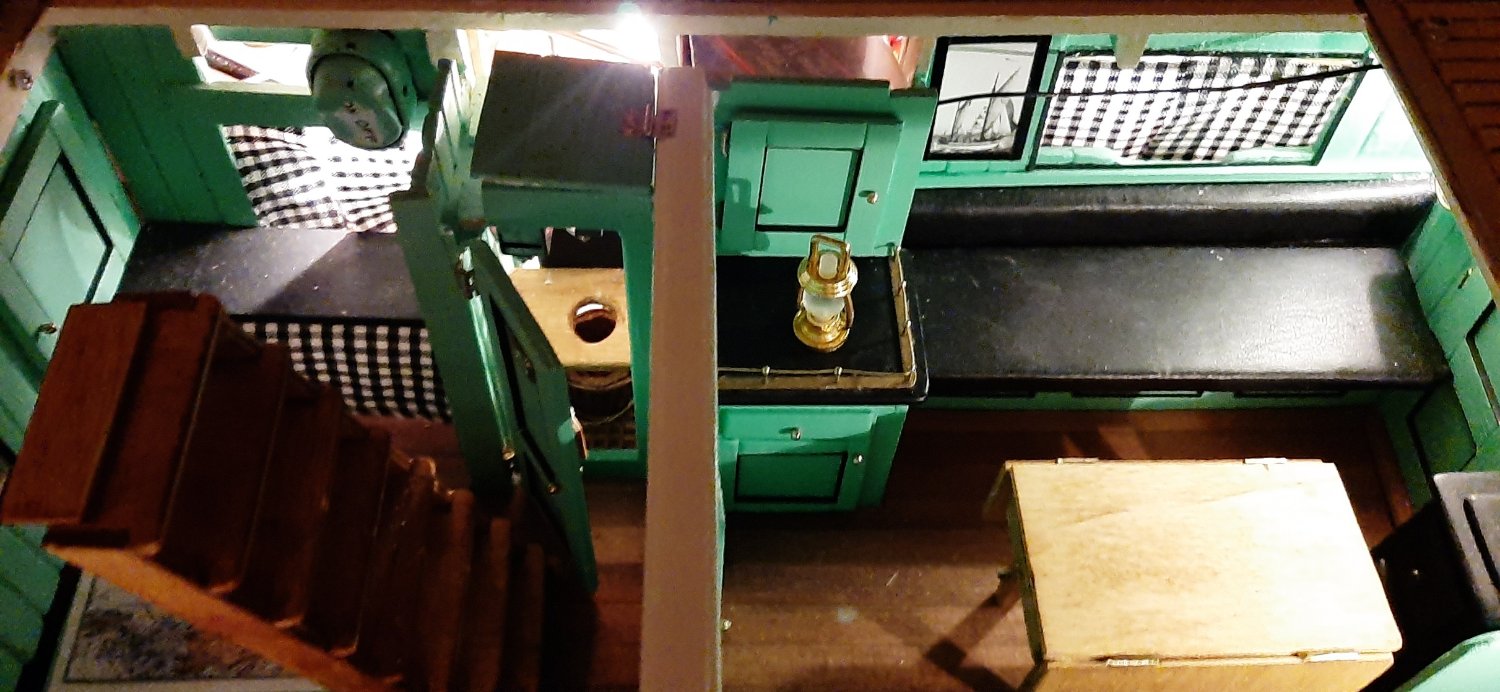
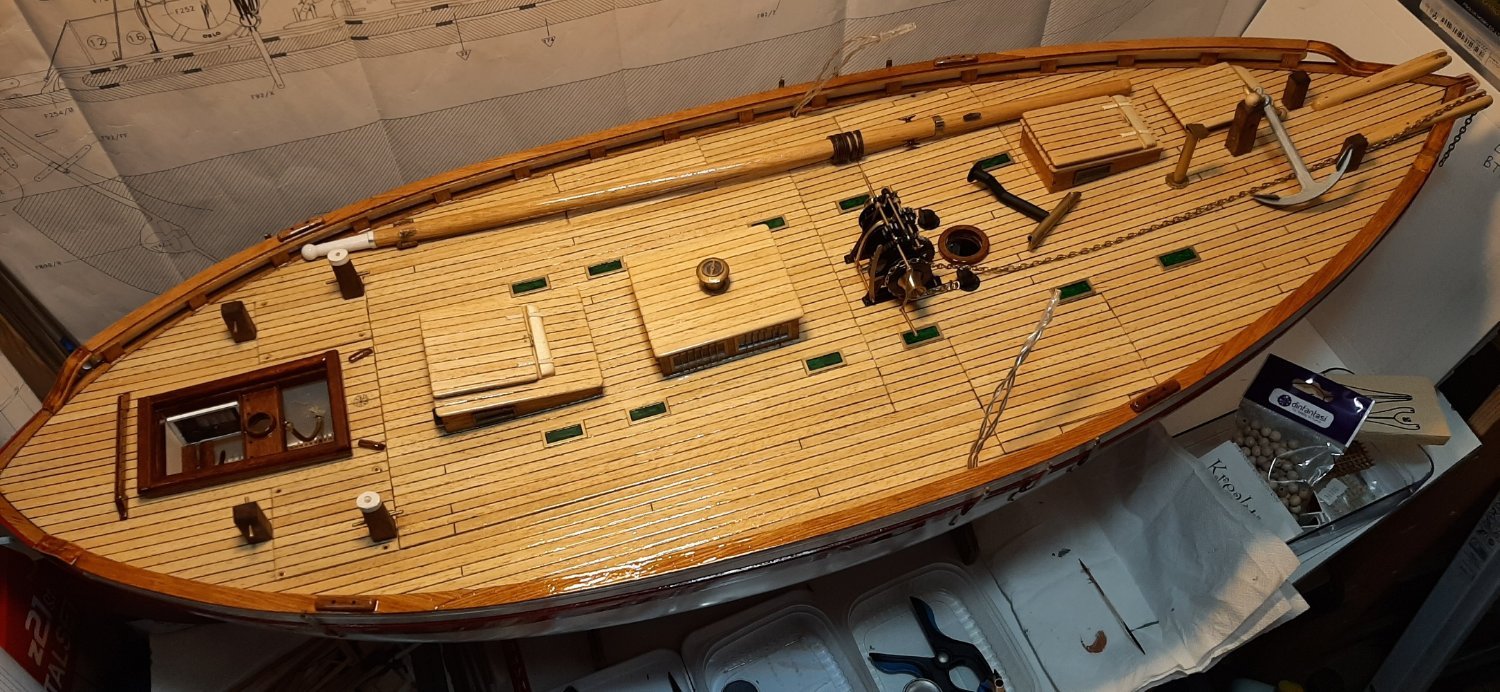
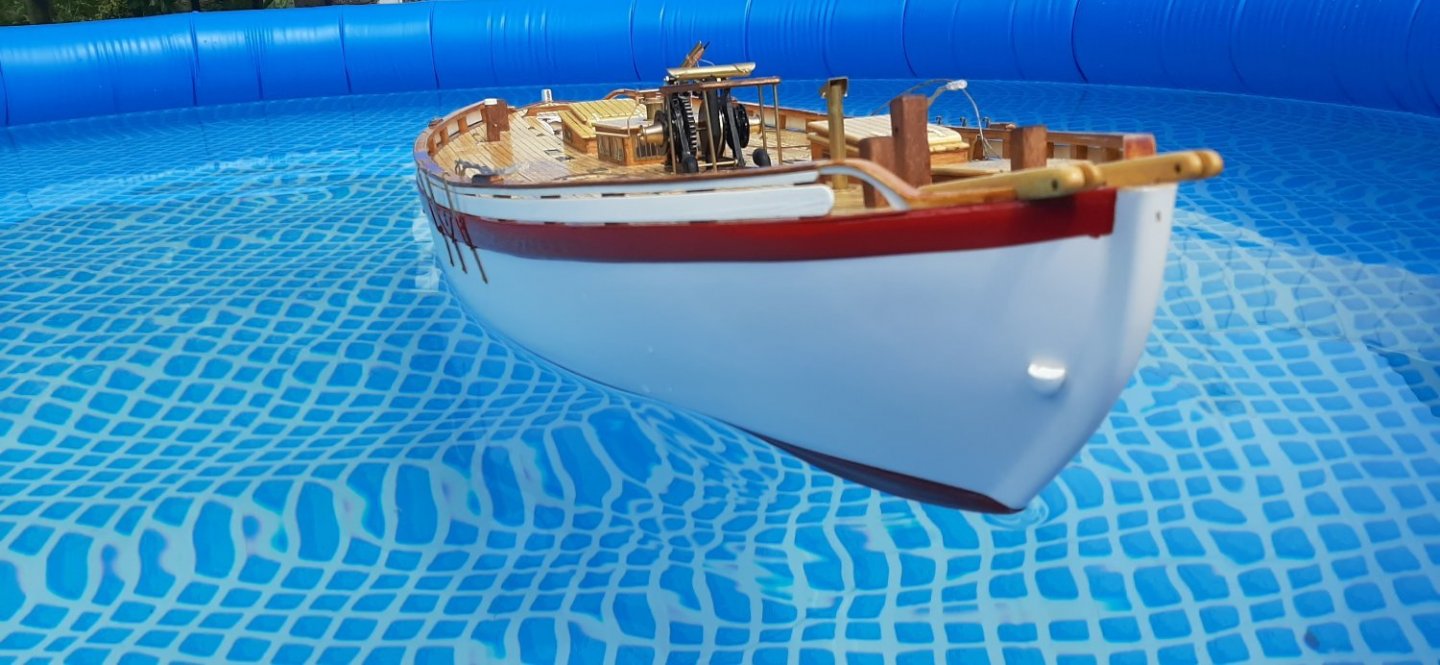
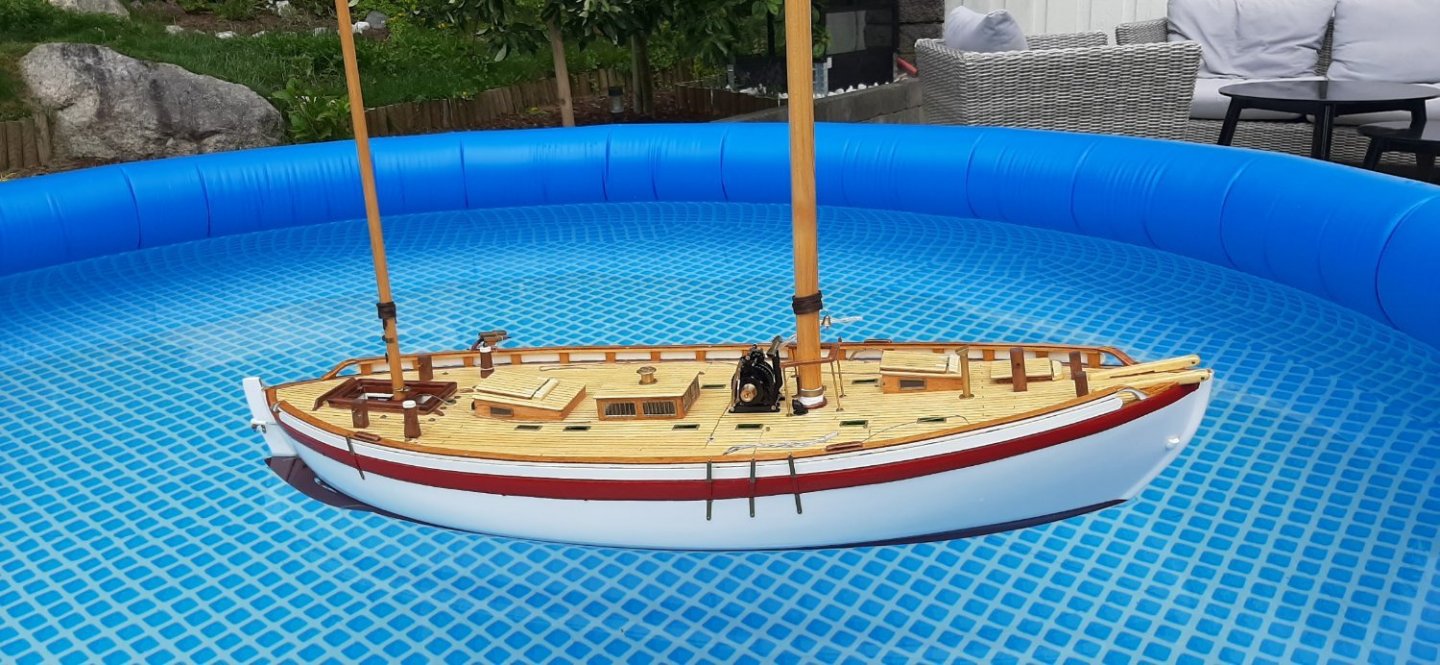
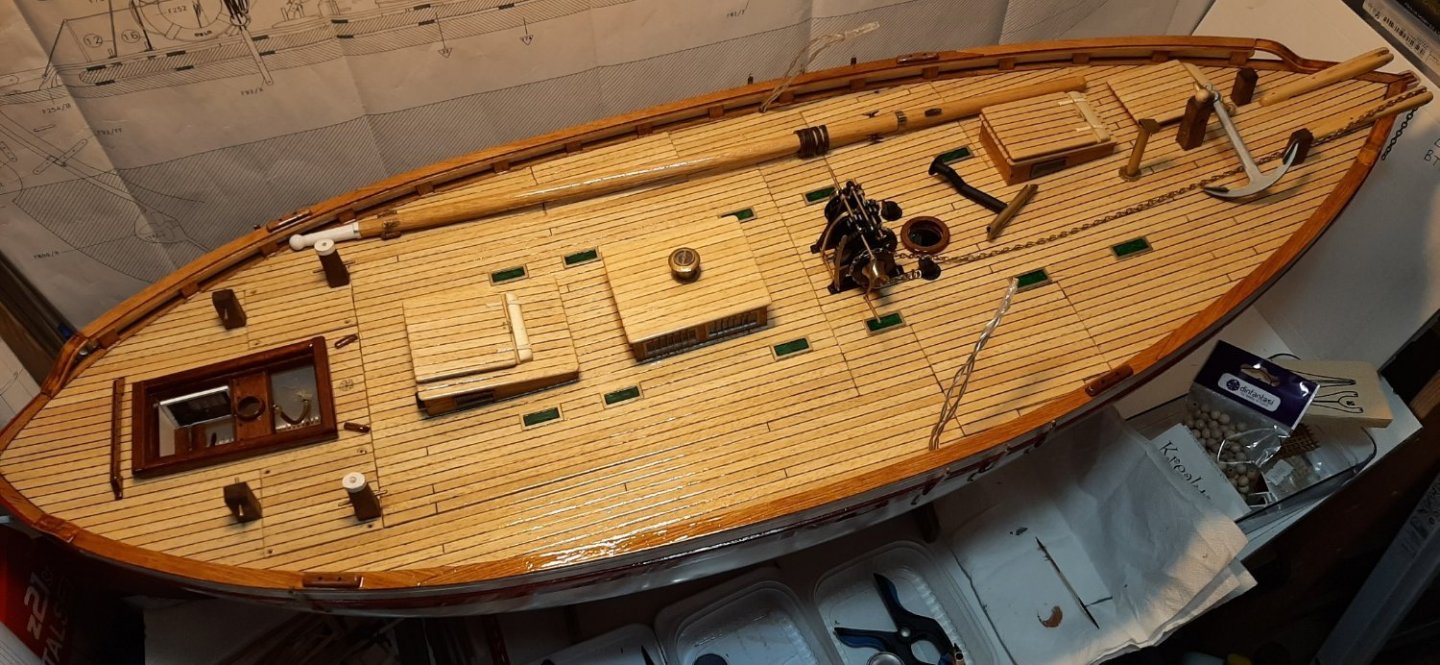
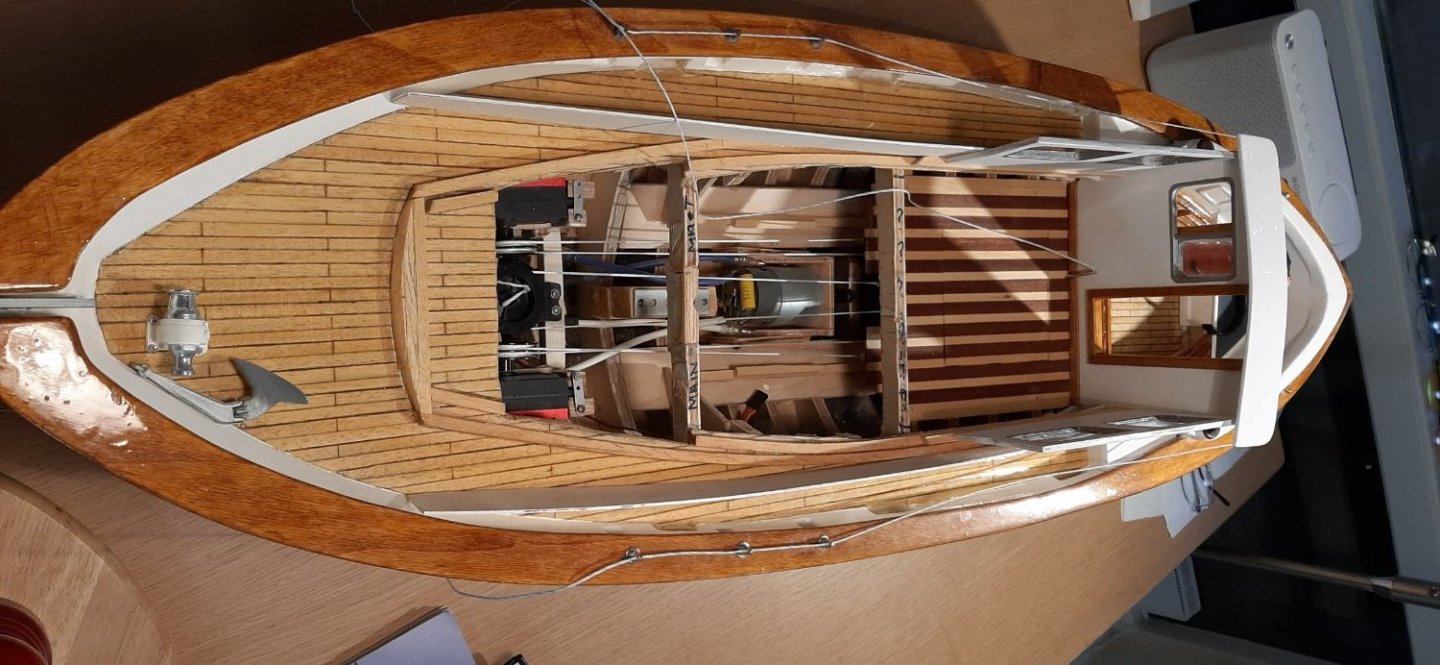
Floatation tests show -as expected-that the interior detail has increased displacement! The antifouling line will have to be rasied about 1 cm. Ran the motor and sailed around the pool a few times.
Later inspection showed a few drops of water in the aft bilge. Propshaft has been withdrawn and re-greased thoroughly to try to seal it better.
Bowsprit now added as well as many small detail items.
George
-
Floor-laying thing went very well. Got rid off 2 kg off ugly fatt too! Need to dump 5-6 kg more, but I'm not going to do it in the floor laying business.
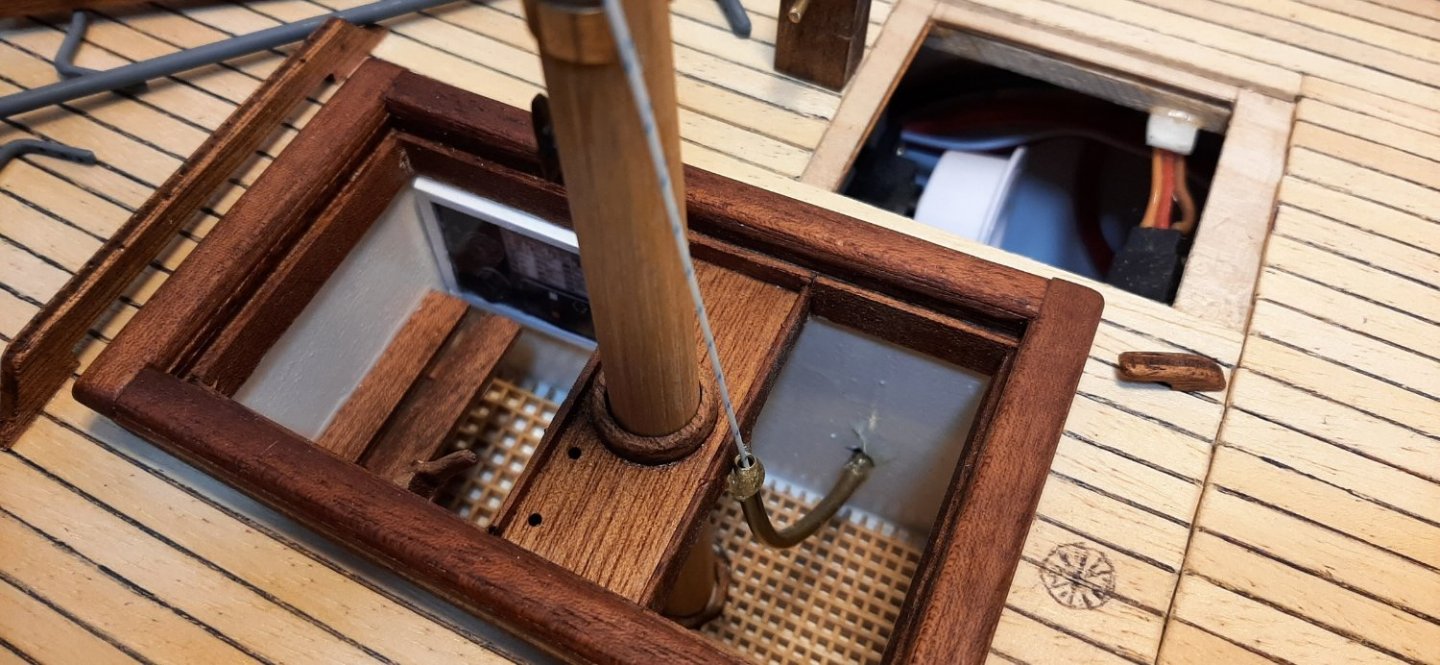
Not easy to get back into the swing of yacht building again, but starting on some small jobs like fitting the steering well so that it can be removed for access to the propshaft and servos below deck.
The smaller deck hatches will be held down by brass-painted 6.5mm screws and washers. The main hatch will be held by Caldercraft/Krick 'hatch-latches.
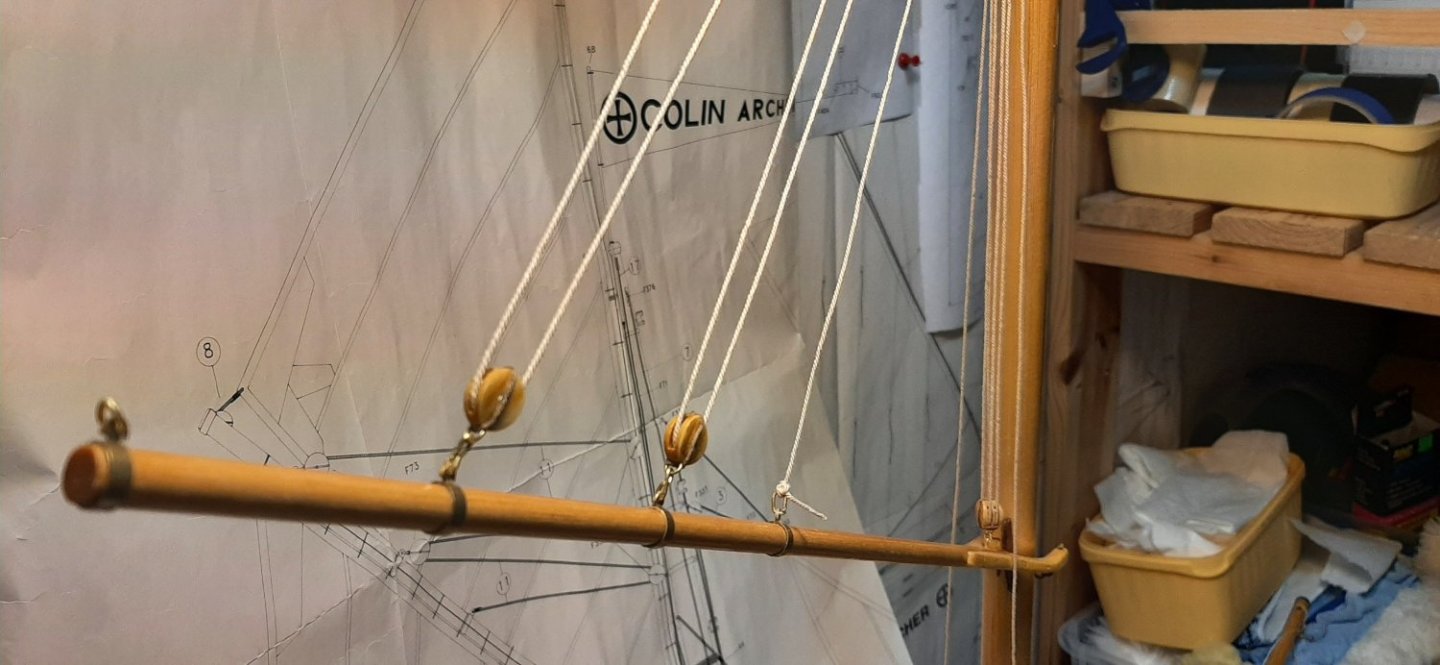
A lot of small jobs to do on deck fittings for the sheets and standing rigging. Also dozens of blocks to be assembled with eyes and straps.
Not quite onto a good build rhythm yet. The coming summer weather will also delay 'play'.
George

-
Very fine workmanship Frodo. You are a fast builder. Nice too see the 'Nordlandsjolle-ish' dinghy too. Hope you added some lead so you can tow it? Looking forward to seeing both afloat this summer. My wife bought me a 'present' last friday. 76 sq.m of oak wood flooring. Have to replace the old parquet flooring before I am allowed to continue with the RS1.🥴 George
-
Yesterday it looked like my wife had bought me a giant, ready stained, Colin Archer kit. She said it was a kit. A kit of hundreds of identical planks which, when fitted together properly would make 76 square metres of wood flooring😬
There will be some delays in model boatbuilding during the next few weeks. Luckily, all hammering, drilling and swearing has to stop by 1700 each week day or the sake of the neighbours. So some assembly of blocks and shackles can take place in the evenings!
George
-
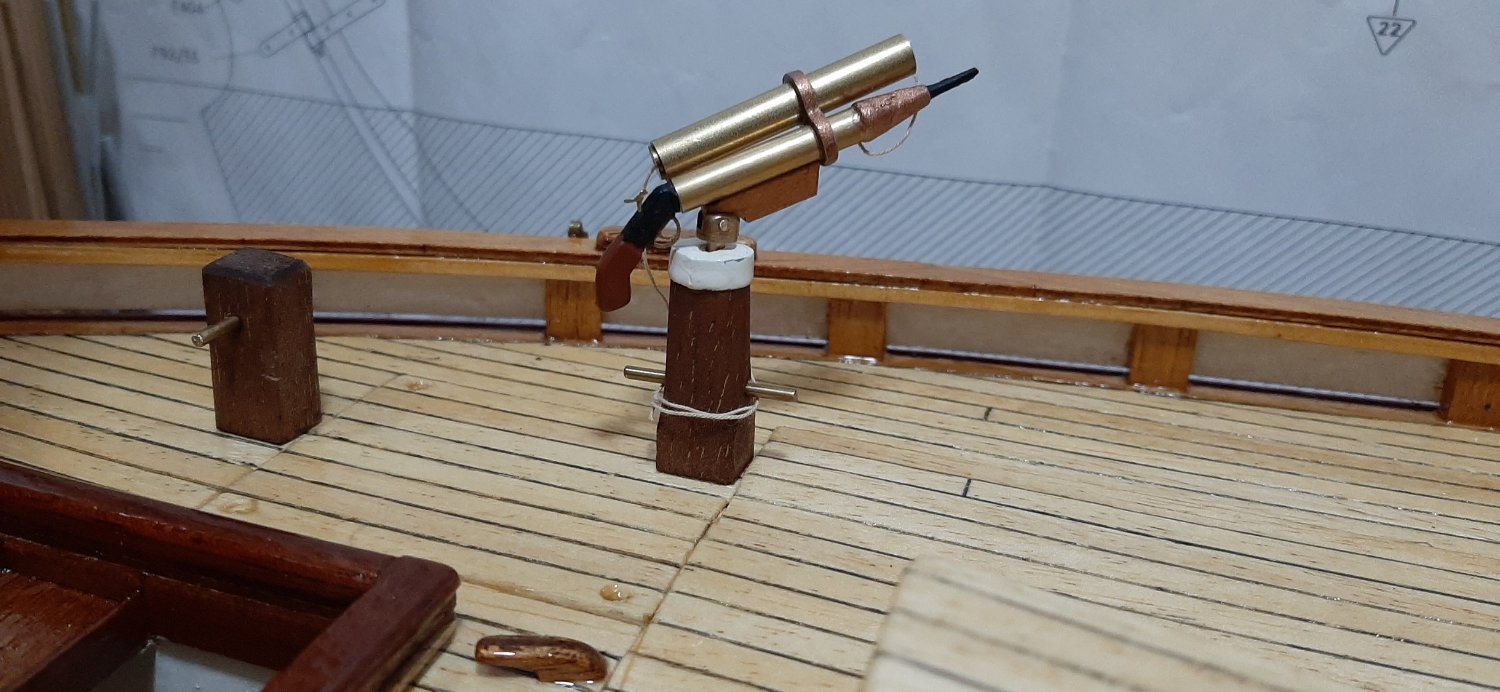
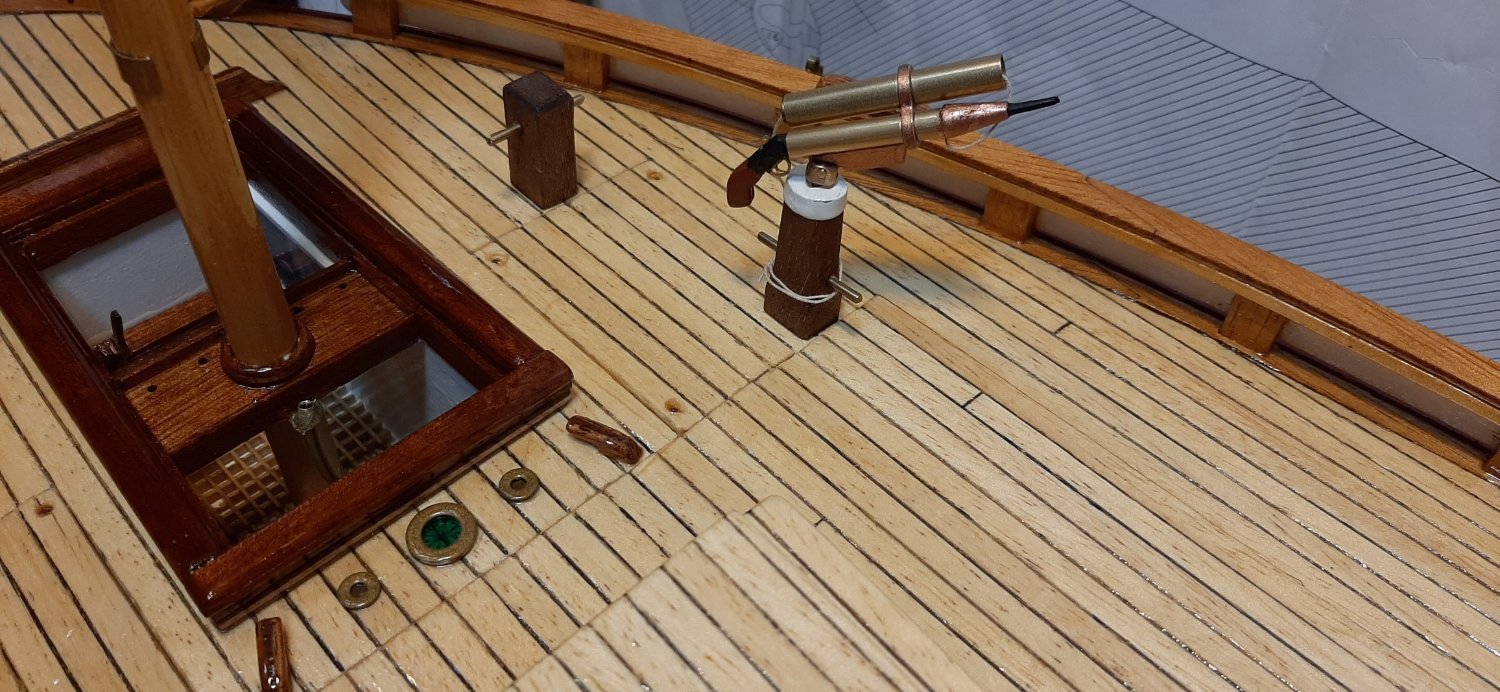
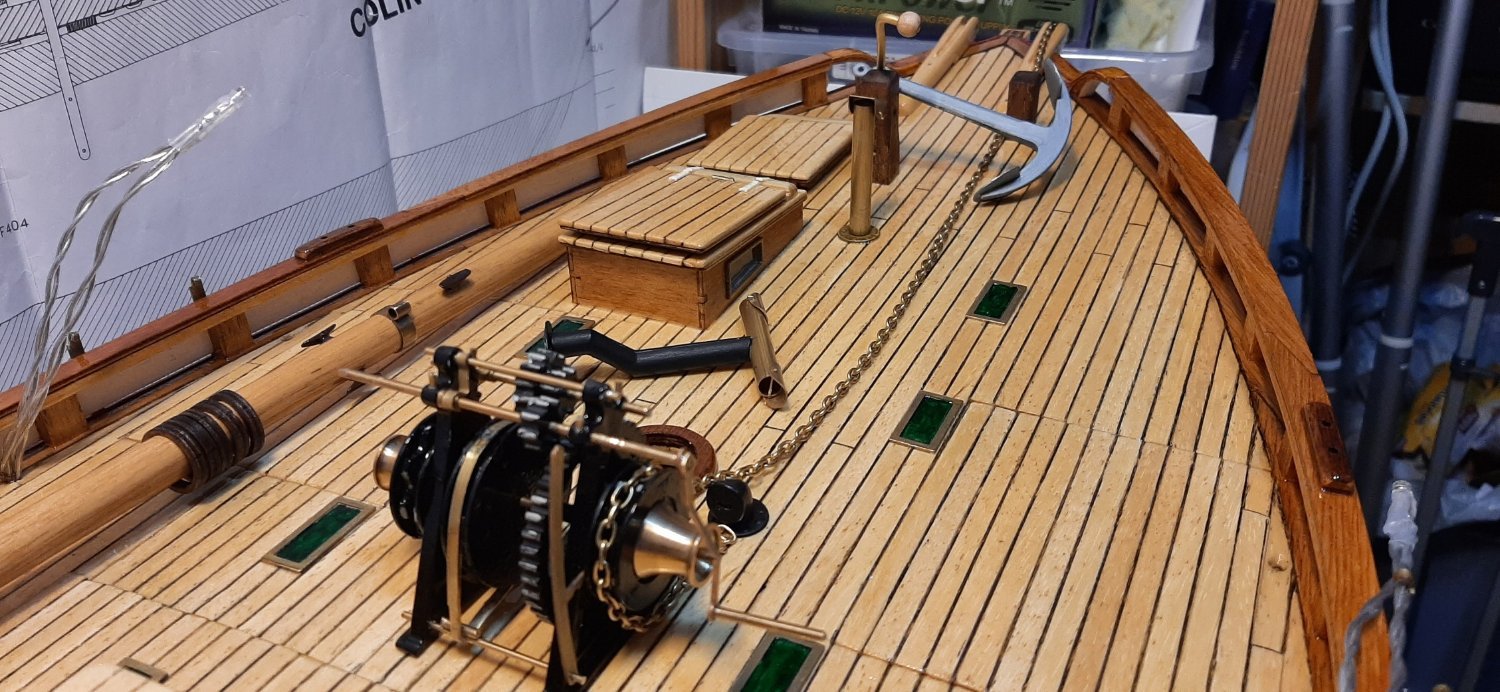
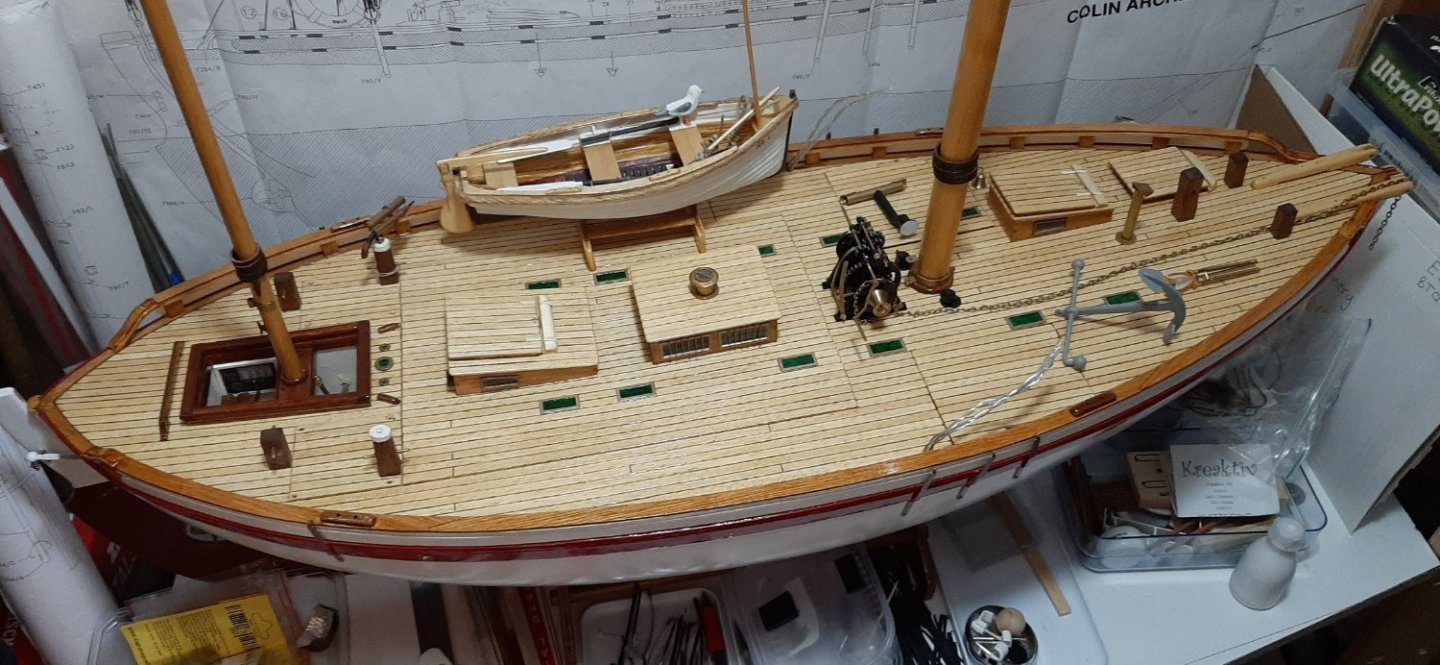
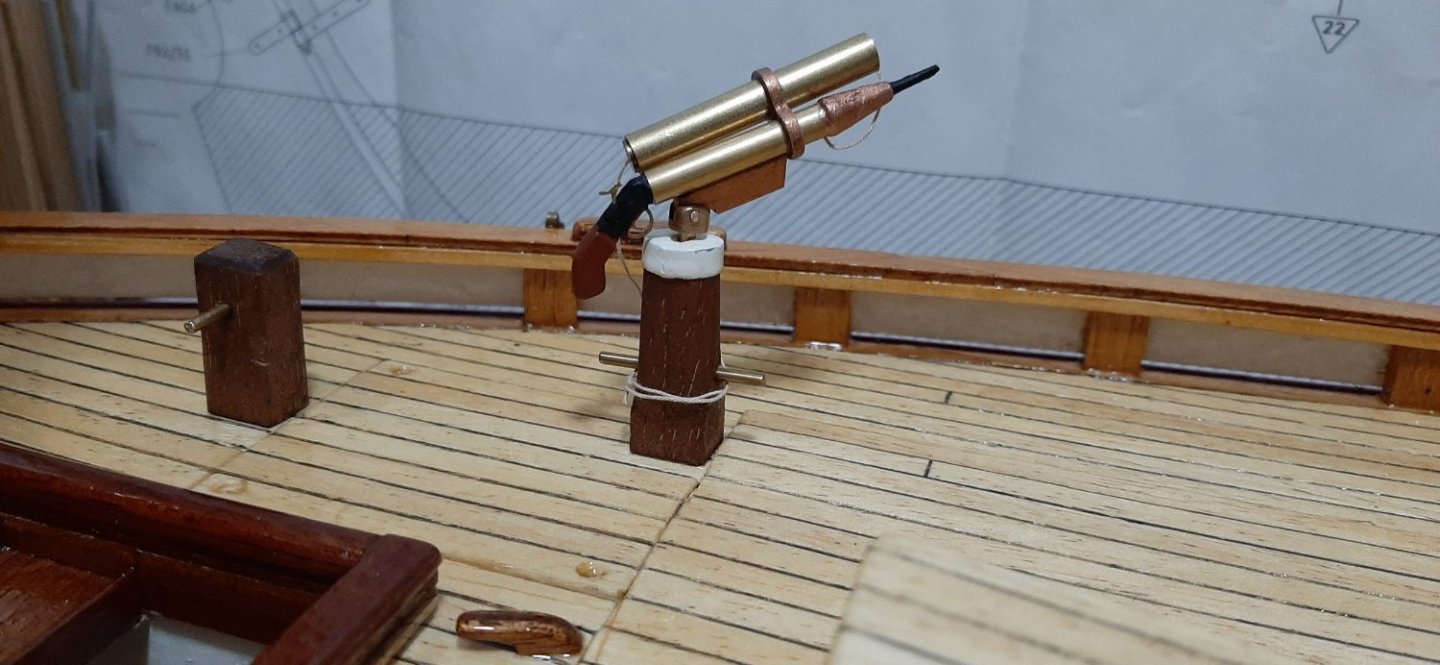
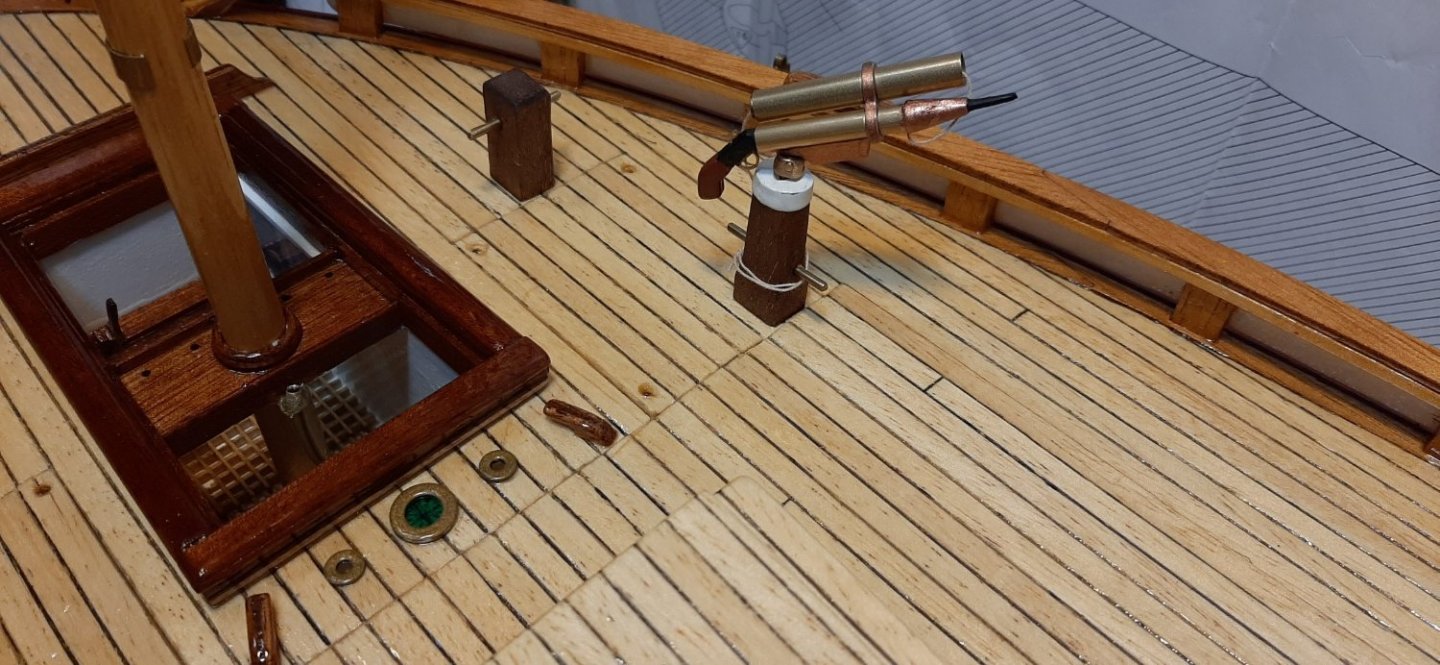
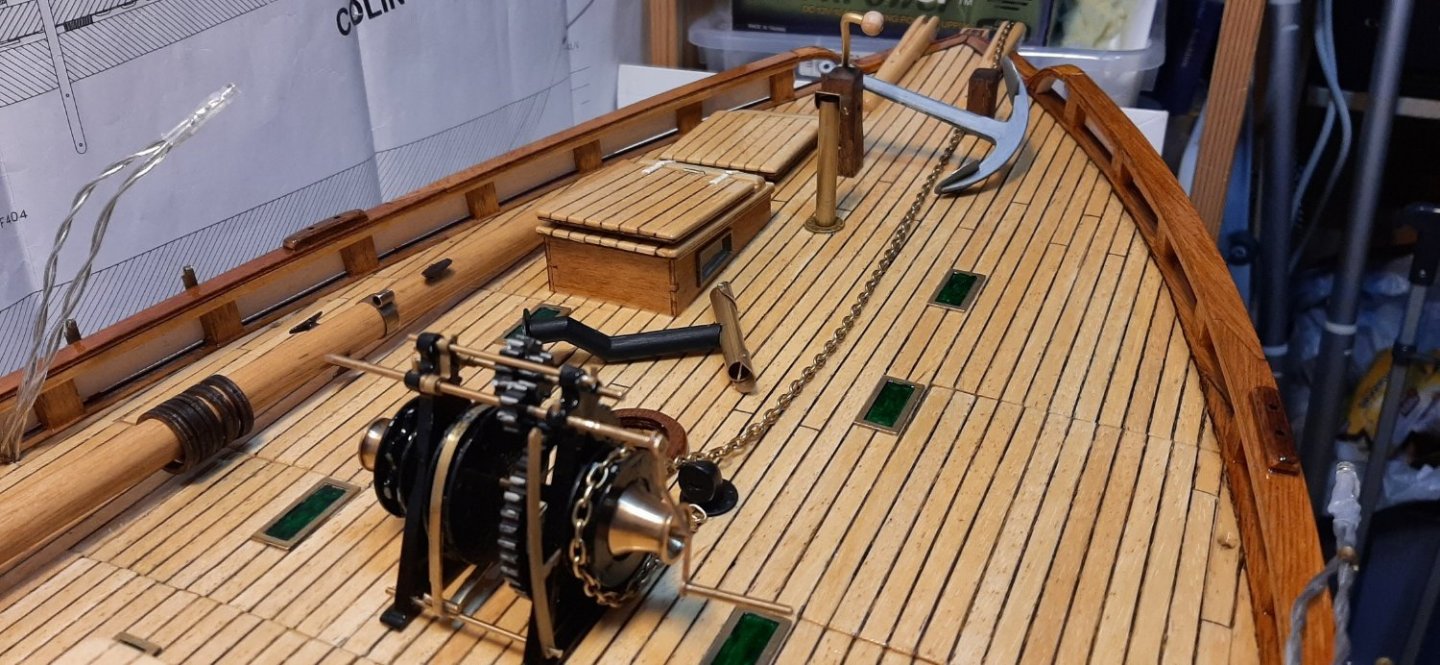
Assembled the line gun. Shoots a line over to a vessel needing a tow -for example. It's supposed to be black, but as with the windlass, I want some shiny, brass contrast on deck.
George
-

-
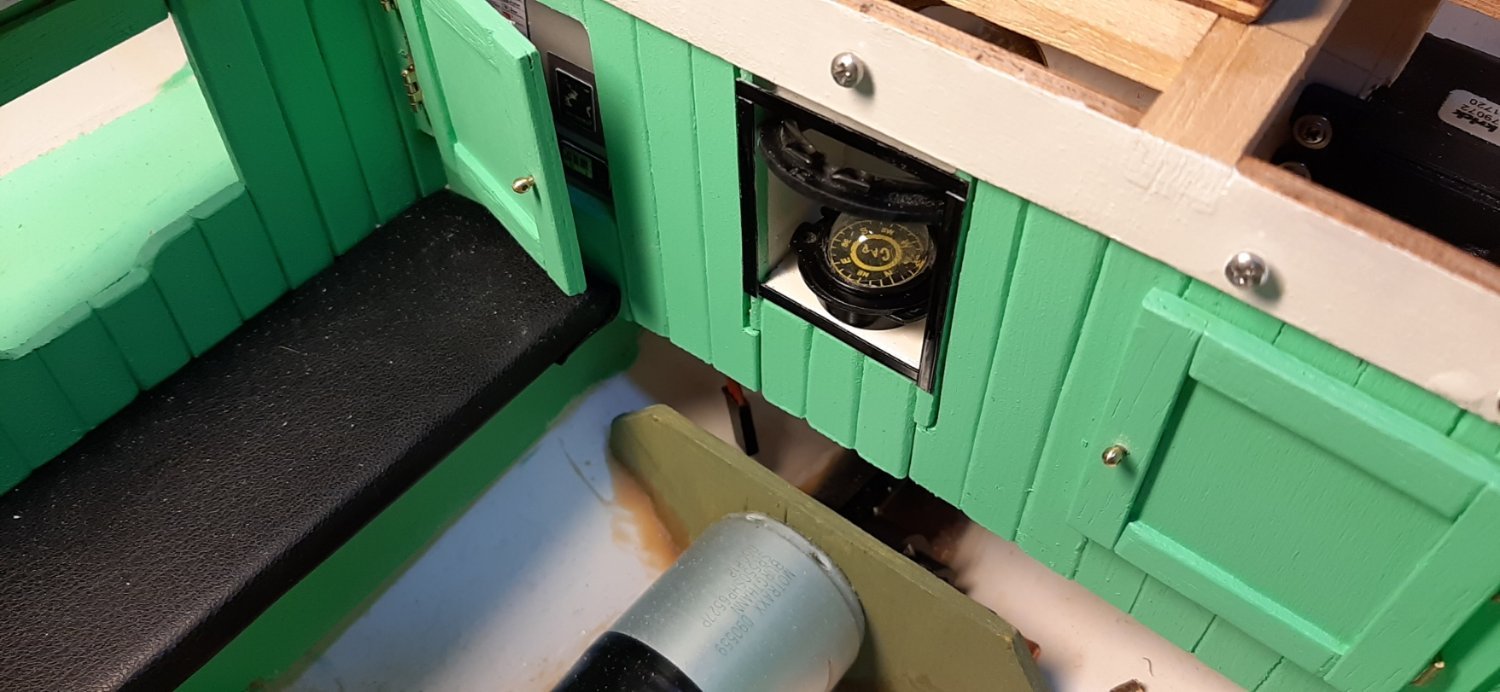
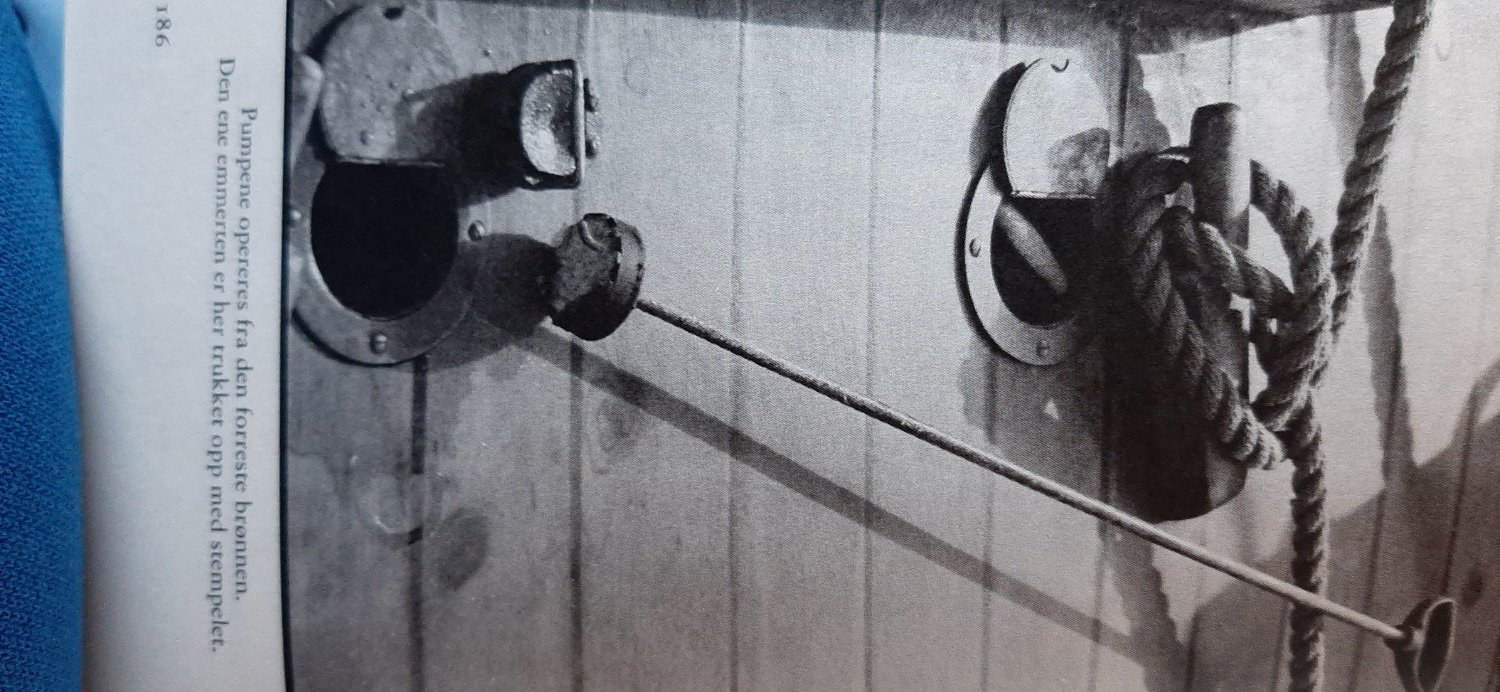
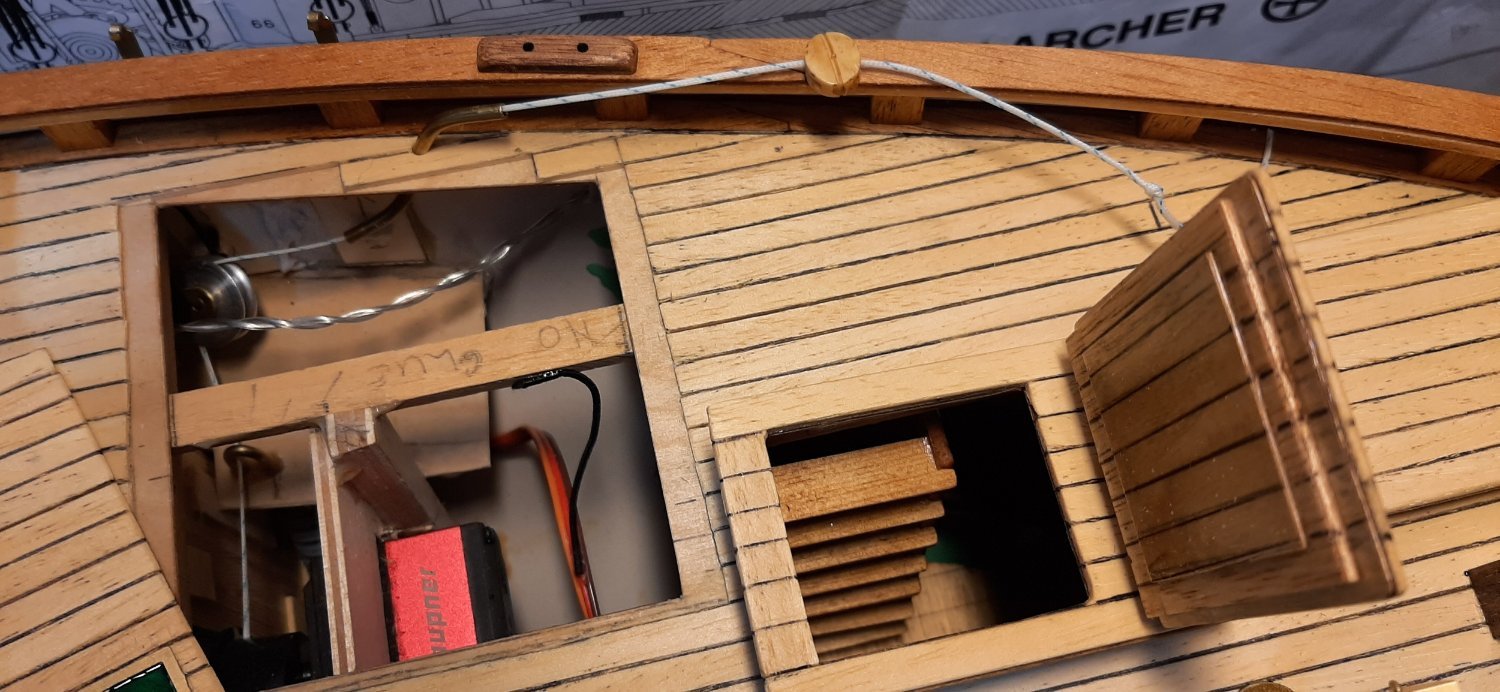
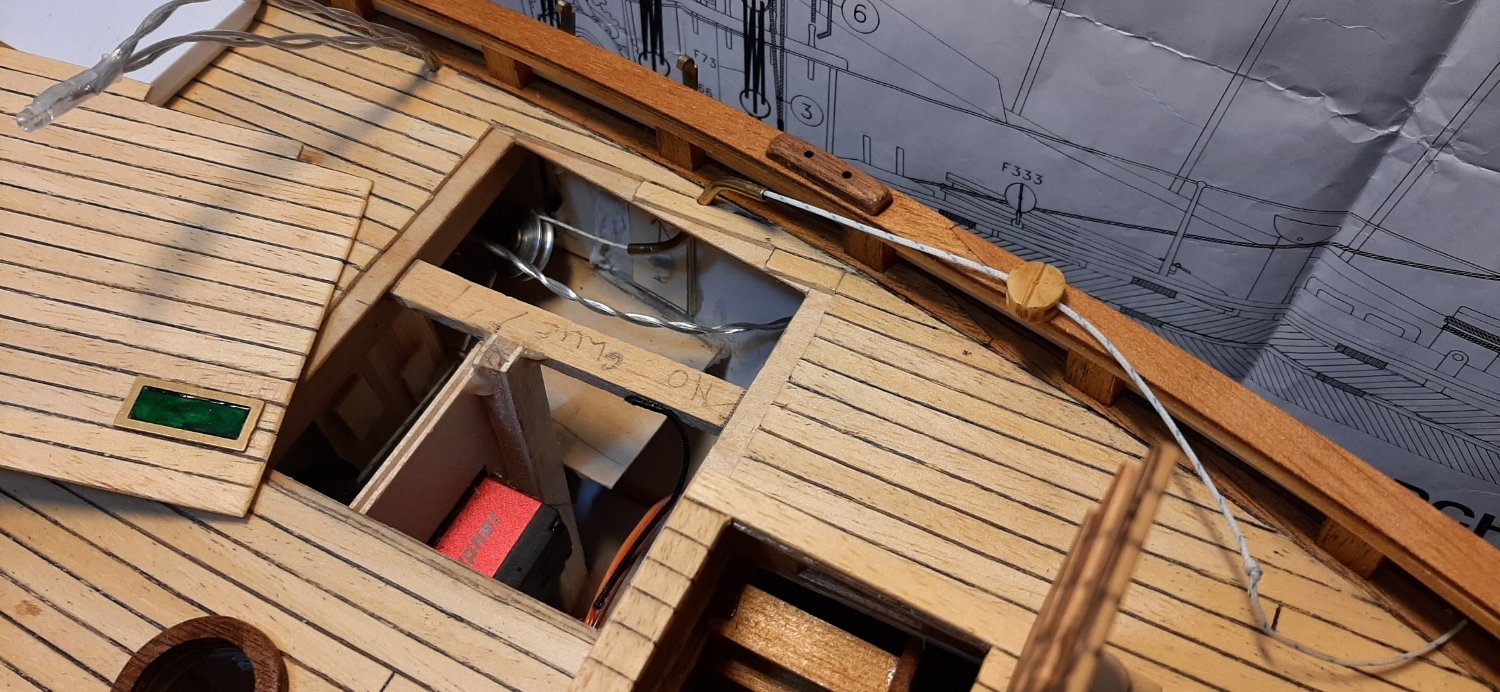
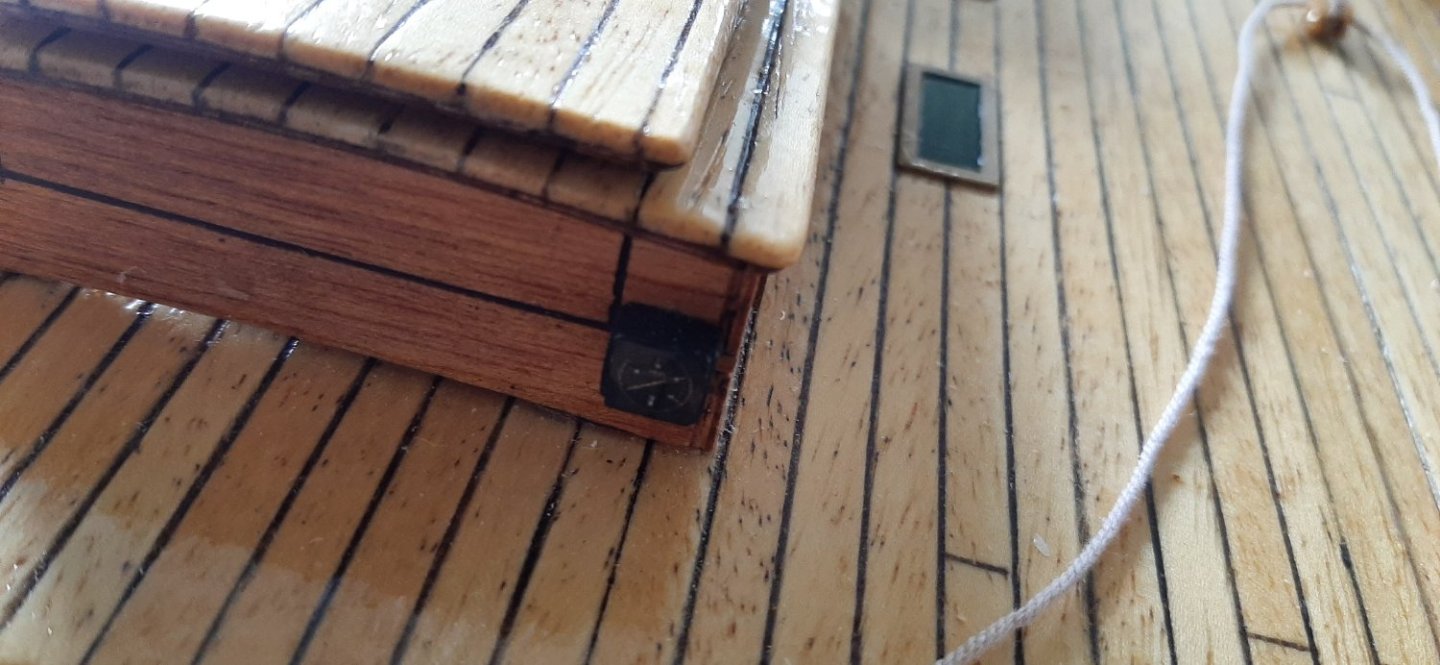
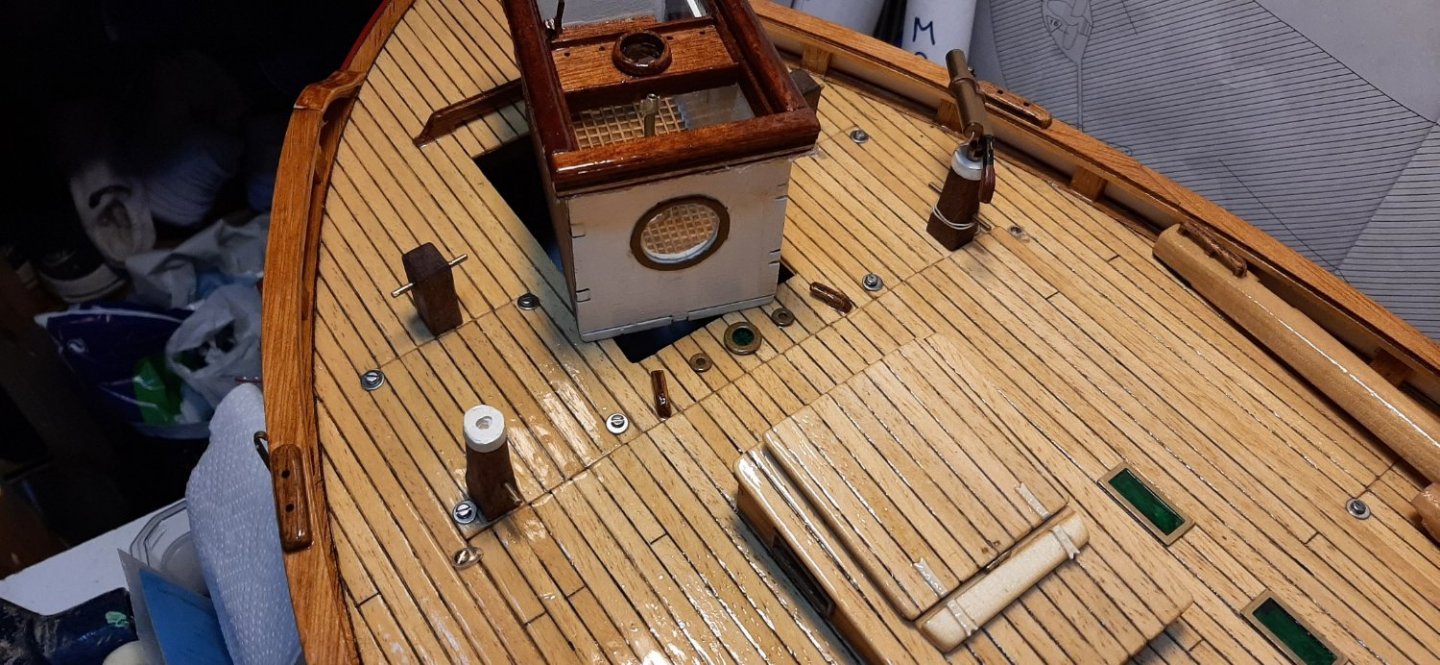
Hi Frodo. This is a long story.....The two small rings (steel washers painted brass) represent the two bilgepump outlets. I think these can be seen on the Colin Archer museum photo Gallery, but I'm not quite sure where I have seen this detail -I will check. There are two pipes that go down into the bilges to pump out any seawater which has leaked into the boat. Of course, mine are simply painted washers placed on deck! The centre of the washers can be filled with brass paint, but for some strange reason I found out that I would make it complicated.... the bronze metal in the centre of each small washer is not brass paint. It's from the metal top of french crémant Bourgogne Pinot Noir from 'vinmonopol'. A few drops of brass paint will do fine though!
The large ring represents a port hole/skylight which allows light to shine down onto the steering compass mounted in the aft cabin -foreward of the cockpit. This is a larger washer (also painted brass) with a small round piece of green acetate/plastic below. I used green acetate to indicate the colour below decks. Before I placed the acetate on deck I drew an outline of a compass rose on the deck. So if anyone looks closely, it looks like they are seeing the steering compass one meter below the deck.
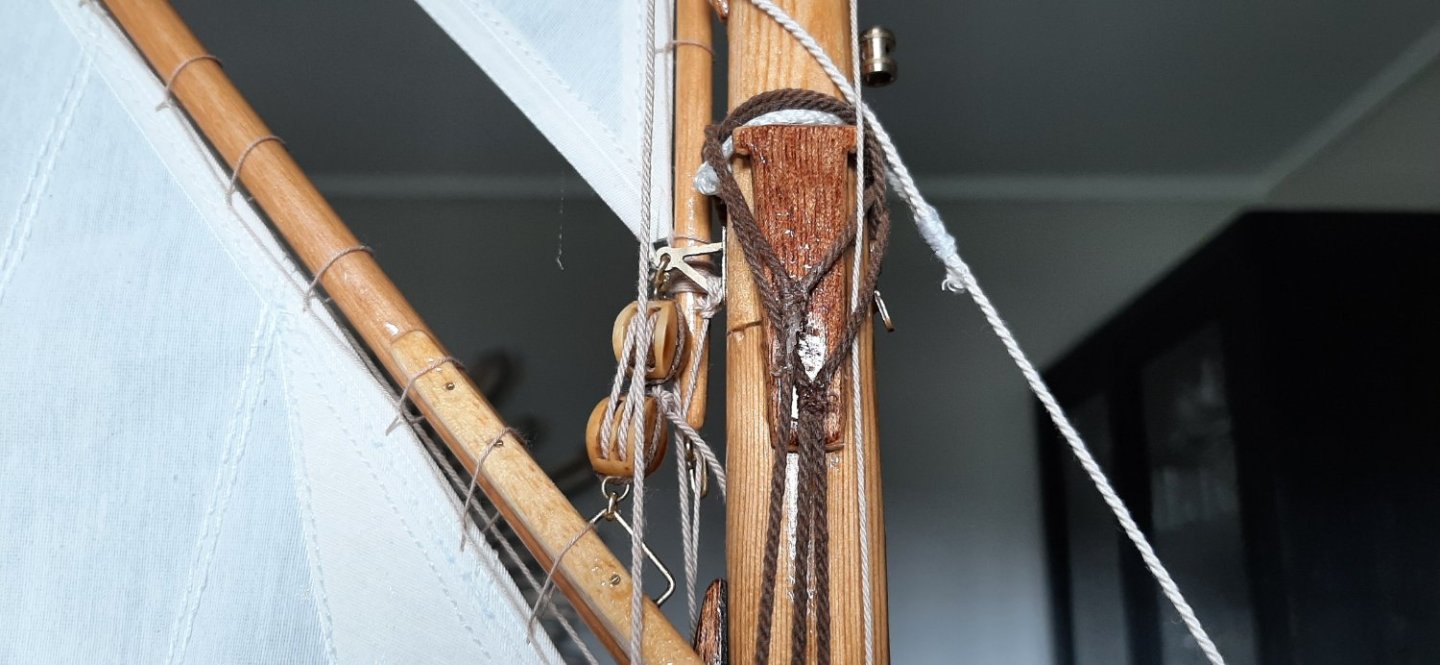
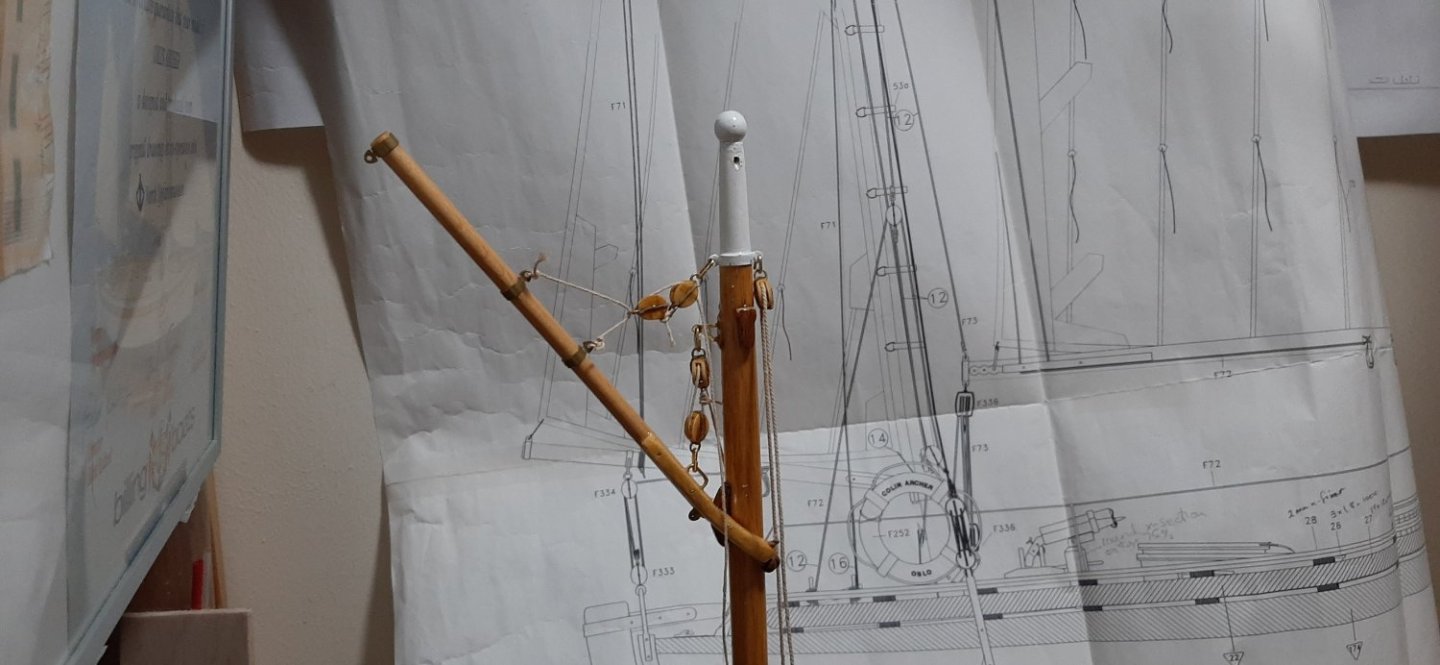
The servo line for the main boom comes up just forward of the mizzen mast. It will pass through the brass ring part 505 which is lashed to the mizzen mast.
Now you know why I have been building this RS1 for a looonng time!😬
George

-
-
-
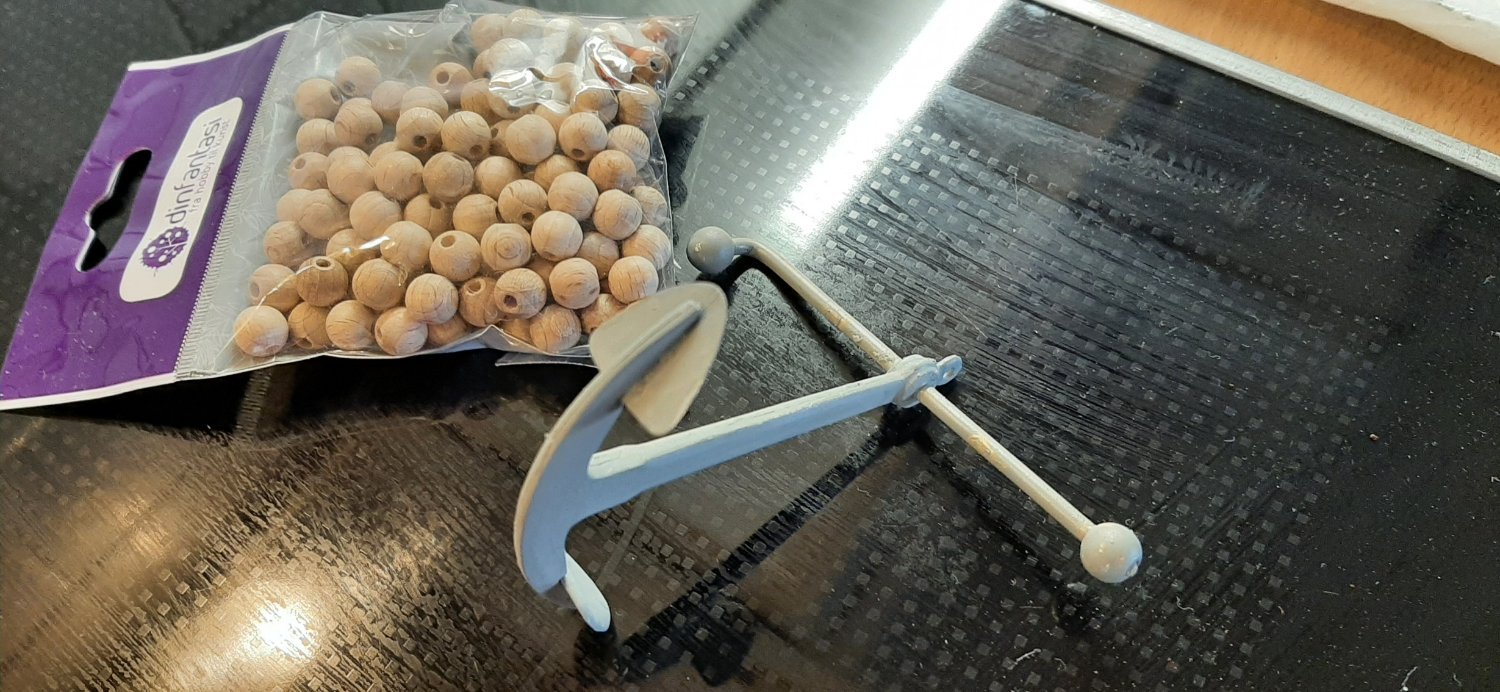
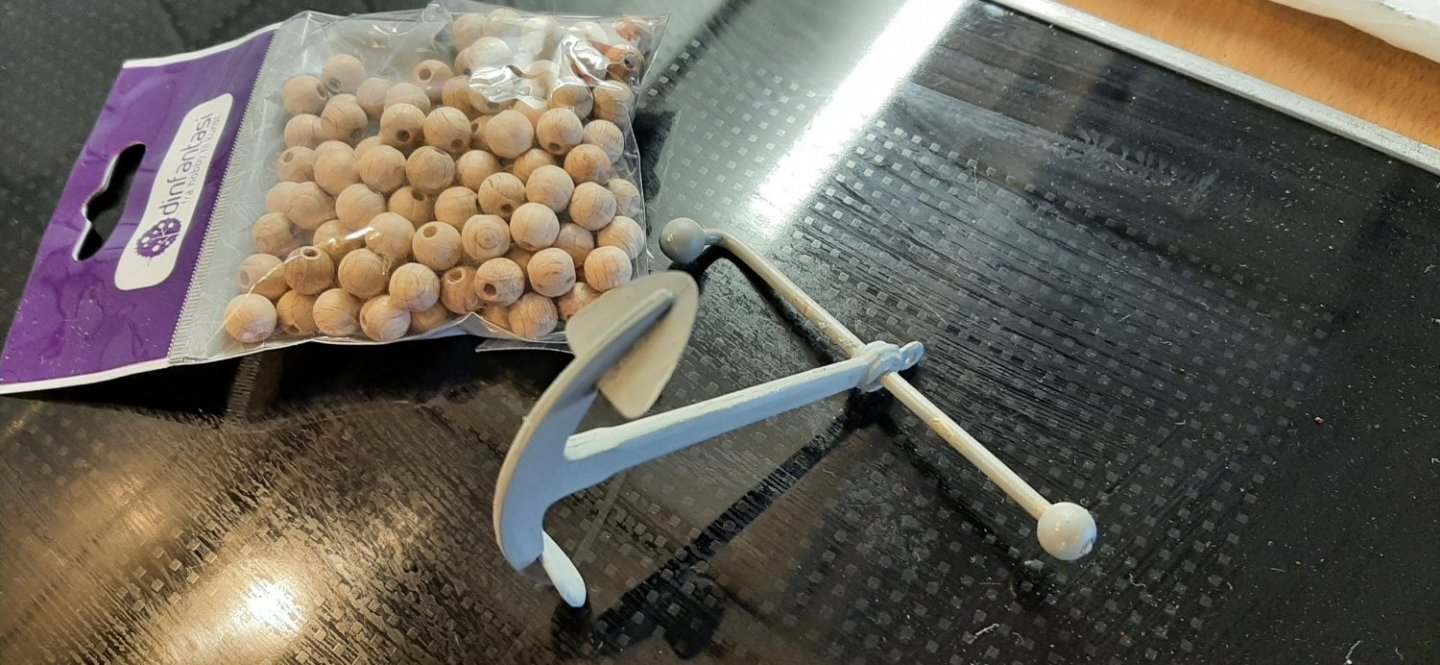
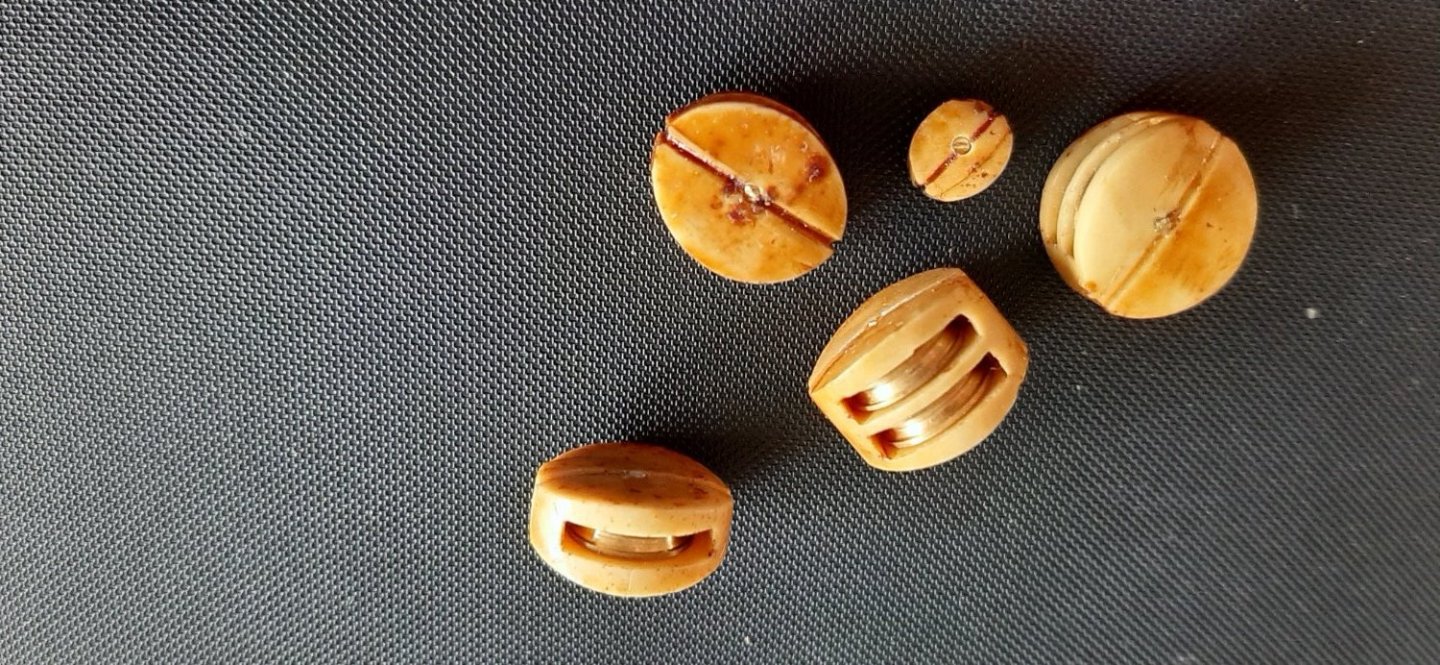
Assembled the anchor this evening. The hardwood spheres on the ends of the stock are marked as 6mm in the parts list. The ones in my kit were only 5mm part nr F347.
When I tried to drill out the hole to fit the diameter of the stock....it split. I thought they looked a bit small anyway, so out I went to the local sewing centre and bought some 8mm hardwood spheres. The smallest packet they had contained 140 spheres 🥴.
So now I can make 69 more stock anchors! Lucky boy🙂. I can use some of them as freight on the N-scale Chistmas train set.😬
Just thought I would share this useless piece of info'.
George
-
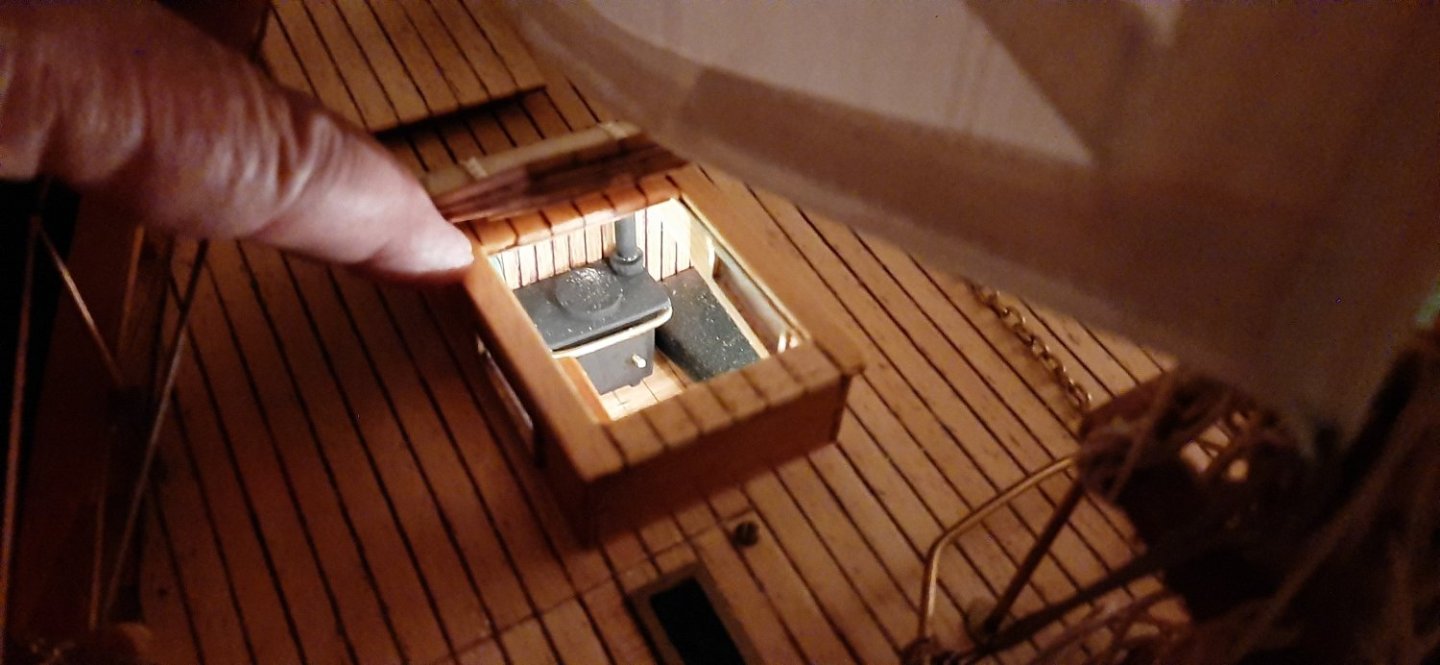
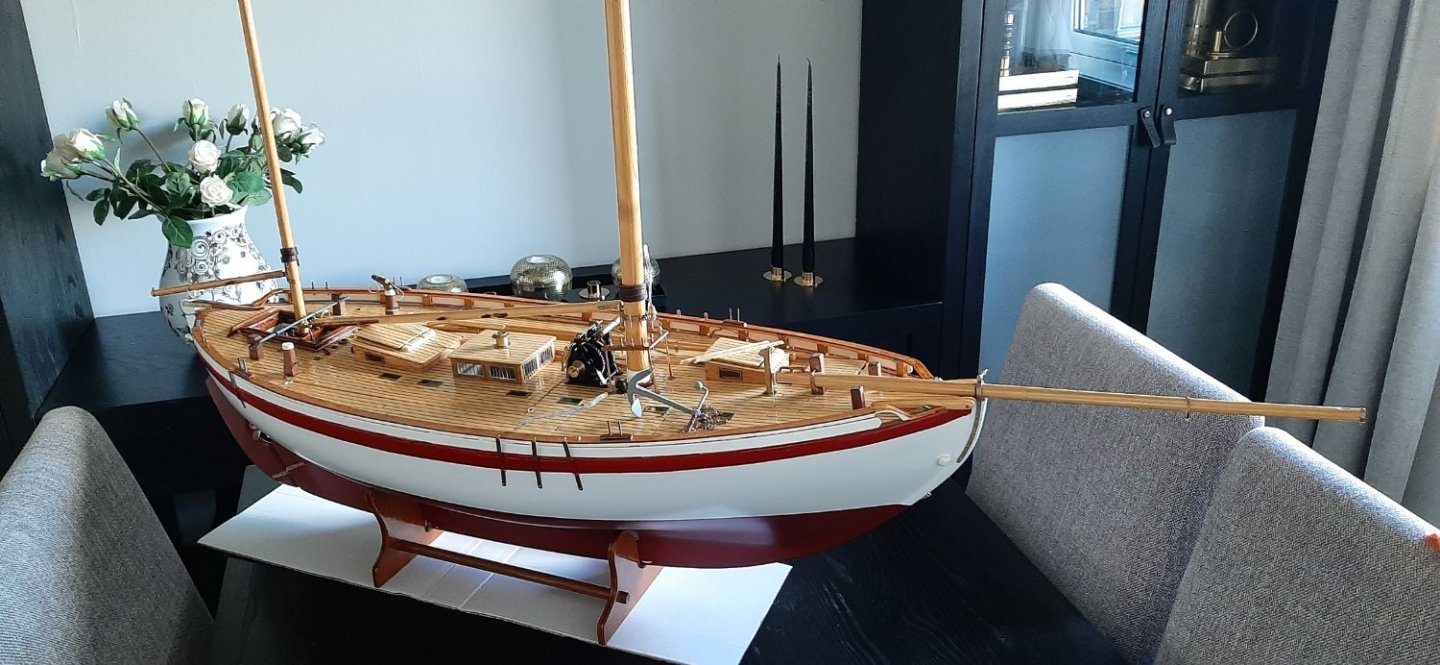
4 coats of varnish have now been applied to the deck and top of deck structures. The hatches were a little bit 'stuck' in place, but managed to prise them open again before the varnish dried too much.
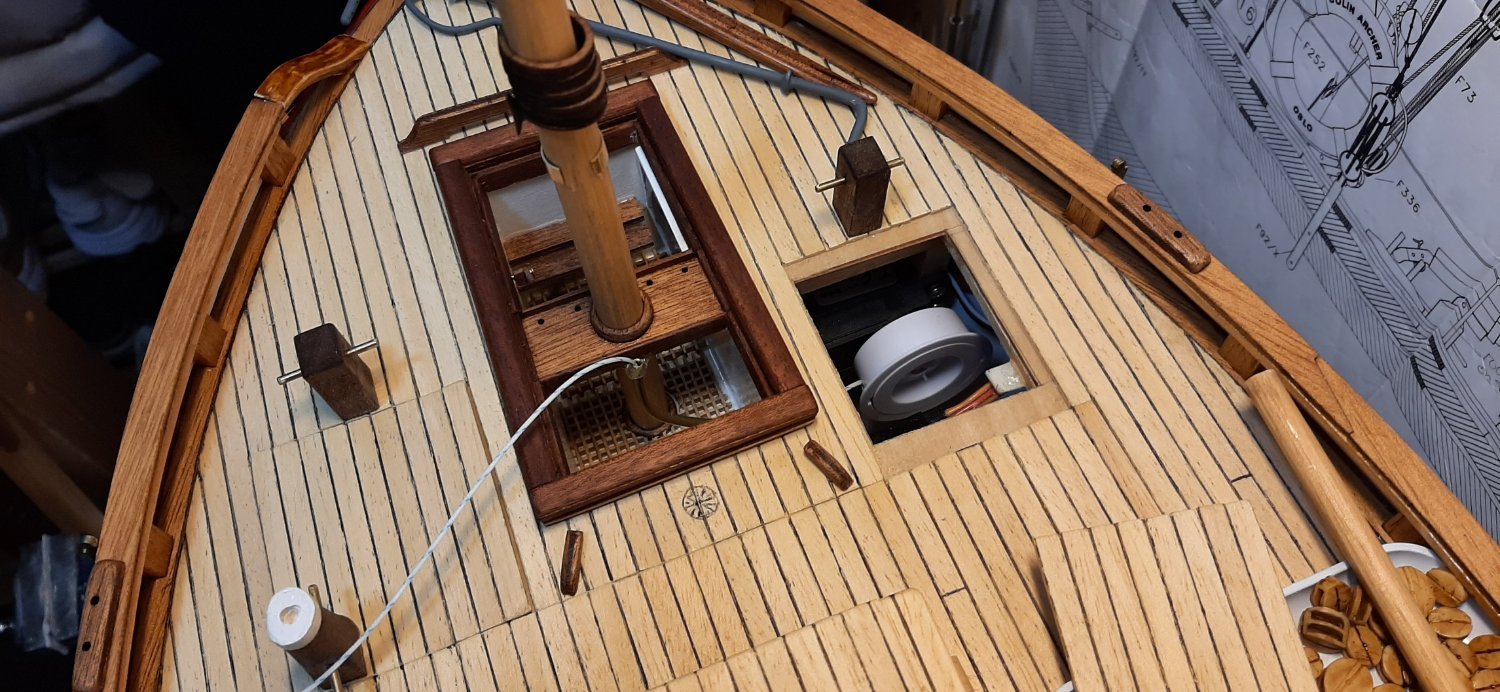
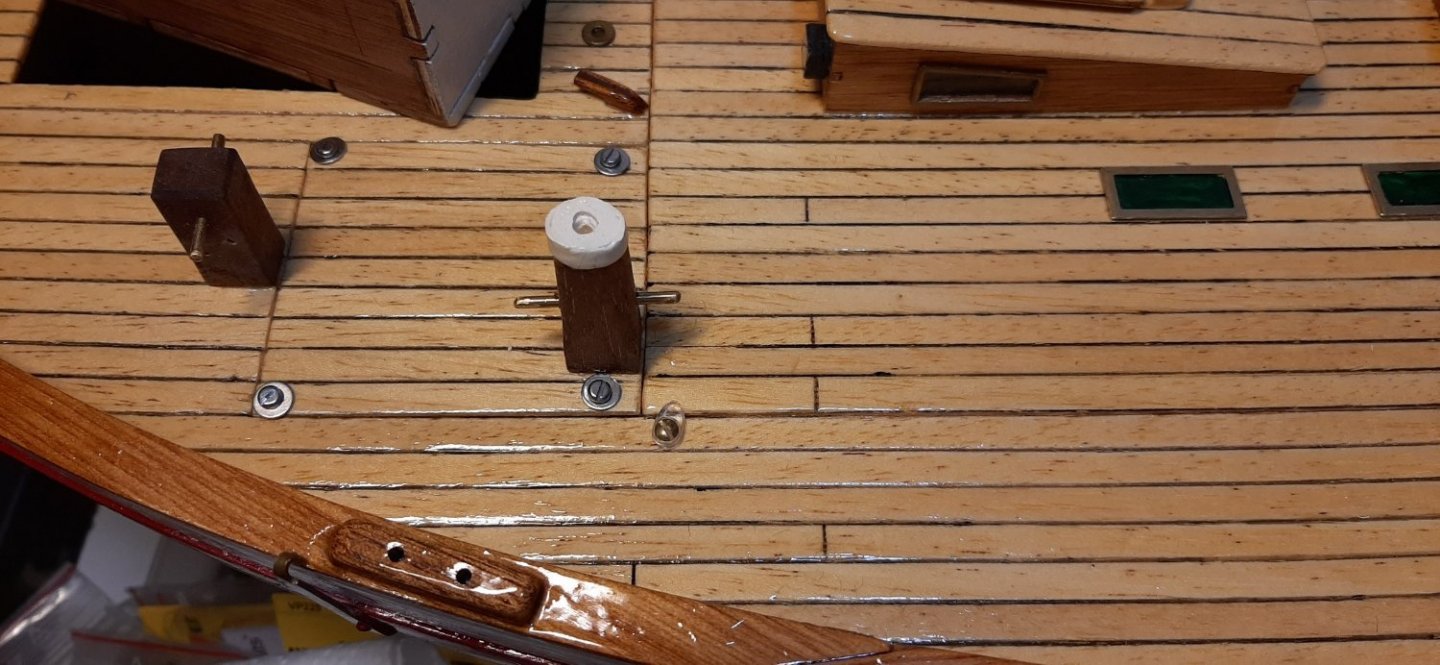
With the yacht back up in the flat again, I just had to test the look of the windlass on deck. The full size windlass is painted all black, but I will keep some of the brass rods unpainted to add a little contrast. In fact I will leave several of the real brass fittings unpainted. They can be painted black later if I feel for it. I am waiting for some 2mm brass nuts to arrive for the ends of some of the brass rods.
George
-
Hi Frodo,
I see that I have some other photos of the Sarik dinghy 'conversion' on file which are NOT on the modelboats album. Can you confirm that you can see the photos that I have posted on the modelboats album? There are about 6 more photos of construction detail I can post. Do you want them HERE on your own thread?
George
- Show previous comments 4 more
-
-
-
Yes, went a bit mad from the start in 2019 and onwards! Got a lot of help from many others who have posted on many different subjects. All very helpfull. Especially when scratch-building or building a kit with few instructions!
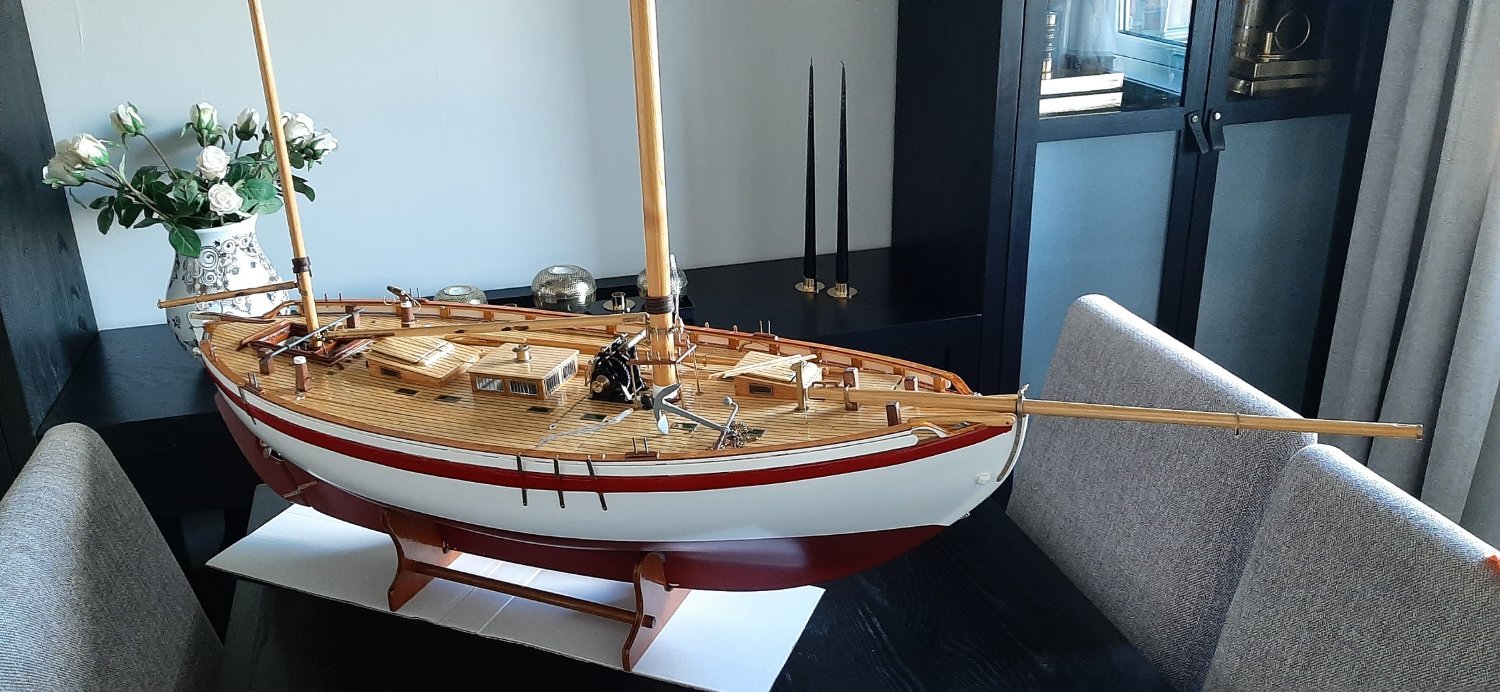
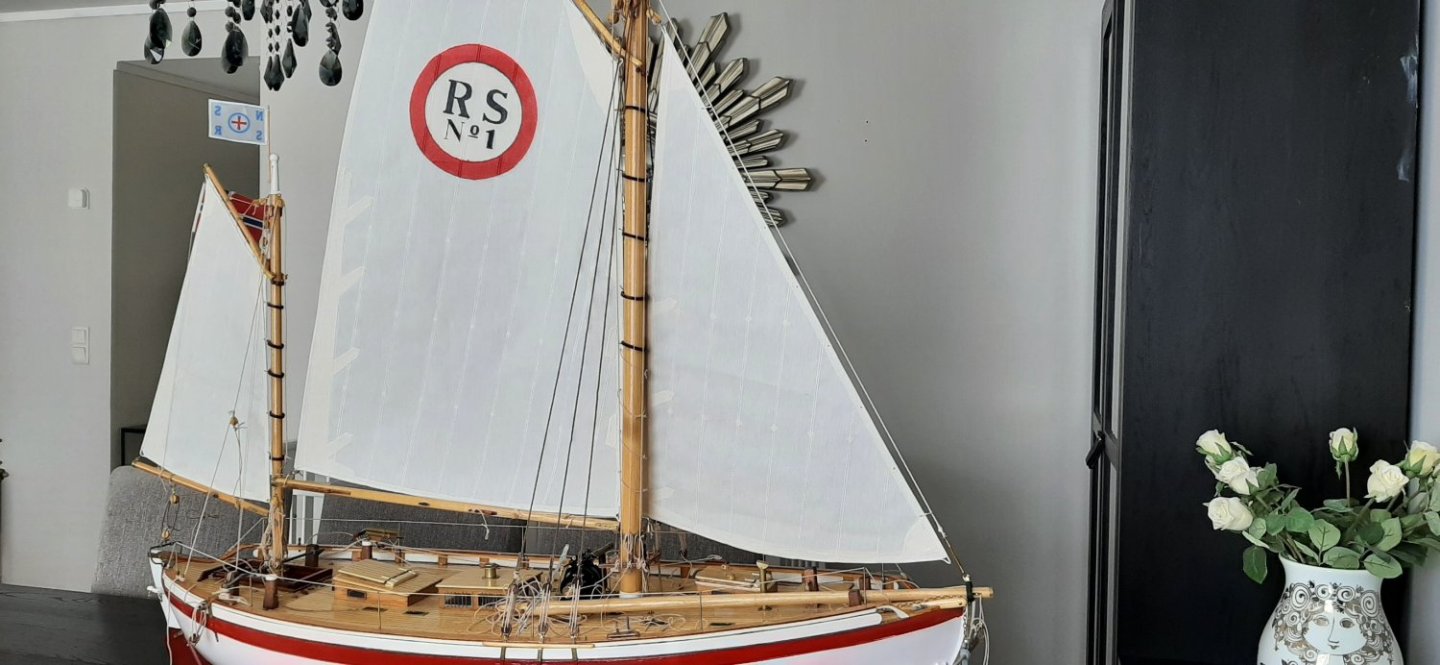
RS1 up from the 'paint shop'.....posting yet another photo very soon!
George
-
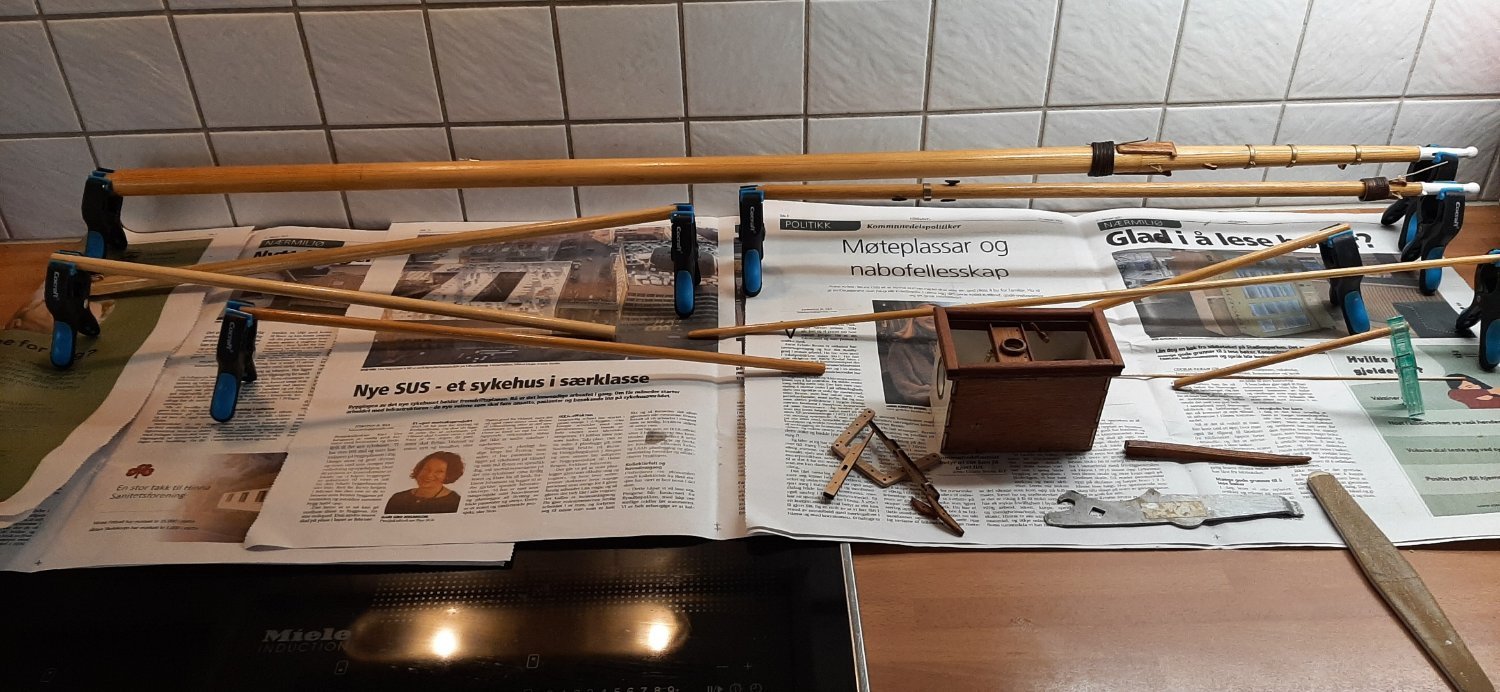
Started varnishing the masts and spars yesterday. Deck recieved first coat today. Hope to be finished with 3 coats on everything by Sunday Weather forecast is OK -so far!
George


-
-
-
I think there is a building sequence of photos in my Colin Archer album on the modelboats forum. I'll check.
George
I remember now....I built the jolle before starting on the RS1 !!, There is a photo sequence at the beginning of the album. Let me know if you need more info. Note that I put about 100gr of lead in the keel to give it some stability. I will try to tow it behind the RS1.
George
-
-
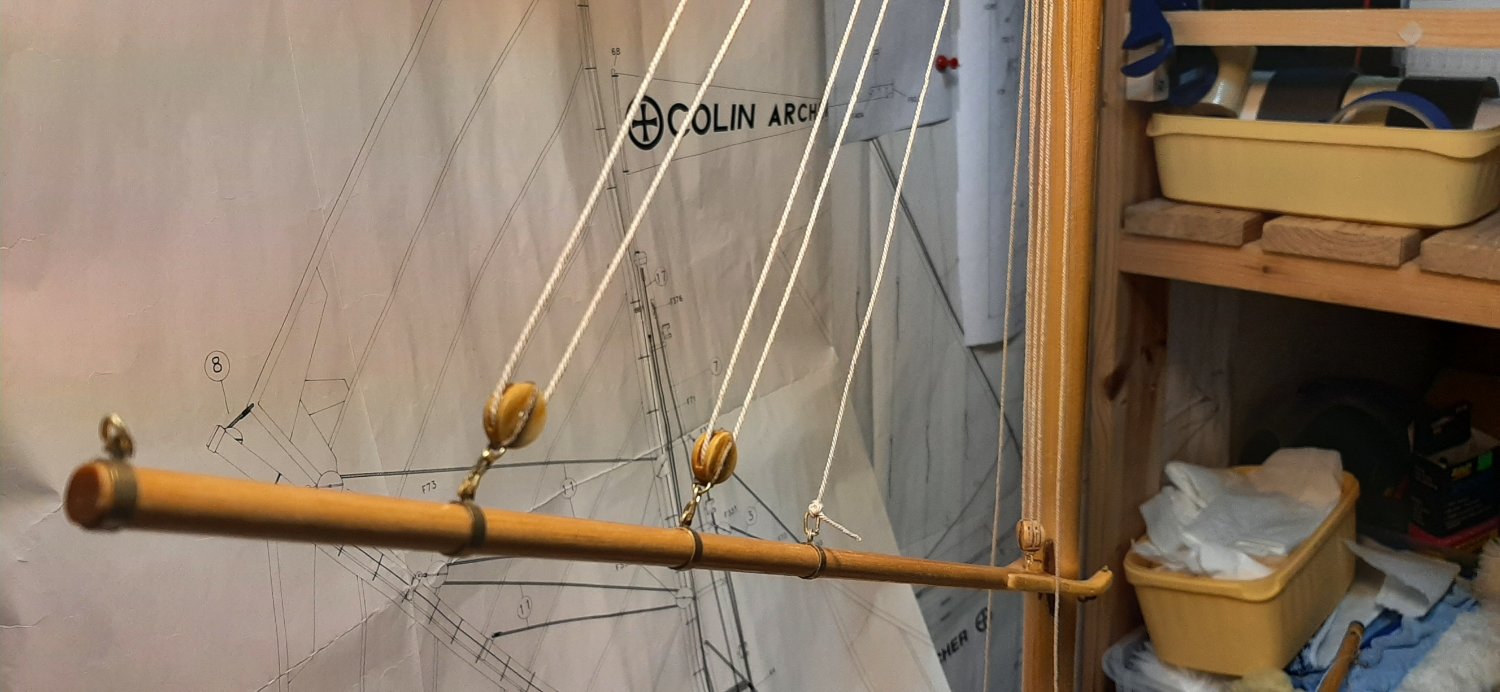
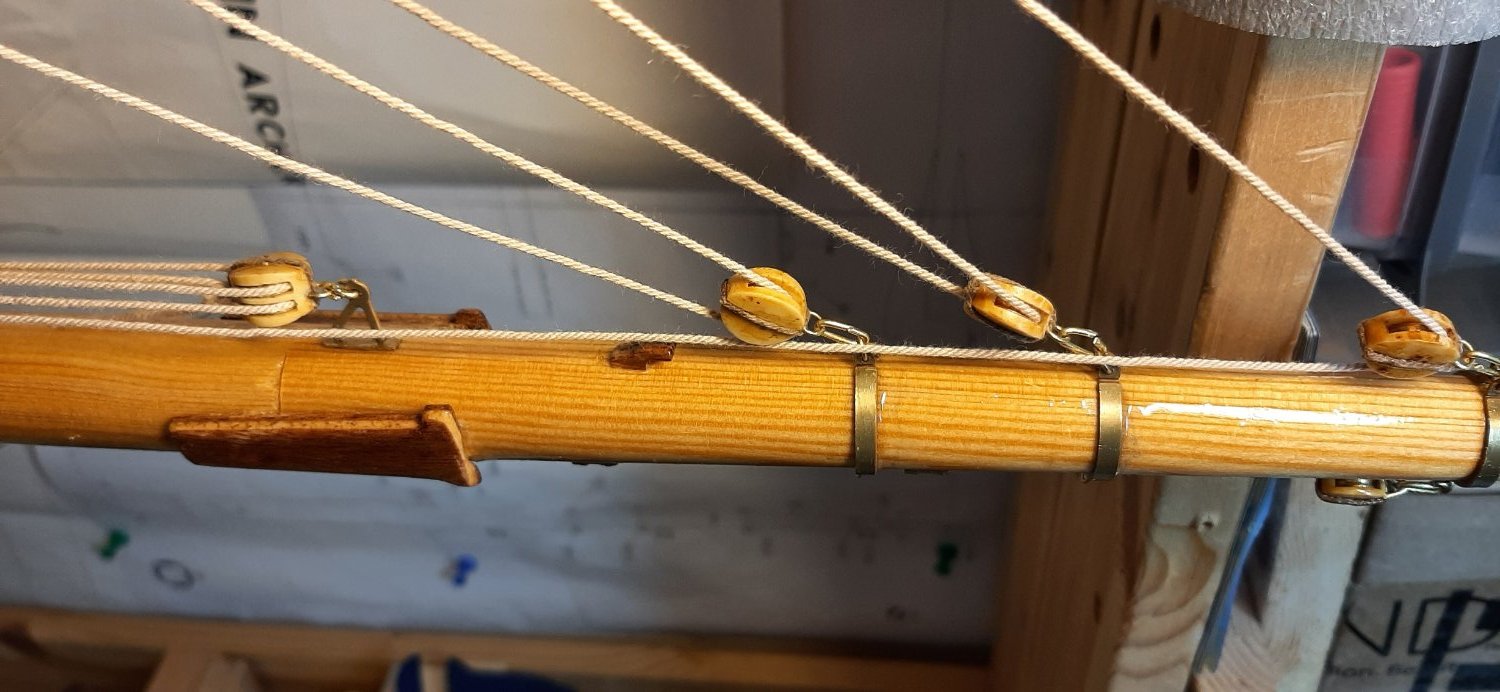
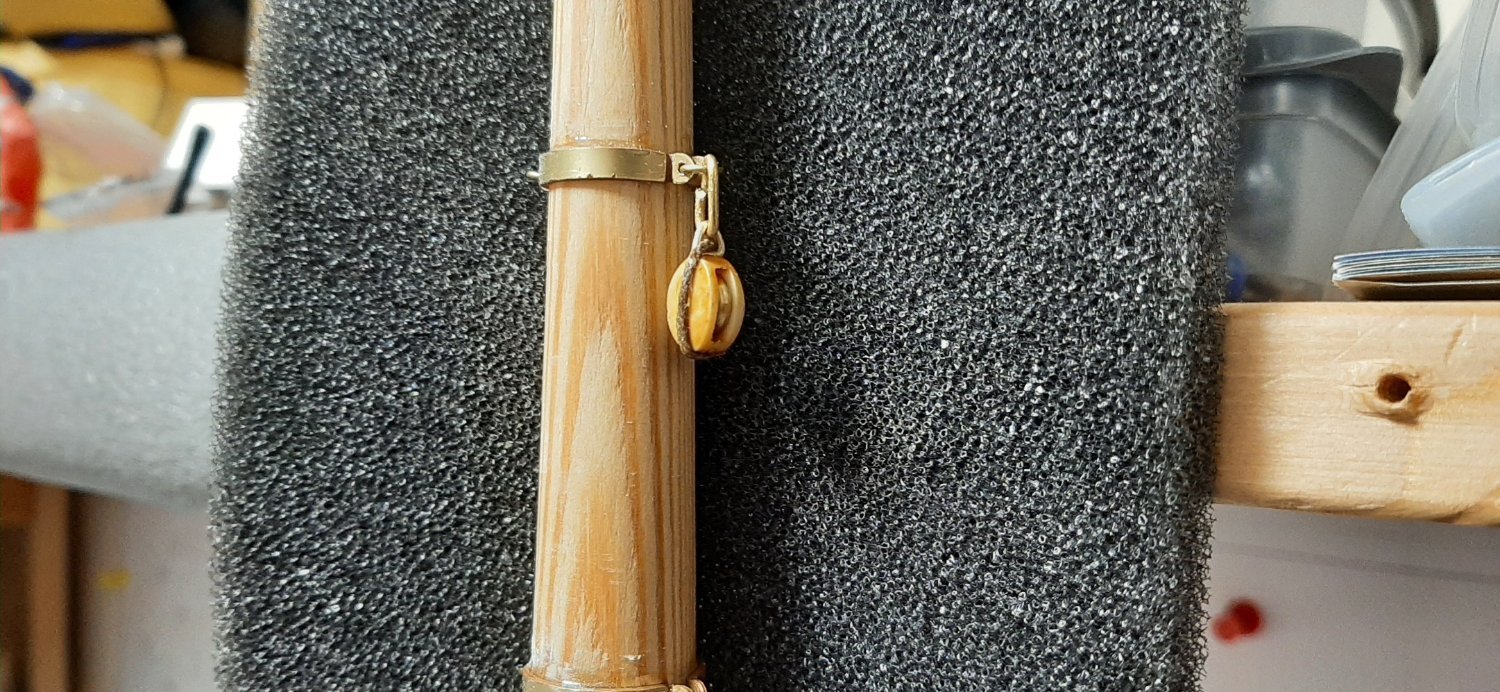
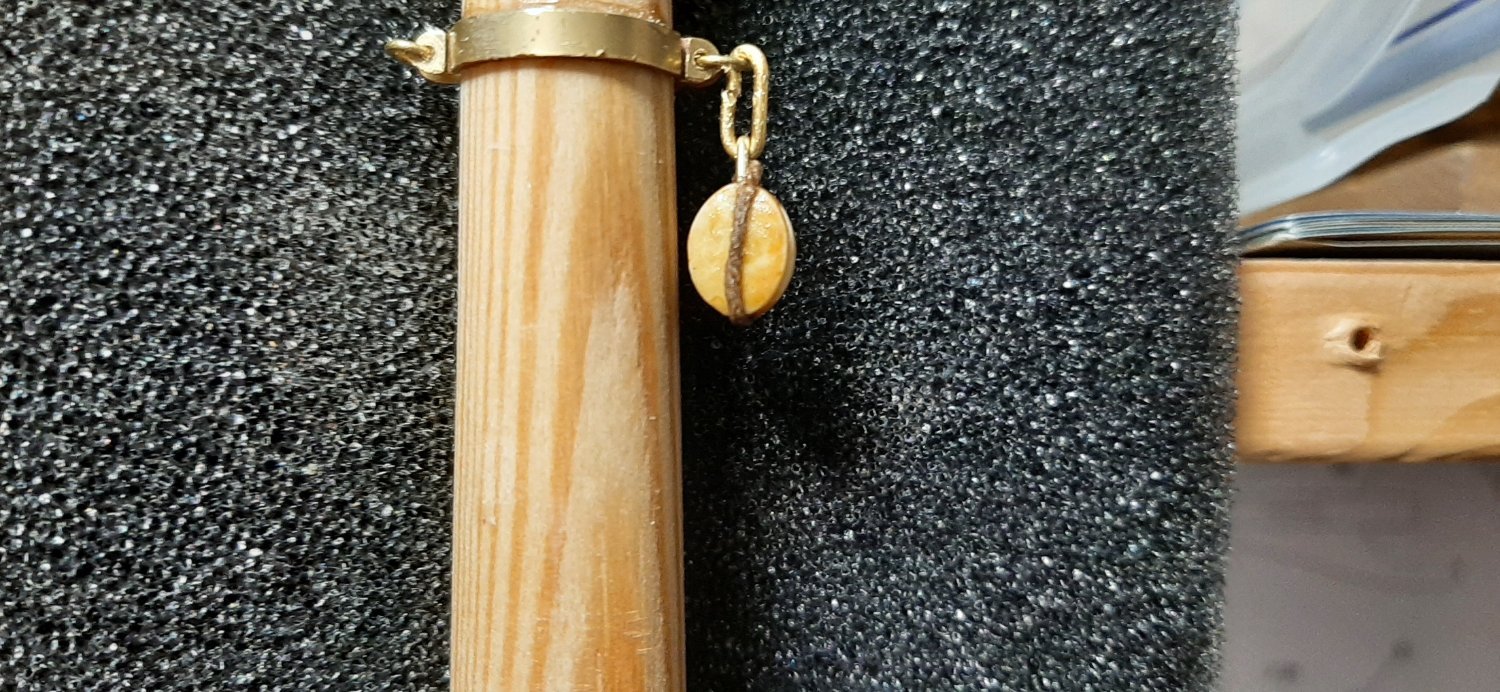
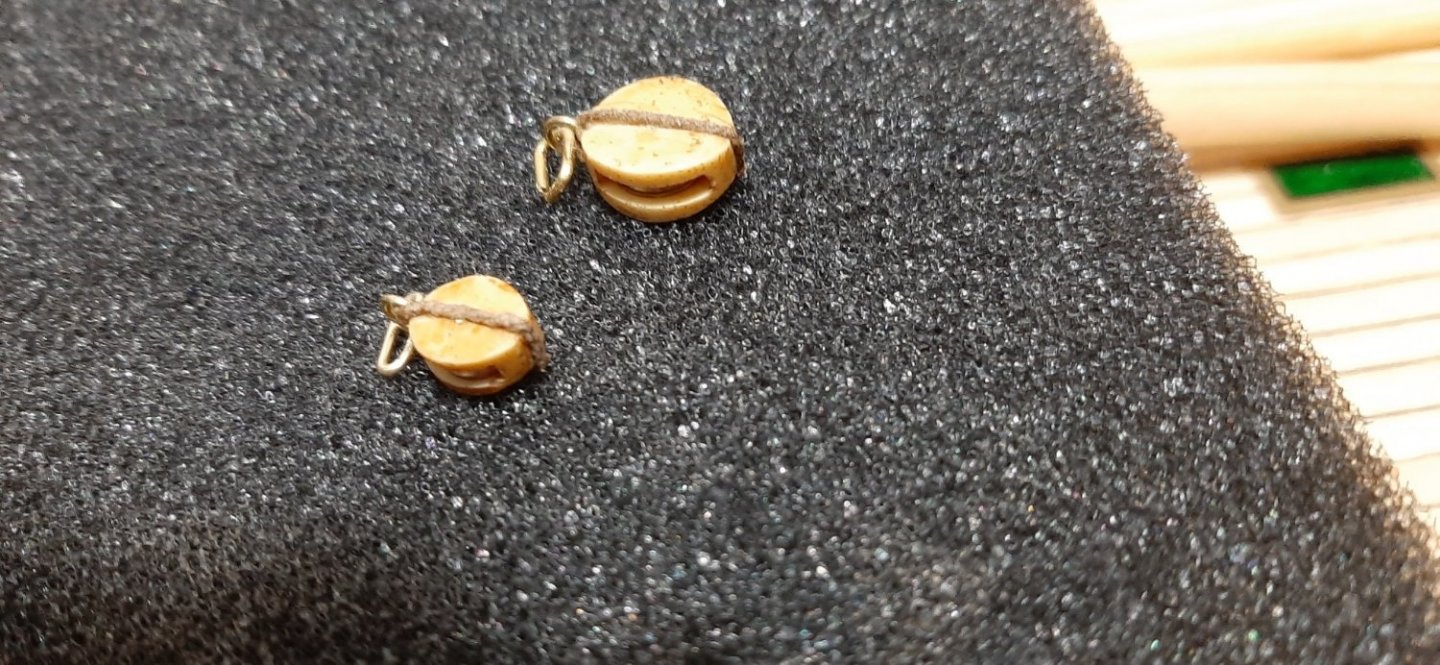
Made up 3 different blocks yesterday, with brass eyes and stained rope strops. Tested some different shapes of brass eyes and links. One block hung at the top of the main mast just for inspiration.
Only about 35 more blocks to go! This will take time.
George


-
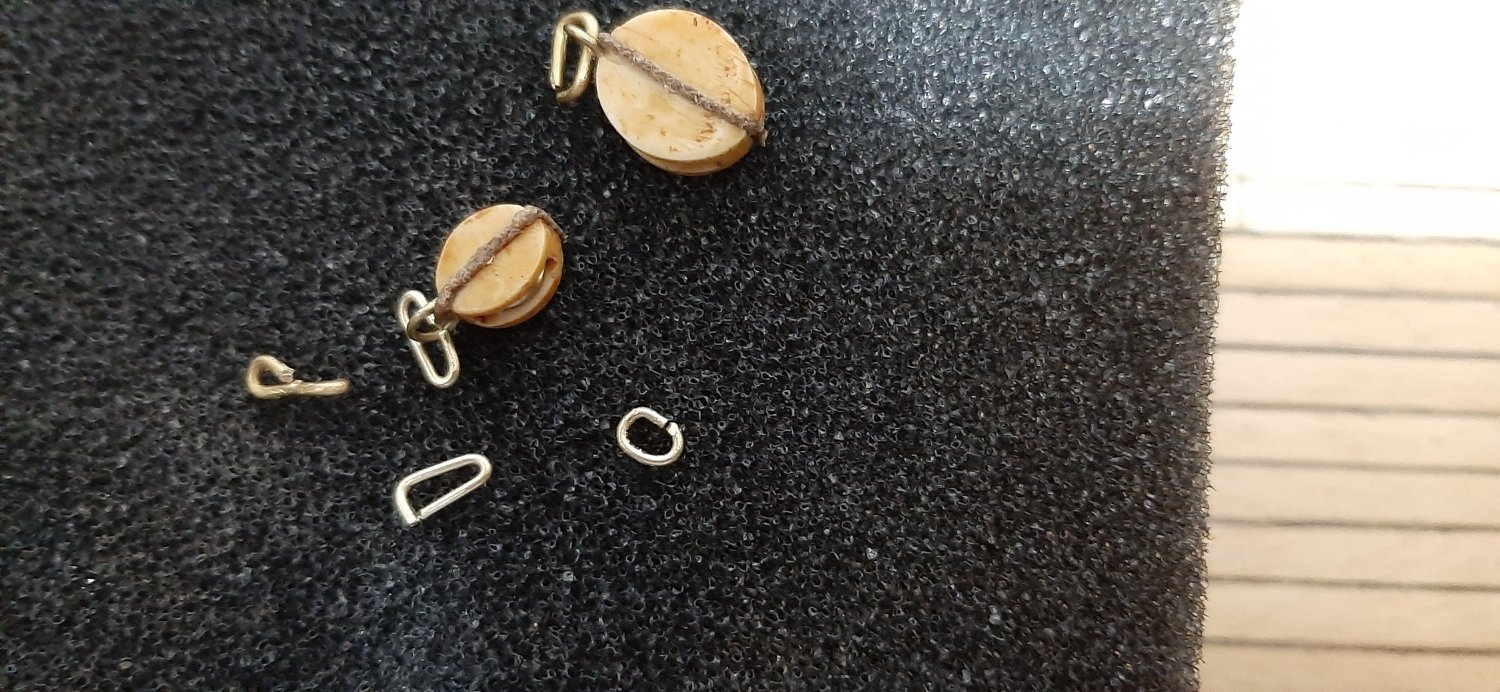
I have had a test-assembly of a few rigging blocks. The supplied plastic blocks have already been 'dipped' in teak stain. They came out looking more or less like those on the original RS1. Drilling blocks and fitting the sheaves went surprising well...but only did 11 of them yesterday....there's dozens more to do🥴. I thought that these blocks would be rather weak but they seem to be quite robust. The true test will come when I try to attach the 'rope' and ring -which I will try soon. The 'instructions' don't suggest how to construct strong blocks. I suspect that cyano' glue will be a prevalent feature here!
This has to be done in relation to how I will attach them to the brass mast hoops. The supplied brass rings seem a bit soft and I am afraid that they may fail under sail. May replace them with a short, 1mm brass rod. The flying headsail (klyver) will I think, stress the blocks a bit, although there are two blocks there -to share the load. The inner headsail is on a steel wire stay, so that will relieve those blocks considerably.
Instead of telling what I have done, I'm babbling about what I think I might do!! Not exactly informative....off to make some wake-up
 coffee.
George
-
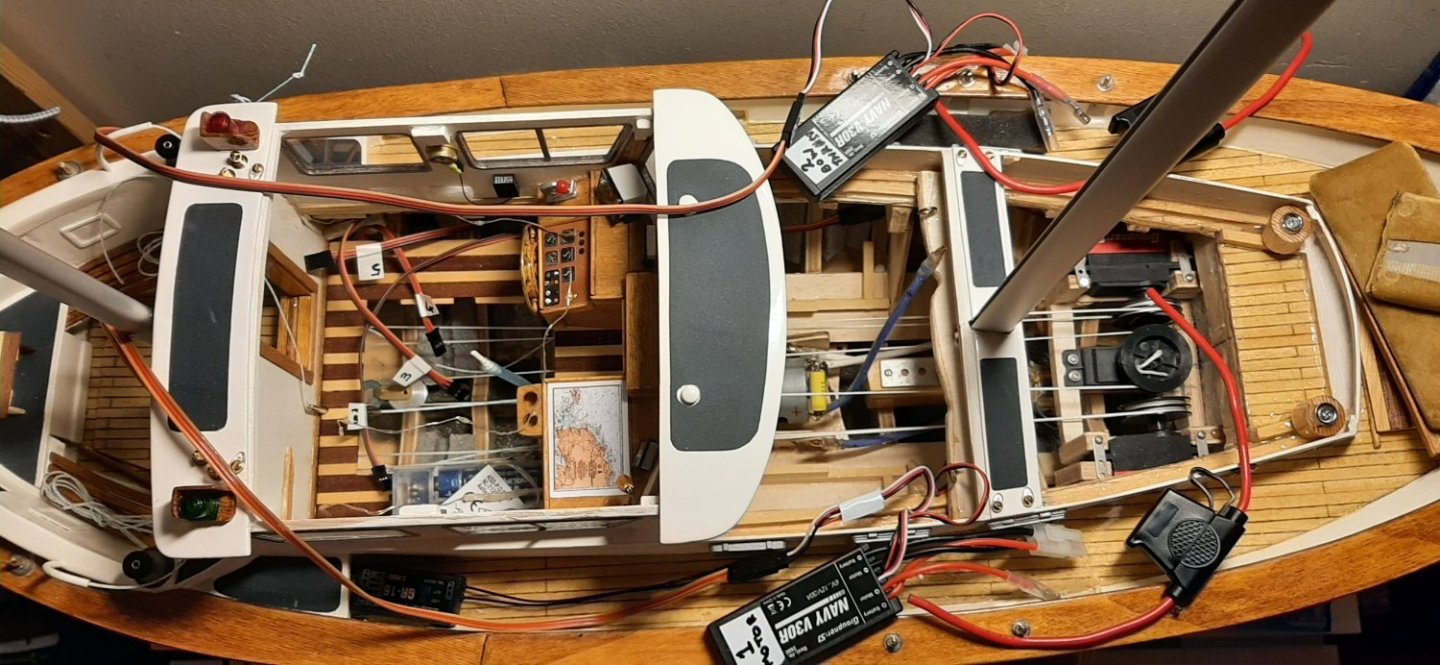
For R/C control I have decided to let the inner foresail (genoa?) tack freely but with some restraint from a thin round elastic (Ca 1-1.5mm) which will run on a short horse across the deck just forward of the pinrail.
The flying genoa (klyver sail, or whatever!?) will be controlled by one sailwinch mounted below deck, abeam the main mast. The sheets are guided by pulleys below deck to pass up through brass guide tubes which emerge on the side decks. It is hoped that the sheets will then run to the approx position of the scale mounted blocks for the 'klyver' sail.
If the scale kit blocks fail to function properly, I will mount additional brass blocks near these and the kit blocks will just be there for show.
The mainsail will be controlled by a winch mounted aft abeam the cockpit / steering well. The sheet from this will emerge from a brass guide tube positioned just below the guide ring (part 505) on the forward side of the mizzen mast. It is hoped that the mainsail will then be controlled by simply pulling the boom in to centre and letting it out again on the next tack.
The flying genoa cannot be controlled so easily though. I think it will have to be physically PULLED from side to side across the forestay of the inner foresail (genoa?) Otherwise it will get 'stuck' on the windward side when tacking.
The mizzen sail will also be restrained-only and not controlled, by a 1mm round elastic from the mizzen horse, up to the mizzen boom.
Hope it all works...I'm rather committed to the plan now!
George
-
Ahhh, so it's Gringo Bob to the rescue! I have in fact have had e-mail correspondence with him about headsail control ...and the Fisher 34 layout. Yes you will need som space in the hull to do this. I am not sure that it is needed in the case of the RS1 though. Fisher 34 was a nightmare of 'string' below decks. I've seen some YouTube videos where the headsail is simply left to be on the wrong (windward side) on one tack, but the RS1 still seems to sail OK. But it looks a bit strange! So long as it floats, it'll look good anyway! George

-
Photos on the boxtop......mmm I seem to have sent them to someone in the post!😁 But I have photos of the boxtop...many say that the boxtop gives more build info' than the "look-alike instructions" Is the hole in the hull for the rudder linkage well sealed? It seems very near the waterline. I'm studying your idea for controlling both foresails. I have not taken any measurements myself yet, but I think that the clew if the inner sail will have to be able to move through an arc of approx 15-20cm. The clew of the klyver will need to move through much more because it has to go all the way around the forestay when tacking. Maybe a block on the inner sail would give a 50% reduction and reduce the movement of the foresail clew -in relation to the klyver. I'm thinking while I'm writing, and that's not always a good idea for me! I'll have some breakfast then think while actually looking 🧐 at the RS1 deck! You are doing great things with your RS1, and kindly giving tips about the build to the 'world'. Keep up the good work. I look forward to seeing your sailing videos on YouTube! George
-
Your 'nr3' ropework seems good to me! Thanks for finding F697. It's clearly marked on the drawings for the top half of the sailplan, but I did not see it! Not sure yet if F697 for the top of the flagline or part of the mizzen rigging. Don't know why I have 2 more than in the parts list. Will find somewhere to put them. Part F92M is a 'rudder horn' -to attatch the rudder servo to the rudder. It is nicely marked so you can bend it to 90* I will consider chainlinks to strengthen some of the parts. Where did the chain come from? Clas Ohlson?...etc. Made something like that on the Fisher34 but can't remember where the chain came from! George
-
For R/C control I have decided to let the inner foresail (genoa?) tack freely but with some restraint from a thin round elastic (Ca 1-1.5mm) which will run on a short horse across the deck just forward of the pinrail.
The flying genoa (klyver sail, or whatever!?) will be controlled by one sailwinch mounted below deck, abeam the main mast. The sheets are guided by pulleys below deck to pass up through brass guide tubes which emerge on the side decks. It is hoped that the sheets will then run to the approx position of the scale mounted blocks for the 'klyver' sail.
If the scale kit blocks fail to function properly, I will mount additional brass blocks near these and the kit blocks will just be there for show.
The mainsail will be controlled by a winch mounted aft abeam the cockpit / steering well. The sheet from this will emerge from a brass guide tube positioned just below the guide ring (part 505) on the forward side of the mizzen mast. It is hoped that the mainsail will then be controlled by simply pulling the boom in to centre and letting it out again on the next tack.
The flying genoa cannot be controlled so easily though. I think it will have to be physically PULLED from side to side across the forestay of the inner foresail (genoa?) Otherwise it will get 'stuck' on the windward side when tacking.
The mizzen sail will also be restrained only -not controlled, by a 1mm round elastic from the mizzen horse, up to the mizzen boom.
Hope it all works...I'm rather committed to the plan now!
George