Dale Hallier
-
Posts
43 -
Joined
-
Last visited
Content Type
Profiles
Forums
Gallery
Events
Everything posted by Dale Hallier
-
Do you think that these paints would have to be airbrushed only, or could they be applied with brushes and still approximate the weathered effect? Can you further describe the difference between version 1 and 2, because I really have appreciated your review and would like to purchase this for my next build. Thanks for all your work!
- 3 replies
-
- 1
-

-
- san bartolome
- stand
- (and 1 more)
-
Your build is looking great-glad to see your progress!
-
Thanks Penfold. I am doing a much simpler Victory cross section next and then I will try the Bluenose and see if I can get the planking looking as good as yours!
-
Thanks guys. I think part of the problem is that the start of the ship is so easy and quick with the bulkheads that it seems easy, but then the more challenging work is yet to come! Still, a good experience for me. On to a Victory cross section next.
- 59 replies
-
- 2
-
-
- DeAgostini
- Victory
- (and 1 more)
-
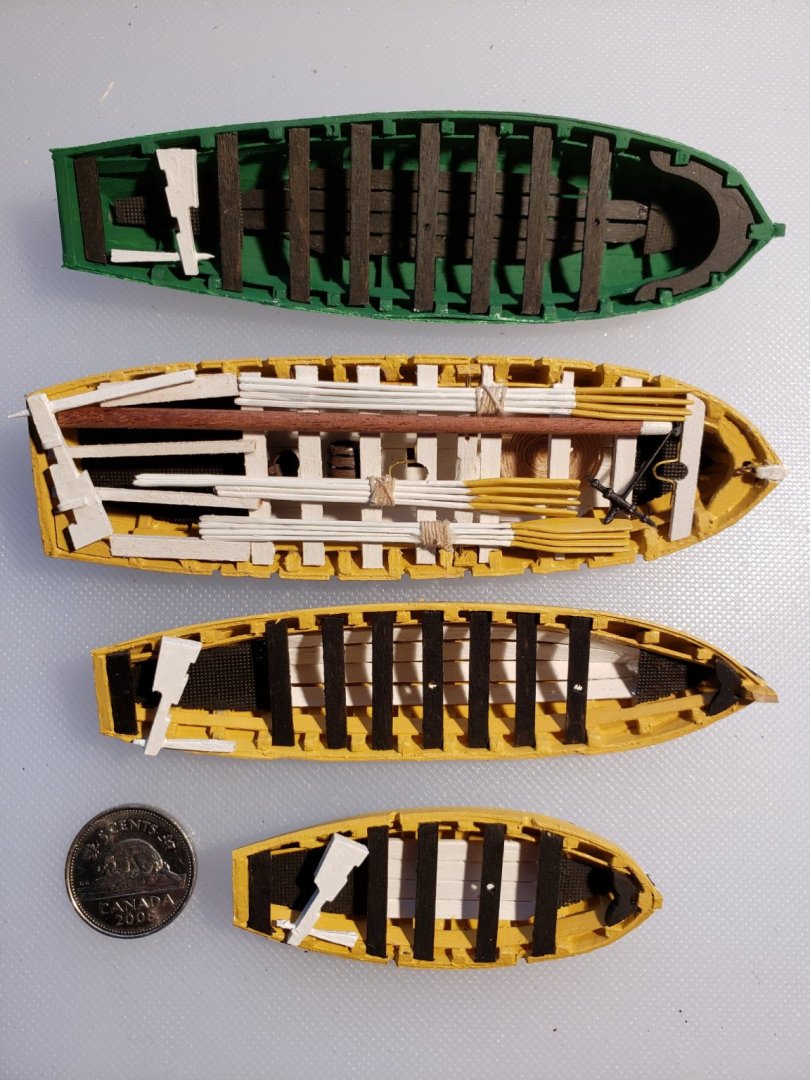
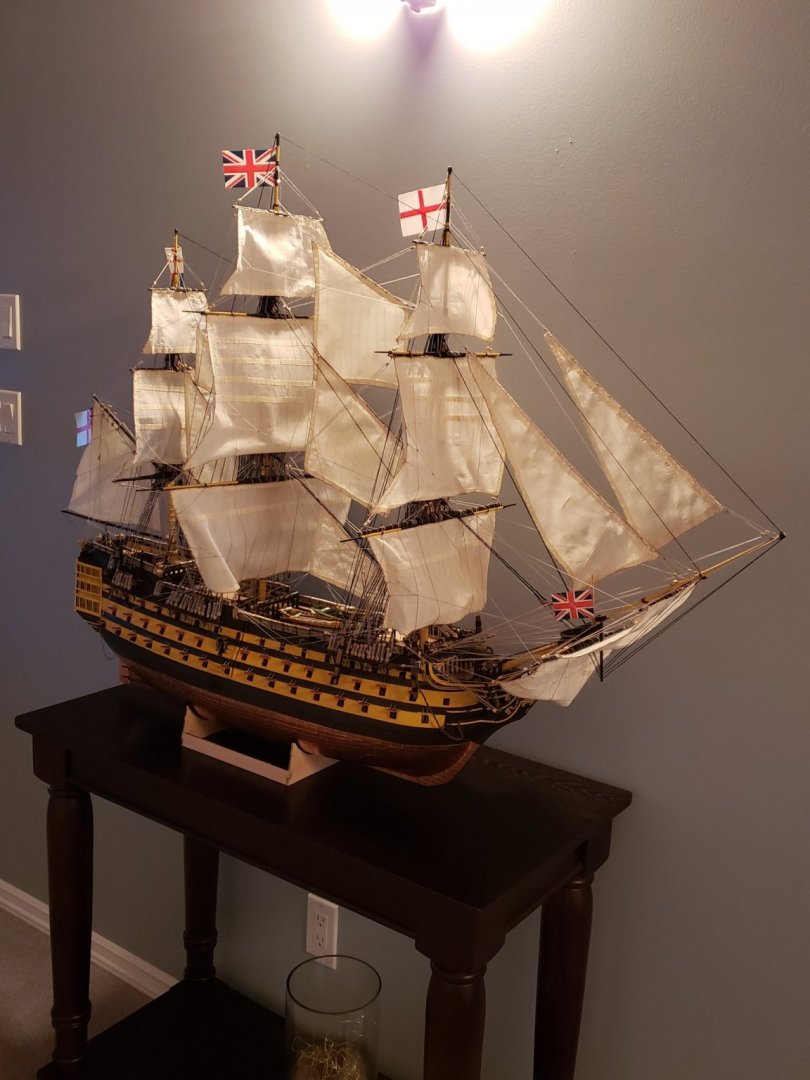
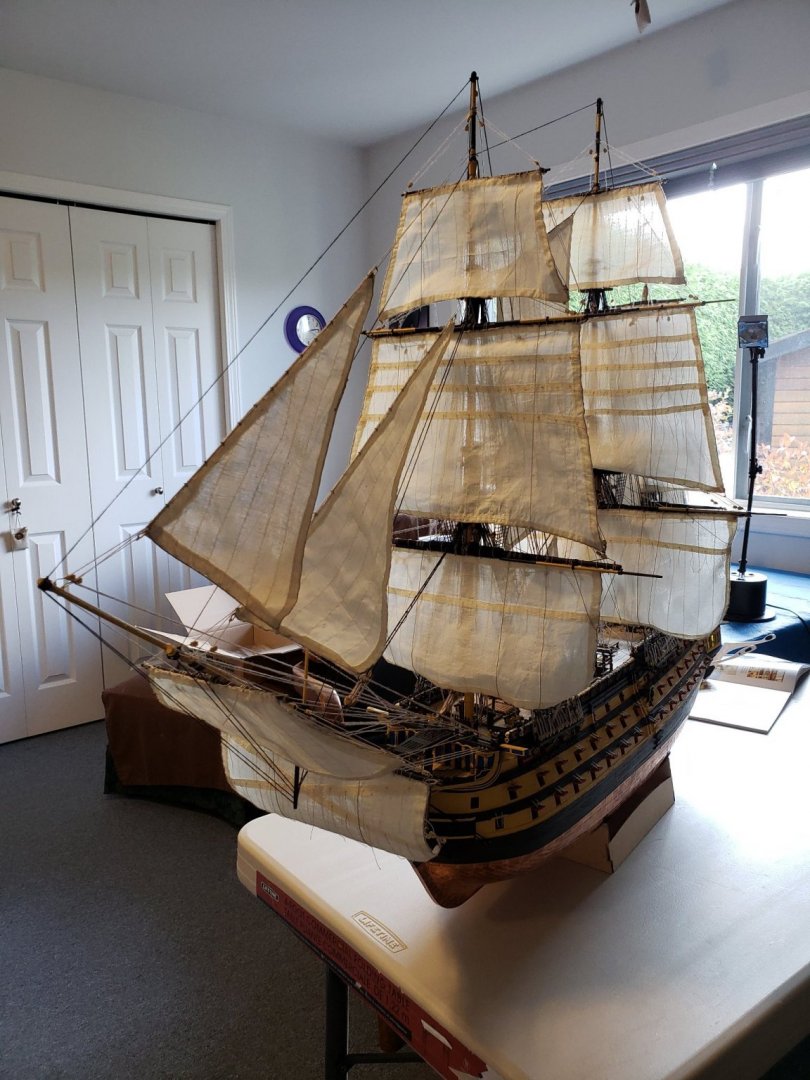
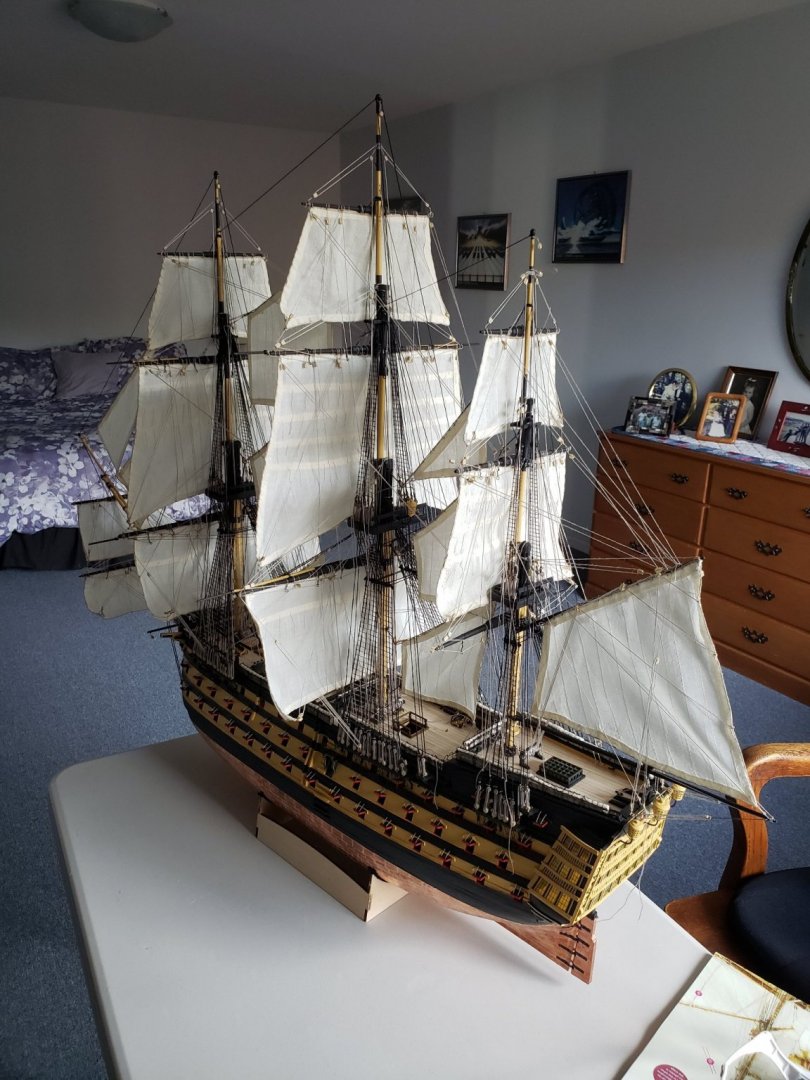
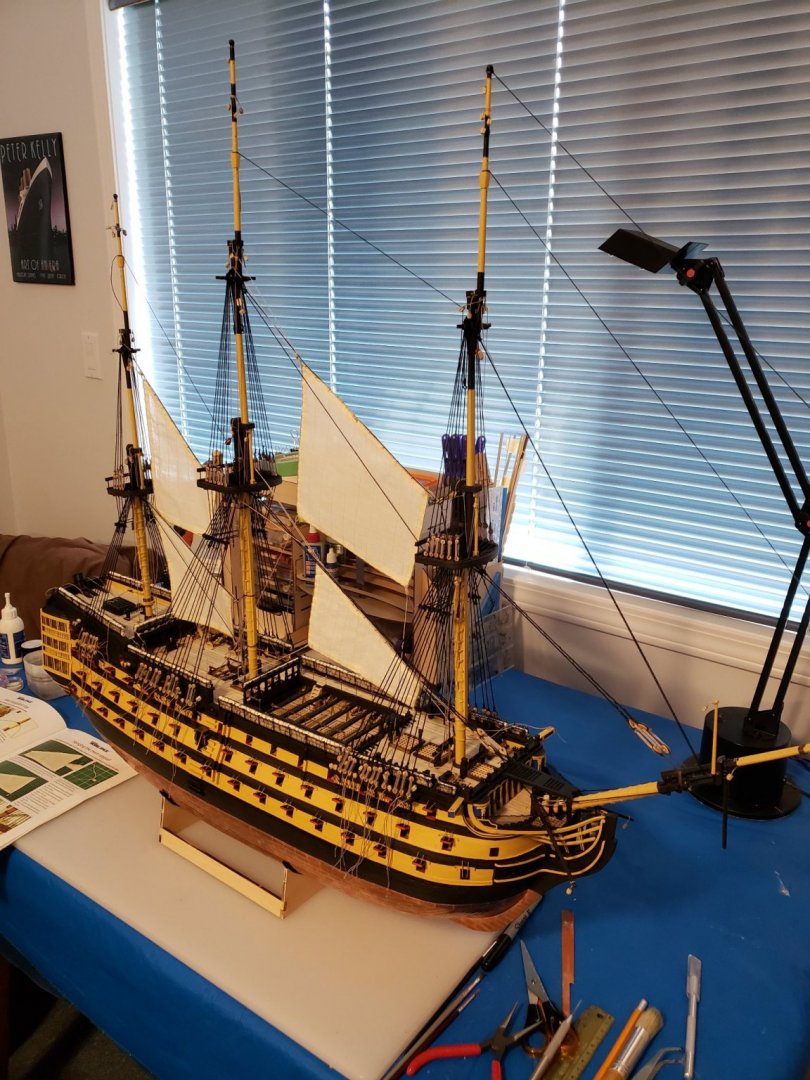
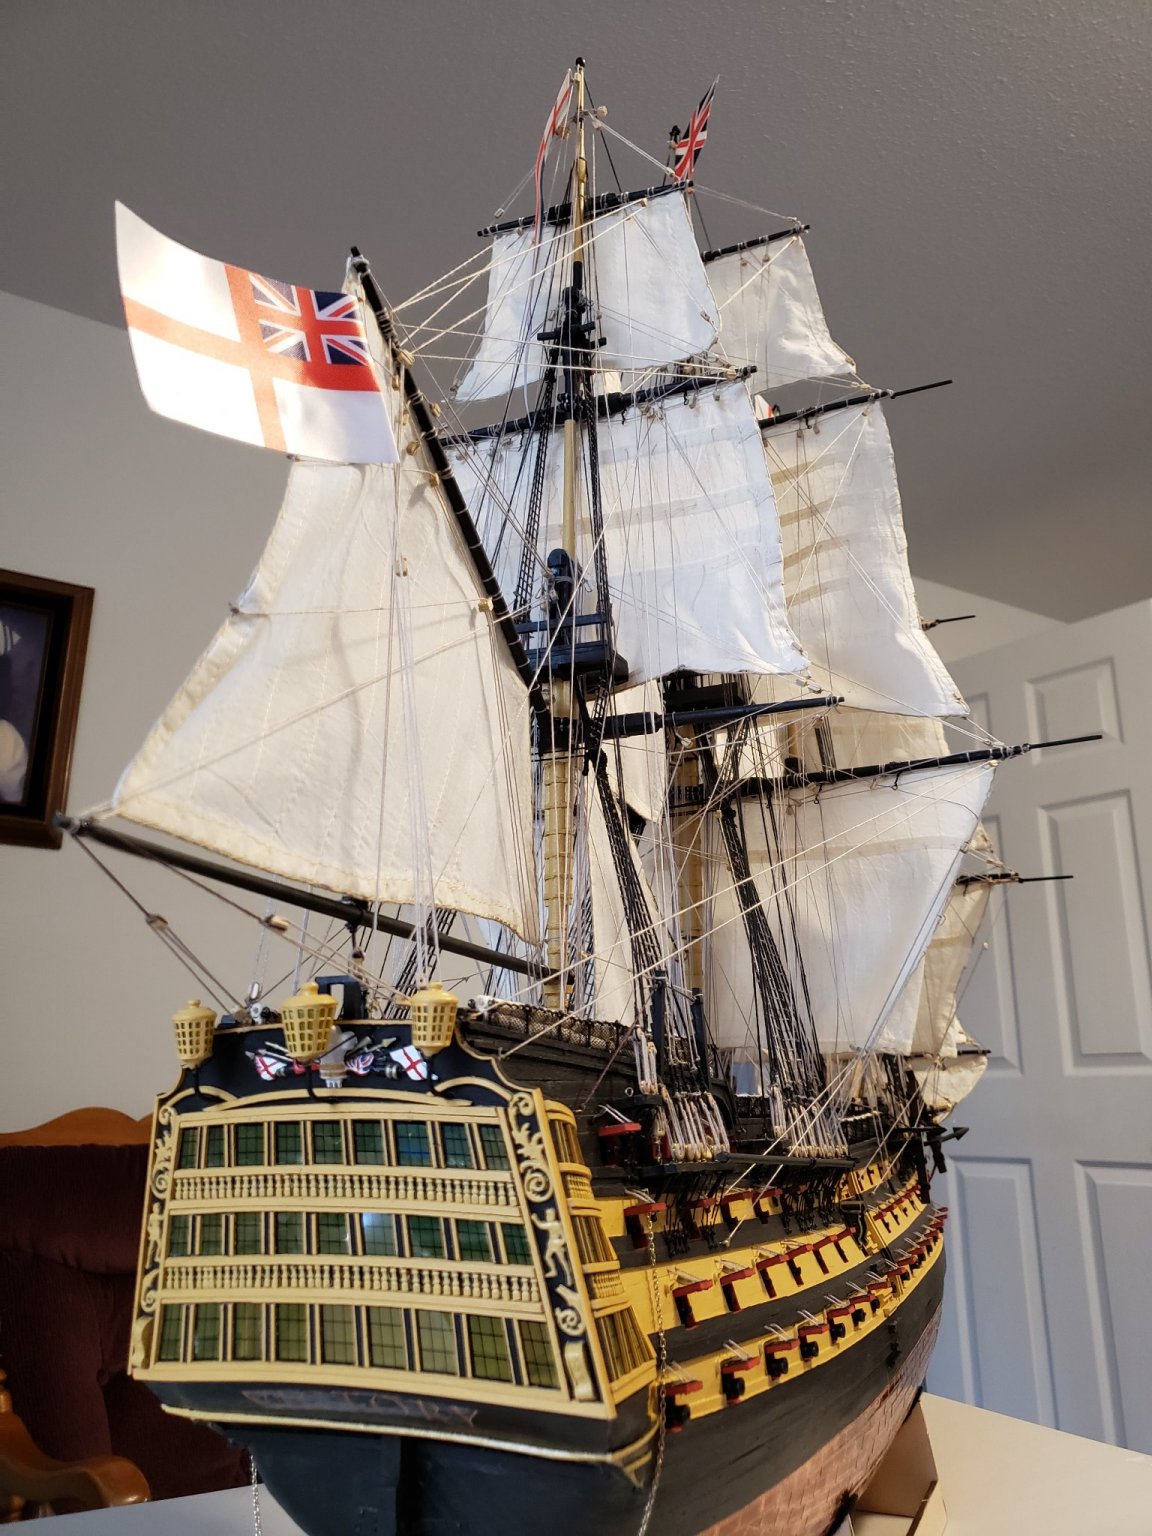
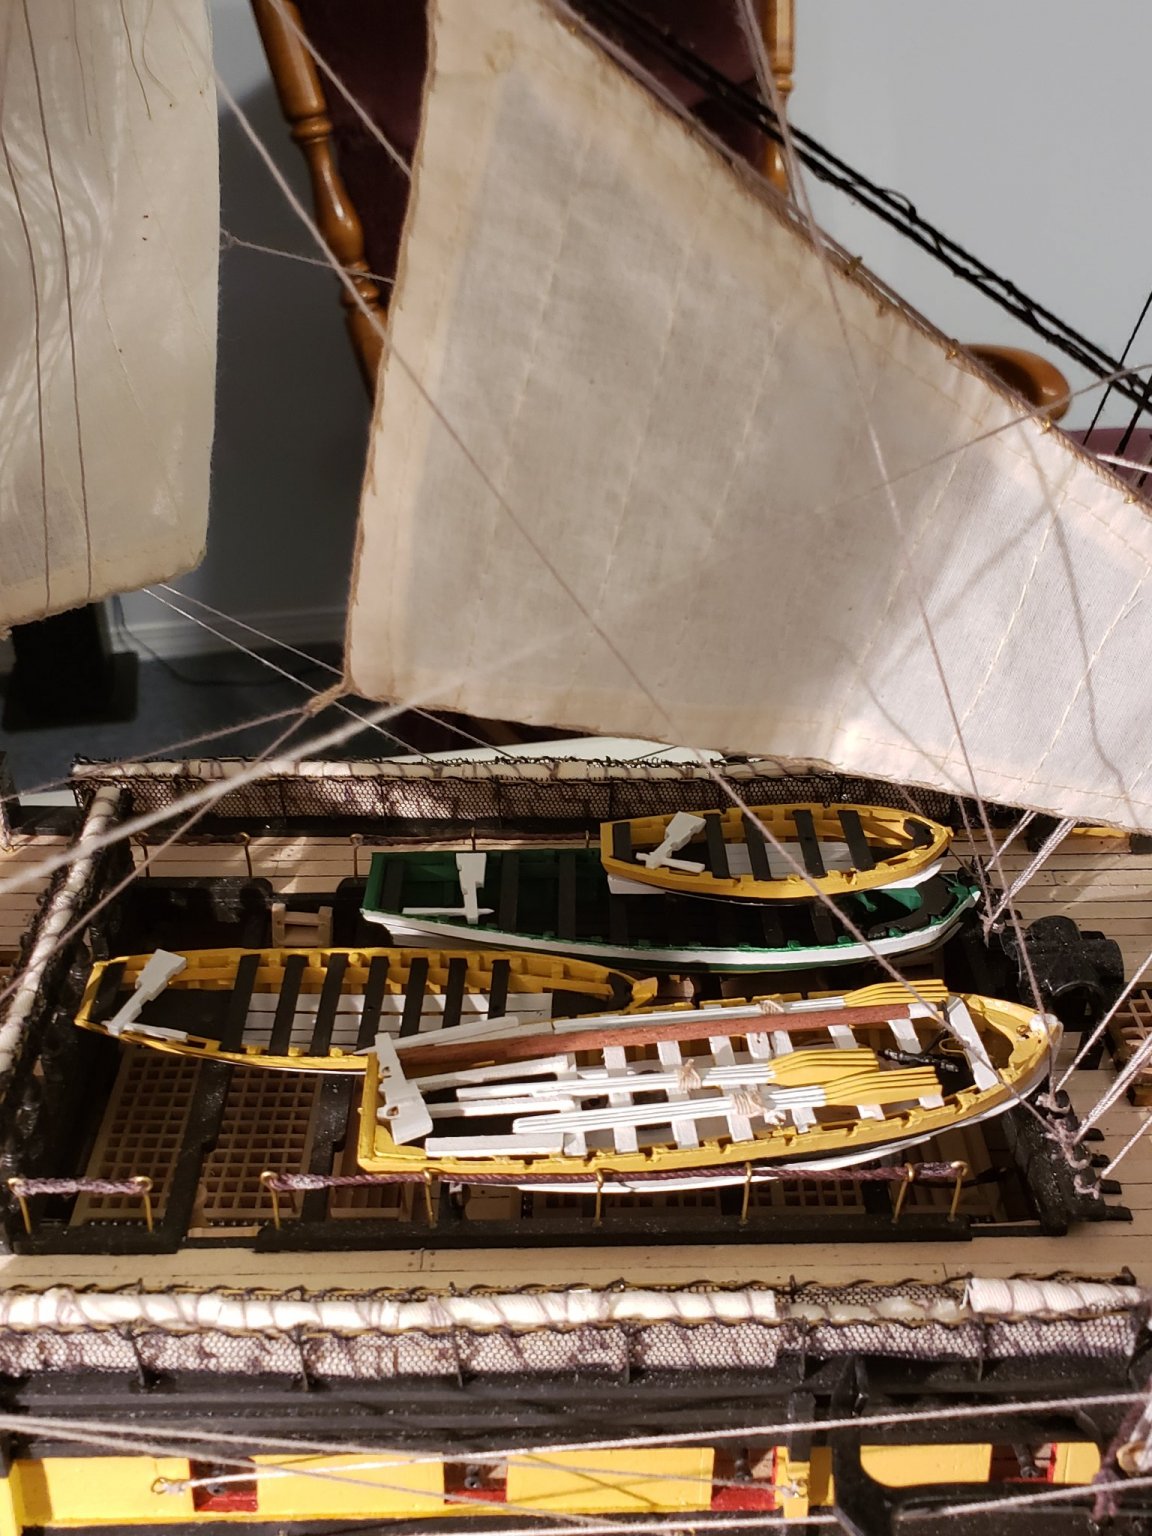
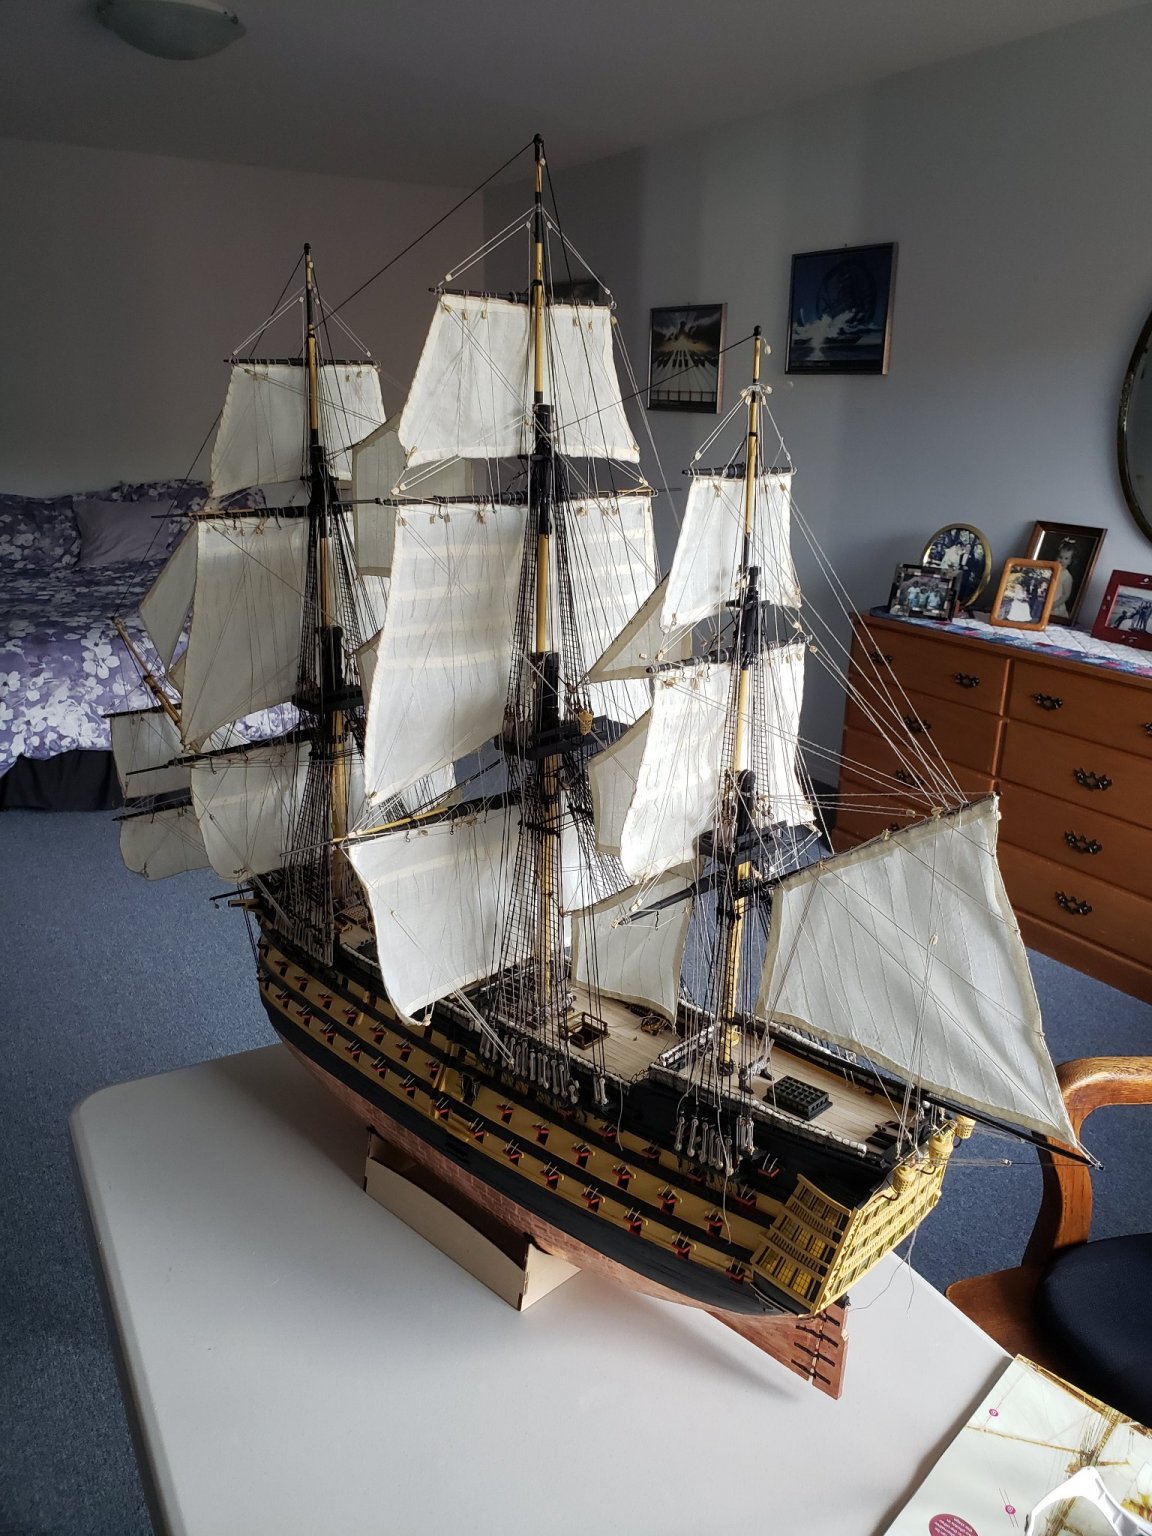
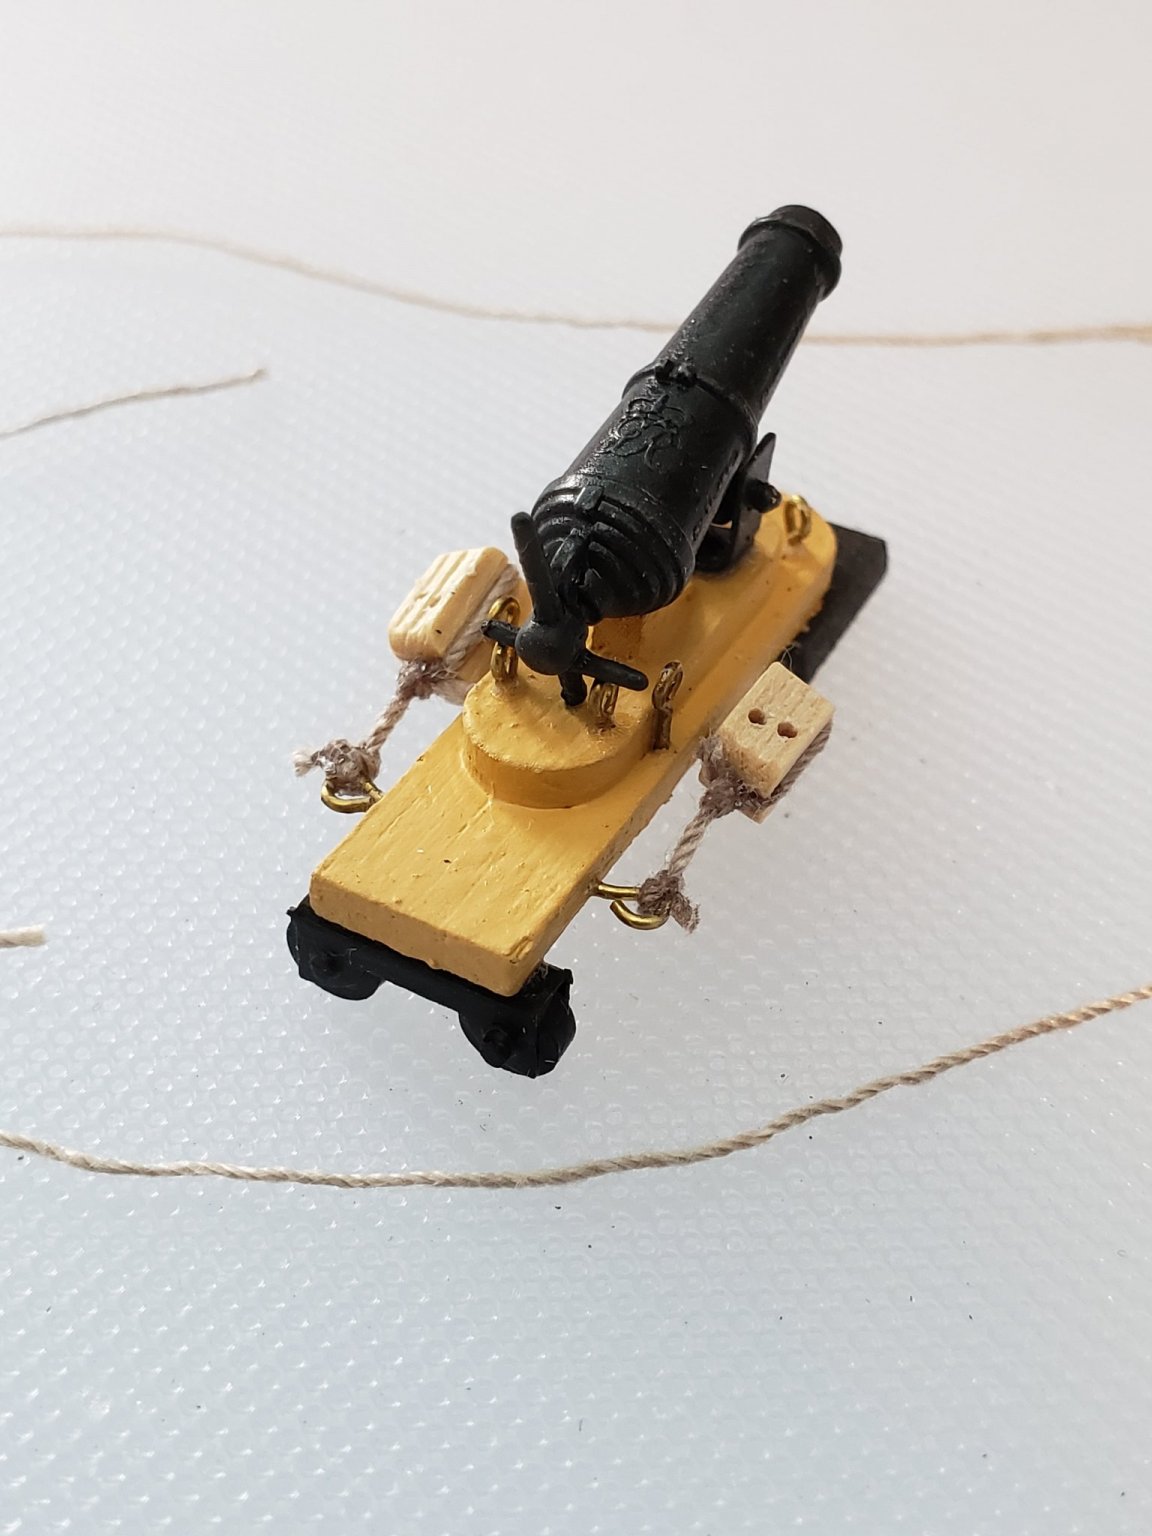
Well, almost 15 months to the day and she is finished! I made the four ship's boats and placed them on the skids (unfortunately blocking so much hard work under them that no one will ever see) and put in the dummy cannons. After flags were added, it is a finished model. Things could be improved, but I have really enjoyed the process and learned a lot. I am relieved to finally complete this mammoth project! Now it can rest in a place of honor at home - and I still have to make a case!


- 59 replies
-
- 9
-
-
- DeAgostini
- Victory
- (and 1 more)
-
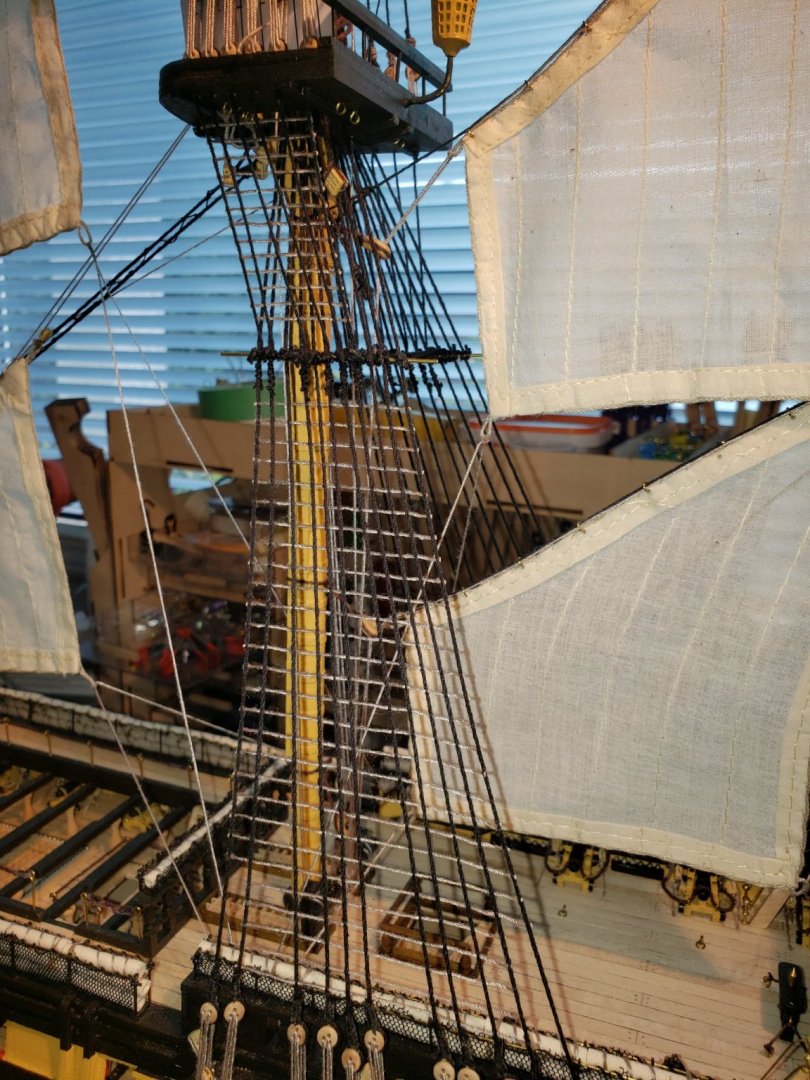
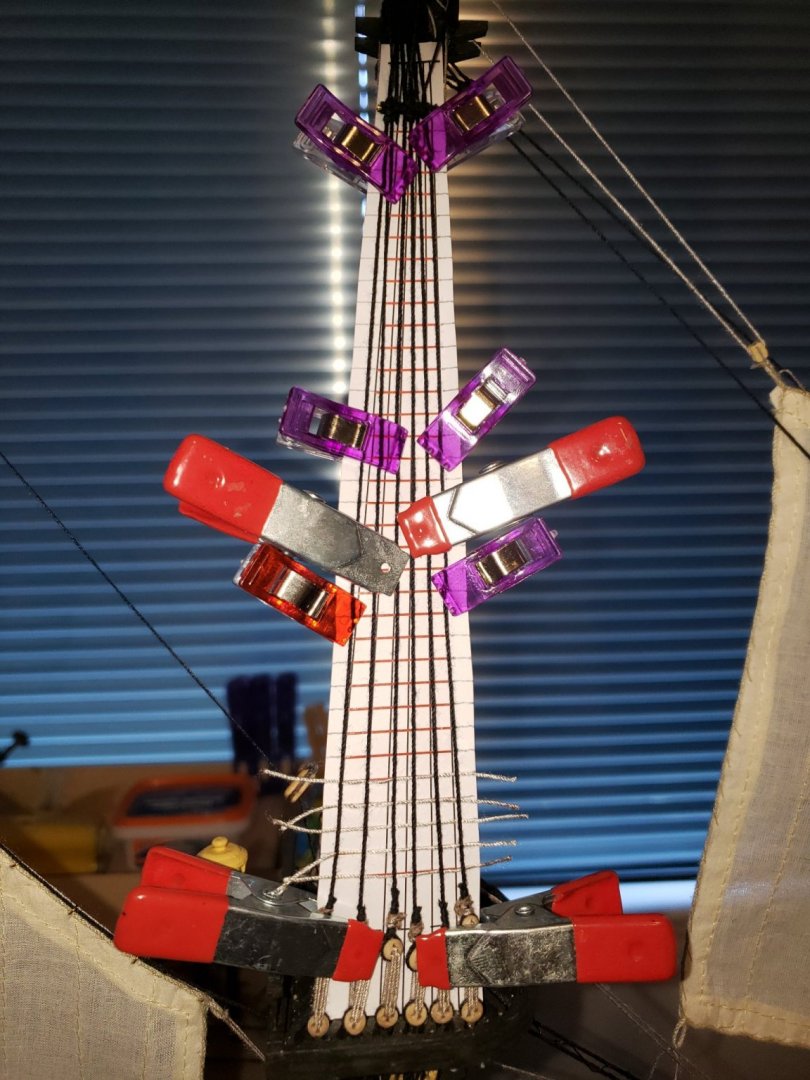
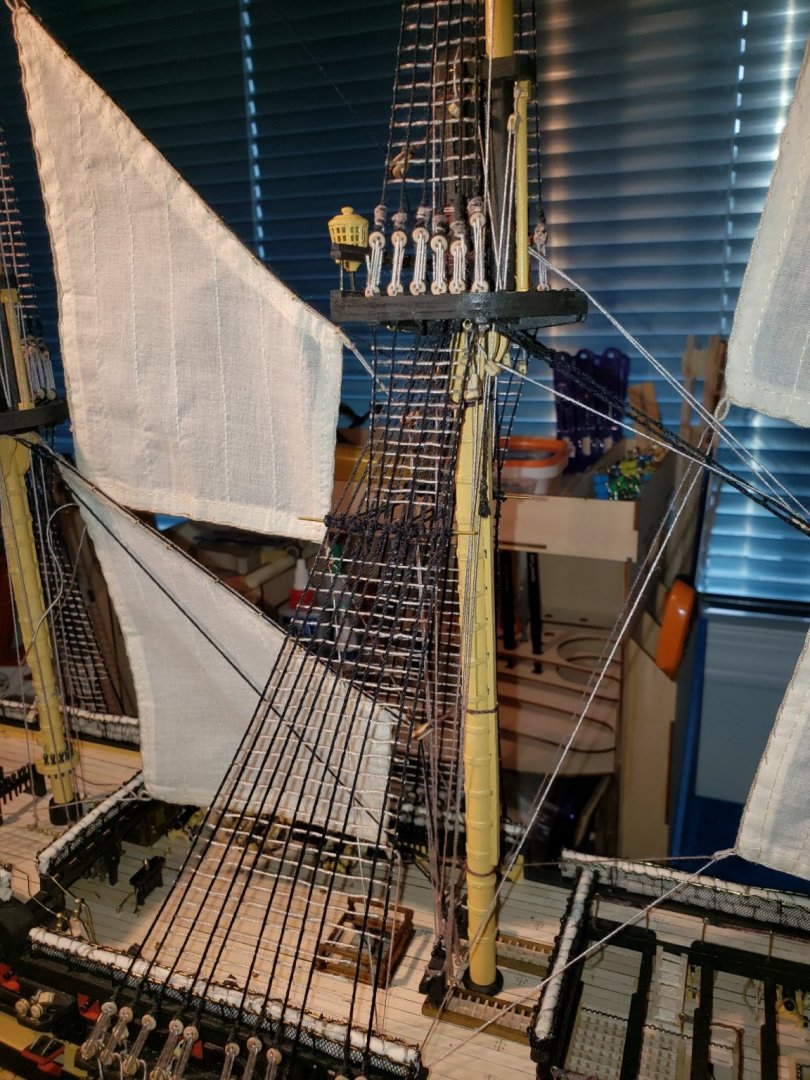
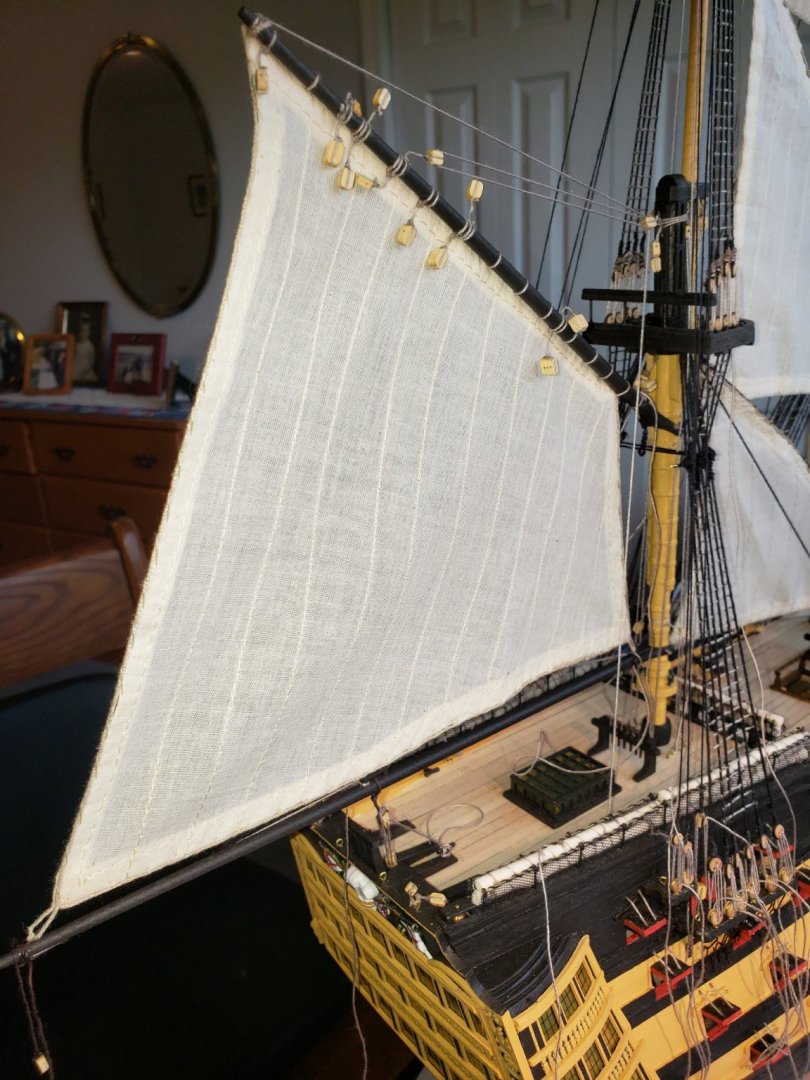
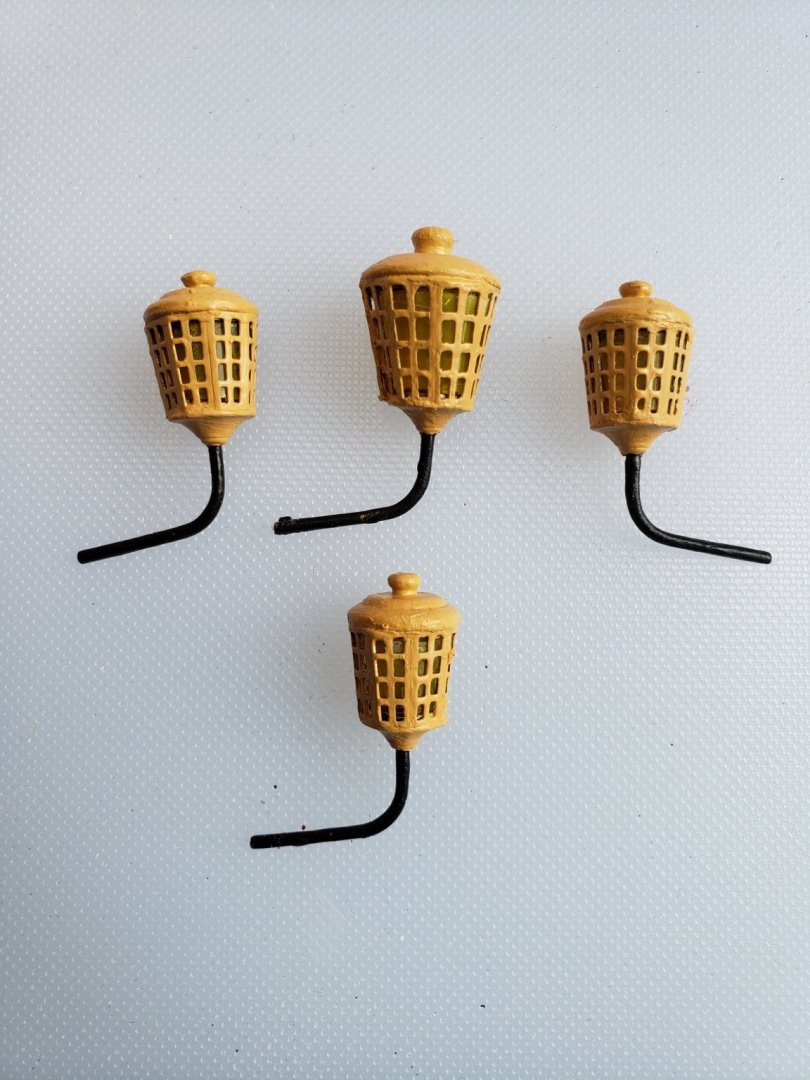
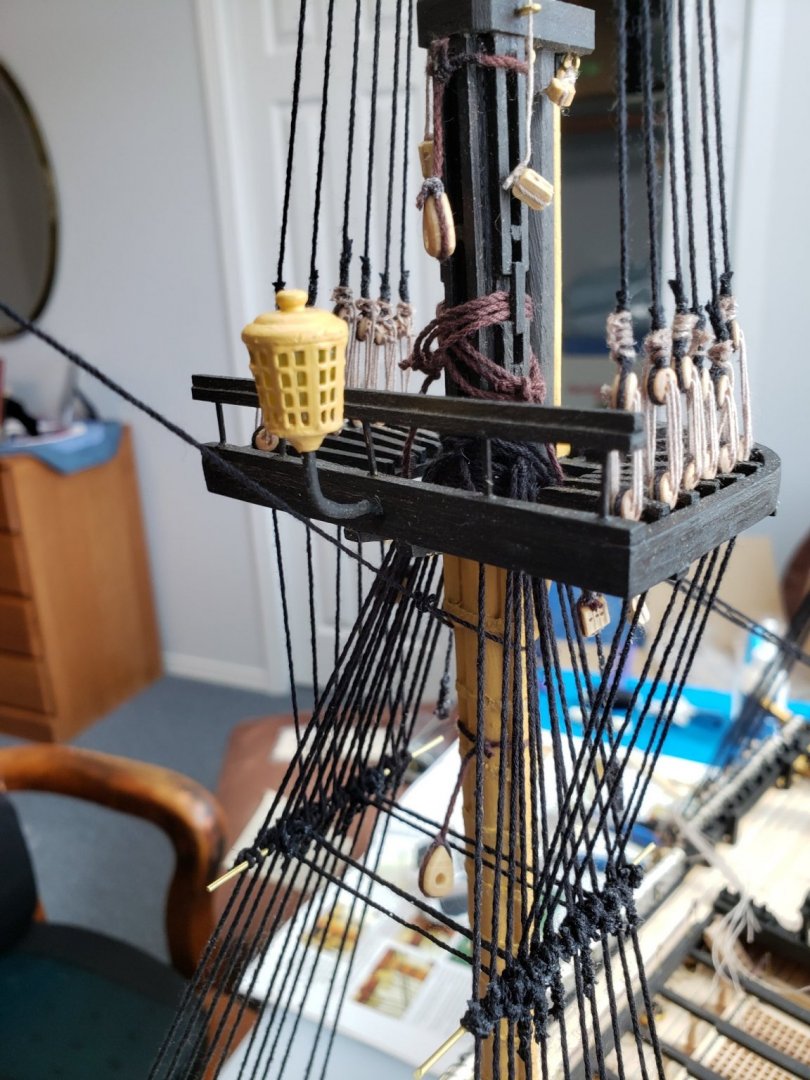
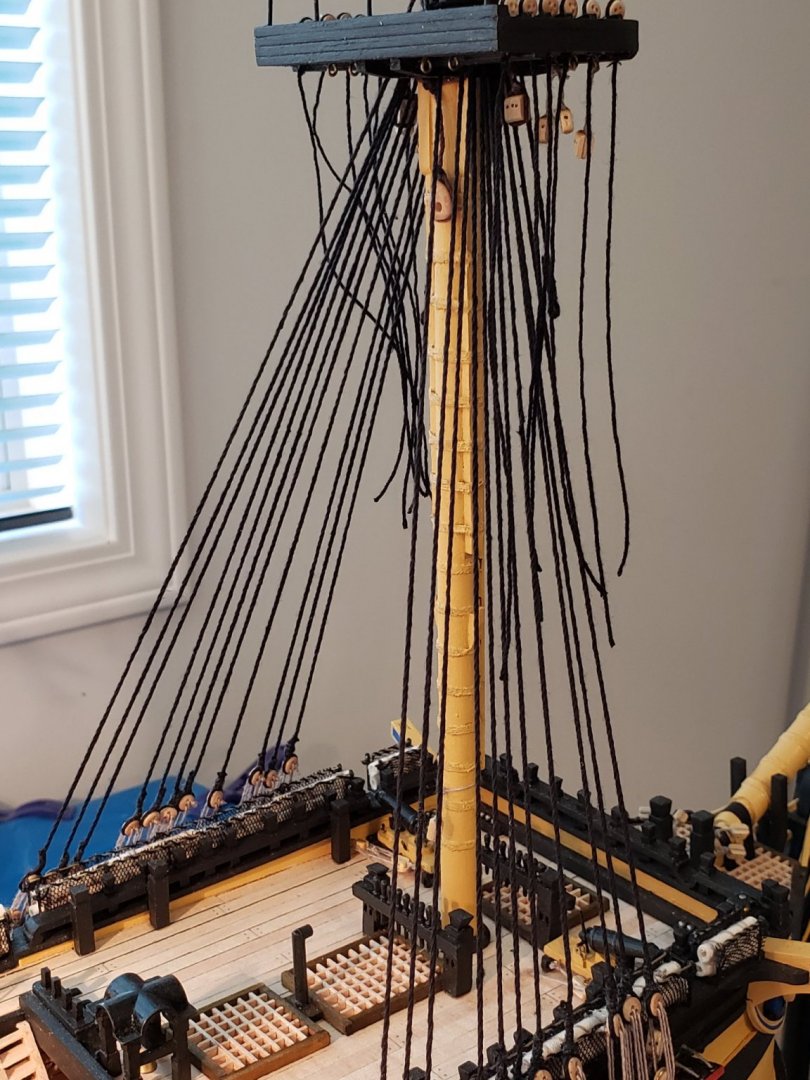
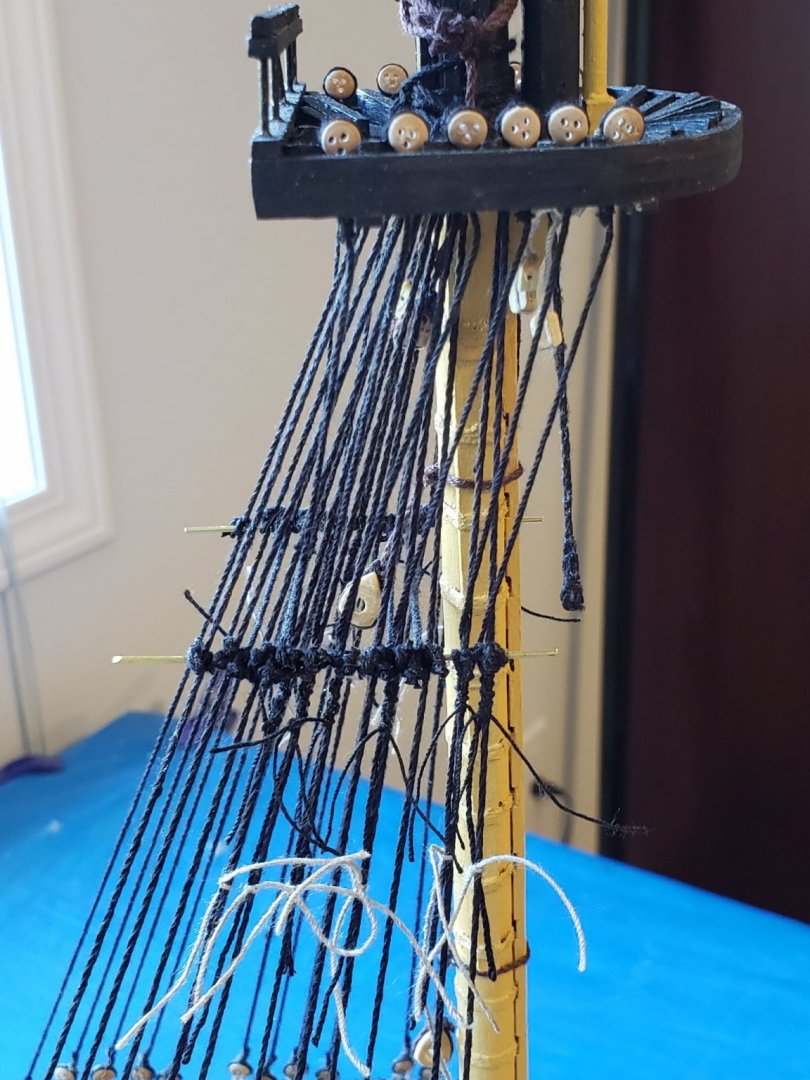
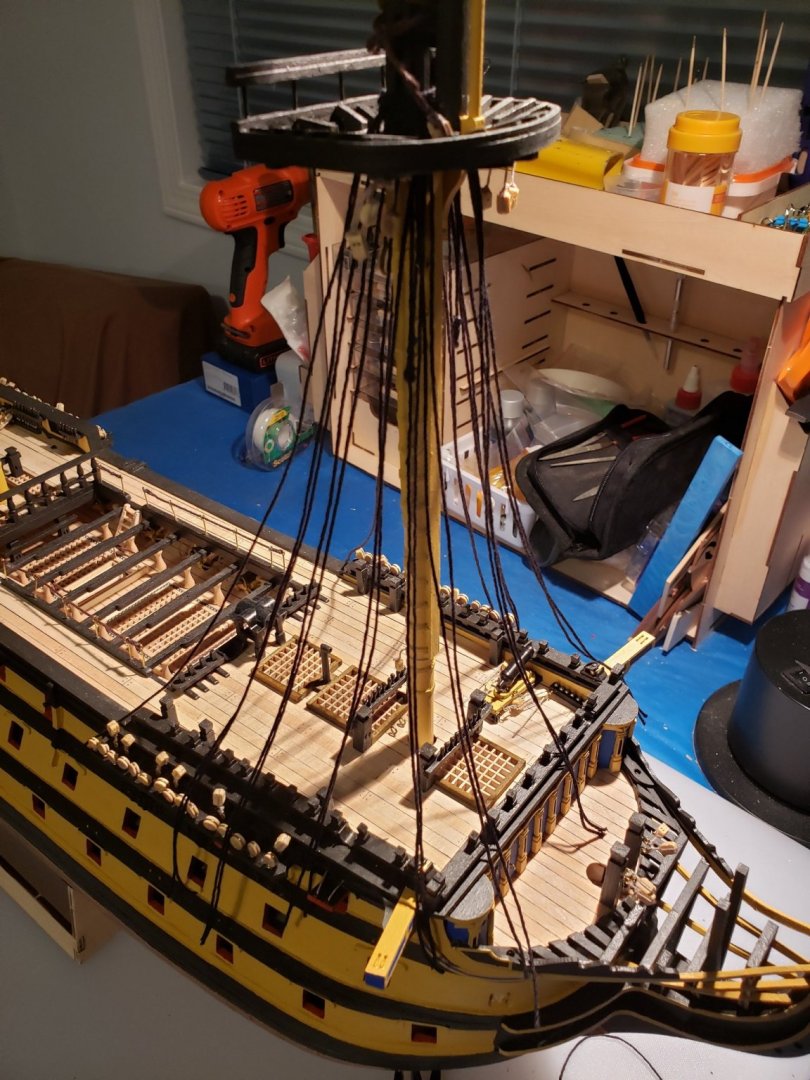
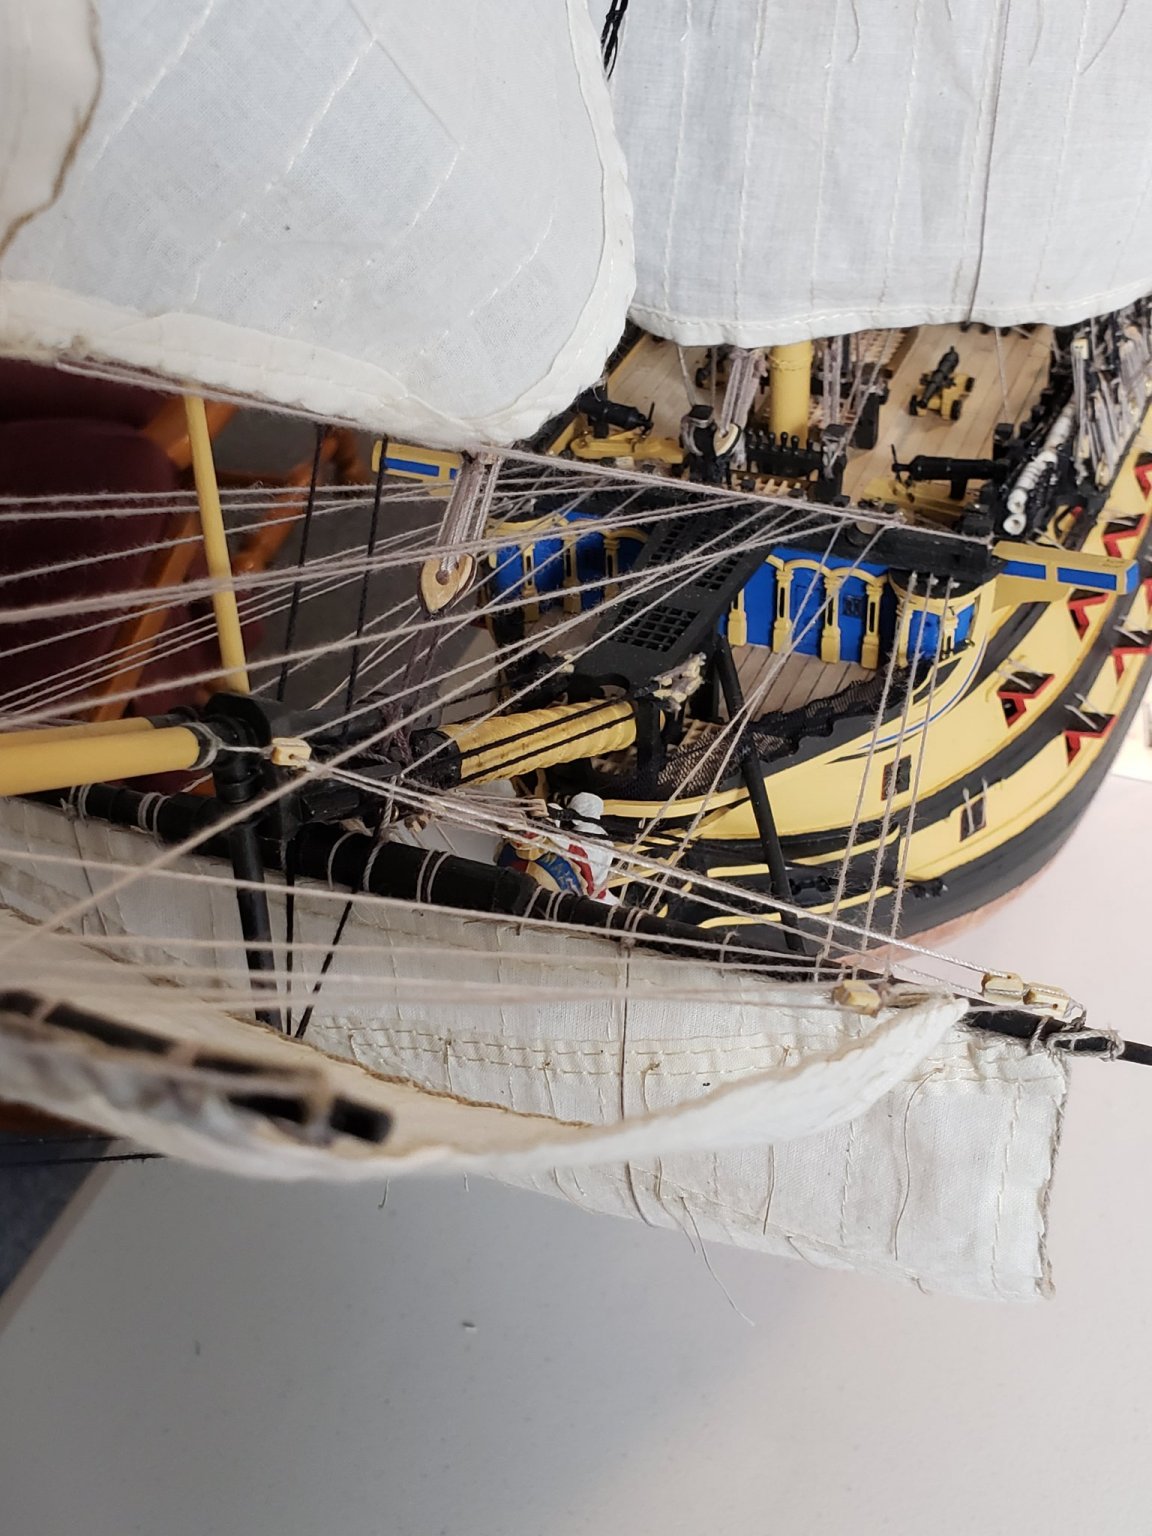
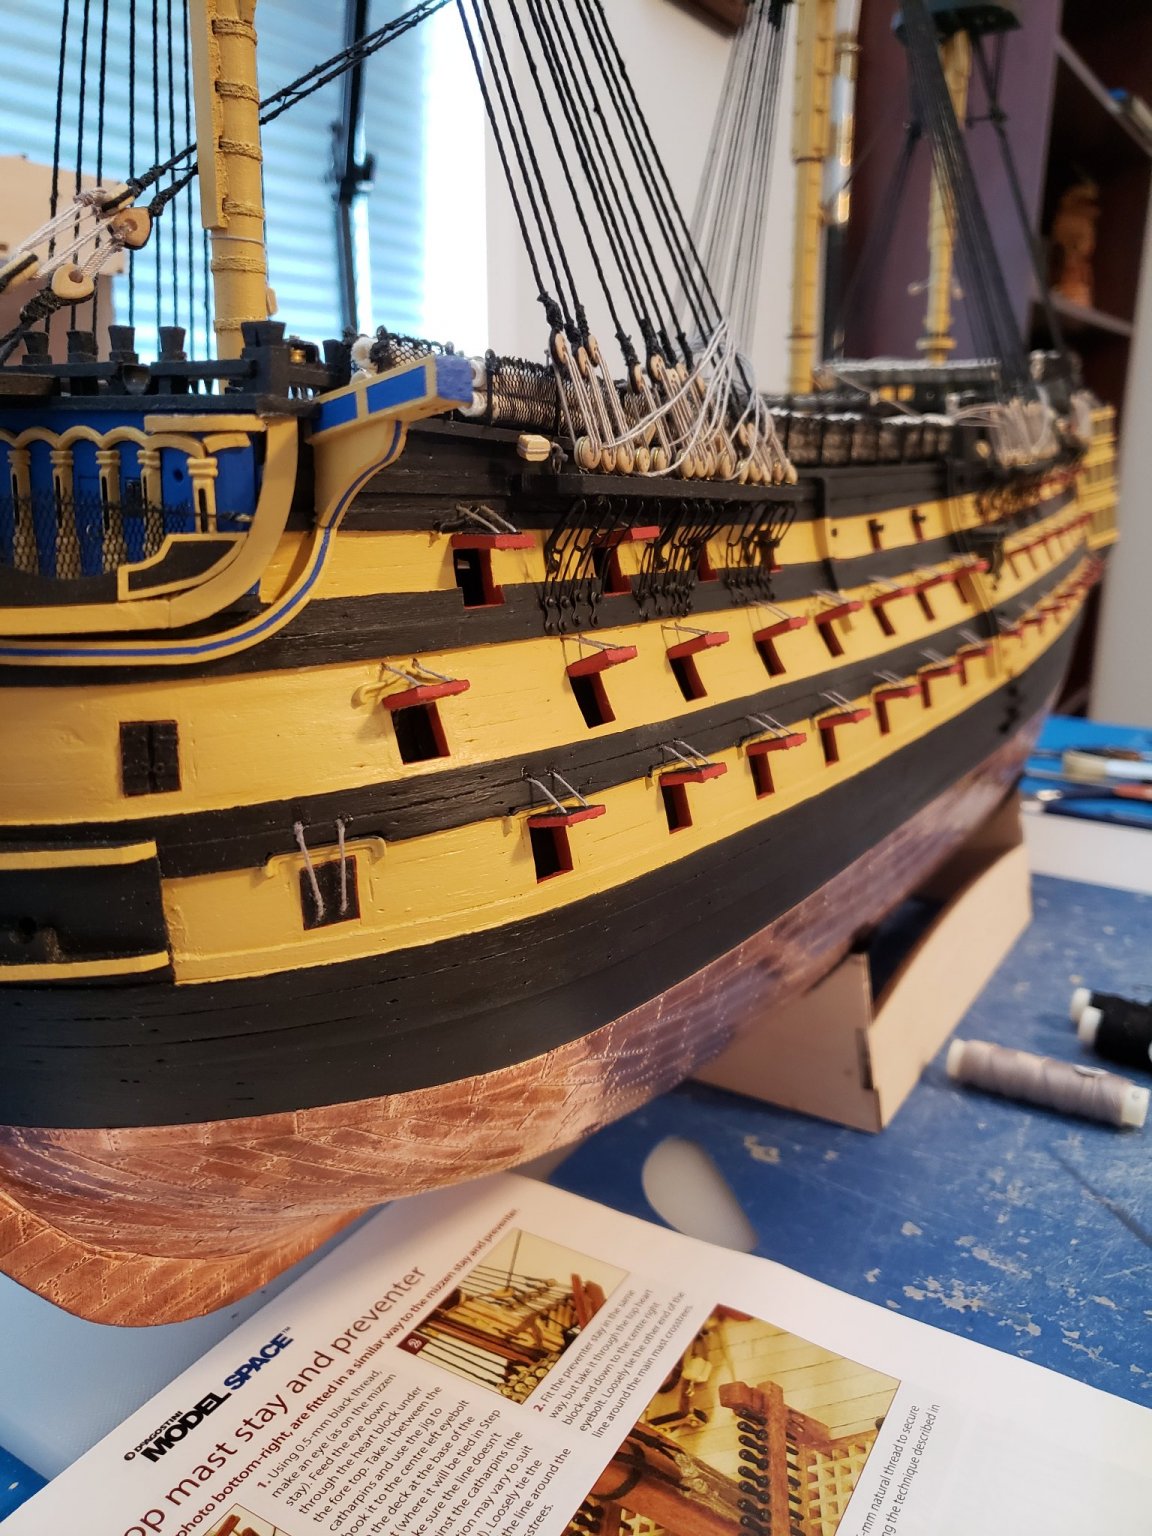
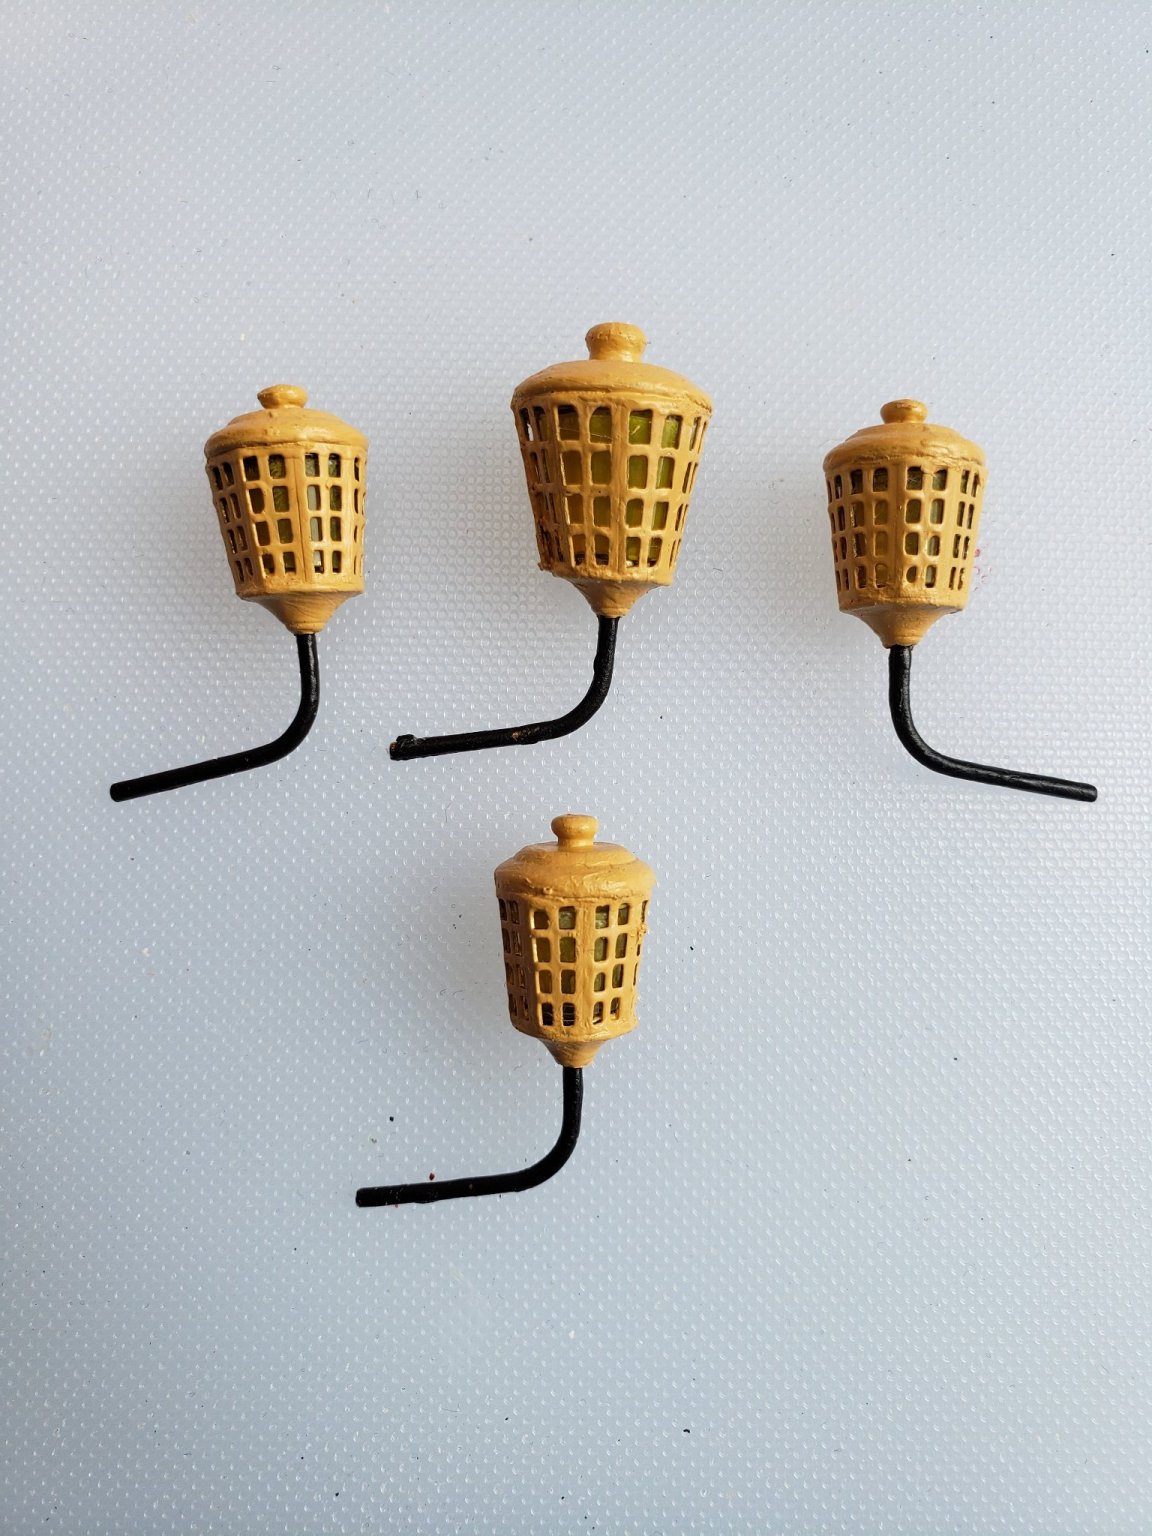
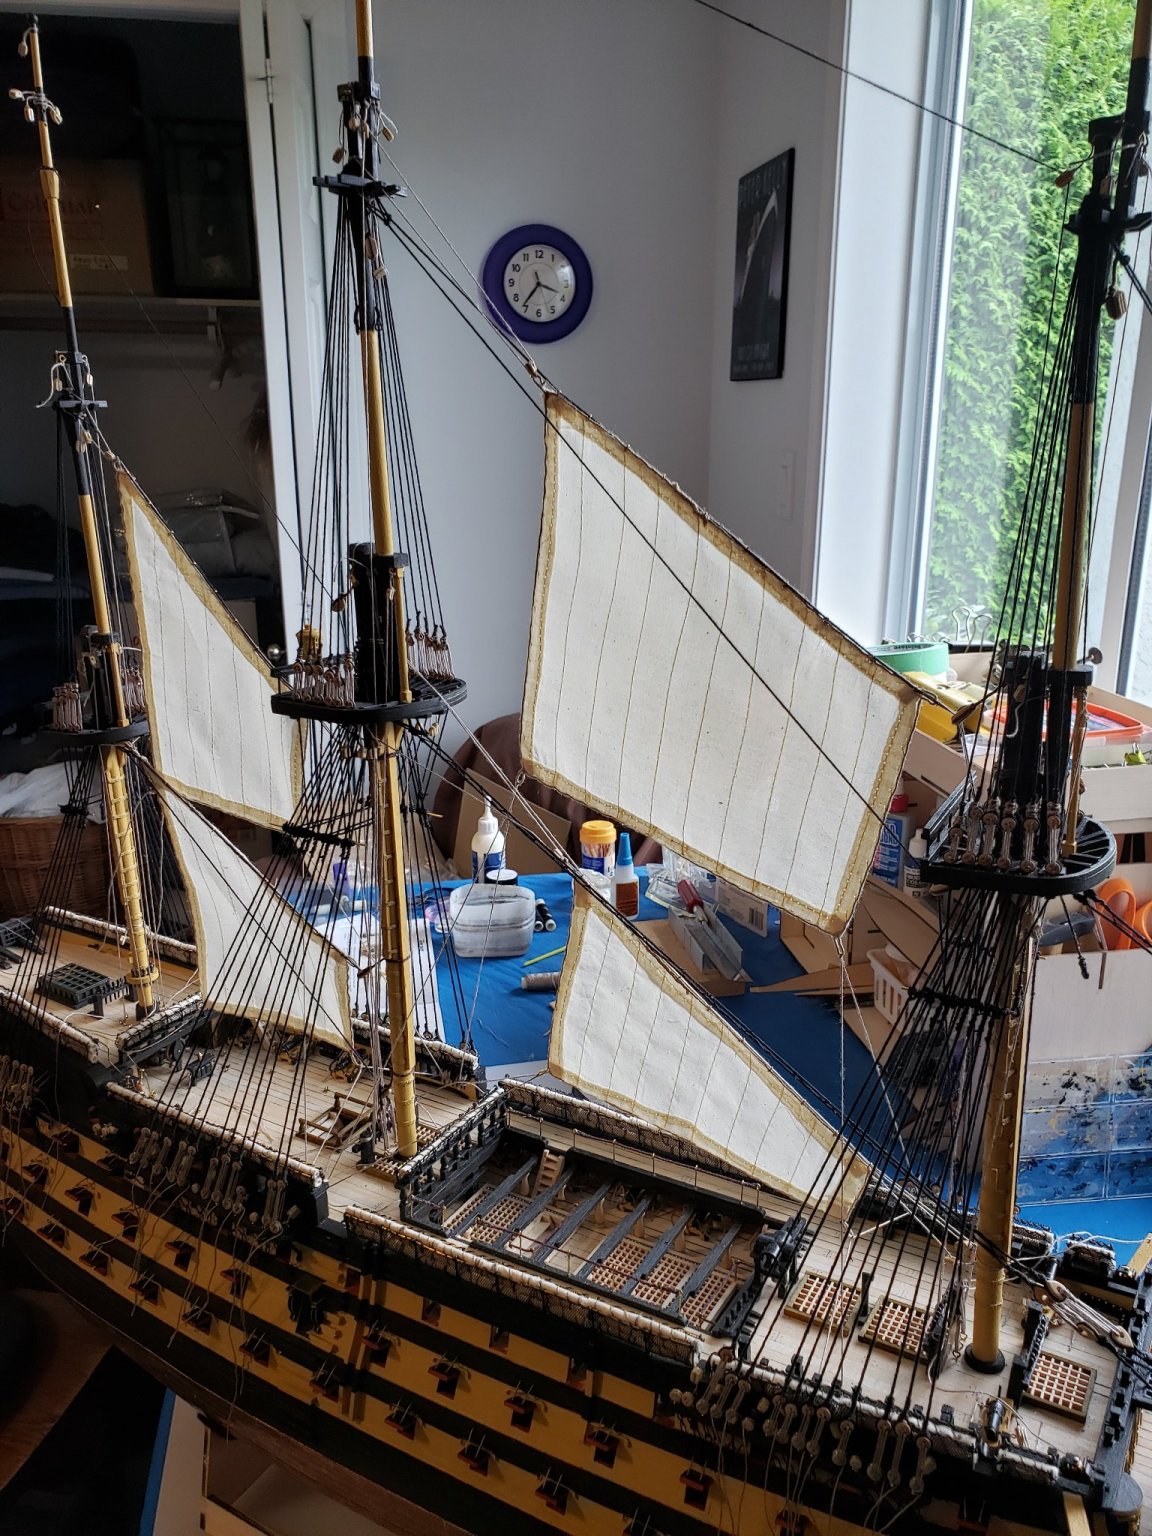
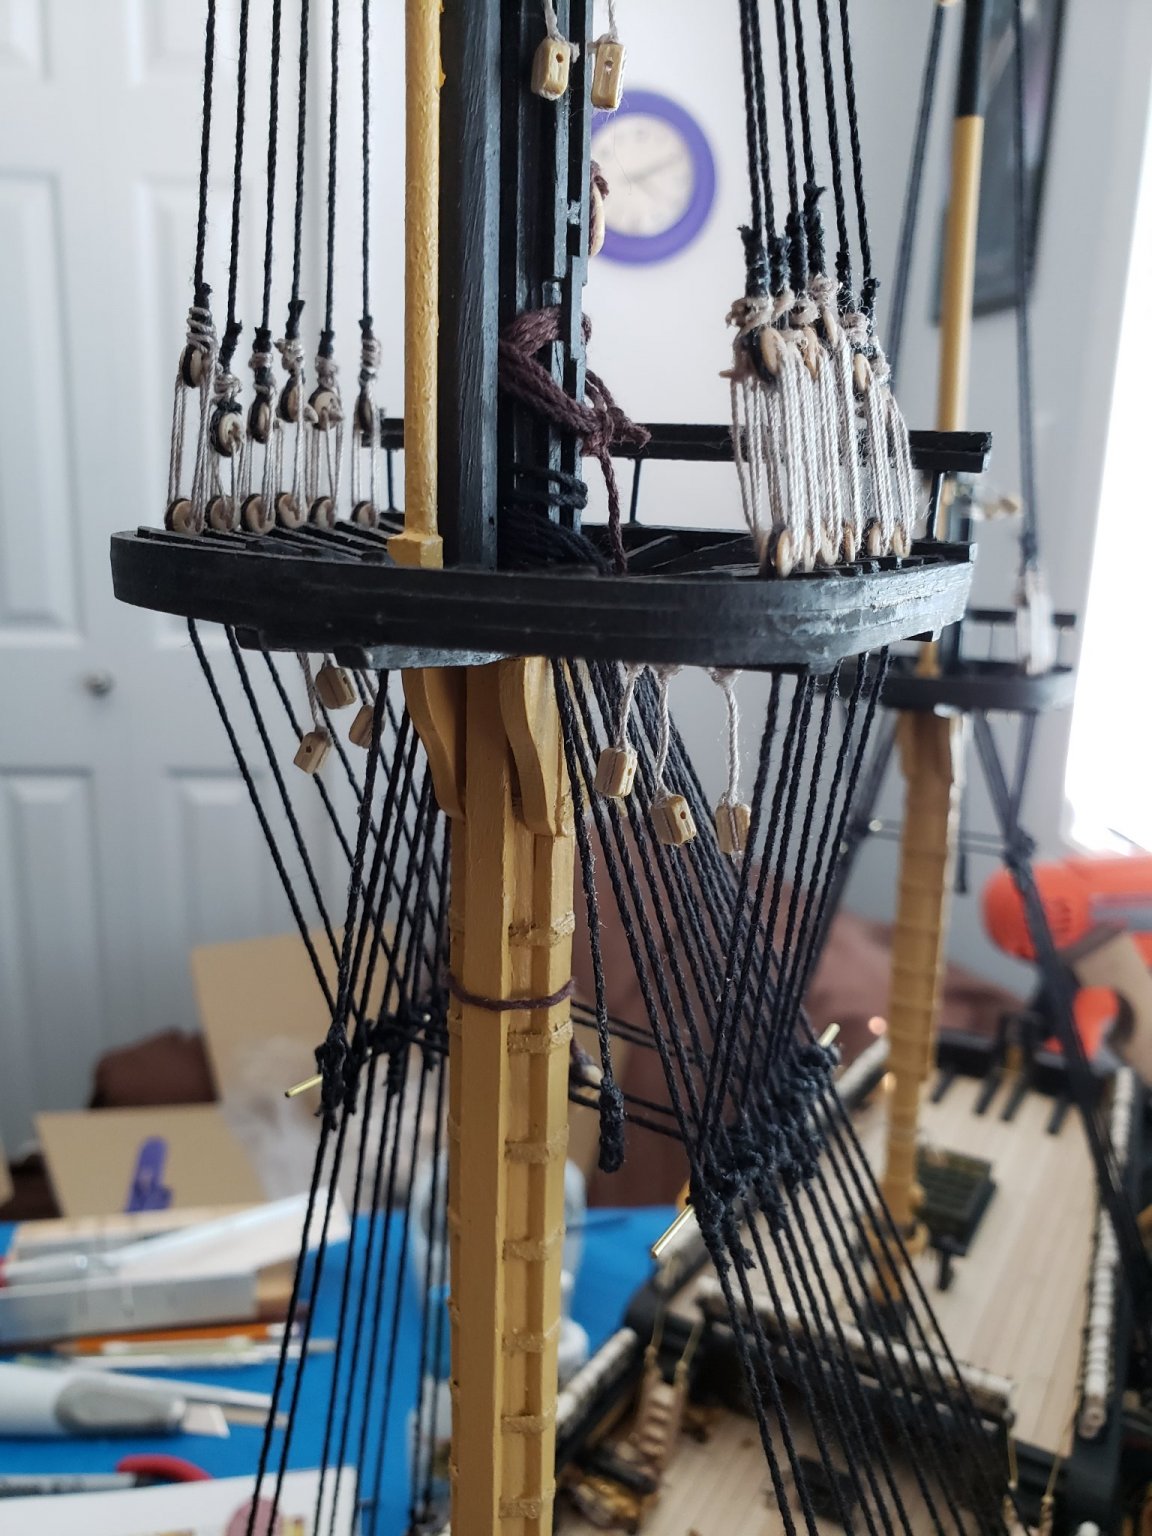
About six weeks since my last post, and I have made lots of progress. After adding the topgallant shrouds, I finally began (with some trepidation) the process of the ratlines. The company provided ratline guides sized correctly for each ratline needed which was a huge help in keeping the ratlines level and spaced properly. The instructions suggested an alternative way to do the ratlines to avoid scale issues with the clove hitches that I used, and found it really successful. I know the purists will be shocked that I passed on several thousand clove hitches, but in truth this technique resulted in really well spaced ratlines that were perfectly level, and so I am satisfied with the results. I used a needle to thread the ratline thread through each of the vertical shrouds using the guides provided, and just used glue on the outer shroud edges to seal the ratlines. It still took several days as threading through .8mm and .5mm thread was not simple, but the results were good, and I can only imagine how long the clove hitch method would take. You can see the results in the attached photos. After the ratlines were done, I added the mizzen and the jib and flying jib. While I slowly added the main sails, I also put the ship's lanterns on the stern, finishing the detail here. I spent quite a while working on the figurehead and motto strip, and despite next to no artistic talent, I was happy with the result when the job was done. Much of the sail work and rigging doesn't show well in photos, so I just added a few pictures. The bottom two yards were held to each mast with a parrel assembled here. I did attach some pictures showing the growing complexity of rigging on the ship. All the sails are now attached. I like the look, but can see why many would choose a bare spars option, as you could see so much more of the ship and rigging that way. My wife likes it though, and she is an important audience to please! Today just attached the anchors and am closing in on completion of the build. Just a few ship's boats and final rigging and flags to attach and I will be done!


- 59 replies
-
- 5
-
-
- DeAgostini
- Victory
- (and 1 more)
-
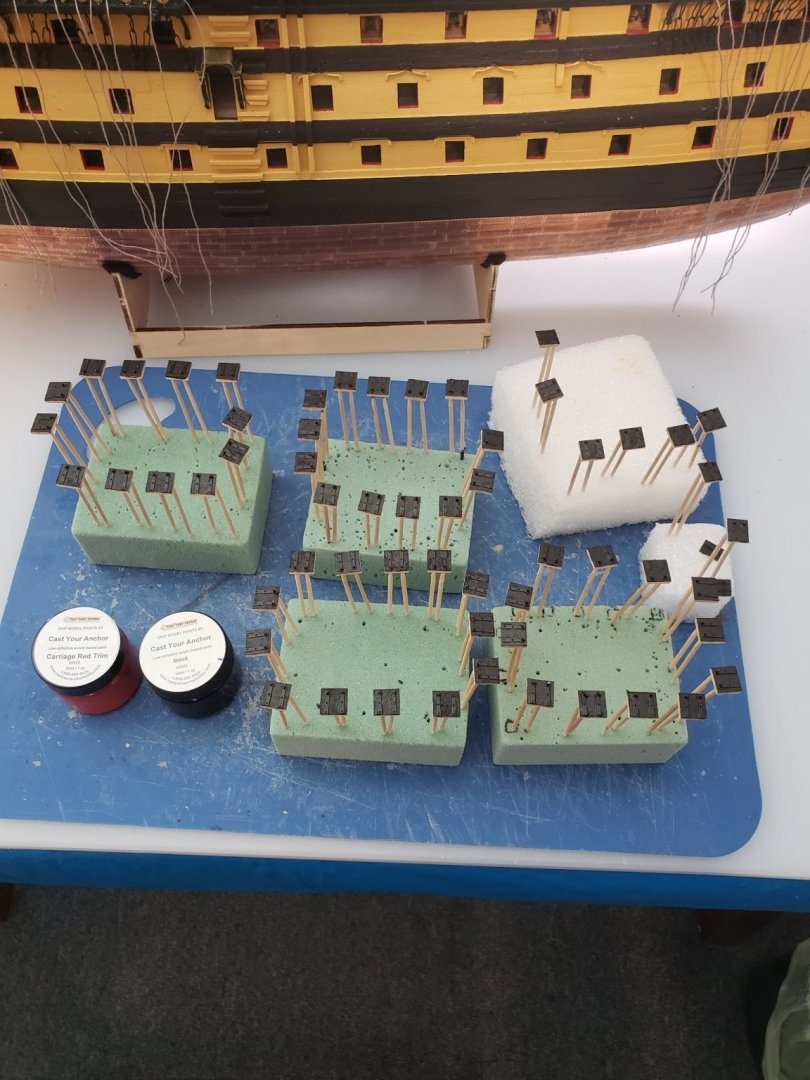
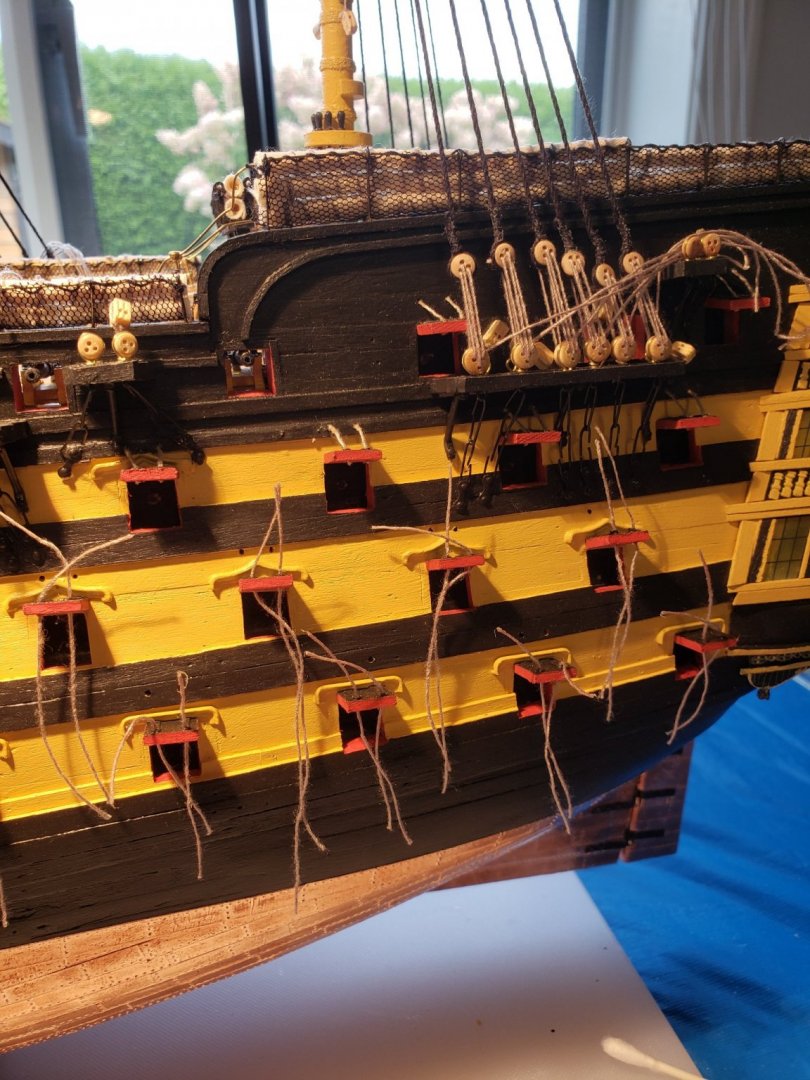
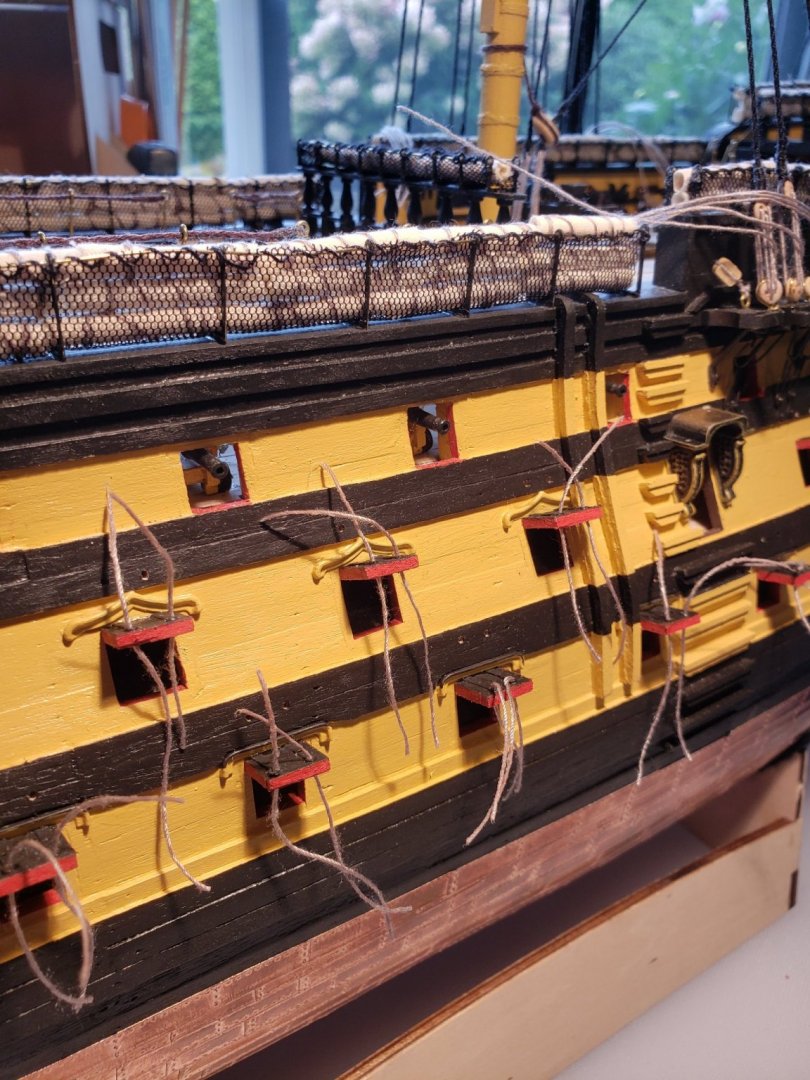
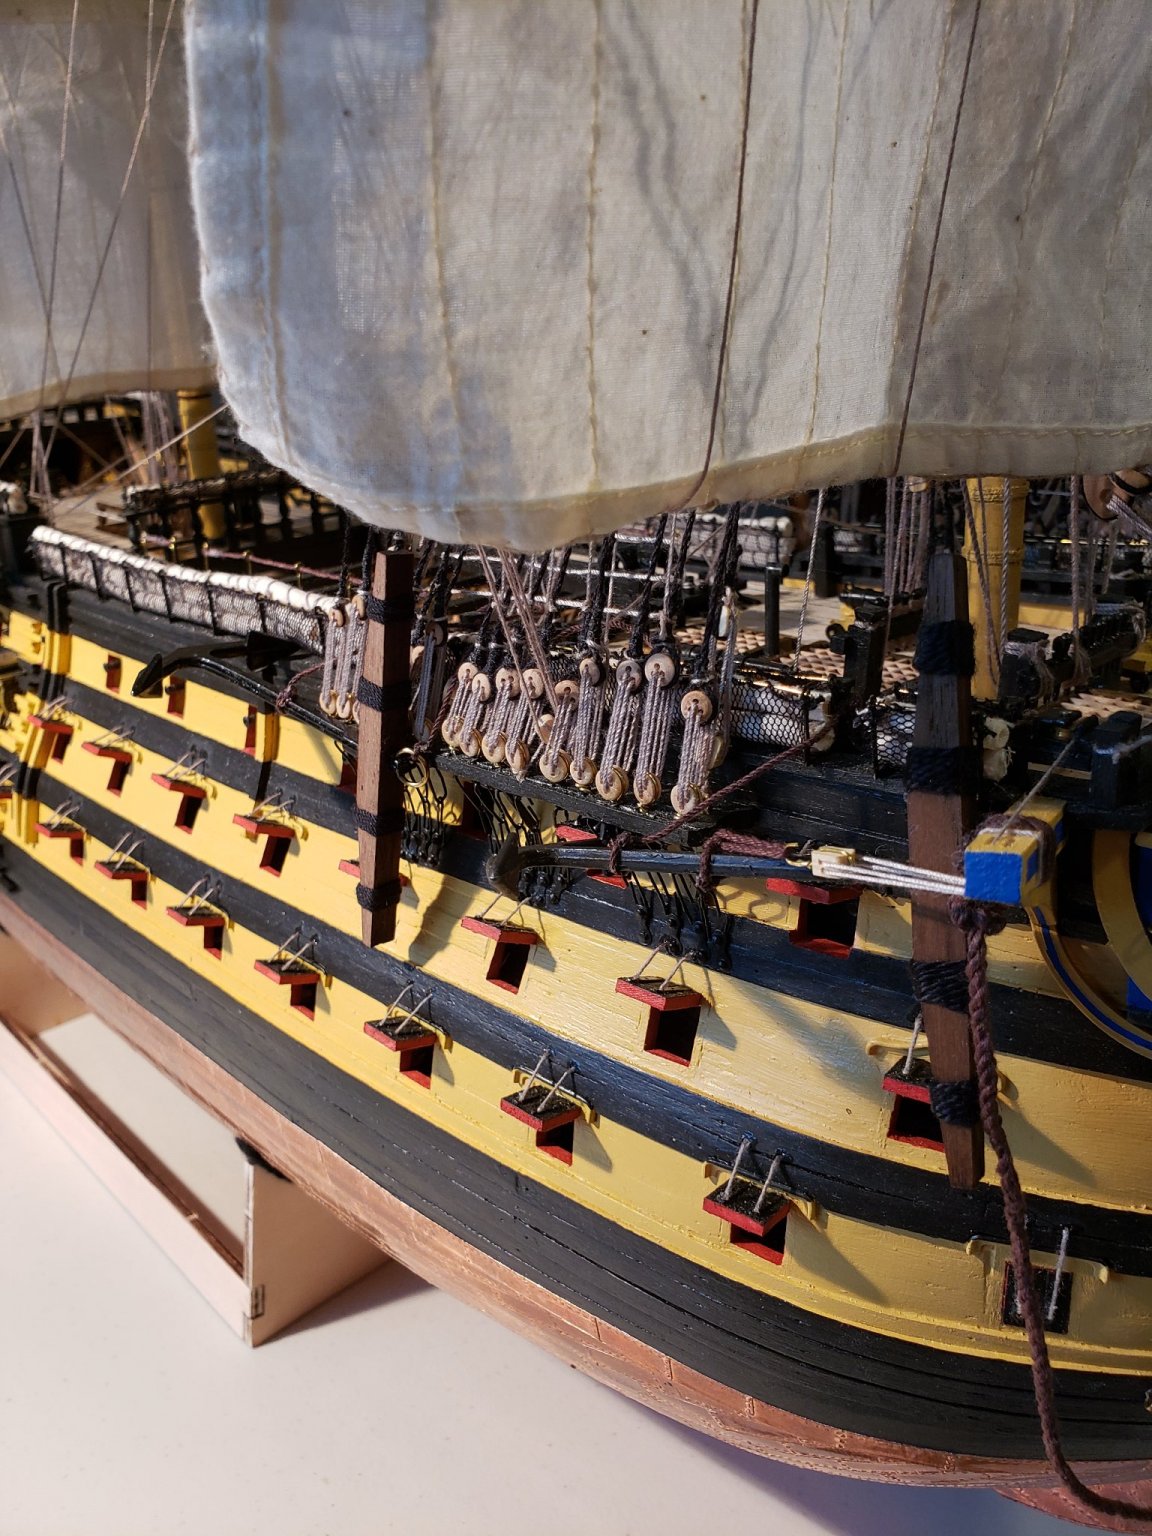
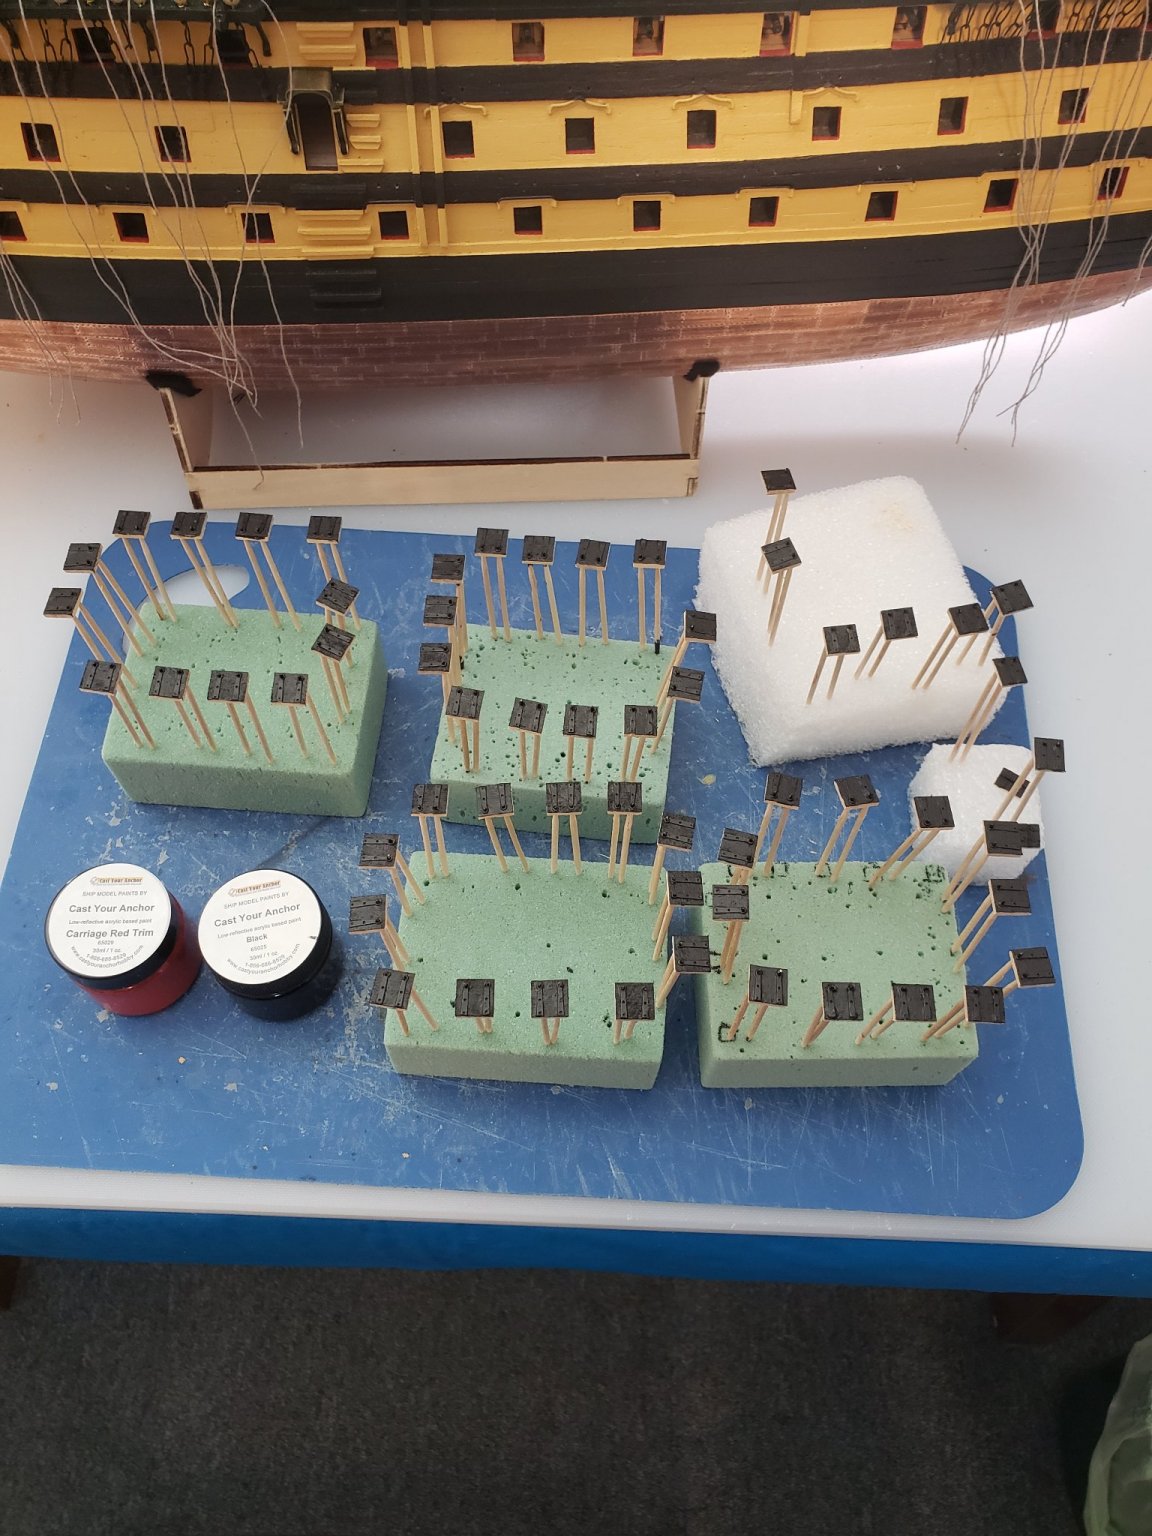
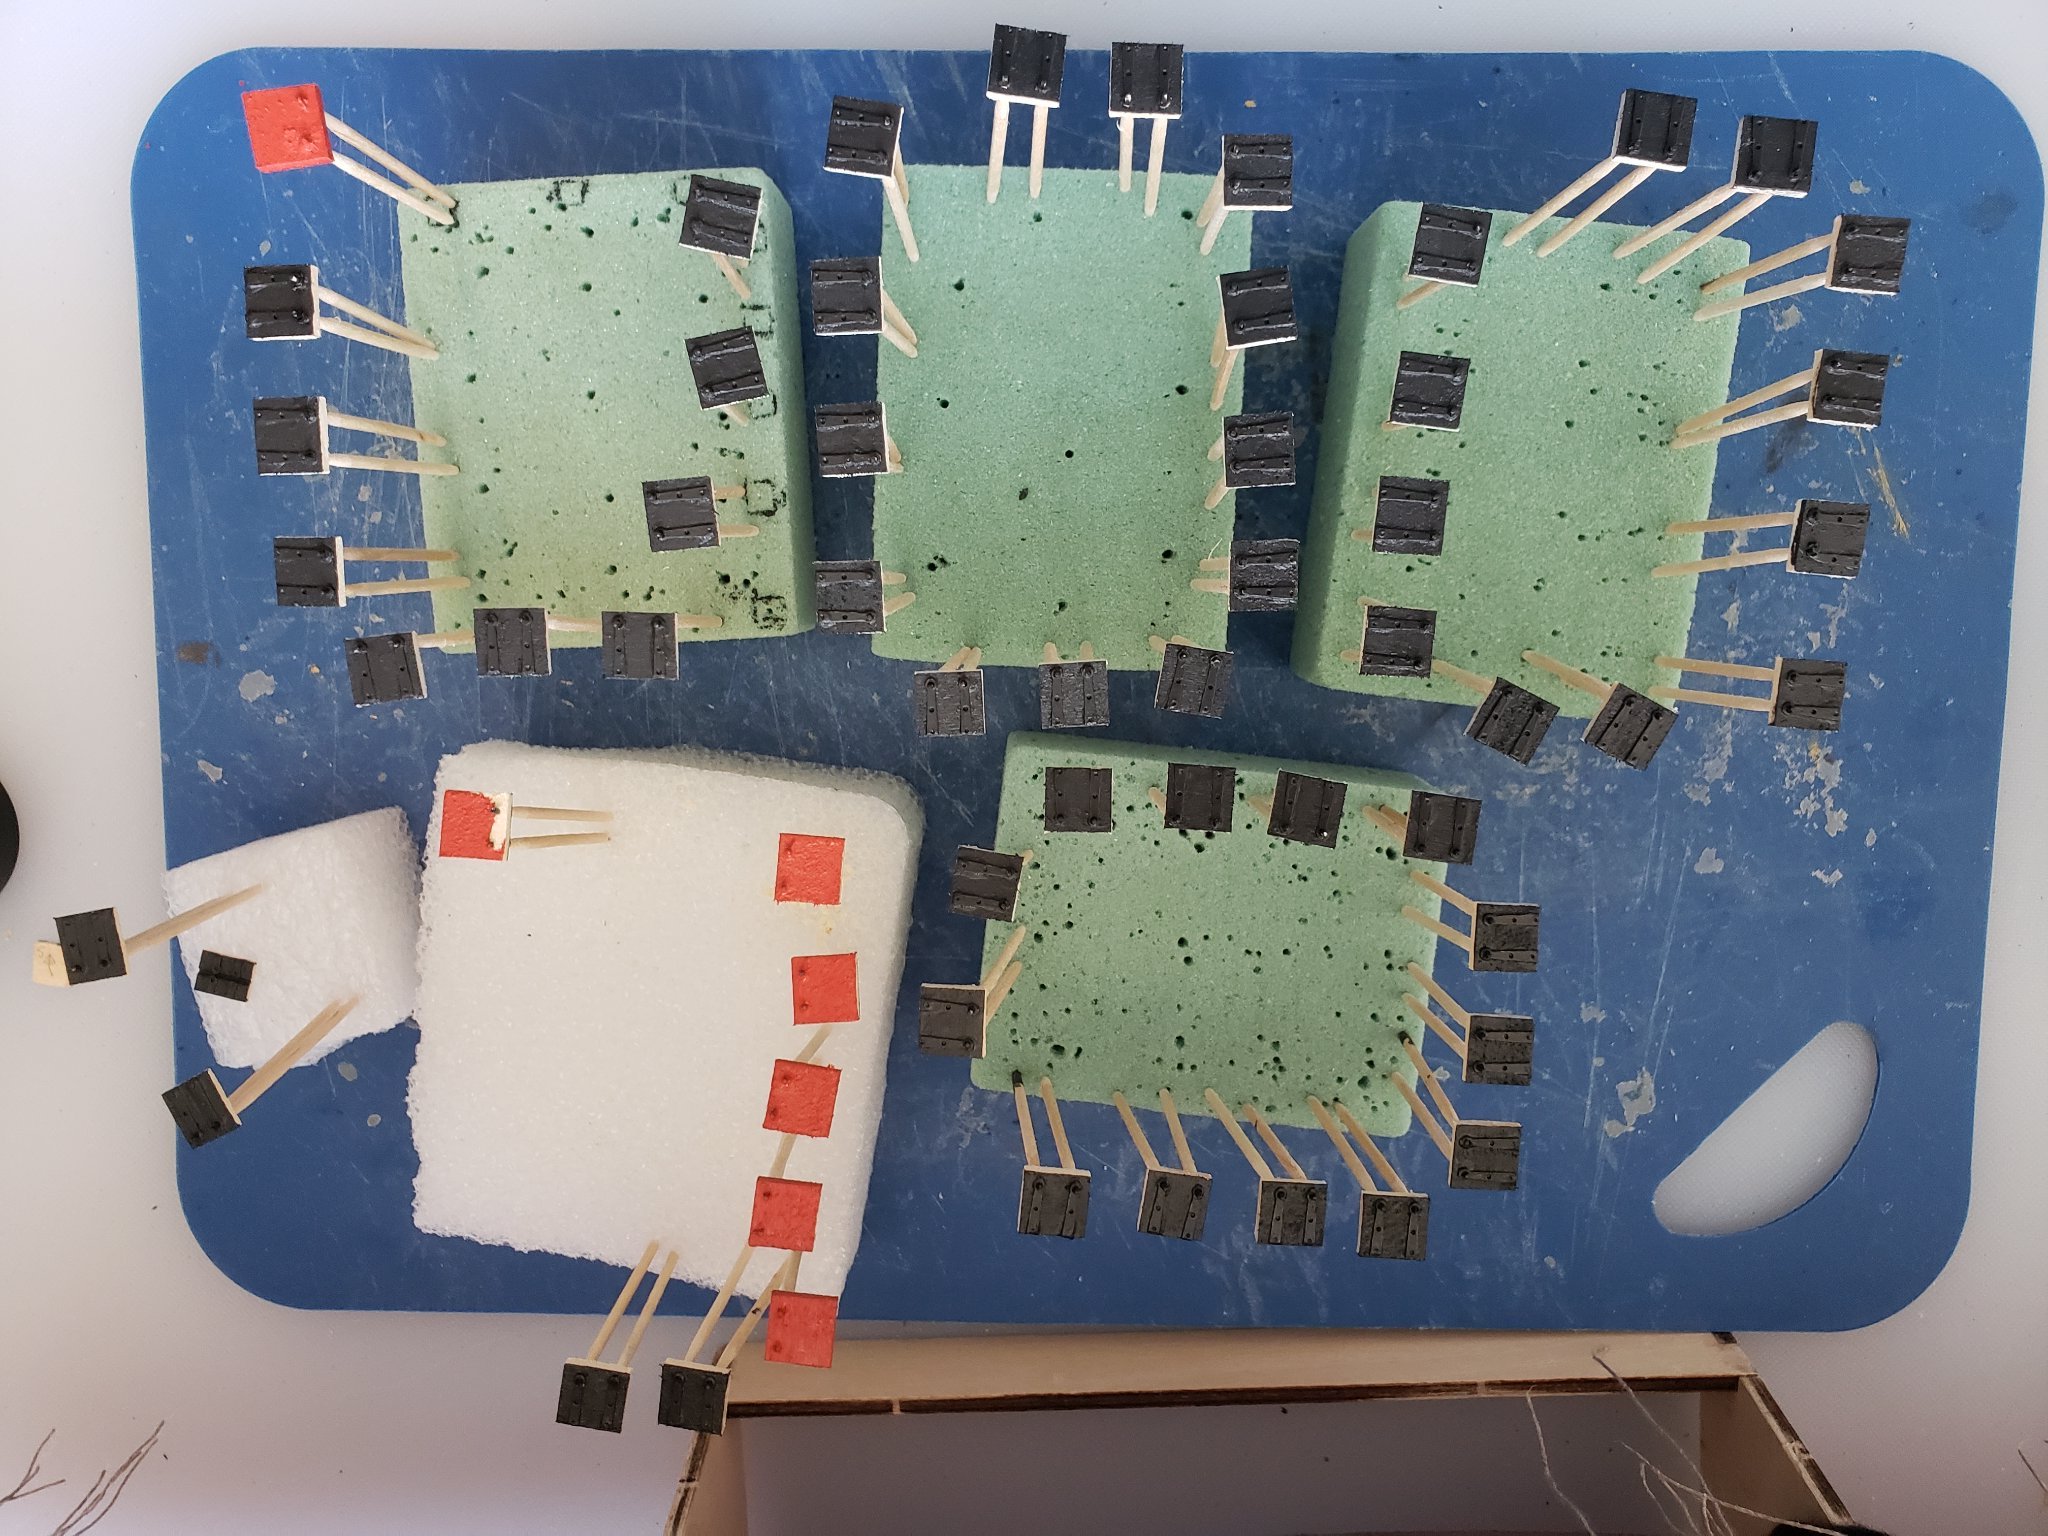
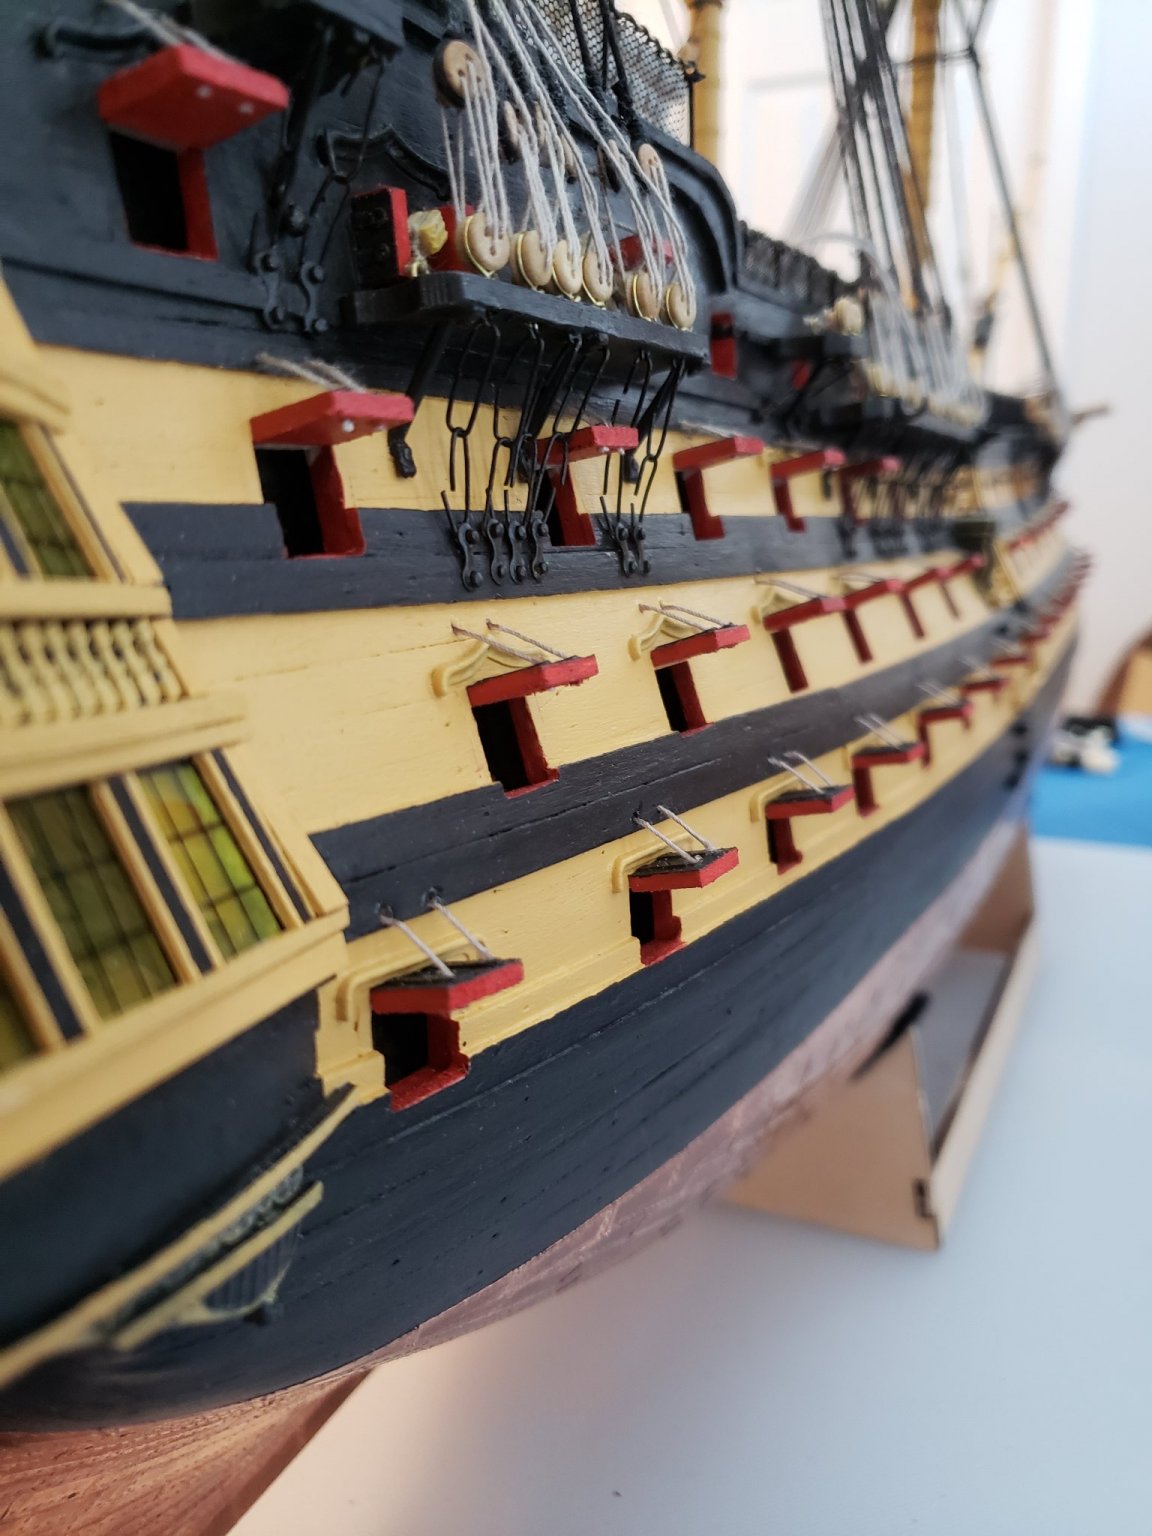
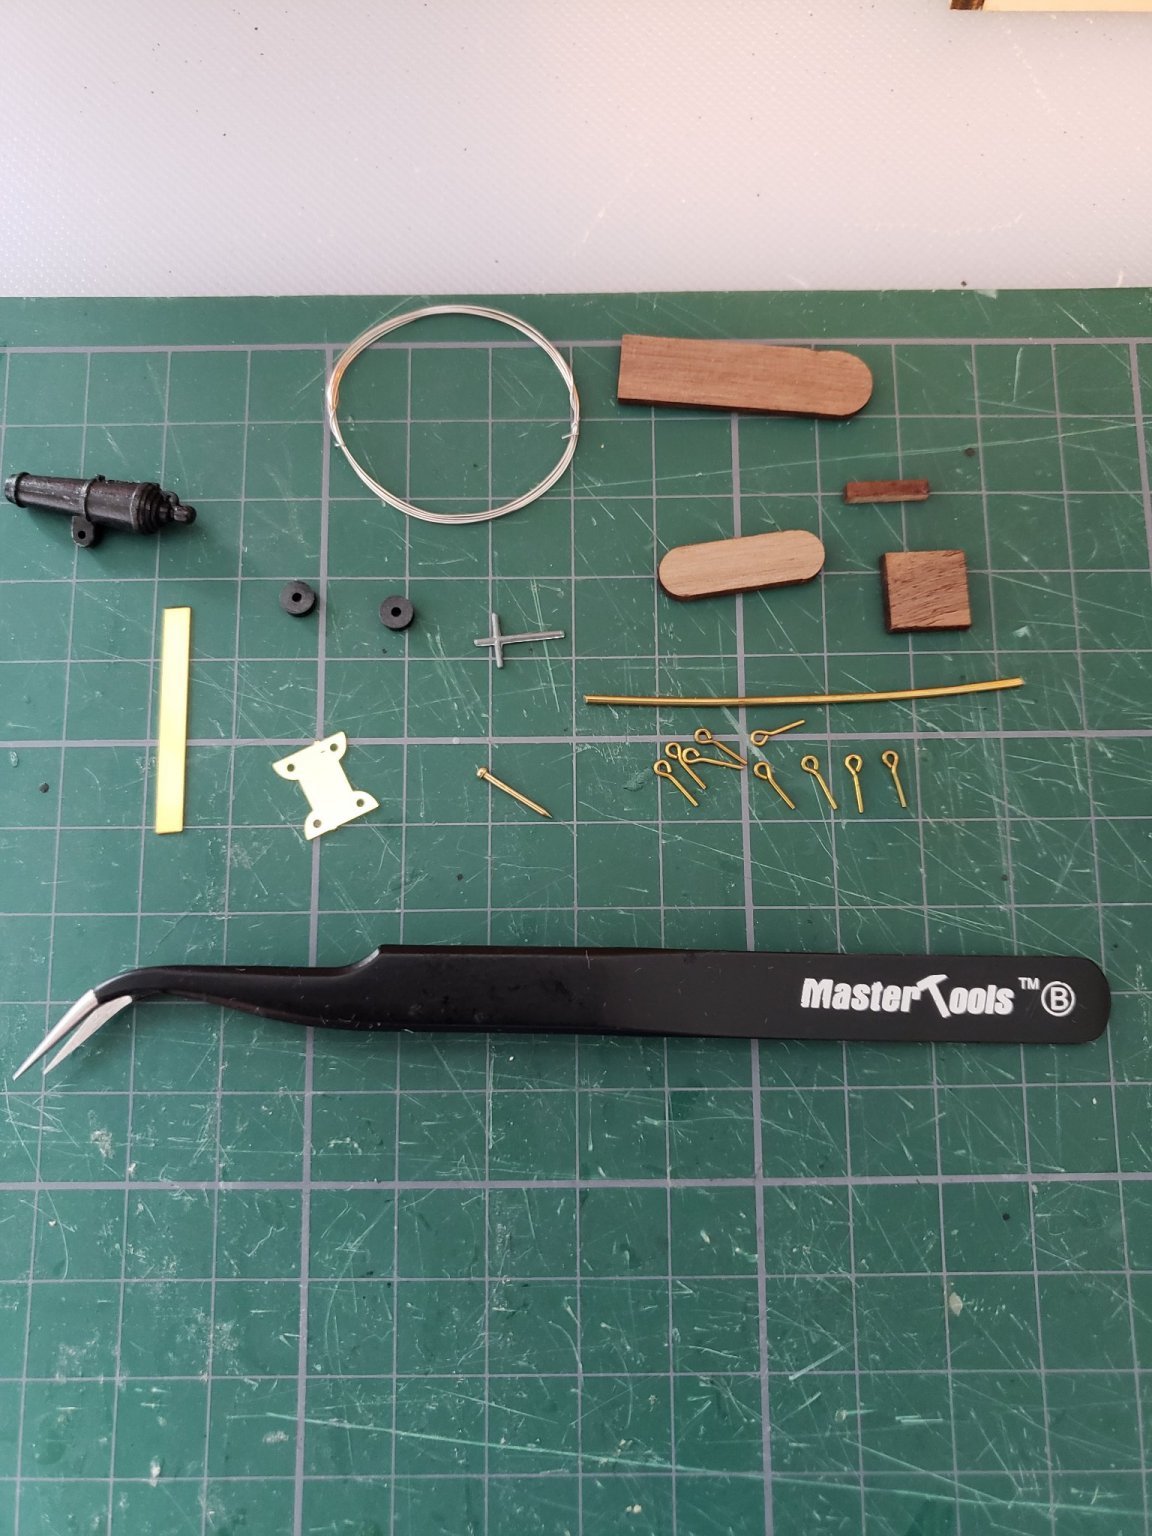
It has taken me two months to do the last 10 stages of the ship (out of 120). Some of the tasks (hammock rolling and netting, shrouds and deadeyes, gun port lids) simply took a long time and were repetitive in nature, so I took more breaks - and summer time had lots of other pursuits besides staying inside modelling! I used the same assembly line mode to make the gun port lids, priming the hinges to take paint better and cutting the hinges to fit, cutting gun port lids to size, then adding the hinges and painting the outer door face black. Next I turned them over and painted the outer three faces and the inside face red. I added the thread before mounting the lids on the ship just to minimize my working with the lids in case I damaged them. After that, I inserted one end of the thread into the holes I drilled in the side of the ship, and once the glue was dry then cut off the ends at the gun port. A bit tedious, but looks good when completed! My only issue was the usually comprehensive instructions told me to make 60 lids, but as I began fixing them on the ship I saw that I was 2 lids short, and I actually needed 62... so I began the assembly process all over again for the last 2 lids. That is what happens when you turn off your brain, and rely too much on the instructions given! I still say though, that this model is possible for anyone because of the depth of the instructions. That is why when I read about Chris Watton telling James Hatch to make the instructions for his new Sphinx model as long and detailed as needed, that I knew I wanted to work on some of his Vanguard models. I think poor or scanty instructions are why so many new modelers give up - with clear photos and text, so much more is possible, even for inexperienced modelers such as myself. I hope Vanguard models is successful, because I think that Chris Watton is really showing established companies where they should be. A welcome break was forming the four ships lanterns. The Admiral's lantern is shown here attached to the main top. The stern lanterns will be attached later. Very excited to add my first sails! I debated whether to do the bare spars' option, but my wife and friends really felt sails were the way to go, so I will be adding them. I do see why many prefer the bare spars, as the sails do obscure a lot of the rigging. I have set the main and main topmast staysails, and the mizzen and mizzen topmast staysails. I also added top ropes for all three masts, but like so much of the rigging it doesn't really show well in pictures. The next 10 stages will see yards and more sails fitted, as well as working on some of the ship's boats. I think in 2-3 months I will finally bring this project to a close.


- 59 replies
-
- 3
-
-
- DeAgostini
- Victory
- (and 1 more)
-
Thanks Penfold! Just about done with the gunpoint lids...then on to more rigging. I am enjoying that part, but trying not to think about all the knots in the ratlines to come!
-
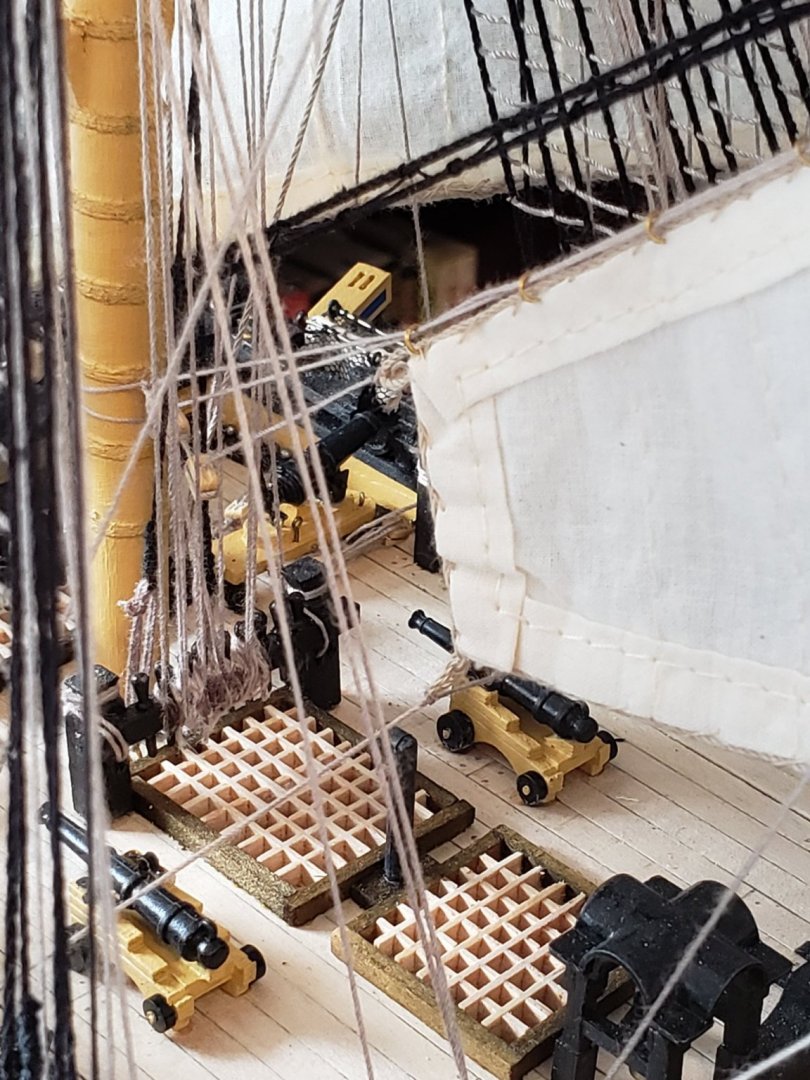
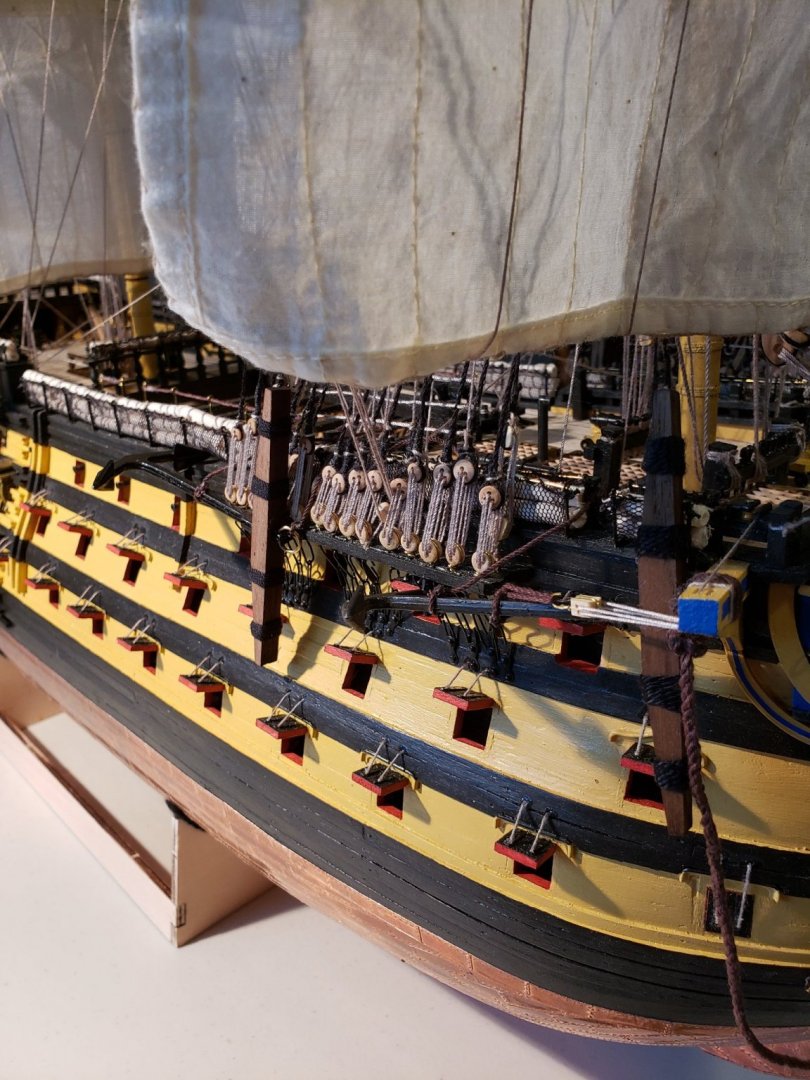
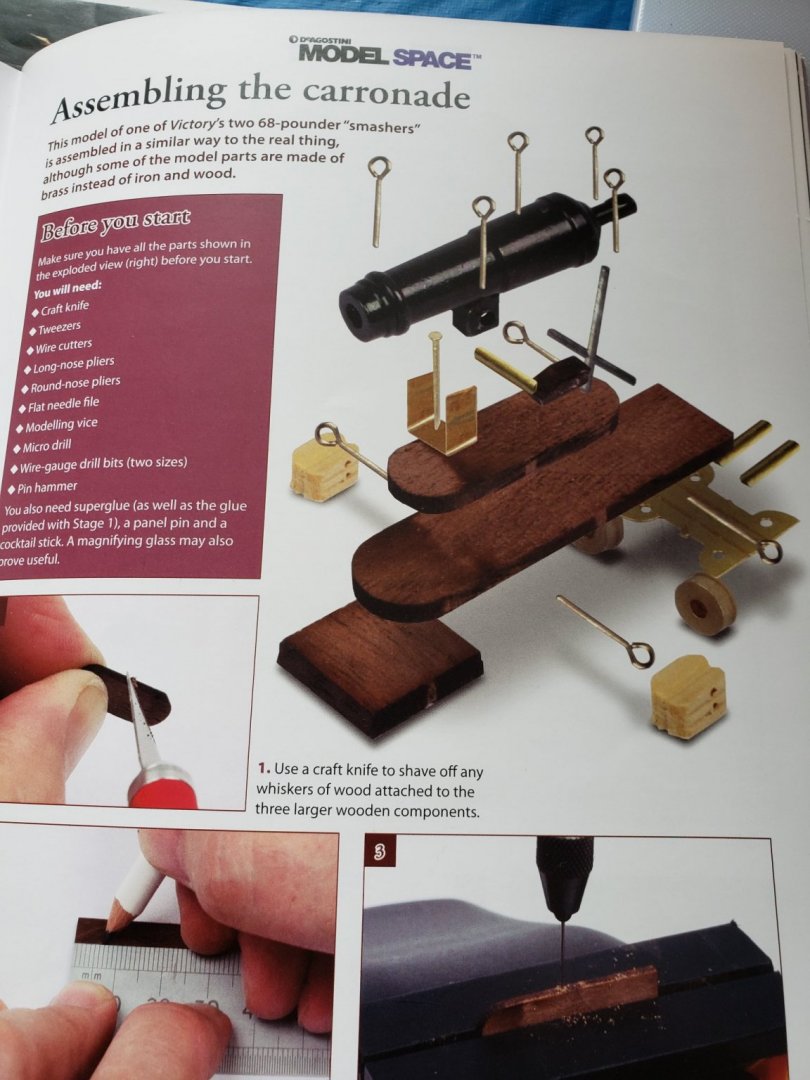
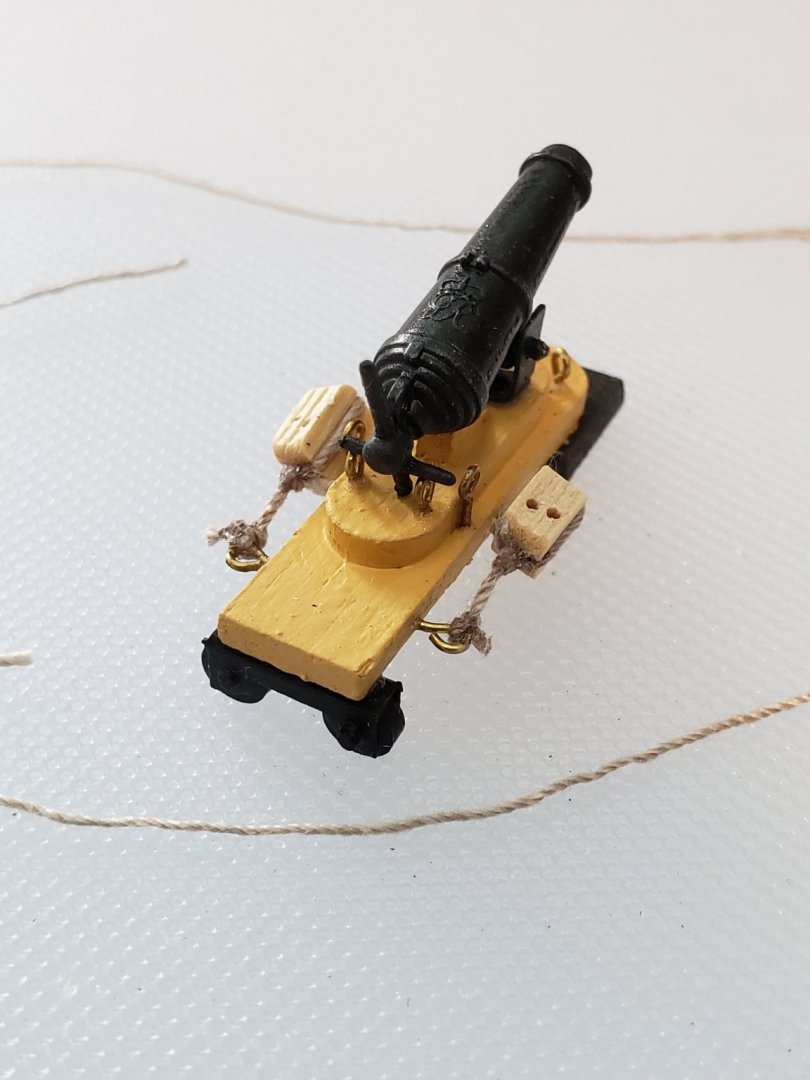
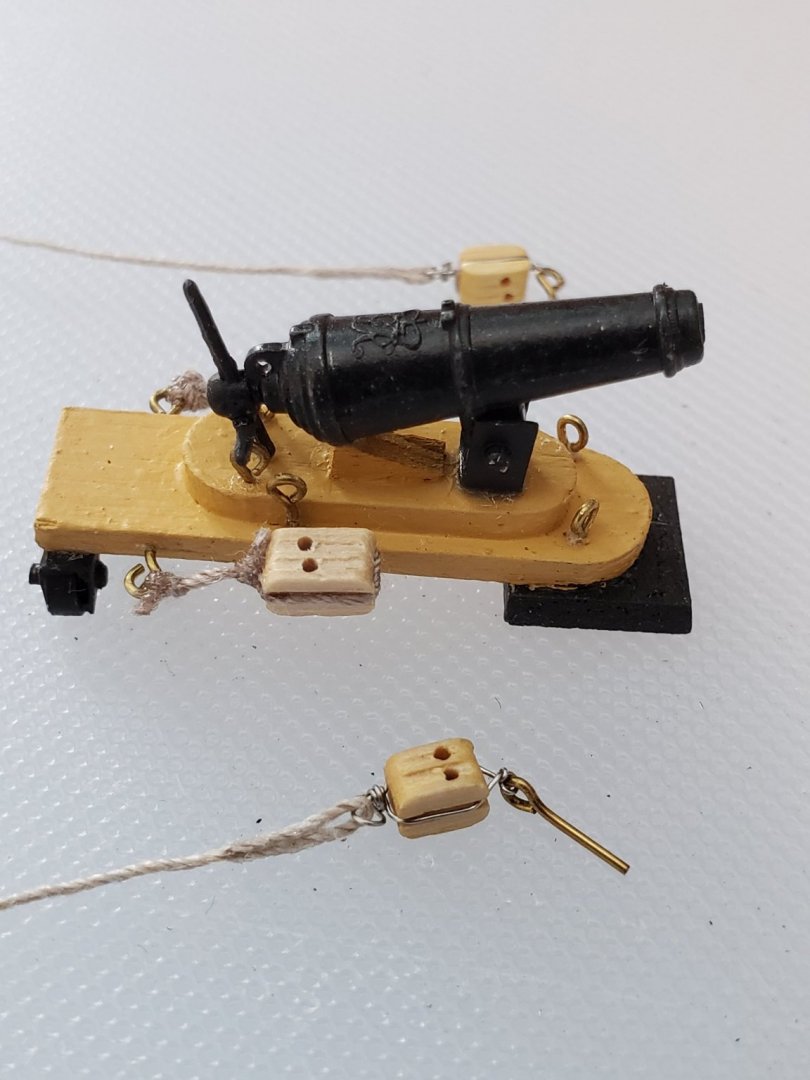
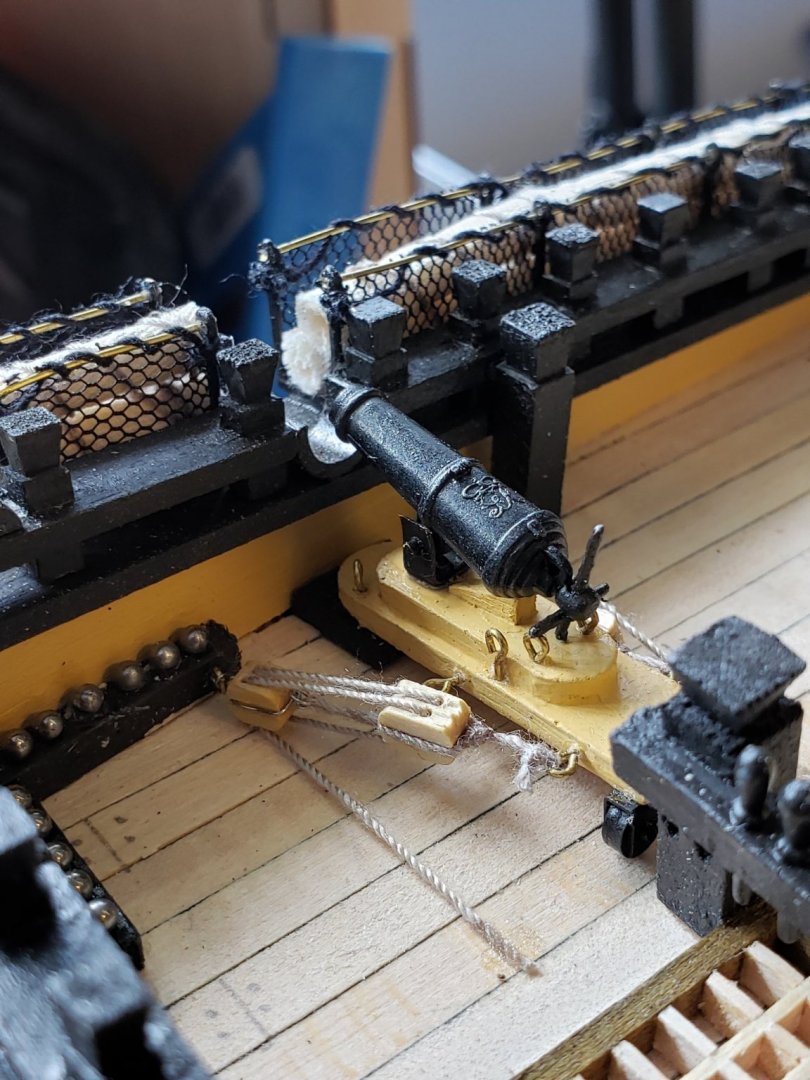
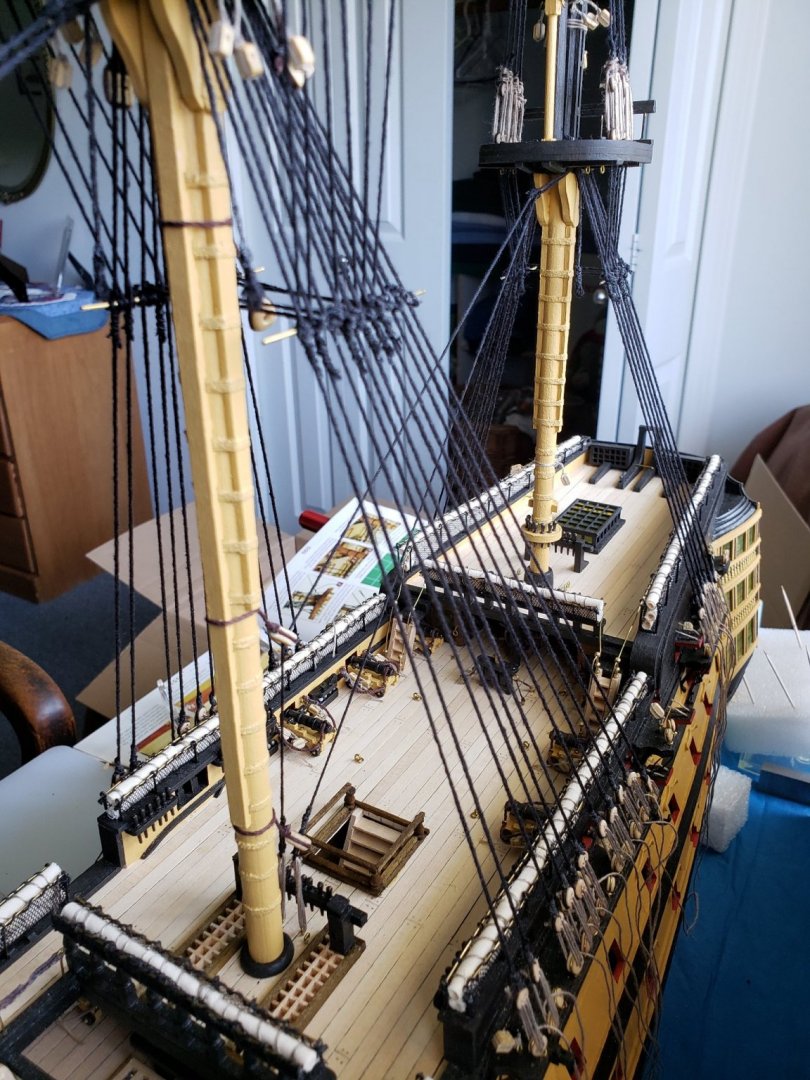
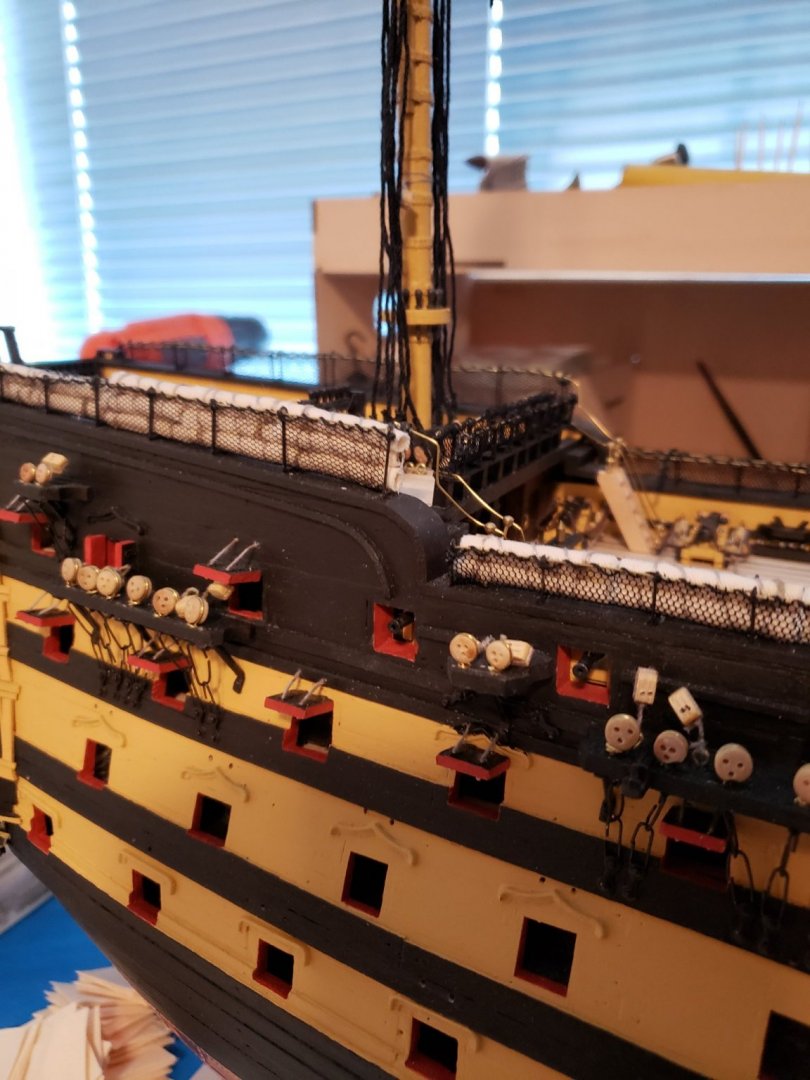
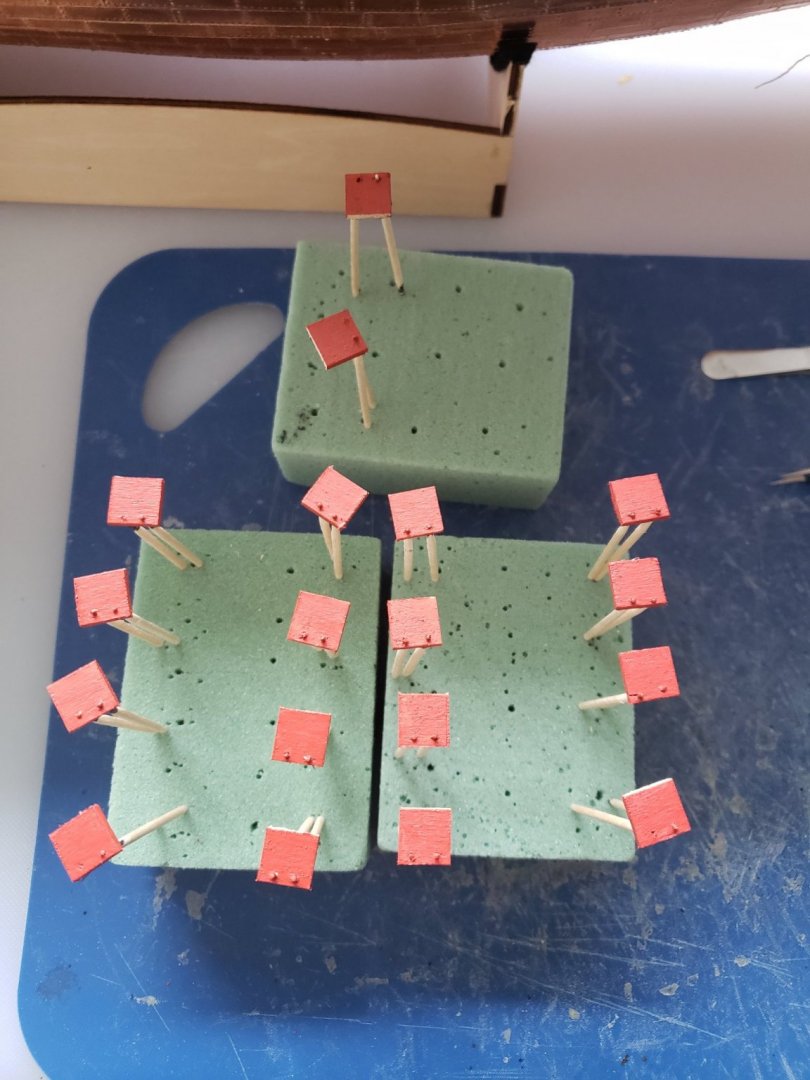
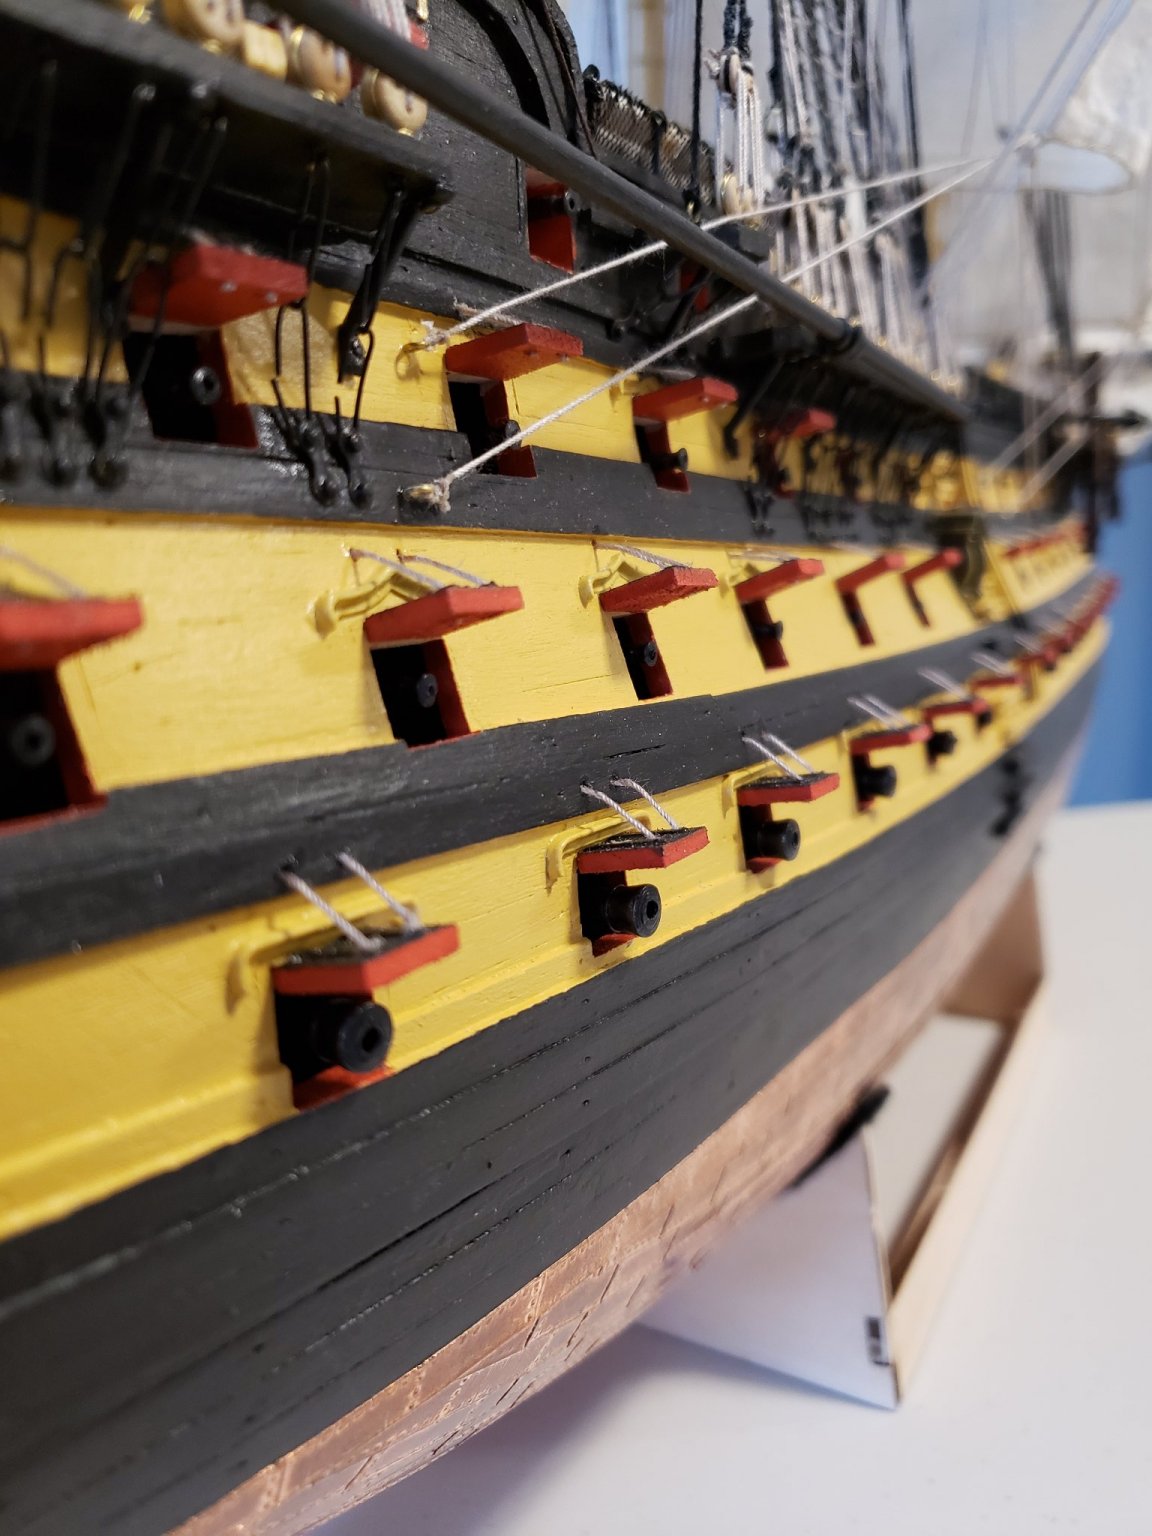
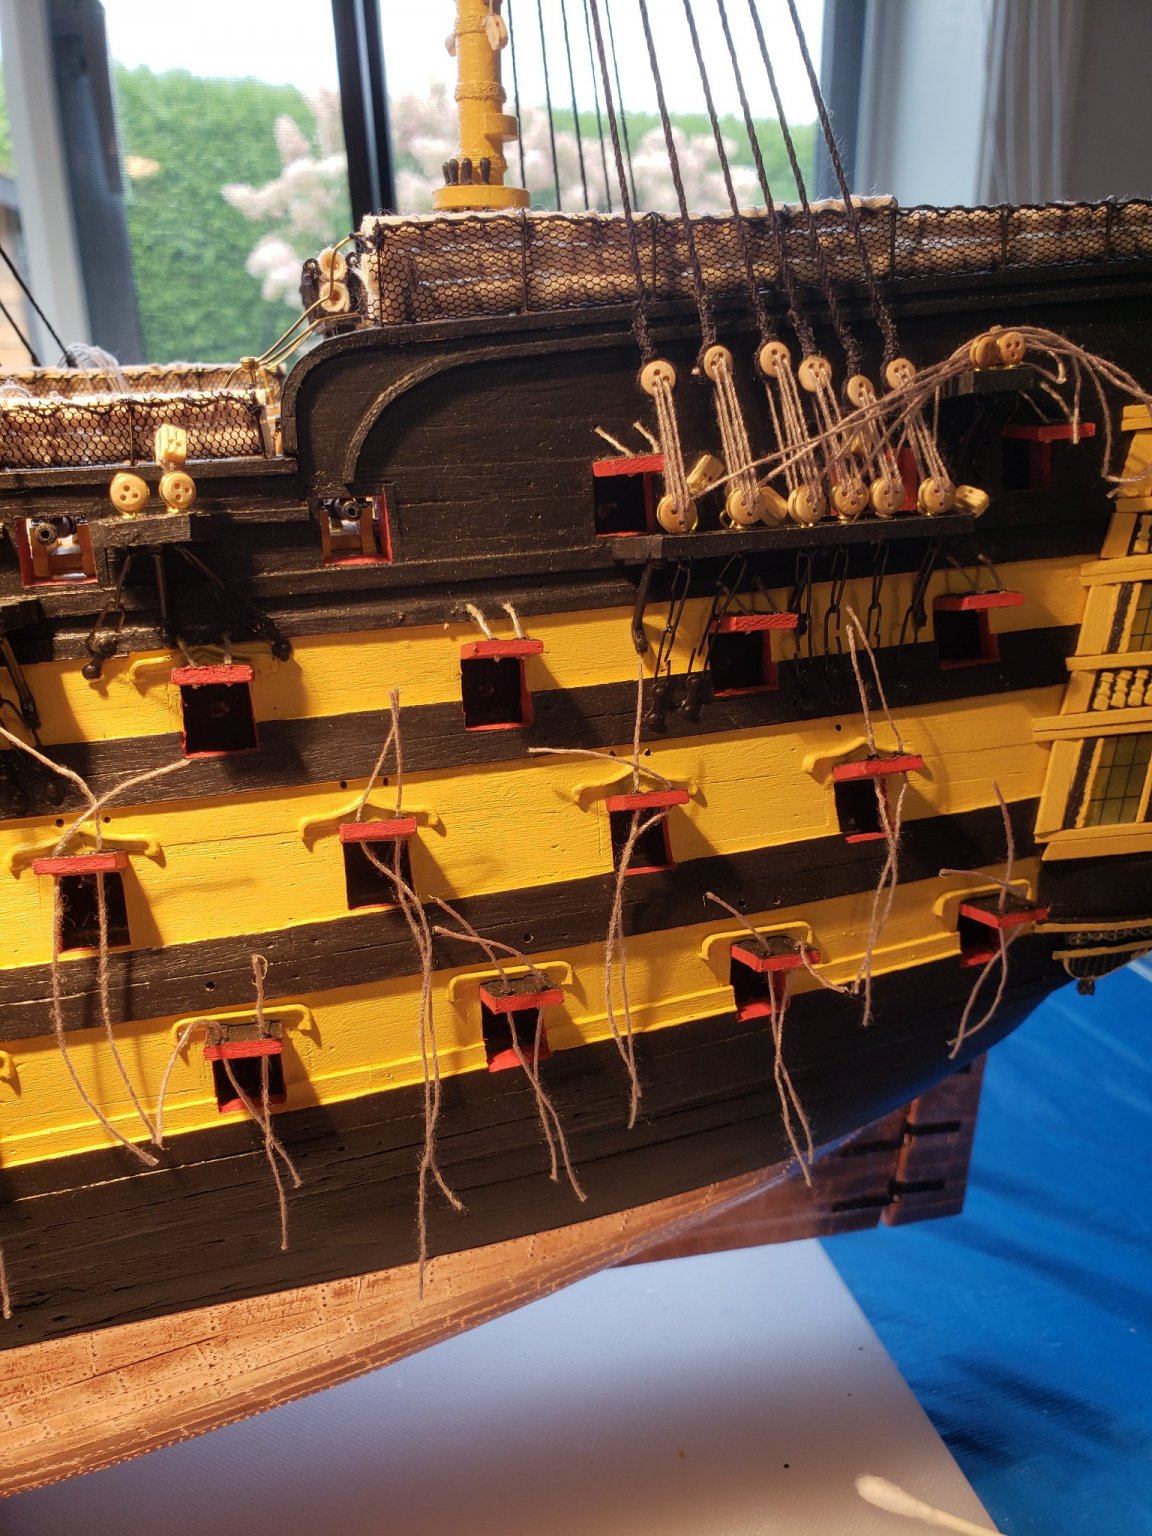
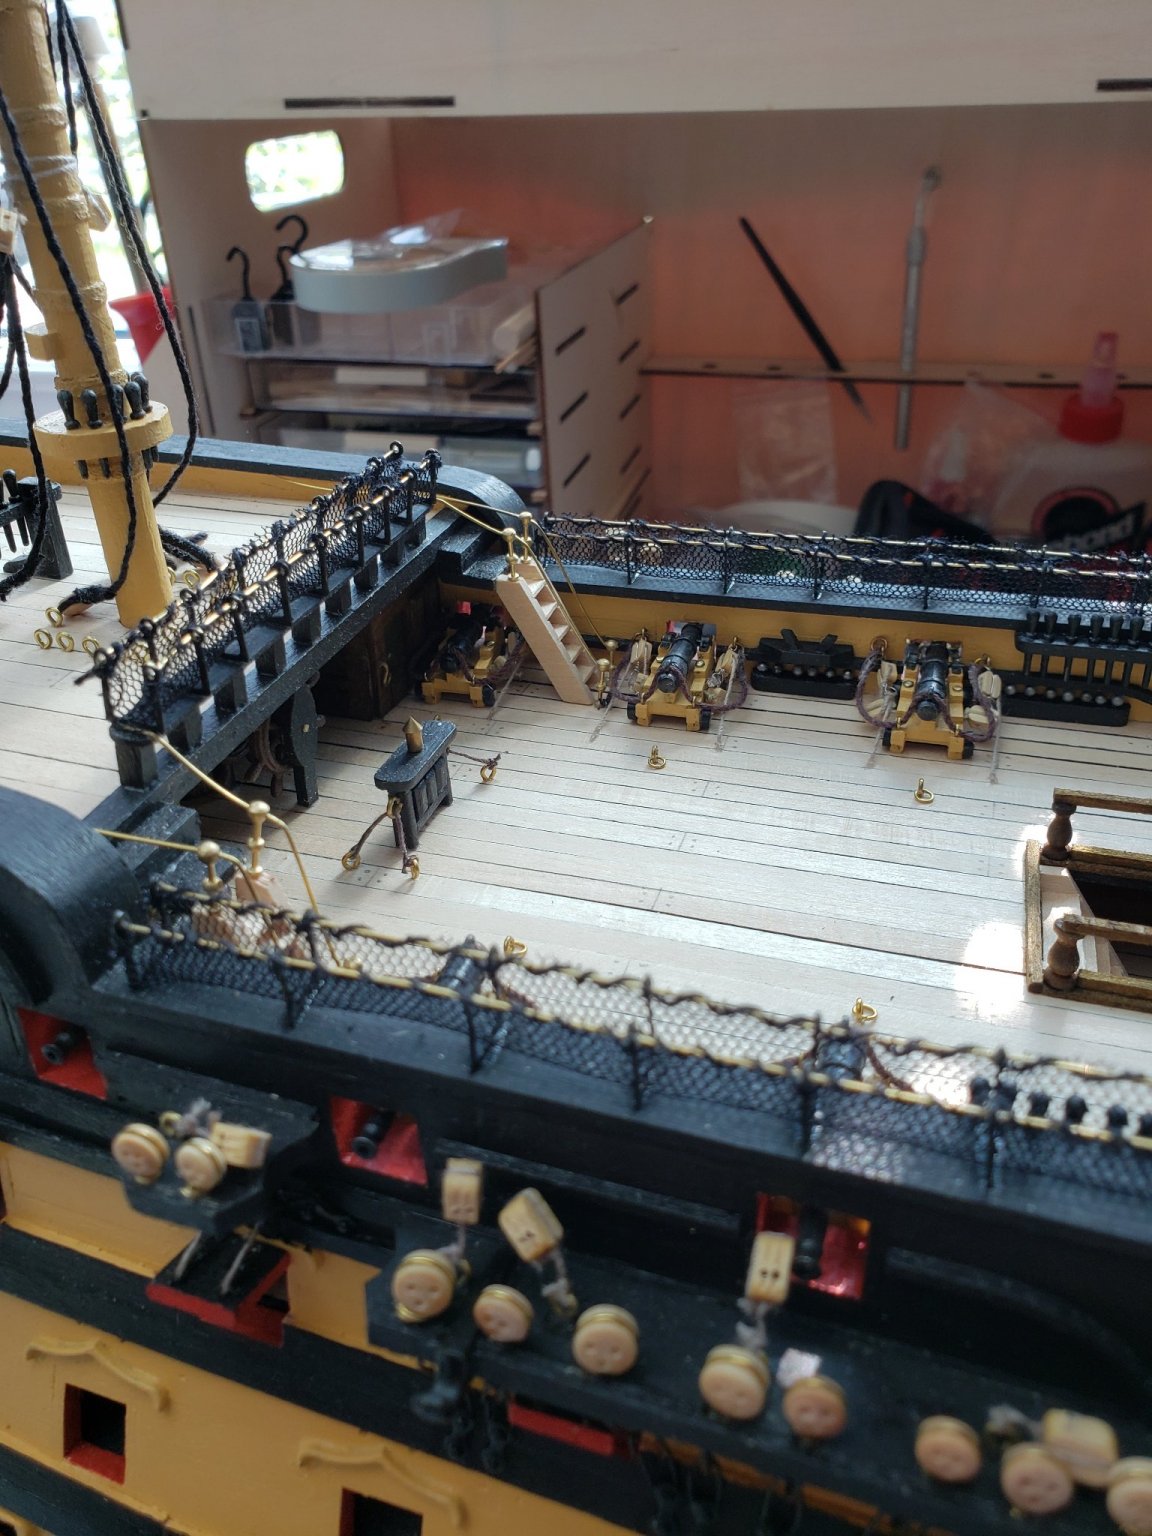
Haven't updated this build log for a while as most of the rigging work doesn't make for great pictures. although is consuming lots of time! I finished the second of the two carronades and placed it on the deck. Instructions were very clear as always. Next I worked on securing the shrouds and adjusting the deadeyes. Even though I used a jig to make sure all the deadeyes were even before I seized the shrouds, the results were mixed - mostly even, but some not even at all. There was no drinking involved, but I sometimes wonder what happened when I finish a task. Here I added the catharpins, which are the transverse rigging lines running behind the mast which attach to the futtock stave (I used brass wire) that secure the base of the futtock shrouds. I seized the futtock shrouds from each top to the shrouds on each mast. I added the boomkins to either side of the bowsprit, and the netting protecting the bow area. After constructing the gangboard, I attached it and fitted the main stay attachments. Next were the fore stay and preventer and the mizzen stay and preventer connecting the masts together, with the latter shown in this picture. I am now working on making the 60 remaining gun port lids, and will post more pictures as I continue...stage 97 of 120!


- 59 replies
-
- 5
-
-
- DeAgostini
- Victory
- (and 1 more)
-
I feel the same at times with the Victory. Because of the size of the ship, there is a lot of " make 50 of this" and do this 124 times! I just plug along and over time get the jobs done, but this is why my next build will be a smaller ship.
- 59 replies
-
- 1
-
-
- DeAgostini
- Victory
- (and 1 more)
-
The instructions are available to download on the AL site for free now.
-
I ordered this model from a Canadian distributor called Sunward Hobbies, and they had the option to get full colour instructions printed out for just $15 Canadian (about 7 pounds for you). That is way less than I could print it myself, so thanks for the warning - when I finish Victory I will be ready to go!
-
Thanks so much reklein. Where the instructions are very clear, I have had some success, and where left to my own devices, the mistakes creep in (like the chainwale attachment to the hull). Still, I am (mostly ) pleased with how it is turning out. My next projects will not be such a massive undertaking! Will you post a build log when you start Syren? I would be interested to see how it turns out. I loved the pictures showing your pile driver. The detail for your diorama is incredible!
-
I see you are working through the Beagle now. My first build was from Occre, so it will be interesting to see how you feel Occre compares with Artesania Latina. I was a biology teacher, so I want to build the Beagle someday because of the connection with Charles Darwin. Maybe I should just let you pick all my future models, and I can follow you and learn from your mistakes! I am also interested in Vanguard models by Chris Watton because of his really clear instructions. With clear instructions, I think you can build almost anything. Well, except when I mess up by not paying enough attention to centering things!
-
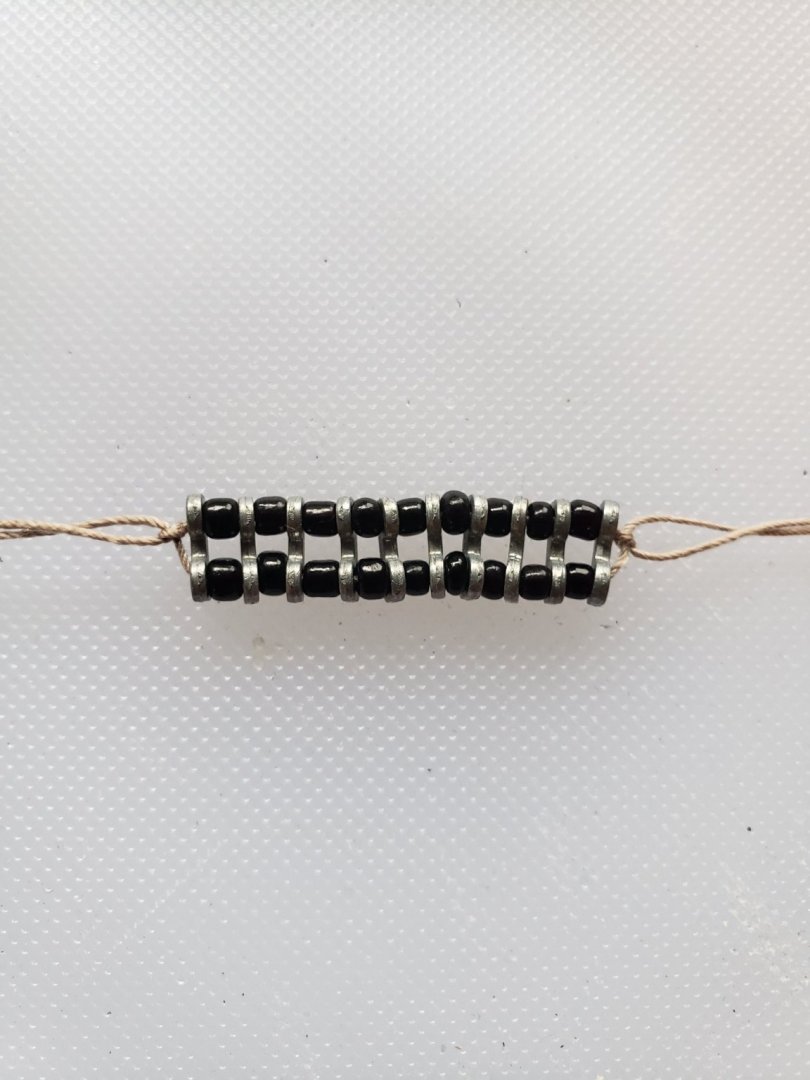
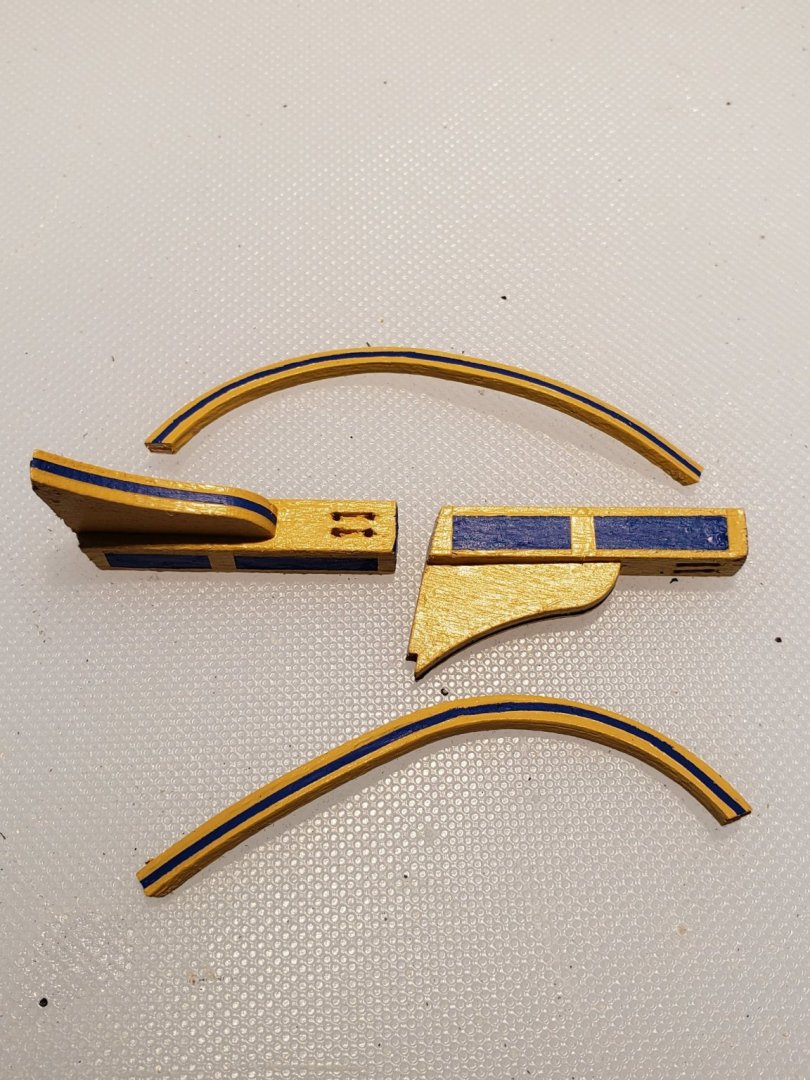
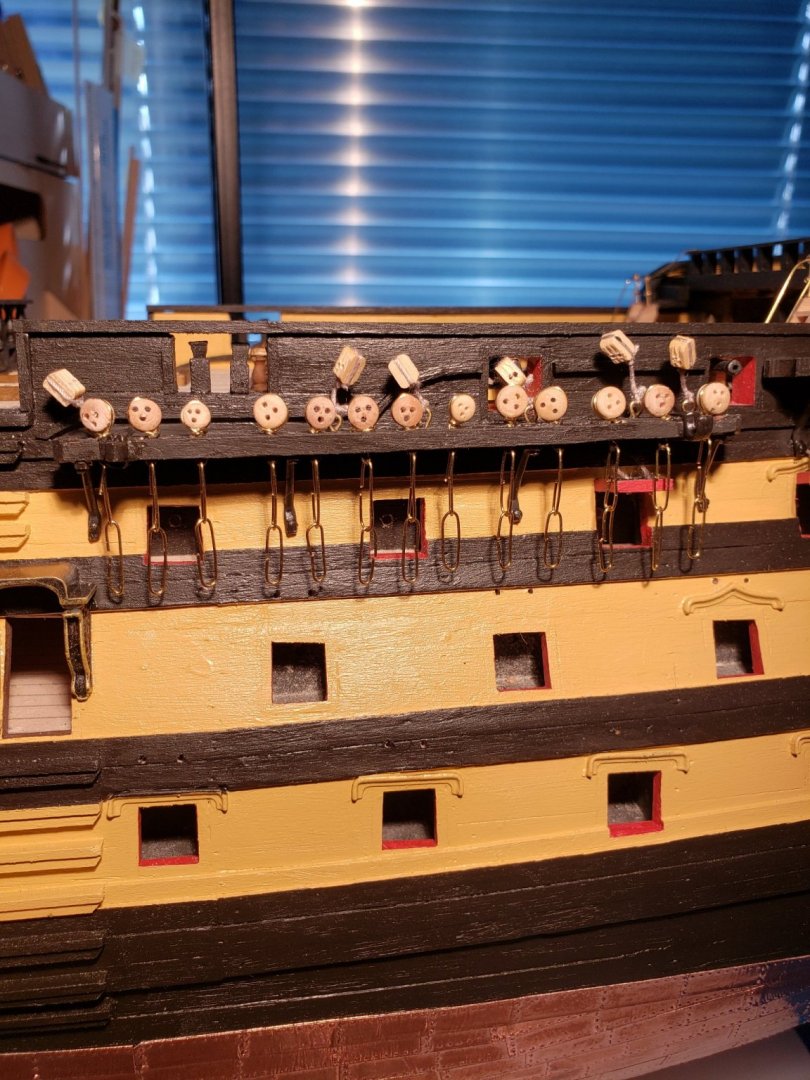
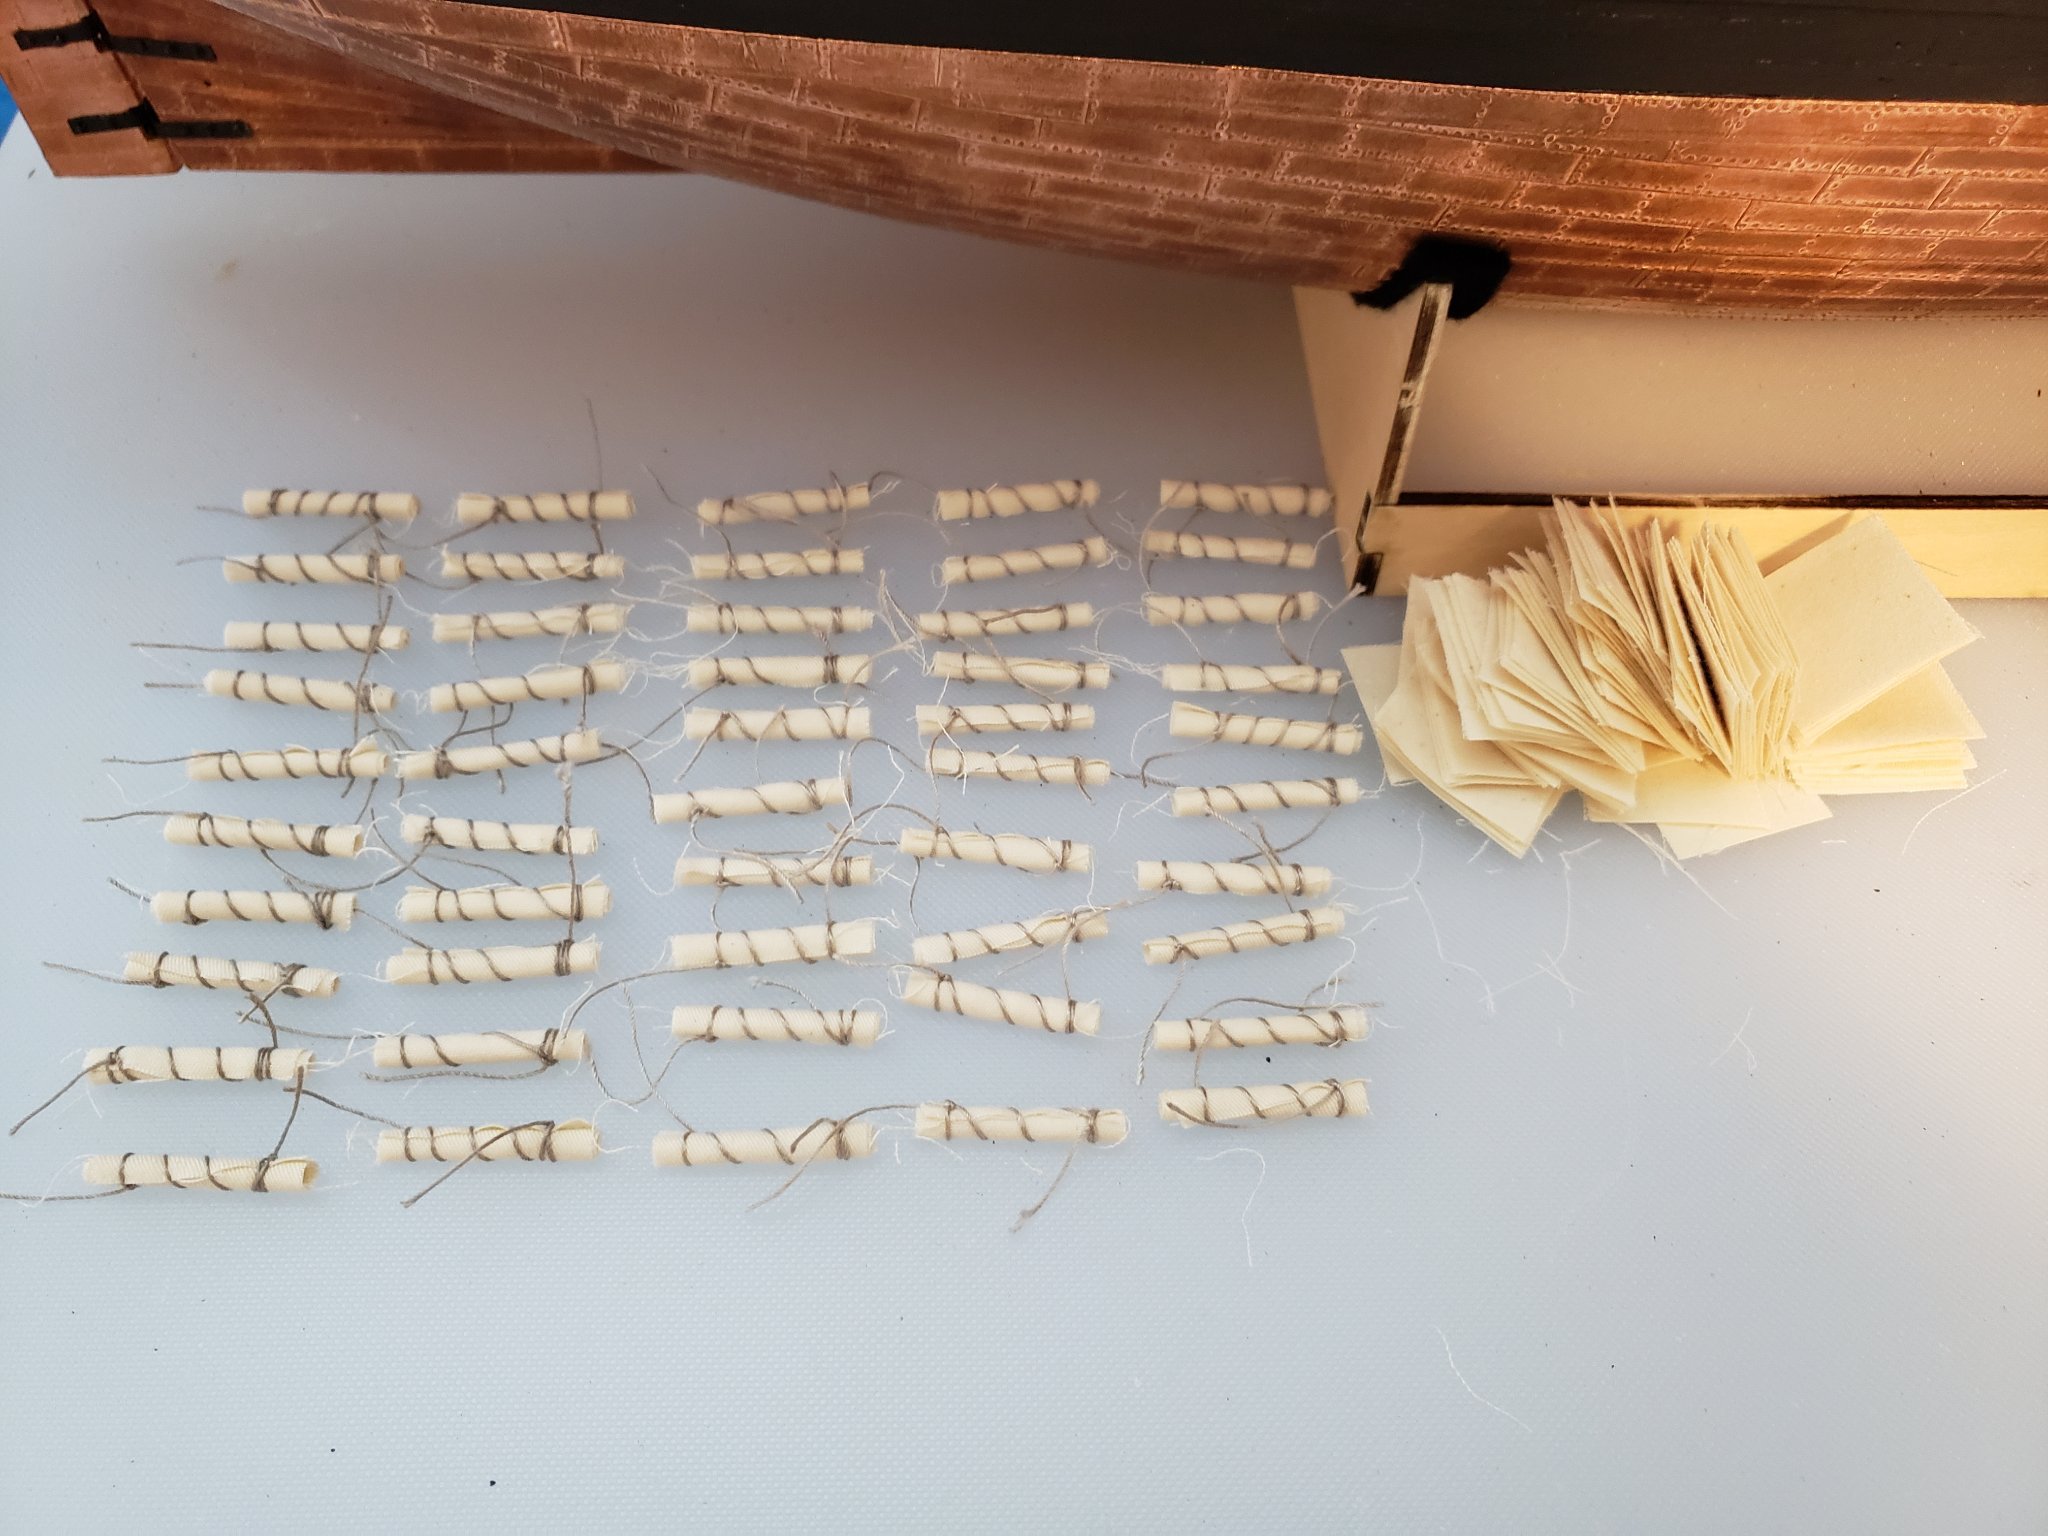
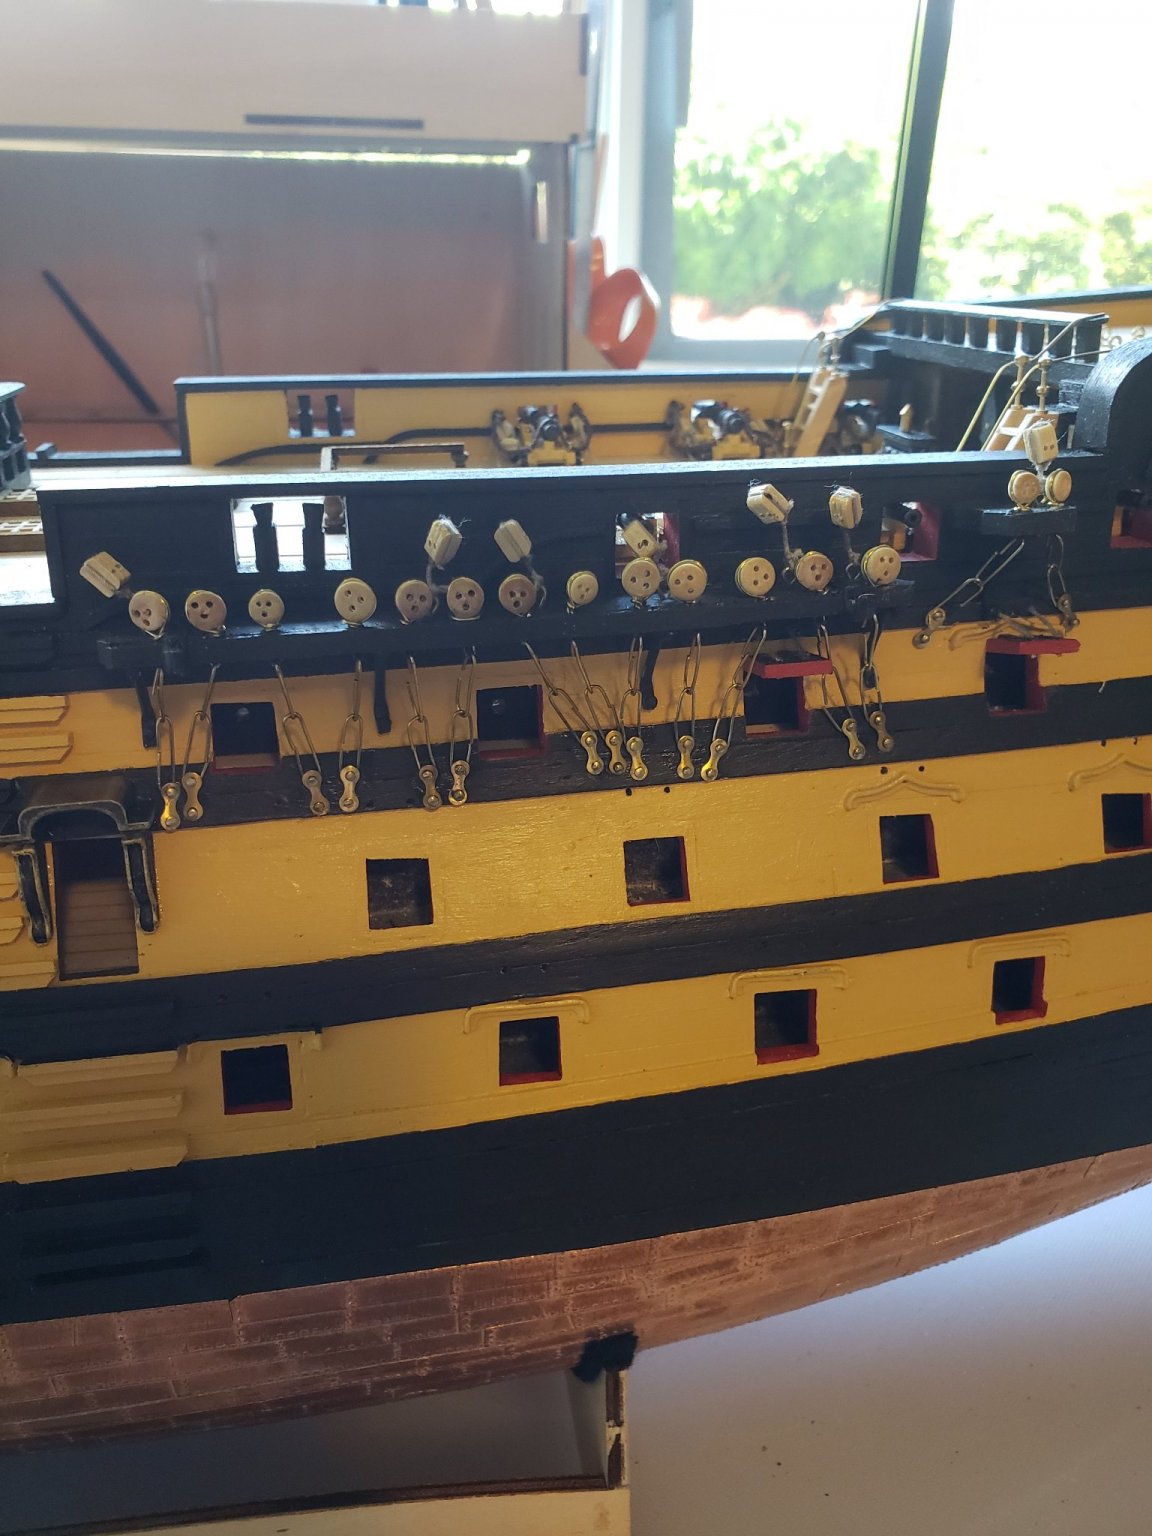
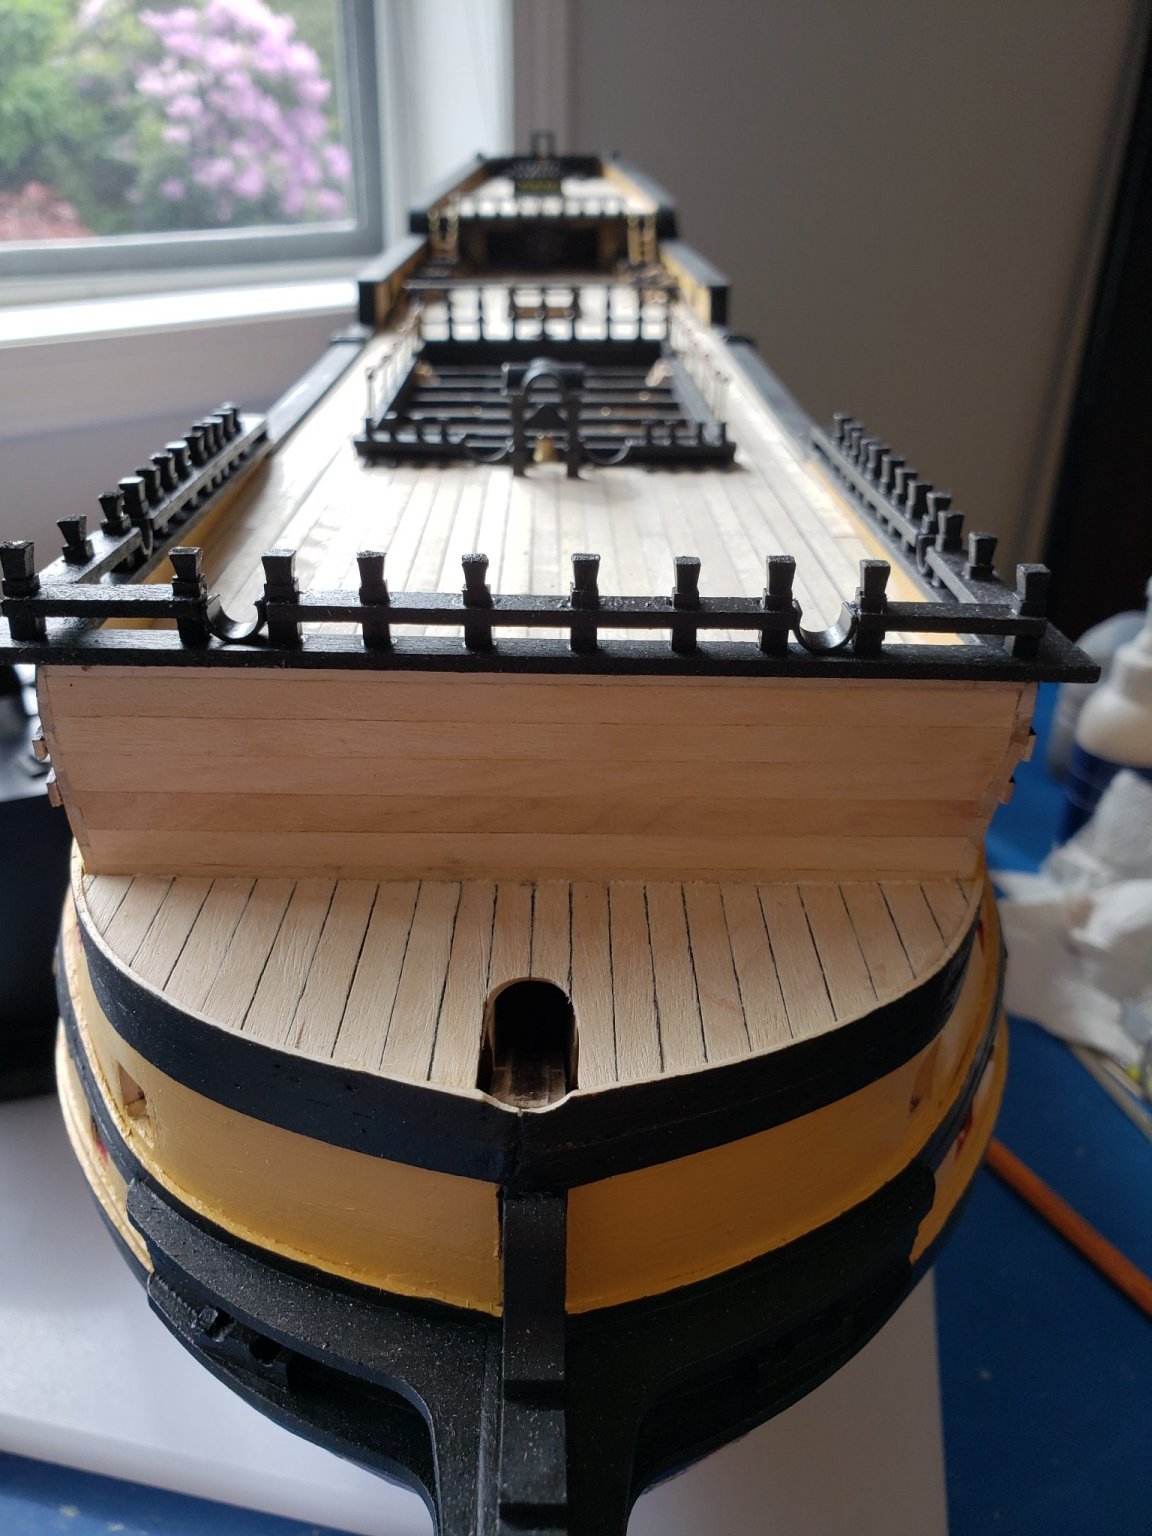
Finished most of the decorative work on the bow section by adding the catheads and ekeing rails. For me it was a bit tricky getting the angles right for the catheads as they had to point forward and up as well. Used my 1mm masking tape and the details for the blue and ochre paint turned out well. Finished more deck details, adding pinrails and some cannonball racks. Finally began rigging, adding shrouds to all three masts and seizing deadeyes to the shrouds. I used a jig to help with deadeye spacing, but the seizing process is not my favourite part of the build. Speaking of less favourite parts, I next added hammock cranes to all the deck rails and sewed very flimsy hammock netting onto the cranes. My wife enjoyed my sewing, while me, not so much. The next brief part of the instructions described rolling up hammocks to put in the hammock cranes, finishing with the ominous line "now make 104 of these". As it turns out, I will need about124 to finish the ship. It takes about an hour to do 20 for me, so another long process! Here is the first 50 waiting to have the thread ends tied off. One final picture showing some of the hammocks installed. Finally my build log has caught up to where I am actually building today!


- 59 replies
-
- 3
-
-
- DeAgostini
- Victory
- (and 1 more)
-
I see what you mean Ian. I did measure and follow the instructions carefully when placing the deadeyes. I checked them again and they are correct according to the instructions, but obviously not accurate compared to the actual ship. Perhaps the flaw lies in the size of the deadeyes themselves as you suggest. I'll just have to make the best of it. I don't like the look of it compared to what it should be.
-
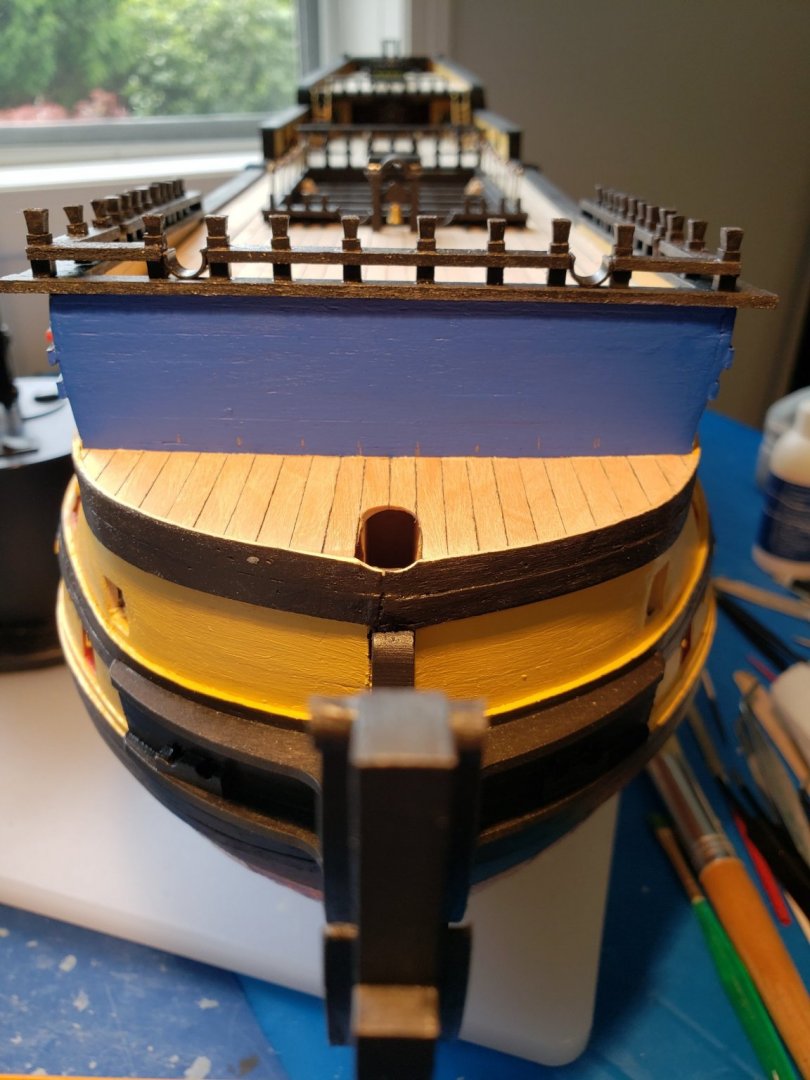
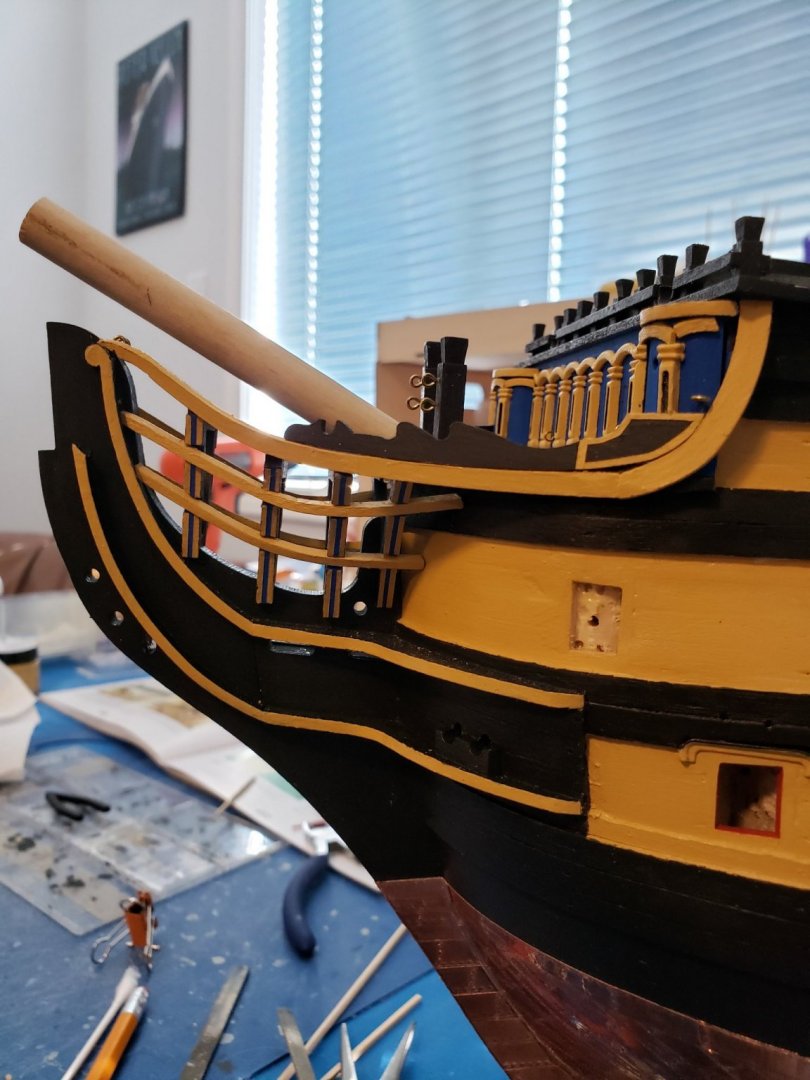
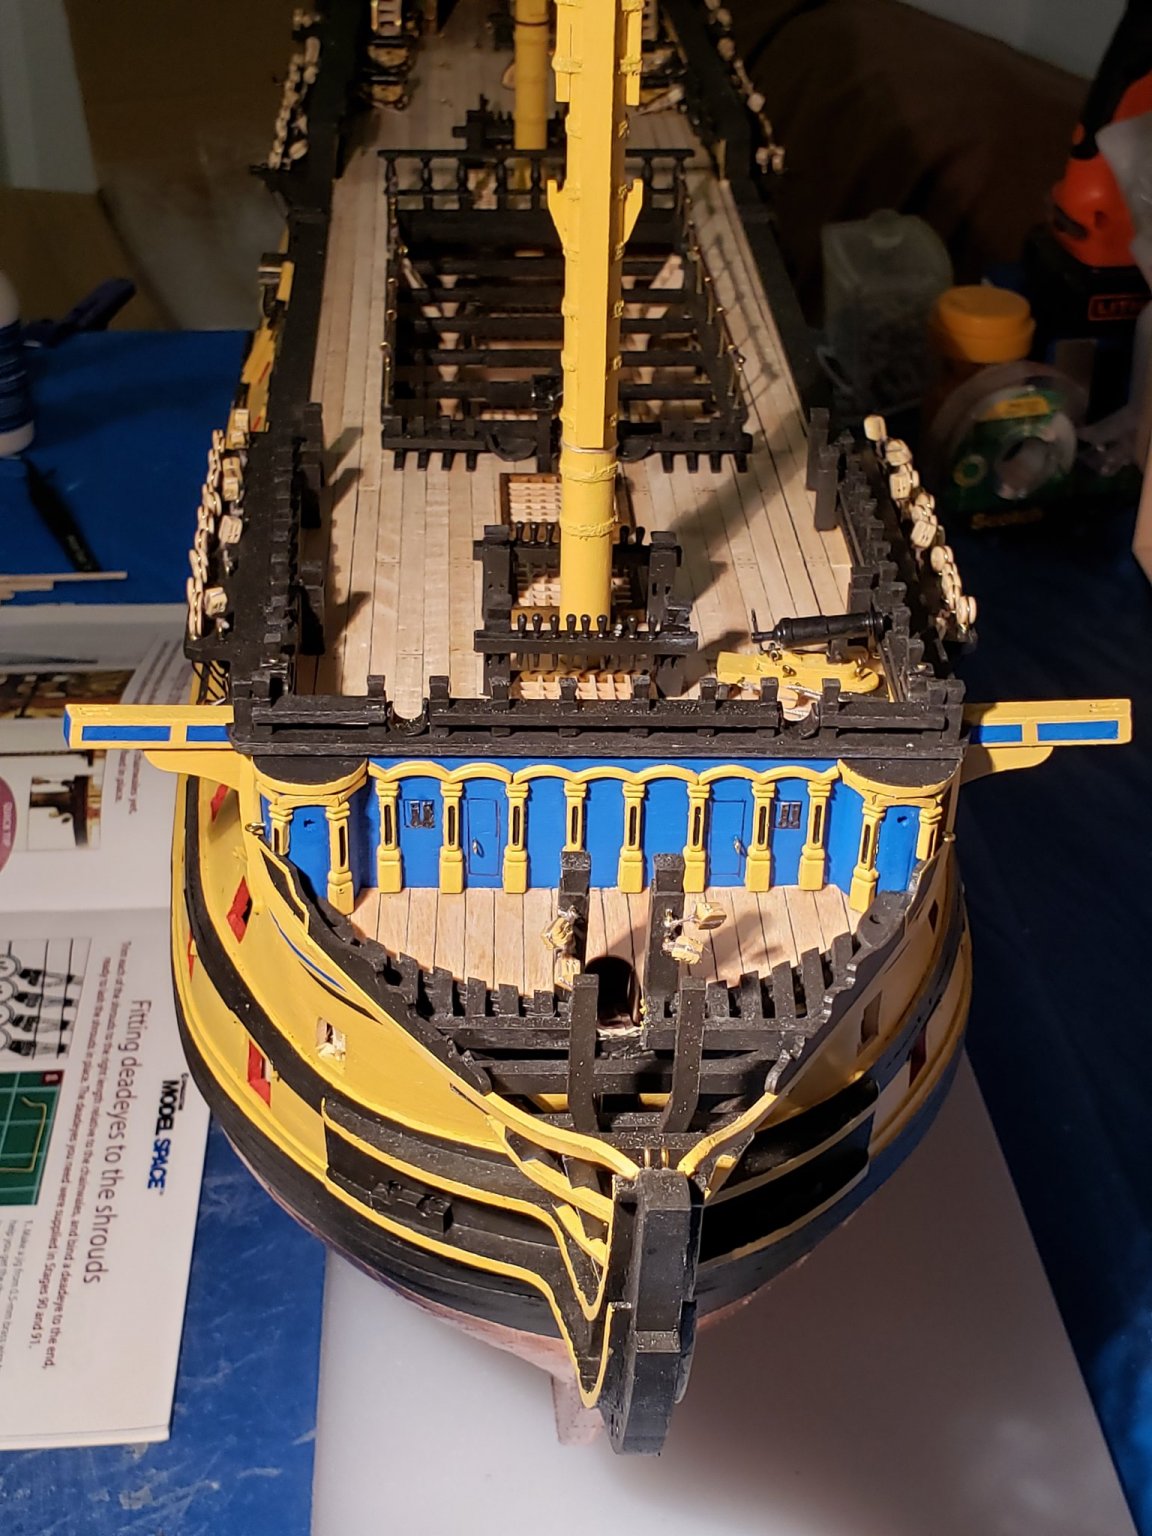
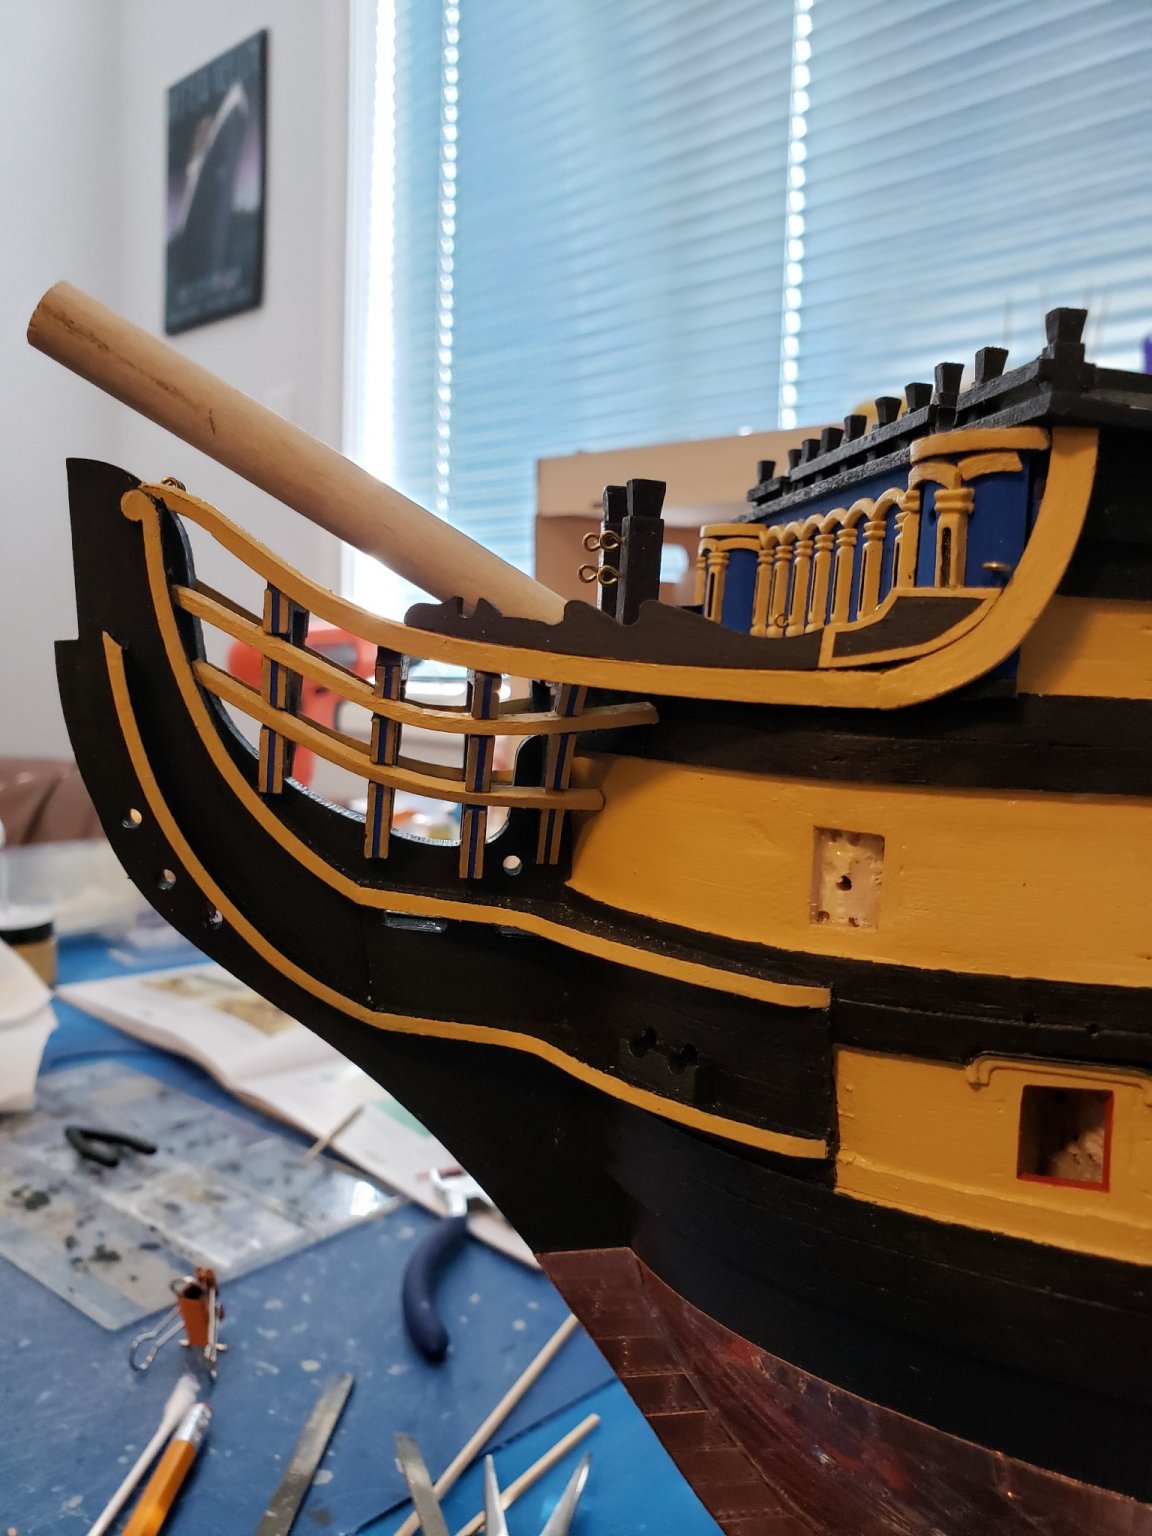
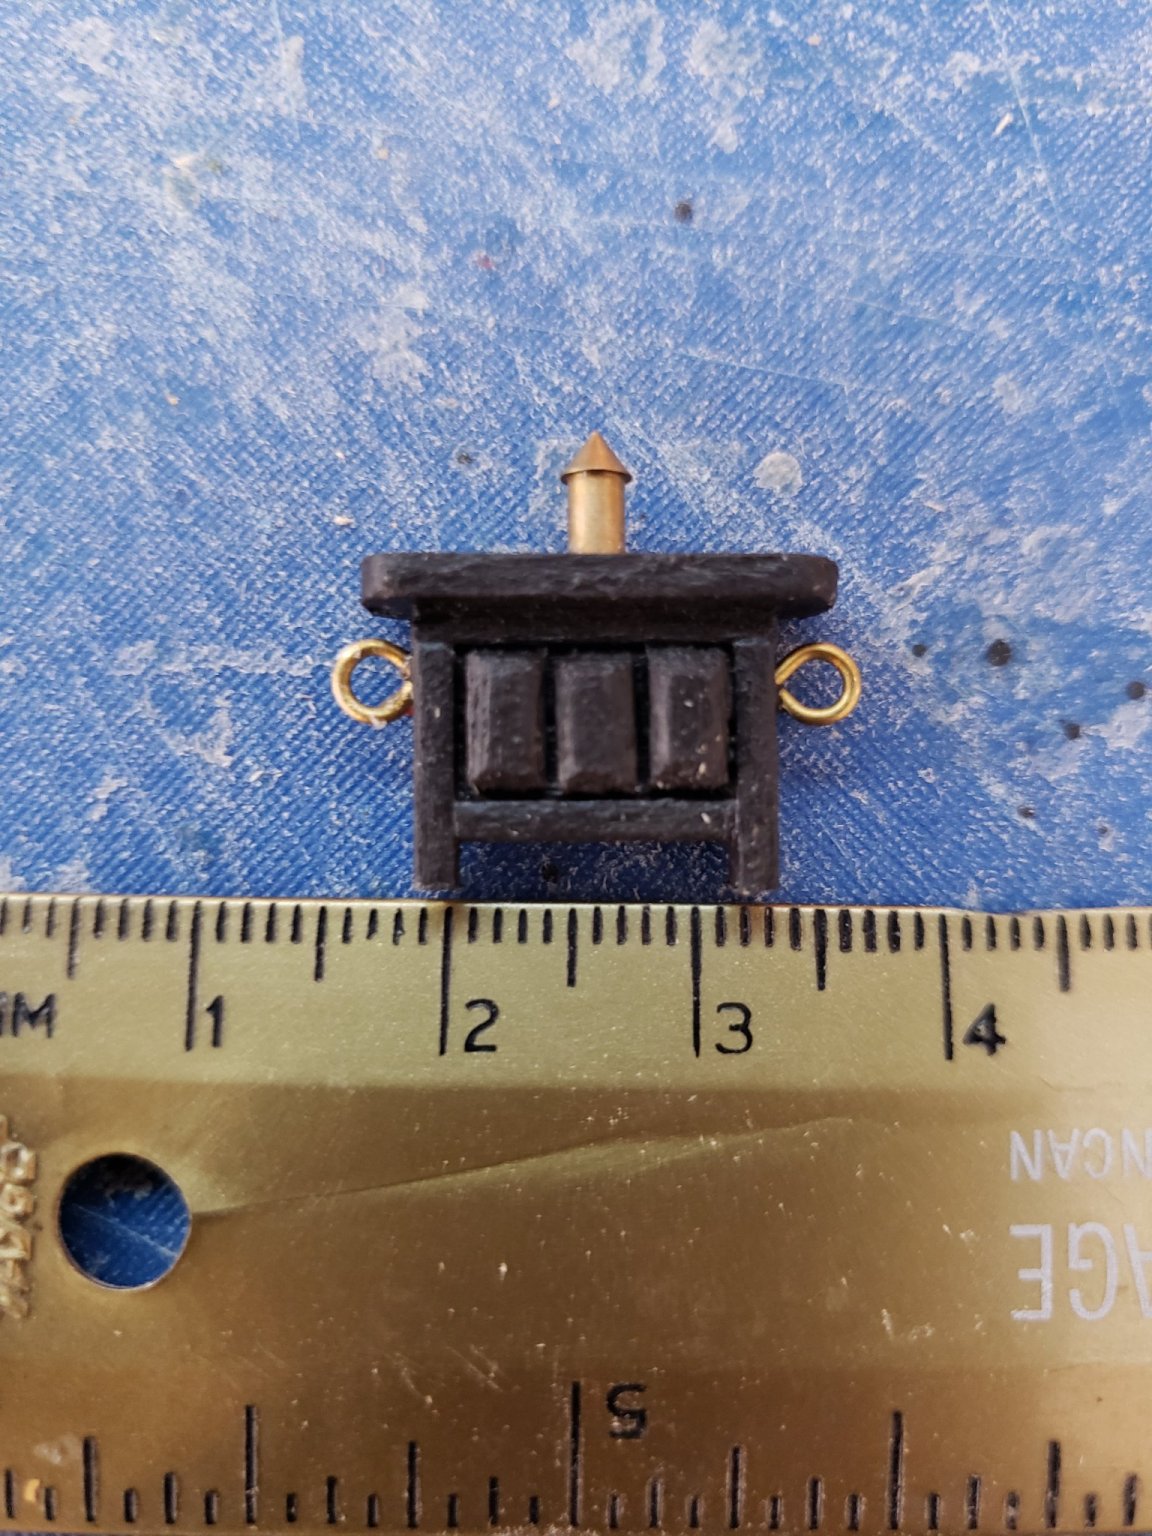
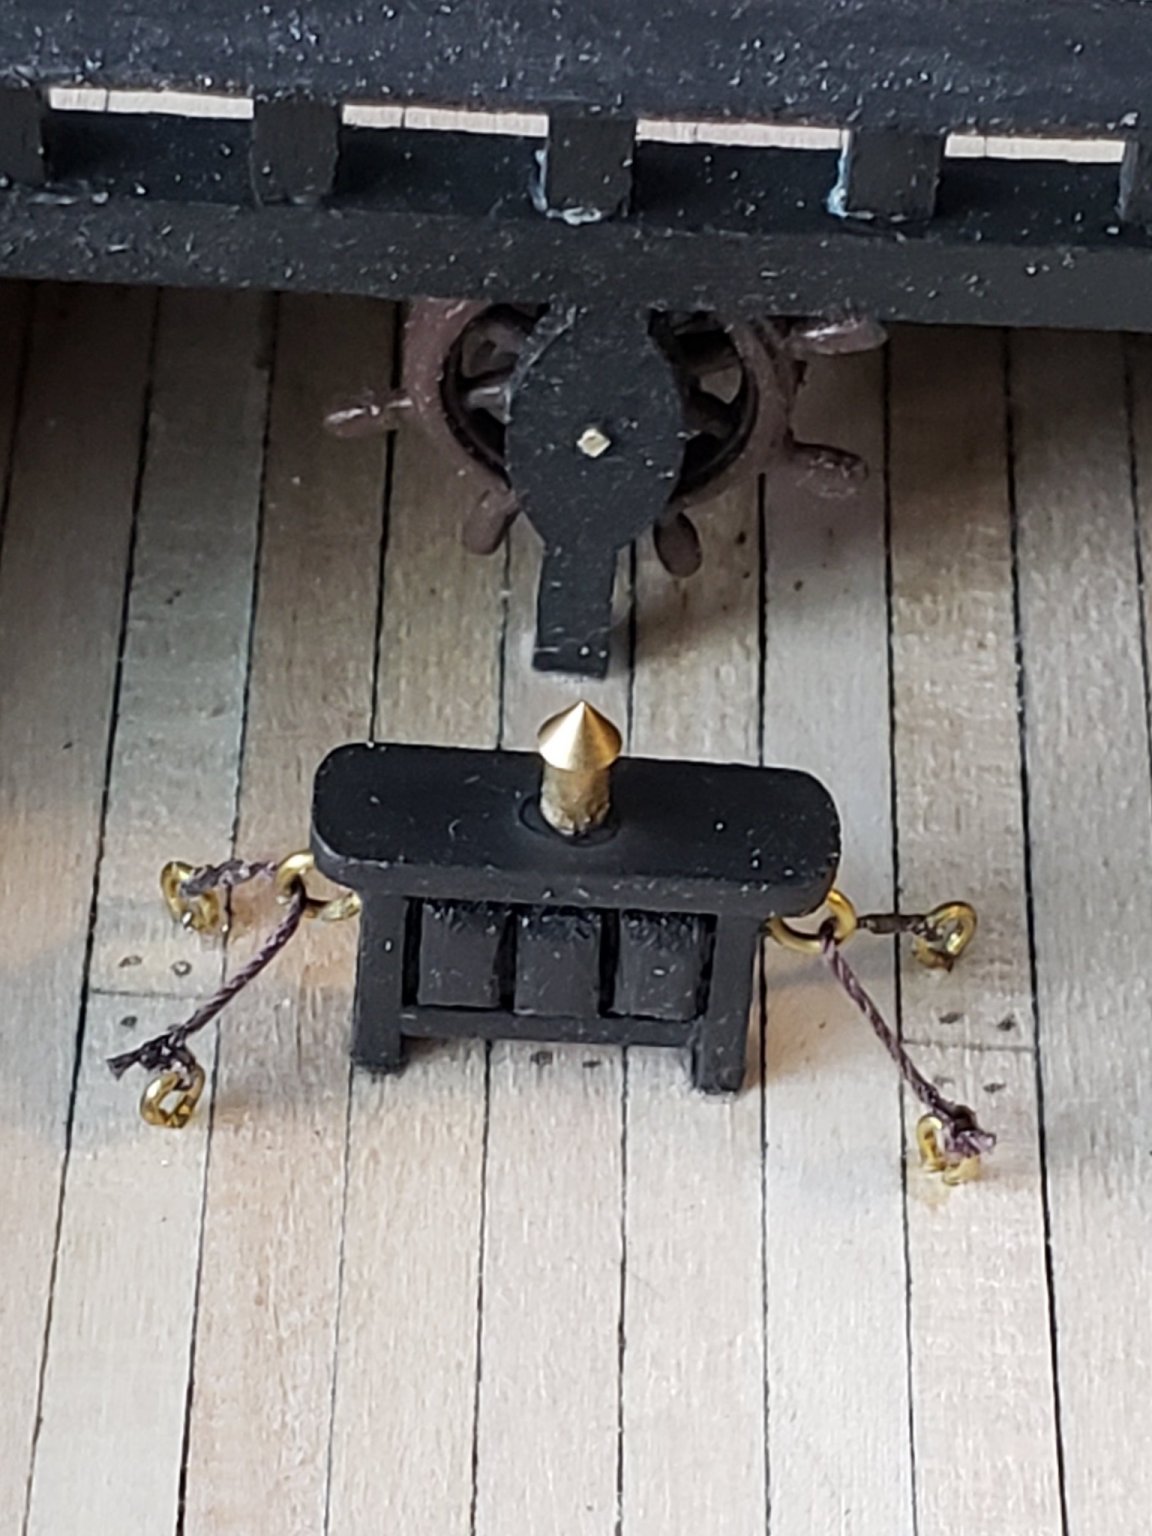
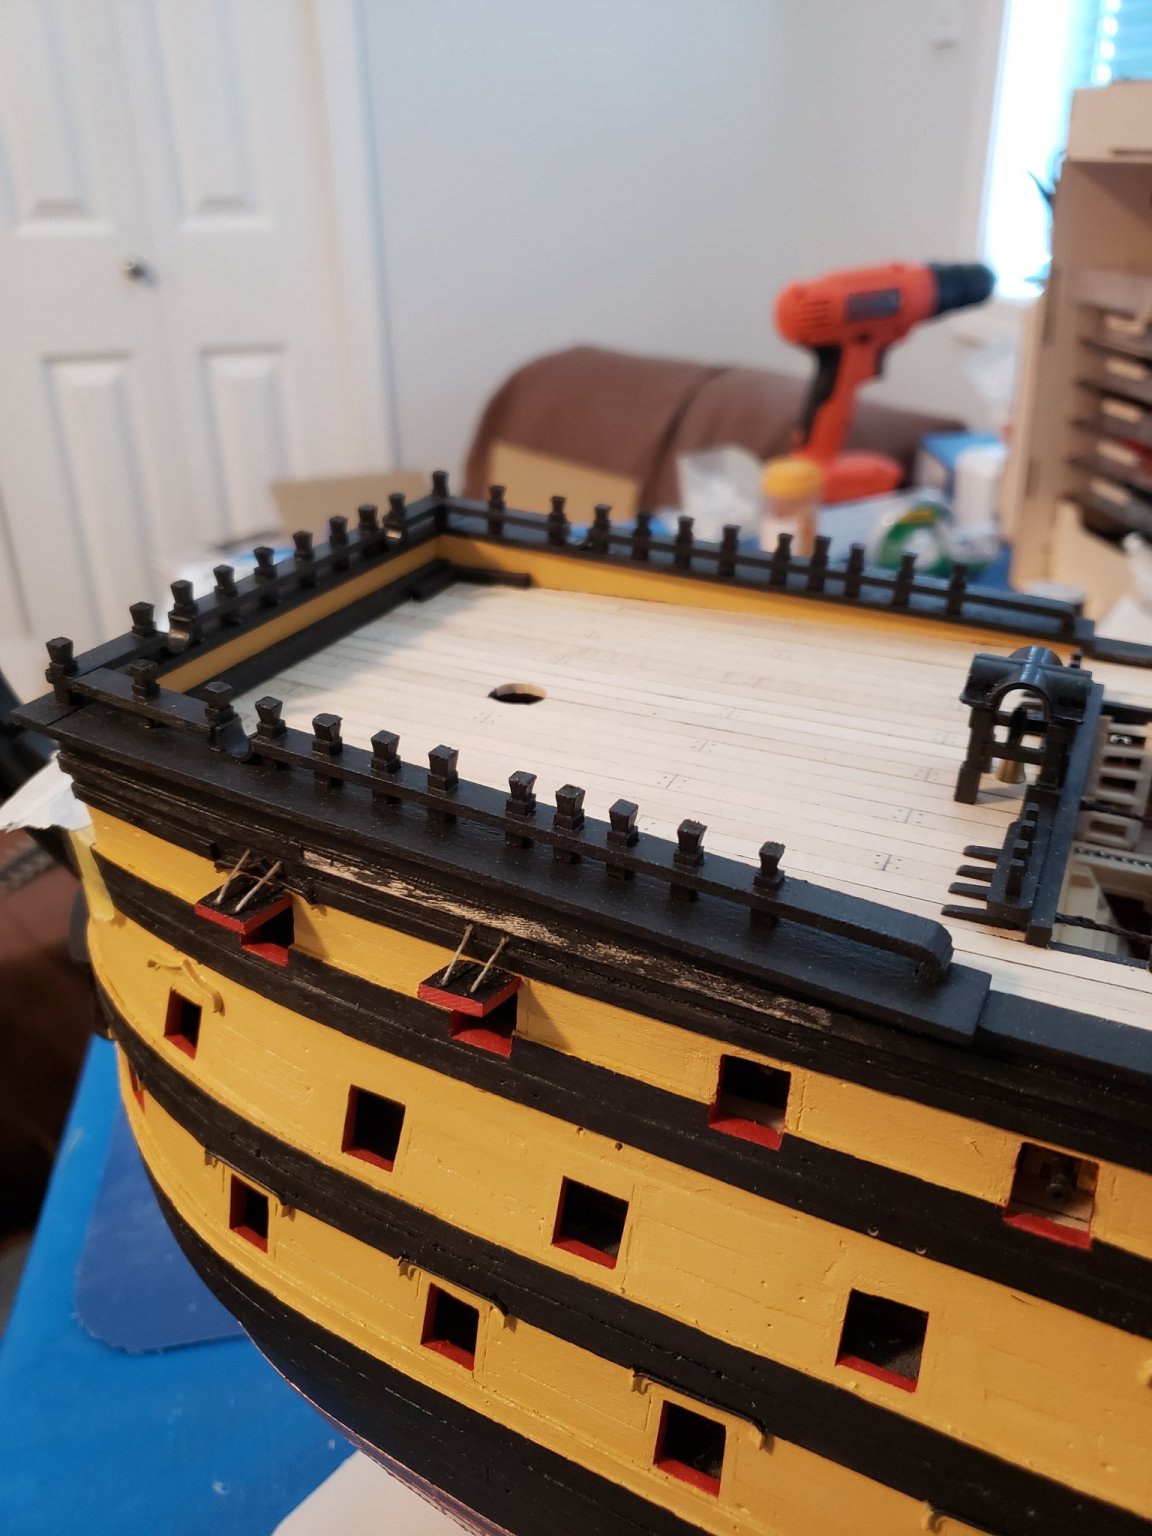
June, 2021 Almost caught up to where my actual build is now in real time. I really enjoyed working on the decorative parts of the bow section. I first painted the bulkhead the closest blue I could get at the hobby store to the French Blue (Royal Blue, but close). I next primed and painted the arch castings and pilasters ochre and black in the inset sections. I attached all of these to the bulkhead after making and attaching the roundhouses. The beakhead frames and grating were more of a challenge. Bending the frames out and up while keeping them matched to the preformed slots was not easy. Again, I painted the frames with the blue stripe using 1mm masking tape before attaching, rather than waiting until after installation per the instructions, which would be much more difficult for me. More detail will be added to the bow next month. Added the compass binnacle, just because it was a fun break in the build! I attached the chainwales which was a bit of a chore. I did veer a bit off what the instructions recommended (and is likely more historically accurate) by attaching all the chainwales using loops directly to the wale itself. A few of the loops were to be attached to the ship itself using a loop of wire, but I had issues so I just modified the procedure. It does make the attachment points a bit crowded between the gunports, I know. The loops were all painted black later. Finally worked on the last major piece of the ship, the bowsprit. Lots of angles and challenges making sure that the vertical angles of the jackstaff and dolphin striker will be correct when it is attached to the ship. In July I finished the bow details, and began the laborious rigging process. I'll post those pictures when I get a chance next.


-
Thanks for the comment Ian. I really was just guessing where the waterline was, as the usually comprehensive instructions didn't state clearly where this should be. I knew it was a bit low ( or evidently a lot low!) but you're right, I can add a few rows of copper tiles above my installed tiles to raise the waterline. Thanks for the observation.
-
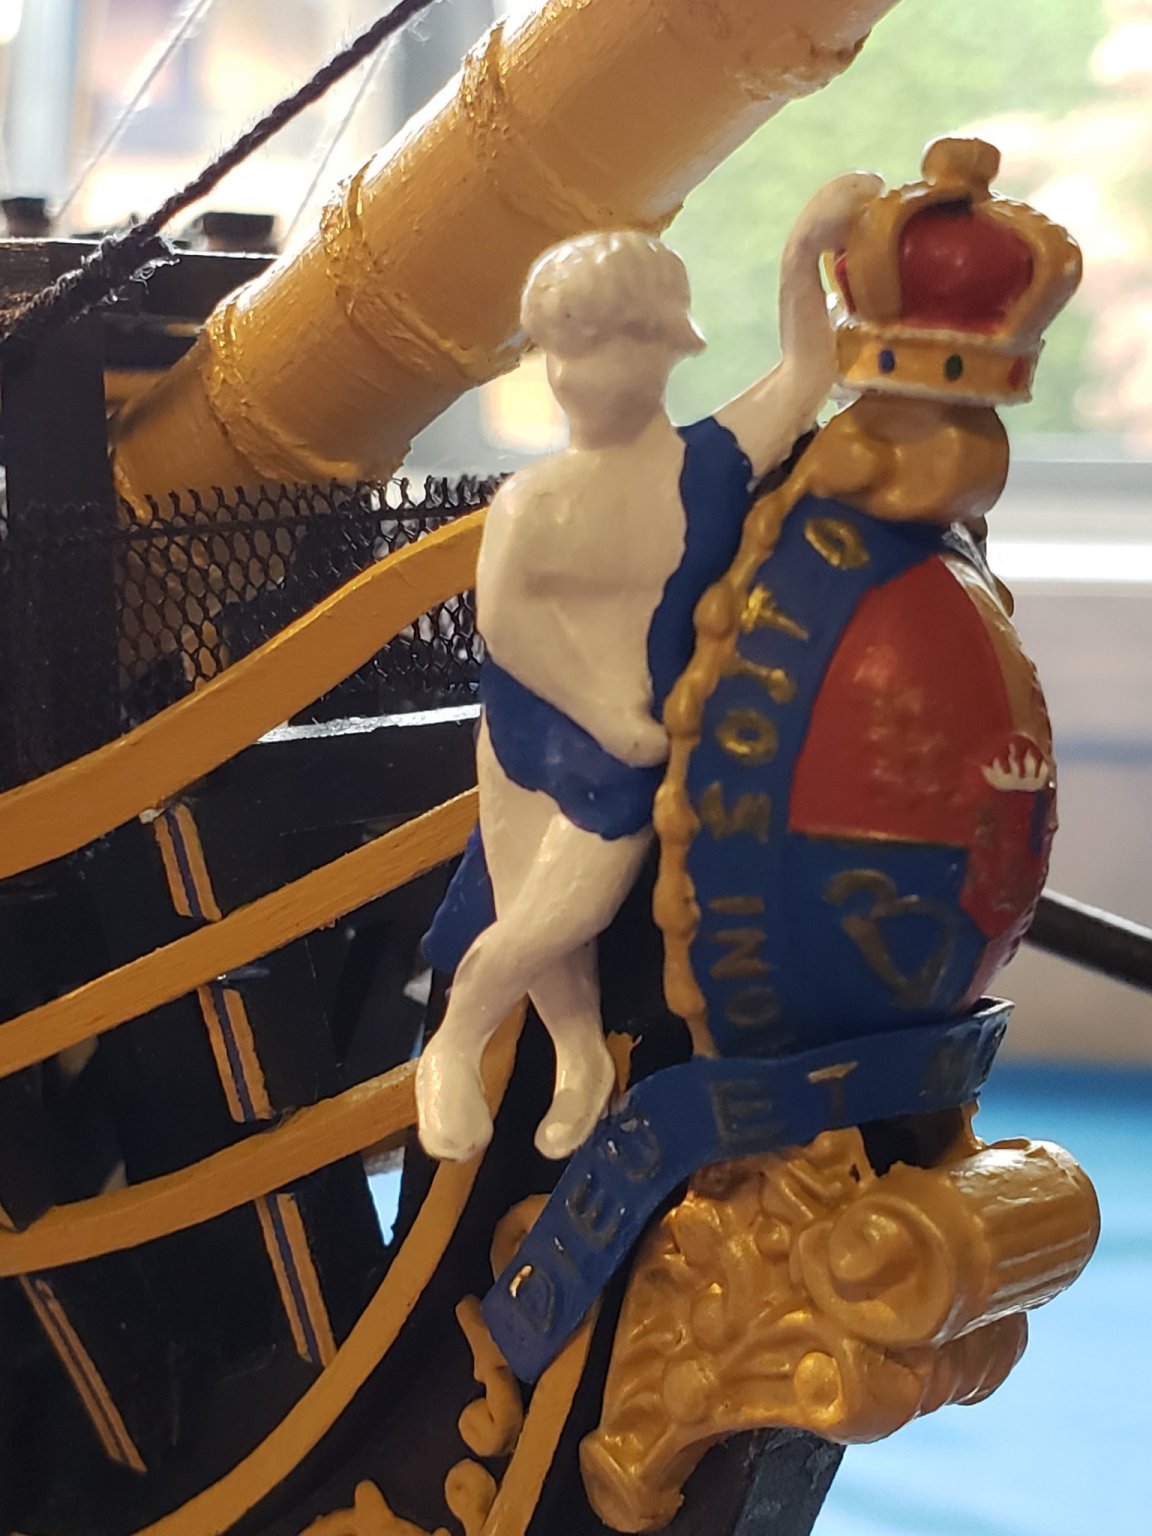
Penfold, it's just that the coat of arms is slightly off center to the right. I read about acetone but was worried it might remove the paint on the coat of arms and I was not wanting to paint that again. I should carefully give that a try. Thanks for the comment. I did order the Bluenose II, and I will try to match your standard when I get to it next!
-
Thanks for the comments on my Victory log. I decided to come over and see how your build is coming along. It is looking great! My Victory would be impossible for me except for the really detailed instructions (I am on page 526 now). Having all the people on this site as a resource makes this hobby much more possible as well. Your log has great detail - good luck on the rest of your Build.
-
Thanks so much! It is far from perfect, but I was happy with how most of it turned out. It was really satisfying working on this part of the build.
-
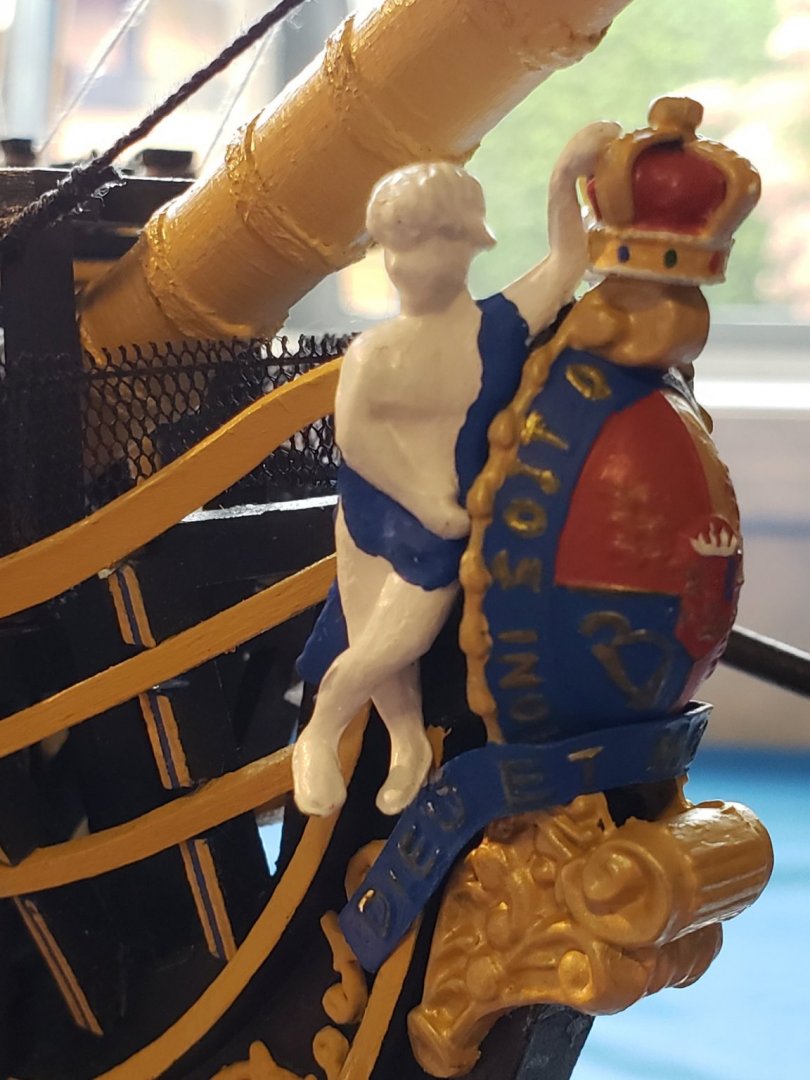
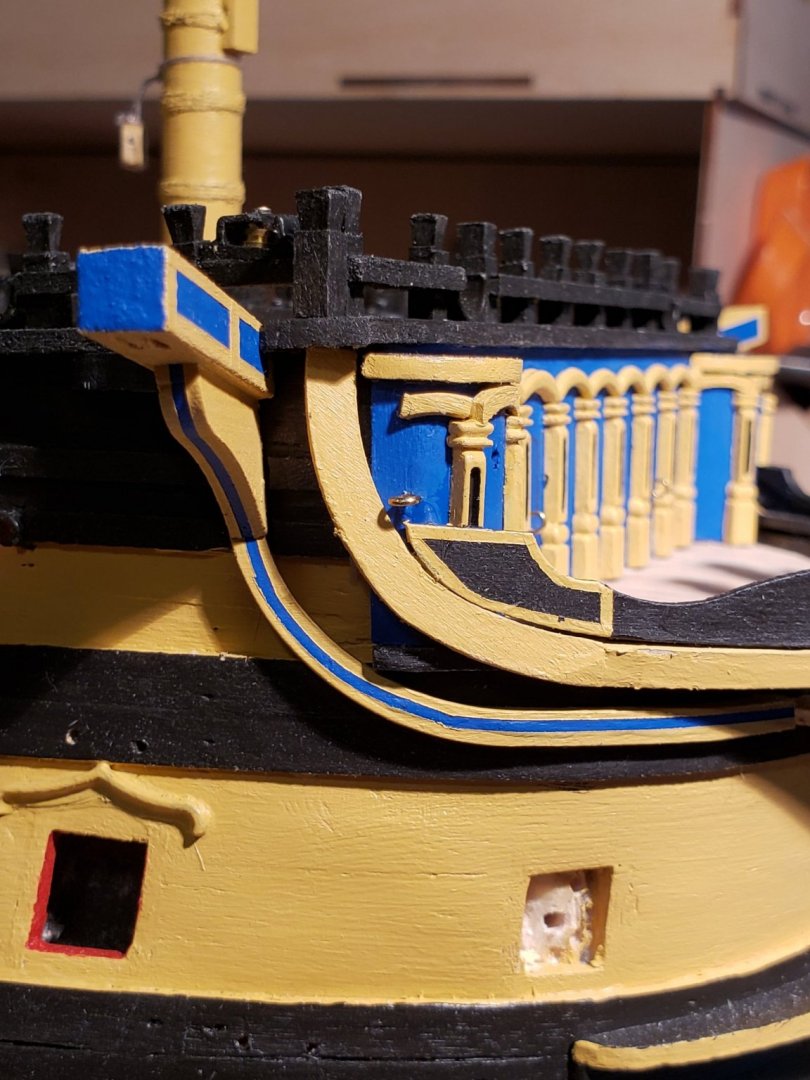
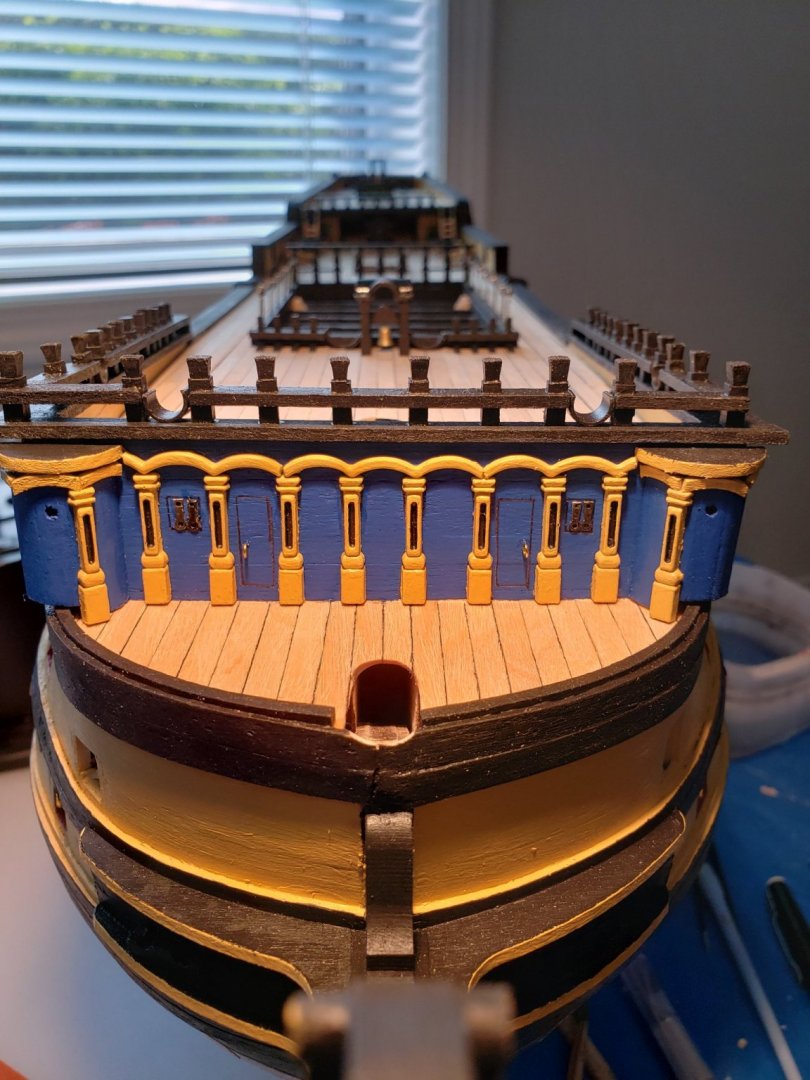
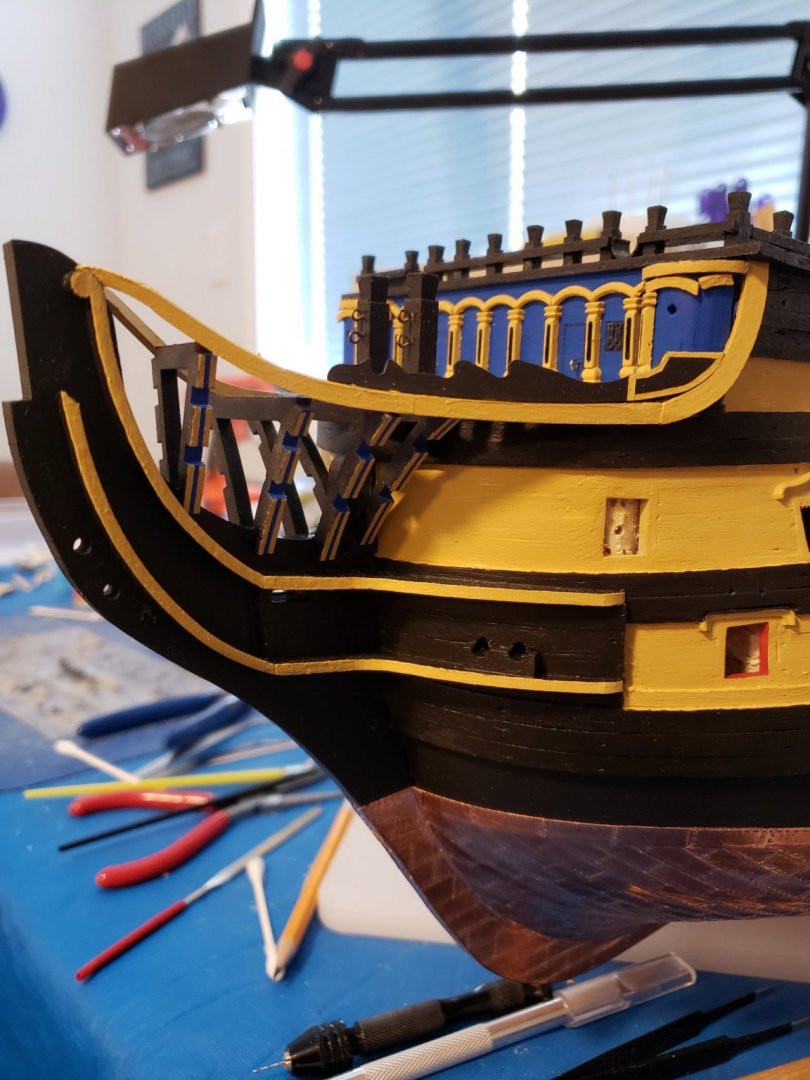
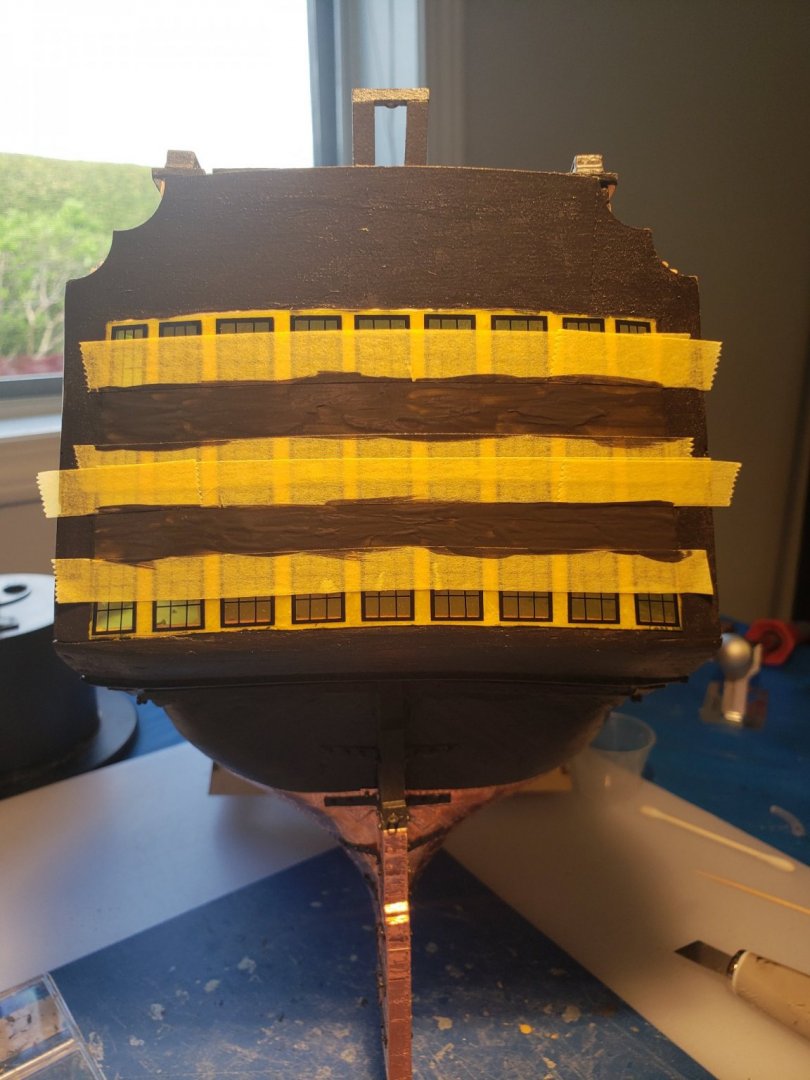
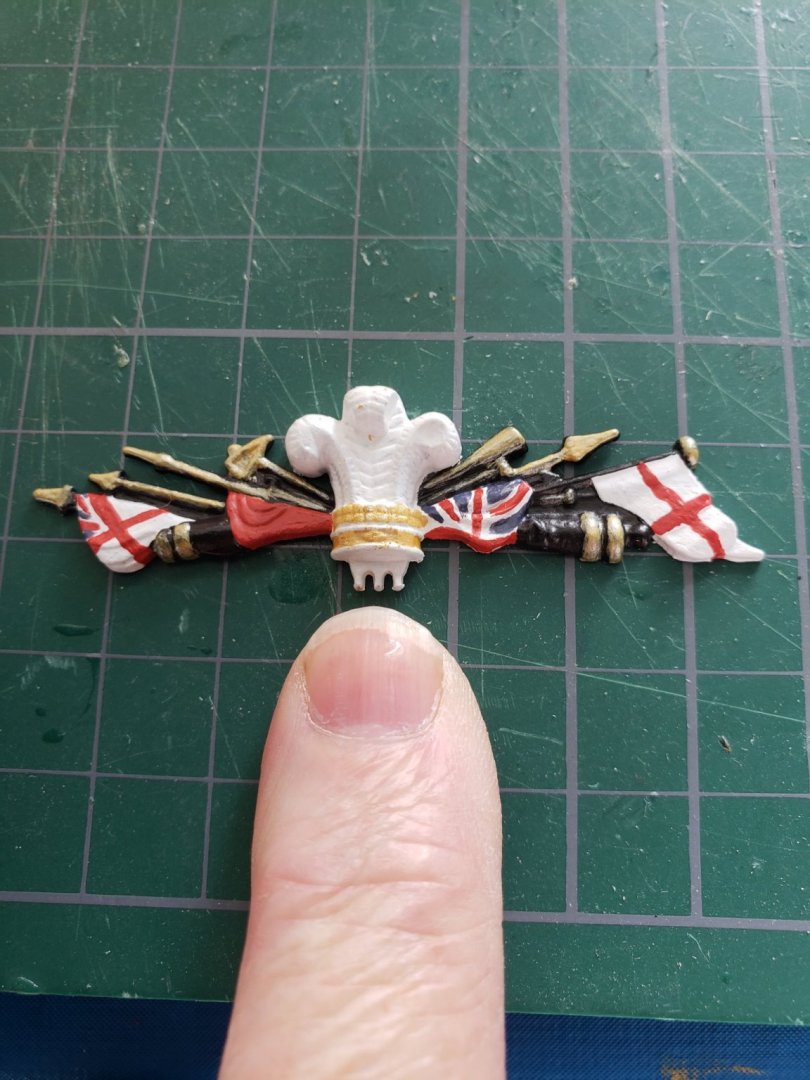
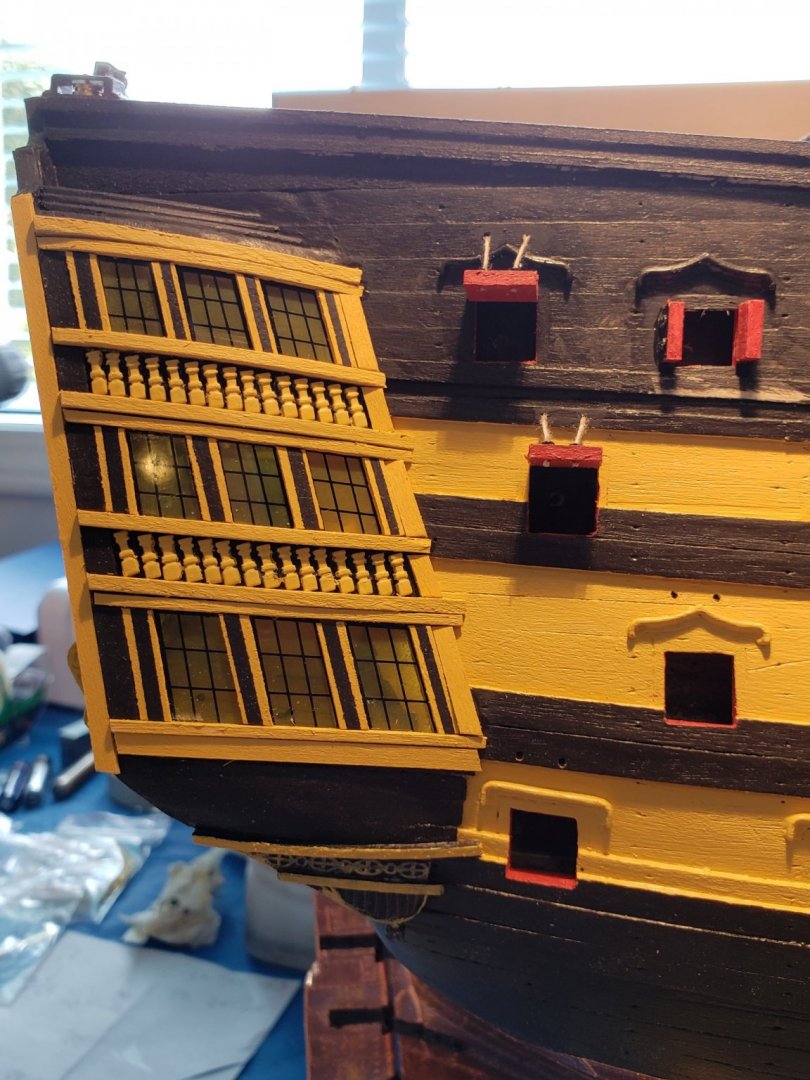
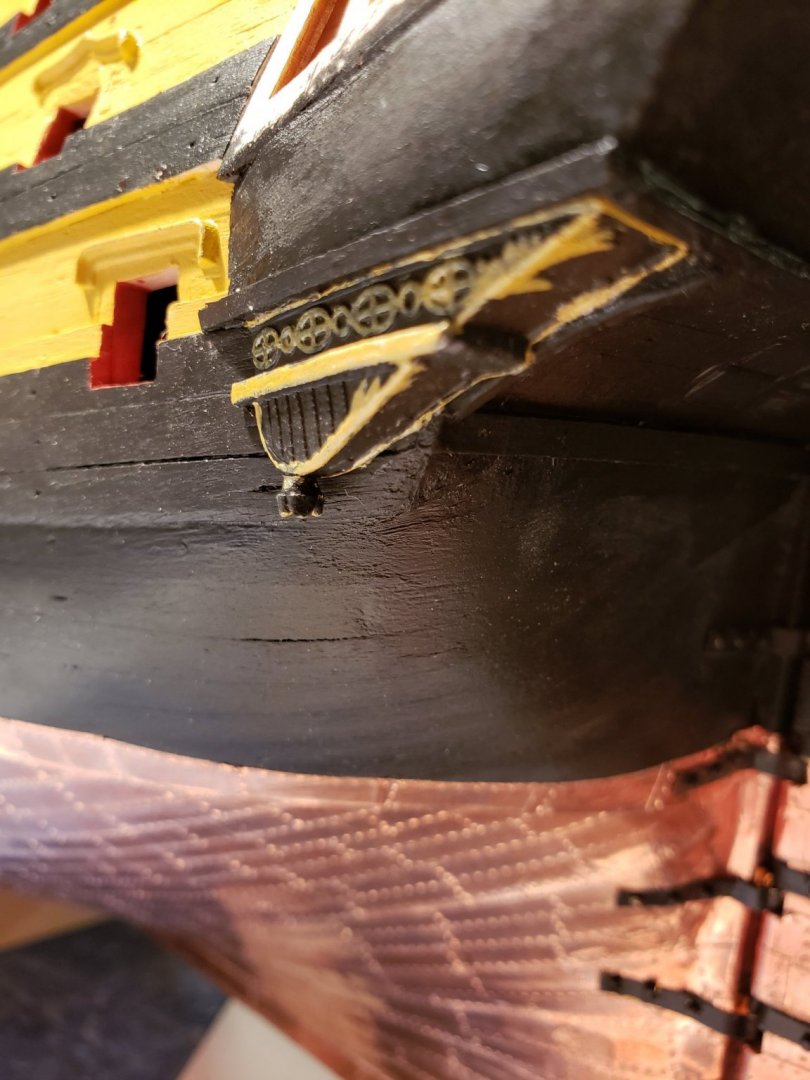
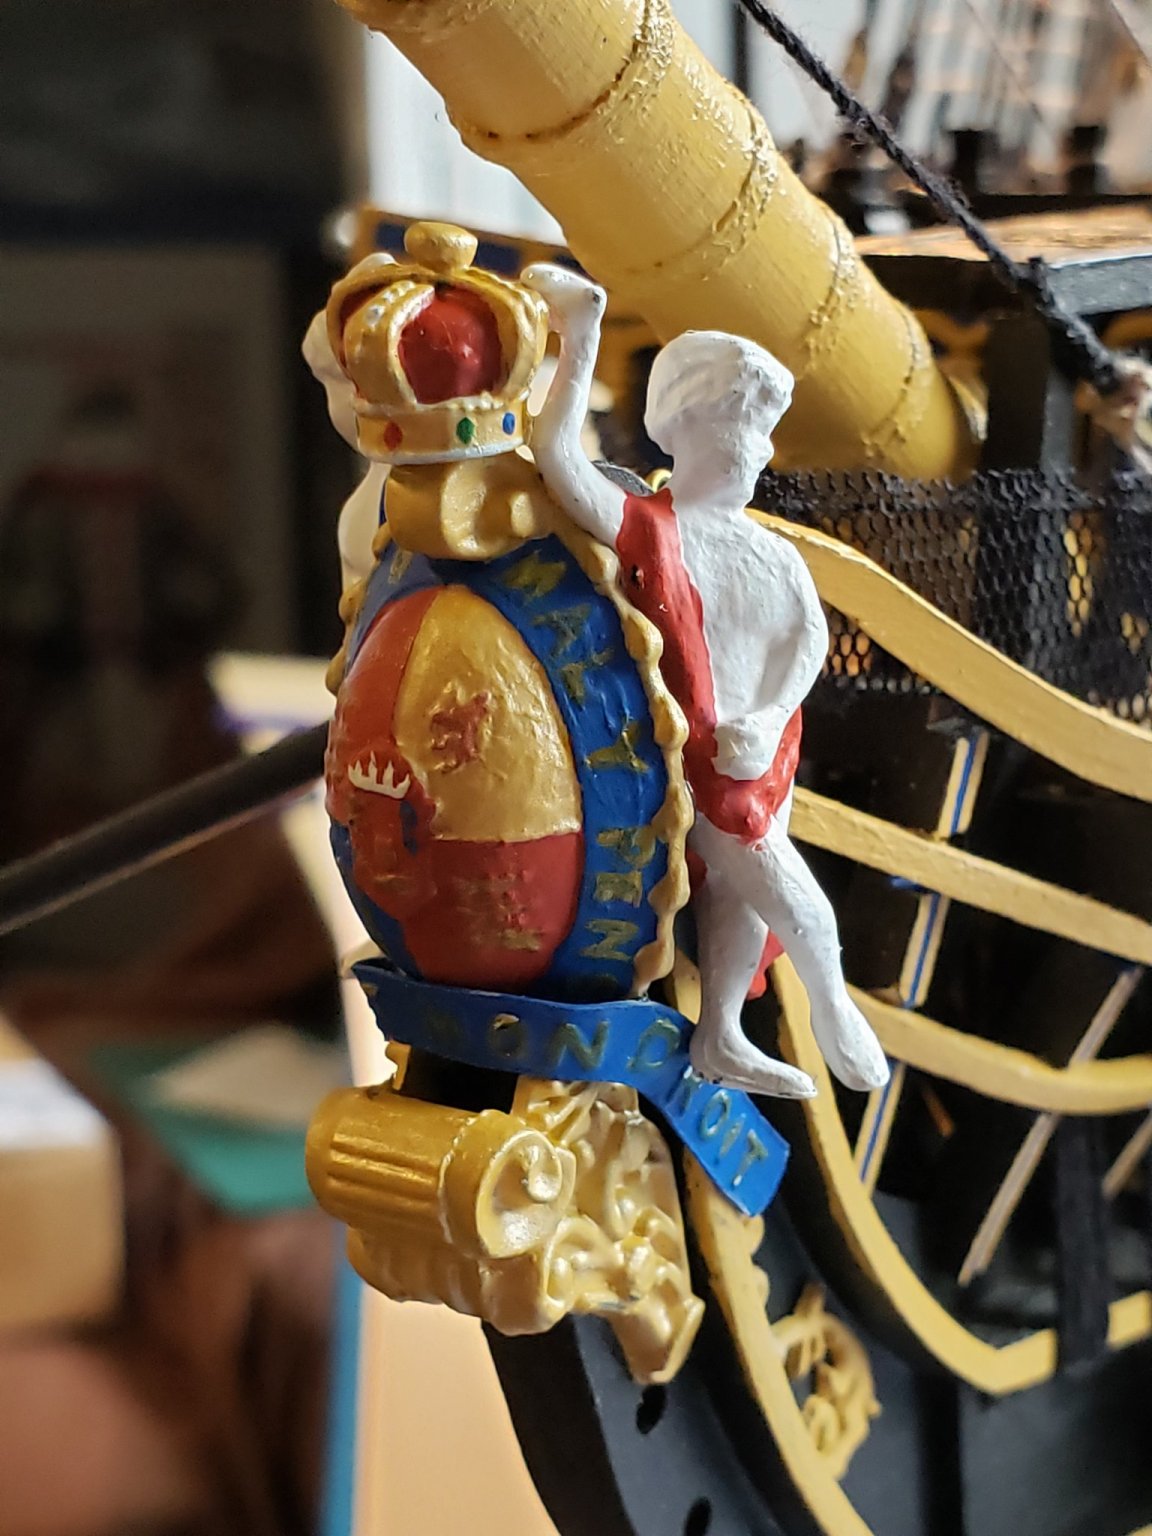
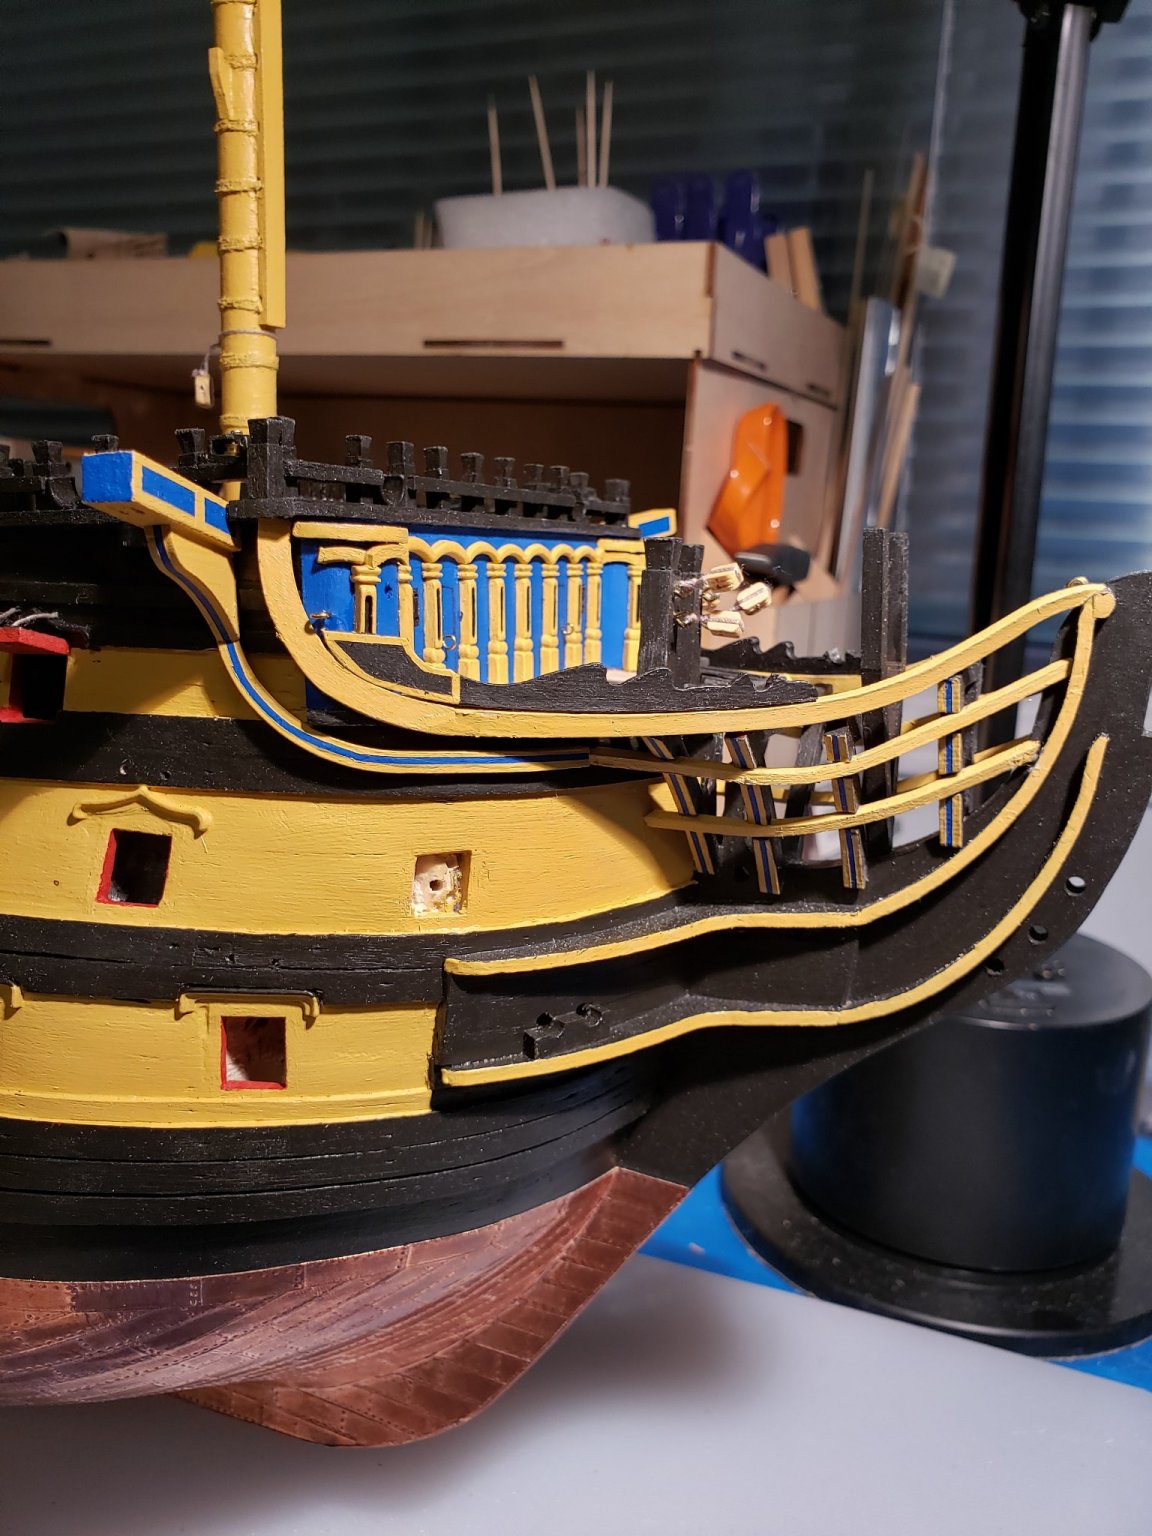
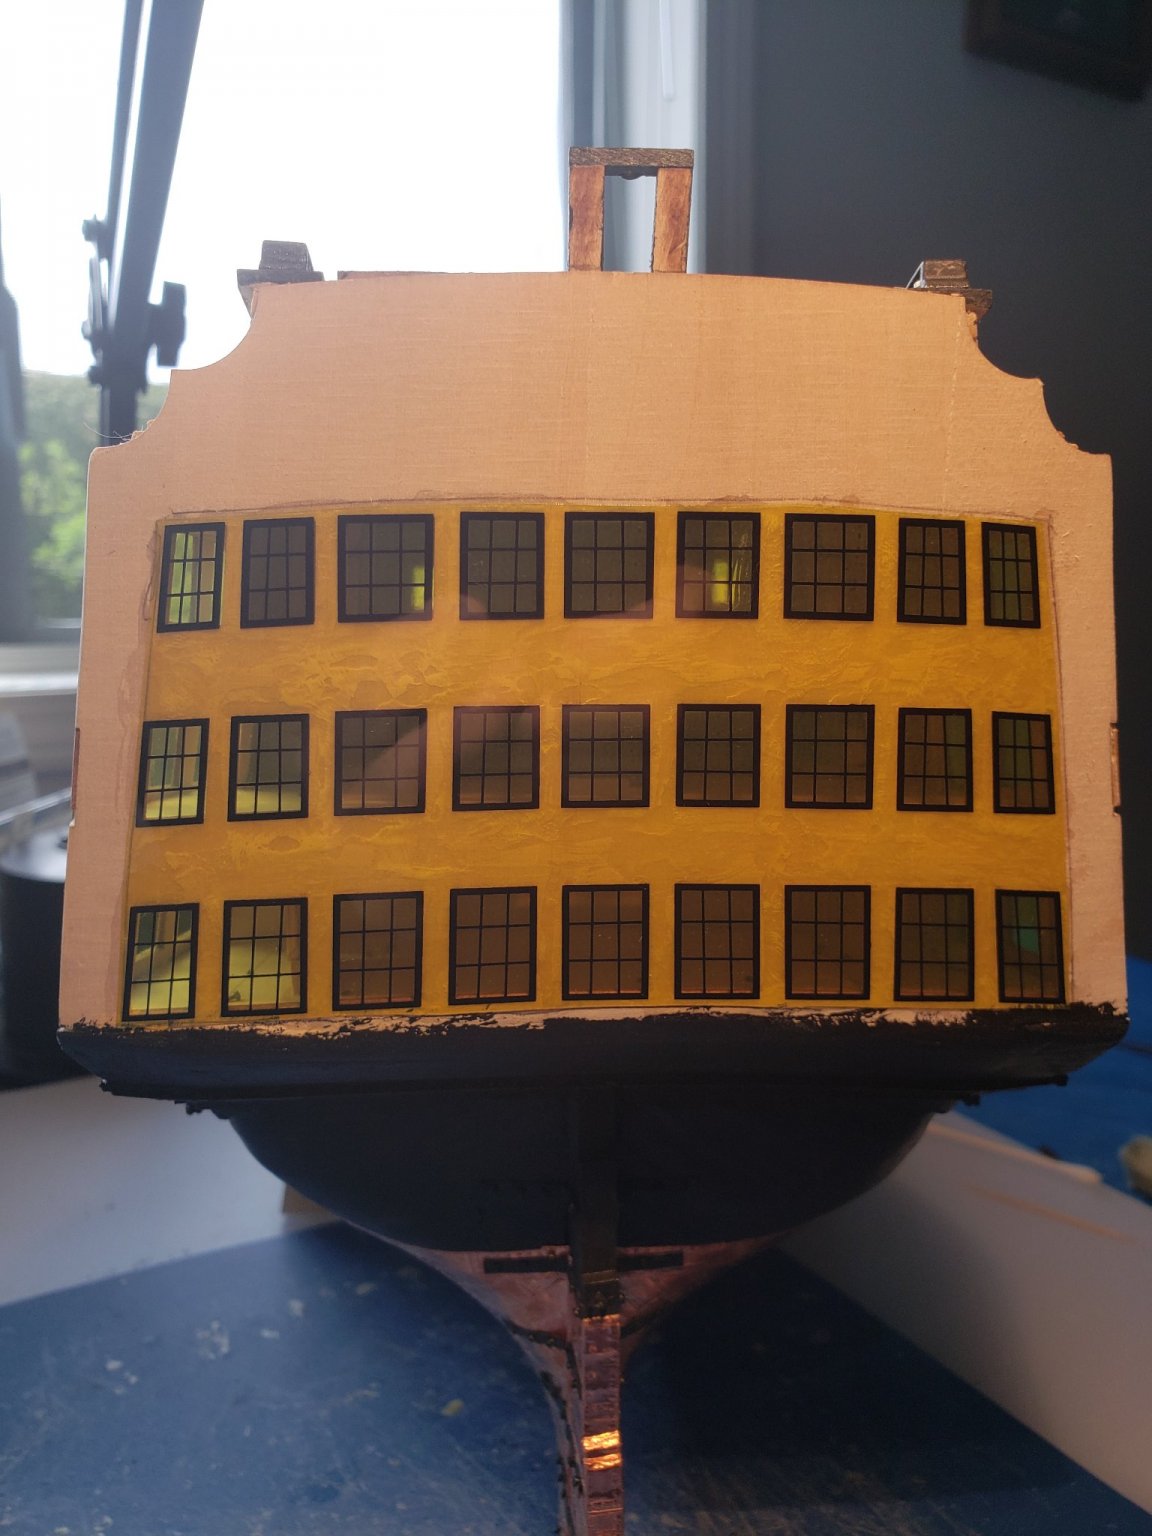
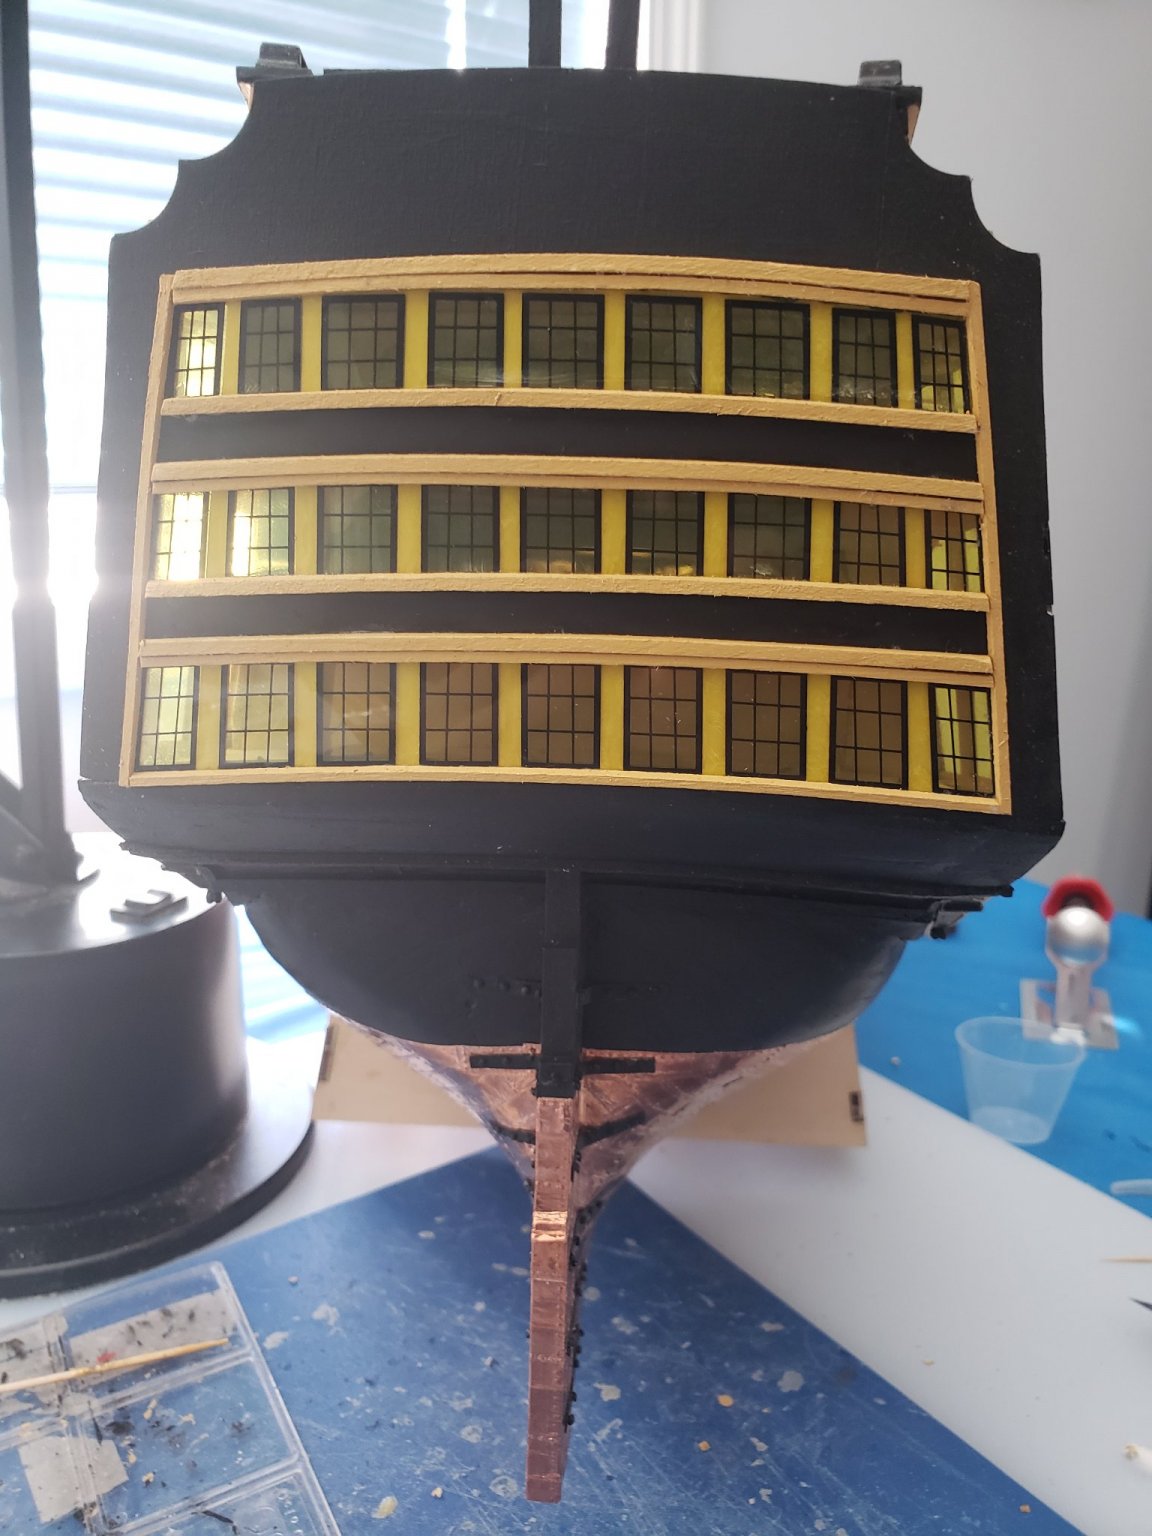
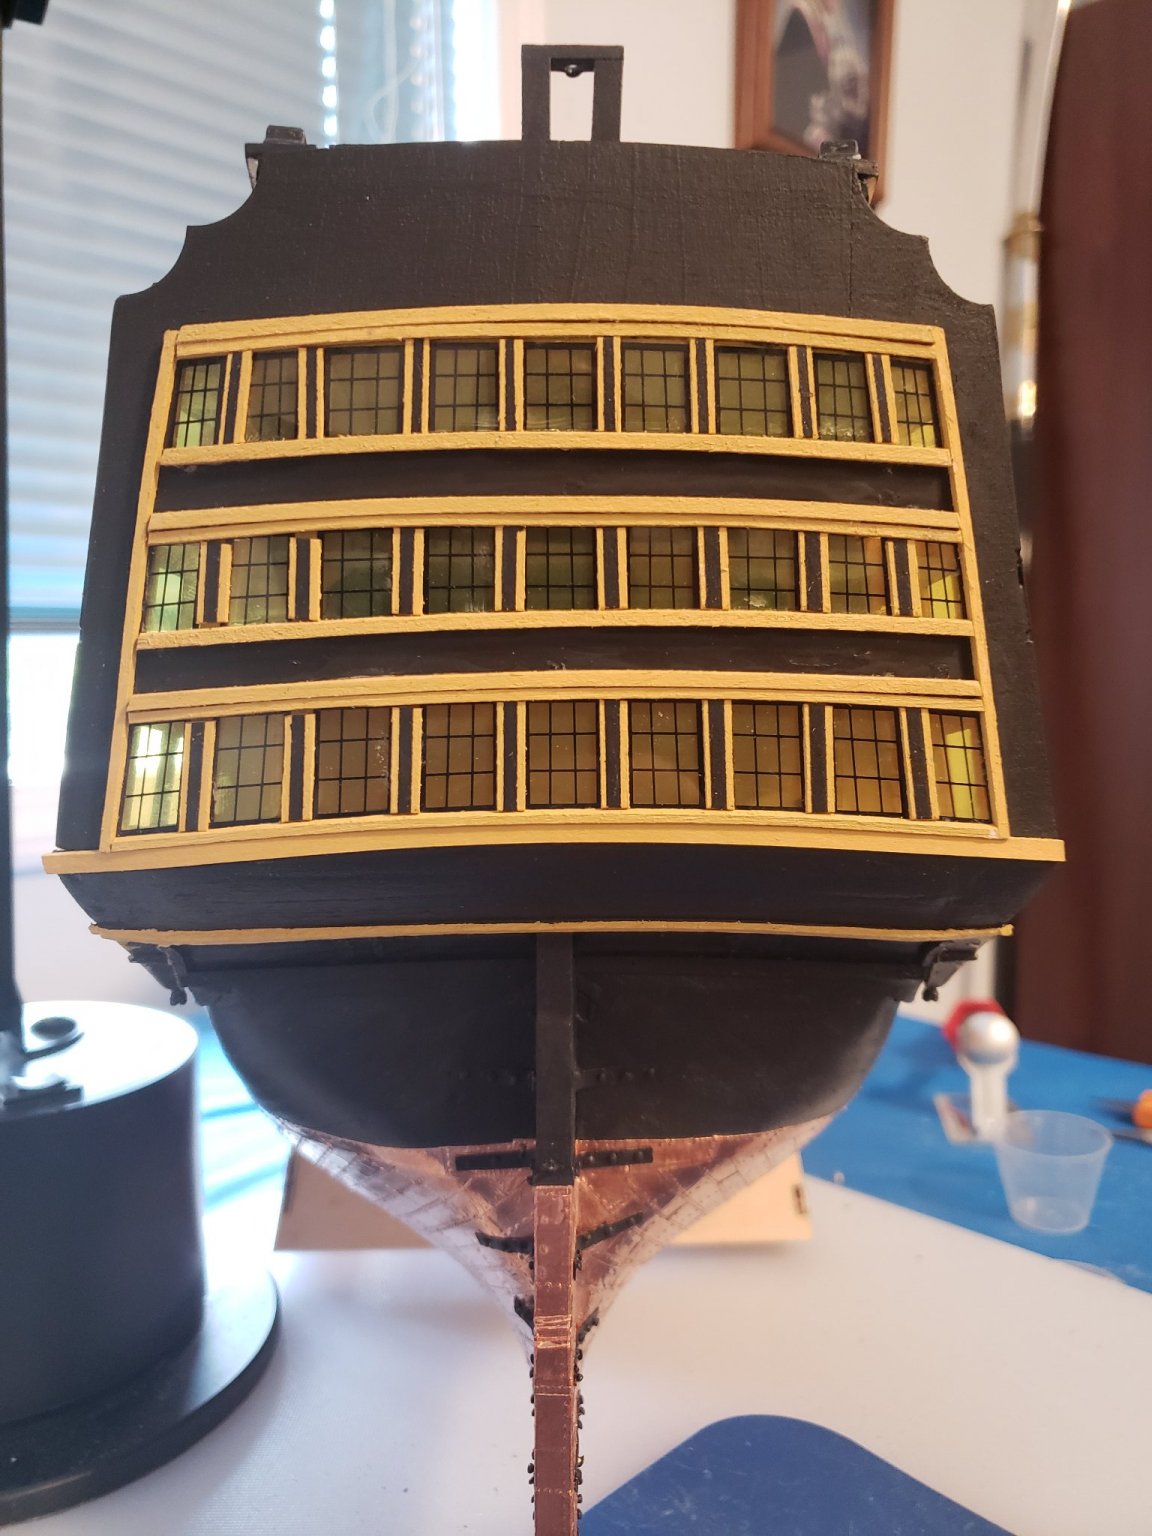
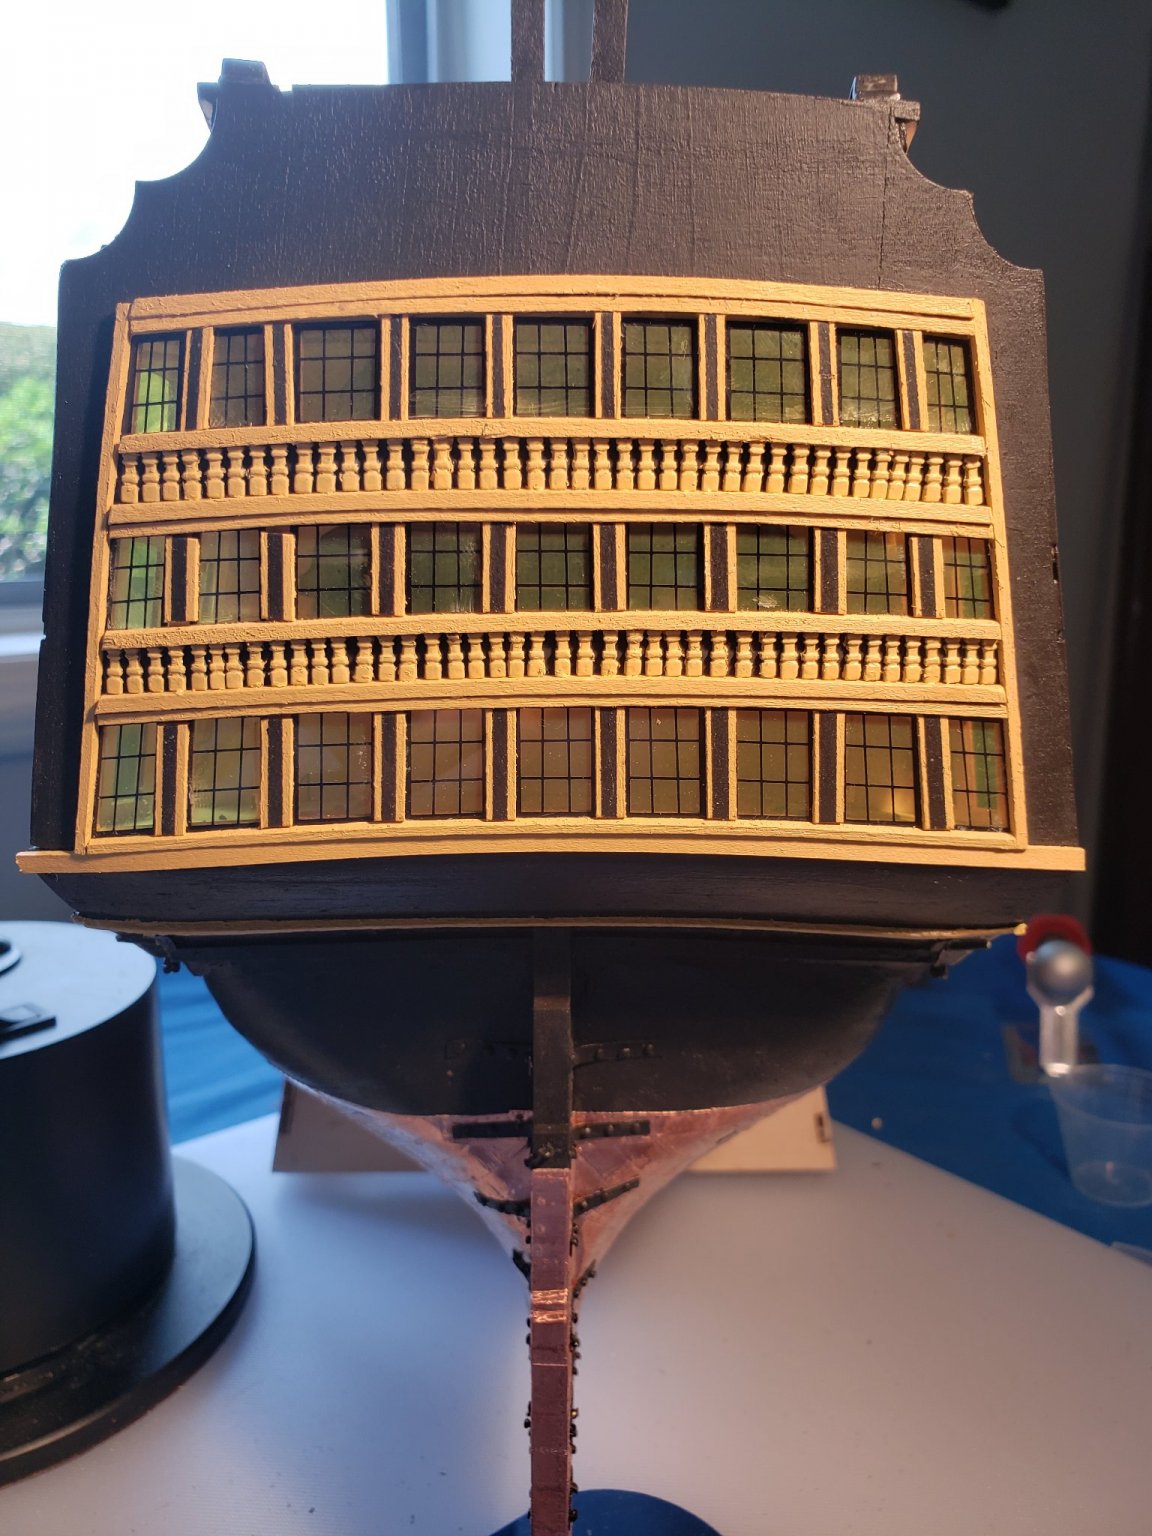
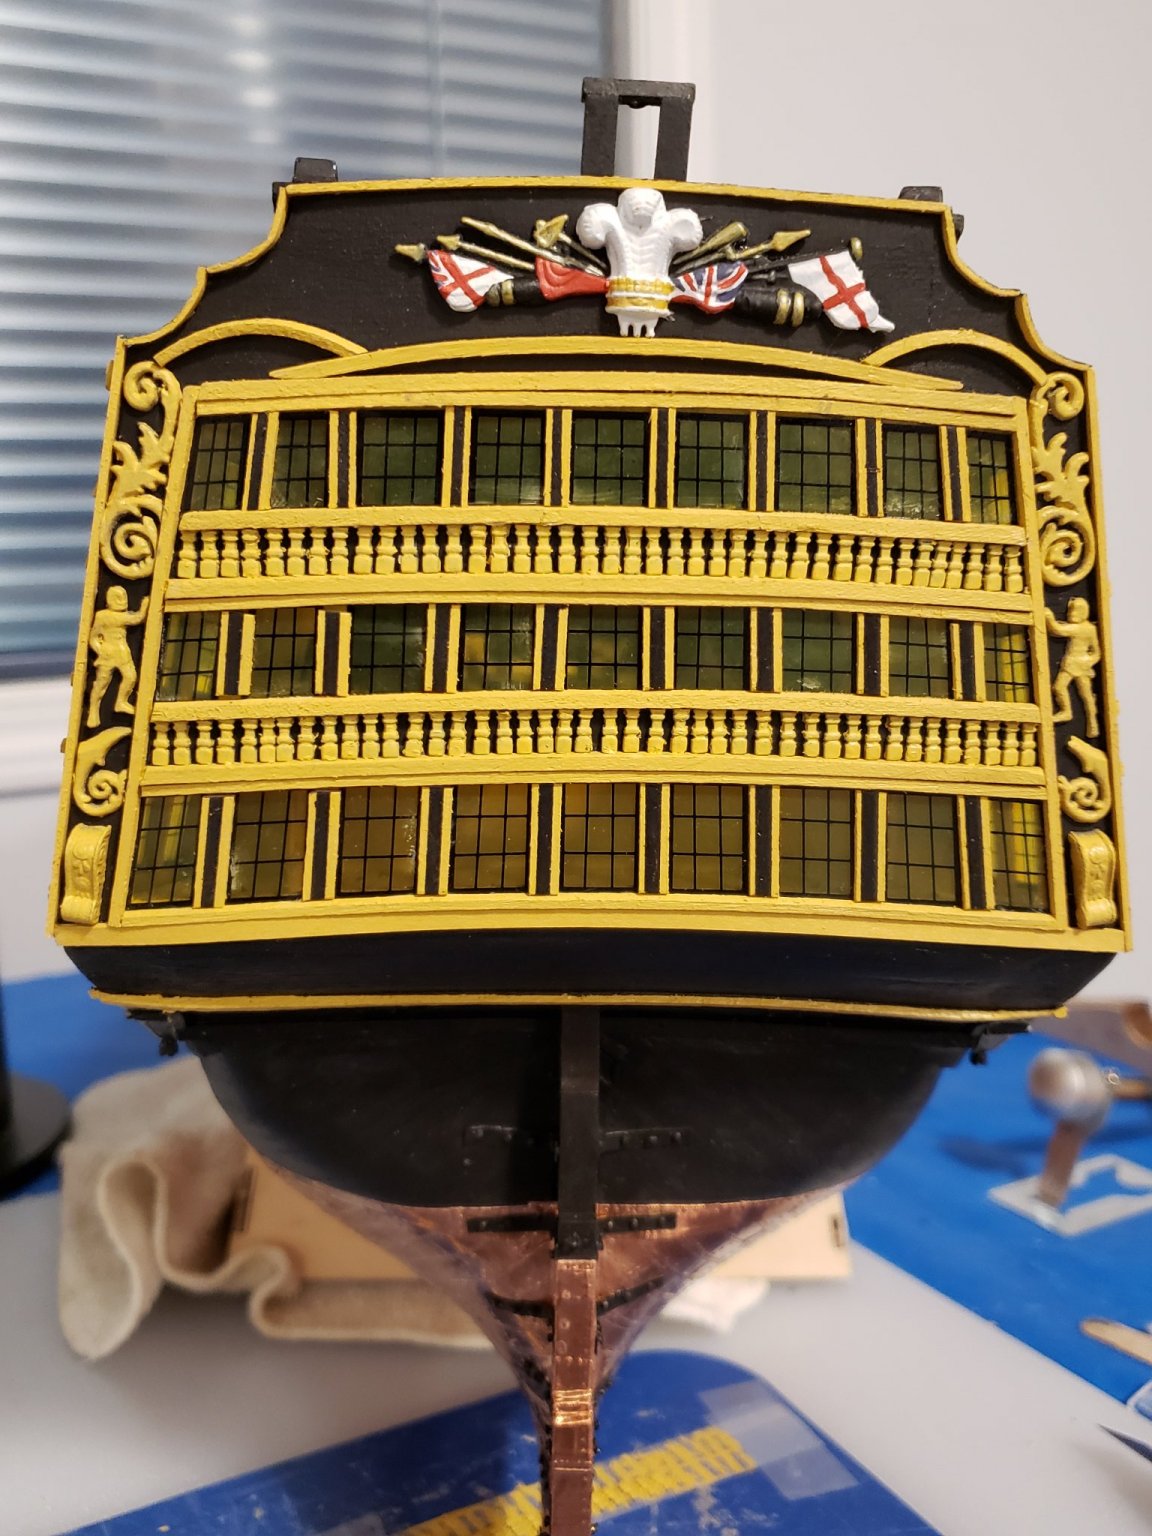
May, 2021 This month I enjoyed working on the most decorative part of the ship, along with the bow section I suppose. I worked on completing the stern gallery windows and frames, and did depart from the suggested order of work in the instructions as I will explain later. I stayed with the materials given in the kit, although there are impressive after market materials available for this section of the ship. At first we have the plain plywood stern and side gallery sections. Next acetate windows were added to all three sections. I then painted the main wood sections black before adding trim details. I added trim pieces to enclose the whole gallery in a frame. At this point the instructions have all extra trim added in black, with yellow ochre stripe details added later, which would be much harder to mask. I masked and painted the trim in black and yellow first and then attached the pieces to the ship - much easier! Primed and painted baluster castings were added next. I then worked (with much trepidation) on painting the stern trophy of arms. I am no artist, but it turned out okay. Side castings were painted and added to the stern making a very cool finished product. Except...unfortunately, after all that work when I superglued it onto the stern, I lined it up with the knees on the deck above which are obviously not lining up with the stern gallery windows. I am waiting for some superglue debonder to try and fix this mistake. I can't even look at the stern anymore. Knightheads and kevels were then placed around the forecastle and bow deck to finish this month's work.


-
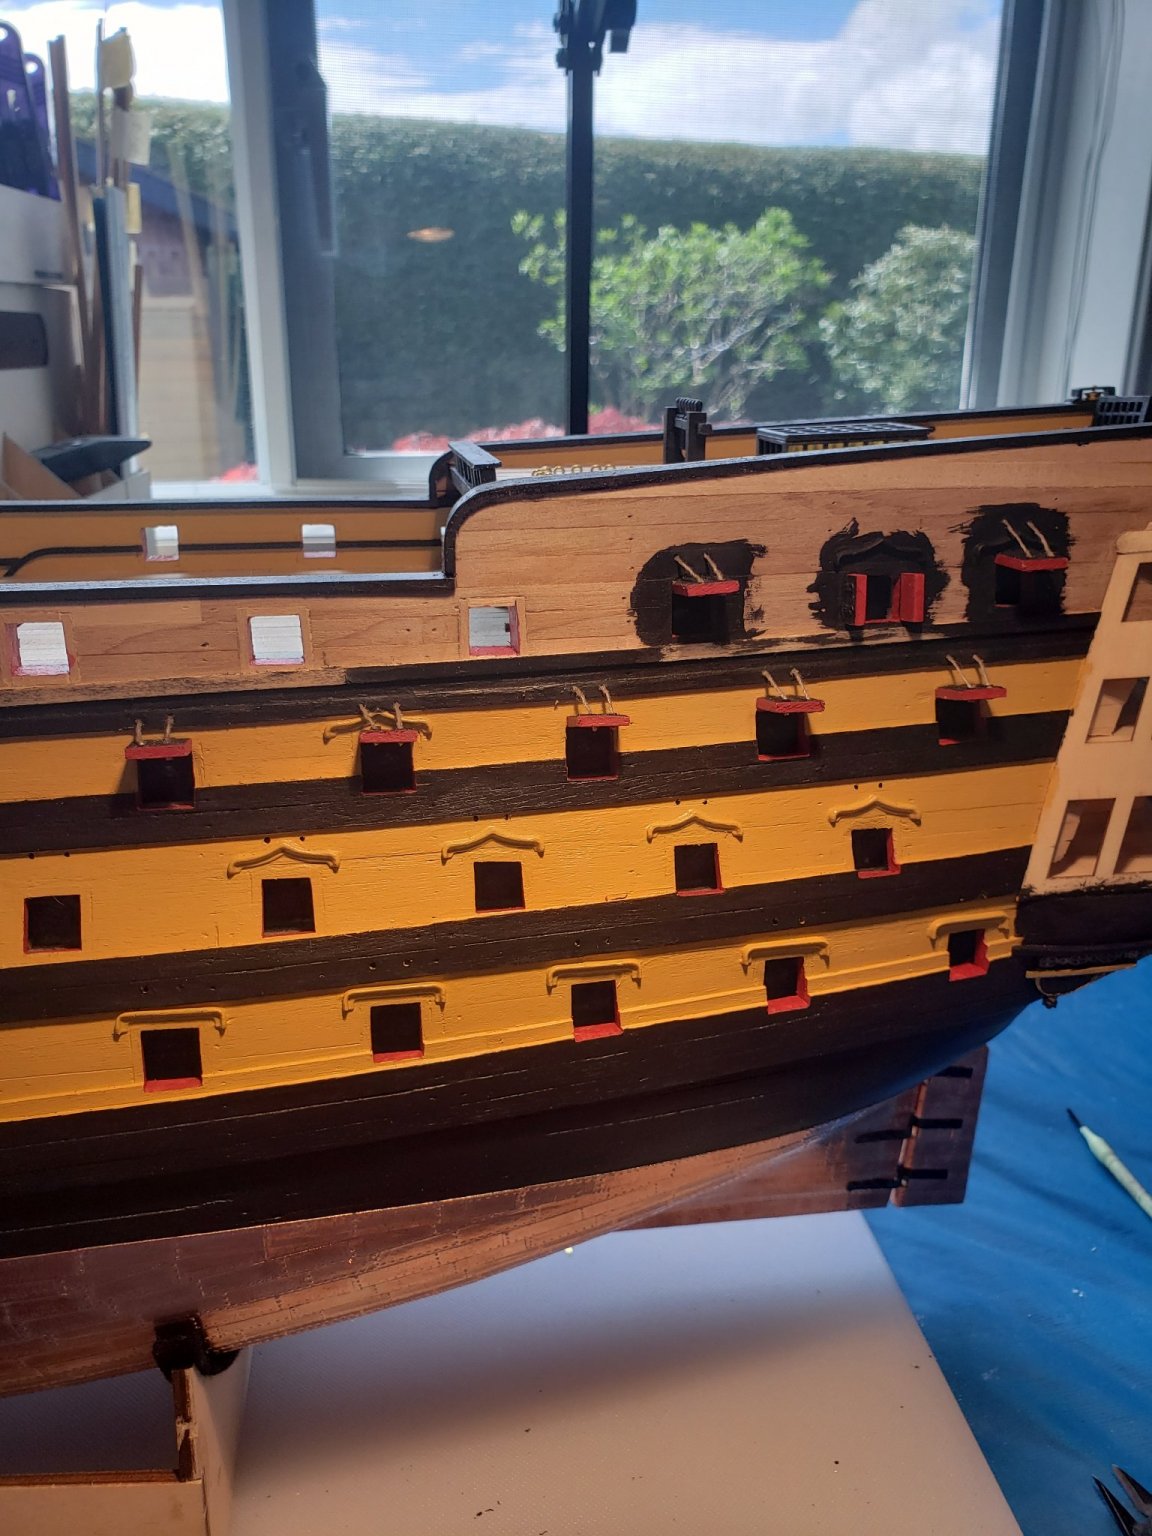
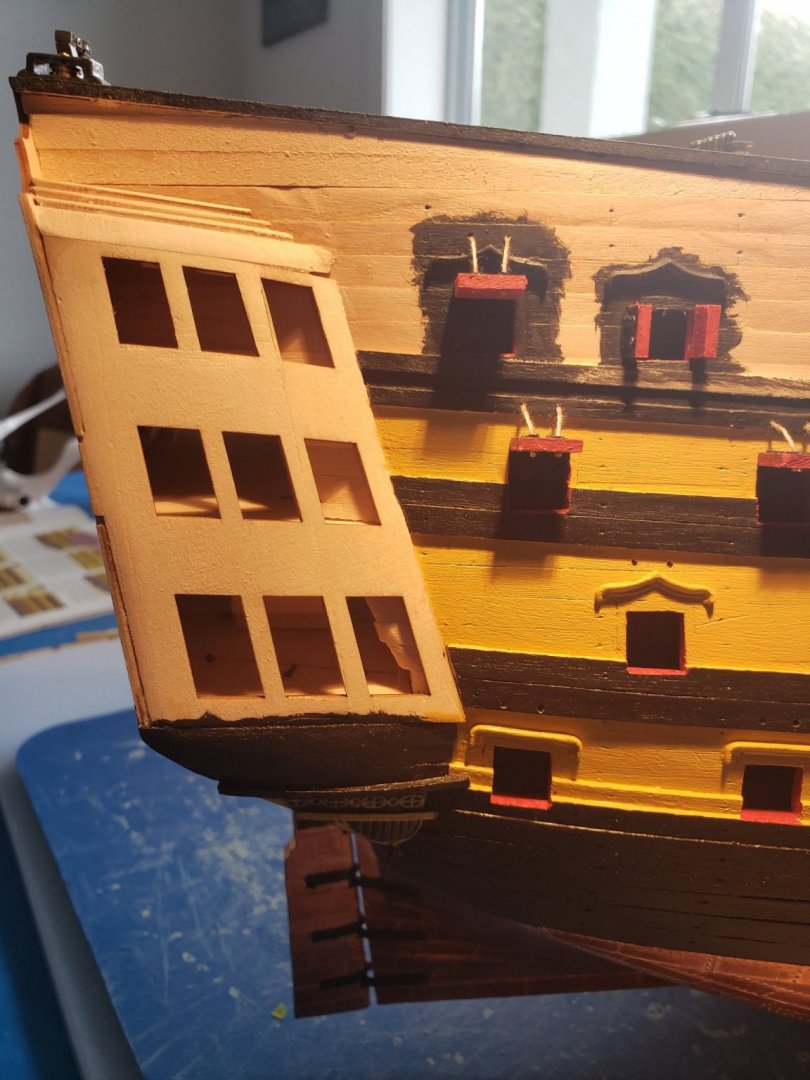
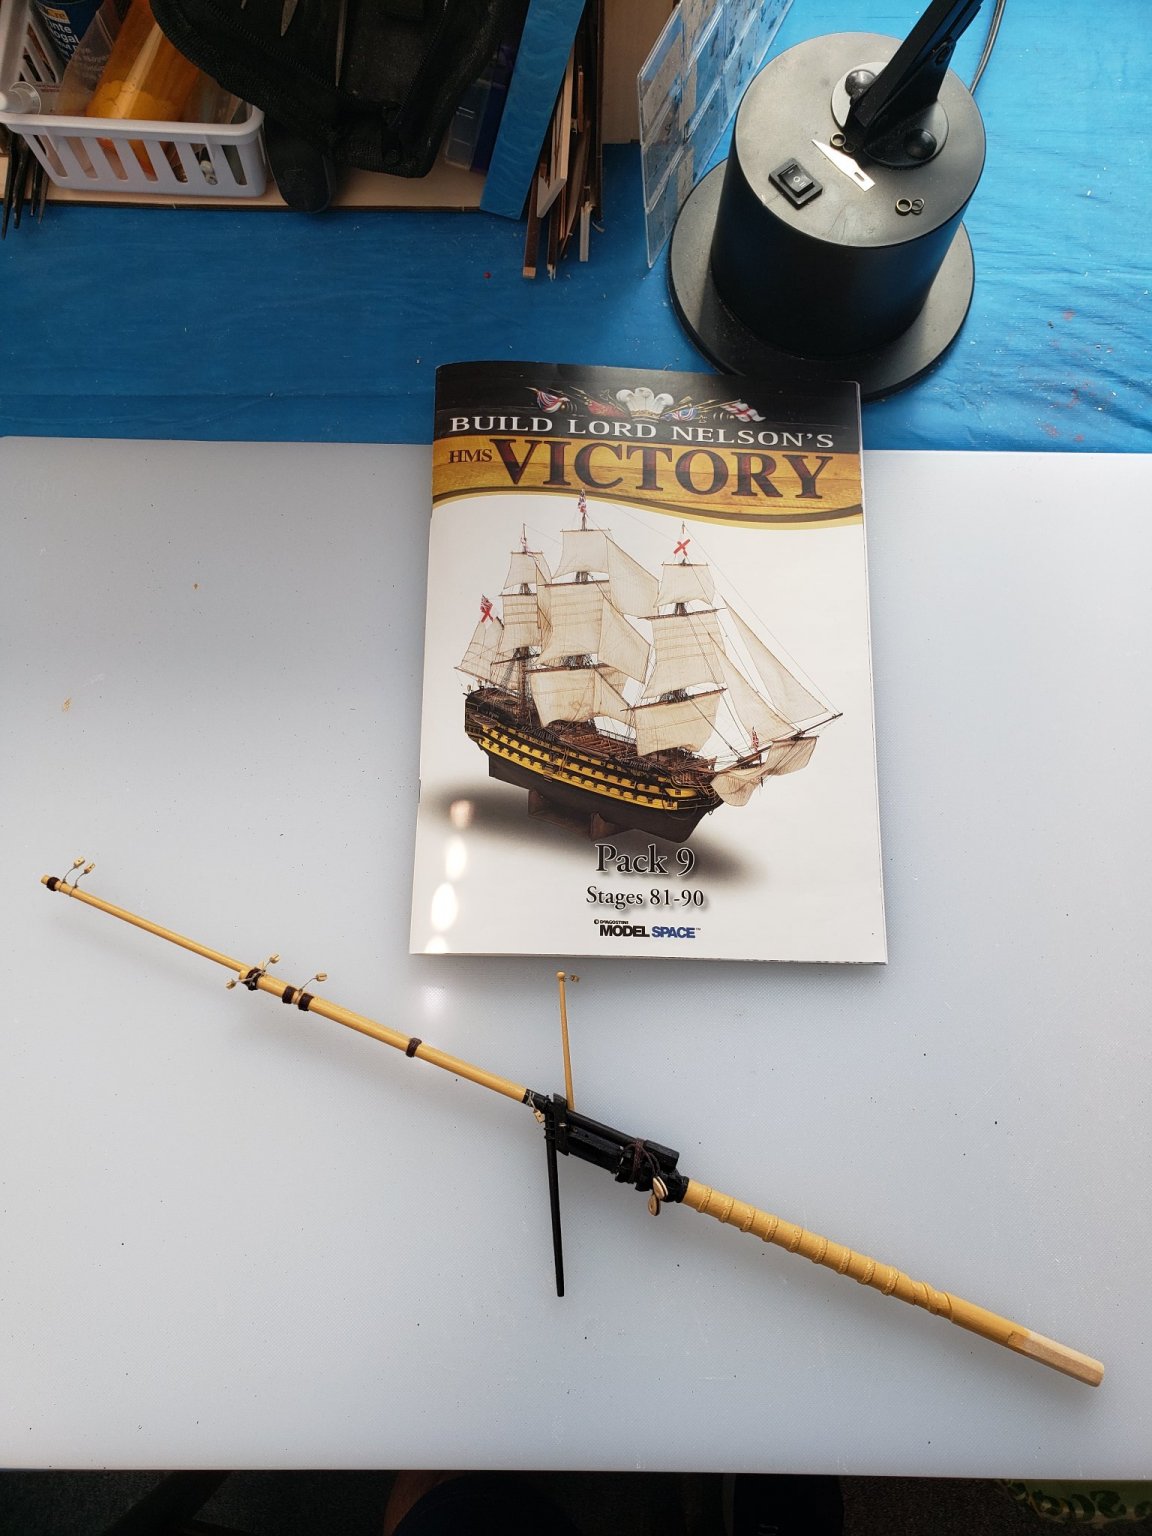
April, 2021 This month was spent completing all of the yards and finishing the gallery support. Not much text this month, mostly just pictures. The skylight and flag lockers also were made and placed on the poop deck. Next I made the deck rail for part of the cockpit. At this point the instructions recommended doing some of the gun port lids that would be obstructed by the chainwales.so I went into assembly line mode and made the first of many to come! First you cut out the hinges and the gun port lids. Then paint the outer face black and the inner face and sides red. Then prepare the threads and mount the lids on the ship and glue the threads to the ports. After installing these, I moved on to the gallery windows and frames for the next month .
.thumb.jpg.ceae3e8ab7c98f5239aedb2444172fa5.jpg)
.thumb.jpg.ccc2b7e274e3e3a188d2fd1508c97ddd.jpg)
.thumb.jpg.3c1b57eef3158832a278baafe9227ce8.jpg)
.thumb.jpg.922e91a98362adce14aaaf171fb6f475.jpg)
.thumb.jpg.624b3e59449fa6a2bcc57f4bc45ad6ec.jpg)

.thumb.jpg.d0b27c75c205c8813f9c7fc669ebde2c.jpg)
.thumb.jpg.c3cf95e3ab9127739f5acb7d9e4b89bd.jpg)
.thumb.jpg.3bca7e40af19095fc647676a7d20ce34.jpg)
.thumb.jpg.dce17d2cf111bf1abafd4931fb99fbc4.jpg)

- 59 replies
-
- 1
-
-
- DeAgostini
- Victory
- (and 1 more)
-
You can download the instructions from the Artesania Latina website directly now.


.jpg.29673fd313036b3d615d477aa0209c12.jpg)
.jpg.acb47ac306ce4f16db21c1e973d8a146.jpg)
.jpg.7d33a88f1ddd9ebc6c6b4aafcf79cb02.jpg)
.jpg.8fff149dfd8f882dab6f5ba82087dbdc.jpg)
.jpg.ad19bc5ff396e629c70090adc7bf6ecf.jpg)

.jpg.c585888055d5c692a2bbd1cf96357588.jpg)
.jpg.360a5b8d280a84fecc892183d8395ef1.jpg)

.jpg.9d5d8182bfeaf1f2e789f736f8932e26.jpg)
.jpg.7b649d2aeae27c33e7f1b6e622d382bf.jpg)