-
Posts
566 -
Joined
-
Last visited
-
 Wintergreen reacted to a post in a topic:
Vigilance of Brixham (BM 76) by FlyingFish - 1:32
-
 Wintergreen reacted to a post in a topic:
Atlantica by Wintergreen – Scale 1:30 - POF - sail training ketch - a smack of English heritage
-
 Keith Black reacted to a post in a topic:
Atlantica by Wintergreen – Scale 1:30 - POF - sail training ketch - a smack of English heritage
-
 mandolinut reacted to a post in a topic:
Orca by FlyingFish – FINISHED - Scale 1:20 - from the movie Jaws.
-
 mandolinut reacted to a post in a topic:
Orca by FlyingFish – FINISHED - Scale 1:20 - from the movie Jaws.
-
 mandolinut reacted to a post in a topic:
Orca by FlyingFish – FINISHED - Scale 1:20 - from the movie Jaws.
-
 mandolinut reacted to a post in a topic:
Orca by FlyingFish – FINISHED - Scale 1:20 - from the movie Jaws.
-
 druxey reacted to a post in a topic:
Cangarda 1901 by KeithAug - Scale 1:24 - Steam Yacht
-
 KeithAug reacted to a post in a topic:
Cangarda 1901 by KeithAug - Scale 1:24 - Steam Yacht
-
 FlyingFish reacted to a post in a topic:
Pelican 1943 by FriedClams - 1:48 - Eastern-Rig Dragger
-
 FlyingFish reacted to a post in a topic:
Cangarda 1901 by KeithAug - Scale 1:24 - Steam Yacht
-
 FlyingFish reacted to a post in a topic:
Pelican 1943 by FriedClams - 1:48 - Eastern-Rig Dragger
-

Tally Ho by AntonyUK
FlyingFish replied to AntonyUK's topic in - Build logs for subjects built 1901 - Present Day
Very impressive work on the computer Anthony - and such lovely visualisations of the plans. Well above my head, but I'm enjoying it - and you live just up the road from me!!- 34 replies
-
- mixed materials construction
- Albert strange design
-
(and 1 more)
Tagged with:
-
It appears the housing market is at a 30 year low... so yes, Yuk is about right. Not to mention the need to keep the dust down!!
- 174 replies
-
- Vigilance
- Sailing Trawler
-
(and 1 more)
Tagged with:
-
 FlyingFish reacted to a post in a topic:
Vigilance of Brixham (BM 76) by FlyingFish - 1:32
-
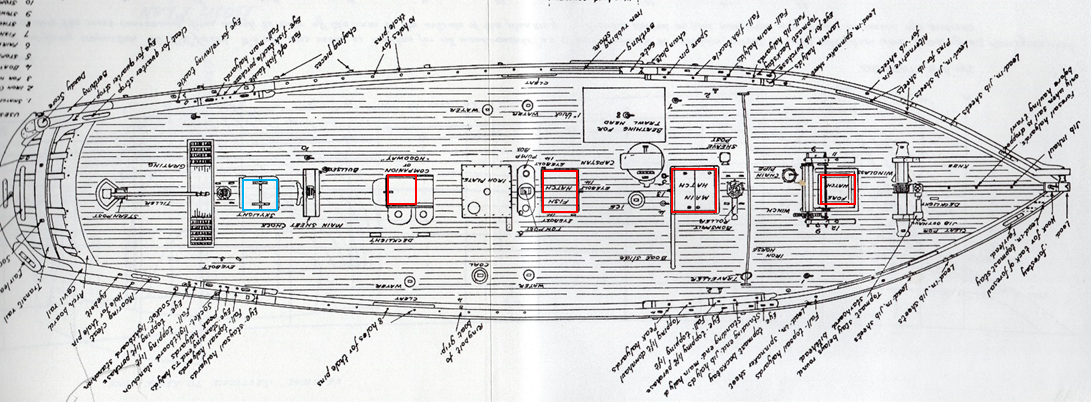
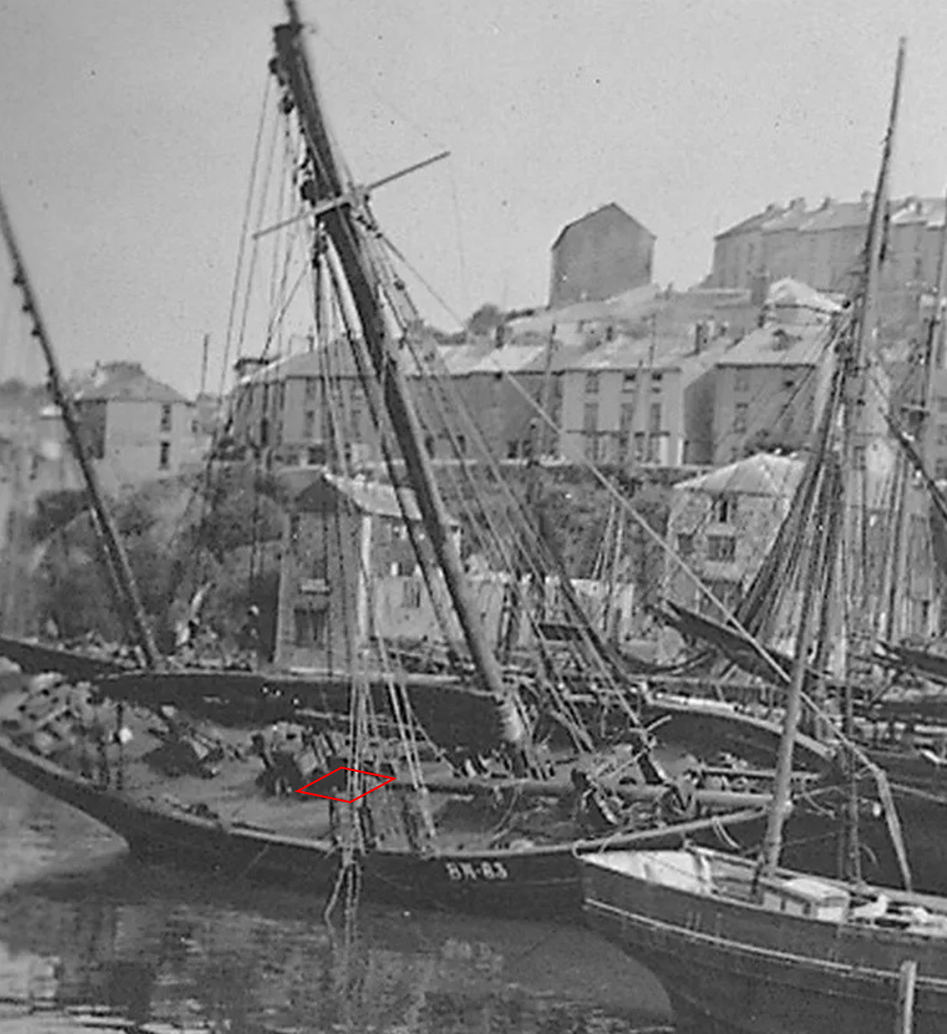
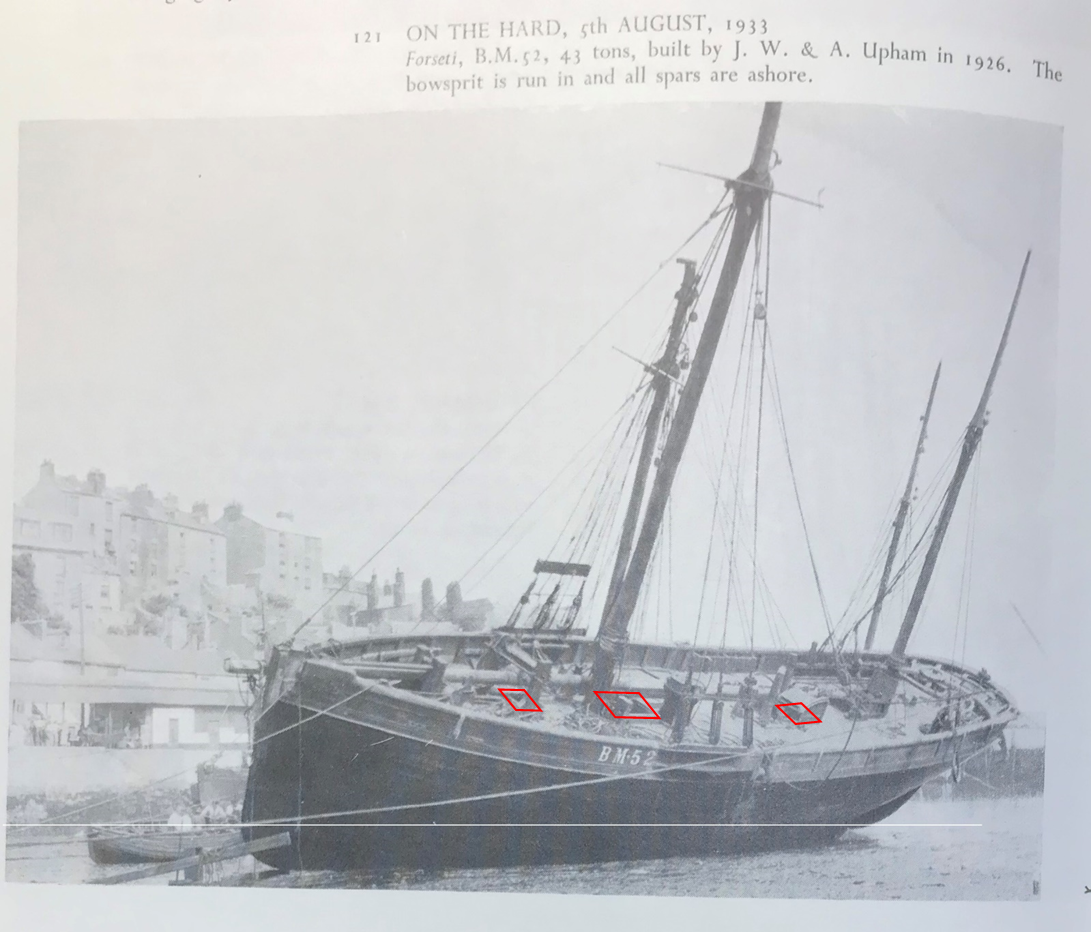
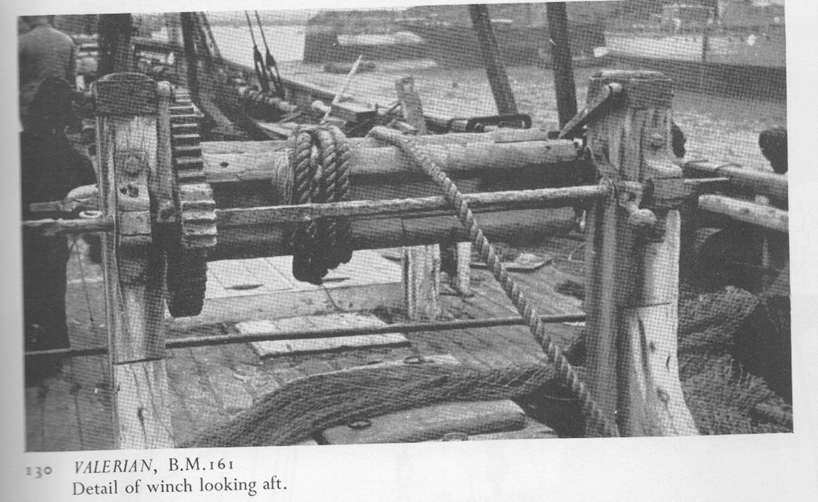
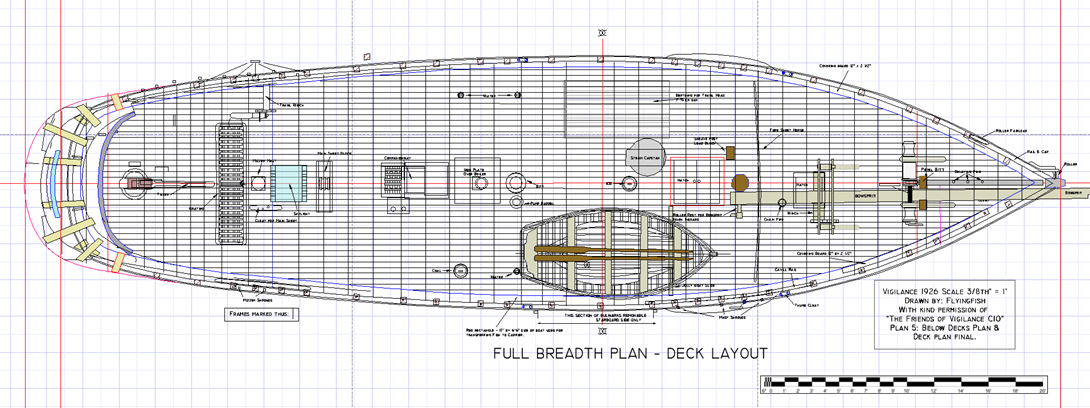
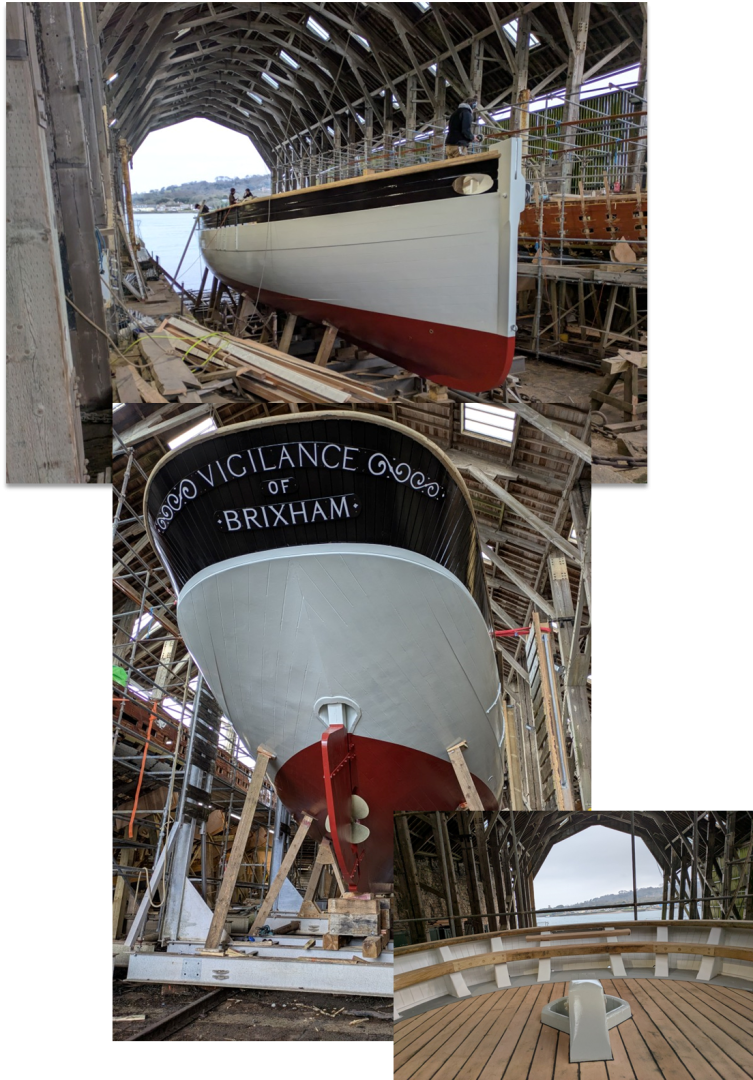
It's been a while... We have our property on the market - looking to 'downsize', so its been a matter of sorting and clearing out decades of accumulated stuff, and many little tidying up tasks. The Admiral and I went around the place with a clipboard listing all the little unfinished maintenance task and snags needed to smarten up the place, and after two pages I realised my time on Vigilance would be limited - plus of course the workshop has to look presentable. Not condusive to getting the planking done at all! Nevertheless, I thought I'd at least get some thinking done as to the internal layout of the boat. Deck and below deck arrangement – a survey of evidence. Vigilance’s layout has been remodelled over the years, and much of the original is lost. No images or plans of the 1920’s exist so far as I am aware. In general, the arrangement for Brixham sailing trawlers usually followed that shown below: Underhill’s plan of Valerian (the sister ship to Vigilance) shows the companionway to the cabin quite far forward due to the elliptical counter, with the addition of a skylight (blue) which would be over the cabin table below. What is puzzling is that the main hatch is so far forward – you would expect it to be over the fish pounds. It seems unlikely the pounds and ice box would be so far forward, given their weight. Ibex, a contemporary Upham boat was laid out in a very similar manner, but being less beamy the hatch could have been over the fish hold, just. March includes detailed drawings of the below deck arrangements of Masterhand the best reference we appear to have. Masterhand had an additional fish hatch between the main hatch and companionway, as shown: This arrangement allowed access to the fish pounds directly, and the main hatch is now positioned over the warp and chain storage area, and this must have made life quite a bit easier for the crew. It would have been simple to transfer the below decks arrangements of Masterhand to Vigilance, had it not been for this difference in hatch placement which now needed investigating. Whilst Vigilance was being rebuilt, I looked for more evidence. On deck, the hatches are not original, there being a deck house over the old companionway and skylight. The other hatches are not present. So we must determine the relationship between the hatches and the below deck arrangement. I looked at the beam positions, carlins and marks on the beam shelf for indications of where things originally were. I have assumed that the mast steps and bitt positions are unchanged, and that the frame positions are probably original, even if many of the futtocks have been replaced. There is no reason to think she might be much different from March’s drawings of Valarian, although the lack of a hatch directly over the fish pounds suggests they were further forward than on Masterhand, perhaps. I also turned to several photographic sources from the same period. It is unusual to have photographs of the deck – most are taken from an angle below the sheer. This is Seaplane BM 83 built in 1915 by Jackman’s. Note the square stern. She appears to have a large hatch over the fish pounds. Also in March is a helpful photograph of Forseti BM 52 built by Uphams in 1926, the same year as Vigilance, and also with a round stern. She is laid over on the hard with spars removed which gives a very good and rare view of the deck. The photo was taken in 1933 . It seems from this image that she is very close to Vigilance in many respects, and is one of the smacks seen racing in the ‘Red Trawlers of Brixham’ 1933 Pathe News clip, along with Vigilance. Here we see three hatches and a skylight aft. The main hatch is just aft of the main mast. The following image of Valarian in her decline (the main mast is missing) from March shows the main hatch aft of the winch. It is substantial, and I think must be the one used to offload the catch. So were the pounds that far forward, given their weight, or were the fish boxes dragged forward to exit through a door in the bulkhead between the pounds and the stores? Based on all this I set about aligning the below deck arrangements to this hatch configuration, and location of the bitts, masts, chain pipe, ice and water pipes, boiler chimney, and capstan and other deck fittings. Based on this evidence this layout was drawn: Next will be the relationship of the hatches to what lies below. Meanwhile the real boat is almost ready to leave the Yard after its refit - they have done a wonderful job: A ask for your forebearance whilst I manage the ramifications of house viewings ( 16 so far each requiring mega tidying of the house), with the lack of progress on the build. All for now.
- 174 replies
-
- Vigilance
- Sailing Trawler
-
(and 1 more)
Tagged with:
-
 FlyingFish reacted to a post in a topic:
Pelican 1943 by FriedClams - 1:48 - Eastern-Rig Dragger
-
 FlyingFish reacted to a post in a topic:
Pelican 1943 by FriedClams - 1:48 - Eastern-Rig Dragger
-
 FlyingFish reacted to a post in a topic:
Cangarda 1901 by KeithAug - Scale 1:24 - Steam Yacht
-
 FlyingFish reacted to a post in a topic:
Pelican 1943 by FriedClams - 1:48 - Eastern-Rig Dragger
-
 FlyingFish reacted to a post in a topic:
Pelican 1943 by FriedClams - 1:48 - Eastern-Rig Dragger
-
 FlyingFish reacted to a post in a topic:
Vigilance of Brixham (BM 76) by FlyingFish - 1:32
-
Hi Trevor, welcome to MSW. Pleased you are enjoying the build. Provident is still sailing, having been rebuilt in the late 1980's. Like all these ships now they survive on public support, and grants. Thank you for the offer of sharing your research. I'd suggest you contact the Brixham Heritage Museum who would I'm sure be very interested. They can be found here.
- 174 replies
-
- Vigilance
- Sailing Trawler
-
(and 1 more)
Tagged with:
-
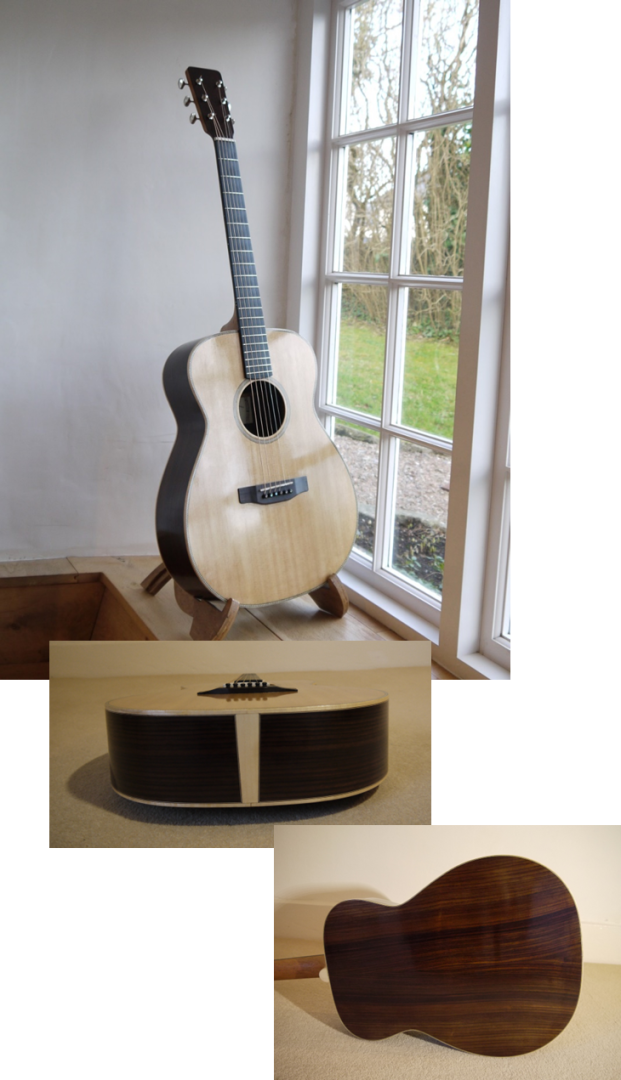
My apologies for the lack of progress on Vigilance. The workshop has again been ‘lutherised’ whilst my son and I recently finished the guitar build. Should revert to a boatyard shortly, although there seem to be many winter jobs on the clipboard! It turned out alright; in fact, we were quietly pleased with ourselves. Importantly it sounds great.
- 174 replies
-
- Vigilance
- Sailing Trawler
-
(and 1 more)
Tagged with:
-
Thank you Keith, same to you and apologies for the tardiness in replying. We went to our daughter in Scotland for Christmas, and just returned.
- 174 replies
-
- Vigilance
- Sailing Trawler
-
(and 1 more)
Tagged with:
About us
Modelshipworld - Advancing Ship Modeling through Research
SSL Secured
Your security is important for us so this Website is SSL-Secured
NRG Mailing Address
Nautical Research Guild
237 South Lincoln Street
Westmont IL, 60559-1917
Model Ship World ® and the MSW logo are Registered Trademarks, and belong to the Nautical Research Guild (United States Patent and Trademark Office: No. 6,929,264 & No. 6,929,274, registered Dec. 20, 2022)
Helpful Links
About the NRG
If you enjoy building ship models that are historically accurate as well as beautiful, then The Nautical Research Guild (NRG) is just right for you.
The Guild is a non-profit educational organization whose mission is to “Advance Ship Modeling Through Research”. We provide support to our members in their efforts to raise the quality of their model ships.
The Nautical Research Guild has published our world-renowned quarterly magazine, The Nautical Research Journal, since 1955. The pages of the Journal are full of articles by accomplished ship modelers who show you how they create those exquisite details on their models, and by maritime historians who show you the correct details to build. The Journal is available in both print and digital editions. Go to the NRG web site (www.thenrg.org) to download a complimentary digital copy of the Journal. The NRG also publishes plan sets, books and compilations of back issues of the Journal and the former Ships in Scale and Model Ship Builder magazines.


