Don Case
-
Posts
482 -
Joined
-
Last visited
Content Type
Profiles
Forums
Gallery
Events
Everything posted by Don Case
-
I got my Langridge so now I'm trying to apply the knowledge to my tentative build. I'm looking at a scantling list that someone(sorry) posted a link to the other day. It lists ships according to number of guns. The Discovery had 10 guns apparently. I've seen it called a Sloop of War, it was converted to a bomb ship and was about 100' long. Oh, and it was 300 tons. That narrows the scantling list down to 3 columns I think. Sloop of War, 300 ton sloop and a Bomb vessel. So if I picked a column would I be fairly safe as to sizes of stuff? Thanks
- 1 reply
-
- 1
-

-
It definitely looks like coffee sticks work. Nice job🙂
-
If you get a piece of a 40 grit sanding belt and DS tape it to a stick it makes a very good rasp
-
Joints
Don Case replied to Don Case's topic in Building, Framing, Planking and plating a ships hull and deck
Thank You. It's somewhere between here and Chicago and the tracking isn't working☹️ Supposed to be March 5 I think -
Joints
Don Case replied to Don Case's topic in Building, Framing, Planking and plating a ships hull and deck
Thanks Allan. Every answer(unfortunately) leads to another question. Boxing joint. I did a search and after wading through all the Mike Tyson stuff ended up at one of your posts where you were wondering if a 1690's ship should have a scarph or a boxing joint but it didn't explain what a boxing joint. I have downloaded Oxfords Glossary and find it very helpful but the drawing of a boxing joint is almost incomprehensible. Enough so I don't think I'll be trying it😃 Figure G-11b. Scarfs and seams. | Oxford Handbooks Online Just to be clear, this is not a request for more info, just a bit of a whine about the difficulty of wading through a new lingo. I'm sure you've all done it unless you were born in a shipyard. Will Langridge help with this or am I putting too much hope on one book? Edit- found it here on my next search Fusion 360 - Page 2 - CAD and 3D Modelling/Drafting Plans with Software - Model Ship World™ Don't think I'll be trying that😃 -
Joints
Don Case replied to Don Case's topic in Building, Framing, Planking and plating a ships hull and deck
Thanks for the replies. This is where I saw it. Took me awhile to find it. Post #10 HMS Vulture 1776 by Dan Vadas - 1:48 scale - 16 gun "Swan" class sloop from TFFM plans - Finished - - Build logs for subjects built 1751 - 1800 - Model Ship World™ Is there something different about this area that would call for rotating the scarfs? -
Joints
Don Case replied to Don Case's topic in Building, Framing, Planking and plating a ships hull and deck
Like this. The scarf by the clamp is 90° to the one by the keel.
-
Also on the West Coast we have Ocean Spray (Holodiscus discolor). It's very much like Lilac on steroids. Very hard, white, straight and so dense that bone dry it sinks in salt water. It does work well with bladed tools like a plane. Like Lilac it's hard to dry. Checks like mad. I don't know why my font changed.
-
This is good to know if you get halfway though a build and get sick of it😃
-
I think I've noticed that when a timber is scarfed or otherwise joined that the scarfs are rotated 90° at each one. Have I been noticing right? Can this "rule" be broken?
-
Why is Boxwood so in demand for ships? Aren't there substitutes?
-
I kinda like those🙂
-
These are made in China so have no idea what kind of wood they are. They don't appear to be bamboo. In 1:48 they would be 2 1/2"x12"x 28' I think. I thought that sounded about right. A little thin maybe.
-
I was testing my plank saw and noticed how much my planks resemble the coffee stir sticks I get from the Dollar Store to mix epoxy with. Anyone ever plank a ship with coffee sticks? They are 7" long, .25" wide and .050" thick. Nice clear wood. My planks on the left and coffee sticks on the right. They are about 1 penny Can each.

-
Miniature Drill Bit Chuck for Dremel Tool?
Don Case replied to turangi's topic in Modeling tools and Workshop Equipment
Does each size drill bit have an optimum speed? Is faster better than slower or? Opinions? -
Making and using a draw plate
Don Case replied to Don Case's topic in Modeling tools and Workshop Equipment
Thanks Jim. I am very very new at this. I have only split out about 20 splints of bamboo and I had a lot of difficulty getting any length to them at anything much smaller than 1/16" square. Is there a step I'm missing because quite a few of them would not go through a no 53 hole? From my very limited experience a few more holes on the big end may help. Then again yours would definitely cut better than mine. I thought long and hard about posting this because I am so new but what the hey🙂 -
Making and using a draw plate
Don Case replied to Don Case's topic in Modeling tools and Workshop Equipment
Mine is going to be 1:48. Right now the smallest hole is .035(I ran out of drills) and if I draw it though a few times I can get it down to.030 which is about 1 1/2". I'm not sure if I'm happy with that or not. I'm toying with the idea of a "stand off" scale if I can't find any better info. Still no results n my e-mails. -
Making and using a draw plate
Don Case replied to Don Case's topic in Modeling tools and Workshop Equipment
I'm not sure if this was for me or everyone.🙂 I've never tried one of your draw plates because I just prefer making my own stuff. I do have a question. Are you plates drilled in .001" increments? One of the things I noticed when making one is that numbered bits don't go up in even steps the difference can take a bigger jump sometimes. I'm wondering if that's when they hang up. Anyway I'm sure yours is 10X better than mine. -
Making and using a draw plate
Don Case replied to Don Case's topic in Modeling tools and Workshop Equipment
I'm one of those guys that like to make my stuff. That and I'm waiting for my copy of TAONS before I start anything ship related. So I made a draw plate and I'll give a quick review of how it went. I started by cutting the end of an old hand saw blade. I started drilling holes and my old titanium coated drills would work but none of my new HSS ones would cut it. So I tried to anneal it and it warped big time. Even after it was annealed the HSS bits wouldn't drill it. I went and pouted for an hour. Then I tried a piece of stainless steel kind of in desperation. It drilled well and I got all the holes done. When I tried pulling the boo through it with mixed results. Then I re-read Jaager's post and he mentioned sharpening a draw plate by using a stone to flatten the out part of the hole. This worked like a charm. I was under the impression that you left that side rough and that's what cut the dowel. I was wrong. I had centerpunched the metal before I drilled and that dimpled the metal causing a high spot on the back. This makes it easier to sharpen. I think rather aggressive center punching would be a good thing. Anyway I think it was a success, time will tell. I had to buy some drill bits but I still brought it in under the $25 that a Byrnes cost but just. Buying one is probably the best idea for most people but I get immense satisfaction from making my own stuff. -
I'm making a draw plate. I plan on using bamboo for treenails. How much diameter change should I have between holes? When I'm using what I have now I taper the boo splint enough to go into the first hole, pull it through and the pliers mess up the taper so It won't go into the next hole. Is this normal? Do you find you have to re-taper the splint for each hole?
-
Apron frame rebates
Don Case replied to Don Case's topic in Building, Framing, Planking and plating a ships hull and deck
TTFM?? I may try to make one with just random dimensions just to see how it looks. The reason I asked is that Don Vadas' actually looked like it was three pieces at first glance and then I realized that it was carved out of one piece. He was a talented man. -
I'm looking at Kevin Kenny's and Don Vadas' (post #9) build-a-longs. Don mentions that this could be the most difficult piece to make in the whole boat. Am I correct that the rebates are carved into the side of the apron? Would it be considered bad form to saw the rebates into a thin piece of wood and then glue those pieces to the side of the apron? Sorry if I have the terminology wrong
-
I like your dust collector😃 You could move that around as needed. You make some good points. I will lower the top (that was already planned to expose more sandpaper). I like the divider idea, it solves a couple of concerns. I'll have to tear it down a bit but I've got not much to do while I'm waiting for Longridge to arrive. Thanks
-
Improving a Homemade Thickness Sander
Don Case replied to Roger Pellett's topic in Modeling tools and Workshop Equipment
The pawl stops the sled but that little strip that goes across the sled is all that stops the workpiece isn't it? Am I missing something. Have you got the grain vertical on that stop piece or something? -
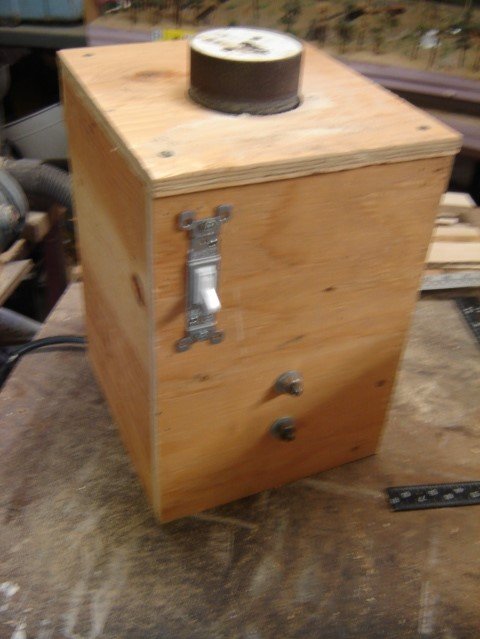
Nice. You guys do better work than me🙂 I tend to stop as soon as it works. My drill press chuck is just held in by the Morse taper and any vibration in the drum cause it to drop out. Here's mine. It sands square which is the big thing I guess. When I first put the drum on it was almost perfect, No wobble. I removed the drum and put it back on and now I have a very slight wobble. I found that if I have a very nice fit between the sanding tube and the drum that I don't have to glue it but that may only work with this tube. Now I have to come up with an easy way of raising and lowering the deck so I can use the whole sandpaper surface. That and dust extraction. Right now there is no back on it so it can cool. If I cover the back and always have the dust extraction on do you think there would be enough air flow to cool the motor? Also with the whole think closed up it would mean that the motor would be operating in a very dust environment. Fire or explosion hazard maybe. I don't know how sparky these motors are.