

Techtonic
-
Posts
145 -
Joined
-
Last visited
Content Type
Profiles
Forums
Gallery
Events
Posts posted by Techtonic
-
-
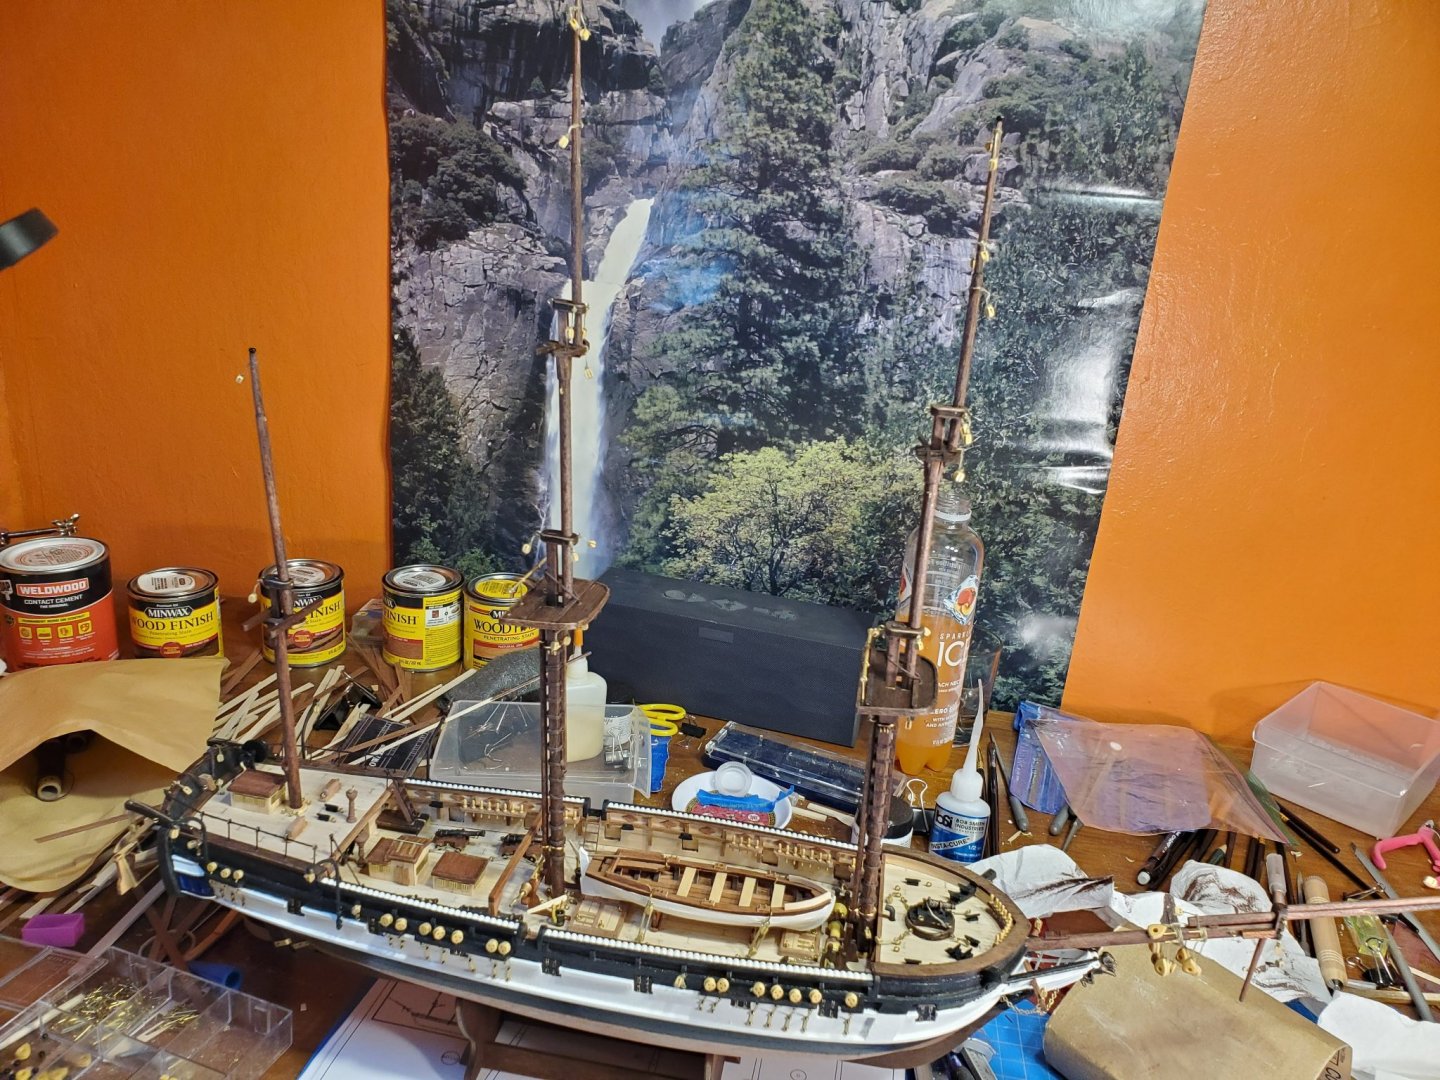
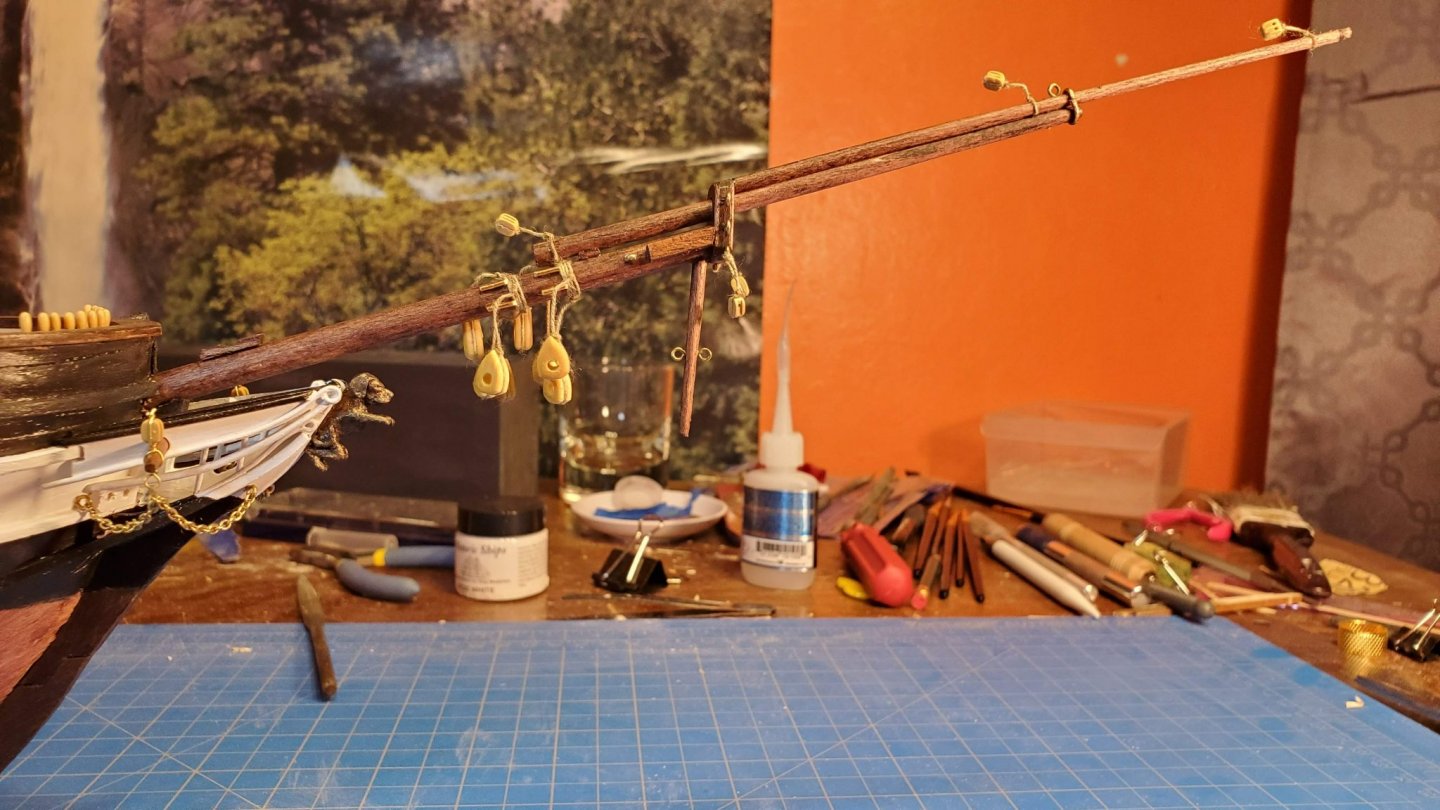
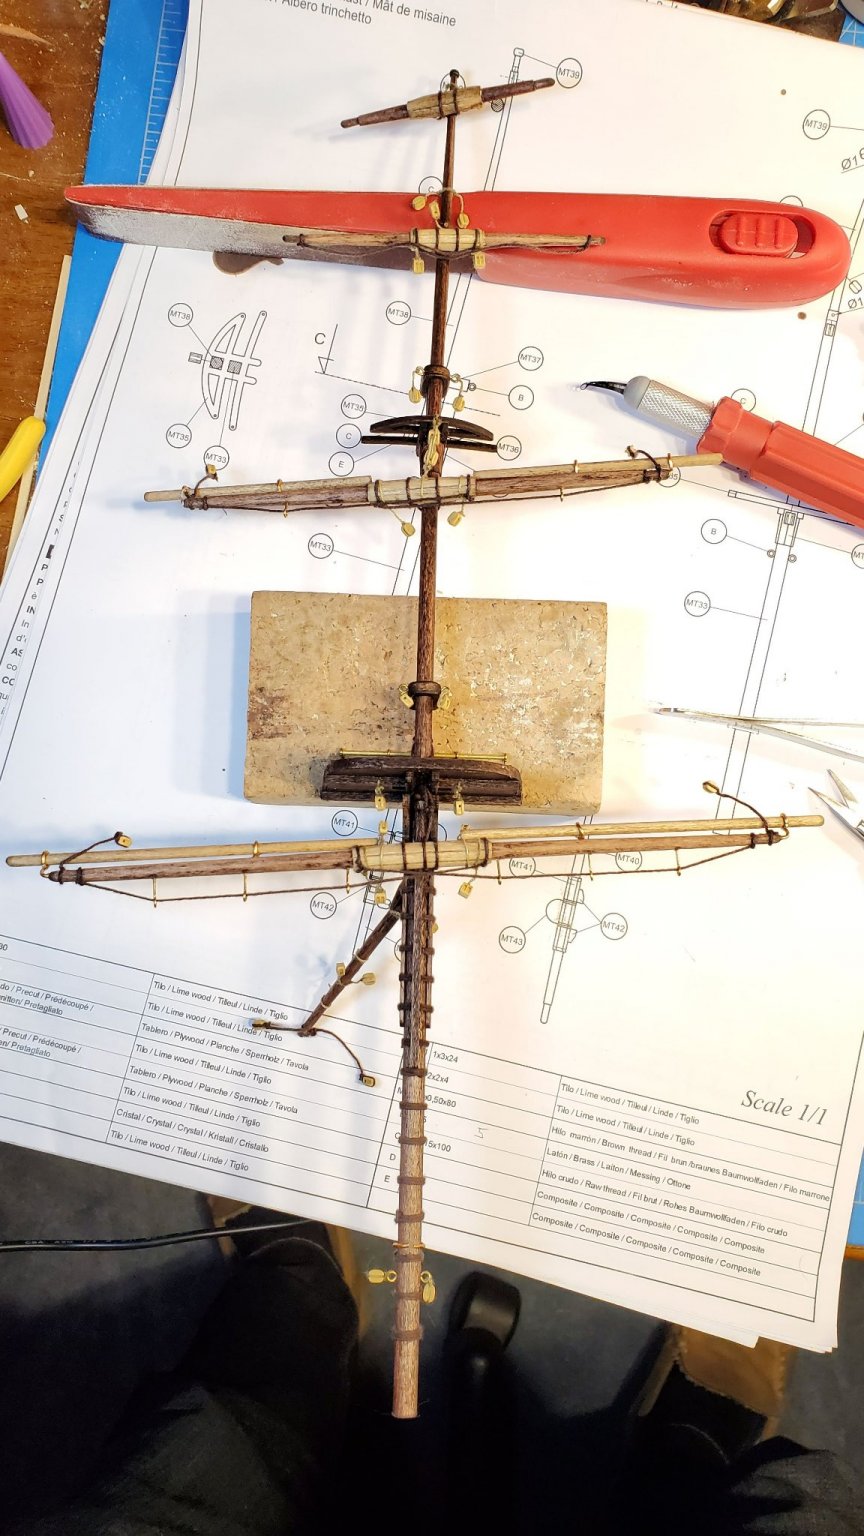
Finished the anchors and most of the stays, just got a couple left to do on the main and mizzen masts.


So here's a cautionary tale... About 5 weeks ago I came down with a cold, but one that just wouldn't go away. Each day it got a little better or a little worse, but always there. Every day a congested runny nose, sometimes a cough. Had a COVID test - not that. After 5 weeks of suffering it finally clicked that this all started when I got to the build steps that used more CA glue. After some googling I found that CA glue fumes can cause exactly these symptoms in some people!
What made the problem worse is that some days I felt so bad I took the day off work - so what did I do when stuck at home - work on the boat of coarse!
So now I've installed a small desk fan that I'll use when I'm gluing - hopefully that'll fix the problem.
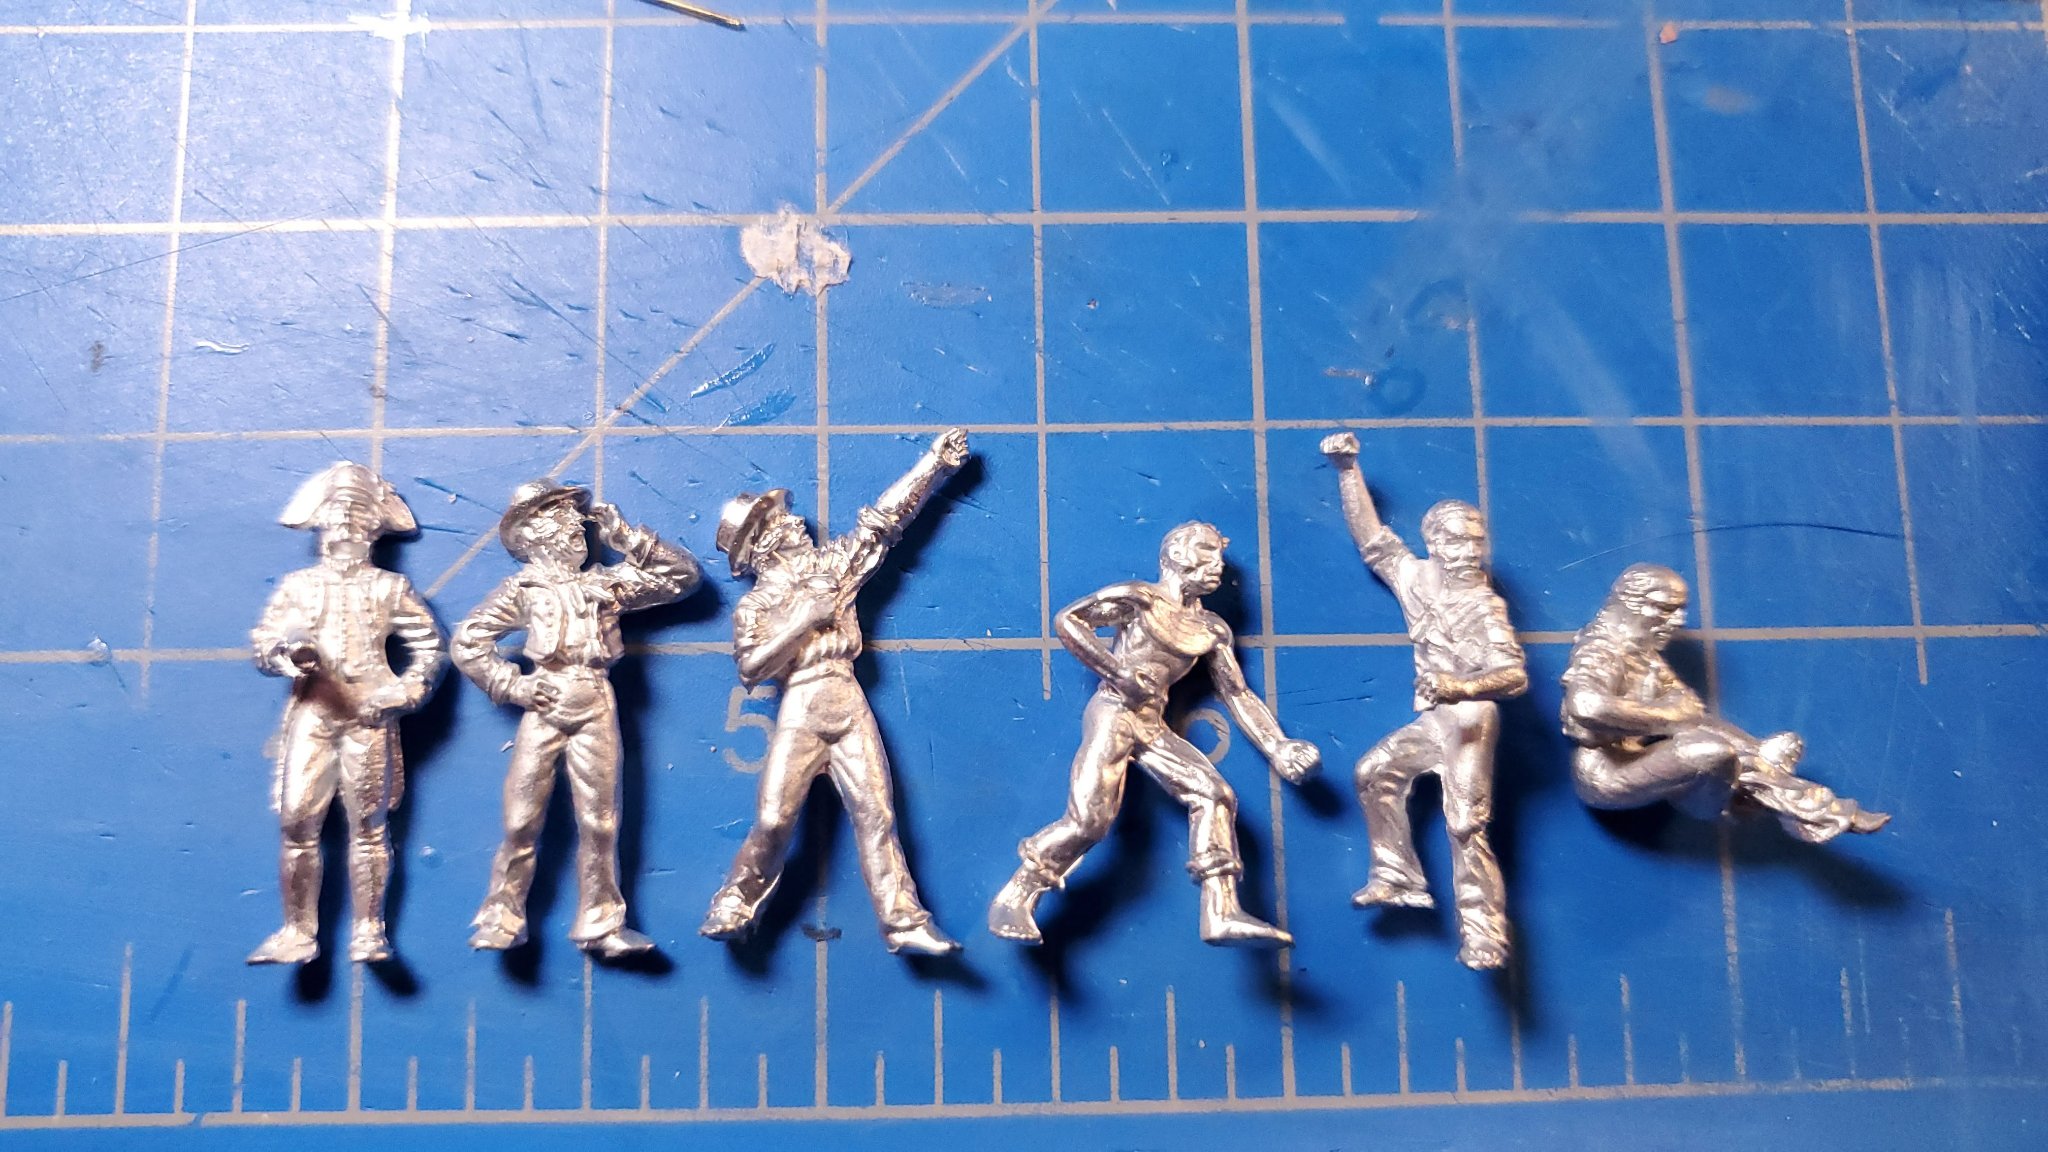
To give my nose a rest today I switched to task that didn't involve any gluing. I recently ordered these guys to crew my ship:

I thought they might add a bit of life to the ship and also add a sense of scale. These are Amati 25mm figures which are about the right size for 1:60 scale. works out to 1.5m or 5 feet, which given people were generally shorter back then is not too far out. I bought them here https://www.agesofsail.com/ecommerce/figures/25mm-sailors.html
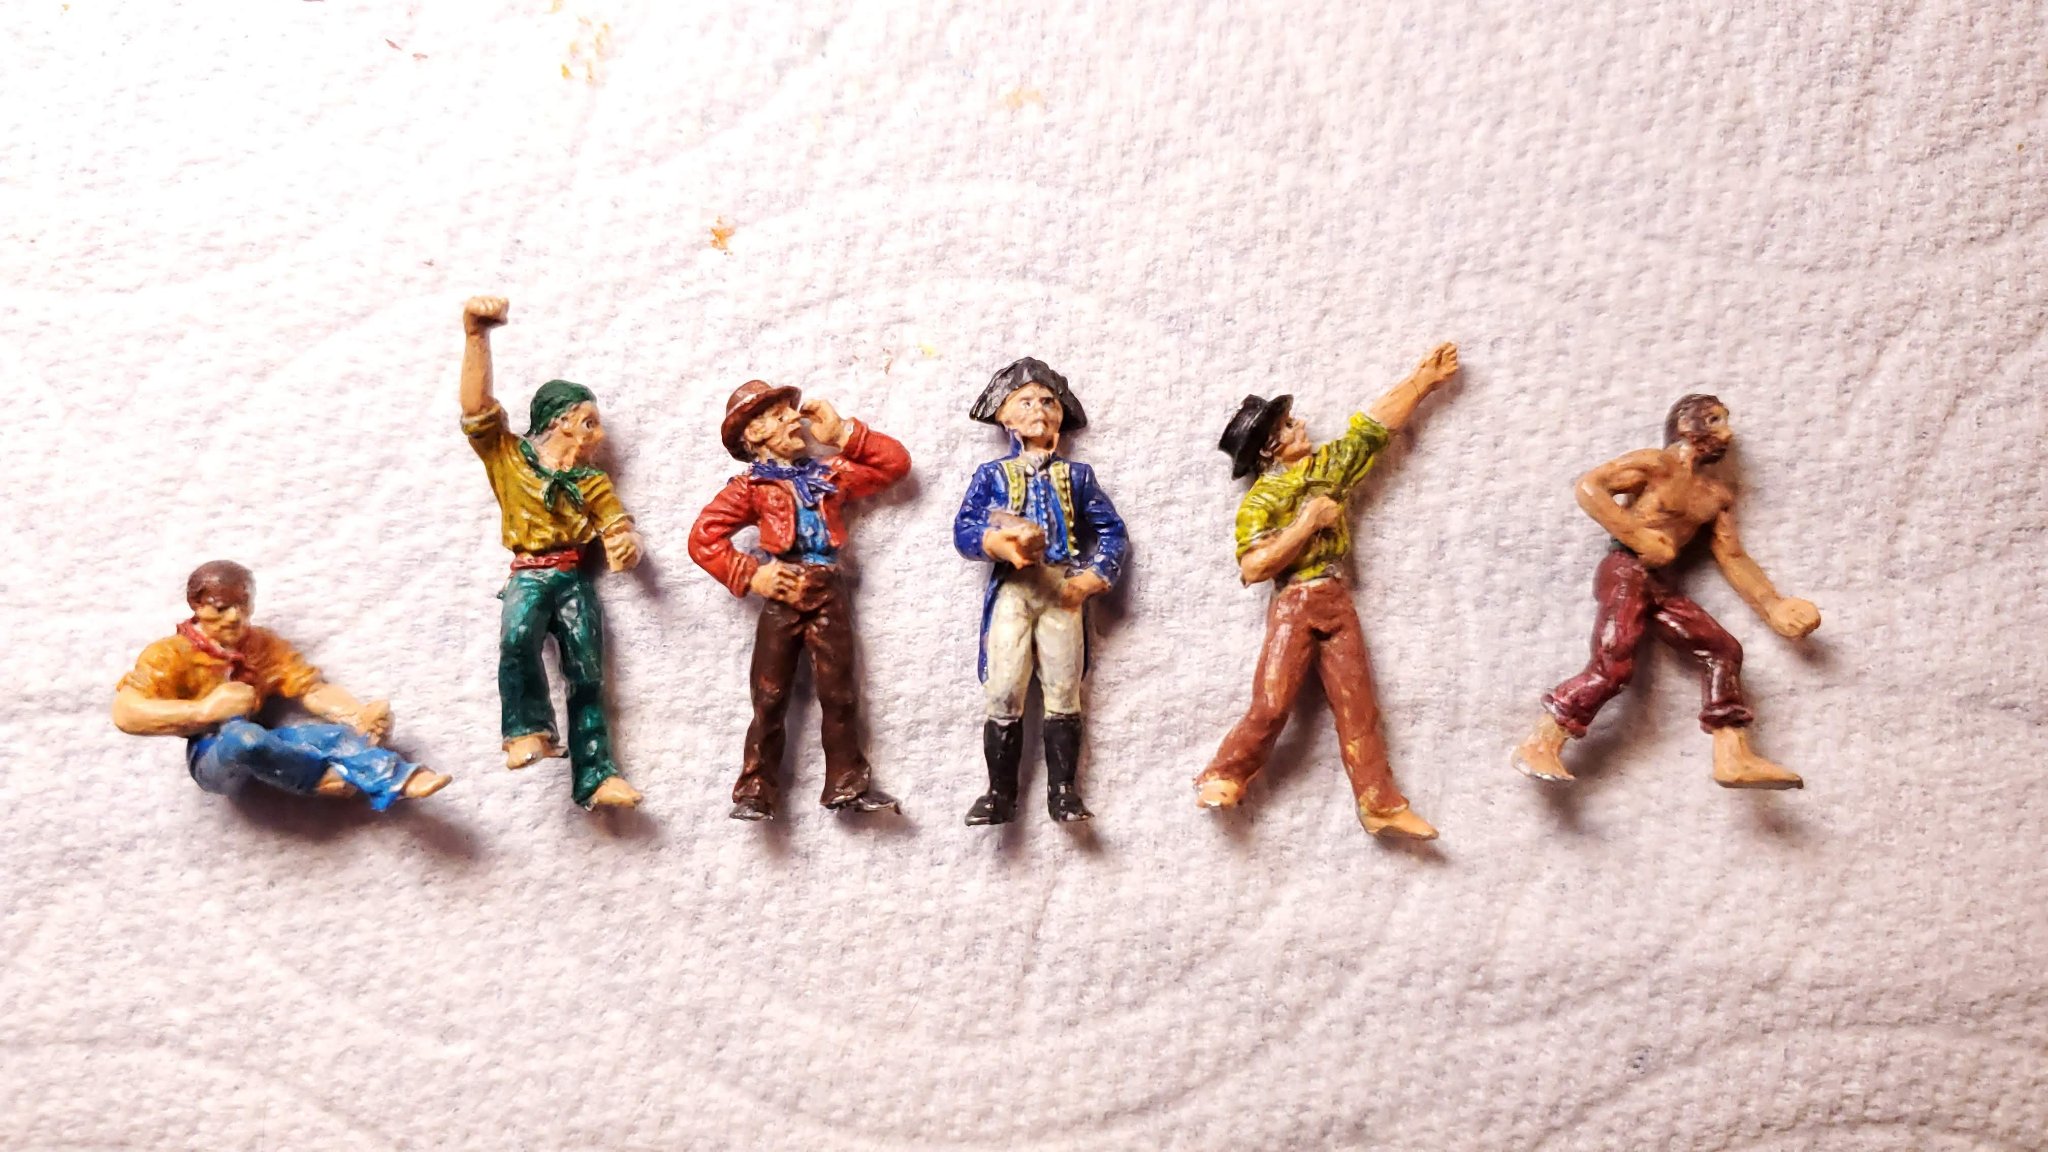
Today after about 4 hours of experimentation with acrylic paints these got transformed to this:

This was my first ever attempt at painting miniature figures. They're not perfect but I'm pretty happy with how they came out. We have of course Charles Darwin and Captain Robert Fitzroy in the middle, surrounded by various grunts.
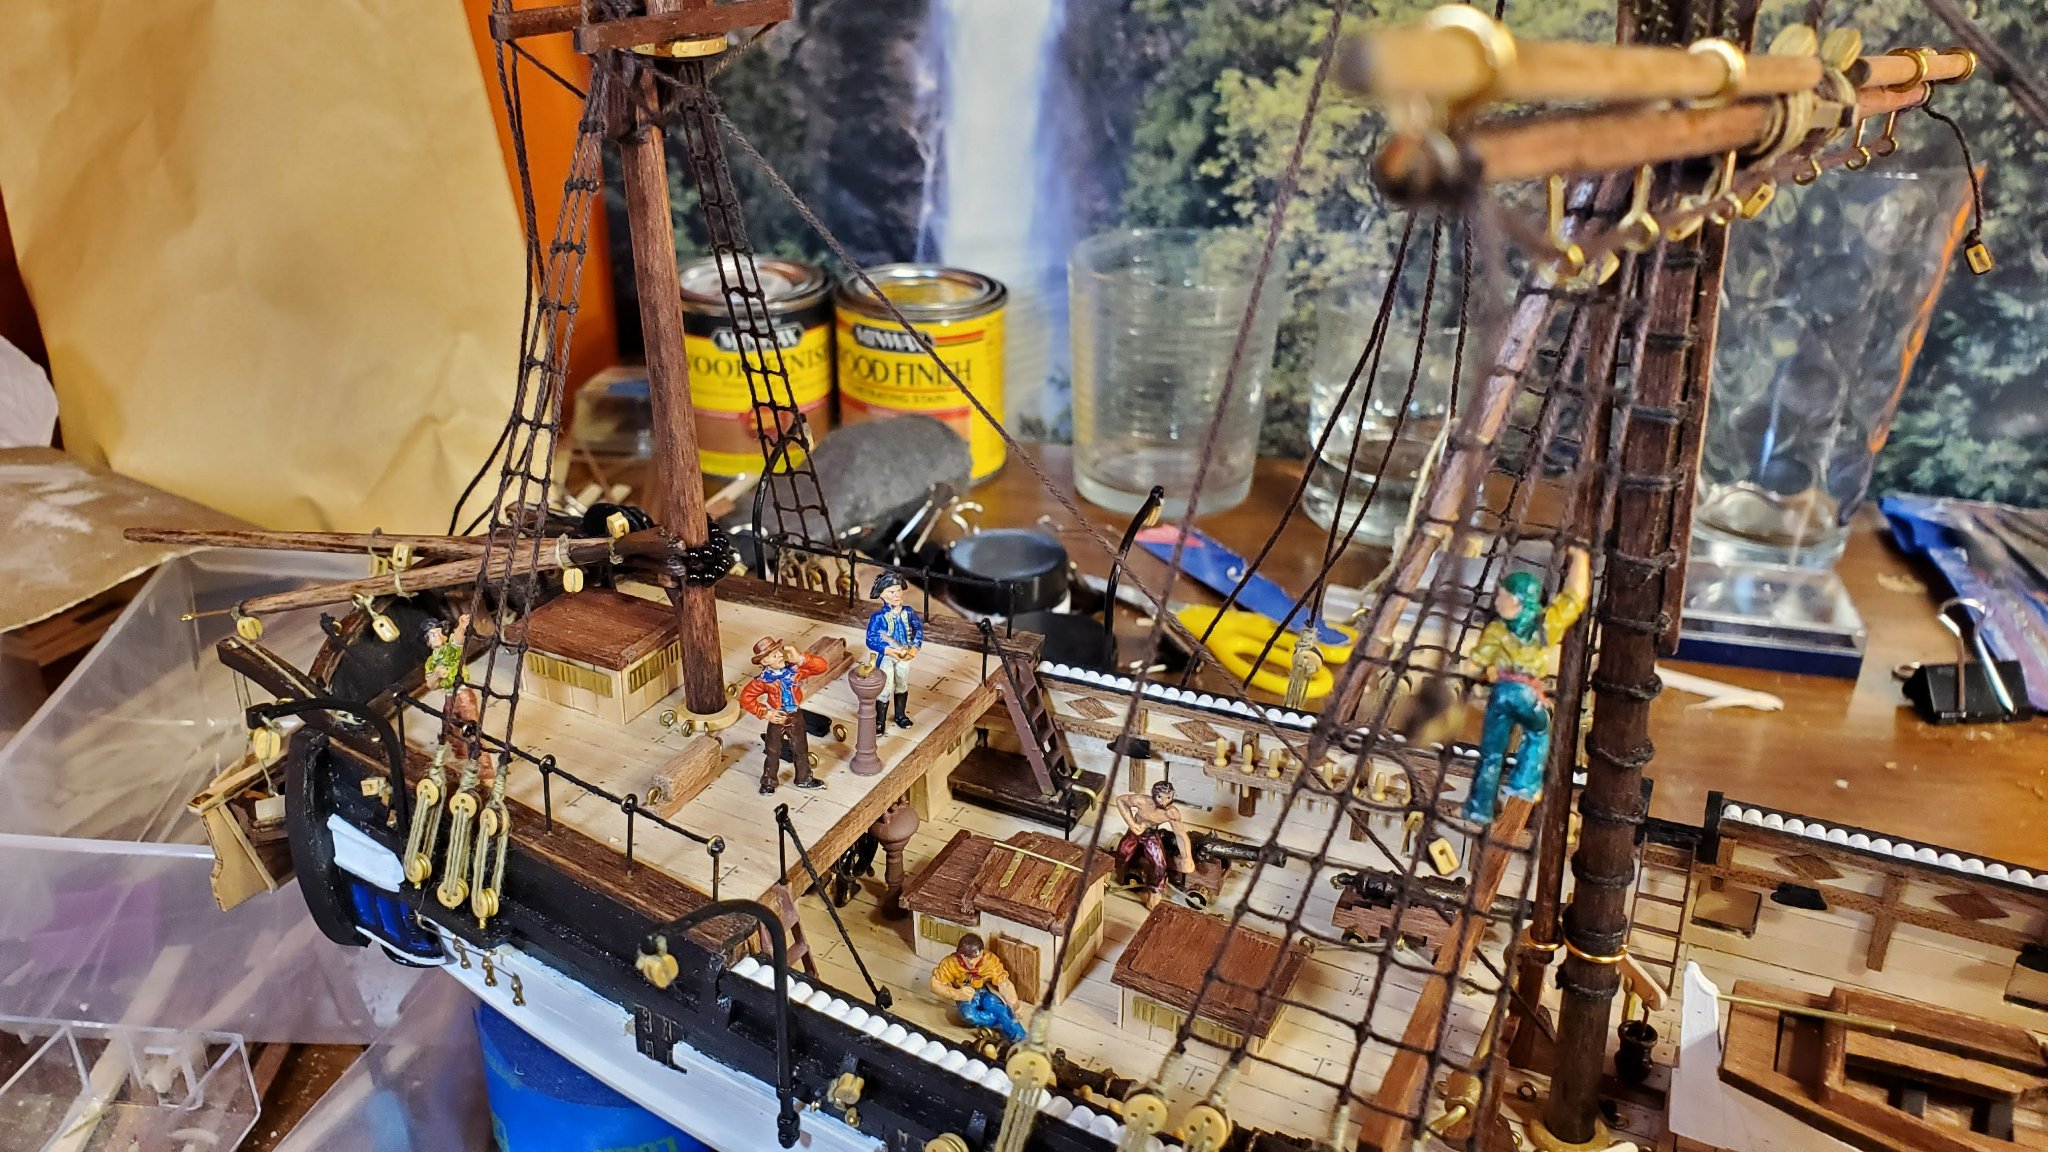
This shot shows them placed in the ship. I won't glue them in till the very end but this gives a good idea of what they might look like.

- usedtosail, ccoyle, Cathead and 2 others
-
 5
5
-
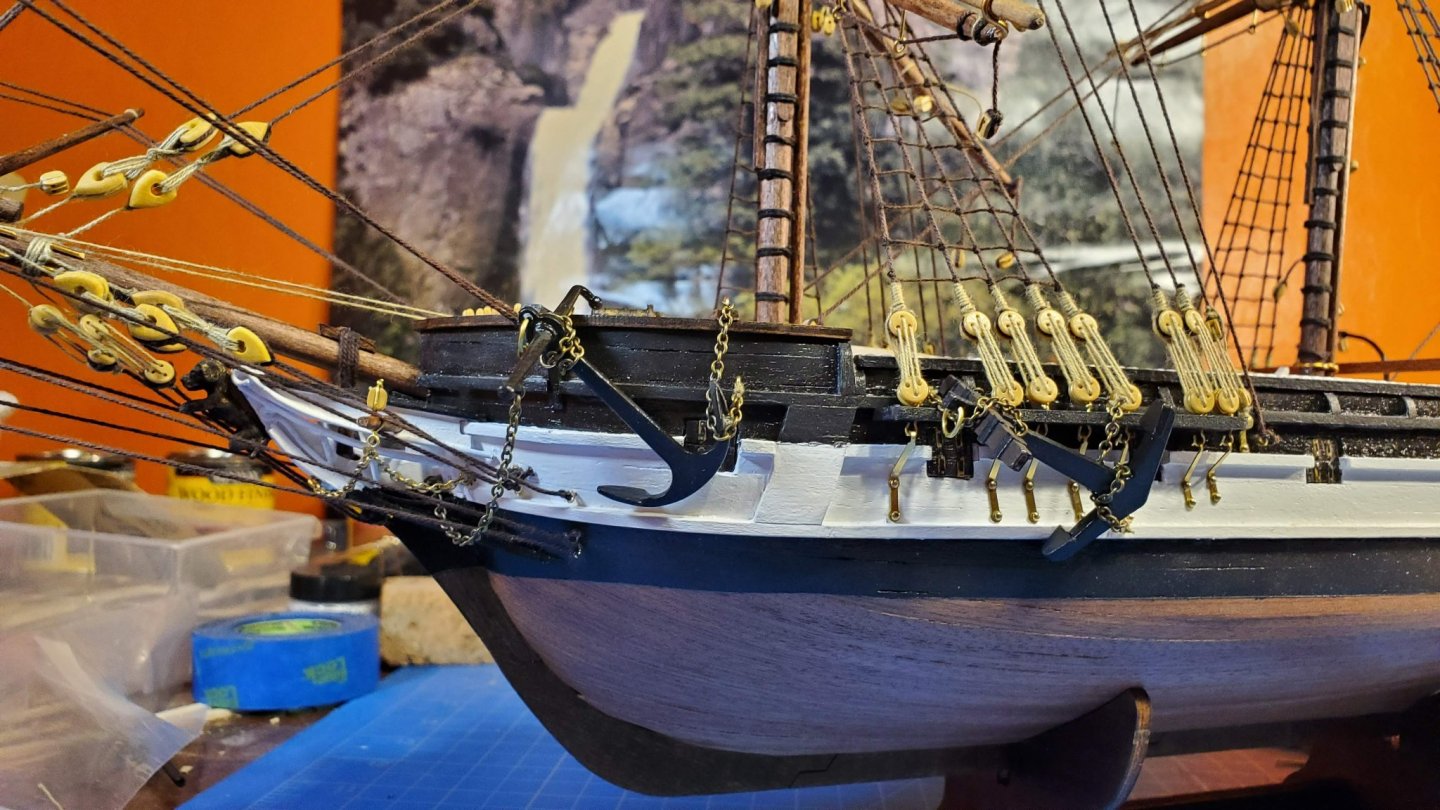
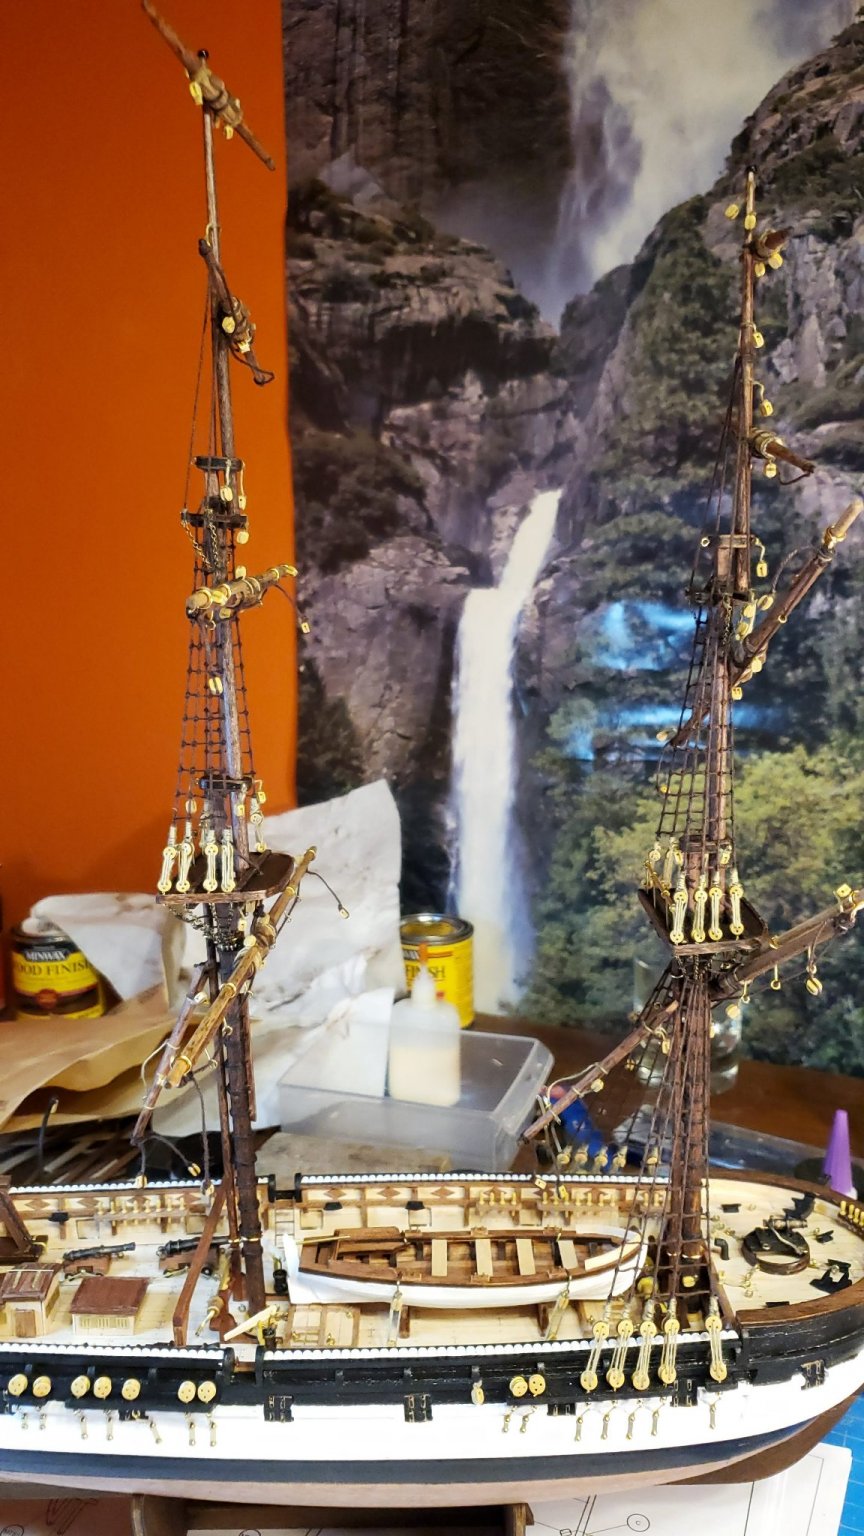
So 504 clove hitches later and the shrouds and ratlines are now complete.
Before doing the main mast shrouds I took a bit of time to correct the issue mentioned in my April 12th post with the mistake in the instructions with part H20 being mounted upside down. To fix it I pulled out the center deadeye on that wale after unfurling the hook underneath. Then I drilled a new hole in the wale about half inch fore of the existing hole. Then I pulled out the top pin of the chain and rotated it to line up with the new hole. Then refitted the deadeye into the new hole. So this is what it looks like now:
You can see a slight bit of damage where I pulled out the top pin as it was glued in. I've given it one coat of paint so far - it should be less noticeable after I give it a second coat. But I'm now much happier with the way it looks as the chains now all line up nicely with the shrouds.
A reminder of what it looked like before the fix:
Here's some pics of the completed shrouds/ratlines:

Next up I'll probably go back and add the anchors. I figured I would fit all the shrouds first as the anchors might get in the way.
-
8 hours ago, Robp1025 said:
So looks like the kit is notorious for being short on certain parts like the 1mm brass and now the 1mm by 3mm planks for the life boats. I'm gonna have to fashion the 2 mm by 4 mm I think to get enough materials because I have about 15 extra of those @Techtonic
I would have a good look and see how much 1x5 limewood you have. It's mixed in with the 5mm sycamore veneer which makes it hard to spot. My kit came with three 2 foot lengths of it. The only place it is used is on the long cheeks of the fore and main masts (e.g. mt69), so you actually only need less than a foot of it.
It would be much easier to split the 1x5 into two 1x2.5 than it would to try and trim down the 2x5 (I assume you meant 2x5 not 2x4) limewood that was used for the main hull first planking.
Talking of shortages, and since you will be coming on to the masts soon - be warned that there is only just enough of the 3mm, 4mm and 5mm dowels. I ended up with just a few very short offcuts of each of these leftover by the time I'd finished the masts/yards/booms. If you make any mistakes and have to scrap a piece then you may run out. There is, however, plenty of spare 6mm dowel. I ended up with two unused full rods of it. So I guess at a pinch you could whittle this down to whatever radius you need.
- Keith Black and Robp1025
-
1
-
 1
1
-
6 hours ago, Robp1025 said:
So has anyone else that has done this kit run out of 1x3 tilo because I am having that issue atm and trying to see if it will look ok with something substituted in
Yes same here, I did not have enough 1x3 for the yards. But I had a lot of extra 1x5, so I ended up splitting it down the middle and used that. If you slope the knife when splitting it, at say a 30 to 40 degree angle, then it will lay better around the yards with less gaps.
- Keith Black and Robp1025
-
1
-
1
-
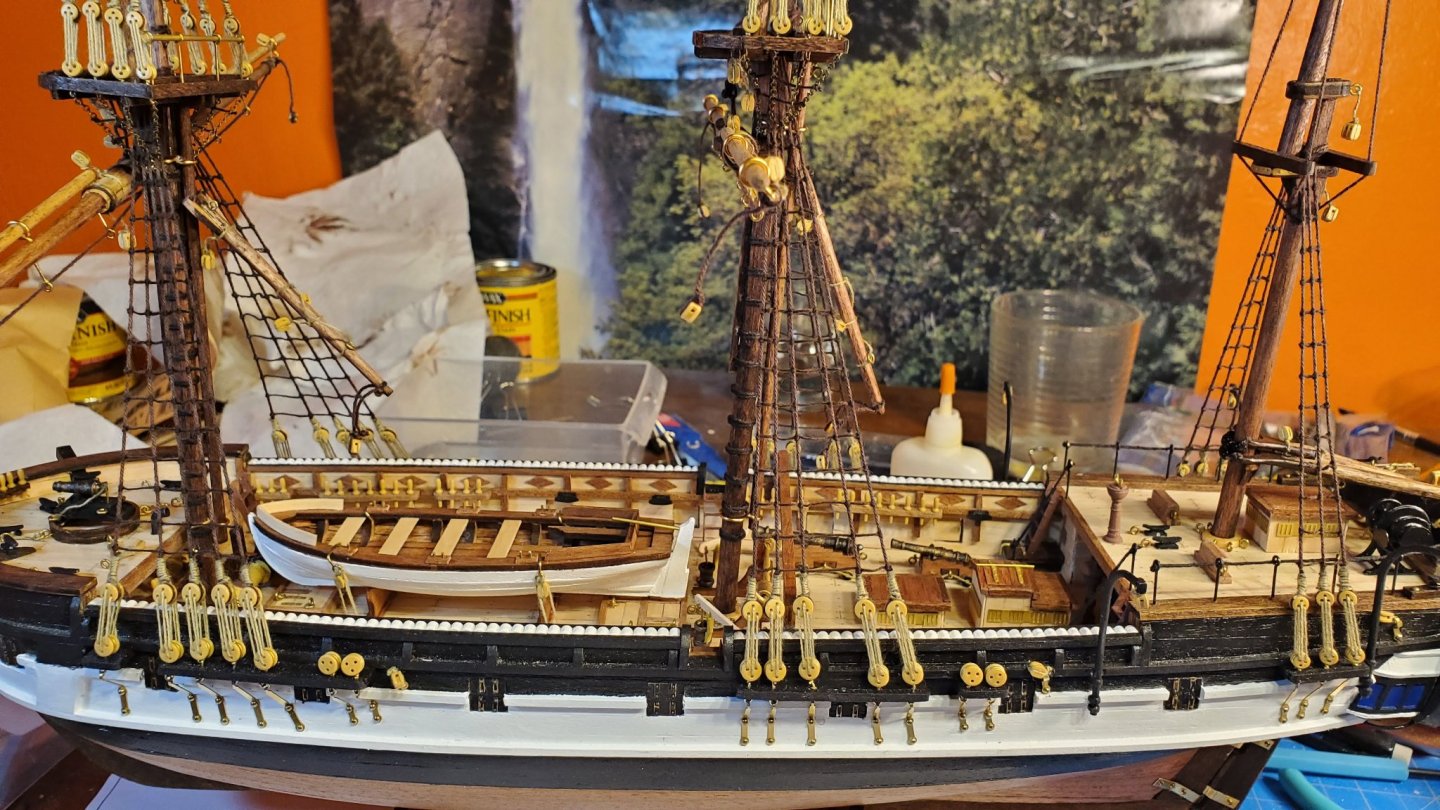
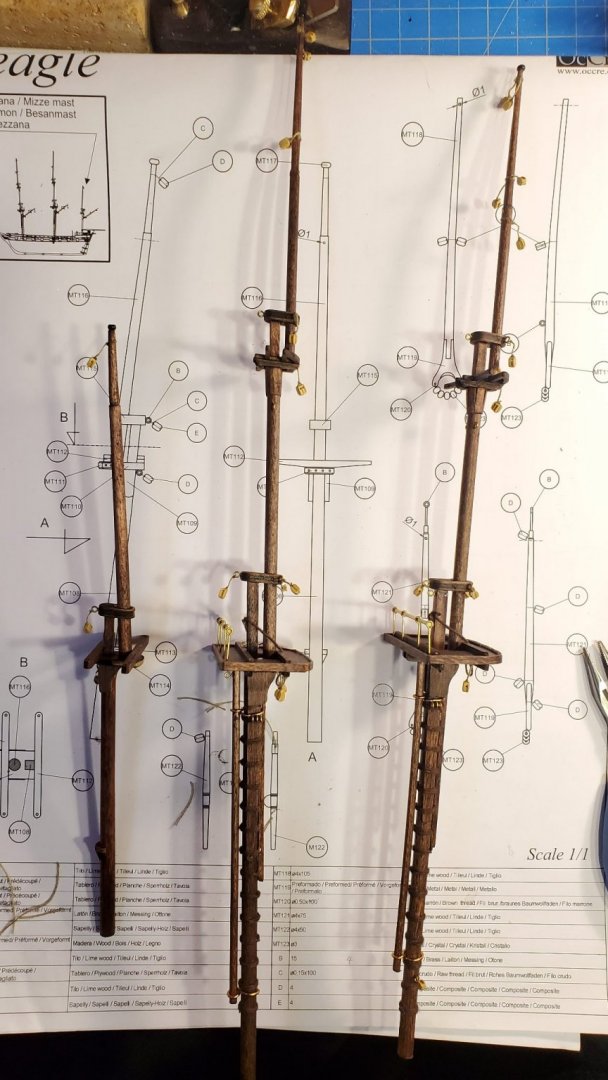
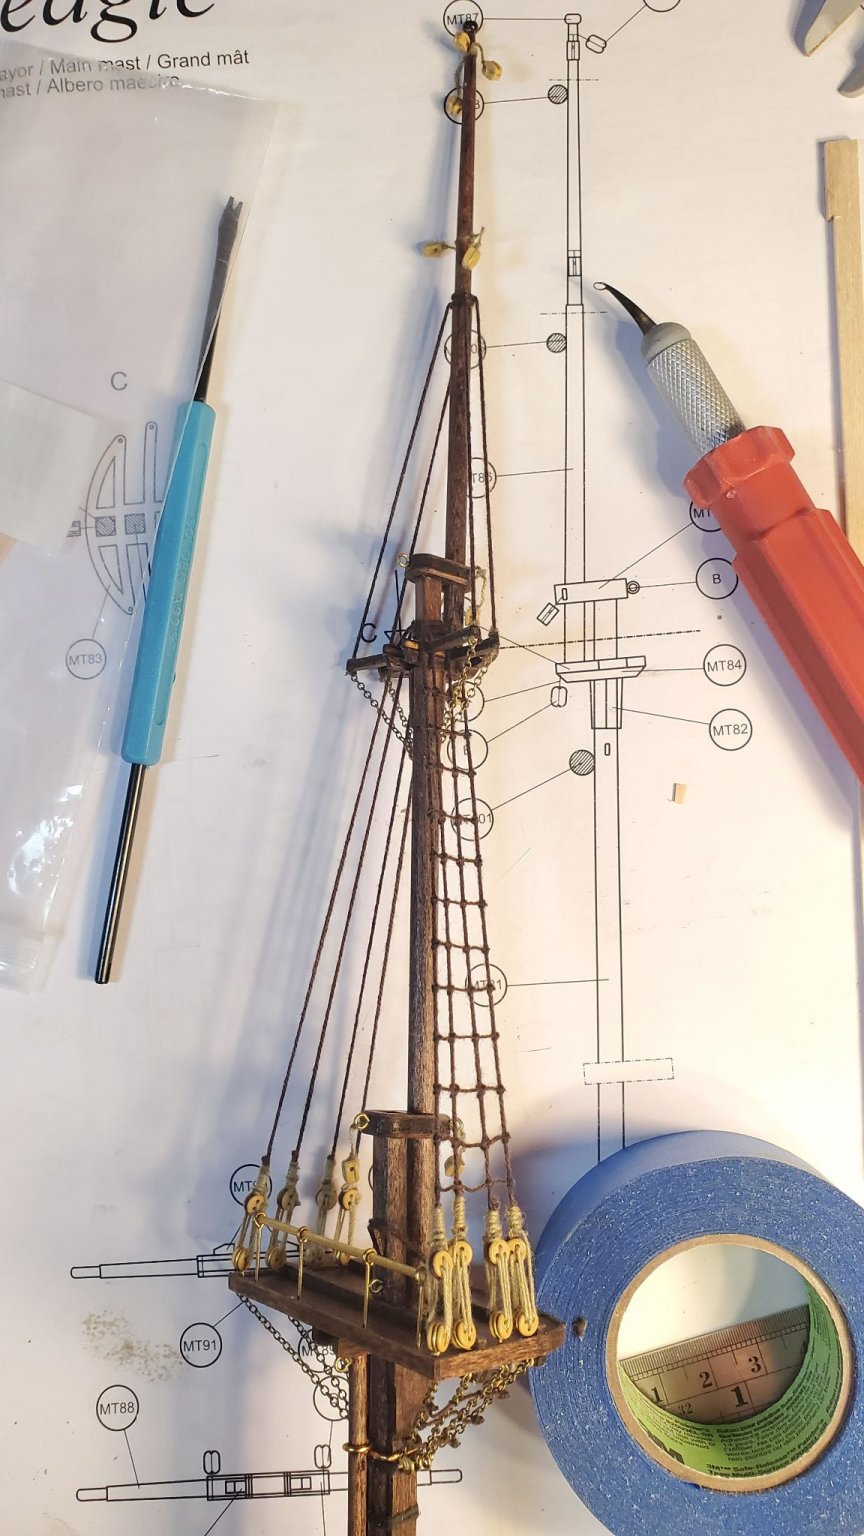
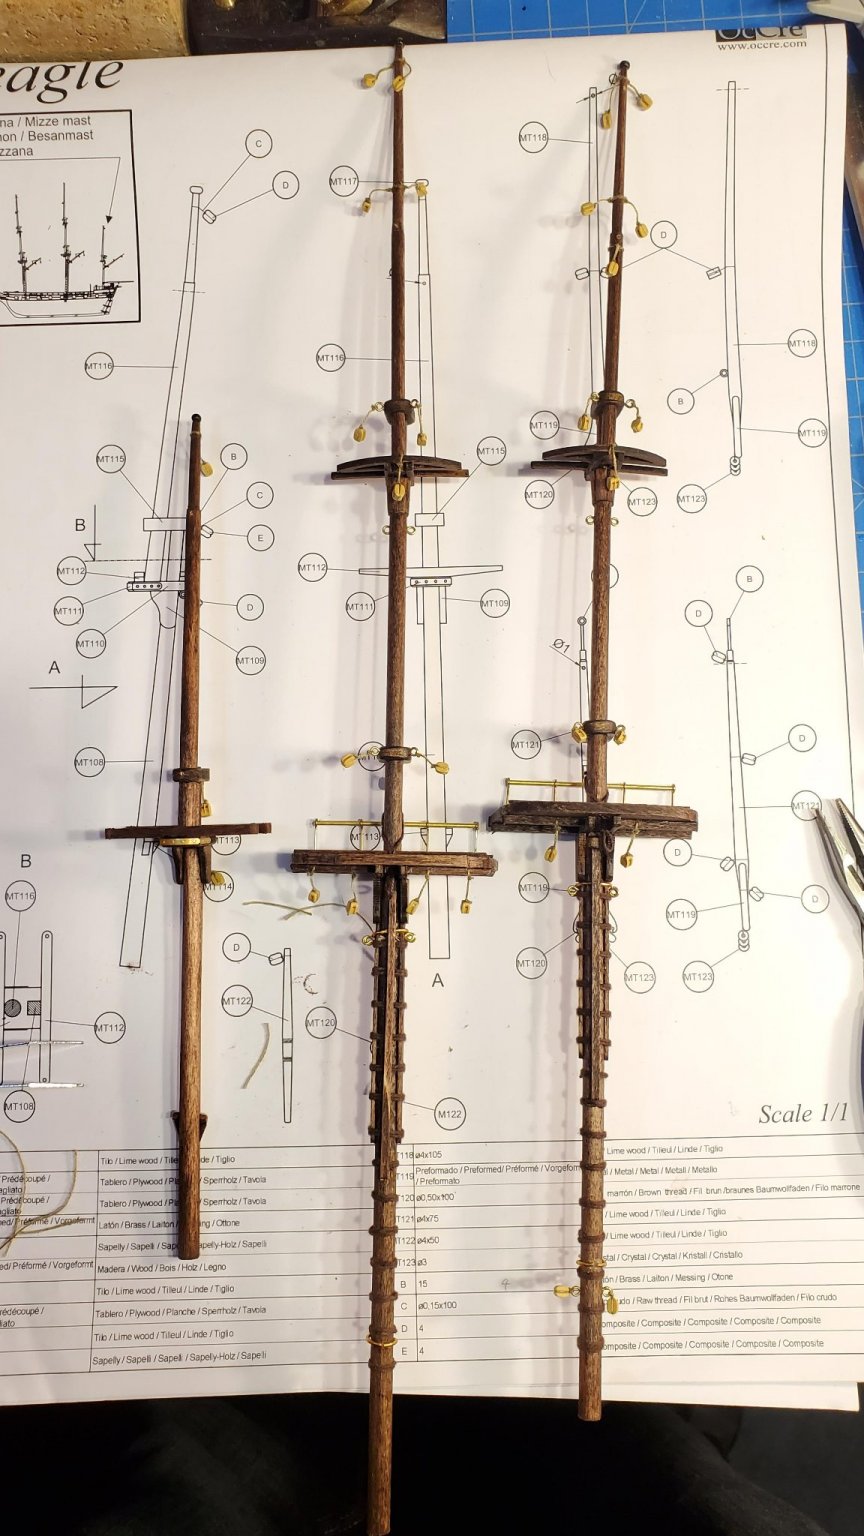
Still working my way through the shrouds and ratlines. Have now completed the whole foremast and the topmast of the main mast.
After completing the first set of ratlines that I pictured in my last post, I happened to glance the backside of them and noticed that it looked neater than the front side. The knots are neater and the ratlines kind of go behind the shrouds in a visually appealing way. So I decided that for all the remaining ratlines I would tie them differently - that is to begin each clove hitch by going behind the shroud rather than in front of it.
Here's a pic again of the first one I did beginning each clove hitch in front of the shroud:
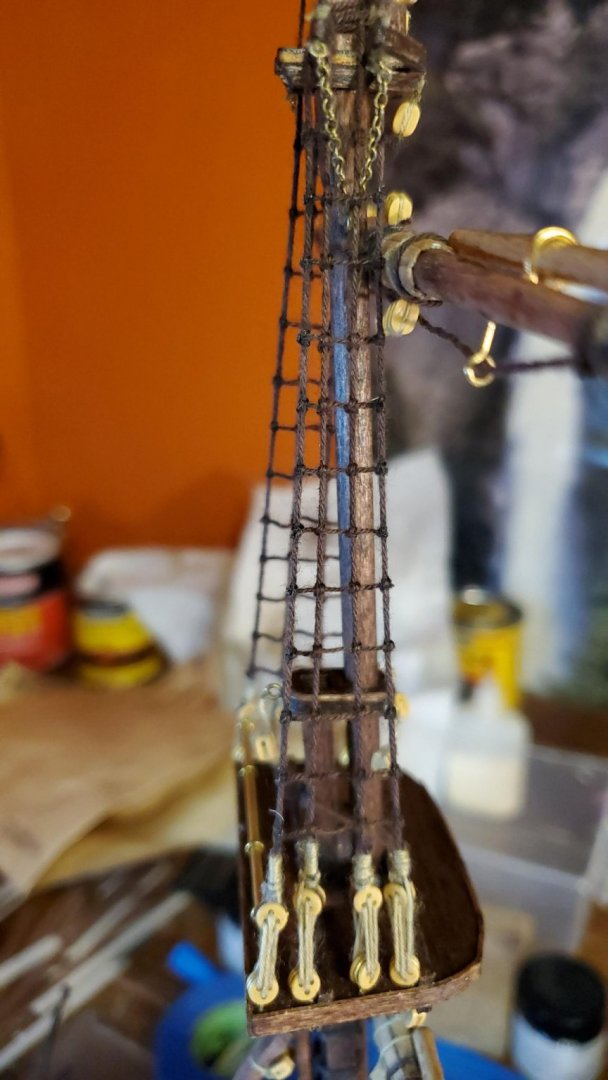
Compare with the next one I did with each clove hitch beginning behind the shroud:

Hopefully you can see from the pic that it is neater. It is definitely neater IRL.
Here's the foremast lower shroud/ratlines:
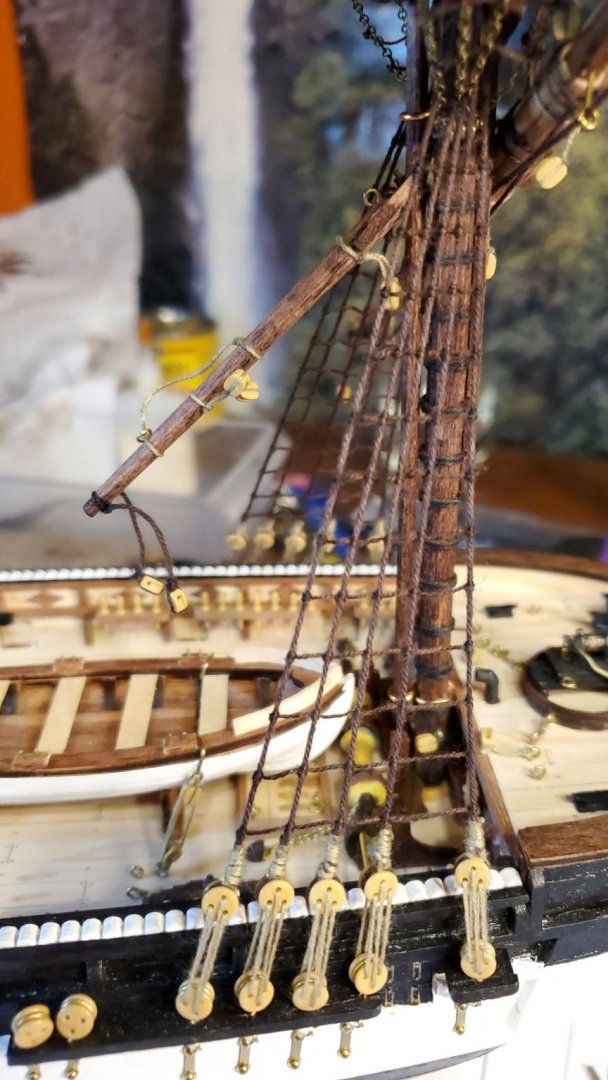
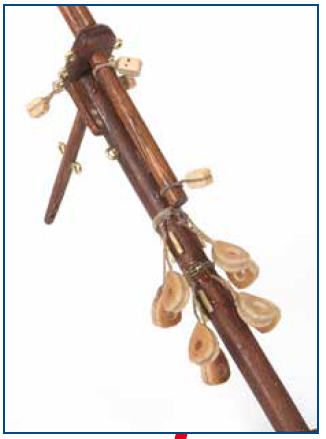
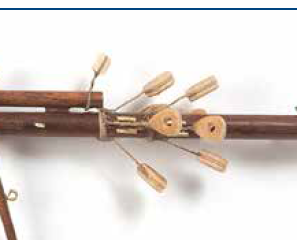
A closer look at the chain futtock shrouds.:
This is finer chain than what comes with the kit, specifically the 1.5mm antique bronze here https://www.amazon.com/gp/product/B01B1FG83K. This looks great for the futtock shrouds but is too fine for the anchor chain so I ended up getting some thicker chain for them.
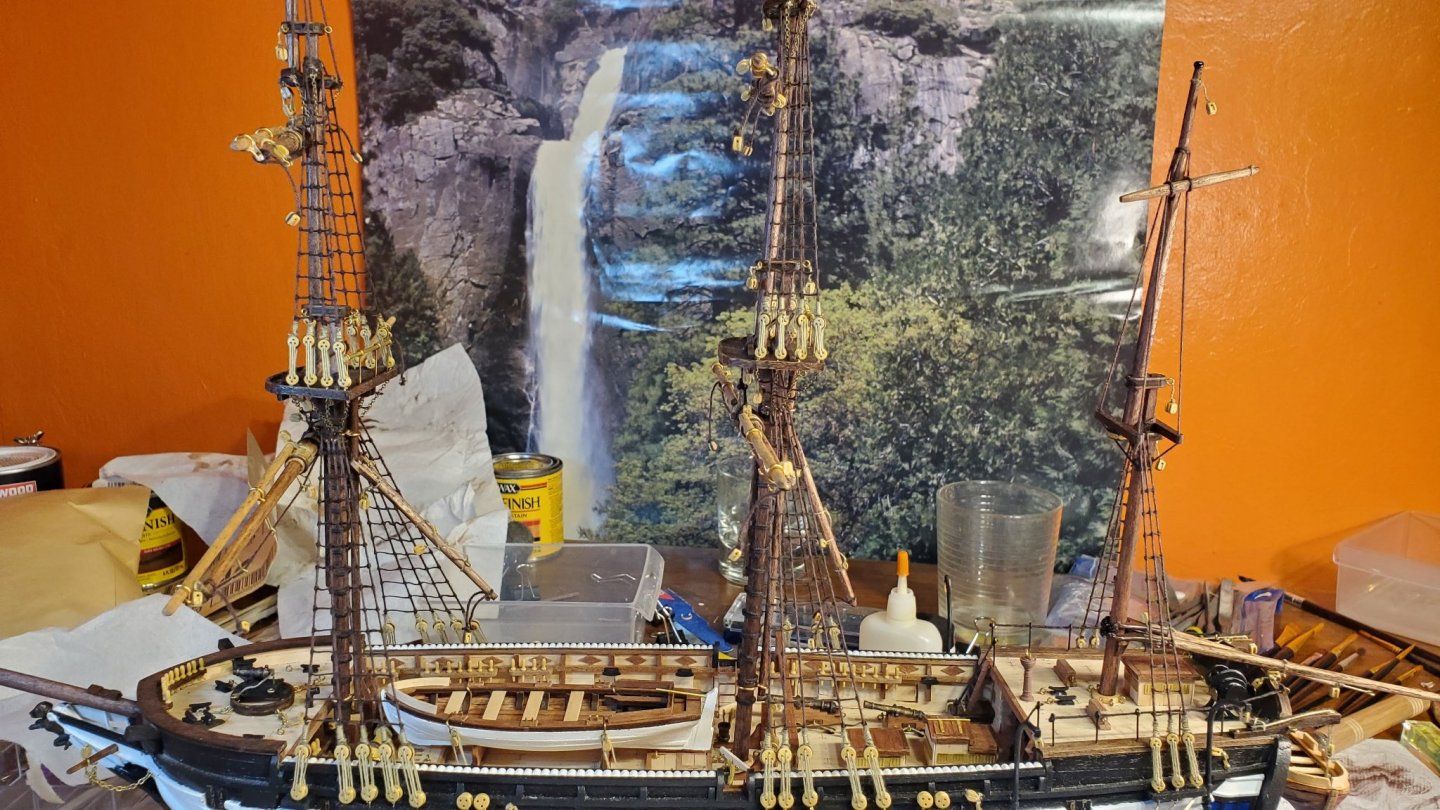
The main and fore masts showing where I'm at right now:

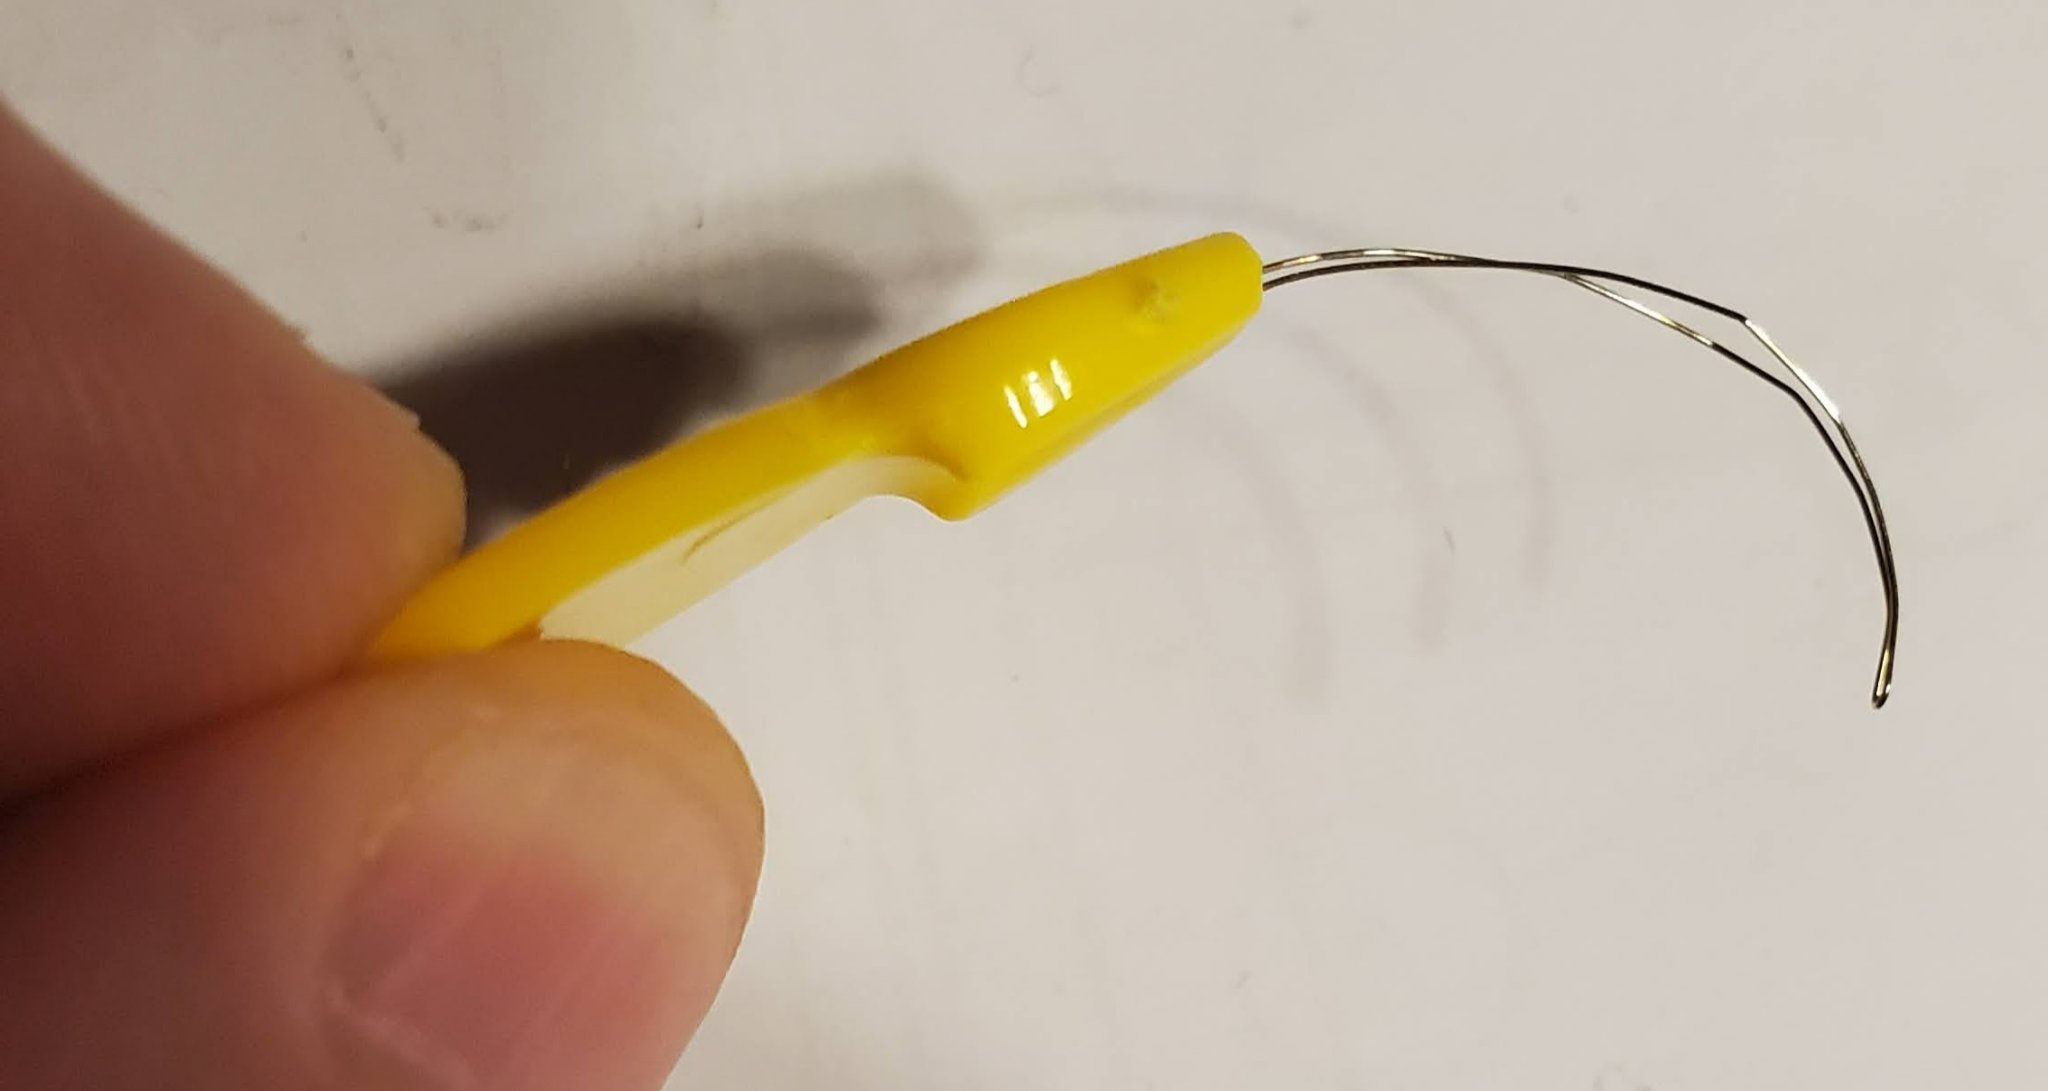
I definitely recommend one of these https://www.amazon.com/gp/product/B08R361B5Y for threading the deadeyes:

I needed to squeeze the tip with some pliers so that it would go through the holes more easily. They are straight when you buy them, but as you can see in the pic I made one where I curved it around quite sharply. This makes it much easier to thread through the back of the deadeyes, particularly the lower ones that are mounted to the wales of the ship.
- Cathead and usedtosail
-
2
-
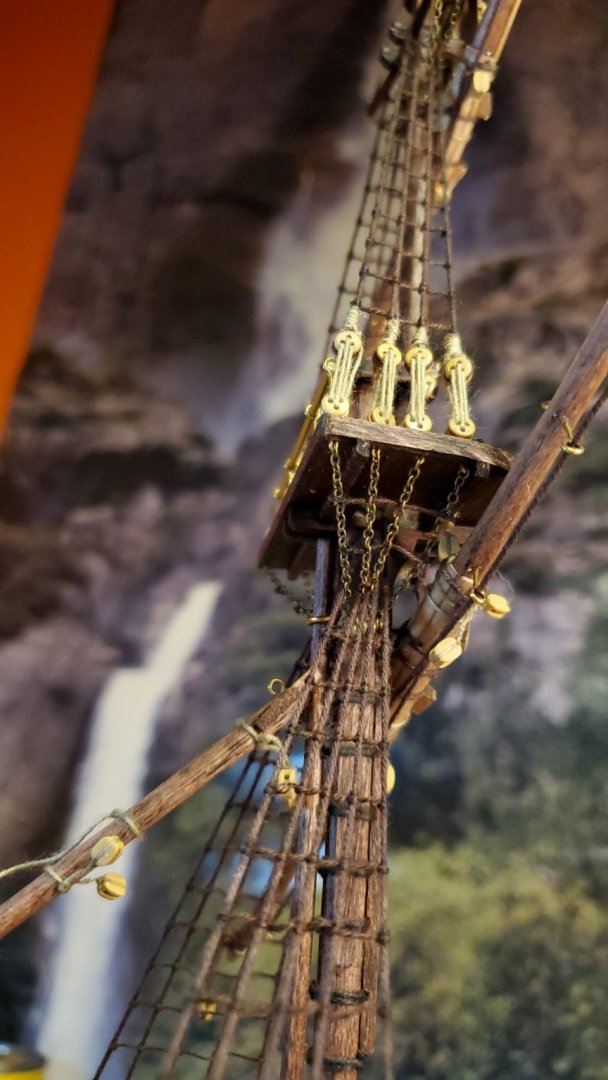
I finished all the yards and booms. Reading Mastini's book it recommends fitting the topmast shrouds and ratlines before fitting the yards to the masts so that the yards don't get in the way. I figured this made sense, it was too late for the foremast as I had already fitted the yards, but I switched the order for the mainmast.
The other thing I noticed is that in the videos the futtock shrouds are rigged with 0.5mm thread, but in the rigging diagrams and on OcCre's promo pics they are rigged with chain. Since I had already bought a reel of antique bronze fine chain due to my kit not coming with enough chain I figured I'd use that. I also used it for the topgallant futtock shrouds which may be technically incorrect but I'd already done it by the time I realized the rigging diagrams used thread for those.
For the shrouds for increased realism I seized them around the deadeyes rather than using the double overhand knot that they use in the video.
For the ratlines I made a 6.5mm spacer out of wood to keep them even (6.5mm x 60 = 16" which is the spacing to use according to Mastini). I used a clove hitch for each knot. I've just done the ratlines on one side so far. I was very pleased with the result for my first go.
- Cathead, Robp1025, usedtosail and 1 other
-
4
-
10 minutes ago, DonSangria said:
I'm building the Beagle too. I finished the foremast and all the yards. I will be attaching the yards shortly.
I have one question about that: Is it necessary to glue the yards in place?
I would rather just tie them around the mast and let them be free to swing, because I will probably brace the yards at an angle...
No, you don't glue the yards directly to the masts. They are tied on with thread and will flop around quite a bit until they are secured in place later by the rigging.
-
6 hours ago, Maliba1025 said:
That's some good advice I didn't know if CA dried in the air if its puddle since I never tried it. What do you do just dip the tool in then apply it to spot or is there a chamber that's filled?
Yeah, that CA glue is funny old stuff. I've actually accidentally left two or three drops in a bottle cap overnight and it was only slightly thicker in the morning. I usually dispense 4 or 5 drops into the cap at a time - that's enough for fixing 20 or 30 knots. Any unused at the end of the session I just suck back up into the bottle.
For the Glue Looper you just dip it in the glue and it immediately sucks up a controlled amount of glue by capillary action. It's not really a chamber, just a little loop and a channel. Then when you touch the tool against anything absorbent like thread it sucks the glue back out. It only works with the very low viscosity CA, like the super thin. You can clean the tool periodically with a cigarette lighter, just takes a couple of seconds.
-
6 hours ago, Pete D said:
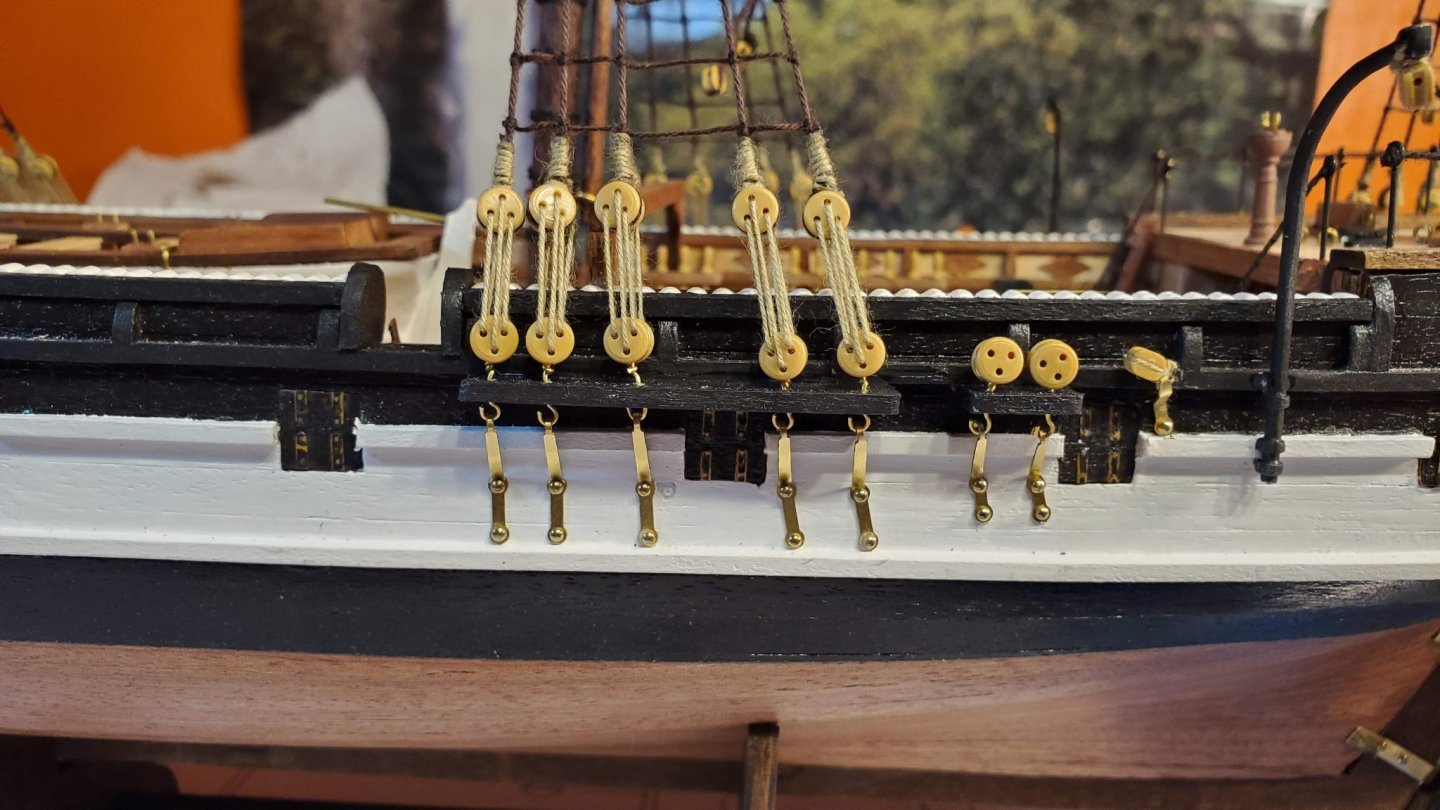
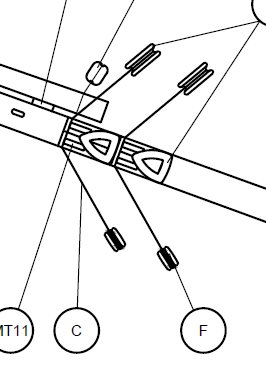
There are in fact 2 sets of blocks . One that hang down on the 0.5mm thread about an inch long , and then 2 at the top mage from siezing a single block and attaching it so that it point up , and will be used when you attach running rigging on all the yards. If you look at my build there is a picture that shows that set of rigging
Ah yes, your correct, I see it now. I believe this is the bit that shows the connections to the blocks on the brown 0.5mm thread. So rather than just hang straight down they actually should be oriented to aft on the foremast and towards the bow on the main mast.
Foremast:
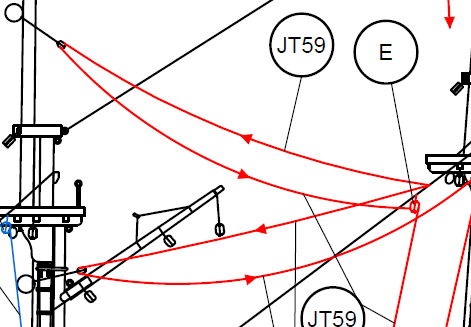
Mainmast:
-
6 hours ago, Pete D said:
Just an observation. If you could change MT47 and MT52 through 180 degrees , should that not correct the issue .
I had already glued the thread to attach the yards to the mast. It really just needed the yards to be removed from the mast, flipped around and refitted. But that would removing and redoing the glued thread. When I finished up last night and noticed the problem I wasn't in the mood to backtrack like that. But today with a fresh mind I decided to go ahead and do it.
-
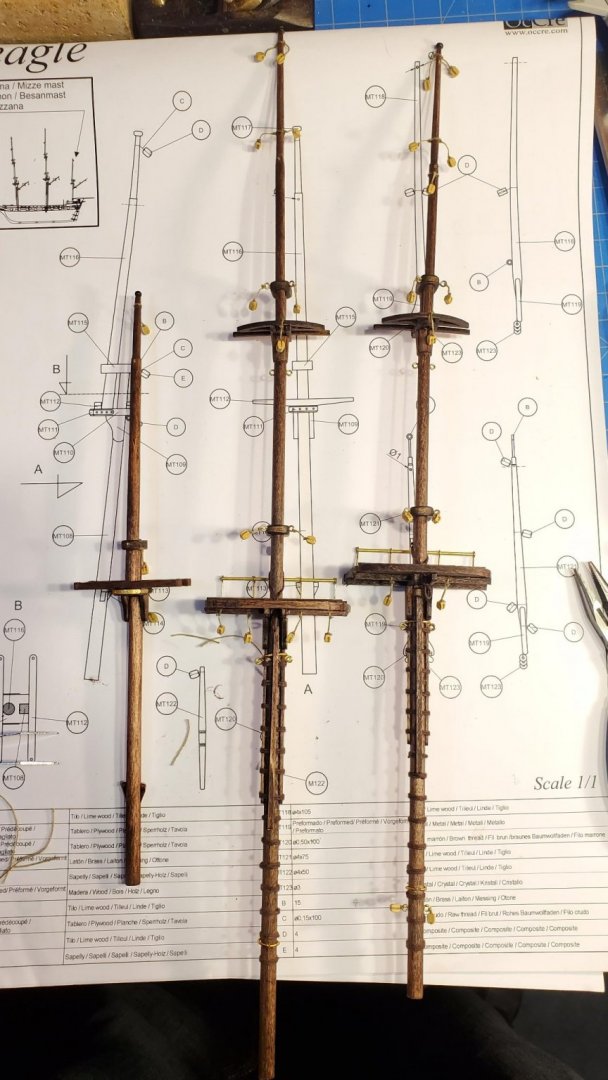
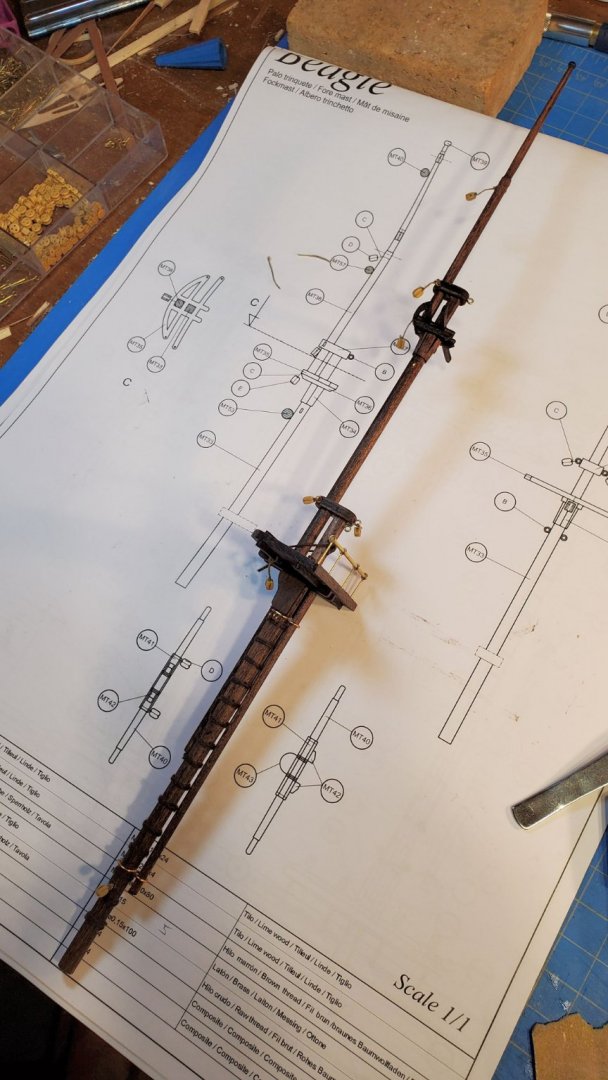
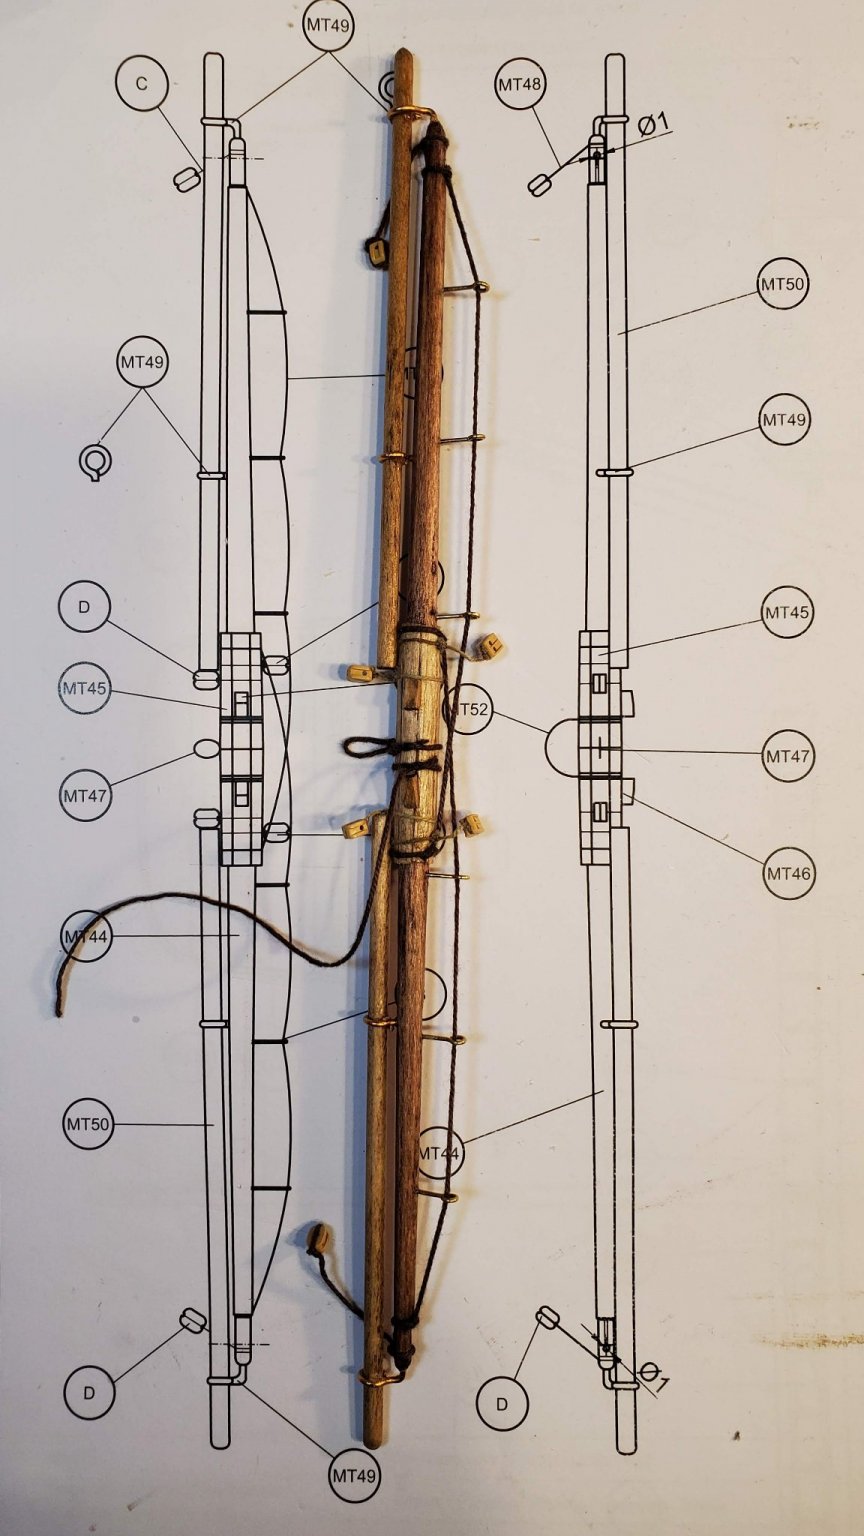
Next started on the yards. I've now completed all the foremast yards.
The first pic below is the mainyard. There is some confusion in the instructions for the outermost blocks. In the two cross section images below on one it is marked as using 0.15mm raw thread (C) and in the other it is marked as 0.5mm brown thread (MT48). Then in the photos in the manual it shows two blocks attached to each end, one with each type of thread. I'm pretty sure there should only be one block and it should be with the thicker brown thread. I can't see any figures in the rigging diagrams that shows more than one line attached to the yard ends.
I made couple of minor mistakes. The footropes I installed taught, but now looking at various ship images I see there should be some slack in them so that they hang down a bit. Then when I installed the yard on the mast I assumed the MT46 parts should be on the side facing the mast to kind of key the yard in place. I assumed it was an error in the instructions where they showed them facing away from the mast. But, after googling some images I see they should face away.
So now I have to decide if I should repeat the errors for the mainmast yards so that it looks uniform, or do it correct for the mainmast and have two slightly different looking masts.
My tip for the day - I highly recommend the Glue Looper V2 http://www.creativedynamicllc.com/the-glue-looper.html with BSI super thin CA glue for sealing each knot in the thread. I put a few drops of the glue in a plastic water bottle top that's tipped up at about 30 degrees so the glue pools to one side. It will sit like that for many hours without drying out. The Glue Looper than makes it very quick, accurate, and mess free to transfer just the right amount of glue to the knot where it soaks in and dries instantly.

-
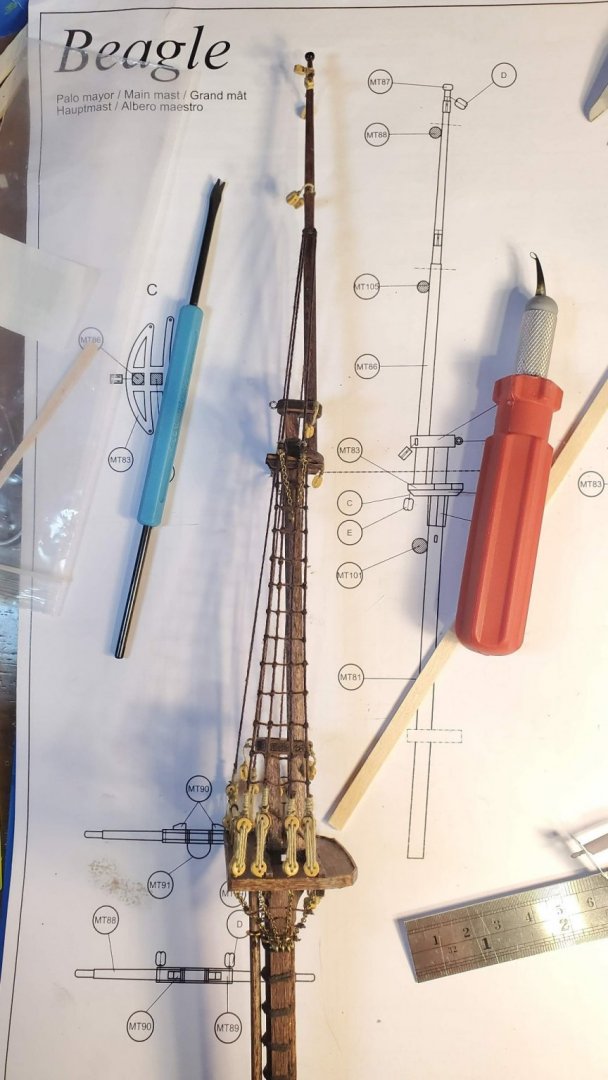
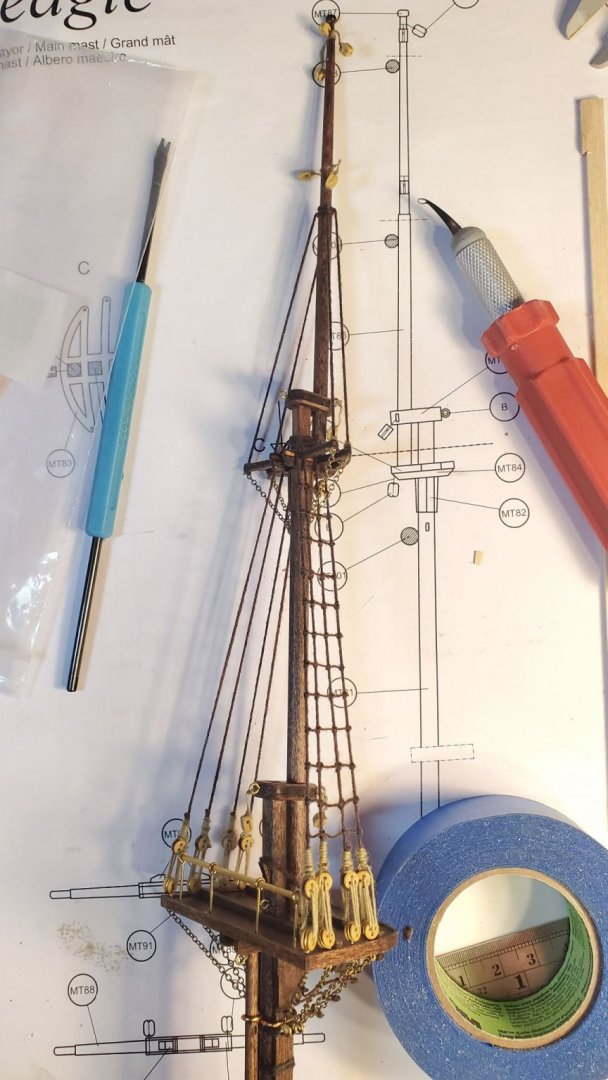
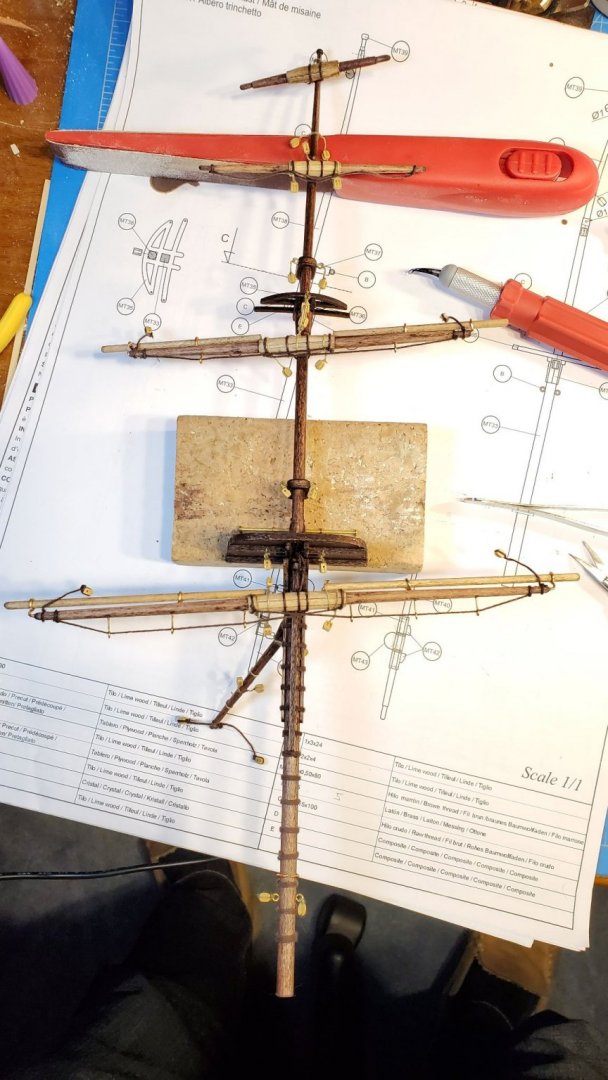
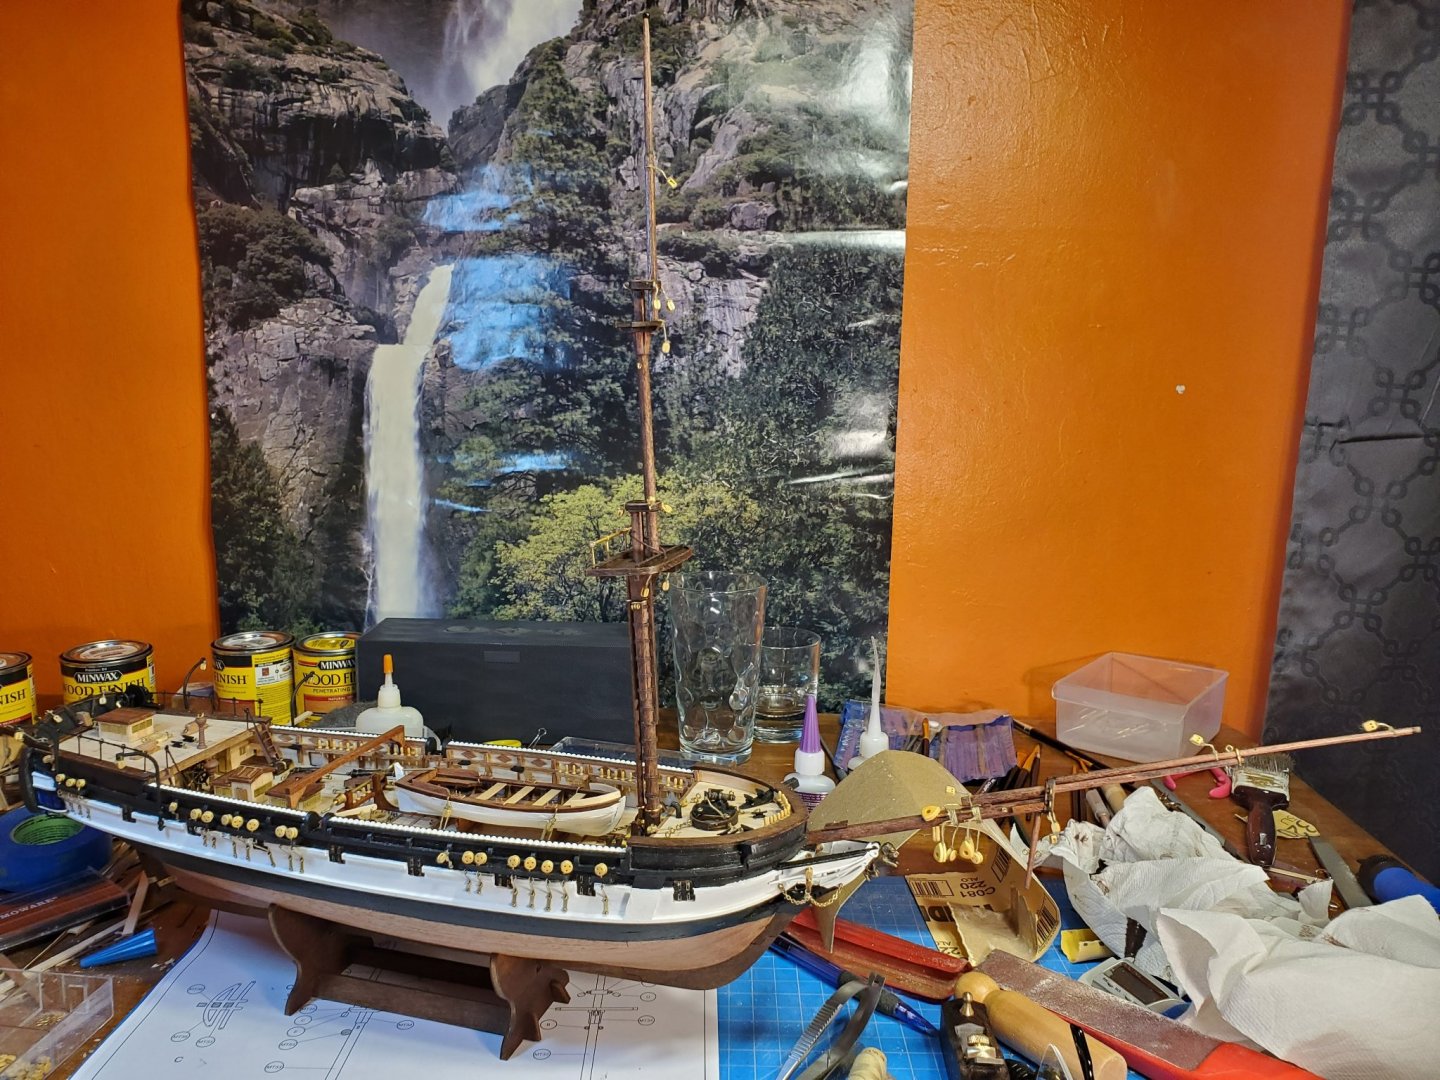
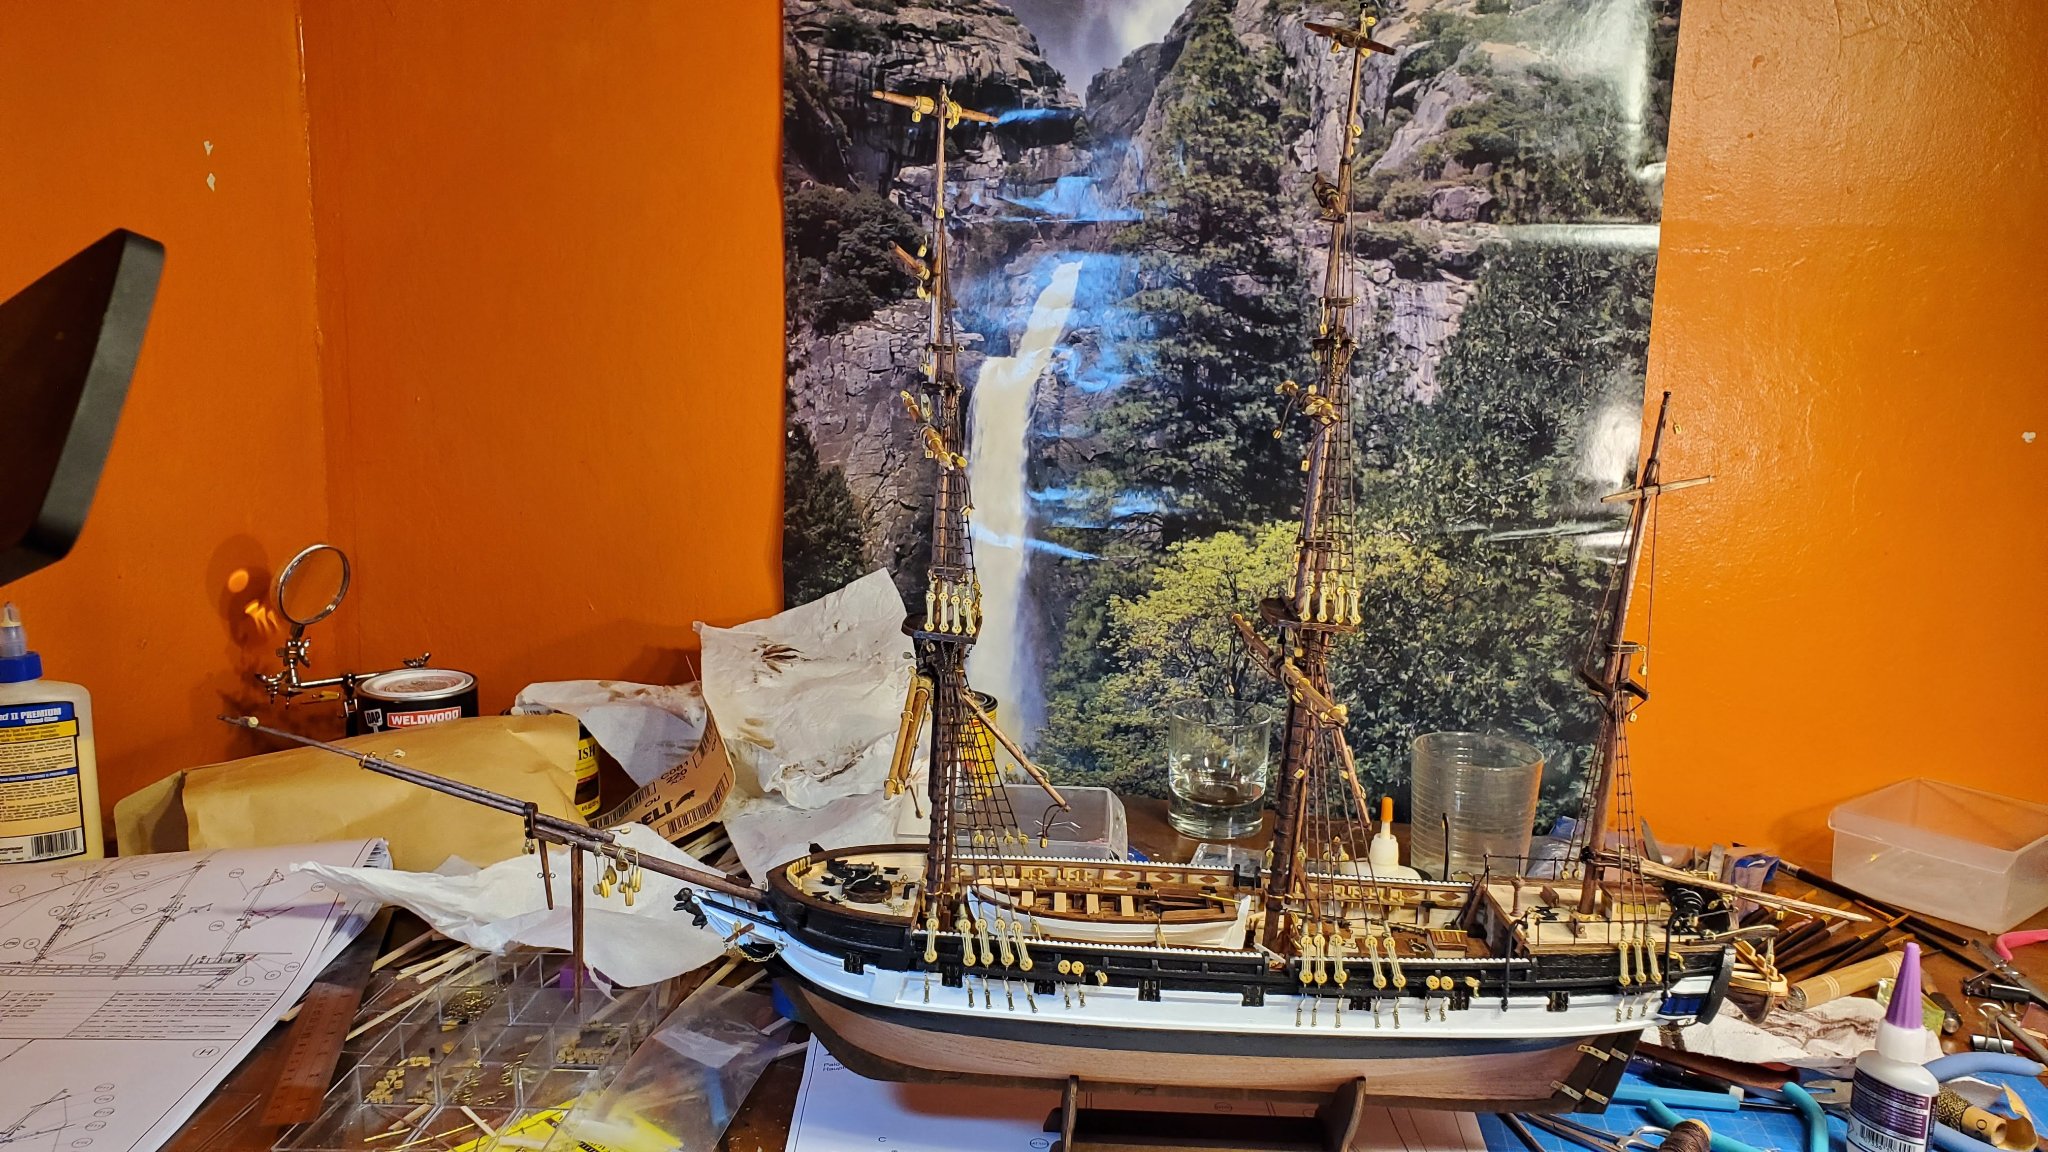
Completed the main and mizzen masts.
One thing I learned later when fitting the yard arms is that the thread should be kept really short for the blocks that suspend the center of the lower two yards on the main and fore masts. I made them too long so ended up folding and CA gluing them to make them shorter.
For the mizzen mast I spent about 10 minutes looking for part mt113. I couldn't figure out what it was. Then I finally realized it is one of the rings like the ones that go around the mast holes in the deck. You just have to cut one in half
-
Completed the foremast. The woolding (ropes wrapped around the lower mast) proved tricky at first. I tried using the method shown in the OcCre video where they just glued the first end to the mast, wrapped it a couple of times, then glued the other end down. But I couldn't get a decent neat look this way and it was fiddly and took a long time for each. Then I looked up in Mastini's Ship Modeling Simplified and used the method he suggests. This worked perfectly and was quick to do once you got the hang of it. Also allows each one to be perfectly adjusted before applying glue. It's the same technique suggested in the first few replies for this thread: https://modelshipworld.com/topic/1488-how-to-rope-masts/
Dry fitted it to the ship. I had to ream out the mast hole by hand turning a 1/4" wood drill to get the mast to insert. You can also see here I replaced the two dead blocks with deadeyes on the bowsprit as mentioned in my last post.
-
3 hours ago, Pete D said:
I found the same . I always seem to keep all the offcuts of the timber , pins etc . so I fashioned the eyebolts out of whatever I could . For reference I have shown an original eyebolt and pin , and then eyebolts that were made from the pin as well as a bit of offcut of a short eyebolt . Will require a pair of round nosed pliers . Hope this helps
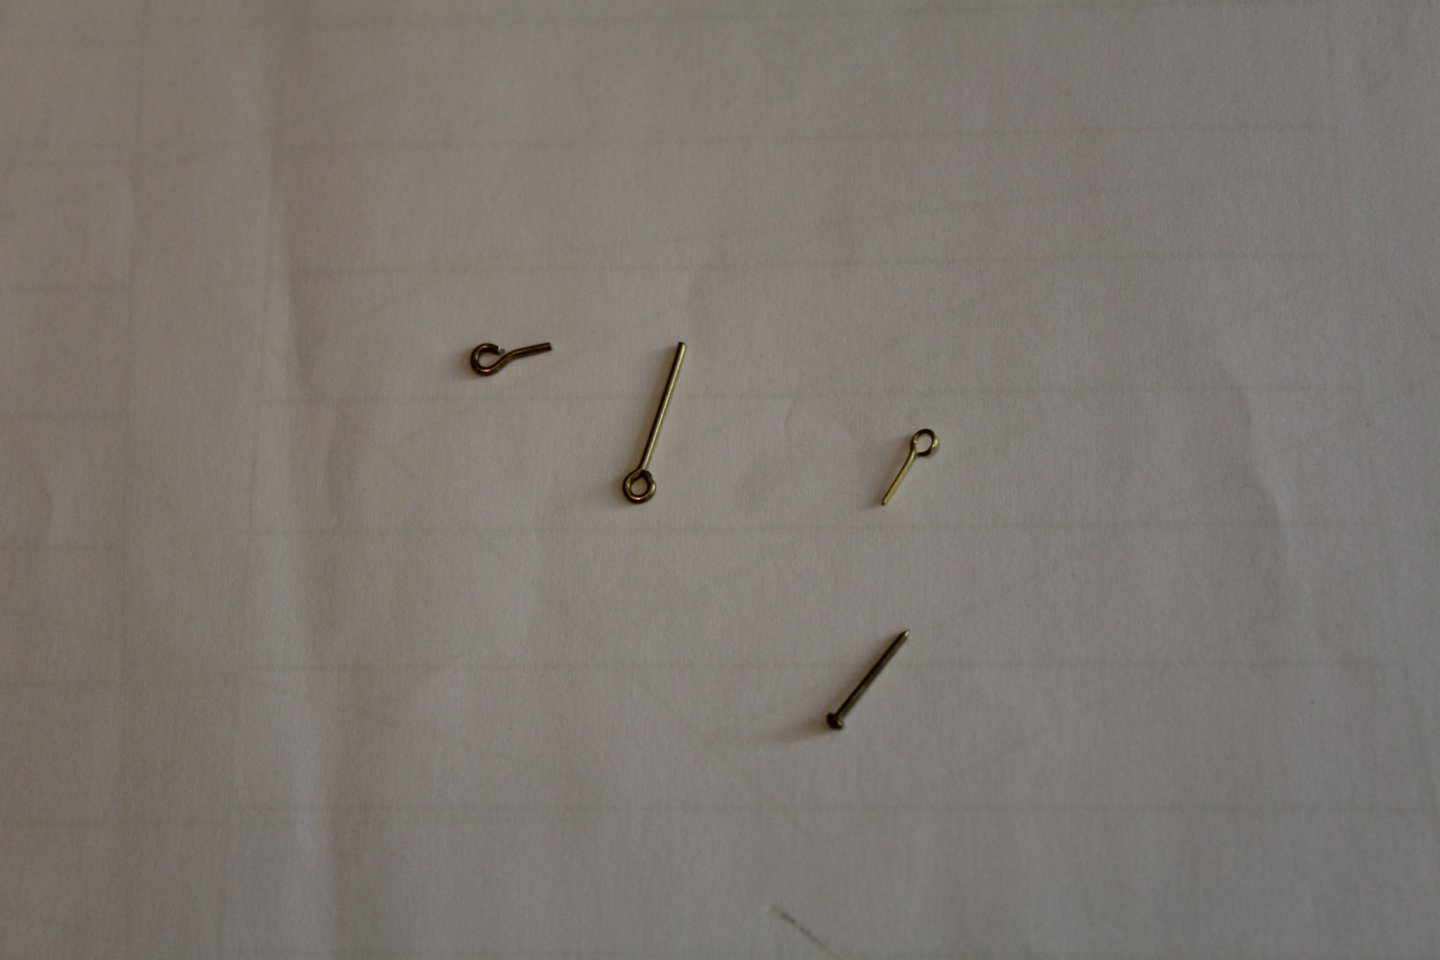
I did the same when I thought I was only short on 10. Then I remembered there were also a bunch that have to be added in the side of the ship, plus the ones I need to fit the anchors. I like things to be perfect so in the end decided to get some manufactured ones.
I also seem to be short of the 1mm x 3mm limewood planks which need to be used for the central sheath around each yardarm. But I do have quite a lot extra 1mm x 5mm limewood which only seems to be used for the mast cheeks, so about 10" total. But I have 3 x 24 inch lengths of the stuff. So I'm going to split it down the middle and use them.
On the plus side, I do have enough of the 2x5 first planking wood left over to pretty much build a second boat, 32 x 24" lengths!
-
I found mistake in the manual for the manual for the bowsprit. In the photographs it clearly shows 8 dead blocks (the large teardrop shaped blocks) attached:
But in the plans it shows the lower two should be deadeyes:
The plans are correct. Unfortunately I was looking at the photo when doing this step so I'm going to have to cut off two of the dead blocks and replace them.
Another shortage I'm having is the jackstay eyebolts. I noticed I was getting a bit low so counted how many were left in the build. I'm about 30 short. I haven't wasted any. I even reused the heads of the ones where you cut the head off (e.g. on some of the boats). So another Amazon order...
-
Skipped the anchors for now until I get the missing chain. So today I moved on to building and fitting the bowsprit.
Decided to go with the red mahogany stain for the masts. I did a test on the dowel wood with the red chestnut and it came out a bit pink for my liking.
It was definitely a bit nerve racking drilling a giant hole in the front of my ship.
Now starting to get a real sense of just how big the finished ship will be.

-
-
3 hours ago, Maliba1025 said:
@LucienL I have a question I just downloaded the anatomy of the ship for the Beagle and I was looking through the diagrams and the OcCre instructions aren't the same as the book.
Should I be switching the the 5 slot and the two slot to make it correct? Or is the OcCre correct?
As I mentioned in my log a few days ago, the 5 slot wale is in the correct place but is incorrectly installed upside down in the instructions. It looks like you have swapped the places of the two and five slot wales. I'd say it's too late to change it now, breaking it apart and re-doing will probably make more of a mess of things than it's worth.
-
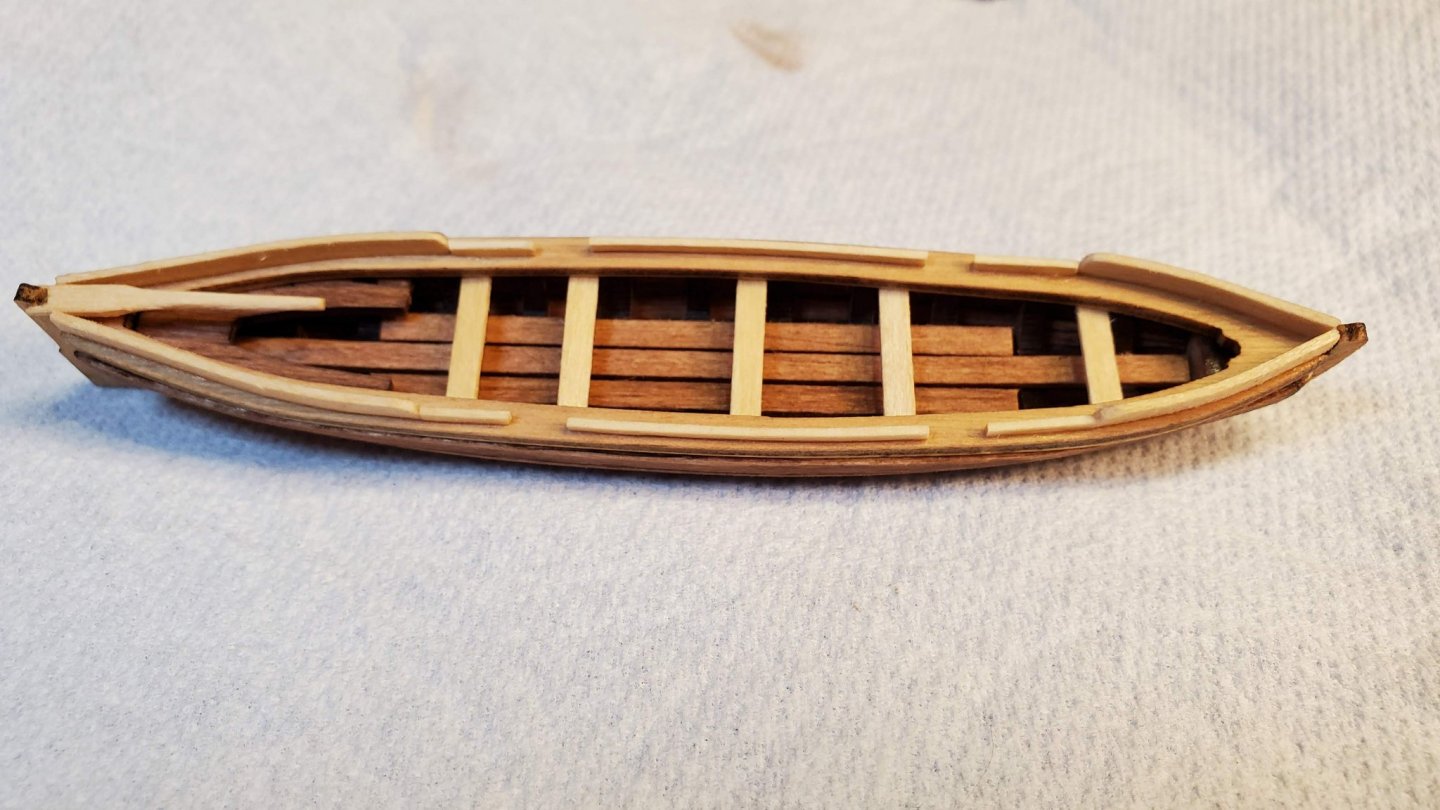
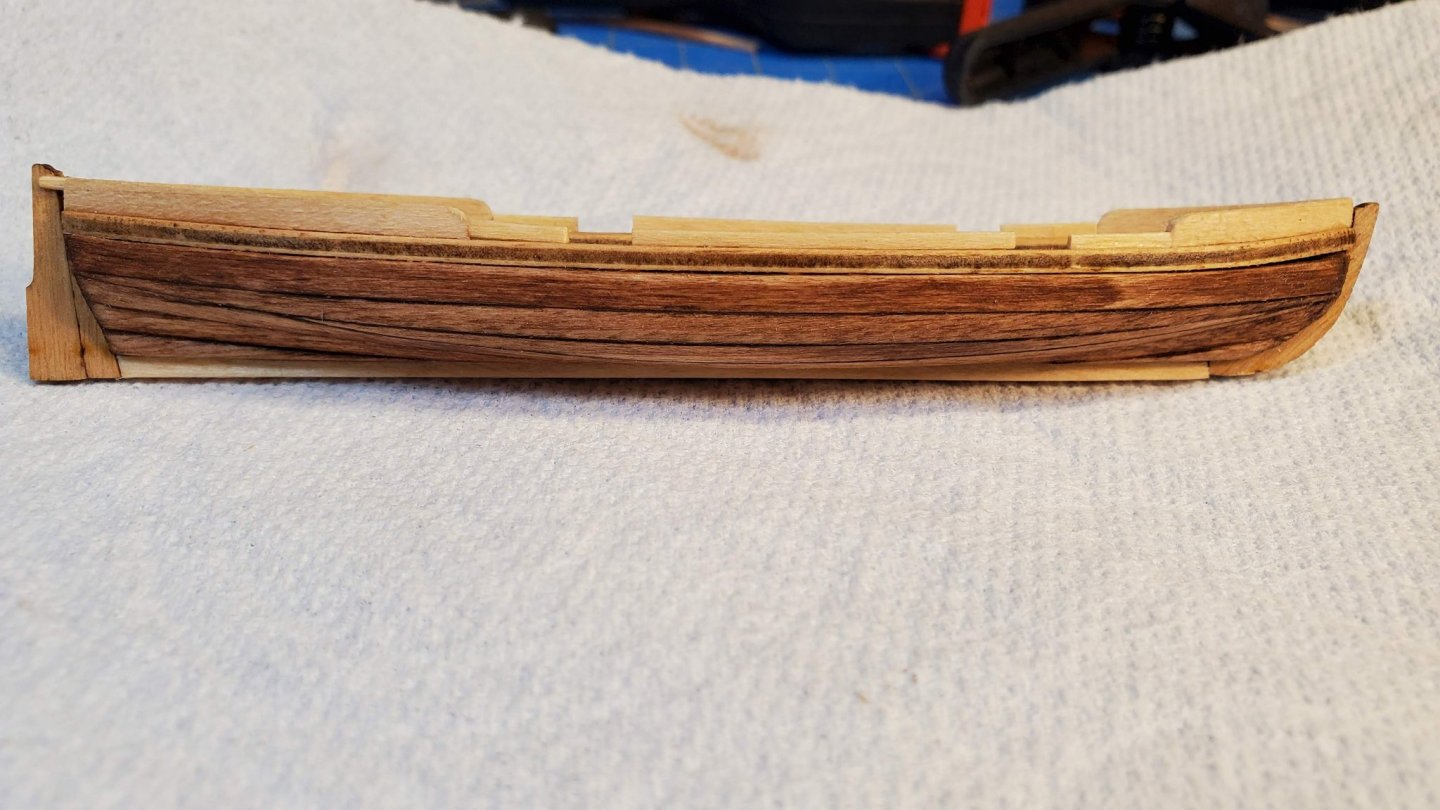
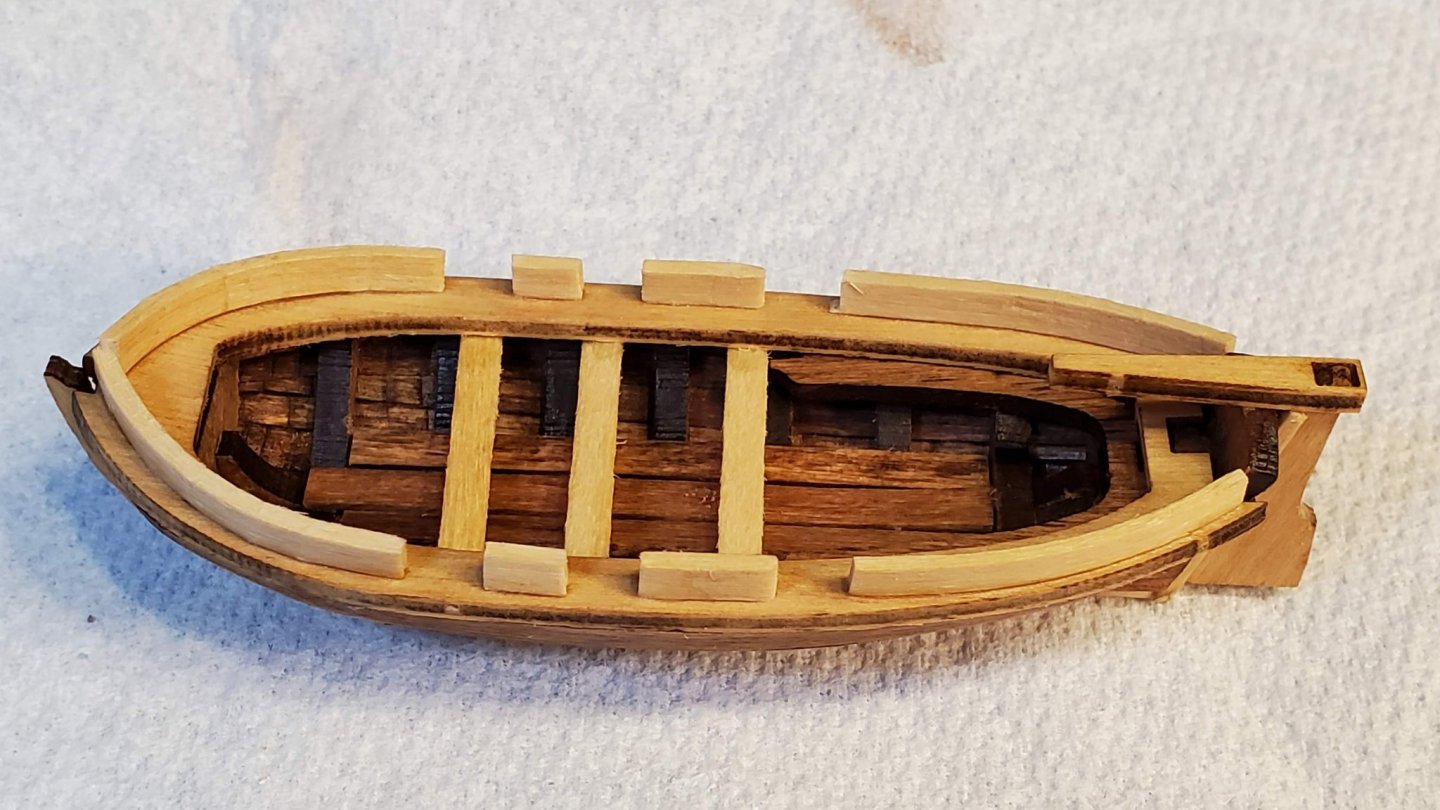
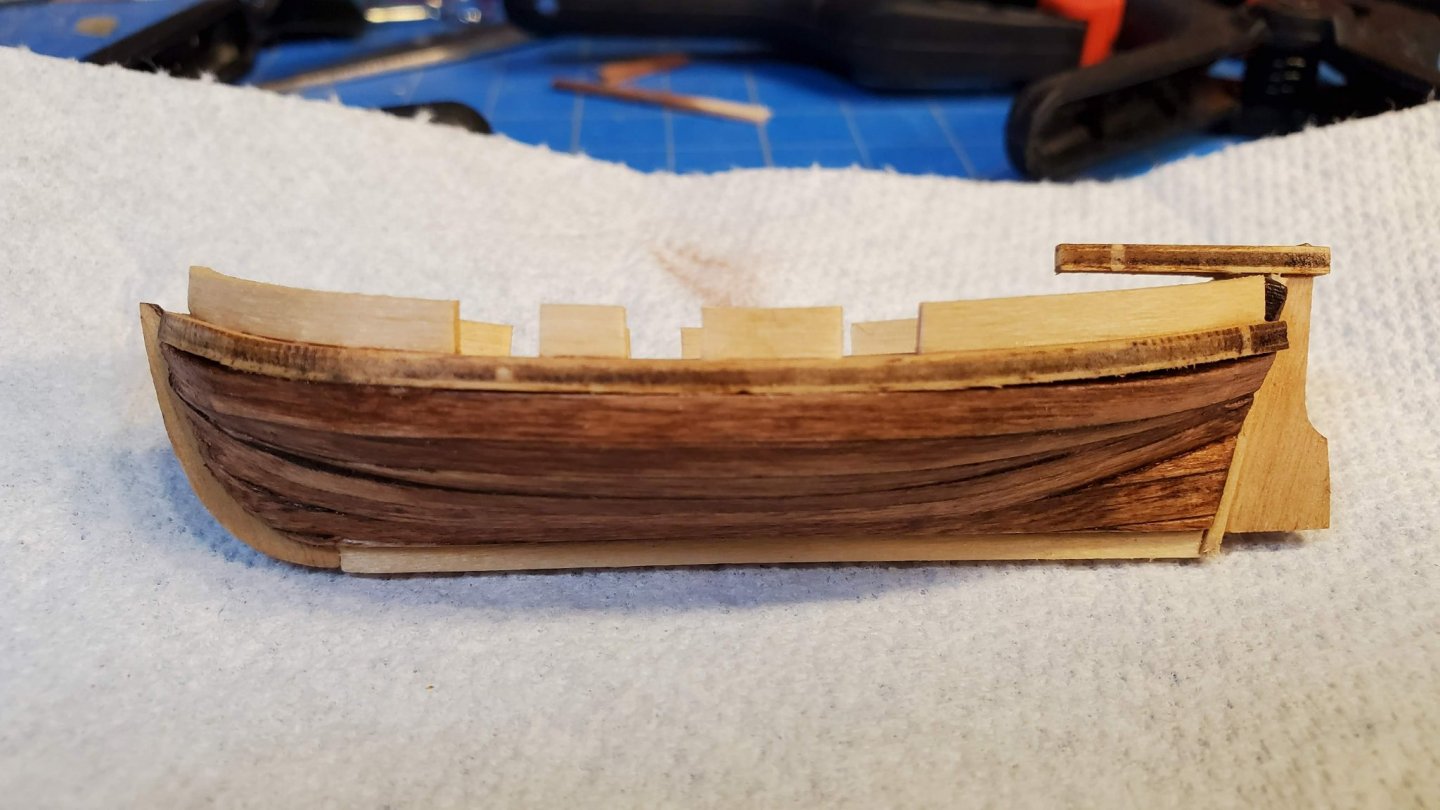
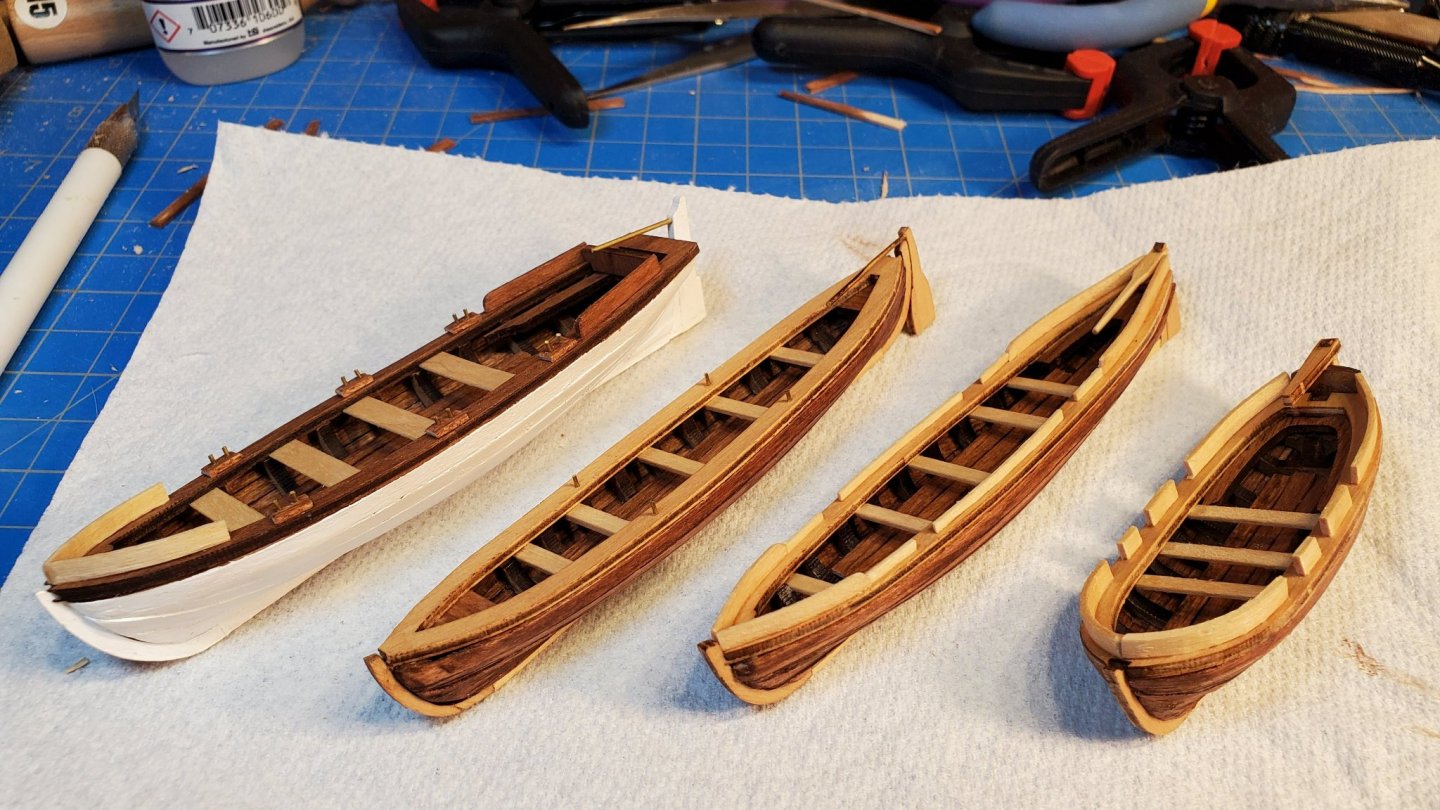
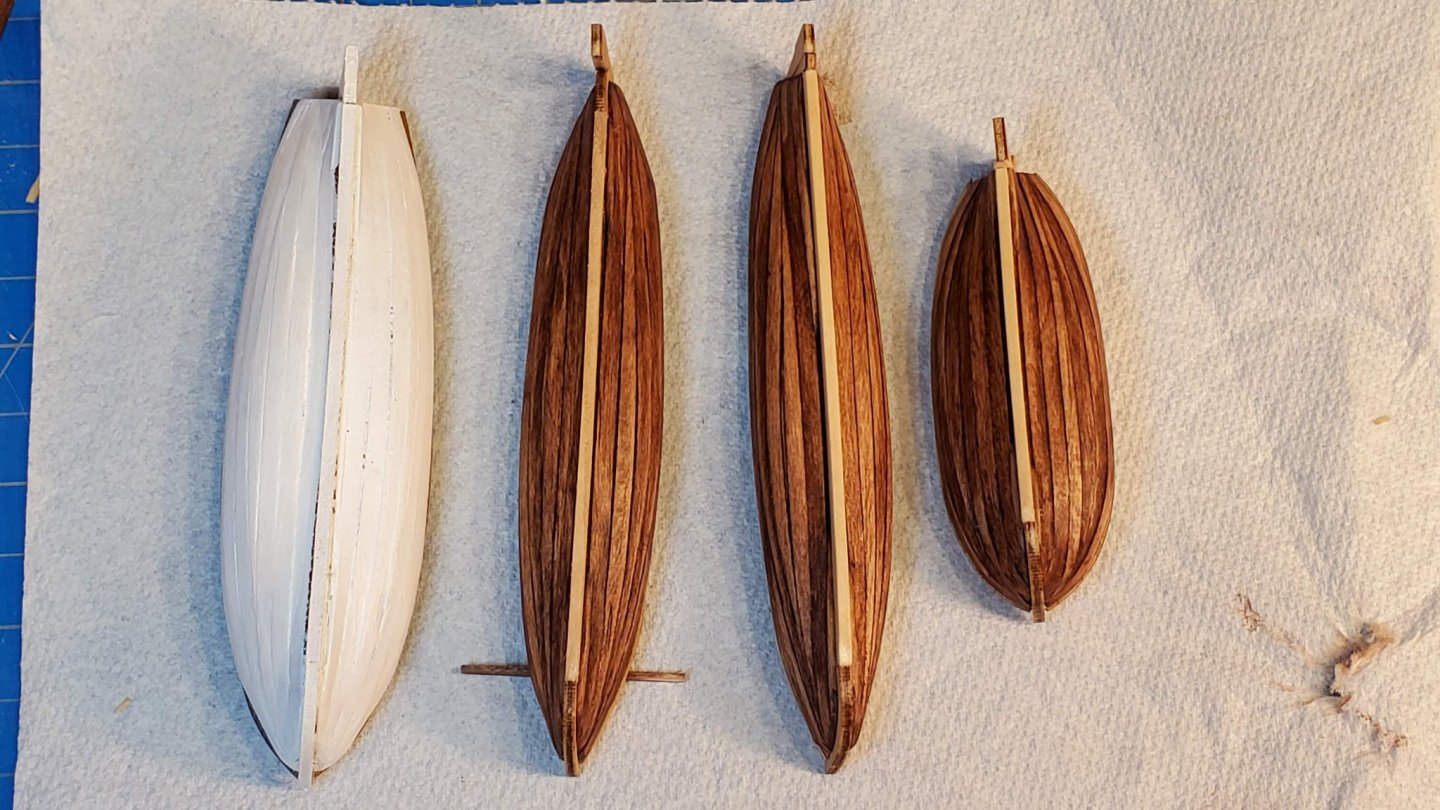
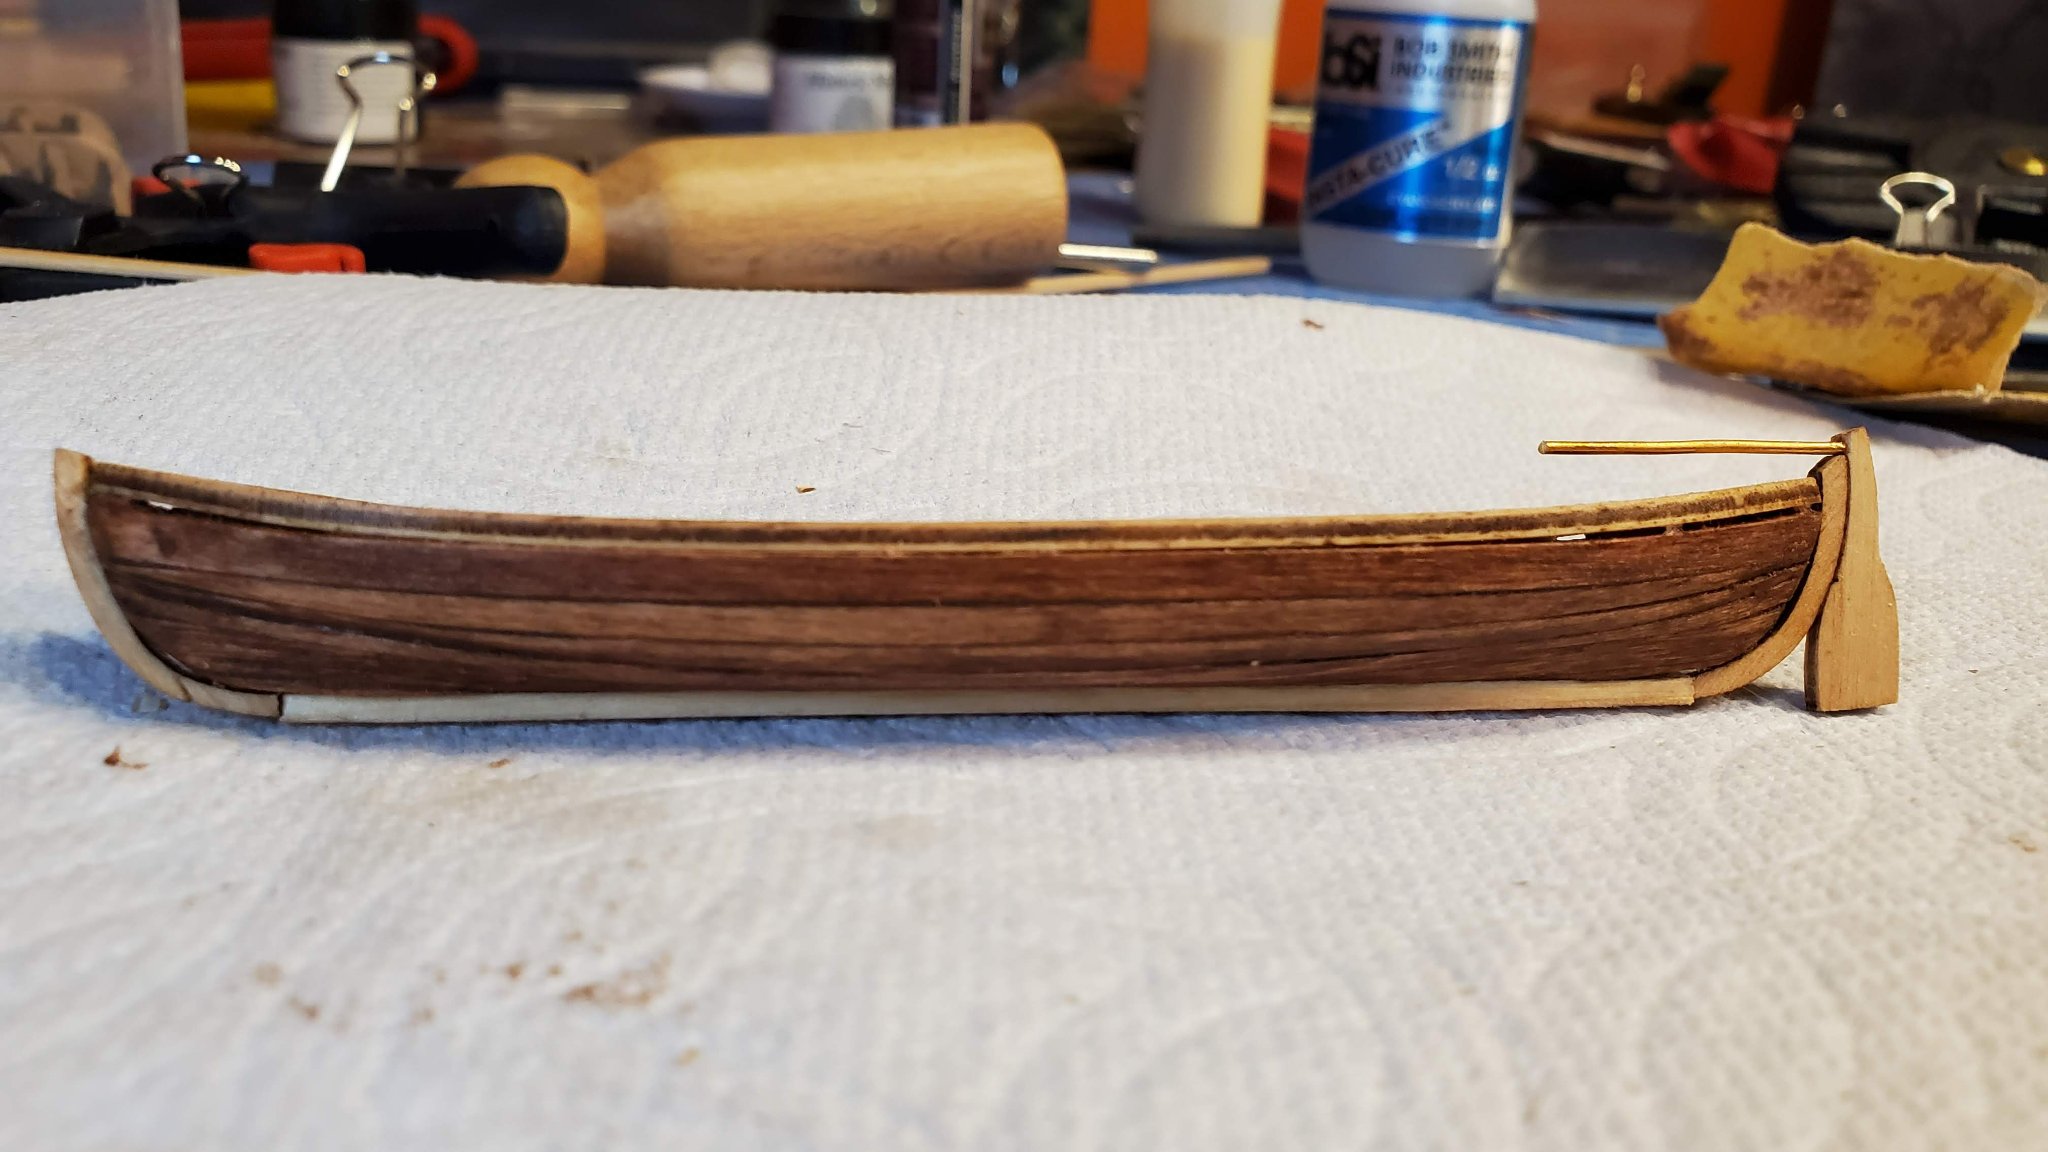
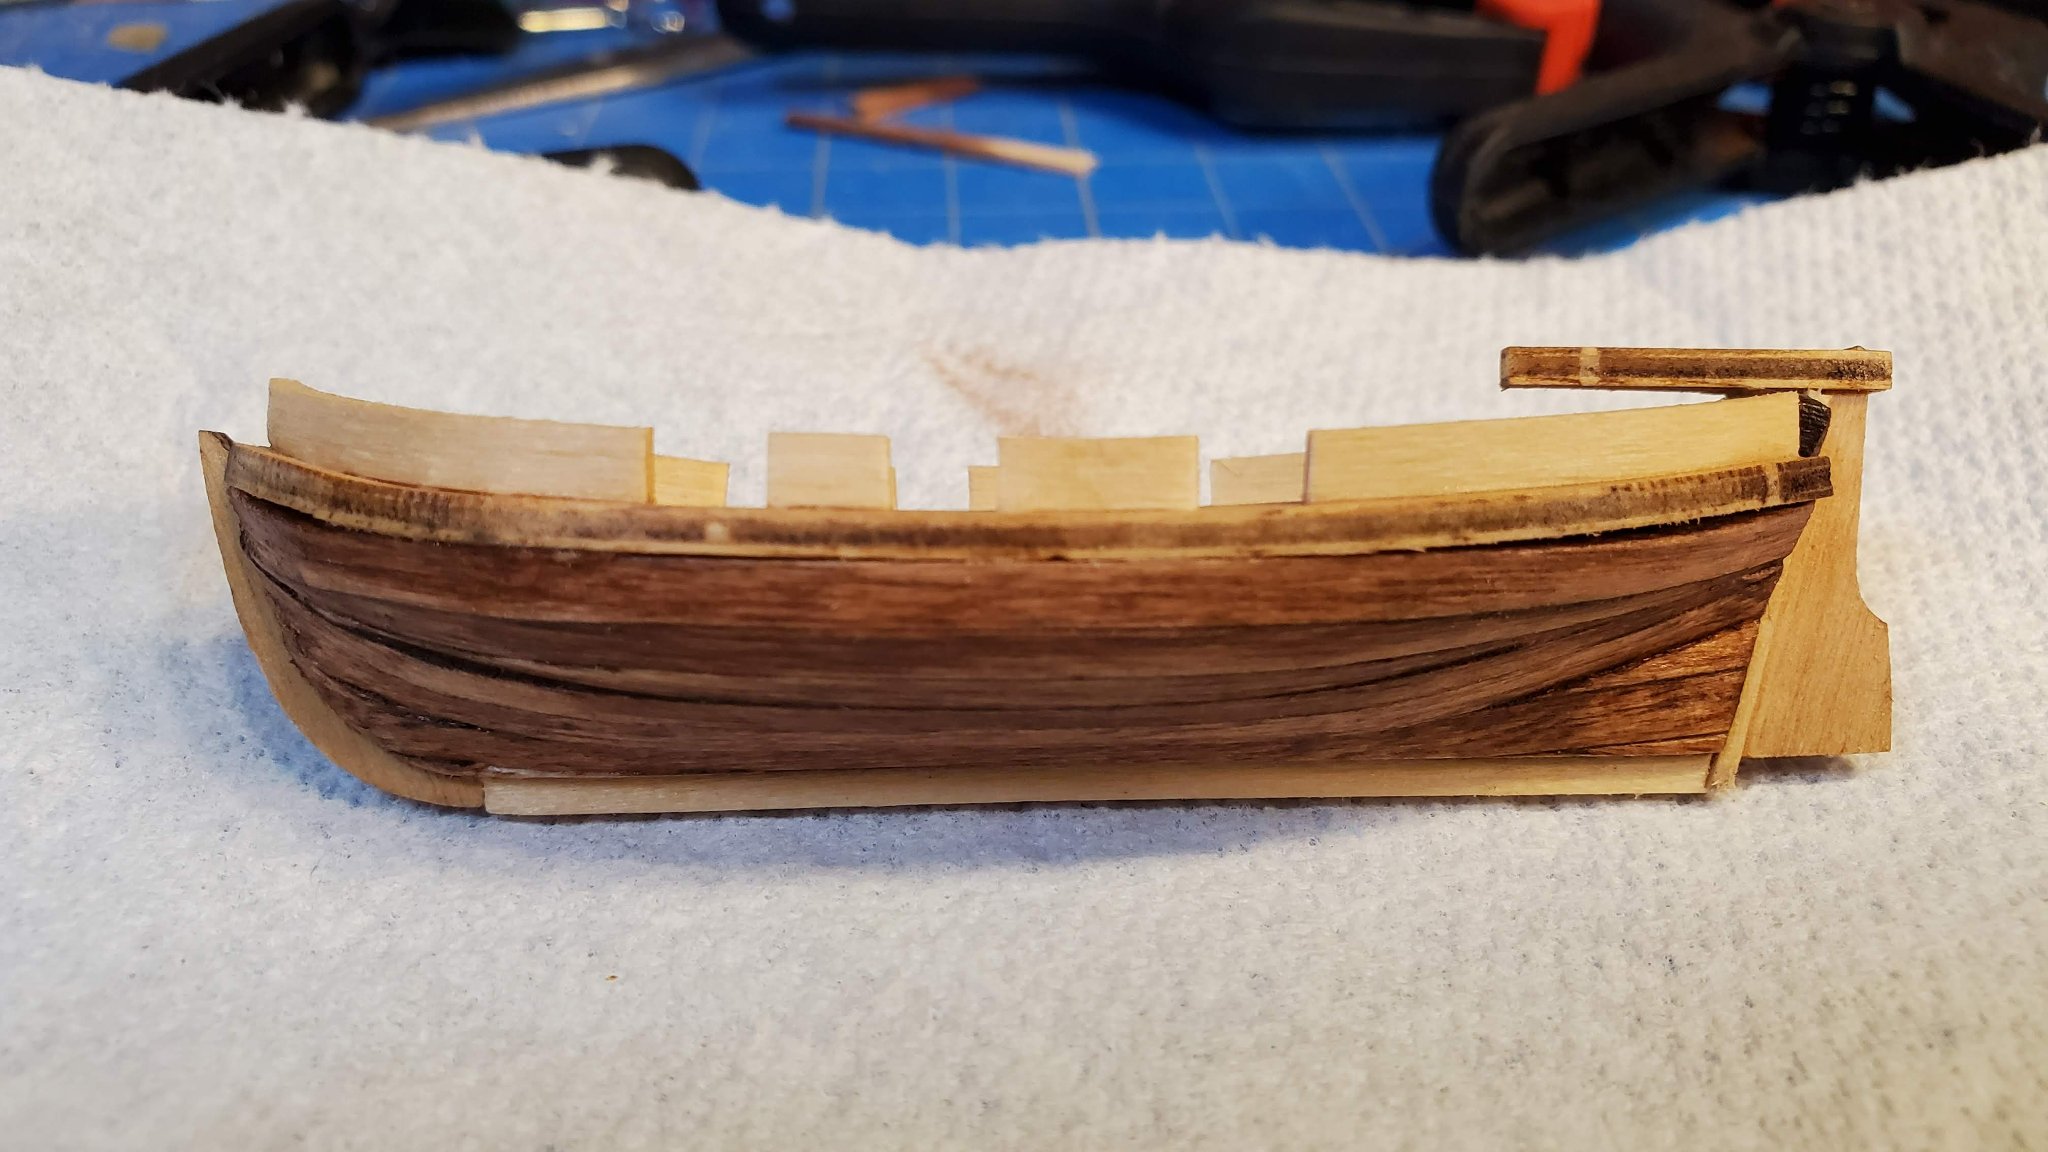
So had a few marathon sessions over the past few days and managed to complete the four boats. I'd say each of these was 4 to 6 hours work. I thought the planking looked good as it is so didn't go for the sapelli second planking option that I was considering earlier.
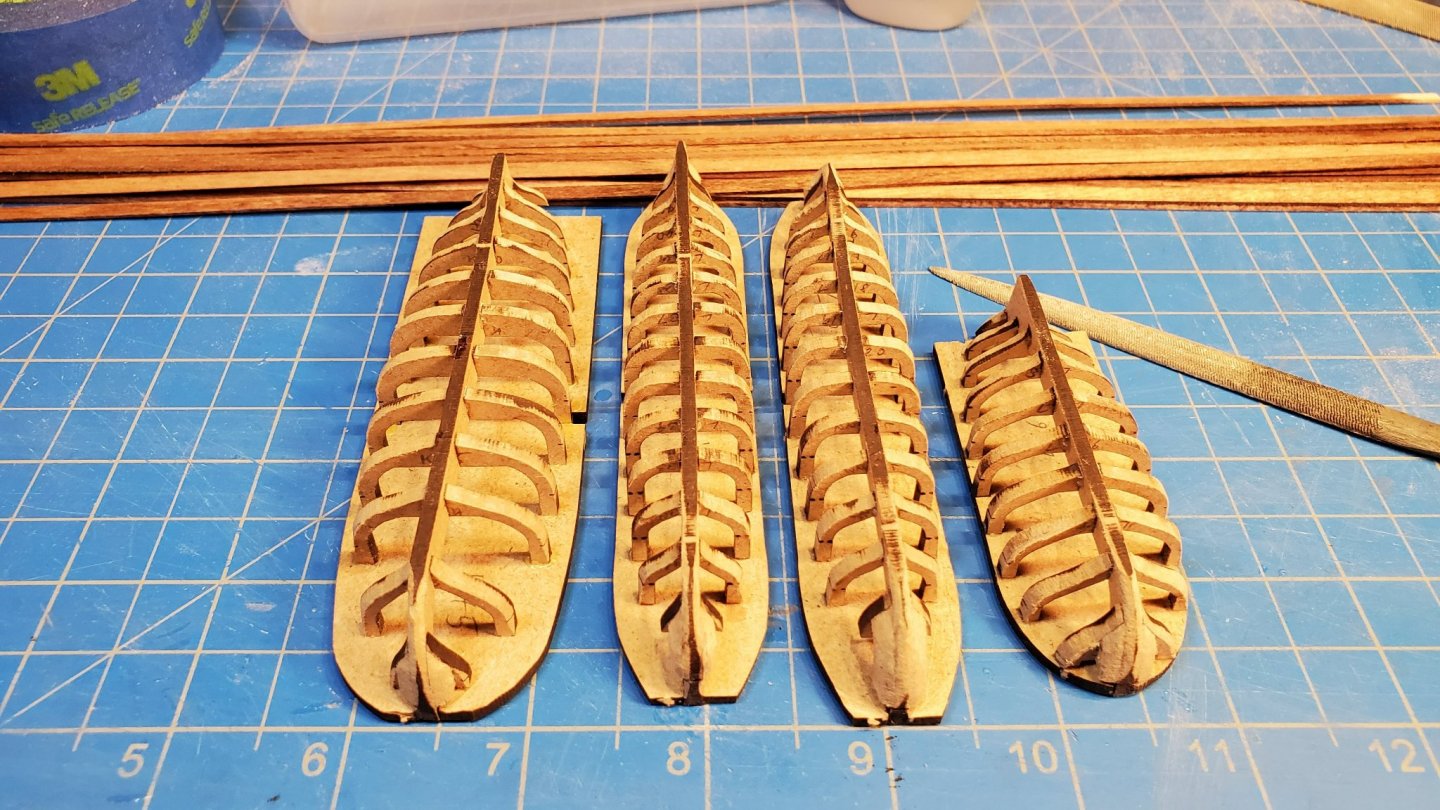
The tiller on this one was my very last bit of 1mm brass wire.
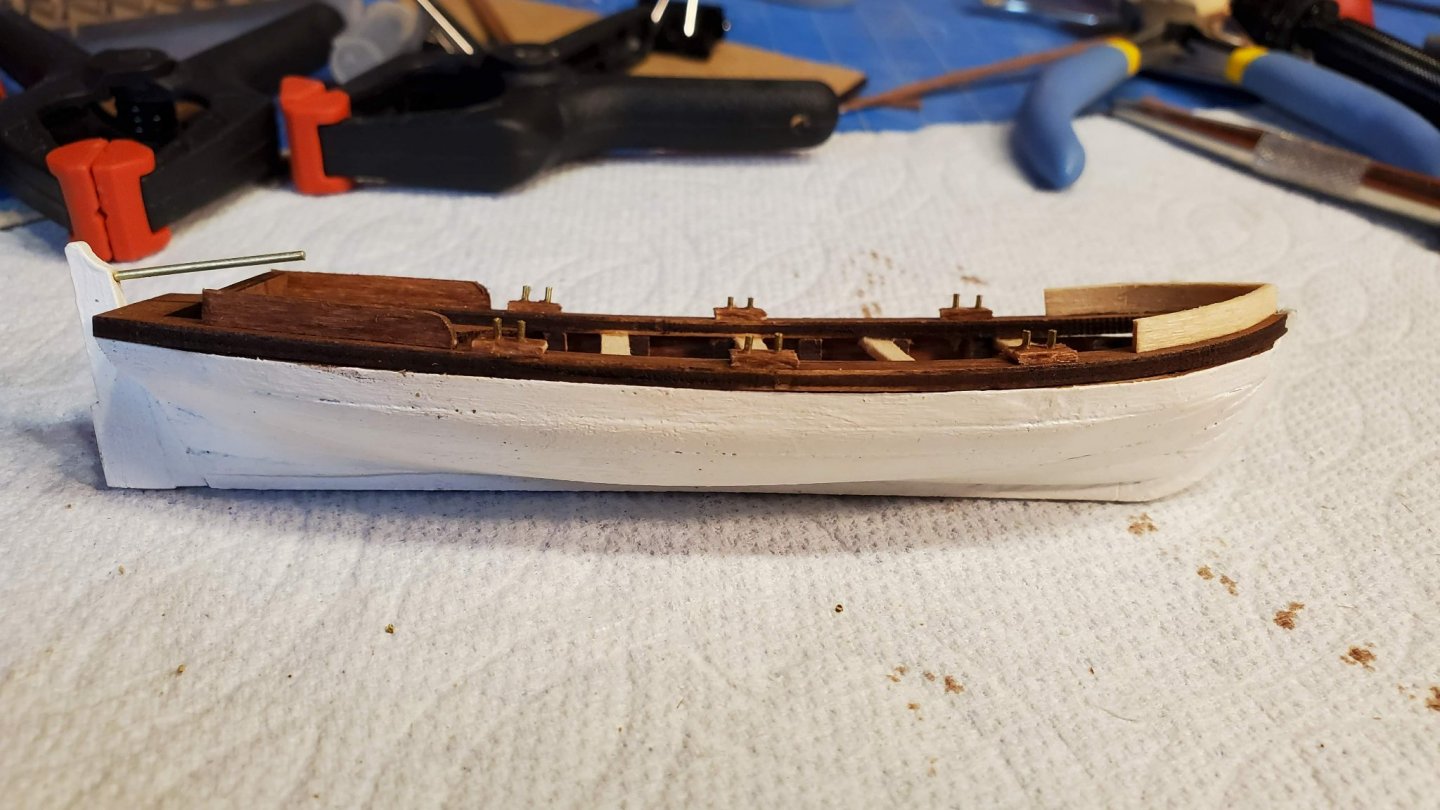
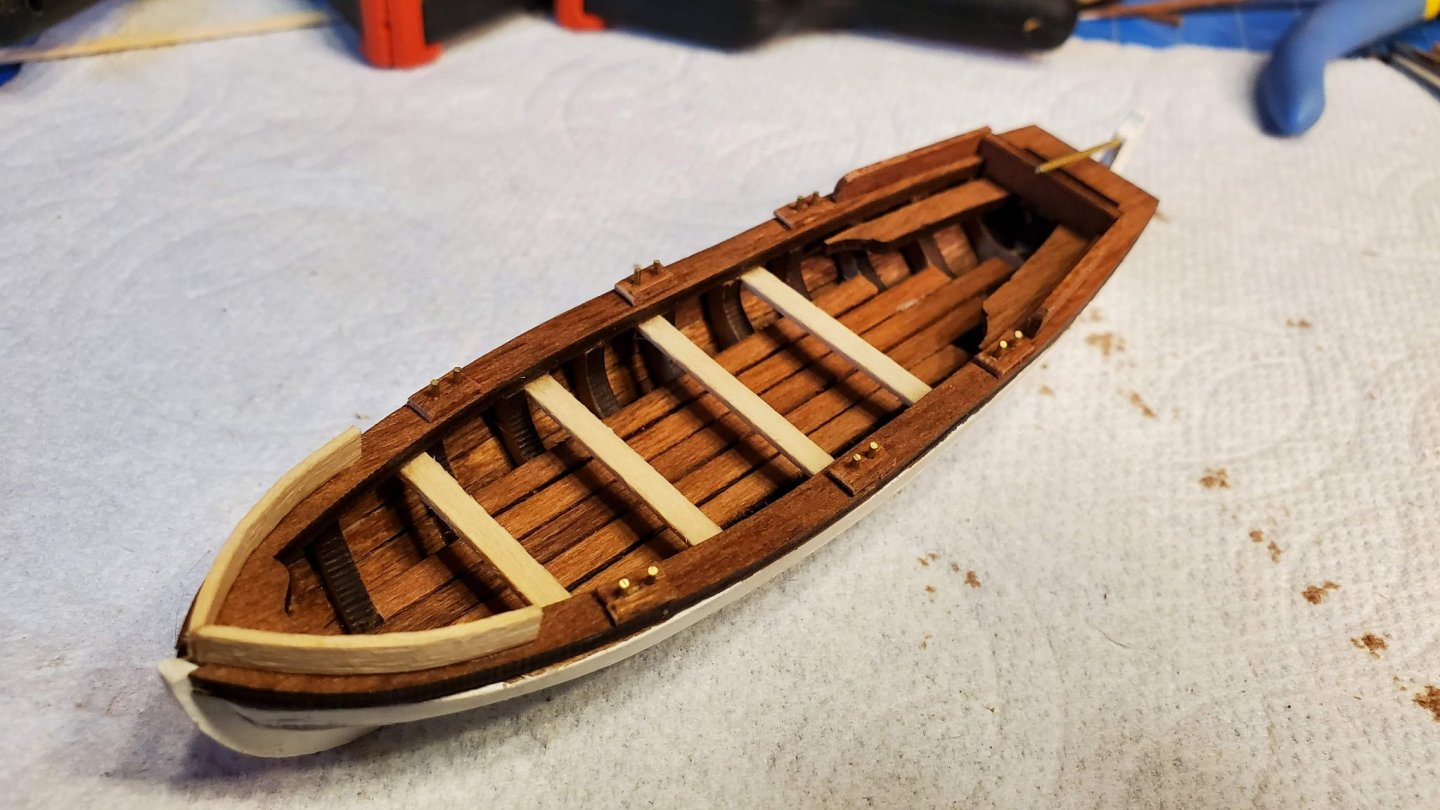
I later added some of the sycamore veneer to the benches on this boat which you can see in the next pic. It makes the benches a bit wider with a better finish.
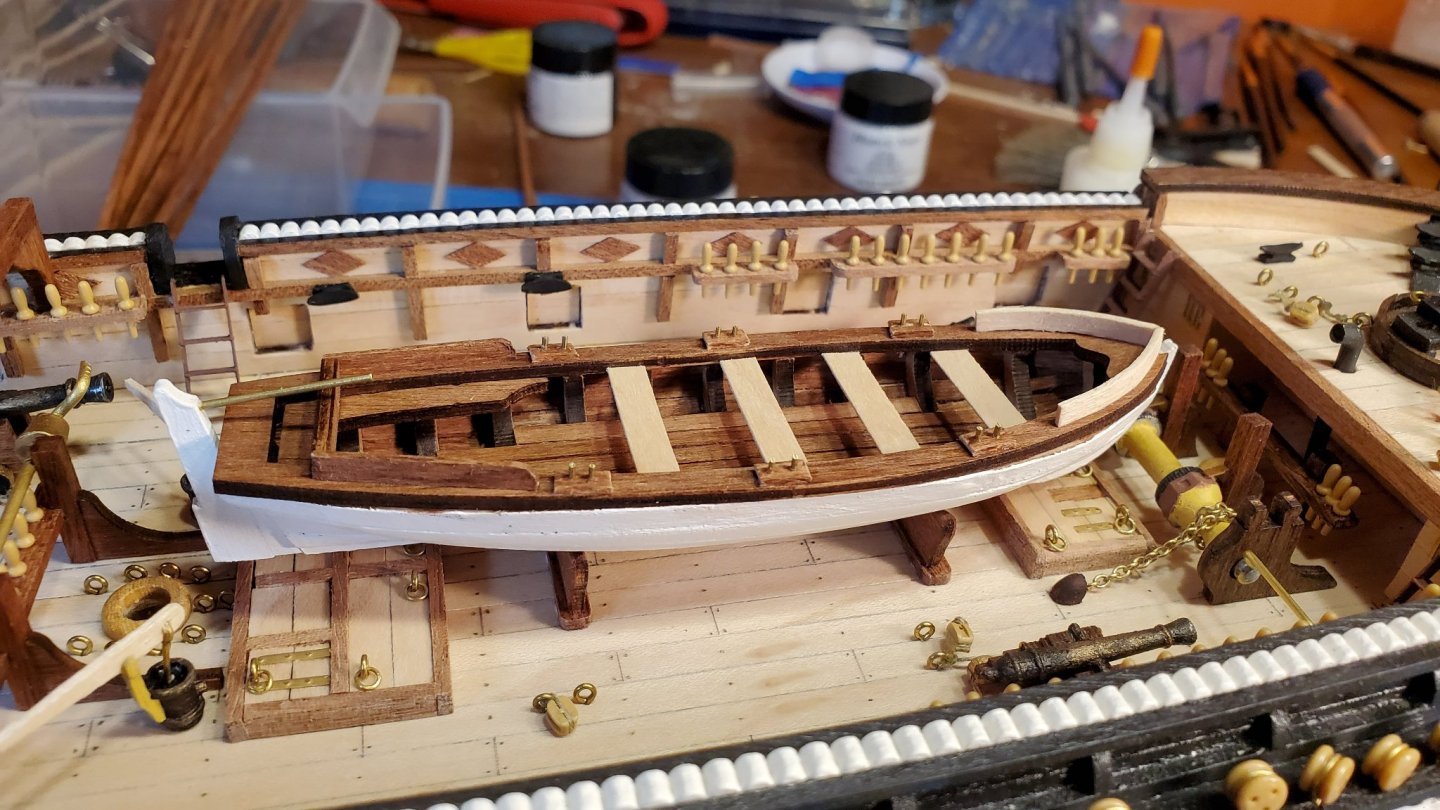
The next boat is missing the brass pins (which I assume are supposed to be oar pivots). I noticed the omission after I took the pic and added them, you can see them in a later pic. Also the tiller on this one is the replacement 1mm jewelry wire I got from Amazon. It is more of a bronze color than the yellow of the supplied brass, and is also very shiny, but I think it will work fine.
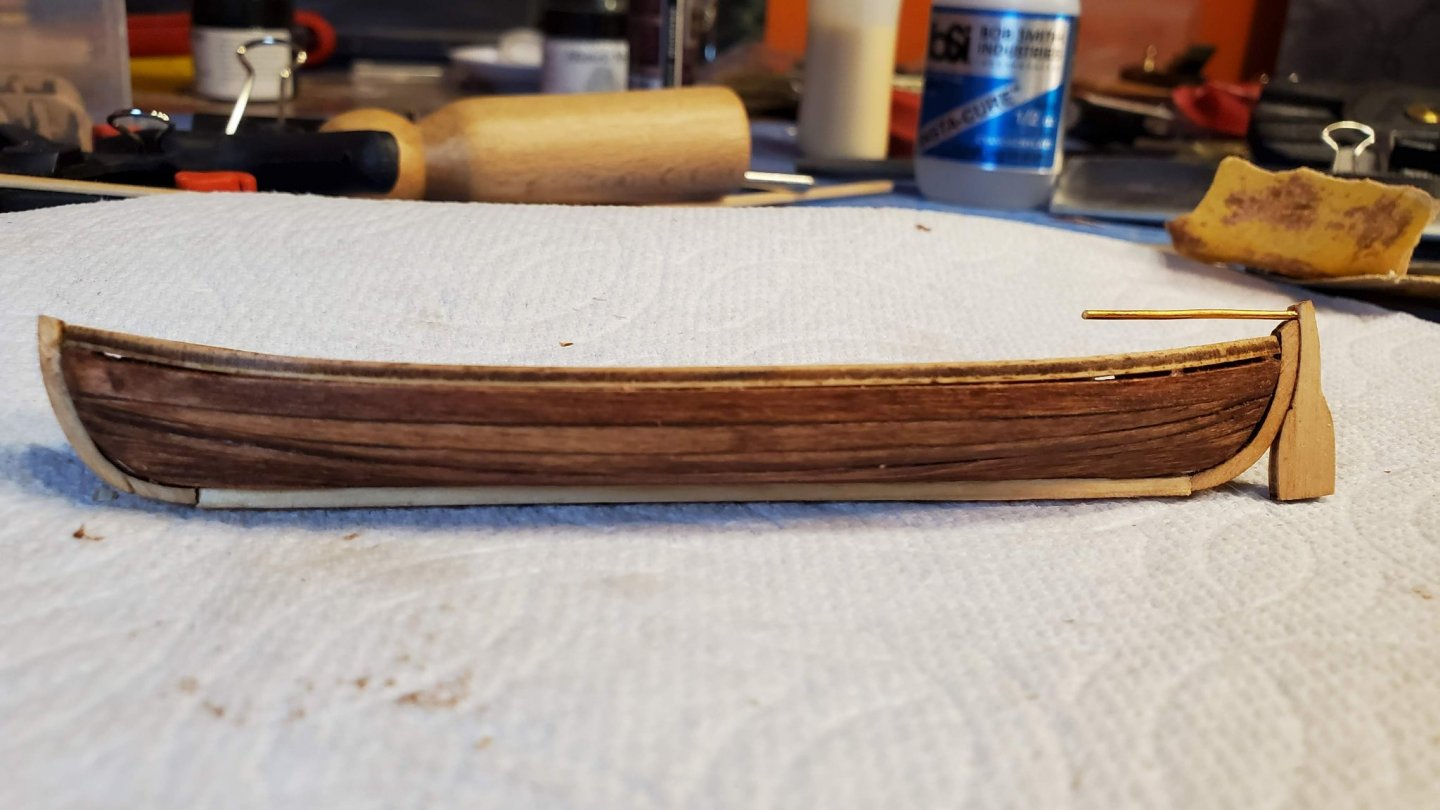
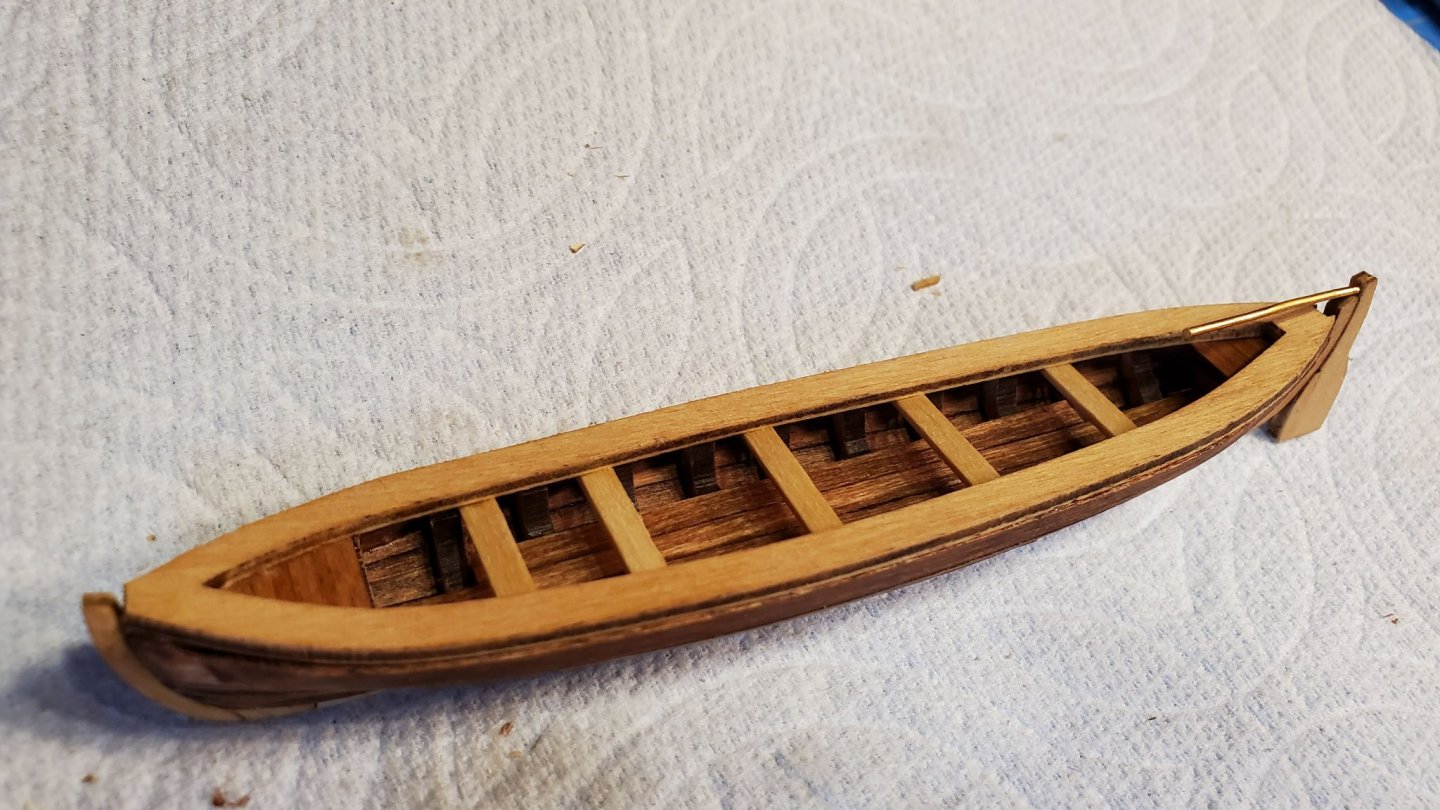
The tiller on this one has to be carved out of a piece of 1x3.
-
That copper plating looks awesome! You did a great job!
-
-
Thanks for detailing your process. I'm definitely going to use this as a guide when doing mine.
-
Good rescue on throwing out the originals! If you haven't glued the gun ports in yet you might want to rotate them 90 deg. The hinges should be vertical.
- Cathead, Pete D, Keith Black and 1 other
-
4
-
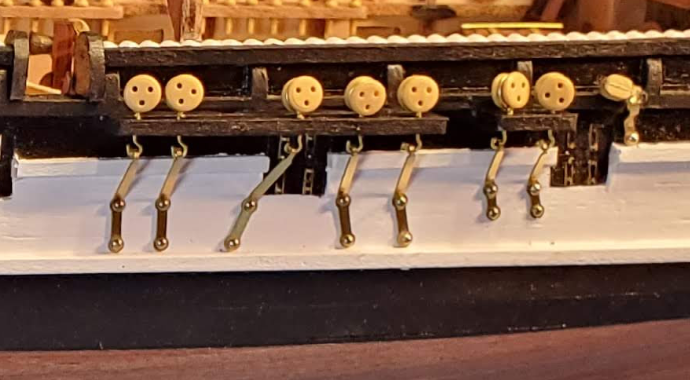
One final thought for the day. I think the guy that created the model for the instructions messed up when installing part H20. I believe it is installed upside down which is why you end up with the odd splaying of the chains around the gun port. So I believe the group of three deadeyes should be fore of the gun port and the group of two should be aft, with the gap being inline with the gun port. It's too late for me to fix on mine but if I were to build again I would definitely correct this.


HMS Beagle by Pete D - FINISHED - OcCre - 1:60 Scale
in - Kit build logs for subjects built from 1801 - 1850
Posted
Looking great! I'll be getting on to the sails soon so I'm following your progress and suggestions very closely.
It's strange you've had so much problems with your 0.15mm thread - I've had no problems with any of mine breaking and I've got it rigged pretty tight. Not one single breakage. Maybe your kit had a bad batch.