Will Ferris
-
Posts
44 -
Joined
-
Last visited
Content Type
Profiles
Forums
Gallery
Events
Everything posted by Will Ferris
-
 Ted, I'm doing the same kit now and would love to know how you finished your deck planking. Did you simulate nails with a pencil? Your cannons - Brass blackener?
 -
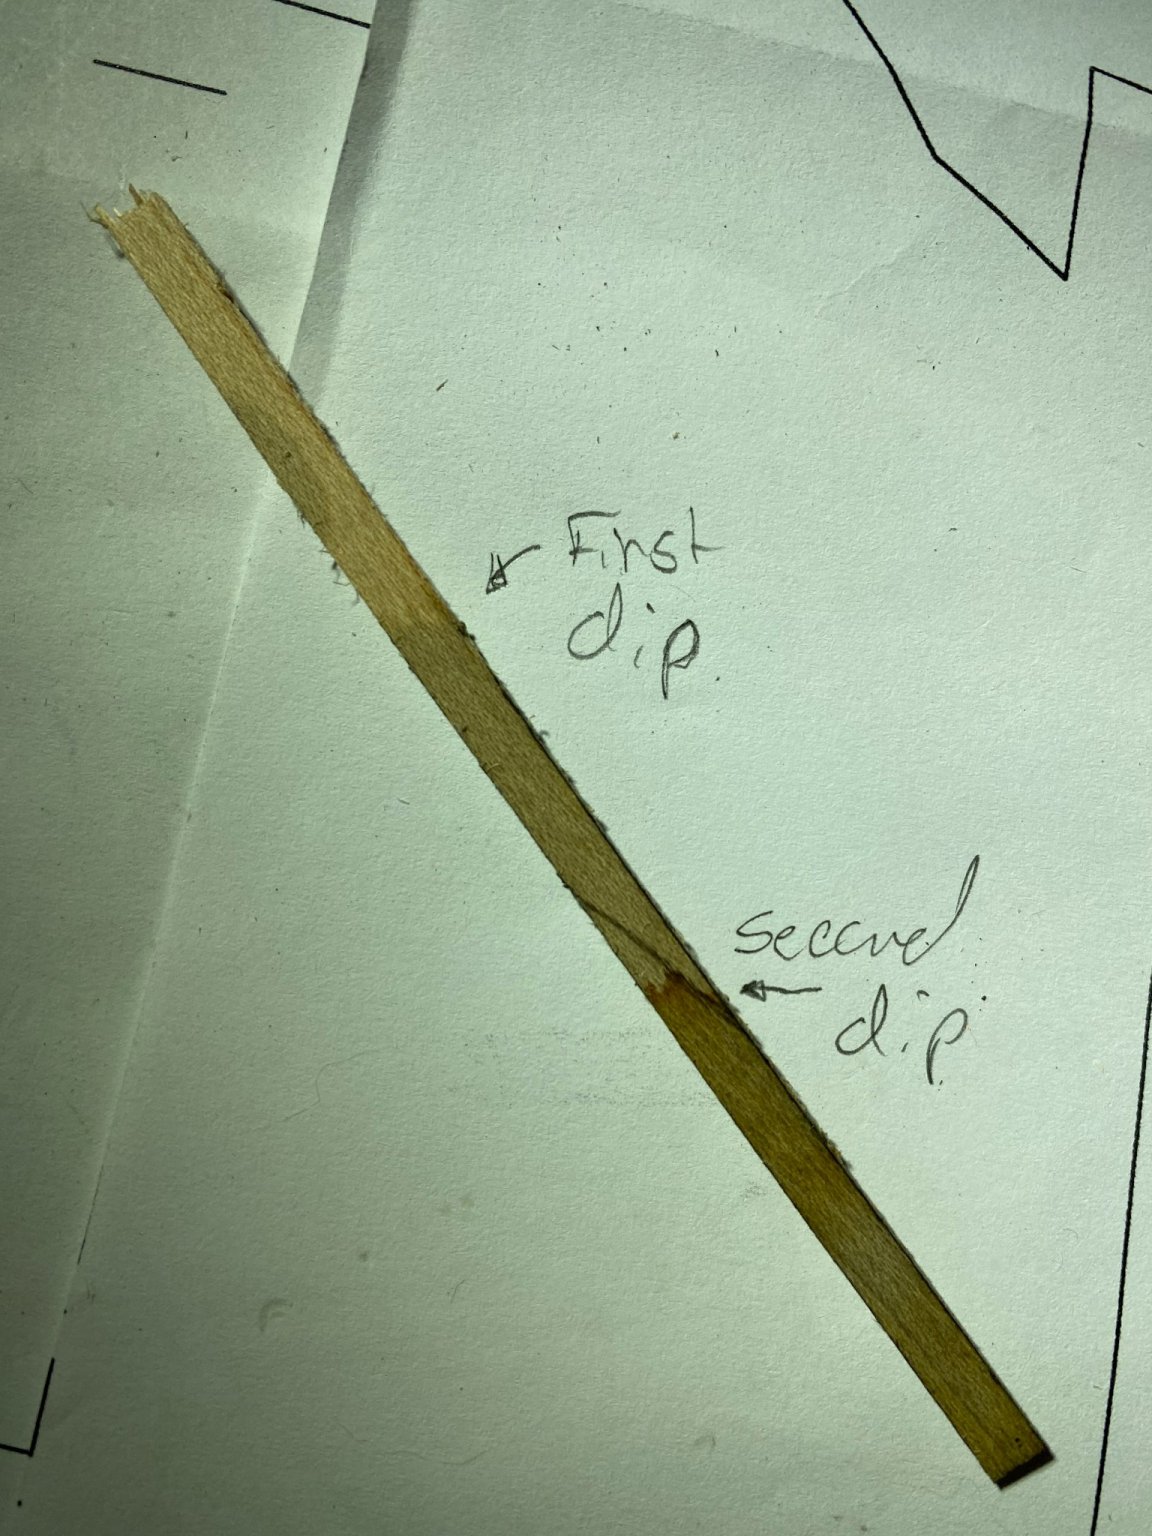
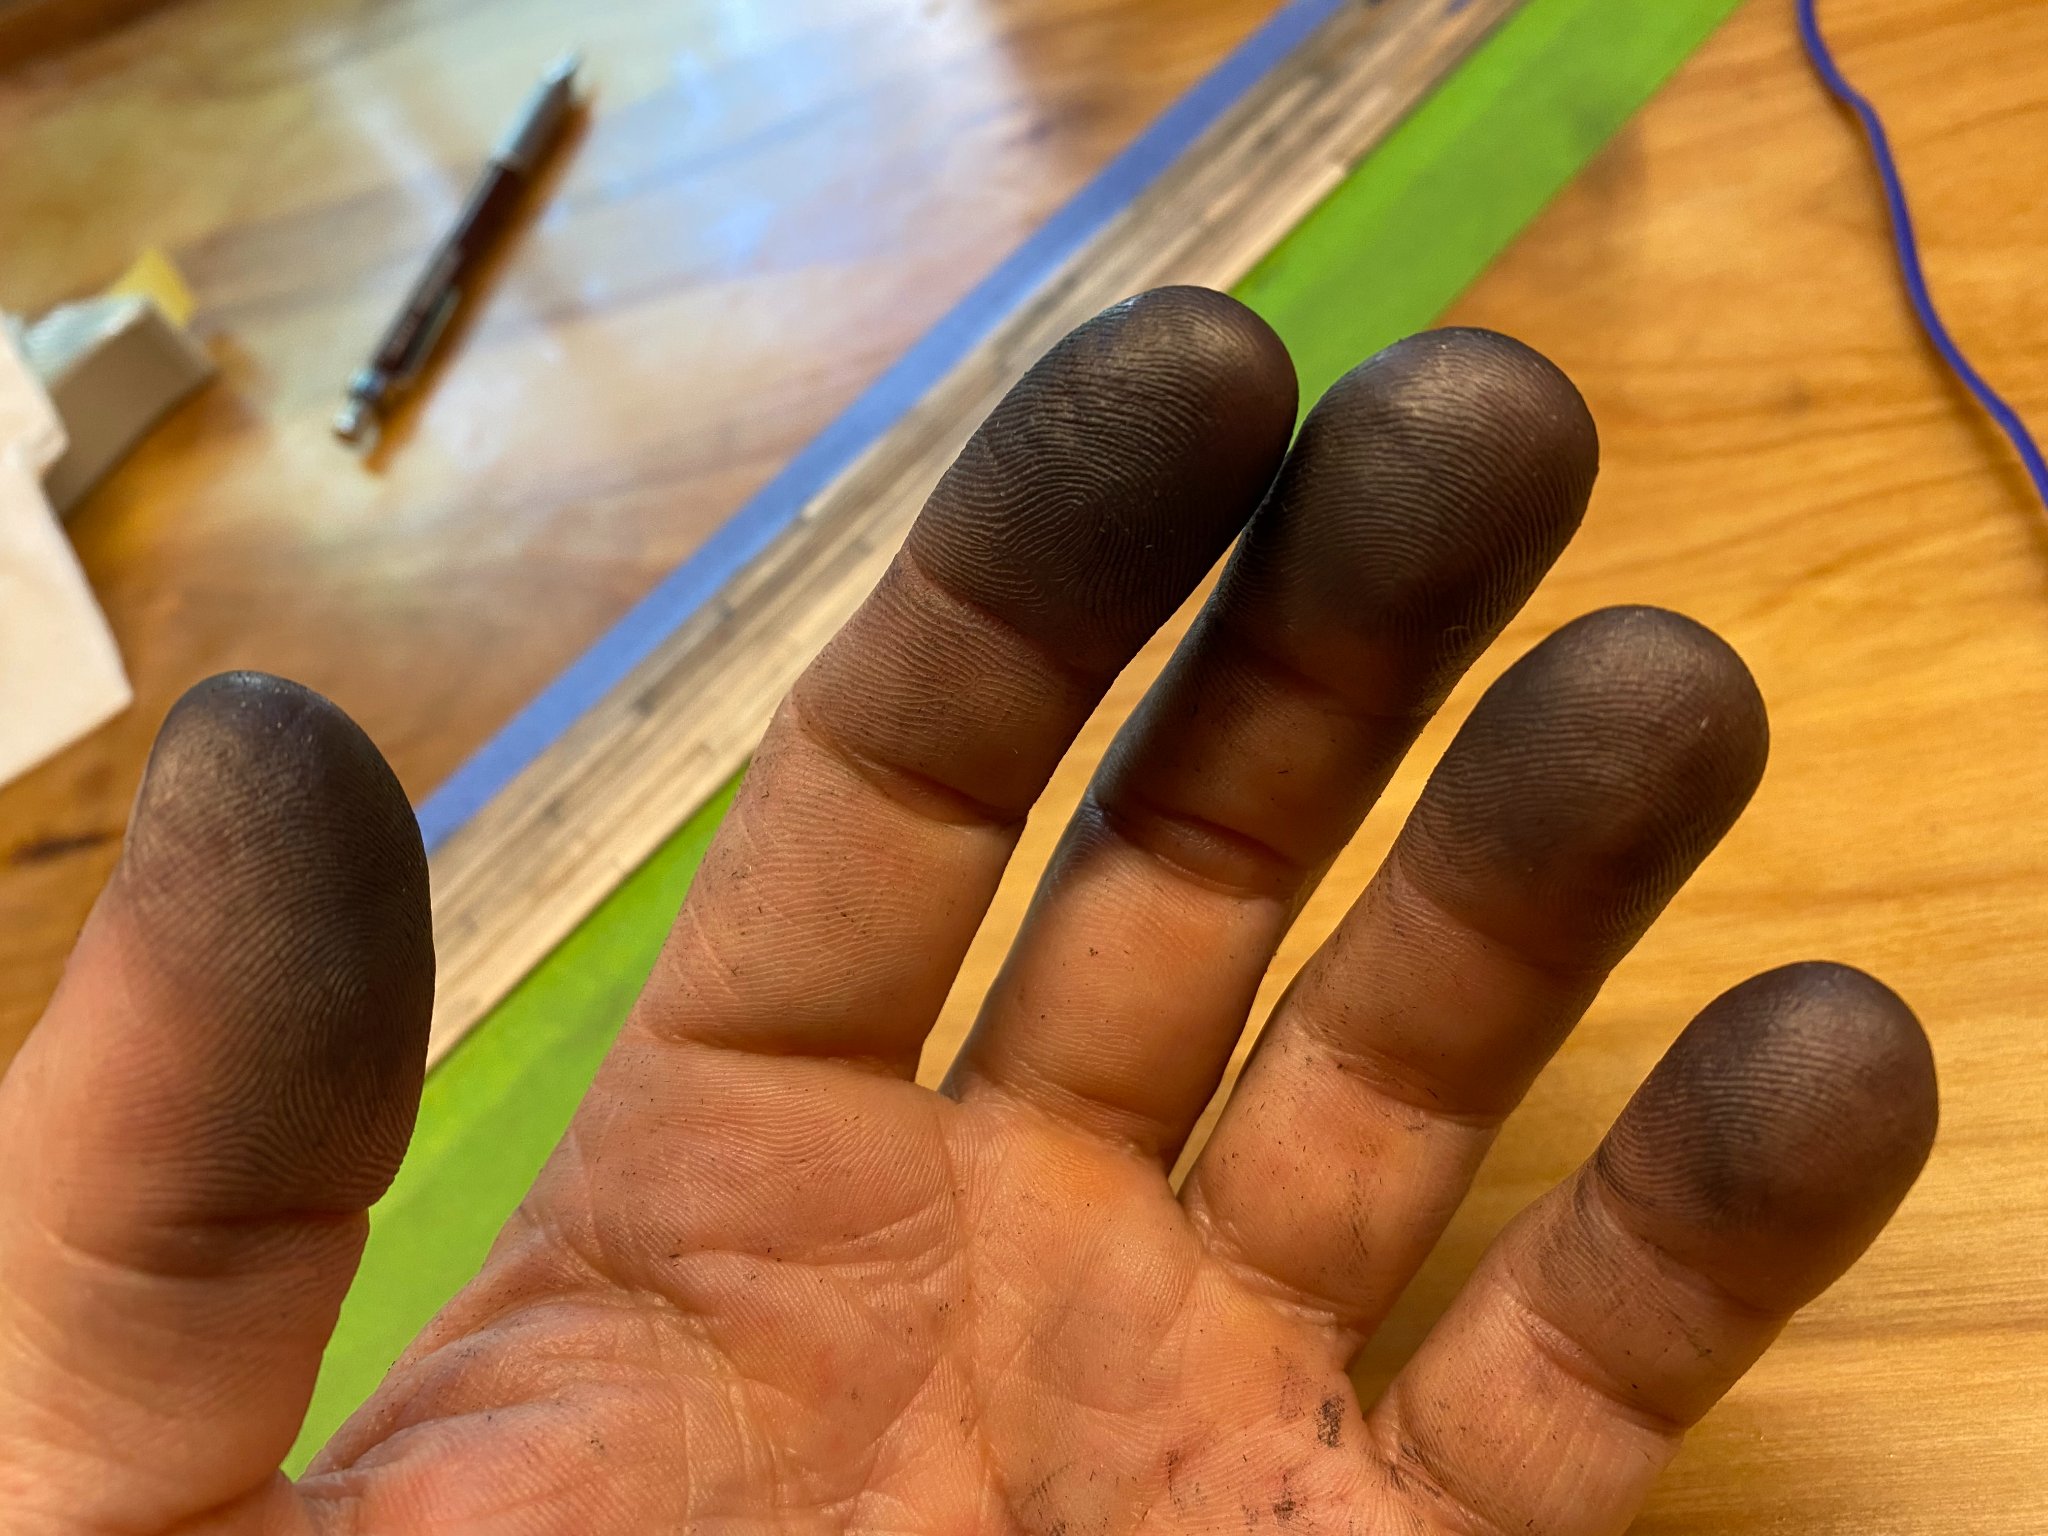
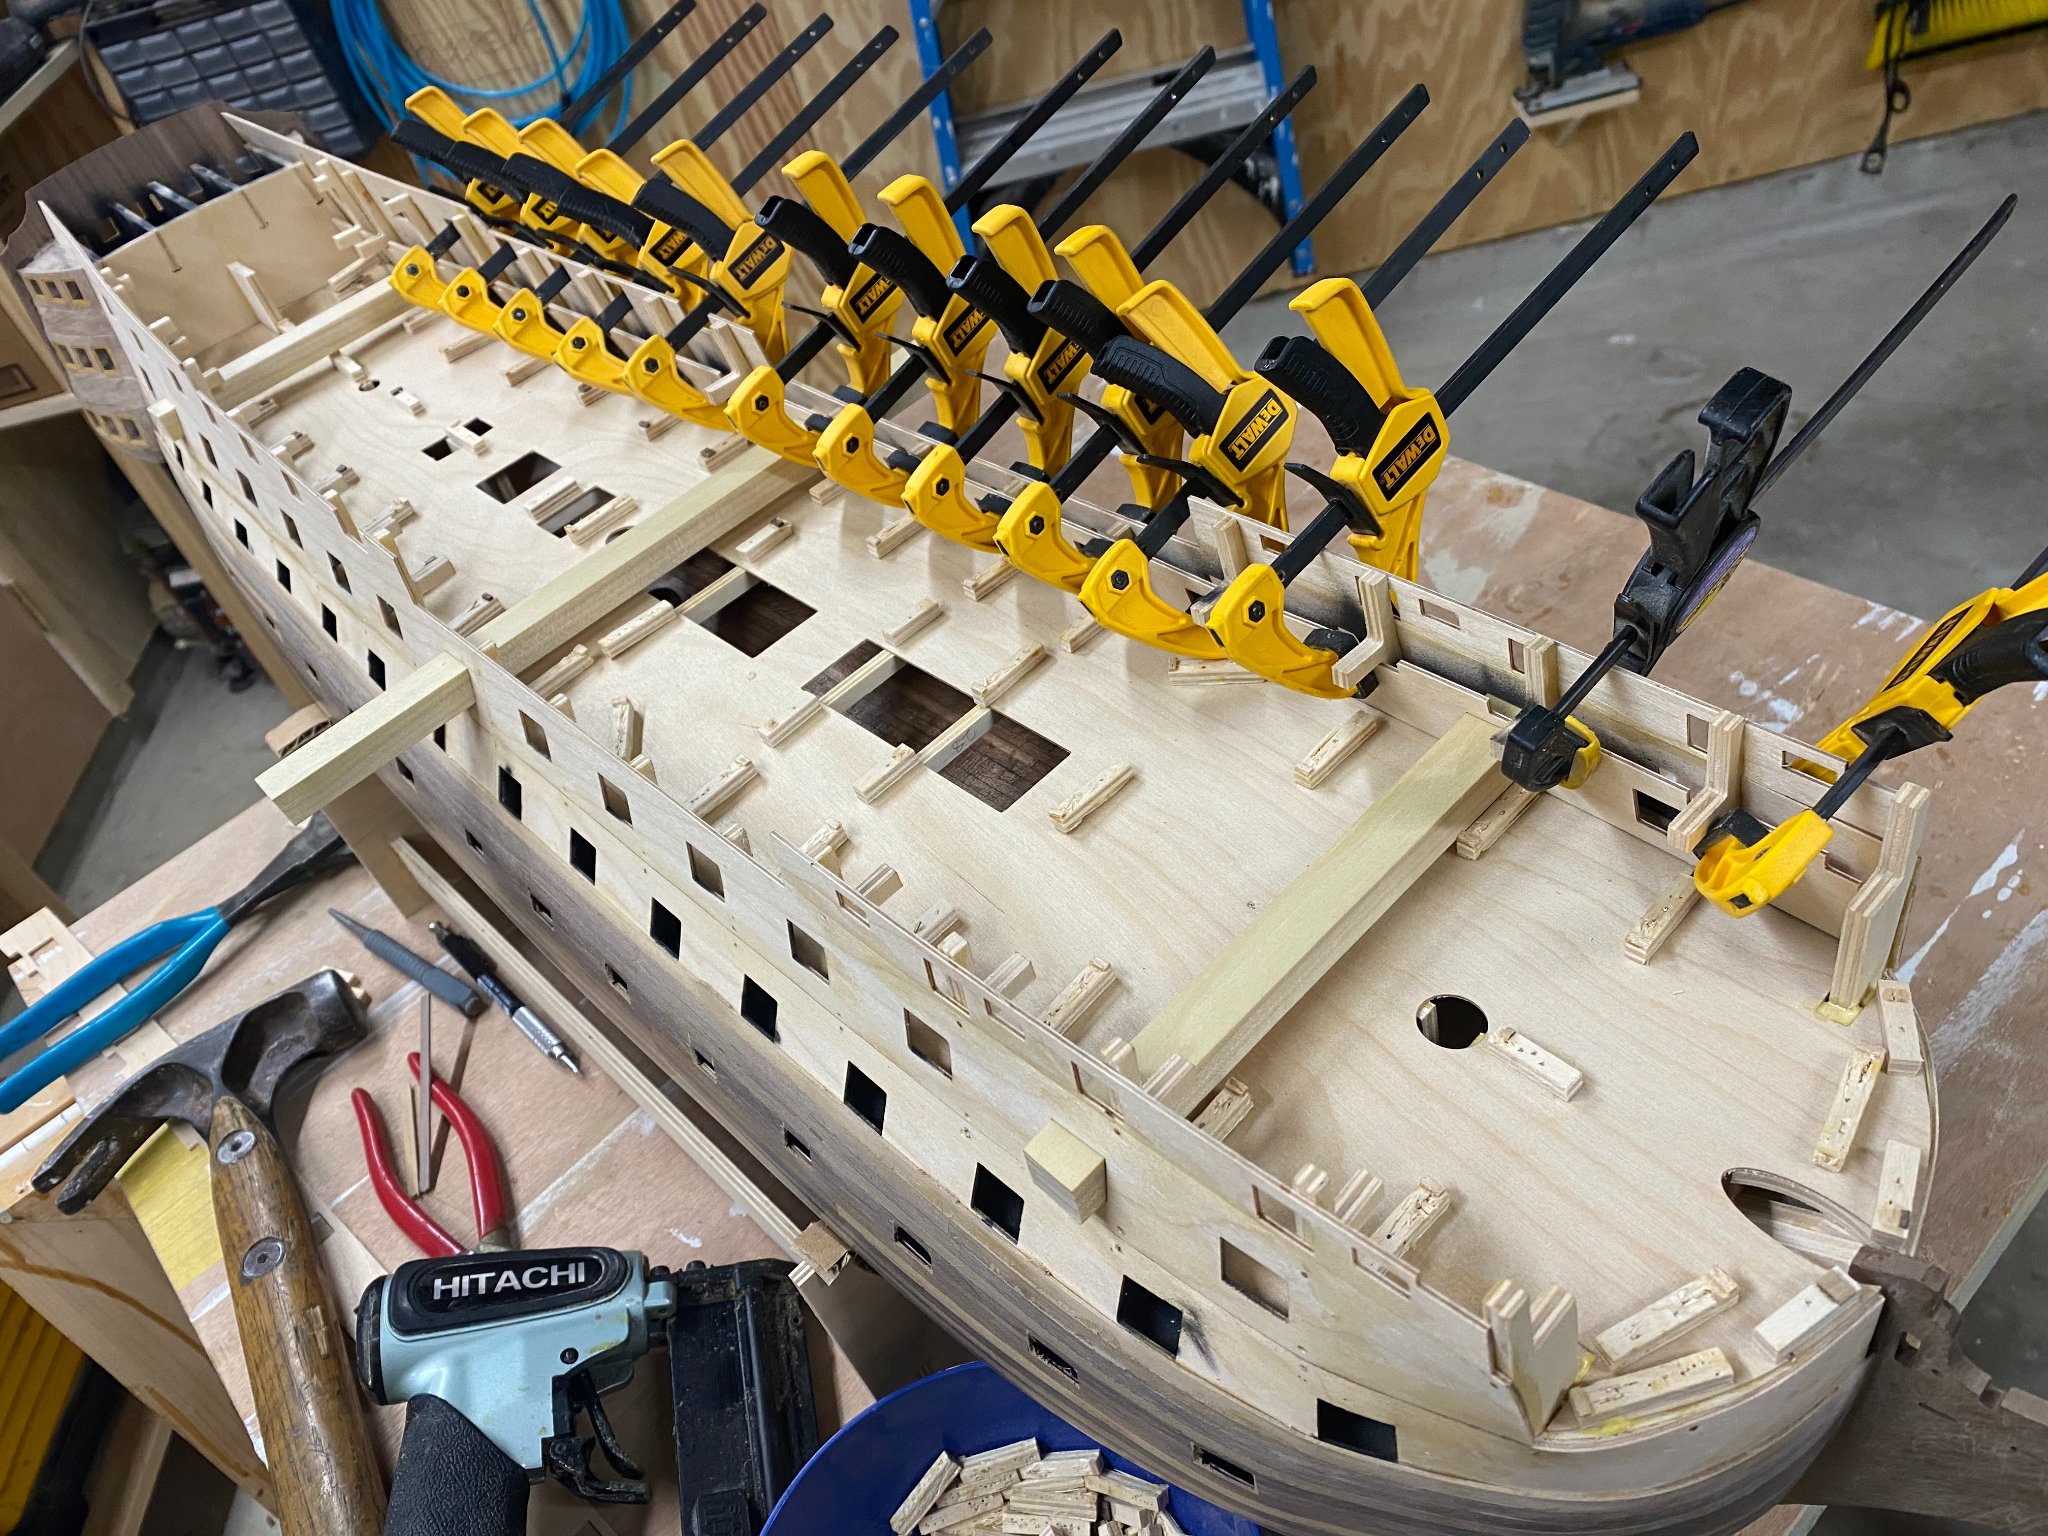
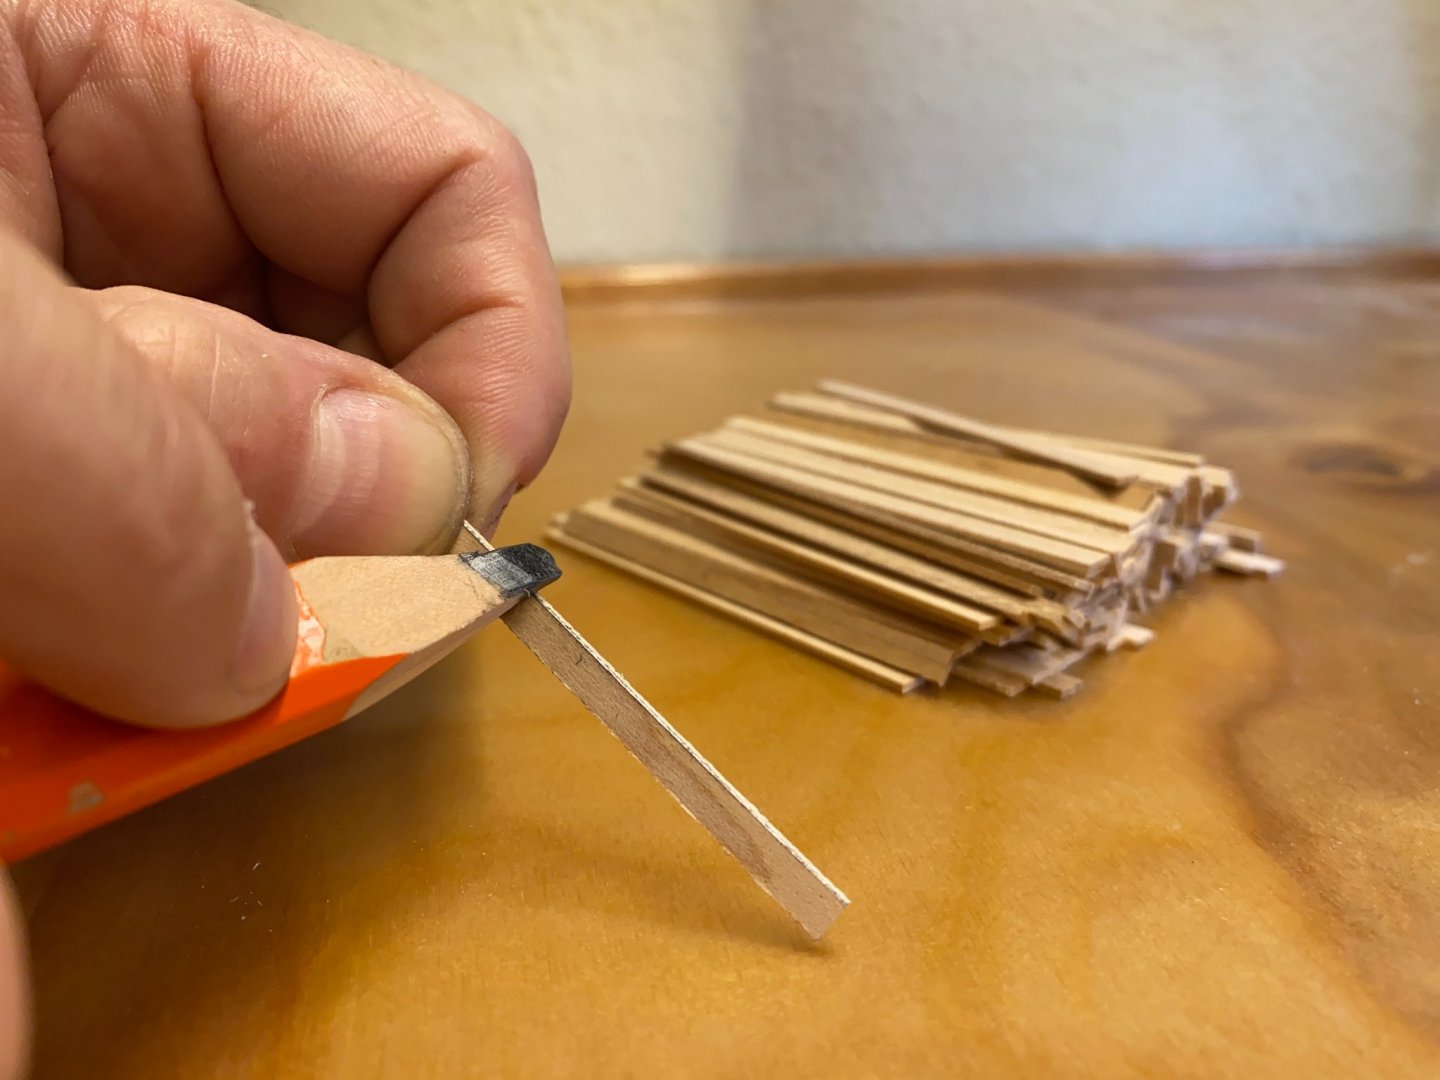
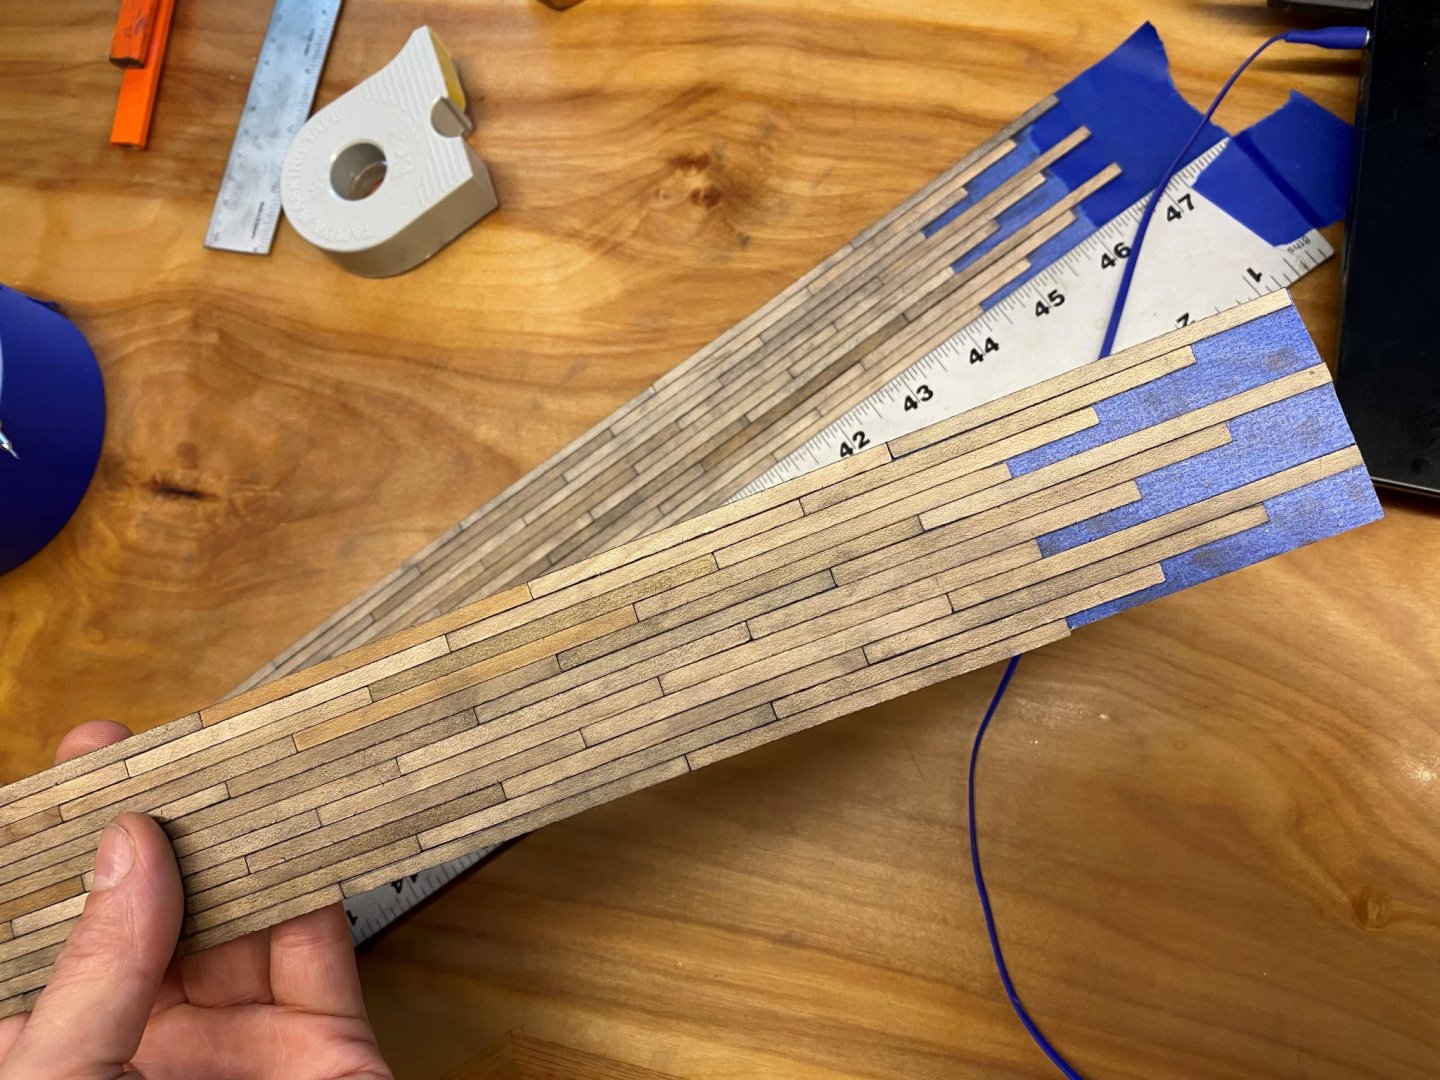
Okay, So now that the upper gun deck "subfloor" is glued, it's on to the planking. (The blue stuff is Bondo - I had a low spot I didn't see until after the glue dried.) I tested a mix of 1 pad of 000 steel wool completely dissolved in 1 liter white vinegar on a single maple plank supplied with the kit. Two dips seemed to get me the weathered grey I wanted. Per the manual, I cut a pile of planks to 85mm and started rubbing the edges with a pencil to simulate caulking. (Found this tip in numerous places on the forums) After getting into it a bit, I have identified some problems with this method of caulking: I tried laying out my deck planking on a piece of upturned painter's tape before installation. All of it is pretty heavily smudged. I'm hoping that my vinegar-wool mix will take care of this. I read somewhere else that sanding just seems to make it worse. (Anyone just try an eraser? -It is indeed pencil...) This seems to be a neurotically tedious process. 10-12 hours to "caulk" planking enough to cover two pieces of painter's tape each 2 inches wide by 30 inches long. Finger food is out of the question; I also read somewhere that the average human unconsciously touches their face an average of 23 times an hour. This must be true as I now look like I dropped acid before visiting the cosmetics counter. I'm not planning to simulate nails here as I do not readily see nails in any of the Victory photos I found on the web. I really appreciate everyone's input. - Especially when you see me making a mistake! Is anyone aware of another way of simulating/laying out/installing the deck planking? Has anyone tried mixing graphite powder with glue and then individually squeezing the planks into place in such a way so that the glue extrudes a little bit up through the cracks for example? Is there a faster way?


-
Hand Saw Recommendations
Will Ferris replied to Jonathan_219's topic in Modeling tools and Workshop Equipment
Mike's right on the money with his post. I still have a number of Japanese pull-saws left over from an earlier carpentry career. Some of them are 20+ years old, but time hasn't dulled them at all. (The teeth are so brittle that they break off rather than dulling.) I never had a problem using them on hardwoods either. (besides the teeth snapping off when I accidentally "hooked" an edge.) I still use the Zona (disposable?) type saws, for single pieces of smaller modeling stock, but the more expensive Japanese pull-saws are highly recommended. If you're going to buy one, pick up a good quality (That website that Andreas mentioned looks good.) short single-edge model with a fine TPI count. There's also a nice Suizan 7 inch - 30 TPI flush -cut Suizan on Amazon for $34.60US.
-
Incredible work Heinz! I'm a newbie who just joined the forum and am attempting the same kit. I will be following your build with interest!
-
Greg & Lucien, I like your thinking. Where on earth did you come up with the egg? Those stones Lucien refers to have both shrunk and reverted back to "ovary mode." You guys are going to need to spoon-feed me rigging 101 soon. (well, maybe not so soon, come to think of it...)
-
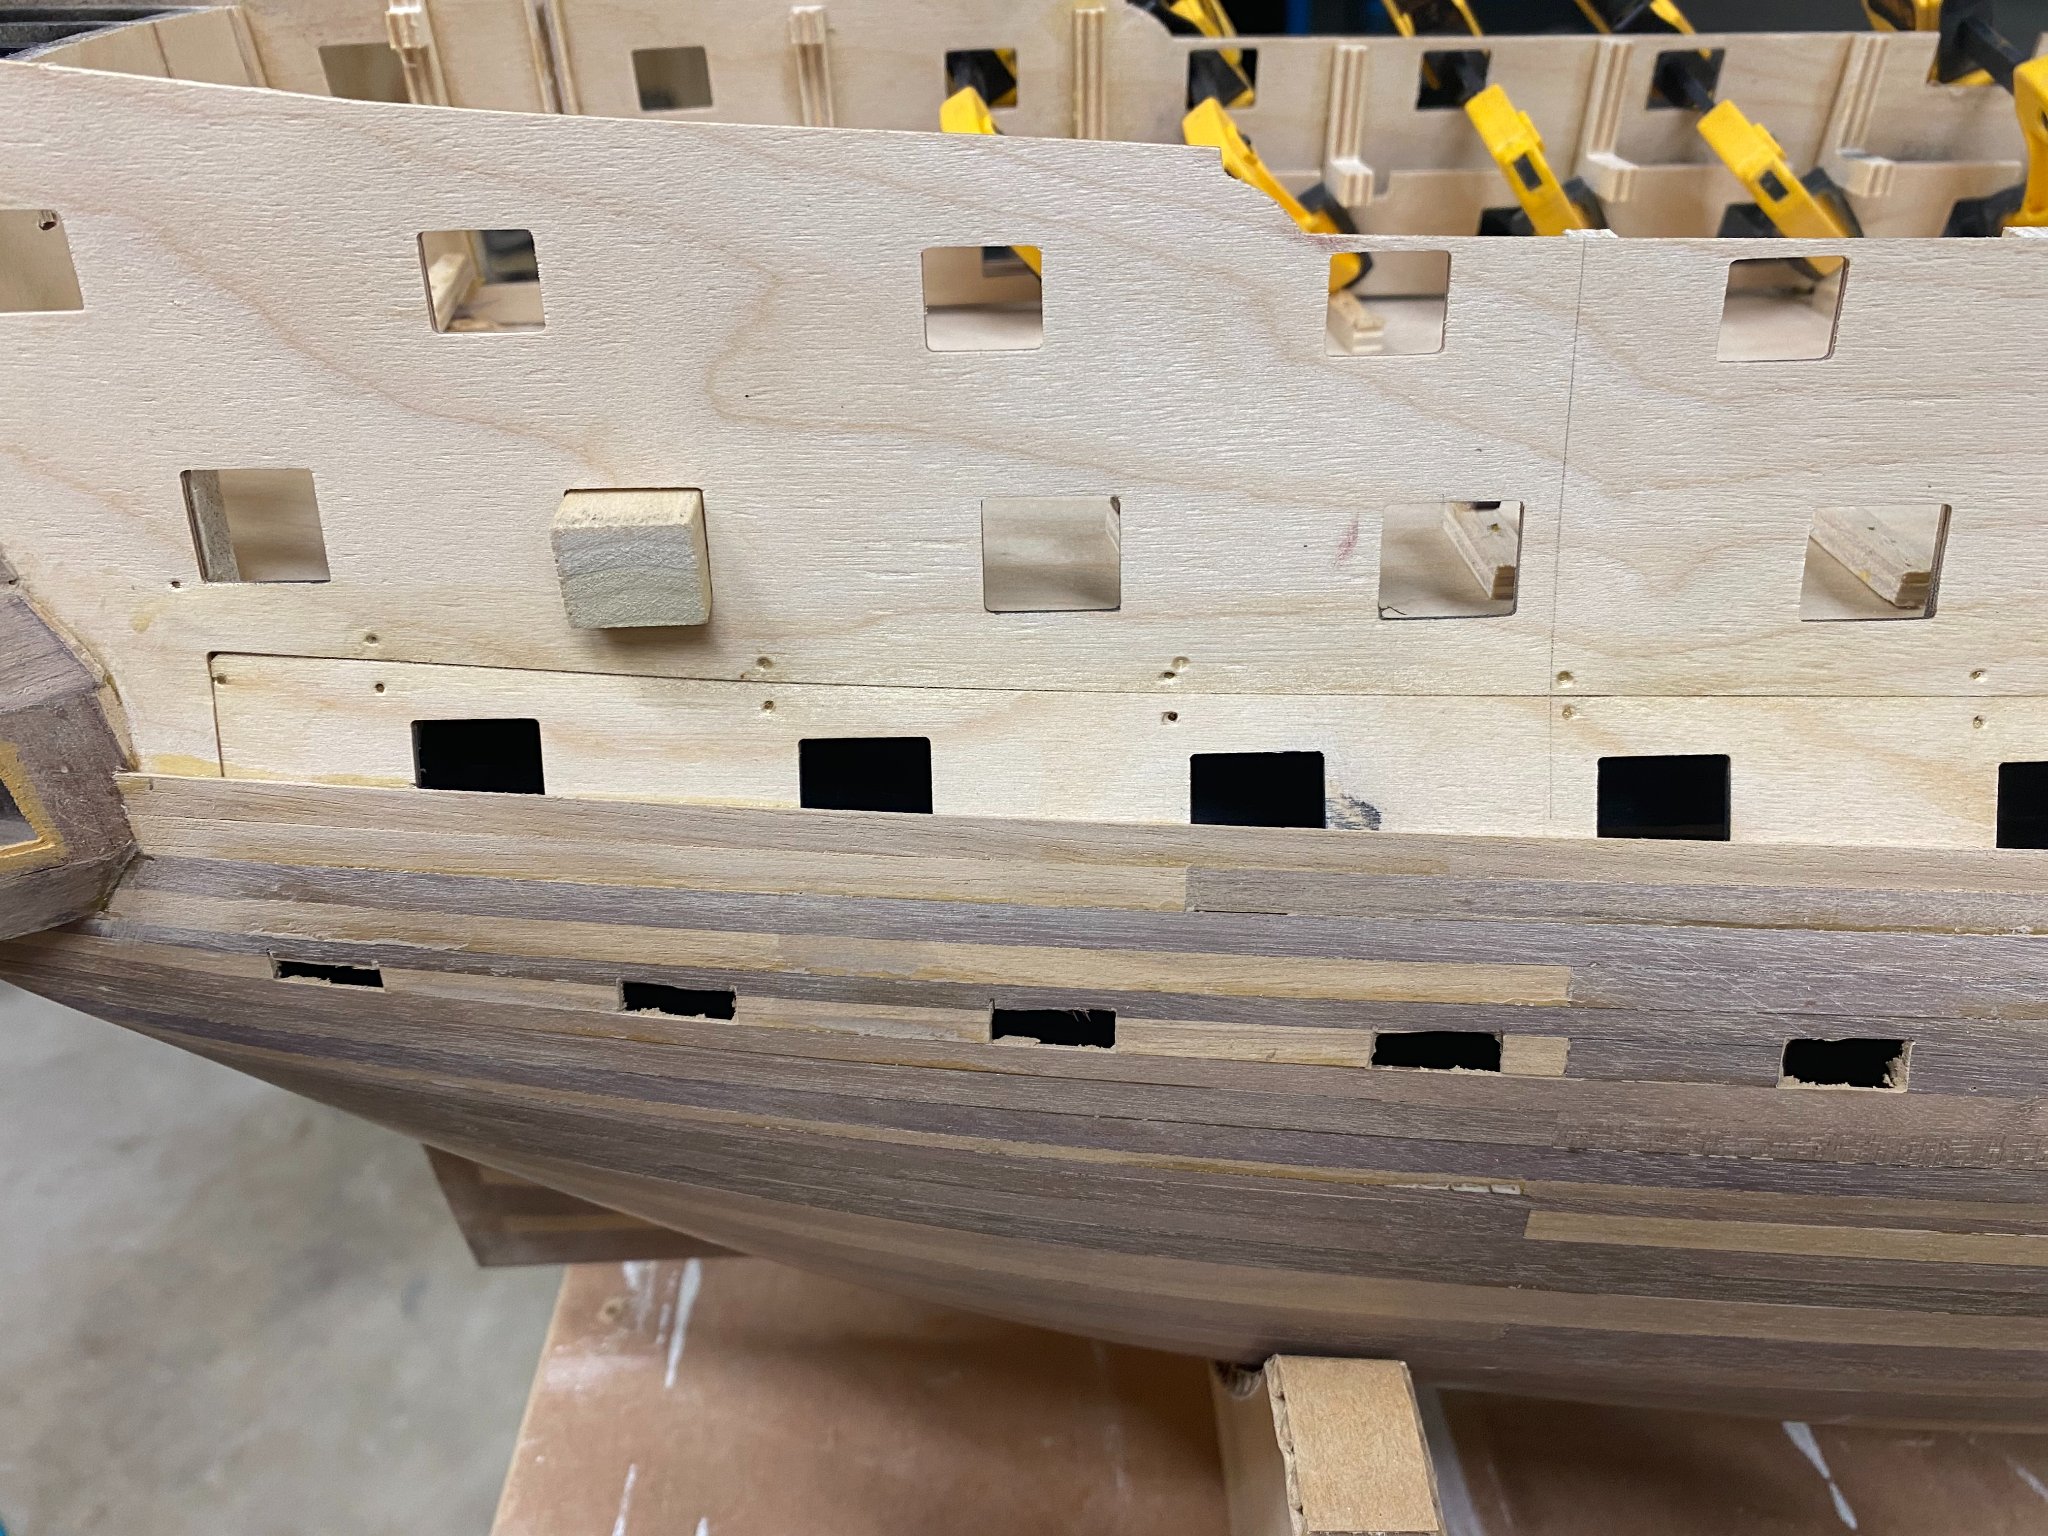
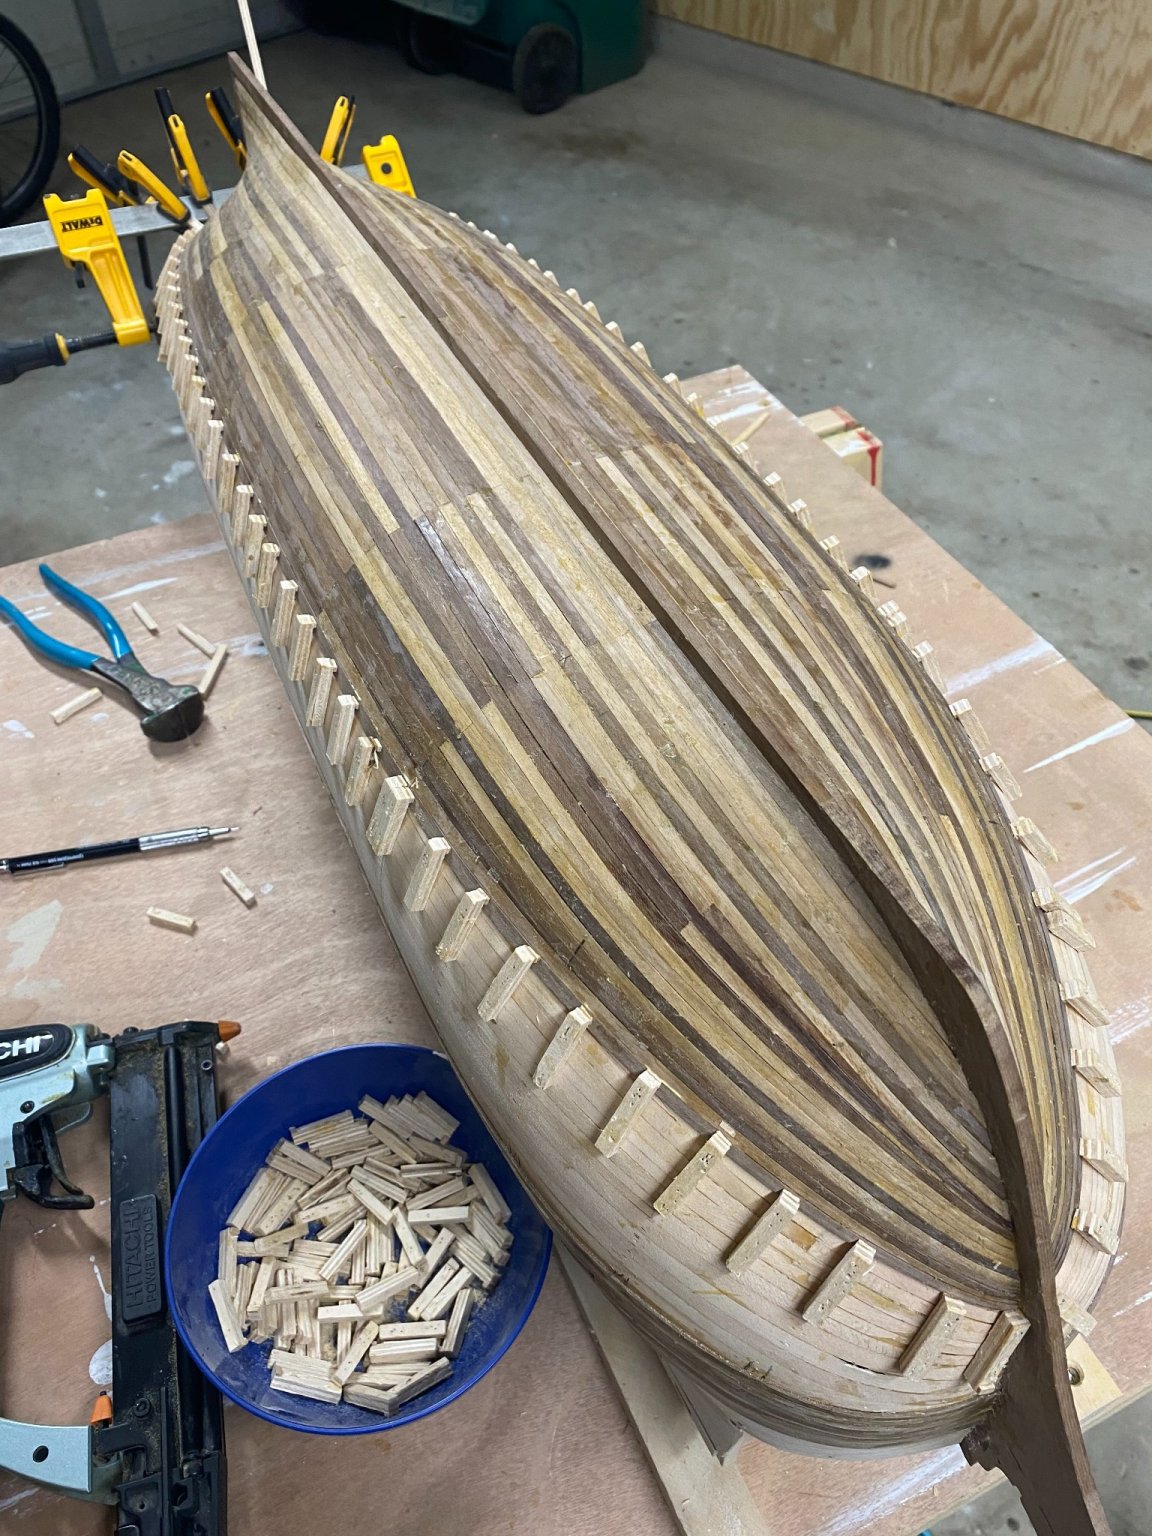
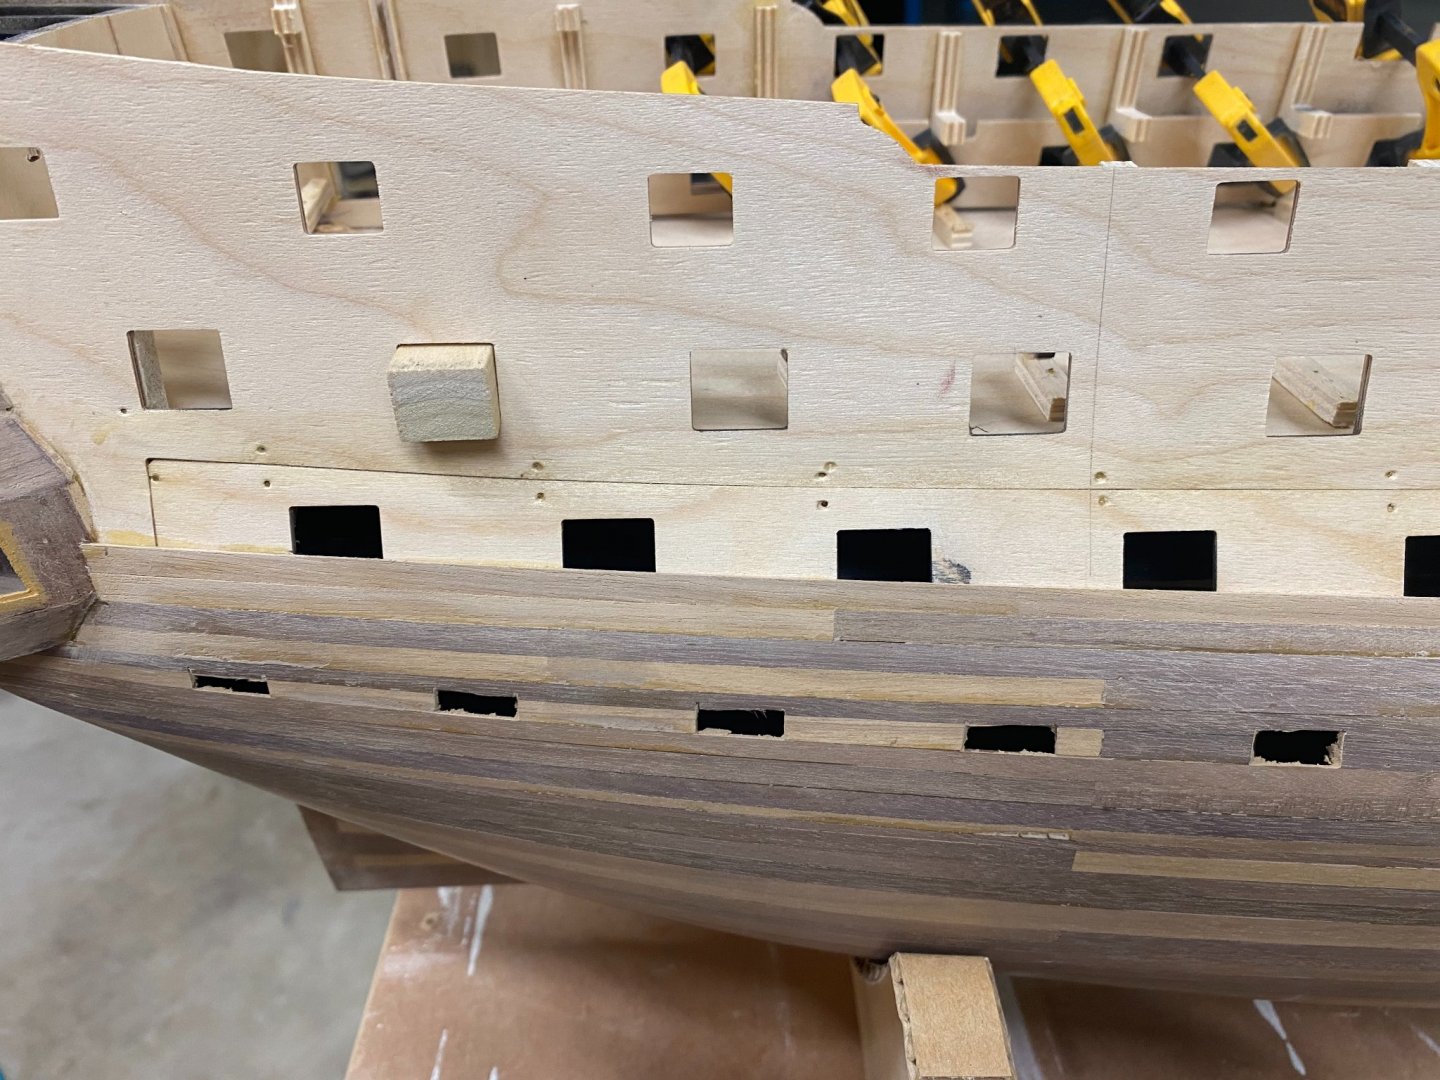
I think I screwed up here. I carefully placed my first "second" planks according to Caldercraft's manual, but since it never really addressed what to do about gun ports at this point. I just left a small piece of plank out at each of the lower ports thinking I could cut everything back to the edges of the openings in the underlying plywood patterns later. Um... Any ideas? Anyone know if Dremel makes a tiny flush cut "guide" router bit?
-
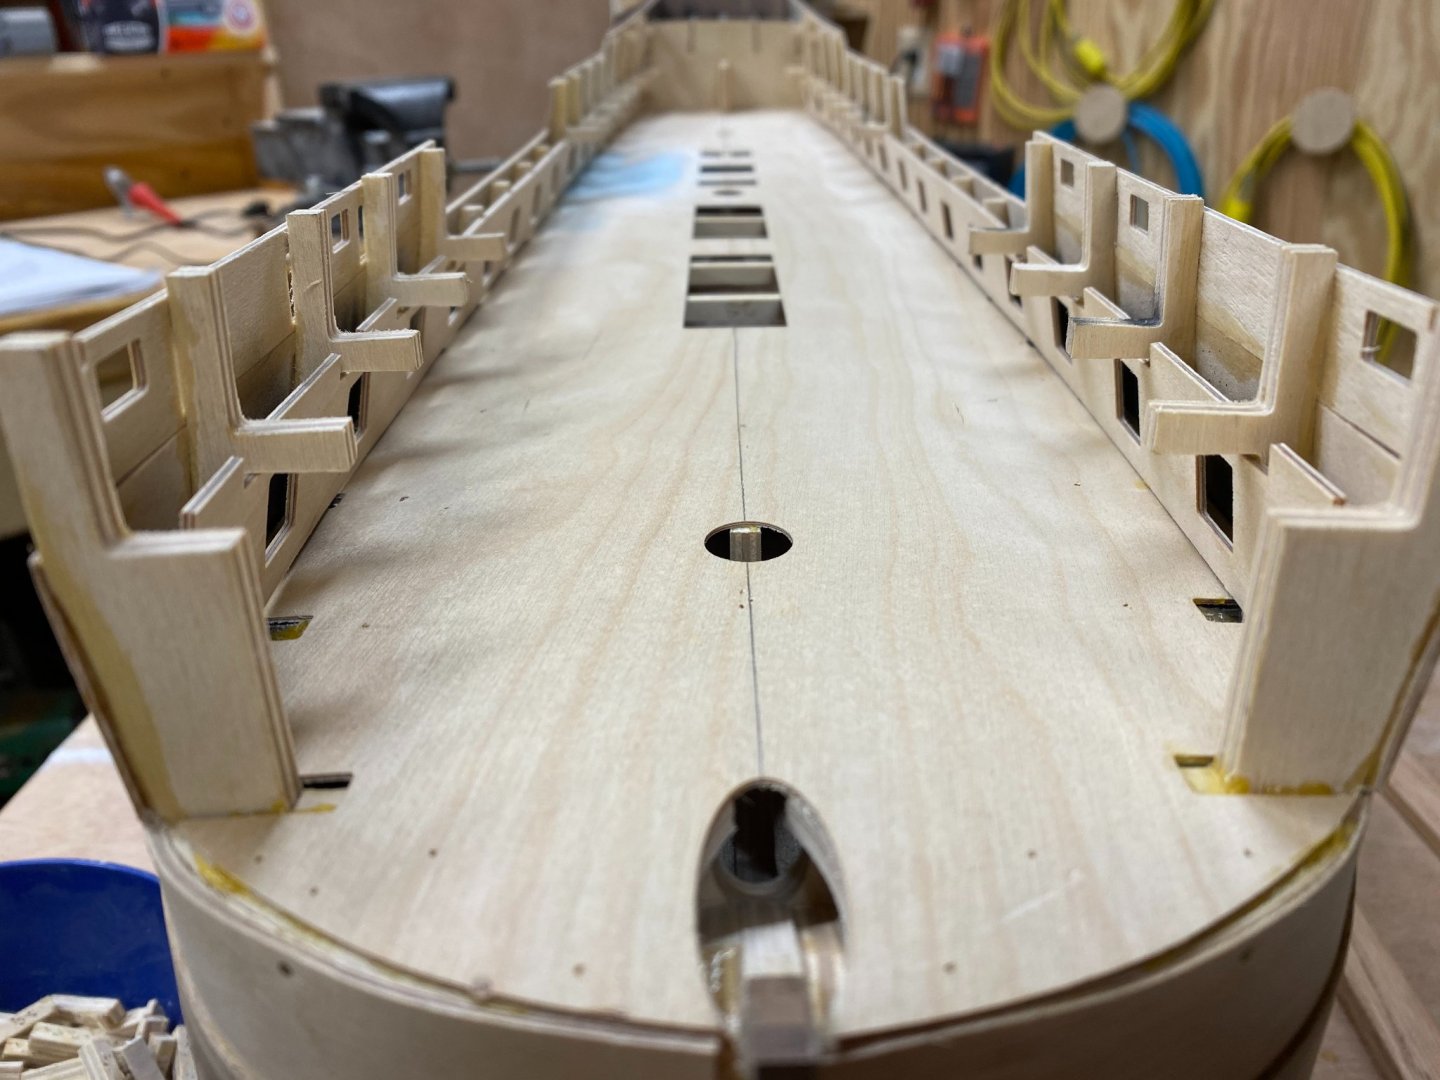
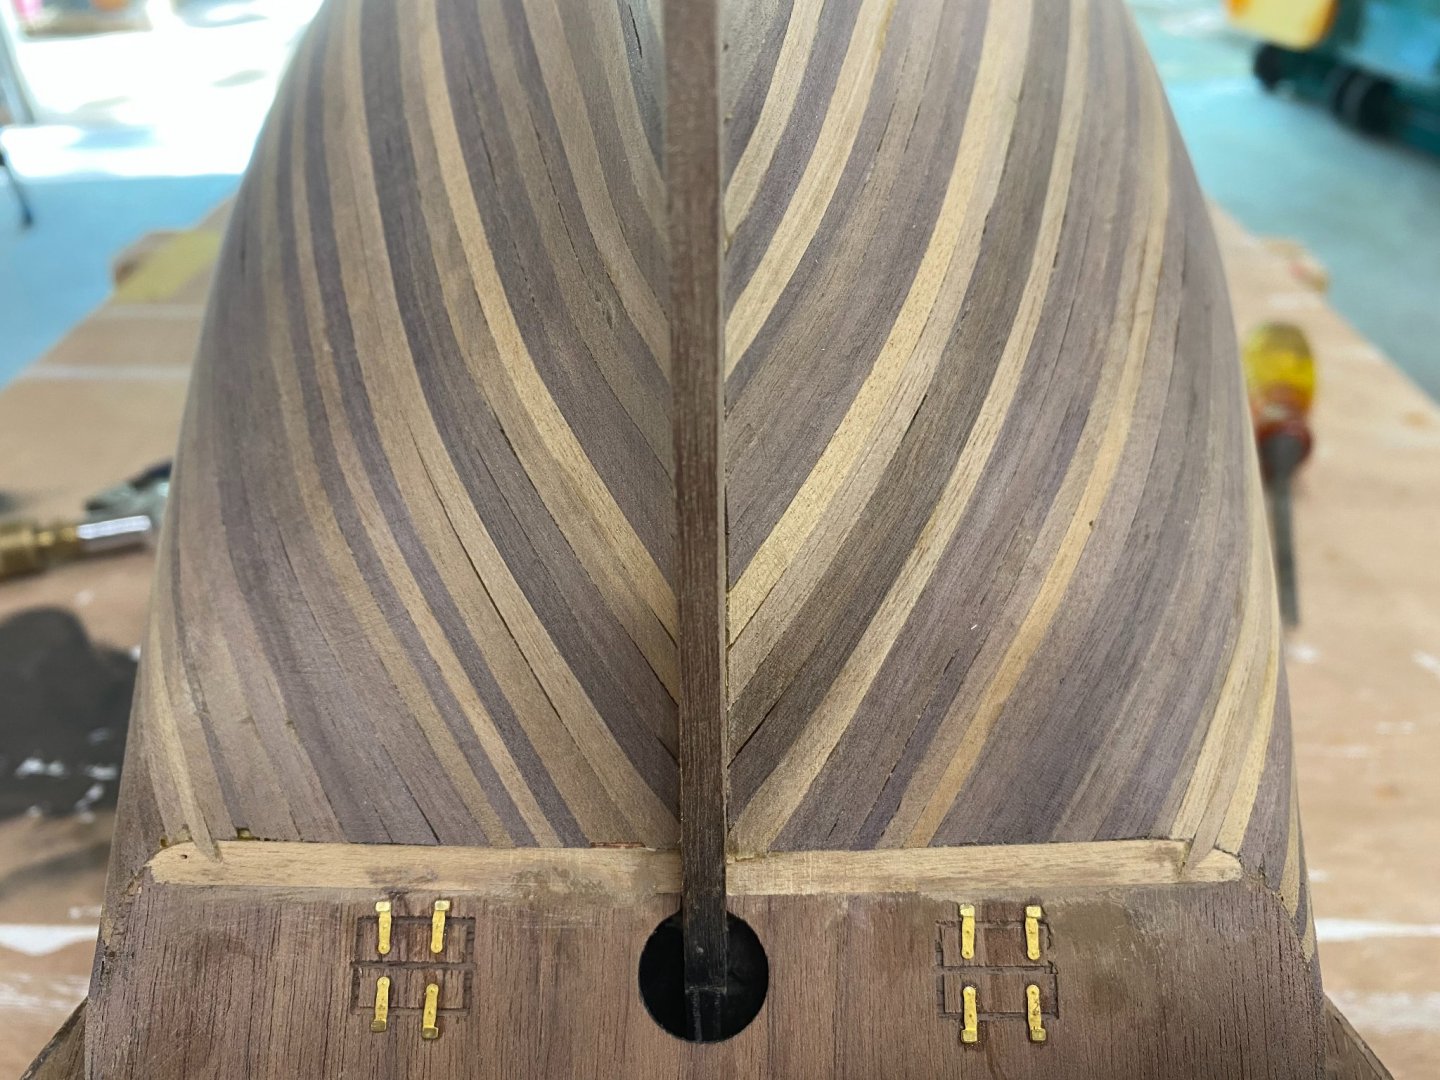
You make me blush sir... (However, there's a reason I didn't post a photo of the bow after final sanding!) Speaking of tiles, What would you guys recommend for a decent patinating solution for the copper? I have seen a few on the forums ranging from vinegar to urine of all things! I don't want the pitted fifty-year old look, but the bright new look doesn't look right to me either. How about a look that's no longer bright and just starting to "green up" a bit? Any suggestions? Also, I noticed everyone seems to be in agreement that all tiles need to be individually treated before installation. Why? I would think it much easier to confirm results first on a few spare tiles before just coating all of them at once after installation. Today's progress: Upper gun deck and corresponding port inner bulwark glued into place. (note appropriately sized pieces of wood at three places to line up inner and outer gun port openings.)

-
Keith, Thank you so much. This is precisely the kind of information I was hoping to find in this forum. Great point! I wasn't really planning on poly/varnishing, due to the "gummy" factor, (Seen too many models ruined my opinion because they looked like they've been dipped in the stuff.) but given your point, what do you think about a thin coat of water based matte (or satin possibly) poly applied with an airbrush? Do you think this would be enough to allow good adhesion?
-
Robert, Excellent build! I bought the same kit. We're at slightly different stages. It would be great to be able to compare notes with you as this is my first ship model. I'm definitely going to borrow your trick for cannon placement.
-
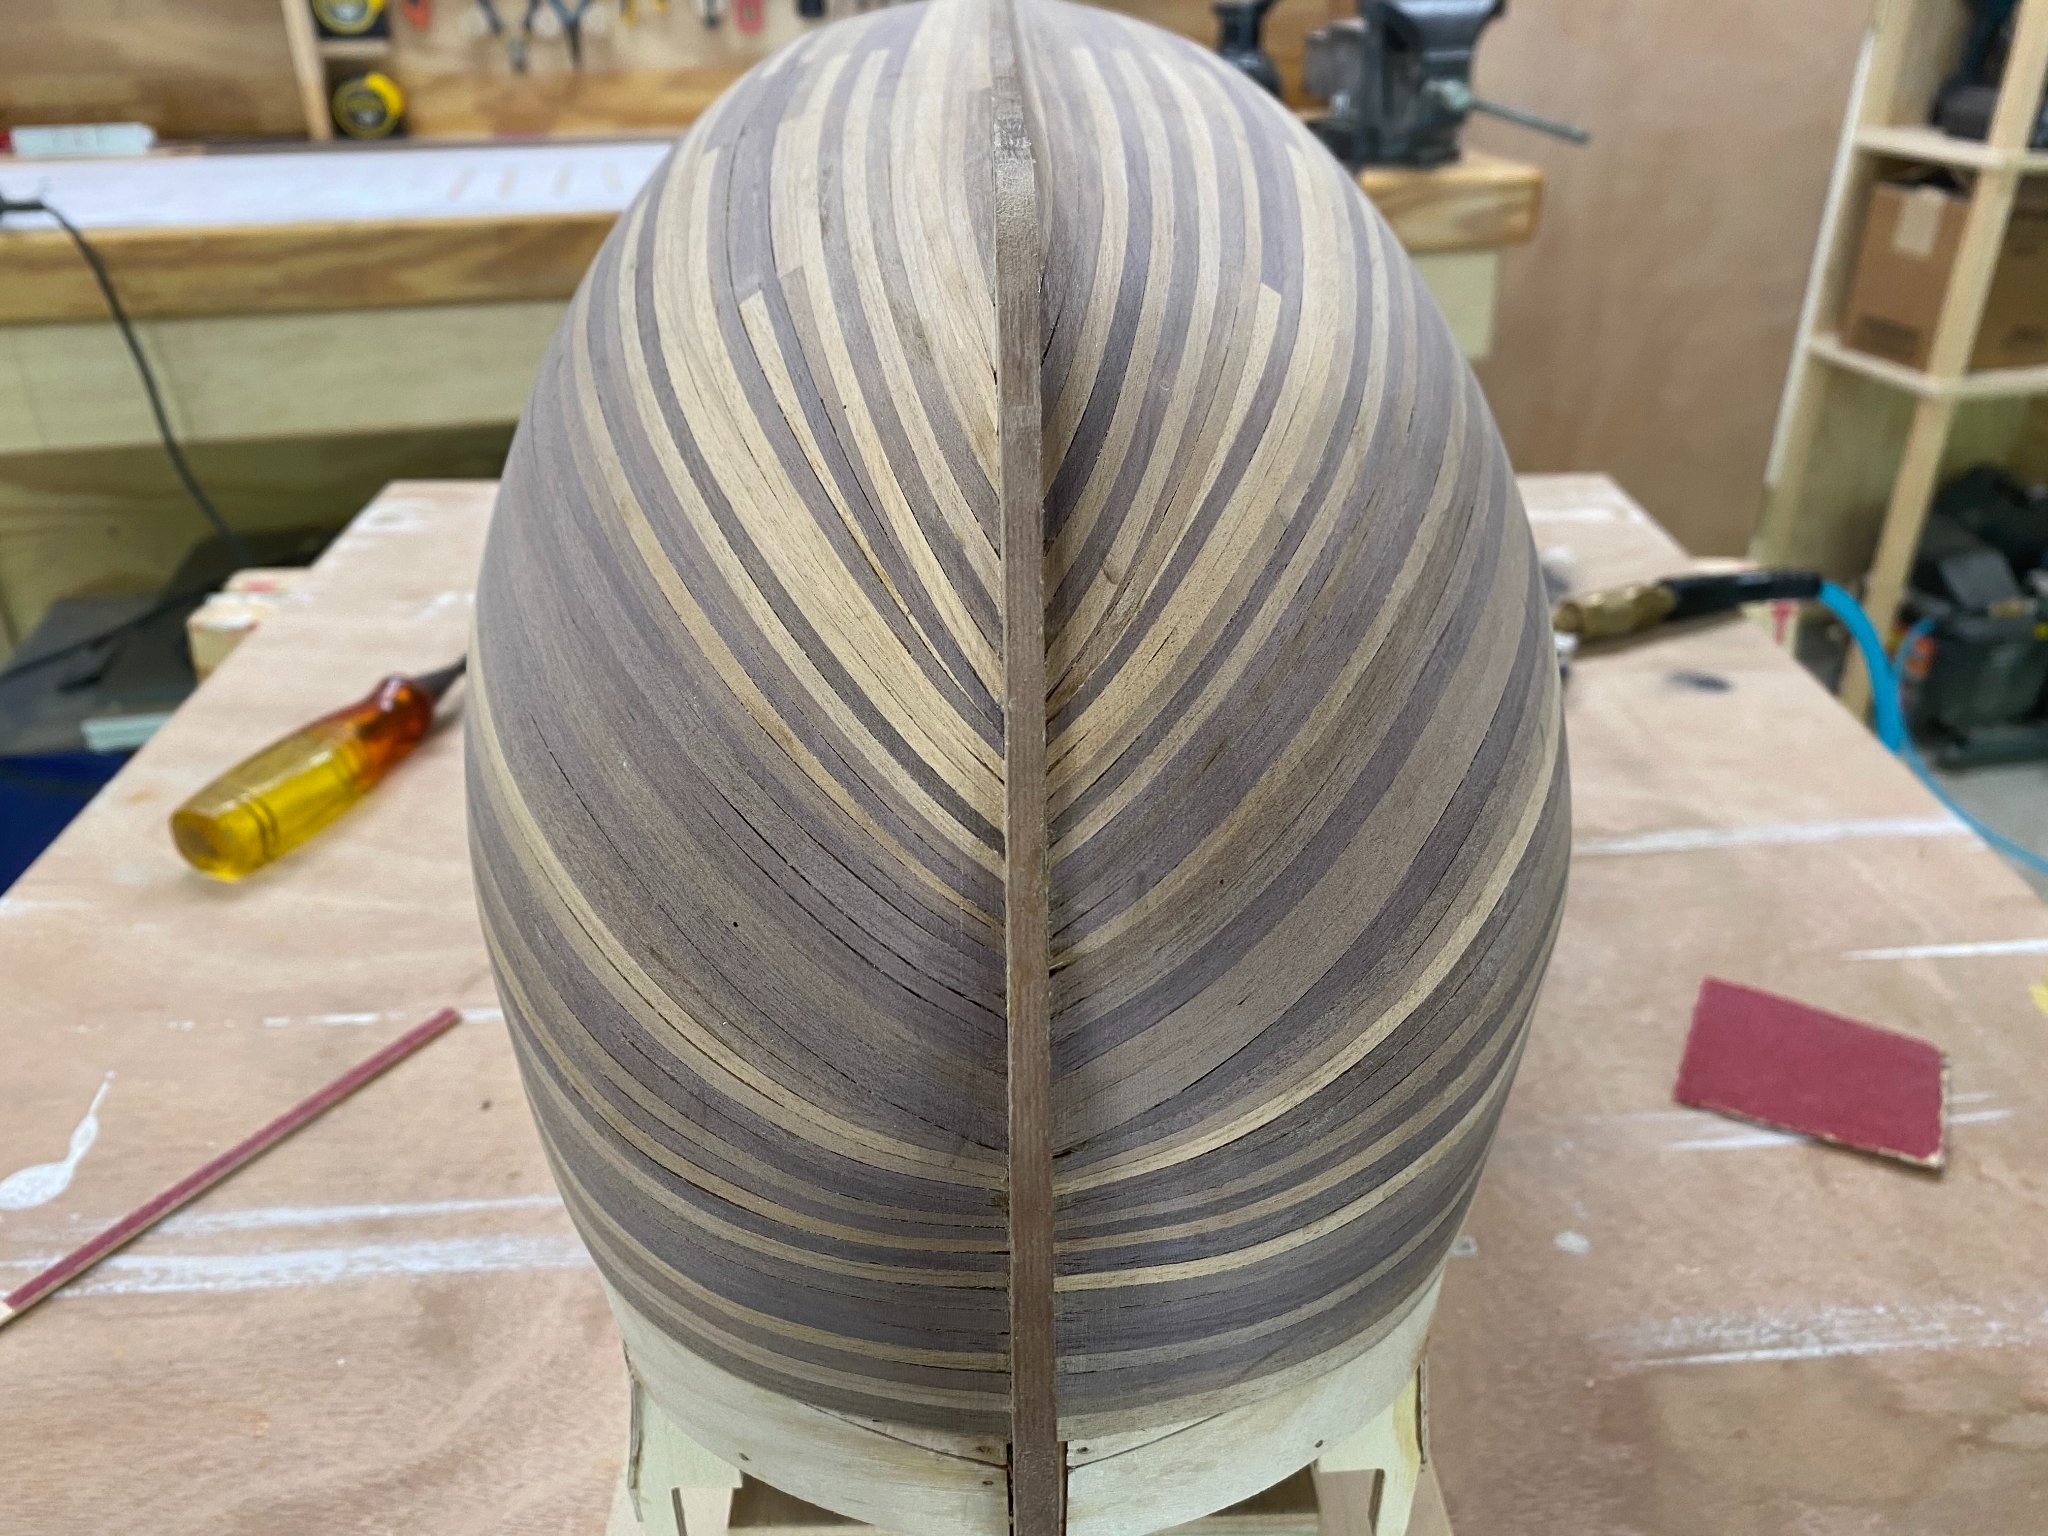
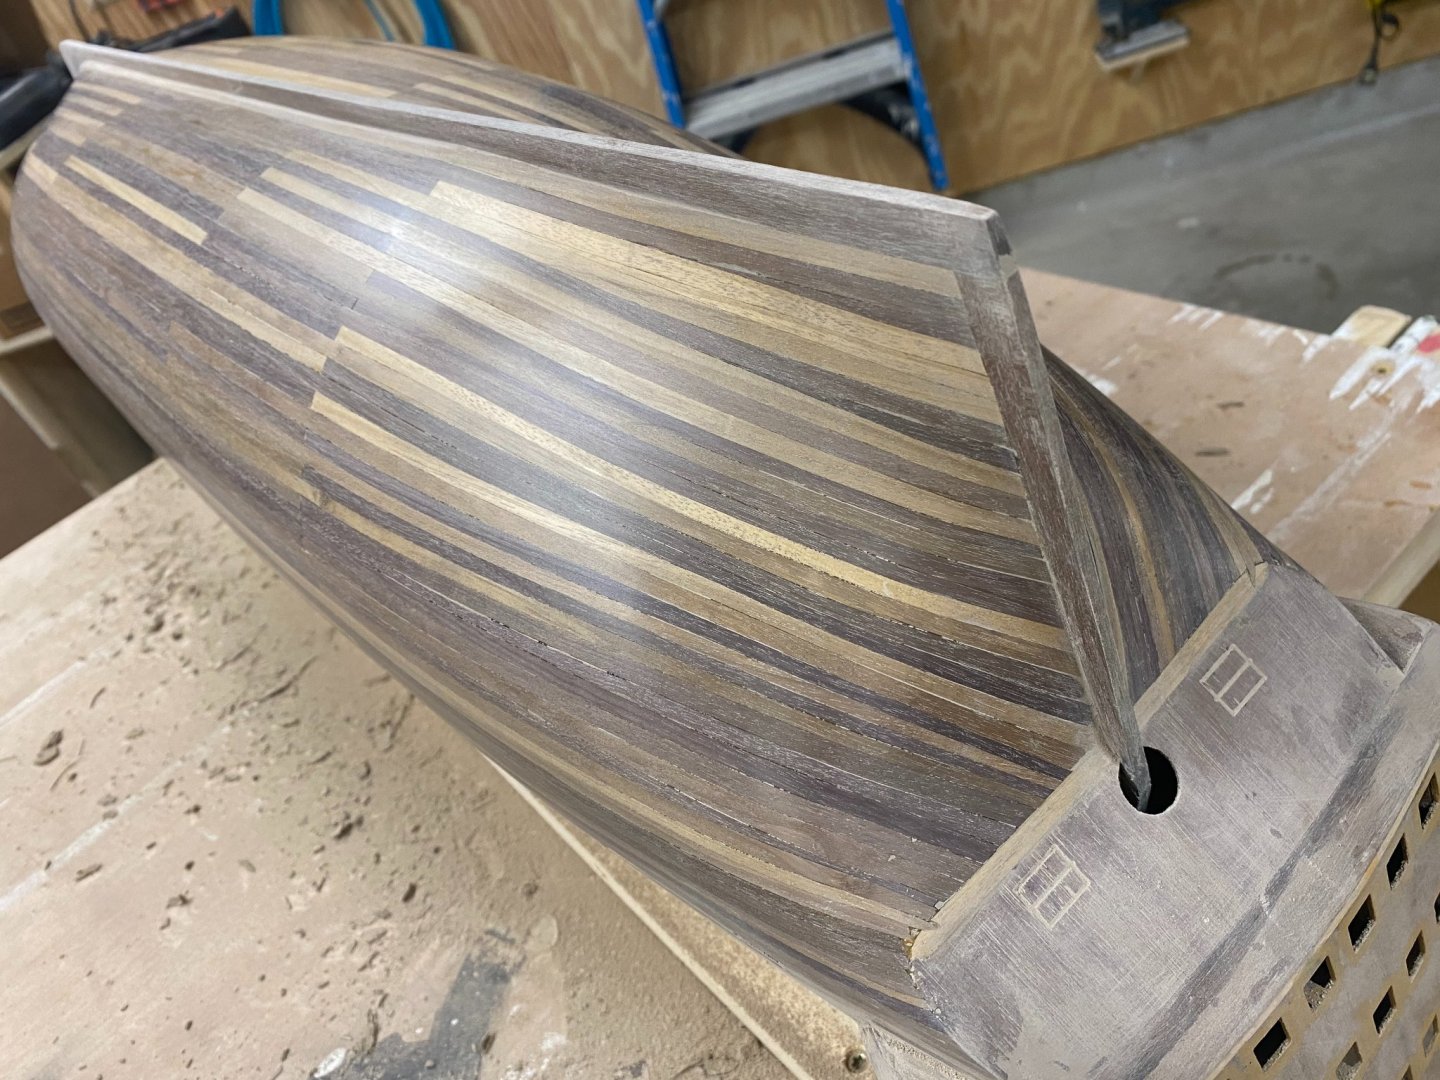
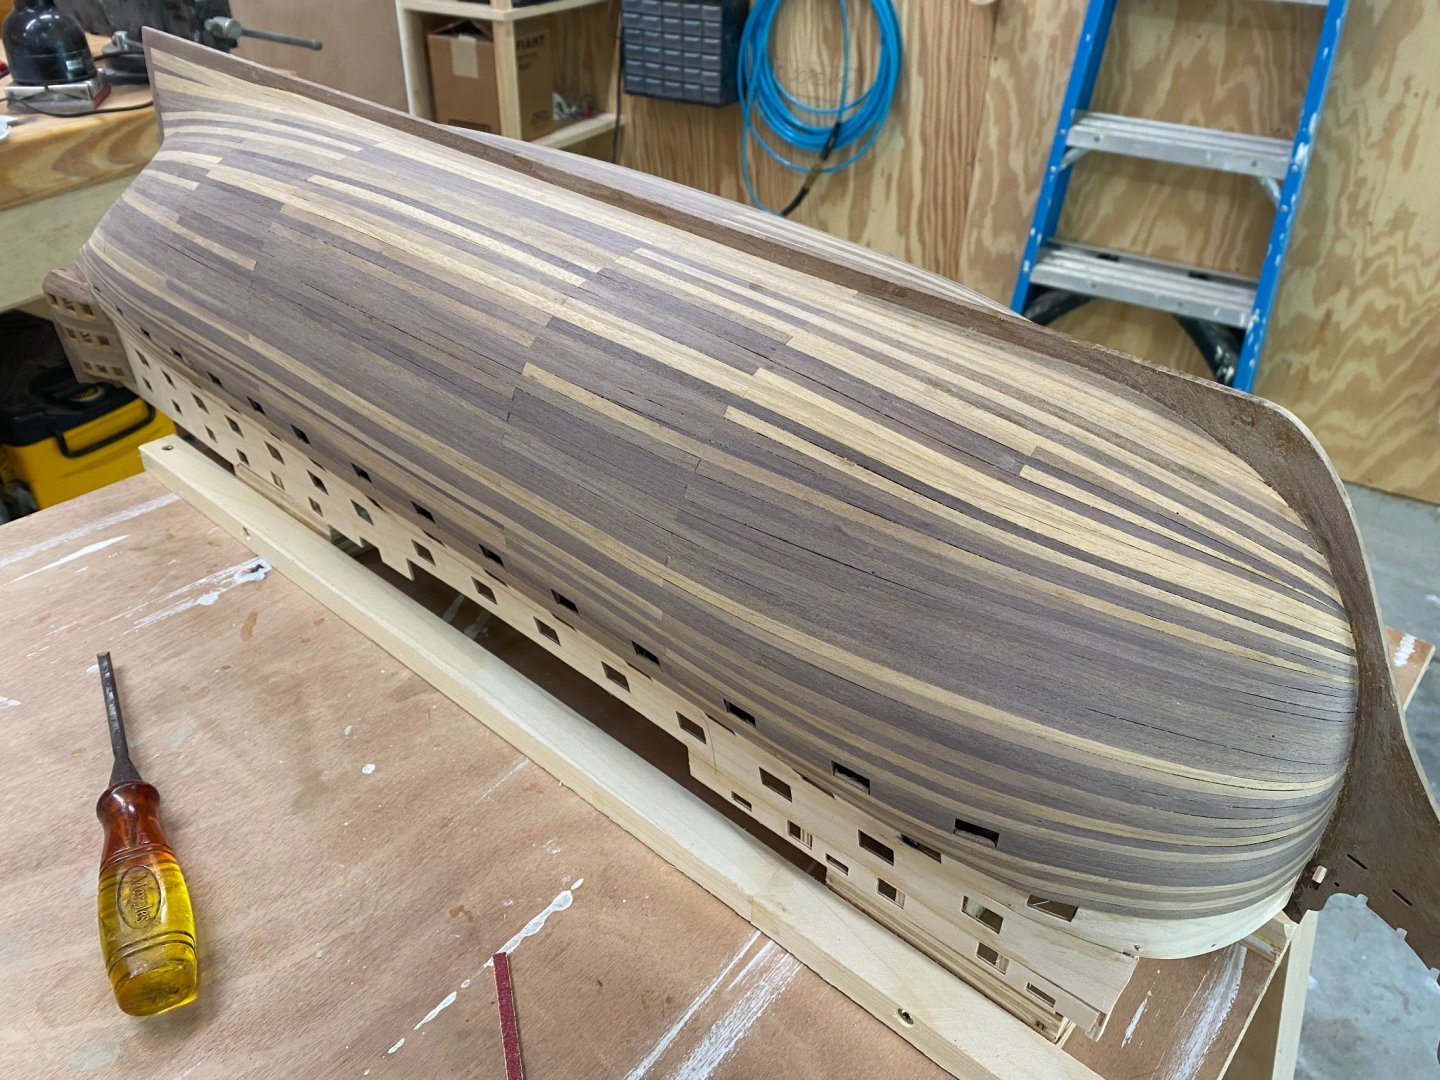
Thank you both! Chris - Very cool canoe; and I'll be keeping an eye on your PWS-10 build as well. Ben - Your Sherbourne model looks incredible. Such clean, concise lines! I really appreciate your input and encouragement. I went into the planking with the best of intentions, but even after reading and understanding everything available, my plank symmetry and uniform width plan never made it past about the 5th strake. At least I wound up with a straight keel. See below for today's final shot. After sanding all planking flush with 120#, I mixed some walnut filler to sour cream consistency before working it in to the hull with some gloves and an old credit card. While waiting for the filler to dry, it occurred to me that the brass double door hinge straps (See photos above) at the stern were going to need to come off for two reasons: They were a mess! - "Free-handing" these into place with tweezers just isn't going to cut it. Next time I'll try placing them with tape. On second thought, and contrary to the build manual, I think it would be far easier to paint that stern area first rather than having to paint around them. After the filler dried, I sanded again, ending at a final grit of 2000 this time. Ben - How do you get a uniform amount of glue on each tile? I have never done it before, but it would seem too little wouldn't be good and too much would be worse. Or is this a case of just try it a few times and I'll get it?
-
Hi All, I just joined today after starting a build several months ago and would greatly appreciate any and all input. Questions for everyone: Would one or two of you be willing to act a as mentor for this build? Caldercraft seems to be a tad vague sometimes about when to paint what for example. Does anyone have any specific suggestions regarding hull treatments before I install the copper tiles? Do I need to apply a thin hand-rubbed coat of polyurethane first? If so, water-base or oil? I found an assembly guide for copper tiling DeAgostini's kit. They recommend using a glue from England. (Solvent-free contact adhesive.) What does this equate to here in the States? I'm looking for something in stock at my local Home Depot. Thank you Guys!


-
Hi All, Thank you for allowing me to join. I have a confession to make right out of the gate. I suspect the moderator(s) (ccoyle) started his "For Beginners -- A Cautionary Tale" thread with me in mind. After being captivated by some of the big museum quality model sailing ships I saw as kid, I decided to try building one on my own. Why not go big I thought! After all, the smaller ones aren't nearly as impressive. I recently surprised myself by successfully installing some shelves in our bathroom closet, so, I'm obviously more than qualified, and it would be a shame to let all this new-found hubristic confidence go to waste. (I thought again...) Hmmm... HMS Victory looks really cool! 'Shame Amati still has not released their 1:64 scale; DeAgostini's kit is only 1:84 scale, and their manuals seem to include very detailed instructions with far too many photos that leave almost no room for that sense of "creative freedom" I so cherish. This is how I became the proud (and upon opening the box, extremely intimidated) owner of a JoTiKa Caldercraft HMS Victory kit. Please note that while all member commentary is welcome here on this specific subject, (Not to mention admittedly deserved.) my wife of many years has already addressed me about this with what she considers to be both a necessary and commensurate level of alacrity, volume, and redundancy. (ad nauseam) That said, I am enjoying the build of my first ship, have finished second planking, and will be starting a build log tonight with current photos. I have questions and greatly appreciate everyone's input and guidance. 😉
- 11 replies
-
- 12
-