


Dan Vadas
-
Posts
3,261 -
Joined
-
Last visited
Reputation Activity
-

 Dan Vadas got a reaction from CaptainSteve in HMS Vulture 1776 by Dan Vadas - FINISHED - 1:48 scale - 16-gun Swan-class sloop from TFFM plans
Trucks
I gave a bit of thought on the easiest way to make the Trucks (wheels) without resorting to using dowel - the grain would run the wrong way, although at this scale it would be difficult to pick the difference.
The Trucks are 4" thick, the Hind Trucks are 10.5" in diameter and the Fore Trucks are 12" diameter. On larger guns they were made from four pieces of timber with the grain running crosswise to each other and bolted together, but a 6-pounder's trucks were made from one solid piece.
I started off by cutting a strip of timber a little wider than the required diameter. I set up a simple stopper jig on my mill vice by CA'ing a couple of pieces of scrap to the top and drilling the 2mm centre hole. Then I cut the piece off square on the table saw.
To hold the piece into the lathe for turning the outside diameter I used a spare mandrel from my Dremel accessories. The screw was only 1.7mm, so I turned up a small brass sleeve to give a snug fit to the hole. When tightened it held the piece of timber beautifully.
I found it difficult to remove the truck from the mandrel, so I drilled a slightly smaller hole than the truck in a piece of scrap. By placing the piece over the hole I could easily remove it by pushing it into the hole :
There was a burr on one side of each piece after turning it, so to hold the rather awkward round piece without damaging it while sanding I drilled another hole in my piece of scrap which was slightly larger than the diameter of the truck and a bit less than it's thickness. The piece protrudes slightly from this hole, and a couple of wipes with a sanding stick soon removes the burr :
A view of the progress so far. The carriage sits on top of a 5 cent piece :
Danny
-
 Dan Vadas got a reaction from SkerryAmp in HMS Vulture 1776 by Dan Vadas - FINISHED - 1:48 scale - 16-gun Swan-class sloop from TFFM plans
Trucks
I gave a bit of thought on the easiest way to make the Trucks (wheels) without resorting to using dowel - the grain would run the wrong way, although at this scale it would be difficult to pick the difference.
The Trucks are 4" thick, the Hind Trucks are 10.5" in diameter and the Fore Trucks are 12" diameter. On larger guns they were made from four pieces of timber with the grain running crosswise to each other and bolted together, but a 6-pounder's trucks were made from one solid piece.
I started off by cutting a strip of timber a little wider than the required diameter. I set up a simple stopper jig on my mill vice by CA'ing a couple of pieces of scrap to the top and drilling the 2mm centre hole. Then I cut the piece off square on the table saw.
To hold the piece into the lathe for turning the outside diameter I used a spare mandrel from my Dremel accessories. The screw was only 1.7mm, so I turned up a small brass sleeve to give a snug fit to the hole. When tightened it held the piece of timber beautifully.
I found it difficult to remove the truck from the mandrel, so I drilled a slightly smaller hole than the truck in a piece of scrap. By placing the piece over the hole I could easily remove it by pushing it into the hole :
There was a burr on one side of each piece after turning it, so to hold the rather awkward round piece without damaging it while sanding I drilled another hole in my piece of scrap which was slightly larger than the diameter of the truck and a bit less than it's thickness. The piece protrudes slightly from this hole, and a couple of wipes with a sanding stick soon removes the burr :
A view of the progress so far. The carriage sits on top of a 5 cent piece :
Danny
-
 Dan Vadas got a reaction from mtaylor in HMS Vulture 1776 by Dan Vadas - FINISHED - 1:48 scale - 16-gun Swan-class sloop from TFFM plans
Thank you Greg, Adrieke, Mark, Randy and JP .
Mark, I have absolutely no plans to build a 74 - 16 guns (well, half of them ) is more than enough . In fact, I doubt I'll be doing another 18th Century or earlier ship - I might get into a few "working ships/boats" like Tugs or Offshore Supply vessels, maybe a modern battleship .... we'll see.
Danny
-
 Dan Vadas got a reaction from Jeronimo in HMS Vulture 1776 by Dan Vadas - FINISHED - 1:48 scale - 16-gun Swan-class sloop from TFFM plans
Trucks
I gave a bit of thought on the easiest way to make the Trucks (wheels) without resorting to using dowel - the grain would run the wrong way, although at this scale it would be difficult to pick the difference.
The Trucks are 4" thick, the Hind Trucks are 10.5" in diameter and the Fore Trucks are 12" diameter. On larger guns they were made from four pieces of timber with the grain running crosswise to each other and bolted together, but a 6-pounder's trucks were made from one solid piece.
I started off by cutting a strip of timber a little wider than the required diameter. I set up a simple stopper jig on my mill vice by CA'ing a couple of pieces of scrap to the top and drilling the 2mm centre hole. Then I cut the piece off square on the table saw.
To hold the piece into the lathe for turning the outside diameter I used a spare mandrel from my Dremel accessories. The screw was only 1.7mm, so I turned up a small brass sleeve to give a snug fit to the hole. When tightened it held the piece of timber beautifully.
I found it difficult to remove the truck from the mandrel, so I drilled a slightly smaller hole than the truck in a piece of scrap. By placing the piece over the hole I could easily remove it by pushing it into the hole :
There was a burr on one side of each piece after turning it, so to hold the rather awkward round piece without damaging it while sanding I drilled another hole in my piece of scrap which was slightly larger than the diameter of the truck and a bit less than it's thickness. The piece protrudes slightly from this hole, and a couple of wipes with a sanding stick soon removes the burr :
A view of the progress so far. The carriage sits on top of a 5 cent piece :
Danny
-
 Dan Vadas got a reaction from Sjors in HMS Vulture 1776 by Dan Vadas - FINISHED - 1:48 scale - 16-gun Swan-class sloop from TFFM plans
Trucks
I gave a bit of thought on the easiest way to make the Trucks (wheels) without resorting to using dowel - the grain would run the wrong way, although at this scale it would be difficult to pick the difference.
The Trucks are 4" thick, the Hind Trucks are 10.5" in diameter and the Fore Trucks are 12" diameter. On larger guns they were made from four pieces of timber with the grain running crosswise to each other and bolted together, but a 6-pounder's trucks were made from one solid piece.
I started off by cutting a strip of timber a little wider than the required diameter. I set up a simple stopper jig on my mill vice by CA'ing a couple of pieces of scrap to the top and drilling the 2mm centre hole. Then I cut the piece off square on the table saw.
To hold the piece into the lathe for turning the outside diameter I used a spare mandrel from my Dremel accessories. The screw was only 1.7mm, so I turned up a small brass sleeve to give a snug fit to the hole. When tightened it held the piece of timber beautifully.
I found it difficult to remove the truck from the mandrel, so I drilled a slightly smaller hole than the truck in a piece of scrap. By placing the piece over the hole I could easily remove it by pushing it into the hole :
There was a burr on one side of each piece after turning it, so to hold the rather awkward round piece without damaging it while sanding I drilled another hole in my piece of scrap which was slightly larger than the diameter of the truck and a bit less than it's thickness. The piece protrudes slightly from this hole, and a couple of wipes with a sanding stick soon removes the burr :
A view of the progress so far. The carriage sits on top of a 5 cent piece :
Danny
-
 Dan Vadas got a reaction from jaerschen in HMS Vulture 1776 by Dan Vadas - FINISHED - 1:48 scale - 16-gun Swan-class sloop from TFFM plans
Trucks
I gave a bit of thought on the easiest way to make the Trucks (wheels) without resorting to using dowel - the grain would run the wrong way, although at this scale it would be difficult to pick the difference.
The Trucks are 4" thick, the Hind Trucks are 10.5" in diameter and the Fore Trucks are 12" diameter. On larger guns they were made from four pieces of timber with the grain running crosswise to each other and bolted together, but a 6-pounder's trucks were made from one solid piece.
I started off by cutting a strip of timber a little wider than the required diameter. I set up a simple stopper jig on my mill vice by CA'ing a couple of pieces of scrap to the top and drilling the 2mm centre hole. Then I cut the piece off square on the table saw.
To hold the piece into the lathe for turning the outside diameter I used a spare mandrel from my Dremel accessories. The screw was only 1.7mm, so I turned up a small brass sleeve to give a snug fit to the hole. When tightened it held the piece of timber beautifully.
I found it difficult to remove the truck from the mandrel, so I drilled a slightly smaller hole than the truck in a piece of scrap. By placing the piece over the hole I could easily remove it by pushing it into the hole :
There was a burr on one side of each piece after turning it, so to hold the rather awkward round piece without damaging it while sanding I drilled another hole in my piece of scrap which was slightly larger than the diameter of the truck and a bit less than it's thickness. The piece protrudes slightly from this hole, and a couple of wipes with a sanding stick soon removes the burr :
A view of the progress so far. The carriage sits on top of a 5 cent piece :
Danny
-
Dan Vadas got a reaction from CaptainSteve in HMS Vulture 1776 by Dan Vadas - FINISHED - 1:48 scale - 16-gun Swan-class sloop from TFFM plans
Thanks Mark, Kevin, Aldo and Druxey.
Carriage Assembly Jig
I've made up a jig to assemble the carriages, I can do four at a time.
The one in the foreground is completed (for now), three are glued together in the jig, and one is being set up :
Danny
-
 Dan Vadas got a reaction from ikkypaul in How To : Add Pictures in your Posts and PMs
How To Add Pictures in your Posts and PMs
1. Open the Edit Box by clicking the "Edit" at the bottom of the Post :
2. Click on the "Full Editor" button :
3. Click on the "Choose Files" button :
This will open a Dialog Box to your Computer Files. Select the picture file you want to add and click "Save" (or "Open") to upload the picture.
4. Place the Cursor where you want the picture added. You can use the Icons (circled) to position it on the line :
5. Click on the "Add to Post" text under the Thumbnail of the picture. This adds the Attachment Code into the message at the position you selected :
6. You can add more Text after the picture if you want, or add more pictures (limit of 8 per Post).
7. Click on the "Submit" button. You can use the "Preview" button to make sure your layout is OK before clicking Submit. If you need to Edit your Post again simply restart the process by clicking on "Edit" again. You MUST use the "Full Editor" to post extra Pictures.
A view of the completed Post with Text and Picture Added :
.
PLEASE NOTE THAT THIS TUTORIAL IS FROM THE PREVIOUS VERSION OF MSW AND NO LONGER WORKS AS DESCRIBED. AN UPDATED VERSION WILL BE POSTED SHORTLY.
-
 Dan Vadas got a reaction from cabrapente in HMS Vulture 1776 by Dan Vadas - FINISHED - 1:48 scale - 16-gun Swan-class sloop from TFFM plans
Thanks Mark, Kevin, Aldo and Druxey.
Carriage Assembly Jig
I've made up a jig to assemble the carriages, I can do four at a time.
The one in the foreground is completed (for now), three are glued together in the jig, and one is being set up :
Danny
-
 Dan Vadas got a reaction from sonicmcdude in HMS Vulture 1776 by Dan Vadas - FINISHED - 1:48 scale - 16-gun Swan-class sloop from TFFM plans
Thanks Mark, Kevin, Aldo and Druxey.
Carriage Assembly Jig
I've made up a jig to assemble the carriages, I can do four at a time.
The one in the foreground is completed (for now), three are glued together in the jig, and one is being set up :
Danny
-
 Dan Vadas got a reaction from ianmajor in HMS Vulture 1776 by Dan Vadas - FINISHED - 1:48 scale - 16-gun Swan-class sloop from TFFM plans
Thanks Mark, Kevin, Aldo and Druxey.
Carriage Assembly Jig
I've made up a jig to assemble the carriages, I can do four at a time.
The one in the foreground is completed (for now), three are glued together in the jig, and one is being set up :
Danny
-
Dan Vadas got a reaction from jaerschen in HMS Vulture 1776 by Dan Vadas - FINISHED - 1:48 scale - 16-gun Swan-class sloop from TFFM plans
Thanks Mark, Kevin, Aldo and Druxey.
Carriage Assembly Jig
I've made up a jig to assemble the carriages, I can do four at a time.
The one in the foreground is completed (for now), three are glued together in the jig, and one is being set up :
Danny
-
Dan Vadas got a reaction from Sjors in HMS Vulture 1776 by Dan Vadas - FINISHED - 1:48 scale - 16-gun Swan-class sloop from TFFM plans
Thanks Mark, Kevin, Aldo and Druxey.
Carriage Assembly Jig
I've made up a jig to assemble the carriages, I can do four at a time.
The one in the foreground is completed (for now), three are glued together in the jig, and one is being set up :
Danny
-
Dan Vadas got a reaction from mtaylor in HMS Vulture 1776 by Dan Vadas - FINISHED - 1:48 scale - 16-gun Swan-class sloop from TFFM plans
Thanks Mark, Kevin, Aldo and Druxey.
Carriage Assembly Jig
I've made up a jig to assemble the carriages, I can do four at a time.
The one in the foreground is completed (for now), three are glued together in the jig, and one is being set up :
Danny
-
Dan Vadas reacted to gjdale in HMS Victory by gjdale - FINISHED - Mamoli - Scale 1:90
Hi all,
A bit of progress to report at last.
First up, the re-do on the paint job. As you can see from these first few photos, I've managed to get it back to where it was, but this time with successfully applied DullCote finish (four coats).
Then at last it was time to install the previously made footwalling, along with the risers and some framework to support the grating in the bow and the stern platform:
I then made up some grating using some Boxwood pre-milled for me by Jeff at HobbyMill. I gave the grating a contrasting border in Swiss Pear. Note the larger square hole in the grating - this is to take the bowsprit step and will have a matching hole in the thwart above it. In the stern, you will see the step for the davit. This was made from walnut, with a Pear frame around it.
Here you can see the first thwart installed, with the square hole cut into it for the bowsprit step:
And finally, the addition of the rest of the thwarts. Note the third thwart from the bow with the mast support and four holes for belaying pins. All of the internals have been given a coat of sanding sealer.
That brings me up to date - with enough photos to keep you know who happy for at least a week!
Next job will be fit the stern sheets, knees (maybe!), windlass, and then the cap rail. I made a windlass today, but I guess it says something about the size of this little beast that I now can't find it!!!!!
-
 Dan Vadas got a reaction from aykutansin in HMS Vulture 1776 by Dan Vadas - FINISHED - 1:48 scale - 16-gun Swan-class sloop from TFFM plans
Thanks for looking in again Janos, Brian, Sjors, Grant, Mark and Ian.
Janos, the guns are cast in brass, not bronze. I've never used pewter so far, so I don't know anything about blackening it.
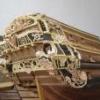
Drilling the Bolt Holes
Apart from the already drilled capsquare holes there are another 8 holes to drill in each bracket for various bolts and eyebolts. To assure precision placement of each hole I made a jig to hold the bracket from some pine board and scrap planking. I set the mill to the first hole, drilled all 16 of them and then reset for the second hole etc. There are three 0.5mm holes for the Breeching and Training Tackle eyebolts, and two 0.7mm holes for the Bed Bolt and Transom Bolt :
The jig was also used to accurately scribe the join between the upper and lower halves of the brackets using the back (blunt) edge of an Xacto. A pair of stops aligned the steel rule
:
I used the same setup as for the capsquare holes to drill the three 0.7mm holes for the bracket bolts :
Danny
-
 Dan Vadas got a reaction from gjdale in HMS Vulture 1776 by Dan Vadas - FINISHED - 1:48 scale - 16-gun Swan-class sloop from TFFM plans
Axletrees
The Hind Axletree should have had a pair of rebates where it fits up to the bracket, but I decided not to show that feature as it would look identical to the way I have rebated them anyway. It was much easier to simply enlarge the rebates in the brackets.
I had a few attempts at turning the stub axles into the trees. As I had to use a 4-jaw chuck it wasn't all that successful, at least time-wise (it took to long to accurately set them up). I came up with the idea of drilling the ends of the trees with the mill and inserting two lengths of 2mm dowel (these were trimmed down off the longer lengths after gluing) - perfect results and it didn't take very long at all . There is a small step on the inboard end of each axle to prevent the Truck from fouling the bracket. I cut these on the Byrnes saw :
The Fore Axletrees are a different size and shape to the hind ones. I made them in similar fashion, once again using the saw to cut the spacing rebate :
Danny
-
Dan Vadas got a reaction from Sjors in HMS Vulture 1776 by Dan Vadas - FINISHED - 1:48 scale - 16-gun Swan-class sloop from TFFM plans
Axletrees
The Hind Axletree should have had a pair of rebates where it fits up to the bracket, but I decided not to show that feature as it would look identical to the way I have rebated them anyway. It was much easier to simply enlarge the rebates in the brackets.
I had a few attempts at turning the stub axles into the trees. As I had to use a 4-jaw chuck it wasn't all that successful, at least time-wise (it took to long to accurately set them up). I came up with the idea of drilling the ends of the trees with the mill and inserting two lengths of 2mm dowel (these were trimmed down off the longer lengths after gluing) - perfect results and it didn't take very long at all . There is a small step on the inboard end of each axle to prevent the Truck from fouling the bracket. I cut these on the Byrnes saw :
The Fore Axletrees are a different size and shape to the hind ones. I made them in similar fashion, once again using the saw to cut the spacing rebate :
Danny
-
Dan Vadas got a reaction from mtaylor in HMS Vulture 1776 by Dan Vadas - FINISHED - 1:48 scale - 16-gun Swan-class sloop from TFFM plans
Axletrees
The Hind Axletree should have had a pair of rebates where it fits up to the bracket, but I decided not to show that feature as it would look identical to the way I have rebated them anyway. It was much easier to simply enlarge the rebates in the brackets.
I had a few attempts at turning the stub axles into the trees. As I had to use a 4-jaw chuck it wasn't all that successful, at least time-wise (it took to long to accurately set them up). I came up with the idea of drilling the ends of the trees with the mill and inserting two lengths of 2mm dowel (these were trimmed down off the longer lengths after gluing) - perfect results and it didn't take very long at all . There is a small step on the inboard end of each axle to prevent the Truck from fouling the bracket. I cut these on the Byrnes saw :
The Fore Axletrees are a different size and shape to the hind ones. I made them in similar fashion, once again using the saw to cut the spacing rebate :
Danny
-
 Dan Vadas got a reaction from Ferit in HMS Vulture 1776 by Dan Vadas - FINISHED - 1:48 scale - 16-gun Swan-class sloop from TFFM plans
Axletrees
The Hind Axletree should have had a pair of rebates where it fits up to the bracket, but I decided not to show that feature as it would look identical to the way I have rebated them anyway. It was much easier to simply enlarge the rebates in the brackets.
I had a few attempts at turning the stub axles into the trees. As I had to use a 4-jaw chuck it wasn't all that successful, at least time-wise (it took to long to accurately set them up). I came up with the idea of drilling the ends of the trees with the mill and inserting two lengths of 2mm dowel (these were trimmed down off the longer lengths after gluing) - perfect results and it didn't take very long at all . There is a small step on the inboard end of each axle to prevent the Truck from fouling the bracket. I cut these on the Byrnes saw :
The Fore Axletrees are a different size and shape to the hind ones. I made them in similar fashion, once again using the saw to cut the spacing rebate :
Danny
-
 Dan Vadas got a reaction from JPett in HMS Vulture 1776 by Dan Vadas - FINISHED - 1:48 scale - 16-gun Swan-class sloop from TFFM plans
Thanks for looking in again Janos, Brian, Sjors, Grant, Mark and Ian.
Janos, the guns are cast in brass, not bronze. I've never used pewter so far, so I don't know anything about blackening it.
Drilling the Bolt Holes
Apart from the already drilled capsquare holes there are another 8 holes to drill in each bracket for various bolts and eyebolts. To assure precision placement of each hole I made a jig to hold the bracket from some pine board and scrap planking. I set the mill to the first hole, drilled all 16 of them and then reset for the second hole etc. There are three 0.5mm holes for the Breeching and Training Tackle eyebolts, and two 0.7mm holes for the Bed Bolt and Transom Bolt :
The jig was also used to accurately scribe the join between the upper and lower halves of the brackets using the back (blunt) edge of an Xacto. A pair of stops aligned the steel rule
:
I used the same setup as for the capsquare holes to drill the three 0.7mm holes for the bracket bolts :
Danny
-
 Dan Vadas got a reaction from janos in HMS Vulture 1776 by Dan Vadas - FINISHED - 1:48 scale - 16-gun Swan-class sloop from TFFM plans
Thanks for looking in again Janos, Brian, Sjors, Grant, Mark and Ian.
Janos, the guns are cast in brass, not bronze. I've never used pewter so far, so I don't know anything about blackening it.
Drilling the Bolt Holes
Apart from the already drilled capsquare holes there are another 8 holes to drill in each bracket for various bolts and eyebolts. To assure precision placement of each hole I made a jig to hold the bracket from some pine board and scrap planking. I set the mill to the first hole, drilled all 16 of them and then reset for the second hole etc. There are three 0.5mm holes for the Breeching and Training Tackle eyebolts, and two 0.7mm holes for the Bed Bolt and Transom Bolt :
The jig was also used to accurately scribe the join between the upper and lower halves of the brackets using the back (blunt) edge of an Xacto. A pair of stops aligned the steel rule
:
I used the same setup as for the capsquare holes to drill the three 0.7mm holes for the bracket bolts :
Danny
-
Dan Vadas got a reaction from mtaylor in HMS Vulture 1776 by Dan Vadas - FINISHED - 1:48 scale - 16-gun Swan-class sloop from TFFM plans
Thanks for looking in again Janos, Brian, Sjors, Grant, Mark and Ian.
Janos, the guns are cast in brass, not bronze. I've never used pewter so far, so I don't know anything about blackening it.
Drilling the Bolt Holes
Apart from the already drilled capsquare holes there are another 8 holes to drill in each bracket for various bolts and eyebolts. To assure precision placement of each hole I made a jig to hold the bracket from some pine board and scrap planking. I set the mill to the first hole, drilled all 16 of them and then reset for the second hole etc. There are three 0.5mm holes for the Breeching and Training Tackle eyebolts, and two 0.7mm holes for the Bed Bolt and Transom Bolt :
The jig was also used to accurately scribe the join between the upper and lower halves of the brackets using the back (blunt) edge of an Xacto. A pair of stops aligned the steel rule
:
I used the same setup as for the capsquare holes to drill the three 0.7mm holes for the bracket bolts :
Danny
-
-