HOLIDAY DONATION DRIVE - SUPPORT MSW - DO YOUR PART TO KEEP THIS GREAT FORUM GOING! (Only 13 donations so far - C'mon guys!)
×


mrangus
-
Posts
232 -
Joined
-
Last visited
Content Type
Profiles
Forums
Gallery
Events
Everything posted by mrangus
-
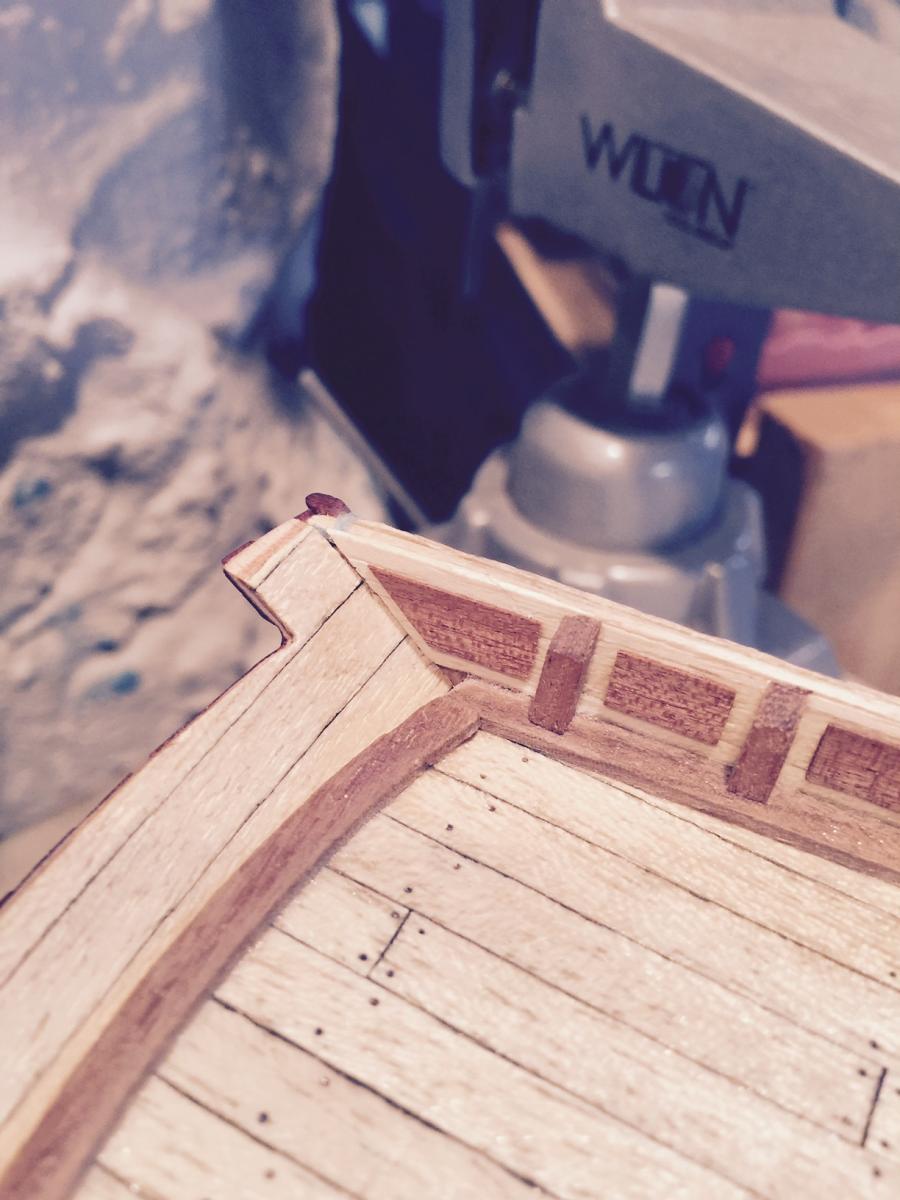
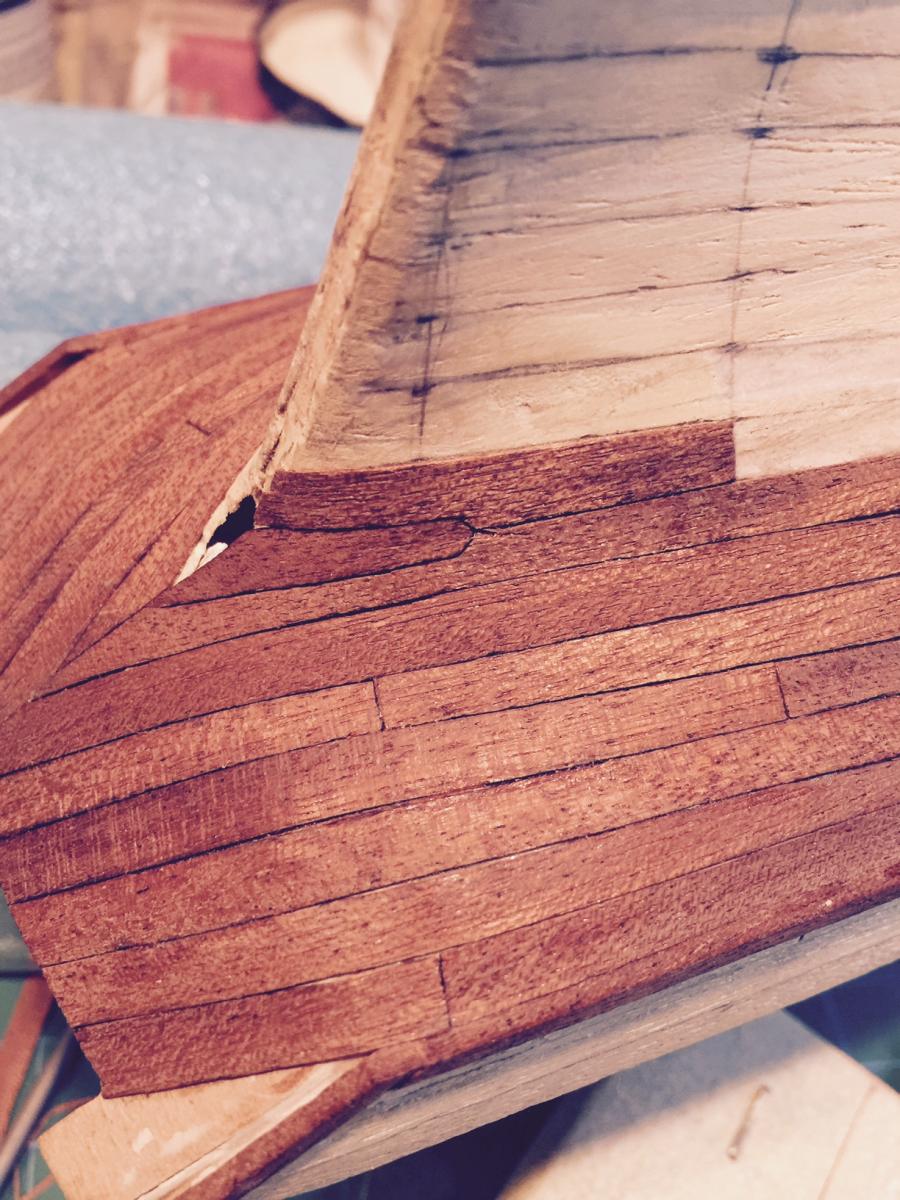
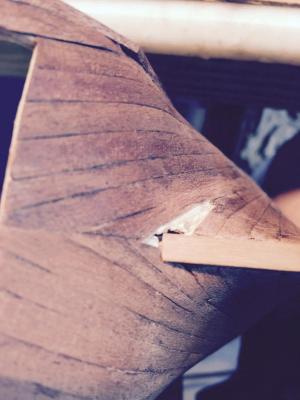
 Fixed the paneling yesterday where I had cut the end of the bulwark at the wrong angle. Looks a little better....

- 389 replies
-
- 2
-

-
- scottish maid
- artesania latina
- (and 1 more)
-
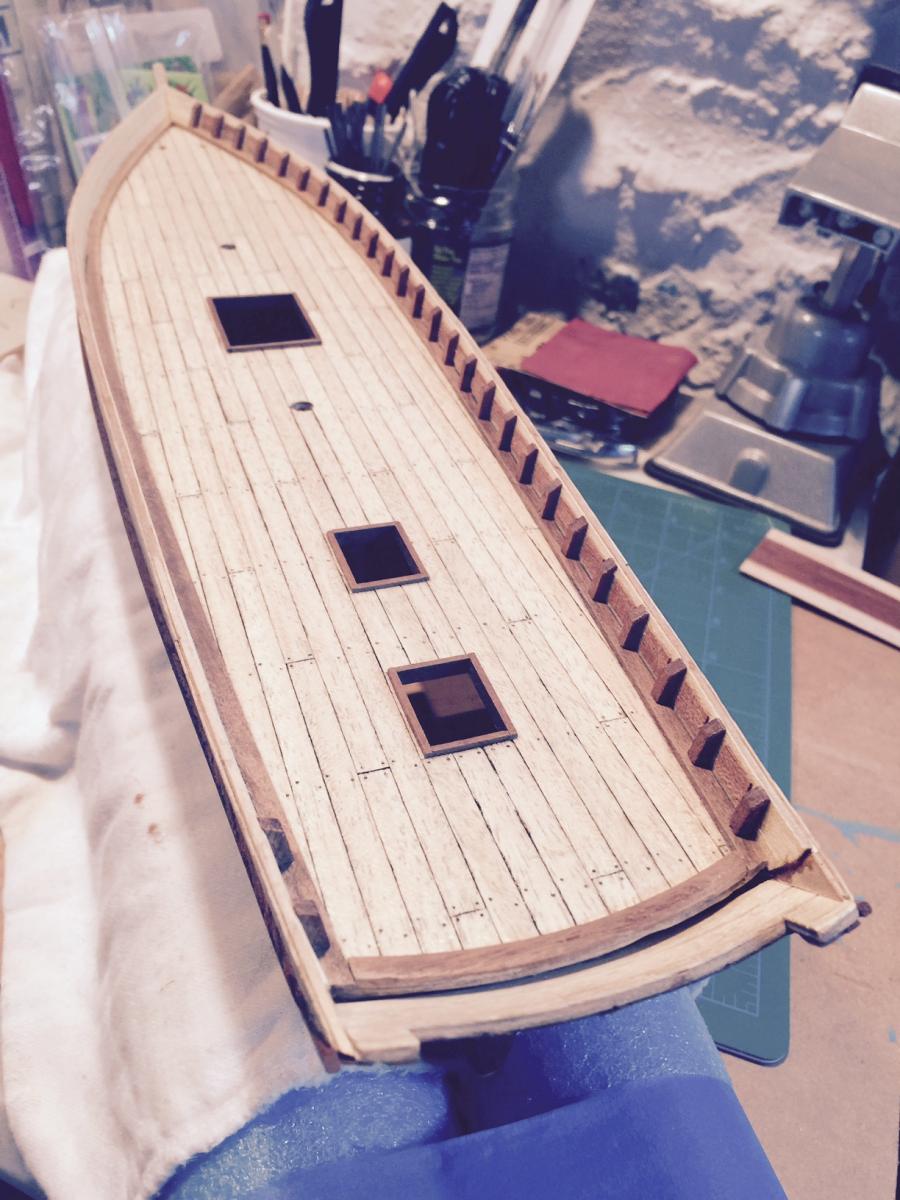
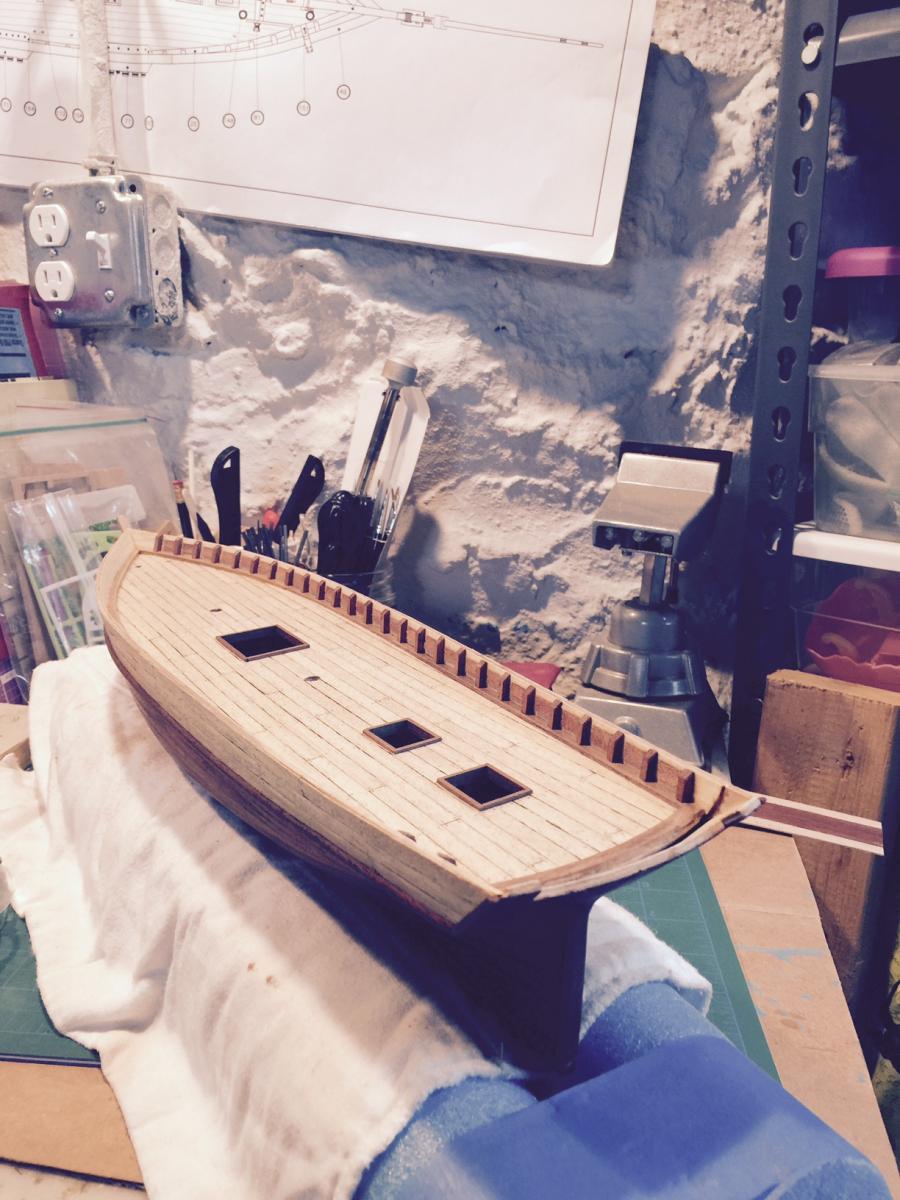
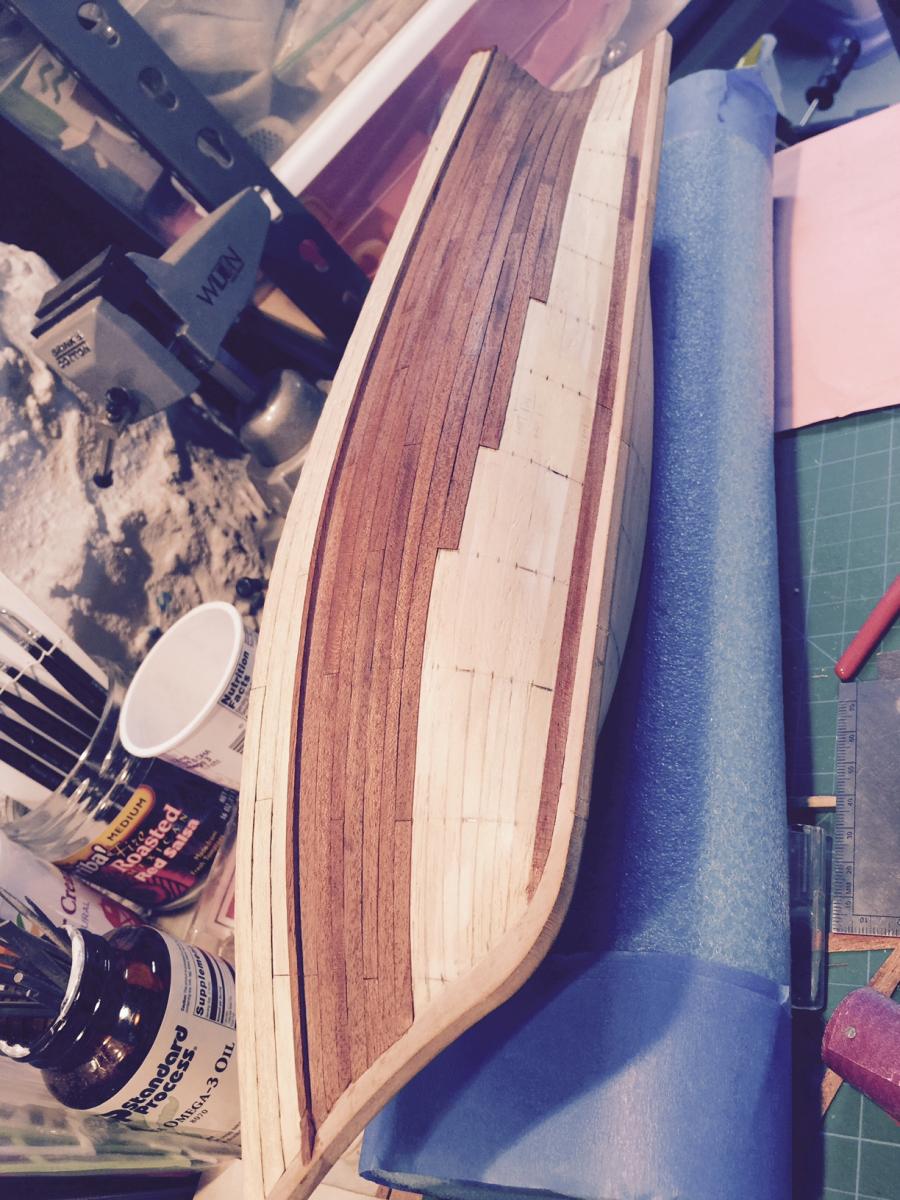
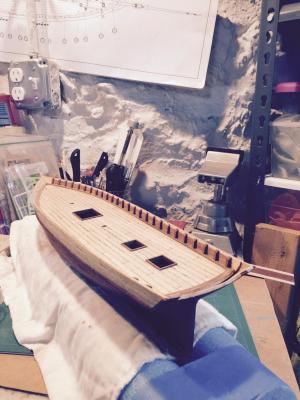
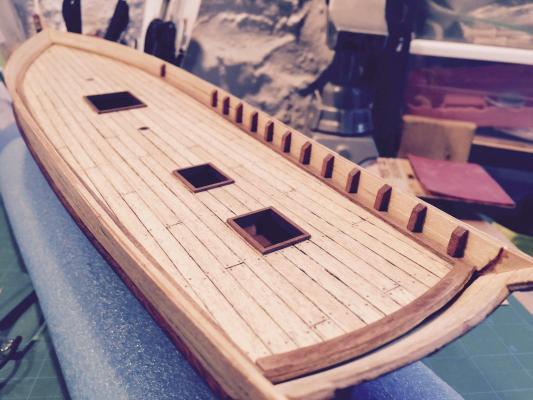
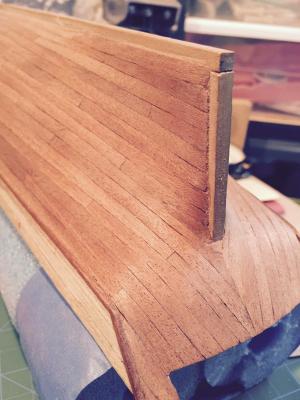
Finished the timberheads and panels between the timberheads. Looks ok... I think when it's a bit hidden it will look better... So my rudimentary list of todos for next time include: - small repair where I cut the bulwarks off too short - need to add a little planking in the corner. - bend the African walnut planks for the gunwales - sand down the edges of the gunwales to give a curved look. - fit remaining panels - keep square or contour to the space they belong in? - sand down timberheads to fit gunwales - figure out color of gunwales (stain? oil?)

- 389 replies
-
- 3
-
-
- scottish maid
- artesania latina
- (and 1 more)
-
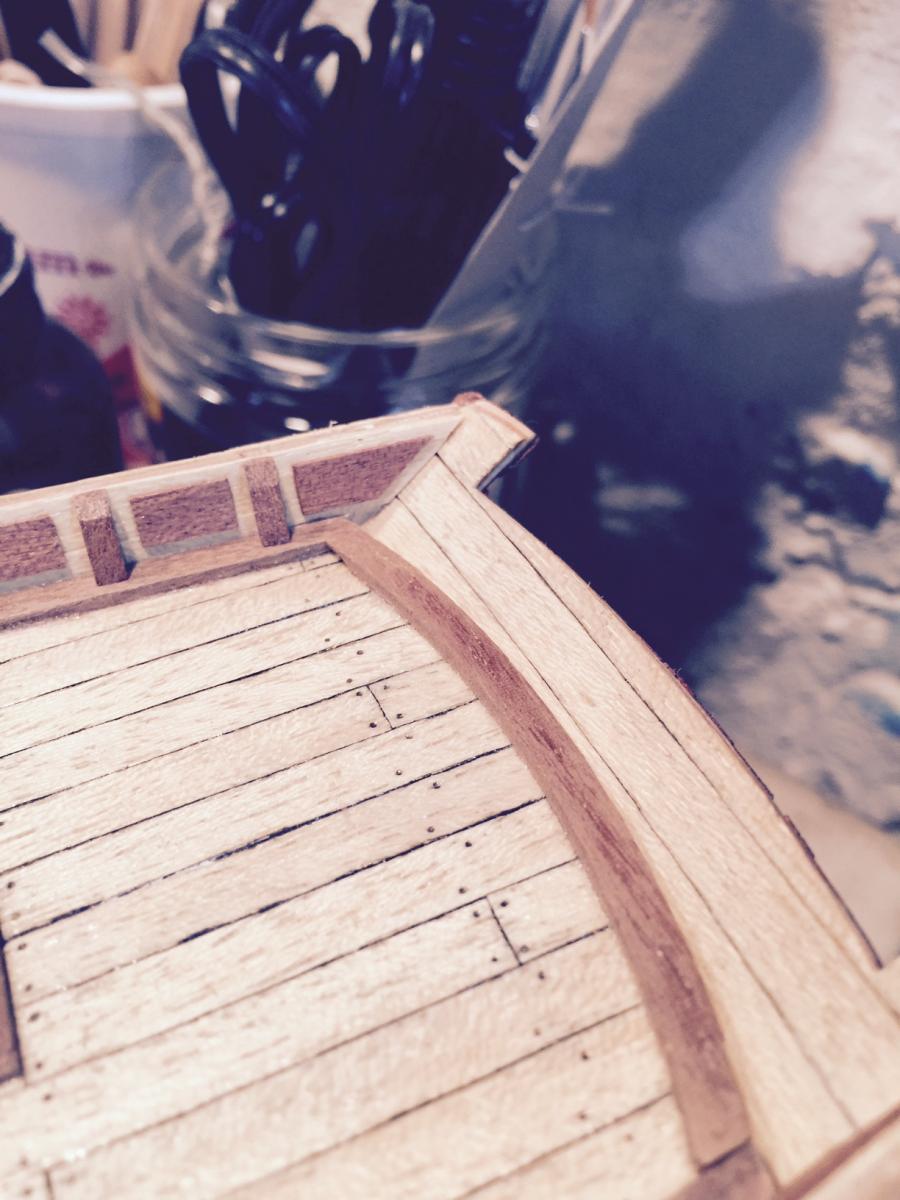
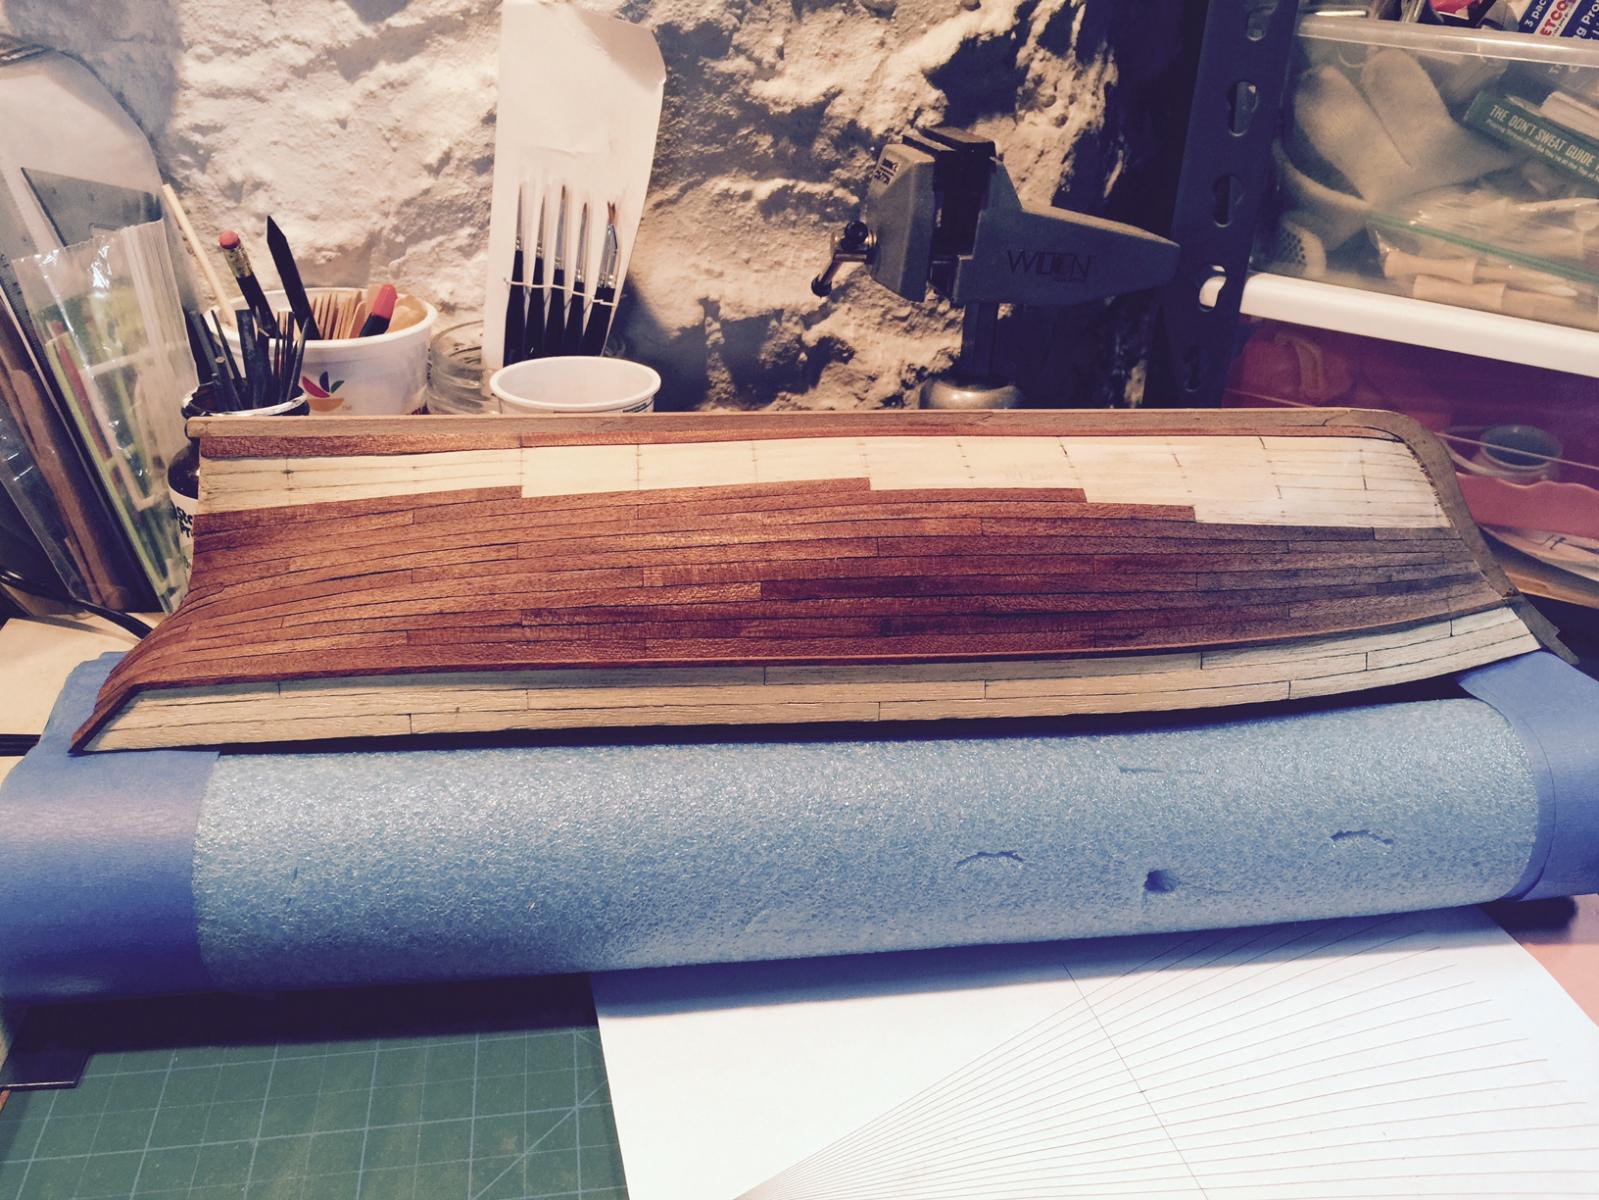
Got a little more done this weekend between family and house work. had to fix the gap between the inner bulwark planks with some thin pieces of mulaki. looks reasonable, the varying height across the bulwark is evident now with the decorative planks on. I was torn between placing them and not, in the end I thought it would look ok with the planks - though I respect Jesse's concern about historical accuracy. It helps hide some of the inner planking woes A few pics:

- 389 replies
-
- 3
-
-
- scottish maid
- artesania latina
- (and 1 more)
-
Looks great. amazing what a pencil/graphite can be used for in modeling. It helped me with the tar between planks, very easy to do.
-
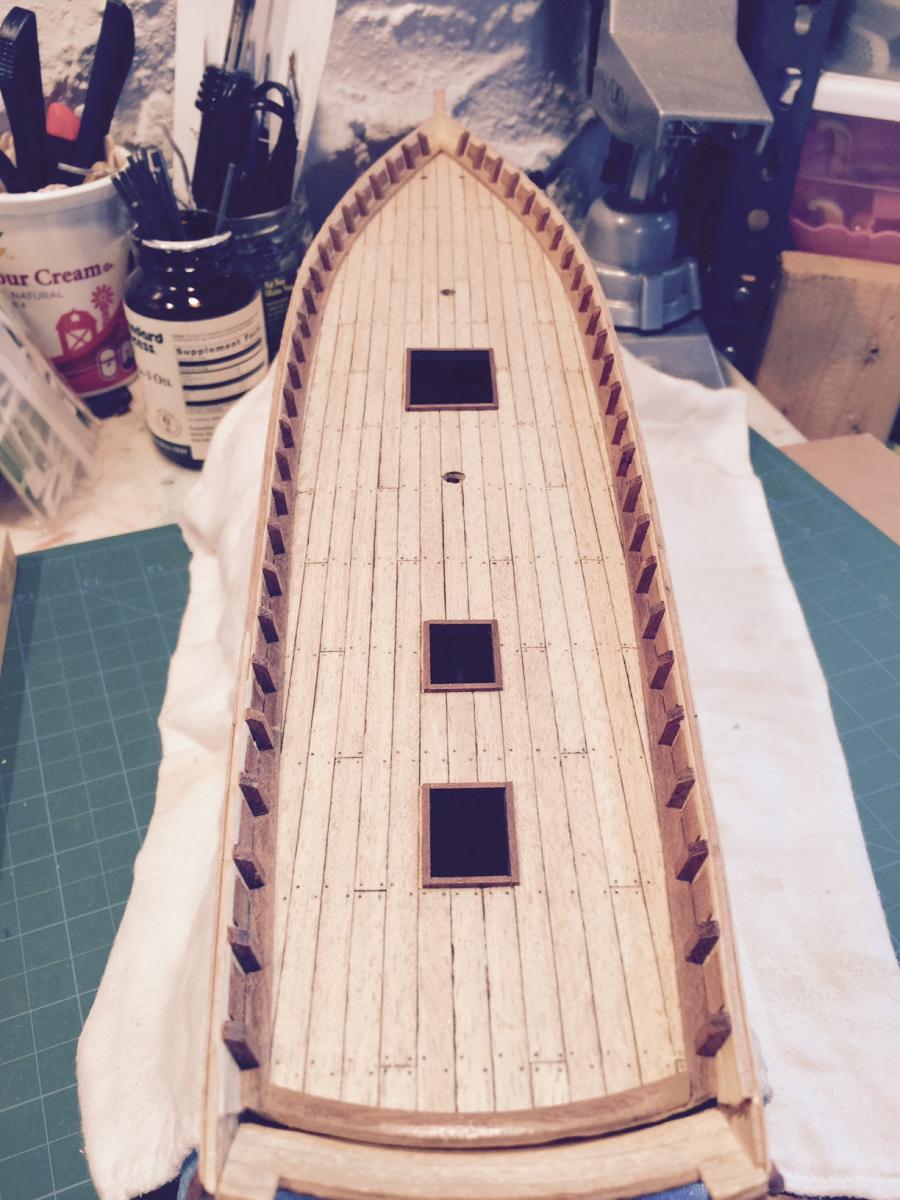
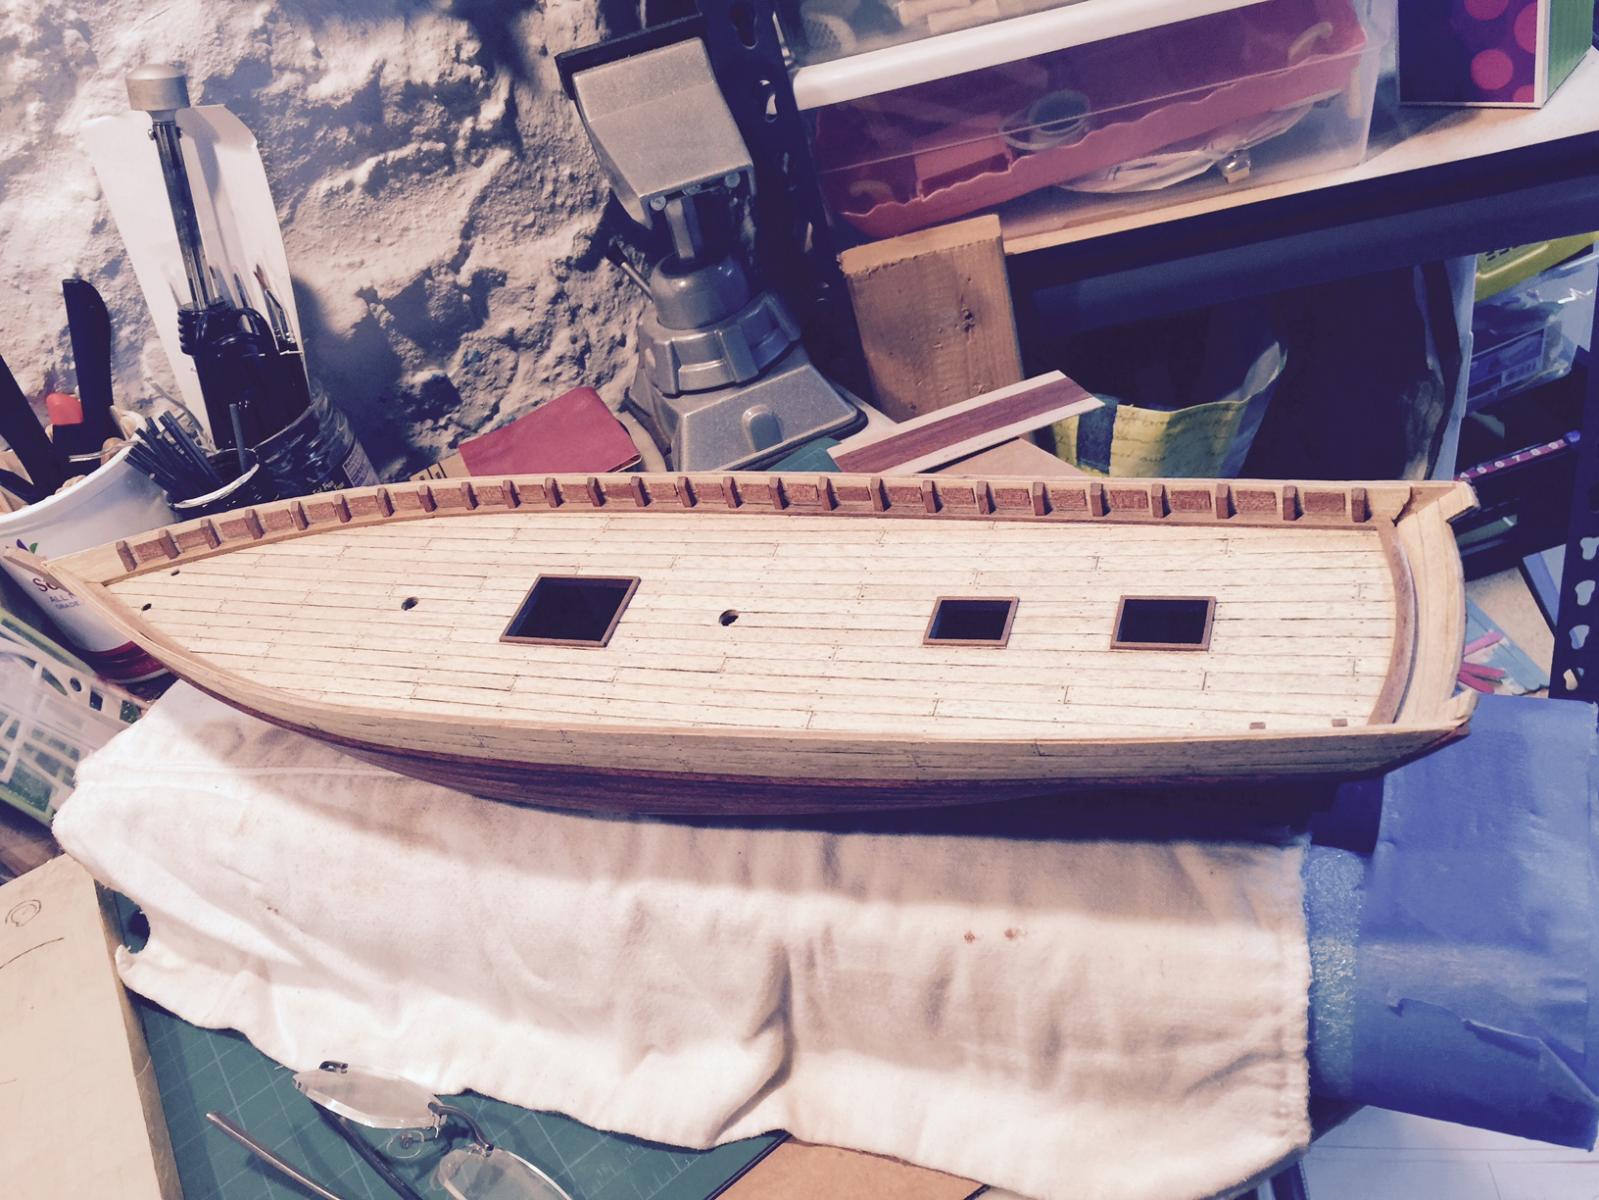
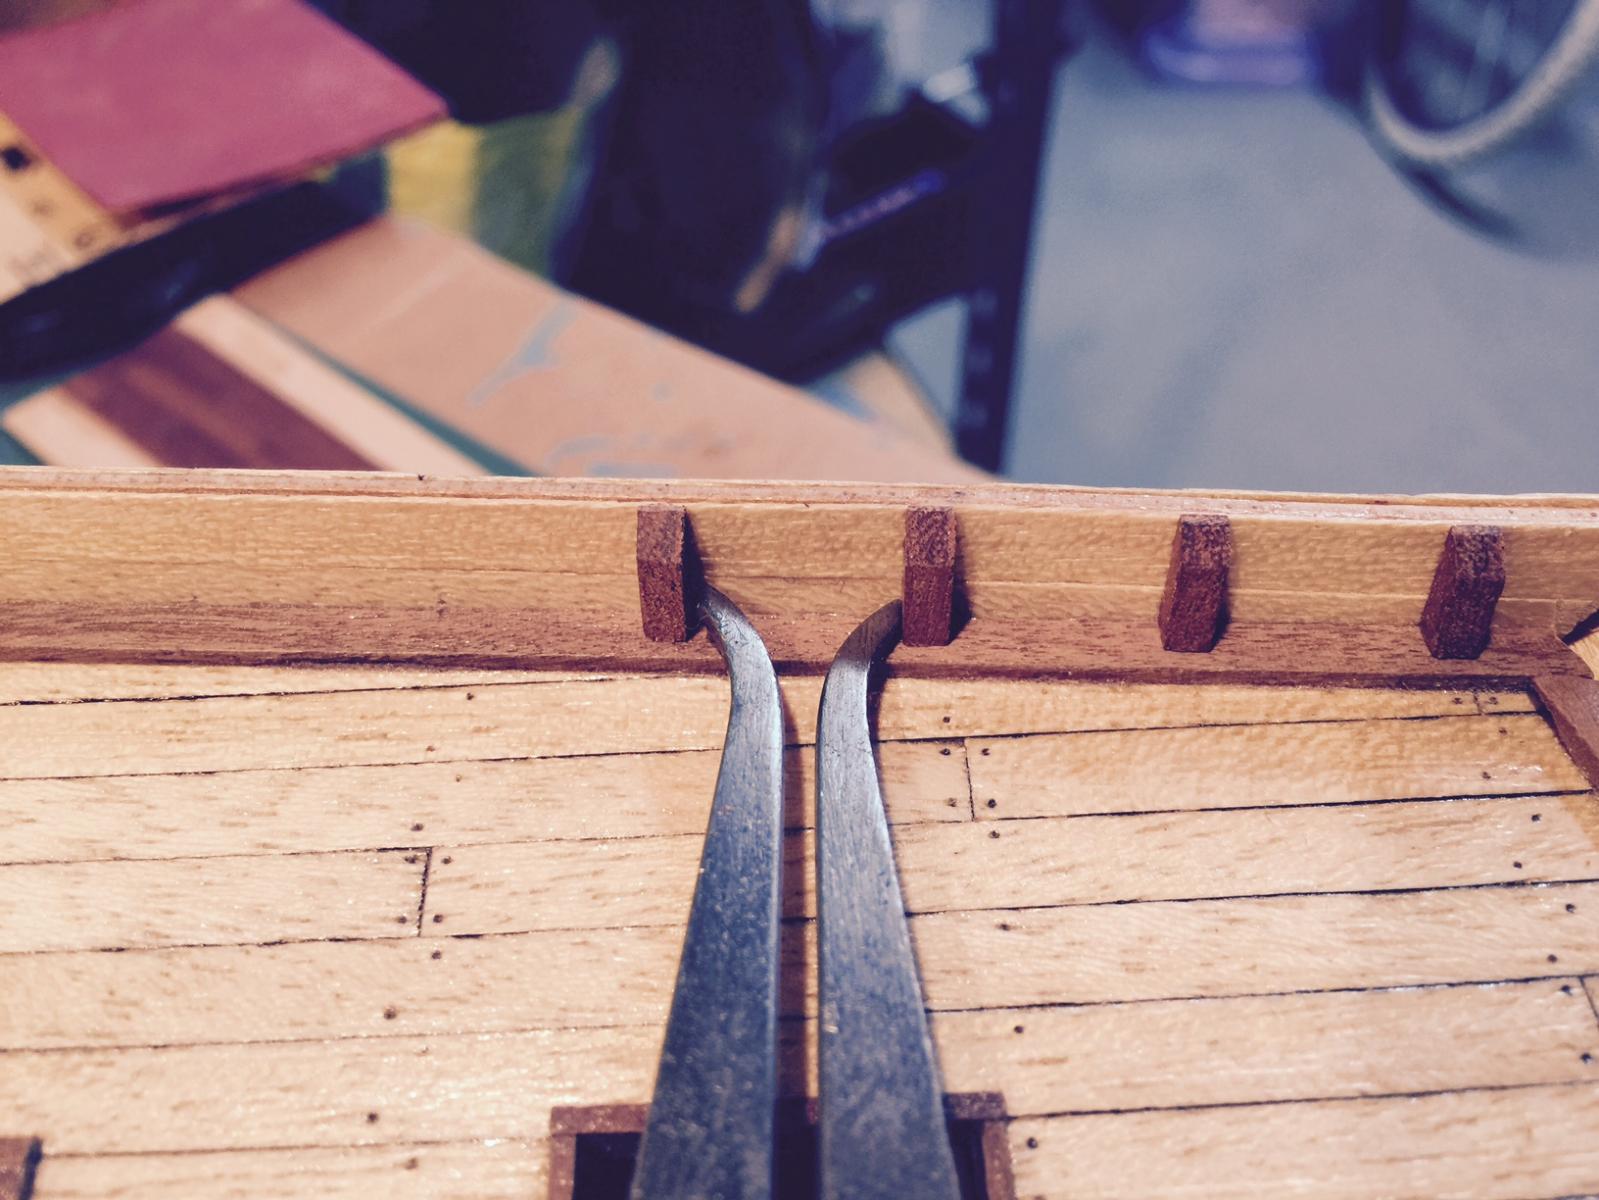
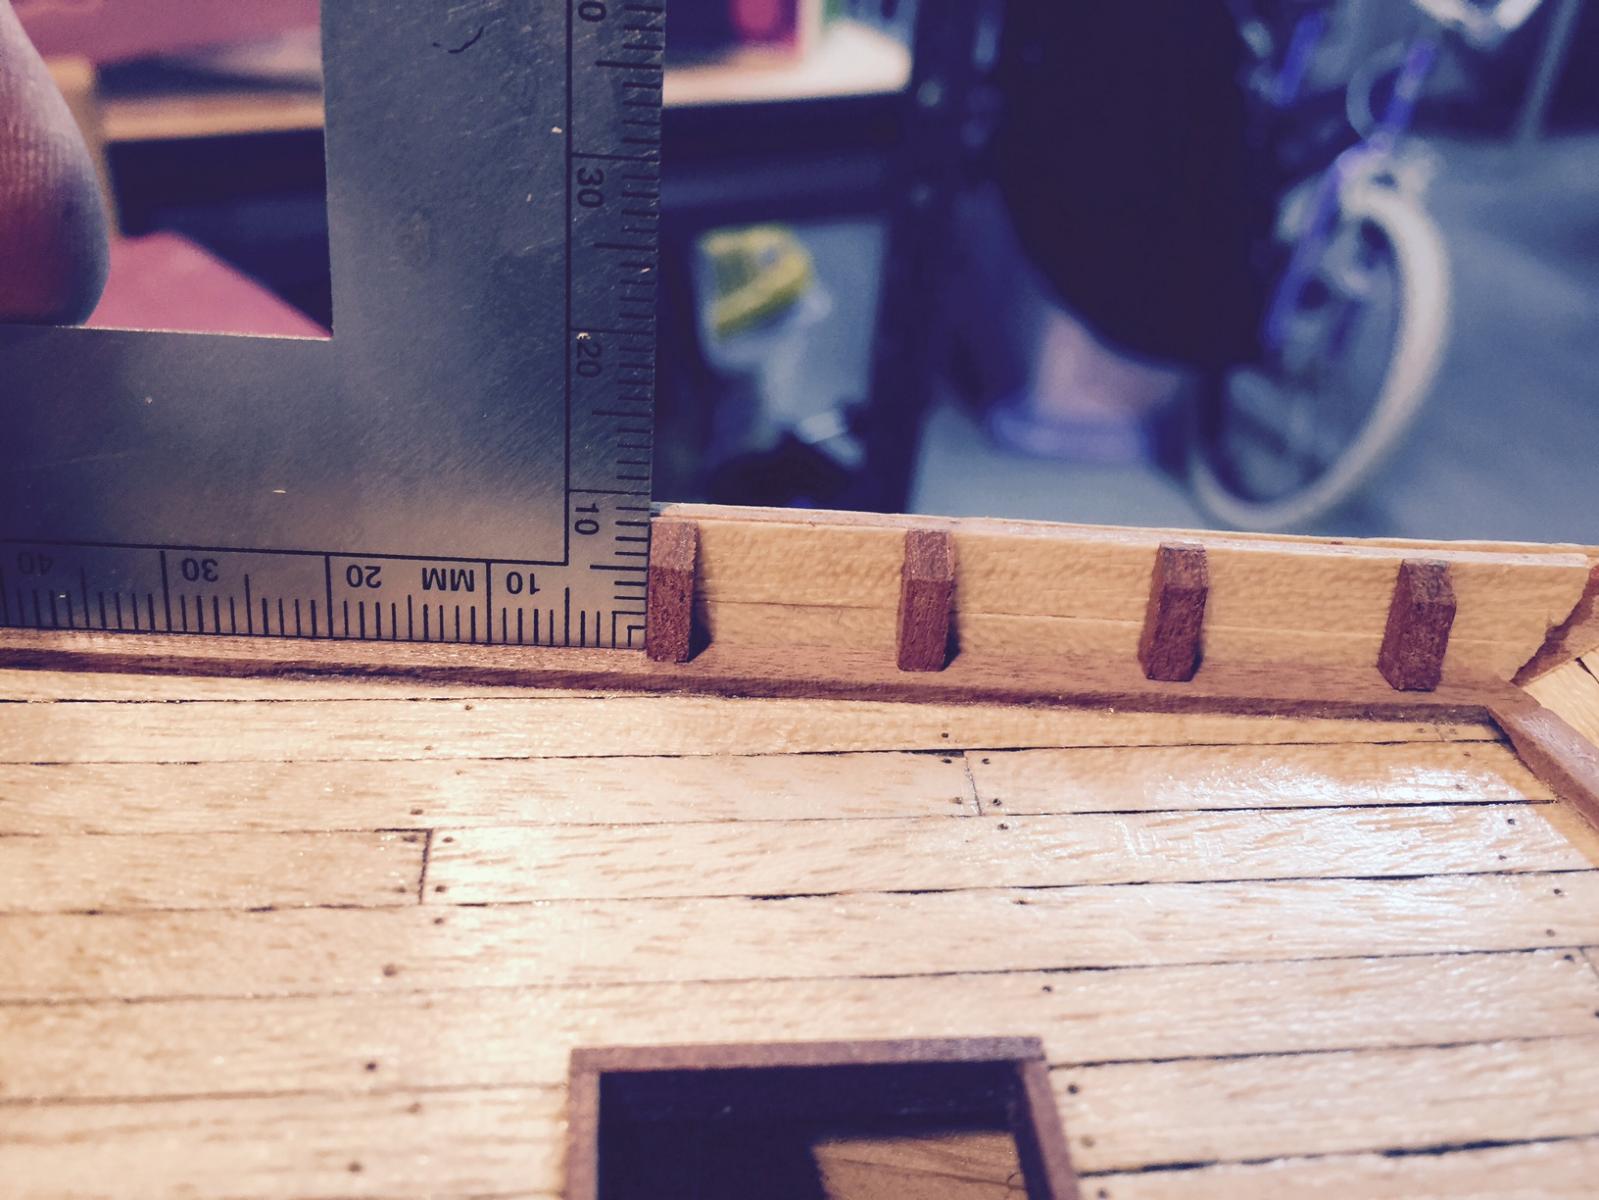
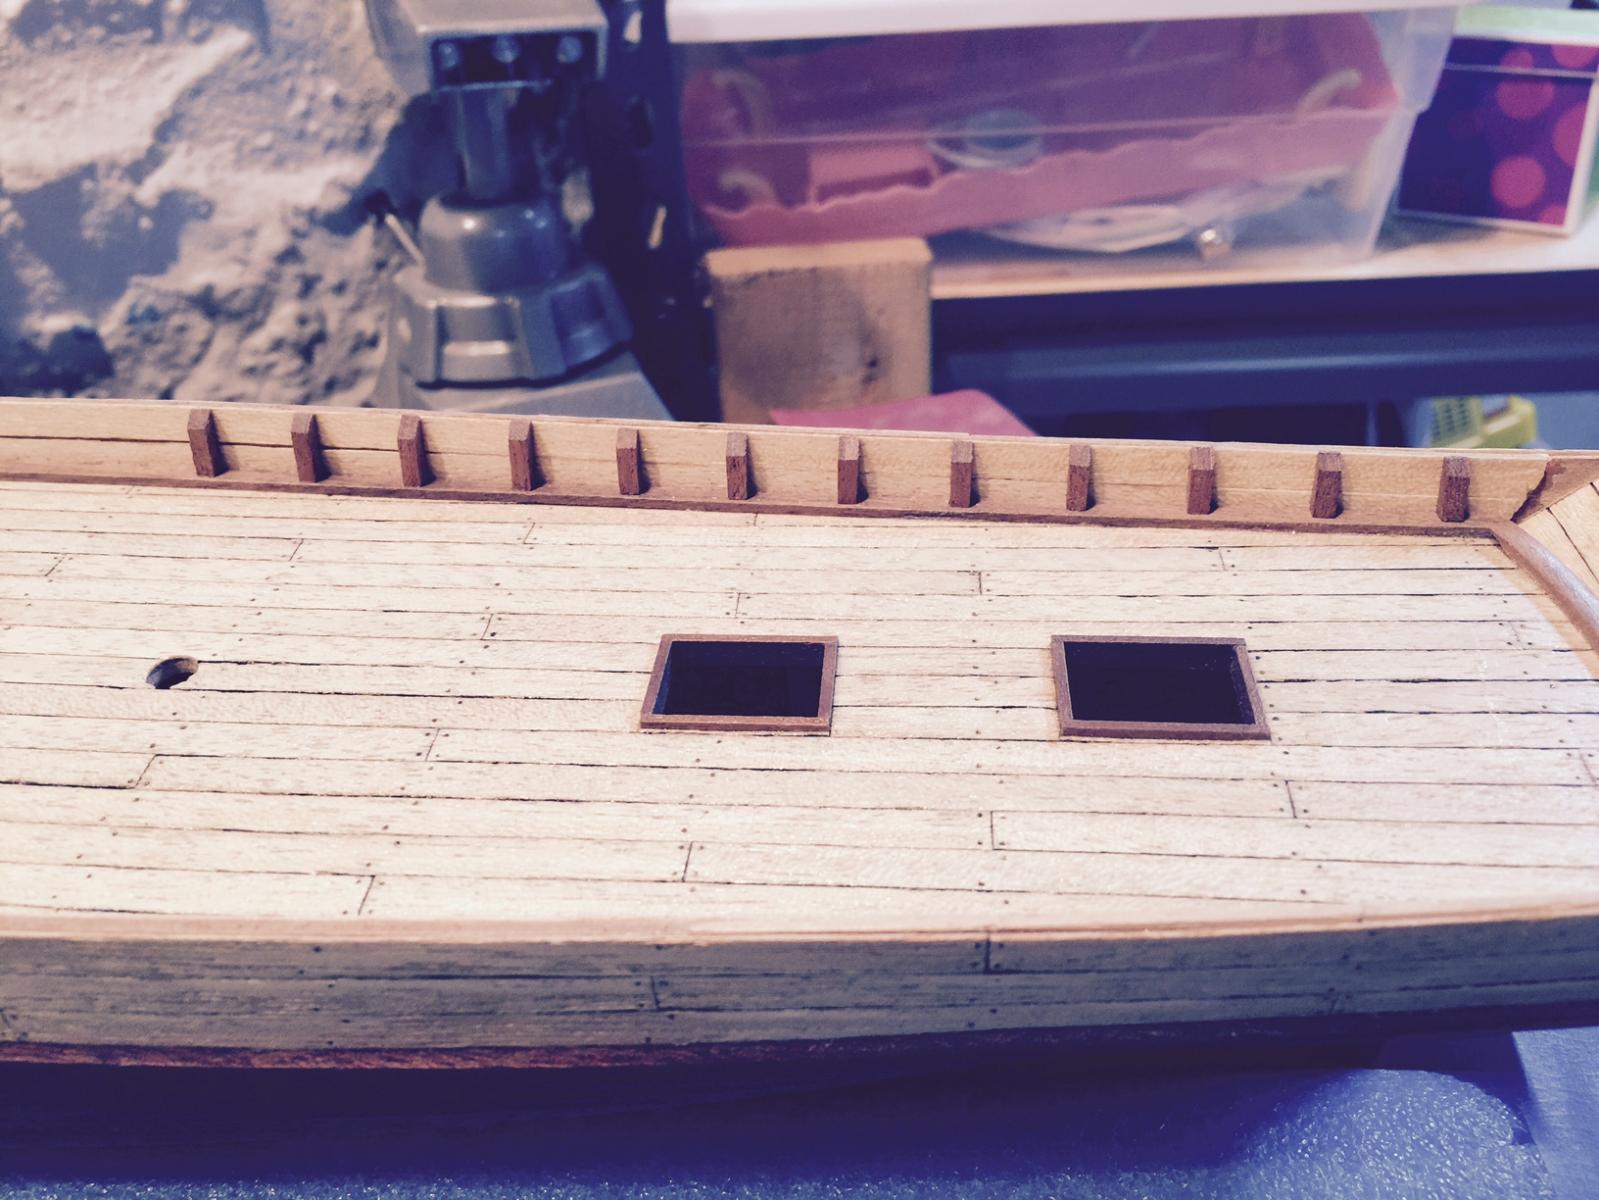
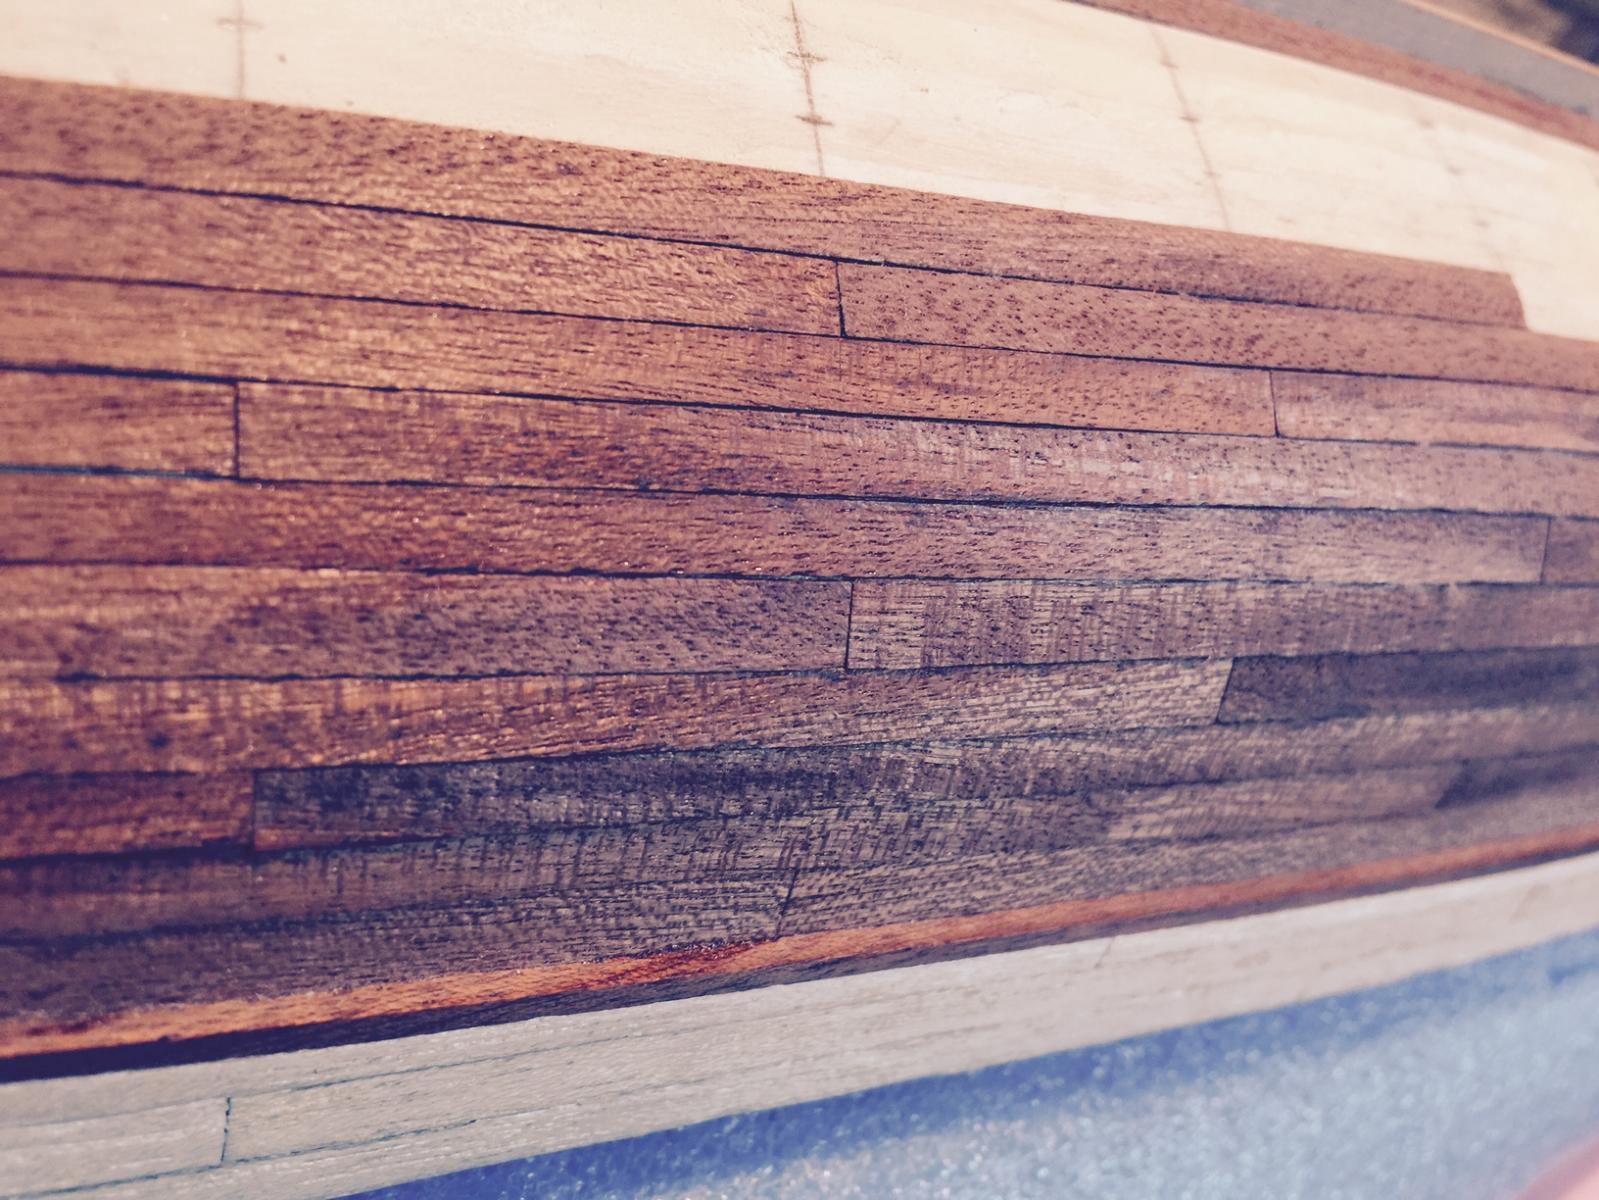
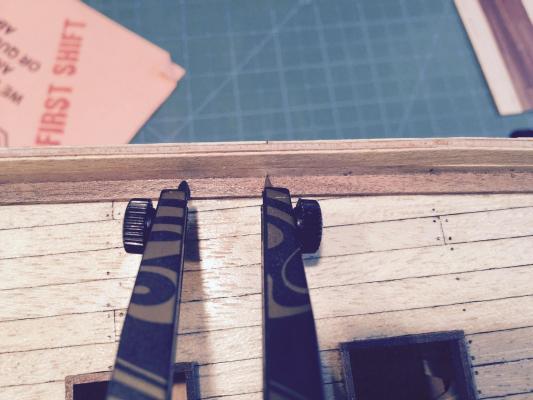
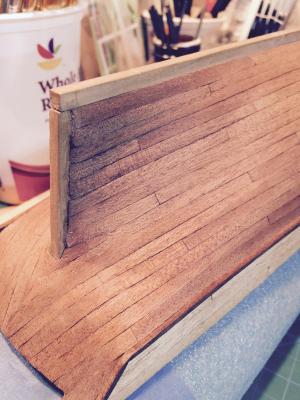
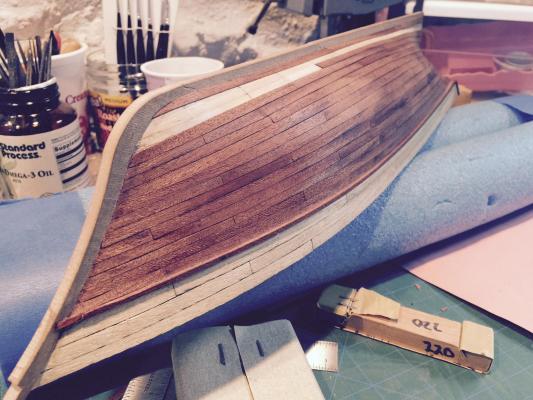
More accomplished tonight. I had gone down to put another coat of tung oil on, and 3 hours later.... Decided to add treenails to the bulwark planks, since they are a different color and would stand out nicely. also put a coat of varnish on top of the planks and got a nasty little splinter under the fingernail while doing that. ouch. Not being satisfied with progress, I also started on the timberheads. marked out the spacing with a protractor (which I gave to my daughter afterward and she promptly broke it ) cut, shaped and added 10 or so timberheads. The bulwarks aren't completely even height so I'm measuring and cutting each one individually. Being very careful with measurements to try to keep even spacing. The one rogue timberhead is one that was slightly short, but fit better further down the bulwark. ...and then I added a coat of tung oil. Take a look... GL - thanks for the advice on the drill hole - I will certainly take that advice when I come to that step (hopefully soon).


- 389 replies
-
- 4
-
-
- scottish maid
- artesania latina
- (and 1 more)
-
I ordered the boxwood blocks, 4mm. also ordered a set of drill bits for the 4mm rudder post hole, it's a bit disturbing that I have to put a great big hole in a piece of work I spent hours on! Any advice on how to avoid making a splintered mess of the situation?
- 389 replies
-
- 1
-
-
- scottish maid
- artesania latina
- (and 1 more)
-
Boxwood or Pear Blocks? As I'm getting closer to needing blocks, I'm thinking about getting nicer ones (Chuck's). Boxwood or Pear? What do you think would make sense for this ship?
- 389 replies
-
- 1
-
-
- scottish maid
- artesania latina
- (and 1 more)
-
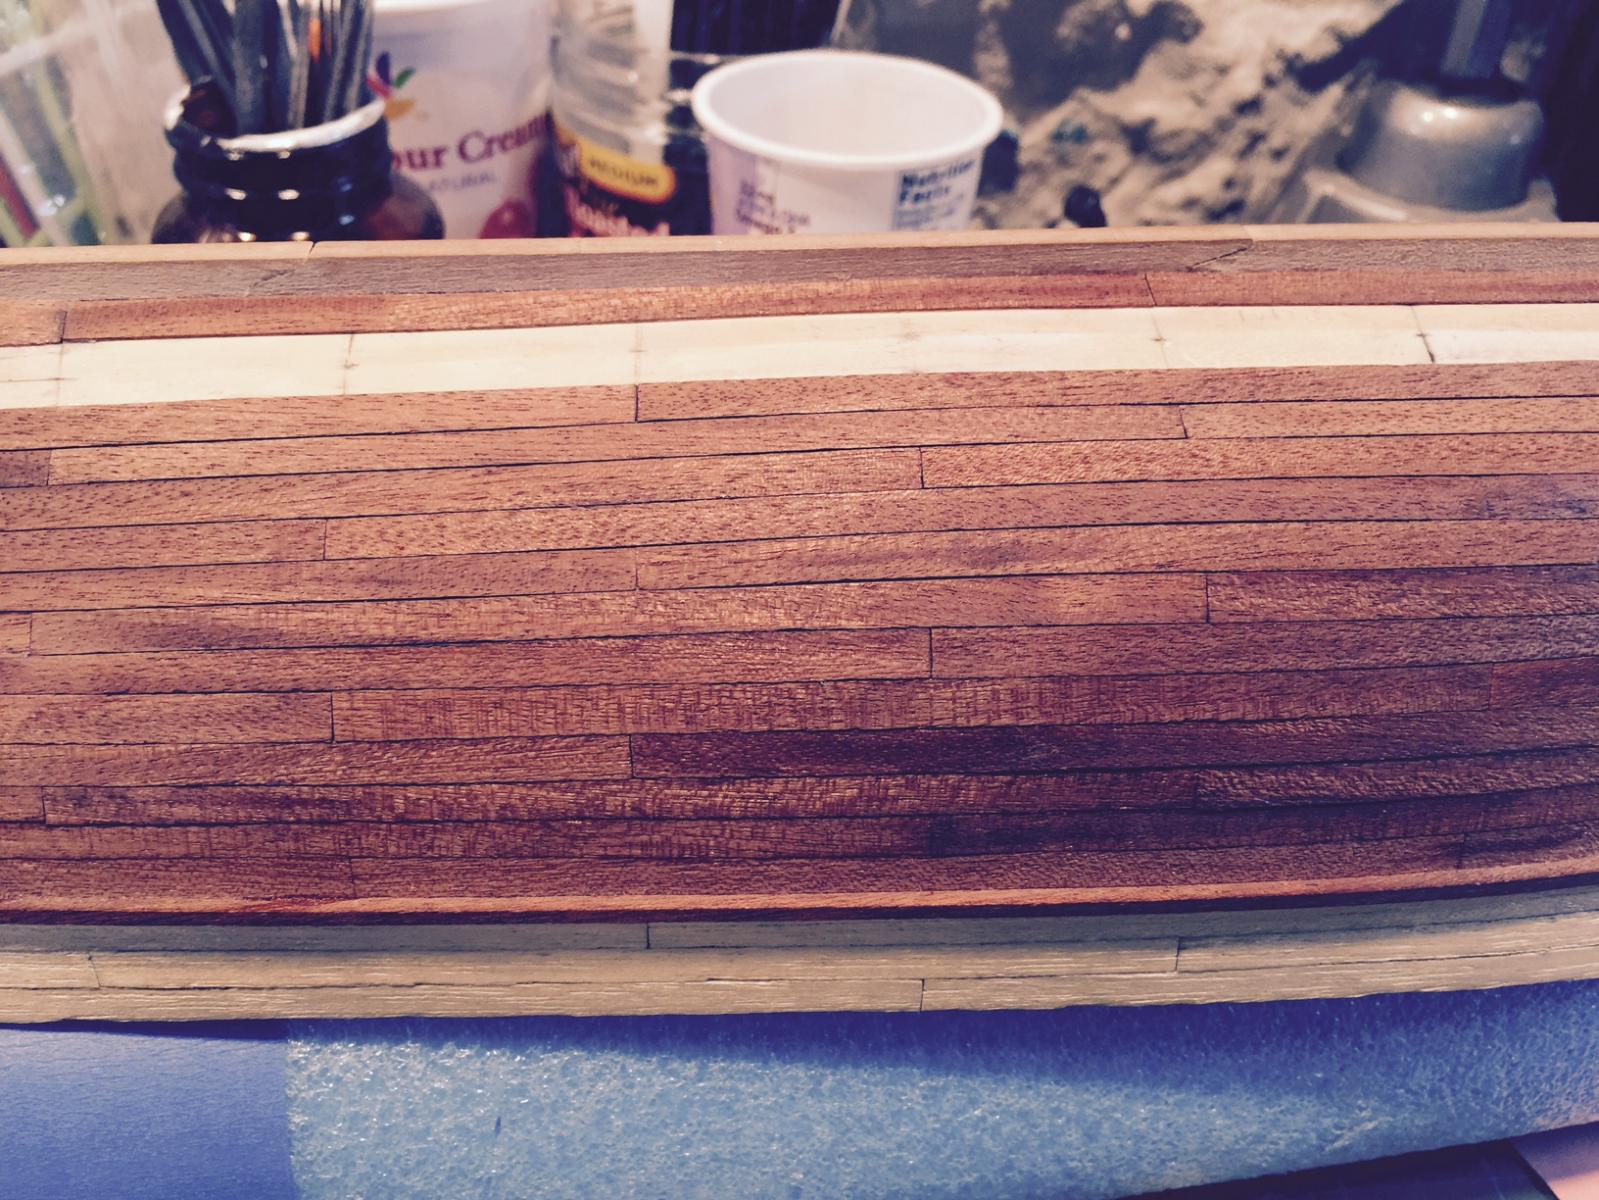
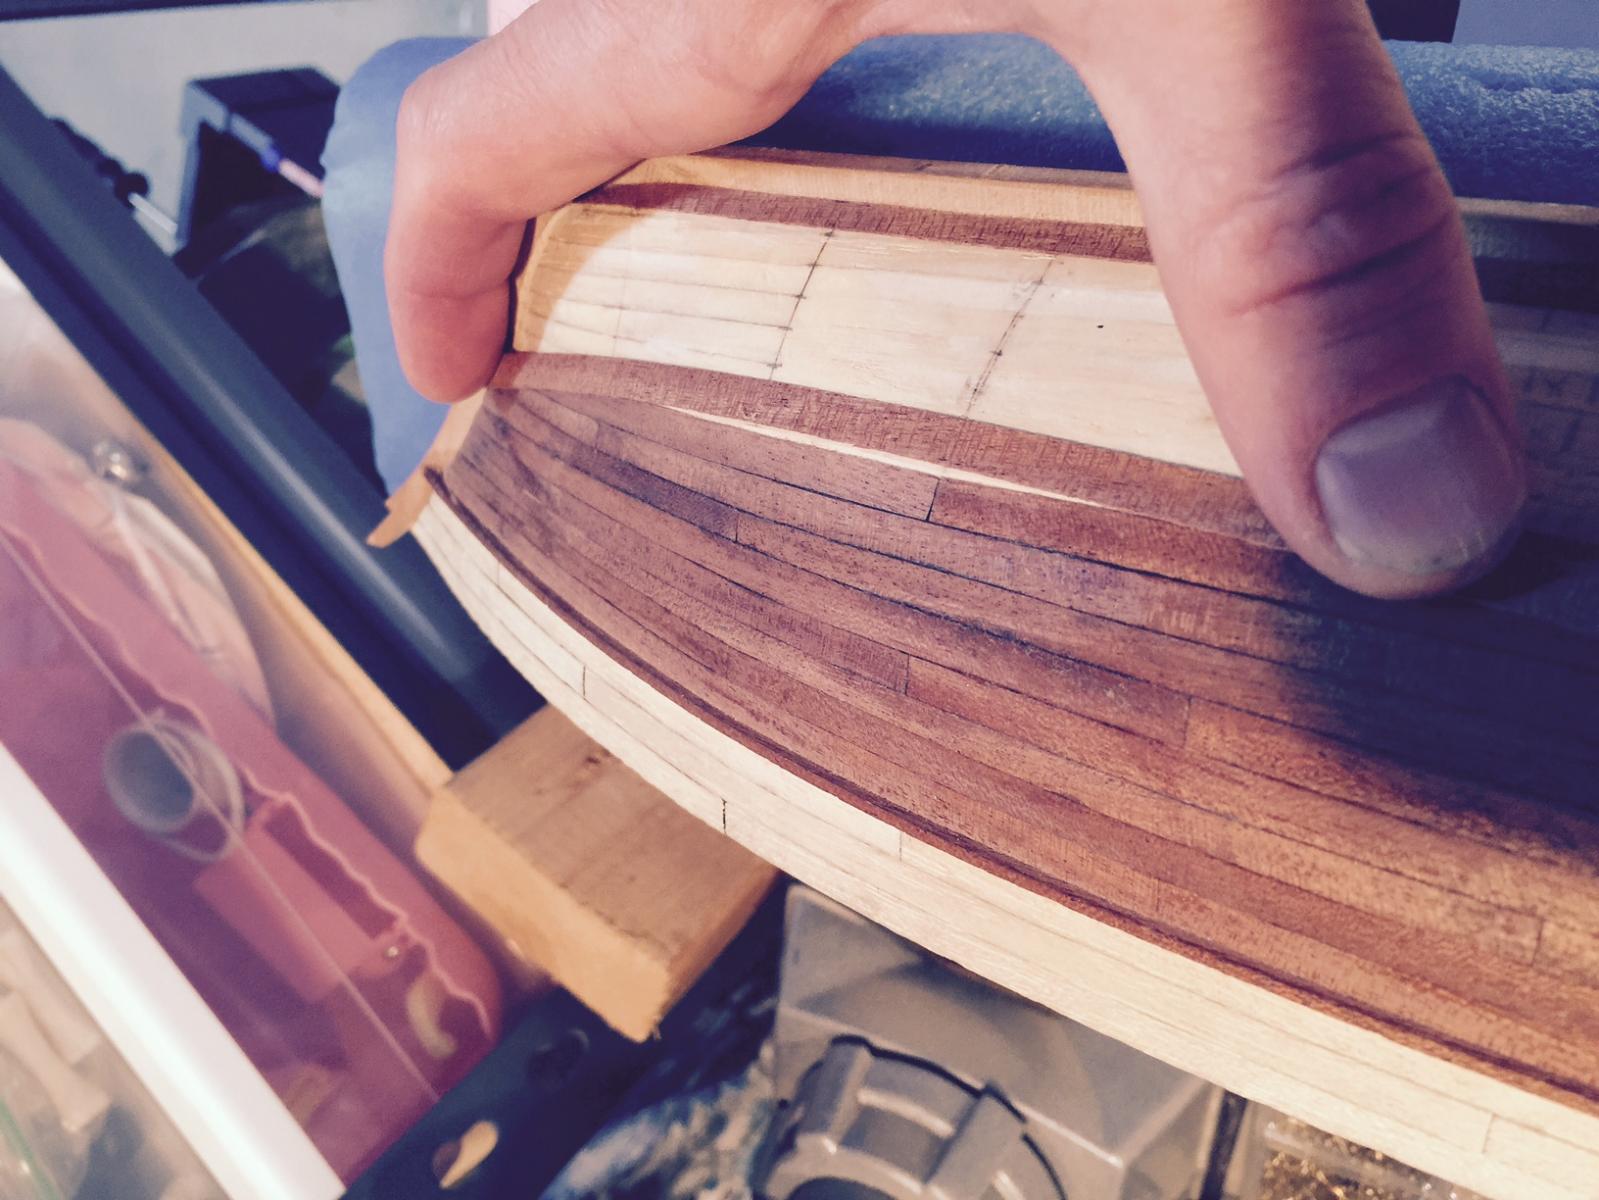
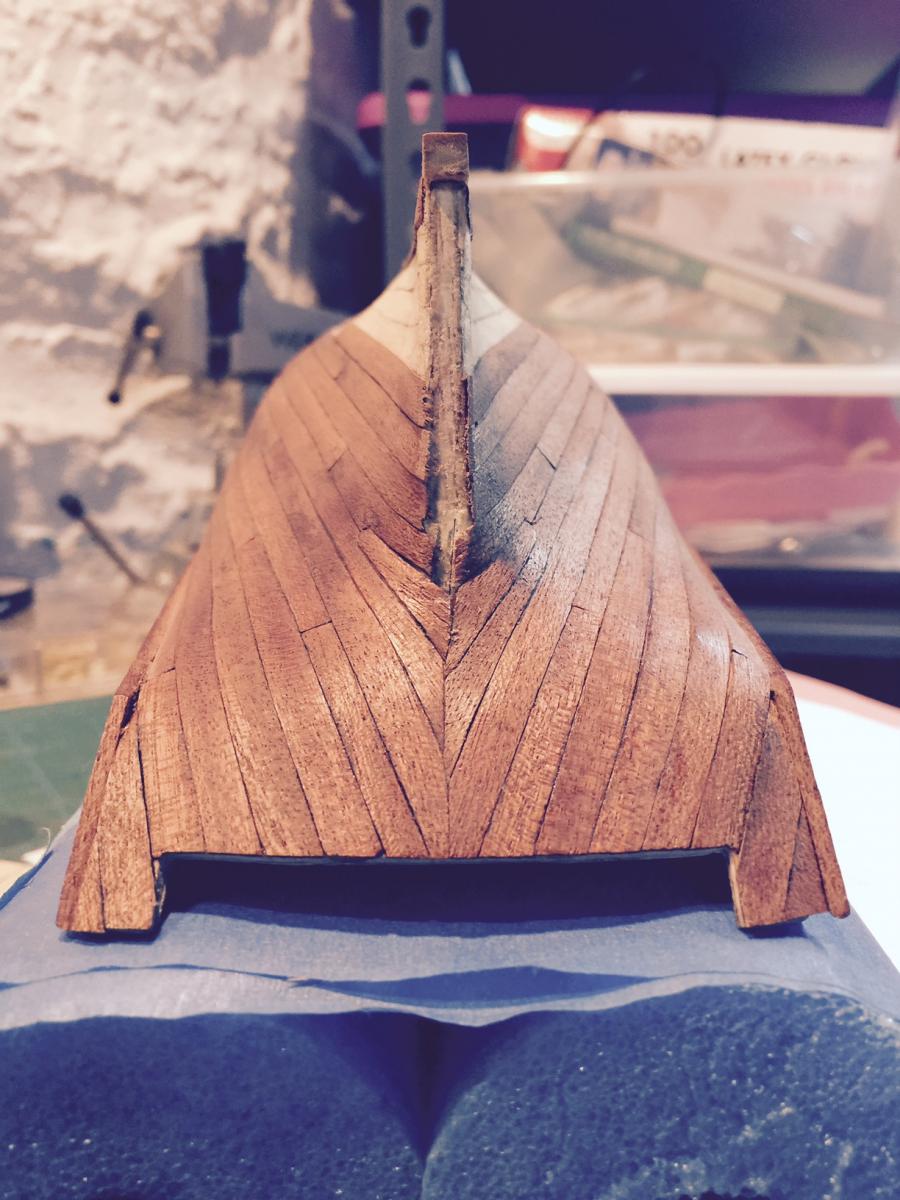
Thanks David and Jesse - I agree with you, treenails on the hull seem to be overkill, can barely see them anyways when finished. I think I will, however, put treenails on the mulaki strips above the rubbing strake - they came out ok on the deck. The hull planks are quite a bit narrower (and darker) so... I am taking your advice. From an aesthetic point of view I also think they'd be distracting. @GLakie - thanks! That stern post was difficult. One thing I need to learn if I do this again is to cut an effective rabbet line for the planks to butt up against. I still don't know how to do that, especially without power tools. Also - Angus is a 12 yr old Weimaraner.
- 389 replies
-
- 1
-
-
- scottish maid
- artesania latina
- (and 1 more)
-
One more question. Tree nails on the hull? I've seen both but not sure what will look better. Tung oil certainly highlights everything...
- 389 replies
-
- 1
-
-
- scottish maid
- artesania latina
- (and 1 more)
-
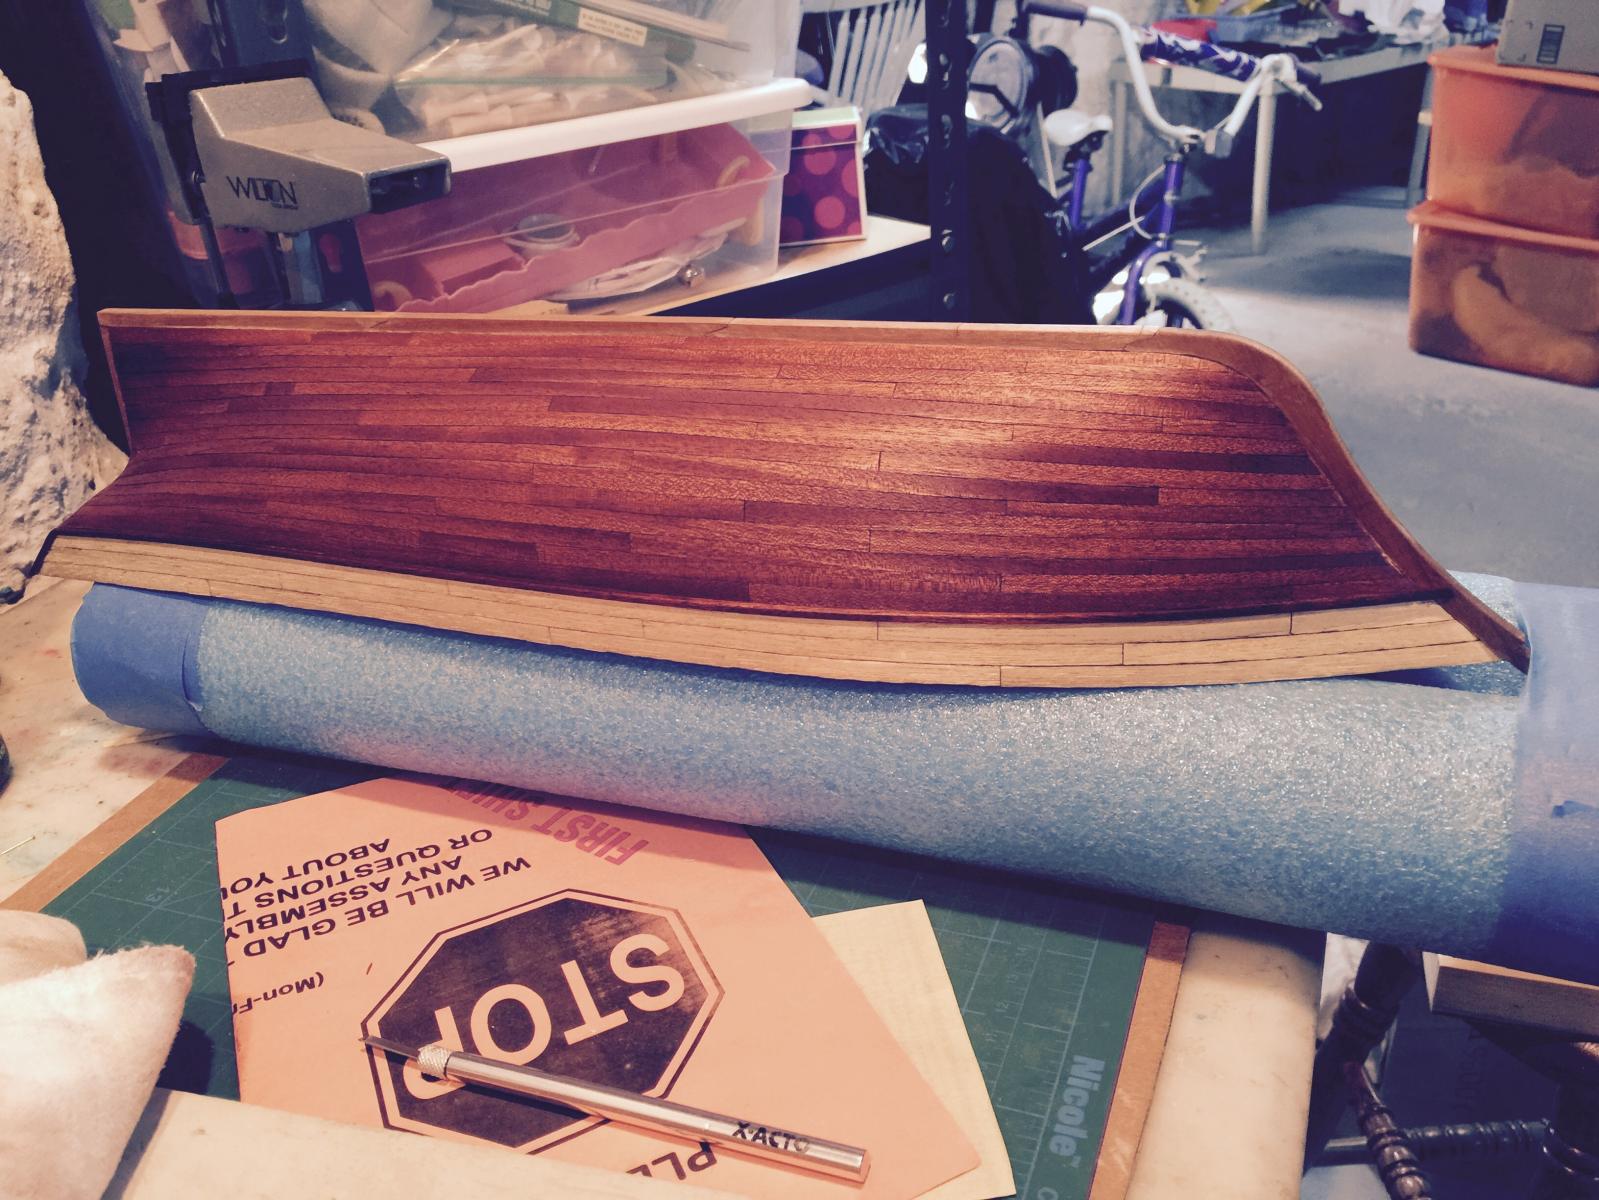
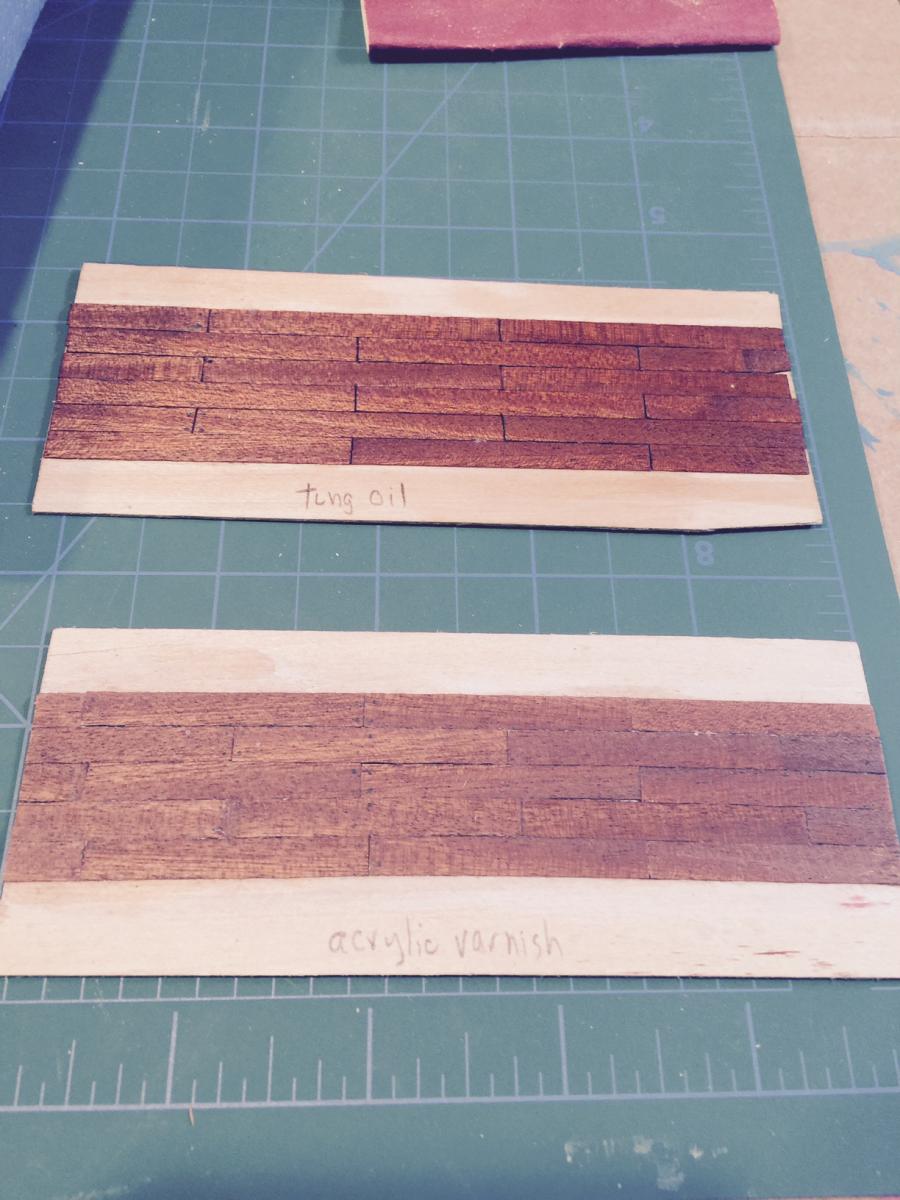
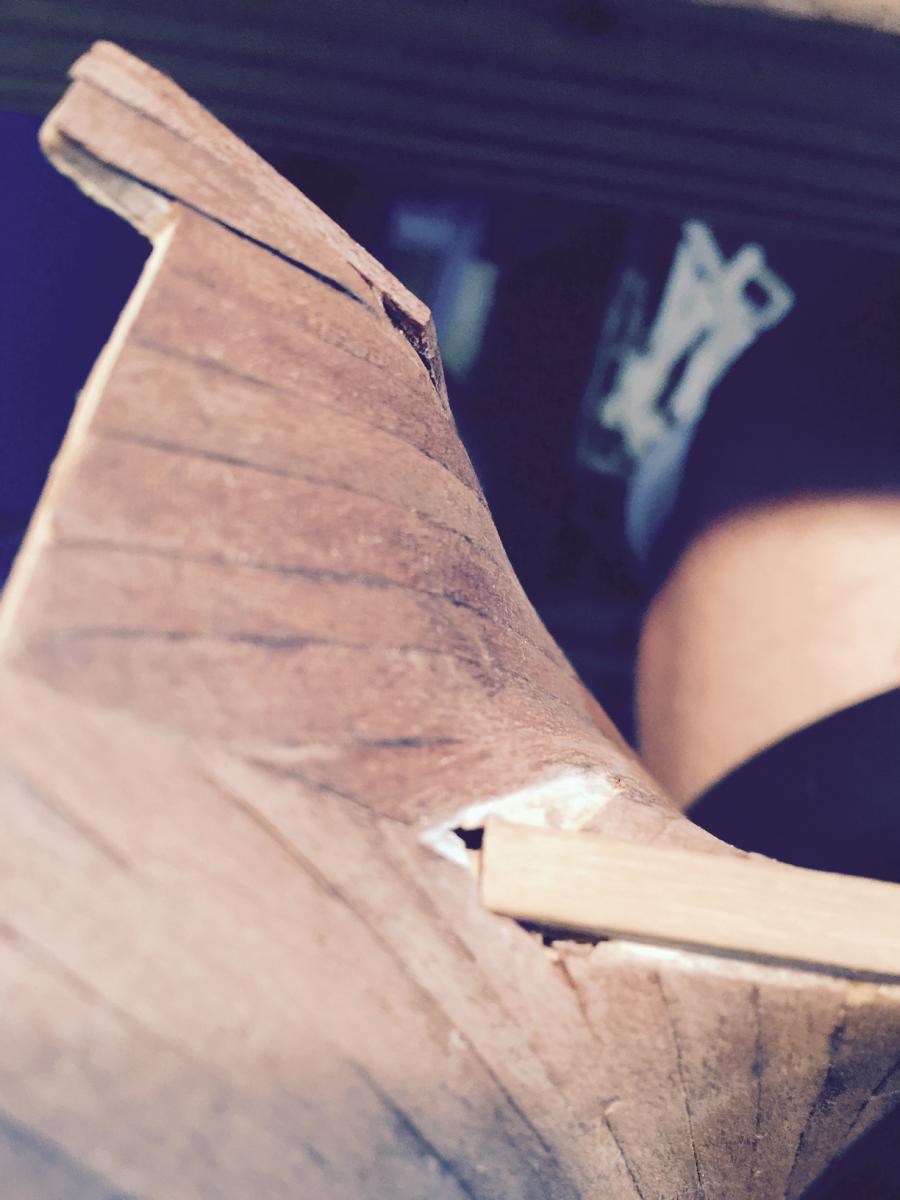
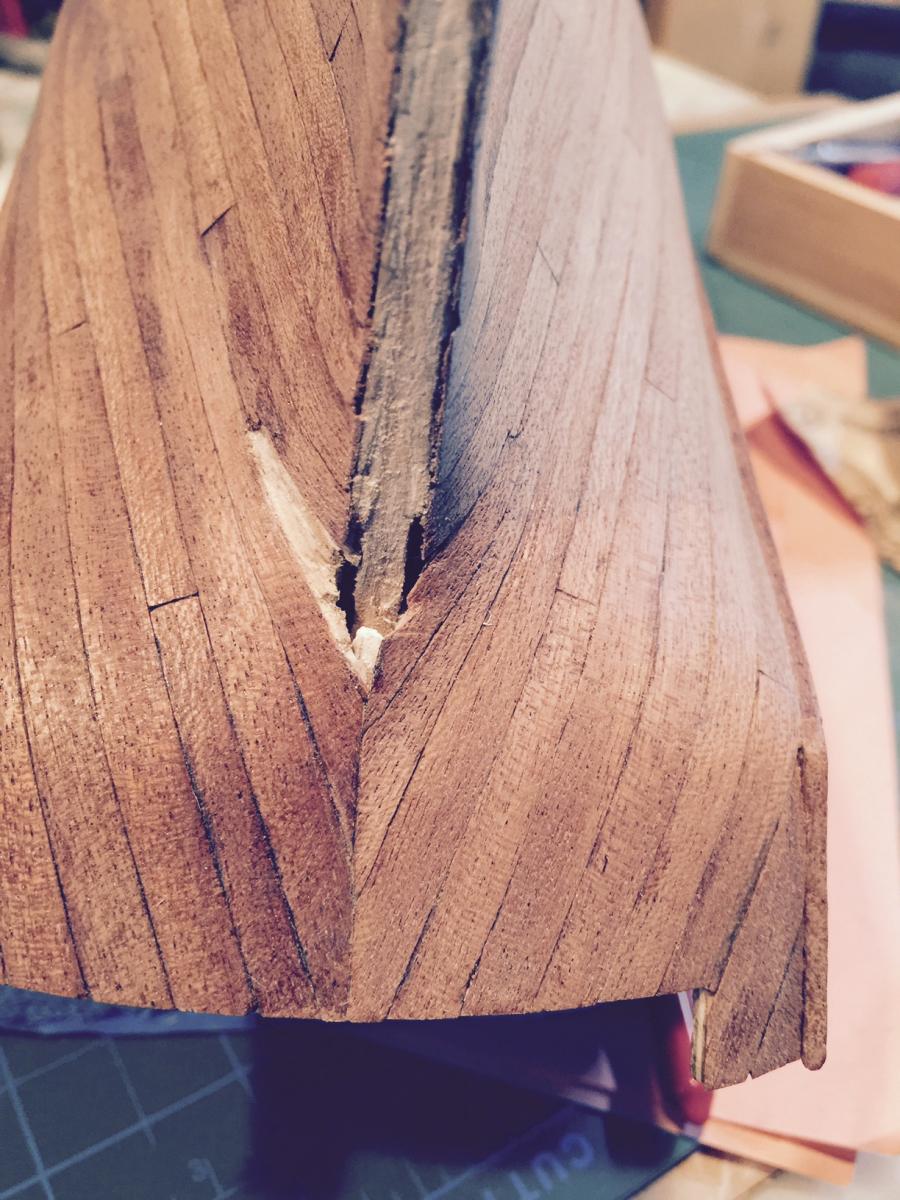
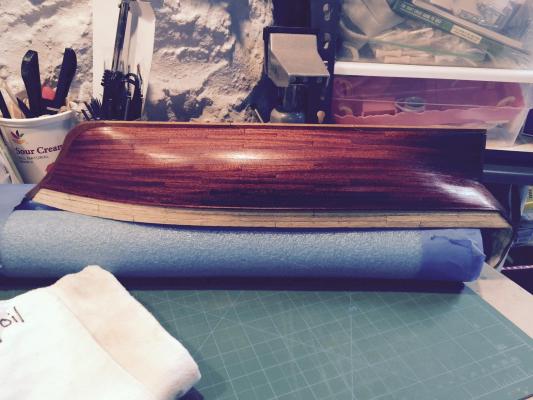
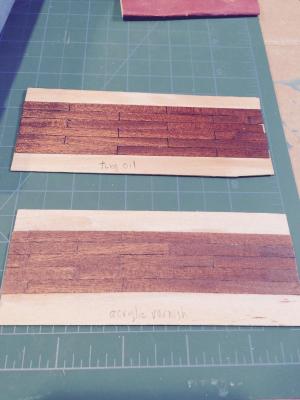
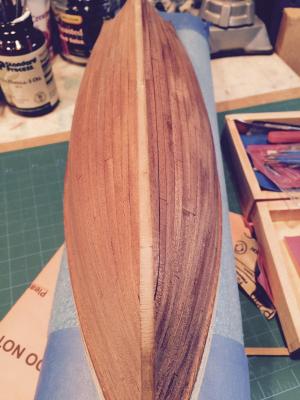
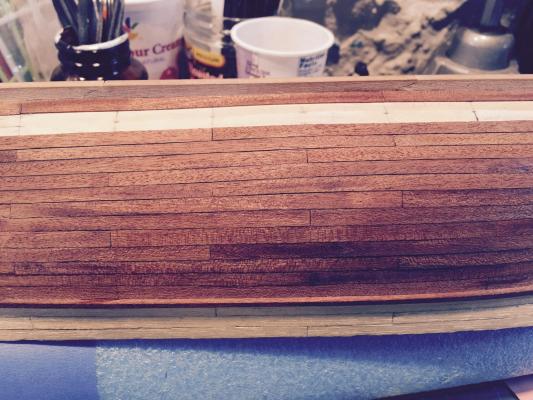
Ok, a lot accomplished.... I decided to run a little experiment to compare Tung Oil to acrylic varnish. I built two sheets of planking, complete with a little glue on top that was sanded off, as well as the graphite pencil rubbed between the planks for tar. I thinned the varnish with water, and thinned the Tung Oil with mineral spirits. Taking a look a the results, its clear that I will try the tung oil because I like the look of it. rich colors... On to the boat. I took a look at what I had to do and ripped out the offending planks (the stealer planks), filled the holes with wood filler, and let dry overnight. Then with my +1.75 glasses on, I carved a slight channel where the stern post sits to try to get the planks a little closer and have less of a gap. it's a bit of a hack job but the best I could do with the situation. I really didn't want to rip out all the planks, file down the stern a little more, and then re-build everything. I'm going to chalk this up as a really good learning experience and move on. The gaps are minimal now and hopefully won't be too obvious once the rudder is on. Then I carefully carved out the stealer spots remove the excess filler and prep the new planks. In the end, I created the two new stealers as well as a small triangular piece of planking that fit right underneath the stern post. I thought it was going to look terrible, but with a lot of sanding, it's ok. Finally I sanded with 220, then 400, and wiped down with some mineral spirits. Ready to finish with the oil once dry! Question. What takes longer - planking or rigging?
- 389 replies
-
- 5
-
-
- scottish maid
- artesania latina
- (and 1 more)
-
I like the "action pics" Jesse. It helps visualize what you describe. Thx
- 1,306 replies
-
- 4
-
-
- syren
- model shipways
- (and 1 more)
-
Thanks gents for the input. Yep I was trying to find a way to make it work without taking a few planks off but I just don't see it happening that way. Oh well just when you think you're done with a step it seems like there's always one more thing. Stopped at the local art supply store this evening and picked up some acrylic varnish to test out. Will also compare with tung oil which I will pick up later this week. I don't have any finishing experience other than the deck, so this is all trial/err for me.
- 389 replies
-
- 2
-
-
- scottish maid
- artesania latina
- (and 1 more)
-
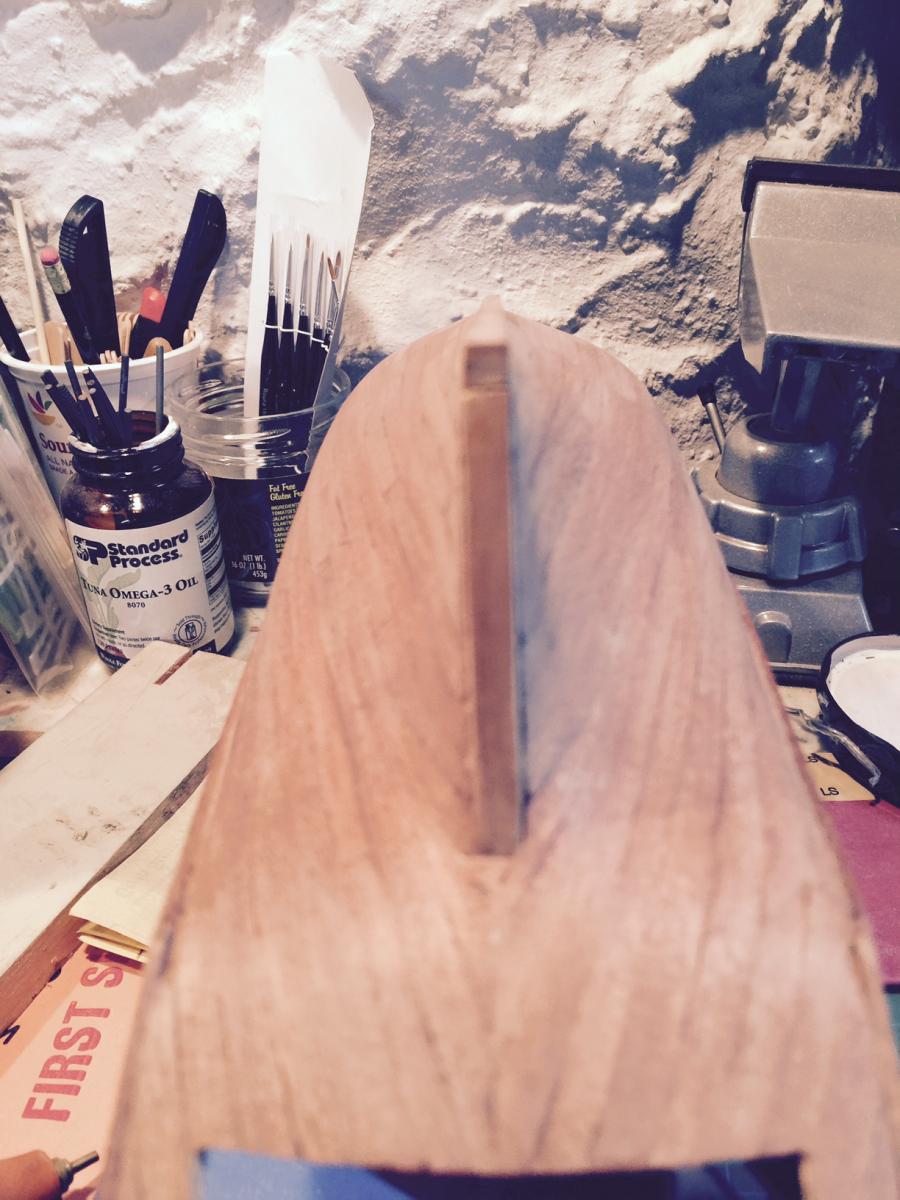
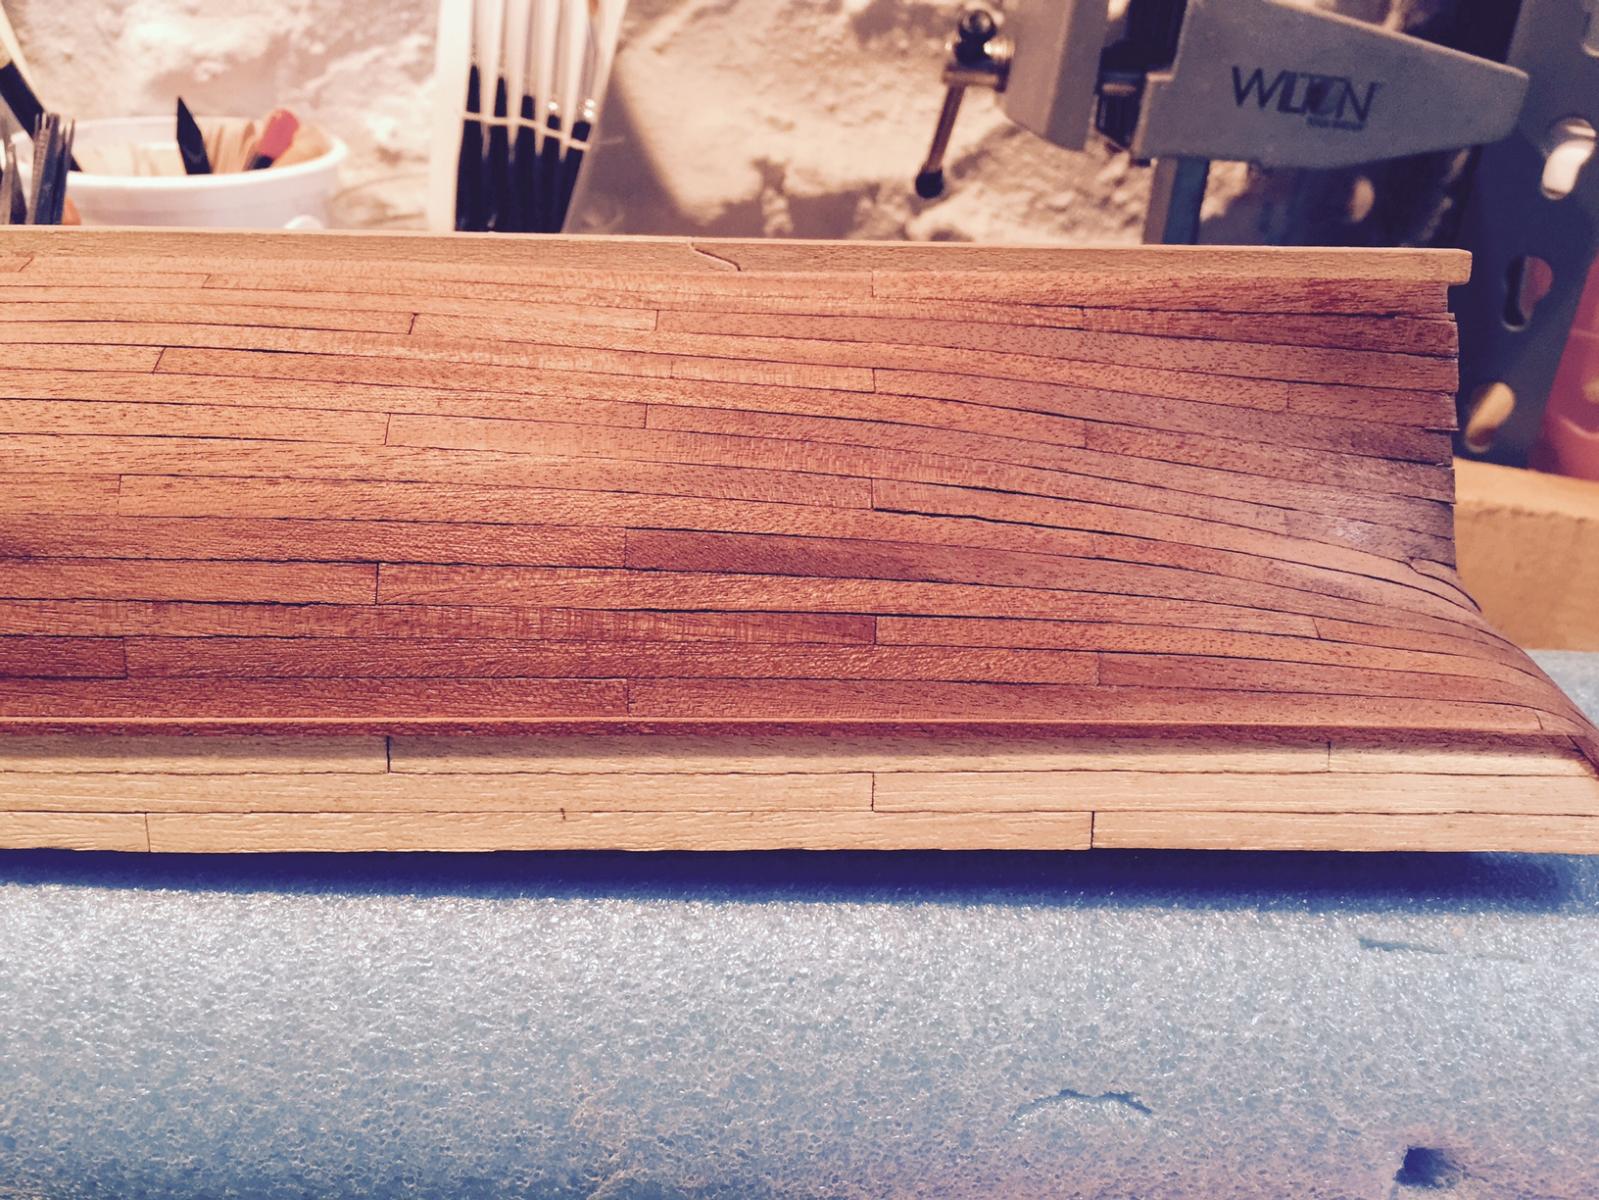
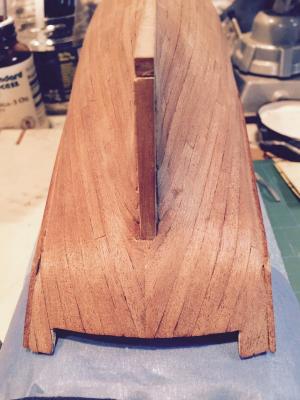
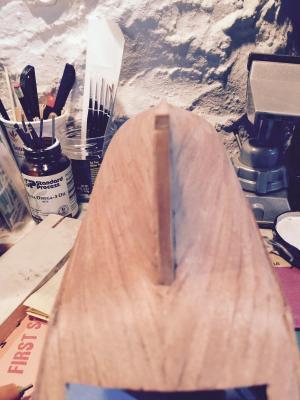
I've run into a bit of a problem.... The stern post isn't fitting well to the area where I planked. In particular, the base of the stern post where it attaches to the hull, there's nothing solid to be able to build on. I'm afraid I'm going to need to do a little deconstruction to make this work. Any thoughts? I've provided a few pics that hopefully will help. On the good side, the sanding makes quite a difference. Should I try Tung Oil or just and acrylic varnish? I've been reading up on several approaches to finishing the hull and it seems that it comes down to a matter of preference. (I'll build a few test models to see what I like but would be interested in others' perspectives.)


- 389 replies
-
- 1
-
-
- scottish maid
- artesania latina
- (and 1 more)
-
Thanks Jesse! I have referred to your build many many times and has been extremely helpful. Your feedback is motivating. Sometimes I feel that my work is less than ideal... Might have a few questions for you if I get stuck... Have been keeping an eye on your latest Syren build. Looks great thus far. Thanks again!
- 389 replies
-
- 2
-
-
- scottish maid
- artesania latina
- (and 1 more)
-
Thanks GLakie! So it's known... my dog's name is Angus. See profile pic.... I go by Robb. Upon hearing that the planking was finished, my daughter was quite excited. See pic below. Her comment: "It seems like you've been working on planking for 300 years now." Yep. The voice of encouragement.

- 389 replies
-
- 4
-
-
- scottish maid
- artesania latina
- (and 1 more)
-
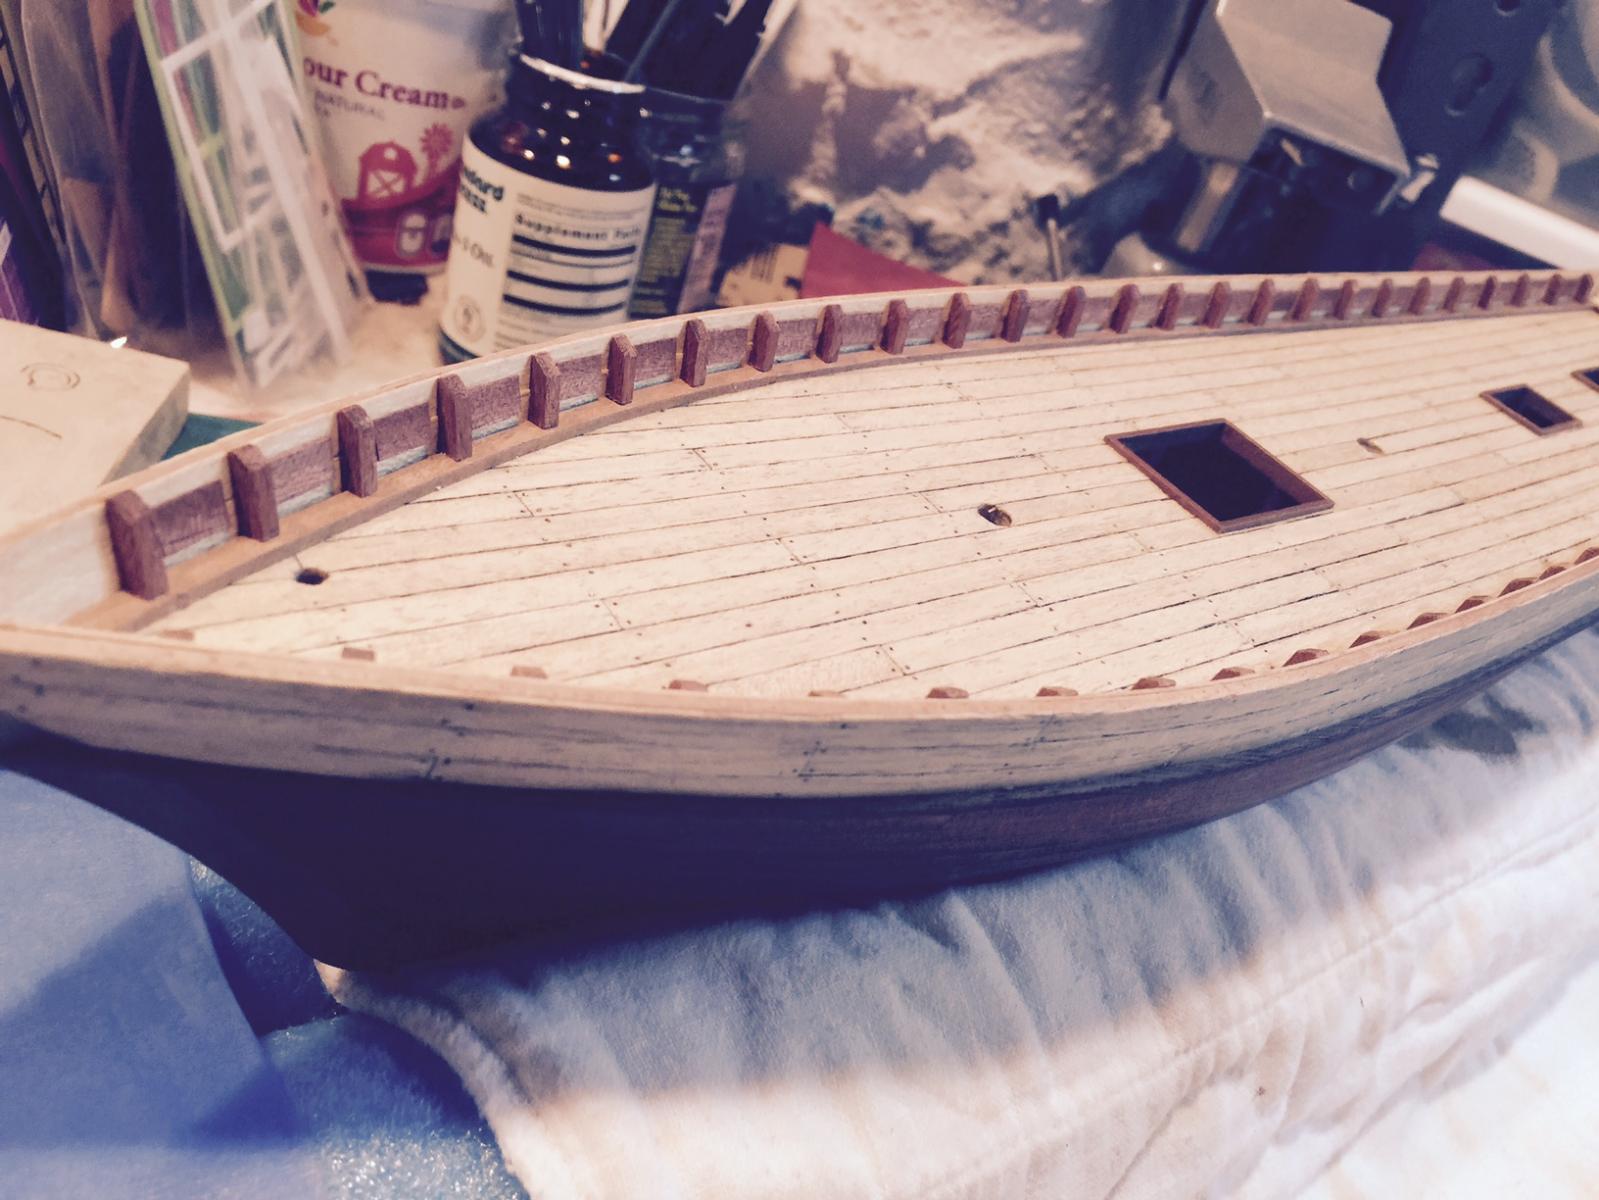
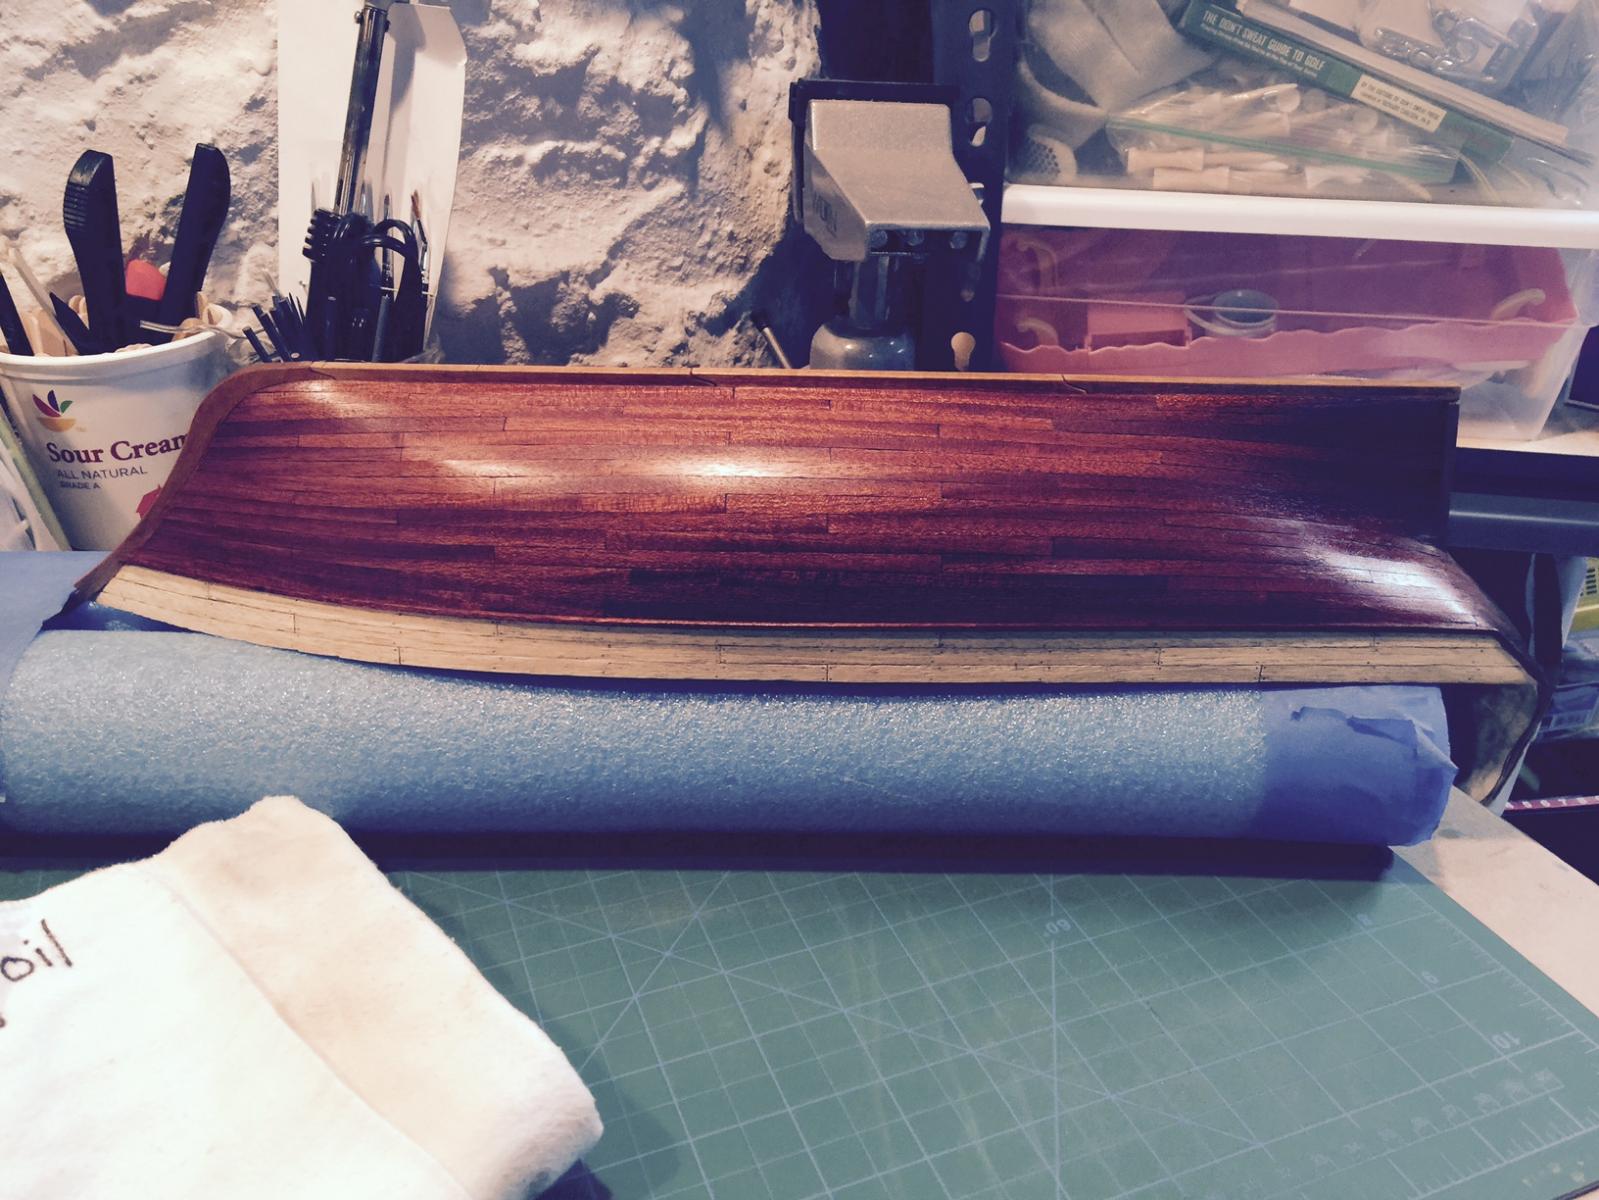
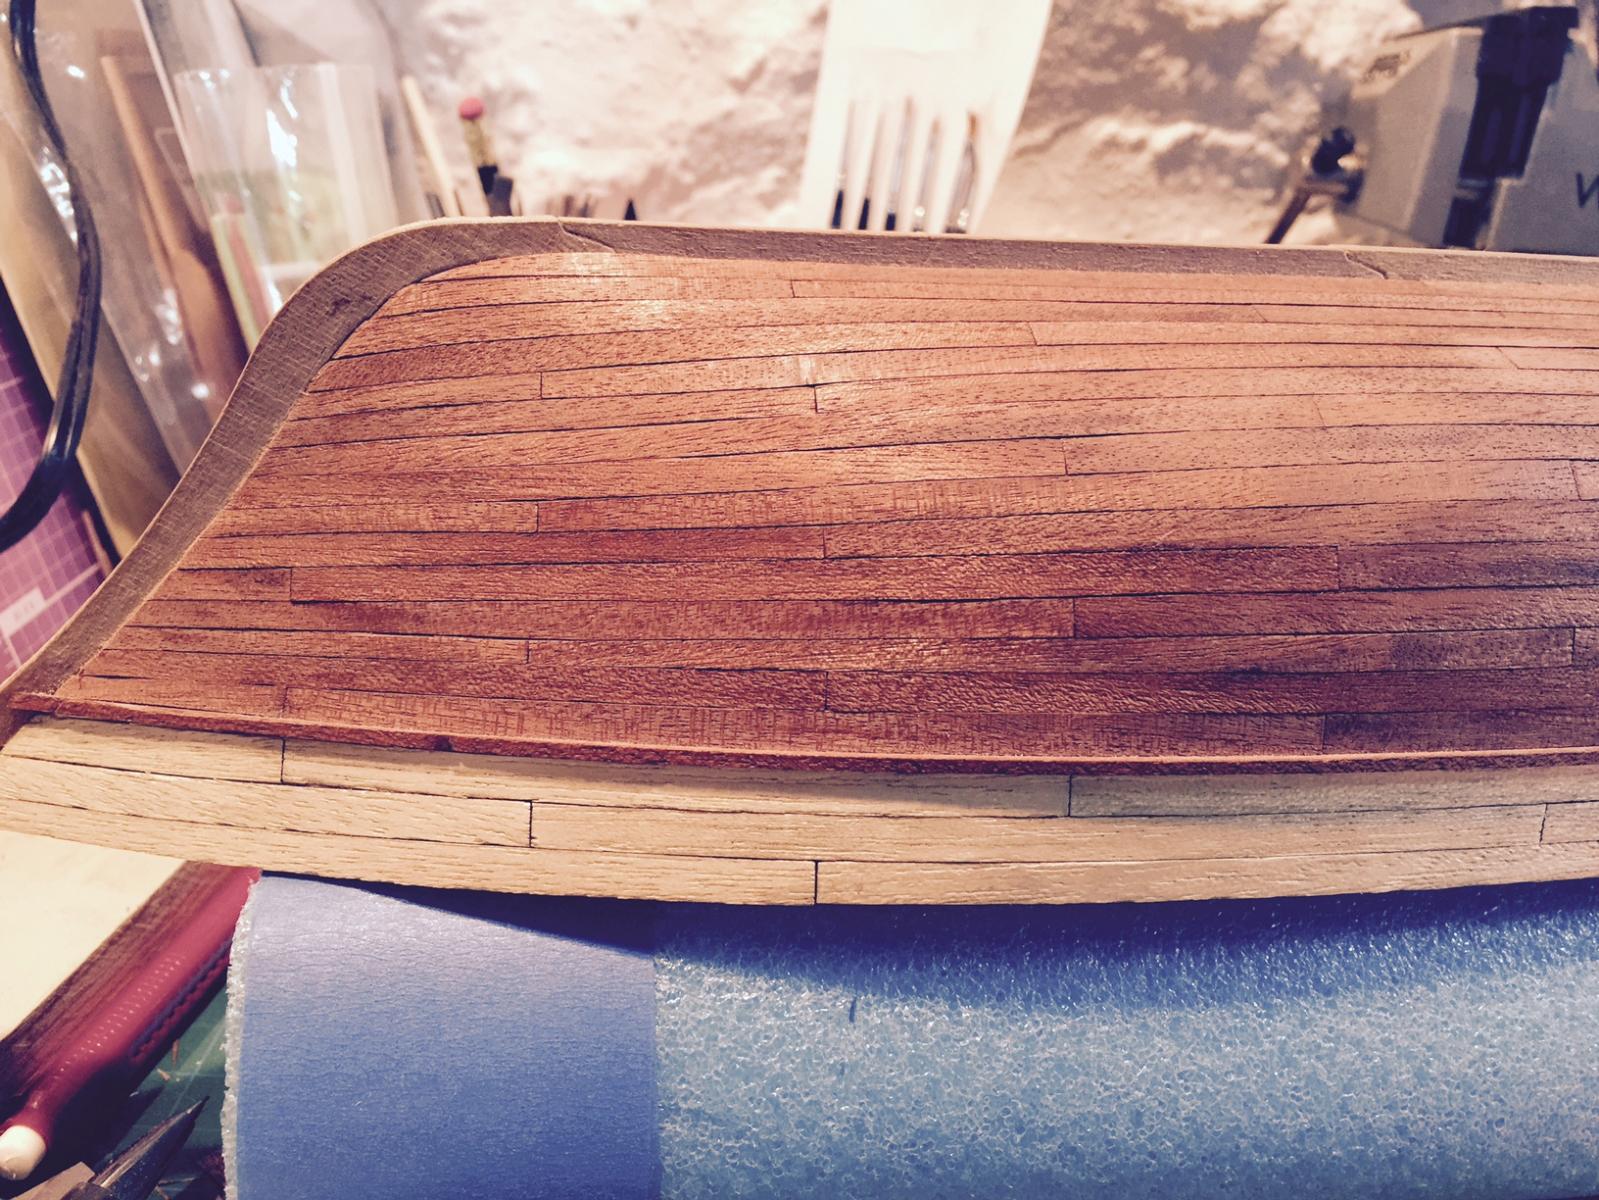
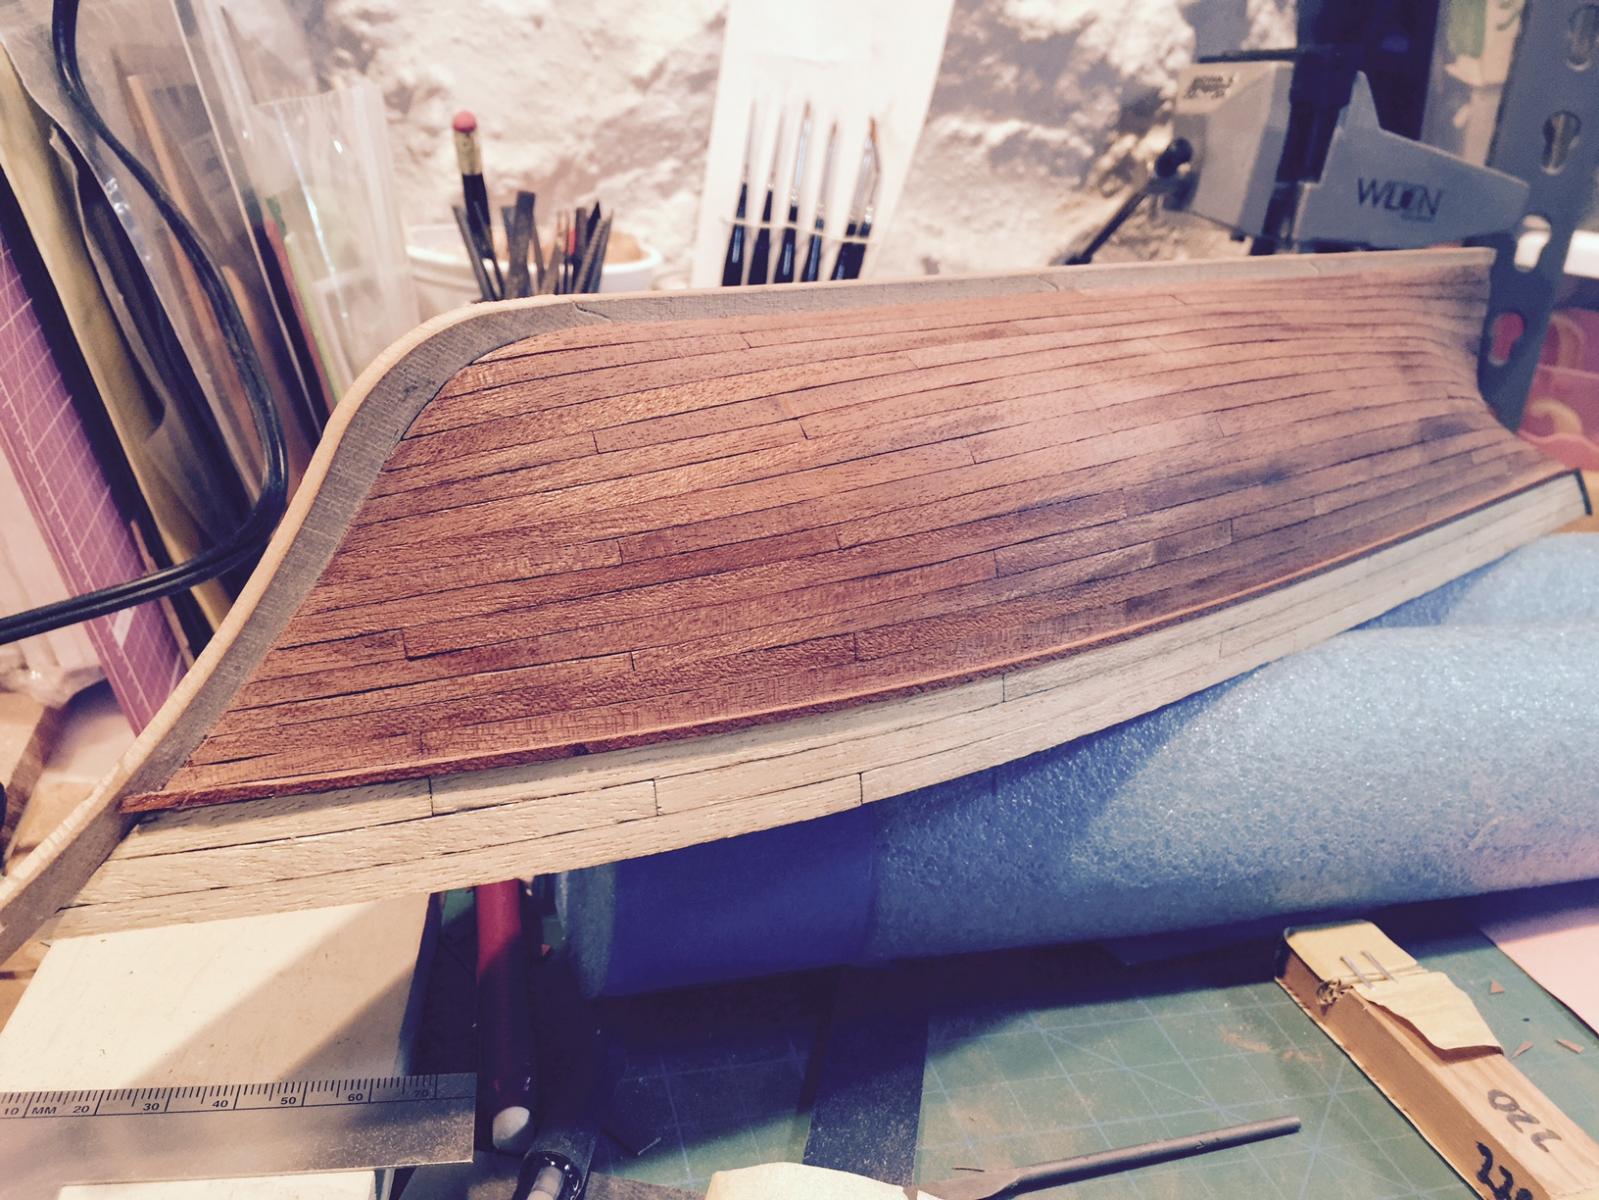
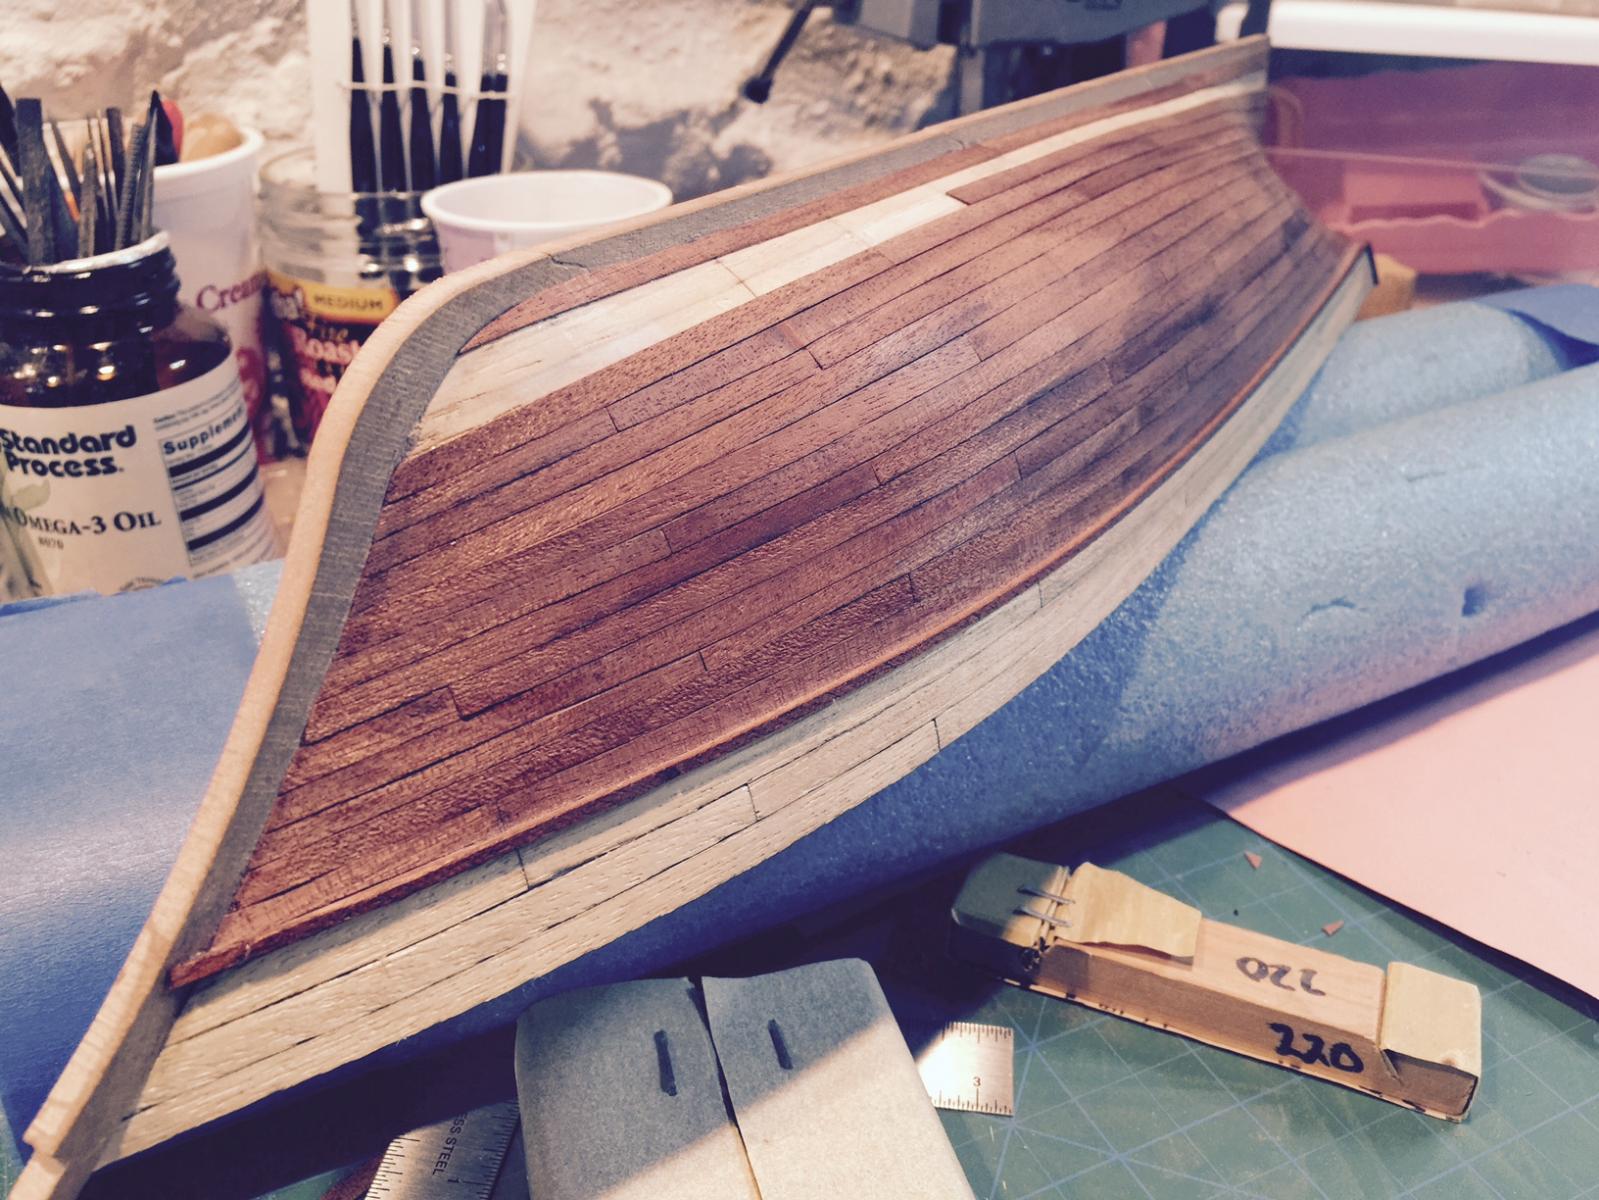
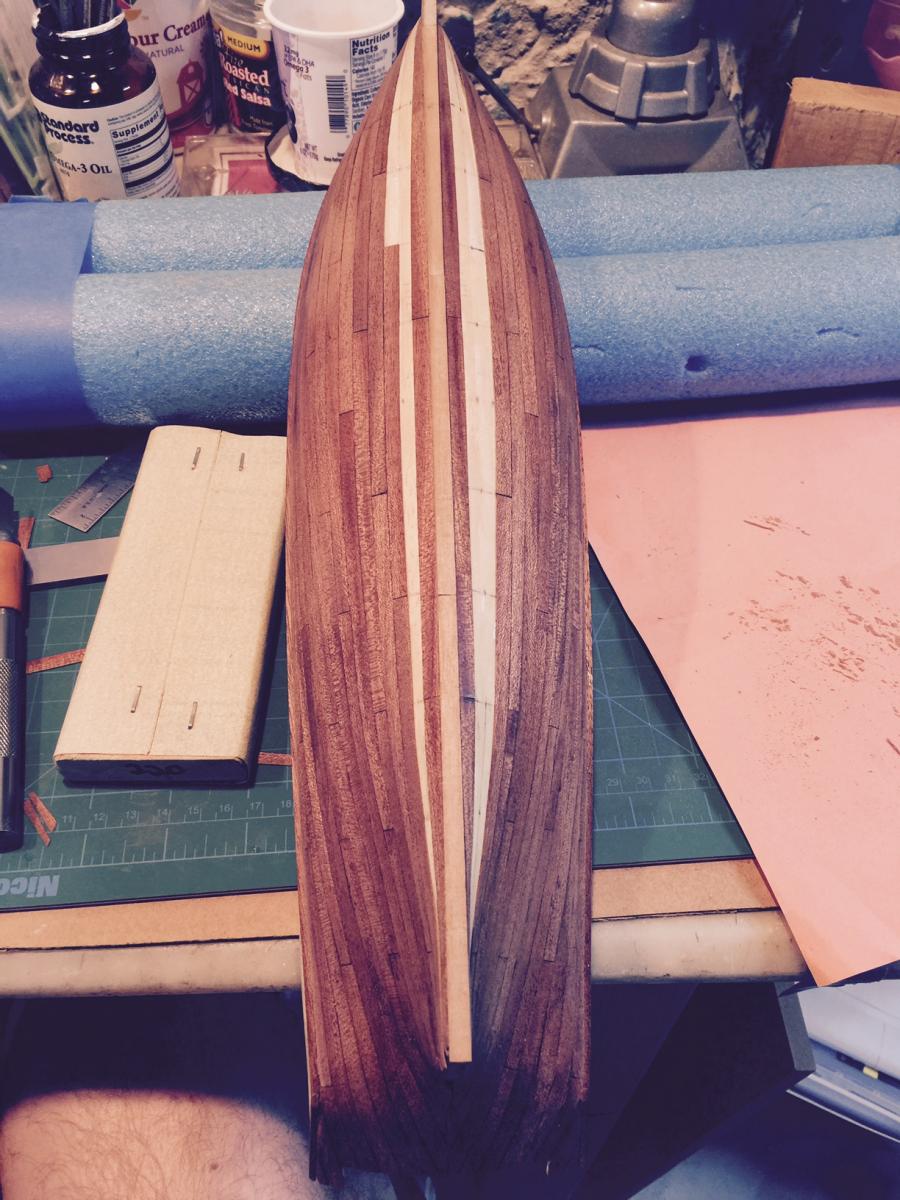
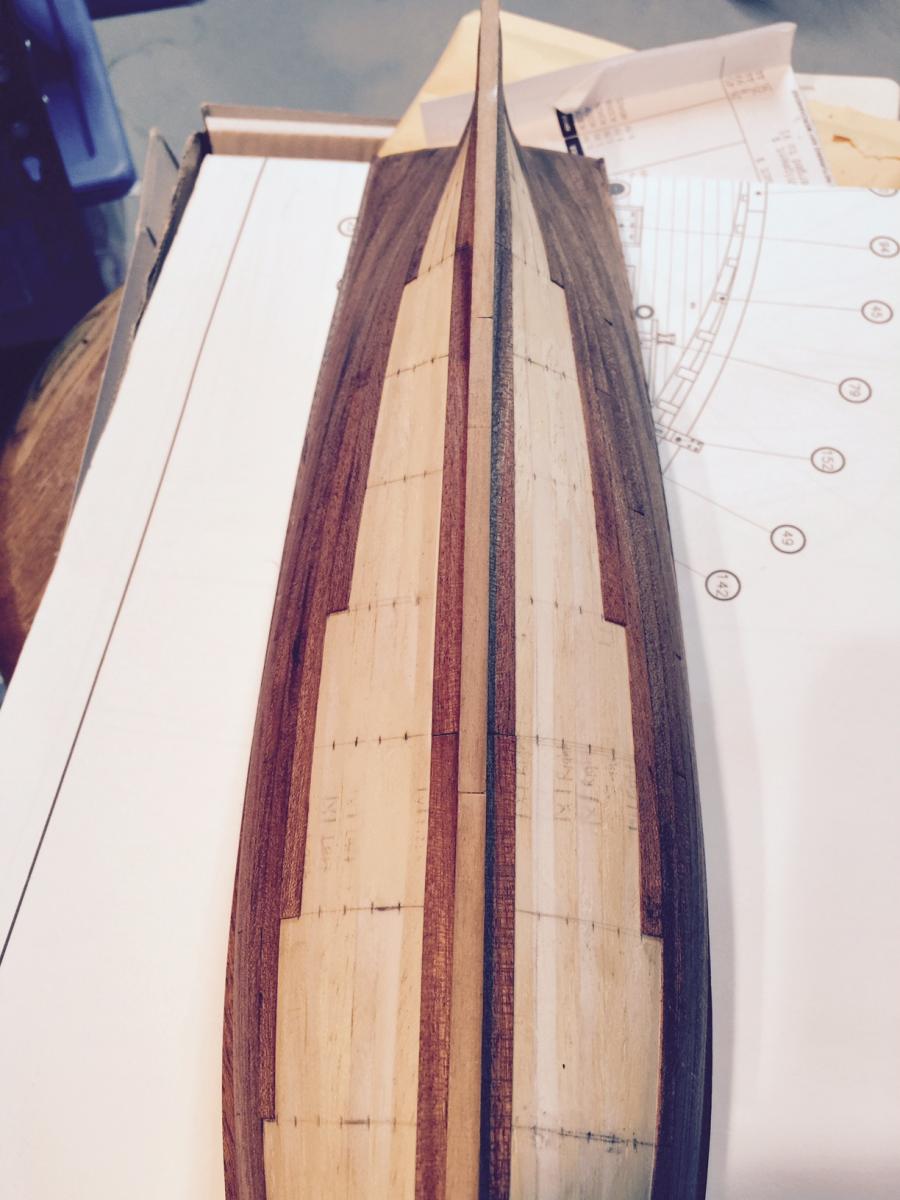
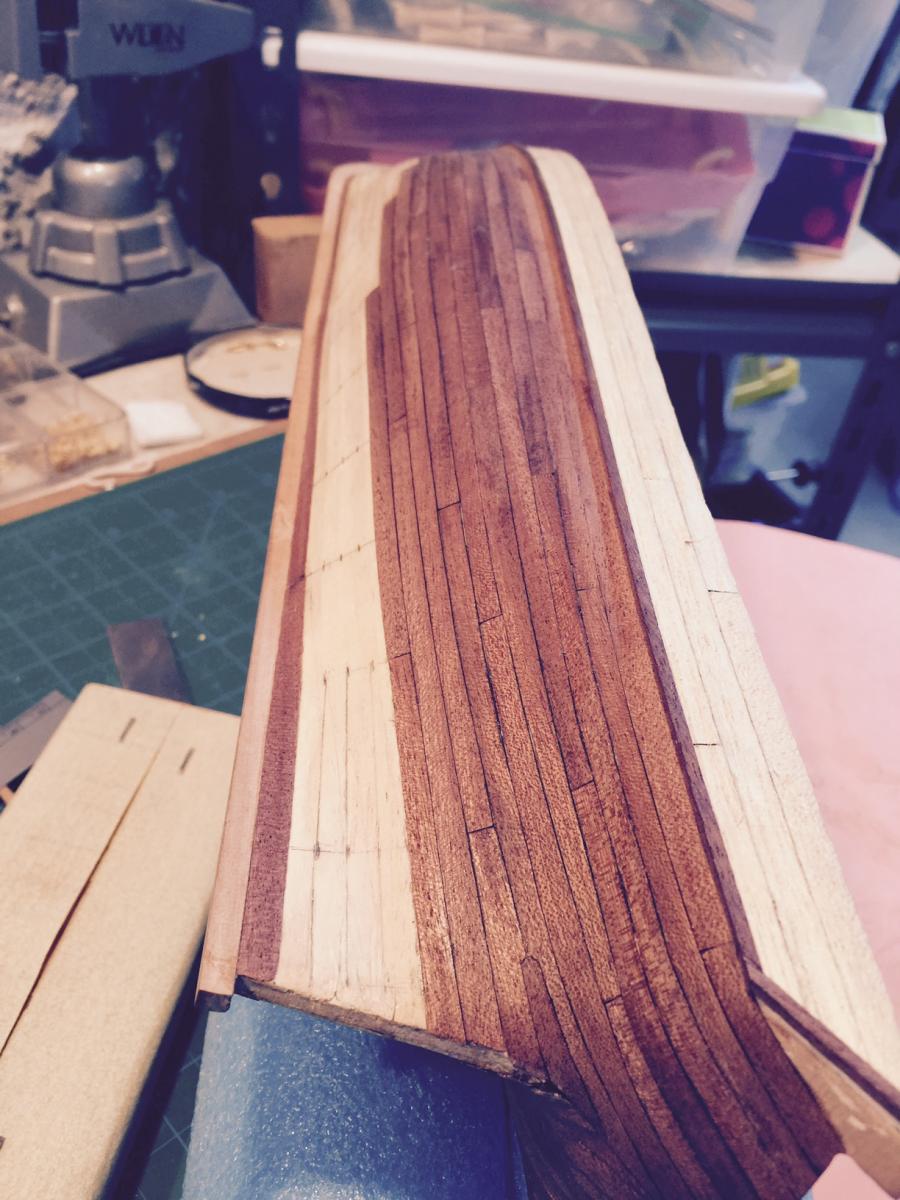
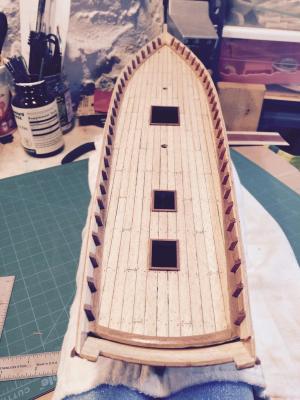
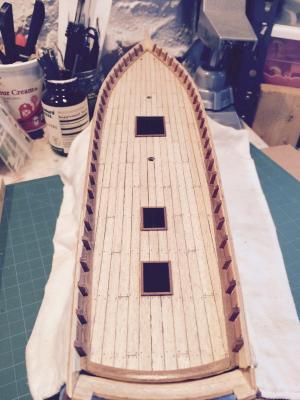
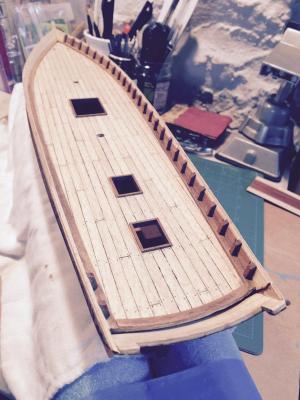
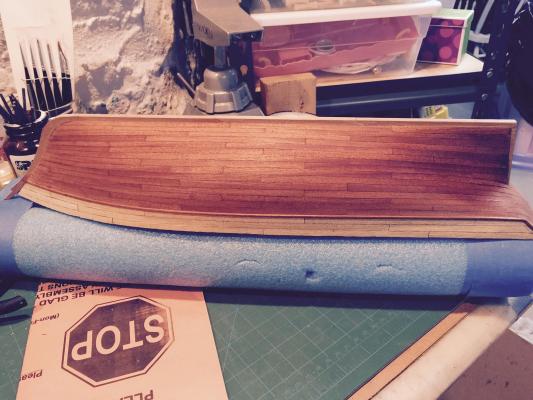
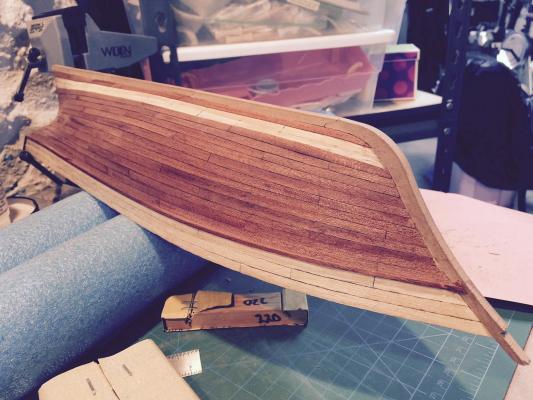
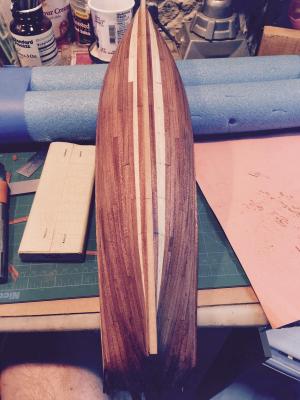
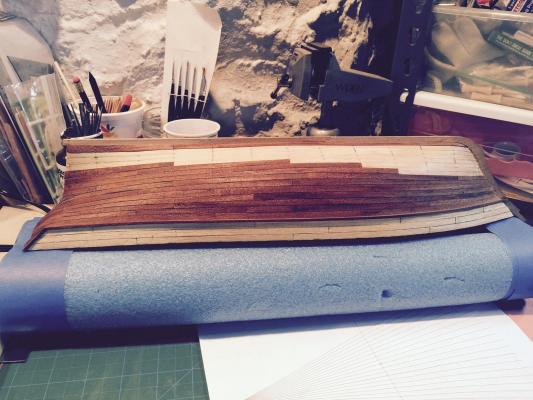
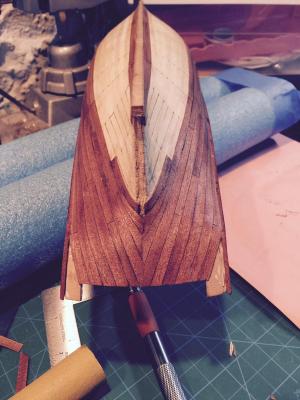
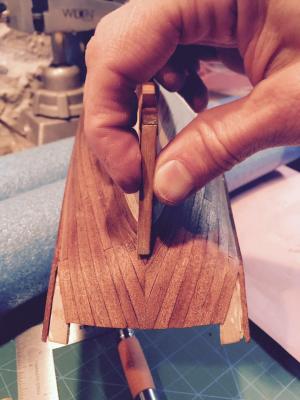
Major Accomplishment: Planking is complete! Took far longer than I thought it would. Overall I'm pleased with how it came out... I could have done a little better in some areas but I will label this a very instructive learning experience. Shout out to GLackie and dgbot for the comments, suggestions, support and just paying attention! Thanks. Now after admiring for a few minutes, I have a new list. And lots of questions. - Sand - how much can I sand the thin strips? - put stern post back on. - clean up excess CA on wood - how? - stain and varnish. I read about water based stain and poly which appeals to me. anyone have experience with this? I was reading about it in a blog a while ago but don't remember where. Anyways, here's what it looks like:
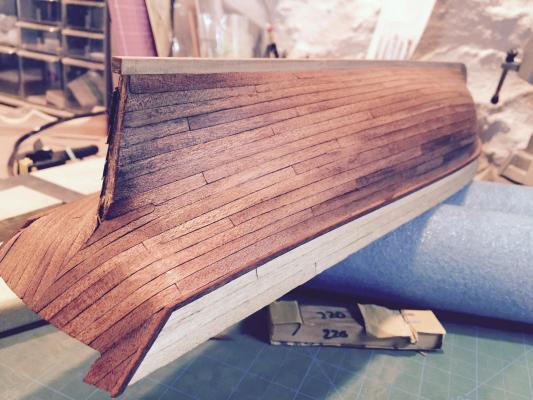
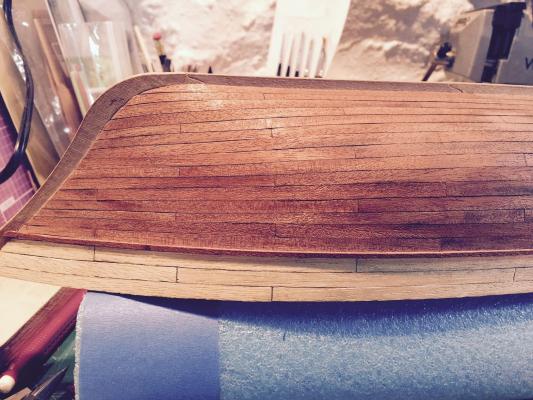

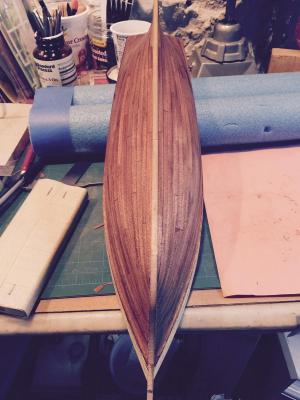
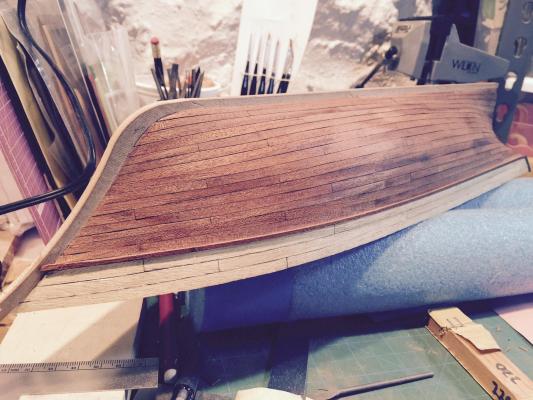
- 389 replies
-
- 8
-
-
- scottish maid
- artesania latina
- (and 1 more)
-
Almost done... got a few more planks done last evening. last part will be a little tricky to get them to fit just right. Lots of sanding... I've been saving the sawdust (can be seen in the picture with the pink piece of paper) I'm hoping to use that for some filler for the areas that I didn't get quite right. Does anyone have experience mixing the sawdust into a paste? I tried the last time when filling in the keel spots with less than stellar results. Thx
- 389 replies
-
- 1
-
-
- scottish maid
- artesania latina
- (and 1 more)
-
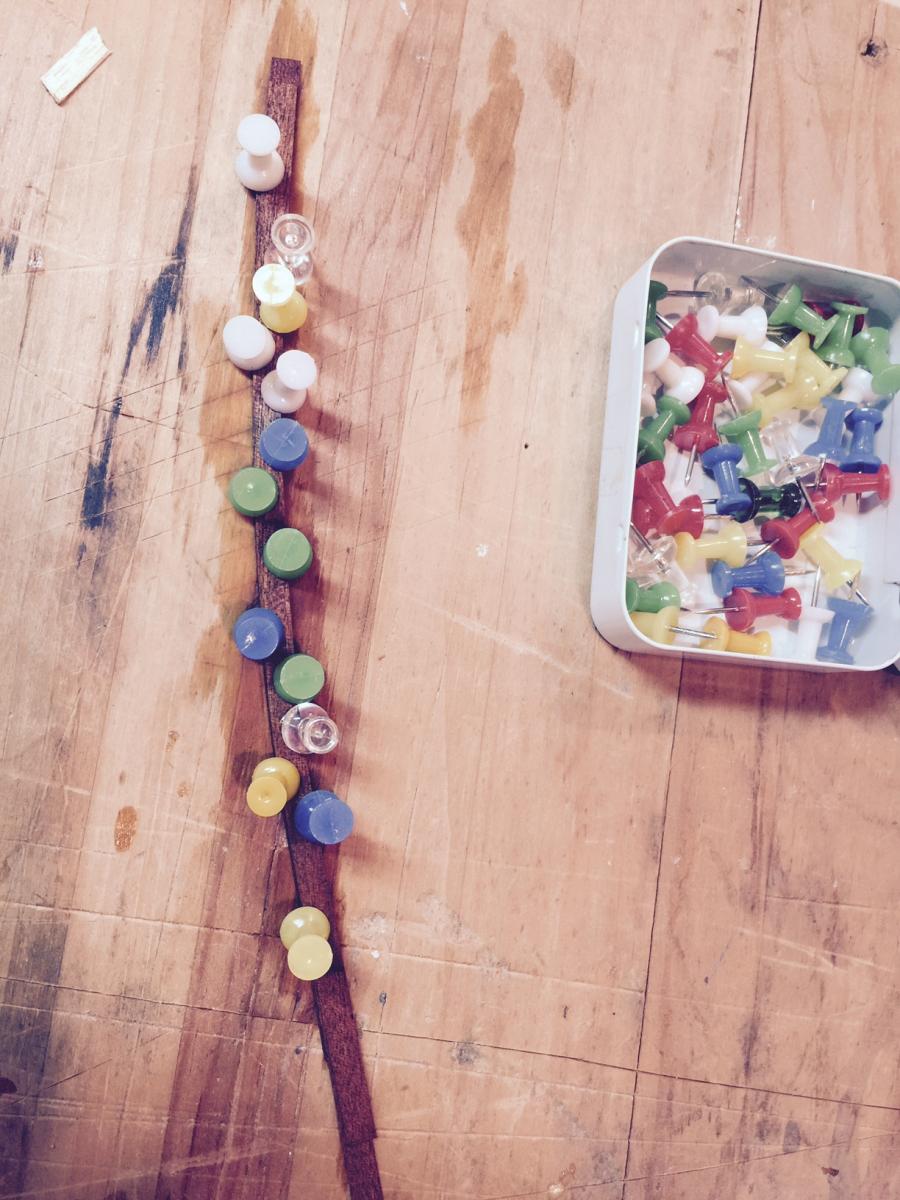
Thanks GLakie - I reviewed and it gave me some ideas. I came up with a fairly creative way to give the thin planks a little "bend". After running under hot water and massaging them to loosen the wood up a bit, I pat dry and put on a large (spare) bathroom tile, and tape down with painters tape with a little bend to it. I do this for several pieces. Then I take a second tile and place face down to keep them nice and even. I increase the pressure with a heavy weight and let sit for a day. The curve stays nicely in the wood. What a difference in shaping a plank with this approach - I'm no longer "fighting the wood". A little more progress, should have planking done (hopefully) by the weekend. But that's all dependent on what the big boss and the little boss have to say.
- 389 replies
-
- 1
-
-
- scottish maid
- artesania latina
- (and 1 more)
-
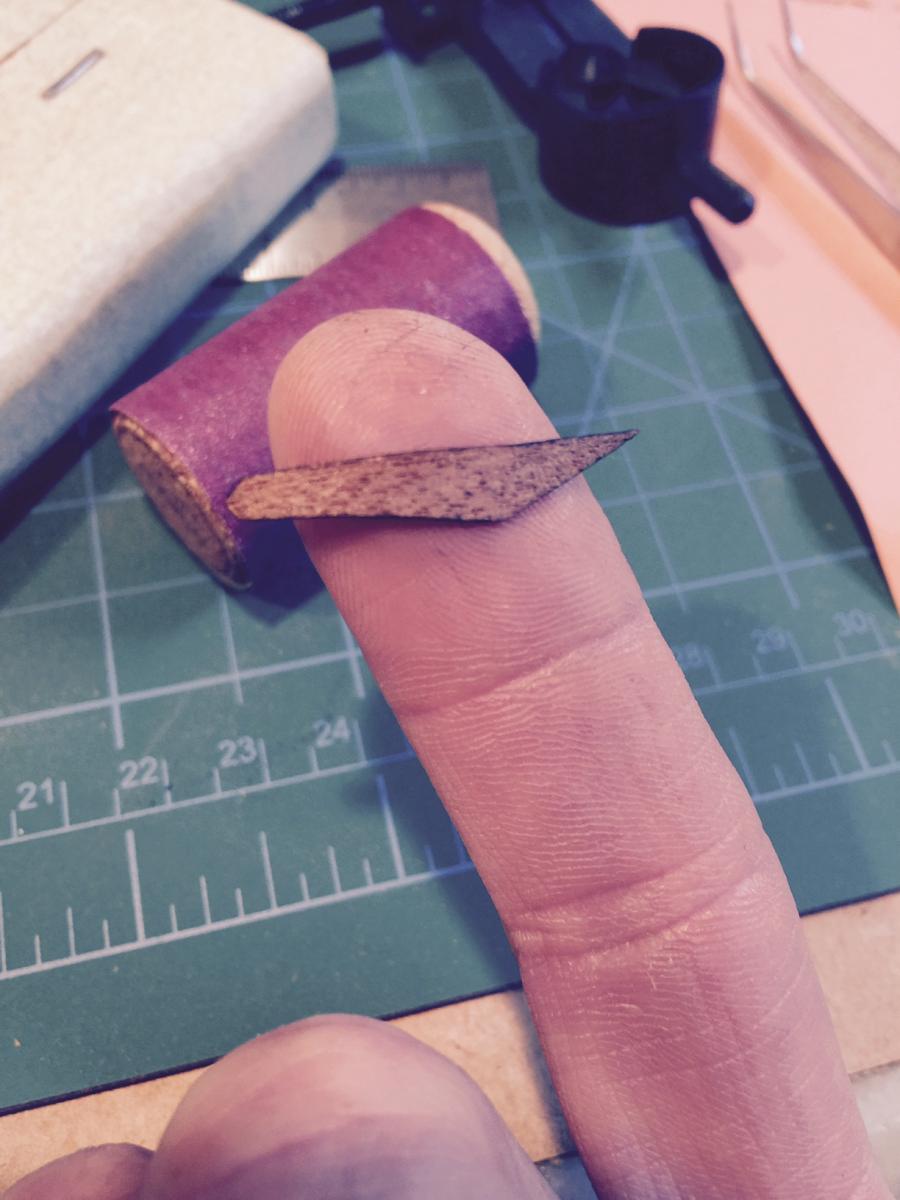
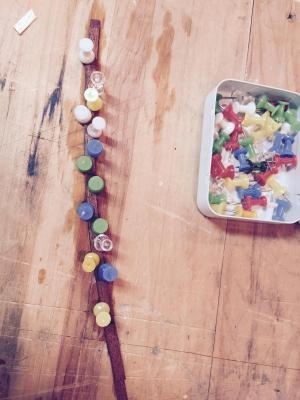
I had to shape a few planks for the curves on the boat, I couldn't get the shape right by just cutting and sanding the board. The first picture shows the problem I'm having. so here's what I did. I soaked 4 planks for a bit in hot water and stacked them on top of each other. Then I used push pins to bend the wood in the long direction, as in the picture. They bent nicely, but the wood is no longer completely flat. Because the planks are so thin, small buckles show up in the wood. Do I re-soak and press them with something very heavy to try to re-flatten them? or would using plank bender to "iron out" the bumps be good enough?

- 389 replies
-
- 1
-
-
- scottish maid
- artesania latina
- (and 1 more)
-
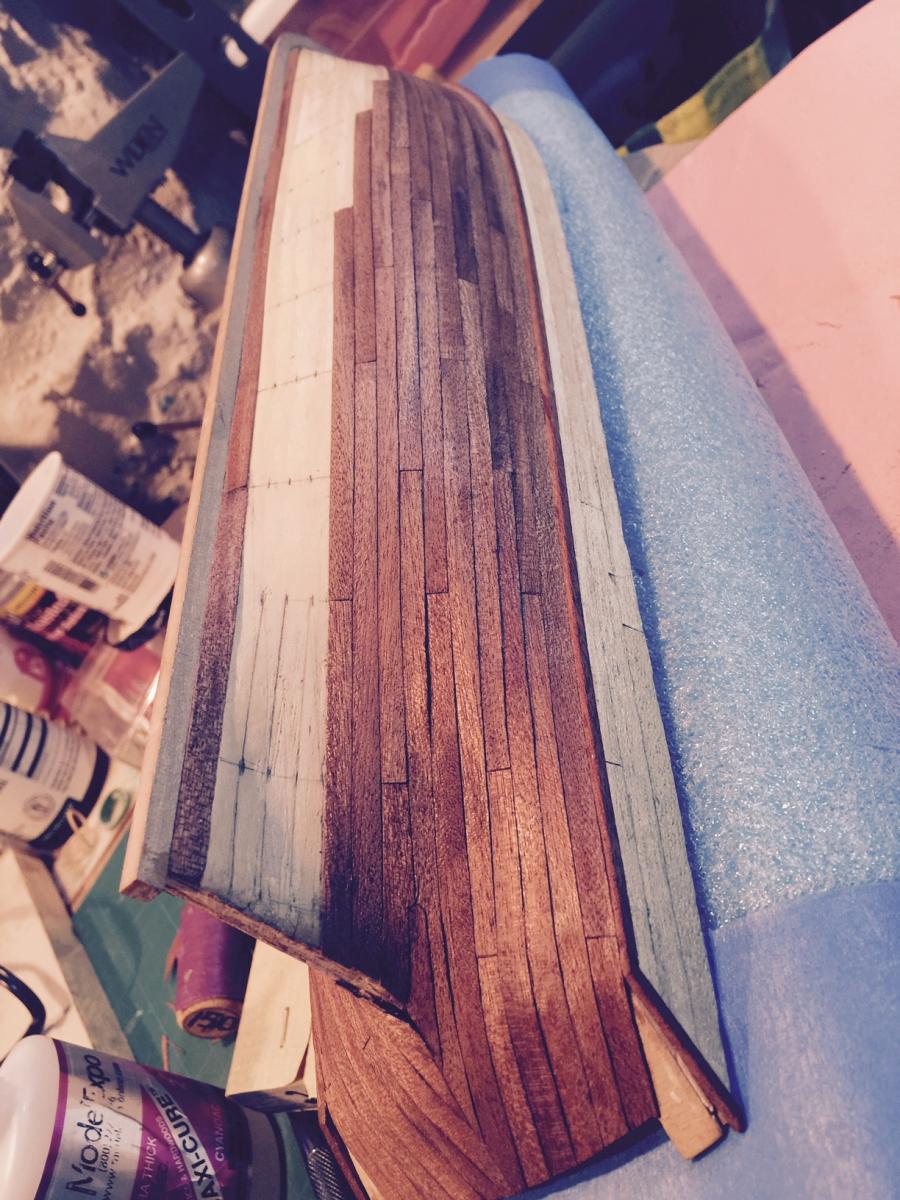
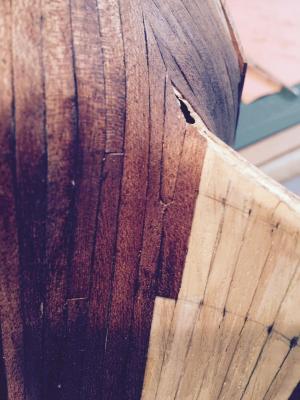
More progress... Taking the picture from the stern and seeing the black on one side confused me. that is not visible to the naked eye at any angle, I'm wondering if it's some graphite that I use to "tar" the edges. Not sure if it will impact if/when I get to staining and/or finishing the hull. Anyone ever see that?


- 389 replies
-
- 2
-
-
- scottish maid
- artesania latina
- (and 1 more)
-
Hey Jesse, I've reviewed your Scottish Maid build many times and continue to use as a great reference for my first effort. Looking forward to following along on this new build.
- 1,306 replies
-
- 2
-
-
- syren
- model shipways
- (and 1 more)
-
Thanks GLakie! it's a slow process to get the planks to fit nicely. I'm finding the thin planks have their plusses and minuses. I'm in Florida with my family this week (Orlando) so no progress for the next few days. I've been using CA to glue the planks down, and naturally a little bit of glue gets on the outside of the planks. I have concerns that this will distort the staining when I get there. How much do I sand to get to wood? or do I use a flat blade and scrape? There are also a couple of planks that I think I'll need to pull up and re-plank - they just aren't fitting right. Debond or scrape out?
- 389 replies
-
- 1
-
-
- scottish maid
- artesania latina
- (and 1 more)
-
Well gents I had a little time tonight so here's what I did... As you can see from pics, I cut out stealers and fit them as best I could between the two "problem" planks. I think they came out ok, although one side is a little better than the other. I included a pic of the stern post which will cover up most of the area that didn't look quite so good. So I think I'll go with this for now... Rest of planking hopefully will go smoothly given the relatively straight runs now. I'm starting to get anxious on what I should use for finishing the hull. I was reading the other night about water based stain and urethane, which sounds a bit easier to use than other products. Anyone have thoughts on this? Thanks again for the ideas, please keep sharing as it does help.

- 389 replies
-
- 3
-
-
- scottish maid
- artesania latina
- (and 1 more)