MORE HANDBOOKS ARE ON THEIR WAY! We will let you know when they get here.
×


mrangus
-
Posts
232 -
Joined
-
Last visited
Content Type
Profiles
Forums
Gallery
Events
Everything posted by mrangus
-
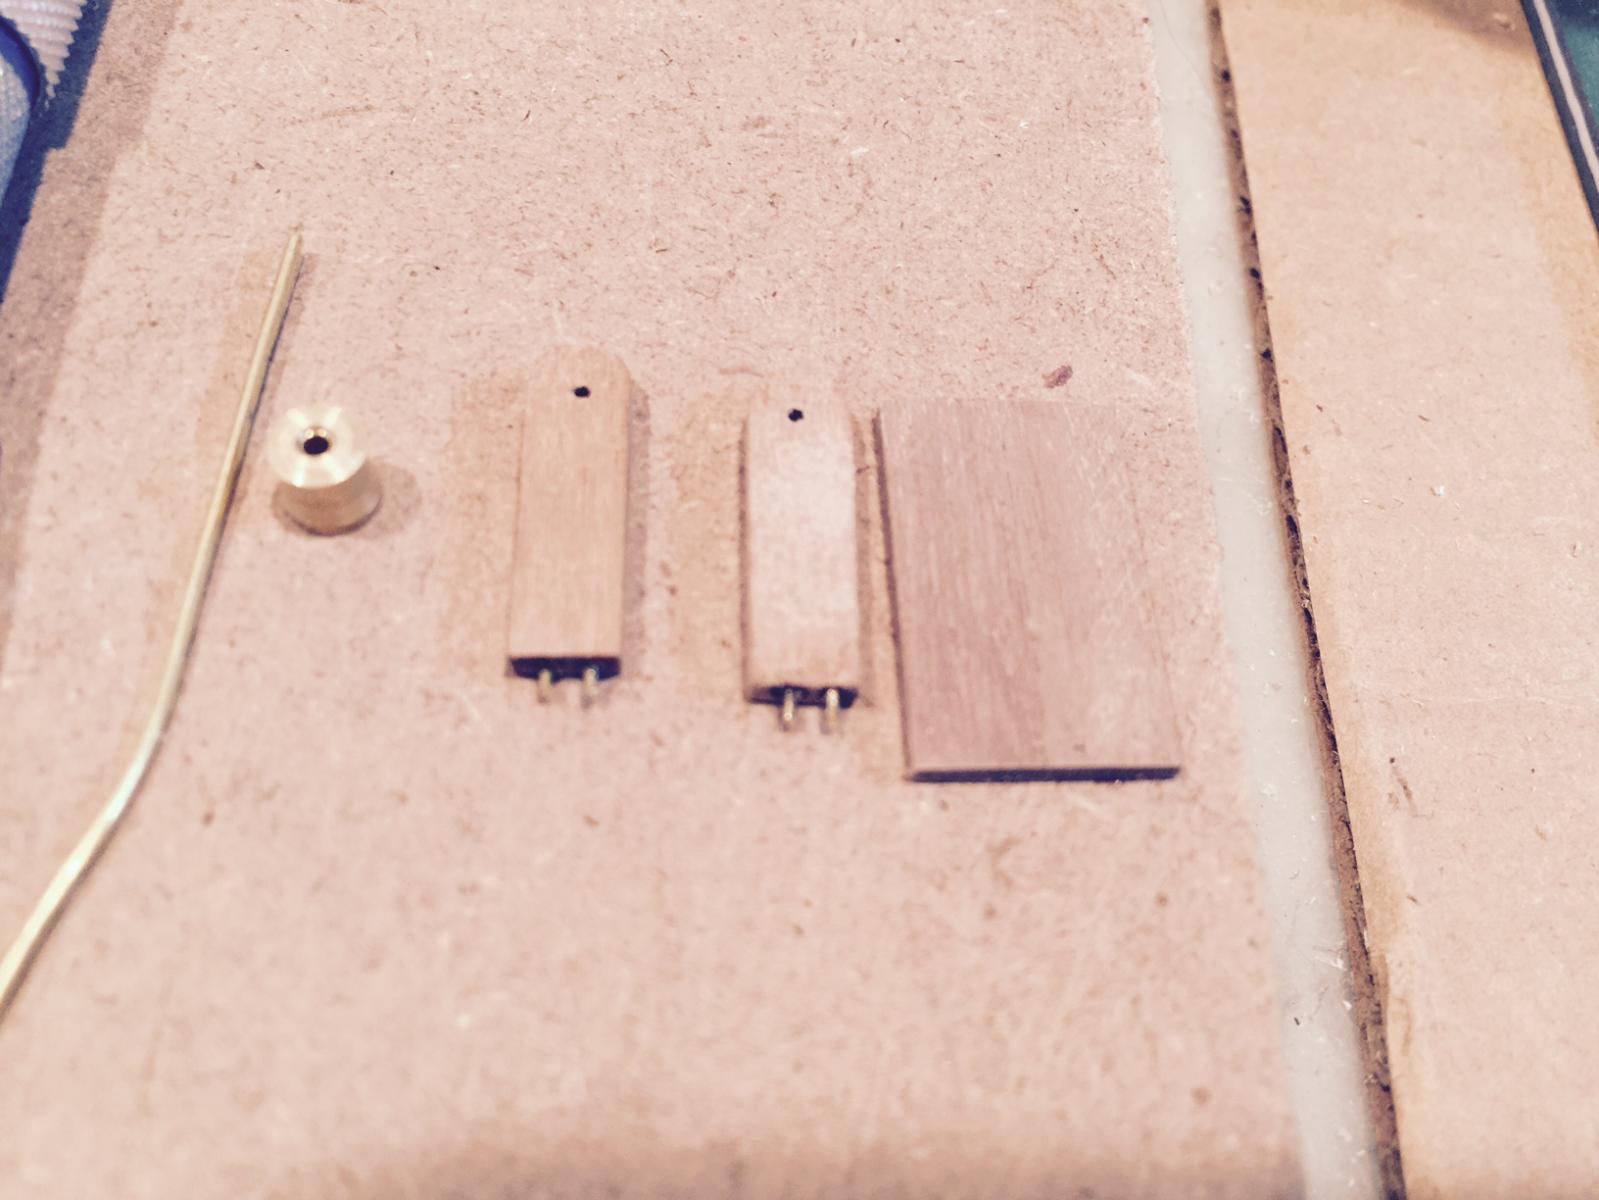
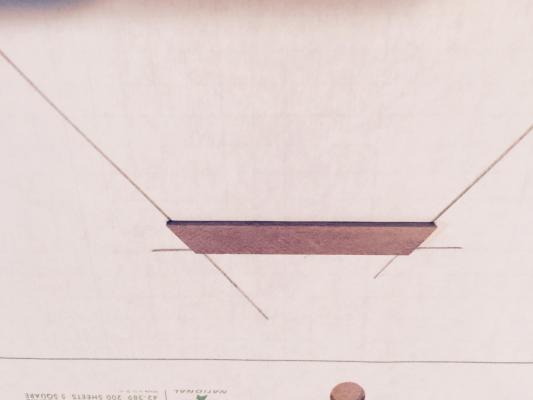
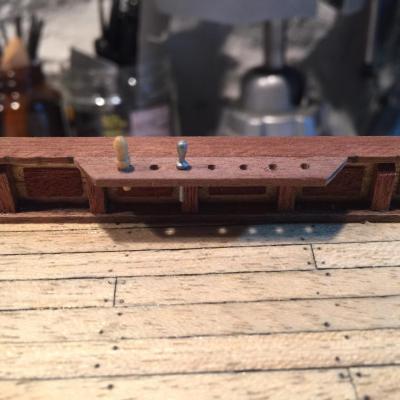
 Creating the pinrails. I found that the angle for the cut is NOT 45 degrees. I measured and it's 50 degrees, so I had to re-cut. Getting the pin holes drilled was tricky, I don't have a drill press and when doing by hand the holes are a little crooked. Hard to see by naked eye, so I kept as-is. Otherwise I'd have to order more wood as I;m out of the 6mm walnut strips. Also the kit parts list said that the belay pins are boxwood, but they're actually a cheap metal! So I ordered some boxwood (and pear) pins from modelexpo and I like them, but I ordered 10mm and only saw the part after the fact that they are 8mm. so I need to get more....
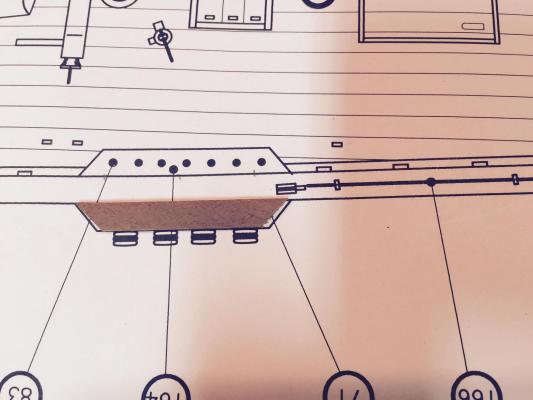


- 389 replies
-
- 5
-

-
- scottish maid
- artesania latina
- (and 1 more)
-
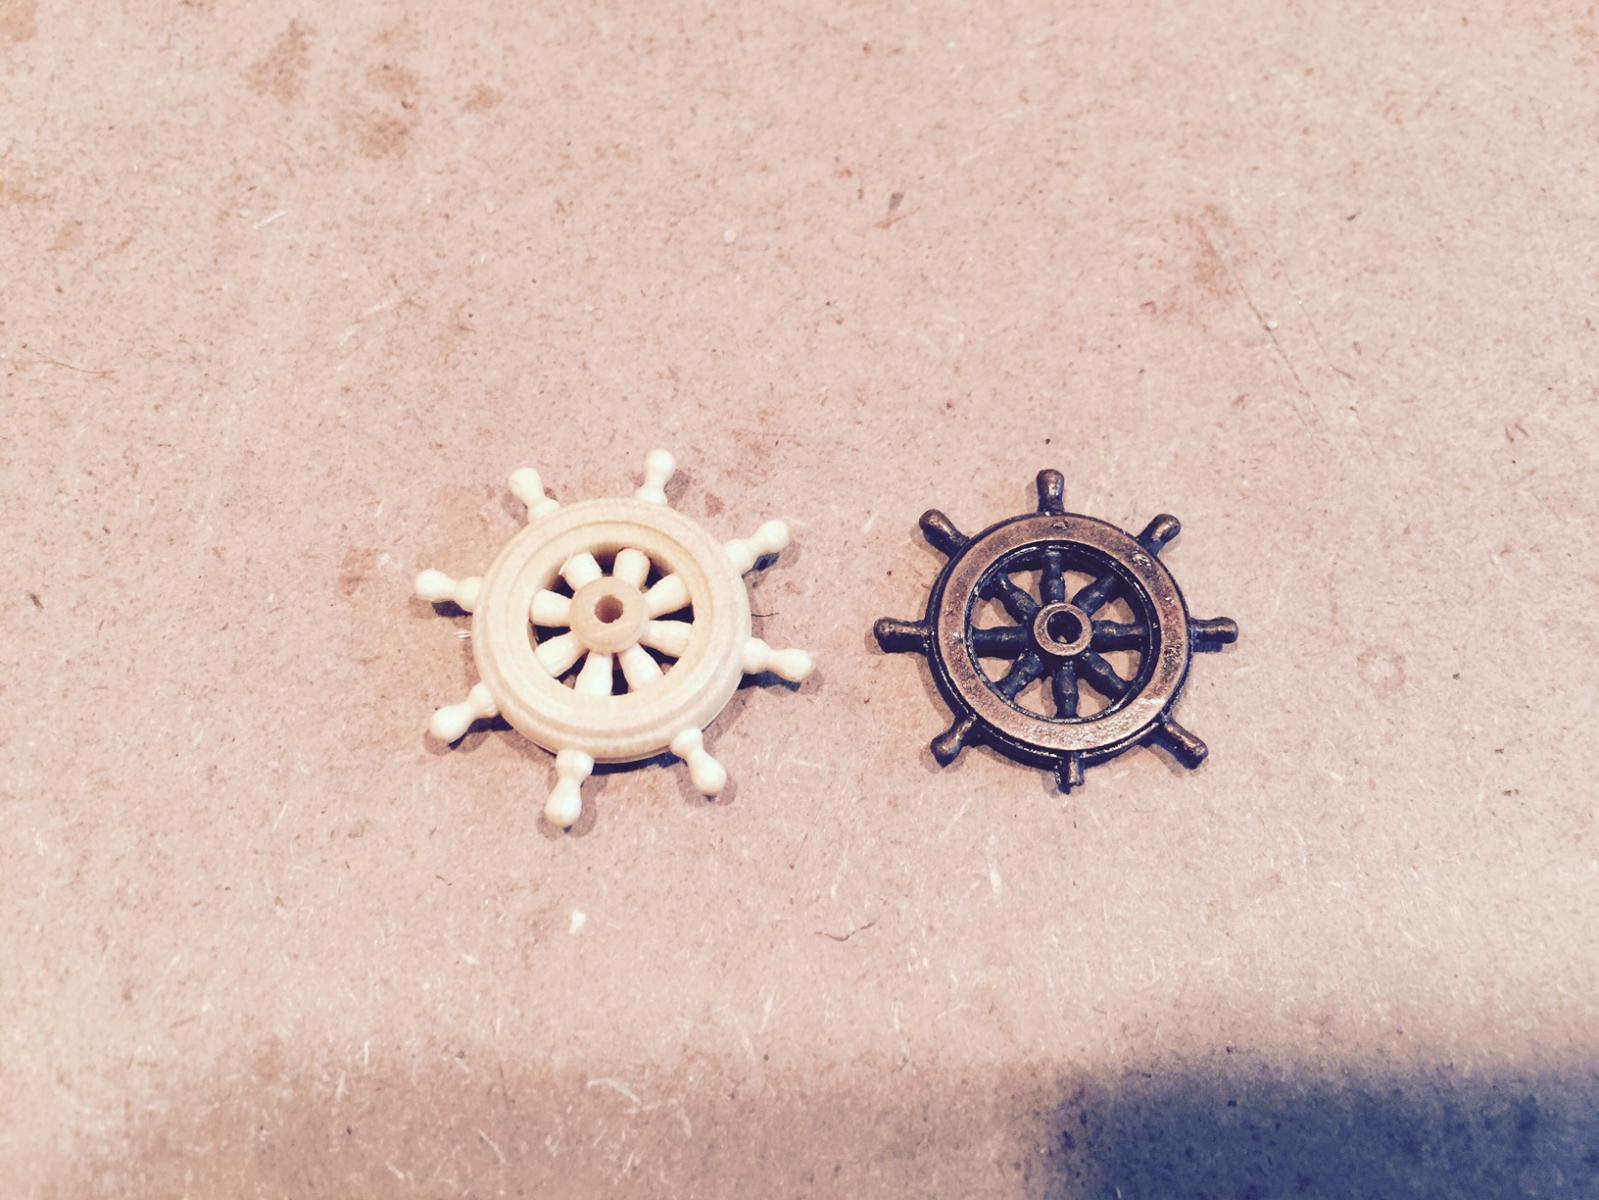
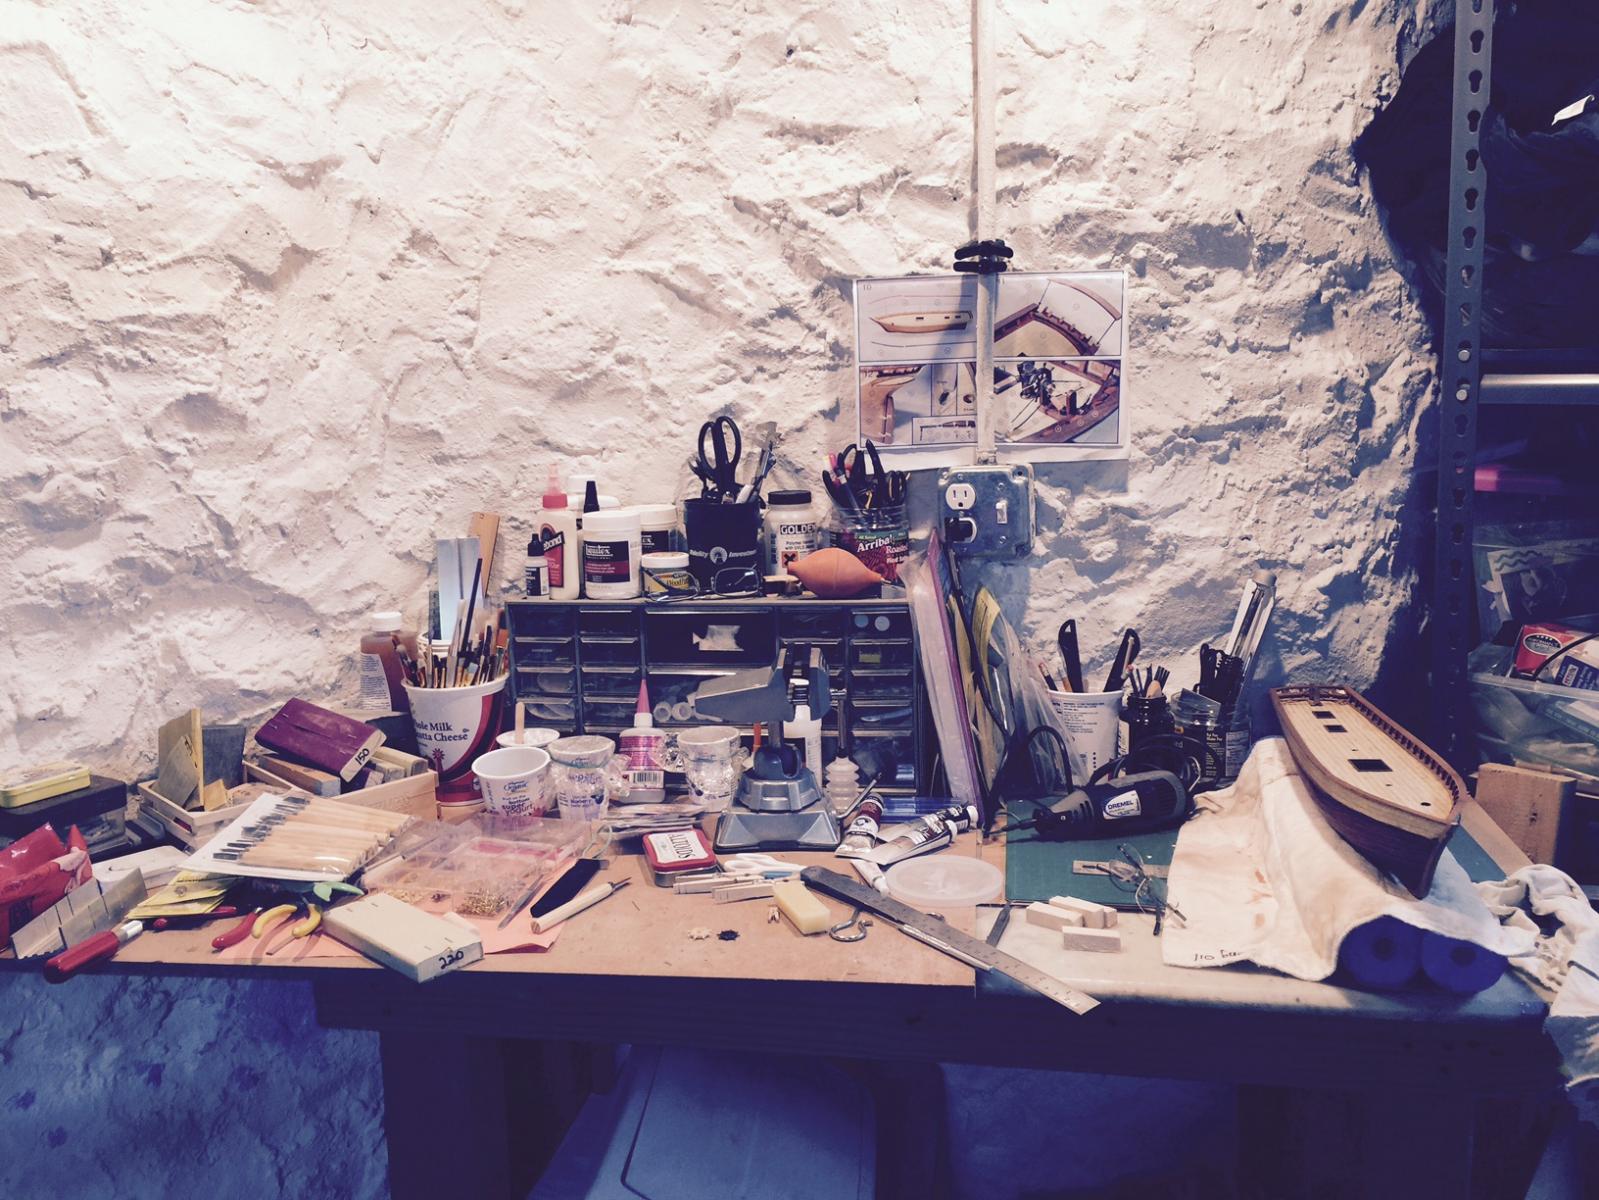
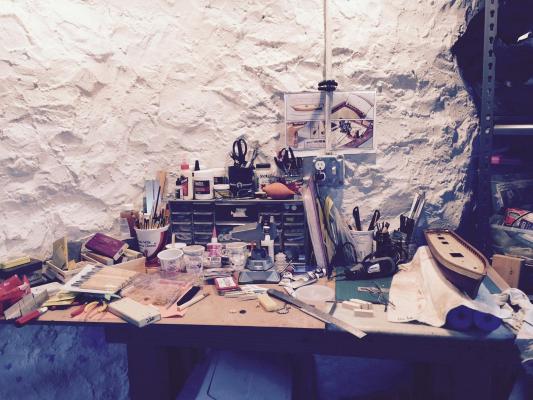
Thanks George. Good advice... for the SM (as Jesse can vouch for) the "instructions" basically say: look at the pictures, it's easy from here on! So I've been tracking closely a few builds on how to accomplish the small pieces. Right now I'm playing around with how to color the basswood components I've ordered as well as the boat I carved. I have a few things I'm going to try on dummy models: stain followed by paint, oil based paint, thinned in various tones. I ordered a wooden ship's wheel which has much more detail than the cast version that came in the ship, but in order to get looking more appropriate with the ship, I need to do something with it. I'm afraid to try to paint on too many details as I think I'll just mess it up. I've also included my highly efficient workspace. I do know exactly where everything is. Just takes a while to find.

- 389 replies
-
- 2
-
-
- scottish maid
- artesania latina
- (and 1 more)
-
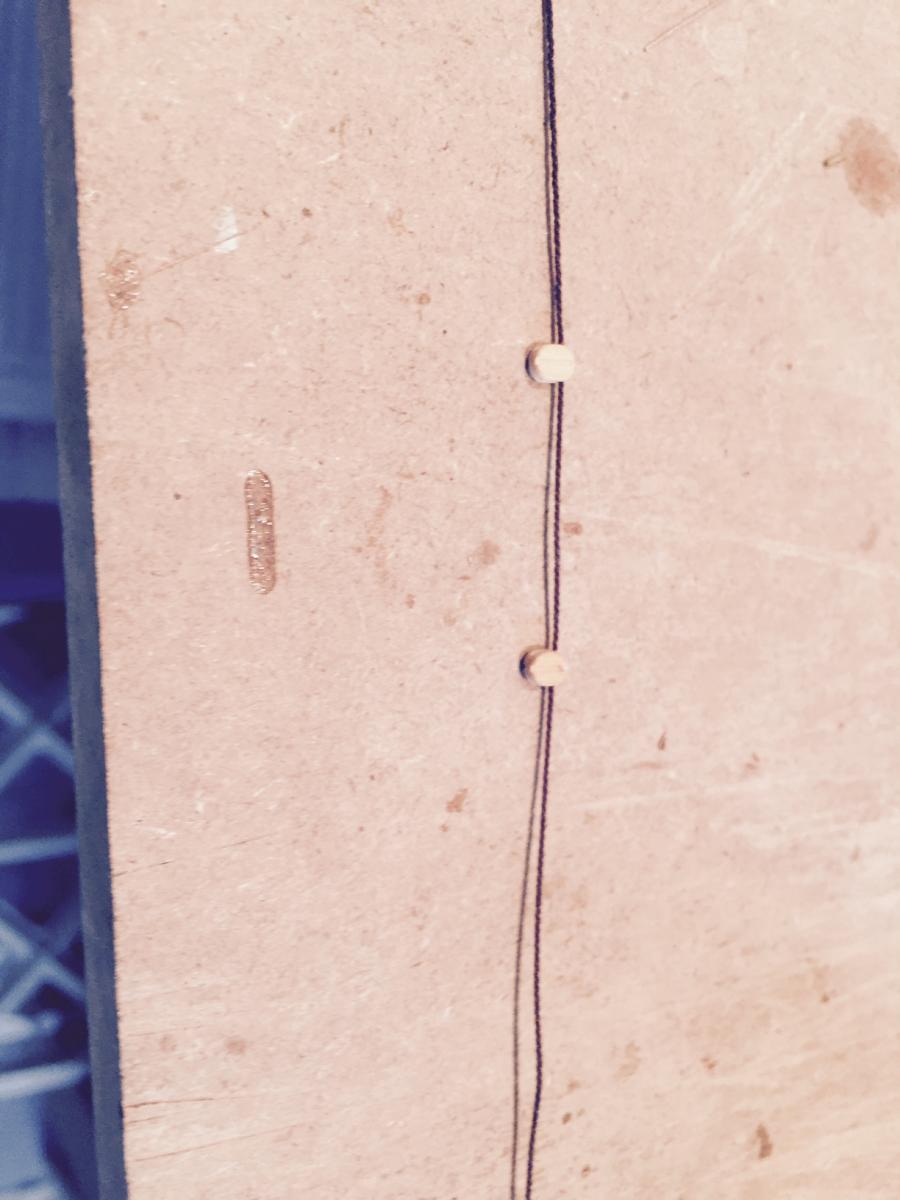
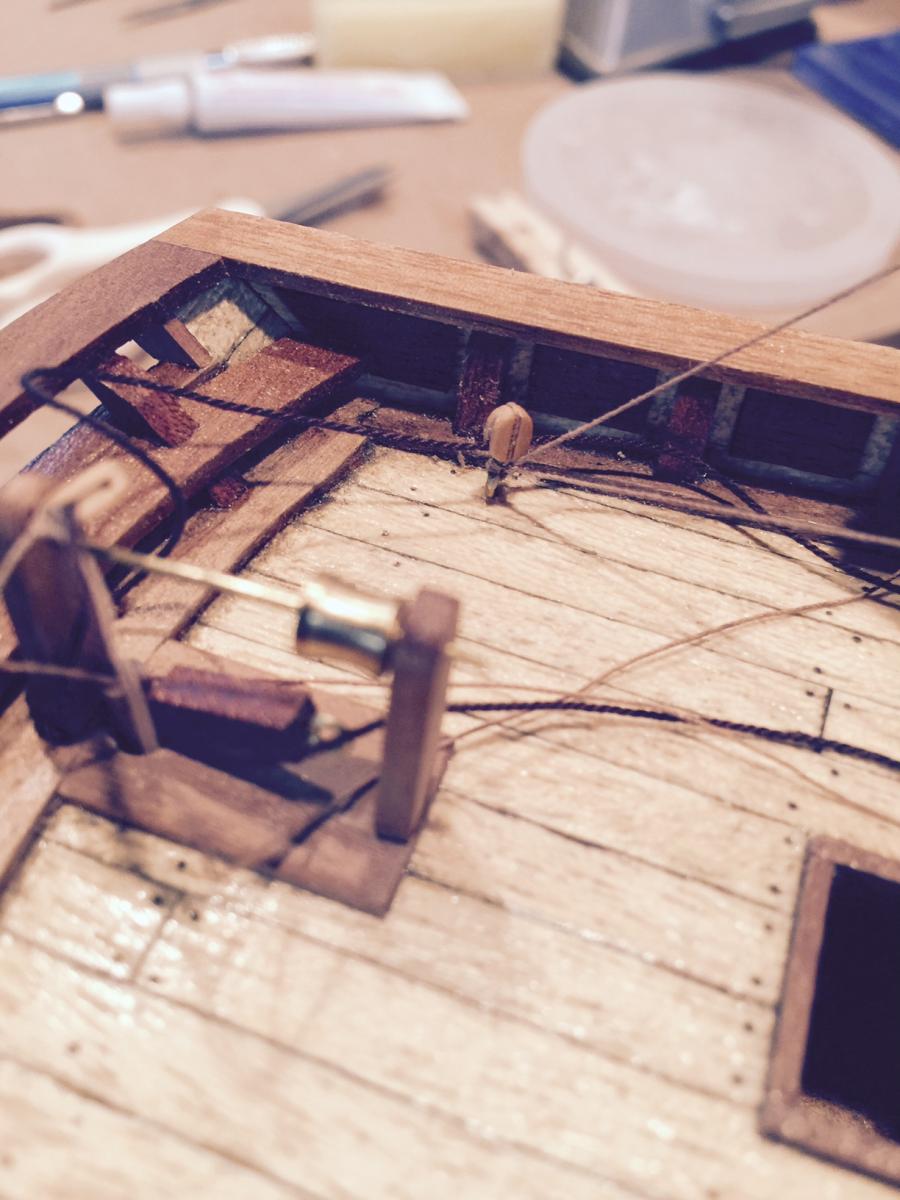
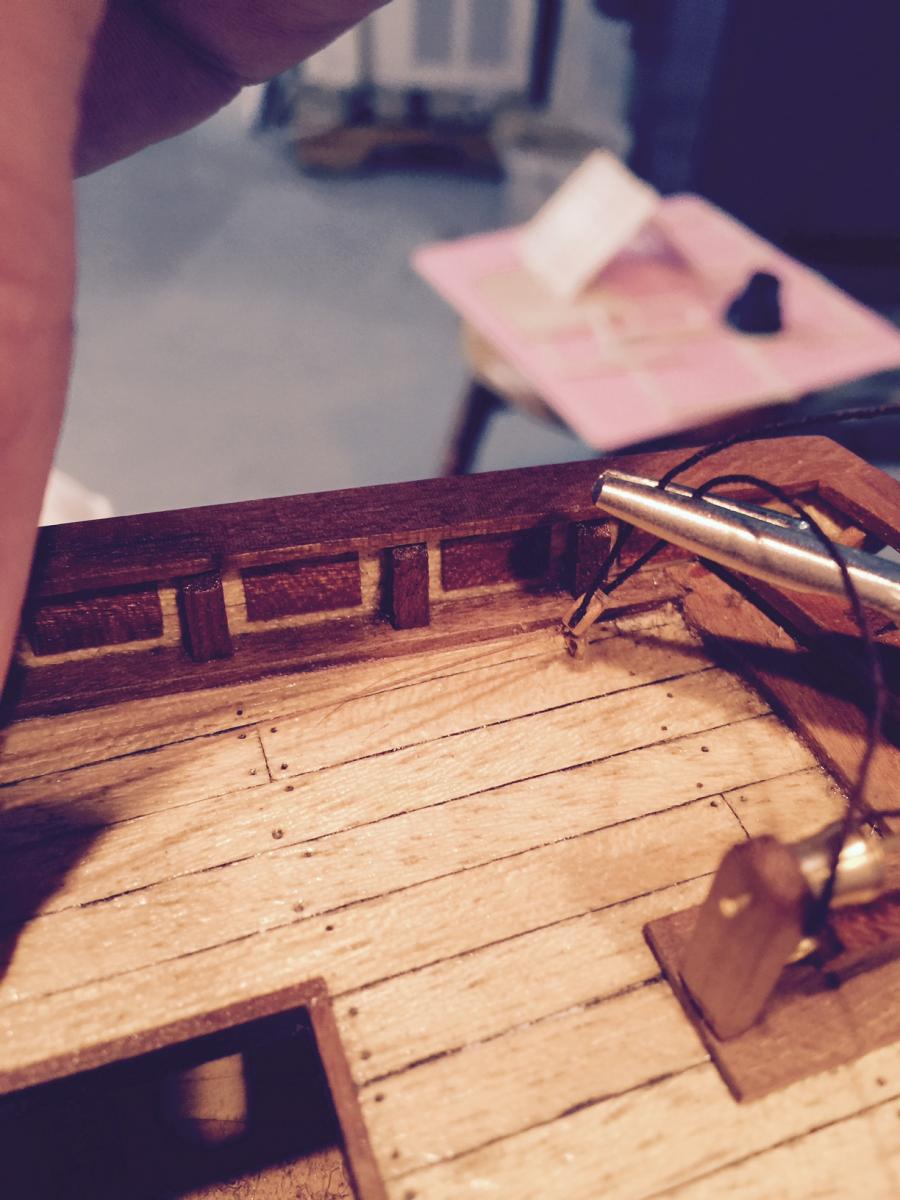
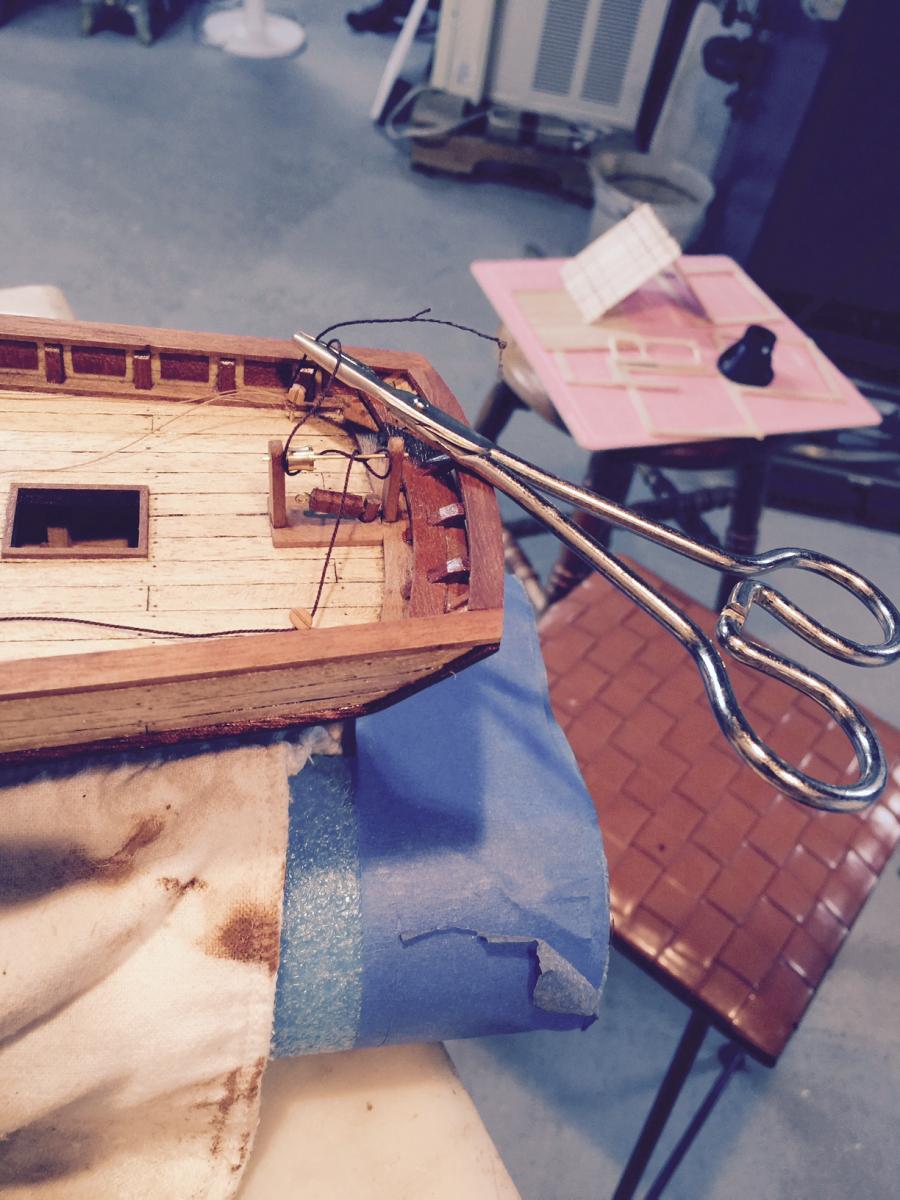
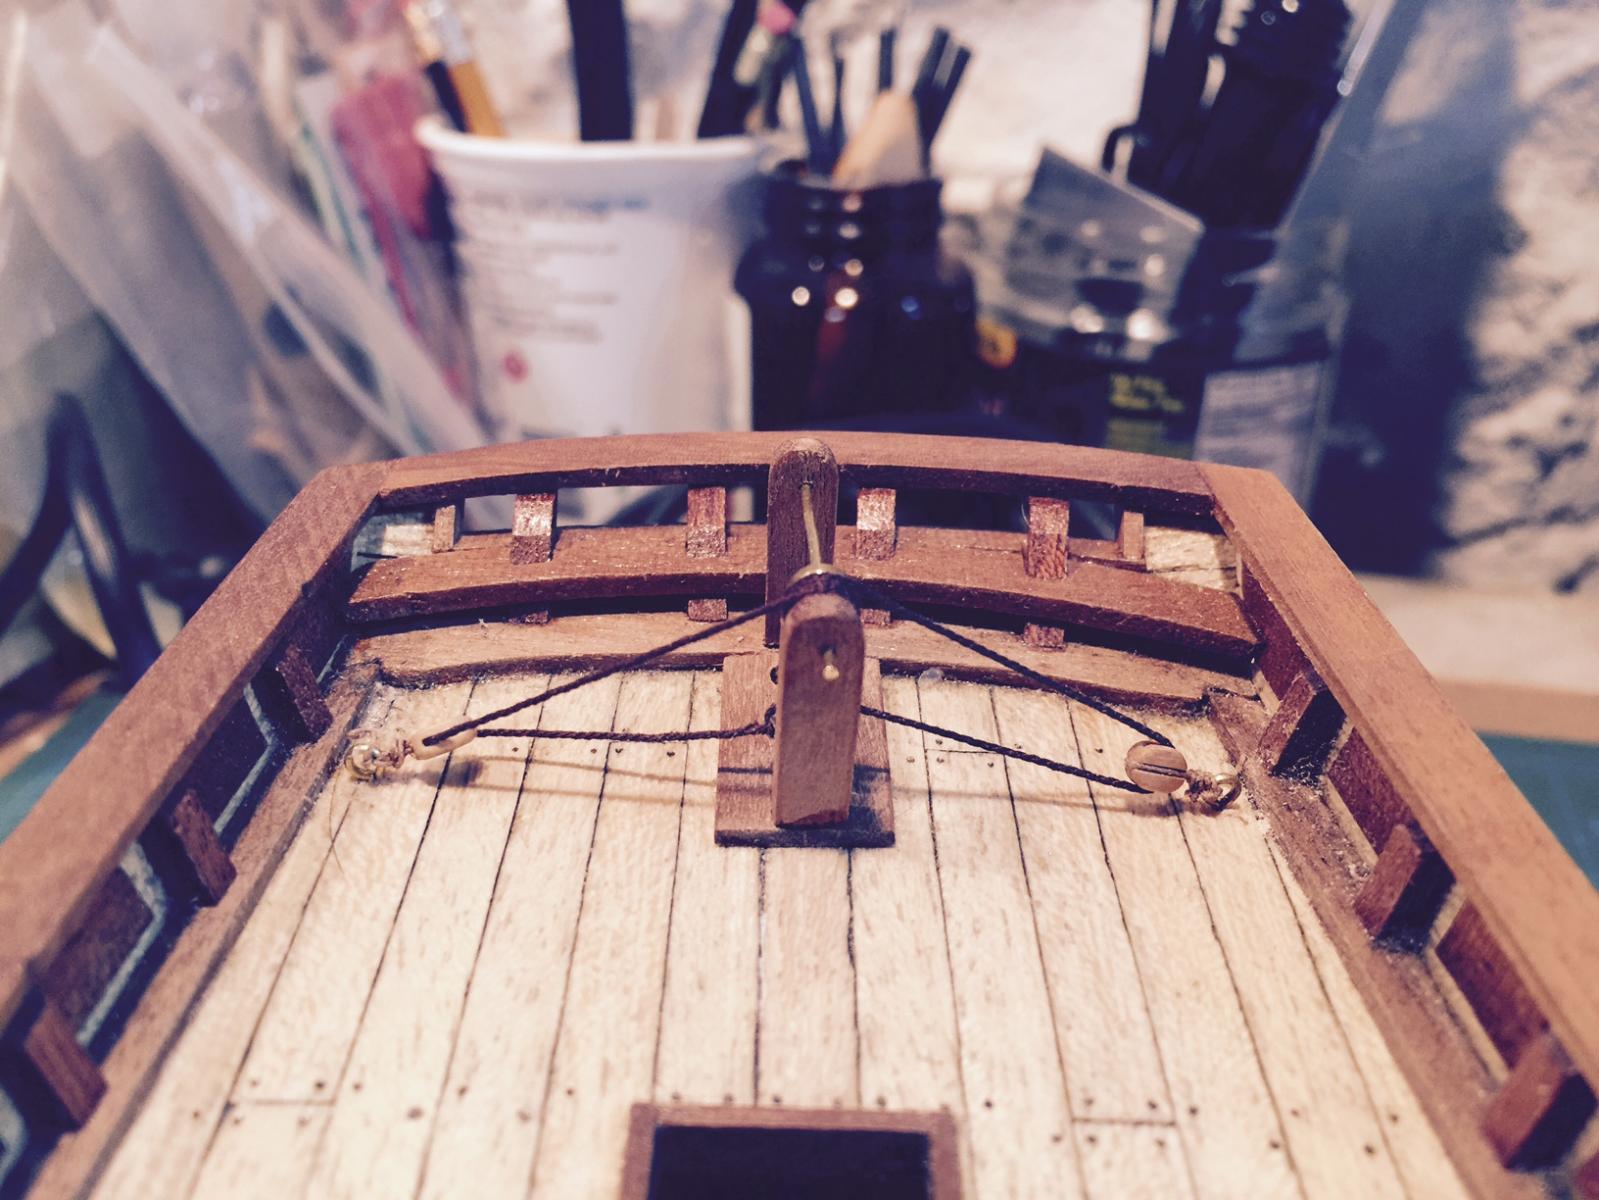
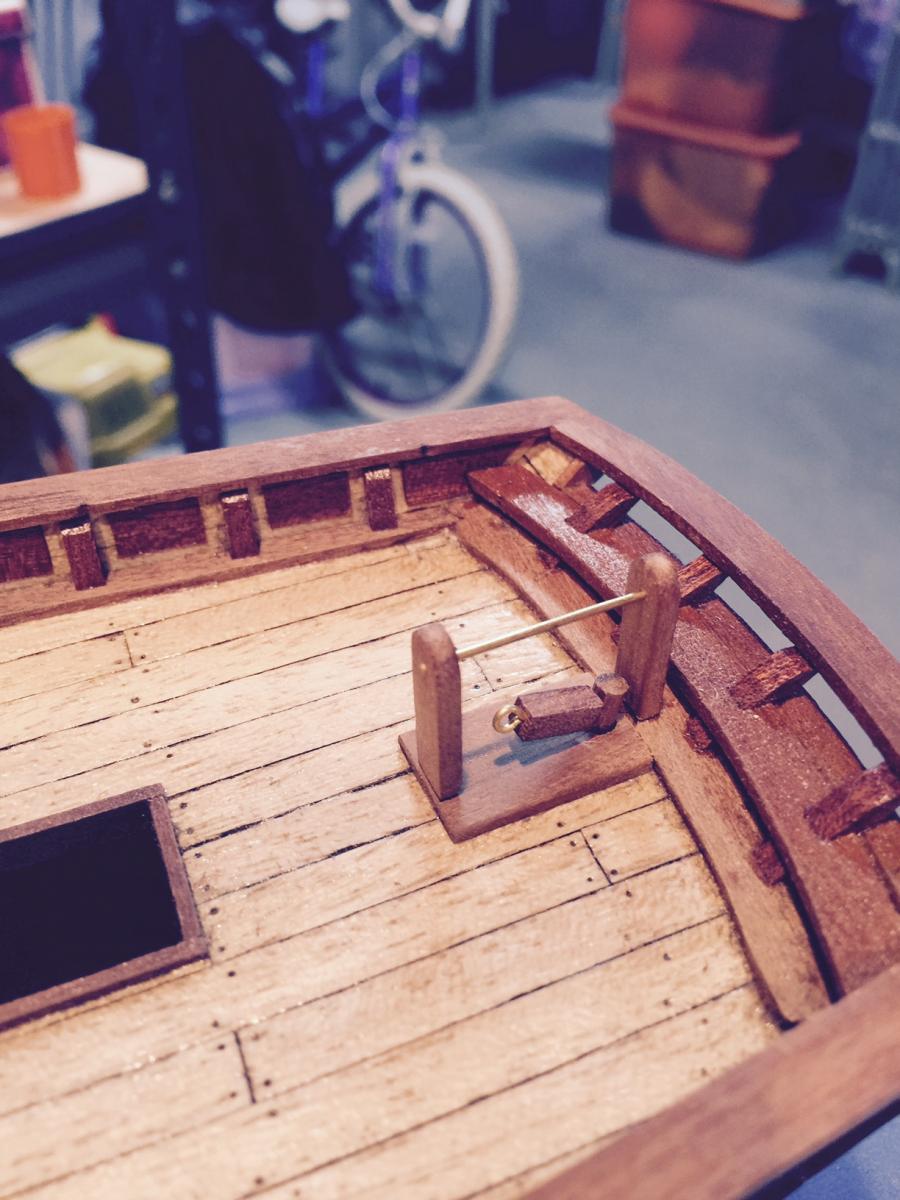
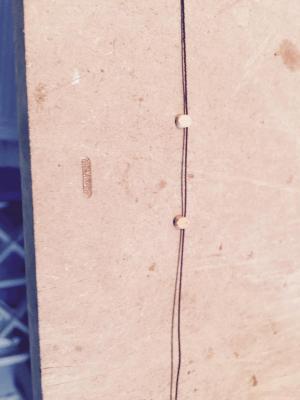
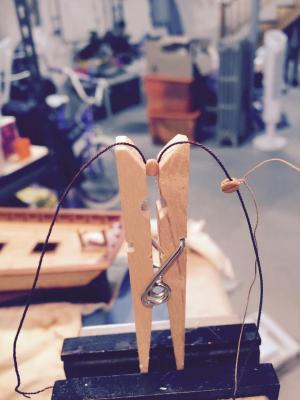
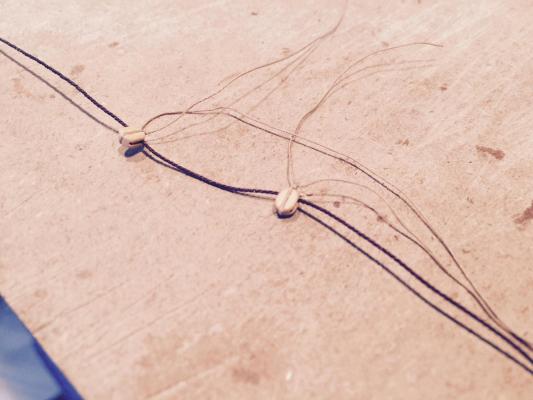
Well I had some free time today and I worked on the ship steering mechanism. My first foray into working with the rigging and I learned a lot... First I had fits getting the rope through the block eyelet - until I discovered how much beeswax helps that process. Tying the blocks was similarly challenging until I did a little research on this site and discovered that holding the block with a clothespin does the trick. I also learned that you need to think through the steps in setting up rigging, I tried threading the block eyelet once tied onto the boat and that just wasn't going to happen. So more backtracking. I thought I was getting real ingenious by using a small clothespin to hold the rope tight in the block, keeping tension across the wheel, which I had wrapped the rope around three times. I also managed to tie the rope to the steering block eye nice and tight, but didn't consider the slack that would be added when I released the small clothespin - so now my whole system looks a little droopy. I'm hoping that's realistic to how this setup looked. I need to look for a picture to validate. One last minor point of frustration. I had intentionally set the two pins I placed in the stantions a little off center to get the line up correct, and when I put the glue on and was rushing because we know how fast that glue cures - well I got it wrong and now it looks a little off-line. I'm going to try to fix that when my ship's wheel arrives. I took a few more pics than normal because I wanted to capture the steps for myself as well as others that might be trying this for the first time as well. Definitely educational for me and hopefully for others.


- 389 replies
-
- 6
-
-
- scottish maid
- artesania latina
- (and 1 more)
-
I've discovered the secret to threading those tiny little holes in the blocks. Beeswax!
- 389 replies
-
- 2
-
-
- scottish maid
- artesania latina
- (and 1 more)
-
I realize after looking at the picture and comparing to others that I need to make the rudder block a little longer. That's an easy fix....
- 389 replies
-
- 1
-
-
- scottish maid
- artesania latina
- (and 1 more)
-
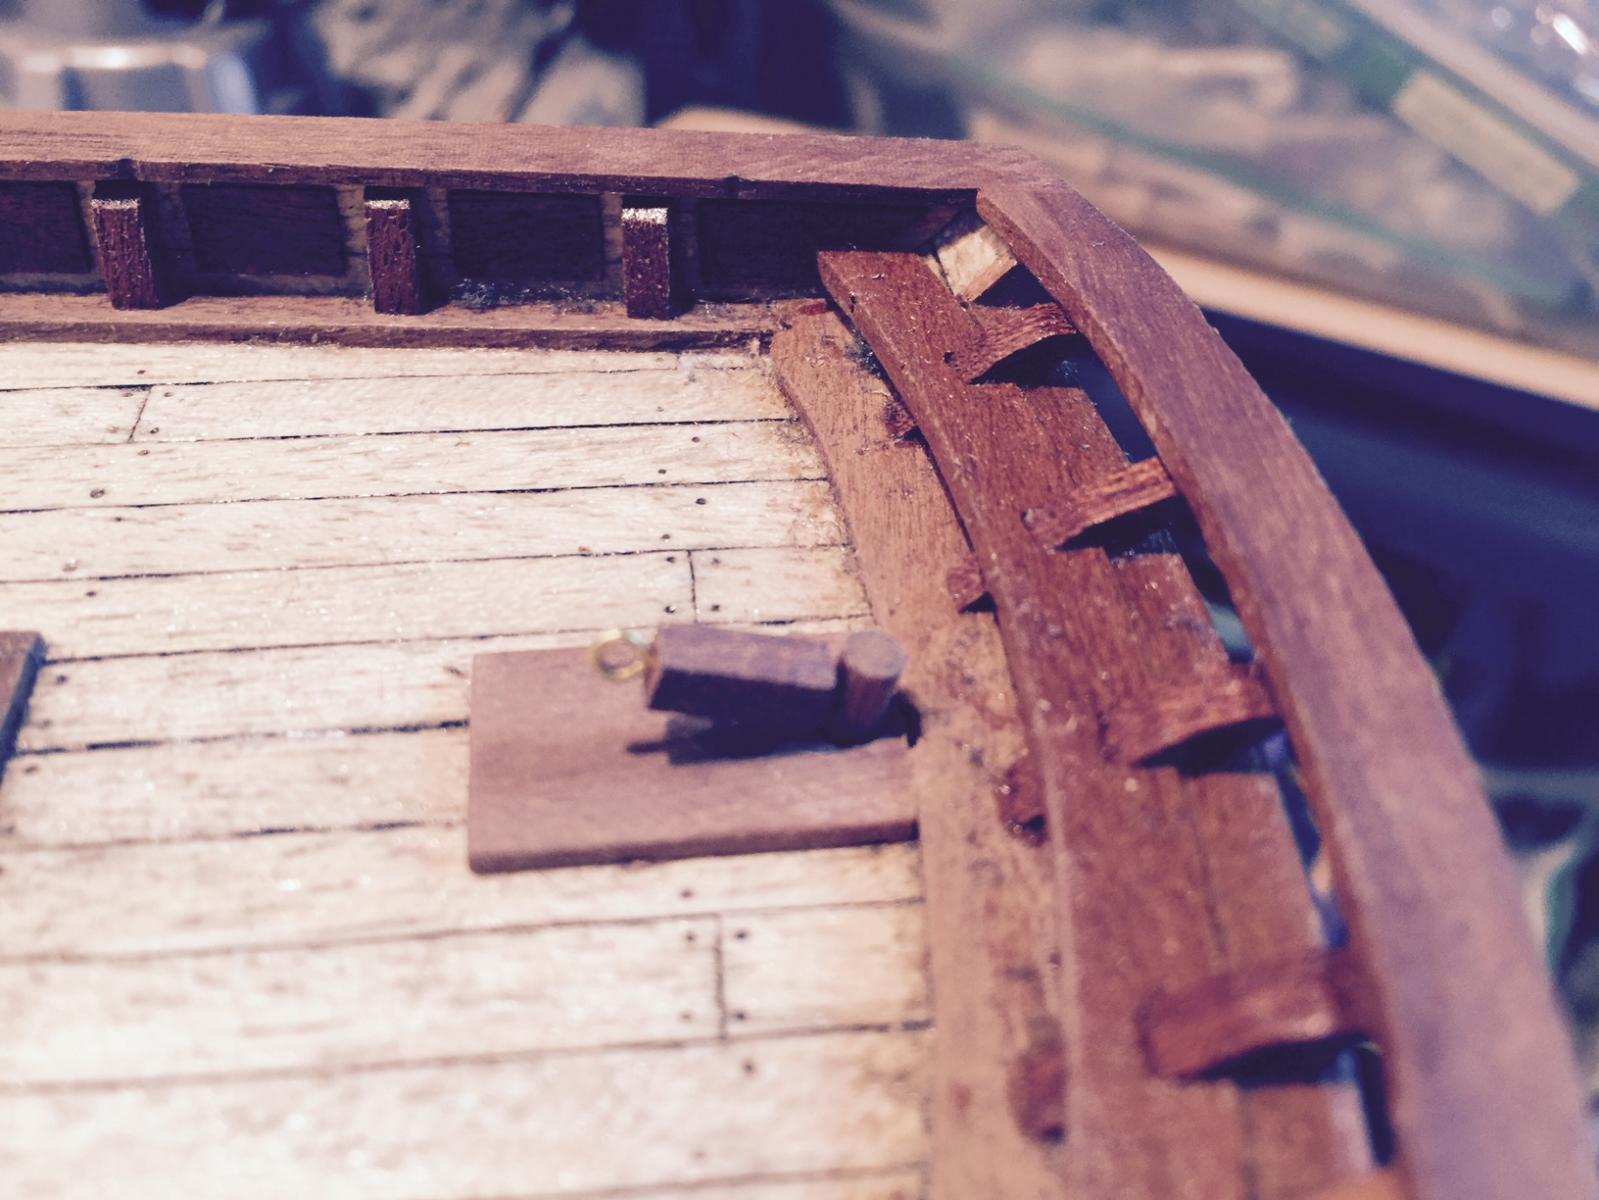
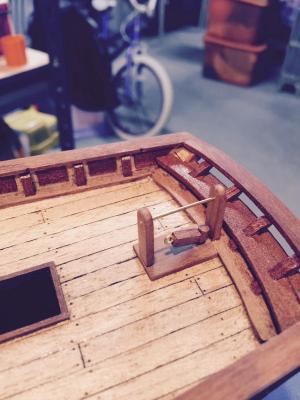
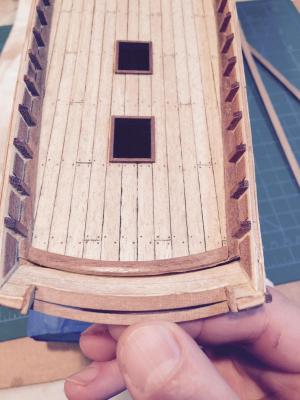
I decided in the second option of putting the stantion platform on the waterway. I think it looks pretty good, I've mocked up what it looks like without glueing the second stantion. I also had to make my own stantions - I couldn't find the ones that were supposed to be prefabb'ed in the kit. wasn't sure how wide they were so I had to guess based on the pictures in the instructions booklet. Now I'm just waiting for my ship's wheel to arrive. I got a wooden one instead of the brass one that comes with the ship. I hope to add some detail to it to make it look a little more realistic. I assume they were painted?

- 389 replies
-
- 4
-
-
- scottish maid
- artesania latina
- (and 1 more)
-
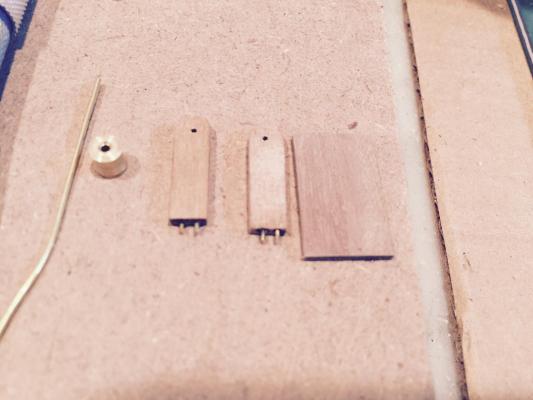
Problems... I've run into a few issues. My rudder post hole was drilled too close to the stern waterway so I don't have room for the station to sit on the platform. I think my two options are a) pull the rudder off, re-drill the hole and cover the original hole with the stantion platform (more work) or put the rear stantion on the waterway (easier approach). Thoughts on this? Also my ship's wheel is broken. One of the handles is broken off, so I looked into ordering a new one, and I'm not sure whether the measurements for the wheel are from the tip of the handles (20mm) or from the wheel itself (14mm). Since I'm going to order a new wheel, I've decided to get better belaying pins. The kit has cast metal ones that just don't look all that good. I'm also puzzled on the size I should order. Any advice would be welcomed.
- 389 replies
-
- 1
-
-
- scottish maid
- artesania latina
- (and 1 more)
-
Thanks Jesse. I've read that basswood doesn't take stain too well. Any luck with staining?
- 389 replies
-
- 1
-
-
- scottish maid
- artesania latina
- (and 1 more)
-
The details look great Nigel. Very clean lines.
- 270 replies
-
- 1
-
-
- red dragon
- artesania latina
- (and 1 more)
-
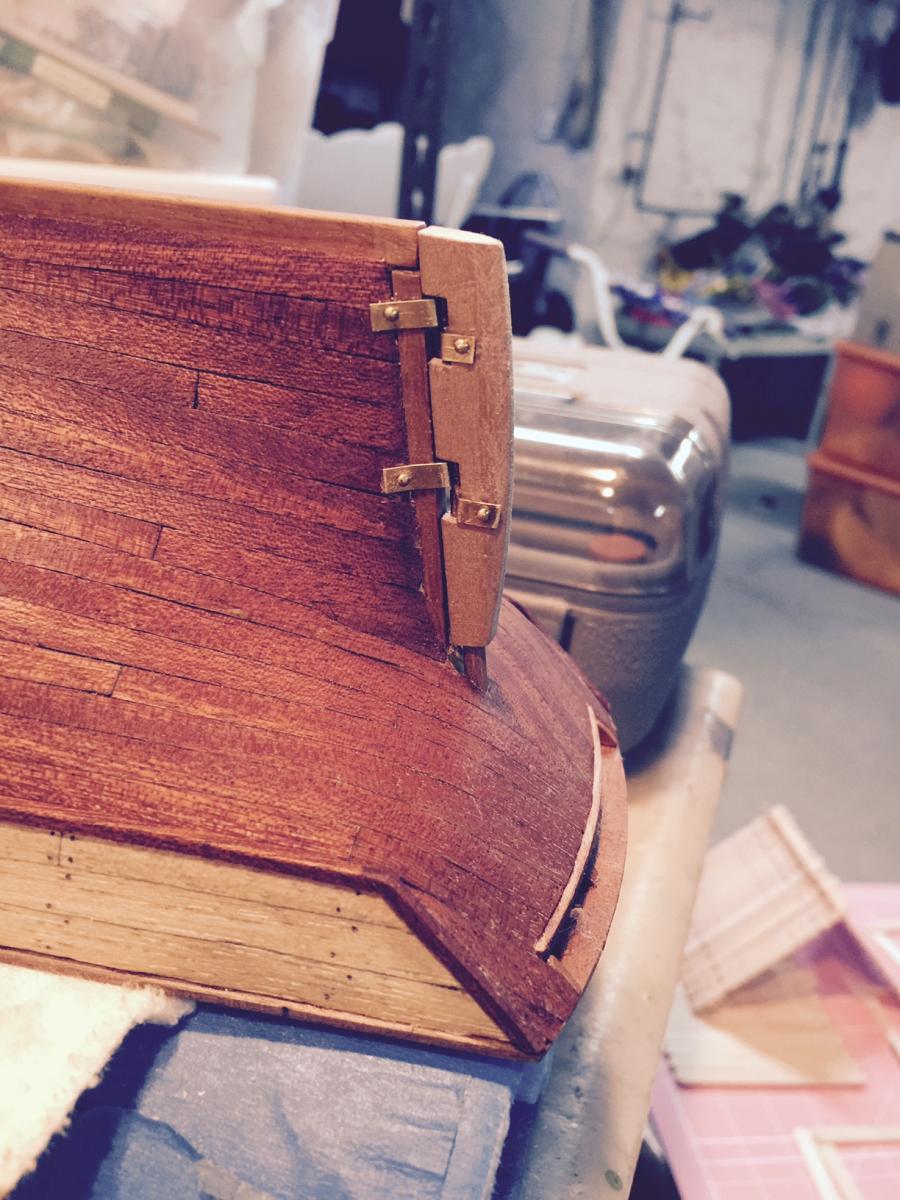
The rudder was pretty challenging lining up the hinges appropriately... I struggled with getting the brass pieces bent correctly, I just don't think I have the know-how and/or tools to get this right, but I'll live with what I've put on. Drilling the hole wasn't as bad as I thought. I started with a hand drill 1mm, and slowly expanded from there. When I got to the dremel, the drill went a little quicker than I had anticipated, and Fortunately - the drill came out on target.... the hole by the stern post is a little bigger than I had hoped, but not sure if I''ll be able to get in there to repair. tight spacing and I don't want to take the rudder off at this point. On to the fun stuff on the deck!


- 389 replies
-
- 4
-
-
- scottish maid
- artesania latina
- (and 1 more)
-
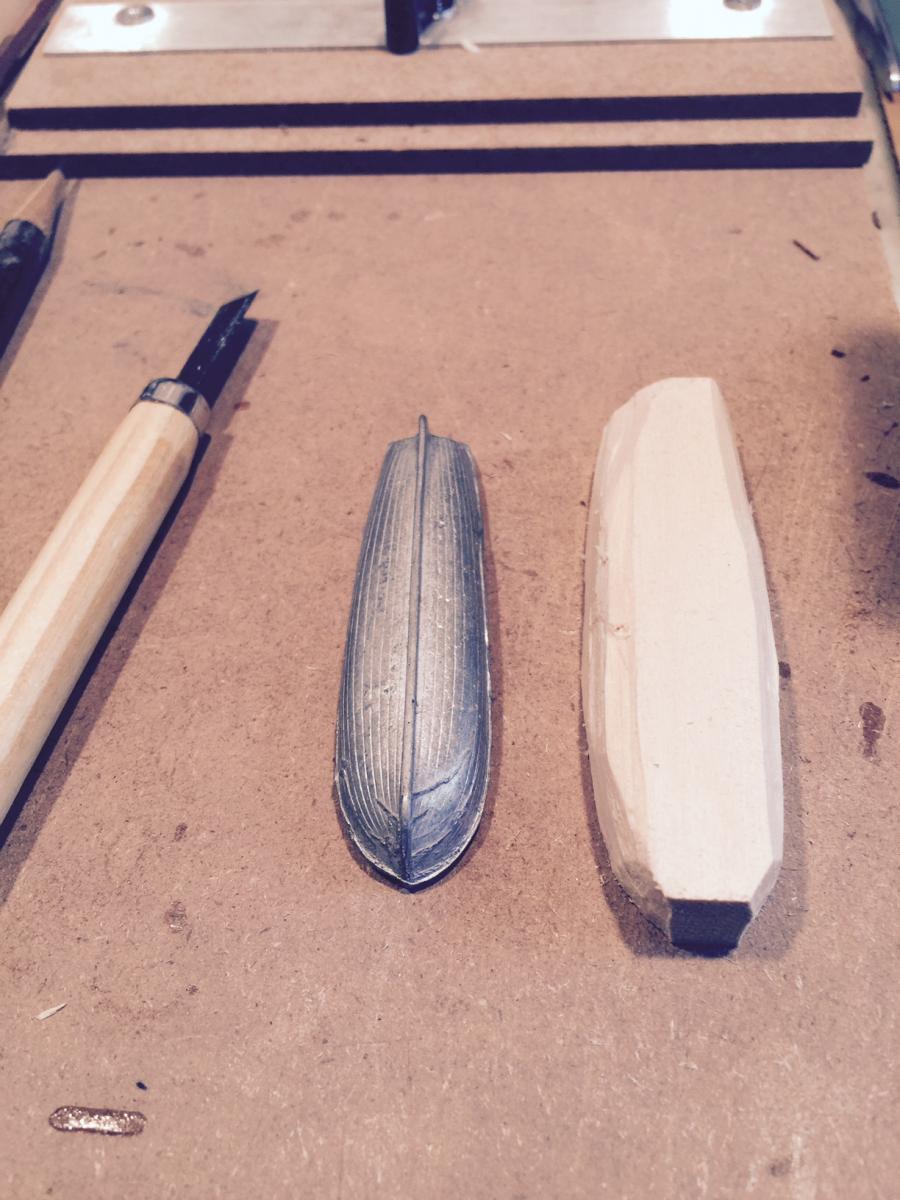
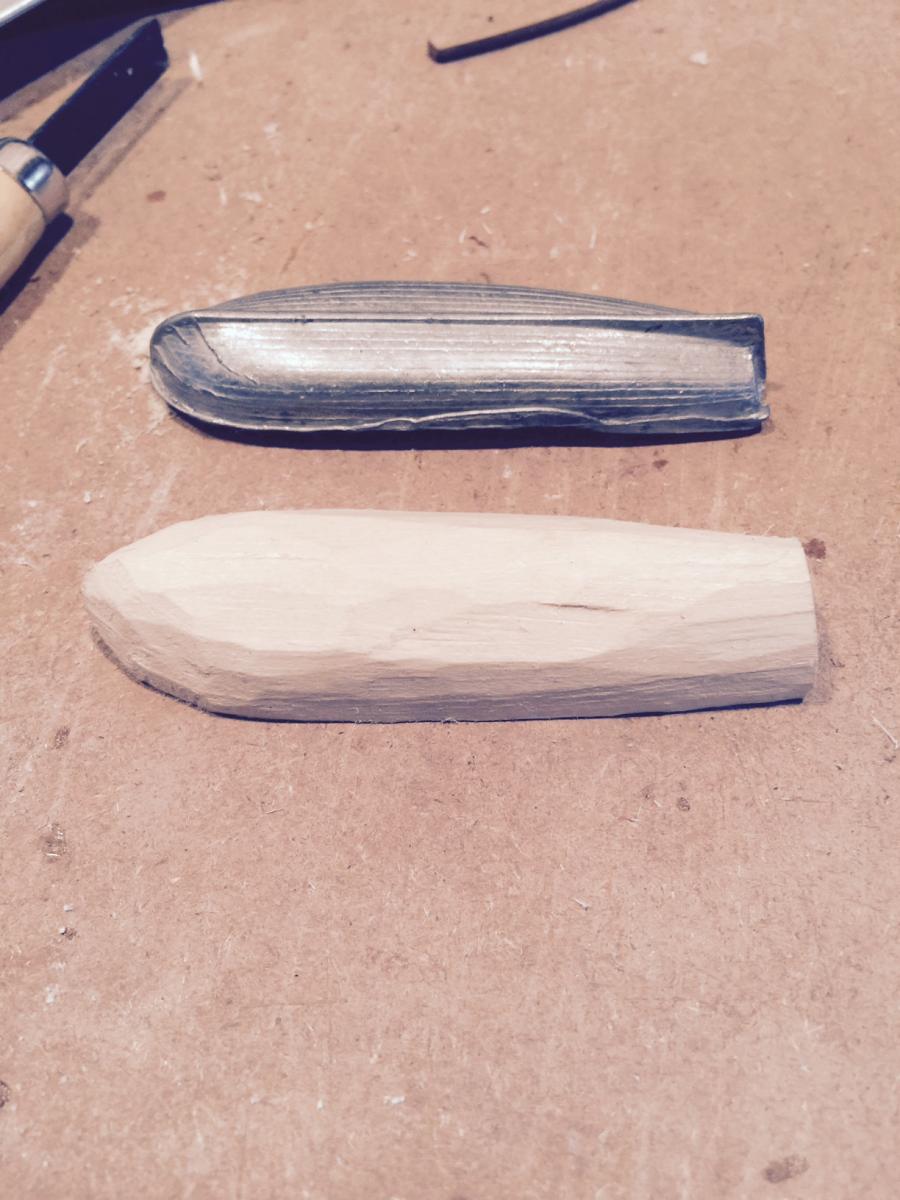
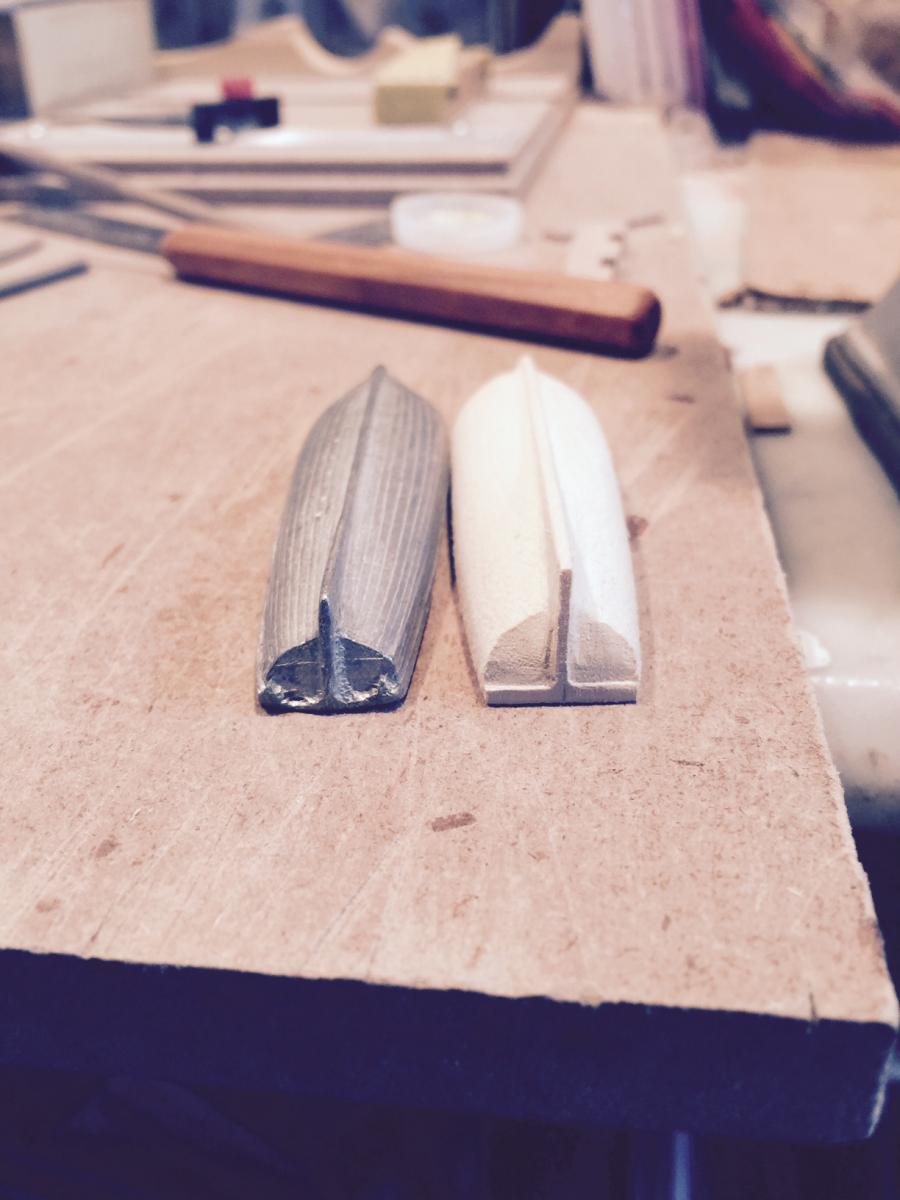
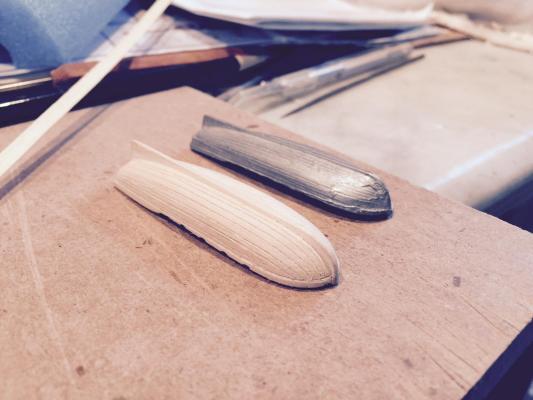
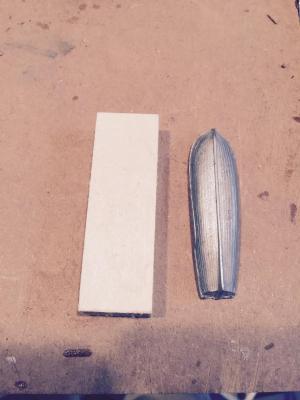
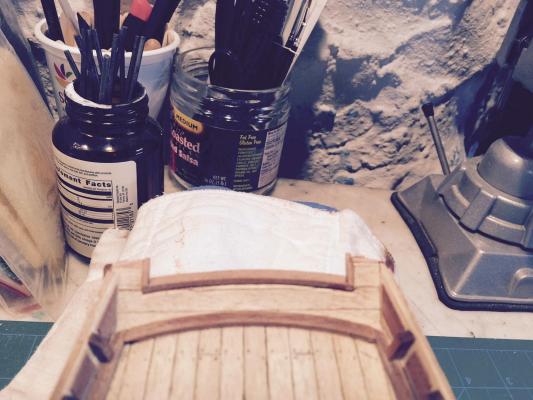
Here's a look at the lifeboat - it's complete from a carving perspective, getting the plank lines on was a little tricky and not super accurate but for the size I'm ok with the look. I'm trying to determine what color I want to have - I could stain, or try an oil... Any ideas on how to get an ash-grey/weathered wood color? Would that even be appropriate? I've also started on the rudder. Still nervous about drilling to the boat! But I'll get over it....

- 389 replies
-
- 4
-
-
- scottish maid
- artesania latina
- (and 1 more)
-
Basswood is amazing - very easy to work with when getting details done. I added some detail to the lifeboat... I think I will plagiarize Jesse's idea of using a comb to create the planking. His looked awesome after done...
- 389 replies
-
- 3
-
-
- scottish maid
- artesania latina
- (and 1 more)
-
Hello Nigel, Very clean and crisp build here. I was drawn to your id name as I spend a week every summer up at Lake George with my family and have fallen in love with the area. Anyways, wanted to comment on your fantastic work and will keep to the subject. Thanks. Robb
- 270 replies
-
- 1
-
-
- red dragon
- artesania latina
- (and 1 more)
-
Hey GuntherMT just catching up with your build, looks great and good info on the cannon builds. I'll be paying attention to this build, very attractive ship.
-
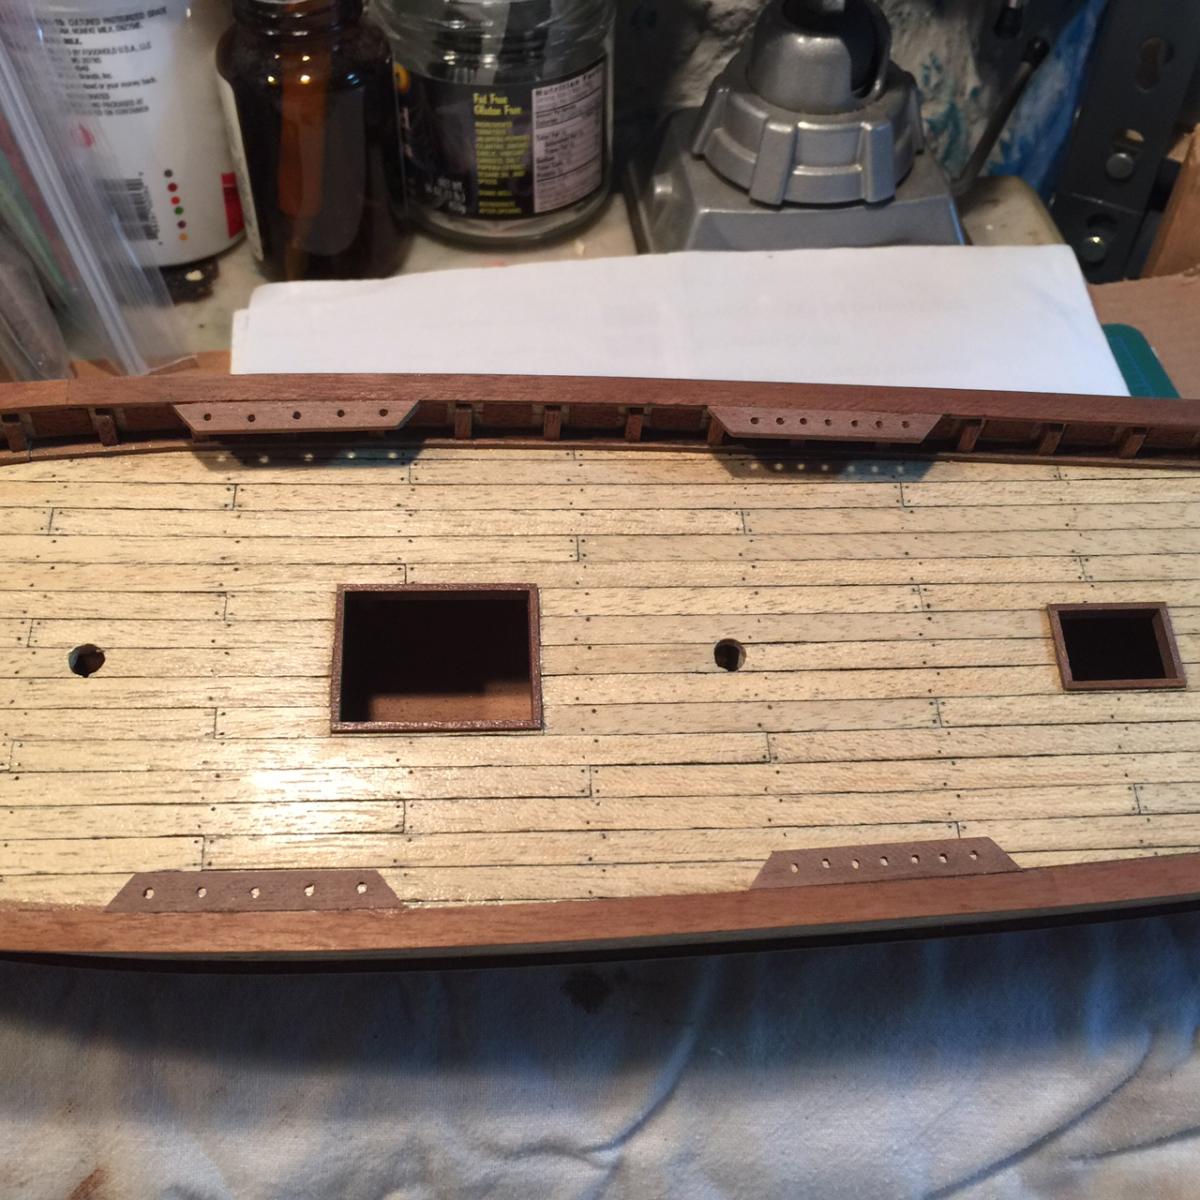
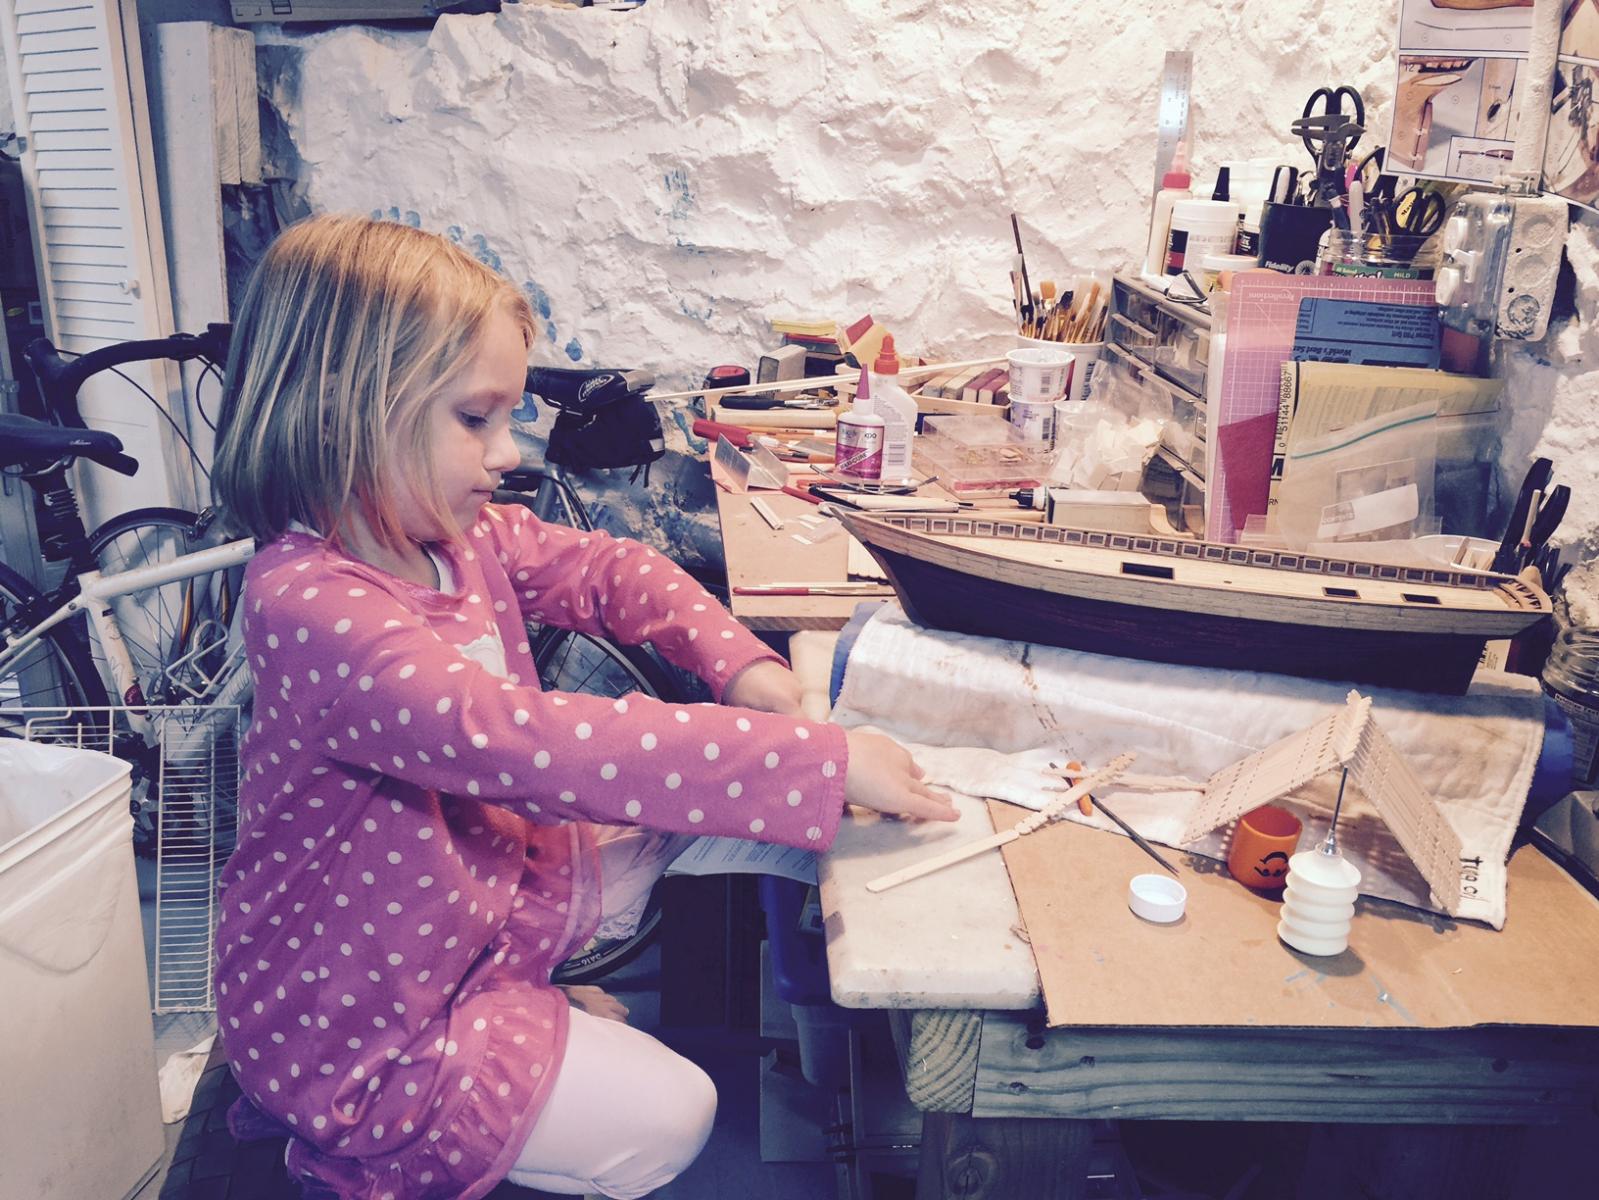
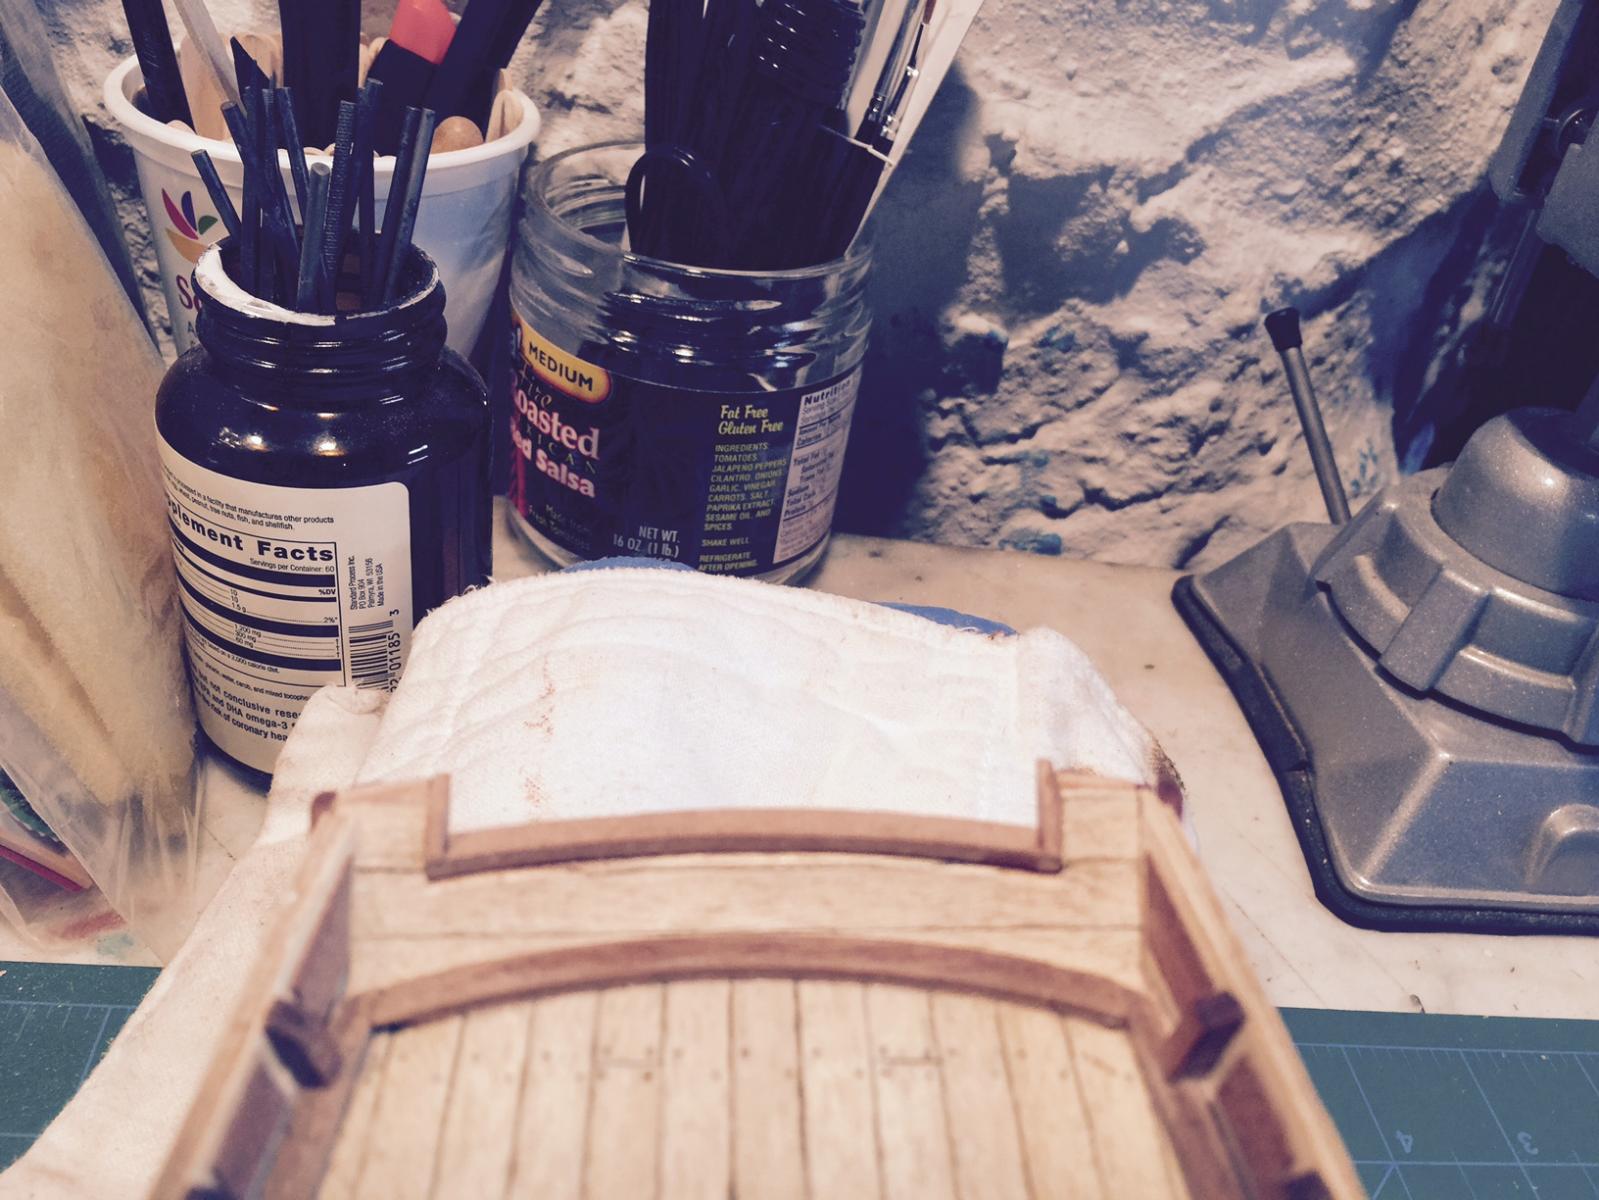
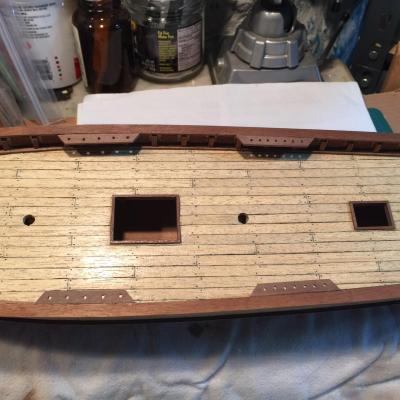
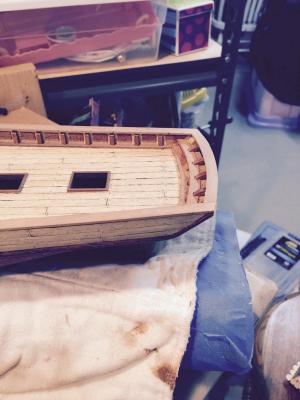
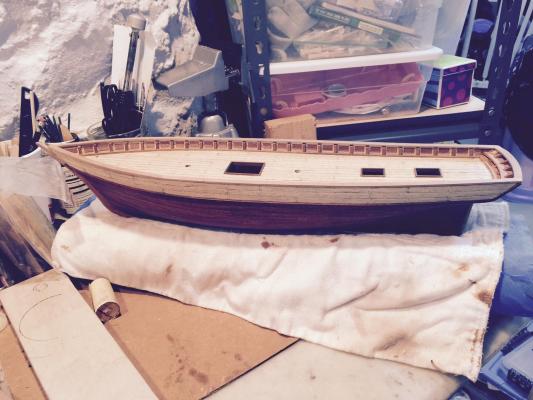
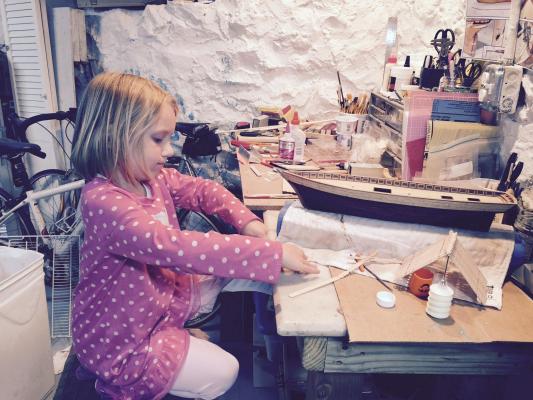
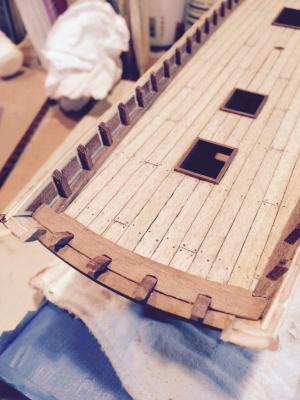
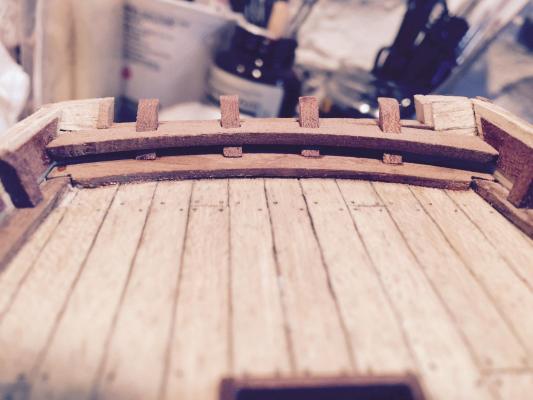
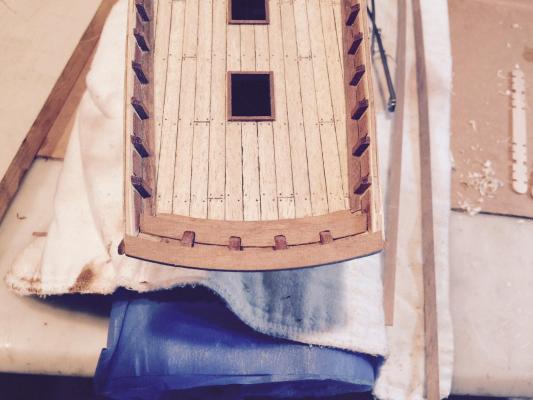
Here's a new milestone, but I have lots of questions at this point. I've got the gunwales on and ready to start on the deck. But before I do that I think there are several tasks I need to perform. The gunwales - do I take the edge off the corners with a little sanding? Also on gunwales - the colors are quite different from the front pieces (laser cut) and the rear (bent). Could I stain them to even out the color some? I have little experience staining. The timberheads and inner bulwarks - put a few coats of acrylic on? I included one picture of my little helper. She's working on the popsicle stick house.
- 389 replies
-
- 4
-
-
- scottish maid
- artesania latina
- (and 1 more)
-
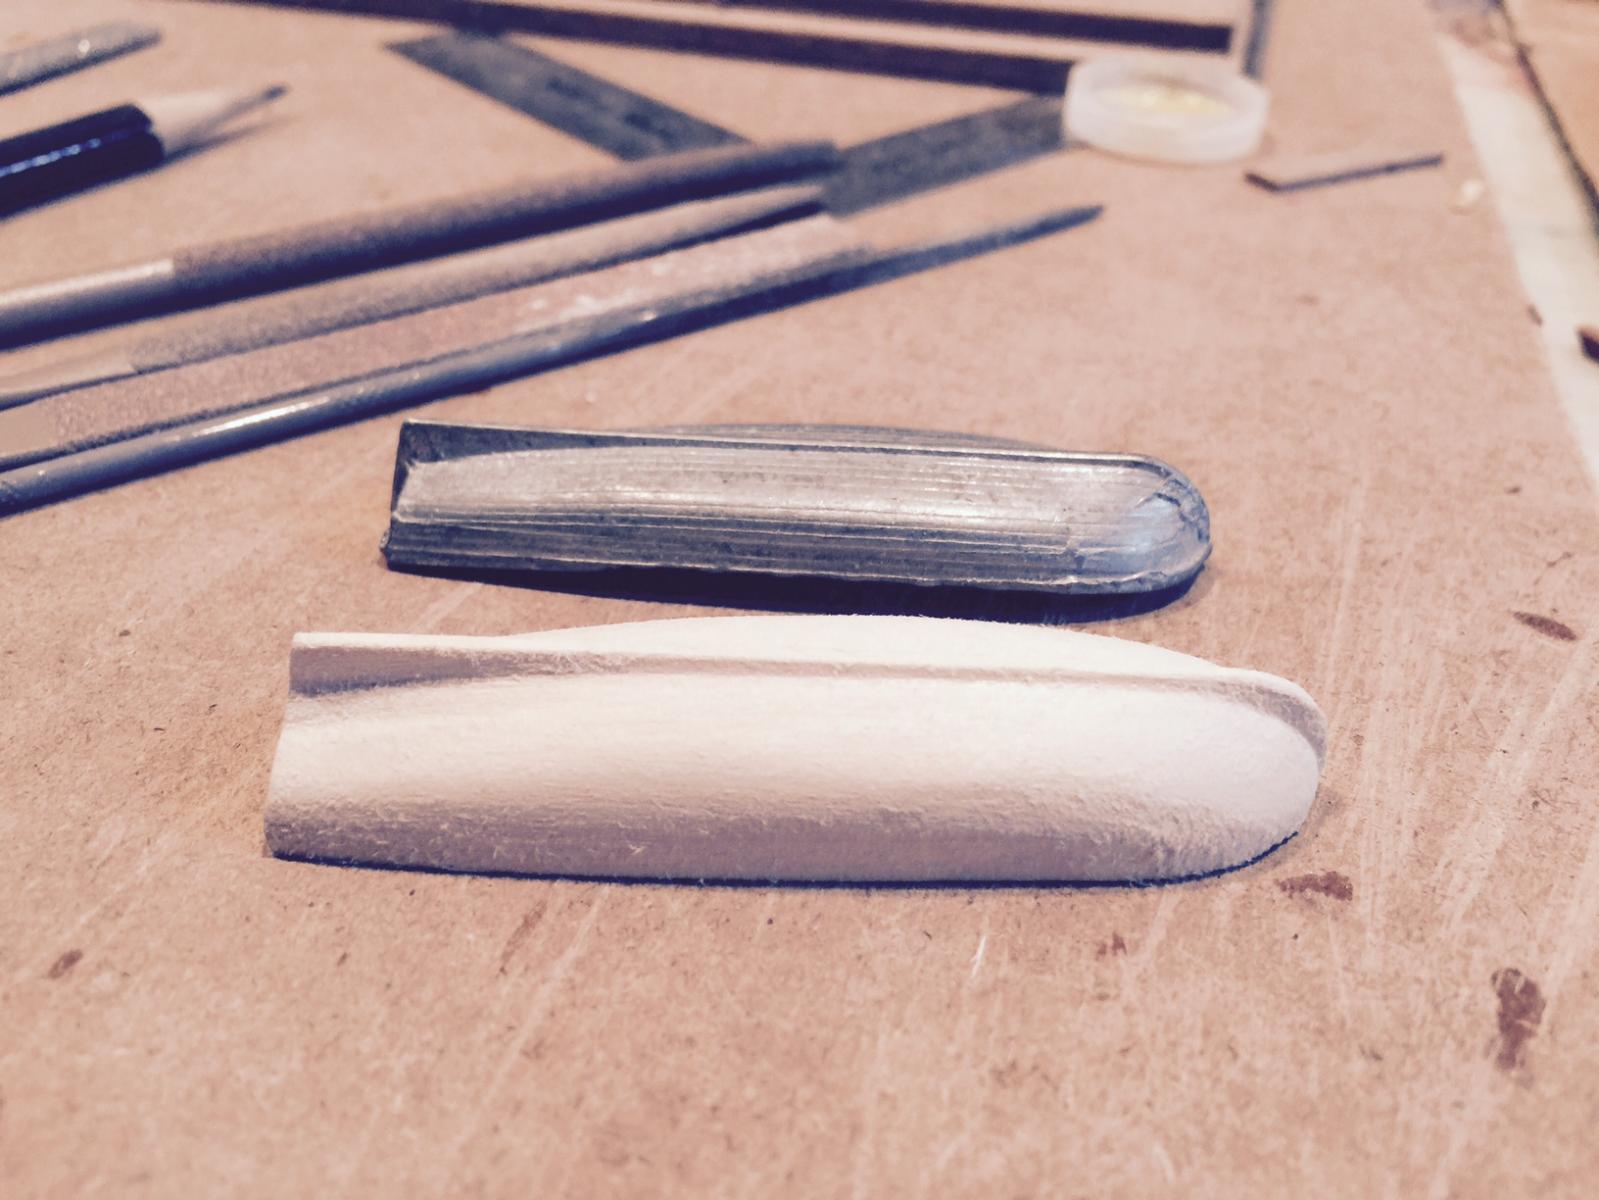
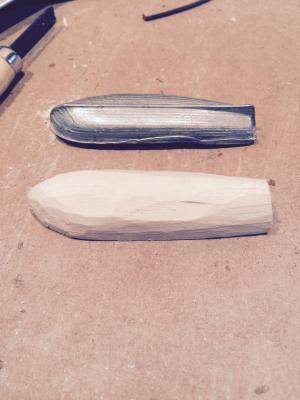
Well here's my in-progress version of the lifeboat, with motivation coming from Jesse's version. It's a slow patient process but coming along to my satisfaction. I'm using carving tools (the cheap ones work just fine) and good rasp files that take off wood cleanly and quickly. The one issue I'm having is trying to find something to hold the boat while I carve out the inside - I had in my vice but I left some marks which I had to sand off. I'd like to avoid that again. I tried holding with a towel but it wans't tight enough. I'm thinking I have to build something that it can sit in. Ideas?


- 389 replies
-
- 5
-
-
- scottish maid
- artesania latina
- (and 1 more)
-
Thanks George. one is slightly crooked but I can live with it. Yep I think you're right Jesse. I've burned a lot of cycles thinking about it, and will capitulate. I even had a piece of scrap wood lined up to use but when I pulled the stern waterline to build a better, wider one, I screwed up the first one and had to use the scrap set aside for the stern gunwale so I'm kind of out of options now. Funny I was just looking at your lifeboat carving a minute ago. Mine is coming along slowly, trying to emulate what you did.
- 389 replies
-
- 2
-
-
- scottish maid
- artesania latina
- (and 1 more)
-
Zosen I'm in the middle of my SM build. I will take pic of the deck arrangement when I get a moment and post here for you. It's a good, challenging first model. JesseLee's completed build is a great resource/reference as you proceed, he has much detail overall.
-
Seeing all the prep you put into the work Jesse is a great lesson in slowing down to get it right. Looking good...
- 1,306 replies
-
- 3
-
-
- syren
- model shipways
- (and 1 more)
-
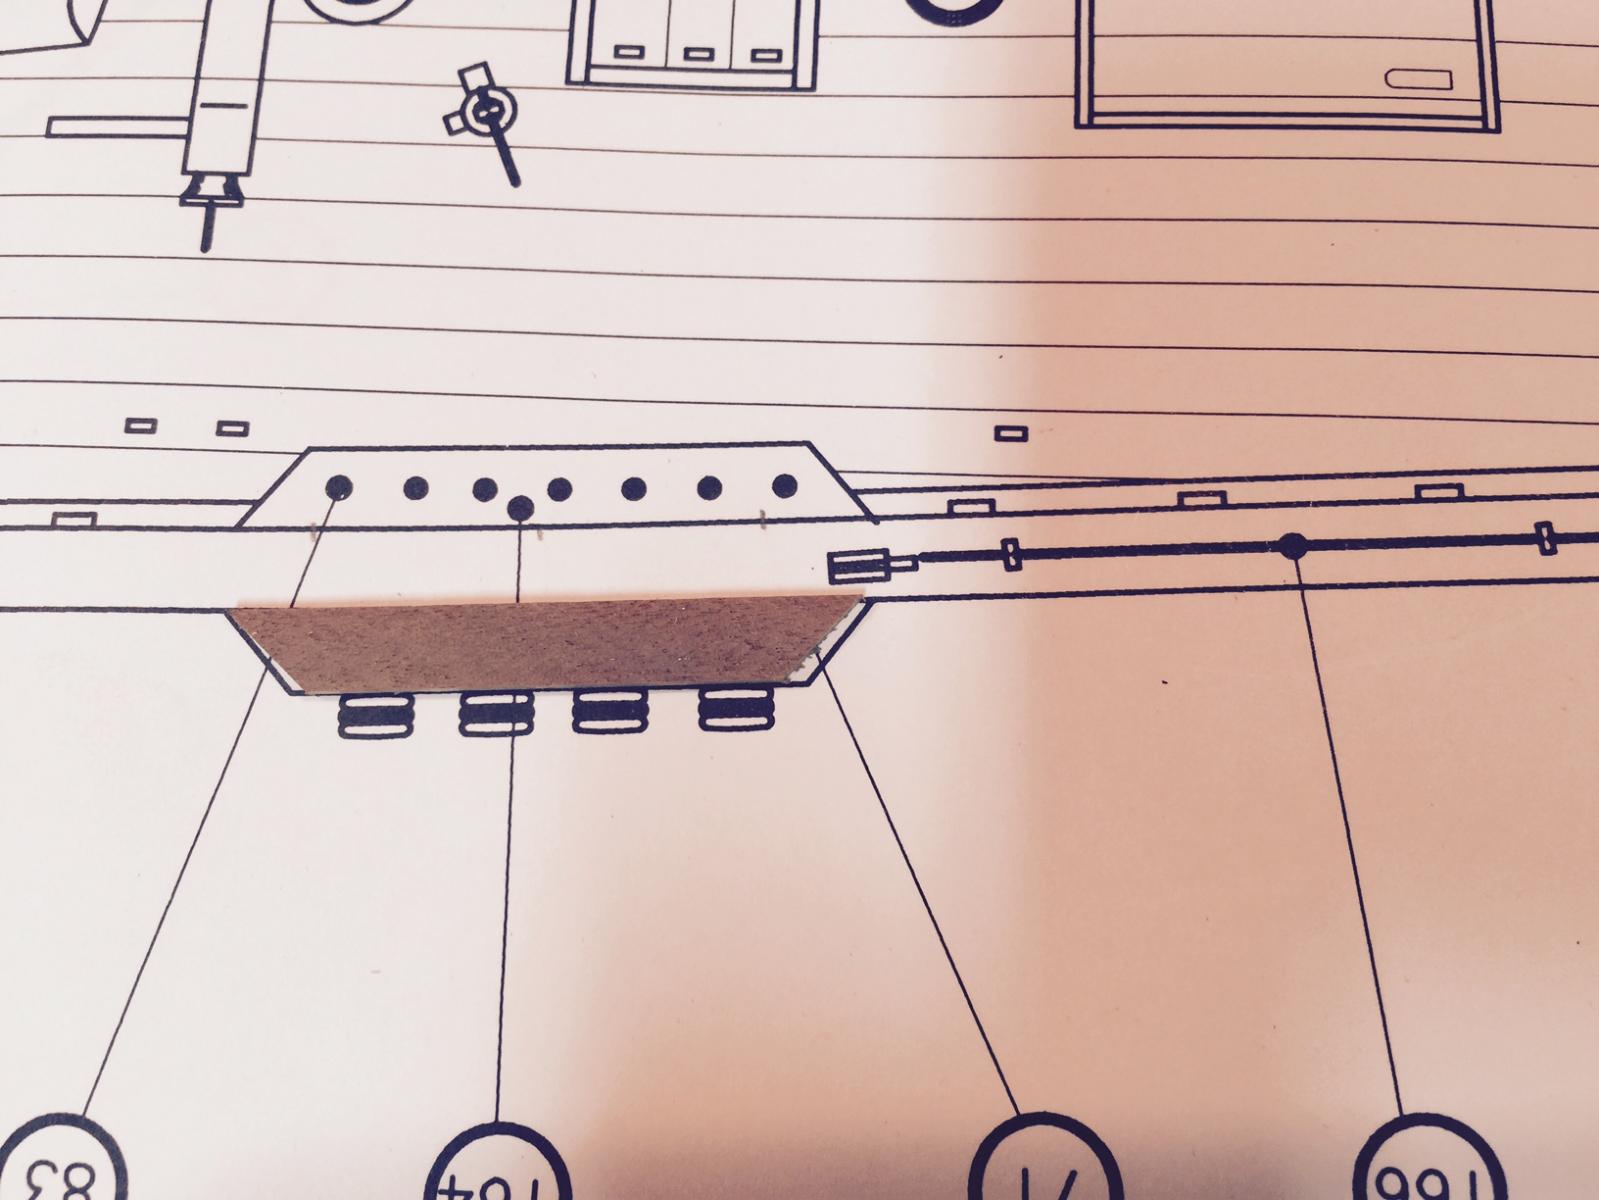
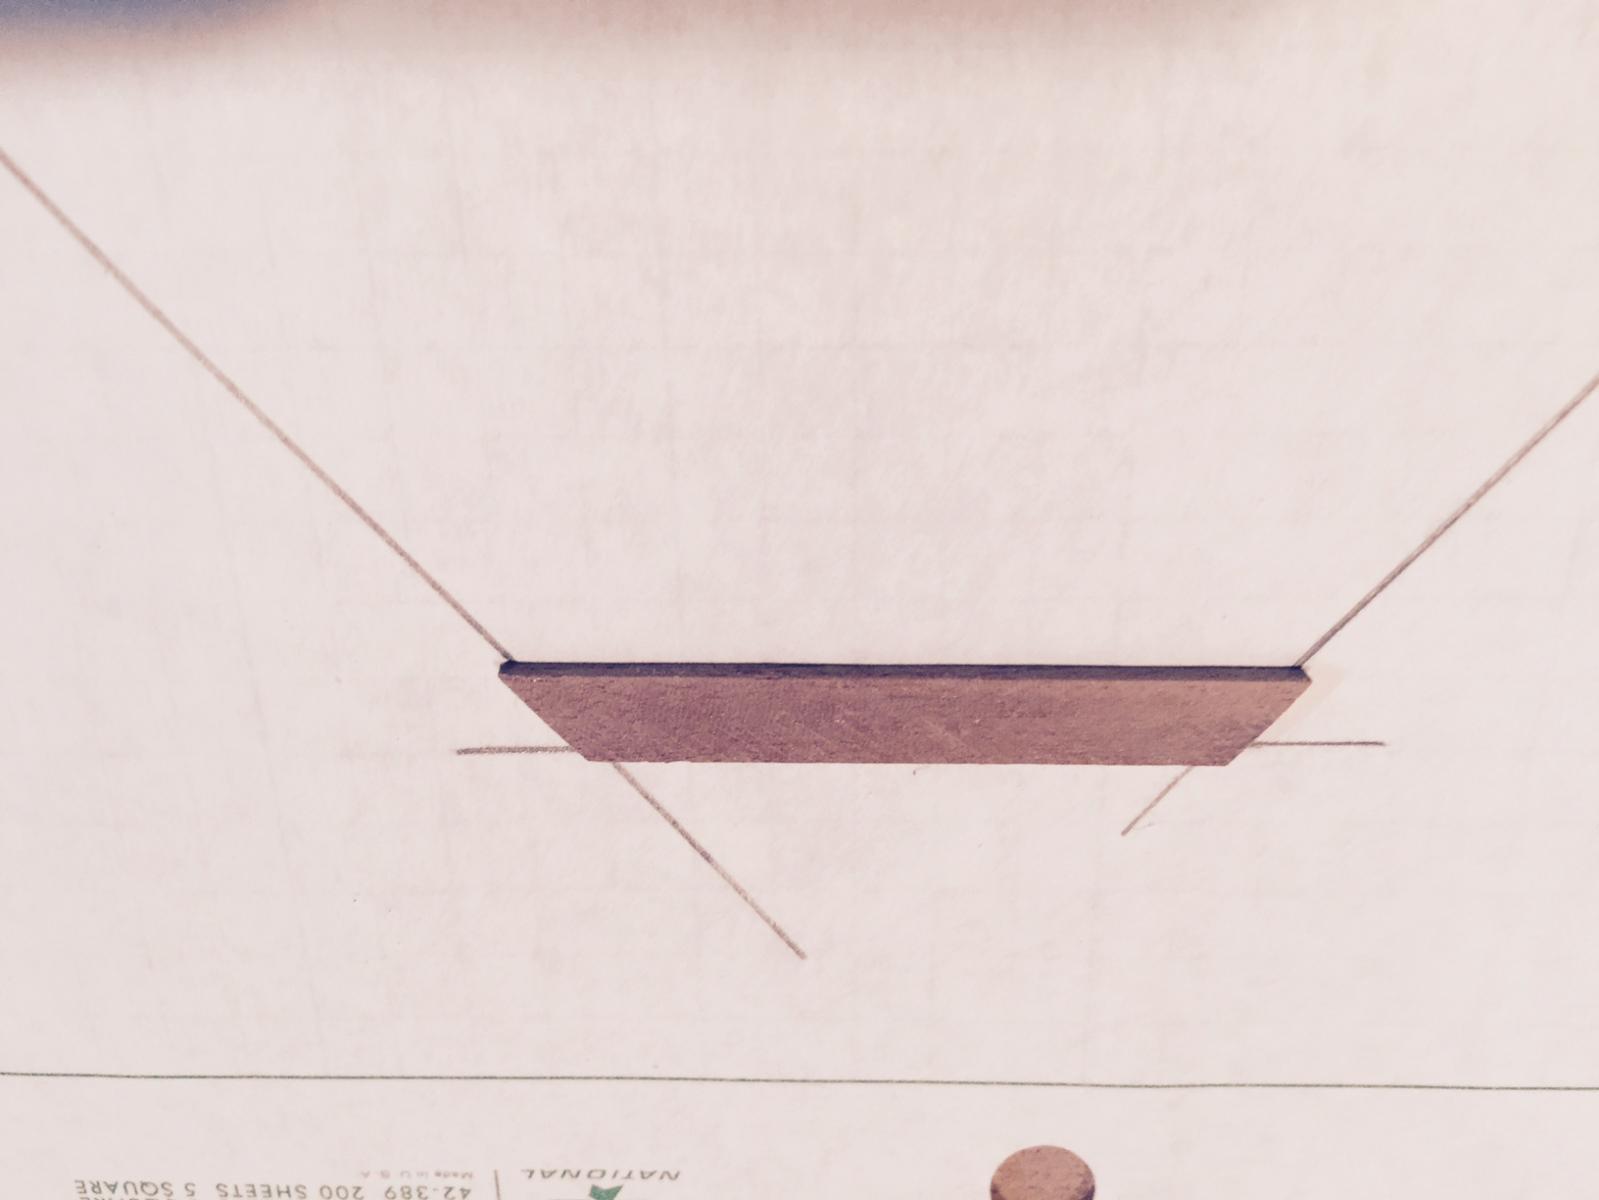
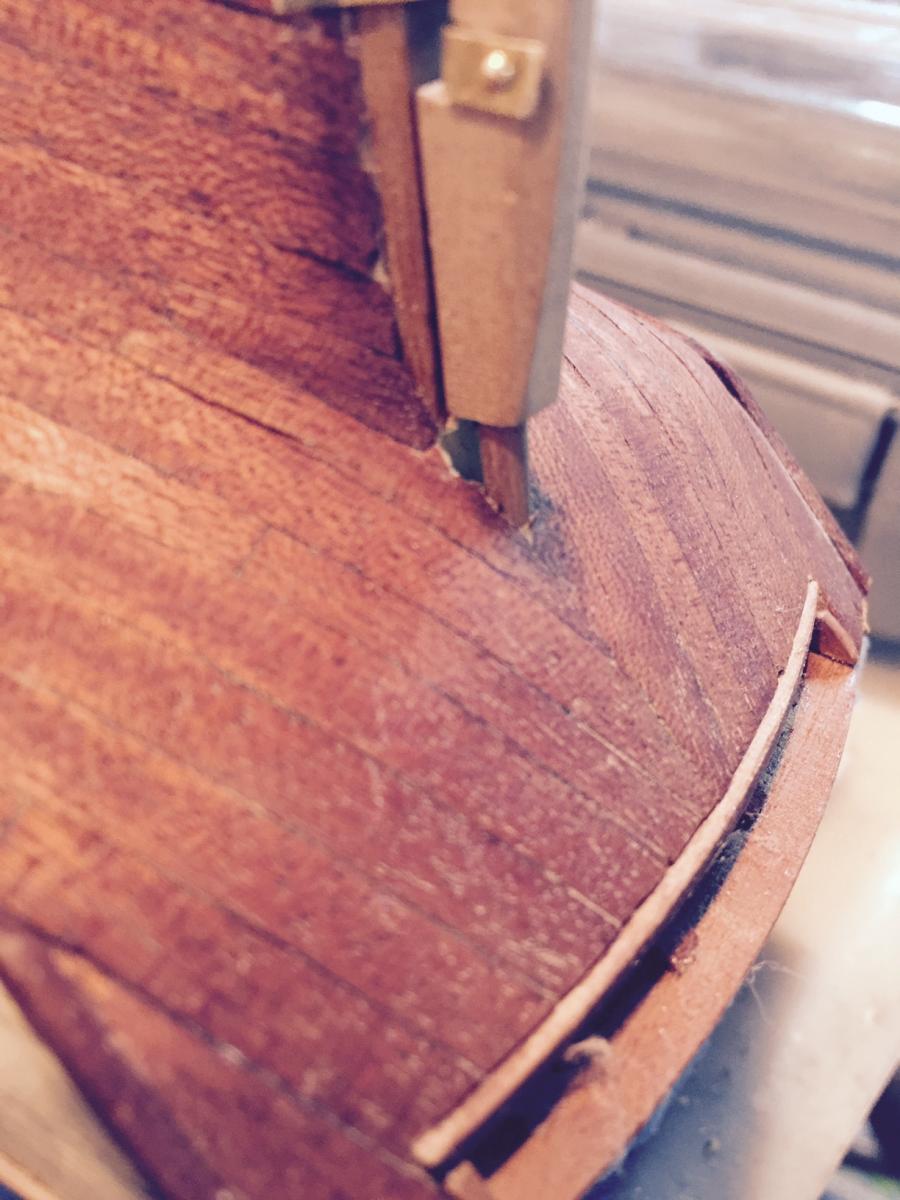
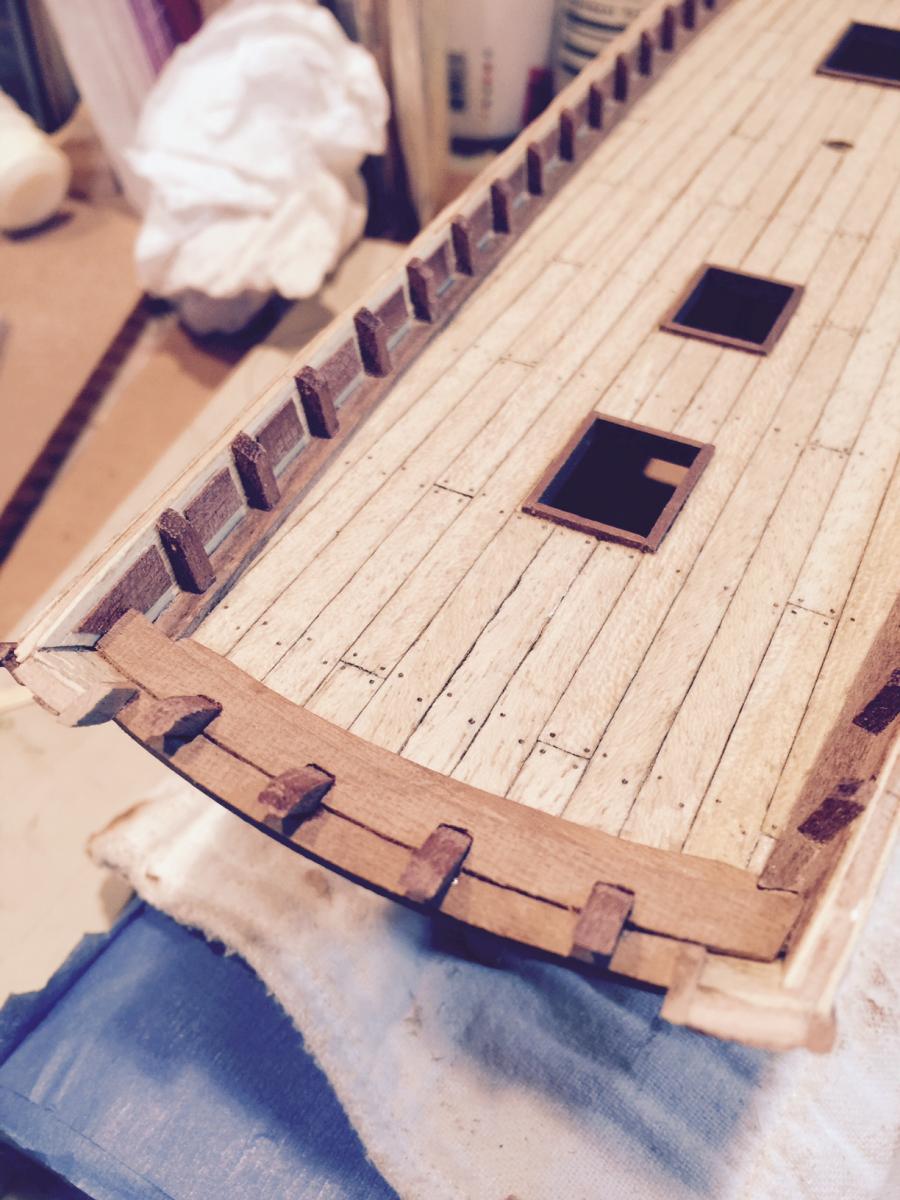
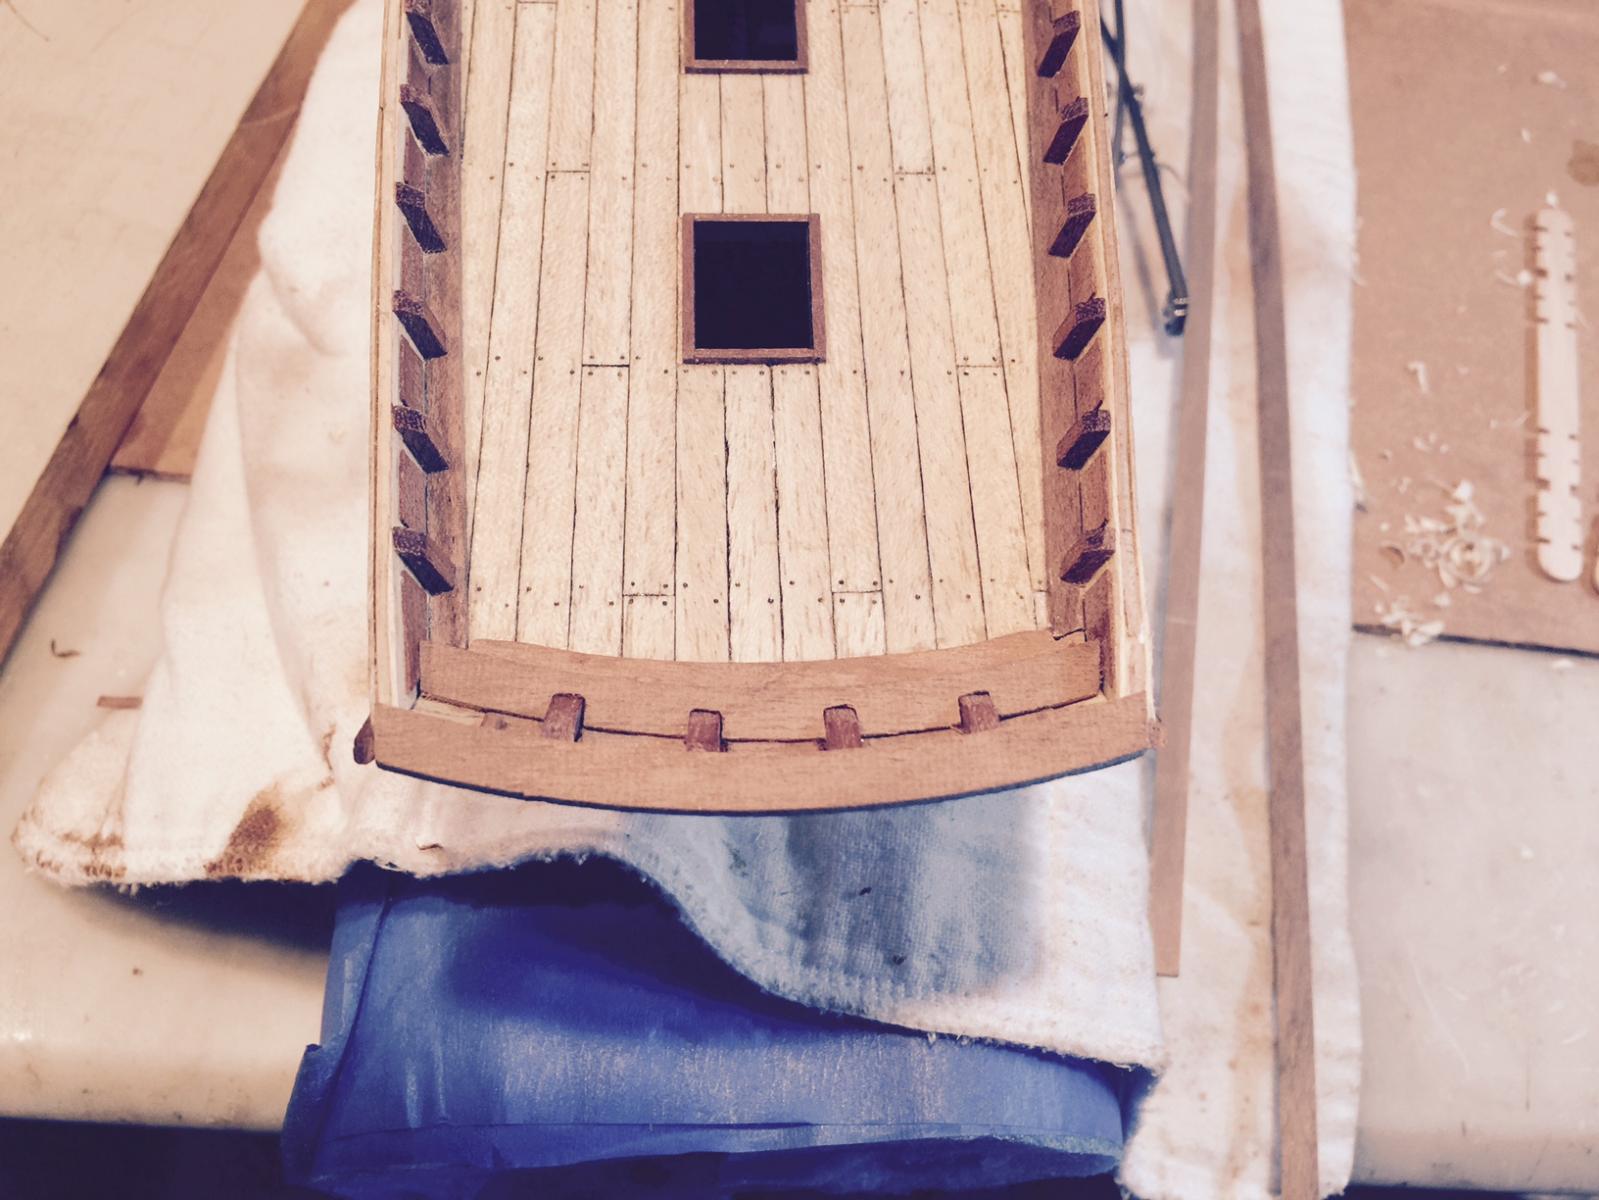
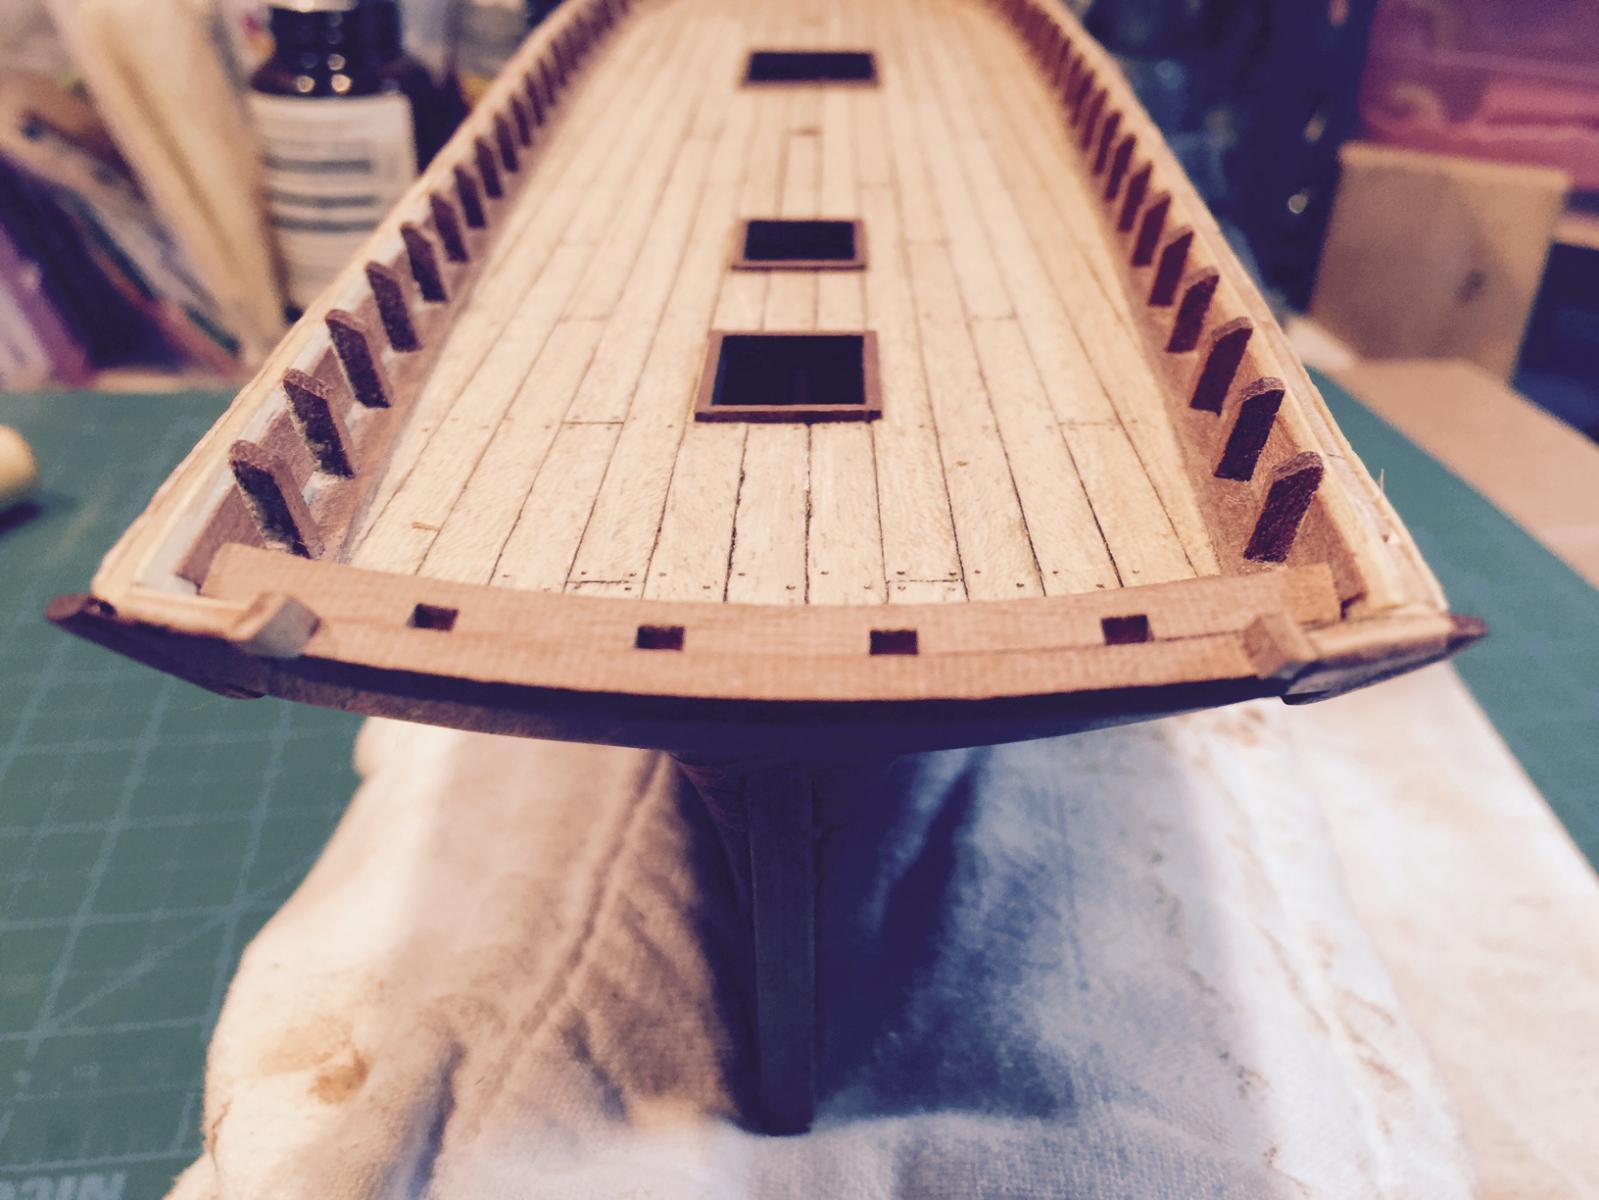
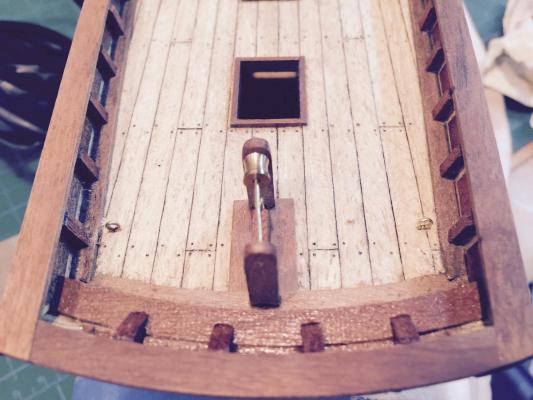
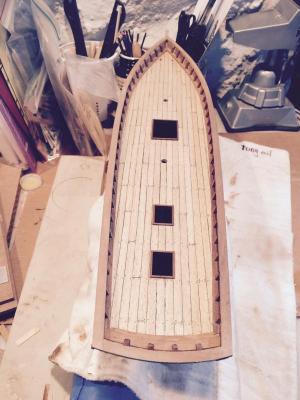
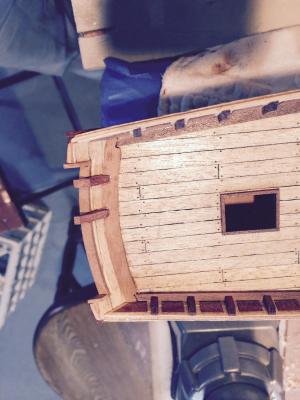
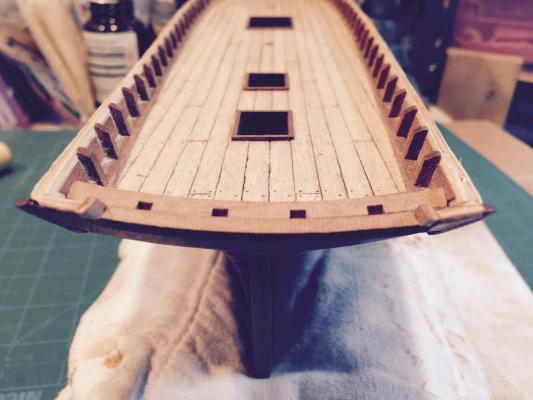
getting the stern timberheads and stern thwart to all work together was a challenge. After much filing and a bit of patience, along with re-gluing one of the timberheads that was out of line, I managed to get some pretty straight lines and I think it looks ok. I thought I had filed down one of the timberheads too far but it turns out that the rest had to come down to fit with the hull edges. I have run into another small challenge. The transom/stern gunwale isn't quite wide enough to fit across the whole stern. What do I do? I think my options are to have the main gunwales come down to the stern and fit the transom gunwale between the two main body gunales. The other option is to "notch in" the stern gunwale to the main body gunwales. Any thoghts to the way i't's been done? I've added a picture at the end that depicts this. Thoughts would be appreciated. Thanks!

- 389 replies
-
- 4
-
-
- scottish maid
- artesania latina
- (and 1 more)
-
Thanks gents. Jesse, I took a page out of your build and I am attempting to carve out the boat that sits on the deck. Will have pics when I get somewhere....
- 389 replies
-
- 2
-
-
- scottish maid
- artesania latina
- (and 1 more)
-
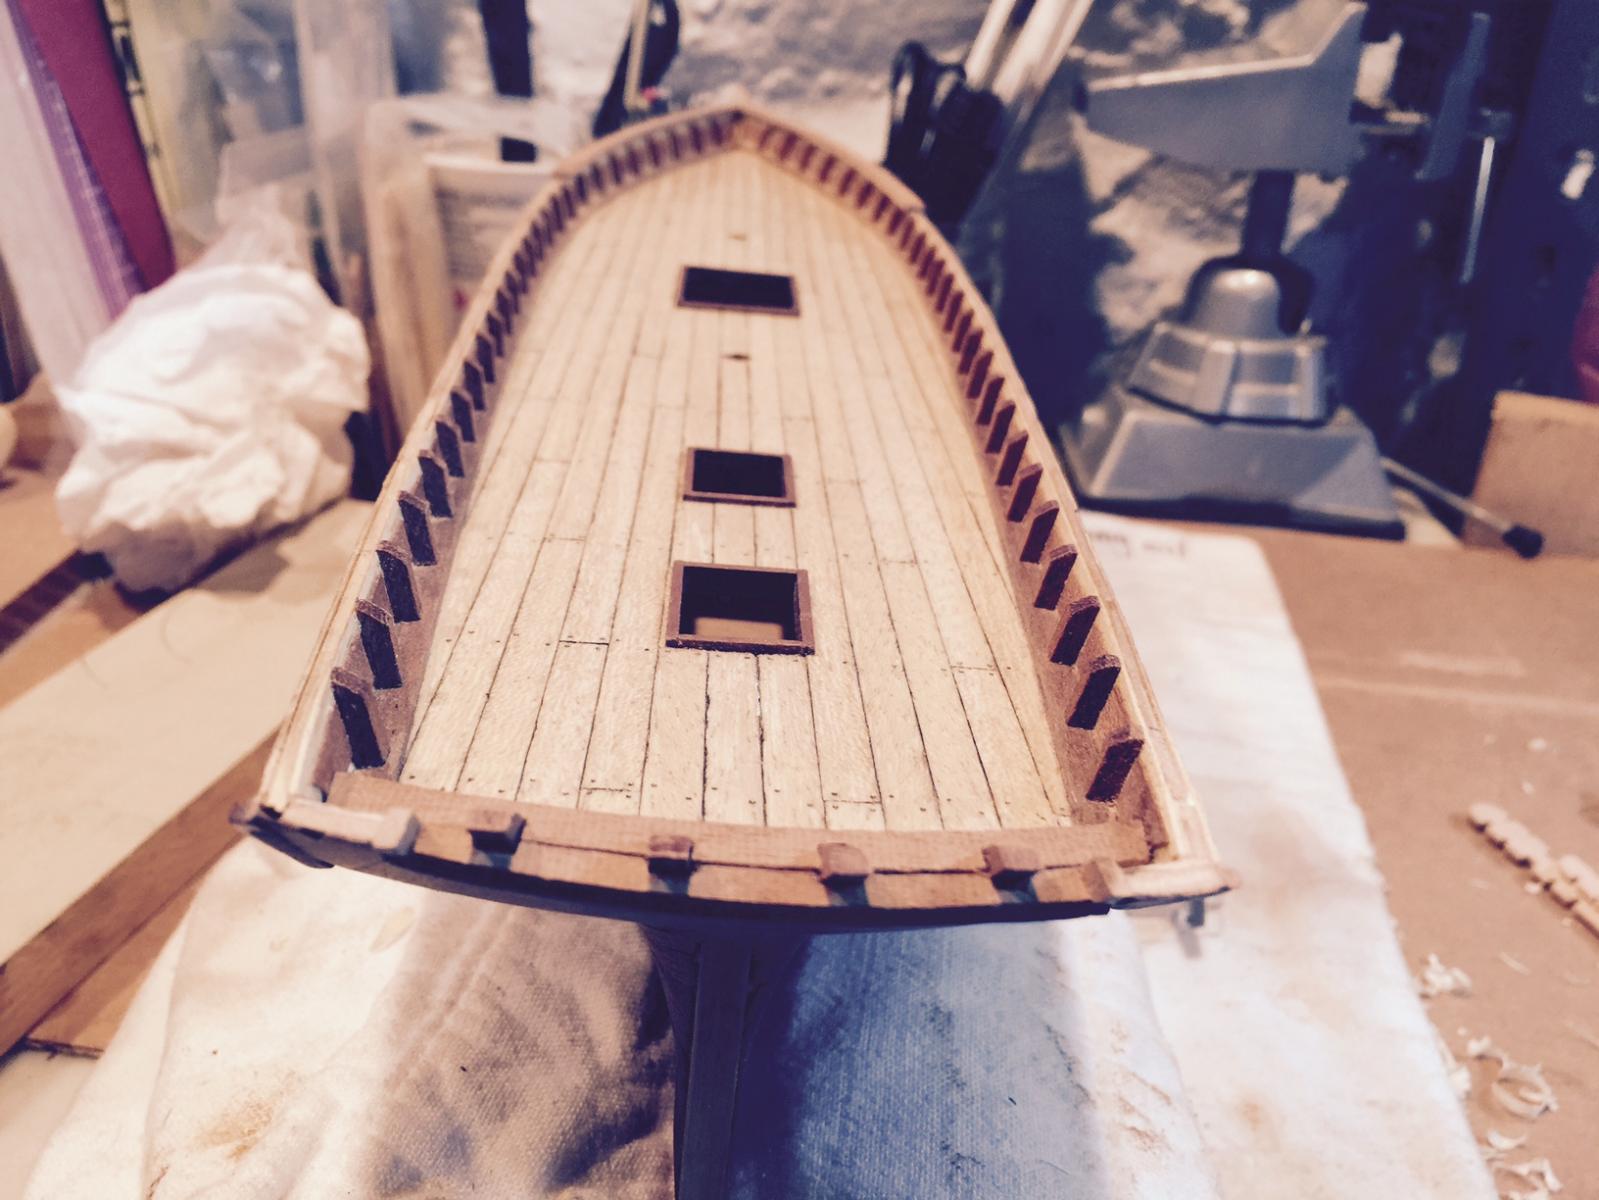
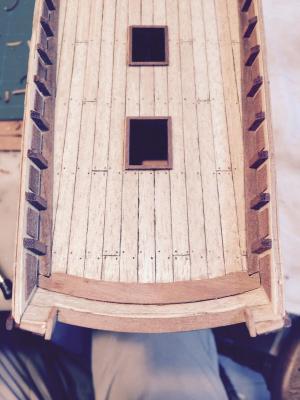
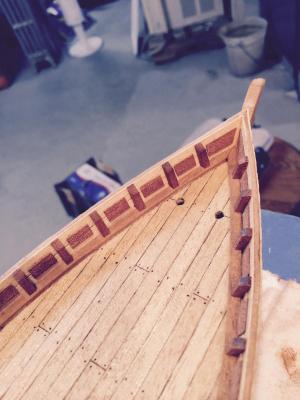
Hello all, I was unhappy with the piece of wood on the deck that was supposed to butt up against the transom, so I carefully pulled it off and replaced with a much wider board. The issue I'm having with getting everything to line up is that the angle of the transom is much steeper than it should be, and some of the pre-fab pieces just don't fit right. So... I'm using scrap to create my own. I messed up once before getting it to look ok. Most of it will be covered once I get the gunwale and stern thwart on. I am doing a lot of filing for the timberhead grooves that go on the transom. But the base of the timberhead seats nicely onto the new board I put down - before it was falling into the gap that was leftover. And I'm NOT ripping up the rear of the boat to re-do . I think I have the workarounds that will look decent once all done.

- 389 replies
-
- 5
-
-
- scottish maid
- artesania latina
- (and 1 more)
-
Nick I've been following your build for a little while now. I'm looking forward to seeing the Hermione come to Boston, where I'm from, and keeping and eye on your progress. Looks great. I love the deck.
-
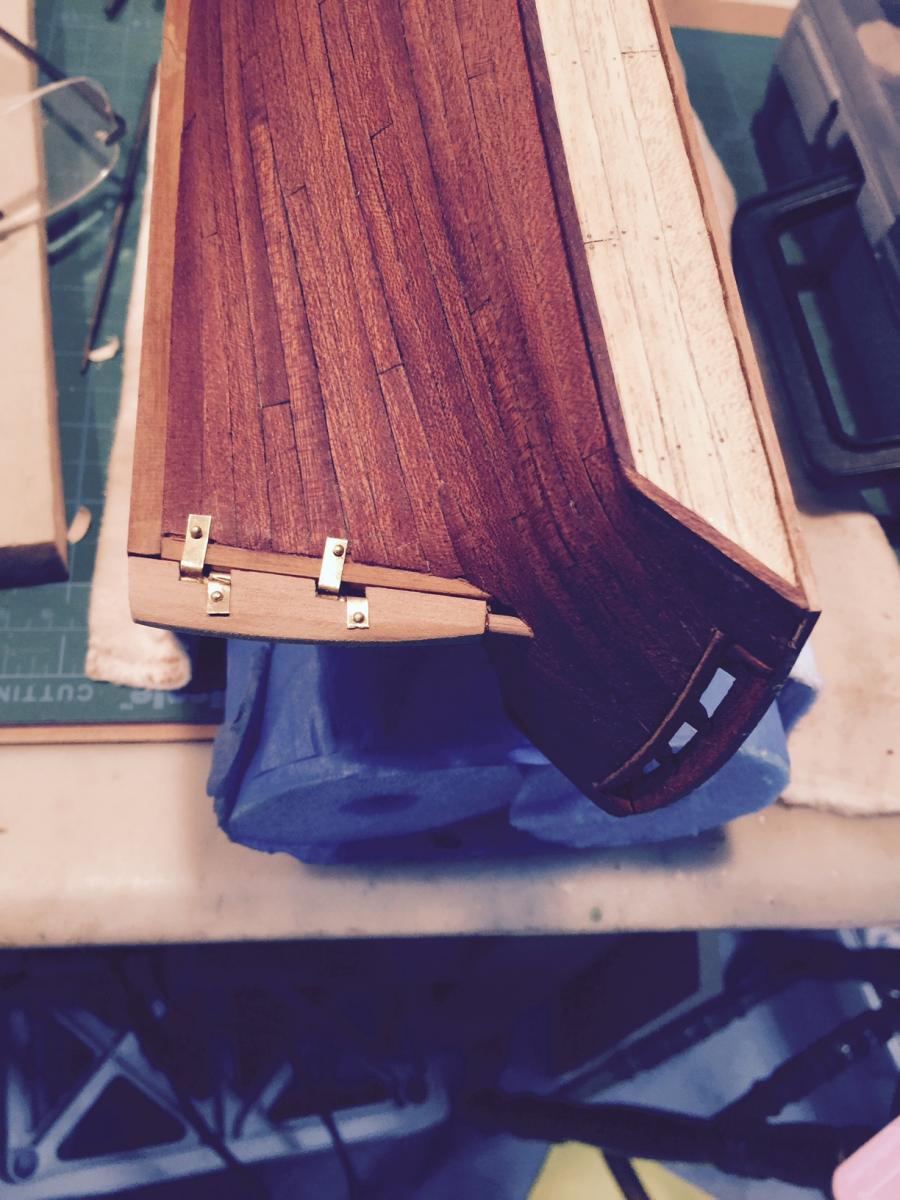
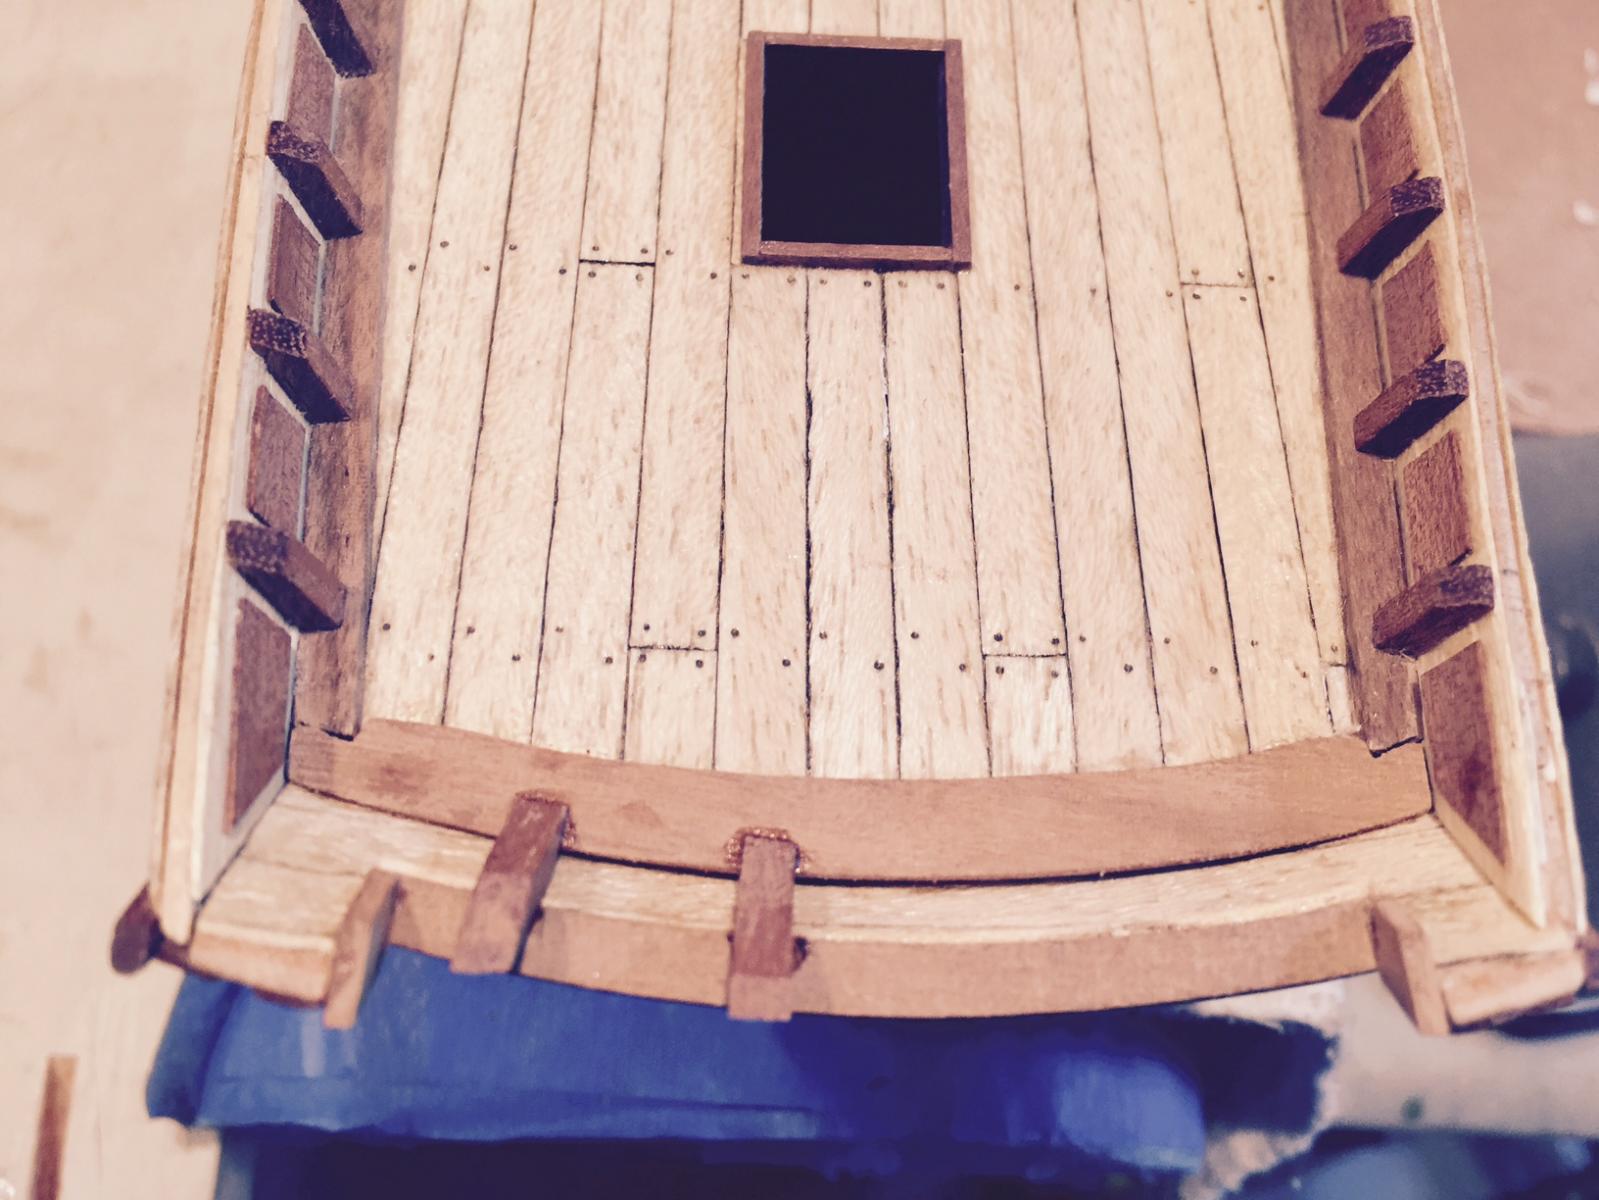
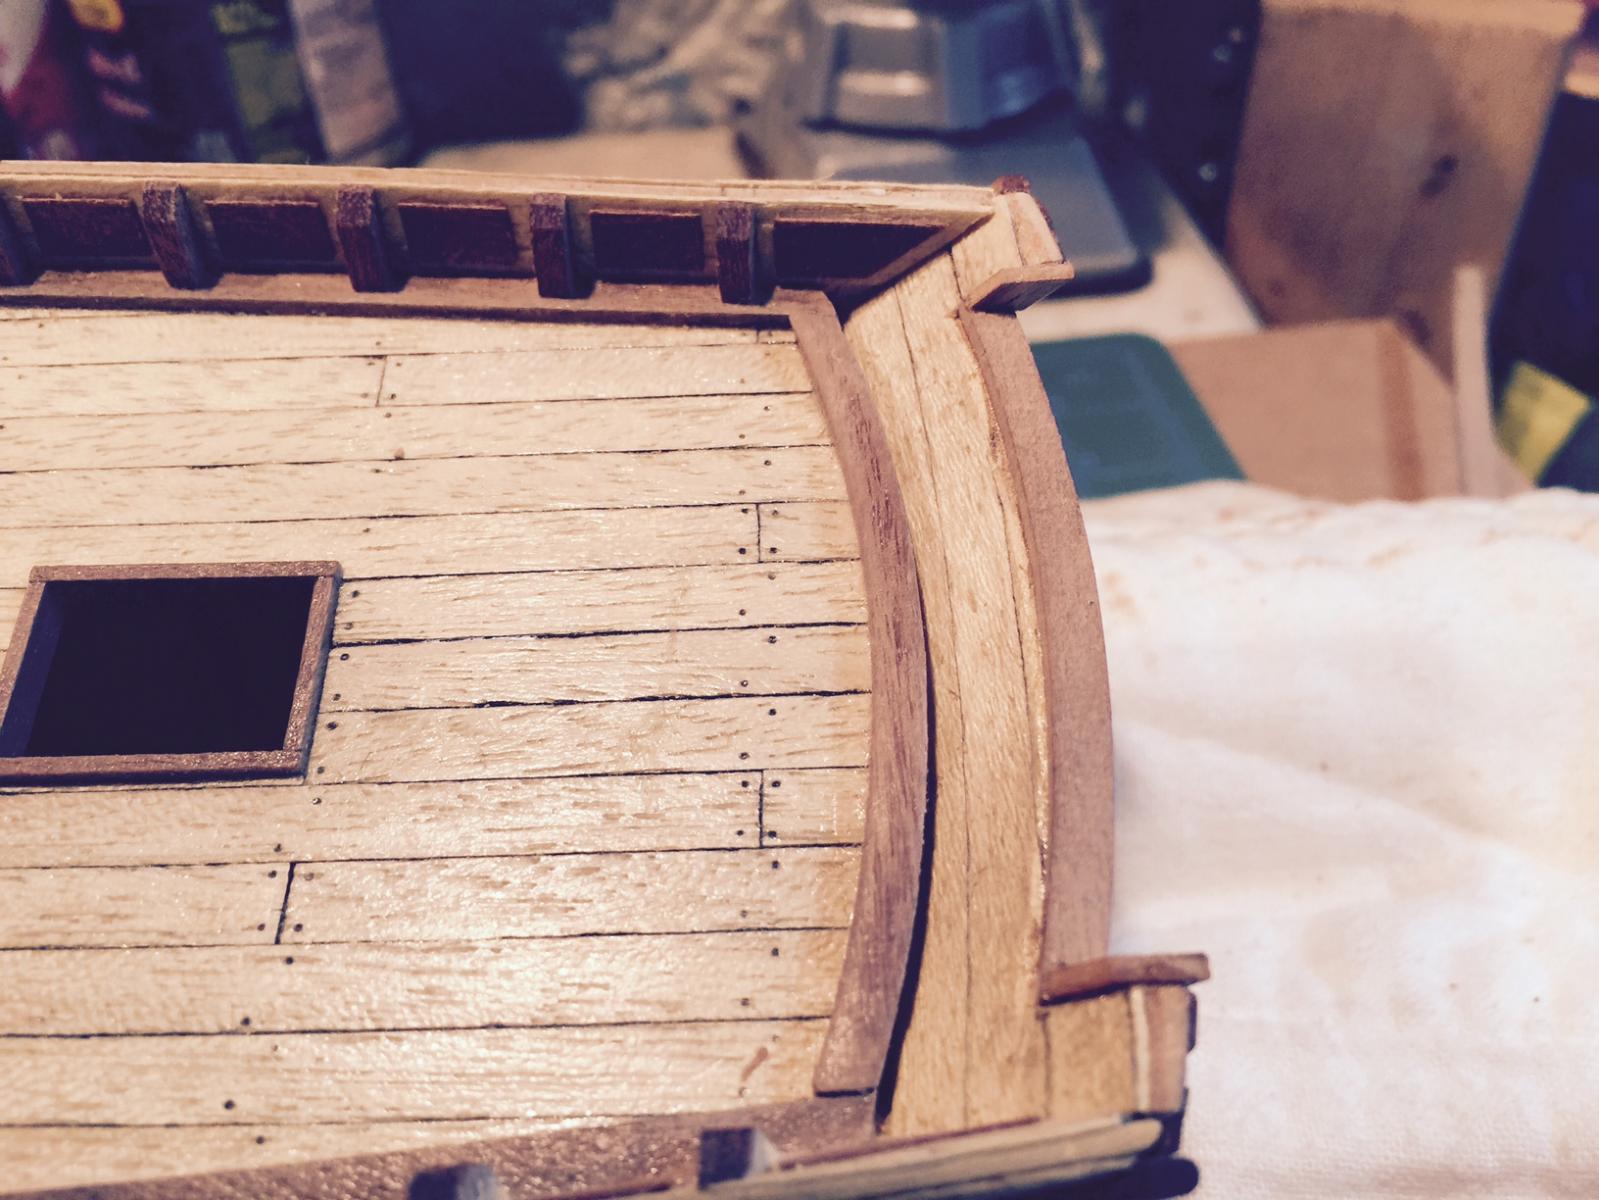
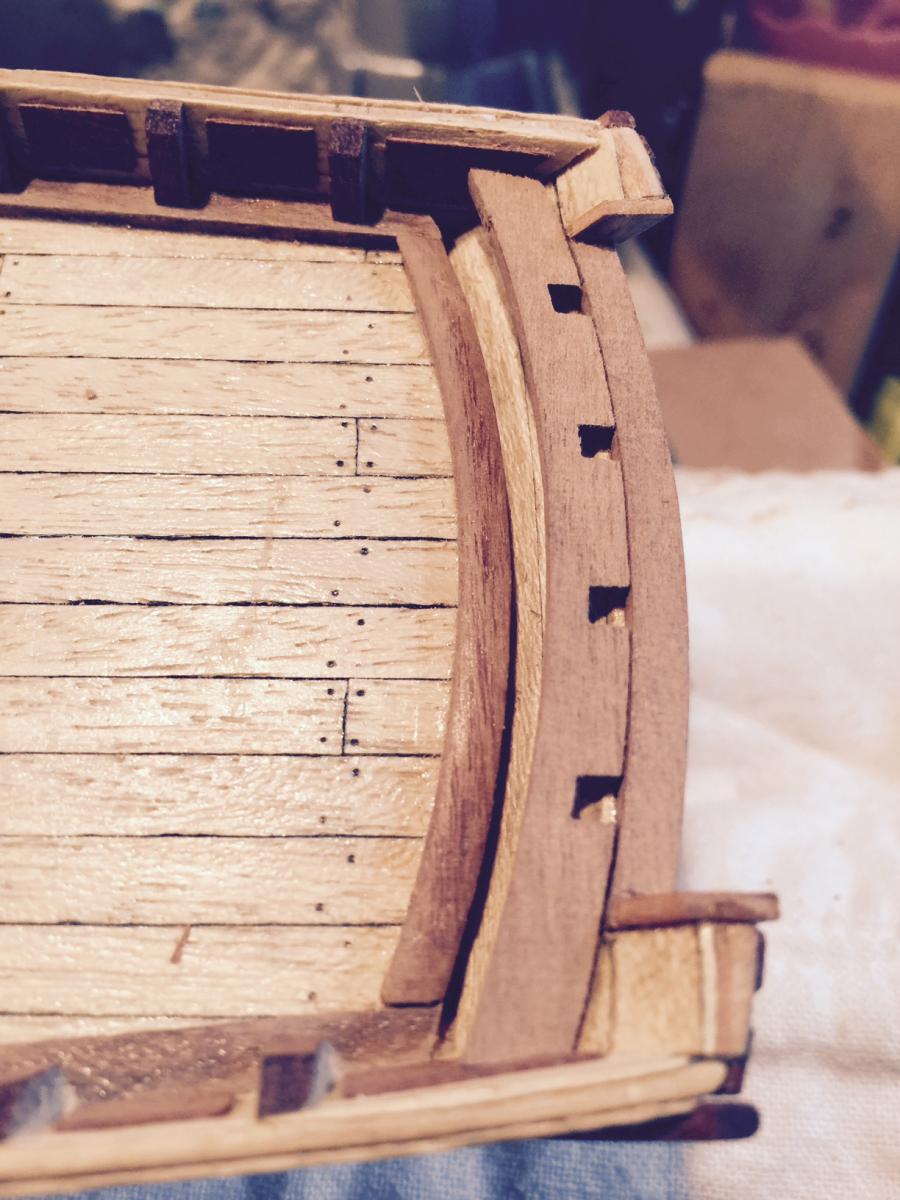
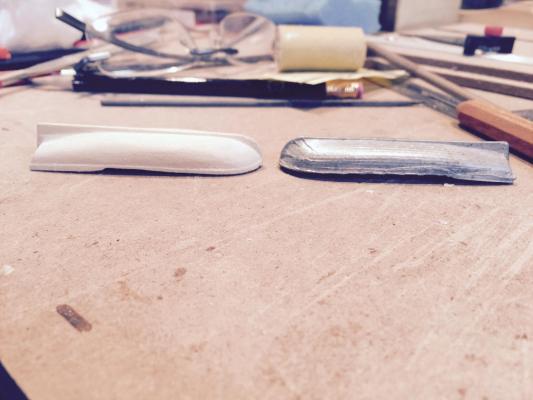
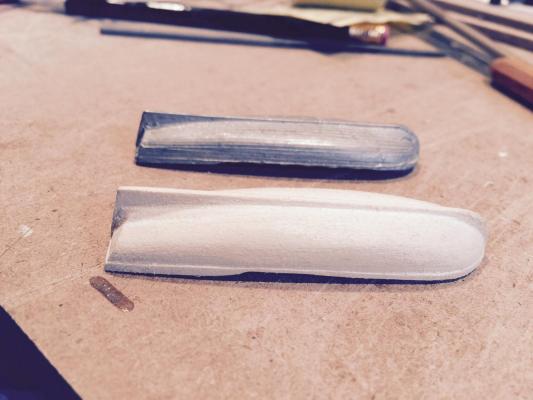
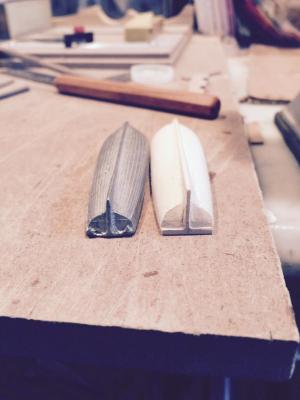
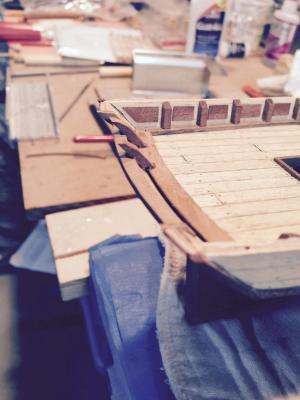
I got some more detail done over the weekend. The pre-cut "transom step gunwale" as it's called in the parts list didn't quite fit where it was supposed to go after much fiddling, so I took some spare wood from the laser cut pieces and made my own, which called for a shallower curve and I made a little wider. I think it fits pretty good. I took a pic of the kit piece (which I'm holding) as well as the piece already on the boat, where you can see the difference. Then I worked a while on getting the stern thwart (another new word in my boat vocab) to fit nicely in its place. The two pics show the fit thus far but it's not glued yet. I now have to add the timberheads.


- 389 replies
-
- 6
-
-
- scottish maid
- artesania latina
- (and 1 more)
-
Thanks George. I put paneling on the bow of the boat as well...
- 389 replies
-
- 1
-
-
- scottish maid
- artesania latina
- (and 1 more)