HOLIDAY DONATION DRIVE - SUPPORT MSW - DO YOUR PART TO KEEP THIS GREAT FORUM GOING! (Only 24 donations so far out of 49,000 members - C'mon guys!)
×


Azzoun
-
Posts
333 -
Joined
-
Last visited
Content Type
Profiles
Forums
Gallery
Events
Everything posted by Azzoun
-
 Ever use sand sealer? Apply, sand then one more, and fine sand should get you there.. Joshua
-
By the way, all those references came from a book you should get if you're going to continue rigging ships. Excellent reference. here's the cover
-
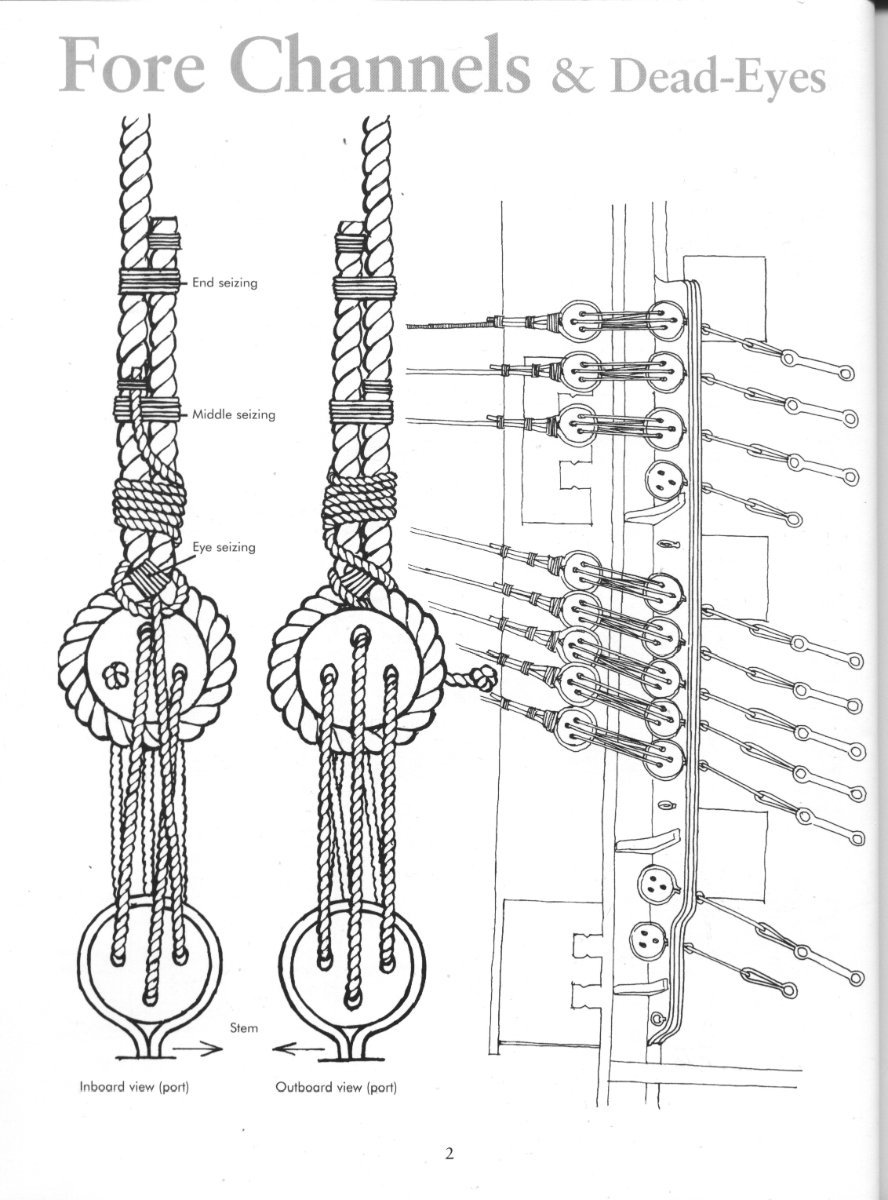
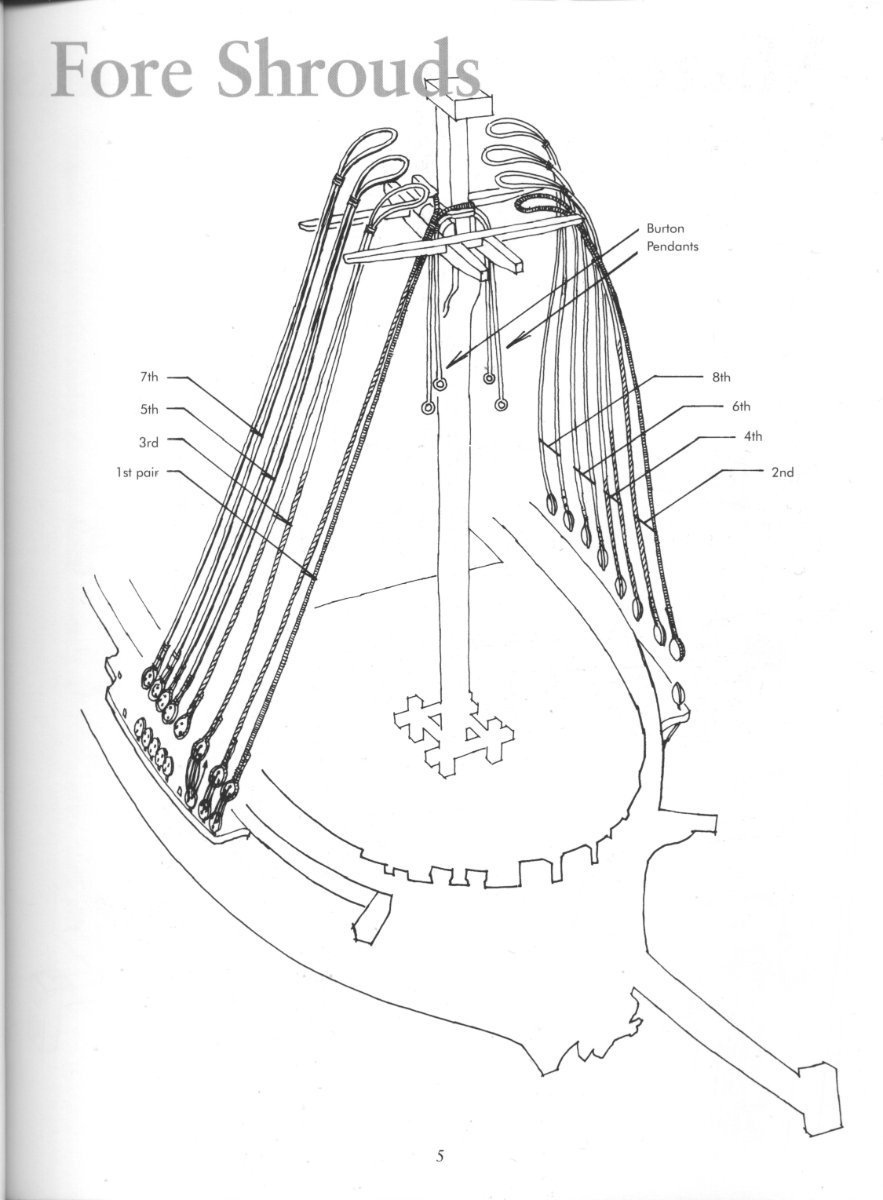
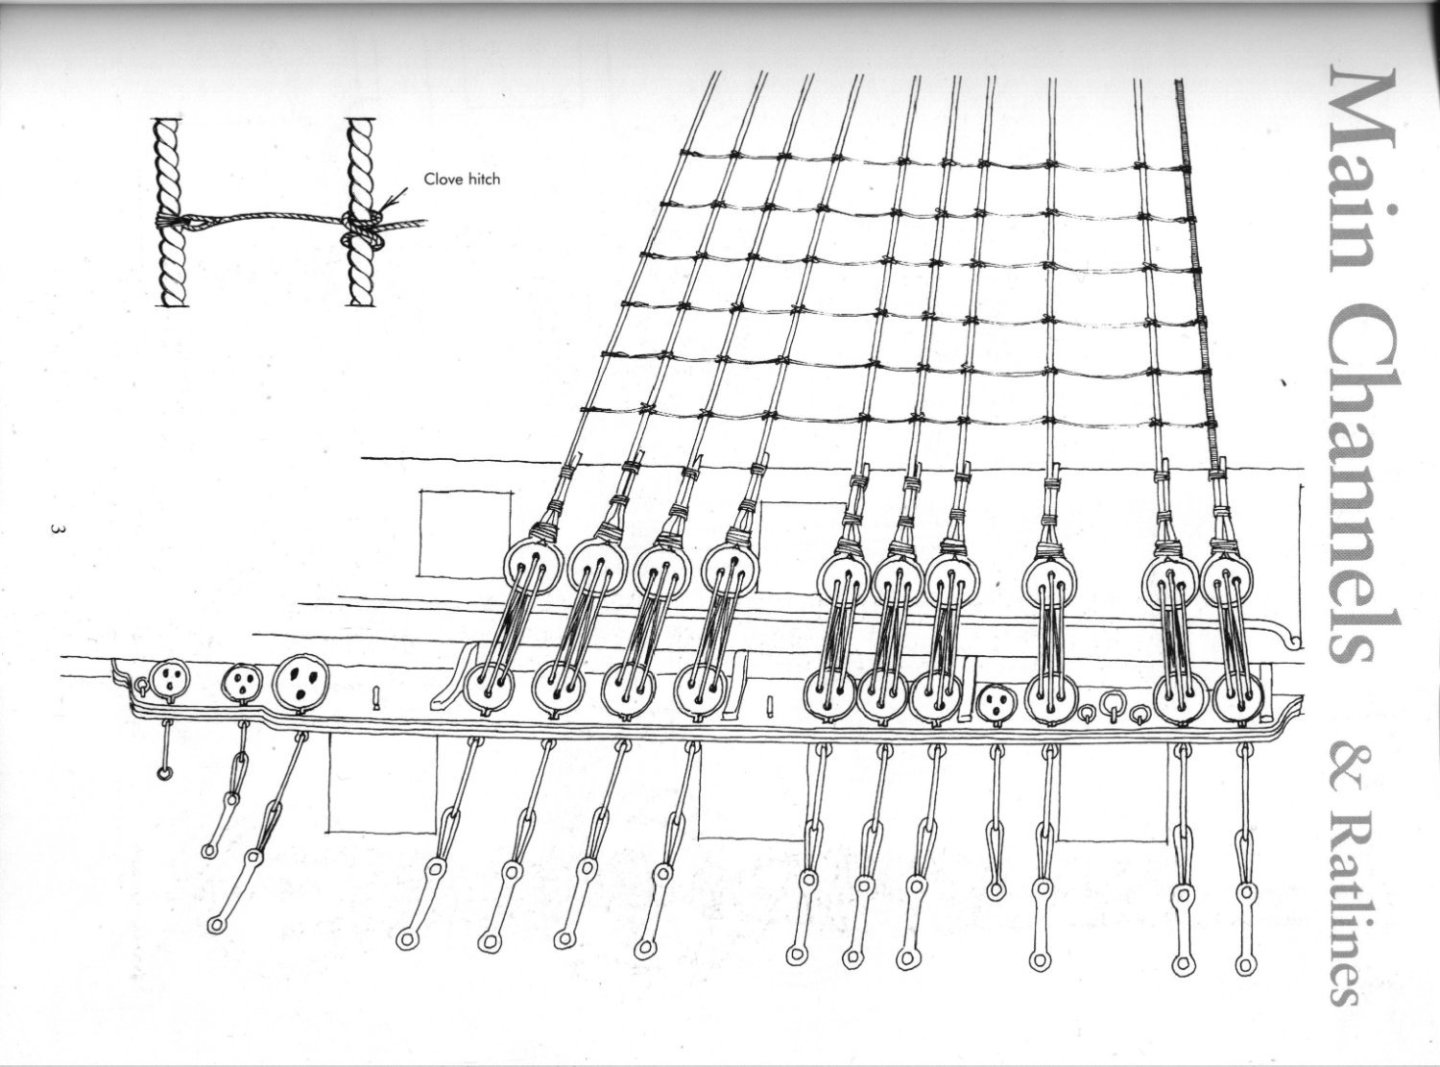
So. The portion you're starting with there is rigging the shrouds to the dead eyes. Generally would be dark dark brown or black to show that they were tarred. You're best bet is to attach the shrouds at the top of the mast first, then using a spacer that holds the top deadeye at a certain distance, wrap and secure the shroud to the deadeye. Then rig the deadeyes together like you're doing but use some thread/rope about 1/3 of the thickness of the rope you're using there.. here are some pics that may help Joshua


-
Hi Will, welcome to MSW. If you're into maritime history, you should consider checking out the Philadelphia Ship Model Society, our next meeting is this Sunday at Laurel Acres park where the membership will be running RC models in the lake. www.PhiladelphiaShipModelSociety.com All the best, Joshua
-
You don't need to, and it's probably a better idea to not glue the mast in and use the stay rigging to keep the mast in place. Coming along nicely! Joshua
-
I know where there are some Helldivers and Hellcats are for sale.... Let me connect with the seller. How much you offering? PM me. Thanks! Joshua
-
Anyone out there working on a card model?
Azzoun replied to gagliano1770's topic in Card and Paper Models
I recently acquired a number of paper model kits that I'm interested to take a shot at however everything is in German. Can anyone suggest where I can get English instructions? Or just info in general on the kit? Thanks!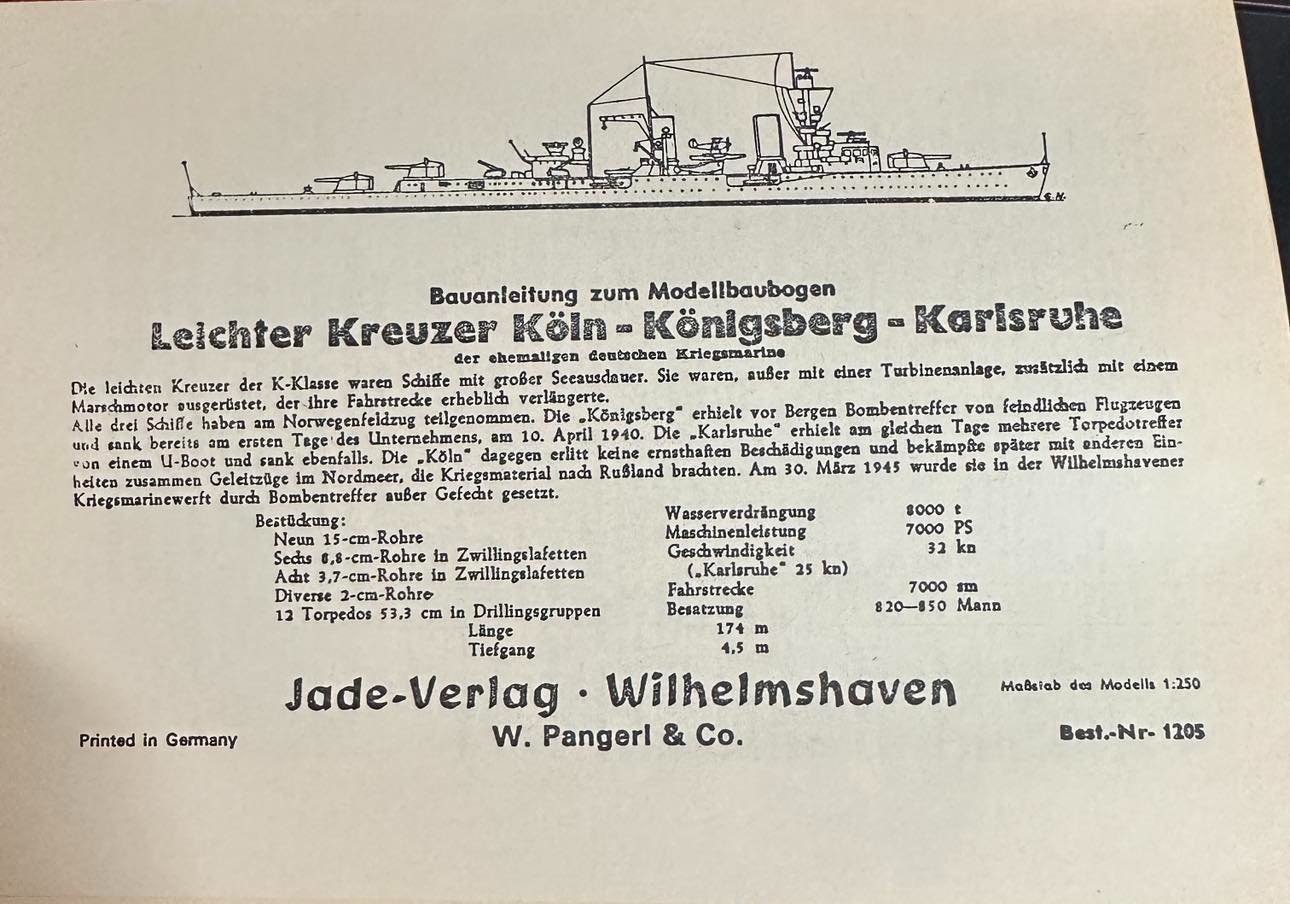
-
Jerome, could you advise on where you're located? Our club receives numerous requests that we cannot fullfill. Joshua
-
It's your model, but I've seen most people use flat black because in small scale, to high of gloss looks out of scale. If it's brass, many of use a diluted blacken solution that will chemically turn the outside of the metal black which can then be polished. These steps should be performed prior to assembling to other parts of the model. What do you think? You enjoying building model ships? Making better progress than I would have expected! Joshua
-
Congrats! Looks amazing... If mine comes out looking that good, it'll be amazing to see in the water!
-
Next NRG Conference
Azzoun replied to YankeeClipper's topic in NAUTICAL RESEARCH GUILD - News & Information
Battleship NJ?, Philadelphia? -
Holy Crow, you’re a natural. That looks really nice. Keep it up! Awesome paint work, nice crisp water line.
-
Didn't spend a lot of time in the plans but both models looked impressive - Thanks to Nick for hoisting them down. Joshua
- 1 reply
-
- 3
-

-
Ted, Thanks for keeping us posted. I also own this Nichimo kit and had considered selling it except my kit is mint. My initial intent was to build it as a static model but now have acquired the more accurate Trumpeter version. Now, I've decided I want to make the Nichimo RC as it was meant to be. And so, acquired the hardware but I'll be following your log to the finish line, looking forward to seeing the end product.! Joshua

-
If you're talking about the series holes that you drop pins into, it's call a pin rail where belaying pins go. You're really doing that kit some solid justice, I think you're going to land a pretty impressive model for your first when you're done! Joshua
-
Doing some fine work- looks great!
-
Your build log is primarily for you to share your work and seek assistance. If there's time between updates, that's more the normal than the exception. Take your time and enjoy the process, there's no hurry. Contribute to your build log in a way that serves you, your audience will chime in as they can, if they see it. If you want more interactions with members on this site, visit their build logs or discussion threads and chime in. You should check out the New London, Connecticut Northeast Ship Modelers' Conference on Youtube. Joshua
-
No worries on posting, sometimes I only post once a year! Not a job Looks like good progress!
-
Just a note, before you plank, you'll need to fair the bulkheads to the shape of the hull. Meaning, take a sanding block and knock the square corners down so they're at an angle the is inline with the shape of the hull so the planks lay flat upon them.
-
Hey Lego! Looks like you're learning a lot on this build and that's the point! Despite anything you may be unsatisfied with, when the build is done, it'll be hardly noticeable, especially to those who don't build models. Keel looks nice and straight now! So, couple fileable items for next time is along with making sure the keel is straight before you start, before you glue in the bulkheads (cross members to the false keel), you'll want to make sure they fit square to the keel. Is your false deck now glued to the tops of the keel and bulkheads now? The back section should align with edges of bulkheads like in the front. You'll definitely want to straighten that out. If you used the white pva wood glue, rubbing alcohol will dissolve the glue and unbind it if you need to re-do. To answer your question, the deck planking should be smooth and flush with the other planks, so you'll need to keep sanding to achieve that. Joshua
-
https://www.bluejacketinc.com/ build ships for commission, maybe reach out to them? Joshua
-
Completely understand - I'm happy to chat with your parents on the phone or over zoom. Joshua
-
Now you don't have to worry about screwing it up, by the way, every model is screwed up in some way to the builder - screw up as many kits as you can! Joshua
-
For free... you're a young person wanting to build a model, happy to support that. If you were an adult with a job, I'd charge. Joshua