
HOLIDAY DONATION DRIVE - SUPPORT MSW - DO YOUR PART TO KEEP THIS GREAT FORUM GOING! (Only 20 donations so far - C'mon guys!)
×


DocRob
-
Posts
1,261 -
Joined
-
Last visited
Content Type
Profiles
Forums
Gallery
Events
Everything posted by DocRob
-
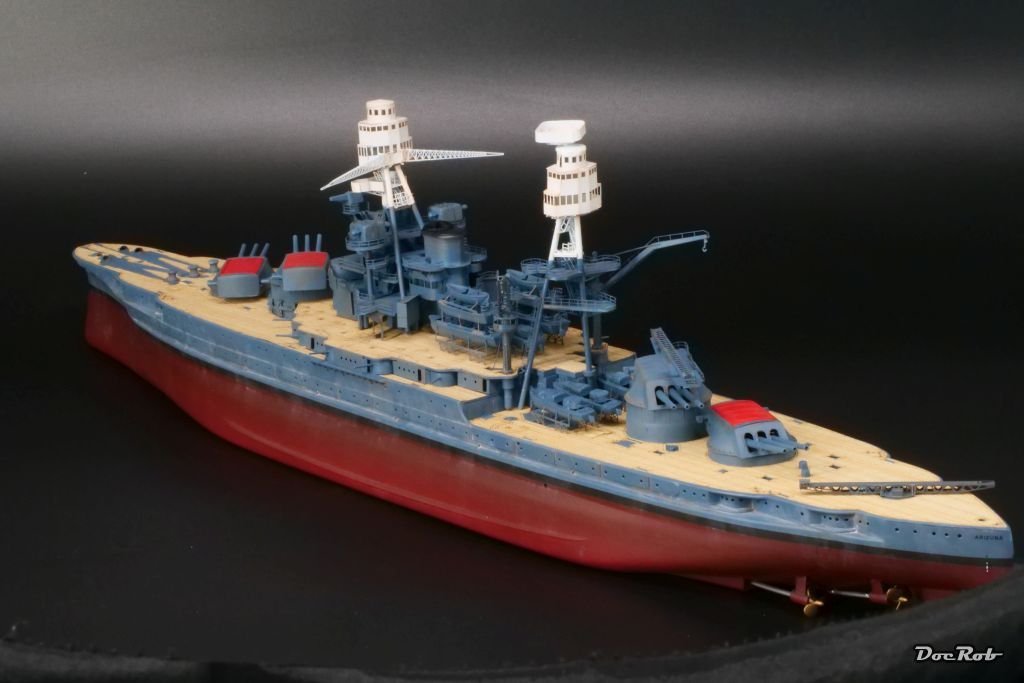
 Thank you Ken and Edward, the built was demanding at times, but well satisfying. Speaking of detail, The USS Arizona is not quite finished, the anchors are missing and I noticed, I forgot the yellow prop blade markings on the Kingfisher planes. Then there's the rigging. I've not decided finally, how deep I will get into that. As for the next build, the decision is made. I will build a sleek flying racehorse, diversification is the best medicine against boredom . Caudron C.561 French Racing Plane - 1/48 - S.B.S. Cheers Rob
 -
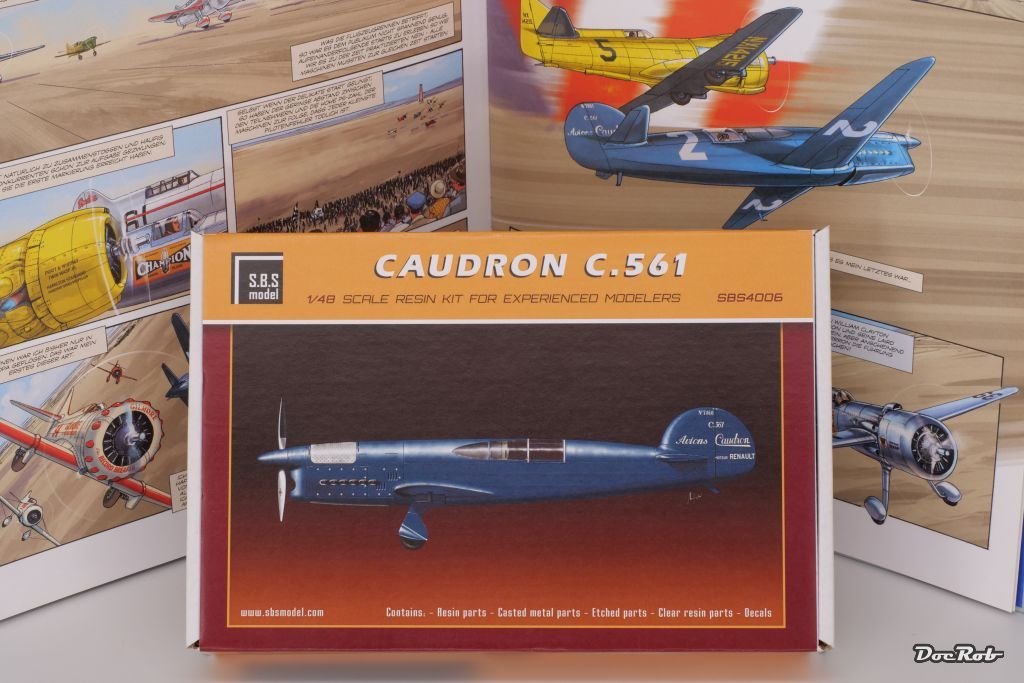
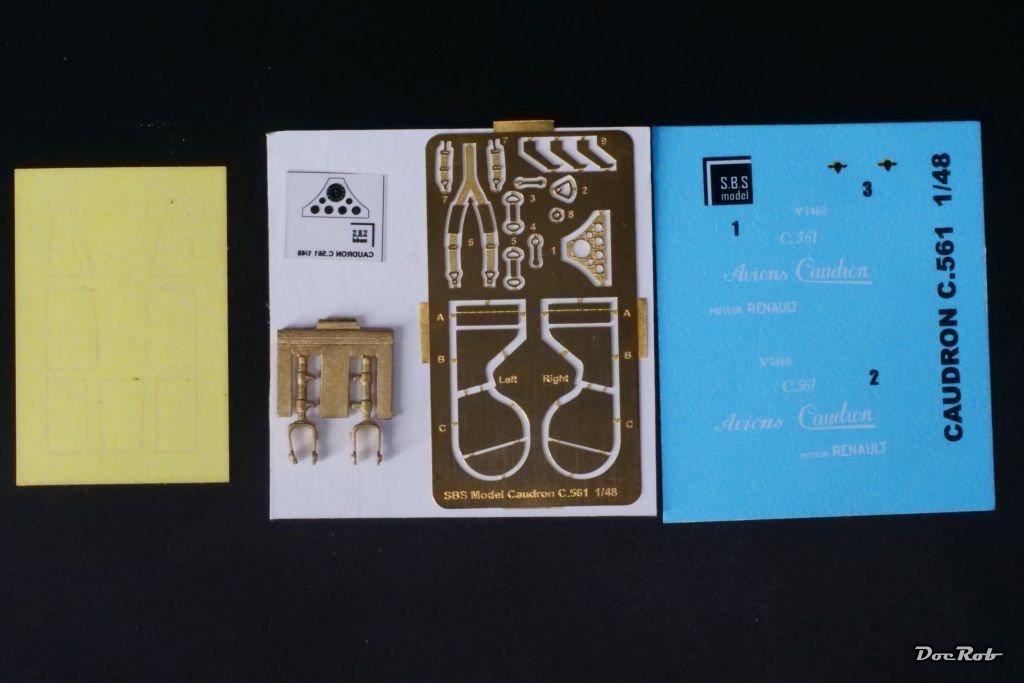
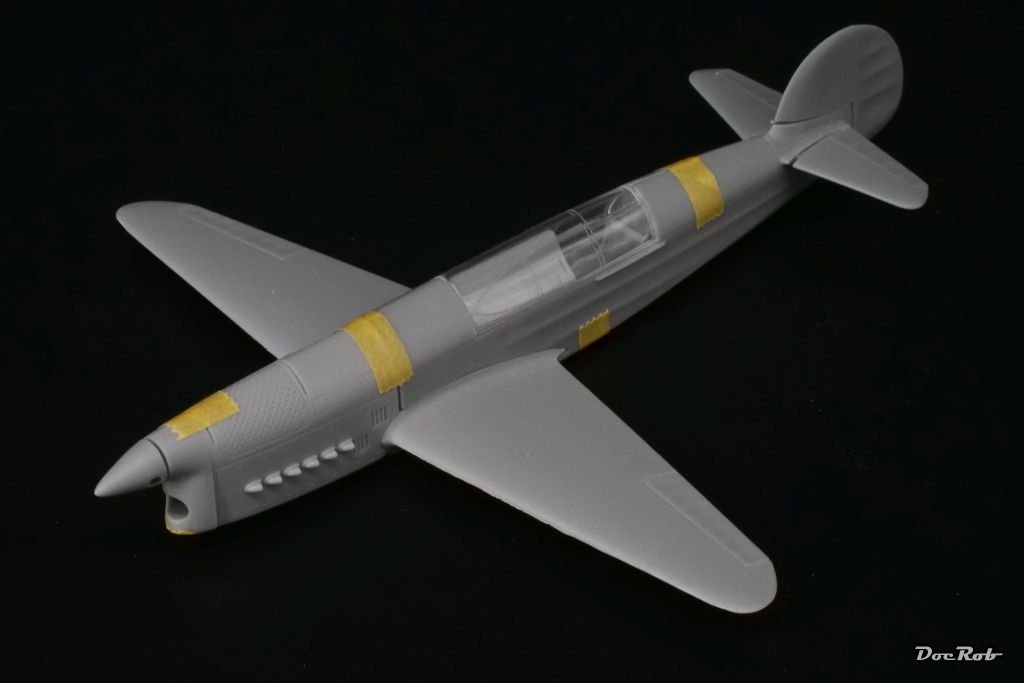
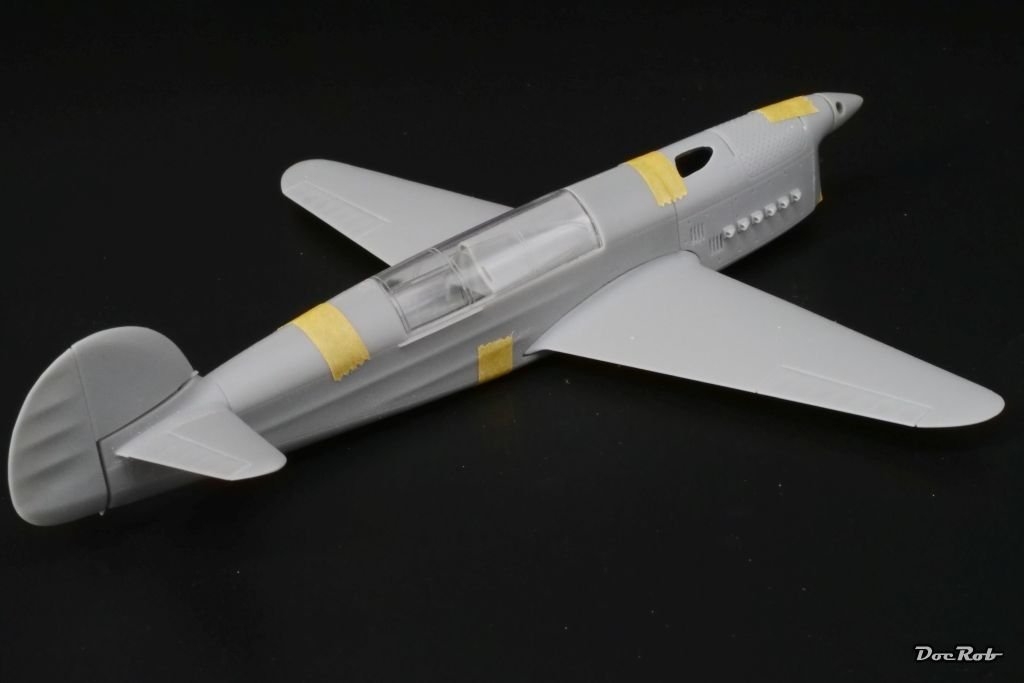
Très cool was my first impression when I've first seen the Caudron C.561, what a design, completely different than other race planes of it's time. The design was not so much max power orientated, than sleek and aerodynamic. My last contact with the whacky racer were Hugault's paintings in the German version of the comic book 'Au-dela des nuages T1'. I bought the kit a while ago, initially after I stumbled over it somewhere in the net, I couldn't resist the magnetizing box art. The producing company is from Hungary and they produce resin planes and accessories in 1/48 and 1/72 mainly. When I opened the sturdy and beautiful designed box, I was up to my next wow. Securely packed where the grey resin parts for the airframe, including a quite detailed interior, along with a clear (and I mean clear) resin canopy, metal casted wheel struts, a PE-fret, including seatbelts, a dashboard, wheel covers and other detail parts, Kabuki canopy masks, decals, a manual and a separate four side color print. The quality of the resin is perfect, there are no bubbles or blemishes, the whole kit oozes a 'build me' type of quality and as it is my first full resin plane build, I have to confess, all my fear was gone, after inspecting the kit contents. Yesterday, with my USS Arizona build more or less in the books, I decided to use a good spare hour for removing the cast blocks (easy) and do some test fitting. What's to say, the first impression didn't exaggerate, the fit is almost perfect and it seems, filler will only be needed in small quantities on the bottom seam of the fuselage. The parts design is absolutely clever, especially around the wing root to fuselage to engine cowling area and even includes guiding pegs, Chapeau S.B.S. Another example for smart design are the wheel well covers, which are made from PE, which should be annealed and then press formed between the included resin punches. This kit is a true gem, it doesn't happen very often to me, that I'm totally enthusiastic from first of the kit, through opening and inspecting the box and dry fitting and getting a grip for the kit. Cheers Rob

- 62 replies
-
- 12
-

-
Thank you Paul, I'm completely undecided about my next build. It could be a 1/48 Oeffag 253, an Austrian biplane of WWI or a 1/20 vintage McLaren, or I continue with some stalled builds. The next days will show. Cheers Rob
-
Thank you Johnny, I wanted to build this kit, the moment I saw the color scheme. What a nice distraction from the normal light grey jobs. The build was testing at times, but I have to say, there were no real project threatening failures, astonishingly. Most hick ups were self induced, due to lack of research or laziness and being inexperienced. I have to praise the Eduard PE, which is very detailed and precisely designed. The only determining factor in this project was the will to finish, as it needs some tedious and methodical work. I had moments, where I distracted me with thoughts about next projects, but the motivation came always back, after taking a short break. Cheers Rob
-
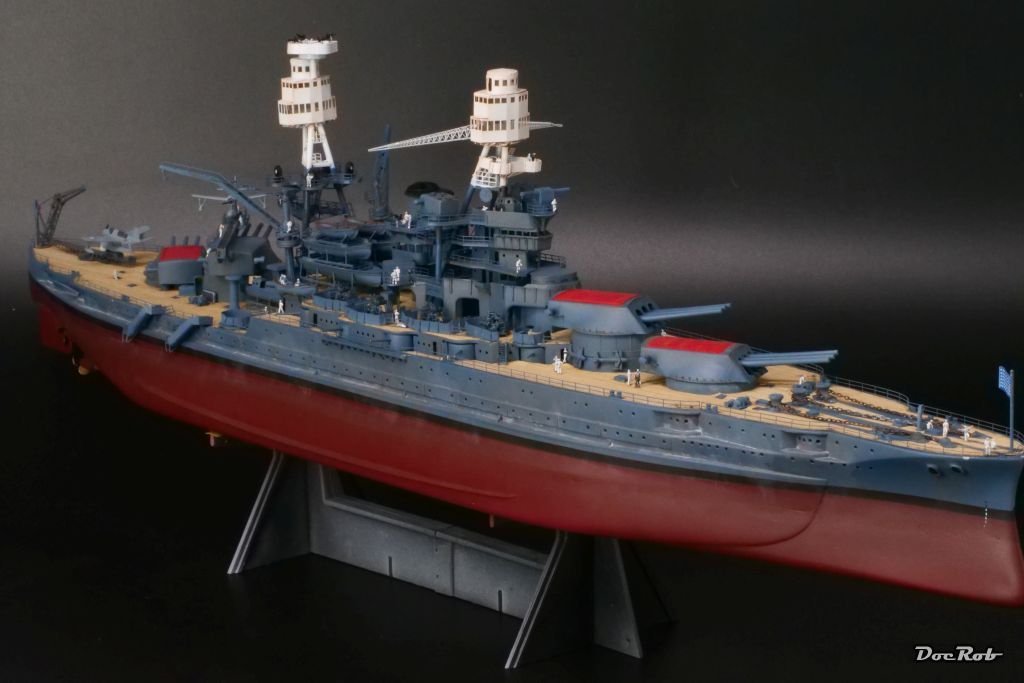
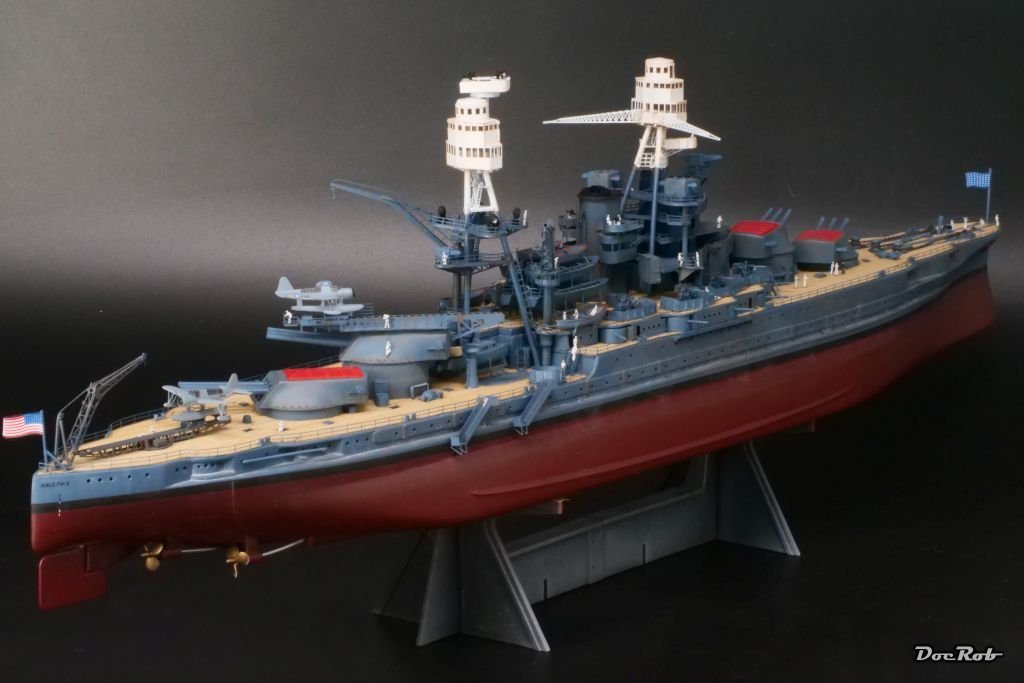
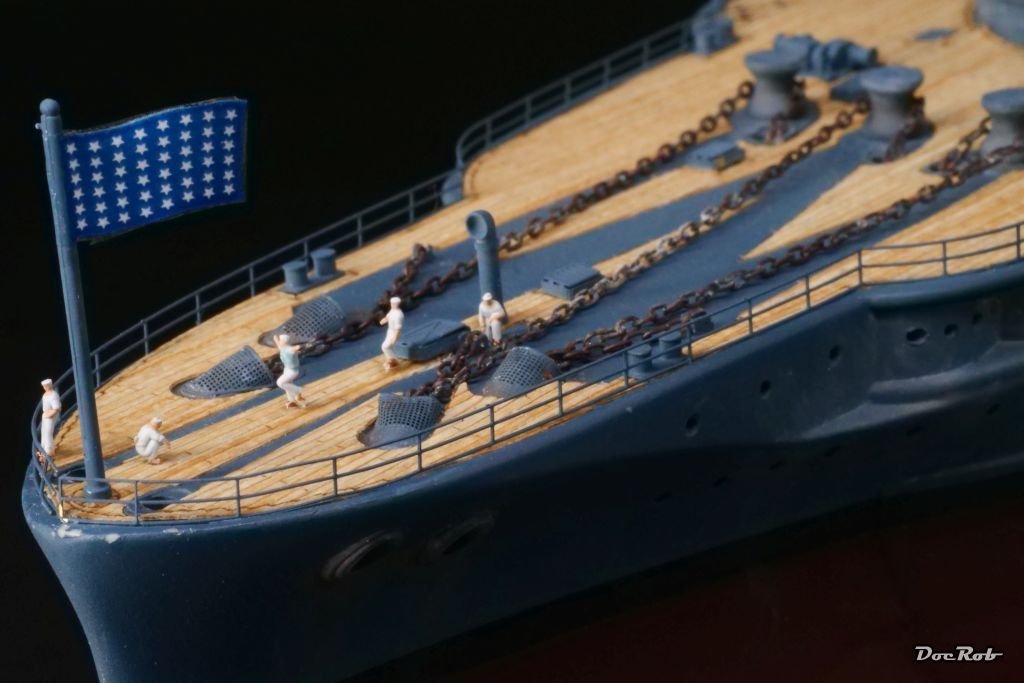
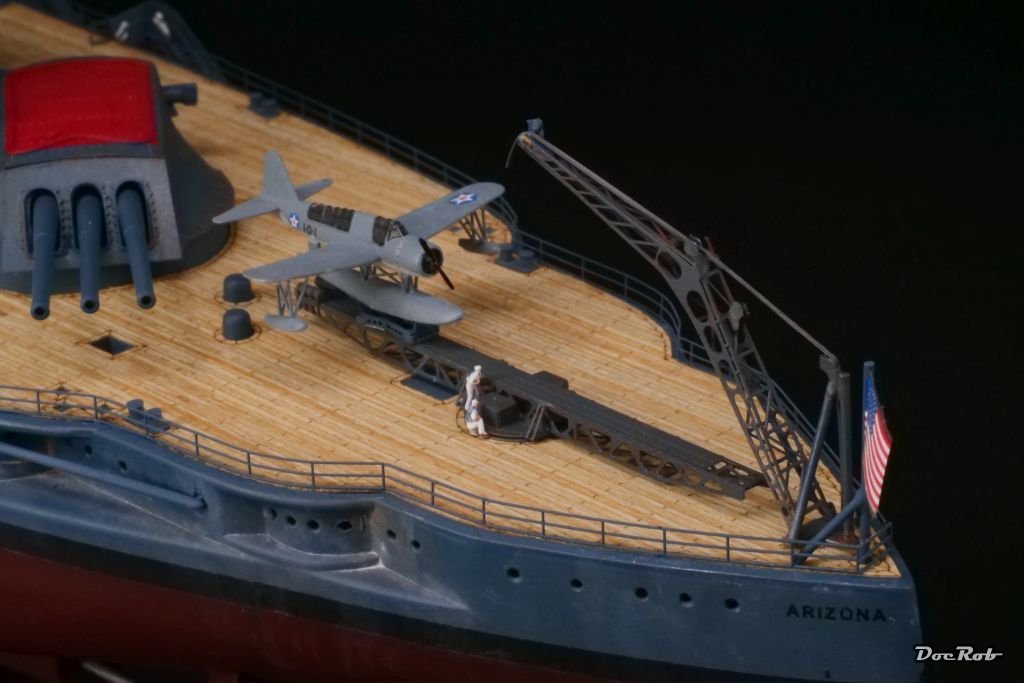
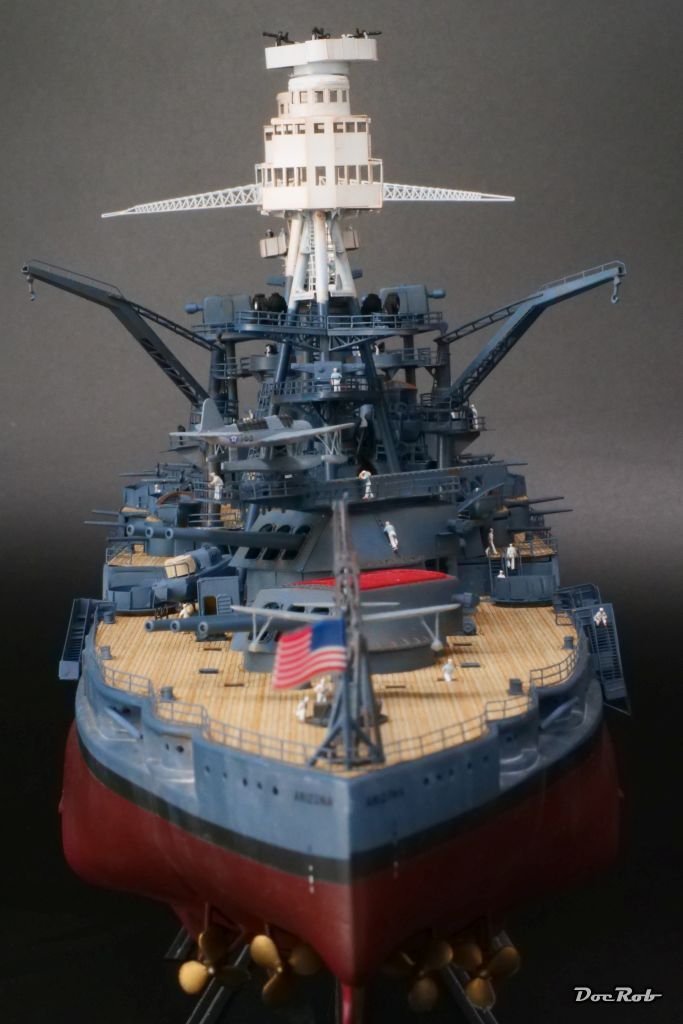
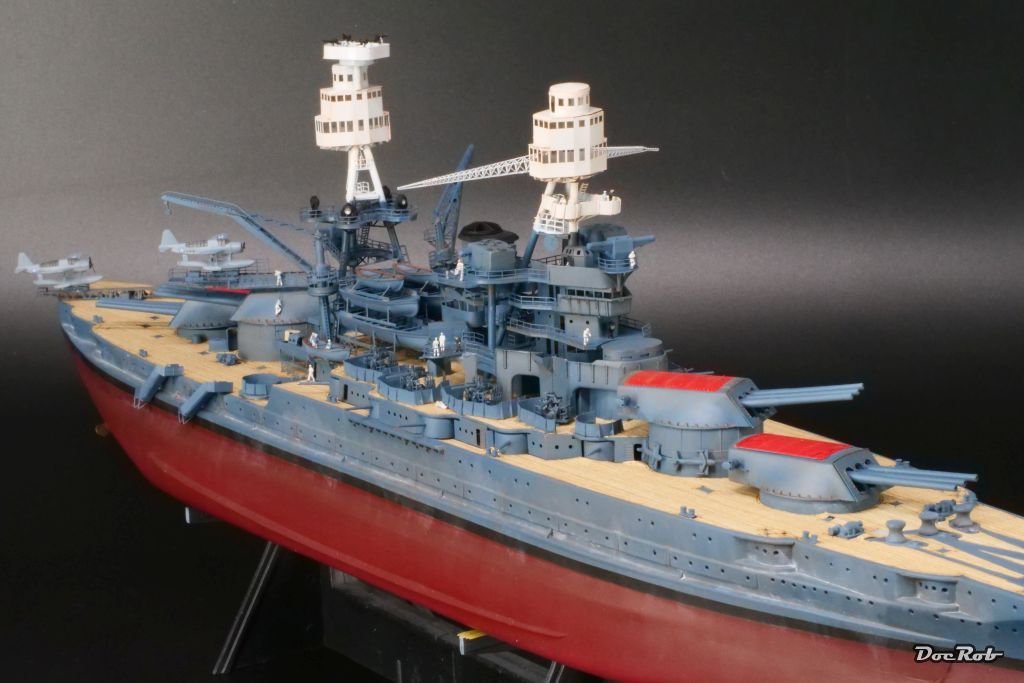
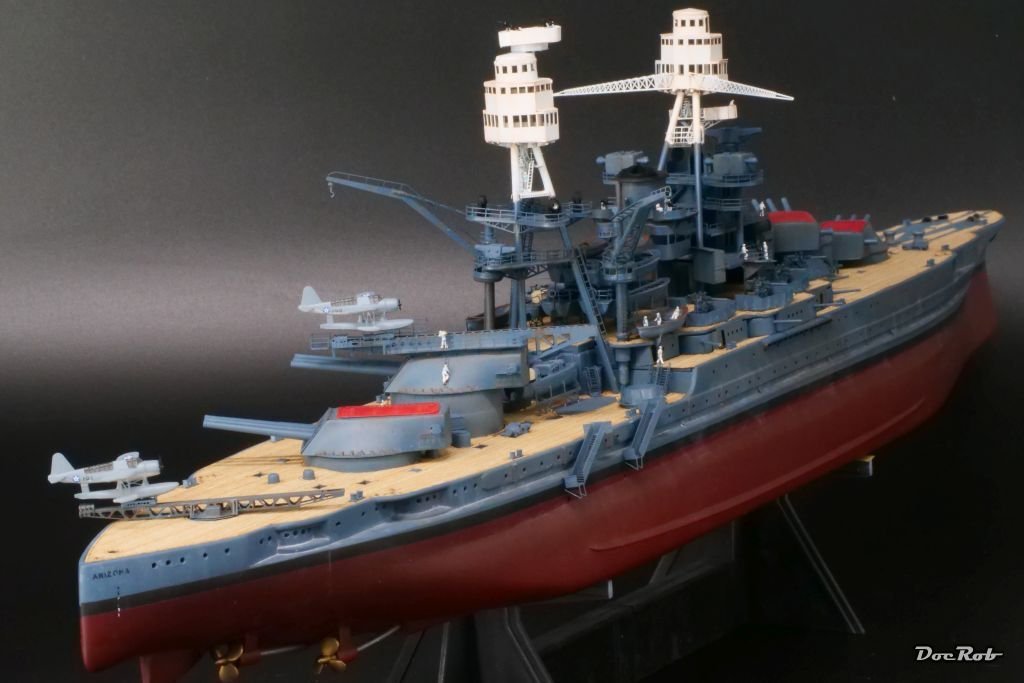
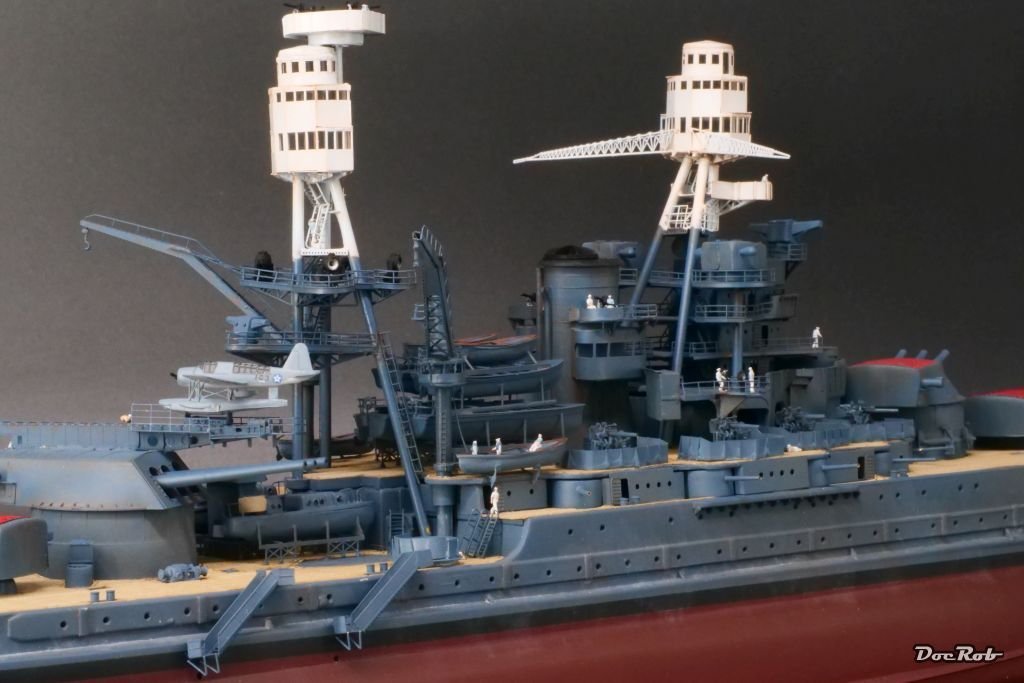
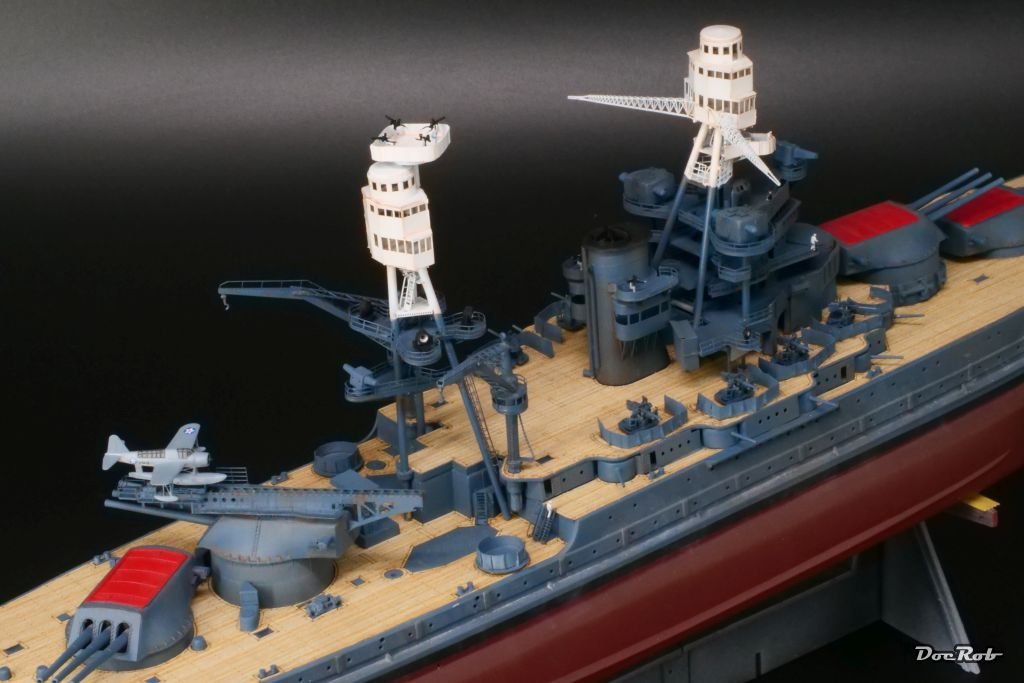
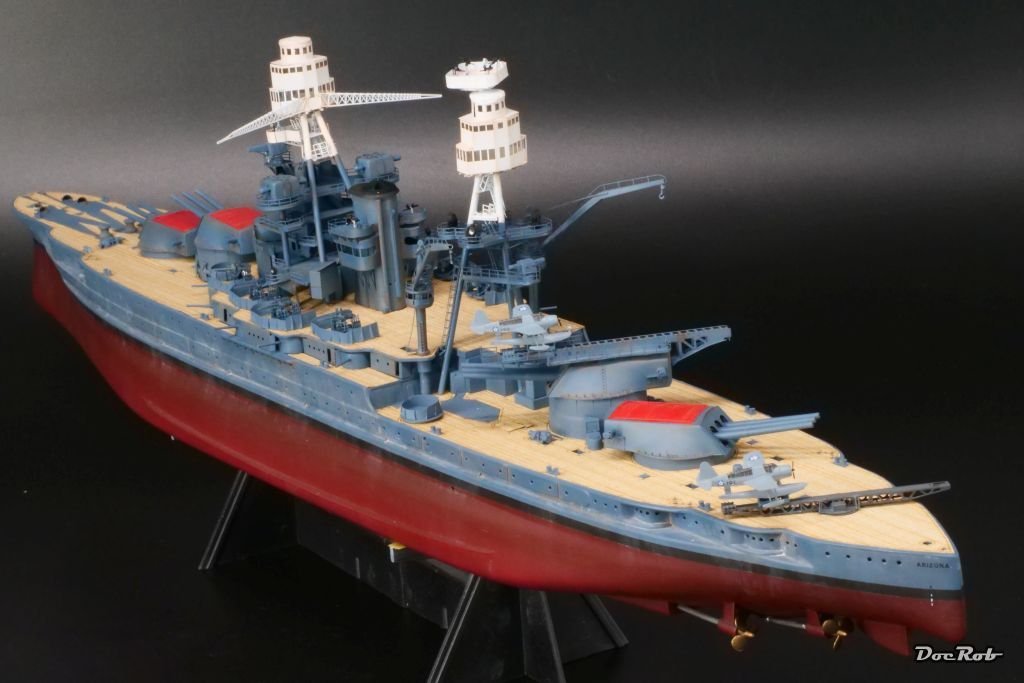
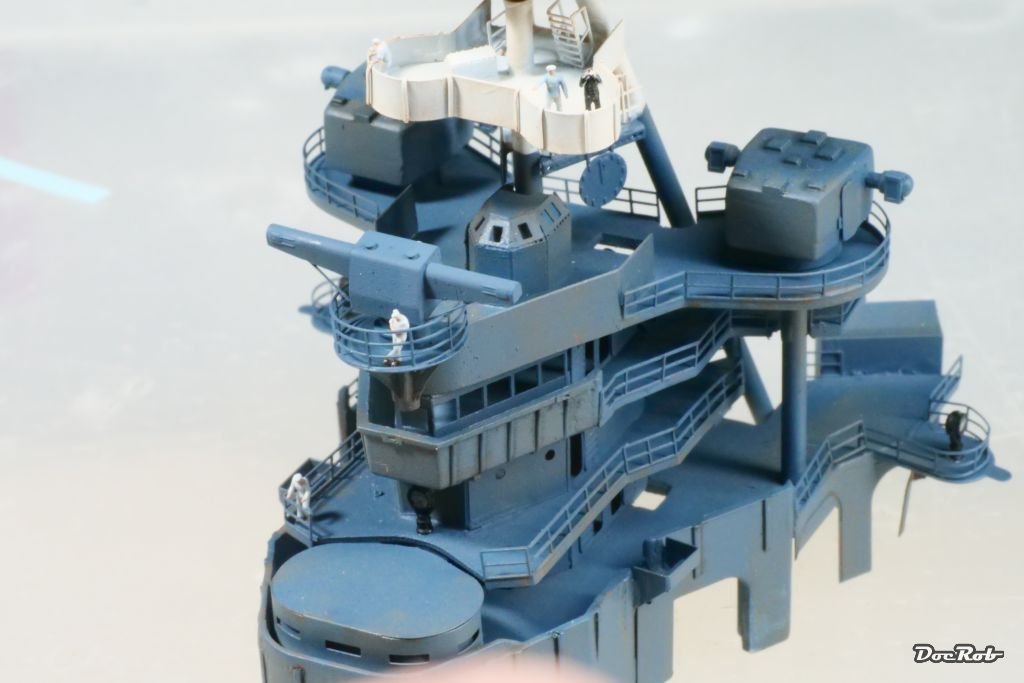
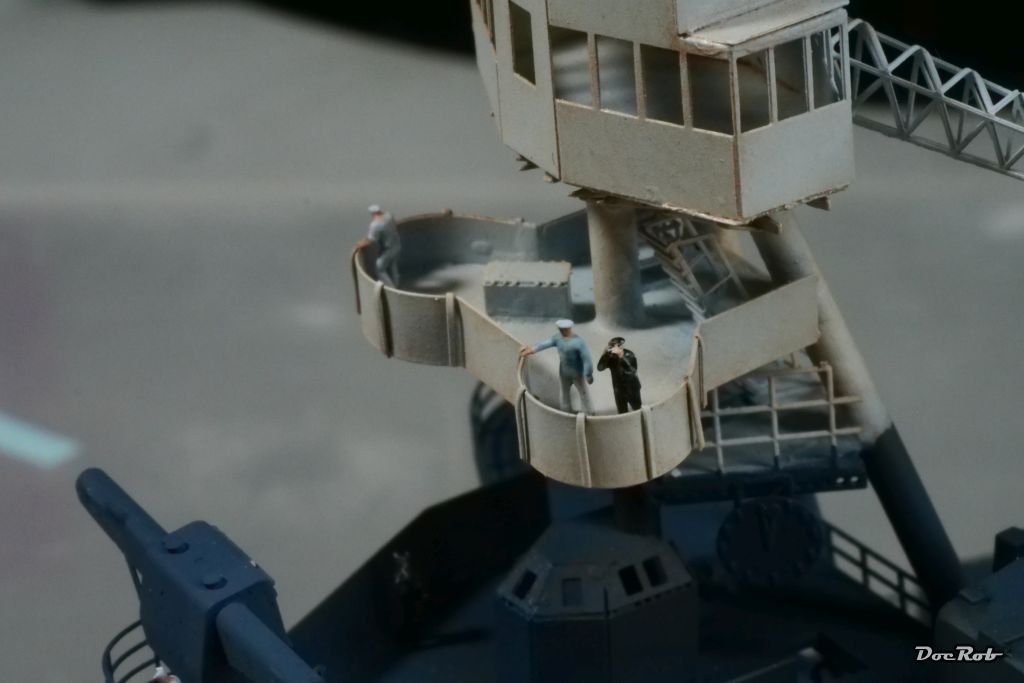
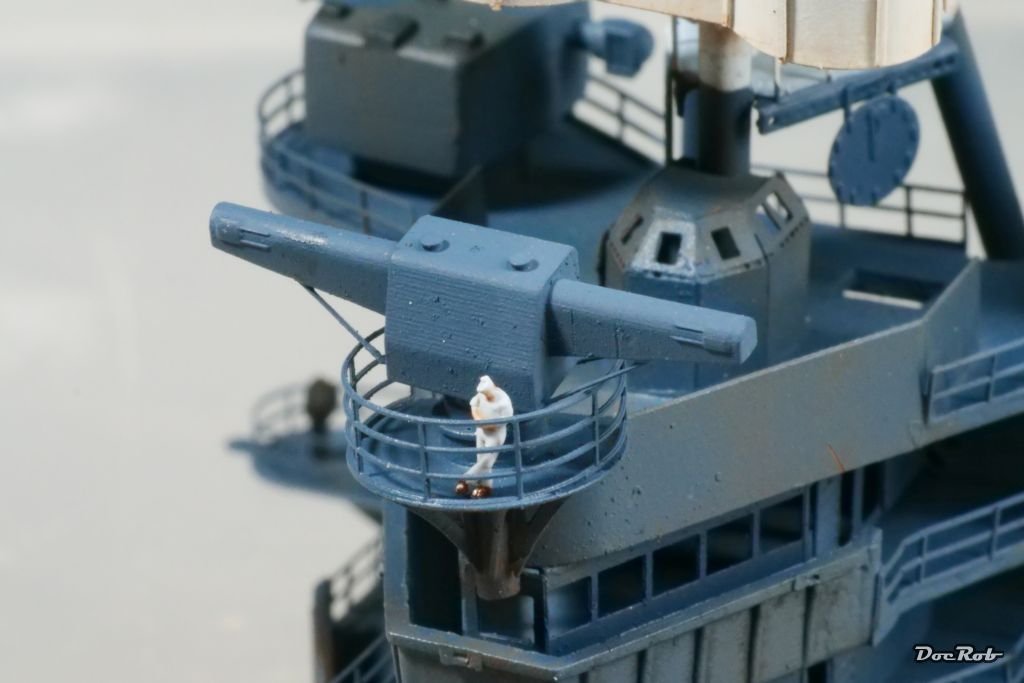
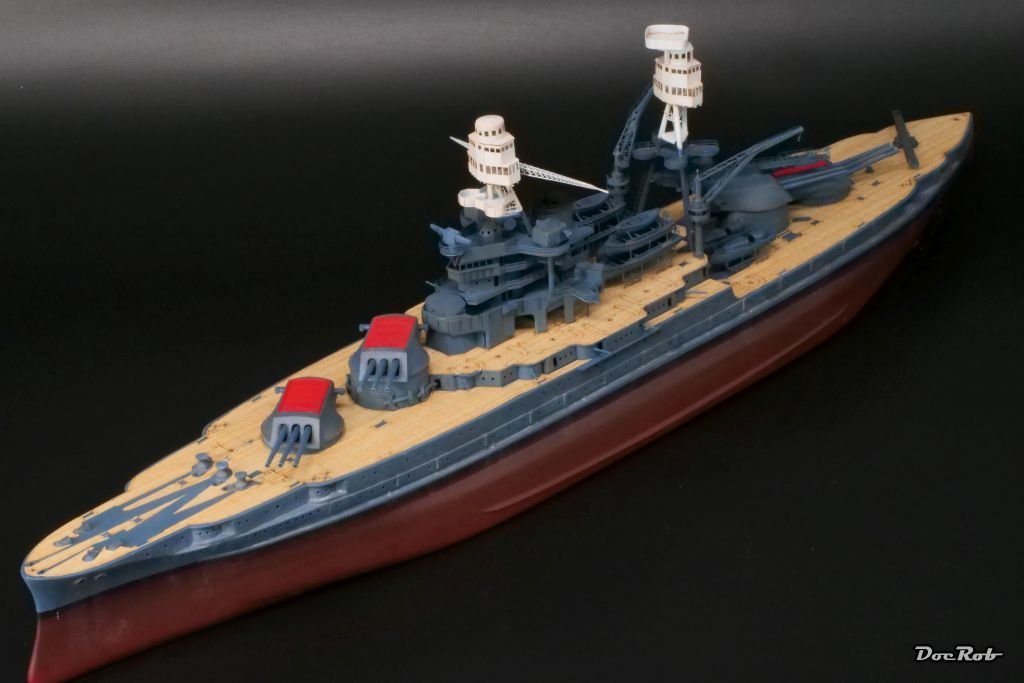
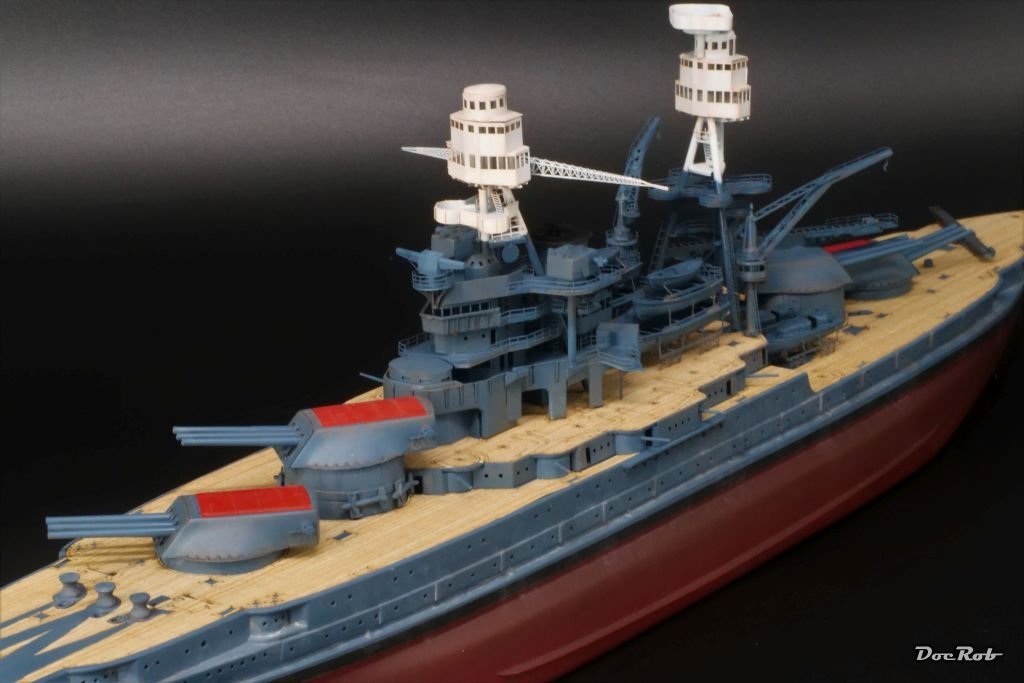
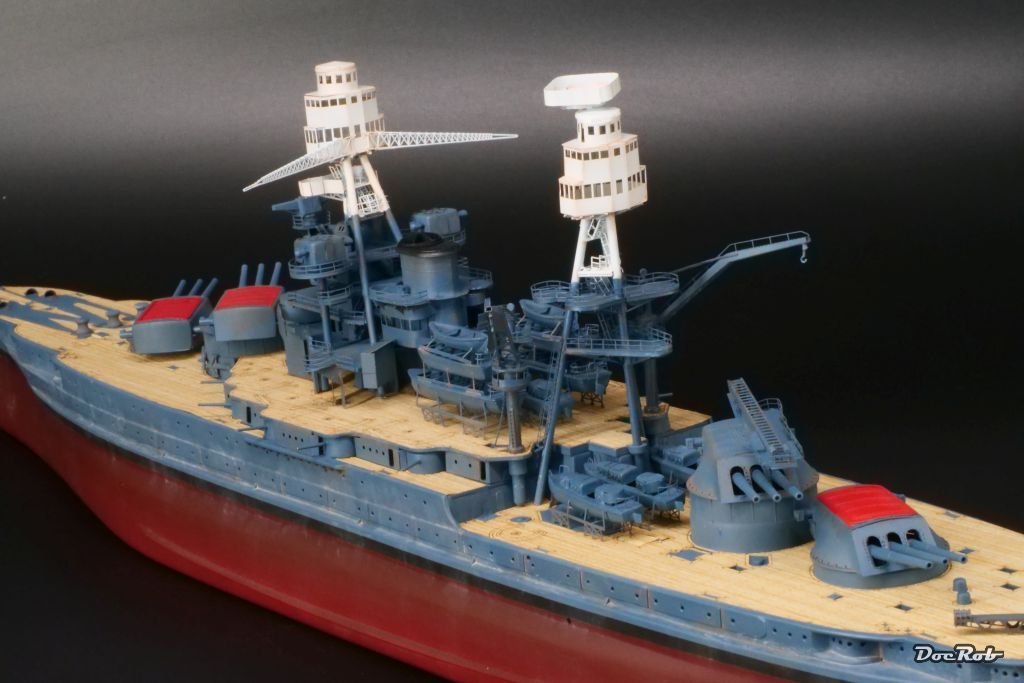
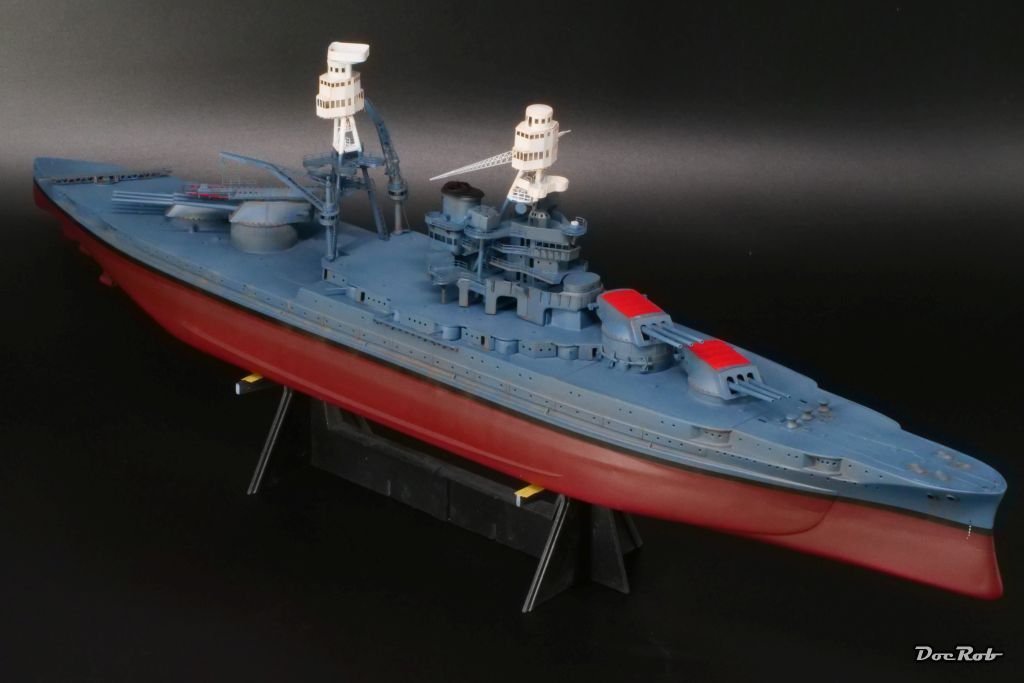
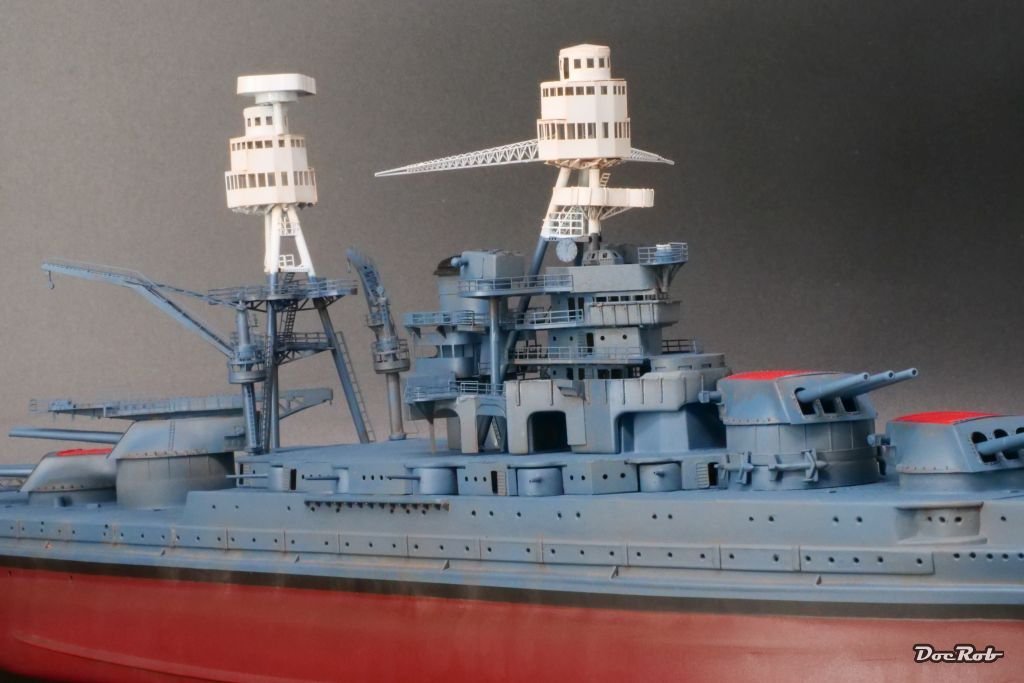
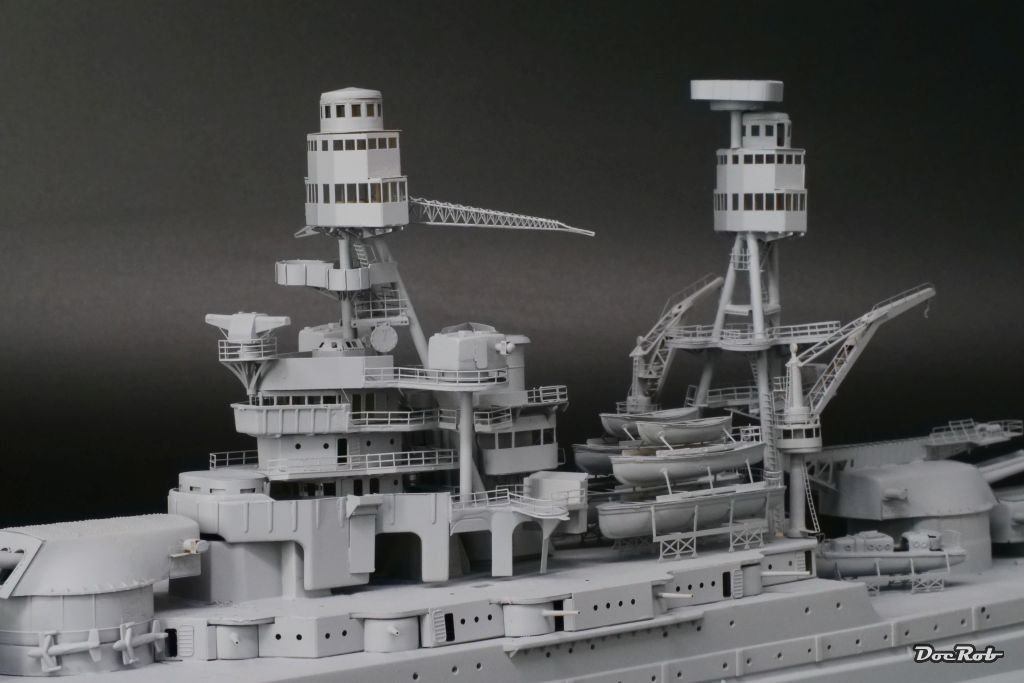
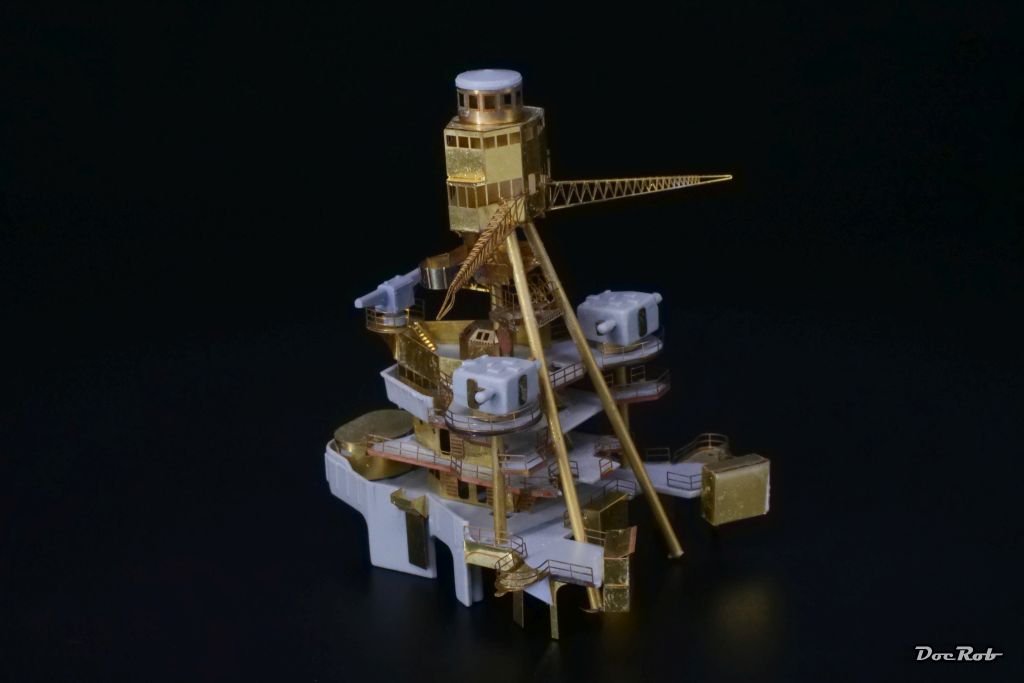
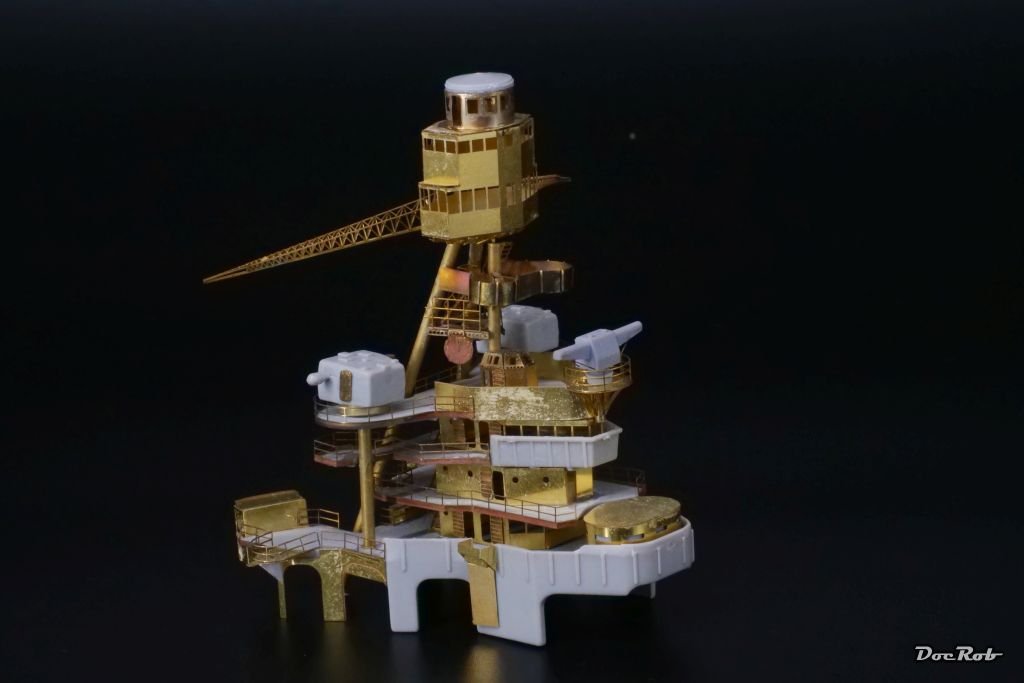
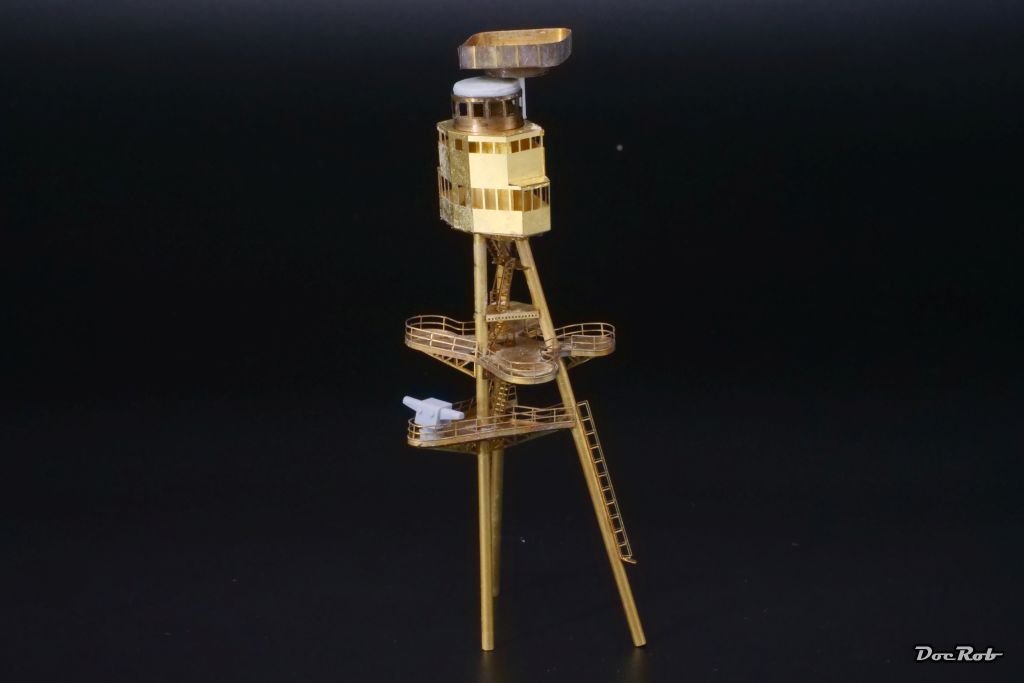
Phew, almost there. Some touchups are still to do and there are still some parts missing, like the anchors, which I forgot. I added all the railings, which proved easier than thought. I bent them to shape before carefully set them on a wooden board with double sided adhesive tape and then primed and sprayed the railings. Before installing the outer railings, I glued on the masts, cranes and superstructure, not to interfere with later. Lots of figures were added and I hope, they tell little stories with their poses, interaction and placement. Lastly, there is the question, if I rig the Arizona. I'm not so sure, if rigging would be visible in this scale, but this decision will be made later. It seems like I can think about new projects. There were times, where I couldn't think of getting to this stage, during the build and this feels good and satisfactory. Cheers Rob

- 115 replies
-
- 13
-
-
Thanks for continuously finding hairs in my USS Arizona soup, ddp . Checking the pictures, it seems you are right. I initially wanted to place the guns like you mentioned, but now they are glued in place like they are. Not the most accurate Arizona build around, I fear, but I can live with that. Cheers Rob
-
I added more and more sub assemblies to the mix. After a bit of detail painting with a brush, the numerous boats were glued to the decks, later followed by the gangways. More figures were CA-ed to their stations. The superstructure and the mast section are not glued in place yet, as I will add some railings first. Not shown on the pictures are the anchor chains, which I blackened in burnishing fluid. Cheers Rob
- 115 replies
-
- 10
-
-
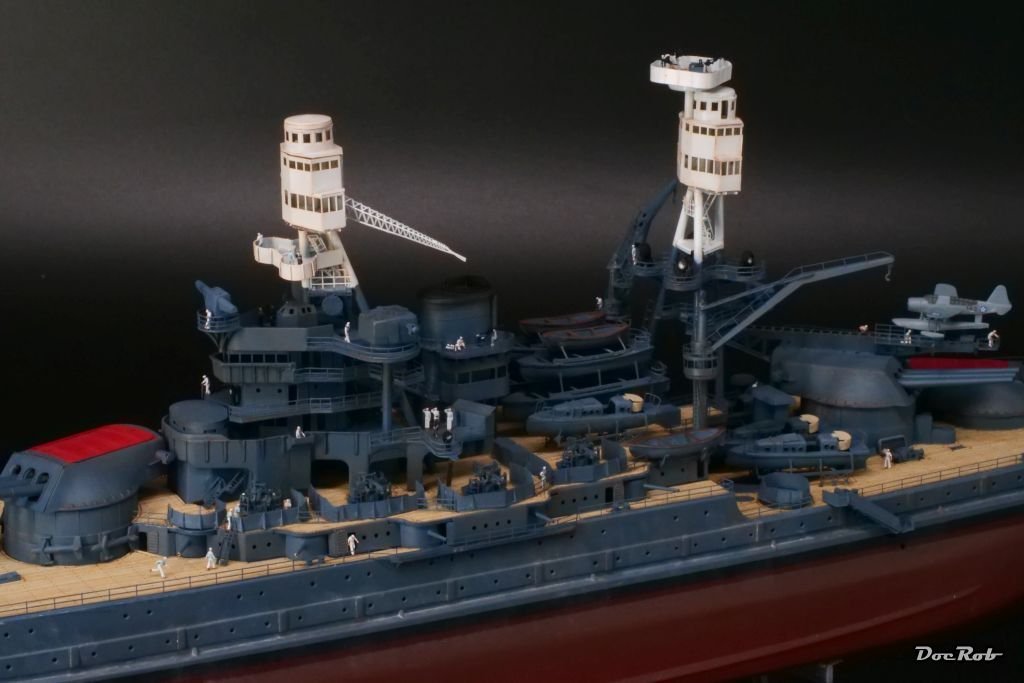
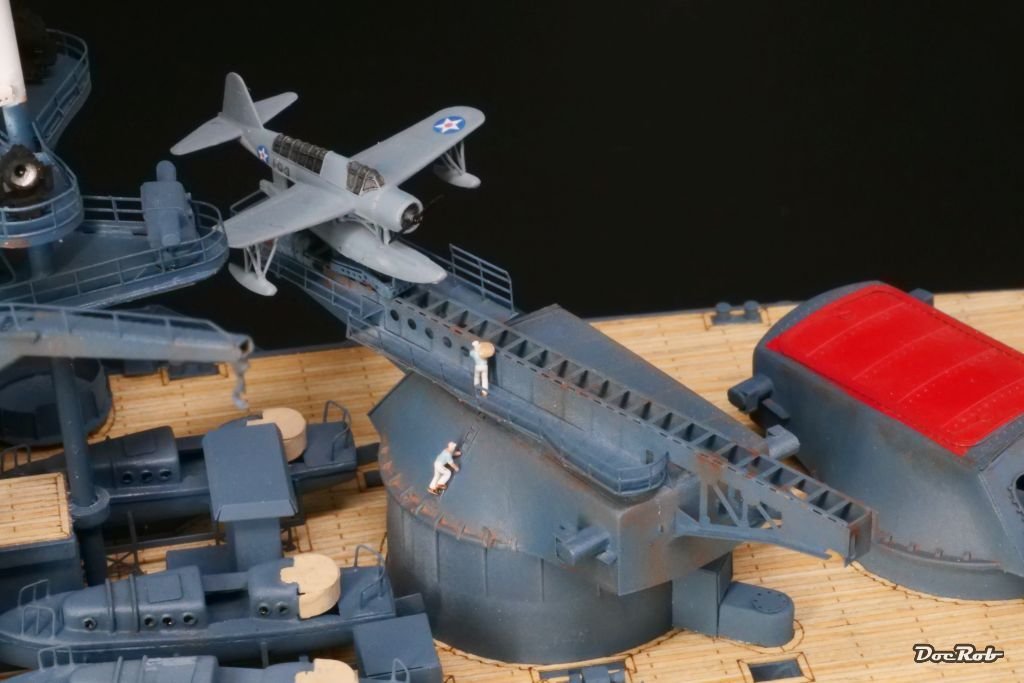
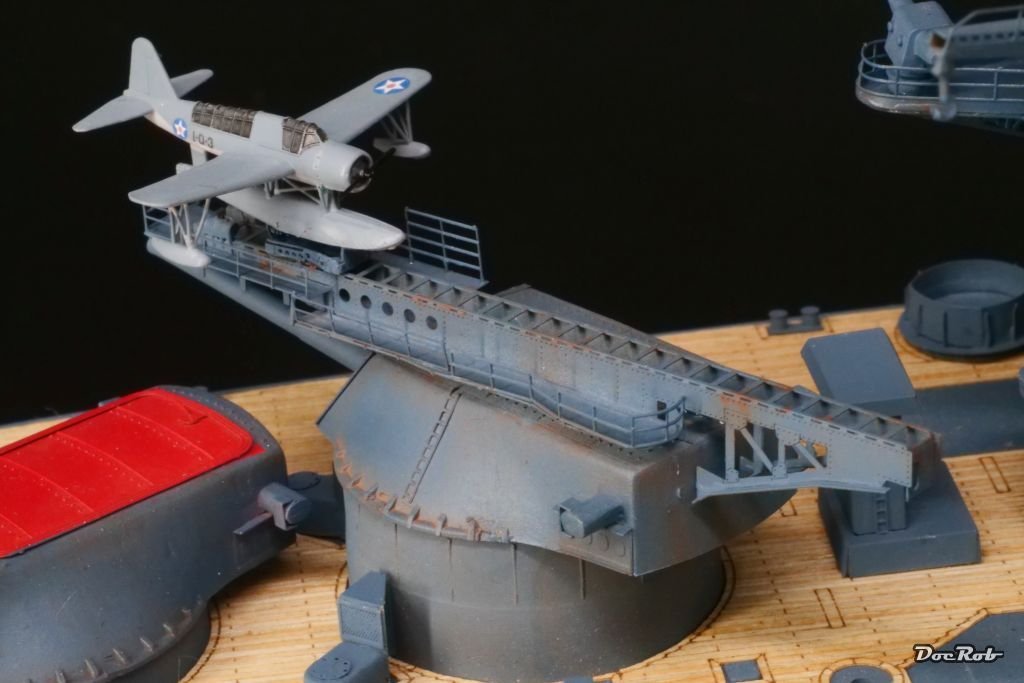
It's a bit of cash in time now, as it's the time of the build, where all the pre fabricated sub assemblies got finally detailed and added to the decks. I mounted the planes on their sleds onto the catapults, dozens of bollards, winches, AA guns and mid artillery with their gun shields. Not all is glued yet, and I try to assemble in a logical order, without risking to destroy glued on details through bad sequencing. Suddenly the whole build appears to melt together with these very rewarding steps. Cheers Rob
-
Plastic or Wood models? Your Favorite?
DocRob replied to Bill97's topic in Modeling tools and Workshop Equipment
You made your decision Bill and I think it's a good one. Answering the initial question of your thread, I can only add a personal view, as my experience in wooden ship and plastic ship builds are limited. I'm an experienced modeler though, but ships weren't on my past schedule. Last year I took all my courage and started my first serious attempt in wooden ship modeling, I built the Duchess of Kingston from Vanguard models. I never limit my modelling urges, but I always need a trigger or a point of fascination to start a project, in this case the biography of the name giving dame. When this initial spark is ignited, I will loose myself in a project, no matter what. The DoK was way above my skill level, but it is a well designed and with the help of the forum members, I almost sprinted through the build, which is finished sans the rigging. I had more fun learning and building and working with wood instead of plastic. It was so very exciting, that I bought another Vanguard kit, which is very helpful with a very clever design, good materials and exceptional step by step manual. This year, I started on the other side of the medal, building a 1/350 scale USS Arizona and it was a love and hate build until now. The plastic of the base kit is so bad, that luckily nearly all the weaknesses of the kit are substituted by countless photo etched parts and 3D-printed ones. I had difficulties to get into a building groove, like with the wooden sailing boat, but I will finish USS Arizona soon and besides some letdowns, most of the build is tedious but satisfactory, too. Interestingly it took me four month to build the Duchess of Kingston (without rigging) and the USS Arizona will take about the same time. Like I did before, I will build models from plastic, wood, resin and maybe metal like before, but it will be generally more biased to ship modeling. Personally, I easily get bored, therefore, I always seek new challenges in modeling. I guess with your background in modeling and woodworking skills, you will easily achieve good results with a decent wooden ship kit. The rest is determination and working always to your standards and like others already mentioned, have fun. Cheers Rob -
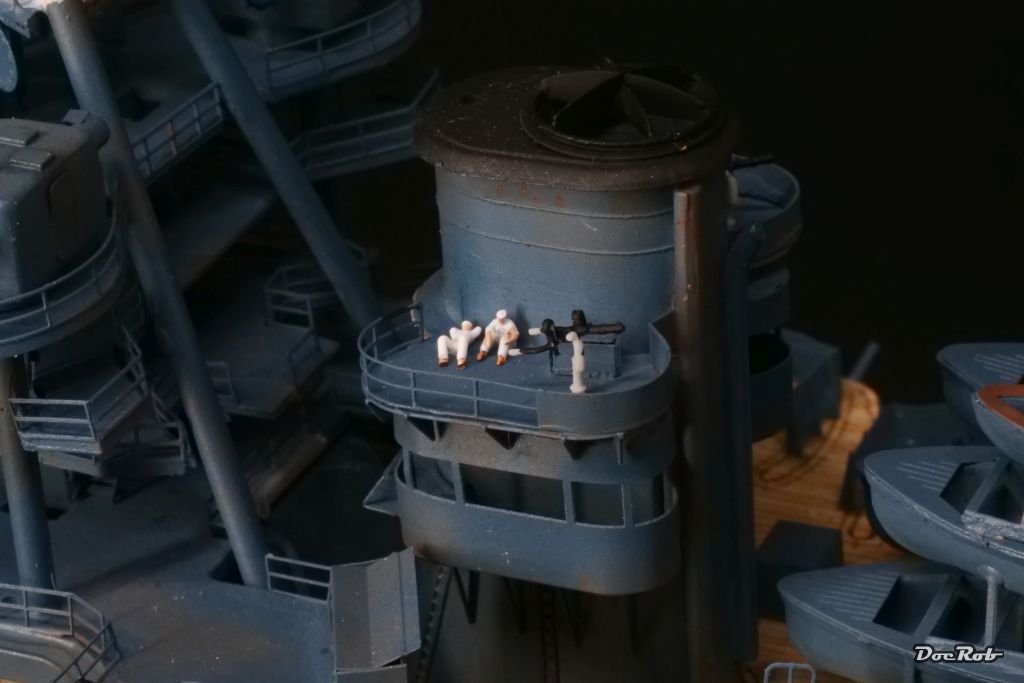
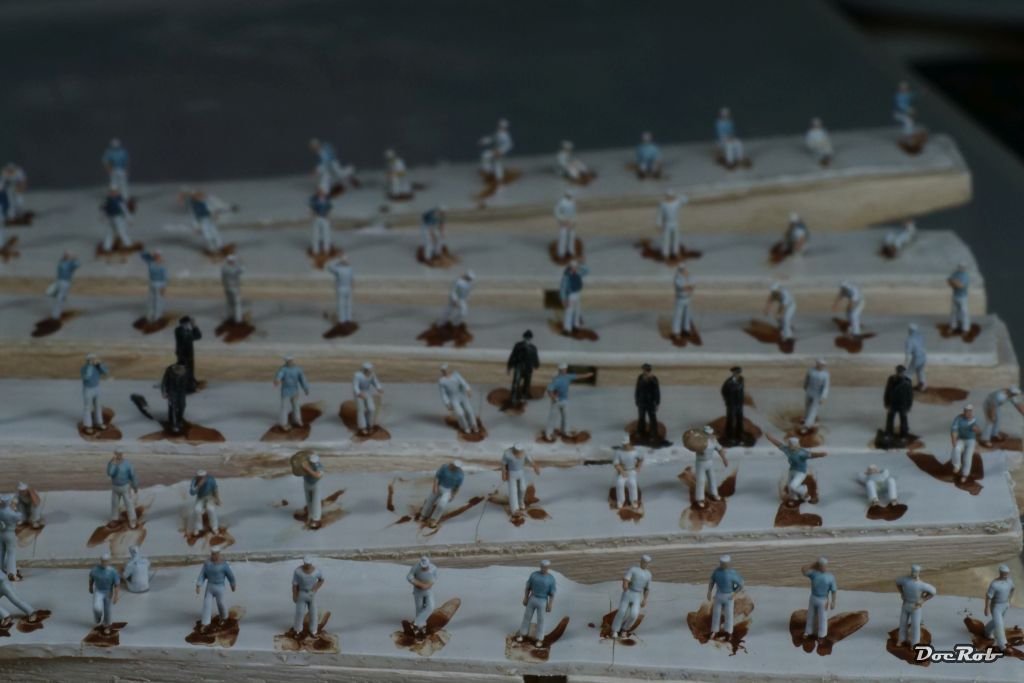
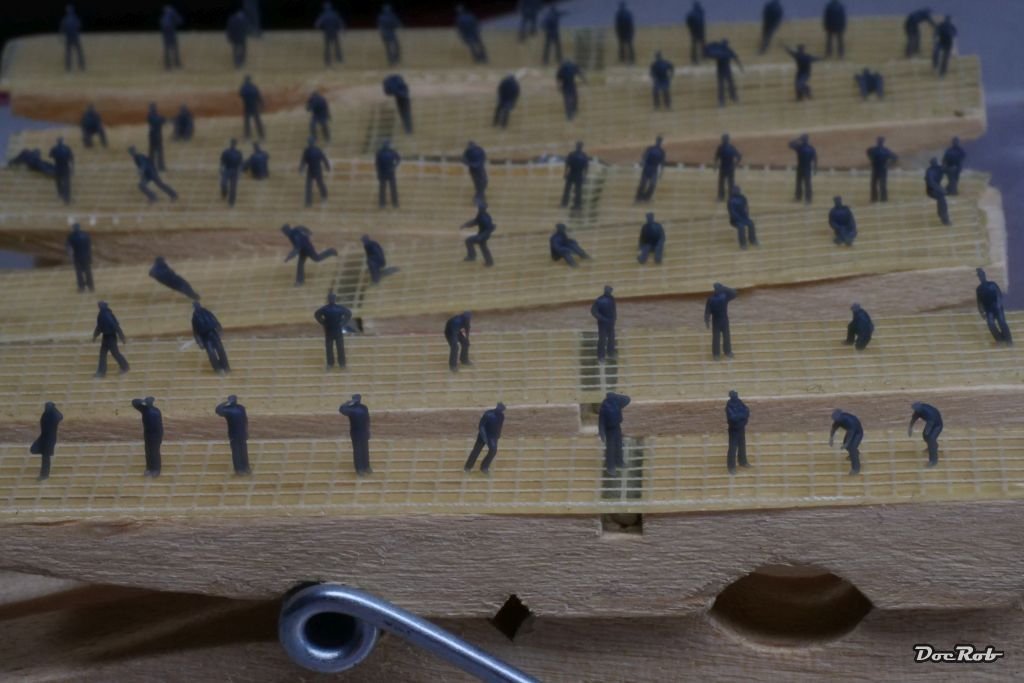
Phew, I painted up the figures. The printing quality is excellent for the scale and these little guys will bring some life onto the decks of USS Arizona. The figures were primed matte white with the airbrush and then followed by skin color, light blue and blue gray, brown for the shoes and some other details, applied with a 000 brush. Last, I brushed on a mix of grey oil paint and matte thinner as a wash, to let the detail pop a bit more. And here there are the first officers and sailors on duty (or resting). Cheers Rob
- 115 replies
-
- 10
-
-

-
Dust masks and respirators.
DocRob replied to Bill Hudson's topic in Modeling tools and Workshop Equipment
I always use a good respirator mask, when airbrushing and cleaning the equipment. I use my airbrush frequently and I can remember my airbrush beginnings, when I sprayed acrylics in my room. If I lifted a cup afterwards, there was a non soiled spot, I definitely don't want to have that in my lungs, along with aggressive and poisonous chemicals. My health is too important to me than to have that tiny bit of more comfort. I wear the mask, even as I have a spray booth, which minimizes the spray particles. I also wear a mask, when I sand or saw resin parts, as the dust particles are carcinogenic. Well with wood sanding it depends on the amount and the sanding place. When I sand a planked hull outside, I might skip the mask, but mostly, I wear one. If the question is, do you need a mask for different modelling tasks, my answer would be definitely yes, it's a 35€ investment into your future. I got this one and different sets for filters (dust / paint) Dräger X-plore® 3300/3500 | Draeger Cheers Rob -
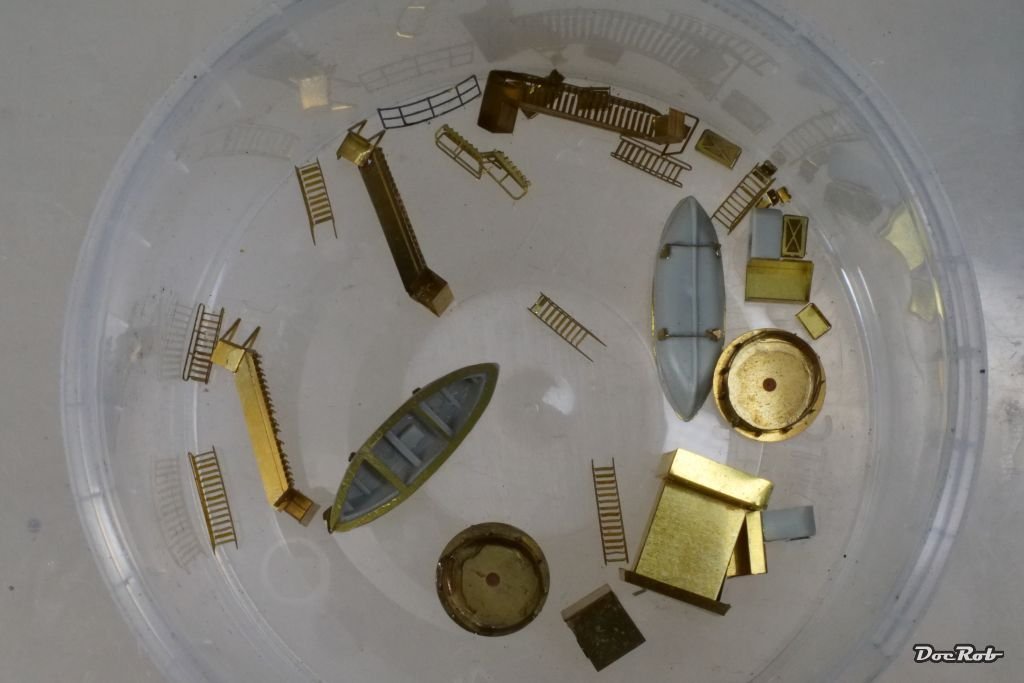
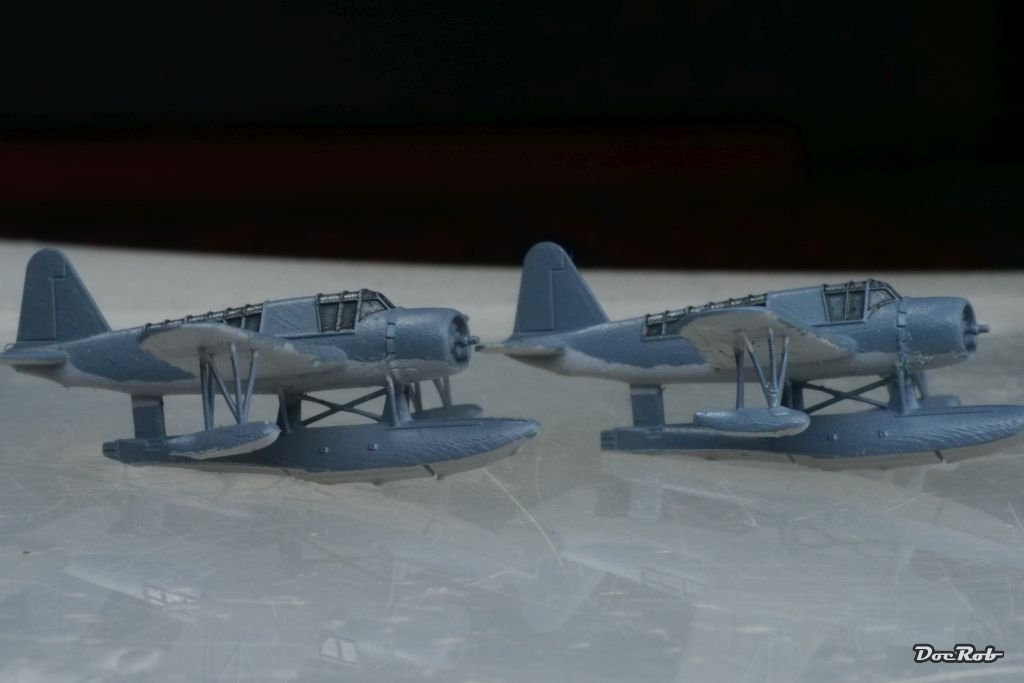
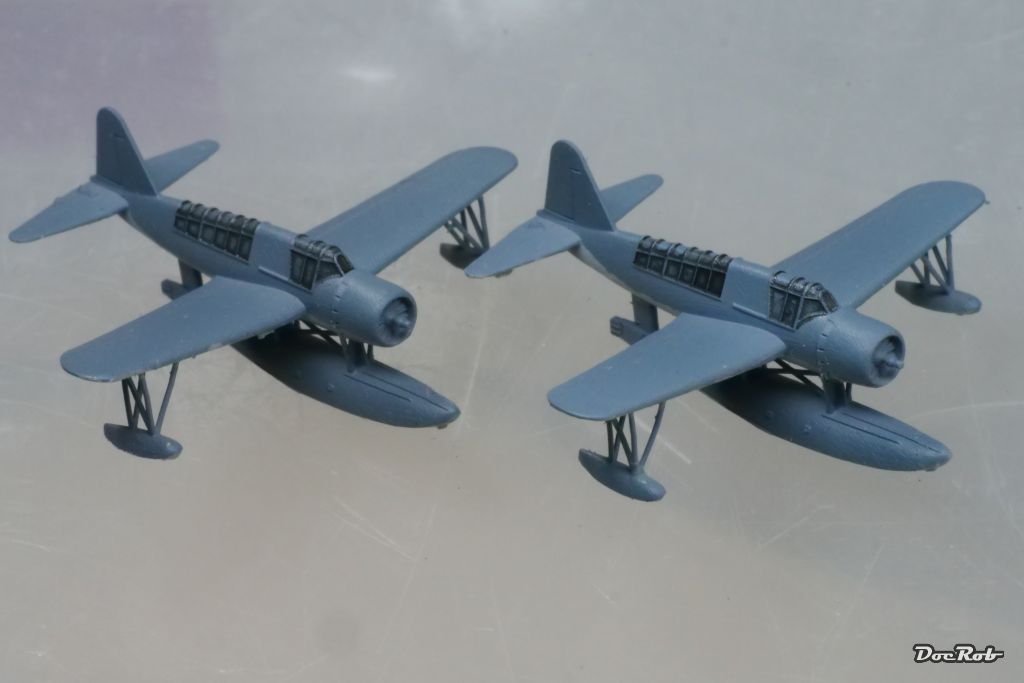
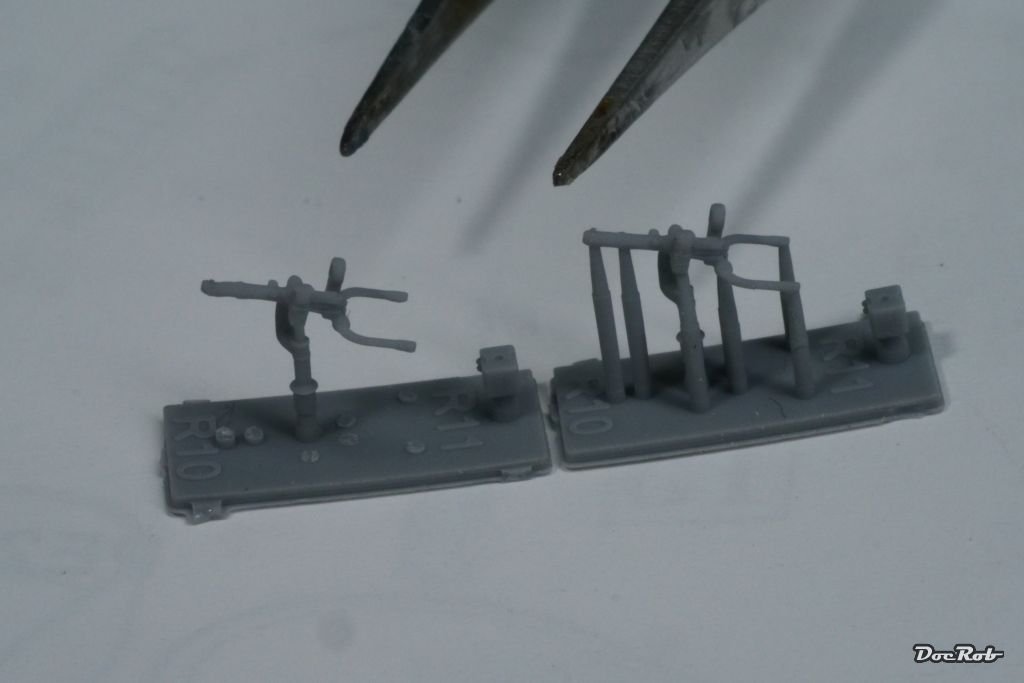
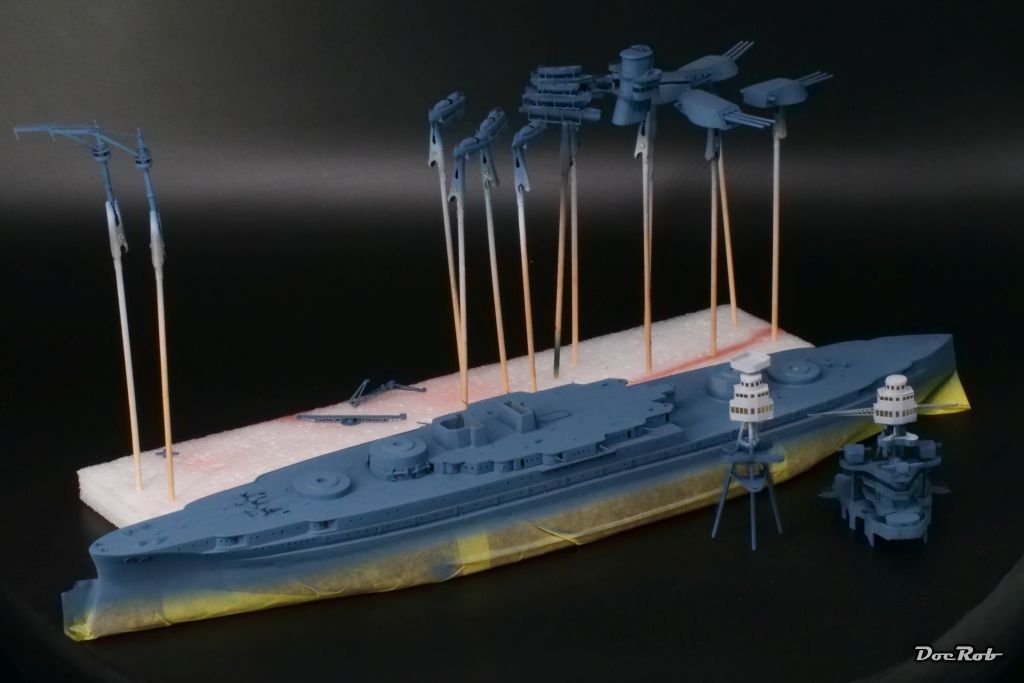
It looks like I've done nothing, but that's not true, did many little things, indeed very little things. I folded lots of boxes and hatches from PE along with ladders, which are time consuming, because I bent all the single steps with a sharp blade and a very fine pair of tweezers. There are more boats with racks and a big range of other tiny PE assemblies, some shown here. All these are now painted up and ready to install. Next were the Kingfishers, which received a two tone camo. The planes were primed light grey and then all undersides where covered with liquid mask, brushed on and then sprayed with the top color mix of light blue grey. I thought about how to paint the windows and tried black panel wash and liked it, as it pronounced the framing and dries glossy for contrast. Now they are up for decaling. Before I install all the larger subassemblies to the decks, I will apply the figures, which is easier due to better accessibility. These figures from Ion Models are really tiny and it took a while, to cut them off the print sprues. Luckily only one leg was lost, the print material has a bit of flexibility and is not too brittle. I grouped the 74 sailors onto double sided adhesive tape for painting and prime them white with the airbrush and continue with brush accentuation . Cheers Rob
-
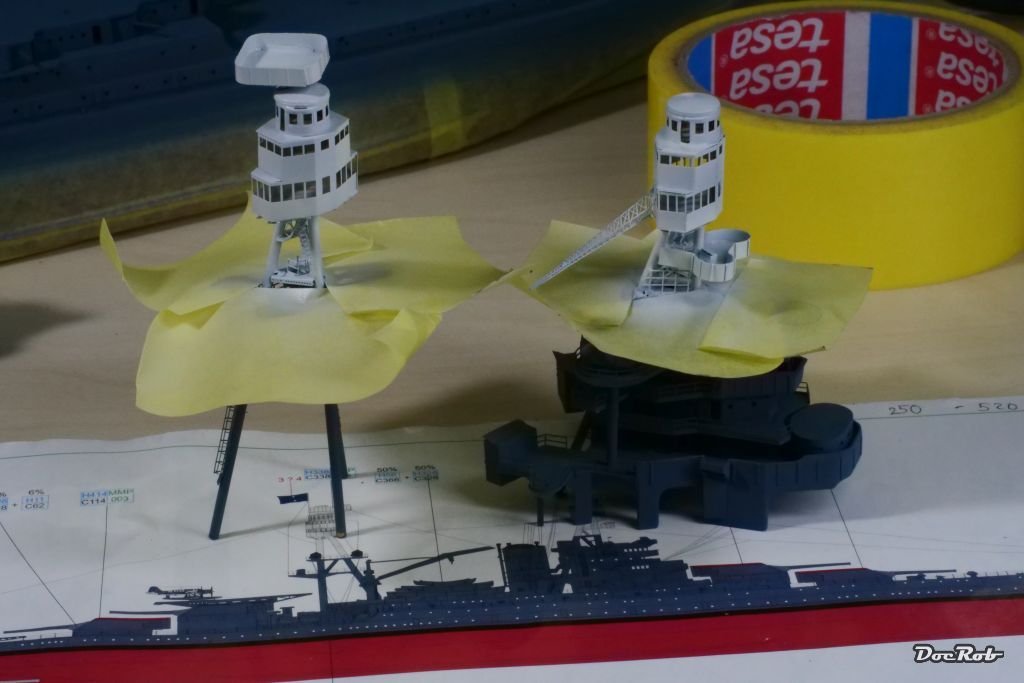
Thanks again ddp, I corrected the catapults angle and the housing will be, where it belongs. Cheers Rob
-
These are great drawings and photos ddp, thank you for that. You are right about the angled catapult, I somehow missed it in the manual and I have to see, what I can do about it. The proposed quad gun tubs are raised, but somehow, it doesn't show on the picture. I've read, that the tubs were readily installed, but there were no guns mounted, when USS Arizona was attacked. The 'thing' you mentioned, is only there for a condensed view in the picture. It belongs behind the single mast of the main mast structure, between the boats. Cheers Rob
-
Slowly pacing through the on deck applications. This build is testing my patience a lot and the last nagging bit are the gun shields for the middle artillery. They are made by PE and the enforcing struts, tiny triangles needed to be bent in place. I dreaded this part of the build, because the first shield, I tested, lost a lot of the tiny struts through breaking. The others, I annealed had less broken parts, but still some. Some of the sensible struts were too long and had to be shortened with unshivering hands. Nothing is glued, because the parts will be airbrushed off the deck. You will notice, that I left the cut out deck segments in place, which would have to be removed for the original plastic. Leaving them, will look more convincing, I hope. Cheers Rob

- 115 replies
-
- 10
-
-
That's an interesting project ddp, converting these kit dinosaurs with a lot of scratch work. No wonder, you are familiar with the details and drawings. For me USS Arizona is only a short stint into small scale ship modeling, as I do all kinds of modeling and like to continue with my wooden Duchess of Kingstons rigging and some other plastic kit projects. Cheers Rob
-
Handley Page Heyford by RGL - FINISHED - Matchbox - 1/72
DocRob replied to RGL's topic in Non-ship/categorised builds
Somehow, I missed your build RGL. I really like what you've done to that dinosaur kit. Extra detailing and great painting skills show on that positively quirky airframe. Cheers Rob -
After the rust oil weathering had dried, I started the next layer, salt residues made with a white naval wash from AK. I applied it on the sides of the hull and only a little in the bow area, which then was blended with white spirit. Next were the shafts and propellers, which were rubbed with AK's old bronze wax, a perfect fitting tone. The shaft got Uschi van der Rosten's iron pigments rubbed in. Alignment is a little bit off, but I decided to let that be. On to the wooden decks, which are self adhering. All fitted well, except the delicate bow section, where the wood material was not cut thoroughly, which led to some free handed cutting, with a half glued deck. Despite this, fit was exceptional, with the exception, where PE parts substituted plastic, so no fault by Artwox. Most of the on deck assemblies will be added now, after the deck application, exactly for this reason. On some spare deck material, I tried a varnish first, but decided against it, as I didn't like the looks. If I weather the decks, it will be done later, with pigments, I guess. Cheers Rob
- 115 replies
-
- 10
-
-
Thank you ddp, that is some great material. I'm absolutely no specialist on the USS Arizona and I'm well aware of some of the shortcomings of the kit. I don't want to correct all mistakes, as this is my first 1/350 ship build and I'm about to learn the needed skills. I read about the bilge keels before and this is not the only strange area of the hull. For the guns, you are correct, about the non existent overhang, but when I look at pictures from the late USS Arizona, the gun port openings seem to have flat bottoms. Maybe there was some change over time and the drawing doesn't say, it's an USS Arizona turret shown. Cheers Rob
-
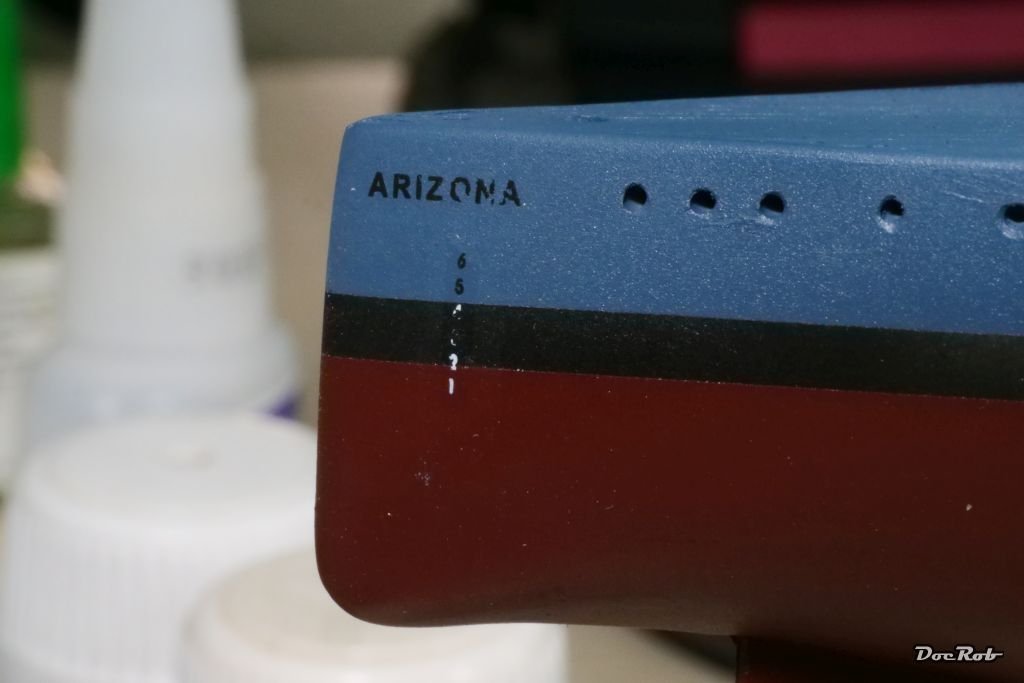
I've been busy over the last days with the USS Arizona. I decided to weather a bit, because no ship ever looks clean and because I wanted to learn weathering on ships. But first to the decals. Luckily there are not many and that's definitely a pro for ship modeling. These here are the new incarnation of Eduard decals which have to be cut out, because the carrier film is not. After application, they looked like this with silvering and reflecting carrier film. Eduard claims, the carrier film of these newer decals can be removed, leaving an almost painted on result. Hmm, sounds good, but after peeling off the carrier film very carefully all the decals had stencil lifts .. My underlayer maybe was not perfect, but it was not too shabby either with a coat of gloss GX100 from Mr. Color. Before I try these again on a larger scale, I would test on some mules. With the carrier film on, they look worse than other decals, quo vadis Eduard? Next I prepared some of the tiny printed parts for painting, like AA-guns and searchlights, which will be added to the superstructures after the weathering stage. Like I said above, I gloss coated the model, to have a good base for weathering for which I used Tamiya panel liners, but mainly brown oil colors for the first step. My technique is to apply oils liberally and not to scarce with a larger synthetic brush. Different areas were treated with different mixing ratios of oil color and matte finish whit spirit. After a short period of drying, I spread the colors again with help of a bit of thinner and try to work in the direction of the flow, hull downwards and reduce the amount of oil color accordingly. This time, I used the oil color from one of AK's oil pens, and these oil are of a lesser quality, than my normally used from Abt 502. This is where I am now, albeit after taking the photos, I knocked back the effect a bit more, a true benefit of oil rendered weathering. Cheers Rob
- 115 replies
-
- 10
-
-
-
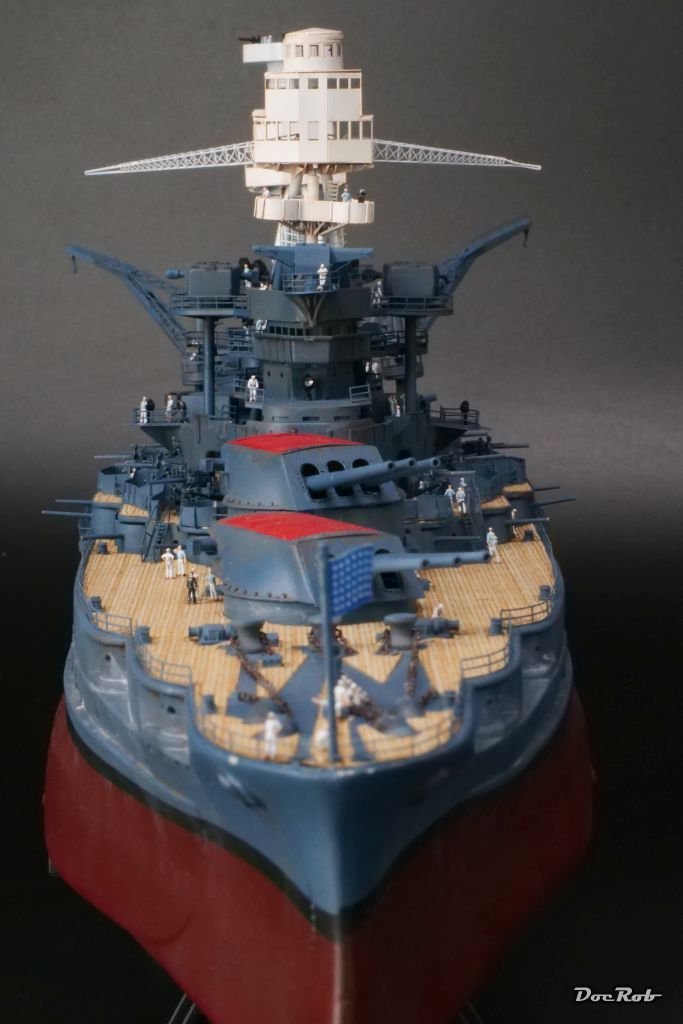
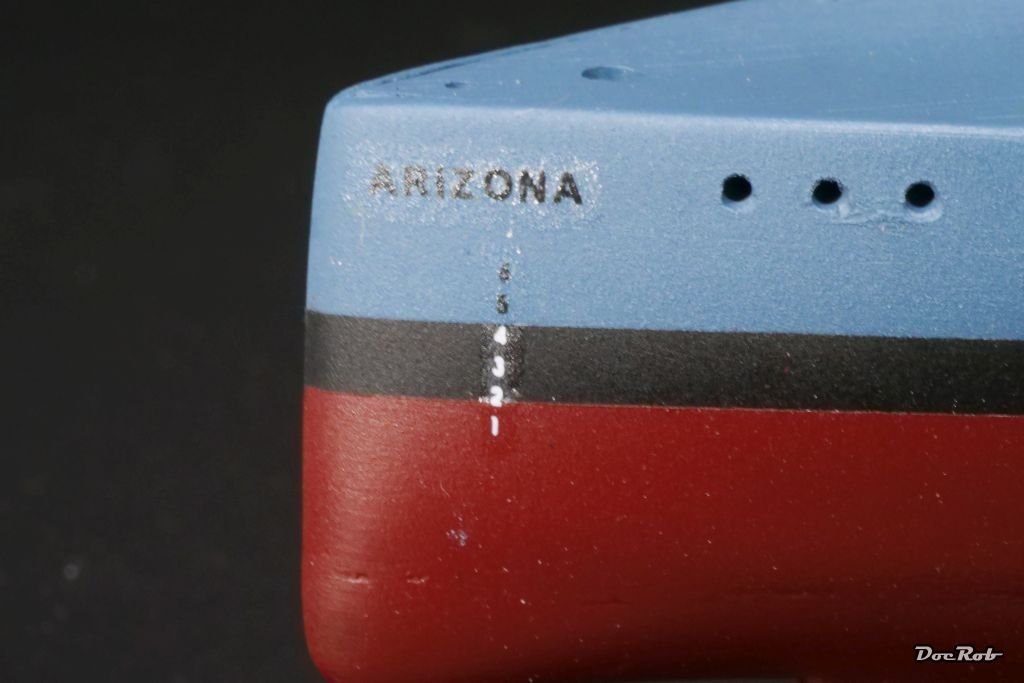
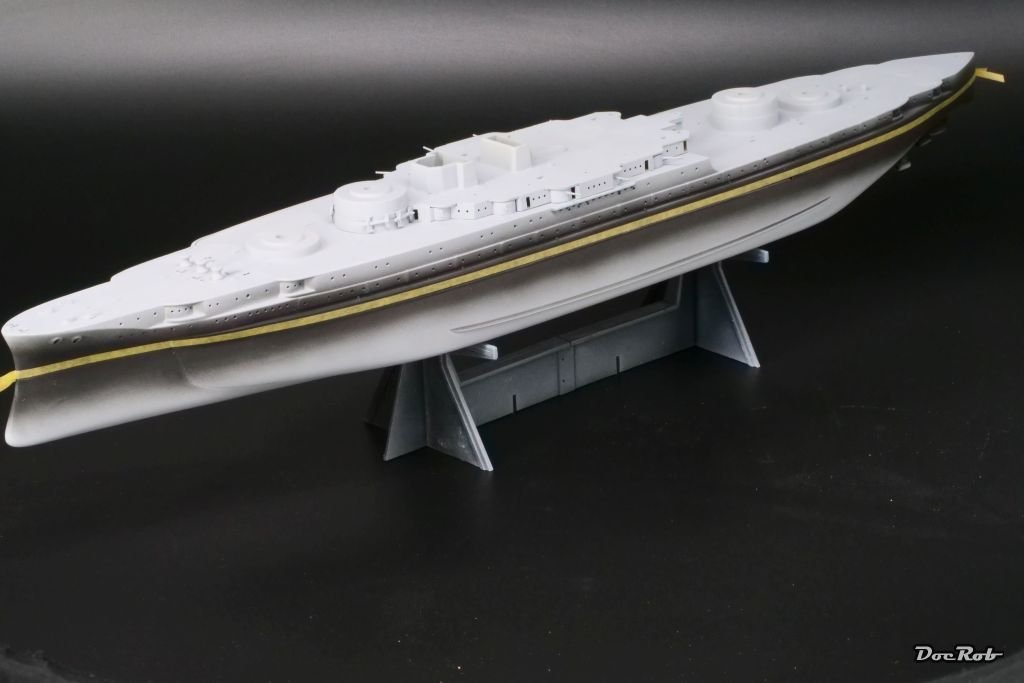
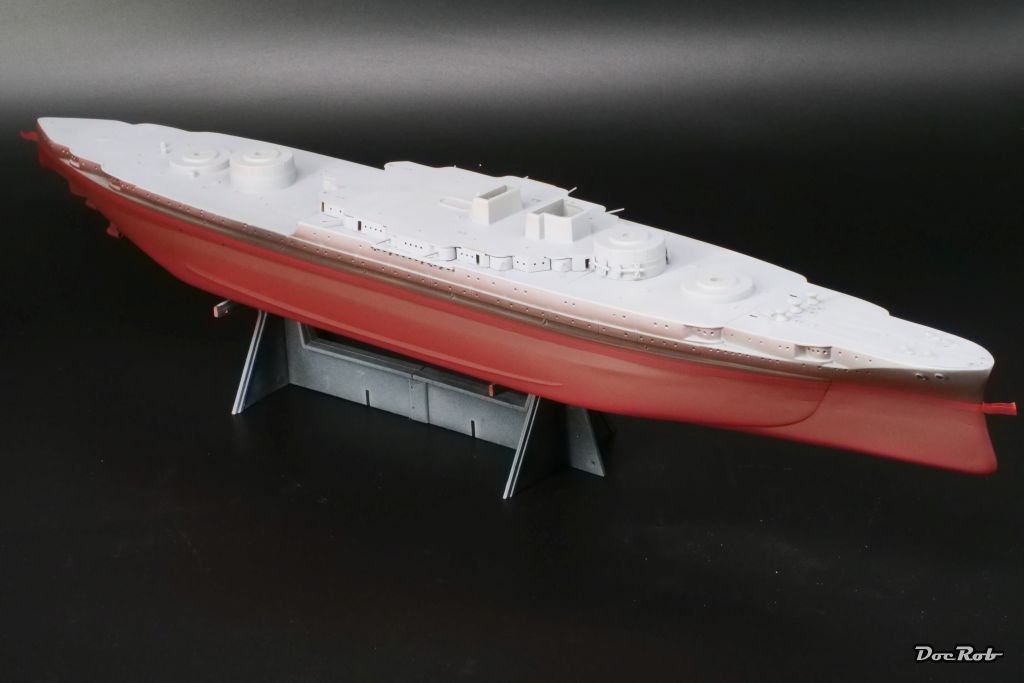
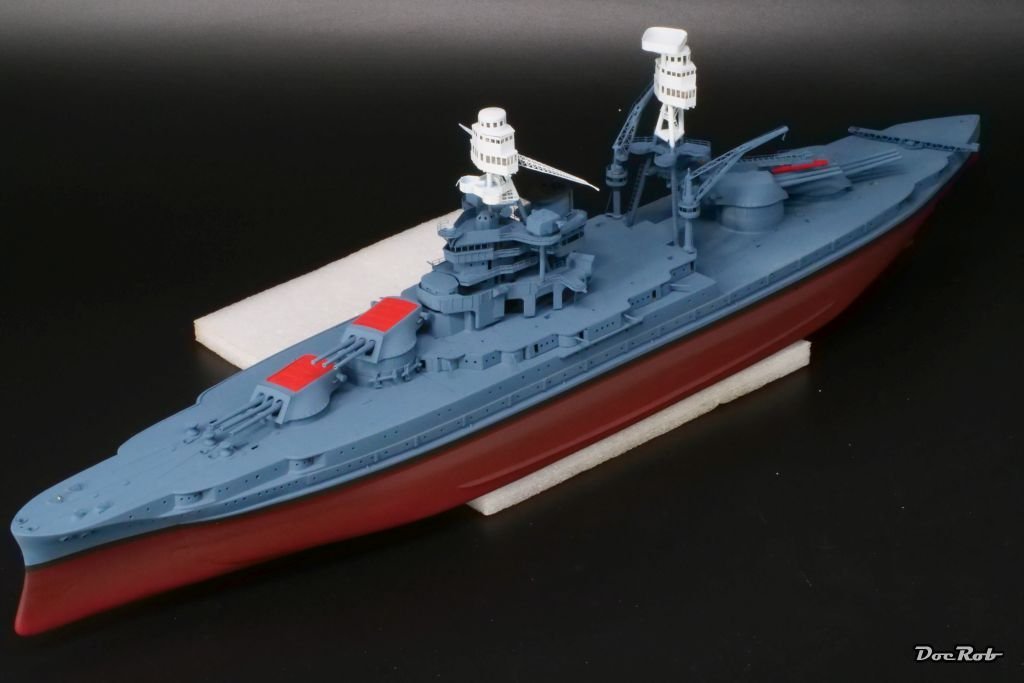
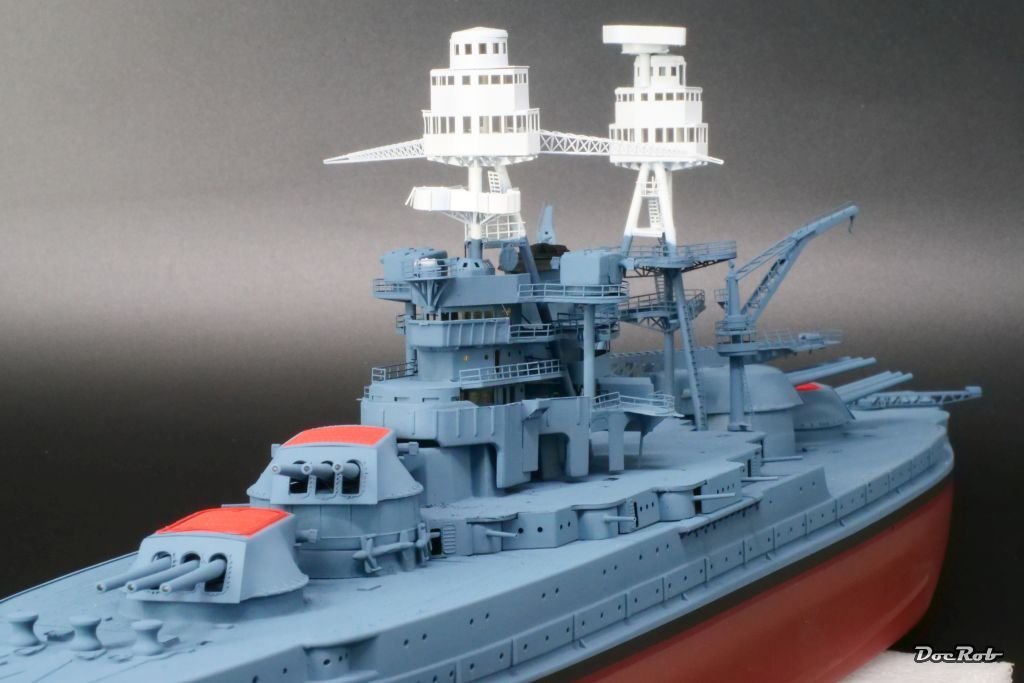
After the grey primer, it was time to put some colors onto the Arizona. I started with the stripe around the hull. The hull got a wide spray of flat black around, then I took the measurements from the side view and marked 1mm under the lower border of the strip with my waterline marker tool. I used 3mm Kabuki tape, parallel to the pencil mark for masking the strip. Afterwards the underwater ship was airbrushed with a mix of about 70% of Tamiya XF7 flat red and the rest with Tamiya XF9 hull red. There is a bit of modulation in the color to break the monotony of this large area. The underwater ship was masked then, along the top of three gun turrets, which were beforehand painted flat red on the tops for divisional markings. I read a lot about the coloring above the waterline and concluded with nothing is 100% certain about the hue. I decided to go with a very blue version of grey and looked through my stores, as I didn't want to mix the color, because, I will need it over a longer period of detail painting and corrections. My firs intention was to use Real Colors Intermediate blue, but than I found a jar of Tamiya's XF18 medium blue and liked it a lot. It was exactly the shade of blugrey, I was looking for. After this application, I went to the upper superstructure, which many claim to have been white, others say light grey. I went with Real Colors Insignia White, but masking the areas off was tedious. I used Panzer Putty, which took away a railing or two and de-tacked Kabuki tape. After peeling off the masks, The main components put together looked like this. Now it's time for the wooden decks, but before, I have to decide, If I apply a clear coat and some weathering. I have the tendency to do so, but let's see. Cheers Rob
- 115 replies
-
- 11
-
-
-
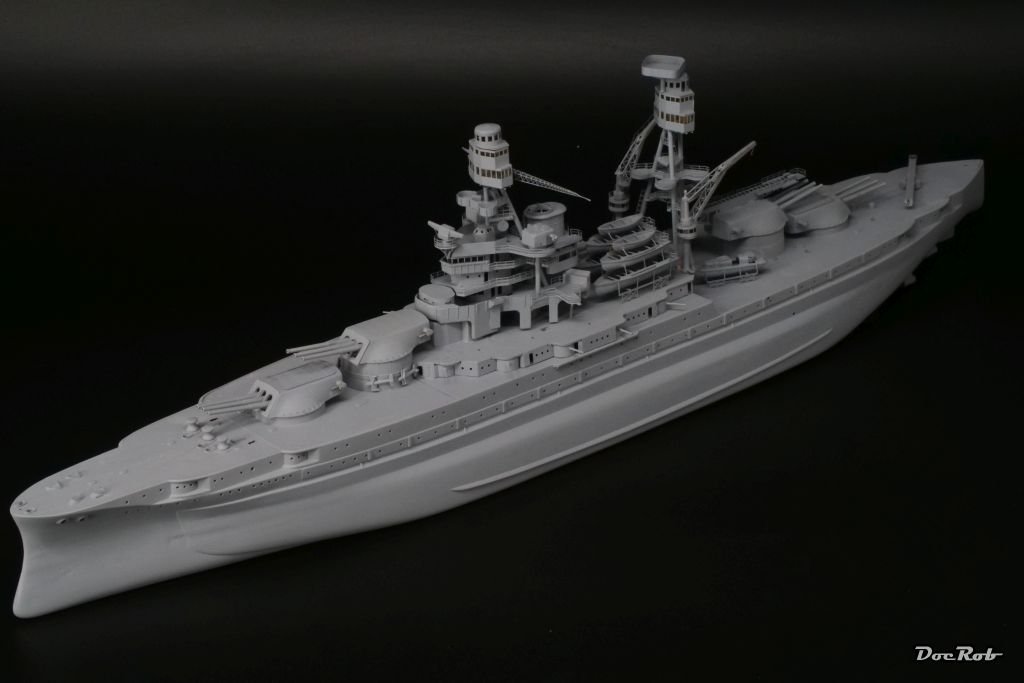
Thank you Edward, the priming indeed changed the appearance a lot. No more fancy shining, only man o' war serious grey. The color scheme will be a little bit more interesting with blue grey, the contrasting red underwatership and divisional markings on the turrets and last but not least, the wooden deck. I use airbrushes since decades, so drips are none of my problems. One of the biggest factors for successful airbrushing is to have the perfect thinning ratio for the purpose along the correspondent fitting air pressure. In this case, I thinned the primer down to a very thin mix and raised the air pressure a bit to have the paint particles distributed better into the nooks and crannies. You can't work with a high throughput of primer and to get the primer everywhere, I move the part permanently in random patterns, which allows the primed areas to dry rapidly. It's always berst to apply at least two coats, checking the coverage in between. Mr. Surfacer primer is very forgiving, the way it settles and cures and is a perfect match with levelling thinner. Cheers Rob
-
Prim (er) Time - I used Mr. Surfacer 1200 for the job and used a bit more pressure than usual for the superstructures, to get the primer in the tiniest hidden spots. Next will be painting the hull, but before, I mark the waterline with my waterline tool, easy, because the bottom of the hull is completely flat. Cheers Rob
- 115 replies
-
- 12
-
-
-
Thank you S-boat, this build was only a substitution for a S-boat build on another forum (LSM), where there is a maritime group build taking place. I lost all the PE and brass parts from my S-38 kit, so the USS Arizona had to jump in and as it is my first small scale ship build, it is demanding, to say the least. I hope, I can continue with priming and painting soon, as I need a break from fiddly PE assemblies. Cheers Rob
-
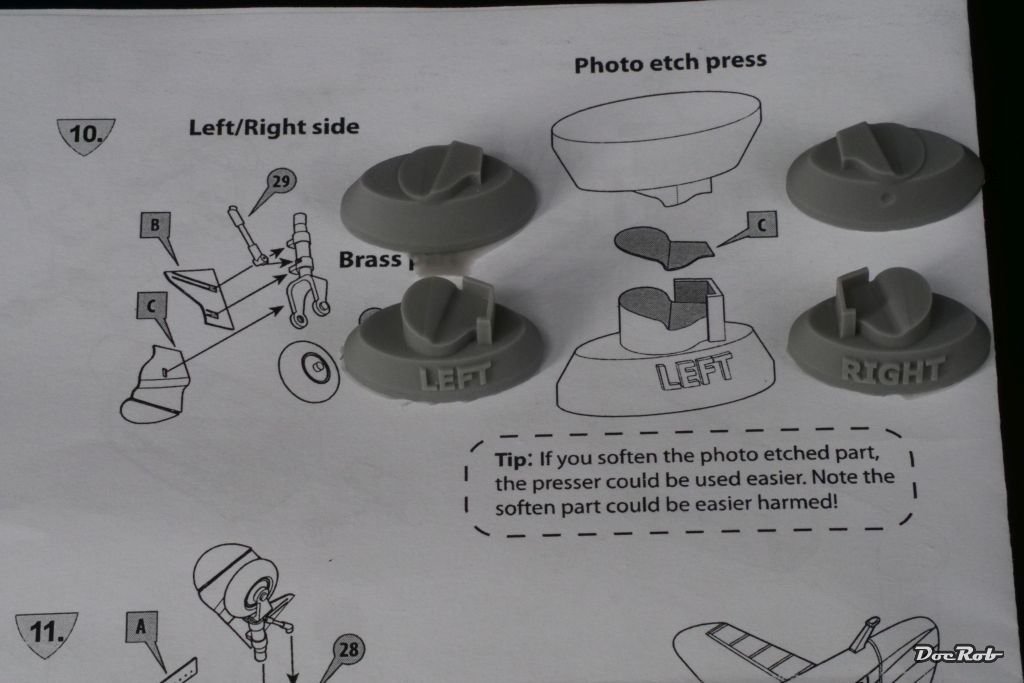
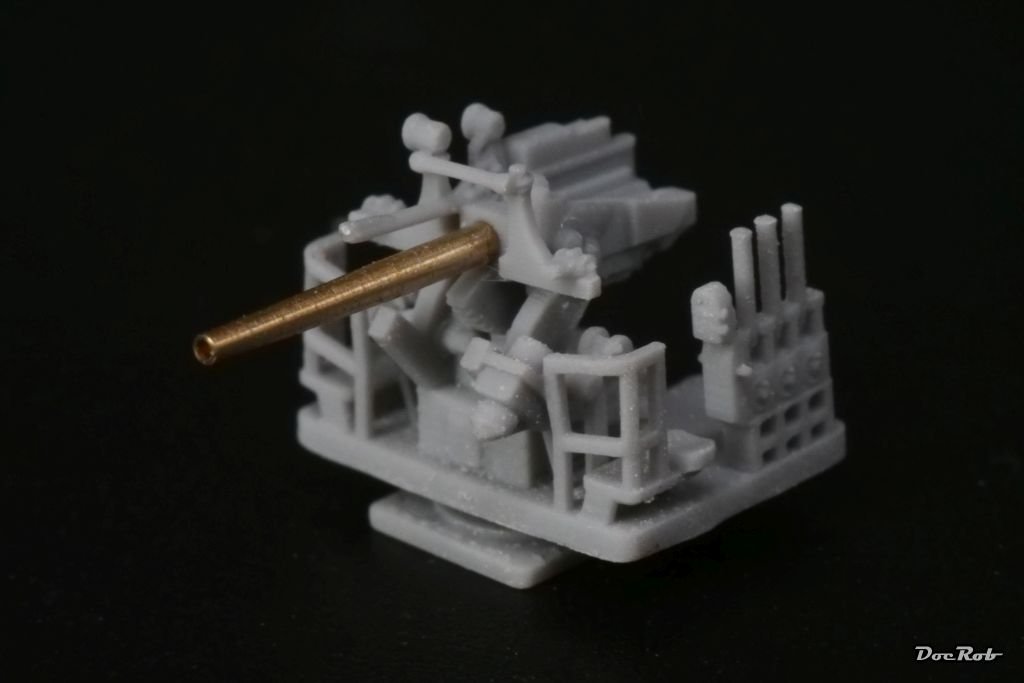
Today in the morning, I fired up my trusted old compressor with the intent to prime all that glaring PE along the few plastic remains with some Mr. Surfacer. Inspecting the manual showed me that there are several parts better to add now, than later, as I initially intended, like railings on the superstructure and some ladders here and there and parts, where I believed, they had to be glued to the deck, instead they are to glue to the superstructure. Railings are especially painful and the rounded shaped are the worst. I think the superstructures are finished now, except tiny antennas, AA-guns, searchlights and water pumps, which will be added after painting. Last for today, were eight of these guns sitting on top of the deck. They are 3D printed and have brass barrels and are superbly detailed. The manual suggests to cut away the railings and substitute them with PE, but I think they look good as they are and handle safer. Cheers Rob
- 115 replies
-
- 12
-
