Patrick Matthews
-
Posts
406 -
Joined
-
Last visited
Content Type
Profiles
Forums
Gallery
Events
Everything posted by Patrick Matthews
-

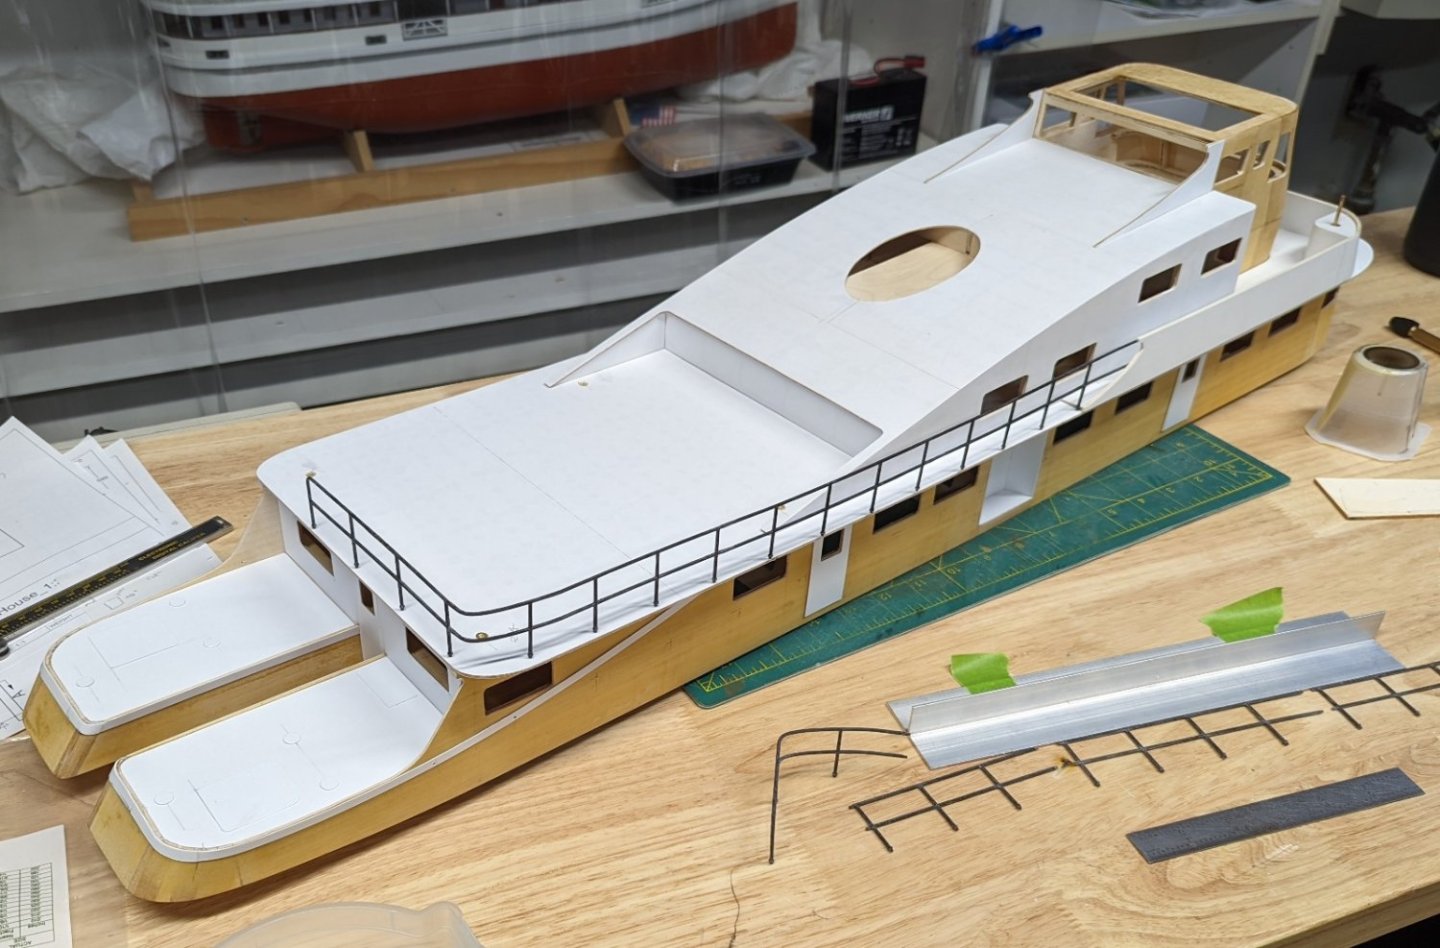
USLSS 36'Lifeboat
Patrick Matthews replied to Patrick Matthews's topic in CAD and 3D Modelling/Drafting Plans with Software
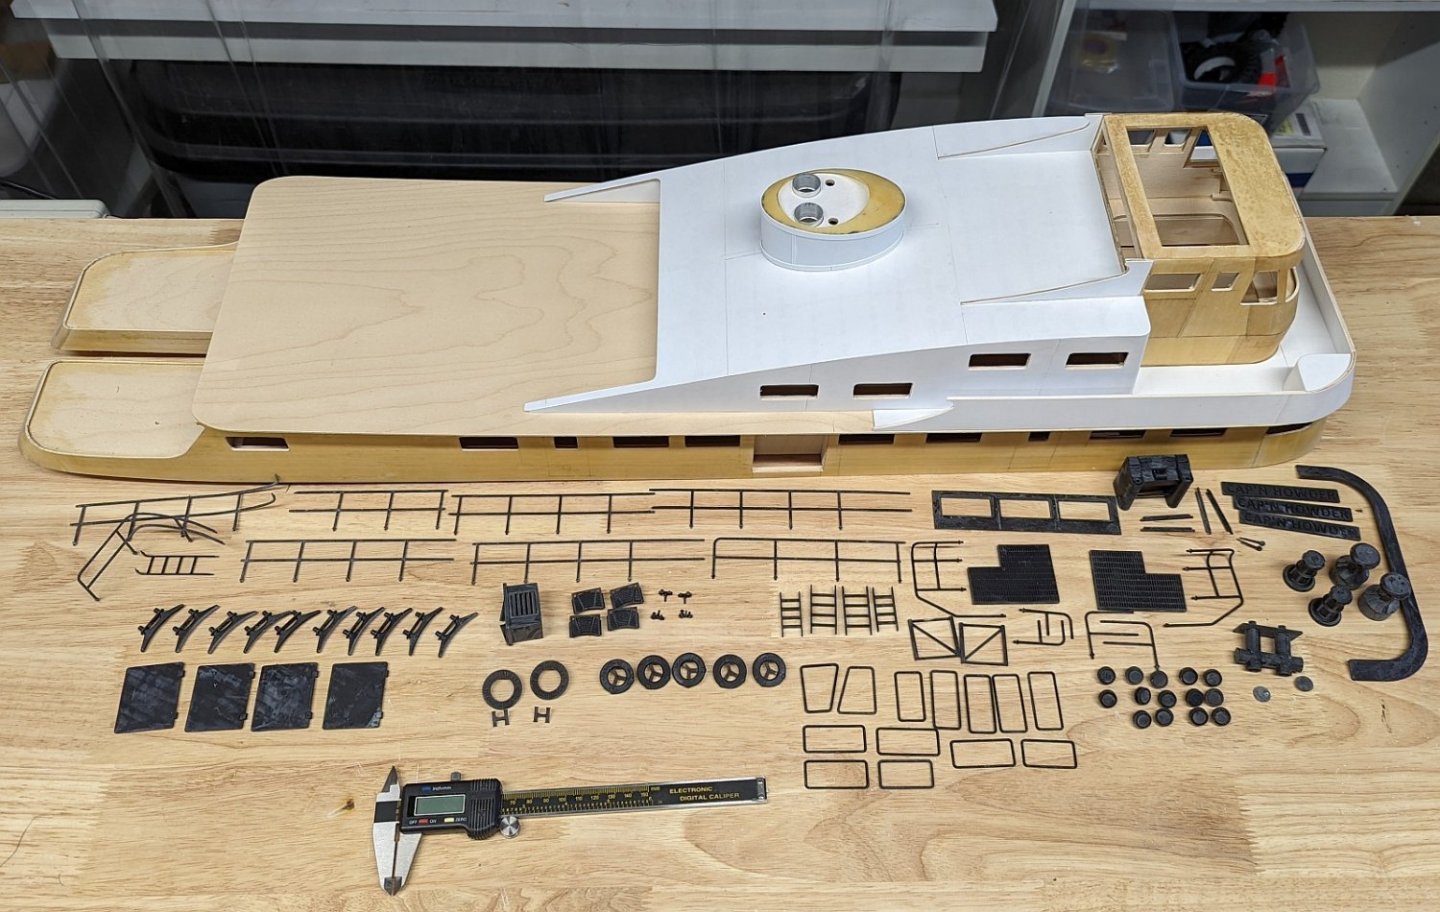
Mostly all wood of course, and lots of varnished mahogany, including the dual-diagonal planked hull, just like later and more famous Elcos... it would be pretty. -
Work in process, from original plans. 36' lifeboat as built for the USLSS by Elco in the early 1900s.
-
3d printing process
Patrick Matthews replied to henrythestaffy's topic in 3D-Printing and Laser-Cutting.
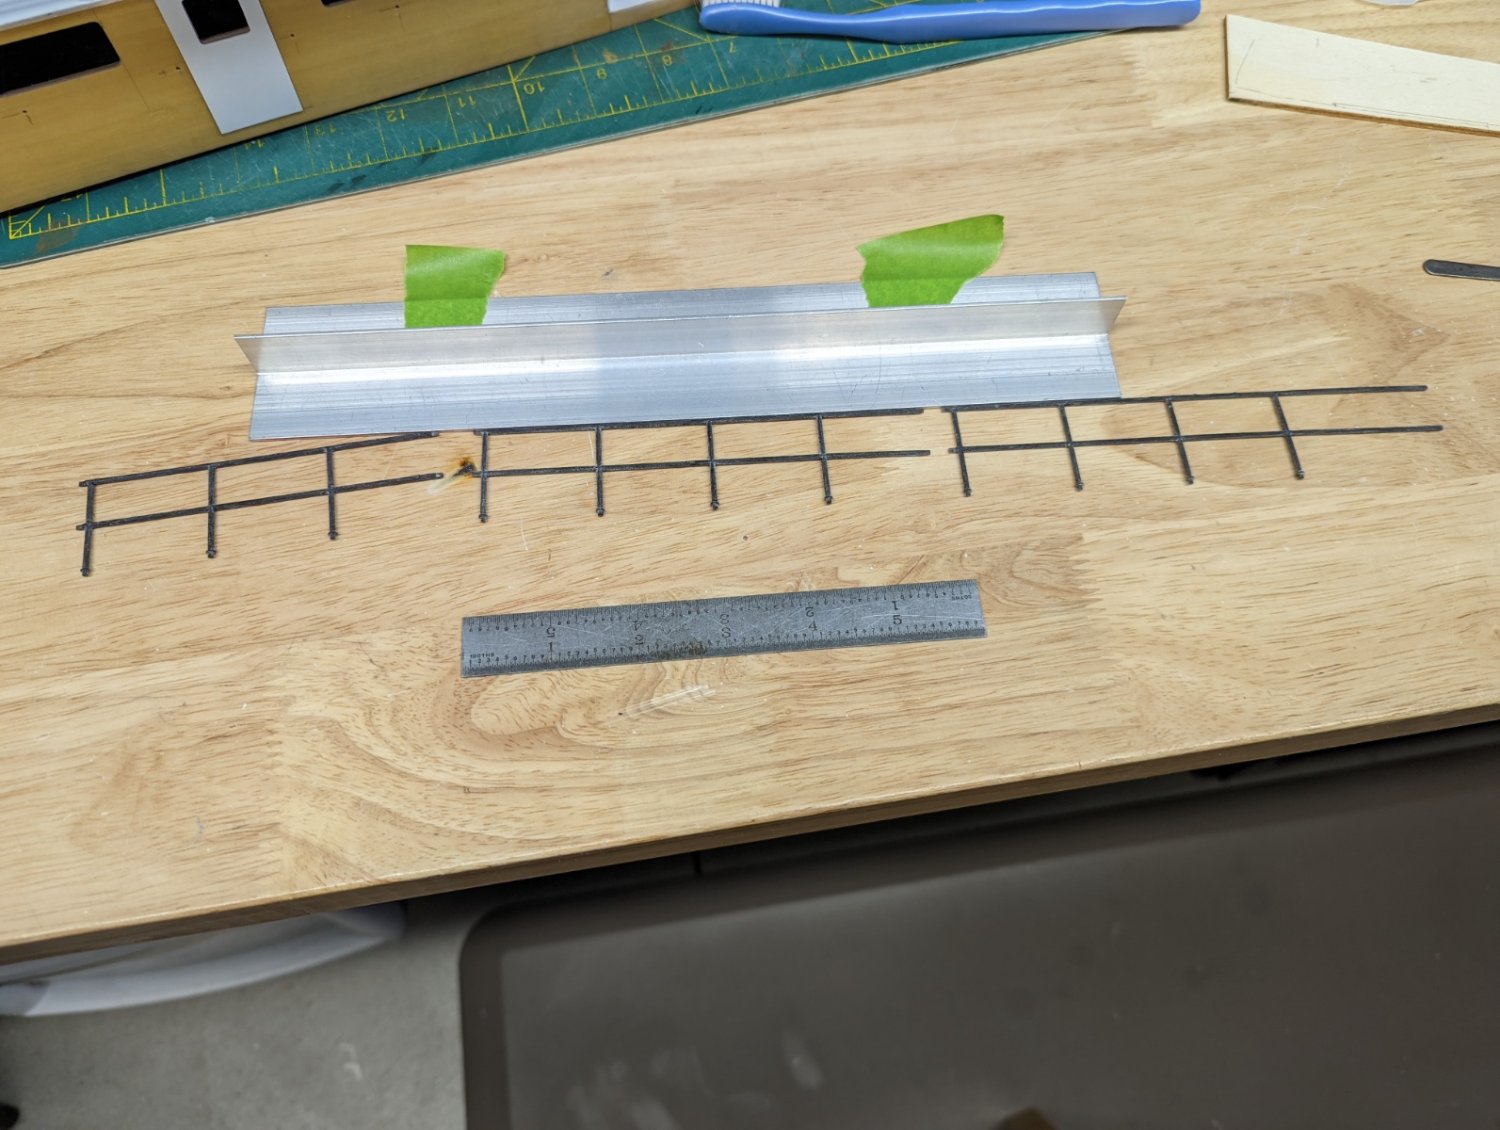
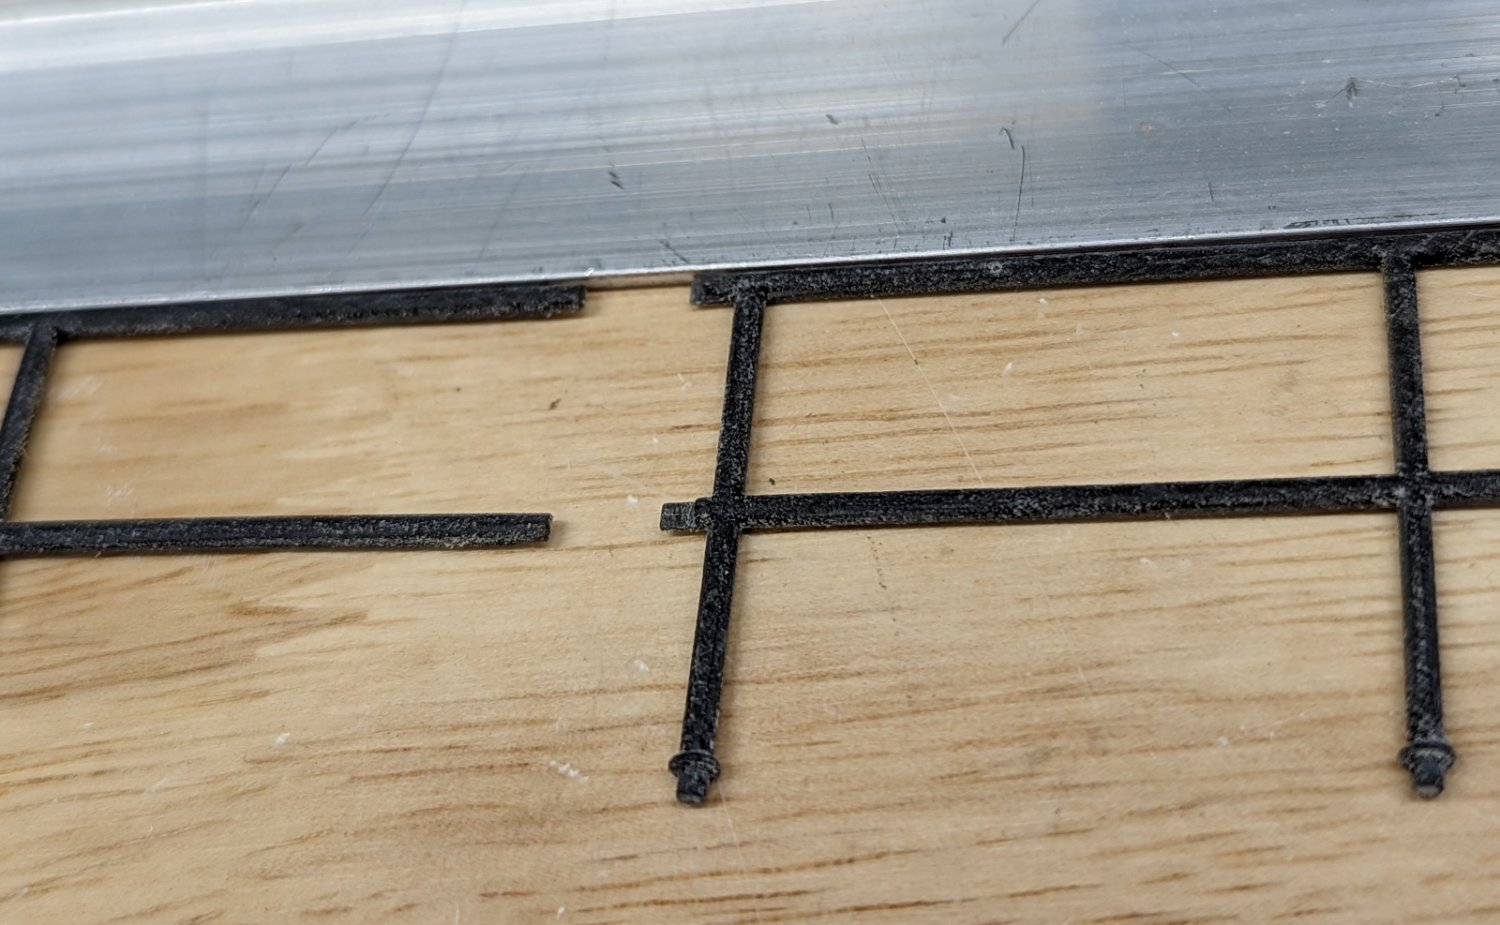
Got something long that won't fit in your printer? You may be able to break it into segments, with strategic glue joints. I made a 20 inch long railing section this way, with half-lap joints in the rails. Joints were made with CA, but I still had some tiny gaps. These were filled with printer resin and zapped with a UV flashlight. Filed smooth, the joints are invisible. Long continuous railing: Lining up the segments: Half laps: You can use resin to fill gaps. Here I'm filling seams in styrene overlays. Use a UV flashlight and UV safety glasses:


-
Gorgeous! Yes, those are her "wrong" 1930s repro guns.
-
Thx, I think. p.83: "1. 24-pdr English long gun" It's already been established that contrary to an earlier opinion, she DIDN'T (for the most part) carry English guns. Probably doesn't matter much, they all looked about the same! Except for the mistaken English markings cast on the 1930 repro guns...
-
Brenckle's post in 2015 suggests that: - The drawing of the "old" long gun barrel may well represent Constitution's 24 pdrs of 1812; - We have no idea if any of these exist today ("It is hoped that some of this information will help us identify some existing guns that might conform to types carried on Constitution during the War of 1812 and the following decades. If you know of any early 32-pounder carronades or 24-pounder long guns that match these measurements, we’d love to hear from you!") Desy & Monea (2015, https://ussconstitutionmuseum.org/2015/08/25/modern-armament/) also say that the reproduction guns present today are not correct, but without mentioning what IS correct. And no one seems to have specific carriage drawings, other than the several generic carriages of the period, such as depicted on p.2 of the pamphlet: https://www.navyhistory.org/the-constitution-gun-deck/ Will be interesting to see if Tucker sheds any light on all this. For a model of Constitution's 1812 24 pounder, I guess I'd go with the "old" barrel drawing and that generic carriage drawing. Oh, and use the words "might be" in any description of said model!
-
Can anyone point me towards accepted info on Constitution's 24 pounders? I've read that the 1906 and 1930 restorations both resulted in the "wrong" guns being recreated for her, and the most (all?) of the current 24 pounders are from the 1930 restoration. But do we know what the "right" guns may have been? I'm hoping to find dimensional info to help in constructing a larger scale gun model. I searched here, but the number of hits are overwhelming while not shining light on this question...
-
3d printing process
Patrick Matthews replied to henrythestaffy's topic in 3D-Printing and Laser-Cutting.
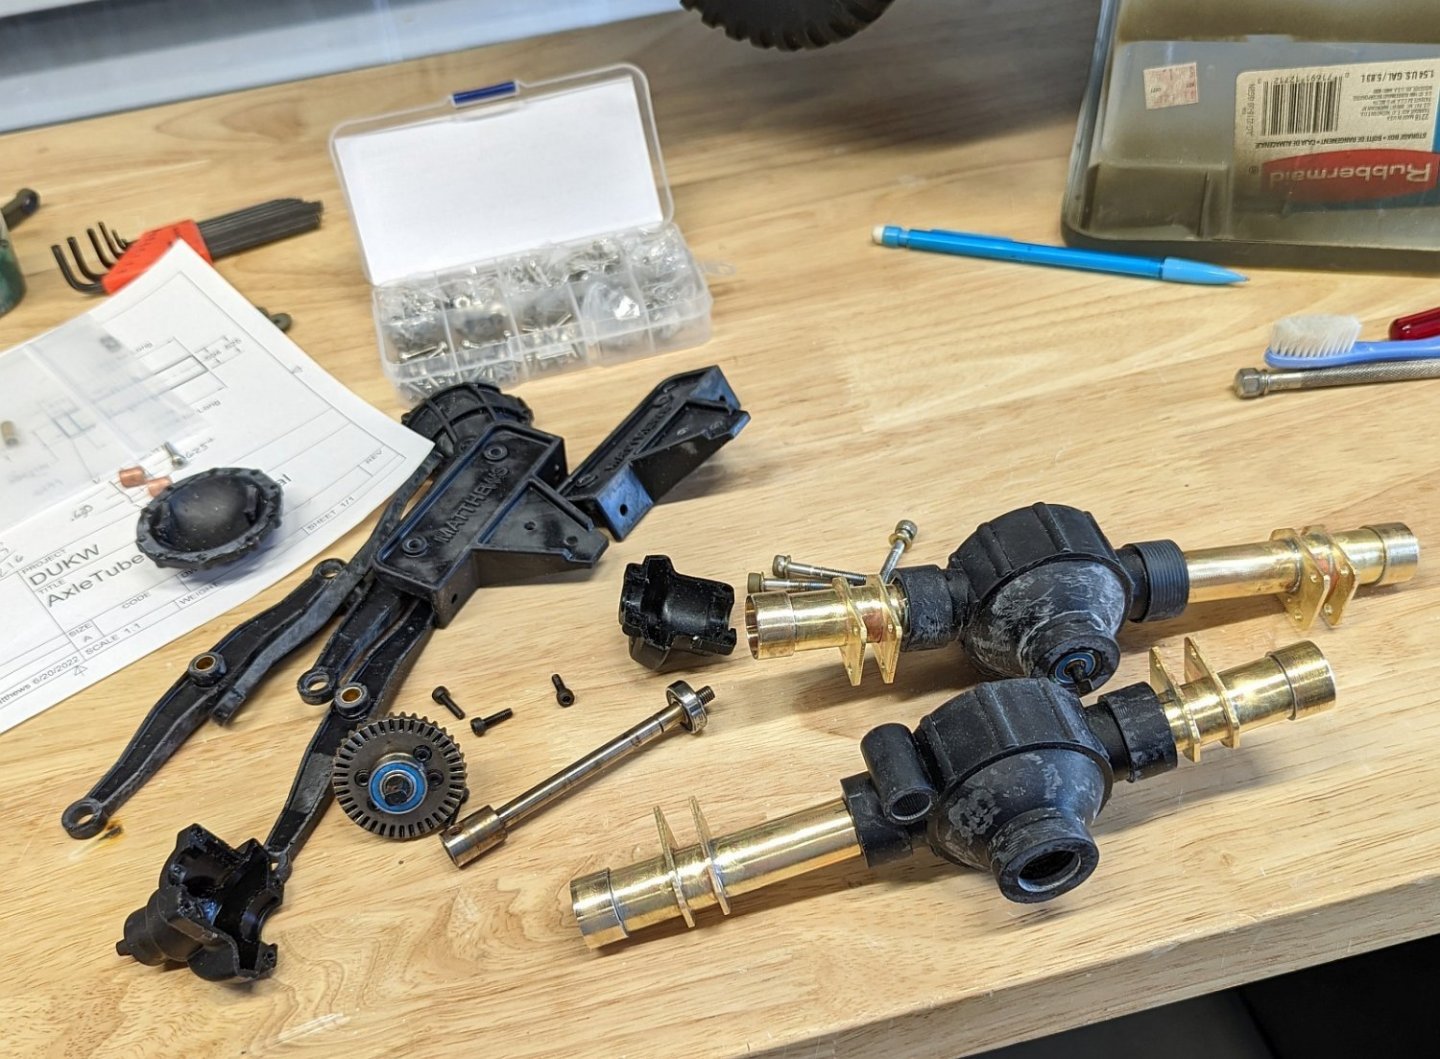
And it doesn't all have to be printed. The house above is wood and styrene, with printed details. My 1:8 R/C DUKW axles work better with some brass parts: Printed wheels, rubber tires from a printed mold: Brass tubes because the printed ones I made before actually sagged ("crept") under load: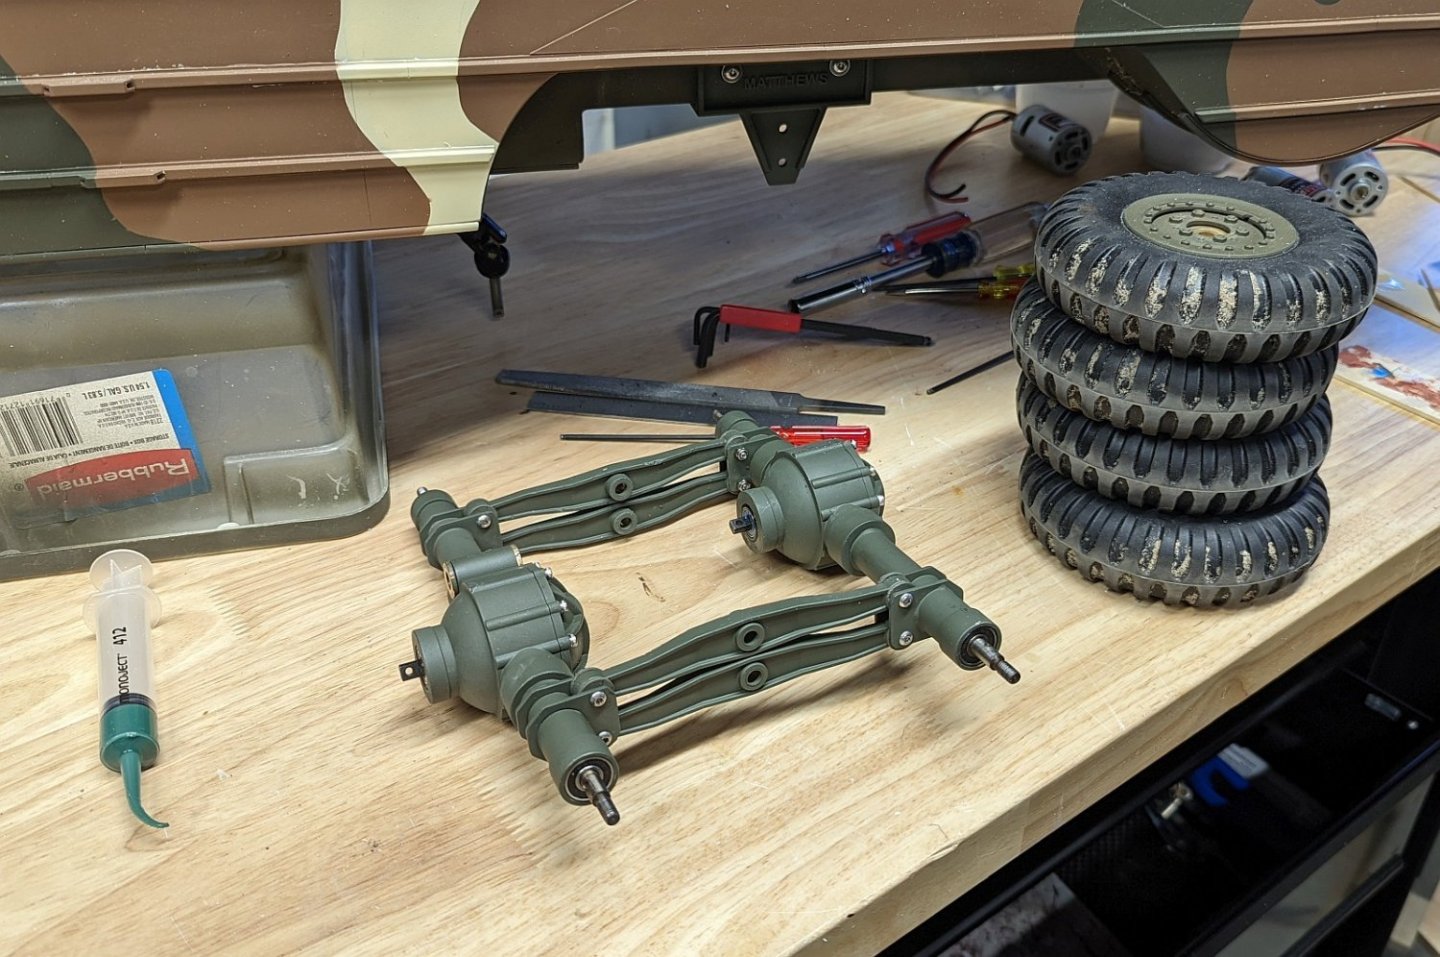
-
3d printing process
Patrick Matthews replied to henrythestaffy's topic in 3D-Printing and Laser-Cutting.
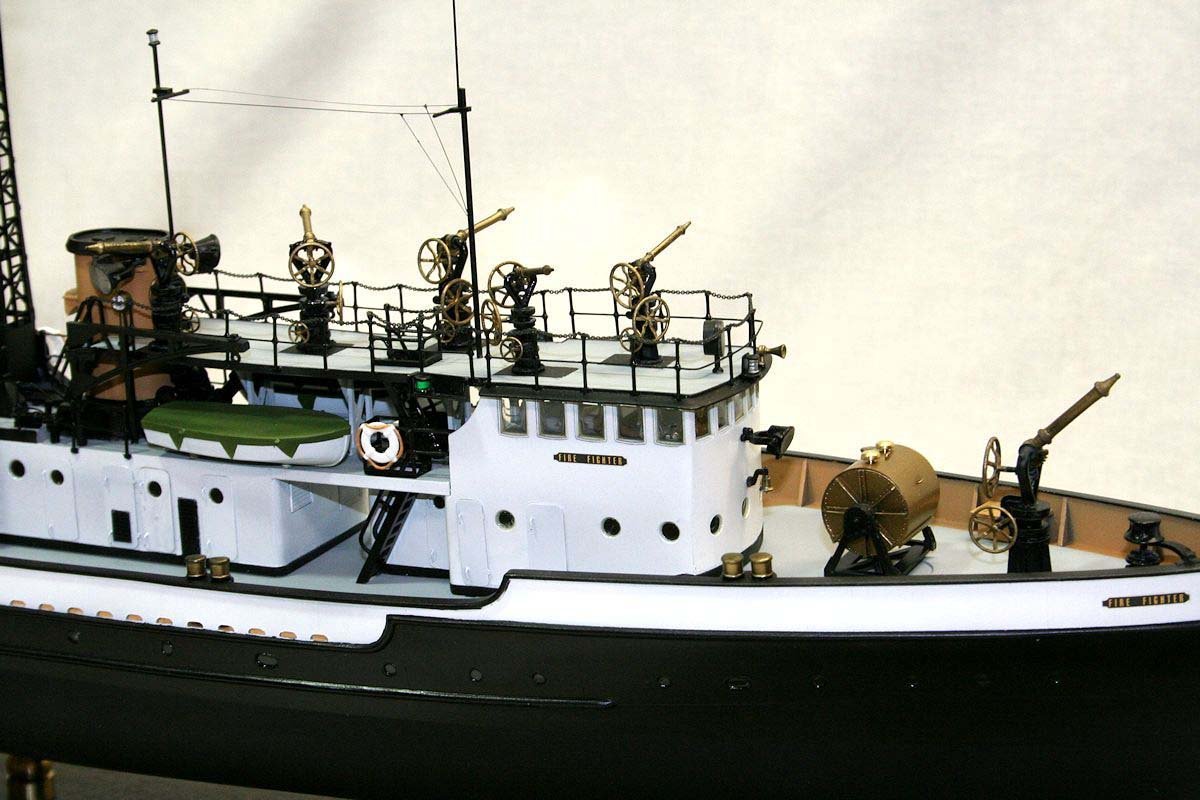
And sometimes we print parts for things that float! Railings- sometimes there's more resin in supports than the parts: Many of the parts needed for this inland rivers towboat: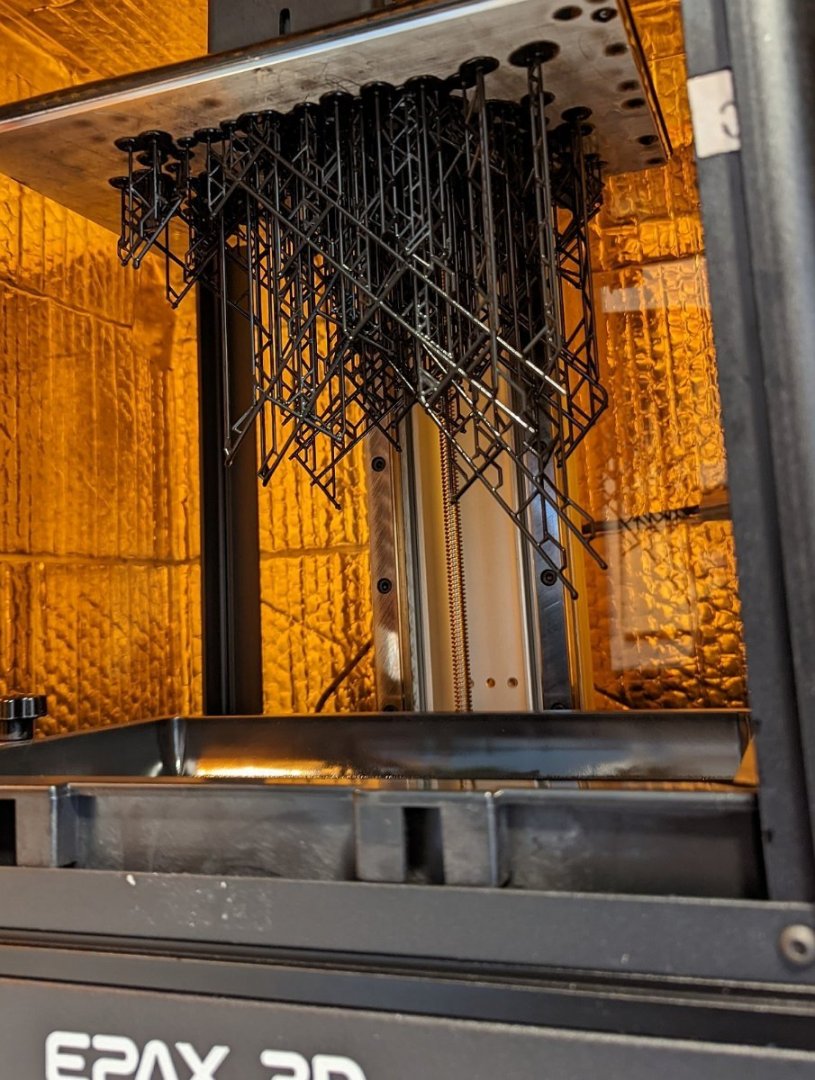
-
3d printing crew figures
Patrick Matthews replied to highlanderburial's topic in 3D-Printing and Laser-Cutting.
p.s.: As a white guy, I feel I can take any liberties when painting a Caucasian... but somehow I feel- uneasy? - trying do a creditable Black soldier (who by the way were operating many of the DUKWs, with for example the 476th Amphibian Truck Co at Iwo Jima). And it seems that available skin tone paints just don't go here. This paint is too "chocolate" imho... darned if I know how to fix it. -
3d printing crew figures
Patrick Matthews replied to highlanderburial's topic in 3D-Printing and Laser-Cutting.
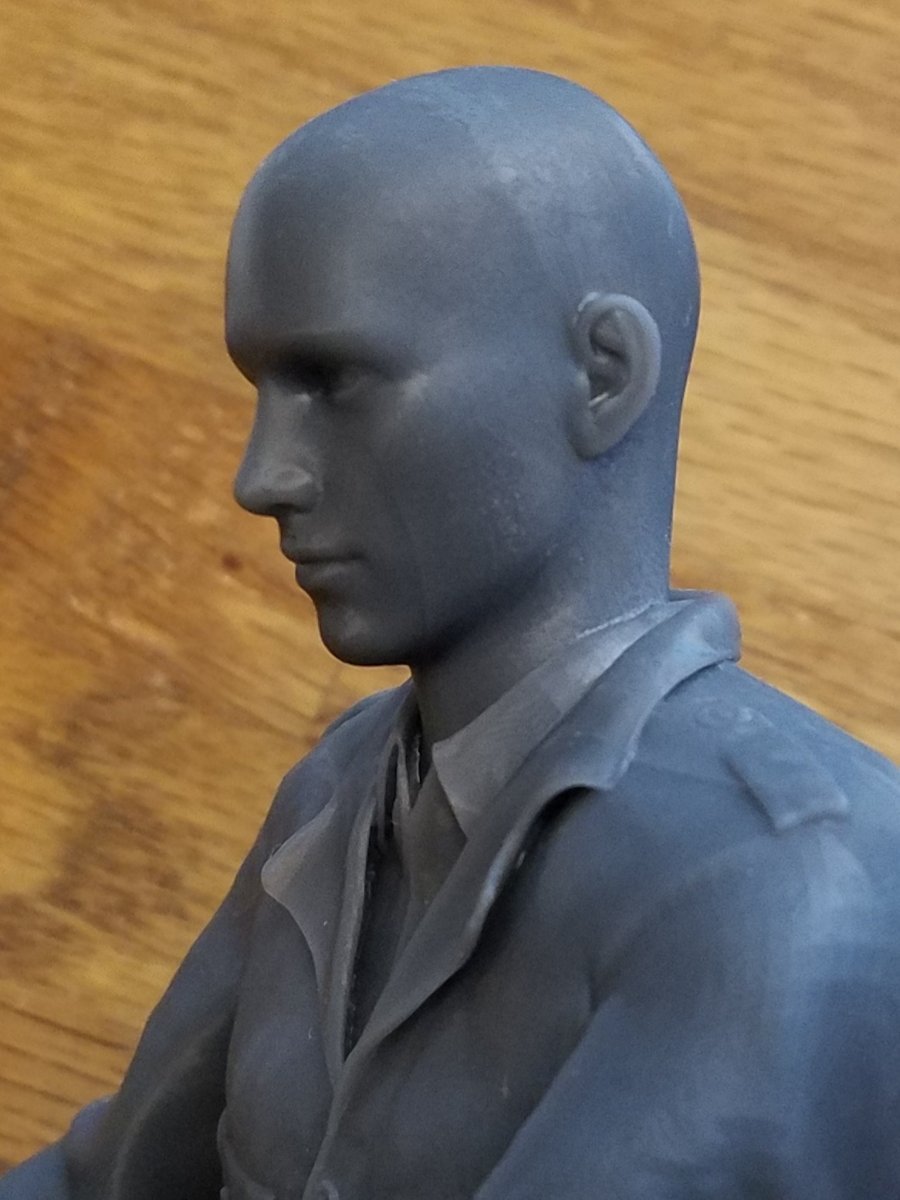
It sure is hard to pin down the correct shades to use for faded and well-worn US uniforms, but here are my choices for my 1:8 GI DUKW driver and leatherneck hitchhiker. I'm no figure painter, and I want to make more improvements on the faces and eyes in particular... but I still have to finish building the rest of the DUKW! - Dressed and posed in DAZ; - Messy stl's cleaned up at GamePrint; - More clean-up in Blender; - Hollowed in Fusion360; - 9" figures printed on an EPAX E10 - Mostly Lifecolor paints.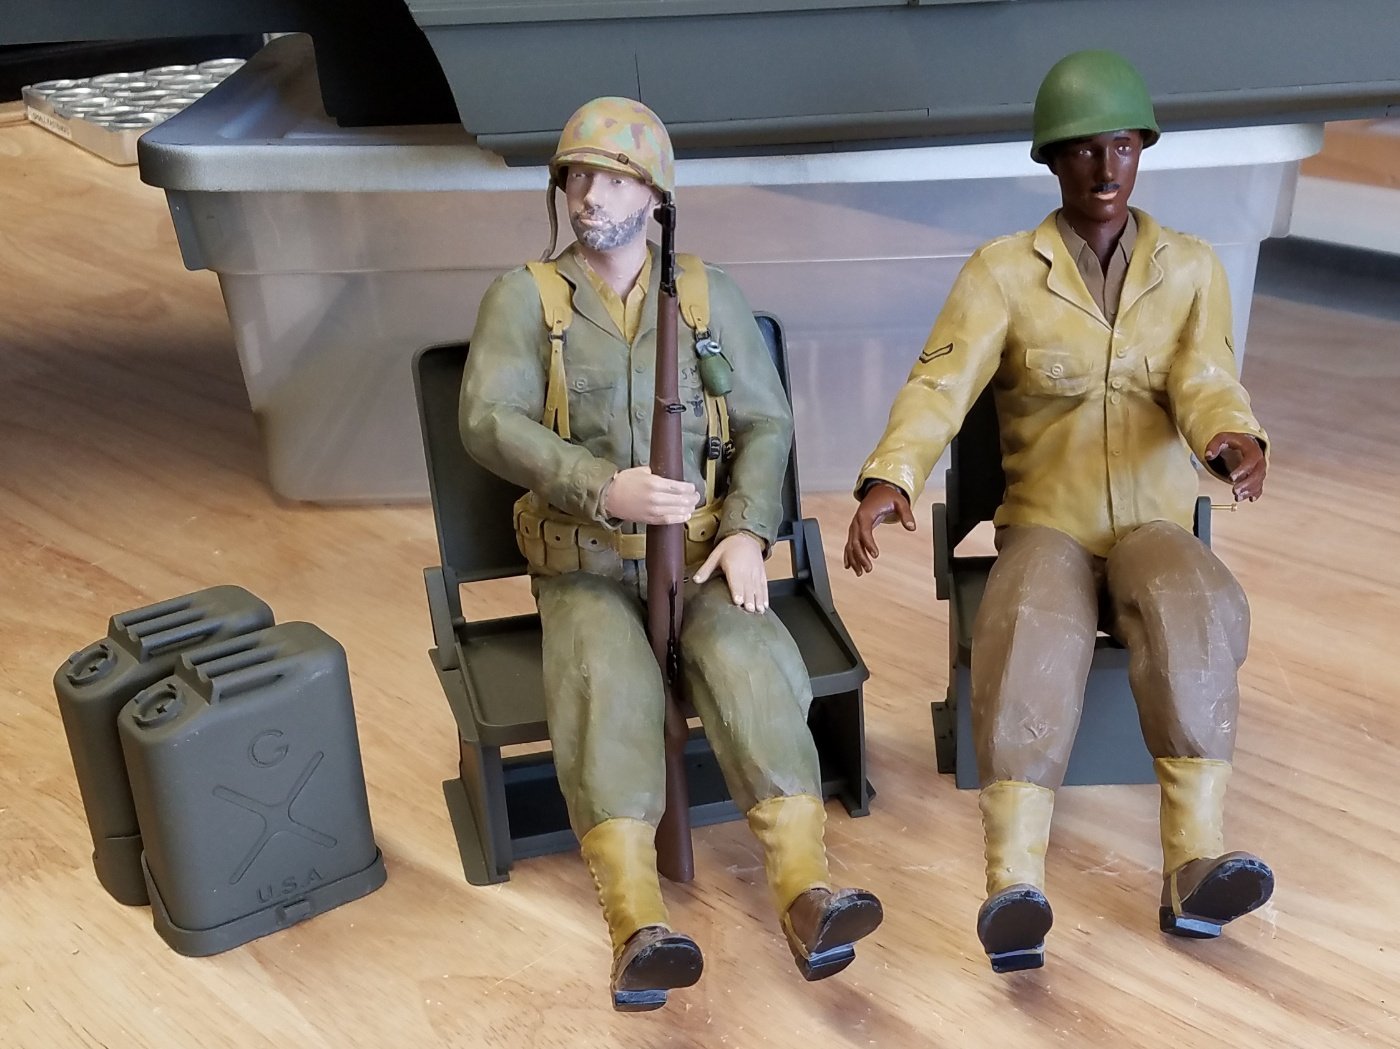
-
Large scale cargo net
Patrick Matthews replied to Patrick Matthews's topic in Masting, rigging and sails
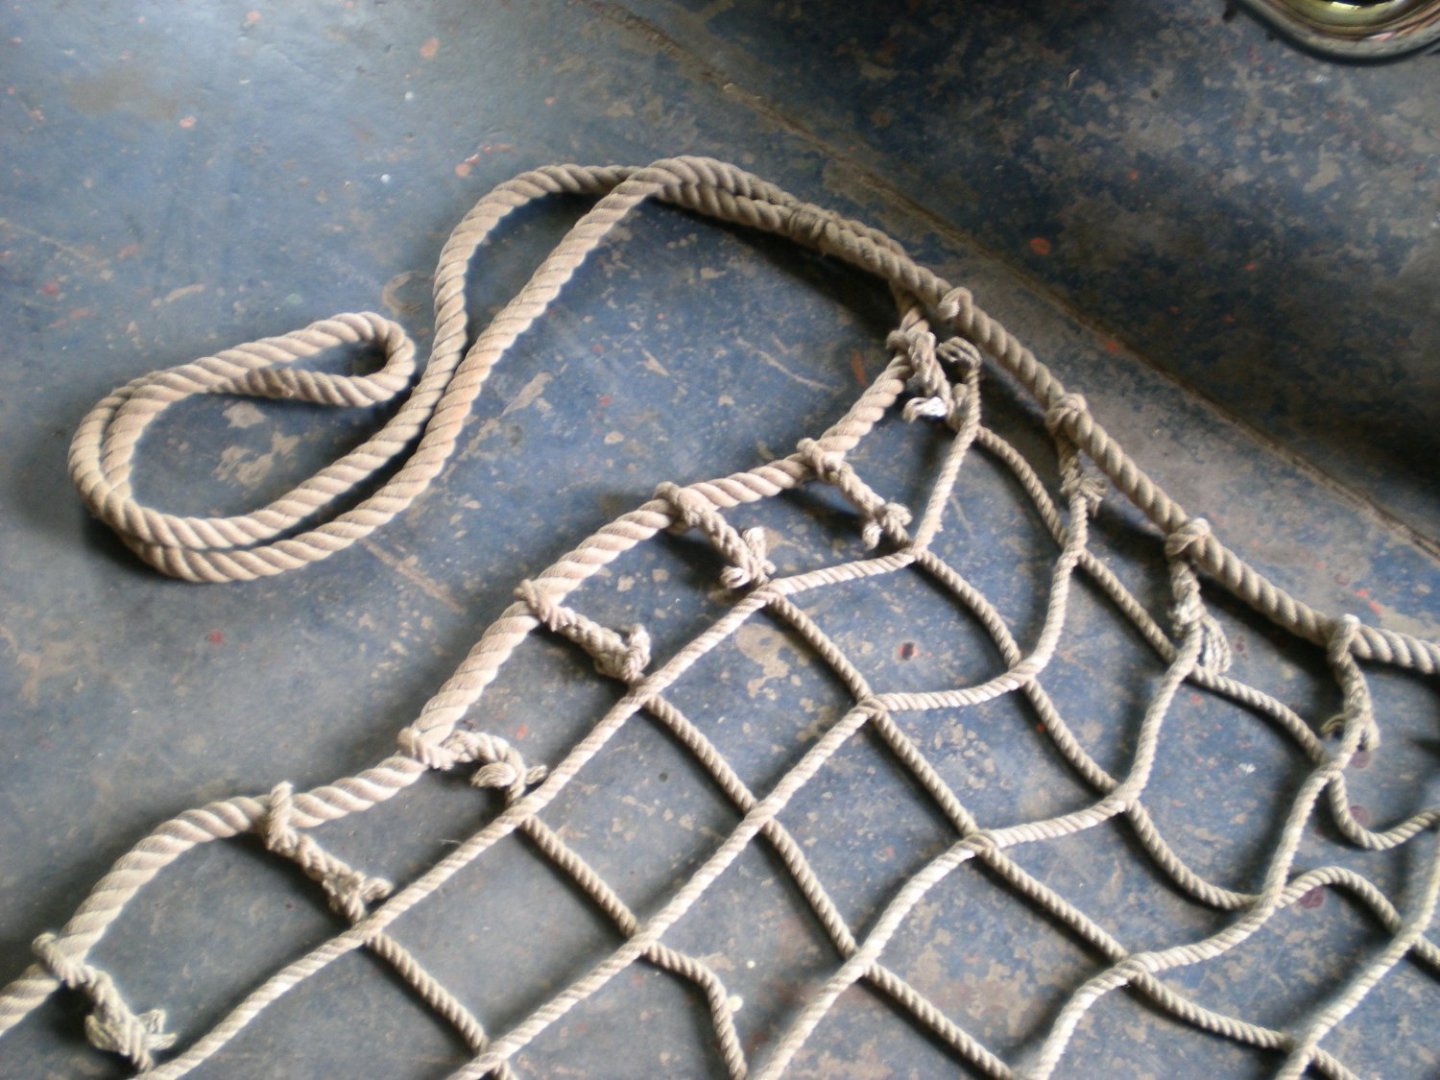
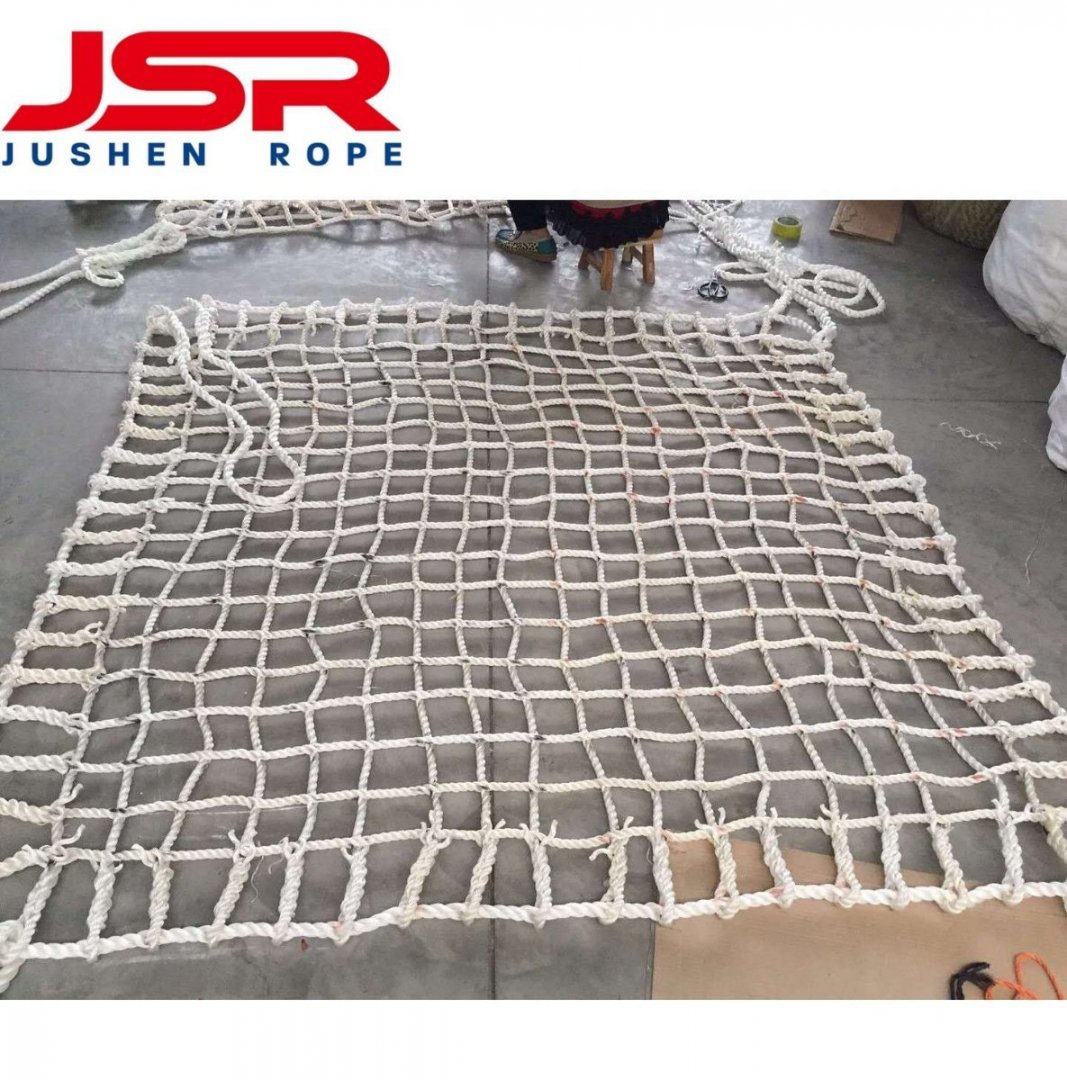
Yes, the crossings in the "field" are easy... it's all those splices at the perimeter that give me heartburn. I'd hate to just tie knots, but it might be that or nothing! -
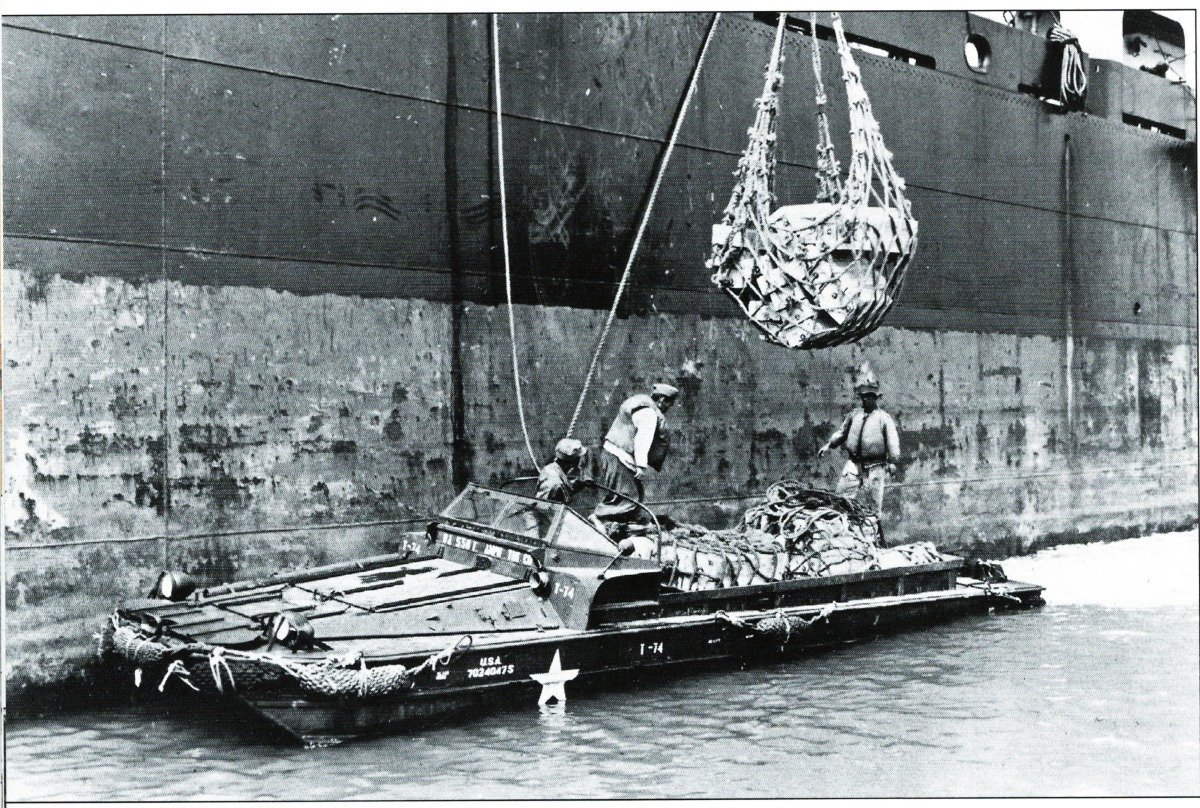
I'm well along in building my 1:8 (yes, 1:8) scale DUKW. I'd dearly love to have a cargo net for it's load. I'm guessing these things are about 8 or maybe 10 foot square with 4 foot long corner eyes, and about 18 runs of small rope spliced to a larger perimeter rope... perhaps 1.5 and 3.0 mm respectively in scale. OK fine, I can make or purchase the scale rope. But some 88 splices in scale??!? I don't relish that idea. Any alternate ideas?
-
3d printing process
Patrick Matthews replied to henrythestaffy's topic in 3D-Printing and Laser-Cutting.
I merely posed an available figure from Daz... not my sculpting work. Amazing stuff though! -
3d printing crew figures
Patrick Matthews replied to highlanderburial's topic in 3D-Printing and Laser-Cutting.
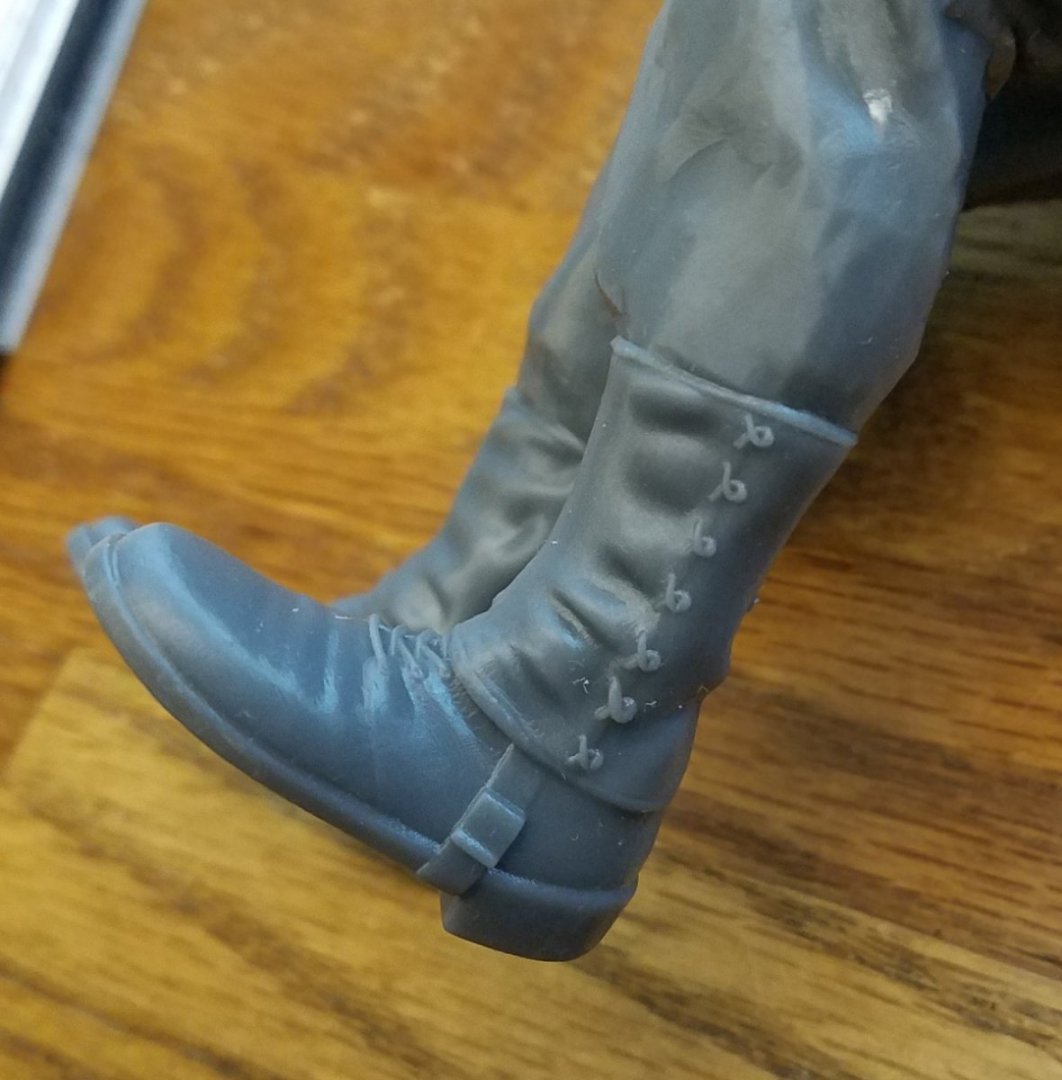
More of the DUKW driver: Daz file cleaned up and made printable by Game Print. Bad gaps all filled in with no serious loss of detail. Pics show the figure fresh off the printer and post-cure, no fettling yet. But depending on the skill of the digital sculptor, some amazing detail can be included, as evidenced by the lacing, cuffs, collars, face. Of course a lot of this would be lost in smaller scales... this big boy is 1:8. BTW, I didn't bother buying the hair package! But he'll be wearing a helmet anyway.

- 51 replies
-
- 11
-

-

-
3d printing process
Patrick Matthews replied to henrythestaffy's topic in 3D-Printing and Laser-Cutting.
BTW, here is the first driver print, with flaws that aren't too obvious here- mostly the faceting and the shredded collar. Second and better one is on the printer now. 2 oz. glue bottle for scale.
-
3d printing process
Patrick Matthews replied to henrythestaffy's topic in 3D-Printing and Laser-Cutting.
Yes, this not merely a leaky STL. It's several layers of self-intersecting surface meshes (not close to a solid) wrapped around the watertight figure mesh. It would require a huge amount of manual editing in Blender or Meshmixer. The idea of "shrink wrap" is appealing, but even that is very limited in Blender. -
3d printing process
Patrick Matthews replied to henrythestaffy's topic in 3D-Printing and Laser-Cutting.
OK, I tried 3D Builder. Was pleased at first- it worked! But upon closer examination, the "fixed" model was still loaded with issues. Maybe because I'm working in a very large scale, so it tried to leave details like his trouser pockets and gaps under his collar and a number of other issues. I went ahead and printed it. Mostly OK, but some very visible areas lost detail or fell apart in printing. I poked around and found another way: https://integralrealitylabs.com/gameprint These folks want to print (and paint!) high end game figures for you. But you can also use their plug-in for Daz to merely upload and clean a downloadable STL, for the princely sum of $2! I tried it and was much happier with the result. All gaps filled, all thin sections beefed up. Two gripes though: 1. They insist on resizing the STL as a standard (to them) figure size, like 6 or 12 inch, thus losing the original size. You'll have to rescale to your own needs. 2. The mesh is heavy- many many triangles. Mine was 430 MB. If it's a problem, the mesh can be decimated in Blender. This will be my workflow, until something better comes along. I'm amazed that a powerful application like Blender doesn't have such a feature. My new fixed driver:
-
3d printing crew figures
Patrick Matthews replied to highlanderburial's topic in 3D-Printing and Laser-Cutting.
Forget Hero Forge, see elsewhere here about Daz (and probably others). I was able to get a WW2 army uniform for a figure, pose him, and he's now on my printer. Big guy, for my 1:8 scale DUKW.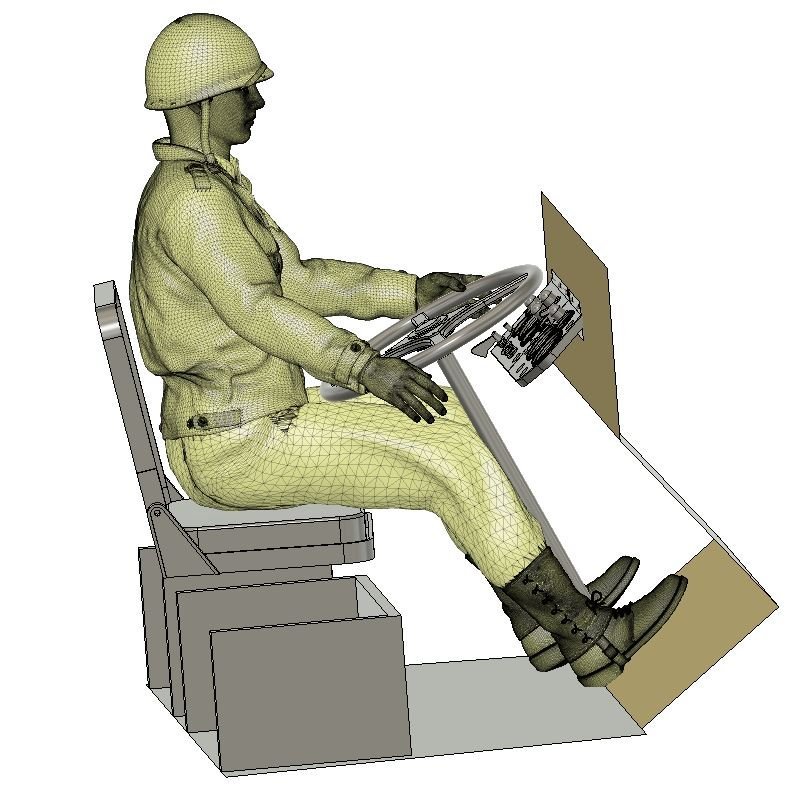

-
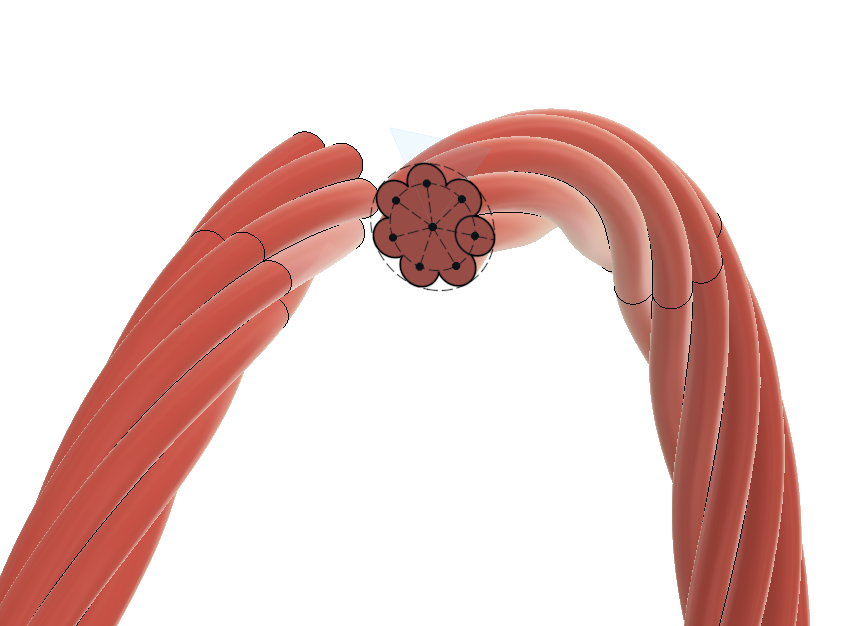
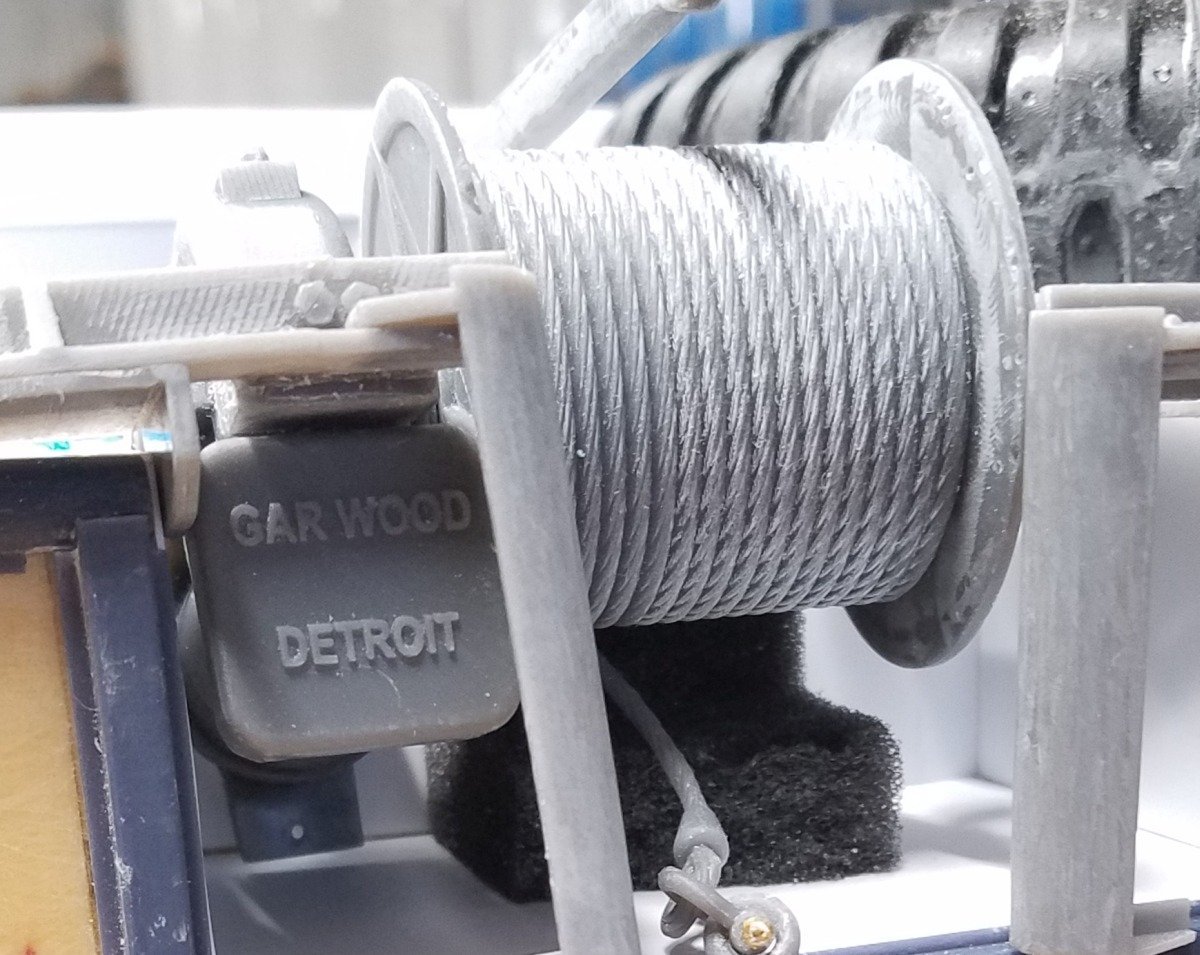
In Fusion 360 (and probably other packages), create a single path for the centerline of your rope. For multiple lines in a block, do just one loop and copy the solid segment rather than doing the entire length. But with your path, create a single sketch with all the strands. Overlap them a bit and cut away the interior overlaps. Then sweep that sketch along the path, adding twist. In F360, I have to specify the entire twist amount for the entire length, might be a few thousand degrees. Here's a printable wire spool for my 1:8 DUKW winch. One loop of wire: The printed wire reel:
-
3d printing process
Patrick Matthews replied to henrythestaffy's topic in 3D-Printing and Laser-Cutting.
Nice find, I'm trying it out now for a big 1:8 scale driver I need for my DUKW. And yes I see that much repair is needed for the STL. Not only removing bits that are too small to print (like shoe laces), but also filling gaps under the layers of clothes. I have to look if any of the mesh programs have a "shrink wrap" function, like I had in some high end software at my previous employer. Does what it sounds like, covering a messy mesh with a new mesh that bridges holes and gaps under a set size. That would make life easier! I also need to find out how to import a CAD seat and steering wheel to Daz, that I can then use to position the figure correctly... a learning curve! Cross section through the STL reveals gaps that would cause print problems: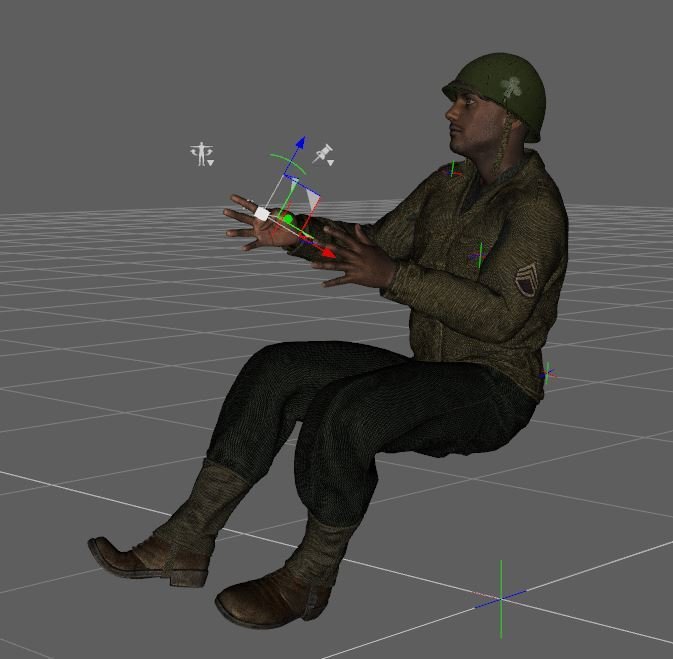

-
3d printing process
Patrick Matthews replied to henrythestaffy's topic in 3D-Printing and Laser-Cutting.
I like any of the "hard/tough" resins for just about all parts I make. And yes, a thick wall, 2 - 3mm, provides a lot of strength without building excessive internal stress. There are ways around that issue too if needed... plastics can be "tempered", but I haven't needed to resort to that. 1:96 railings: That's a tough one for printing. I did some in 1:87, with 1/32" printed stanchions and brass wire rails. Those stanchions were really delicate and I was terrified of breaking them simply by threading the wires through. They really want to be metal.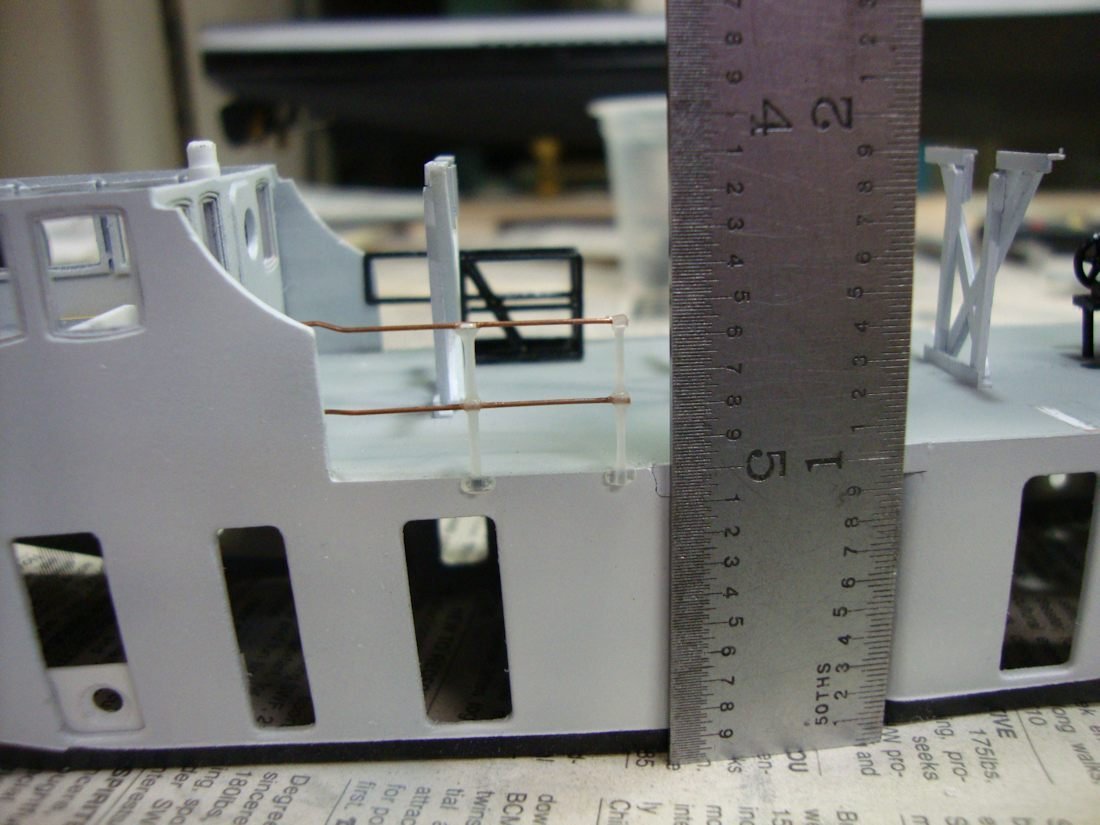
-
3d printing process
Patrick Matthews replied to henrythestaffy's topic in 3D-Printing and Laser-Cutting.
And let's not forget another thing you can do- print metal parts! Actually, you have a service print waxes for investment casting, and they outsource the parts to a casting house. You can also print your own waxes at home, but have to deal with the casting process yourself. Here's a 3 inch Federal-Mogul "weedless" prop for that same DUKW, cast in bronze: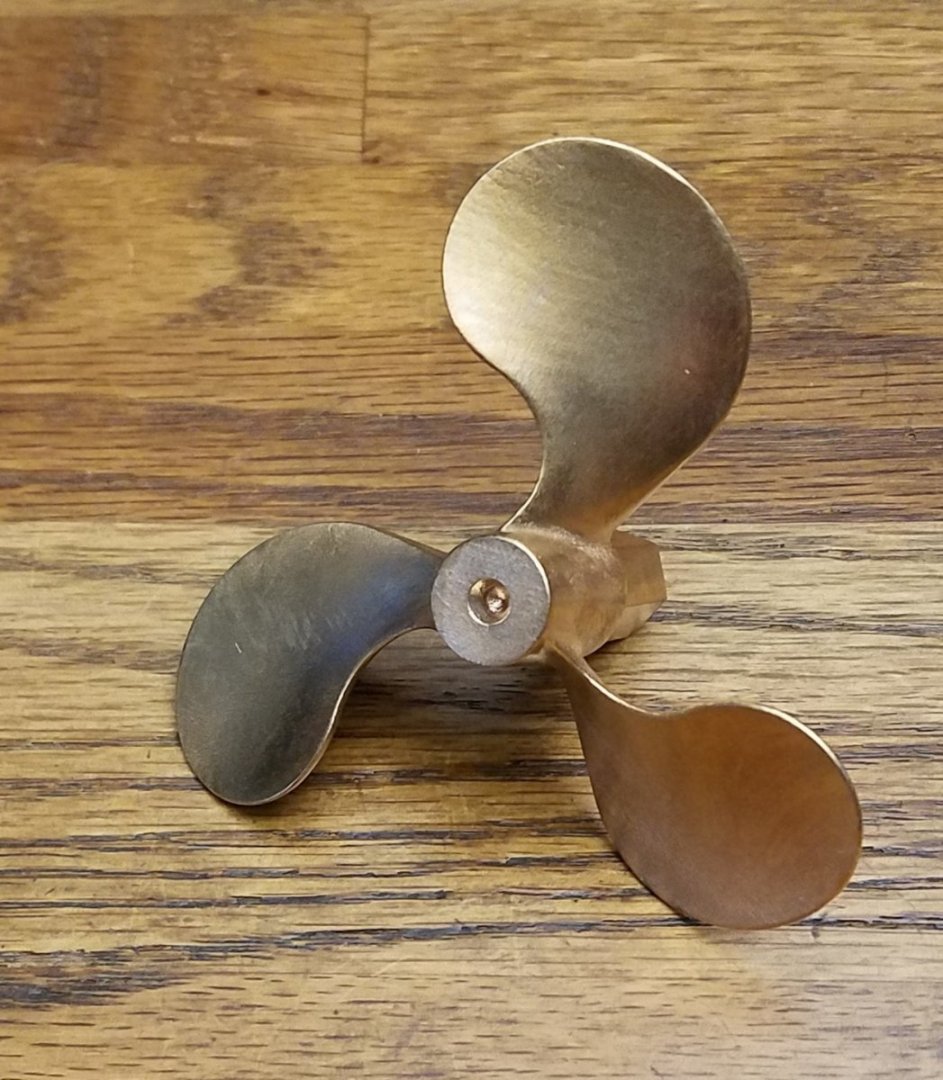
-
3d printing process
Patrick Matthews replied to henrythestaffy's topic in 3D-Printing and Laser-Cutting.
Another use for printing: Rubber tires, as shown above. There are some flexible black resins, but they are difficult to work with and produce a material more like vinyl. Instead, I printed a mold for the 5 inch OD tires, and had a friend pour polyurethane rubber into it.