Patrick Matthews
-
Posts
406 -
Joined
-
Last visited
Content Type
Profiles
Forums
Gallery
Events
Everything posted by Patrick Matthews
-

3d printing crew figures
Patrick Matthews replied to highlanderburial's topic in 3D-Printing and Laser-Cutting.
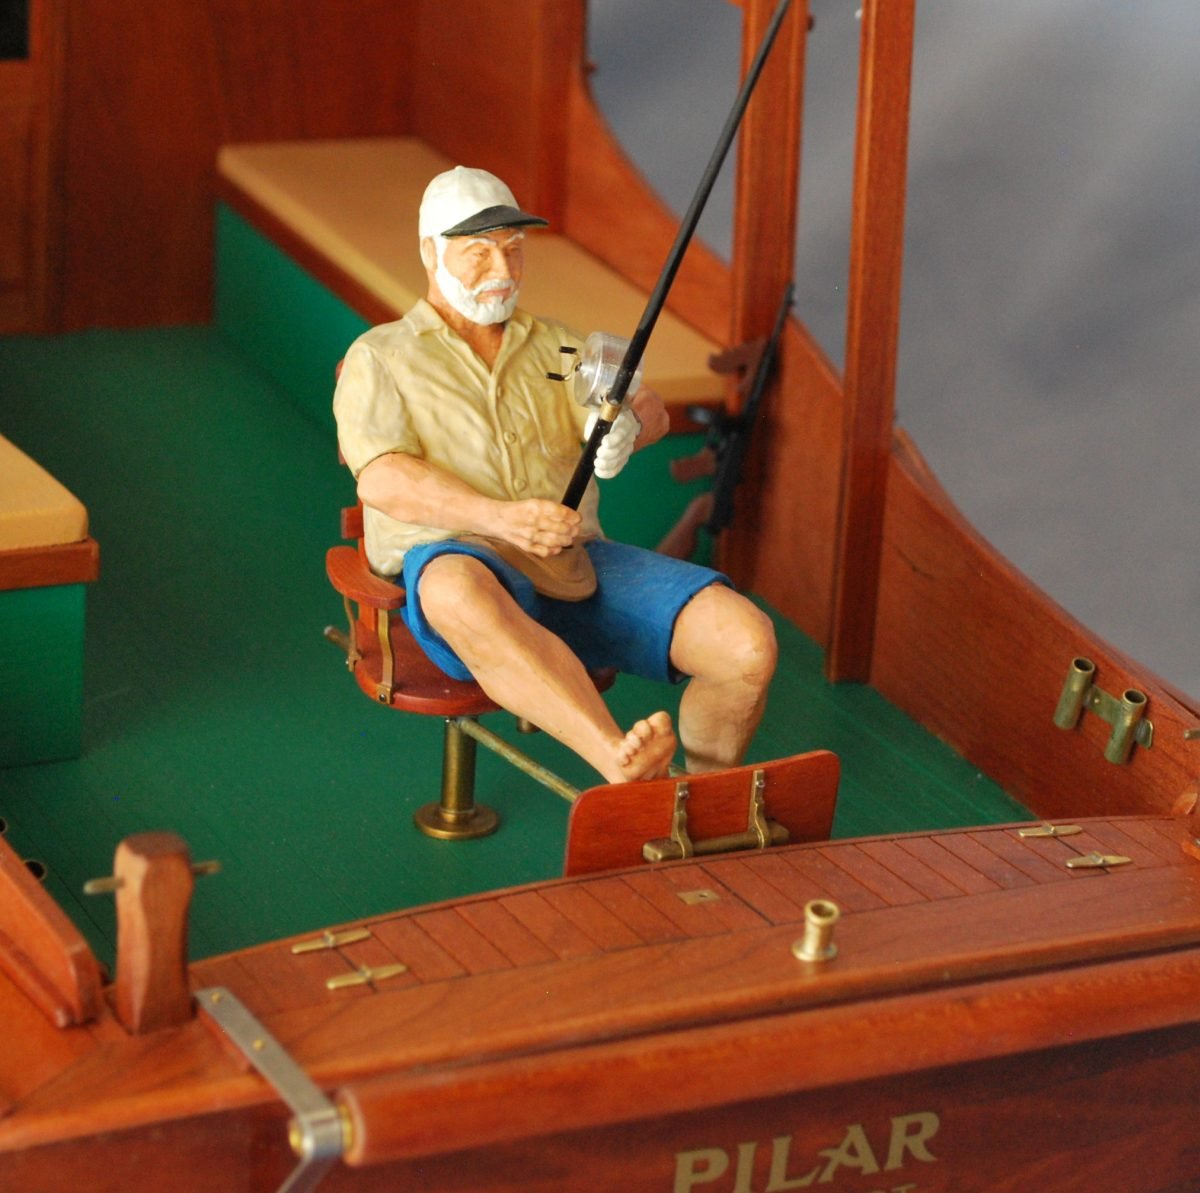
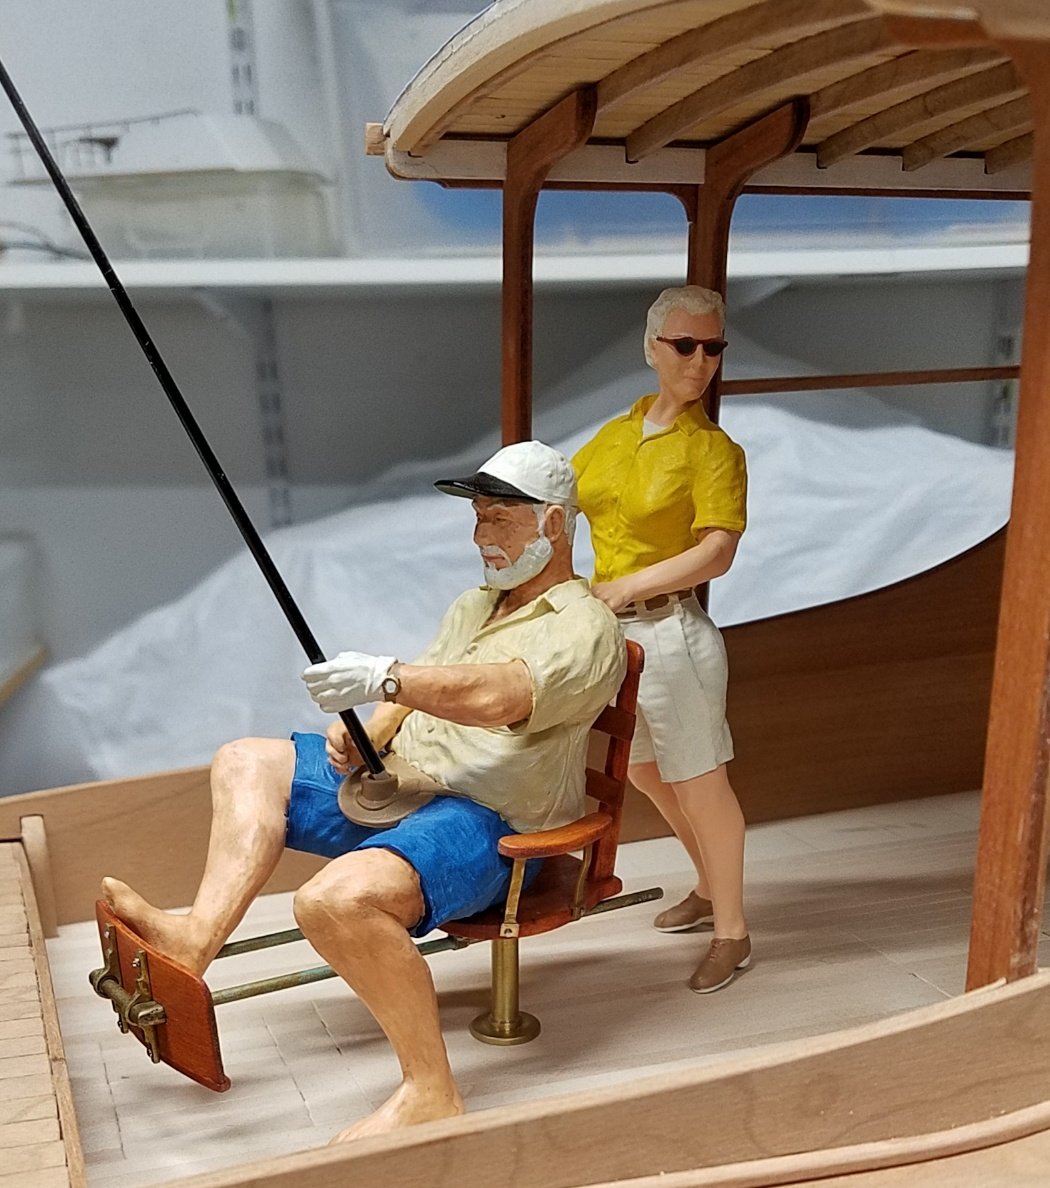
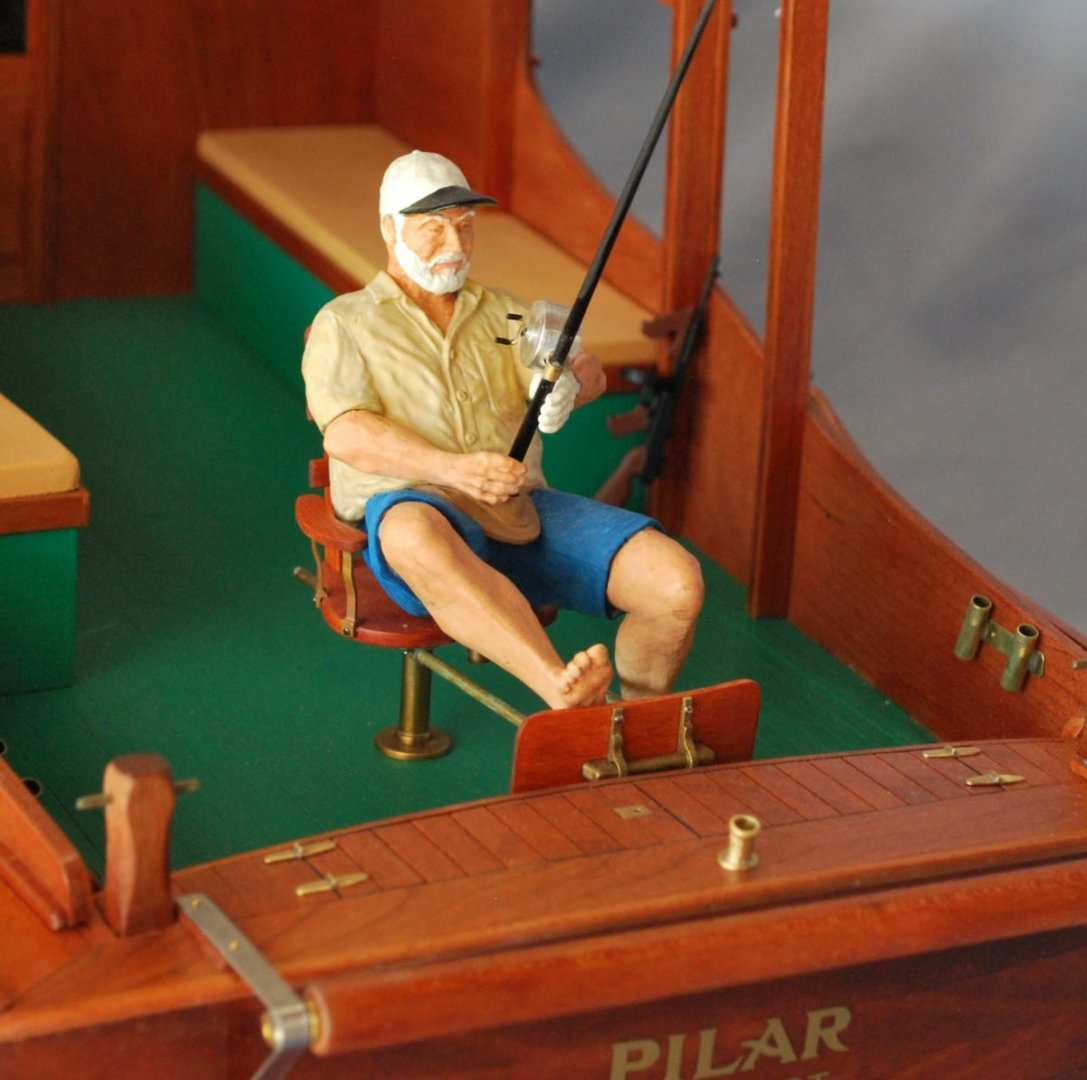
The real art is in the original 3d sculpting, from a digital ball of clay, a figure that not only looks realistic but is recognizably a historical figure. I know a fellow in Spain who can do that- here's "Papa" Hemingway in 1:12 scale. .
- 51 replies
-
- 11
-

-
Mahogany Marvels by GPR
Patrick Matthews replied to Patrick Matthews's topic in RC Kits & Scratch building
Yes, this site remains "sticks & strings" even though it aspires to be all-inclusive. Most of those modelers wouldn't even bother with this dim corner of the site. -
I have a 350 model and previously a 144 model... post a nice image of your parts tree, we can proffer anything from sage advice to wild @ss guesses!
-
Just saw this build for the first time- excellent. Do I see some of my 3D printed parts in there? You've taken them far beyond the rough parts I designed!
-
Cutting brass sheet
Patrick Matthews replied to Landlocked123's topic in Metal Work, Soldering and Metal Fittings
Tip: Polish the stainless before cutting strips... -
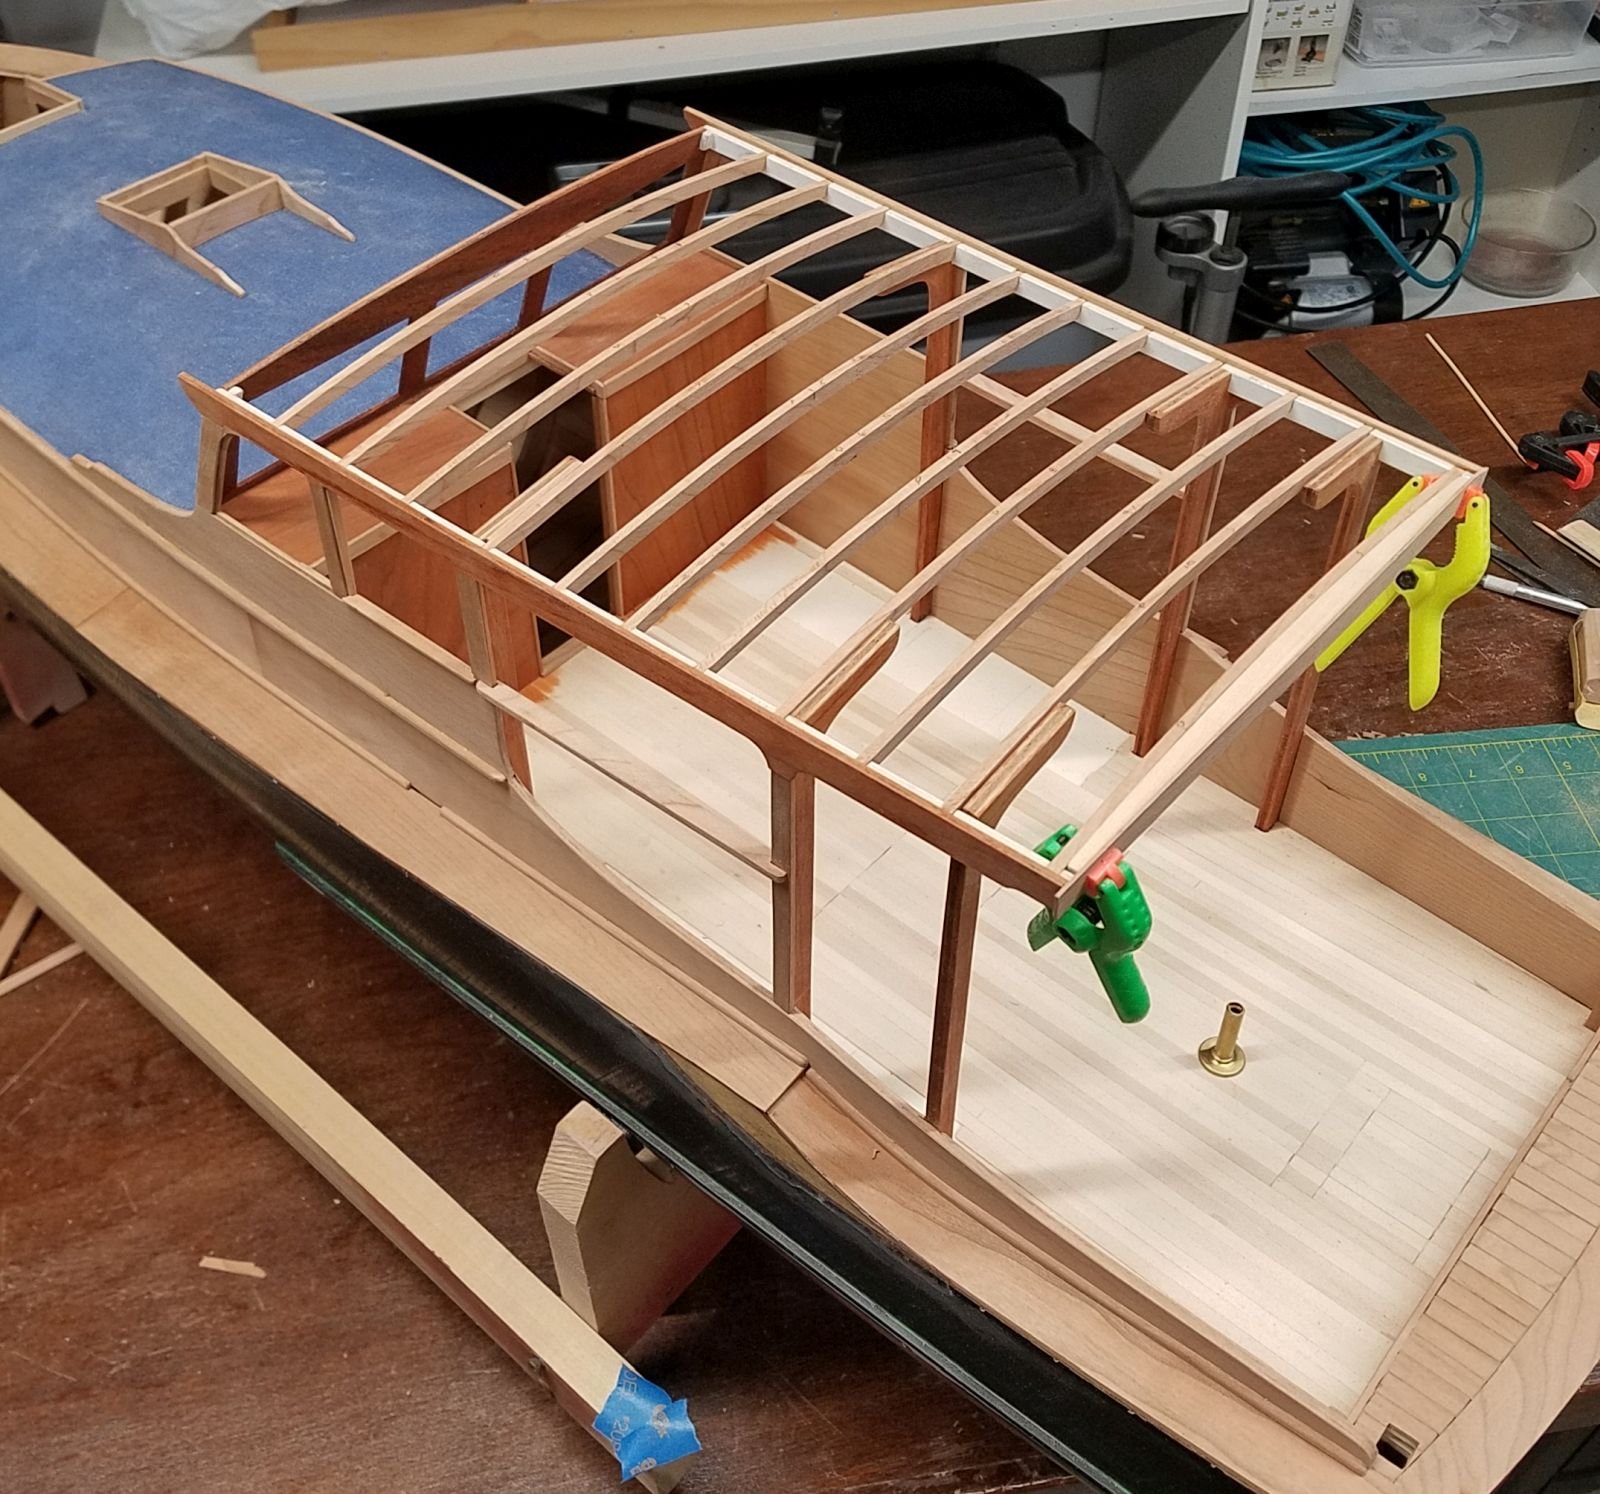
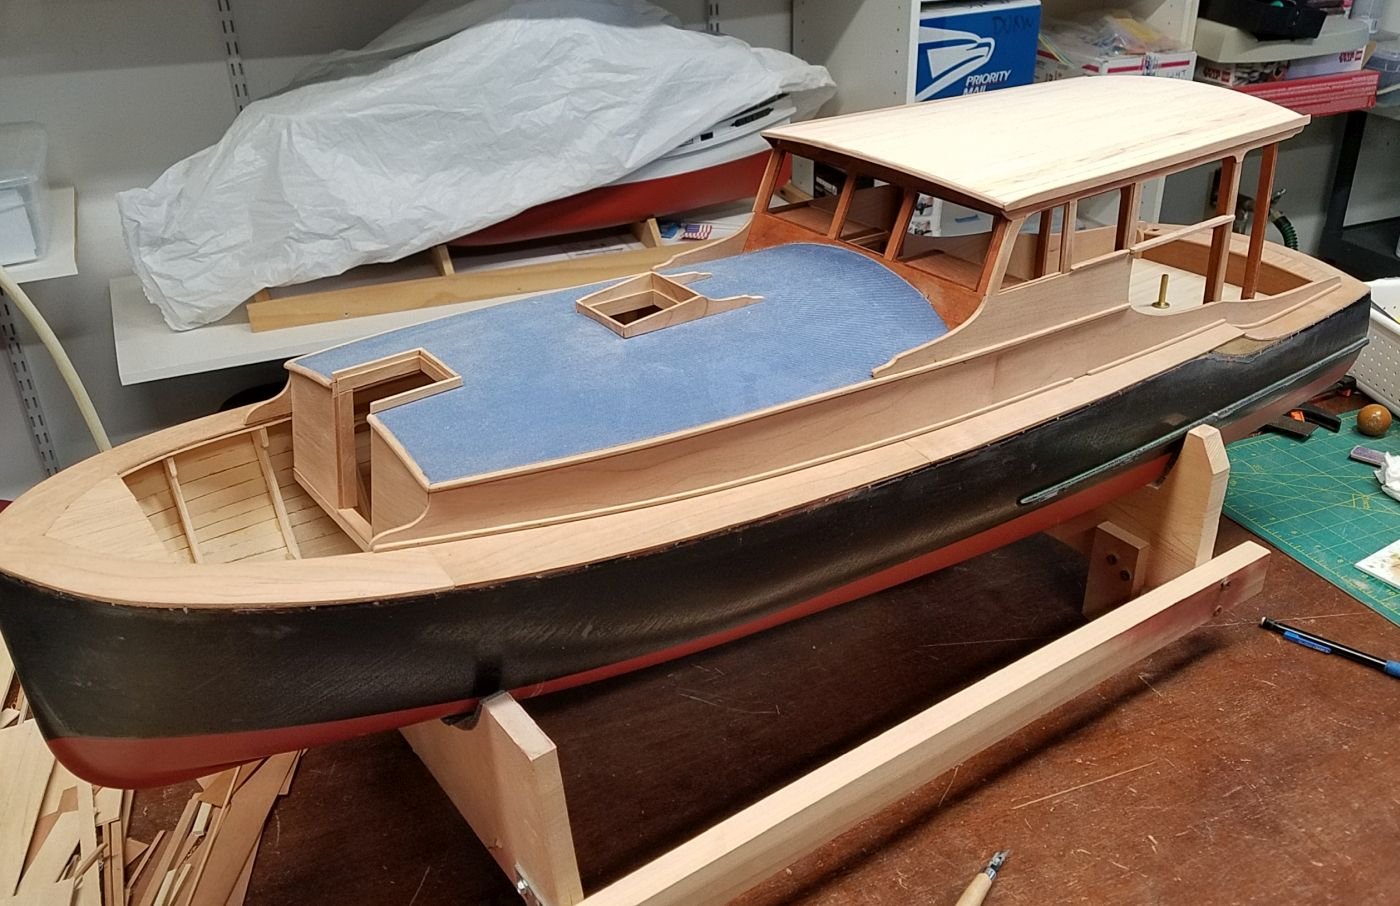
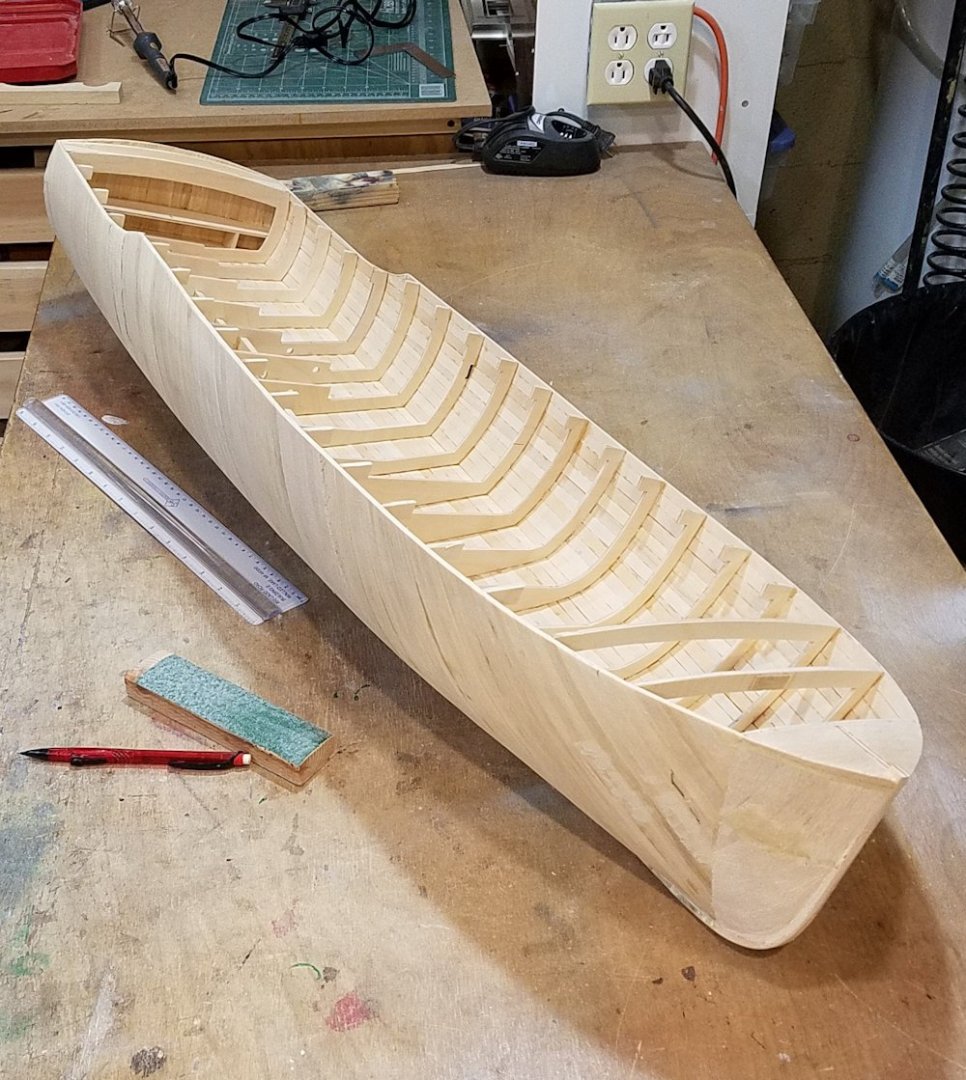
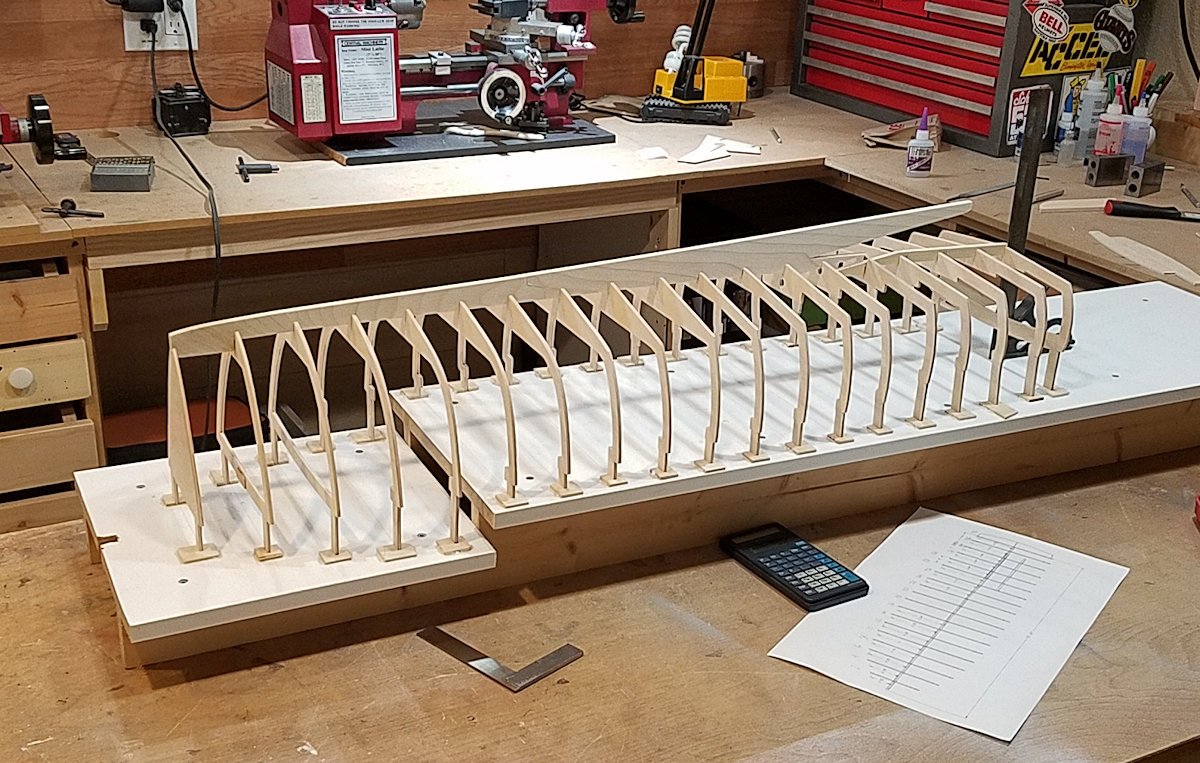
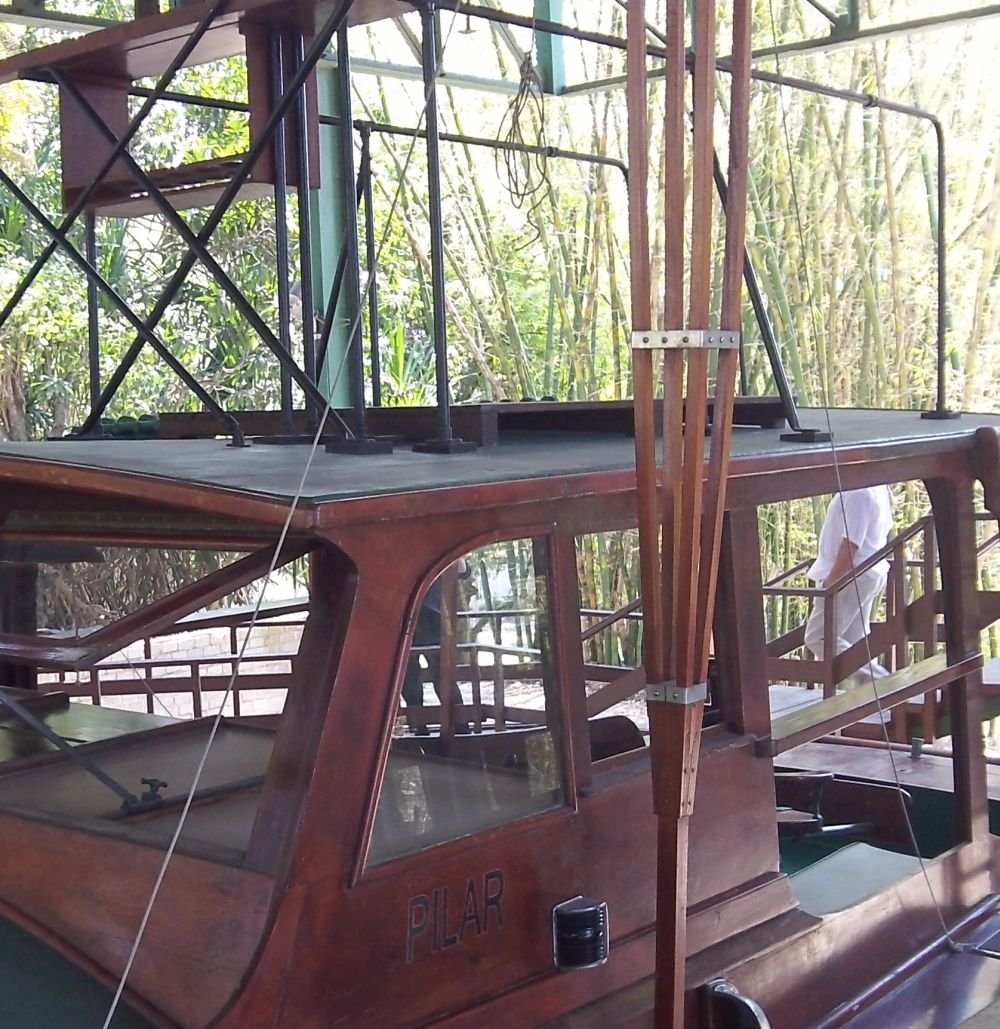
Cabin is constructed of ply and basswood, with all exposed wood done in cherry. The real boat appears to have been built with mahogany, but I find that cherry "works" better, and has a better scale grain appearance. The sides are built up as a 3d jigsaw puzzle, as many as 3 layers deep. They hang down straight like a curtain from the deck intersection, but angle inwards at 2° from that line up, while also following the sheer... a bit tricky. The cabin roofs are covered with shirt cloth to simulate canvas. The cloth is secured with water based polyurethane, painted, and clear coated. The weave still shows through, like painted canvas. The cherry is all stained with Minwax "Gunstock", and clear coated with lacquer. Warning: Most all of my cherry stained a very nice color, but occasional pieces turned orange, yuk. Always test! . I changed my mind after this shot and added the forward cockpit. Roof beams First piece of cloth installed


-
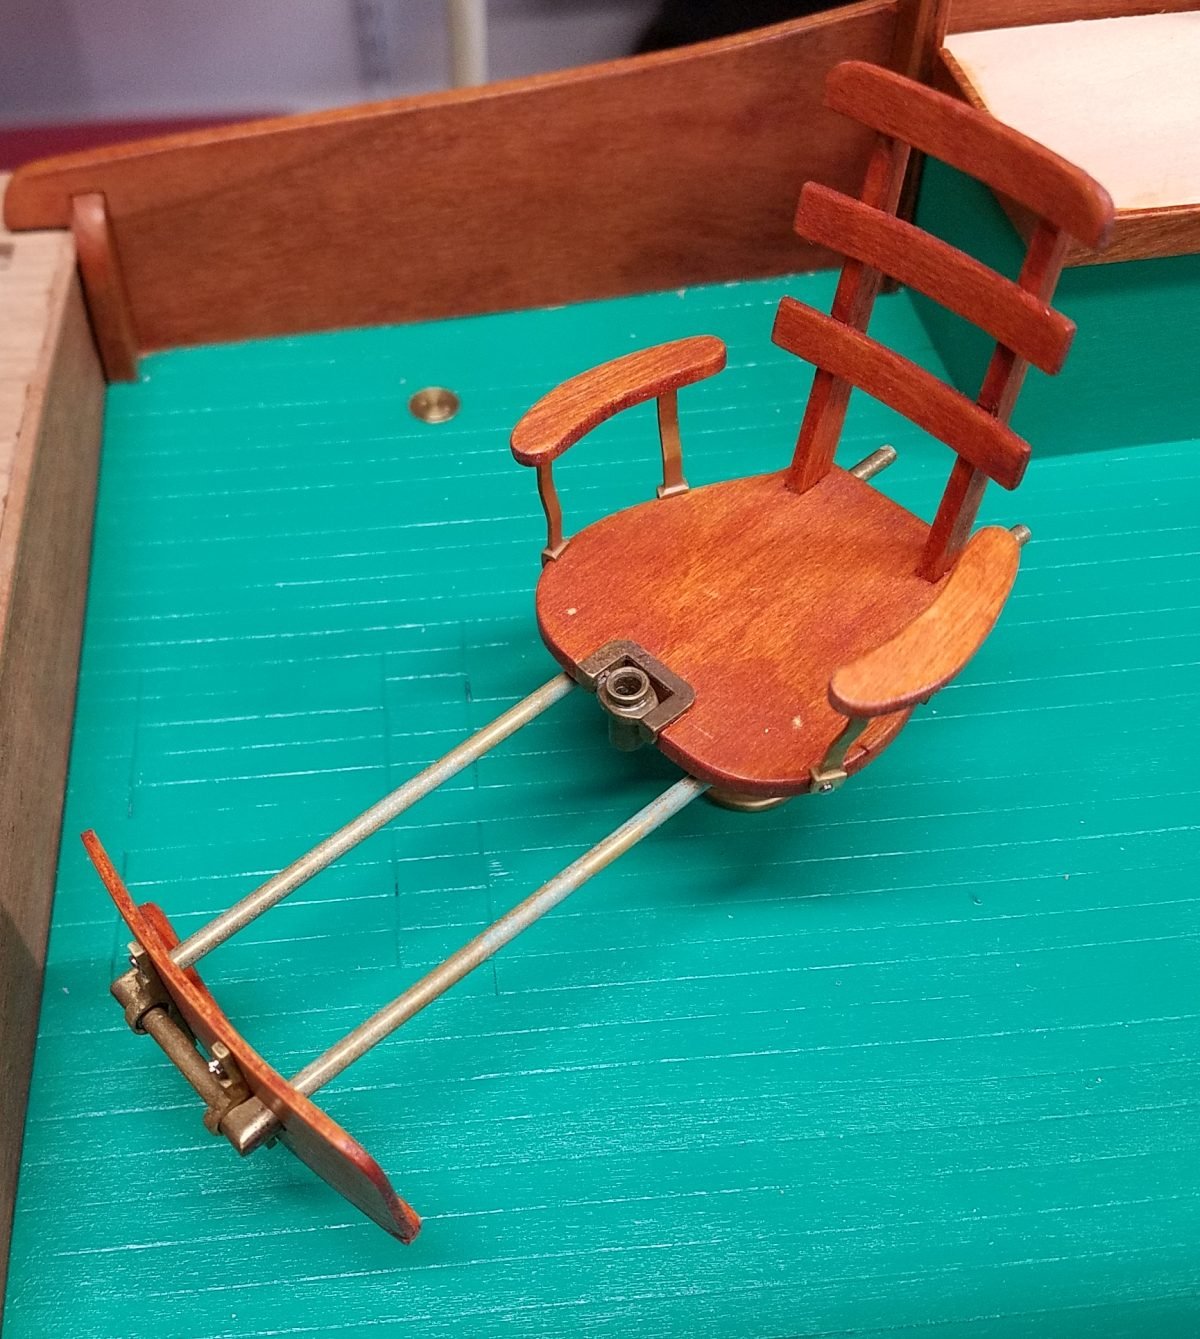
The most important part of the boat- the fighting chair. Brass parts aged in vinegar. The figures were masterfully sculpted digitally and 3d printed by Luis Hidalgo, aka "Holden8702", of Spain. .


- 17 replies
-
- 10
-
-

-
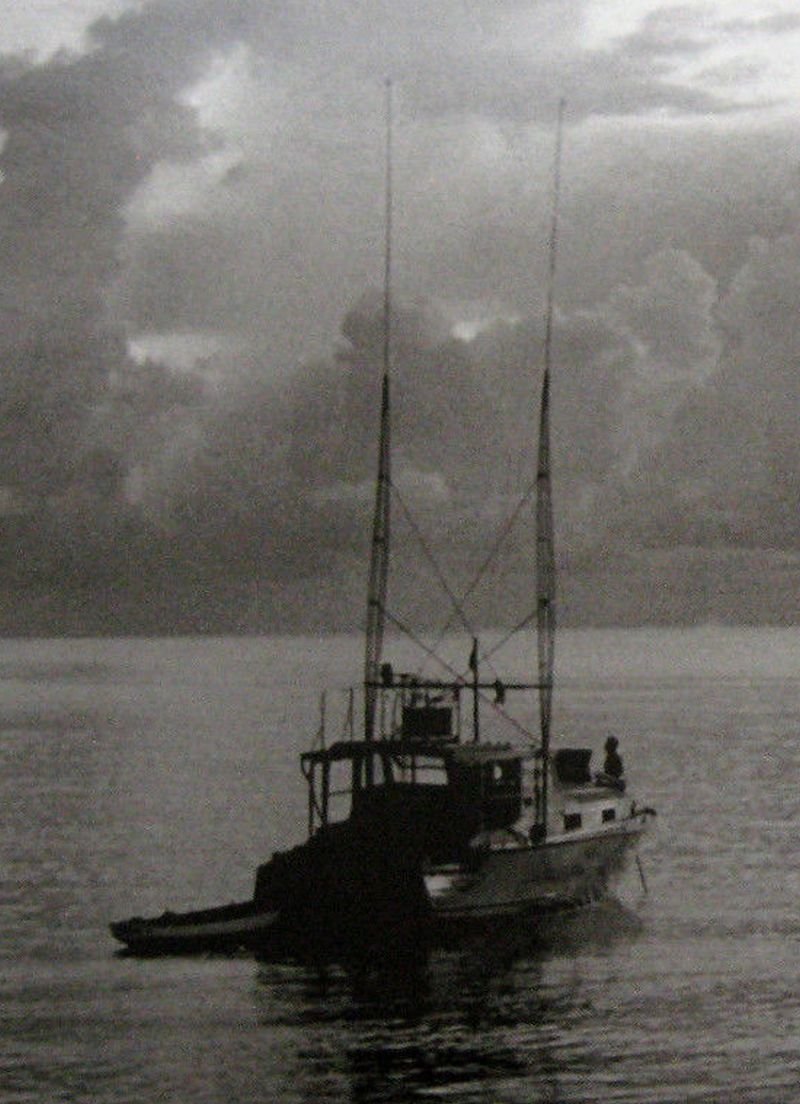
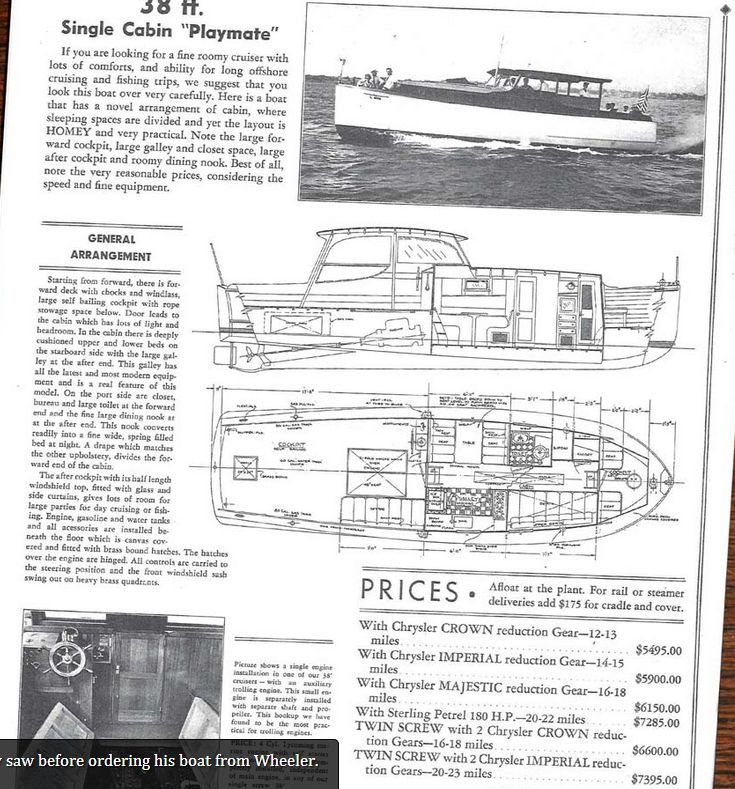
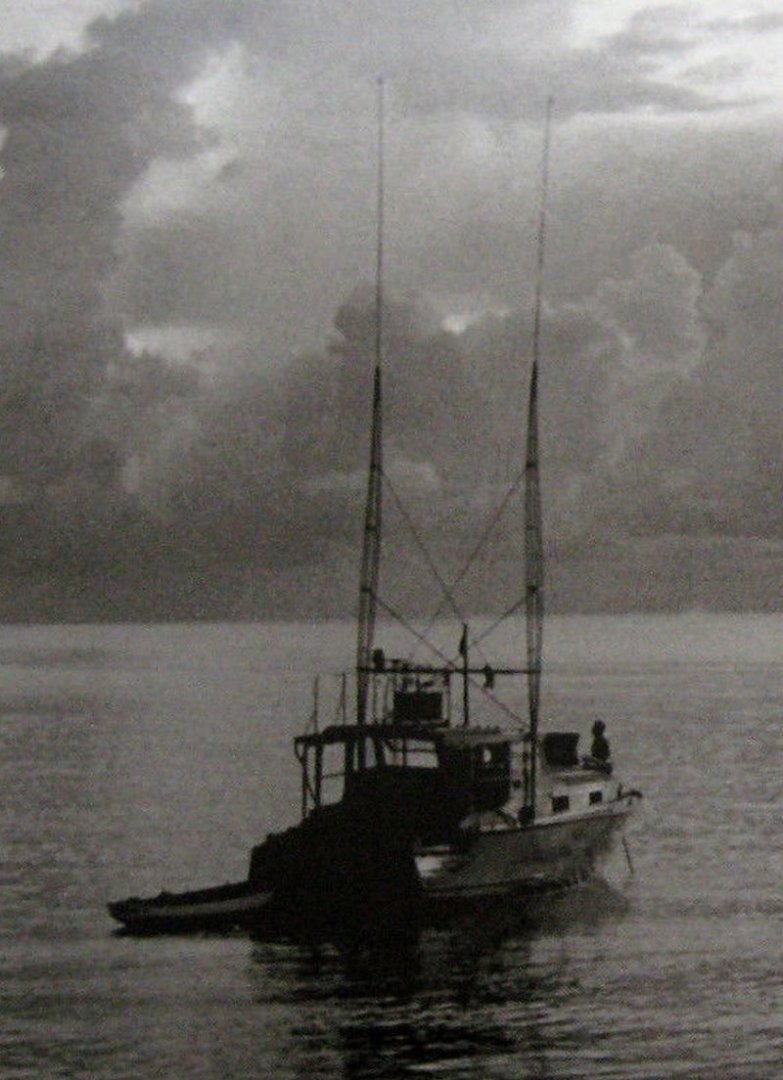
Source material: Many many photos, both historical and from tourists to Finca Vigia. Many of these nice folks post high resolution images on Flickr and elsewhere- very helpful, thanks! There's also one page from a Wheeler brochure showing the profile, but with a somewhat different cabin... still helpful for working out basic dimensions. The grandson of Wheeler went to Cuba and measured Pilar in order to develop a modern take on the boat. But he won't share, I tried. And yes I know about the several fake Pilars, none are useful for determining original features. There's a Popular Boating issue from 1957 that has some good (and some imagined) information. .

-
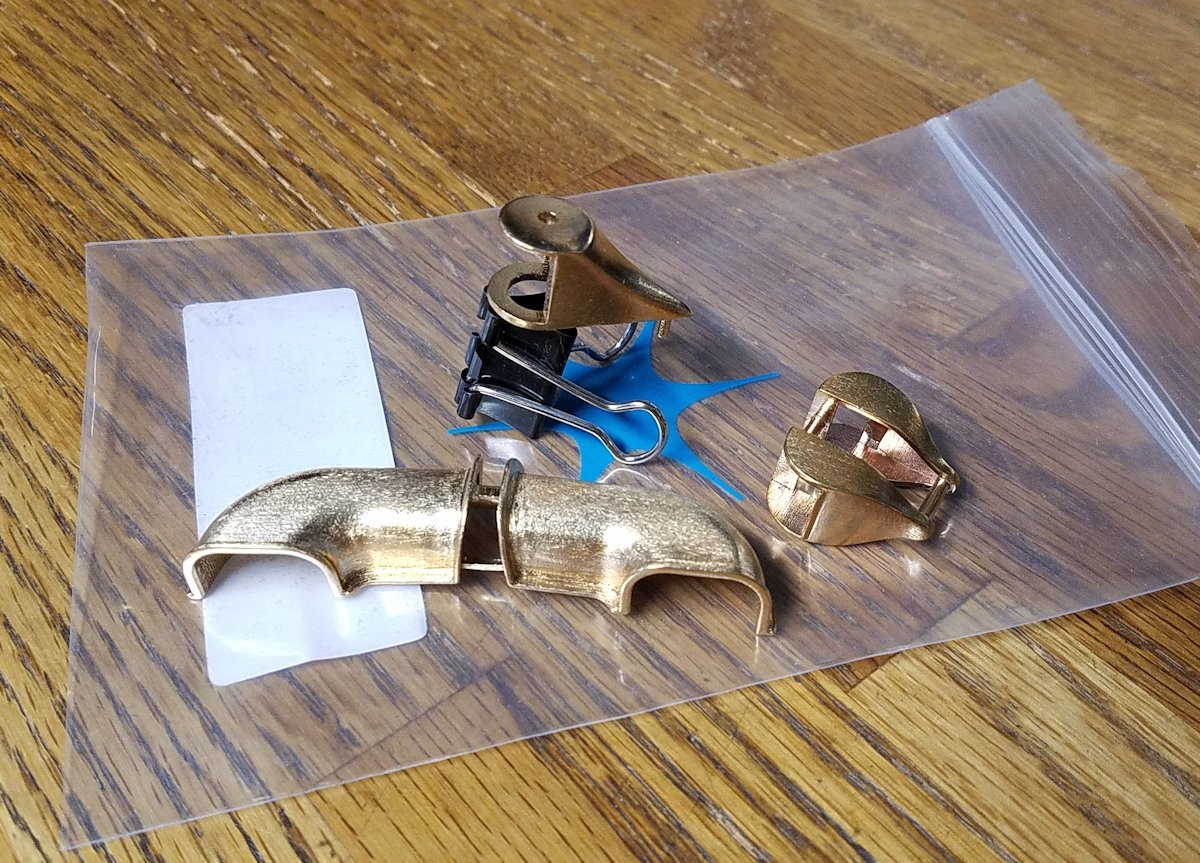
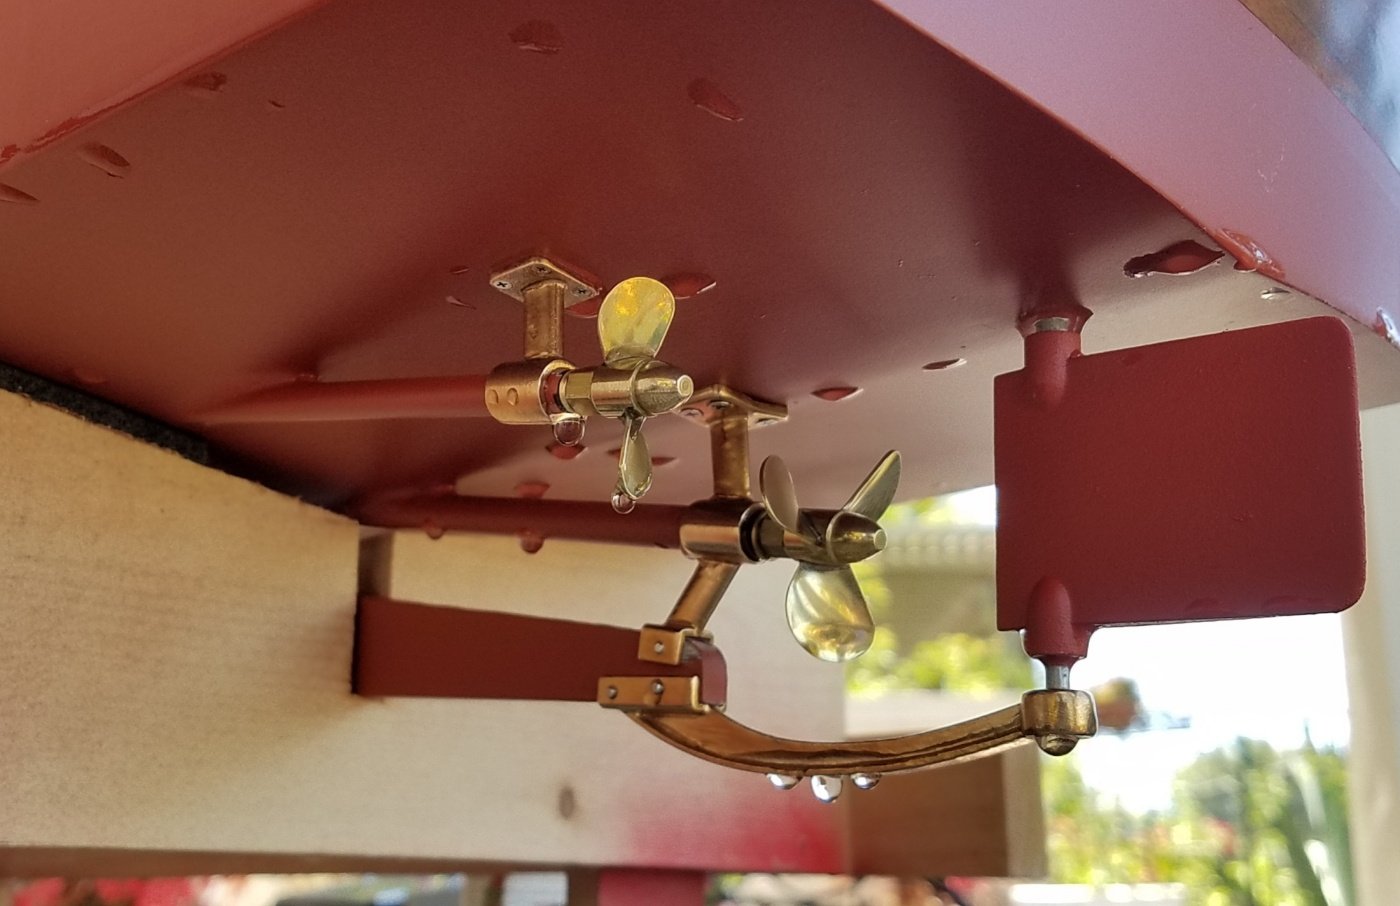
Most of the model is hand built from wood of course... but certain components were printed- either in plastic, or in wax for investment casting in bronze. Such as the struts and rudder footing. The footing works with the extended wood skeg, a common design layout in the 20's and 30's. This casting is missing from the boat at Finca Vigia, which leads some modelers to make some odd drive arrangements. If only they knew... Hemingway had Wheeler make several well known modifications to Pilar, including the installation of an auxiliary 4 cylinder Lycoming for trolling. There is no evidence of this on the boat now, so this is also omitted from models. .

- 17 replies
-
- 11
-
-
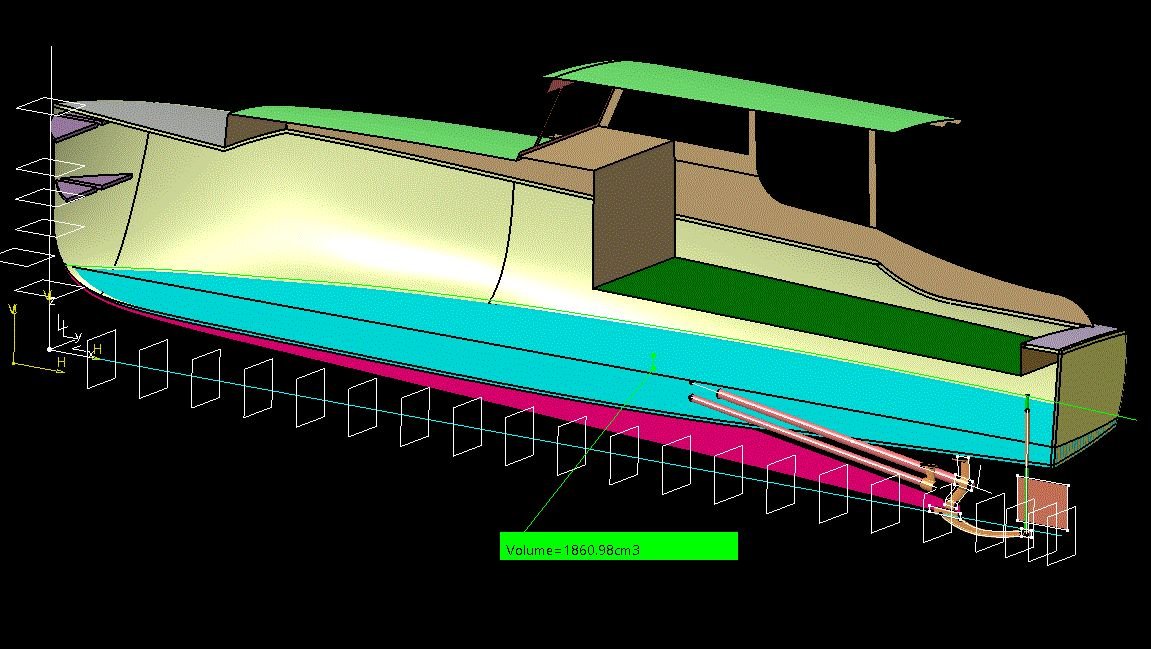
Designed in CAD starting in 2015. Made a few changes... since 2015, I built a whole new hull and a whole new cabin, tossing the previous versions. Accurate plans don't exist, but overall dimensions are known, and there's a decent profile from a sale brochure for Wheeler Playmates.
- 17 replies
-
- 10
-
-
PILAR build thread... coming soon to a forum near here. Completed model gallery: https://modelshipworld.com/gallery/album/2157-hemingways-pilar-in-112/ Scratch built in 1:12 from photos and one original sales brochure.
-
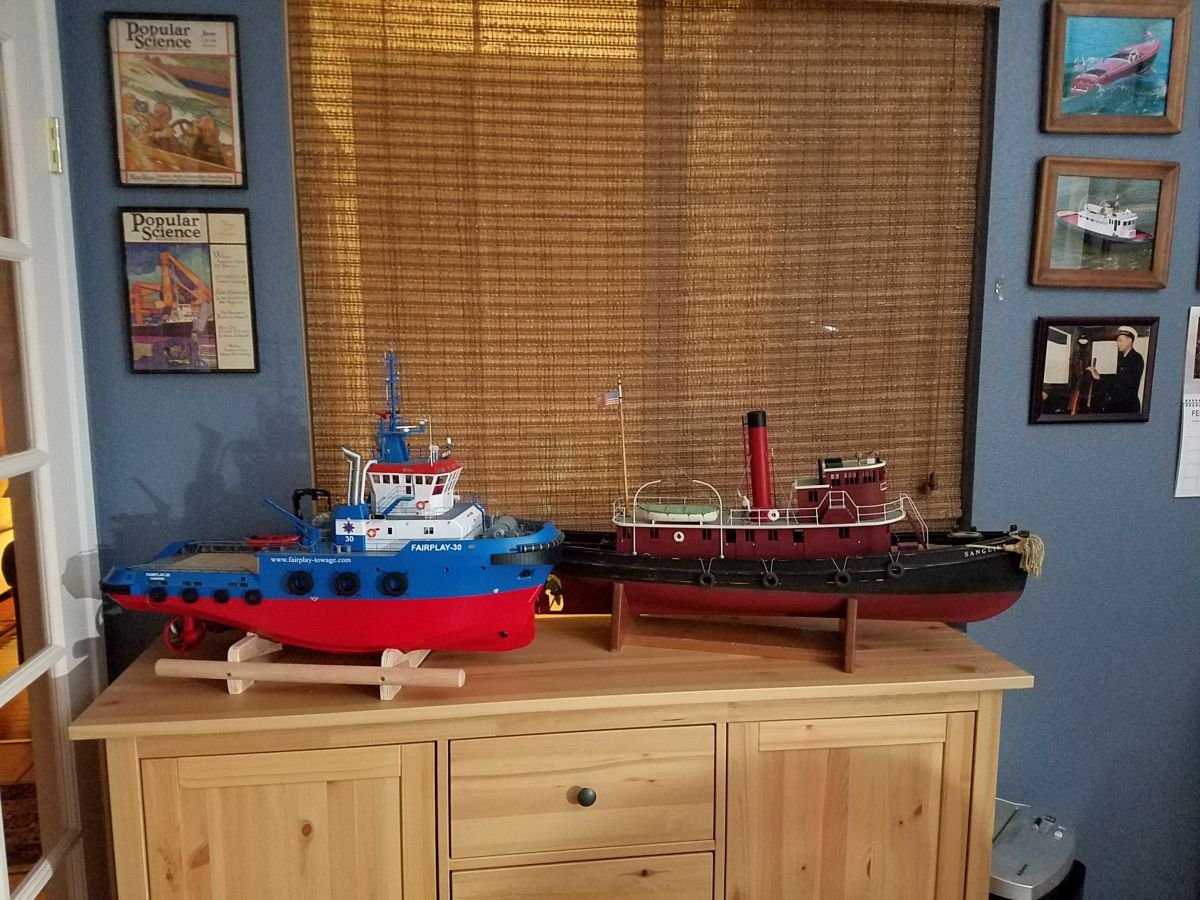
We RC'ers model FUNCTION as well as form... the boats get moved around too much to bother with display cases. Get your boats wet! Keep those models out and ready to use:
-
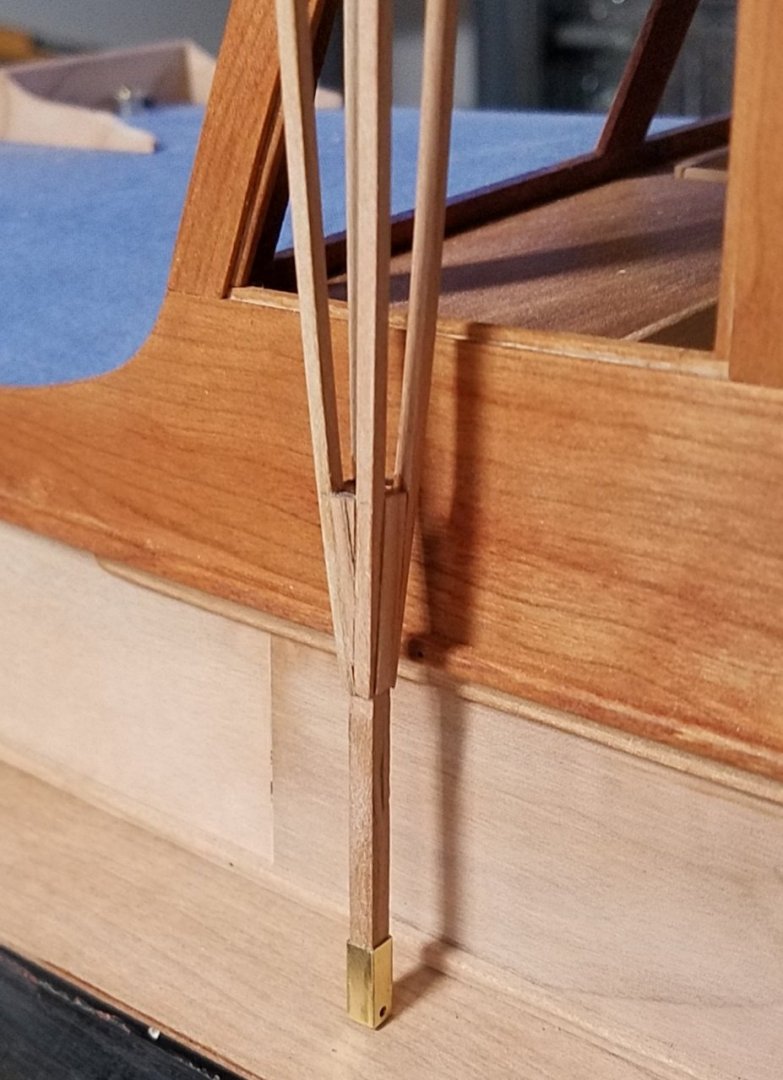
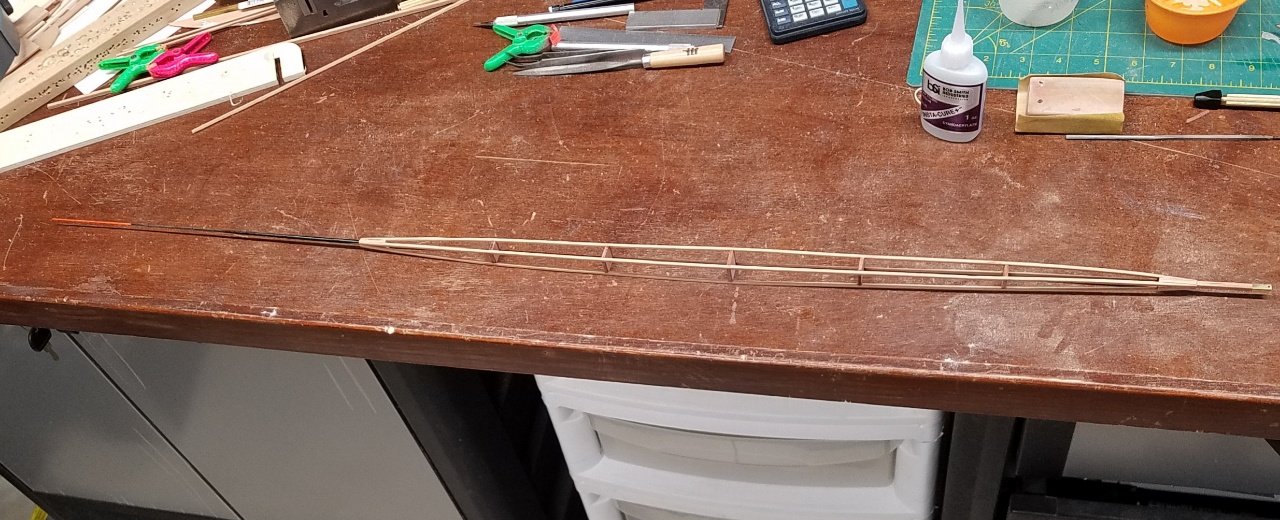
Well, since I already started, I finished one outrigger in cherry. Satisfyingly strong and light, but I'm sure a false step could see it crumpled. The tip is a real fiberglass fishing pole... well actually, an ice fishing rod blank... perfect size! 3 feet of outrigger, light as a feather:
-
Hard, tight fine grain, springy... maybe holly? I can work brass, but this will be wood.
-
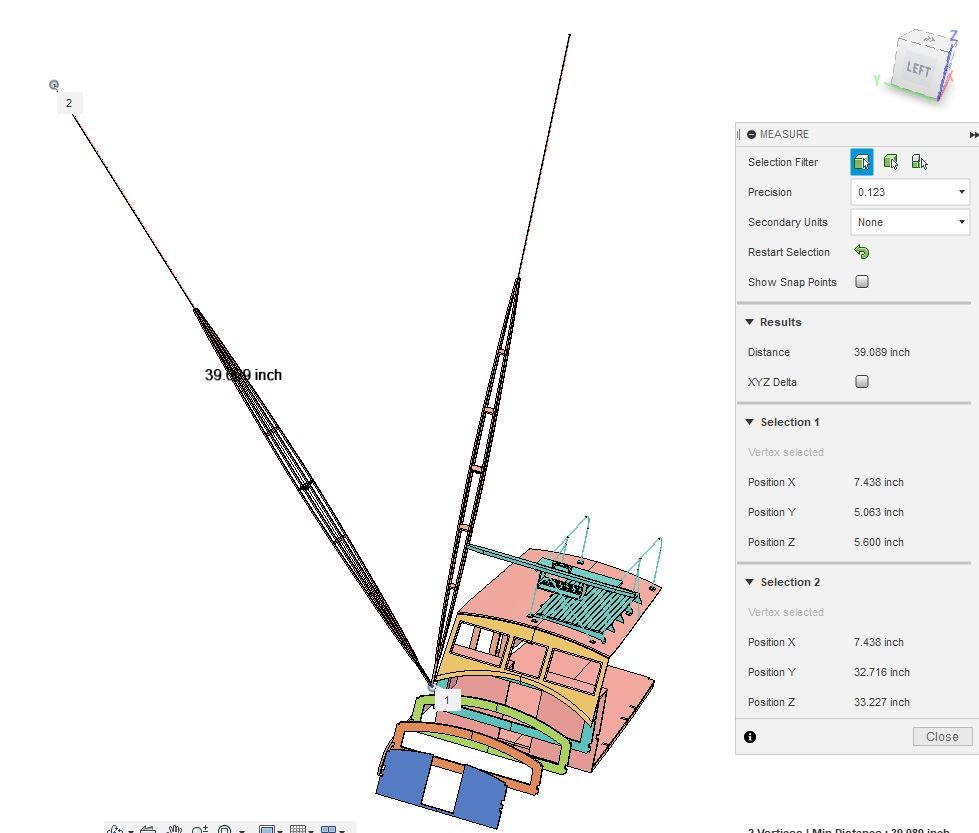
Well, not really spars... but the stringers in a fishing boat's outriggers. I'm building "Pilar" in 1:12 as a functional RC model. Not for real fishing, unless a carp happens to jump in the back... but the enormous outriggers Hemingway installed on Pilar translate into 39 inch long assemblies of 0.083" (2mm) square stringers. Actually, the box-girder section is only about 23" long, but it's still likely to bang into things. I'm about to start building them in cherry, but I wonder if something else would be more appropriate?

-
Byrnes thickness sander vs Micro Mark's
Patrick Matthews replied to twintrow's topic in Modeling tools and Workshop Equipment
I just changed the drum for the first time on my Micromark thickness sander, after years of light use. Whaddapain. Now, the machine works well enough for me, and it's solid and heavy. But the designer knew nothing of "design for service". What should be an easy abrasive change operation requires fiddling with a number of too-tiny screws, exposing the wire box, removal of TWO snap rings (the correct snap ring pliers must be in your kit), pulling a pulley off a shaft (need a small pulley puller), and the use of a special spanner wrench for the nut on the sanding drum- I lost the one which allegedly comes with the sander, but happened to have a suitable spare but only due to my having other machine tools. But I did find that the sanding drum doesn't actually have to come out of the machine as the instructions show, which saves a few steps. Not easy, but the old abrasive can be worked off the drum and pulled out one side of the machine... still busted my knuckles doing that. -
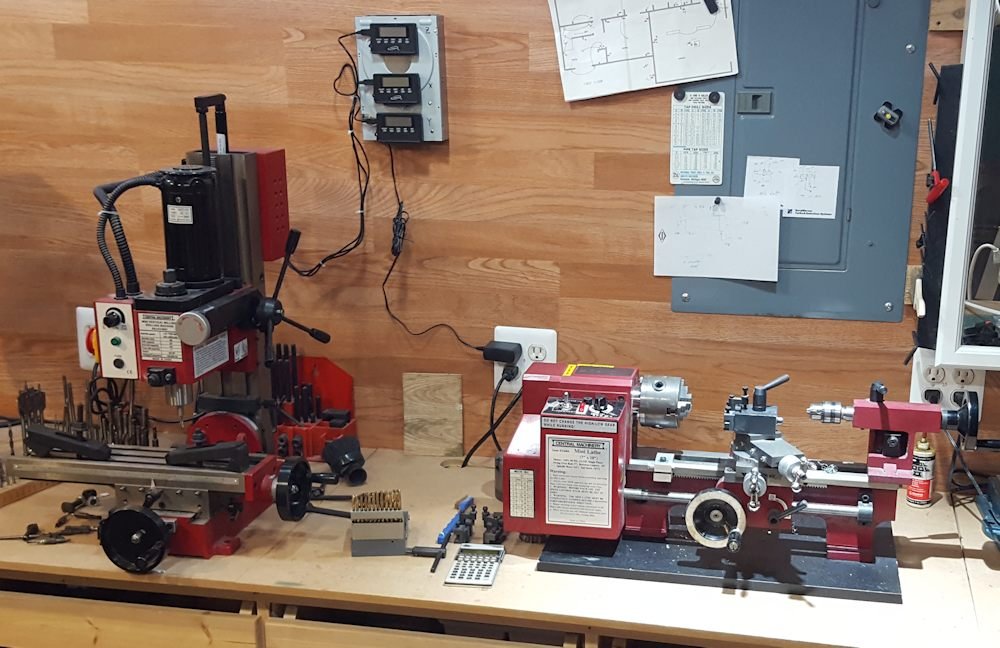
Another option, which I *hardly* regret making- the once very inexpensive and now not so much anymore, Chinese mini mill and lathe. As offered by Micromark, Little Machine Shop, Harbor Freight and others. I'm happier with the MASS of these cast iron machines, as sometime I need to machine something a bit bigger. And yes I've added many tools over the years... some 20 years I've had these things. .
-
It takes acrylic and enamel just fine. But for either (and Shapeways will not tell you this), you MUST post cure with UV light to complete the solidification process. Shapeways happily ships parts with an incomplete cure, and the traces of uncured resin WILL leech out and ruin the paint.
-
Nylon- smooth nylon is not so good for painting. But this is fused powder, so primer/filler paints lock on mechanically. I have had no problem at all painting it... but again, I would prefer the "fine detail" plastic for this sort of work, which takes painting just fine, even on its smooth surface.
-
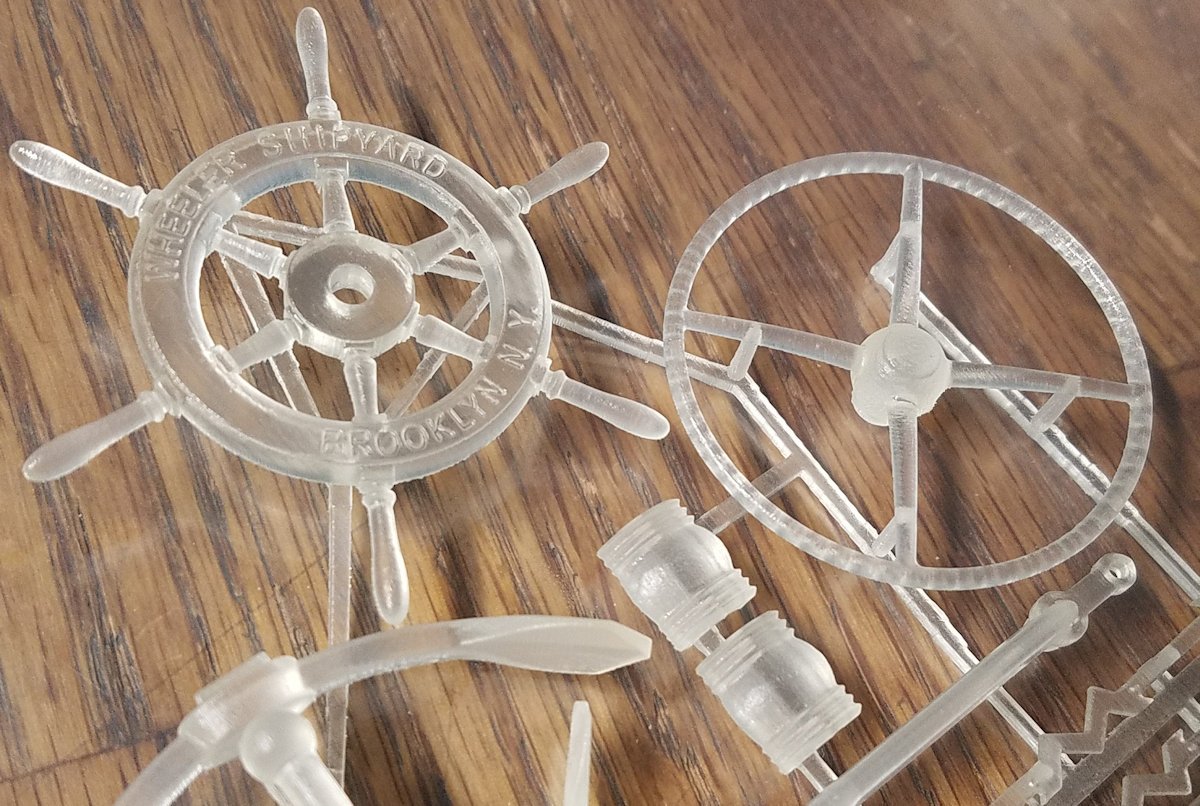
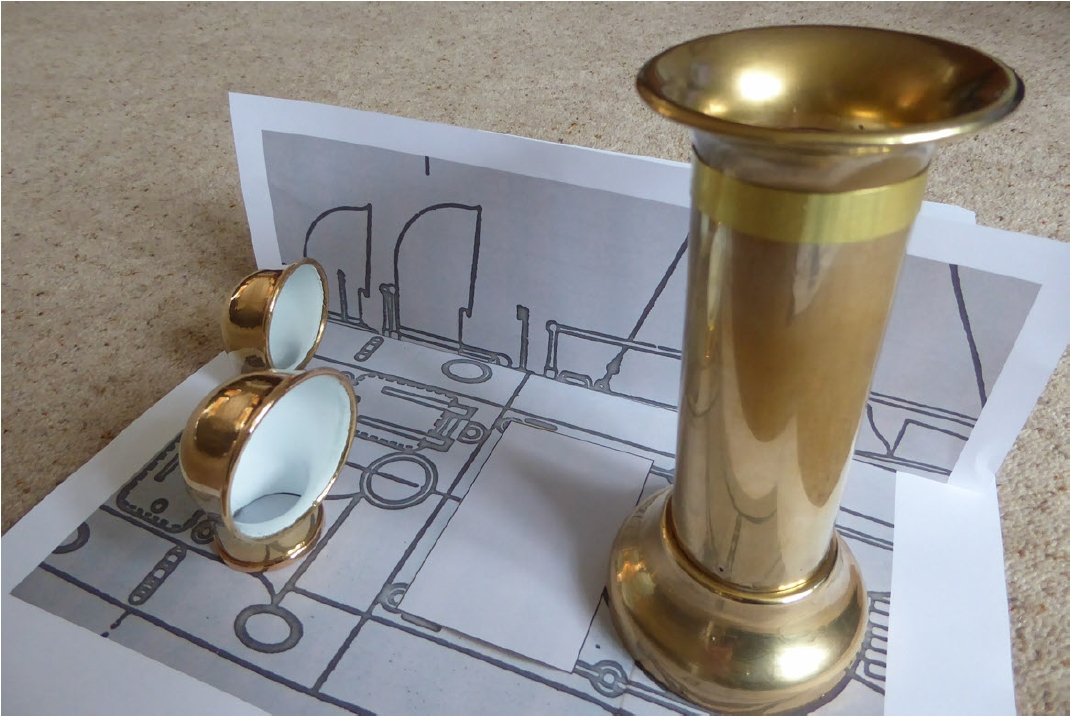
First, kudos to those who can use handwork to create beautiful shiny metal parts from real metals. Me- I'm lazy, and will go to 3D Printing every time! I have previously shown that 3D Printing can be used to create waxes for lost wax casting of real metal parts in a variety of alloys. As one might expect, it's not a low cost approach, especially for larger parts. But a modeller in the UK shared some results that offer another approach. He's working on a large scale Admiral's Barge, which features a polished brass stack and cowl vents. I designed the parts for him, and he procured them in the lowest price 3D Printed plastic, sintered nylon (grainy porous stuff, "fine detail plastic" would cost twice but be much easier to work with). Anyway, he filled the grain, polished that, then applied silver-bearing conductive paint. Next, brush plating of copper (which can be further buffed), followed in this case with brass plating. One can also brush plate nickel for the look of stainless or a fair-enough chrome, or invest in rhodium plating for a more convincing chrome. Pictures show the raw plastic parts and the final product.

- 24 replies
-
- 24
-
-
chain sources
Patrick Matthews replied to omarcs's topic in Metal Work, Soldering and Metal Fittings
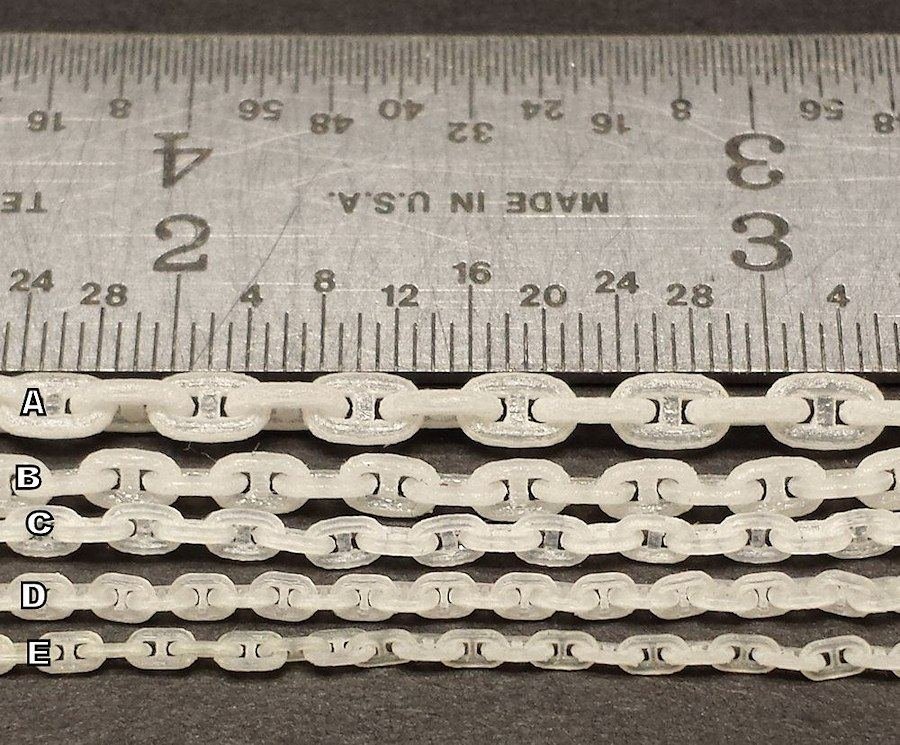
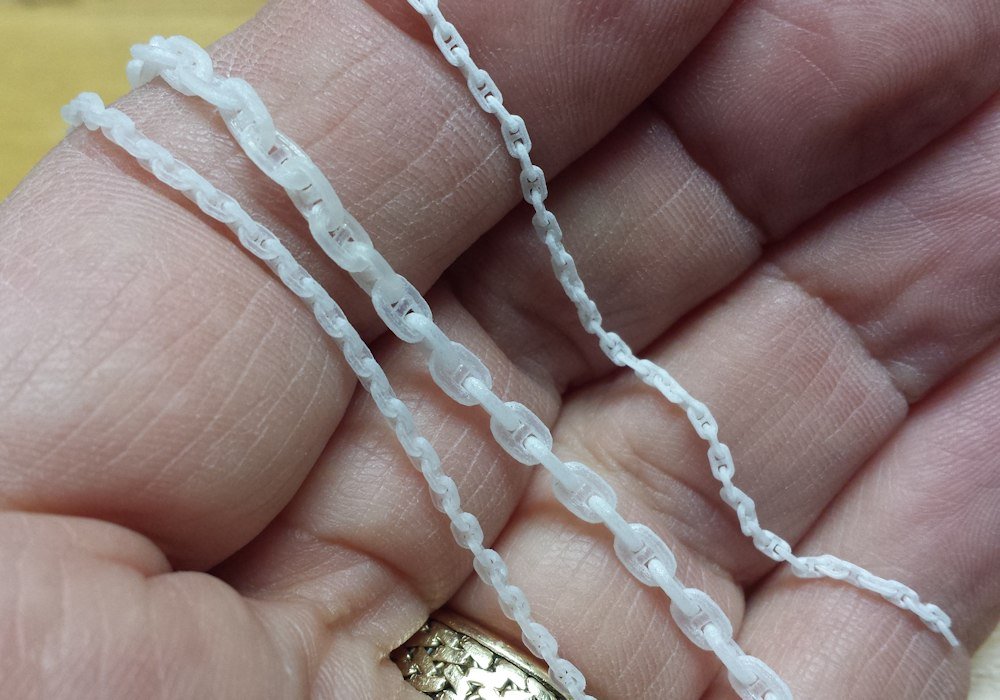
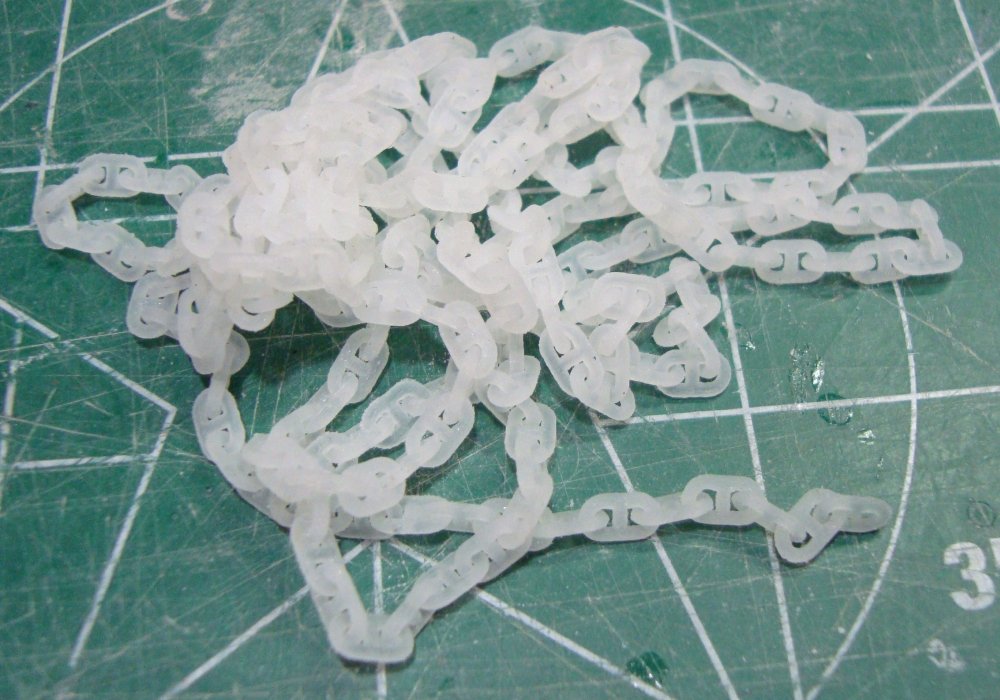
Yep, the products are offered by market... in this case, for the builders of the very common 1:350 battleships. The smallest stud link chain I ever printed was 13 links per inch, suitable for the new 1:200 plastic battleships. It couldn't be produced reliably, so I gave up on it. I still get plaintive calls- "do you have any more chain???" This PE chain could be available for 1:200 BB's, would be a little easier to work with! -
chain sources
Patrick Matthews replied to omarcs's topic in Metal Work, Soldering and Metal Fittings
That 2nd one is photoetched 0.005" brass... here is the maker's page: https://www.whiteensignmodels.com/p/WEM+1350+Battleship+Stud+Link+Anchor+Cable+PE+35157/10061/#.XsavsWhKiUk -
Making extremely tiny fittings
Patrick Matthews replied to BETAQDAVE's topic in Metal Work, Soldering and Metal Fittings
I support the economic principle of "division of labor"- I let the pros do it! This example was from Shapeways. -
I have done nickel plating at home, relatively inexpensive and easy. I wouldn't recommend rhodium plating for an amateur, even though you can buy the supplies. A 500ml bottle with 1g Rh costs almost US$500. Here is a video demonstrating an available set-up for a jeweler: https://www.riogrande.com/article?name=How-To-Rhodium-Plate-Jewelry-Video The cost for the plated Rh is small, as there is so little used.... just as with gold plating. But the investment to do it properly is a disincentive!
-
chain sources
Patrick Matthews replied to omarcs's topic in Metal Work, Soldering and Metal Fittings
That fine chain is all very fine... but if you need some chunky stud-link anchor chain, it can be printed!