Patrick Matthews
-
Posts
406 -
Joined
-
Last visited
Content Type
Profiles
Forums
Gallery
Events
Everything posted by Patrick Matthews
-
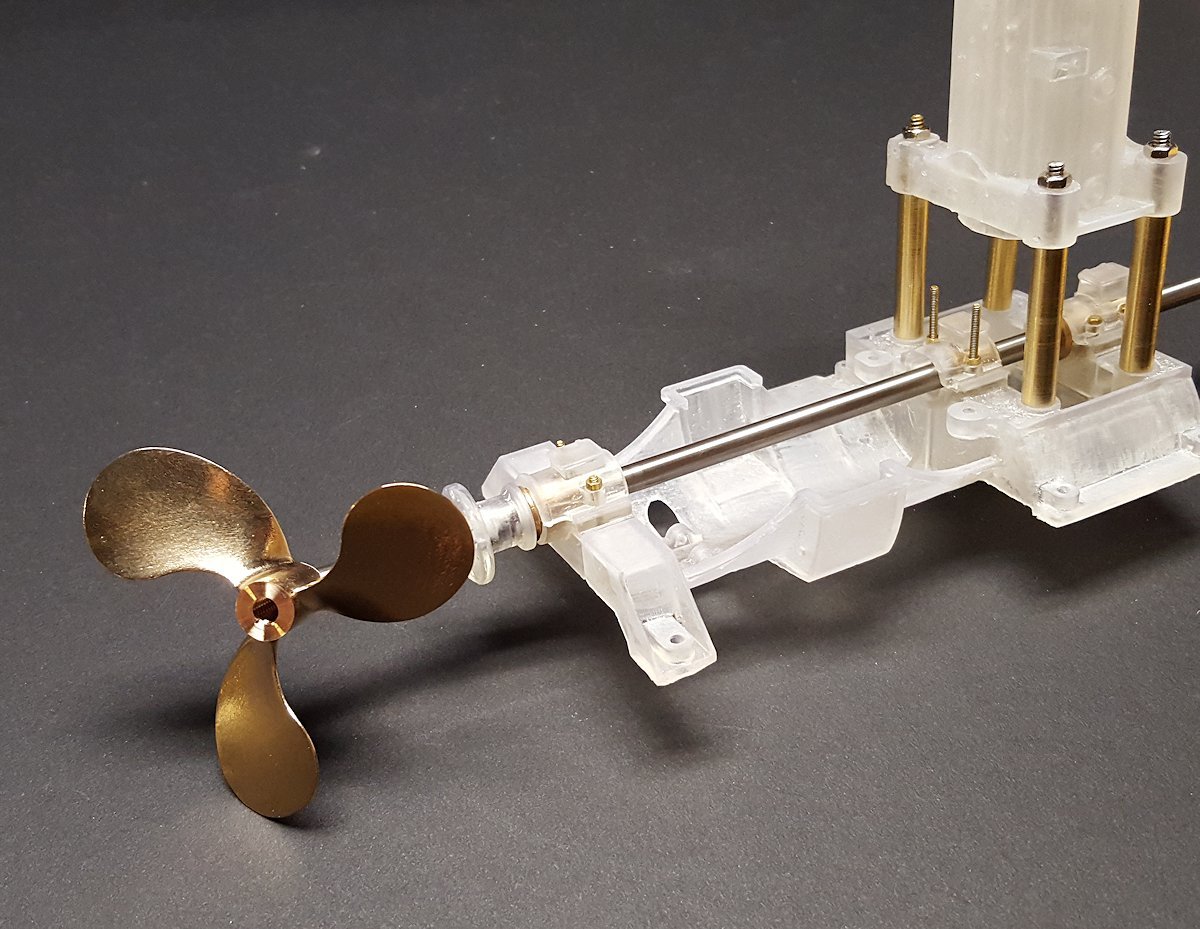
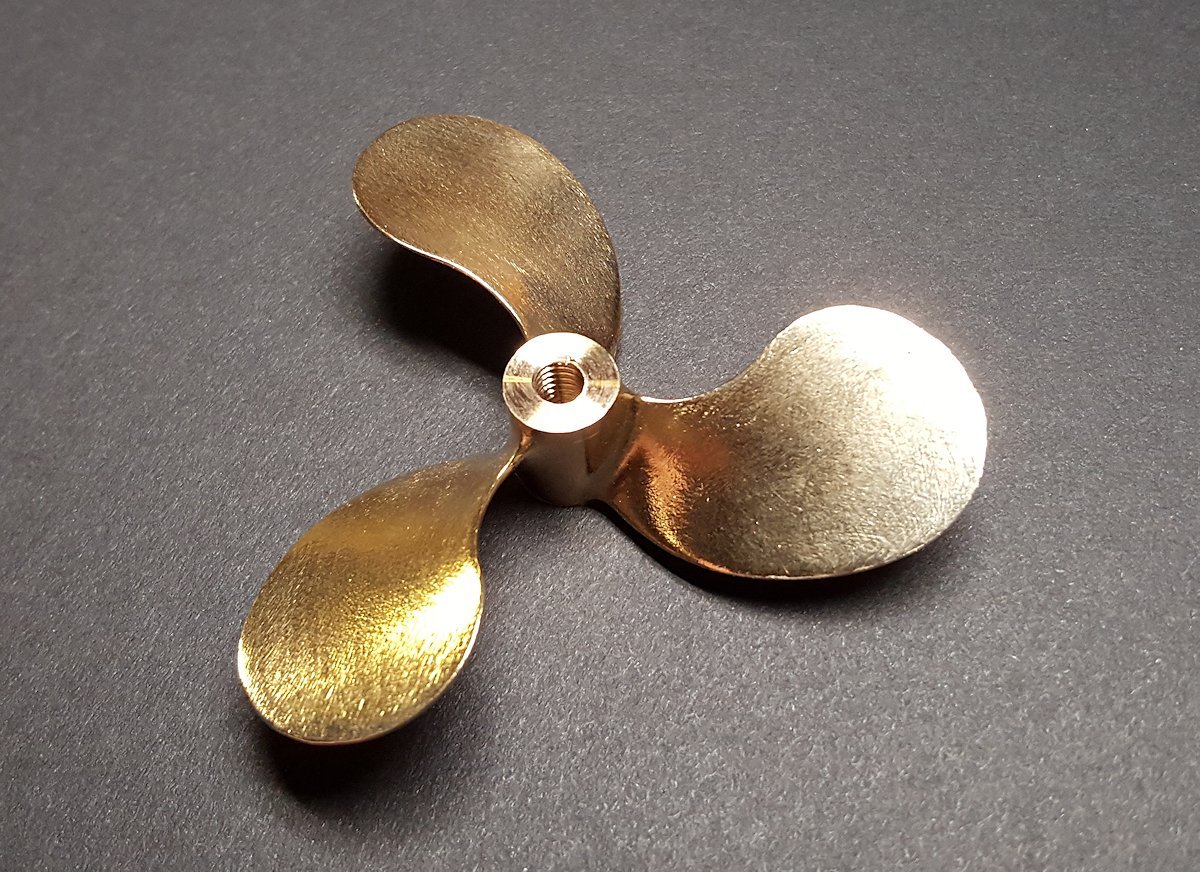
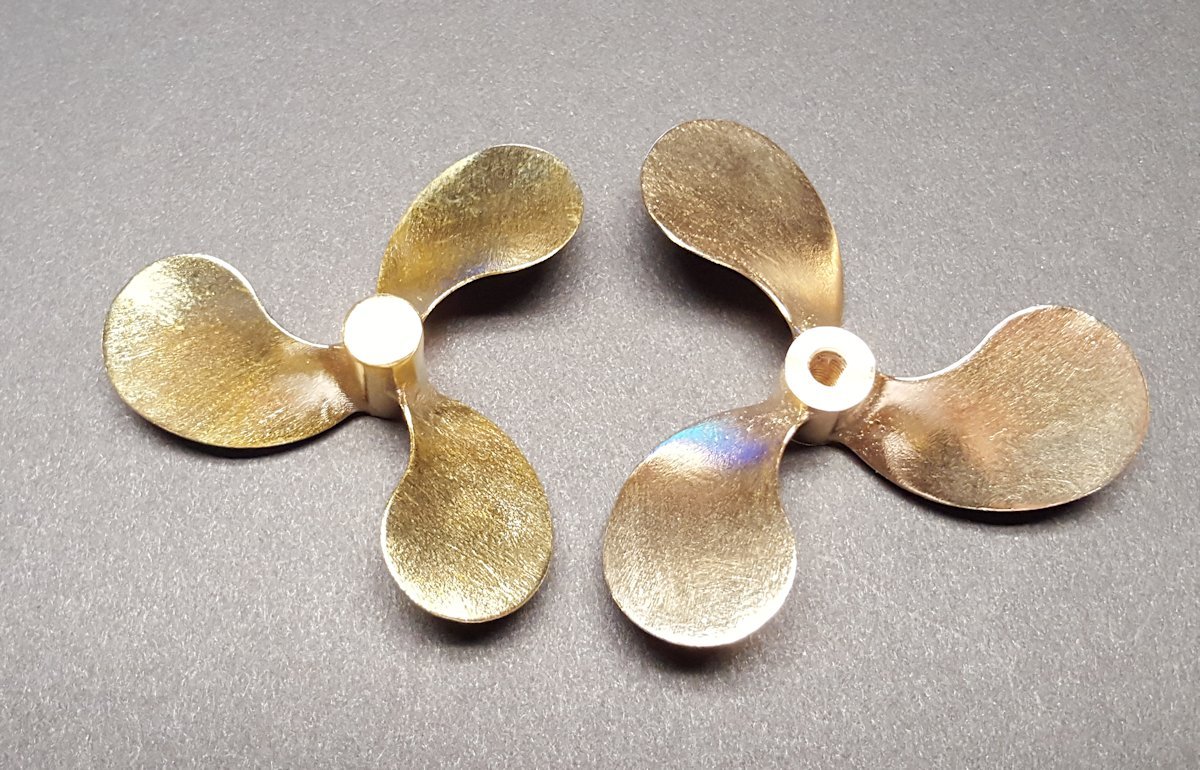
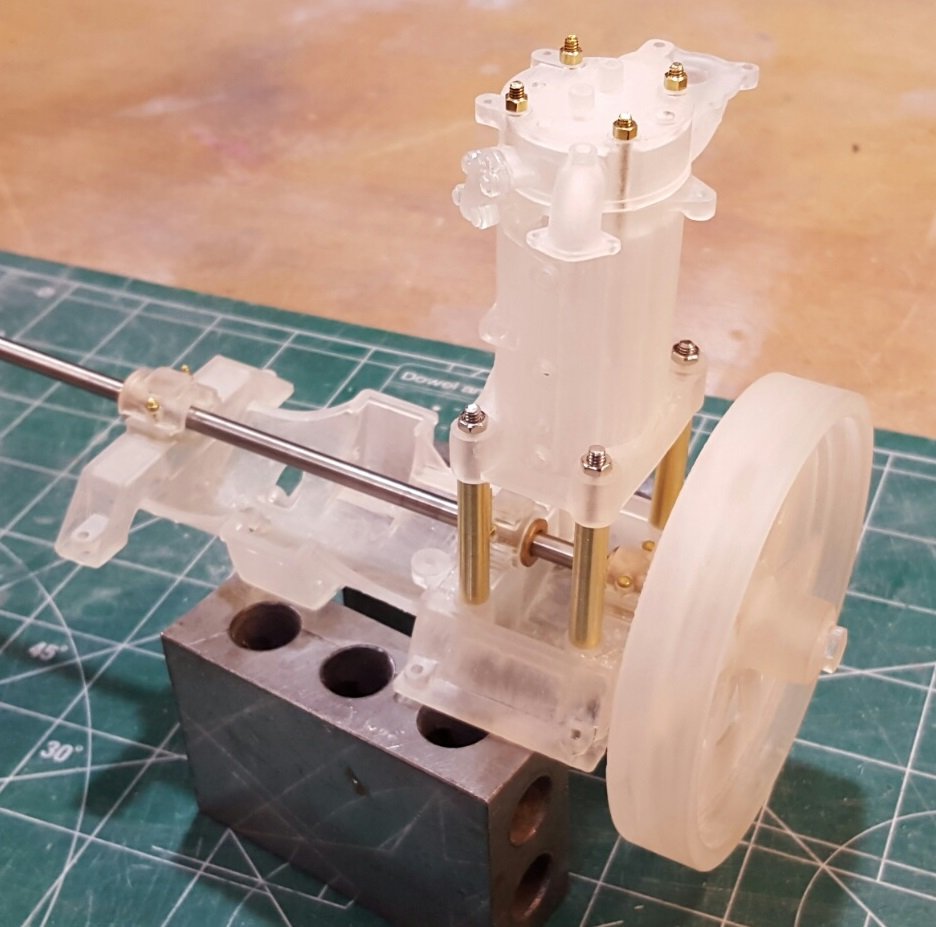
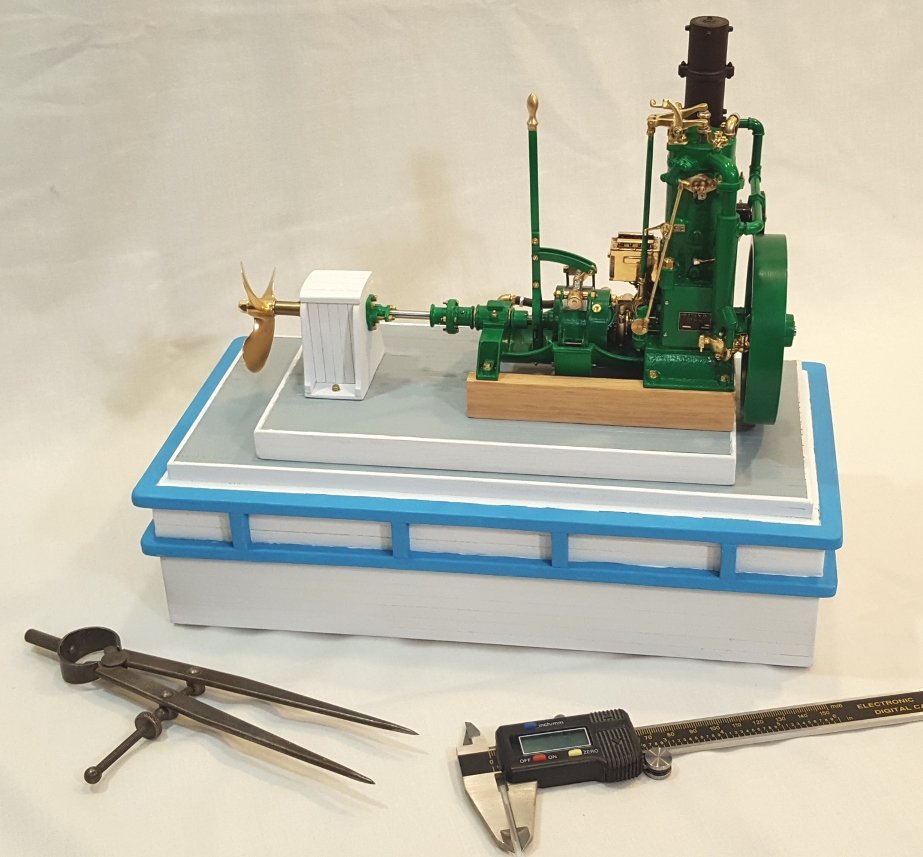
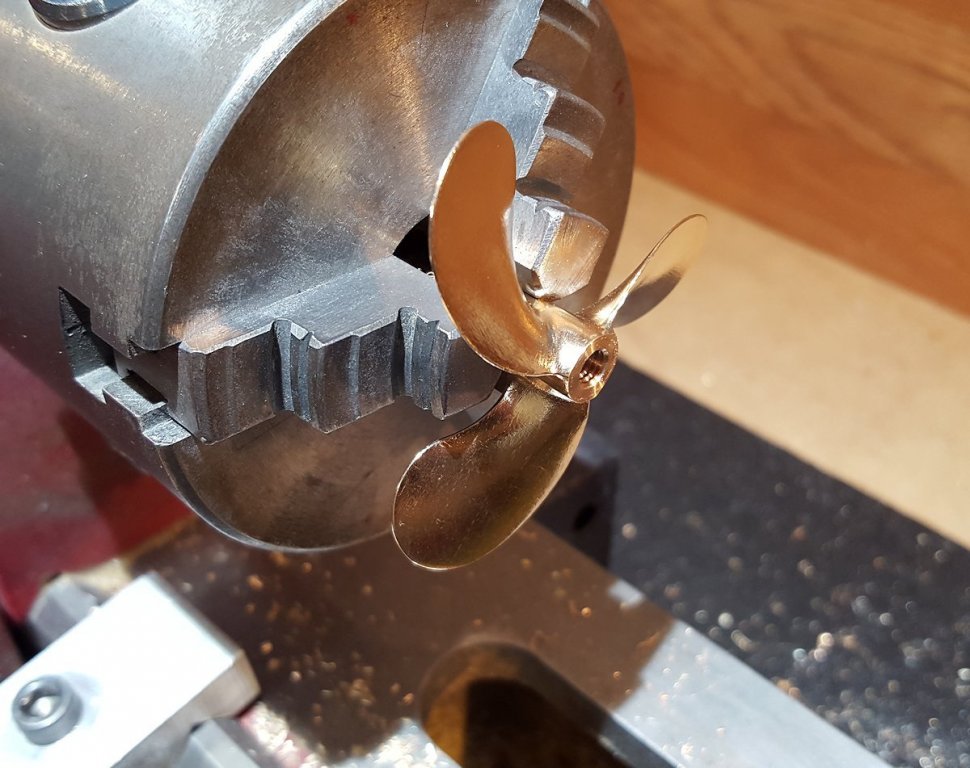
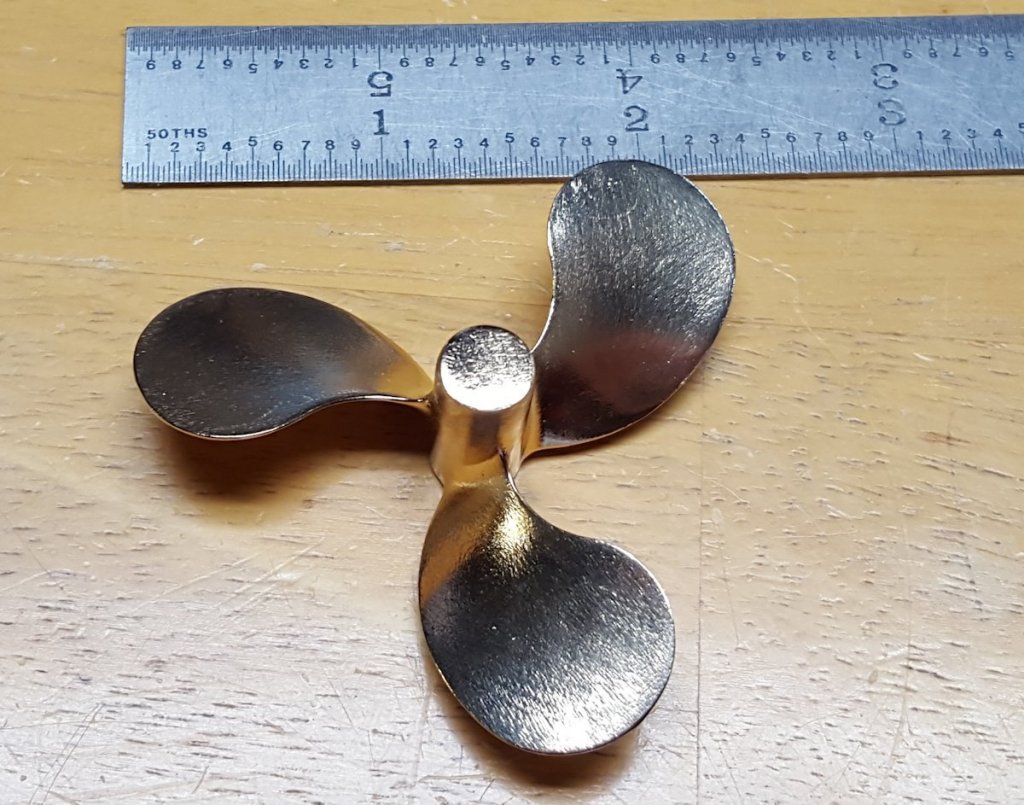
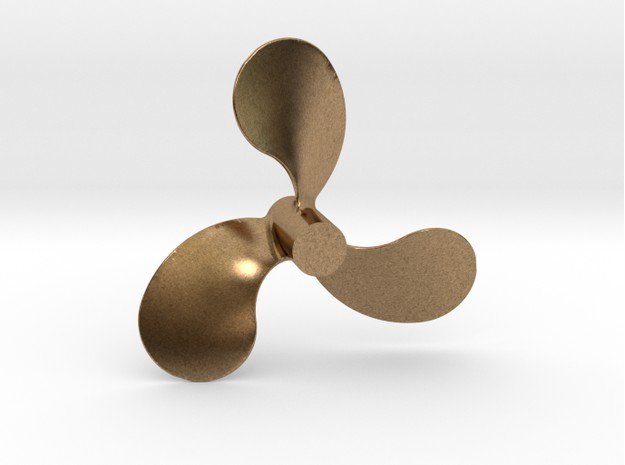
 In functional boat and ship models, many modelers use brass props made of stamped blades soldered to machined hubs. Nicer props, having a more realistic shape, are made by casting in brass or bronze. The process used for these is lost wax, or investment, casting. Usually, the waxes are made by injecting wax into a rubber mold; the rubber molds can be made from a carved or machined master. Should you need a unique prop design, you’ll need to commission a master and a mold; don’t forget to allow for casting shrink when you specify the master! Need a left and a right? Twice the masters and molds. Another option? 3D print the waxes- no need for masters, no rubber molds, and complete freedom to scale and mirror the design. BTW: You can also machine the waxes on a 5-axis mill… but that’s another challenge. But if you can create a 3D CAD model of the prop, and don’t mind machining the bore yourself, you can use very convenient 3D printing services like Shapeways to source your own custom props. In this example, I made some props for Monterey Clipper fishing boats, using the Yuba-Hicks “weed cutter” design that many of these boats carried. While it’s possible to draw a convincing prop from scratch with some basic knowledge of prop blade shape, I had the benefit of the original factory drawing to work from: CAD rendering of the design: Raw cast bronze prop from Shapeways- 2.5” diameter: From the same CAD model, a 2.25” opposite hand prop (on left): Machining the bore and threads on my lathe: Prop with a 3D printed Hicks engine model: The 2.25” prop went on this 1:8 scale model Monterey:
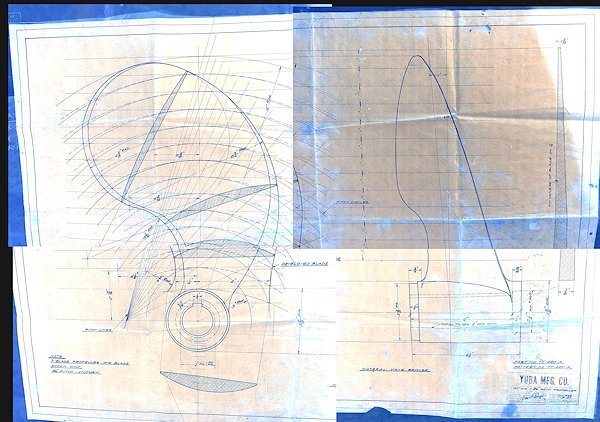


- 5 replies
-
- 22
-

-
3D-printing for modellers?
Patrick Matthews replied to Jean-Pierre's topic in Modeling tools and Workshop Equipment
Yes, that's what it is. But two topics here: 1. For any CNC machine, one starts with a 3D CAD model of a part. This is fed into some sort of tool path generating software, wherein you define the part's orientation and the size of the rough blank. Using the s/w, you then define what the rough and finishing cuts look like, based on the cutting tools used... the s/w generates the path that the cutting tool will follow. For simple 3-axis mills (including router tables with an adjustable Z-axis), I believe there is even free s/w available. 2. Going beyond the basic 3-axis machines, you have 5-axis and even more complicated machines available. Something like a half hull can be machined on a simple 3-axis; a complicated carving, like a 3D sculpture, a figurehead, etc., could make use of 5-axis. It gives the machine the ability to twist and turn the part under the cutting tool... search Youtube with "5-axis CNC" and you'll find plenty of fascinating videos of this. But 5-axis machines are very specialized, expensive, and take very skilled programmers to set up... so your machine-carved figurehead will likely be very important to you, for you to take this path! -
3D-printing for modellers?
Patrick Matthews replied to Jean-Pierre's topic in Modeling tools and Workshop Equipment
3-axes are plenty for most machinable-from-wood jobs... what would need 5? But all you need is the appropriate software to generate tool paths, and away you go! -
3D-printing for modellers?
Patrick Matthews replied to Jean-Pierre's topic in Modeling tools and Workshop Equipment
And ANOTHER thing... these outfits (like Shapeways) have set up so that you can sell your own designs in your own shop... they handle the web work, order taking and fulfillment, and send you a check every month. Sweet. I got started in it just to make my range of cowl vents available... those nasty little vents, about the hardest part to make on any ship model! The examples below are on a 1:32 ocean salvage tug.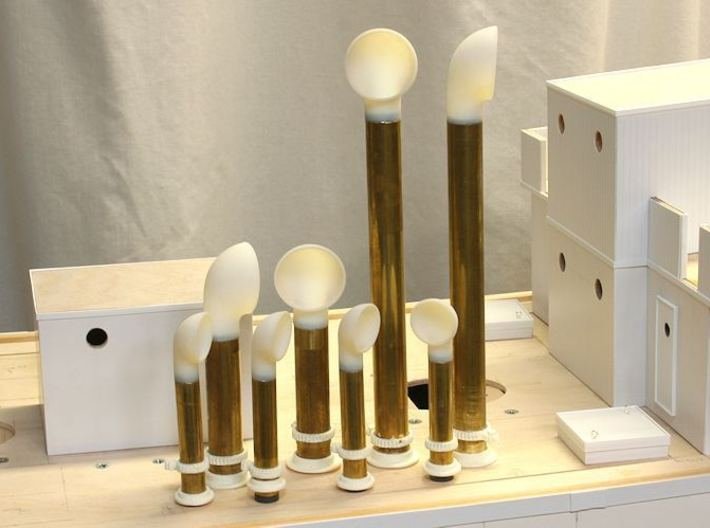
-
3D-printing for modellers?
Patrick Matthews replied to Jean-Pierre's topic in Modeling tools and Workshop Equipment
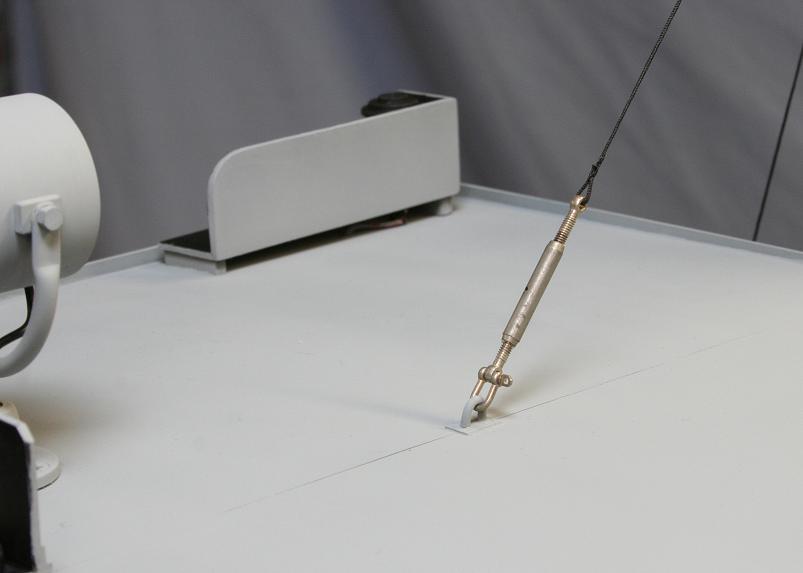
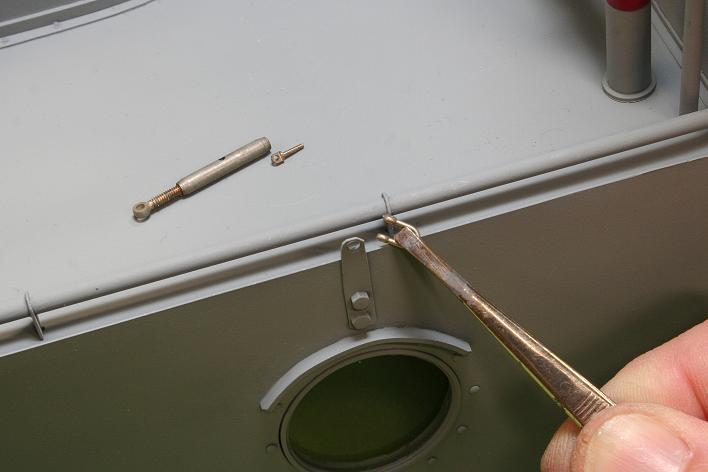
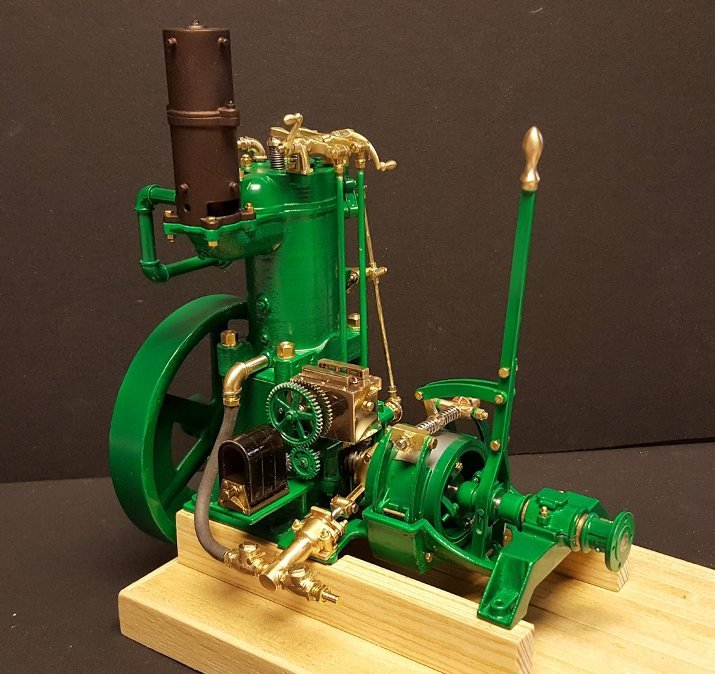
Kurt- Sorry I couldn't make it to Manitowoc to give that talk! My advice to any fine modeler: Do NOT waste money on "affordable" home 3D printers... they are frustrating to use, and produce poor quality parts. Instead, take your designs to a commercial house like Shapeways or iMaterialise, where they have spent MILLIONS on top quality equipment... parts will come out quickly and much nicer than anything a home machine can produce. Here is my latest 3DP project, an animated Hicks marine engine in 1:8 scale. Mostly 3D printed, with a little PE and traditional machining. Even the brass parts, including the prop, were 3D printed. Well actually, the waxes were printed, and then fed into the traditional investment casting process.

-
Cutting brass sheet
Patrick Matthews replied to Landlocked123's topic in Metal Work, Soldering and Metal Fittings
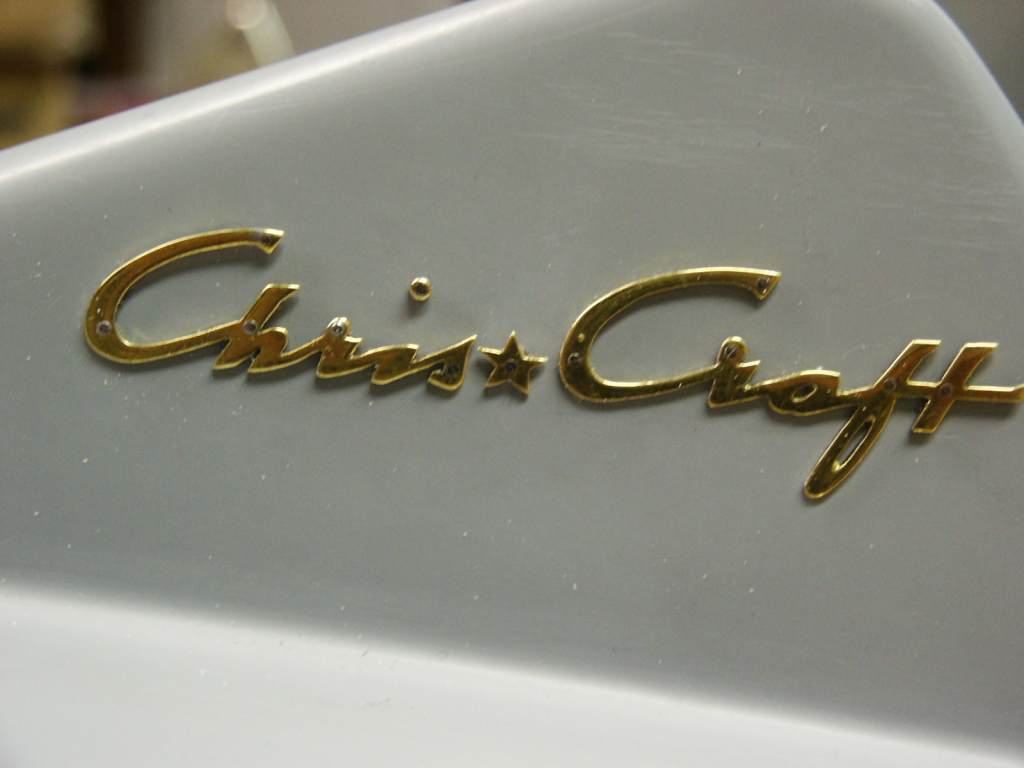
For cutting complex shapes in brass sheet (thick or thin), nothing beats a jeweler's saw (used with a proper "bench pin"). See: http://www.fdjtool.com/custom.aspx?id=117 I have a friend who cut out a beautiful example (two actually) of the cursive text "Chris Craft" in 1:8 scale from brass sheet... just takes patience! No need to anneal your brass.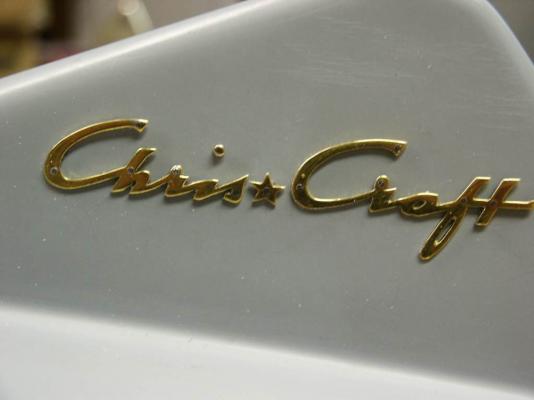
- 24 replies
-
- 10
-
-
galvanized fittings and chain
Patrick Matthews replied to Jond's topic in Metal Work, Soldering and Metal Fittings
Tinning: You should try it! Much more durable than paint or blackening, and if the parts should be galvanized, this is your best bet! You are looking for "Tinnit", and easy to use solution, that normally is used to apply (electrolessly) a tin plate onto PCBs' copper traces. It works quite well on brass too. http://www.allelectronics.com/make-a-store/item/er-18/tinnit-bright-tin-plate/1.html Find an example here: http://www.rcgroups.com/forums/showthread.php?t=967801&page=9#post11881171 where I used it on large scale brass rigging fittings.

-
Thanks; it is listed there now.
-
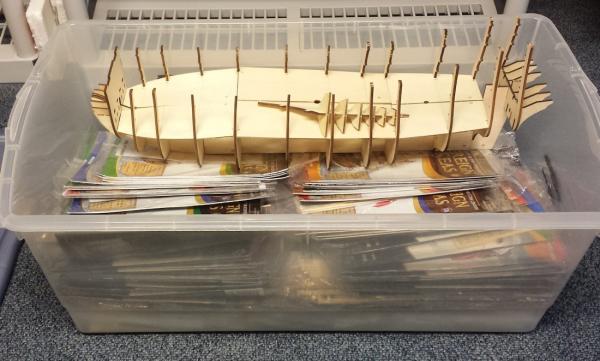
I'm happy to say that I now have the full kit in hand, no missing installments. I could build it... if I had the time. But I may need to let all 40 pounds (including the 135 "magazine" instruction booklets) of this kit go. Postage might be a bit, it'll be a big carton, for the 135 packets and the partially assembled framework (bulkheads and keel assembly). Yes, it's expensive to obtain through the DeAgostini parts work plan, currently comes to about US$1250 at the current exchange rate, and more for getting it across the pond if you could find someone to gather and ship it. Maybe I should just let ebay work its magic... Looks more impressive when all 135 packets are laid out on the floor! But see all of them and their contents at: https://yankeesots.wordpress.com/
-
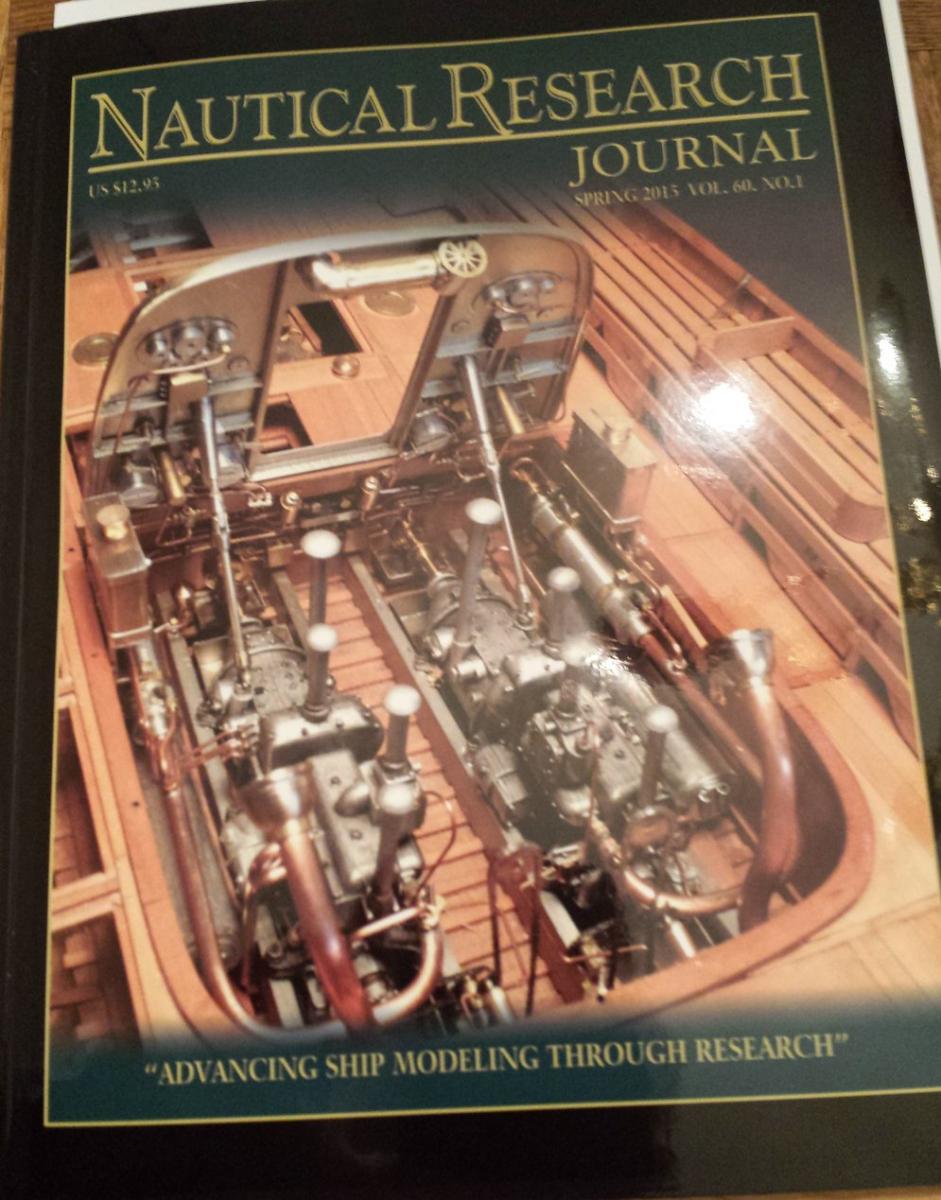
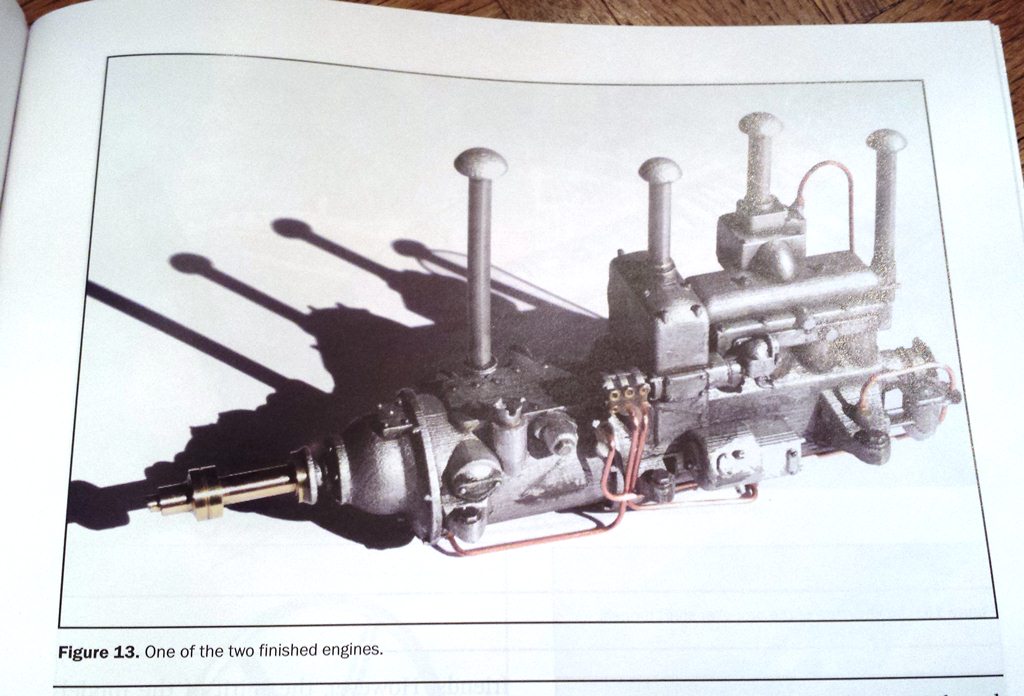
After having my article on 3D printing published in the NRG Journal last summer, I was pleased to see some actual parts show up in the Spring 2015 issue. Hubert Mallet's article on an RNLI lifeboat includes a pair of engines which are 3D printed. And I think this is an excellent example of using the best tool (or process) for the job. The engines are "modern" mechanical items that lend themselves to modern modeling techniques. On the other hand, I would usually avoid 3D printing a part which simply needs, nay, demands, to be shaped from wood. And Mssr. Mallet has done the right thing here by shaping his model's wood hull from ... wood. Nicely done, Hubert...


-
- 6
-
-
3D Printing - Not Just Yet!
Patrick Matthews replied to dvm27's topic in CAD and 3D Modelling/Drafting Plans with Software
Thanks, but I wouldn't touch it. This is another example of a cutely packaged machine which can make NOTHING of use to the maker of fine models. This is a "fused deposition machine", basically a computerized hot glue gun. It builds parts in squiggles, melted noodles of plastic. Instead, the modeler is well advised to spend the money instead at a commercial house which has invested hundreds of thousands (if not millions) into the finest industrial 3D printers available. THESE machines can make the parts that we modelers need. -
3D Printing - Not Just Yet!
Patrick Matthews replied to dvm27's topic in CAD and 3D Modelling/Drafting Plans with Software
Interesting, but I call BS... we here should stick to reporting practical and real applications of the tech for our modeling needs. Shoes: Just look at the complexity of materials and assembly in any desirable modern shoe... tough but cushioned soles, sides with appropriate support and tensile strength (leather or fabrics), soft cushioned and absorbent linings, extremely strong closure systems (metal eyelets and strong laces), all tied together with binding materials that withstand the continued pounding from our significant masses... and now replace all that with a single printed material? Even if the printer can deliver variable densities (e.g., foam), is this something you'd want to wear? Or pay for? (Think of shoes currently made with minutes of low cost Asian labor, vs. HOURS on a 3D printer)... There's no end to the 3D print hype out there... -
I list a number of R/C and model ship books at my blog (an Amazon list actually): http://astore.amazon.com/modelmarine-20?_encoding=UTF8&node=4 John Cox's book is my number one recommendation if you want just one R/C beginner's book, readily available through Amazon and Traplet pubs. BTW, I also hang out and contribute heavily at RC Groups (Boats)... there is even a section dedicated to "Scale Sail". We model FUNCTION as well as FORM! If your ship doesn't move or get wet, you've left out a major part of the model, eh?
-
Miniture machine screw sizes
Patrick Matthews replied to grsjax's topic in Metal Work, Soldering and Metal Fittings
What, this? See more on the construction at RC Groups: http://www.rcgroups.com/forums/showthread.php?t=694350 -
Soldering Trouble
Patrick Matthews replied to rhephner's topic in Metal Work, Soldering and Metal Fittings
The most likely cause for lack of heat is a loose tip. Many screw into the holder... grab it with pliers, loosen it, then snug it up again. I have a cheapo iron that also had a grub screw close to the handle... loosening and retightening this regularly was also needed. Finally cured all these ills by getting a decent iron: http://modelshipworld.com/index.php/topic/8698-recommendations-for-soldering-equipment/page-2 -
Miniture machine screw sizes
Patrick Matthews replied to grsjax's topic in Metal Work, Soldering and Metal Fittings
A friend lucked into a gross of stainless Swiss-made watch screws that were just right for finishing his 1:8 scale Chris Craft. All the rub rails, cutwater, and hatch strips are "secured" with these little guys. The rub rail in this image is about 1/8 inch high...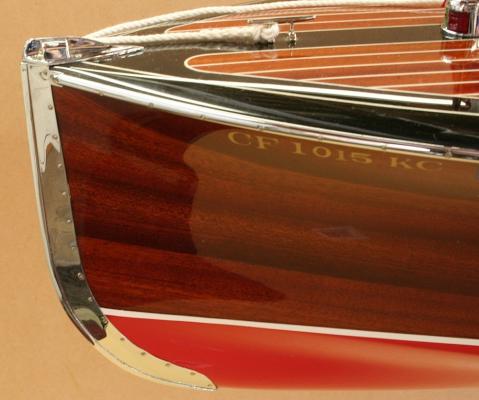
-
Torches: For big stuff, and for true silver solder. I've given up (mostly) on jewelry grade silver solder, as it requires such high heat, and it always anneals my brass dead soft. Instead, I use TIX, a lower temp silver-bearing solder, but it's still much stronger than electrical solder. It's been great for all my modeling needs, and I can work it with a soldering iron. Iron: Best buy I ever made was a good (not great) quality digitally controlled iron from Radio Shack. See my commentary at: http://www.rcgroups.com/forums/showthread.php?t=1372225&page=14&highlight=radioshack+soldering#post18112560 The iron has good quality tips, heats up VERY fast, is easily adjusted, it's been a wonder and a huge improvement over the cheap pencil irons I've used in the past... yet quite a bit less pricey than good quality pro equipment. http://www.radioshack.com/radioshack-digital-soldering-station/6400053.html#.VJ3PWl4AHA
-
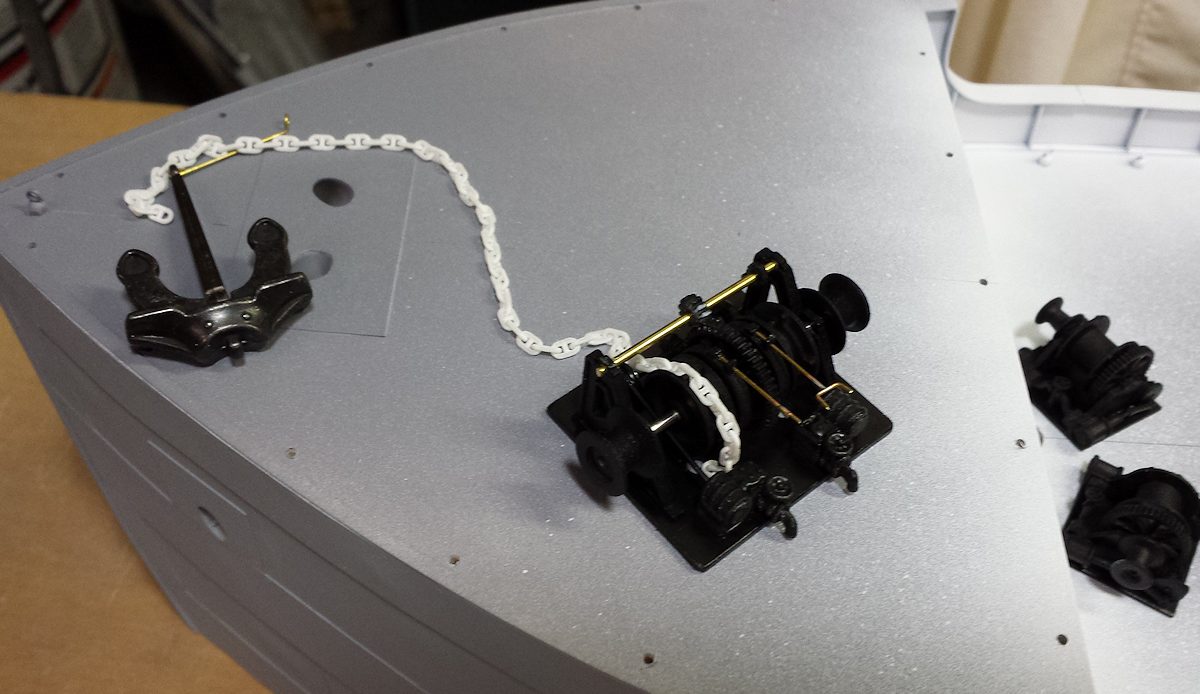
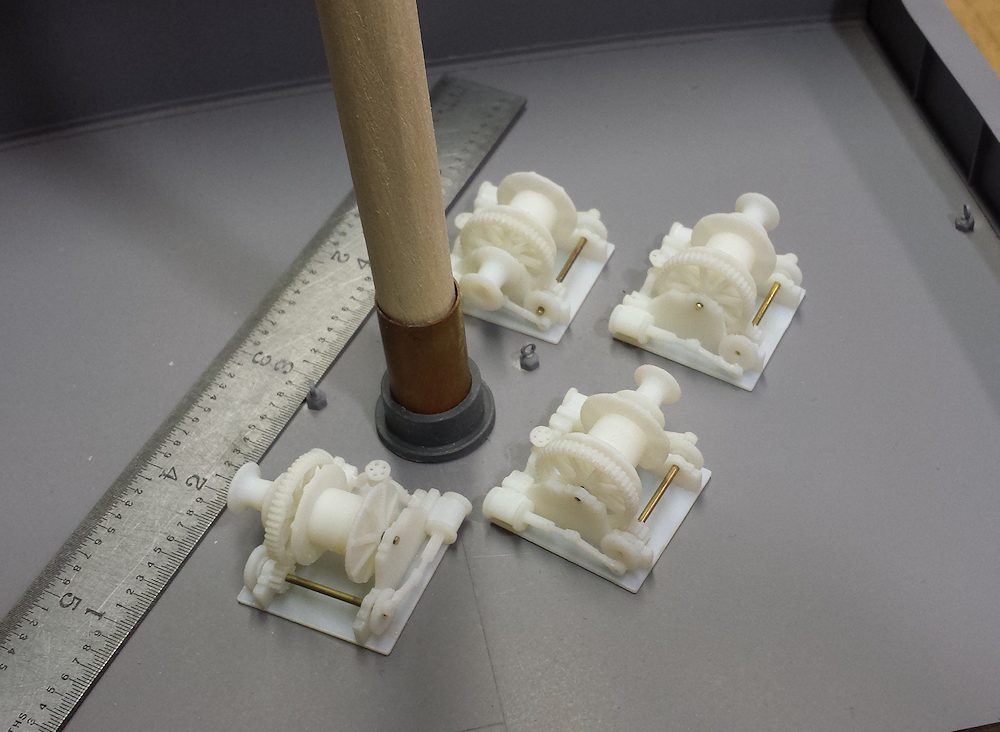
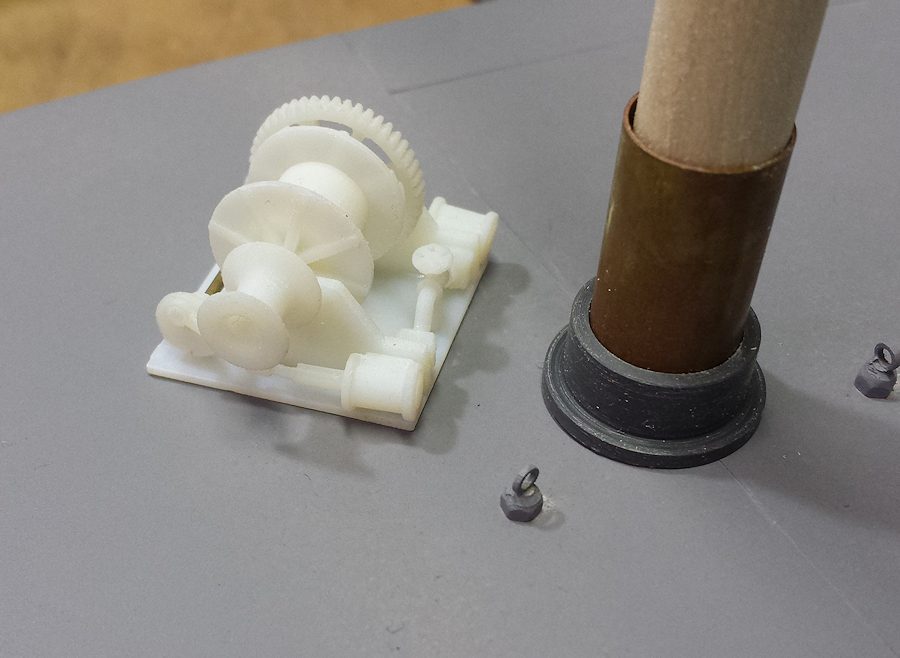
I needed some in 1:48 too, so I designed and 3D-printed them. An anchor windlass too. And the stud link anchor chain. Not having any reliable drawings or images to go by, they had to be figments and overly simplified at that. But good enough for this job, a waterline model on a railroad layout. I do wish I had access to good drawings of such gear, would love to work up some better designs.


-
Instead of paint, you may want to try "Tinnit" http://www.allelectronics.com/make-a-store/item/er-18/tinnit-bright-tin-plate/1.html This is a simple dip which "plates" tin onto the copper traces of printed circuit boards. Use brass or copper sheathing and coat it with this stuff. If the copper is rough (sand blasted), it might avoid a too-bright finish... or coat it with matte lacquer. Photo shows Tinnit applied to machined brass fittings.
-
Let's talk 3D printers.
Patrick Matthews replied to Keith_W's topic in Modeling tools and Workshop Equipment
I've used iMaterialise, but don't care for their near exclusive use of stereolithography for detailed parts... the process leaves little nibs all over, from the support structure made of parent material. I've had very few delivery issues with SW, other than their tendency to jam delicate parts into stiff poly bags... -
Let's talk 3D printers.
Patrick Matthews replied to Keith_W's topic in Modeling tools and Workshop Equipment
I design in 3D with all the parts in context of one another... so not too many oopses get past that stage for me to correct later. But the best laid plans... let's just say that every build is full of learning opportunities! -
3D Printing - Not Just Yet!
Patrick Matthews replied to dvm27's topic in CAD and 3D Modelling/Drafting Plans with Software
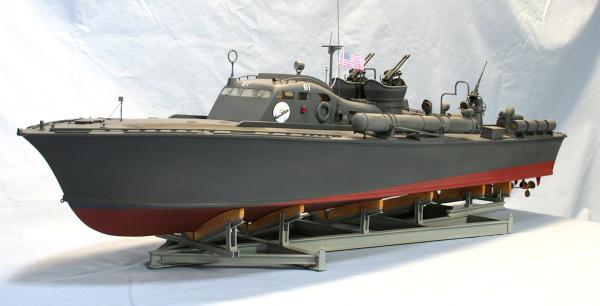
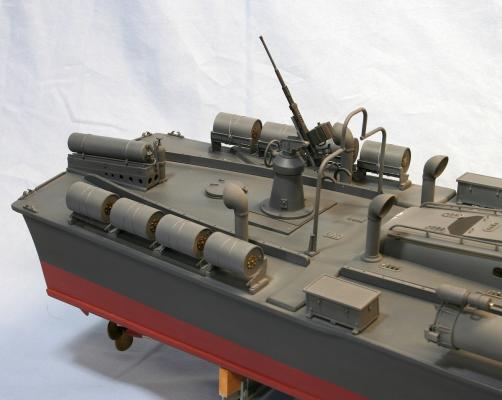
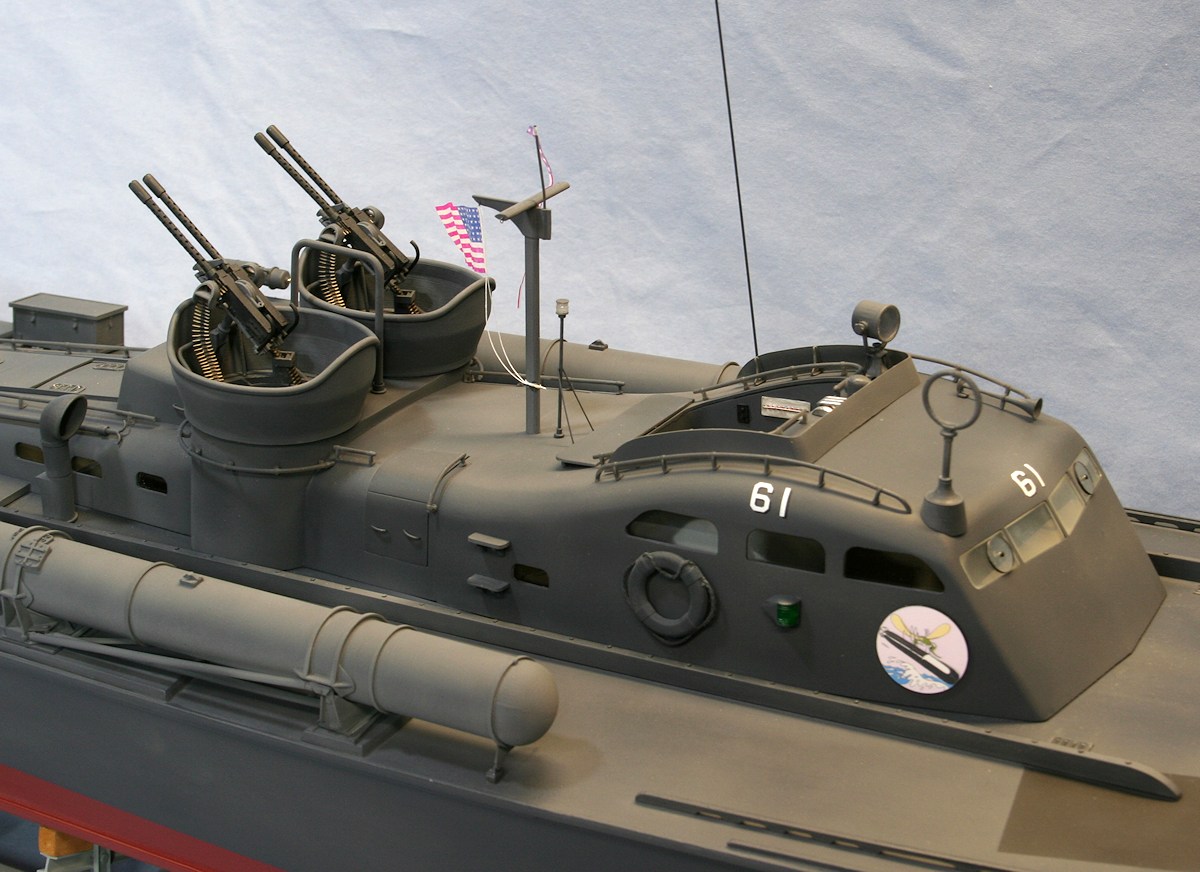
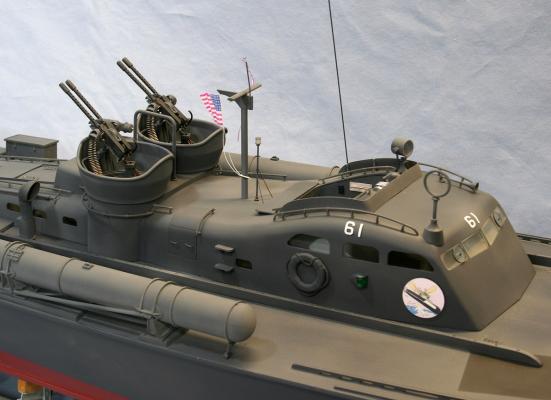
Inability to see might be related to having one's blinders on! Seriously (and again as I've said elsewhere), if your goal is to make a wood model of a wood ship, then by all means that's the best thing to do. But not all ships are wood, and neither must all models be wood, and not all modelers are limited to age-of-sail. Is wood the best medium to recreate the Bell Mk17 carriage for the twin Browning 50 caliber machine guns on my 1942 PT boat? Maybe not! Care to form the air cooling holes around those Brownings' barrels by whittling a twig? Yikes! How about recreating the conical sheet metal surrounds with their beaded lips from a block of burl? I think not. Also, not all builds are the leisurely exercises of hobbyists with infinite time on their hands. The PT boat above was a commission, and 3DP helped enormously in its rapid completion- 4 months from laser cutting the first hull frames to the posting of these images of the finished model. There are reasons enough, believe me... -
3D Printing - Not Just Yet!
Patrick Matthews replied to dvm27's topic in CAD and 3D Modelling/Drafting Plans with Software
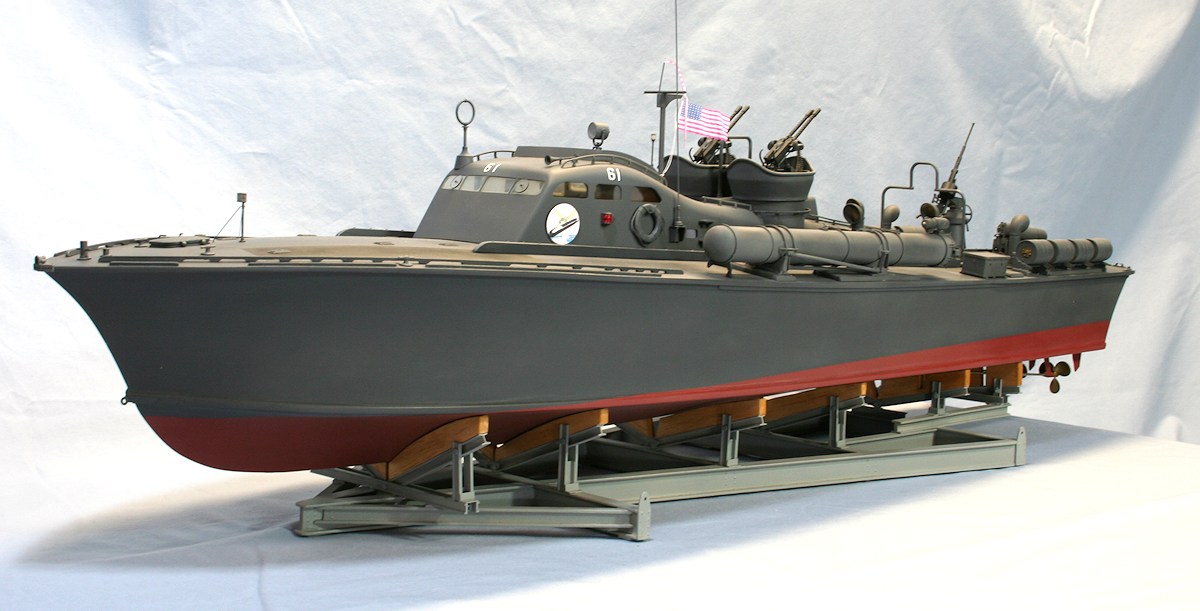
As posted in another thread here, there are places where 3DP works, are there are processes that are usable... and some that aren't! Virtually no printer that you or I can afford will be satisfactory, and most all printed parts (for now) require a lot of surface clean up to remove the visible layering. But it is possible. This 1:24 PT boat is 3D Printed from the deck up (all cabin parts, weapons, deck fittings, even the glazing), less a few bits of string, tissue, and and a few whittled parts.
-
Let's talk 3D printers.
Patrick Matthews replied to Keith_W's topic in Modeling tools and Workshop Equipment
Fletch, thanks! And see my comment above about desktop printers... I don't own a printer and likely never will; my parts all come from places like Shapeways. -
Let's talk 3D printers.
Patrick Matthews replied to Keith_W's topic in Modeling tools and Workshop Equipment
Sorry that I didn't find this thread earlier. A few quick comments: 1. If you want to make a wooden model of a wooden ship, that's perfect, and don't let 3DP annoy you at all. Do what YOU want to do. But do avoid being a wood-ship chauvinist! Not all ships, nor their models, nor their MODELERS, are age-of-sail-ers, and not all of such parts are best whittled from sticks. 2. If you DO want to use 3DP, "too old" is no excuse! I'm pushing retirement age myself. 3. For the time being, DON'T waste time and money on any "affordable" desktop printer... the machines that can do work suitable for decent models have many many zeroes in their price tags. Go to a shop like Shapeways instead, let them take the depreciation on their capital investment. BTW, here is my latest 3DP model, PT-61 (a late Elco 77 footer). In 1:24 scale, it's large enough for R/C, but this copy is for display only. The hull is wood, because sometimes wood just makes sense! (PT hulls are quite easy to build up with dual-diagonal planking). But virtually everything else is printed, from the cabin to the weapons, and even the window glazing. Kurt likes to remind us that "if you have to hurry, it ain't a hobby". Well I had to hurry, as this was a commission, and tools like 3DP helped a lot. From the first laser cut frames to the final photos: 4 months. Pat M