


Jaager
-
Posts
3,084 -
Joined
-
Last visited
Content Type
Profiles
Forums
Gallery
Events
Everything posted by Jaager
-
 If a thickness that is almost thin enough to read thru is needed, a very sharp plane may get you a semi thick shaving. A knife and steel straight edge for the other dimension. A compatible wood species would increase the probability of success. No loss to kerf, either. You would need to research the type of plane that does this. I expect it will need a high quality plane and a whole lot of practice. Maybe White Pine, because the examples of long wide curls from a plane seem to come from Pine. Holly, because it bends so well may be an option. Advantage Lumber still shows the low quality, non-white stock at $6.00/BF and some stock that is more clear for $12.00/BF. Holly that has been infected by Blue Mold is just as sound as normal Holly, it is just blue or grey.
 -
Gluing deck, will this work?
Jaager replied to ubjs's topic in Building, Framing, Planking and plating a ships hull and deck
You might consider giving yellow PVA a try. PVA does not bond as a putty type substance would. It "invades" the wood surface pores and irregularities with long chains. The chains interlink in the gap between the two surfaces. Concepts to keep in mind as PVA is applied: The smaller the gap, the stronger is the bond. The more surface are covered, the stronger the bond. We work with very small surface areas that have tight tolerances - if done correctly. I have good luck using miniature sponge sticks - I use the packing foam that comes in sheets or rectangles. An actual sponge paint applicator would work as a source, but the other stuff is free. The flexible and irregular surface packing material that can suck up the PVA is what is wanted. The stuff that is like Styrofoam cups or peanuts is not at all a good choice. A Gem single edge or carpet layers cutter will allow for any size and shape needed to get at any particular surface. Duco is not all that good for much, but a round toothpick (or two or three) can be dipped in it and then pushed into a hole in the foam. This makes for a handy handle that can be ready to go in about 15 minutes. If you have a favorite foam stick, it can be rinsed in tap water and reused - if you get to the sink before the PVA has a chance to set. Use the foam stick to apply a just wet PVA layer on both meeting surfaces. If done correctly, there should be minimal squeeze out. If it is where it will not be sanded off later, a damp paper towel, or steel blade scraper easily removes it.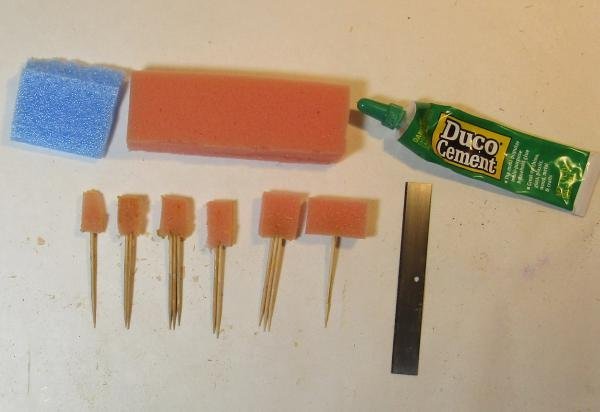
-
I would place a sizable bet, that you have some homemade ropewalk product there. The corrugated cardboard is what I use to hold my ropewalk product. I used the wrong spacing and got a layup that looked like that --- like string. It is probably waxed, so what you feel is probably not indicative of its substance. If it is waxed cotton or linen, treatment with a solvent to remove the wax may be necessary for a dye to penetrate. If it is a synthetic polymer, a dye will probably not take. If it is a synthetic, the solvent meant to remove wax may turn it into a gummy mess, so test a small piece first. It looks like it could pass for steel standing rigging - if the size matches your scale - and even thin black paint - maybe organic solvent based - may make it stiff like wire. I sure would not have been much interested in pulling steel running rigging bare handed. I would not have wanted to even be on deck if a steel rigging rigging line broke loose and whipped around. My point being that while steel standing rigging makes sense - using it as running rigging seems like it could have been dangerous.
-
Is it weed green or synthetic dye green? The linen yarn that I bought from one of the Baltic countries is what I guess the dried flax plant stem would be. Or at least a variety grown in the Baltic region. When I owned 5 acres and gardened, during the Winter one year, I thought about planting some flax. Then I read about the process required to convert the plant stems into yarn and thought better of it. The other suppliers have white, half bleached, and natural - which is not as green. Hemp is a tan/yellow so white (bleached) and half bleached would not match. I have no problem using the Baltic green for running rigging. I plan for a dark Walnut (Van Dyke) dye for standing rigging. But my interest stops at 1860. Cutty is a different generation and technology. There may well have been steel cable - depending on when in her working life is chosen. There was actual petrol based tar during Cutty's time, so actual black would probably match. If your purchase actually includes real linen - that would be something special.
-
The wise path is to buy a tool when you know that you will need it. That is not advice I have ever been able to follow myself. It does not apply if having tools 'just in case' is one of your compulsions. It does give you an extensive knowledge base of tools that are useless. One tip, basic tools are much less likely to be a part of that knowledge base than handy looking jigs and gimmicks with catchy names - tools that you could make yourself from scrap and have it be a better fit. It sounds like you have your head on straight as far as how you are beginning this. It may serve you to look for local woodworkers and self employed custom cabinet makers. Neato tools, small supplies of domestic lumber, and a short cut to mentor level skills and knowledge.
-
Bulkheads from solid wood
Jaager replied to Burroak's topic in Building, Framing, Planking and plating a ships hull and deck
As long as Roger and Bob have introduced POF intended to be totally planked, here is a way to do that: https://modelshipworld.com/topic/22608-la-renommee-1744-by-jaager-160-frigate-pof-using-the-fully-planked-solid-hull-option-of-the-station-sandwich-method-this-option-is-offered-as-an-alternative-to-pob-using-filling-wood-between-each-mold/ Now, I would use knot and sap free construction Pine from a builder's supply instead of Hard Maple. I would also forego any attention to port location during the frame-up. The frames make it easy to site them later. The inside can be rough and wider. I was being compulsive in the moulded dimension be determined by the scantlings. The sided dimension can be whatever is convenient. Using 1/4" stock works well. There will be an odd thickness layer in every station section to get distance correct. If the hull is to be planked, only one layer is needed. If the hull is to be copper covered, and the frame dimensions are properly adjusted, no planking is needed where there is to be copper. With a stencil and the proper actual copper containing paint, the bottom can be paint only, The ModelMaster (?) line has old penny copper and with it being the actual metal, any green oxidation can be place where it is wanted. Until Roger and Bob brought the above subject up, I did not intend to present the above. I wrote, but decided not to post the following: An interesting tree your namesake is. Although it is not really a species for use with a scale model ship if the unpainted wood is to be on display, you could use Burr Oak or any other Oak for molds, since it will be hidden. It is not the best of choices, but it is an option. A mold is actually what is named a bulkhead really is. Western wooden ships did not have bulkheads. Chinese seagoing Junks did have bulkheads. A single piece of wood can be used for a mold. The thicker it is, the better it will do its job. A factor ruling against the use of solid wood for molds - at least for the larger scales is the width of the plank it must be resawn from. Any Oak is fairly dense and offers resistance to being cut and shaped. Clear Pine will do just as well and is less expensive. There is a scratch log for Charles W. Morgan doing exactly what you want to do, and is POB, right at the top of the 1801-1850 forum. -
First, I doubt that anyone but you will even notice. White PVA usually dries water clear. Titebond II dries amber. Titebond III dries a brown color. PVA is water based, so adding dry aniline dye could in theory darken the polymerized glue. I tried it and found that there is not enough water in stock PVA to dissolve much of the dye. Mixol make a liquid concentrate that may work. Once PVA has polymerized, it is a plastic. Nothing water based will stick to it. You may be able to cover the parts that concern you if you buy a Walnut shade or if one does not exist mix several colors of artist's oil base paint. Thin it with an organic solvent enough to need several thin coats. Impasto will want sanding and doing that will probably remove all of what you apply. There are very fine touch up brushes. On a side note, I am hard pressed to think of any species of wood that would have been used to plank a hull - that actually had a dark Walnut color to it. Being decorator instead of strict historical offers you more degrees of freedom for your presentation.
-
Gregg, Here is one way There is a Woodcraft in your city. The Lime can be replaced with a better acting wood species. There are packages of veneer of Hard Maple, Birch, and Beech. The smaller size is ~$20. Straight grain, NOT rotary cut (when cut like a continuous sheet like from a roll of paper towels, the wood will want to re-curl across the grain. ) A very sharp #11 style knife and a steel straight edge will free the scale planking from the stock. It is unwise to dilute PVA that is used for a wood-wood bond. If what you have is too thick to spread as a wet layer, it may be too old. Get a new bottle of Titebond II when you get the veneer. The job in question may be an opportunity to try the contact glue version of PVA. This is: apply a thin layer of PVA to both surfaces to be joined. Let the glue dry (polymerize). Place the two pieces together and apply heat from an iron or maybe heat gun. Take care not to char the wood or even so much as to denature it. Practice on scrap first, Practice as lot. Wet to wet PVA bonding is stronger It wants weight or pressure to make the gap as small as is practical. Making the bonding surface half heat contact and half wet to wet may be the best of both ways, but it requires constant attention and concentration to keep straight what goes where. Do research to learn the proper placement and staggering of deck butts. Unless your vessel is 16th century or earlier, they will not be close together. On and actual vessel, the trunnels are all but invisible unless you are on your hands and knees, so if you add them, it is for model decoration - not historical. Learn the patterns used. Just having four trunnels only at each butt joint looks ridiculous. A scraper or a quality single edge razor blade is a good way to even the decking to the same plane. Half strength shellac primer and full strength 2nd coat with a ScotchBrite rubbing is probably all the finish that is needed.
-
I have an old Aeropiccola Torino plank bender - it works well on thin Maple. I do not see that a curling iron is any different in technology. I would give a dry heat curved surface and then a damp version of the same a long intense effort before devolving to something meant for full size like a steam chamber, ..... or a microwave - which has a good possibility of doing serious harm to the unseen interior. With the plank bender, I learned that wearing a pair of cotton or Kevlar carving gloves will save on blisters and unwanted notification that fingers not holding the wood are where they should not be. The real keys to success are probably: using the correct species of wood to begin with - most if not all of the species provided with mass market kits are probably species that resist bending. the thickness if the stock is thin and wide - bending across the thick dimension is never going to go well,
-
The Science Museum had a model of HMS Prince that may meet your spec -
-
Painting the hull
Jaager replied to Steve47's topic in Building, Framing, Planking and plating a ships hull and deck
A really poor bit of instruction! PVA should have been used. It is not instant grab and clamping can be a challenge. Unlike a contact adhesive, PVA will last. PVA can be made to be like a contact adhesive. A thin coat on both surfaces - let dry - join - apply enough, but not too much heat with an iron. The bond will not be as strong as wet to wet PVA, but will probably be stronger than DAP. I have found no solvent that dissolved DAP contact cement. It losses its bond and makes sticky balls when rubbed with Naphtha or Mineral Spirits. It is a real mess to undo. It makes for a bond that lasts maybe 10 - 20 years. Time and probably 02 , make it become brittle. A painful learning experience? A single coat of 1:1 diluted shellac (1 part shellac to 1 part 95% ethanol (shellac thinner)) ( Even if you could get 100% ethanol - which requires distillation from Benzene - as soon as it is exposed to air, it sucks in water from the atmosphere and quickly becomes 95%.). If you are compulsive - a follow-on coat of full strength shellac. Buff with a ScotchBrite pad - wipe clean and use any sort of paint. -
I see! So it is the zone where top timbers and half tops reside. A hardwood scab on the front and/or the back would make it even stronger.
-
This is far out of my bailiwick, but perhaps if you supplied a bit more information? I may be wrong, but I think Model Expo is a retail sales agent and not a kit manufacturer. One their site, I see three versions of Constitution, all POB, but from three mfg. Billings Mamoli ModelShipways Contact with the actual kit mfg may better serve your needs. Mamoli was a family operation that had a fire, and the expiration of the individual who was the engine? All of the rights and intellectual parts were sold to a larger company = ? Given the time and the nature of the original Mamoli product, the current version may be "a bit" improved. What do you mean by extension? After 10 years of hanging in space without extensive internal supports, things may be bent, curved, warped, racked. Going back to step one may give you a better final product. Most of the plans that come with POB kits have full size patterns of both the central spine and each of the molds. It would be an easily accessible process to have 1:1 copies made of these patterns, purchase quality plywood - even thicker than the kit supplied parts - and use a hand fretsaw and then rasp, file, sanding block to free the parts from the plywood sheet. A little study of information here and double or triple the number of molds constructed to provide a more adequate base for planking. I looked at the PDF of the Billings plans - the number of molds that they provide is not really adequate. From what I have seen of the old Mamoli - the number of molds is likely no more adequate. My experience with ModelShipways shows them to be a quality shop that strives to supply much more than the bare minimum. But even there, POB is what it is.
-
Planking glues
Jaager replied to ChiefCarr's topic in Building, Framing, Planking and plating a ships hull and deck
For POF trunnels can add significant hold strength. There are many contemporary models that use either brass or wood and some with both. The diameter is out of scale. No reference to support this, but I think that the choice of glue then was hide glue. It would likely have been either a home made extract or a cottage made product - no QA. Both English and French built models have doweling. The patterns and numbers match full size requirements. My money is on there being method behind most everything the old guys did. It was a professional and shop built operation back then. Pins and trunnels can be effective clamps also. Although using bamboo trunnels to hold wet planks down can be tricky. Some species of bamboo are strong and hold up to push pressure. Some species are not so strong. They bend and crack. The perverse aspect is that the softer species are much easier to pull and have a higher yield. A high speed electric drill with industrial HSS bits of standardized diameters probably makes this much easier for us. -
Planking glues
Jaager replied to ChiefCarr's topic in Building, Framing, Planking and plating a ships hull and deck
It is my guess, but perhaps Franklin was first on the market with yellow PVA and it gained enough of the market attract competitors. Effective advertising and placement in how-to magazines did the rest. As for the rubber cement - Over time the bond will fail. No surface treatment is likely to save it. Bamboo dowels may, but there is not much backing support for them. The wood species makes it more decorator than historical, so even brass pins could enhance the presentation. There is still the problem of not enough support thickness. A more permanent solution may be to number each plank. Treat the hull with n-Hepane to solubilize the rubber cement. Remove the planking. Clean all surfaces of cement. Then reapply the planking using PVA. The re-application processes is a lot like the kit coming with pre-cut and pre-bent planking. Except that instead of a computer guided laser, it is a human guided tool. -
The timber efficient way on the original ship would probably have used six pieces of timber to make the rail. It would still require spilling from wider stock and five scarphs. Three hook scraphs - but for the two "v's" I can't think of anything but a straight butt. Given the mfg and the year of origin, the wood species that you are calling walnut is probably actually of African origin. It is probably in the Mahogany family, open pore and brittle. It probably does not want to bend thru the thin dimension, never mind bending thru the thick dimension - which also never goes well with any species. This one will probably split if you try to bend it in that plane. Since you are going to need to obtain wider stock, why not use an appropriate species for the rail? If you like the Walnut color - which would not be the color of the original, a dye can do it. For a stain, Walnut is probably the most common shade. You do not want to use a stain though, On your JPEG #1 - the pattern of the deck butts indicates that the designer of the kit was beyond incompetent. The deck plank butt patterns in the 17th century may have been less regimented, but a butt on the same beam for every other strake is just wrong and ugly.
-
I do not know much at all about The Med. Are tides much of a factor? Does anything like an Atlantic hurricane every roar across it? The galleys seem to have gotten by with fairly light scantlings - for a long, long time. For the Atlantic, no matter the country, my bet is that most merchants did not care to bare the cost of a cargo voyage solo. They would tend to spread the financial risk out to investors. Investors would want some protection from unnecessary risk. When insurance companies came into being so that many more than just "buddies" could get in on the risk/gain of shipping - the standards evolved into something formal. But before then, when it was just "buddies", they would have had limits on how weak a ship they would invest in. So private yards probably had fairly rigid constraints on their degrees of freedom. Play too fast and loose, have a vessel fail because of how it was built, and farming or fishing may have been the next job choice.
-
The physics - the engineering characteristics - the strength - of wood has not changed over the last 2500 years. The hull volume and length would determine most of it. The warships would have to factor in the mass of the guns and the stresses produced by discharging them. There were fads - because they did not practice real Science for their inquiries and did not have any instruments that could measure the data anyway. So from 1650 to 1860 at least - any variation in scantlings relative to and within a class of vessel size is probably difficult to observe - at 1:48 and smaller. Personal philosophy: It is easy and probably natural to become hung up on what are insignificant differences. A tendency toward obsession over minor details comes with this territory. Letting a search for the Perfect become a blocking force field for getting to the Good - can be counterproductive and discouraging of an otherwise worthy project. I am happy to have finally found my way out of that mental wilderness.
-
My guess is that the dark horizontal line is a wooden batten. A spreader lashed to the shrouds instead of a foot rope. There could be a hole in it for the line, but I would scab a horseshoe shaped piece of wood at the back instead.
-
It sort of comes down to what your goal for the final model is. Is it a piece of art or is it intended to represent the actual - but really "idealized" underlying construction as whole? To be used in an engineering instruction classroom? The actual ship is likely to have been messy and irregular. Close enough was good enough. Use what you have. Time is money. Materials coat money, waste costs money. There would likely have been lots of square or rectangular chocks between the bends and probably within each bend for air circulation. Note that what is shown is all bends and a small space between each bend. The space is more than a liner of that era would have, it is still mostly wood. Leaving off planking would show something with academic interest. But from an artistic perspective, there is little of visual interest there. A fully planked hull would probably be prettier. But, to my eye, doing an exact Hahn style framing - that is omitting every other bend for visual interest, would leave too much as space. If there is more space than room, it looks snaggle tooth.
-
I have the plans from AAMM. When I look at the plans, my evaluation is that there sure are a lot of guns! It is kinda busy looking. Given the year that it was built, I think the design was based on an obsolete concept. I think they are mostly close range shotgun type cannon. anyone foolish enough to get close could get hurt. However, not too long after, there would be very large caliber rifled shell guns on tracks at the mid line. A corvette with two or three of those - - smaller, faster, less expensive - and in a few more years add steam and this frigate may as well be a towed target.
-
https://boutique.aamm.fr/monographies/plan-belle-poule Is this what you want?
-
I really can't draw. If you look at most any NMM plan that shows the framing, it shows something like the following : For a plan with a three bend station interval, there will be a bend with a frame on either side of the station line. (This is normal in most every case.) But in between there will be only one other bend. The rest of the area is filled with single filling frames. The futtocks significantly reduce is sided dimension. They often jog so that they frame the sides of the ports so that they are not cut into. To me, it looks like a cross between a plate of spaghetti noodles and 2x4 16" on center house framing. The NA/French is all bends, most all the futtocks have the same sided dimension - except maybe the tops. The timbers are cut into for the ports. The zone with cant frames is as small as possible. (On a model, I take this more efficient method one step further: I avoid cants altogether. I do not mind cutting away a lot of wood, so I keep my frames square to the keel all the way. At the last station forward, the bow/hawse timbers come in at 90 degrees (parallel to the keel). At the stern, my last square frame is where the fashion frame would be.) ( I think the stern framing is a bear - It does not matter how the rest of the hull is built - POF, POB, even carved - it is difficult.) Most of my framing has been for all bends, before about ~1770 it was about 2/3 timber and 1/3 space. Attractive to display. Somewhere around 1770 the framing was about all timber. The space was 1"-2". Pointless to display. Here is where the Hahn style of omitting every other bend makes sense. This also really saves on wood. Then some time around 1815 it went back to 2/3 timber and 1/3 space (on average). I guess that it was discovered that all wood does not stop hogging and does not stop cannon balls and less space meant more fungal rot. Of late, I now feel comfortable with a Navy Board style framing for vessels up to 1770. True Navy Board framing has the floor timber extending above the turn of the bilge. The shortened F2 is missing as is part of F4 below the wale. F1 is much longer. It goes from above the wale to a bit short of the keel. It makes both timbers very long and very curved. The plank that they are cut from has to be wide. There is a lot of waste. For a more efficient use of wood and to not need frame stock wider than 2", I alter the disposition. I have a normal length floor ( ~ 60% of the breadth ). I have an extra long F2 that butts against the floor and goes above the wale. (unlike the floor with a different curve at either end, it is a single curve, so it fits on a 2" board.) For F1, I use a 5'-7' piece that half laps the floor and F2. It is either a short timber or a long chock. The spaces are not staggered. They are both in the F1 zone. From a distance it looks the same as Navy Board - until you notice that the spaces do not stagger. I get the look without the waste. Oh, because I think it is ugly, I plank over everything from the wale on up. Because it is covered, I use a solid wall of timber from the wale on up. I also have a piece of deadwood between every floor timber. From what I read, most ships also had this as a chock. There was a 1"-2" gap above the keel so that water could flow across the keel from bilge to bilge, A model doe not need the gap.
-
Fixing paper to timber
Jaager replied to Boccherini's topic in Building, Framing, Planking and plating a ships hull and deck
I have had excellent results using rubber cement. I use a high quality brand - BestTest. I apply a healthy coat to both surfaces - let it dry for ~15 min - then apply. This is an instant grab- no adjustment version. It will hold for a long time. It just takes rubbing with your thumb to completely remove it. I have a bottle of n-heptane - the solvent. adding it to the cement bottle when it gets too thick to brush easily. Plain paper can be a bit of work to get started to curl up - it will tear - the edge is a challenge to get under. To make my patterns easier to remove, mostly immune from the effects of humidity, and protected from dirt and smudges - I brush a thick layer of brushing lacquer on the sheets. The solvent is fierce enough when brushed outside, I would never consider any spray version. I overlap all four edges with 1/4" crepe masking tape because if the lacquer sneaks under the pattern and dries the patterns stick to the butcher paper they are taped onto. -
Lighting upgrade to Proxxon band saw
Jaager replied to Kevin Kenny's topic in Modeling tools and Workshop Equipment
Kevin, Same idea for the same reason: I opted for the long gooseneck LED - with an ON/OFF magnetic base. It is not low cost, but it is bright, the magnet is a strong one, and it can get close but not in the way.

