


The Sailor
-
Posts
298 -
Joined
-
Last visited
Reputation Activity
-

 The Sailor got a reaction from teloo in Mercury by The Sailor - Amati/Victory Models - 1:64 - Russian 20 gun brig
Thank you very much for the nice comments.
Only a small update on the ship‘s boats for today. The boats are not finished yet.
So here we have the longboat:
The cutter:
And at last the two boats together:
-
 The Sailor reacted to galf in USS Constitution by galf
I am farther along, spent last couple of hours trying to figure out this website...Notice tape on Exacto knife, GOOD TIP, helps prevent knife from rolling off table and sticking in your FOOT! LOL
-
The Sailor reacted to pete48 in Mercury by The Sailor - Amati/Victory Models - 1:64 - Russian 20 gun brig
hey Richard , Glad to see you back at it , Looks good
Best Regards,
Pete
-
 The Sailor got a reaction from egkb in Mercury by The Sailor - Amati/Victory Models - 1:64 - Russian 20 gun brig
Thank you very much for the nice comments.
Only a small update on the ship‘s boats for today. The boats are not finished yet.
So here we have the longboat:
The cutter:
And at last the two boats together:
-
 The Sailor got a reaction from Beef Wellington in Mercury by The Sailor - Amati/Victory Models - 1:64 - Russian 20 gun brig
Thank you very much for the nice comments.
Only a small update on the ship‘s boats for today. The boats are not finished yet.
So here we have the longboat:
The cutter:
And at last the two boats together:
-
 The Sailor got a reaction from pete48 in Mercury by The Sailor - Amati/Victory Models - 1:64 - Russian 20 gun brig
Thank you very much for the nice comments.
Only a small update on the ship‘s boats for today. The boats are not finished yet.
So here we have the longboat:
The cutter:
And at last the two boats together:
-
 The Sailor got a reaction from mtaylor in Mercury by The Sailor - Amati/Victory Models - 1:64 - Russian 20 gun brig
Thank you very much for the nice comments.
Only a small update on the ship‘s boats for today. The boats are not finished yet.
So here we have the longboat:
The cutter:
And at last the two boats together:
-
The Sailor reacted to GuntherMT in Carmen 1850 by GuntherMT - FINISHED - Constructo - Scale 1: 80 - pailebote (Schooner) - first wooden ship build
Main mast backstay is done, which completes the standing rigging.
I can build the booms and gaffs now, but after that I will be at the point where I need to decide what I'm going to do with the sails. Just the thought of hand-stitching them has me ready to quit (I do not have a sewing machine before you ask). I know I've read a few things about people using pencils or other ways of 'faking' the stitching, just need to go find some of those now and read up on them again now that I'm nearing that point.
Here she is with all the standing rigging.
And bow on, got the masts pretty close.
-
The Sailor reacted to GuntherMT in Carmen 1850 by GuntherMT - FINISHED - Constructo - Scale 1: 80 - pailebote (Schooner) - first wooden ship build
Pictures to go along with the previous post.
I did my first rope stropped block. Fairly happy with it.
The offending line. Is it the topmast shroud?
And here is all I have to go off of in the instructions:
Here is what I did, for better or worse.
And the deck attachments.
Now I get to do another one just like this for the main mast.
Russ - see that you replied while I was typing this. Thanks!
So is this a 'shifting backstay', or is that just the name for the deck attachment method? It does make sense to me that it would be two separate ropes, just for ease of replacement if nothing else.
-
The Sailor reacted to Alfons in Gloucester Fishing Schooner by Alfons - BlueJacket Shipcrafters - scale 1:48 - first build
Fellow ship builders.
First of all, thanks for all the nice comments, and also for the "likes".
I have finally gotten around to start working of the Smuggler again, feels great. Making my own wooden barrels seemed like a good way to get up to steam again. This is the first part of the wooden barrel project, enjoy.
First, I took the barrel that I originally had planned to use, and sanded it to a nice and smooth shape.
Secondly, five sections of staves were glued edgewise to one end of the barrel, creating a lid.
Then pieces of individual staves were tapered in both ends and glued to the barrel form.
Finally, staves were trimmed and sanded to final shape.
This is the result compared to the original barrel.
My next post will contain painting and barrel hoops.
What I learned so far (to be practiced during the build of the 5 remaining barrels) are the following. It´s a good idea not to use too thin staves, since quite a lot of sanding is required to achieve the final shape of the barrel. I also learned the importance of placing the first stave accurate, and to safeguard each stave in terms of its shape. One litre misalignment has the tendency to grow for each stave this is added. Hopefully the next barrel will turn out even better.
Thanks for dropping by.
/Alfons
-
The Sailor reacted to JPett in Rattlesnake by JPett - Model Shipways - Scale 1/64th - Kit #MS2028
Ahoy Mates
Well its been quite a while since my last post but that does not mean nothing has transpired in the shipyard. We can say for a few months it was next to nothing but the shipyard never really shut down.
As anyone who has been following my log knows, I seem to have a slightly unhealthy obsession with gunports and their appearance. This is combined with my ignorance and undeveloped skills, but overcome with by a level of determination that borders on insanity. It has taken me quite a while to reach this point. The gun port framing was done six times on one side. This BTW was a mistake as I learned that the position of gunports does not have to be determined by the framing but can be adjusted in the final filing and sanding after planking if you prepare it this way. On my build around "take 4" I made the framing for a slightly smaller port using slightly wider pieces of wood. then I finished them to the proper size and orientation with a file and sandpaper after the planking. Care and caution must be exercised as any wood removed can not be easily replaced but for me this way has more options and yields better results in much less time
First I painted the interior sills red which I loved on everybody else's ship but for some reason I did not care for on my Ratt. Probably because I am only doing the sills. Black was brought out but the Red put up quite a stink and did not leave with out a fight.
I use long paper strips to transfer measurements from the port side ports to the starboard side ports which will remain slightly smaller until the inner gunwale is planked. I mark the paper and then cut those marks with my Xacto knife so I can accurately transfer/mark the other side of the paper. Port is a mirror to starboard so you need to flip your ruler. It all sounds so simple now "lol"
After an accident in the shipyard I learned a nice trick to paint the inside of the gunports. Apply a thin coat of WOP to the surrounding "wood colored" area first then paint. This way you can come back and easily sand away stray paint to get a sharp line. Any paint on the wood finish just sits on top of the WOP and sands away easily leaving a sharp crisp line. A fresh coat of WOP prevents any paint from soaking into the wood like it did on my initial attempt. This is much harder to correct BTW. In one of the pics you can see where I have gone back and re-re-re-filed the line for the lower sills which was not up to par after sanding. The black really shows any irregularities in your work. I will re-coat with WOP, and repaint until I get get the clean "straight" line I want. Its a side project.
I spent a lot of time with the trim. What you see here is "take 4" on the trim and "take 6" on that fancy step down "thingy" which I think I will now go with. I was burning the midnight oil with the Vanda Lay trying to come up with something here. I made both the trim and steps with the Vanda Lay. Although the trim does not follow the plan it does look "acceptable" to me. My stern window position is too high and has the "scale" trim running into it. It 's not a very good look and after multiple attempts I have decided that a "trimming of the trim" is my best option. I was however able to duplicate this window and its height on the starboard side. In shipbuilding; it isn't whether or not you can perform the task but whether you can repeat it on the other side that counts.
Speaking of which I did make one more try, to save the step in my wale plank by adding a piece of wood which has now been completely removed, I am finding that many things I did wrong in the beginning are still haunting me and I expect this to continue just a little bit more. Like in chess I see it pays to be a few moves ahead in shipbuilding. I still have some minor issues with the poop and stern decks, but after that I am telling myself that my earlier mistakes should only cause minor issues. Well; less me cutting out the transom windows but I am working to resolve that now.
I am also experimenting with a slightly "weathered" look which I have found a blue kitchen scrubber sponge to be very useful for (see insert). In one of my painting accidents I recently also found that simulated gunpowder residue can be created using flat black oil paint and a wide feathered brush. This also adds another nice weathering effect, although I am not sure if I will use it on this kit: We will see.
I am now starting to experiment with decking using paper for chalking and my gunports. Can you say ADHD. I really like the paper and found that just bending the gunport hinge around the lid looks much better then creating a full on hinge at this scale. I am not a big fan of the cluttered but its historically accurate and functioning look that I seemed to be able to create so well with my previous attempts. Sometimes less really is more
Last but not least. There is concern as to whether I will be able to show 20 guns. I have 10 of the nice brass ones and can not currently secure anymore. I called Frank and Chucks are too big too. If anybody has a lead as to where I can get ten more of these brass cannons please let me know
Thanks for stopping by
-
The Sailor reacted to egkb in Mercury by The Sailor - Amati/Victory Models - 1:64 - Russian 20 gun brig
Cool news to see Mercury back up an running Richard.. roll on the updates, so no pressure there then eh ?..
Be Good
Eamonn
-
The Sailor got a reaction from egkb in Mercury by The Sailor - Amati/Victory Models - 1:64 - Russian 20 gun brig
Well, the long break is over now and I‘m glad you are still interested. I think, this build log deals with the brig Mercury...
So thank you very much for your kind comments, Pete, Jeff, Henry, Robert, B.E. and Nils.
Believe me, you can‘t measure enough! And here you see the mistake I made last year:
The gunports are completely on the wrong position. Note: Never trust a gunport pattern, read the plan instead! But I think, I can correct this problem quite easy. Anyway, back into the drawer with the hull for the next days.
The ship‘s boats are next:
This may take a few weeks... but I‘m confident.
-
The Sailor reacted to GuntherMT in Carmen 1850 by GuntherMT - FINISHED - Constructo - Scale 1: 80 - pailebote (Schooner) - first wooden ship build
Thanks Bindy, too bad you can't send me some of that awesome looking cooking and peppers.
Today was a big day..
Masts!
After giving them a chance to set and making sure they remained correctly placed, I placed the deck stuff.
Here is a shot trying to show the blocks pre-rigged to the masts before they were stepped. I managed to put several of these in wrong, not just once, but twice. Yea..
Thanks to a fantastic post with pictures by qwerty2008 here - http://modelshipworld.com/index.php/topic/7277-stropping-and-seizing/#entry214960 - I decided to try my hand at 'real' seizing on the shroud deadeyes. Here is the first one, then the second one done before and after trimming.
I had quite an entertaining time figuring out how to hold things in order to get the top of the seizing tight. Finally figured it out using a 'helping hands' thing along with a hemostat. Then of course, I needed to seize the top of the shrouds, and since it's attached to the mast, it gave me a lot of trouble. I got it done, but it's not very pretty. Need to figure out how to keep a seizing tight where I can't hold solid amounts of tension on all the lines. I didn't want to put a lot of stress on the mast without anything to balance it out, so wasn't able to hold a lot of tension on the lines while doing this.
Not sure how many hours a day I'll be able to stand fighting with the rigging in spots like that, it was a bear.
All in all, progress continues however, and while it's nothing like some of the truly amazing builds on here, I'm pretty happy with it, and will have no problem displaying it in my front room (or maybe at my office).
FYI - I have a bunch more pictures at much higher resolution that I'm not putting up, just sorting through them for the posts and resizing them to a reasonable size, but if anyone wants a higher resolution of something, or would like to see something that I haven't posted, feel free to ask, I might have a picture of it.
-
The Sailor reacted to GuntherMT in Mercury by The Sailor - Amati/Victory Models - 1:64 - Russian 20 gun brig
Good looking ship, I look forward to seeing your gunport solution, and the build as it progresses. The planking is great.
-
The Sailor reacted to Beef Wellington in Mercury by The Sailor - Amati/Victory Models - 1:64 - Russian 20 gun brig
Glad to see you back working on Mercury Richard.
-
 The Sailor got a reaction from puckotred in Mercury by The Sailor - Amati/Victory Models - 1:64 - Russian 20 gun brig
Well, the long break is over now and I‘m glad you are still interested. I think, this build log deals with the brig Mercury...
So thank you very much for your kind comments, Pete, Jeff, Henry, Robert, B.E. and Nils.
Believe me, you can‘t measure enough! And here you see the mistake I made last year:
The gunports are completely on the wrong position. Note: Never trust a gunport pattern, read the plan instead! But I think, I can correct this problem quite easy. Anyway, back into the drawer with the hull for the next days.
The ship‘s boats are next:
This may take a few weeks... but I‘m confident.
-
The Sailor got a reaction from mtaylor in Mercury by The Sailor - Amati/Victory Models - 1:64 - Russian 20 gun brig
Well, the long break is over now and I‘m glad you are still interested. I think, this build log deals with the brig Mercury...
So thank you very much for your kind comments, Pete, Jeff, Henry, Robert, B.E. and Nils.
Believe me, you can‘t measure enough! And here you see the mistake I made last year:
The gunports are completely on the wrong position. Note: Never trust a gunport pattern, read the plan instead! But I think, I can correct this problem quite easy. Anyway, back into the drawer with the hull for the next days.
The ship‘s boats are next:
This may take a few weeks... but I‘m confident.
-
 The Sailor got a reaction from VonHoldinghausen in Mercury by The Sailor - Amati/Victory Models - 1:64 - Russian 20 gun brig
Thank you very much Jeff, Nils and Mark.
Well, I think I was just lucky with the first planking. Believe me, the kit supplied walnut stripes for the second planking are of very good quality. Besides the bulwark area needs a stronger planking.
And here are the first pictures:
Look at this:
This is a very remarkable stern design for a ship of the 19th century.
-
 The Sailor got a reaction from clearway in Mercury by The Sailor - Amati/Victory Models - 1:64 - Russian 20 gun brig
Well, the long break is over now and I‘m glad you are still interested. I think, this build log deals with the brig Mercury...
So thank you very much for your kind comments, Pete, Jeff, Henry, Robert, B.E. and Nils.
Believe me, you can‘t measure enough! And here you see the mistake I made last year:
The gunports are completely on the wrong position. Note: Never trust a gunport pattern, read the plan instead! But I think, I can correct this problem quite easy. Anyway, back into the drawer with the hull for the next days.
The ship‘s boats are next:
This may take a few weeks... but I‘m confident.
-
The Sailor got a reaction from clearway in Mercury by The Sailor - Amati/Victory Models - 1:64 - Russian 20 gun brig
Thank you very much Jeff, Nils and Mark.
Well, I think I was just lucky with the first planking. Believe me, the kit supplied walnut stripes for the second planking are of very good quality. Besides the bulwark area needs a stronger planking.
And here are the first pictures:
Look at this:
This is a very remarkable stern design for a ship of the 19th century.
-
The Sailor got a reaction from clearway in Mercury by The Sailor - Amati/Victory Models - 1:64 - Russian 20 gun brig
Thank you very much, B.E.
Well, the main problem with the gunport patterns provided with my kit was the grain of the plywood. It was easy to bend the patterns horizontally, but imposible bending them vertically. My method was much more easy but a little more time consuming. But don‘t get me wrong, there were no problems at all glueing the gunport patterns of my Pickle. Next time I‘ll try it again with the provided patterns first.
Anyway, the cutting is done and she looks like a warship now.
After cutting the oar ports on portside I can start with the second planking.
-
The Sailor got a reaction from clearway in Mercury by The Sailor - Amati/Victory Models - 1:64 - Russian 20 gun brig
Hello, a few days ago I started a second project: The Russian brig Mercury.
The original
The Russian 20 gun brig Mercury (Меркурий) was laid down in Sevastopol on January 28, 1819 and launched on 7 May 1820. She was designed as a patrol ship to guard the Nothern Caucasus coast. The Mercury fought in many important naval battles during her career.
The kit
The weight of the box is really notable. The shipping details showing the kit weighed 6 kg. No wonder, the 5 mm MDF for keel and frames weighs more than plywood. Furthermore the kit contains many brass etched parts, 17 plan sheets, a flag set, a 20-page step-by-step instuction (hull assembly only) and much more.
Scale: 1:64
Length overall: 860mm
Height overall: 654mm
I wonder why there are no building logs. In fact I found only one in a Russian forum. Is there something wrong with this kit? Or with the ship?
Anyway, let‘s start!
The false deck and the gundeck are a special feature of the kit. The planks are laser-engraved.
It looks pretty nice. Unfortunately it‘s plywood.
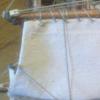
Next stage and the first problem was to fit the plywood gun port patterns. I‘ve soaked the parts for one hour, but for all that it wasn‘t possible for me bending the patterns vertically. So I planked the bulwark with 1x4 mm stripes. That means a little more work but much more easy on the nerves. Later on I can use the gun port pattern for marking the gunports.
The planks are only glued among each other, not to the frames.
And here we have the bulwark; still without the gunports:
-
 The Sailor got a reaction from GuntherMT in Mercury by The Sailor - Amati/Victory Models - 1:64 - Russian 20 gun brig
Thank you very much Jeff, Nils and Mark.
Well, I think I was just lucky with the first planking. Believe me, the kit supplied walnut stripes for the second planking are of very good quality. Besides the bulwark area needs a stronger planking.
And here are the first pictures:
Look at this:
This is a very remarkable stern design for a ship of the 19th century.
-
The Sailor got a reaction from GuntherMT in Mercury by The Sailor - Amati/Victory Models - 1:64 - Russian 20 gun brig
Thank you very much, B.E.
Well, the main problem with the gunport patterns provided with my kit was the grain of the plywood. It was easy to bend the patterns horizontally, but imposible bending them vertically. My method was much more easy but a little more time consuming. But don‘t get me wrong, there were no problems at all glueing the gunport patterns of my Pickle. Next time I‘ll try it again with the provided patterns first.
Anyway, the cutting is done and she looks like a warship now.
After cutting the oar ports on portside I can start with the second planking.