JacquesCousteau
-
Posts
1,383 -
Joined
-
Last visited
Content Type
Profiles
Forums
Gallery
Events
Everything posted by JacquesCousteau
-
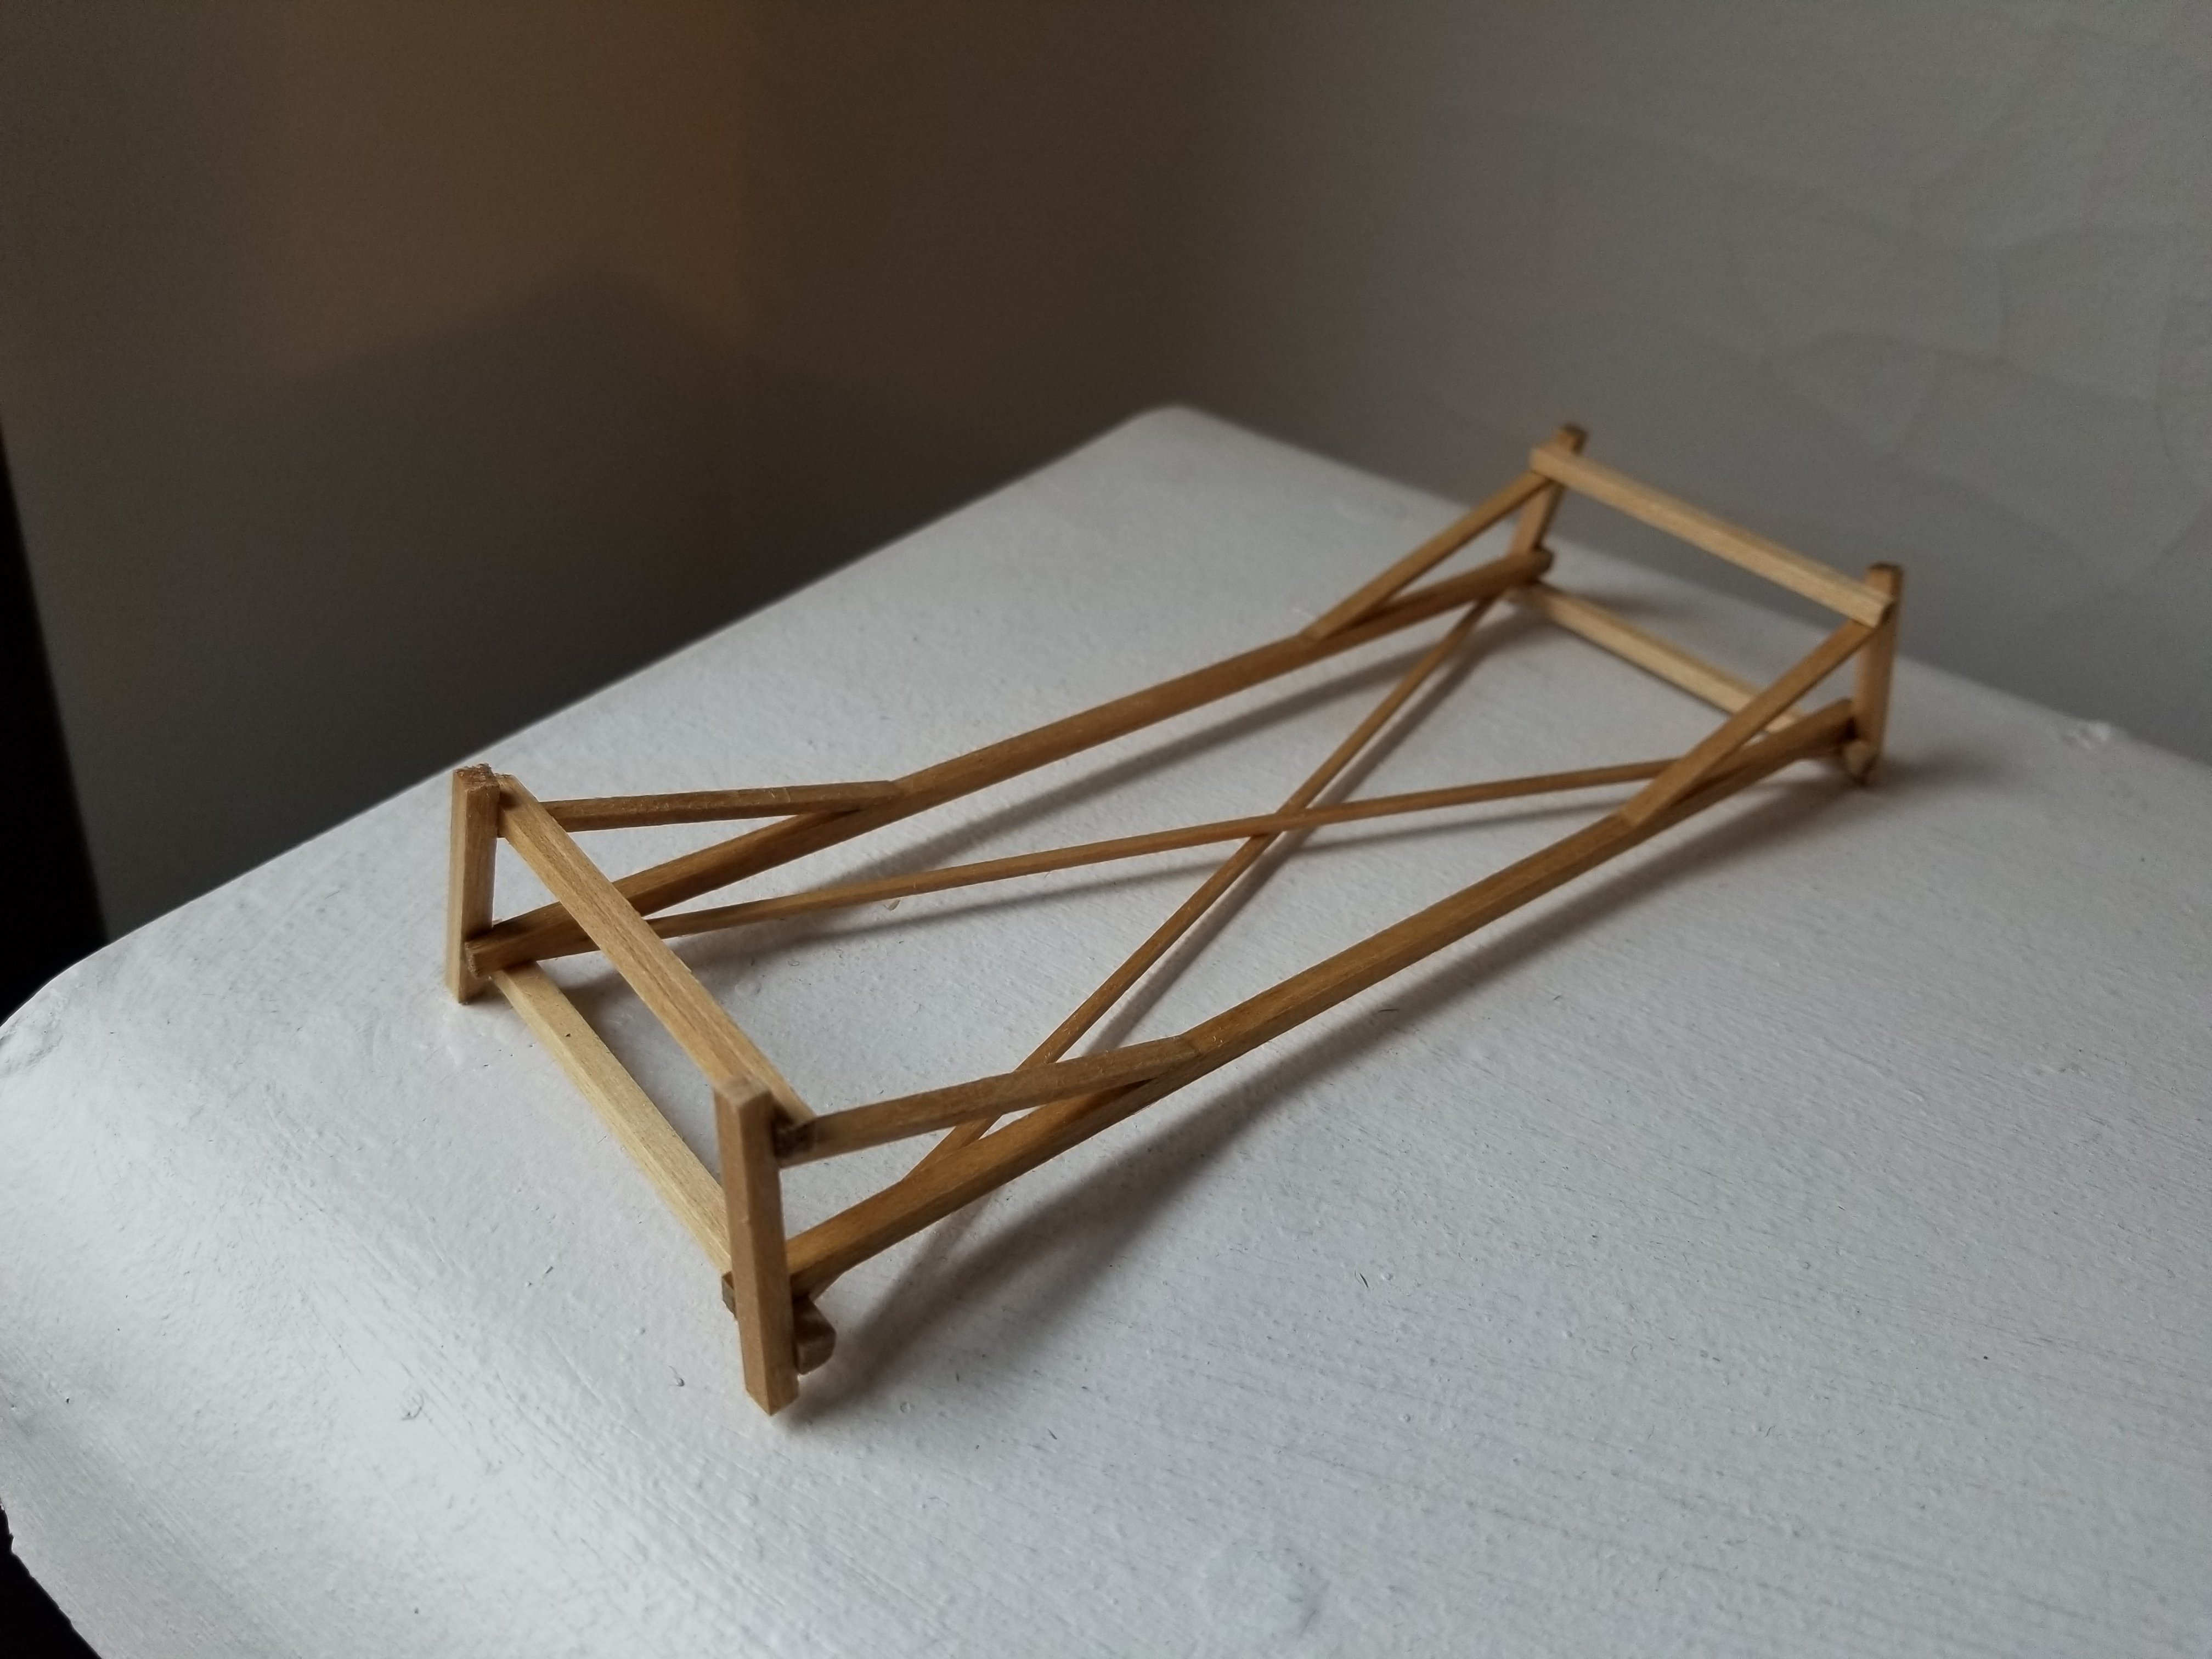
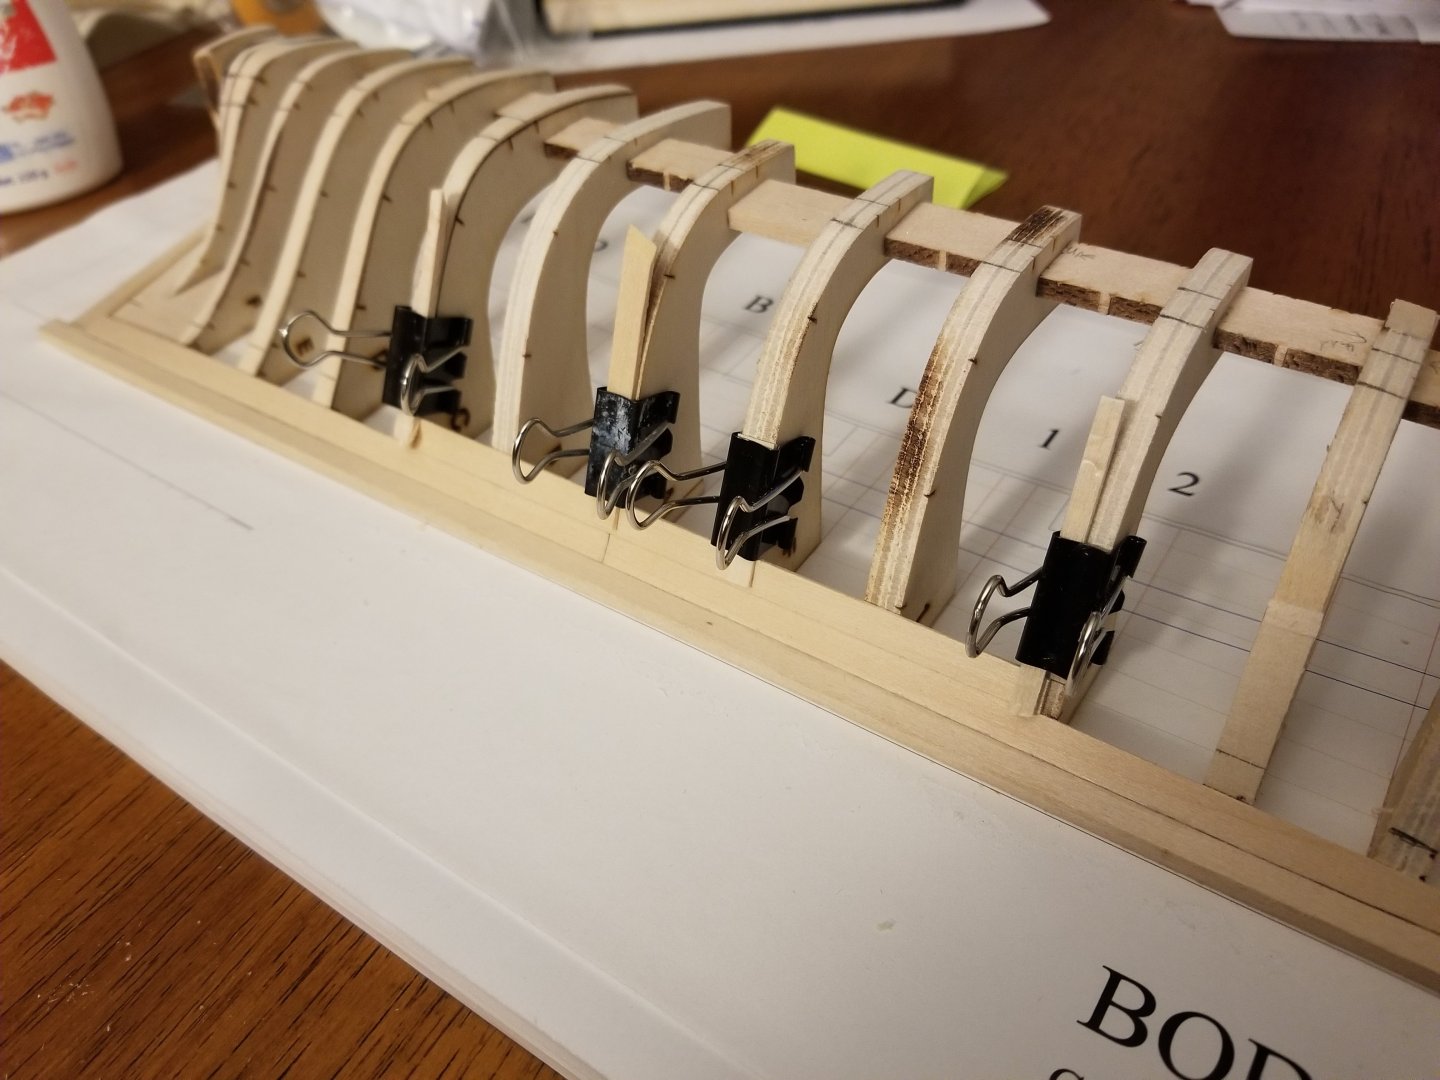
 It's amazing how much progress you've made in such a short time!
 -
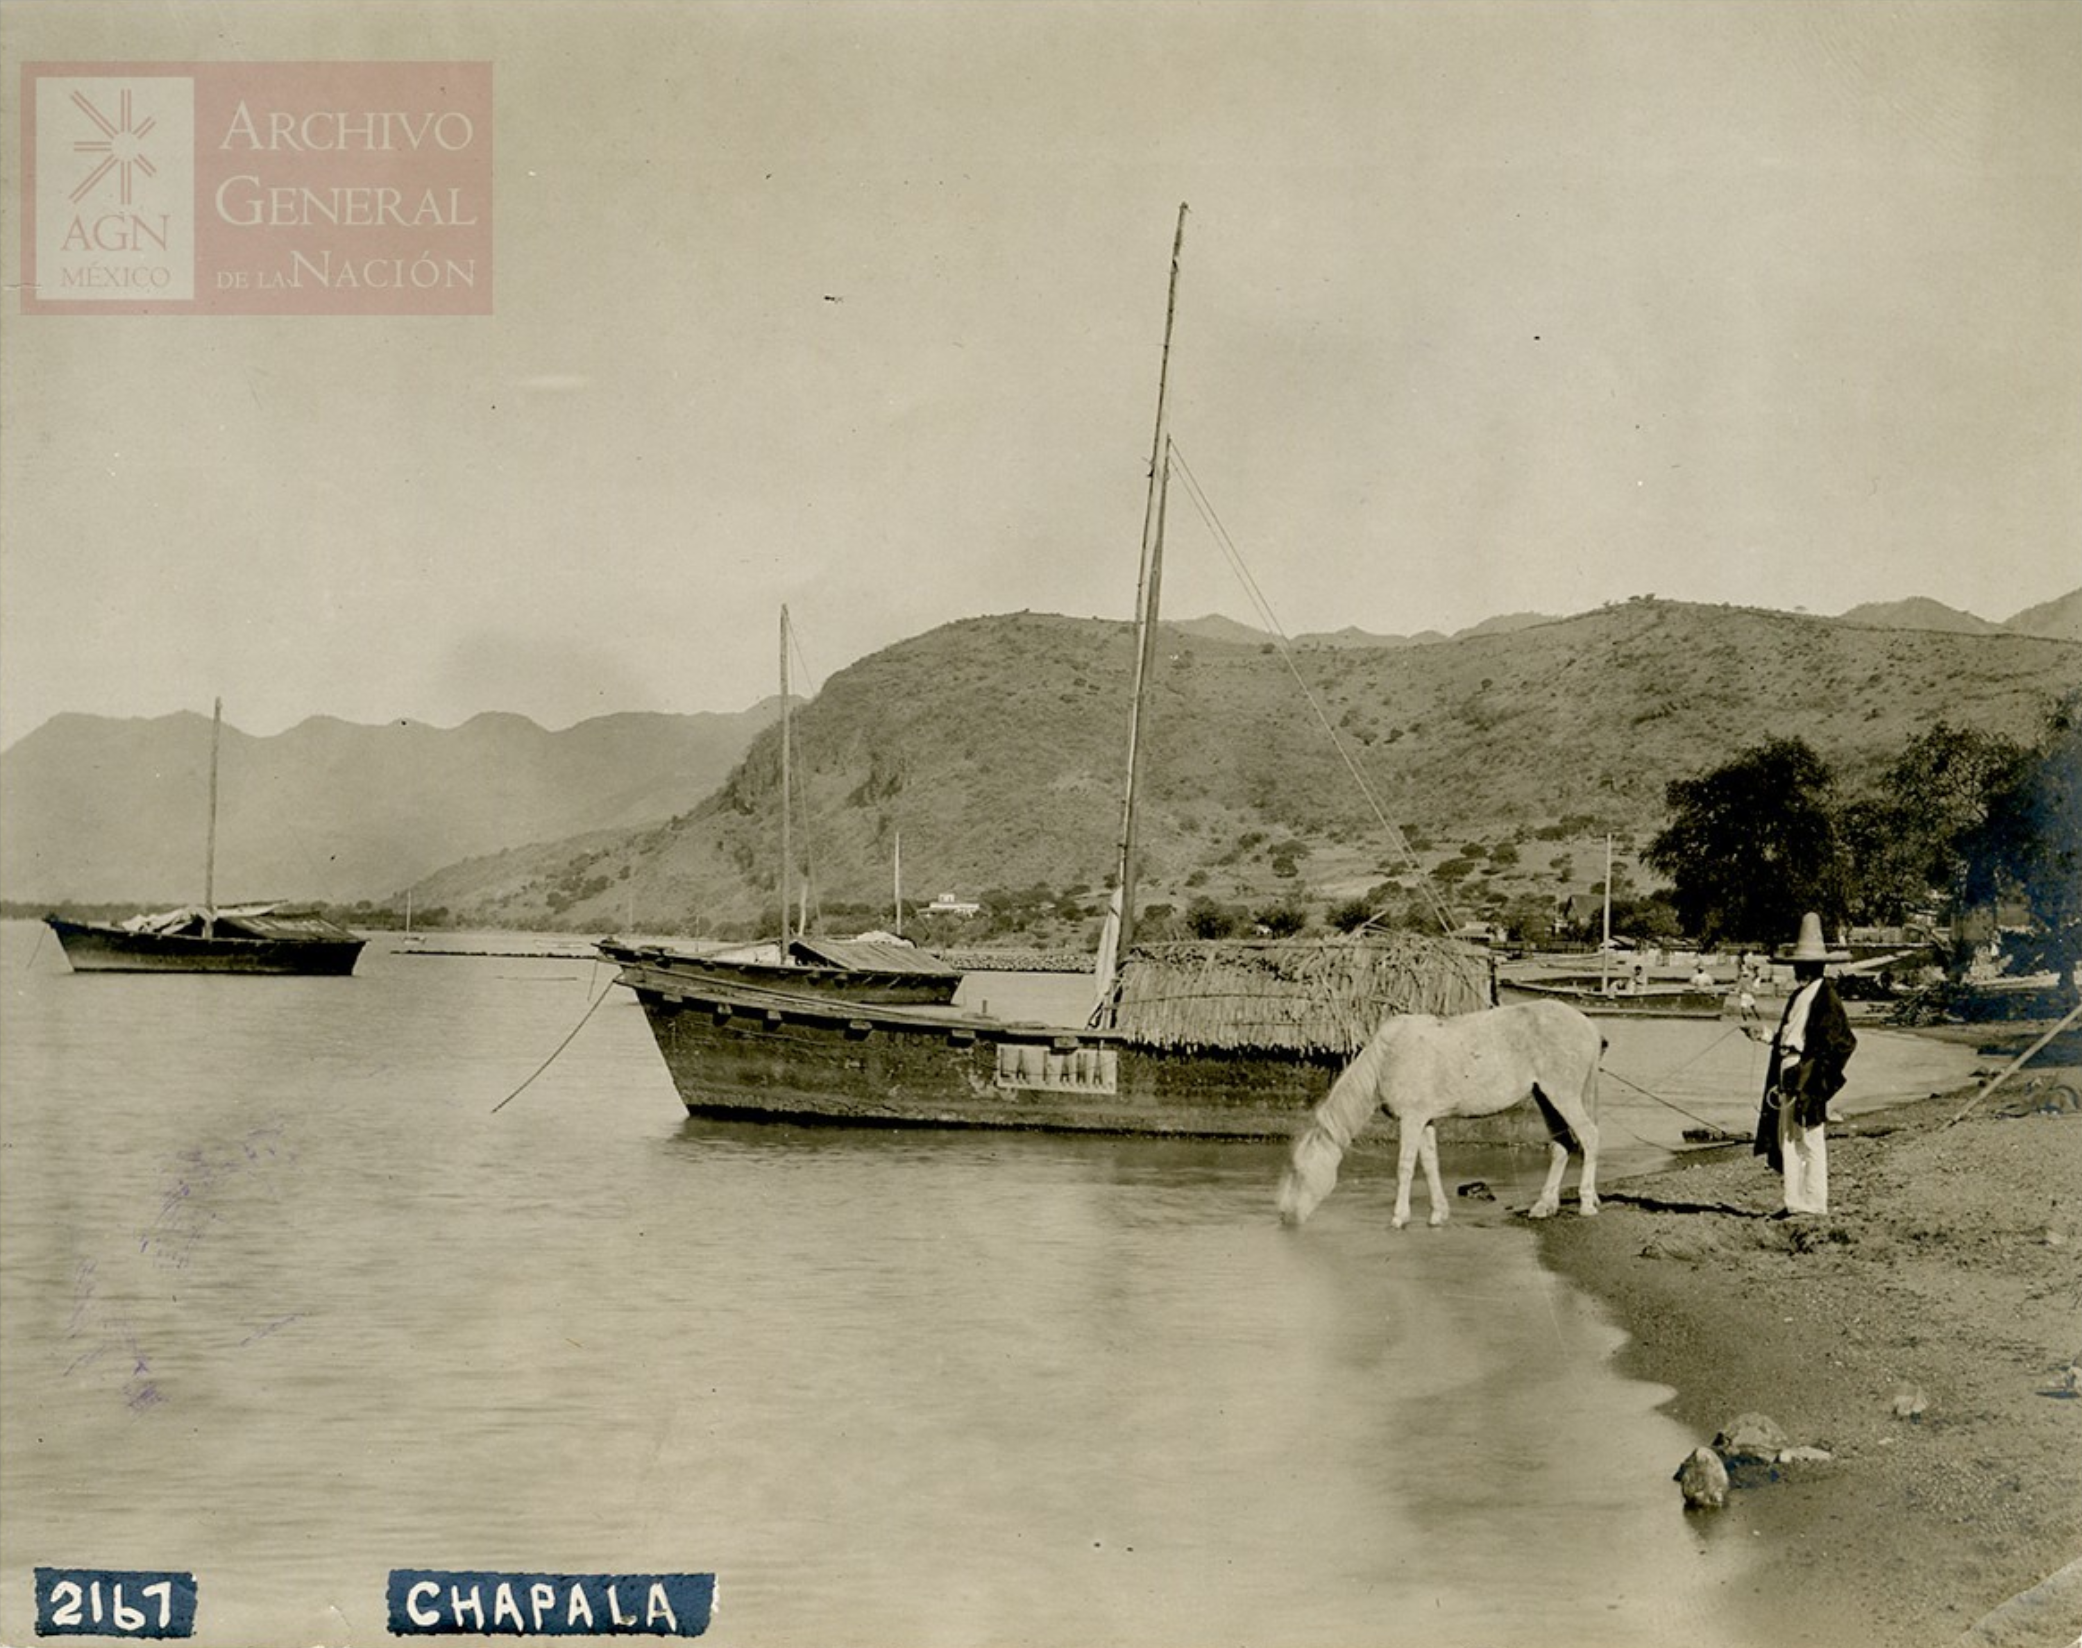
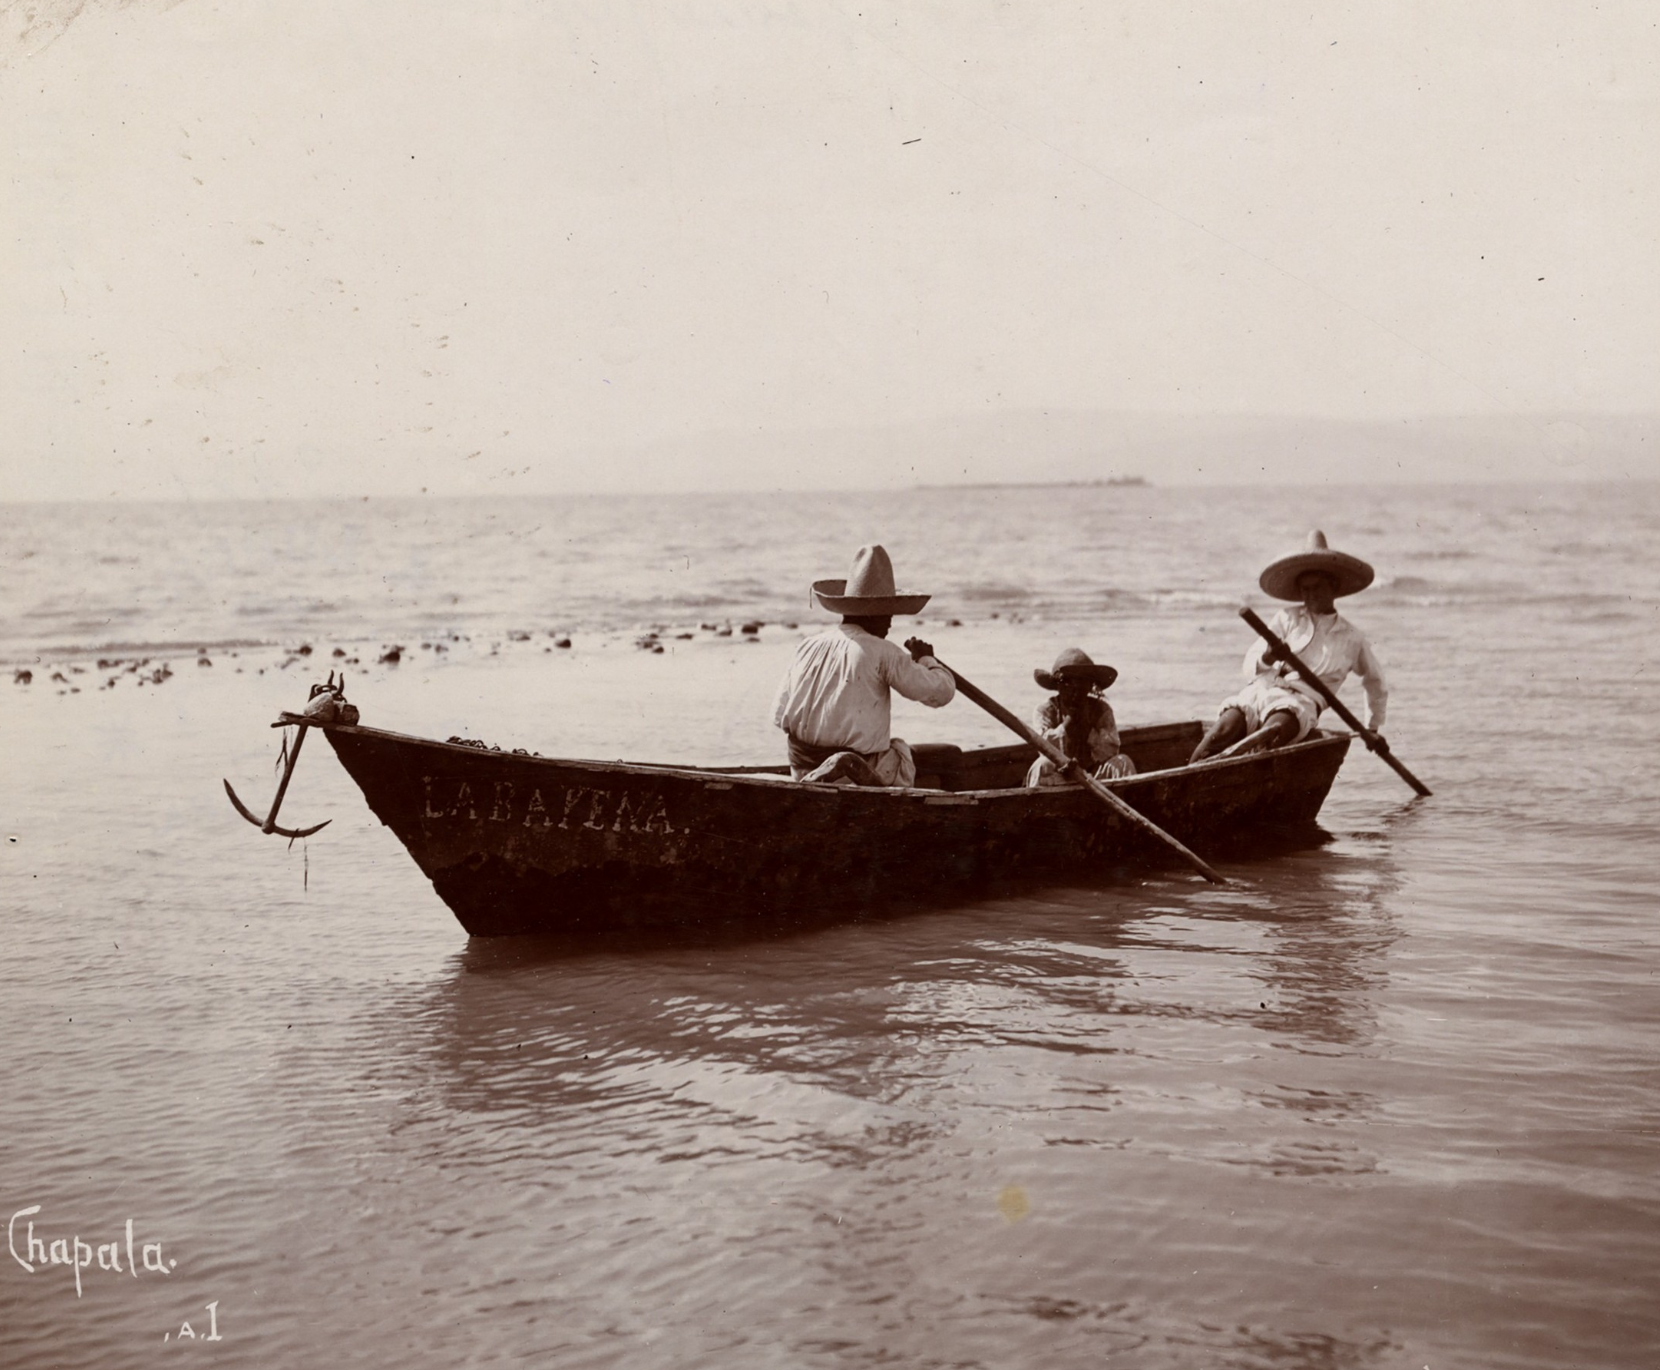
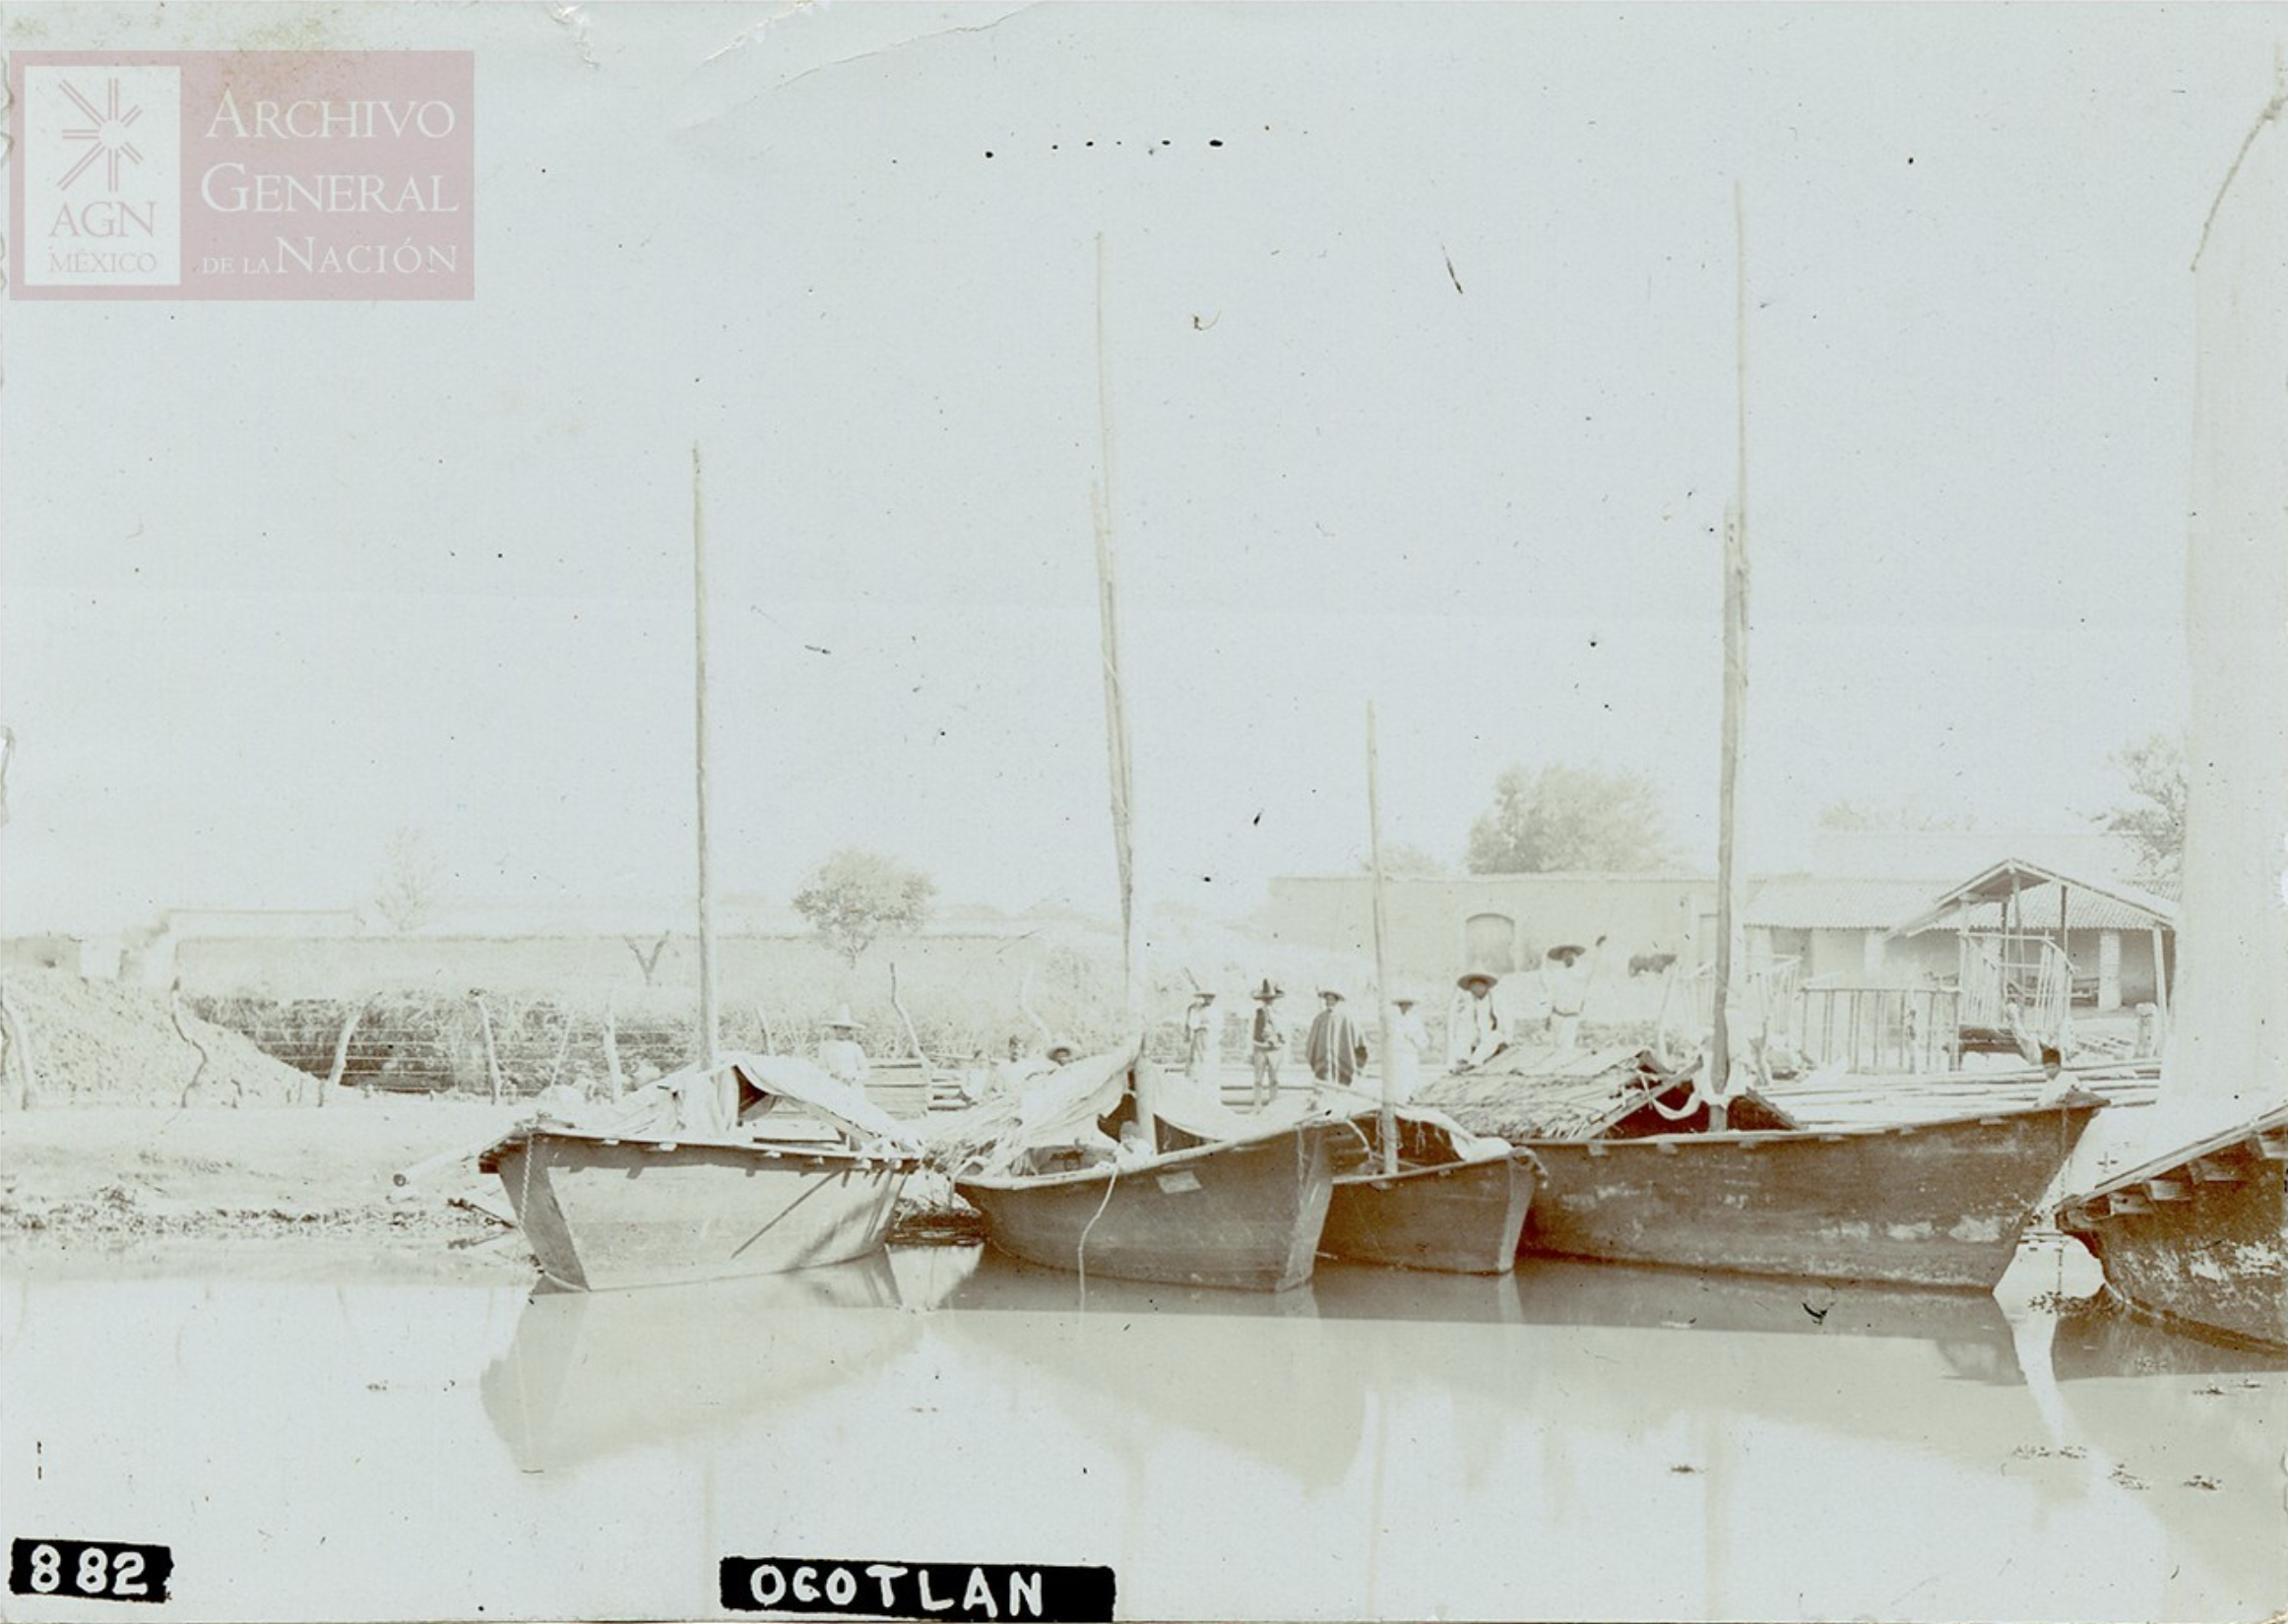
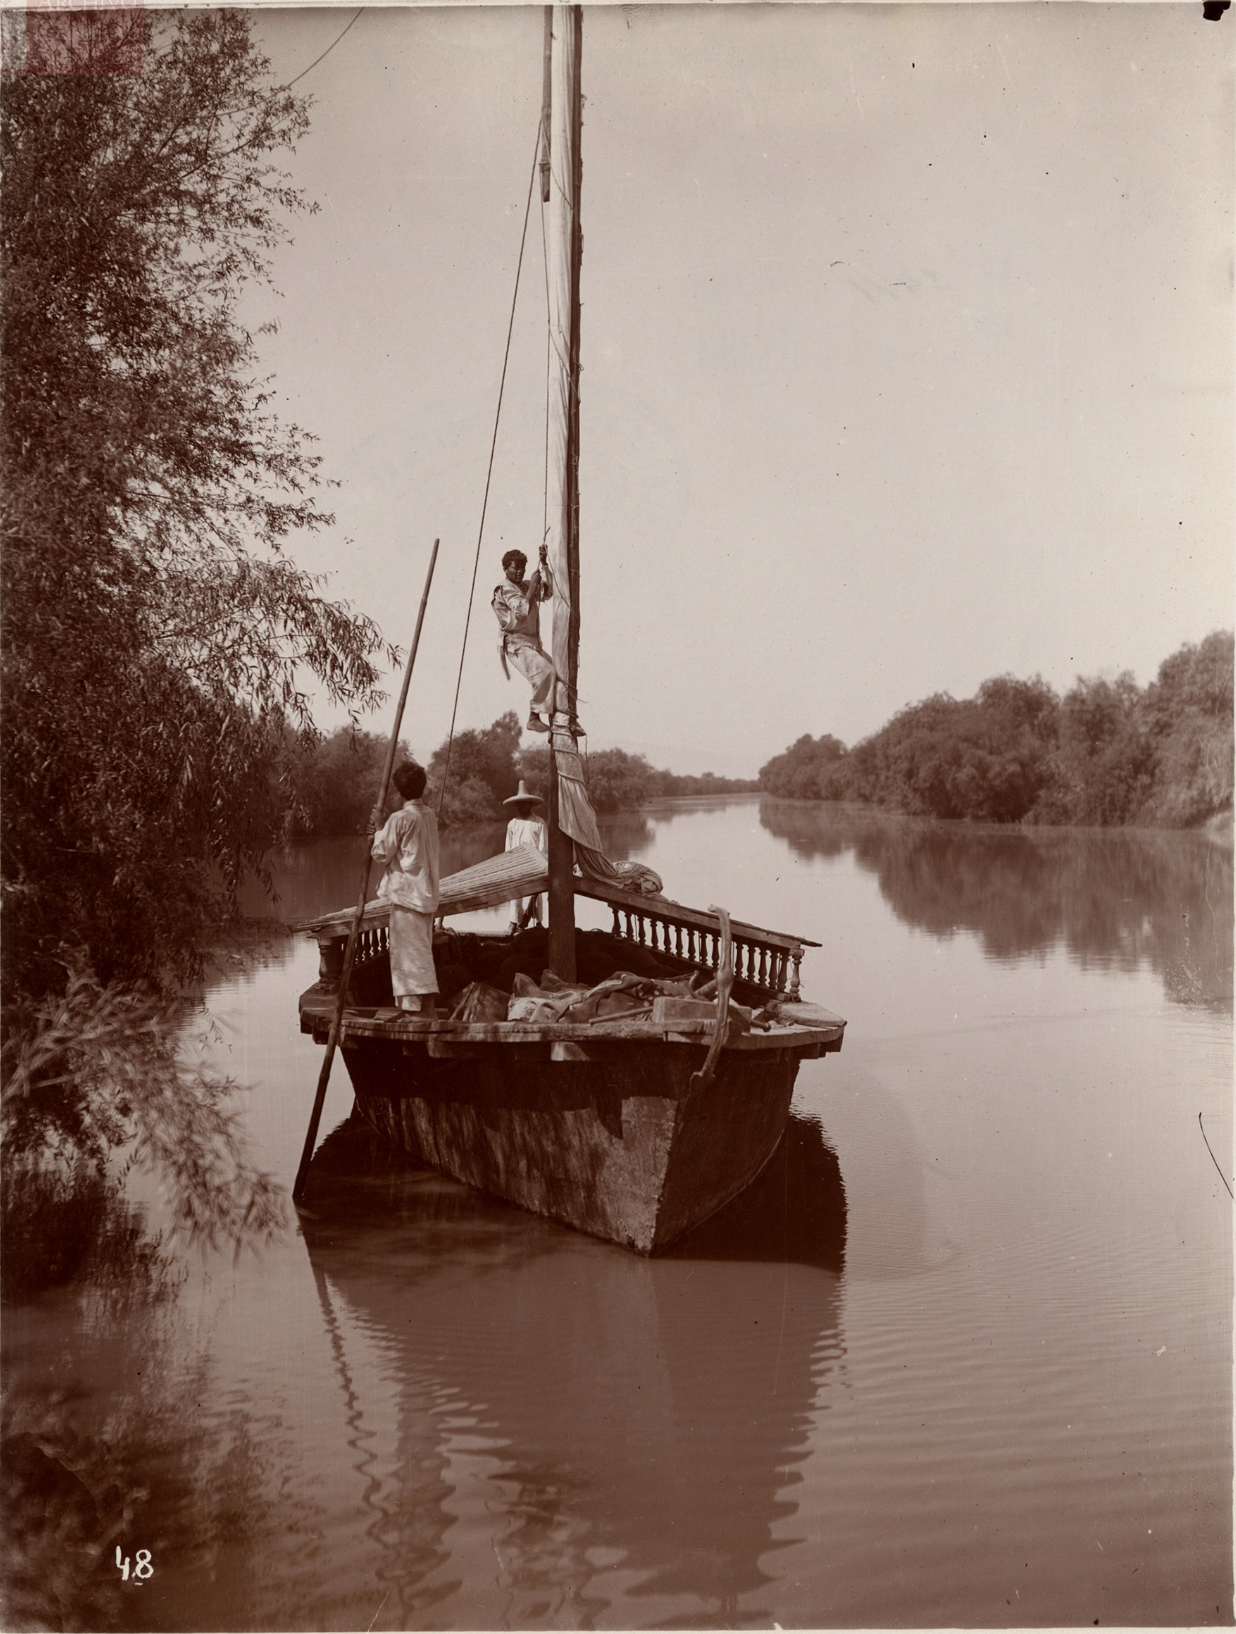
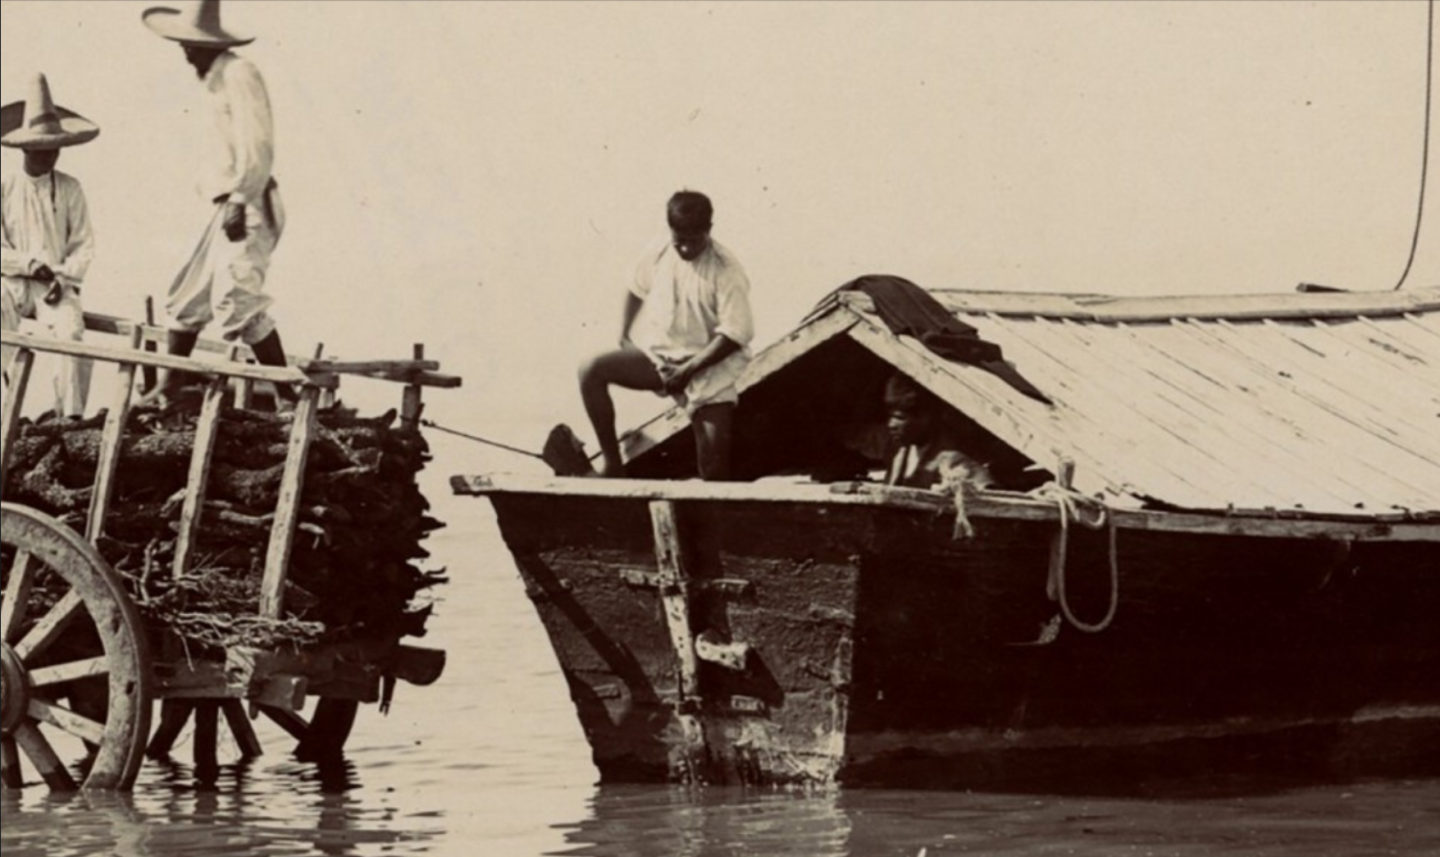
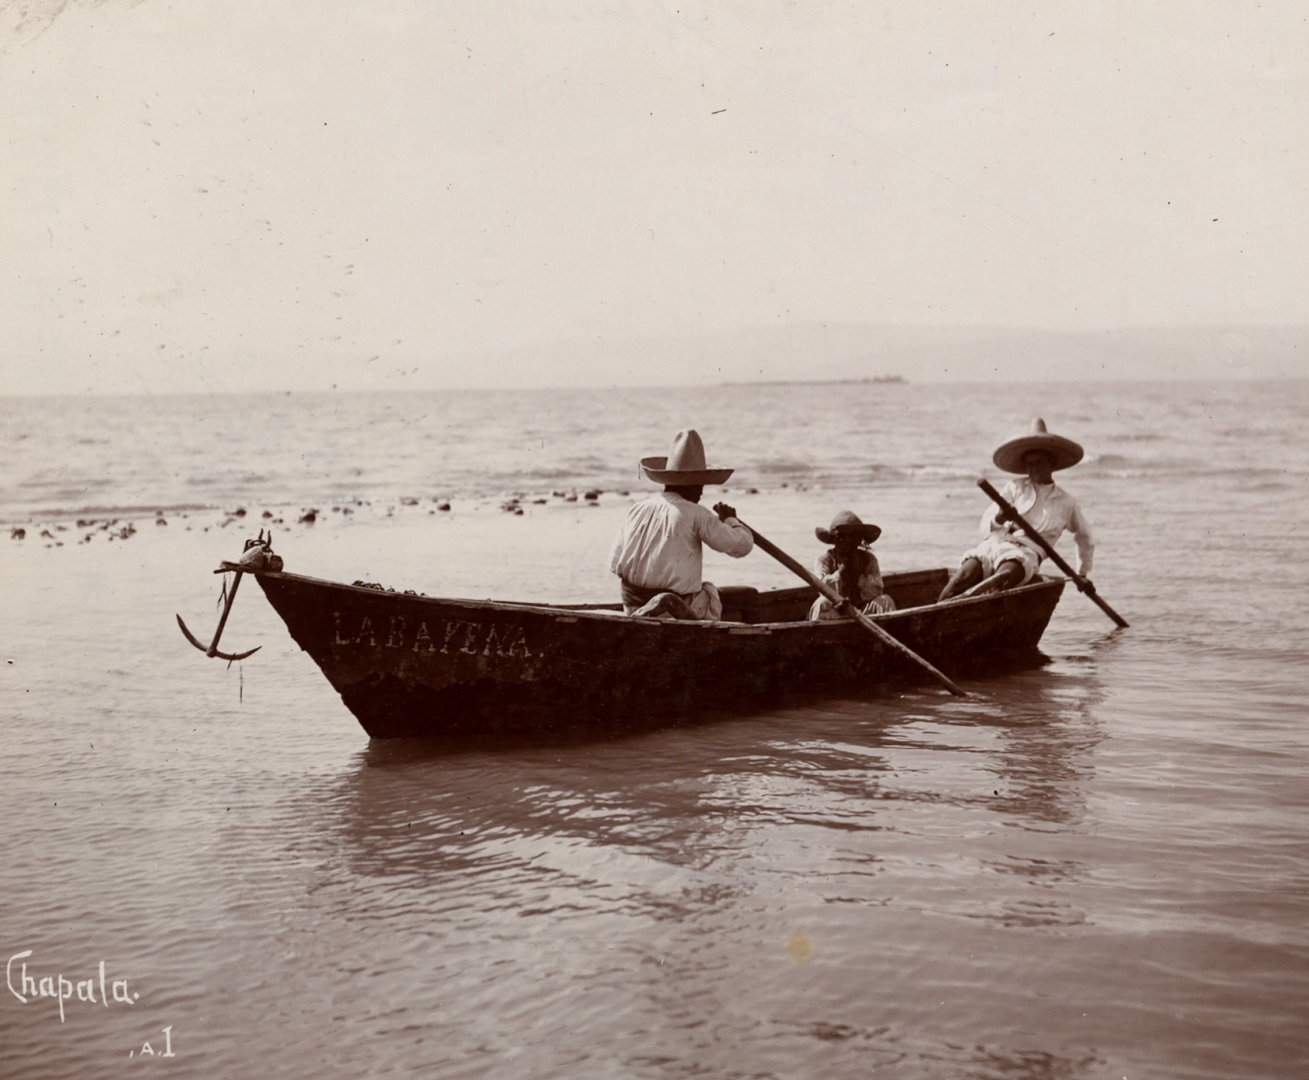
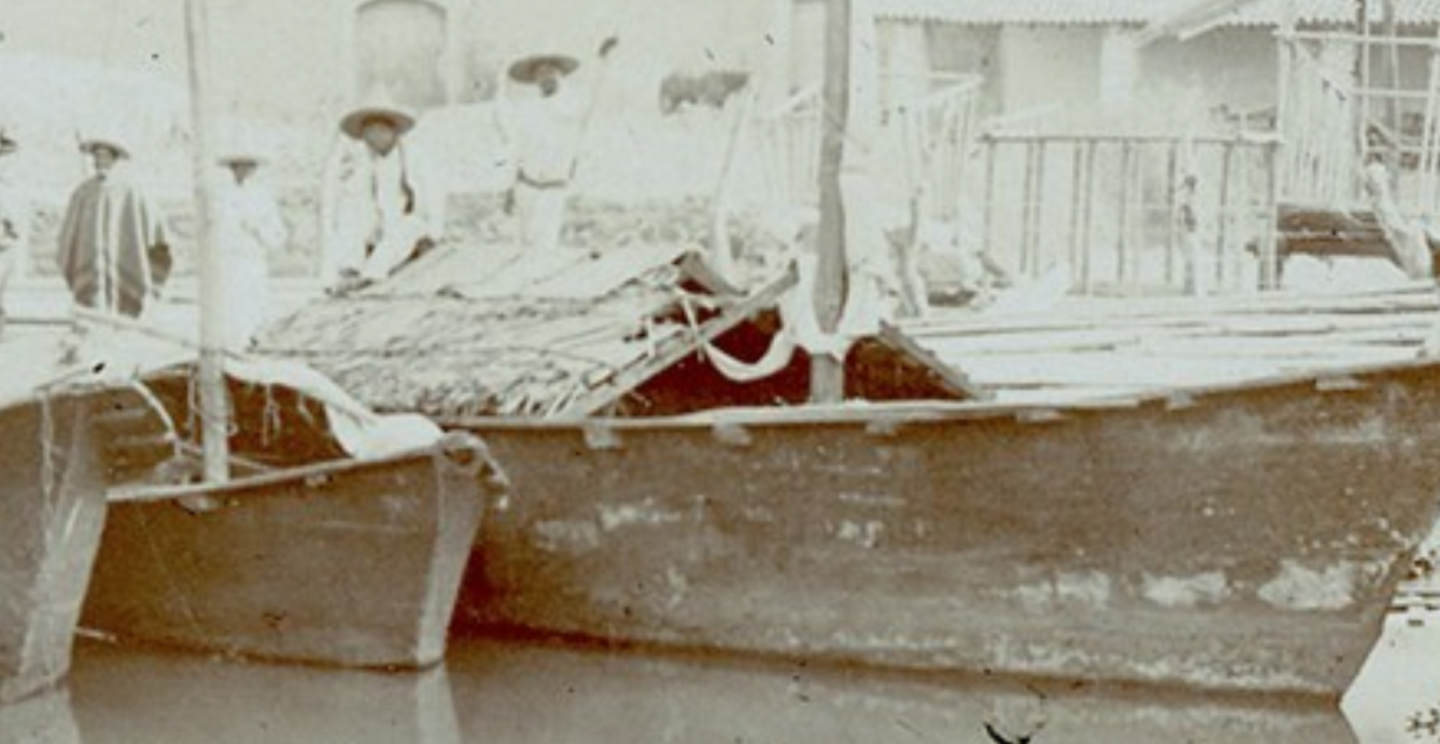
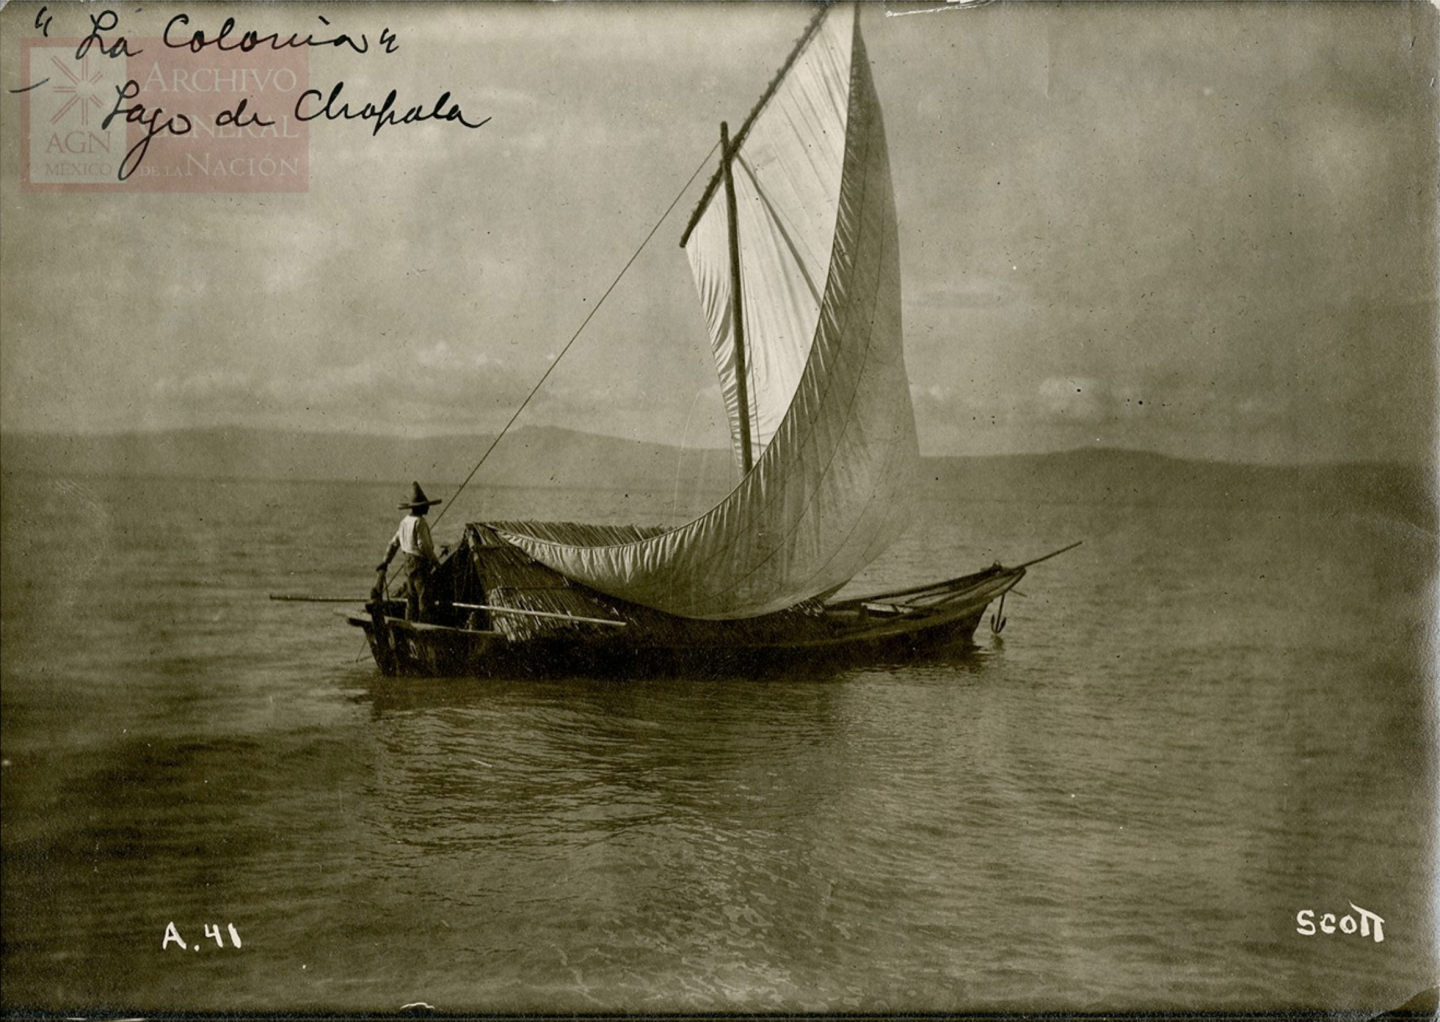
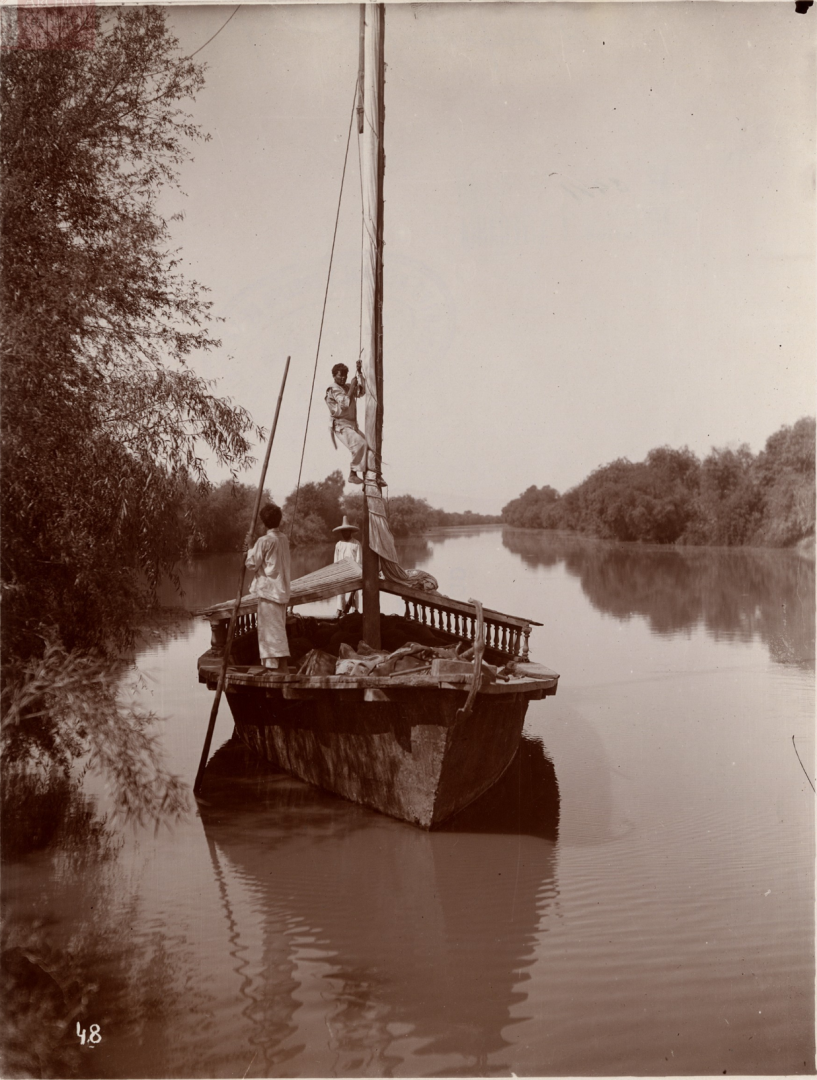
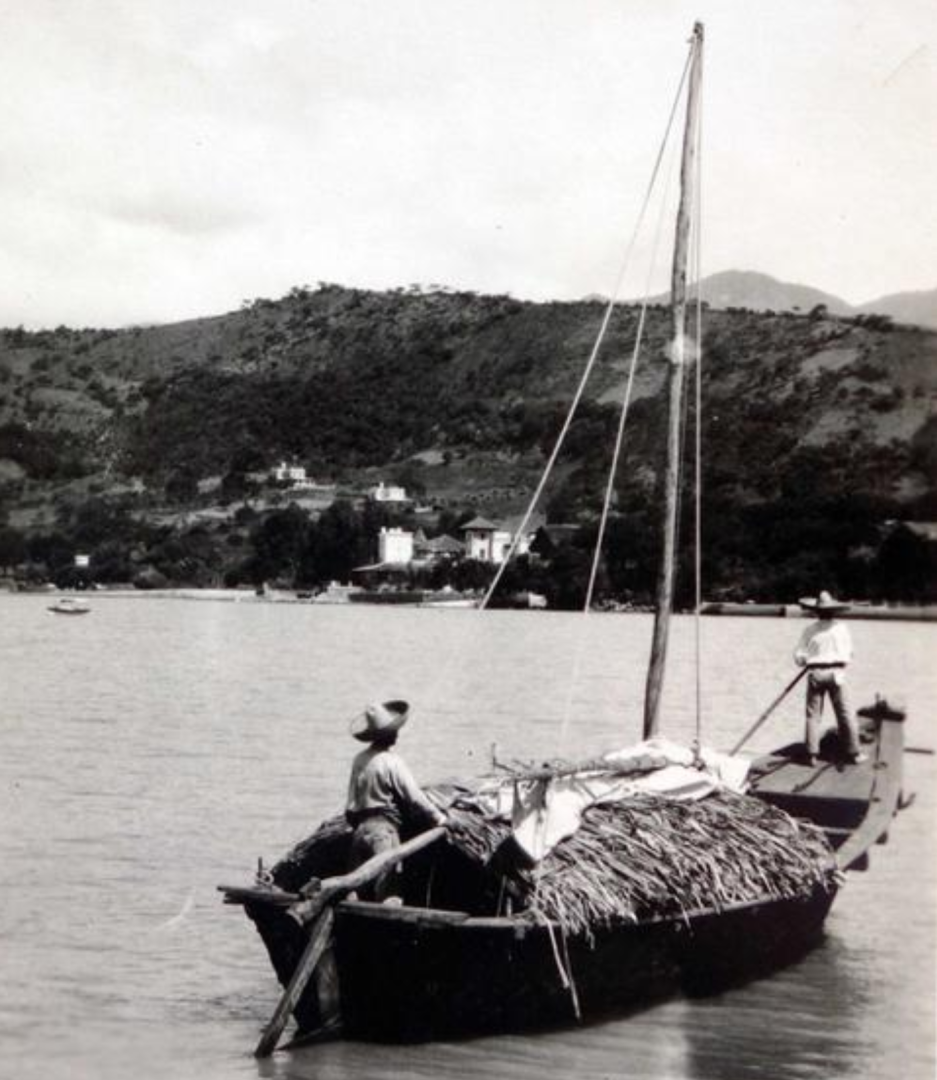
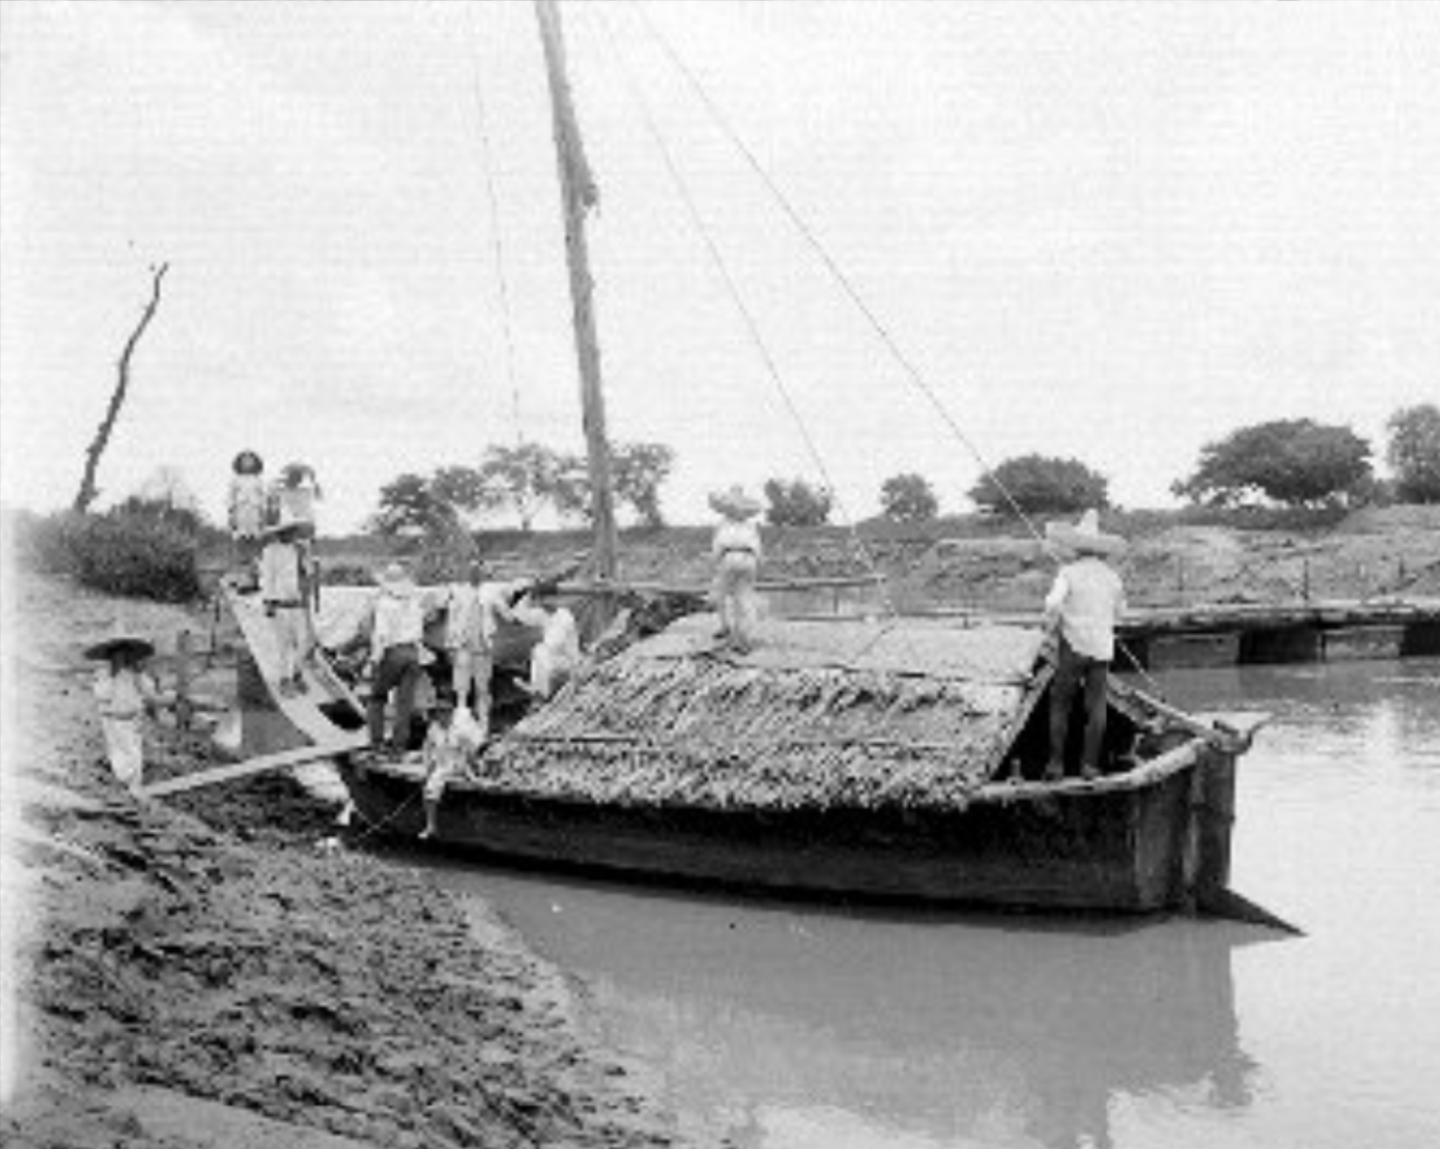
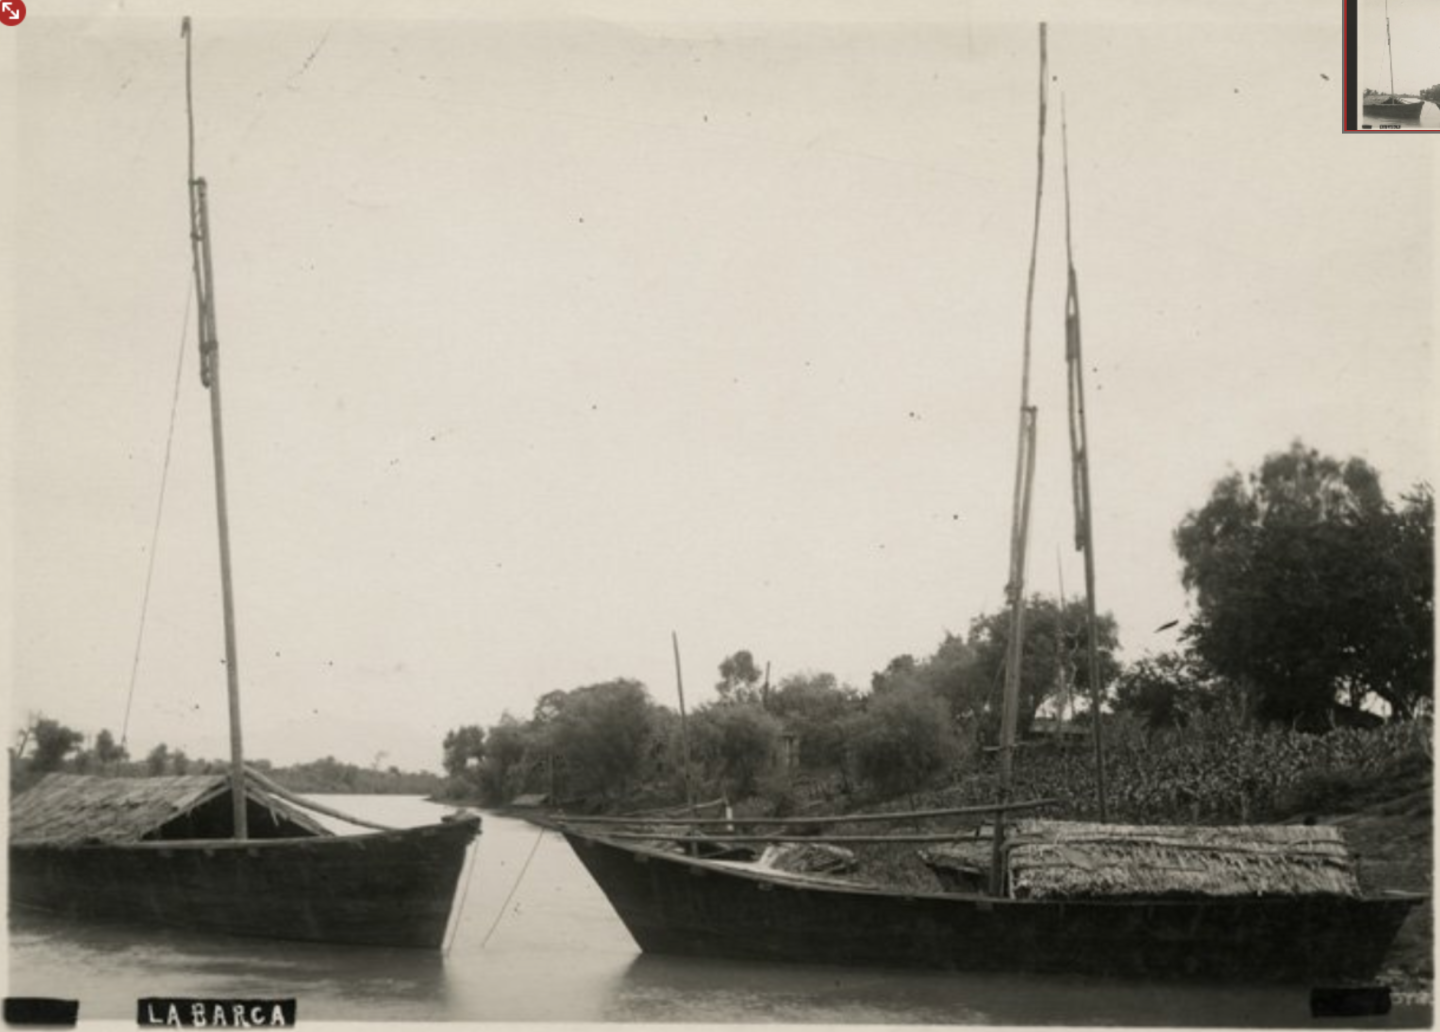
No further progress at the moment due to work and illness, but I was very happy to find a new source of photos of Canoas. Memórica (https://memoricamexico.gob.mx/ ) is relatively new online digital repository containing digitized documents from a number of Mexican archives. Early on, I didn't find it very useful as its collections were limited, they were very random in terms of what documents had and had not been digitized, and the search function didn't seem to work very well. However, on a whim I recently thought I'd see if they had anything on Lake Chapala, and found that they have a large number of photos of Canoas. Finding all of them took some time as they required a number of search terms (canoa, bote, lancha, embarcación, etc). Some are photos I've seen before, but they've mostly been digitized to a much higher quality than the blurry versions on the INAH Mediateca site. Although they don't answer all of my questions about Canoas--notably, I still don't have any good photos of the floorboards)--they're very useful, and I thought I would share a few of the more interesting one. (These are just screenshots, and higher-quality images are available at the link). Although I'd seen this photo, from 1909, before, it was in a really blurry version. With the higher quality image here, it's possible to make out a few things. The Canoa closest to the camera is named "La Fama" (best translated as "The Renown"). You can see how it uses thin poles running lengthwise along the rancho to help hold the thatching in place. Also, it interestingly has a thole pin located forward of the rancho (and a raised bit of wood on the rail that to me looks like a seat for a second thole pin nearby). This is a detail that I'd like to model, as a few of these smaller Canoas de Rancho seem to have had thole pins for rowing. ( https://memoricamexico.gob.mx/swb/memorica/Cedula?oId=0r6c_YsBTon6gu63zcYu ) I'd also seen this 1905 photo before (this is just a detail from the bigger photo). What's most interesting about it to me is that it shows not just the gudgeons for the rudder wrapped around the stern post, but it also shows metal brackets around the edge of the transom. It would not be too difficult to model this detail, so I might add it to my build. (Source: https://memoricamexico.gob.mx/swb/memorica/Cedula?oId=mPts2osBVs6S4R6nmckF ) This 1905 image was entirely new to me. It shows a small Canoa (without a rancho), named "La Bayena"--"The Whale," a perhaps ironic name for such a small vessel. The anchor at the bow is quite prominent. Notably, this is one of the few images clearly showing how they used the half-ring anchor support, which other photos show to be a common feature on these vessels. While it was clear that it was used to guide the anchor chain, it wasn't clear to me how they used it to hold up the anchor. As this image shows, they could simply place the anchor chain or the ring of the anchor onto the support in order to hold the anchor up when not in use. ( Source: https://memoricamexico.gob.mx/swb/memorica/Cedula?oId=mvts2osBVs6S4R6nmckQ ) This photo from 1908 of vessels docked at Ocotlan is also new to me. What's most interesting is what it shows about rancho construction. The vessel at the far right clearly is missing a substantial portion of the thatching--likely undergoing repairs or renovations--and for this reason part of the peak of the rancho is covered by cloth. (Source: https://memoricamexico.gob.mx/swb/memorica/Cedula?oId=ir6c_YsBTon6gu638cxb ) This is clearer in the detail below: This suggests to me that cloth coverings like this were likely only temporary measures. It also suggests that, if I decide to build my model in this way, I'd have to use several wider pieces of cloth overlapping along the top, instead of a single long, thin strip. On the topic of the rancho: earlier, I had noted that I wasn't positive whether the poles running lengthwise along its exterior were structural and used to hold the thatching in place, or if that was just a handy place to hold the poles used for poling the Canoa. This photo, titled "La Colonia" ("The Colony")--which may be the name of the vessel, which is written across the transom but is not totally clear in the photo--definitively shows that the rancho poles were just used to hold the thatching in place. The actual poling pole is, in this photo, balanced across the boat just in front of the helmsman, and others are located forward. The photo also shows that the rancho itself seems to have been used as a tie-down point for the sheets. (Source: https://memoricamexico.gob.mx/swb/memorica/Cedula?oId=g_ts2osBVs6S4R6nsc0d ) One final photo, from 1905. It's highly unusual in that it shows a rancho that has been propped up on some kind of balustrade. I'd be surprised if this was made specifically for the boat, it looks more like something from a house. The rancho may have been propped up to give more space for the clearly bulky cargo load. Other interesting details include the crew member climbing the mast--the only such photo I've seen--and the anchor resting in the half-ring at the bow. Although I'm not planning on borrowing elements from this photo for my build, it was too interesting not to share. (Source: https://memoricamexico.gob.mx/swb/memorica/Cedula?oId=mfts2osBVs6S4R6nmckK )


-
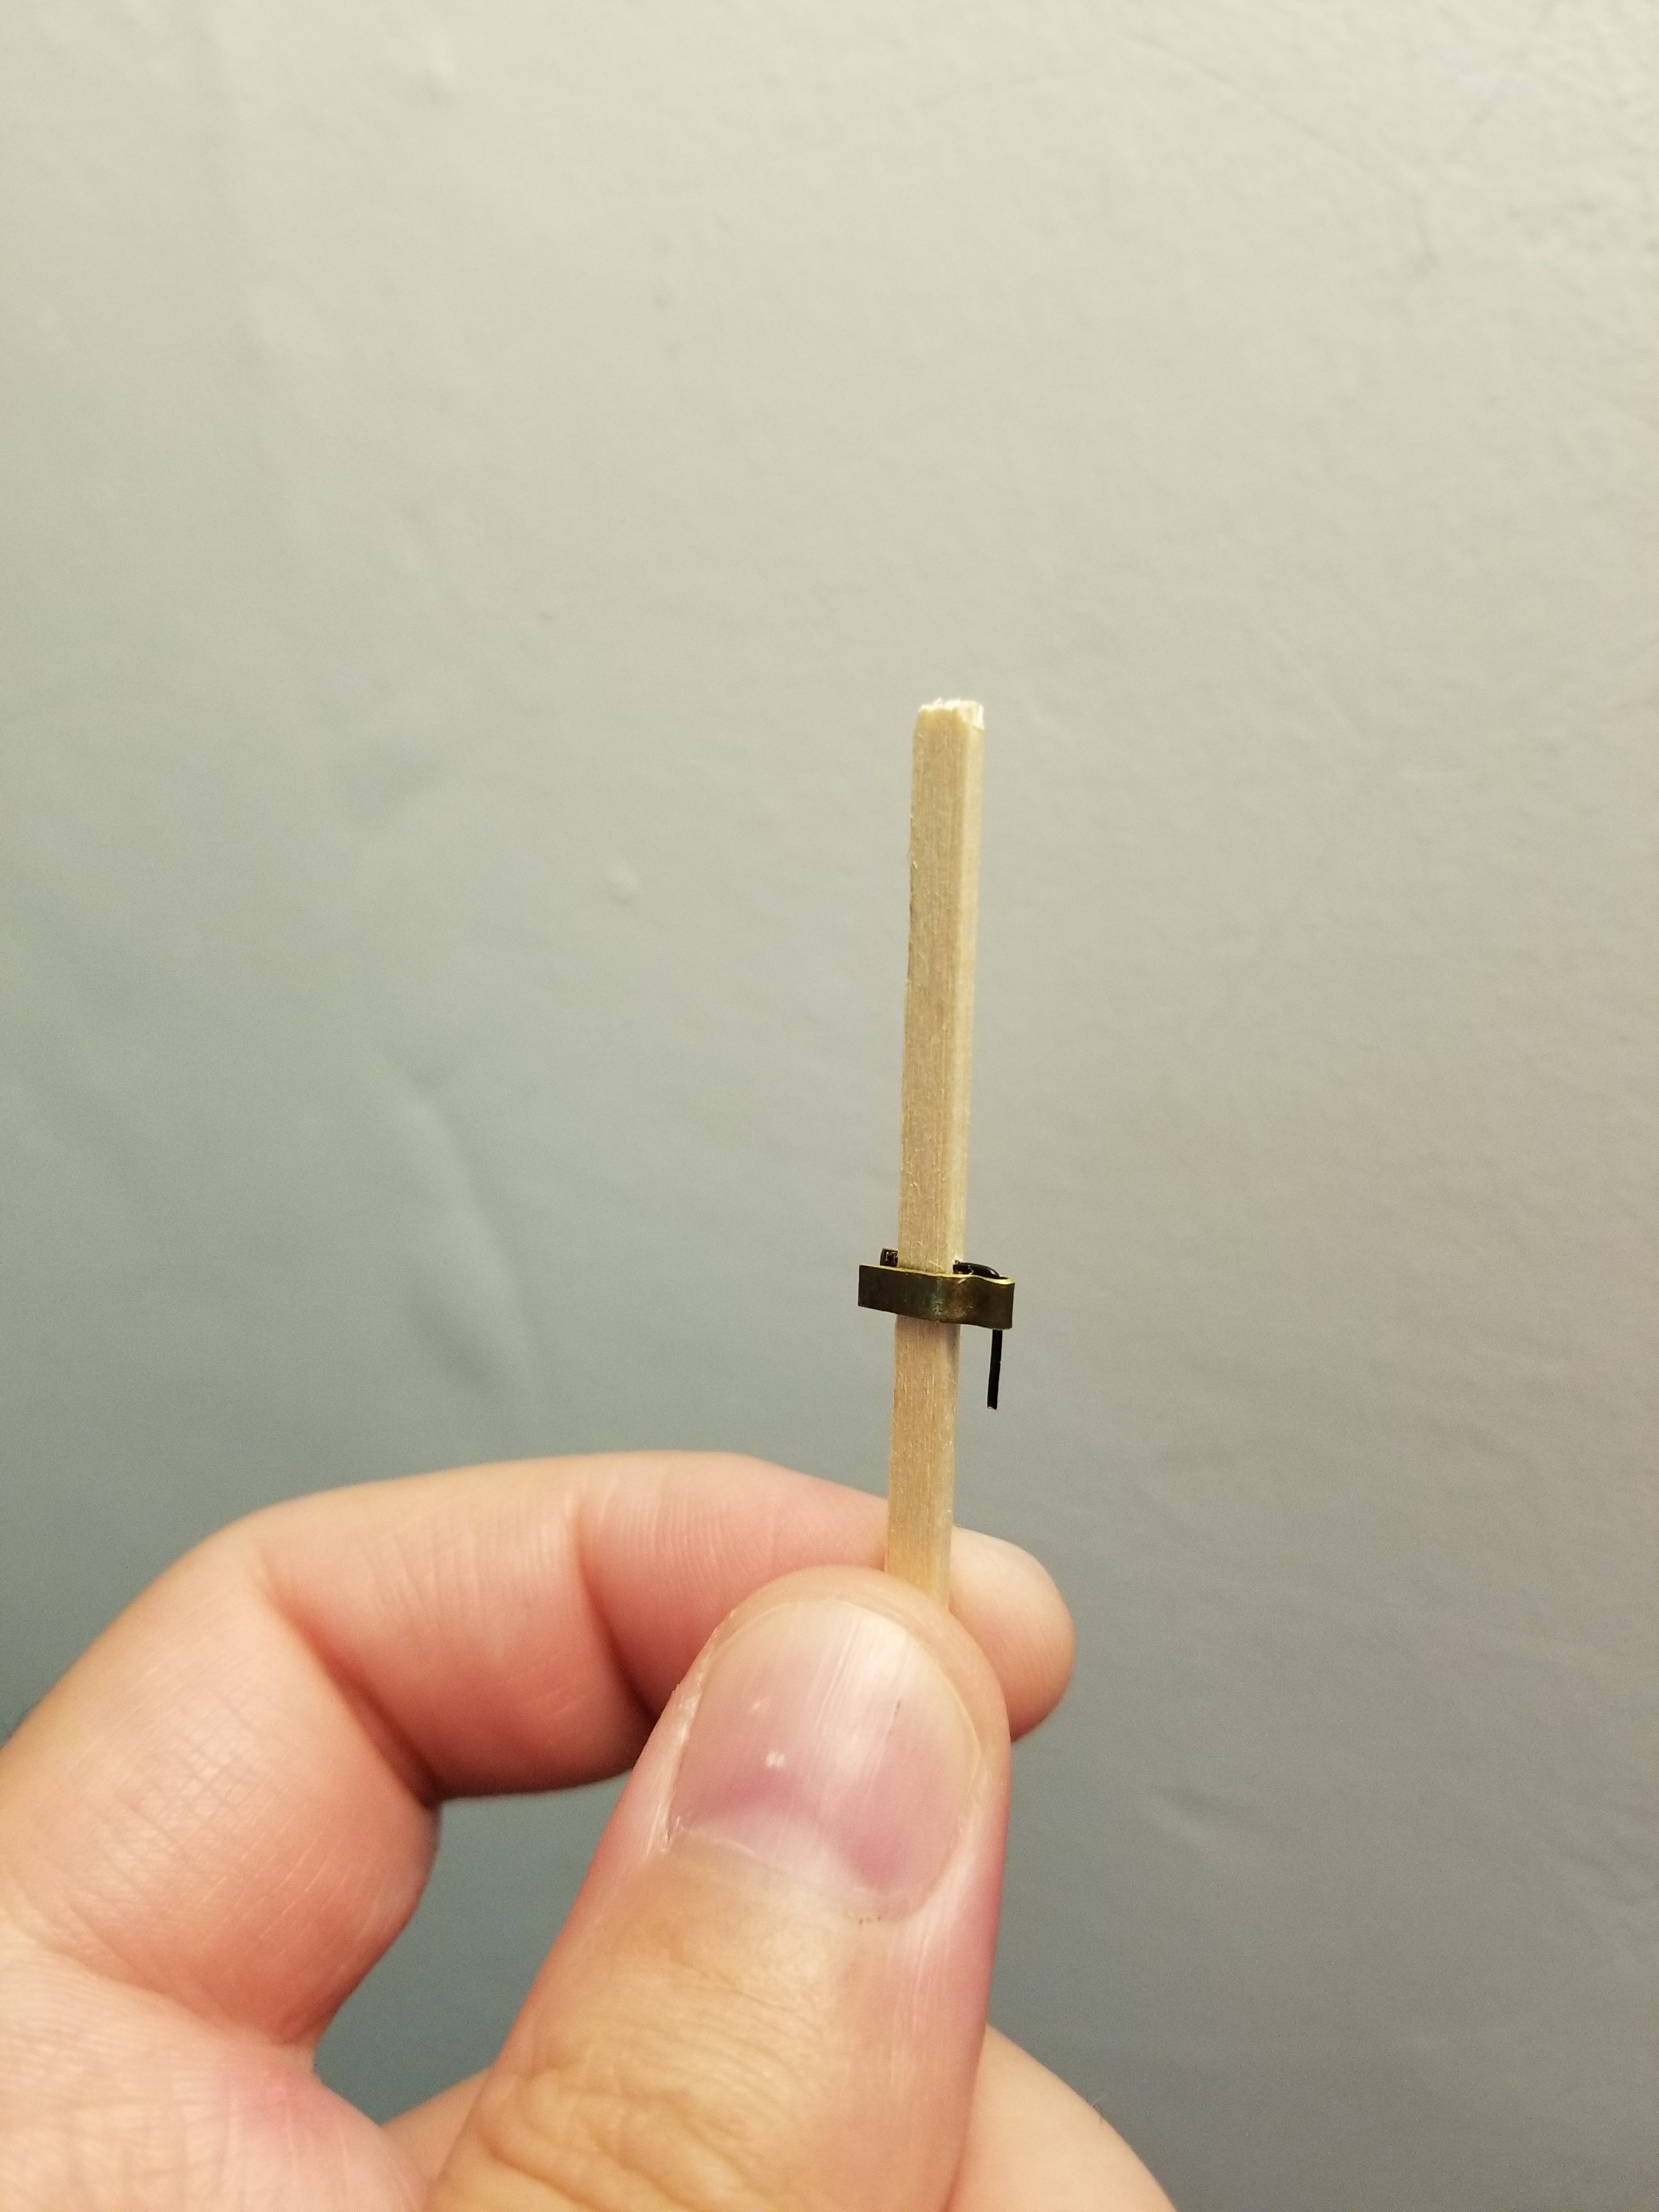
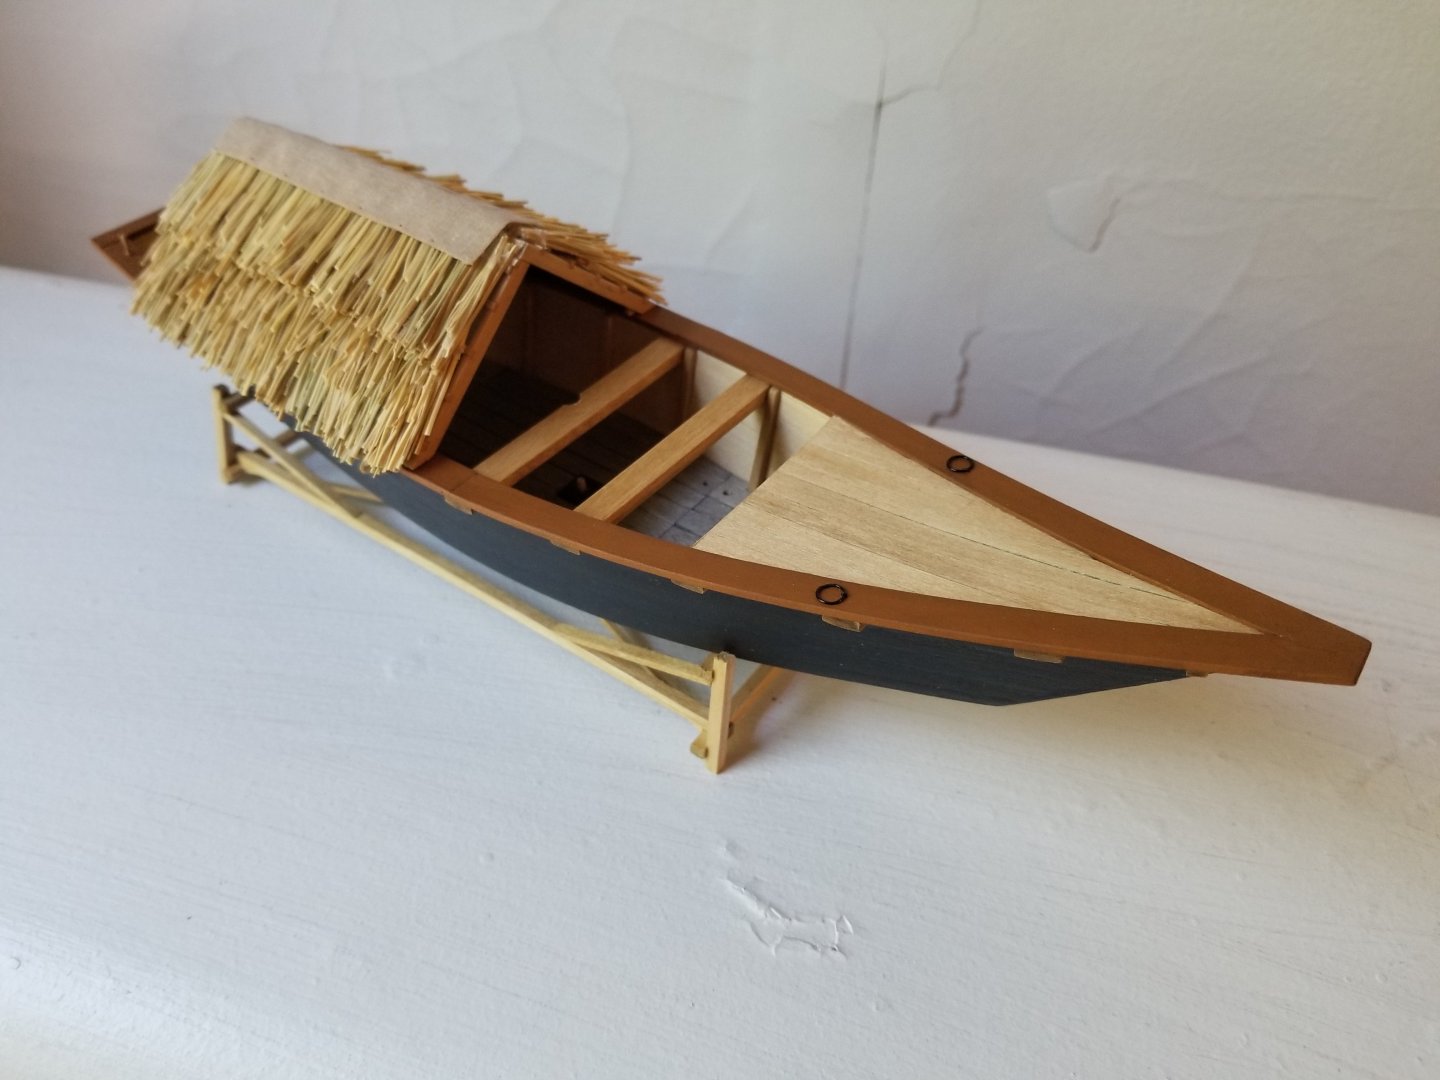
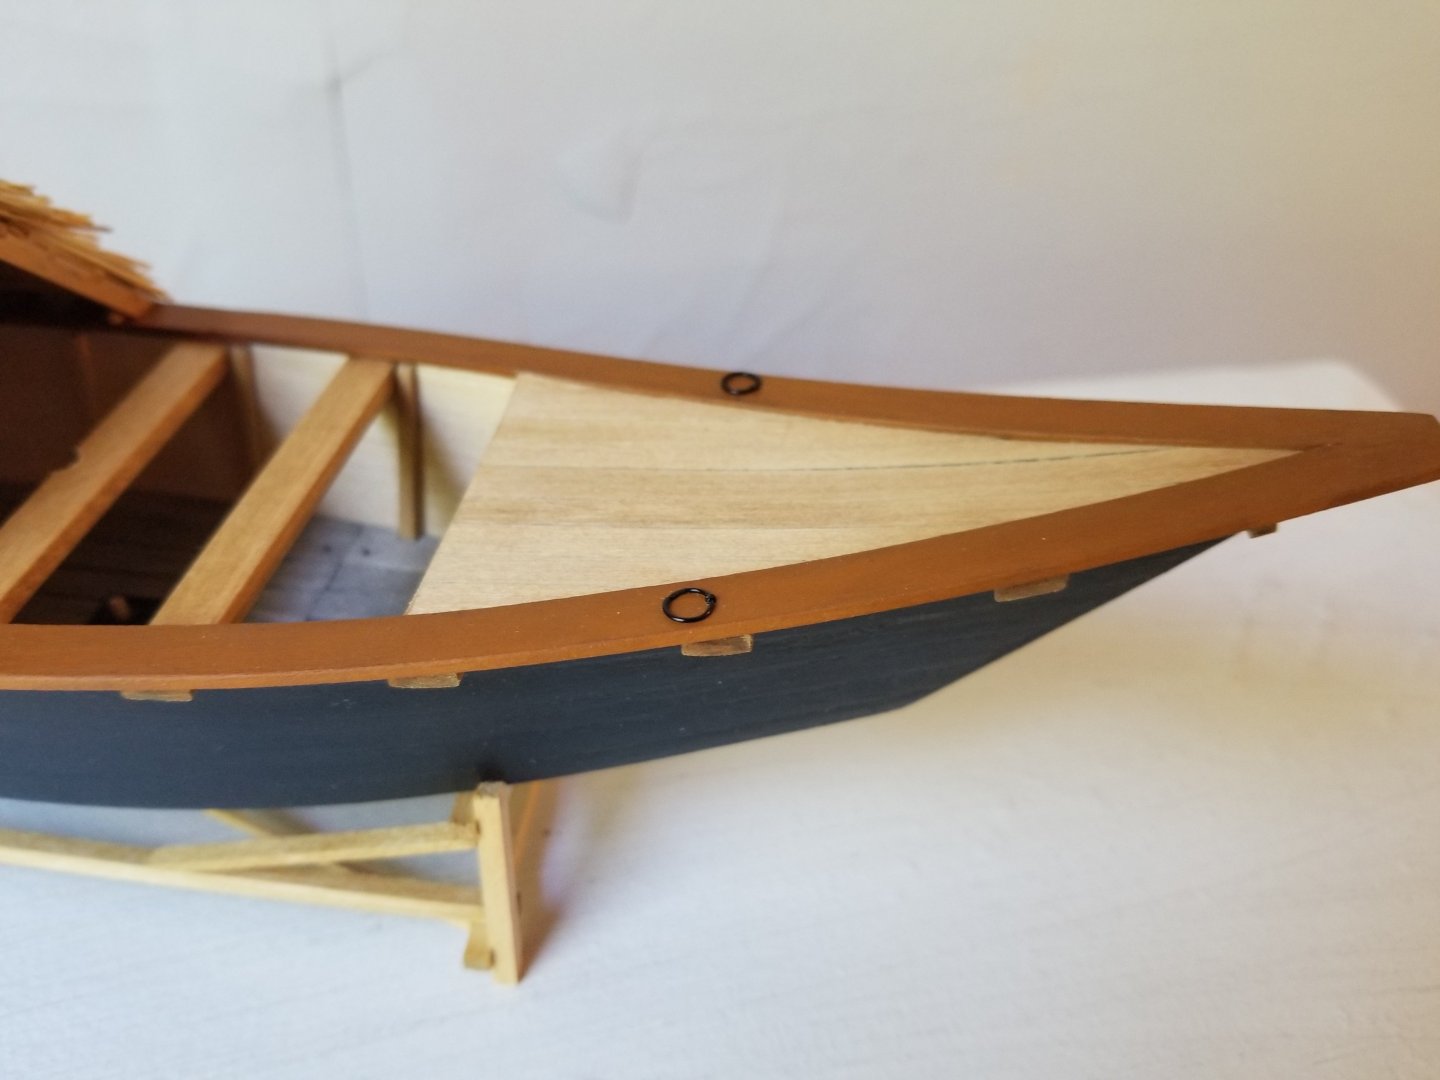
Thanks, I think my main concern is that I have a lot of clear evidence for the thatched roof cap and very little and rather equivocal evidence for the cloth cap. I may tinker with a thatched cap layer to see how tedious it is to make. I've turned my attention to some light metalwork. First, I made a pair of rings bolted to the edge of the foredeck. They're made of 24- and 28-gauge black wire, following the methods Chuck Passaro shows in his Speedwell log. Although every canoa seems to have had a different arrangement of tie-down points (as I discussed way back somewhere on the first page of this build log), I have clear evidence that at least some had a pair of rings located midway on the foredeck, as seen in the photo below: (Source: https://www.mexicoenfotos.com/antiguas/jalisco/chapala/cargamento-de-entre-MX14652247742300/5 ) I've also been thinking about the rudder hinges. Originally I was going to make the pintle by supergluing a brass pin into the rudder strap. But, I'm concerned that it won't be a very strong joint, especially because these are quite small and I've had trouble using pliers to properly clamp the strap around the pin. So, I decided to test, with some scrap, using a short length of black 24-gauge wire bent at a 90-degree angle. I drilled a hole for one end through the test "rudder" and placed the wire into it, then attached the brass rudder strap around it. You can see the wire poking out around the top of the pintle and entering the hole in the rudder. Although not quite accurate, I think this will ensure a much stronger joint for the pin and will better keep the rudder in place. It's also two parts less to blacken.

-
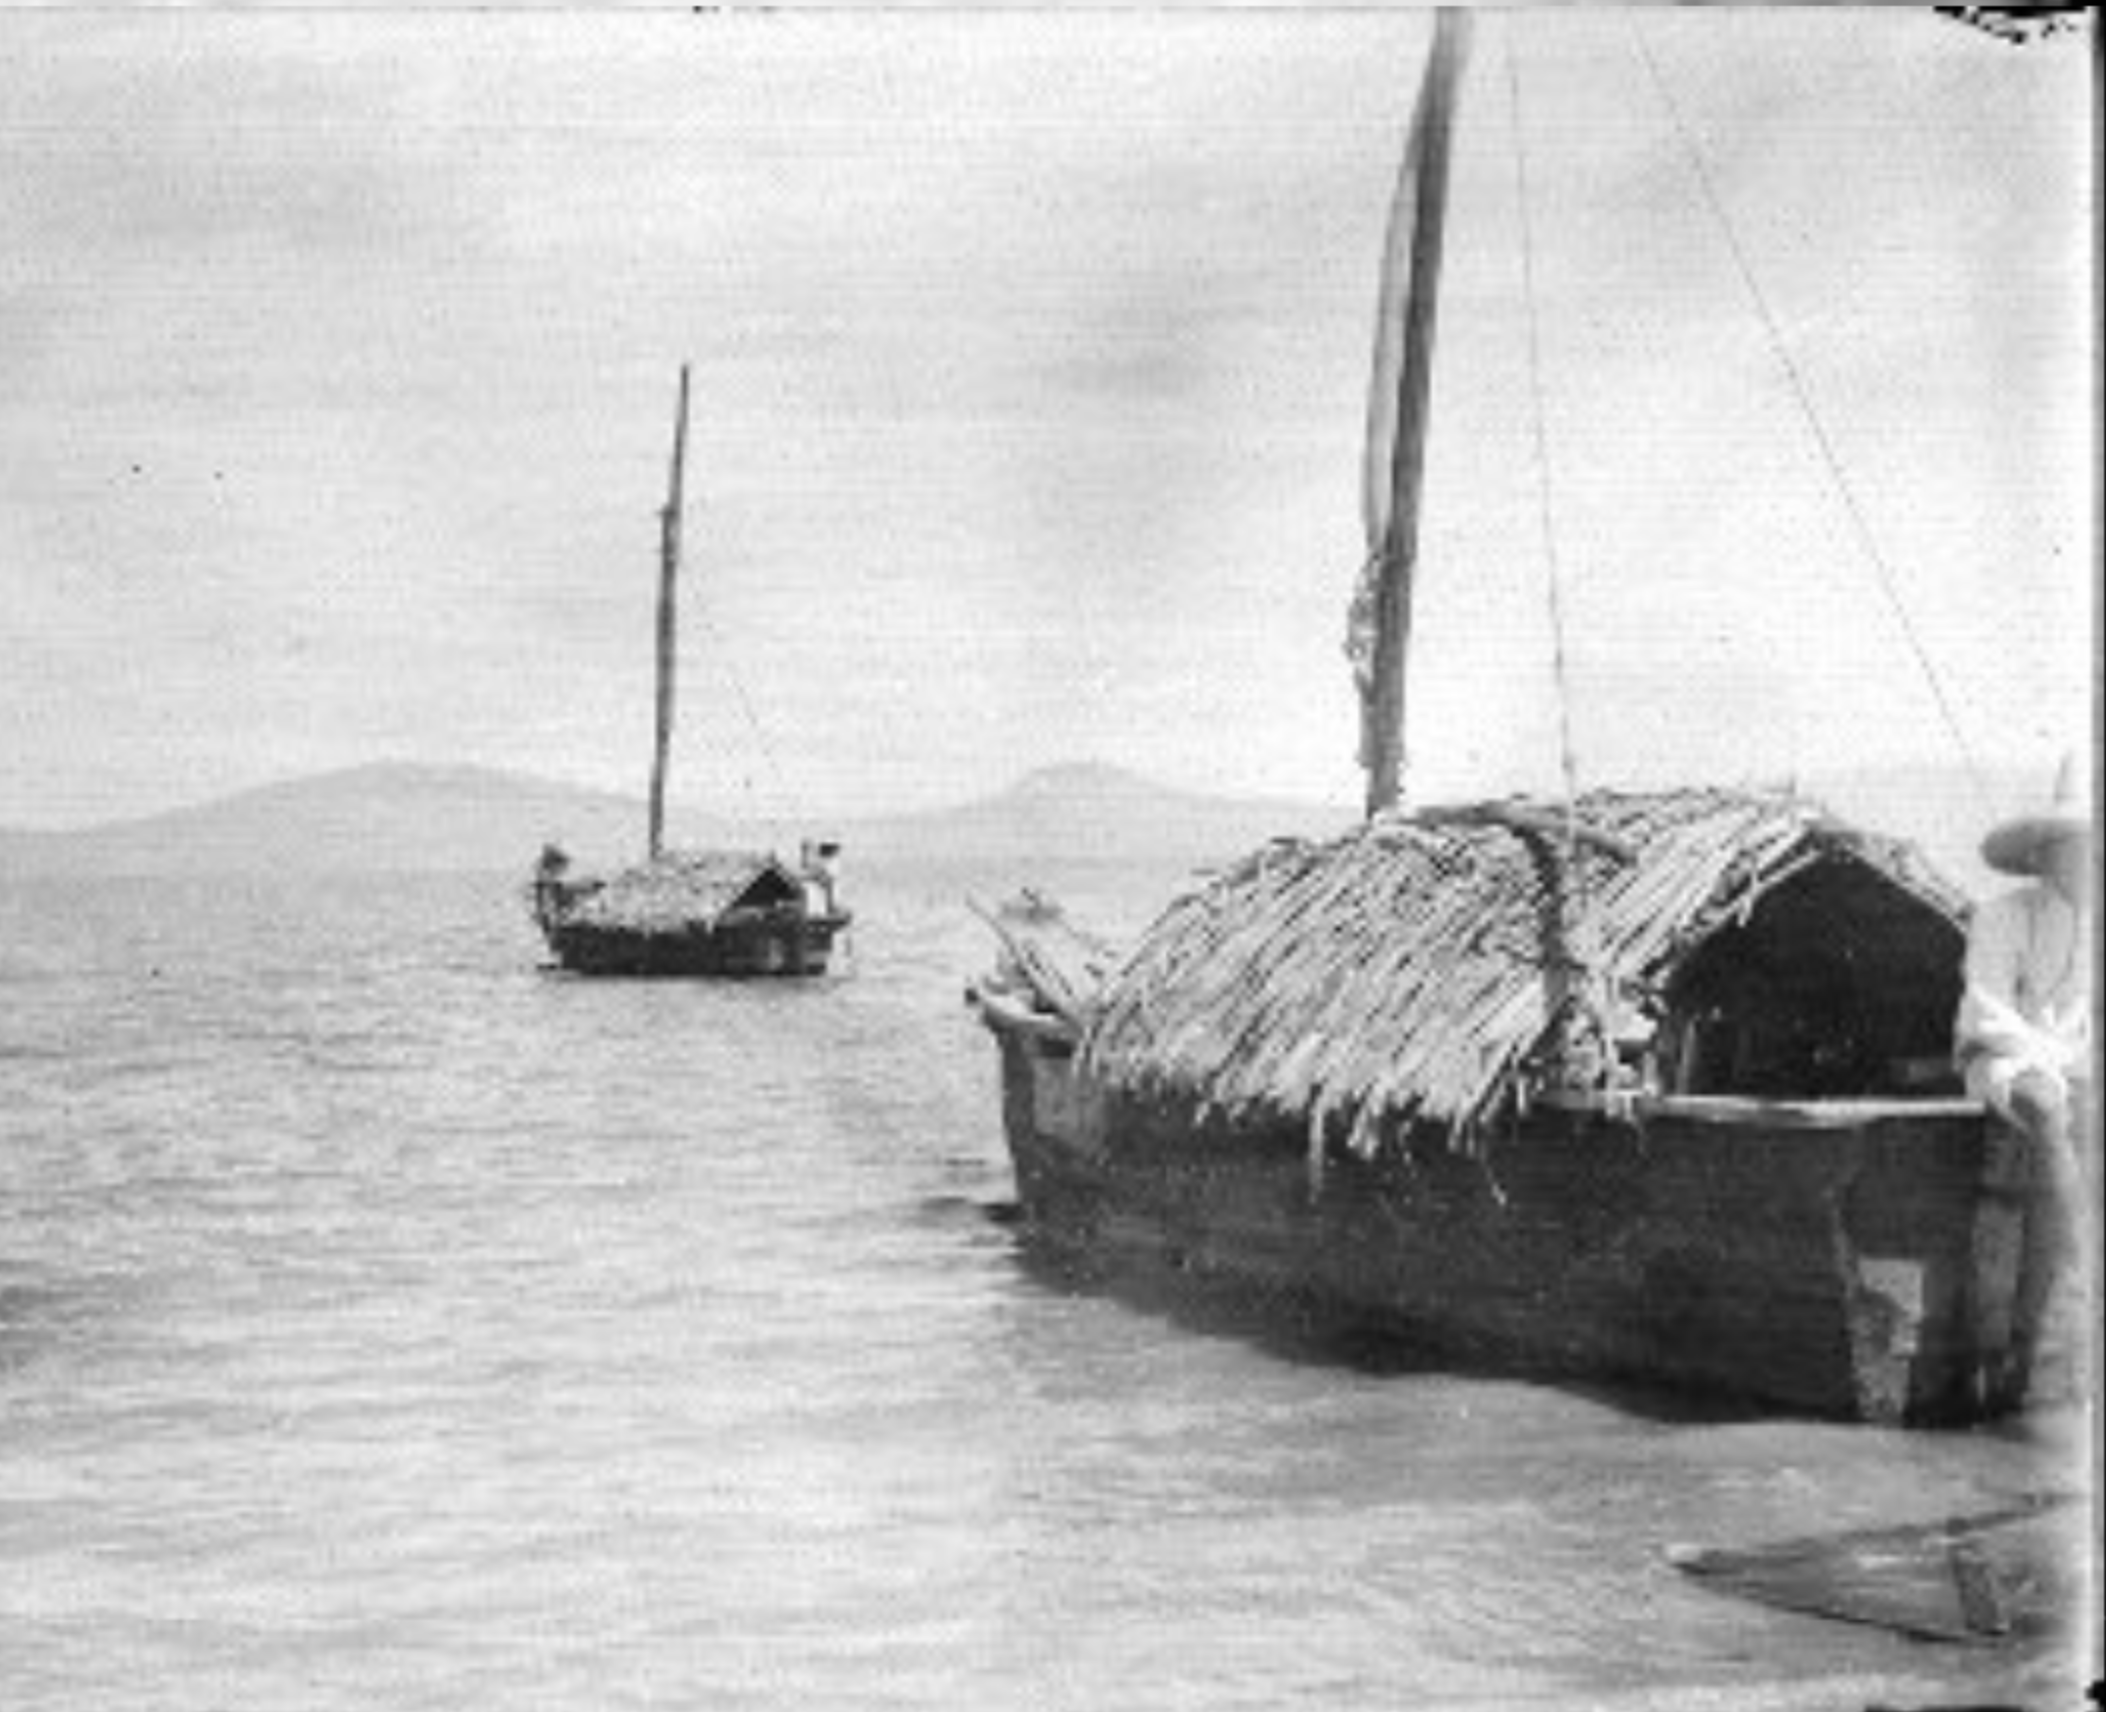
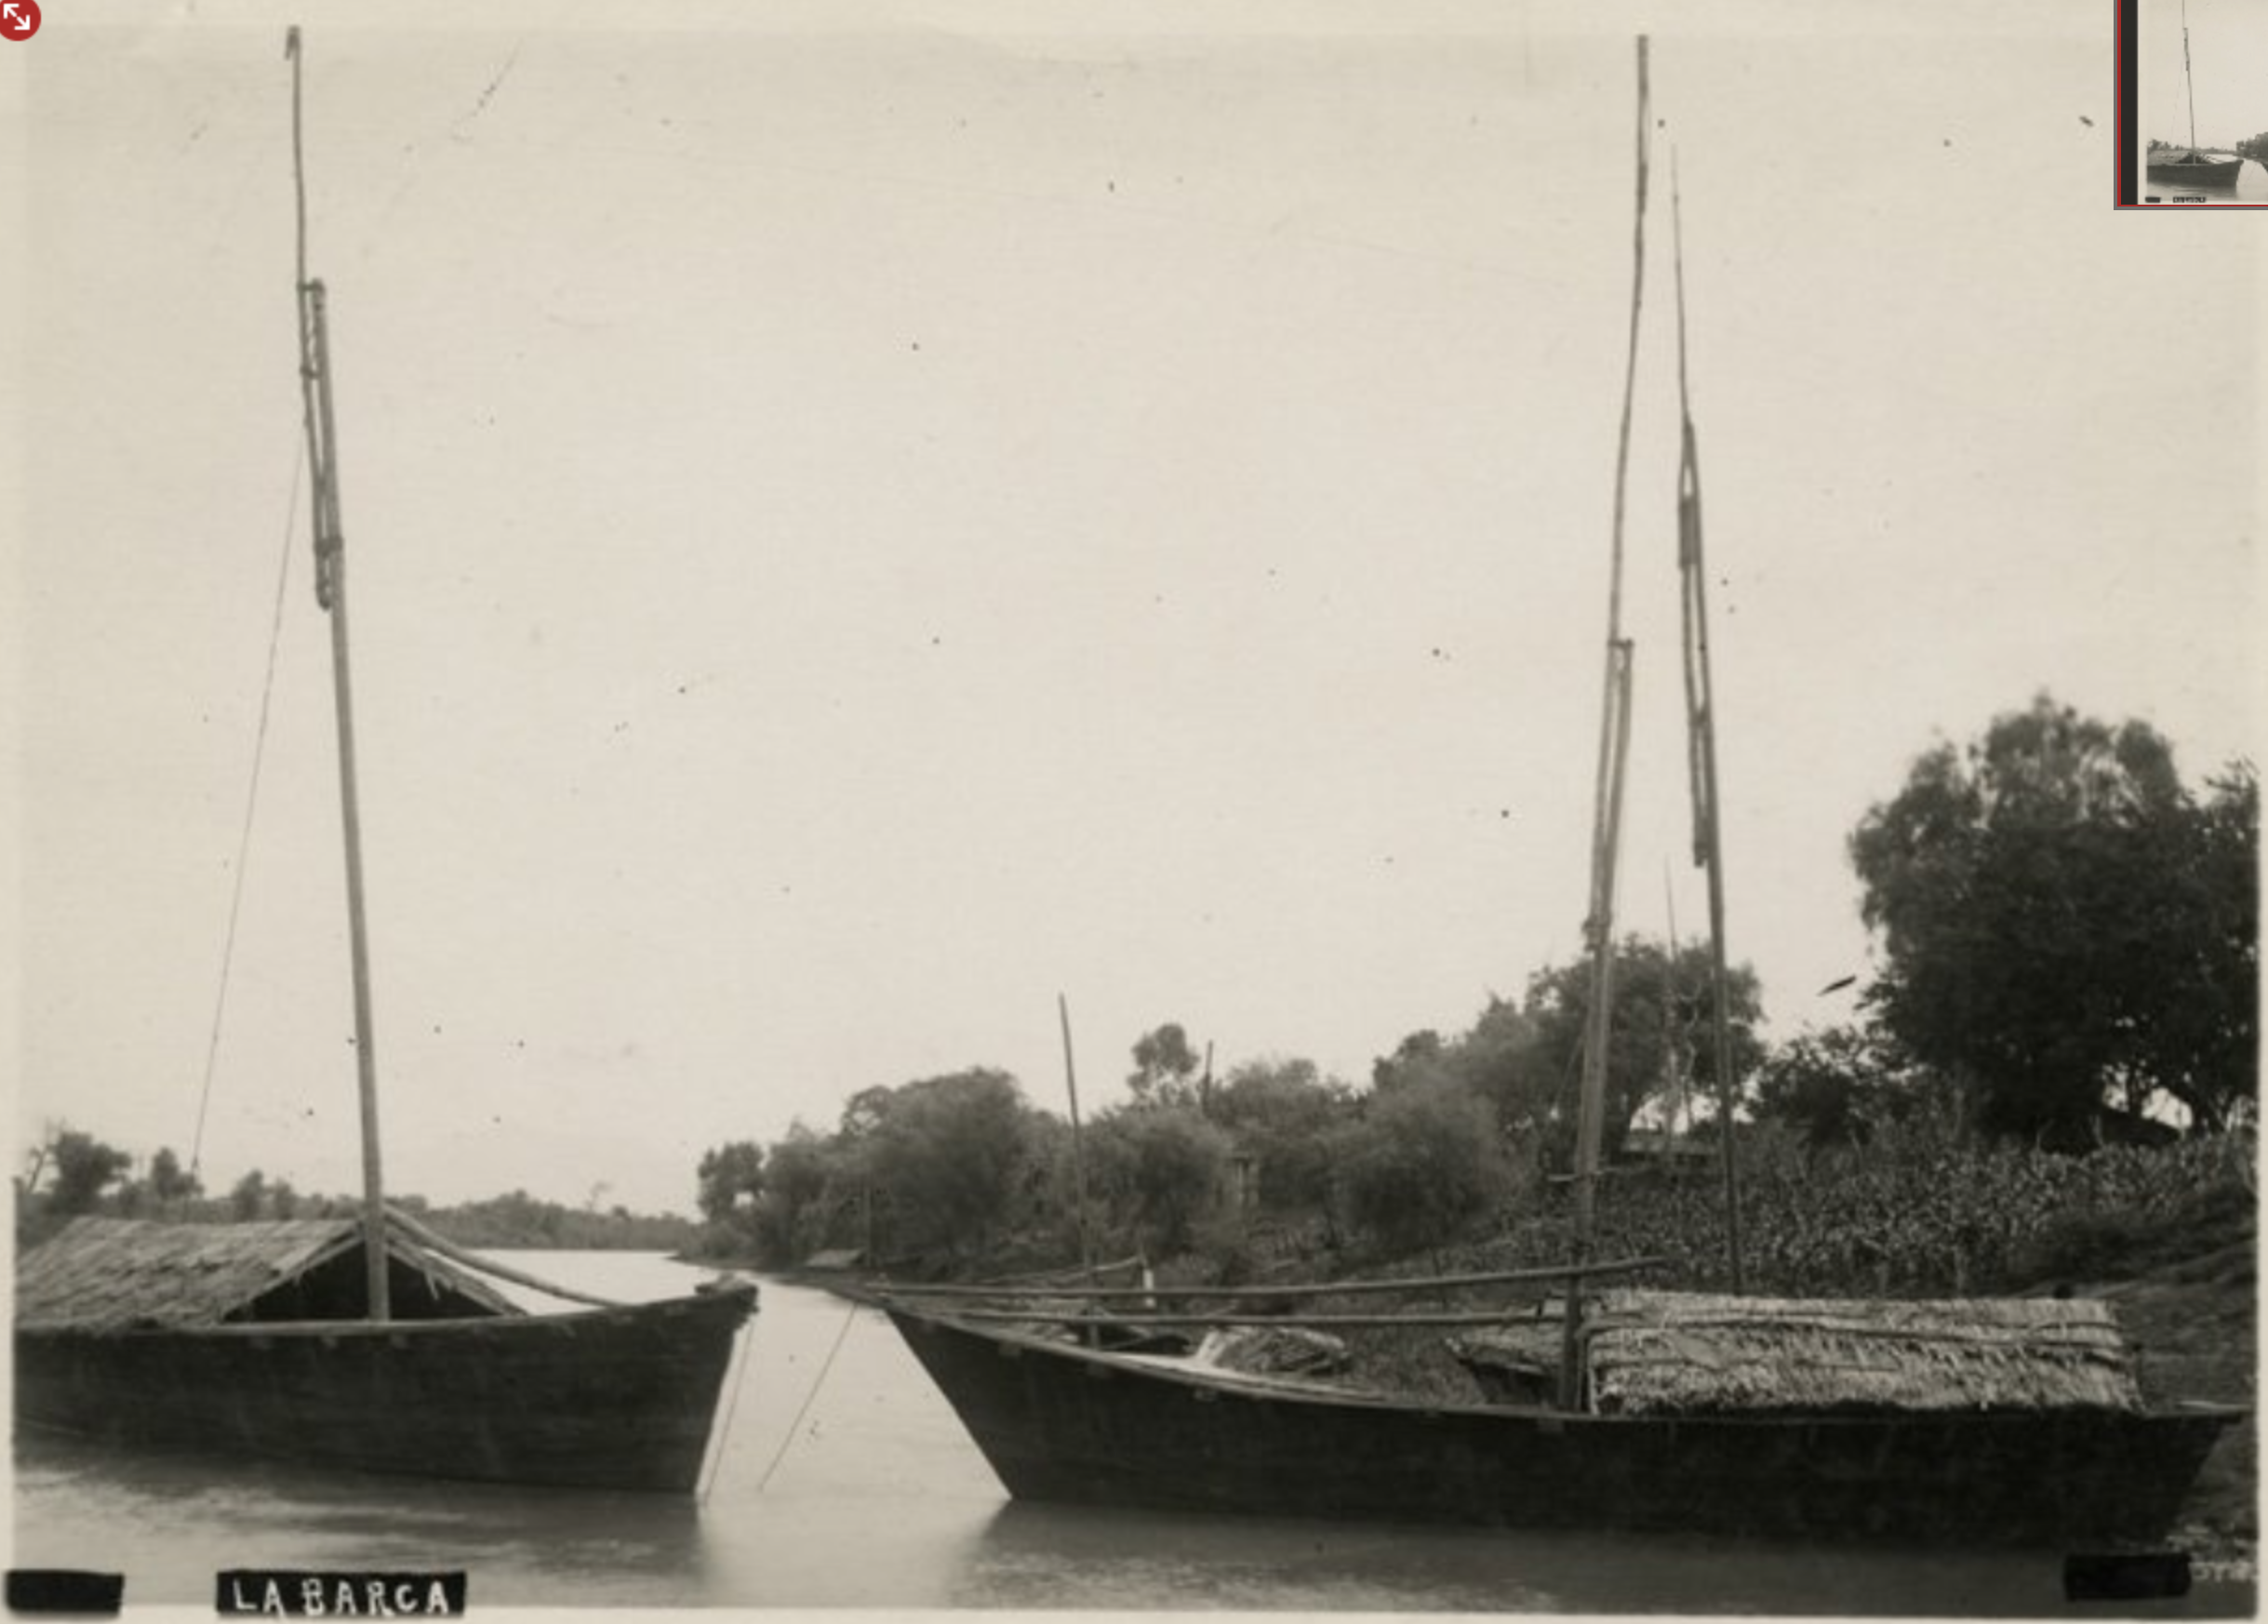
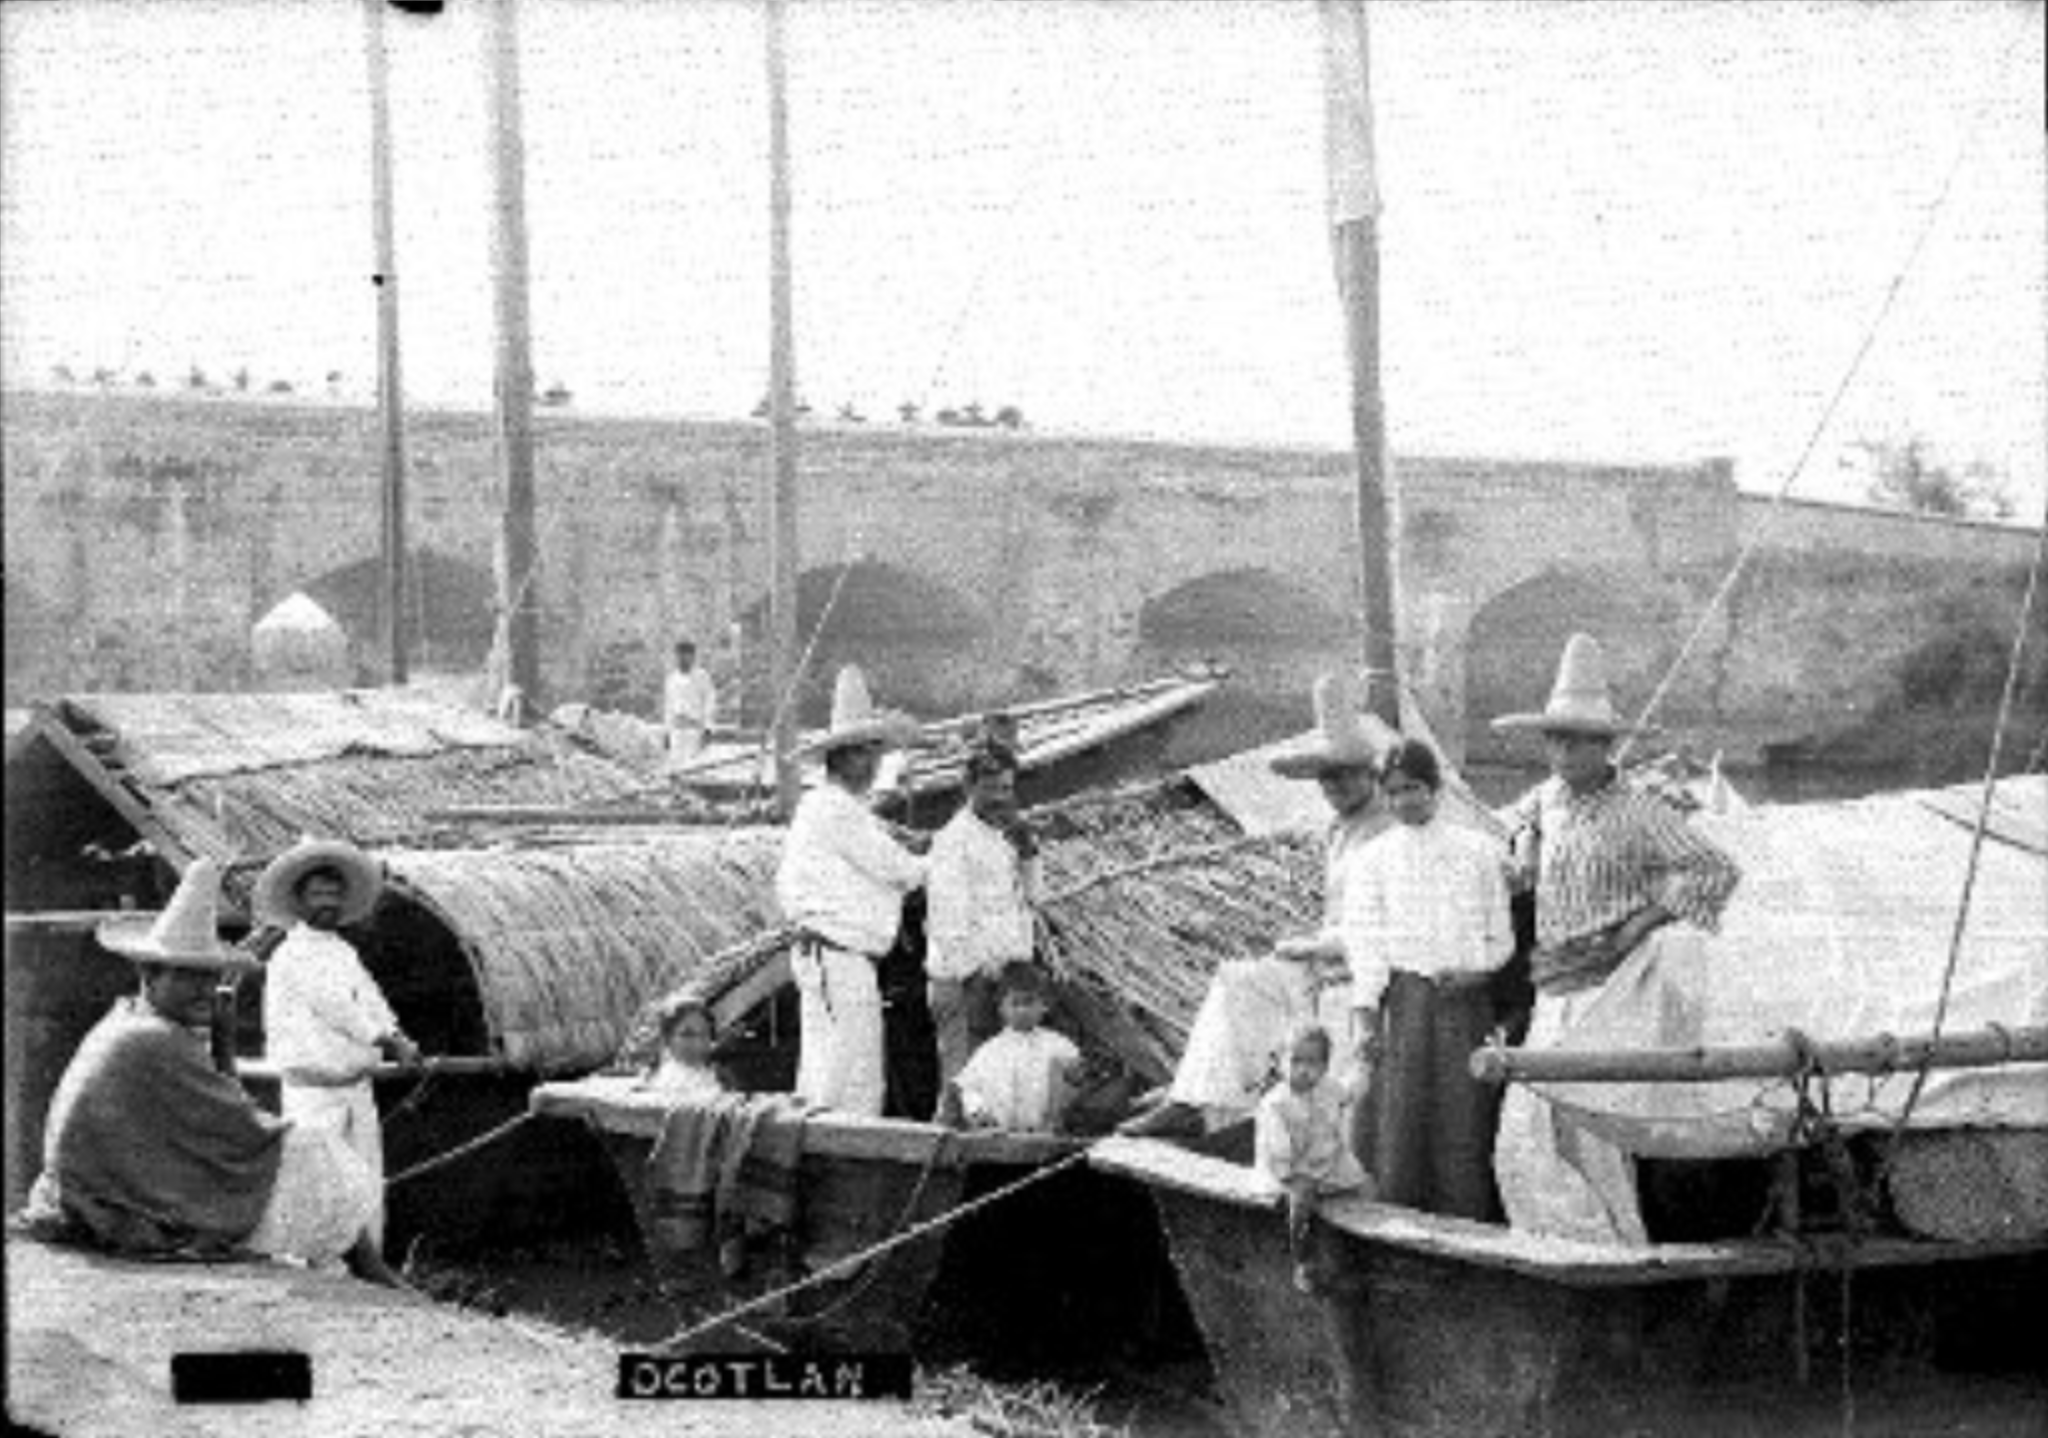
A bit of progress and yet another roadblock with the thatched rancho. First, the good news. I had bought some Falkonet belaying pins through Crafty Sailor in their going-out-of-business sale, and I decided to add them a couple to the stern of the canoa, where they serve as tie-down points for the backstays. I could have easily made simpler ones by sanding down a toothpick, but I thought these looked very nice and, based on photos, seemed to be appropriately scaled. Next, the thatched rancho. As I've mentioned earlier, my plan had been to cover the seam at the top of the rancho with a bit of cloth. Here we can see it so far, I dyed it with the woodstain (which worked quite well) and punched some holes to thread a line through the edge so as to tie it down at the ends. But now that I've started and have taken a closer look at photos, I'm not entirely sure that that's the most accurate way to do it. When I was planning this, there seemed to be a number of ways to handle the peak of the rancho roof. Many examples simply seemed to have the thatching running continuously up to the top, with it difficult to see how they actually covered the seam. See, for instance, this photo: (Source: https://mediateca.inah.gob.mx/islandora_74/islandora/object/fotografia%3A139789 ) Other photos showed some kind of added layer of thatching or something, apparently folded over the peak of the roof and held down on both sides by either a rope or a wooden pole running lengthwise along the rancho. This is clearly visible in this photo, where, by the ragged edge of the top layer, it seems clear that it's some kind of thatching (although the much more uniform texture compared to the lower thatching layers makes me wonder if it's actually a very ragged-edged woven petate mat, which were used as roofs for ranchos in some parts of the lake): (Source: https://mediateca.inah.gob.mx/islandora_74/islandora/object/fotografia%3A140947 ) You can see something similar here on both canoas. The rightmost one is definitely thatching. Interestingly, it has much more prominent poles running lengthwise to hold the thatching in place than the vessel to the left. Although I suppose there's some possibility that these are actually the poles used for poling the canoa in shallow water, they look to me in the two photos above like they're strategically placed to keep the upper layer of thatching in place. (Source: https://mediateca.inah.gob.mx/islandora_74/islandora/object/fotografia%3A431254 ) That said, as I've repeatedly noted, I've found the thatching extremely tedious to do. I was instead inspired by this other image of thatched rancho roofs, which seemed to indicate that a strip of cloth might also be used to cover the peak seam. (Source: https://mediateca.inah.gob.mx/islandora_74/islandora/object/fotografia%3A140957 ) In particular, the leftmost rancho, and the one in the middle (second from right, with the two men and two children in the stern). The one on the left appears to have a squared bit of cloth covering the peak of the roof. Interestingly, it seems from the aft end that there is little if any thatching right at the top of the rancho roof, with the cloth apparently covering the gap. The rancho in the middle, meanwhile, clearly has some sort of cloth draped across at least the fore section of the rancho, with what appears to be a thick rope running along it aft. It's unclear whether there's a gap at the peak, but it is unusual that there appears to be a definite color change at the very peak, as you can see that the thatching is much darker there. In any case, this appeared to be a much easier option for covering the seam on the rancho roof than doing more thatching, so I planned on it for my build. As I've been building, though, I began to wonder whether this photo actually shows cloth being used to cover the rancho peak, or if the cloth is just the sail set out to dry. I increasingly think that the cloth on the peak of the middle rancho is just the dangling edge of the sail (which otherwise is lashed vertically along the mast and yard) placed there to keep it out of the way. The leftmost rancho looks more to me like the cloth is being used to cover some gap in the thatching, but perhaps I'm misreading the image or perhaps they were simply in the middle of re-thatching the rancho and temporarily used the cloth to cover it. All of which is to say, I'm not sure if I can use the cloth cover anymore. I'm now debating whether to make a new, thin top layer of thatching curving around the peak. Doing so will be very slow, as I will need to proceed one straw at a time. Moreover, given that the current layer of thatching is a bit lumpy due to being made of bunches of straw, it will be difficult to get a top layer to sit right, and difficult to glue it in place when it will definitely want to spring straight. I'm therefore considering whether to use the cloth I cut as a base, glue the straw to it (and completely cover it), and then bend it in place by gluing first one side down, and then the other. Definitely a bit frustrating, at this point I'm wishing that I had just gone with a wooden rancho all those months ago.


-
That's very odd about the parts sheet. Hopefully it doesn't end up being too big of an issue once it's sanded down. Very nice job on the lobster trap!
- 69 replies
-
- 1
-

-
- Lowell Grand Banks Dory
- Model Shipways
- (and 2 more)
-
Nice job on the sails!
-
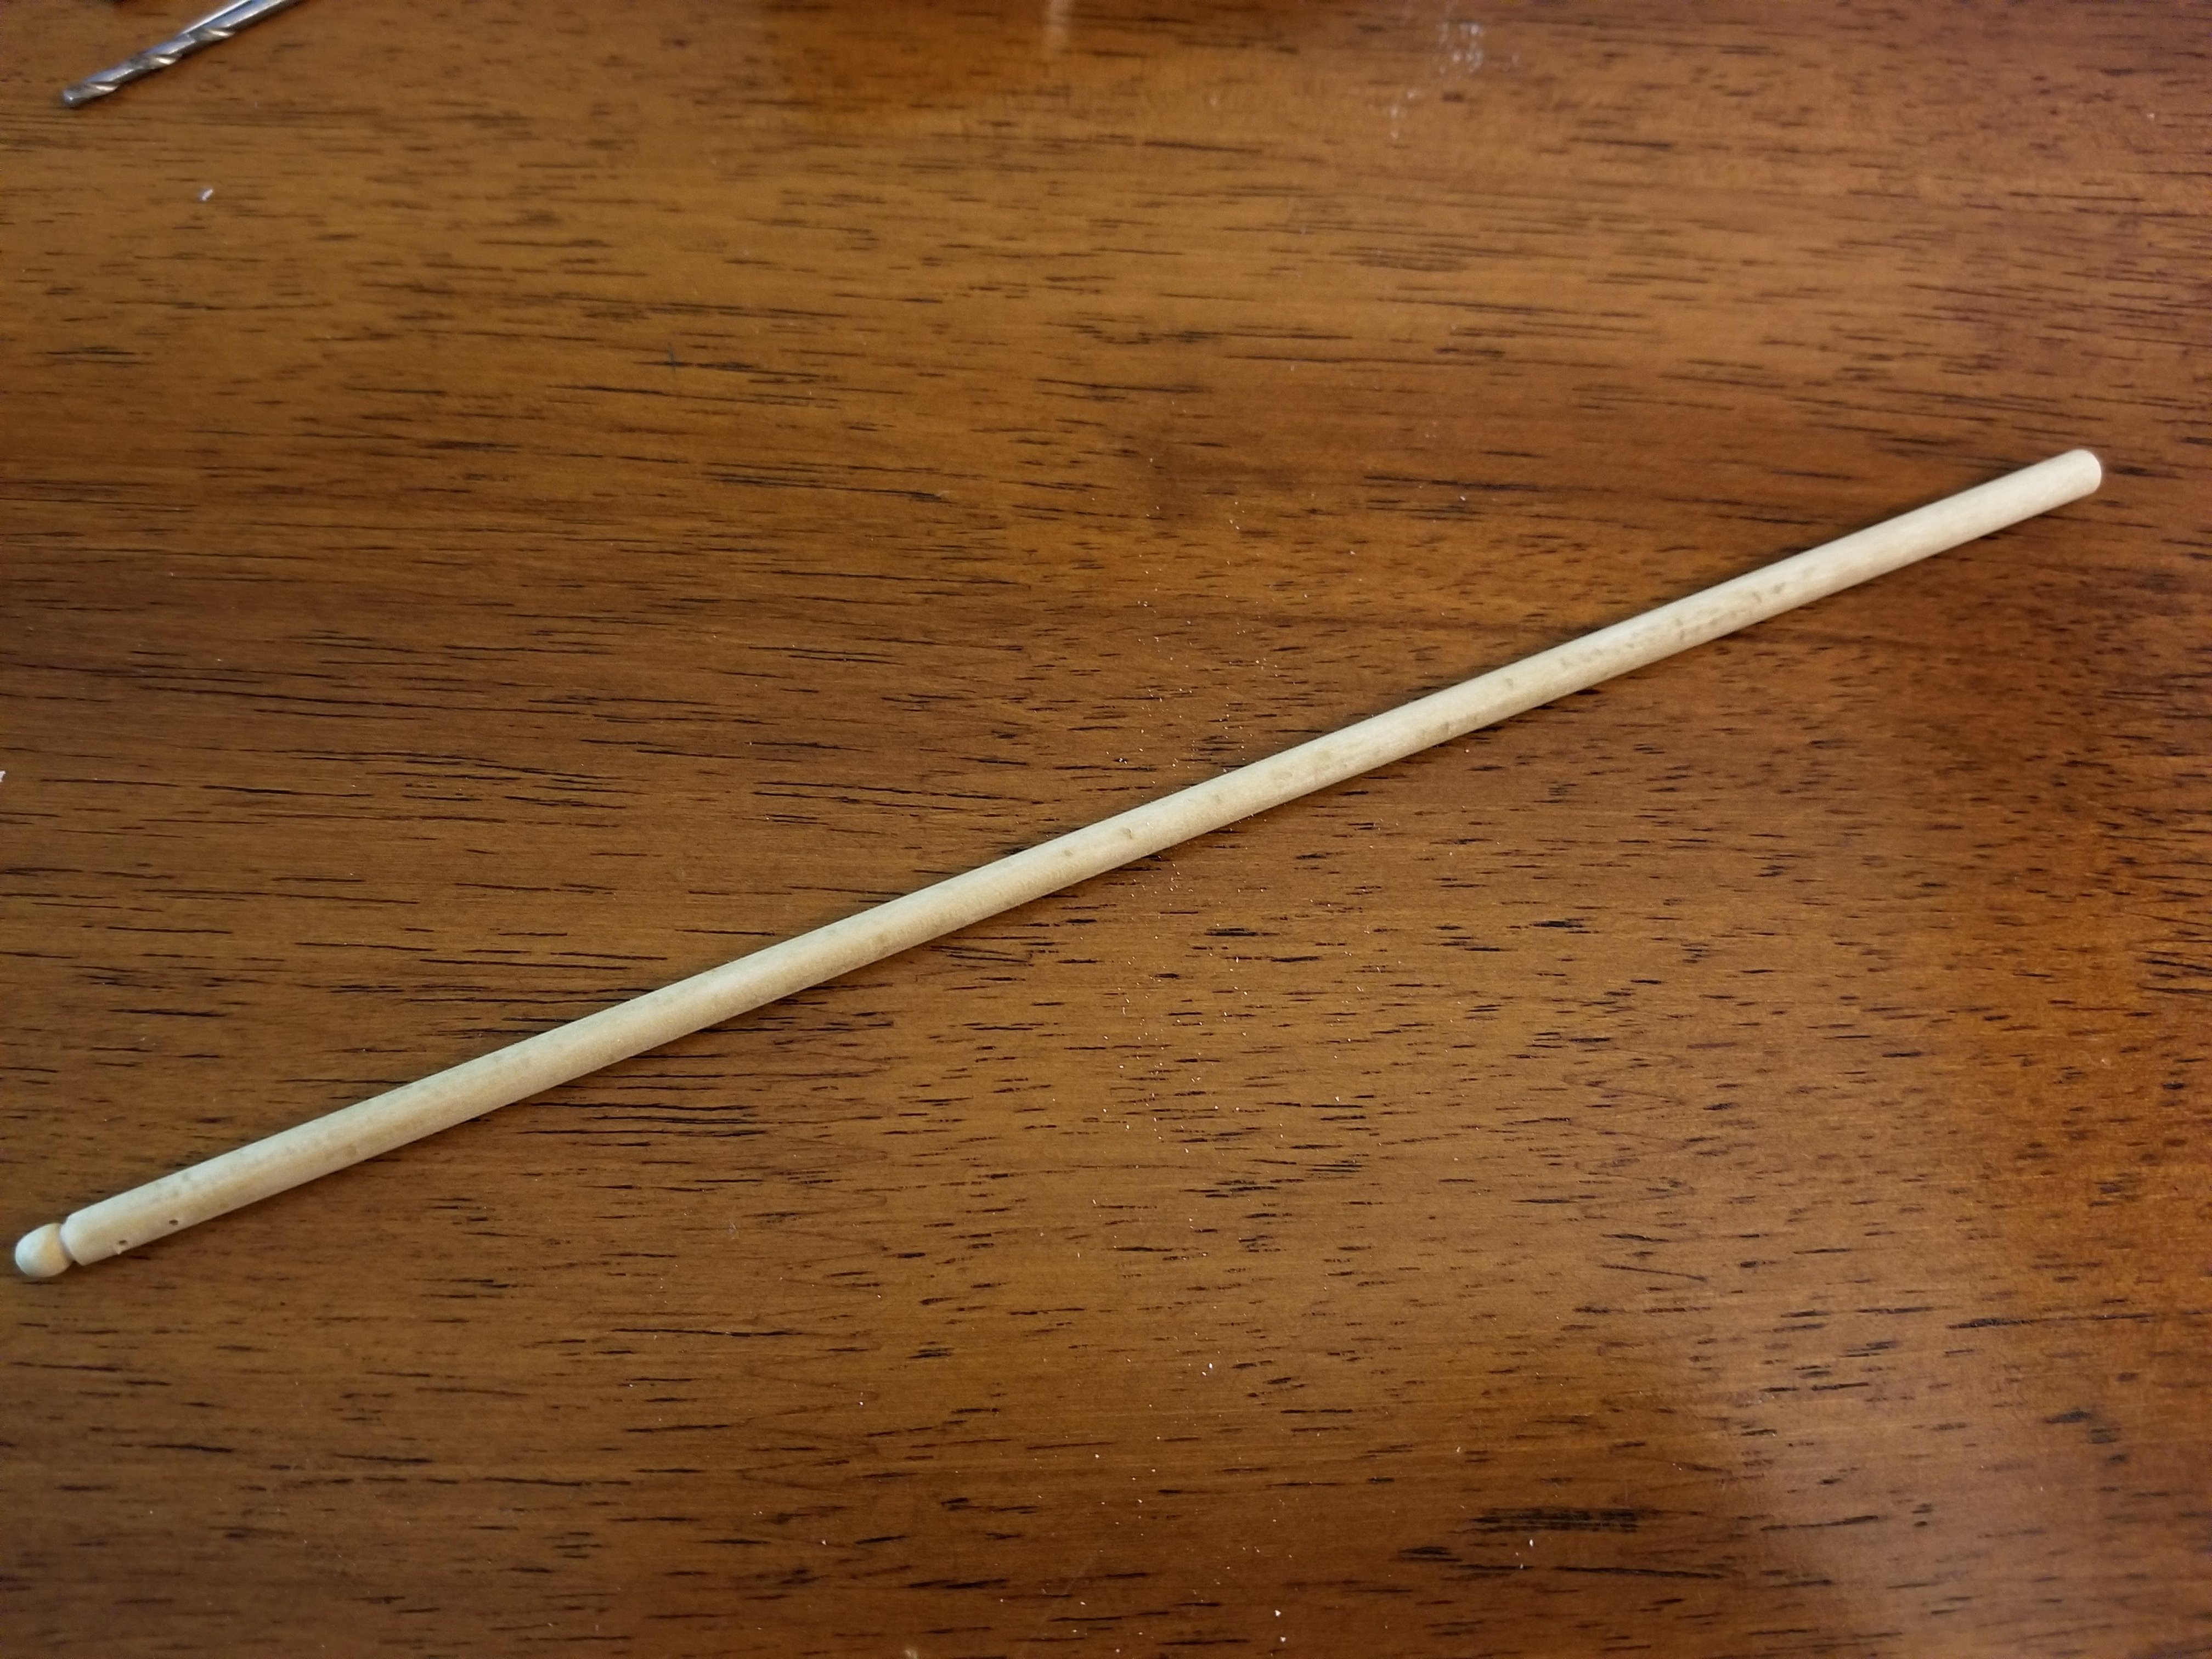
Brief update: I will be making a new mast after all. I decided to try staining this one as a test, and as I feared, the gouges really messed up the finish and became much more visible. The test also confirmed that I do prefer the color of the stained wood for the mast. So, I've begun tapering a new mast from the dowel. It was tricky to figure out which way the grain ran, but I was able to reverse the direction of my planing to fix the handful of gouges that did occur. I also aggressively sanded. I don't have a drill or lathe, so my method is to fold a piece of sandpaper around the dowel, use my hand to hold it somewhat tight to the dowel, and sand it lengthwise and by spinning simultaneously.

-
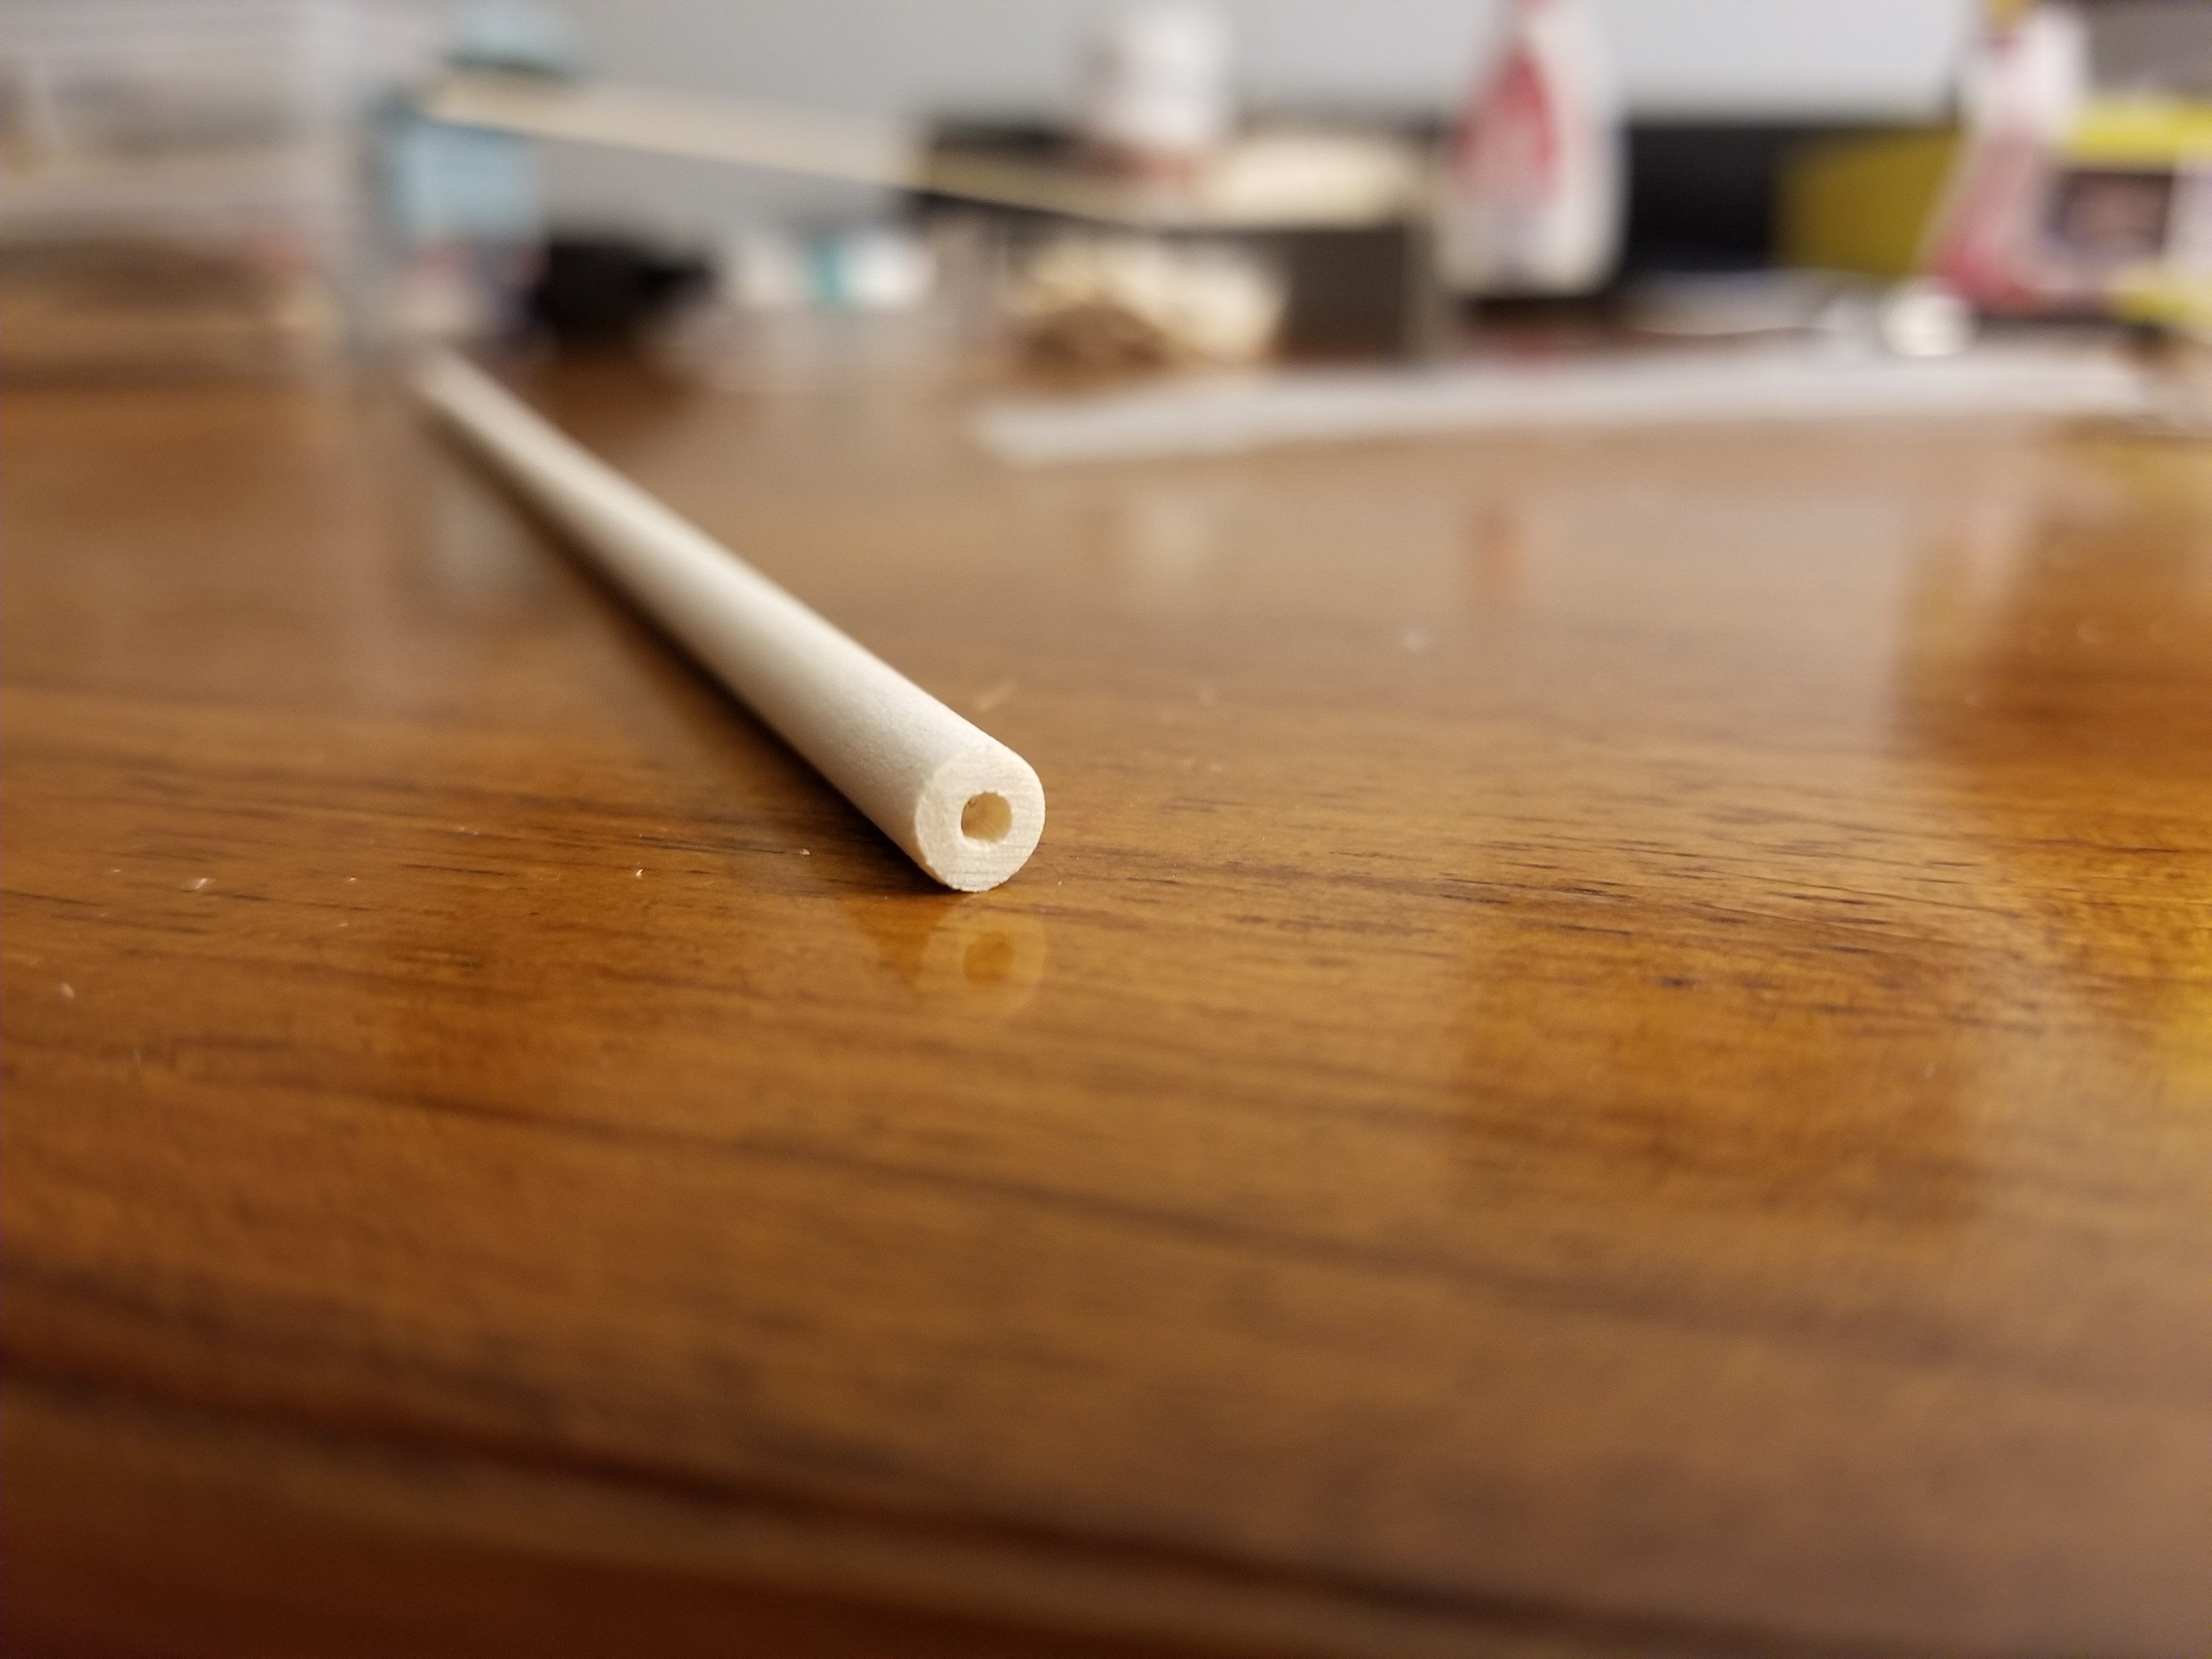
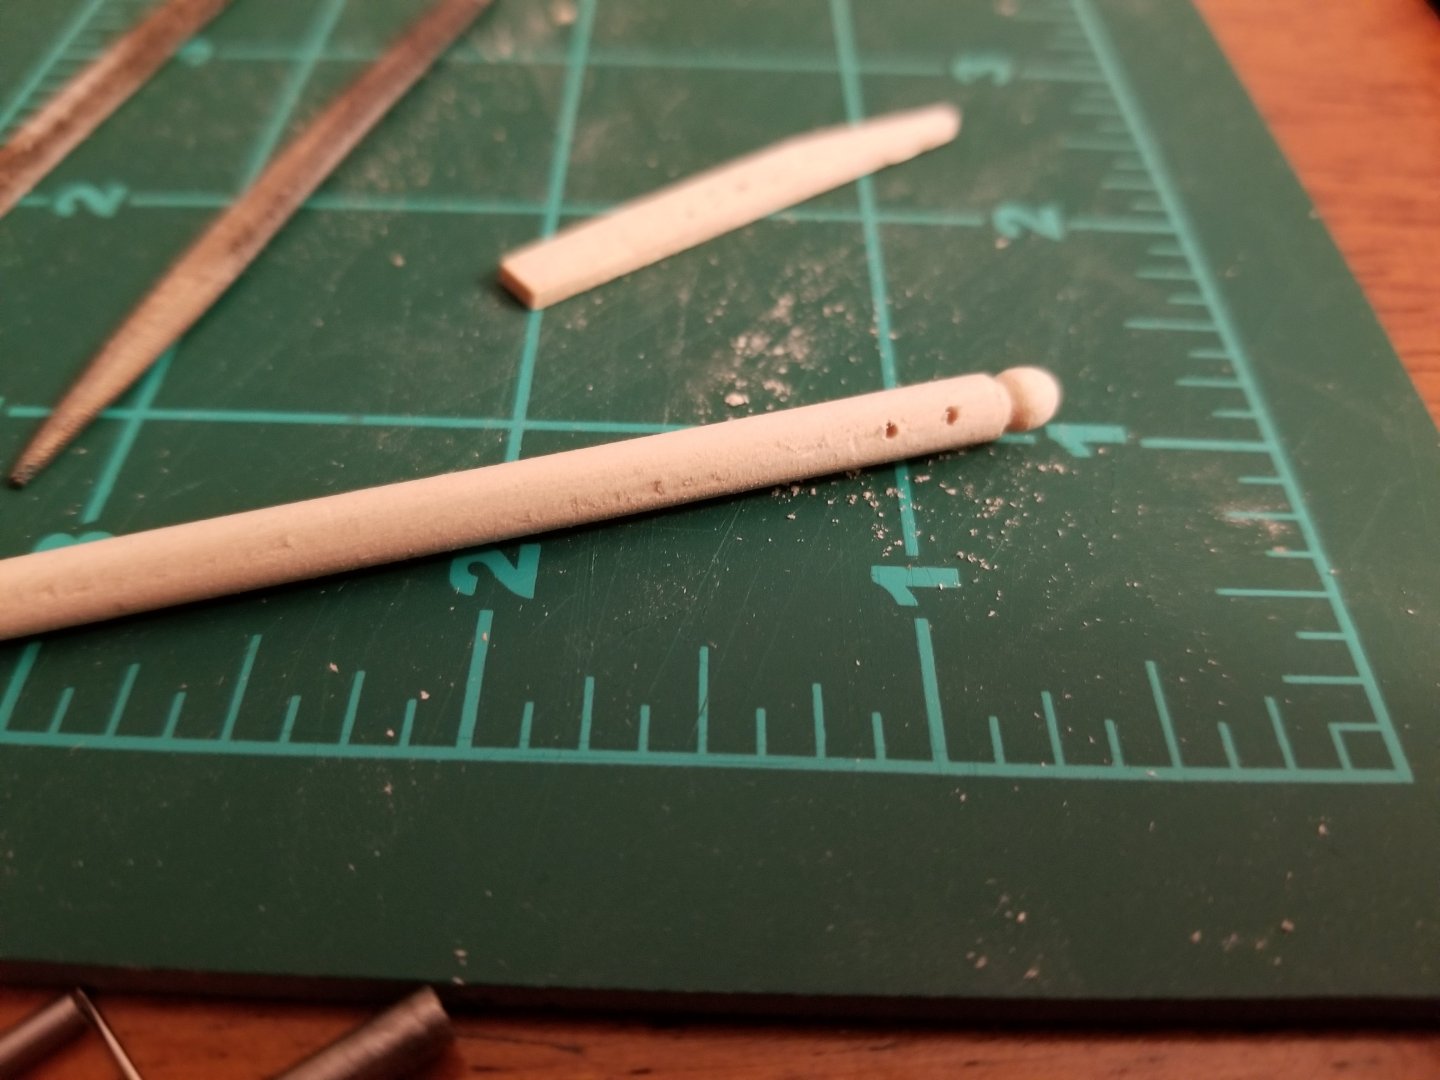
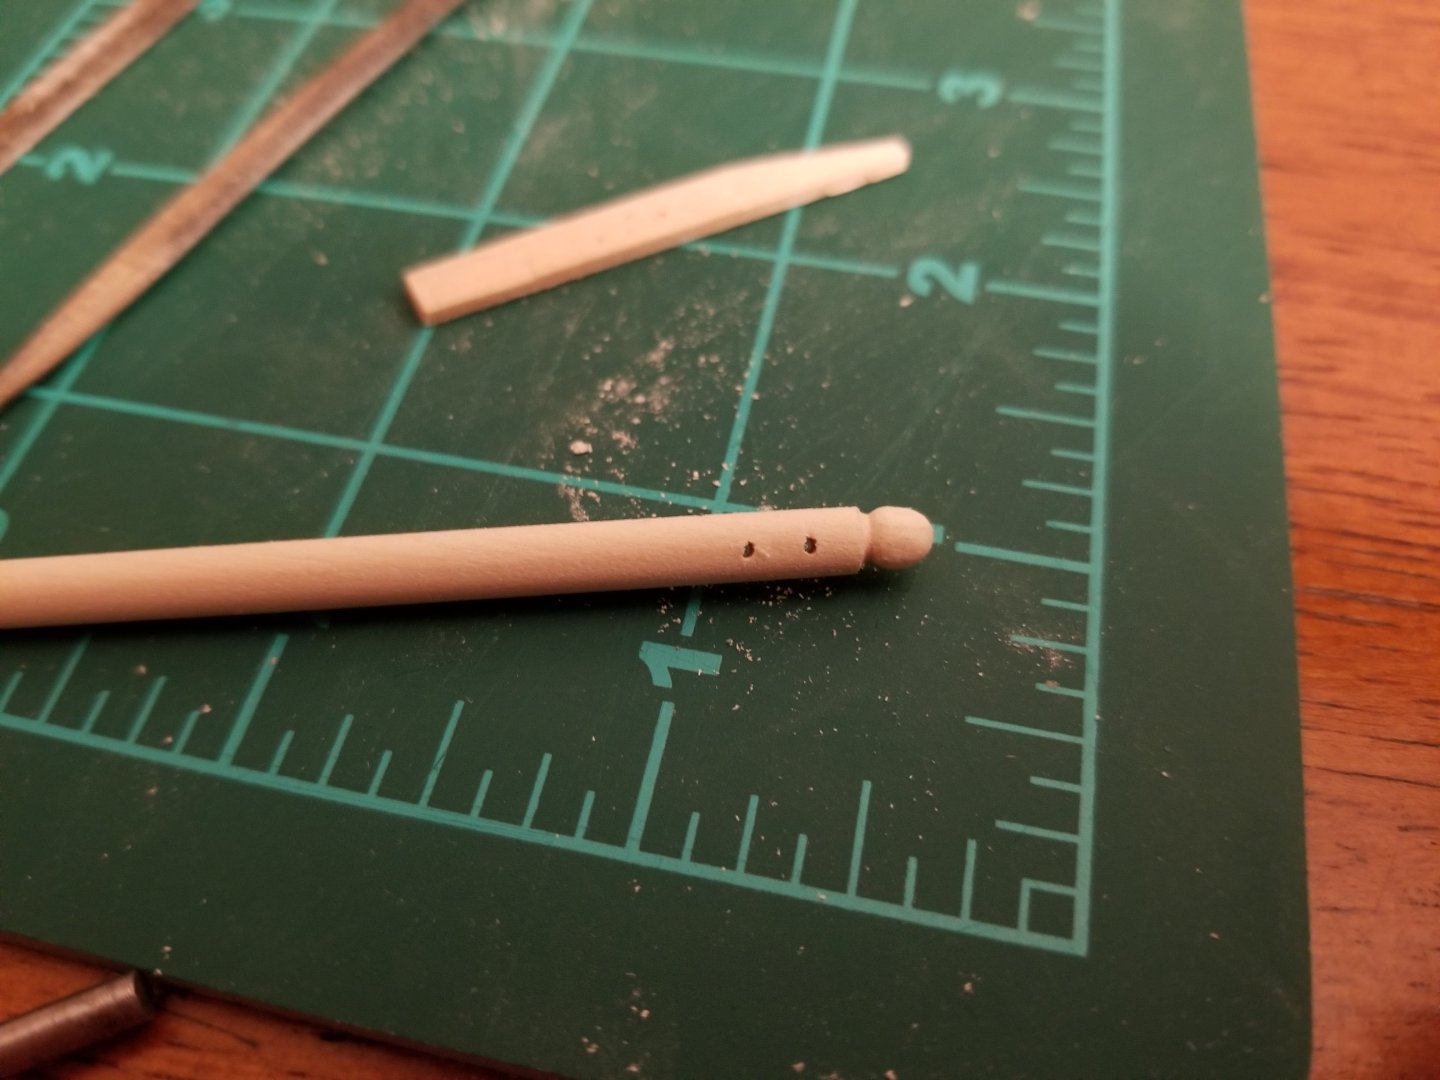
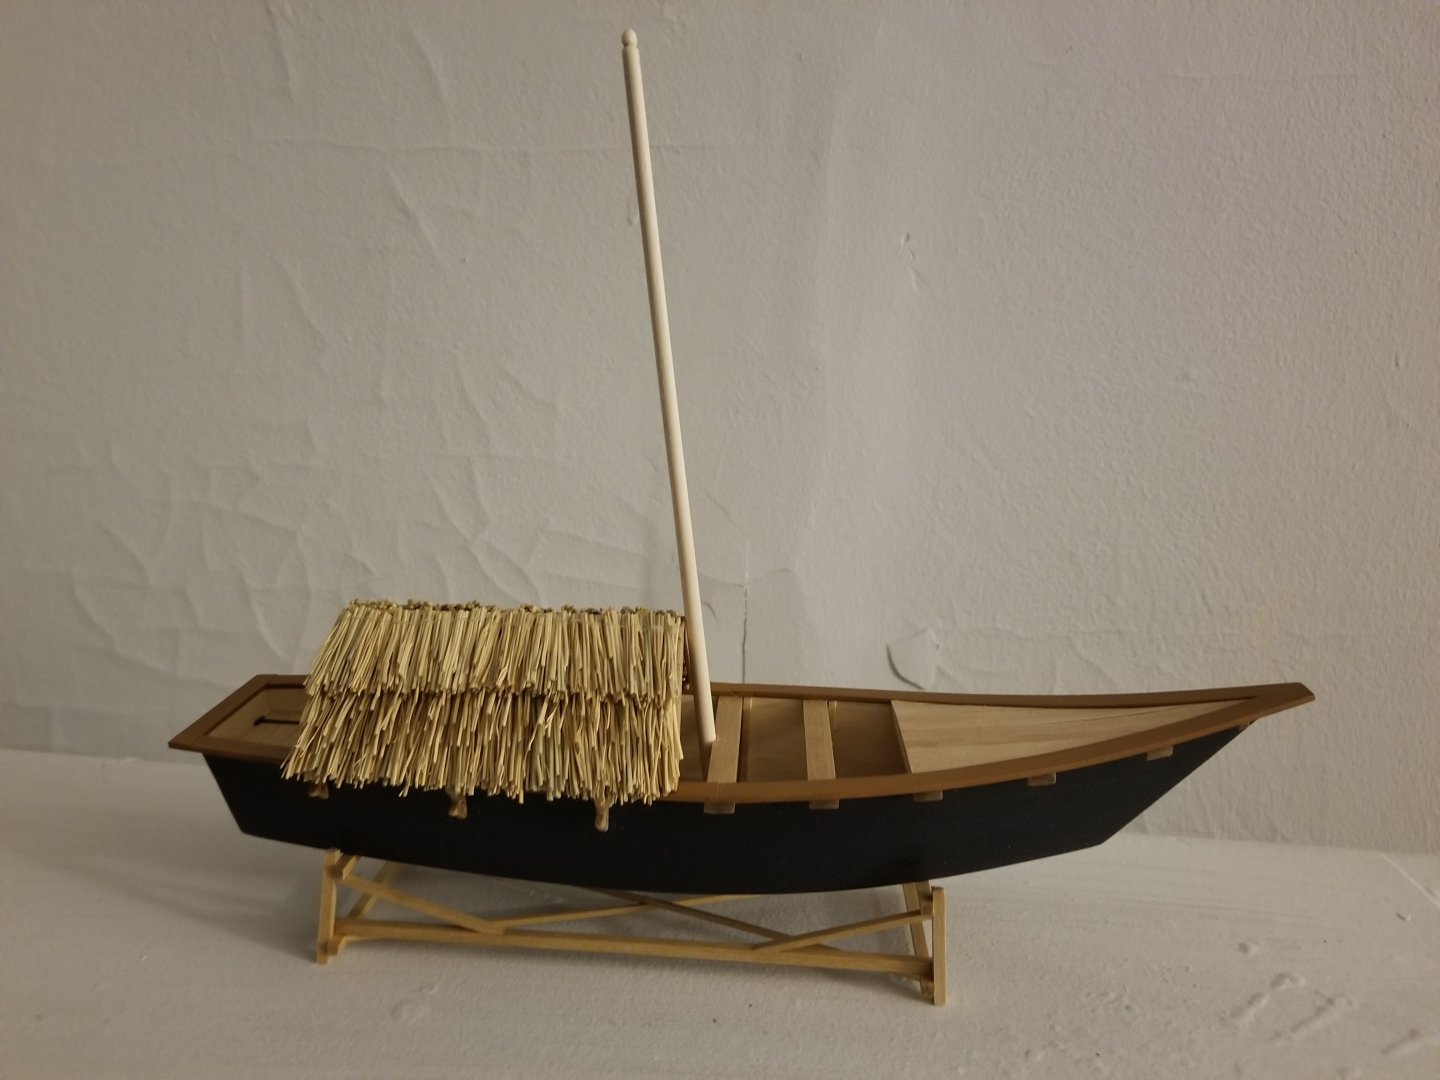
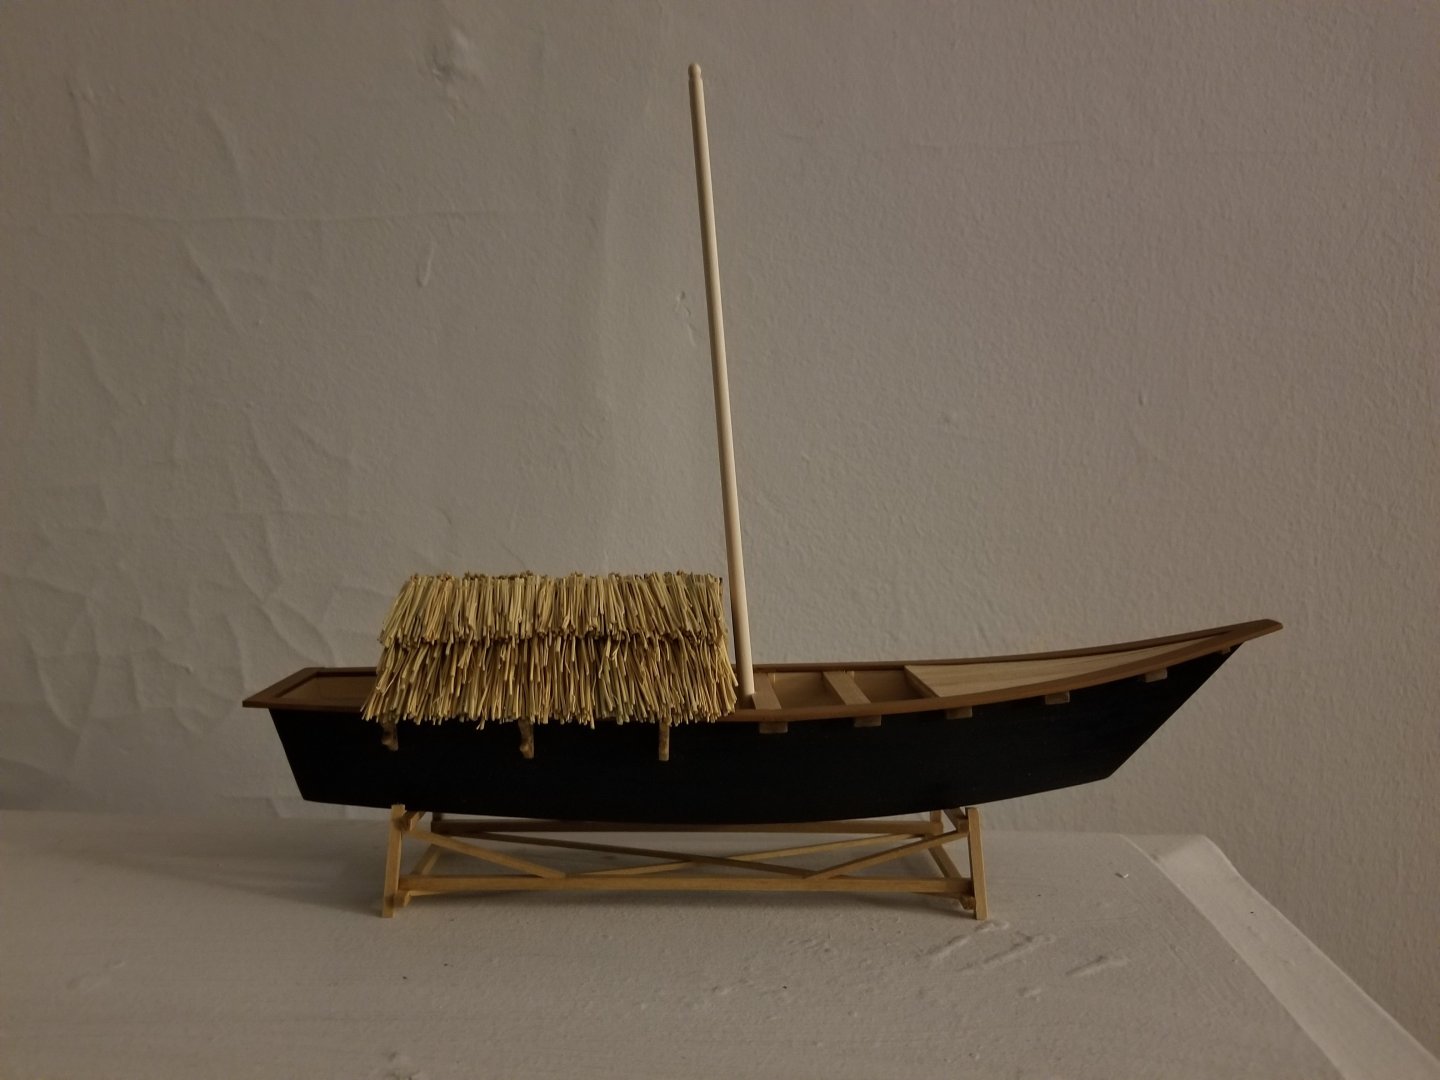
Thanks for the tips! While I slowly advance on the hinges, I turned my attention to the mast. Looking over photos, I saw there was a wide range of thicknesses of Canoa masts. I ultimately decided to go with one made of a 3/16‐inch dowel, corresponding to a mast with a 6-inch diameter at the widest point. This is towards the skinny end for the examples I've seen, but my model is of a relatively small Canoa de Rancho, and I think the thinner mast looks better for this size. For the mast height, I looked at 17 photos showing canoas from the side and compared the number of pixels of their mast height to their overall length. The height/length proportion varied from as low as .57 to as high as .99, but all but a few outliers were between .67 and .79. The average proportion was 72% of the overall length. On my model, that comes out to a hair over 8-1/4 inches long, which I marked on the dowel. I've been using a mini block plane to taper the planks on my peapod build, and was curious to see if it would help with tapering the mast. I quickly discovered that, although the grain pattern was practically imperceptible to me, planing against the grain was a recipe for gouging the wood. Nonetheless, I decided to continue making the mast as at least a testbed. After planing a bit more with the grain--which I could only discover through trial-and-error--I finished the taper by hand with sandpaper. Some photos show the mast capped with a sphere, forming a ledge for the backstays to be tied off around, so I used a combination of an exacto knife and sandpaper (for the top of the ball) and files (for the bottom half of the ball and the ledge) to shape it. Then, I drilled out the holes to mark the sheave at the top of the mast. I drilled from both sides, which reminded me to be more careful, on the actual mast, with making sure I'm lining up the drill properly. Here we can see the top of the mast. I have not fully carved the sheave, but I might as practice for the real one. And here is the other side. The gouge is visible running along the mast, even after a good bit of sanding. I then sawed the mast to the proper length, and drilled out the bottom to accept the 1/16‐square peg that holds the mast into the step. The peg, placed separately in the step, is visible below. Unfortunately, I drilled out the hole slightly off-center, more on the aft side of the mast than it should be. This compounded an earlier error--way back when I originally placed the mast step (or the aftmost crossbeam? I forget which came first) I set the mast for a slightly steeper rake aftward than I wanted. Despite these issues, the mast does fit in the model. Here we see it with the excessive rake aft. So, redoing the mast will allow for a better-raked, smoother mast without an ugly gouge. Alternately, on a whim I reshaped the bottom of the mast (which was angled for the rake) and reversed it, which corrected the rake, as seen below: (Apologies for the bad lighting) Much better, but there's still that gouge, which also will make it difficult to stain the masts if I decide the natural wood is too jarring. That said, if I leave the masts natural, the gouge would be mostly covered by the sail on the finished model.... So, there's where I'm at. I suppose the question is whether the gouge will bother me if I leave it.


-
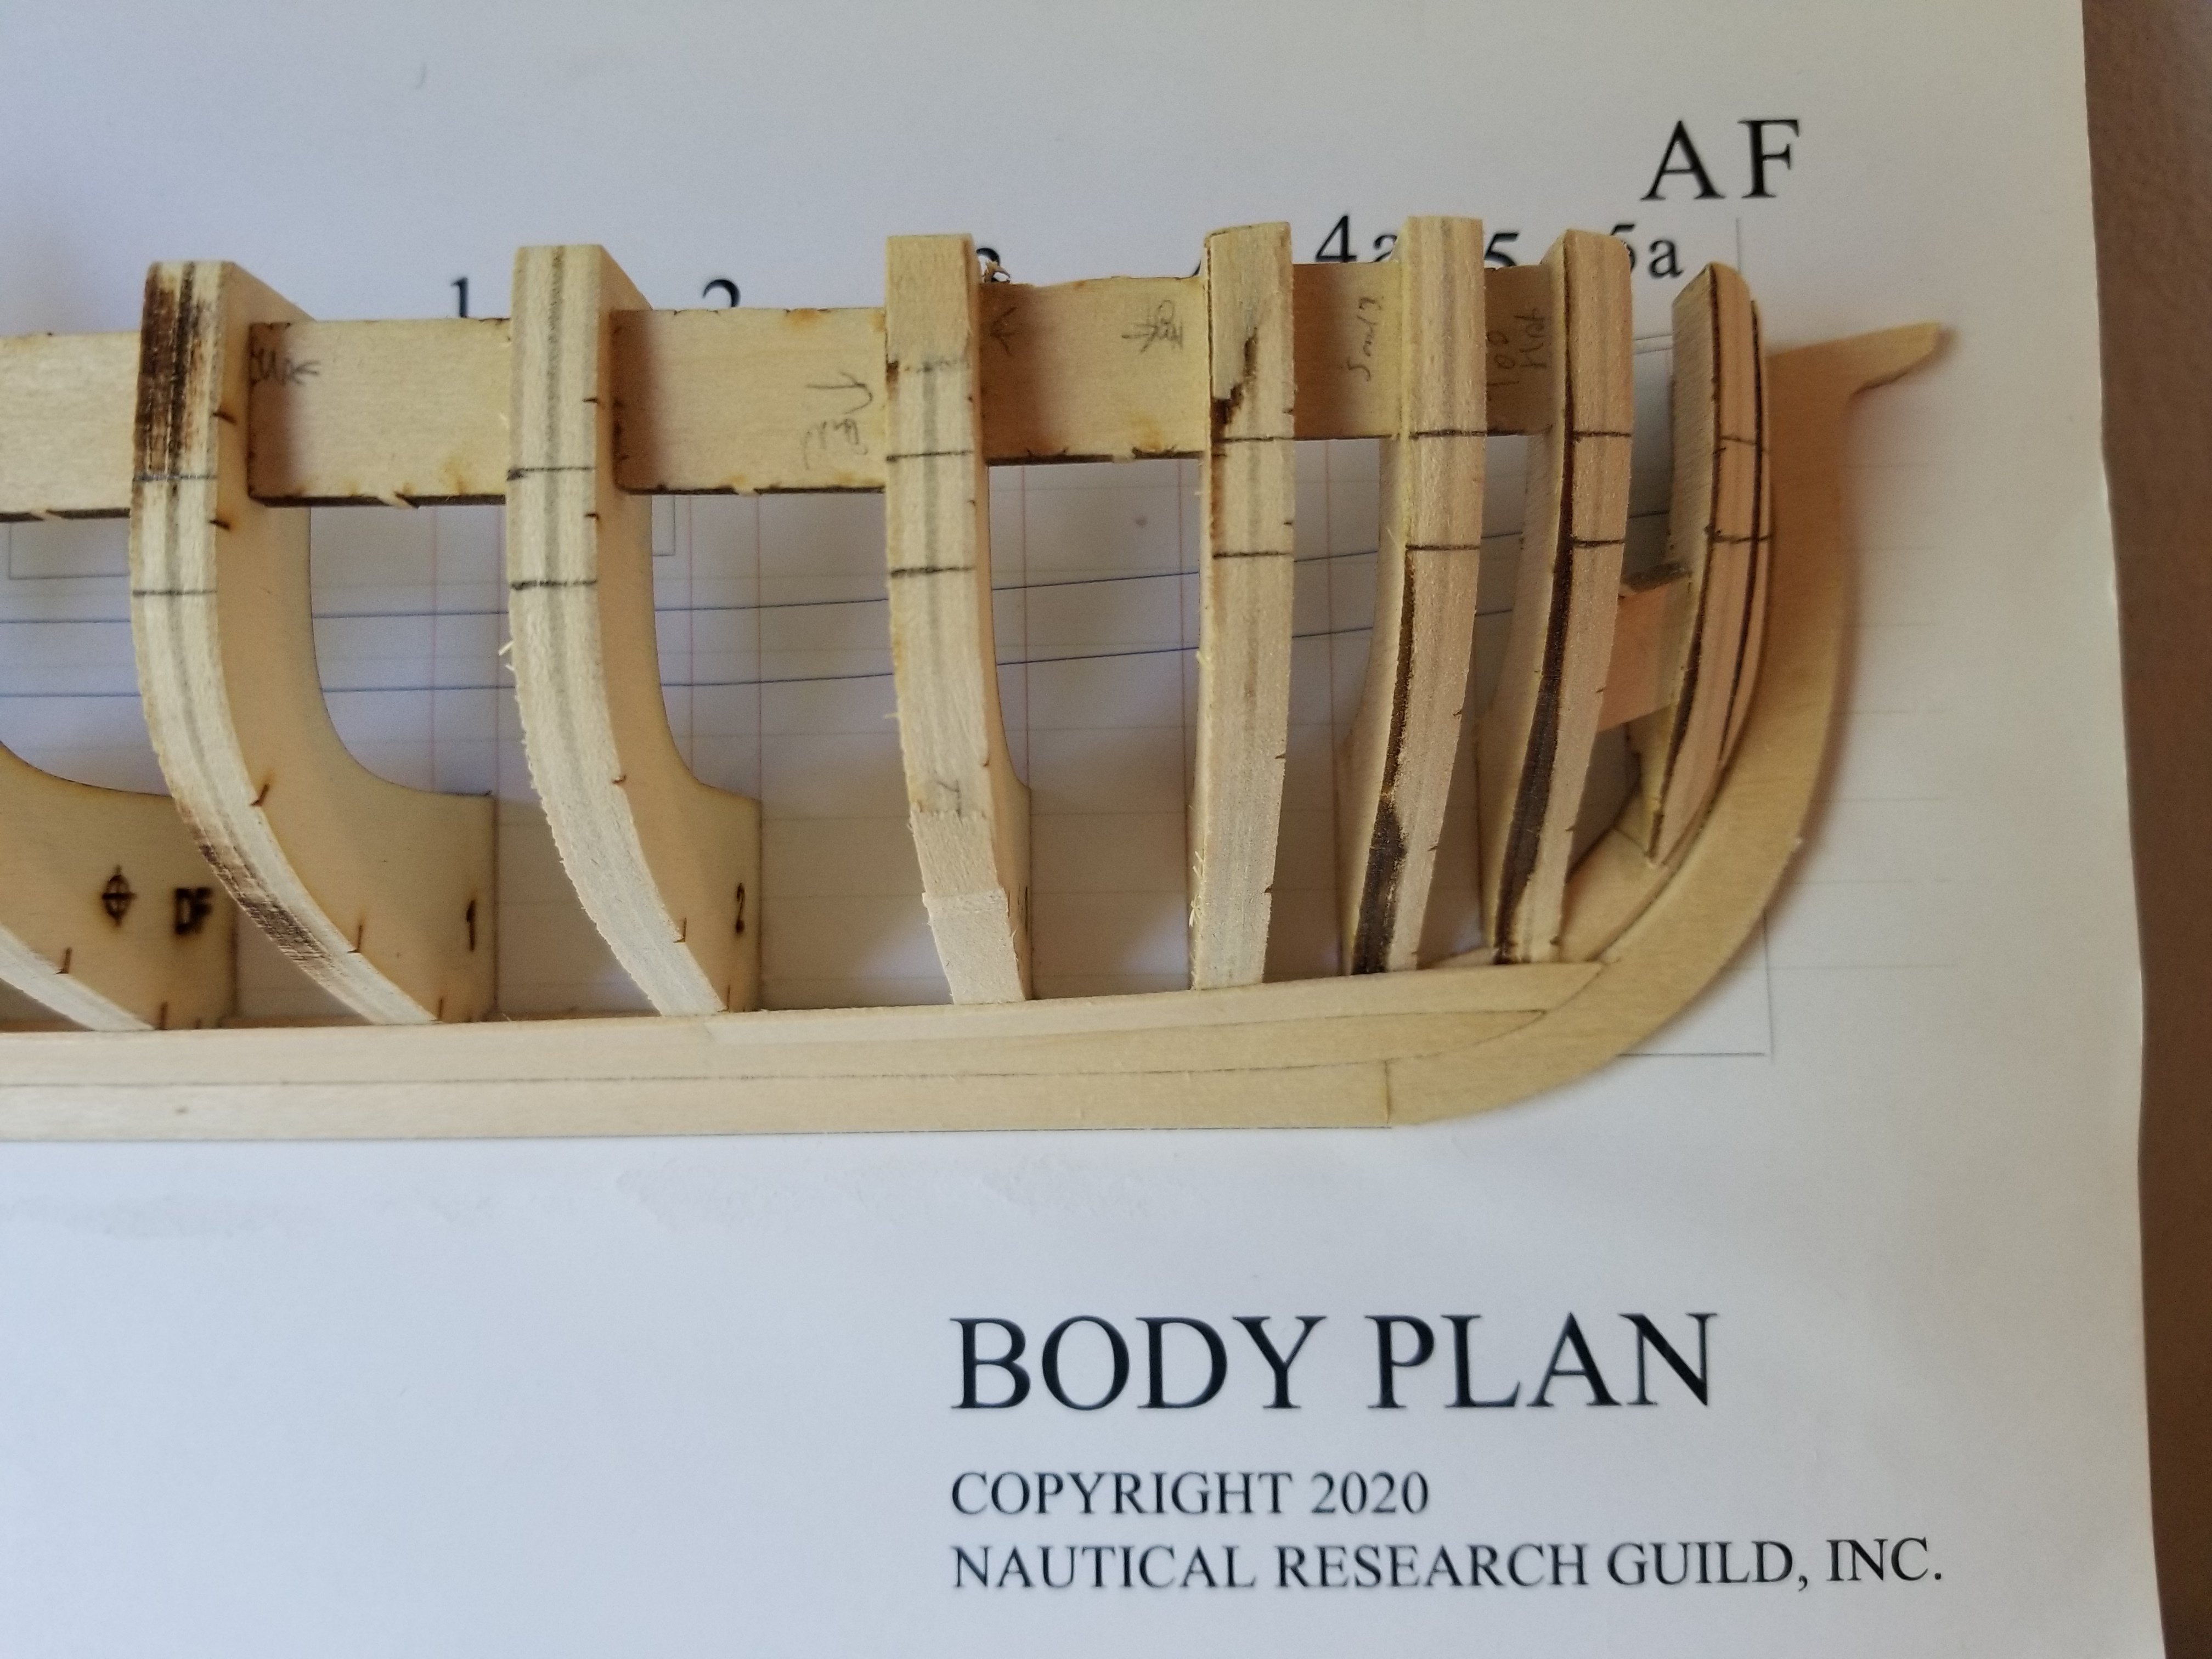
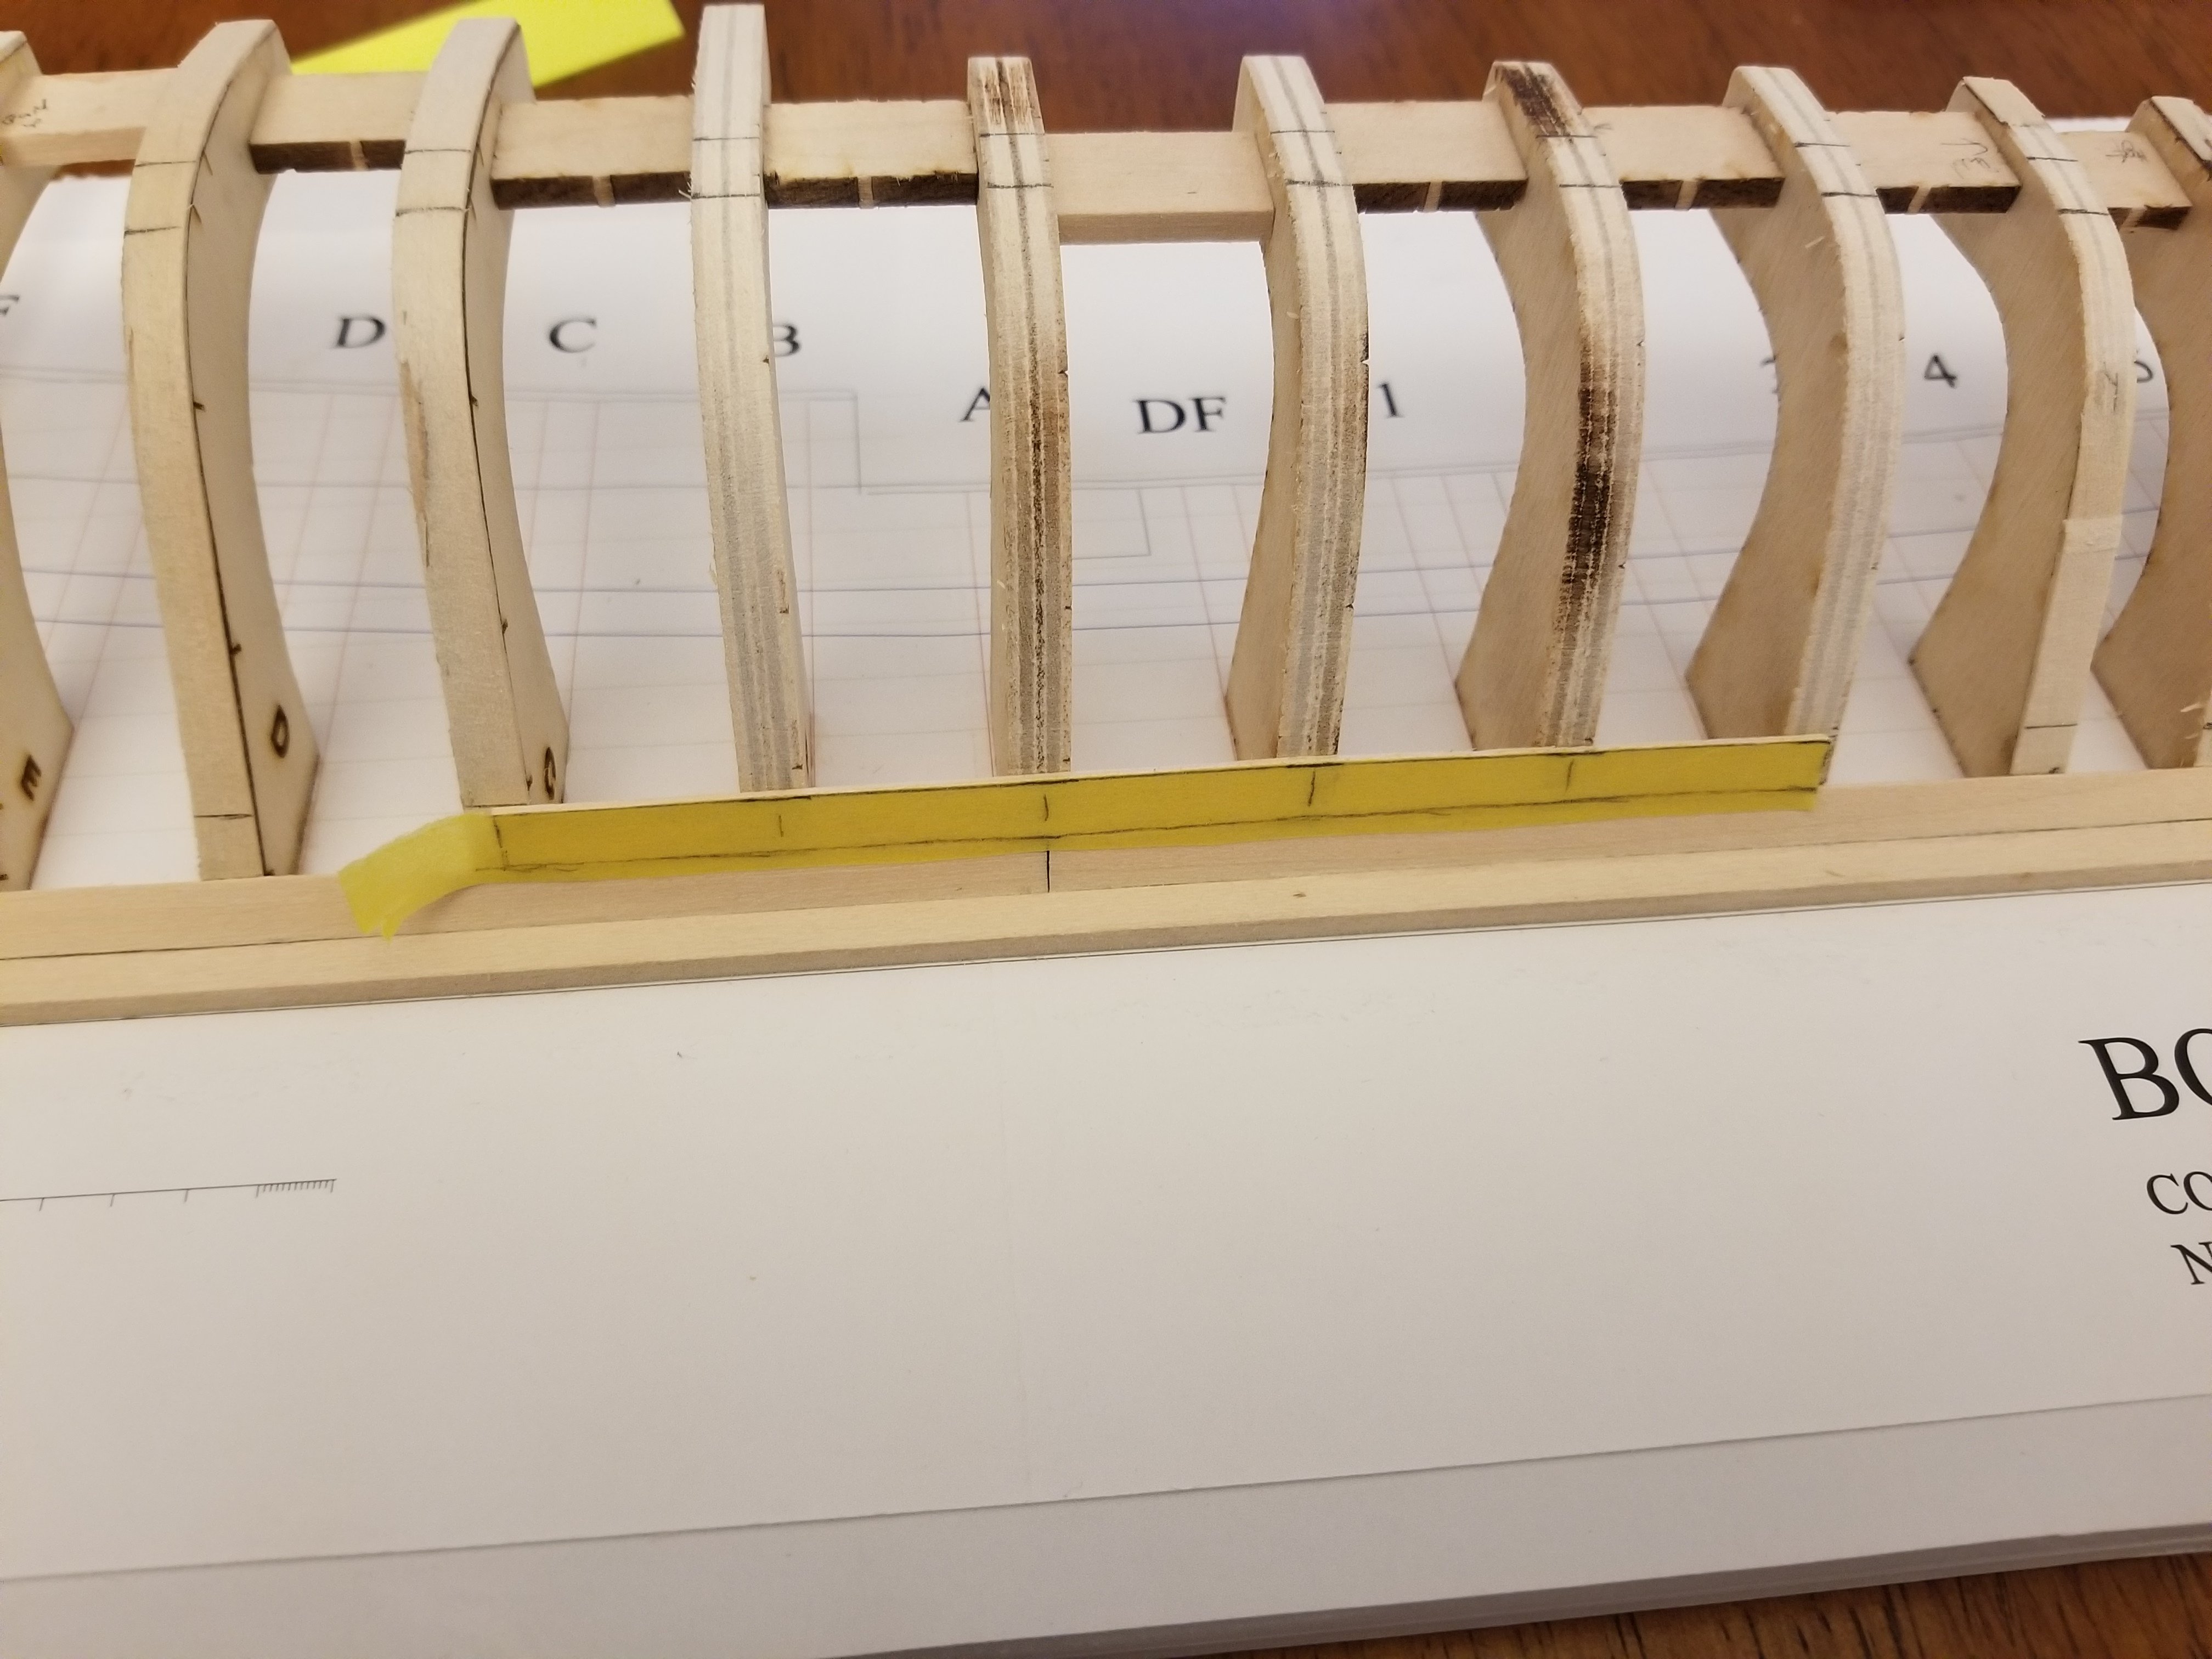
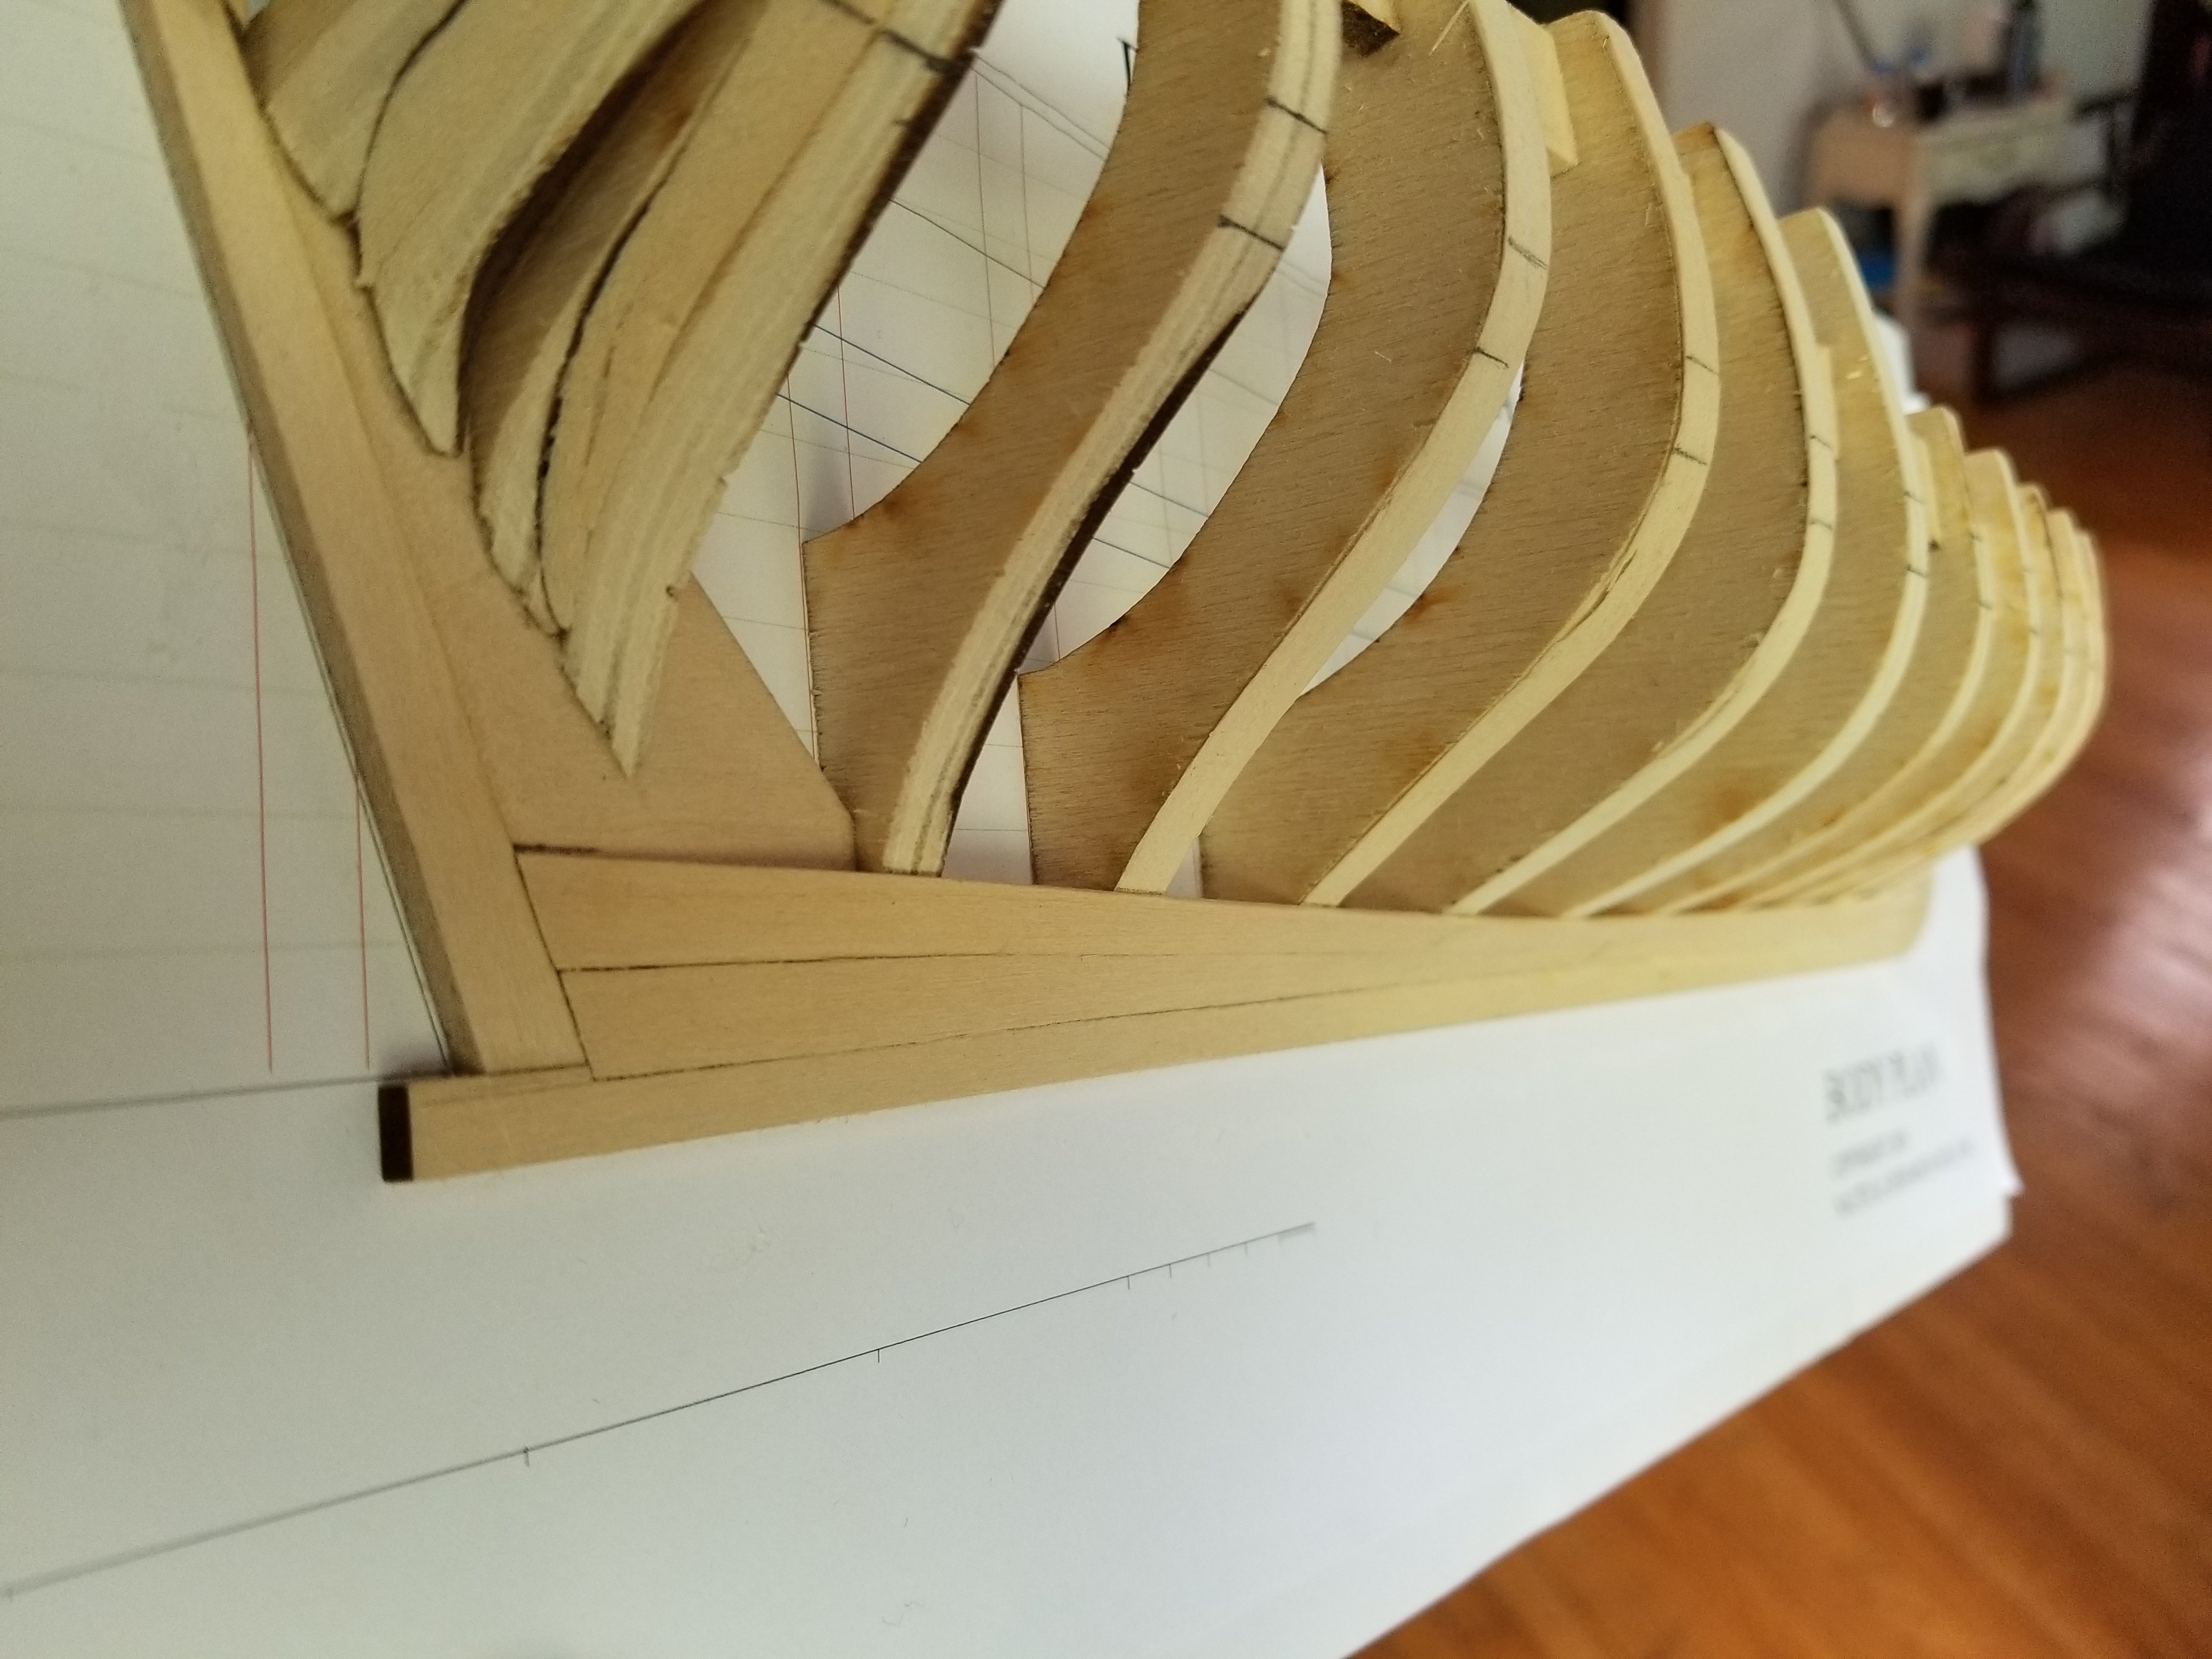
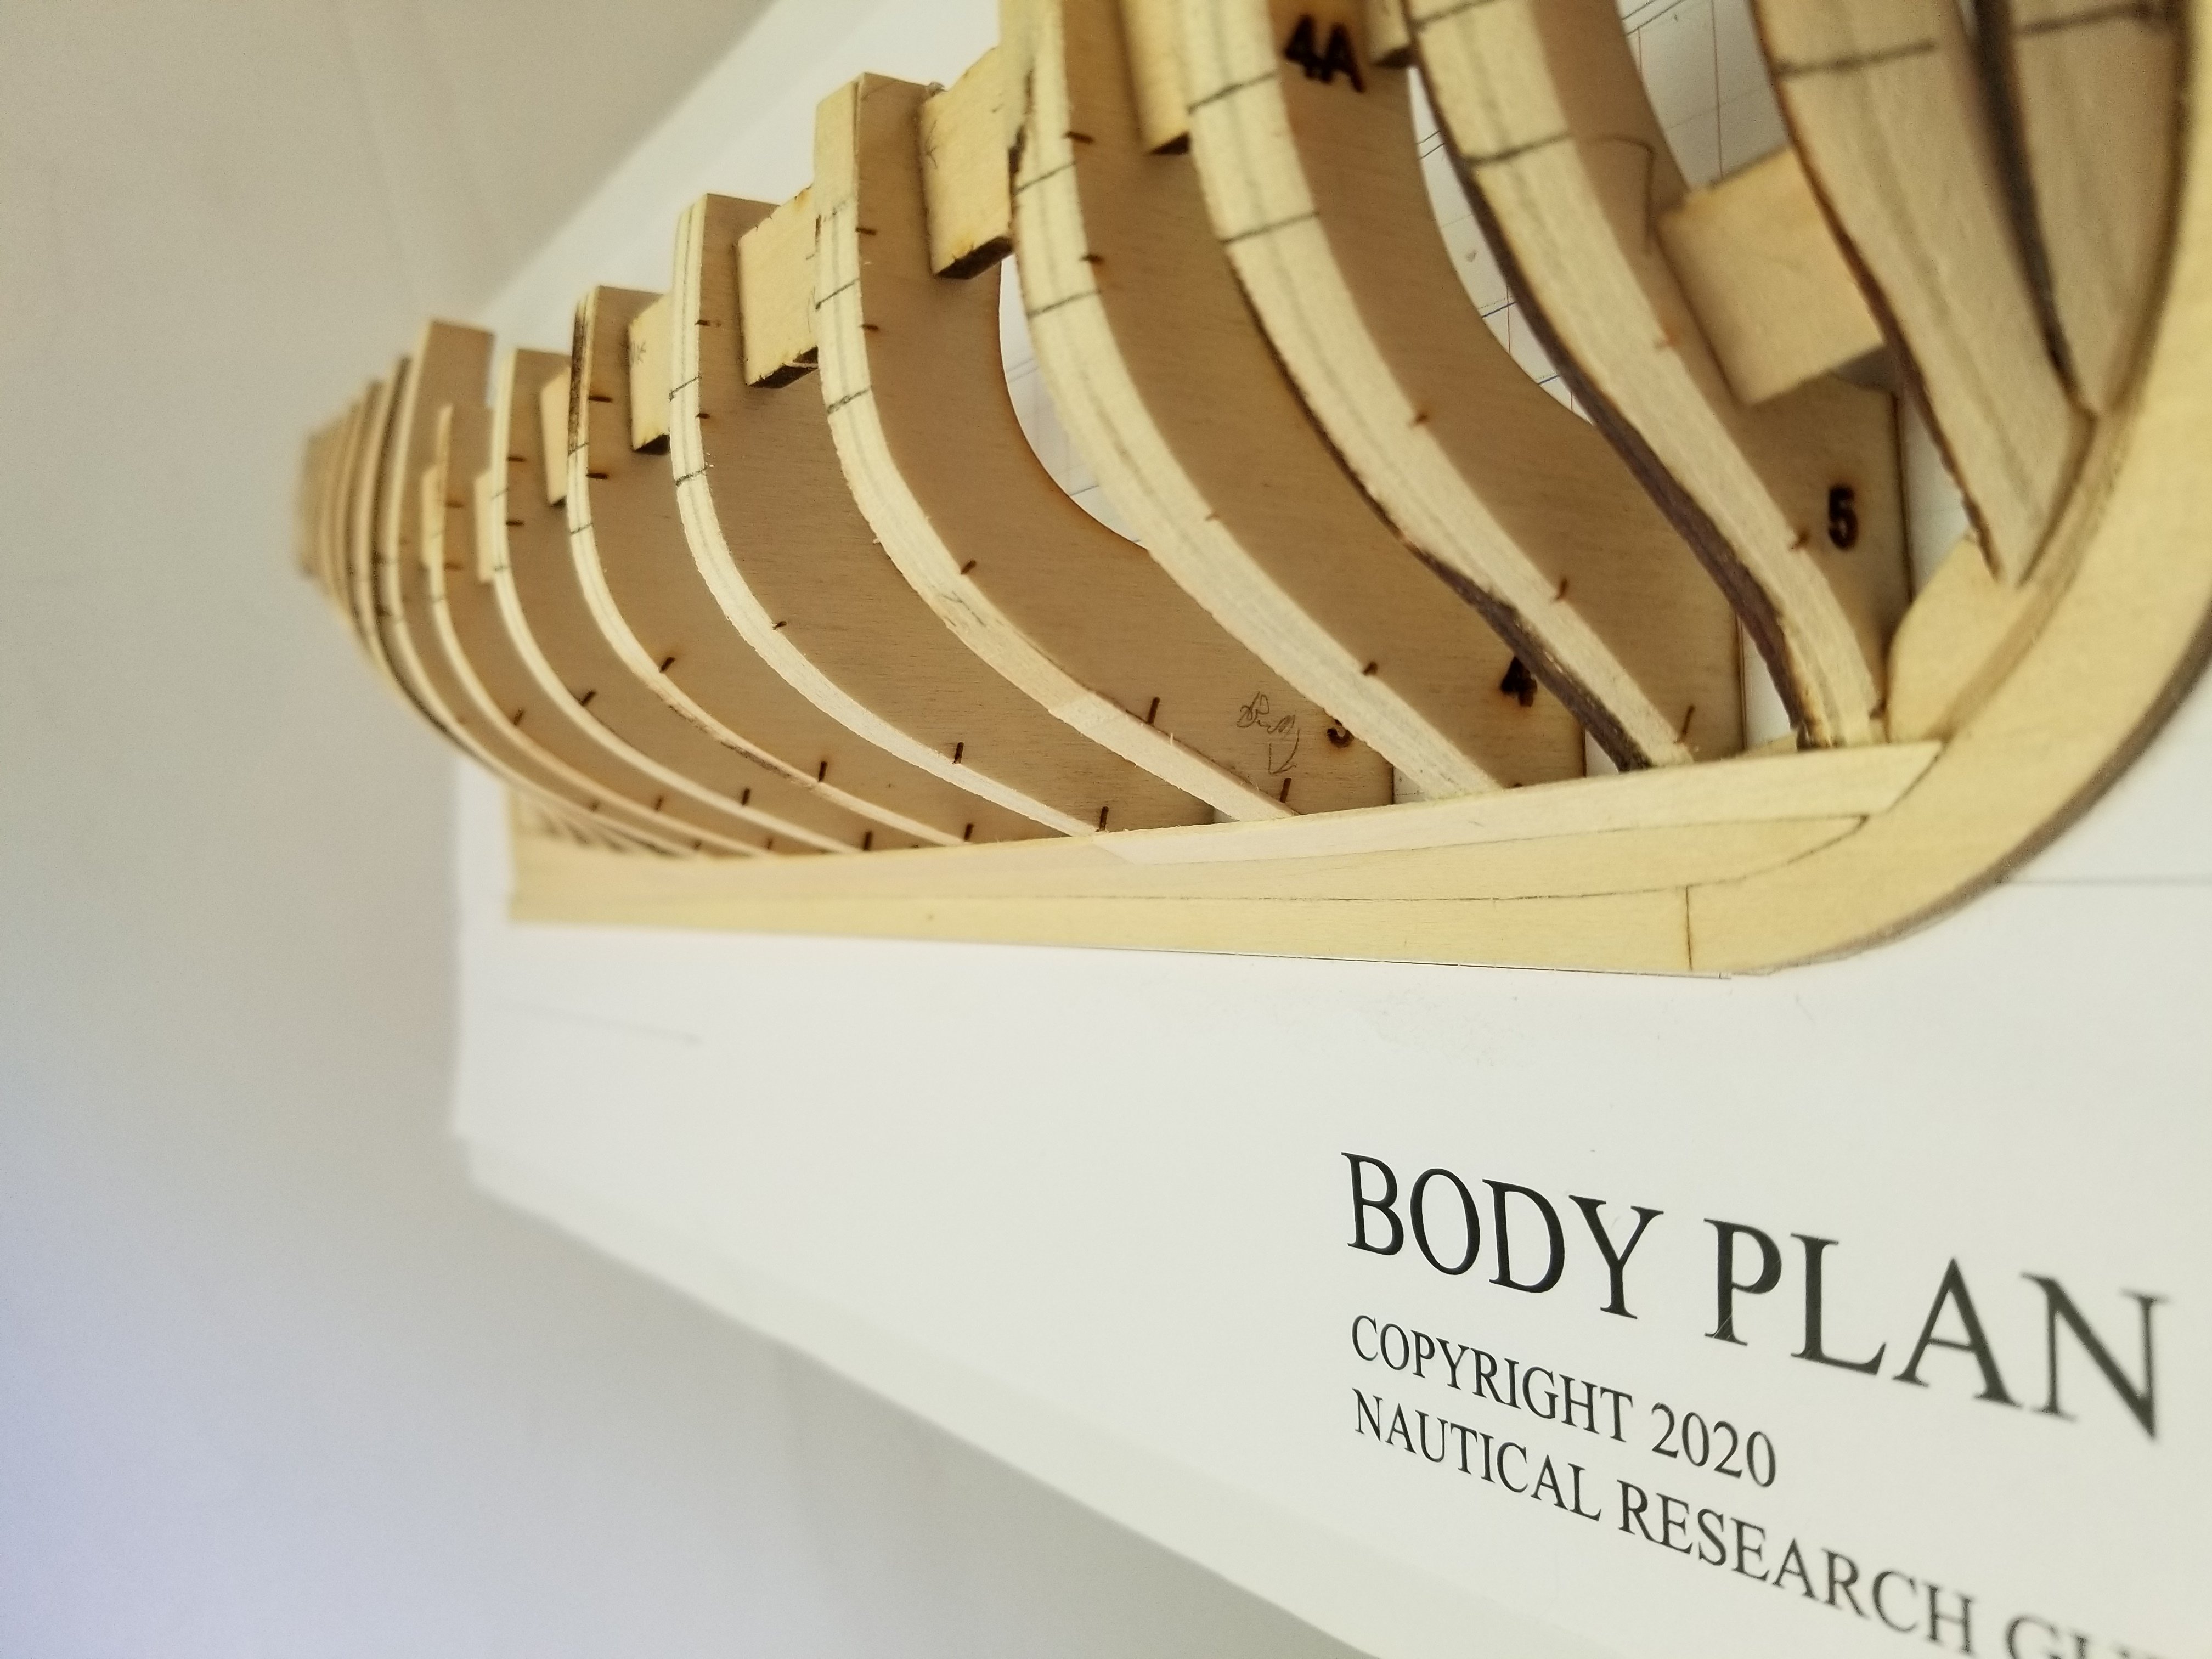
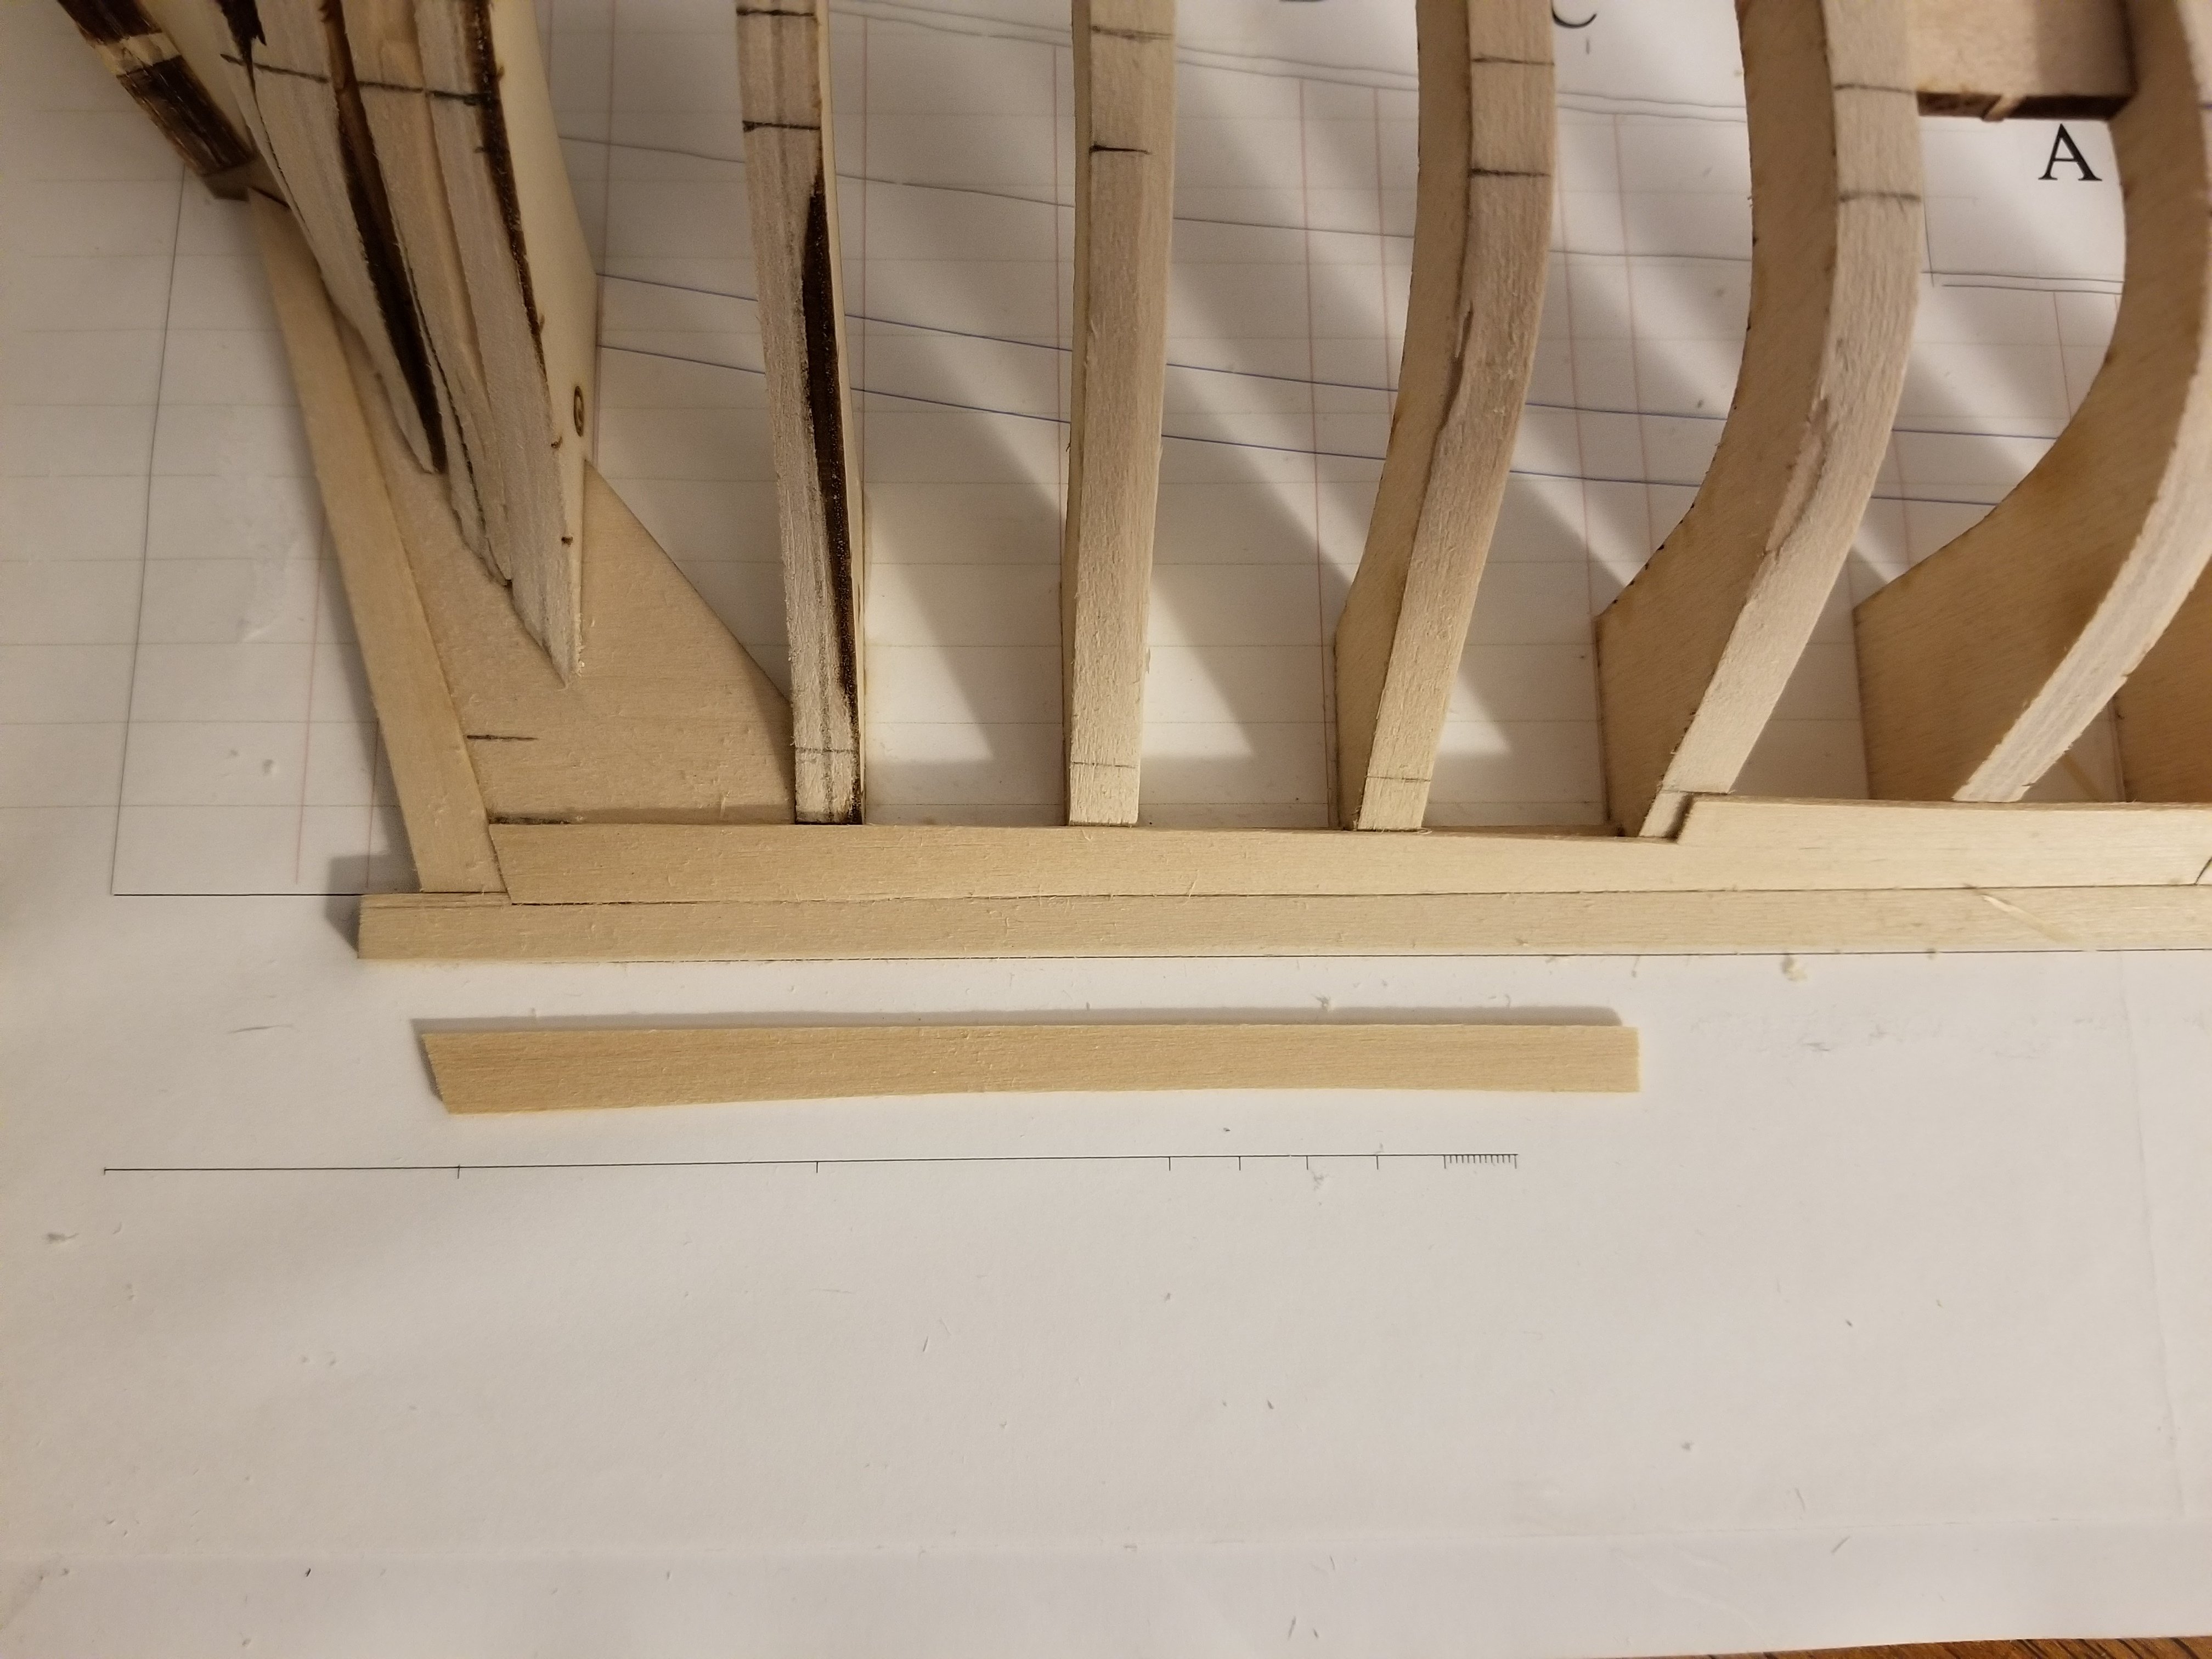
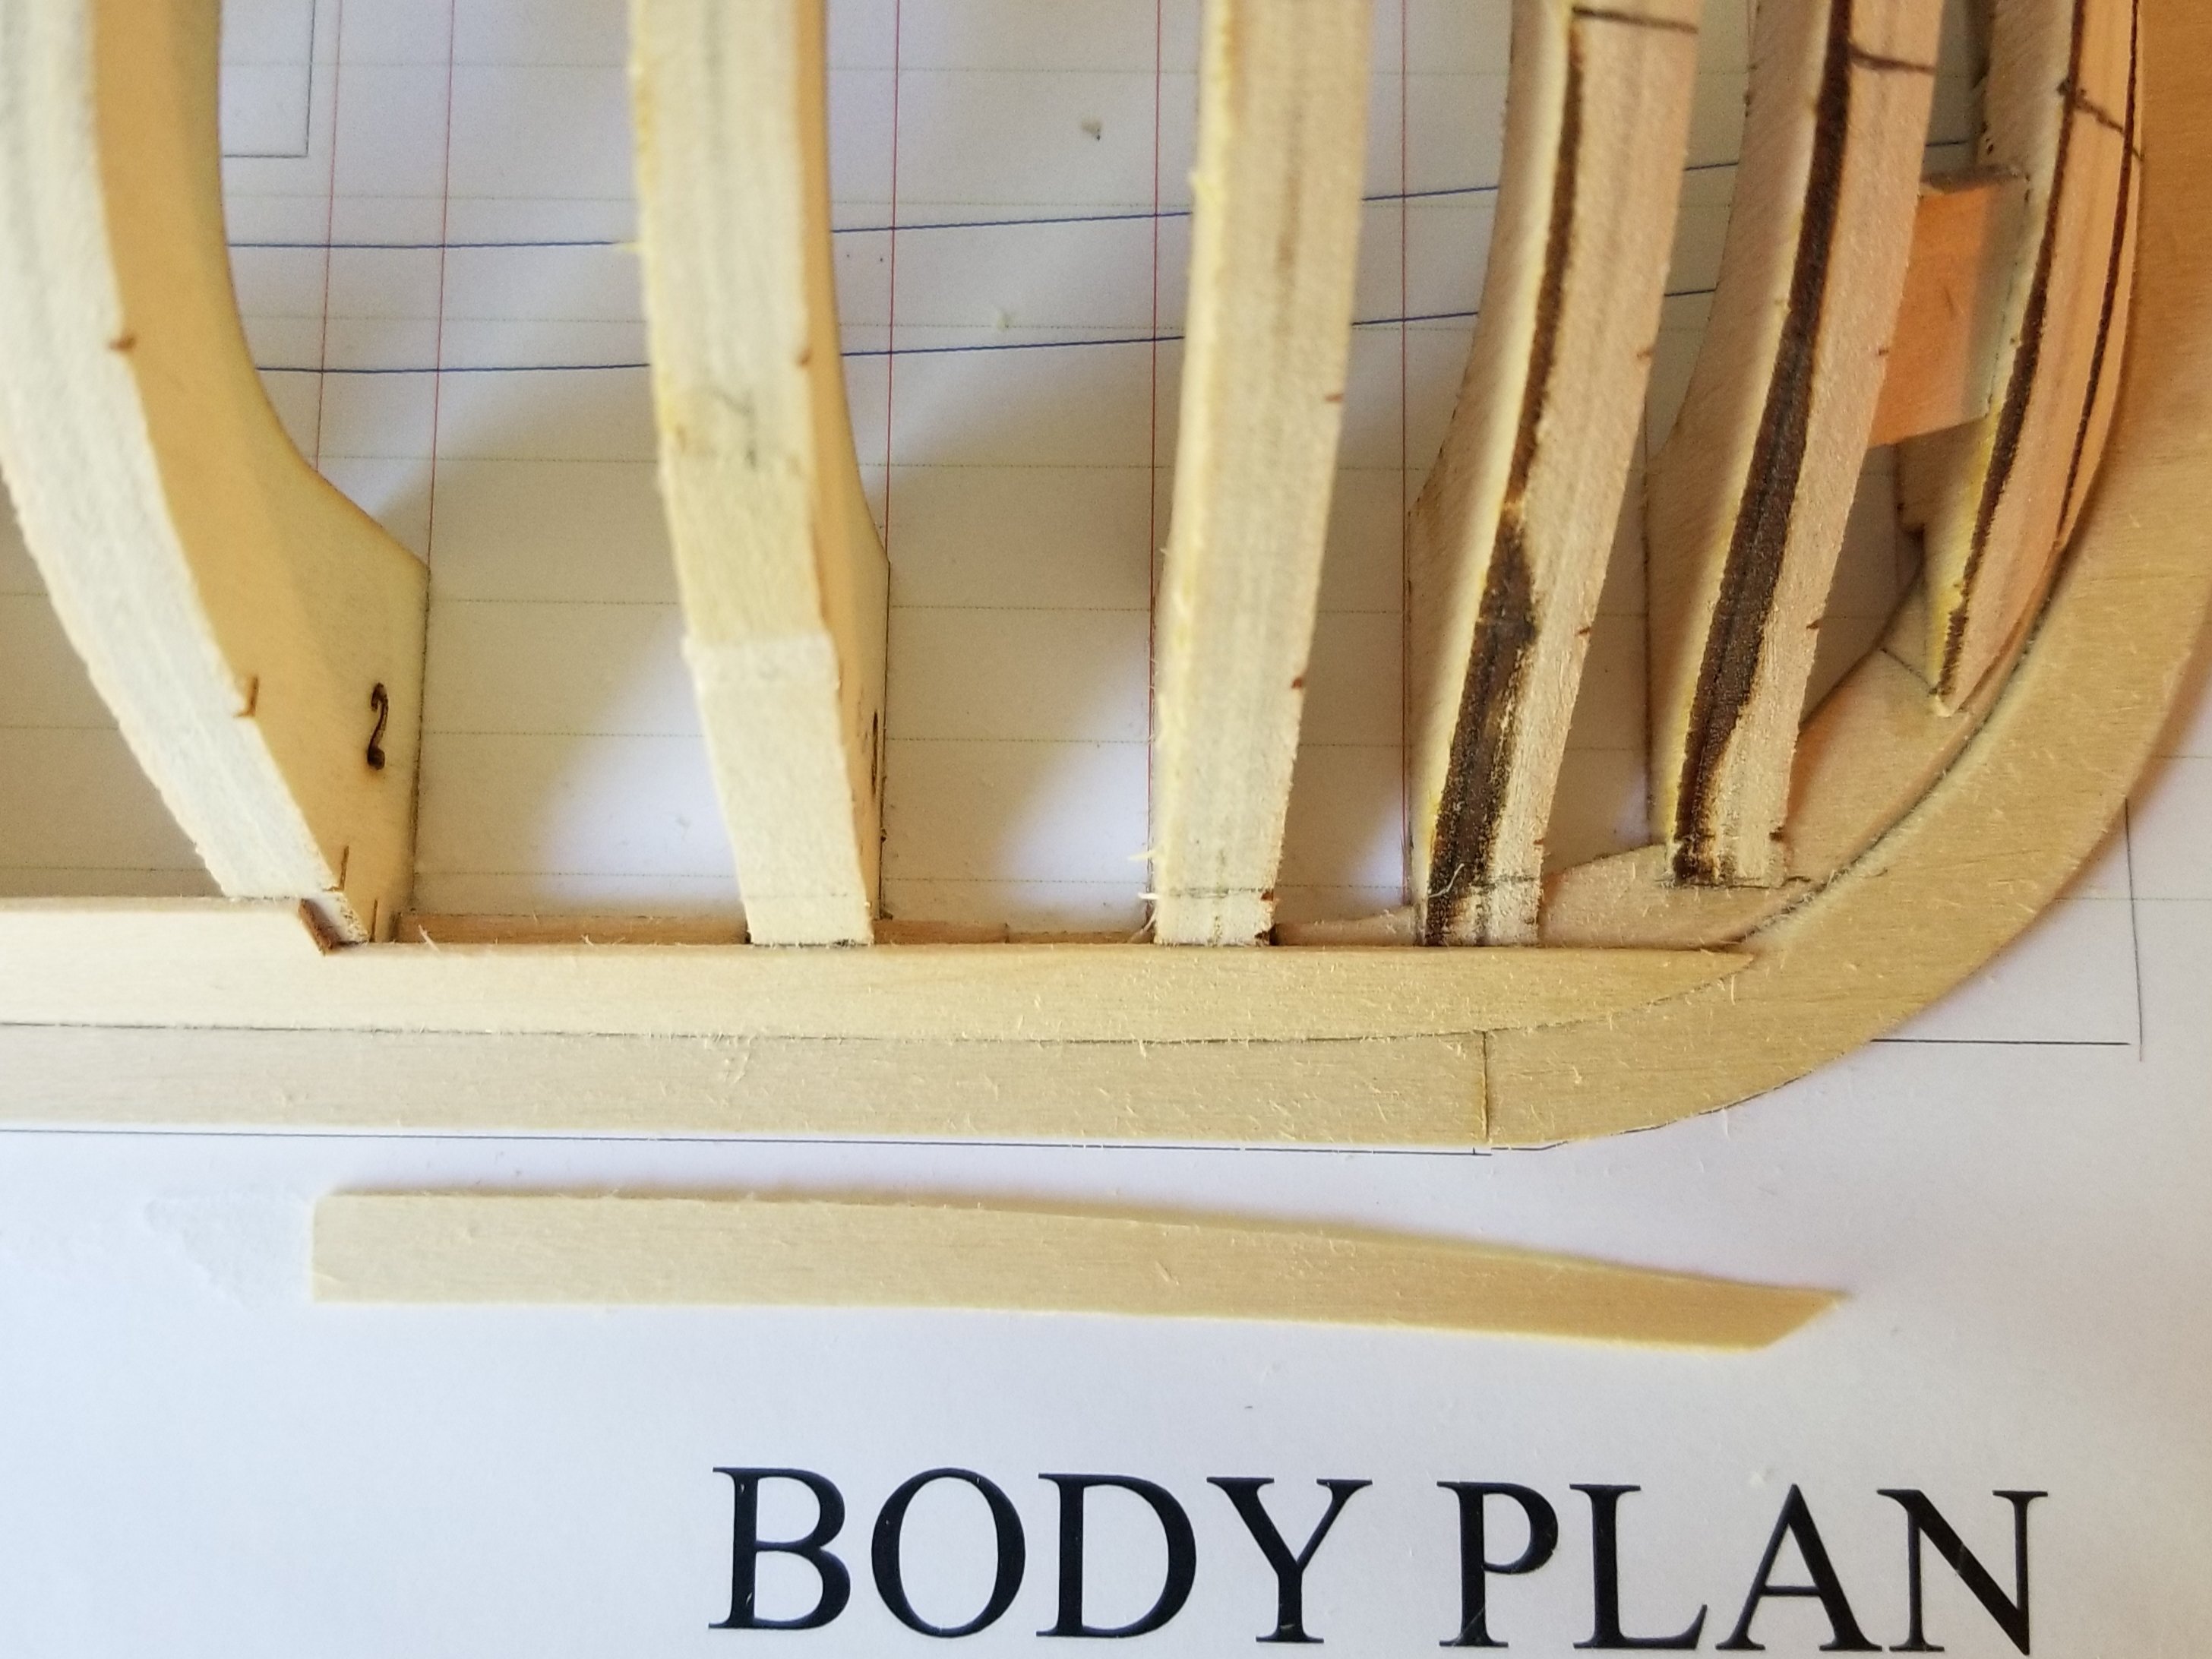
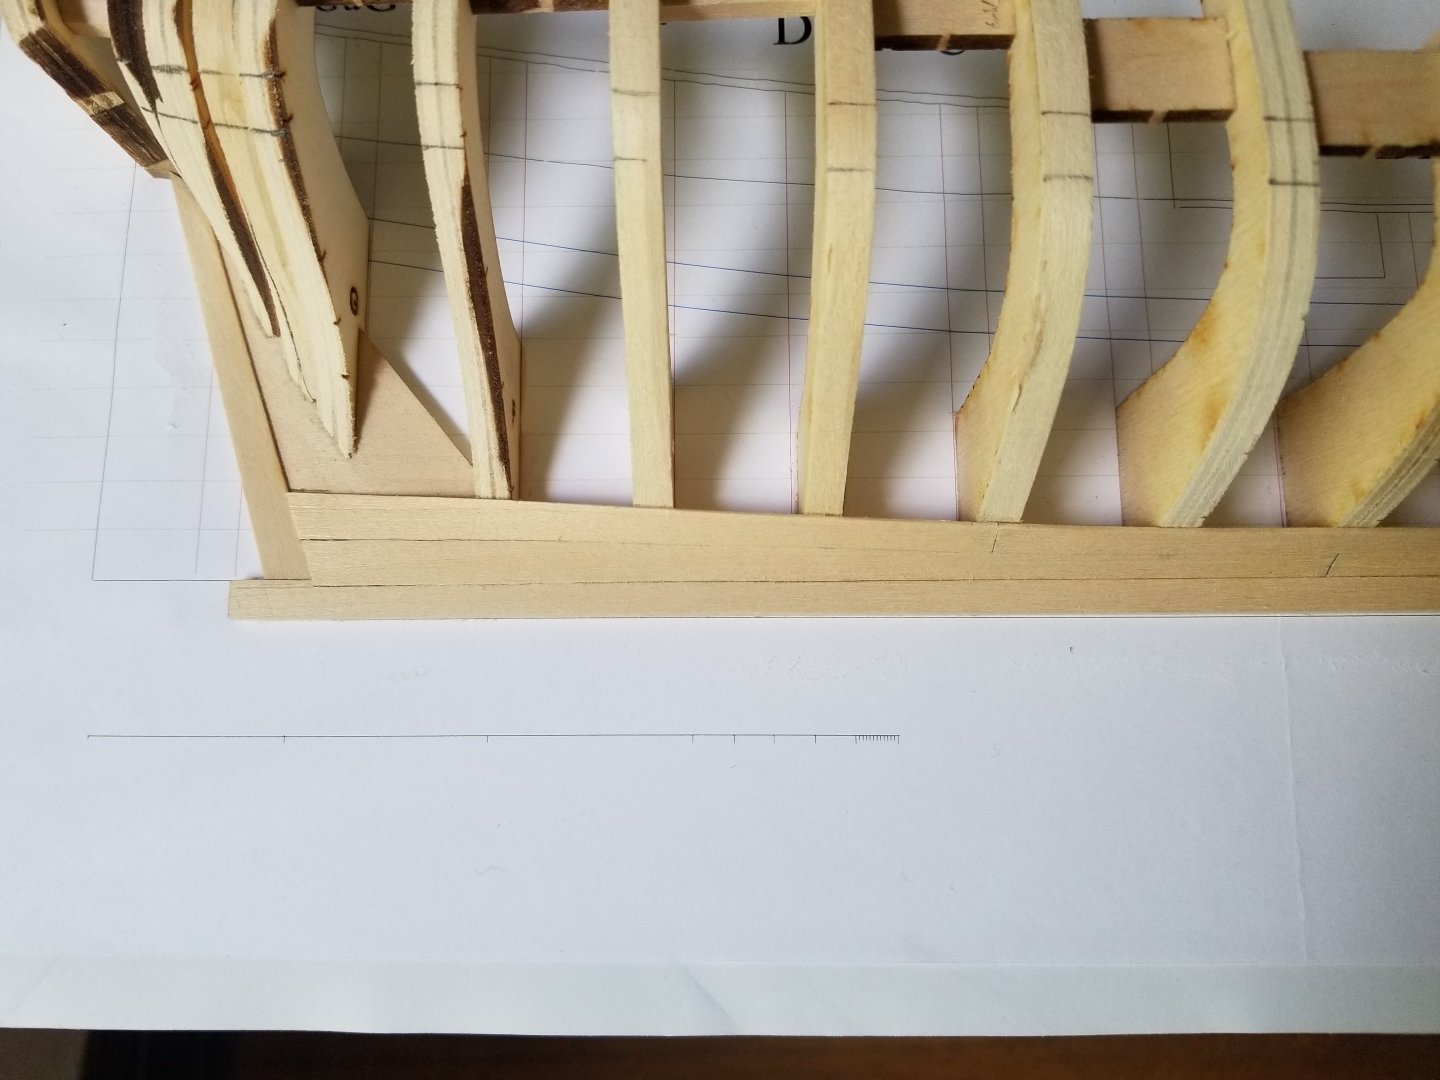
Thanks! It's been hard to find much time, but I've now added the broad strake. I started with the middle plank and worked my way out. There's only a little twist in it, so I was able to simply glue it in place with clamps. In contrast, the bow and stern planks twist quite a bit, so I soaked them and clamped them in place overnight. I did the stern first. Shaping the planks is, so far at least, a lot of fun. Then, the bow. One issue I've had is that, for these first strakes, it's very hard to fit them into the stem rabbet because they approach it from a nearly flat angle. If I did this again, I might try to carve or sand a smoother transition into the rabbet here. I think I'm avoiding the "smiley face" effect? It's very cool to see how the strakes curve along the length of the hull. The planking definitely needs to be sanded, and there are some very slight gaps that are visible when held up to the light. If I fill these with a mix of sawdust and glue, will they show up when I finish the hull?


- 82 replies
-
- 7
-
-
- half hull planking project
- half hull
- (and 2 more)
-
Thank you, good to know. Is it possible to blacken multiple types of metal in the solution at once? I have brass, copper, and some kind of white metal parts. I'd assume I can drop them all in at once without causing any weird reactions?
-
Bit of a change of plans. While I read a lot about how to use Birchwood Casey Brass Black and purchased a bottle, one thing that skipped my mind was how to dispose it. I live in an apartment, don't have a car, and all hazardous waste disposal sites are a bit of a trip from here. Carting a jar of acid and toxic waste around on a city bus doesn't seem like a great idea, and I certainly don't want to dump it down the drain (my building is pretty old). If I don't really have a way to dispose of the waste, I suppose my best bet is to try painting the brass.
-
Very nice job! The stand is a really great touch. As for cutting the planks to length: I have no experience with a cutter, but I've found a razor saw and small miter box to be extremely helpful for a wide range of tasks. It's definitely one of the most frequently-used tools that I have, besides the basic exacto knife. I have a pretty cheap zona saw and orange plastic miter box combo that works fine, the main issues being 1) there are times when it would be nice to have a slightly deeper/wider miter box than the 1/4‐inch deep one that I have, and 2) when the saw eventually dulls in the (hopefully distant) future, I don't think mine has a replaceable blade. But these aren't serious issues for me, and in general I've found it to be an incredibly useful tool.
- 30 replies
-
- 5
-
-
- Grand Banks Dory
- first build
- (and 2 more)
-
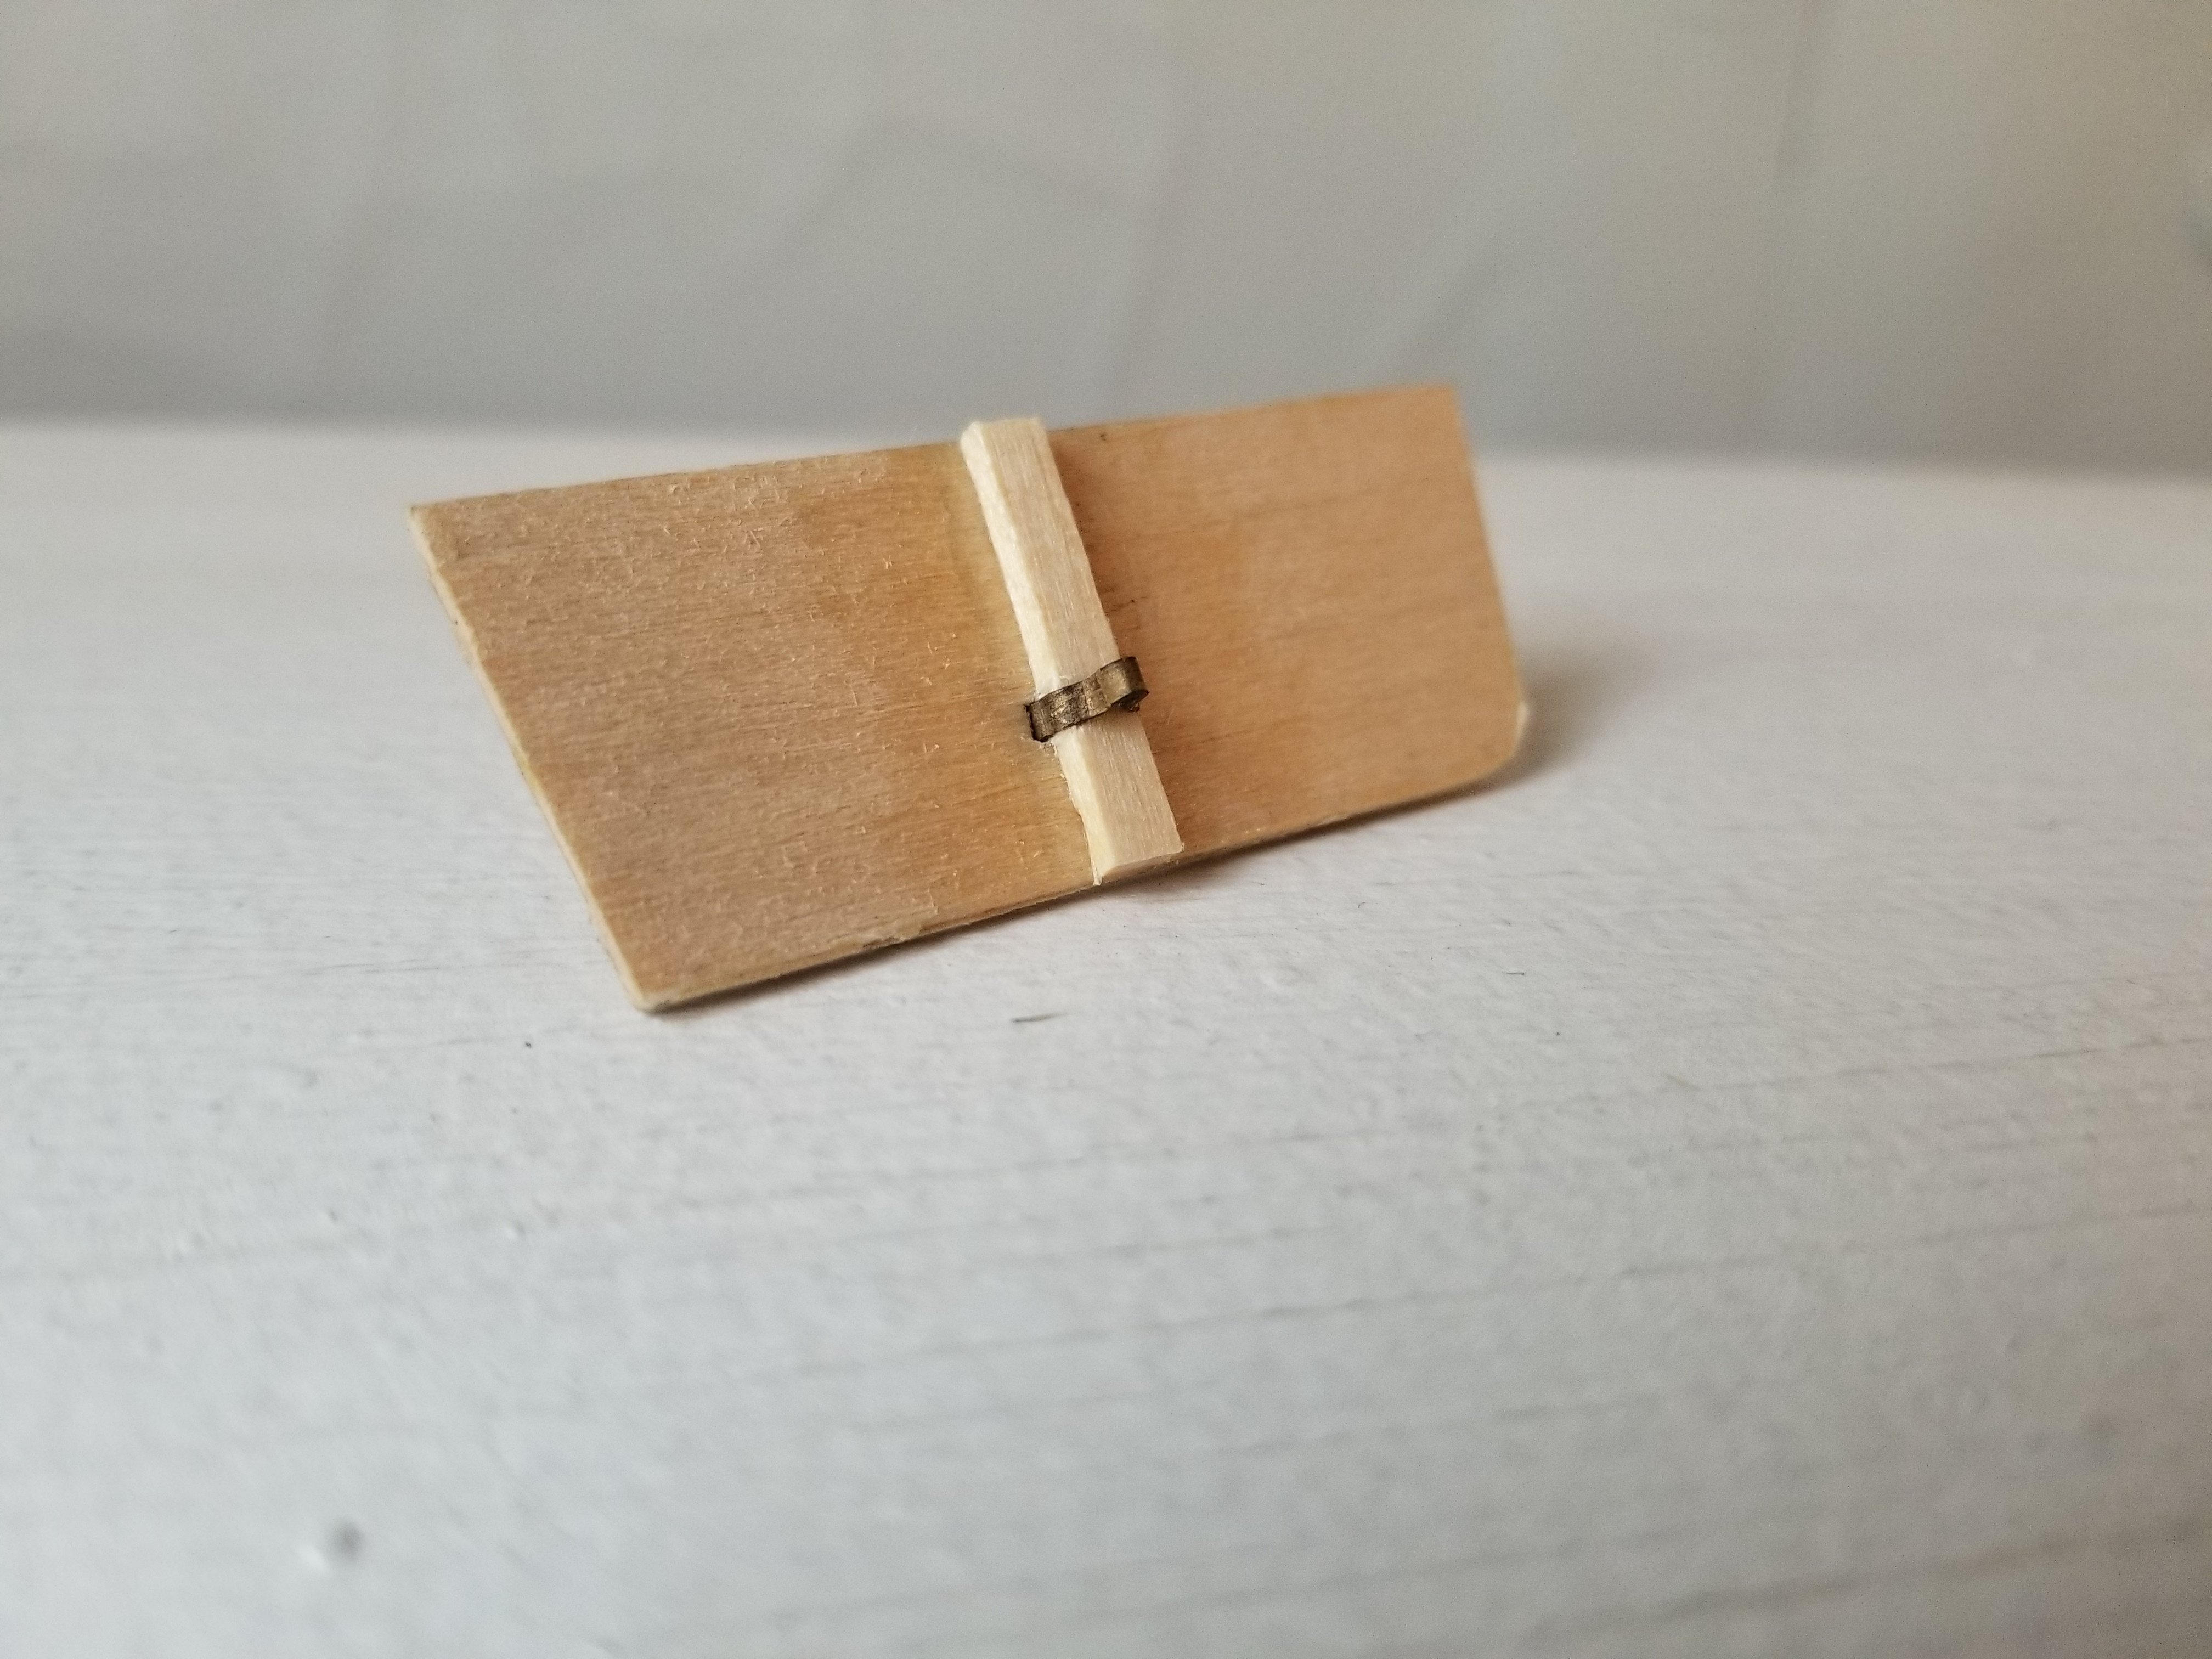
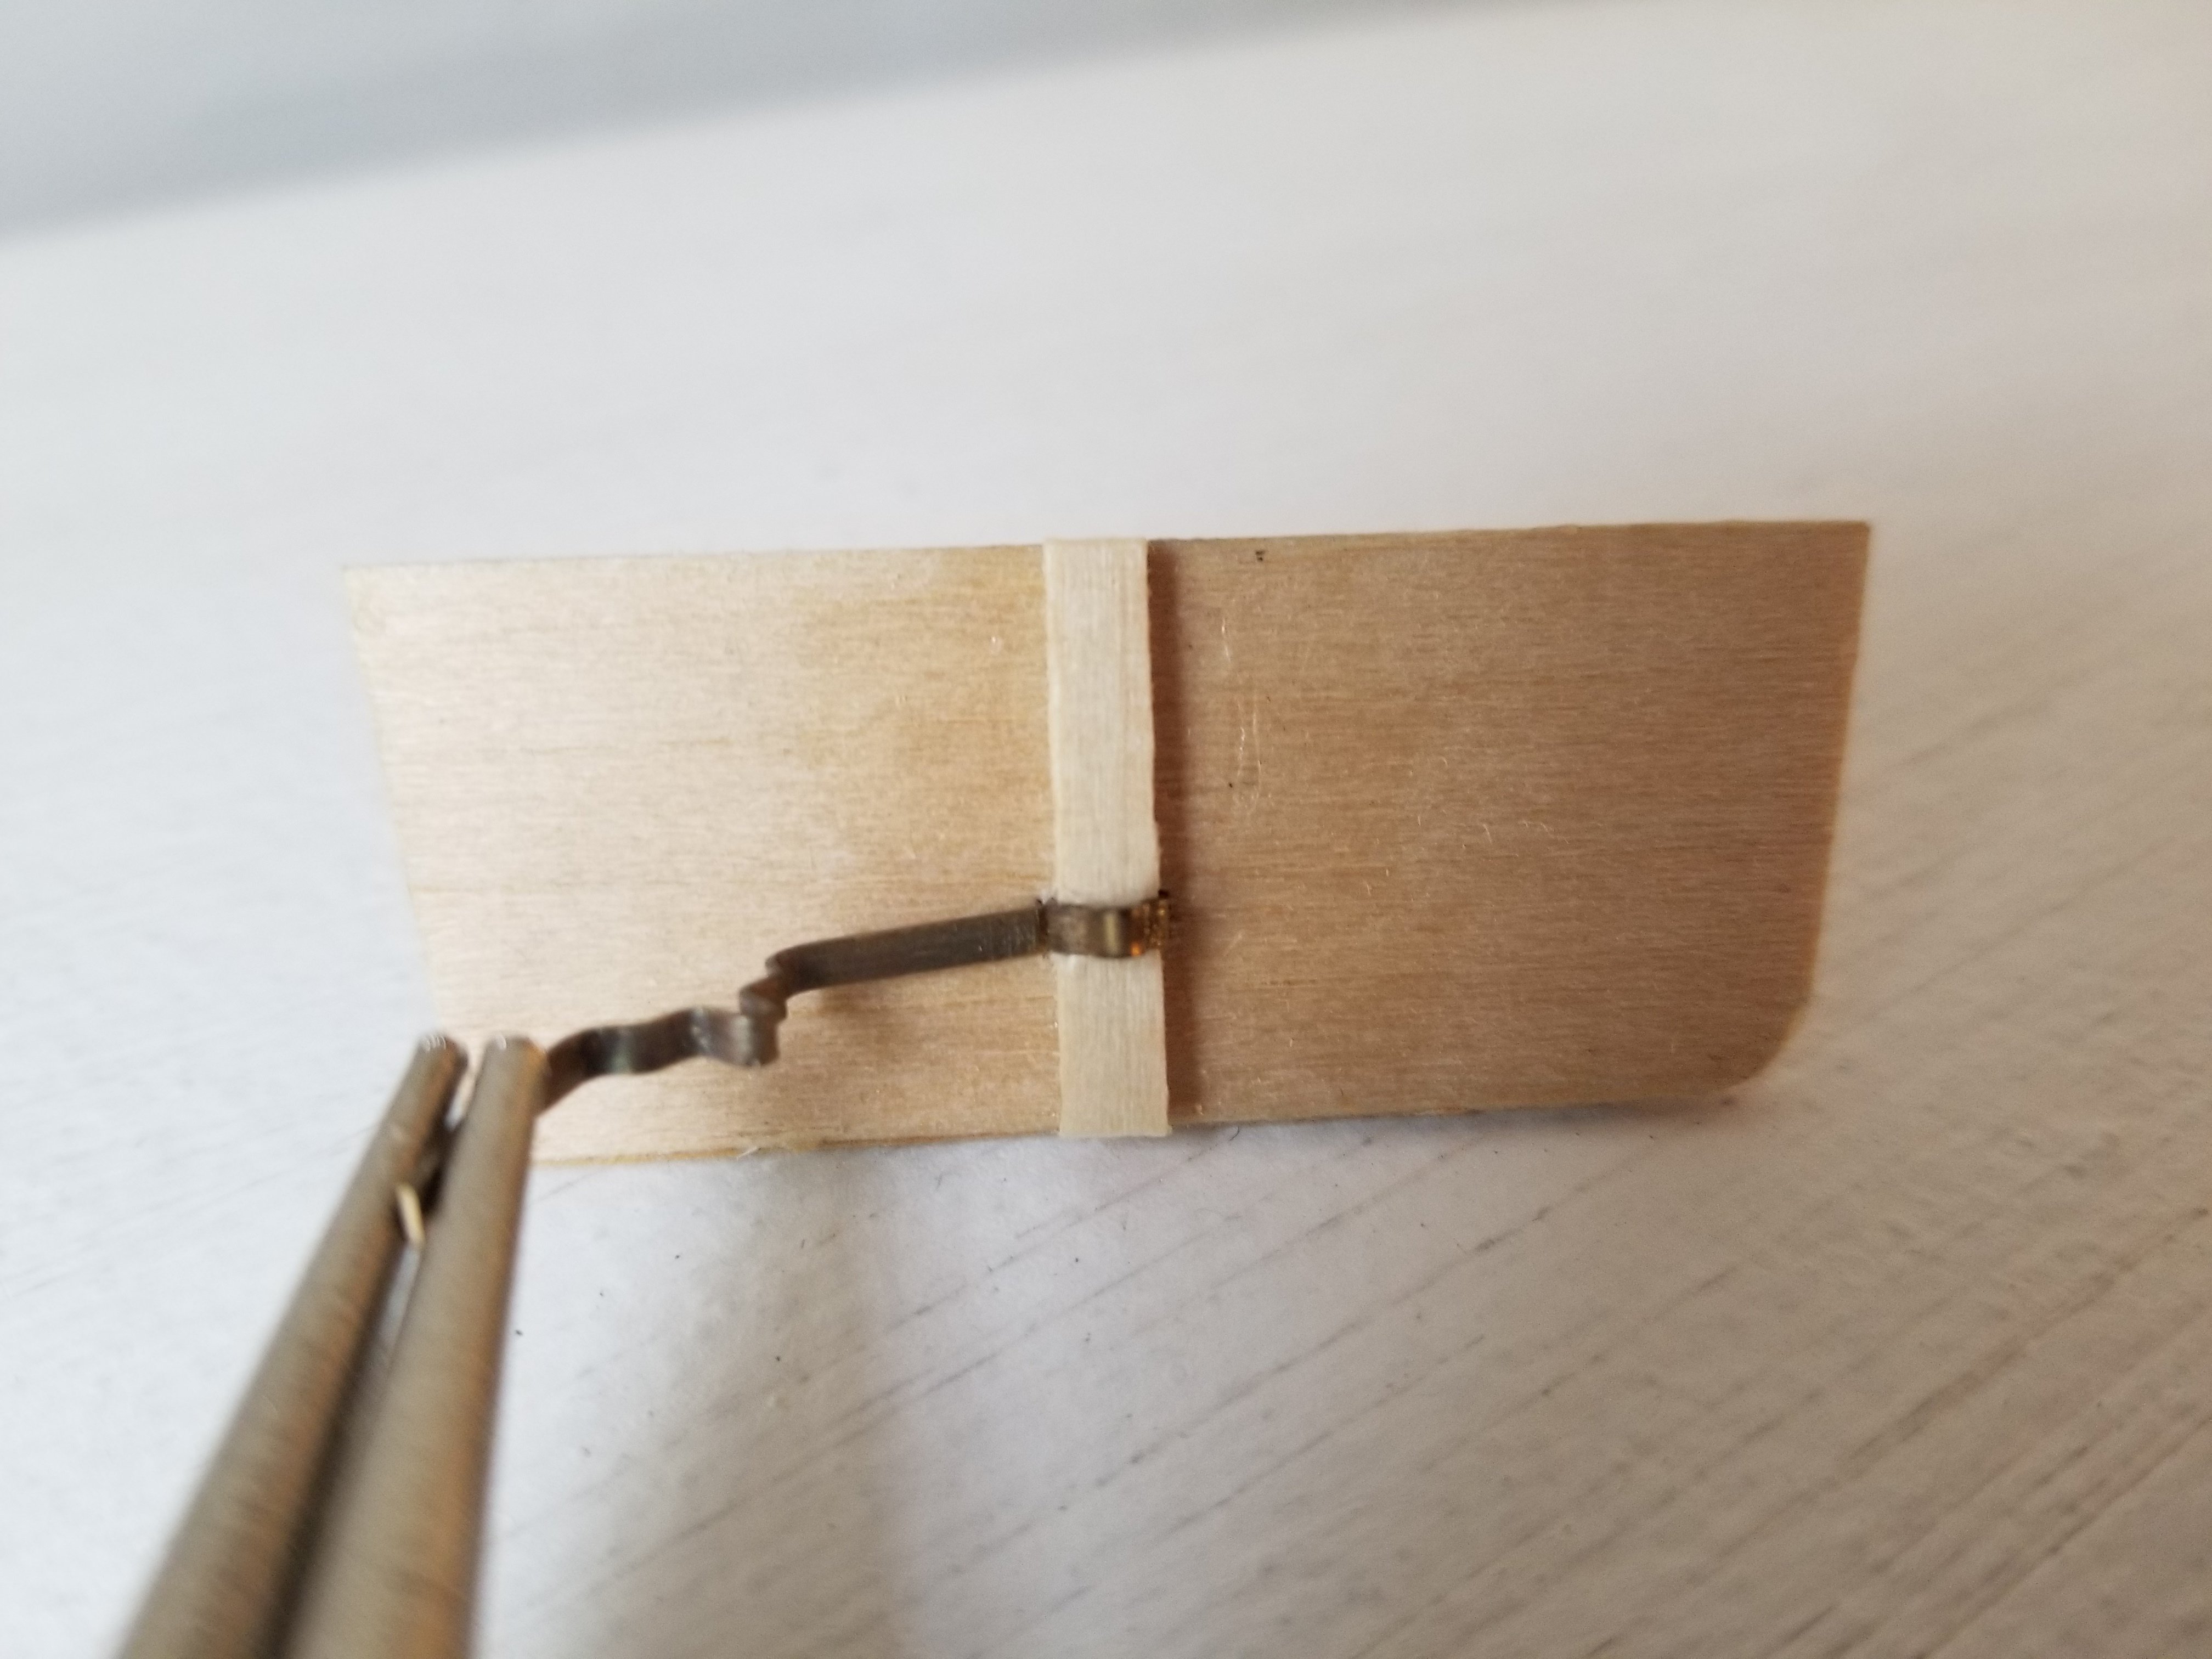
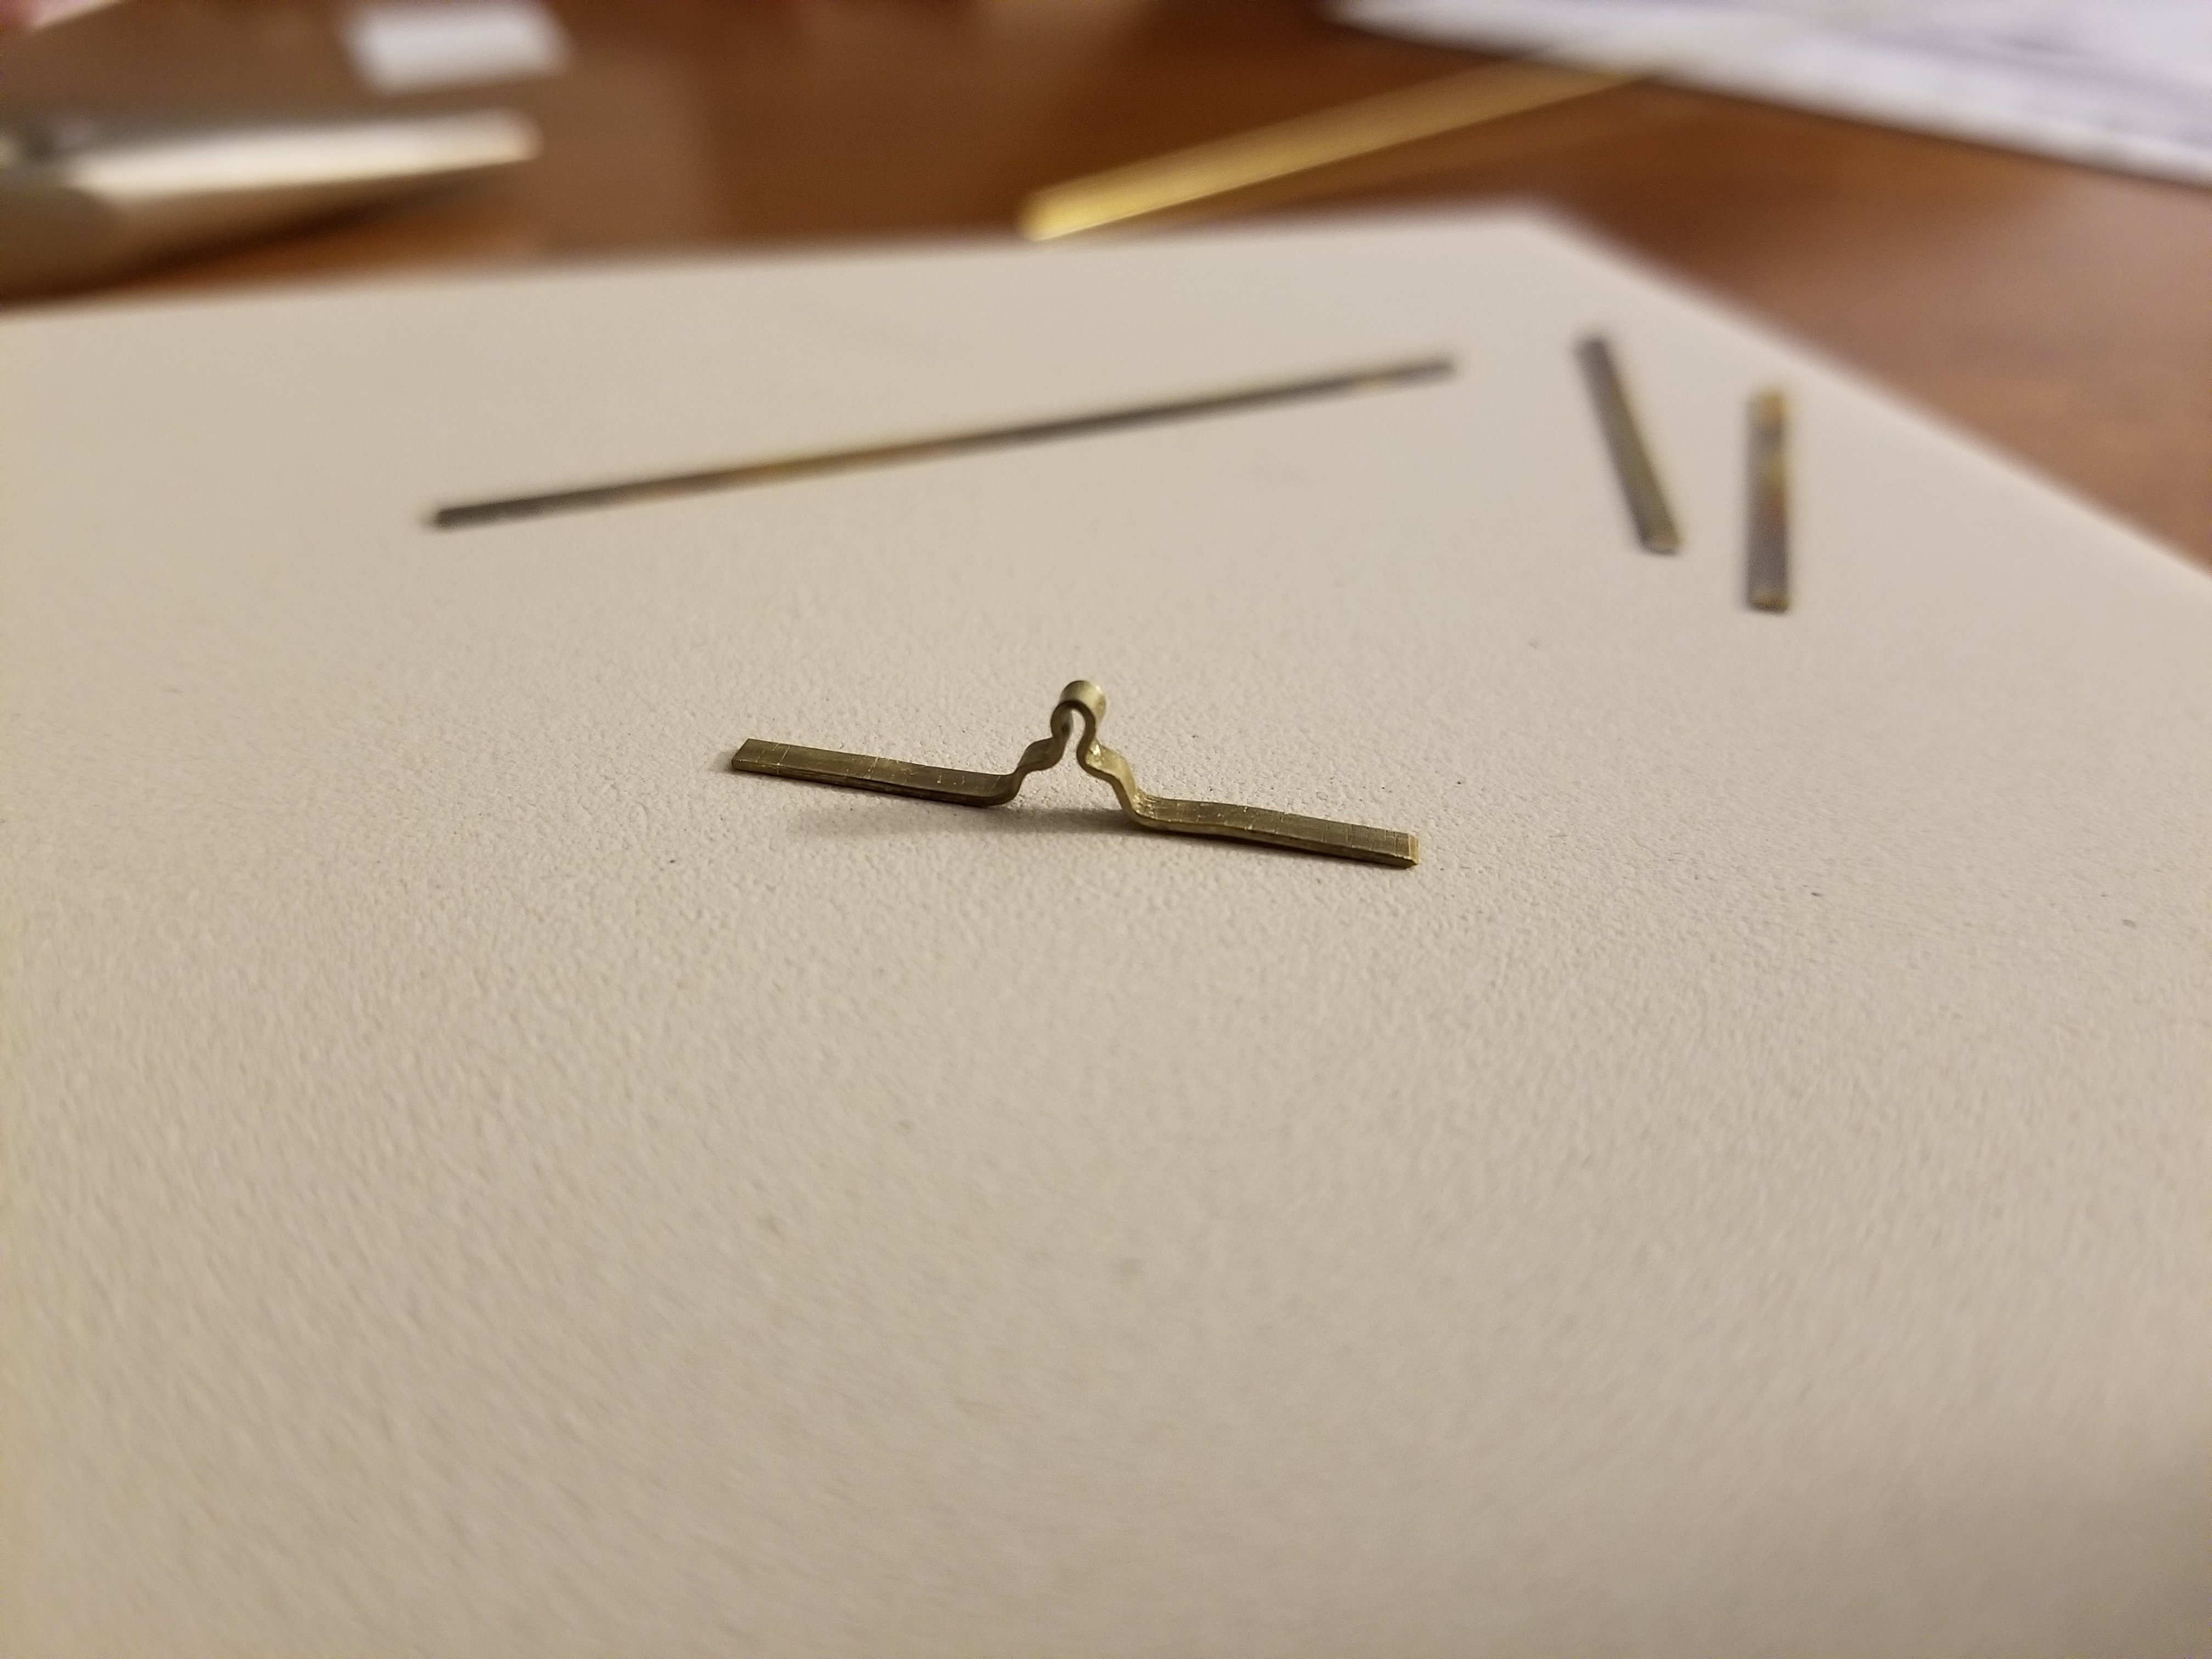
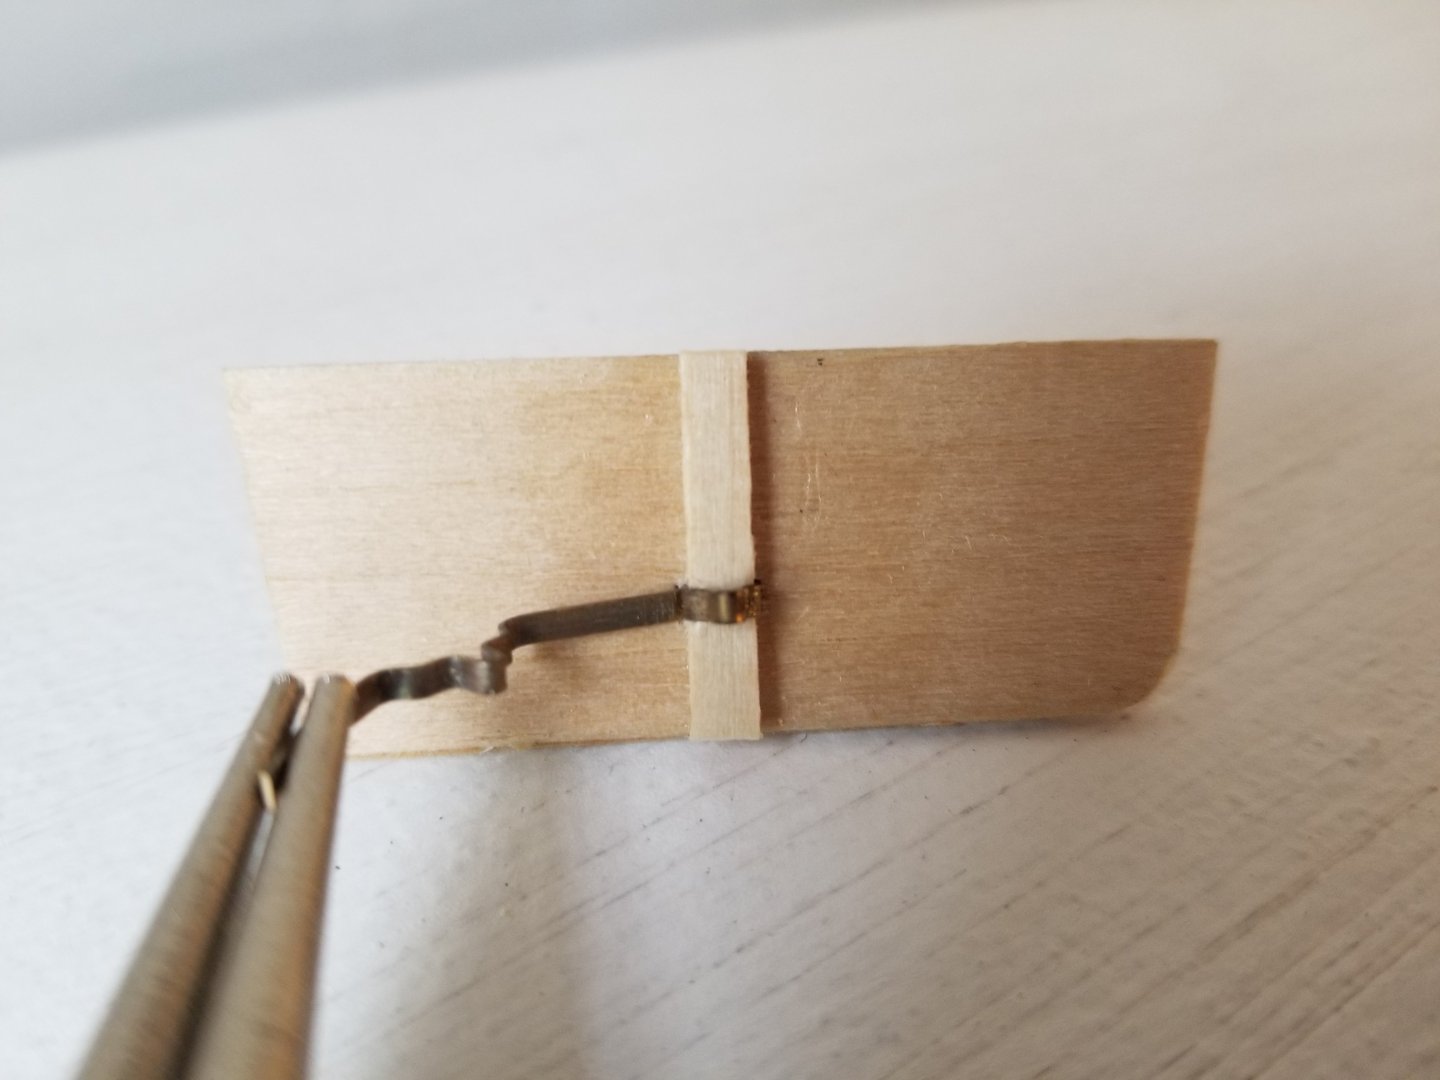
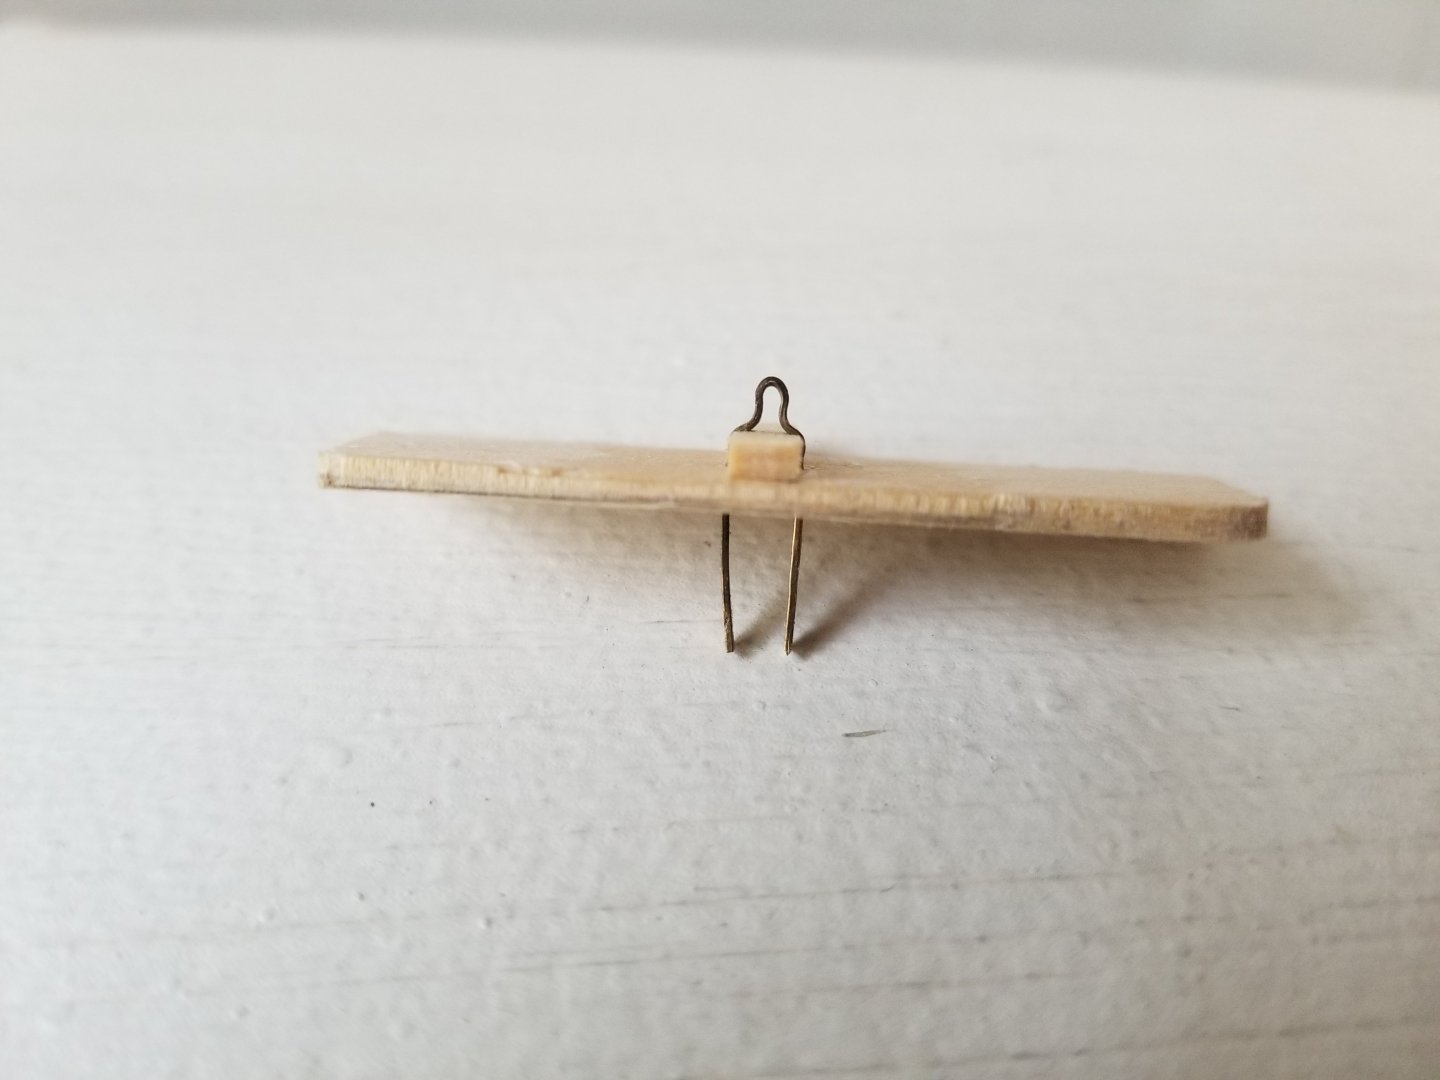
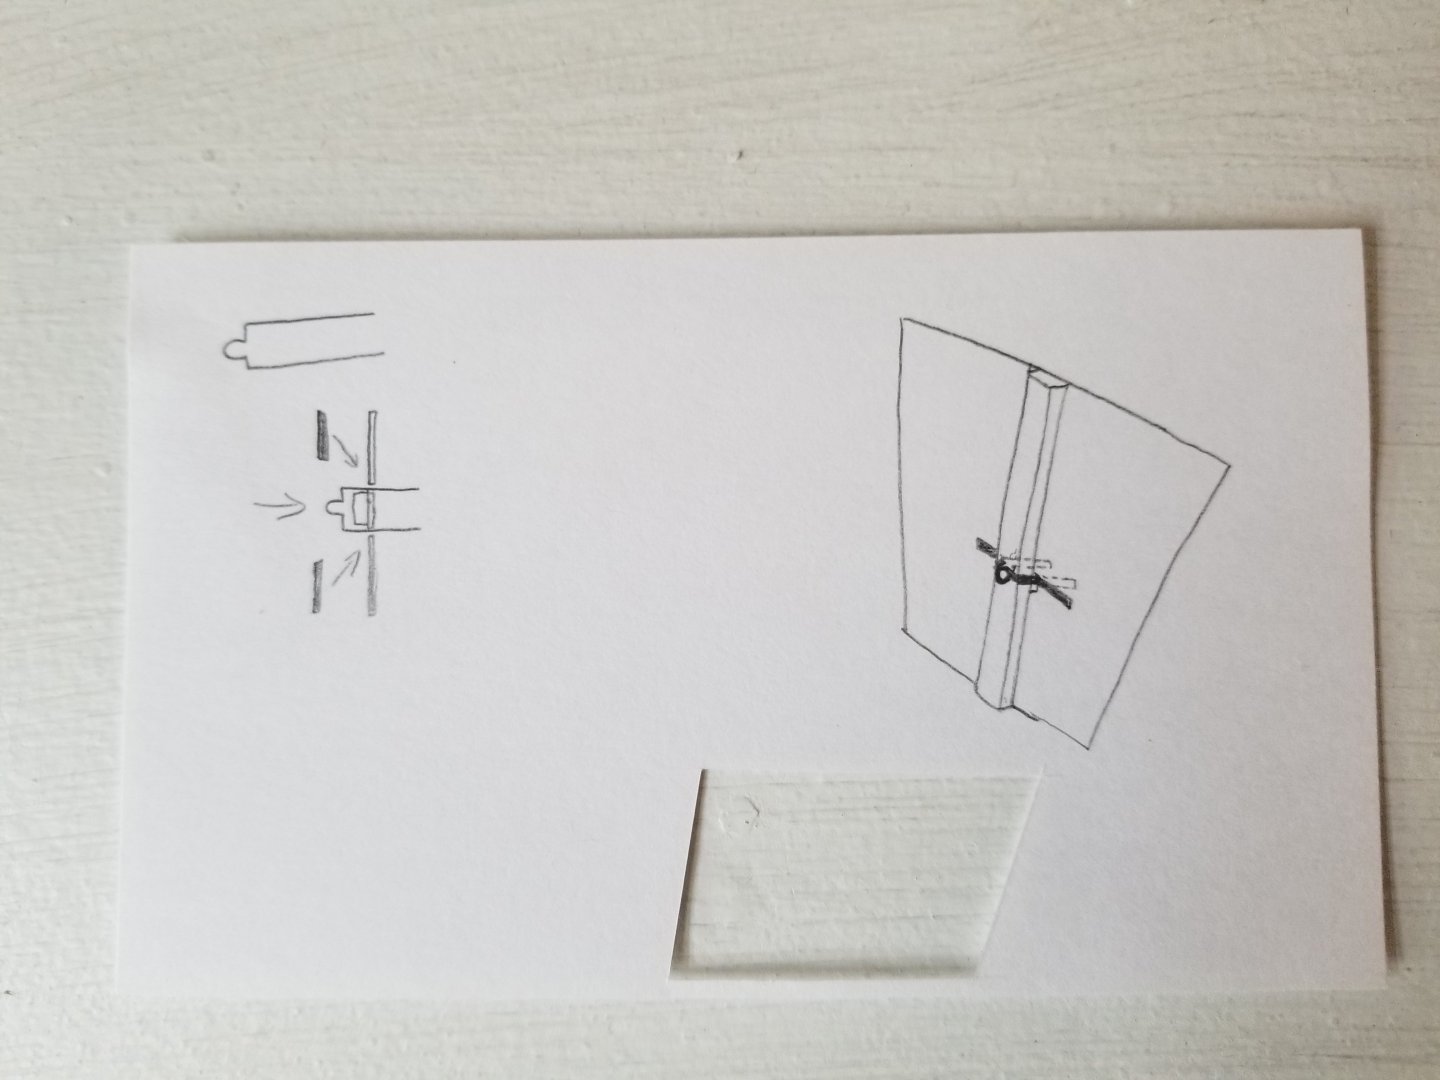
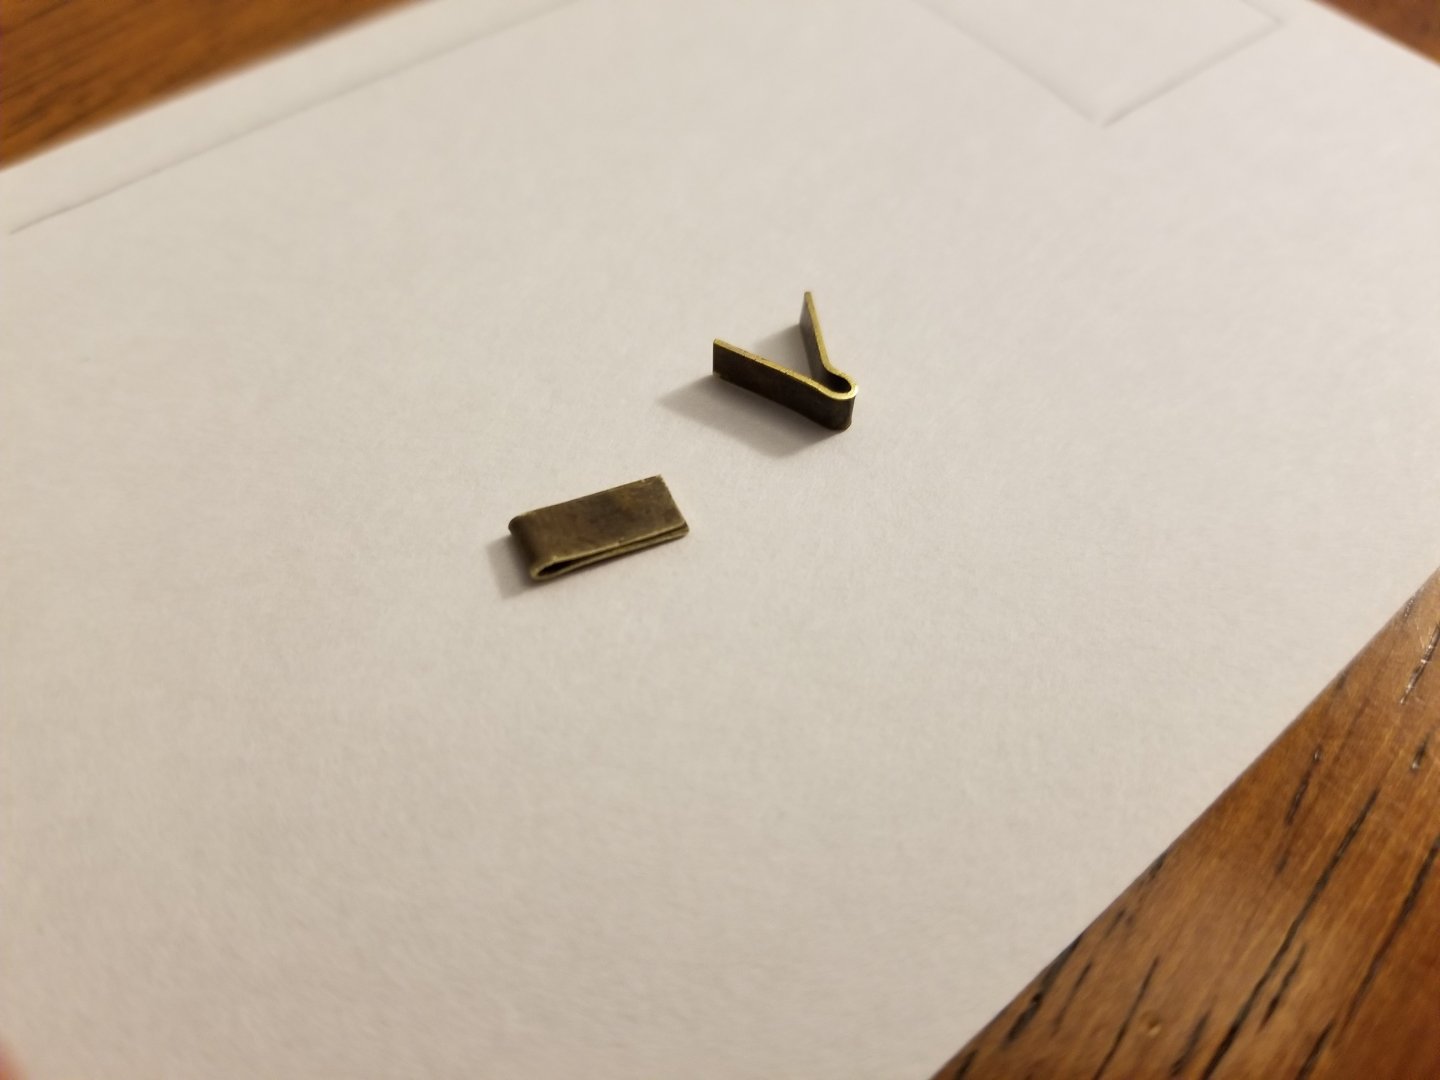
I've been doing some more thinking about the hinges. The pintles are more or less straightforward to make, but the gudgeons are giving me trouble given all the right angles they take wrapping around the rudder post (which is external) and onto the transom. So I began to wonder if there was a way for me to fake it: what if I could cut slits in the transom around the rudder post so the gudgeons could just go straight back and run into the interior of the hull, and I then glued extra pieces of brass along the transom to represent the gudgeon's extension along the transom? I first tried to draw it out: Then I decided to test it with some scrap. I made a fake transom with a rudder post down the center and applied some sealer to stiffen it. Once that dried, I bent one of my gudgeon's arms back straight, and used my smallest drill bit to make a small slit on each side of the rudder post. I was then able to push the gudgeon into place. It's actually very secure even without being glued. I then tested how it would look to place a strip of brass (in this case, the other gudgeon) to fake the arms of the gudgeon running out on each side of the transom. By placing it right up against the gudgeon body, I was able to largely avoid any visible gap. (Terrible photo below, it was hard to hold it in place and take a photo at the same time). I'm planning on blackening the brass. I think that I should be able to avoid gaps with careful shaping. Any remaining gap I can probably cover with a tiny dab of black paint--at worst I'll just have to paint the whole hinge black, which would not be the end of the world. Overall, this seems like a much easier way to do it than trying to get so many precise 90-degree bends into a small space. I just need to properly plan the gudgeon location so that the slits are covered from view by the helmsman's platform.

-
Very nice job! The gunwales look great. I'm glad to hear my build log was useful. I'm not totally sure on an appropriate thickness for the thread, you can probably eyeball it by finding photos of an old bucket with a rope handle. Also, I don't think you lost the false stem, as far as I can tell the instructions just don't mention that it should be made of scrap.
- 30 replies
-
- 2
-
-
- Grand Banks Dory
- first build
- (and 2 more)
-
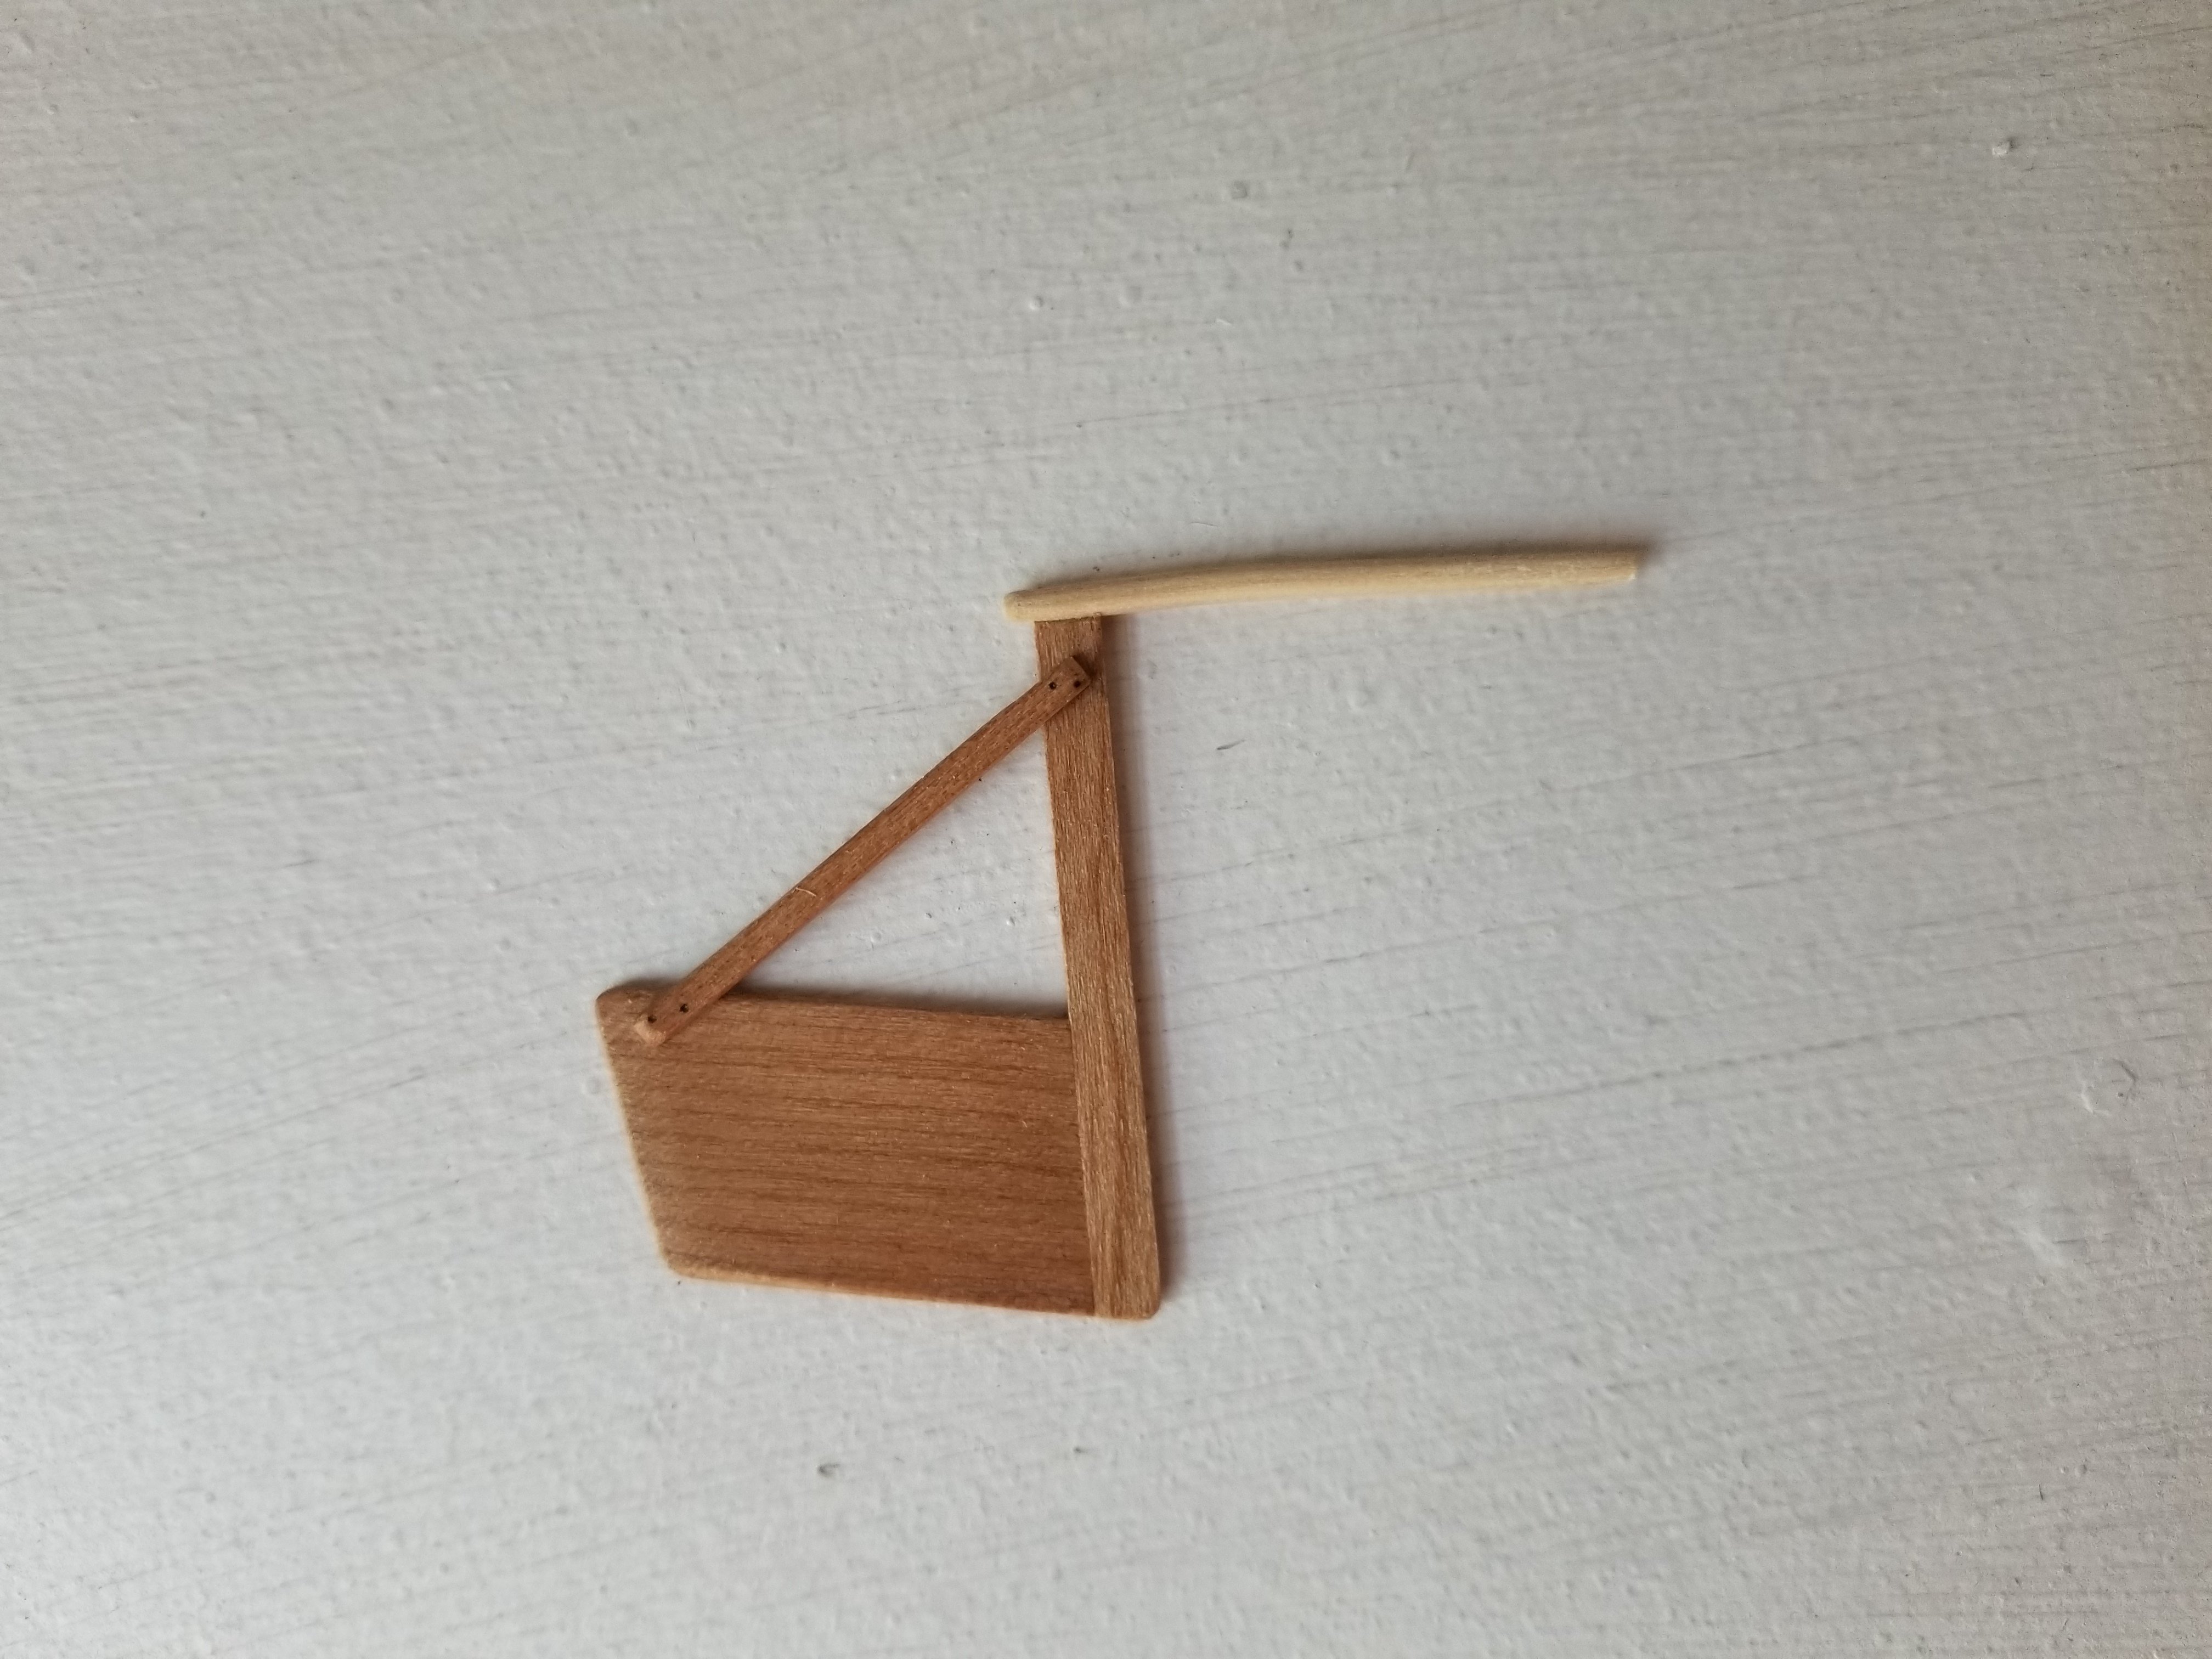
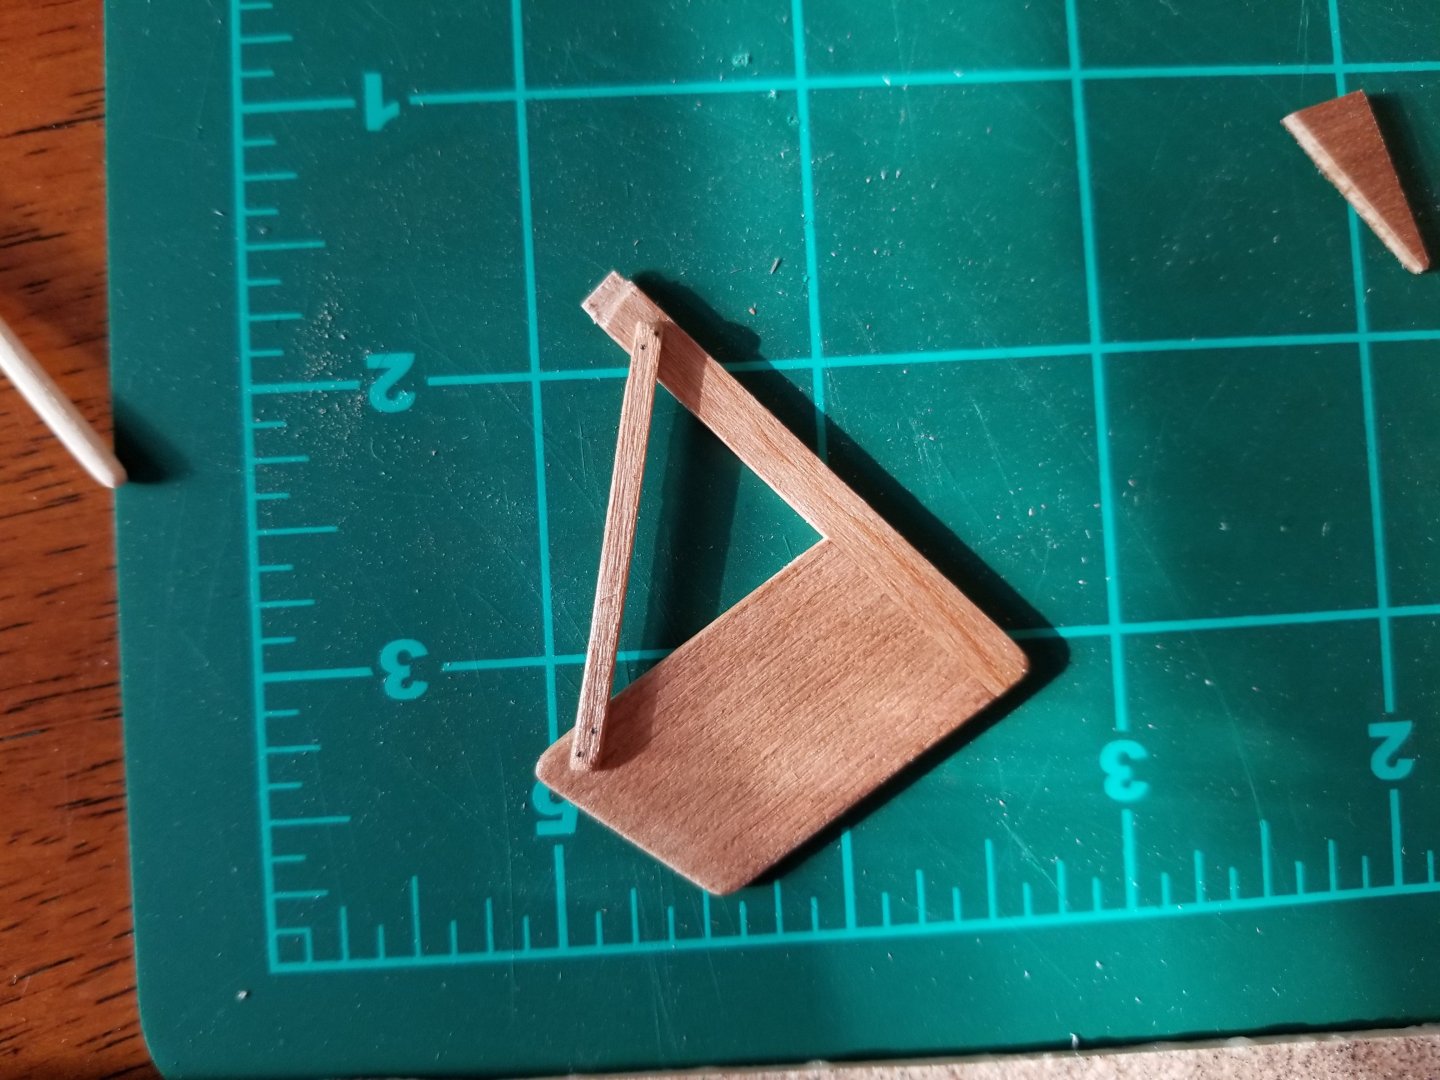
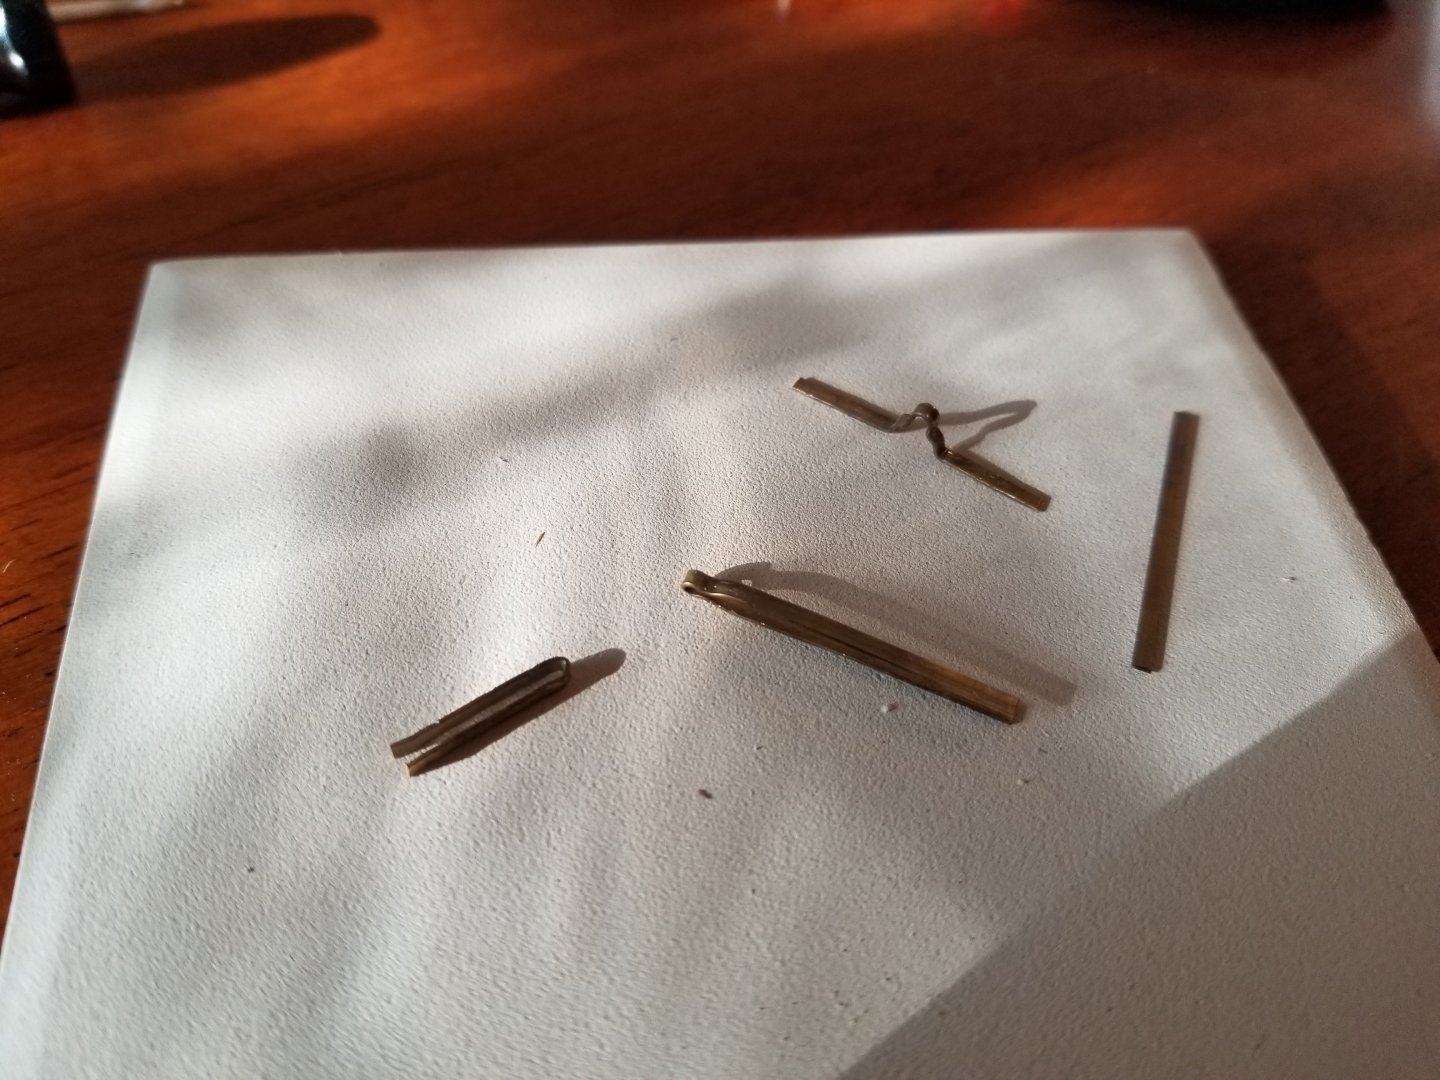
I've moved on to the rudder. I wasn't happy with my initial attempt at carving a rudder from basswood in a similar shape to what I used for the Cargo Canoa. So, I decided to try something different. Although I don't have any good images of a full rudder, a number of photos depict a long rudder with one or two support beams. After trying out several shapes in card, I made a decision. I built it out of 1/16‐inch-thick cherry. In hindsight it would have been nice to use cherry for the hull frames and other parts, for more consistency, but I didn't have any then. For the tiller, I followed the same process as on the Cargo Canoa, making it from some of the mango wood I collected. The hinges have been giving me trouble. I first tried to make them by splitting part of a 1/64x1/4-inch brass strip in half lengthwise. For whatever reason, I couldn't seem to anneal it. It was difficult to work with and hard to get even, and difficult to cut. I then was able to order some 1/64x1/16‐inch brass strips, so that I would only need to cut it to the right length. These annealed very easily, but it's still been very difficult to make the hinges. This is especially the case for the gudgeons, which need to wrap around a 1/8x1/16 rudder post and then extend further on the transom. There are a lot of right angles in a very short space to bend for that, and I've found it tricky to bend it properly. It's also been tricky to get the pin-end to be properly shaped to accept the pin, which will be a simple length of brass rod. Is there a limit to how many times I can bend a brass strip, or will re-annealing it keep it from becoming brittle and breaking? I'm still working on getting them right. Once I get hinges I'm happy with, my plan is to use brass blackening to color them, super-glue the pins into the pintles, and then attach them to the rudder and hull and hang the rudder. Any advice on making rudder hinges would be appreciated! I'm very impressed by the many examples that I've seen on other logs, but some seem to require more metal-working tools than I can really access now.


-
Having now made two lobster traps (one of which is shown somewhere in the Canoa de Rancho long), I would be happy to try to answer any questions you have about them!
- 69 replies
-
- 2
-

-
-
- Lowell Grand Banks Dory
- Model Shipways
- (and 2 more)
-
Very nicely done, it looks excellent! I like the contrast between the natural wood and the paint job.
-
Glad to hear my build log was helpful! It looks like you're doing a great job. I found that sometimes two bobby pins worked best.
- 69 replies
-
- 2
-
-
- Lowell Grand Banks Dory
- Model Shipways
- (and 2 more)
-
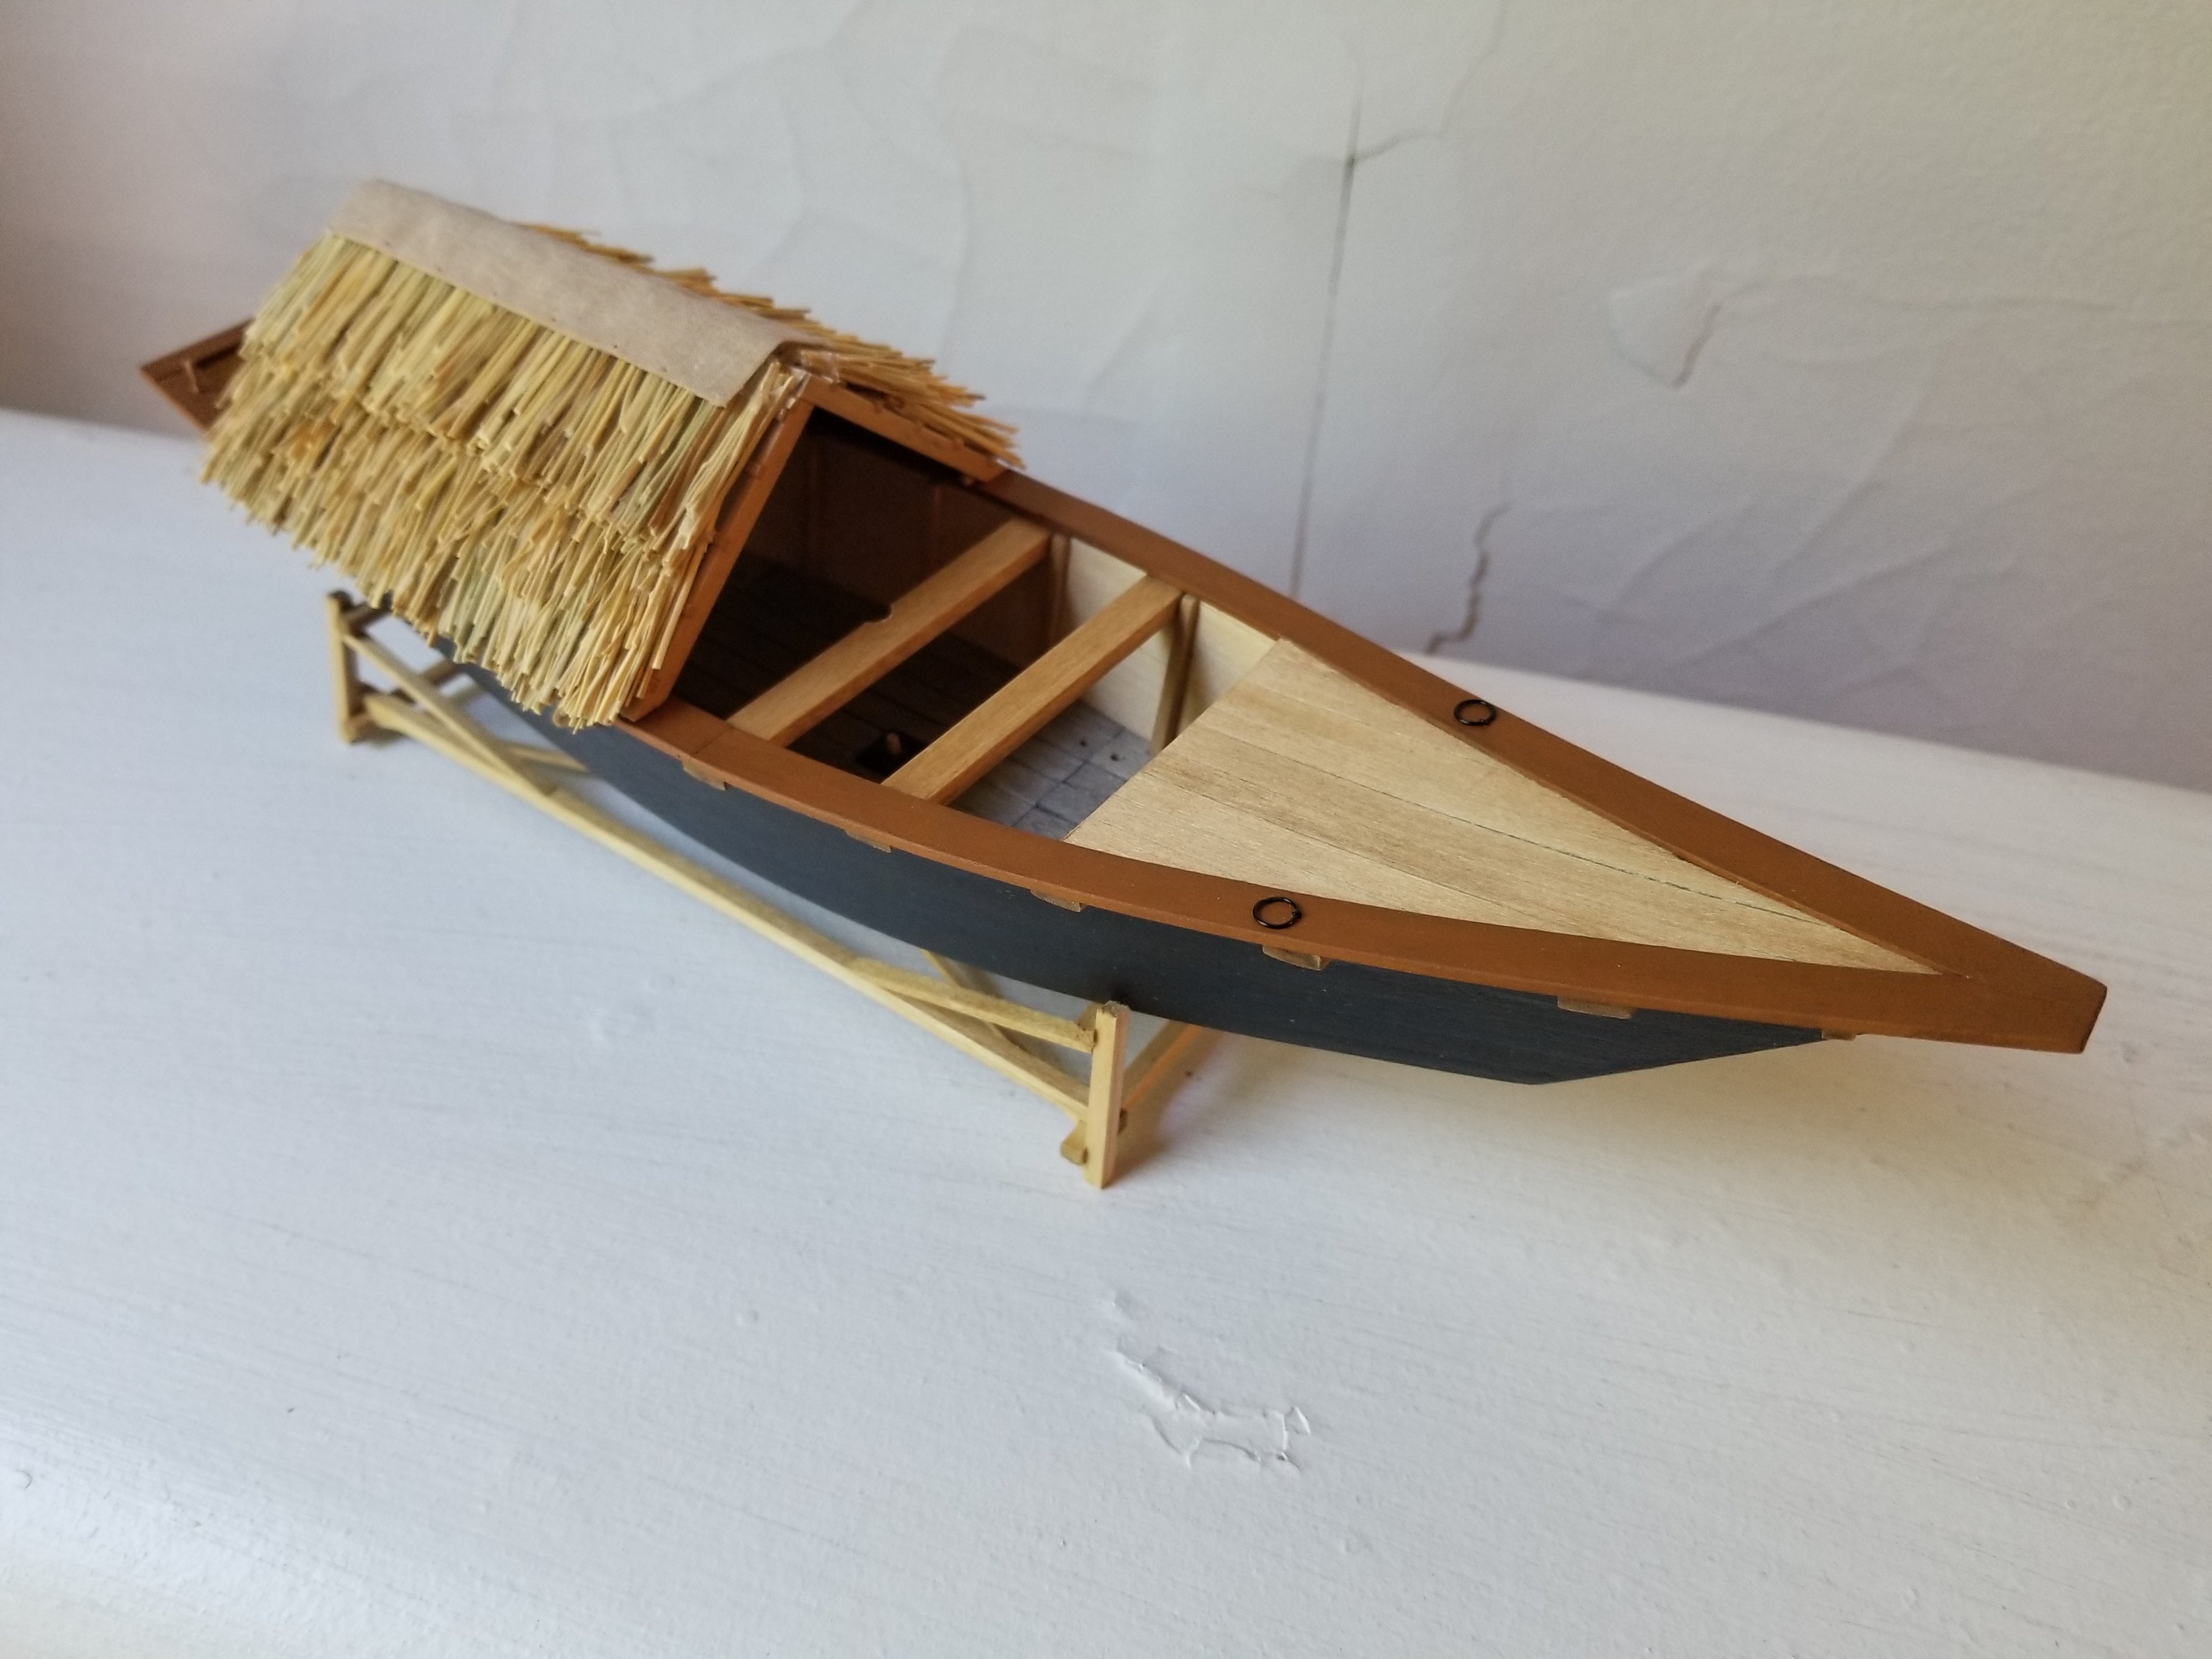
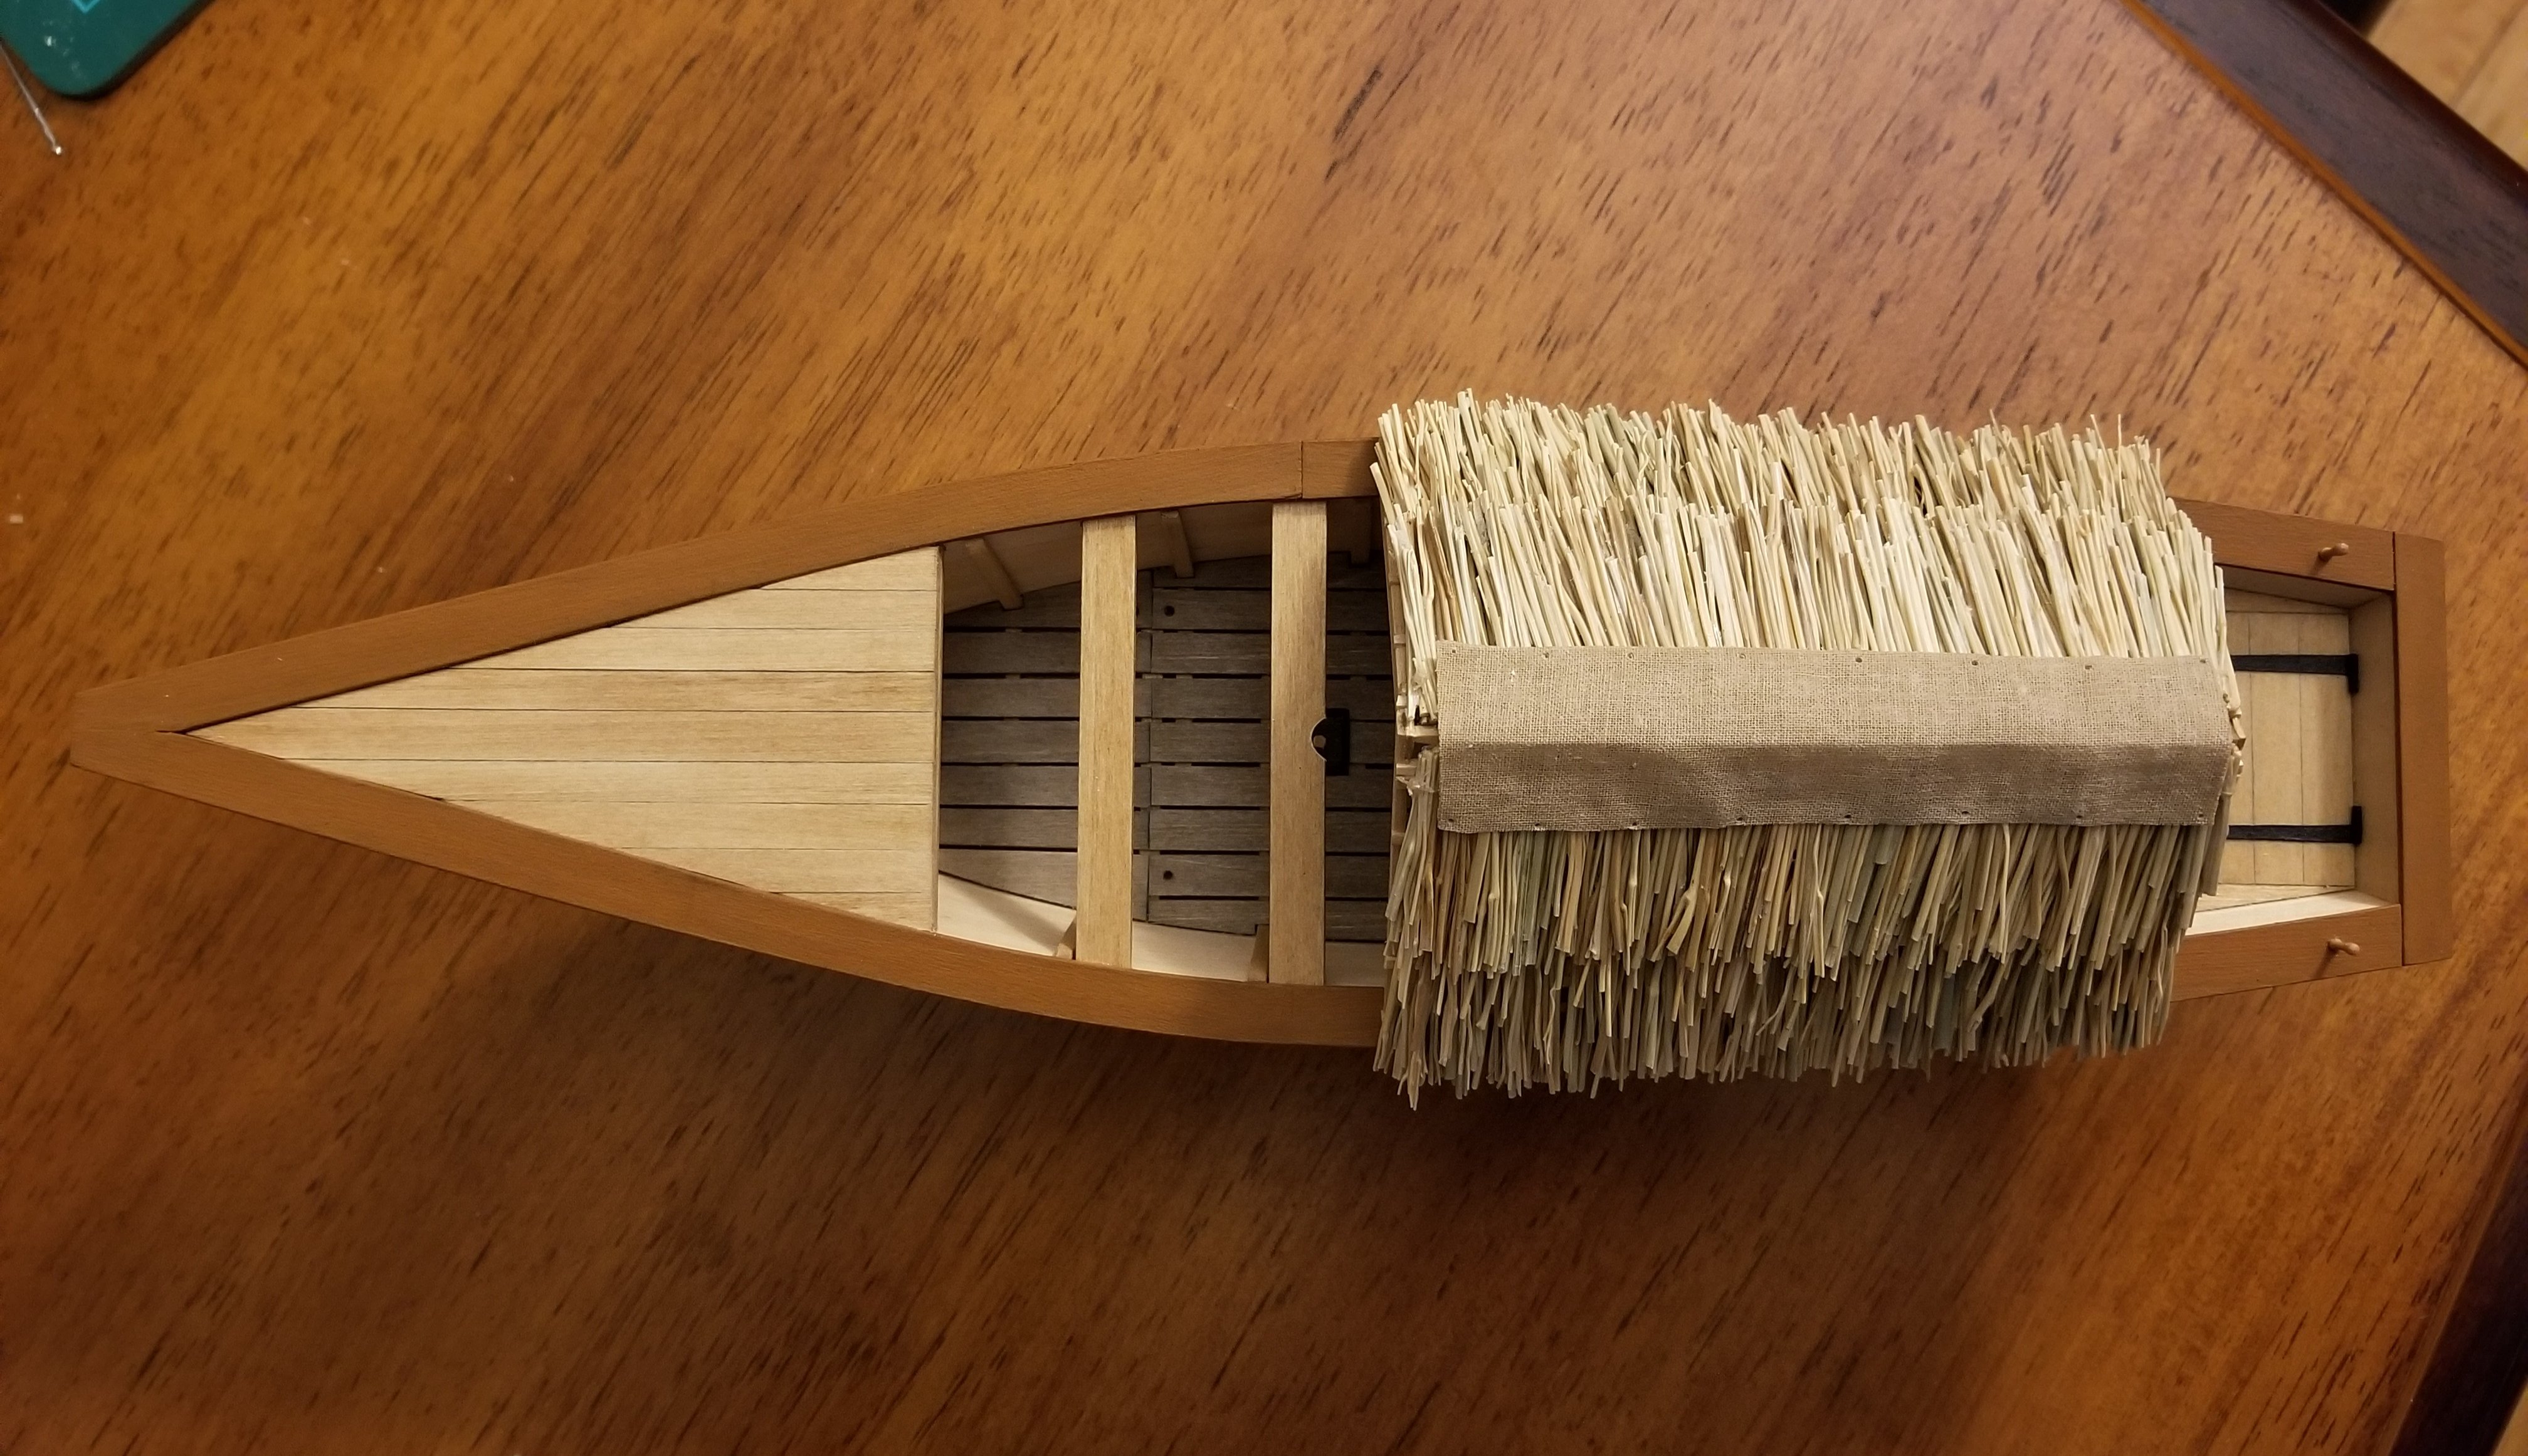
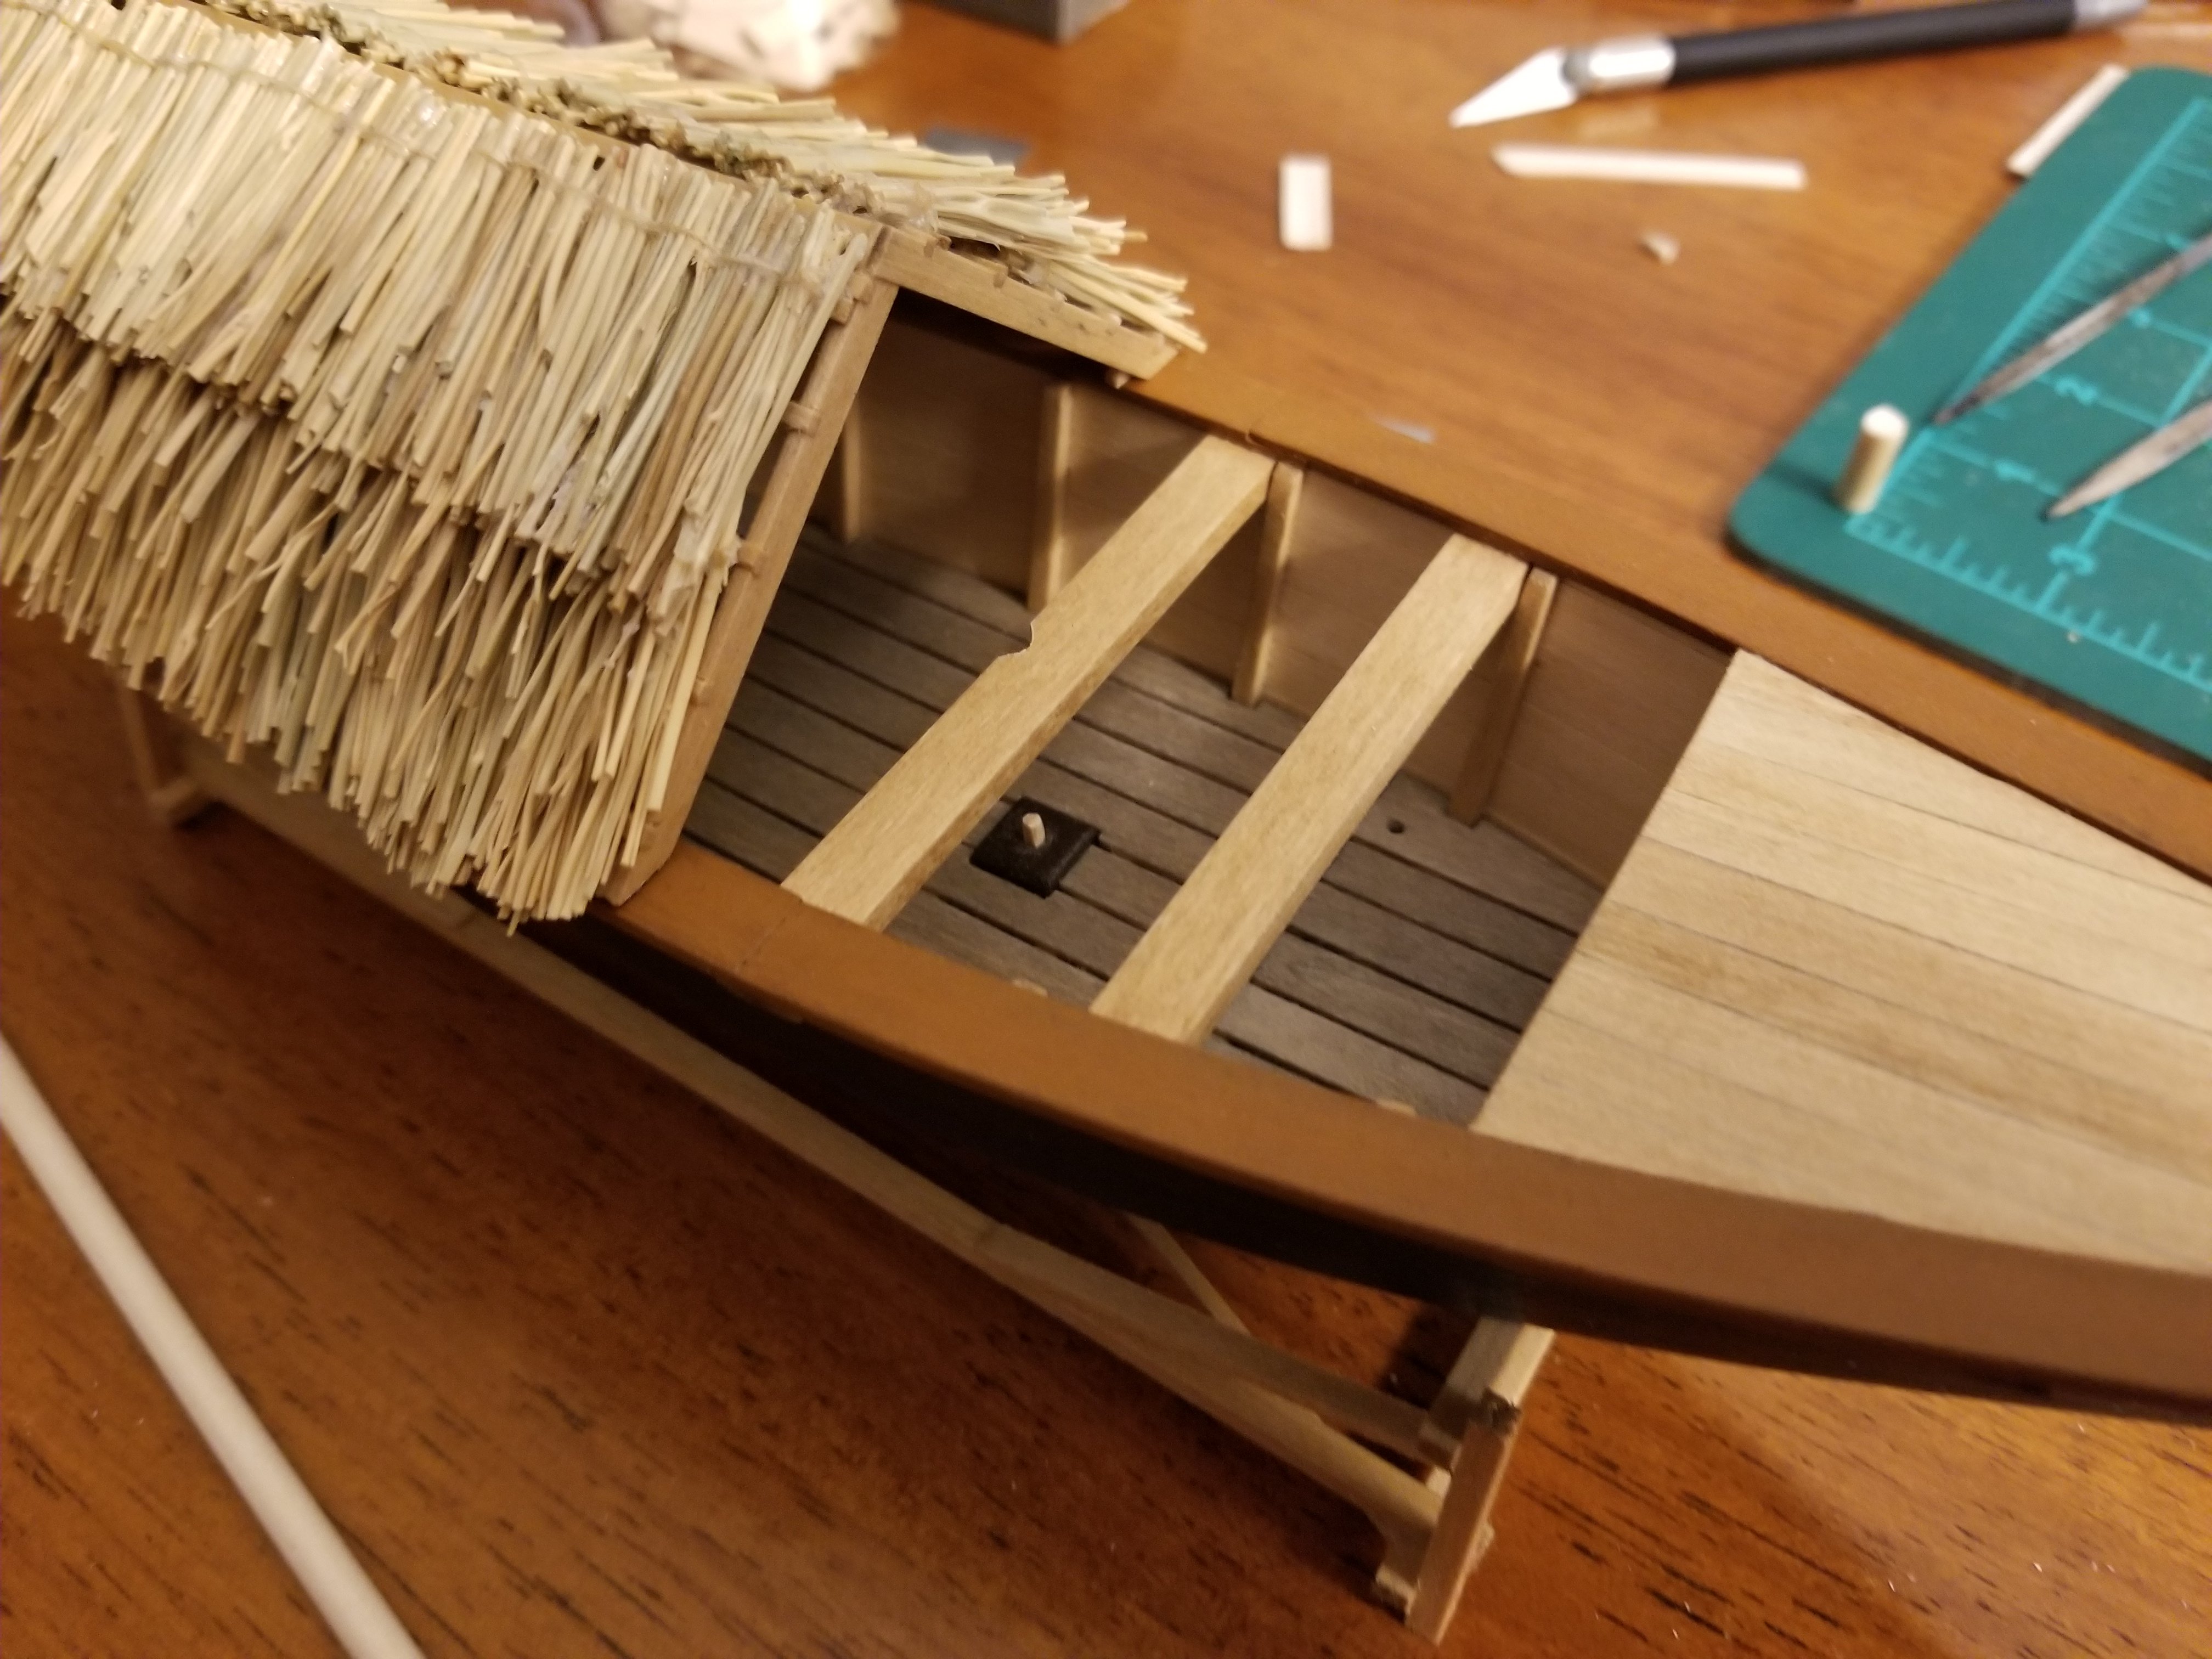
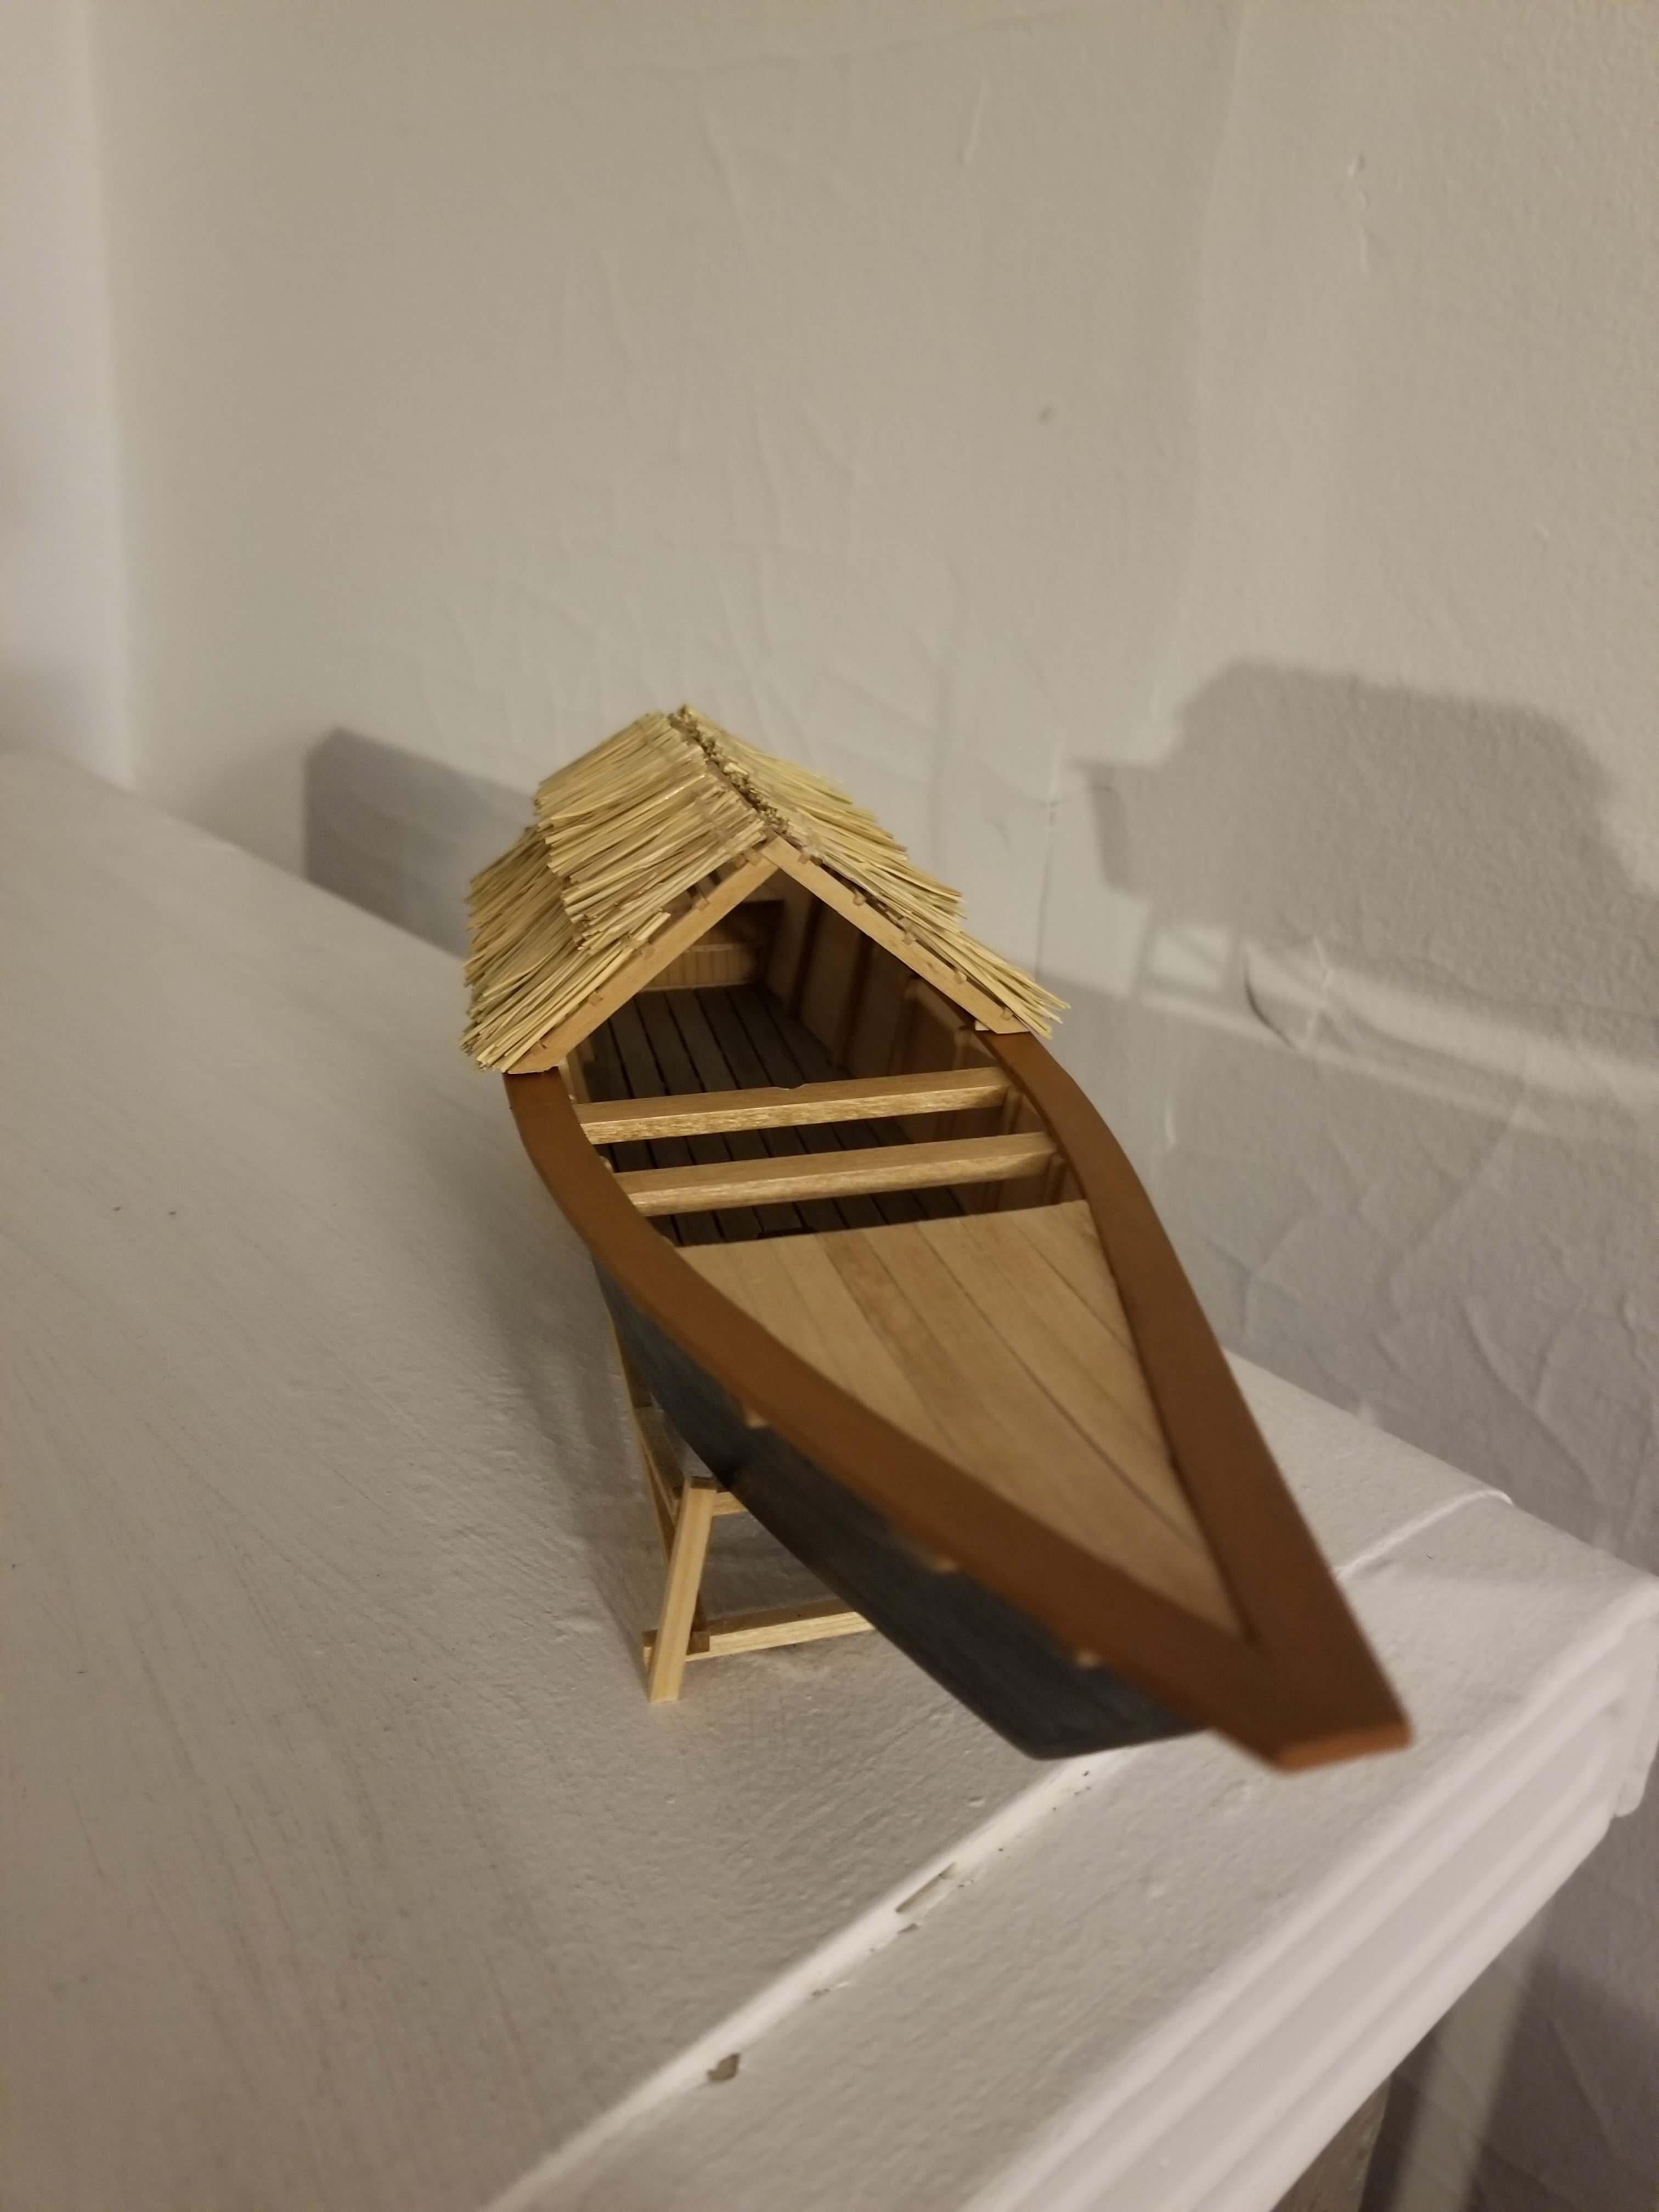
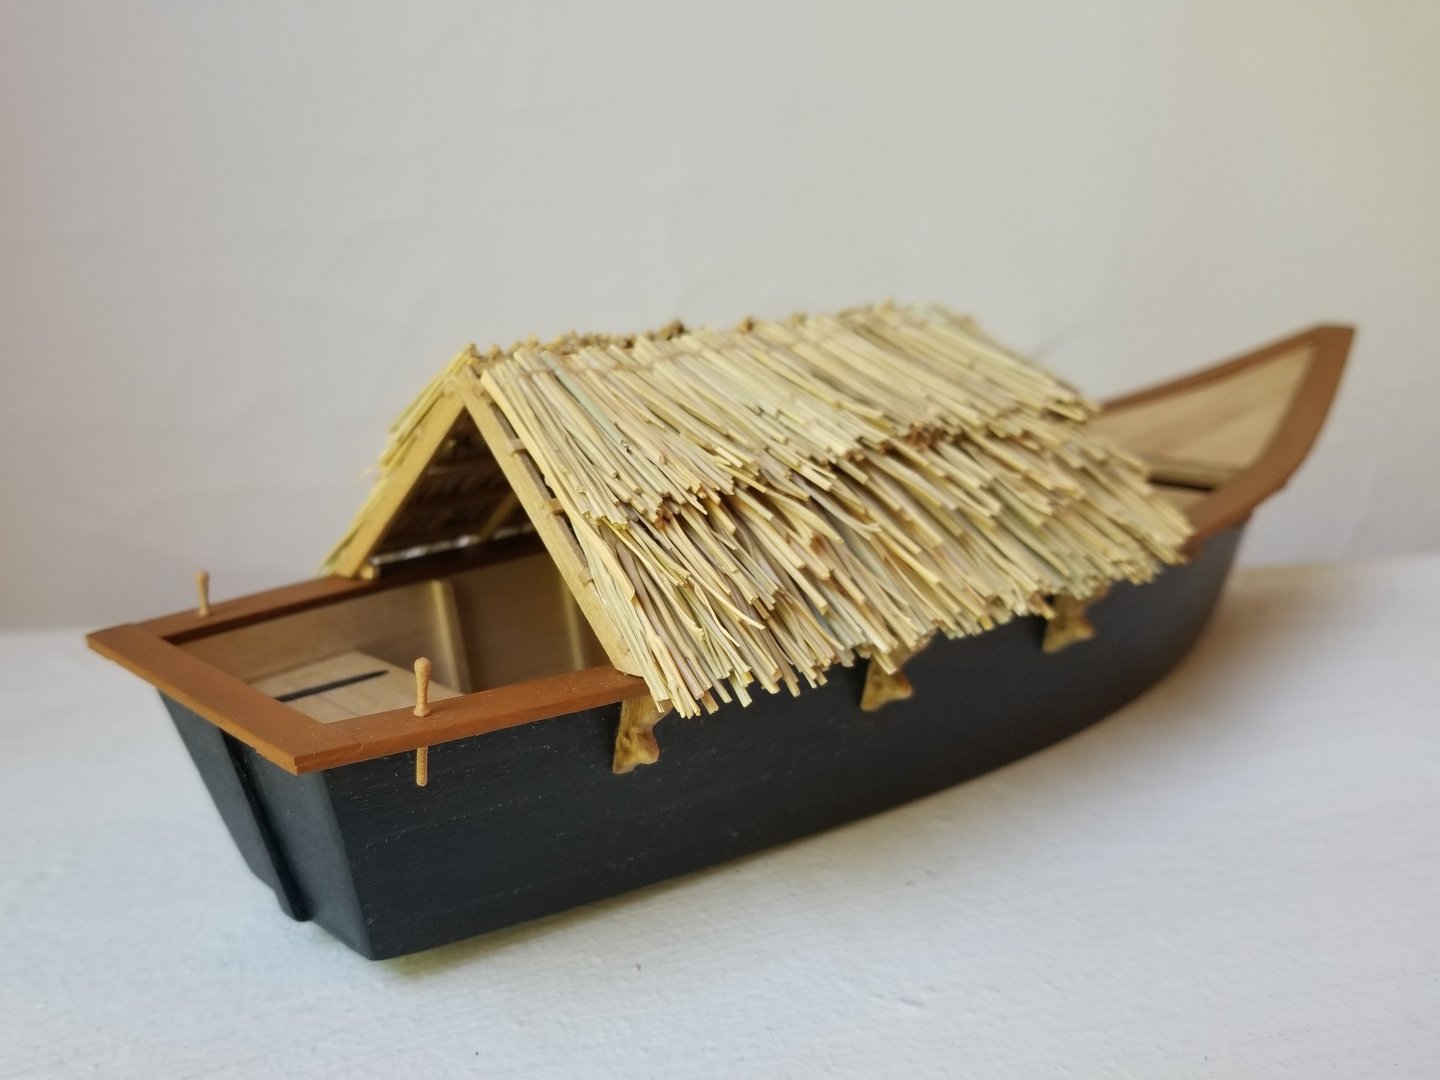
Thanks! Between cutting away some of the upper layer straws and poking new ones into the gap between layers, I think it's turned out in a way that I can accept. The rancho isn't glued in place yet, just held by the pins. Next, I'll need to add some protective/stiffening varnish, especially over the new additions. Then I'll be working out the cloth covering that runs along the top.


-
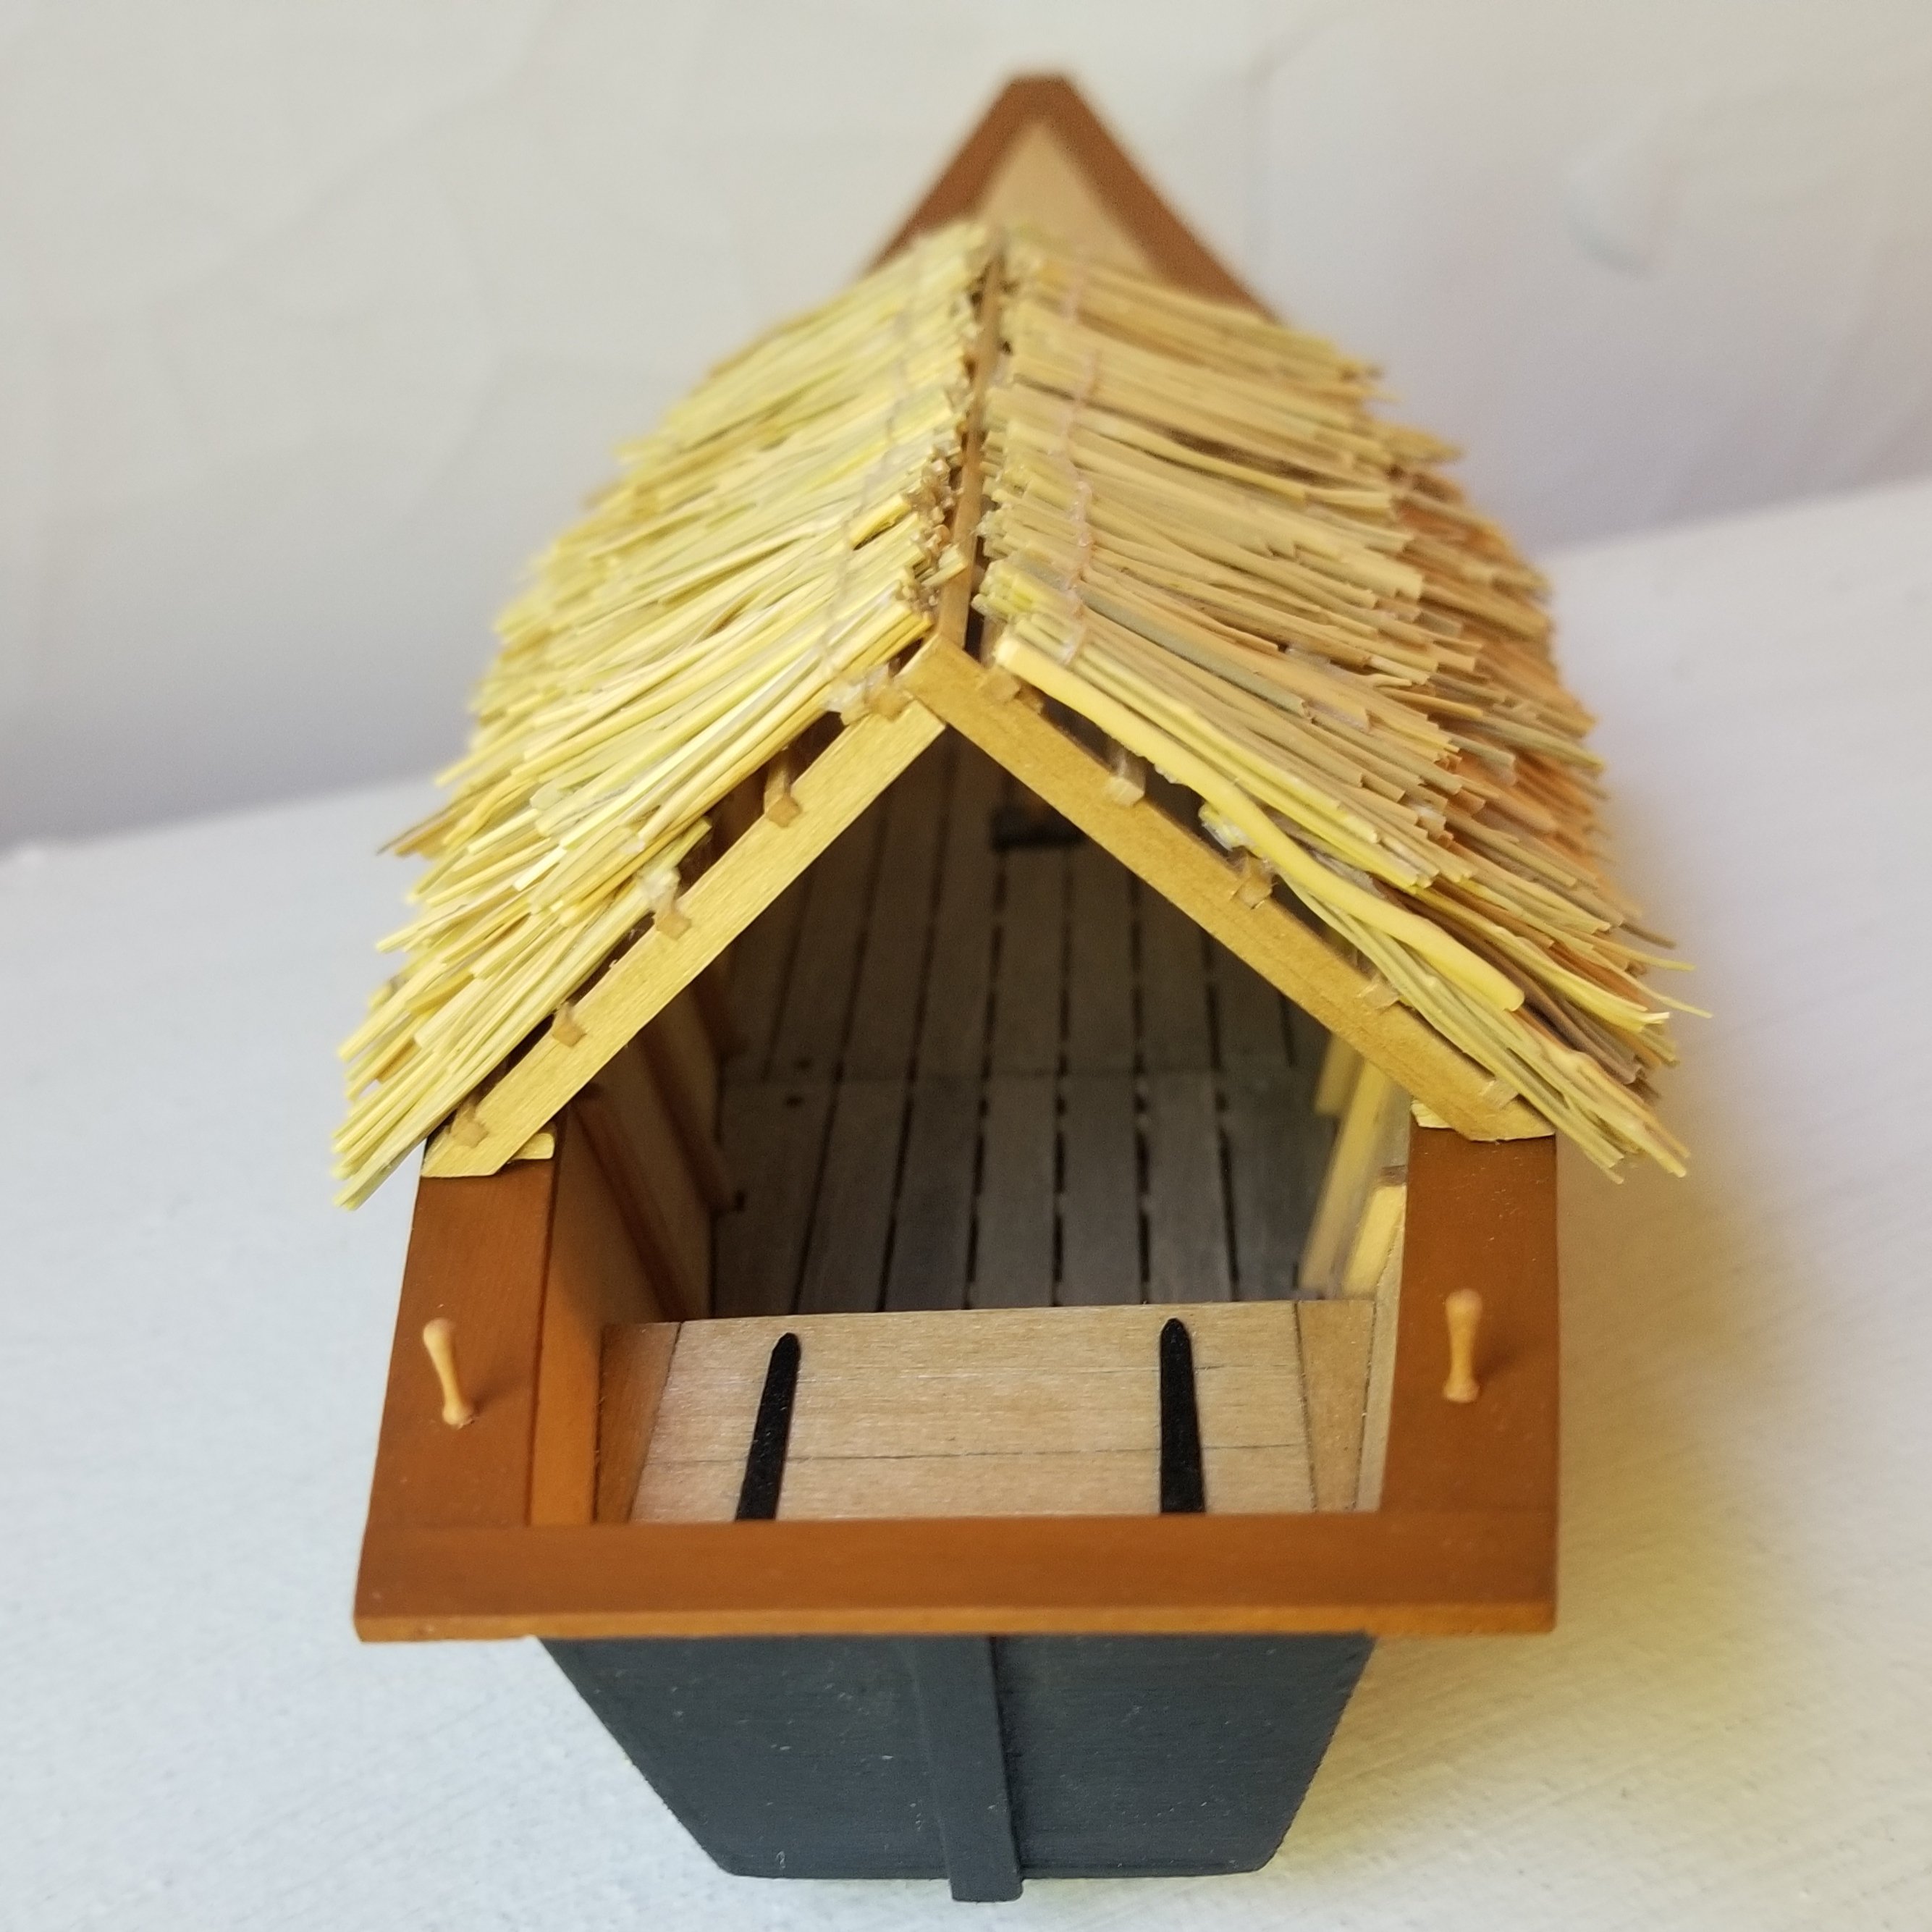
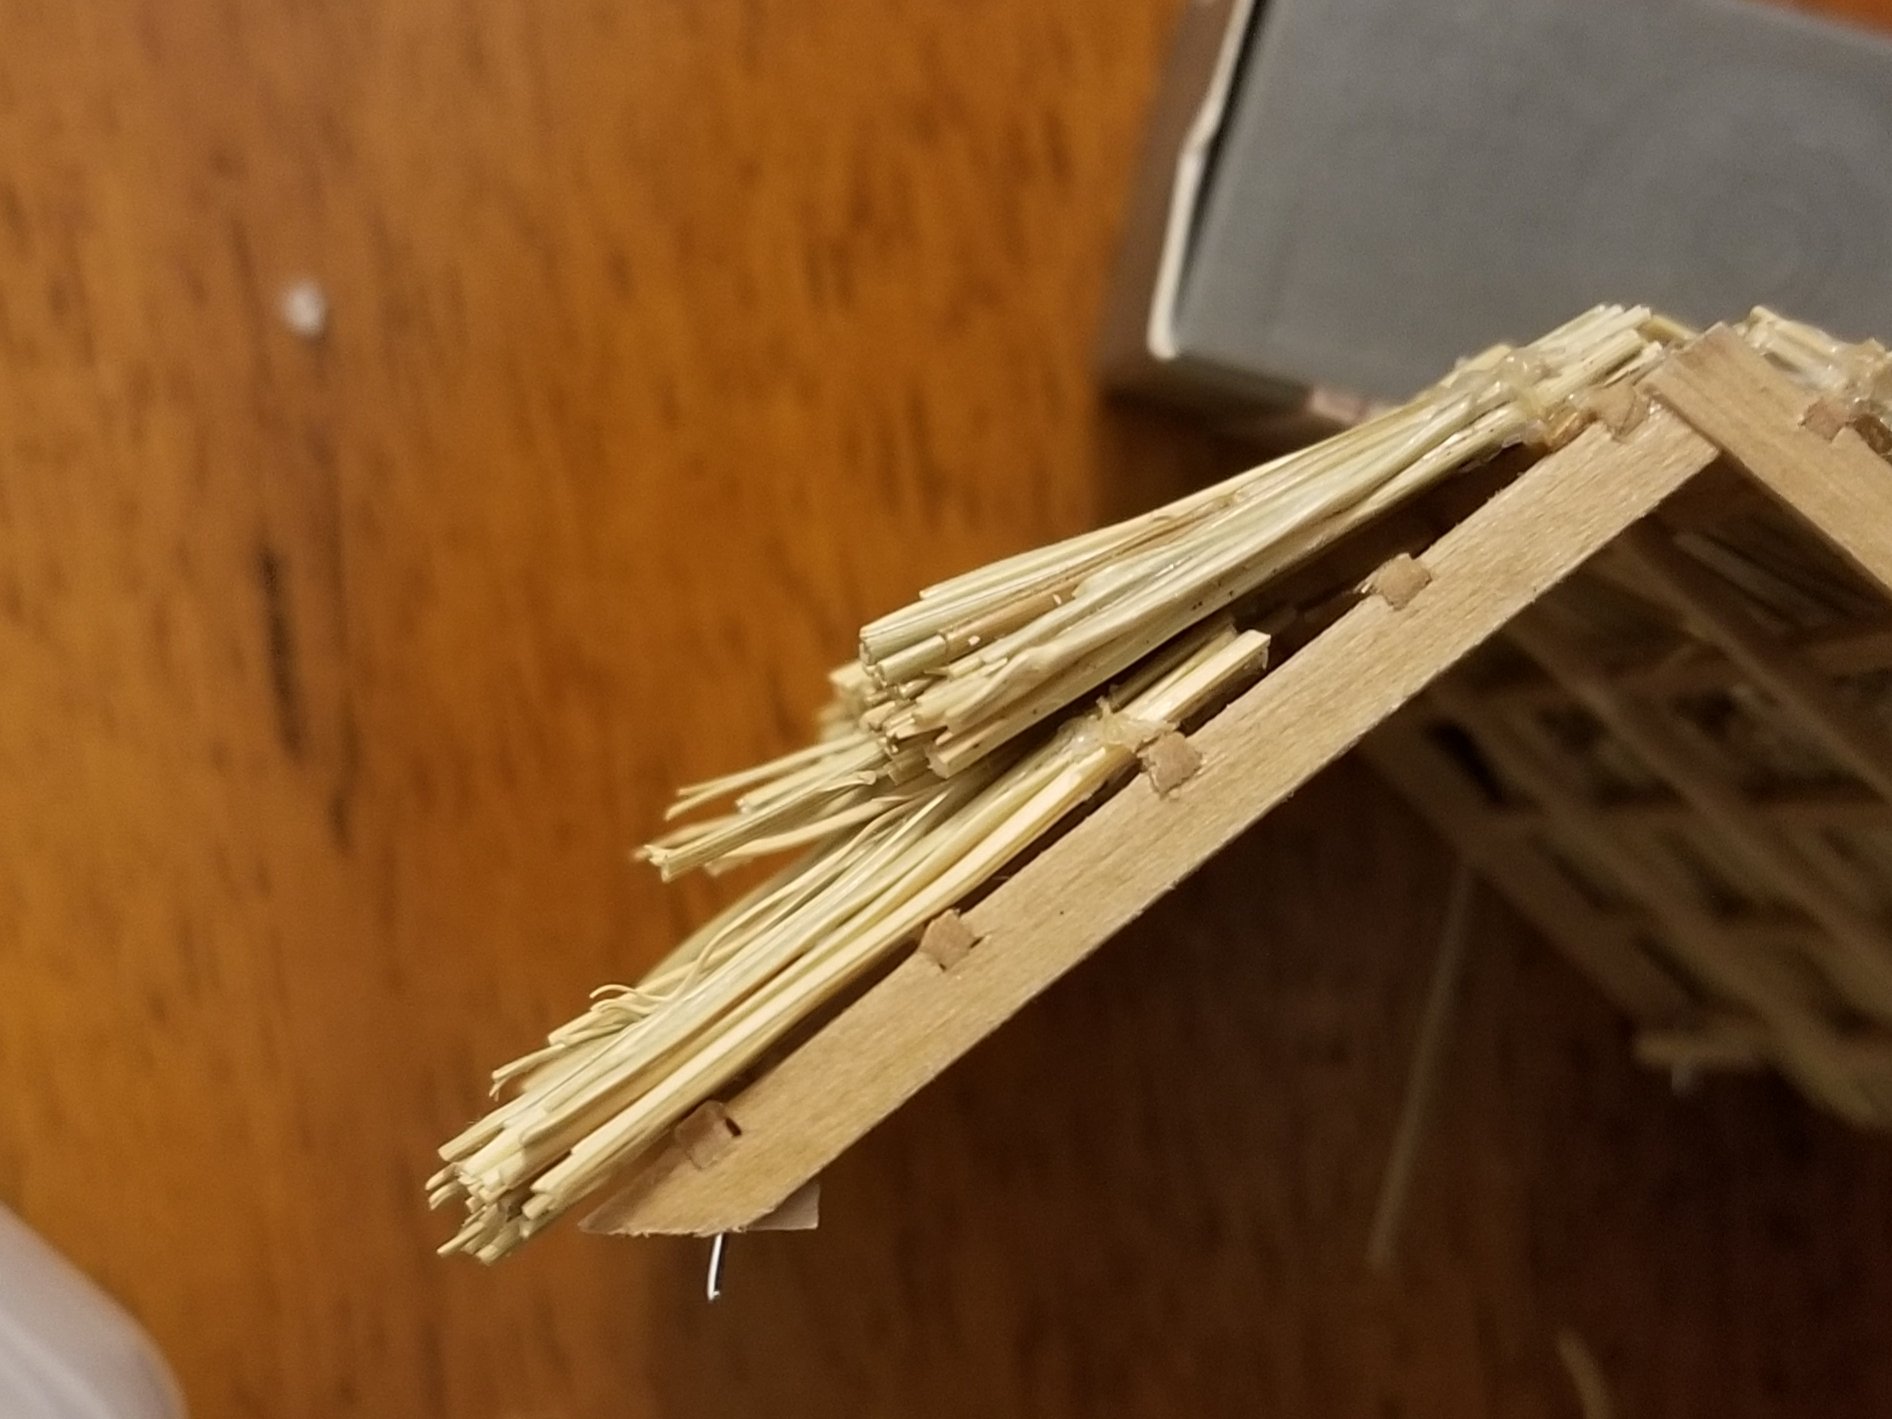
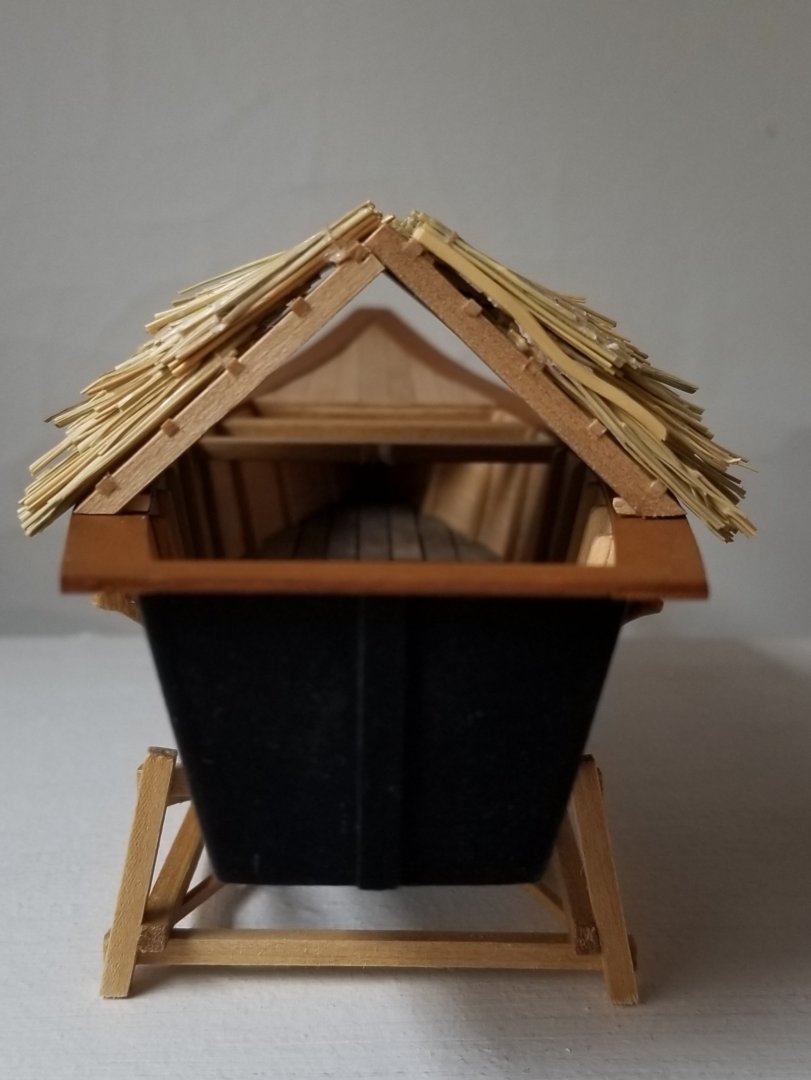
Thanks for the suggestions! @Glen McGuire Unfortunately each layer is pretty solid in itself due to all the varnish, but I have been able to pick out a few here and there to disrupt the solidity of the edge of the layer. I've also been busy inserting new pieces one at a time into the gap on one side. It's not perfect, but I think it's looking a lot better. As with any bad haircut, letting it grow out makes the problem less noticeable. As can be seen, the difference between the two sides is most apparent when viewed head on. I may try to cut back a few more from the top layer, add a few more to the gap, and perhaps add a few shorter pieces above the top layer. It'll be a bit on the shaggy side, but that seems accurate for at least some canoas, based on the photos record.
-
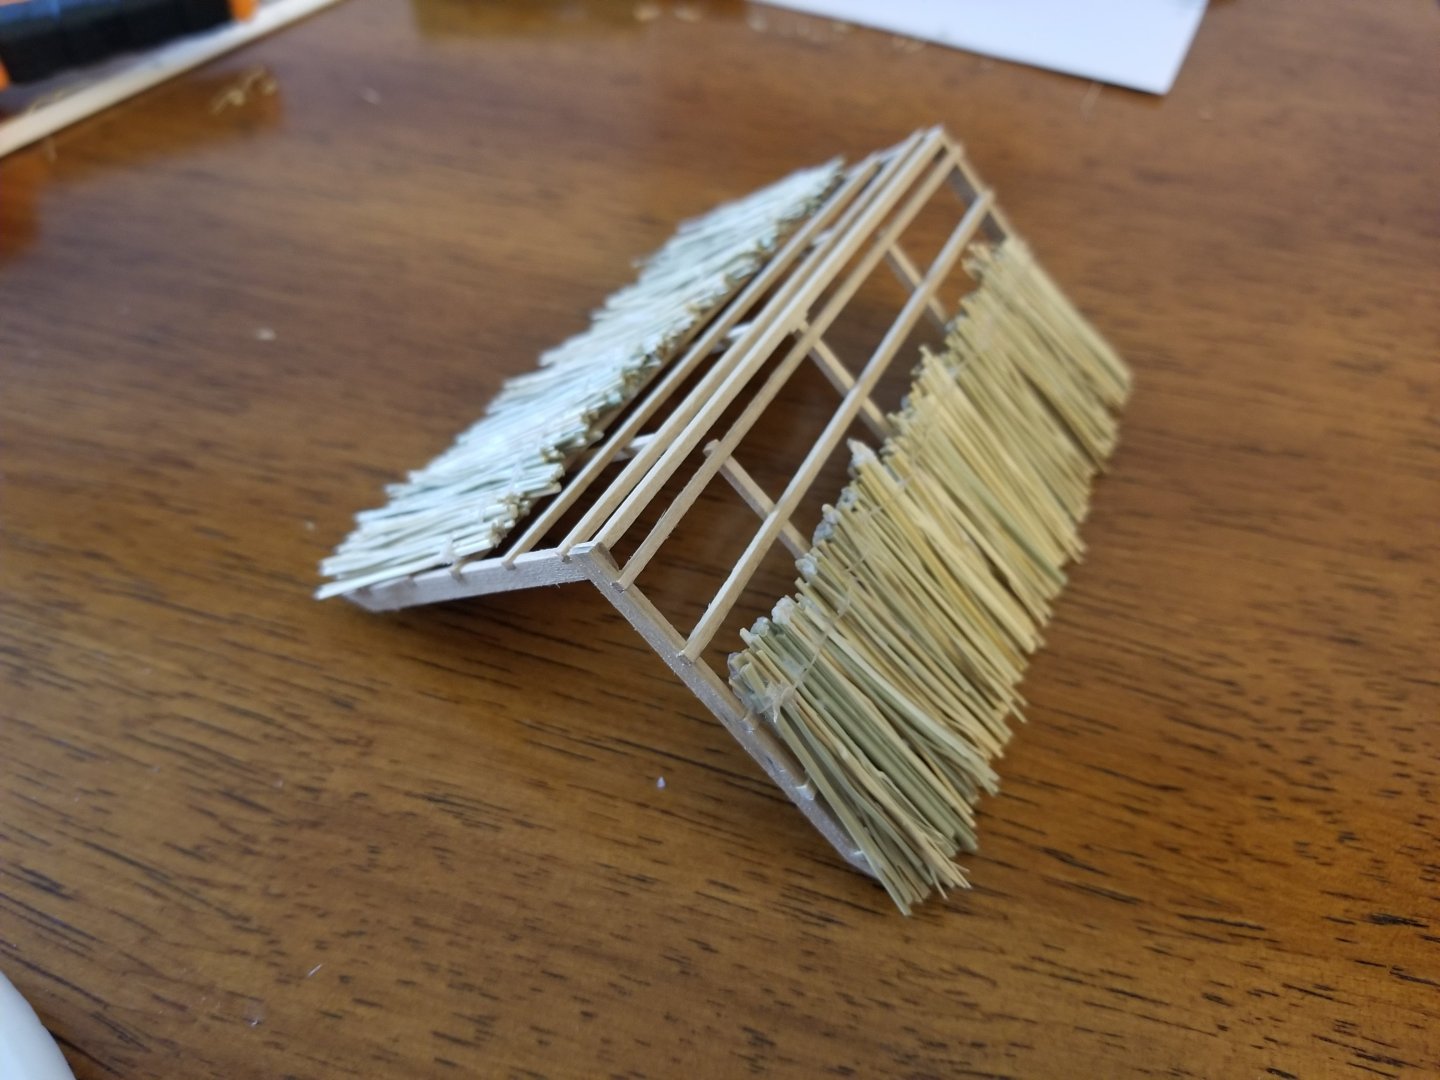
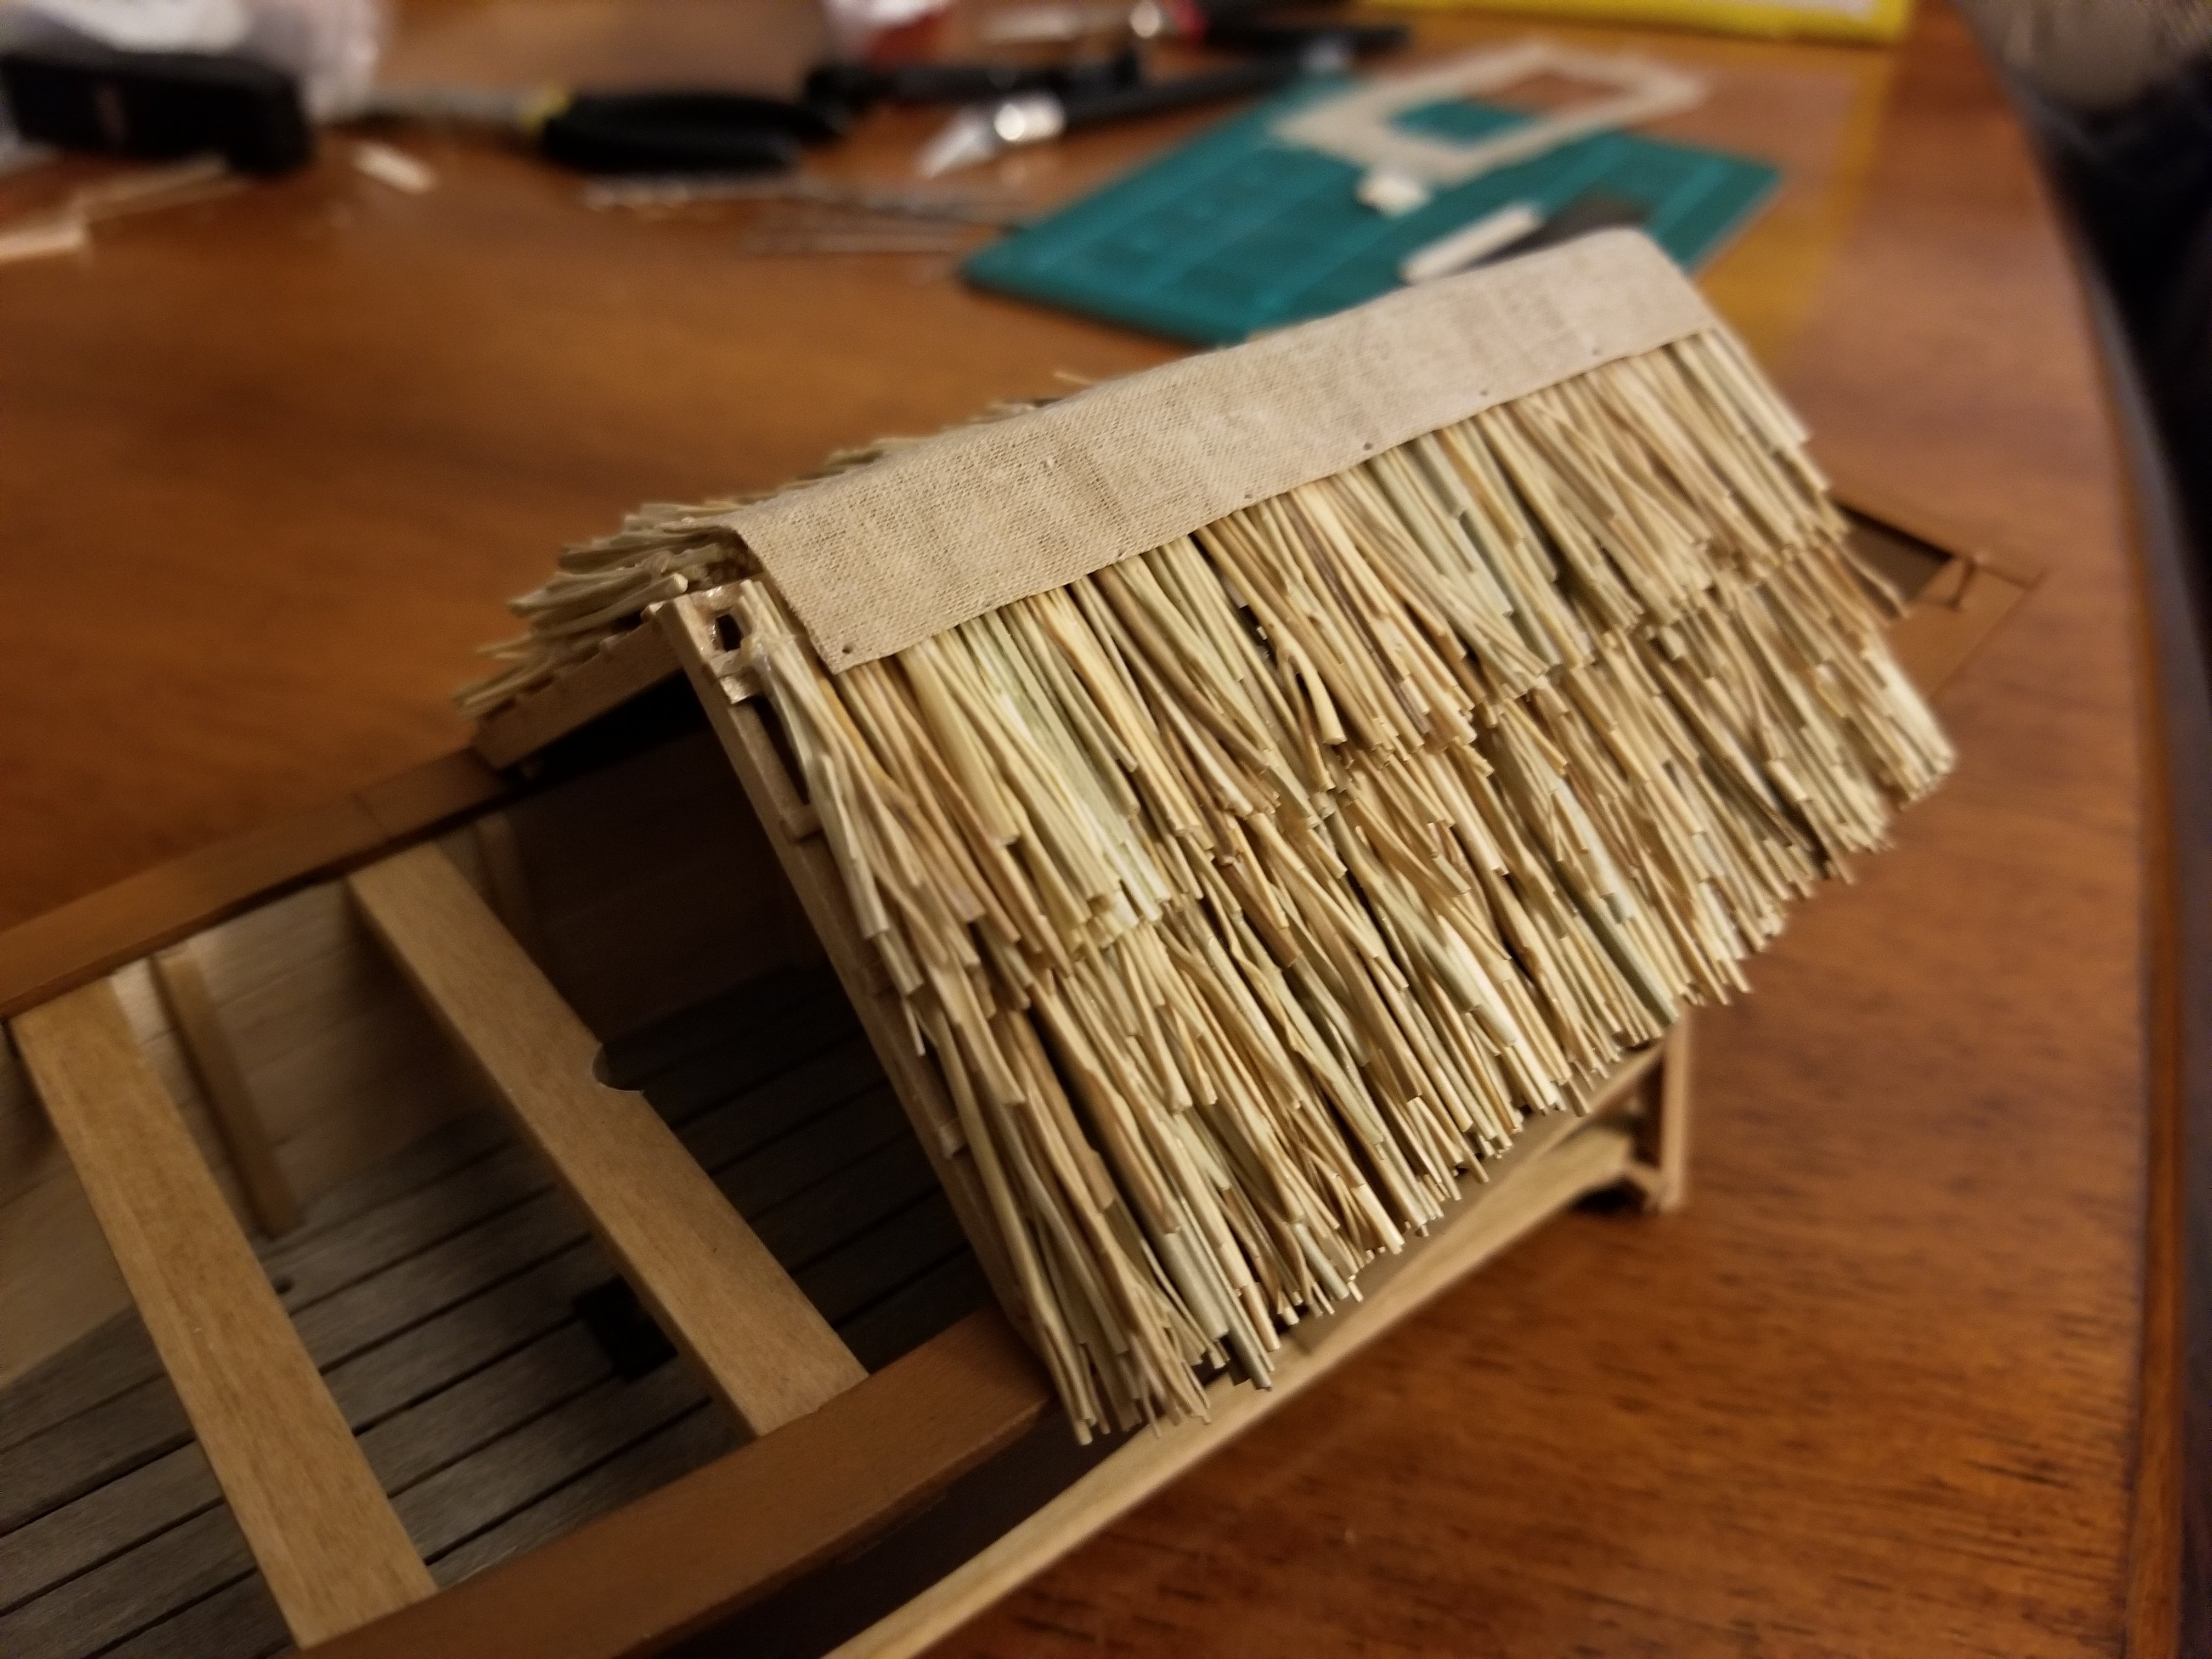
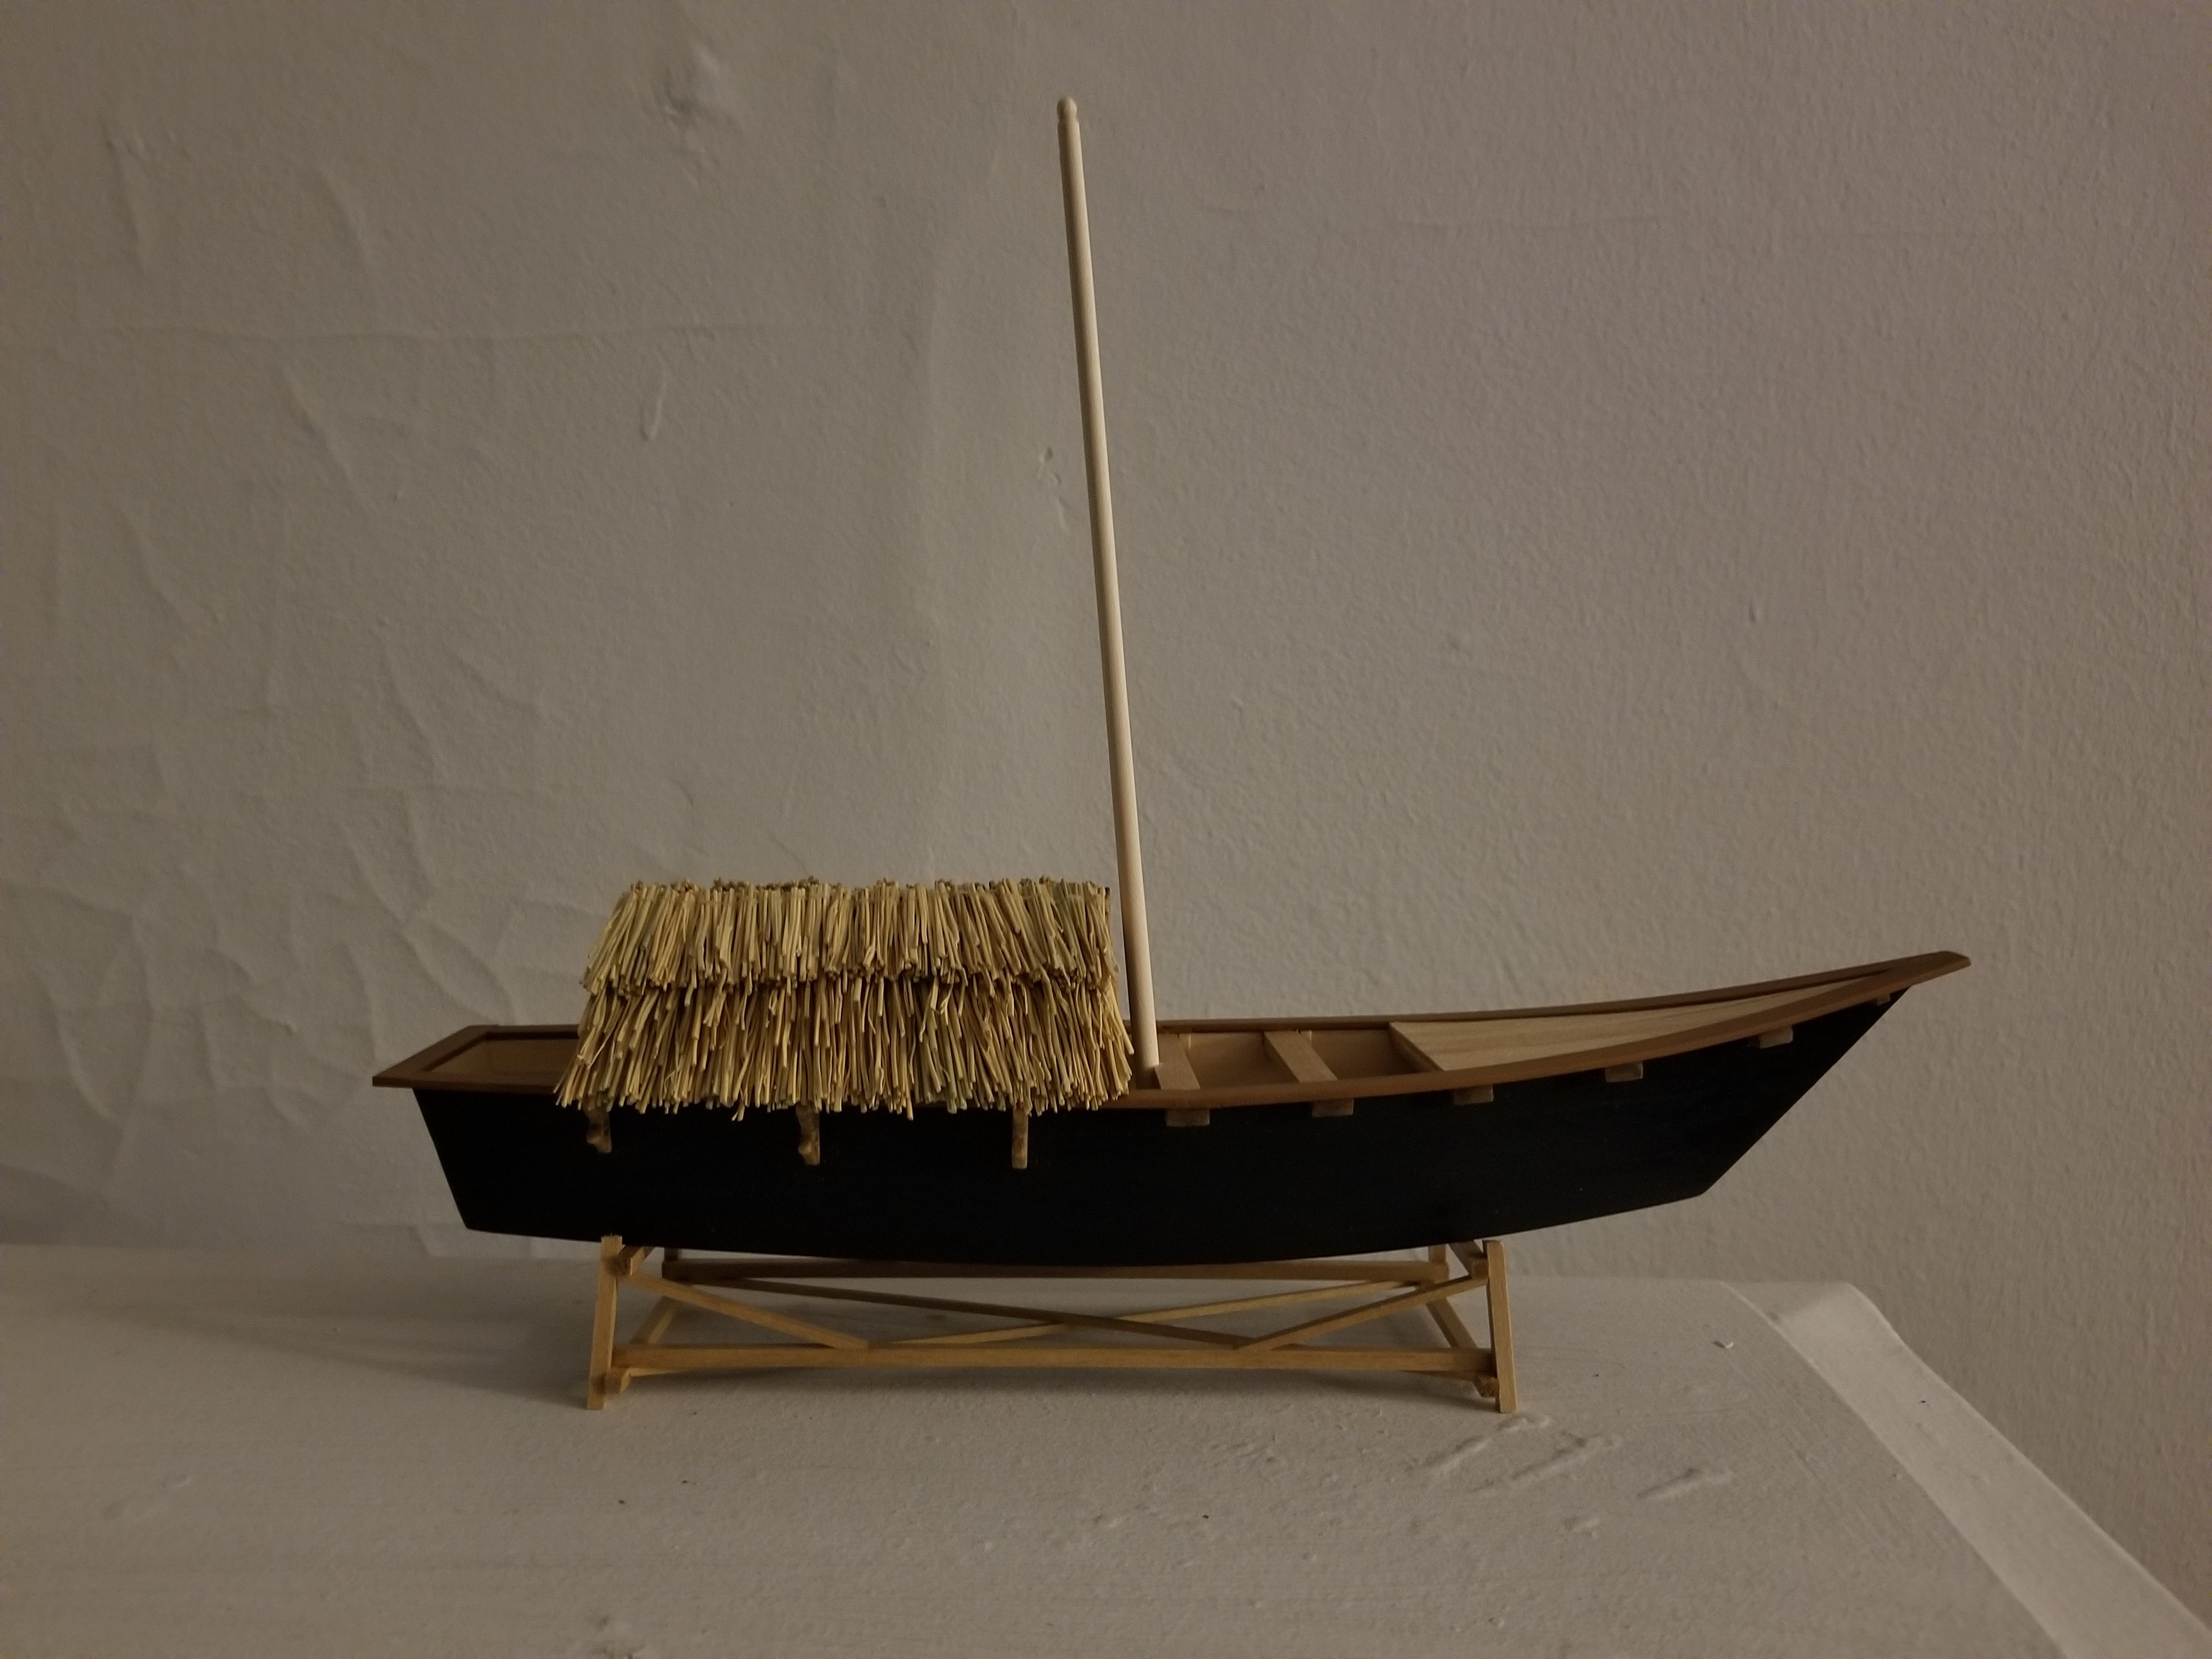
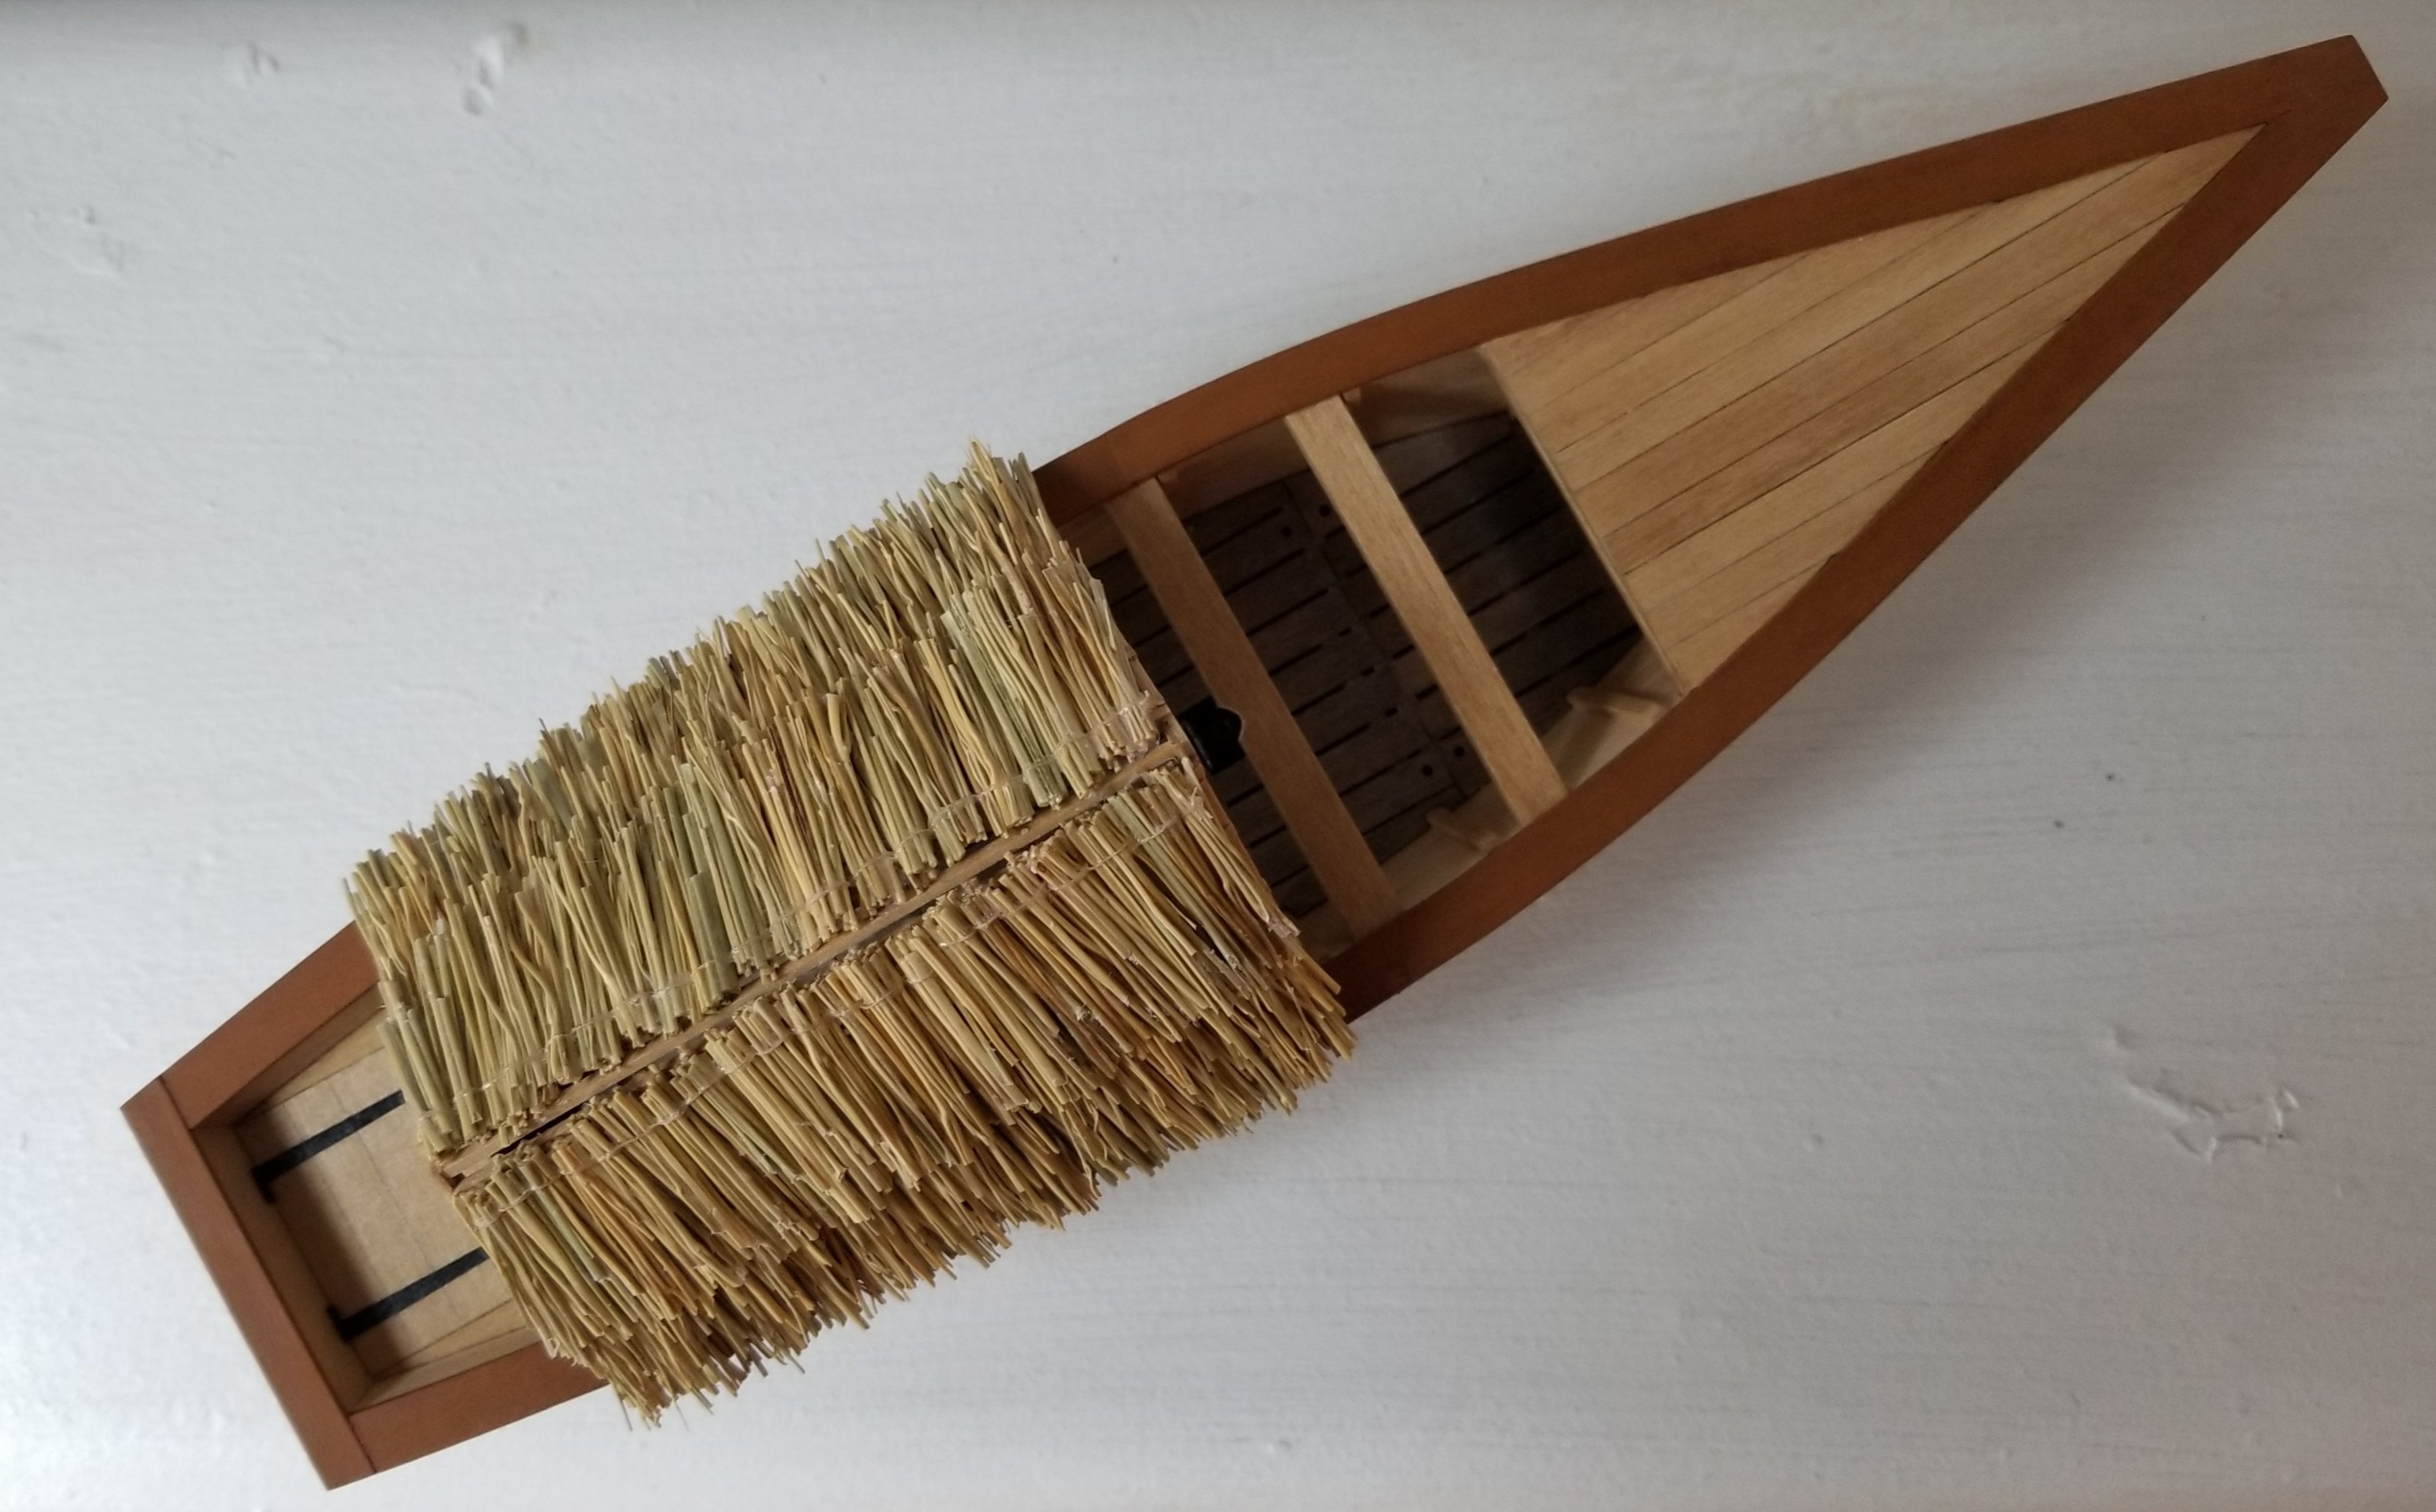
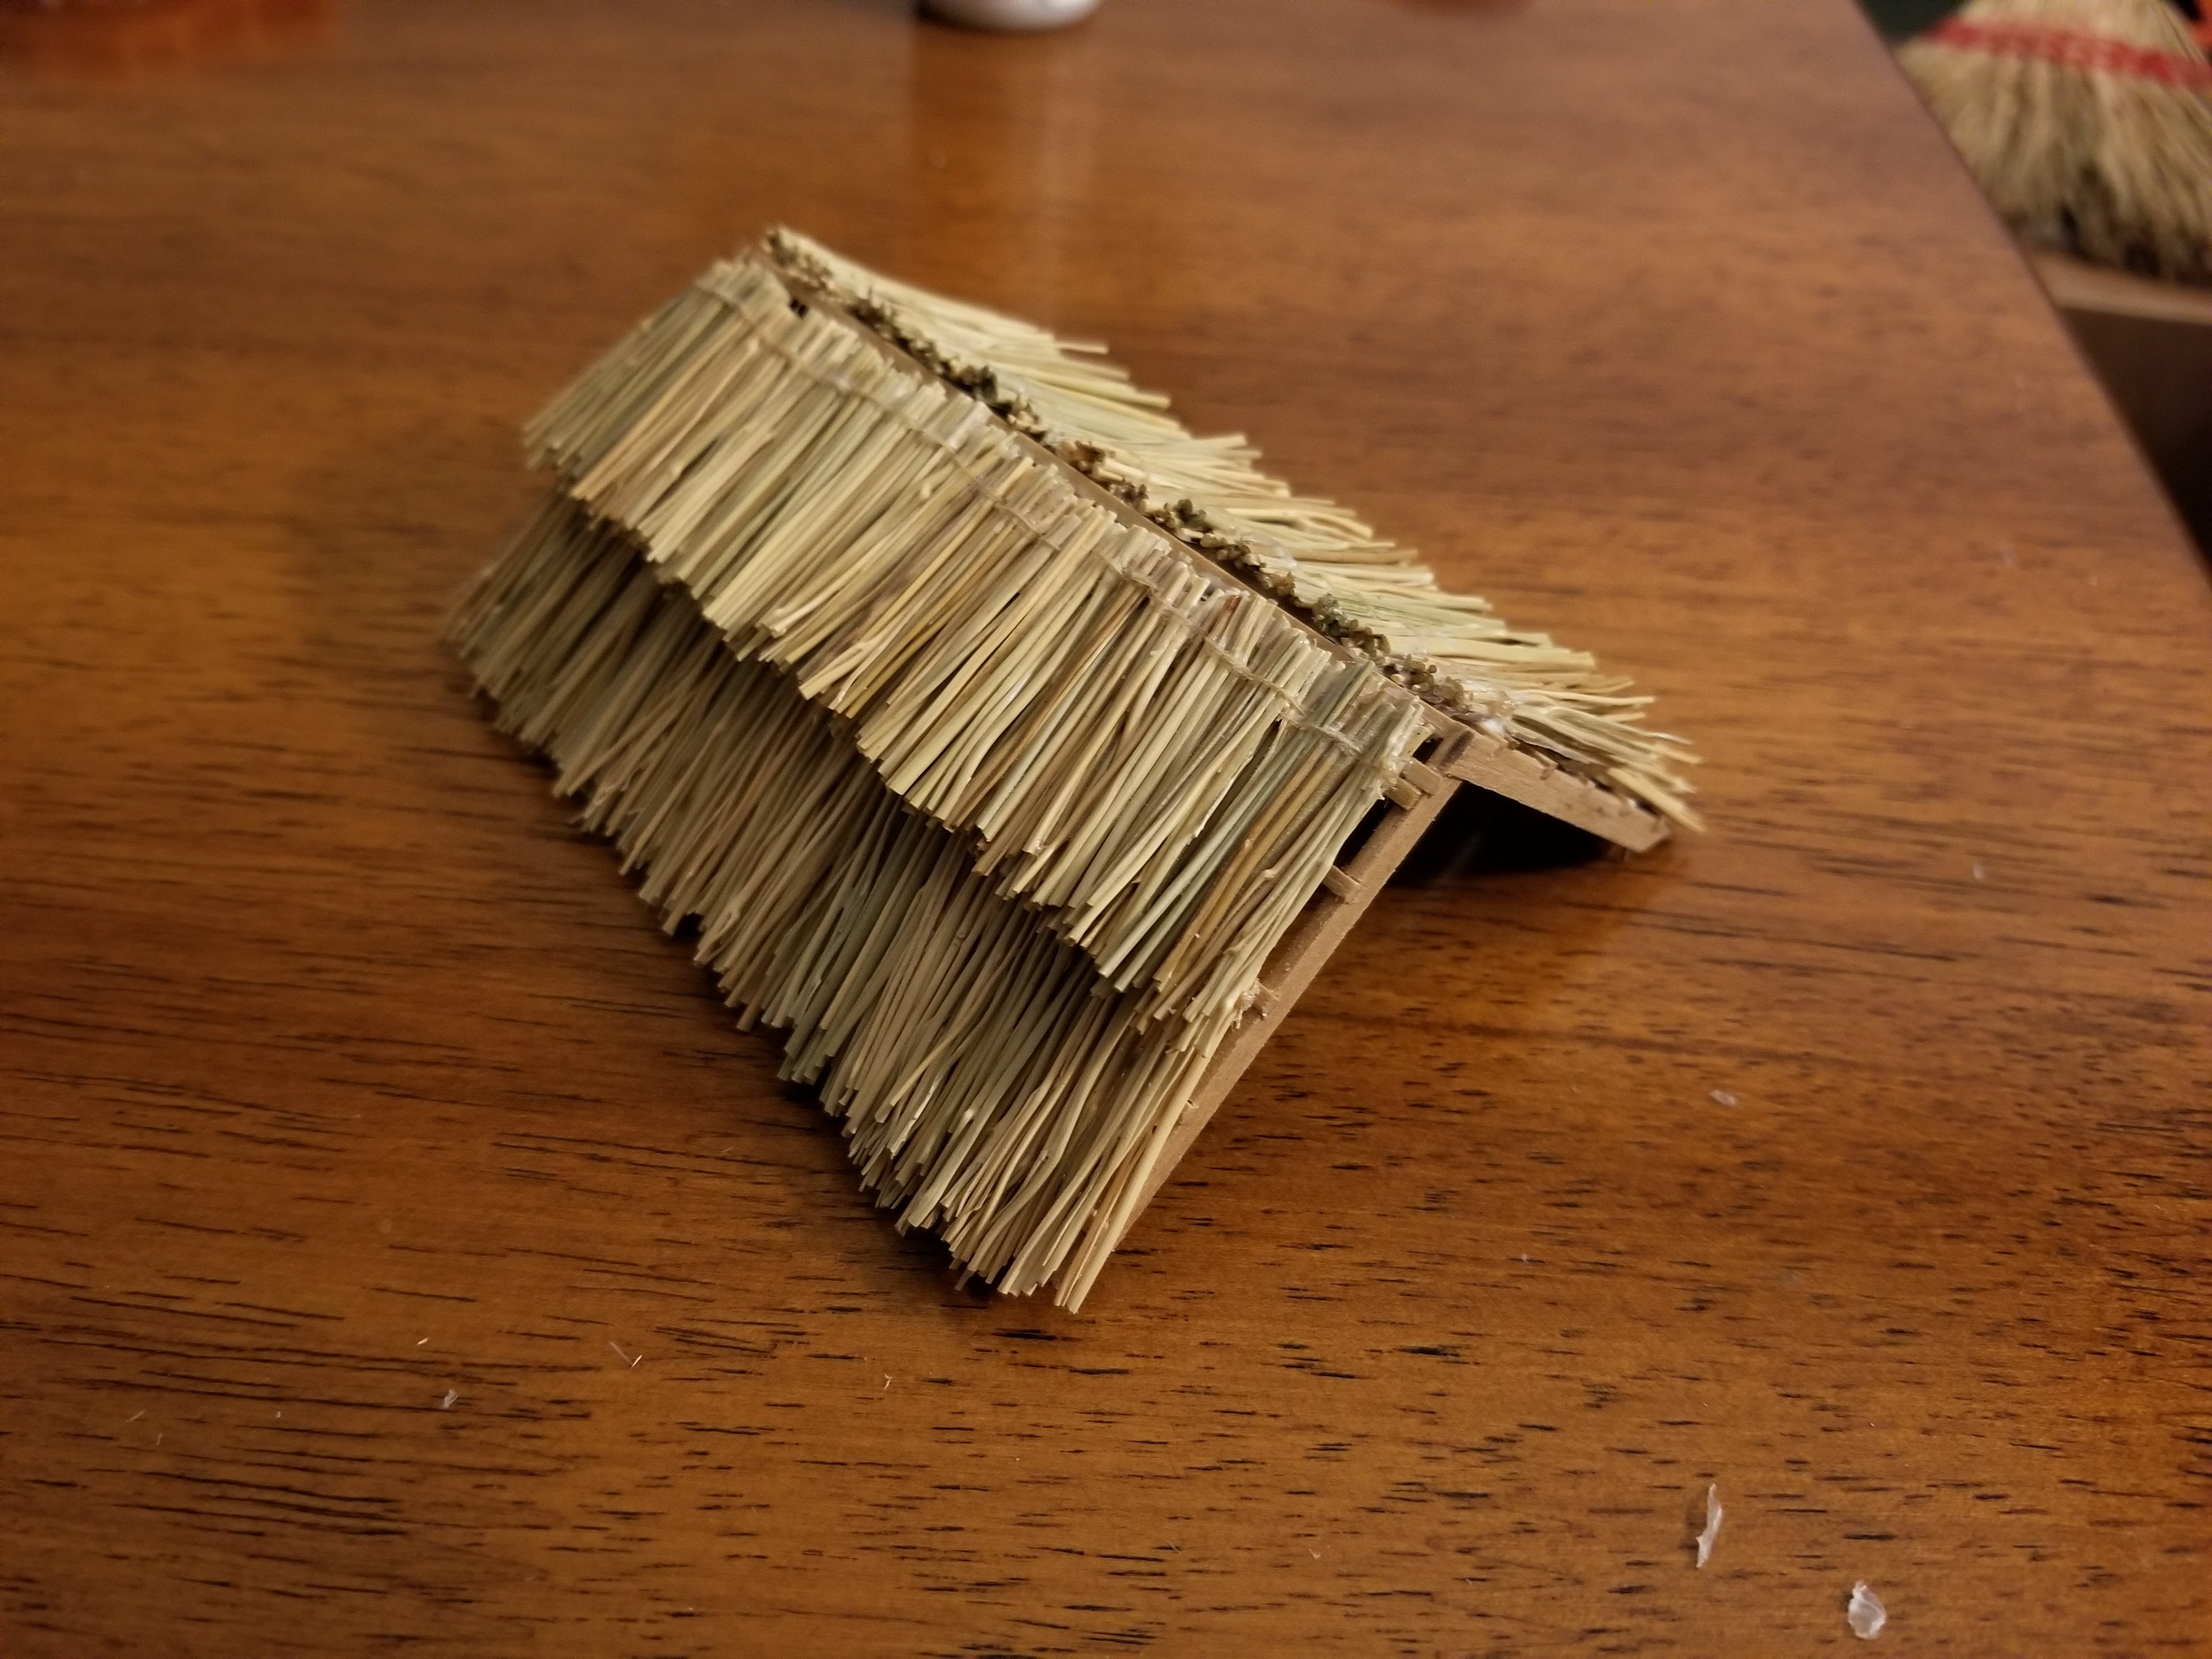
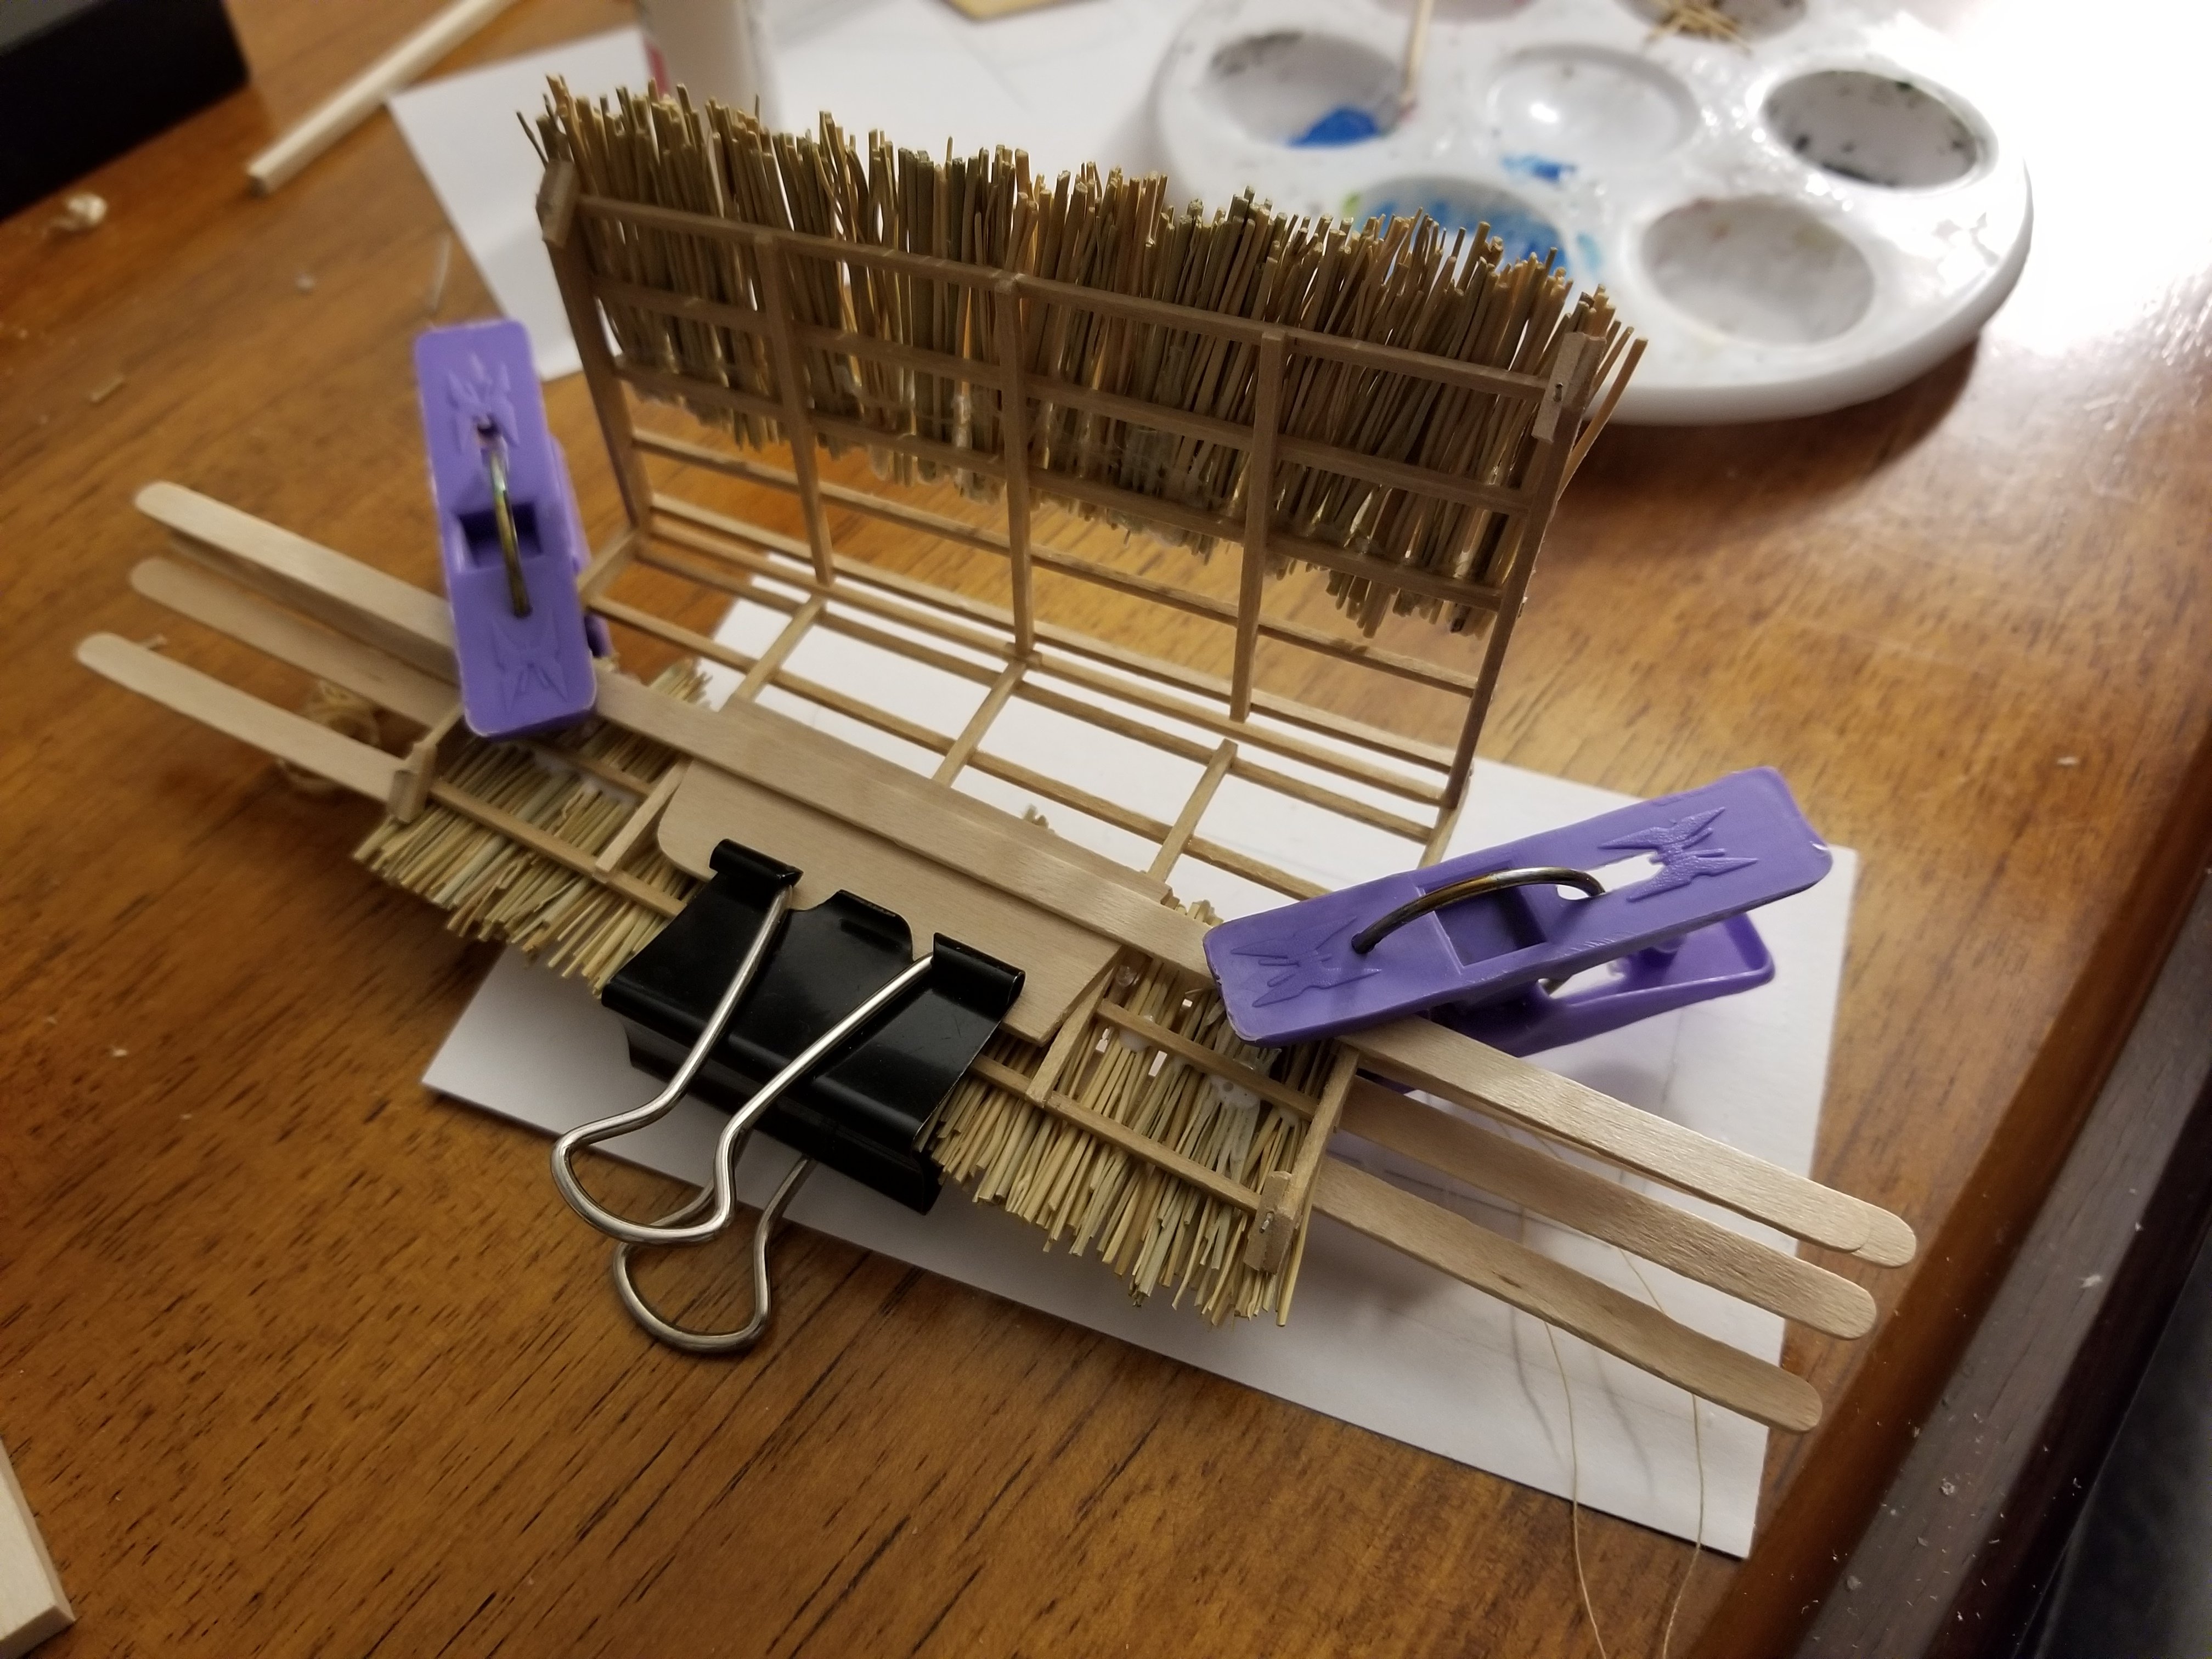
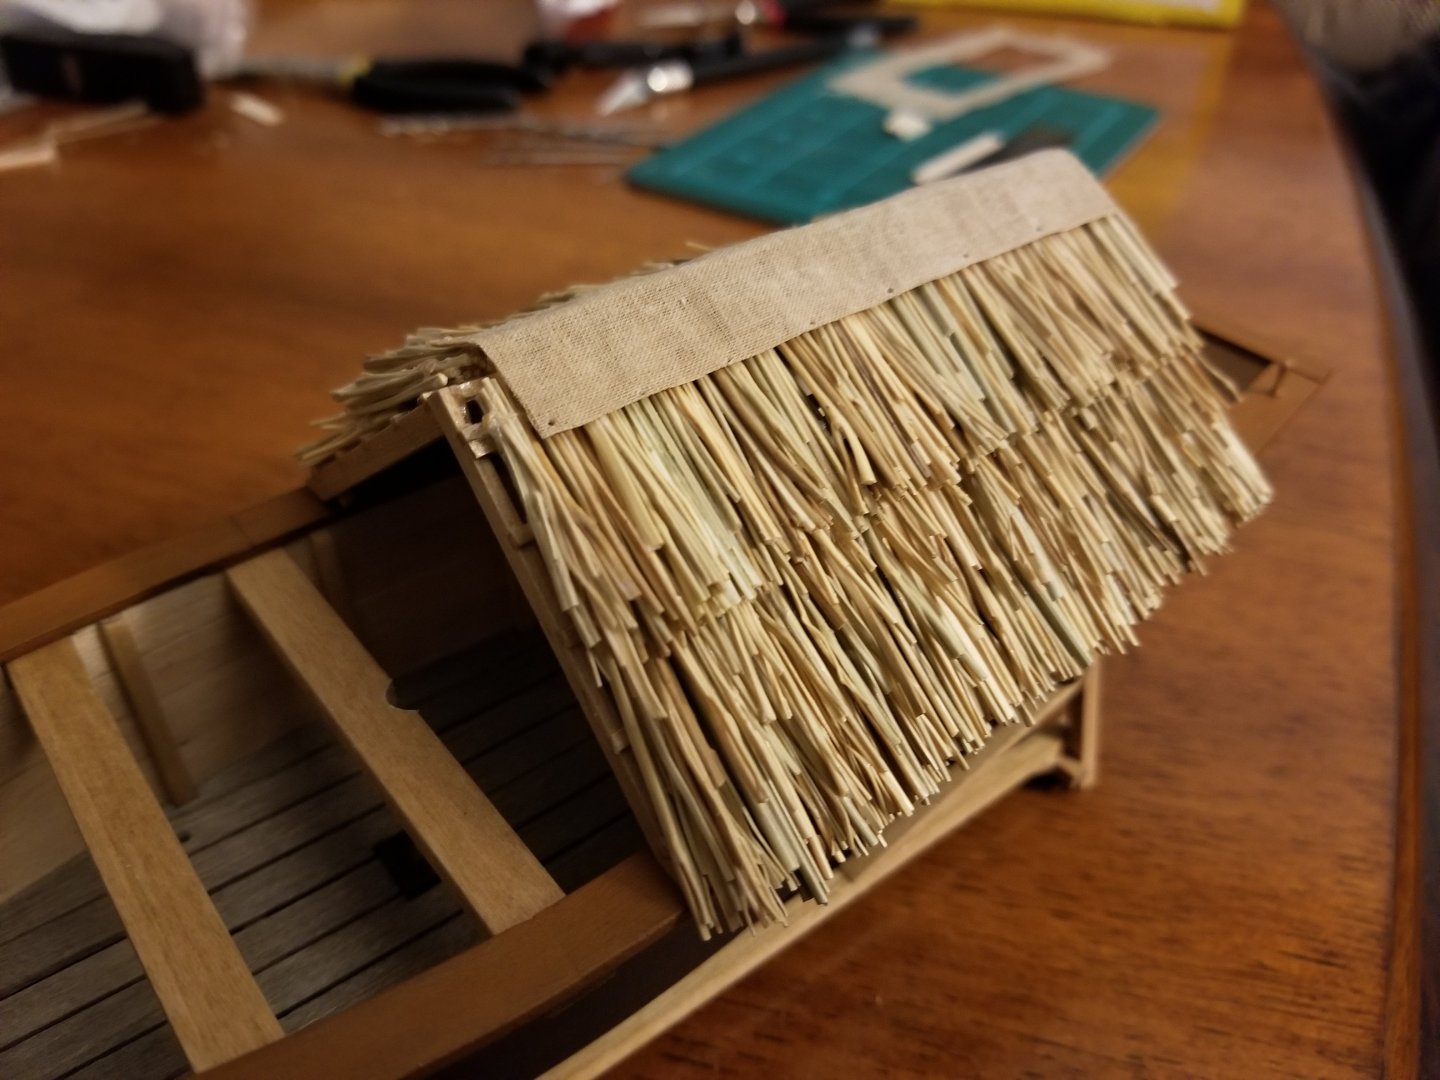
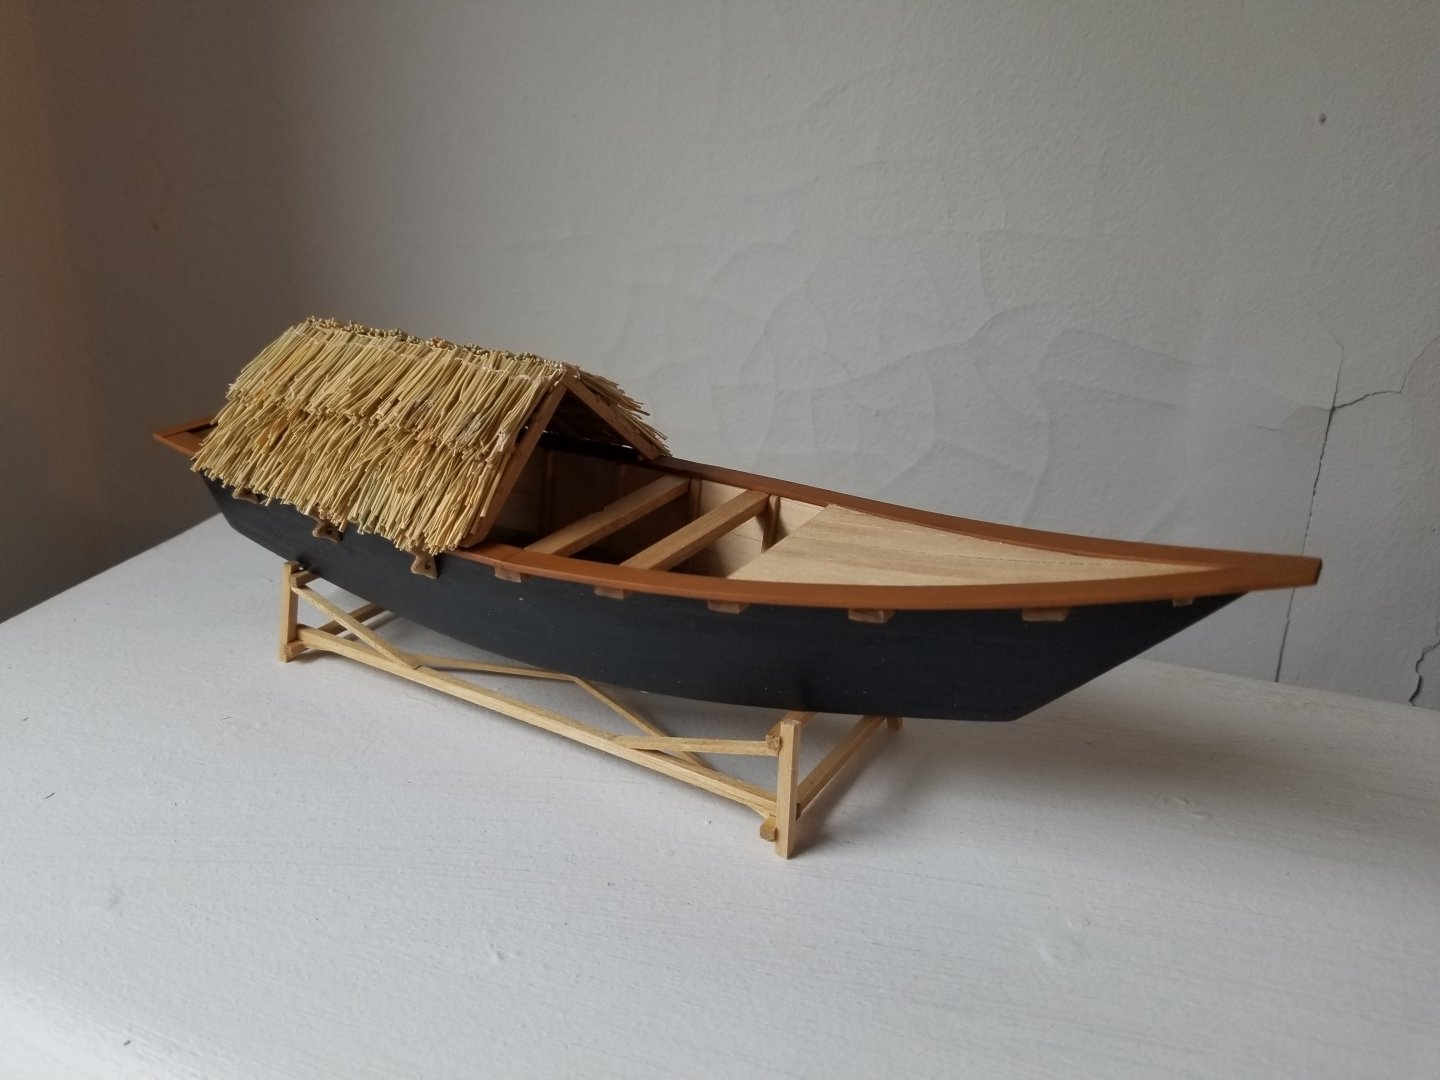
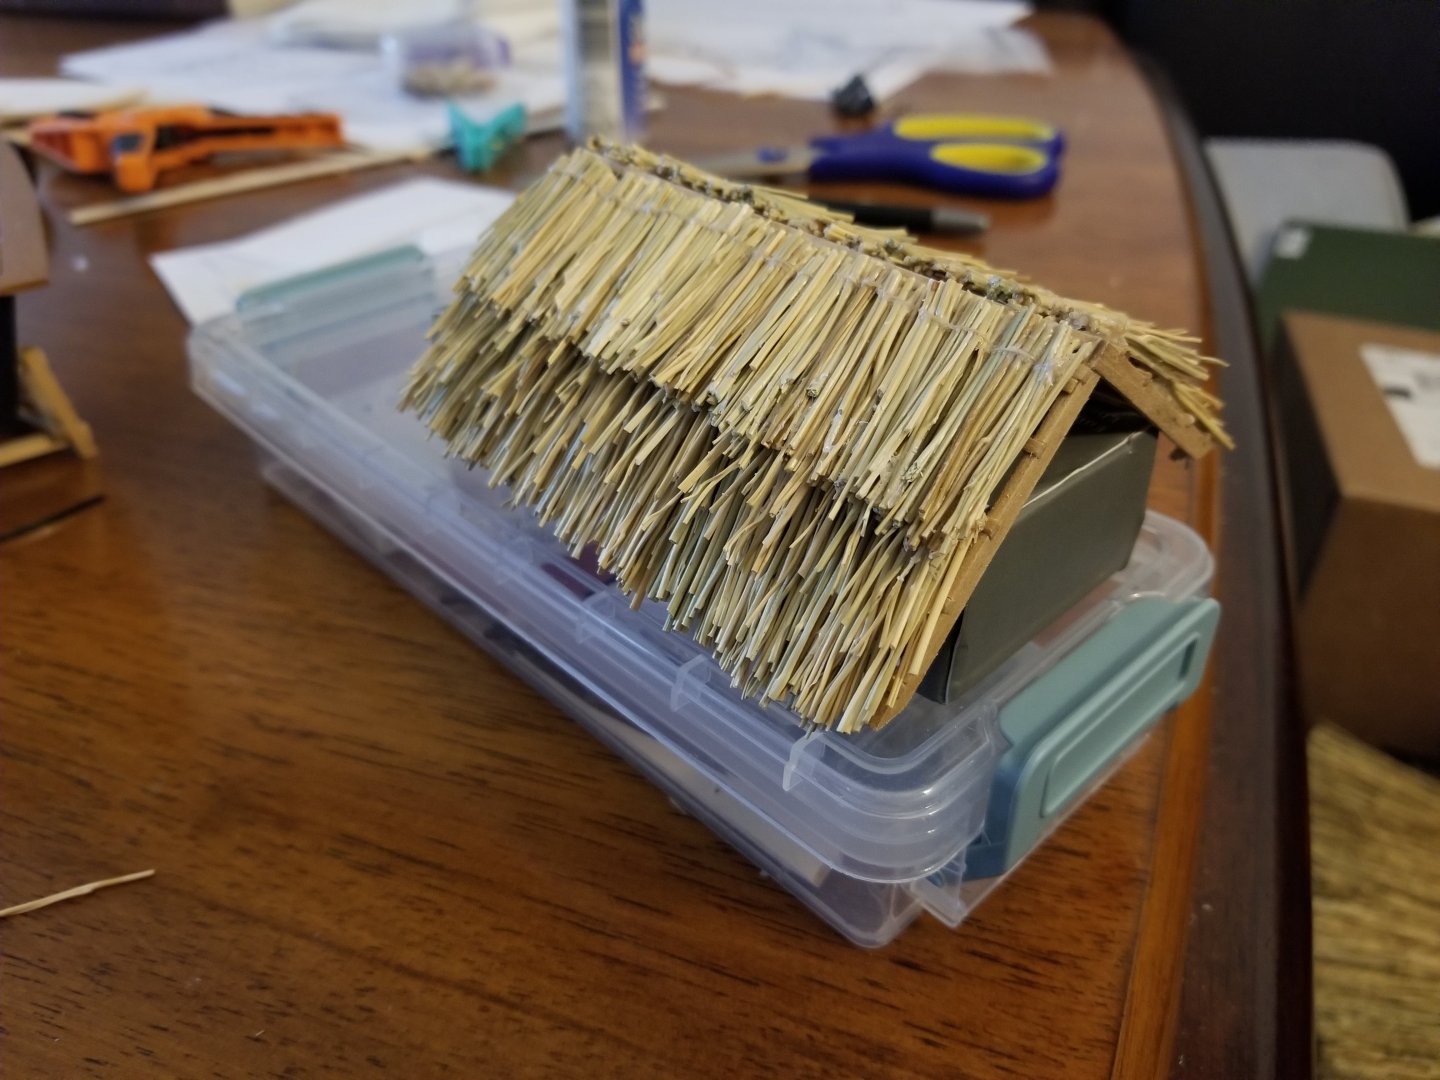
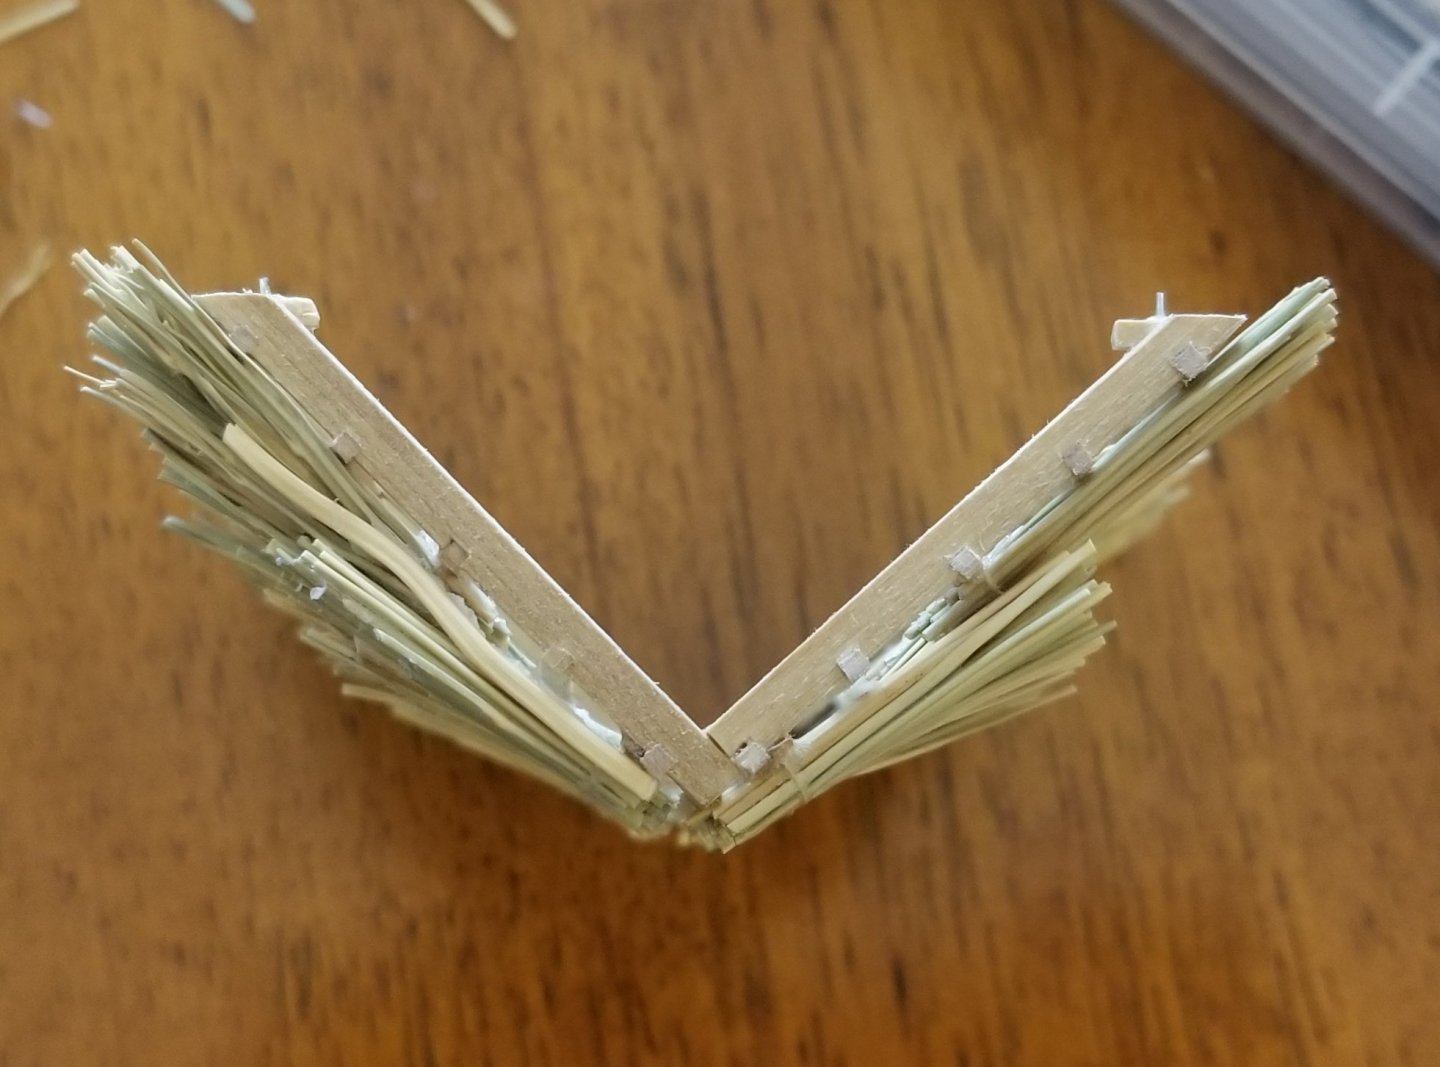
@Harvey Golden Thanks! I may look into a base board. The stand is just stained basswood, so it wouldn't be hard to match, although I would probably have to pre-treat the board so the stain comes out evenly. Well, I finally got the upper layers of the thatching on. The results are.... a bit mixed, I think. As can be seen, I ended up doubling the upper support crosspiece so there would be more of a gluing surface to work with. The very top will be covered with some cloth, which seems to be what was done on the actual vessels if I'm interpreting the photos correctly. While I avoided the unnaturally straight edge I unintentionally gave my first attempt, I'm not totally happy with this one. As can be seen, the layers are each very thick. This wasn't a problem on my first attempt, as the layers were much thinner, but on this one it's very noticeable. While photos make it clear that plenty of actual canoas did have layered thatching, it never seemed to stick up so much like this. From some angles, and from a distance, I don't think it looks bad. But from others, it looks like a bad haircut. So, I'm a bit torn about how to proceed. As I see it, I have a few options: 1) I could redo it with just a single layer so that I don't have to worry about any overlap, but that seems daunting. I've already spent months working on the rancho, and while I'm not on any timeline for completion, I would like to actually finish the build at some point, and I especially would like to be able to move on from the rancho into more interesting parts of the build. 2. I could redo it with a simple wood rancho. It would be a lot easier and faster, but I have to admit that I think it would be visually less interesting. 3. Leave it as it is, accept that I've done a lot on this already and have learned some lessons about considering how parts will come together while scratch-building, and hope that I one day come to love it, bad haircut and all. 4. Continue with it, but see if I can lesson the jarring transition between layers by sticking some additional individual pieces of straw into the gap, as I've started testing (without glue) below. I think I'll try option 4 for at least a bit to see how it turns out. I don't think it's going to make the haircut look worse, at least.


-
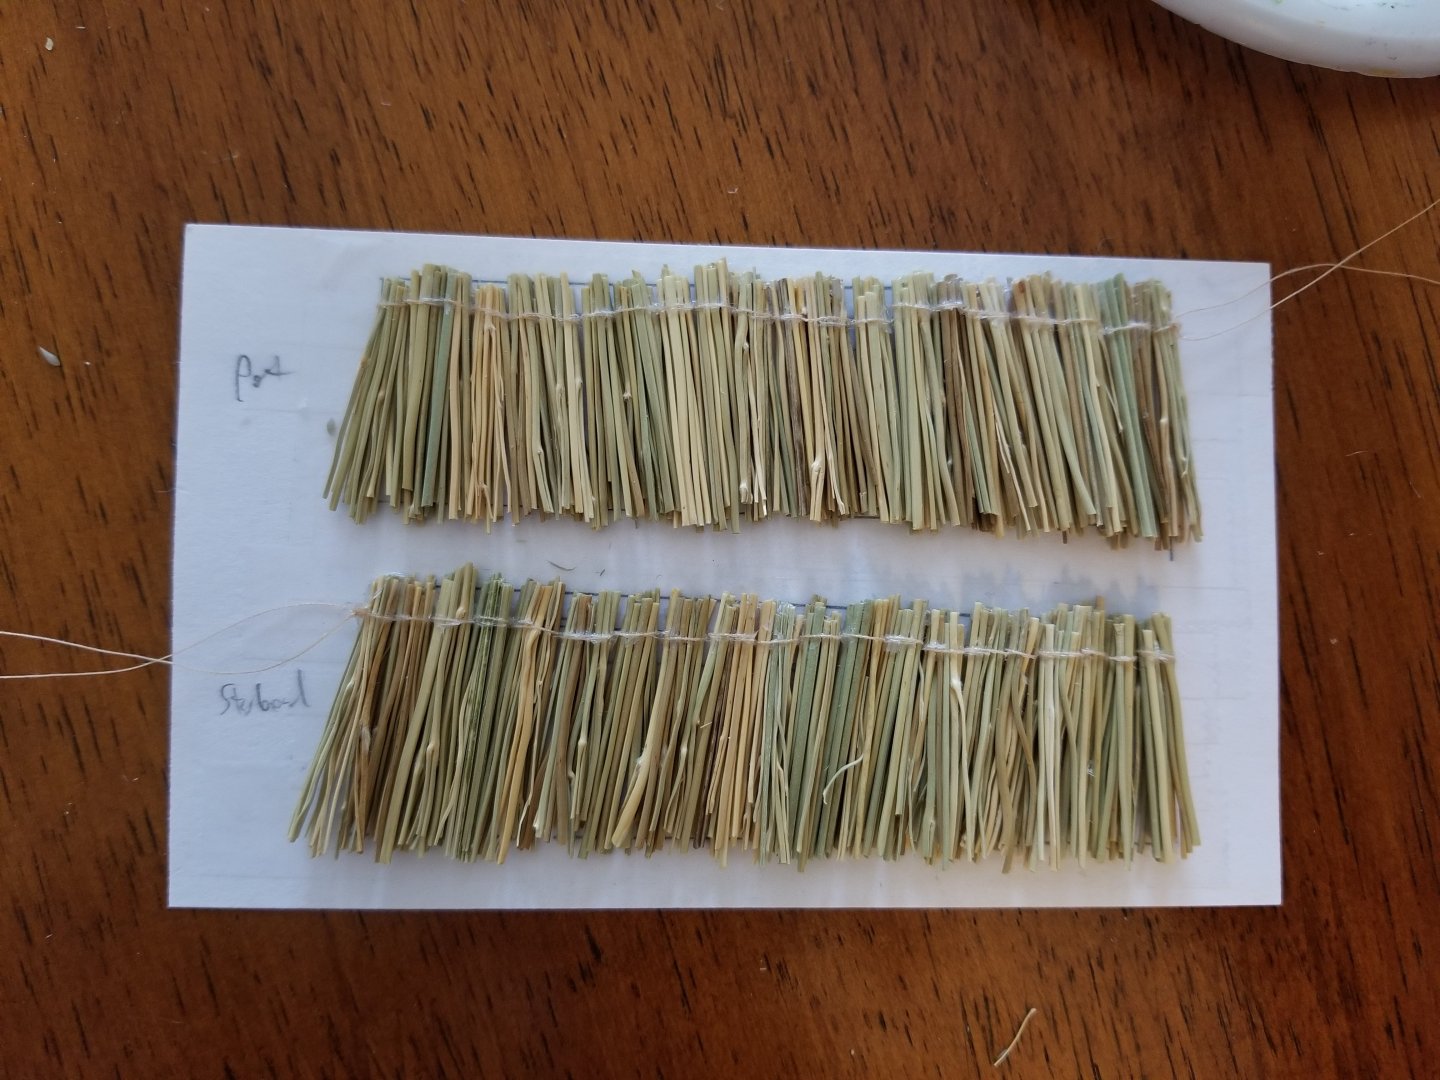
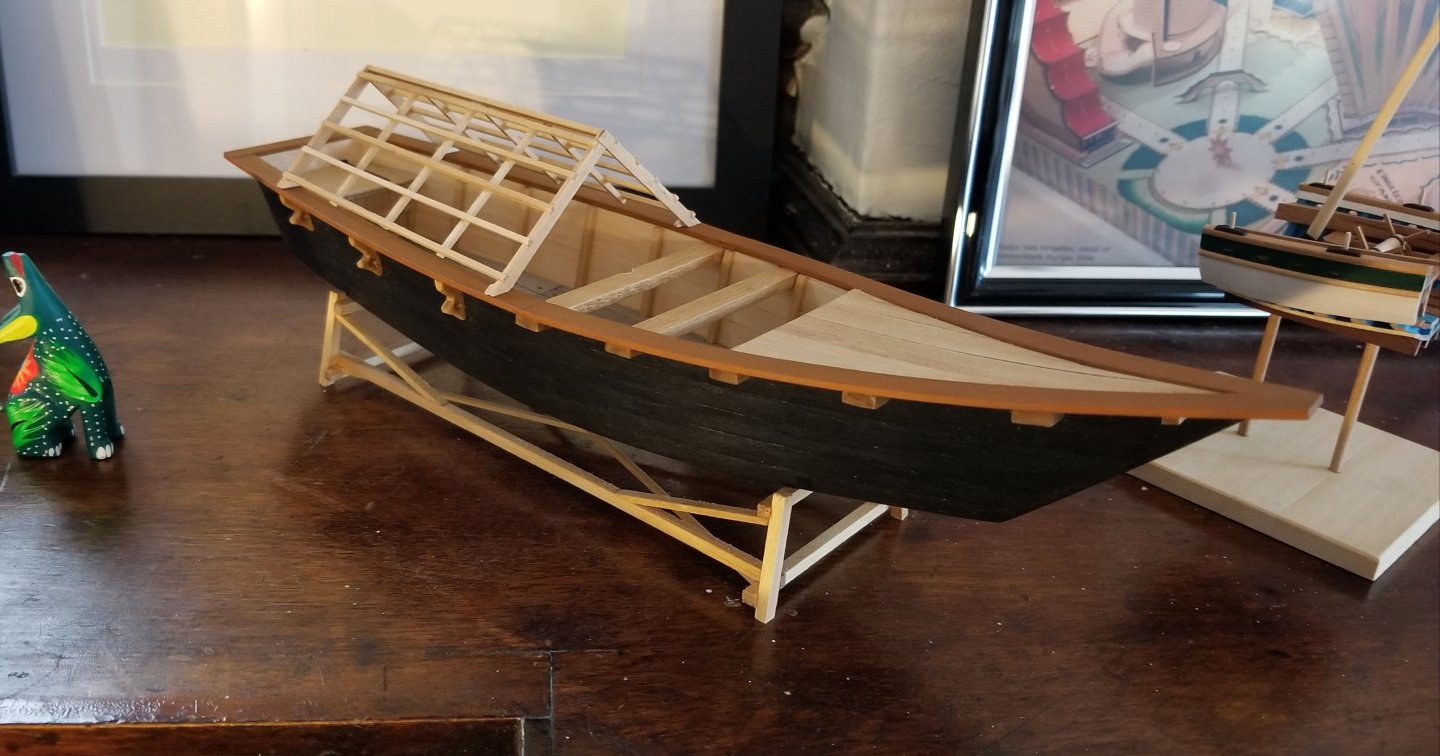
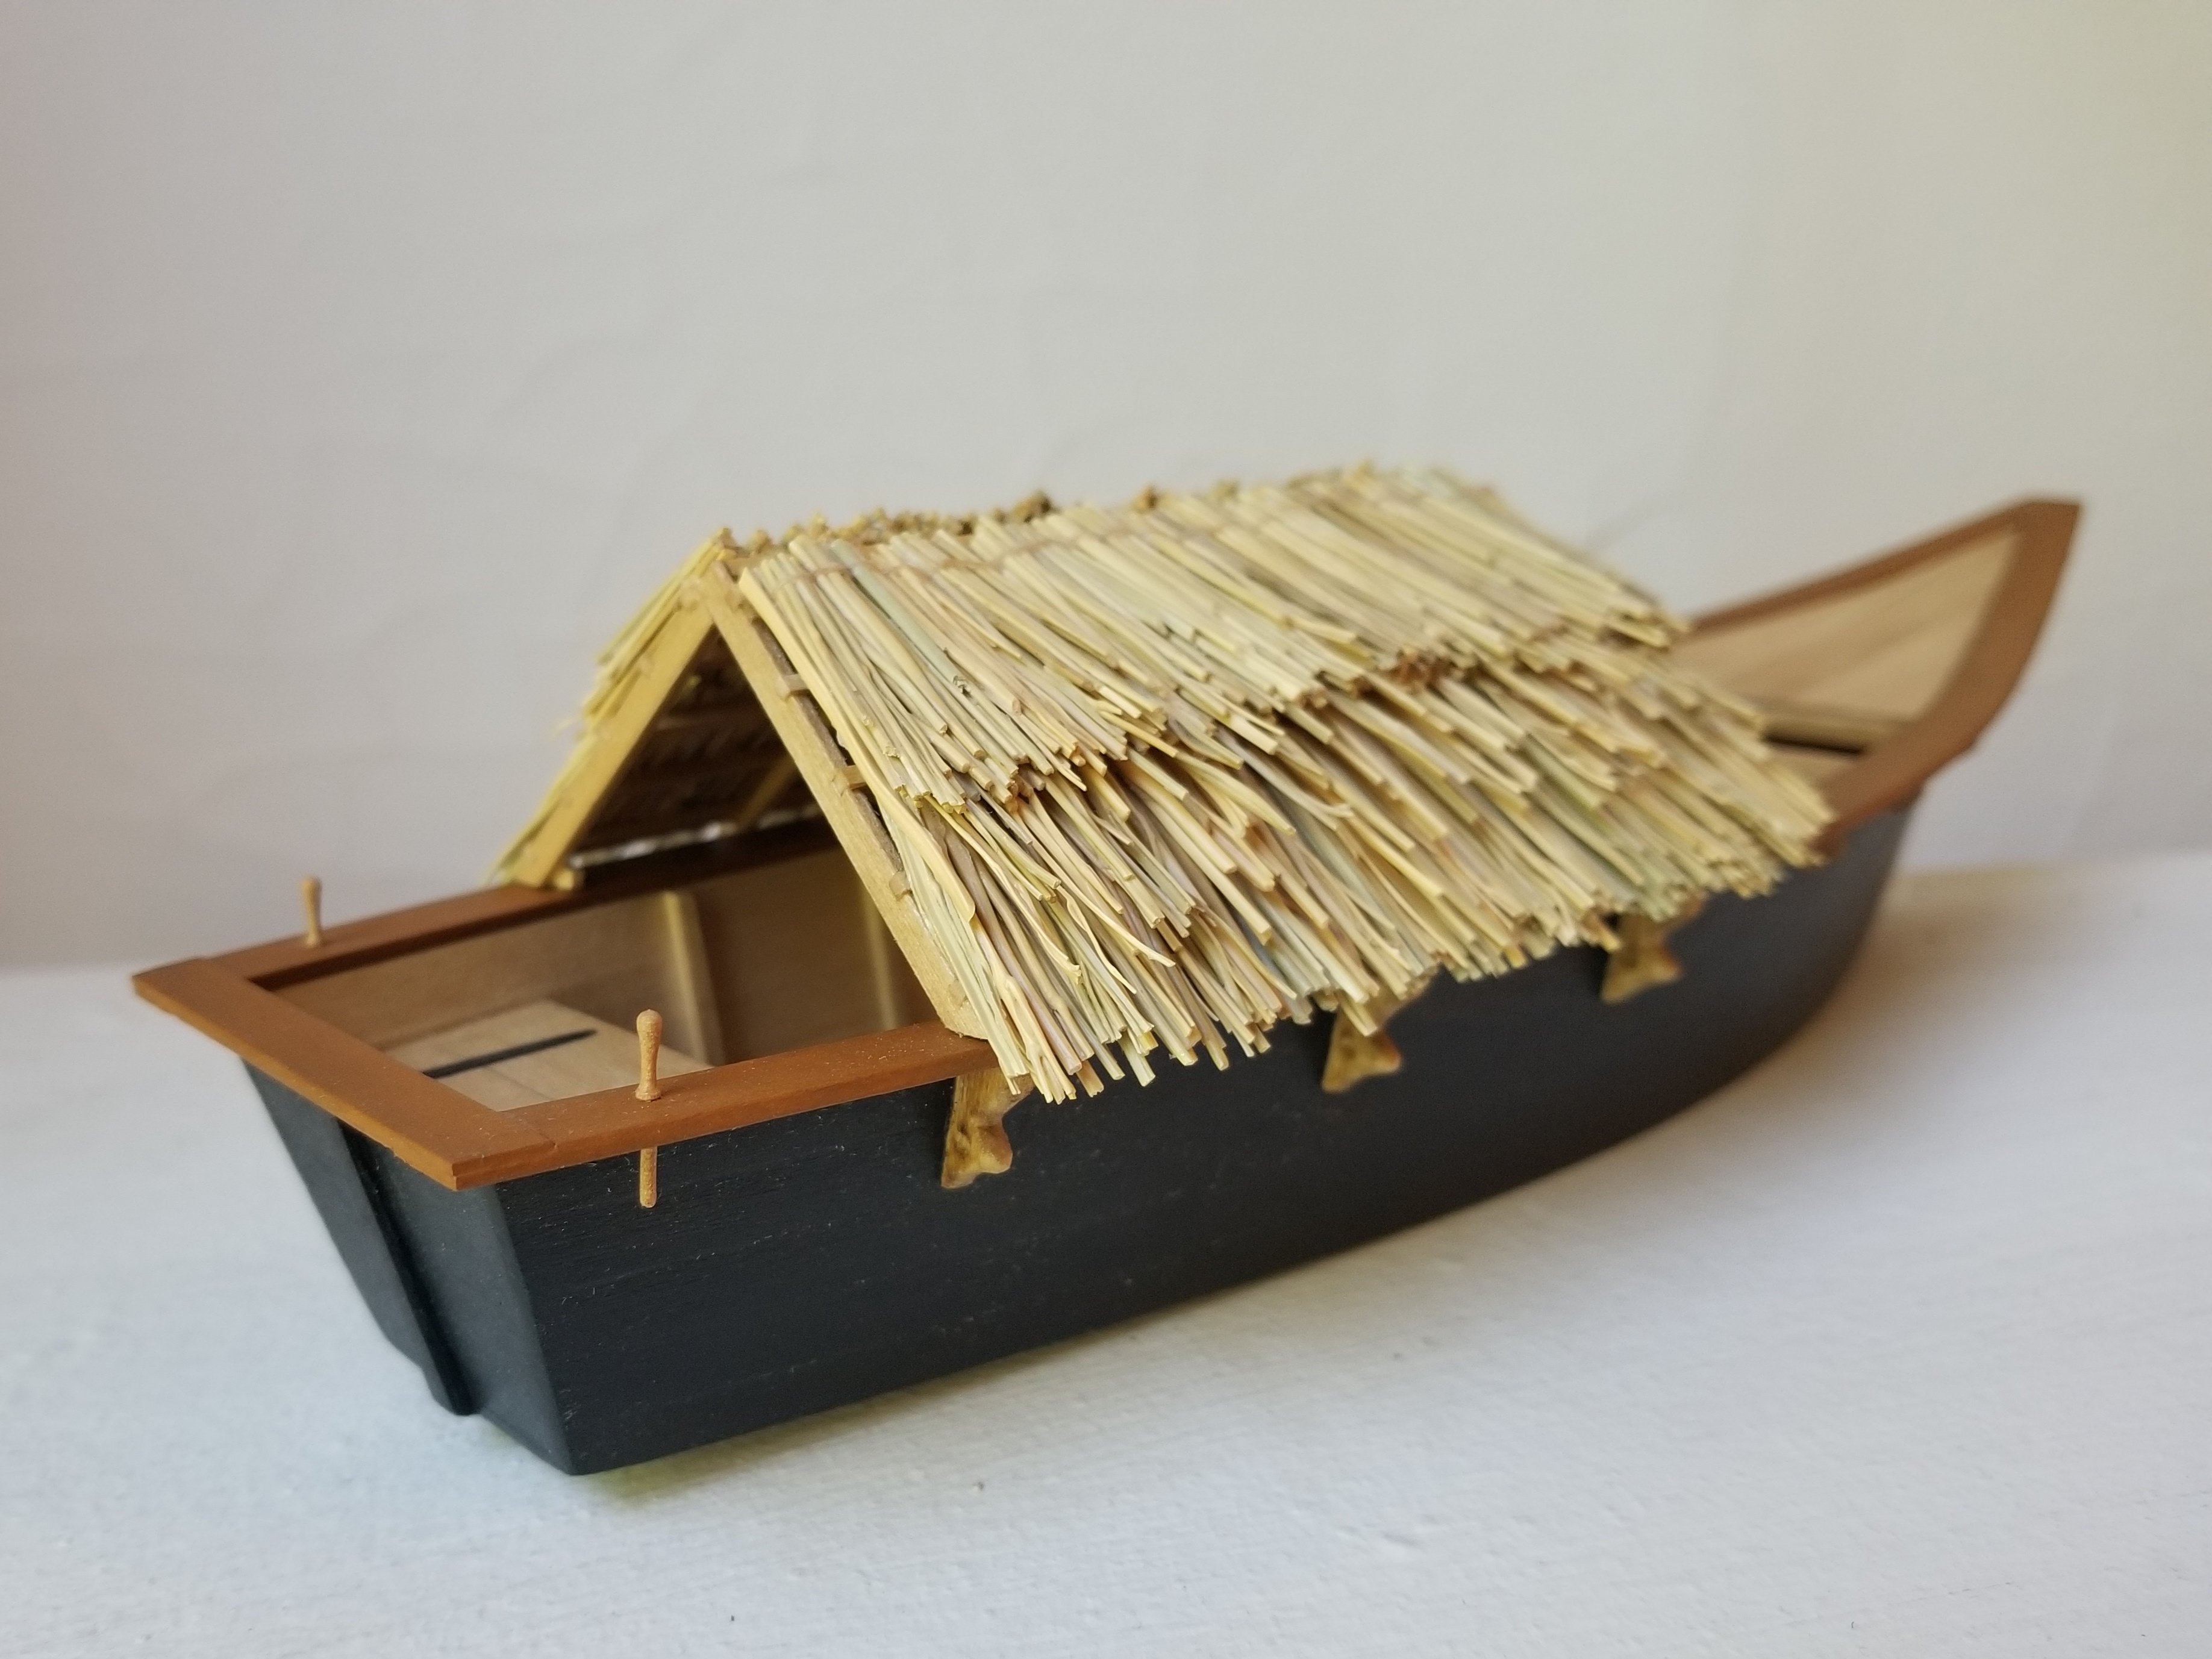
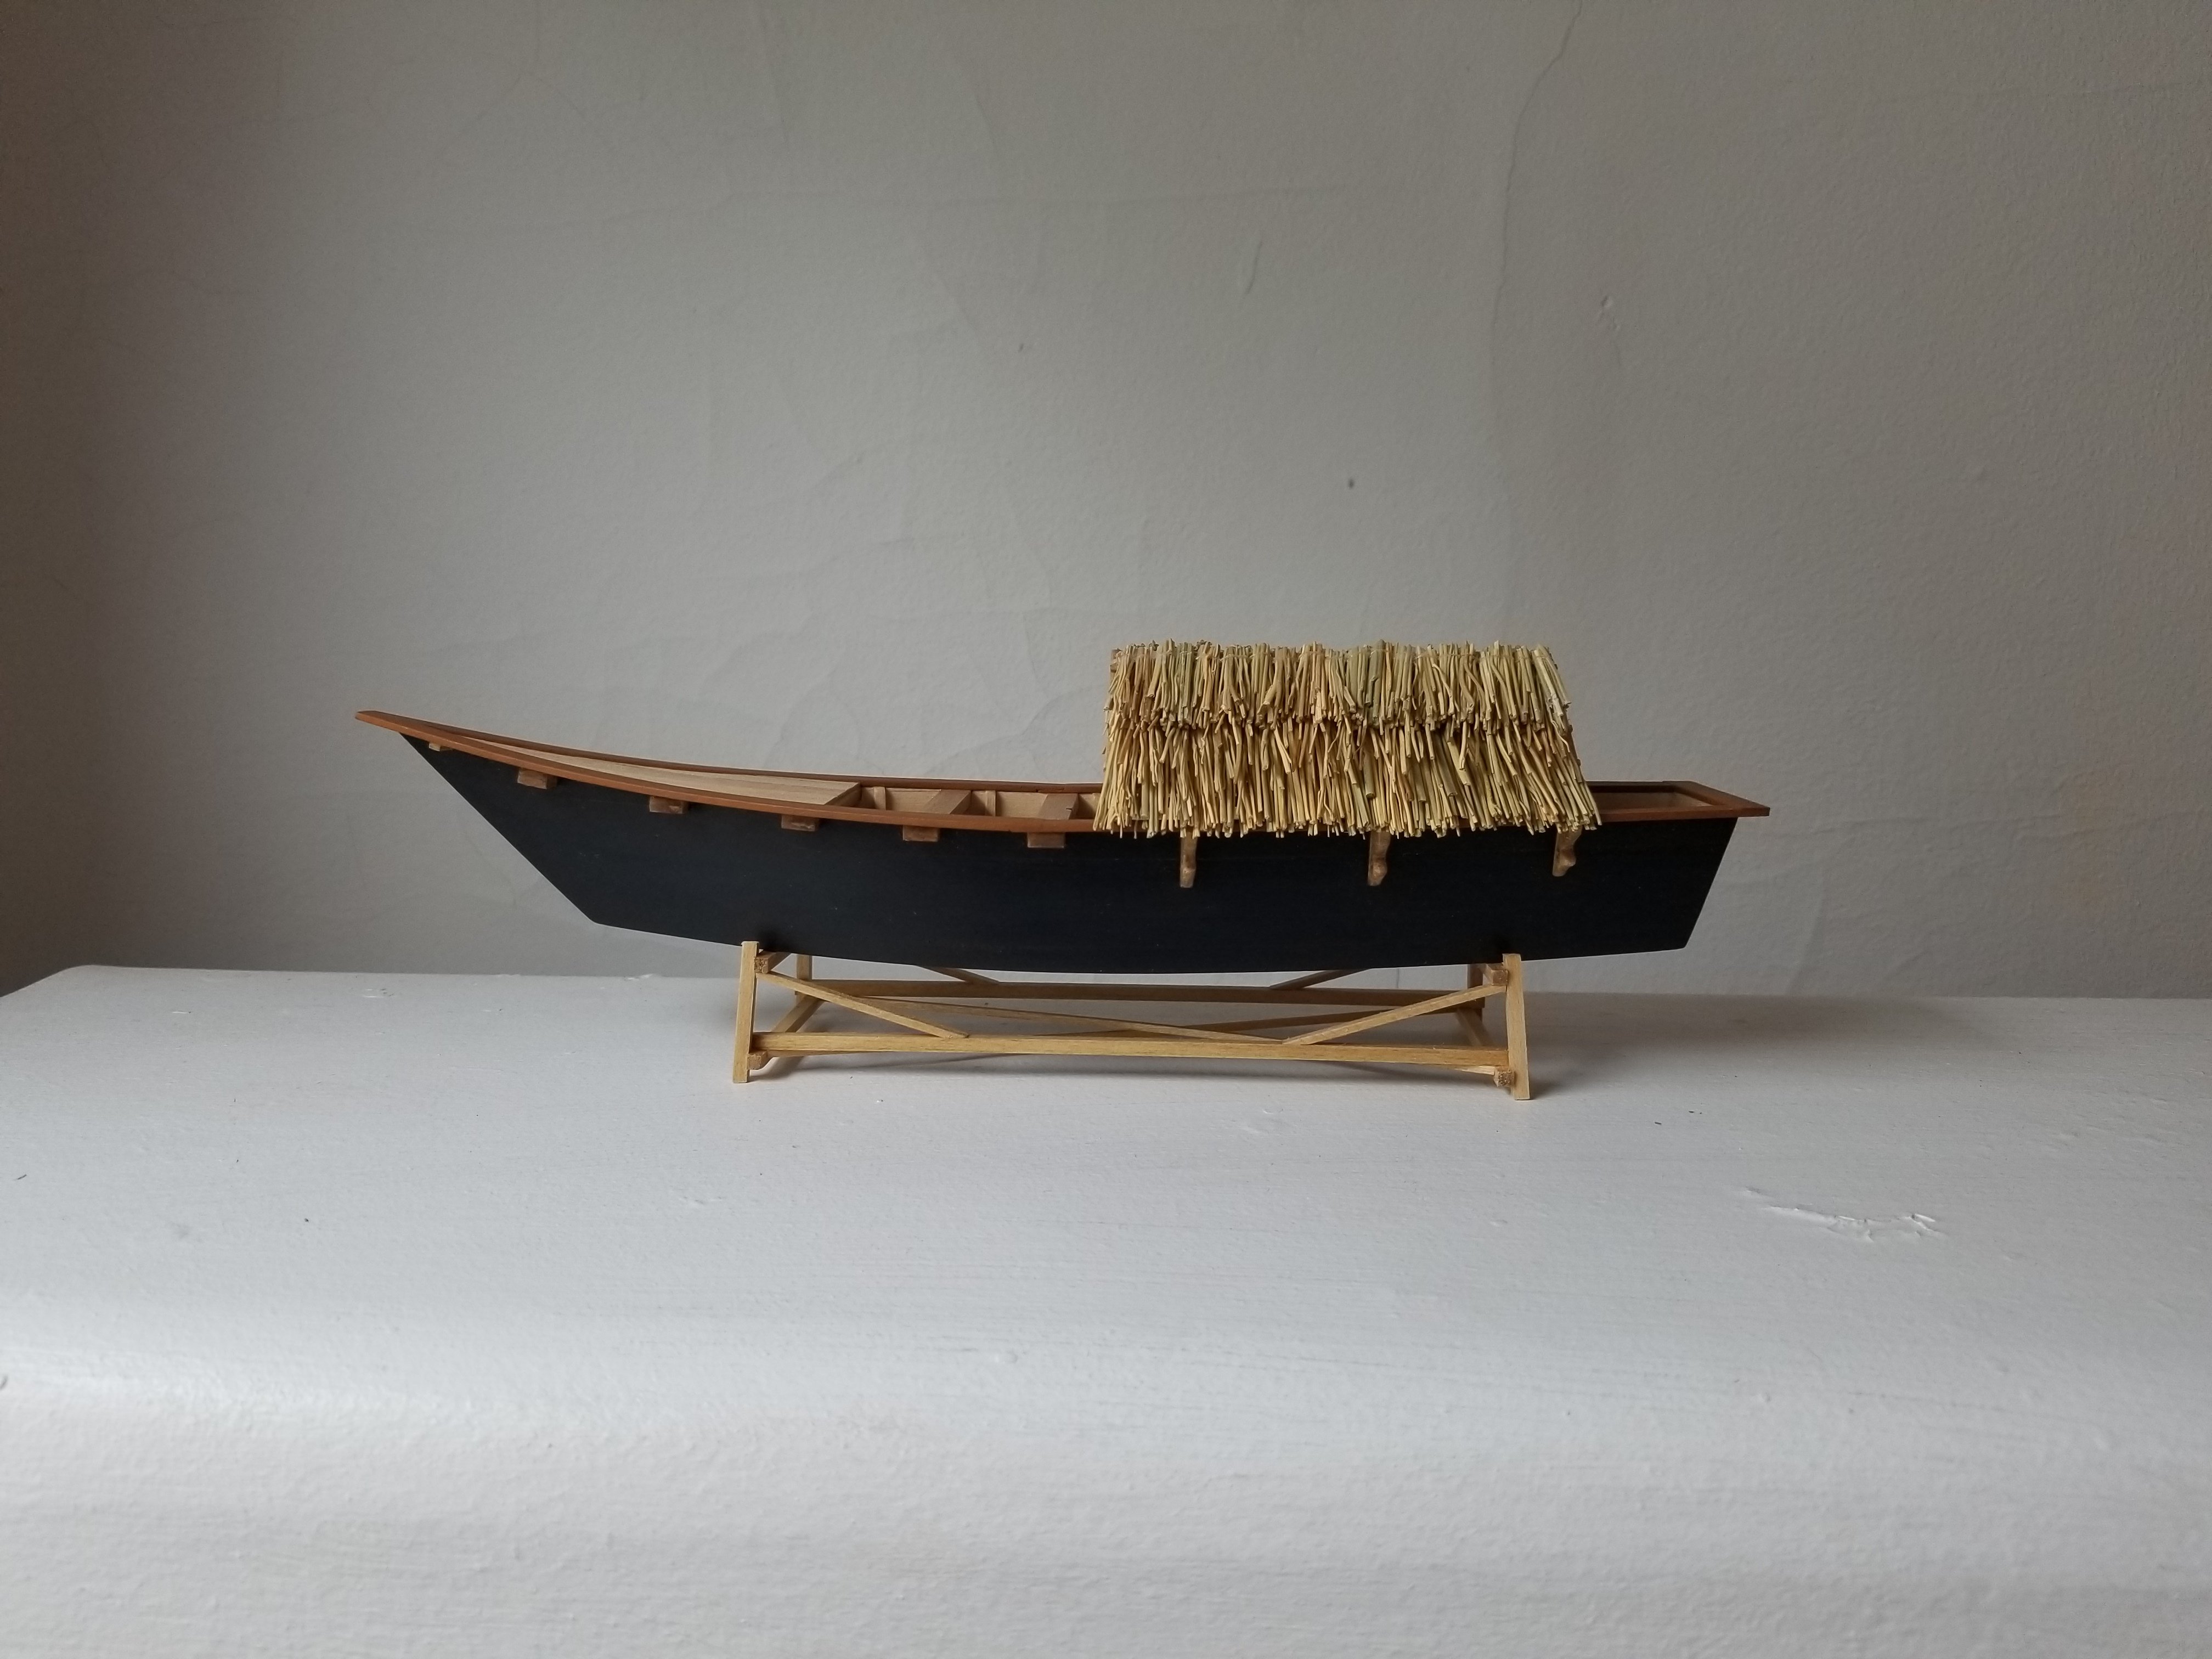
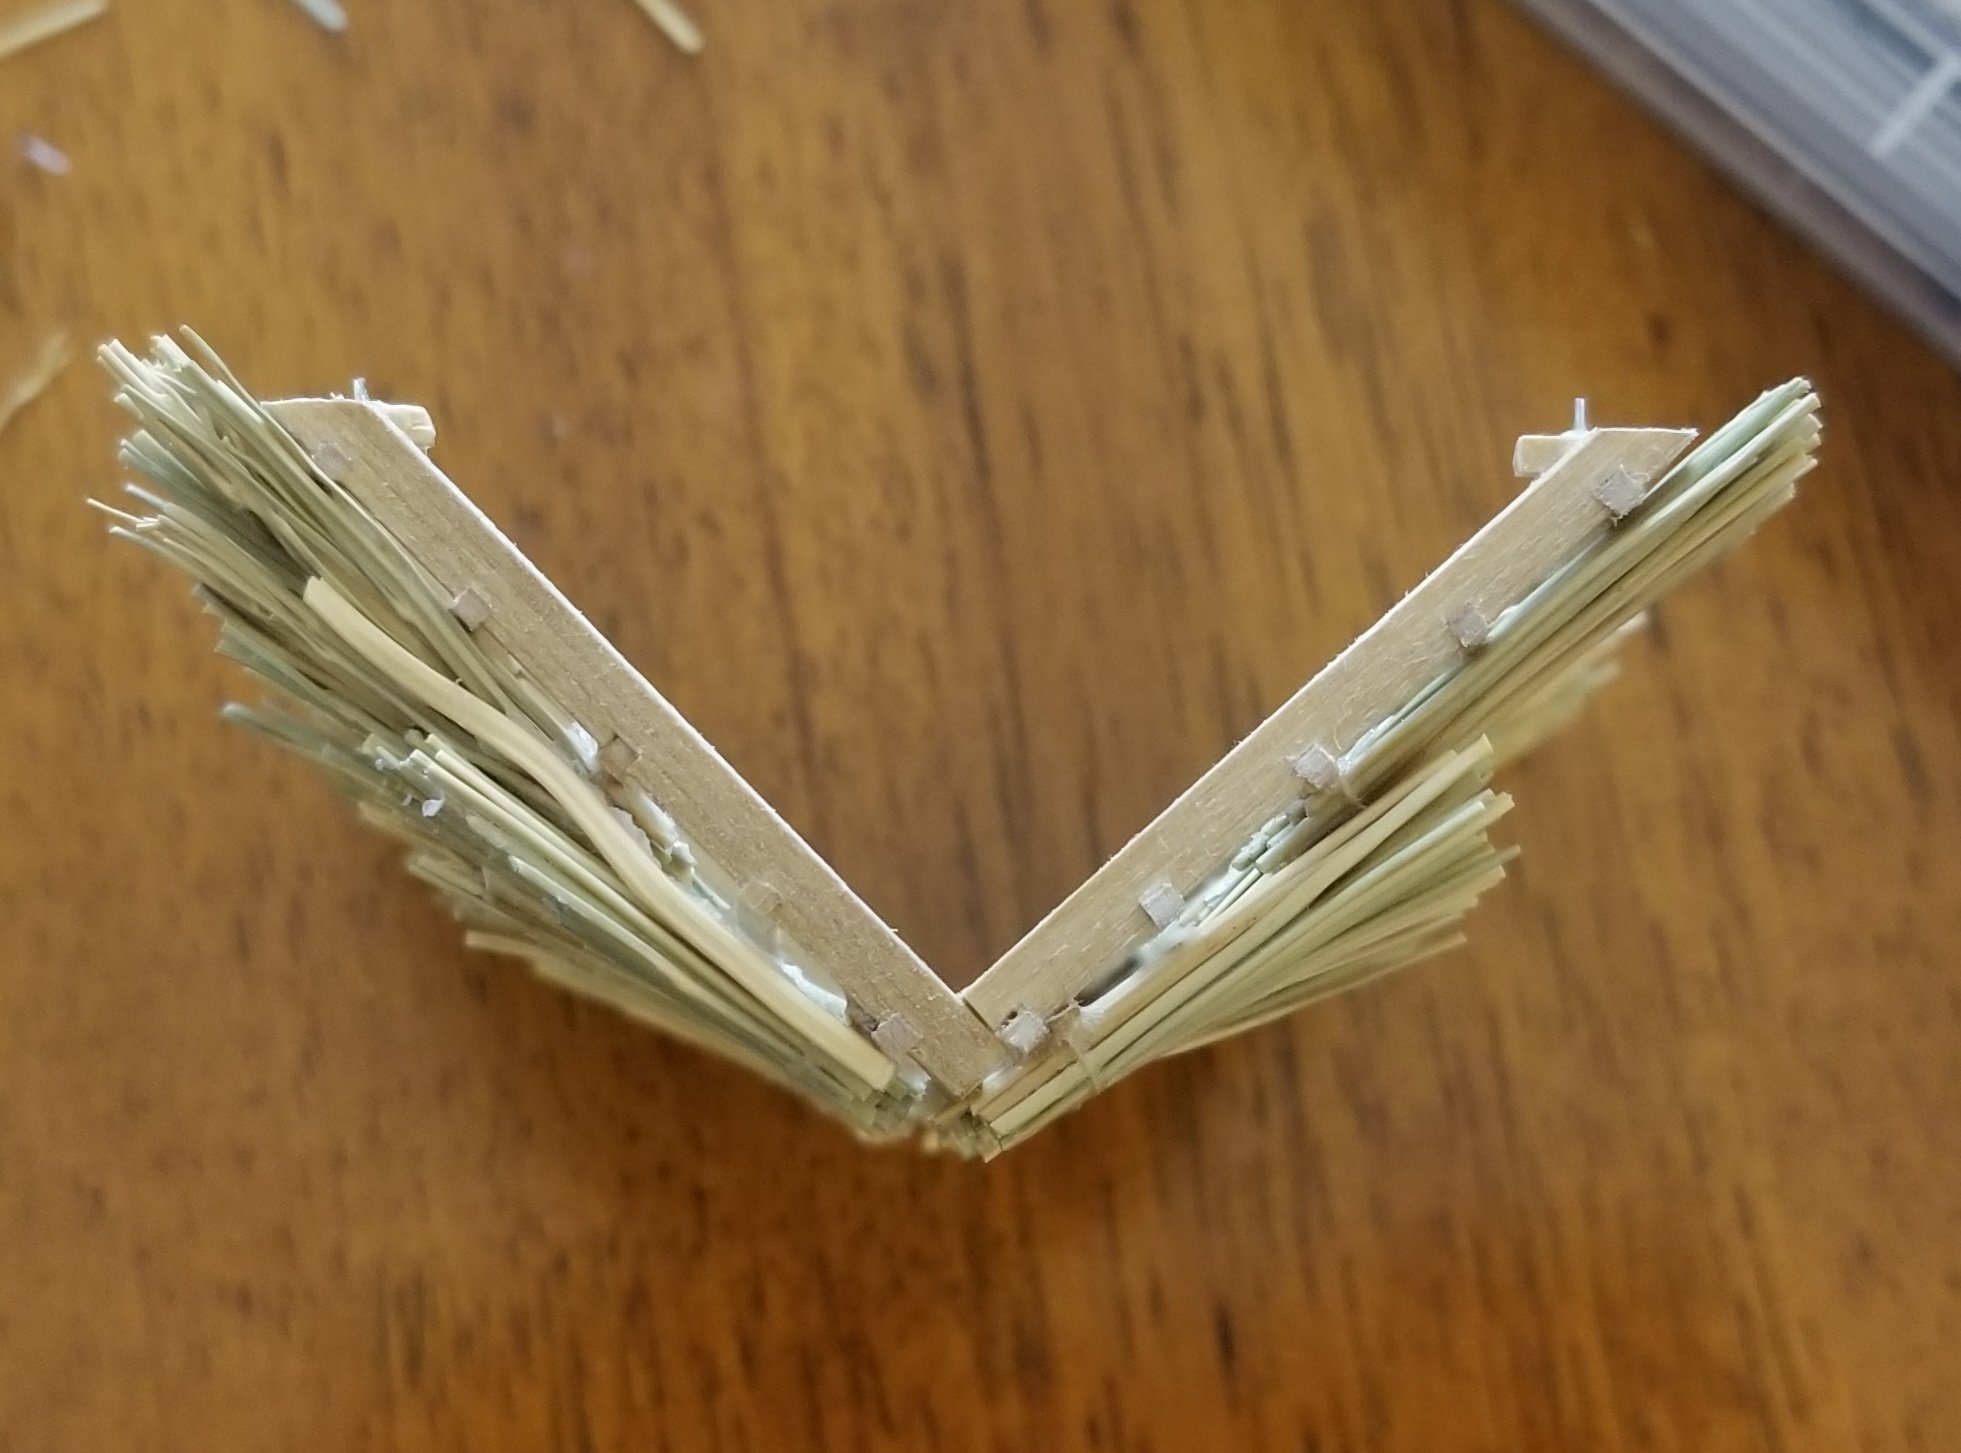
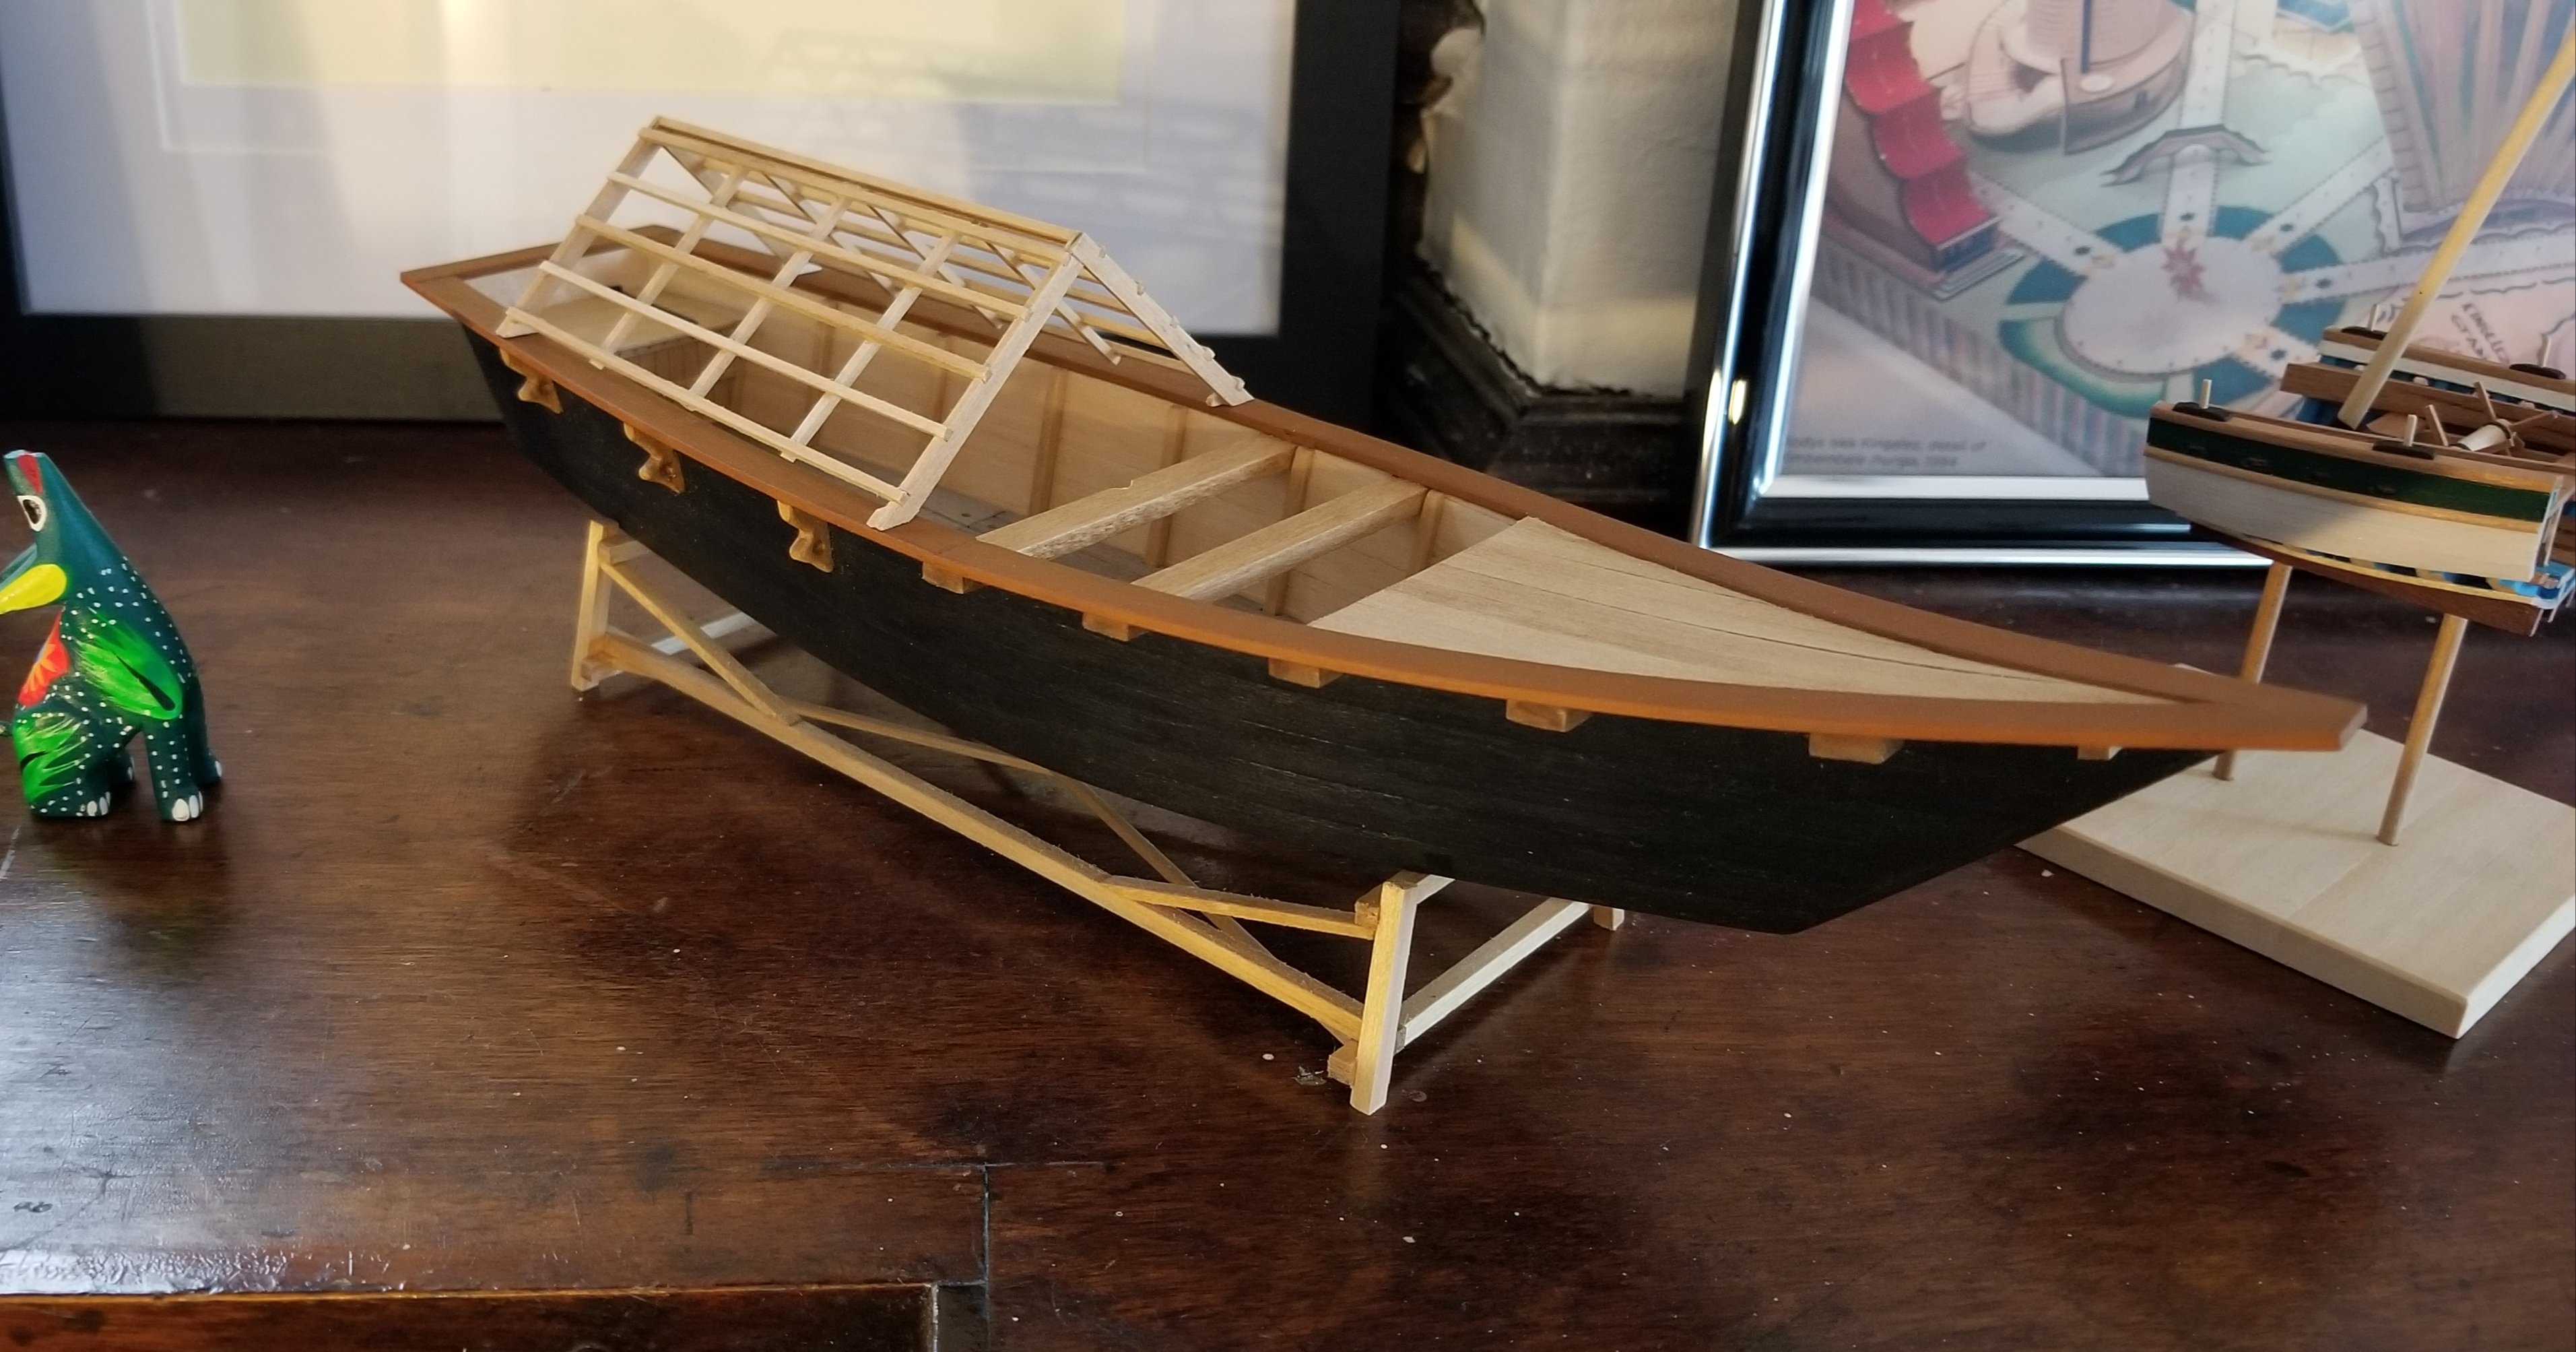
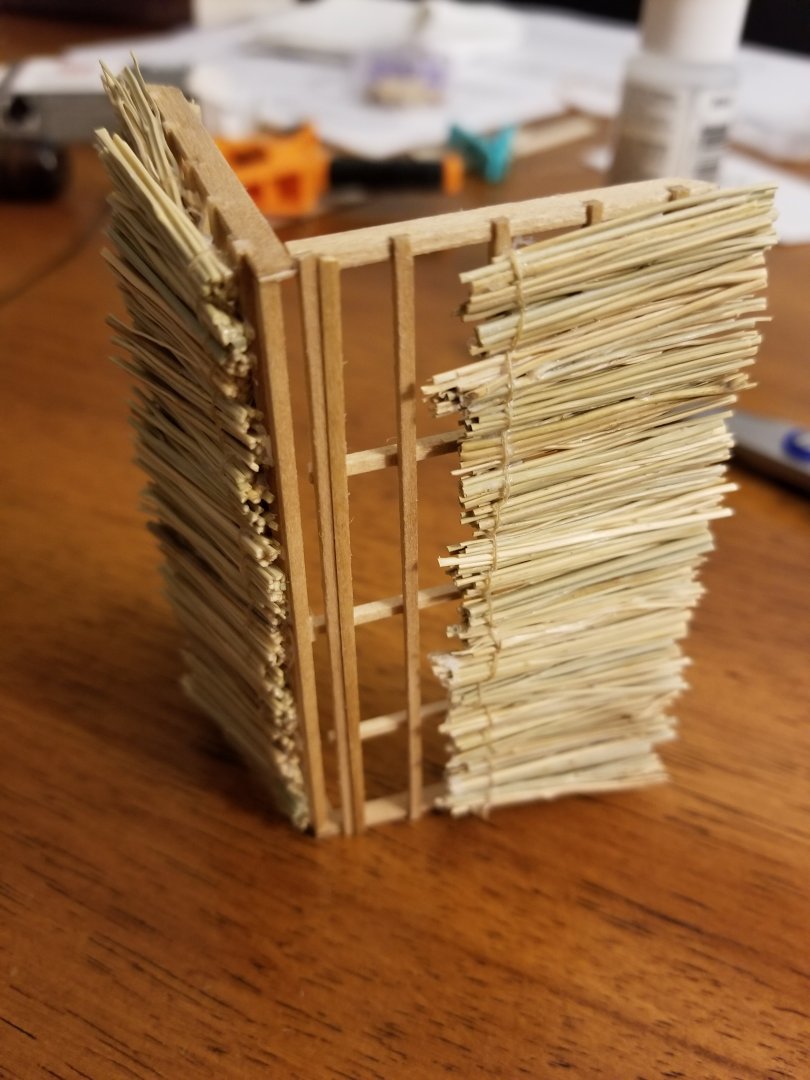
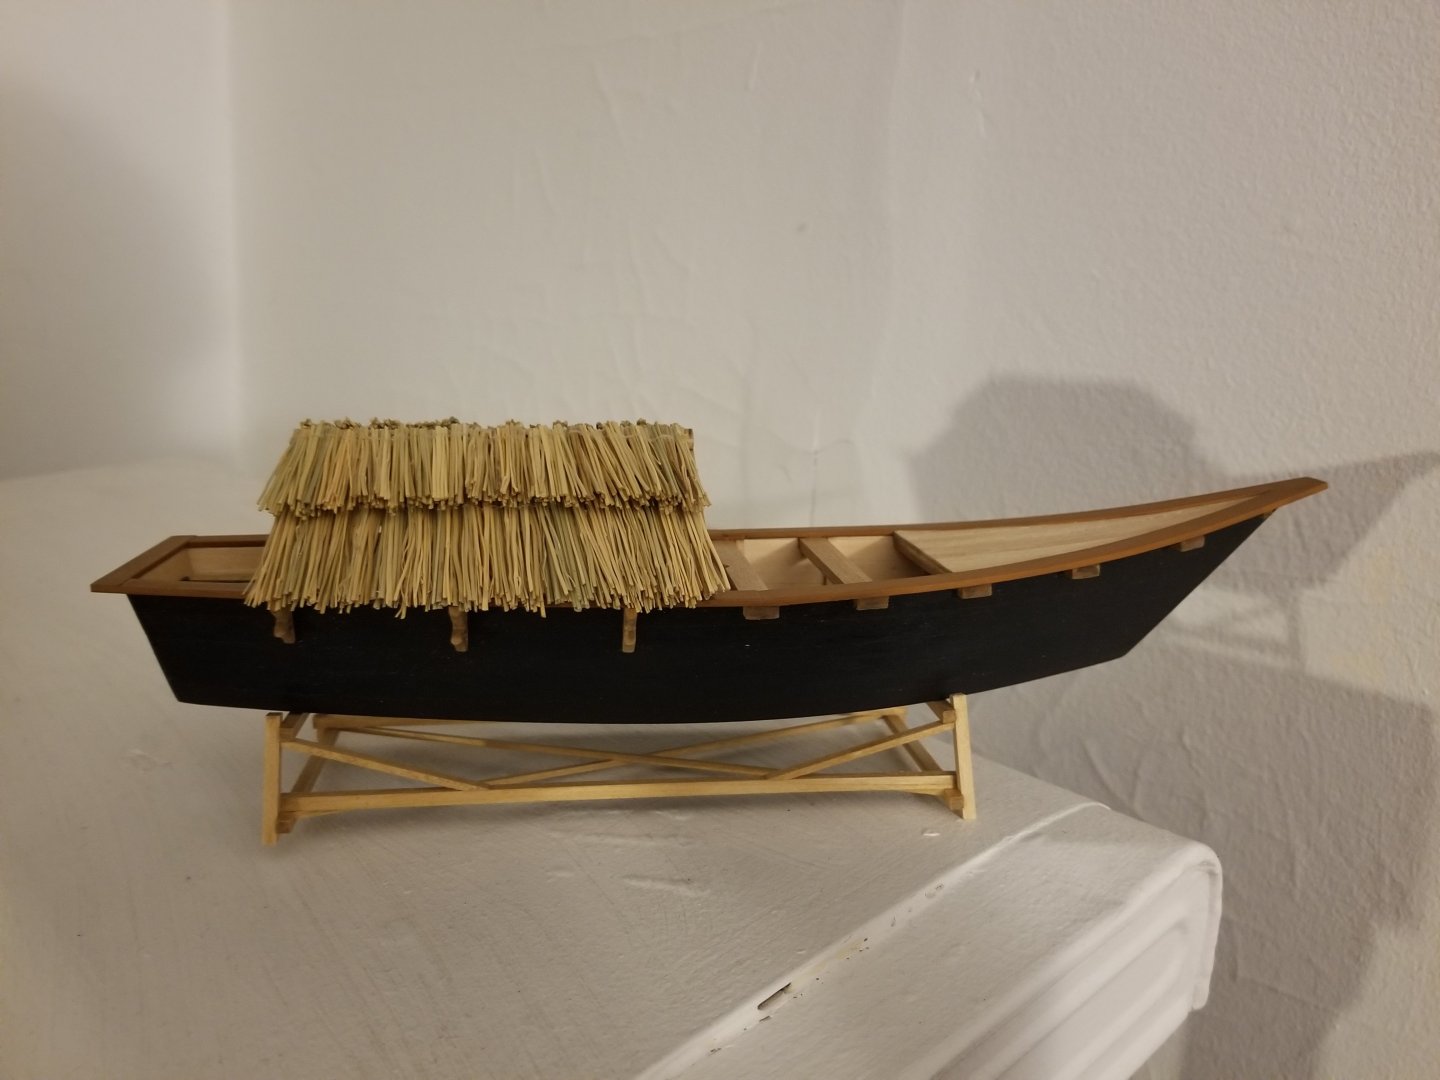
I finally had a peaceful weekend and was able to advance! First, I finished the base. I'm not crazy about it, as I think I made it slightly too long, and I feel like the color stands out too much. I may paint it black, or make a new one to a different design later. But for now, at least the model has a proper stand. I also finally made some progress on the rancho! First, I superglued bits of wire into the holes I drilled in the base of the rancho supports. I think I need a new superglue, as the stuff I got is extremely tacky and seems to stick poorly. Meanwhile, I was progressing bit by bit on the upper layer of thatching. As can be seen, I improved a lot at keeping the string more or less in line. Unlike the lower layer, where I added varnish after each bunch of thatching, for the upper layer I used a generous helping of glue from the string to the top as I went (it will be covered later) and have only added the varnish now at the end. Once that dries, it will be time to remove the thatching from the backing (index card laminated in tape so the glue doesn't really stick). I also glued the lower layers in place on the rancho, using a lot of coffee stir sticks and scrap to clamp. The lower layer is now on pretty solidly. I'm looking forward to finally being done with the thatching, it's taken far longer than I had hoped. If something goes catastrophically wrong at this point, I'll probably just make a wooden rancho, which would be less interesting but equally accurate at far, far easier to make.