JacquesCousteau
-
Posts
1,383 -
Joined
-
Last visited
Content Type
Profiles
Forums
Gallery
Events
Everything posted by JacquesCousteau
-
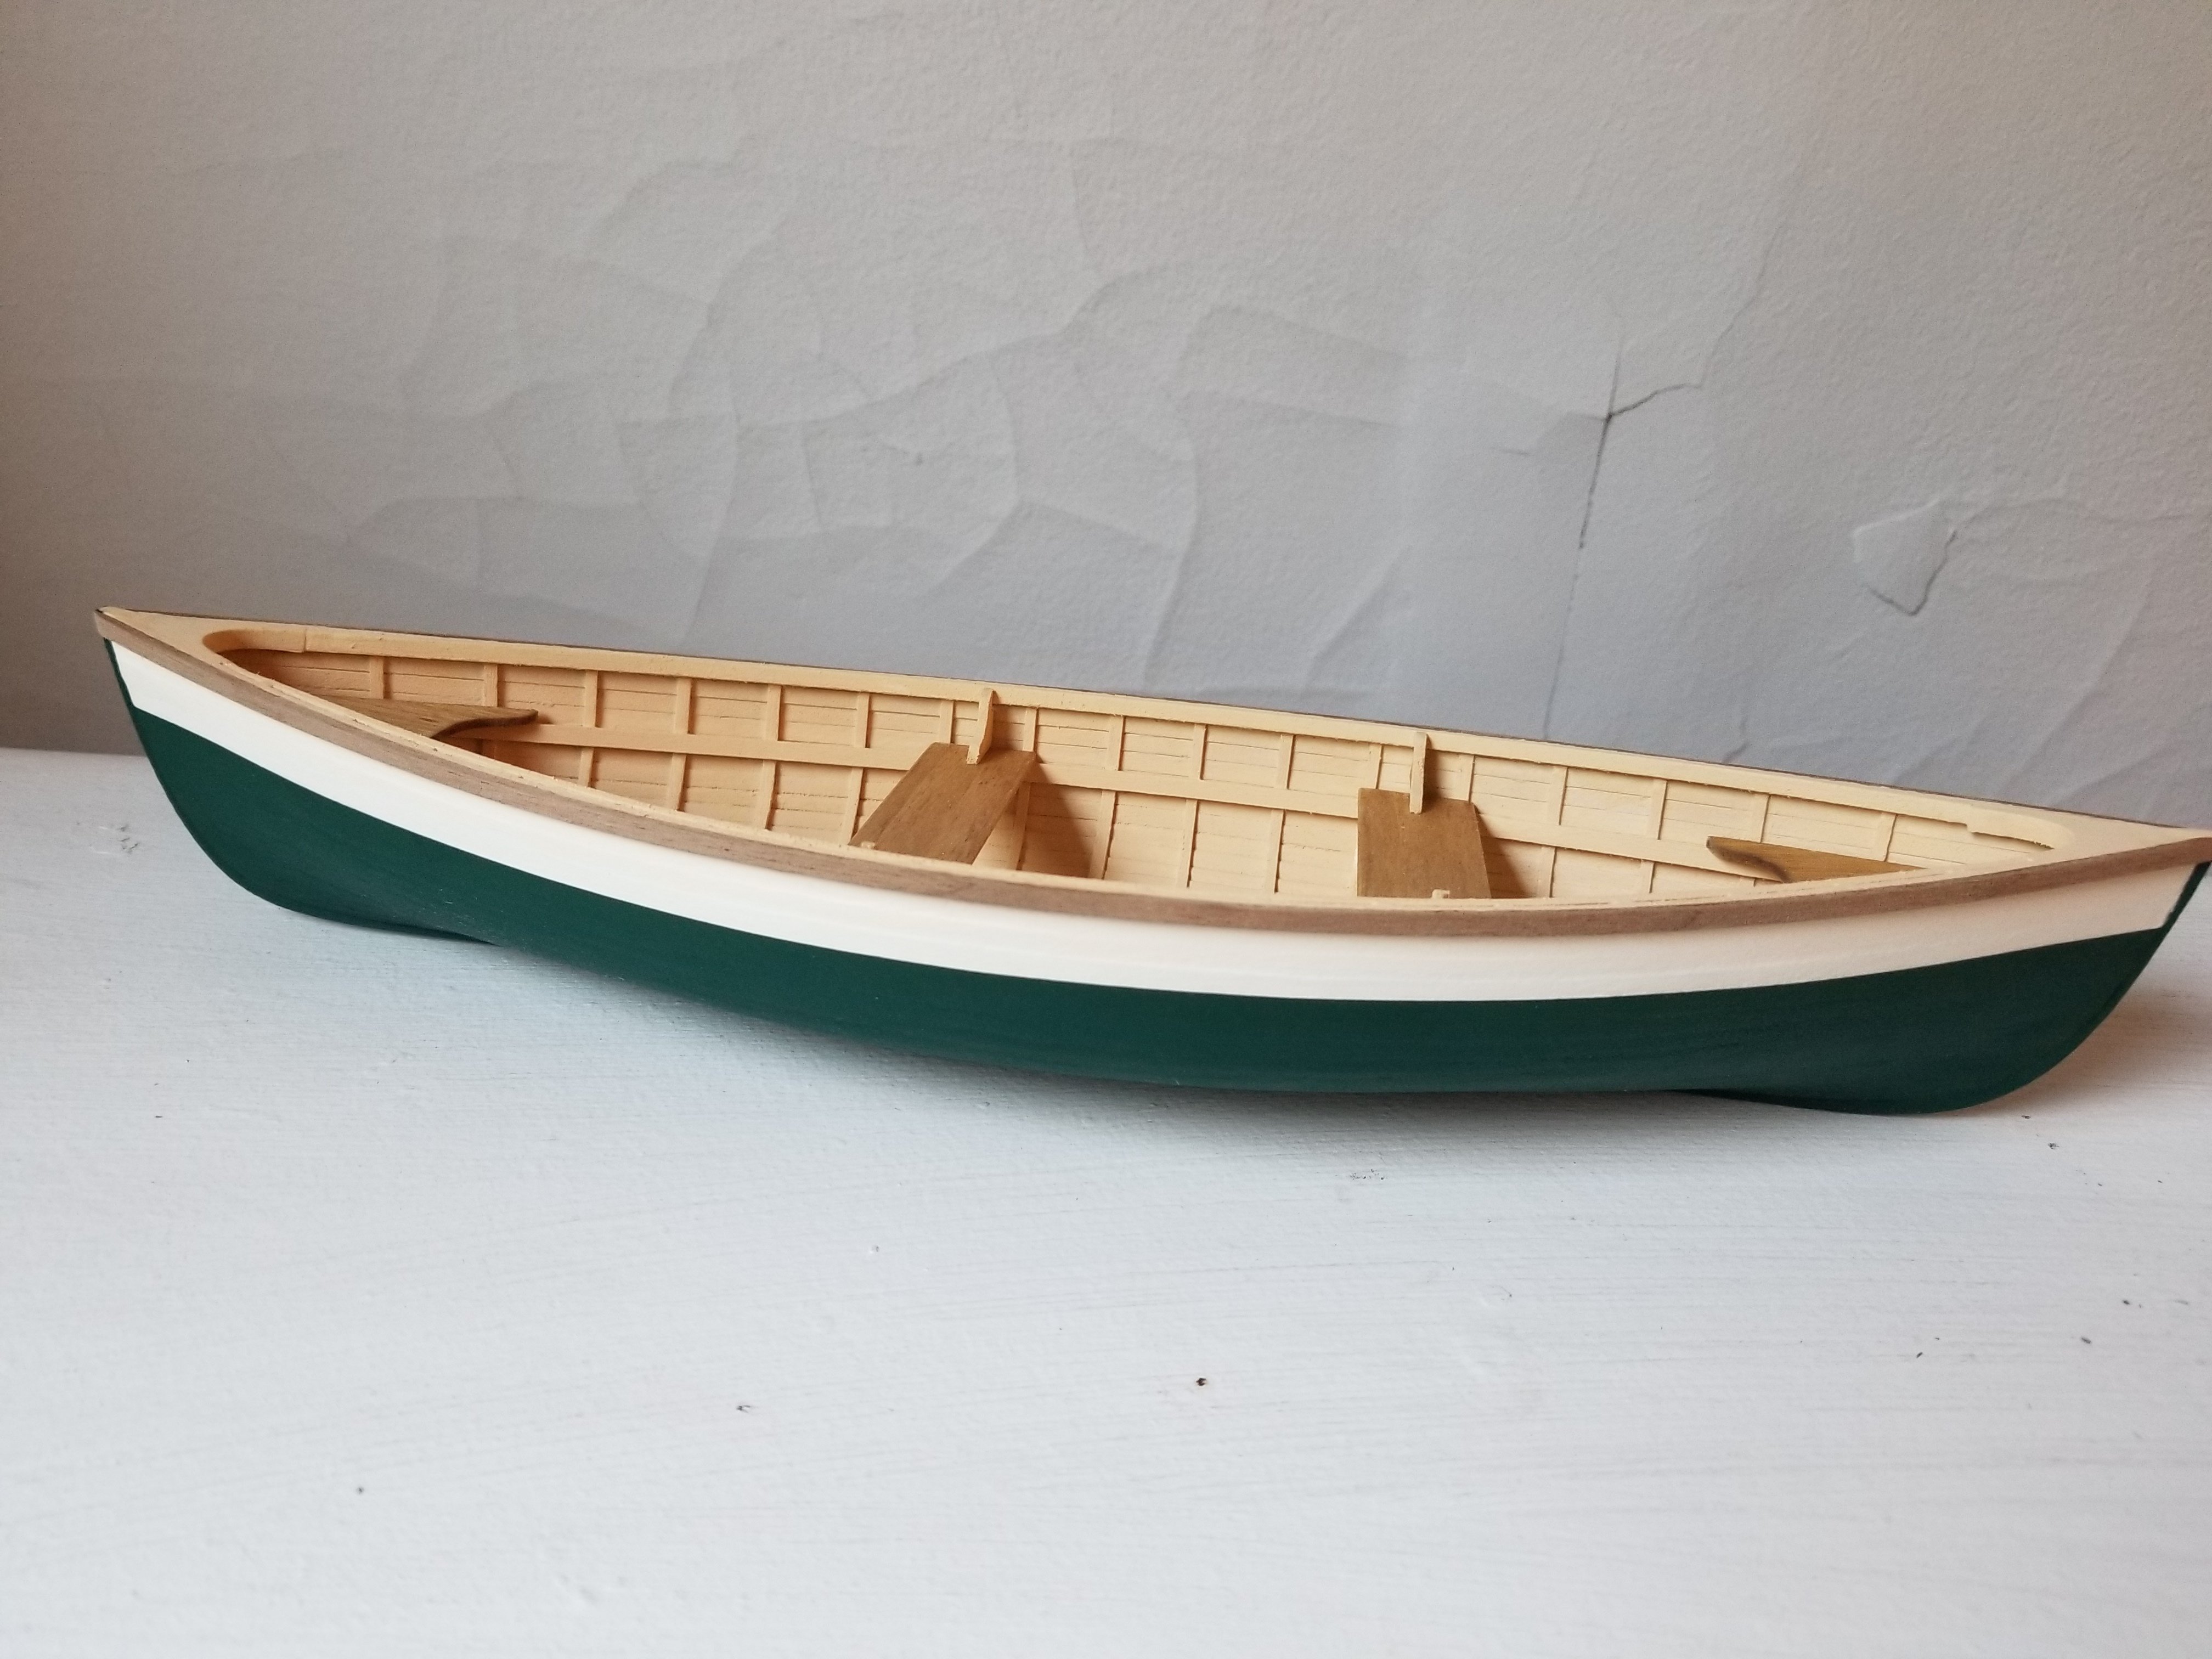
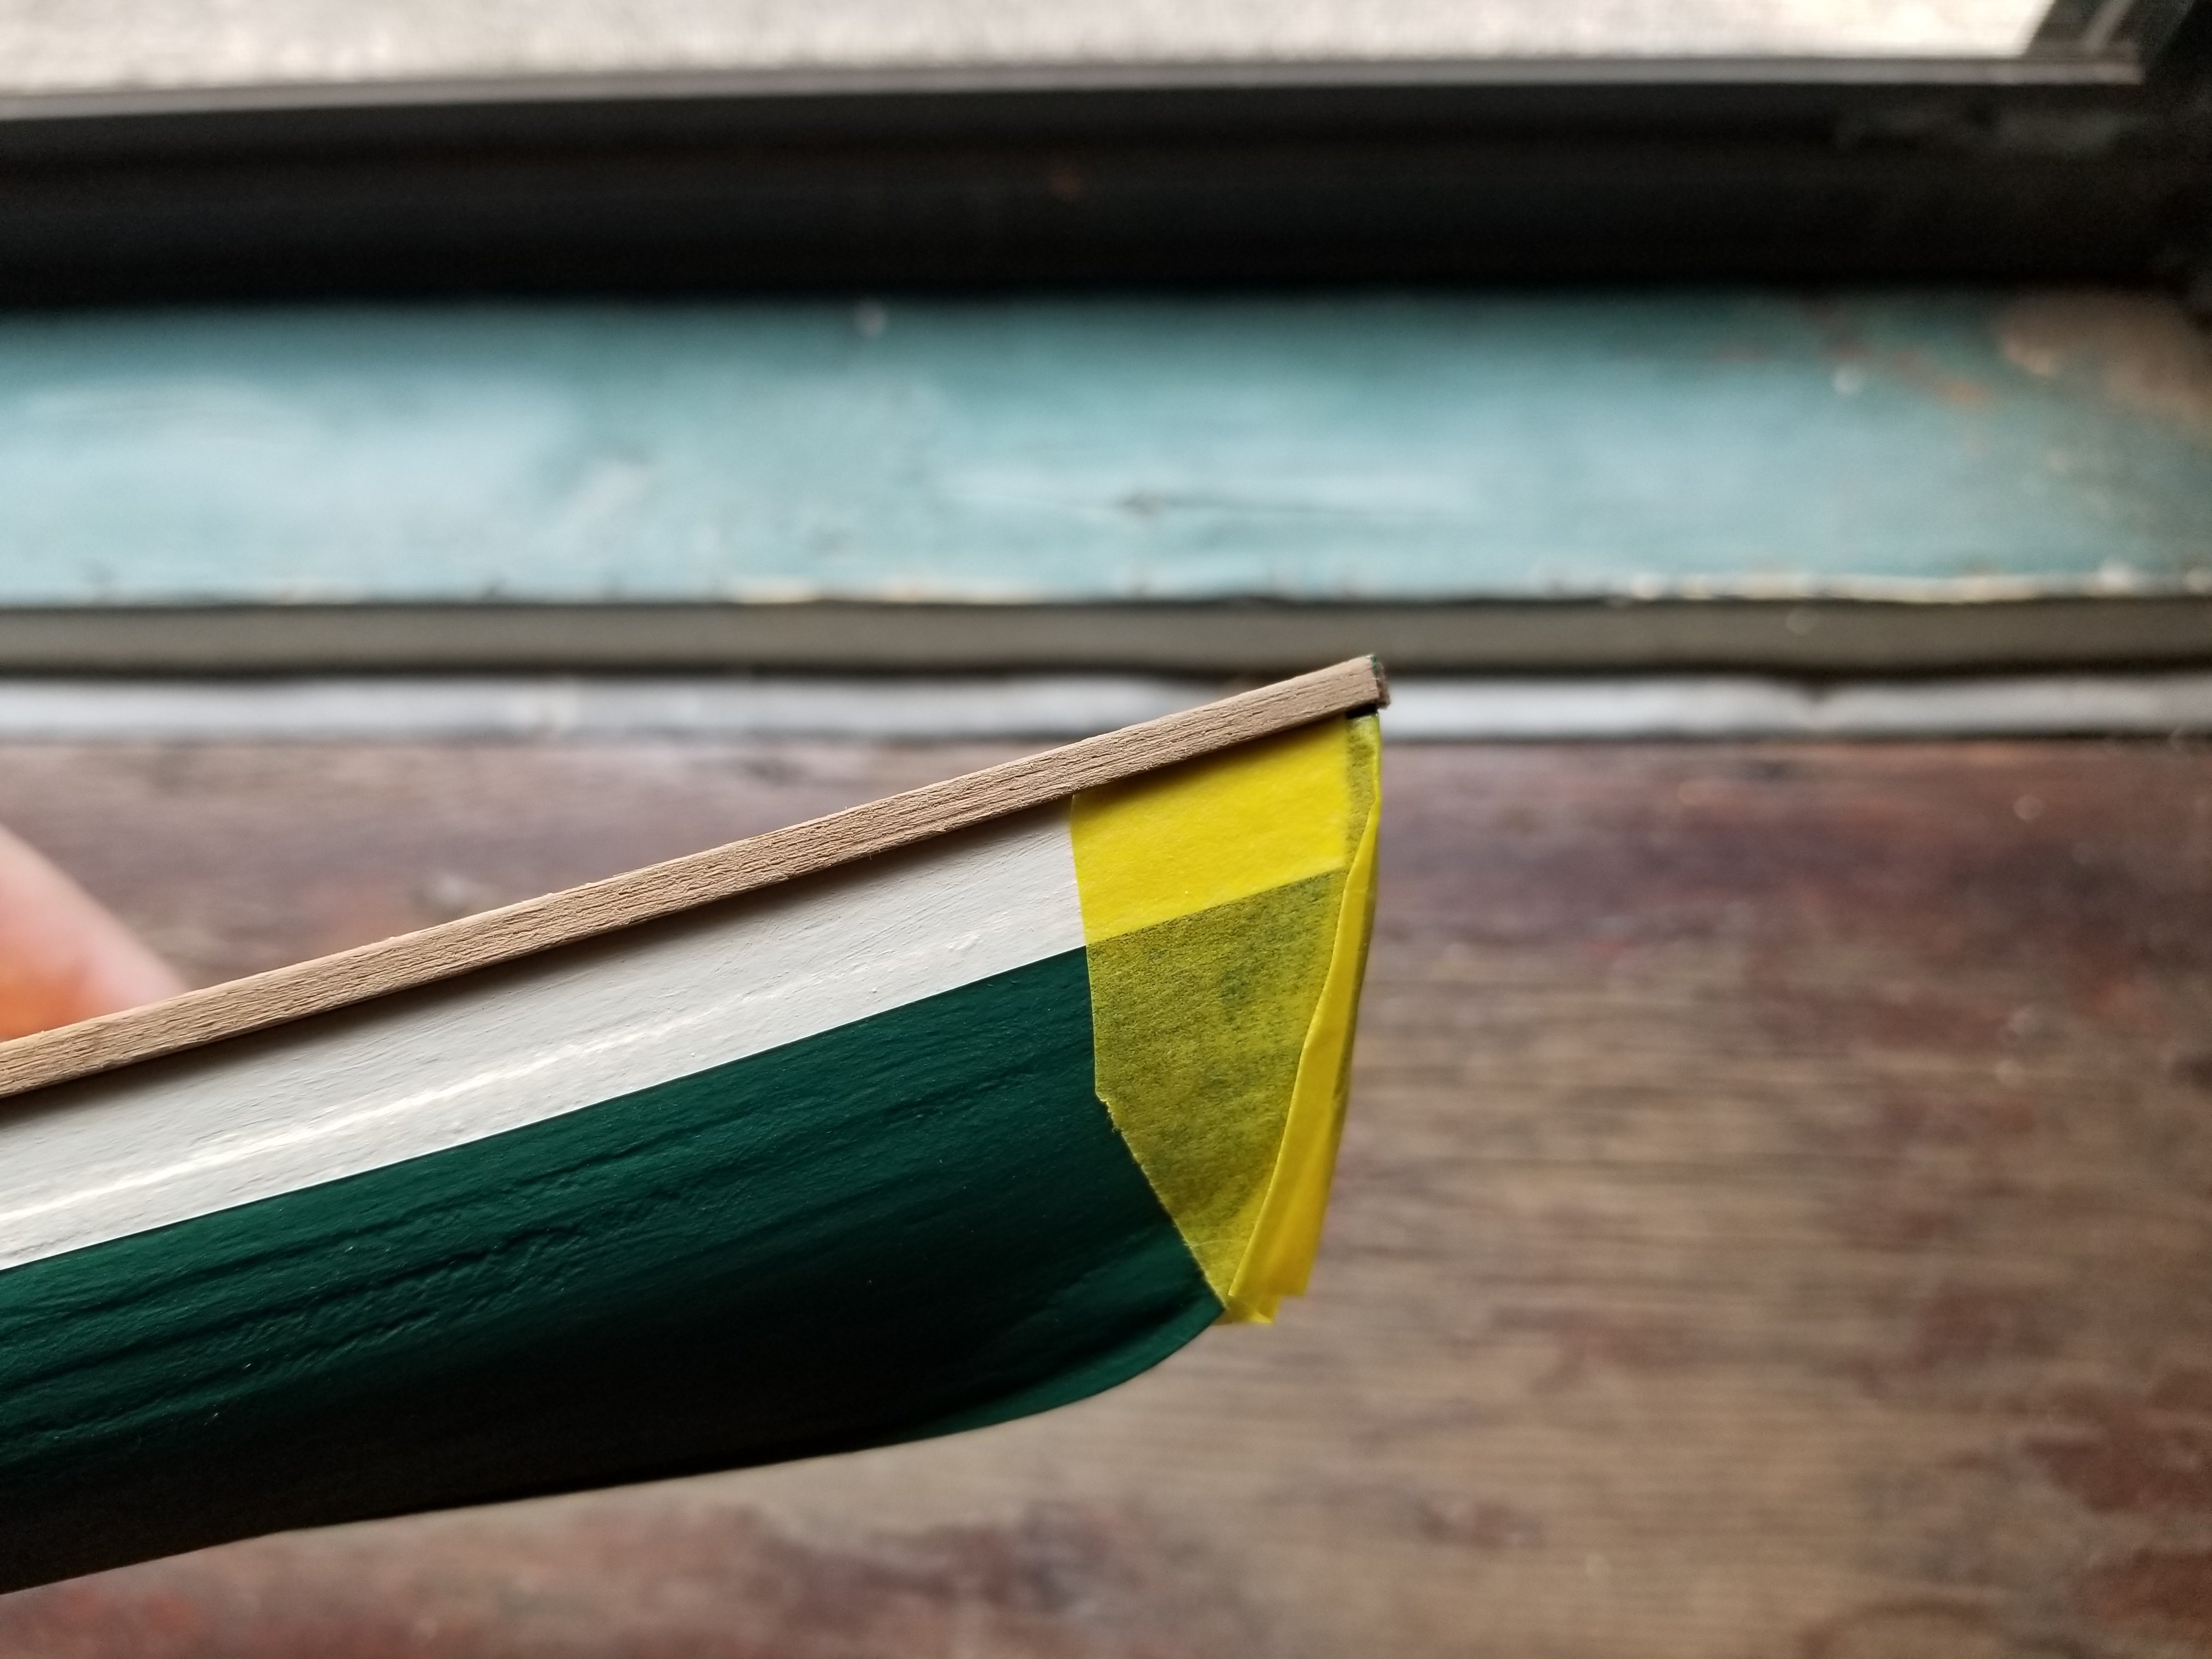
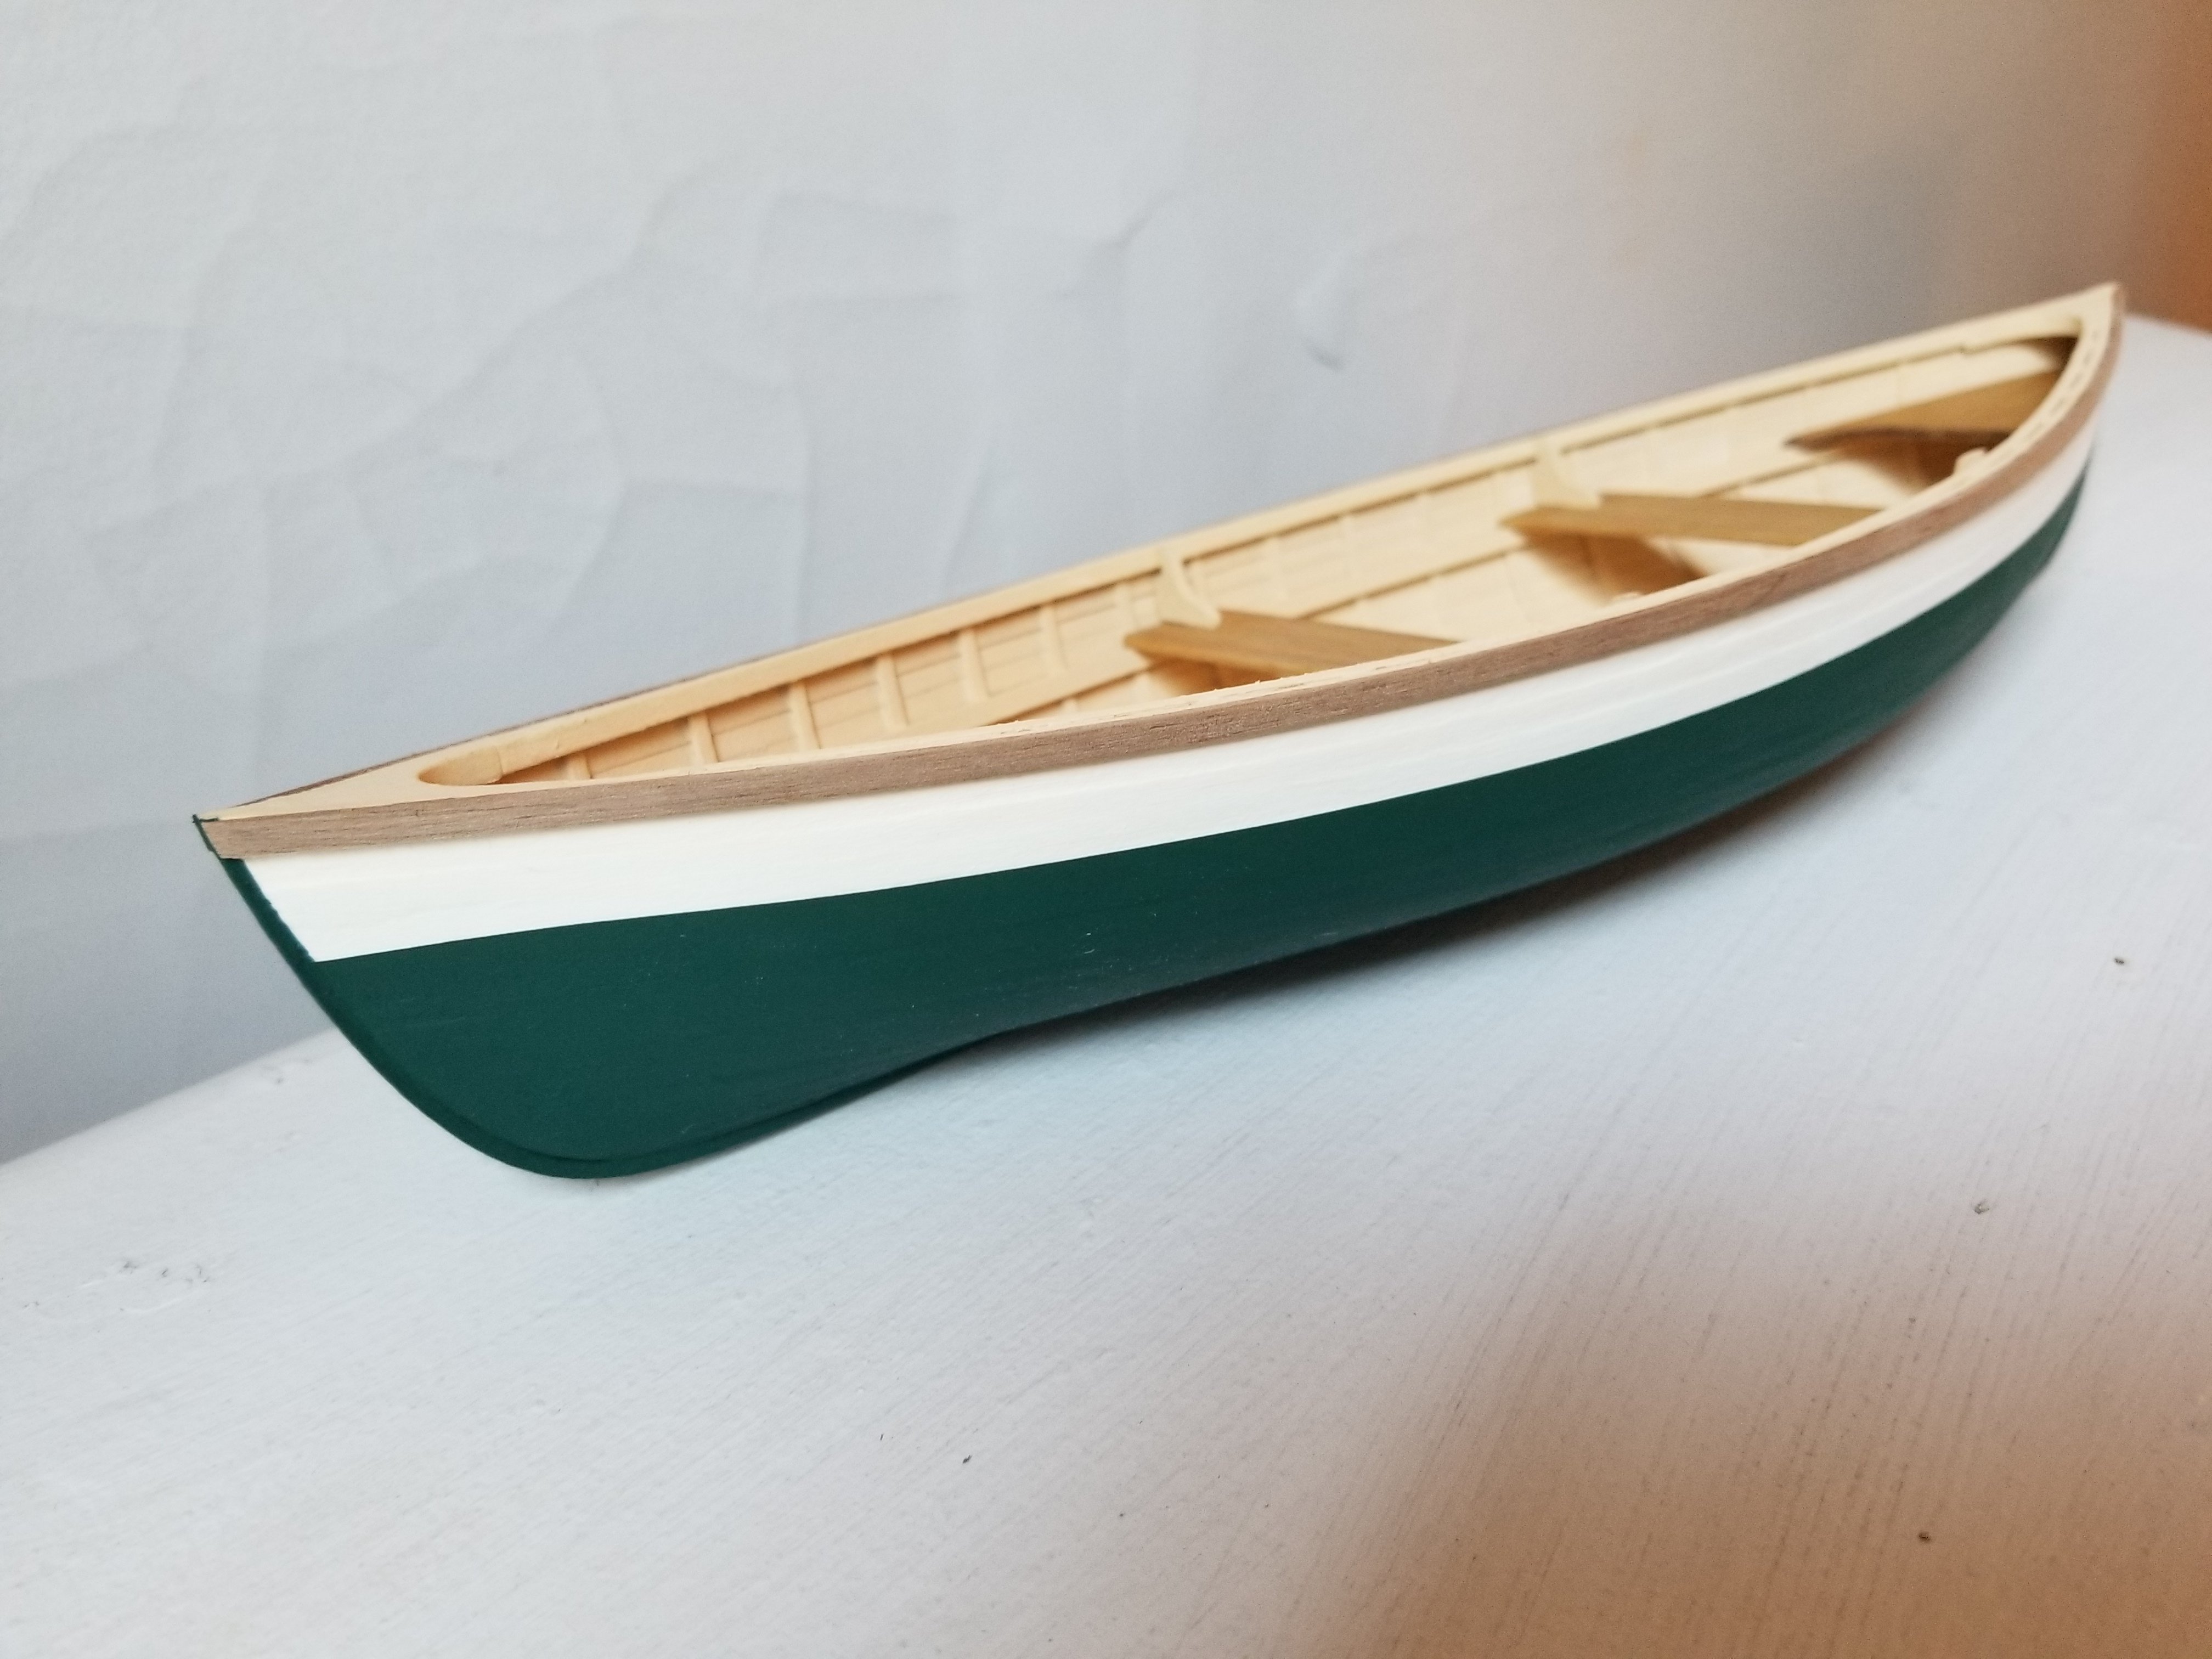
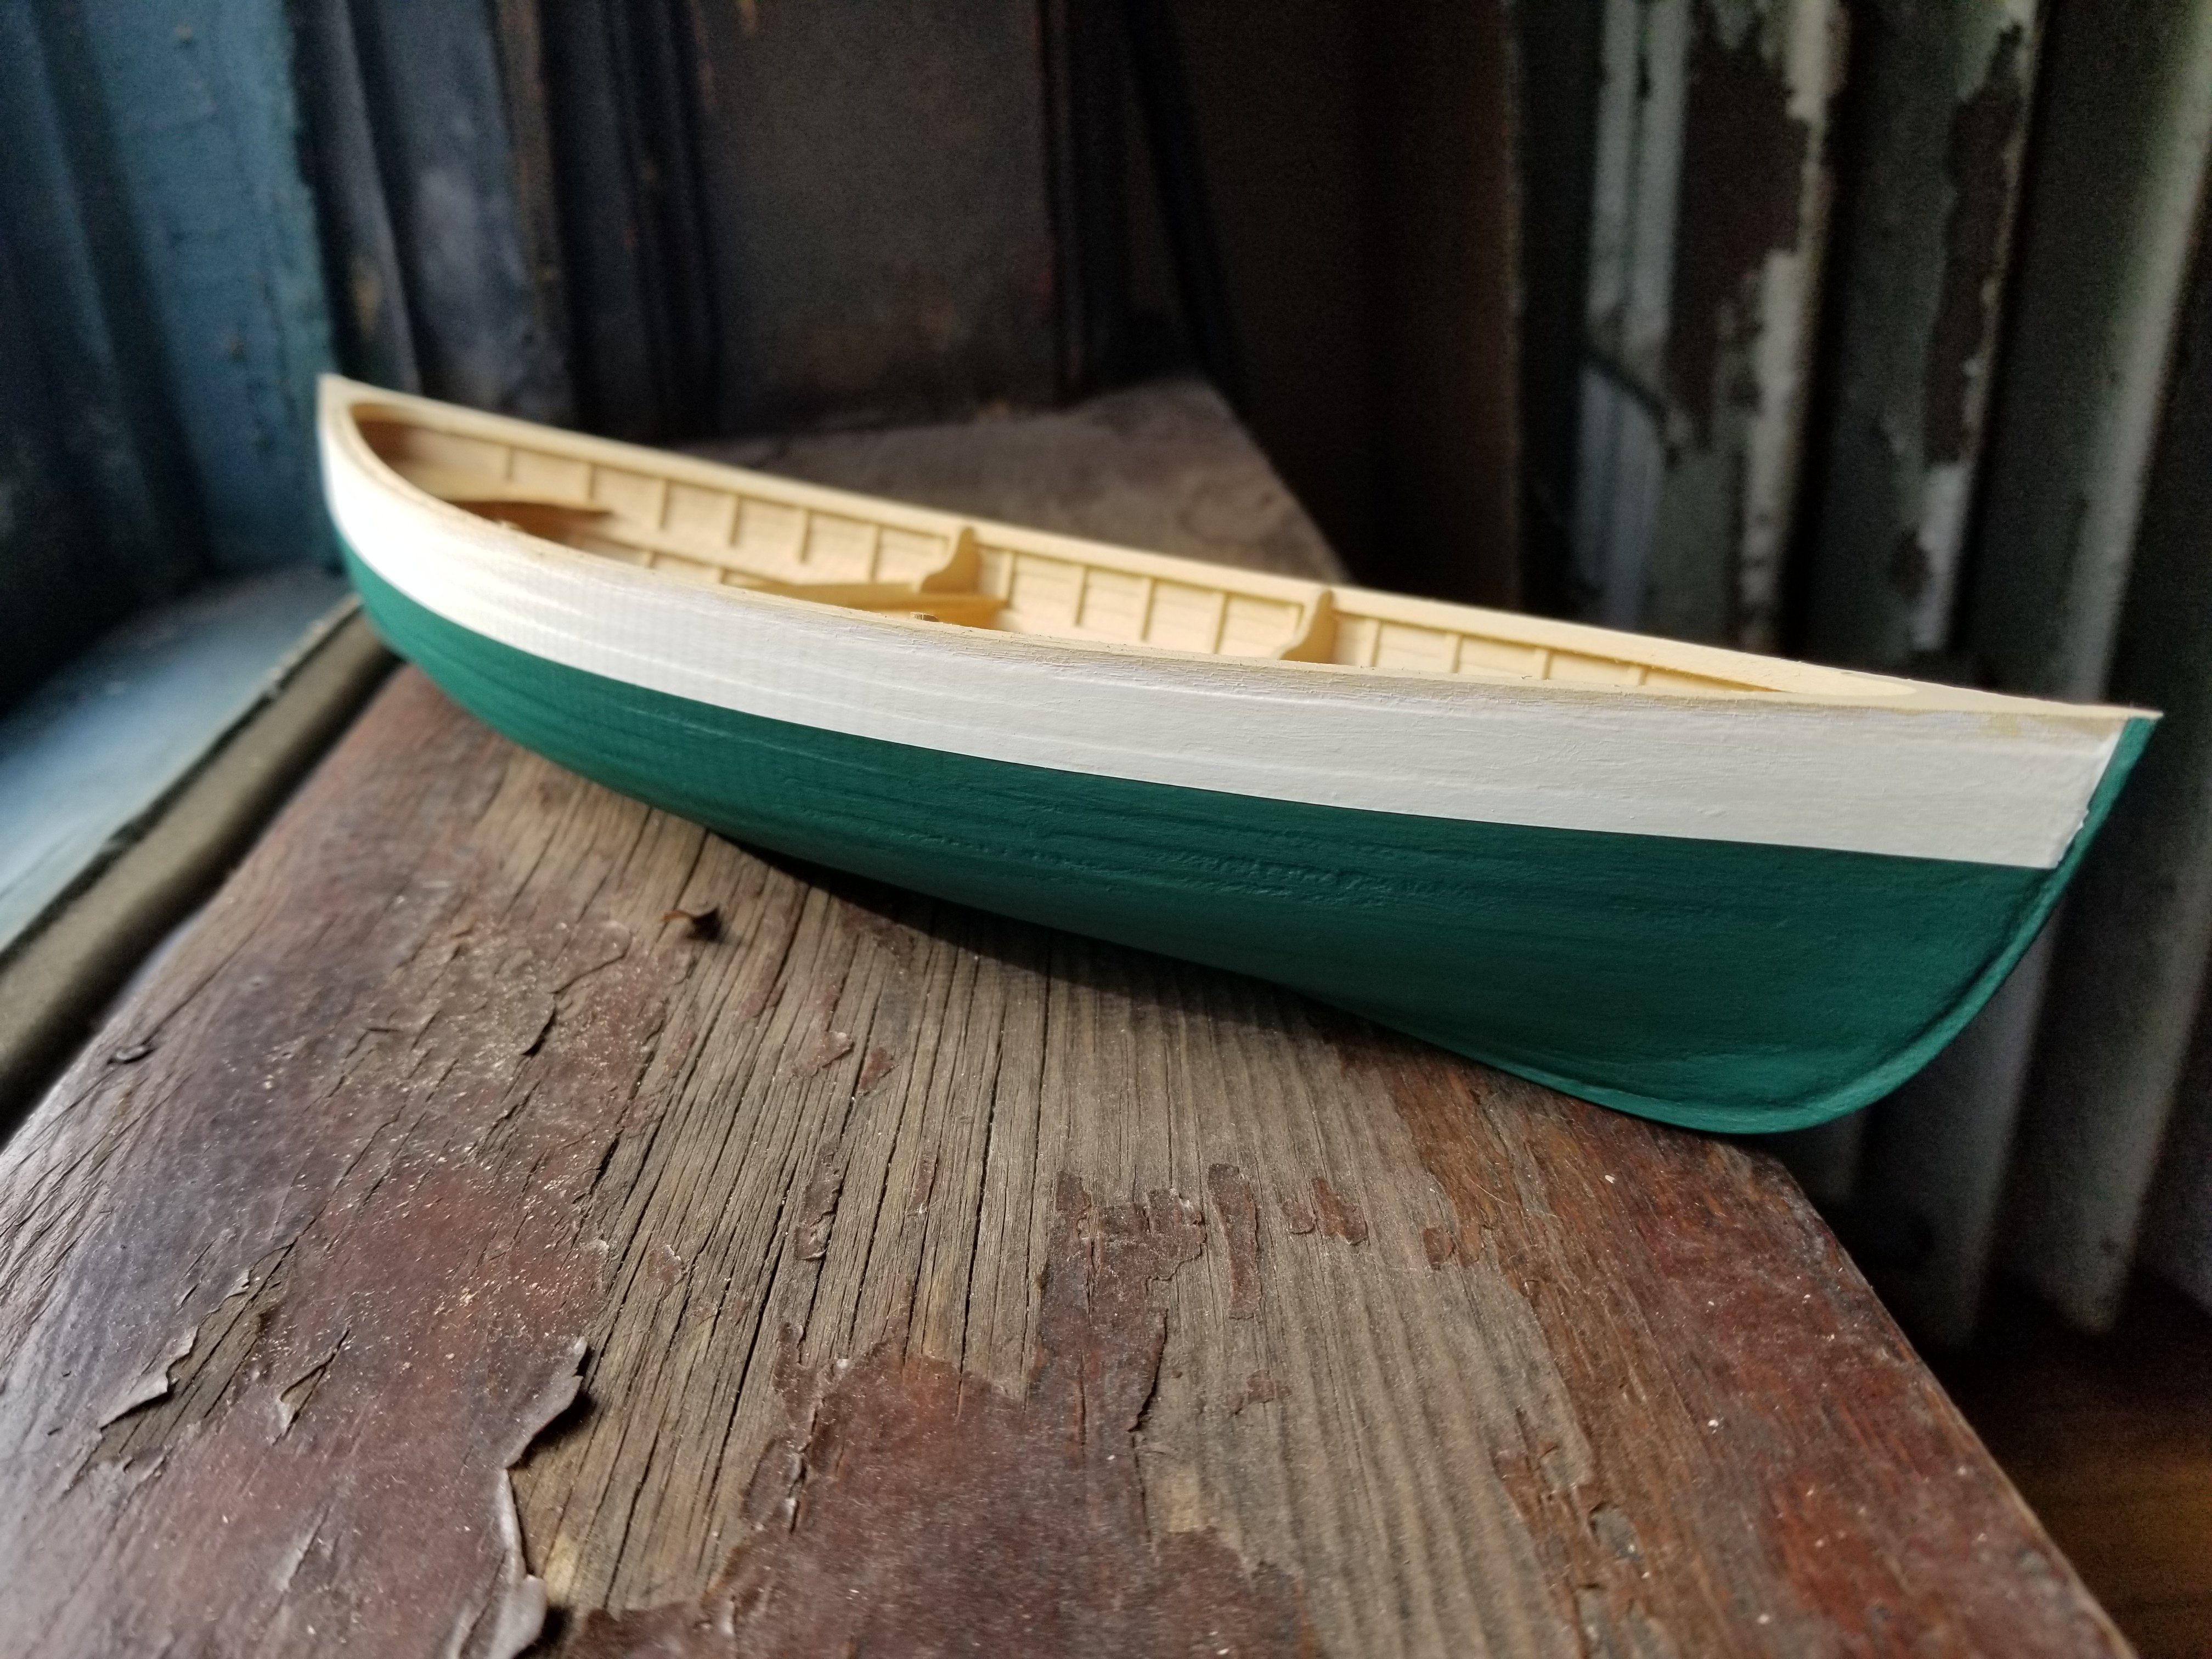
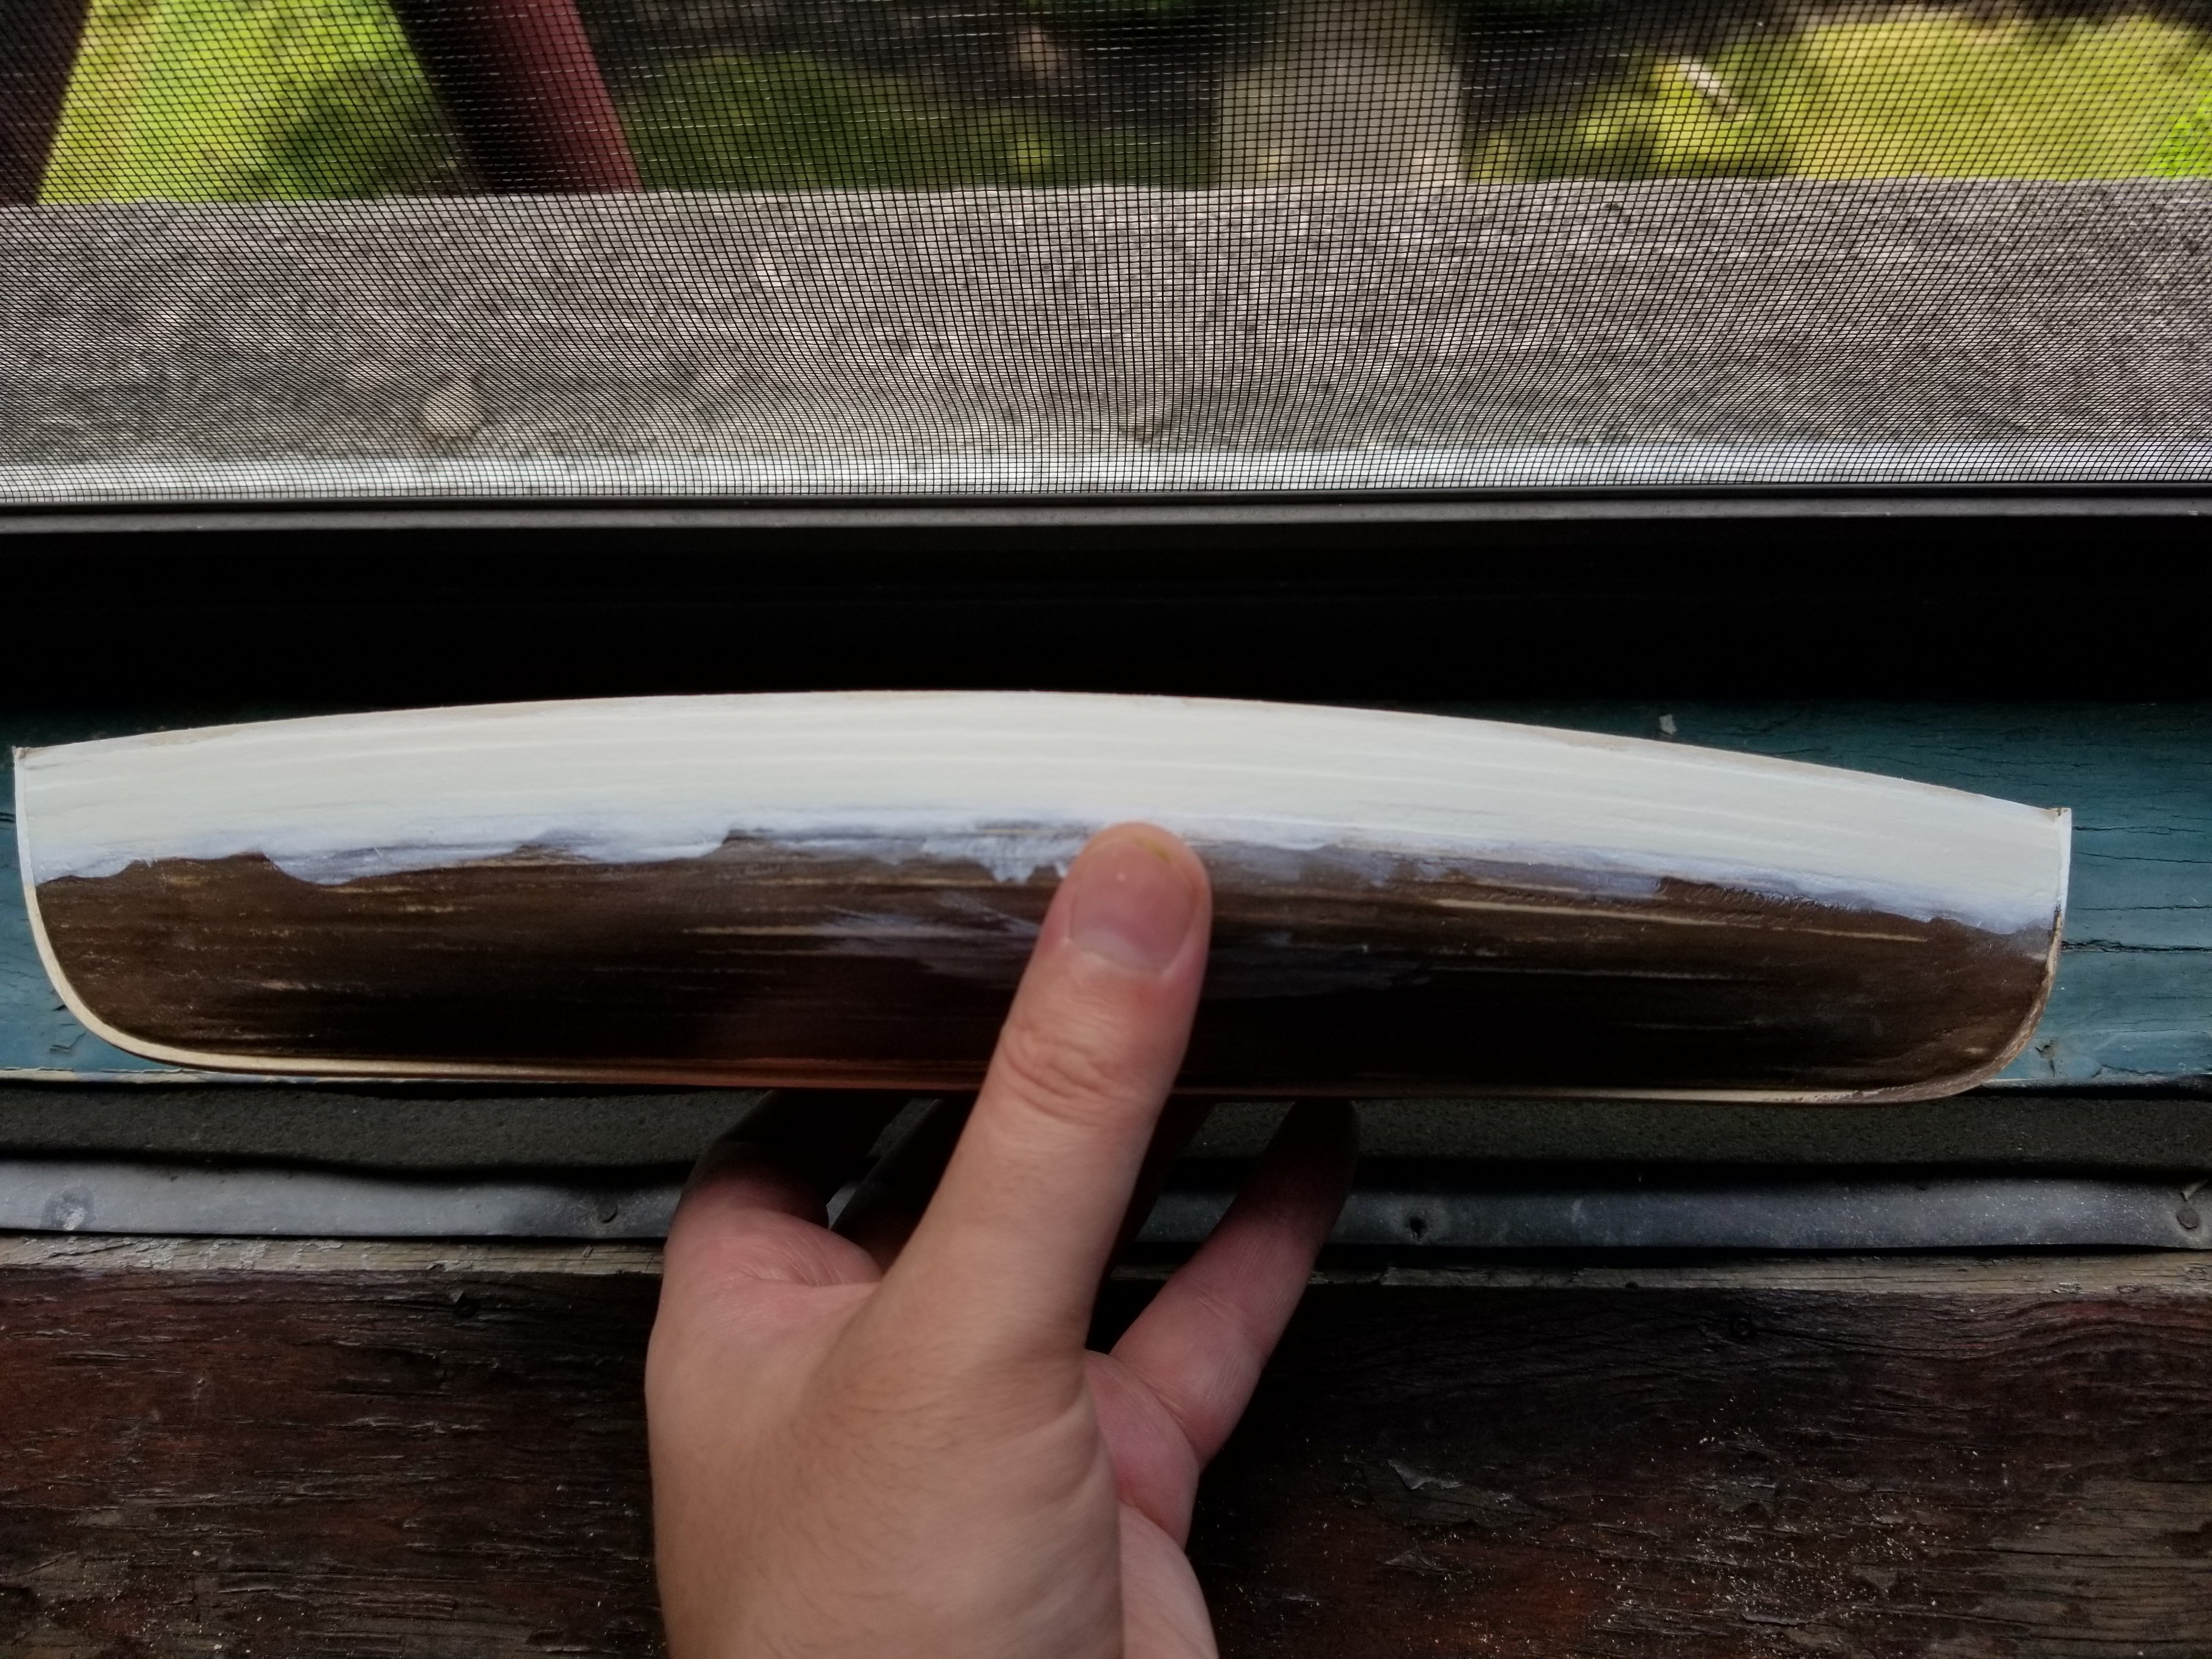
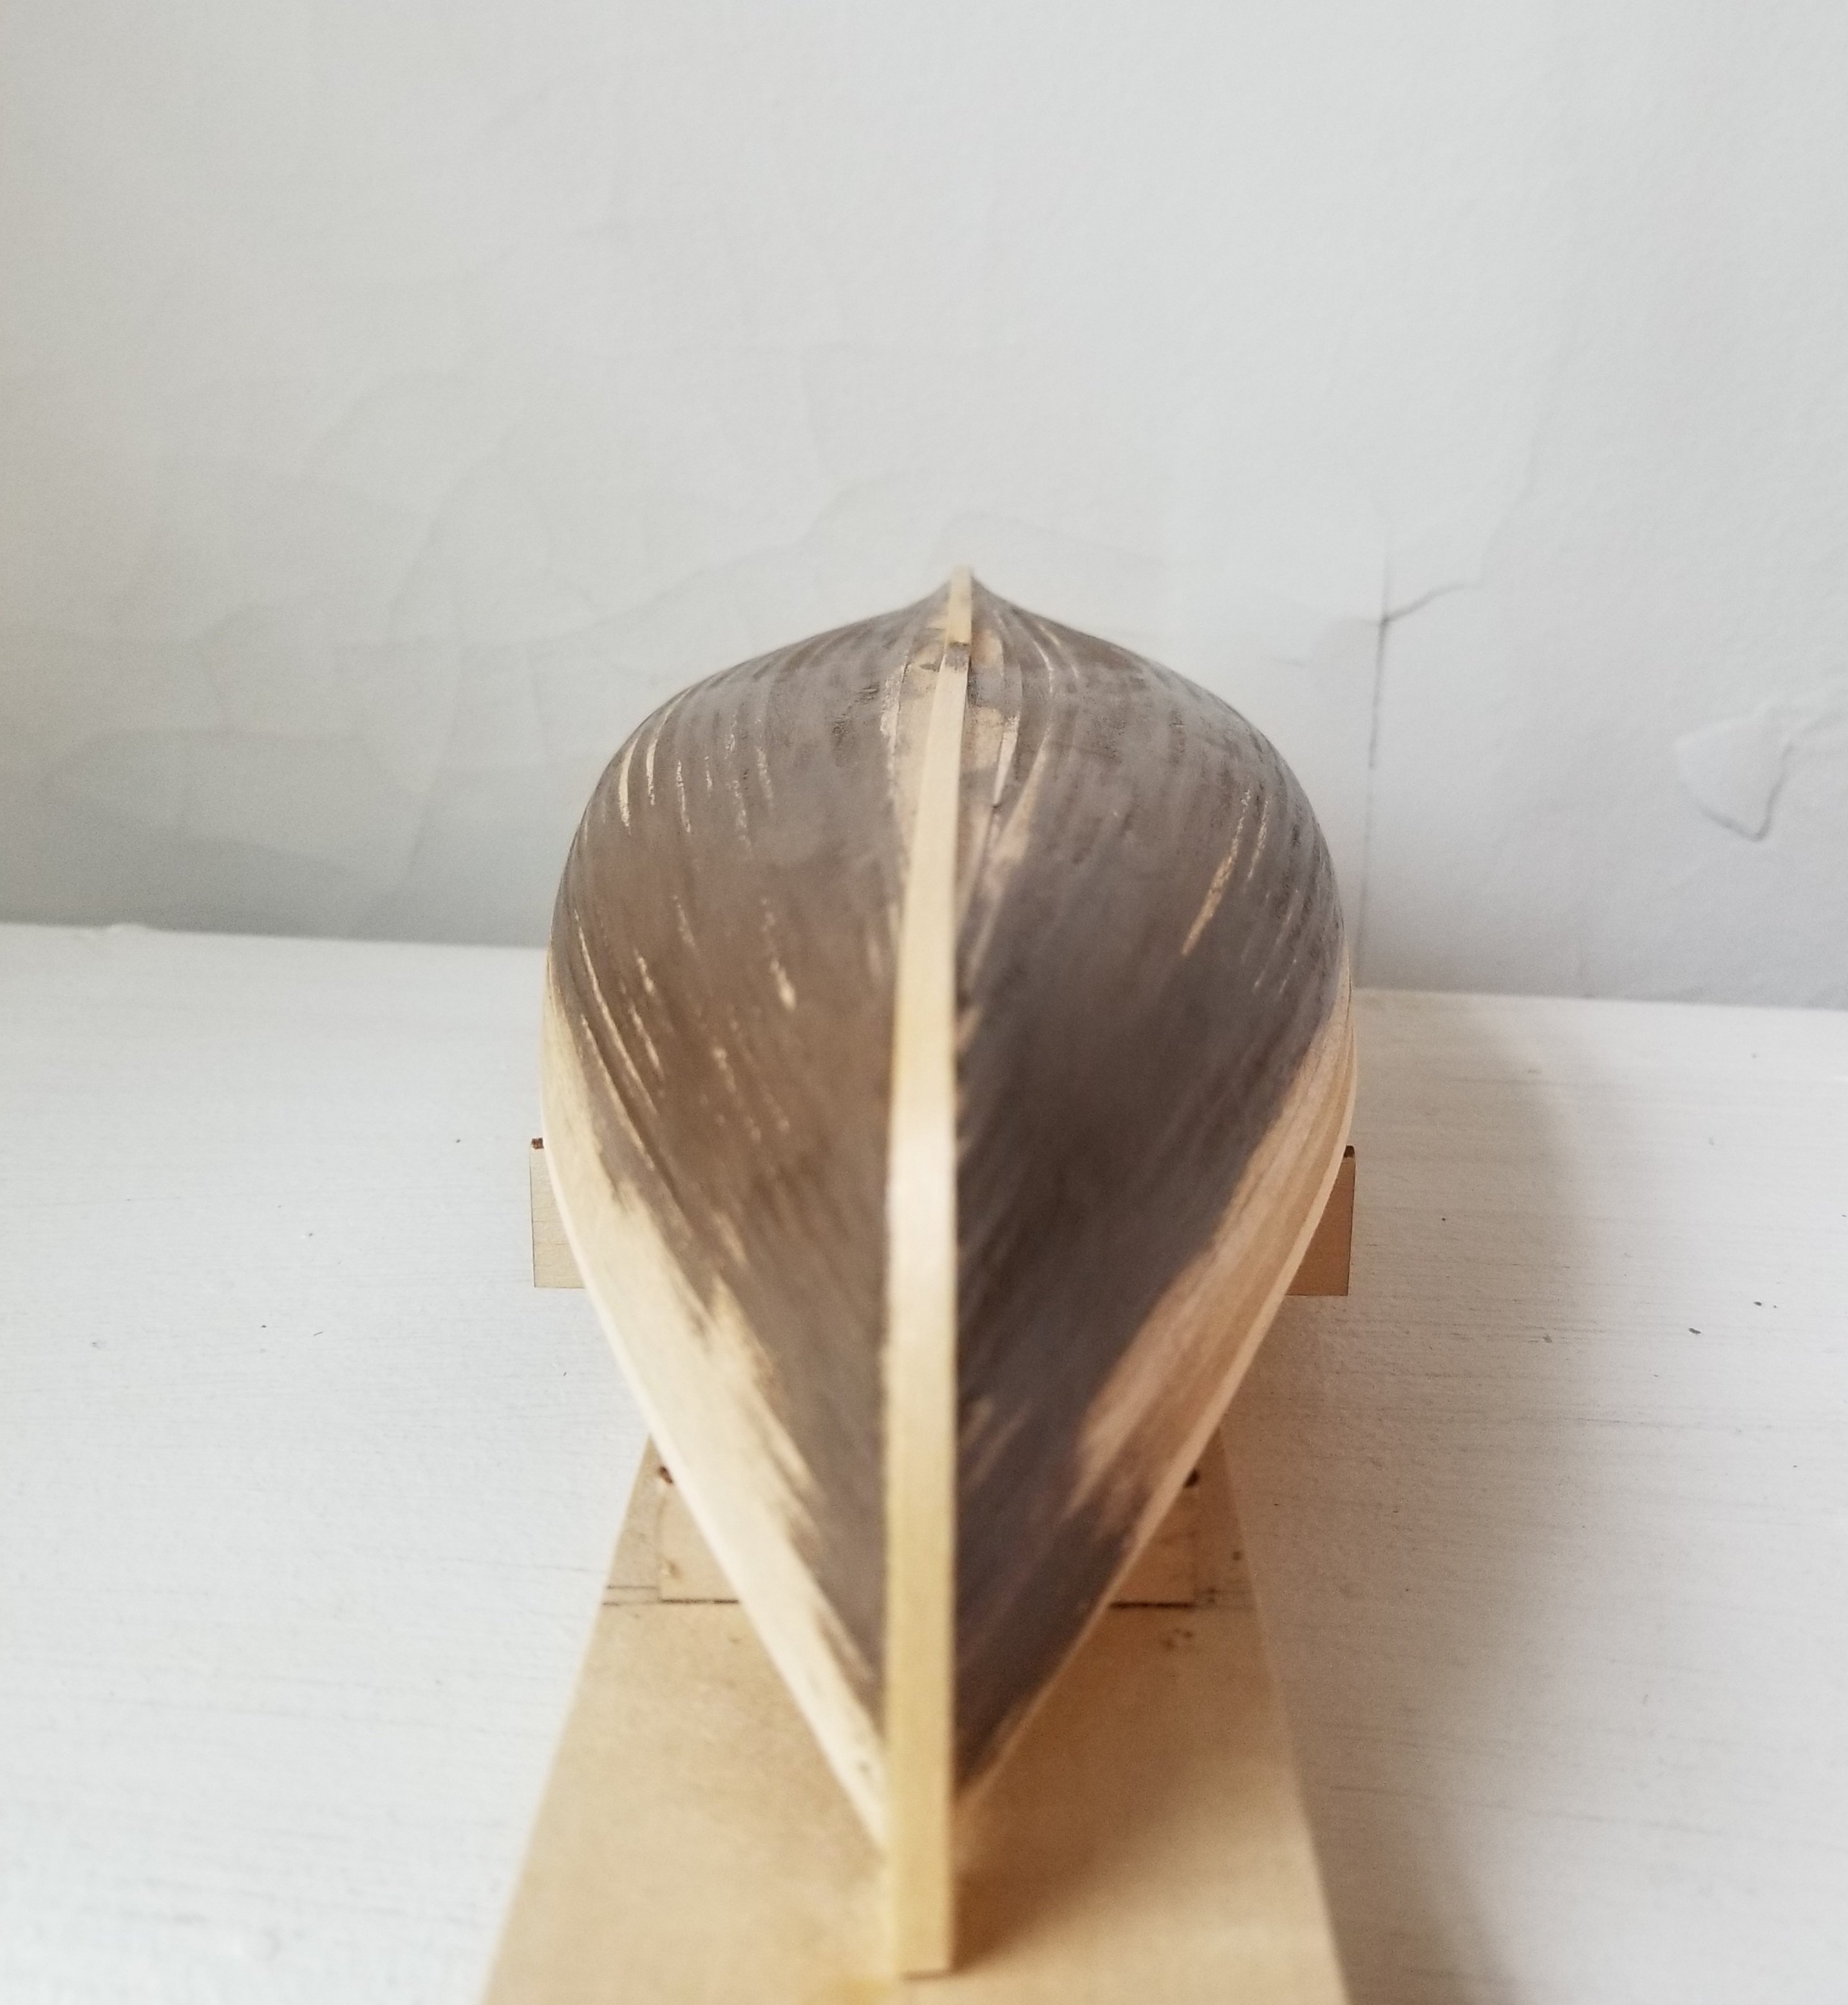
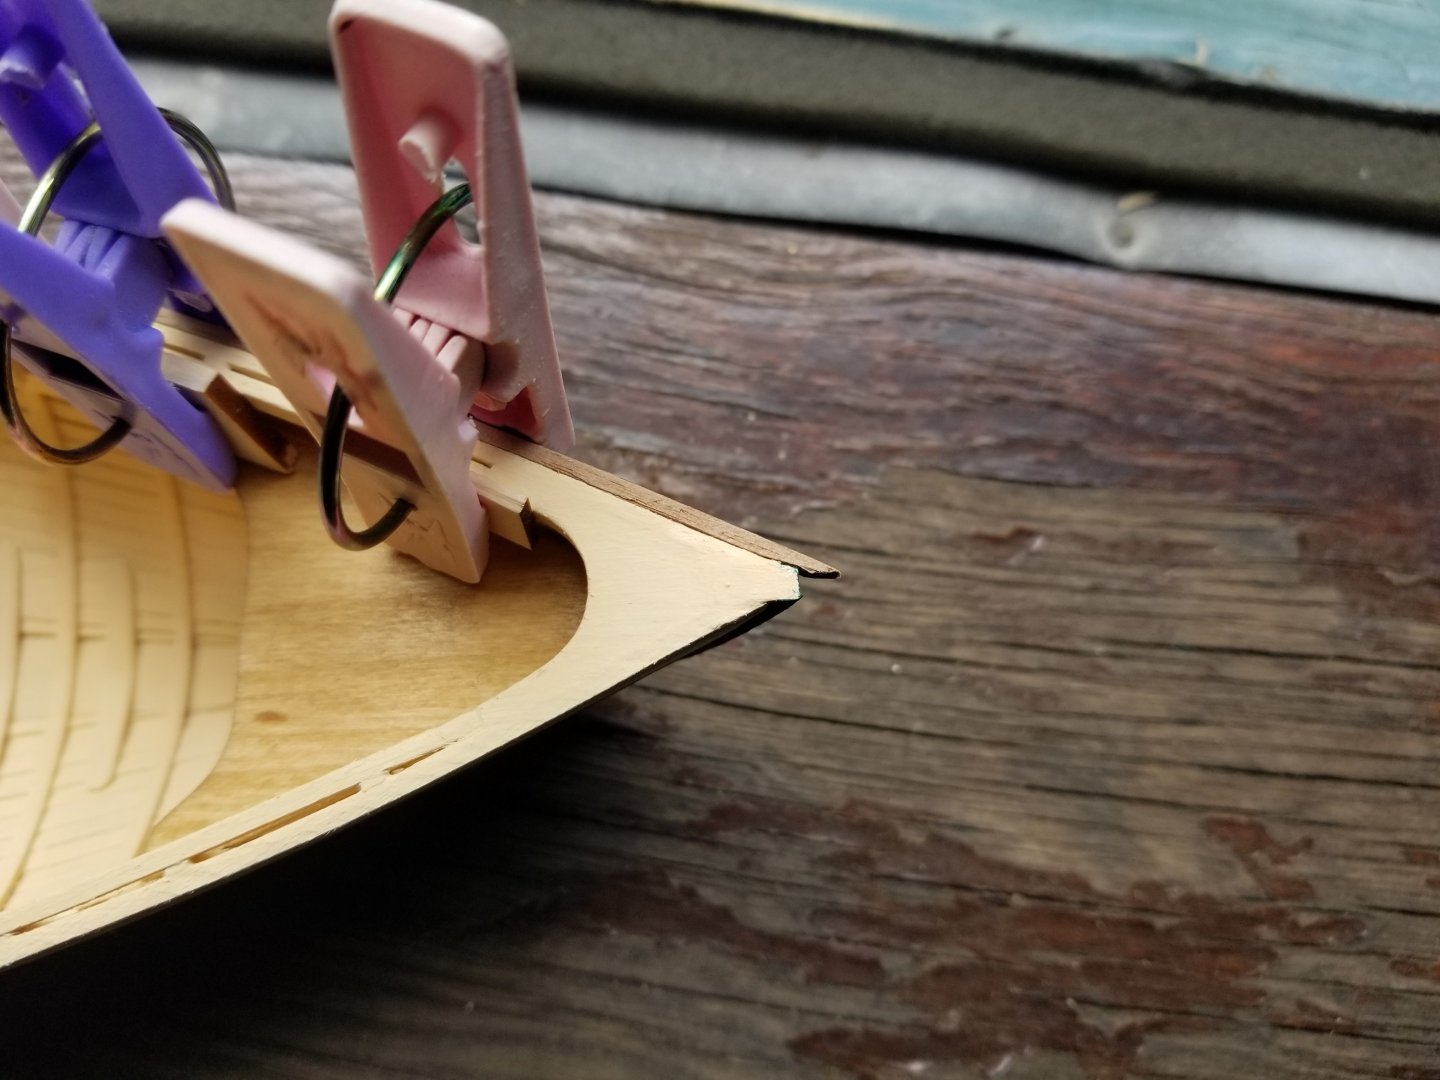
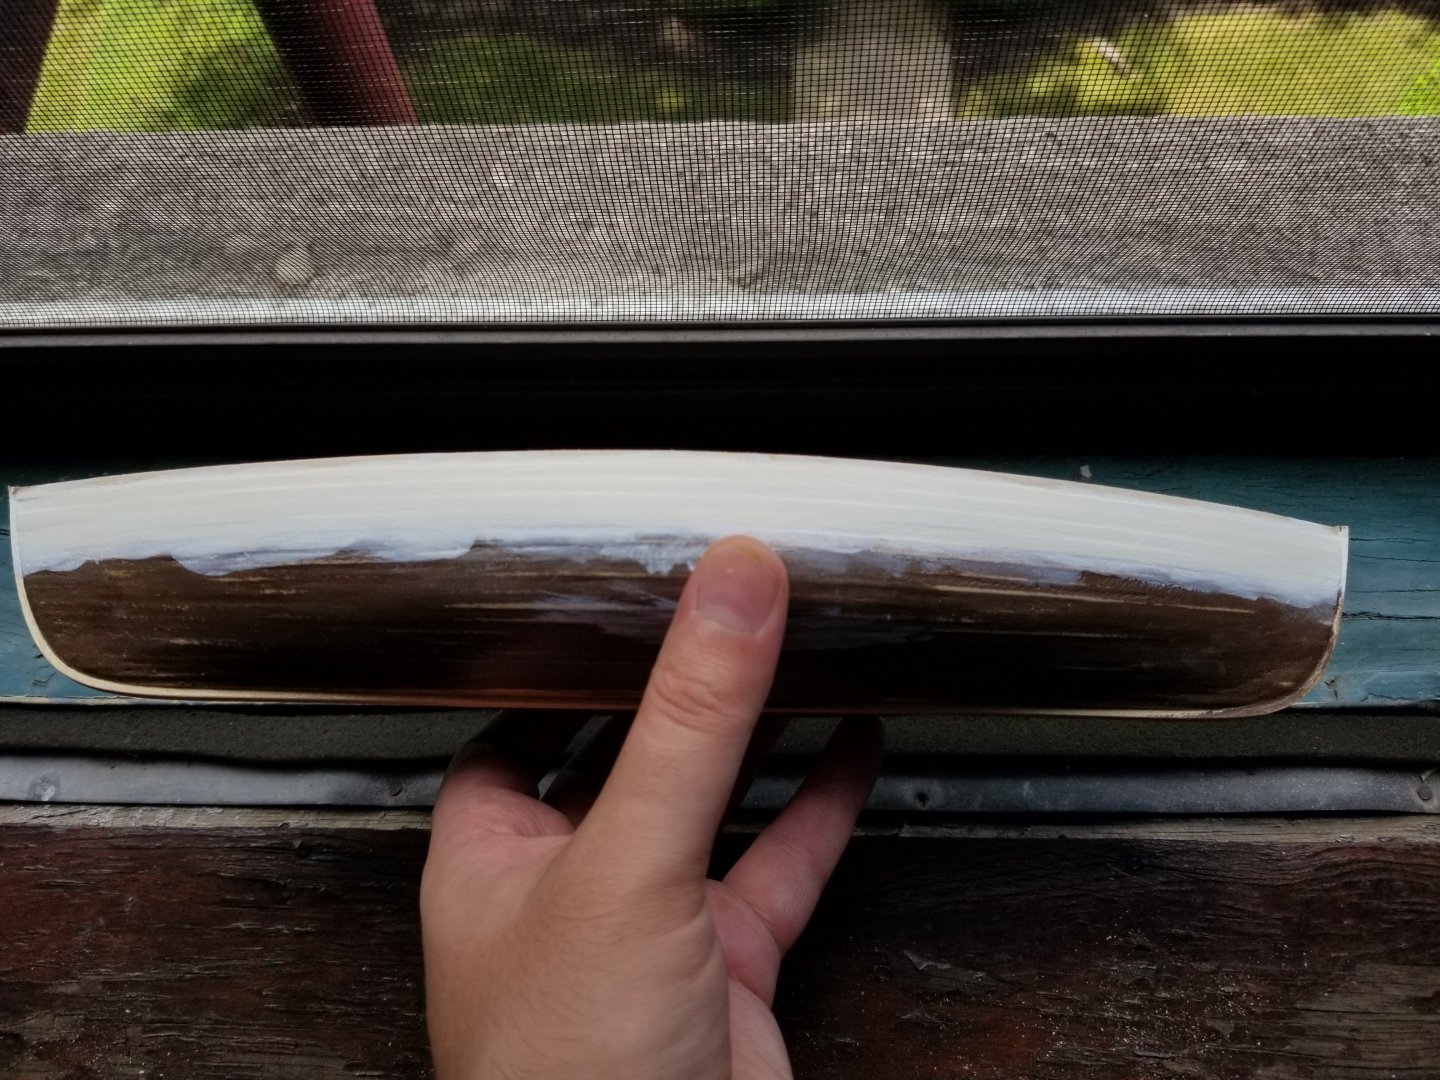
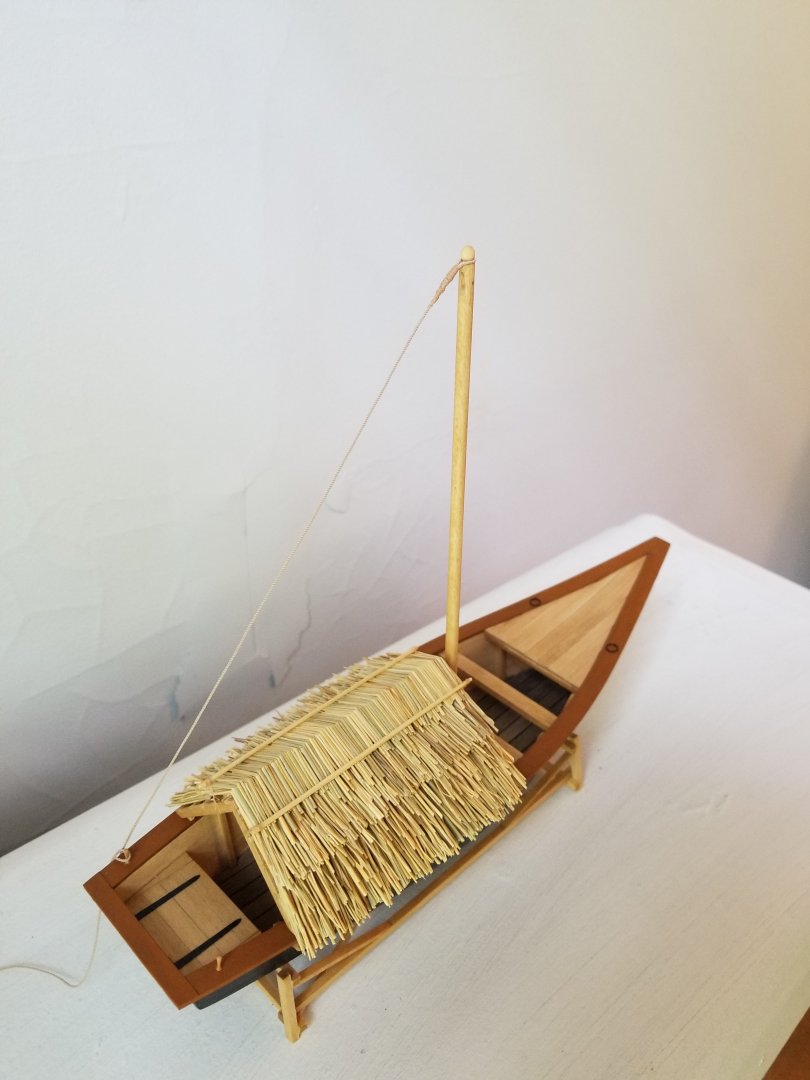
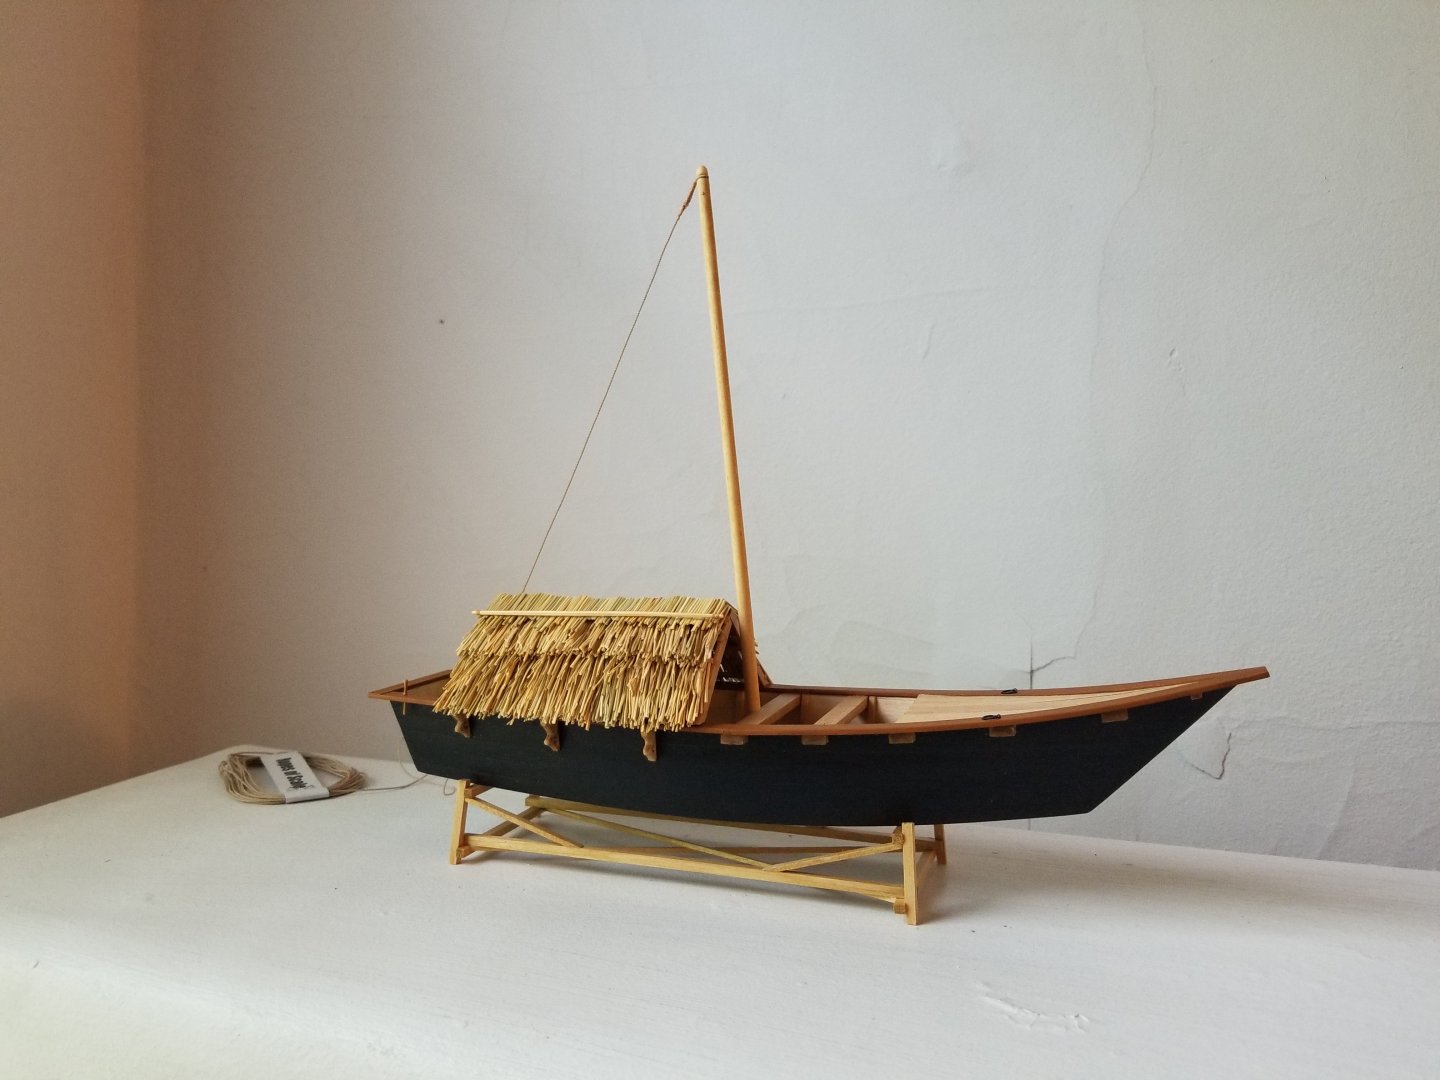
 Thanks! The walnut rub rail has now been attached. While the instructions say to just use super glue to hold the strip to the necessary curve, as with the rest of this build I soaked the walnut strips in hot water, clamped them to dry to shape, and used white glue to attach them. First, though, I scraped and carefully sanded some of the paint away from the area to be glued. Then, as the walnut strip was a bit splintery, I lightly sanded the exterior side of each strip and slightly rounded the exterior edges. After soaking and allowing the strips to dry to shape, I glued them in place. I found it easiest to glue half a strip at a time, clamping as I went, as shown below. I should note that, as I couldn't clamp right at the tip, I just held the strip in place by hand for 15 minutes or so until it was sturdy enough to stay in place. Beveling the tips to fit against the stems was a bit more complicated than the instructions suggested, as the stem didn't always form such a perfect angle with the hull planking. In a couple joints, I was able to bevel it more or less as given in the instructions: At other joints, though, I had to trial-and-error a fit as there wasn't really a defined angle. I allowed the strip to run a little long to allow final shaping afterward. Once both strips were on, I did the final shaping. I taped off the stems to protect them while sanding. I then trimmed and sanded the rub rails to make them smoothly run into the stems. I then used green paint to touch up where needed (and to touch up a couple spots on the border of the white strip). With that, the hull is complete except for the oarlocks. As can be seen, the rub rails run smoothly into the stems. Next, I think it's time to make a stand.
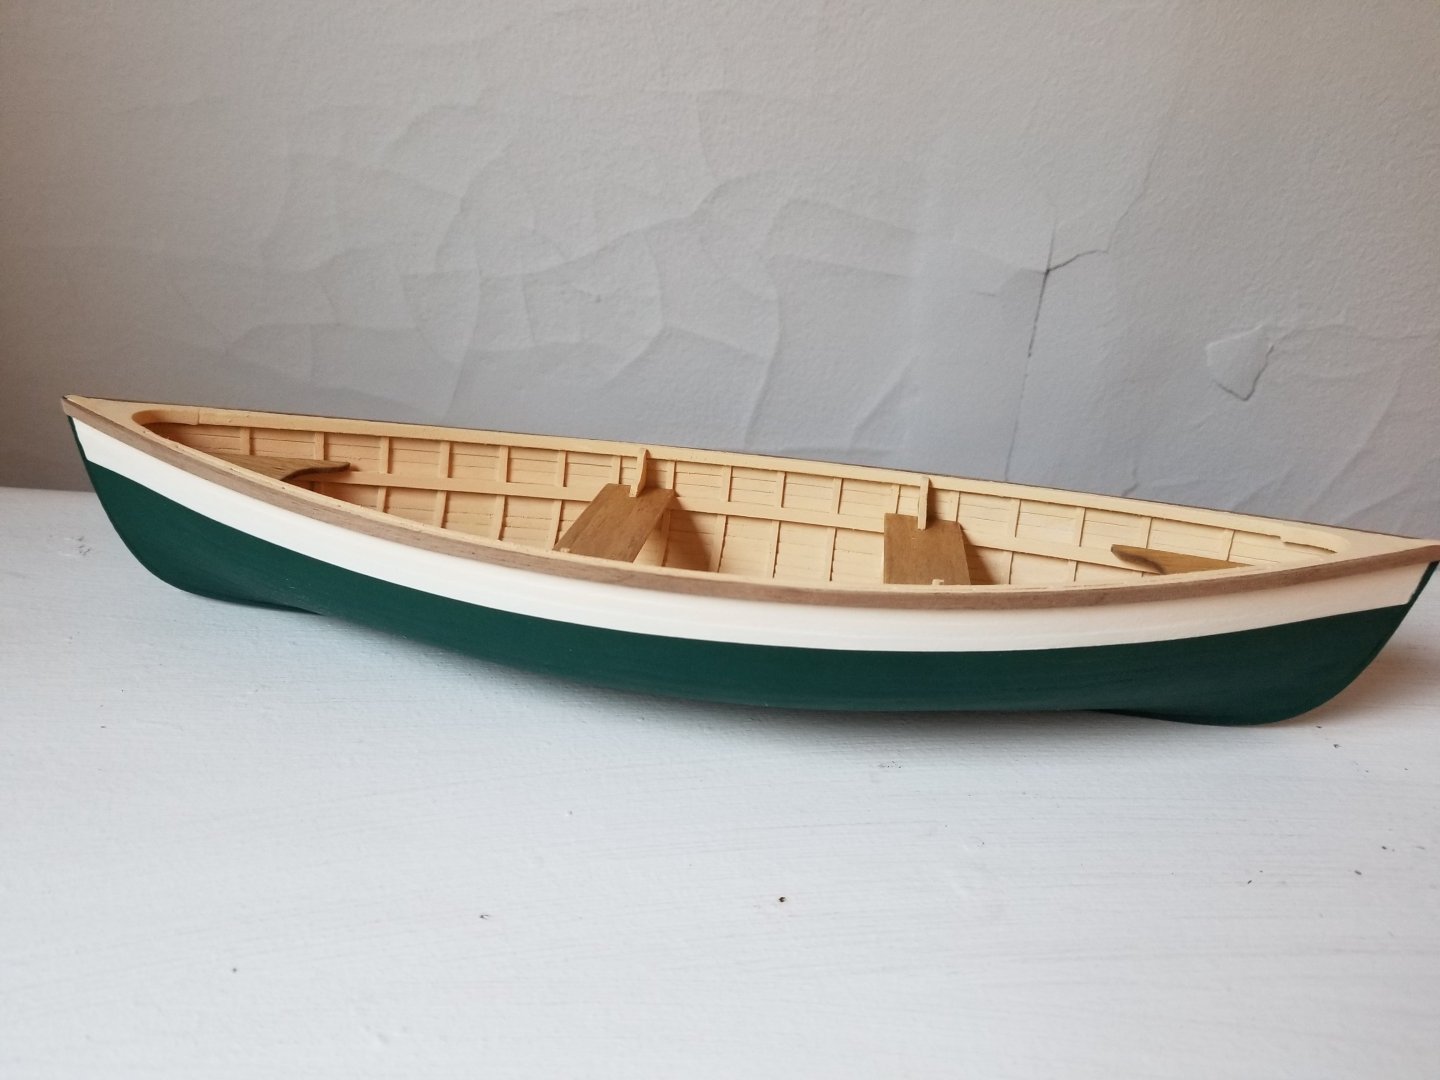


- 65 replies
-
- 12
-

-

-
- Maine Peapod
- Midwest Products
- (and 1 more)
-
Very nice start, looking forward to following this build!
-
Very nicely done!
-
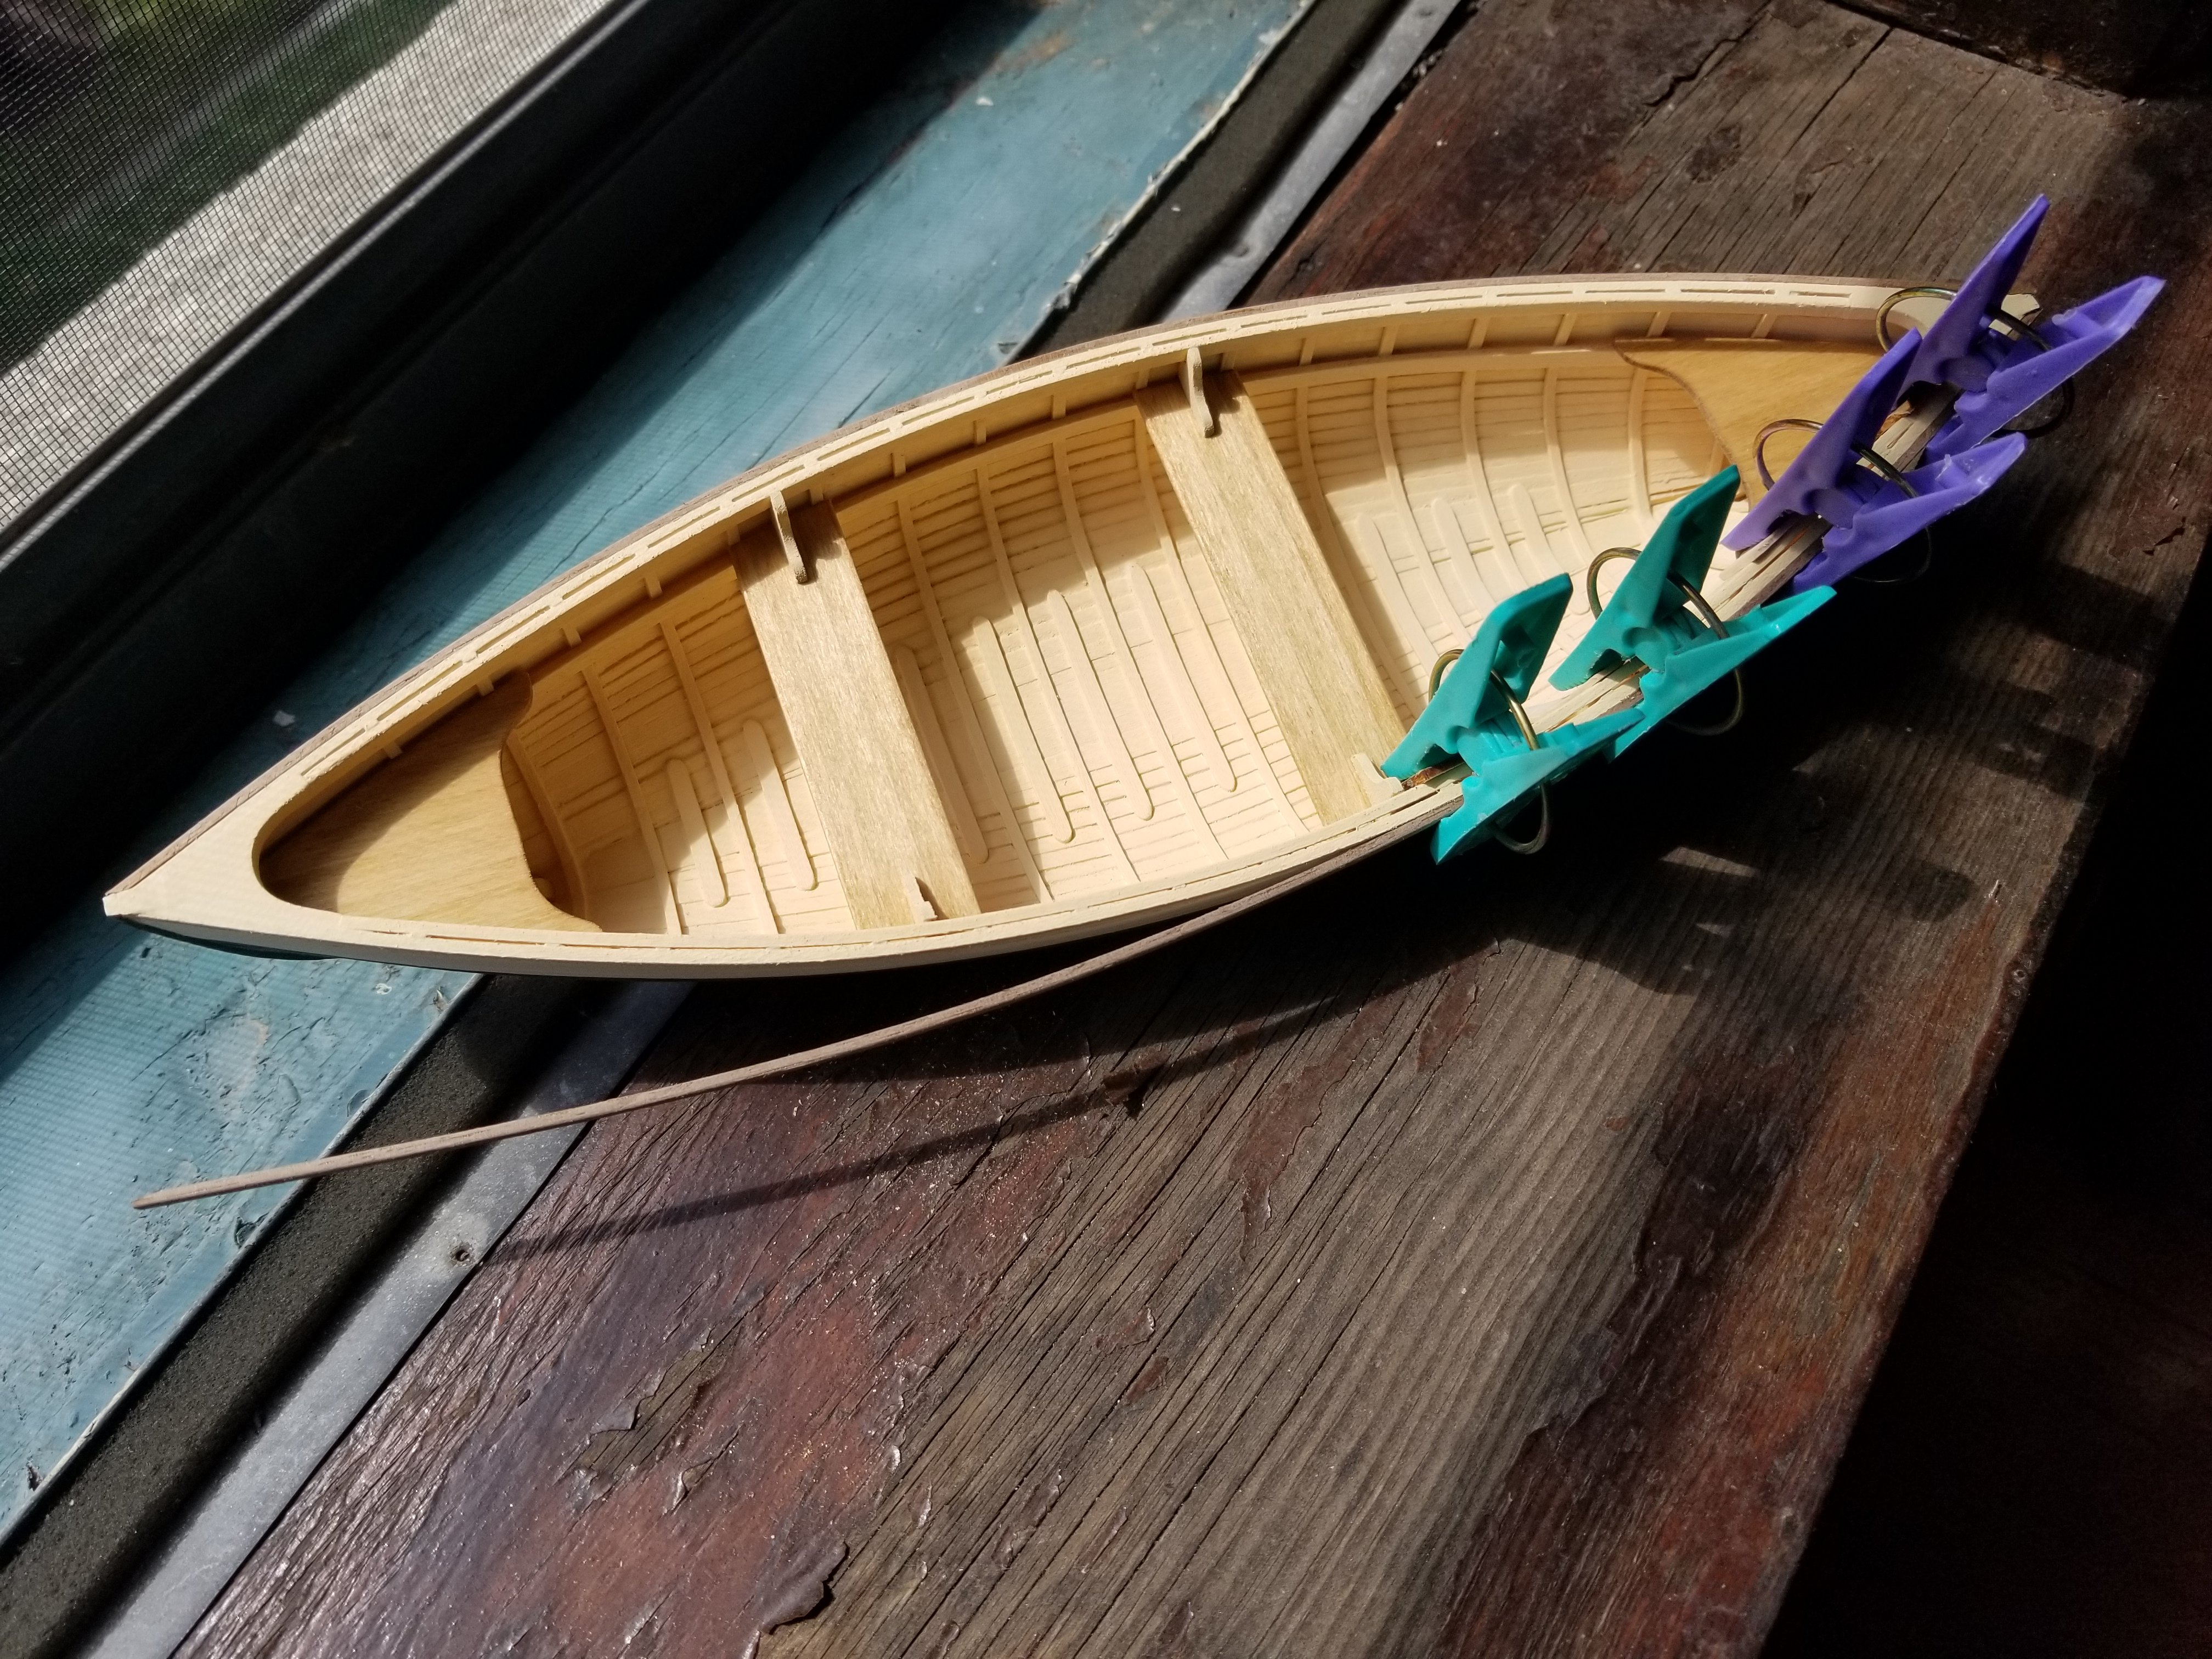
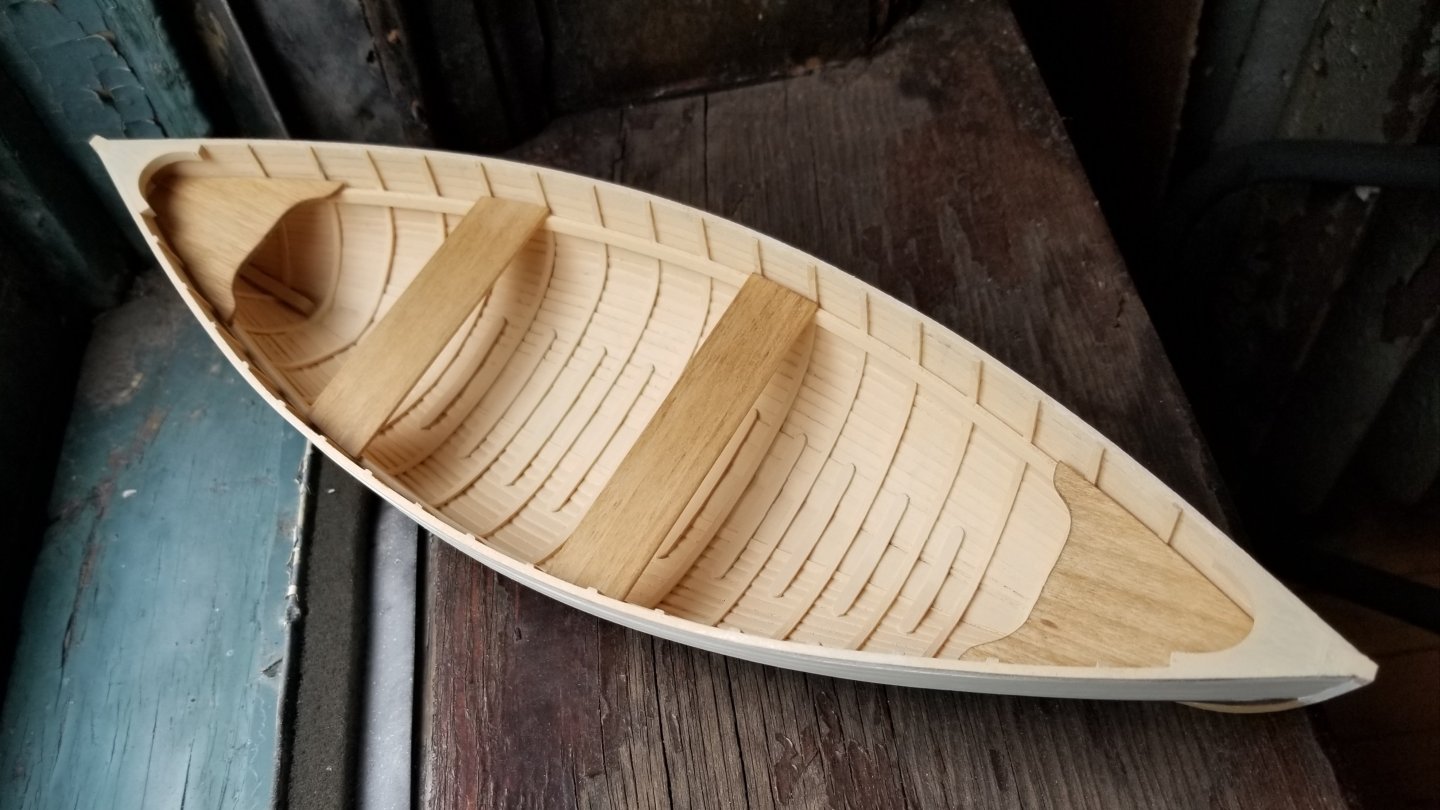
Thanks! I shaped the edges of the breasthooks to run smoothly into the inwales, and then fully painted the interior. My first attempt wasa shade too light, but I was able to add a bit more brown to the mix and matched the previous coat pretty well. I also decided to paint the knees. Once they dried, I glued all the thwarts etc into place. The interior is now nearly finished, except for oarlocks/oars/lobster trap/etc. Next, to paint the exterior. A bit of the interior color had gotten onto the exterior white stripe, so I gave that a new coat. Then, I used tamiya masking tape to set off the stripe, and painted the rest of the hull a dark green. As can be seen, despite the filling and sanding the hull is still not very smooth. However, that will mostly be out of sight on the bottom, so I'm not too worried. After allowing it to dry and removing the tape, I can see I'll have a little touch-up to do at the stem. But otherwise, the hull is nearly complete. Next I'll add a walnut trim strip as a wale around the edge.


- 65 replies
-
- 10
-
-
-
- Maine Peapod
- Midwest Products
- (and 1 more)
-
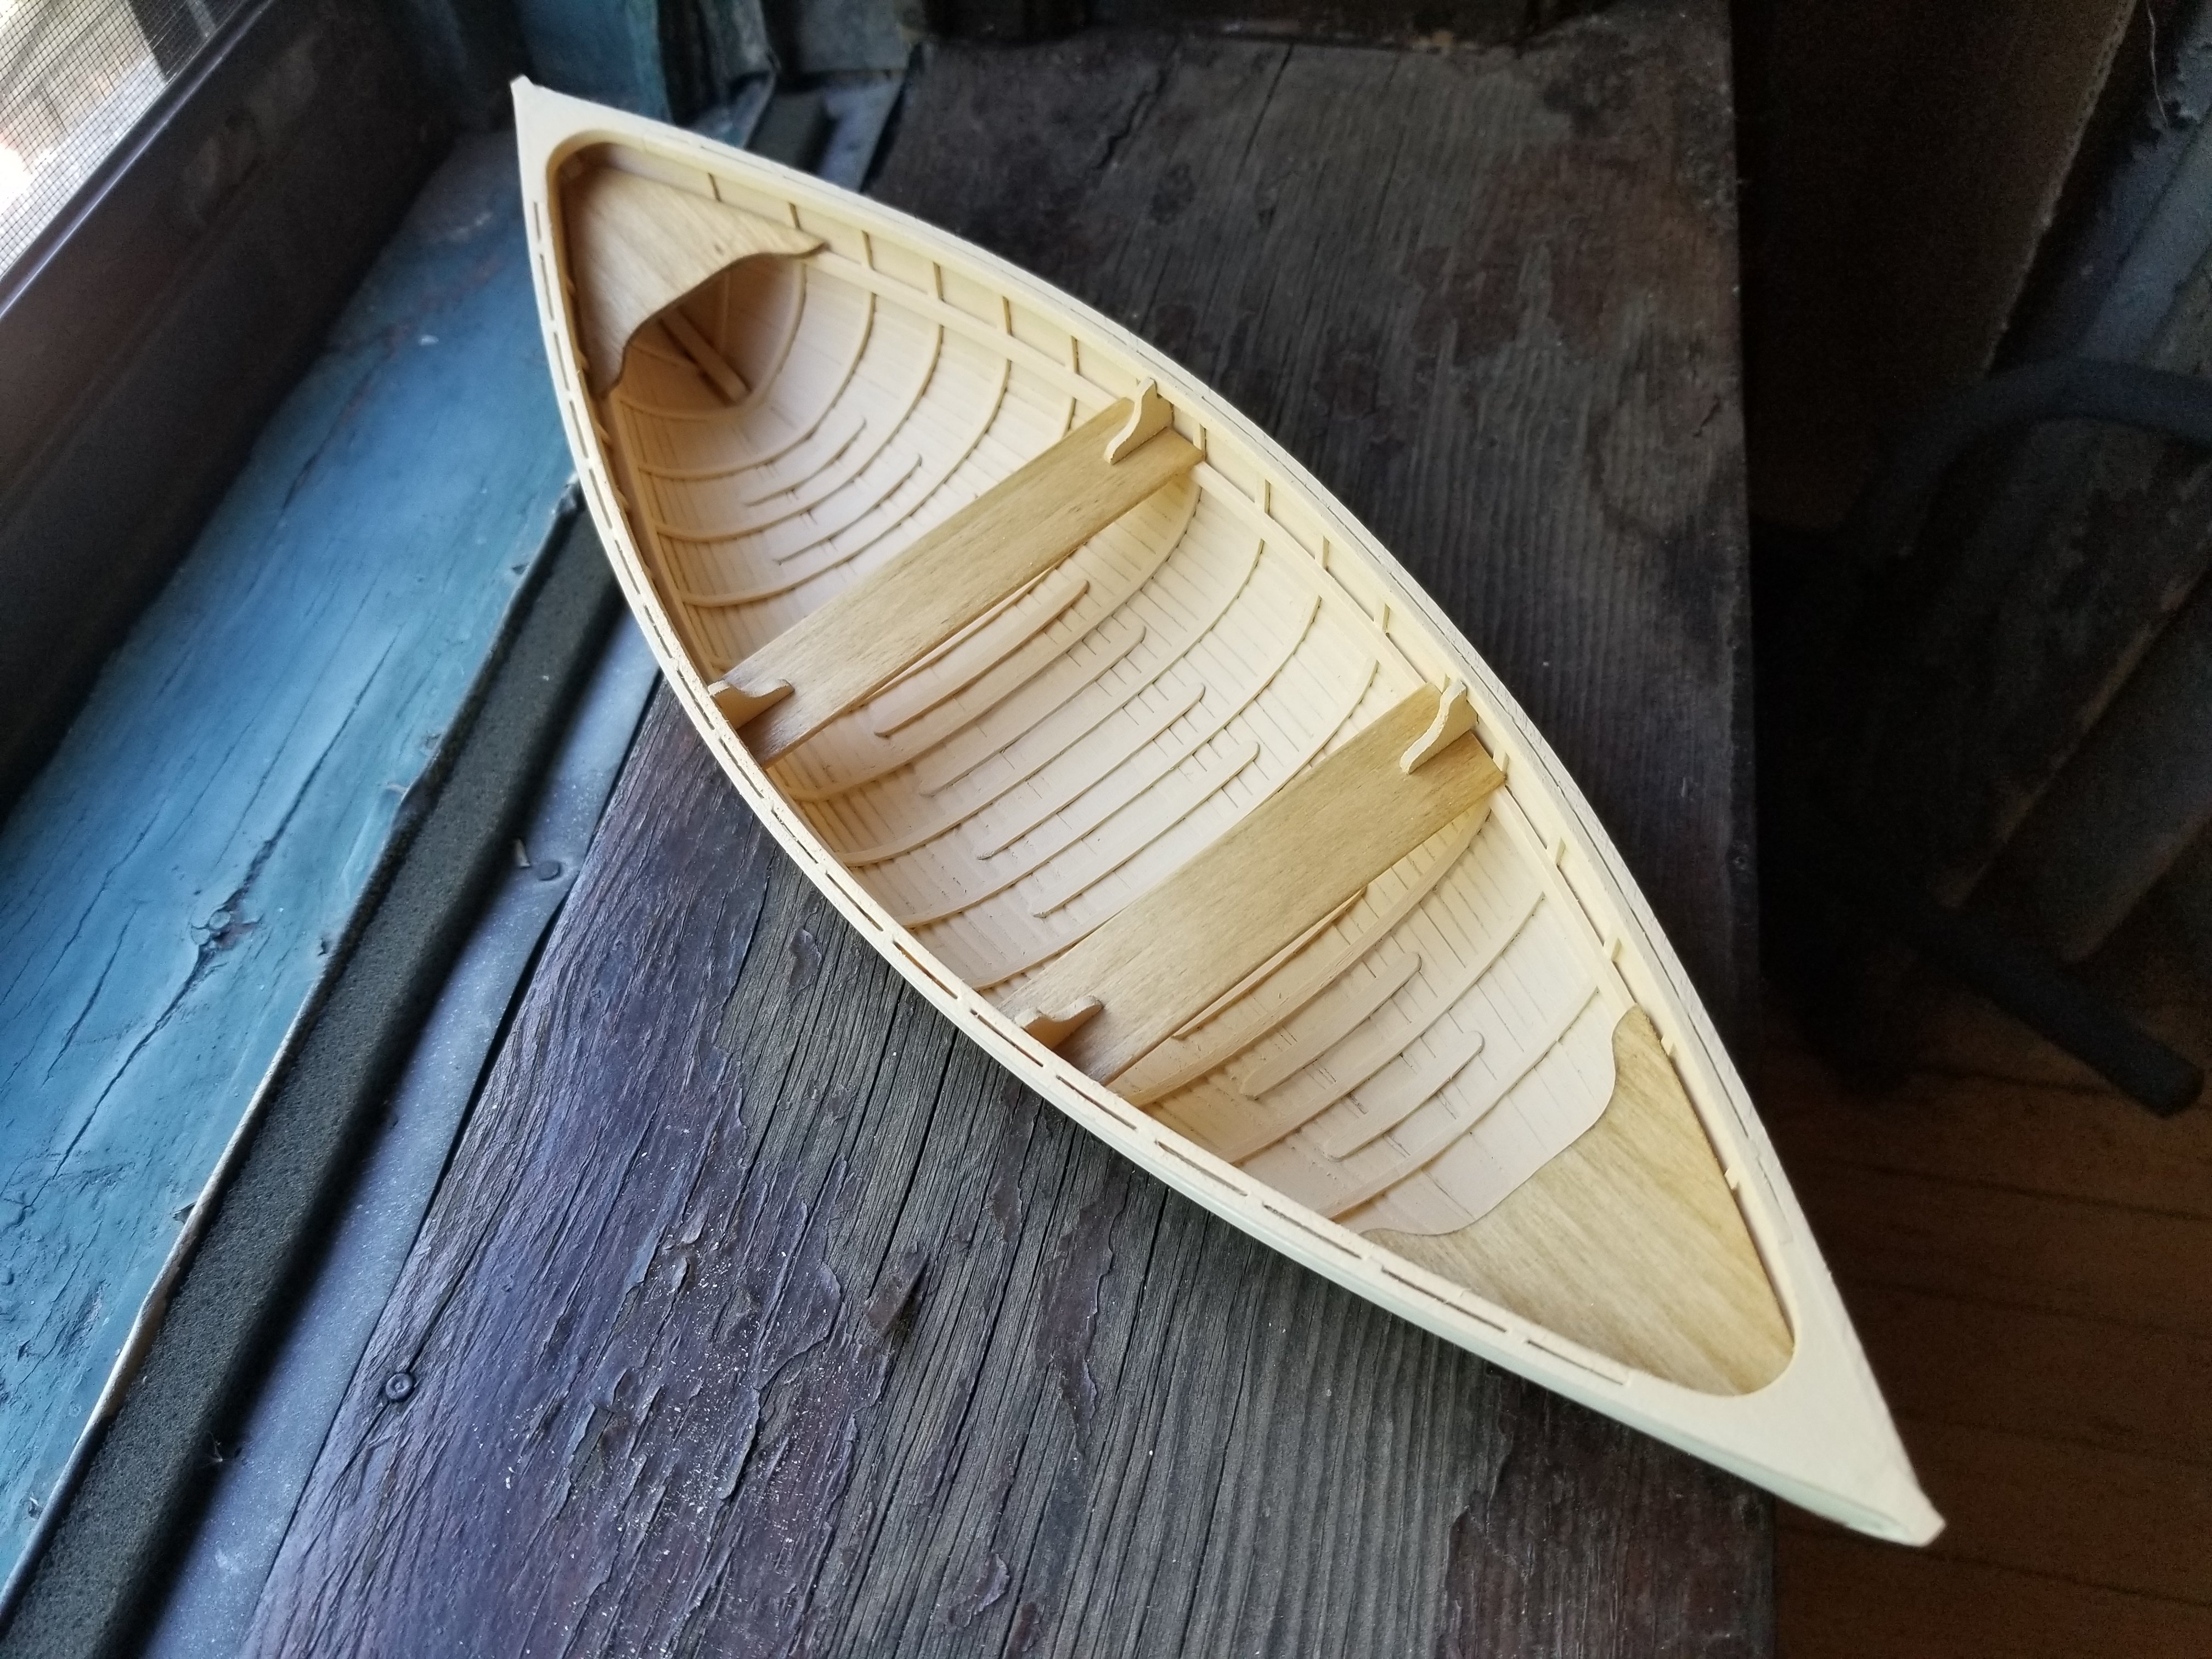
Excellent point! I've made a bit more progress on the interior. First, a second coat of paint really helped to even things out. I think one or two more costs of paint will be enough. However, before I get to that, I realized that I need to add the inwales. They've been cut to size and are drying into shape. I'm actually not clamping them now (although I will when I glue them), because the pressure from the breasthooks is enough to hold them in shape. After they're glued into place, I'll need to sand the ends of the breasthooks flush with them. I also decided to color the seats and thwarts with stain. They aren't glued into place yet. They required a bit of shaping to fit properly--better that they're provided oversized and can be trimmed down than be provided in a size too small. Adding the thwarts really gives a sense of this model's large scale. Earlier, with the numerous frames and the use of thin strips for planking, the hull almost felt like it could be a smaller-scale model of a much larger vessel (by which I mean something around 30 feet in length), but that's not the case with the thwarts in place. I also checked the fit of the knees, which I will also need to color. I'm debating whether to paint or stain them. Once the interior is finished, I'll be able to fully paint the exterior. The end is in sight for this build, but I'm not there yet.

- 65 replies
-
- 8
-
-
- Maine Peapod
- Midwest Products
- (and 1 more)
-
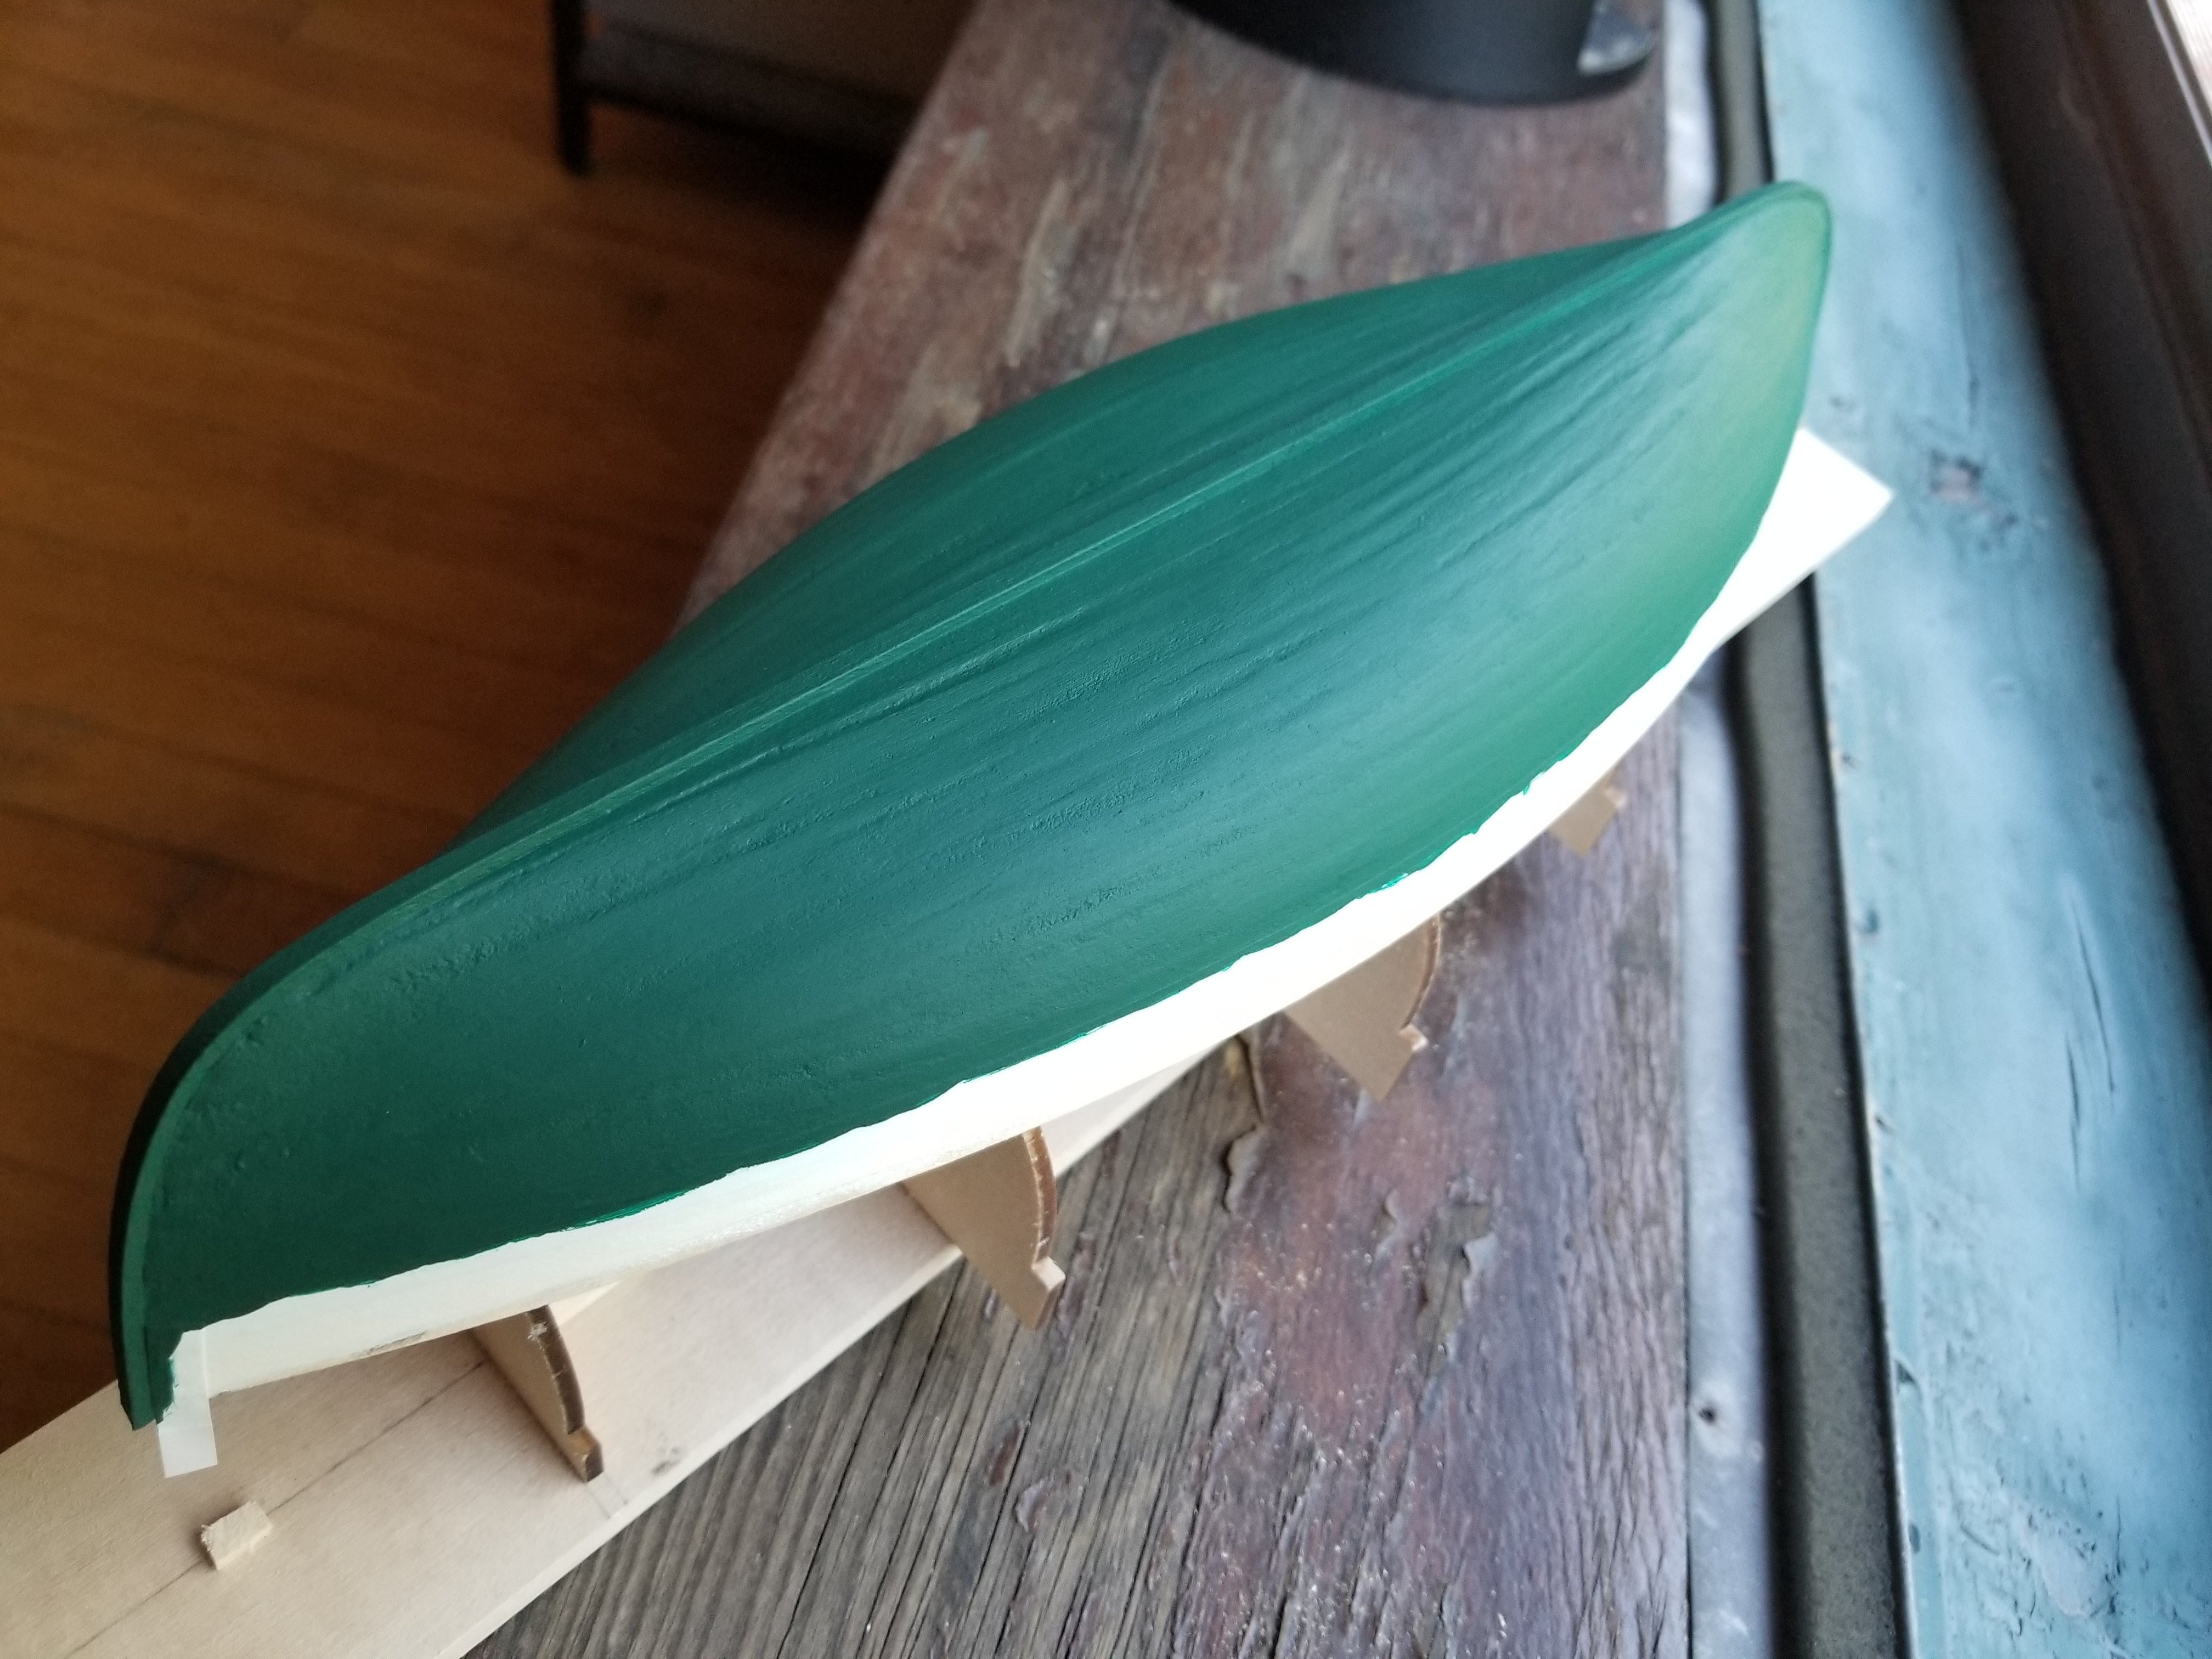
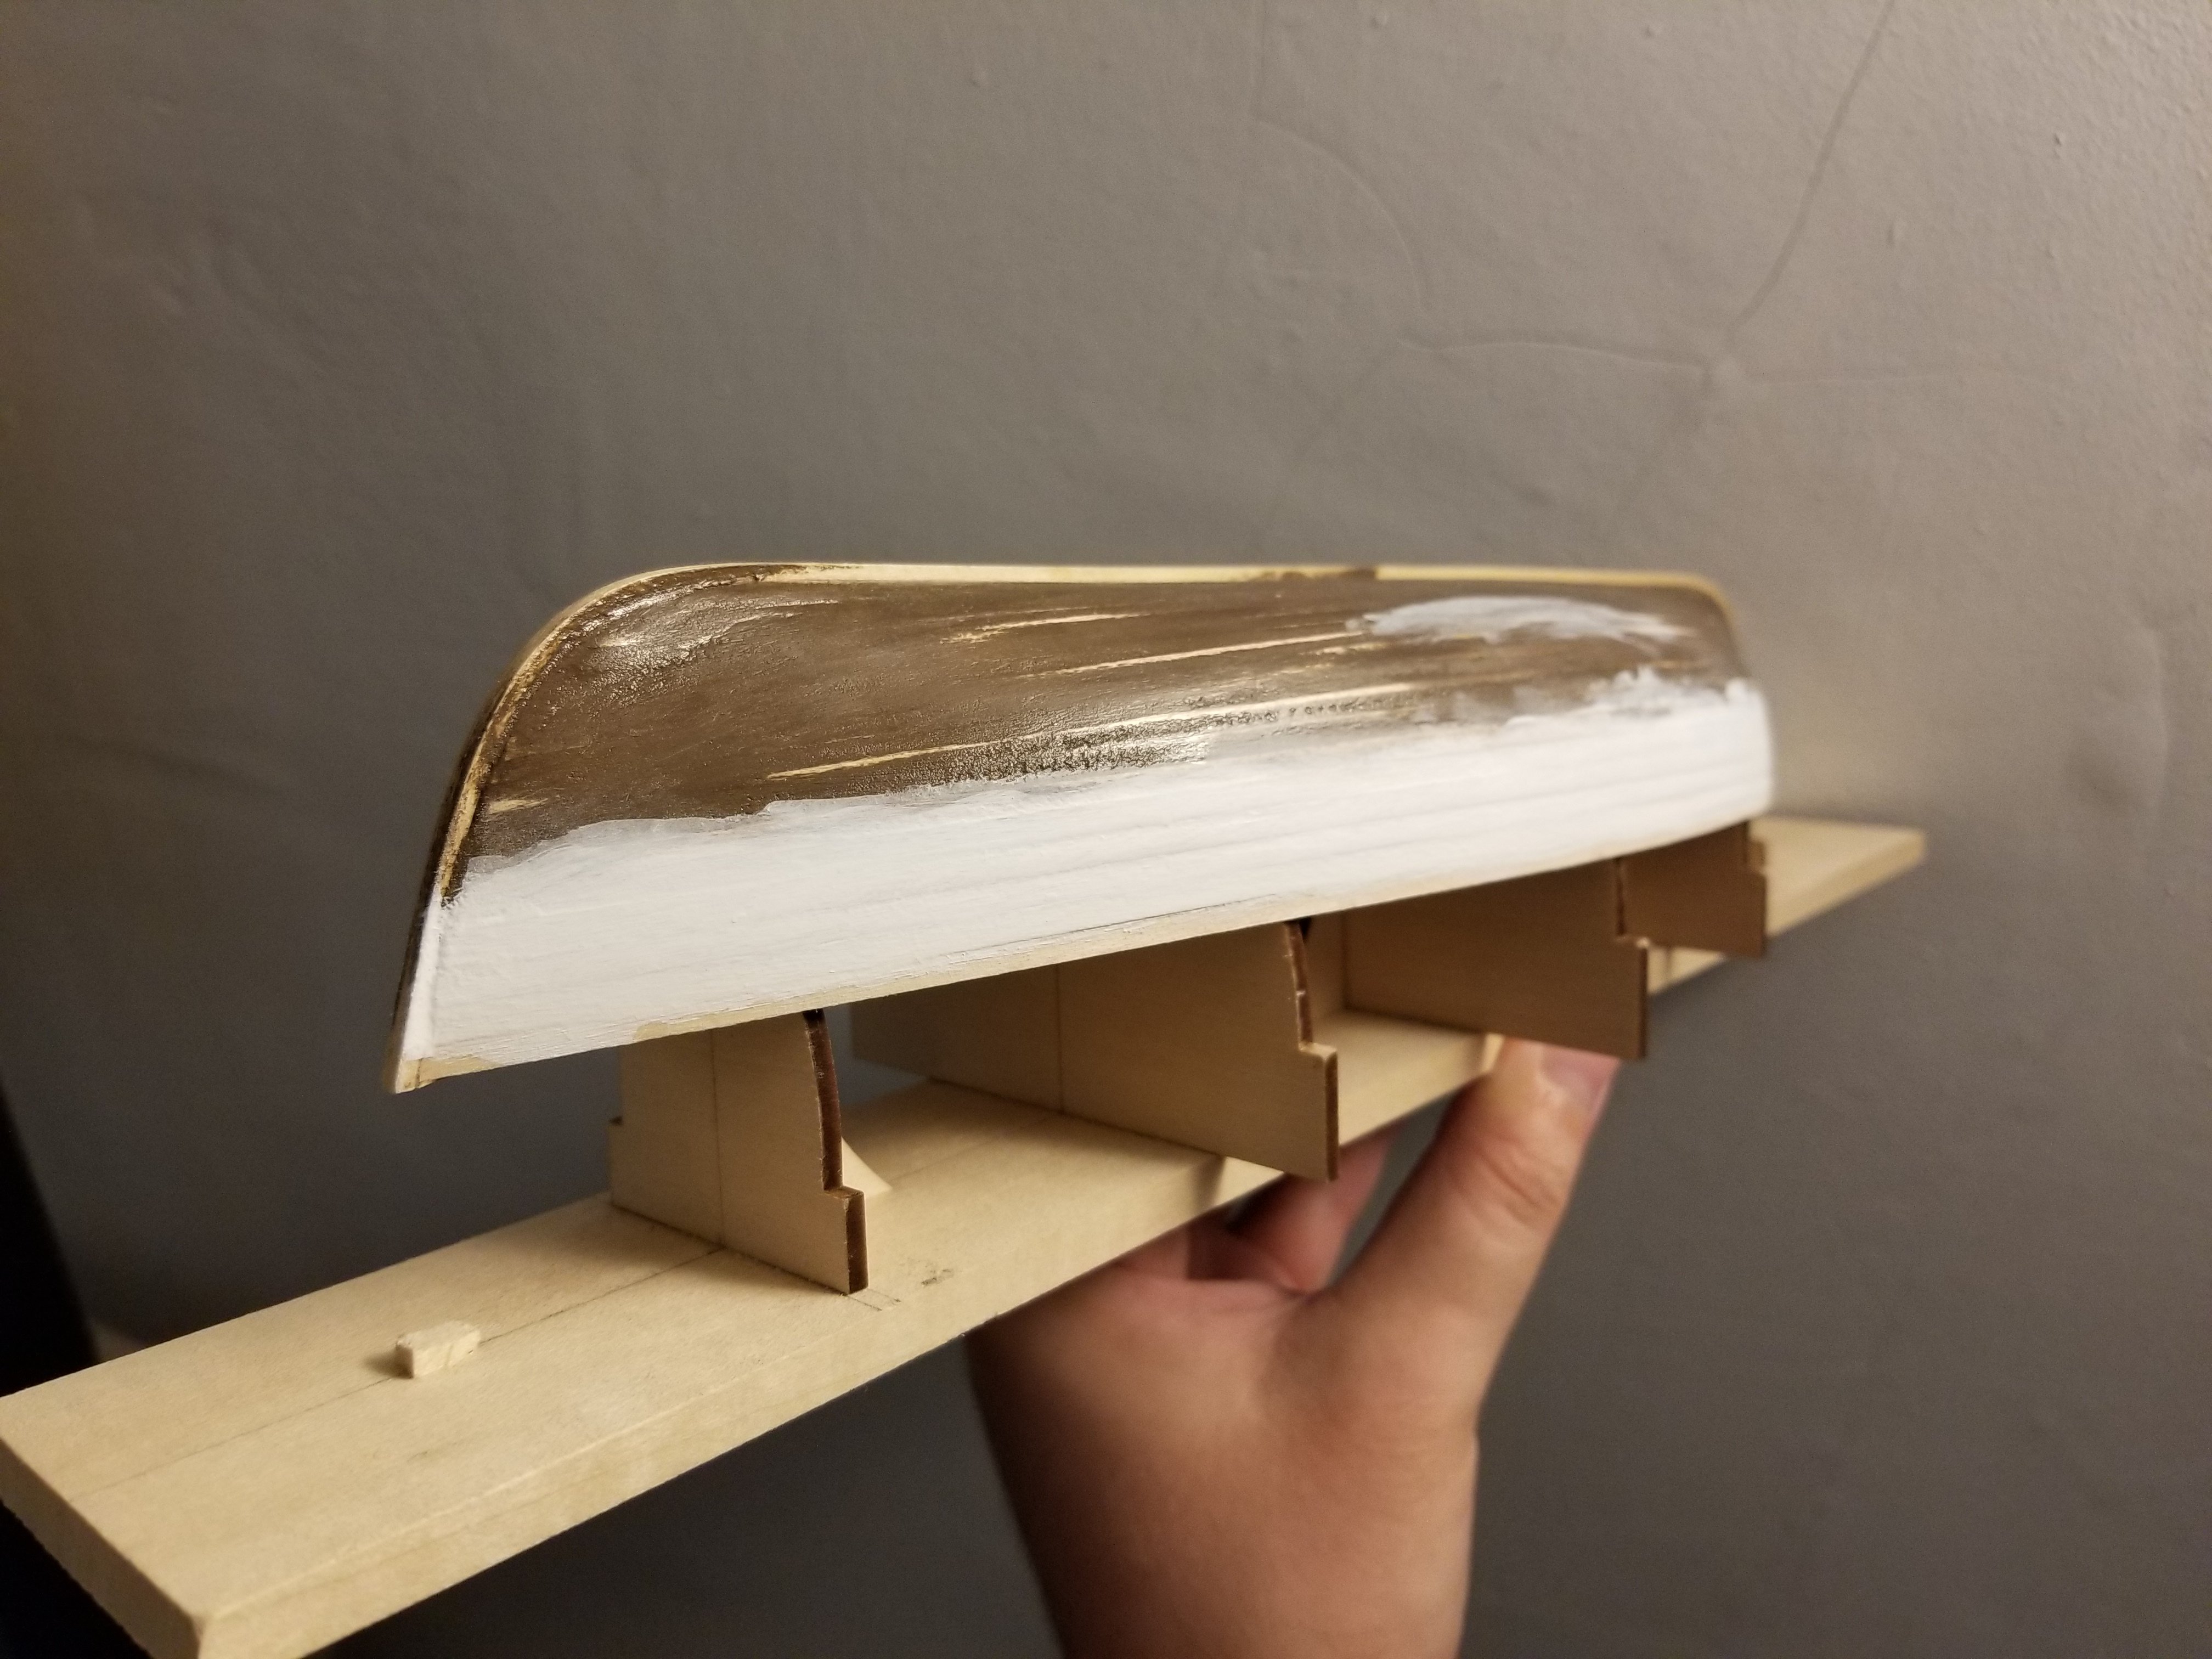
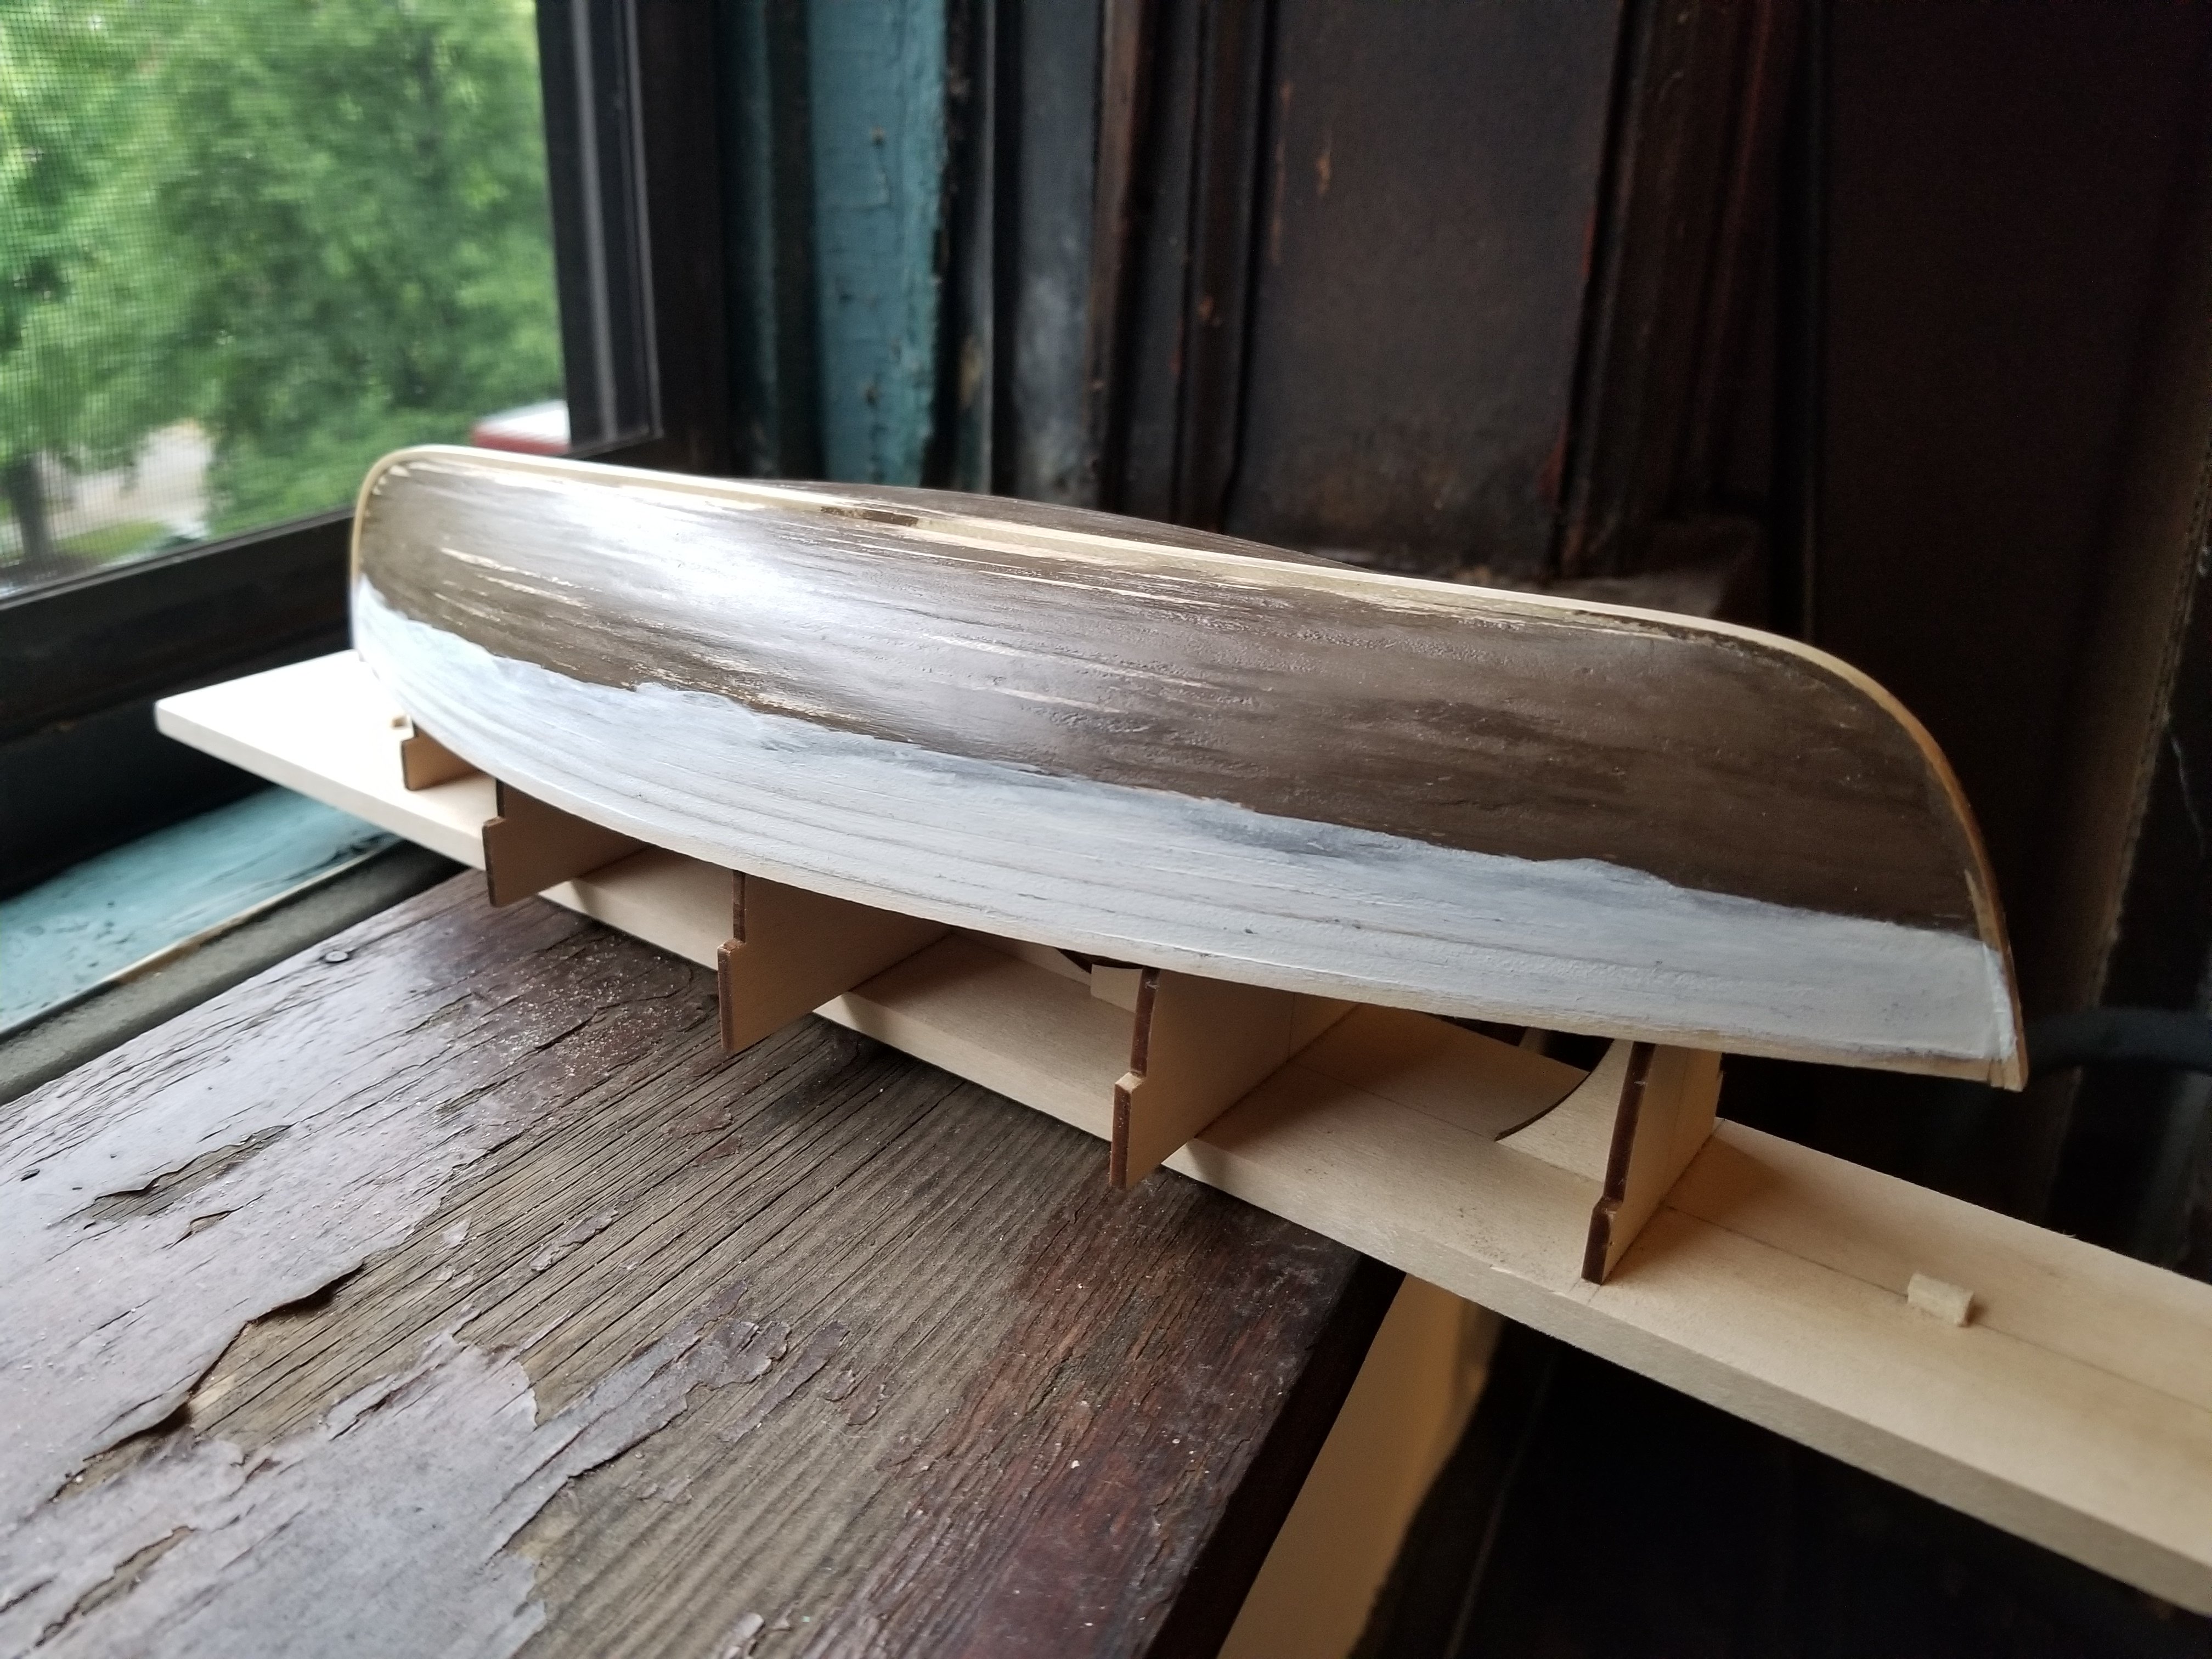
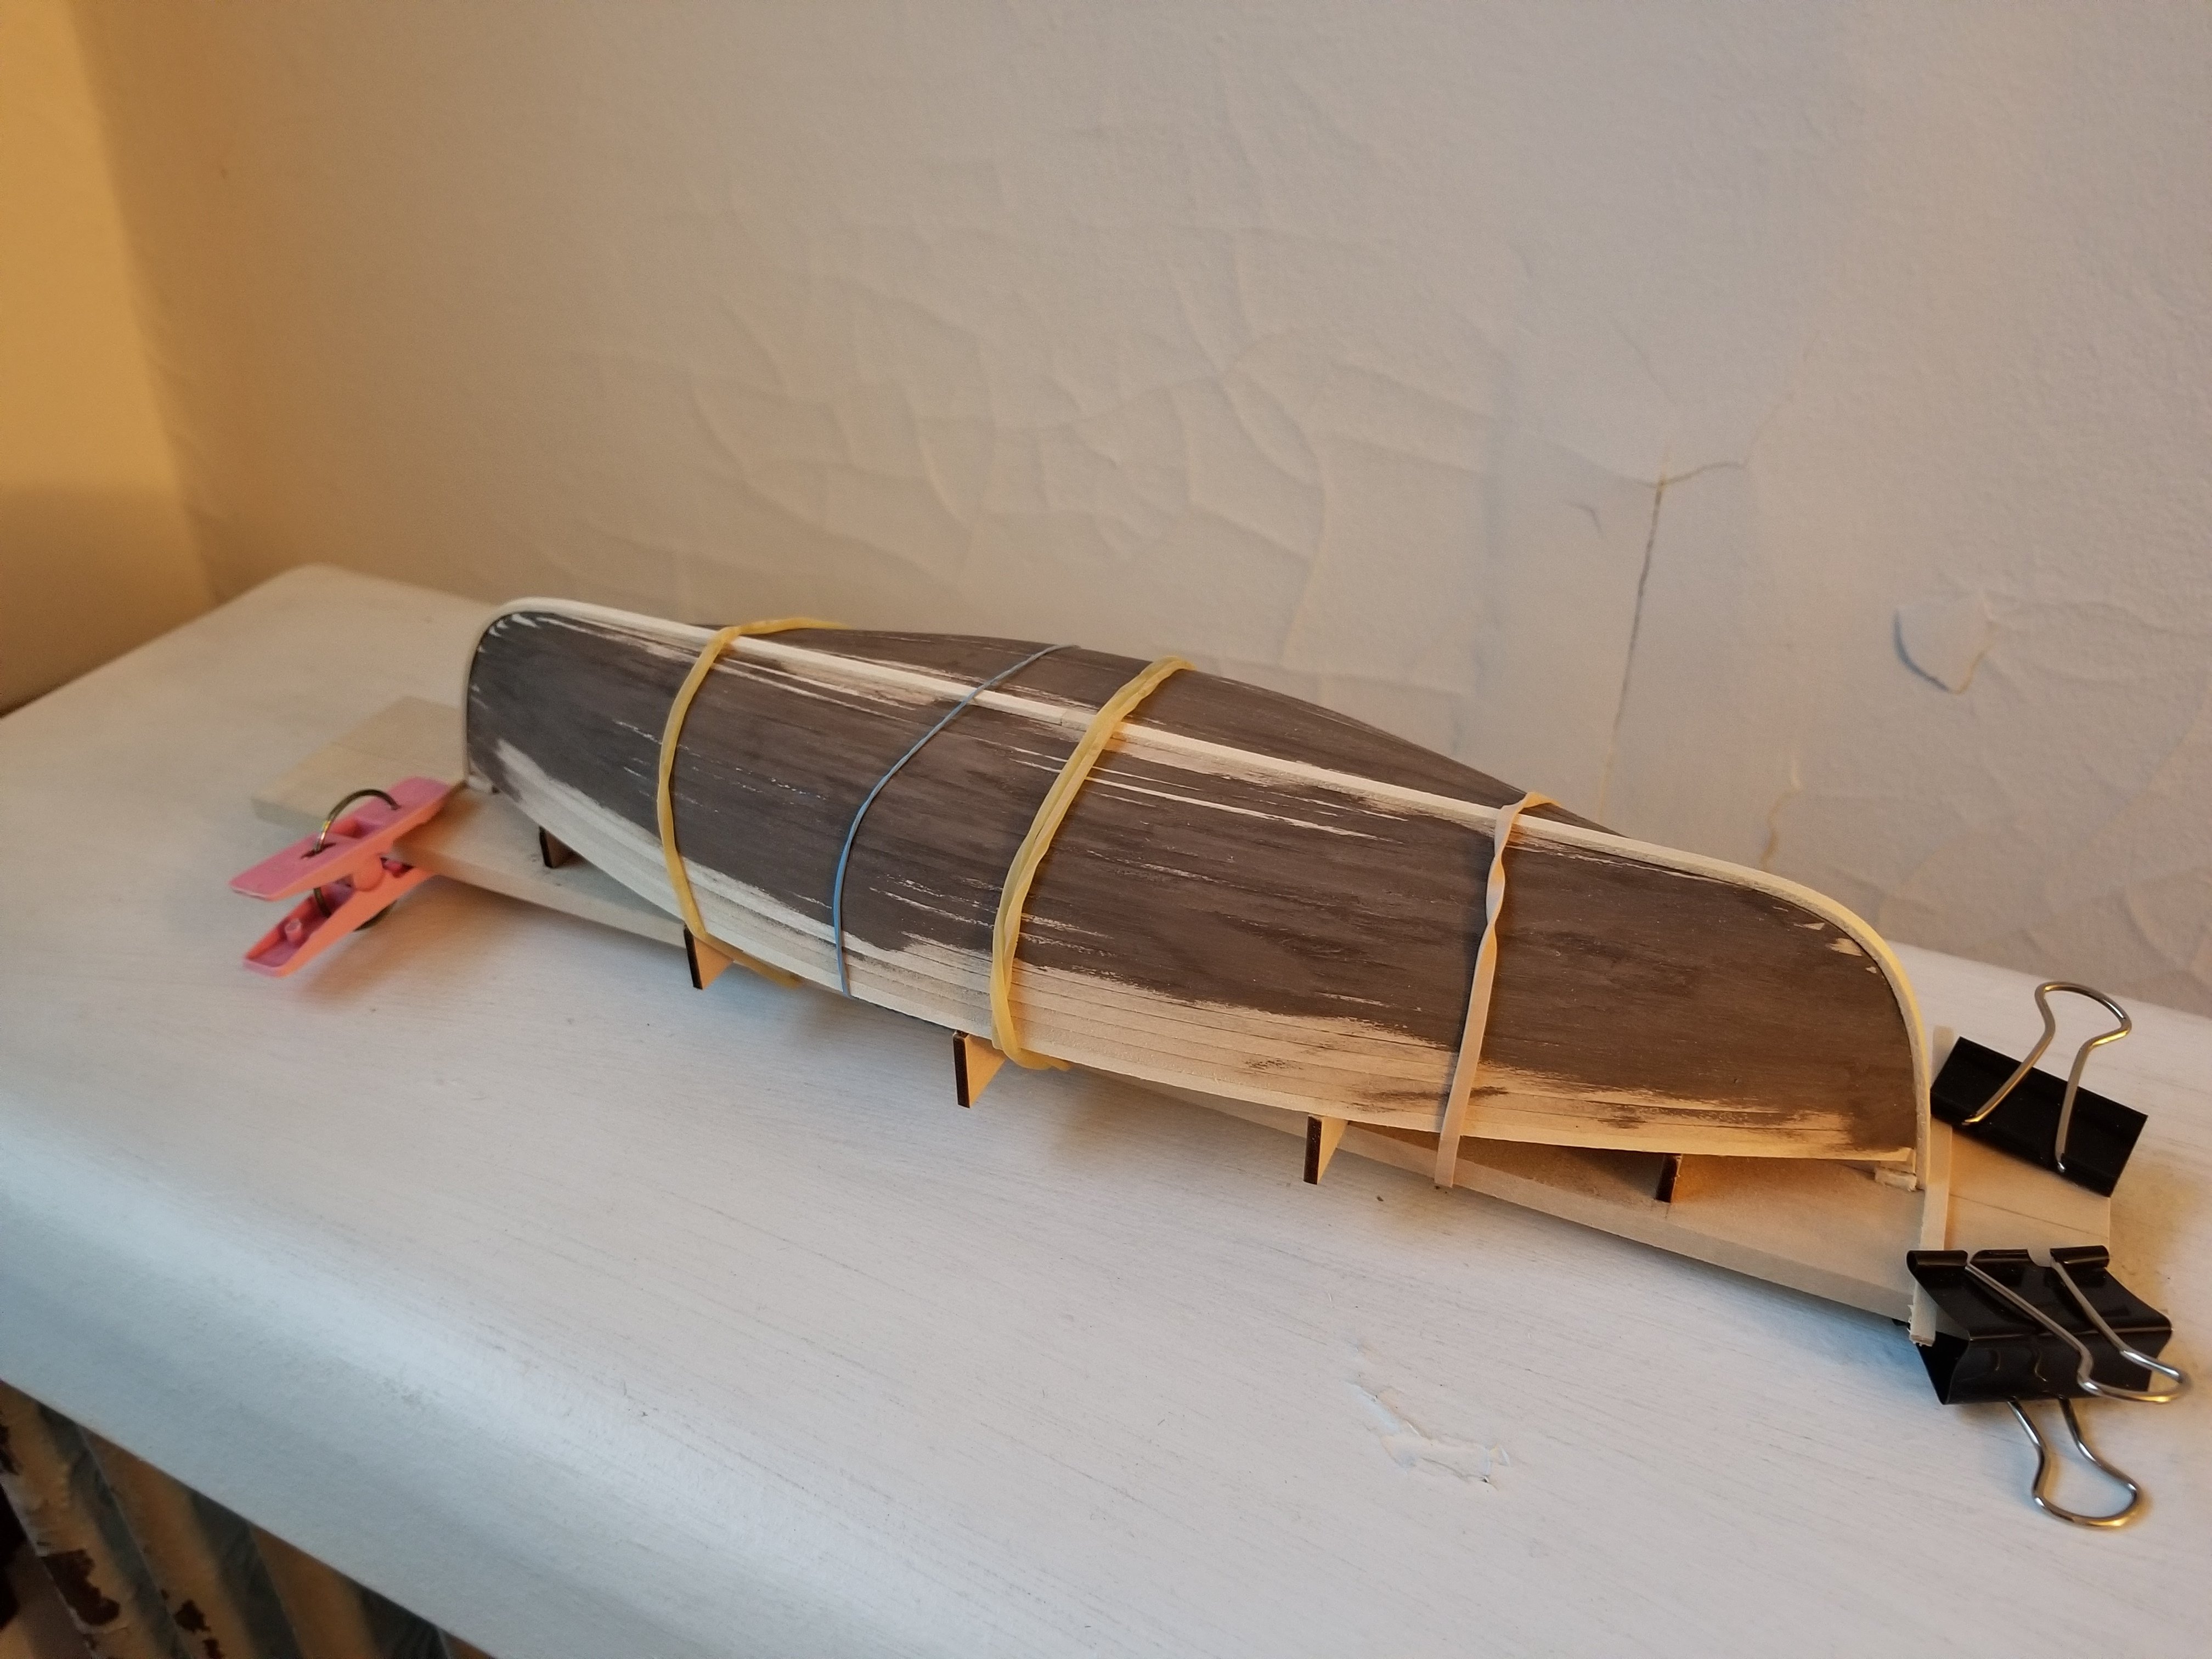
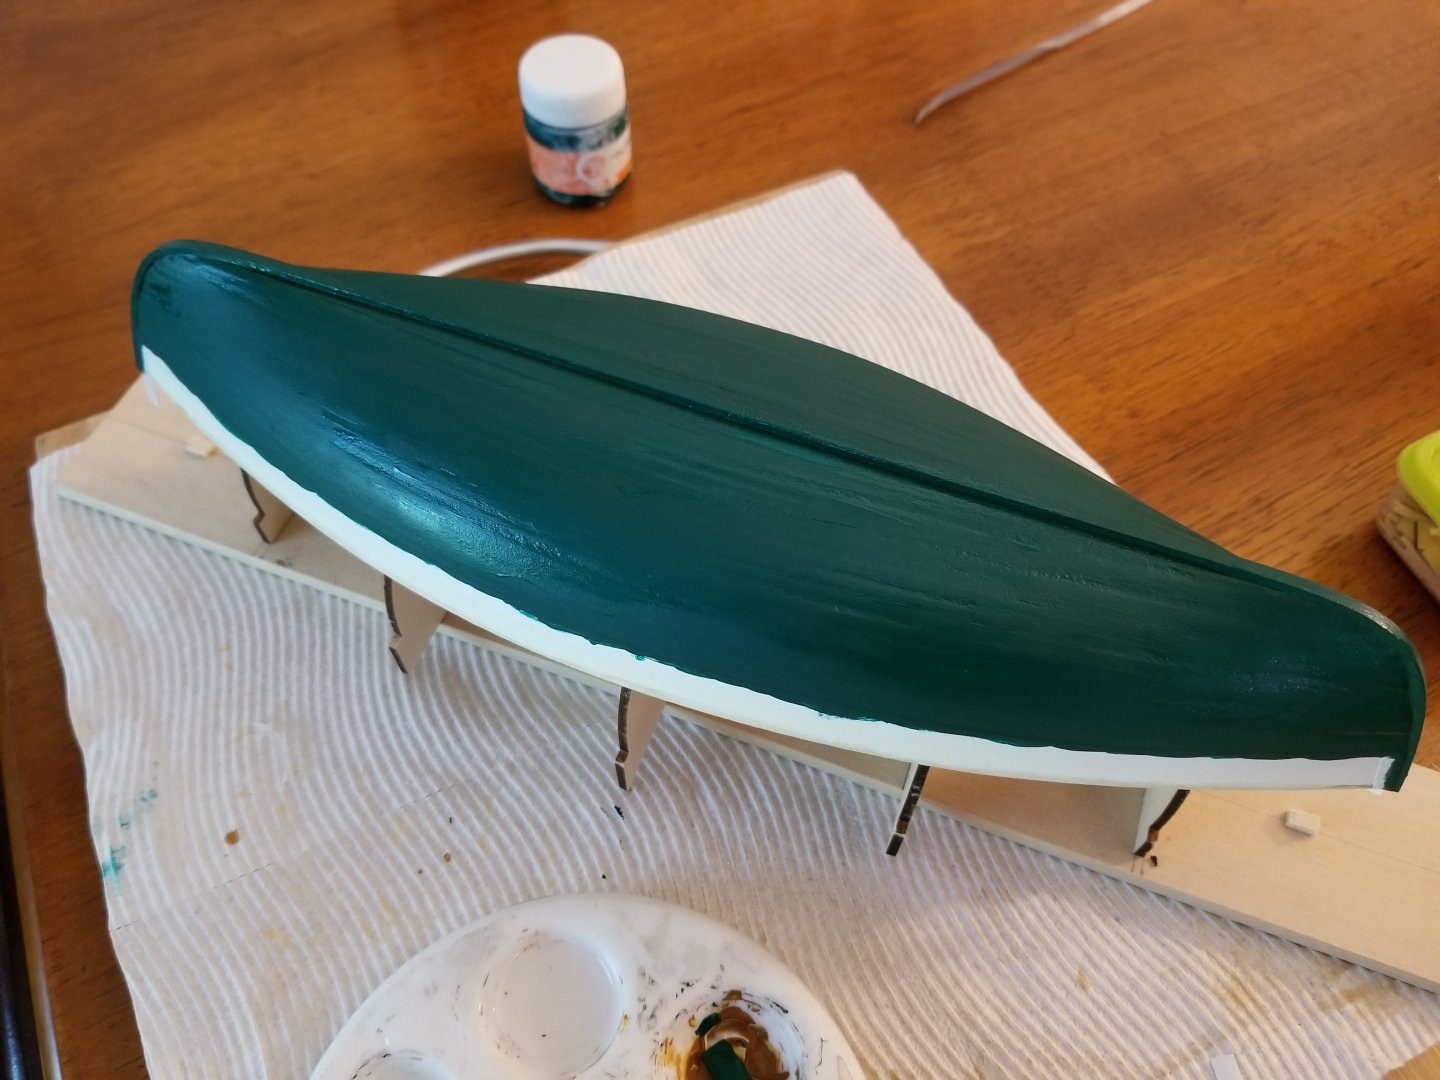
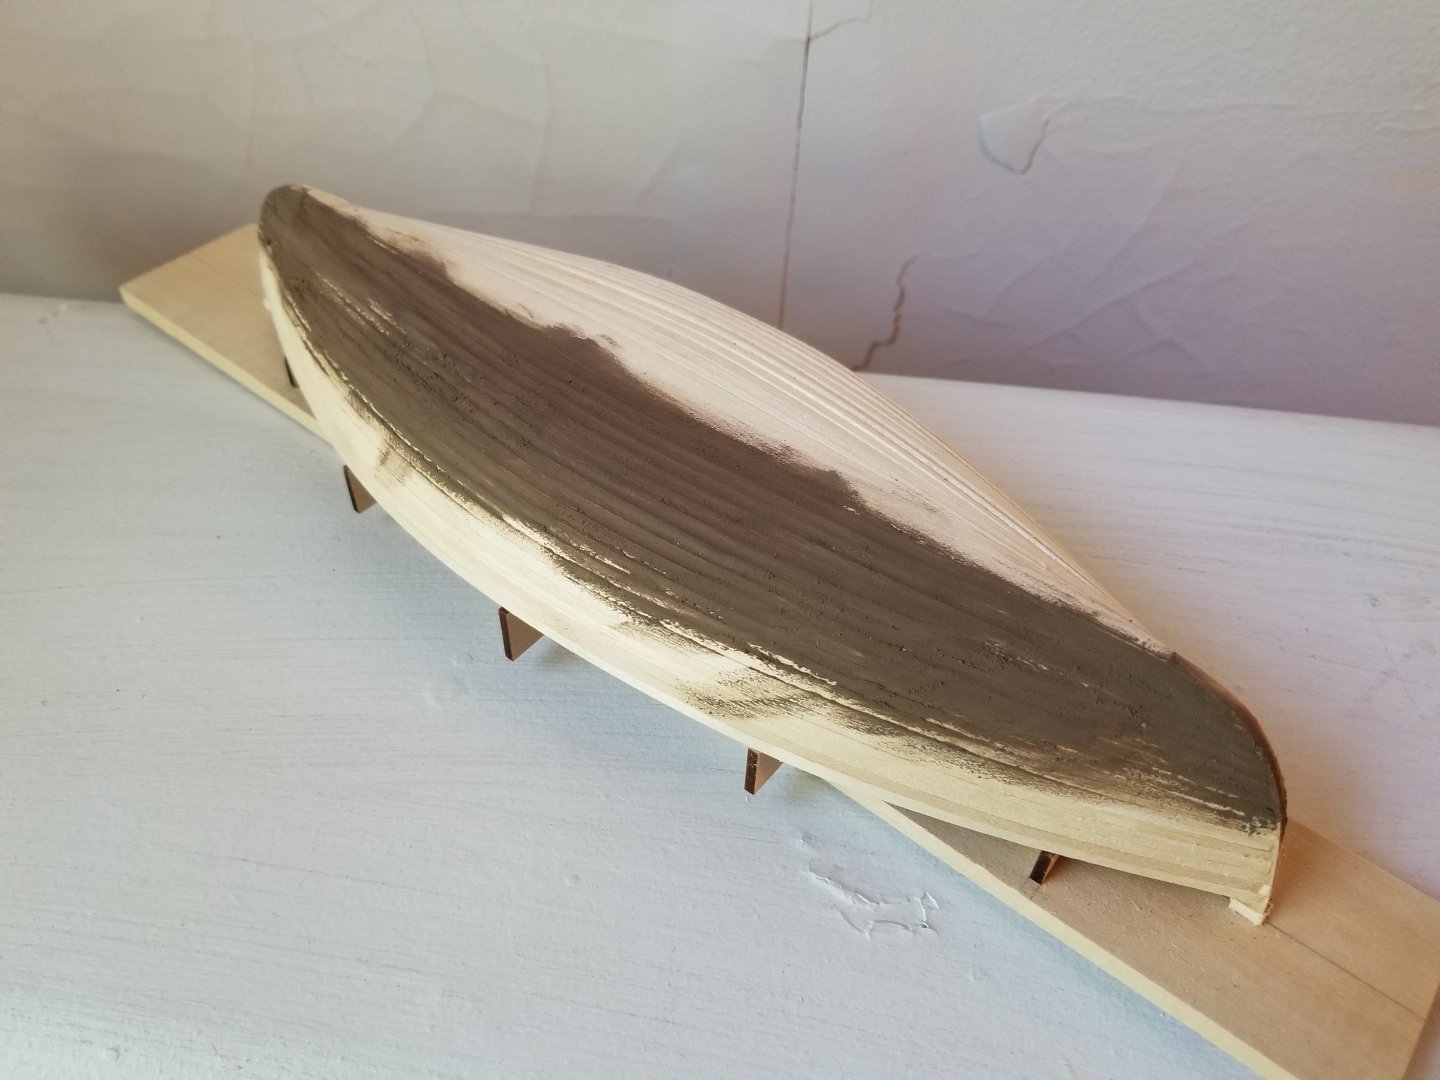
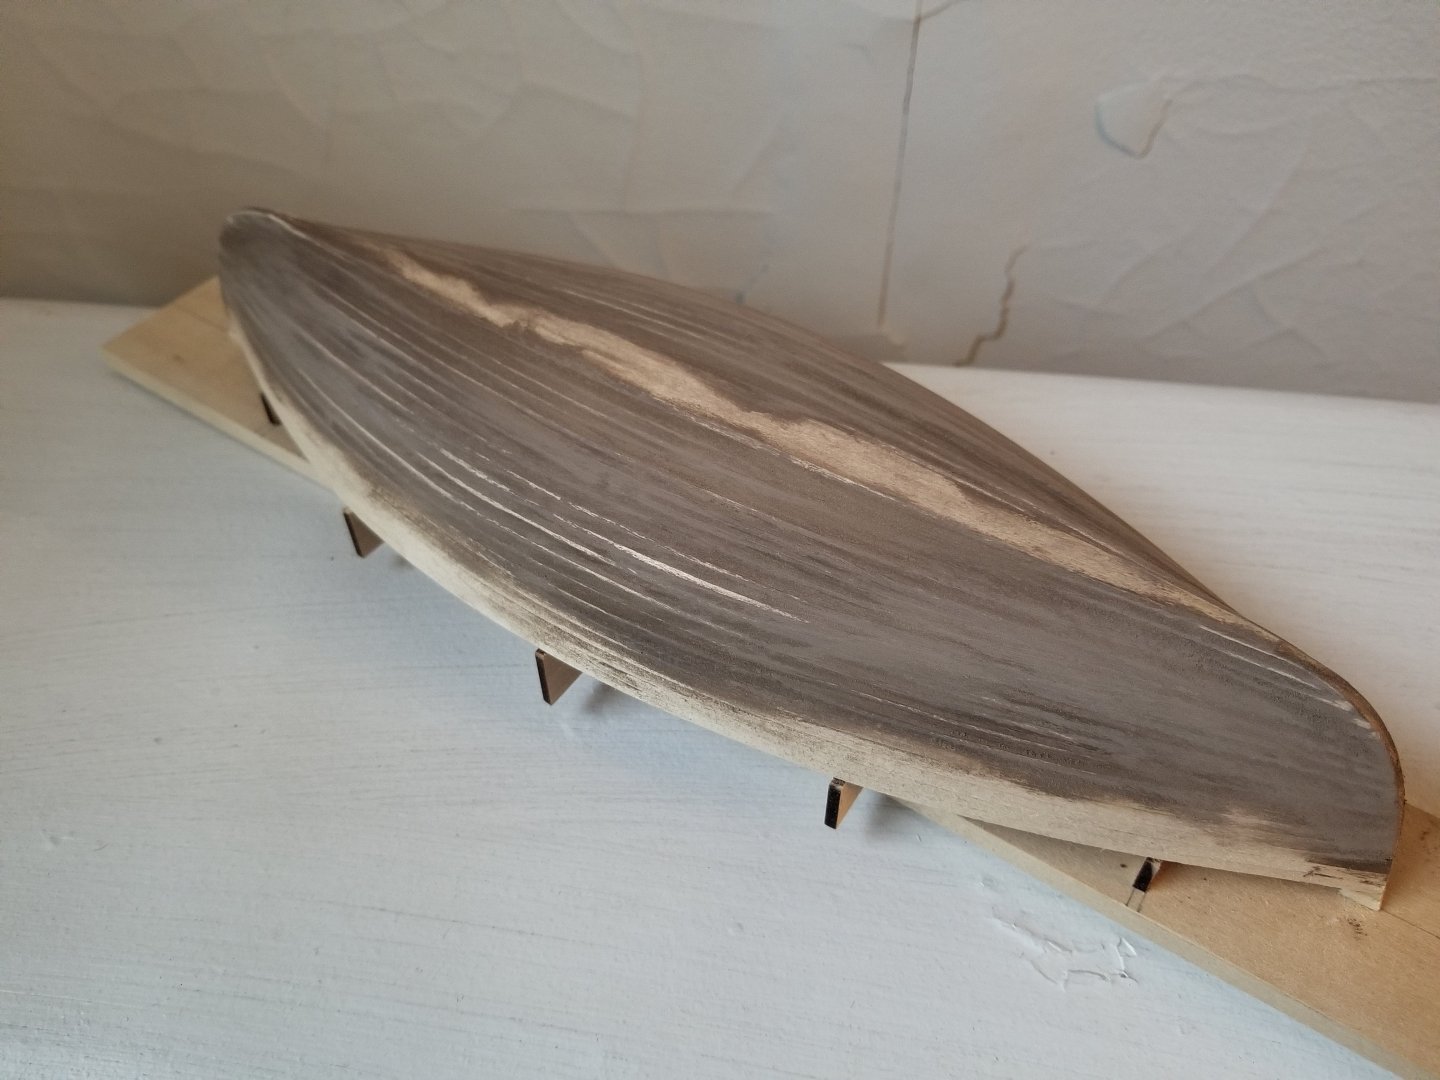
Thank you all for your kind comments! The kit calls for painting the hull exterior with an accent stripe under the walnut rub rail, with a buff interior. From what I can tell, white hulls were quite common on small fishing boats. White paint was cheap and readily available. That said, I have to admit that I'm not a huge fan of how it looks on a hull, as it's very bland. (This is one of the reasons I have no plans to make a Chesapeake skipjack or bugeye anytime soon--the traditional white hull with white deck with white hatches etc is very monotonous!) Moreover, white paint seems to highlight everything imperfection in the hull in a way that darker colors don't quite seem to. Finally, it also doesn't cover dark colors very well, and unfortunately, my wood filler is very dark. So, although it may not be the most traditional, I've decided to paint this model with a dark green hull, set off by a white accent stripe under the rub rail. I've begun with the accent stripe, as it's the lightest color, painting an oversized patch of hull--the green should cover up the white pretty easily. I gave it several coats and then sanded to somewhat smooth out the stripe, as can be seen below. I'm applying fairly thin acrylic coats, which thankfully dry pretty quickly. My paints are about a year old by now and seem to be drying a bit in their bottles. This isn't a problem price-wise, as they were very cheap, but the paint is getting a little chunky and has some hard flakes that have marred the surface, needing to be picked off with an exacto knife. And here we see it after several more coats, not quite ready. Many of the darker spots are shadows from slightly uneven planking. After letting it sit overnight, I decided that the white stripe would be a bit too stark alongside the green. For the final coats, I mixed a tiny bit of brown in to get more of a cream color, which I think will work much better. After several coats, the stripe is now ready, and the next step on the exterior will be to tape over the stripe and paint the rest green. I also started on the interior, mixing a bit more brown into the leftover cream paint to get more of a buff color. I needed more paint than I thought, and had to mix a bit more to cover at least under the riser. The color didn't quite match, but that's ok for the base layer. I'm going to need a lot more coats for the interior. I'm still deciding whether to go for a buff interior, or whether I want it gray, which could also look sharp alongside the green.


- 65 replies
-
- 5
-
-
- Maine Peapod
- Midwest Products
- (and 1 more)
-
Risers are in! First I faired the inner side of the frames and smoothed the places where I had applied filler, some of which were very difficult to sand. I added the risers one at a time, as I didn't have enough clamps to get both at once. The next step in the instructions is to start adding the thwarts and other parts, but I think I'll be painting the interior first before it gets too complicated to paint. Time to decide on a paint scheme.
- 65 replies
-
- 9
-
-
-
- Maine Peapod
- Midwest Products
- (and 1 more)
-
Congratulations, that looks amazing! Really nice job. Is the base just the basswood that came with the kit? What stain did you use with it?
- 69 replies
-
- 1
-
-
- Lowell Grand Banks Dory
- Model Shipways
- (and 2 more)
-
Definitely! In Latin America, I've noticed some serious differences between countries and regions. Chile, for instance, not only is nearly entirely coastal, but its maritime history has been regularly drawn on for nationalist purposes. Practically every city there seems to have something named after Captain Prat, hero of the War of the Pacific, for instance, and more prosaically, the Pinochet dictatorship seems to have promoted reconstructions of the schooner Ancud, as well as a regatta of "traditional" sailing craft from the south (possibly, I need to do further research on this) to help reinforce national claims to disputed territory in Tierra del Fuego. This seems to have fueled the creation of a sizeable body of literature on Chilean maritime history. Meanwhile in Brazil, from what I've seen (which is just scratching the surface) there doesn't seem to be much in the way of national promotion of traditional vessels. However, the saveiros of Bahia have received a great deal of attention, in part as a symbol of local/regional identity strongly connected with Northeastern identity, and something similar could be said about the jangadas further north. In Mexico, in contrast, there is very little written about modern "traditional" vessels like the Chapala Canoa, with most scholarly attention instead focused on pre-Hispanic dugouts. It's very interesting to consider how and why we have the sources that we have through which we can understand the histories of these vessels.
-
Next up, the floor planks, which I cut to size and rounded the edges. These needed a bit of a curve, especially further toward the bow and stern. The instructions recommend just using super glue, but I prefer to use as little as possible (the fumes irritate my eyes). I soaked the planks to bend them to shape. As there wasn't any space to clamp them into place, I used various clamps to make a simple bending jig. Given that the bending jig wasn't perfect, they still needed a little pressure to fit into place in the hull. I ended up using a drop of super glue in the center, and white glue along the rest of the plank. This worked well, as I could adjust the plank into position and then press down on the center for 30 seconds to pin it in place while the white glue dried. I also was lucky and found that the ends of the planks matched up with the same strake of hull planking along the full length of the hull, making it easy to make sure they were centered. I'm pleased with the results. I then added a bit of wood filler to see if I could use it to correct some creases and gaps in the framing. Next up, I'll be adding the risers, which I had soaked and clamped to shape while the floor planks were drying. But first, I'll need to lightly fare the interior side of the frames.


- 65 replies
-
- 3
-
-
-
- Maine Peapod
- Midwest Products
- (and 1 more)
-
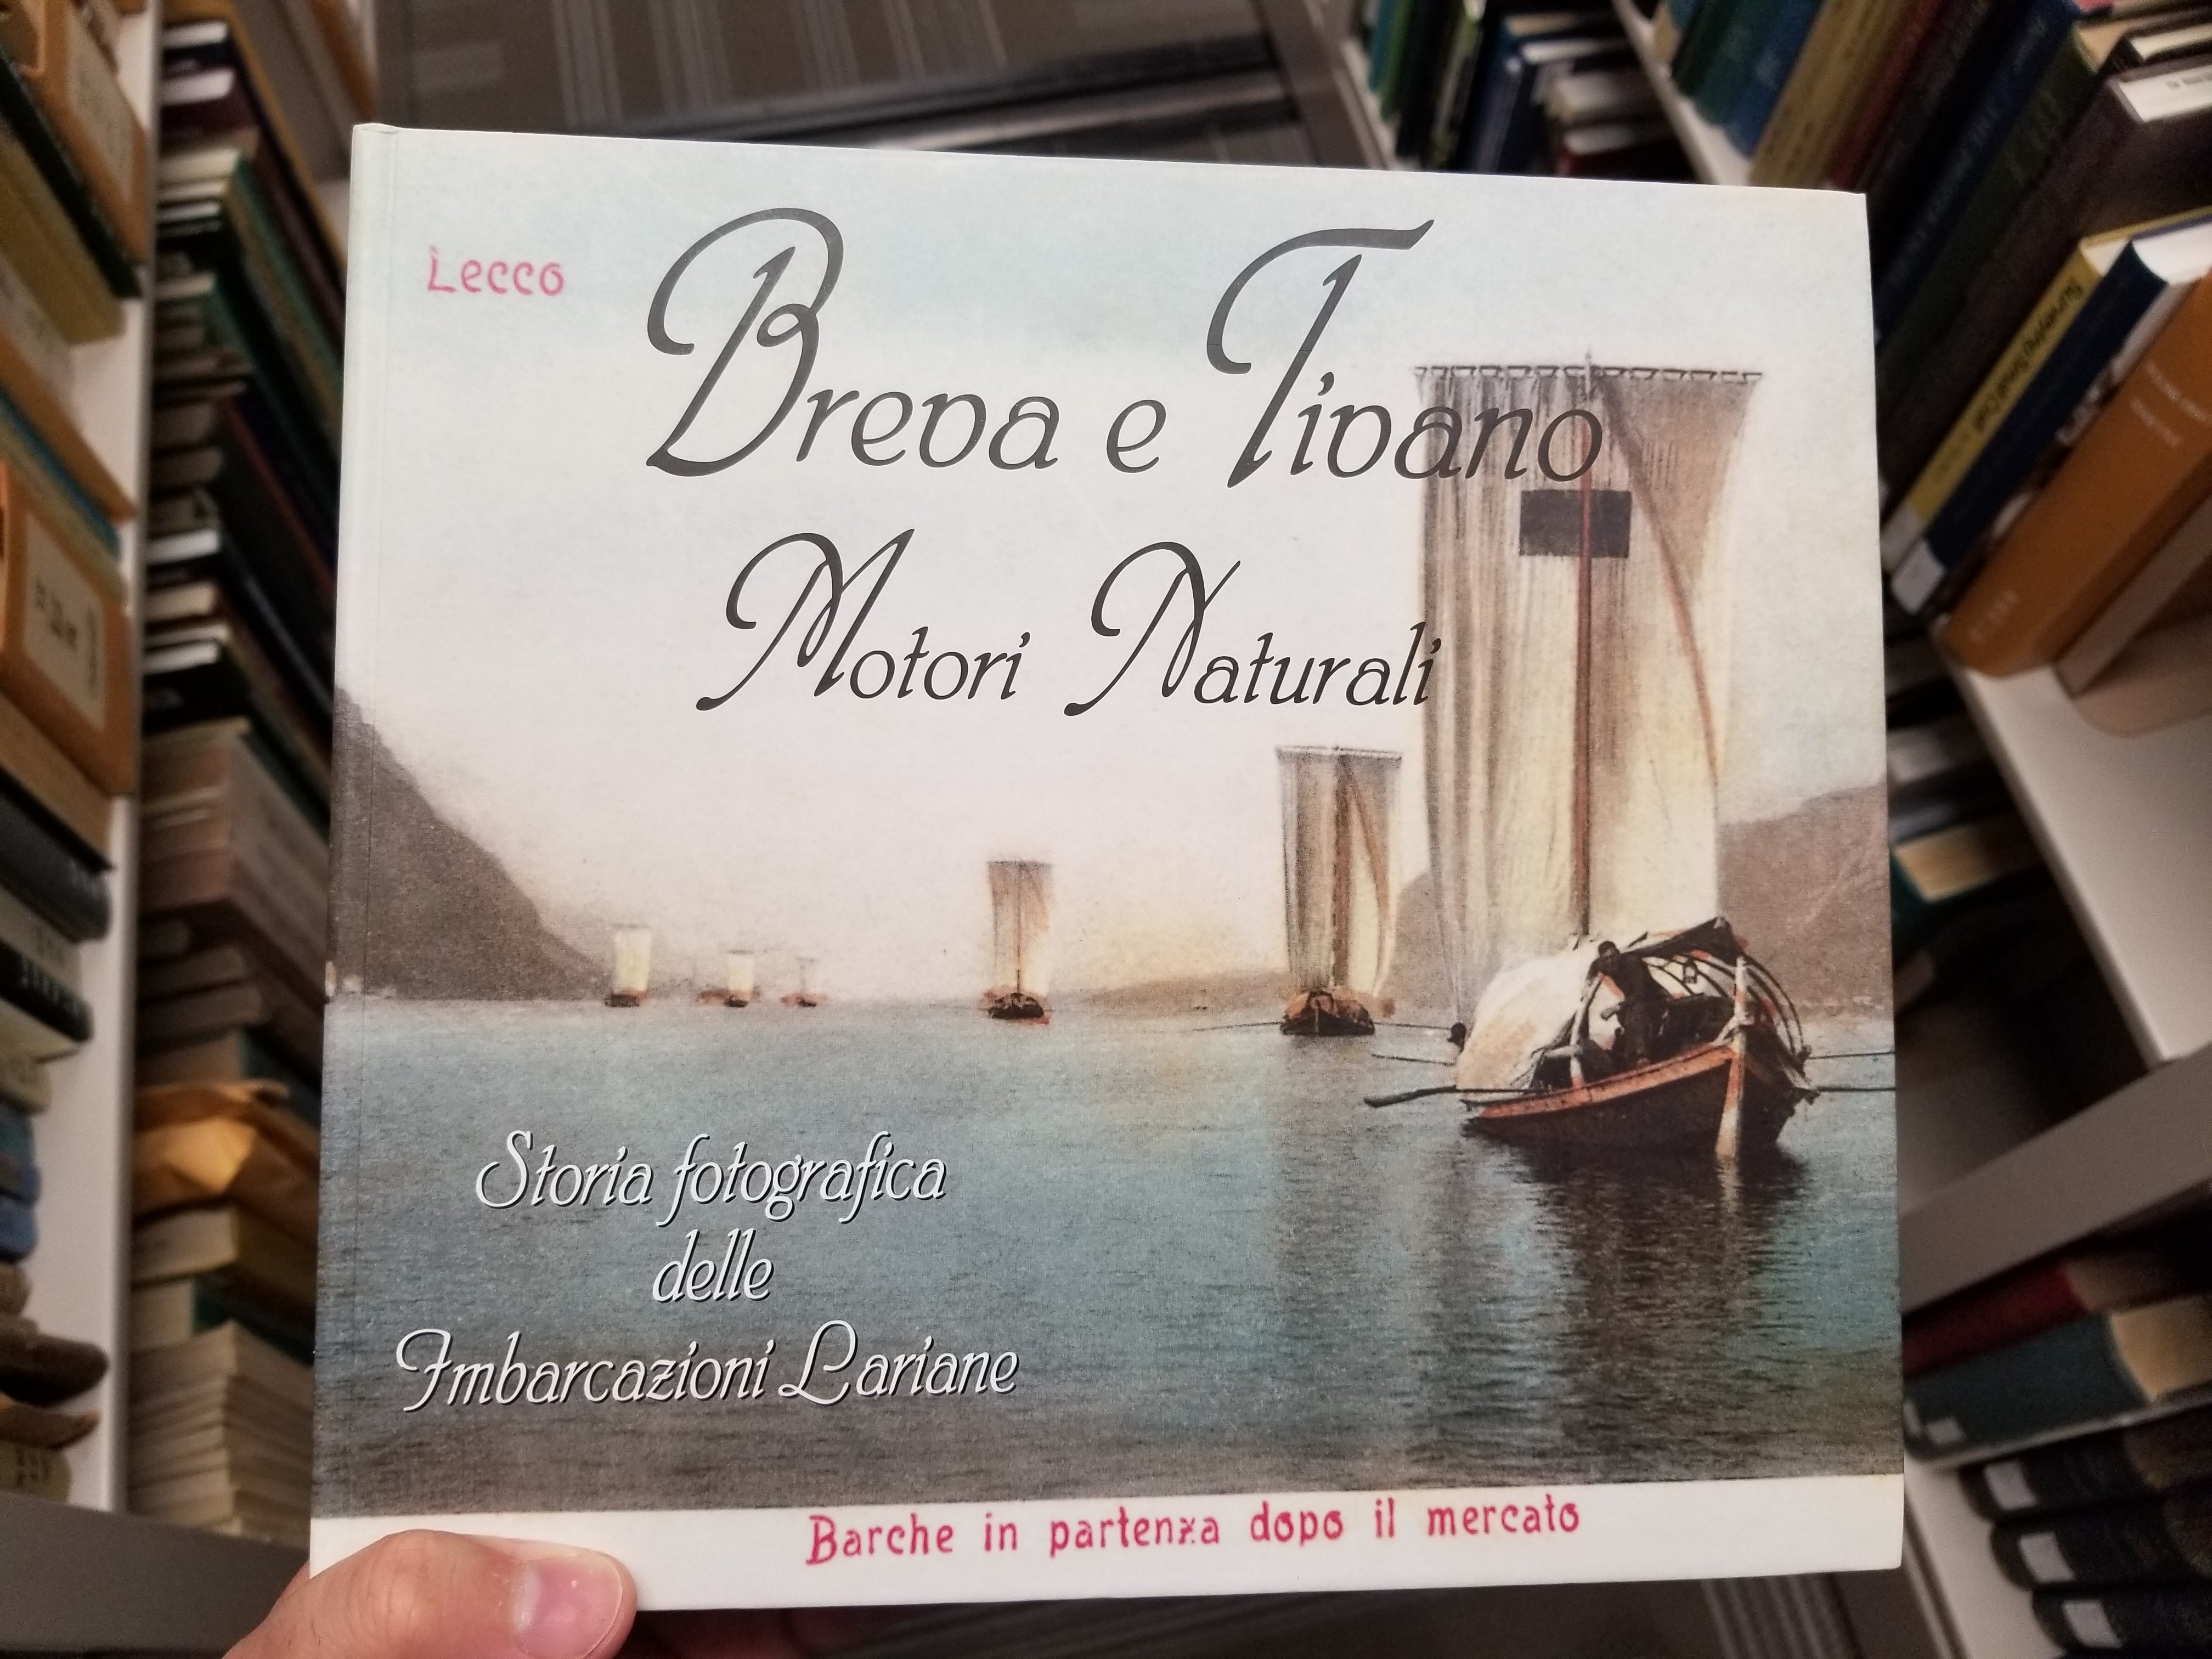
Thanks for the suggestion! I was thinking grains of rice might work, but I'll have to look into seeds as well. It's interesting that you mention the difficulty of finding photo records. I've only really had much success in finding photos from areas that saw extensive tourism, which makes sense given that most of these photos were intended for postcards. Lakes Yuririra and Cuitzeo were not tourist destinations for much of the 19th and 20th century, and the very few photos I've found from then focus on their churches, not on work on the lakes. So far practically all the photos I've found of vessels from these areas are of recent vintage. In contrast, I've found more photos of work boats on the Veracruz coast--an area that received a lot of foreign investment and some tourist interest, although it was too hot and prone to tropical diseases for many tourists to stay long. But the most extensive photo records of workboats by far are from 1) Mexico City/Xochimilco, 2) Lake Chapala, and 3) Lake Pátzcuaro. Mexico City was of course the capital and received a lot of attention, and Xochimilco was a popular site for recreation in the 1800s and, increasingly in the late 1800s and early 1900s, for tourism. Lake Chapala and Lake Pátzcuaro both became popular sites for tourism and for retreats for the wealthy in the late nineteenth and early twentieth century. Moreover, the vessels of each respective area--the trajinera, the canoa, and the icháruta--became important subjects for photographers because they seemed to encapsulate an idea of an authentic indigenous tradition. This was appealing both for nineteenth-century tourists and, after the Revolution especially, also for political authorities. The process has been best described by Jennifer Jolly in her book Creating Pátzcuaro, Creating Mexico: Art, Tourism, and Nation Building under Lázaro Cárdenas (University of Texas Press, 2018), who emphasizes how 1930s nationalist artists and officials built on nineteenth-century precedent to find in Pátzcuaro--and its fishermen--a readily available indigenous past that could be used to promote an idea of Mexico as a nation built on ancient traditions. That the lake was picturesque and commercializable undoubtedly helped. Something similar happened in Xochimilco and in Chapala. In the process, though, the more complex local history, including the histories of transfers and adaptations that led to the replacement of dugouts by plank-built vessels in Xochimilco and Chapala, was effaced. Photographs for the tourist market present these vessels as timeless, but they definitely weren't--they developed in a time and place. (Here it's worth noting that the Pátzcuaro icháruta dugout has the best claim to be "timeless," or at least pre-Hispanic, but I do think it would be worth asking whether its design changed at all over time. After all, as Jolly notes, Pátzcuaro was located on a major trade route and was cosmopolitan in the colonial era. Apparently they just recently discovered a preserved tepari cargo dugout on the Pátzcuaro lakebed, and I hope they are able to do a detailed study of its design.) All of which is to say that, I wonder if something similar was at play in Europe. Perhaps ordinary working boats were mostly ignored (at least in areas where they weren't seen as central to regional or national identities--the UK seems to have pretty extensive workboat records), unless they were in highly touristy areas? I ask because I came across this book the other day in the library, which contains a ton of images and drawings of various types of vessels on Lake Como, a major tourist destination.

-
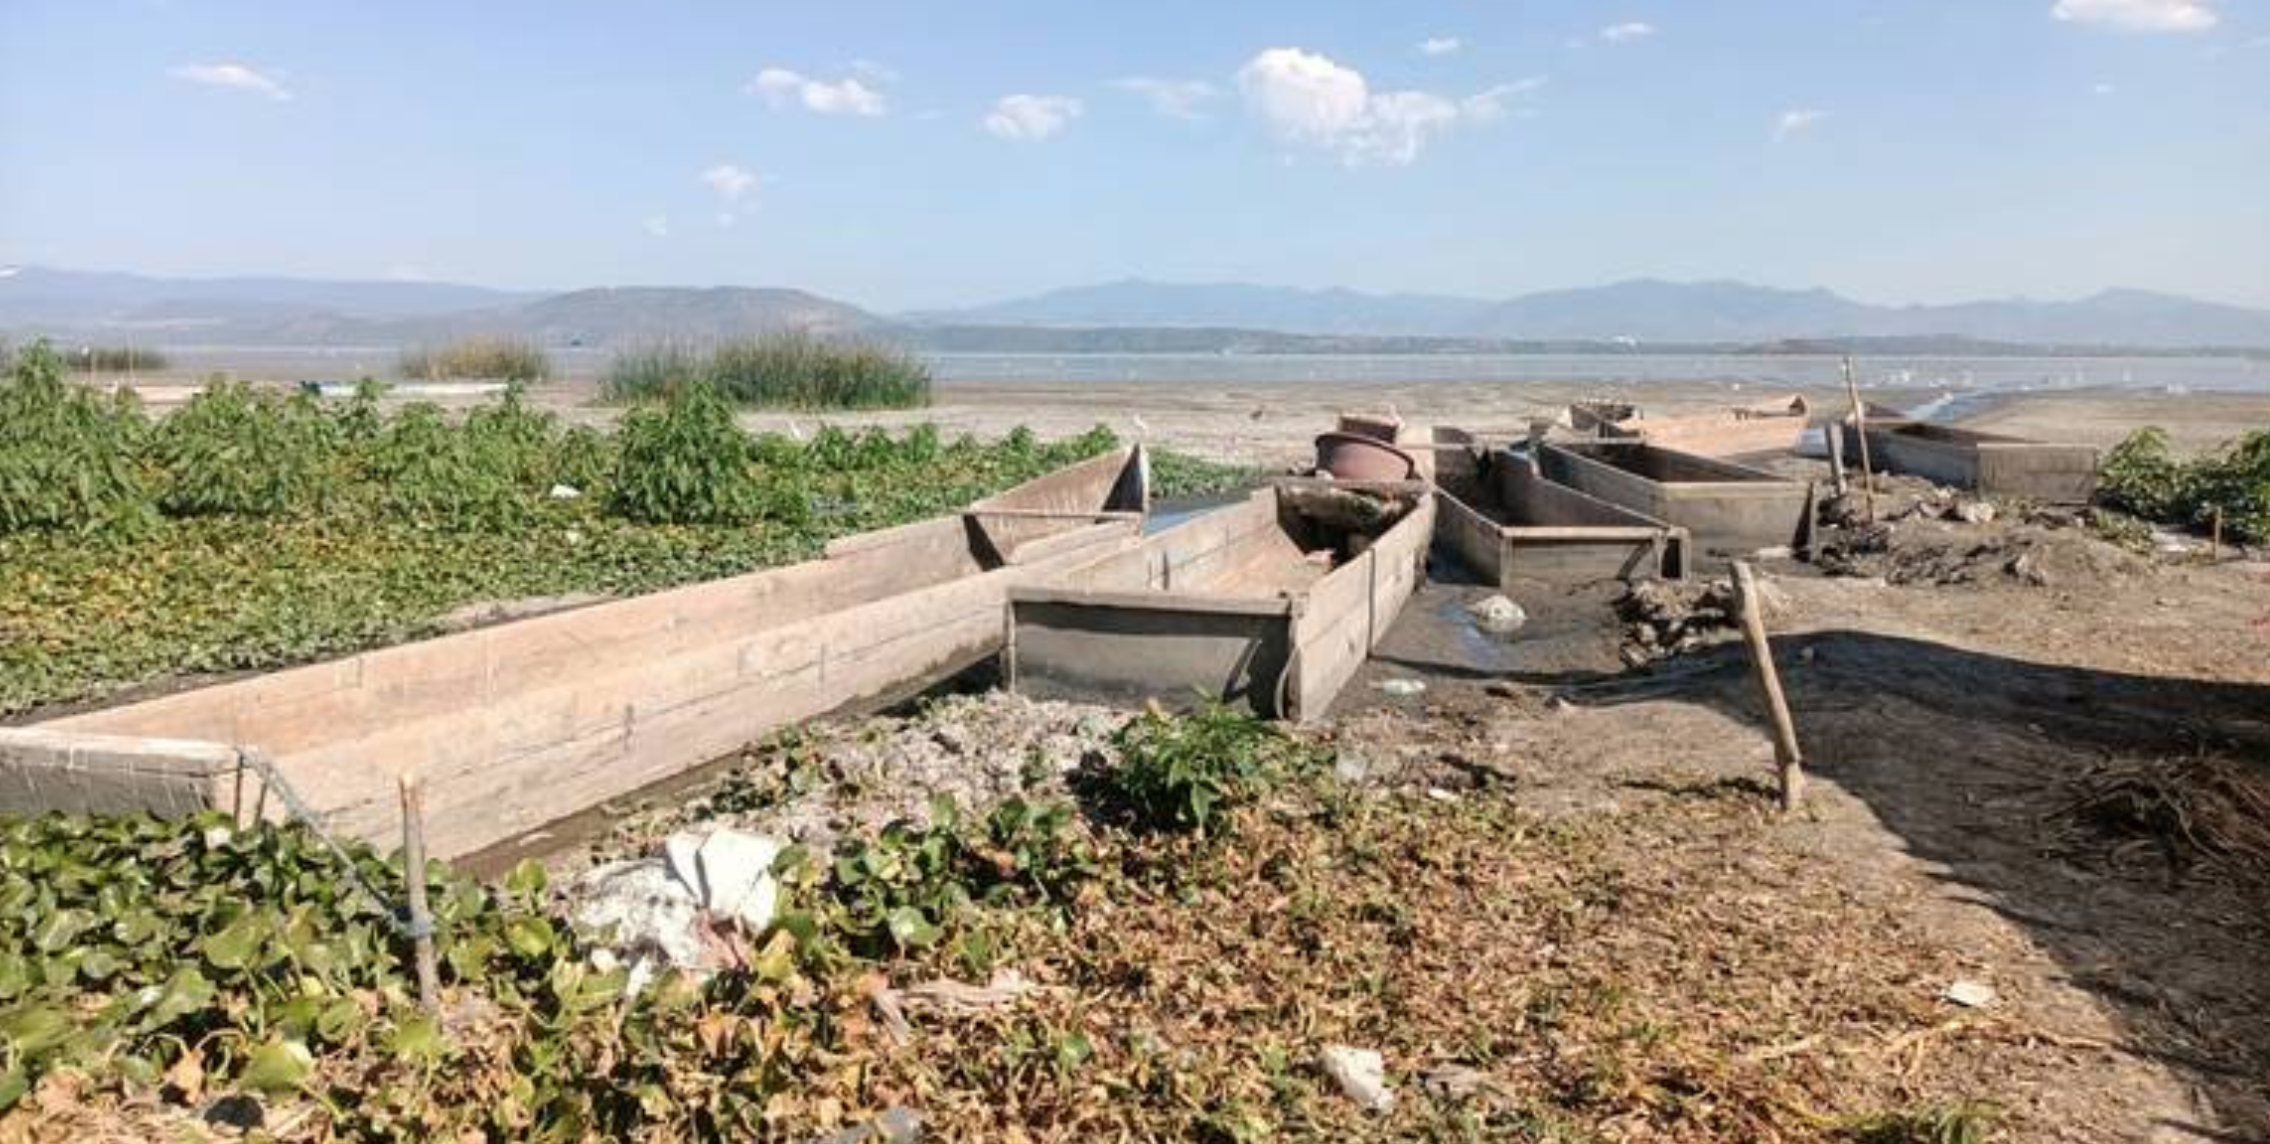
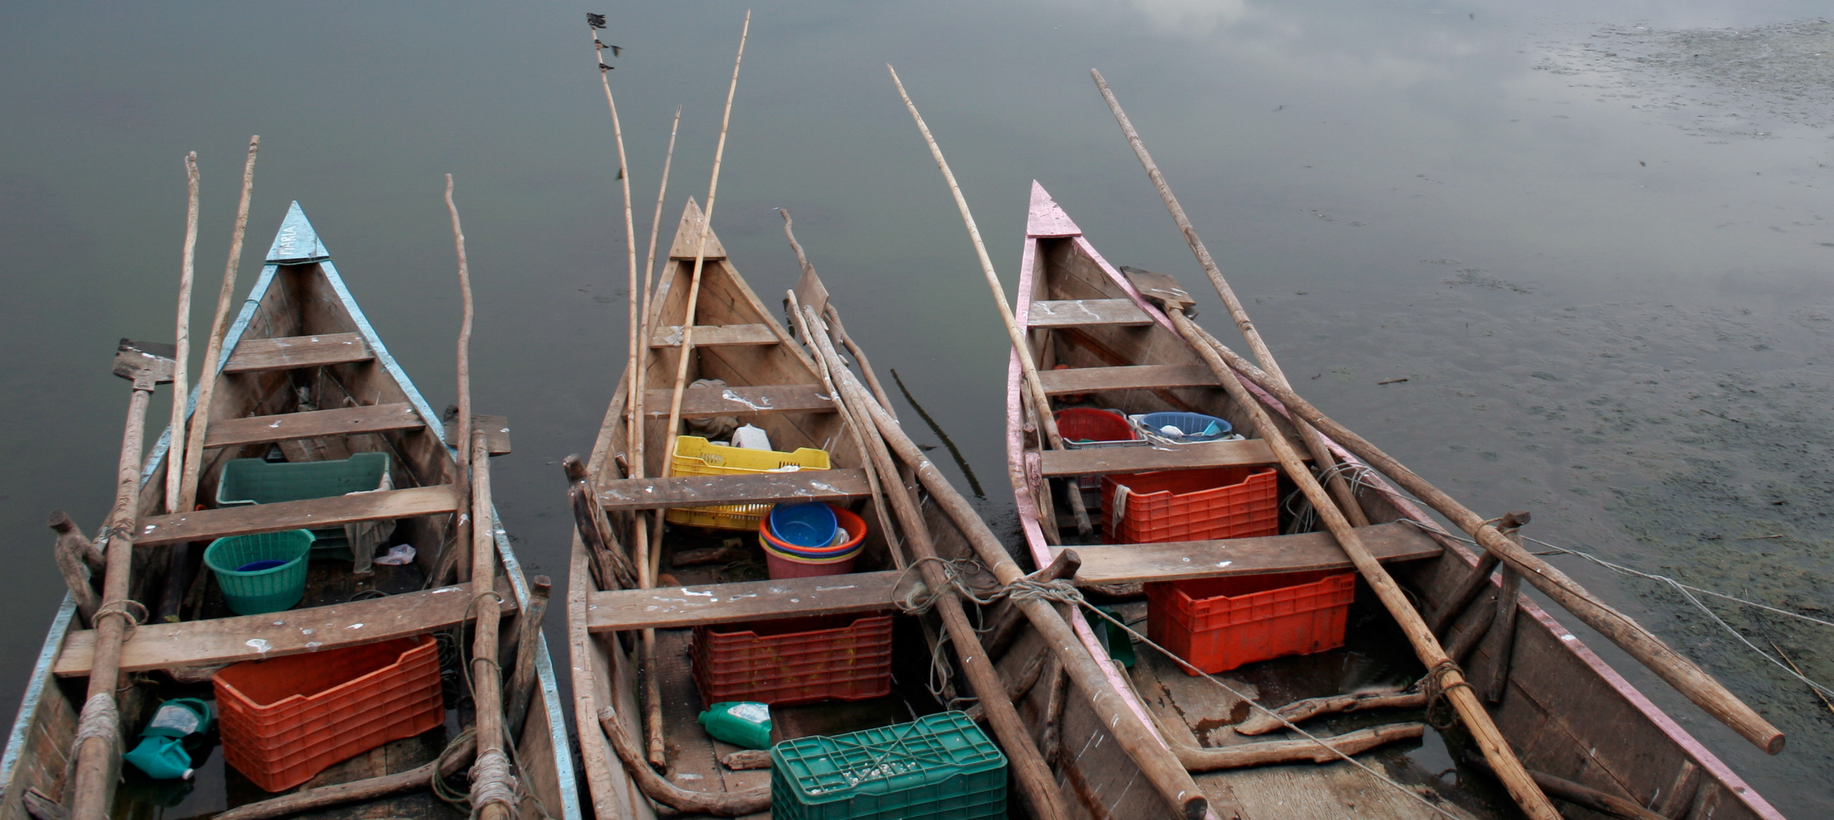
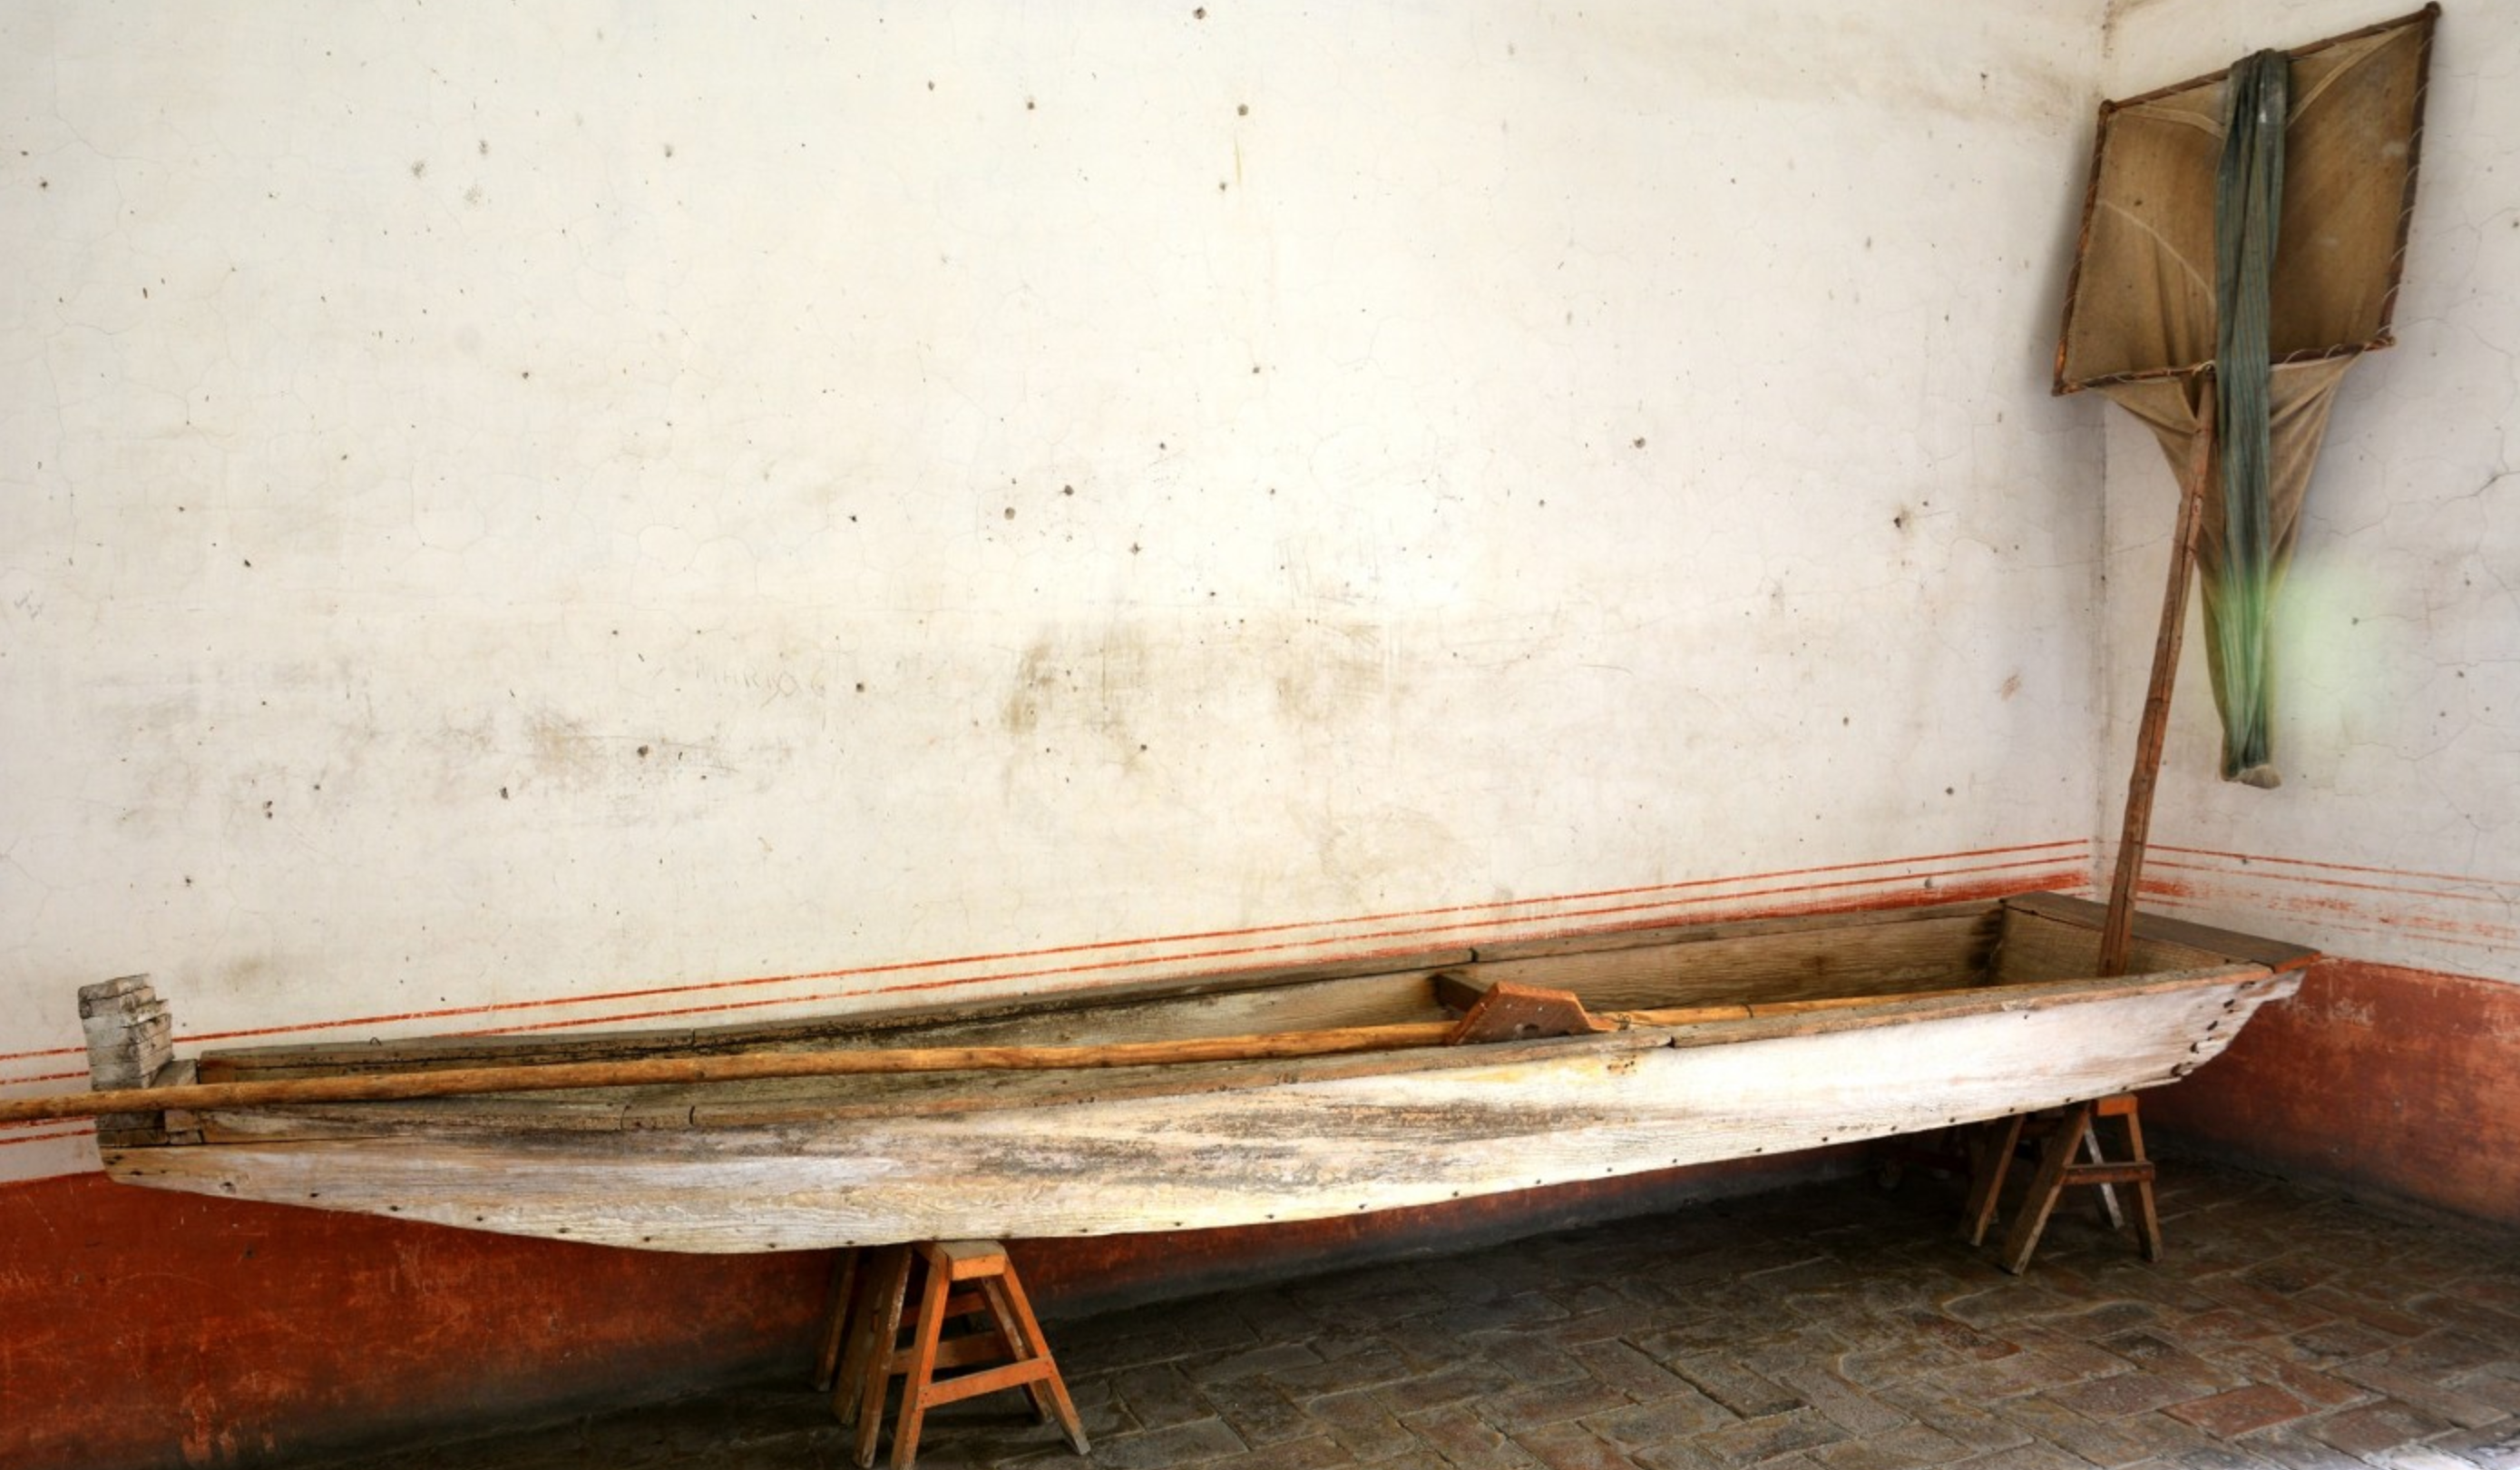
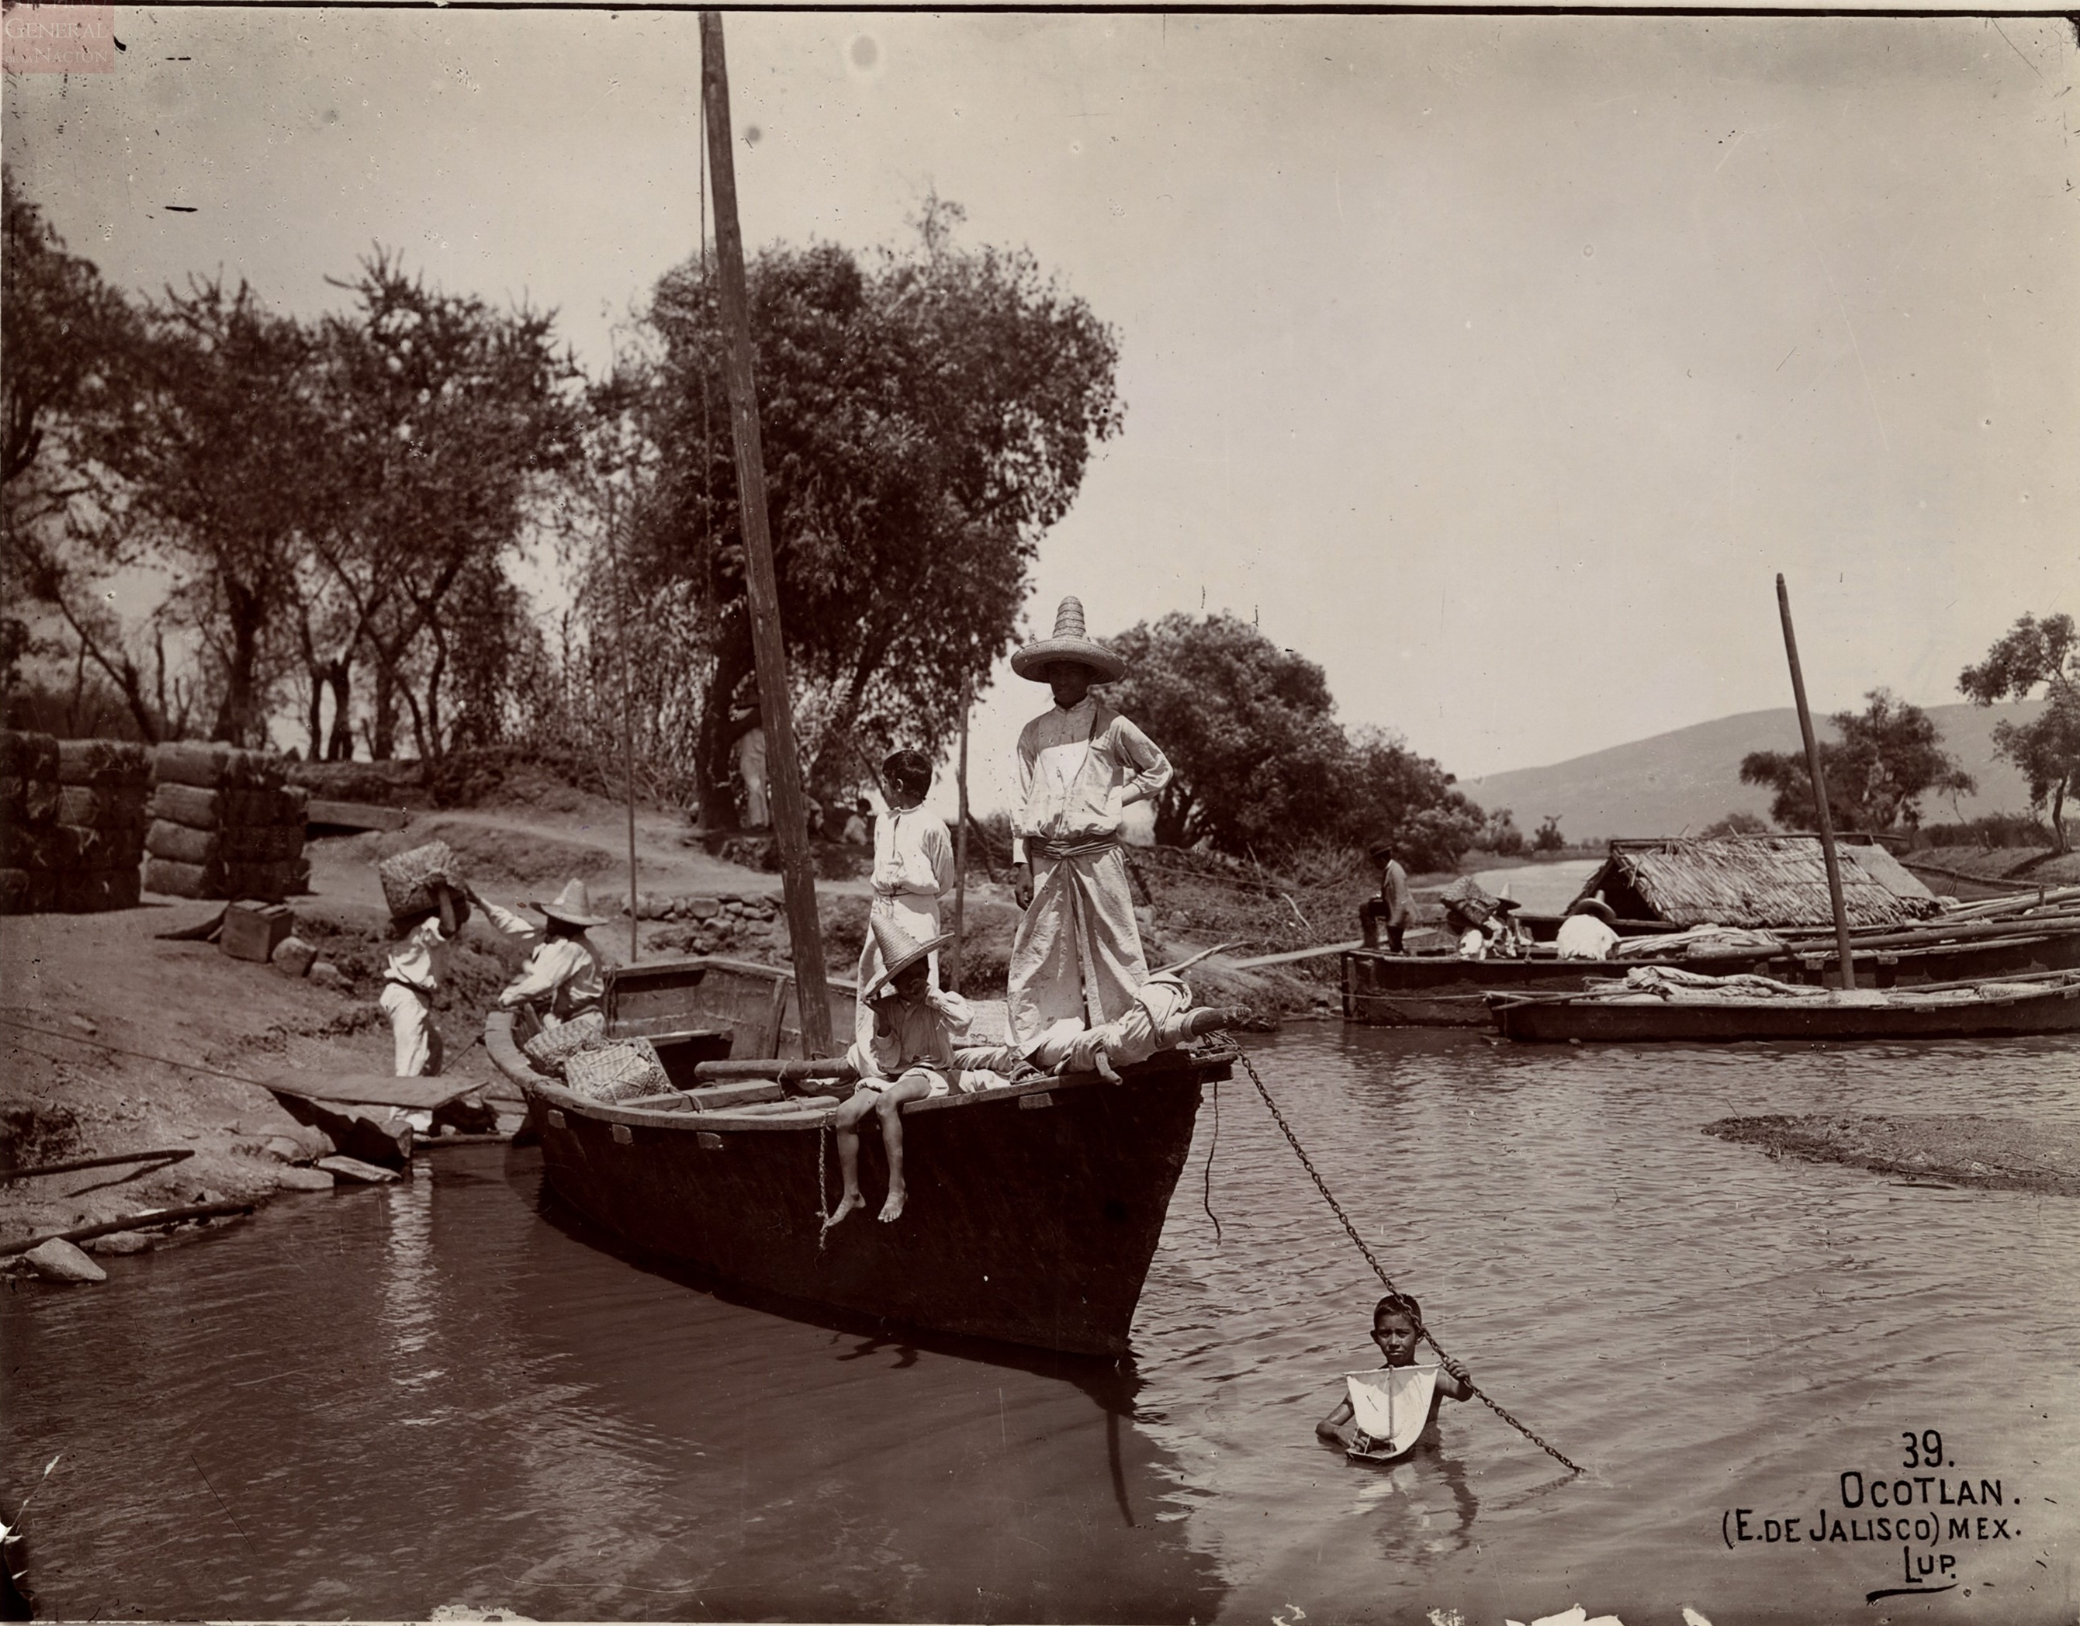
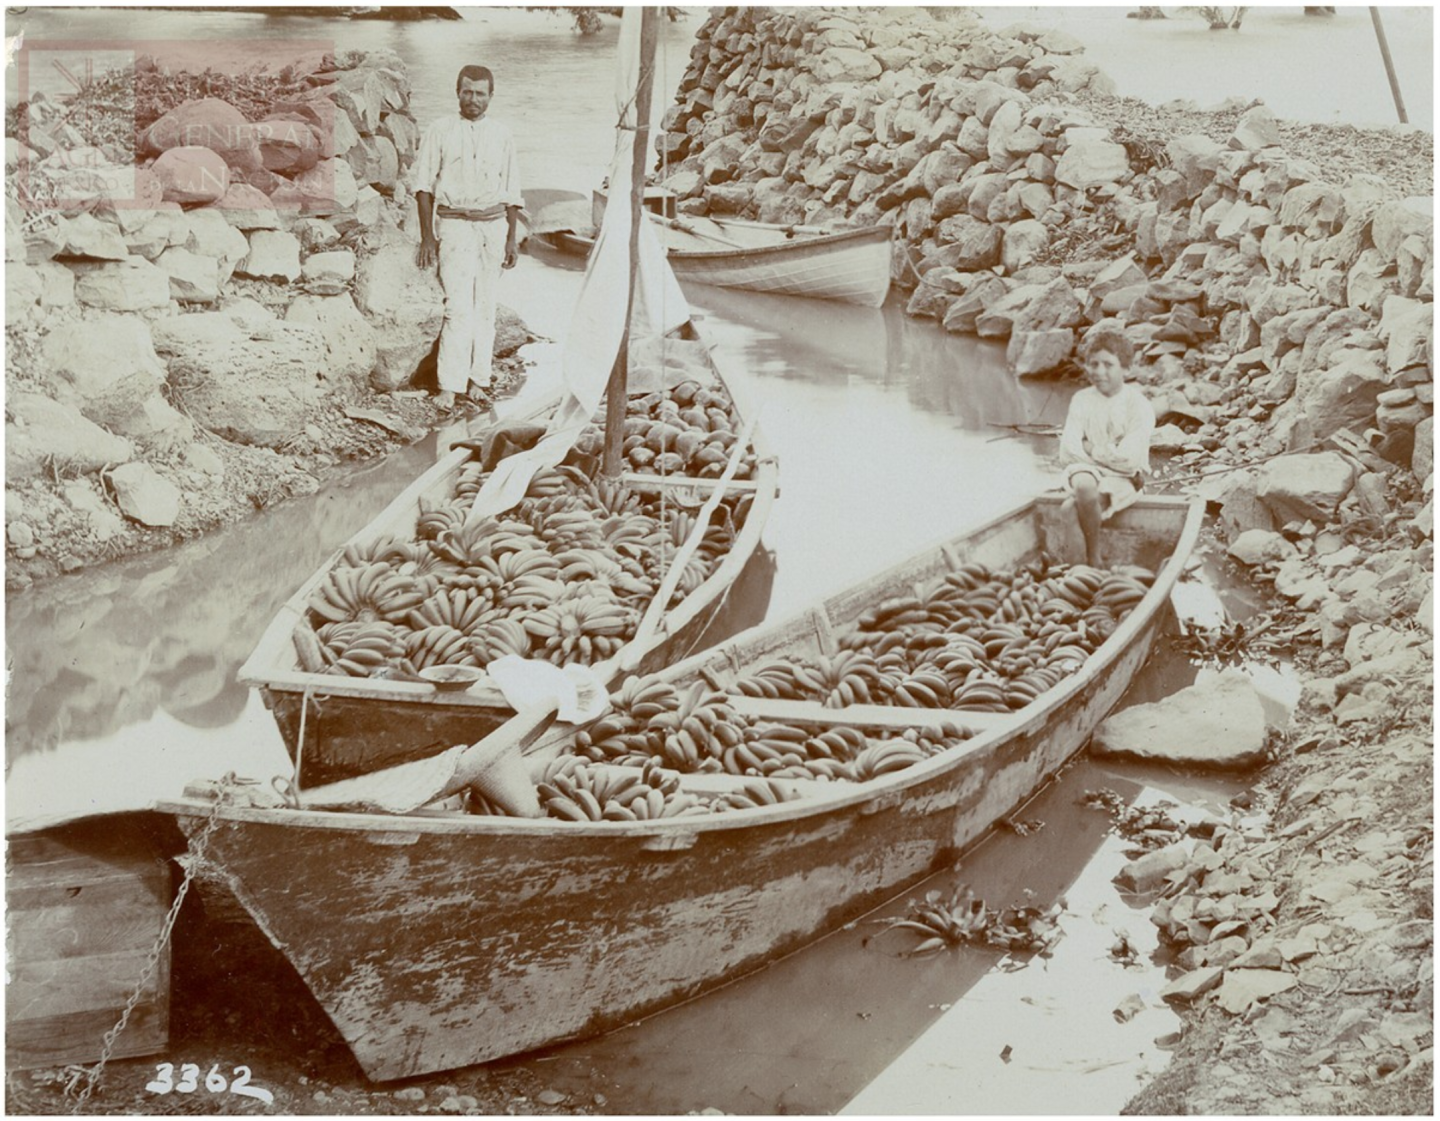
No updates yet on the build itself, but a bit more research and photos. There were a couple of interesting photos on the Memorica site that I found, which I think do add something worthwhile to my understanding of these vessels and their context. First, this fun one from 1908 of two small canoas absolutely filled to the brim with bananas. I almost want to try to make a few bunches to add to the Cargo Canoa, although I have no idea how I would do that at scale. Source: https://memoricamexico.gob.mx/swb/memorica/Cedula?oId=K76c_YsBTon6gu63yMbs Second, there’s this amazing photo from 1905, by photographer José María Lupercio. It highlights a few details of canoa construction. It’s notable how thin the anchor chain is, for instance. More importantly, it has a clear view of the aft bench/helmsman’s platform, which is clearly just a seat and not a locker as I built into my models. While it’s still possible that a larger canoa (as this photo is of a fairly small one) might have a more substantial sort of locker there, which would fit with Ramón Rubín’s reference to there being a “box,” I think it’s most likely that this is an inaccuracy in my build. Oh well, it’s not like I’m going to redo it now, but it is something I’ll be aware of. It’s also notable that there seem to be a few ropes dangling from the rail, perhaps serving as tie-down points for the sheets. Beyond that, the photo is also a highly evocative portrayal of daily life for the canoa sailors of Lake Chapala, although there’s a lot that’s not clear. Is the man in the bow the captain/owner? He certainly looks proud of the vessel, and he doesn’t seem to be helping with the unloading going on at the stern. It’s interesting to see so many children on the boat—are they his?—and the one in the water is actually playing with a toy canoa, perhaps looking forward to one day having his own real one. The photo, and the fact that children might have toy canoas, gives some suggestion of what these vessels meant for the people of the lake. Source: https://memoricamexico.gob.mx/swb/memorica/Cedula?oId=j_ts2osBVs6S4R6nmMnO ______________________________________________________________________________________________________ Changing gear a bit, I’ve also found that the basic Canoa design was slightly more widespread than I originally thought, although still seemingly limited to the Lerma River area. Originally, based on the photos I could find, it seemed like the Canoa—by which I mean a plank-built vessel, with a sharp raised bow, a squared-off stern, crossbeams running across the fore half, and usually staggered half-frames instead of complete frames—was entirely limited to Lake Chapala and the nearby small lake of Cajititlán. Elsewhere in Mexico, they seemed to mainly use dugout canoes—a seemingly endless variety of which were in use everywhere from the central highlands to the coast—, the flat-bottomed bargelike trajinera (also called a canoa) of the area around Mexico City, or vessels that appeared more like European-style standard plank-on-frame small craft. However, I recently found that Lake Yuriria, a smaller lake located over a hundred miles east of Chapala but connected by a canal to the same Lerma River that feeds into the larger lake, also had vessels very similar to canoas, a photo from 2006 of several of which is below. The design is clearly very similar to the Chapala Canoa, down to the use of naturally curved sticks as frames. The main difference visible from this angle is at the tip of the bow, which is capped with a triangular bit of wood—on Lake Chapala, there was always just a small crossbeam here used to support the anchor half-ring. Source: https://commons.wikimedia.org/wiki/File:Lake_yuriria.jpg As it turns out, several of these vessels are also in museums. In fact, I likely saw the one below at the Guanajuato Regional Museum when I visited years ago, without paying much attention. Wish I had taken some measurements then! Notably, the “canoa” here (which is listed as a “lancha”) has another feature not seen on Chapala canoas: some sort of rubbing strip running the length of the side and seemingly covering one of the seams in the planking. Source: https://lugares.inah.gob.mx/en/museos-inah/museo/museo-piezas/14955-14955-lancha-y-atarraya-de-pescadores-de-la-presa-de-yuriria.html?lugar_id=440&item_lugar=481&seccion=lugar The Ex-Augustine Convent Museum in Yuriria itself also has a similar vessel or two. More photos can be found uploaded to google maps by visitors than on the museum website itself. Notably, one of them (as seen in google maps photos) has its bottom planked with planks running side-to-side (like on a sharpie or some skiffs) rather than the more usual fore-and-aft, although I’m not sure if it’s an actual vessel or a replica made for the museum. They also seem to have a metal reinforcement along the stem. Source: https://lugares.inah.gob.mx/es/museos-inah/museo/museo-espacios/12308-497-2-escaleras.html?lugar_id=9804 Interestingly, as far as I can tell this type of vessel is limited only to Yuriria (and Chapala and nearby Cajititlán). Notably, I can’t find any evidence of them using similar vessels on Lake Cuitzeo, Mexico’s second-largest lake, which is a bit south of Yuriria and is not connected to the Lerma River. Instead, they seem to use distinct, extremely boxy vessels, a photo of which can be seen below: Source: https://www.elsoldemexico.com.mx/republica/sociedad/pescadores-del-lago-cuitzeo-arrastran-sus-lanchas-por-kilometros-de-lodo-para-sobrevivir-10275847.html Meanwhile, Lake Pátzcuaro, also nearby and again not connected to the Lerma, instead traditionally used dugouts of various sizes—the small icharúta are still used by fishermen there, while the larger tepari was used for cargo-hauling. Planked vessels never seem to have seen much use there. The museum in Yuriria also has another vessel, labeled a “canoa,” which has a different design. As can be seen, this canoa has a single plank on each side of a flat bottom, with a squared-off stern. The bottom rises at the bow, but the sheer of the hull doesn’t really sweep up, and rather than ending at a point, the bow is somewhat squared off, too, although it seems to taper to something narrower than the stern. Source: https://lugares.inah.gob.mx/es/museos-inah/museo/museo-piezas/14043-14043-10-445557-canoa-con-red.html?lugar_id=9804 So, what can we make of all this? At the moment, I have questions but no definitive answers. One question is why plank-built, sharp-bowed vessels seem to have spread to some areas (Chapala, Yuriria, etc) but not others (Pátzcuaro). It’s interesting that Lake Yuriria is not a natural lake, and was only created in 1548 after the Spanish ordered the construction of a canal connecting the existing basin with the Lerma River in order to make a reservoir. In contrast, Lake Pátzcuaro is a natural lake, and in fact was the site of Tzintzuntzan, the capital of the Purépecha Empire, in the Pre-Hispanic era. It’s tempting to suggest that Pátzcuaro had a stronger indigenous boatbuilding tradition, centered around dugouts, while Yuriria’s more recent creation meant that it had no indigenous boatbuilding traditions, allowing Spanish plank-built techniques to dominate. But that theory appears unlikely. After all, Chapala did have a substantial indigenous population that used dugouts on the lake, and those seem to have been wholly replaced by plank-built canoas at some point. Perhaps the different construction techniques simply have more to do with the availability of large logs suitable for dugouts vs. sawn planks being available. Determining this would require some study of the lumber industry and environmental change in the colonial era. A second question has to do with the origins of the Chapala/Yuriria-style Canoa (or Lancha), which I’ve identified as a distinctive vessel characterized by plank construction, a sharp raised bow, a flat stern, crossbeams in the fore half, and staggered half-frames. It’s tempting to look at the “canoa” in the Yuriria museum, shown above, as some sort of transitional phase between the plank-built, flat-ended trajineras (which were usually called “canoas”) that replaced indigenous dugout canoes in the lakes and canals of the central Mexican basin, and the Chapala Canoas. After all, the Yuriria museum “canoa” has some similarities with the trajinera: flat bottomed, flat-sided, low freeboard, flat bow. It also differs in apparently using thinner planks than are used for trajineras, having more of a vertical transom than the angled interchangeable bow/stern of the trajinera (instead being closer to that of a Chapala Canoa), and a bow that, if not coming to a sharp point, does notably taper. In this reading, design techniques from the central basin may have been brought to Yuriria and the Lerma River (which, notably, is only intermittently navigable at best), then adapted to use much thinner planks and perhaps were given sharp bows and flatter transoms to better suit local conditions. The frames could have been added to make up for the strength lost by using thinner planks, especially as the Canoas became larger. However, this sort of evolutionary progression can’t be sustained. It’s entirely unclear when they started using plank-built Canoas in Chapala and elsewhere, and it’s unclear whether the Yuriria museum canoa’s design predates that of the Chapala canoas, or if it’s just a simpler vessel. And that doesn’t say anything about the Cuitzeo vessels, which could also be offered as some sort of predecessor of the Chapala canoa but which also lacks the sources necessary to confirm this. All of which is to say, I have more questions than I have answers, and it’s not clear to me how answerable these questions are. Further research into colonial-era sources would be necessary. However, colonial drawings are usually so simplified in their presentation of boats that I’m not sure it would be possible to pick out Chapala-style Canoas vs. dugouts and/or trajinera-style vessels. Moreover, many colonial-era sources (and later sources, as well) simply refer to boats by the generic term “canoa.” What I would need to find would be something discussing boat-building techniques for Chapala and/or Yuriria in some degree of detail, but I’m not sure if such a source exists. What can be said, at the least, is that the lakes and rivers of Central/Central-West Mexico are home to a wide variety of wooden working boats. While the dugouts of Pátzcuaro have received scholarly attention, these diverse plank-built vessels are also deserving of study and could tell us something about the history of technology and cultural change in colonial (and post-independence) Mexico. In any case, thank you for your patience as I speculate and share photos that are not directly related to the build.


-
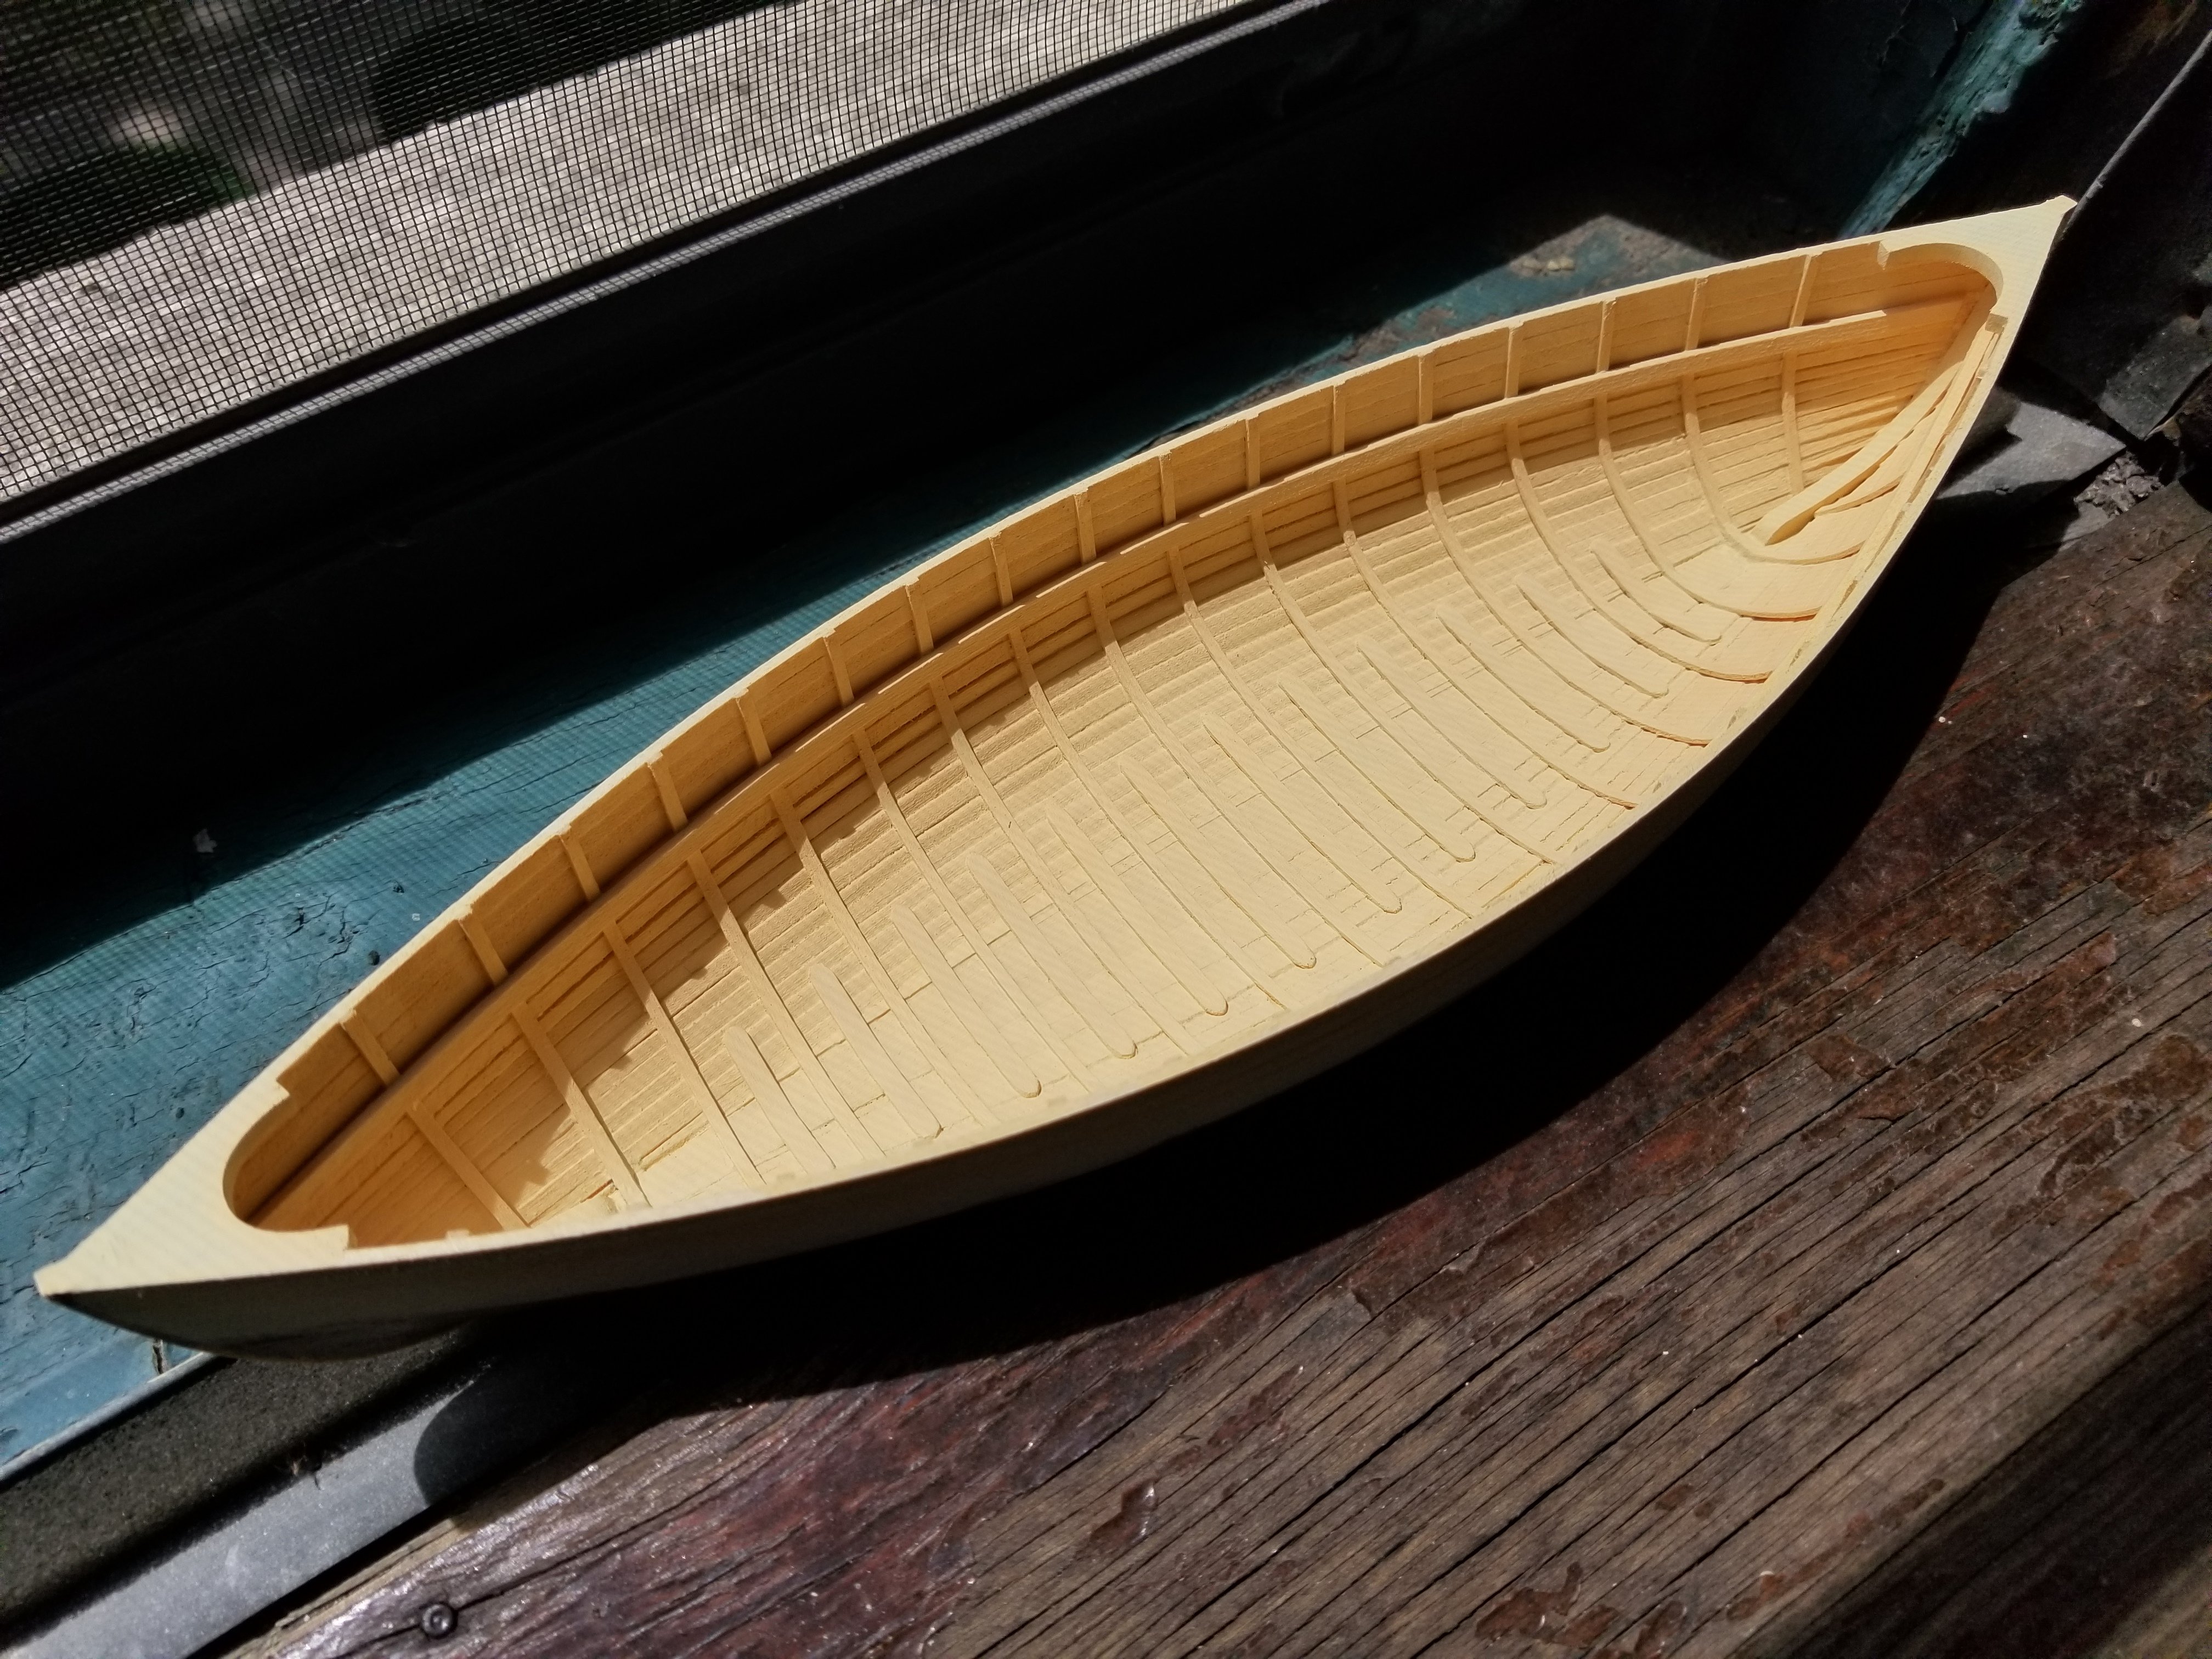
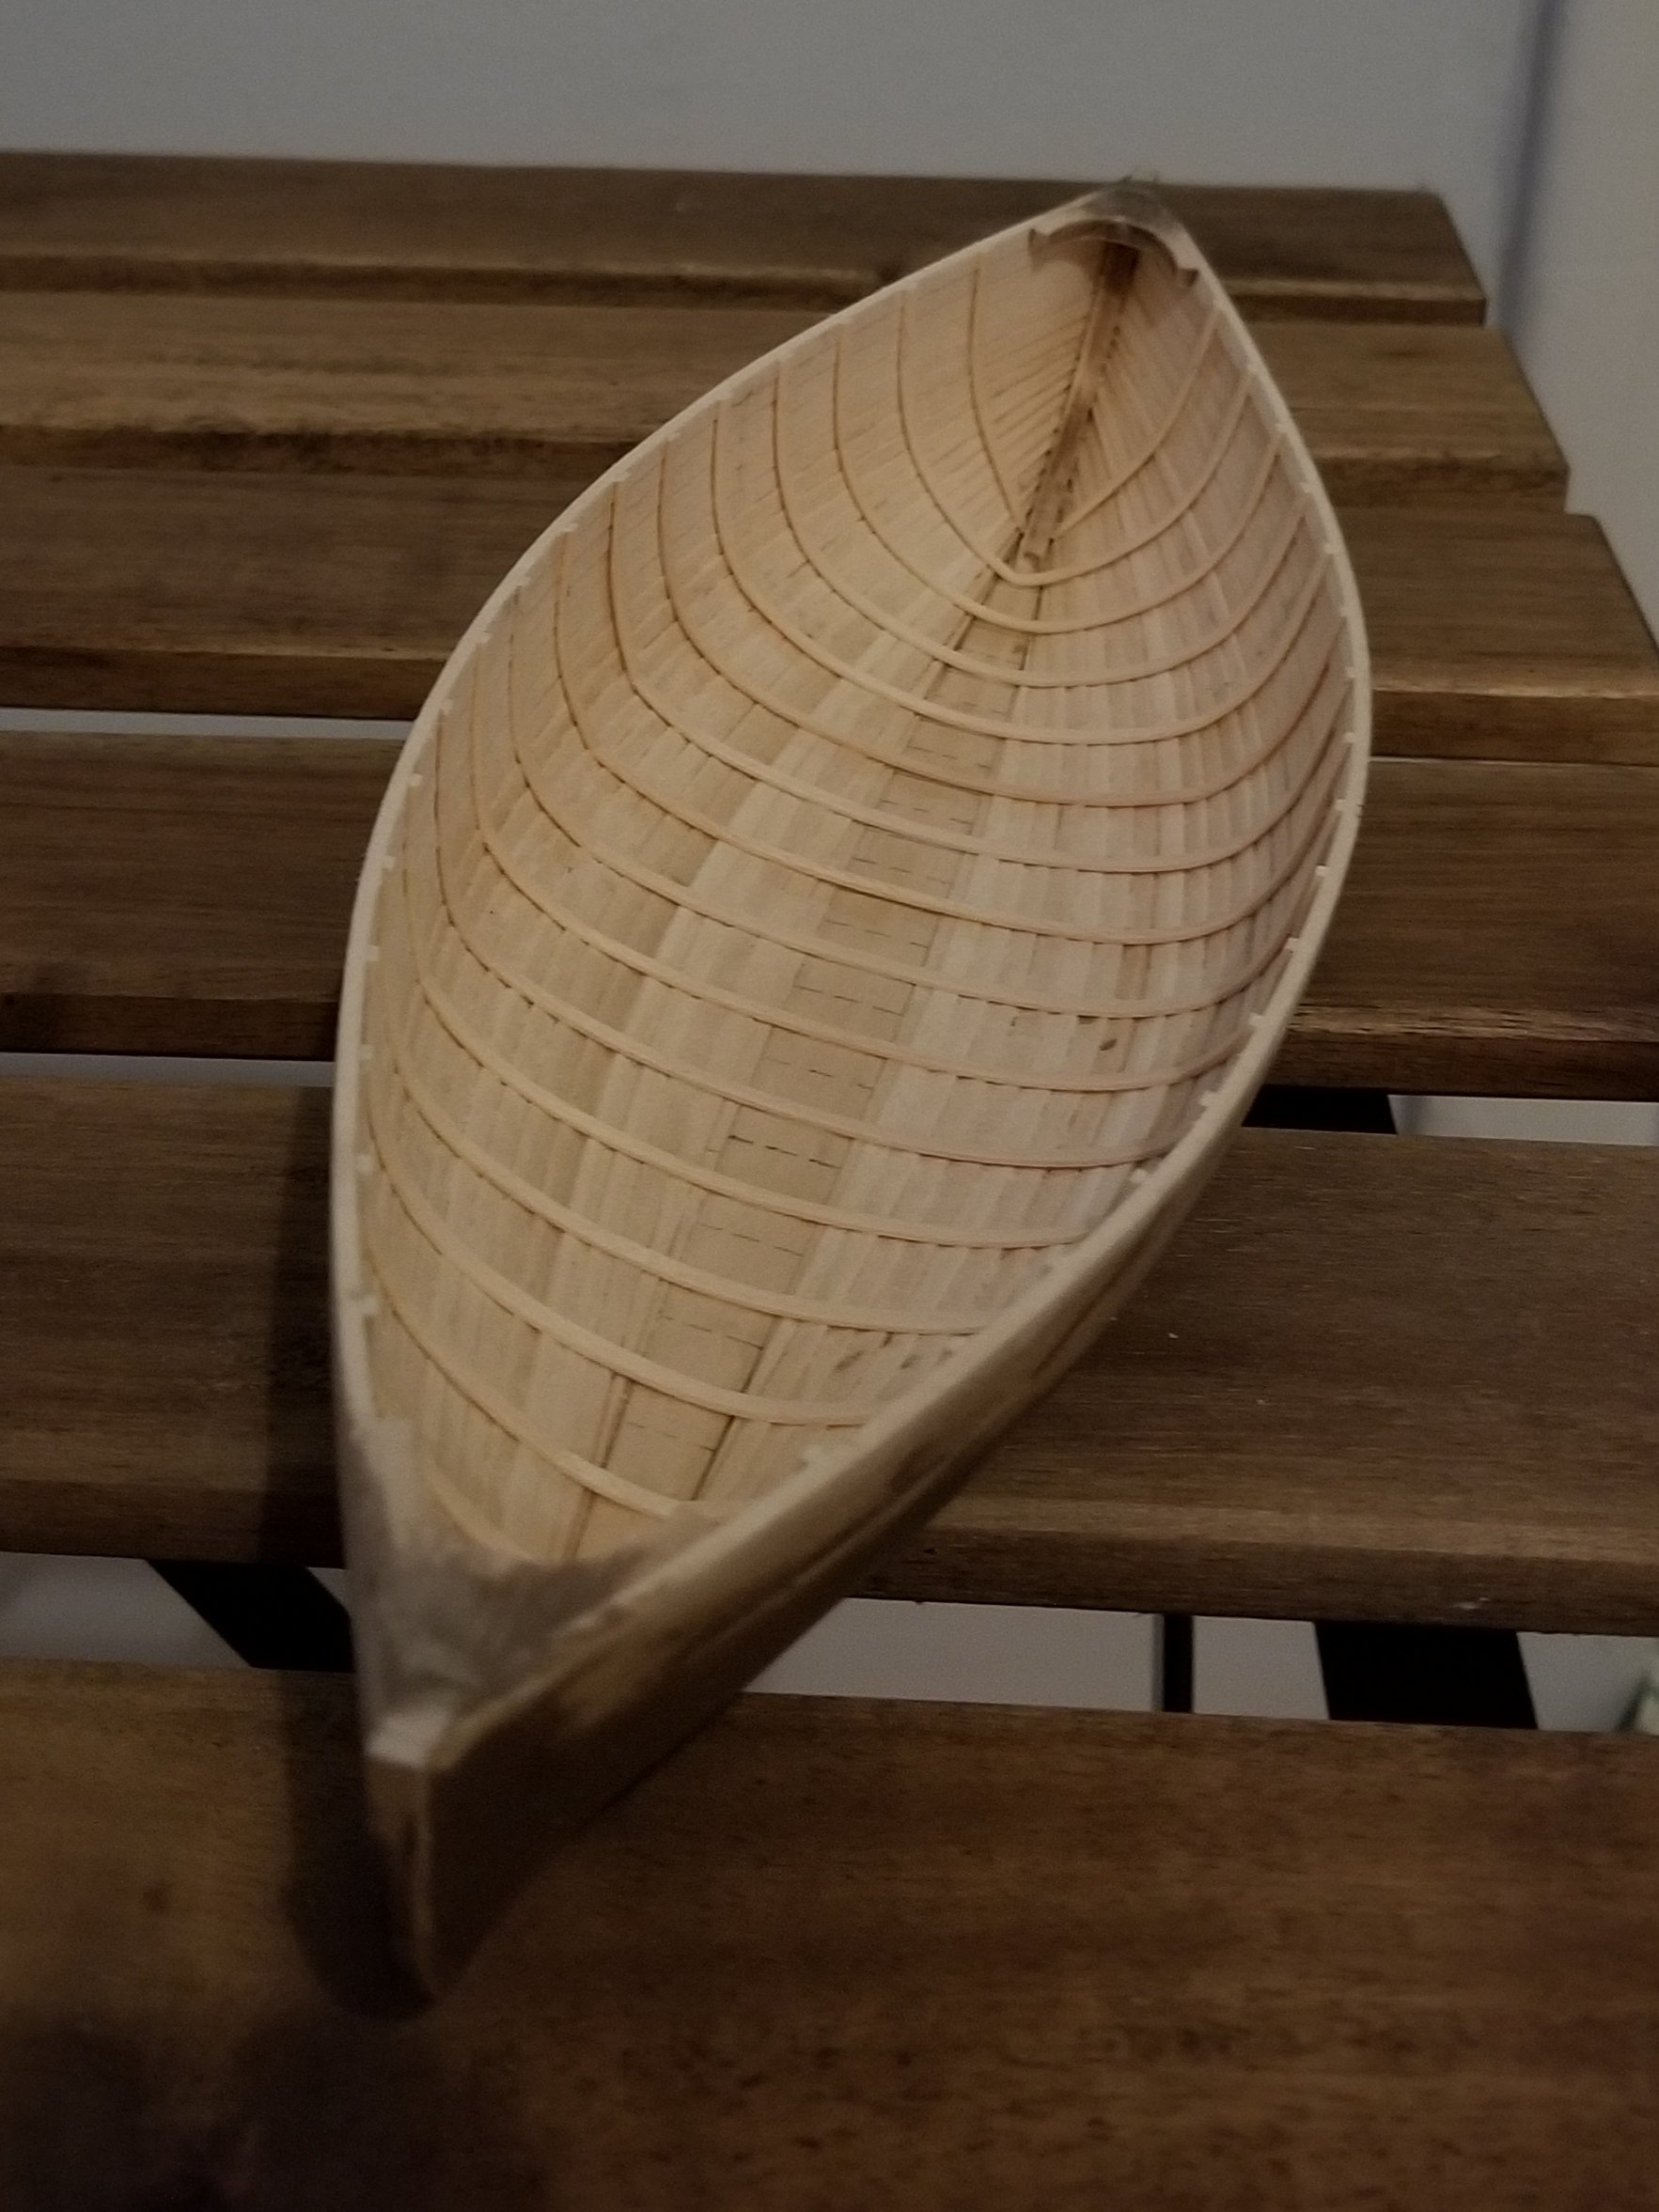
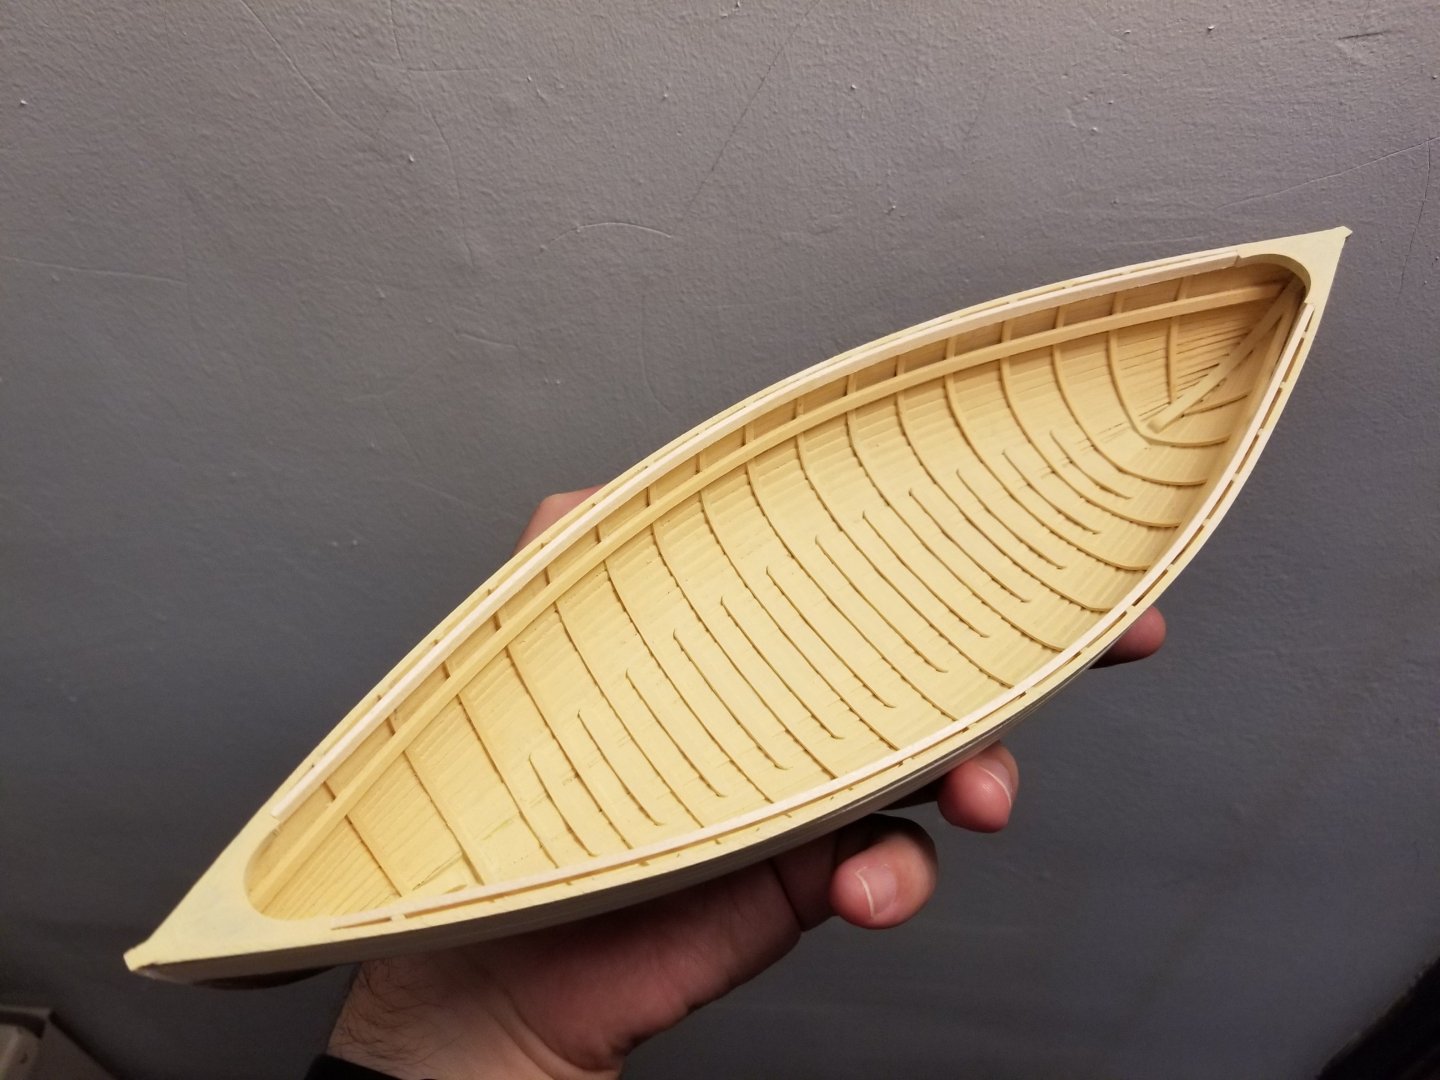
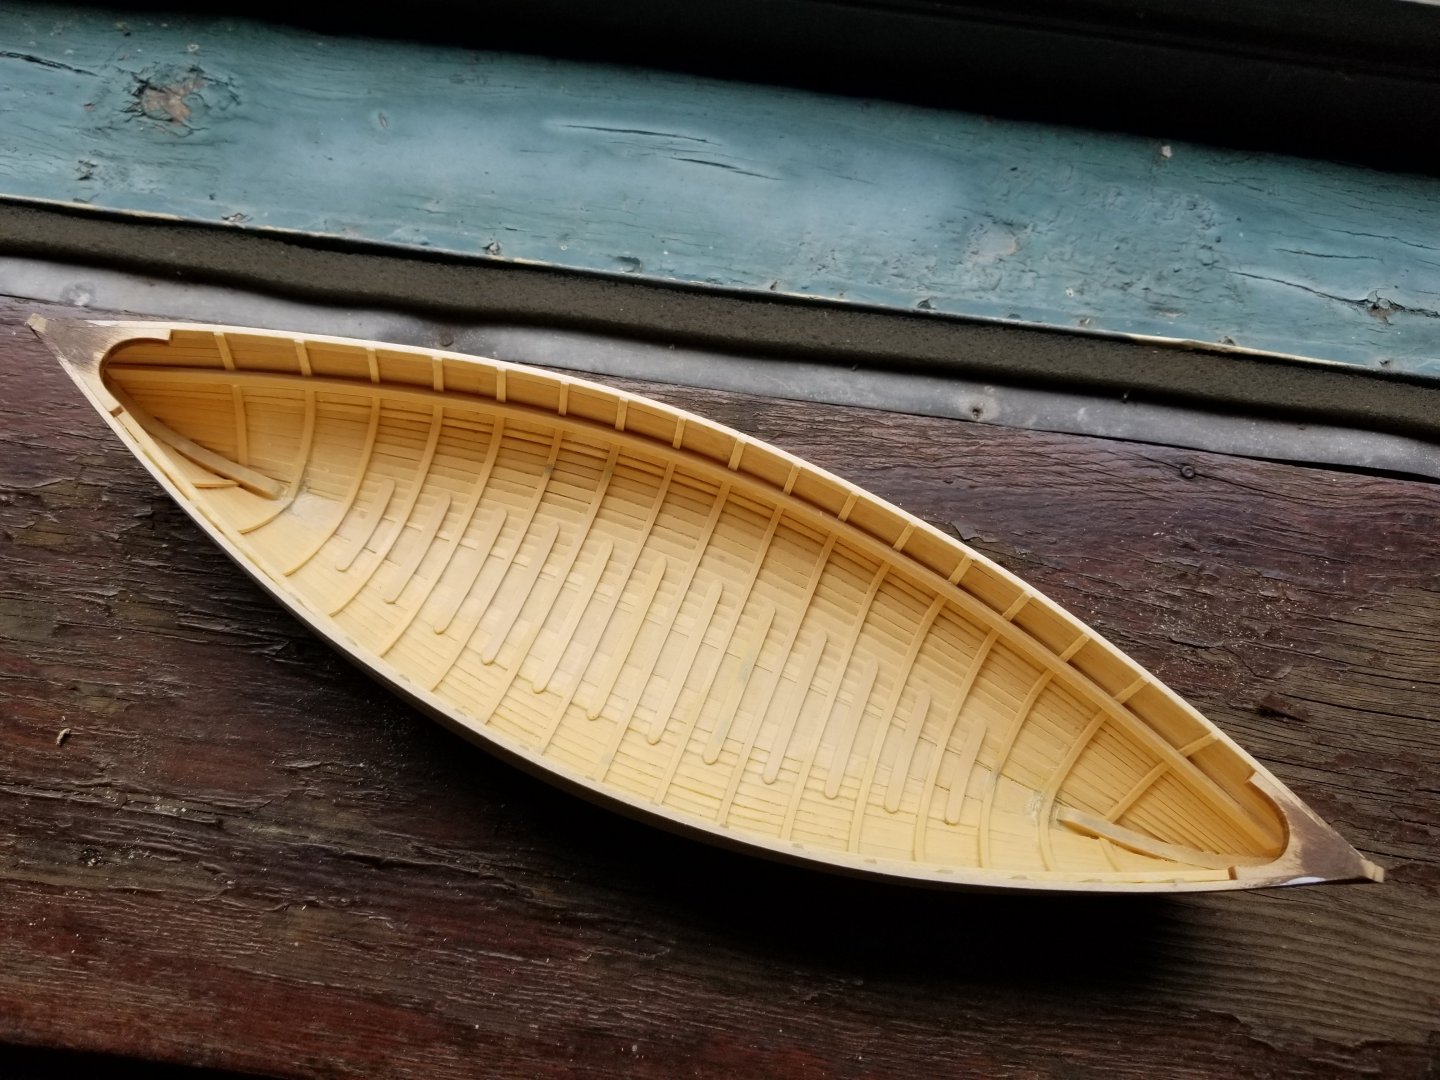
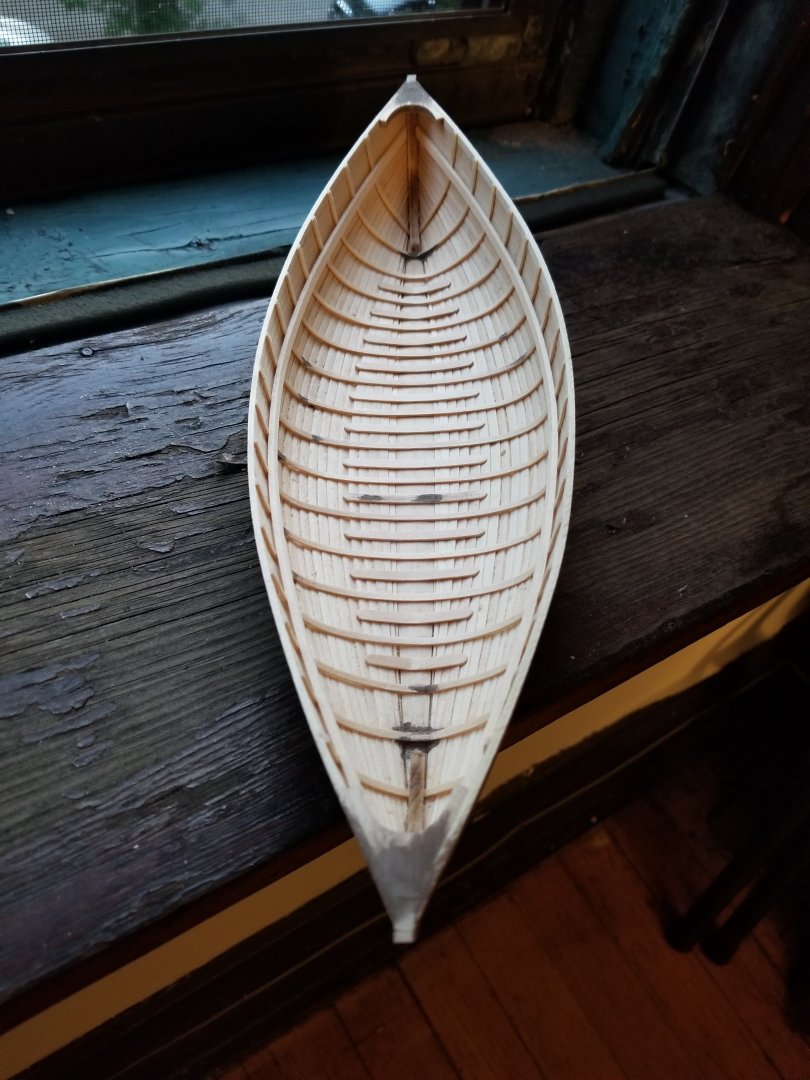
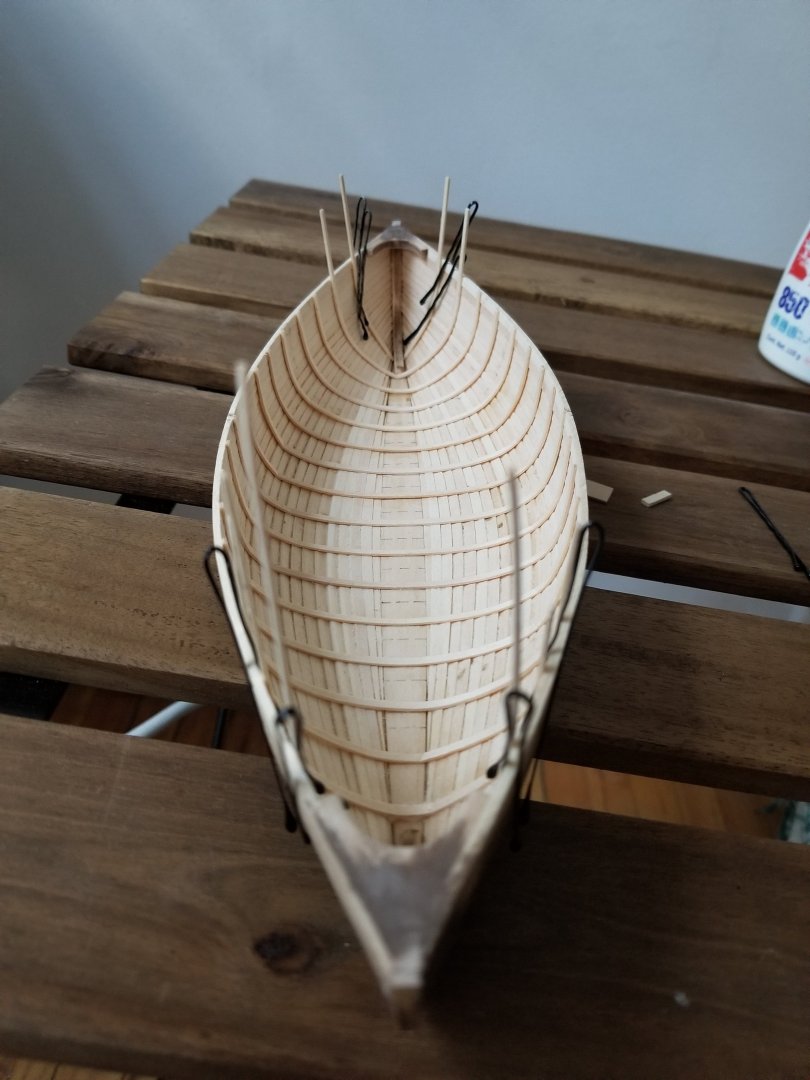
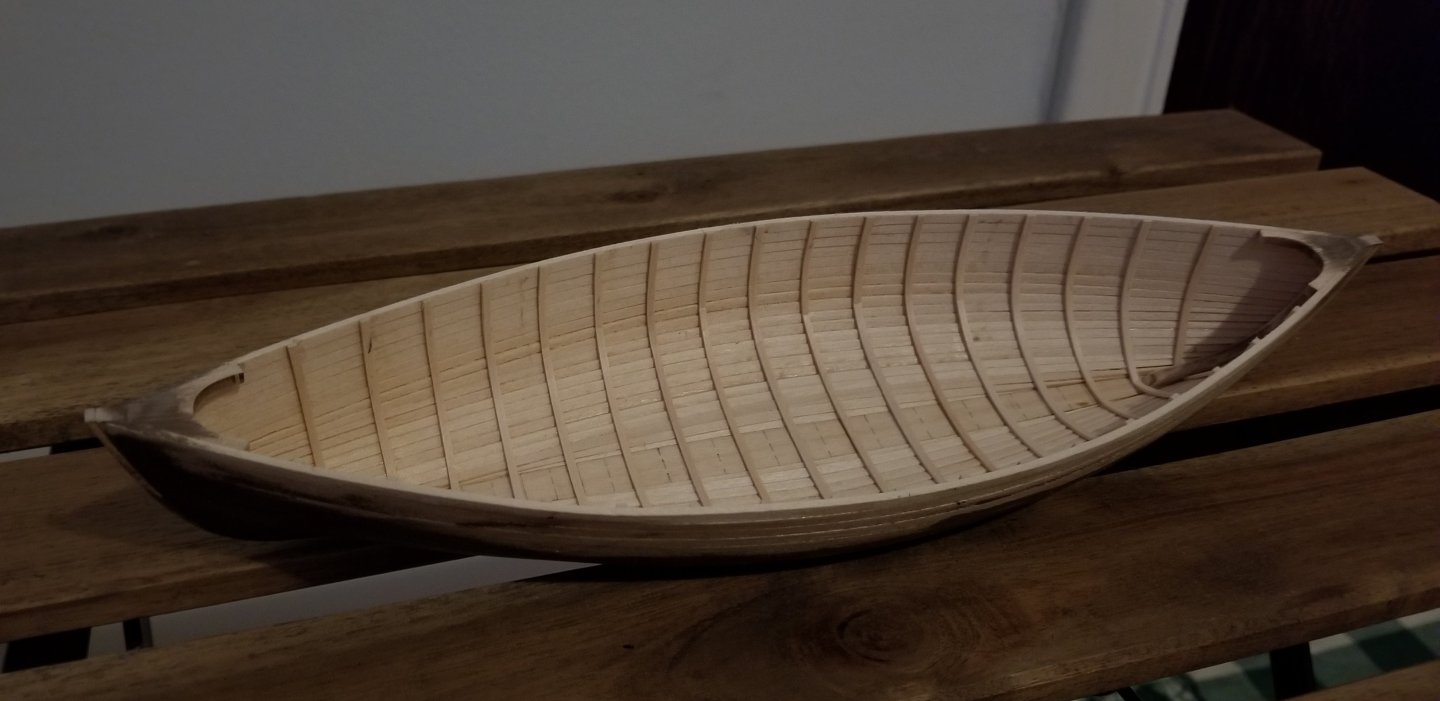
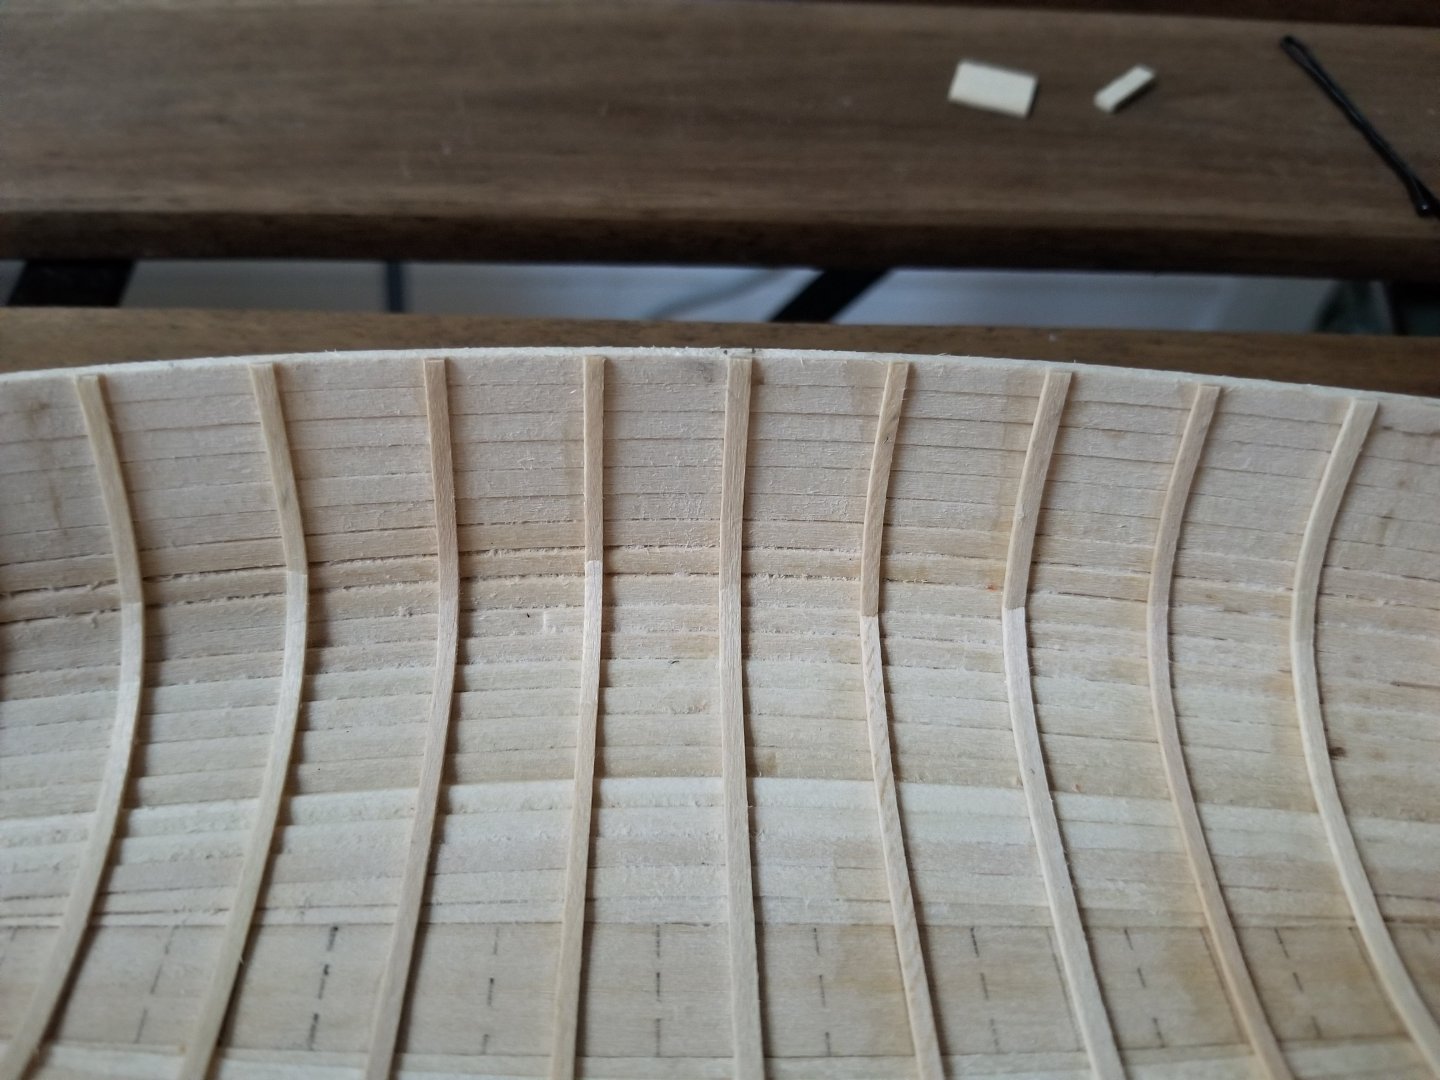
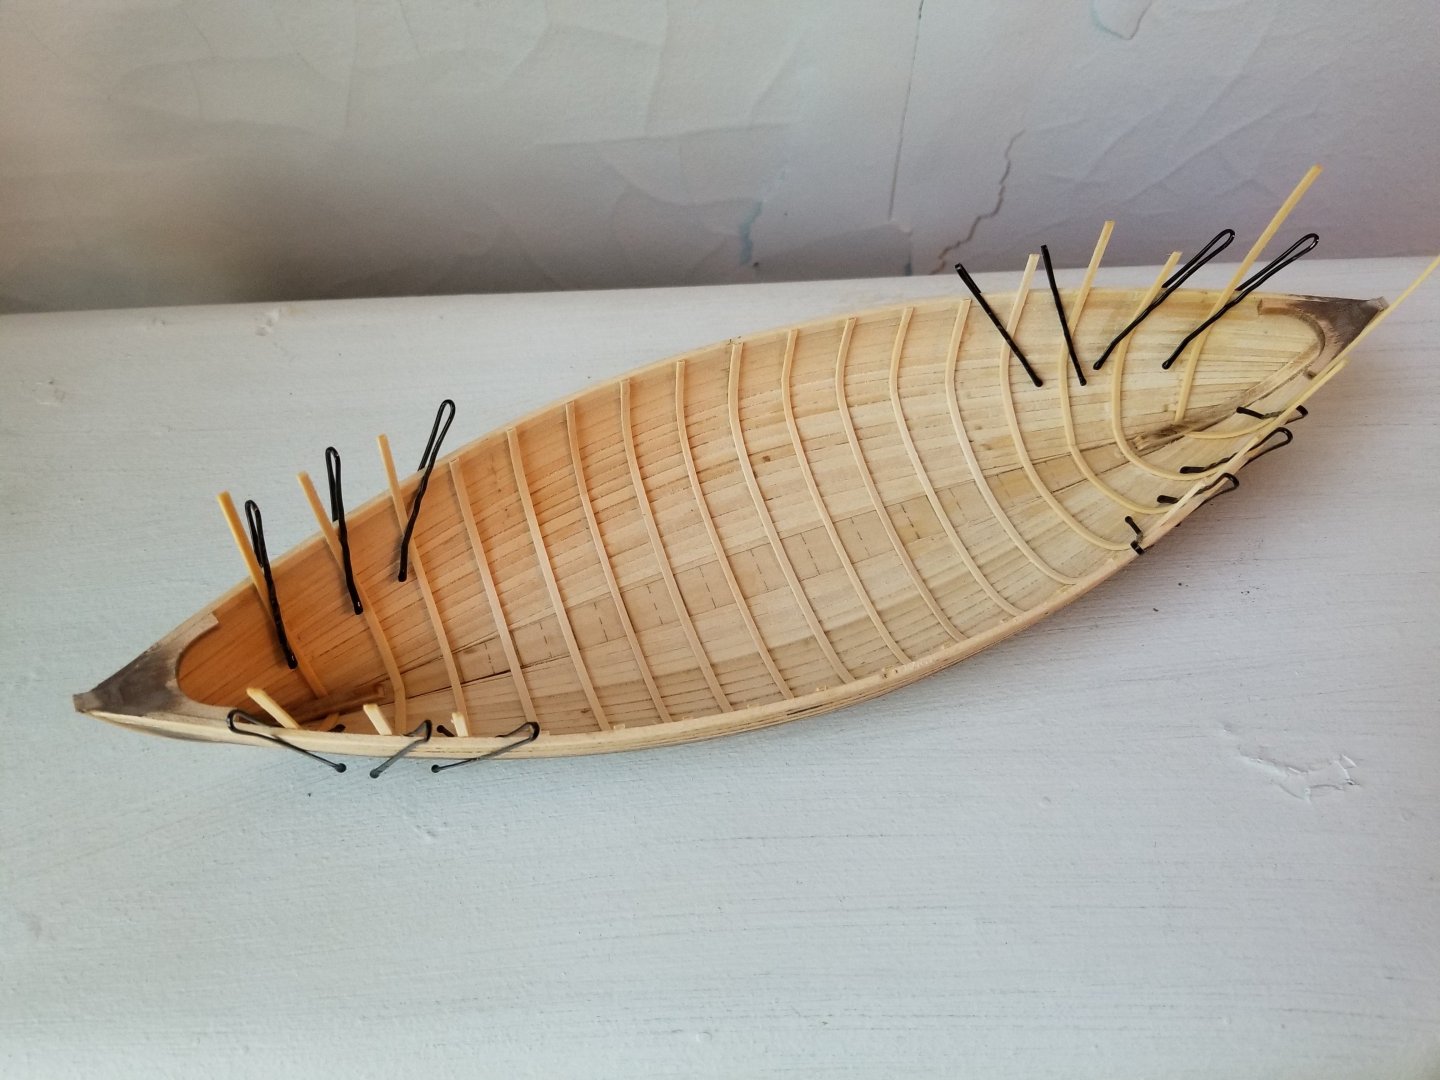
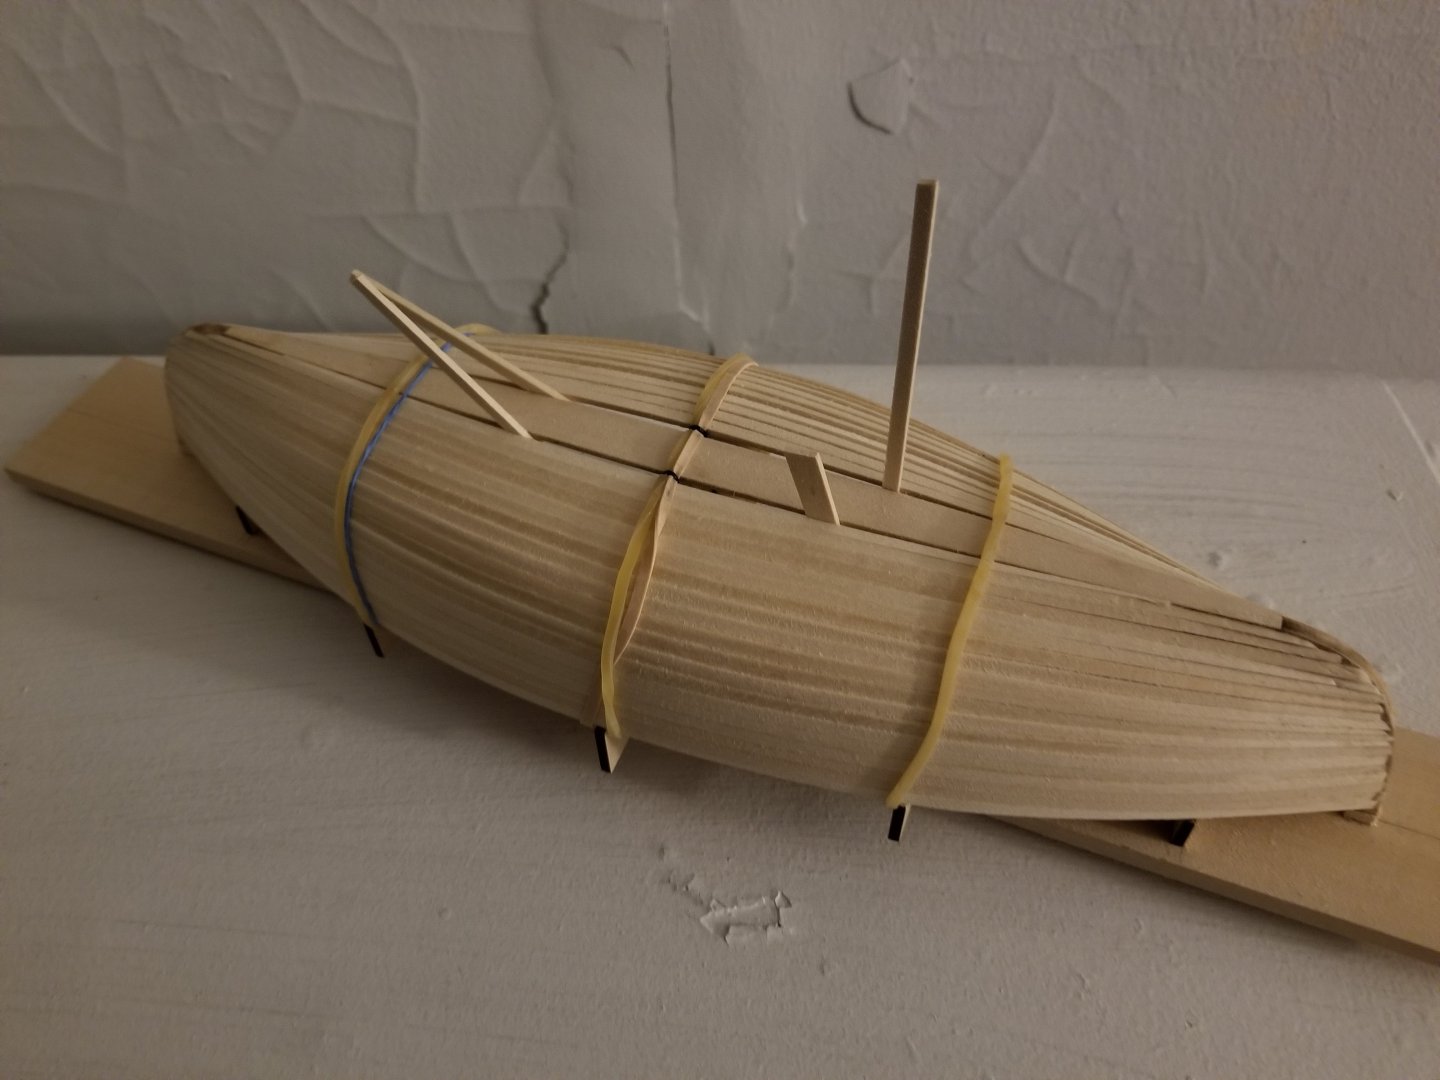
The frames are now finished! Overall I'm happy with how they turned out. I found that working with large batches was most efficient: I set up a number to dry in place after soaking them in hot water, and then glued them in place afterward one at a time. It was a pretty quick process. I made sure to fully dry out the soaked strips before gluing, but I didn't find that I needed to let the glue fully dry before placing the spacers and adding the next frame, instead just letting it dry enough that the pressure from the spacers wouldn't move it out of place (generally 45 minutes or so). Here we can see the last batch drying at bow and stern. And advancing toward each end: Finally I trimmed off the excess and used a sanding block to smooth along the top. One issue to watch out for with adding the frames is that, even bending them very slowly, I found it difficult to keep some of them from kinking at sharp bends, as can be seen on many frames below. I may try adding a dab of filler at the kink to see if that helps.

- 65 replies
-
- 8
-
-
-
- Maine Peapod
- Midwest Products
- (and 1 more)
-
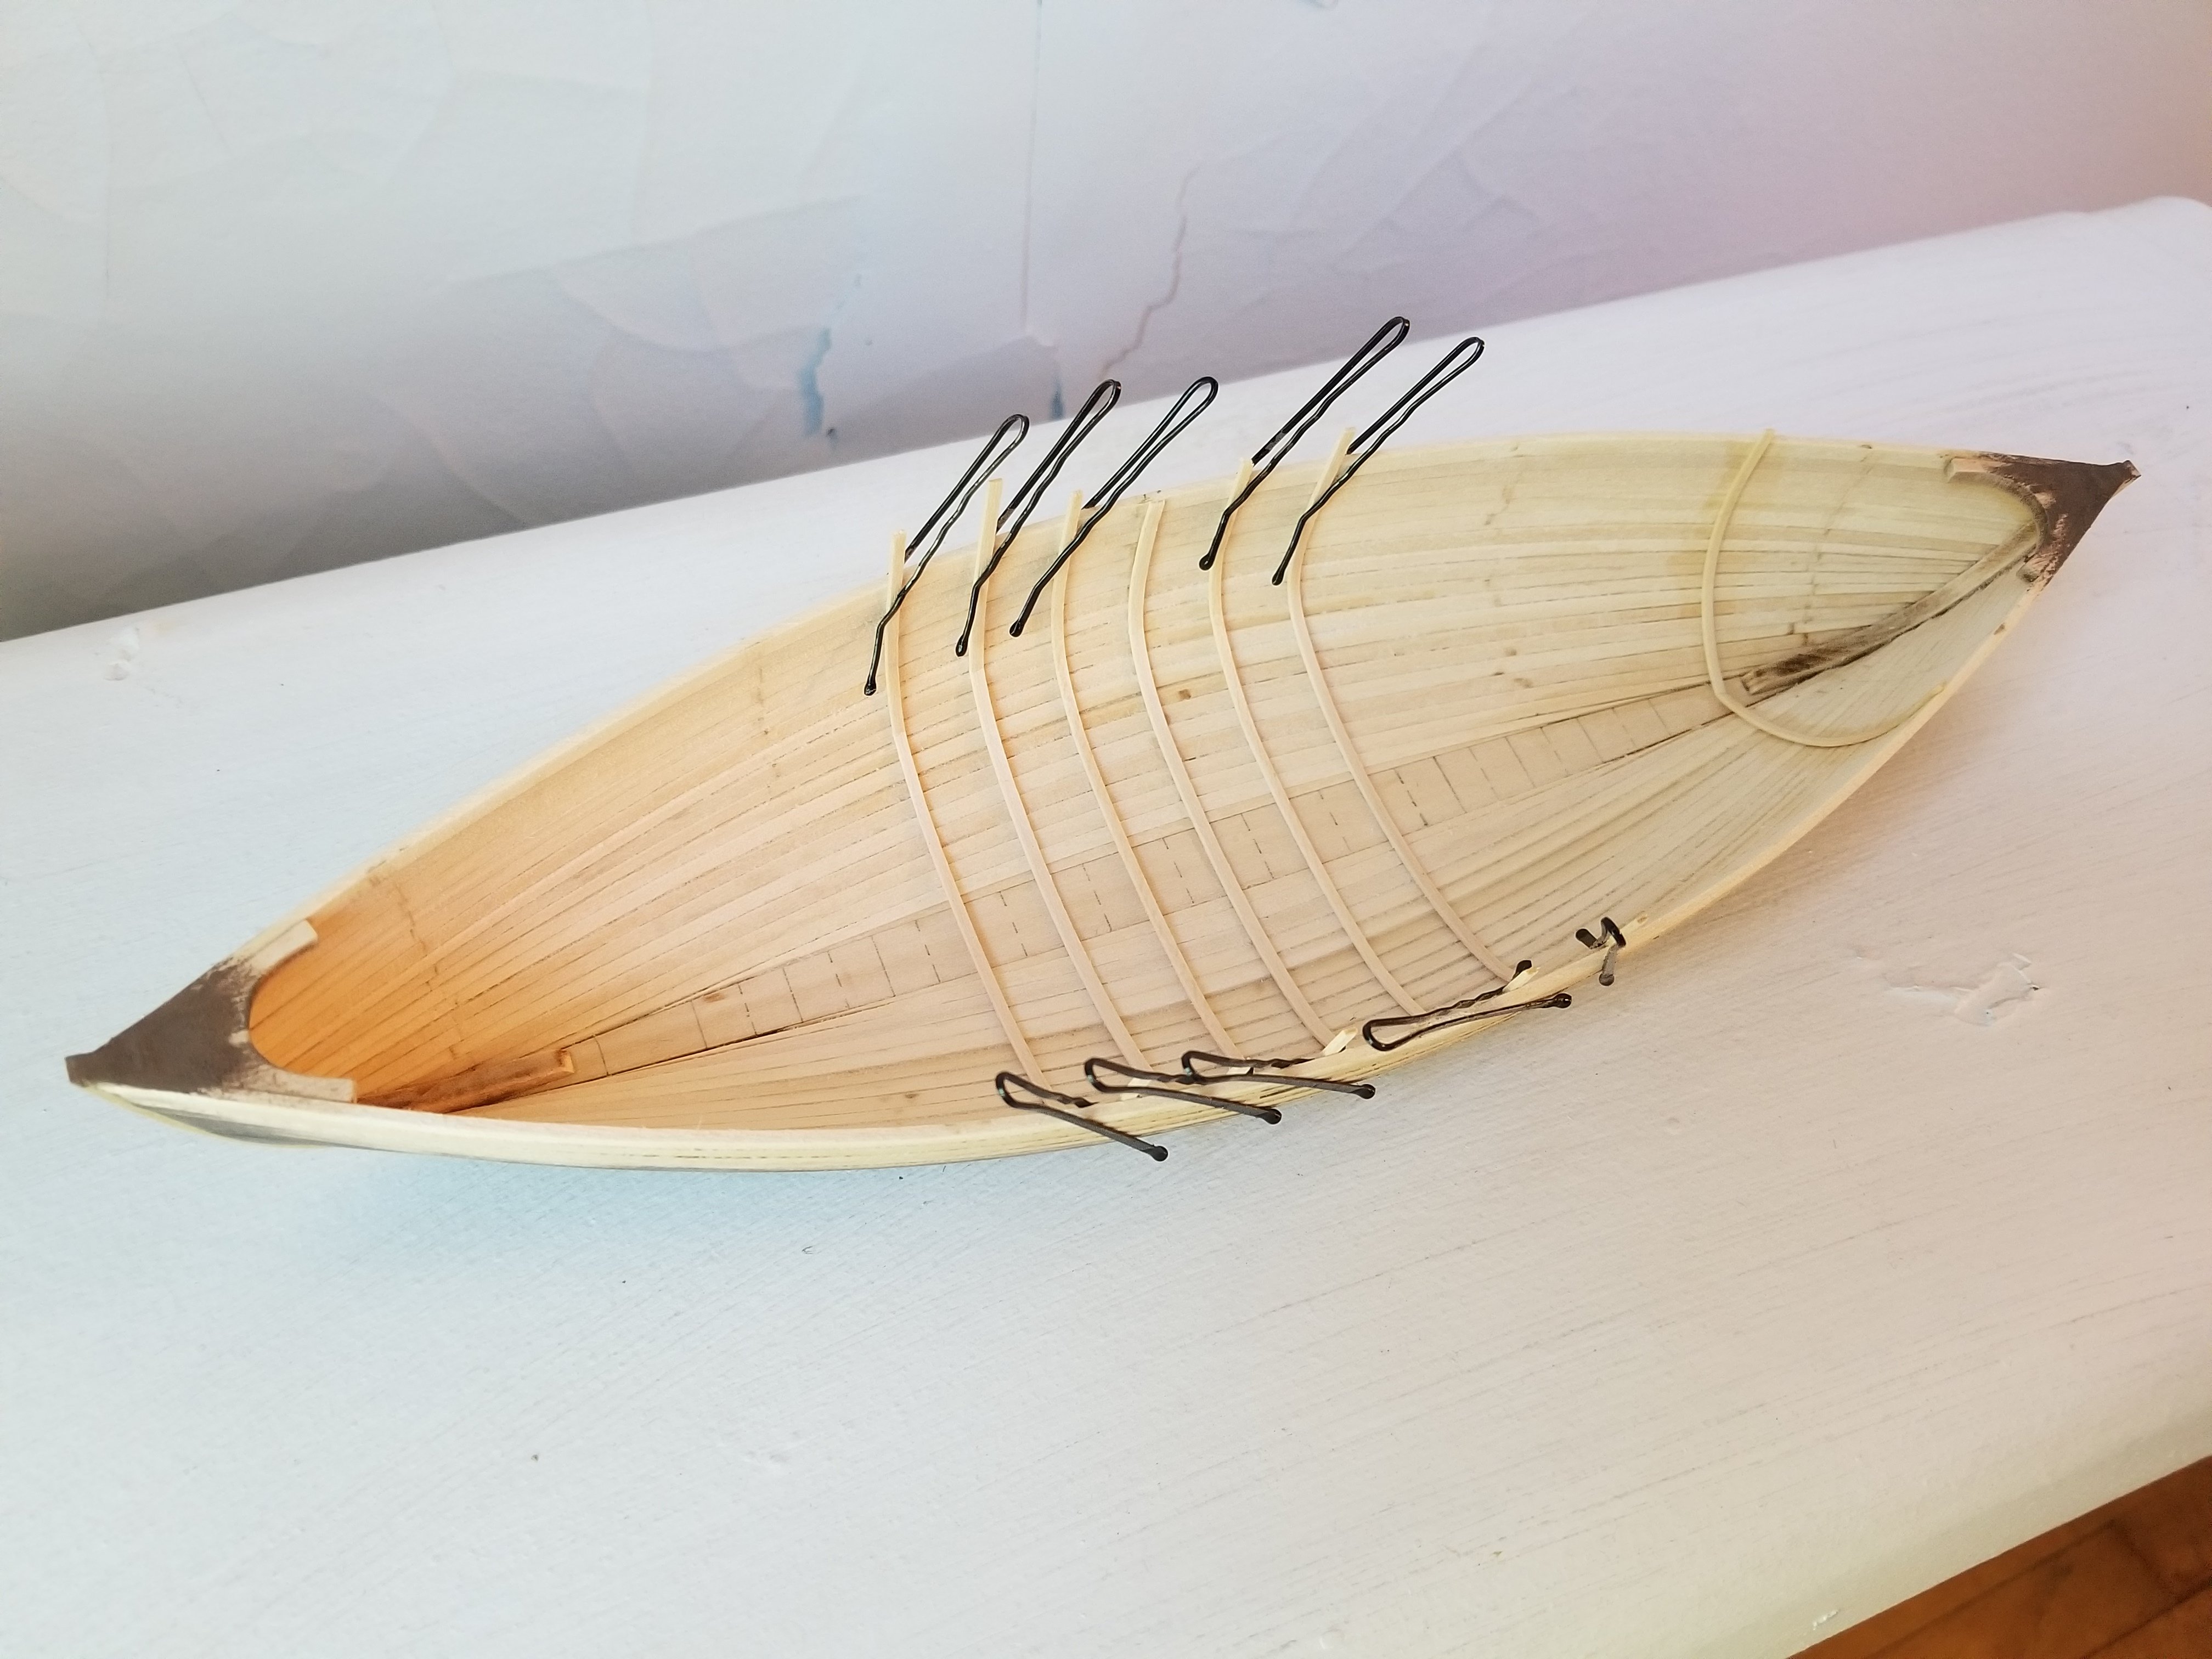
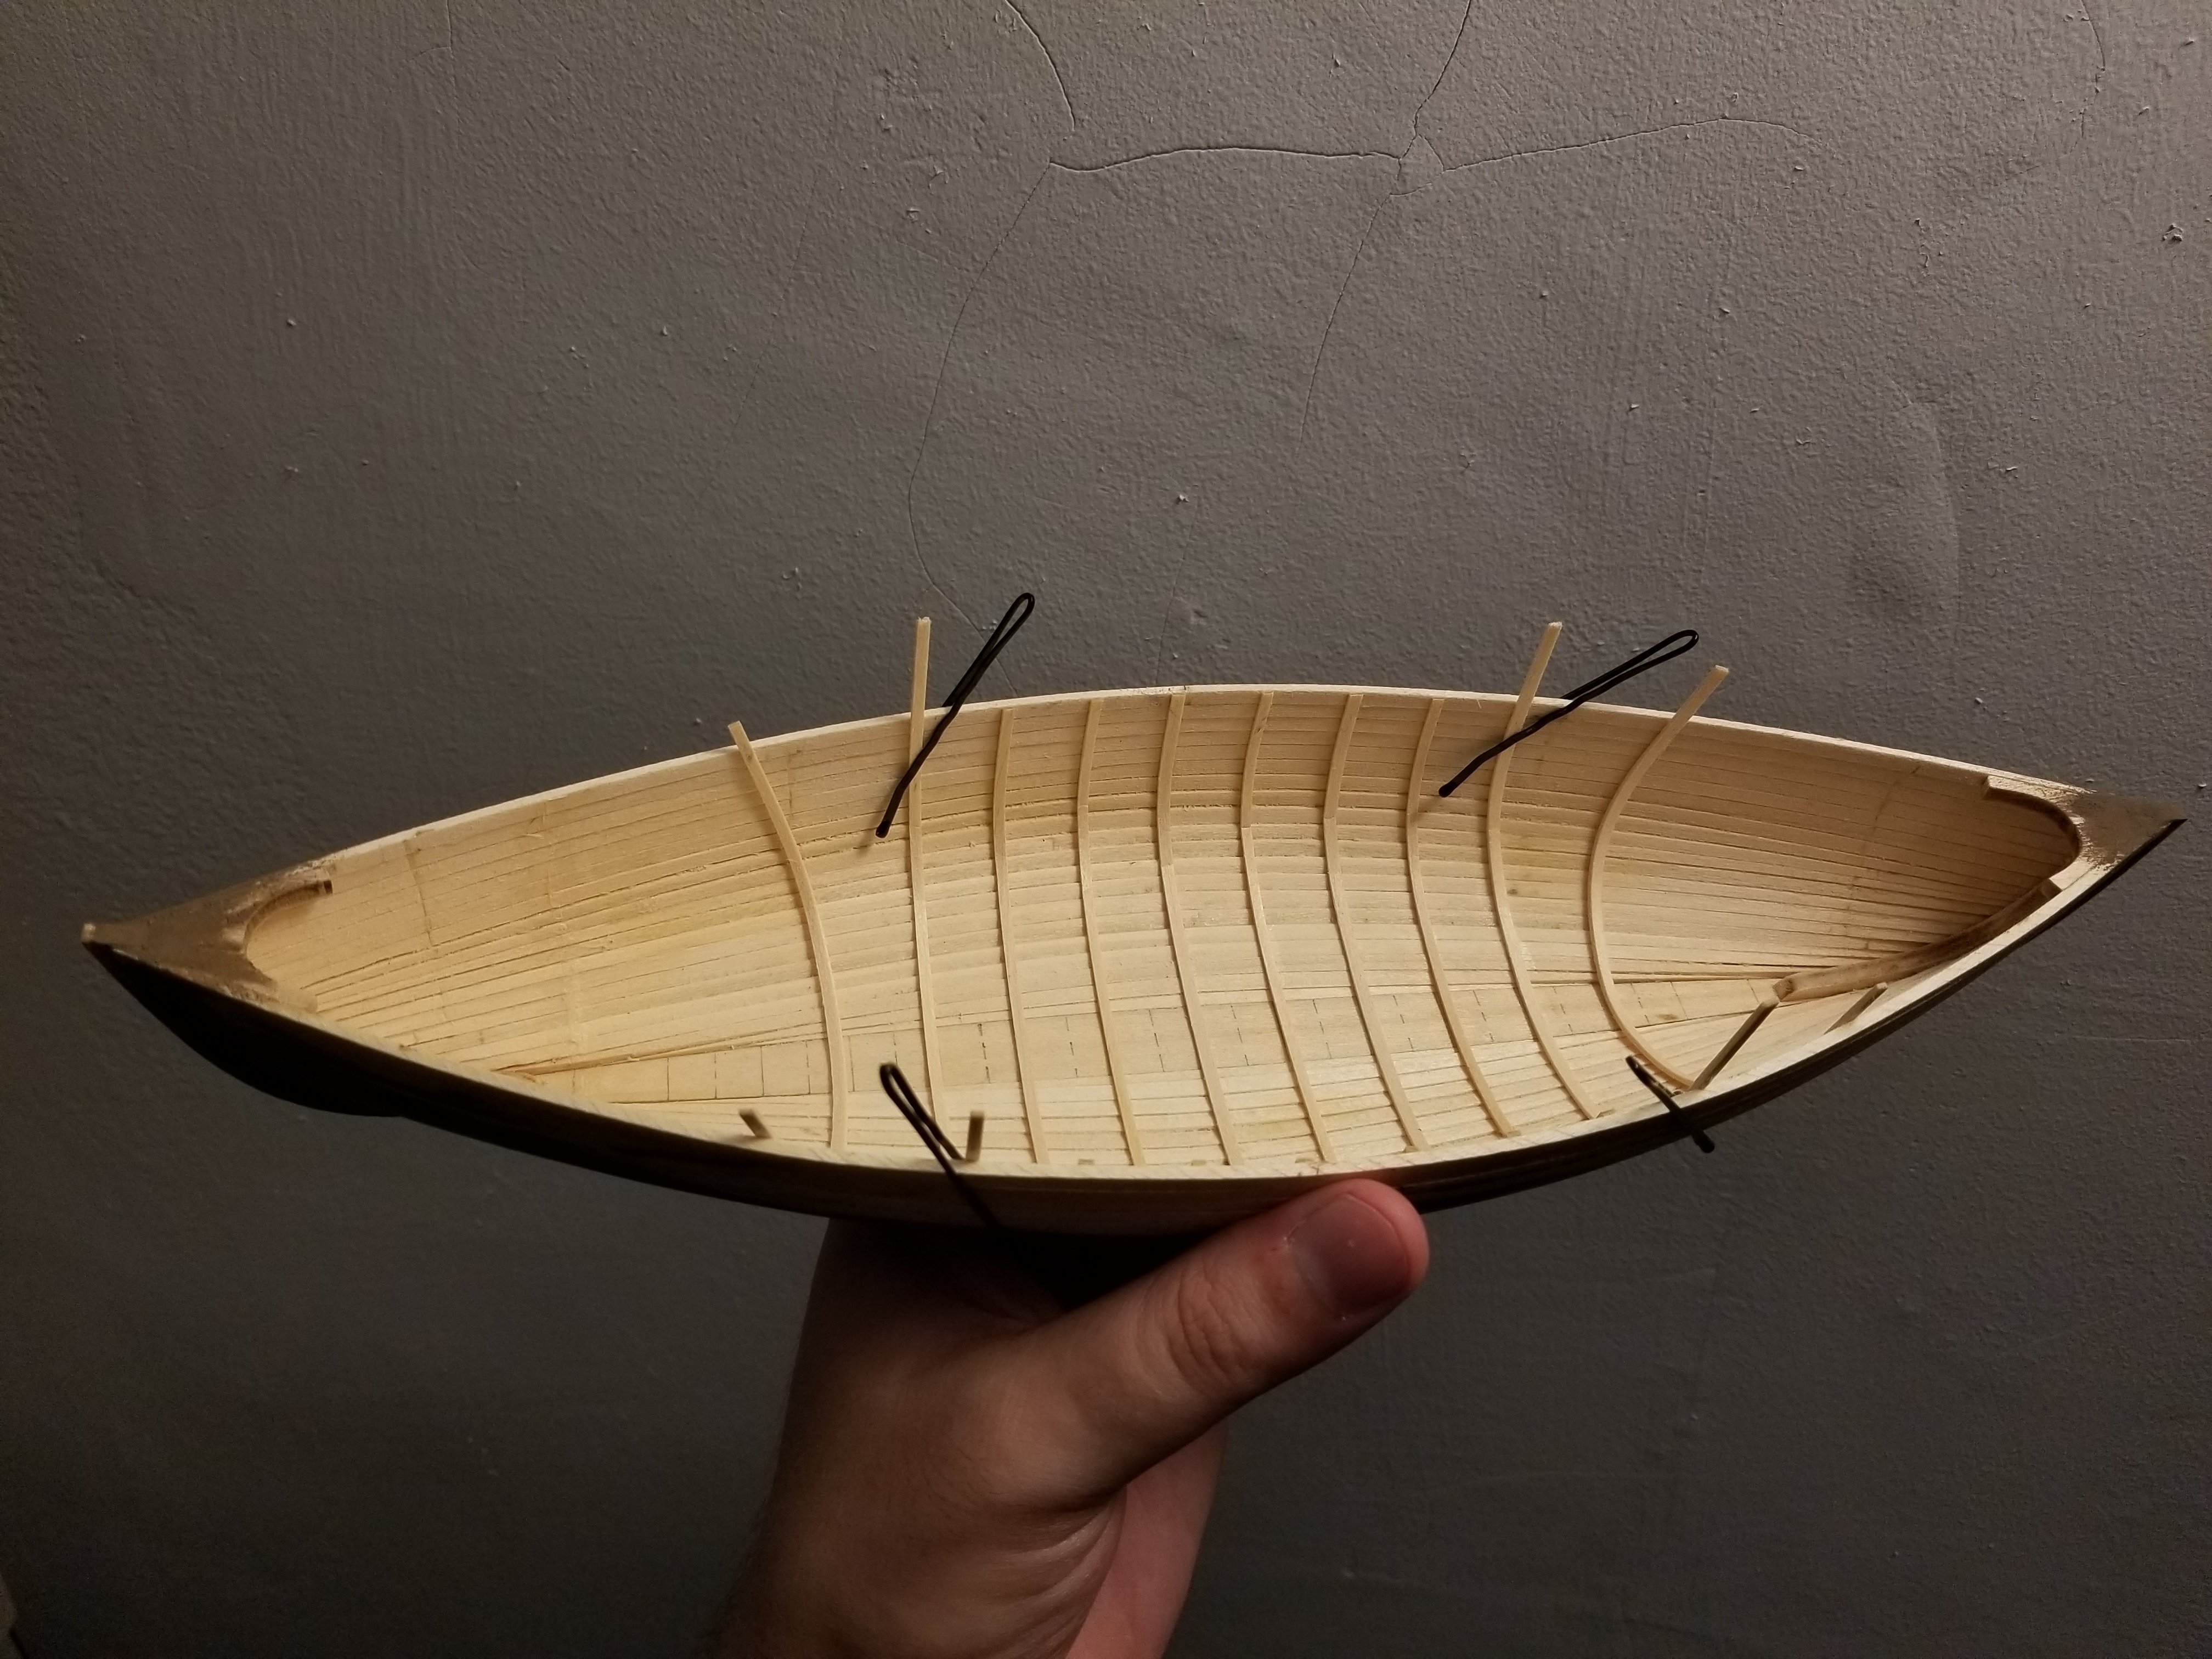
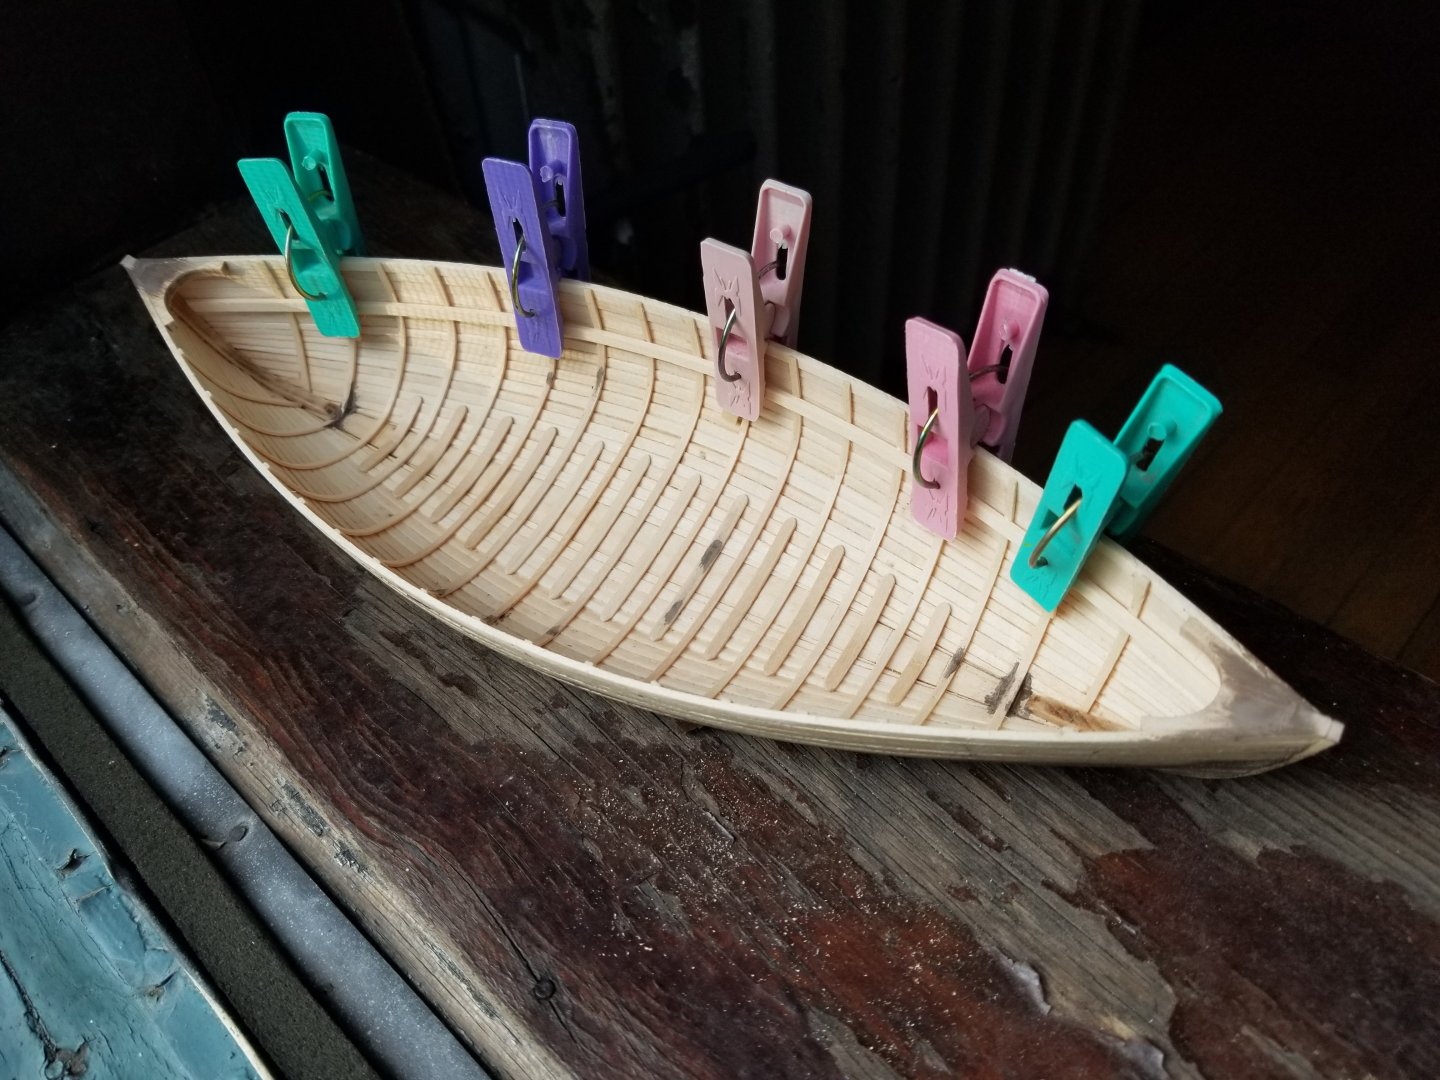
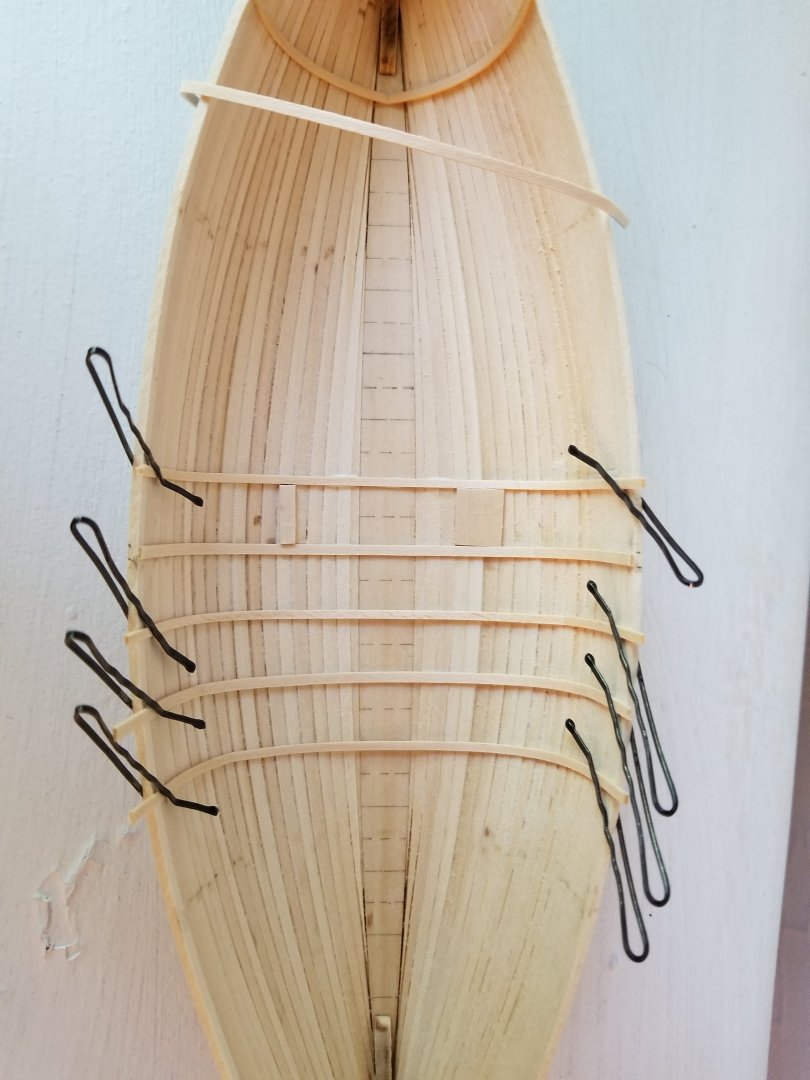
Approaching this step from the middle-out (just like in the show Silicon Valley, come to think of it) has been working much better. I've been proceeding in batches of frames, which are soaked, clamped in place to dry, and then later glued in with precise spacing. As I've found in a number of aspects of model boat-building, bobby pins can be very effective clamps in situations where you don't need much pressure. I did realize at a certain point that my spacers were a hair too long and the difference was adding up, but I was able to correct the issue. The central frames look very off in the photo below, but it's an effect of the camera angle. In the photo below, the bobby-pinned frames have been glued and are drying, while the outermost frames will be glued next.


- 65 replies
-
- 7
-
-
- Maine Peapod
- Midwest Products
- (and 1 more)
-
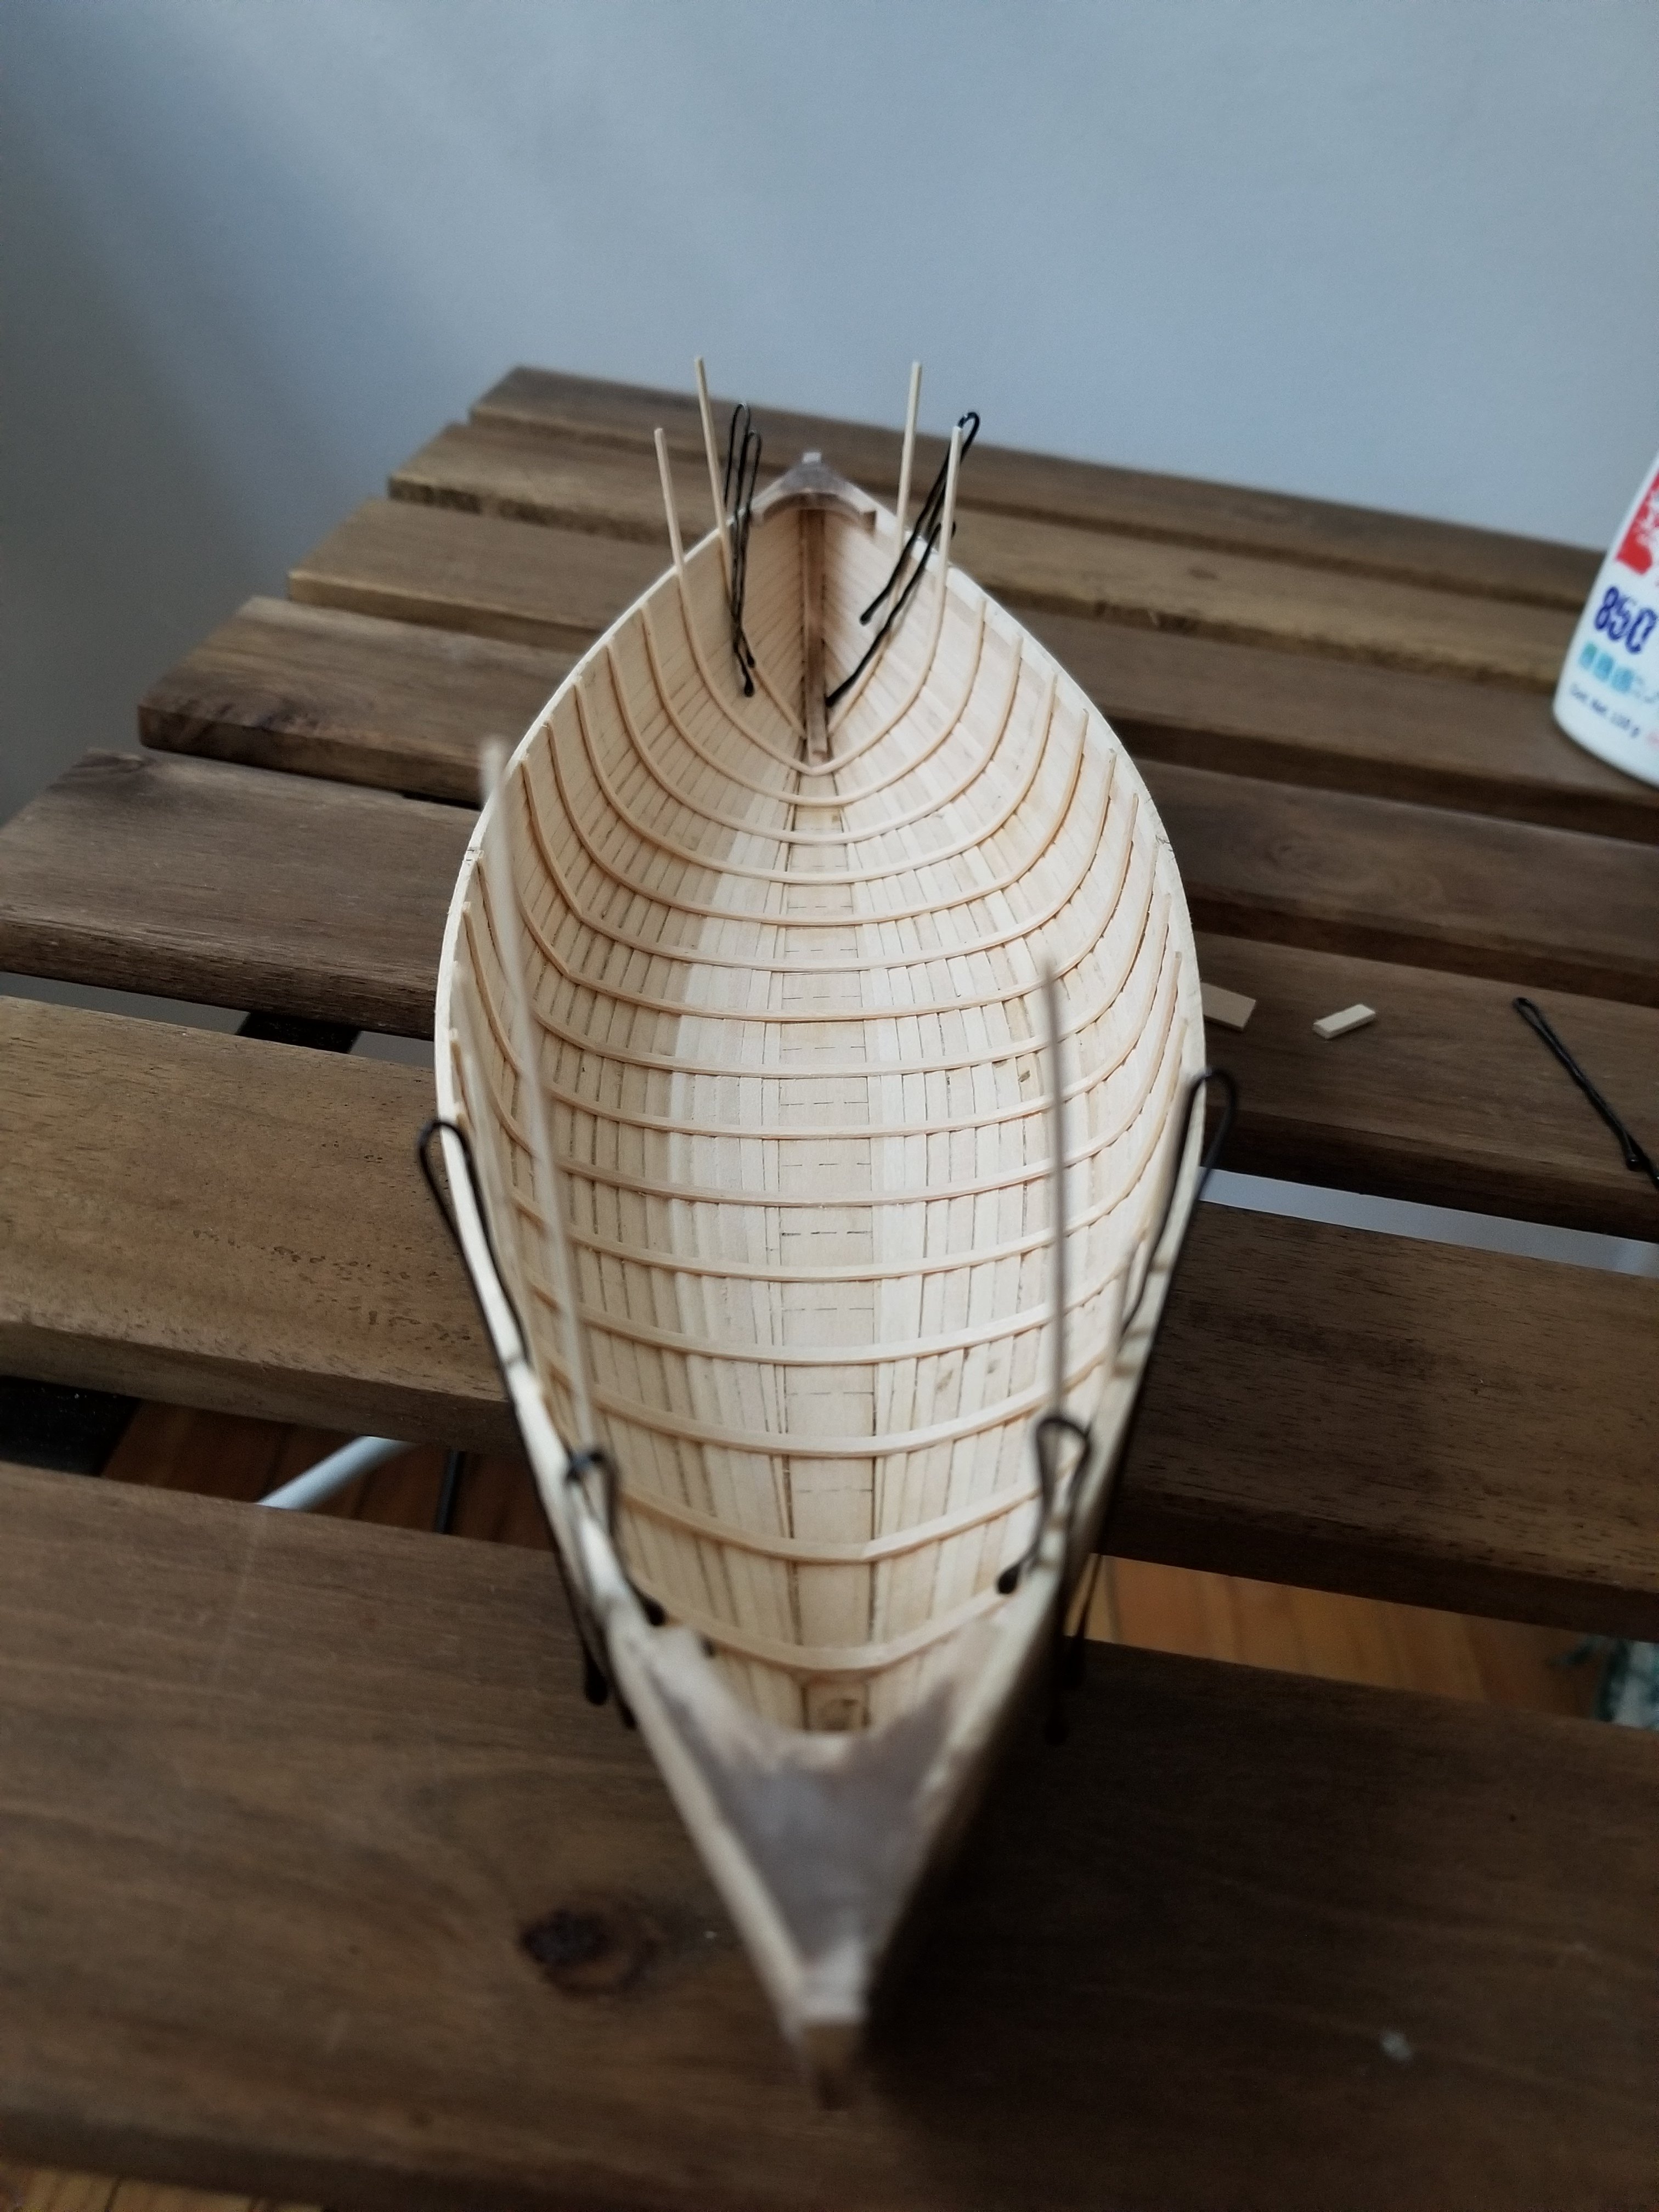
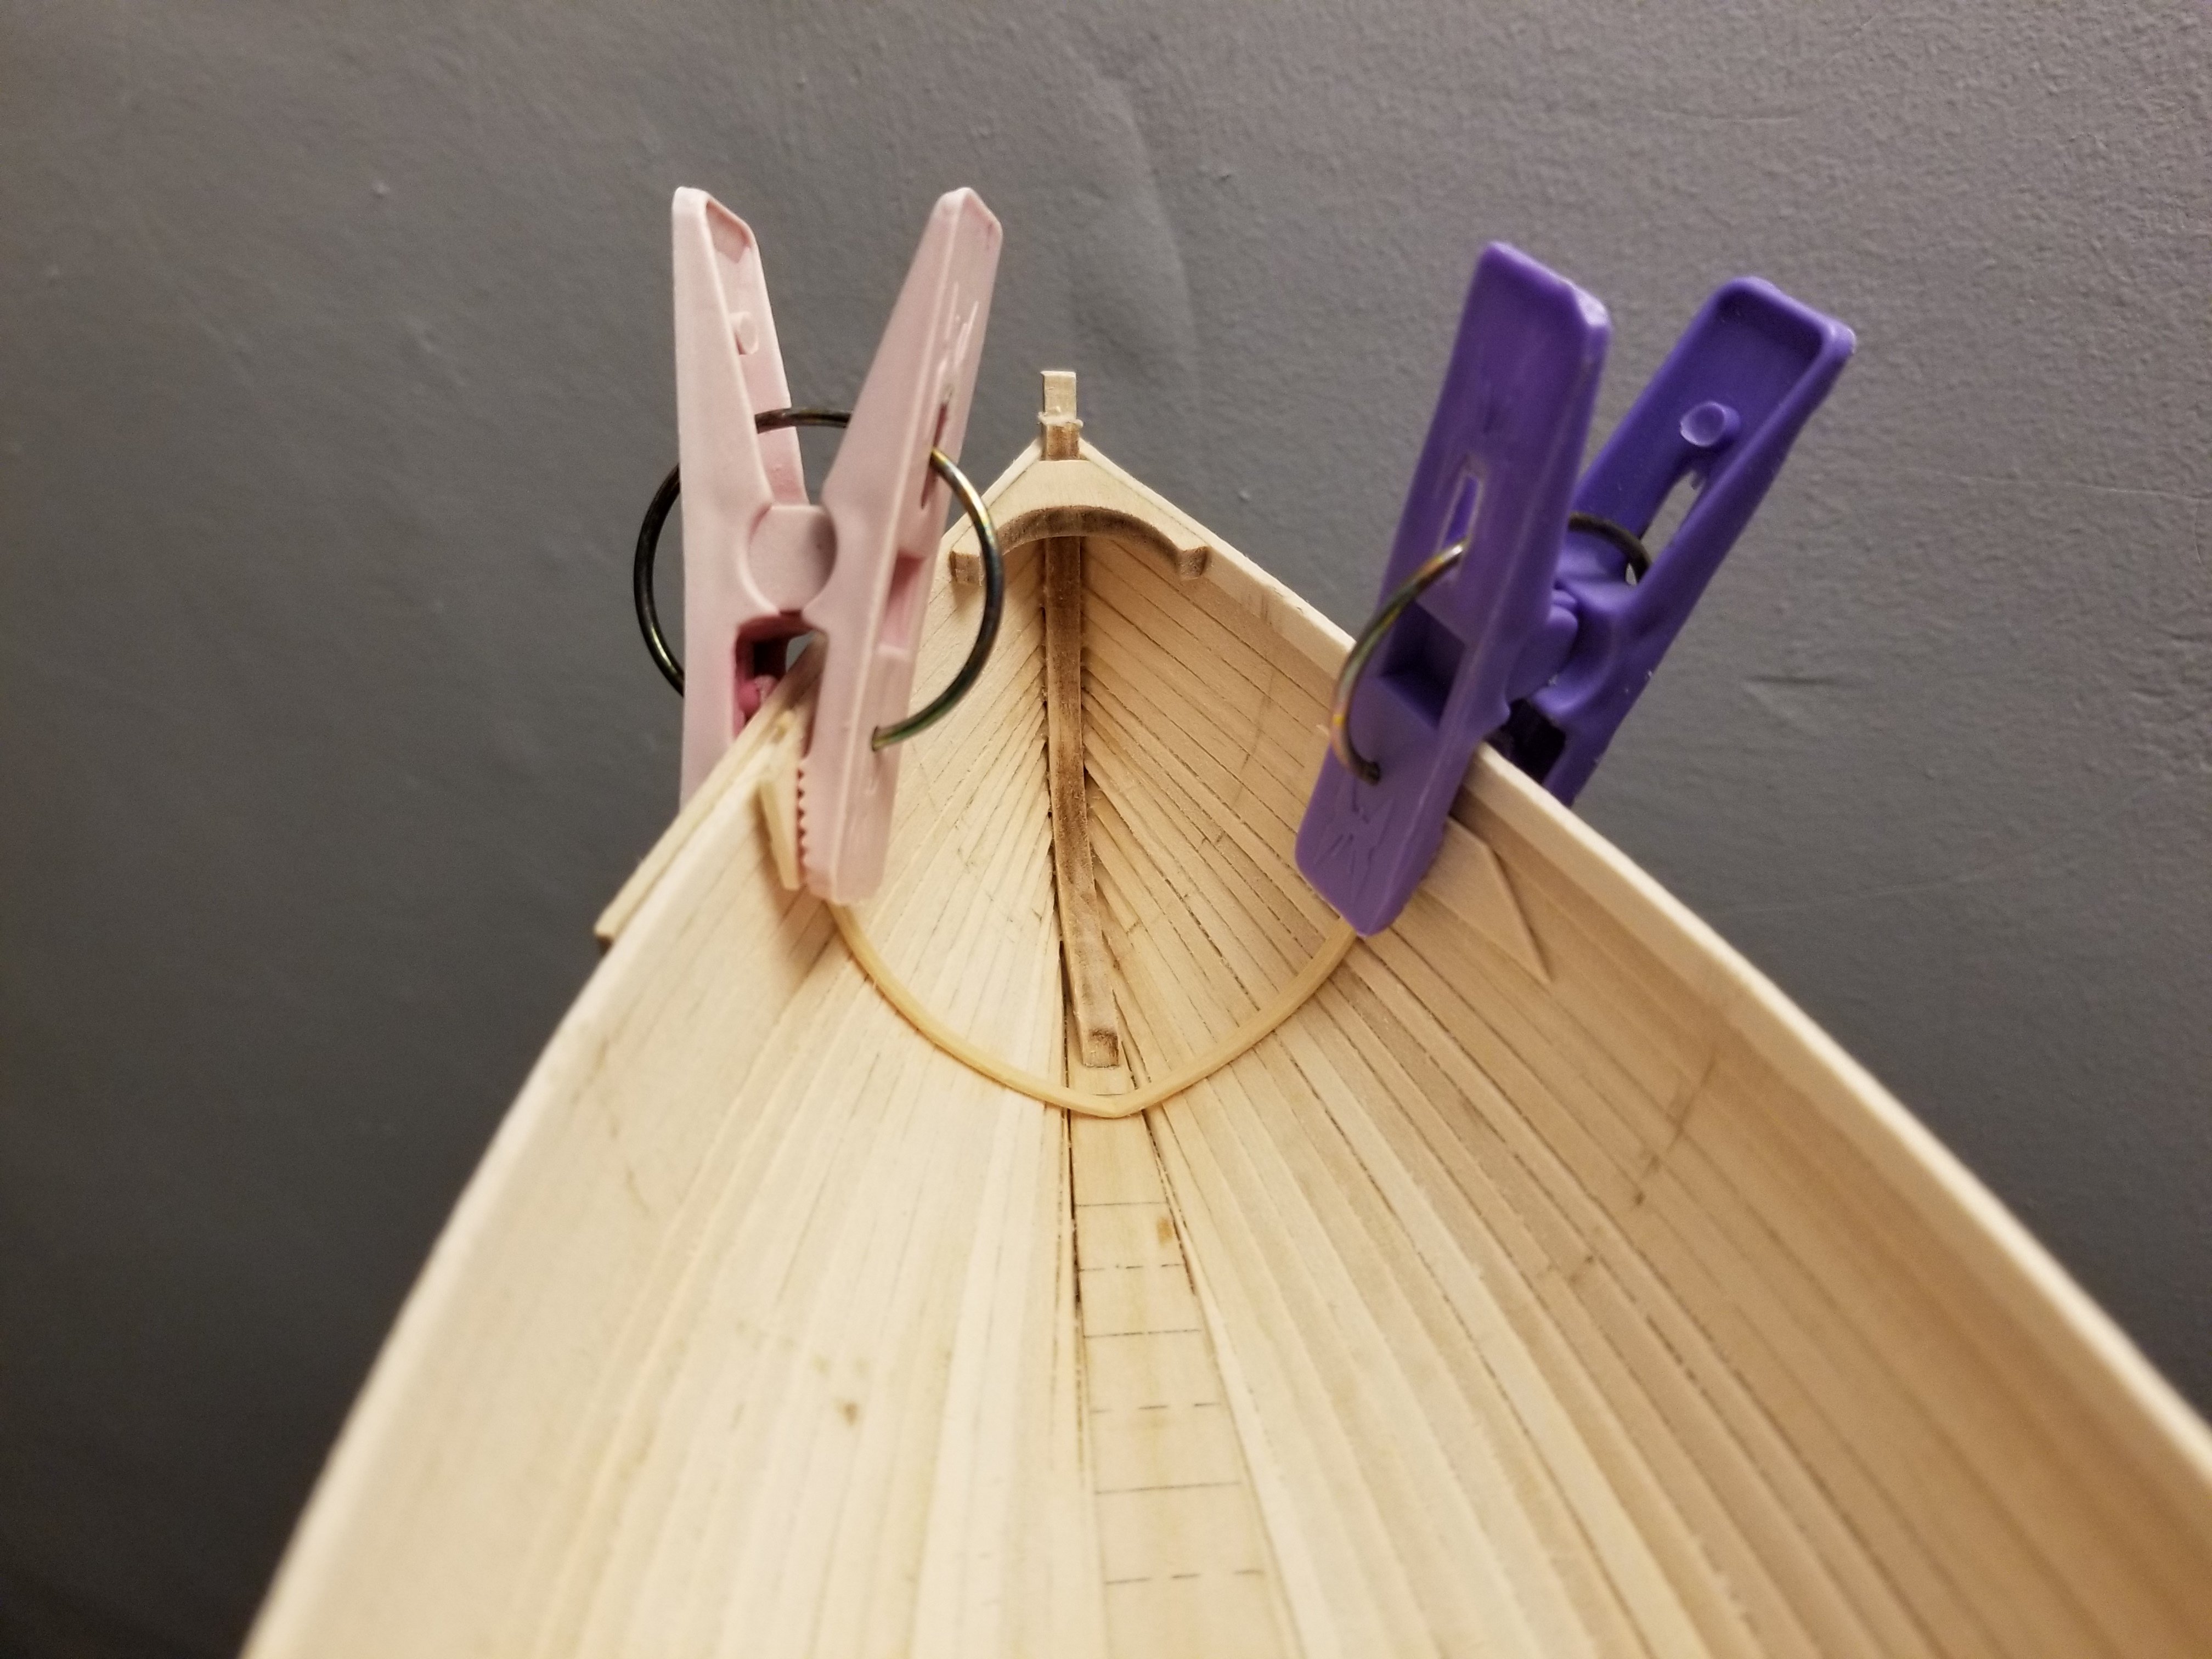
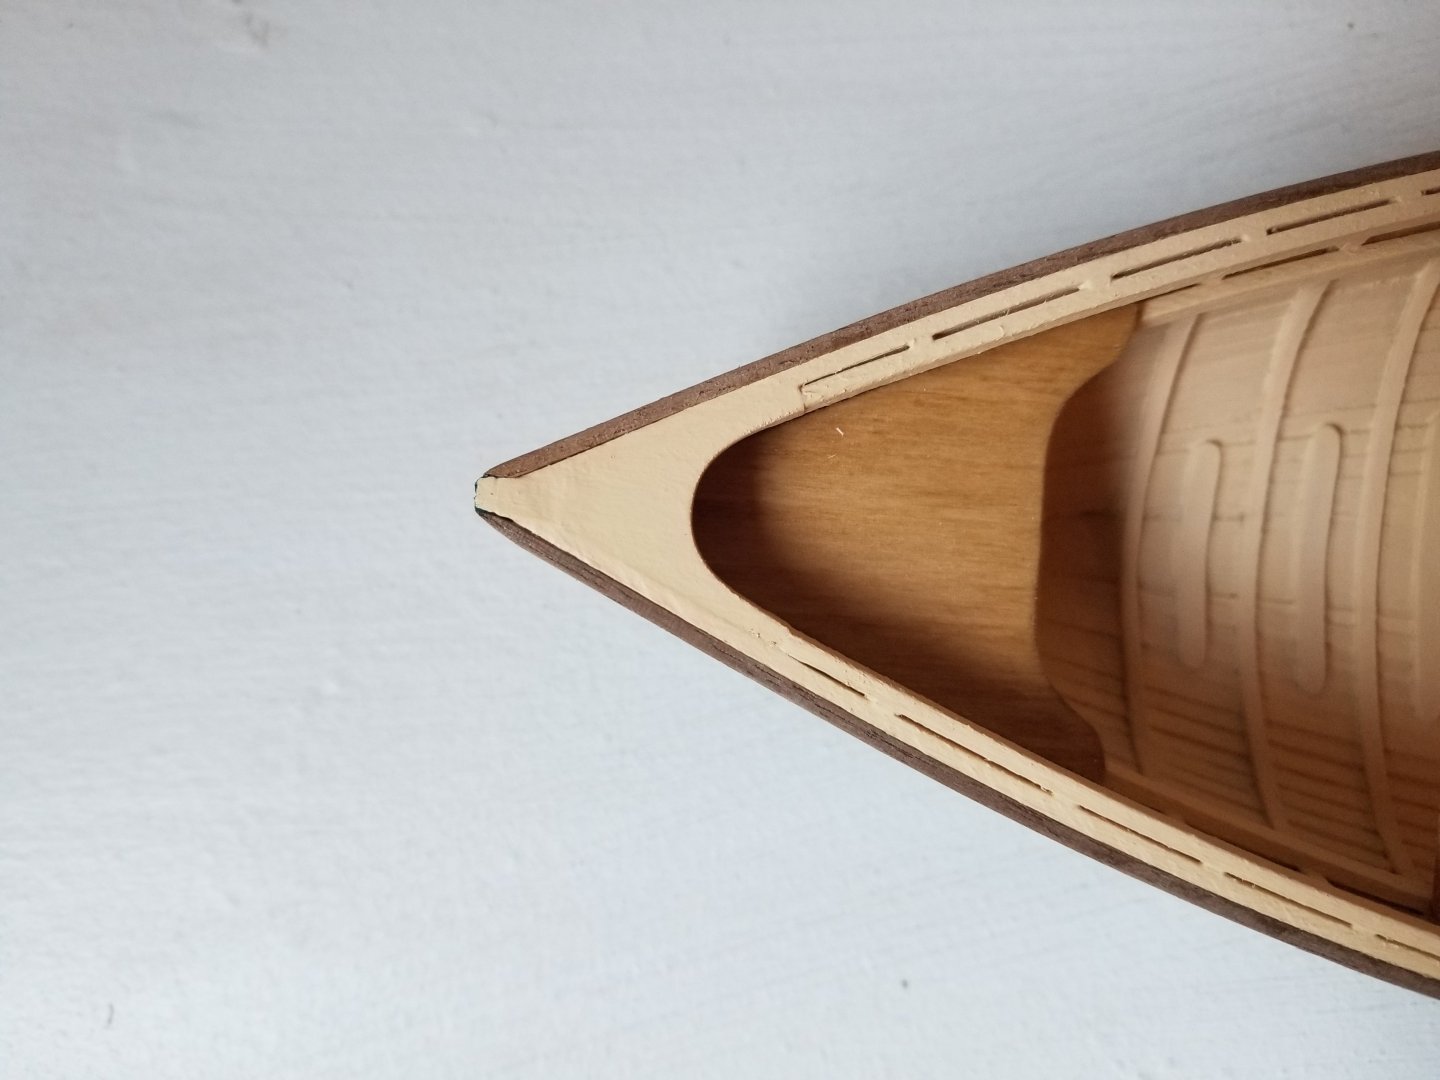
A little more progress. First, I added the breasthooks at each end. These required a little shaping, and there was a slight gap between each and the stems, which I ended up filling with a bit of scrap wood and filler. Next, the frames. The instructions say to start at one end and work your way from there. However, the markings I had made on the keel for the foremost and aftmost frame were both covered by the stems, so I started with the second frame, figuring I could measure back from it once it was in. As can be seen, despite soaking in hot water, it kinked in the middle. However, the real problem was with getting it in straight. The instructions give no indication of how to do this, just saying to make sure it's straight across the hull. This was harder than I expected, as the frame twists at an angle. As can be seen, from some angles the first frame looked ok: But it clearly was twisted and off when viewed from other angles: So, I decided to redo the first frame (which I'll remove later) and instead add the frames from the middle out. The central frame shouldn't have any twist to it, and once it's in place, I can use spacers cut to the right length to make sure that subsequent frames are straight and properly spaced. I marked the midpoint along the sides, as well, to help make sure the frame is correctly positioned. It's drying in place now.


- 65 replies
-
- 5
-
-
- Maine Peapod
- Midwest Products
- (and 1 more)
-
Welcome!
-
Thanks! I do think it's a bit bulky, and I would have liked to properly splice the rope, so I think I'm going to try to redo it once I get some fly-tying thread.
-
Thanks, I'm definitely going to look into some fly-tying thread and a needle. I used to tie flies and this definitely reminded me of that, although I'm very out of practice and don't have my old tools anymore.
-
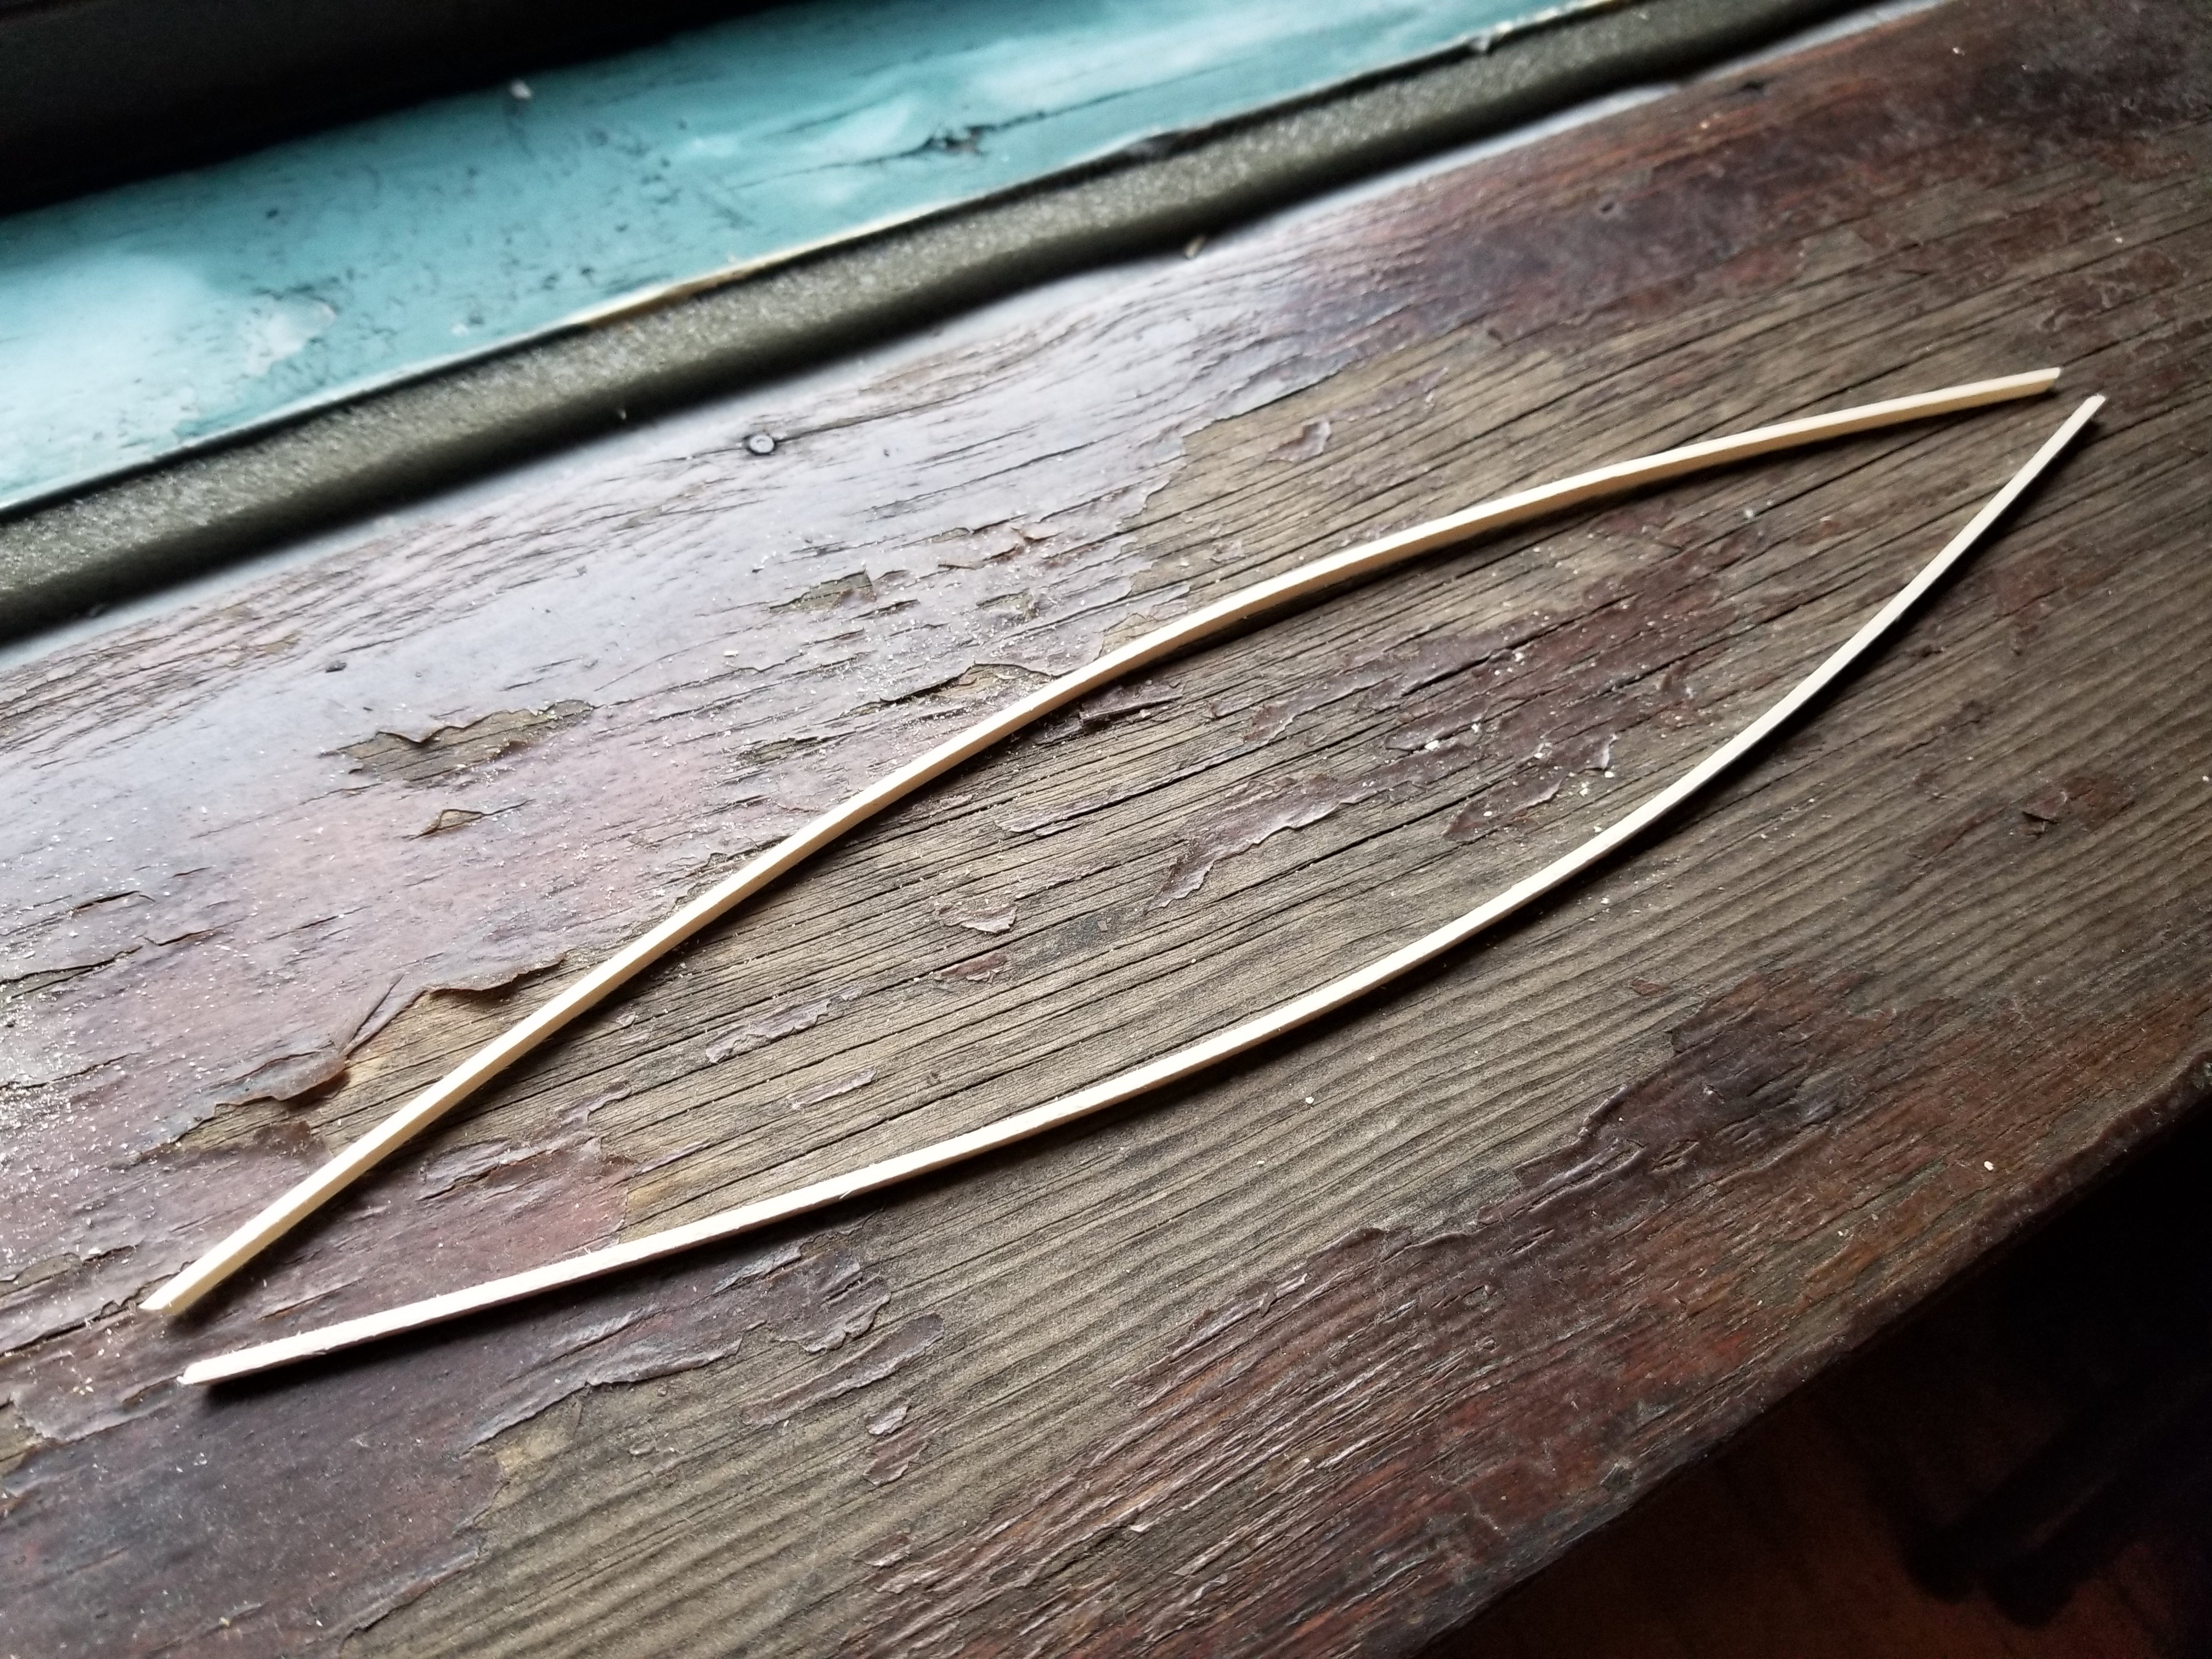
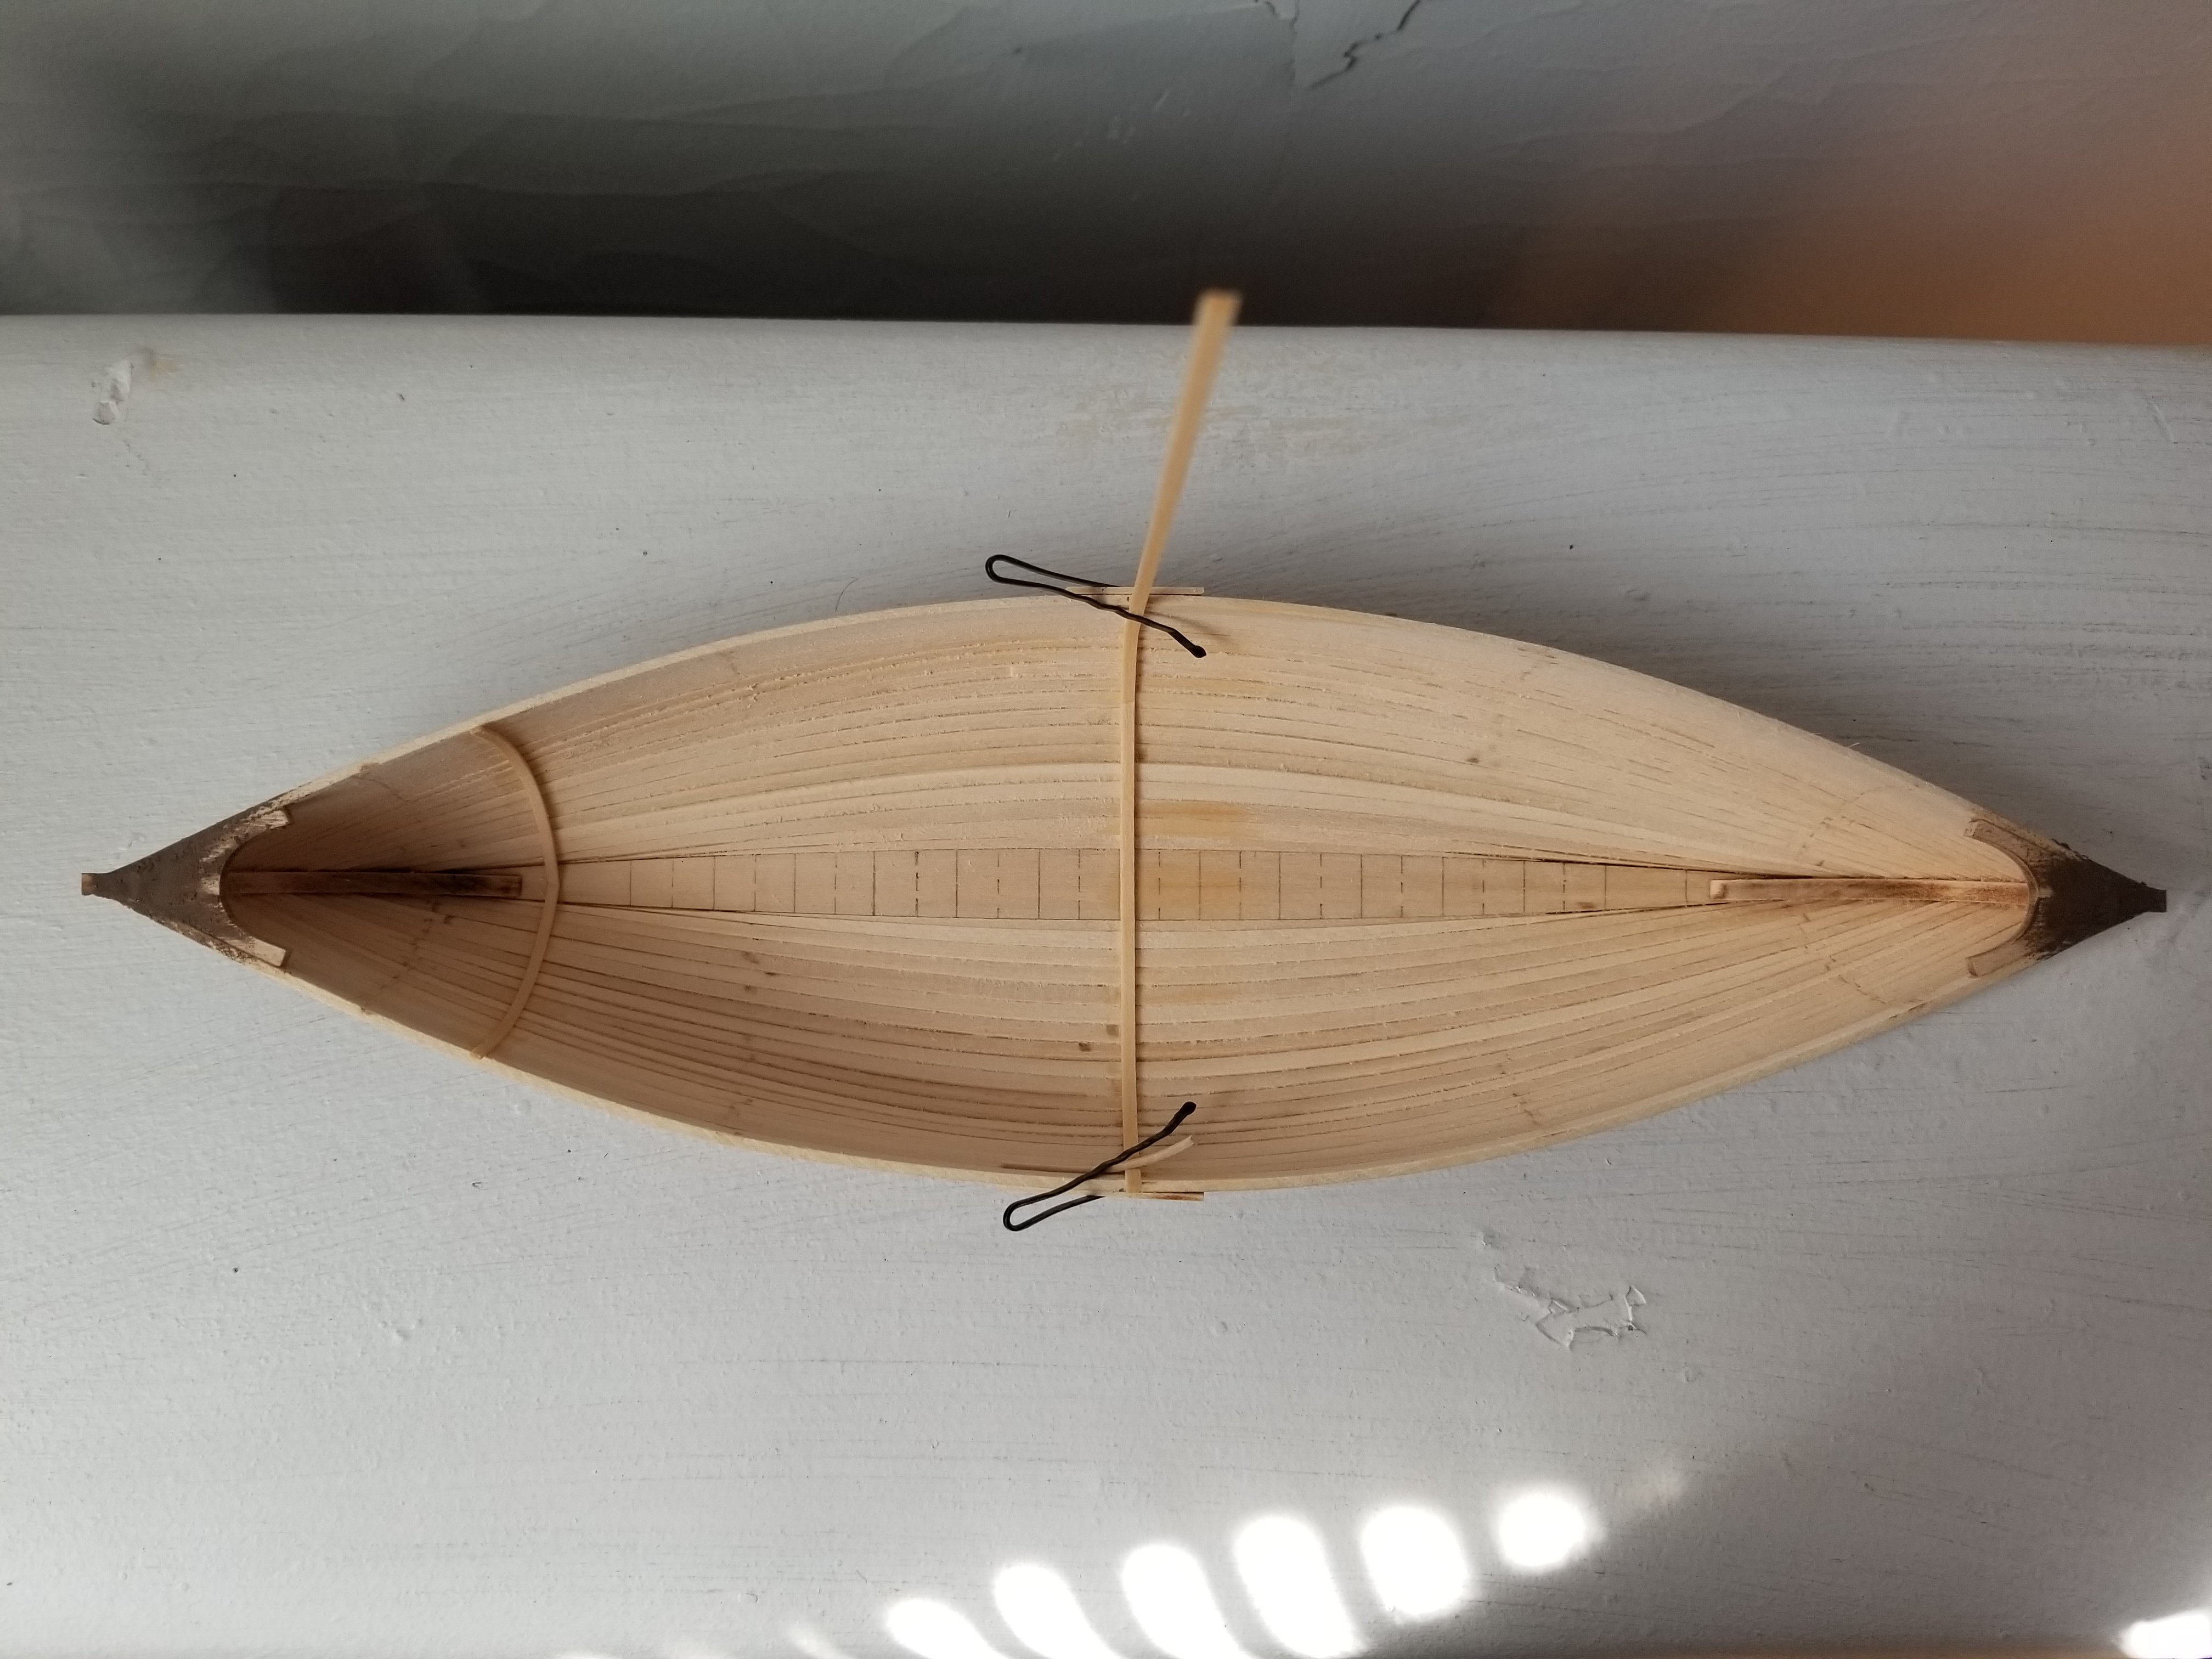
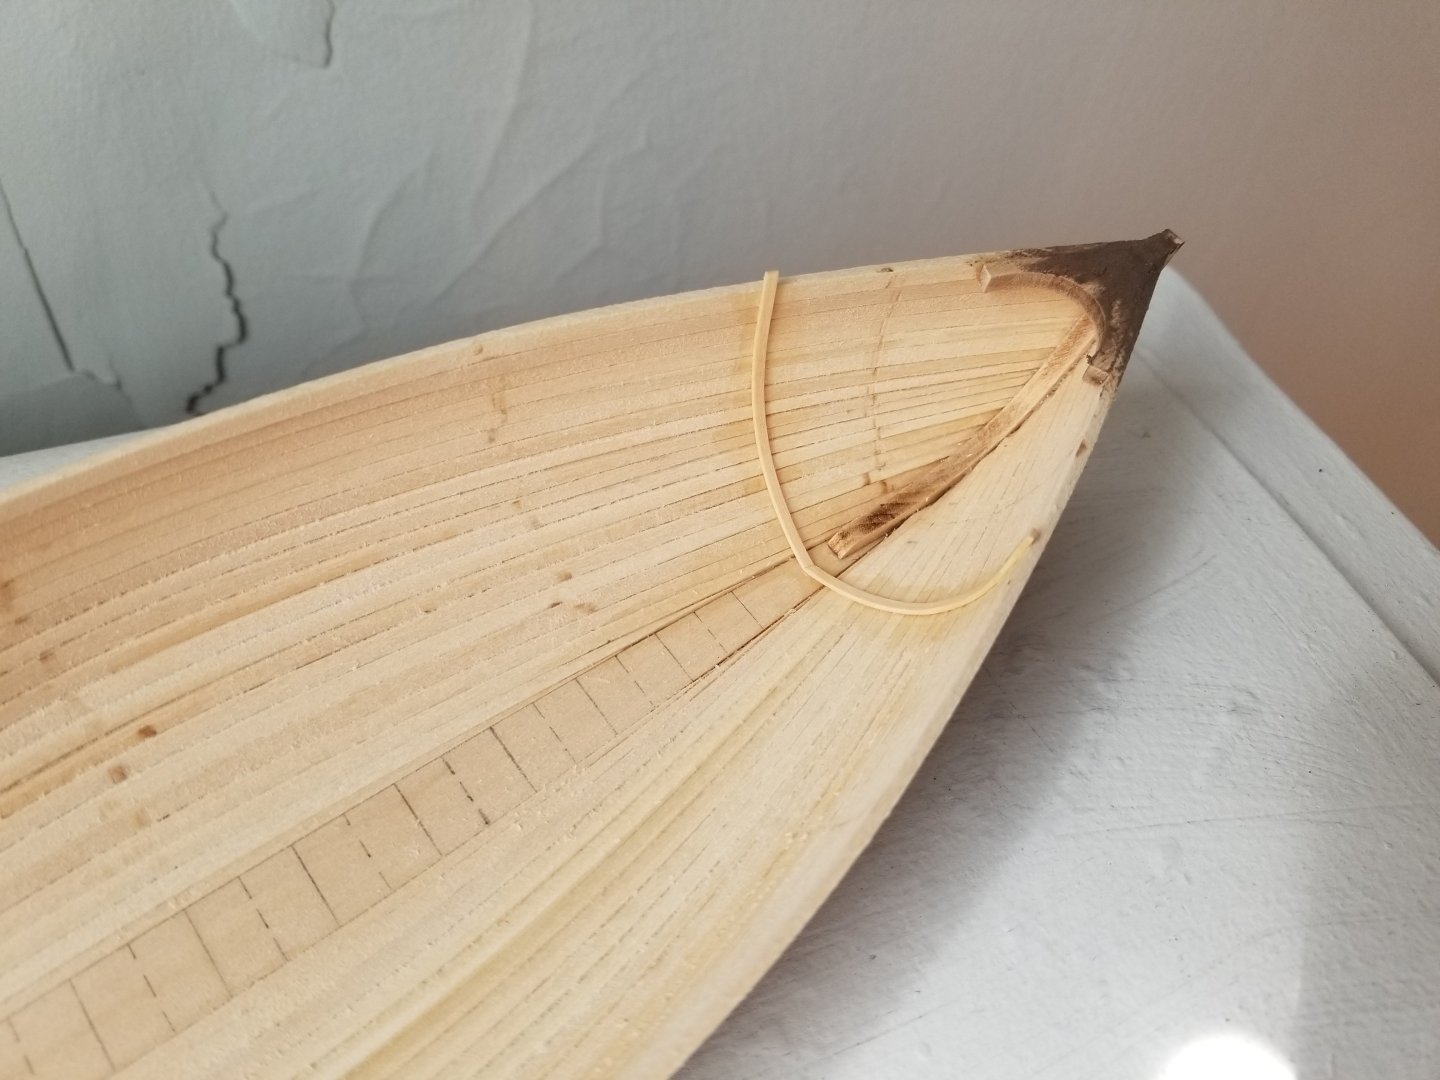
Next up, I added the keel. The instructions say to use two of the 1/8x1/16-inch strips used for planking butted together. As it turns out, the strips are just barely too short (I think by around 1/8 inch) to use a single strip, which would have been a simpler option. In any case, I soaked and heated the strips and bent them to shape, leaving a little overlap to better cut them to size. Once they were dry, I trimmed them and glued them in place. I then added a little more filler, especially where there was a slight gap, sanded, and added a coat of sealer-varnish to the outside of the hull. I'll be handling the hull a lot while I work on the interior, so I wanted to protect the exterior, especially the filler, which is not very hard. One downside of this method of keel construction is that it's hard to get the keel perfectly straight. Mine ended up with a slight kink, as can be seen. Oh well, it will not be visible to anyone when the model is on display.


- 65 replies
-
- 4
-
-
- Maine Peapod
- Midwest Products
- (and 1 more)
-
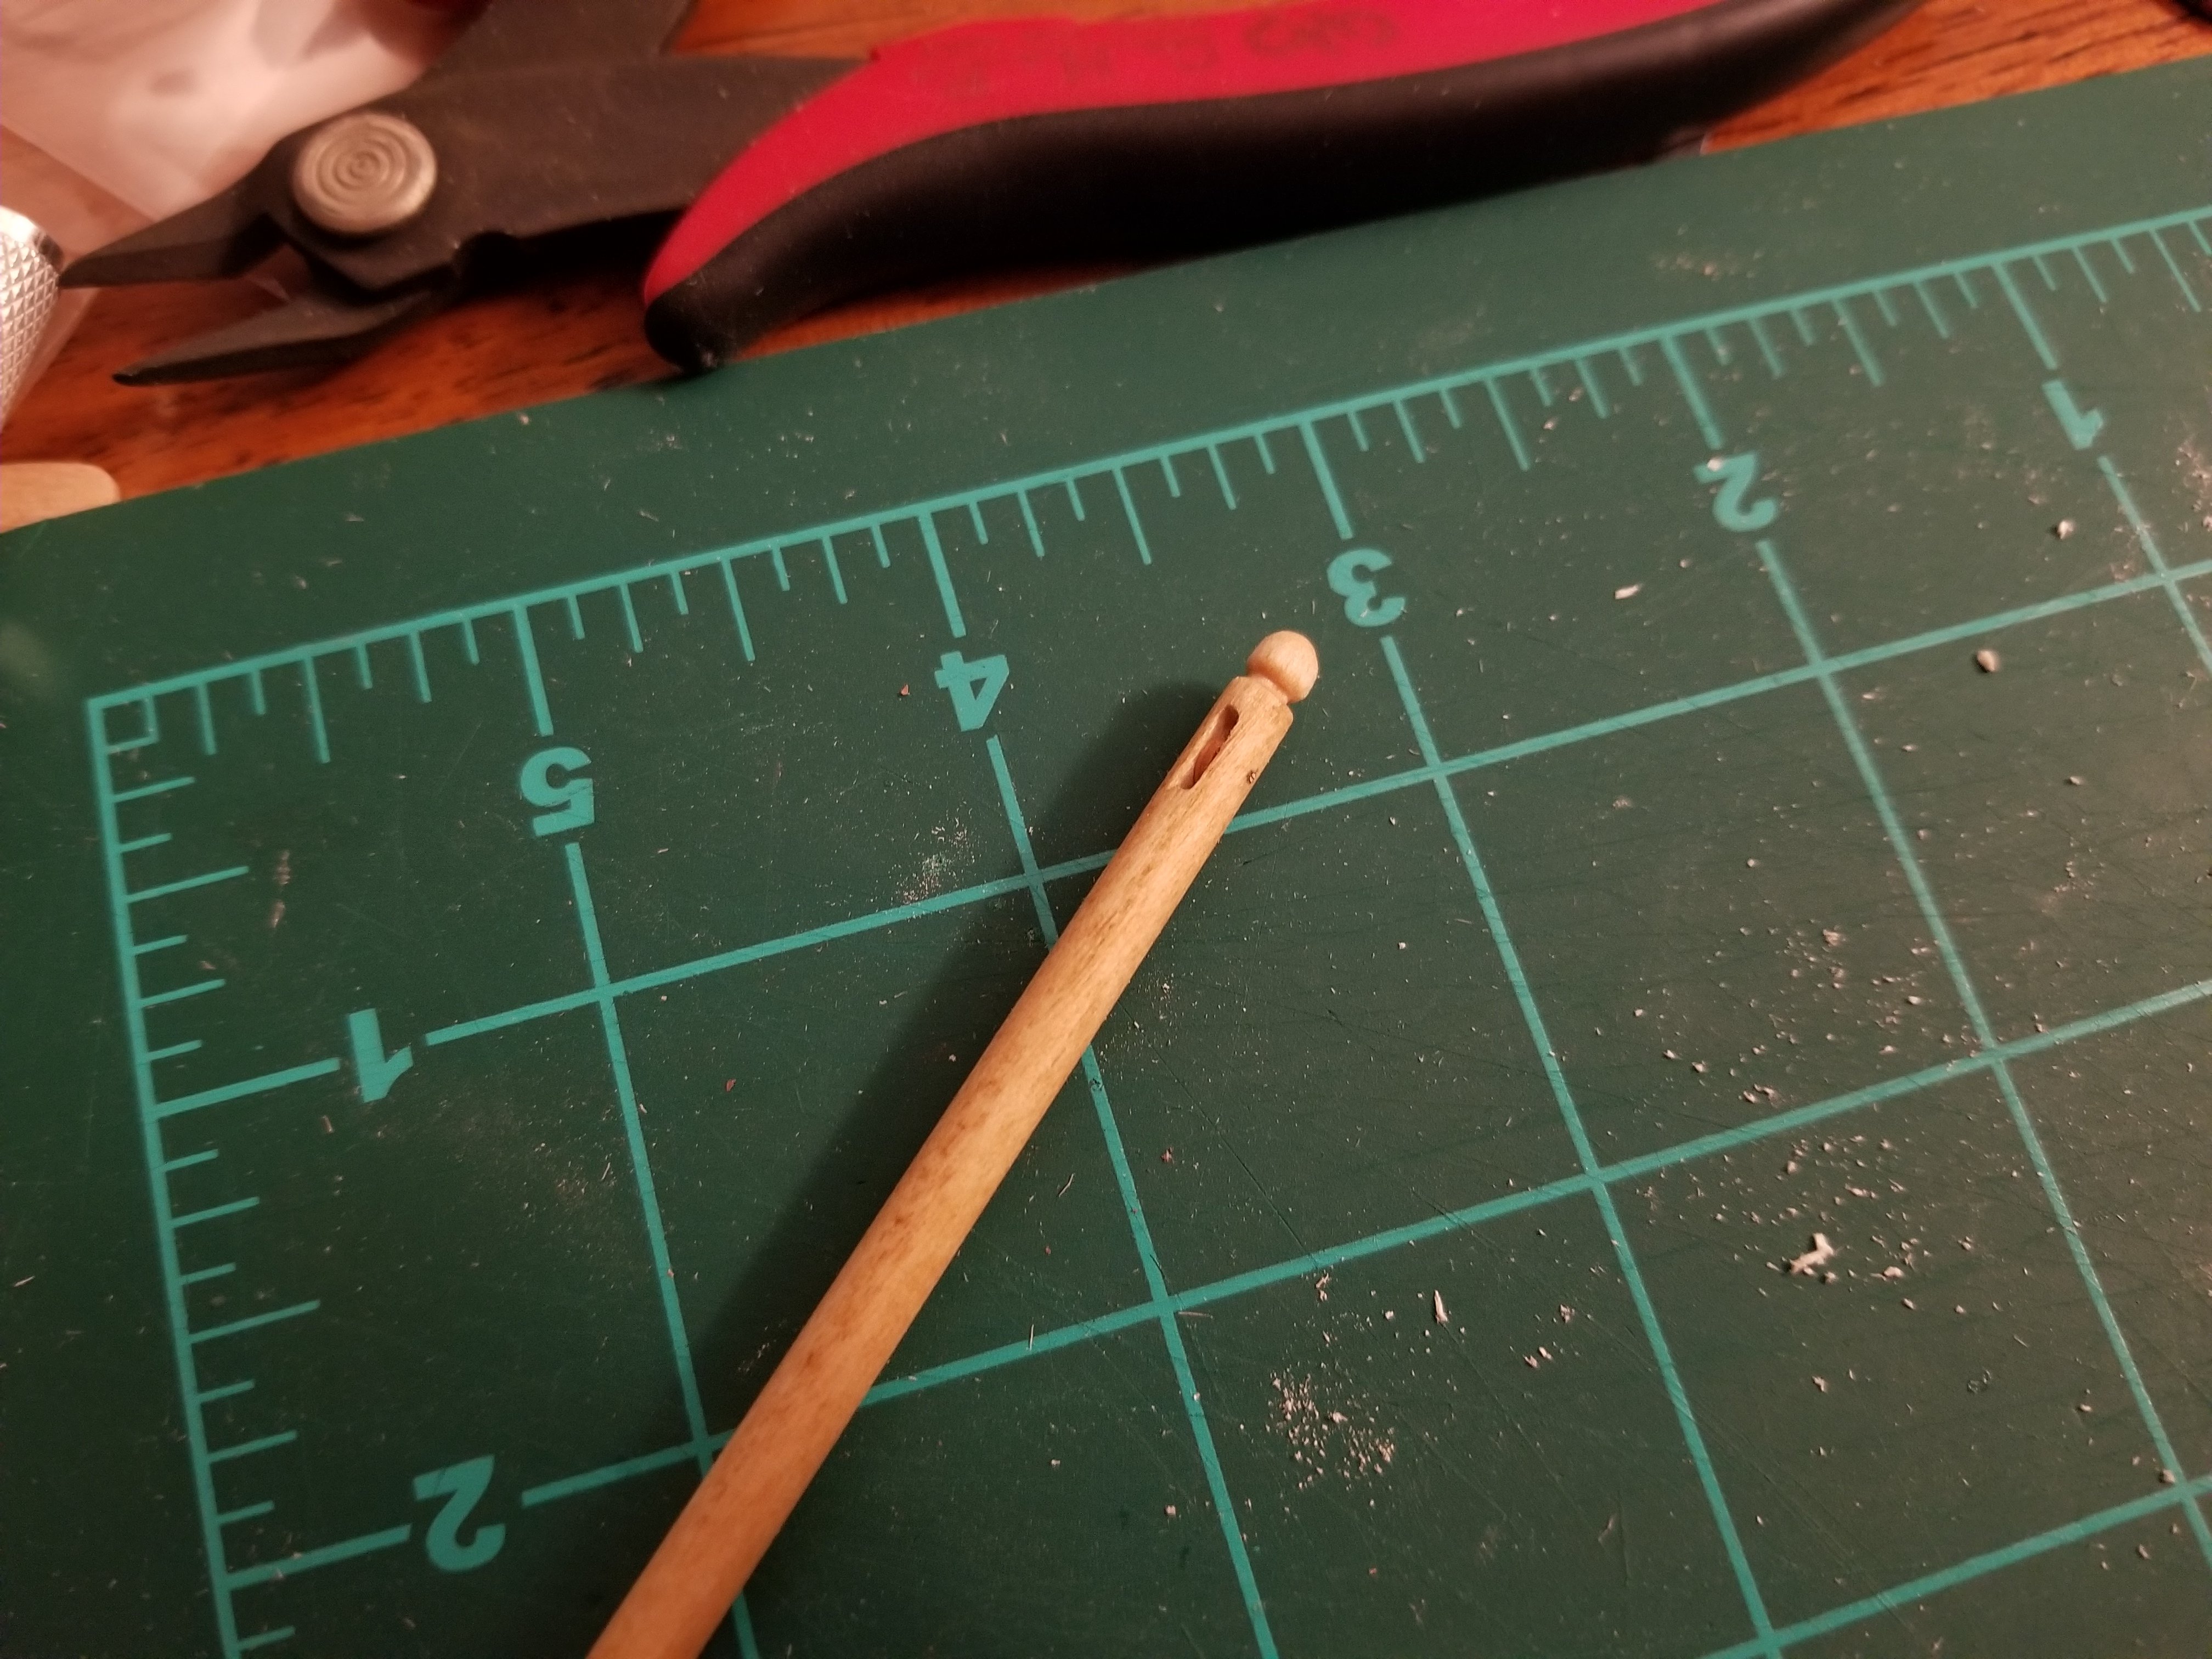
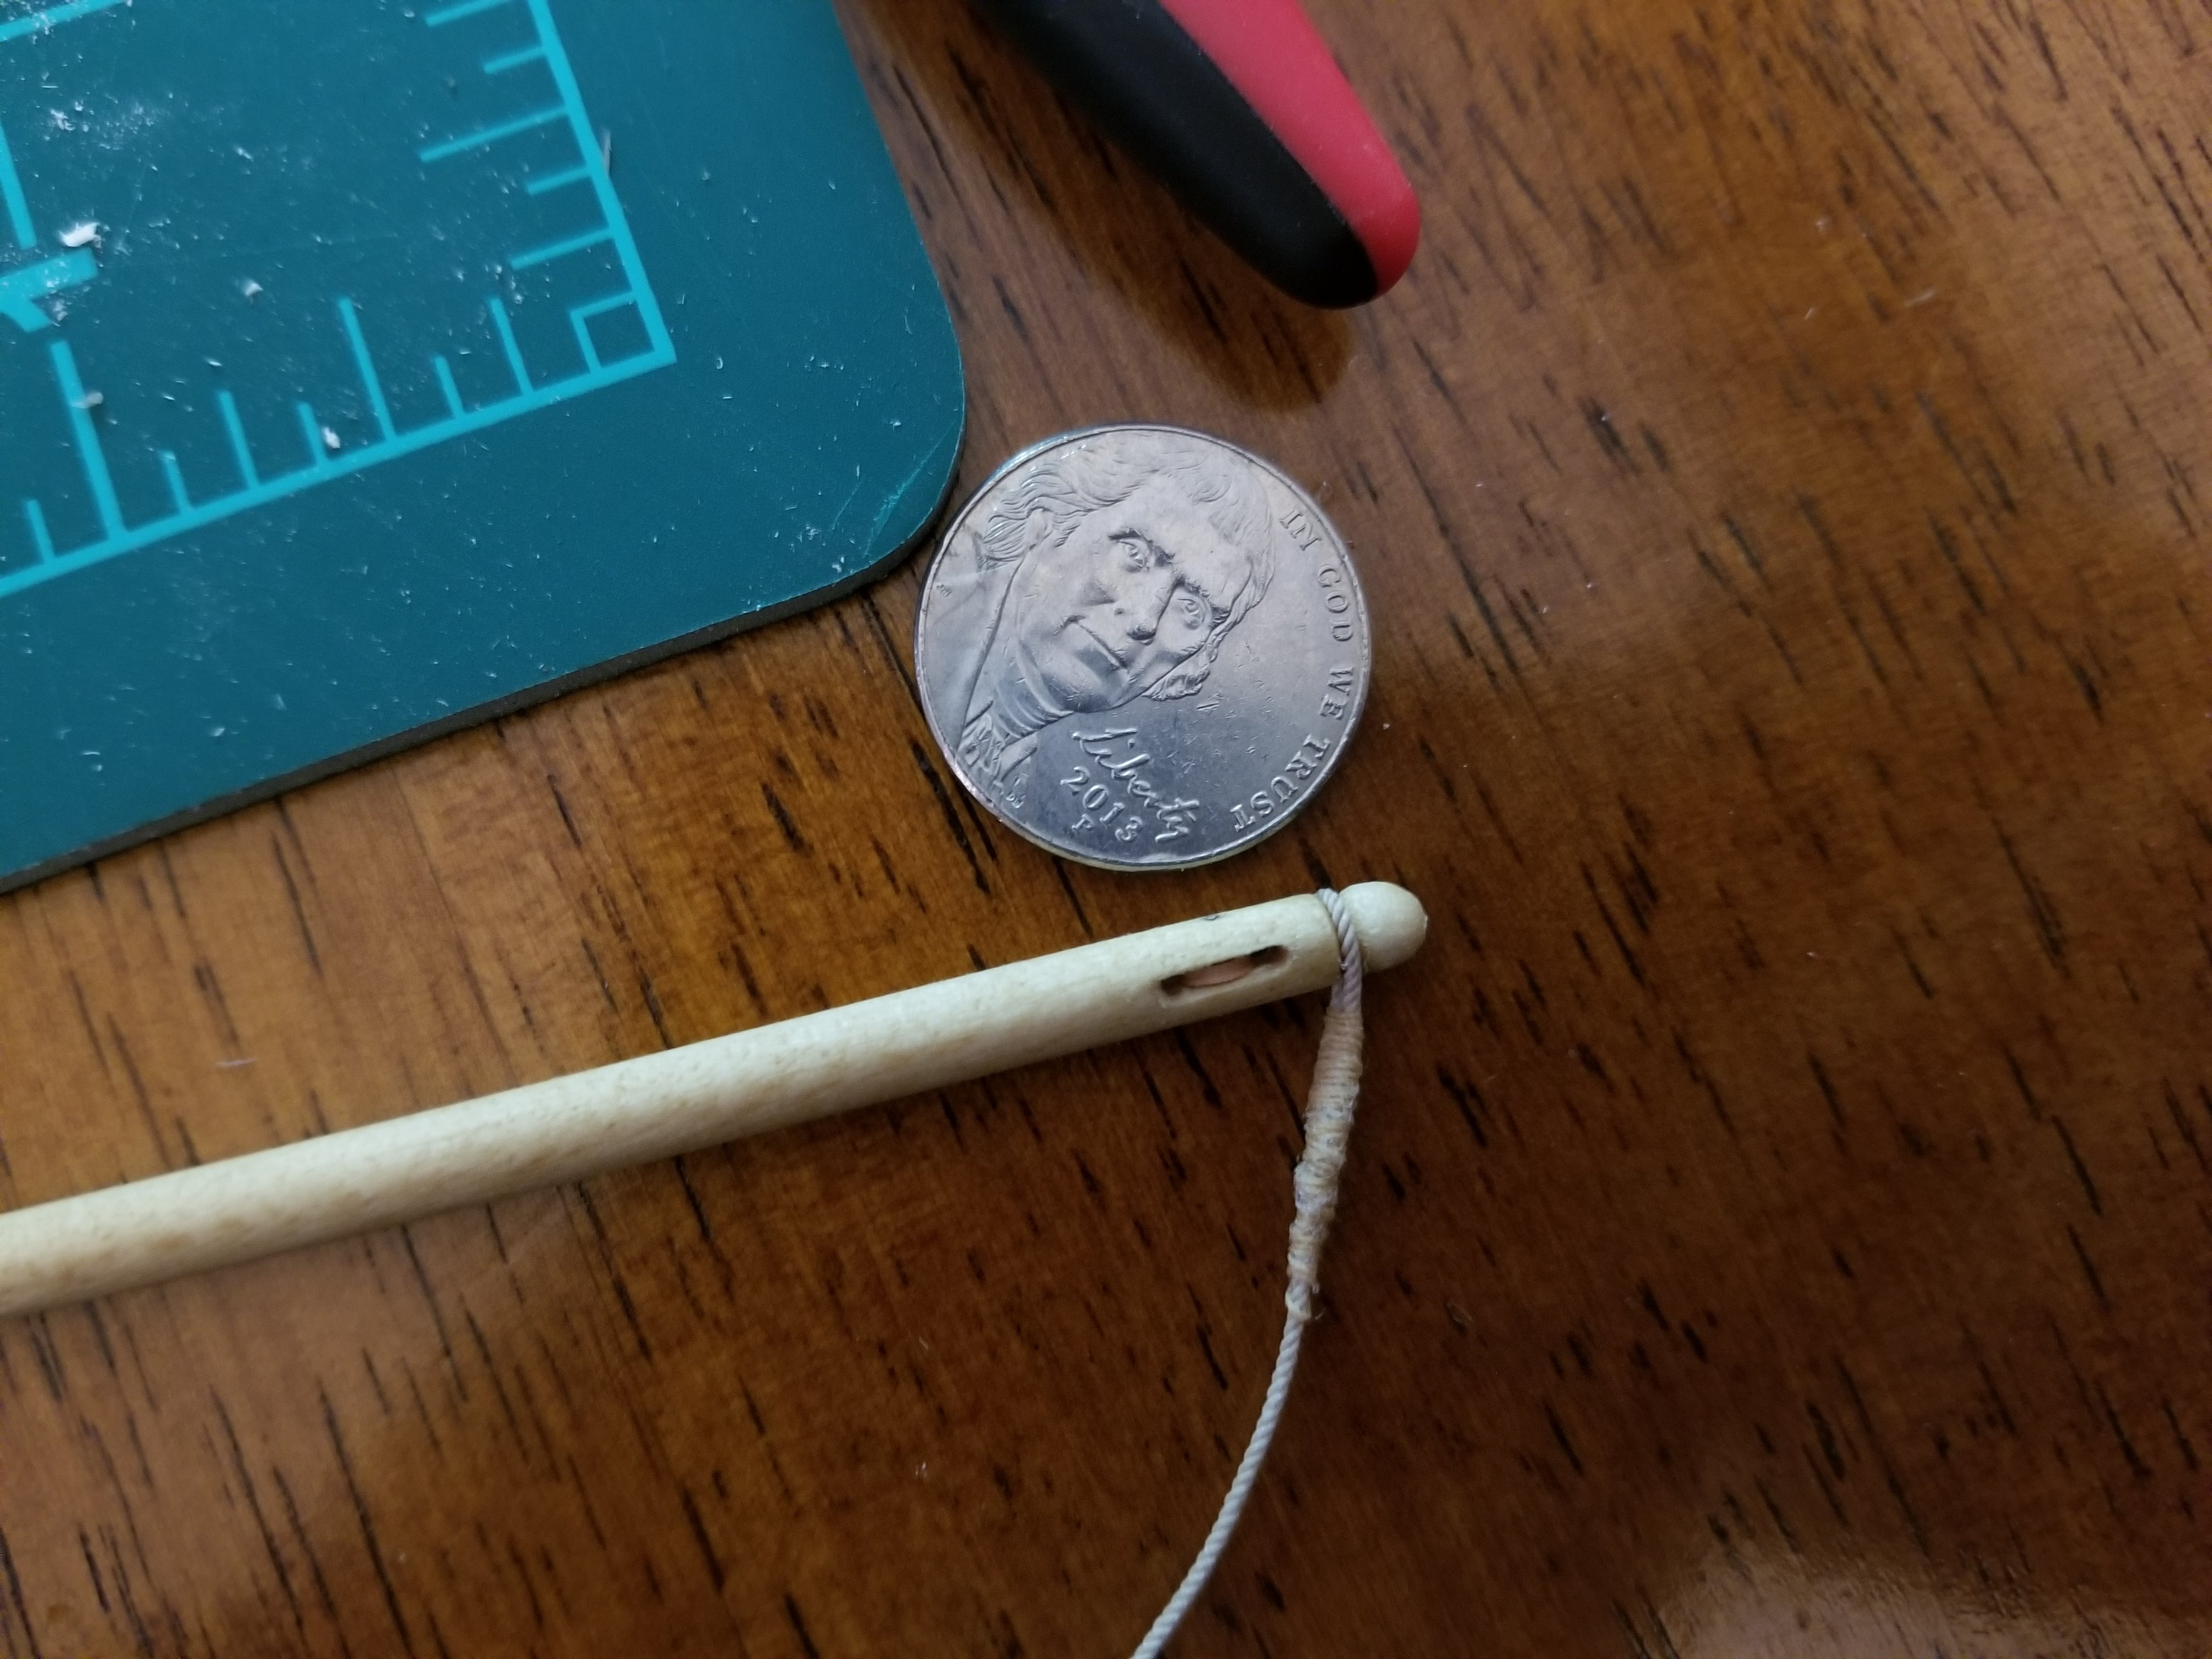
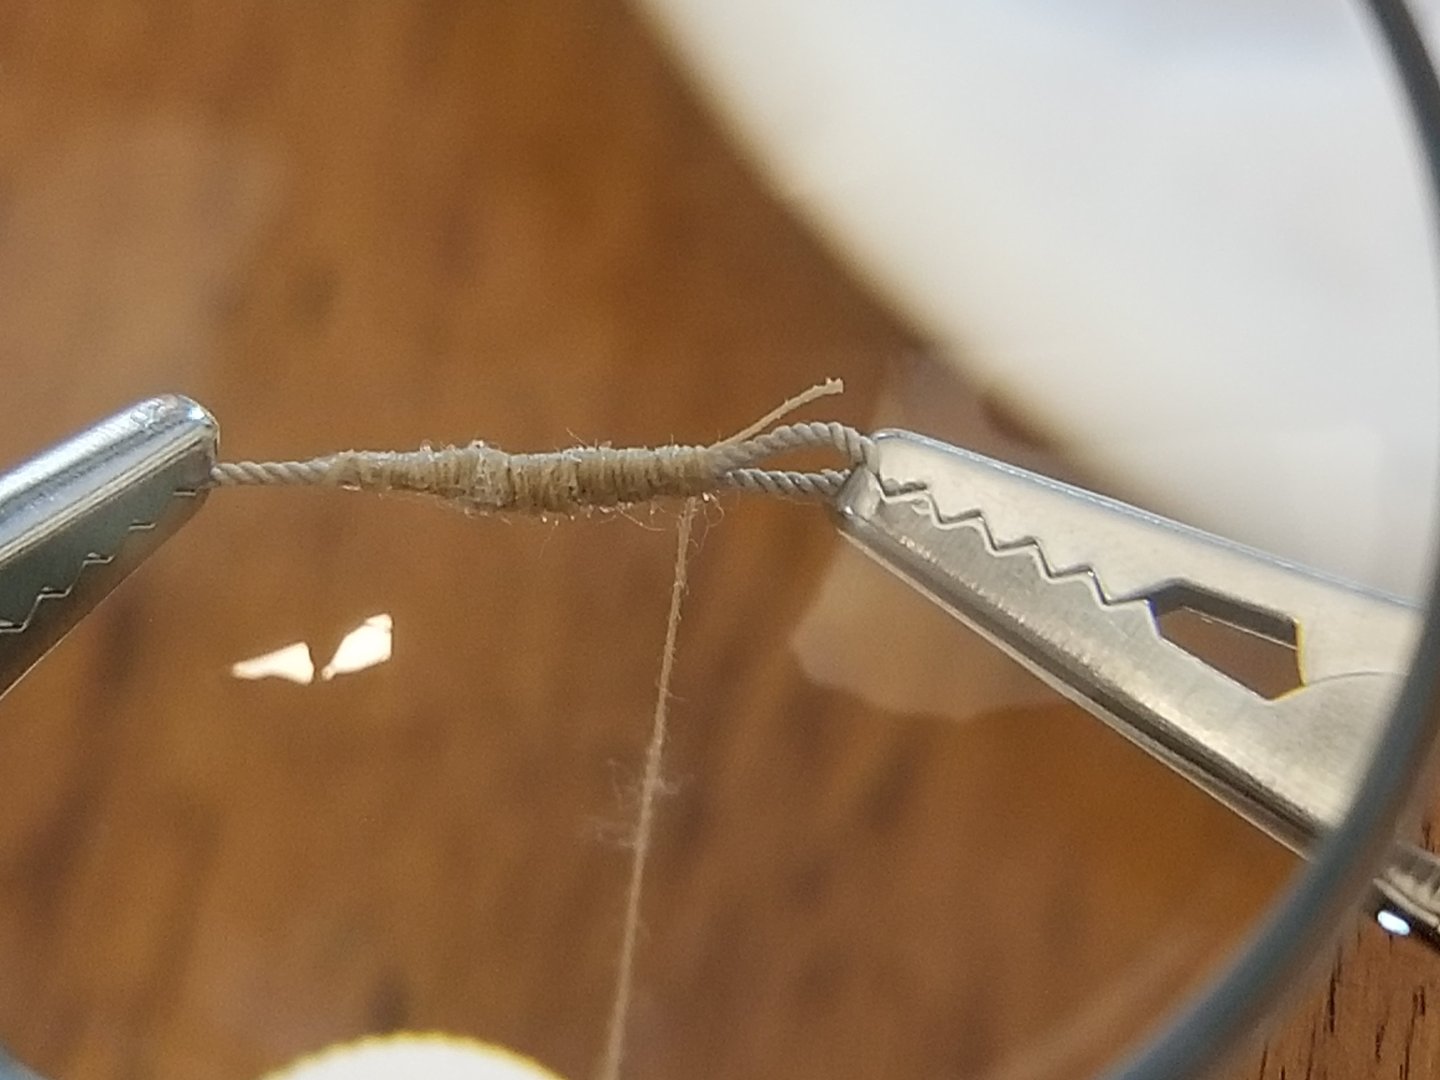
I've done a bit more work with the mast. First, I drilled and cut out the sheave at the top of the mast. I decided to try to make a working sheave, as I had picked up a small bag of 3.5mm sheaves from the Crafty Sailor closing sale. I used a bit of 24 gauge wire. It was hard to get a good photo, but it is a working sheave. Next, although I won't be fully adding the rigging until after the move, I thought that I could at least add the backstay and leave it dangling loosely off the mast. I used .7mm rope from Ropes of Scale, my first time using it. It's a very nice product! Worried that I would ruin it, I just worked on making a loop at the very end of the rope. First I tried to actually splice in the loop, but I had a very hard time opening up the rope for that. Instead I used glue to "knot" the loop, and tried my hand at serving the "knot" with some tan thread. I'm not sure whether they actually served any of the rigging on actual Canoas, as I couldn't find a very clear photo, but I figure that this is a learning experience, and if I decide against it later, I've only lost an inch or so of the nice rope. Serving it was tricky and would have been impossible without a set of helping hands. Here's before I trimmed off the excess. As can be seen, it turned out rather lumpy, unfortunately. In any case, once I tied off the end and applied some watered-down glue, I was able to place it around the top of the mast (nickel for scale): And then a test fitting, although without getting the line taught yet (as the mast is just on a pin and not lashed to the crossbeam). I'm still deciding whether to redo it, as the serving is a bit bulkier than I think I really want. It's still attached to the whole spool, so I wouldn't be wasting much rope. After some consideration, and looking at lots of photos of canoas with one, two, or no backstays, I'm leaning towards giving this model just one, and tying off the halyard at the other belaying point aft.


-
Thanks! I'll definitely have to try thinning the filler when I add it to the interior, I'd prefer to keep a lighter touch there. My hull seems to have pulled in only very, very slightly when I had it off the formers, but not enough that I'm concerned about it. The instructions seem to assume you'll just glue the strips in place without pre-bending them to shape, which probably helps explain it.
- 65 replies
-
- 1
-
-
- Maine Peapod
- Midwest Products
- (and 1 more)
-
Thanks! One thing I would do differently if I redid this would be to be more careful about making sure all the planks run to the end of the stem/sternpost. Thankfully it seems to be evening out with a little filler.
- 65 replies
-
- 1
-
-
- Maine Peapod
- Midwest Products
- (and 1 more)
-
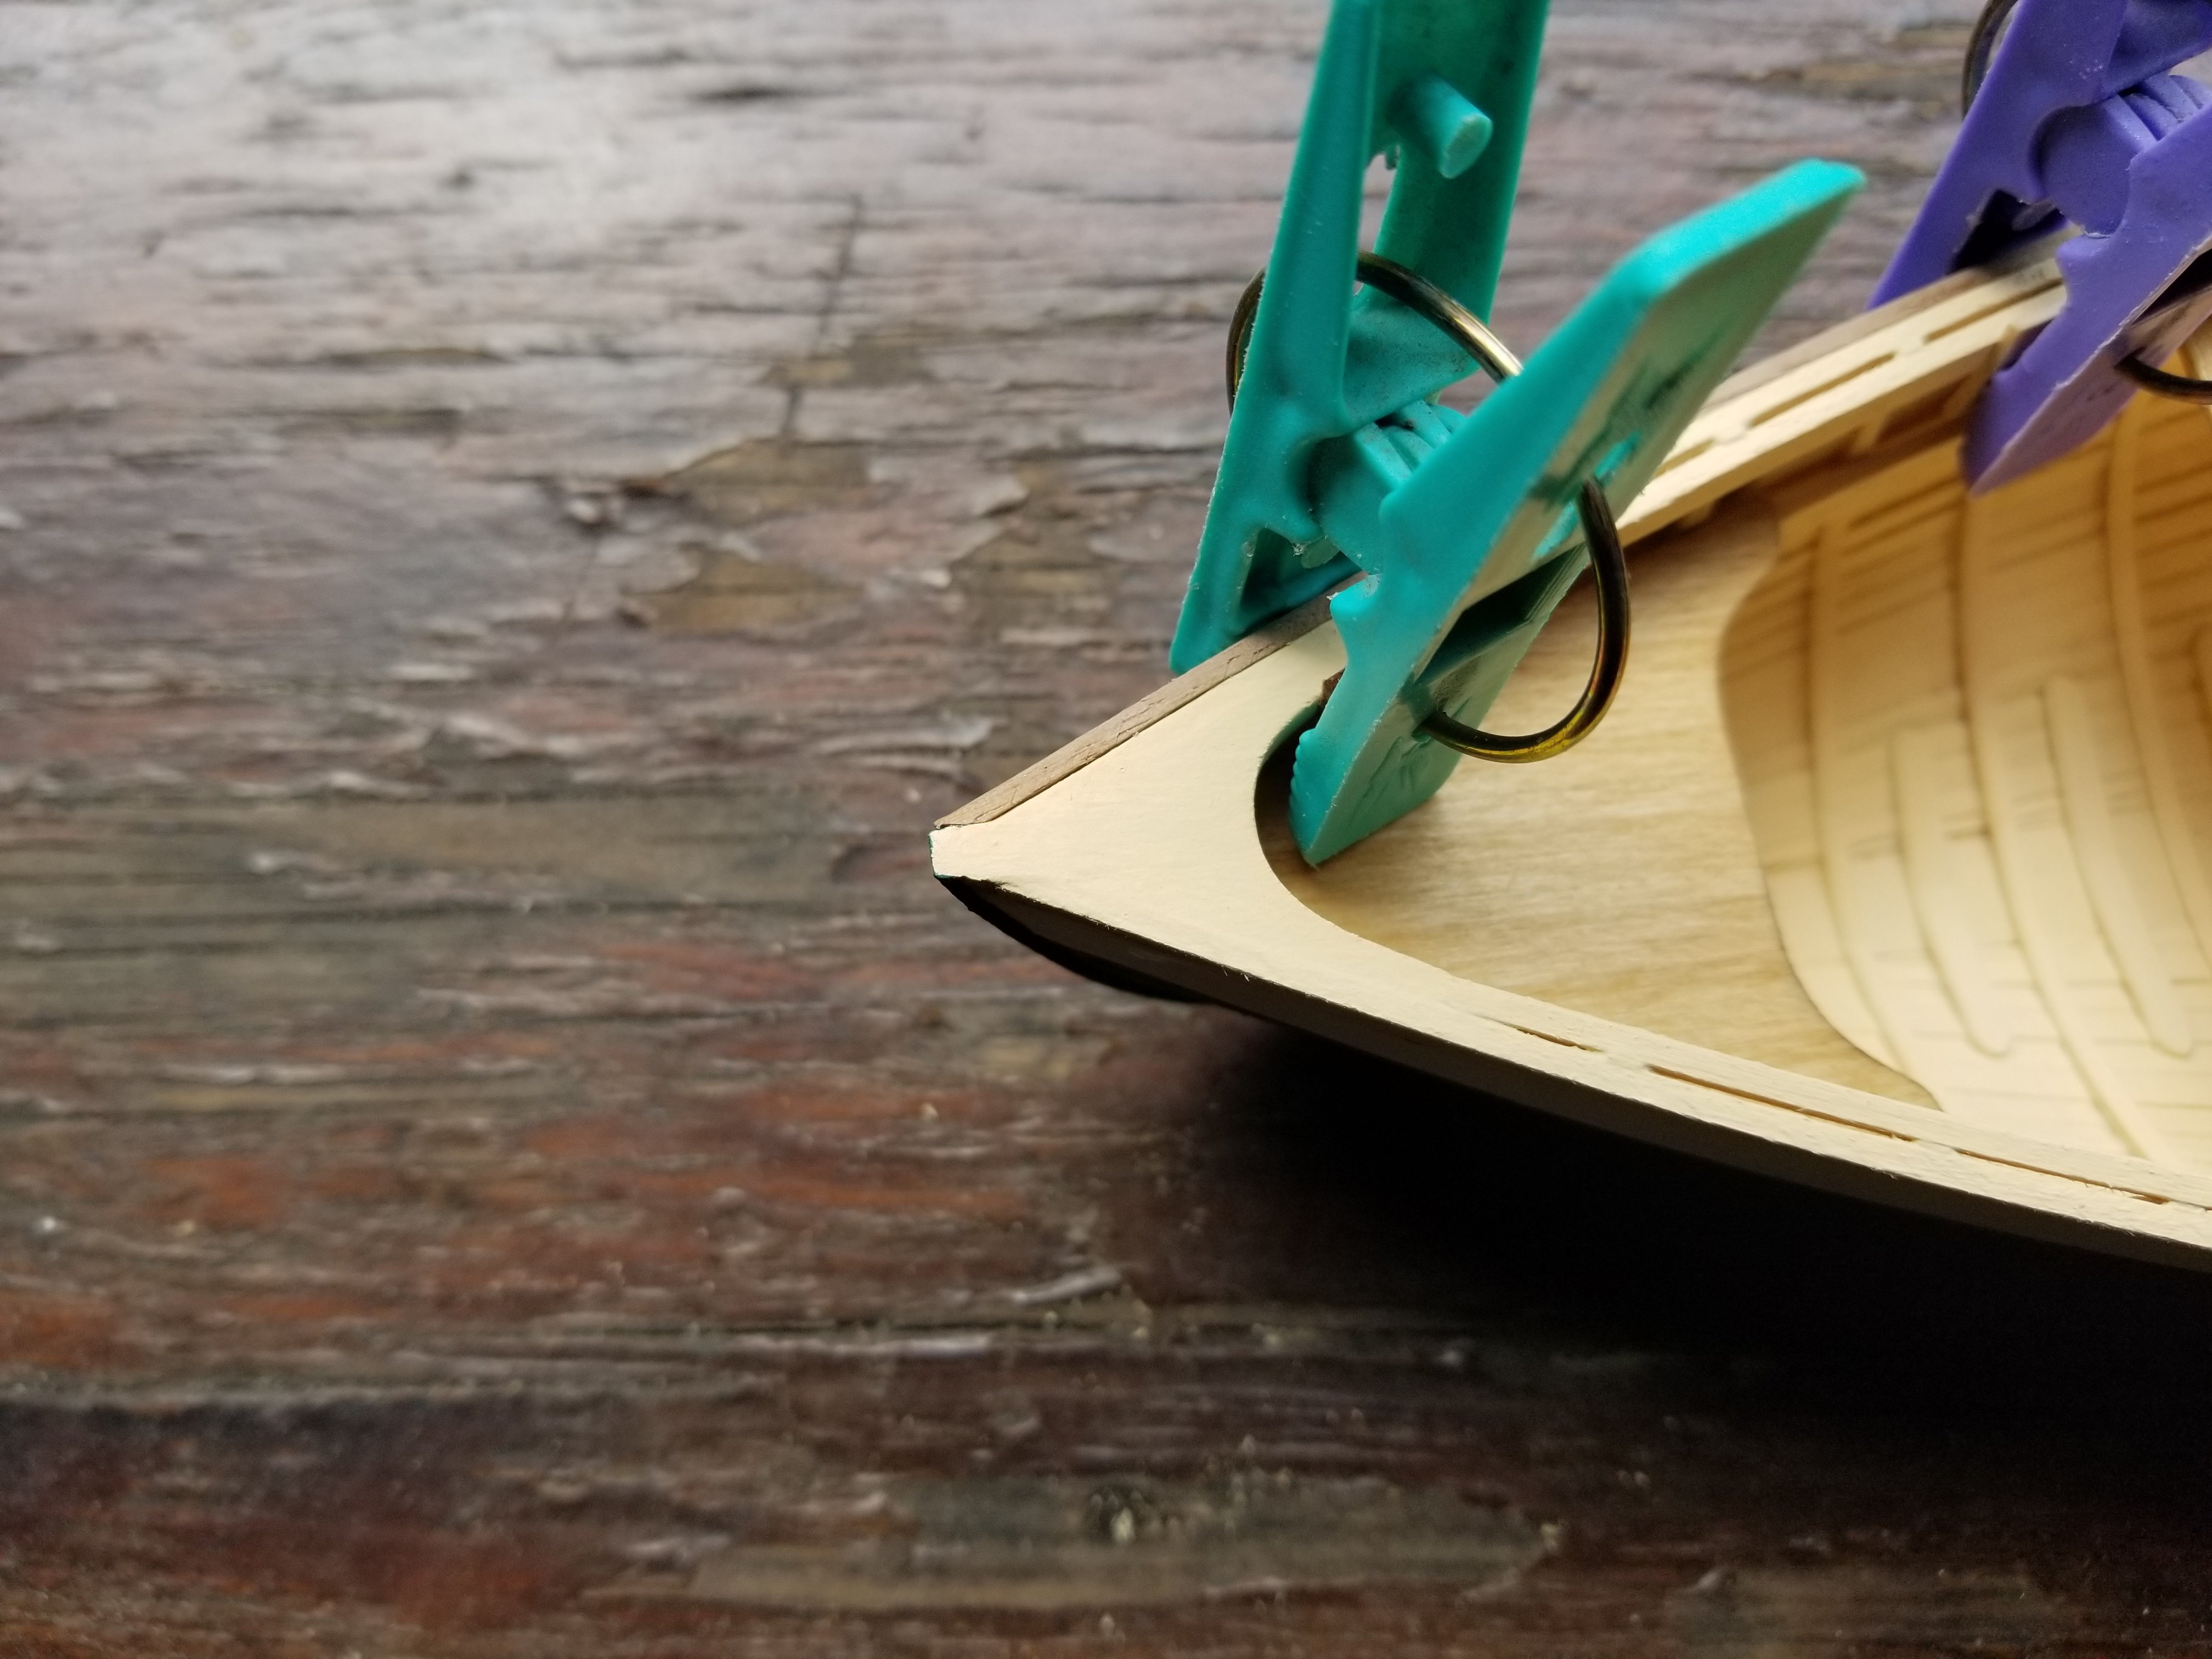
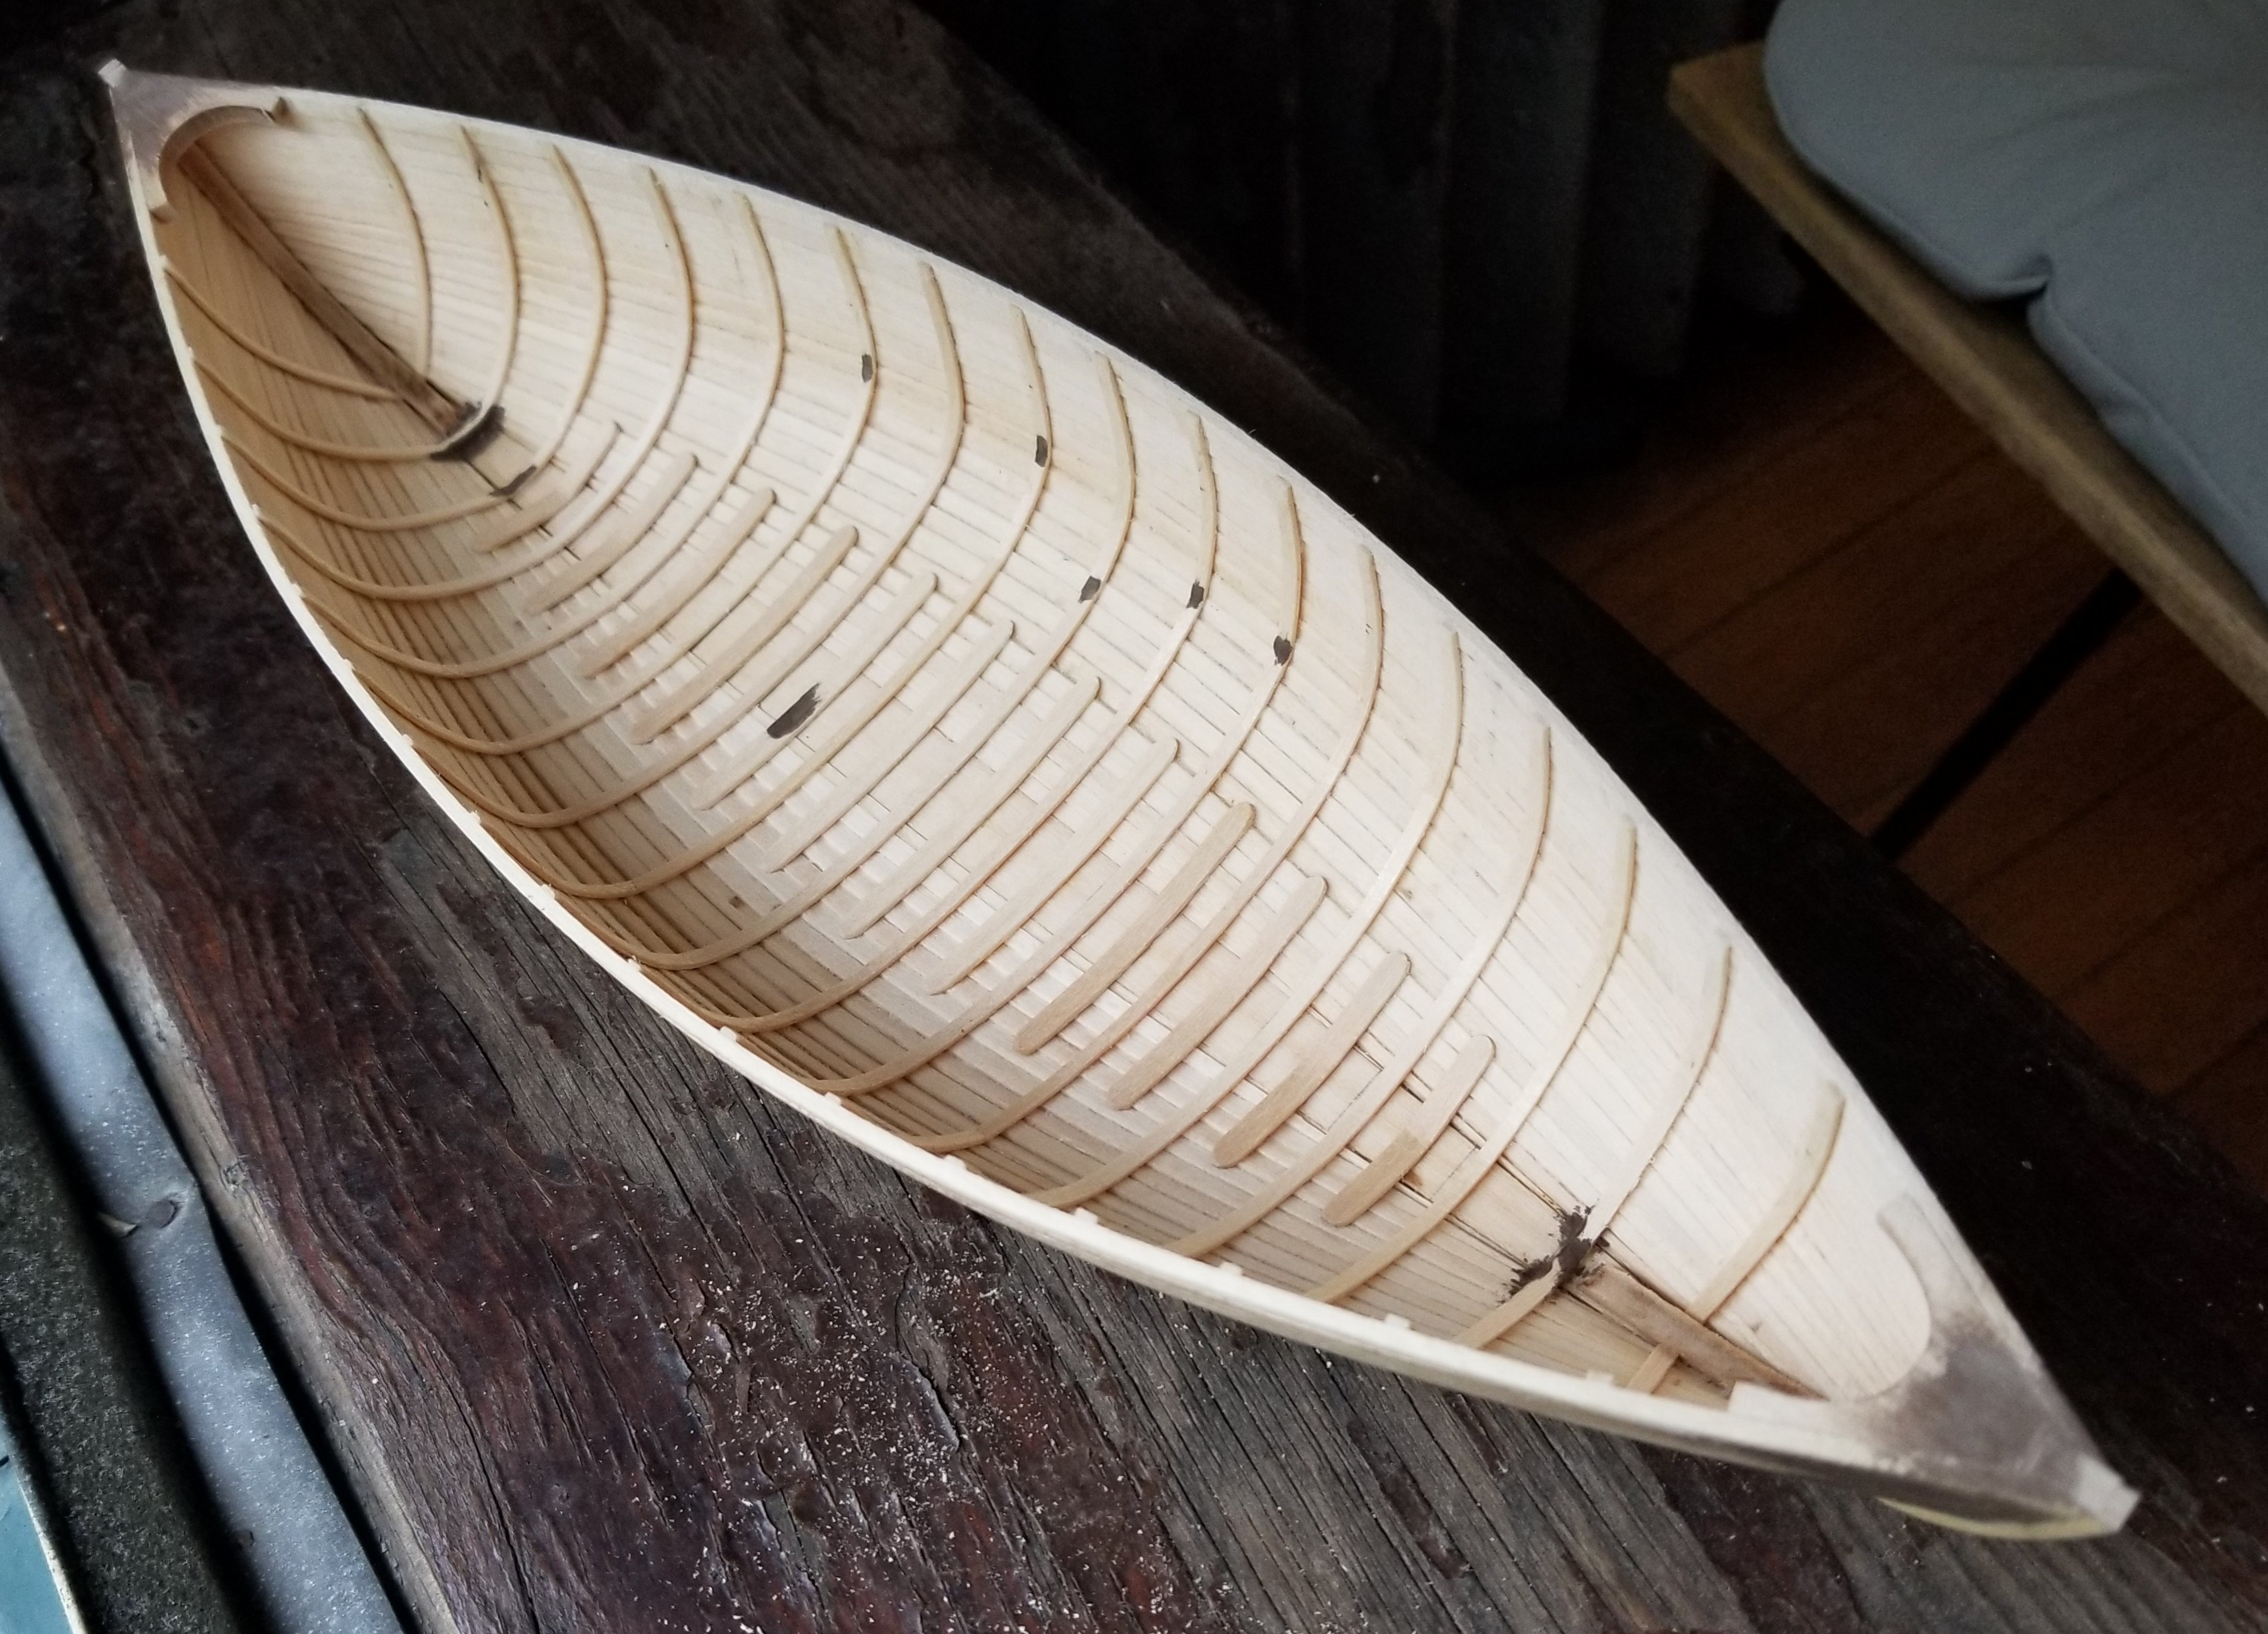
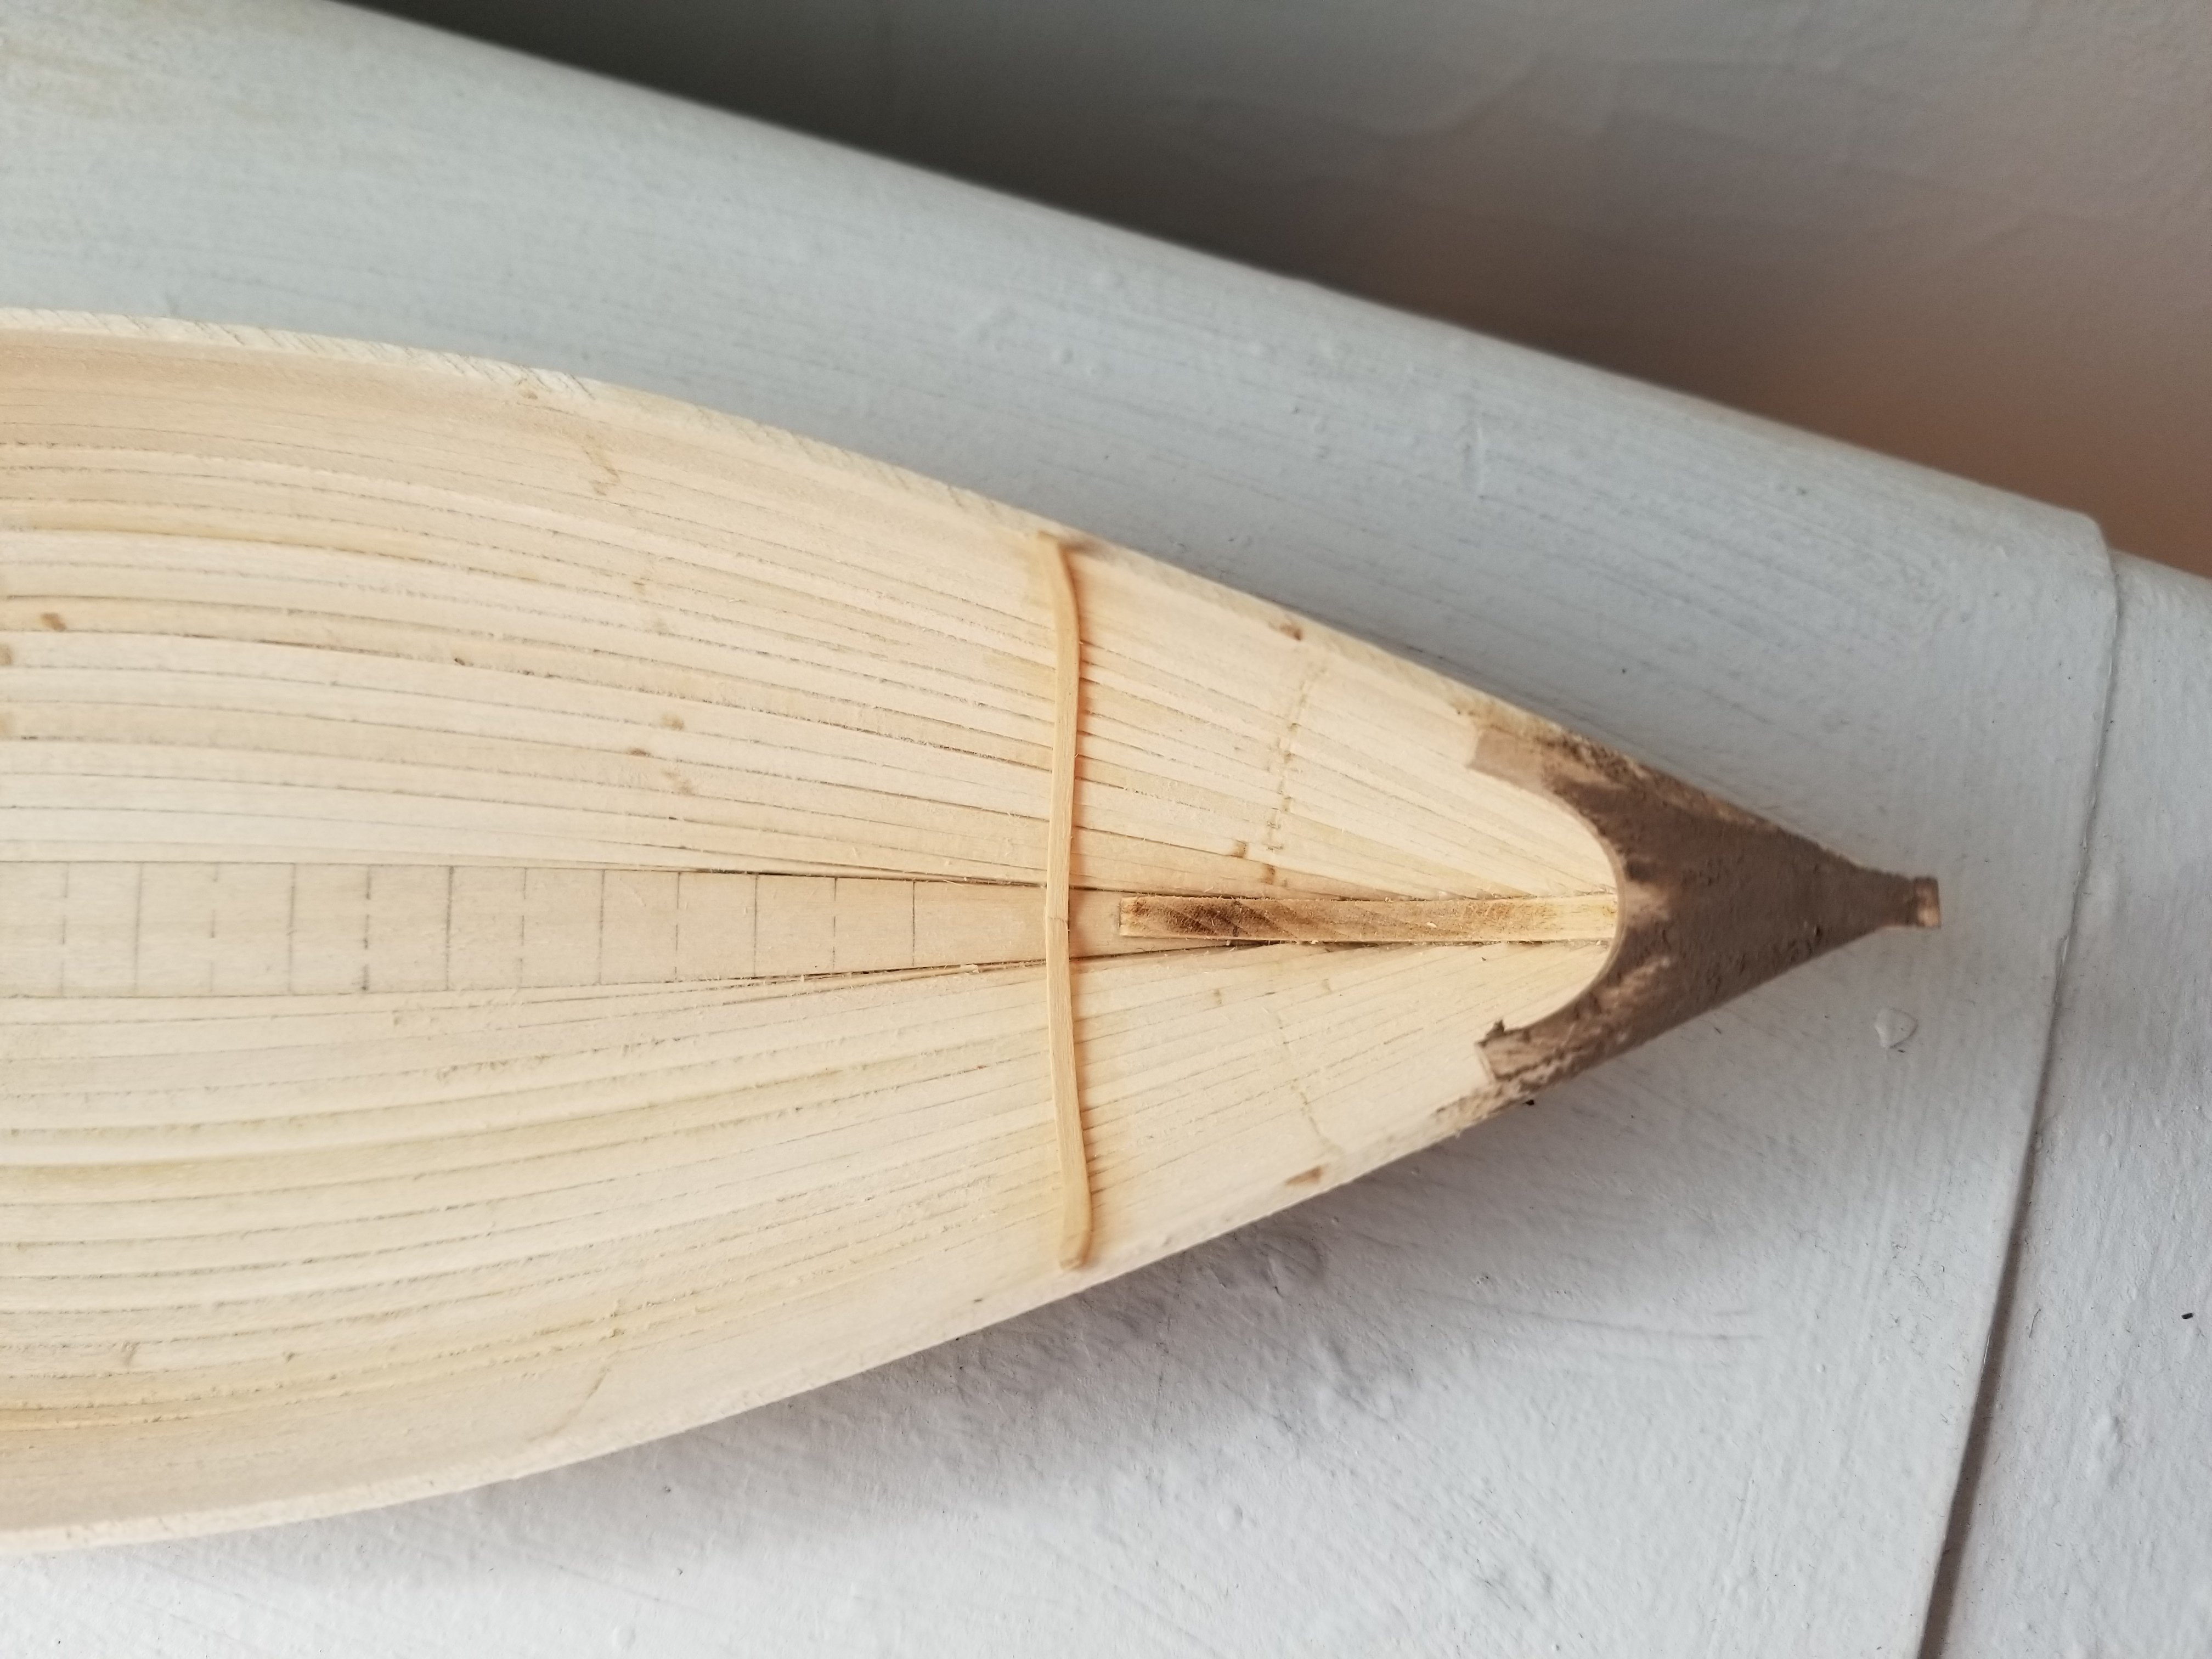
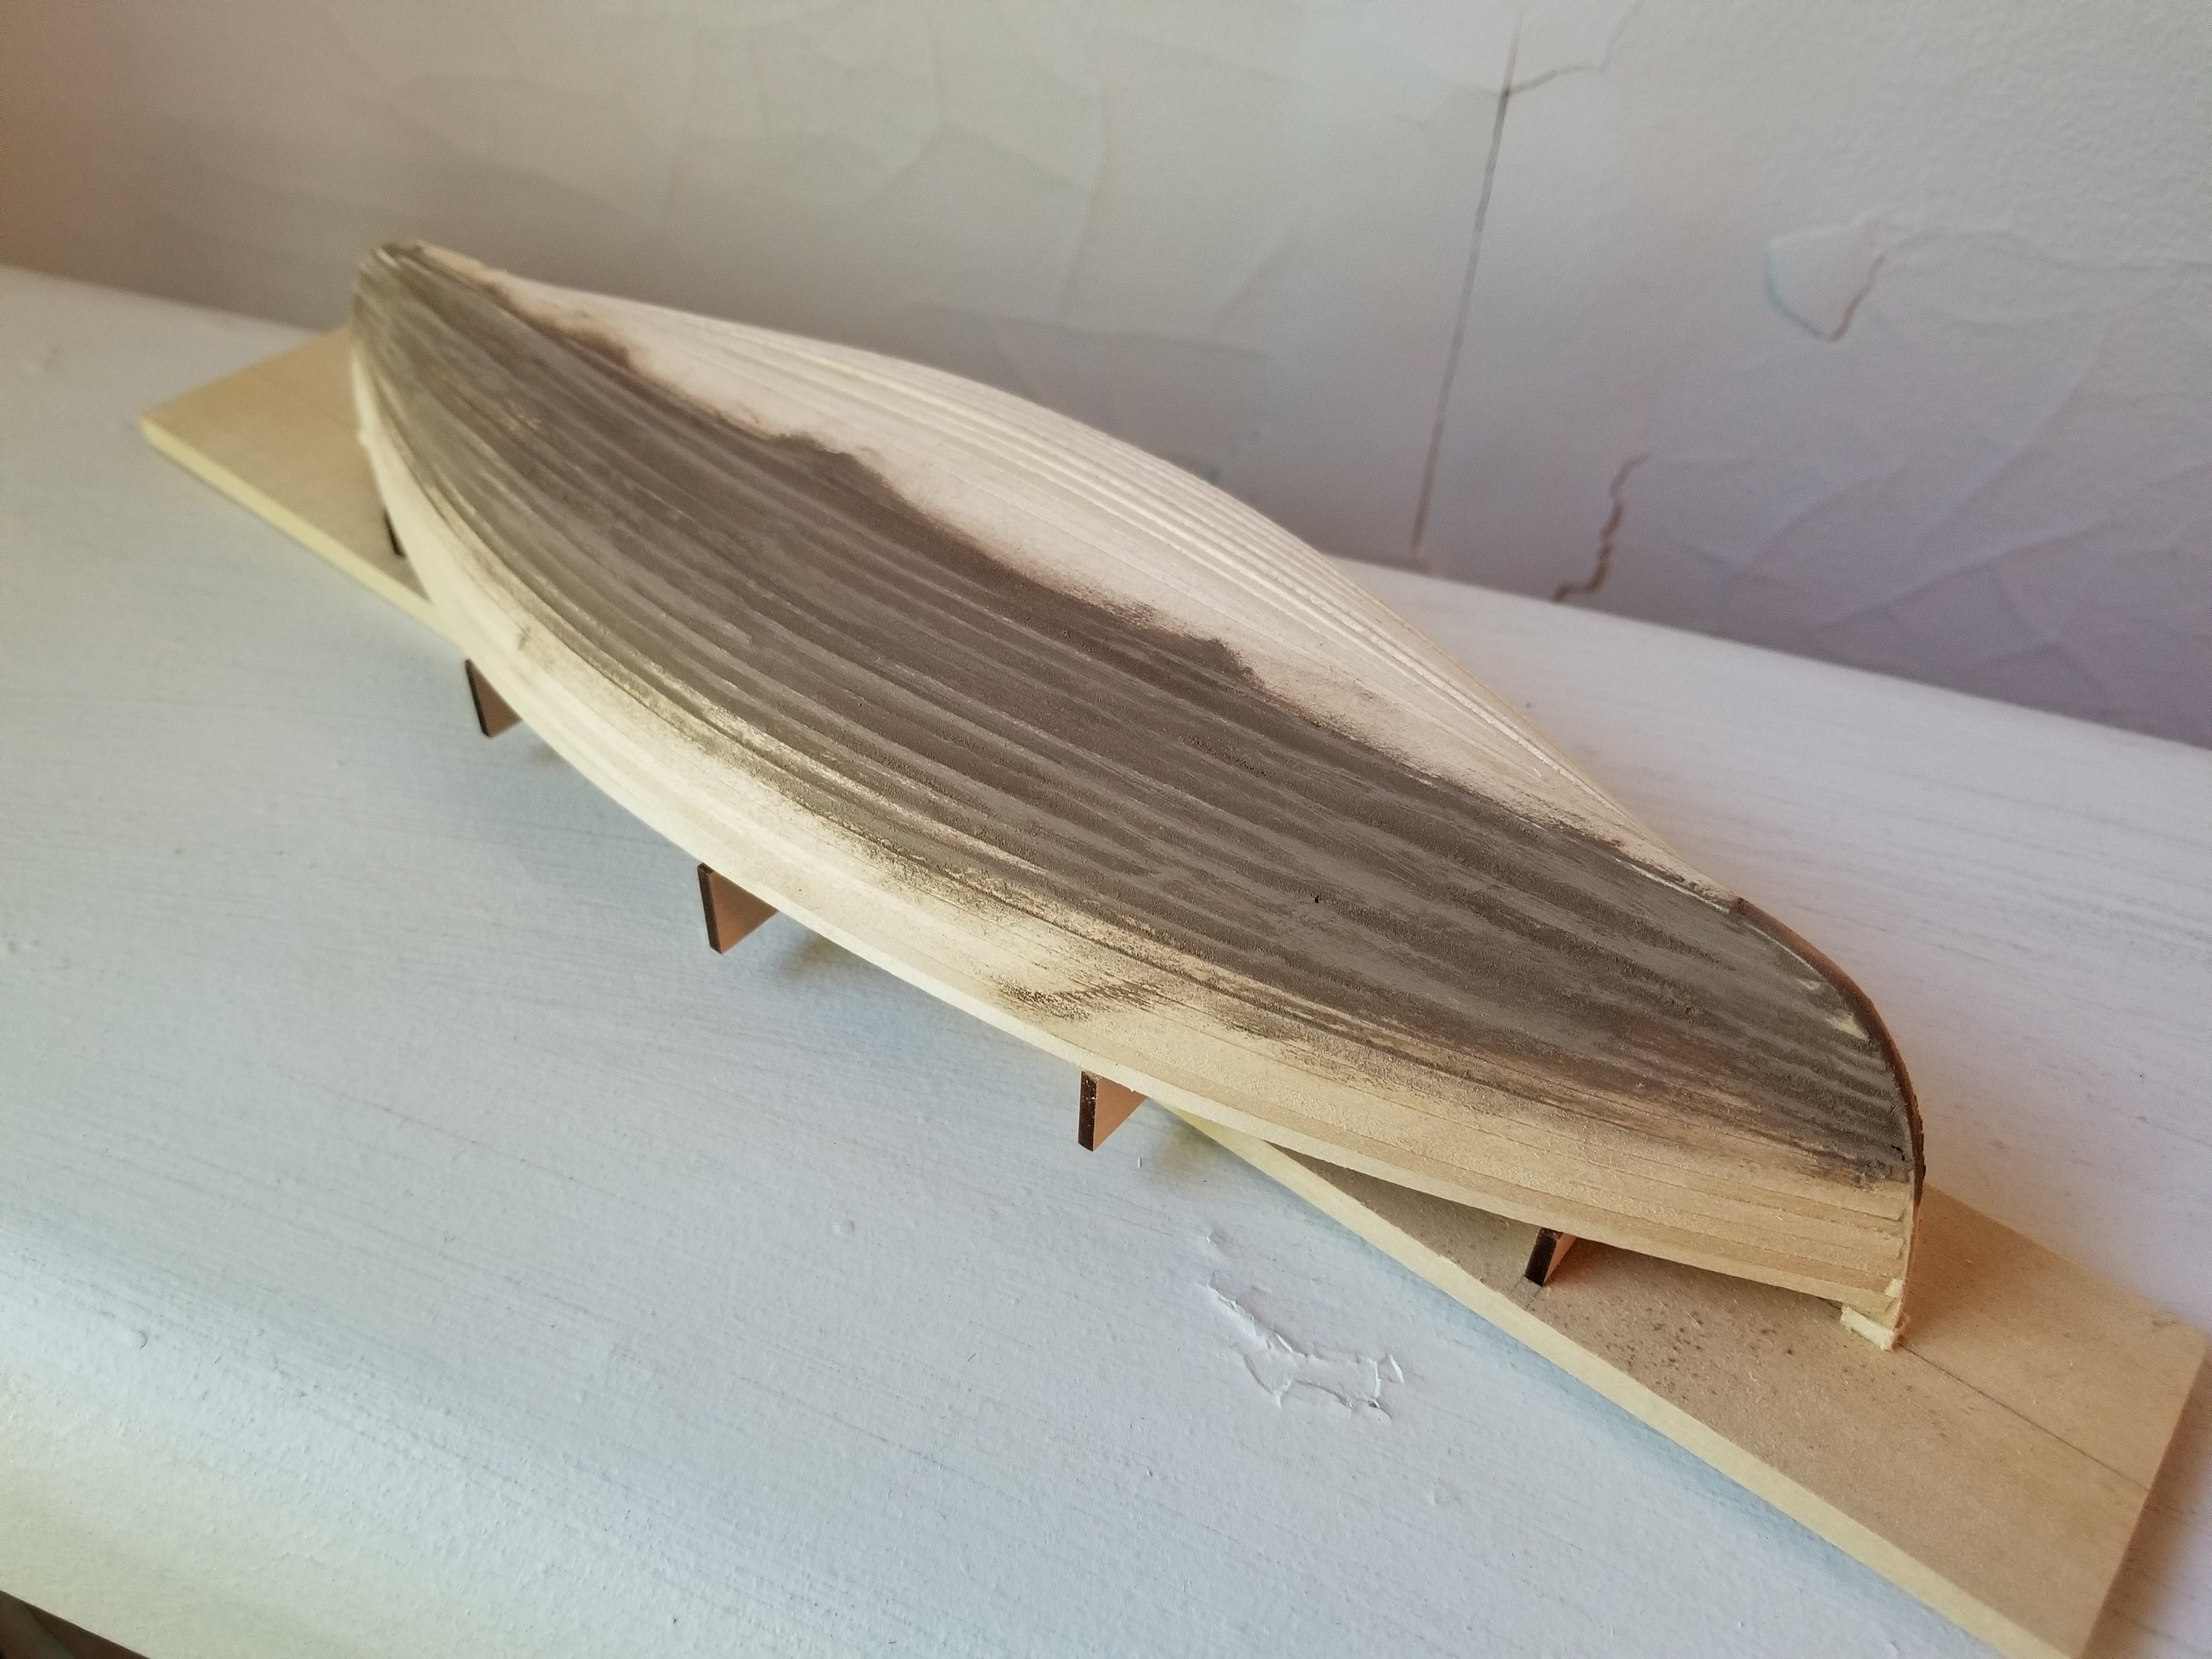
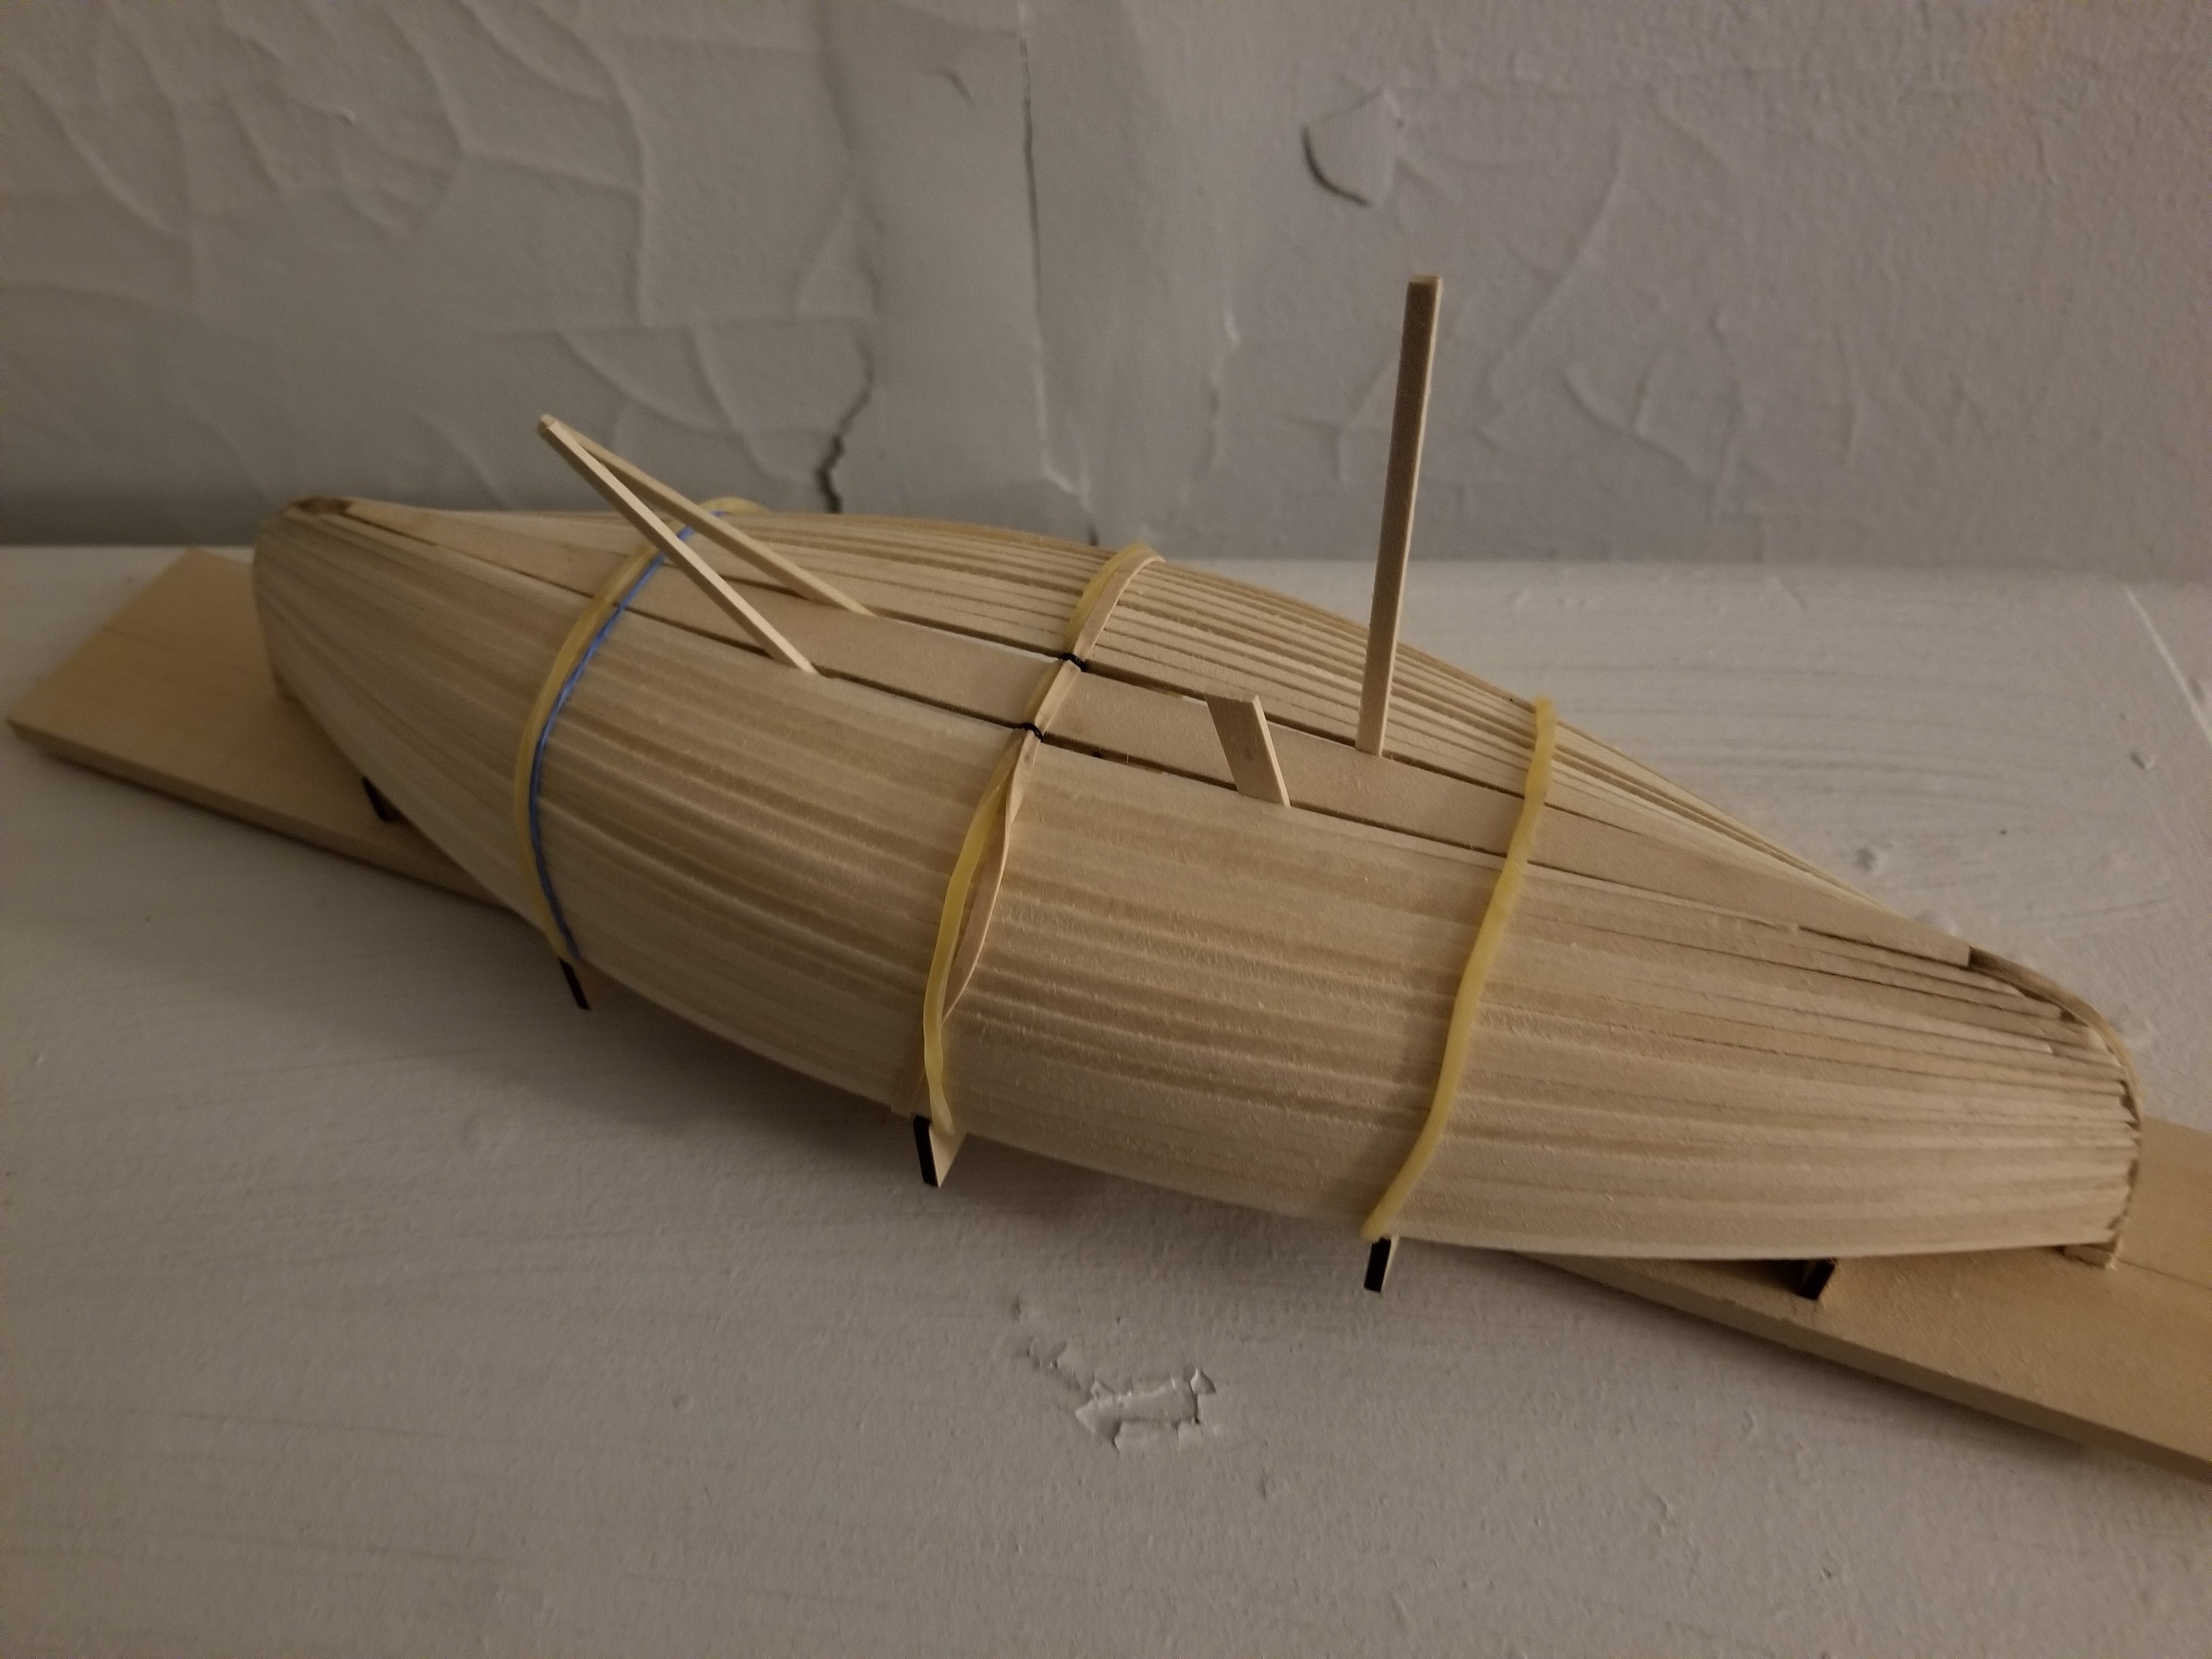
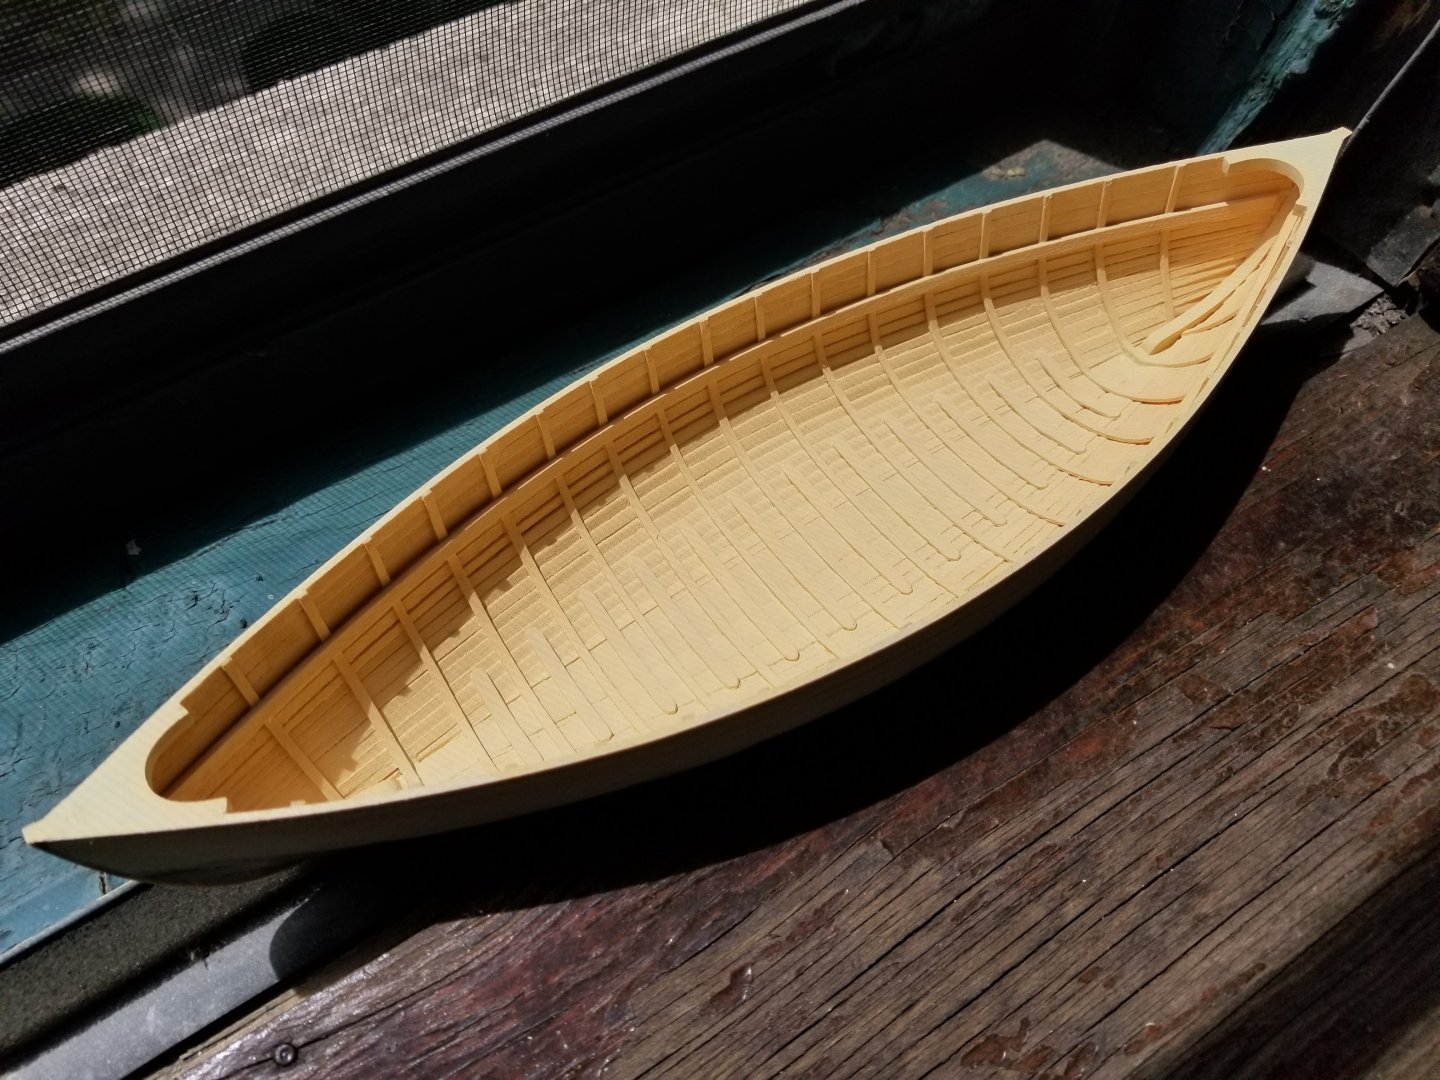
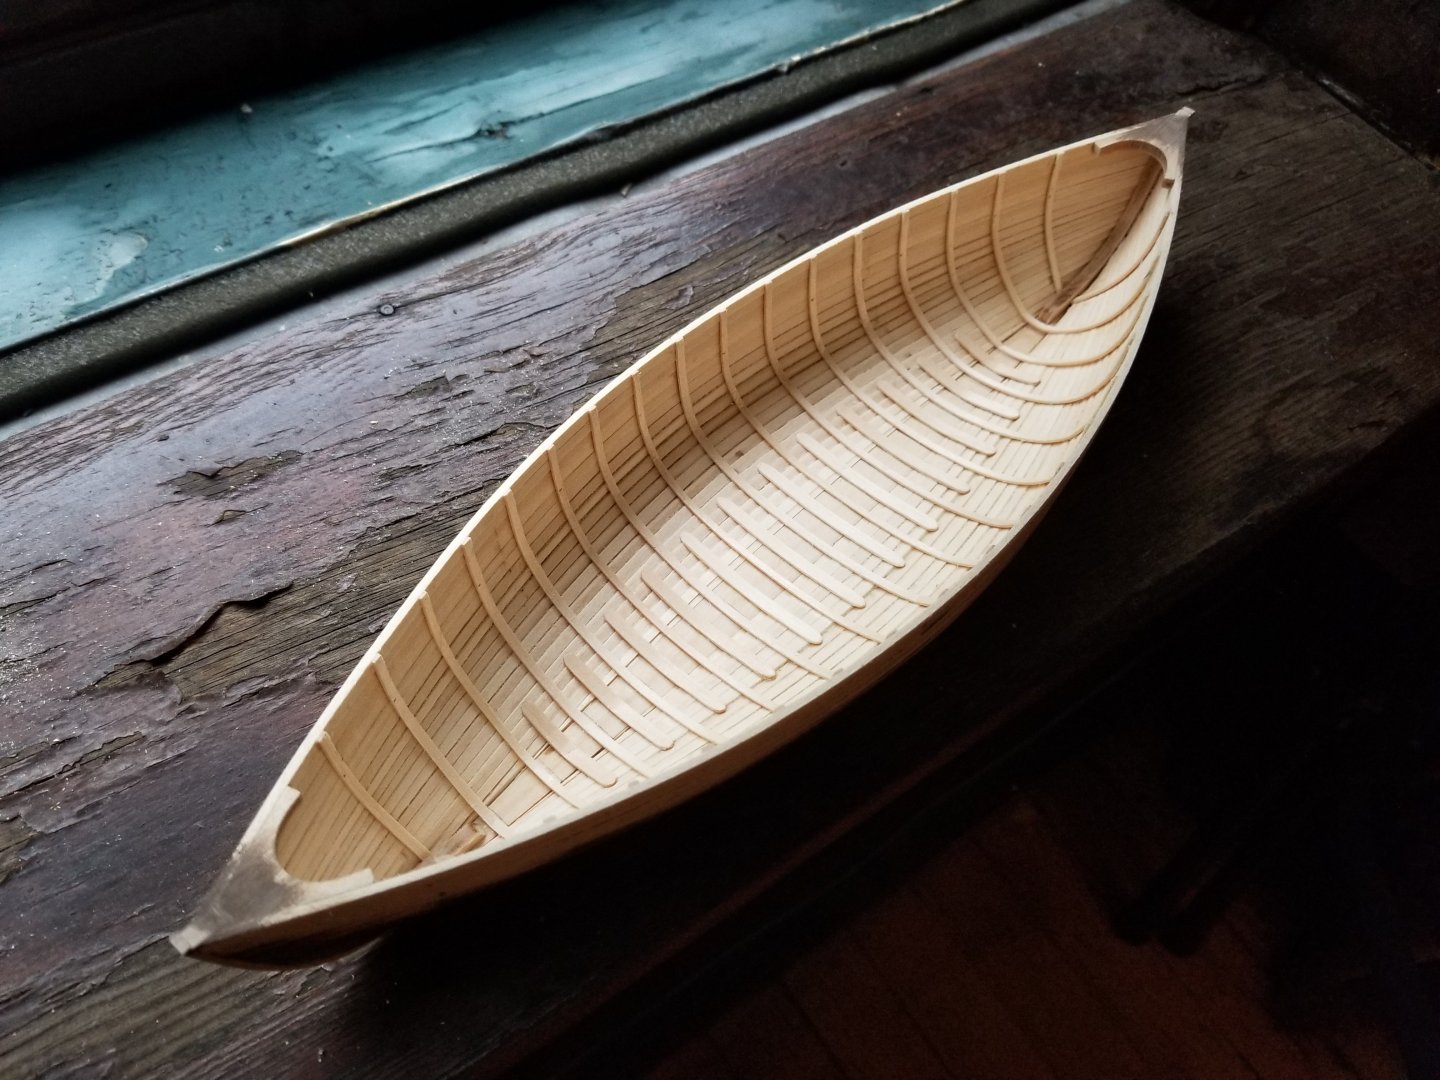
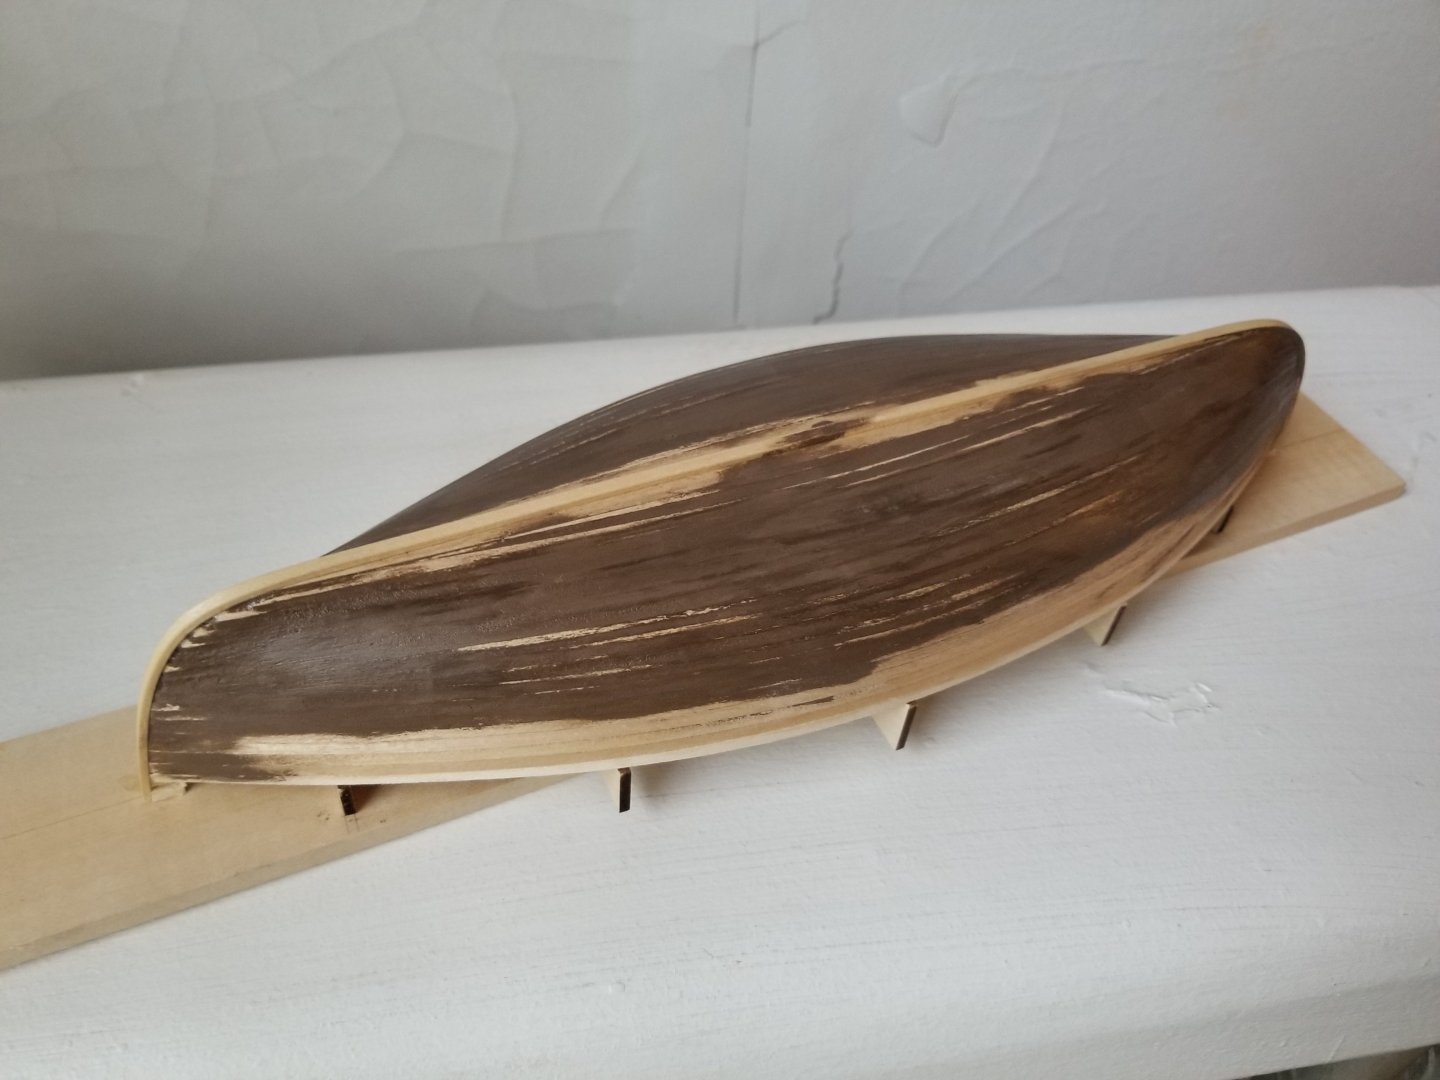
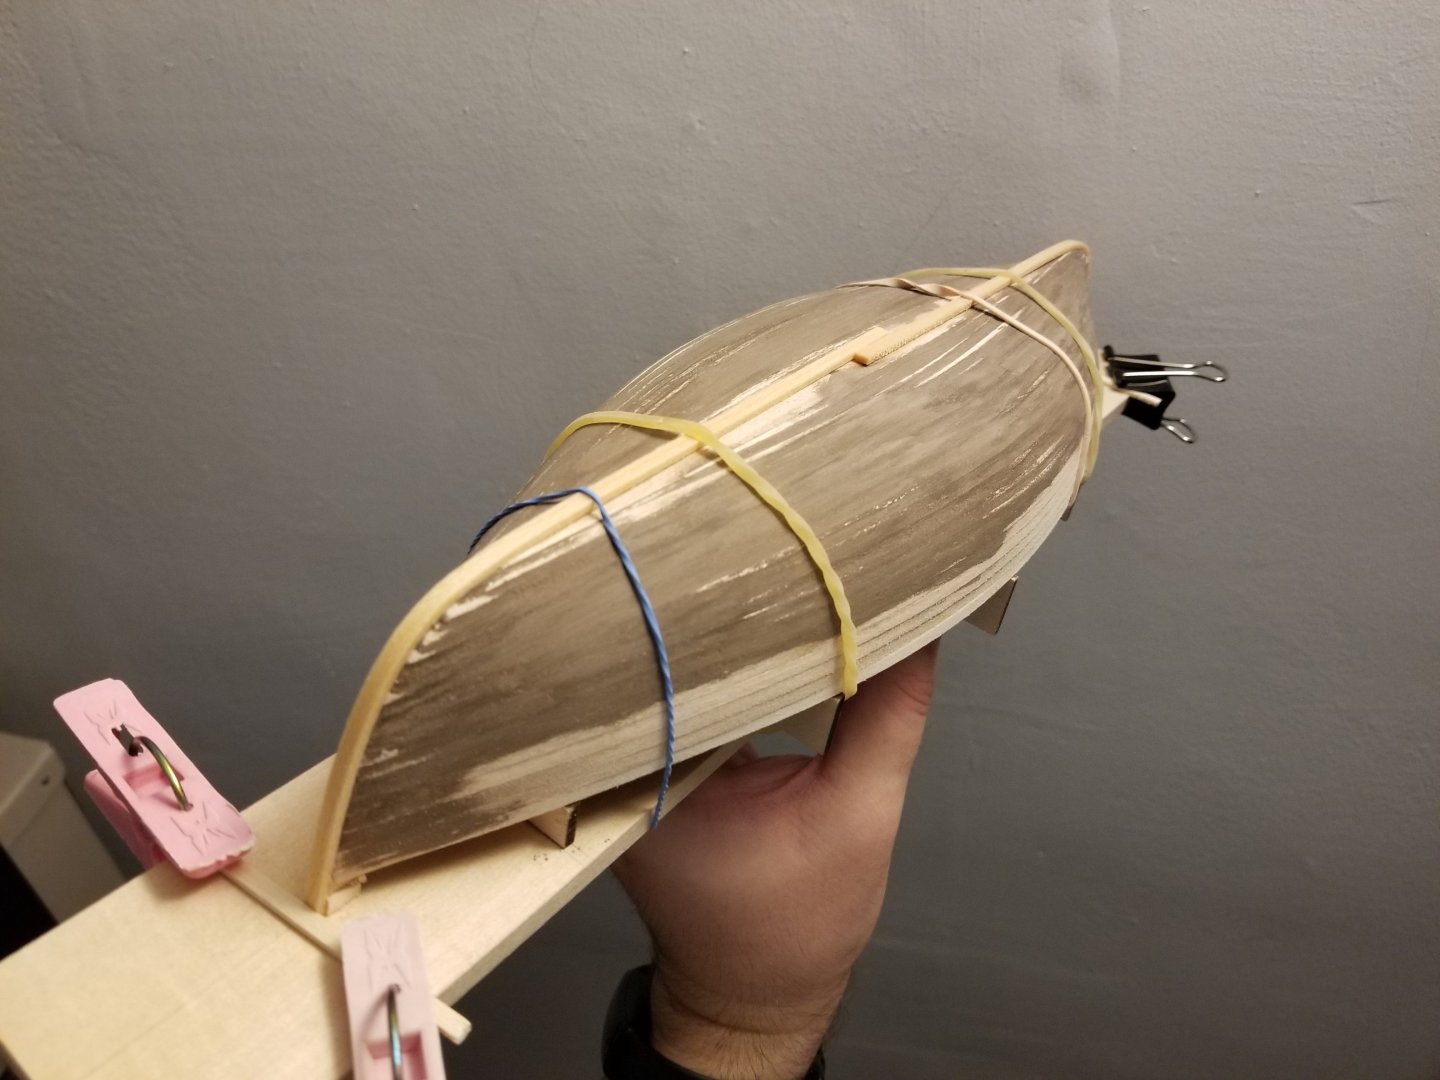
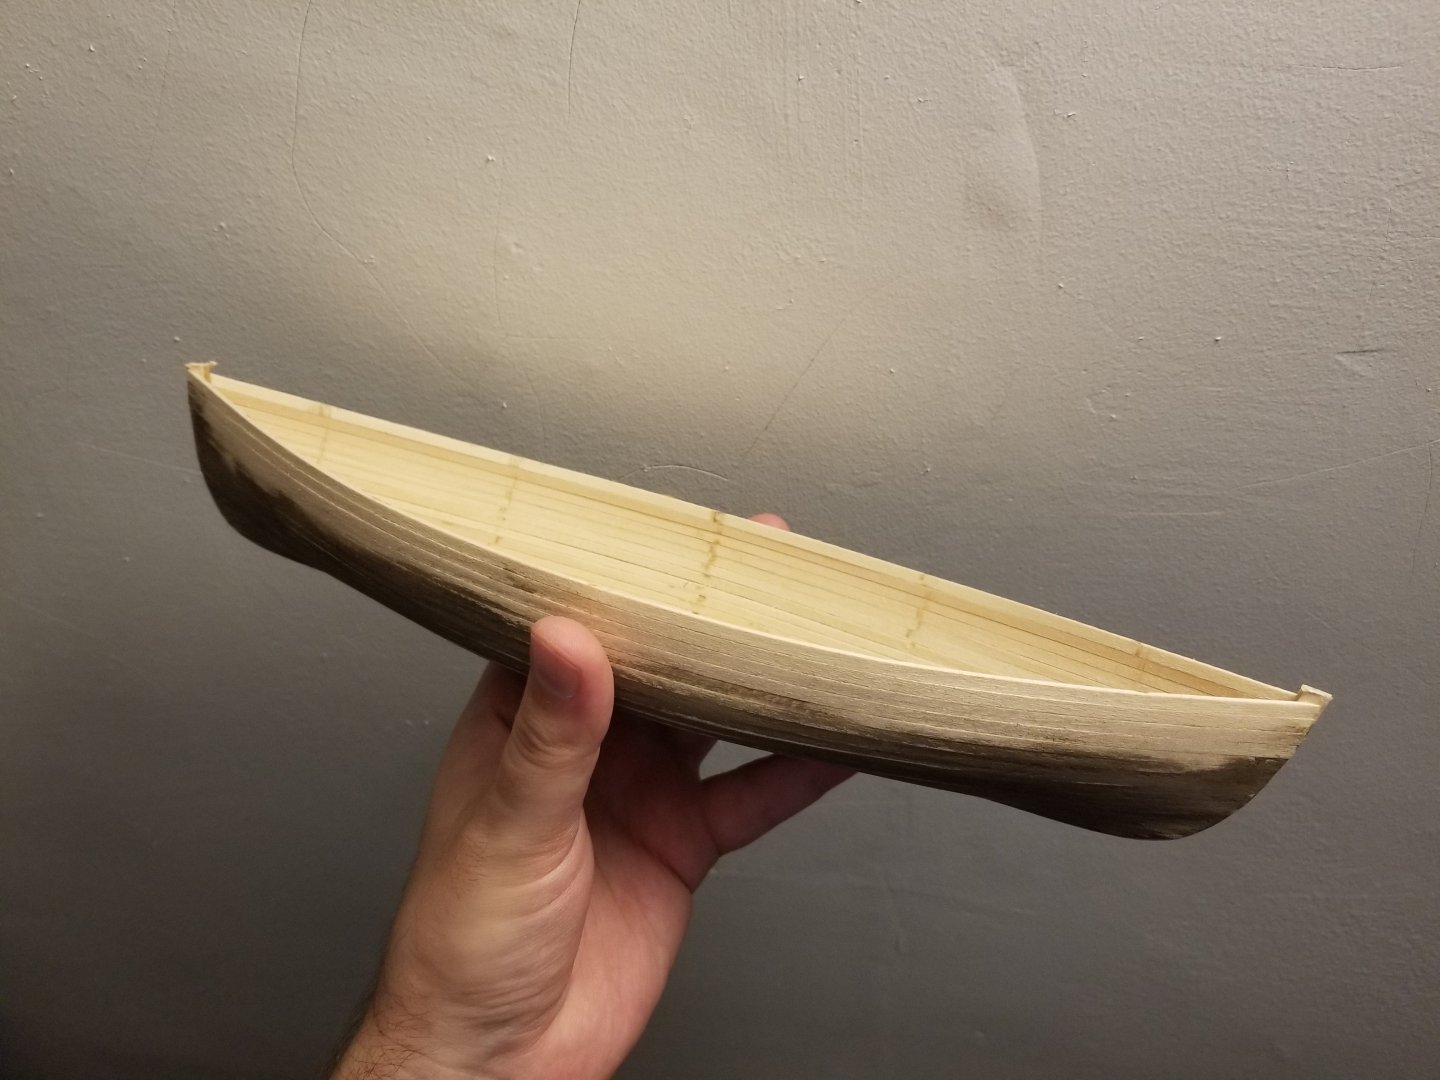
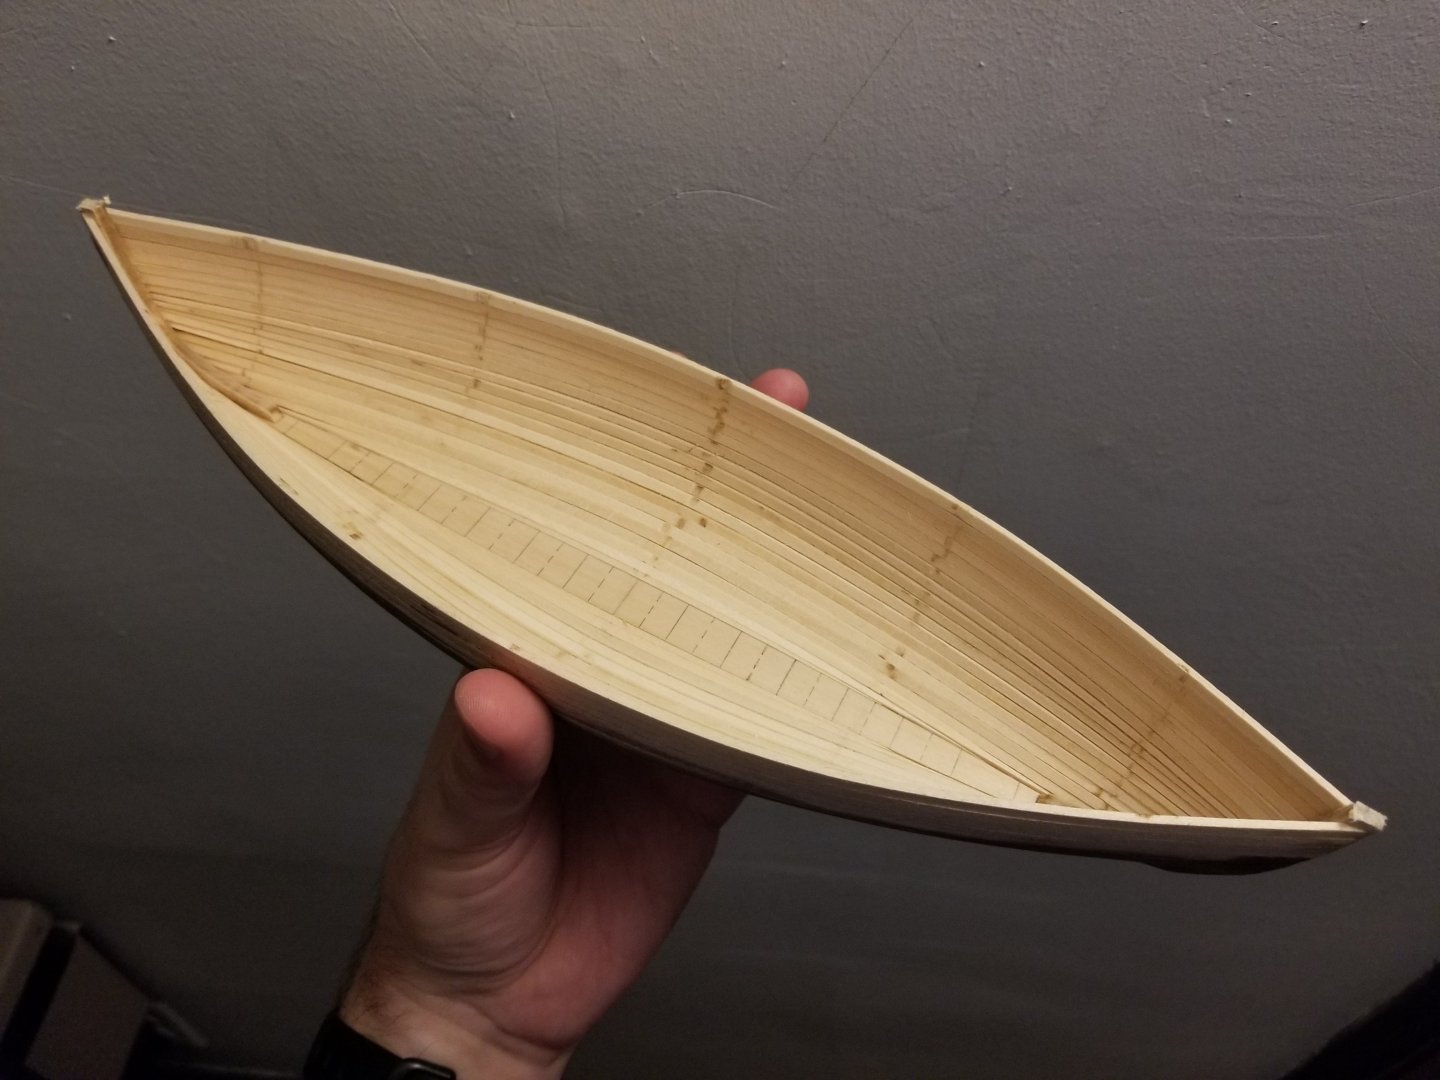
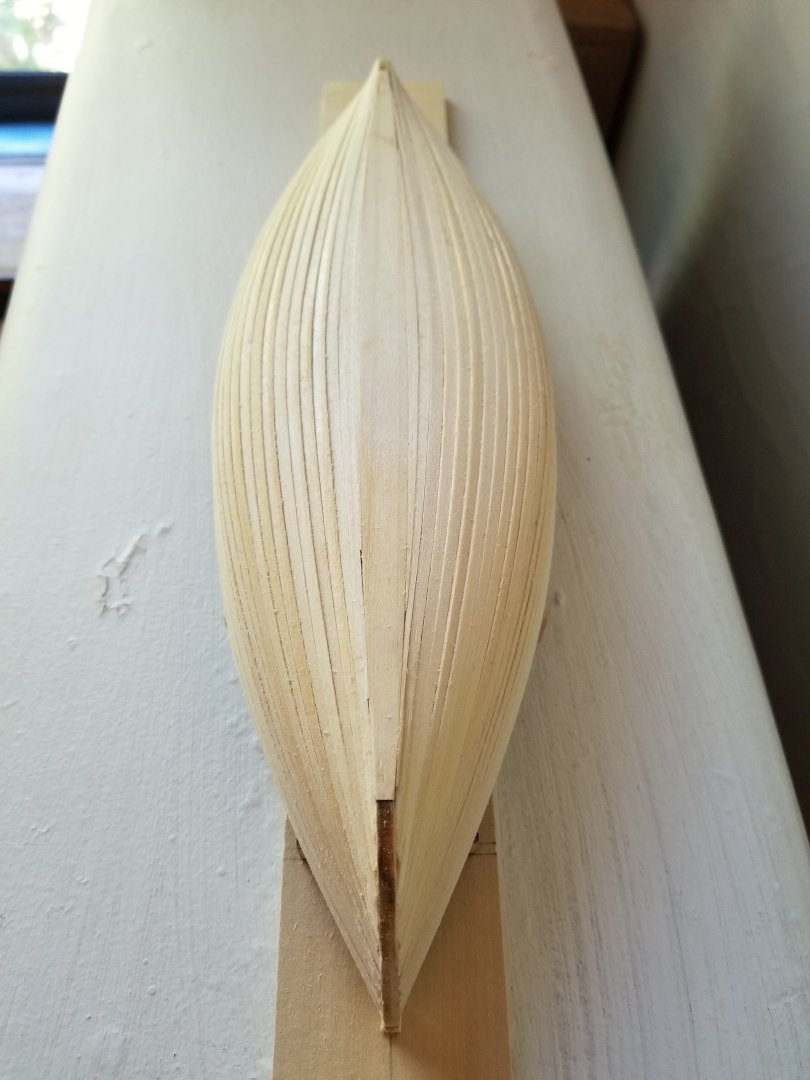
I finished planking the hull. The last two planks on each side were tapered down with the plane to paper-thin at each end. As can be seen, I had to use shims to hold the second-to-last in place while gluing. The final strips just slotted into the holes on each side of the keel. Once the glue dried, I was able to remove the rubber bands. Not the smoothest of hulls, but I'll take it. To deal with the unwanted clinkering around the turn of the bilge, I added Elmer's wood filler. Unfortunately I bought walnut-colored filler without realizing it, but this will all be painted anyway. My goal isn't a totally smooth hull--the working peapod in the photo at the top of this page doesn't seem to have a perfectly smooth hull: https://www.woodenboat.com/online-exclusives/gallery-peapod-lines --but rather to reduce the unevenness. I tested with one side first. And then sanded. It seemed to work, so I added filler to the other side and set it to dry. Once it dried, I used a saw to cut the stem and sternpost. It took very little pressure to pop the hull off the formers. It definitely looks like a boat now! The hull wants to narrow very slightly, so for now I'm going to keep it on the building board. Clearly the interior will need a good deal of sanding and smoothing, but I'm looking forward to the next steps.

- 65 replies
-
- 9
-
-
- Maine Peapod
- Midwest Products
- (and 1 more)
-
The model looks amazing! As for the tiller: you've probably already done this, but maybe looking at examples on other types of vessels would be helpful? From what I can tell, the Chesapeake Smith Island Crab Scraper seems to have had a similar steering arrangement, although I'm not sure if there are any good explanations of how the cable system worked or even if it's actually a comparable mechanism. Hope you're able to find something, this is a fascinating build to follow.