


flyer
-
Posts
1,004 -
Joined
-
Last visited
Reputation Activity
-

 flyer got a reaction from Kingspoke in HMS Bellerophon by flyer - FINISHED - Amati/Victory Models - scale 1:72
anchors
A suitable stream anchor was added to the 5 anchors from the kit, all completed and stored. A conflict for space occurred between the sheet and bower anchors and the lower stun sail booms. The only way I could think of, was to place the anchors on top of the booms. Thus, to set booms you have to move them from under the anchors.
Anchor buoys were formed with some 2-component putty and hung into the shrouds. As I understand anchors were buoyed and buoys should therefore be shown whenever a cable was bent to the anchor making it ready for use. For size I used information from John Harland who writes that '... the anchor buoy was in length one-quarter the length of the anchor shank, in diameter, one-eight...'.
port side with sheet and bower anchors and the extra stream anchor lashed to sheet anchor
stream anchor
the cable is attached to the bower anchor and the cat block with tackle is hooked into the ring
starboard with sheet and bower anchors and the kedge anchor lashed to the sheet anchor
kedge anchor
anchor buoy stowed in the fore shrouds
the buoy rope lashed to the anchor
-
 flyer got a reaction from Kingspoke in HMS Bellerophon by flyer - FINISHED - Amati/Victory Models - scale 1:72
jib sail
Several tries were necessary to find an adequate size for the jib sail. To me it was clear, that the kit's plan for the sail was grossly unfitting. Trying to draw one following the description in James Lees in 'Masting and Rigging of English Ships of War' was more difficult than expected. Several attempts were tested with paper templates just to prove unsatisfactory. Finally I tried to use the same proportions in regard to rigging and the other sails as Pandora's jib in the ATOS series has. Judging by eye it looked about right.
To bend the jib to its stay I used again figure-of-eight robands. The tack was hooked into the traveler and the rigging set up with help of the kit plans and instructions and some clarification by Lees.
Now I only have to install the anchors, to check the natural hang of all lines and to clean up everything...
Oh yes, and to find a suitable berth for a rather big model...
trying to find the right size - the smaller blue outline is the final one
detail of the peak
all sails are now installed
-
flyer got a reaction from Kingspoke in HMS Bellerophon by flyer - FINISHED - Amati/Victory Models - scale 1:72
do kit designers dislike travelers? or
setting up the jib stay
Since I started making the sails I had problems with one of them: I simply didn't like the cut of that jib.
Although in the book Bellona of the AOTS series the jib looks similar or perhaps even stranger than that on the kits plans, all other sources showed quite differently cut jib sails. First I tried to reshape the sail more in accordance with Lees explanations. Very slowly I finally realized, that in the kit the jib sail was wrongly set on the fore topgallant stay and the jib stay completely omitted.
I guess sometime during the making of the bowsprit I was glad not to have to make a traveler for the jib stay assuming that on a 74 a different arrangement was used. Well, it wasn't.
Furthermore I think, I never met so far a kit with a decent traveler included. Perhaps there were some approximations like combining stay and out hauler and leading the stay directly through the hole in the jib boom which represents the sheave or setting up a simple ring around the bowsprit.
But after seeing how much thinking goes into representing beautiful, detailed stoves which are mostly invisible on the finished model a decent traveler shouldn't be asking too much for...
Fortunately the necessary cheek blocks on the fore topmast are included in the instructions. So, the difficulty was only to set up the traveler around the finished jib boom.
I searched some stiff brass wire with 0,7 and 0,4mm diameter in the leftover box and bent the 3 parts: ring around the bowsprit, shackle for the stay and hook for the tack of the sail. Owing to the reduced availability of material and my clumsiness the parts are rather a bit oversized.
Shackle and hook were finished with a bit of soft solder, threaded onto the opened ring, the whole forced onto the jib boom and the ring closed and soldered. While the jib boom was protected with some masking tape the whole arrangement was now painted. A small block was fixed to the ring for the down hauler.
As jib stay I fixed some 0,5mm black thread to the shackle, led it up and through the starboard cheek block on the fore topmast and down the fore channels. I set the end up with a simple tackle, hooked into a ringbolt on the channel. The out hauler is 0,5mm natural thread (slightly oversized again), leading through a hole in the outer end of the jib boom (this represents a sheave) and back towards the portside knighthead. Again it is made fast with a simple tackle, hooked into the lower part of that knighthead.
Now I made an adapted paper template to test the jib sail and found it looking definitely more convincing.
the skipper checks the parts of the traveler
the ring is not yet soldered
finished traveler in place
jib stay through the starboard cheek block
jib stay tackle inboard of the shrouds
in hauler set up with a tackle to the knighthead - its end is belayed in front of the skipper
adapted jib sail template on the new jib stay
-
 flyer got a reaction from KARAVOKIRIS in HMS Vanguard by BikerMart - Amati/Victory Models - 1:72
Your build is looking good.
Those parts 27 and 28 are on the same 5mm sheet as the bulkheads 1 and 3. On my plan - Tavola 16 - they aren't numbered either. They are those 4 roughly triangle shaped items below parts 20.
You definitely need them. Two on top of the galleries to give some headroom for the skipper when visiting his side gallery and below to round out the shape of the lower gallery. If I remember correctly the smaller 2 are numbers 27 and go on top - but you will see how they fit.
Peter
parts 27 and 28 installed and roughly shaped
-
 flyer got a reaction from mtaylor in PEGASUS Block placement
Hi Allan,
And a happy new year to you too!
Yes, Lees mentions '...through blocks under the fore top...' several times and the drawings show those blocks fixed at the extremes of the trestle trees - except on page 102 where a 'double block is seized to the crosstree'.
I wonder if regulations in those times really went as far as to specify the exact locations of those blocks. Lees, in his introduction, mentions that his written sources mainly deal with size and dimensions. I guess that the actual run of the lines of the running rigging he shows is an average of the many but still limited number of models he studied.
I'm always tempted to follow kit instructions if they are not directly contradicted by e.g. Lees. Respectable kit designers may use Lees or their own research for the rigging plans and certainly try to be as historically accurate as possible. But even somebody like Chris Watton may have to use approximations sometimes to construct a practicable and sellable kit. And then sometimes I'm just lazy and tempted to take the easy way out.
Cheers
Peter
-
 flyer reacted to allanyed in PEGASUS Block placement
I am pretty sure there were no regulations, but I would love to see any contemporary charts, scantlings, detailed plans, or text on rigging, especially from the 18th century. Other than The Elements and Practice of Rigging and Seamanship 1794 by David Steel, are there are any similar contemporary books or other sources? Other than Steel, the most comprehensive seem to be modern works from authors such as Lees, Marquardt, Anderson, Harland, et al.
Allan
-
 flyer got a reaction from allanyed in PEGASUS Block placement
Hi Allan,
And a happy new year to you too!
Yes, Lees mentions '...through blocks under the fore top...' several times and the drawings show those blocks fixed at the extremes of the trestle trees - except on page 102 where a 'double block is seized to the crosstree'.
I wonder if regulations in those times really went as far as to specify the exact locations of those blocks. Lees, in his introduction, mentions that his written sources mainly deal with size and dimensions. I guess that the actual run of the lines of the running rigging he shows is an average of the many but still limited number of models he studied.
I'm always tempted to follow kit instructions if they are not directly contradicted by e.g. Lees. Respectable kit designers may use Lees or their own research for the rigging plans and certainly try to be as historically accurate as possible. But even somebody like Chris Watton may have to use approximations sometimes to construct a practicable and sellable kit. And then sometimes I'm just lazy and tempted to take the easy way out.
Cheers
Peter
-
 flyer got a reaction from Keith Black in PEGASUS Block placement
Hi Allan,
And a happy new year to you too!
Yes, Lees mentions '...through blocks under the fore top...' several times and the drawings show those blocks fixed at the extremes of the trestle trees - except on page 102 where a 'double block is seized to the crosstree'.
I wonder if regulations in those times really went as far as to specify the exact locations of those blocks. Lees, in his introduction, mentions that his written sources mainly deal with size and dimensions. I guess that the actual run of the lines of the running rigging he shows is an average of the many but still limited number of models he studied.
I'm always tempted to follow kit instructions if they are not directly contradicted by e.g. Lees. Respectable kit designers may use Lees or their own research for the rigging plans and certainly try to be as historically accurate as possible. But even somebody like Chris Watton may have to use approximations sometimes to construct a practicable and sellable kit. And then sometimes I'm just lazy and tempted to take the easy way out.
Cheers
Peter
-
flyer got a reaction from mtaylor in PEGASUS Block placement
The question I tried to answer was about the green circled blocks in the 2nd picture of #1:
I took those as indication of having two identical rows of blocks on the forward and aft crosstree. The lines then are going through the identical blocks on each crosstree thus leading free of and above the fore yard, perhaps to give some space to brace the yard.
In Lees' book you find on page 73 top right an illustration for the buntlines, installed that way. (BTW on Bellerophon I used a similar arrangement also for the main yard.)
The two outboard single block pairs were thus used for the buntlines and the inboard double block pairs I used for spritsail and sprit topsail braces. This is confirmed by Lees again on page 101 respective page 105.
-
flyer got a reaction from Keith Black in PEGASUS Block placement
The question I tried to answer was about the green circled blocks in the 2nd picture of #1:
I took those as indication of having two identical rows of blocks on the forward and aft crosstree. The lines then are going through the identical blocks on each crosstree thus leading free of and above the fore yard, perhaps to give some space to brace the yard.
In Lees' book you find on page 73 top right an illustration for the buntlines, installed that way. (BTW on Bellerophon I used a similar arrangement also for the main yard.)
The two outboard single block pairs were thus used for the buntlines and the inboard double block pairs I used for spritsail and sprit topsail braces. This is confirmed by Lees again on page 101 respective page 105.
-
 flyer got a reaction from scrubbyj427 in HMS Bellerophon by flyer - FINISHED - Amati/Victory Models - scale 1:72
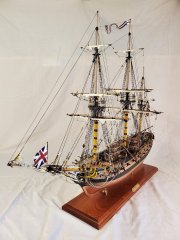
conclusion
After more than 6 years, I'd say it was a rather longish journey but I really had a lot of fun along the way and it was definitely worth the effort. The outstanding quality of the kit and the possibility to build 3 different ships makes it easy to overlook a few shortcomings, such as questionable details in the rigging plan or the very questionable gun carriages. On the plus side are also things like the very detailed plans such as the sail plans, the boats or the many fine details to build bulkheads or stern and side galleries.
A perfect kit where you may build just out of the box without research or rounding out with additions might be just a bit dull - I will probably find out more about that with my next project.
In any case this kit enables you to build a wonderful model of a 74, the backbone of the wooden walls protecting Great Britain during the Napoleonic wars. Finding a good enough place to present the rather large end result is another story...
a few final pictures.
-
flyer got a reaction from Kingspoke in HMS Bellerophon by flyer - FINISHED - Amati/Victory Models - scale 1:72
empty belaying pins and ringbolts, loose ends
Despite having to overcome a shortage of usable belaying points on the forecastle there were still a few unused pin positions on the poop deck.
Also unused ring or eye bolt positions around main and mizzen mast had to be filled. The kit instructions put eye bolts into those locations. However I think that ringbolts, allowed to lie flat when unused, would be more sensible when mounted on the deck. I didn't find much about that in the web but thought it would be easier to run about on deck if you wouldn't have to fear to catch your bare feet in a ring, take a tumble and break your ankle.
To imitate a ringbolt with a small fixed ring which encloses the movable one tightly, I bent an eye bolt 90° and put a drop of glue onto it to simulate the fixed ring.
After fixing all loose ends I could find, finally...finished!
the way I fabricated the imitated ringbolts
unused ringbolts around the mizzen mast foot
fore mast foot with eyebolt(with tackle) to the left and one of the empty ringbolts lying flat on the deck
moderately busy scene on the finished forecastle
the skipper seems quite fond of his ship - and so am I...
-
 flyer got a reaction from egkb in HMS Bellerophon by flyer - FINISHED - Amati/Victory Models - scale 1:72
anchors
A suitable stream anchor was added to the 5 anchors from the kit, all completed and stored. A conflict for space occurred between the sheet and bower anchors and the lower stun sail booms. The only way I could think of, was to place the anchors on top of the booms. Thus, to set booms you have to move them from under the anchors.
Anchor buoys were formed with some 2-component putty and hung into the shrouds. As I understand anchors were buoyed and buoys should therefore be shown whenever a cable was bent to the anchor making it ready for use. For size I used information from John Harland who writes that '... the anchor buoy was in length one-quarter the length of the anchor shank, in diameter, one-eight...'.
port side with sheet and bower anchors and the extra stream anchor lashed to sheet anchor
stream anchor
the cable is attached to the bower anchor and the cat block with tackle is hooked into the ring
starboard with sheet and bower anchors and the kedge anchor lashed to the sheet anchor
kedge anchor
anchor buoy stowed in the fore shrouds
the buoy rope lashed to the anchor
-
flyer got a reaction from Kingspoke in HMS Bellerophon by flyer - FINISHED - Amati/Victory Models - scale 1:72
conclusion
After more than 6 years, I'd say it was a rather longish journey but I really had a lot of fun along the way and it was definitely worth the effort. The outstanding quality of the kit and the possibility to build 3 different ships makes it easy to overlook a few shortcomings, such as questionable details in the rigging plan or the very questionable gun carriages. On the plus side are also things like the very detailed plans such as the sail plans, the boats or the many fine details to build bulkheads or stern and side galleries.
A perfect kit where you may build just out of the box without research or rounding out with additions might be just a bit dull - I will probably find out more about that with my next project.
In any case this kit enables you to build a wonderful model of a 74, the backbone of the wooden walls protecting Great Britain during the Napoleonic wars. Finding a good enough place to present the rather large end result is another story...
a few final pictures.
-
flyer got a reaction from egkb in HMS Bellerophon by flyer - FINISHED - Amati/Victory Models - scale 1:72
empty belaying pins and ringbolts, loose ends
Despite having to overcome a shortage of usable belaying points on the forecastle there were still a few unused pin positions on the poop deck.
Also unused ring or eye bolt positions around main and mizzen mast had to be filled. The kit instructions put eye bolts into those locations. However I think that ringbolts, allowed to lie flat when unused, would be more sensible when mounted on the deck. I didn't find much about that in the web but thought it would be easier to run about on deck if you wouldn't have to fear to catch your bare feet in a ring, take a tumble and break your ankle.
To imitate a ringbolt with a small fixed ring which encloses the movable one tightly, I bent an eye bolt 90° and put a drop of glue onto it to simulate the fixed ring.
After fixing all loose ends I could find, finally...finished!
the way I fabricated the imitated ringbolts
unused ringbolts around the mizzen mast foot
fore mast foot with eyebolt(with tackle) to the left and one of the empty ringbolts lying flat on the deck
moderately busy scene on the finished forecastle
the skipper seems quite fond of his ship - and so am I...
-
 flyer got a reaction from BenD in HMS Bellerophon by flyer - FINISHED - Amati/Victory Models - scale 1:72
spritsail yard and sail
A by 30% reduced and furled spritsail was bent onto its yard. Without the spritsail topsail yard the rigging could be a bit simplified. On the other hand I did add the guys according to Lees' description. The yard was triced up by about 20°, as on the painting above.
I rather like the dynamic impression Bellerophon gives with this arrangement.
-
flyer got a reaction from egkb in HMS Bellerophon by flyer - FINISHED - Amati/Victory Models - scale 1:72
conclusion
After more than 6 years, I'd say it was a rather longish journey but I really had a lot of fun along the way and it was definitely worth the effort. The outstanding quality of the kit and the possibility to build 3 different ships makes it easy to overlook a few shortcomings, such as questionable details in the rigging plan or the very questionable gun carriages. On the plus side are also things like the very detailed plans such as the sail plans, the boats or the many fine details to build bulkheads or stern and side galleries.
A perfect kit where you may build just out of the box without research or rounding out with additions might be just a bit dull - I will probably find out more about that with my next project.
In any case this kit enables you to build a wonderful model of a 74, the backbone of the wooden walls protecting Great Britain during the Napoleonic wars. Finding a good enough place to present the rather large end result is another story...
a few final pictures.
-
flyer got a reaction from Kingspoke in HMS Bellerophon by flyer - FINISHED - Amati/Victory Models - scale 1:72
changes, amendments and mistakes
The biggest changes were the dummy gun carriages on the gun deck and the cast gun carriages, the stern decoration as well as leaving of the spritsail topsail and its yard.
The most rewarding improvement, in my opinion, were the dummy carriages. Thank you, Michael (md1400cs). On any kit which includes such dummy guns, installation of a sort of dummy carriage should be tried.
Minor amendments were the changed curve of the stern, the scuppers, the sails fabricated my way, the flag, shot garlands, the captains skylight, the taffrail, the rudder chains, the anchor bolsters below the fore channels, the traveler on the bowsprit, anchor buoys and several minor changes.
The biggest, uncorrected mistake is probably that I did set up the preventer stays above the stays, thus having to hang the staysails onto the stays themselves.
slightly reworked gun carriage for the upper gun deck and dummy carriage for the lower
gun port with dummy-carriage and -gun / carriage and no gun / gun and no carriage
the elephant was scratched away and replaced by a epoxy-cast of Bellerophon
finished transom with new rail on top
spritsail without topsail and traveller on the bowsprit, holding the jib stay
-
flyer got a reaction from BenD in HMS Bellerophon by flyer - FINISHED - Amati/Victory Models - scale 1:72
empty belaying pins and ringbolts, loose ends
Despite having to overcome a shortage of usable belaying points on the forecastle there were still a few unused pin positions on the poop deck.
Also unused ring or eye bolt positions around main and mizzen mast had to be filled. The kit instructions put eye bolts into those locations. However I think that ringbolts, allowed to lie flat when unused, would be more sensible when mounted on the deck. I didn't find much about that in the web but thought it would be easier to run about on deck if you wouldn't have to fear to catch your bare feet in a ring, take a tumble and break your ankle.
To imitate a ringbolt with a small fixed ring which encloses the movable one tightly, I bent an eye bolt 90° and put a drop of glue onto it to simulate the fixed ring.
After fixing all loose ends I could find, finally...finished!
the way I fabricated the imitated ringbolts
unused ringbolts around the mizzen mast foot
fore mast foot with eyebolt(with tackle) to the left and one of the empty ringbolts lying flat on the deck
moderately busy scene on the finished forecastle
the skipper seems quite fond of his ship - and so am I...
-
flyer got a reaction from KARAVOKIRIS in HMS Bellerophon by flyer - FINISHED - Amati/Victory Models - scale 1:72
changes, amendments and mistakes
The biggest changes were the dummy gun carriages on the gun deck and the cast gun carriages, the stern decoration as well as leaving of the spritsail topsail and its yard.
The most rewarding improvement, in my opinion, were the dummy carriages. Thank you, Michael (md1400cs). On any kit which includes such dummy guns, installation of a sort of dummy carriage should be tried.
Minor amendments were the changed curve of the stern, the scuppers, the sails fabricated my way, the flag, shot garlands, the captains skylight, the taffrail, the rudder chains, the anchor bolsters below the fore channels, the traveler on the bowsprit, anchor buoys and several minor changes.
The biggest, uncorrected mistake is probably that I did set up the preventer stays above the stays, thus having to hang the staysails onto the stays themselves.
slightly reworked gun carriage for the upper gun deck and dummy carriage for the lower
gun port with dummy-carriage and -gun / carriage and no gun / gun and no carriage
the elephant was scratched away and replaced by a epoxy-cast of Bellerophon
finished transom with new rail on top
spritsail without topsail and traveller on the bowsprit, holding the jib stay
-
flyer got a reaction from BenD in HMS Bellerophon by flyer - FINISHED - Amati/Victory Models - scale 1:72
conclusion
After more than 6 years, I'd say it was a rather longish journey but I really had a lot of fun along the way and it was definitely worth the effort. The outstanding quality of the kit and the possibility to build 3 different ships makes it easy to overlook a few shortcomings, such as questionable details in the rigging plan or the very questionable gun carriages. On the plus side are also things like the very detailed plans such as the sail plans, the boats or the many fine details to build bulkheads or stern and side galleries.
A perfect kit where you may build just out of the box without research or rounding out with additions might be just a bit dull - I will probably find out more about that with my next project.
In any case this kit enables you to build a wonderful model of a 74, the backbone of the wooden walls protecting Great Britain during the Napoleonic wars. Finding a good enough place to present the rather large end result is another story...
a few final pictures.
-
 flyer got a reaction from Techtonic in HMS Bellerophon by flyer - FINISHED - Amati/Victory Models - scale 1:72
changes, amendments and mistakes
The biggest changes were the dummy gun carriages on the gun deck and the cast gun carriages, the stern decoration as well as leaving of the spritsail topsail and its yard.
The most rewarding improvement, in my opinion, were the dummy carriages. Thank you, Michael (md1400cs). On any kit which includes such dummy guns, installation of a sort of dummy carriage should be tried.
Minor amendments were the changed curve of the stern, the scuppers, the sails fabricated my way, the flag, shot garlands, the captains skylight, the taffrail, the rudder chains, the anchor bolsters below the fore channels, the traveler on the bowsprit, anchor buoys and several minor changes.
The biggest, uncorrected mistake is probably that I did set up the preventer stays above the stays, thus having to hang the staysails onto the stays themselves.
slightly reworked gun carriage for the upper gun deck and dummy carriage for the lower
gun port with dummy-carriage and -gun / carriage and no gun / gun and no carriage
the elephant was scratched away and replaced by a epoxy-cast of Bellerophon
finished transom with new rail on top
spritsail without topsail and traveller on the bowsprit, holding the jib stay
-
flyer got a reaction from KARAVOKIRIS in HMS Bellerophon by flyer - FINISHED - Amati/Victory Models - scale 1:72
conclusion
After more than 6 years, I'd say it was a rather longish journey but I really had a lot of fun along the way and it was definitely worth the effort. The outstanding quality of the kit and the possibility to build 3 different ships makes it easy to overlook a few shortcomings, such as questionable details in the rigging plan or the very questionable gun carriages. On the plus side are also things like the very detailed plans such as the sail plans, the boats or the many fine details to build bulkheads or stern and side galleries.
A perfect kit where you may build just out of the box without research or rounding out with additions might be just a bit dull - I will probably find out more about that with my next project.
In any case this kit enables you to build a wonderful model of a 74, the backbone of the wooden walls protecting Great Britain during the Napoleonic wars. Finding a good enough place to present the rather large end result is another story...
a few final pictures.
-
 flyer got a reaction from Meriadoc Brandybuck in HMS Bellerophon by flyer - FINISHED - Amati/Victory Models - scale 1:72
Thank you all for the compliments as well as for all the support carrying me through this build.
And a very happy New Year to all of you!
Peter
-
 flyer got a reaction from mort stoll in HMS Bellerophon by flyer - FINISHED - Amati/Victory Models - scale 1:72
changes, amendments and mistakes
The biggest changes were the dummy gun carriages on the gun deck and the cast gun carriages, the stern decoration as well as leaving of the spritsail topsail and its yard.
The most rewarding improvement, in my opinion, were the dummy carriages. Thank you, Michael (md1400cs). On any kit which includes such dummy guns, installation of a sort of dummy carriage should be tried.
Minor amendments were the changed curve of the stern, the scuppers, the sails fabricated my way, the flag, shot garlands, the captains skylight, the taffrail, the rudder chains, the anchor bolsters below the fore channels, the traveler on the bowsprit, anchor buoys and several minor changes.
The biggest, uncorrected mistake is probably that I did set up the preventer stays above the stays, thus having to hang the staysails onto the stays themselves.
slightly reworked gun carriage for the upper gun deck and dummy carriage for the lower
gun port with dummy-carriage and -gun / carriage and no gun / gun and no carriage
the elephant was scratched away and replaced by a epoxy-cast of Bellerophon
finished transom with new rail on top
spritsail without topsail and traveller on the bowsprit, holding the jib stay