


wefalck
-
Posts
6,456 -
Joined
-
Last visited
Content Type
Profiles
Forums
Gallery
Events
Posts posted by wefalck
-
-
The white in these anti-fouling and anti-teredo concoctions was lime. Other ingredients included various oils, tallow, ground glass, and sulfur (as noted above). I don't think pitch was used here. Lars Brucelius also has some recipies, I believe, on his Web-site: http://www.bruzelius.info/Nautica/Nautica.html
I wouldn't use modern replikas as an example, as they almost certainly use some modern paint for the purpose.
Around the Arab peninsula they still smear such stuff onto the bottoms of the various dhows. Have a look here for instance: http://www.omanet.om/english/culture/boats.asp (but note that some of the pictures where taken at low sun, so may look rather yellowish).
wefalck
-
Yes, sewing seems to be a fairly common practices among modellers. But it is not anywhere to scale. I prefer glueing as well.
I gather there are historical examples for both, painting as well as applications to create devices on sails. The same as for flags. Both techniques were used together also.
wefalck
-
-
I didn't know that he died, but had this suspicion. I gather this book is an excerpt of the 'building log' (minus the historical part) of
BEYLEN, J. VAN (1985): De botter - Geschiedenis en bouwbeschrijving van een Nederlands visserschip.- 223 p., Weesp (De Boer Maritiem).
wefalck
-
Just published (but not by me):
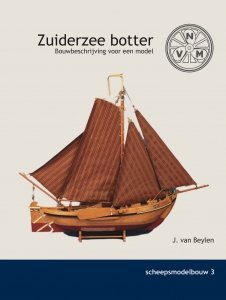 BEYLEN, J. VAN (2013): Zuiderzee botter - Bouwbeschrijving van een model.- Scheepsmodelbouw 3: 64 p., Emmen (Lanasta).
I haven't seen it (yet) and, therefore, cannot say, whether it may be just and excerpt from his (excellent) 1985 book. Van Beylen must be an older gentleman by now, since he started publishing in the late 1950s ...wefalck -
Andy,
That's a good link. These guys make an interesting array of fake fastenings. Bookmarked.
Well, I like to make as many things myself as possible. When I see a commercial product, I always think: if they were able to do, I can do it as well. I also find the delays, particularly when ordering from overseas, a bit frustrating. As I needed only about 40 fake bolts/nuts, it was not such a big deal to make them. And it costed me only my time, no extra cash outlay, as the brass nails have been knocking about for years in my drawer. If, I was to do a large wharf, yes, I probably would have looked for a commercial source.
wefalck
-
The round holes in the ice do give it away, ...
.... patience, I am still many steps away from the finished product. One of the next steps will be the creation of the ice-surface and, thus, blending in everything. Actually, the gaps between the piles and the Plexiglas sheet will be filled-in with acrylic gel, which has a similar refractive index as Plexiglas, so that the gap will disappear.
I had been debating with myself, whether I should give the piles an iron capping or not. I think I have seen both versions on old photographs. Modern piles do have a cap. In the end I decided on the more picturesque version without caps.
wefalck
-
Well, before disappearing on a ten-day scientific mission to the moutains of Kyrgyzstan, here a small update on the work on the scenic display.
In real life the various members of the jetty would have been fastened together with iron bolts. Square washers prevented the bolt heads and nuts from being pulled into the wood and splitting it. The bolts and washers were imitated by taking simple brass nails and milling a hexagonal head and a square on to them with a set-up of an indexer on the mill. The shaft was thinned down and parted off on the lathe.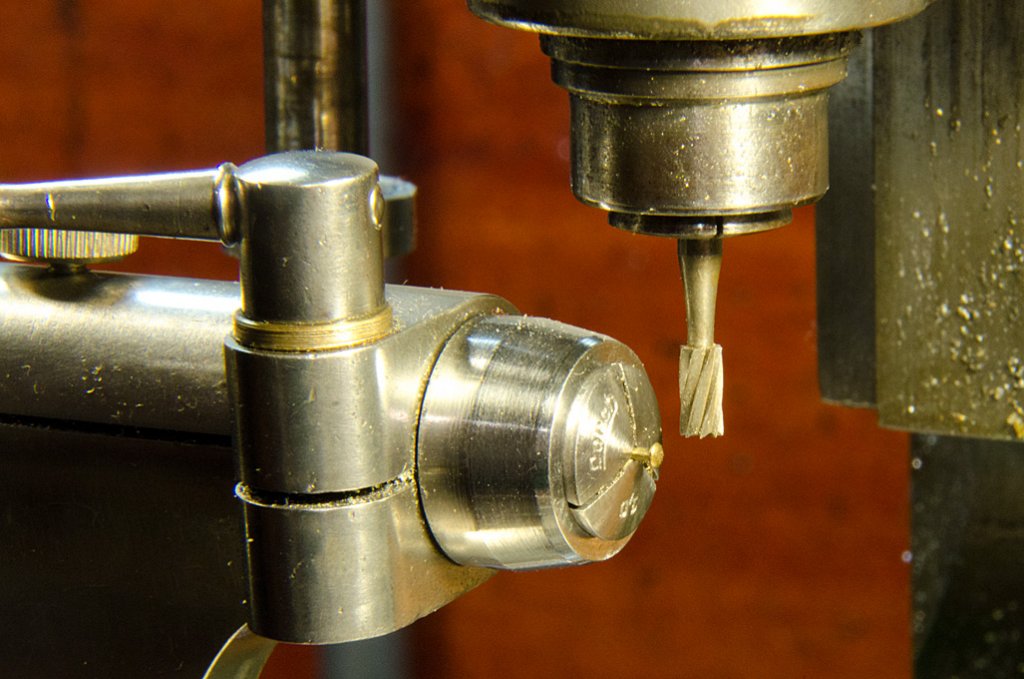 Brass nail ready to be milled into a bolt
 Milled bolt head
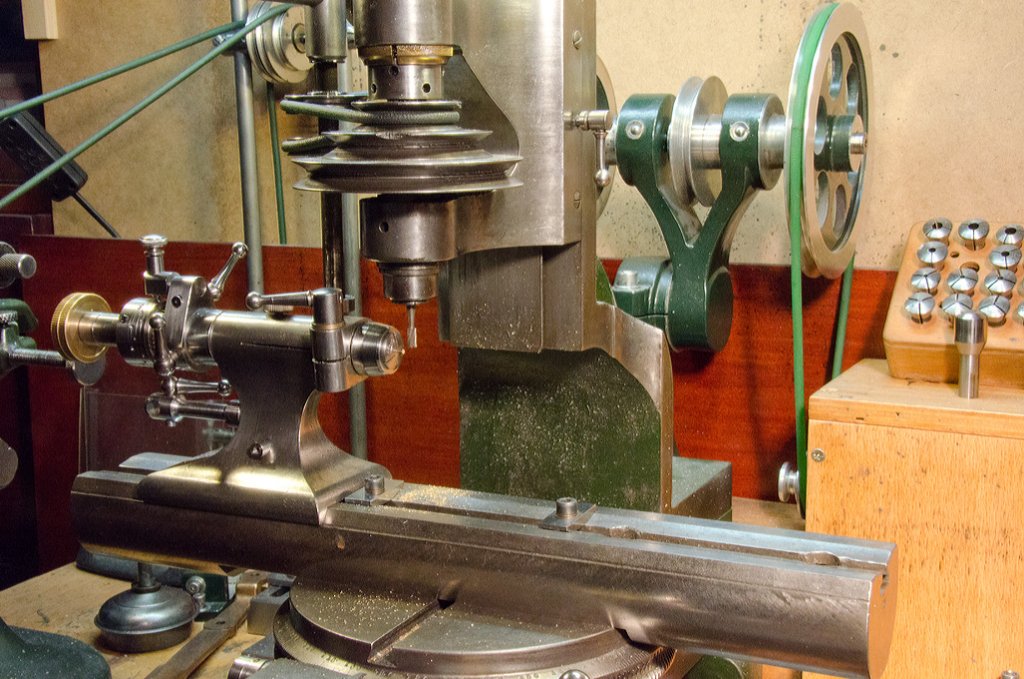 Milling machine set-up with indexerThe wood was stained in 'medium walnut', which gives it a greenish-grayish weathered appearance. The pile-heads were painted white (which gave them a better visibility in bad weather). The effect of the seawater was reproduced by letting the wood soak up some black stain from below.
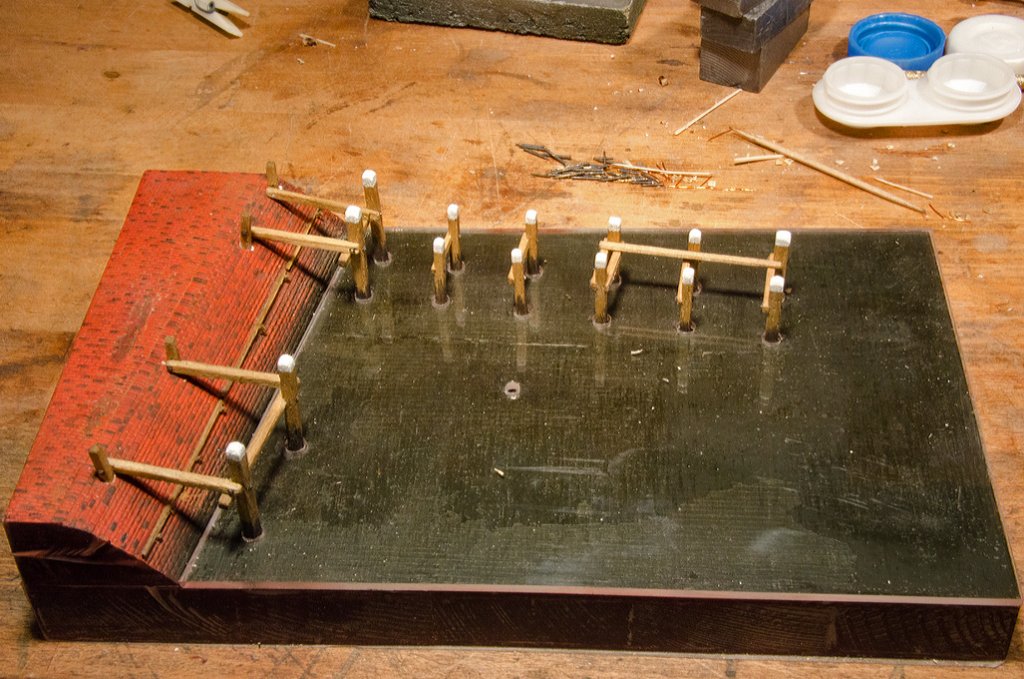 The jetty etc. under construction
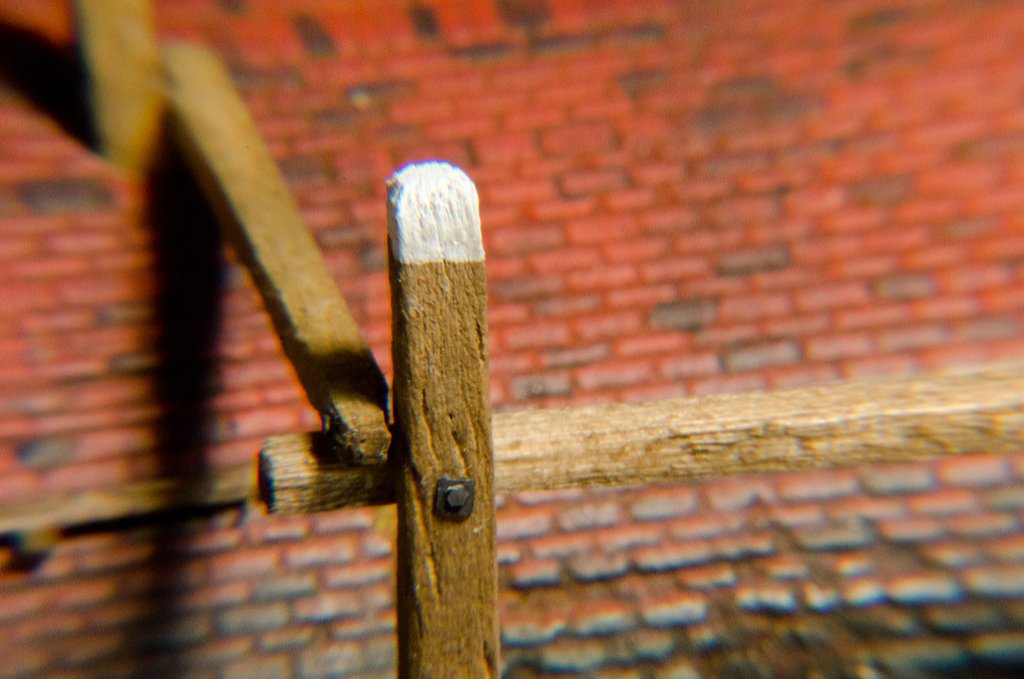 Details of the construction
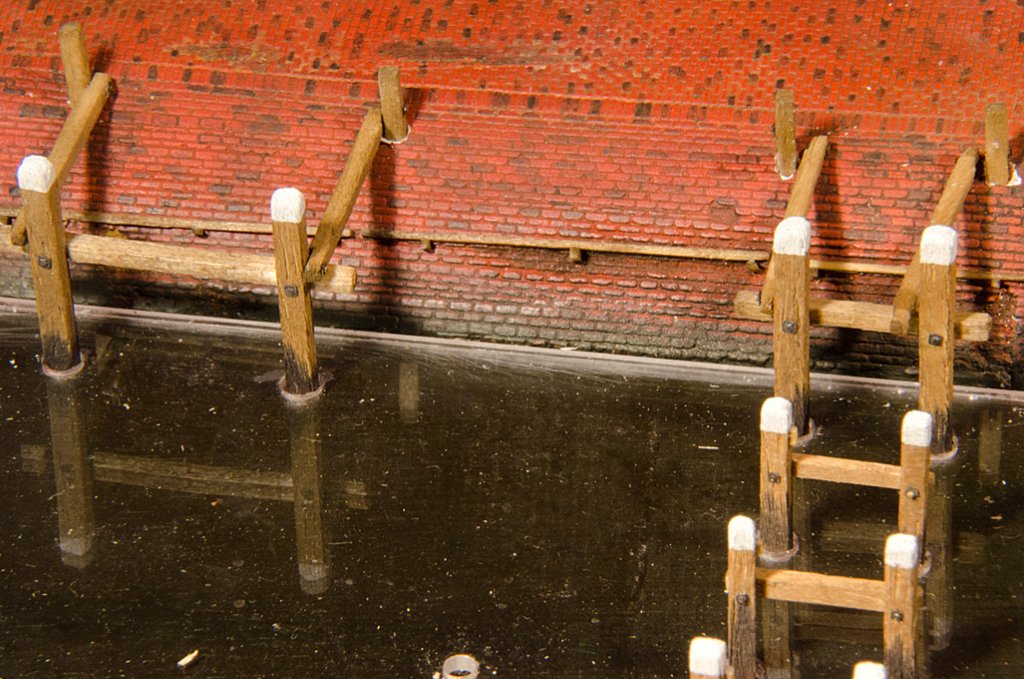 The jetty etc. under constructionTo be continued ...wefalck
 -
As the material used for sails on models usually is way over-scale, perhaps by one order of magnitude, furled sails inevitably look to bulky. Some people, therefore, make the sails smaller than they should be, resulting in less volume, when stowed. Other people use paper for the sails. And again, other people use papier-maché for furled sails. This depends on the style of the model.
wefalck
-
There seem to be several ways of doing this: stowing it on top the bowsprit etc., much like square sails are stowed on top of a yard, with or without gaskets; or sort of turning it around itself after unhitching the sheets, then hooking the halliard into the clew and hitching the sheets back on - so that it is suspended like a sausage in the air:

wefalck
-
Thanks, Tom. Do the Monotones still exist ?
wefalck
-
Yep, started on it, but have to produce the ironwork for it first. Pictures will follow.
Haven't had much time, being out of the country a lot, to catch up with all the building logs since MSW 1.0 went down the drain. Just looked at it, you cutter has been growing very nicely, John

wefalck
-
Saw undersize and then sand/file to the correct dimensions.
wefalck
-
Neutral grey would have the effect of toning down the 'brilliance' of a colour, without changing its spectral properties. I guess, when painting a wall etc. in red on a white basecoat, the effect could be just too stark. A grey basecoat would reduce the 'brilliance' of the red without changing its tone. For small parts on a small modell, however, you may want a brillian colour, but it depends on the circumstances.
A too brilliant red may make a part jump too much out from the rest of the paintwork. It also depends on what other colours are nearby: a brilliant red spot on a green background, for instance, would appear to be floating on it, which is not what you may want. So toning it down with neutral grey would bring it visually down into the same surface.
wefalck
-
Just a small update on the scenic setting today, too much travelling and other activities recently.
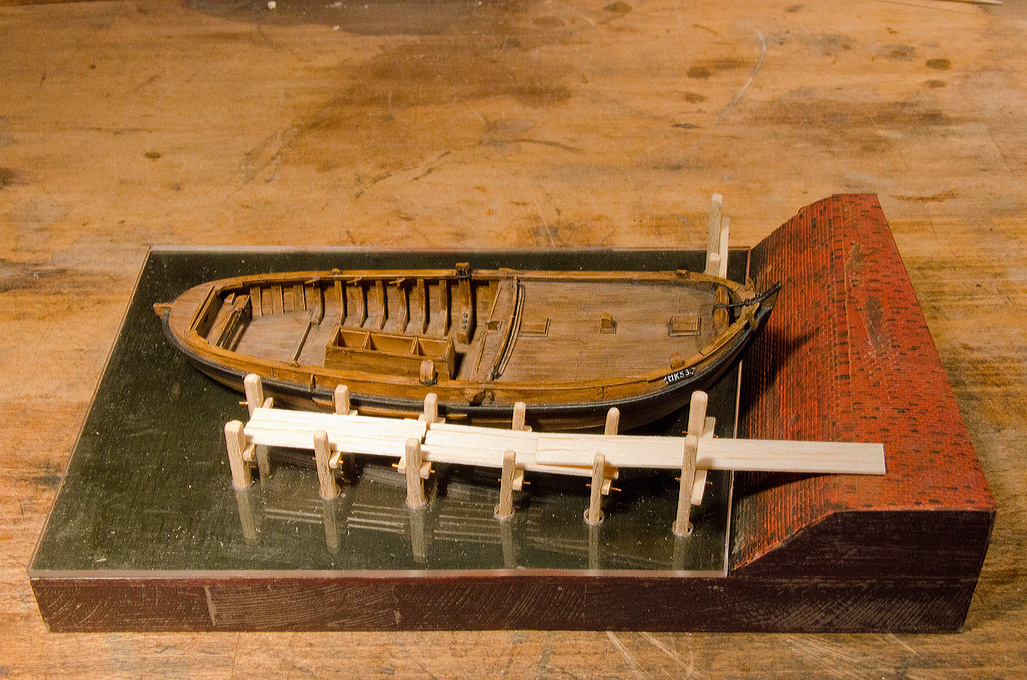
With the Plexiglas sheet to simulate the ice in place, the positions for various piles that carry the planned jetty were marked out. The design of the jetty followed that seen on various historical pictures (see my Web-site). Holes for inserting the piles were drilled throught the Plexiglas into the wood. I cut some square strips of soft wood on the table saw and from these 'piles' of the appropriate length were chopped. The wood was roughend and shaped using a rotary steel-wire brush in the hand-held drill. Cross-pieces etc. were shaped from the same wood.

wefalck
- NAZGÛL, Foremast and Salty Sea Dog
-
 3
3
-
I'm on the third coat now and the blue molded plastic is still showing through.
To get a good coat of red you will need to prime it in white, ...
The cause and the cure: many red pigments do not have enough 'body' to provide full coverage. By definition red pigmentes/dyes reflect/permit only red light. The blue plastic only reflects blue light. So, after going through the red paint almost no light arrives that can be reflected by the blue plastic and it appears sort of black. Providing a white or (neutral) grey underpaint means that all the light travelling through the red paint can be reflected.
wefalck
-
I just noticed that when re-creating the building log from MSW 1.0 I missed out part of the work. Perhaps because it concerns some small and delicate parts that look simple, but are not so easy to manufacture at this scale.
Well, the smithy of the boatyard has been busy and turned out various pieces of ironwork for rigging and other purposes:The mast is held in its tabernacle by a latch hinging on eyebolts.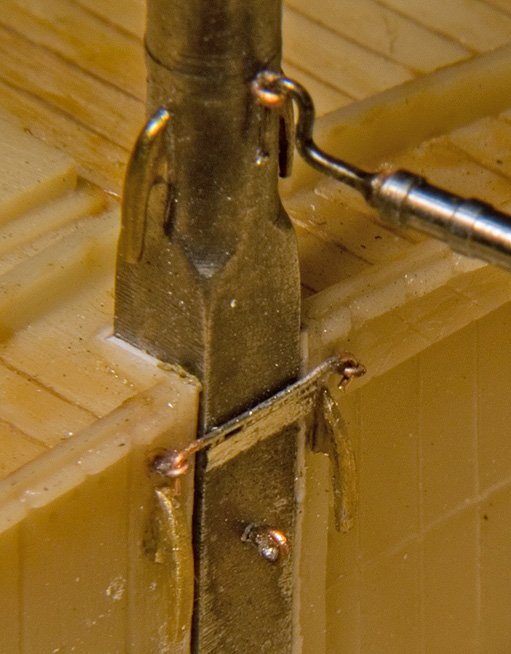 Mast tabernacleThere is a complex piece of ironwork that guides and holds down the running bowsprit (which will not be shown on the model, as it was normally left home during the winter season, when a reduced rig was used). The ring was turned from a piece of brass rod, while stay was fashioned from a piece of steel rod on both the lathe and the mill, as it has partially a square section. In fact, various parts of the ironwork do have square sections, inter alia to prevent them from turning, or because they have made from square bar, hammered to a round cross-section where needed.
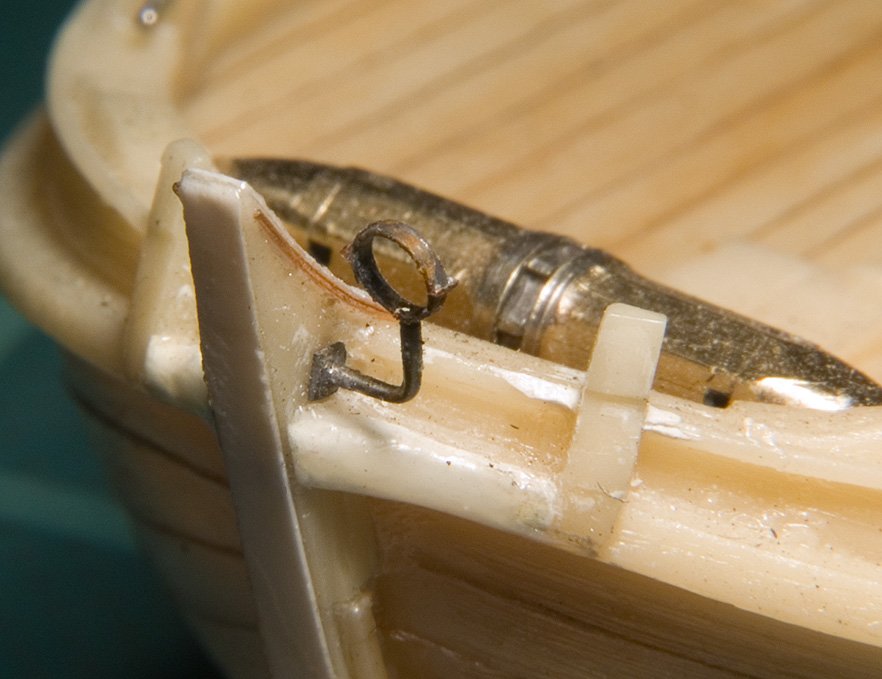 Bowsprit guideThe leeboards are held by sort of square rings that slip over the leeboard-bollards. These rings were made from brass strips soldered together and filed to shape. The leeboard pivots on a bolt that is held by these rings.
 Various ironworkA major challenge were the various belaying and thole pins. On the prototype their maximum diameter is just under 40 mm, the cylindrical sections generally being around 20 mm. So, in the 1/90 scale this means they are 0.2 to 0.4 mm in diameter, with a length of 3 to 4 mm. There are five different types and the literature (VAN BEYLEN, 1995; DORLEIJN, 2001) gives the typical dimensions and shapes for each them. Turning them from the available brass was impossibe, so that 1 mm steel wire was used as starting material. Even then turning them flying, i.e. supported only in a collet in the headstock proved impossible. This lead to the design and manufacturing of a tailstock-held micro-steady. The spherical parts on the pins where shaped free-hand using files and strips of abrasive paper.
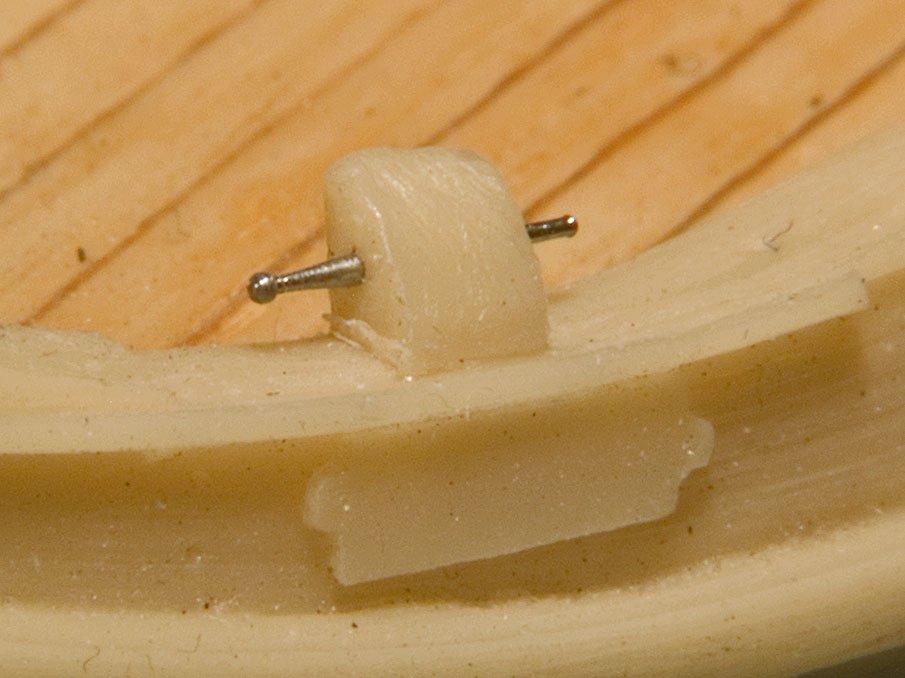 Belaying pin
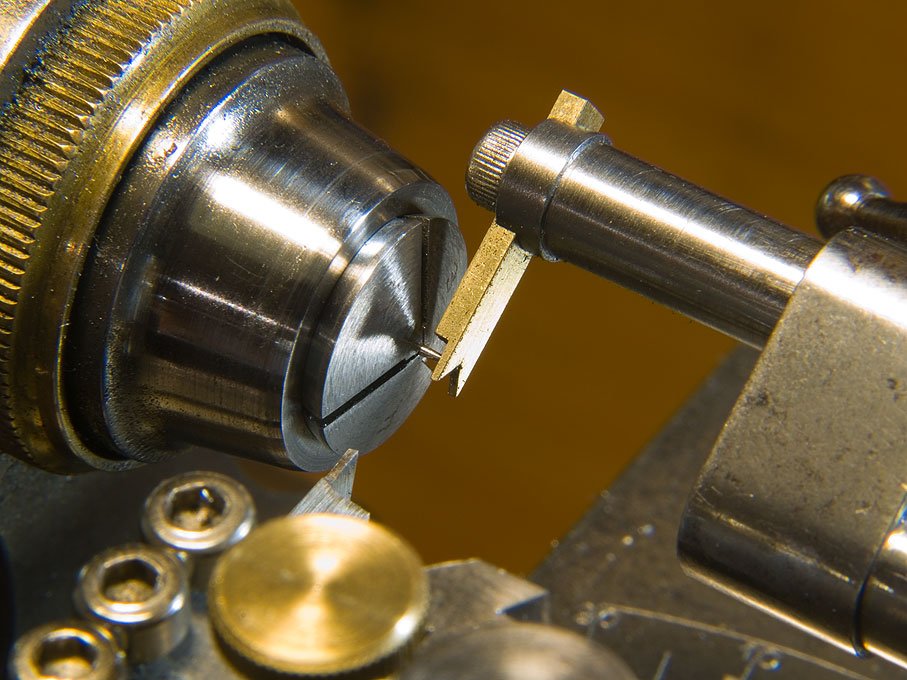 Specially made micro fixed-steady for turning small slender items on the watchmakers lathe.wefalck
- janos, Salty Sea Dog, Archi and 1 other
-
4
-
-
I have used the same technique for larger scale sails (1:60), but used very fine silk cloth that is commonly used for model airplanes. I first prepared a sheet of impregnated silk and then cut the individual sail cloth from it. These then were again stuck together with the sanding sealer. The cellulose-based sealer has two effects, one is that it fills up the structure of the material, making it less coarse looking, and second, you can correct the positioning by applying thinner. Otherwise, diluted white glue would do a similar job.
wefalck
-
I was actually wondering about this, but it seems that the Volendam dyke hasn't changed much in profile. The buildings on the dyke front (e.g. the auction? house) are still there, the slope neither and on the back there wouldn't have been any space to make the slope less steep because of the house immediately behind it.
wefalck
-
druxey - yes it is a cellulose-based sanding sealer
For those wanting to know why the mooring posts are that high: before the closure of the Zuiderzee (now IJsselmeer), even a far-in land harbour Volendam had a tidal range of half a meter, with the level of the tide differing aroudn the year (depending on the tidal waters and wind derection in the North Sea.Thanks, amateur, for this bit of information. I have been trawling the Web, but couldn't find any data on the height of the (astronomical) tide in the Zuiderzee, but guessed that it would be probably in that range.With the scenic setting I am taking a few artistic licences, mainly so as not to overwhelm the real subject, the botter, and to keep the size of the display reasonably small. So the jetties and related infrastructure are not as high as they probably should be, the slope of the dyke is too steep and the dyke is too low (if I remember right from a couple of visits, the crown is about 5 m above the present-day Ijsselmeer level), plus, as amateur noted, it should not be covered in brick. In spite of this, I think in the end the overall impression will be reasonably authentic, giving context to the model.wefalck -
You put me into a dilemma now ... yes, it seems to be hardrock on the slope and bricks only on the dyke's 'crown'. I am also aware that the slope in the model is far too steep (dykes' slopes have become shallower and shallower over the years). Considering the amount of time I spent on it, I am not going to break it up again.
wefalck
-
Amateur, you are right (after all I am sort of also working/teaching in coastal protection). However, I couldn't find any photographs from Volendam that showed the face of dyke in front of the town. I was also wondering, whether in the last quarter of the 19th century hardrock was imported in sufficient quantity into Holland. I guess the basalt from the volcanic mountains near Bonn at the river Rhine would be the closest source. I know that e.g. Scandinavian ships brought granites as ballast.
wefalck
-
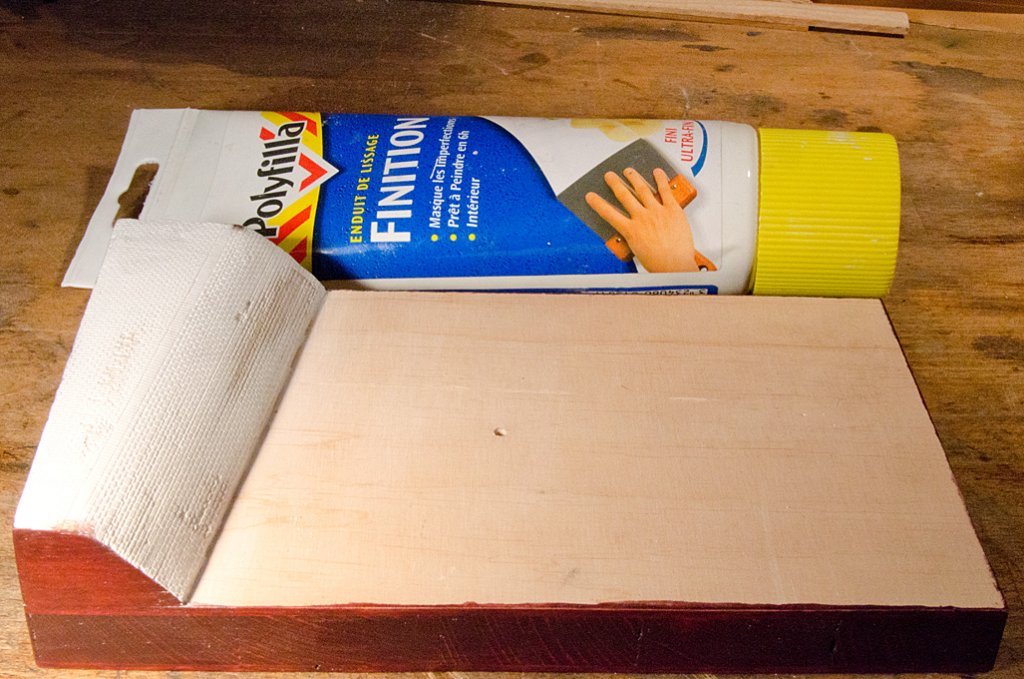
The dyke section was covered in a thin layer of wall-repair putty from a tube that I had around by chance. Otherwise, I would have used plaster of Paris mixed with some wallpaper glue, which improves its sculpting behaviour. Once the putty was dry, it was sanded down smoothly and then single bricks engraved by rows with a needle held in a pinvise. The fact that corners broke out of the bricks was approvingly tolerated, as it will enhance the weathered appearance.
 Baseboard with sculpted dyke
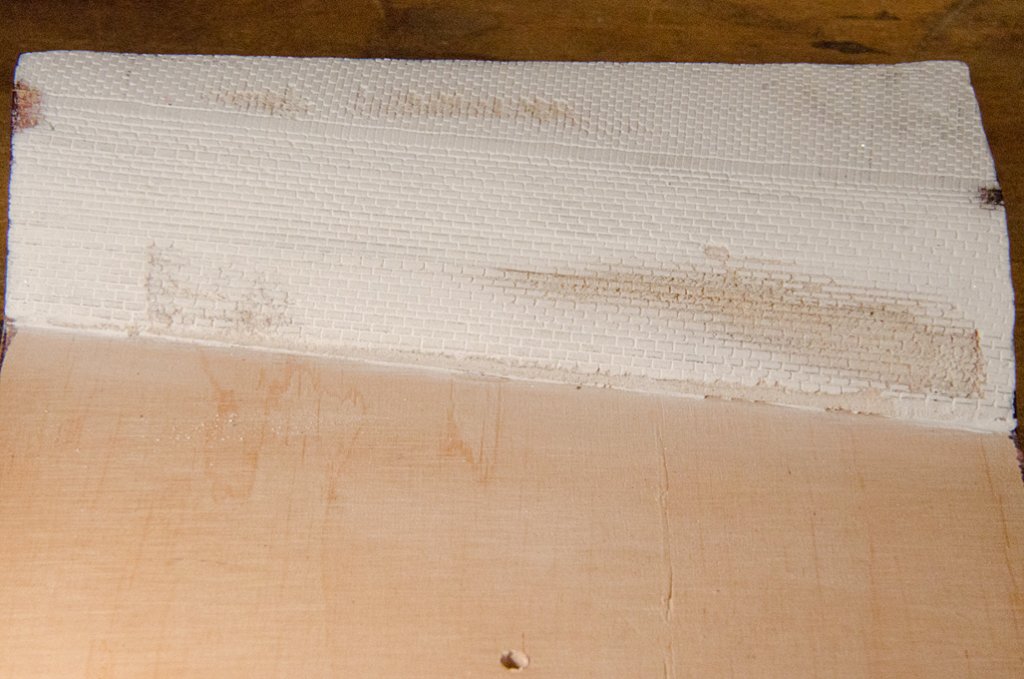 Close-up of the engraved bricksIn order to reduce the porosity of the putty and the wood the whole surface was treated with cellulose-based woodfiller, before the dyke was airbrushed in English Red (Schmincke AeroColor), while the water area received a basecoat of burnt umber, partly mottled with black. In a next step individual bricks were picked out with blue and brown washes to enliven the dyke surface. Since the acrylic paints dry satin, the whole was lightly sprayed with Winsor & Newton acrylic matte varnish. A restrained weathering using artist’s pastels followed.
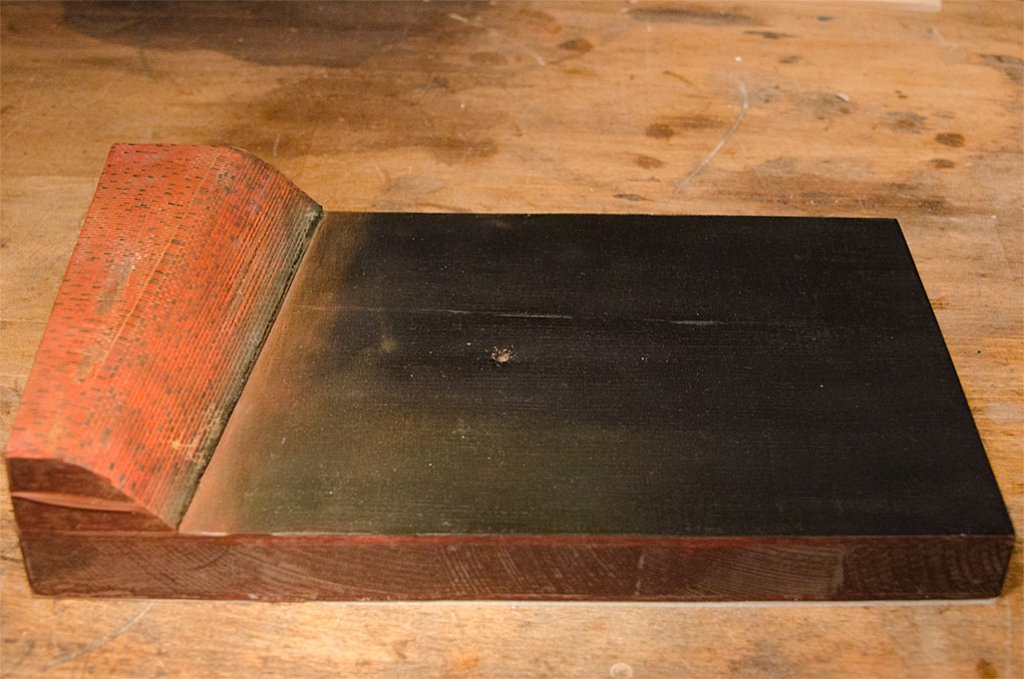 Painted baseboard
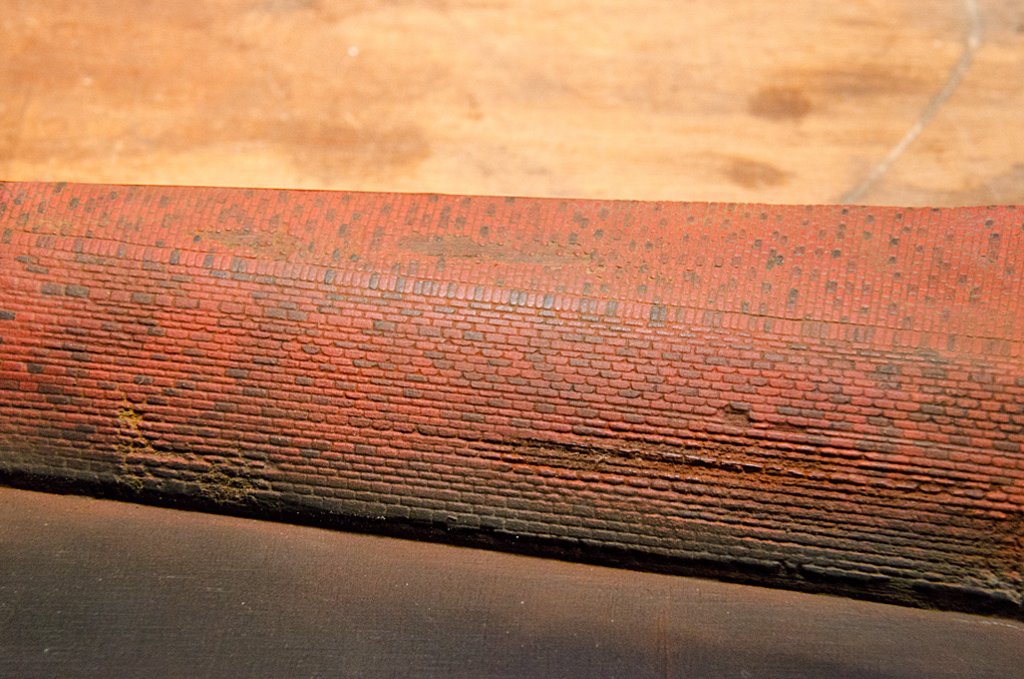 The brick surface of the dyke
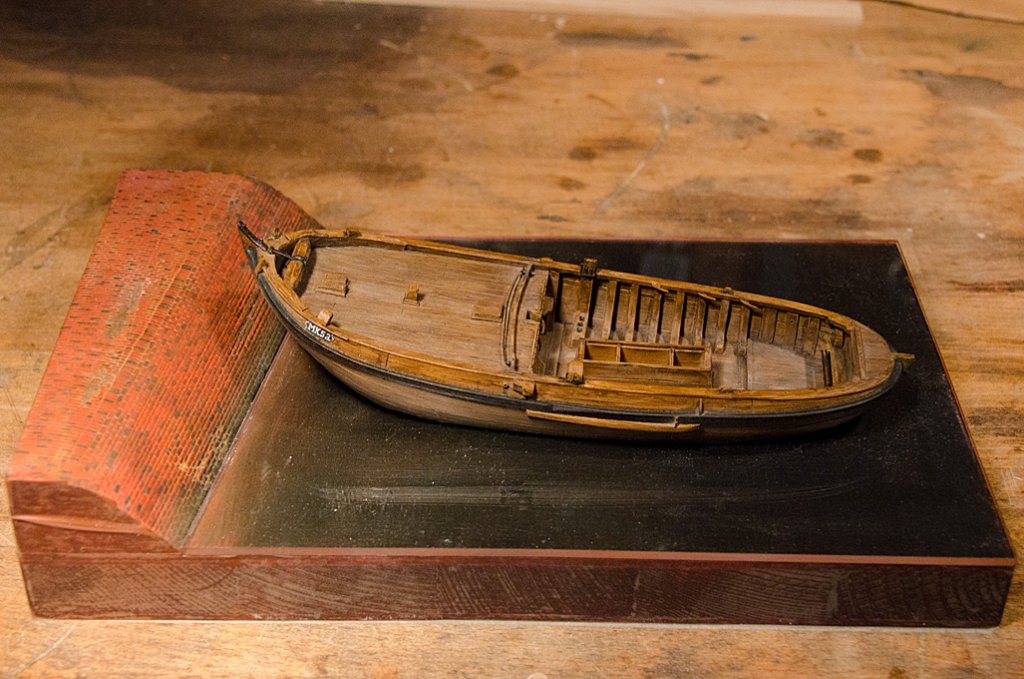 The model of the botter in placewefalck
Squaring Mini Drillpress to Work?
in Modeling tools and Workshop Equipment
Posted
The idea of using a bent wire for tramming is a good one, have to remember it !
I normally use a piece of round carbide held in a chuck (or better: collet), which is pushed against a try-square or a block of which I am sure that the side is at a right angle with the surface that sits on the cross-slide.
wefalck