HOLIDAY DONATION DRIVE - SUPPORT MSW - DO YOUR PART TO KEEP THIS GREAT FORUM GOING! (Only 13 donations so far - C'mon guys!)
×


Jerry
-
Posts
1,753 -
Joined
-
Last visited
Content Type
Profiles
Forums
Gallery
Events
Everything posted by Jerry
-
Good evening, Popeye and many thanks for your nice and encouraging words. It's been fun so far but it looks like things are going to toughen up when I try and attach the little 3mm deadeyes to the upper shrouds. I'll have to use a very thin thread for these lanyards as the .25mm thread won't pass through the holes. But i do have some 0.1mm tan thread which should do the trick. Please visit again.. Best, Jerry
-
Thanks for the explanation, Glenn; I get it. Sounds like a reasonable method to me even if David invented it. It's just a different method then I used. I followed somone else's way which was also posted on MSW, I forgot who it was but I'll bet david will remember. Keep up the great work, Jerry
-
Hello Glenn. I'm having a hard time trying to figure out your method of rigging the gunport lids. I assume that the threads sitting on top of the lids are the lid lines that go into the hull. Am I right? If so, you certainly are doing this stage very differently from the way I did. I had the gunport lid threads enter the holes in the hull as I glued the lids in place. Please help me out if you have a method that may be a better way. Hope you are well. Jerry
-
Good morning, J. In answer to your question, so far I have been using both. The kit did not supply any black line so I am using black thread left over from the Victory kit for the shrouds. The lanyards are strung with kit supplied 0.25mm tan line. I plan to use black line for some of the additional stays and the kit supplied tan line for the running rigging. in some cases I may use black for the stay but tan for the lanyard part of the stay. This is similar to the rigging of the victory. Best, Jerry
-
Hi J, Yes you did tell me about the lack of room at the bottom of the nests and if you check my log above you'll see that I mentioned that you did. Thanks for the nice words by the way. Please come this way again. Best, Jerry
-
Hello Glenn...... I think you are absolutely correct. At least, I HOPE you're correct. So far it seems very familiar and I imagine this model will be completed in a couple of months at the most. Then what???? Hope you're having a good evening.. Best, Jerry
-
Hello David, Good to hear from you. It's been some time, and I was thinking about you yesterday and hoping that you are well. Many thanks for the good advice; your reminder is well taken. I haven't seen too many posts from you on the Carolinr site or am I missing something? This build is fun but I agree with you, I don't think there is another model with the challange that the Victory gives one especially the rigging. What I'm doing now is very rouitine except for the scratch building of the parts that were not included inthe kit. It apprears that this model will be finished in a couple of months.......and then what????? Keep in touch, please, Best, jerry
-
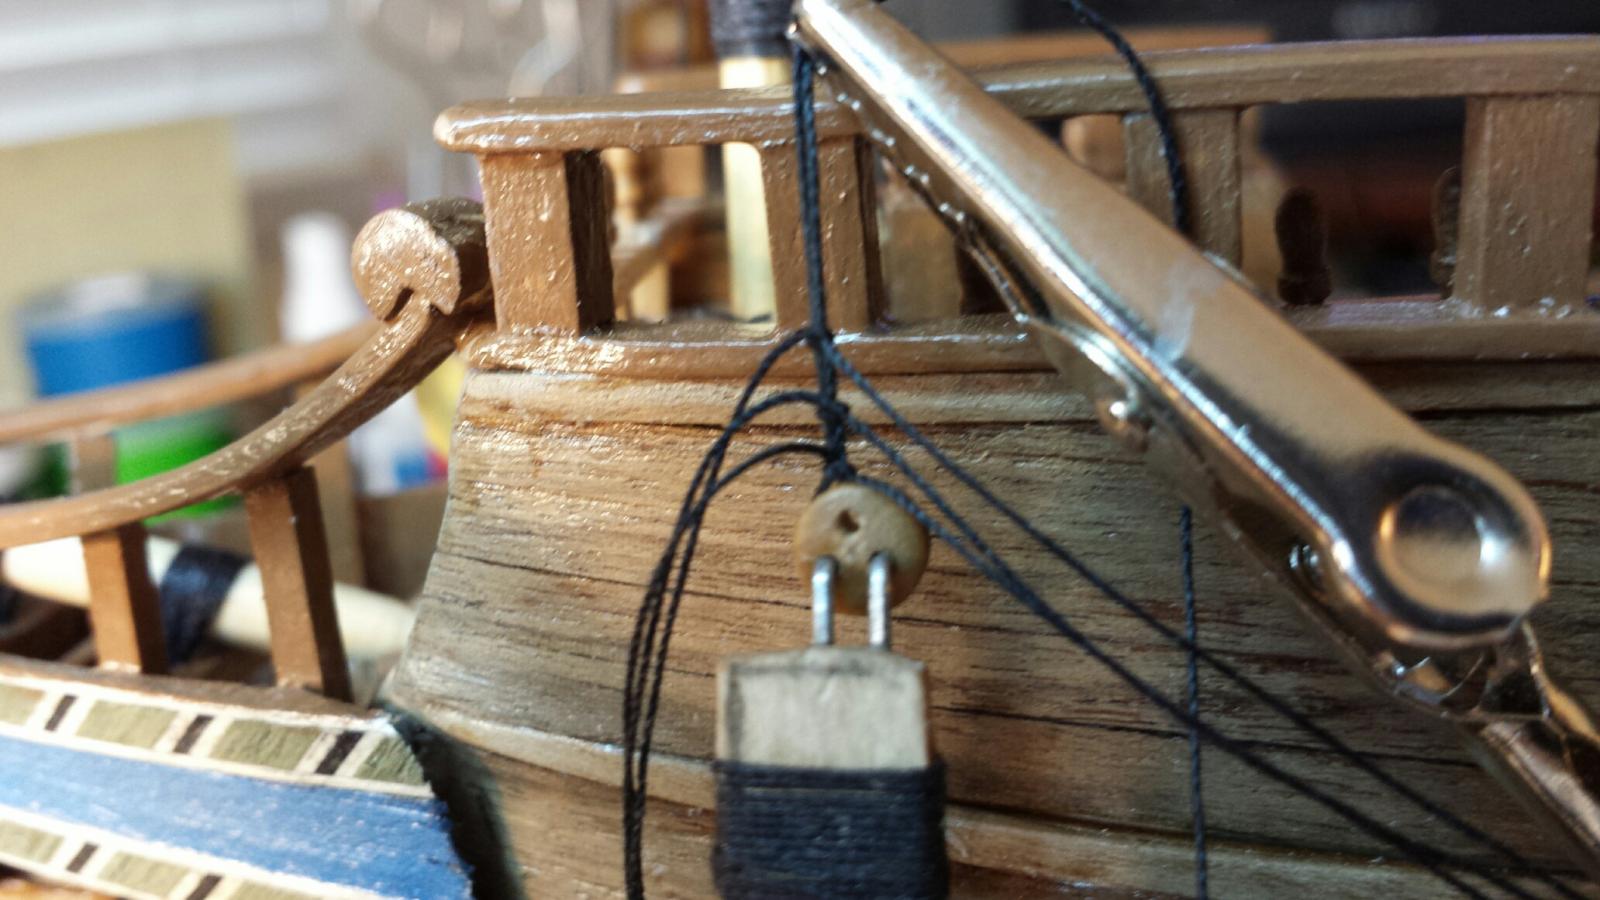
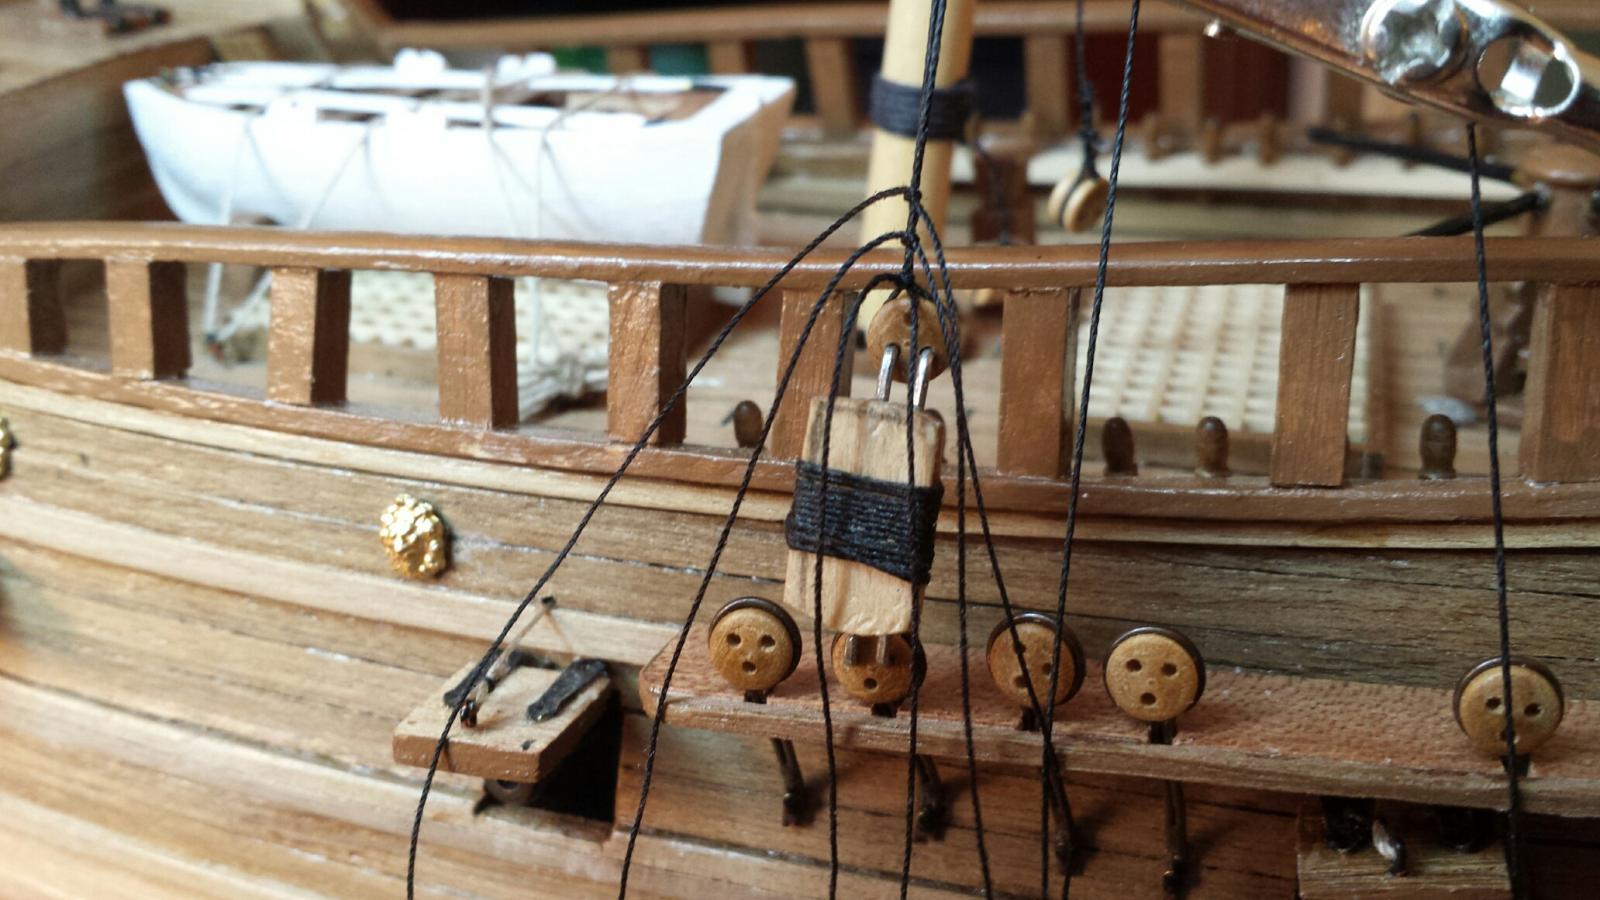
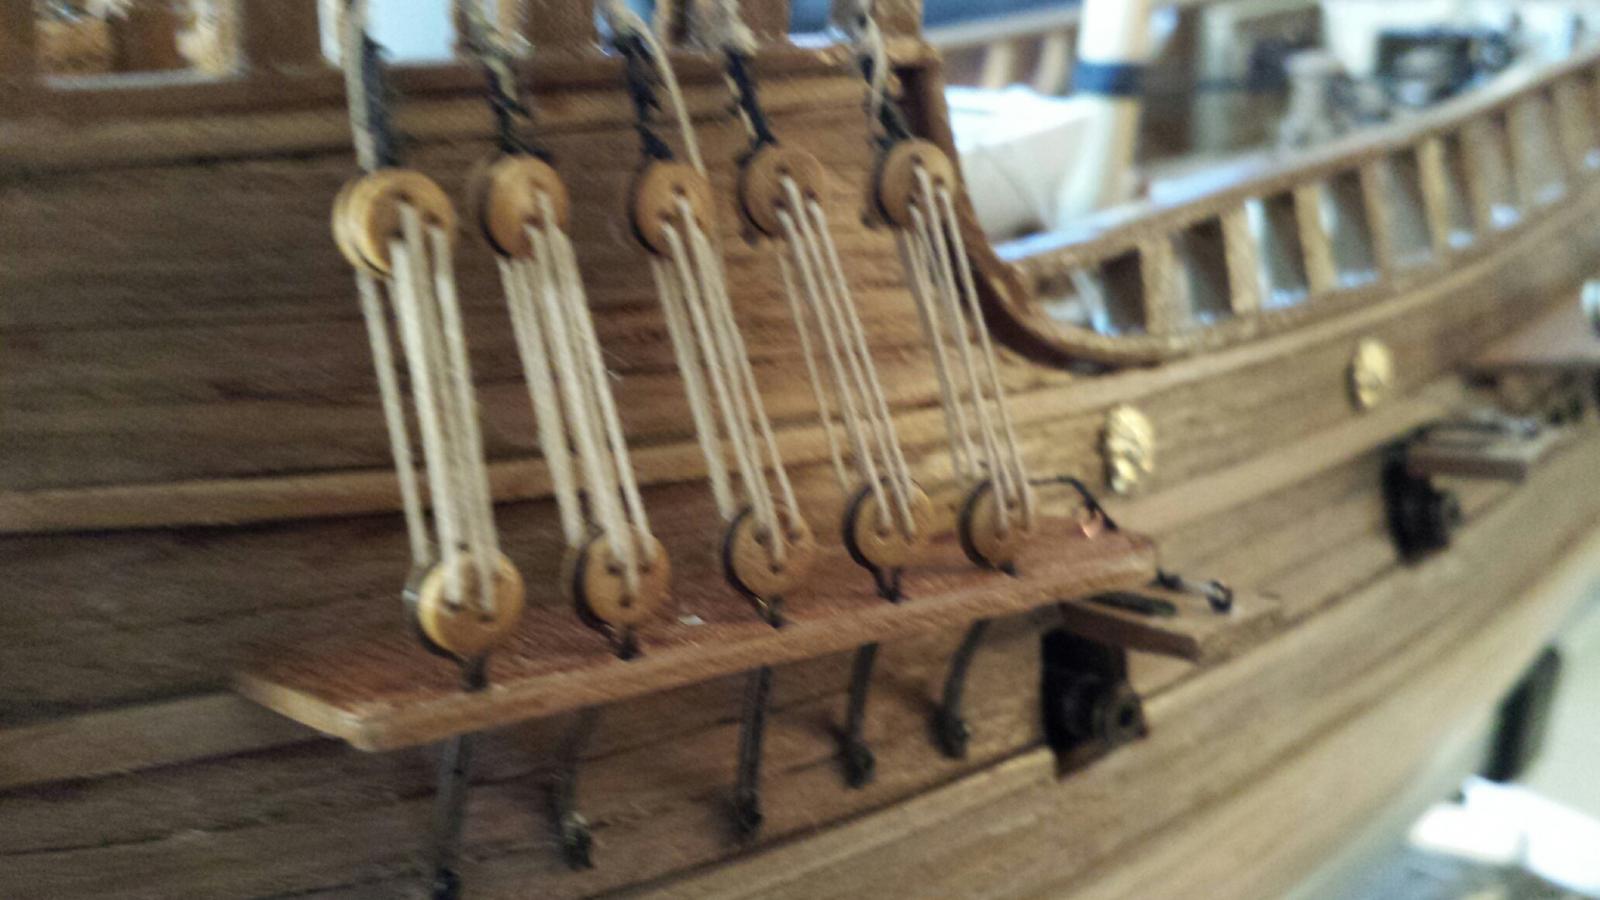
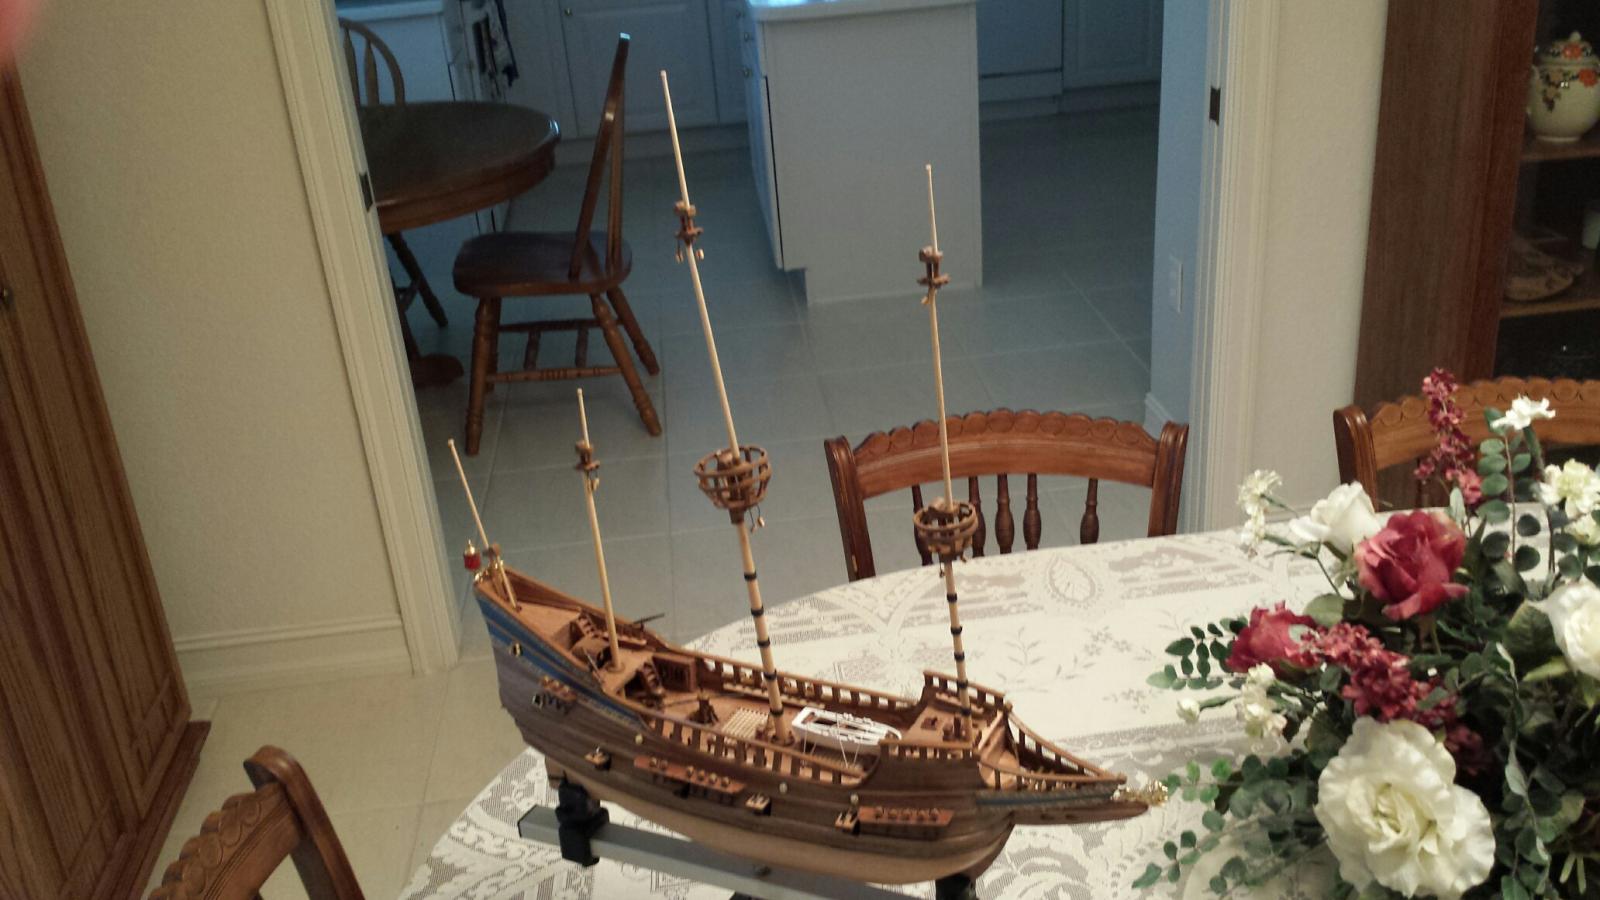
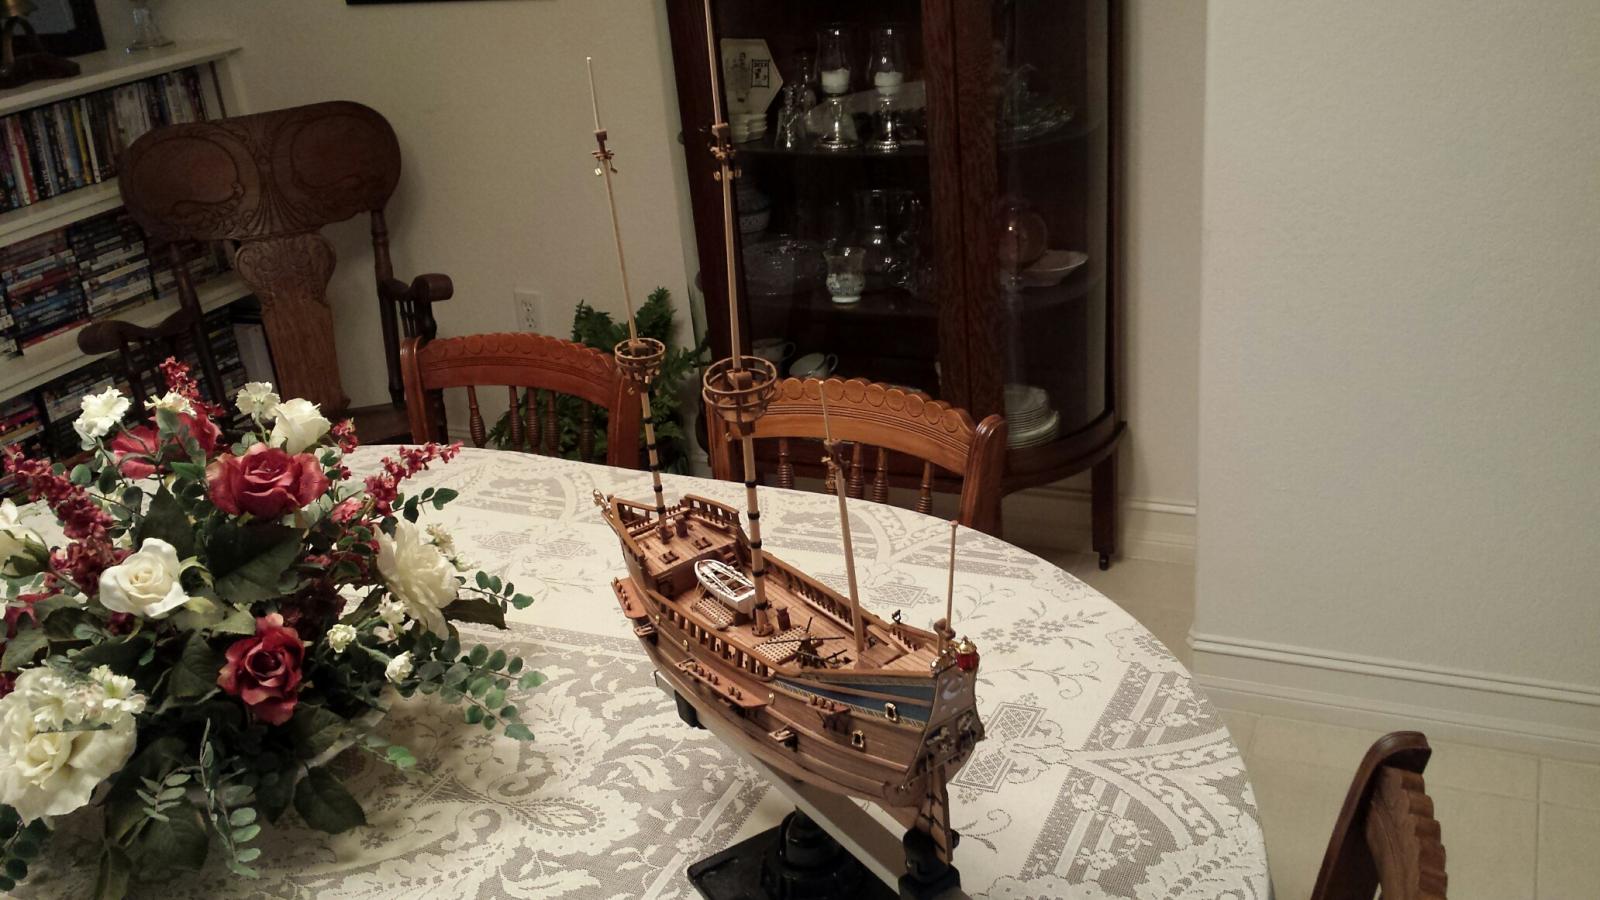
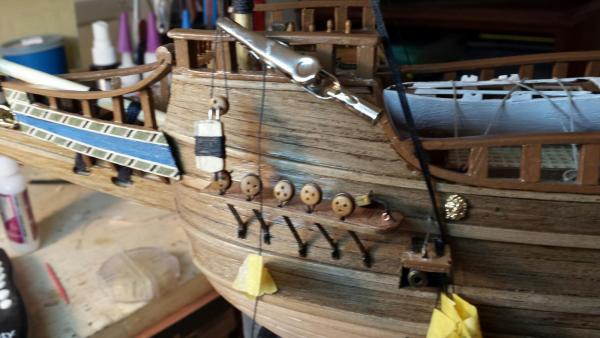
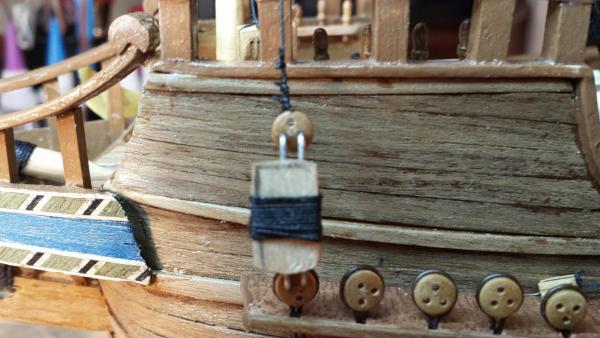
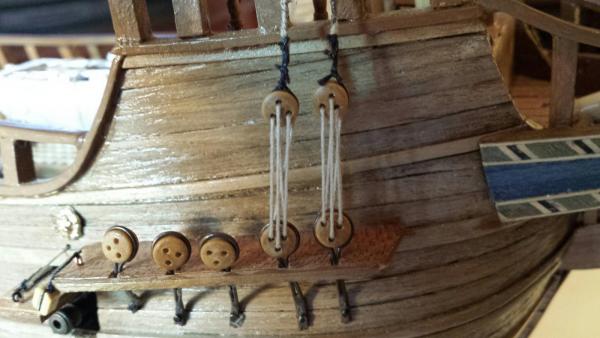
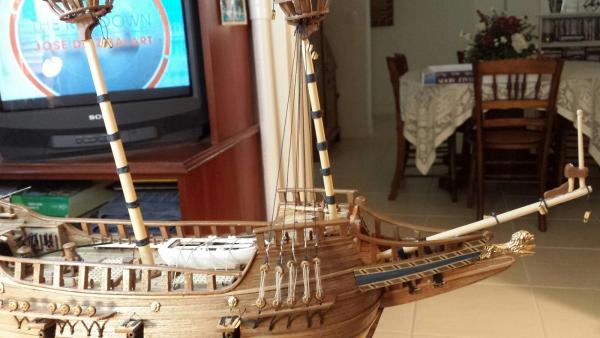
Hello Everyone.. Here's an update from the drydock... The rigging has begun amd it's my intention to complete all the standing rigging first whch I believe is not only traditional but also easier. So I started out on that path by beginning with the shrouds. As J pointed out to me there is not much room between the deck of the crow's nest and the crosstree in order to pass the shroud lines through. And there is not enough material present to remove in order to enlarge these spaces. This discouraged me to seize the shroud lines as I believe is normally done in reality. I managed to open the spaces enough to just be able to get the 10 shroud lines on the foremast through; there wasn't any big problem with the larger mainmast crow's nest deck. To date I have completed the foremast and mainmast lower shrouds and their respective lanyards. The photos are attached and I am more than happy to hear from anyone with comments, especially with constructive criricism. Have a great evening and Best, Jerry P. S. Please don't forget to place your mouse over the photo for the caption.


-
Hello Glenn... Good to see the further progress you have madde. it's so obvious to me that you are striving for a beautiful and strong build. It must be fun to build two models at the same time, working on one while the other may have something drying or setting. i have never tried that and I'm not sure I would have the pschyce to accomplish that. Your work is steady and neat and I look forward to your additional progress. I hope you are having a decent weekend. Best, Jerry
-
Thanks, J..I hope you're right. LOL... Jerry
-
Hello Glenn. I wish you a happy weekend also and many thanks for your compliment. I look forward to seeing what you have done the past few days too. Take care and as always, the Best, Jerry
-
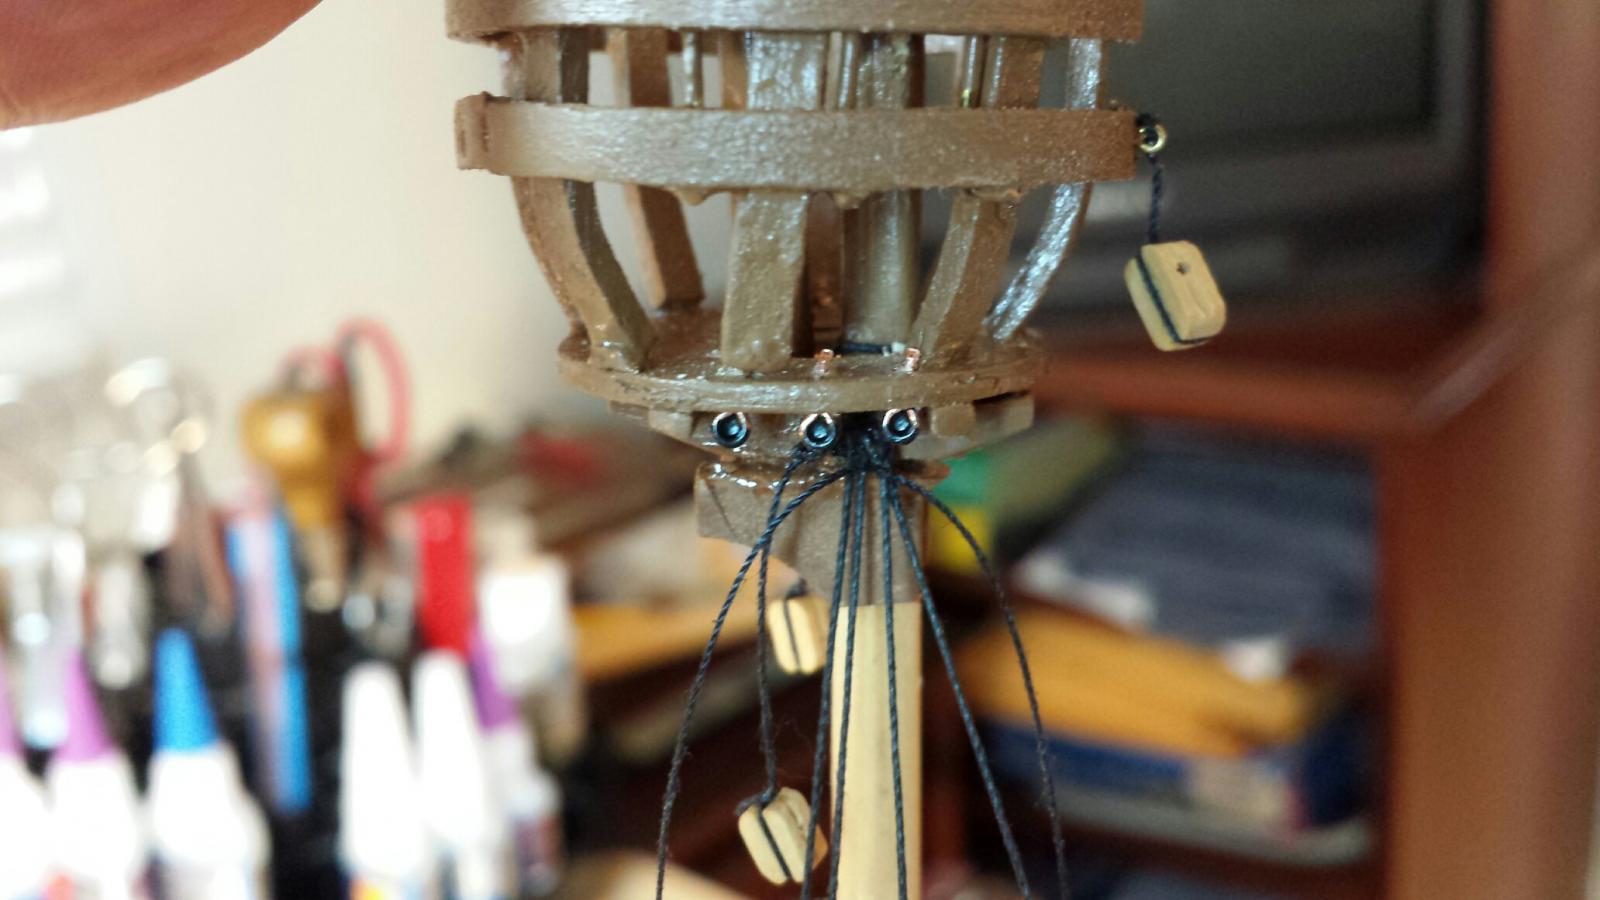
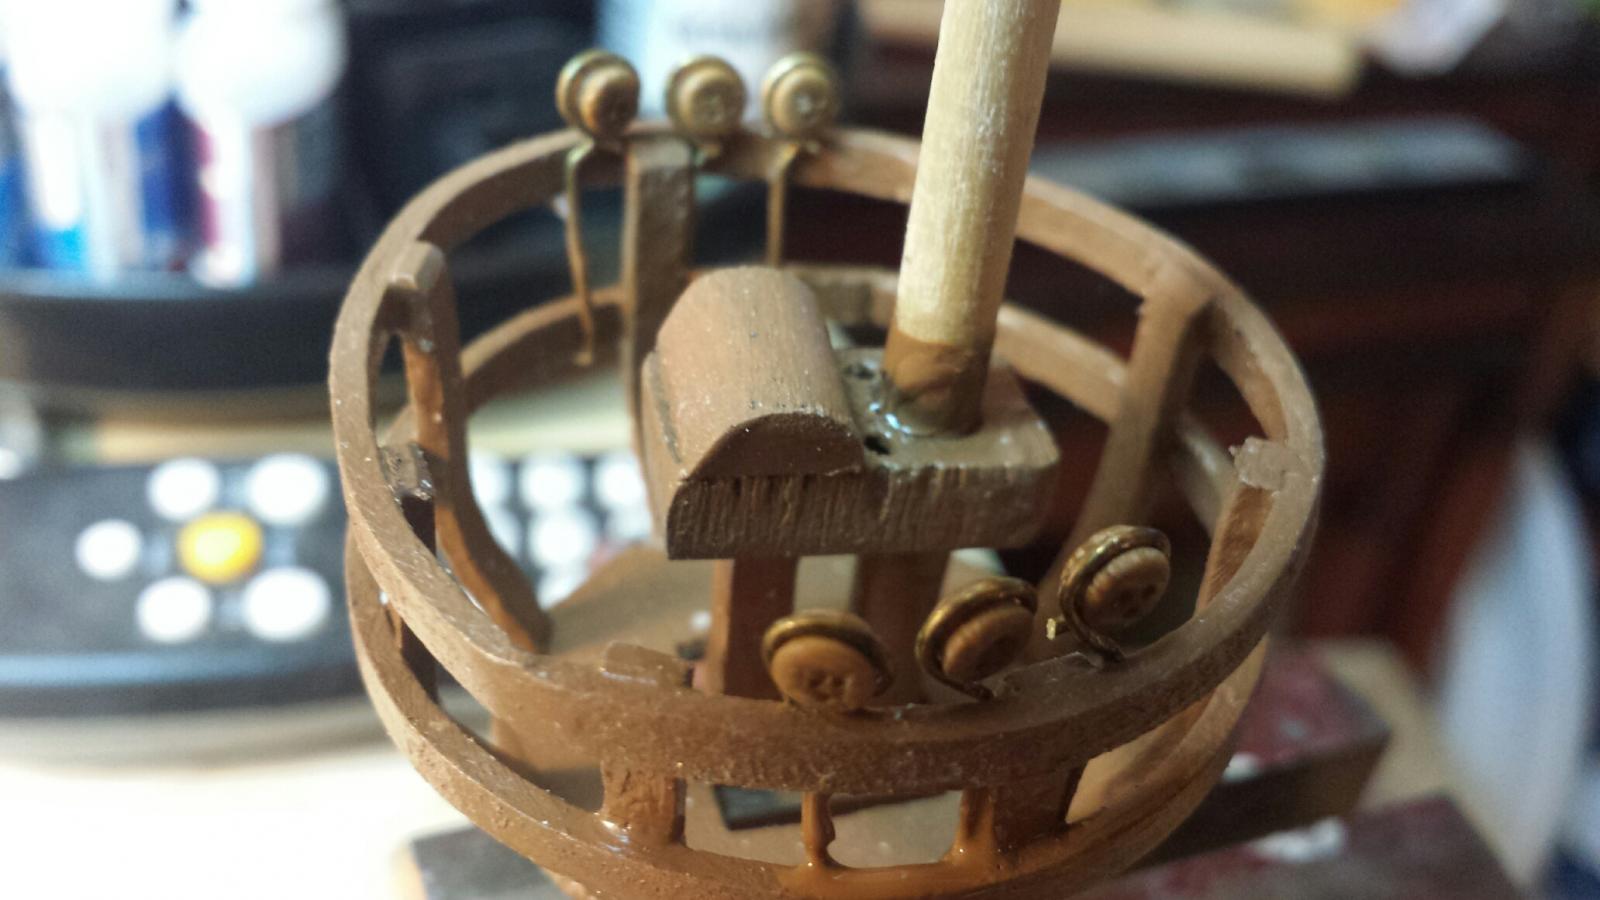
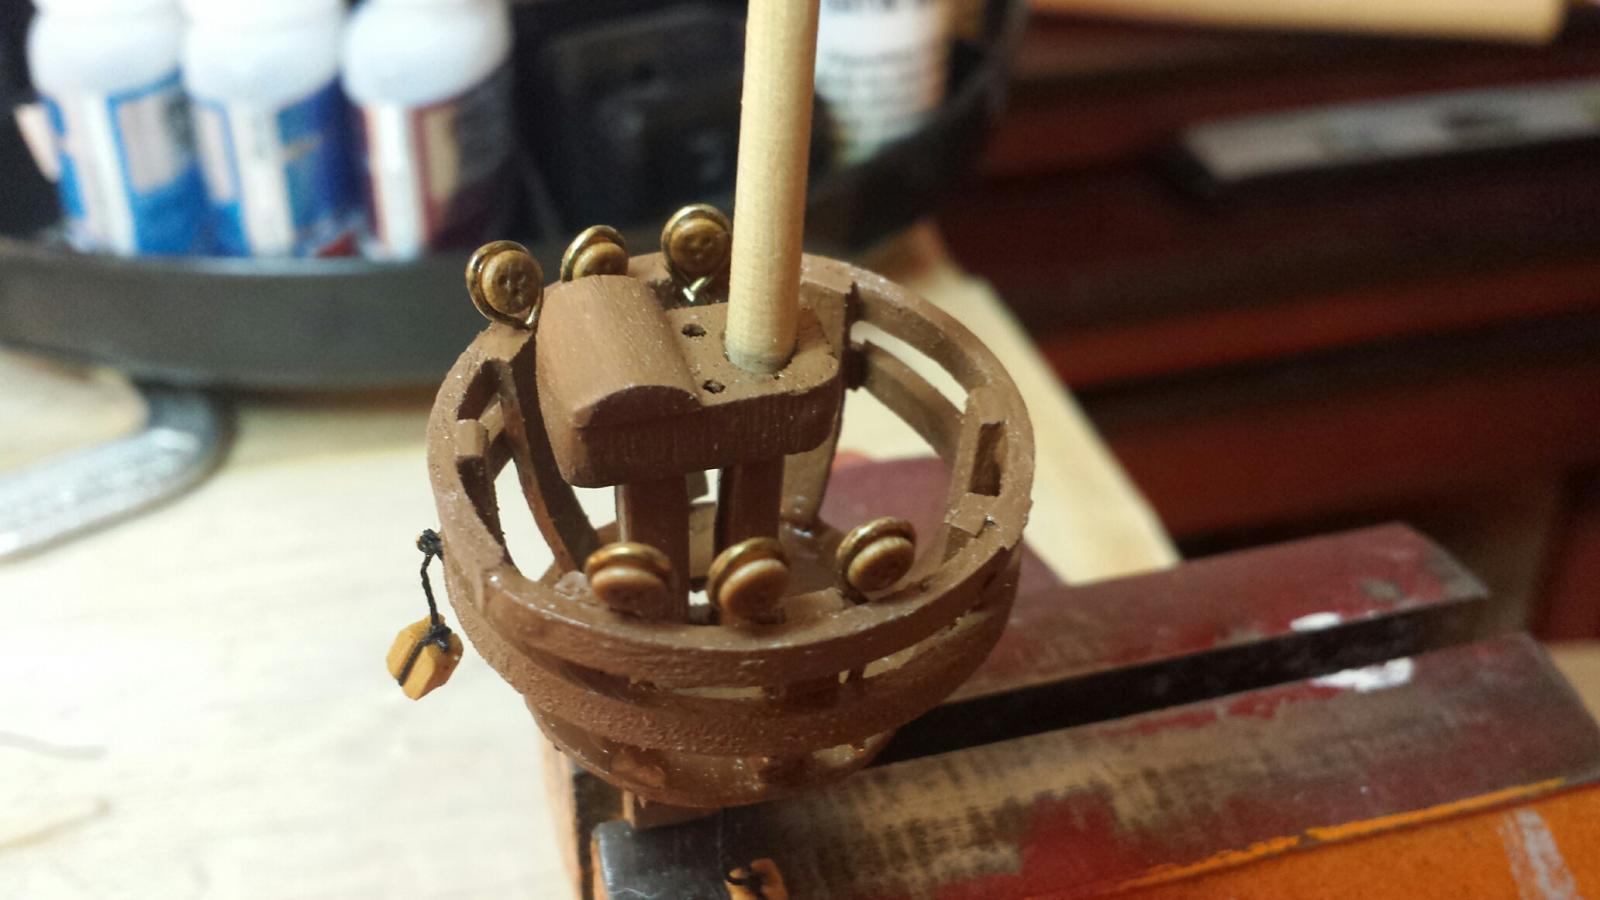
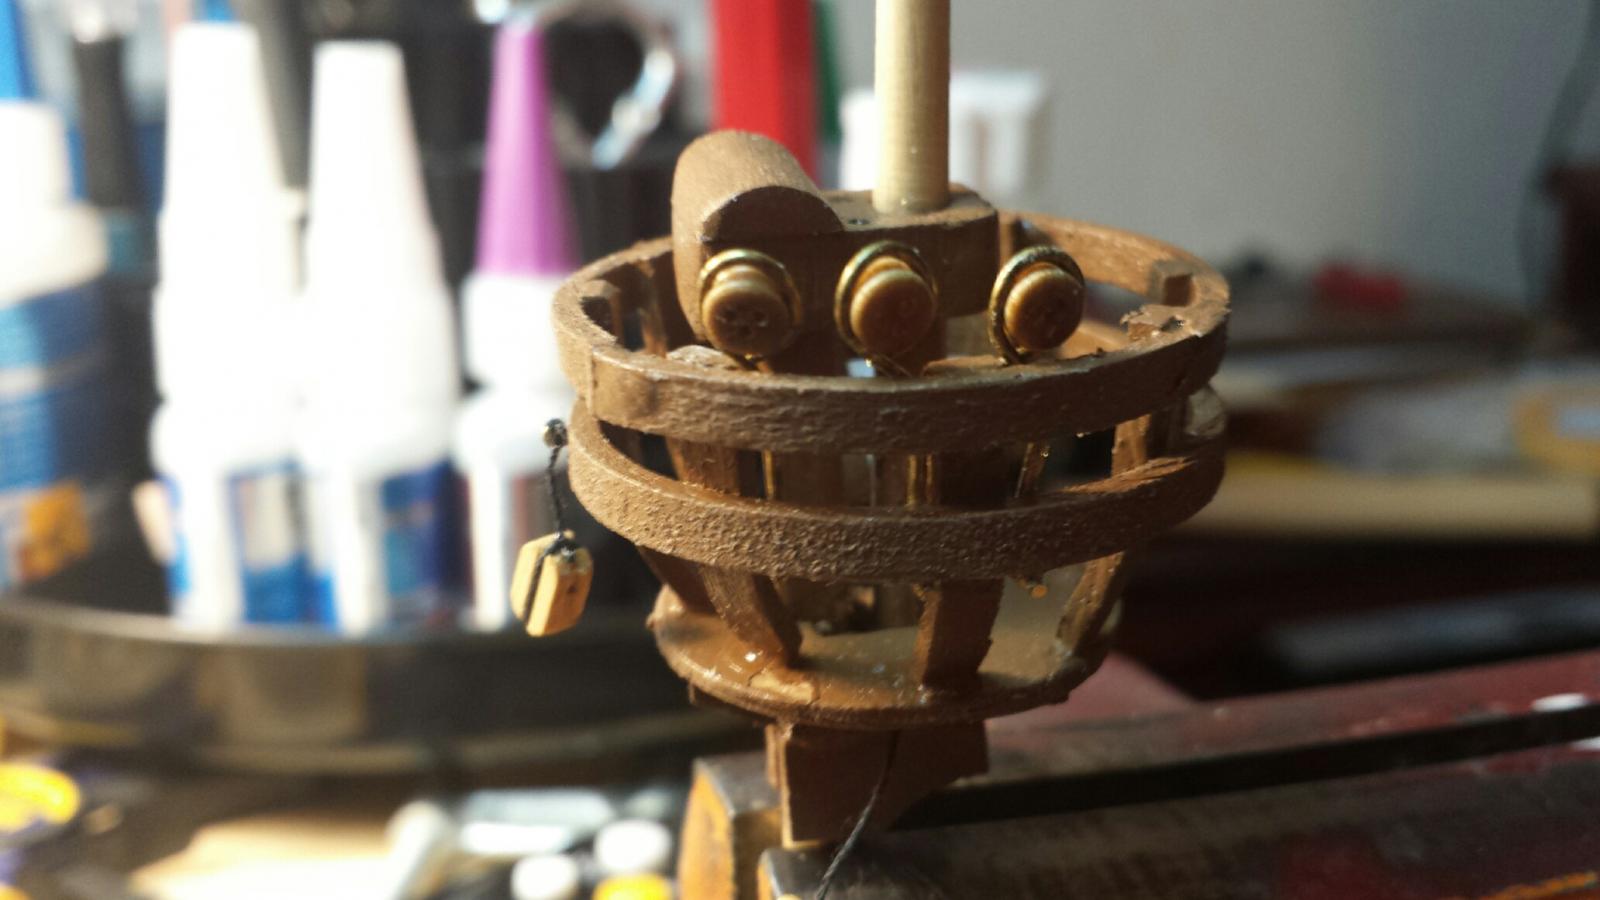
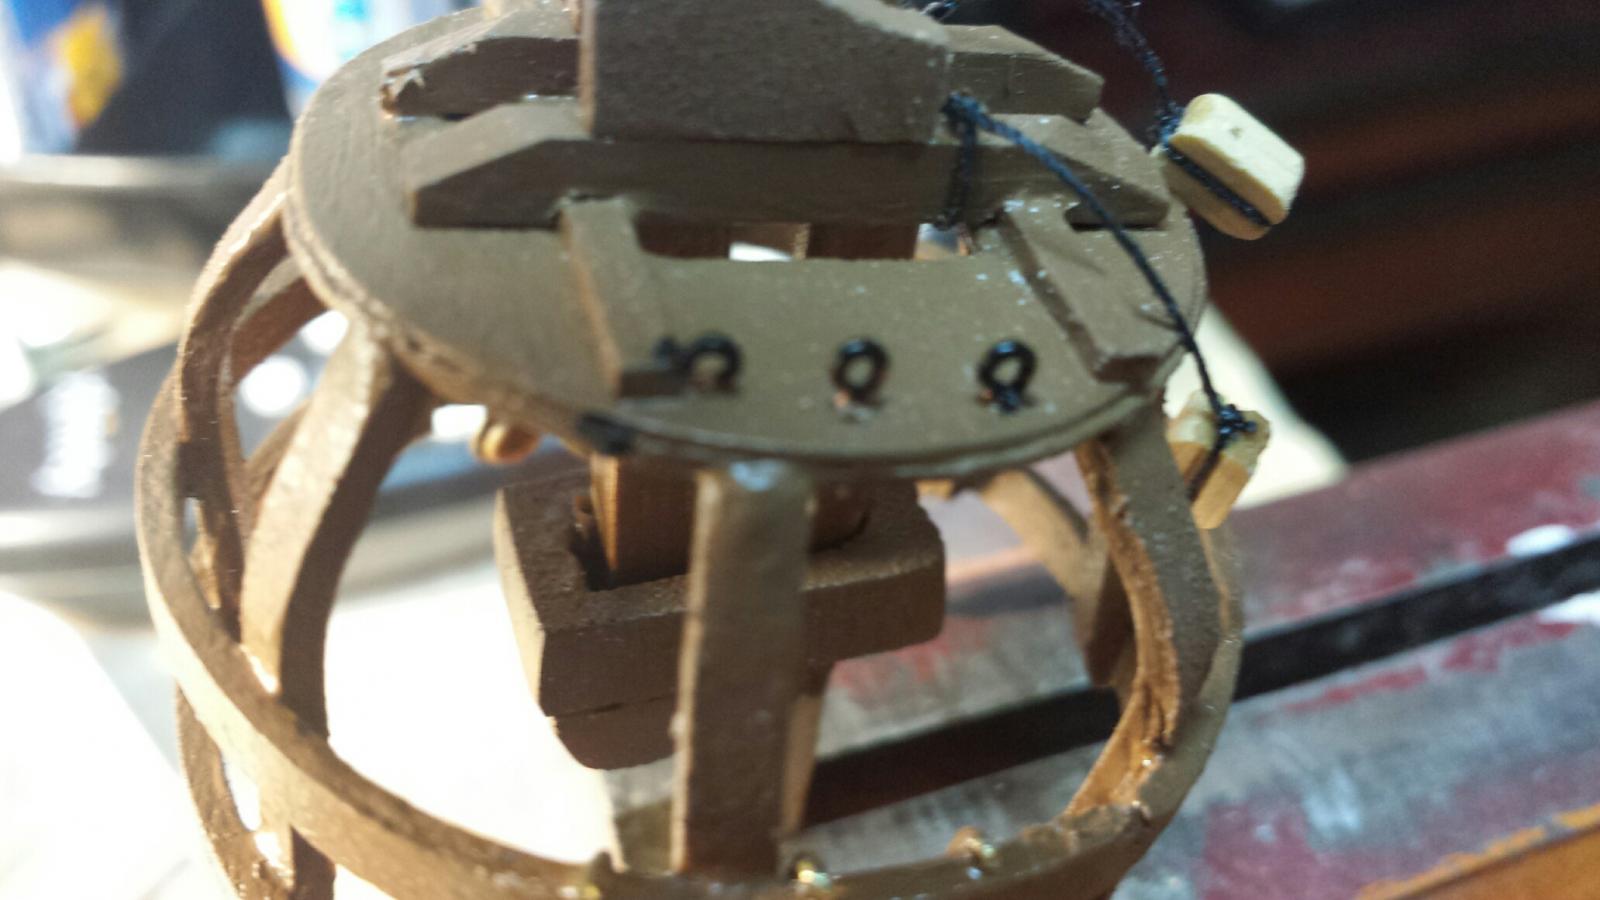
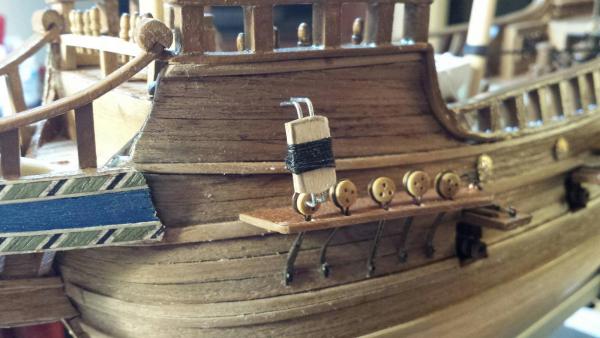
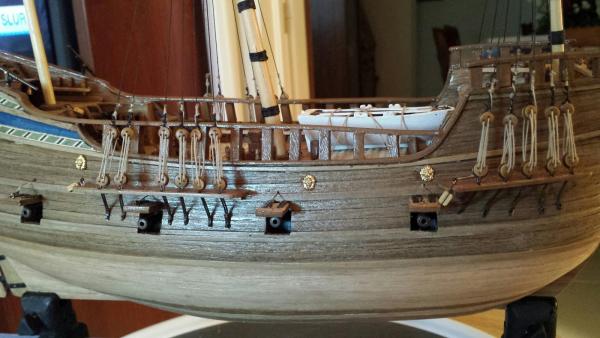
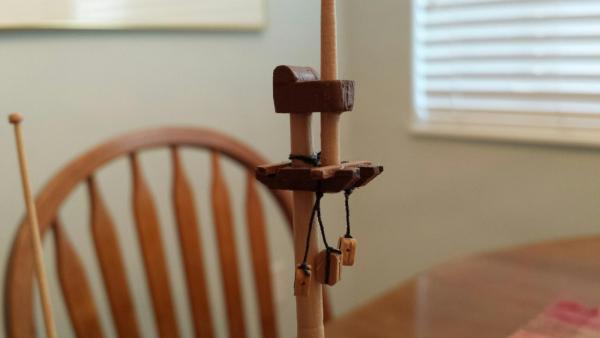
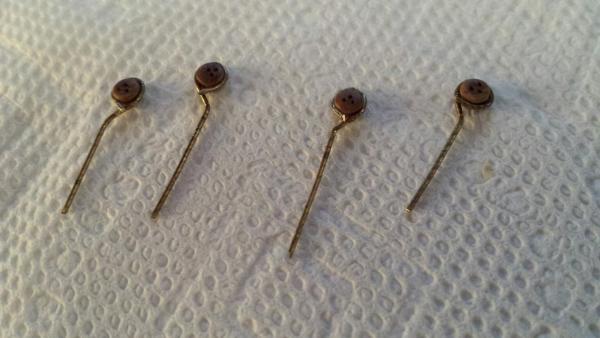
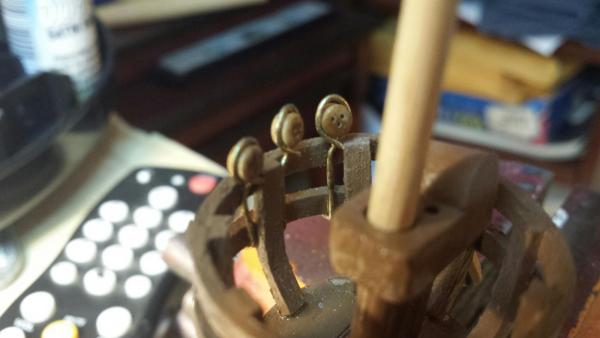
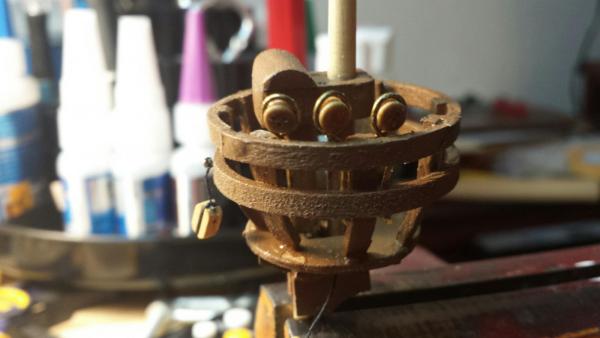
Hello Everyone.. It looks like I'm about ready to step the masts. I had been told by a couple of my predecessor Half Moon builders that if they were to do it all over again, they would not mount the upper deadeyes on the floor of the crow's nests. It seems that this process takes up too much room and gets in the way of running the shrouds and stays. So after giving this some thought I decided to mount the upper deadeyes on to the inside of the crow's nest's railing and have the deadeye protrude above the railing for easier access. My method waas to make my own strops from thin, rigid wire, and to give the deadeye some resistance when tightening the halyards, I hooked the bottom of the wire strop to the bottom of the lower rail. I hope the photos illustrate this. Thanks to Jay, who was nice enough to remind me that if I did this there would be nothing on the bottom of the crow's nest's to attach the futtock stays to. I hope I alleviated this problem by mounting eyelets to the bottoms to which I will hook in the futtock stays. I believe I have all the blocks in place both on the masts and the bowsprit and the hull so mast stepping, here I come. Best to everyone, Jerry


-
Hello Glenn. Looks like you have the channel thing knocked. And no cannons are blocked like some people's I know. LOL. Looks real good and you are definitely making tracks. Keep it up. Jerry
-
She's got it figured out already. Another table is coming into the room. i'm not concerned about the space but more about the tools. Oh well, she's still working so she has money. LOL Jerry
-
LOL Popeye....I think my building has created a monster. My admiral is planning to pick out a model when on spring break (she's a teacher) and build it next summer. There goes my ship yard.......... Jerry
-
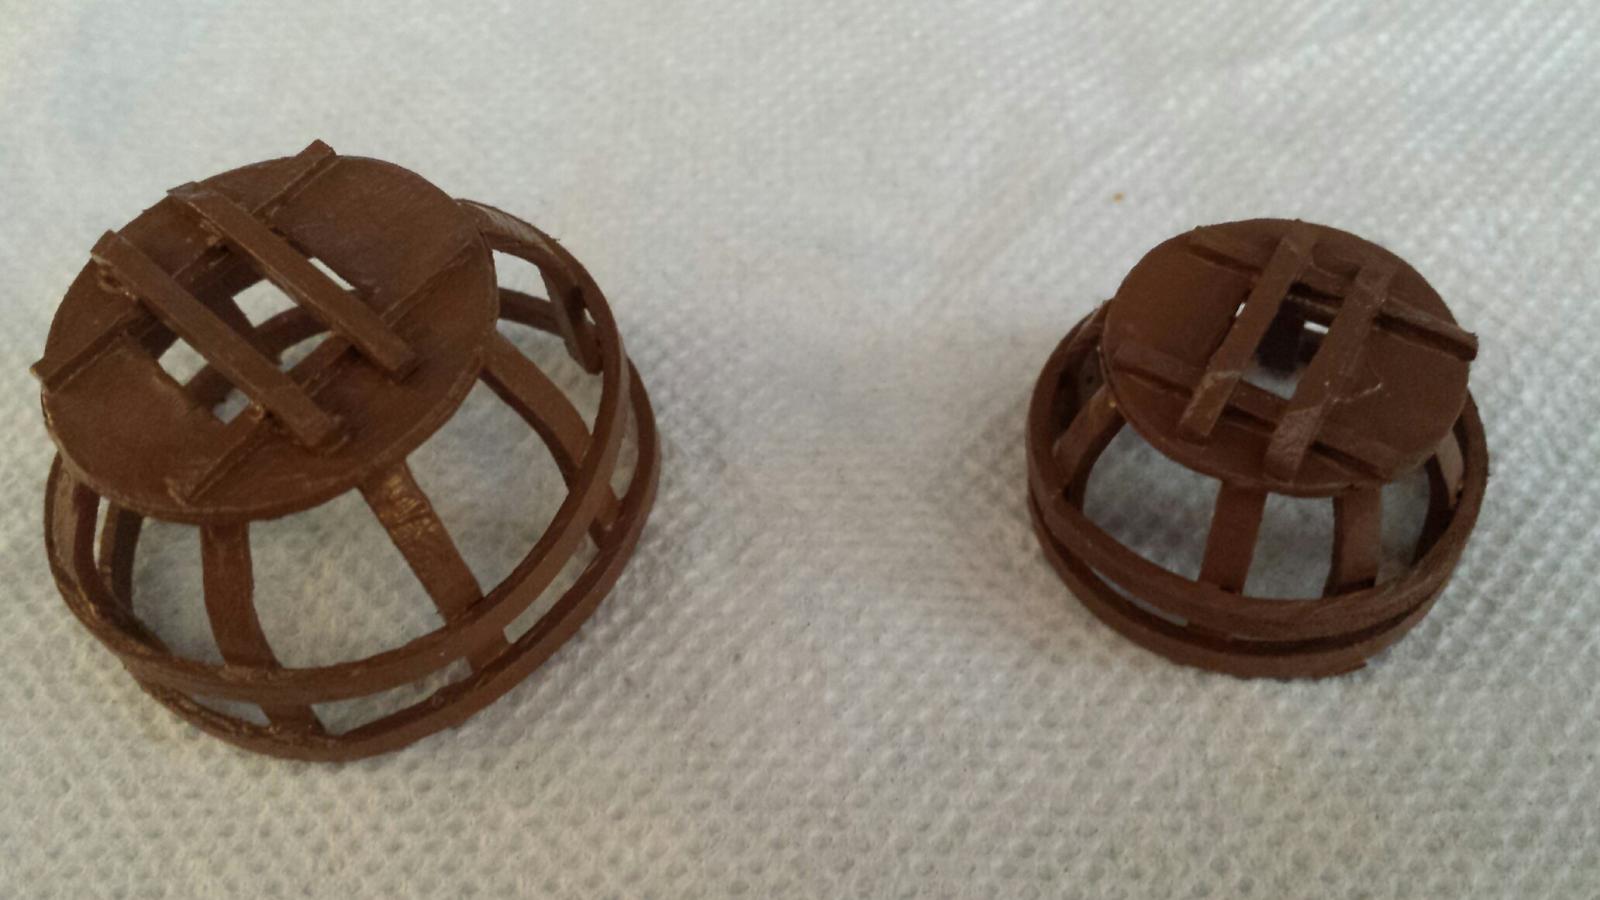
Hi J, You are so right. When that package arrived with the beech strips i was ready for it. Thanks again for your blog as I mirrored what you did. The admiral liked the nests but she said she thinks they are too big. I made them the size you told me so I hope they'll look okay. The main mast one is 1 inch high and the fore mast nest is 3/4 inch. No matter what, I'm keeping them. gake care, Best, Jerry
-
Thanks for he good words, Glenn. I expect to put all the masts together tomorrow and hopefully begin the rigging very soon. Best, Jerry
-
Sorry, David...This kit didn't provide any cannon balls. Hope you are well. Jerry
-
Fugols are a cross between rigols and gunport frames. LOL j/k .Yeah, I meant Rigols. Jerry
-
Hello Glenn... Live and learn, ey?? What about the fugols? When do they get atached? I forgot. Jerry
-
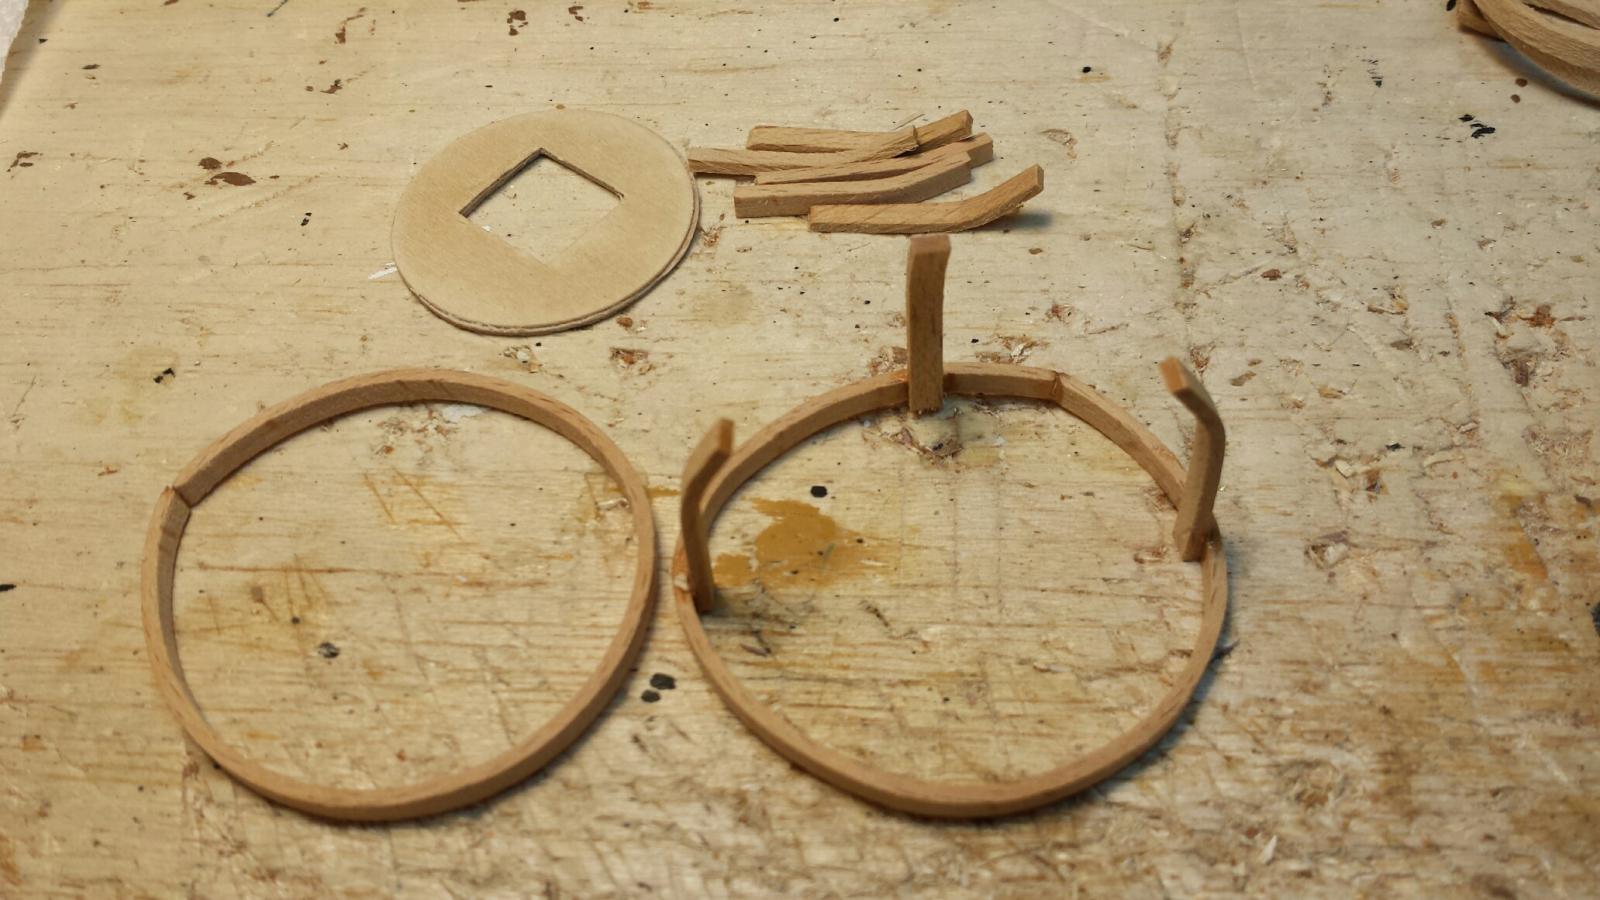
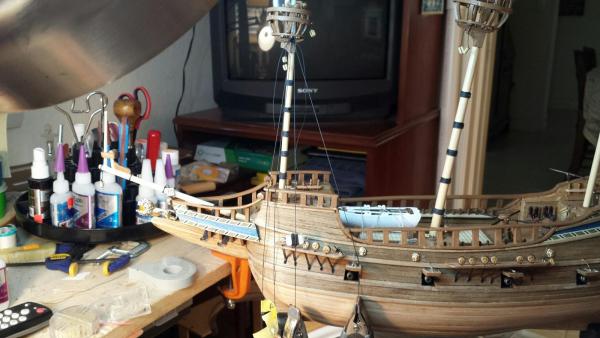
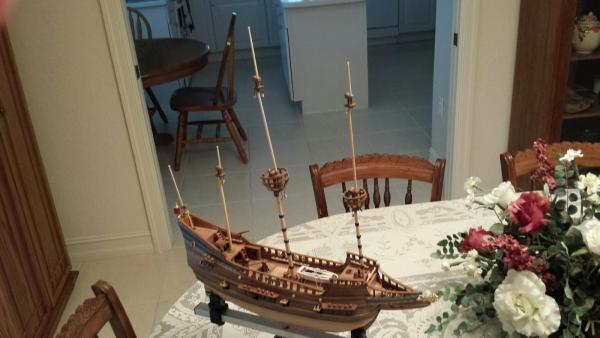
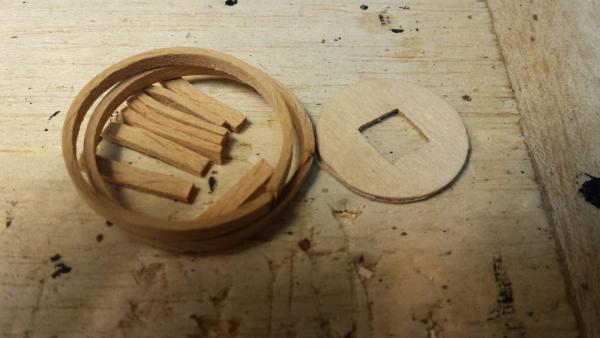
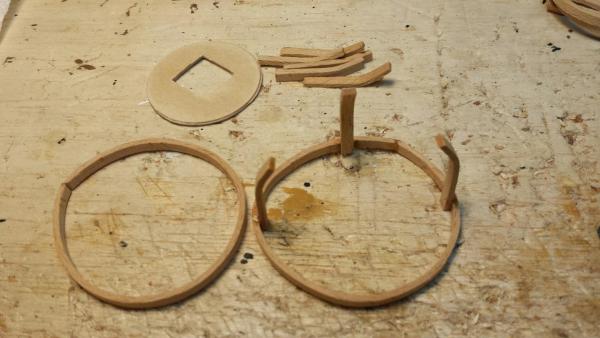
Hello Everybody.. Well the shipment from the U.K. arrived late yesterday so I was able to go ahead and build the crow's nest as planned. I followed very closely J's and Popeye's design and like to thank them both very much for help. So, no more excuses. The nests are built so construction of the masts will be next. I'm really looking forward to that as it really makes a nice picture to see the hull with all its vertical pointy things. The aft flag staff I'm sure will bee the first pointy thing that I'll break. I'm pretty good at breaking these kind of things as my Victory build will attest to. So here ares ome more pictures as to where I stand as of now. Best to all, Jerry


-
Thanks for the crossed fingeres and compliment, too, Glenn; maybe I'll be lucky later with the mail. As for your day today, everyone needs a long break once in awhile. Best, Jerry
-
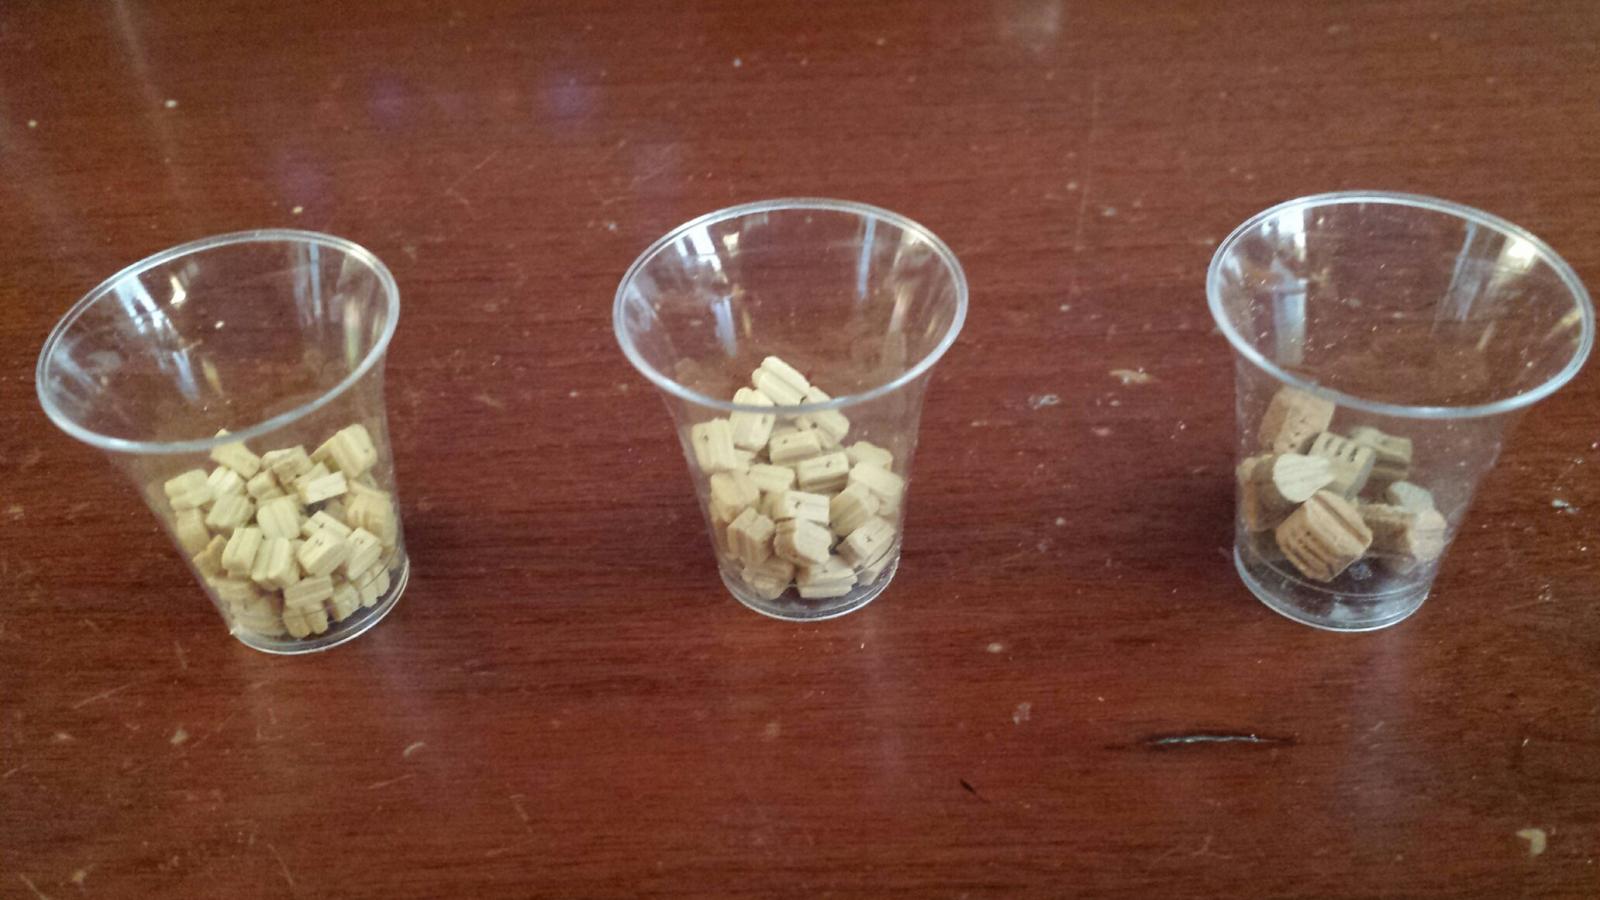
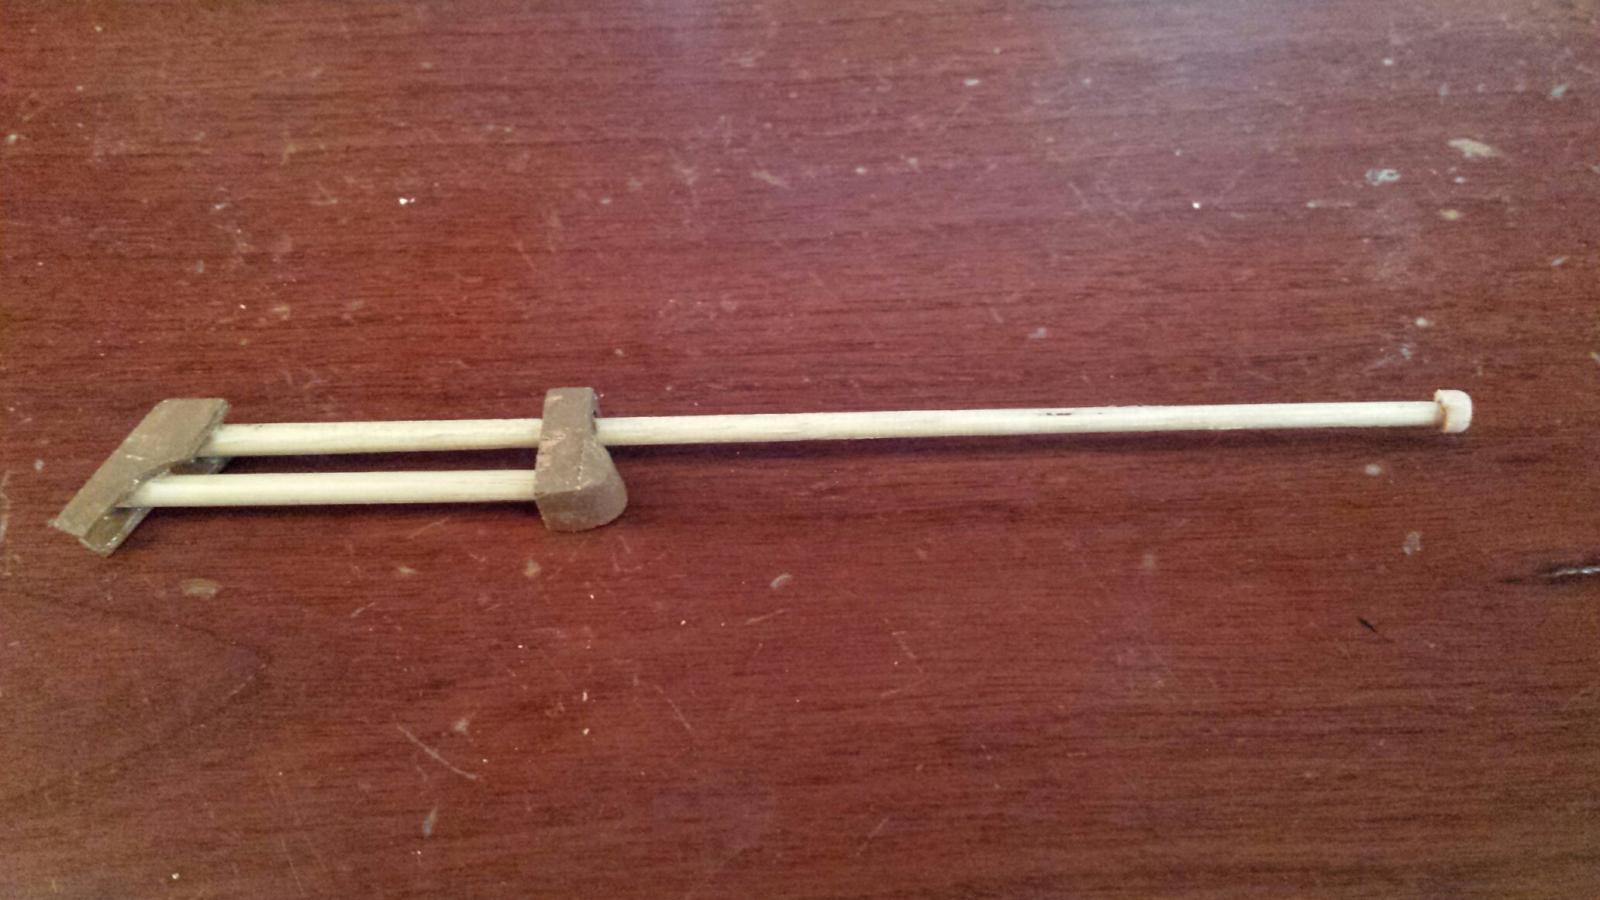
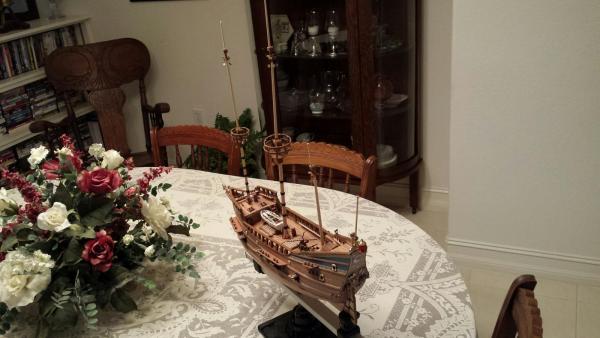
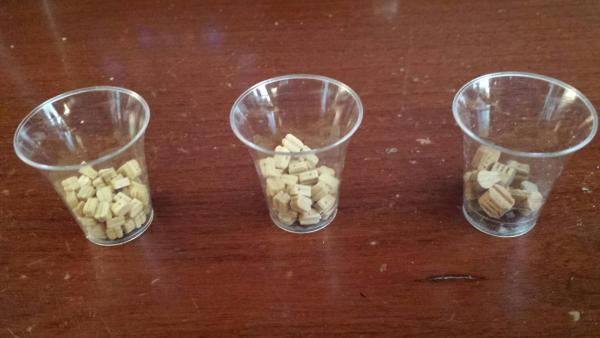
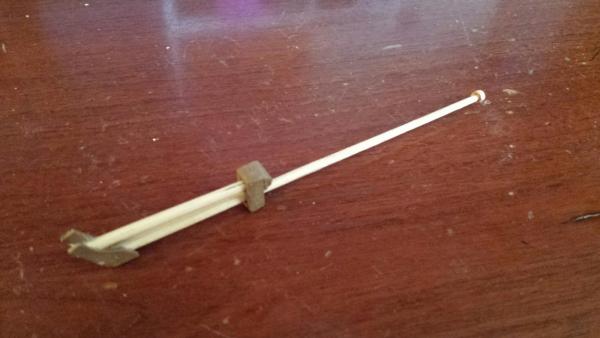
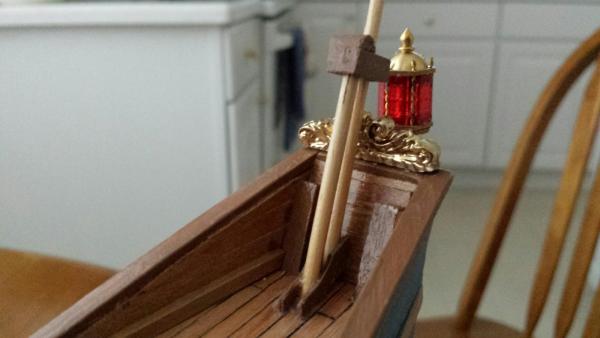
Hello again, everyone, Today was another try and keep busy day, still waiting for the mailed material to arrive. But I did manage to get some things accomplished to make the day usefull. First I decided to lightly stain all the blocks as it's getting close to the rigging. I didn't like the pale color of the natural wood so I dunked them all in a cup of hot coffee and now I have some blocks with a little color and a good smell too. Then I sorted them into 3 catagories, 4mm, 5mm and those larger. Communion cups really come in handy for this. (Hope the church doesn't miss them.) I decided to assemble the aft flag staff assembly and mount it to the deck. But, the kit manufacturer struck again. There were no chocks to hold the staff and support shaft together so I manufactured and painted my own. Another kit bashing during this process. All in all, it felt good to get something done and now i'm hoping that when the post (mail) gets here I may be lucky and find something I'm waiting for. I hope everyone has a great evening. Best, Jerry


-
Hello David.. Good to see you're making some progress. The blue does look familiar and it looks like you're using plenty of it. So I guess things will go faster for you now. Hope you get all the holes figured out. I'm still waiting for rthe U.K. shipment. Take care, Jerry
-
Hello Chris. good to hear from you. Yep, almost......Just a few more steps and we'll be ready for rigging. Take care, Jerry