
Supplies of the Ship Modeler's Handbook are running out. Get your copy NOW before they are gone! Click on photo to order.
×


EdT
-
Posts
2,213 -
Joined
-
Last visited
Reputation Activity
-

 EdT got a reaction from Calhoun Zabel in Young America 1853 by EdT - FINISHED - extreme clipper
Young America - extreme clipper 1853
Part 279 – Main Yard Stuns'l Booms
The main yard was fitted with the two topmast studdingsail booms. These supporedt the clews of the topmast studdingsails as well as the lower studdingsail yards that weresuspended from the ends of each when these sails were set. The booms were 42 feet long and 8 3/8" in diameter over their center sections. They taper to about 5 ¾" at the ends. All the drawing dimensions are expressed in full size decimals to permit easy conversion based on scale. The 1/72 converted sizes may be seen penciled on the drawing in the first picture.
The picture shows a finished boom and the "first trim" of the second – a squared length of Castello marked with centerlines and the two points at the ends pf the straight section. The boom is grooved for jewel blocks at the outboard end and drilled for a lashing at the inboard end. The inner hole was also used to fix a temporary tackle for hauling out the boom. The next picture shows a finished boom set in the boom irons in the retracted position.
The booms were shaped by the process described in earlier posts, then polished and finished with wipe-on polyurethane as described earlier. The next picture shows both booms lashed to jackstay stanchions at the inboard ends.
The next picture shows a close-up of a lashing.
I used untarred hemp for these and all lashings or fixings that would have been temporary. Because of the offset of the booms from the yard centerlines and the gradual taper of the yard, the booms are actually deflected somewhat to pull them fast to the stanchion. The last picture shows the end of the starboard boom after lashing on the two 9" jewel blocks.
The upper block handled the sheet for the topmast studding sail, the lower block the halyard for the lower stuns'l yard. The outer iron is sized for the diameter of the boom's center section.
Ed
-
 EdT got a reaction from BETAQDAVE in Young America 1853 by EdT - FINISHED - extreme clipper
Young America - extreme clipper 1853
Part 278 – Completing the Main Yard
The first picture shows the main yard temporarily connected to the mast. Most of the ironwork has been fitted.
At his stage the yard was ready for the copper ironwork to be blackened. The brass-containing boom irons were pre-blackened before fitting. The next picture shows the removed yard and the ironwork being cleaned with isopropyl alcohol using a cotton swab.
The wipe-on poly base coat resists the alcohol and allows any smudges to be removed and the copper to be degreased. The next picture shows the yard after the liver of sulfur blackening process.
The blackening was done at the kitchen sink with tap water running. The yard and its fittings were liberally brushed with liver of sulfur solution and immediately rinsed under the tap. Any unblackened spots were re-brushed while wet and again rinsed. The yard was then allowed to dry. The next picture shows a closer view of the dried yard, taken the next day.
The straight, black wire shown in the last two pictures, is the jackstay rod. This was next slipped through the stanchions as shown in the next picture.
Straight .020" brass wire was used for this for its relative rigidity. It was pre-blackened using full strength Brass Black®. The eyebolts were spun from 28 gage copper wire. The fit is tight enough to keep the wire in place. In the last picture the jackstays have been inserted and clipped off.
The outer boom irons have also been fitted and a finish coat of satin wipe-on polyurethane applied, using a foam swab shown in the picture. The finish was "wiped" using a dry foam swab. The finish was applied to wood and iron alike.
Ed
-
EdT got a reaction from Calhoun Zabel in Young America 1853 by EdT - FINISHED - extreme clipper
Young America - extreme clipper 1853
Part 277 – Main Yard Boom Irons
The ironwork on the main yard continued with the fabrication and fitting of the boom irons, the supports for the topmast studdingsail booms. The first picture shows two steps in the fabrication of the inner boom irons.
The large circular bands were first made to fit tightly in their positions on the yard. The smaller bands were sized to be about 1" larger in diameter that the 8 ½" diameter of the boom center sections. I used brass for the short arms between the rings – mainly because I had hard brass in that thickness. Making these of copper would have simplified the blackening process later. Because of the brass, these were blackened before installing on the yard, as will be seen below.
The next picture shows a yardarm with its banding and pieces for the end cap and strap that support the outer iron.
The straps were drilled first, then shaped as shown - in a vise with files, and then bent and clipped to the shape shown below.
The straps are secured with tight-fitting, stretched rings pressed over the ends of the yard as shown in the next picture.
The next picture shows the yard with the inner irons installed.
Only the brass-containing inner irons are black. These were also fixed in place with a wire "bolt" – really a small wire nail in a drilled hole – riveted to hold the band on the underside of the yard. The last items to be made were the outer irons – sometimes called "Pacific irons". These consist of rings at the ends of bent iron bars. The picture below shows the rings – same size as the inner rings – soldered to lengths of brass bar stock.
The rings were fitted with a roller on the underside to ease the movement of the boom. These were simulated by soldering a small bit of wire under each ring. The lower assembly shows the soldering configuration before clipping off the excess. A small round section was first filed out of the wire to help it fit to the band. Again, making these of copper would allow the yard to be completely assembled before blackening, which would then be done using liver of sulfur solution.
The last picture shows the finished yard arm after blackening and installation of the outer iron.
Final assembly of the yard and finishing will be described in the next part.
Ed
-
 EdT got a reaction from Erebus and Terror in Young America 1853 by EdT - FINISHED - extreme clipper
Love the comments.
First the number of hoops: At lengths of 82' and 86' respectively, I decided to make the fore and main yards as two-tree made spars. The main yard has a 30 ft scarph joinng the two trees, each about 60 ' long. These were bolted and banded, with heat-shrunk bands about 30" apart over the scarph length. Then there are bands for the sling, the truss, the inner boom irons and a number of eyebolt/fairlead bands. Youre right, Druxey - a lot of iron.
Massive is right, Wefalck. The yokes are about 6 feet across and the distance between mast and yard centerlines is about 6 feet as well. These were both dimensions I estimated from typical data. With a center diameter of 23" and a length of 86', I estimate this yellow pine main yard to have weighed in at about 3 1/2 tons for just the wooden spar - no ironwork, stun'sl booms, sails or rigging Of course the weight of all this was mainly taken on the chain sling at the center - with some help from the topping lifts.
Still smaller than a main yard on a first rate like Victory: 102' x 24" diam.
Ed
-
EdT got a reaction from Calhoun Zabel in Young America 1853 by EdT - FINISHED - extreme clipper
Young America - extreme clipper 1853
Part 276 – Main Yard Truss
The main yard truss described here, and the mizzen version, are identical to the fore yard truss. The basic shapes shown in the first picture were cut out using a band saw with a 1/8" metal-cutting blade with a pasted-on pattern scrap as a guide.
I cut both main and mizzen at this stage to avoid another band saw blade change later. I used the band saw to save time vs. the jewelers saw. The basic profile of the truss was then filed out as shown below in the next two pictures.
The eyes at the ends were marked with dividers set from the band brackets on the yard, then drilled to accept 20 gauge copper wire. The unfinished yoke is shown in a test fit in the next picture.
In the next picture the yoke has been rounded, polished, and again fitted to the yard band brackets.
The center hole for the truss arm bolt is shown in this picture with a straight length of 20 gauge wire inserted. The next picture shows the fabricated truss arm.
The arm was made using sections of telescoping tube. The eye that will fit into the mast band bracket was fitted into a slot at one end and silver-soldered. A short length of 20 gauge wire was soldered into the other end. In the next picture a flange has been soldered to the wire to hold the arm on the yoke, but allowing it to rotate.
The assembly is set up, upside down, for bolting to the yard band brackets. Heads were first formed on one end of the copper bolts. They were then inserted from the top side o be clipped off just above the bracket surface and peened like the right-hand bolt in the picture. A square ended punch was tapped with a hammer in the position shown to enlarge the bolt head like a rivet. The left hand bolt is not yet clipped. The last picture shows the truss installed on the yard.
This picture shows the top of the yard. All soldered band joints, though not very visible, were positioned out-of-sight under the yard.
Ed
-
 EdT got a reaction from PeteB in Young America 1853 by EdT - FINISHED - extreme clipper
Young America - extreme clipper 1853
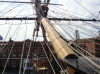
Part 279 – Main Yard Stuns'l Booms
The main yard was fitted with the two topmast studdingsail booms. These supporedt the clews of the topmast studdingsails as well as the lower studdingsail yards that weresuspended from the ends of each when these sails were set. The booms were 42 feet long and 8 3/8" in diameter over their center sections. They taper to about 5 ¾" at the ends. All the drawing dimensions are expressed in full size decimals to permit easy conversion based on scale. The 1/72 converted sizes may be seen penciled on the drawing in the first picture.
The picture shows a finished boom and the "first trim" of the second – a squared length of Castello marked with centerlines and the two points at the ends pf the straight section. The boom is grooved for jewel blocks at the outboard end and drilled for a lashing at the inboard end. The inner hole was also used to fix a temporary tackle for hauling out the boom. The next picture shows a finished boom set in the boom irons in the retracted position.
The booms were shaped by the process described in earlier posts, then polished and finished with wipe-on polyurethane as described earlier. The next picture shows both booms lashed to jackstay stanchions at the inboard ends.
The next picture shows a close-up of a lashing.
I used untarred hemp for these and all lashings or fixings that would have been temporary. Because of the offset of the booms from the yard centerlines and the gradual taper of the yard, the booms are actually deflected somewhat to pull them fast to the stanchion. The last picture shows the end of the starboard boom after lashing on the two 9" jewel blocks.
The upper block handled the sheet for the topmast studding sail, the lower block the halyard for the lower stuns'l yard. The outer iron is sized for the diameter of the boom's center section.
Ed
-
EdT got a reaction from BETAQDAVE in Young America 1853 by EdT - FINISHED - extreme clipper
Young America - extreme clipper 1853
Part 279 – Main Yard Stuns'l Booms
The main yard was fitted with the two topmast studdingsail booms. These supporedt the clews of the topmast studdingsails as well as the lower studdingsail yards that weresuspended from the ends of each when these sails were set. The booms were 42 feet long and 8 3/8" in diameter over their center sections. They taper to about 5 ¾" at the ends. All the drawing dimensions are expressed in full size decimals to permit easy conversion based on scale. The 1/72 converted sizes may be seen penciled on the drawing in the first picture.
The picture shows a finished boom and the "first trim" of the second – a squared length of Castello marked with centerlines and the two points at the ends pf the straight section. The boom is grooved for jewel blocks at the outboard end and drilled for a lashing at the inboard end. The inner hole was also used to fix a temporary tackle for hauling out the boom. The next picture shows a finished boom set in the boom irons in the retracted position.
The booms were shaped by the process described in earlier posts, then polished and finished with wipe-on polyurethane as described earlier. The next picture shows both booms lashed to jackstay stanchions at the inboard ends.
The next picture shows a close-up of a lashing.
I used untarred hemp for these and all lashings or fixings that would have been temporary. Because of the offset of the booms from the yard centerlines and the gradual taper of the yard, the booms are actually deflected somewhat to pull them fast to the stanchion. The last picture shows the end of the starboard boom after lashing on the two 9" jewel blocks.
The upper block handled the sheet for the topmast studding sail, the lower block the halyard for the lower stuns'l yard. The outer iron is sized for the diameter of the boom's center section.
Ed
-
 EdT got a reaction from Piet in Young America 1853 by EdT - FINISHED - extreme clipper
Young America - extreme clipper 1853
Part 279 – Main Yard Stuns'l Booms
The main yard was fitted with the two topmast studdingsail booms. These supporedt the clews of the topmast studdingsails as well as the lower studdingsail yards that weresuspended from the ends of each when these sails were set. The booms were 42 feet long and 8 3/8" in diameter over their center sections. They taper to about 5 ¾" at the ends. All the drawing dimensions are expressed in full size decimals to permit easy conversion based on scale. The 1/72 converted sizes may be seen penciled on the drawing in the first picture.
The picture shows a finished boom and the "first trim" of the second – a squared length of Castello marked with centerlines and the two points at the ends pf the straight section. The boom is grooved for jewel blocks at the outboard end and drilled for a lashing at the inboard end. The inner hole was also used to fix a temporary tackle for hauling out the boom. The next picture shows a finished boom set in the boom irons in the retracted position.
The booms were shaped by the process described in earlier posts, then polished and finished with wipe-on polyurethane as described earlier. The next picture shows both booms lashed to jackstay stanchions at the inboard ends.
The next picture shows a close-up of a lashing.
I used untarred hemp for these and all lashings or fixings that would have been temporary. Because of the offset of the booms from the yard centerlines and the gradual taper of the yard, the booms are actually deflected somewhat to pull them fast to the stanchion. The last picture shows the end of the starboard boom after lashing on the two 9" jewel blocks.
The upper block handled the sheet for the topmast studding sail, the lower block the halyard for the lower stuns'l yard. The outer iron is sized for the diameter of the boom's center section.
Ed
-
 EdT got a reaction from mitchel in Young America 1853 by EdT - FINISHED - extreme clipper
Young America - extreme clipper 1853
Part 279 – Main Yard Stuns'l Booms
The main yard was fitted with the two topmast studdingsail booms. These supporedt the clews of the topmast studdingsails as well as the lower studdingsail yards that weresuspended from the ends of each when these sails were set. The booms were 42 feet long and 8 3/8" in diameter over their center sections. They taper to about 5 ¾" at the ends. All the drawing dimensions are expressed in full size decimals to permit easy conversion based on scale. The 1/72 converted sizes may be seen penciled on the drawing in the first picture.
The picture shows a finished boom and the "first trim" of the second – a squared length of Castello marked with centerlines and the two points at the ends pf the straight section. The boom is grooved for jewel blocks at the outboard end and drilled for a lashing at the inboard end. The inner hole was also used to fix a temporary tackle for hauling out the boom. The next picture shows a finished boom set in the boom irons in the retracted position.
The booms were shaped by the process described in earlier posts, then polished and finished with wipe-on polyurethane as described earlier. The next picture shows both booms lashed to jackstay stanchions at the inboard ends.
The next picture shows a close-up of a lashing.
I used untarred hemp for these and all lashings or fixings that would have been temporary. Because of the offset of the booms from the yard centerlines and the gradual taper of the yard, the booms are actually deflected somewhat to pull them fast to the stanchion. The last picture shows the end of the starboard boom after lashing on the two 9" jewel blocks.
The upper block handled the sheet for the topmast studding sail, the lower block the halyard for the lower stuns'l yard. The outer iron is sized for the diameter of the boom's center section.
Ed
-
 EdT got a reaction from Speedy in Young America 1853 by EdT - FINISHED - extreme clipper
Young America - extreme clipper 1853
Part 279 – Main Yard Stuns'l Booms
The main yard was fitted with the two topmast studdingsail booms. These supporedt the clews of the topmast studdingsails as well as the lower studdingsail yards that weresuspended from the ends of each when these sails were set. The booms were 42 feet long and 8 3/8" in diameter over their center sections. They taper to about 5 ¾" at the ends. All the drawing dimensions are expressed in full size decimals to permit easy conversion based on scale. The 1/72 converted sizes may be seen penciled on the drawing in the first picture.
The picture shows a finished boom and the "first trim" of the second – a squared length of Castello marked with centerlines and the two points at the ends pf the straight section. The boom is grooved for jewel blocks at the outboard end and drilled for a lashing at the inboard end. The inner hole was also used to fix a temporary tackle for hauling out the boom. The next picture shows a finished boom set in the boom irons in the retracted position.
The booms were shaped by the process described in earlier posts, then polished and finished with wipe-on polyurethane as described earlier. The next picture shows both booms lashed to jackstay stanchions at the inboard ends.
The next picture shows a close-up of a lashing.
I used untarred hemp for these and all lashings or fixings that would have been temporary. Because of the offset of the booms from the yard centerlines and the gradual taper of the yard, the booms are actually deflected somewhat to pull them fast to the stanchion. The last picture shows the end of the starboard boom after lashing on the two 9" jewel blocks.
The upper block handled the sheet for the topmast studding sail, the lower block the halyard for the lower stuns'l yard. The outer iron is sized for the diameter of the boom's center section.
Ed
-
 EdT got a reaction from DORIS in Young America 1853 by EdT - FINISHED - extreme clipper
Young America - extreme clipper 1853
Part 279 – Main Yard Stuns'l Booms
The main yard was fitted with the two topmast studdingsail booms. These supporedt the clews of the topmast studdingsails as well as the lower studdingsail yards that weresuspended from the ends of each when these sails were set. The booms were 42 feet long and 8 3/8" in diameter over their center sections. They taper to about 5 ¾" at the ends. All the drawing dimensions are expressed in full size decimals to permit easy conversion based on scale. The 1/72 converted sizes may be seen penciled on the drawing in the first picture.
The picture shows a finished boom and the "first trim" of the second – a squared length of Castello marked with centerlines and the two points at the ends pf the straight section. The boom is grooved for jewel blocks at the outboard end and drilled for a lashing at the inboard end. The inner hole was also used to fix a temporary tackle for hauling out the boom. The next picture shows a finished boom set in the boom irons in the retracted position.
The booms were shaped by the process described in earlier posts, then polished and finished with wipe-on polyurethane as described earlier. The next picture shows both booms lashed to jackstay stanchions at the inboard ends.
The next picture shows a close-up of a lashing.
I used untarred hemp for these and all lashings or fixings that would have been temporary. Because of the offset of the booms from the yard centerlines and the gradual taper of the yard, the booms are actually deflected somewhat to pull them fast to the stanchion. The last picture shows the end of the starboard boom after lashing on the two 9" jewel blocks.
The upper block handled the sheet for the topmast studding sail, the lower block the halyard for the lower stuns'l yard. The outer iron is sized for the diameter of the boom's center section.
Ed
-
 EdT got a reaction from JerryTodd in Young America 1853 by EdT - FINISHED - extreme clipper
Young America - extreme clipper 1853
Part 279 – Main Yard Stuns'l Booms
The main yard was fitted with the two topmast studdingsail booms. These supporedt the clews of the topmast studdingsails as well as the lower studdingsail yards that weresuspended from the ends of each when these sails were set. The booms were 42 feet long and 8 3/8" in diameter over their center sections. They taper to about 5 ¾" at the ends. All the drawing dimensions are expressed in full size decimals to permit easy conversion based on scale. The 1/72 converted sizes may be seen penciled on the drawing in the first picture.
The picture shows a finished boom and the "first trim" of the second – a squared length of Castello marked with centerlines and the two points at the ends pf the straight section. The boom is grooved for jewel blocks at the outboard end and drilled for a lashing at the inboard end. The inner hole was also used to fix a temporary tackle for hauling out the boom. The next picture shows a finished boom set in the boom irons in the retracted position.
The booms were shaped by the process described in earlier posts, then polished and finished with wipe-on polyurethane as described earlier. The next picture shows both booms lashed to jackstay stanchions at the inboard ends.
The next picture shows a close-up of a lashing.
I used untarred hemp for these and all lashings or fixings that would have been temporary. Because of the offset of the booms from the yard centerlines and the gradual taper of the yard, the booms are actually deflected somewhat to pull them fast to the stanchion. The last picture shows the end of the starboard boom after lashing on the two 9" jewel blocks.
The upper block handled the sheet for the topmast studding sail, the lower block the halyard for the lower stuns'l yard. The outer iron is sized for the diameter of the boom's center section.
Ed
-
EdT got a reaction from Piet in Young America 1853 by EdT - FINISHED - extreme clipper
Young America - extreme clipper 1853
Part 278 – Completing the Main Yard
The first picture shows the main yard temporarily connected to the mast. Most of the ironwork has been fitted.
At his stage the yard was ready for the copper ironwork to be blackened. The brass-containing boom irons were pre-blackened before fitting. The next picture shows the removed yard and the ironwork being cleaned with isopropyl alcohol using a cotton swab.
The wipe-on poly base coat resists the alcohol and allows any smudges to be removed and the copper to be degreased. The next picture shows the yard after the liver of sulfur blackening process.
The blackening was done at the kitchen sink with tap water running. The yard and its fittings were liberally brushed with liver of sulfur solution and immediately rinsed under the tap. Any unblackened spots were re-brushed while wet and again rinsed. The yard was then allowed to dry. The next picture shows a closer view of the dried yard, taken the next day.
The straight, black wire shown in the last two pictures, is the jackstay rod. This was next slipped through the stanchions as shown in the next picture.
Straight .020" brass wire was used for this for its relative rigidity. It was pre-blackened using full strength Brass Black®. The eyebolts were spun from 28 gage copper wire. The fit is tight enough to keep the wire in place. In the last picture the jackstays have been inserted and clipped off.
The outer boom irons have also been fitted and a finish coat of satin wipe-on polyurethane applied, using a foam swab shown in the picture. The finish was "wiped" using a dry foam swab. The finish was applied to wood and iron alike.
Ed
-
EdT reacted to tlevine in HMS Atalanta 1775 by tlevine - FINISHED - 1:48 scale - from TFFM plans
The pilasters are finished and installed. Once the middle carved section was completed, the upper and lower parts were made up of various sizes of stripwood. A coat of finish has been applied to the taffarel and all the parts that needed replacing. The dreaded quarter pieces are next.
-
 EdT got a reaction from Richard Griffith in Young America 1853 by EdT - FINISHED - extreme clipper
Young America - extreme clipper 1853
Part 276 – Main Yard Truss
The main yard truss described here, and the mizzen version, are identical to the fore yard truss. The basic shapes shown in the first picture were cut out using a band saw with a 1/8" metal-cutting blade with a pasted-on pattern scrap as a guide.
I cut both main and mizzen at this stage to avoid another band saw blade change later. I used the band saw to save time vs. the jewelers saw. The basic profile of the truss was then filed out as shown below in the next two pictures.
The eyes at the ends were marked with dividers set from the band brackets on the yard, then drilled to accept 20 gauge copper wire. The unfinished yoke is shown in a test fit in the next picture.
In the next picture the yoke has been rounded, polished, and again fitted to the yard band brackets.
The center hole for the truss arm bolt is shown in this picture with a straight length of 20 gauge wire inserted. The next picture shows the fabricated truss arm.
The arm was made using sections of telescoping tube. The eye that will fit into the mast band bracket was fitted into a slot at one end and silver-soldered. A short length of 20 gauge wire was soldered into the other end. In the next picture a flange has been soldered to the wire to hold the arm on the yoke, but allowing it to rotate.
The assembly is set up, upside down, for bolting to the yard band brackets. Heads were first formed on one end of the copper bolts. They were then inserted from the top side o be clipped off just above the bracket surface and peened like the right-hand bolt in the picture. A square ended punch was tapped with a hammer in the position shown to enlarge the bolt head like a rivet. The left hand bolt is not yet clipped. The last picture shows the truss installed on the yard.
This picture shows the top of the yard. All soldered band joints, though not very visible, were positioned out-of-sight under the yard.
Ed
-
EdT got a reaction from BETAQDAVE in Young America 1853 by EdT - FINISHED - extreme clipper
Thank you, Greg. The extra band on the starboard side of the yard was one of those little drawing glitches that have been corrected - or will be.
Actually the finish is more of a benefit in removing handling smudges than for protection from the LOS solution - unless there is metal powder on an untreated wood surface. I had no problem using LOS next to untreated wood in all of the structural work on YA and Naiad. Keeping the wood clean of metal dust from hands or buffing is key. These spars take a lot of handling and its hard to keep hands clean during the concurrent metalwork - so the finish helps with that. Using the separate mandrel where possible for fitting and buffing helps with that.
Ed
-
EdT got a reaction from DORIS in Young America 1853 by EdT - FINISHED - extreme clipper
Young America - extreme clipper 1853
Part 278 – Completing the Main Yard
The first picture shows the main yard temporarily connected to the mast. Most of the ironwork has been fitted.
At his stage the yard was ready for the copper ironwork to be blackened. The brass-containing boom irons were pre-blackened before fitting. The next picture shows the removed yard and the ironwork being cleaned with isopropyl alcohol using a cotton swab.
The wipe-on poly base coat resists the alcohol and allows any smudges to be removed and the copper to be degreased. The next picture shows the yard after the liver of sulfur blackening process.
The blackening was done at the kitchen sink with tap water running. The yard and its fittings were liberally brushed with liver of sulfur solution and immediately rinsed under the tap. Any unblackened spots were re-brushed while wet and again rinsed. The yard was then allowed to dry. The next picture shows a closer view of the dried yard, taken the next day.
The straight, black wire shown in the last two pictures, is the jackstay rod. This was next slipped through the stanchions as shown in the next picture.
Straight .020" brass wire was used for this for its relative rigidity. It was pre-blackened using full strength Brass Black®. The eyebolts were spun from 28 gage copper wire. The fit is tight enough to keep the wire in place. In the last picture the jackstays have been inserted and clipped off.
The outer boom irons have also been fitted and a finish coat of satin wipe-on polyurethane applied, using a foam swab shown in the picture. The finish was "wiped" using a dry foam swab. The finish was applied to wood and iron alike.
Ed
-
 EdT got a reaction from Husar in Young America 1853 by EdT - FINISHED - extreme clipper
Love the comments.
First the number of hoops: At lengths of 82' and 86' respectively, I decided to make the fore and main yards as two-tree made spars. The main yard has a 30 ft scarph joinng the two trees, each about 60 ' long. These were bolted and banded, with heat-shrunk bands about 30" apart over the scarph length. Then there are bands for the sling, the truss, the inner boom irons and a number of eyebolt/fairlead bands. Youre right, Druxey - a lot of iron.
Massive is right, Wefalck. The yokes are about 6 feet across and the distance between mast and yard centerlines is about 6 feet as well. These were both dimensions I estimated from typical data. With a center diameter of 23" and a length of 86', I estimate this yellow pine main yard to have weighed in at about 3 1/2 tons for just the wooden spar - no ironwork, stun'sl booms, sails or rigging Of course the weight of all this was mainly taken on the chain sling at the center - with some help from the topping lifts.
Still smaller than a main yard on a first rate like Victory: 102' x 24" diam.
Ed
-
EdT got a reaction from BETAQDAVE in Young America 1853 by EdT - FINISHED - extreme clipper
Thank you, Micheal. I can assure you that the drawings are as much work as the model - maybe more - and 2/3 of that is checking and review.
Ed
-
 EdT got a reaction from paulsutcliffe in HMS Naiad 1797 by albert - FINISHED - 1/48
Fantastic work, Alberto.
Ed
-
EdT got a reaction from Piet in Young America 1853 by EdT - FINISHED - extreme clipper
Thank you, Micheal. I can assure you that the drawings are as much work as the model - maybe more - and 2/3 of that is checking and review.
Ed
-
 EdT got a reaction from Jeronimo in Young America 1853 by EdT - FINISHED - extreme clipper
Thank you, Greg. The extra band on the starboard side of the yard was one of those little drawing glitches that have been corrected - or will be.
Actually the finish is more of a benefit in removing handling smudges than for protection from the LOS solution - unless there is metal powder on an untreated wood surface. I had no problem using LOS next to untreated wood in all of the structural work on YA and Naiad. Keeping the wood clean of metal dust from hands or buffing is key. These spars take a lot of handling and its hard to keep hands clean during the concurrent metalwork - so the finish helps with that. Using the separate mandrel where possible for fitting and buffing helps with that.
Ed
-
EdT got a reaction from JerryTodd in Young America 1853 by EdT - FINISHED - extreme clipper
Young America - extreme clipper 1853
Part 278 – Completing the Main Yard
The first picture shows the main yard temporarily connected to the mast. Most of the ironwork has been fitted.
At his stage the yard was ready for the copper ironwork to be blackened. The brass-containing boom irons were pre-blackened before fitting. The next picture shows the removed yard and the ironwork being cleaned with isopropyl alcohol using a cotton swab.
The wipe-on poly base coat resists the alcohol and allows any smudges to be removed and the copper to be degreased. The next picture shows the yard after the liver of sulfur blackening process.
The blackening was done at the kitchen sink with tap water running. The yard and its fittings were liberally brushed with liver of sulfur solution and immediately rinsed under the tap. Any unblackened spots were re-brushed while wet and again rinsed. The yard was then allowed to dry. The next picture shows a closer view of the dried yard, taken the next day.
The straight, black wire shown in the last two pictures, is the jackstay rod. This was next slipped through the stanchions as shown in the next picture.
Straight .020" brass wire was used for this for its relative rigidity. It was pre-blackened using full strength Brass Black®. The eyebolts were spun from 28 gage copper wire. The fit is tight enough to keep the wire in place. In the last picture the jackstays have been inserted and clipped off.
The outer boom irons have also been fitted and a finish coat of satin wipe-on polyurethane applied, using a foam swab shown in the picture. The finish was "wiped" using a dry foam swab. The finish was applied to wood and iron alike.
Ed
-
 EdT got a reaction from mtaylor in HMS Bellona 1760 by SJSoane - Scale 1:64 - English 74-gun - as designed
Paint is a lot easier to mask than stain.
Ed
-
EdT got a reaction from mtaylor in HMS Naiad 1797 by albert - FINISHED - 1/48
Fantastic work, Alberto.
Ed