

JanV
-
Posts
394 -
Joined
-
Last visited
Reputation Activity
-

 JanV reacted to fmodajr in Wasa by fmodajr - FINISHED - Corel - 1:75
Hello!
I was able to finish up some more rigging between the foremast and mainmast.
Main topgallant sail bowlines
Main topsail bowlines
Main lower sail bowlines (middle of picture on far side of sail)
Fore topgallant yard braces
Fore top yard braces
Fore lower yard braces
Lines finding their way to the deck railings
Overview of work between the foremast and mainmast.
One thing I am having a lot of trouble with is in trying to minimize the distortion of the main stays
due to all the lines and blocks being attached to them.
My next step is to finish up the bowlines on all 3 foremast sails!
Thanks again for visiting and for all the "likes"
Frank
-
JanV reacted to Remcohe in HMS Kingfisher 1770 by Remcohe - 1/48 - English 14-Gun Sloop - POF
And now for something completely different. I took a break from the tedious deck work, intrigued by Garus' steering wheel on his excellent Victory and especially his duplicating device, I build the steering wheel. Using the technique described in TFFM 2 and 3. Not easy but lots of fun, frustration and multiple redo's later, the results:
Remco
-
JanV reacted to guraus in HMS Victory by guraus - scale 1:48 - plank on frame
Thank you all.
Here are more progress pictures.
Alexandru
-
JanV reacted to guraus in HMS Victory by guraus - scale 1:48 - plank on frame
Hello,
Here are some more progress pictures for the several last weeks.
Regards,
Alexandru
-
JanV reacted to Piet in Surabaya by Piet - 1/80 - Mid 17th-Century VOC ship
Thank all of yuns for clicking the like button and your comments Hans and Bluto Jim.
Yes Hans, the ants were properly disposed of and I like the color blue, matches the ocean
I understand your dilemma with the guns on your ship Jim but they could have been rigged before the gangboards were installed. I'll show you what I did for a similar situation. The Surabaya has two gun decks, the lower or orlop deck has sixteen 18 pounders that are hidden from view, thus not rigged. I did put the gun carriages on the decks and cemented the guns to them.
The upper gun deck has fourteen 12 pounders, six are under the quarter deck and then the eight on the waist I am now working on.
The part under the quarter deck is open in the front thus visible and I rigged them before the quarter deck was put on. I had plenty of space to work with because there was nothing yet behind the main mast. I wanted people to be able to see the guns and their rigging tackle.
Some parts of this build has been a challenge for me, specially at this scale. I am an airplane guy, maintenance and engineering with over 12 certificates in the machinist trades but I have always loved ships and the sea. I understand the basics of ship design (part of my educational background) but it's the details of these 17th century ships I was lacking. Thanks to Amateur Jan, Amazon Dirk and now Hans I'm spooling up to that too.
When I started this build I didn't have much of any info, like books and line drawings, just paintings and copies of old prints. Not much to go by. In the meantime I have increased my library and have a lot more confidence. Besides, I love fiddly stuff, it's a challenge.
Unfortunately my introduction to this build and many posts after that were lost with the crash of version 1.0 of MSW. I explained why I am building this ship and how.
Your ship is certainly looking very good and doing a partial gun rigging should work okay. Too late to install the full gun tackle now.
In any case here are a few pics of the guns being installed under the quarter deck way back in September of 2012.
This shows one of the gun carriages being dry-fitted for the tackle. I made the gun trunnion bands from paper and cemented them to unpainted parts of the carriage cheeks. That way the guns could pivot a little.
This shows all six guns under the quarter deck installed and rigged. That stump is a dummy where the mainmast will be.
Cheers,
-
JanV reacted to Piet in Surabaya by Piet - 1/80 - Mid 17th-Century VOC ship
Yesterday I completed coiling all the gun tackle ropes on the starboard side I have been working on. There is some collateral damage to be taken care off. Nothing that some 360 grit sandpaper and poly brush-on can't handle.
I had to coil the forward rope behind the forecastle ladder because there is no way to put it right in front of the ladder. The sailor's union would never approve it
I understand that this may not even be the way it was in real life, too many obstacles on the deck, unless the sailors walked over the gratings. But it's just to show how the guns may have been rigged. But then again, they could have easily unhooked the pull-back tackles and stowed them under the gun carriages.
After everything is touched up I can rotate the build dock and do the same thing on the port side.
Cheers,
-
 JanV got a reaction from Sjors in Wasa 1628 by JanV - Corel - scale 1:75 - Vasa
Noted that I missed some latest postings.
I expect to continue during the X-mas holiday period (14 days off from work )
in the meantime a smal project in between
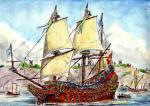
the Golden Yacht, a ship in a bottle
-
 JanV got a reaction from cristikc in Wasa 1628 by JanV - Corel - scale 1:75 - Vasa
Noted that I missed some latest postings.
I expect to continue during the X-mas holiday period (14 days off from work )
in the meantime a smal project in between
the Golden Yacht, a ship in a bottle
-
JanV reacted to Piet in Surabaya by Piet - 1/80 - Mid 17th-Century VOC ship
Thanks everyone for your comments and for all the likes, it's much appreciated.
Actually these are carpenter ants REALLY! They are all over the place, under my palm trees, inside the palm fronds and these I picked from a dead palmetto bush in the vacant lot next to us. They are as fears as fire ants but much larger and we have to keep tem away from the house!
Thanks for the Thanksgiving wishes George, the same to you and everyone reading this.
This morning I prepped the port side to coil the gun tackle ropes. Instead of using two-sided carpet tape, which I don't have, I doubled up on some masking tape. The idea is to coil the rope around a dowel on the tape that'll hold it temporarily in place. After one turn around the dowel I can remove the dowel and coil the rest of the rope inside. To keep the coil from unwinding I'll brush nail polish on it to glue it together.
It'll be tight against the bulwark but I plan to use fewer turns.
Here you see how I plan to make the rope coils.
Cheers,
-
JanV reacted to md1400cs in Wasa by md1400cs - FINISHED - Corel - 1:75
Hi mates,
Thanks for dropping in. Mark thanks as well for your supper compliment SO appreciated. Yes four more (bowsprit done) Hmmm
Though the next ones should be easier. Learned a few things with this lower foremast plate, as well as having a grasp on how to fashion the needed parts.
-------------------------
Continuing, I started to fashion the deadeye “chains” using 20 gauge black wire (pic 1) not correct, but such a small almost hidden detail once the plate gets busy with ropes everywhere.
I then realized that the lower ring braces were extending outward too far (see pic 2, 3, 4) and the chain would not hang properly outside of the lower already attached ring
So removed the ring and Dremeled down the braces (see pic 5)
--------------------------
I then took some leftover bits that I had purchased to use as chains for the hull, but then decided against it. So those bits will now become (after blackening them) the way to attach deadeye/chains to the ropes below the mast cap. See pic 6.
The last three pics show the “fix” my favorite word with this very very slow build. (:-)
So, the next caps will have a bit larger flat ring and or cap floor will be a bit smaller.
Thanks for still following along at this snails pace,
Regards,
Michael
-
JanV reacted to fmodajr in Wasa by fmodajr - FINISHED - Corel - 1:75
Continuing to make some progress on the model!
I finished up all the standing rigging by installing the lines from the bowsprit to the lower foremast stay.
That should do it for the standing rigging.
I also finished working on and installing the last sail. The lower spritsail.
As with all the other furled sails, I took off 1/3 of the sail height in order to make the furling easier. Then I attached the sail to the yard.
I liked the way this furled sail turned out. (Better than the topsail!)
Pre-rigging of blocks and lines to back and front
I fixed the sail to the bowsprit and finished most of the rigging.
I left some of the rigging dangling until I rig the bowlines from the foresails. (It will be easier getting the bowlines in place before the rest of the lines are installed)
Overview of the model at its current state
Next, I will go back to finishing the rigging lines from the foresails and the bowlines from the main sails. (Basically, work on the lines between the foremast and mainmast)
Frank
-
JanV reacted to wim500 in Korean Turtle War Ship by wim500 - FINISHED - Young Modeler - scale 1/65 - wood
Paintint the dragonhead in gold, for more depth it need some black wash.
Studying the pattern.
An impression:
.
This is what is left of the interior
Finished the armor, I am satisfied with the result so far.
-
JanV reacted to RobZorba in Vasa by RobZorba - Billing Boats - 1:75
Here's one of the completed gun ports ... in fact all 54 of them are completed and waiting to be fitted ... the hatch covers are bits of lollipop sticks, the hinges are hammered bits of brass wire, and the canon is mounted to a small square of perspex with a hole drilled, and a "gun carriage" painted in black on the back. The lights installed in the model shine through the perspex of the gun port.
-
JanV reacted to RobZorba in Vasa by RobZorba - Billing Boats - 1:75
Completed the walkway installation in the prow of the ship ... not stained yet ... that will come later, after the rigging stay rails (lower picture) are fixed in place.
-
 JanV got a reaction from Elijah in Vasa by RobZorba - Billing Boats - 1:75
Hello Rob,
I just noted your buildlog today. welcome to the group of Vasa builders
a lot of examples available on this forum.
-
 JanV got a reaction from mtaylor in Vasa by RobZorba - Billing Boats - 1:75
Hello Rob,
I just noted your buildlog today. welcome to the group of Vasa builders
a lot of examples available on this forum.
-
JanV reacted to RobZorba in Vasa by RobZorba - Billing Boats - 1:75
And finally some other images from the museum that may help with building fixtures and fittings:
-
JanV reacted to RobZorba in Vasa by RobZorba - Billing Boats - 1:75
Now a set of images of the actual Vasa which is preserved in the museum:
-
JanV reacted to RobZorba in Vasa by RobZorba - Billing Boats - 1:75
I decided to add lights. I didn't want to fiddle around too much so I bought a 1 meter strip of 3M LED "yellow" lighting complete with 12v power supply. I managed to glue it upside down below the deck gratings so the LED's shine indirectly with reflected light coming up through the gratings. I also cut holes in the rear frames and threaded one end of the strip so it would light up the captain's cabin. In the pictures, the LED strip is not yet in its final centralized position.
-
JanV reacted to fmodajr in Wasa by fmodajr - FINISHED - Corel - 1:75
Hello,
I have been working on the bowsprit topsail.
When I made the sail, I cutoff about 1/3 of the sail so that it would furl better.
However, I think I should have cut off about 1/2 of the sail instead. (this sail is unusually large compared to the yard) When I furled this sail, it still looks a little too bulky.
Oh well! I am pretty sure that when I put tension on all the running rigging attached to this sail I will be able to flatten it some more. We'll see.
Sail mounted onto yard.
Blocks and rigging added to sail
Sail and halliard rigged to platform
Finished foremast topgallant stay mounted to foremast and bowsprit platform
Blackened brass fittings rigged and mounted under platform
View of ship status so far.
Next I will be finishing the standing rigging from the bowsprit mast to the foremast lower stay.
Then I will work on attaching and mounting the spritsail.
Thanks for visiting and for the "likes"!
Frank
-
JanV reacted to md1400cs in Wasa by md1400cs - FINISHED - Corel - 1:75
Thanks for the likes and thanks for dropping by and posting encouraging notes. (;-) Finishing up the fabrication of the foremast platform.
•Trimmed down the lower braces before mounting the first ring
•Then made the bits for the upper ring braces
•Used a divider point to simulate the small nails for the lower braces
•Installed the 18 vertical bits
•Added the rings
•Then with a rotary tool sanded down the protruding edges and tops
+++++++++++++++++++++++
Next up, need to cut the 32 small bits to insert around periphery of the platform. Used the blue tape as a measure guide for all the cuts.
This second platform was easier than the first (bowsprit) I learned through experimenting with the first one. The upper fore, and the three mains should be a smooth build section.
Still mentally thinking of how to insert the shroud deadeyes and keeping the chainplate rope attachments within scale. Still a “?”
I wonder if just wrapping lower the deadeyes in tarred rope and running those eight ropes through the large flat ring would be “OK” ??
However I believe that the last pic IS how it should be Hmmmm
Again, thanks for dropping by.
Michael
-
JanV reacted to md1400cs in Wasa by md1400cs - FINISHED - Corel - 1:75
RobZorba has been a bit frustrated in his log with the Billings Vasa stern measurements, and your ship looks so excellent.
So I thought that I would re-visit the issues that I had with my Corel’s stern.
Pic 1 – A PERFECT out-of-the-box build of Corel Wasa (beautiful work with the addition of sails). Euro builder it was for sale, and it did sell on the commercial market.
Pic 2 – As it should look – and still does
Pic 3 – My Corel out-of-the-box initial work
Pic 4 -6 – My beginnings of a surgical fix
Pics last three – after surgery and butt lift (still not “just right”) an improvement for sure.
Lot’s of extra (should not have been needed) extra work J
-
JanV got a reaction from mtaylor in HMS Agamemnon by Sjors - FINISHED - Caldercraft/Jotika - 1:64
Good to see you back Sjors. Also greetings to Anja.
Nice to see this Aggy again in process.
-
 JanV got a reaction from Piet in HMS Agamemnon by Sjors - FINISHED - Caldercraft/Jotika - 1:64
Good to see you back Sjors. Also greetings to Anja.
Nice to see this Aggy again in process.
-
JanV reacted to mobbsie in Bomb Vessel Granado 1742 by mobbsie - FINISHED - 1/48 - cross-section
Hi Guys, back from the track and a good day was had by all, it was lovely to see my sons face after each event, took me years back to when he was just a young boy, wonderful.
OK, it's time to show the cannon's, as I said in my last post their not identical and their a little longer than should be, but I quite like them.
Also I shall be showing some pics of how I do the Trunion Caps, there not meant as a tutorial so please don't think they are, it's just the way I do them.
Some pics
So now for the Trunion Caps
A sheet of 0.4 brass, cut a little narrower than the sides
Turn the end of the strip up and place 0.5 brass wire inside
Using tweezers, press the turn up down and apply pressure, locking the wire in place.
Place strip into blackener.
Position the strip onto the carriage side and cut to size, then when in position press firmly either side of the Trunion until the strip forms a good fit over the Trunion.
Drill a 0.5m hole into the end of the strip
Place a small eyebolt in the end and a light dab of C/A to fix
A simple way of making the Trunion Caps, the finished item.
I do hope you don't mind me putting my method in here, as I say it's not meant as a tutorial, it's simple and it works for me.
Next up is the Deck Arrangement i.e. Ladders, Kevel Cleats etc.
Be Good
mobbsie