HOLIDAY DONATION DRIVE - SUPPORT MSW - DO YOUR PART TO KEEP THIS GREAT FORUM GOING! (Only 20 donations so far - C'mon guys!)
×


popeye the sailor
-
Posts
16,007 -
Joined
-
Last visited
Content Type
Profiles
Forums
Gallery
Events
Everything posted by popeye the sailor
-
 thank you Mark....the log isn't as colorful {referring to the comments and my narration} as the original one, but given time, more will follow. I can't wait to start the 'other' lost log......I'll be turn'in that one up a notch
 -
nice progress Michael.......another point about the rocks, is some appear to be polished. the color mix looks good...agreed about perhaps looking at aquarium rocks, but not too small. a lot of what they carry looks more like granules. they do sell pea stone in small bags....or you could even make your own. not hard to make smaller rocks from bigger ones deck framing looks great
-
i'm really late for the party this time.......amazing work you've done so far very well done!
-
very nice progress JP the blackening looks real good
- 51 replies
-
- 1
-

-
- krabbenkutter
- billing boats
- (and 1 more)
-
nice looking model Peter
-
*quote* What do you mean Denis? My PM just talked about your M&M revival, I don't think I said anything about my starting on the Providence. we talked about it before you started the log looks like the modifications are agreeing with the Providence....if the decks become harder to line up, you may want to trace the parts together on a fresh piece of flat stock and cut out a new deck platform. this will also make it easier to find those tiny deficiencies where you trimmed out the bulkheads. she's look'in good
-
clove hitch.........two words you will never misspell again {not that you did......just say'in}. super job on the ratz........they look great!
- 1,306 replies
-
- 6
-
-
- syren
- model shipways
- (and 1 more)
-
sorry to hear your not feeling up to par Bob.......you did a great job on the deck in spite of it though! as always you've maintained your clean quality workmanship. hopes yas feel better soon ....and if ya does have a blooper.......do as I does.......hide it wid a rope coil AK-k-k-k-k-k-!
- 359 replies
-
- 5
-
-
- prince de neufchatel
- model shipways
- (and 1 more)
-
yepper........that kit's been around for a while! been a long time since I last heard that company name I've got a project like this in the works......I'm just waiting for my second set of decks to warp out, so I can start all over again { I gotta get that one back on the table}. sounds like a fun project.......will enjoy following along!
-
I was having trouble wrapping my head around the problem at first........I kept coming to the solution that both blocks couldn't be fastened to the roof. the way it looks now is much better....darned I didn't see it either. the picture you showed earlier with the center board rope coming out from under the winch........the pulley on the deck really isn't doing much. with the pulley in the upright position like that, the rope would be rubbing on the pulley bracket. now if the pulley was lying flat on the deck, the the pulley would be more efficient...better pulley / rope contact. true that it runs up to the second pulley......but look what it's doing as it runs through the deck pulley. yours is better though, because this pulley is closer to the cabin wall..........travels the deck.......goes through the pulley where you have it, and then runs up to the second pulley, where the rope is now attached to the double block. there is better rope / pulley contact.
-
there is also molding too........my best friend is 1/4 round. look into Plastruct and Evergreen......they have a wide variety of stuff to play with this is the hardest part........adjustments will be a lot easier once the rest of the bulkheads are in place. looking really good so far
-
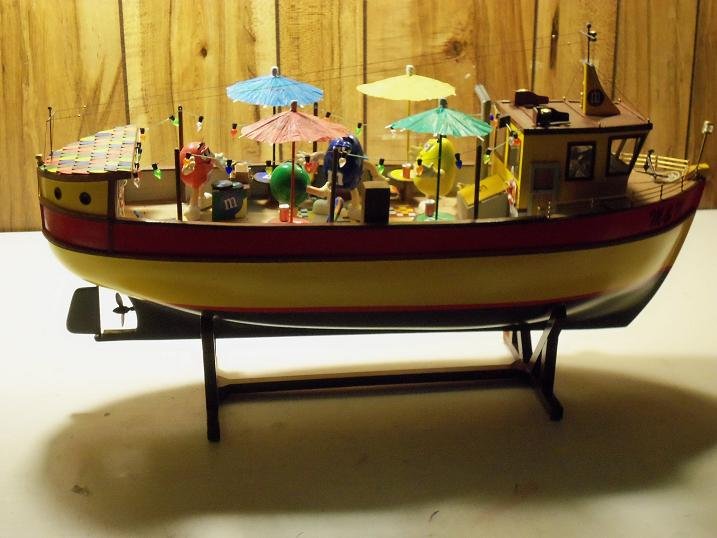
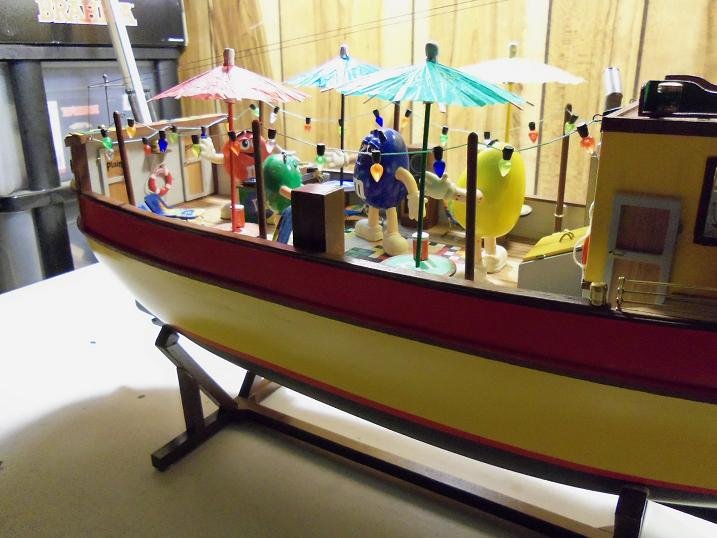
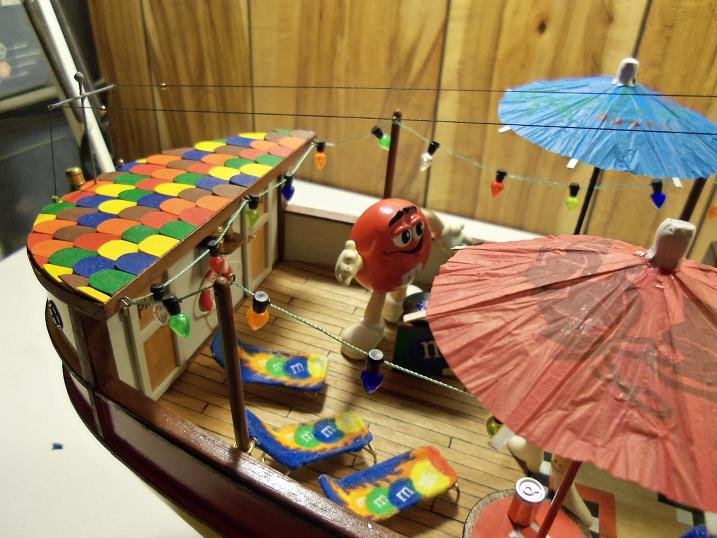
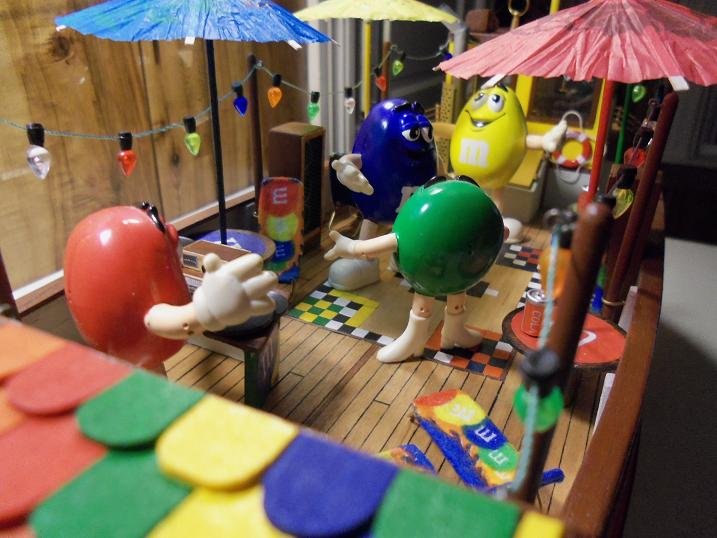
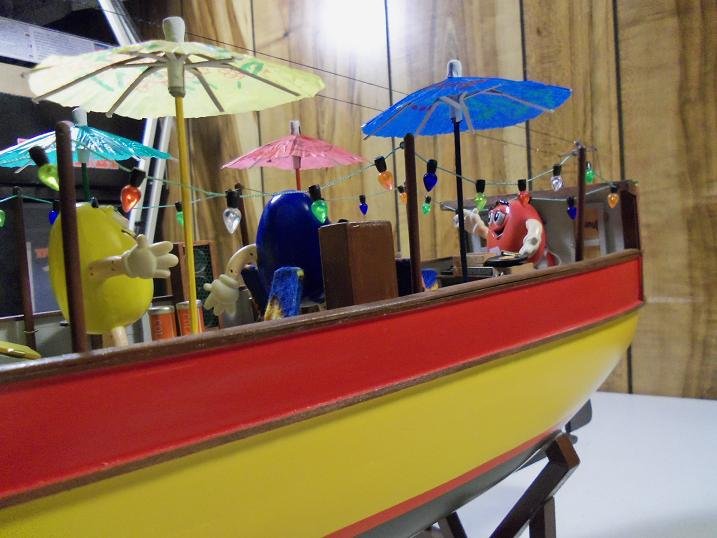
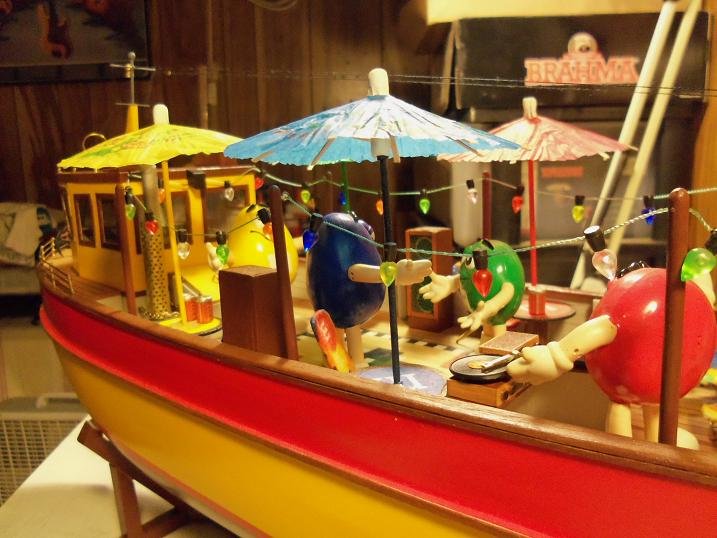
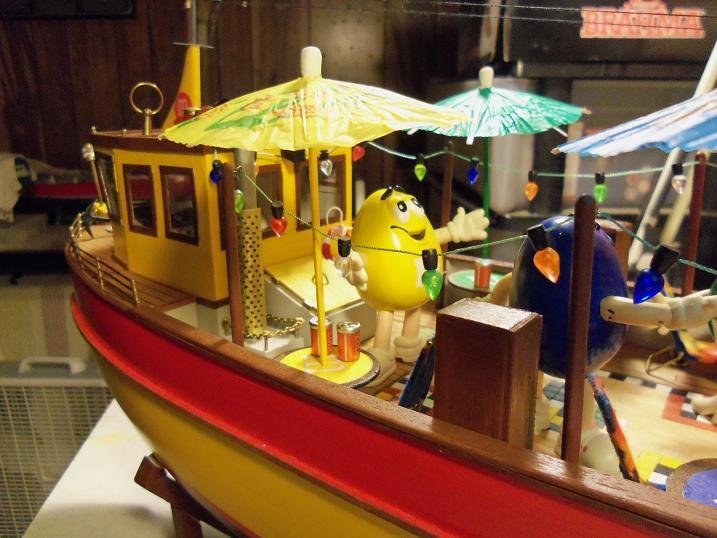
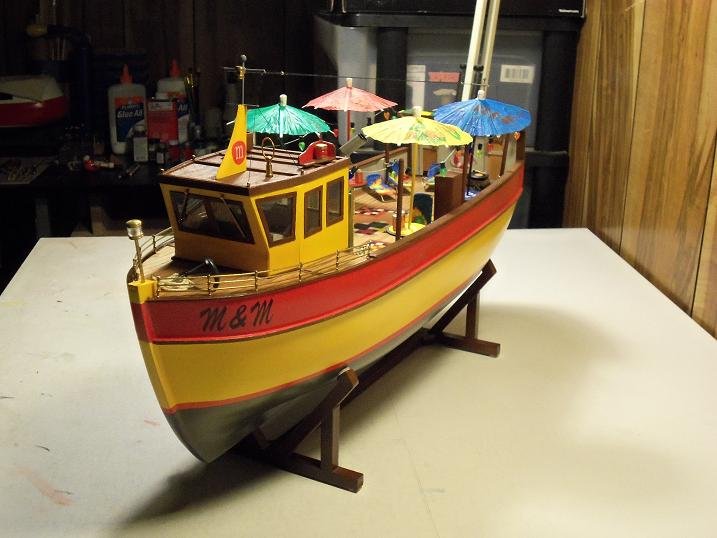
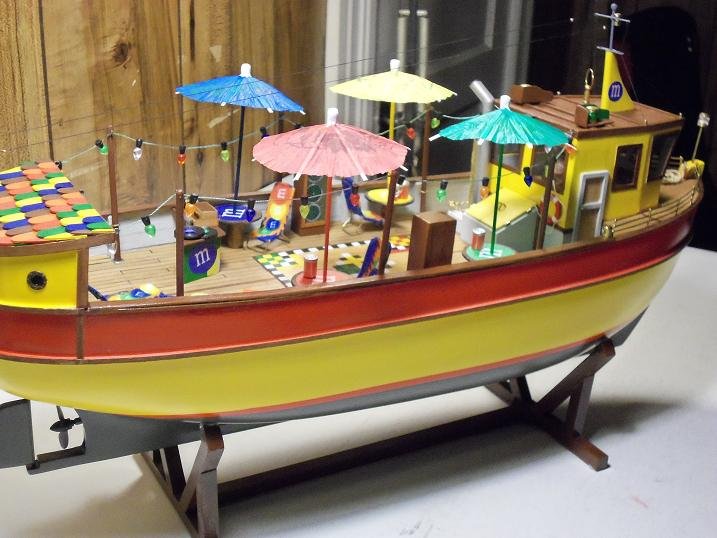
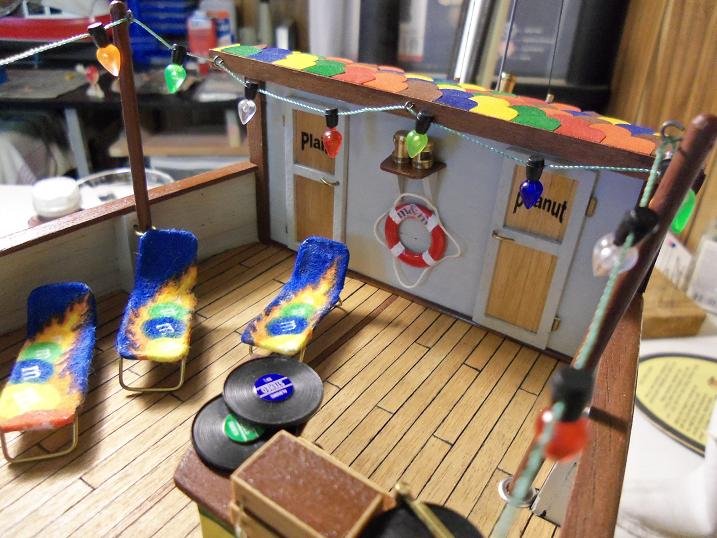
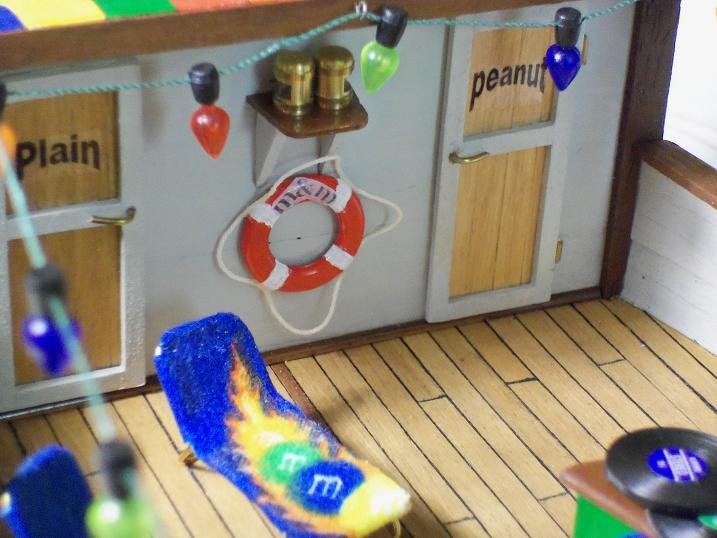
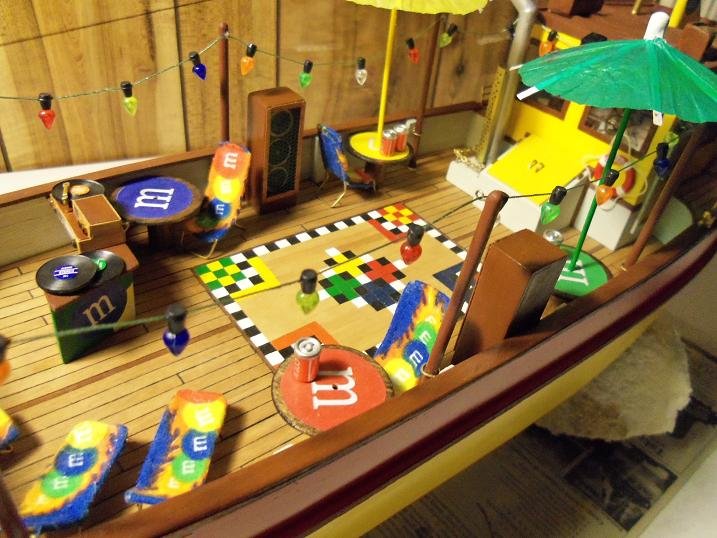
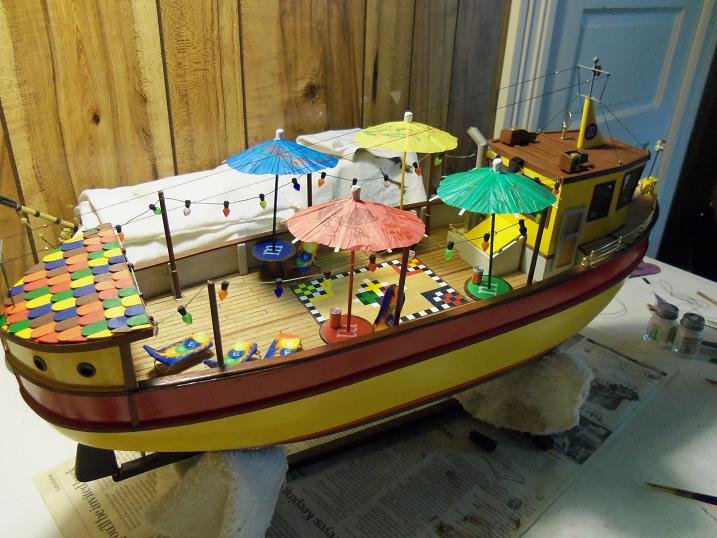
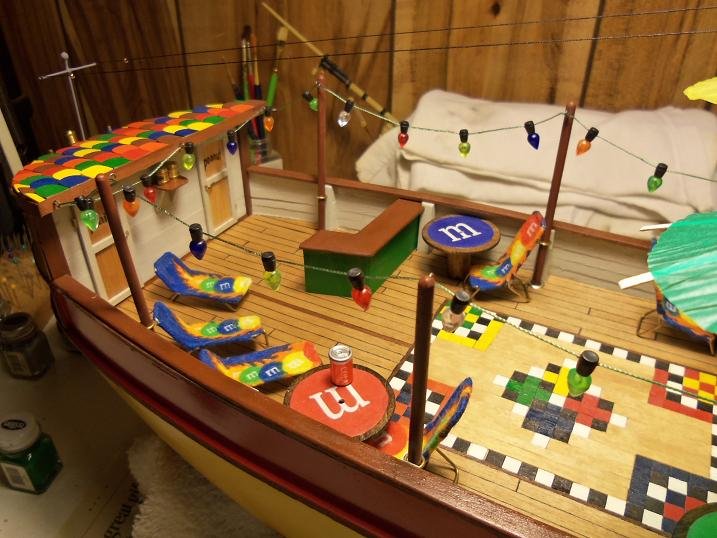
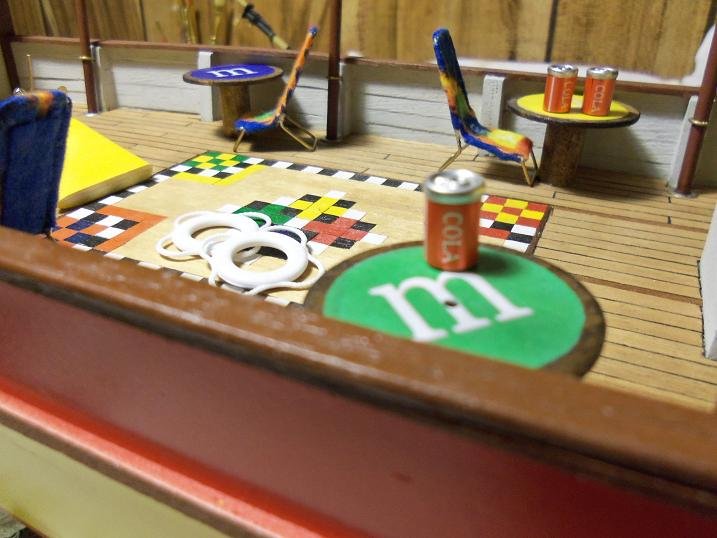
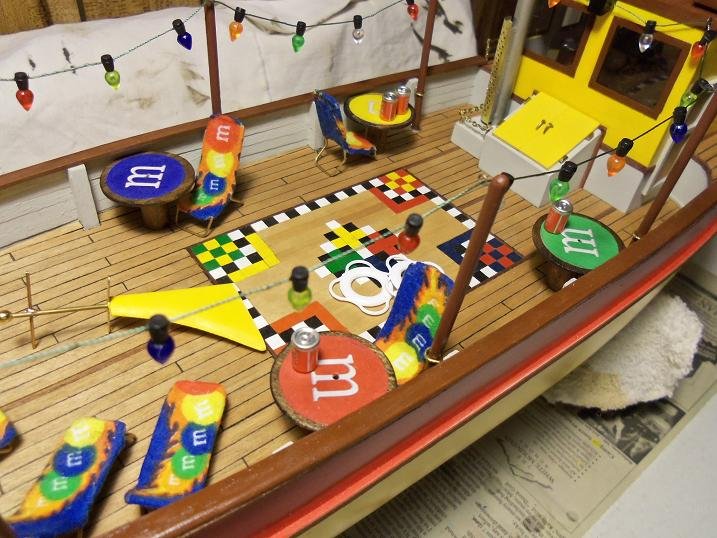
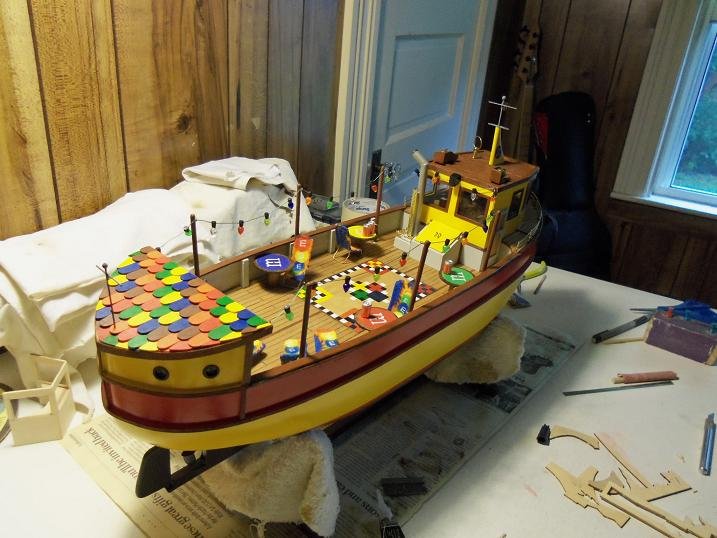
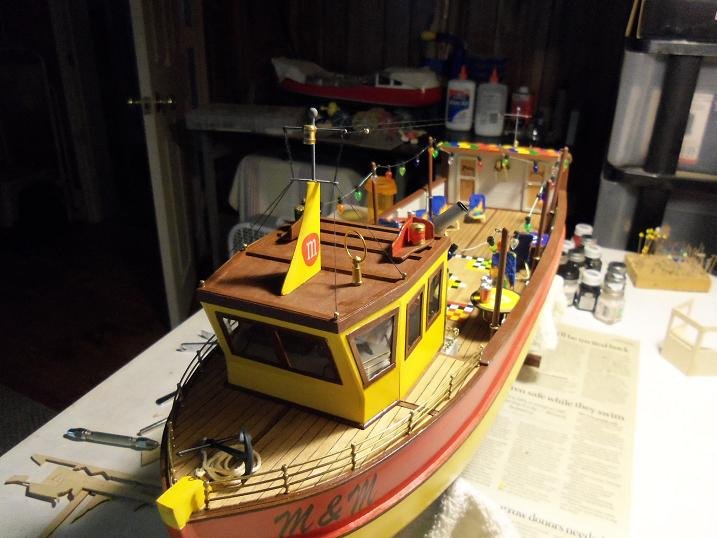
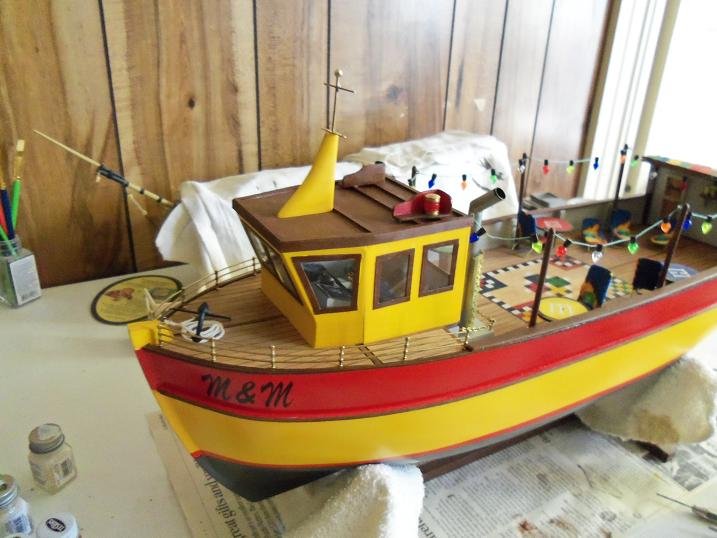
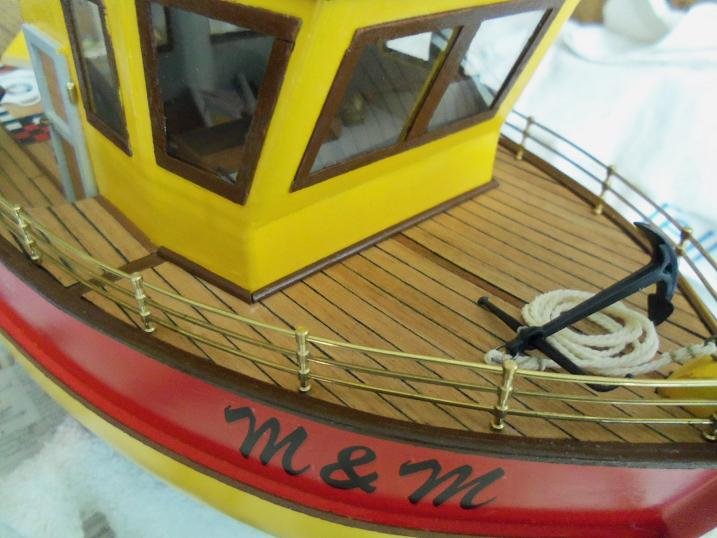
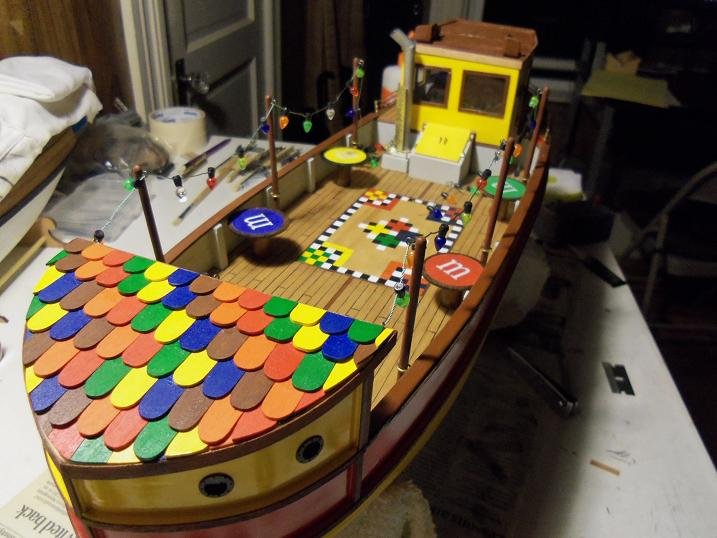
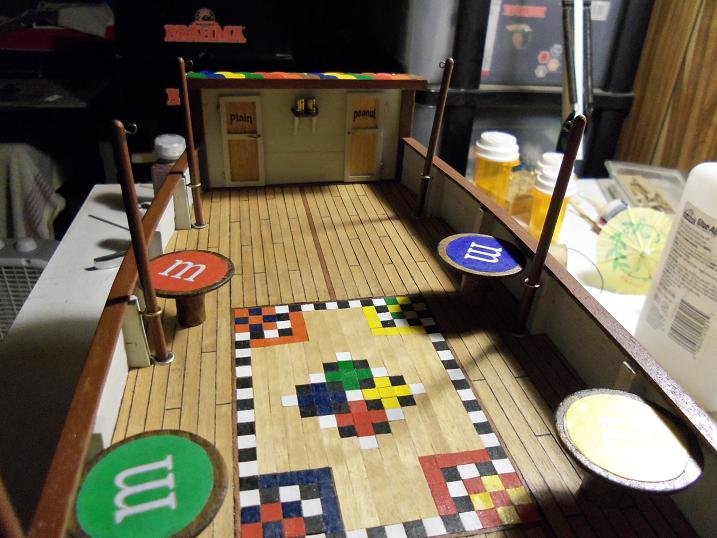
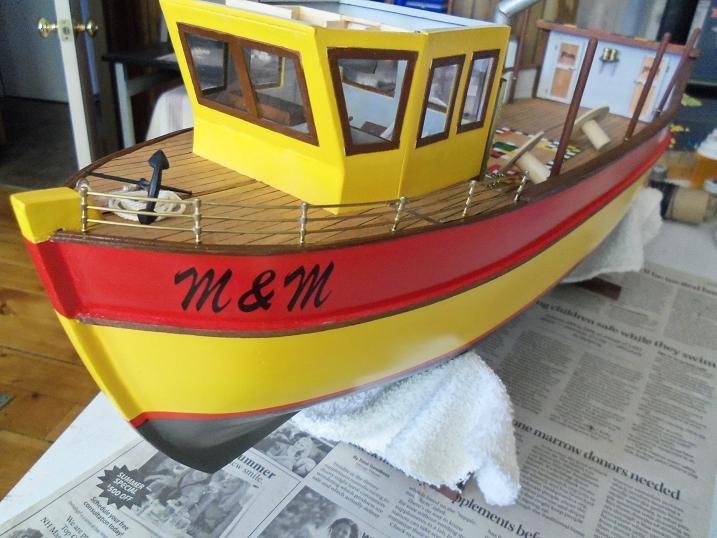
thank you very much everyone for all the kind comments seeing all the interest..... back in the day, I probably should have reposted the log. I think that more folks would have stumbled onto it while thumbing through the archives. it's interesting to see folks are beginning to research the lesser known ships and are trying to model them. not that there is a lack of informational base to guide them or compare them to, but because they feel that these subjects are note worthy, and they want to bring them to light. in some cases, it's harder to do, the research is a lot more intense.....but the information gathered will expand the medium in many ways. this fantasy build was no different.........it was a balancing act between creating a functional subject {a could be}, and a whimsical fun build that I could let my hair down a little. I was glad to get this one out, while I am still able to think of stuff like this a short time after the model was finished, I thought I'd send some pictures to M&M / Mars, the company that makes the candy. here is the reply that I got: Dear Loyal Consumer, In response to your email regarding M&M'S CHOCOLATE CANDIES. Thank you for your email. We're pleased to hear you enjoy our M&M'S CHOCOLATE CANDIES and appreciate your taking the time to tell us so. Your comments will be shared with our Marketing Associates. We also appreciate your enthusiasm and creativity regarding the model boat you crafted. The pictures you linked to show that you have put a lot of time into this, from the DJ stand to the lounge chairs on the deck and even the M&M'S tabletops. We thank you for sharing this with us, and will share your craftsmanship with the rest of our team! Have a great day! Your Friends at Mars Chocolate North America MM/cl011855455A Please do NOT reply to this email. If you would like to respond to this message, click on the link below.
-
the admiral wanted to have the figures we gathered on the model. this is the novelty.......to add them, I had to remove the stands {which was real easy} so here it is.........for those who haven't seen it, I hope you enjoy going through the log. for those who saw it first hand, I hope you enjoyed seeing it again

-
there are pictures of this model in the gallery. I broke this model up into two files.......the model and the novelty. the model doesn't have the figures on it......I took them for sentimental reasons. I'm not much for having figures populating my models......actually, the King of the Mississippi is going to be my first.....was. I had fun building this model.......it was so easy to come up with the ideas......it was planned out before I started. here is the model:


-
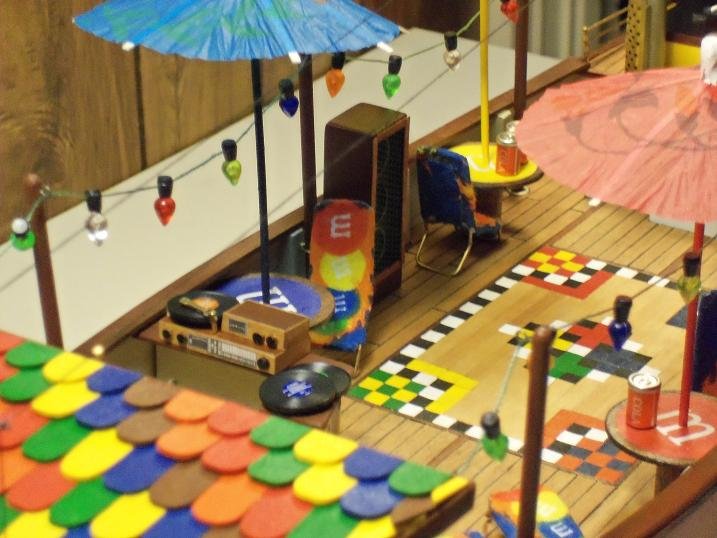
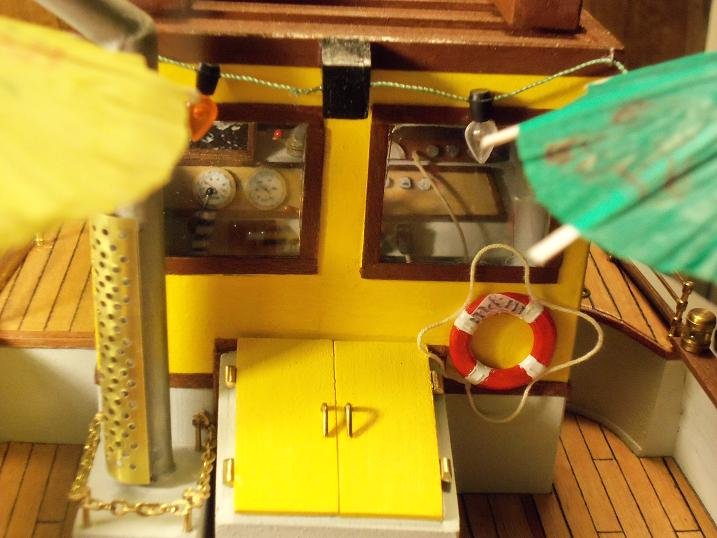
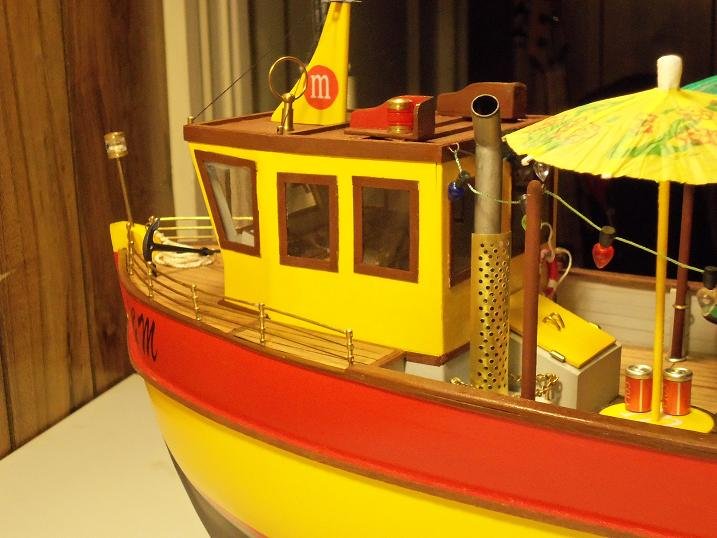
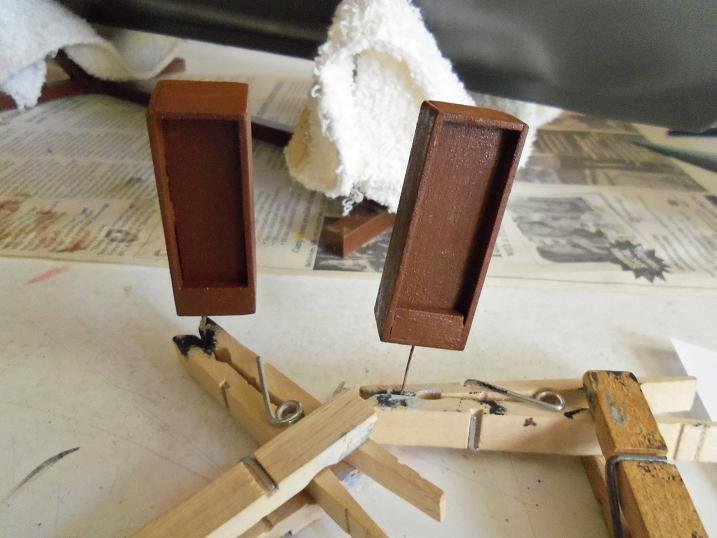
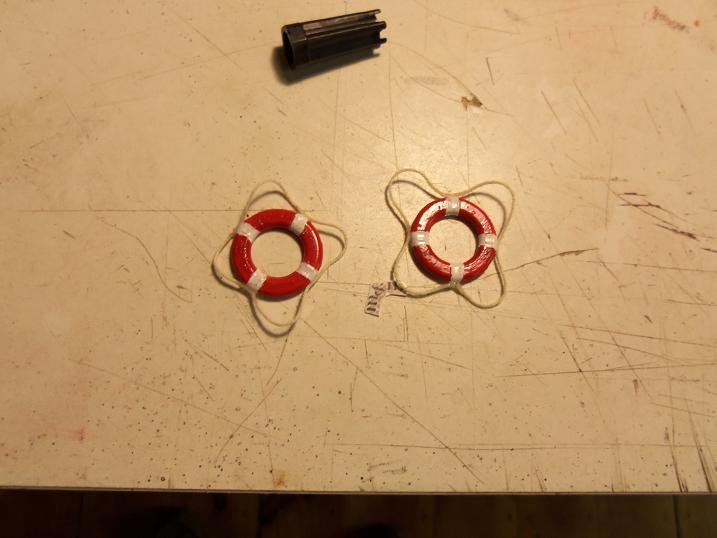
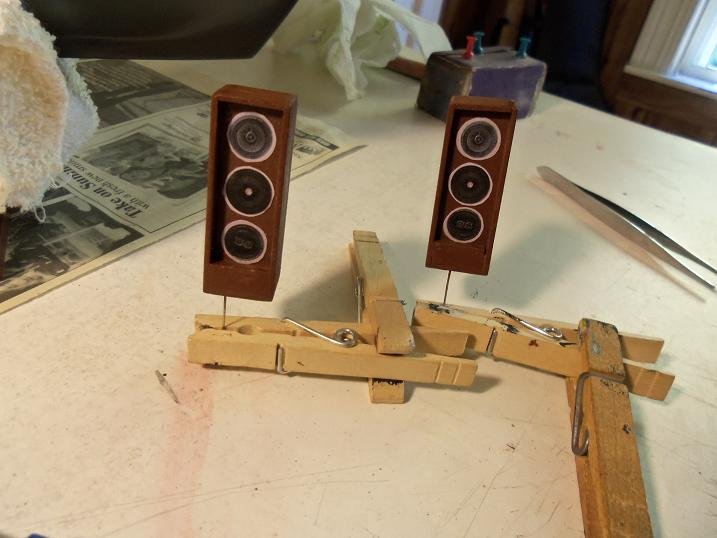
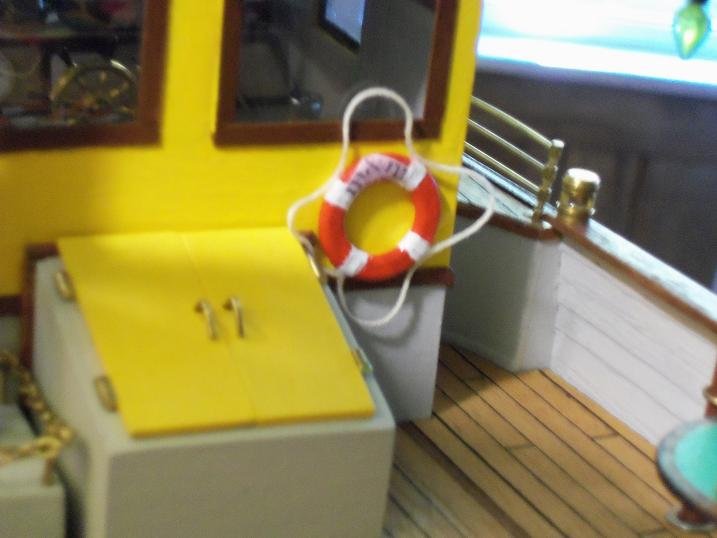
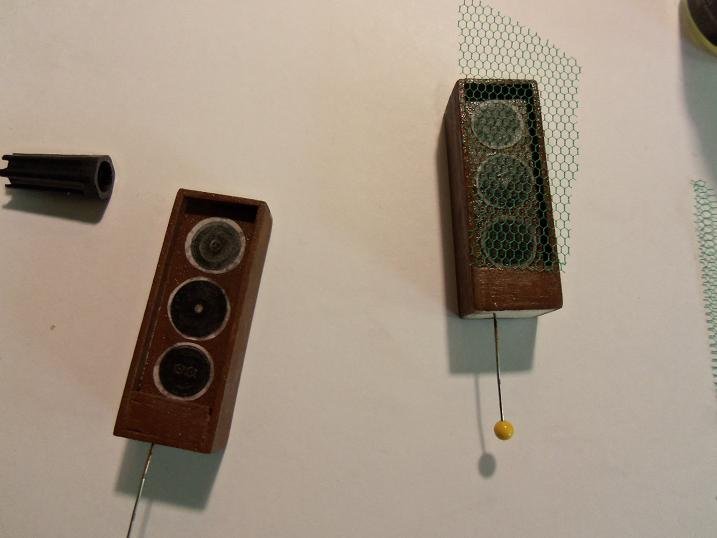
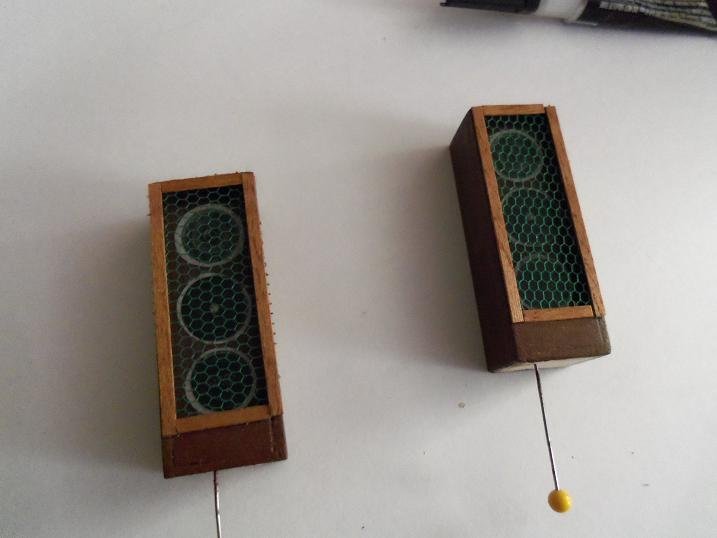
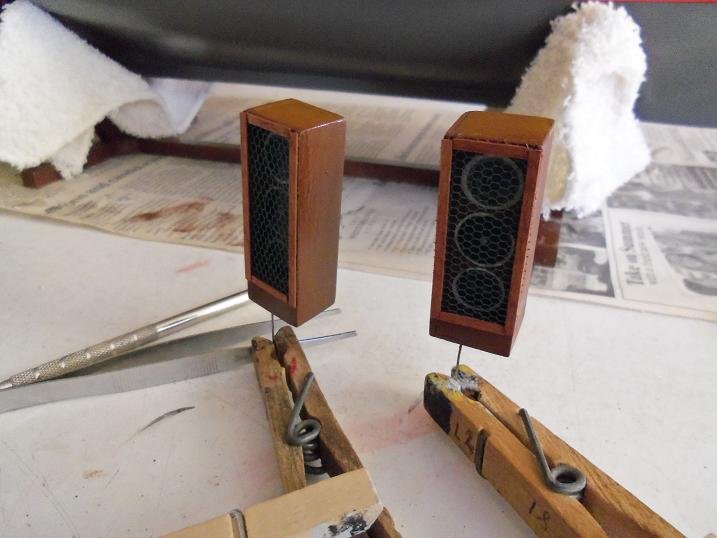
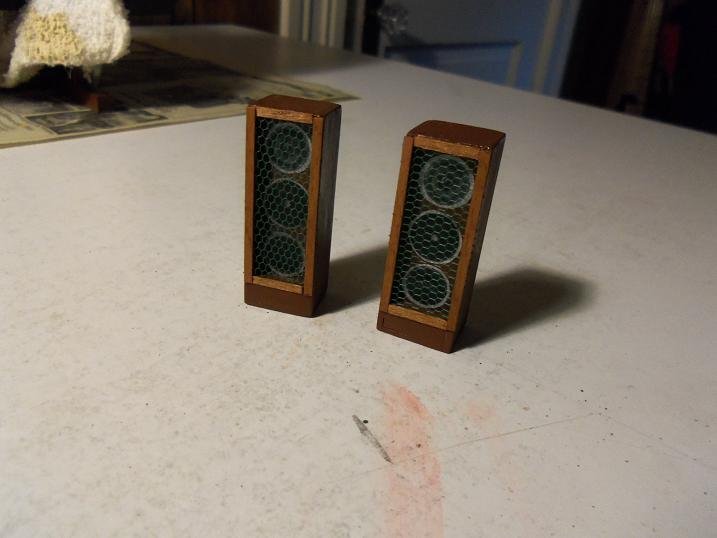
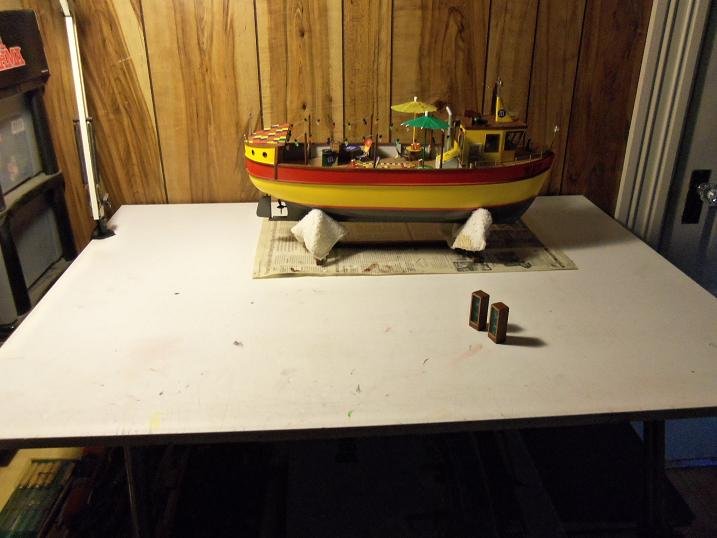
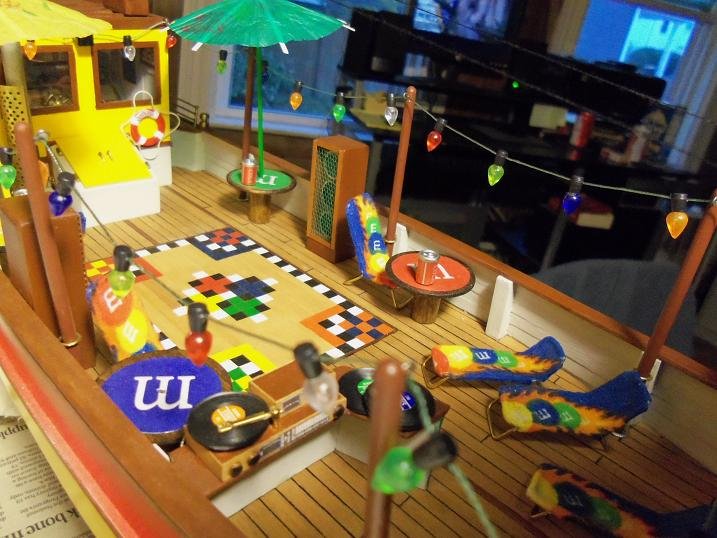
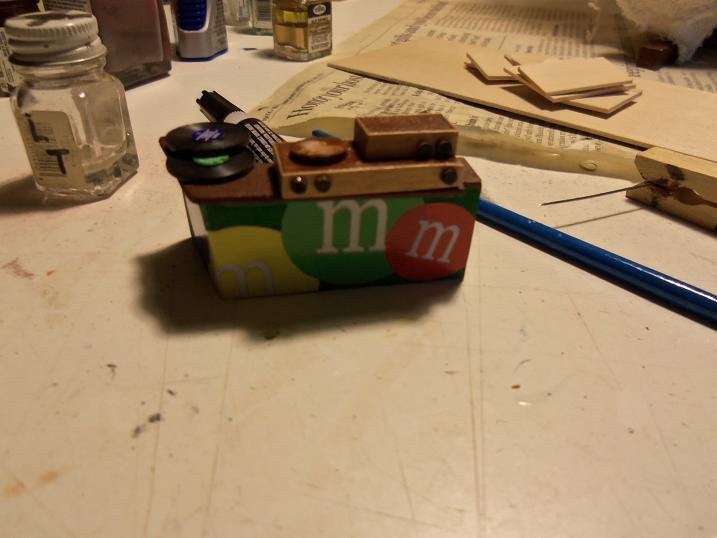
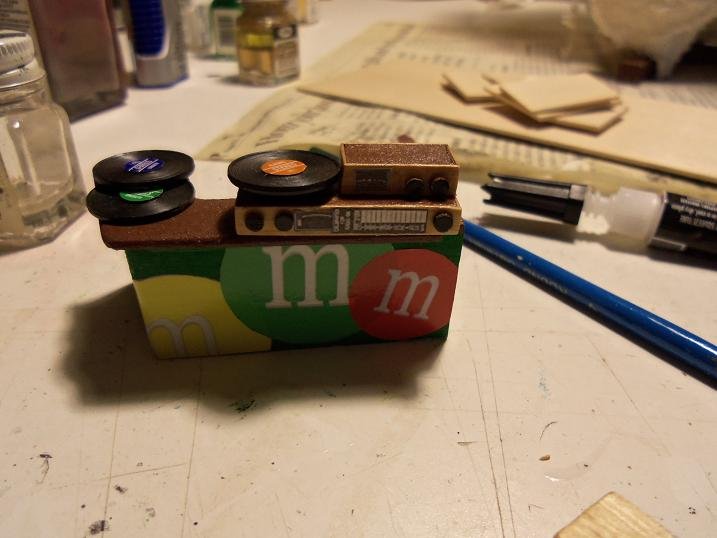
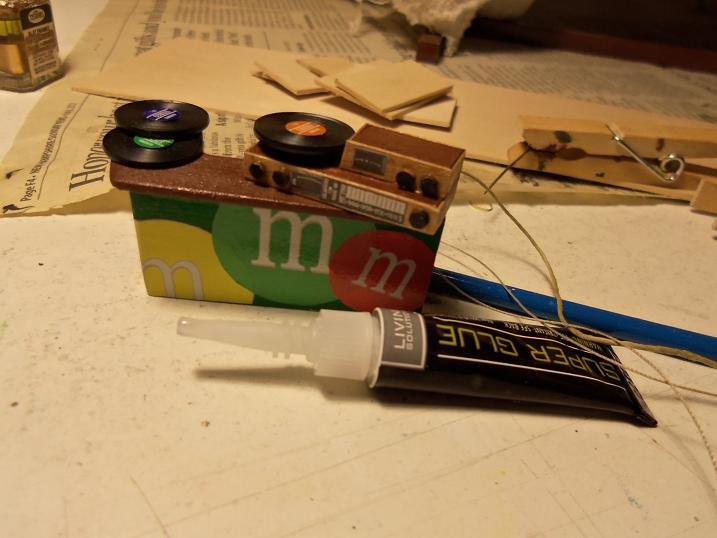
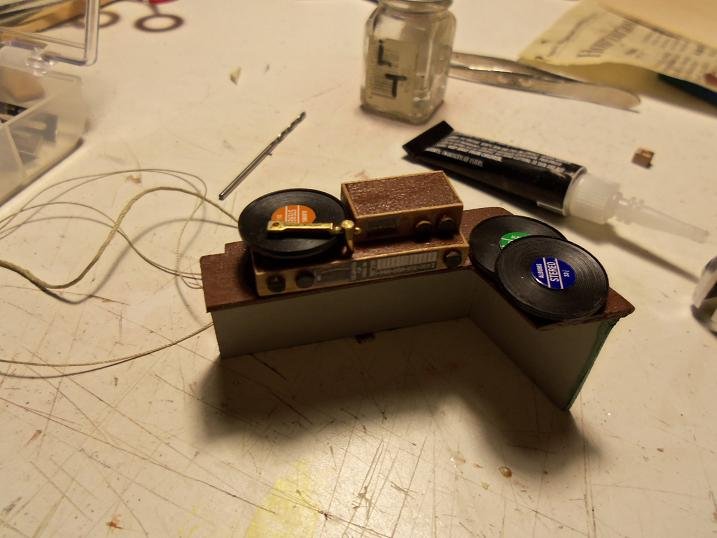
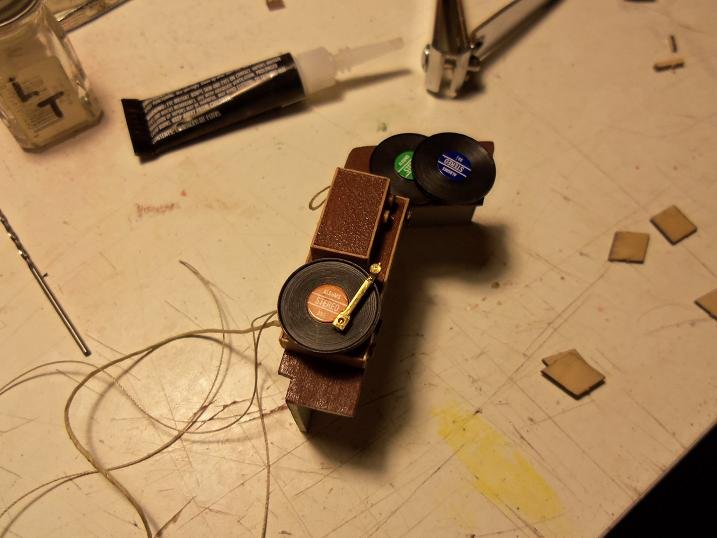
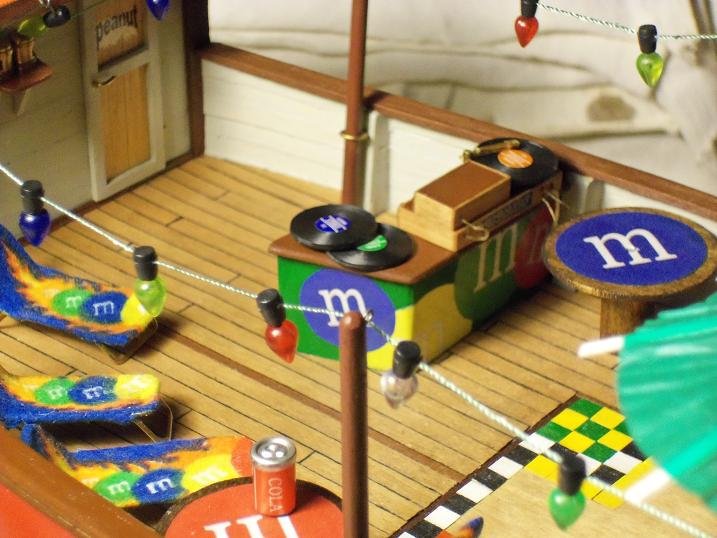
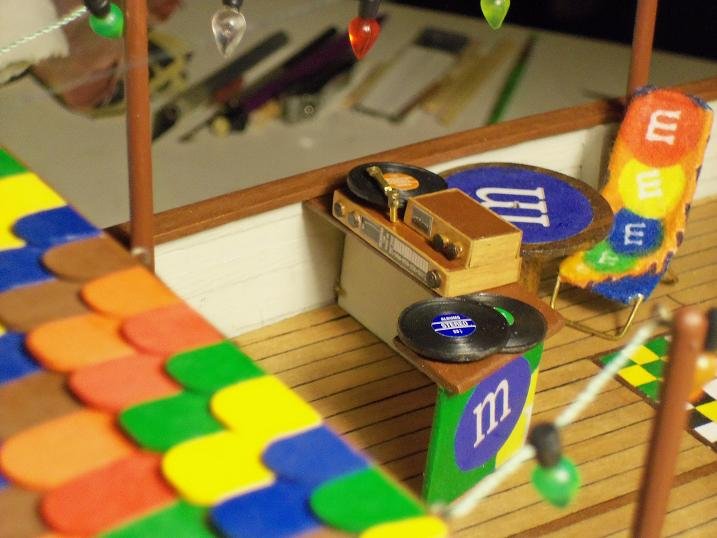
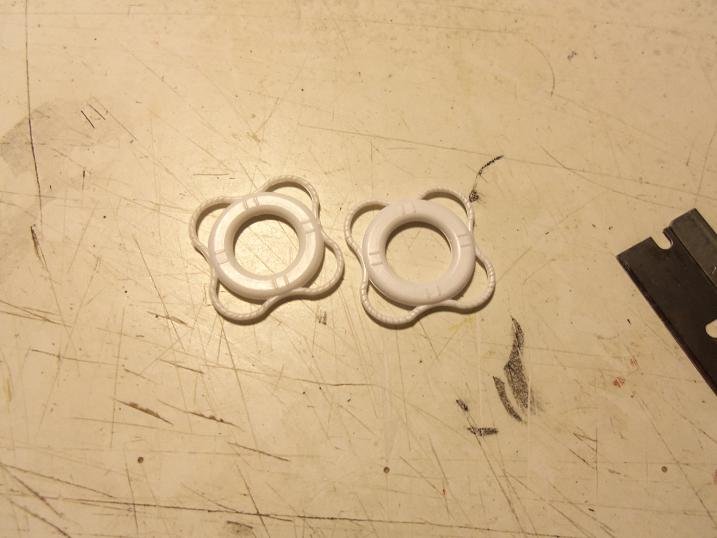
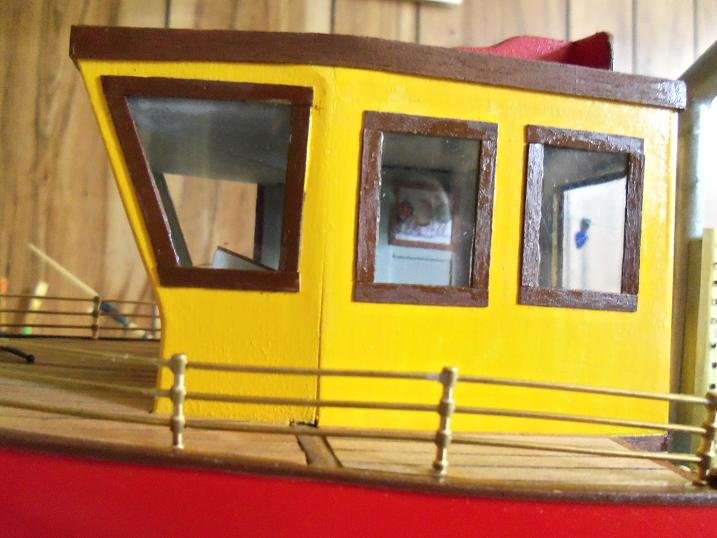
10-5-2012 still working on the speakers.....the main boxes are assembled looking for images on line....I found pictures of speakers. I printed them out in three sizes the cabinets were painted chocolate brown the life preservers with the real rope I made up some decals....just basically says M&M.....they were put on the preservers. one was placed in the center of the aft cabin picking out the right size speakers, they were cut out and cemented into the recess of the speakers. the other preserver was placed in the back of the pilot house. taking some netting with fine mesh, it was cemented over the face of the speaker cabinets. molding hides a lot of the mess the table is clear............ that only means one thing......... the model is finished
-
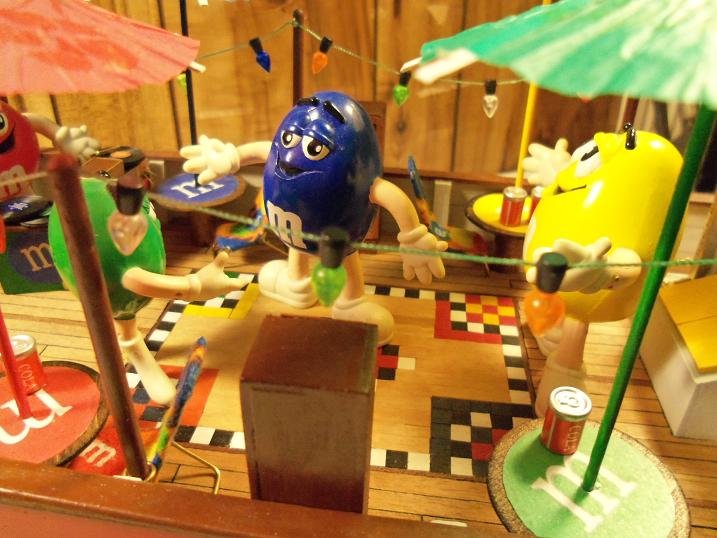
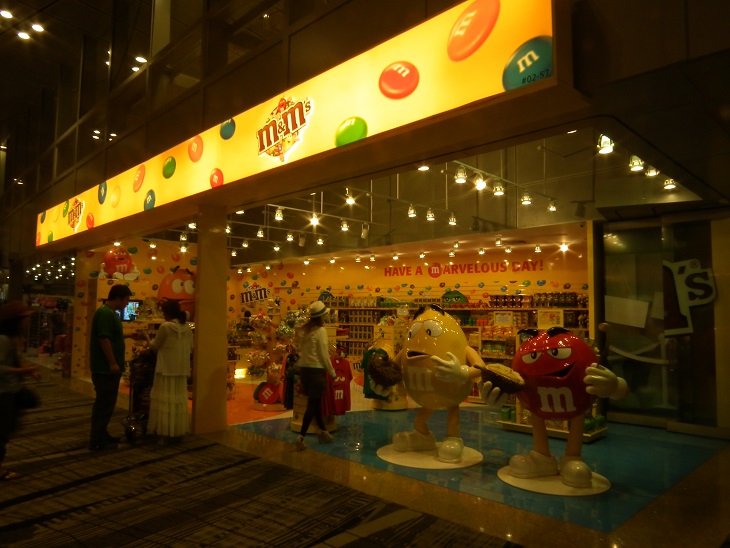
well hello Clare this was a very fun build.......well worth bringing back. it's a novelty.......got the whimsical fantasy stuff, but it has plenty of scratch building, leaving one wide open to do whatever you want. these fantasy projects are good to start with.......especially if one wants to break into scratch building. one really can't goof up too bad.......and if you do......you don't feel so bad buy a cheap boat kit...and have at it. I'd recommend this to anyone who wants to learn. thank you very much for the kind comment I found this to be a really good subject. along the journey building this model, I acquired some interesting pictures from folks, and what I found on the net. Sjors and Anja sent me this one, I believe. through the advertising, the only colors to be shown were red, yellow, blue, and green, the only female in the group. the orange fellow came out when the crispy M&M's came out. only one is not shown......although way back in the early days, the color was shown as a male gender.........in an odd twist of fate......or got caught in the 'Spaceball's' teleporter.......he became a she {it's Ms. Brown} the gaps here were pictures of the characters....but I just realized I can't post them like this.......they're copyrighted these pictures were given to my wife by John {Jim Ladd}. he and his wife were making a trip to the states and he asked me if we'd mind some company I was floored........honored to have them come for a visit he took pictures of the model....we talked shop.....Pam and Phyl entertained each other, and we all had a great chat afterwards. customs between our countries are very different.....they are two very fine folk! this is a store in the Singapore airport if we had a store like this around where we live, I'd never see the admiral
-
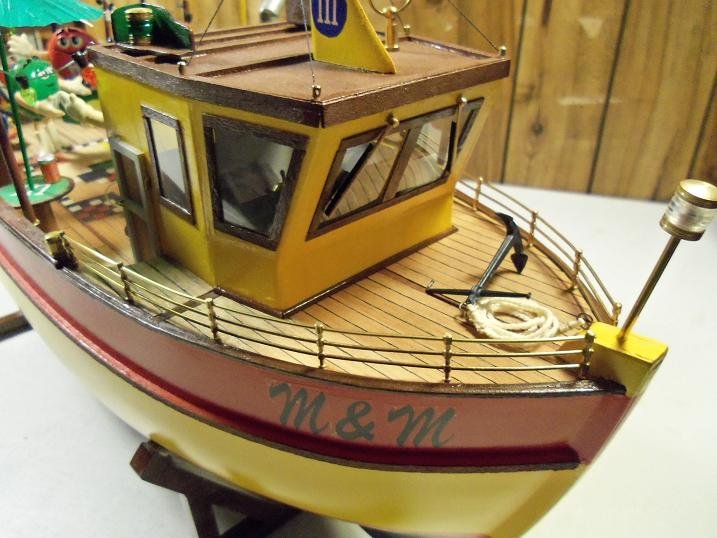
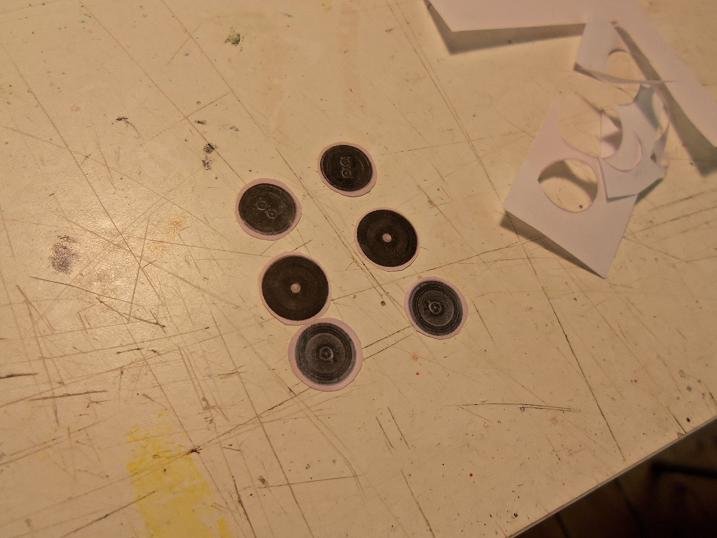
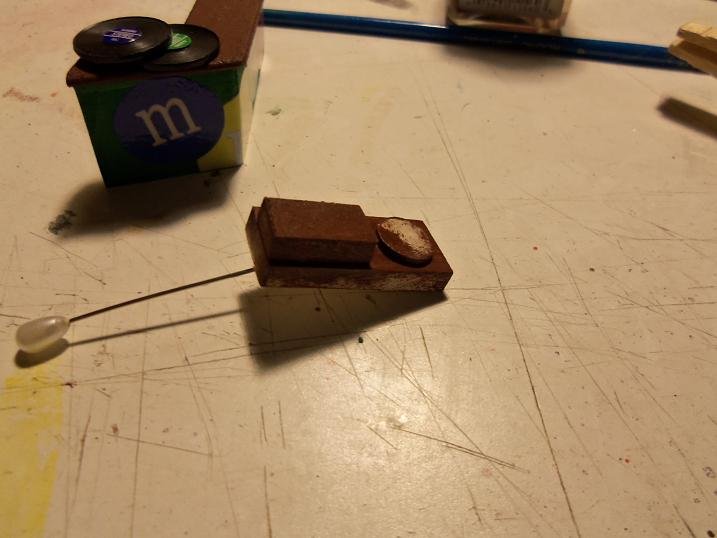
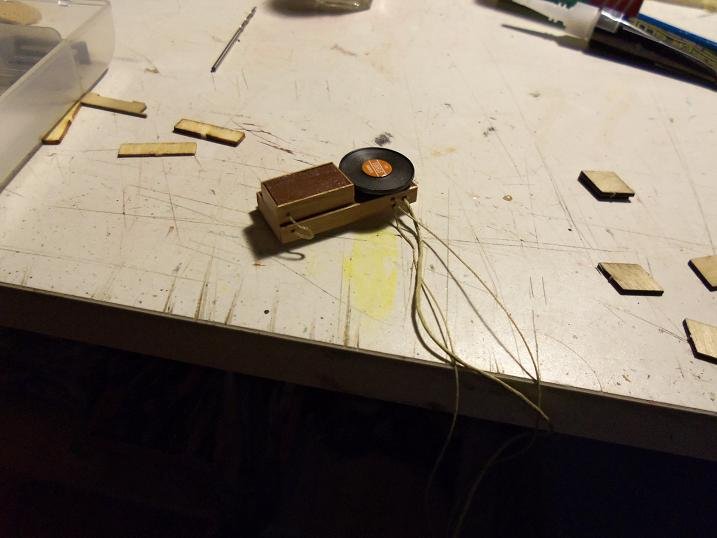
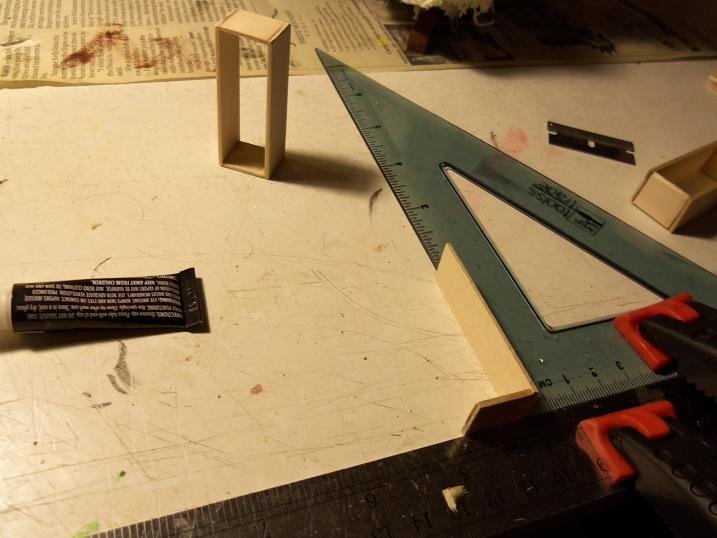
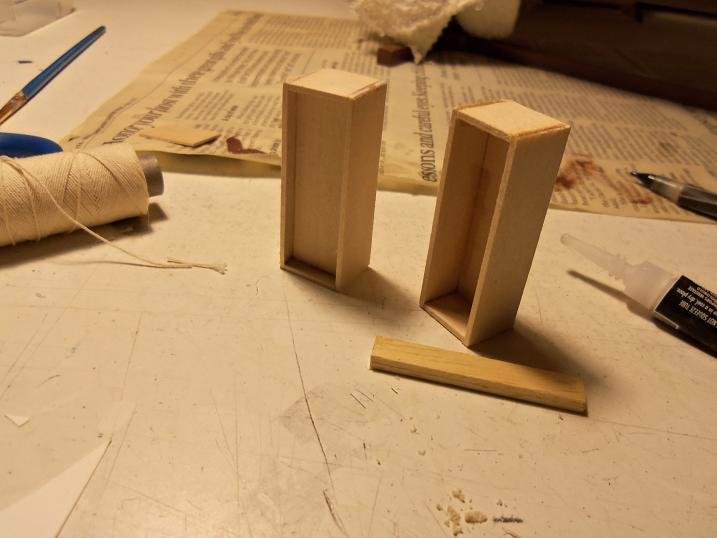
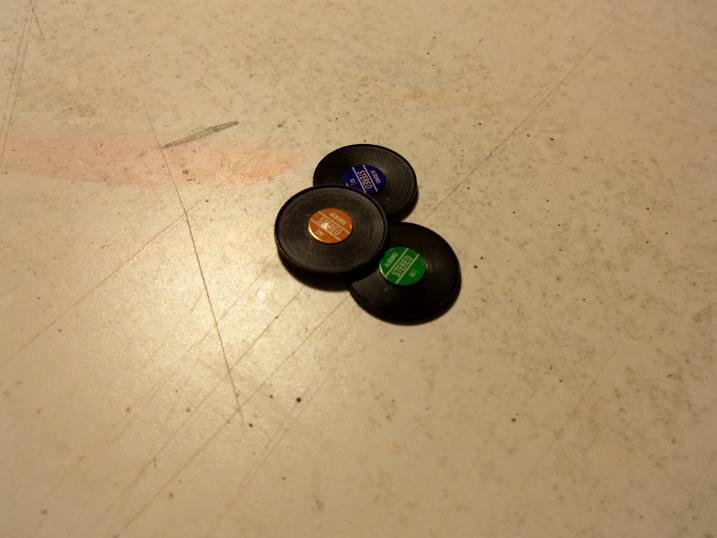
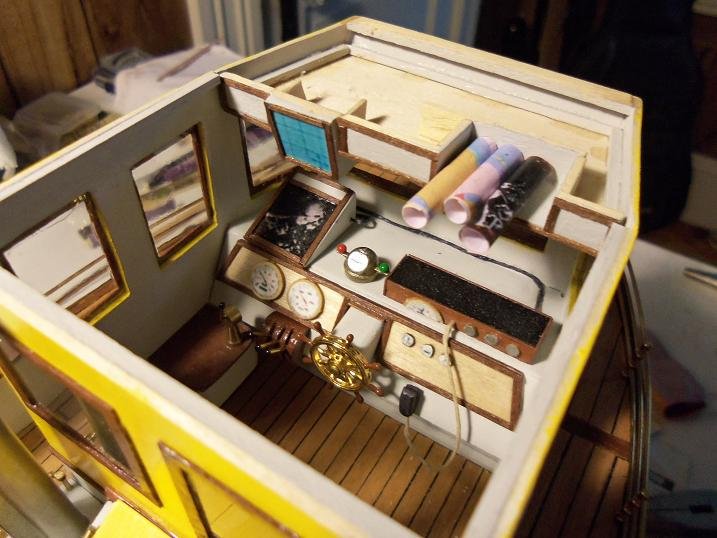
10-4-2012 I had a bow light......can't remember if I ordered it, or I didn't add it to one of my models. I put it to good use right here the record player was cemented together and painted ....gotta have the wiring.........the hard part is yet to come.....I need to make the stylus. stylus made I made sure there is enough wire to reach the speakers.......now I gotta make 'em life preservers ready to go....... when I boxed in the speakers, I recessed the face of them....the front........that's to come

-
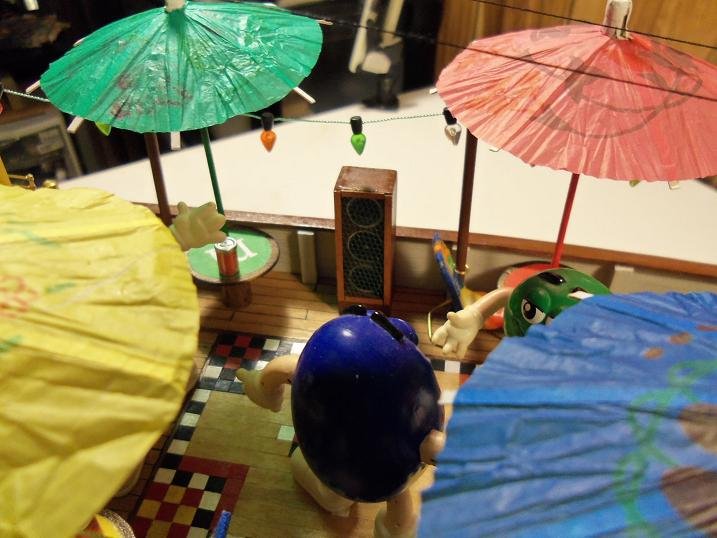
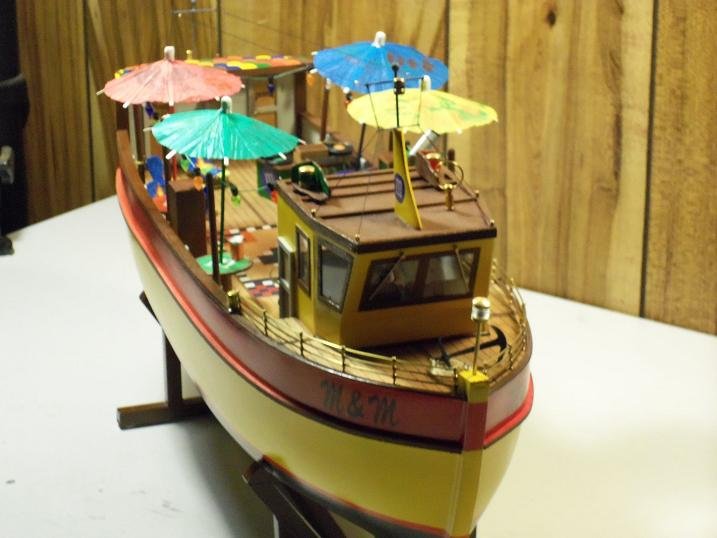
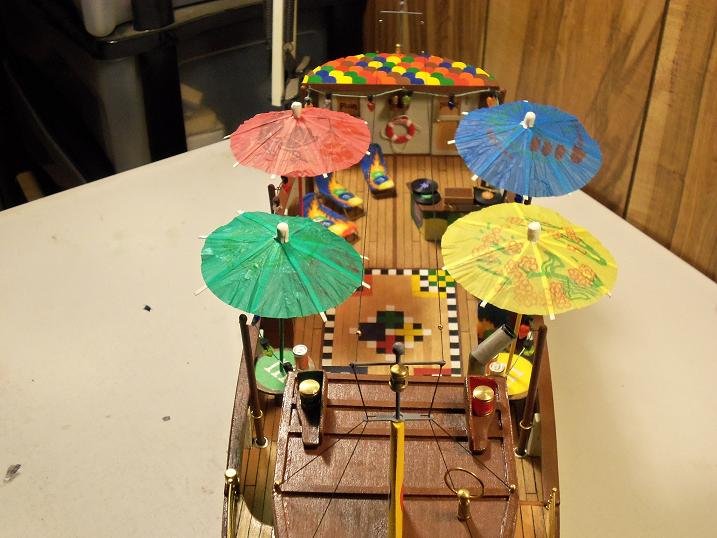
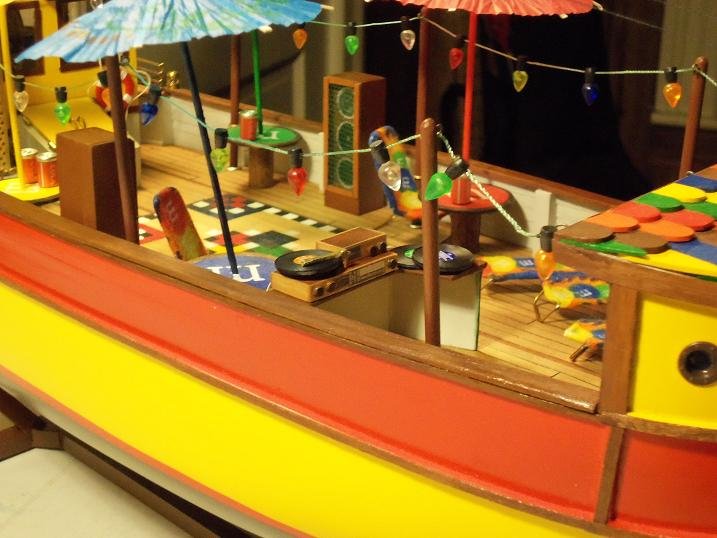
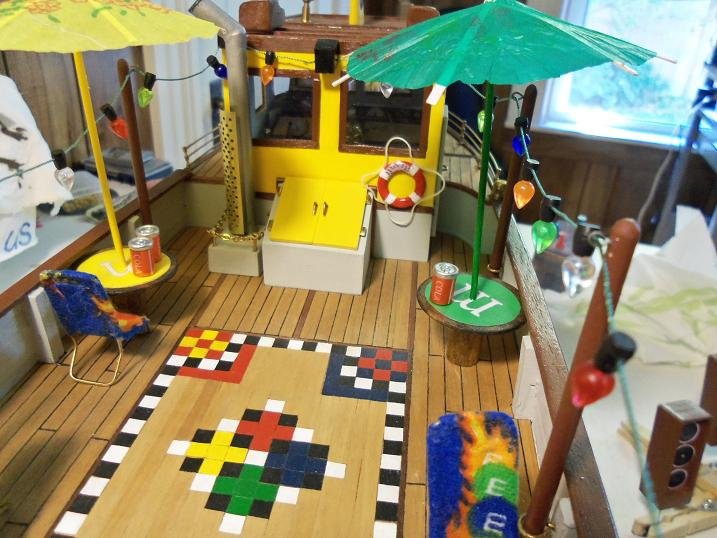
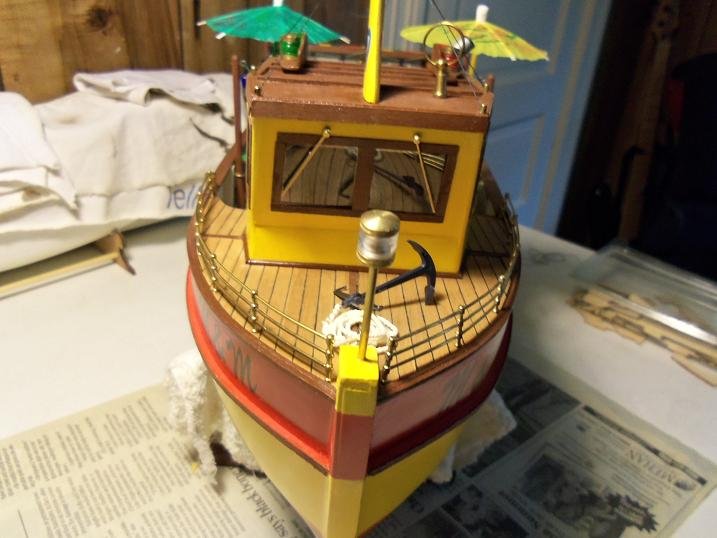
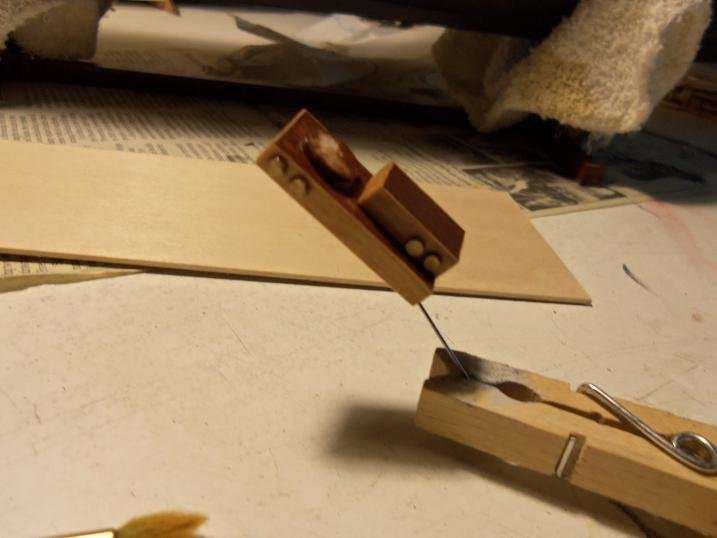
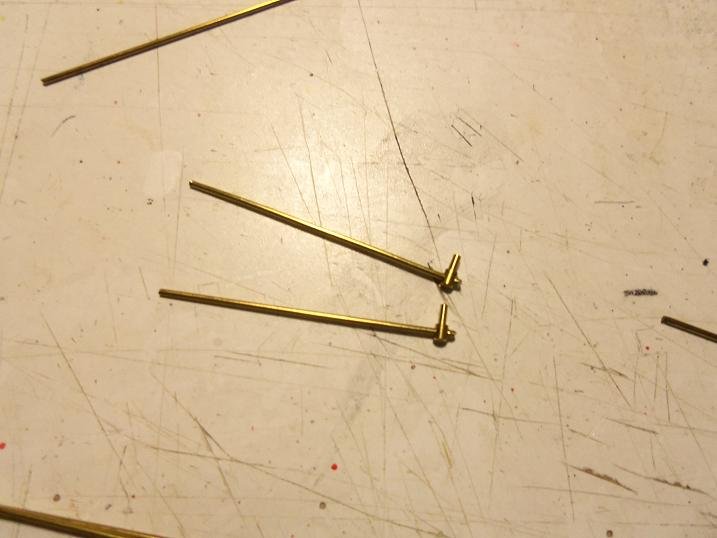
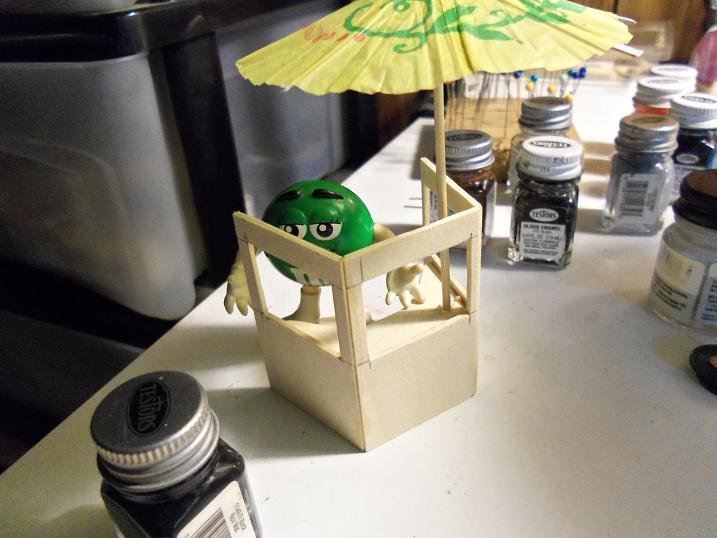
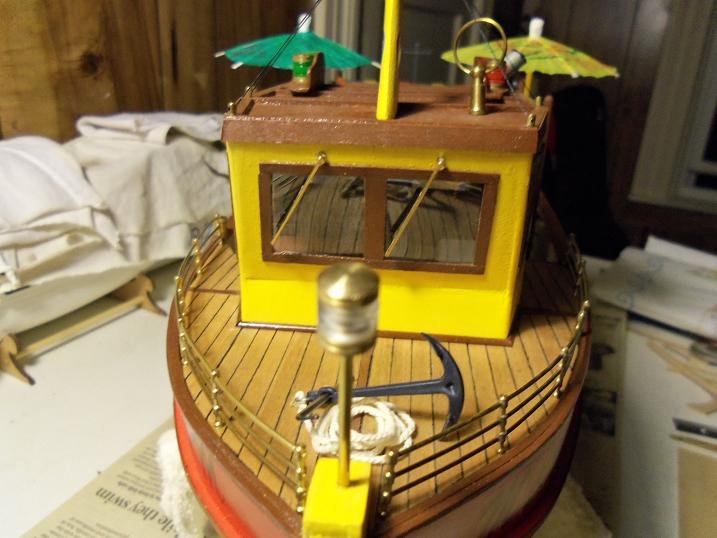
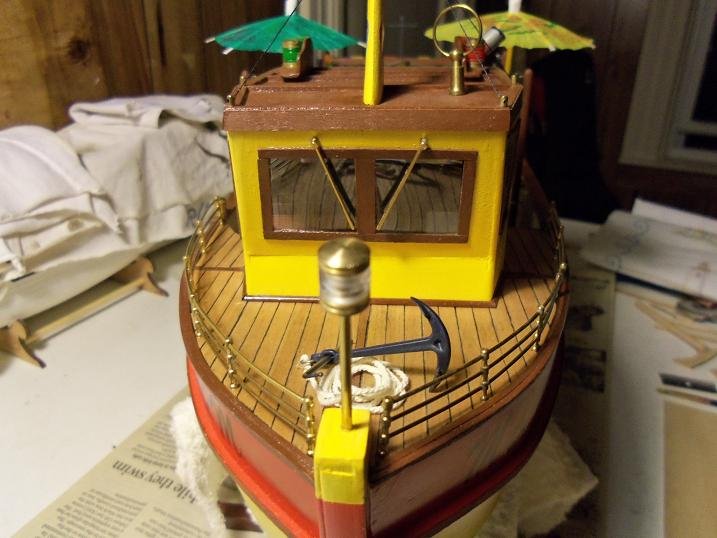
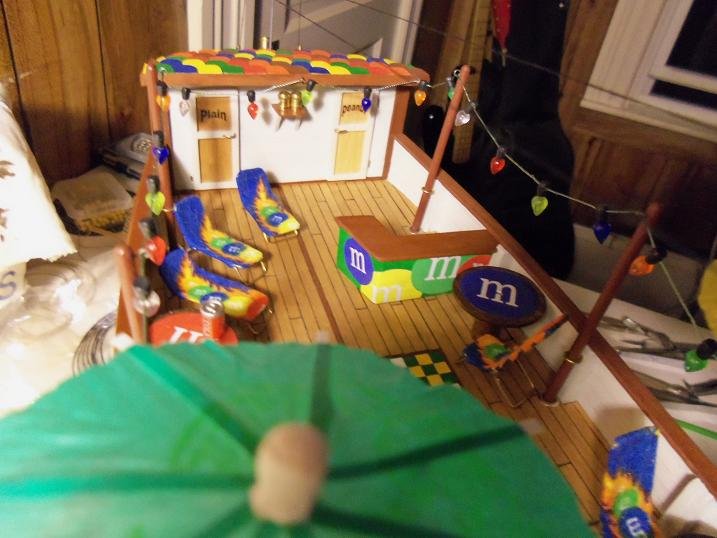
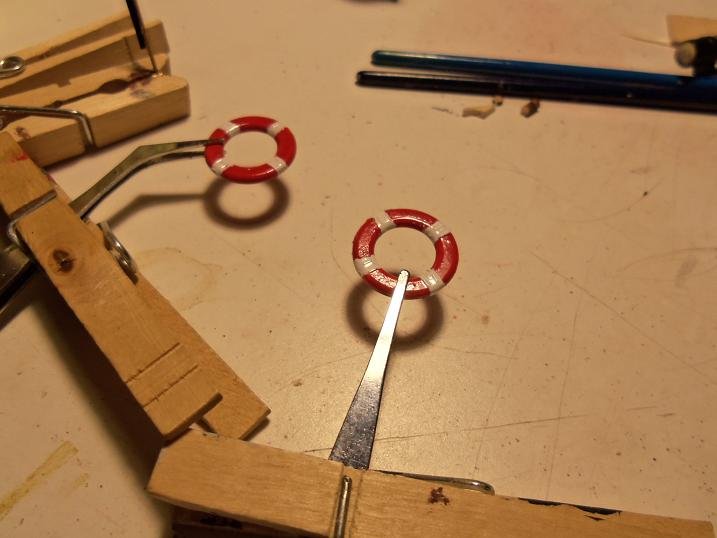
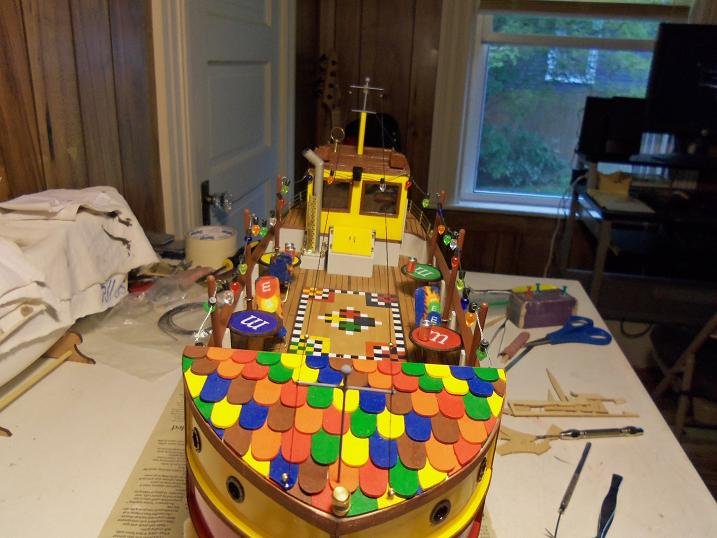
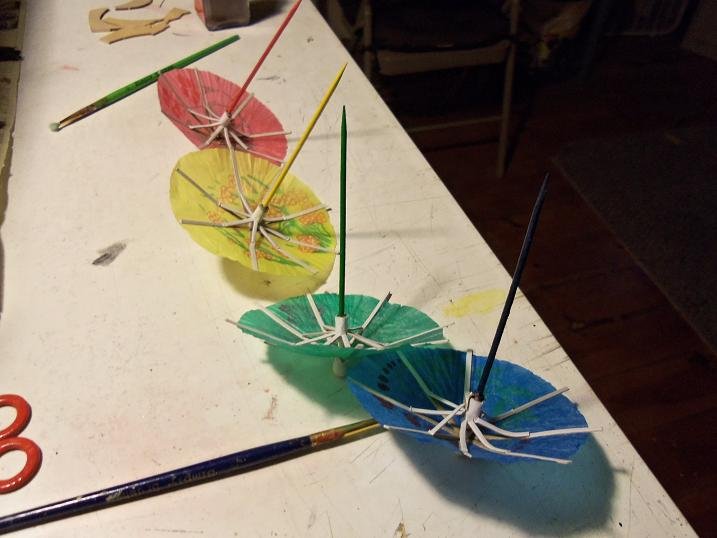
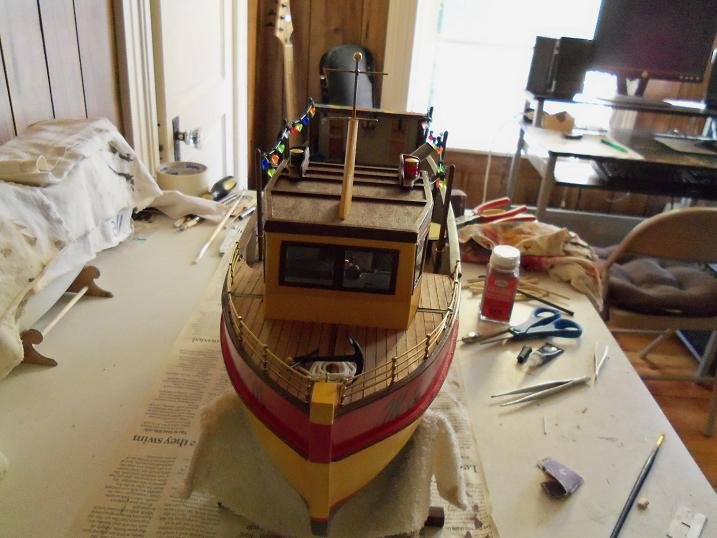
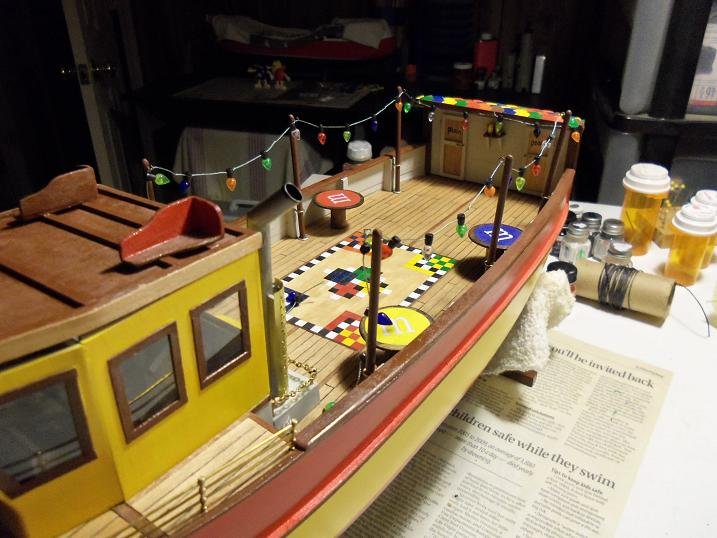
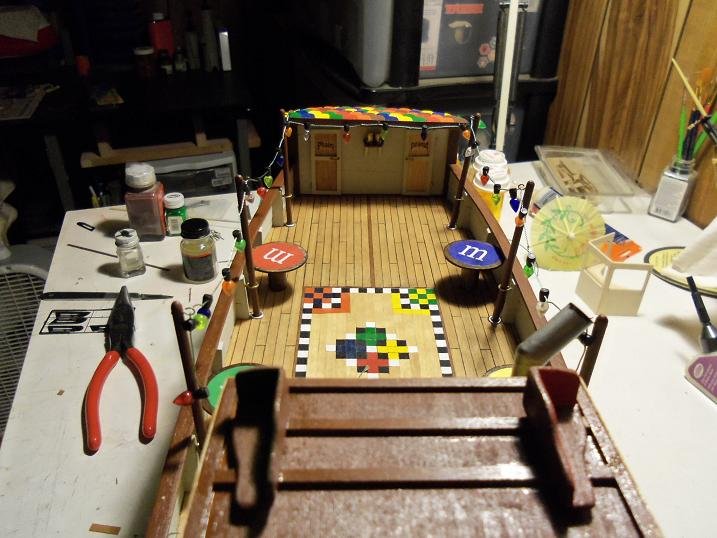
now the admiral knew that I was almost finished with the model. throughout the build, folks suggested ideas to me.........if I could fit it in, I would.....but most of these ideas were already cast in stone, thus some I couldn't do. Andy gave me one though that I couldn't pass up. he suggested that since the windows were large enough, I should add windshield wipers on it. I agreed, and I started to assemble them. these are the wiper arms....at the end are those Billing's eye bolts. I have found so many uses for them. the admiral saw this and she accused me of prolonging the project. so I don't put out another spoiler alert......I'd better show you this first. the umbrellas are in place on the model. I tried one on the disco booth.........I didn't like how it looked.........so I changed it up a notch. gotta have some room for the record player anyway.......the holes for the wipers were drilled above the windshield. and the blades were a work in progress........just strips of brass with the rubber part painted flat black I made up some smaller M&M circles to decorate the booth....painted the booth green and the table top chocolate brown. the wipers were assembled and are now on the model.........two logical positions......... I chose the position on the top.....from right to left. the booth is decorated now....dry fitted in place on the deck. Ha HA.......preservers got a haircut! the plastic rope is all cut off and real rope will take it's place. I started doing it bu using CA to glue it on.......now I just last the rope on and cement the tie-offs here are the main parts for the record player.......the receiver and the record player. high end stuff we're deal'in with here I glued the rope on the life preservers.........the white areas are painted on the preservers.

-
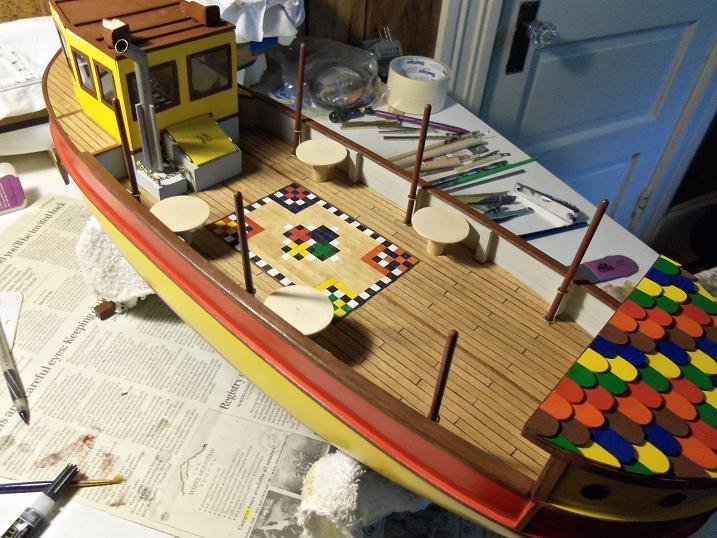
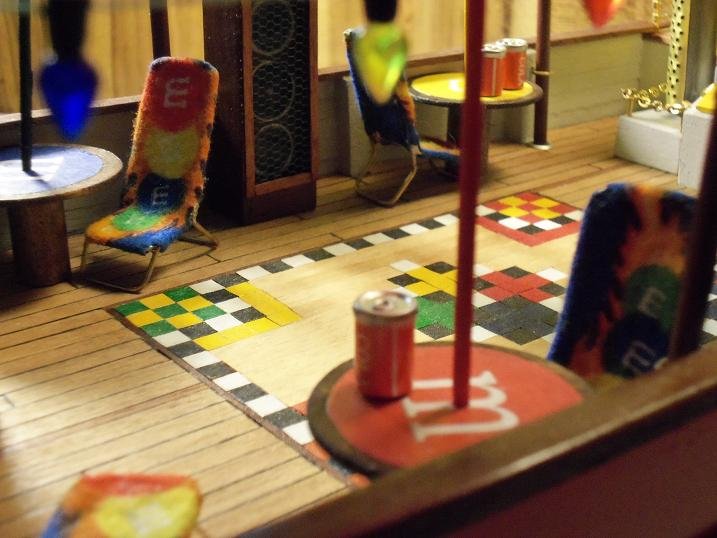
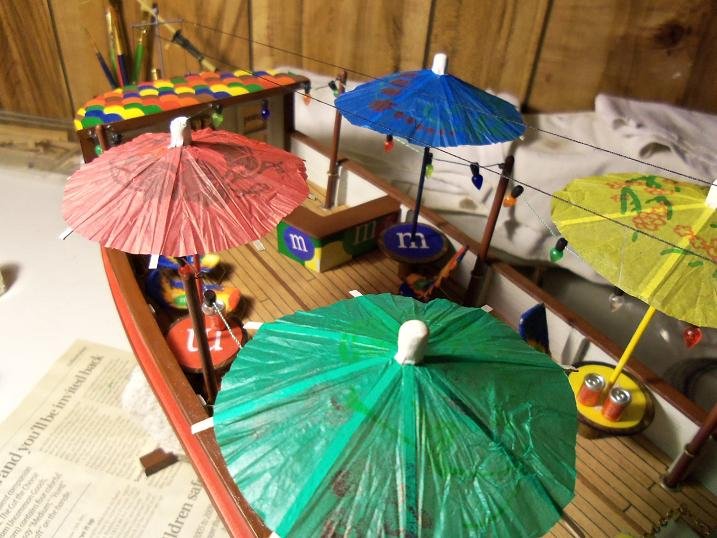
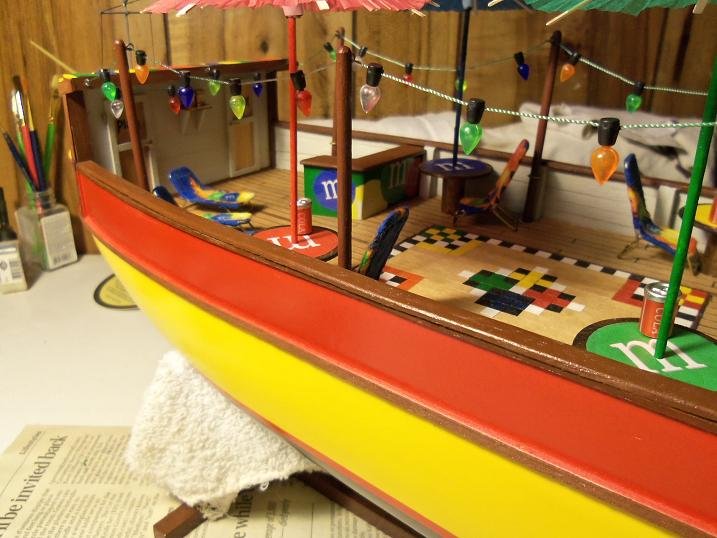
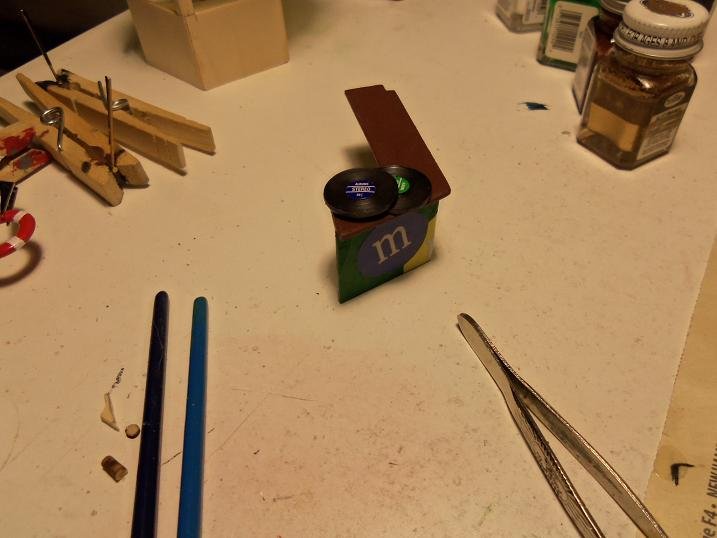
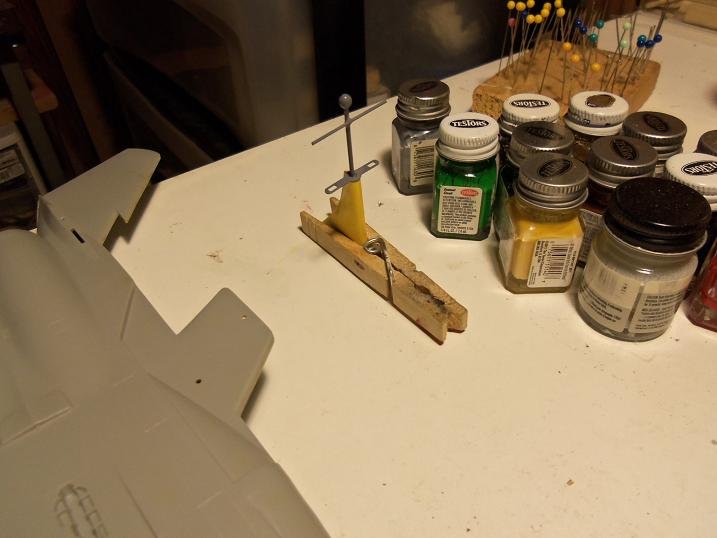
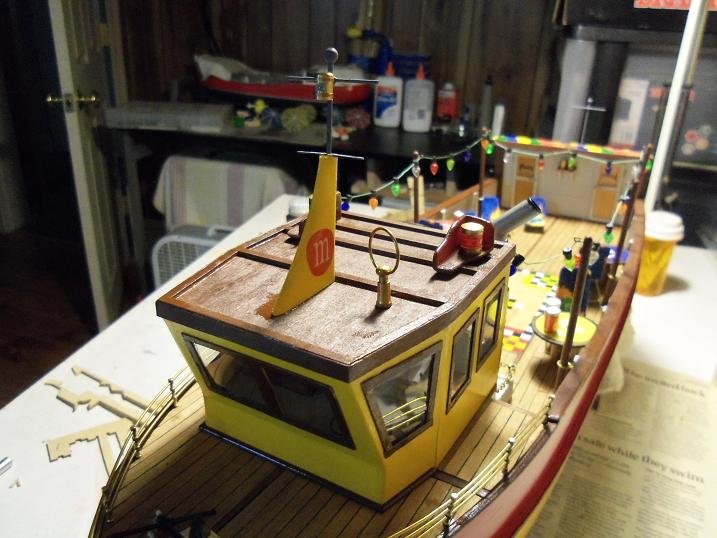
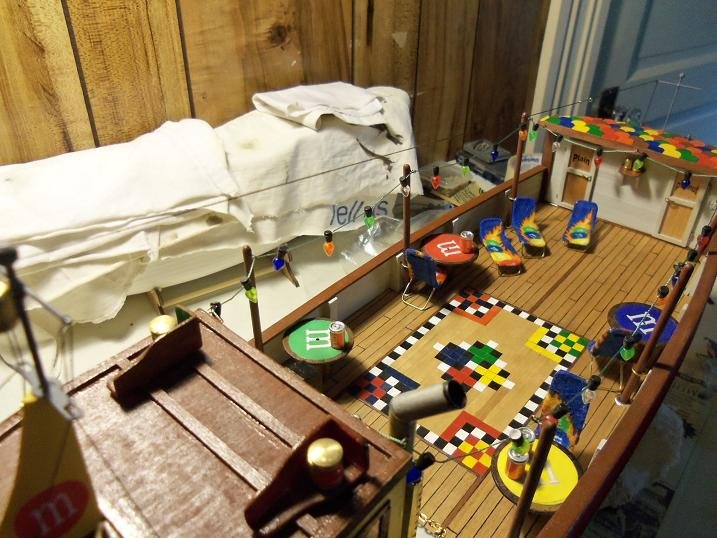
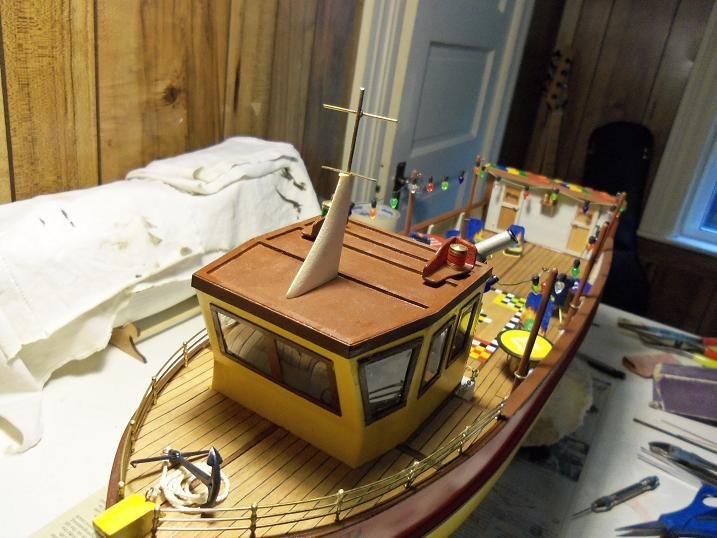
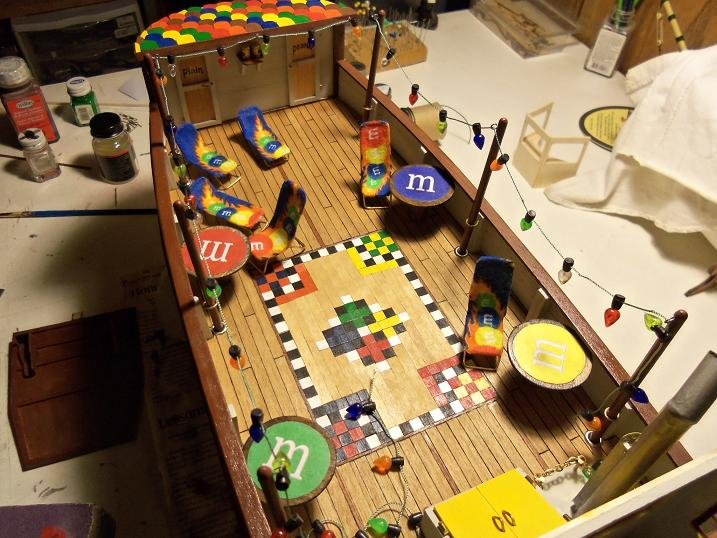
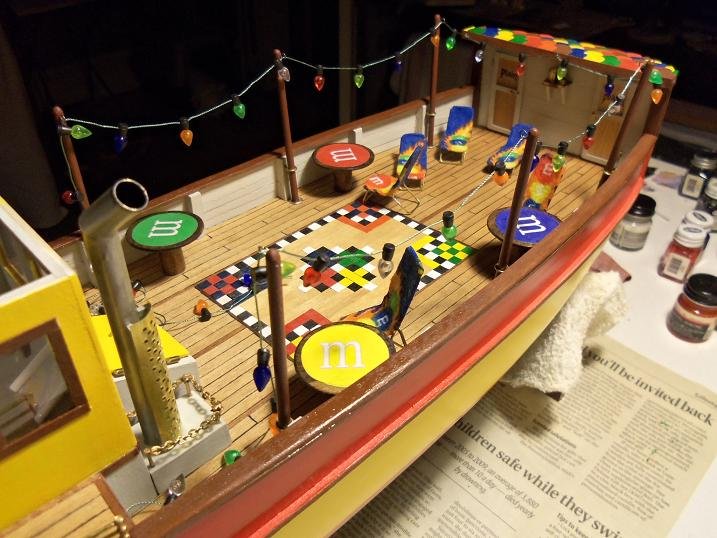
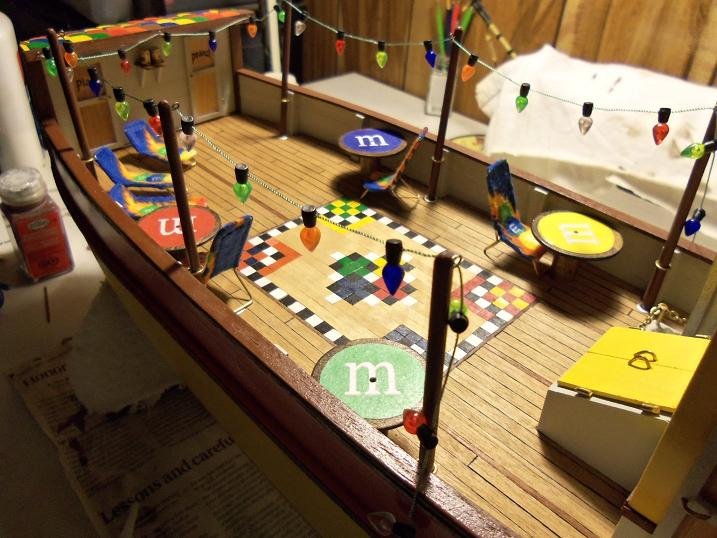
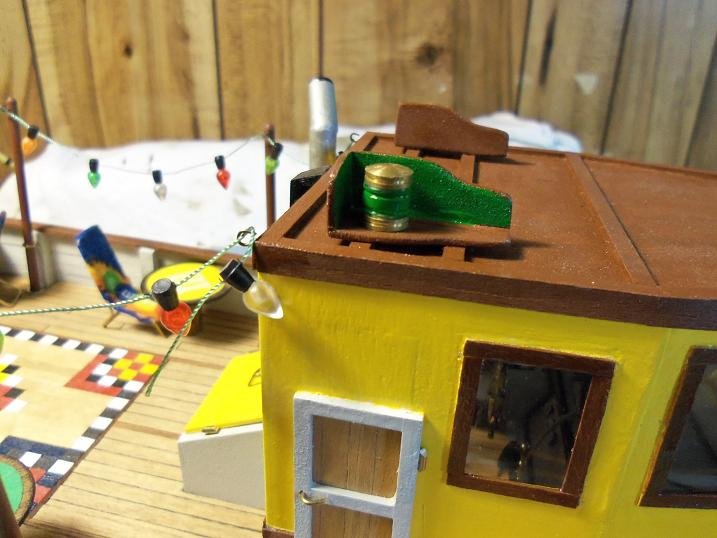
10-2-2012 it's odds and ends time folks.........time to give it that lived in look we worked late last night on the model...didn't clean up after ourselves. left our soda cans strewn about. note the holes in the center of the tables......now what's that all about?!?!?!?! I know that the last session.......we kinds forgot about the life preservers.......we'll get to them in a bit. the antenna part of the forward mast was painted a darker gray, as was the aft mast I saw these too in Hobby Lobby.......I thought this would be kinda interesting......a record player for the disco booth HA....HA.....preservers got a haircut! ......just a really good tip from Jim Ladd {John} more lights and radar....I'll be prepping them up I made up a couple of decals for the forward mast. here again, now that I look at it, I should have made them red and green {like the nav lights}, not red and blue. it's the little thing one thinks about after the fact the light lenses were filled with the window maker one of the light ended up on the forward mast then the forward mast was rigged with communication wires then it was rigged to the aft mast.......you might see small beads on it that I will use as insulators...... both sides were strung and the insulators were cemented in place a stern light was added as well insulators were added for the forward wires too I bought a package of these umbrellas........they were cemented in the open position. Ms. Green seemed to like them....she had the nerve to have me paint the poles to match the umbrellas........she's bossy

-
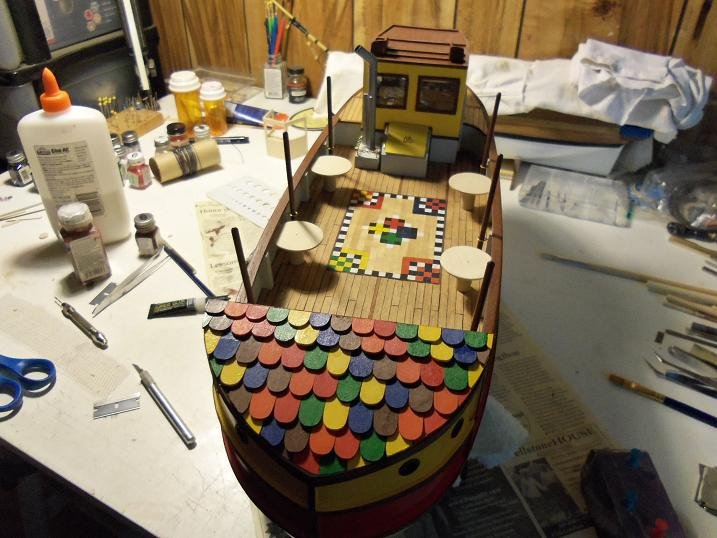
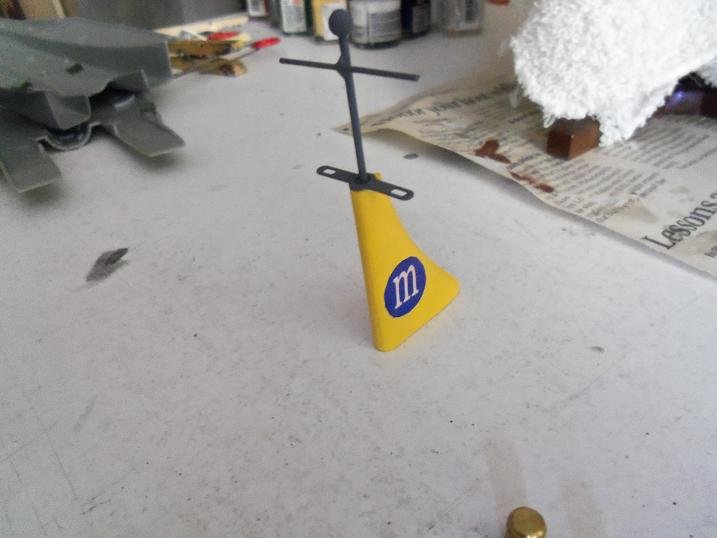
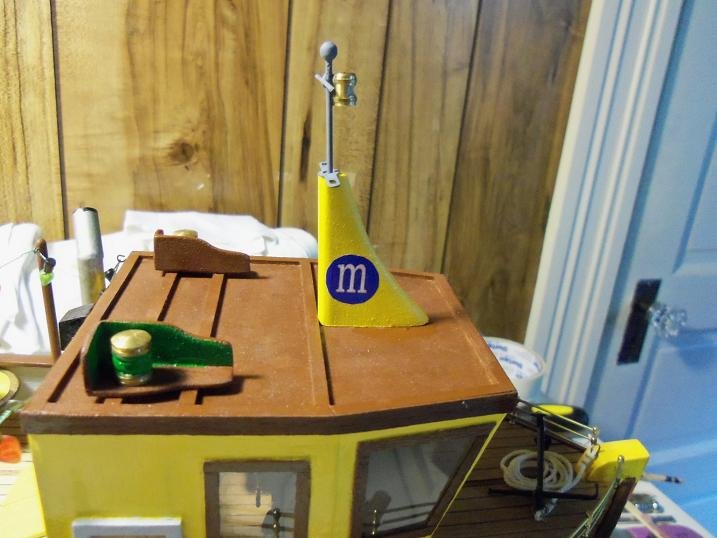
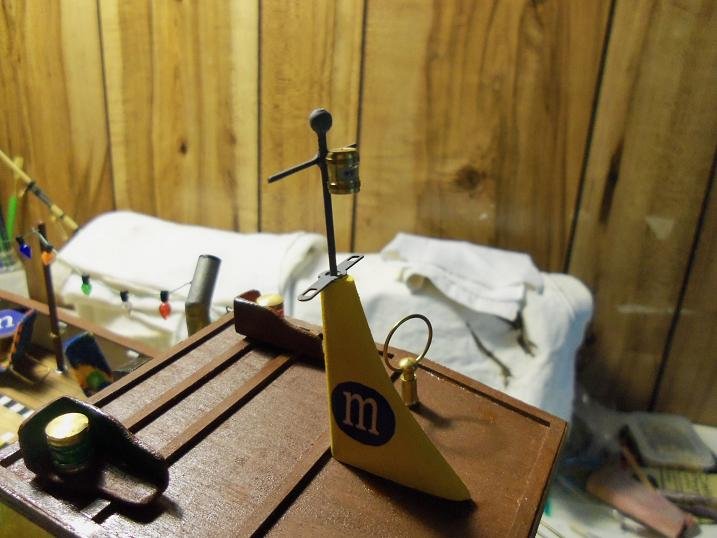
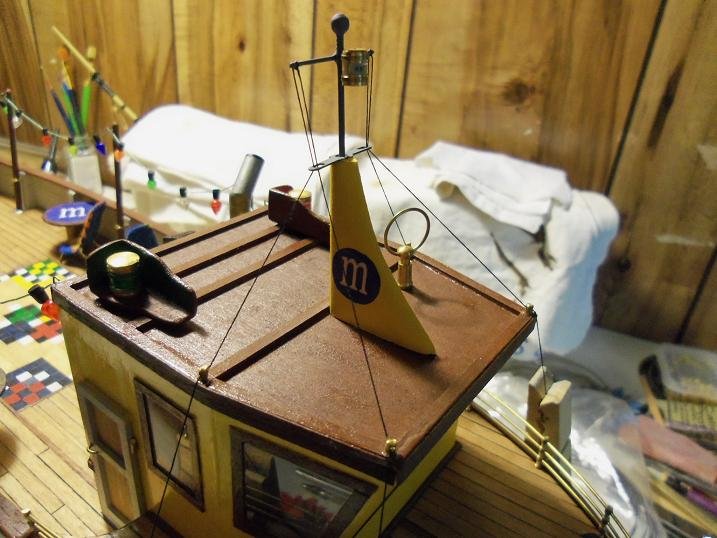
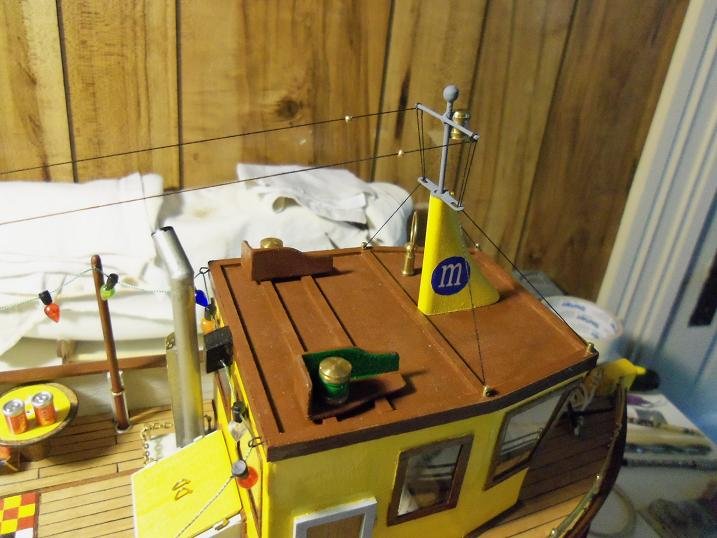
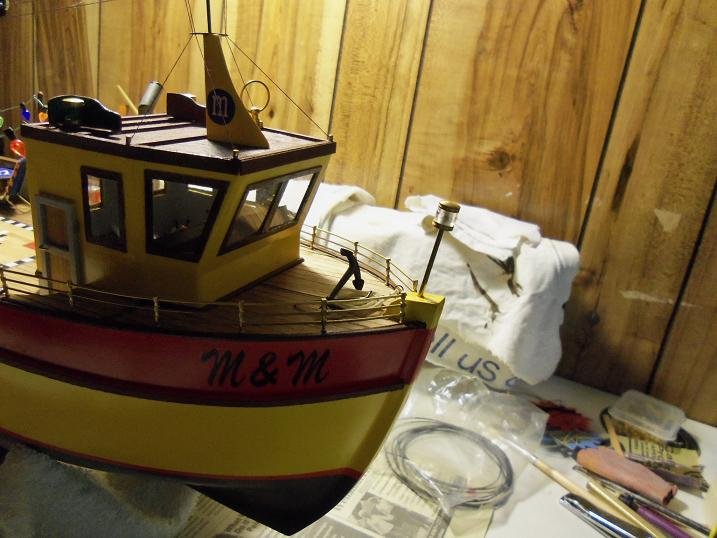
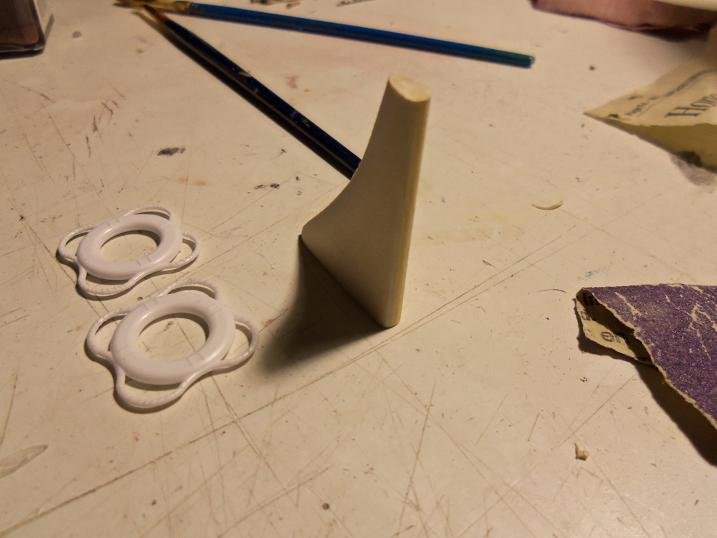
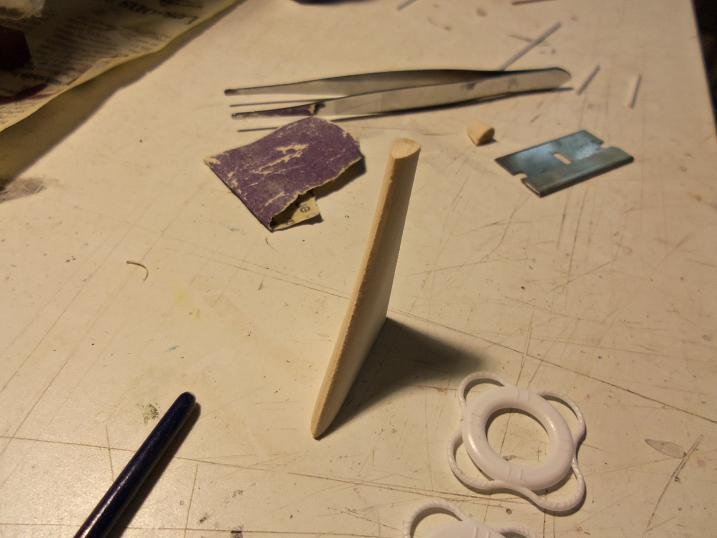
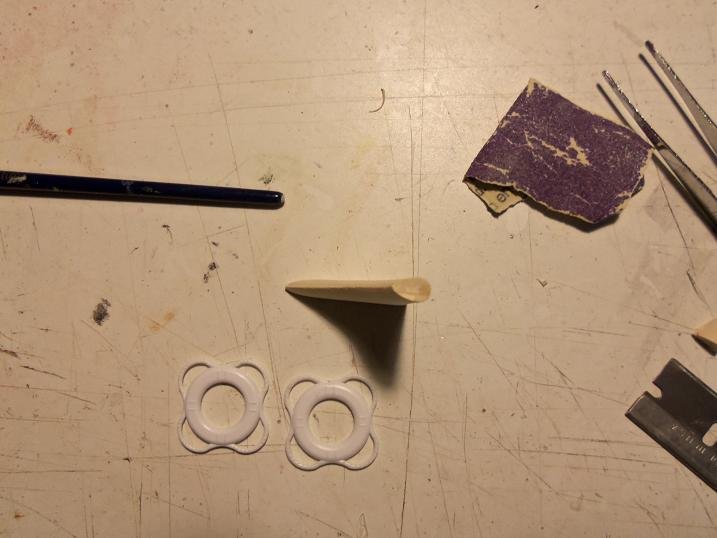
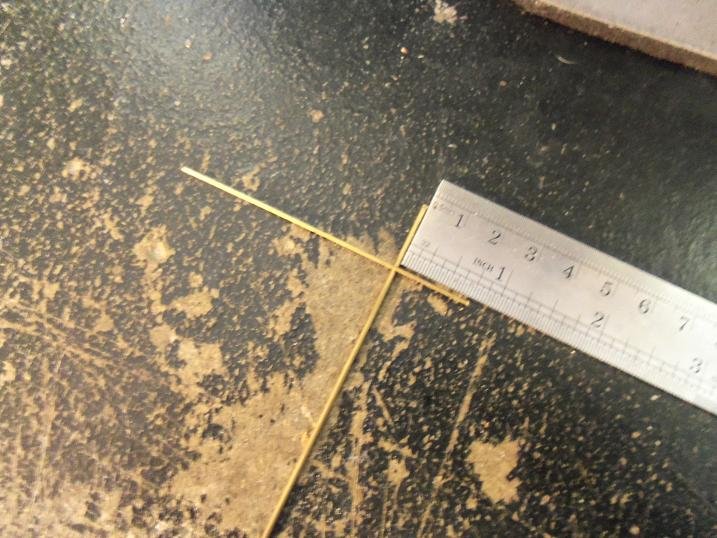
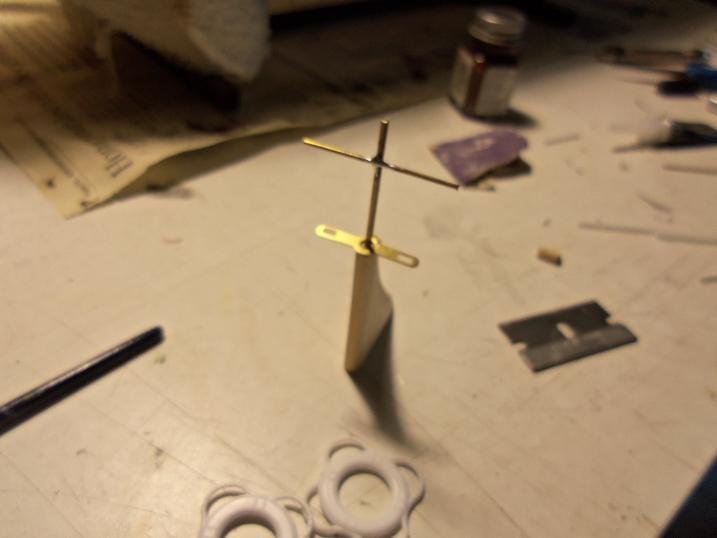
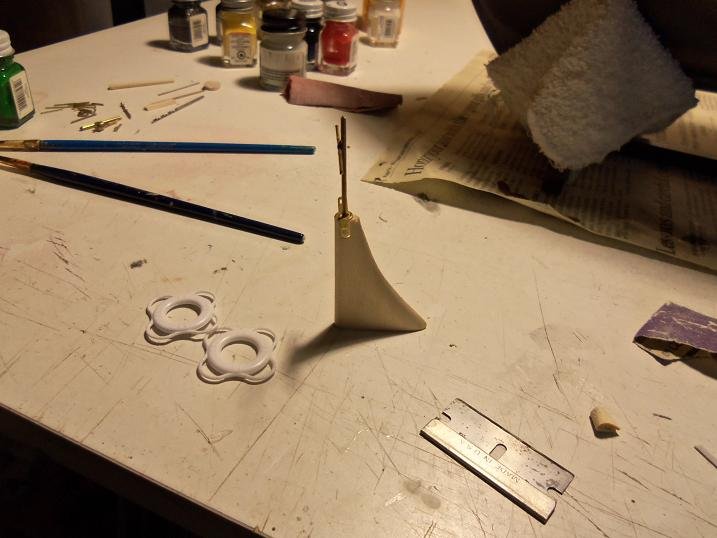
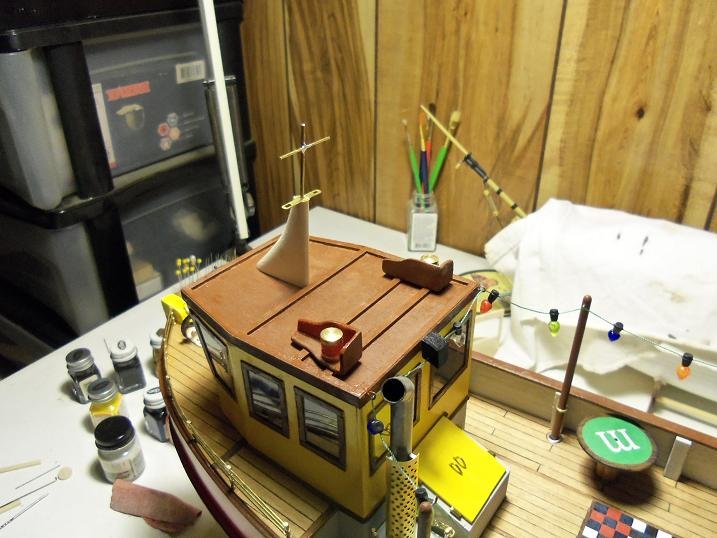
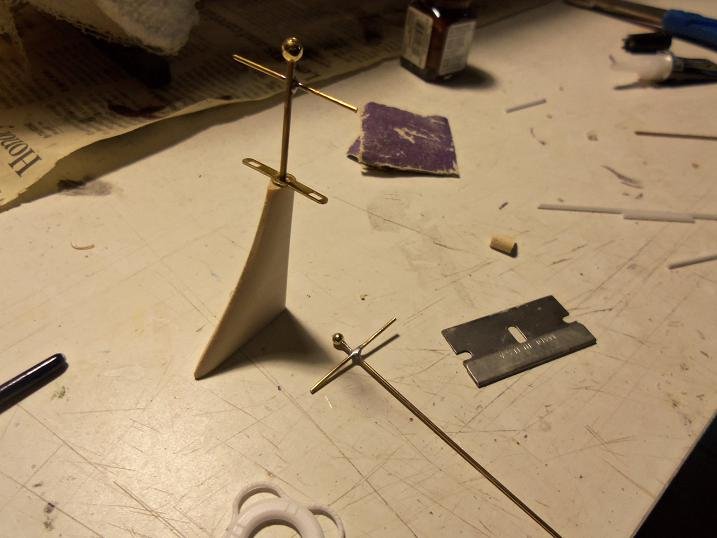
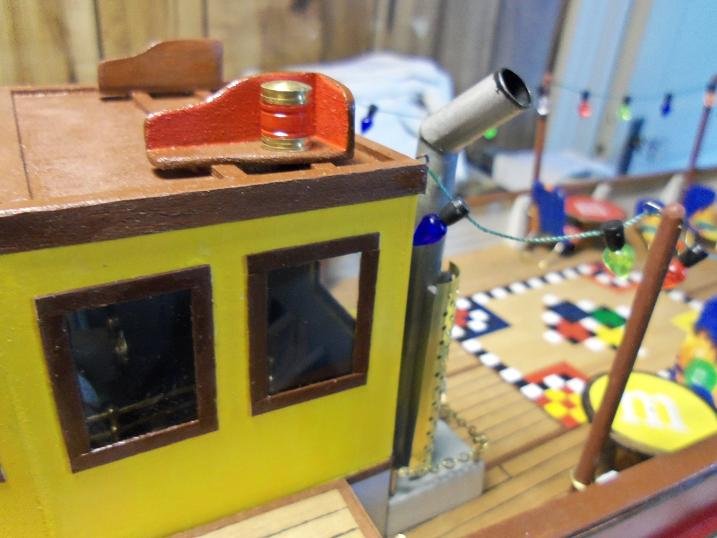
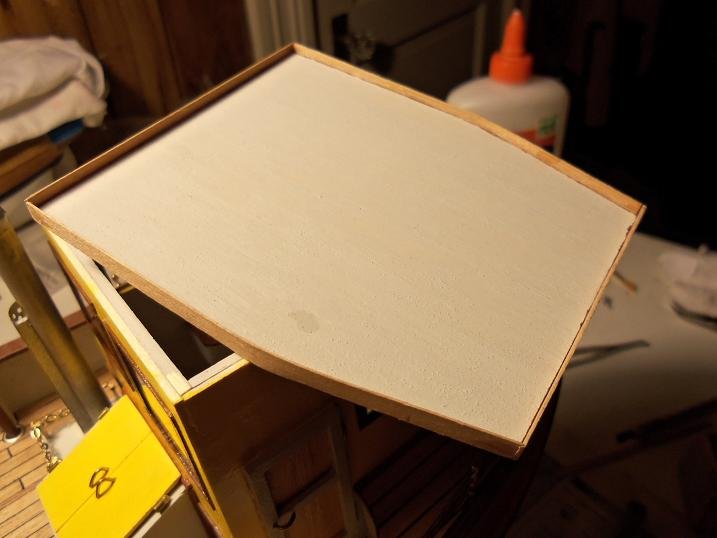
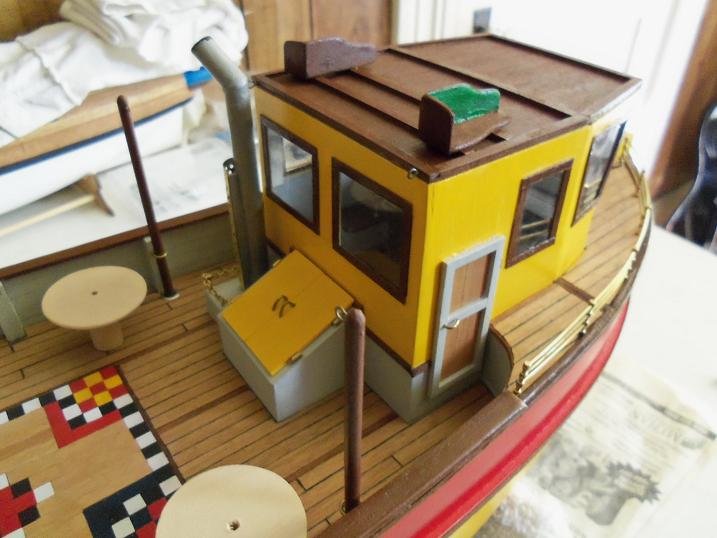
9-27-2012 the life preservers and radar / aerial mast was next to do........ the mast was sanded to shape, with a leading edge and a trailing edge. two antennas needed to be made now. the aerial set up with the wire guides. for some reason, I like it this way put a ball on top and made up the aft mast the bottom section was painted yellow....breaks up the brown the aft mast in place


-
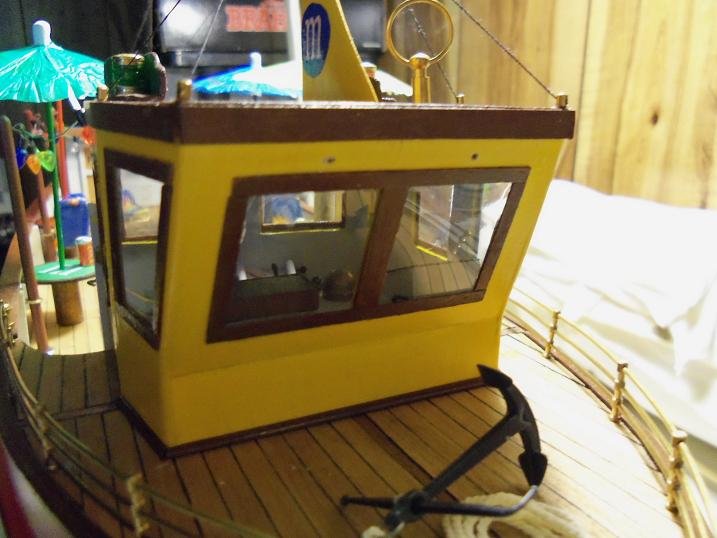
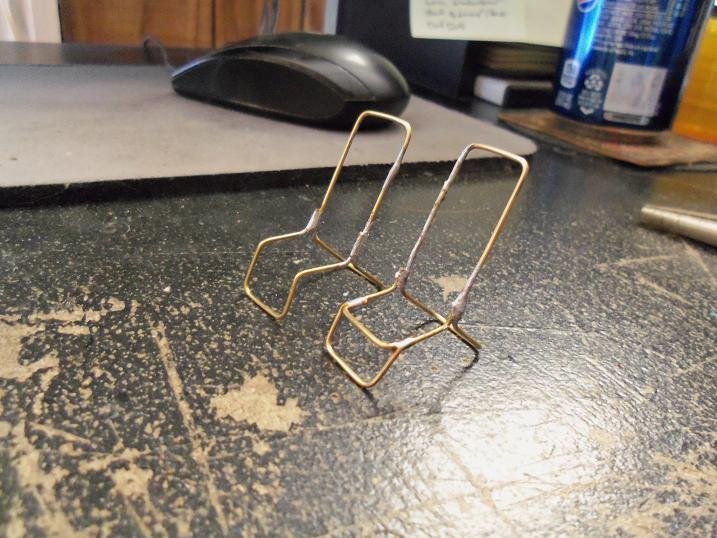
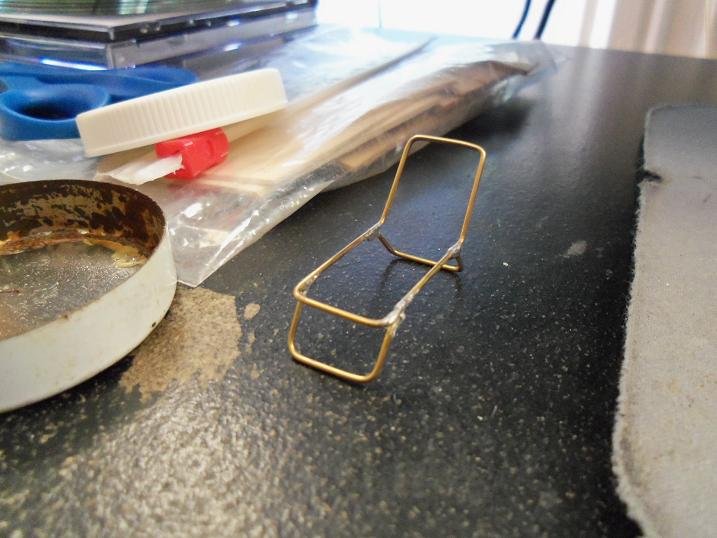
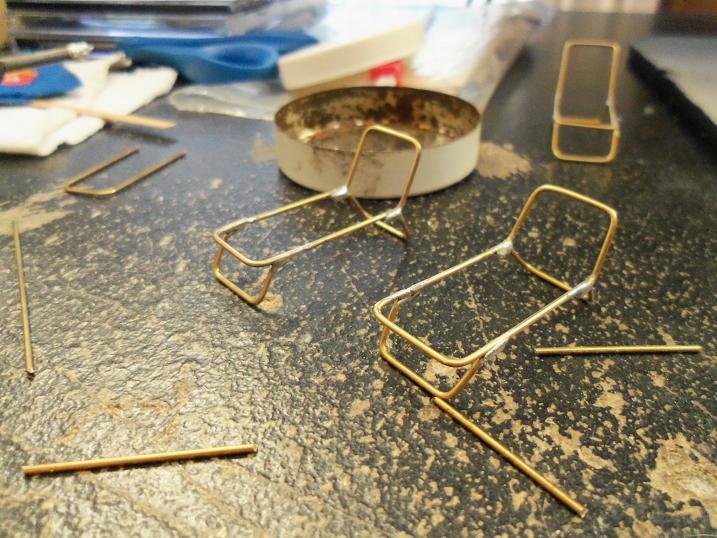
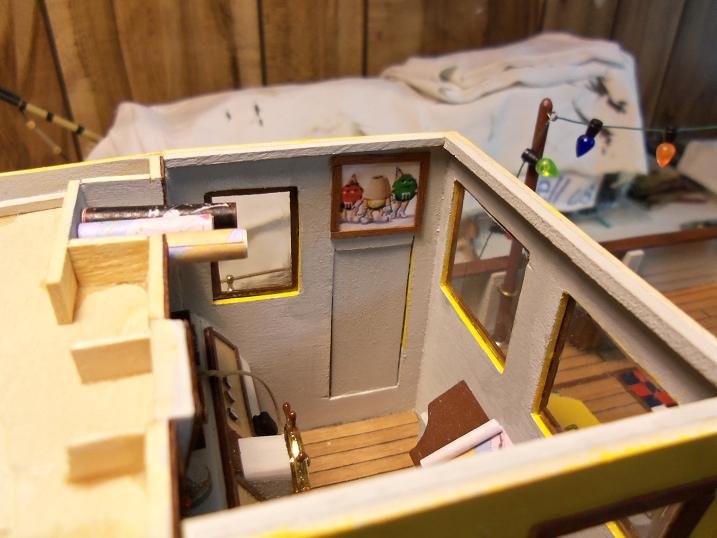
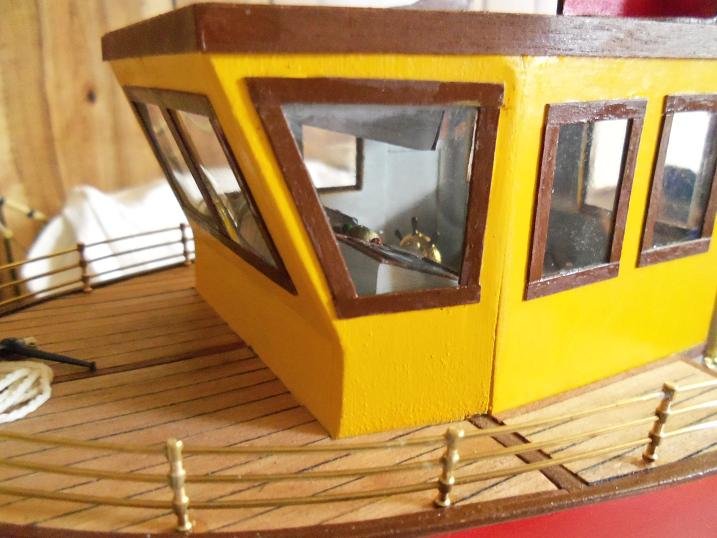
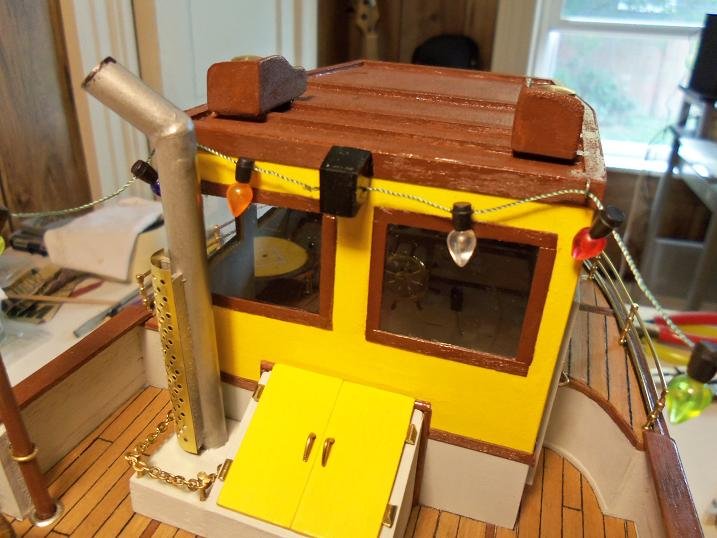
9-26-2012 it took a while to cover all of the lounge chairs.......I made a couple more too. one more thing to add to the interior of the pilot house........some rolled up maps in the cubby compartment. oh..........and a picture of the gang above the door now......I think the roof got cemented on the black box in the center is the junction box for the lights. a hole was drilled into each side to accept the thread. the nav lights are cemented in place now.


-
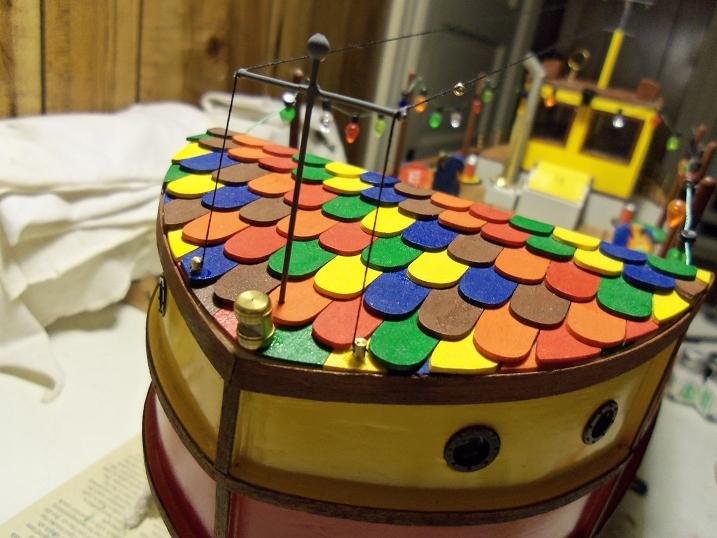
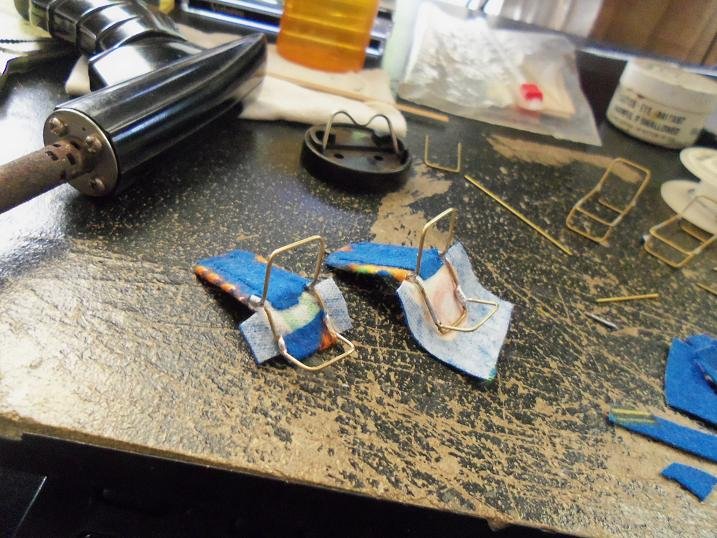
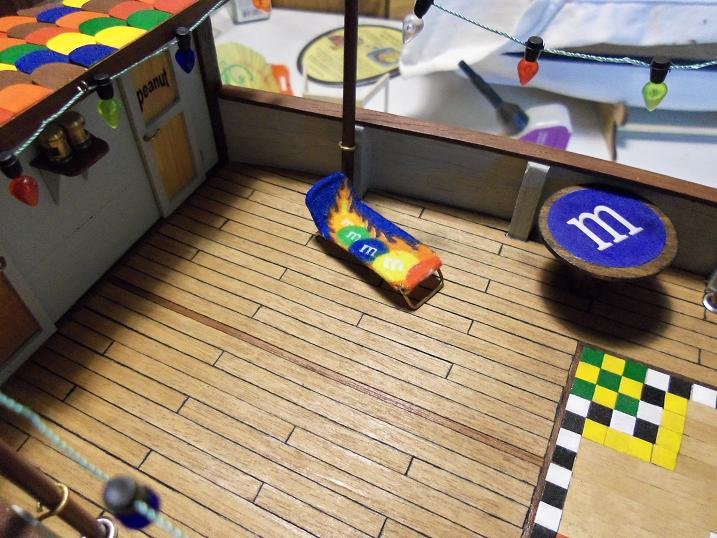
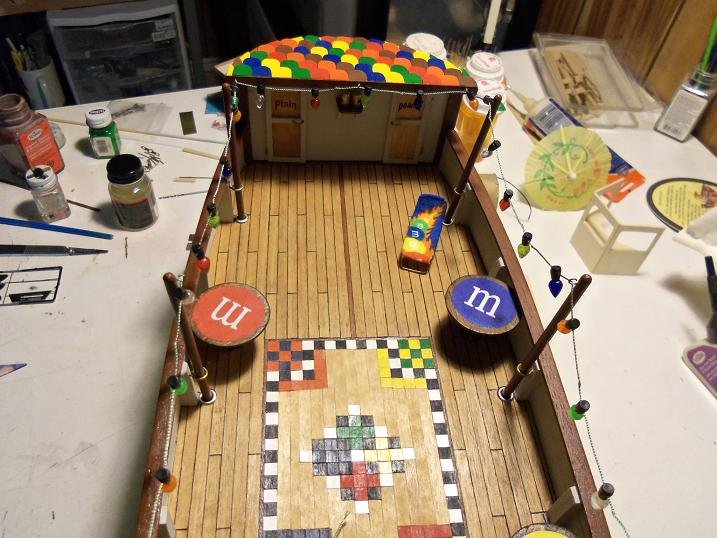
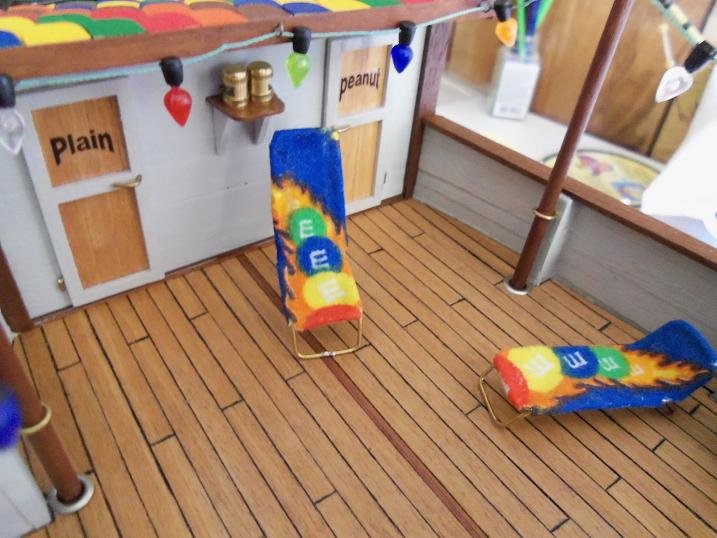
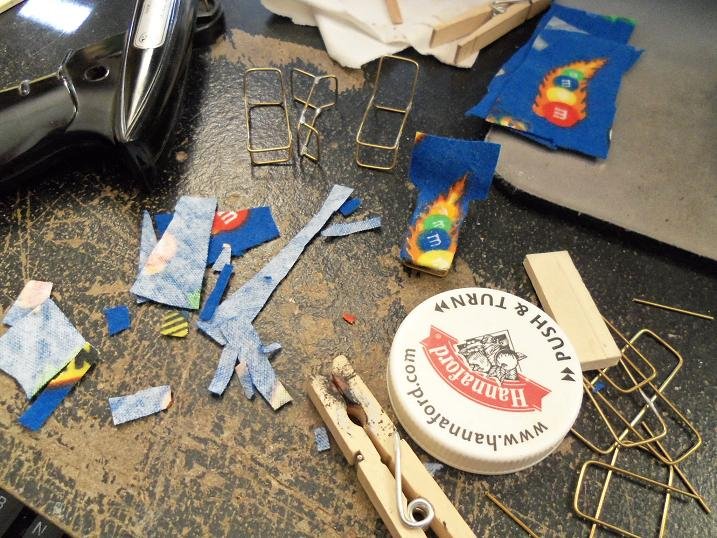
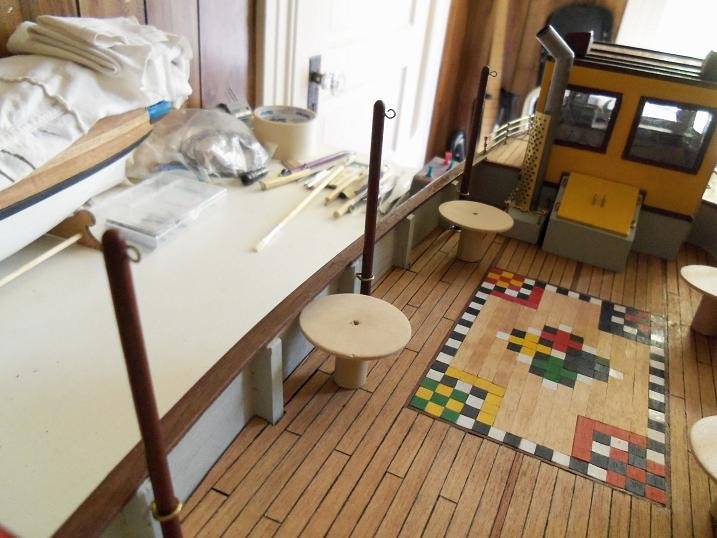
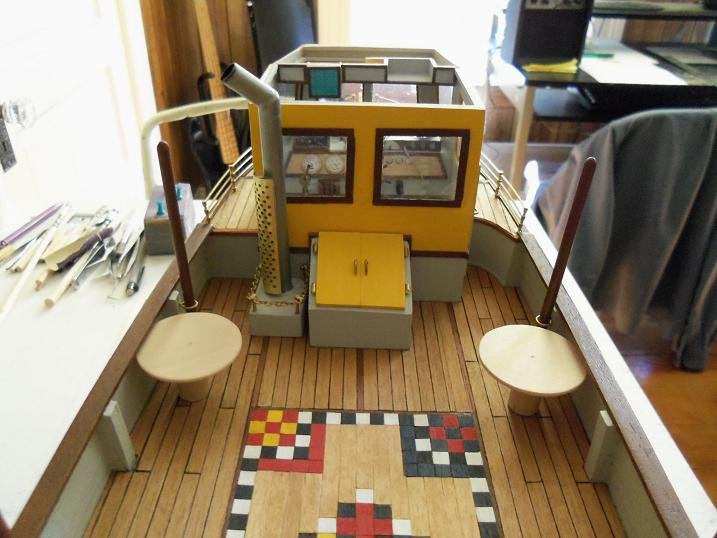
9-21-2012 I used Annegre to do the border around the roof......doesn't matter what I used, it was going to be painted the chocolate brown anyway. I mentioned string'in lights.........I'll wager that you think they may be lit. no.........would have been cool, but I should have thought of that earlier in the project. I found these lights in the dollhouse section at Hobby Lobby. they looked perfect for the task. they will terminate at a box that I need to add to the pilot house. the border around the roof was painted. cutting the M&M material to size, I began to cover the lounge chairs with it. I used white glue to cement it in place.


-
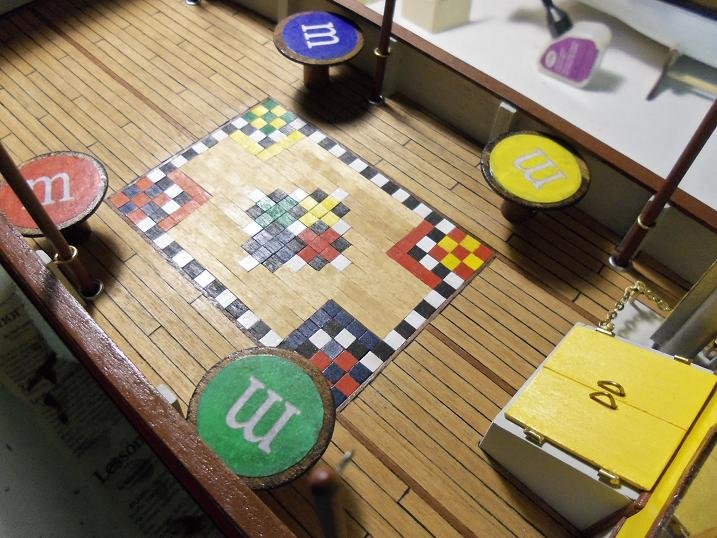
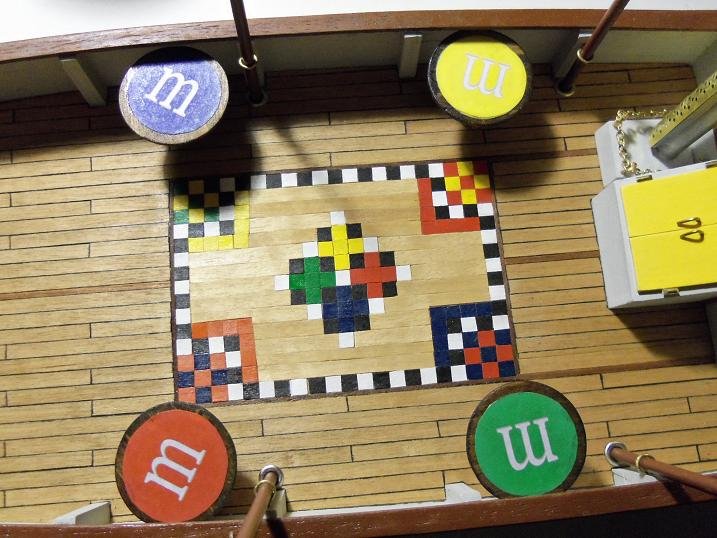
thank you Ben.......there's a lot more 9-19-2012 {part 2} the admiral had some cloth that had M&M racing emblems on it. I cut up the material leaving the emblems intact. hooks were added to the posts.......they will be closed when the lights are strung, I believe the roof is cemented in place at this time....oh........wait!...no, it wasn't! there's still a little bit more to add to the interior of the pilot house. hooks were added at each of the corners though. the tables were stained, instead of painted.....after they were wiped off well enough, the emblems were cemented in place with white glue. the yellow one doesn't look too good.......I waited to see what would happen when the glue dried. it did get better....good enough to use.....the others are drying as well. they were given a coat of semi gloss lacquer......... <-- spoiler alert
-
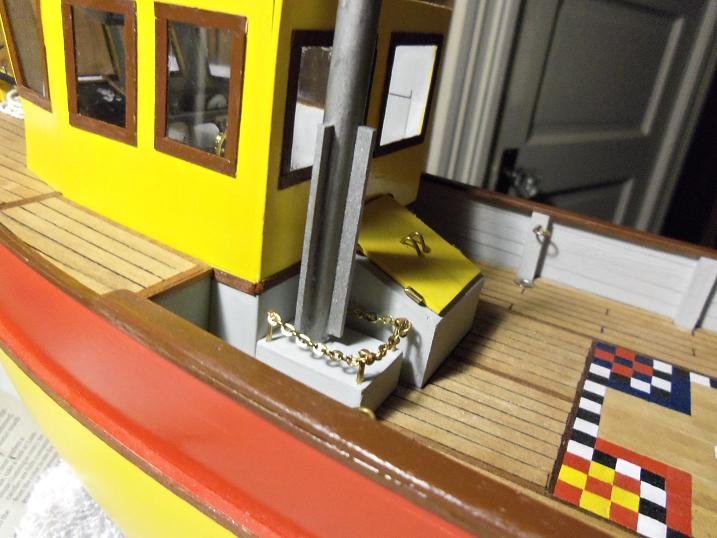
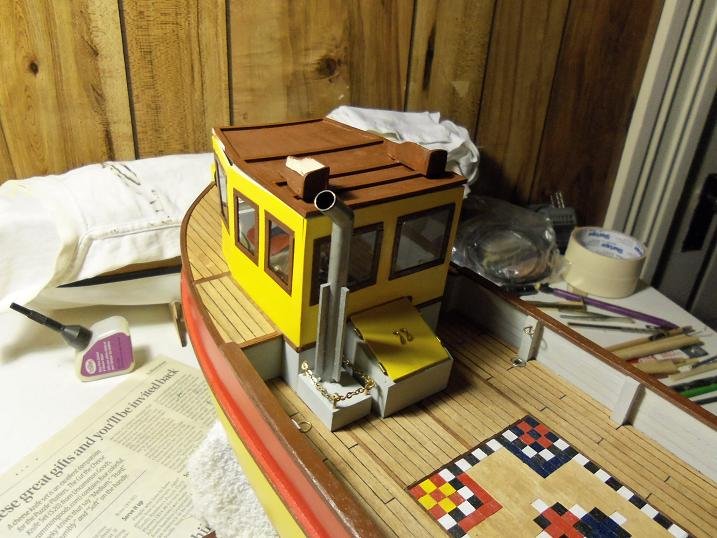
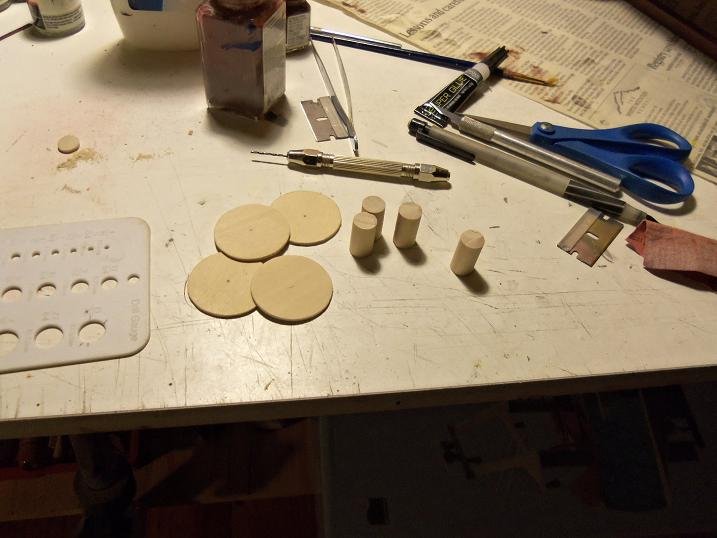
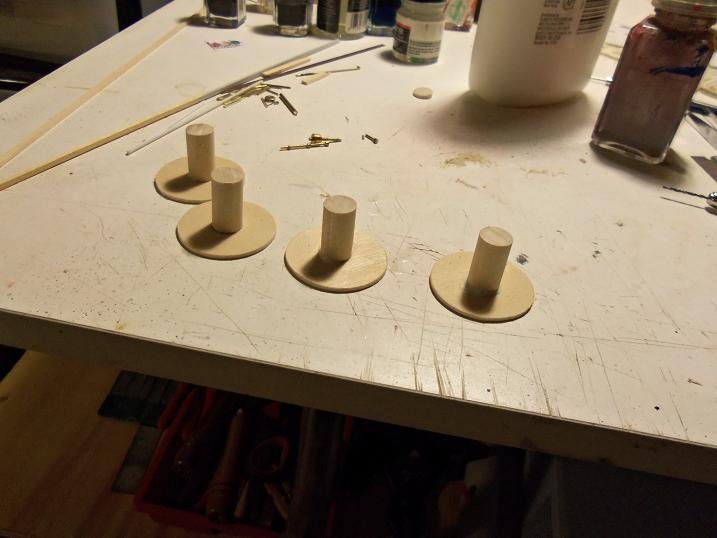
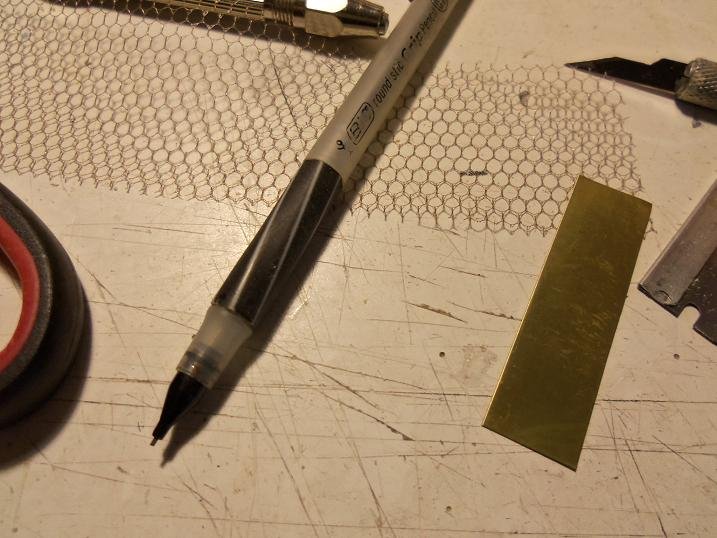
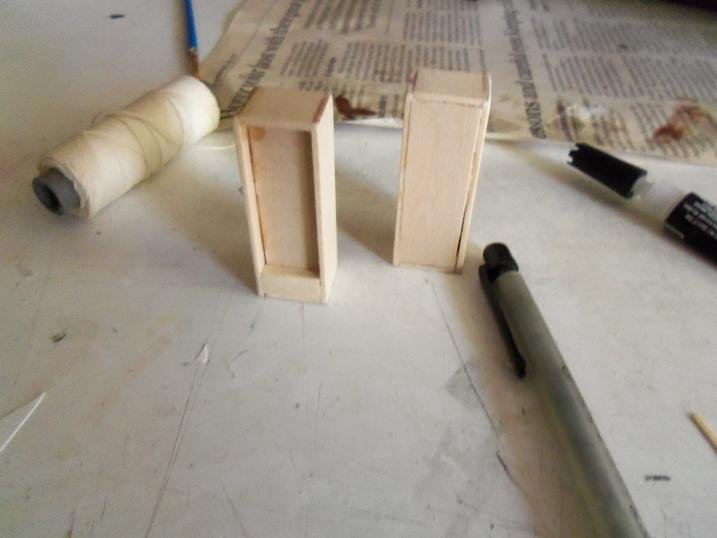
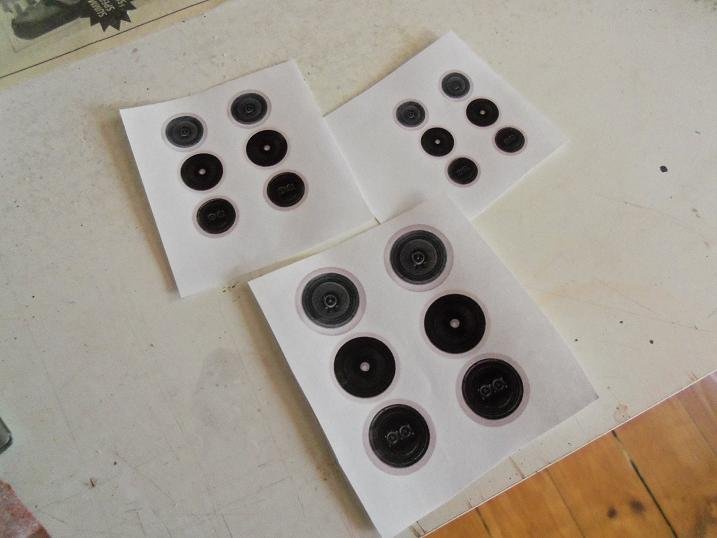
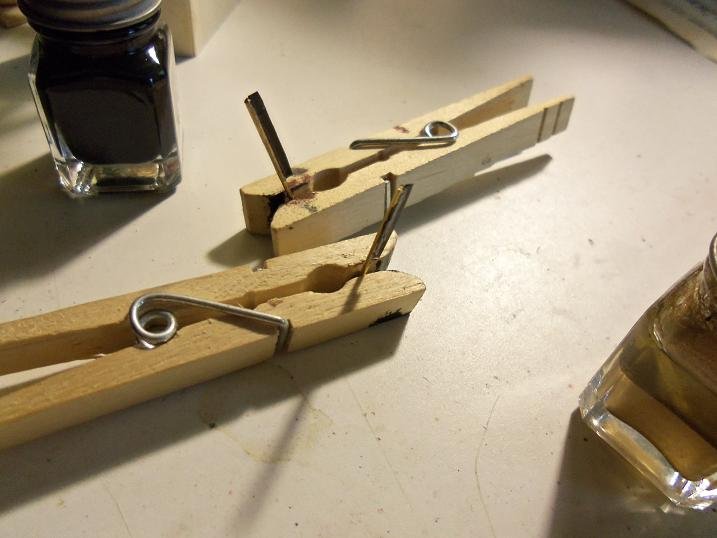
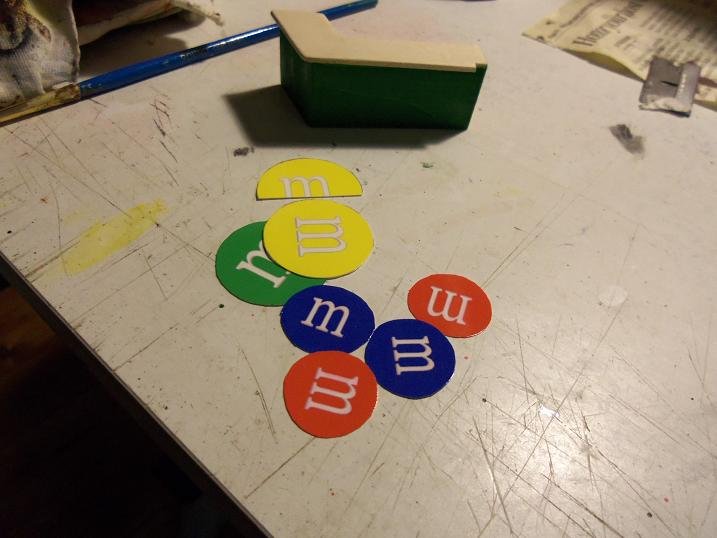
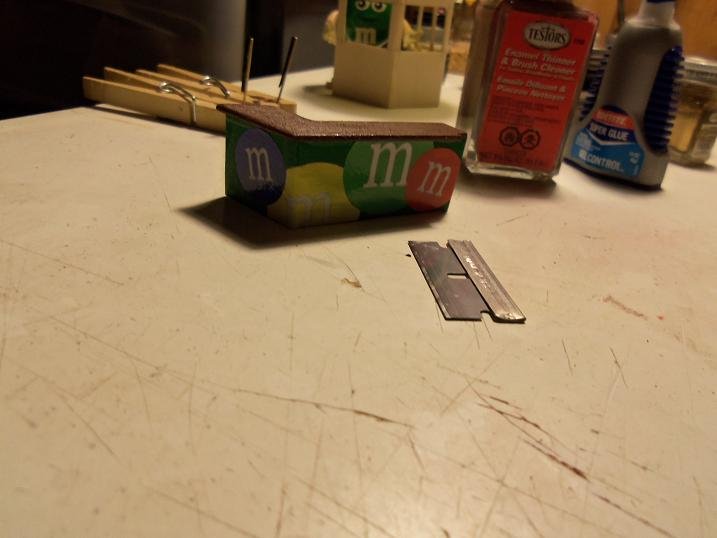
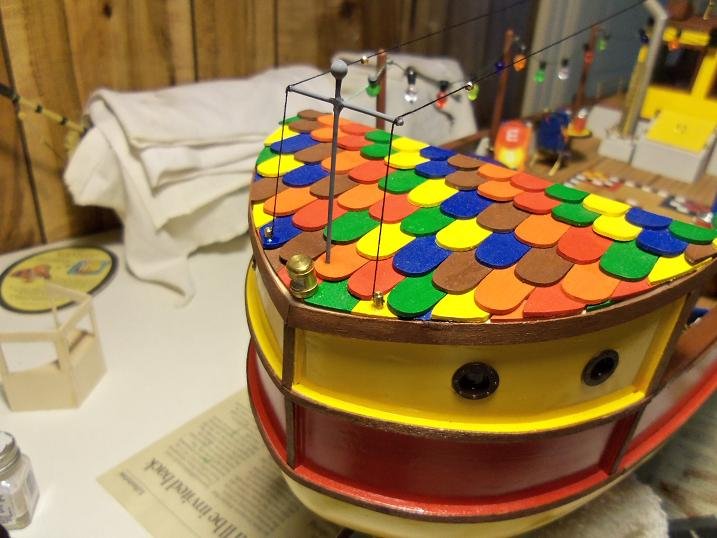
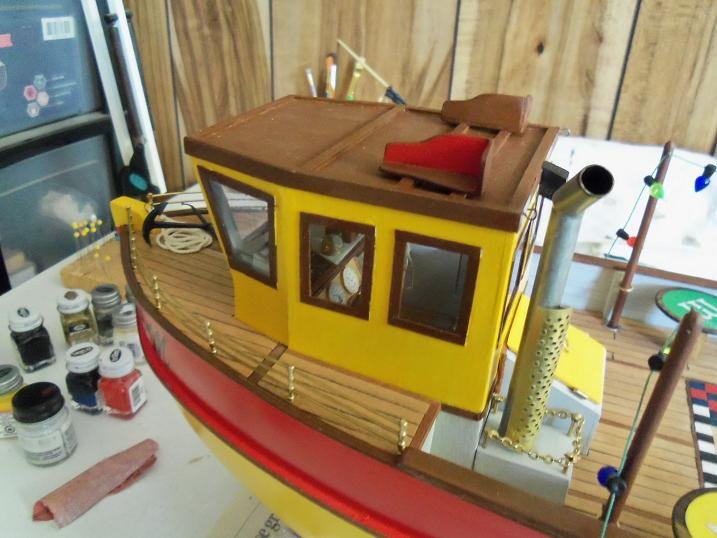
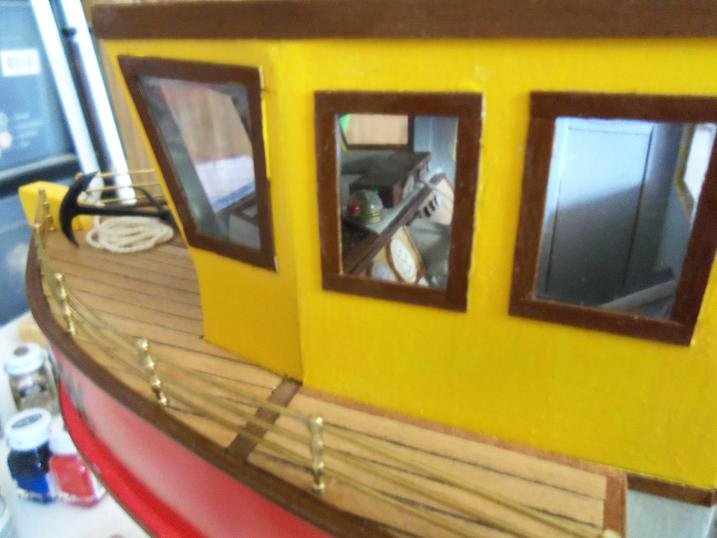
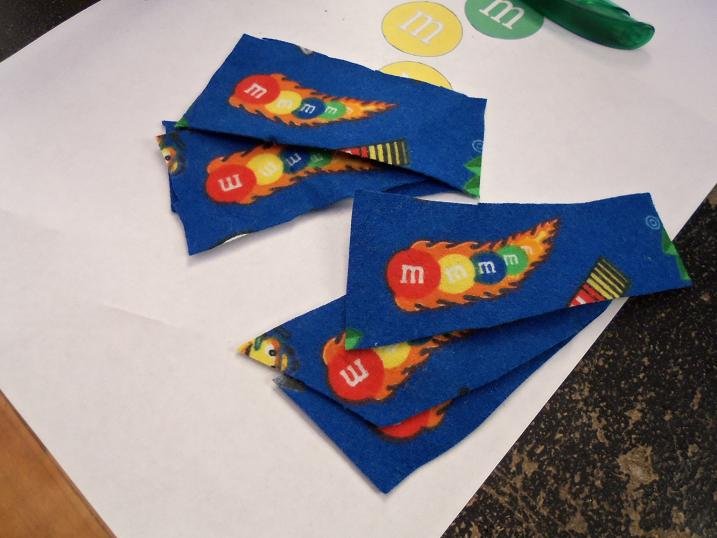
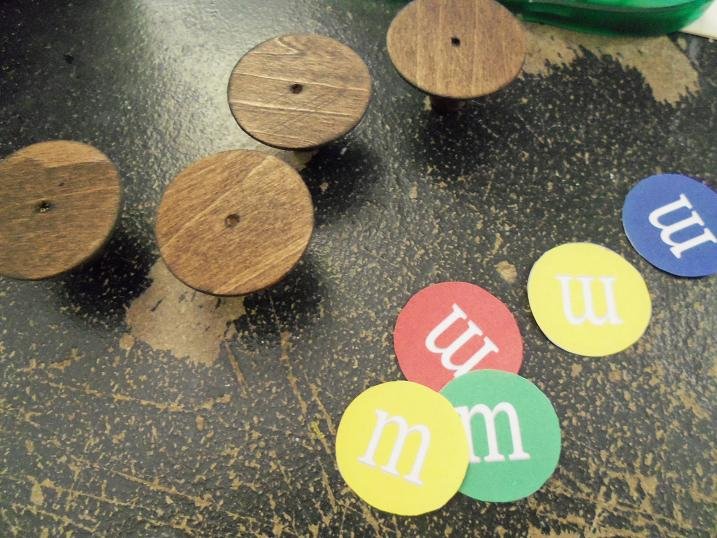
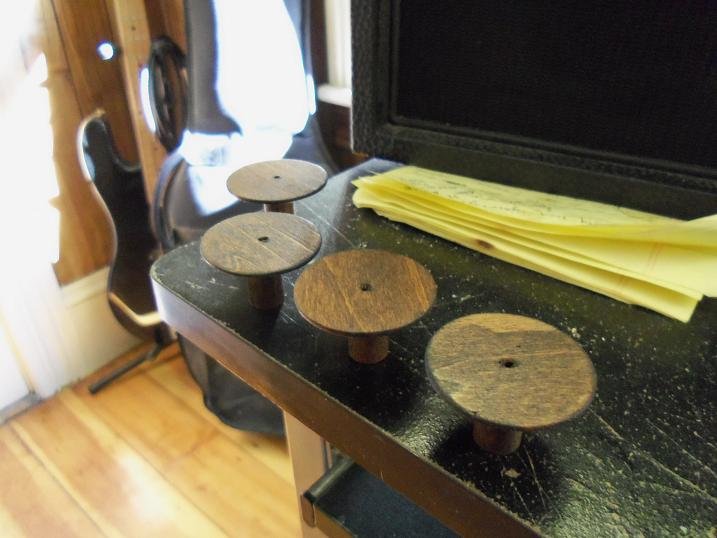
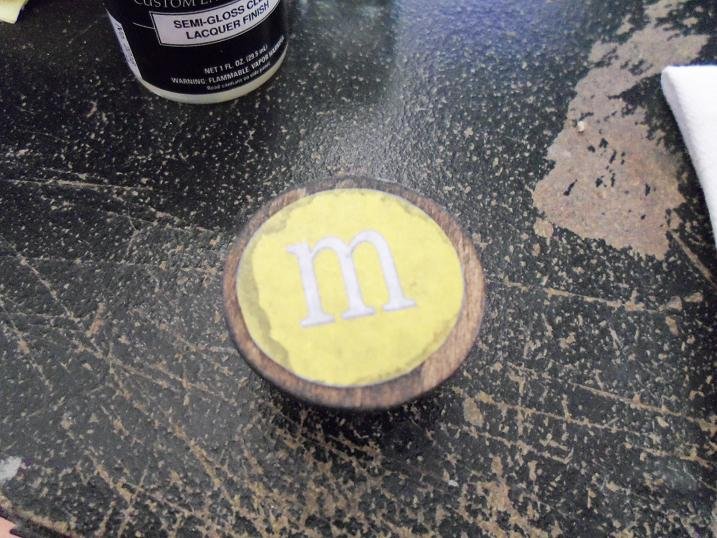
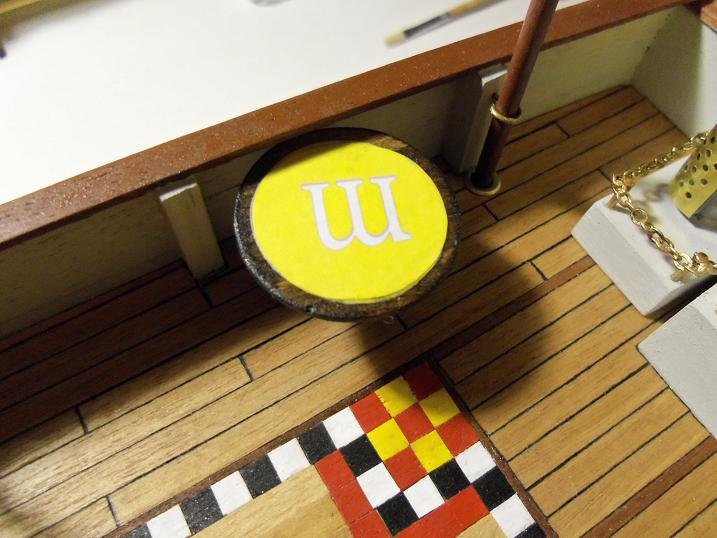
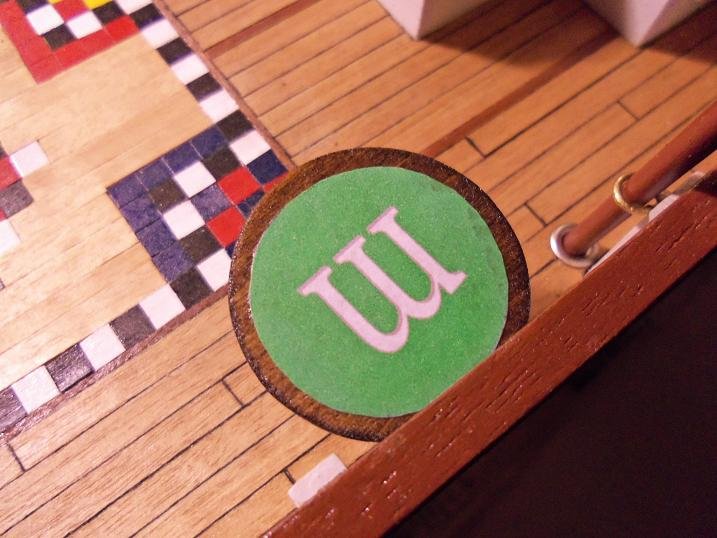
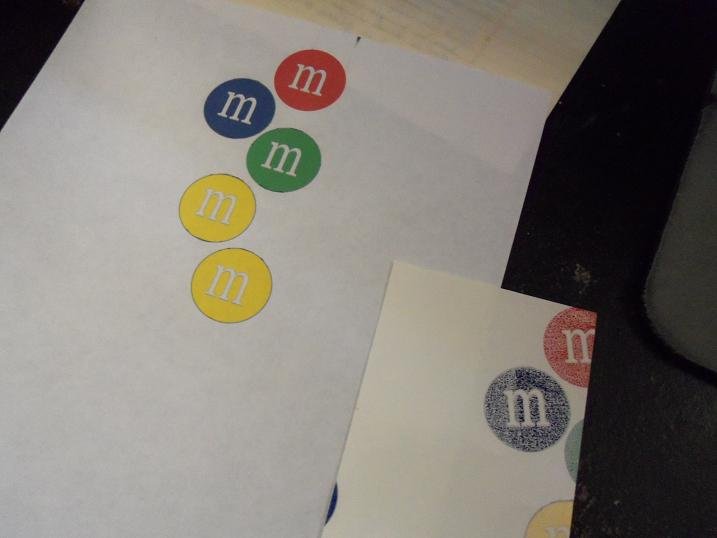
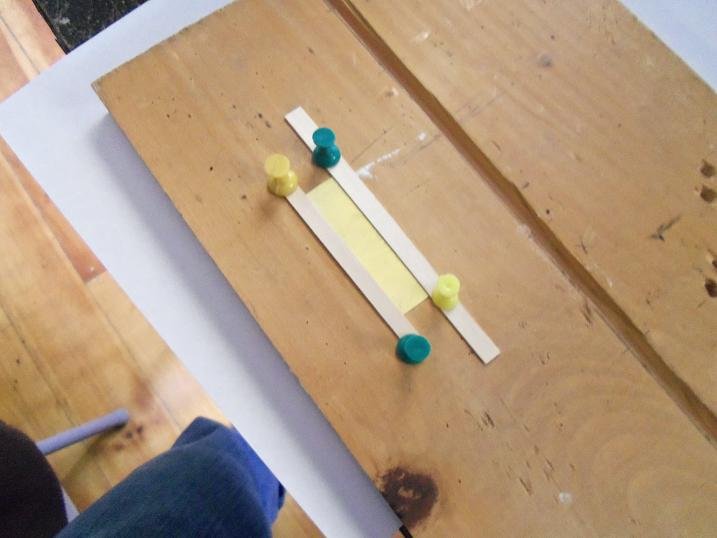
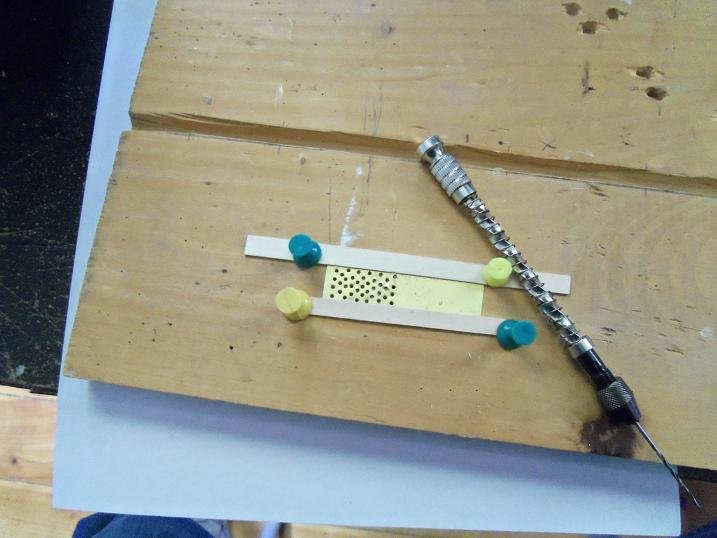
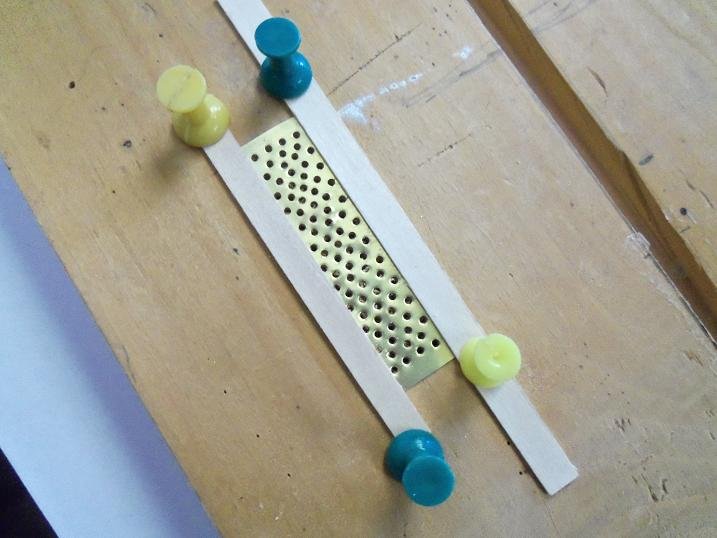
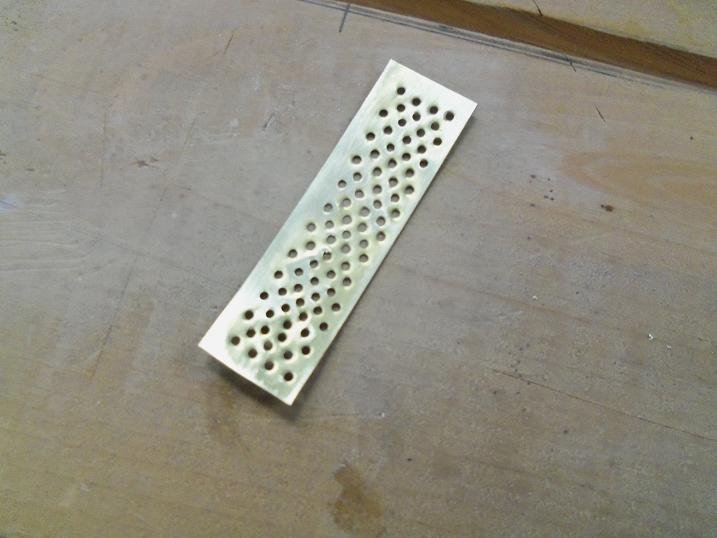
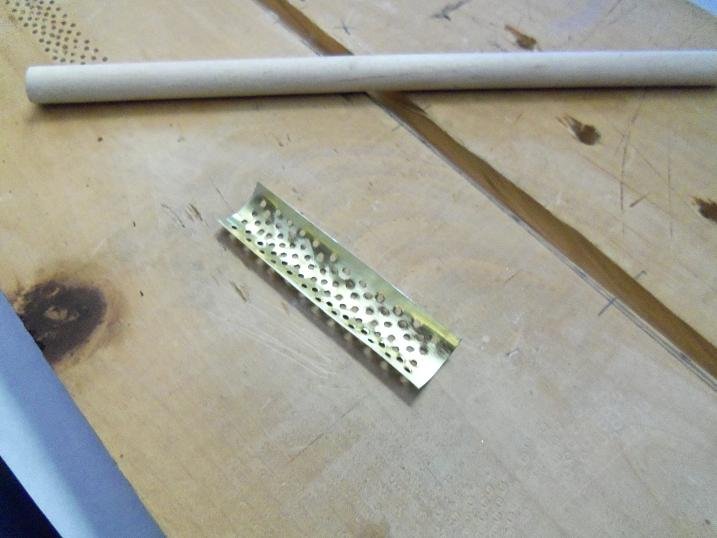
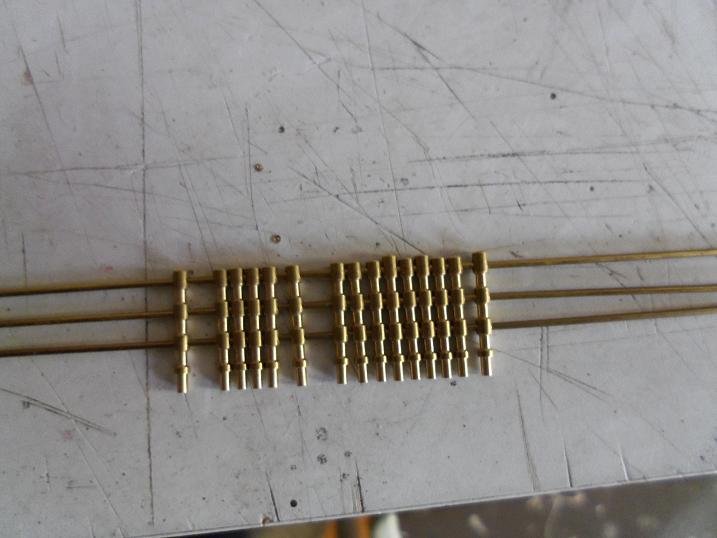
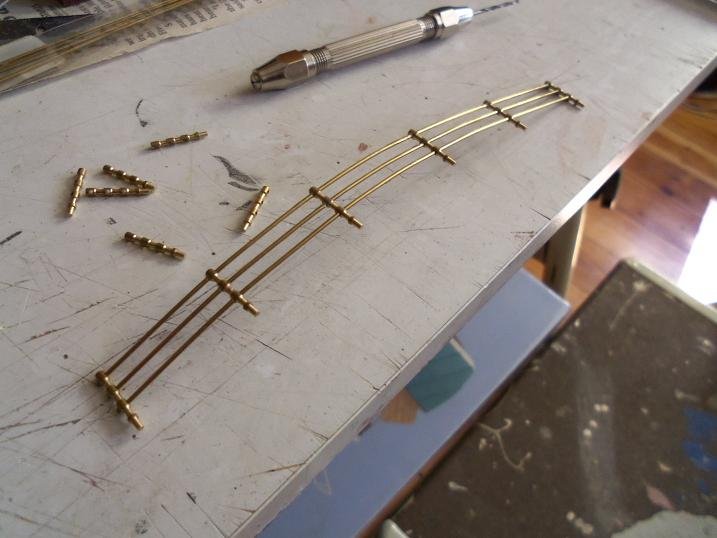
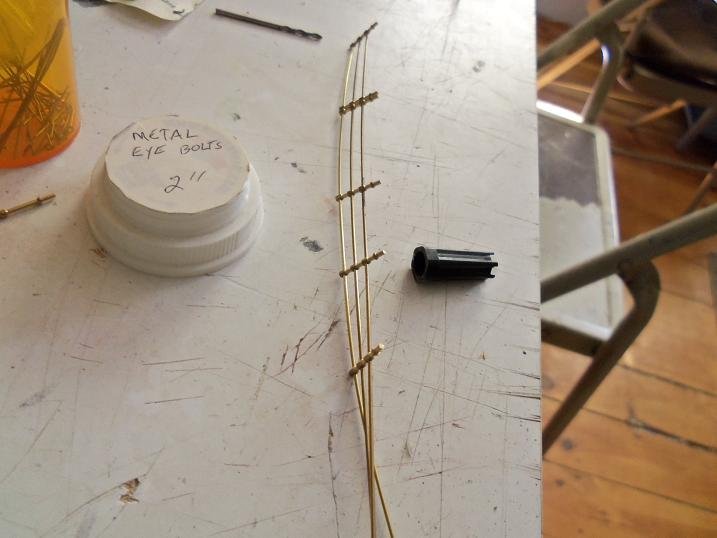
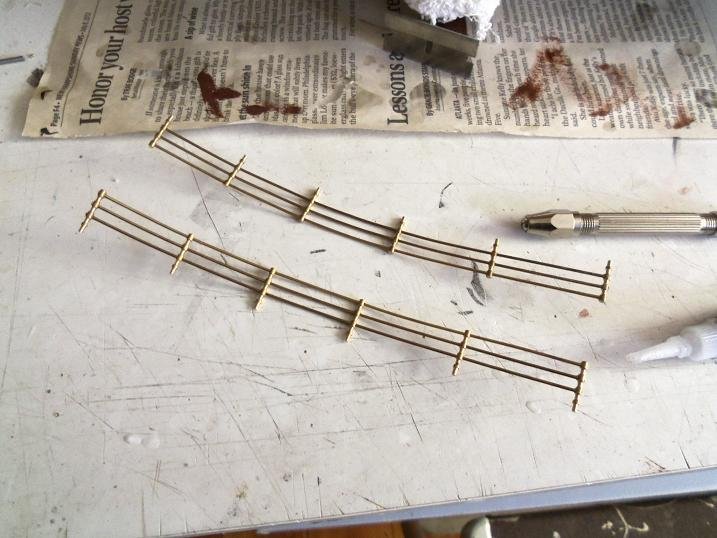
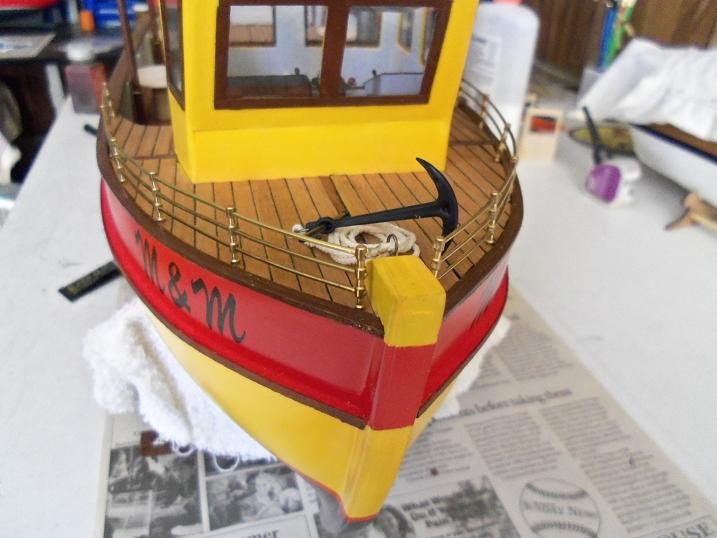
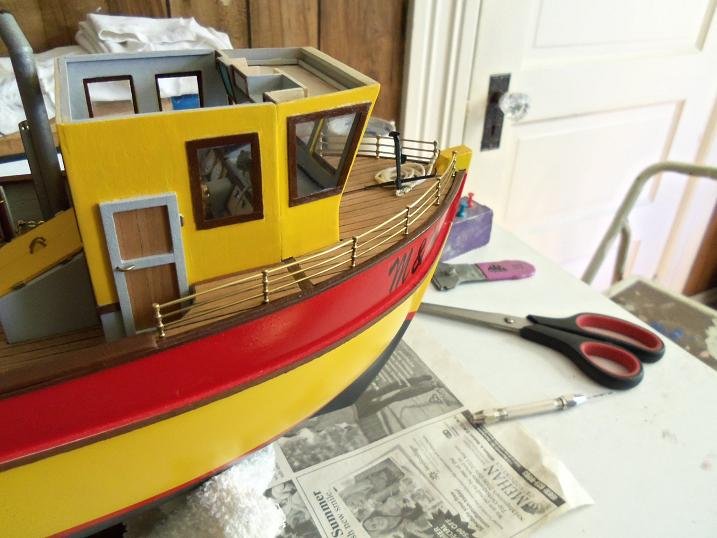
9-19-2012 {part 1} this was a huge session........my picture finger was tired after this one for the table tops, I printed up some images of M&M's - circles with an 'M' bossed in the middle. then the set up to drill the thousand or so holes in the shield.... the back side of the shield was sanded to remove all the drill punctures......them redrilled to clean out the holes. then bent around a dowel to give it the curve. it was then cemented on the funnel next was the set up for the fore deck railings these are the 15 mm three hole stanchions they were spaced by eye after the length was established. I used CA to cement the stanchions in place. the back wall of the nav light boxes were painted the color of the light. they just need a touch up now.

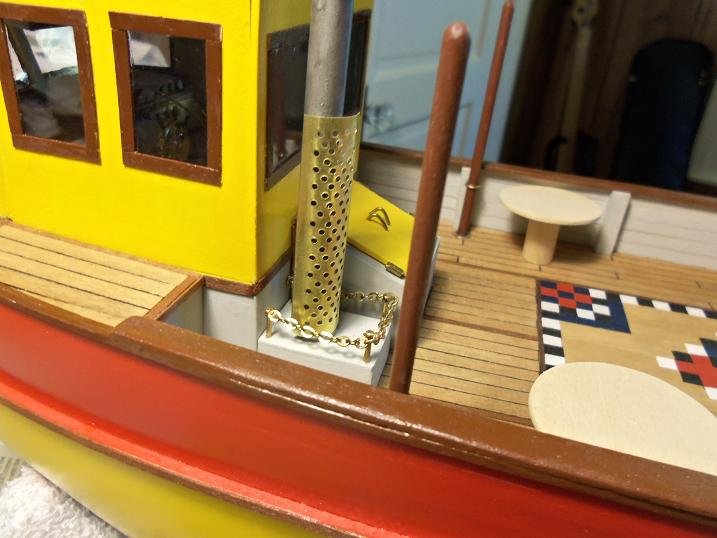
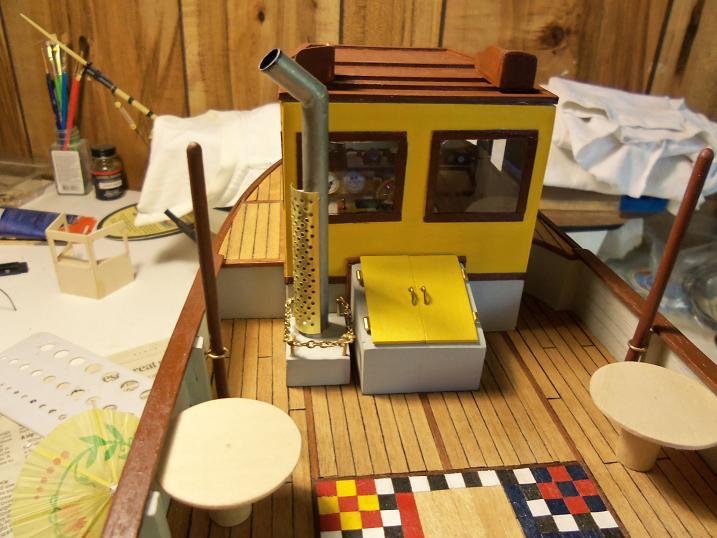
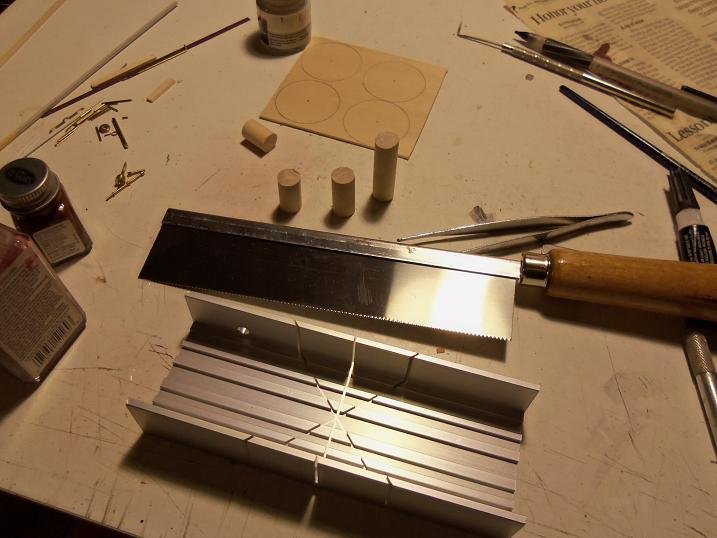
-
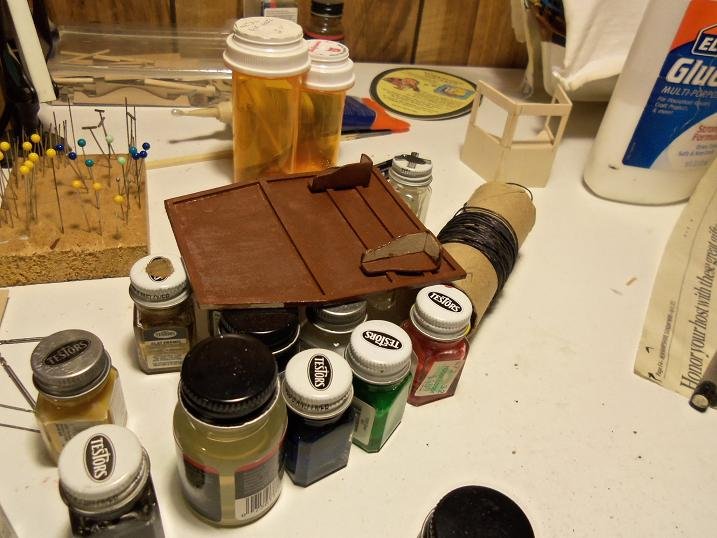
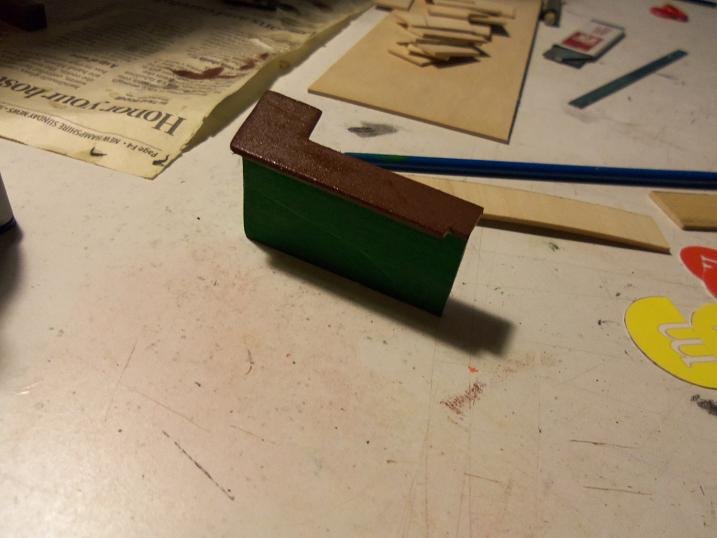
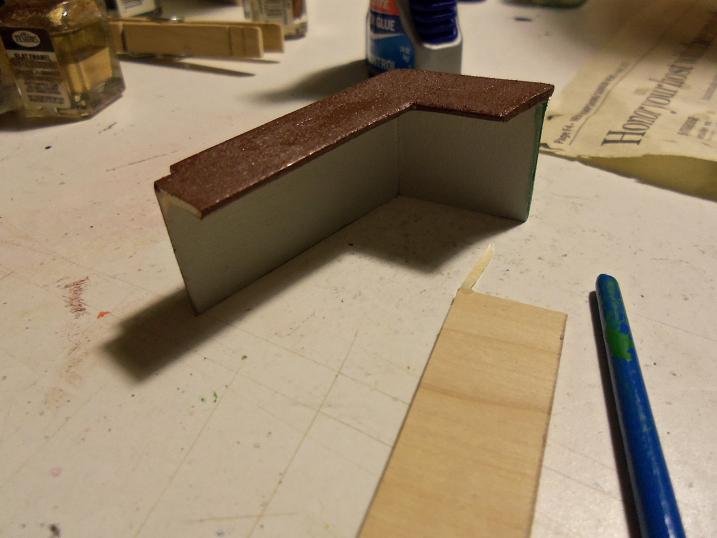
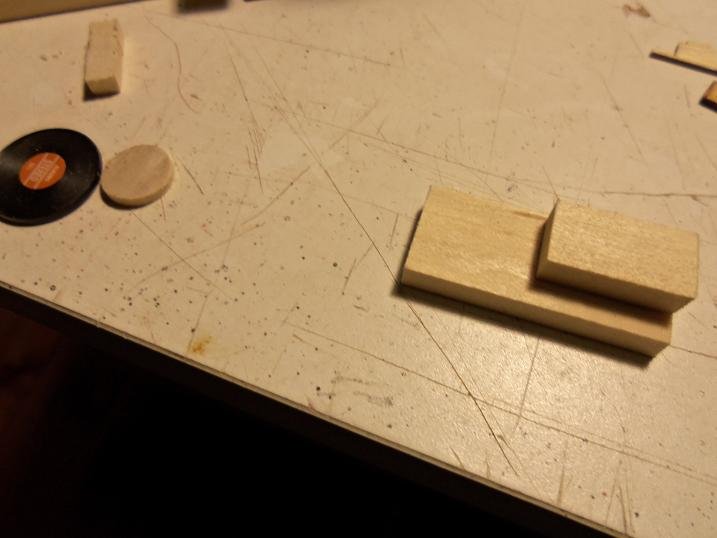
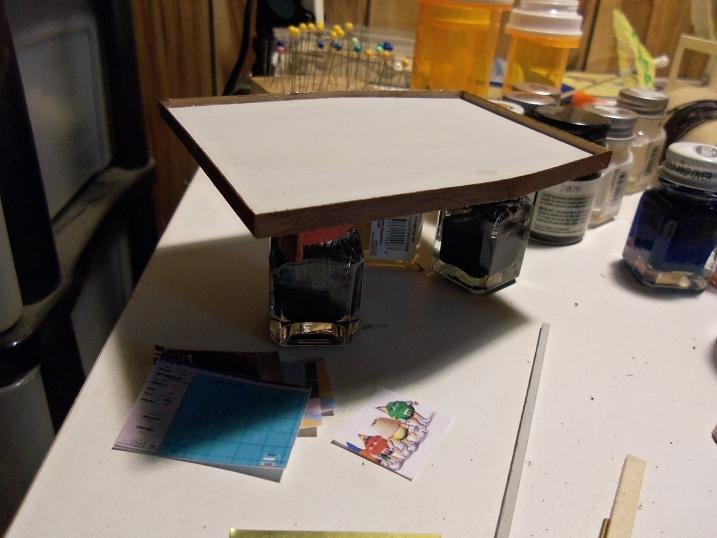
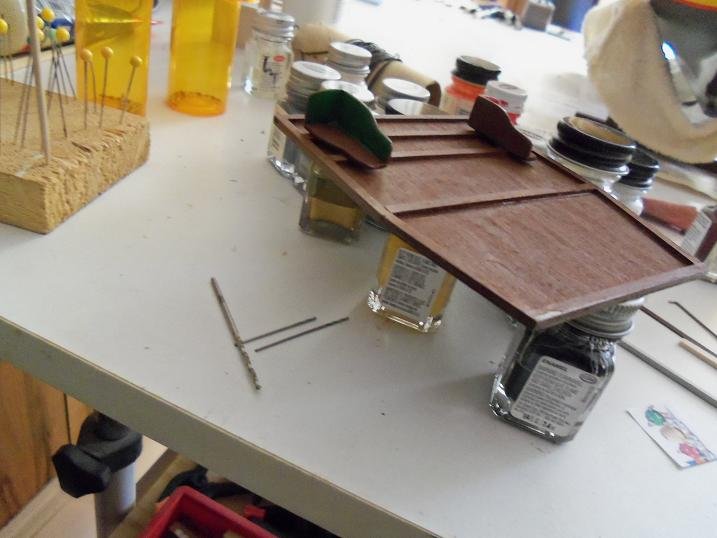
9-18-2012 the funnel was painted silver......the chain was good, but I don't think it's enough. I decided to add a shield to it. the attachment point for the shield was added to the funnel. the roof was painted at this time. pieces of dowel were cut, along with some circles, for the next addition to the model the roof was dry fitted in place. finding the centers of the circles, the pieces of dowel was cemented to them, and then dry fitted on the deck a small thin sheet of brass was cut for the shield