CaptainSteve
-
Posts
1,858 -
Joined
-
Last visited
Content Type
Profiles
Forums
Gallery
Events
Everything posted by CaptainSteve
-
 Too true, Geoff. However, my main problem is that I am my own worst critic. Feel free to comment if you think I have got it wrong, but chances are that I will have already changed my mind and begun alterations. For example, in a fit of madness this evening after work, I tore out the floor-boards of my whale-boats. Instead, I intend to trim the card template-based parts I made and re-fit them into a single layer. This decision was made as I think my risers should have been made with thinner strips of styrene. Essentially, I'm running outta room !! Pics coming when they are repaired.
 -
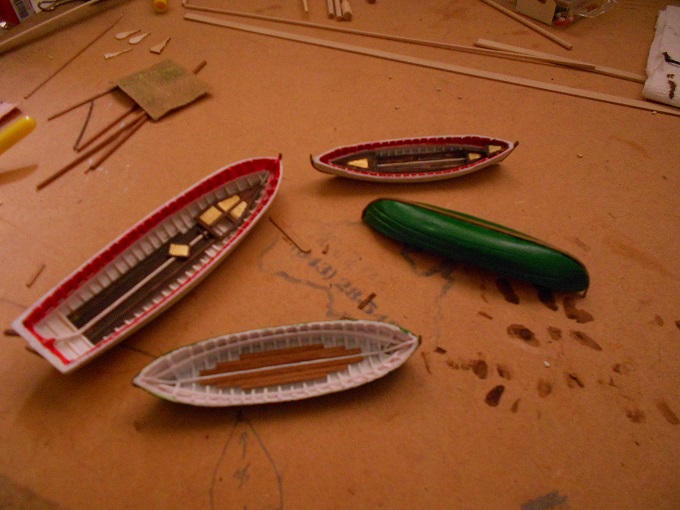
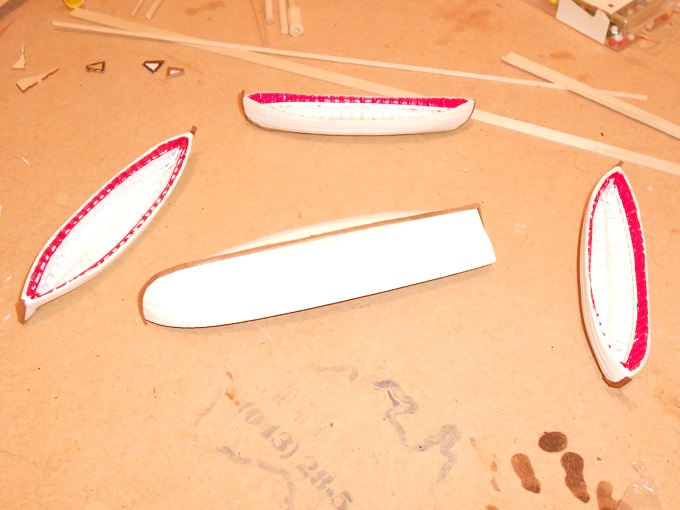
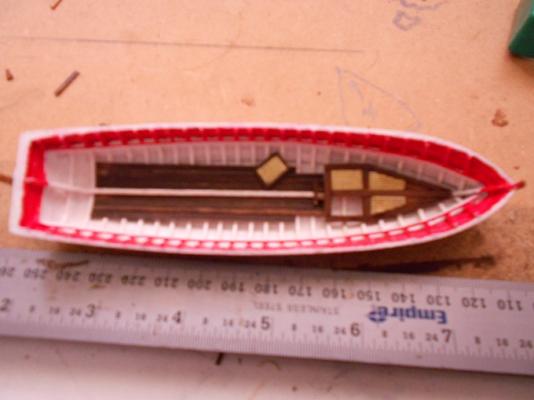
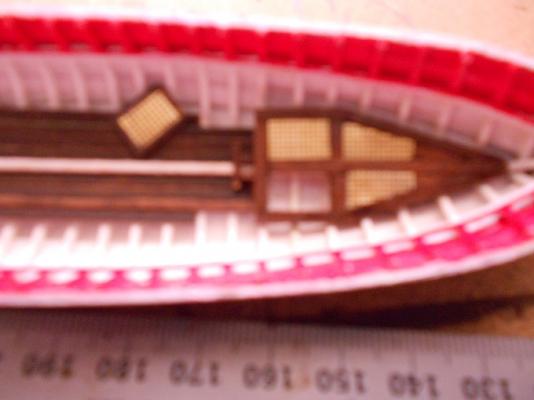
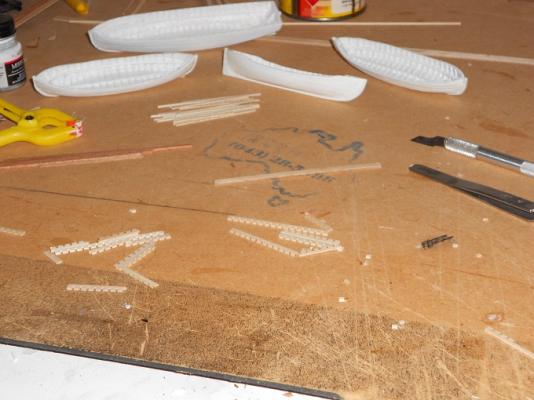
Apologies for the very slow progress over the past week. Whilst I do try to keep moving forward on my Connie, sometimes this can be a battle - especially during football season !! Still working on re-creating your pics, Geoff. Although, there have been some minor modifications. The hulls of the two whale-boats are now green (two coats of paint and matt varnish). A comment by a work-colleague ("Pity you had to hide most of that ribbing") led to a slight re-think with the deck pinnace. As I thoroughly enjoyed spending hours making the tiny gratings for the Captain's Gig, last night I opted to make up a plate of gratings for the floor of this boat. In order to display the ribbing work, one panel has been left off, giving a glimpse of the internal bottom. This panel - constructed on grease-proof paper - will be set lying askew once the benches have been fitted. Also, in these next two pics (though hardly visible with my crappy camera) the mast-step has been put in, just behind the new grating panel.

-
Keep working on her, Harv !!
-
Very nice work, Rodger. You've obviously got some skills when it comes to model ship-building. Looking forward to seeing this one as it comes to completion, particularly because I was thinking of doing the Santa Maria after my current build (of course, that's still about 4 years away).
-
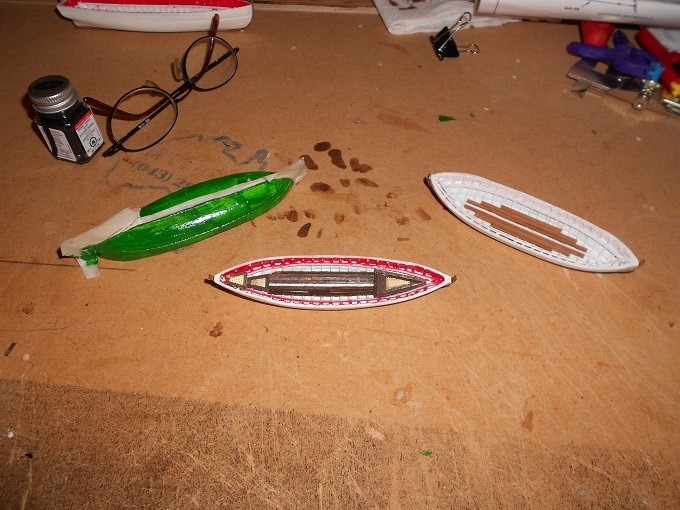
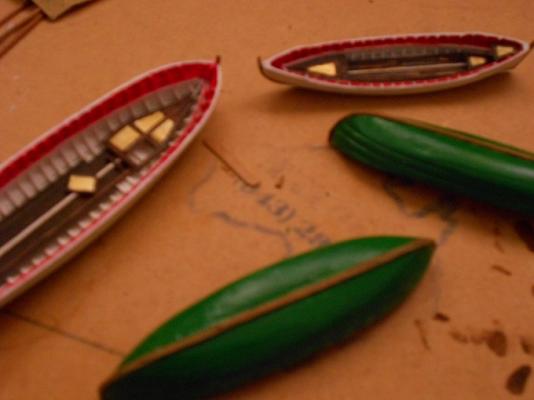
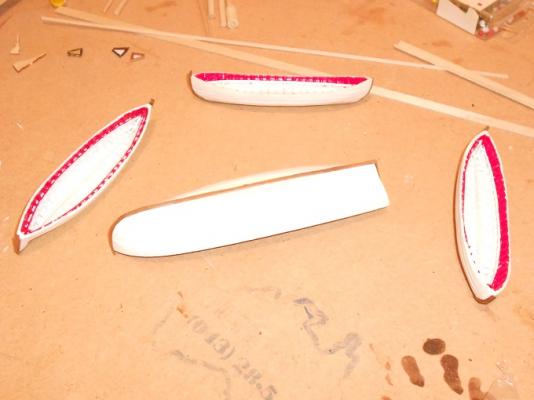
Thanks Tophog (Not gonna call you Geoff, coz there are enough of them around here as it is) I managed to break away and get a few hours at the shipwright's table today. The morning was spent cutting tiny floor-planks and building the gratings for the Captain's Gig. Also, the decision has been made to "go green". So, the red stripe on the two whale-boats no longer exist, and the first coat of green has been applied to one boat. This time around (the second re-paint for these two boats), I have protected my dark wood keel-pieces with masking tape. Work will continue finishing this stage off over the coming week. Here's a pic ...

-
Geoff, My main consideration regarding the matter of colouring is the overall look of the model. I'm a little concerned about over-powering the final image with too much white. At the same time, I hope to cut back on the red stripes with wooden cap-rails and deck furniture. PS Thanks for that latest pic - added to the collection !!
-
Welcome aboard Mad ... I calculate that this is going to be a long journey. Current estimate - based on previous builds, as well as the level of detail on this kit - is appprox 5 to 6 YEARS !!! One idea that I have toyed with (tho' did not use) to replicate the look of real wood. Take strips of styrene and, using the modellers' knife, make tiny slash marks along the length. Random cuts are better. Then a light paint job using BLACK or DARK BROWN/RED paint with broad strokes of the brush. Do not be too concerned about covering the entire surface ... the aim is the highlight of darker colour worked into the knife-work above. Once this has COMPLETELY dried, paint the strips with a slightly diluted light-brown paint. Sand very lightly (Gauge 100), and then a final coating with a matt-varnish. (Painting tip courtesy of my good mate, Marvin)
-
Geoff, Thanks to your pics, they are coming along nicely ... if a little slowly. As you said, they are definitely a lot of fun to do - just like a mini-kit. Next up, floor-boards for the Captain's Gig, mast-stops and the other two gratings. Currently contemplating a repaint of the two whale-boats. The plans do indicate that these should be bulwark-green. As well, a close inspection of photos of modern-day Connie backs this up. Not certain of the historical accuracy of this, however, as there was no colour photography back in 1812.
-
JS, I think the only thing I would do differently would be to have NOT glued the bottom "slice" on until more shaping of the internal sides had been done. I cannot speak for others, but I found it quite a chore to sand the internal bottom curvature without accidentally taking more than I needed from the upper pieces. However, using either curved wood or styrene strips for the ribs does help to hide the less-than-perfect job I did on this shaping. These curved pieces, especially when painted all white, very much help to create the illusion of a well-formed hull shape. Even looking at them very close-up, I am more than satisfied with what I have done.
-
Gotta say, you are doing glorious work there, Jay.
-
Definitely Jeff. Starting with the kit's toast-slice formers, I did originally begin sanding by hand. As I usually get to spend less than an hour a day on my Connie (extra on weekends as much as I can), this could've taken months to get right. But using the engraving tool as a sander cut this back to a few hours. But, yes, I did flatten the bottoms to allow for the thin (1/16") strips used as keel-pieces. Of course, in my case, I ended up re-doing these parts, which meant a little extra sanding and additional re-levelling for the new keel strips.
-
Neither of the above, Jay. I'm talking of a little-known version of football we have here in Orstraya. Well, little-known to nearly all bar the 20 million-plus population of Australia, anyway. It's known officially as the AFL (Australian Football League), but we just call it "Aussie rules". Incidentally, floor-boards have been installed for three of the boats. ... and one grating plate so far. As I am one of those poor, unfortunate people who must work for a living, progress is slow. However, I do try to do something each night. Even if that is just a couple of planks before bed-time.
-
I second that !!
-
Jay, You and Geoff are seriously scaring the life out me re: rigging Connie !! Once upon a time I used to enjoy rigging. Especially with the rat-lines, as they really bring a ship to life !! All I used to use was the stick from any ordinary iced confection, trimmed to required spacing between rat-line rows. Establish your first run, being especially careful of spacing between the rat stay-lines. This is especially important if you prefer to work from bottom-to-top. (Sure wish I had taken pics to show you when I royally messed this part up on my first build!!) Anyway, once your first row is in place, fix the first knot for the next row, and then loosely tie off (half-hitch) subsequent knots of the row. Now, take an ordinary hair-comb and pair of tweezers. Hold your ice-treat stick as a spacer above your first line. Fit the comb teeth loosely onto your back-stays and use to push the knotted line down onto the spacer. I then used my tweezers to tie off each knot in turn after a final check of alignment. With a little practice, I could hold the spacer and comb in place with one hand, and tie off each knot with the tweezers in the other. To achieve the level of detail you guys are doing, may I recommend, once a section of rat-line is complete, that you might use an extremely fine thread looped around each knot intersection, to simulate the (nightmarish!!) numerous sew-lines you mentioned above. Just a thought.
-
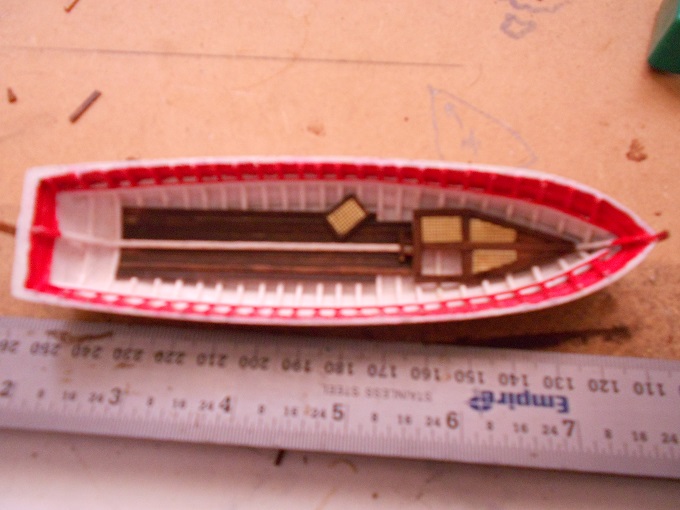
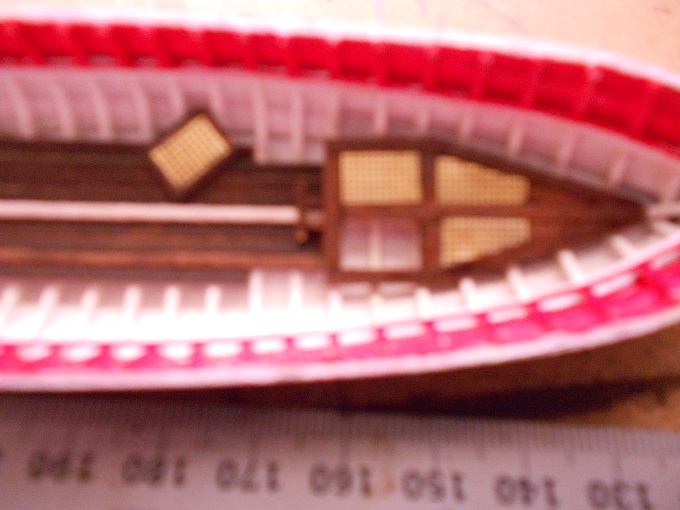
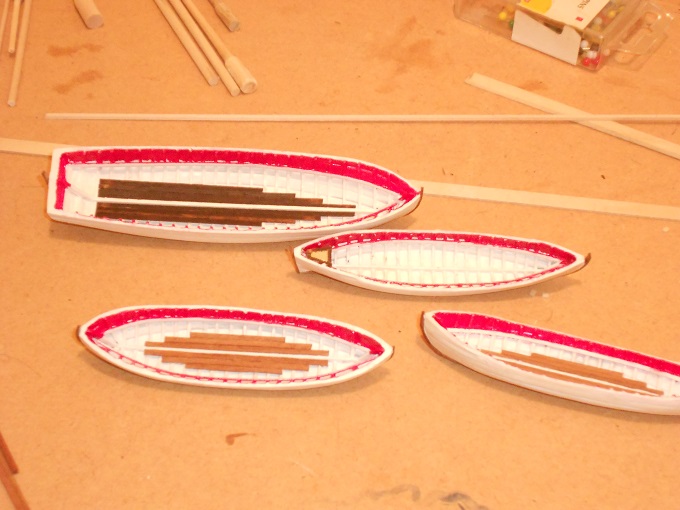
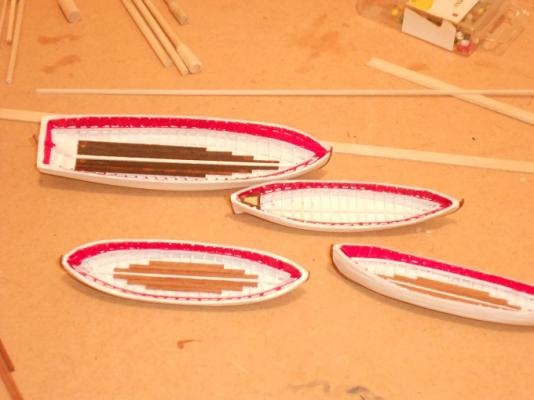
New keels and paint-job. I am much happier with these new keels. I realise that after fitting the cap-rails, benches etc, as well as all the sundry items (masts, oars, ropes) that the red stripes will barely be visible. But red and white are the colours of CaptainDen's football team !! So, without taking anything away from Connie's beauty, I wished to give a little nod to his Sydney Swans (despite them beating my team for last year's premiership.) At top-left of the boats are some early attempts at making the gratings for the Captain's Gig. After some frustrating tries, I made a card template of the grating, checked to make sure it would fit, and then built the grating frame to fit the card-piece. So that the brass-plate would align properly with the top of the wood frame, two very small pieces of card were glued on top of each other inside the frame with the brass-plate CA glued onto this "stack". Geoff, I've taken note of your comment re: hiding the detail with all the deck furniture. I think I'll pare back on these items when the time comes.
-
Just a quick update ... no photos at this stage. The four boats went in for keel-surgery on Wednesday, after I took to them with my modelling knife. All went well and all patients are currently recuperating with newly-fitted keels. Now, back to re-creating your pics, Geoff ....
-
Arrr ... CaptainSteve is hearing 70s porno-music ringing in his ears. Arrrrrrr !!! Seriously though, she's looking absolutely beautiful, Jay !! Very crisp and very clean all the way. I confess that I thoroughly enjoyed rigging previous builds ... I'd stand back and admire the ship as each set of ropes were installed.
-
Okay. I found two of those. I guess that's next on the agenda. A quick update before joining the rat-race and heading off to work .... I have salvaged some old grating strips from Davy Jones' Locker (refer my MSW1 thoughts on Billings kits). These have been trimmed of their "teeth" and wood-stained to become the flooring planks. Still contemplating keel-surgery.
-
Jay, Geoff's pics have helped me a lot. Although, if I could do 'em over, I would leave the exterior hulls unpainted. I painted my keels and now wish I'd stained them instead. Am currently pondering the consequences of removing these strips and replacing with a dark wood. BTW Geoff. After extensive searching, I finally located all four rudders this afternoon. Was also searching for rhe "unique grating" as mentioned with the detail for the 28' Gig on Sheet 5 (top-left corner) ... I can see that yours are a pair of neat triangular gratings with wooden surrounds. However, I can locate nothing similiar to these gratings in my kit !!! Am I missing something ?? Did you scratch-build yours ?? Next up, floor-boards and mast-stops.
-
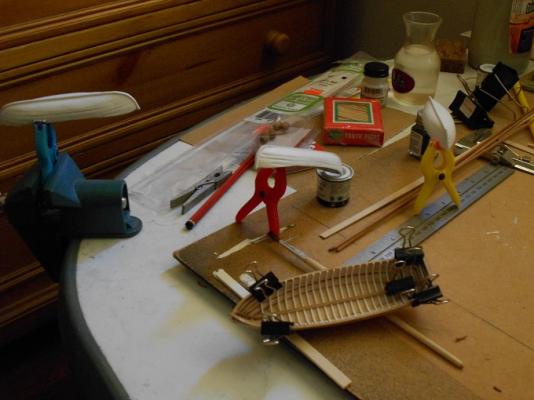
Still working on re-creating your pics, Geoff. Got the first one covered. I ended up using styrene strips for the remaining ribs, as can be seen here on the pinnace. The three long-boats to the rear have had three coats of white paint. A final coat of matt varnish should finish the job. I'm planning on all white with red from the riser up on the interior and a red top-rail. Next up will be stained floor-boards, as I move onto to your next pic.
-
Geoff, This information and your pics are brilliant. Thanks!! I have picked up various sized styrene strips over the last two trips to my favourite hobby store, so will start with those. I hereby declare that my next short-term goal will be to replicate your last pic!! (Sorry folks ... but this is gunna take a few week-ends) Question: I noticed from that last pic that you have mounted your keels. Though I must admit to preferring this look, Marquardt's book suggests that these two, as well as the deck-mounted pinnace(s), had the keels stored onboard.
-
I am almost certain this guess is probably incorrect. But, Damn!, there are similiarities to the old girl herself .... So ... here goes (sigh) Is it USS Constitution ... ?? (If so, Congrats on the old picture!!!)
-
Geoff, Would you mind posting some close-ups of your boats here ?? I think they will help a lot at this point.
-
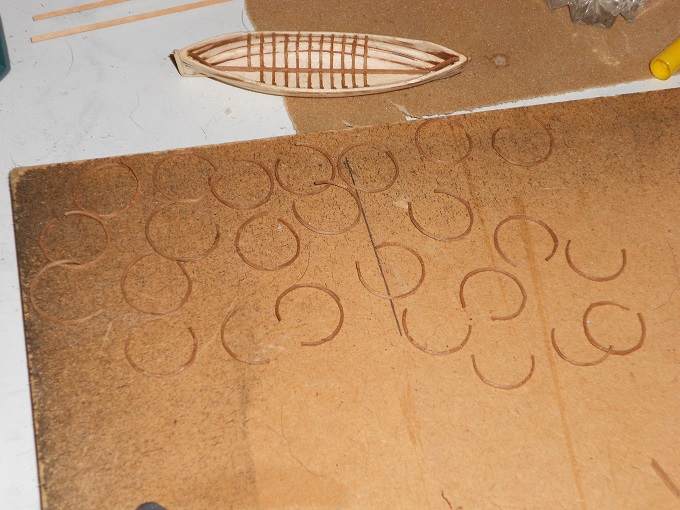
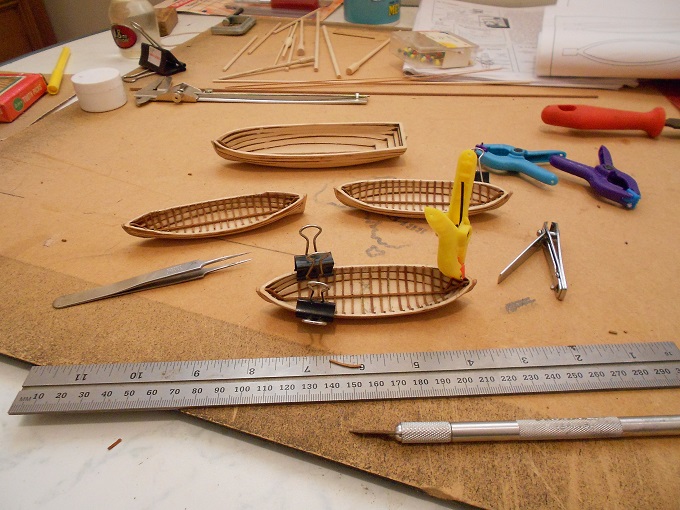
Just as I thought, there were not enough to complete four boats. This pic shows where I'm at after a weekend of ribbing. The one last rib sitting forlornly on the steel ruler will go opposite the yellow planking clamp to complete the bow (or stern, I forget which with this pair) of the second whaleboat. Another two pairs are still required for the other end (stern/bow), as well as about 60 more (30+ pairs) for the deck-mounted pinnace. Since I couldn't source the exact size of stryrene strip needed from my local hobby shop, I'm seriously considering the card option.
-
Harv, They are 1mm x 1mm strips soaked in a glass of water for 30mins or so. Some are from the kit, and the rest were left-overs. Using my hair-curler, I turn them into "hoops" and then cut these into quarters to make the individual ribs. Shorter pieces turned into half-hoops are cut to make two ribs. Apply PVA, align each piece very carefully. I rely upon my one good eye to check they are square. Once glue has dried, trim off the excess with a pair of nail-clippers. However, I calculate that I am going to run out of strips after doing three boats !!! Thinking of a few options for the remaining ribs ... ... the first was inspired by Doris, a brilliant card-modeller here on MSW. Cardboard ribs may not taste as nice, but they will look authentic. ... the second idea is to use some thicker styrene strips. One advantage with these is that they bend easily. ... the third idea is to sand down some 2mm dia strips which have been salvaged from an old outdoor awning. ... as this seems like waaay too much work, the final idea is to order some strips on-line.