HOLIDAY DONATION DRIVE - SUPPORT MSW - DO YOUR PART TO KEEP THIS GREAT FORUM GOING! (Only 13 donations so far - C'mon guys!)
×

GTM
-
Posts
249 -
Joined
Content Type
Profiles
Forums
Gallery
Events
Everything posted by GTM
-
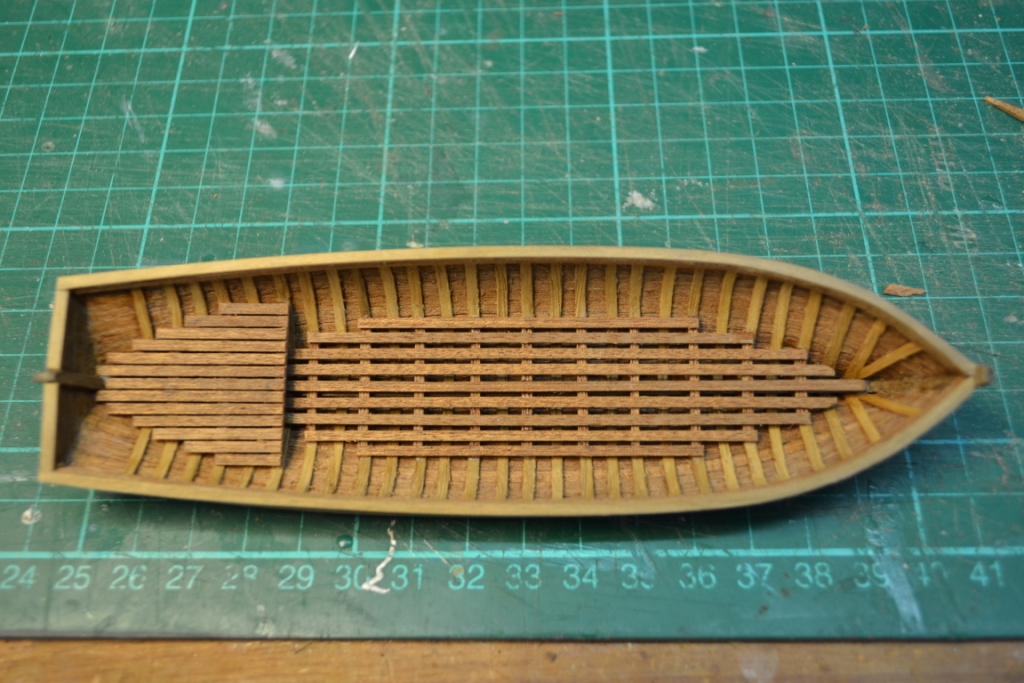
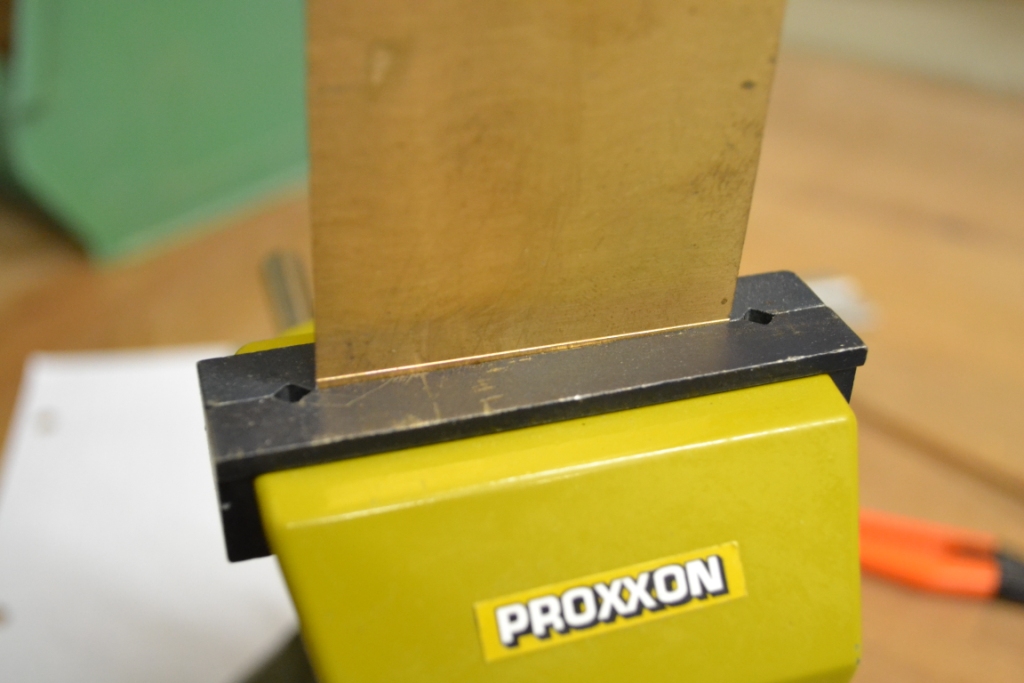
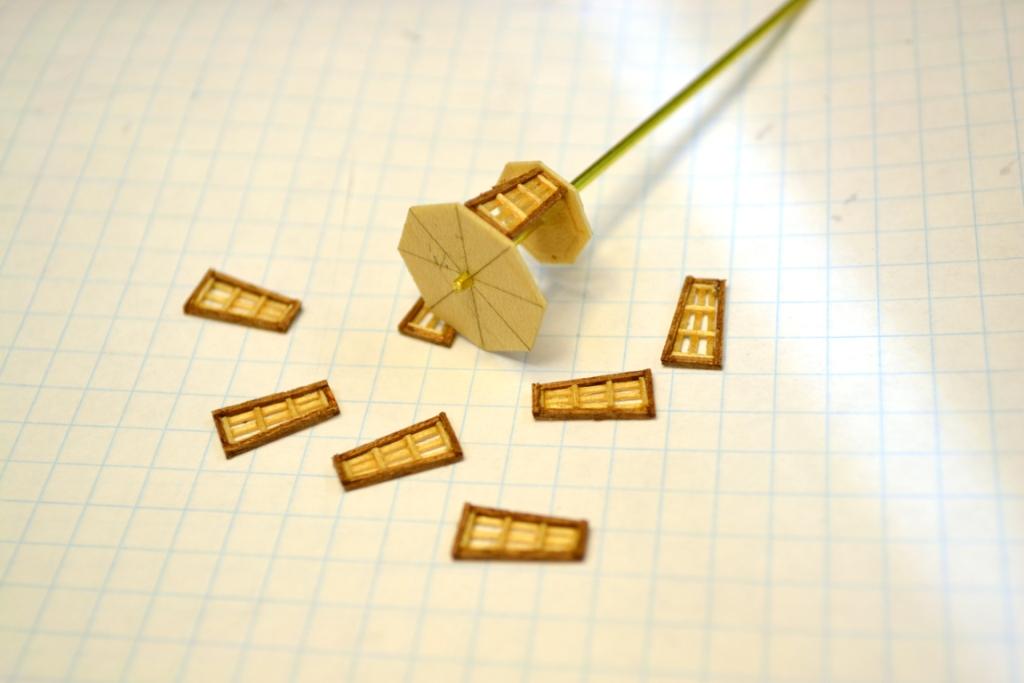
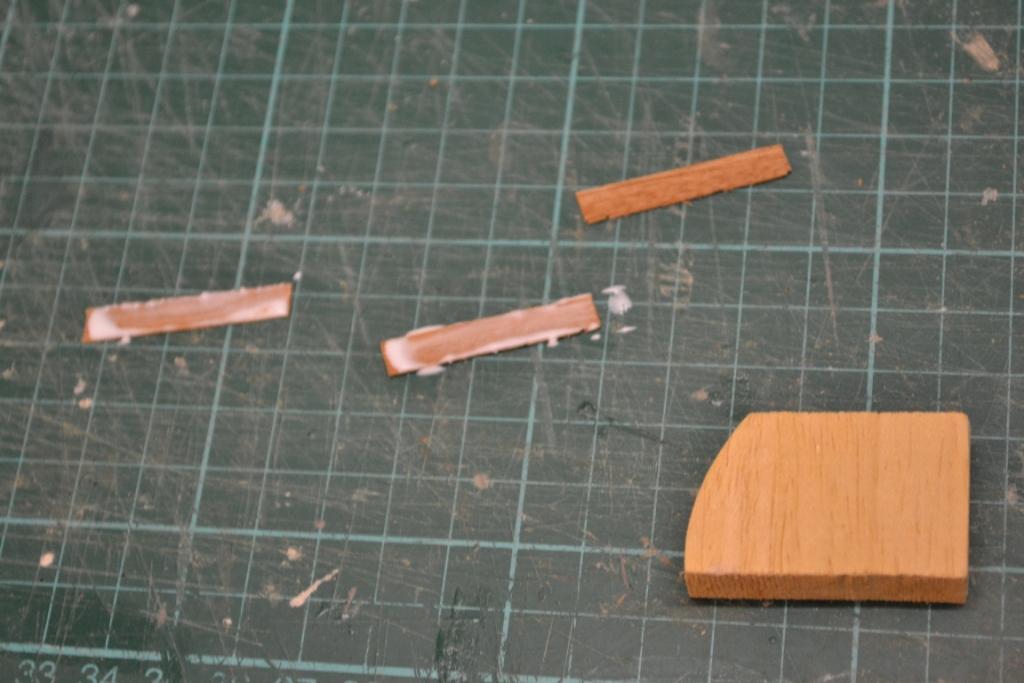
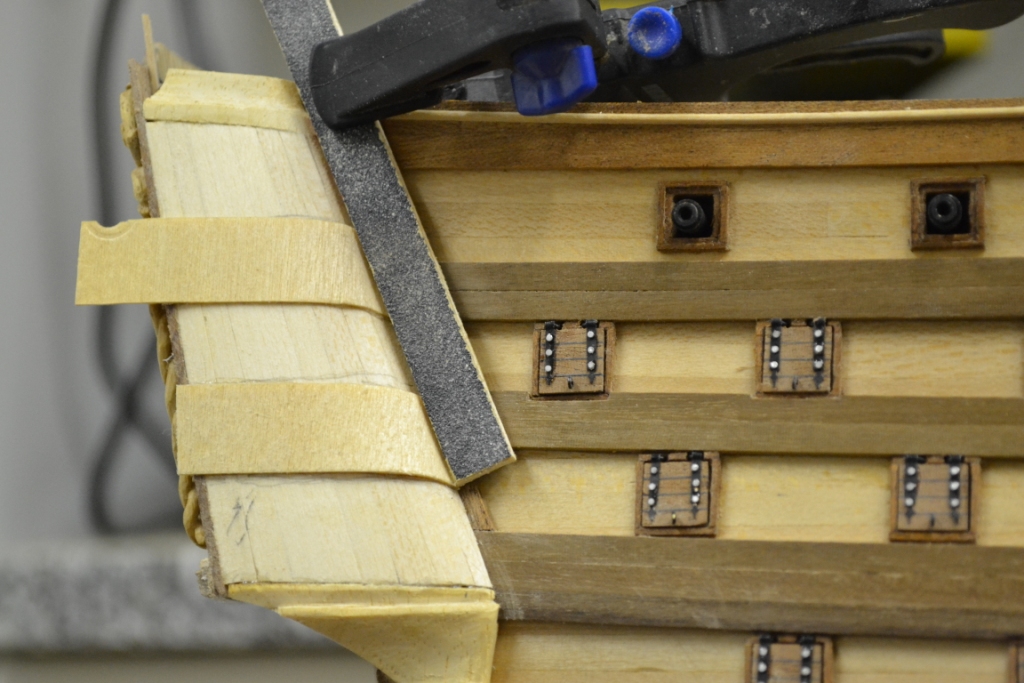
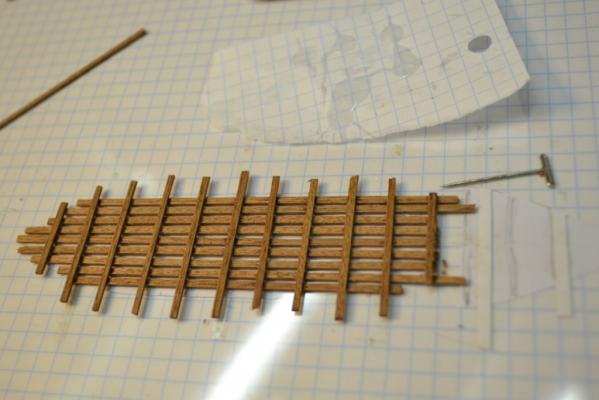
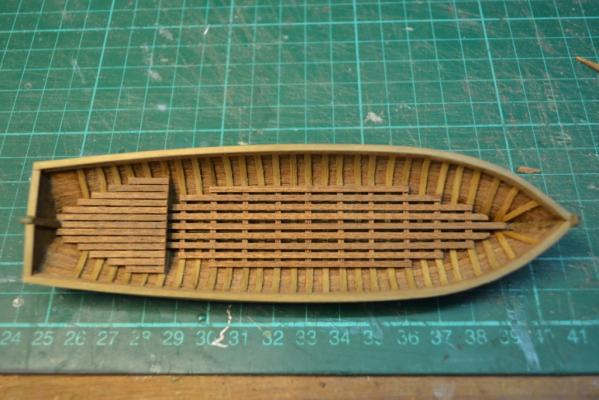
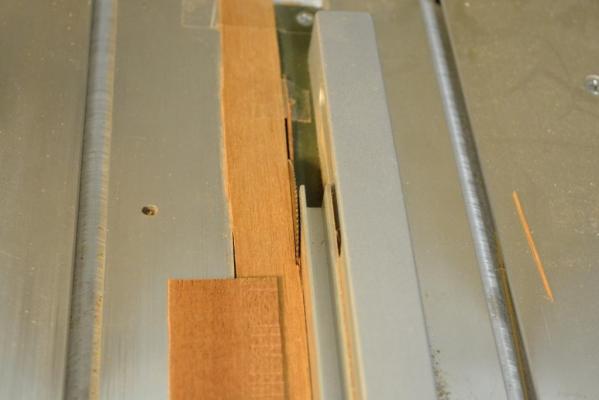
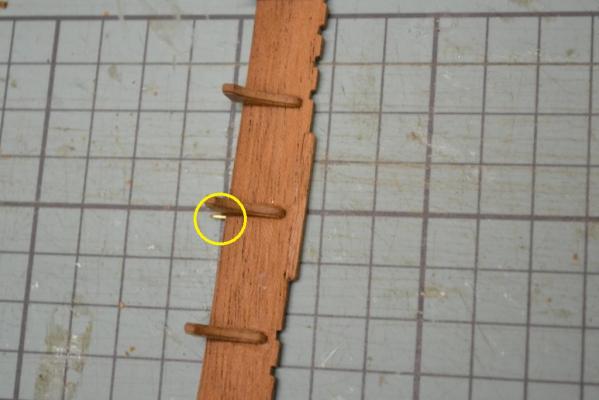
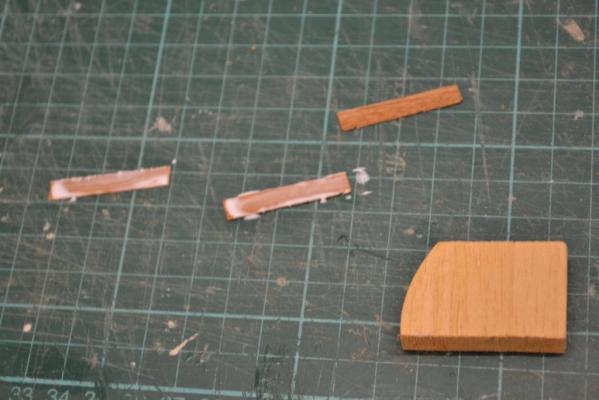
 Thank you for your comment Brian !, they are as always appreciated For the final trimming of the floor boards I used a sharp scalpel with blade No.10 When gently “wiggling” with the blade on the wood and using the marked area of the blade it will (eventually) cut straight through. ..
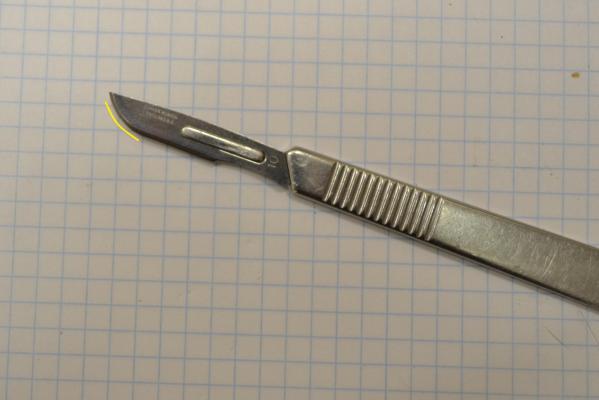
-
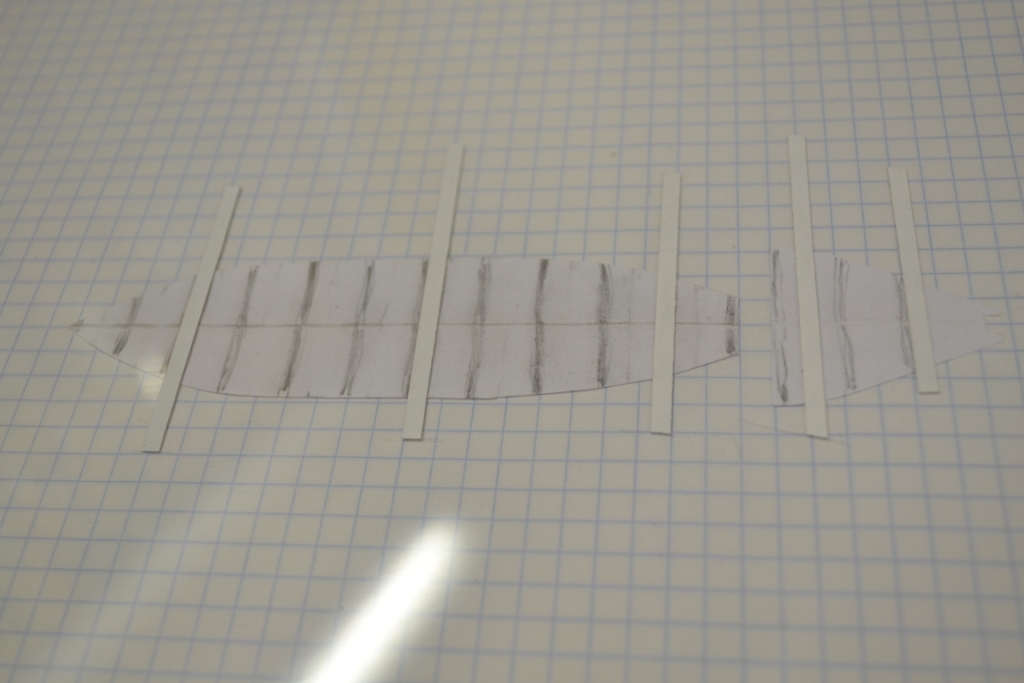
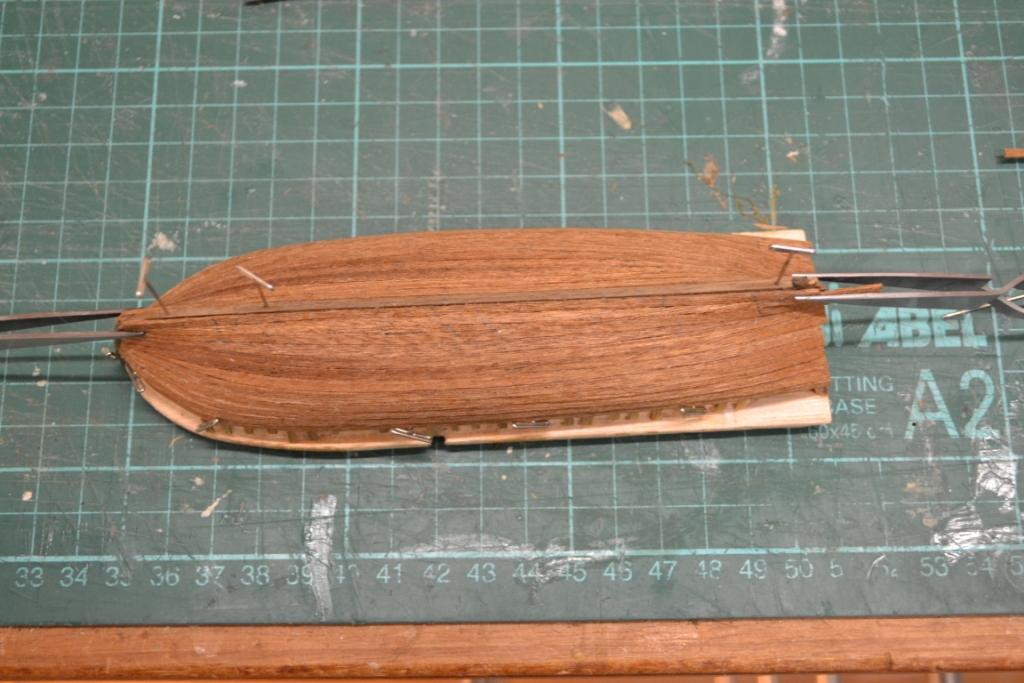
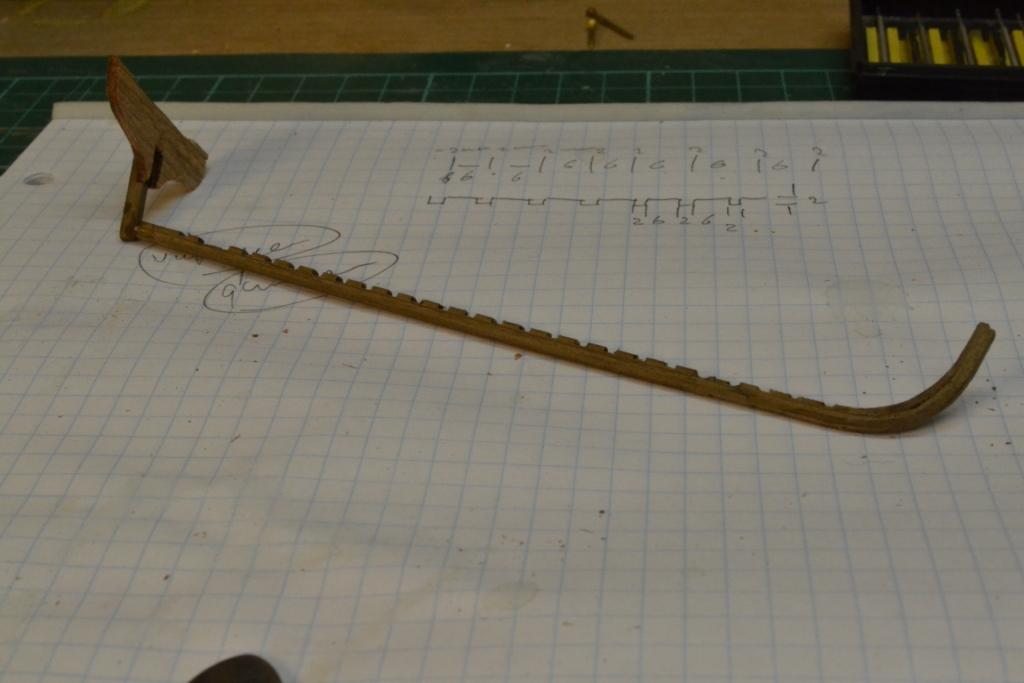
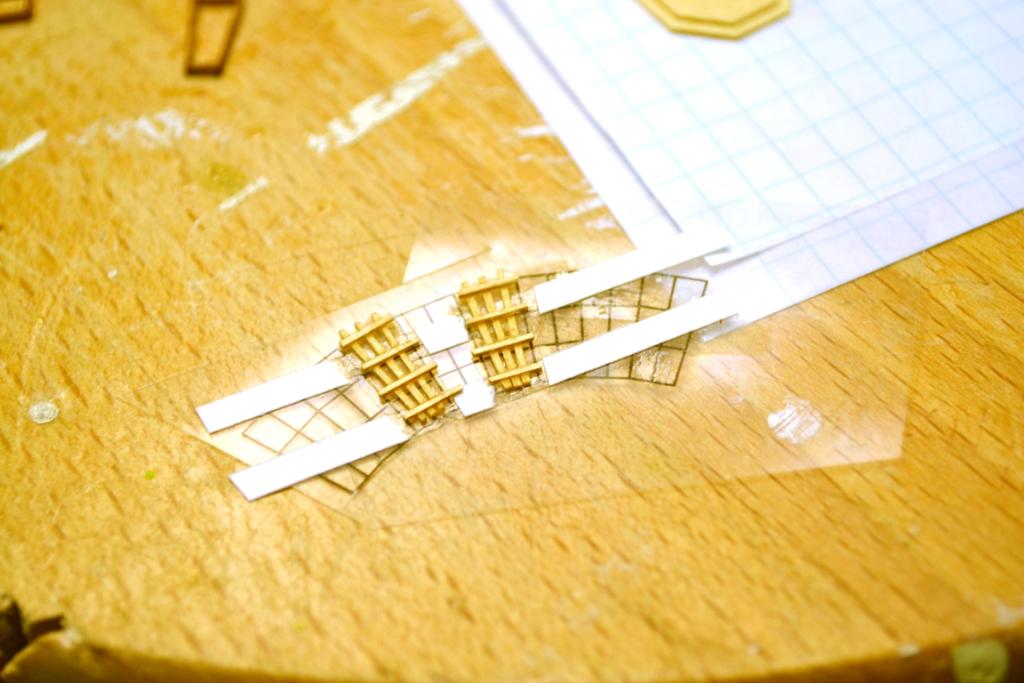
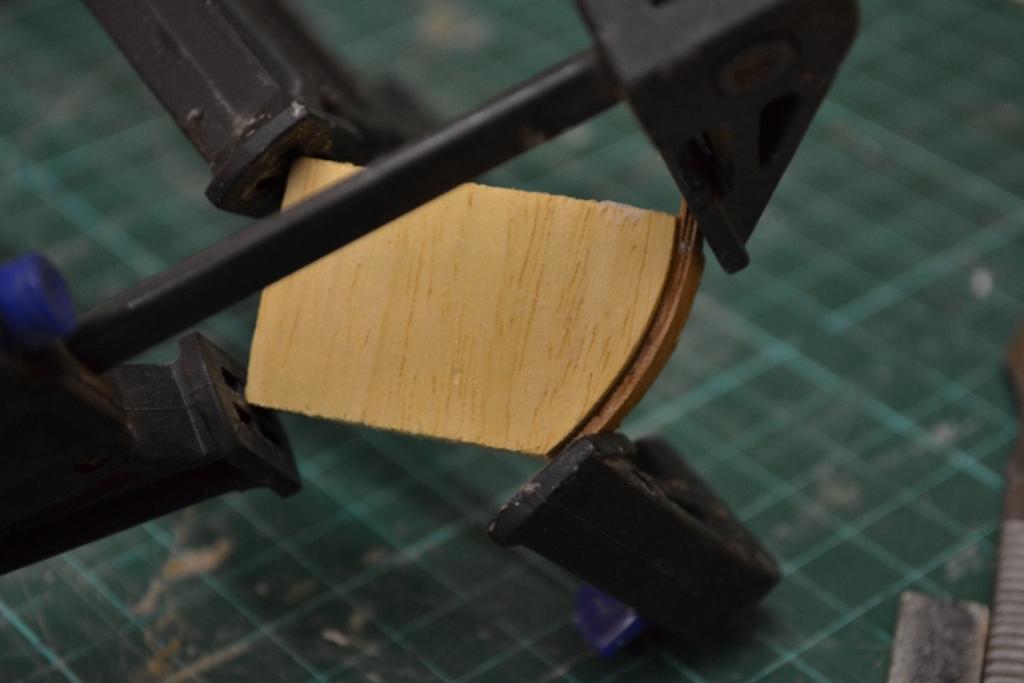
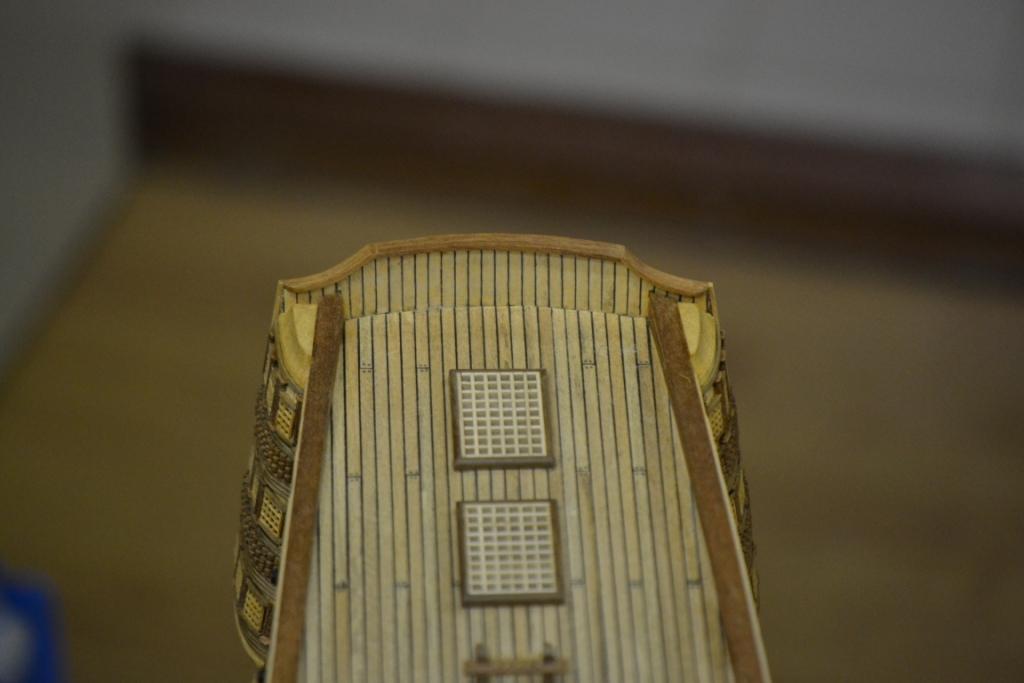
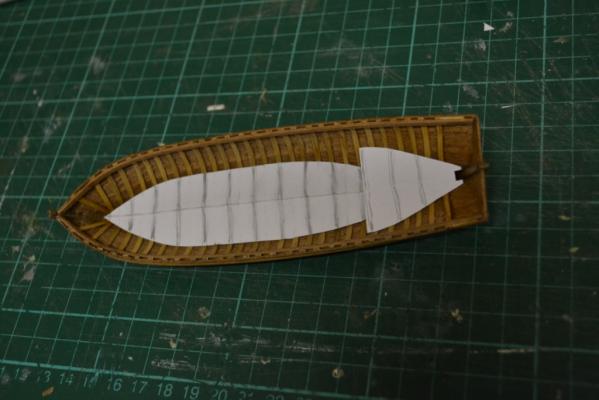
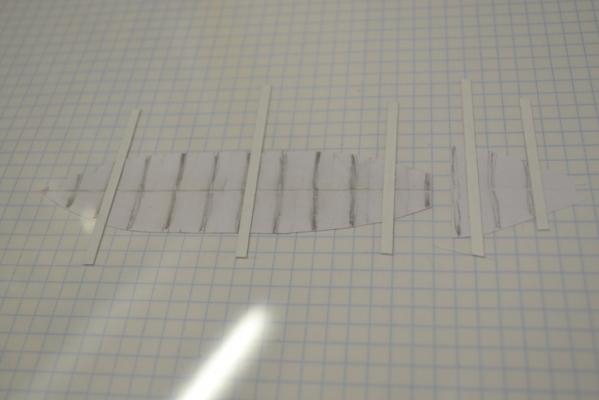
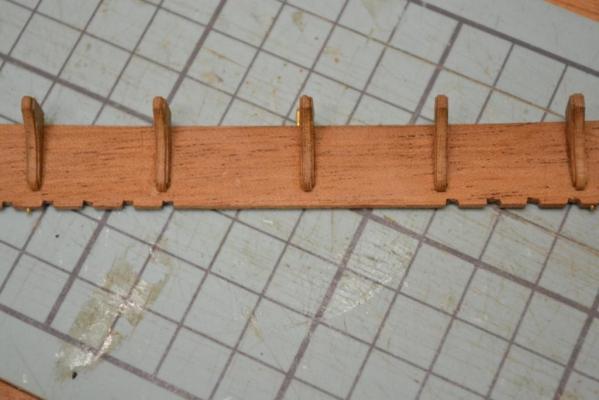
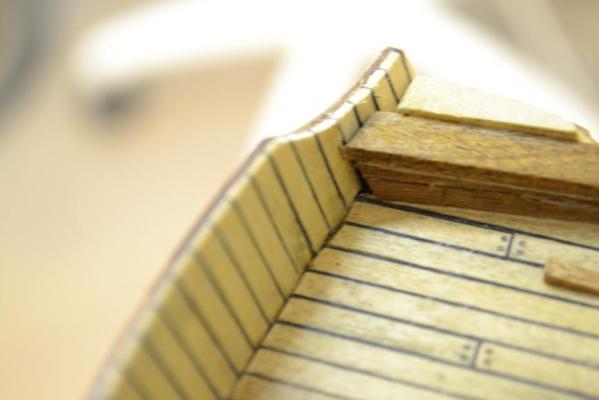
I have made up my mind for the details/fittings.. I found a drawing on the internet which i (more or less) will use as a guideline.. I prepared paper templates for the floorboards and made sure they fit. To secure the laths, I used a sheet of transparent foil with double sided tape and placed it over the templates. Floor boards adjusted and installed ..
-
..An minor update.. And so far no problems. I'll sanded the hull, added a rubbing strake, waxed it on the outside and it's ready for the next step. However I still haven’t made up my mind about the kind of details / fittings i'm going to add. ...

-
Thank you Jack! Agree, not only oak seems to be flexible it also adds a nice contrast to it. ..Even though it is “grainy”, it’s not the last time I have used oak.. and thank you Sjors!, "No" to your question, the ST kit includes material for 2 different sized ship boats. The one I’m modifying now is the “big one”, and if it turns out well I'll have to build the other one in the same style. To be honest, It's a bit more time consuming than anticipated. ...
-
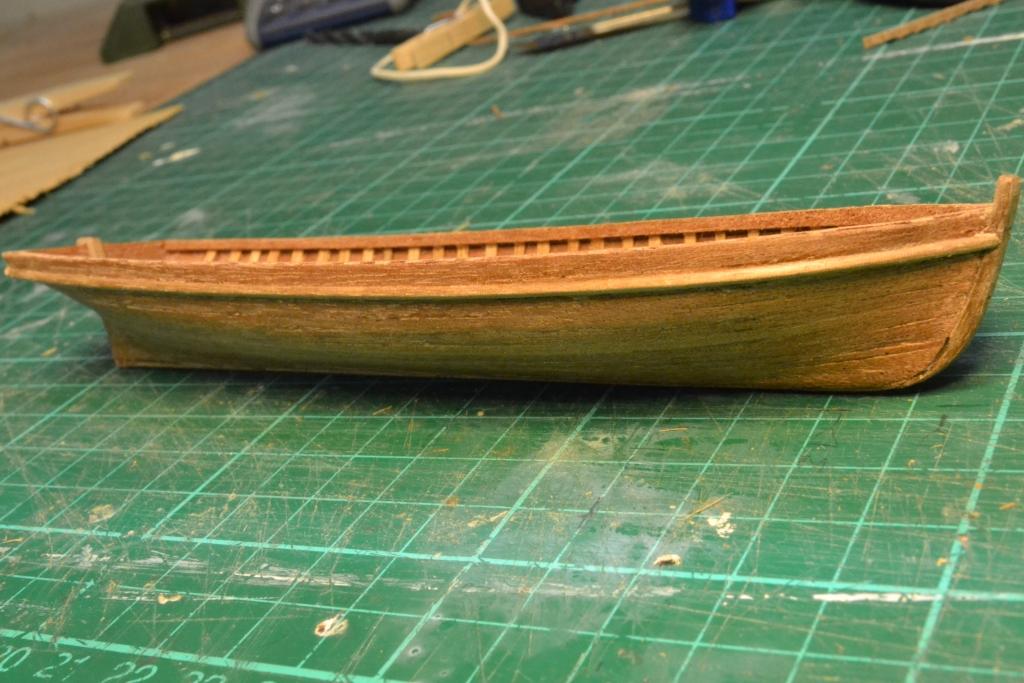
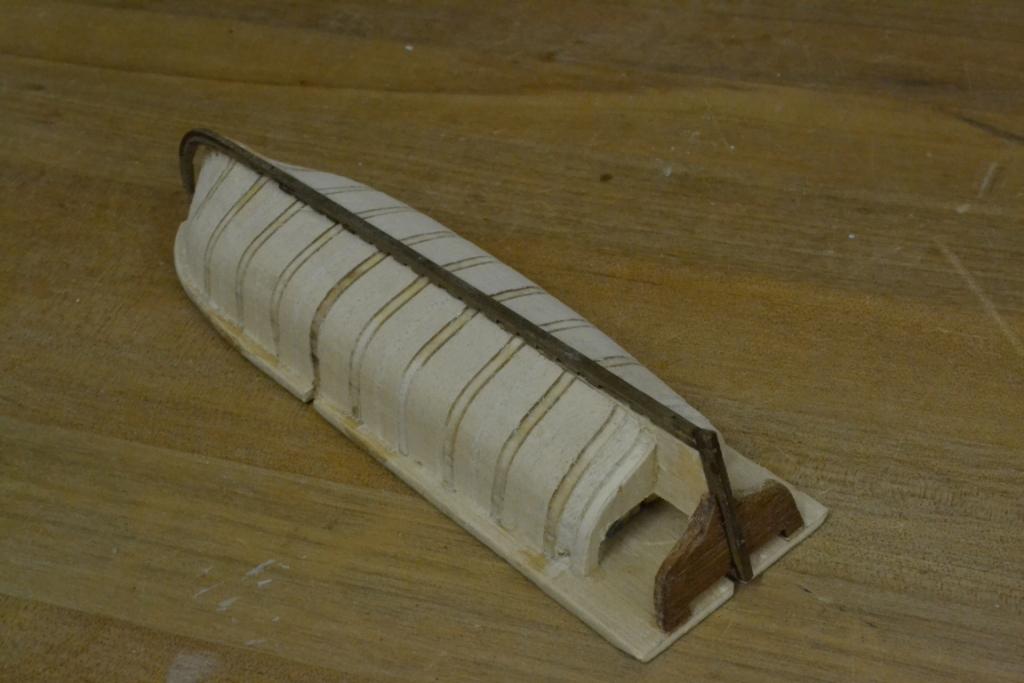
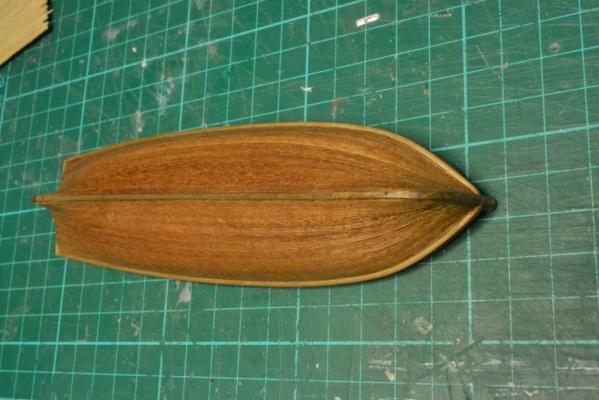
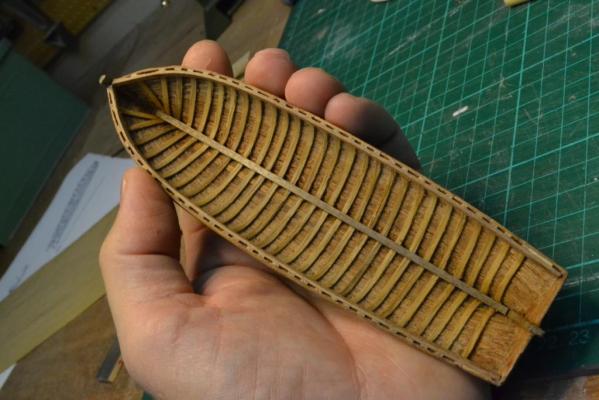
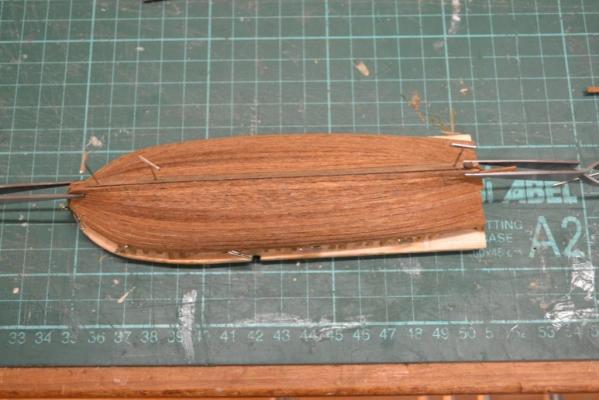
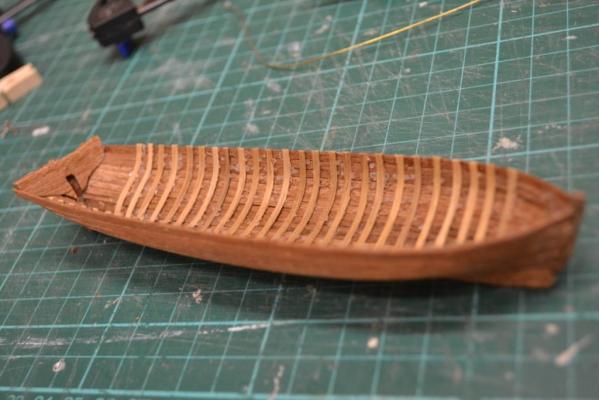
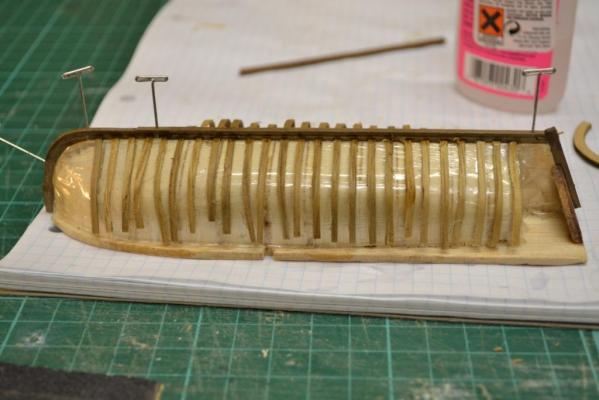
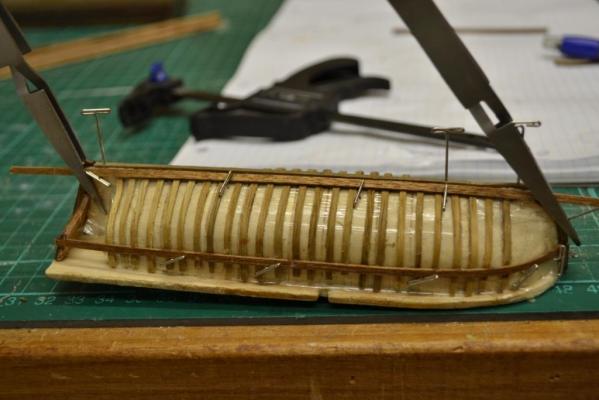
.. Not really "as soon" as i hoped, but .. Today I completed planking of the ships boat. The next challenge: Removing the template without destroying the boat. After having removed the needles from the keel it turned out that the boat (even after having used tape) was glued/stuck to the template. So instead of using “too much” force, I removed the template gently in small chunks with a pair of pliers. Here’s the result right after removing the template/tape. And here after having roughly removed all unnecessary wood.
-
Hej Sjors, Really great copper work !! As for your "edge question", I also might have a tip you can use next time or try out on the rudder. When I have to bend ”sharp edges on copper plates I use a (steel) ruler and a “sharp knife”. I cut a line on the plate with the knife and bend the plate on my clamping device very easy into 90 degrees angles. You might want to try this out and see how it goes with the copper plates .. Note: Be careful not to bend the metal “back and forth” too many times as it will break easily on the line. I added a few pictures to illustrate this technique .. (I hope you don’t mind..) just let me know and i will delete them..

- 1,616 replies
-
- 3
-

-
- caldercraft
- agamemnon
- (and 1 more)
-
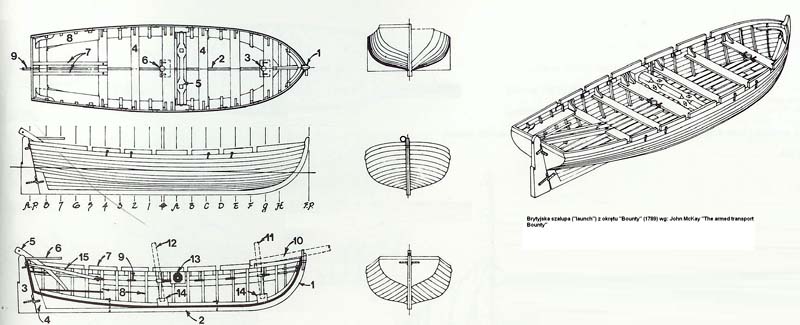
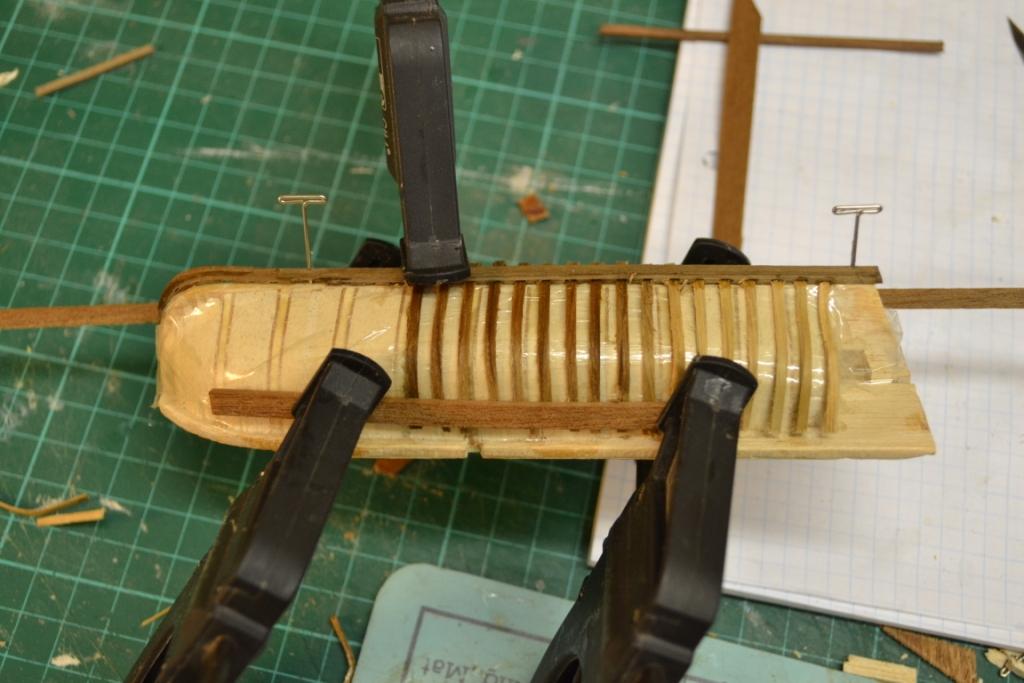
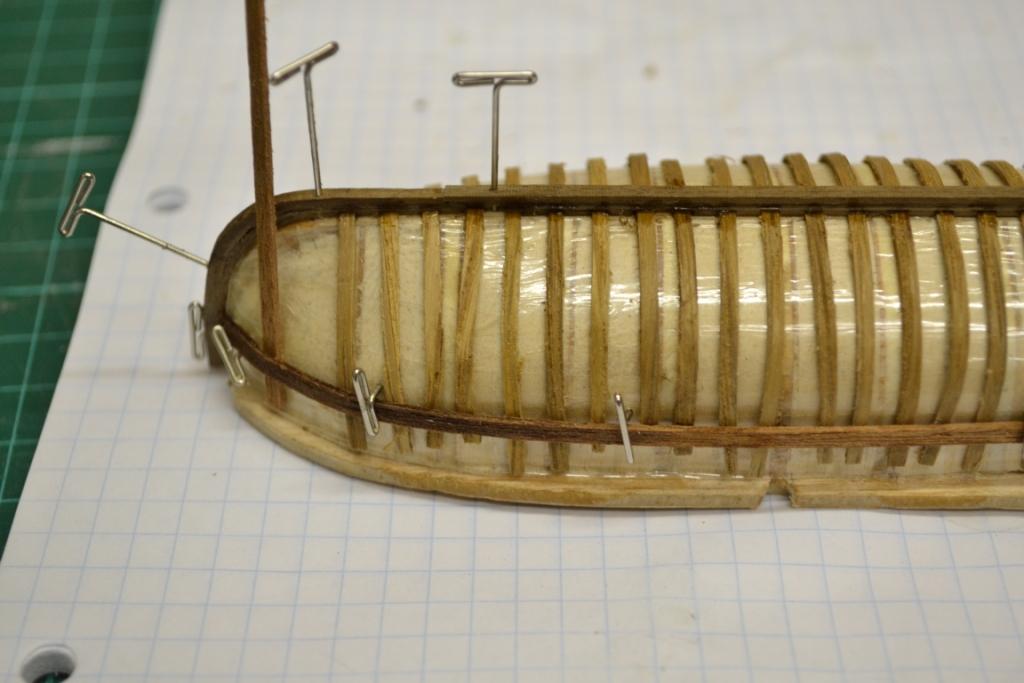
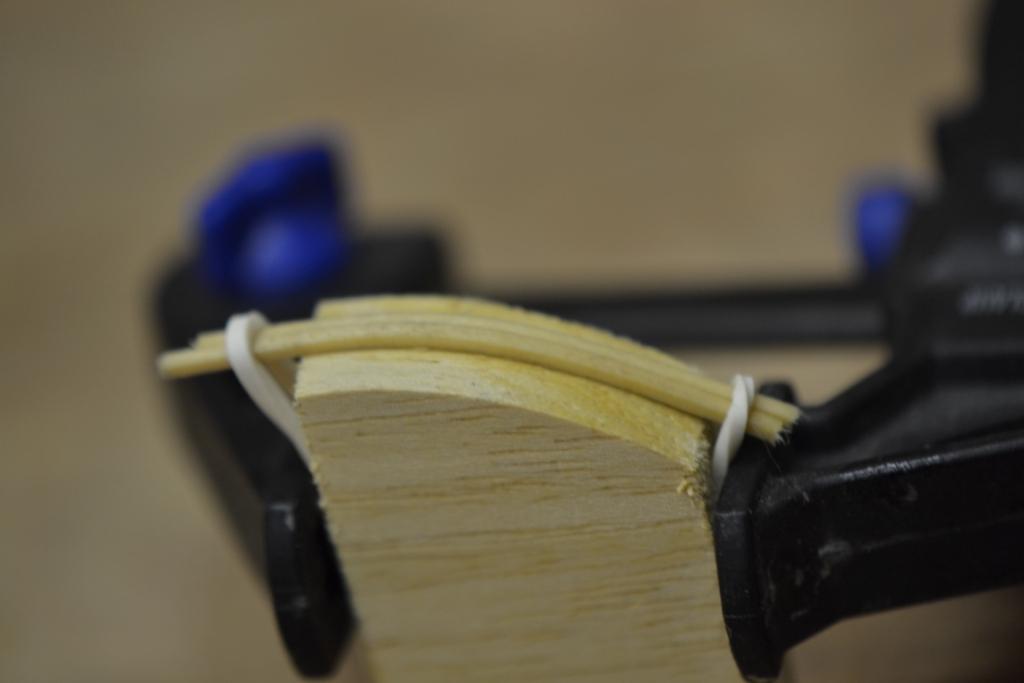
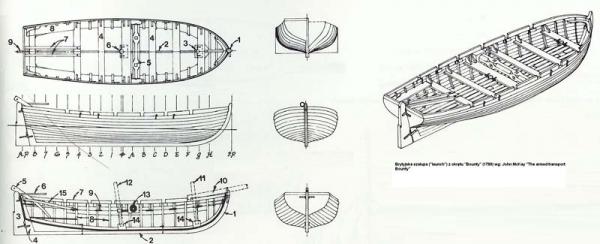
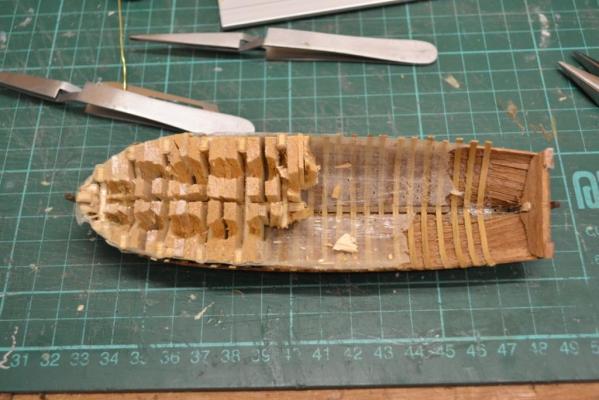
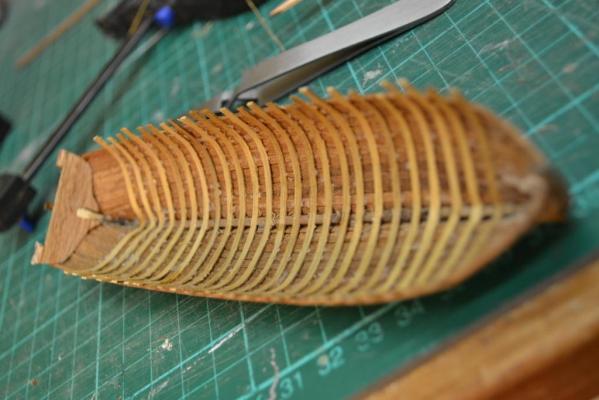
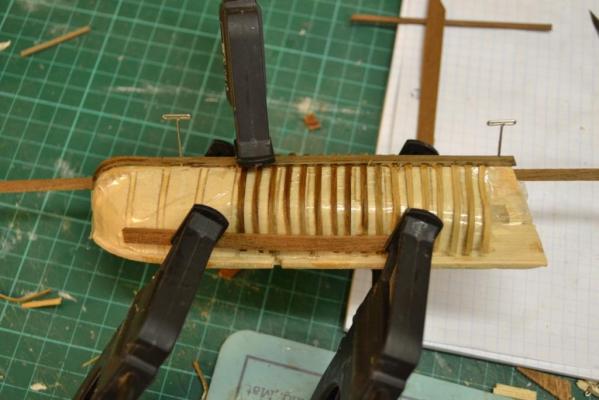
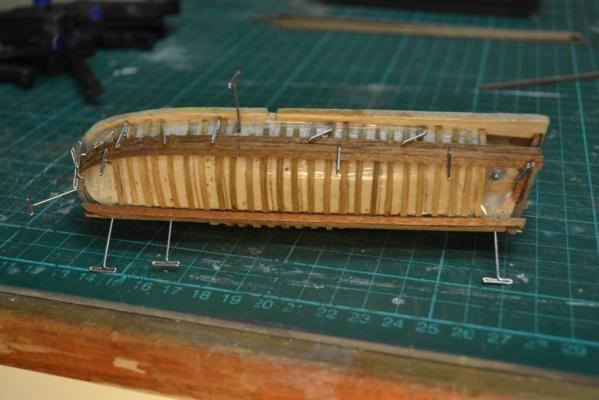
At last… some “quality time” to spend on the ST. The next stage will be the ships boats. After going through the instructions and the parts included, I realized that my ambitions for this build are now at a much higher level than the manufacturer "OcCre". So I decided to use some of the parts, but only for creating a template. The very first thing I “modified” was the keel and the stern. I cut out 25 pcs of 2mm gaps for the bulk heads. And assembled (according to the instructions) the false keel & bulkheads on the provided “stand”. I filled up the gaps in between the bulkheads with “balsa wood” and sanded the whole thing into shape and covered it with clear tape to prevent any glue sticking to the template. As for the bulkheads.. My intentions where to use 2x2mm mahogany strips and "bend" these completly around the template using water/steam. But I really had problems during this shaping process, they just snapped no matter what and how carefully I tried.. I had to give up this idea and ended up in trying out all the different sorts of wood I had available. I found out that “oak” seems to be the perfect "bending wood", this wood (2x1,3mm) I could bend in almost every shape I needed without snapping. I started out with using clamps (and wood strips) to keep everything in place during the drying process of the bulkheads. I found it a very frustrating and clumsy experience.. First during the planking phase I realized that I could have used “needles” to fix everything in place by pushing them completely into the soft balsawood. .. lesson learned.. I’m still busy with planking the ships boat with (1x2,3mm) mahogany strips, and hopefully I can show the end result soon..


-
Hej WQ, Unfortunately i don’t own a copy of ”Longridge’s book” is it possible for you to take a picture of plate 35 ?
-
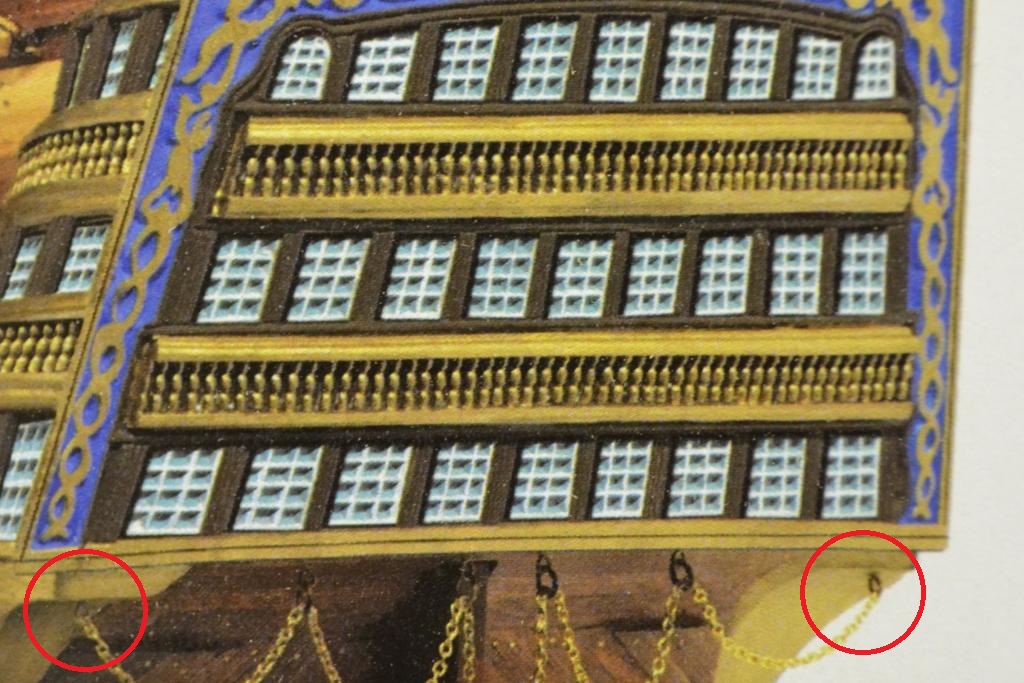
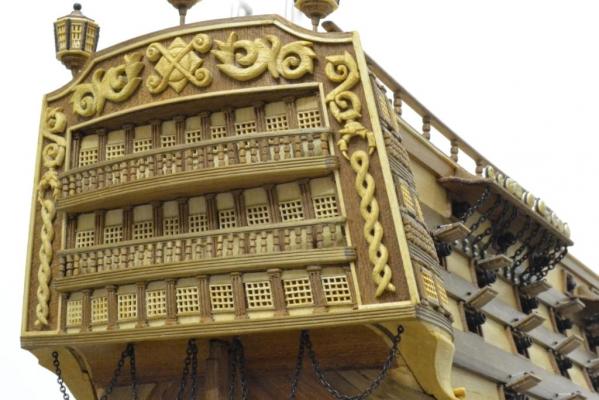
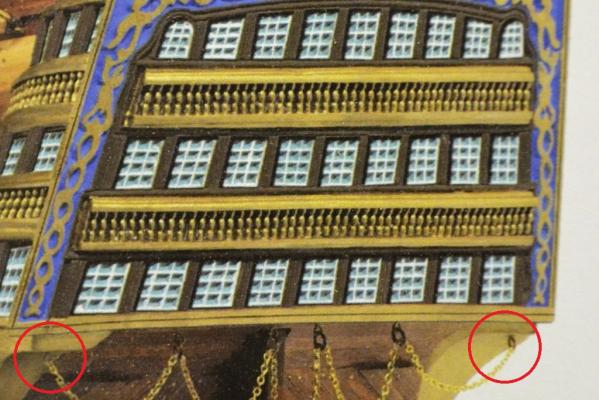
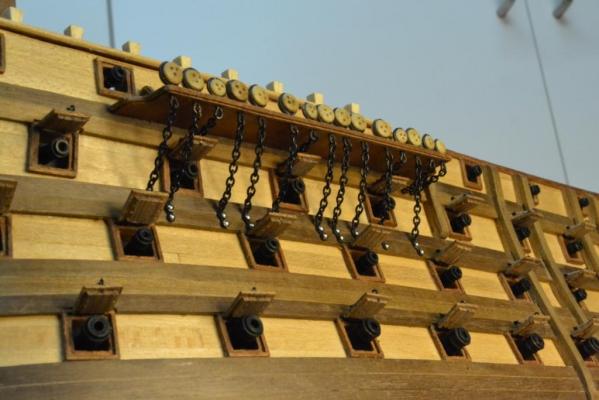
Hej Jud, I have to agree with you that it doesn’t “feel right” how these chains are fixed.. It would be very nice to have some visual guidance (picture/drawing) about how these “emergency steering chains” originally where rigged.. Anyone ?
-
Thanks Michael, Sjors and Kevin. As for your comment Sjors. I think it is great to start this hobby with a kit as all the needed fittings and materials are included in the kit. It is just a matter of copying the stuff (and a bit of modifying) if I don’t like the supplied versions or when it is completely out of scale.. And I know there’s always a “backup” (the kit’s version) if the “modification” doesn’t work out or is too difficult to copy. Continuing: I worked this weekend on the other lanterns. After having found out how to make the first one where the remaining 2 rather quick to make. In parallel I installed the "emergency steering" chains. ...


-
Antony and the "The Arming and fitting of English Ships of Ware 1600 - 1815" has convinced me. So for now I decided to go for the "box solution"... ....
-
Thank you all for the input on this one.. It seems that i now have 2 options to choose from
-
I’m about to install the ”emergency steering chains” on my Santisima Trinidad from OcCre The drawings and instructions of the ST are not clear on how to “terminate” these chains. The “only visual” termination (on the box itself) shows that they are just “ending” .. I can't believe that it should be installed this way.. Anyone ?
-
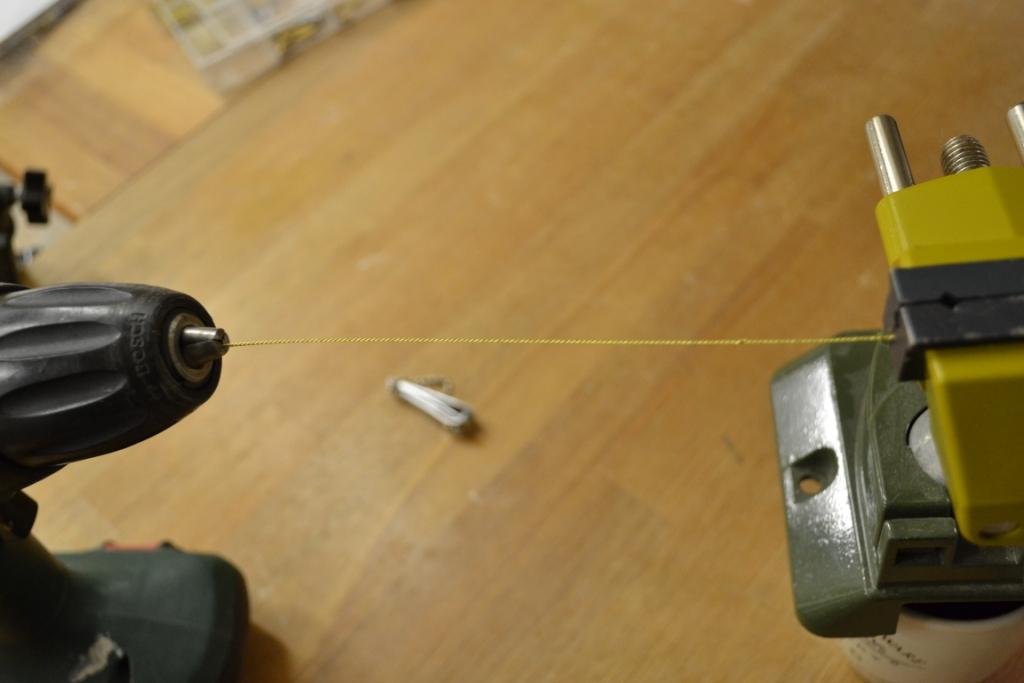
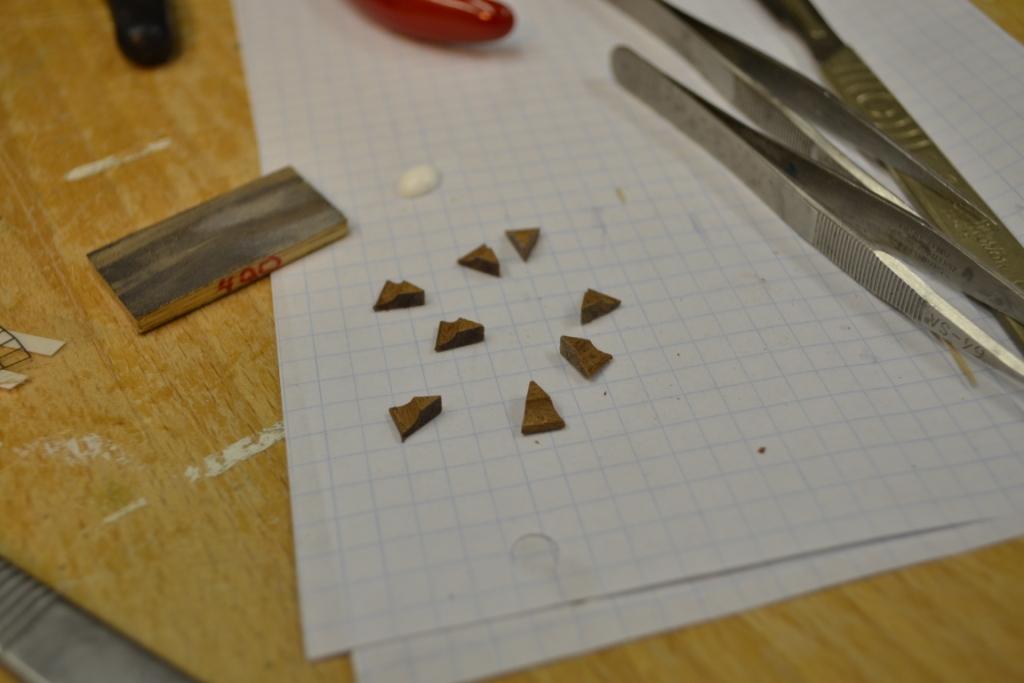
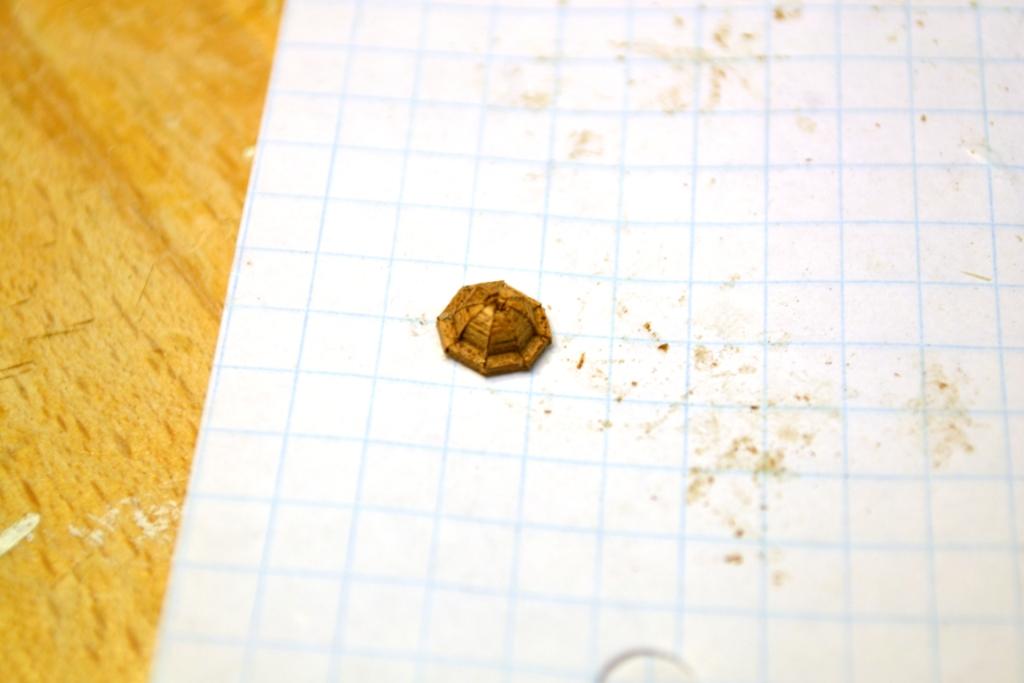
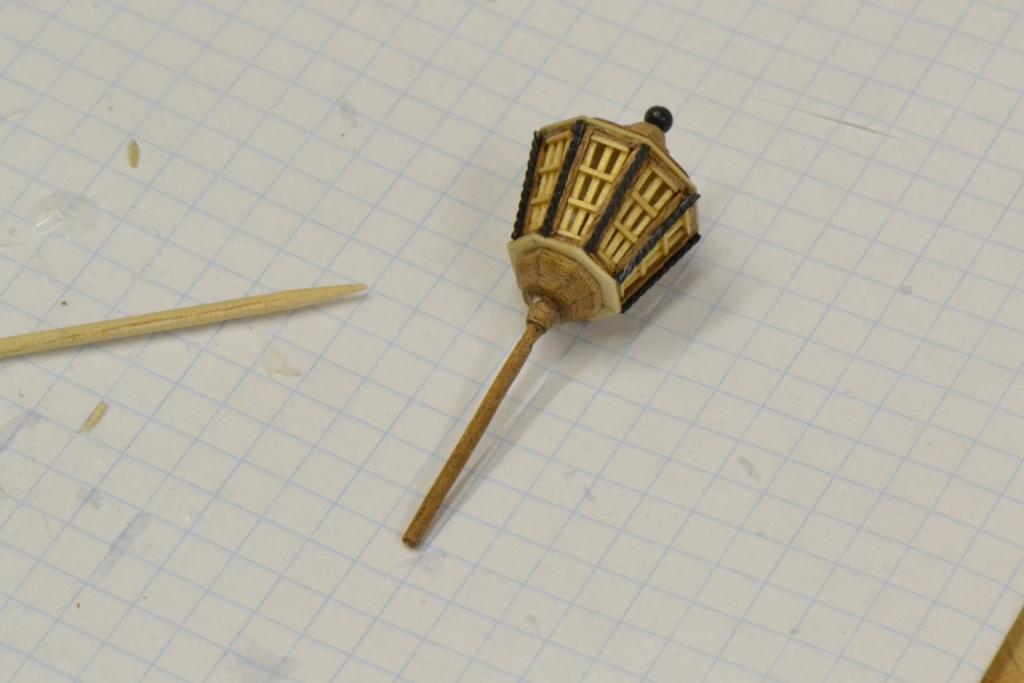
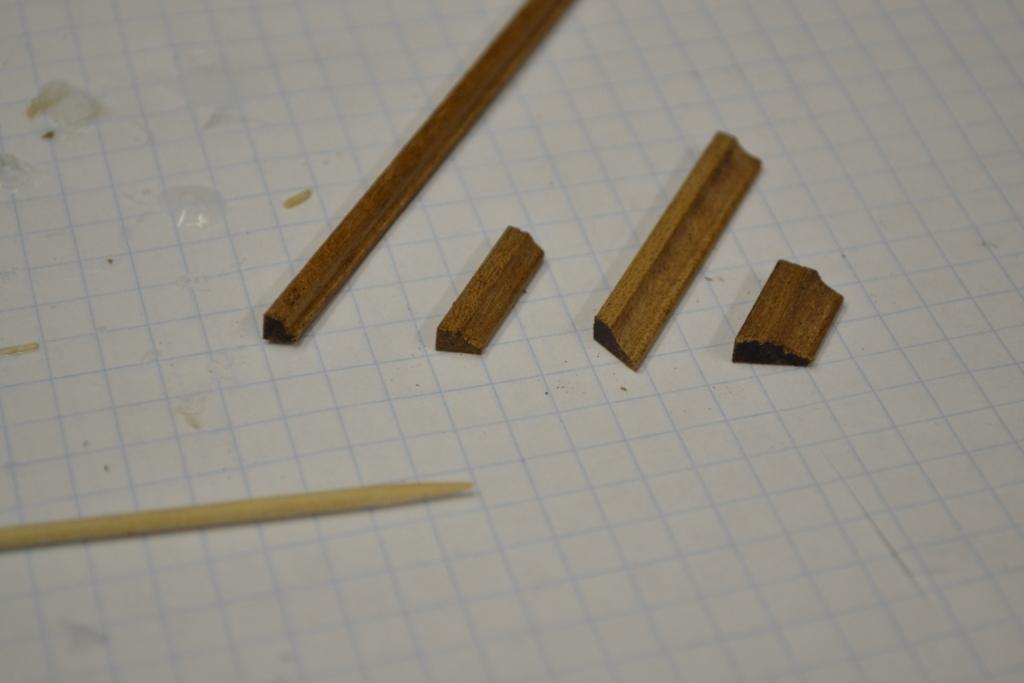
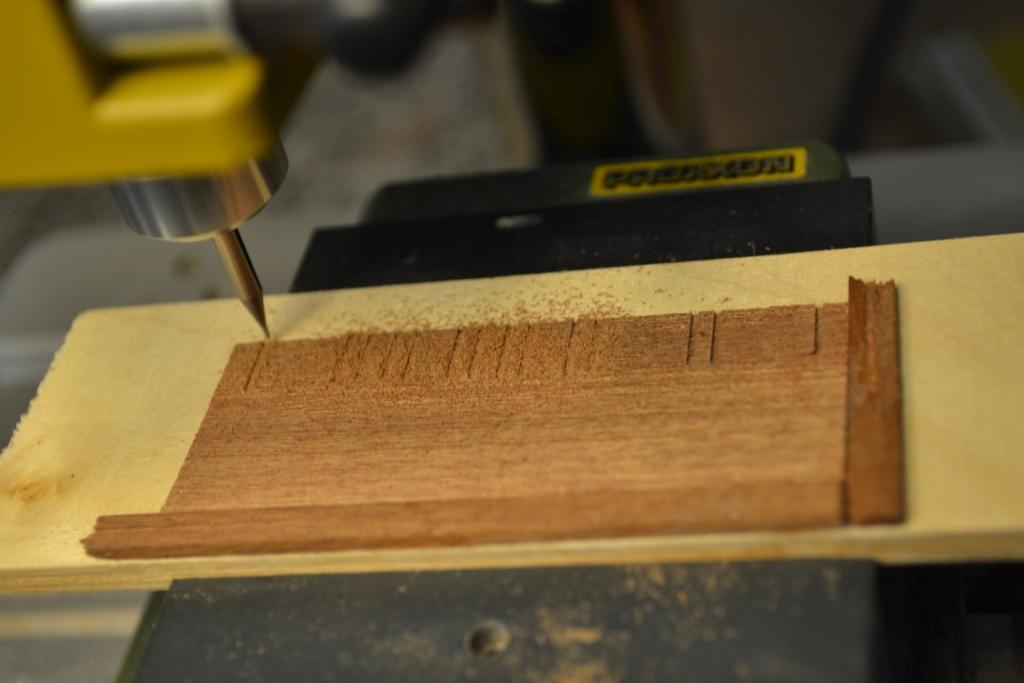
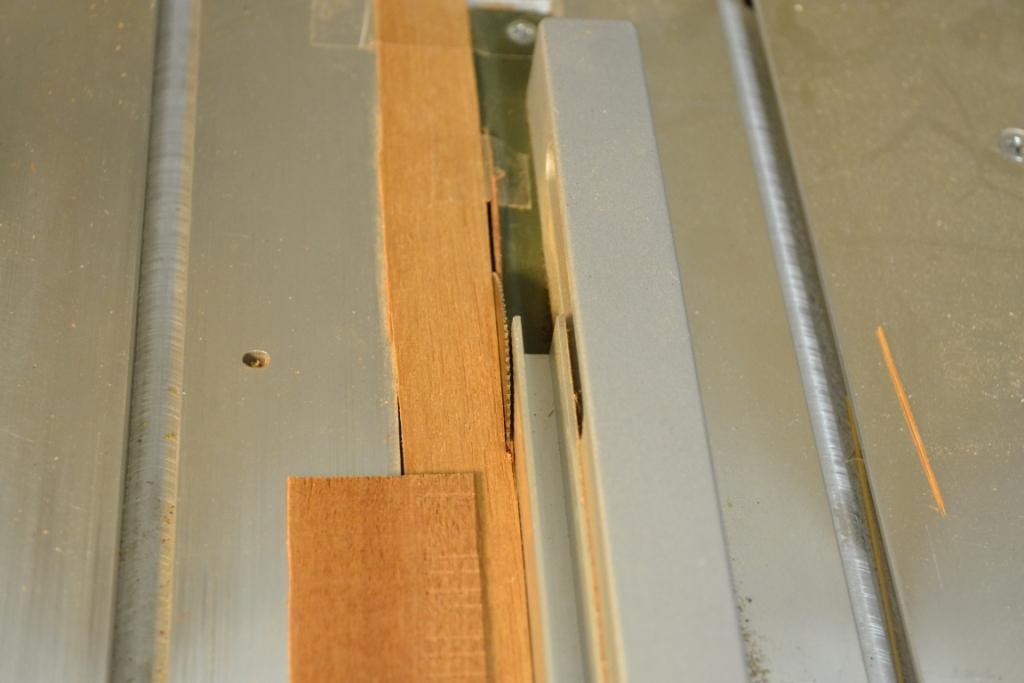
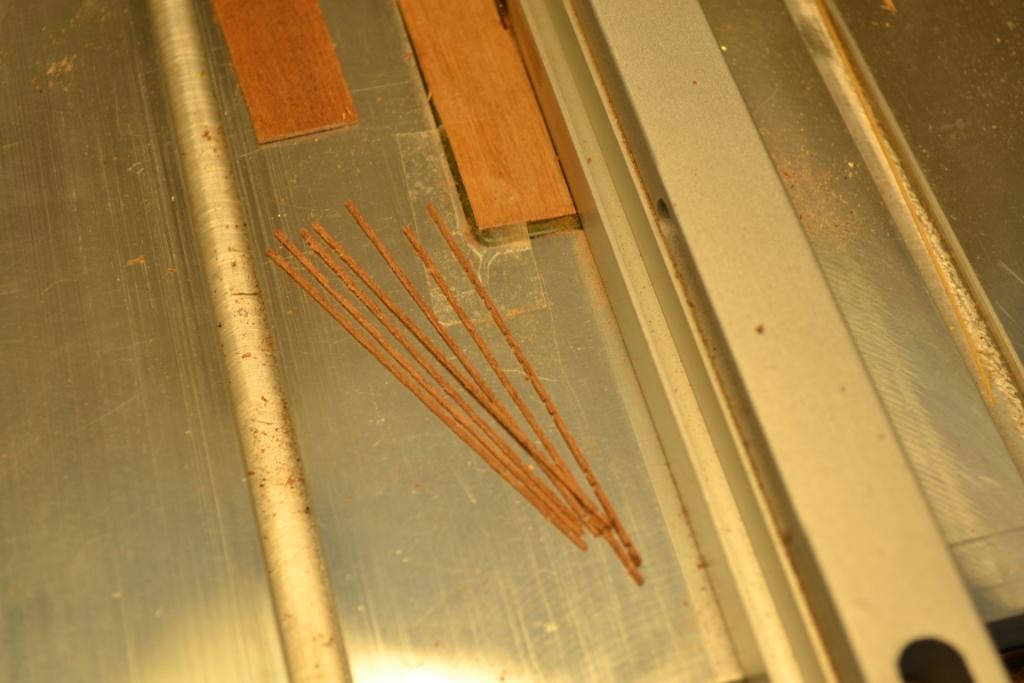
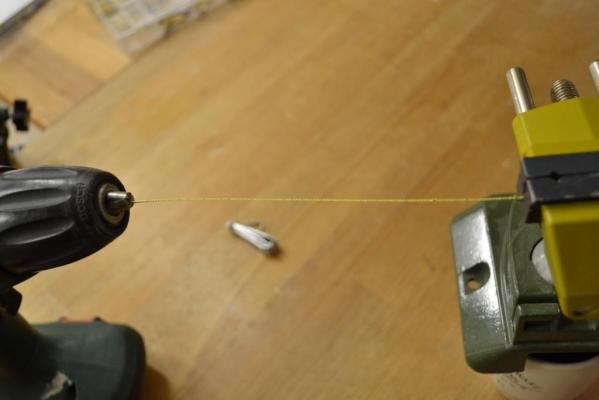
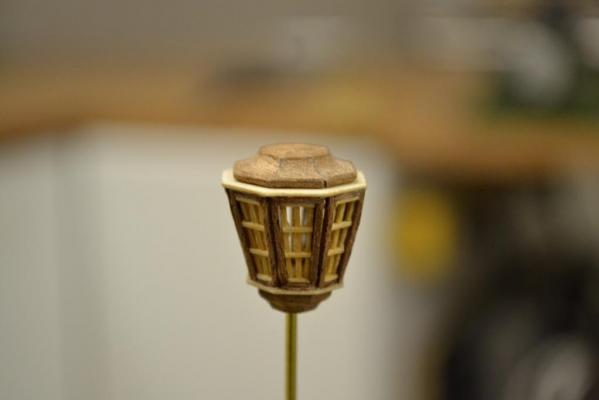
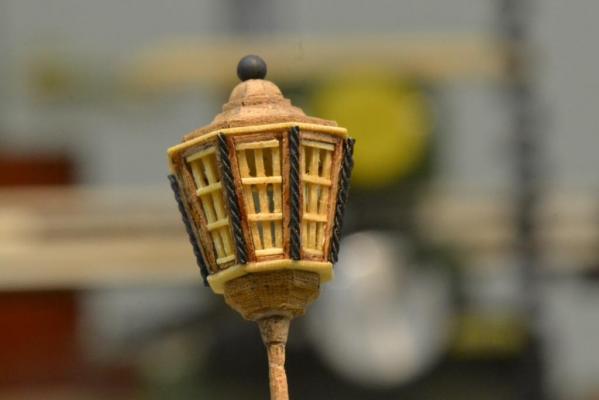
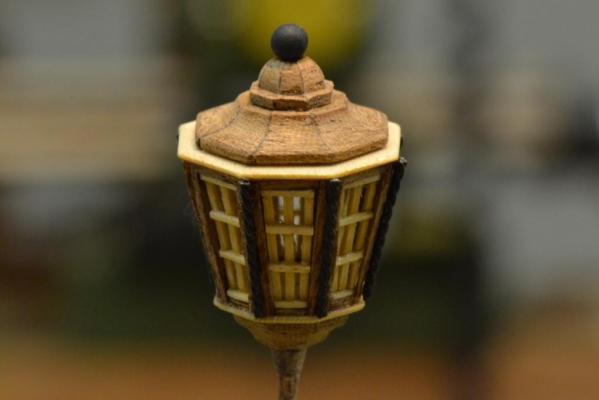
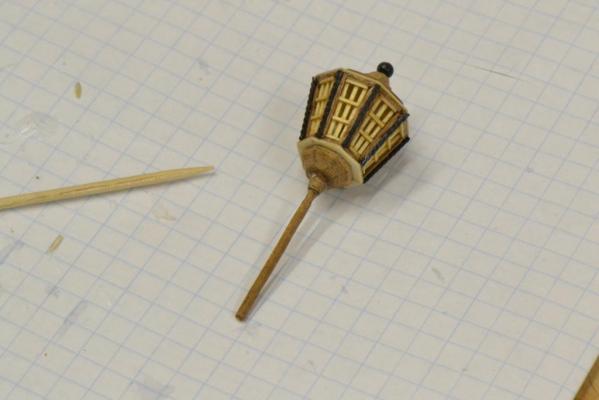
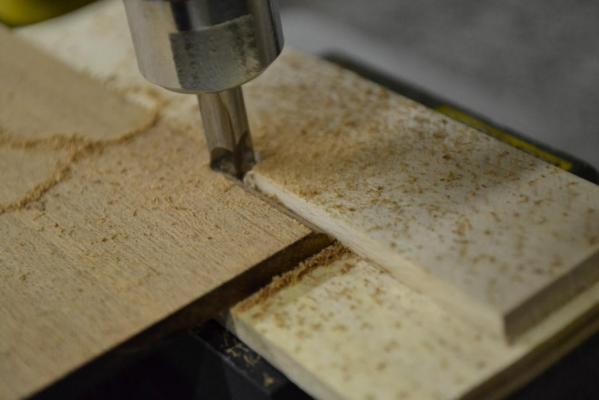
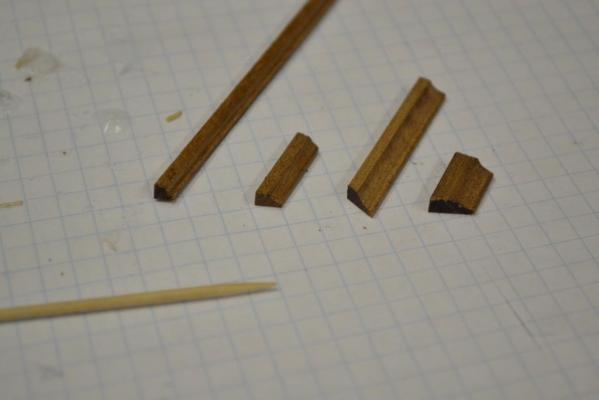
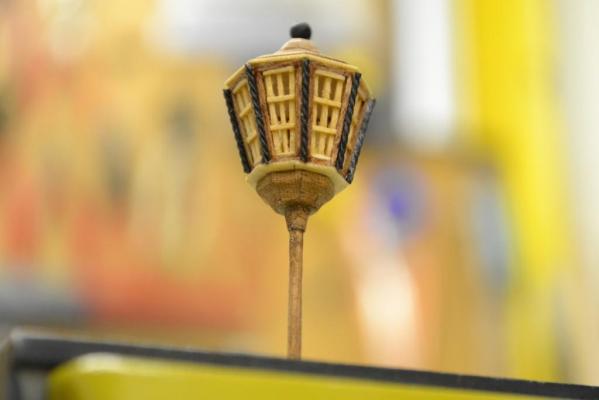
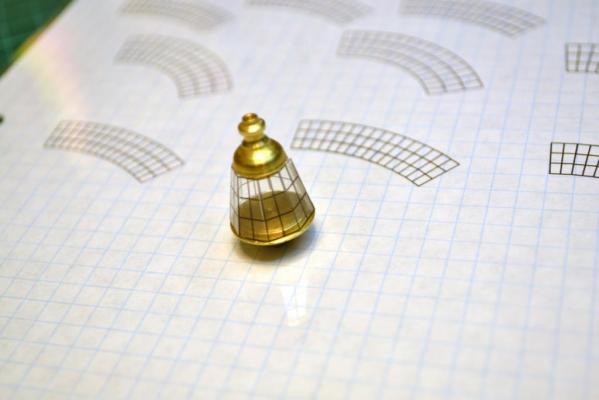
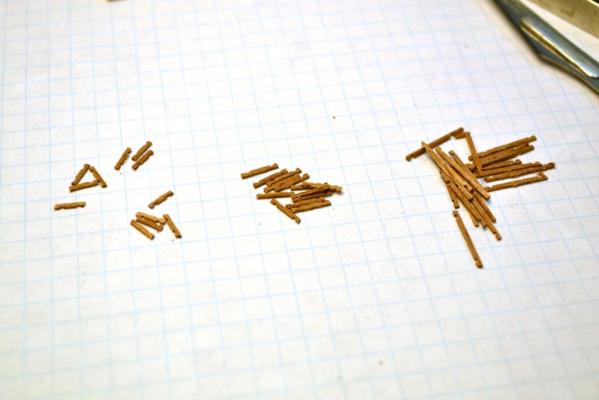
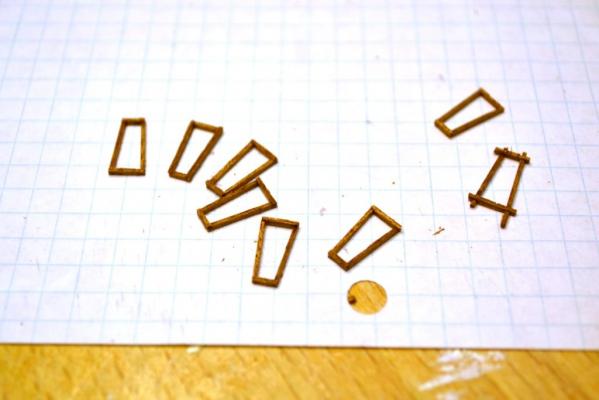
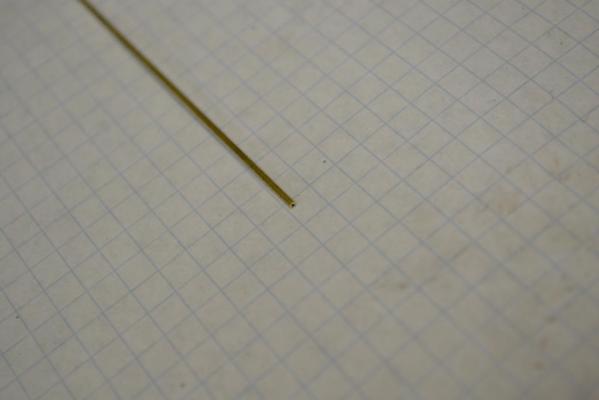
..Thank you Jack.. So here's the promised wrap up.. Next thing was to add some nice attributes so it really starts to looks like a lantern, (and to hide some of the imperfections of the wood). .. I started with “twisting” 3 strings of Ø 0.4 mm brass wire with a drill, pictures will show later where i used it. I used a “rounding over” and an “edge cutter” and milled the profiles into 2 laths and by using the table saw I cut them into 4 individually shaped laths (but I ended up in only using 3 shapes..) Then i really challenged the table saw by cutting them into 8 egual angled pieces (2x22,5 degrees cuts). And could glue these into "perfectly" shaped octagons.. Glued the different octagons on top and bottom.. And camouflaged the “rough” sides of the lantern with pieces of twisted (blackened) brass wire. ..the final finish was to glue an (cannon) ball on top and to add a Ø1,5mm stick and to cut the holder for it … Taa-daa.. So next project will be to create the 2 "smaller" lanterns.. .. the ST has not "1", but "3" lanterns


-
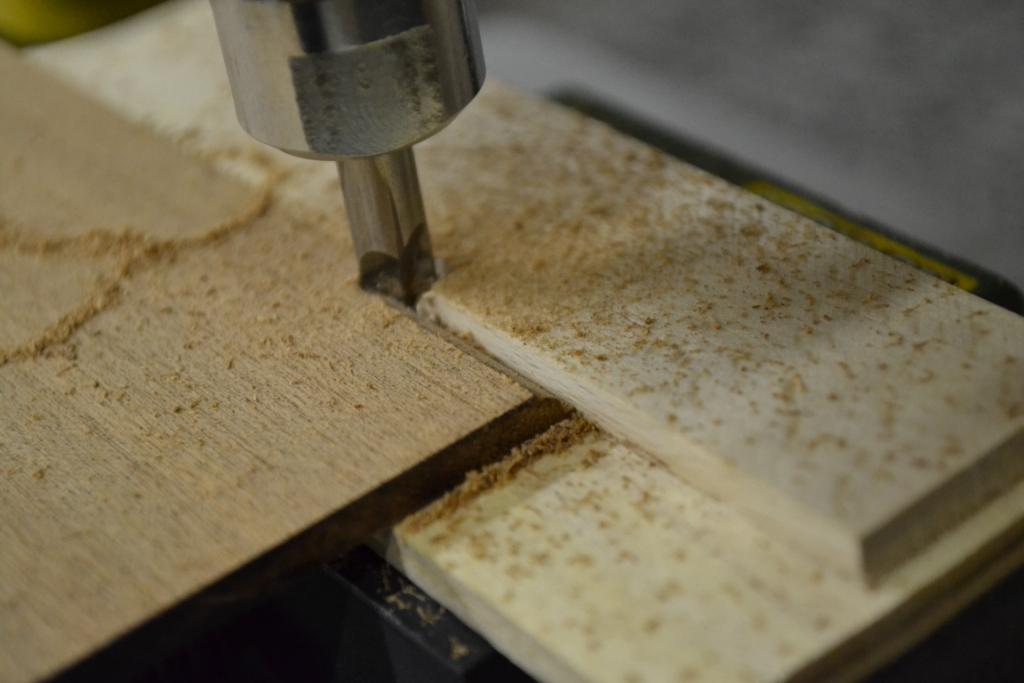
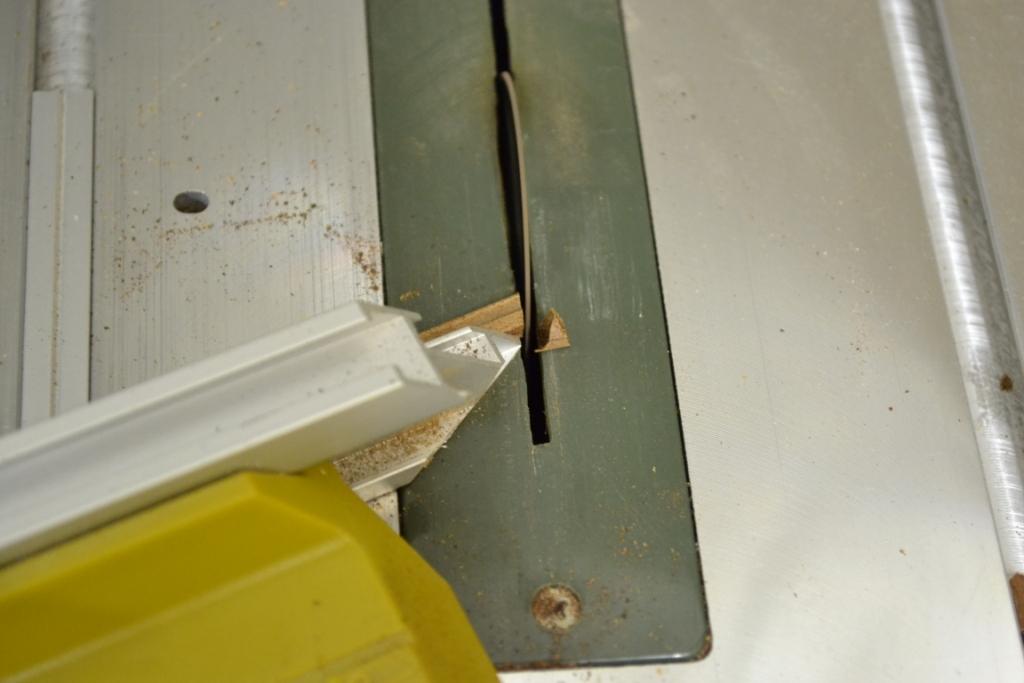
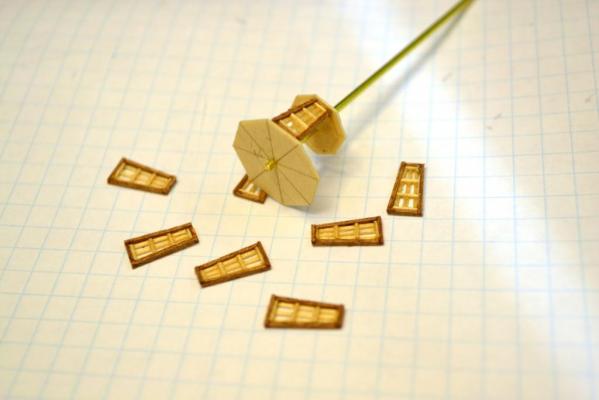
Thank you for your nice comments Michael, Randy & Sjors, and thanks to everyone for visiting/using the like button. Finally I have some time to spend on some other details of the ST.. I had an idea in my head about how to create my own version of the poop lantern .. Too be sure I use the right dimensions I started out with an template and made sure everything was in the same scale. Creating the frame for the glass was a bit of a struggle (after several attempts) I found a "easy" way to manufacture these .. I used my mill setup (with an X-Y table) to have length consistency of the individual frame parts … And used the table saw (with some “homemade” additions) to get the needed thickness of the frame. The result after cutting/assembling them. I used the same technique for the muntins and assembled them with the template I made earlier to make sure they fit inside the frames. I made a top & bottom of 2 different sized pieces of 0.6 mm finer... ... and to make life a bit easier, i used a brass bar to keep the frames in place during the gluing process. So far so good, the wrap up will follow soon...


-
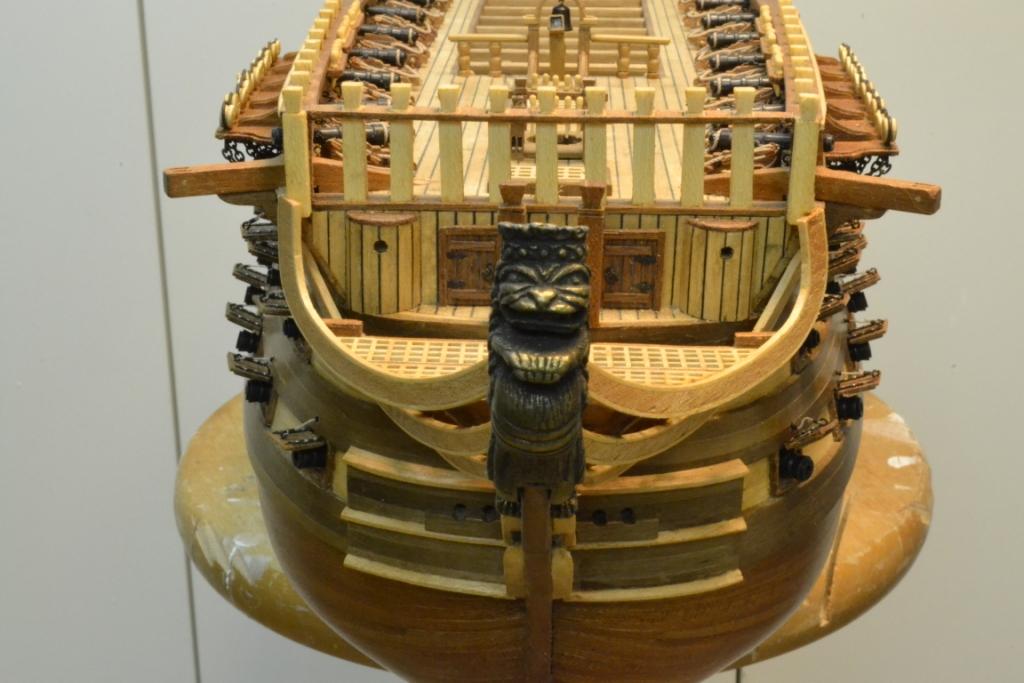
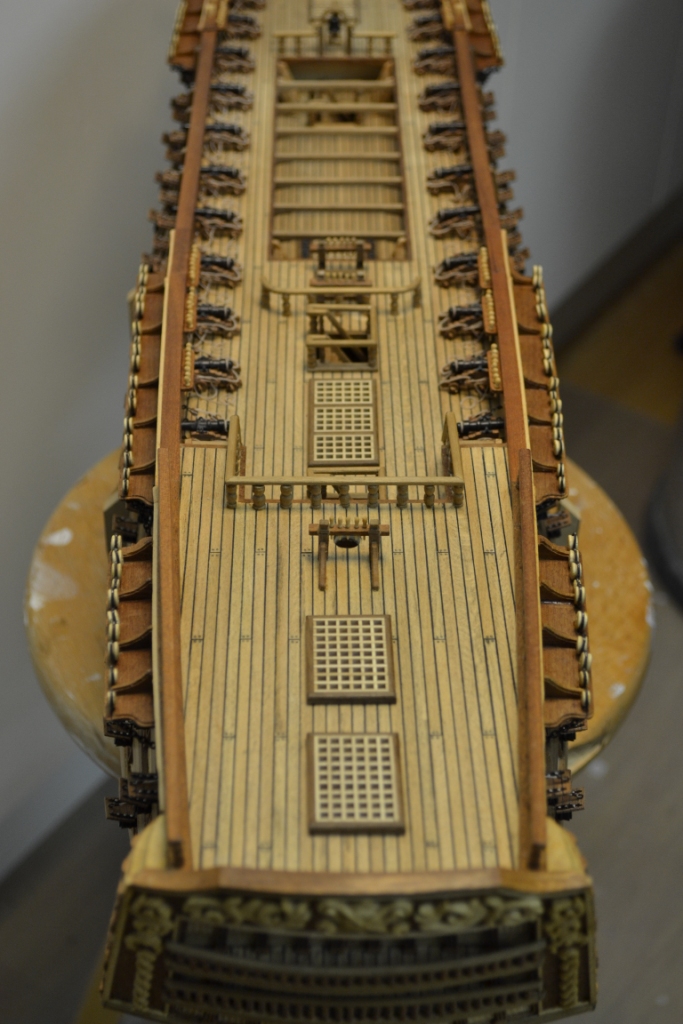
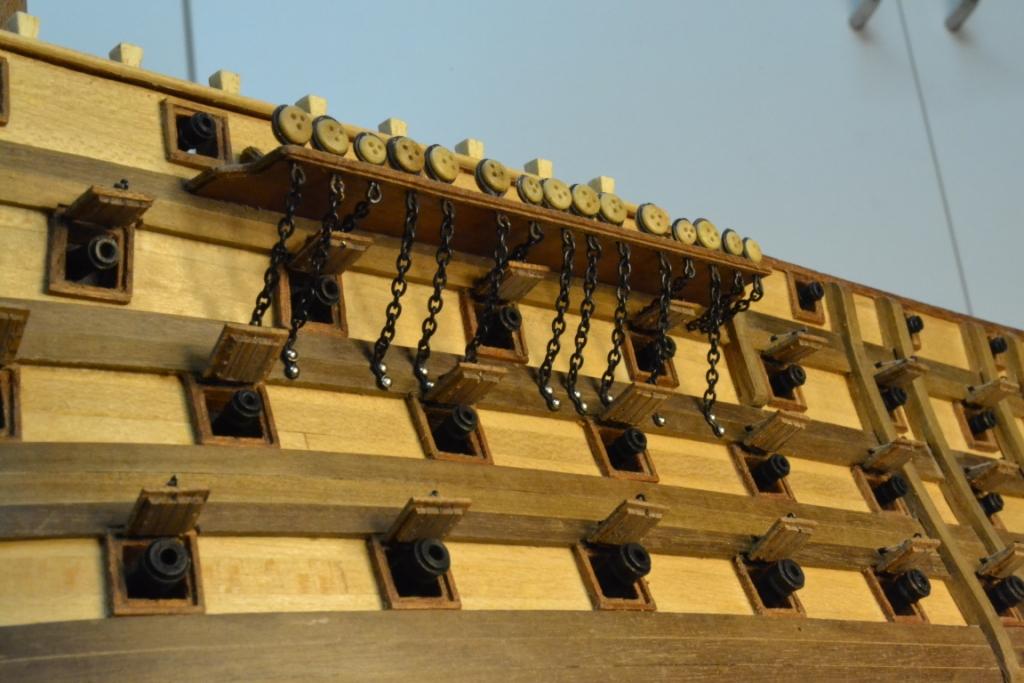
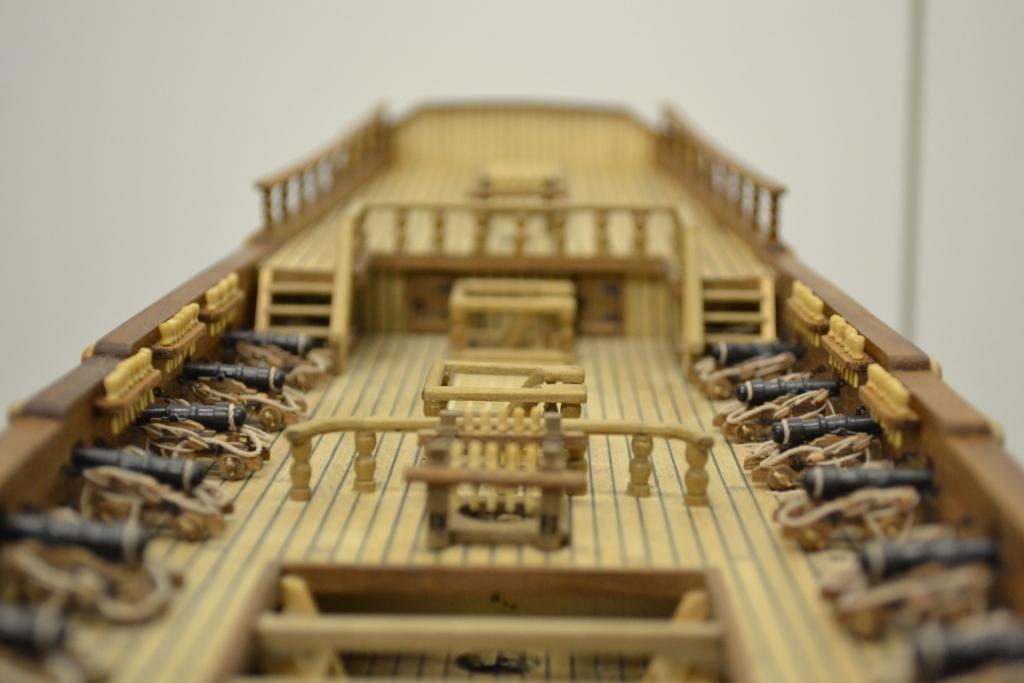
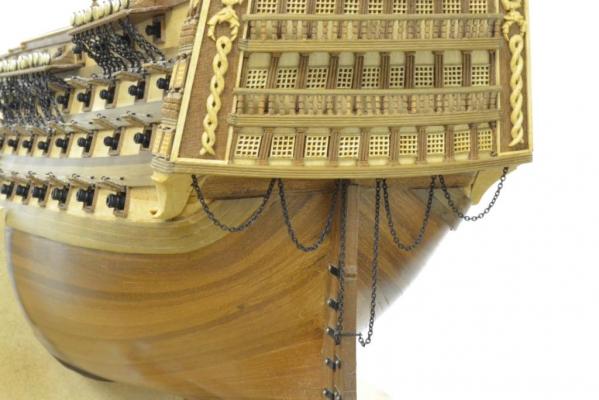
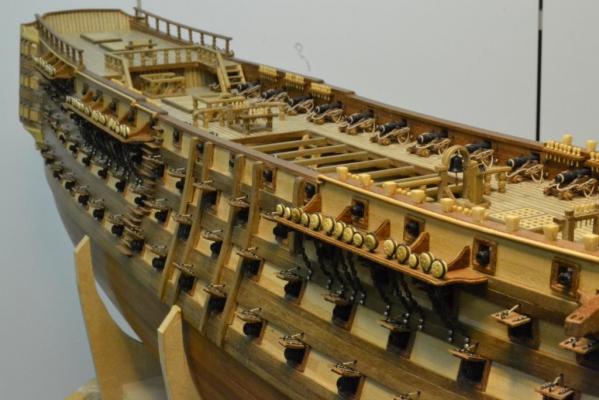
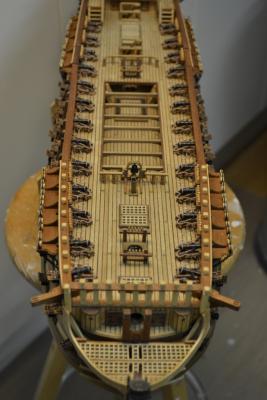
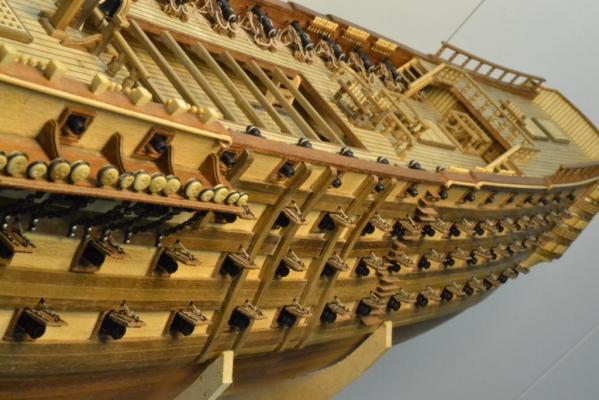
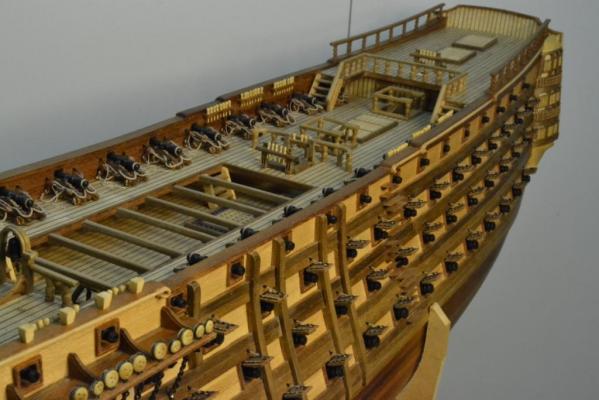
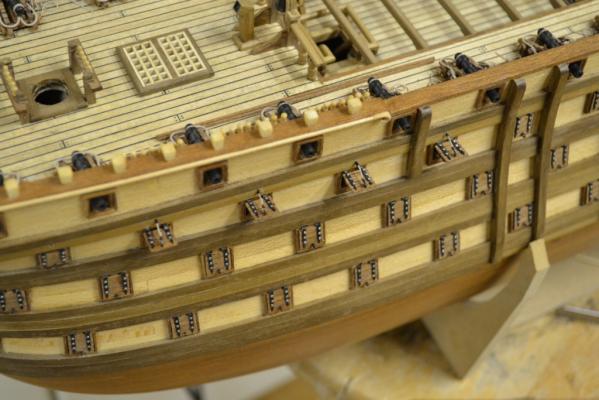
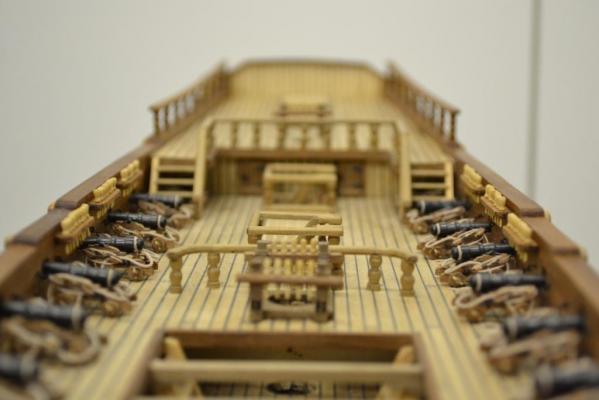
Yes !!! ....It has taken some time.. (so this will not even be an update with a lot of dazzling new stuff..) but .... I managed to install all the channels on port and starboard including all the lower deadeyes and the corresponding chains ! In parallel I rigged all cannon hatches and installed all the armory "OcCre" has included in the kit. Naturally here are some pictures of the final result..

-
.... Thank you guys ...
-
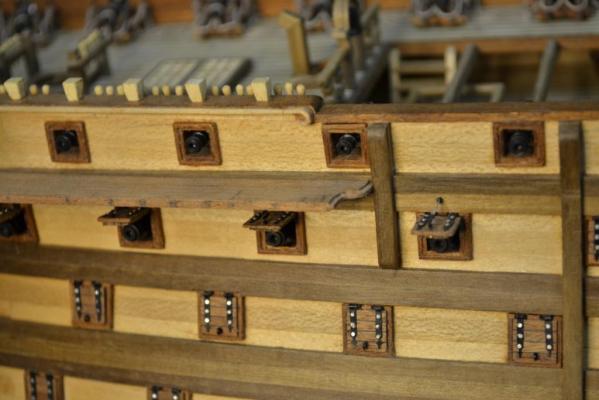
Hej Sjors & Schnu Thanks for dropping in and the comments, they are as always very welcome. This way of installing the lower deadeyes and using a capping strip seems to have been common praxis in the old days and it is actually a quite easy way of implementing them. I made a really good decision by not drilling the holes on the locations pointed out by the instructions and shown in the drawing… This would have been a disaster for me as in my case it would even have blocked a few more cannons ports. So I agree with you Sjors, it is really important to look a few steps forward and not to rush things Ups.. I forgot to mention: Never trust the instructions and/or drawings and always "double check" yourself
-
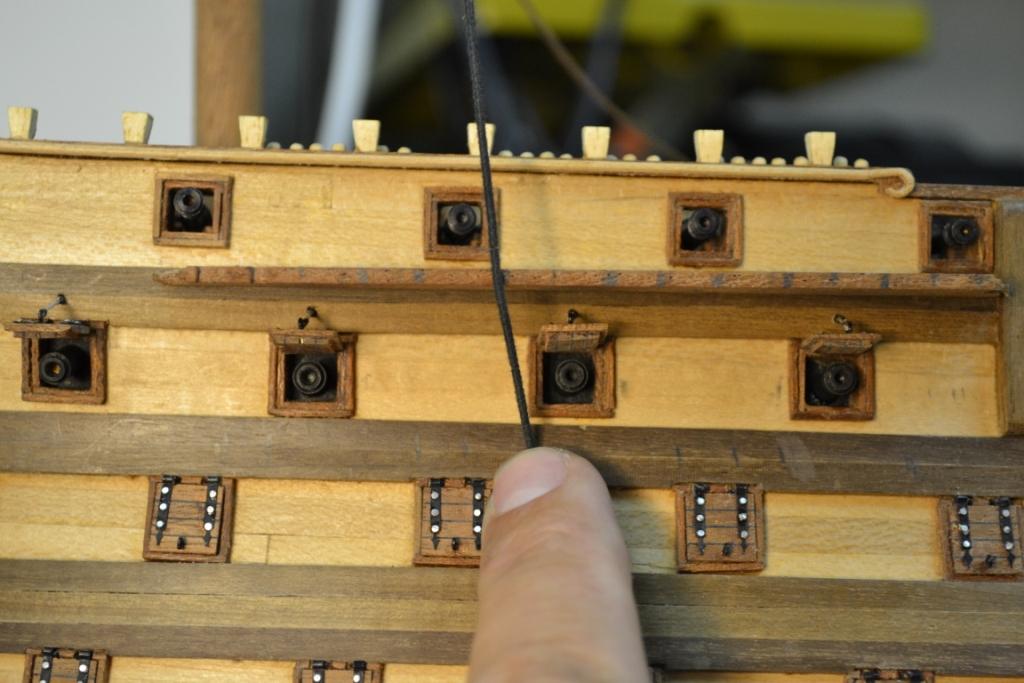
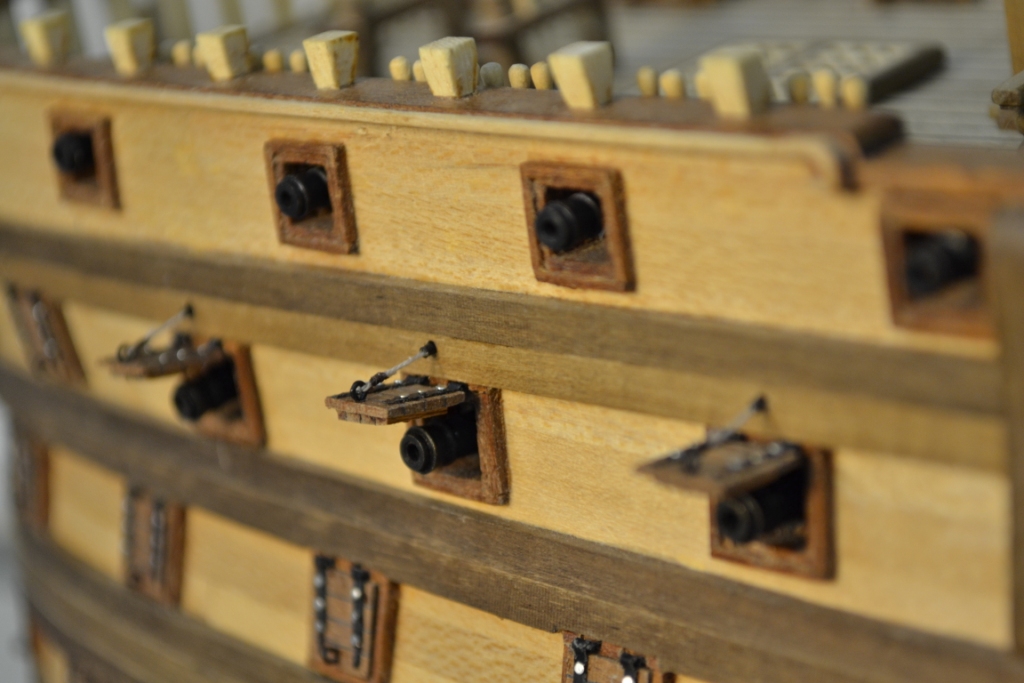
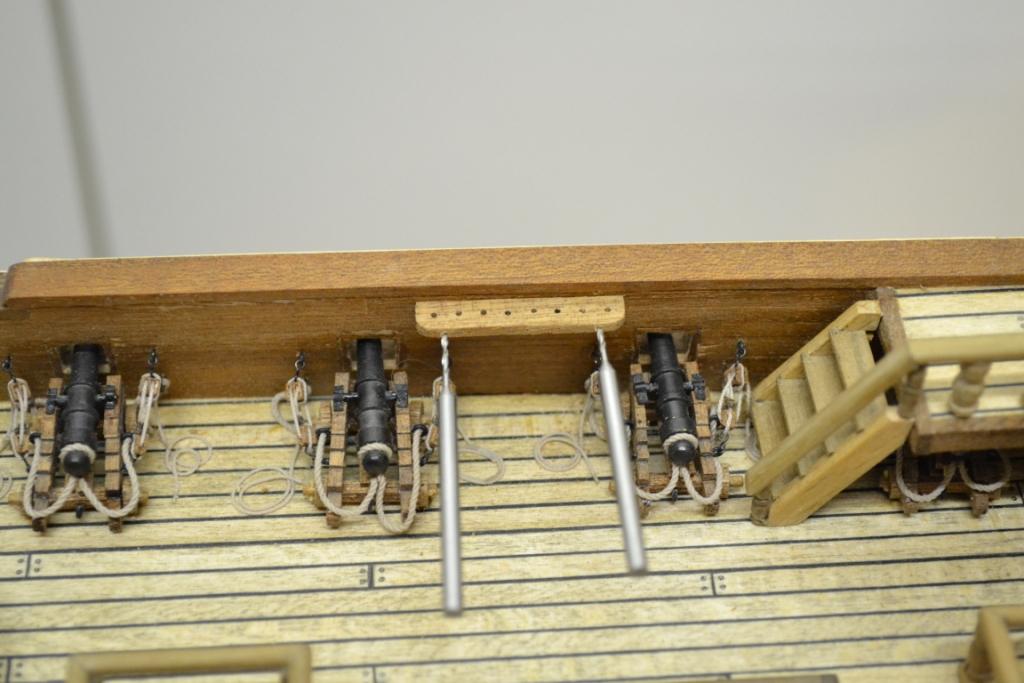
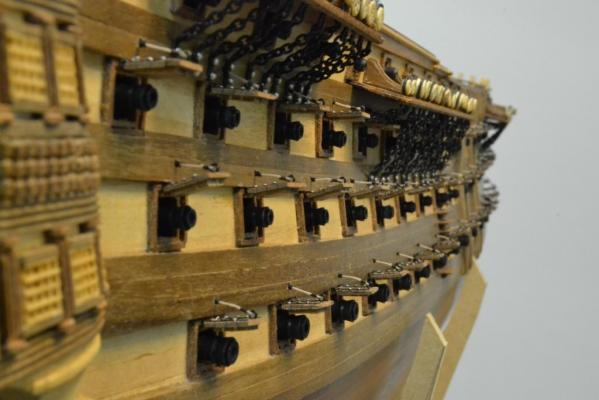
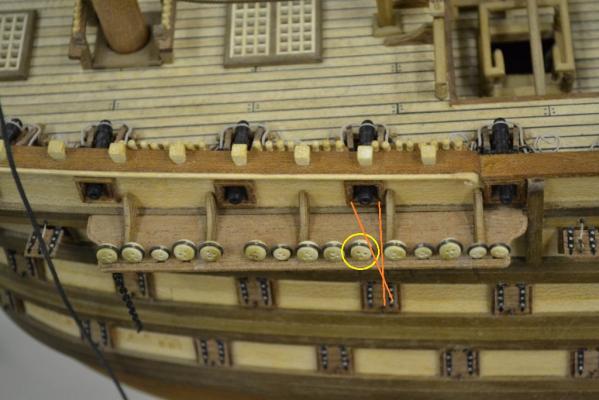
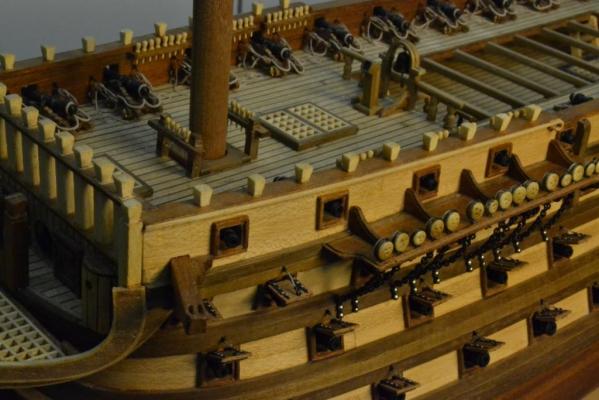
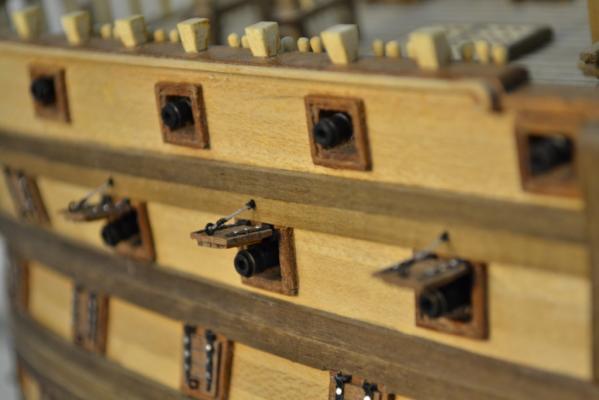
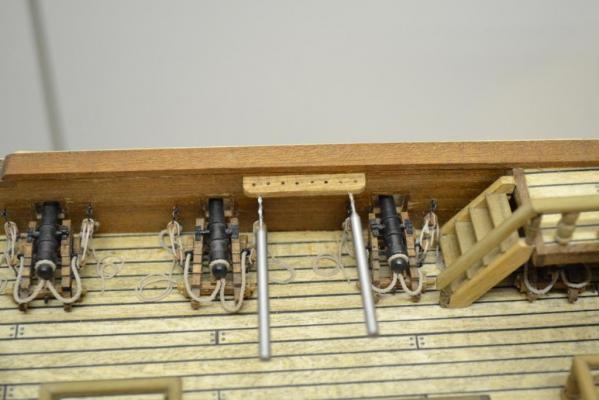
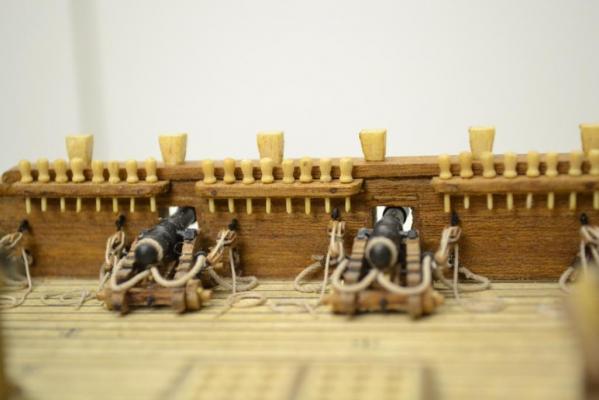
Thank you all for visiting, comments and for hitting the like button. Continuing ... The instructions instructs to “drill holes” in the channel for the deadeyes. but after “all my research”, I decided to do it a bit more authentic and wanted to “carve” dedicated slots for the deadeyes and to install a “capping strip” I “thought” I was very thorough when I marked all the positions for the slots and preventers. But it turned out to be a real puzzle to get everything in place. Somehow I placed this deadeye not so nice when looking at the shooting angles of the cannon behind it.. It turns out that there’s just not much space to play around with.. After a quick fix of this mistake and moving the slots "a bit more" to the left, it became a bit better but it’s still not really perfect.. On this picture you can also see that i have additionally strengthened the channel with (3) nails Here’s the final result with all the chains installed. At least it can shoot “straight” without damaging the deadeye and rigging “Another bonus”, I rigged all the canon hatches and have now installed all the cannons on port side. .."Quite impressive firepower" she had..


-
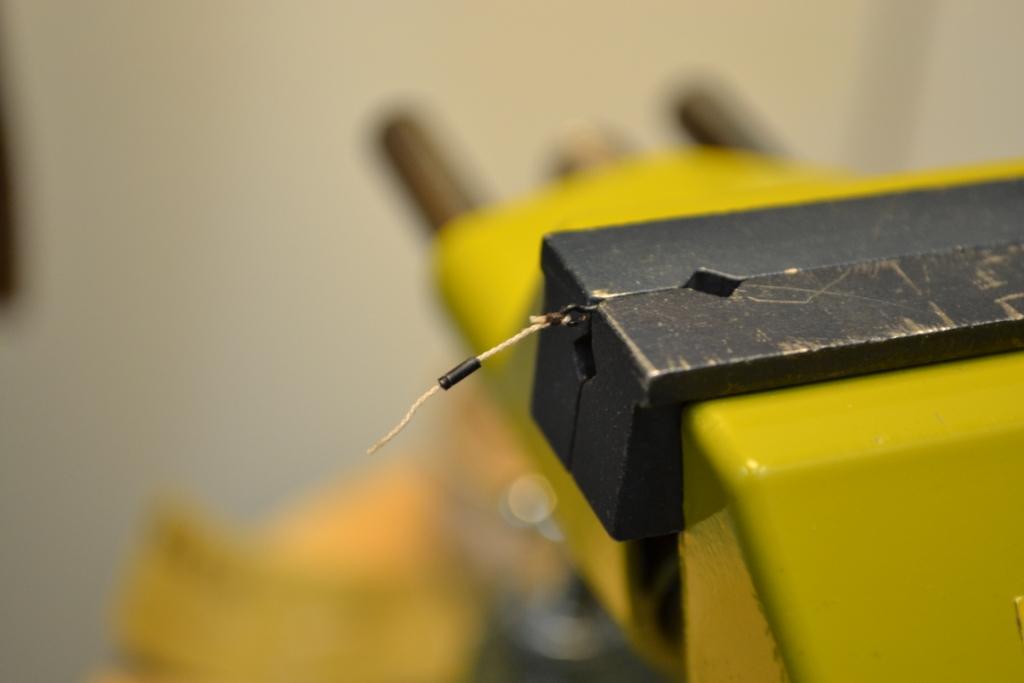
I think you are right Sjors and I probably will paint them black .. On the other hand my canon lids also have “shiny” nails, so.. who knows .. But before I will make that decision, I decided that it would be wise to do some “cannon-port” rigging before installing the channels permanent.. To ease the rigging (and alignment) of these, I removed the "eye" from the lid, fixed the rope to it and glued a piece of Ø1mm blackened brass tube on the rope and installed it once more. Even dough this seems like a good solution, it will still take me quite some time to rig all of them.. Here's the result sofar .. ..and with the channel in place ..

-
Thank you for the nice comment Schnu. Luckily the chain used is provided by the kit and it can be used as it is. However, I’m not sure yet what to do with the nails.. ..either I leave them “as is” or I’ll might have to paint them..
-
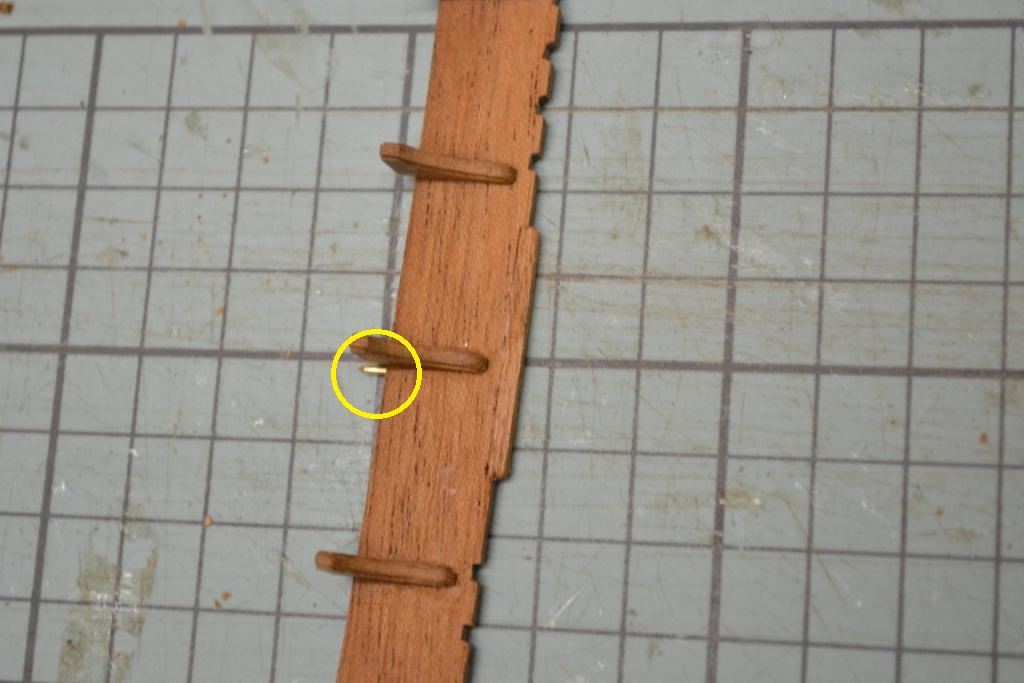
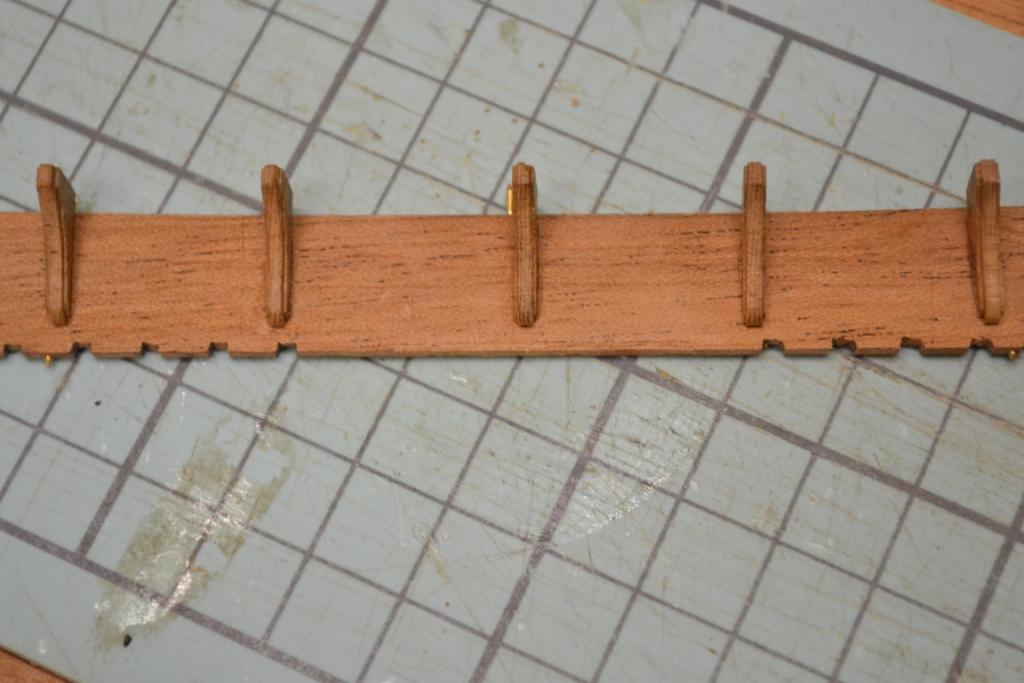
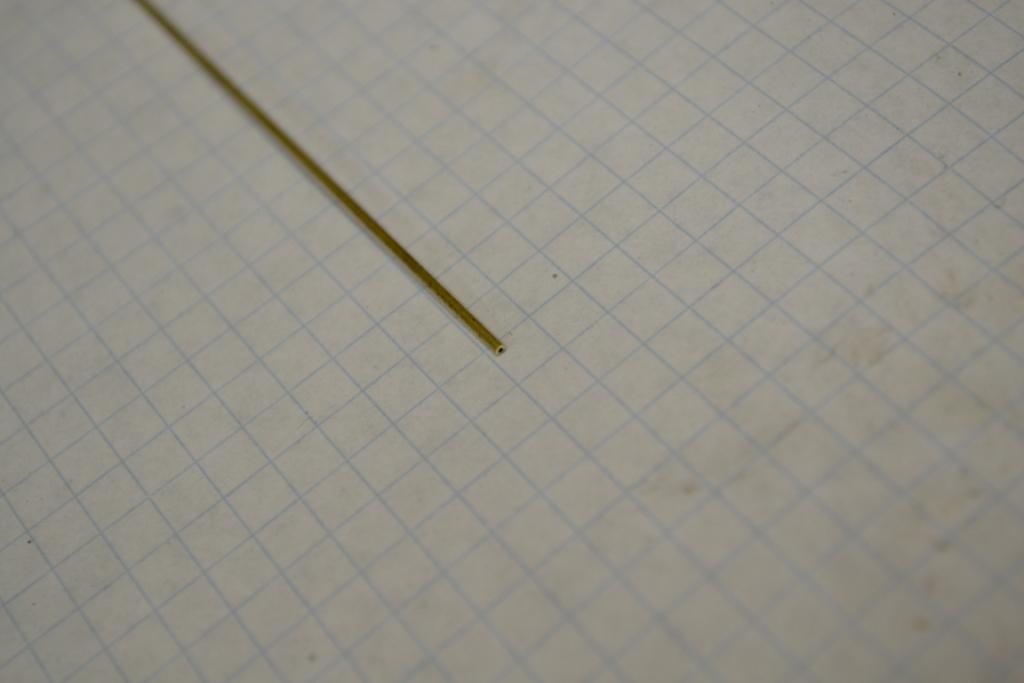
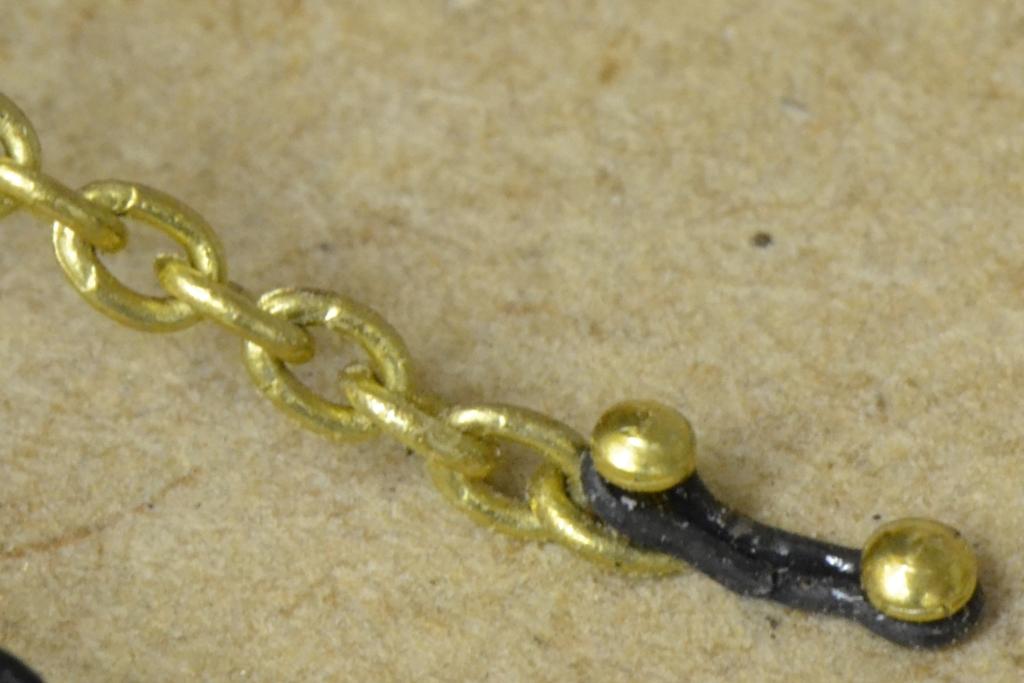
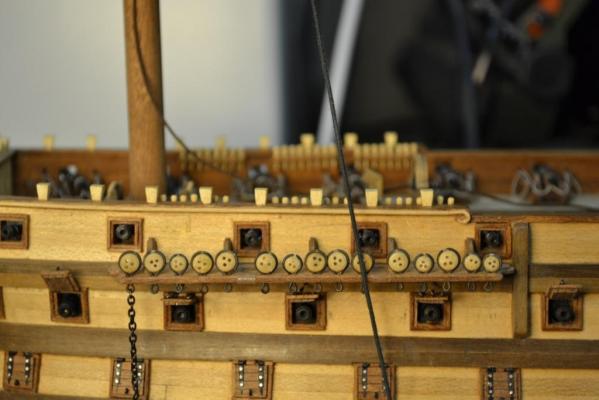
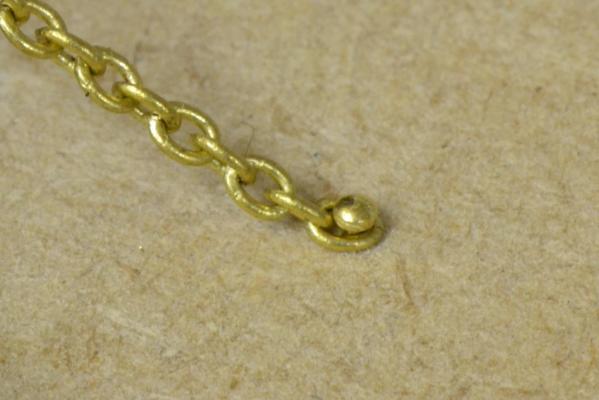
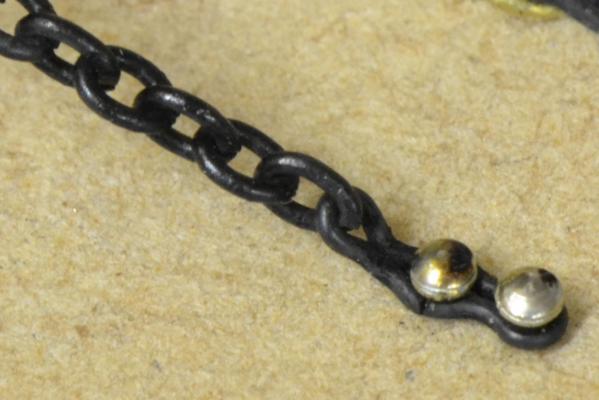
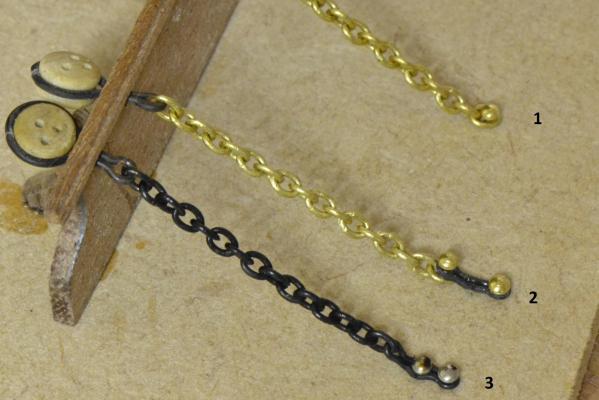
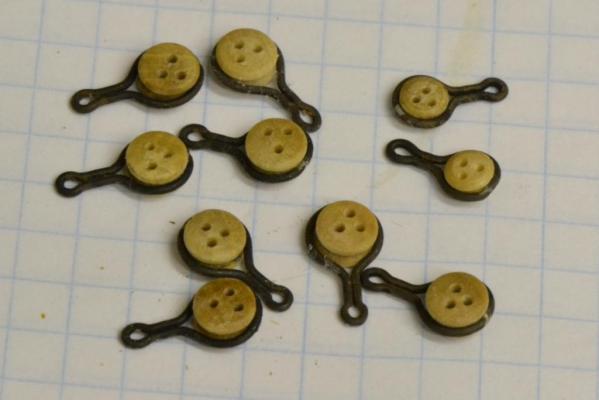
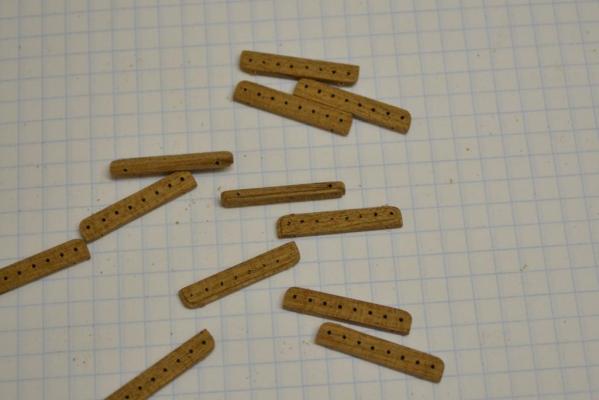
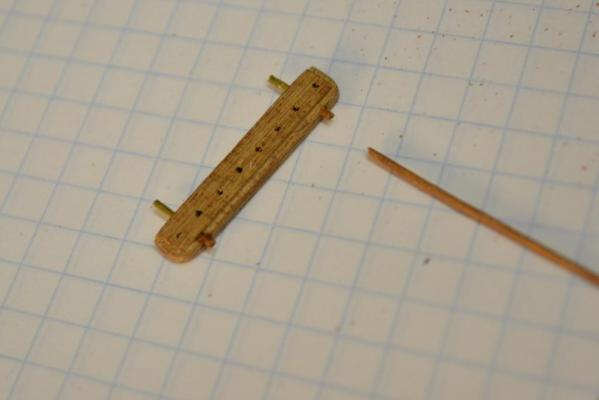
..An minor update.. I’m working on some details for the channels, chains and lower deadeyes. The instructions/drawings are not really revealing anything about this, so I searched the forum/internet for as much detail as possible. I started with straps for the lower deadeyes and ended up with these: If you’re interested, I show in another topic in “Wooden Tips and Tricks and Making Jigs” LINK how I made these. ..The ST uses chains to fix the lower deadeyes to the hull.. According to the instructions this is simply done with a “nail”, but this seemed a bit to basic for me.. So again after searching the net I found out that these are normally fixed in place with help of an “preventer”. I made one, and it looks much better already but I still wasn’t really satisfied. So I made another version which I think looks better, but is (off course) more difficult and time consuming to make.. Here’s a picture showing all 3 solutions. .. during blackening of the provided nails i also found out that they are not made of brass/copper .. .. I think there’s no other way and I have to settle for solution no.3 ..

-
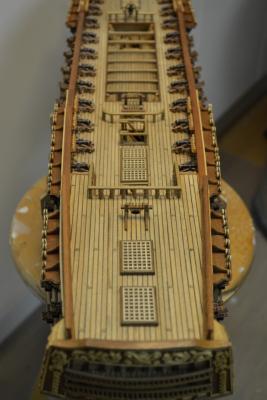
Thanks everyone for the feedback, comments and likes, every single one of them is appreciated a lot After a few weeks of “relaxing” I’m working on the ST again.. I managed to manufacture and install the balusters and rails for the quarterdeck just before my holidays. "Not exactly" as suggested by the kit, but not so much different either.. .. i added a few extra details to them with the previously mentioned techniques.. So today I started to produce the pin racks. Instead of the suggested “square look” I decided to give them rounded edges and milled a rabbet in them .. To fasten them better to the bulwarks I decided to reinforce them with 2 pcs Ø0,8mm brass wire. After using the same holes as a template for the bulwarks holes, I glued the wire in position and finished off with a 0.8mm treenail. The result ..

-
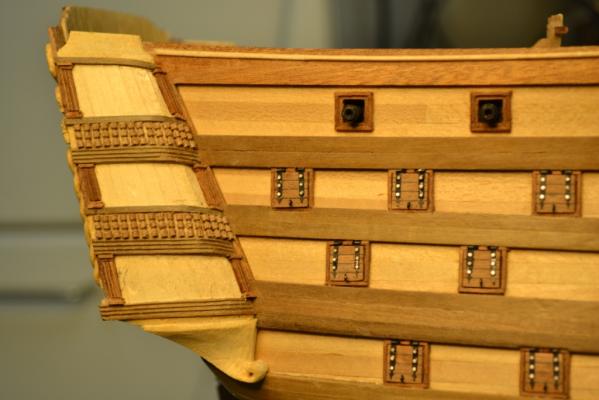
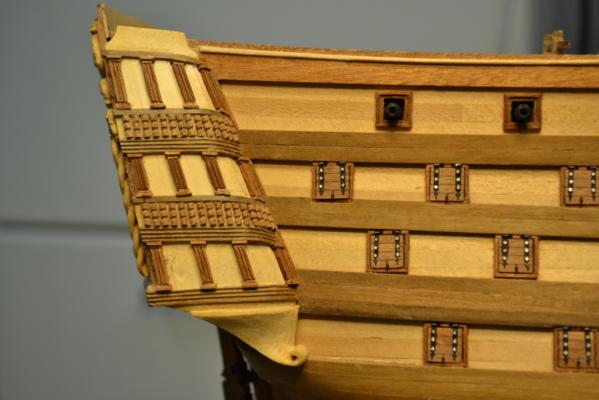
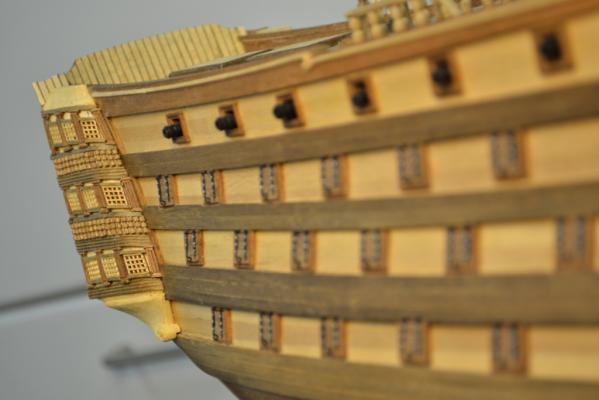
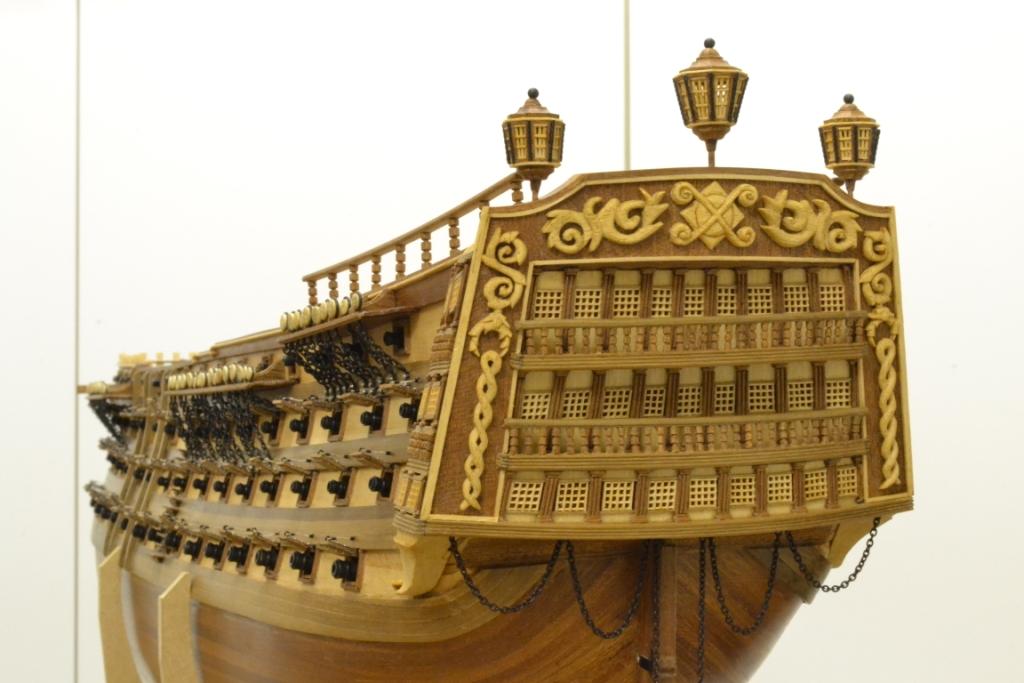
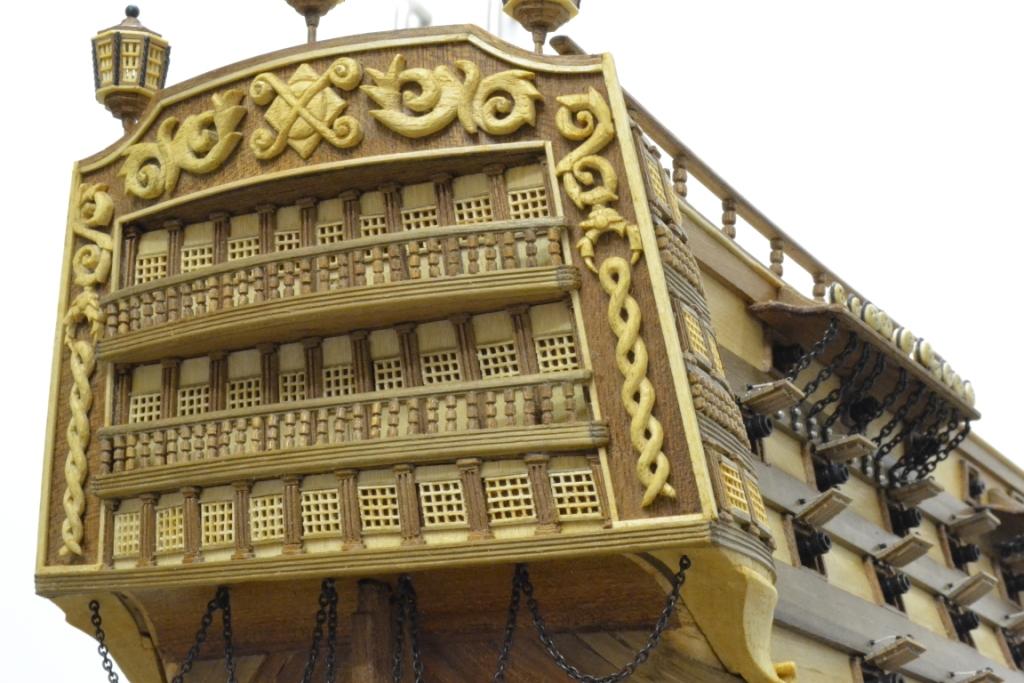
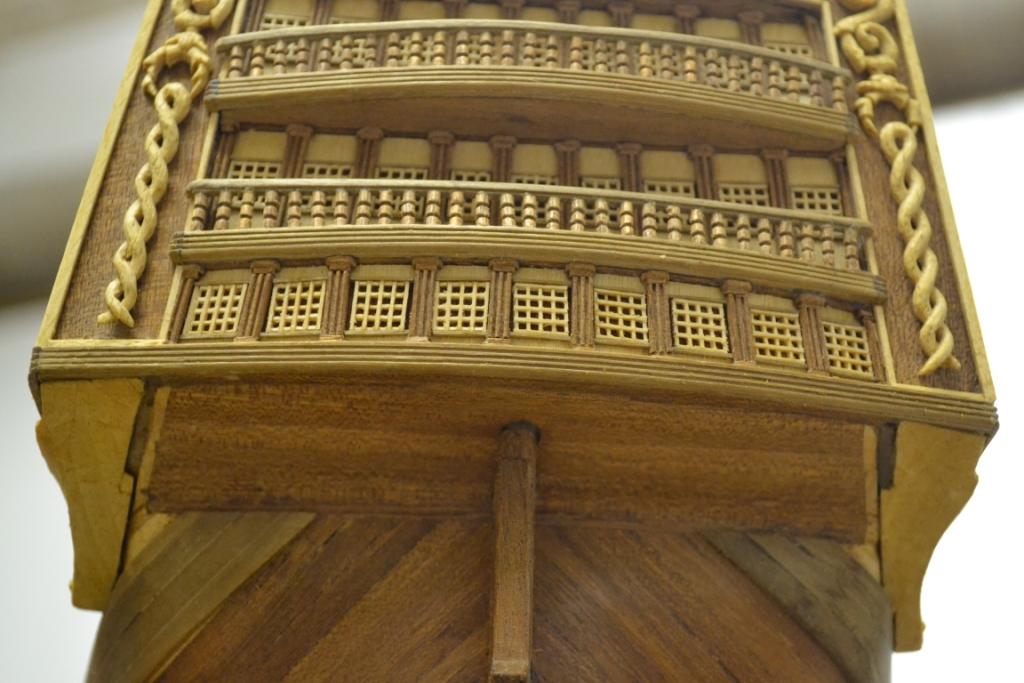
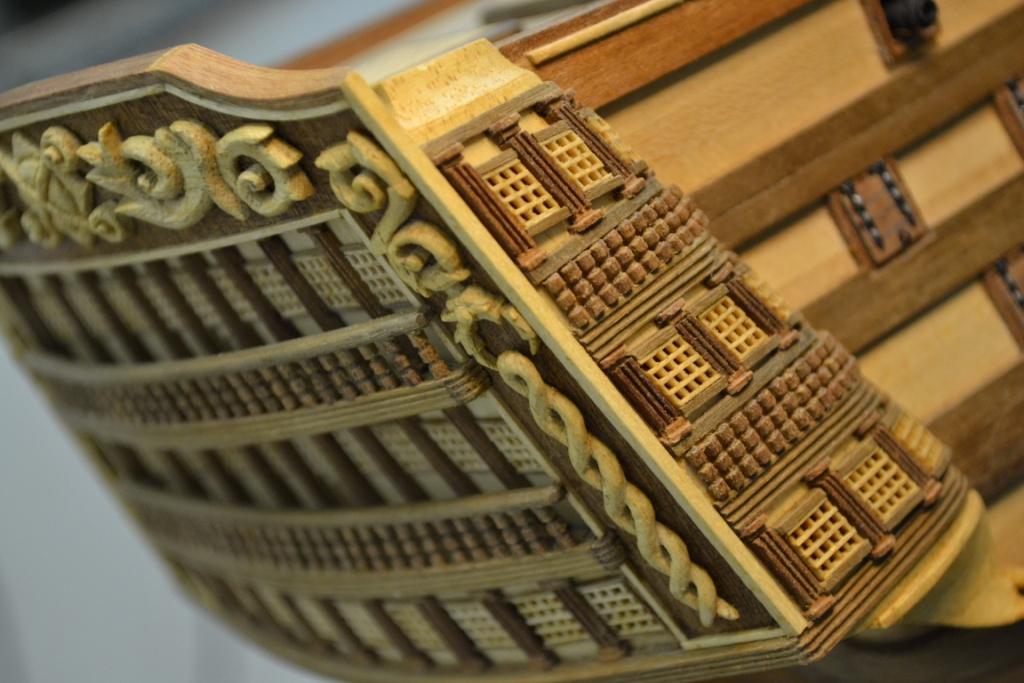
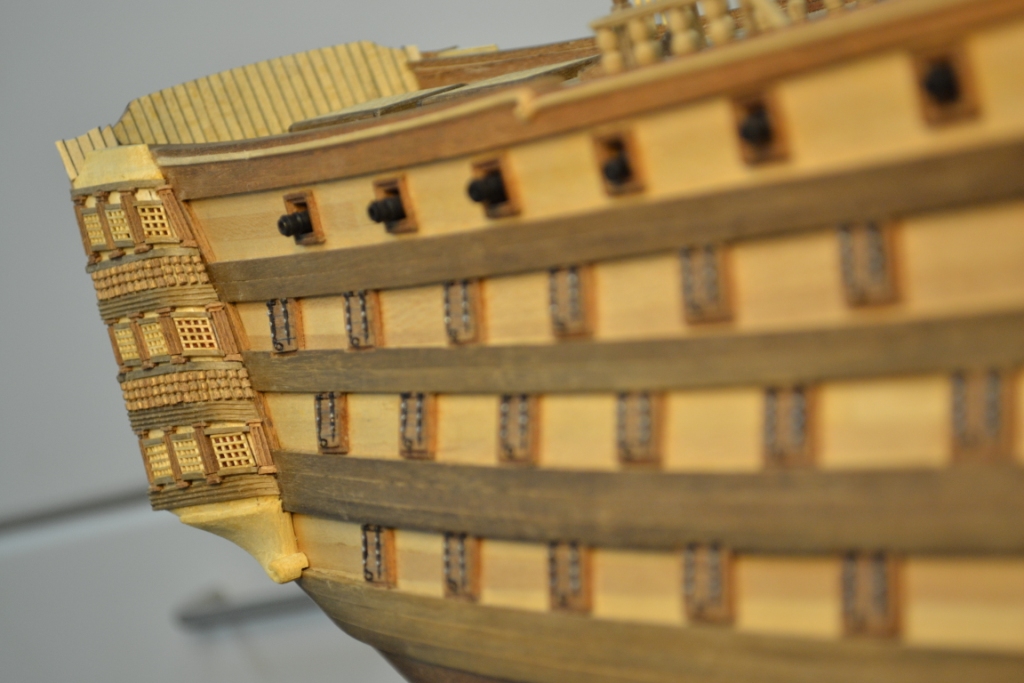
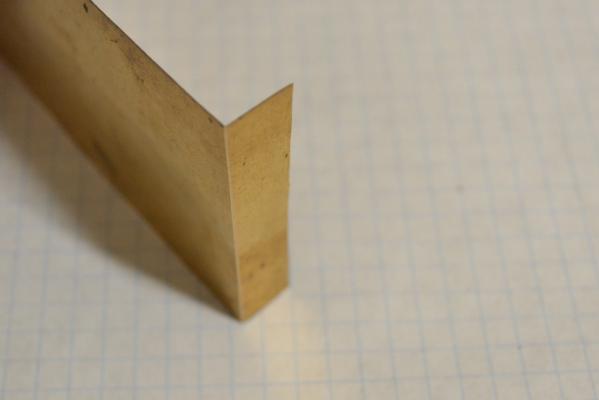
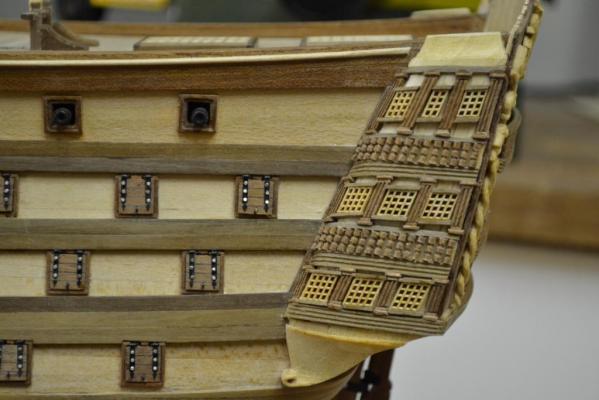
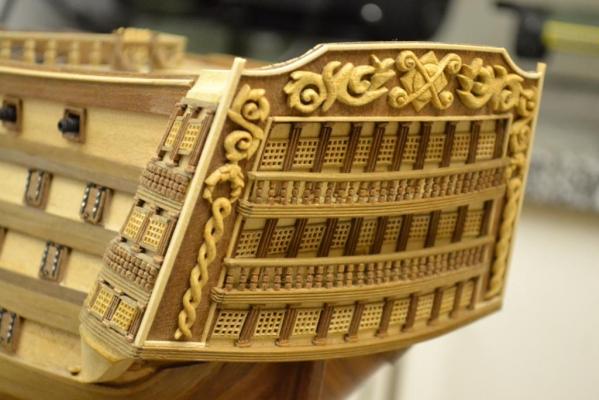
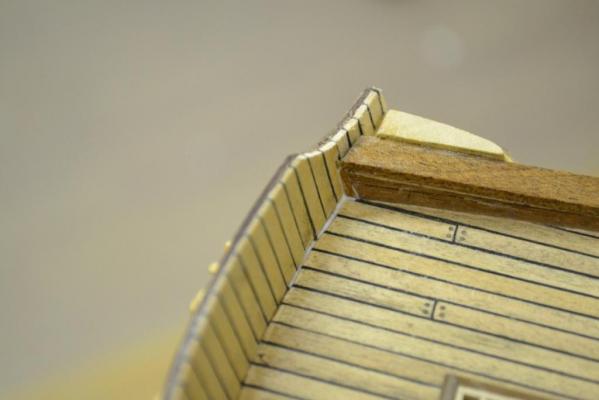
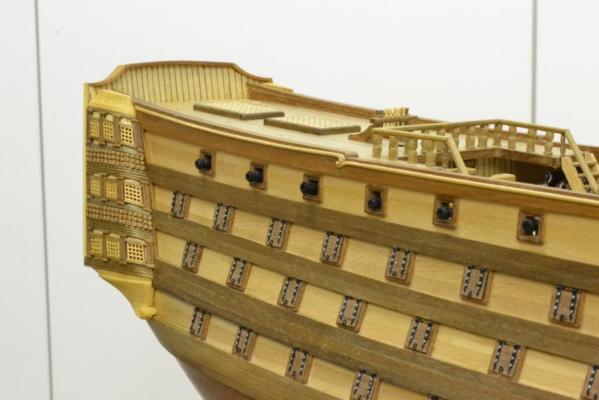
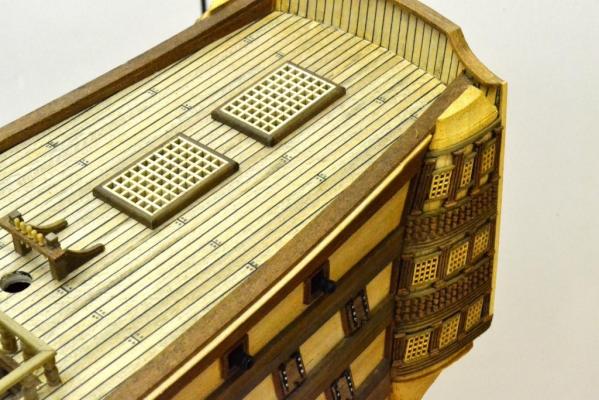
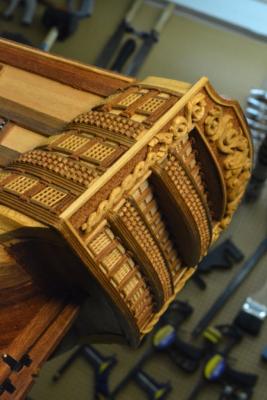
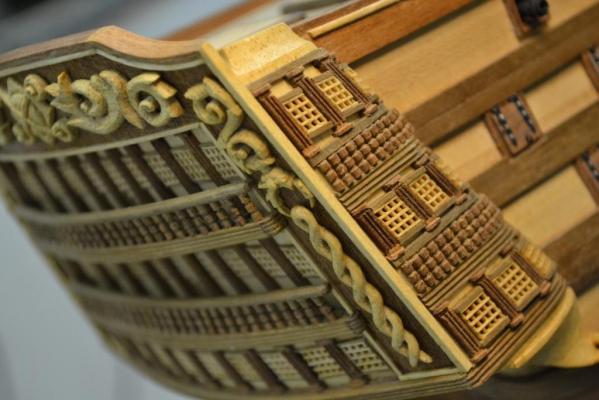
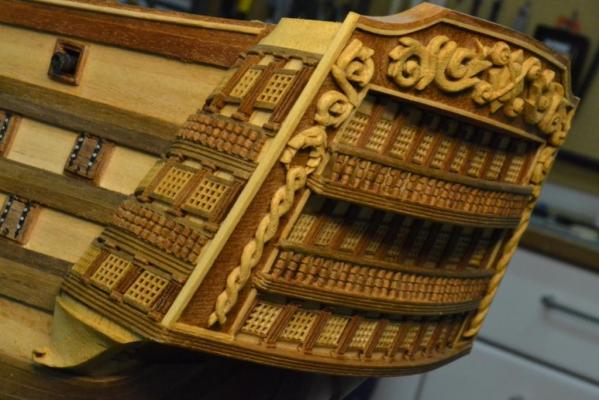
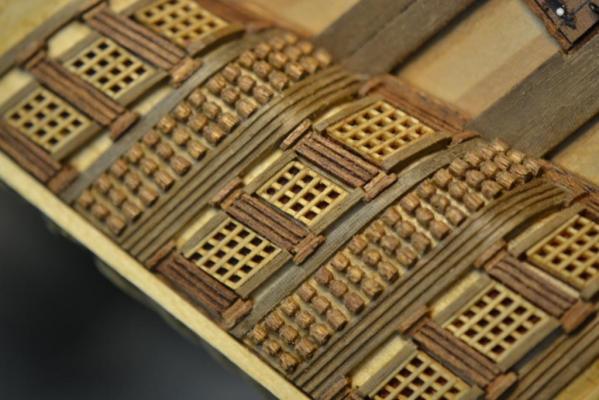
Thank you for the compliments David, Sjors & Brian, they are “as always” very appreciated ! I have also managed to finish the gallery on port side and it looks pretty much the same as the one on starboard .. The next thing on the list: “framing” of the stern and the galleries.. As the stern has some “tricky arc’s”, I decided to use a template to shape the strips. I had quite some issues bending the “lantern stern strip” without snapping the wood or shaping it into strange curves. In the end I used 3 pieces of 0.6mm mahogany veneer (and 3 strips of 2x2mm for the top) and glued these in the correct shape on a template. I also had to cover gabs between the stern and bulwark.. .. and I made an “L” shaped strip (app. 2x2mm) and used this one for “framing the stern” and the “transition” towards the galleries. Here’s the end result which I’m able to present just before leaving for my holidays .. Hopefully I'm not boring everyone with all these stern and gallery pictures, It just that i'm quite happy having completed the stern & galleries. ..and all that even without having to use any paint ..


-
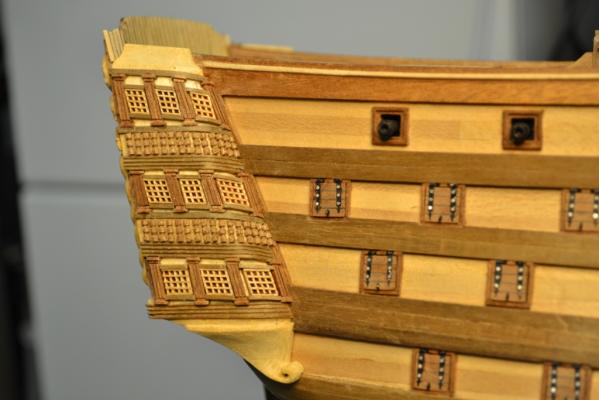
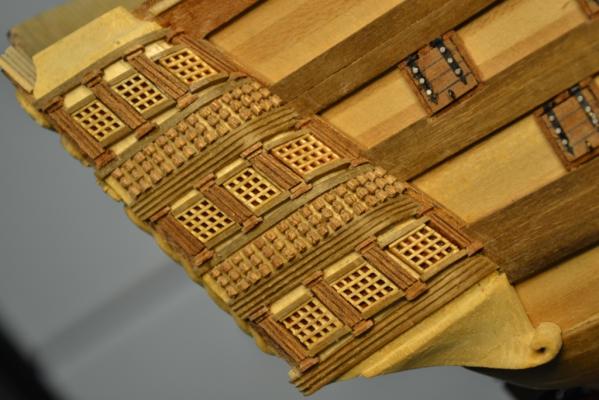
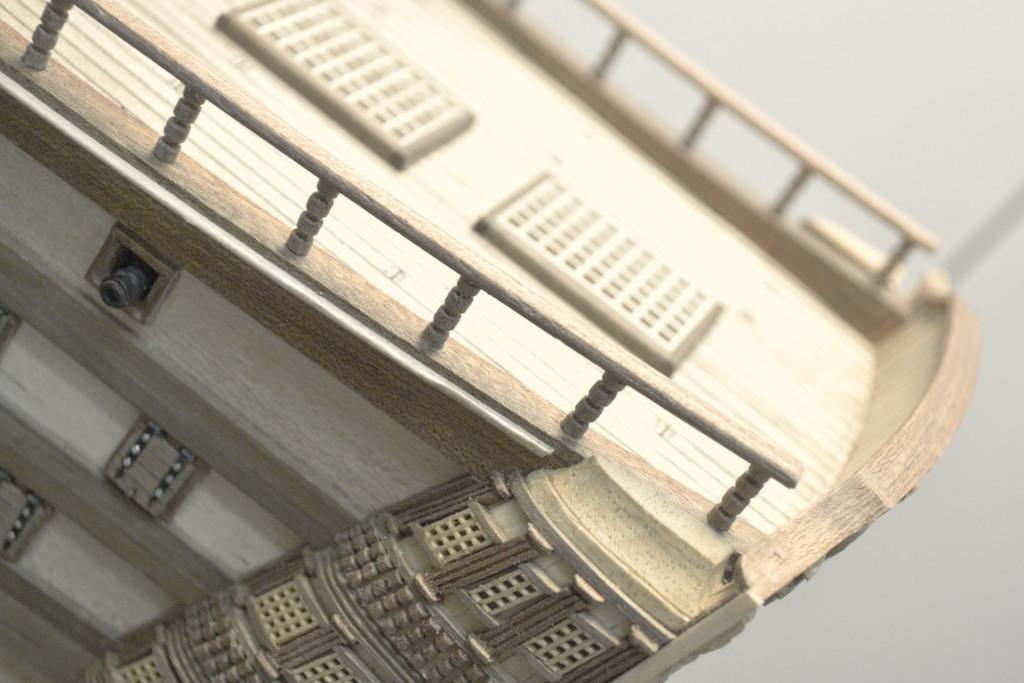
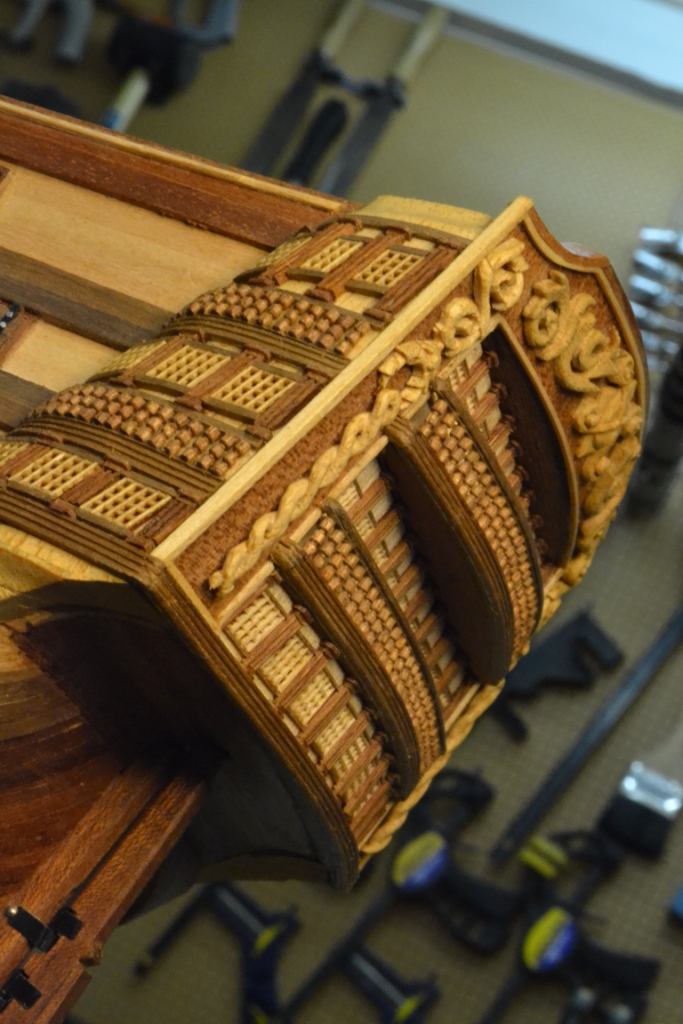
..Thanks everyone for visiting, comments & the likes .. I continued with the galleries.. And of course I have to make them in same style as the stern .. Because of the curves and the lack of any grip for a clamp, I had quite some difficulties in having things glued in place.. and it was a good thing that i didn't rigged the gunports yet, So in all..: the first gallery took quite some time to build .. First at the selection of the pictures, I noticed that I forgot to take a few pictures during the complete progress.... Anyway, underneath (almost) the "step by step" procedure.. I used all the techniques as described earlier for creating all the windows, laths, columns and balusters … However it’s not completely finished, I still have to find out how to finish the “corner” towards the stern and I still need to wax it ..