DONATION DRIVE - SUPPORT MSW - DO YOUR PART TO KEEP THIS GREAT FORUM GOING!
×

GTM
-
Posts
249 -
Joined
Content Type
Profiles
Forums
Gallery
Events
Everything posted by GTM
-
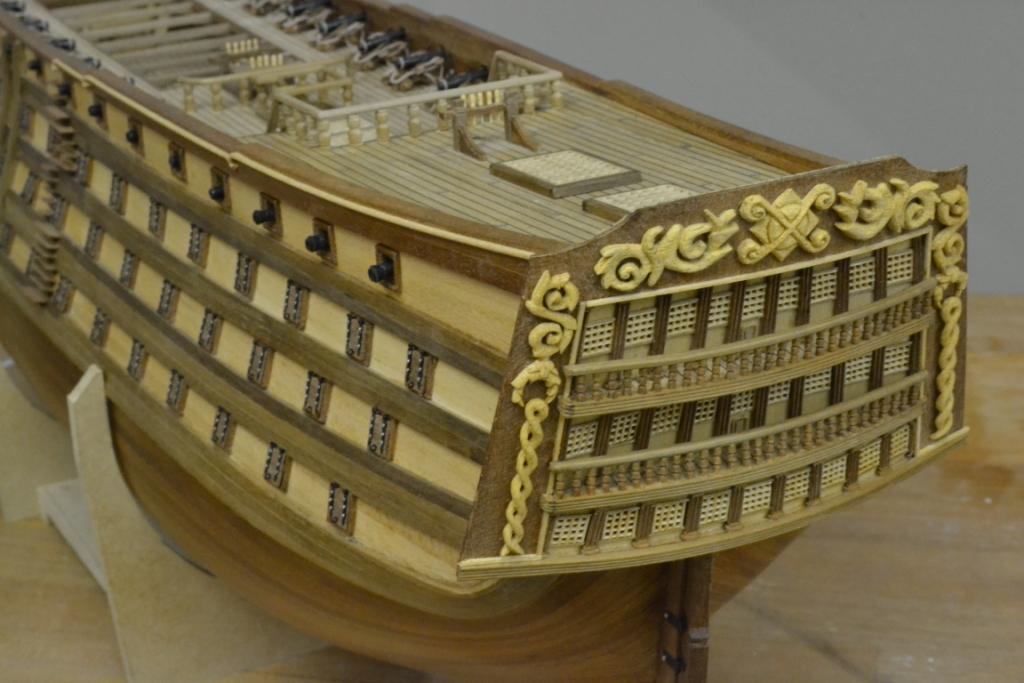
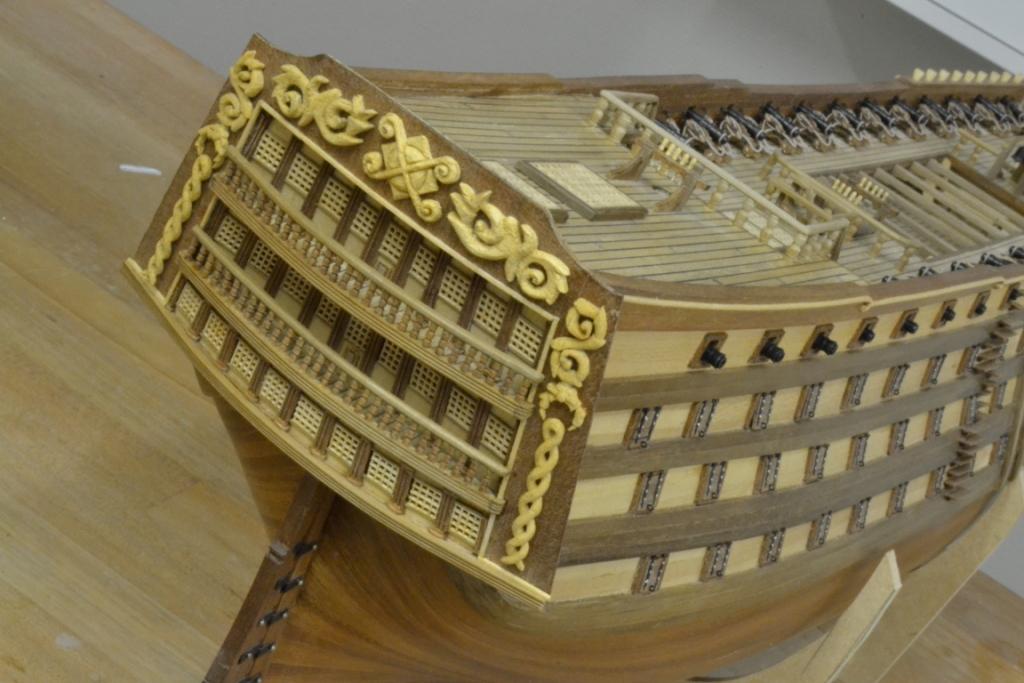
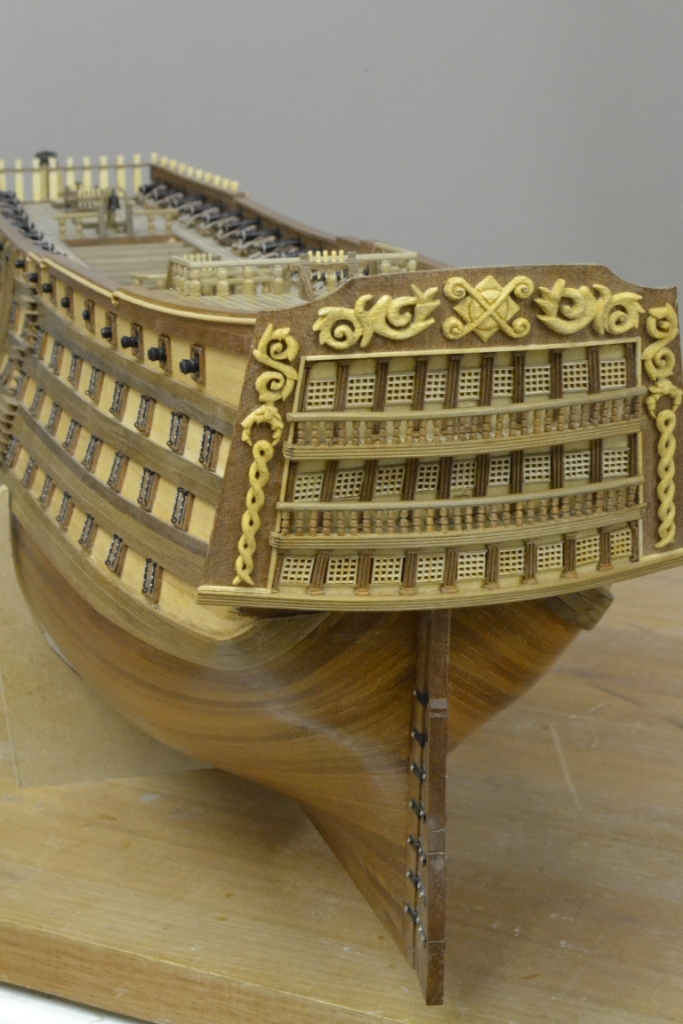
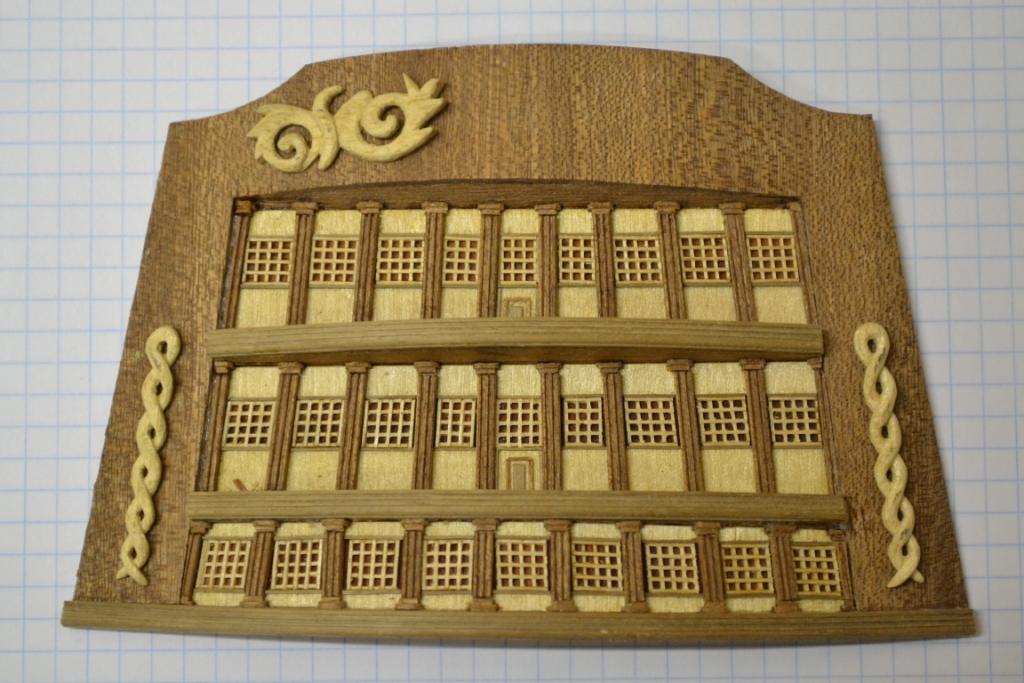
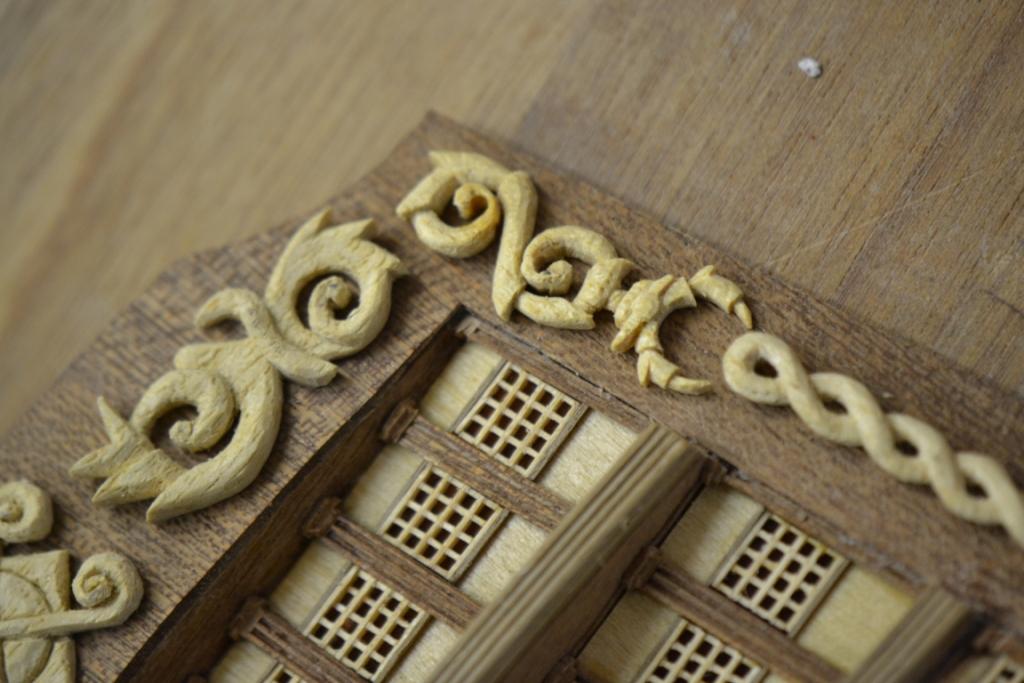
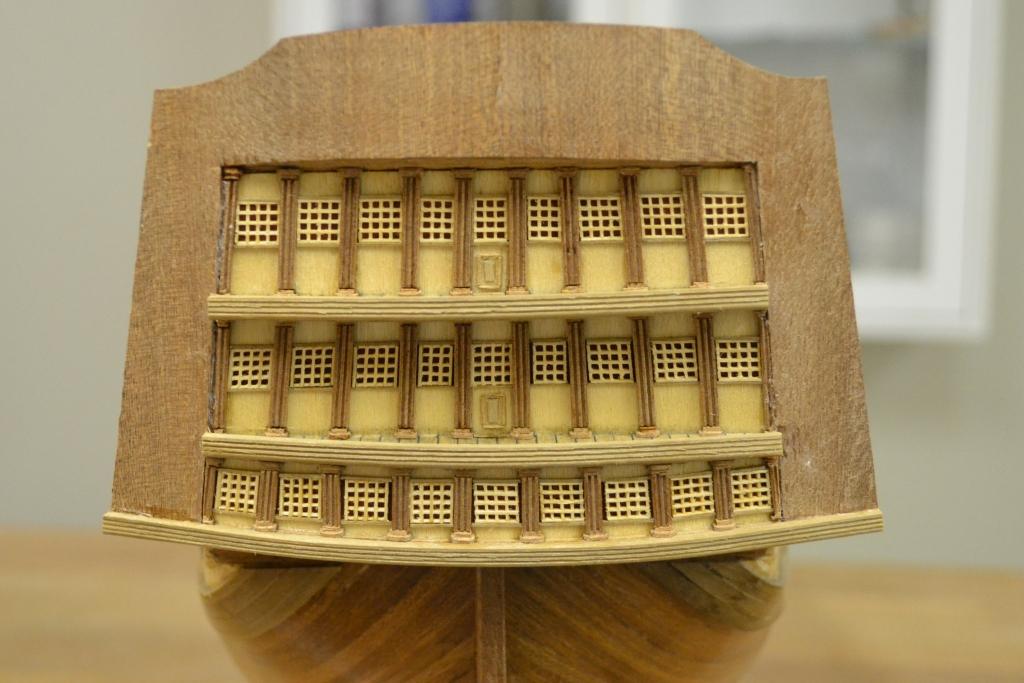
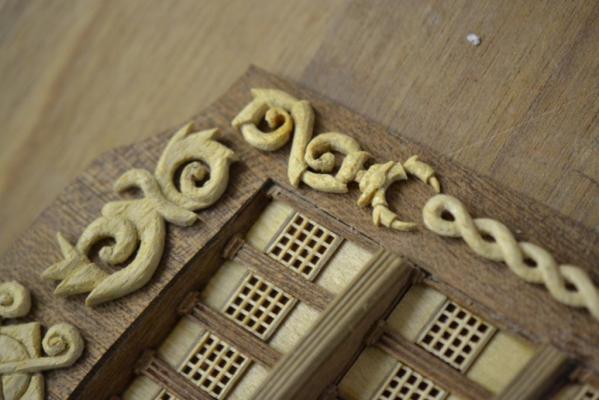
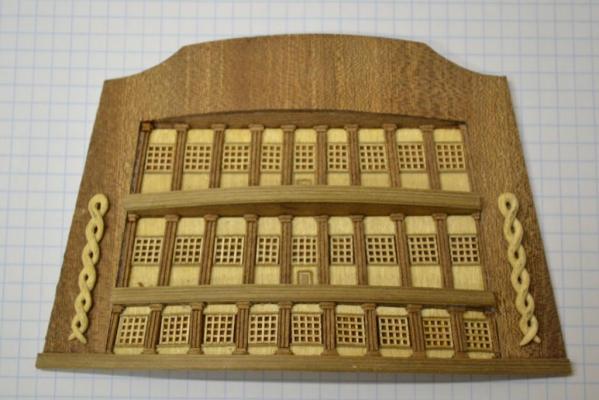
 Thanks !!, luckily everything turned out “ok” after the repair. So continuing with the galleries.. When using the provided bases, the middle base (the top one in the picture) is far off, so i decided to make a better fit. I planked the gallery like it was a hull. I always had the intention to used the supplied casted gallery ornaments, but now after having “some experience” with woodcarving, i decided to give it a try to carve my own. I started by cutting the rough outlines and made sure it fitted "perfectly". I then copied all the gallery lines and used this as the “base shape” for the ornament. And started carving .. As you might notice, I’m still using abachi wood, as this wood is very soft it will break easily when trying to carve very thin surfaces or very fine details. I found a nice solution to prevent this from happening: When dripping very thin CA glue onto the wood it will immediately be drained completly into the wood and it hardens the wood quite well. I agree that it slightly colors the wood, but it is not that bad anymore after carving .. Same thing for the top ornament .. The result so far.. …
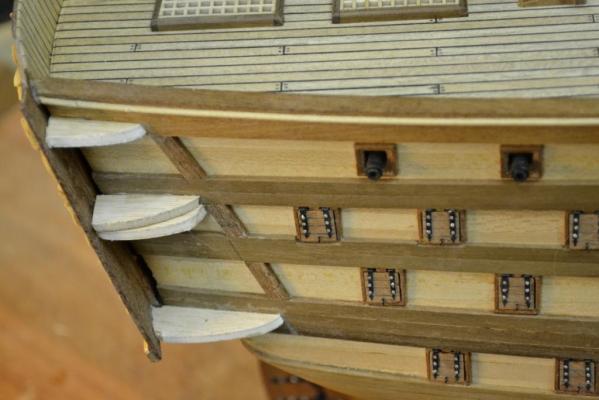
-
Thank you Michael and Robert. ..Pfffffff.. The repairs are now completely done and here is the result of an hard working weekend. a few minor "scratches" can still be seen.. but the pictures are too dark to reveal those

-
Thanks Schnu and Sherry, It actually looked worse than it is. I’m already quite busy in repairing the damage, only the rails can’t be saved and I need to rebuild them. On top of this I had some minor damage to some of the cannons and staircases. In all it could have been much worse .. ....

-
Oh NO !!! Every model builders nightmare just happened… I still don’t know what happened and I’m still in shock.. During the build of the galleries I removed her from her working stand and had her lying on the table. Suddenly without any sign she tipped over and fell from the workbench on the floor. .. and I was not even close to her.. An major setback… .....
-
Thank you both very much for visiting and the kind remarks.. Like yourself I have been inspired by many other members on MSW and I hope to inspire and pass my ideas to many others as well with my contribution. Jack, your doing very well yourself with your Oseberg. a beautiful build with good solutions (I love you’re pictures and not to forget you’re “steaming rig”)
-
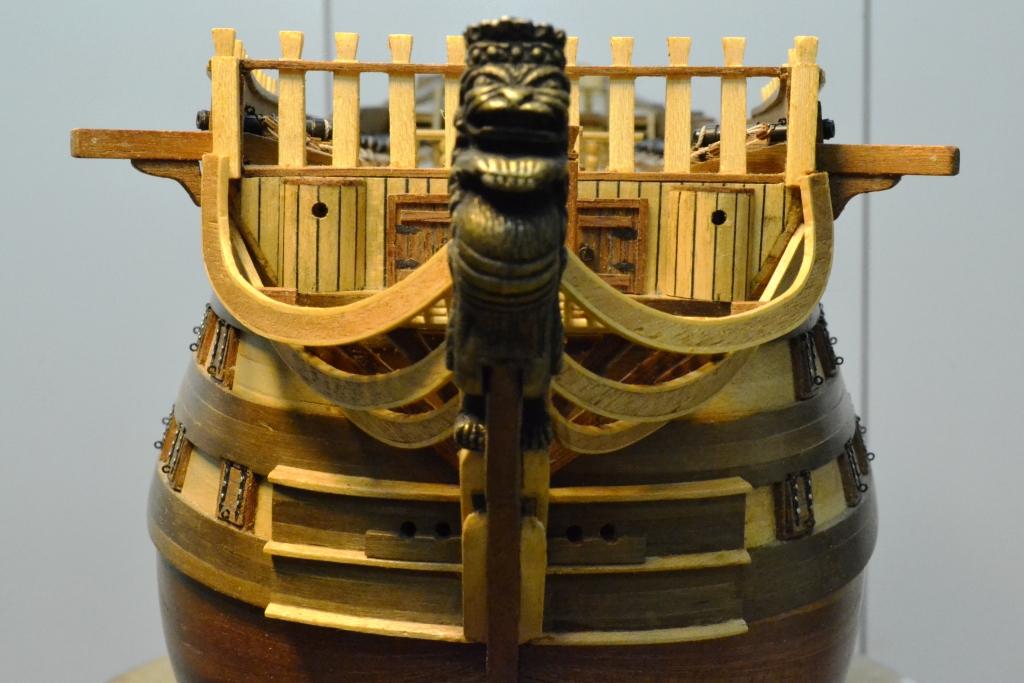
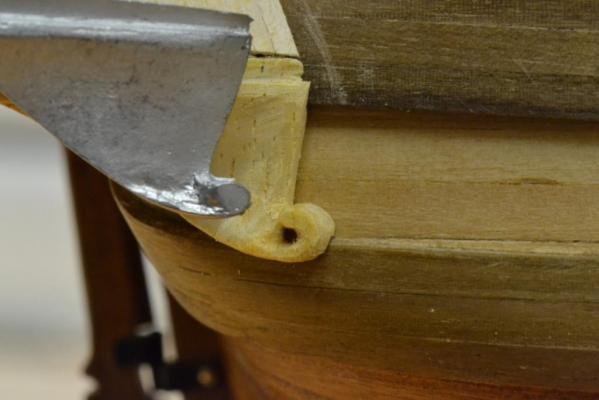
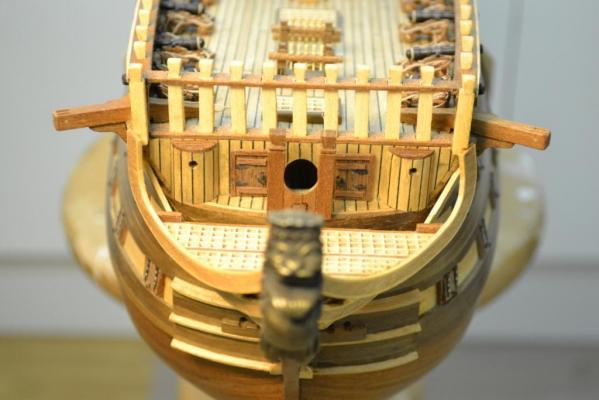
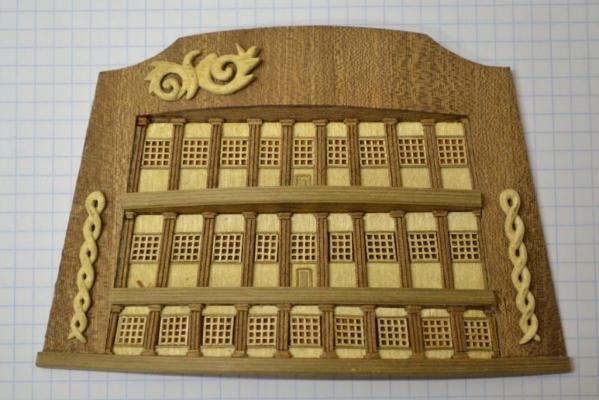
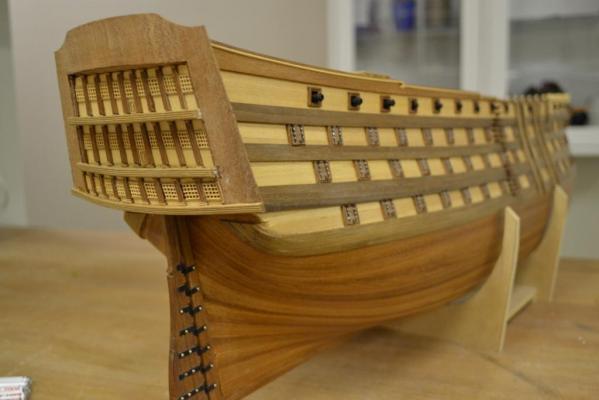
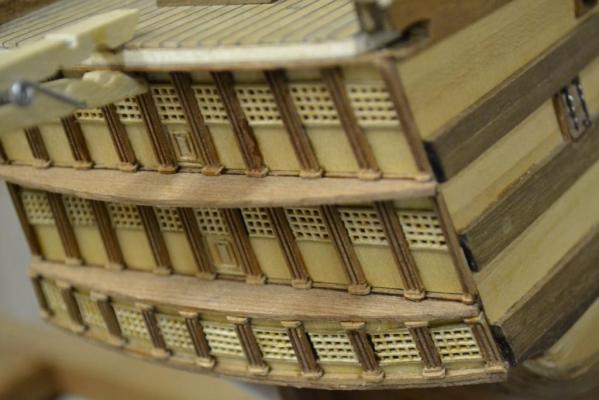
Here’s the update I promised earlier today.. I decided to glue the stern-plate in its final position before gluing any ornament or the balconies in place. and I think this was a wise decision as it would have been an delicate task if they were. After this it was just a matter of gluing the ornaments & balconies on the correct spot. This is how she looks now .. .. up to the next challenge : the quarter galleries


-
Thank you both. ..Silly me.. and I was thinking that it was just me “being lazy” I do understand that most of the solutions we come up with are varying a lot on the tools and materials we have within our reach. .. An (picture) update will come a bit later showing the final result ..
-
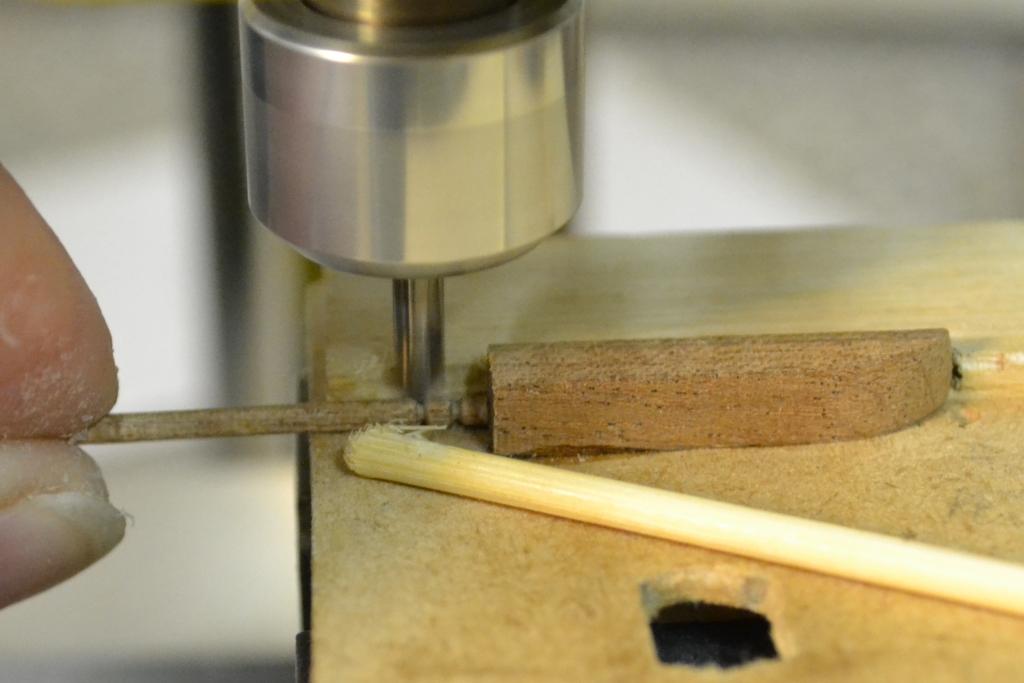
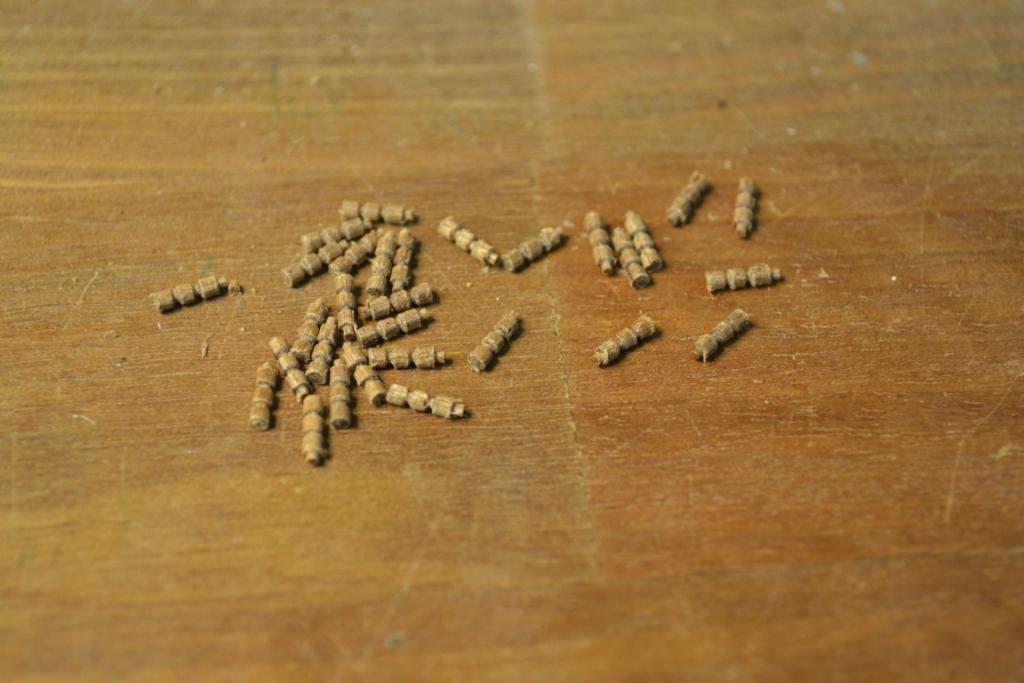
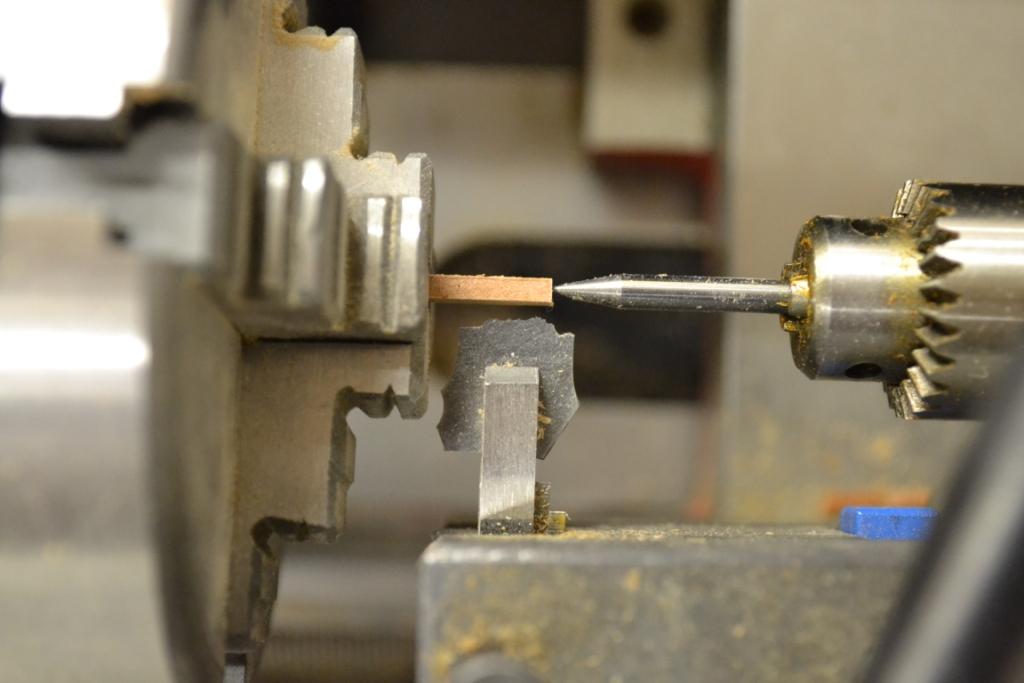
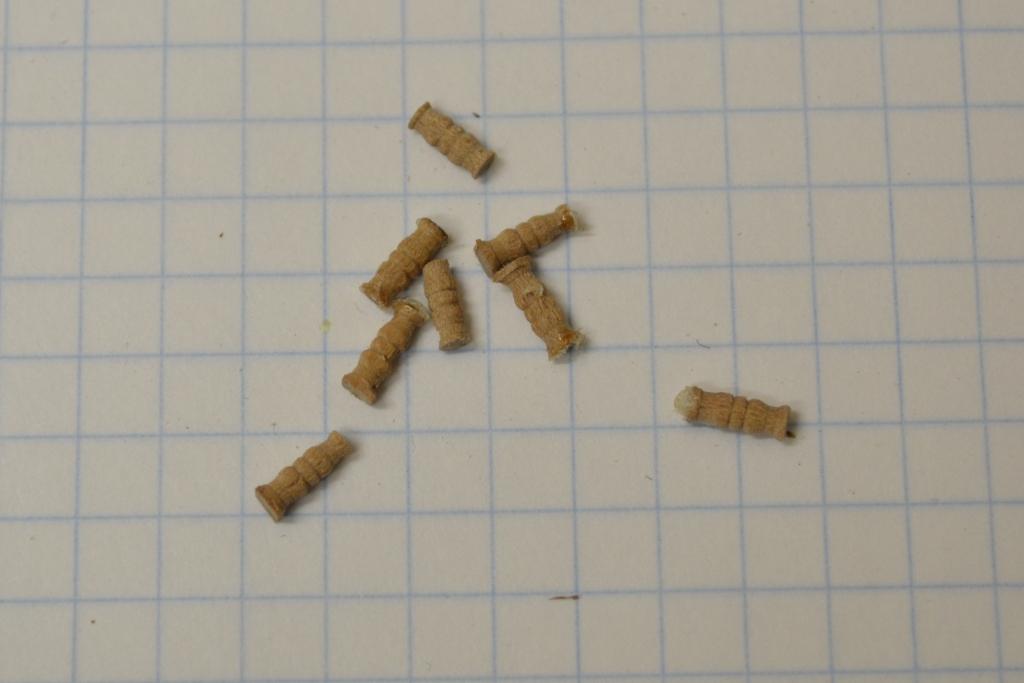
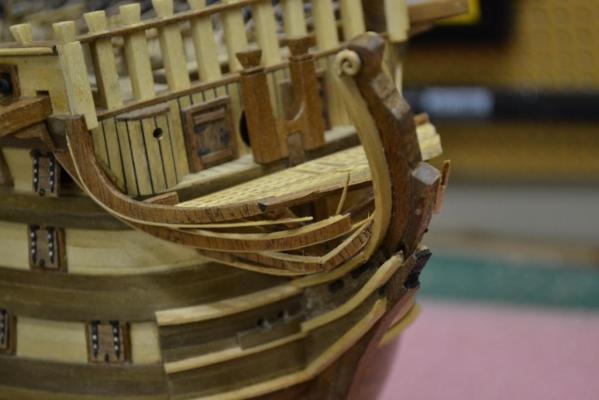
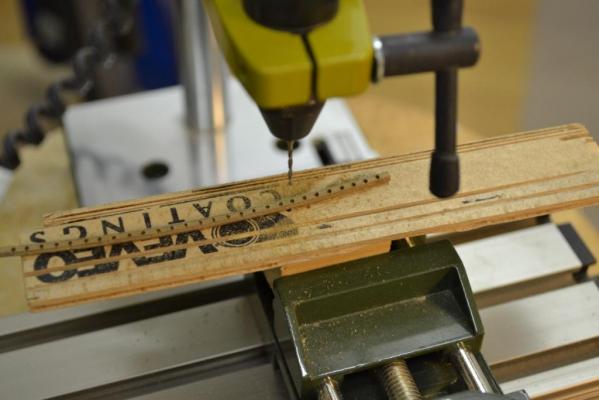
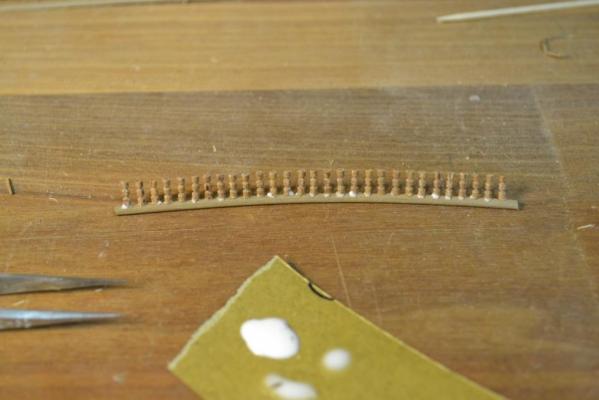
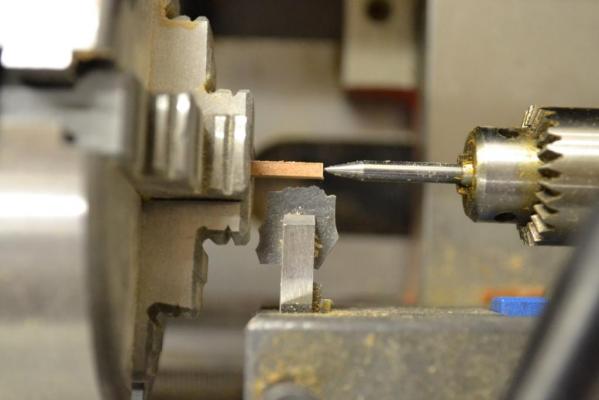
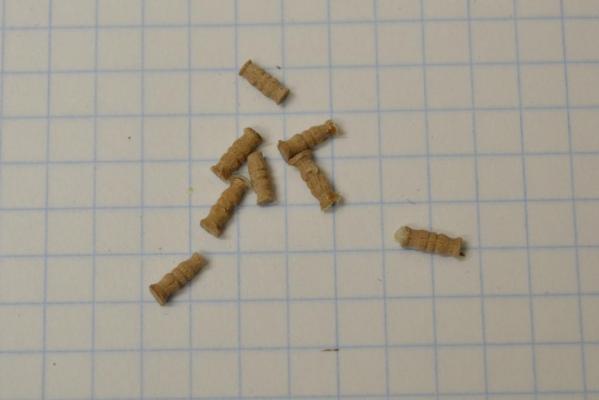
Thank you all for visiting and for all the comments & likes So.. next challenge: the balconies. I made previously balusters on a lathe with a setup shown in the following picture. But now after several attempts (even with different sorts of tree) I gave up that idea. Mainly for the following reasons. The balusters are so “thin” that it is becoming very difficult not to snap the wood. When cutting them free from the stick the length variation is becoming a problem with this setup. Because the wood has a tendency to bend away from the cutter, the shape consistency still varies a lot. They may not look that bad in the following picture, but when glued in position on the stern it certainly didn’t looked good. I had to revise my ambitions and find another way to produce them.., after some brainstorming I came up with the following. Using a drawplate I made a (mahogany) stick in the needed diameter and prepared an setup on the stationary router. With help of a “guiding-stick” I placed the stick into position on the jig and “rotated” at the same time the stick into the running router-bit with my fingers. After this I moved the jig 2,25 mm with the X-Y table and repeated the previous task. .. Too bad I don’t own a "rounding end mill" with an smaller radius as this would have given a nice curved look to the balusters.. (now added to my wish-list) After this I could have cut each baluster in the correct length on the table saw. But instead I used an 2 mm "end mill" and positioned it in such way that it would leave an Ø 1mm tip (when turning the stick with my fingers) This Ø 1mm tip I used as a guide to position and glue the balusters on the handrail. Off course I could also have “cut” the balusters individually with a scalpel like Sherry & Doris did/would do.


-
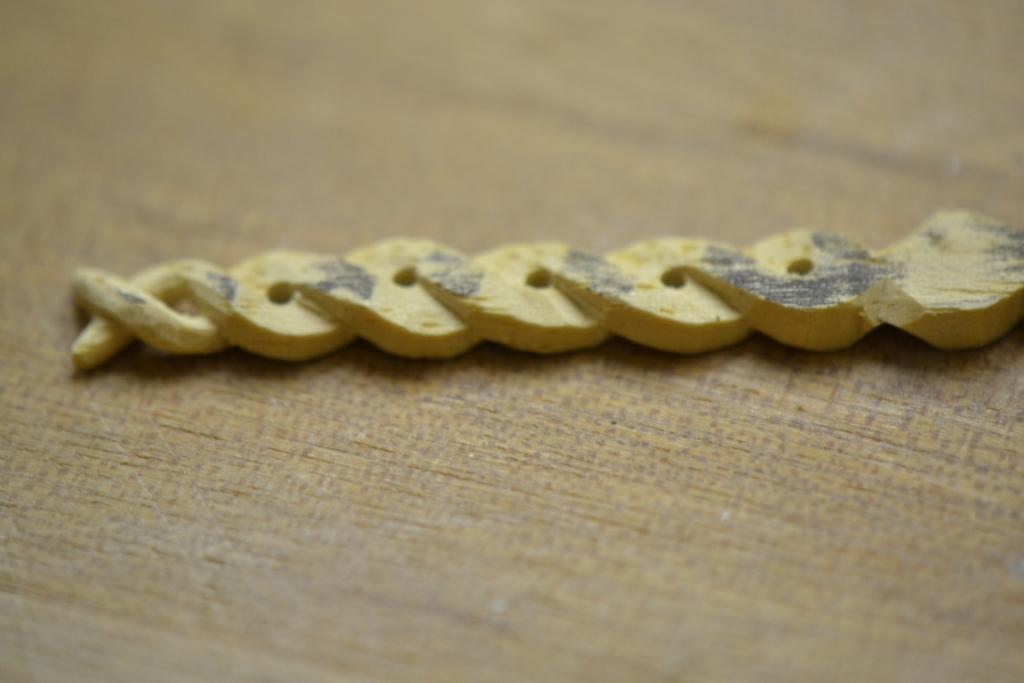
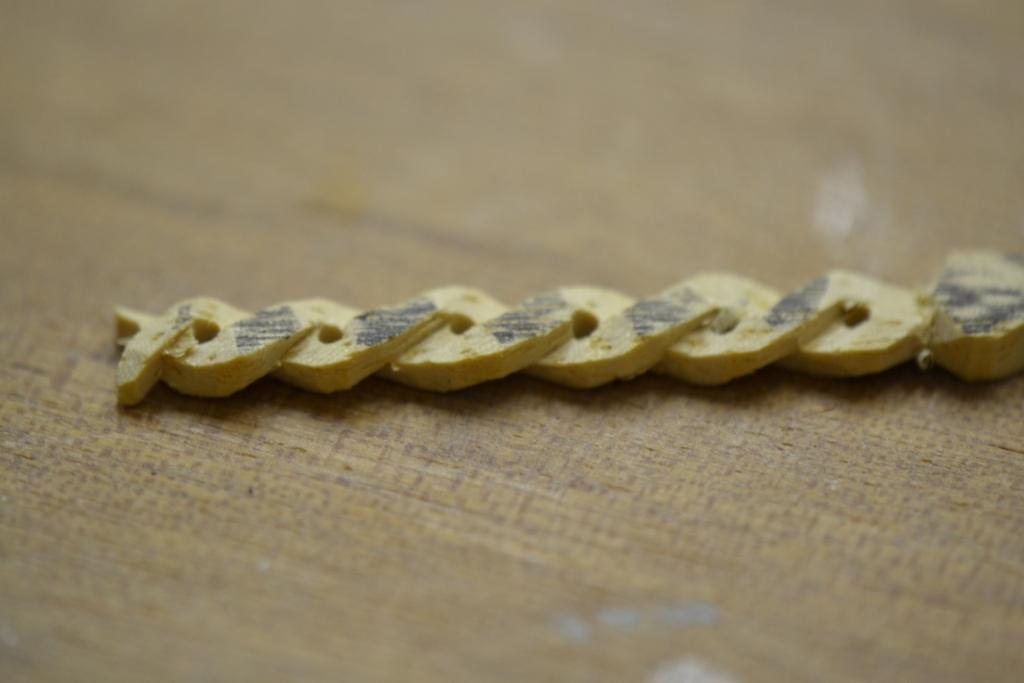
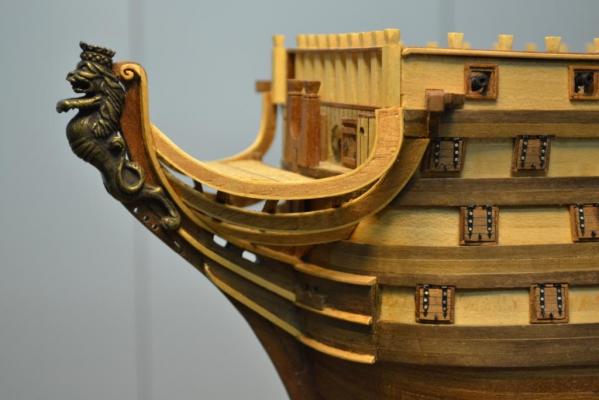
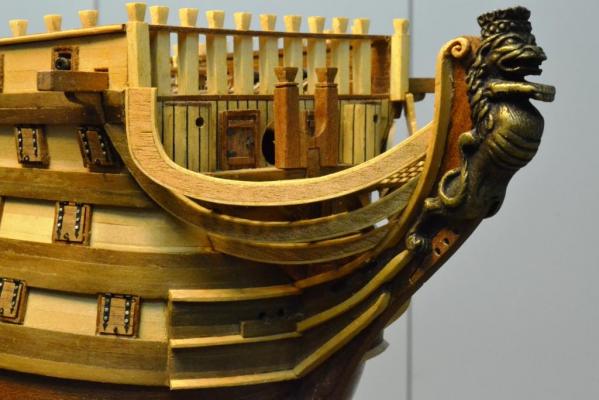
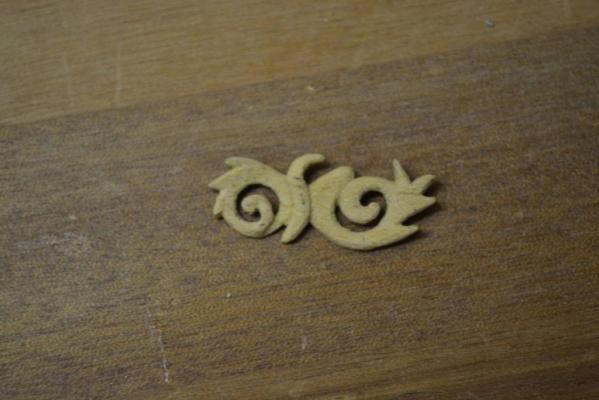
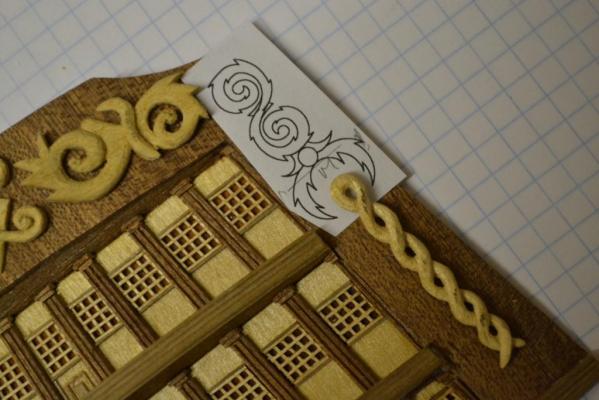
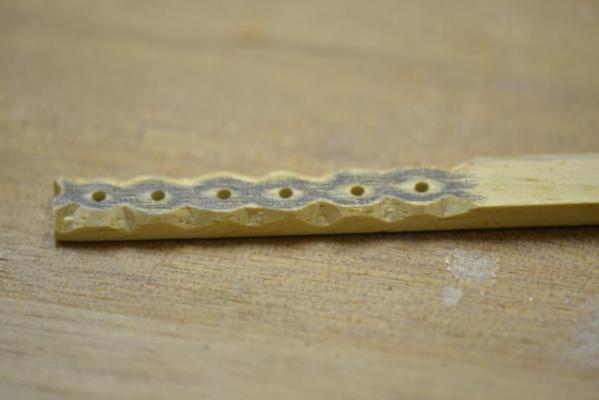
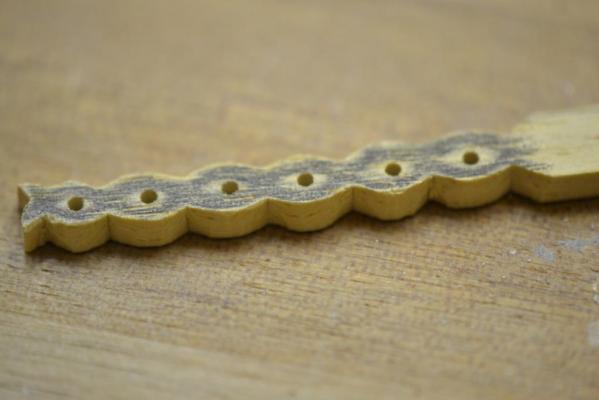
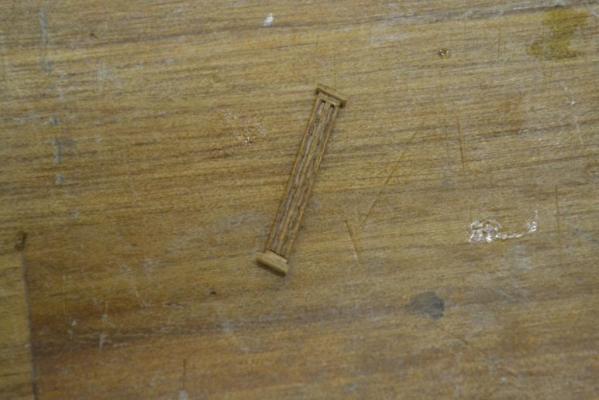
..Thank you all for the comments and likes, as always they are appreciated and very motivating.. As I went along with the carvings they became a bit more “challenging” and the ornaments are certainly not replicas of the original. The techniques i used are similar to what I have described before. Down below a few pictures to illustrate the progress. .. Dry fit .. in a closeup you will notice that "Abachi" might be a bit too grainy for this job. .. Anyway.. I can live with the end result..

-
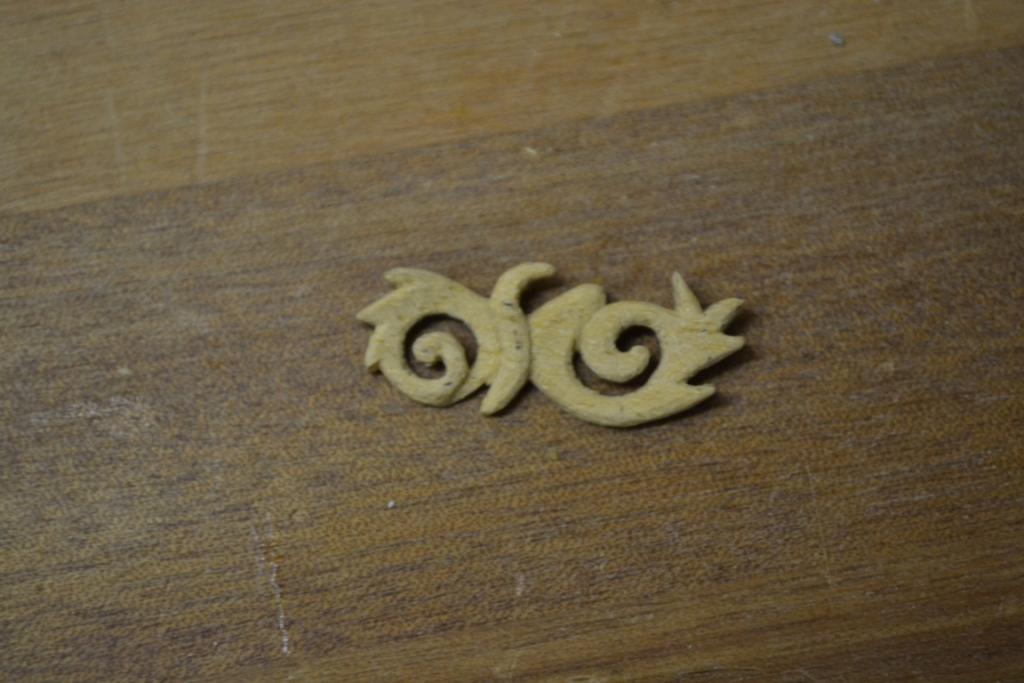
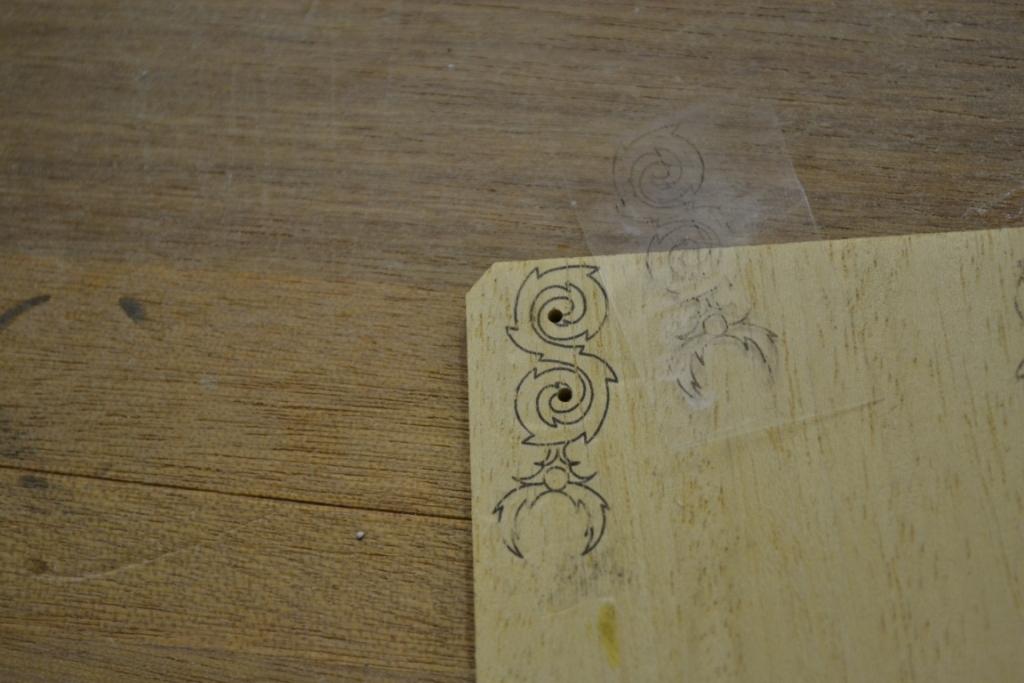
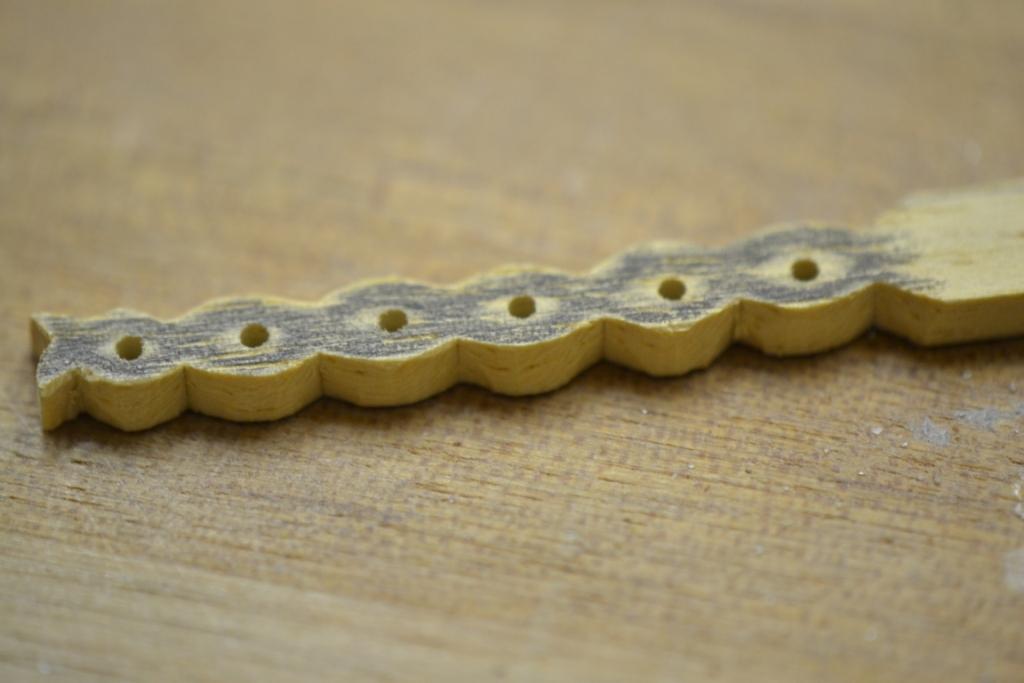
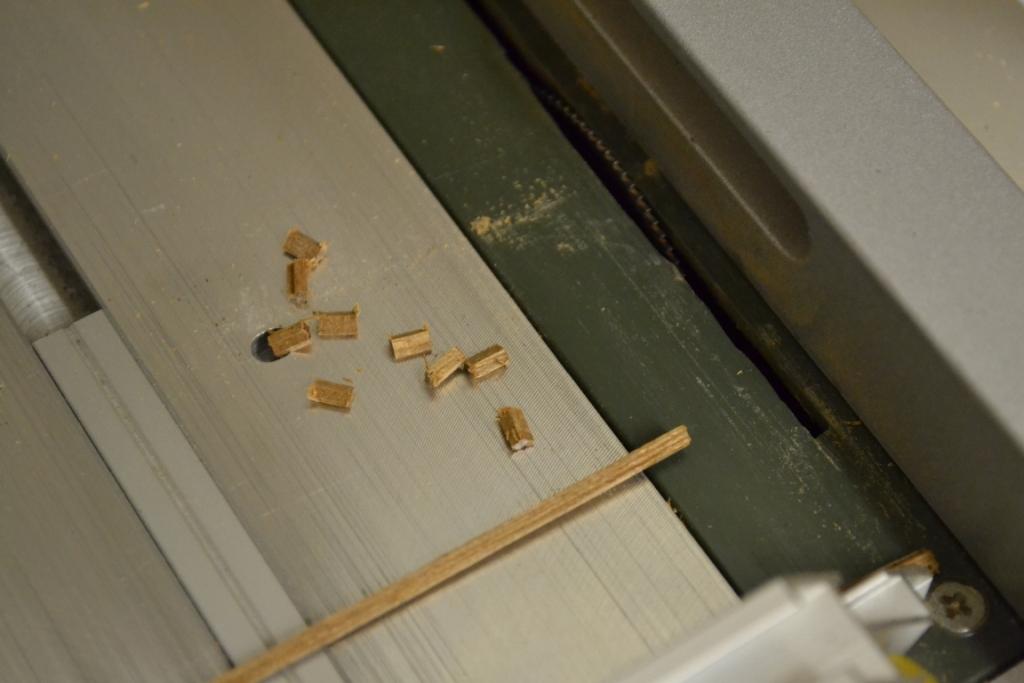
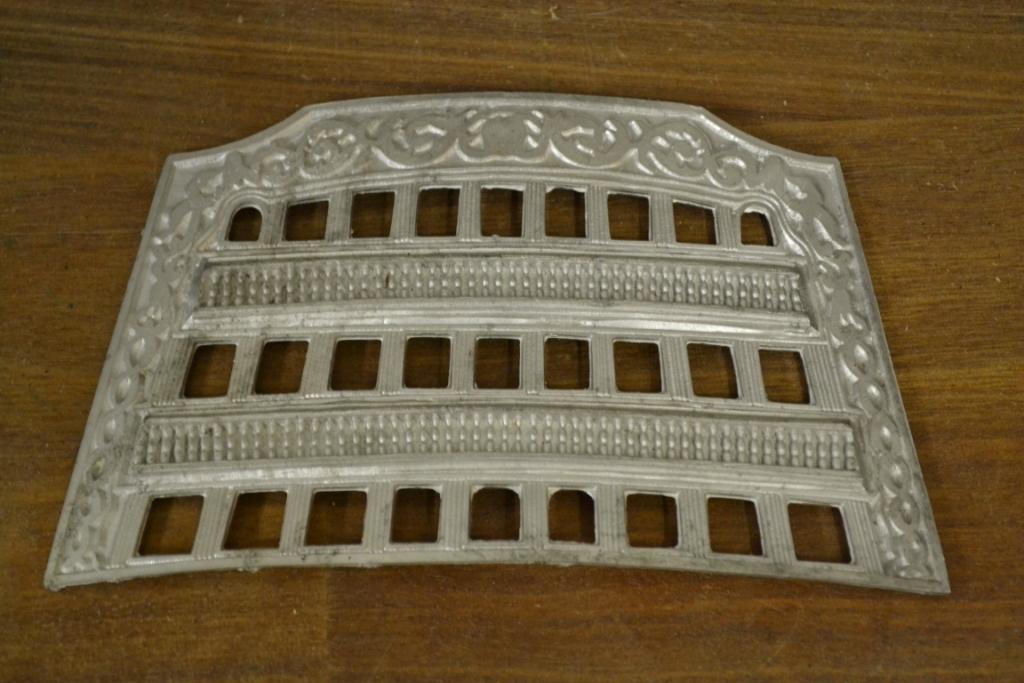
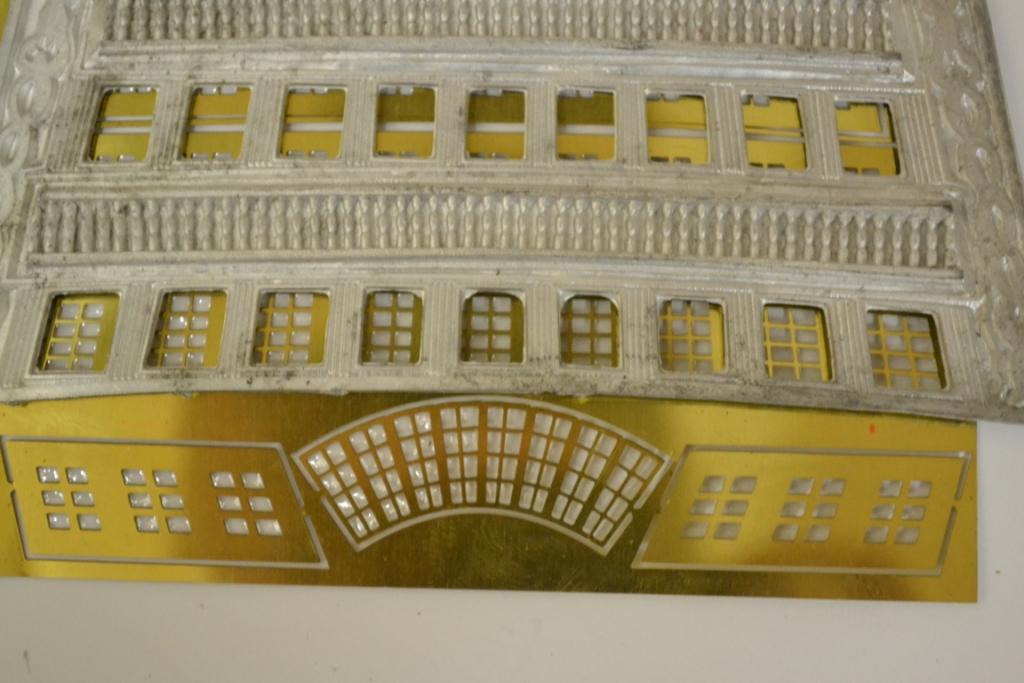
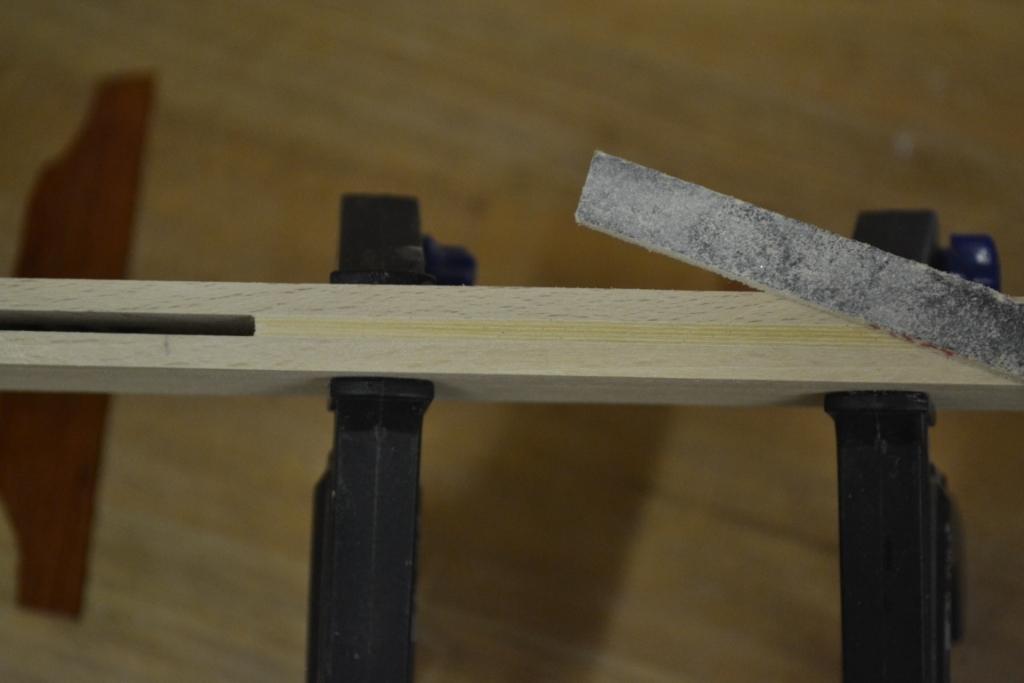
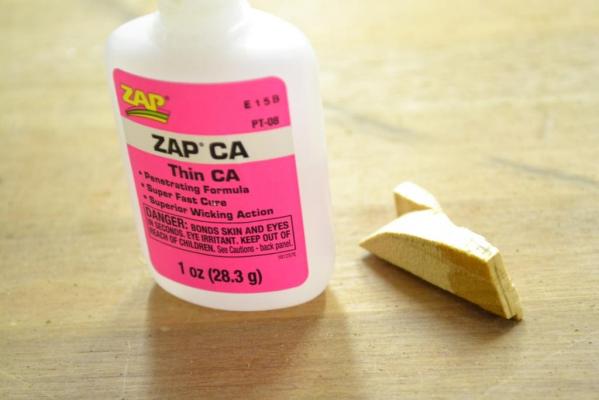
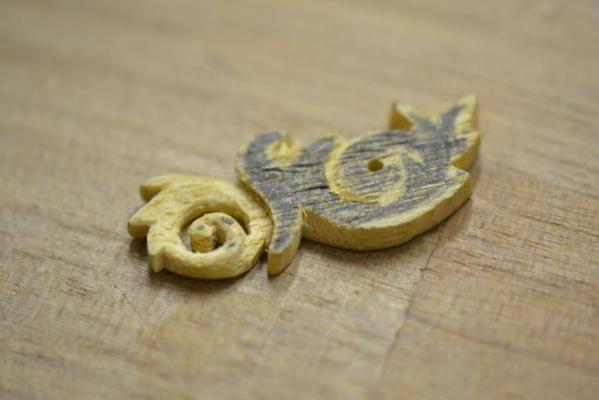
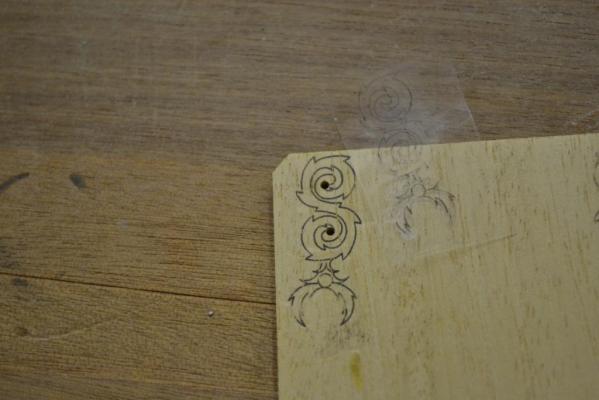
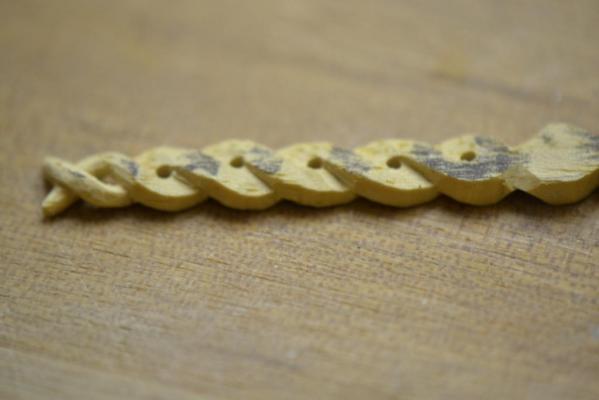
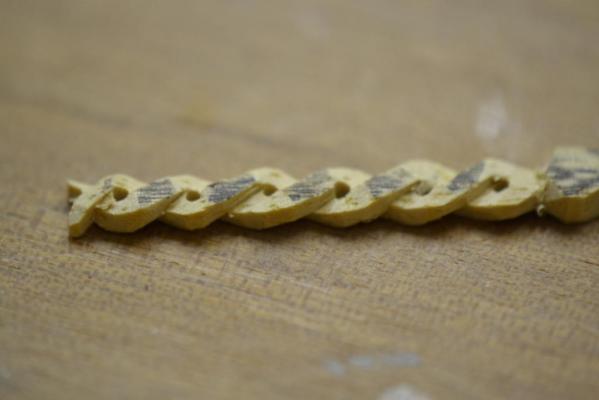
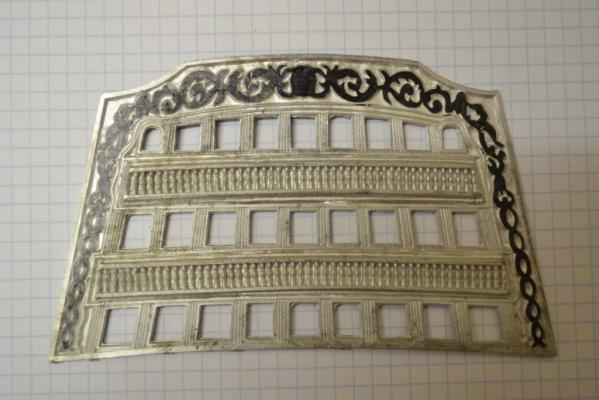
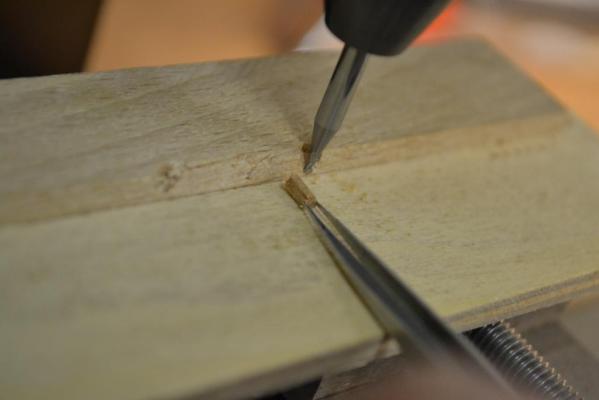
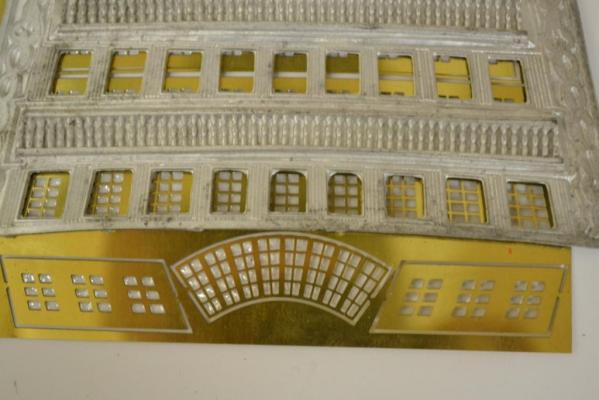
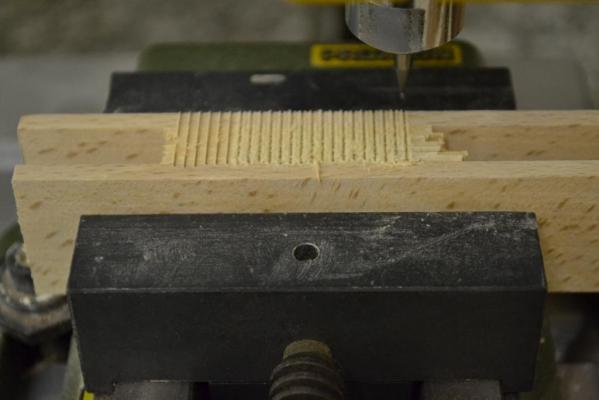
Another minor update. This time I decided to experiment a bit with my “woodcarving talents” .. Note .. I have practically non-experience with woodcarving .. After having darkened the ornaments on the supplied metal plate it shows that they are not very detailed. So again a bit creativity is needed to produce something more detailed. The easiest part seem to be the lower part of it, so I started out with these. The choice of wood I used: It needed to be a light color and without much grain, the obvious choice would be boxwood .. But finding boxwood for a reasonable price doesn’t seem to be that easy so, I decided to give it a try with abachi. The tools I used: - a very sharp scalpel (blade 11) - a printout of the ornament on a sheet of transparent paper - electrical iron for transferring the printout on to the wood - a magnifier glass with light I started out with drilling holes for the openings and carved roughly the edges Followed by carving the complete outline of the ornament After this I gently removed wood from the top and bottom to simulate the up/under “snake like pattern” I had pictured in my mind. And "finally" starting to round all roughly cut edges into smoothly curved lines It turns out for me that starting carving with abachi wood was not a bad idea after all. It is a soft but firm wood and the grains are not that visible, but most important I find it very easy to shape with a scalpel ..I must admit that I’m pleased with my first results..
-
it's just perfect what's the saying: all good things comes in threes ? Are the columns included in the kit or did you made them yourself ?
-
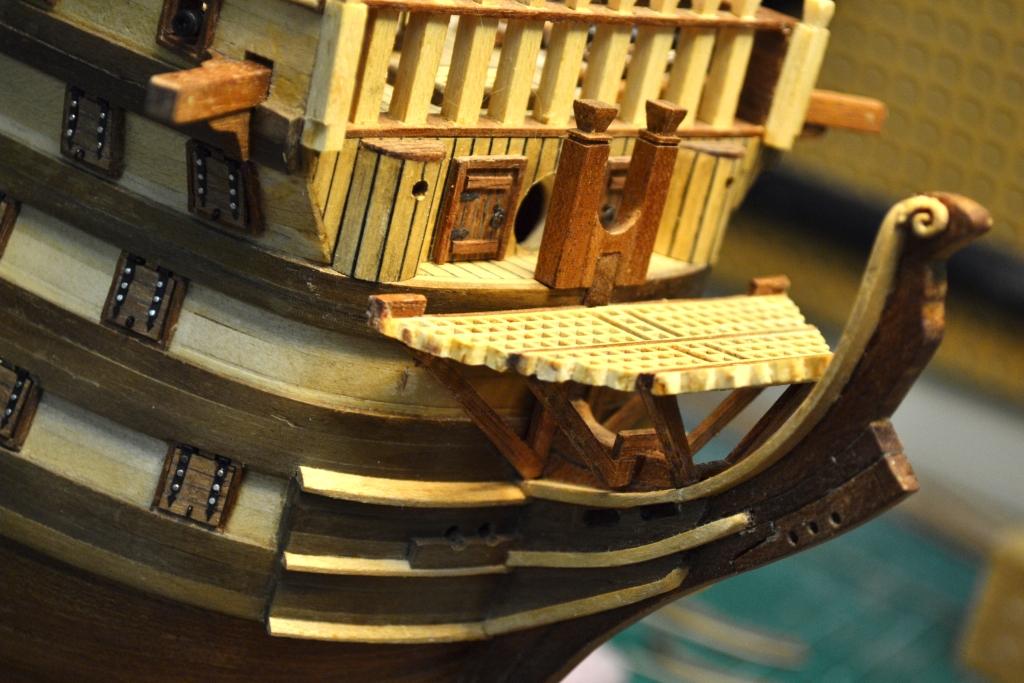
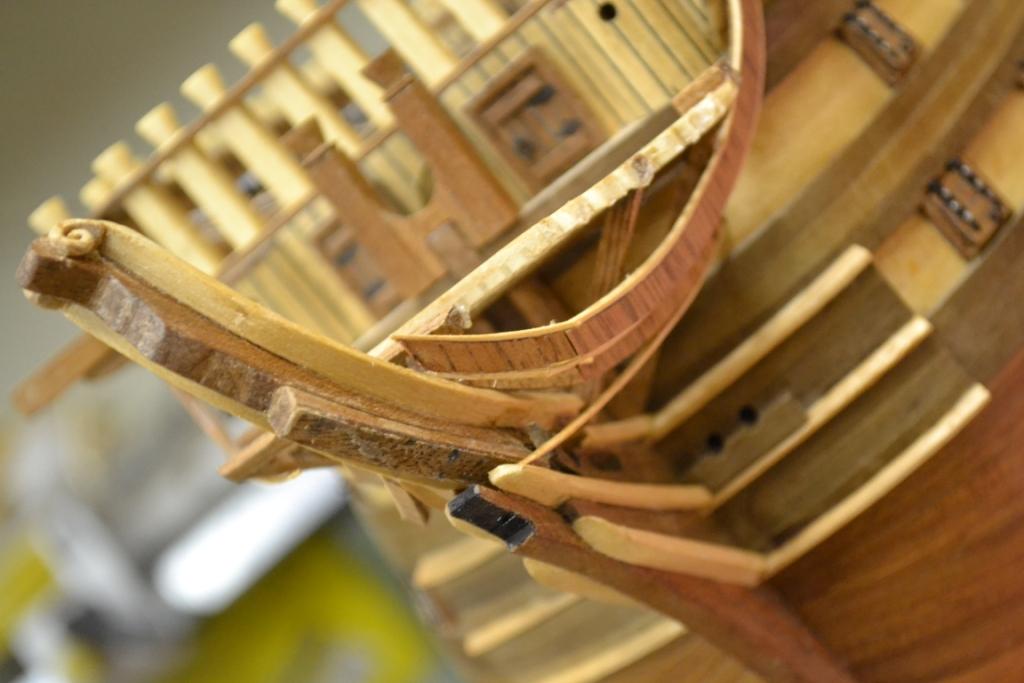
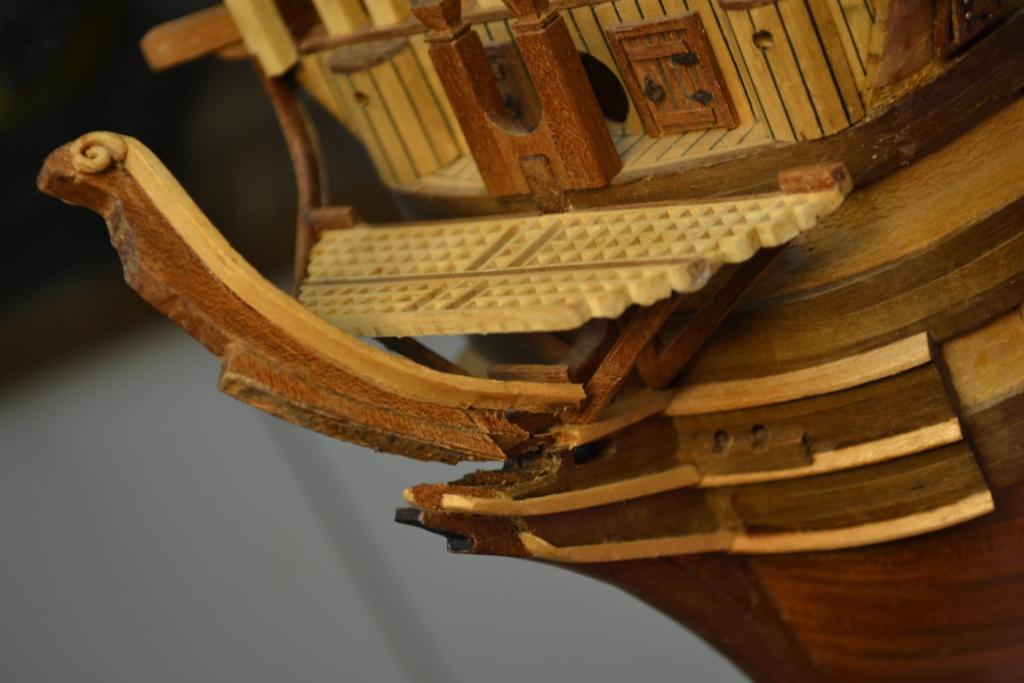
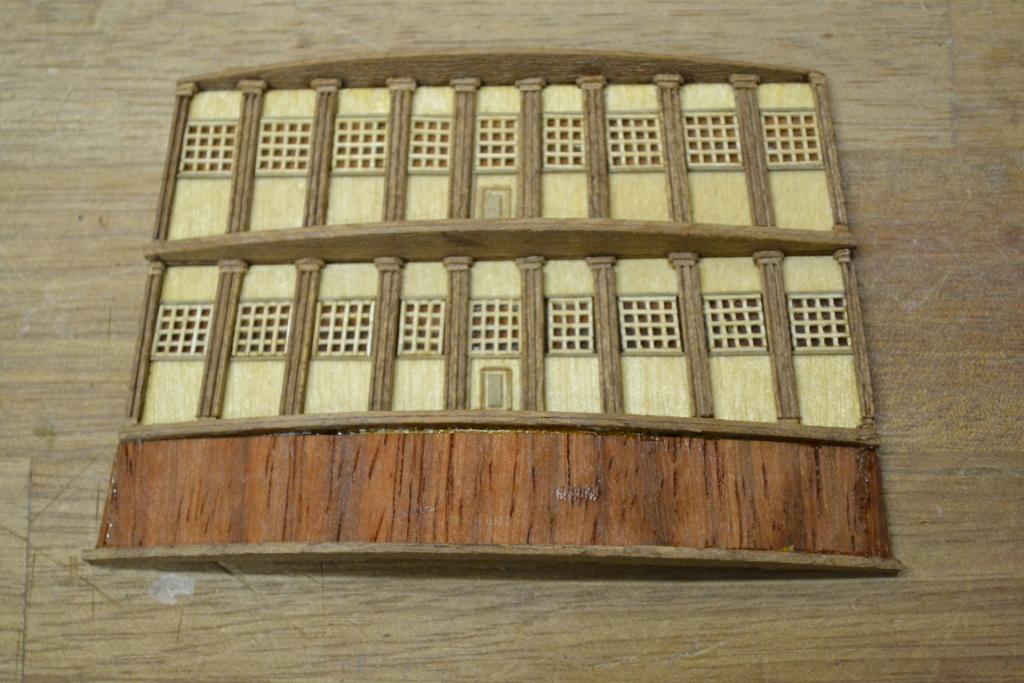
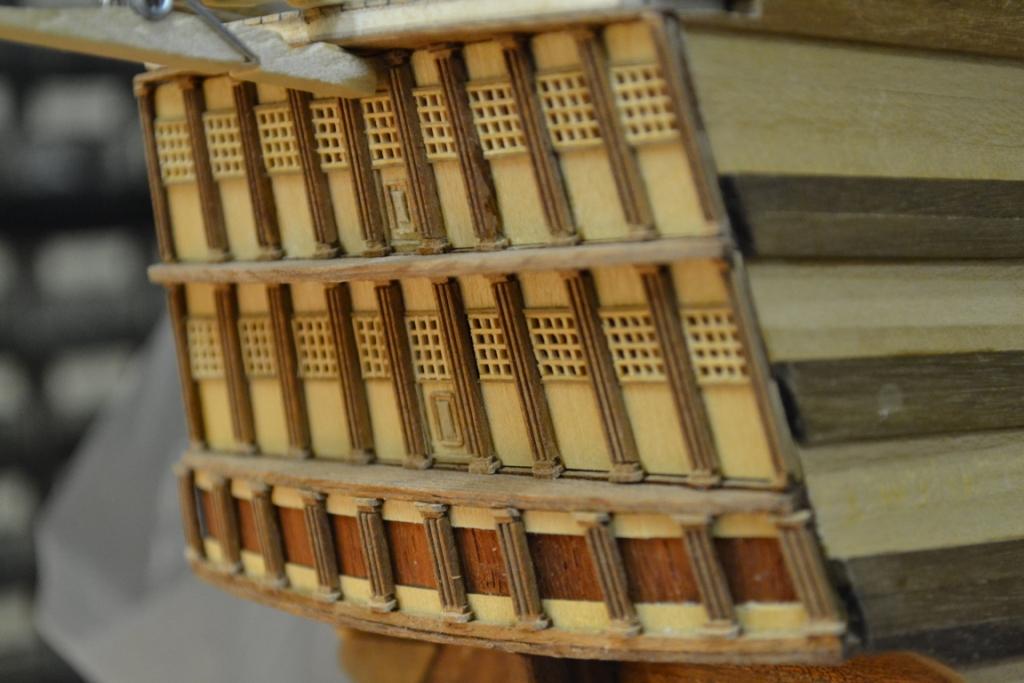
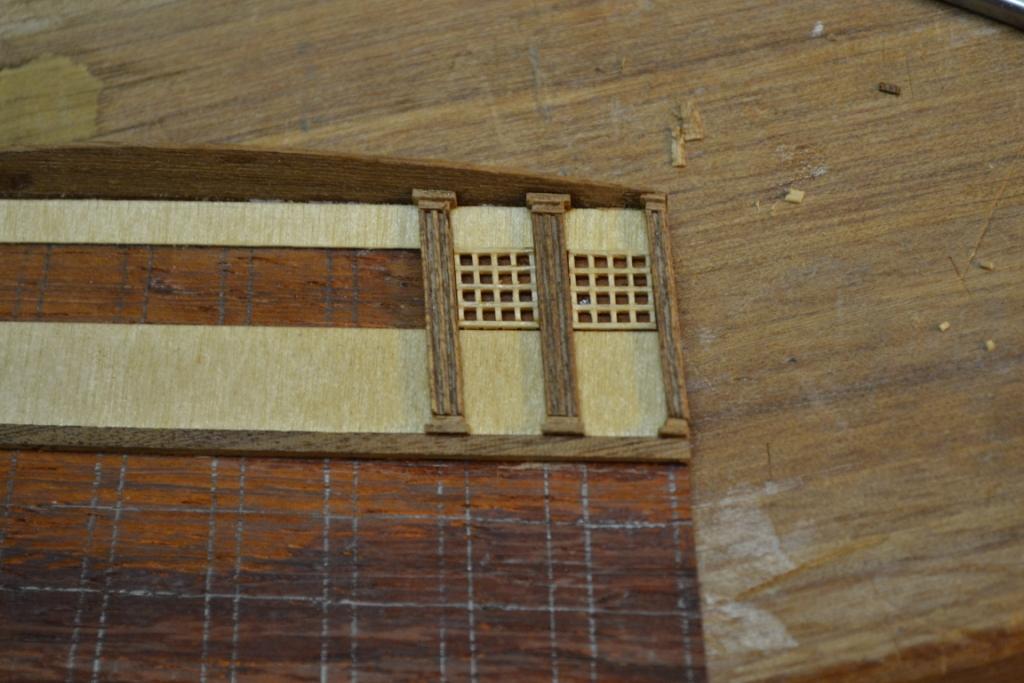
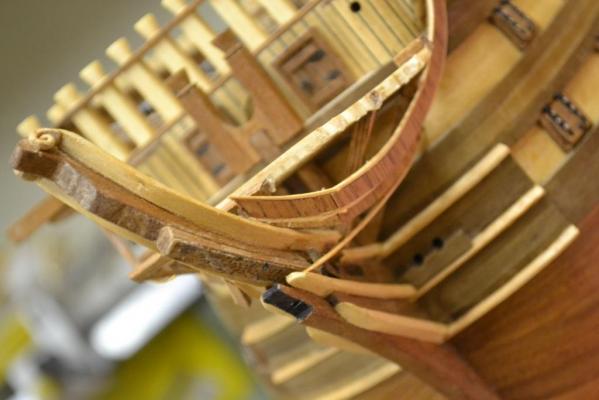
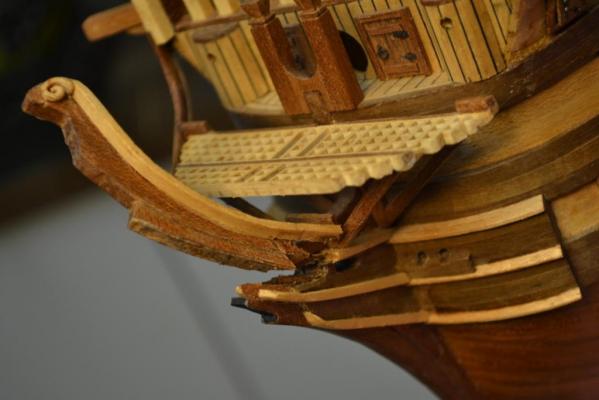
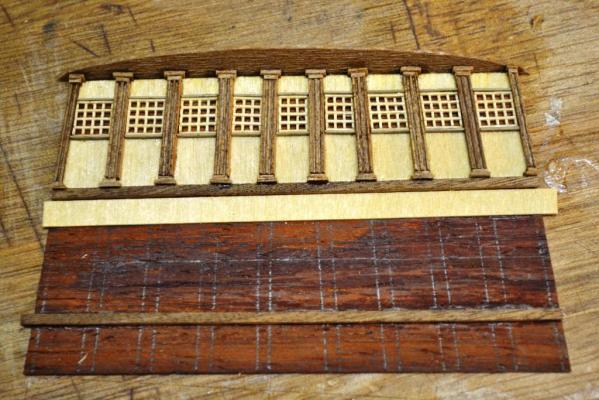
An small update. I decided to plank the balconies and cut-out the frame from 1,5 mm mahogany veneer I made the frame a bit larger so I’m sure I still can adjust its size if needed. So next thing on the list are the columns/handrail and some nice wood carvings ..


-
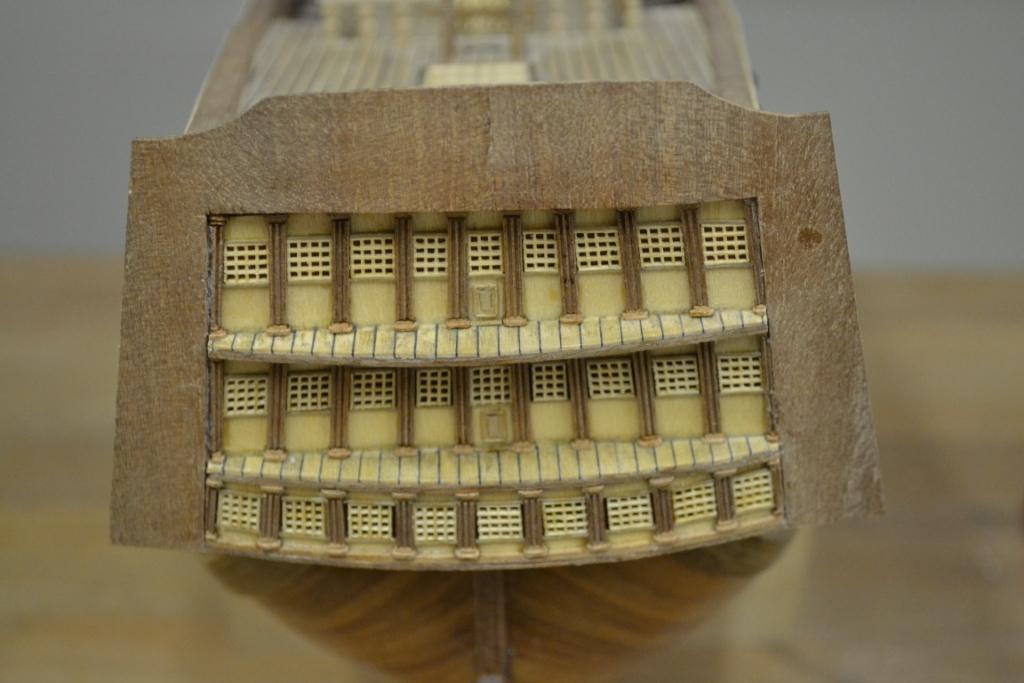
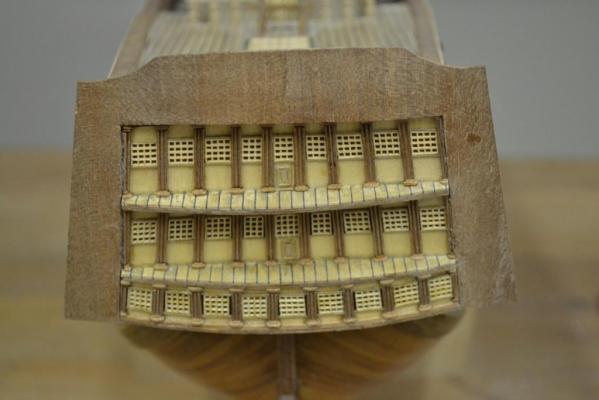
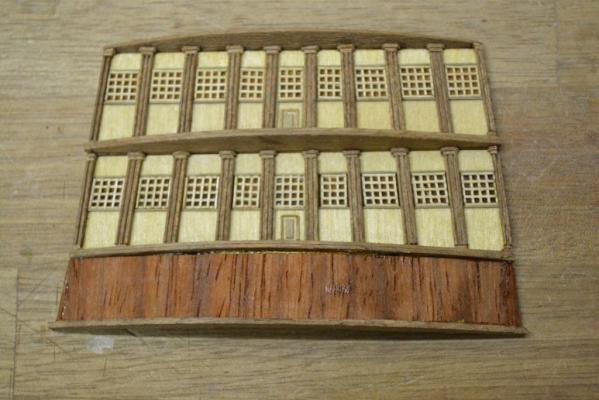
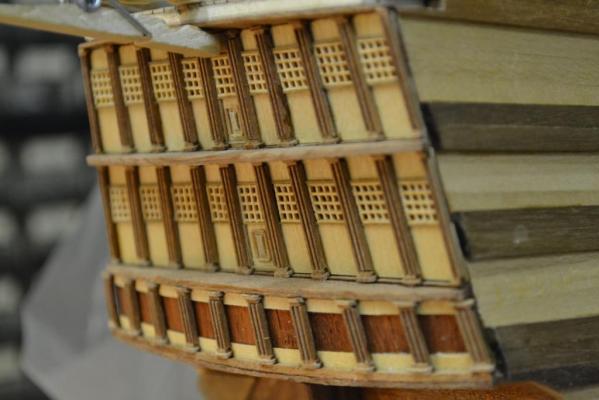
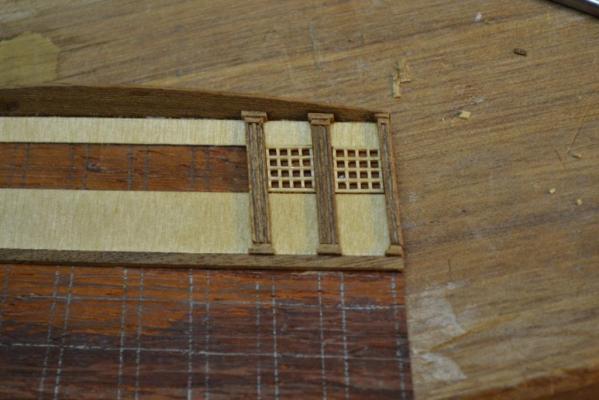
Thank you Sjors for your encouraging words., I continued with the last series of windows and here I had to compromise a bit. Either not all of the windows fit nicely between the columns or the columns are not in a “straight” line from top to bottom .. This must be because I’m building the stern “blindfolded in the dark” ... Anyway, I decided not to redo the windows but decided this time to learn from it for next time.. Underneath you will see I had to dig deep in my scrap box to get the wanted curves and to make sure the structure fits onto the ship ..
-
Yes, So far so good.. But let see where I’m ending, right now I’m even building along without any drawings. That’s like entering the dark side blindfolded i guess .. So I’m really trying to take one step at the time .. and I’m sure I will have to make adjustments as they come along.. The next step would be the balcony’s and the lower window row which in my mind should follow the curve of the balcony above them.


-
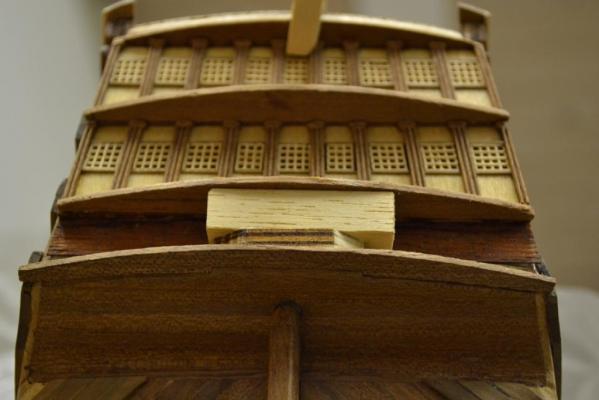
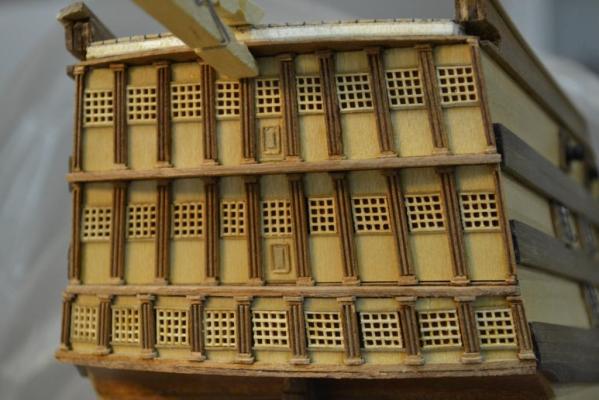
I agree Sjors, it turns out that the build of the ST looks more and more like a scratch build project .. .. It still depends a bit on the results of this build, but ... I’m considering to build the “H.M.S. Triton, 28 gun frigate” (drawings are available as an “online project” on MSW) as my next project. ..with my current building speed I guess this will not be actual within the next 2 years .. an updated picture of the (scratch build) stern, no issues so far..
-
Thank you Dan ?
-
Hej Michael, Thank you very much, I'm pleased to hear that i'm able to inspire you and even give you some ideas. I must say you are doing a great job yourself in giving others (including me) ideas and inspiration with your wasa build
-
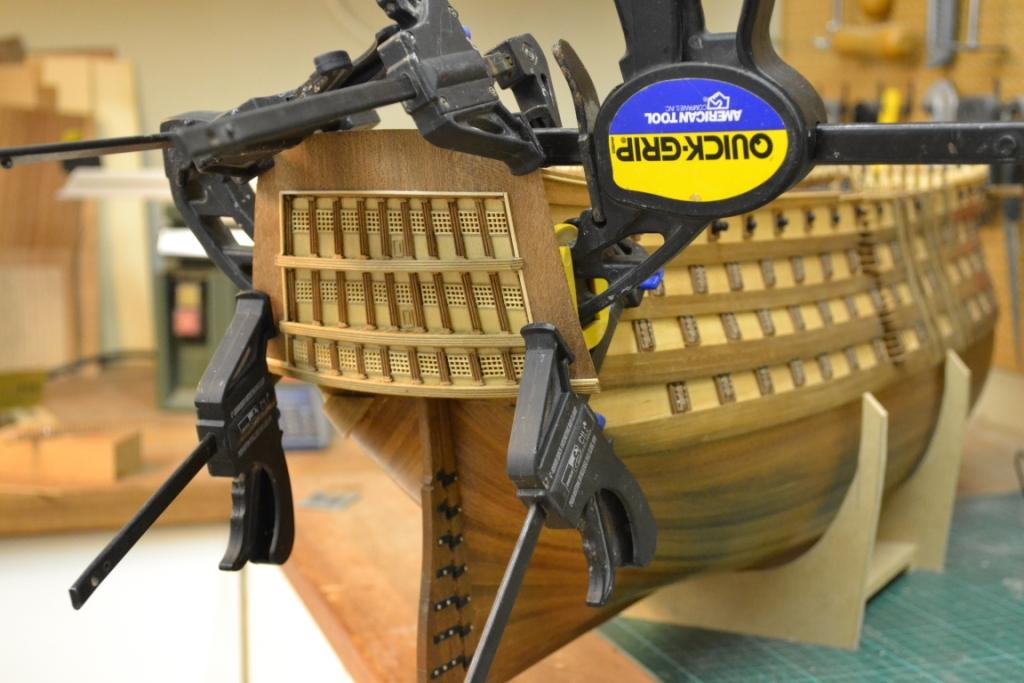
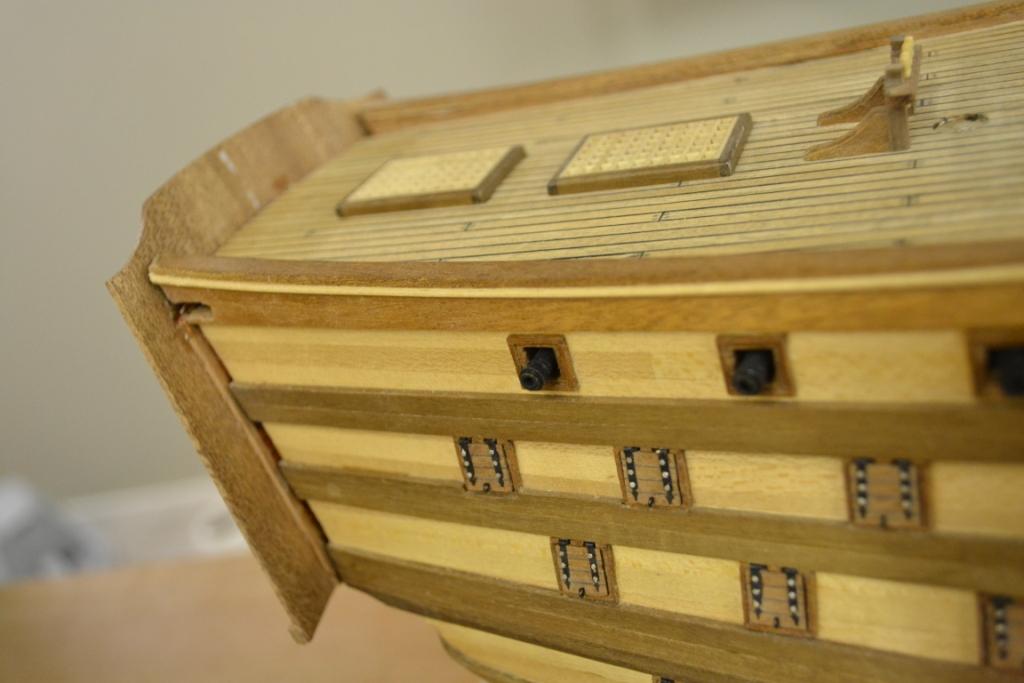
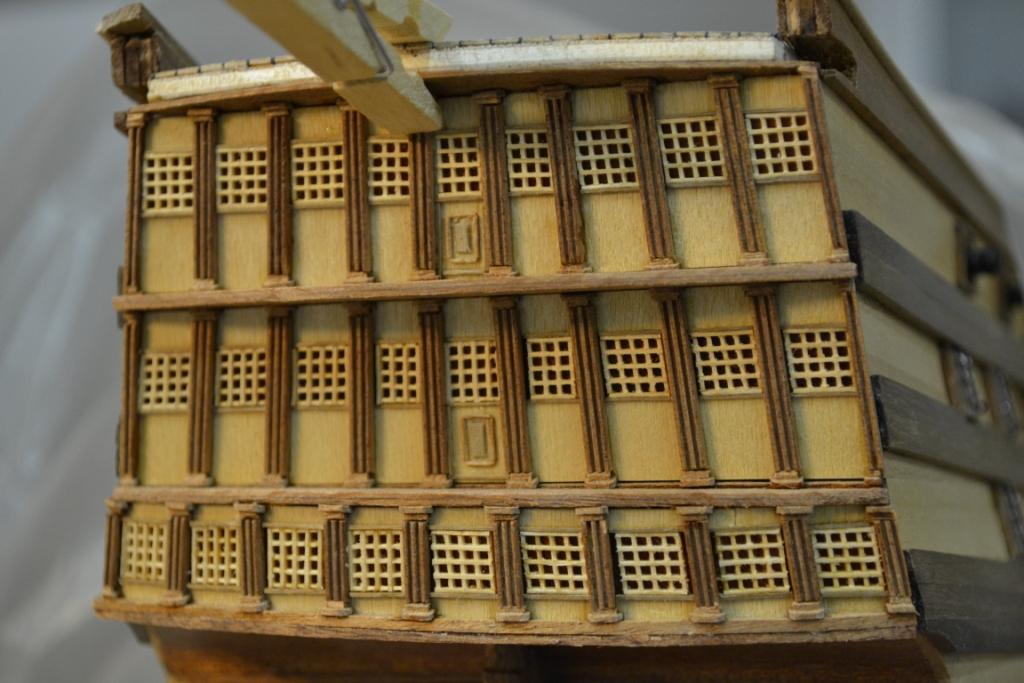
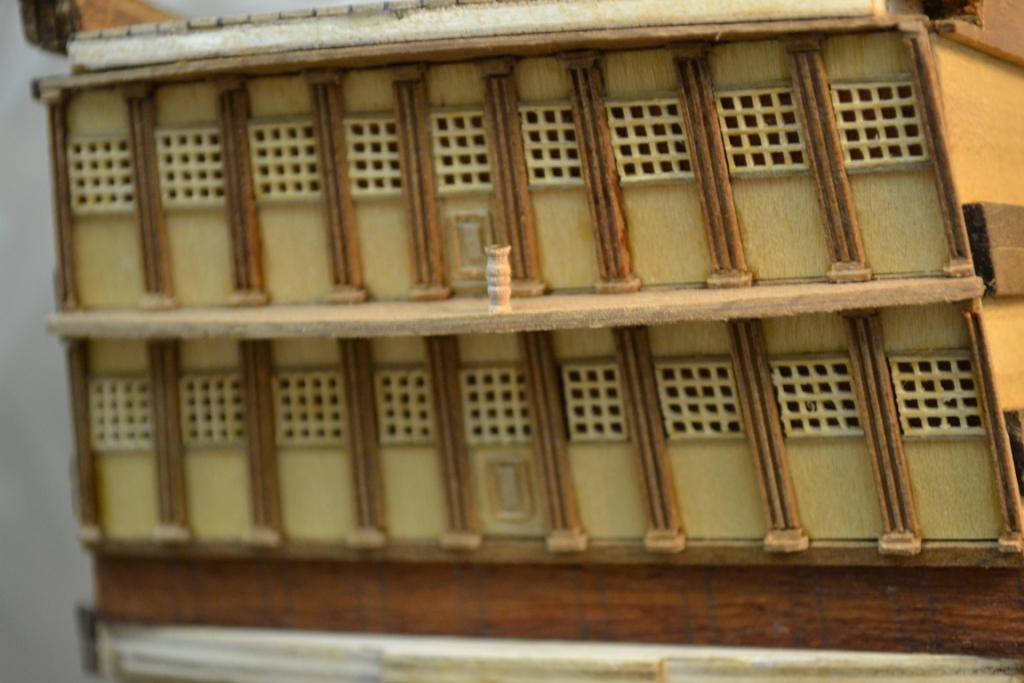
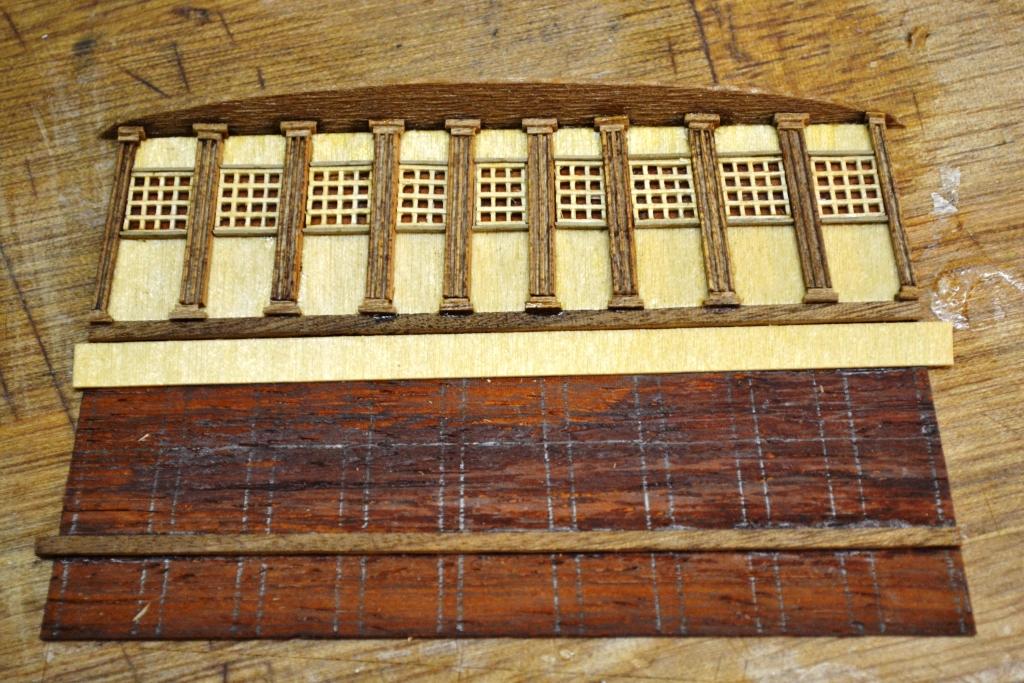
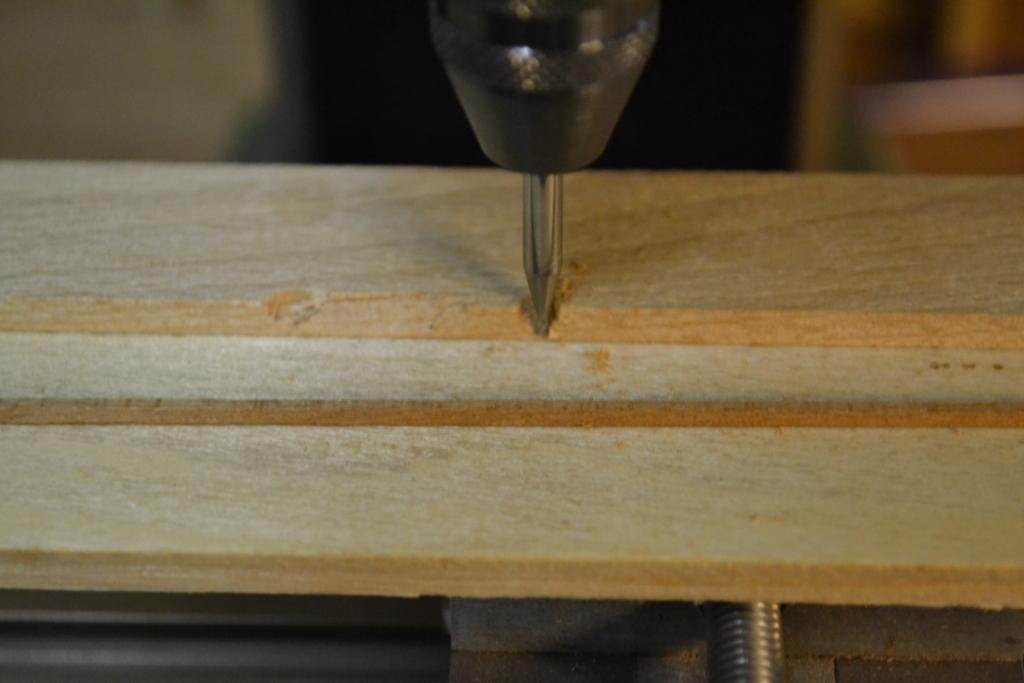
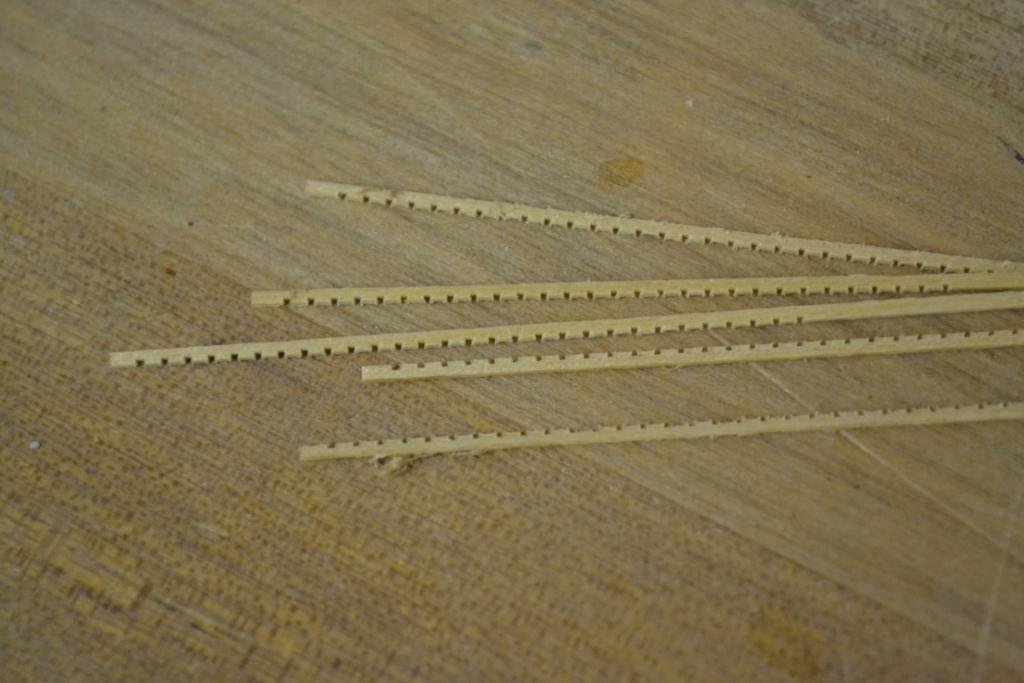
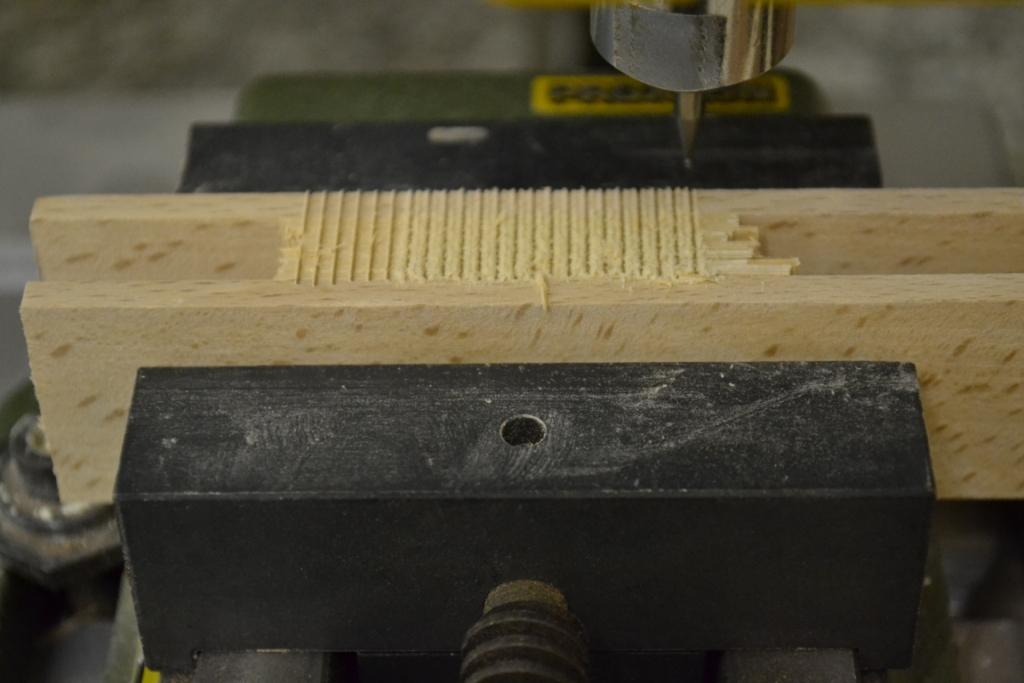
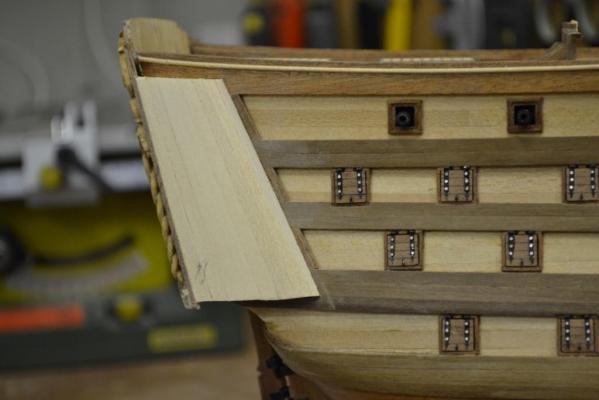
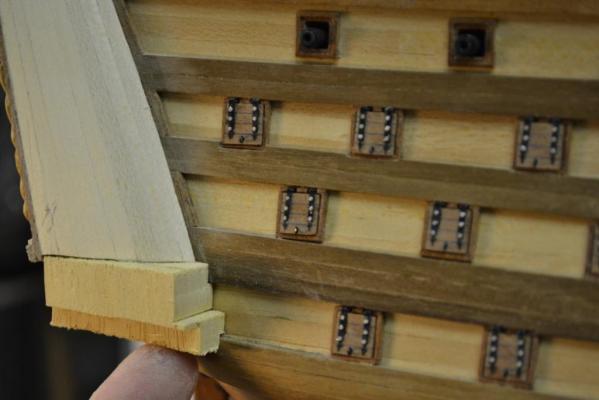
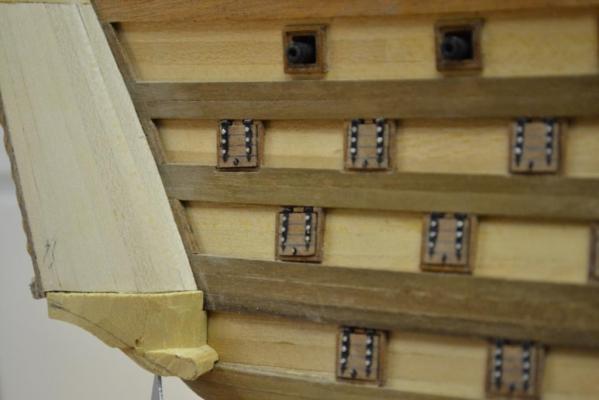
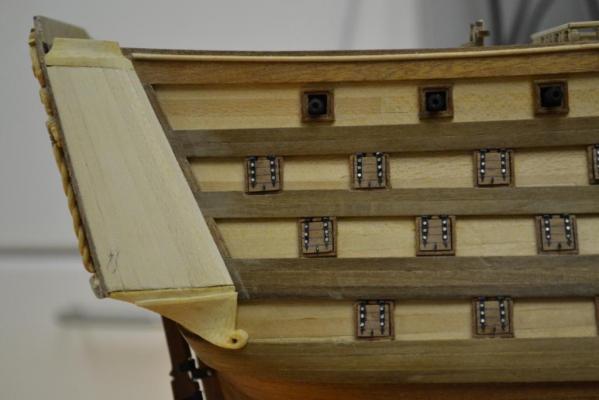
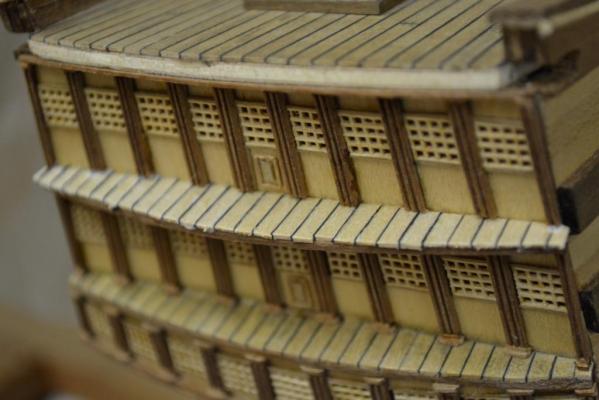
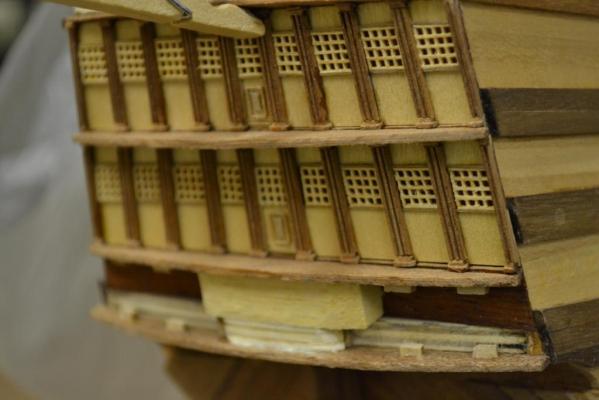
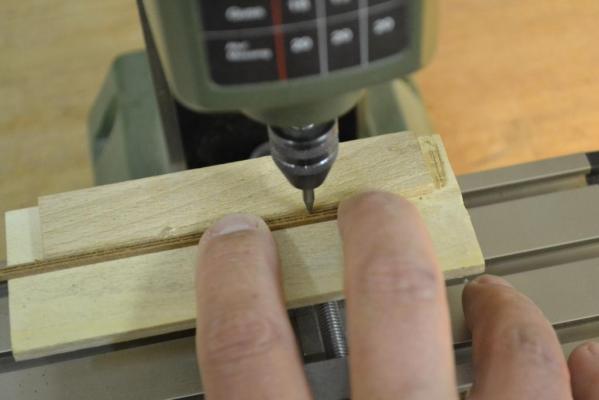
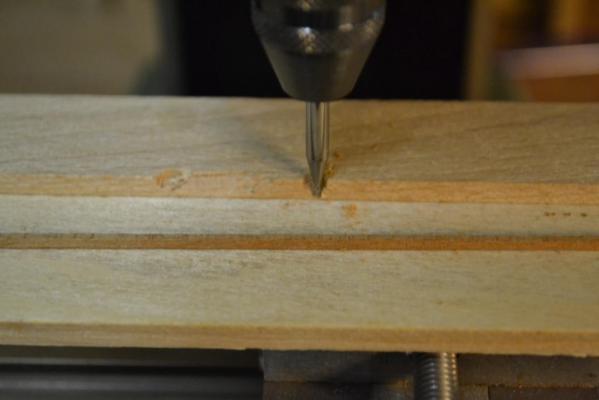
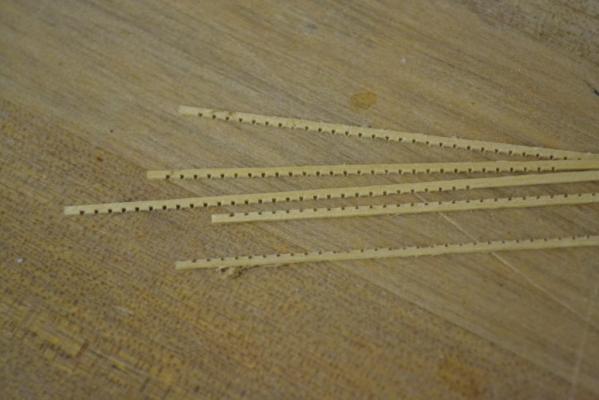
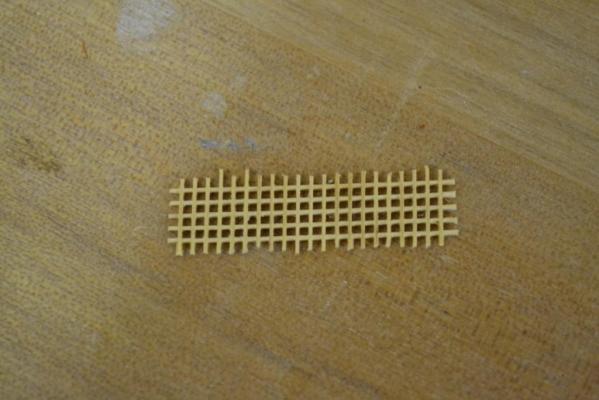
Wow i didn't realize it had been that long since the last time i posted. I had to prioritize several other projects @ home & work, .. but now “I have again a bit of spare time left” .. So I immediately continued with the ST build and here’s the progress so far. I had to think a bit about what to do with the next part of the build: “the stern”, as you can see the provided stern is also made of cast metal . I have the intentions to build it from scratch, but I’m not sure how to do it .. As I have some ideas in my head, I decided just to start with trying-out a few techniques to see if I can make it from wood and just go along with it. I decided to start with the columns (as this seemed to be the easiest part) Down below an quick visual go-through on how i made them.. Next on the list: windows The provided windows are nice, but doesn’t seem to fit that perfect and are not made of wood. So I came up with the following: I Leveled several sheets of thin veneer (0.6mm) in between 2Pcs. of thicker wood Cutting app. 0.3 mm grooves with equal distance in them with a small router. Cutting them on the table-saw in thin strips. And “combining” the strips into one “big window” And here's the very first "try-out" assembly and result of my efforts so far


-
Hej Mick, Sorry, Just found your "new" log and health state.. Hopefully your fine & everything goes well.. best wishes, Theo
-
only one word: wow..!!!
-
I’m not sure what has happened.. After checking my log I seem to have lost “86” pictures in random posts .. Luckily I still had them on my computer so I have uploaded them again .
-
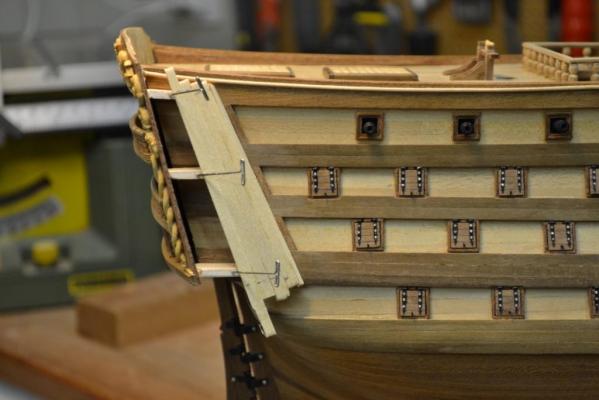
Wow, what a responds !! I’m not used to so many comments Thanks Wacko Joe ?, I make sure to keep them coming “don’t worry” Thanks Sjors, I might consider that one as my new avatar, I need an up-to-date avatar Thanks Pavel, Yes I must admit it feels like slavery with all these cannons, and.. one of the next tasks will be to rig all the port lids .. Thanks MarisStella.hr, “I’m not sure” but when being a member it seems these like icons appear underneath each post by itself. Thanks Sherry, I’m looking forward to see your cannon solution & rigging on the San Felipe Thanks Louis, No knowledge is needed (just a bit of imagination, patience, a steady hand and a big magnifier glass ) As for the Occre Kit, To be honest: The quality of the wood is very good (besides the “visual” plywood parts) but I find the “metal casting” parts a bit to ordinary and many of them are out of scale. So as for me I decided to scratch build a lot of them . Thanks Joe, “Yes” and besides the “authentic look” it is not so difficult to coil them .. Thank you all for visiting & the likes ..
-
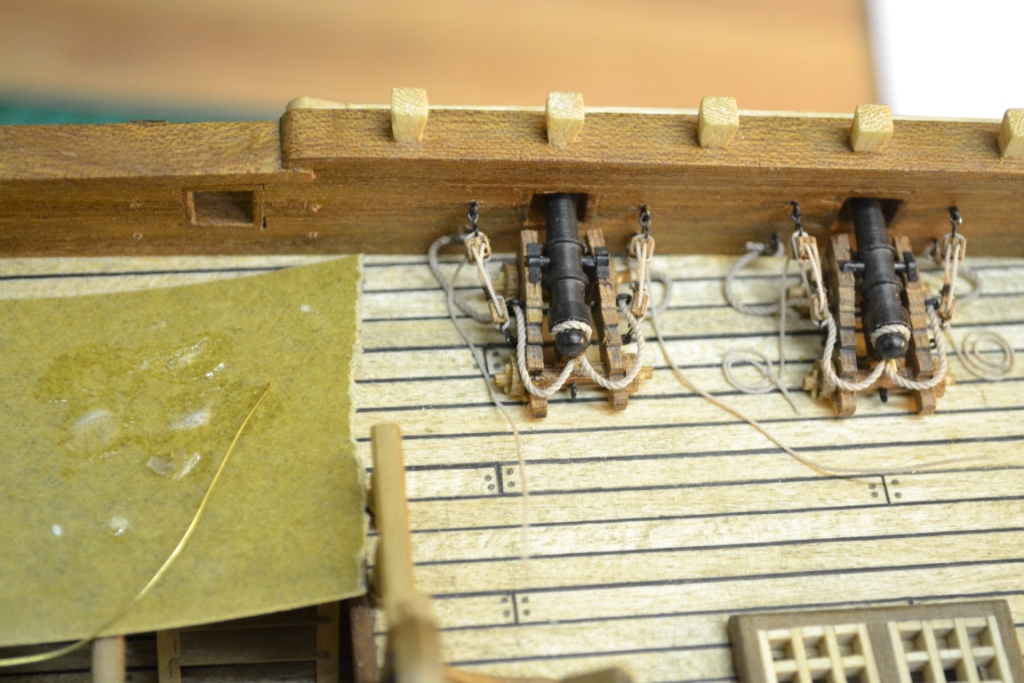
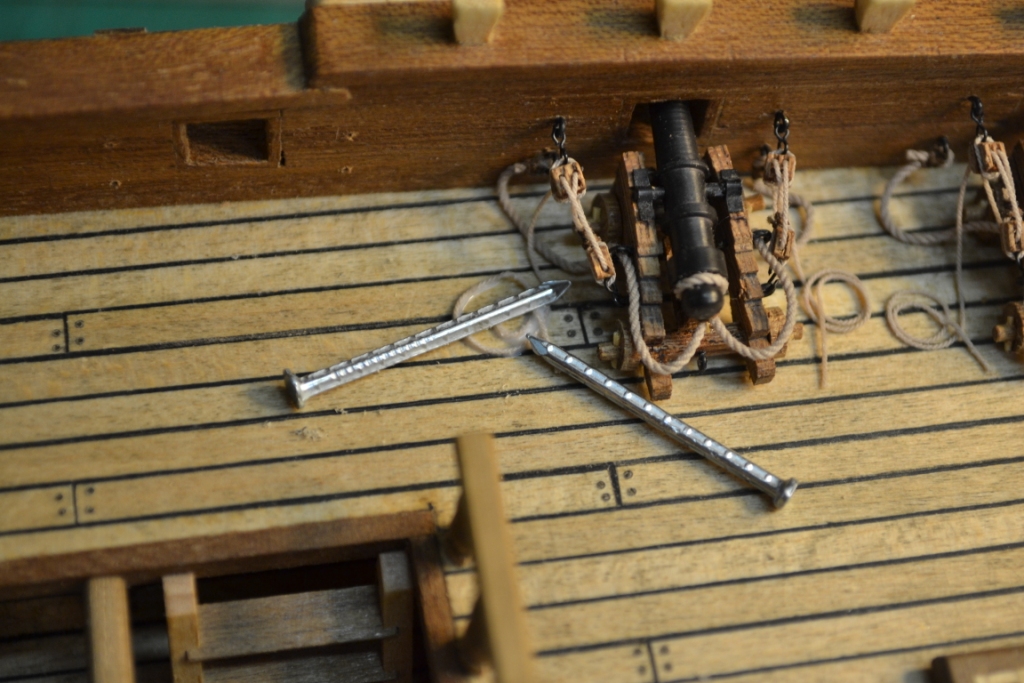
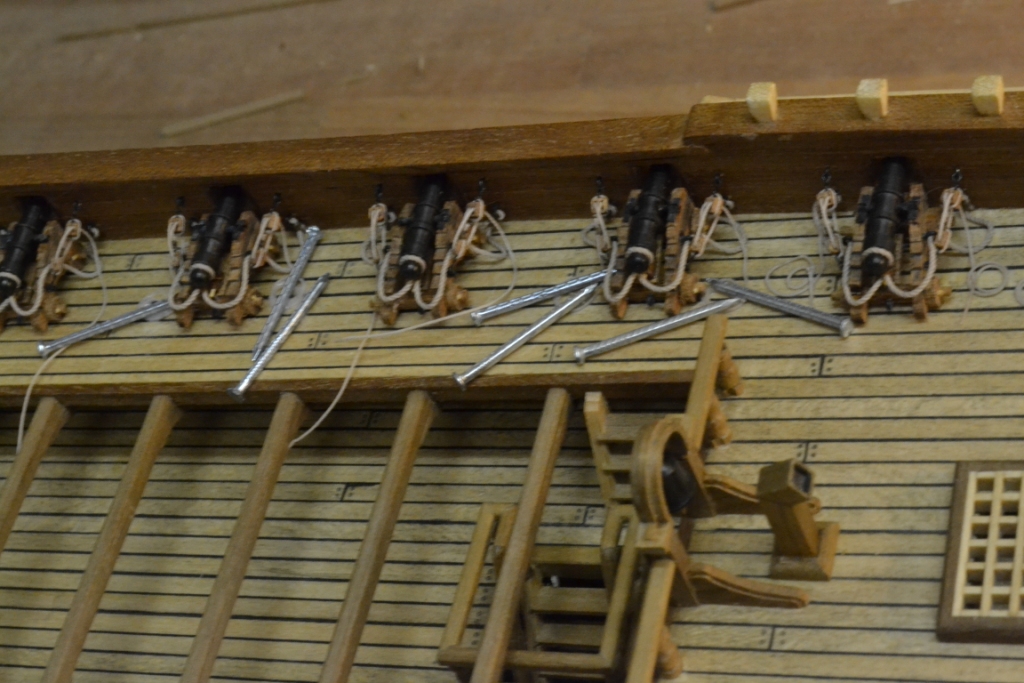
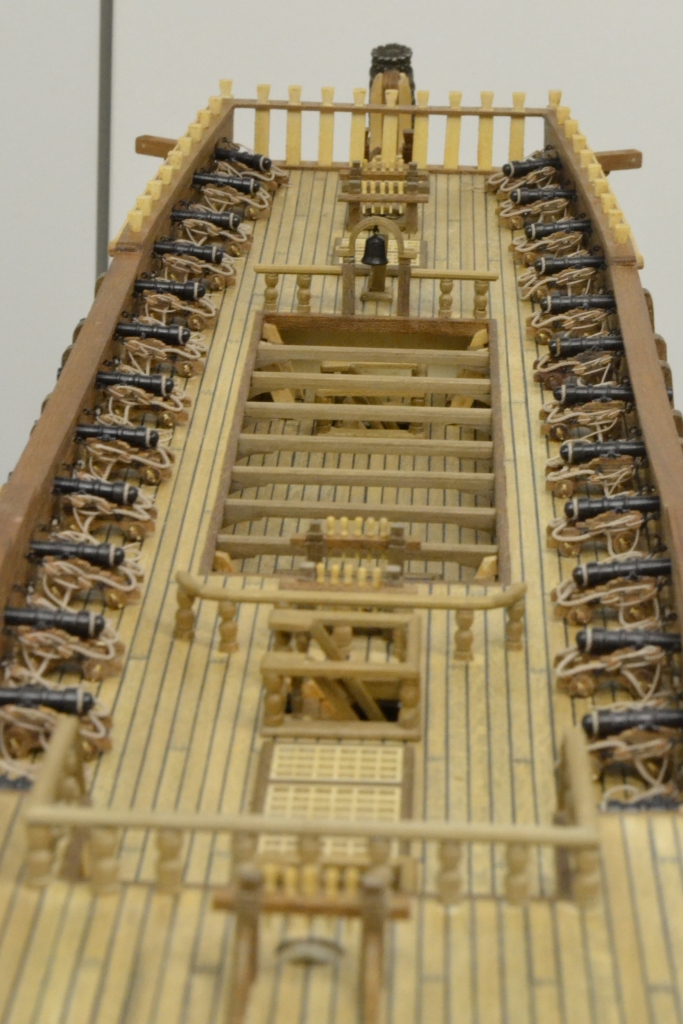
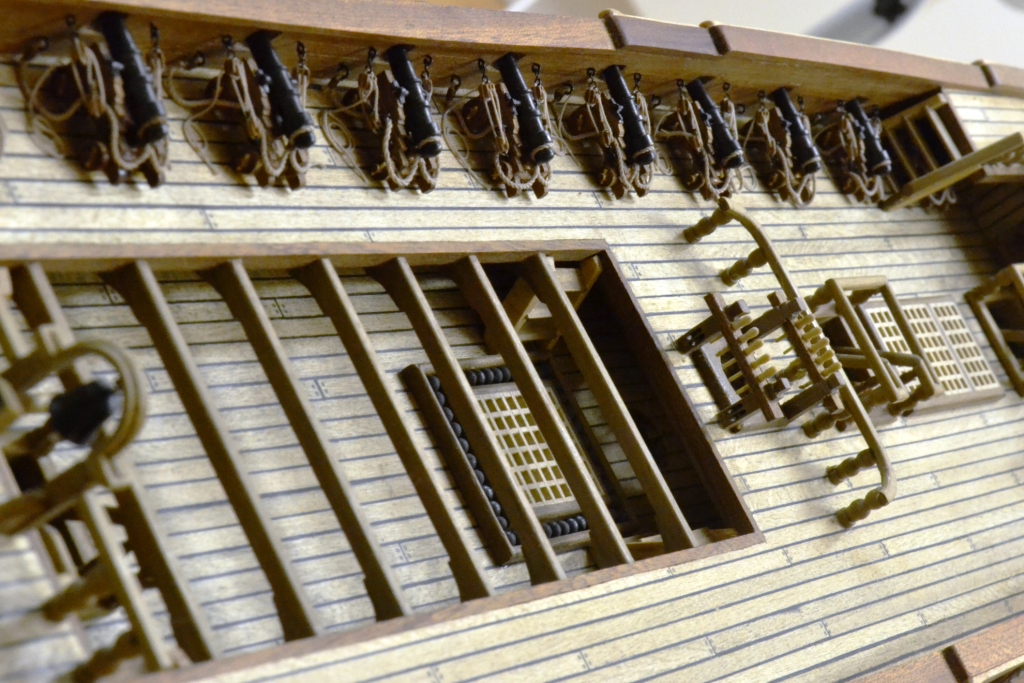
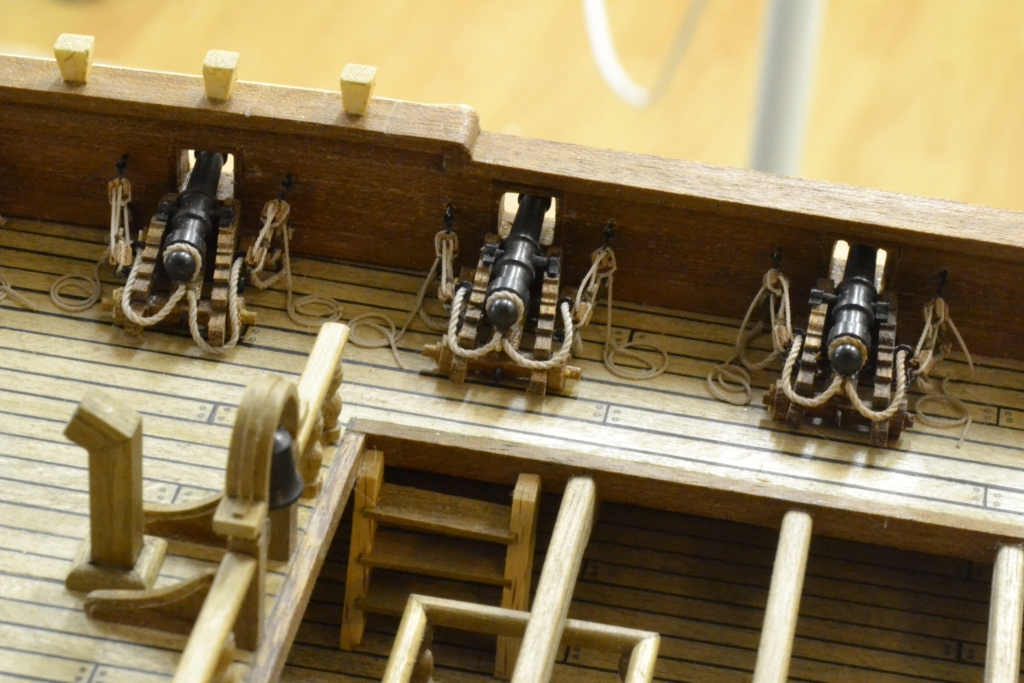
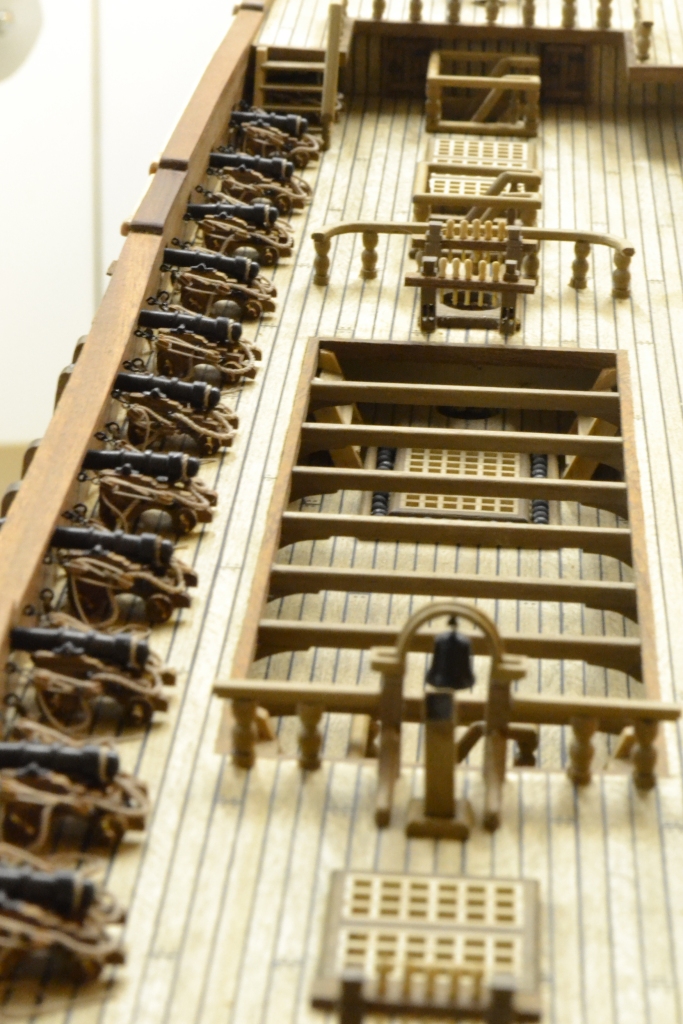
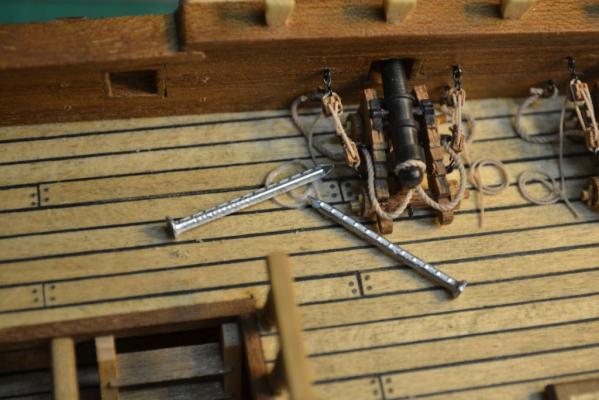
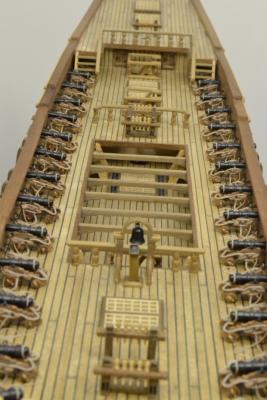
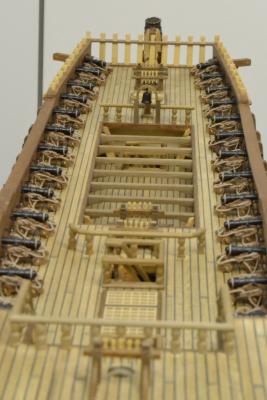
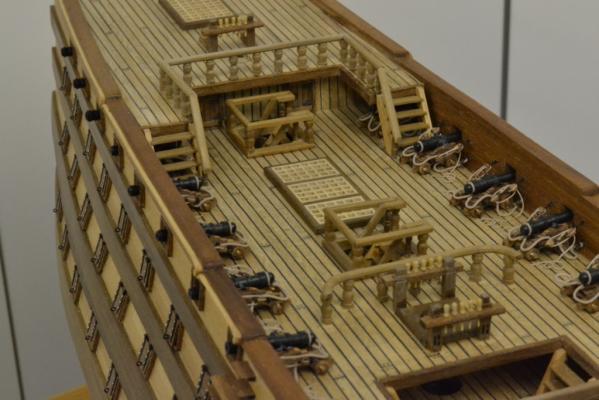
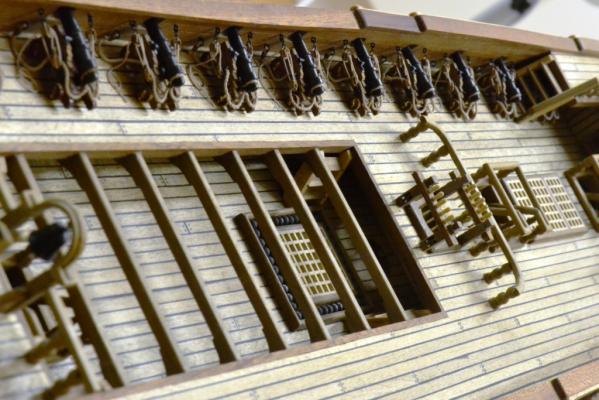
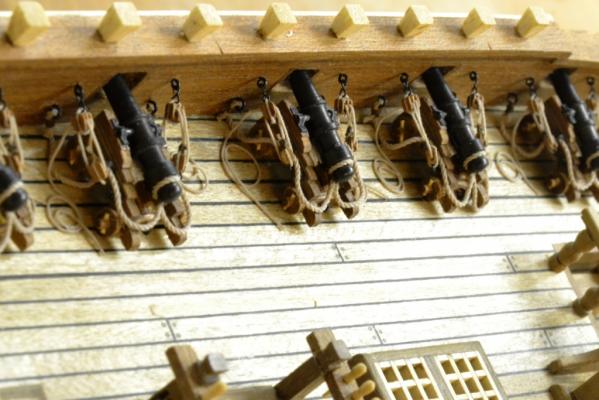
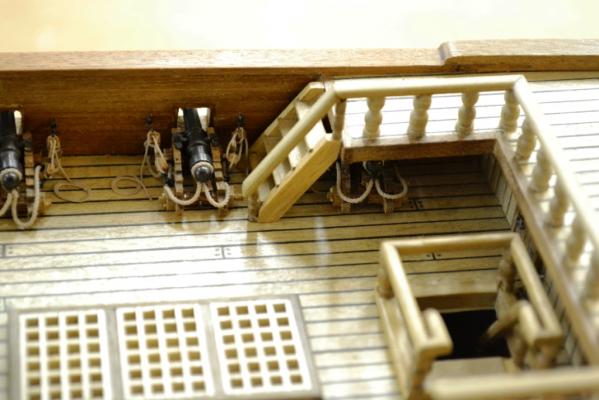
Thank you Sjors and all the others for dropping in and all the likes. ..it is really appreciated and is motivating me to move to the next level.. "At last" I’m finished with the rigging of the cannons on the upper deck. After setting up the second battery I finally got some of the procedures In place. I use a small drop of CA to fix the ropes onto the deck and the cannon carriage. For coiling the ropes, I used diluted carpenter glue (the consistence looked like fat milk) and soaked the ropes completely with it and kept the ropes in place by using small nails. After drying nothing of the glue can be seen. All 28 installed.. Maybe difficult to se on the picture, but instead of neatly coiled up ropes I decided to coil them op randomly so it seems like the cannons have been in action ..

-
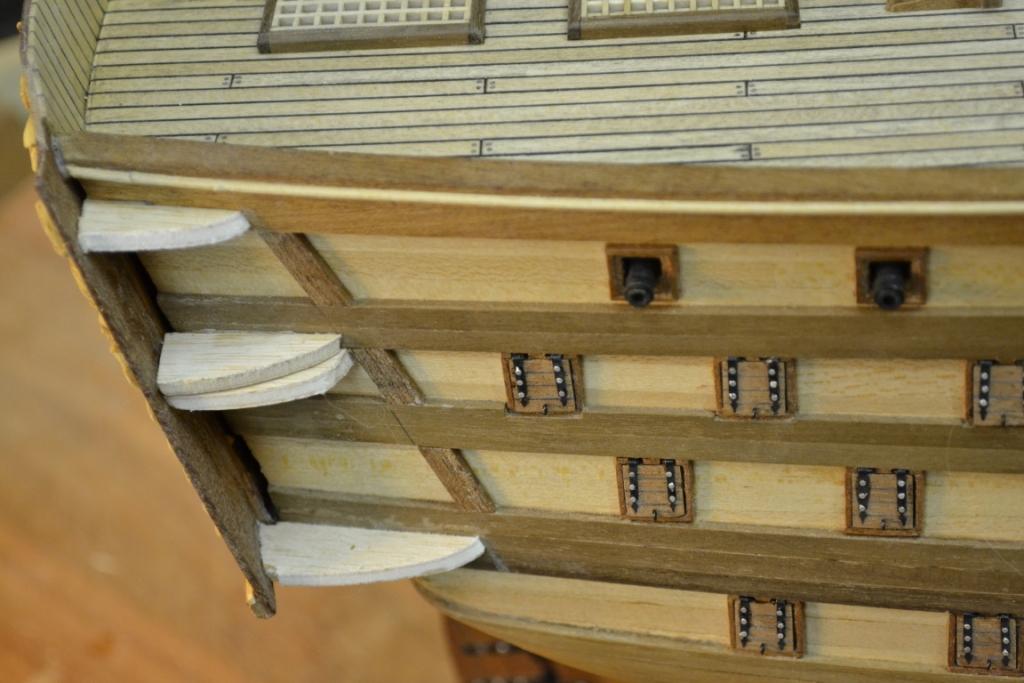
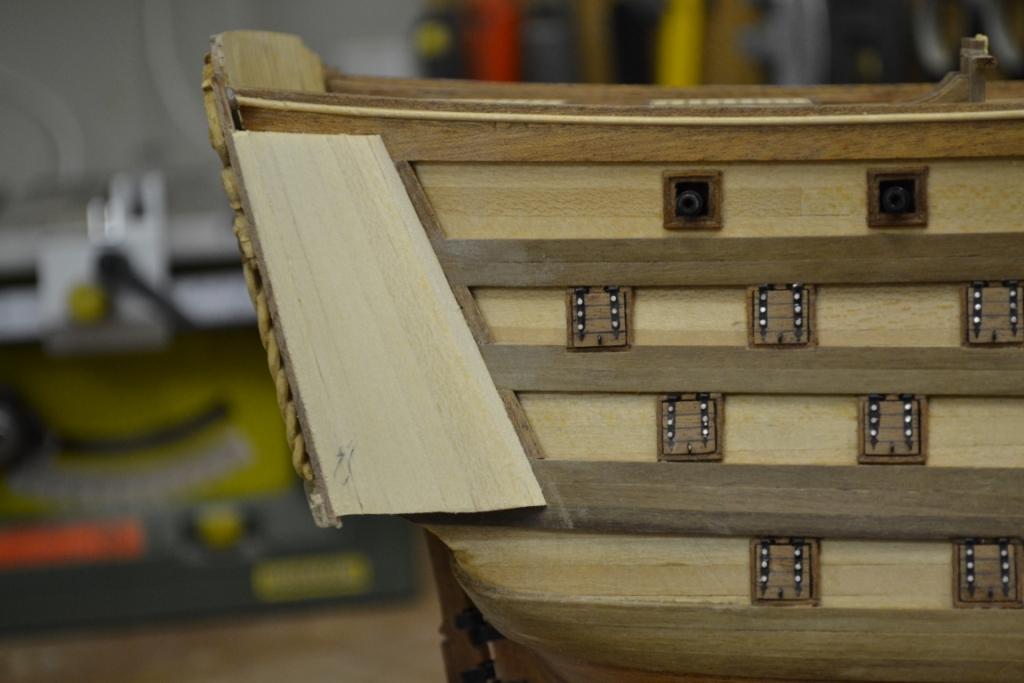
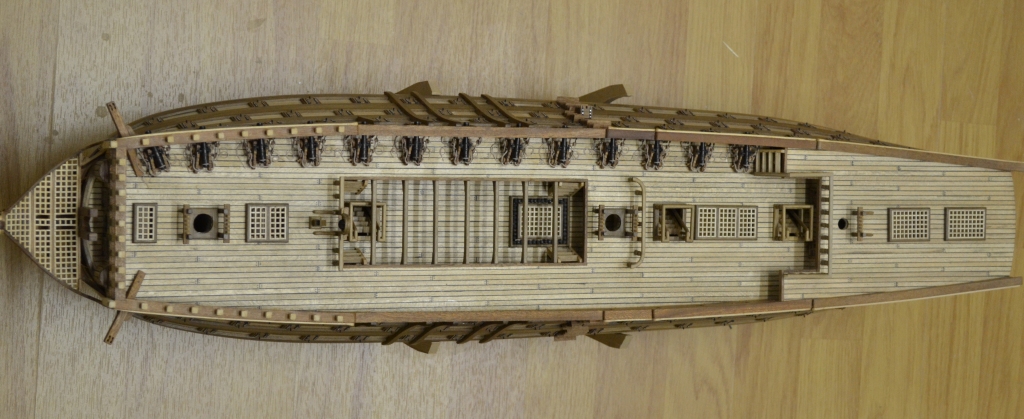
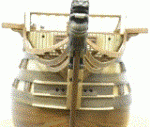
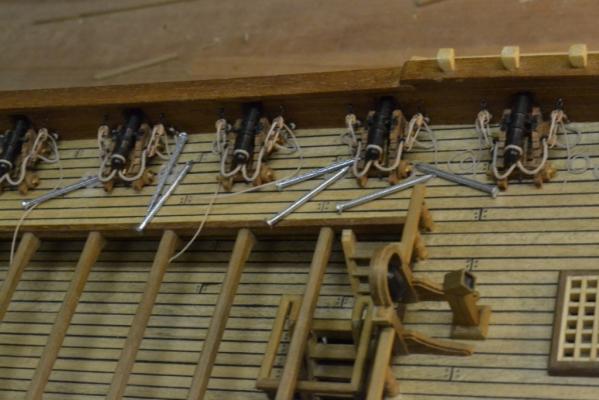
I’m finished with all the preparation of the rigging and started to install the cannons on the upper deck. ..enjoy.. I still have 14 more to go, but so far I’m pleased with the result. It is starting to look a bit more messy now ..


-
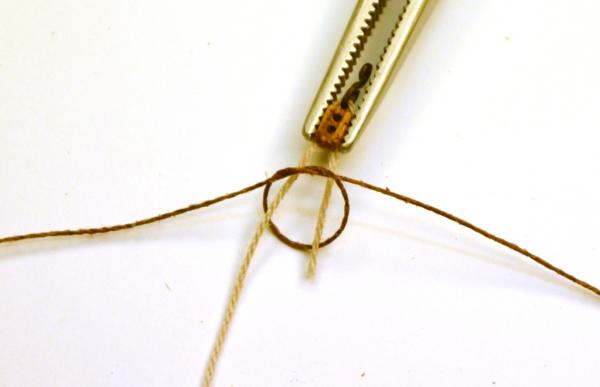
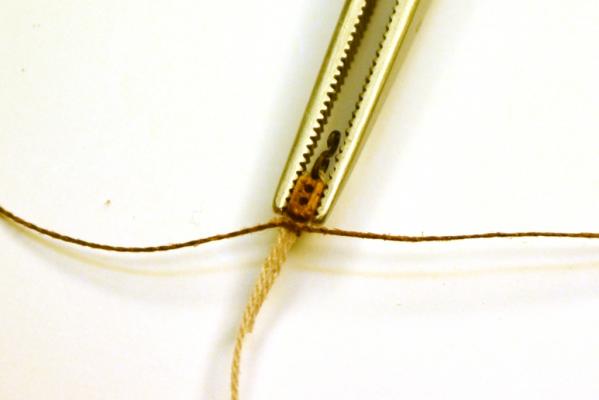
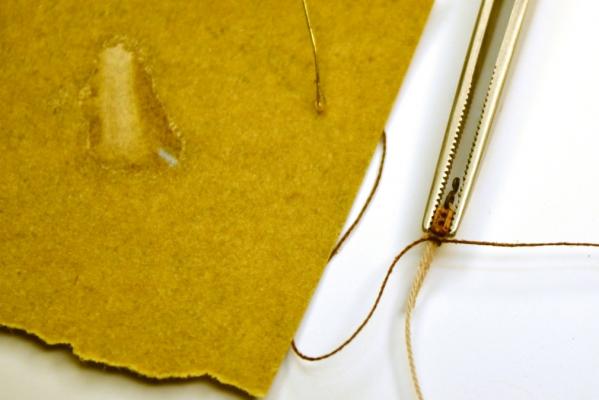
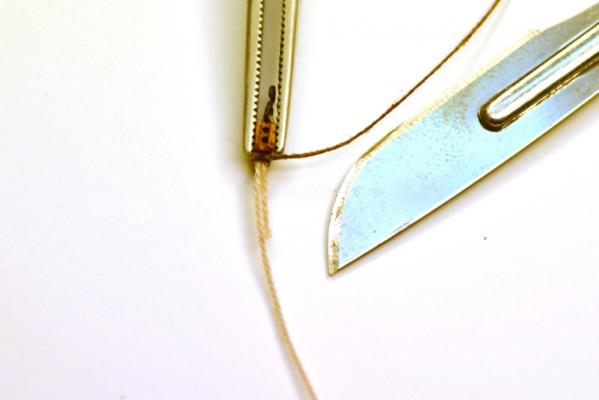
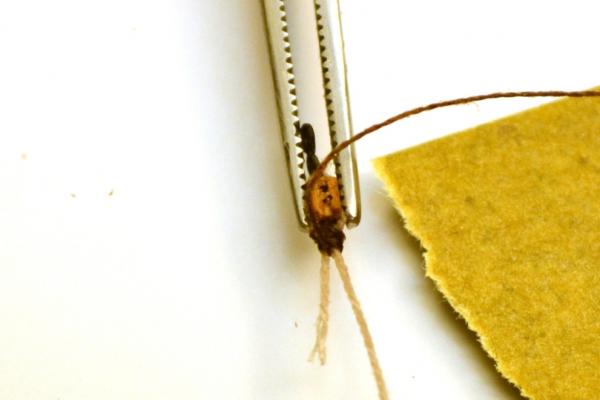
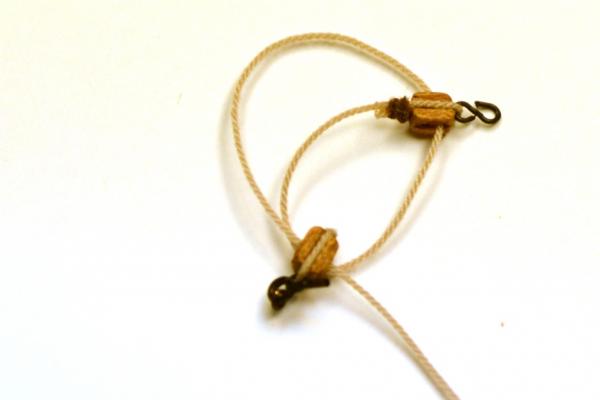
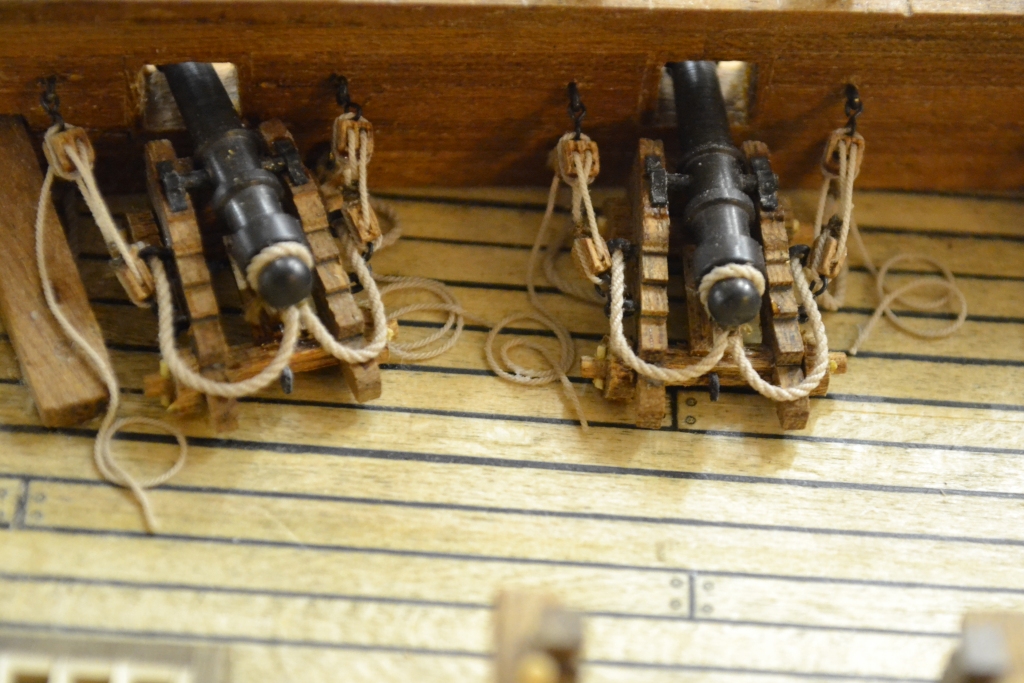
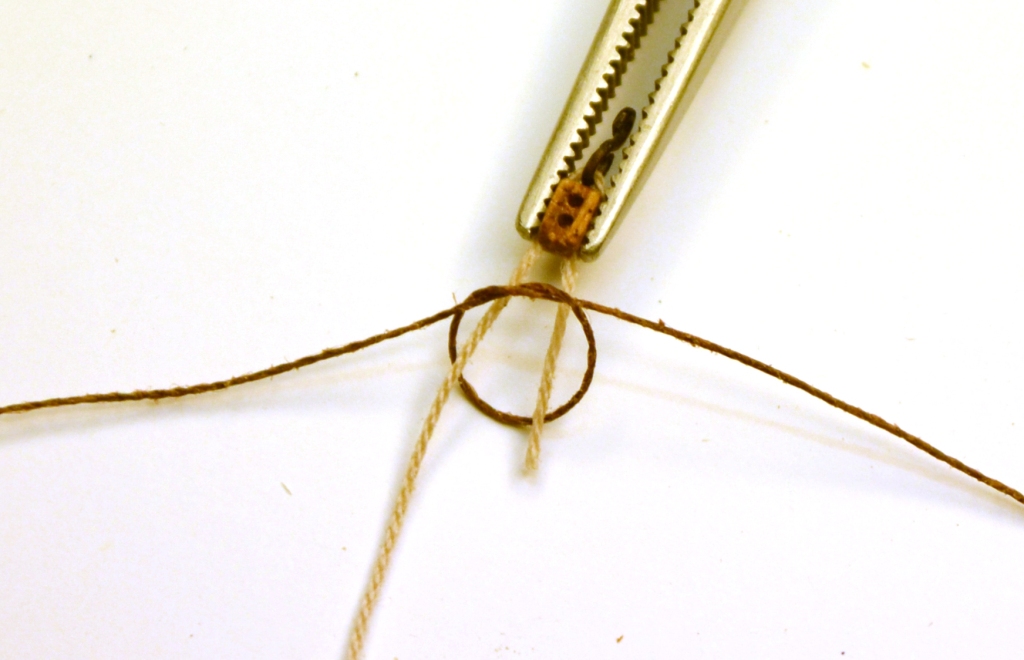
On special request Underneath more detailed the process I used for my single block rigging overhand knot Tighten & positioning of the knot (i use sharp pointed tweezers for this task) securing the knot with CA glue Cutting off the not needed thread Winding 2,5 times the knot around the rope (picture shows 1,5 times) I used CA glue to simulate this, This task demands both hands to keep the thread tight & around the rope Again using CA glue to keep the thread secured between the ropes (and using a scalpel to trim the thread & rope) In more detail the rigging of both blocks This is pretty much the end result