DONATION DRIVE - SUPPORT MSW - DO YOUR PART TO KEEP THIS GREAT FORUM GOING! (91 donations so far out of 49,000 members - C'mon guys!)
×


gil middleton
-
Posts
308 -
Joined
-
Last visited
Content Type
Profiles
Forums
Gallery
Events
Everything posted by gil middleton
-
Thanks Joe. I hope you're back to modeling before long. Harvey, I'm not that clever. I served the stay to just beyond the location of the mouse and then wormed it from there on. Perhaps I should have done what you describe. Gil
-
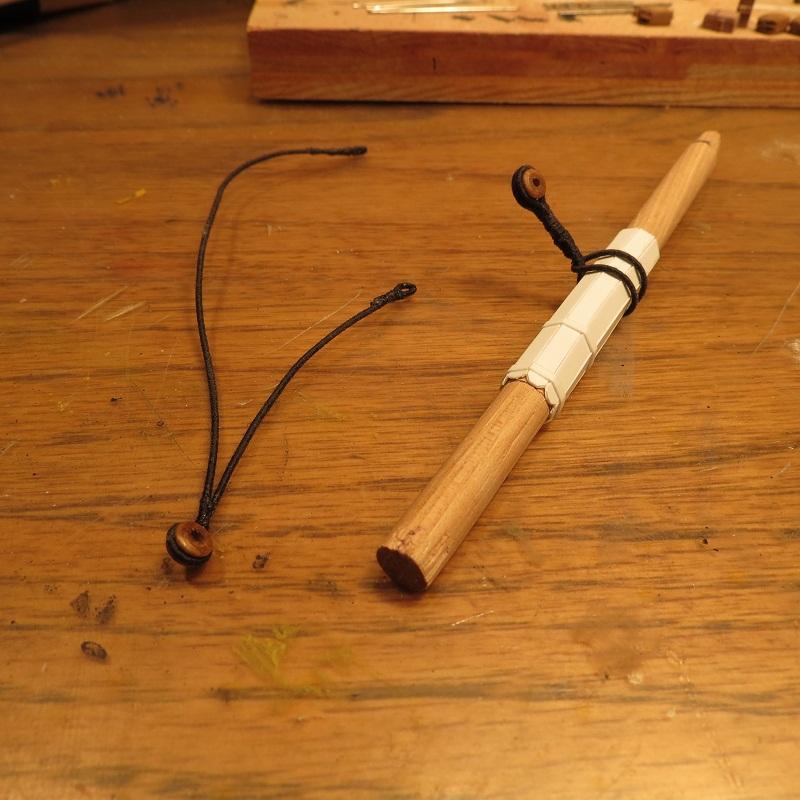
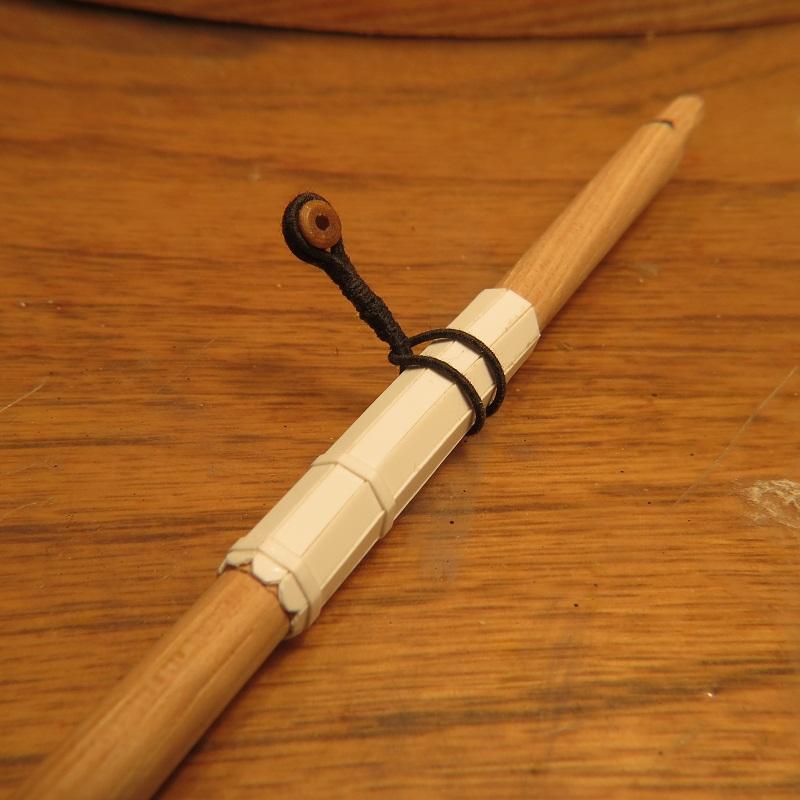
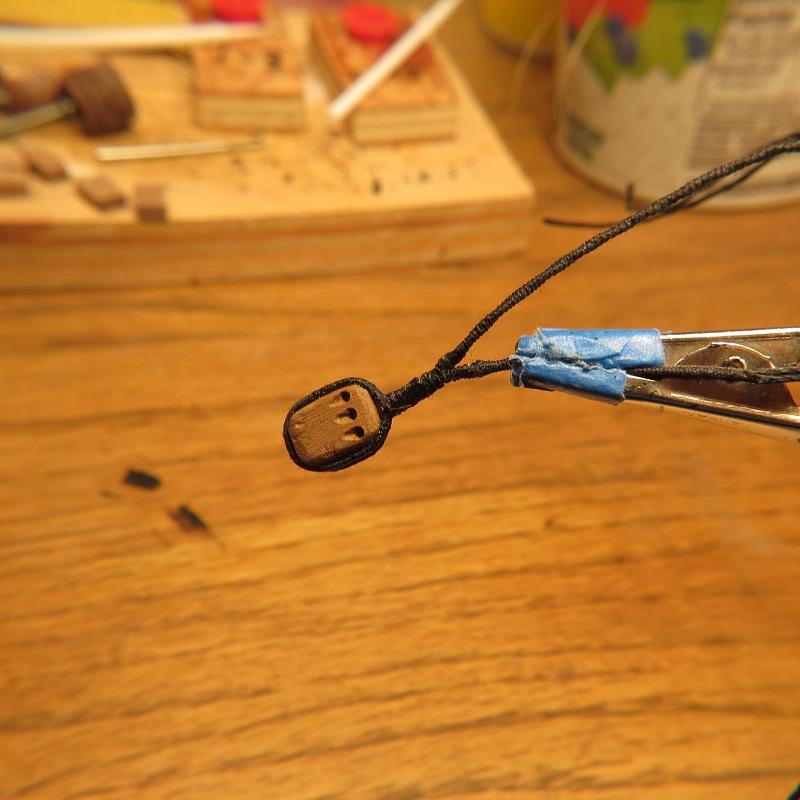
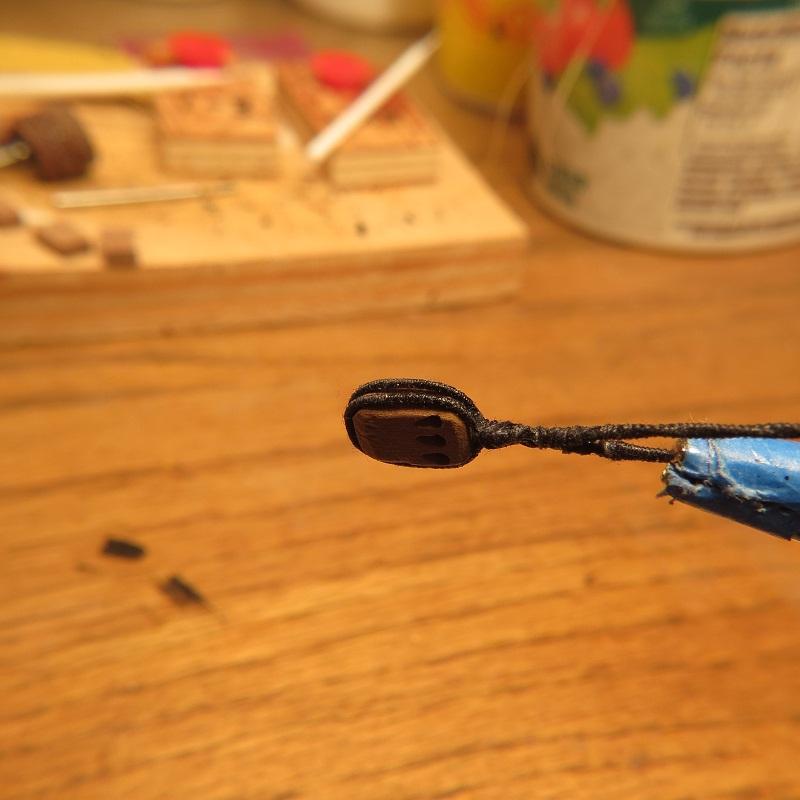
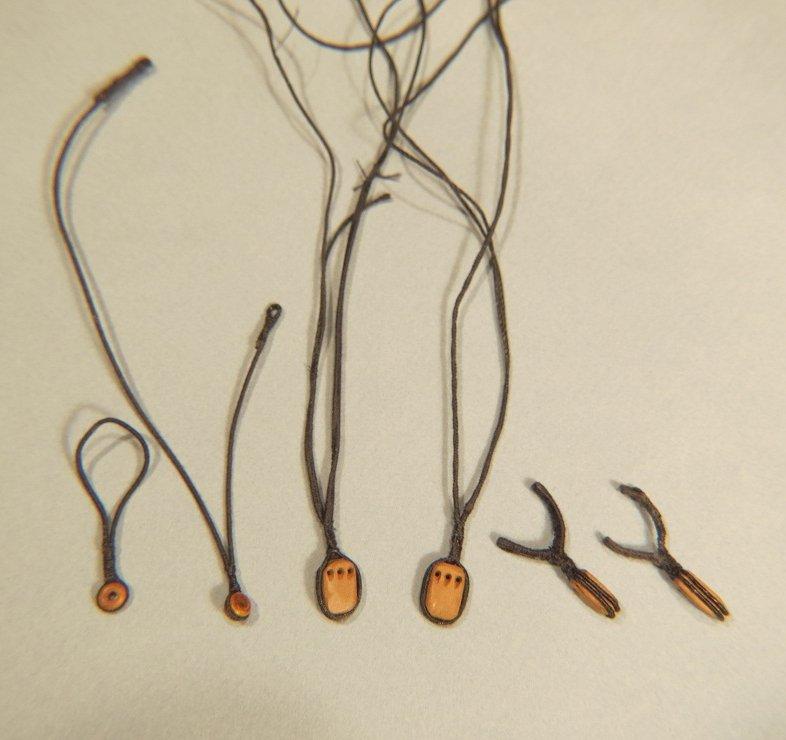
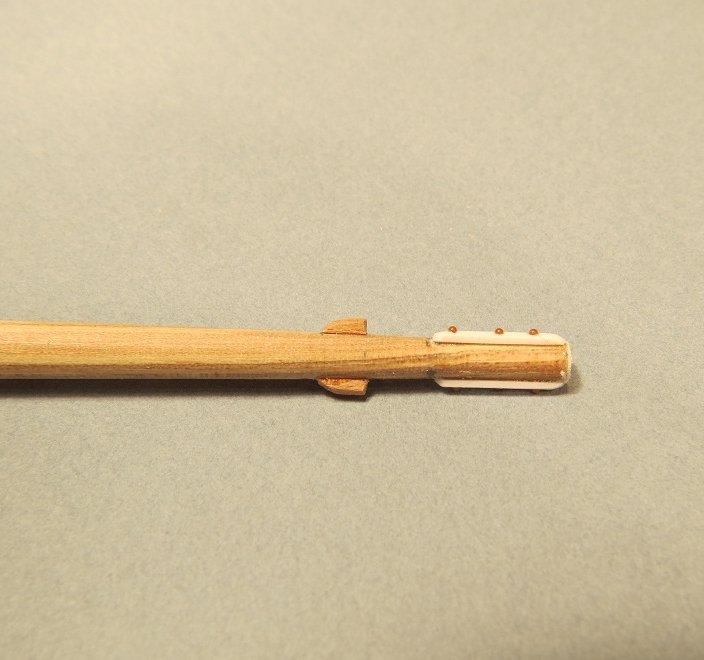
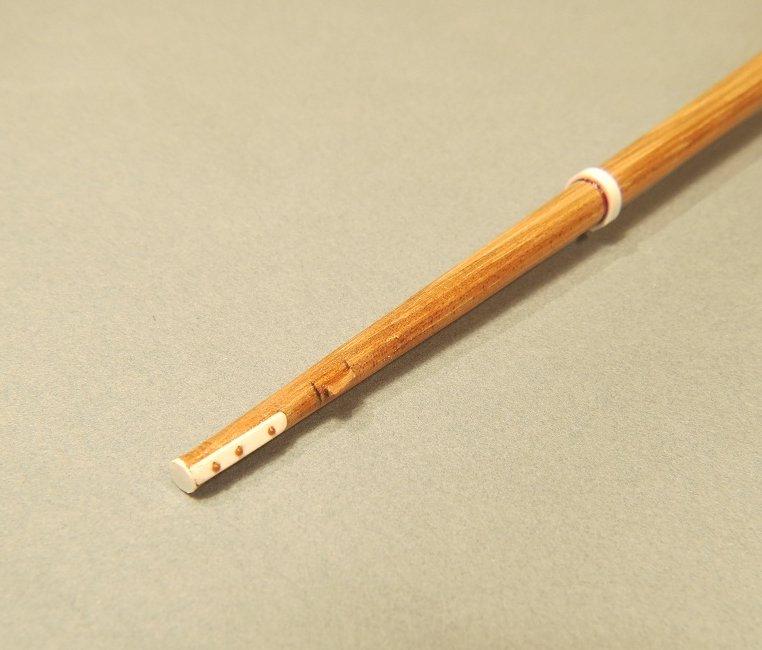
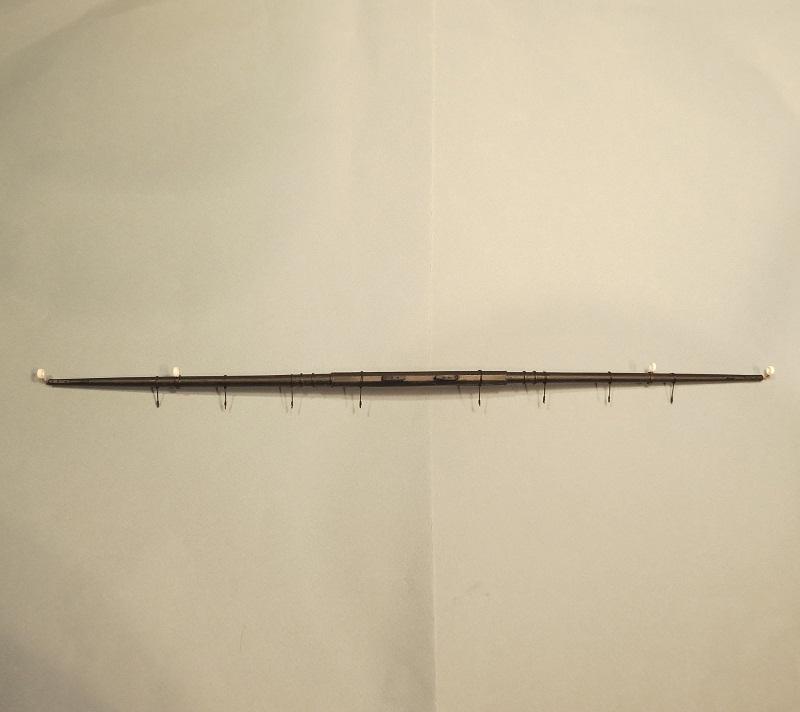
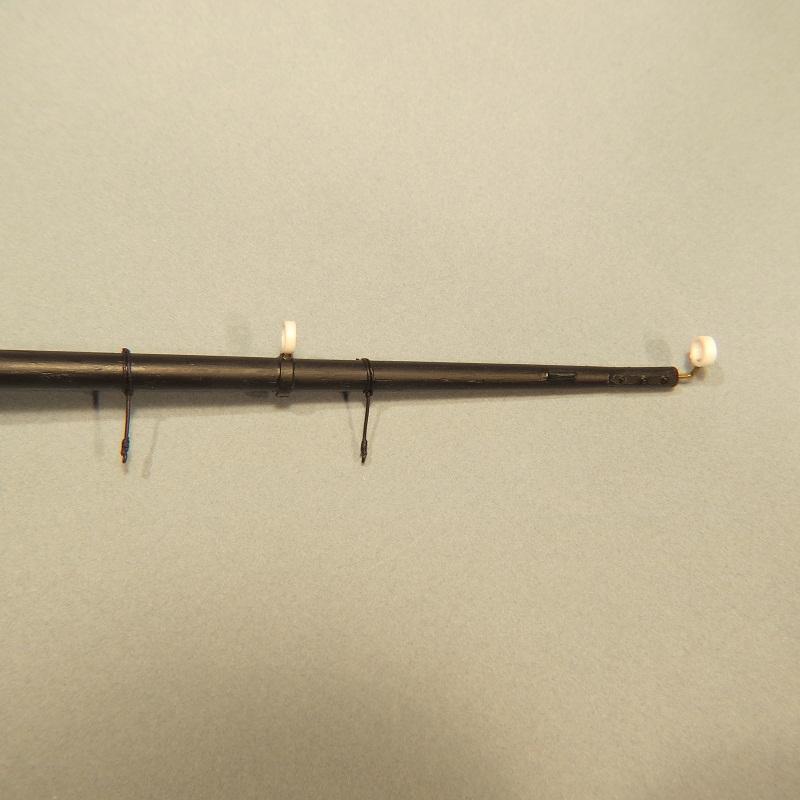
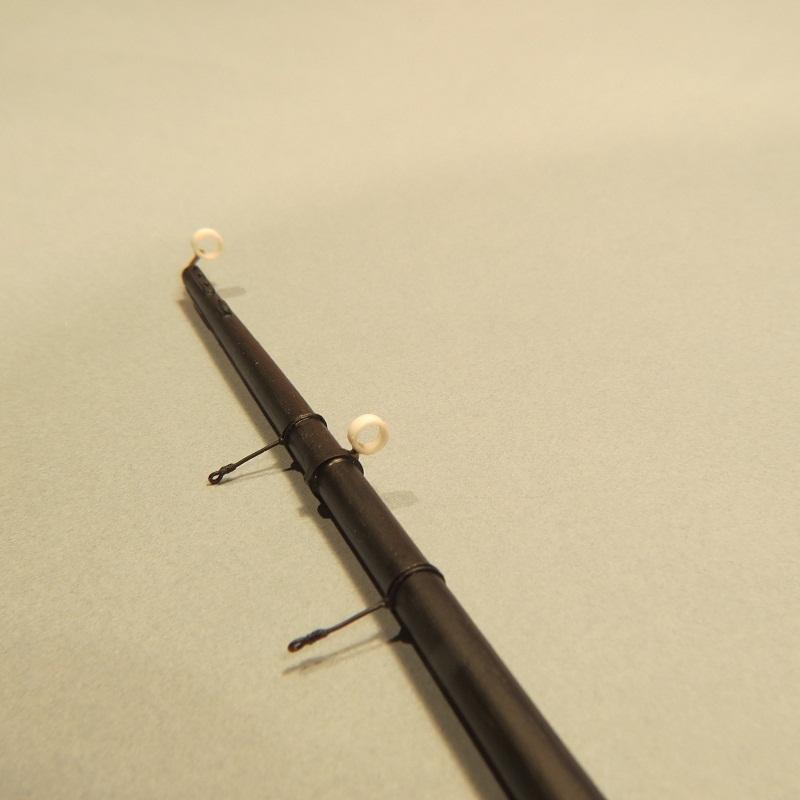
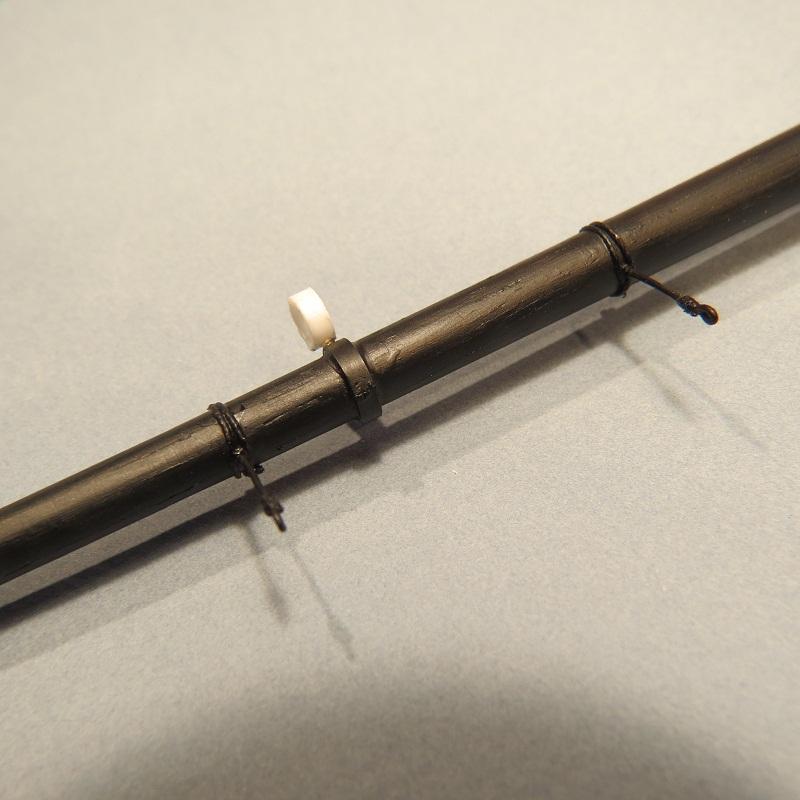
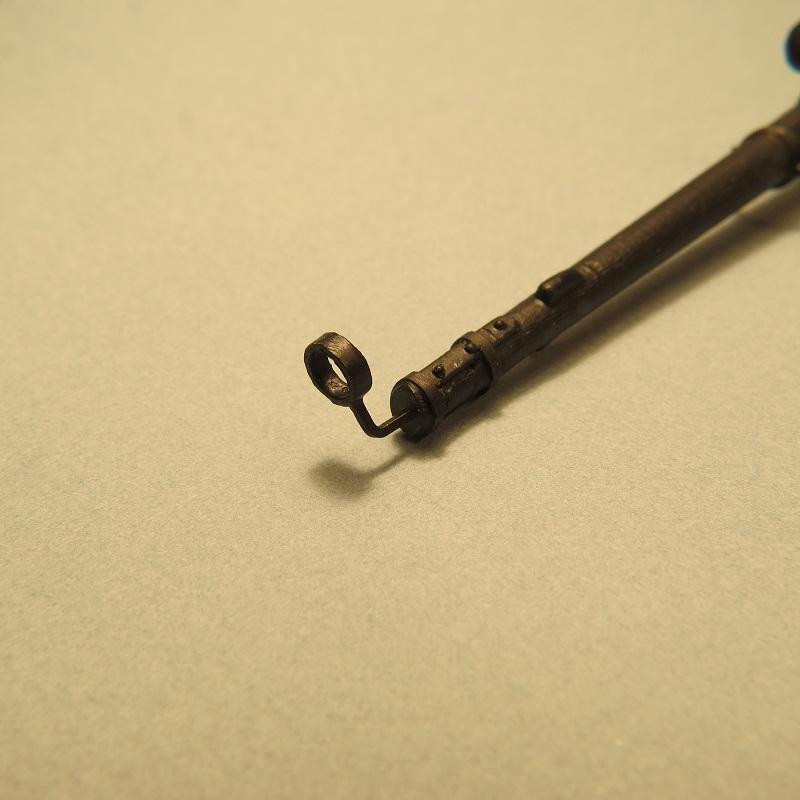
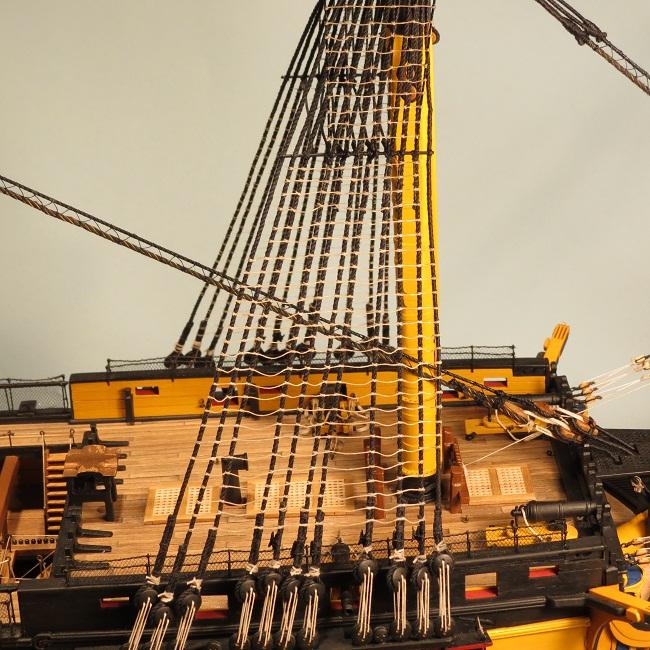
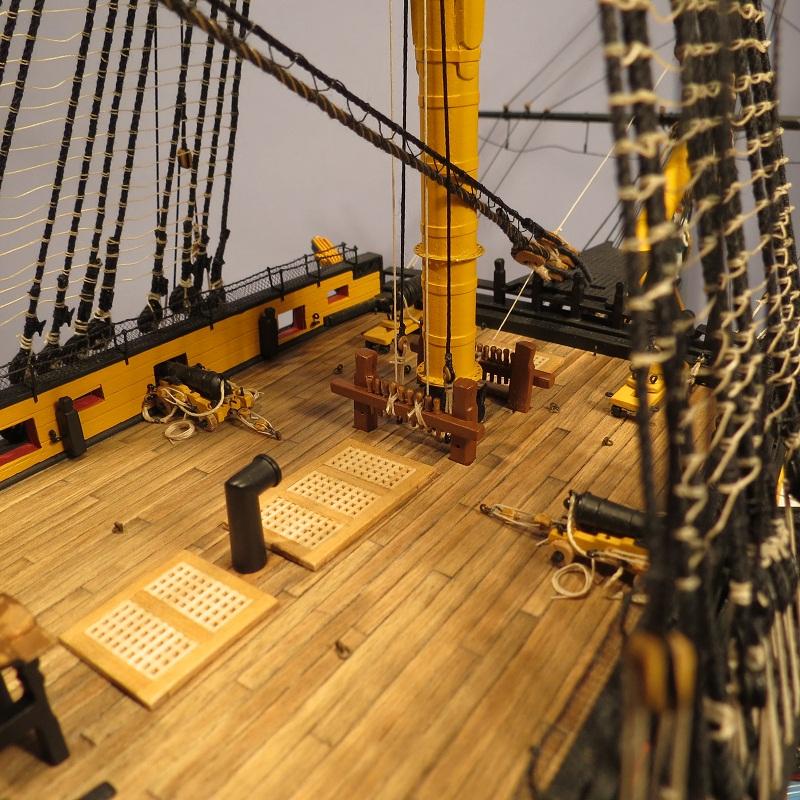
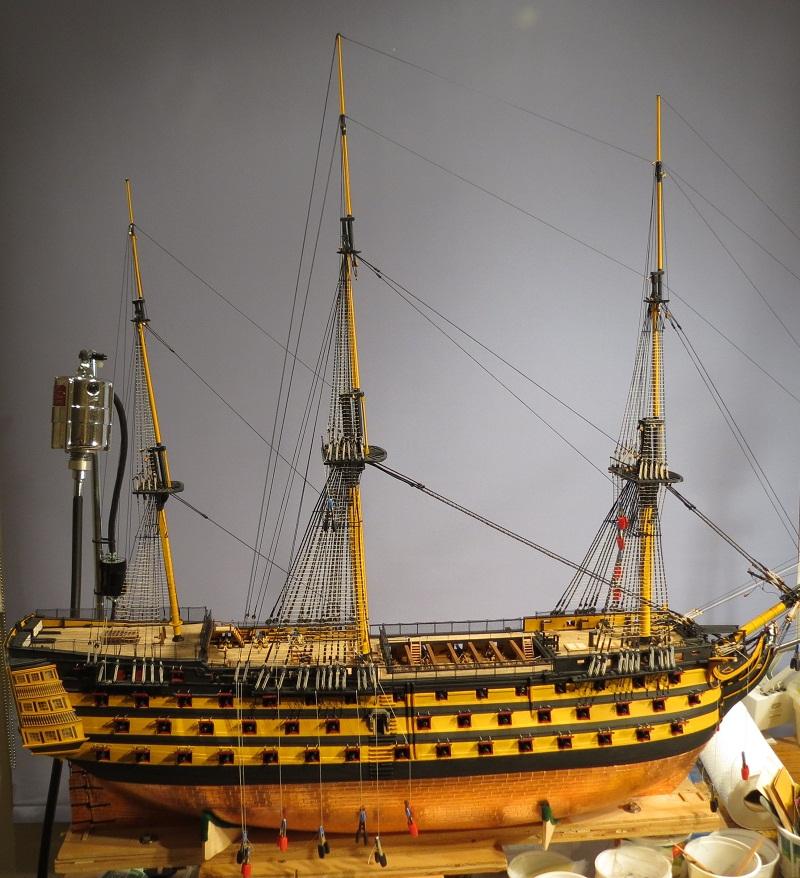
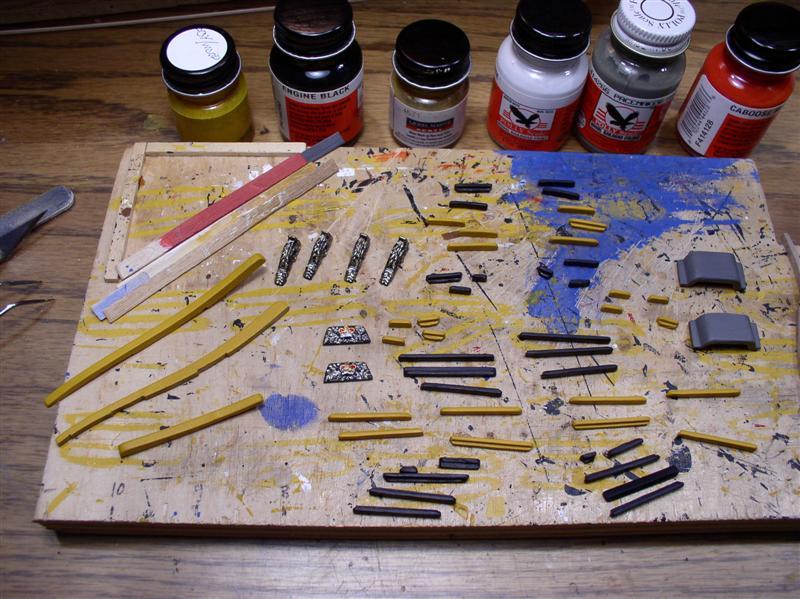
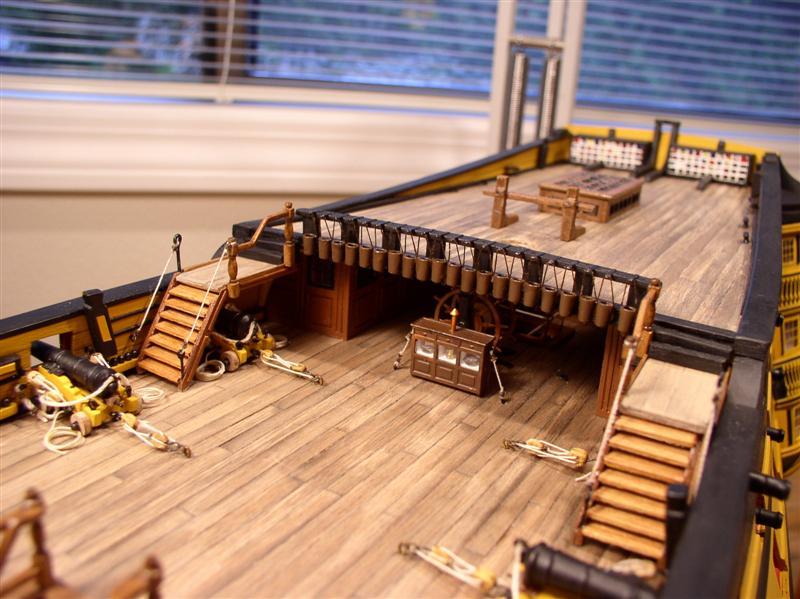
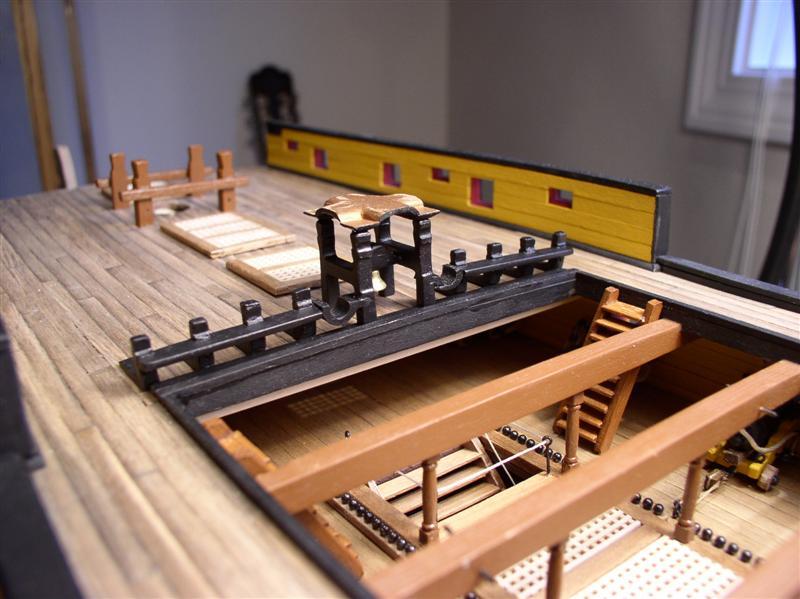
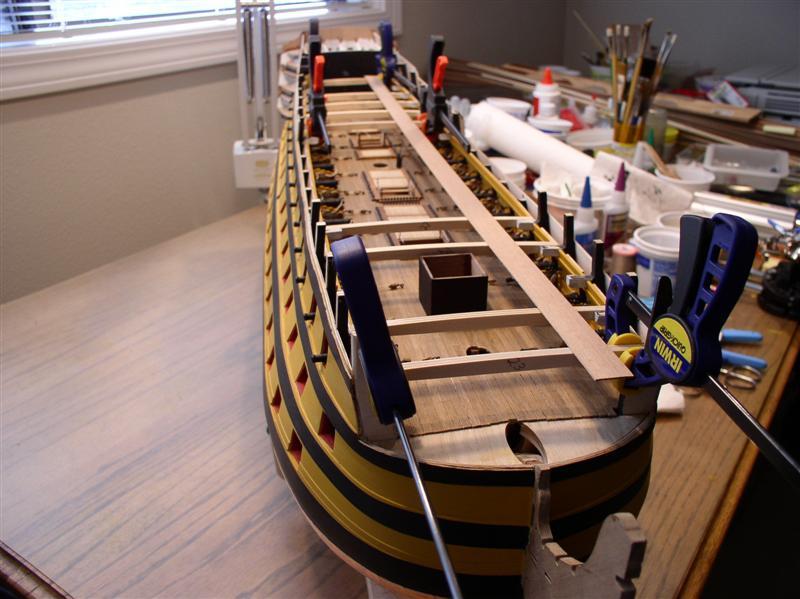
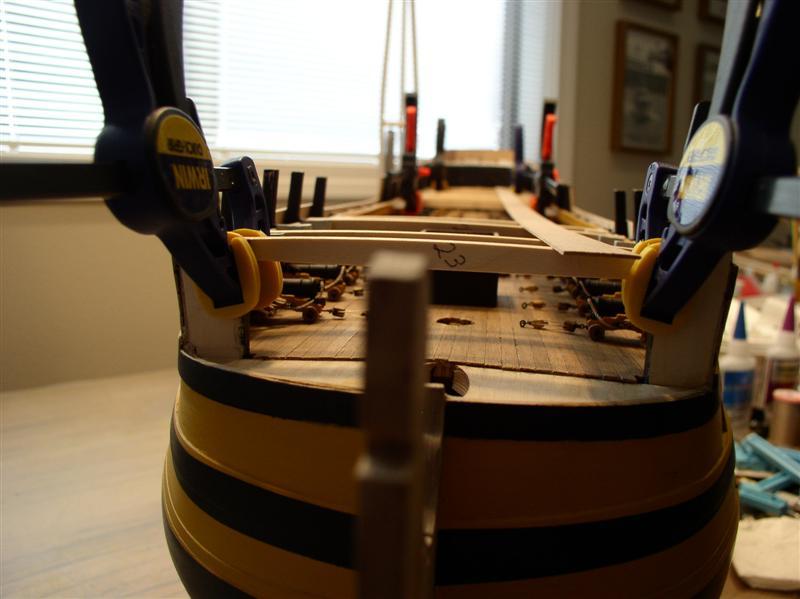
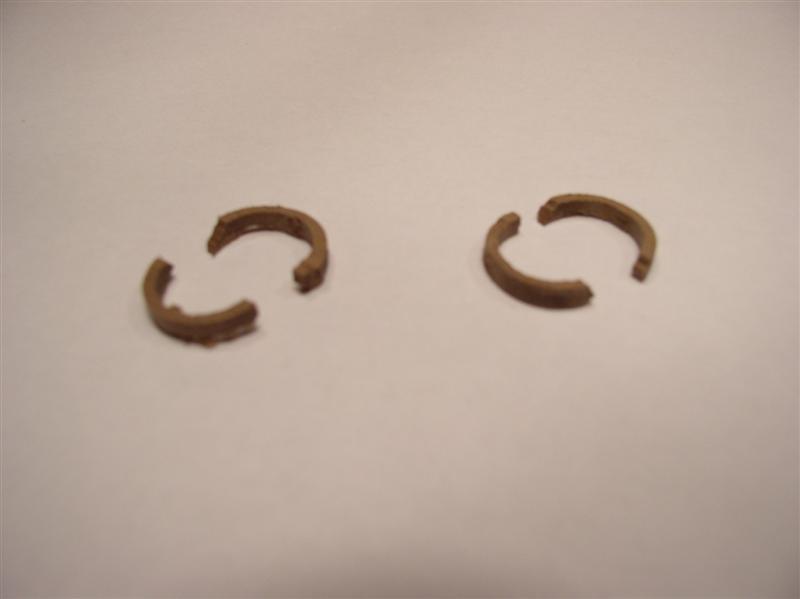
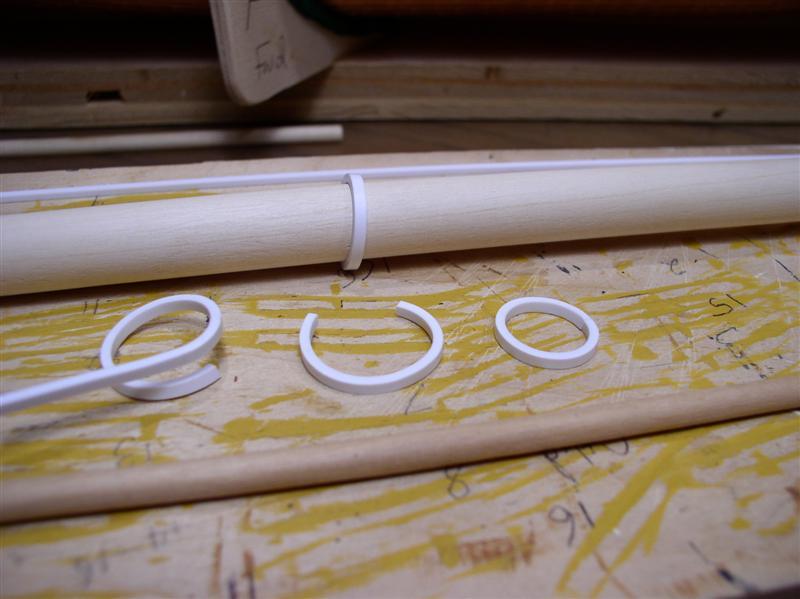
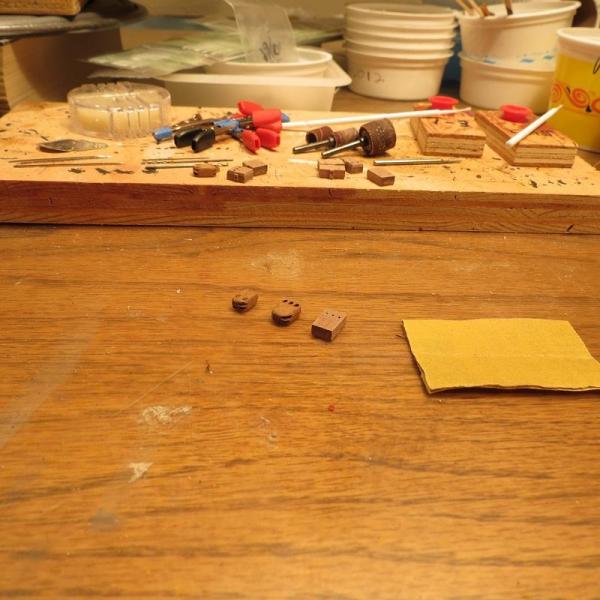
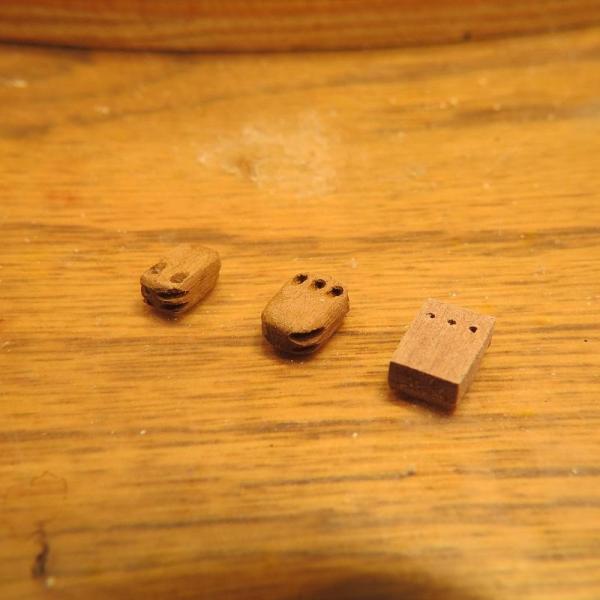
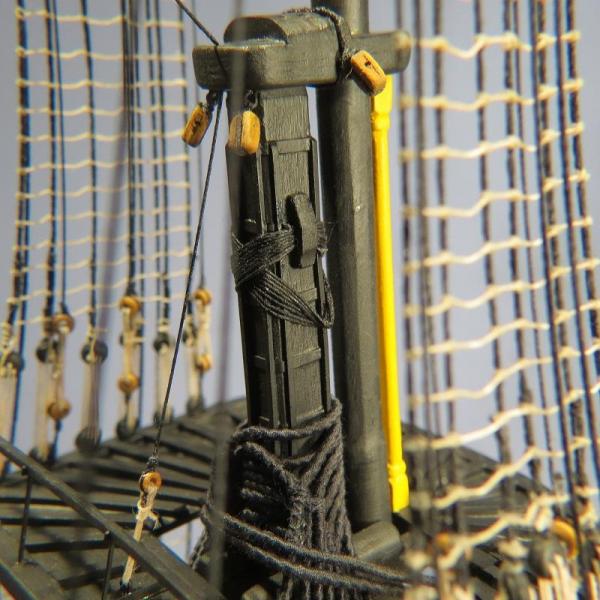
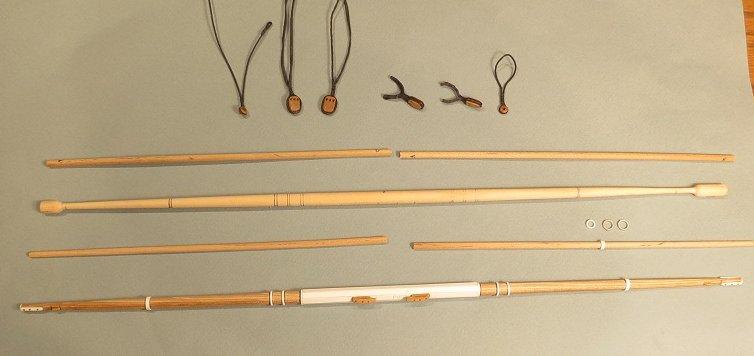
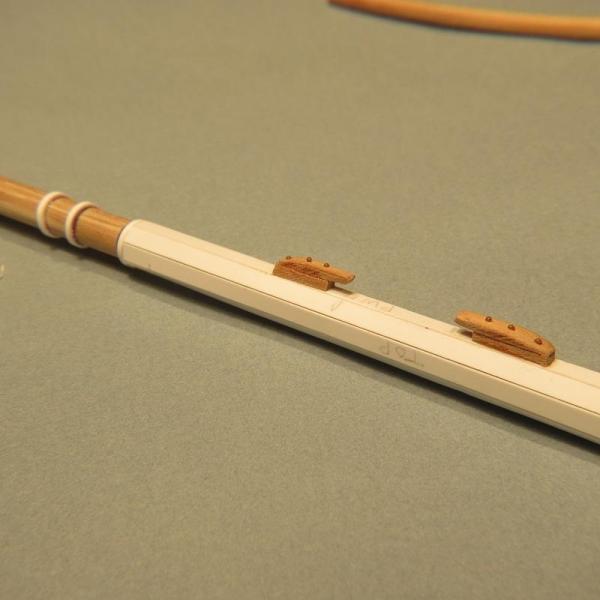
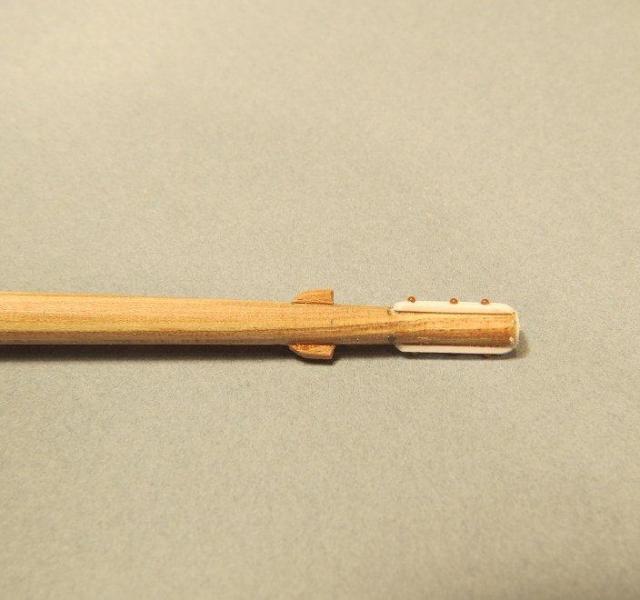
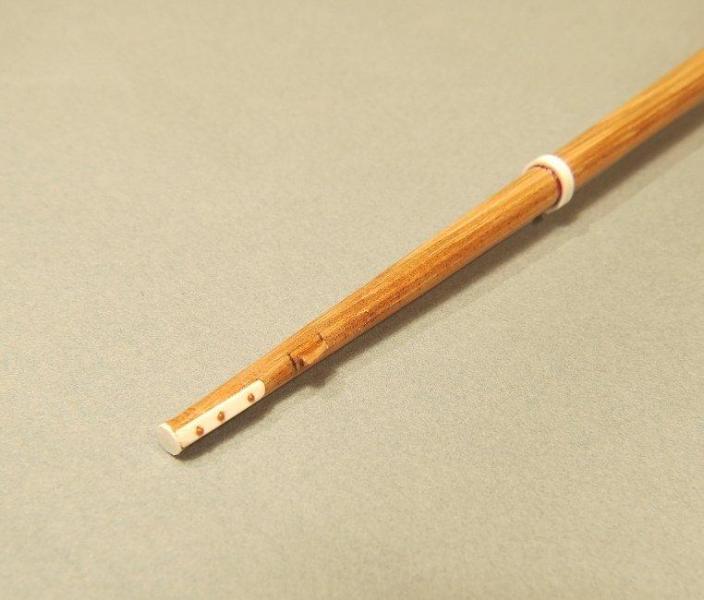
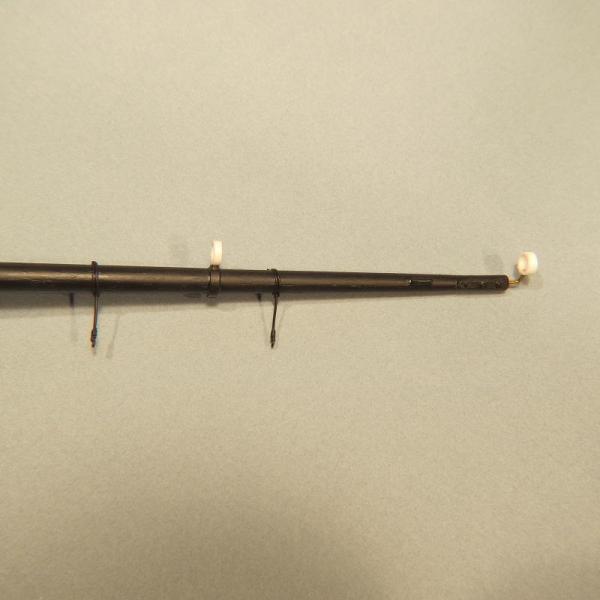
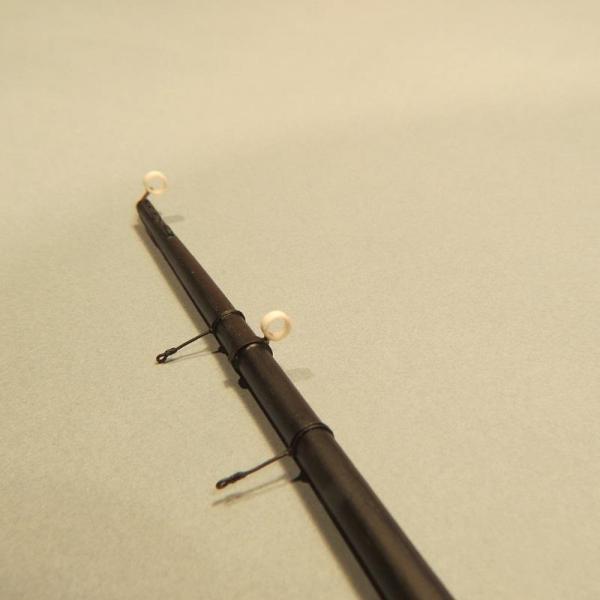
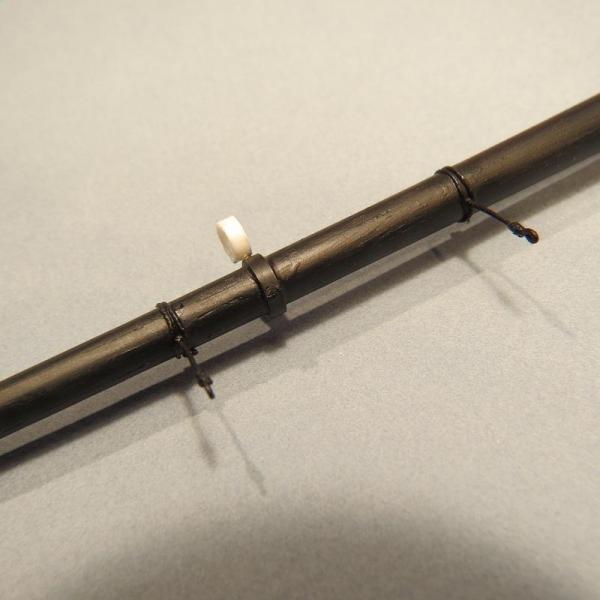
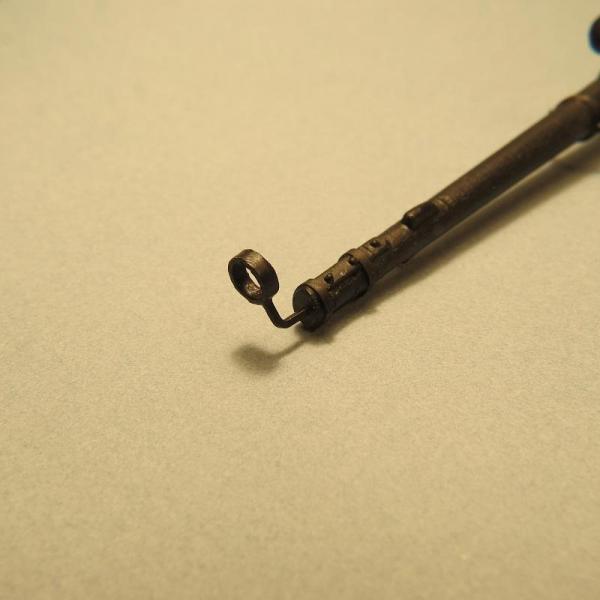
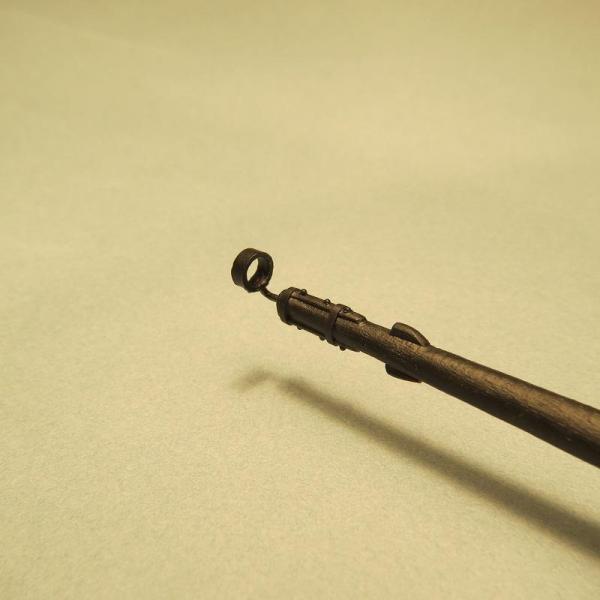
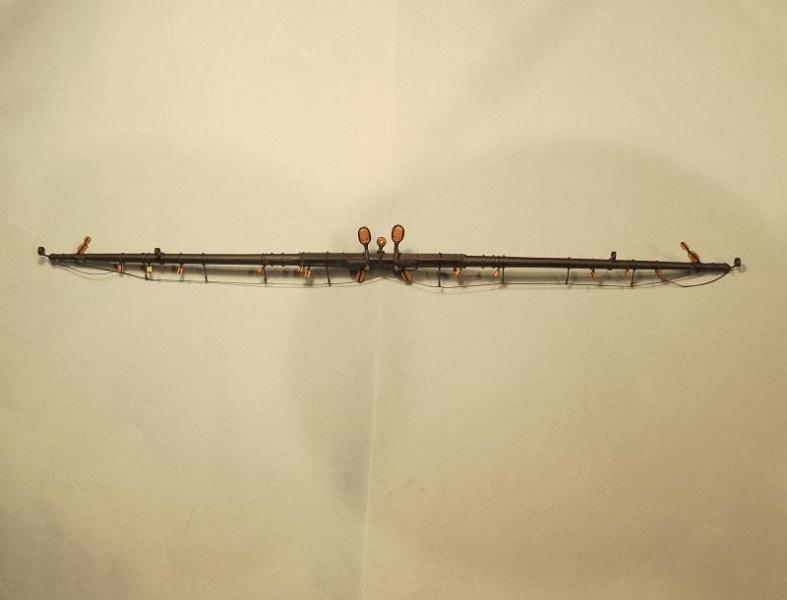
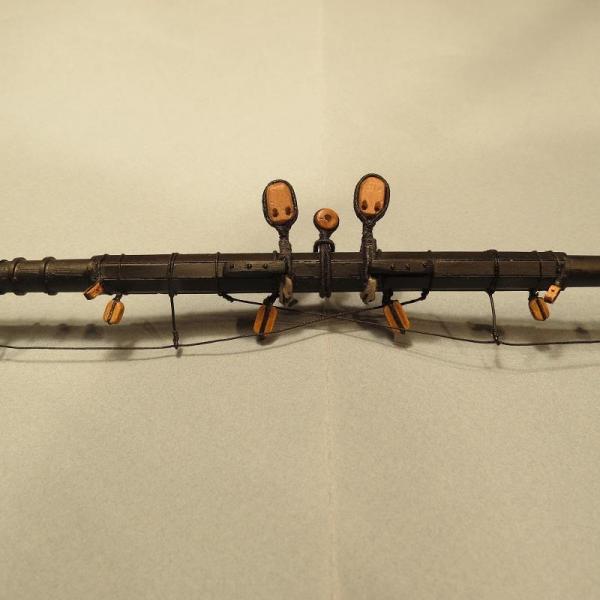
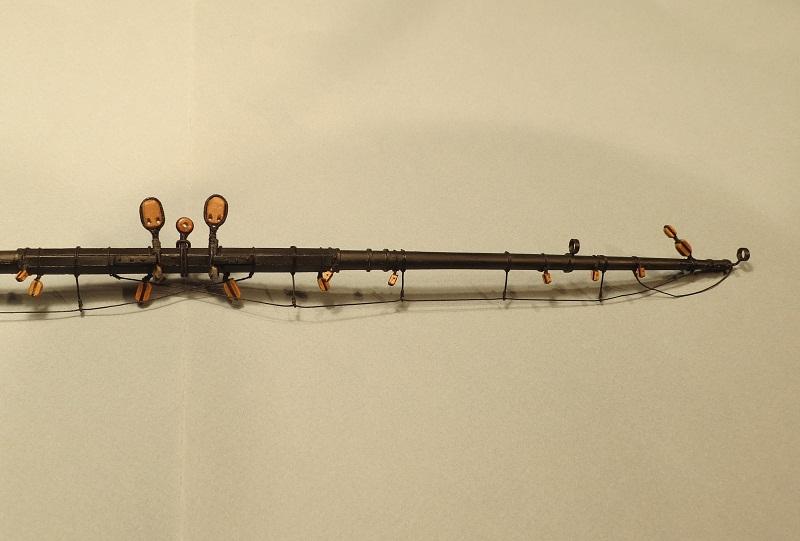
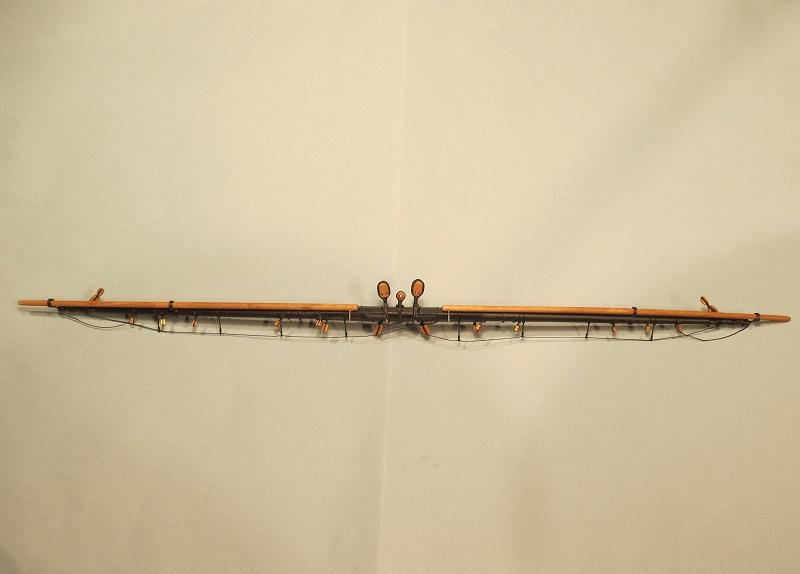
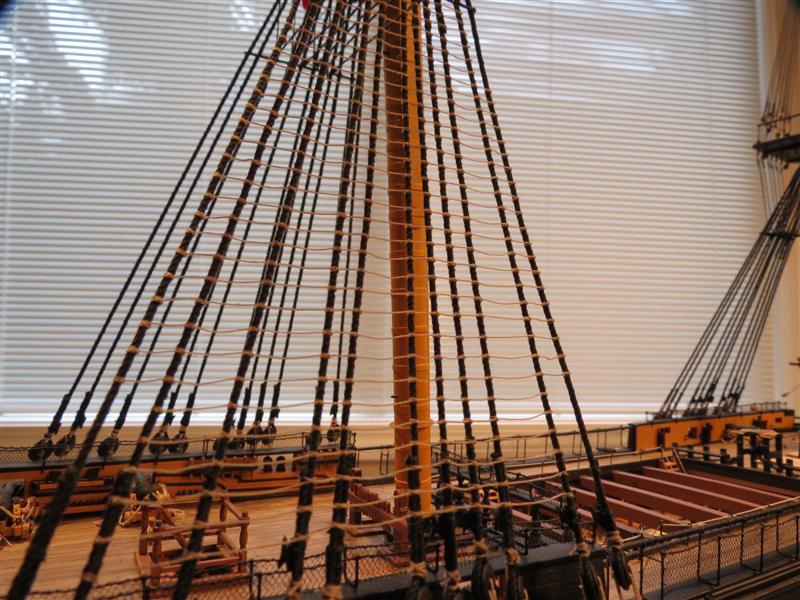
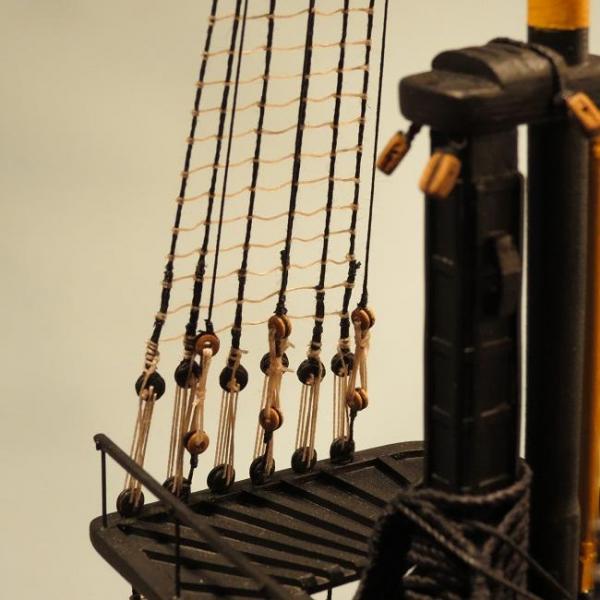
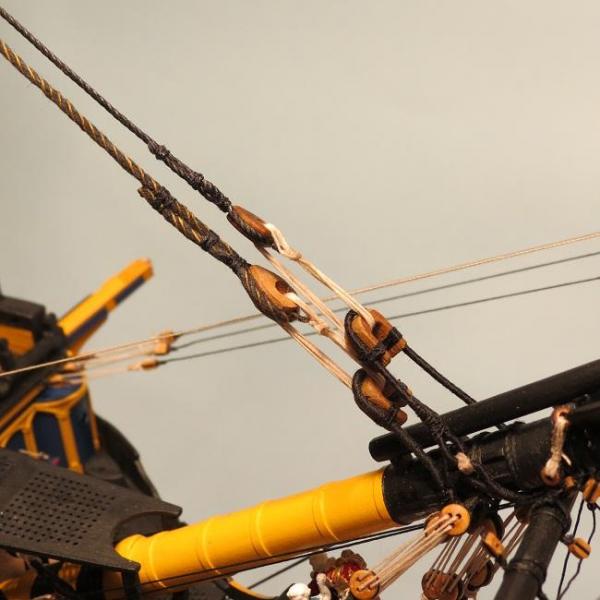
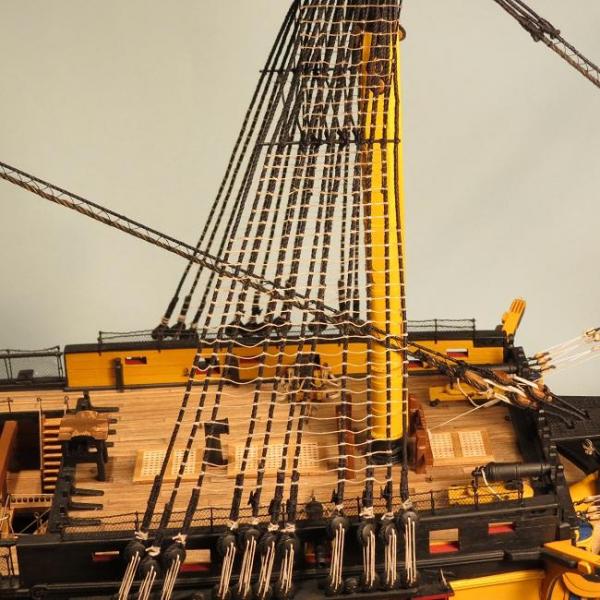
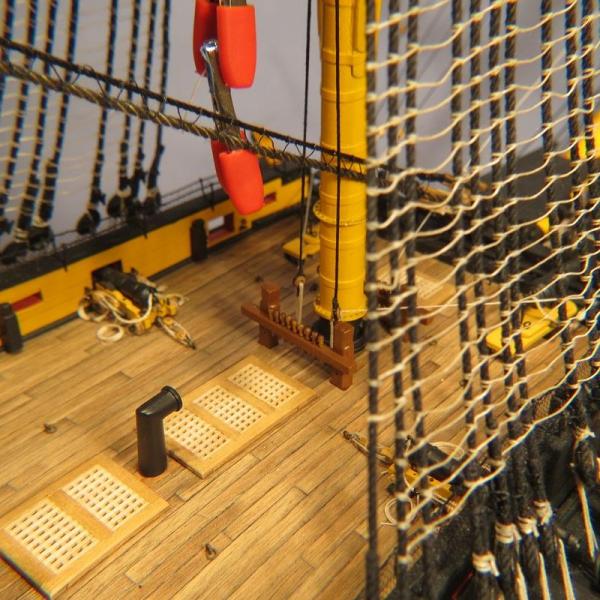
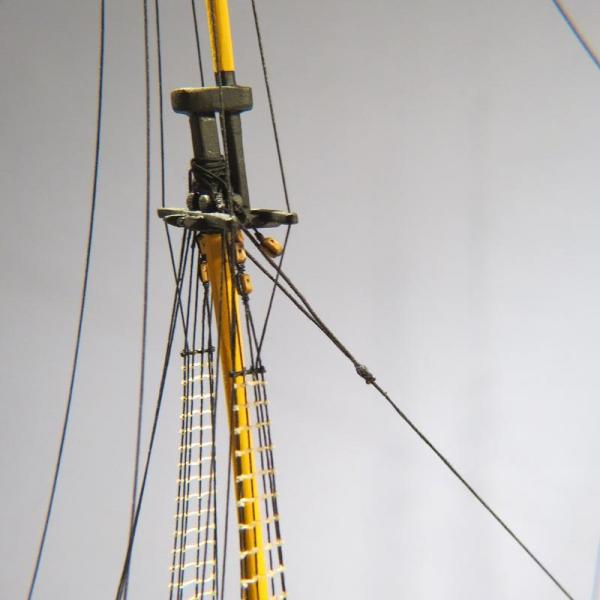
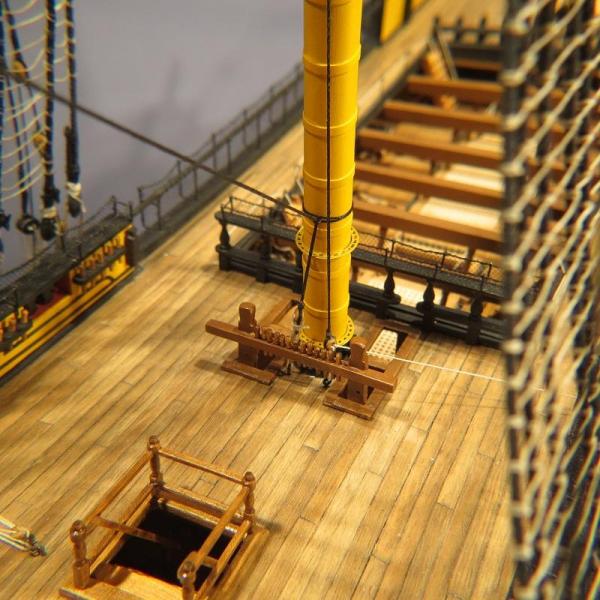
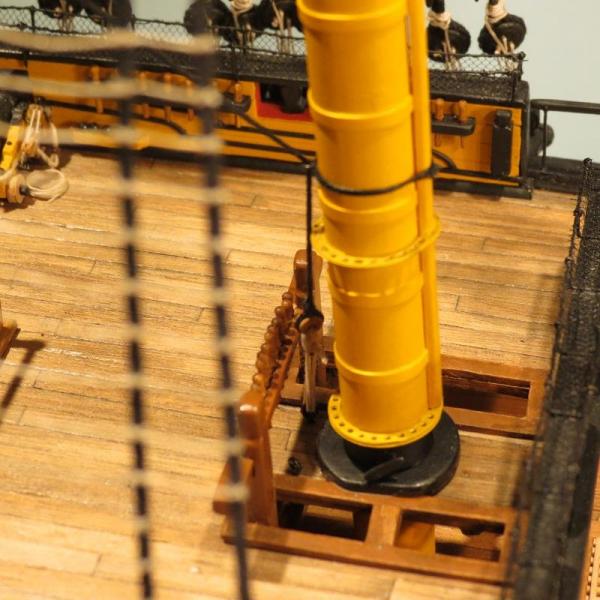
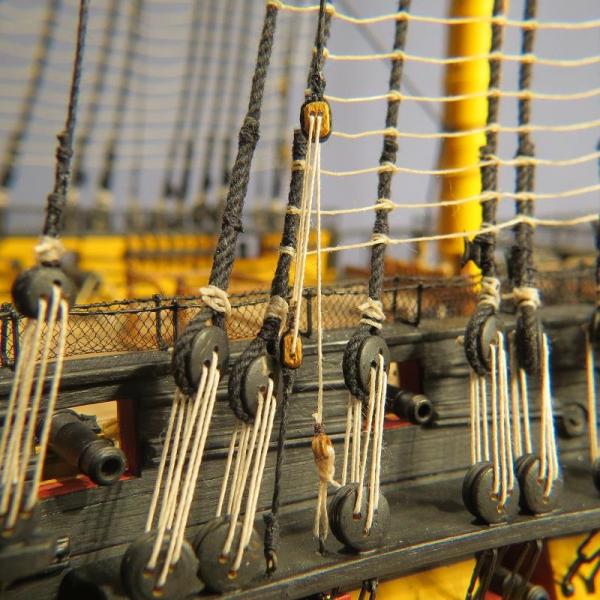
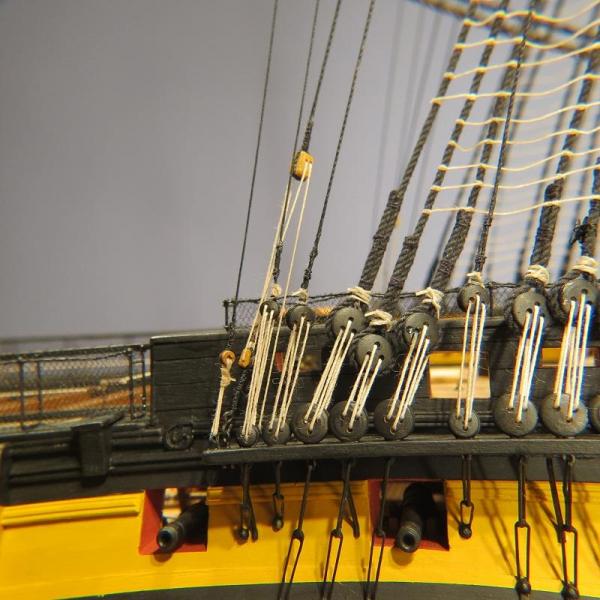
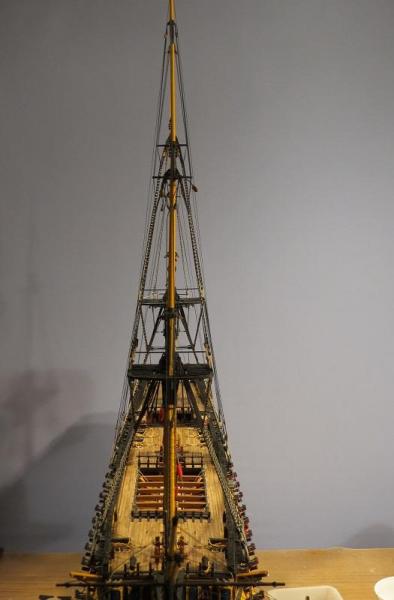
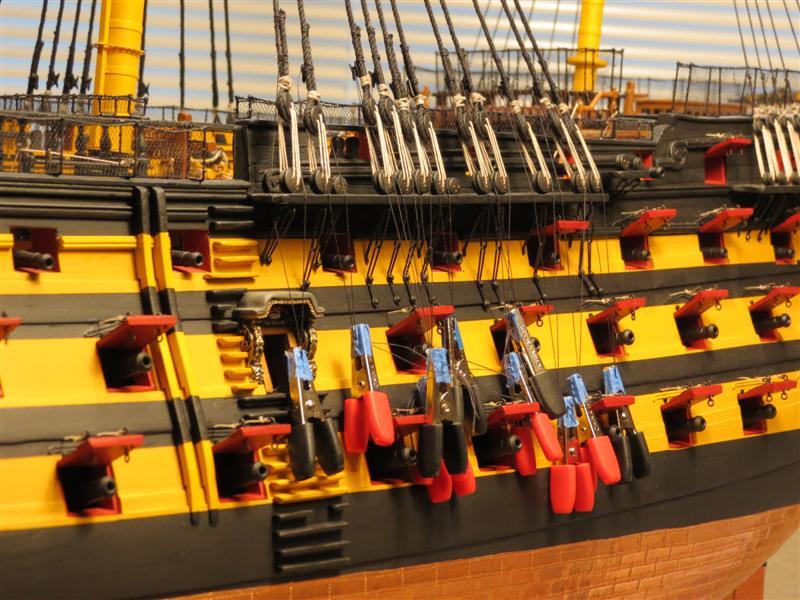
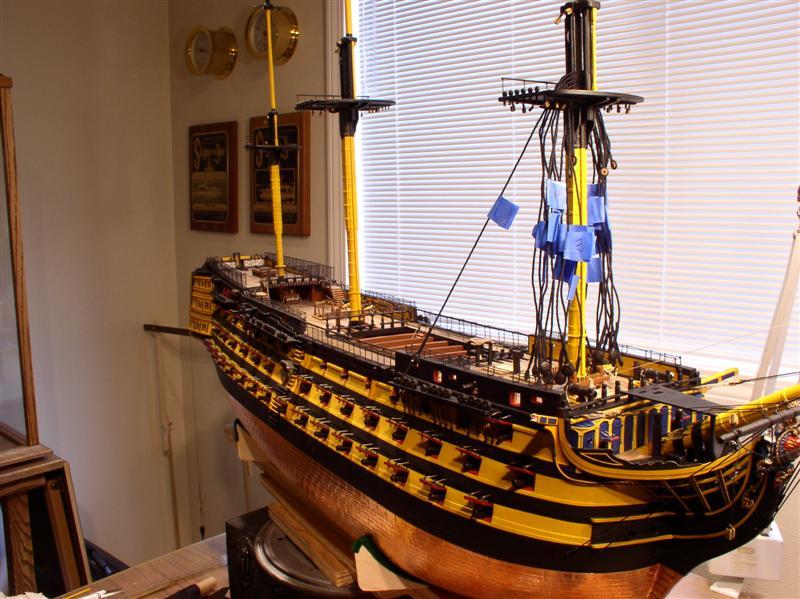
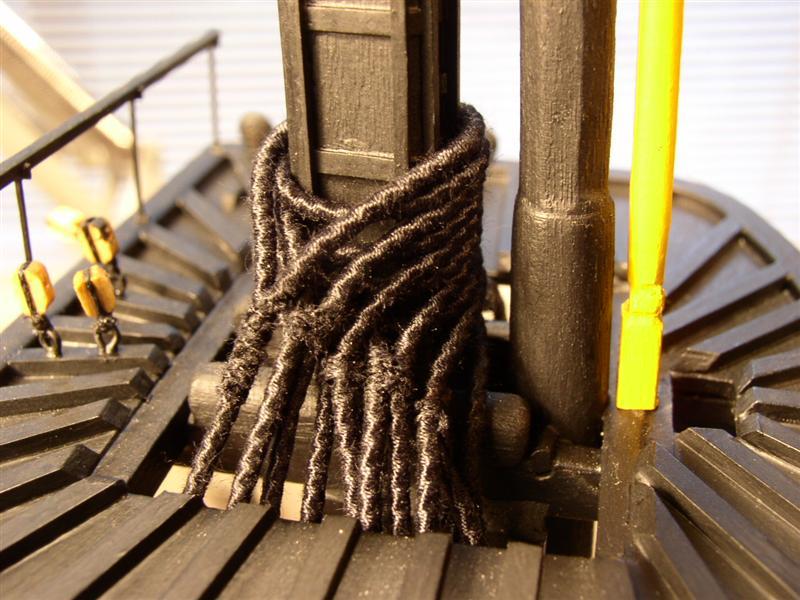
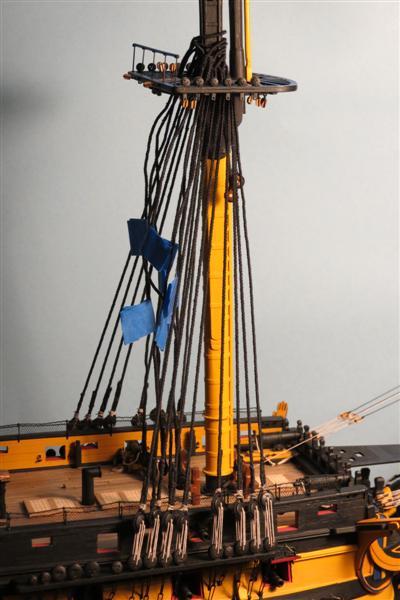
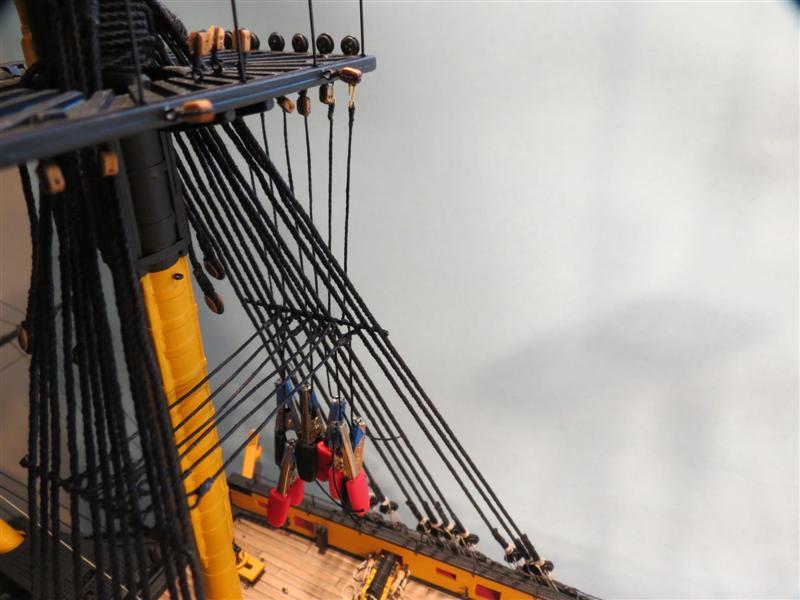
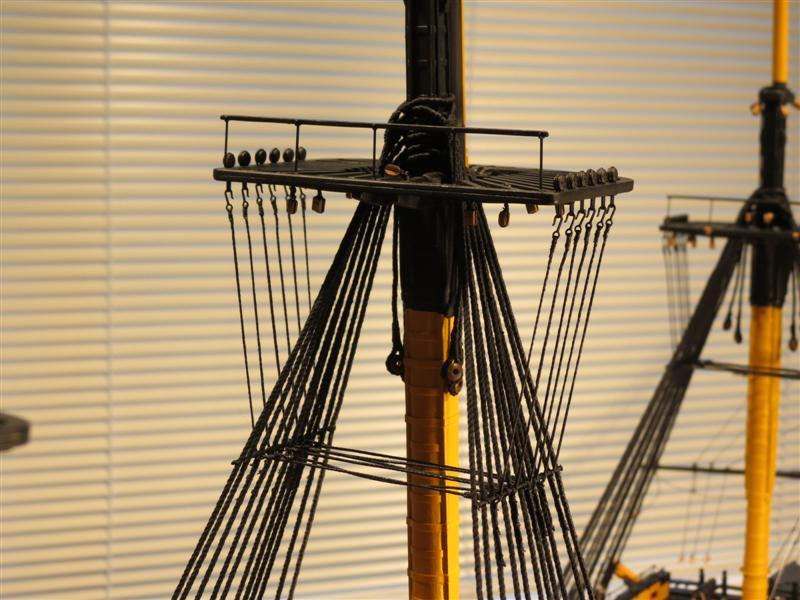
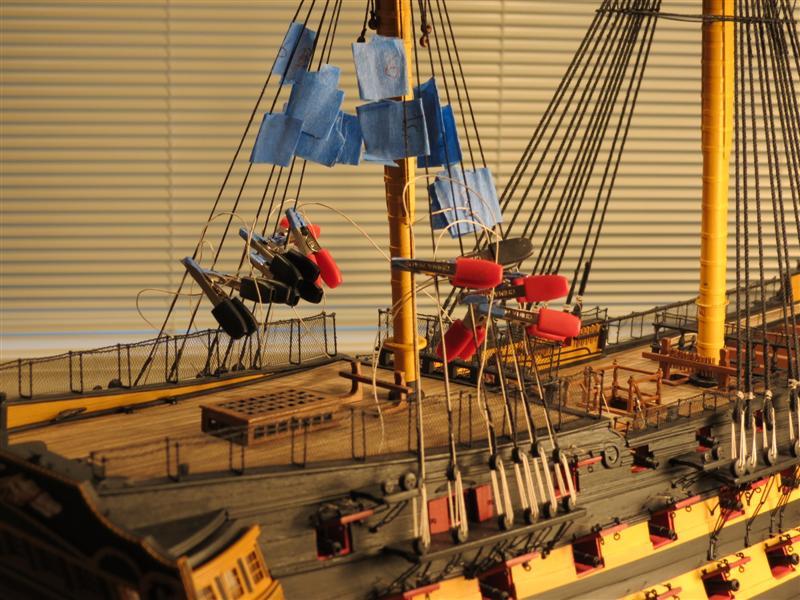
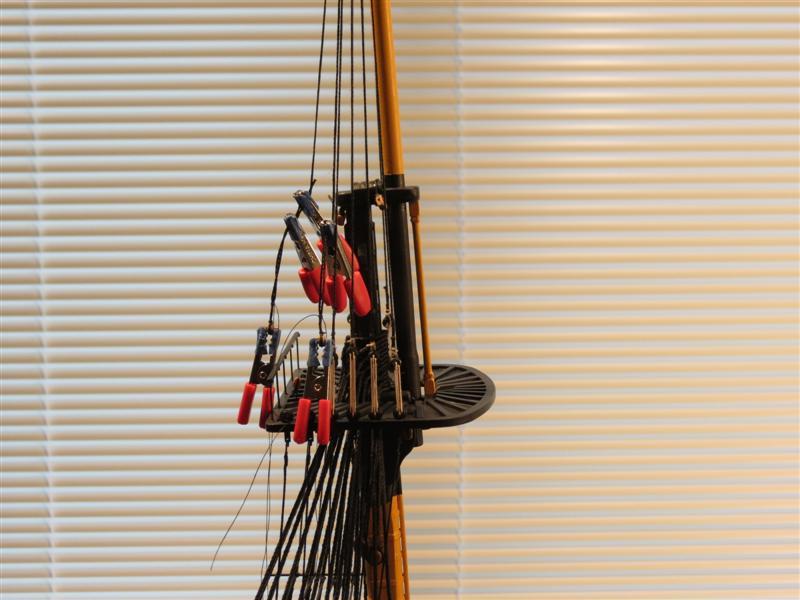
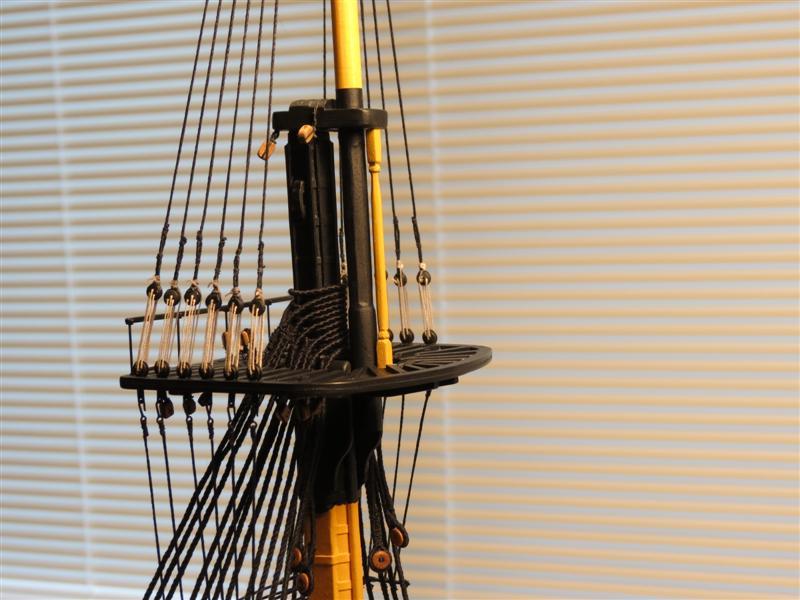
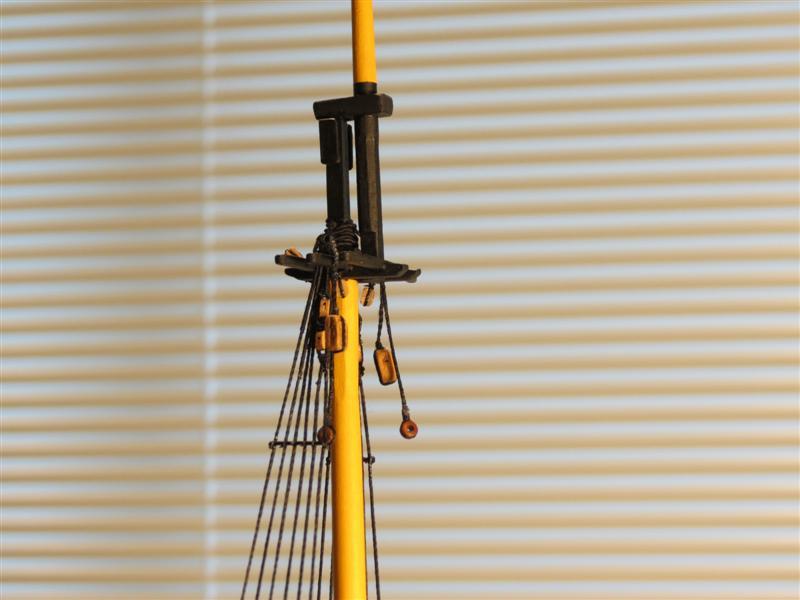
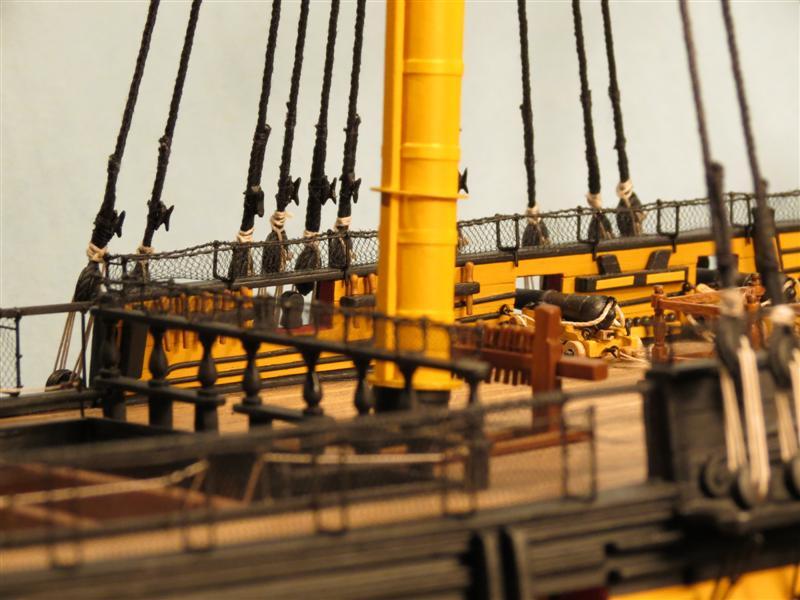
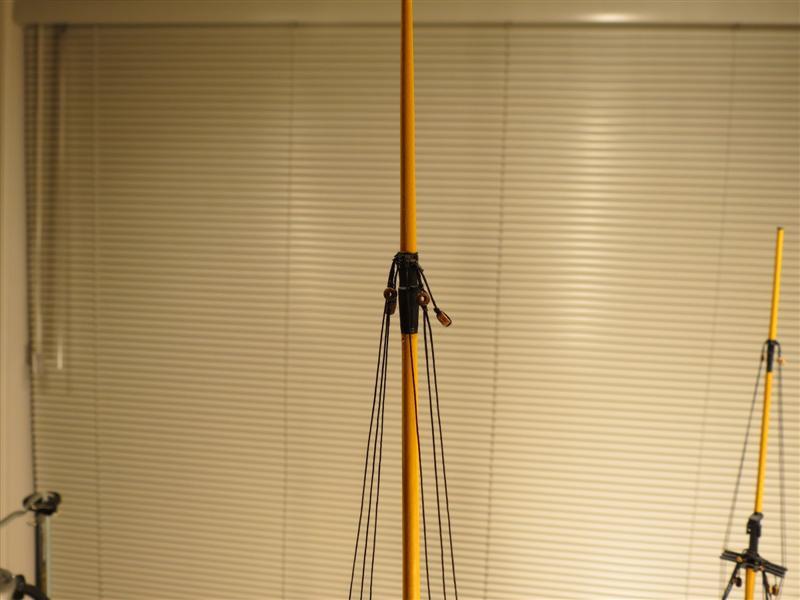
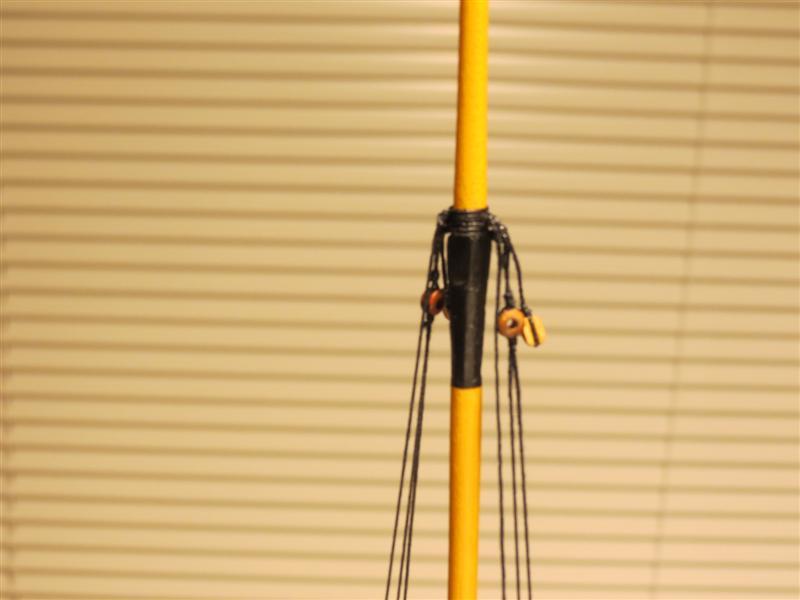
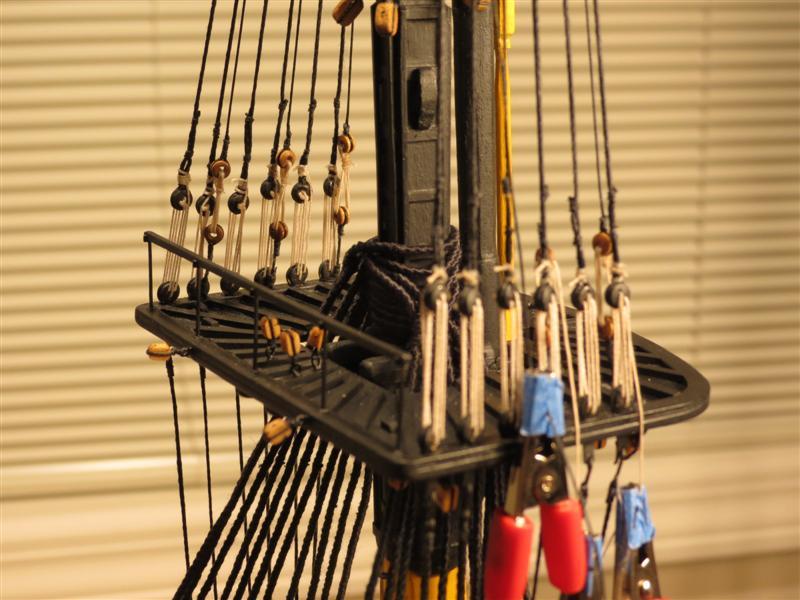
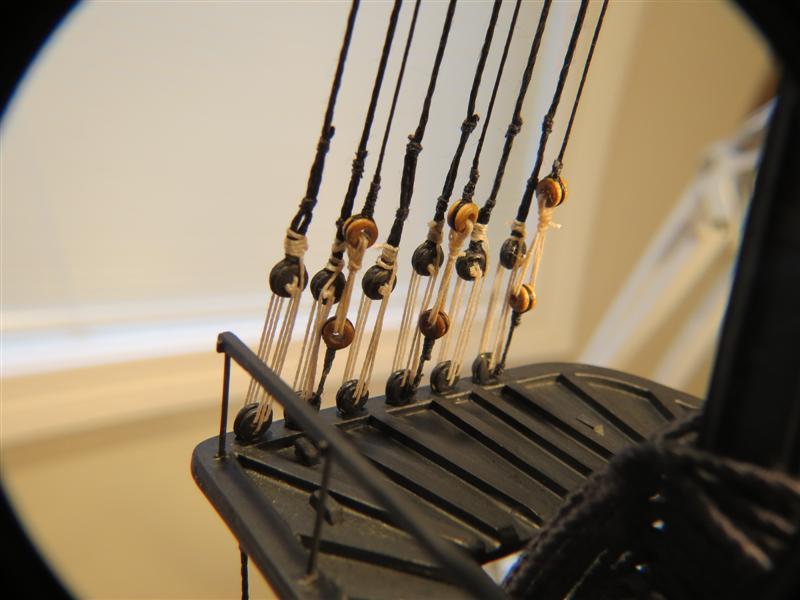
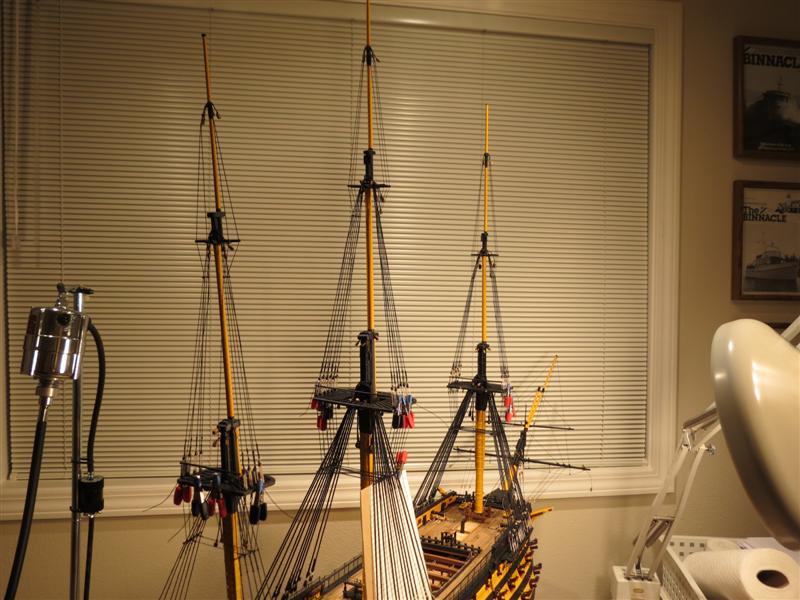
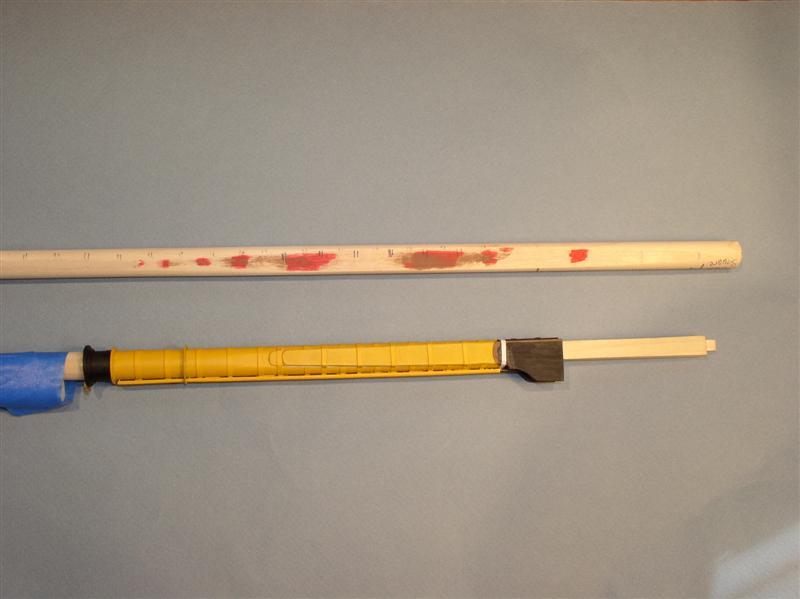
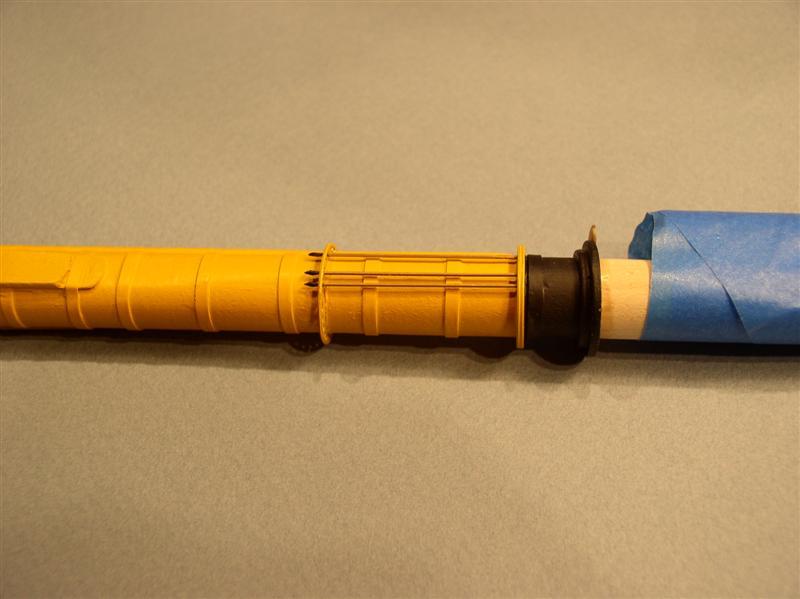
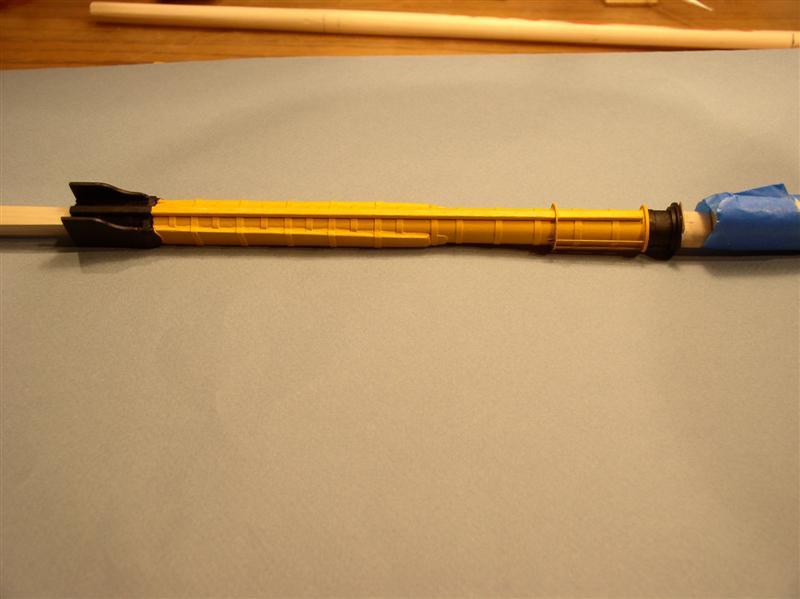
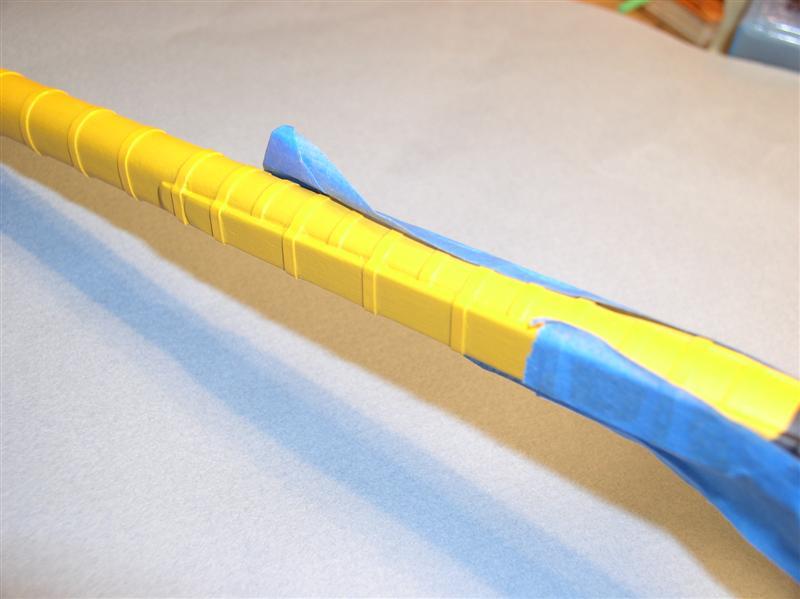
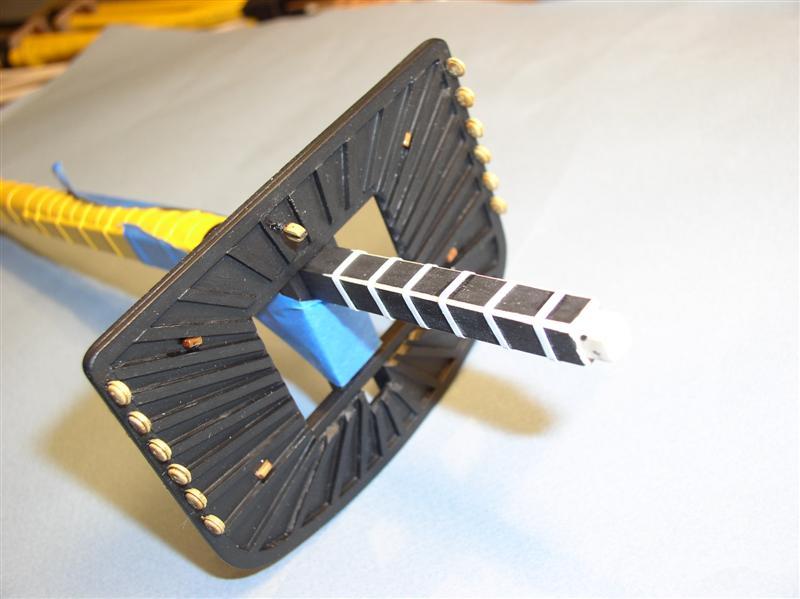
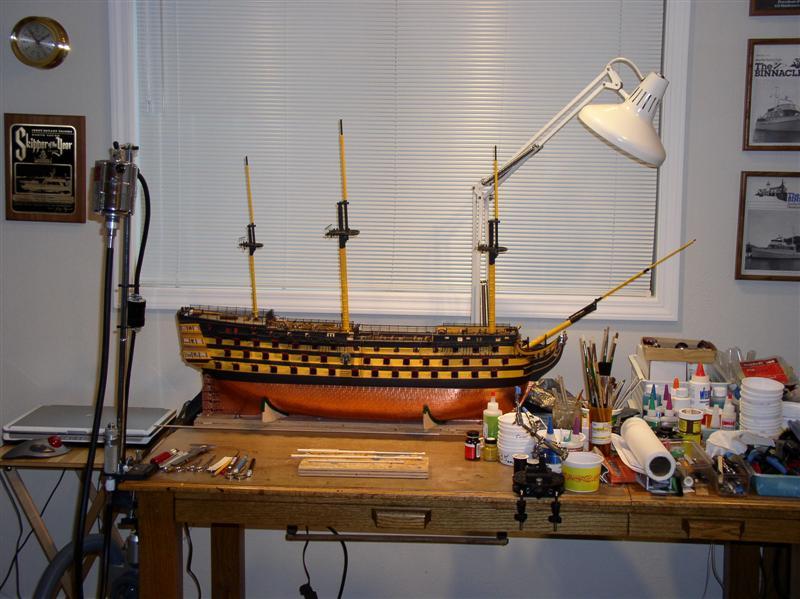
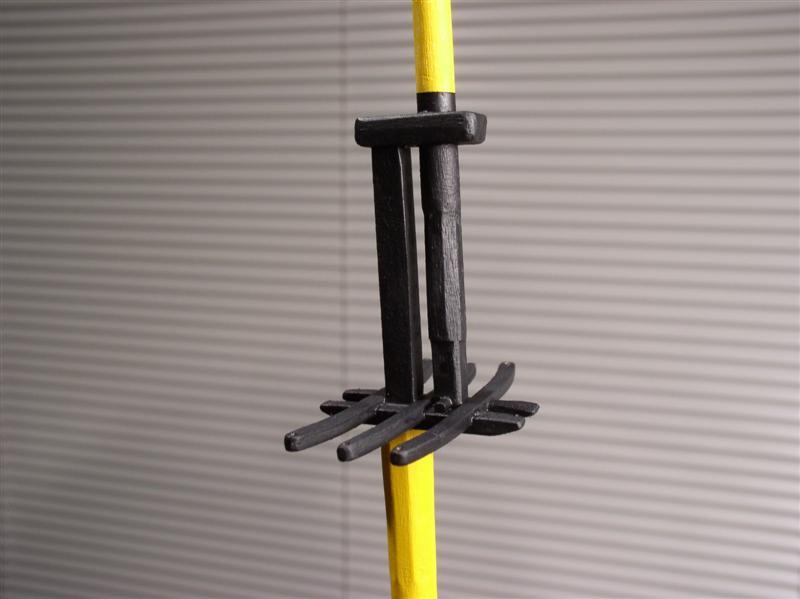
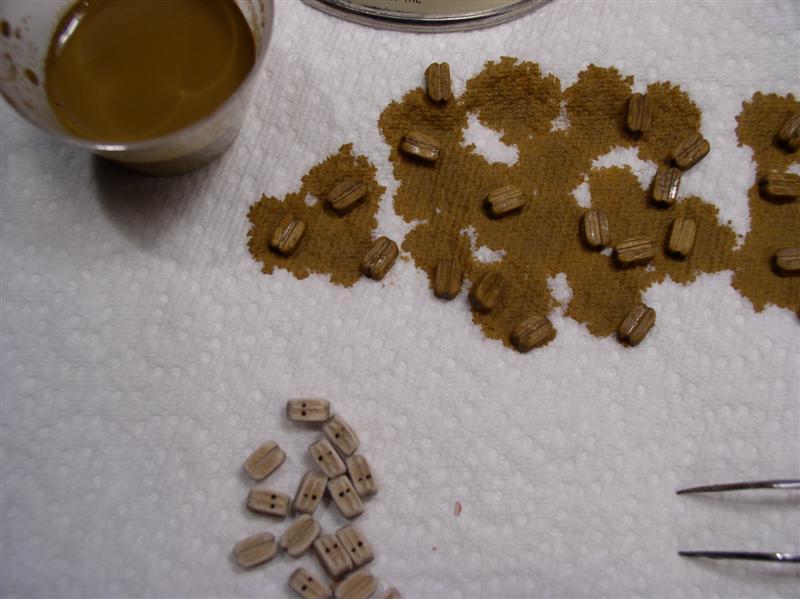
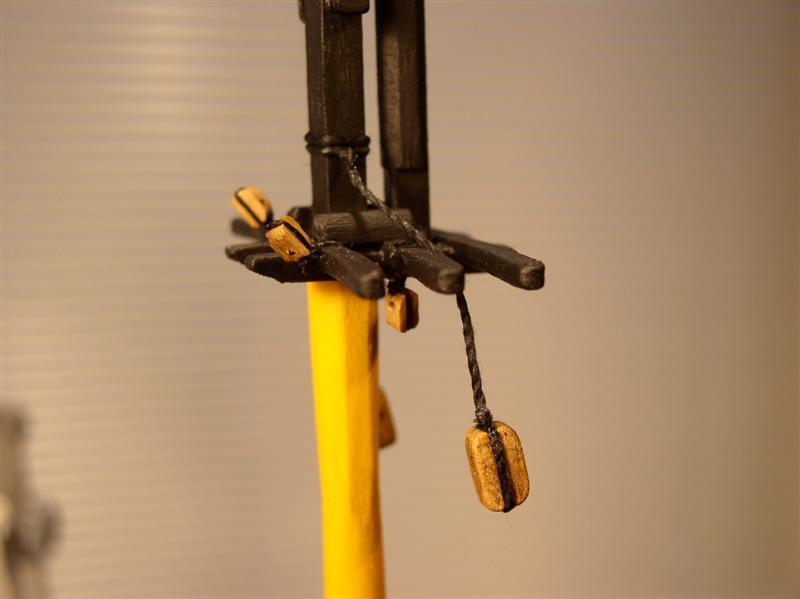
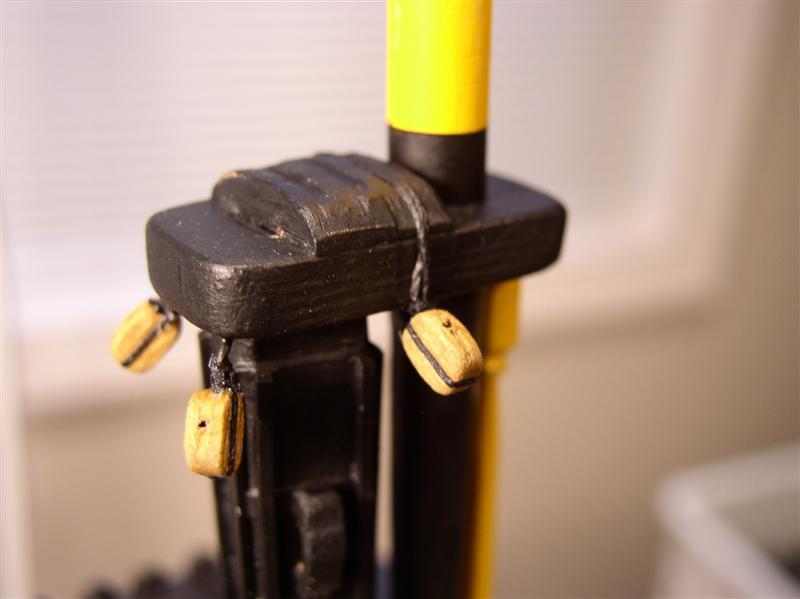
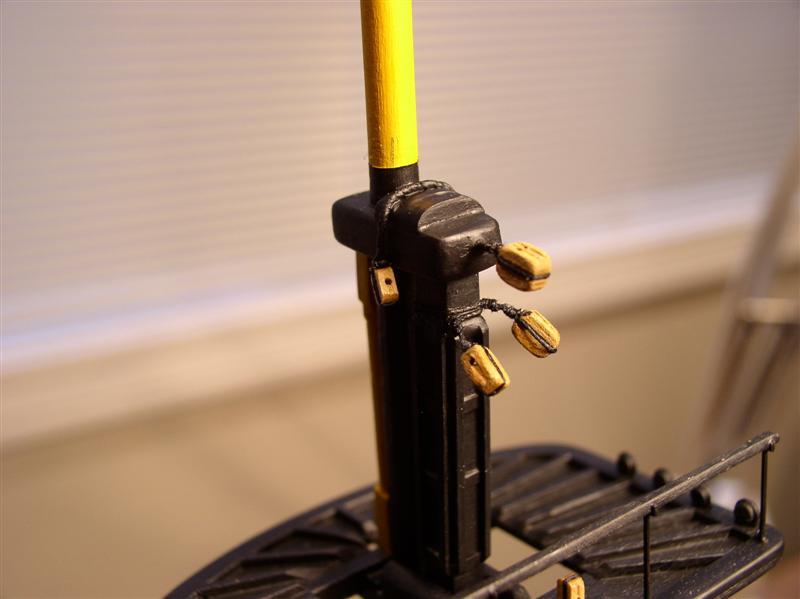
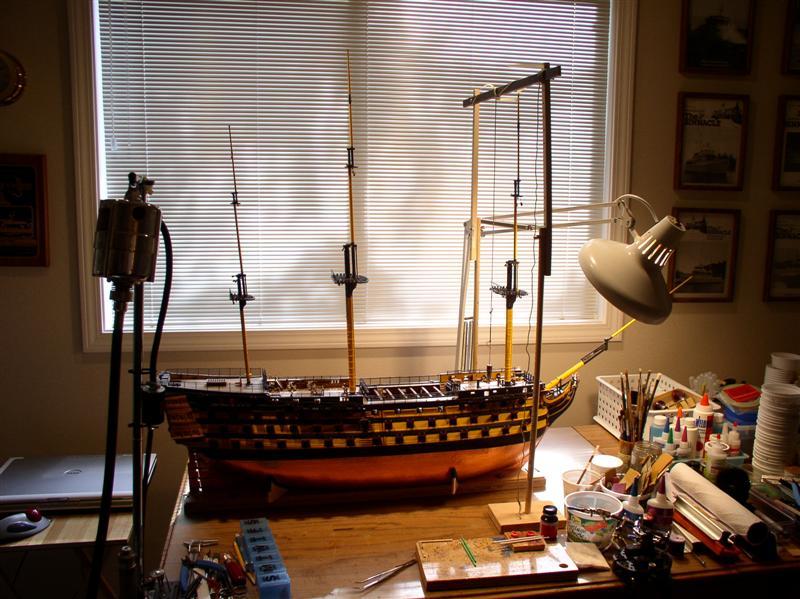
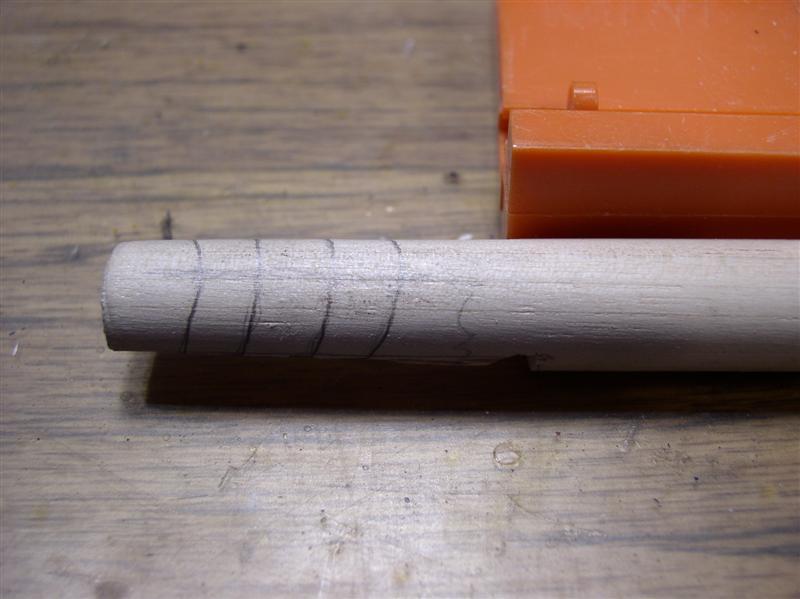
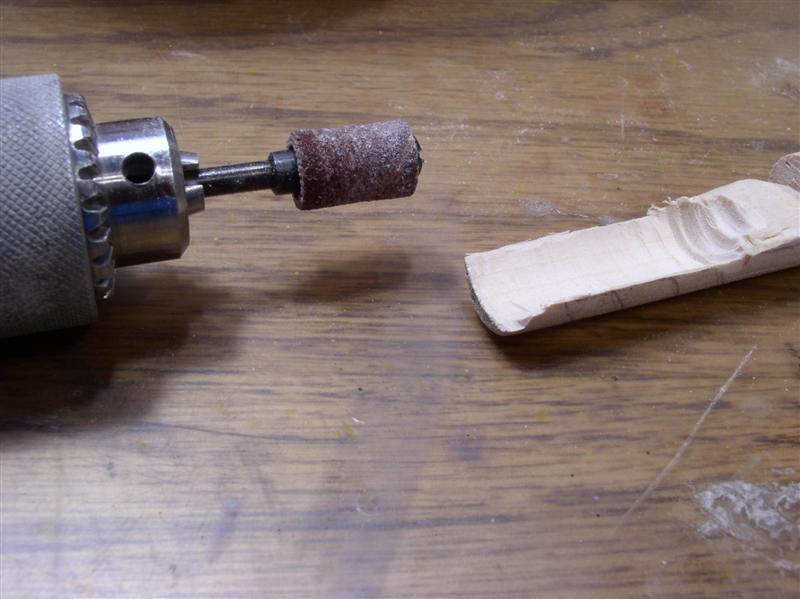
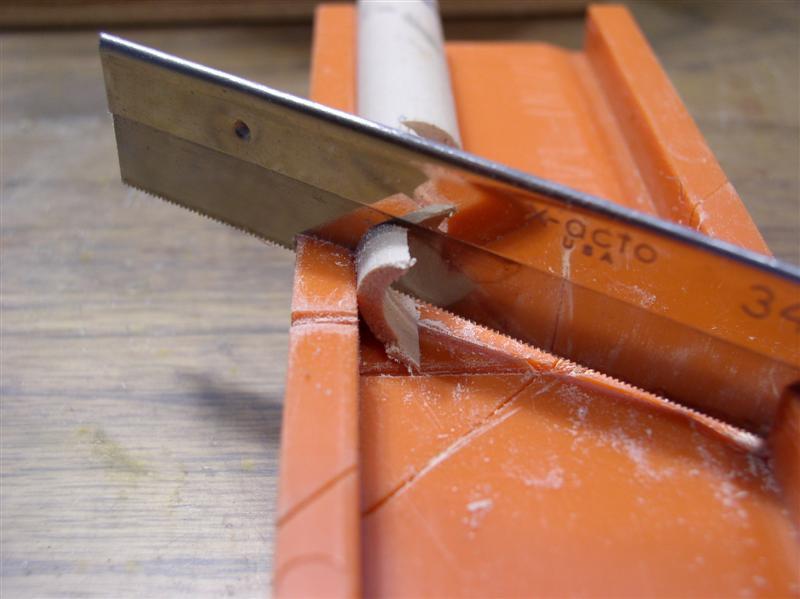
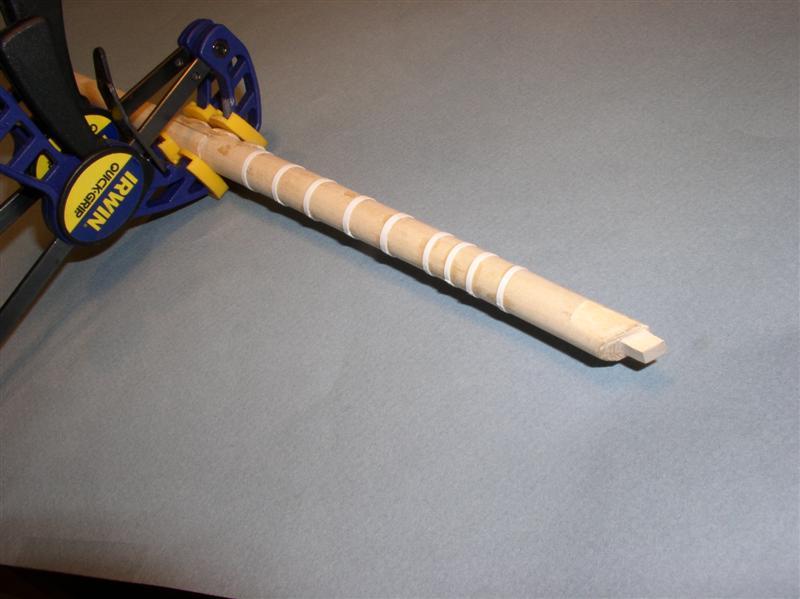
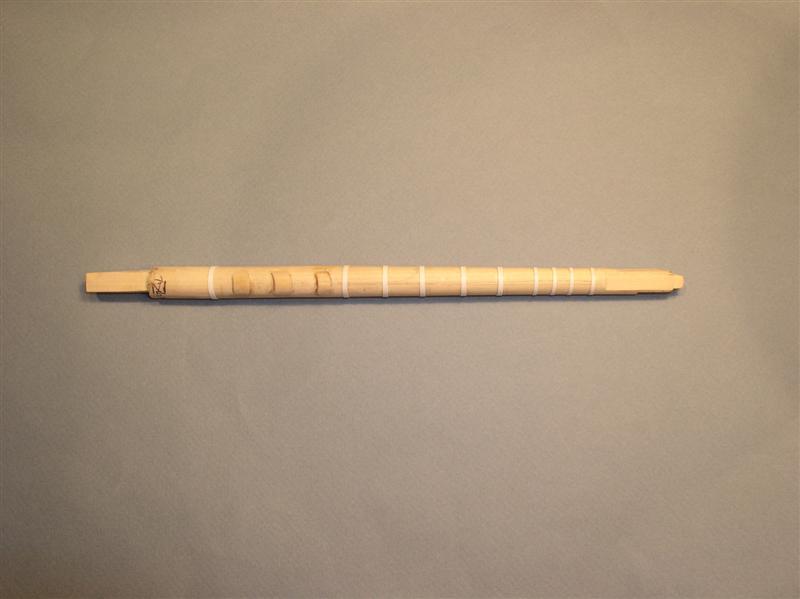
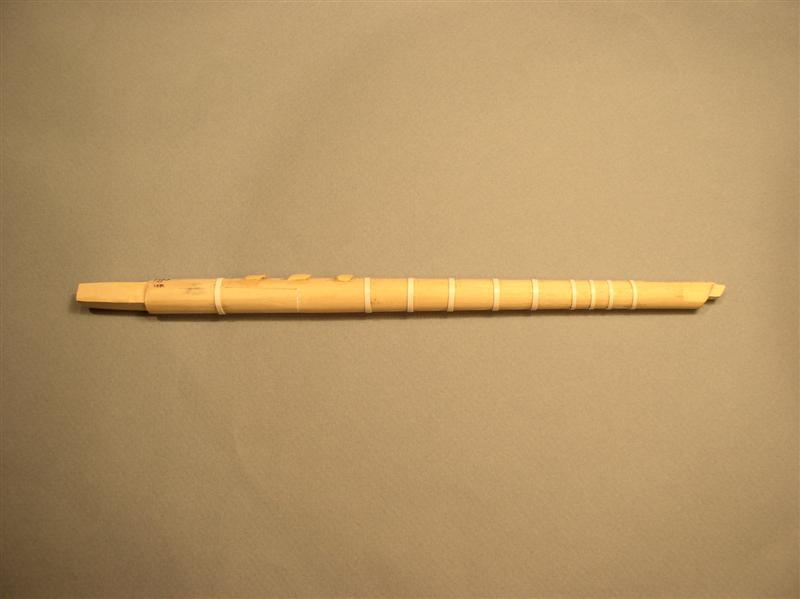
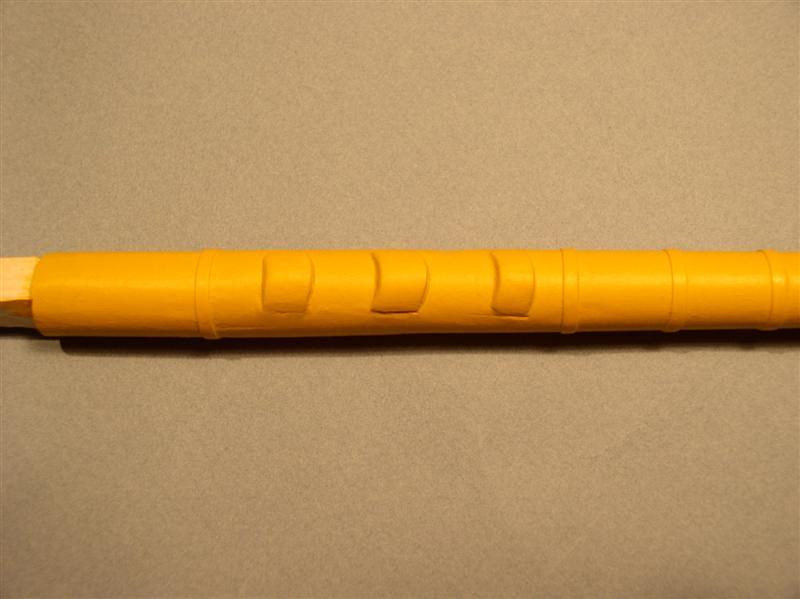
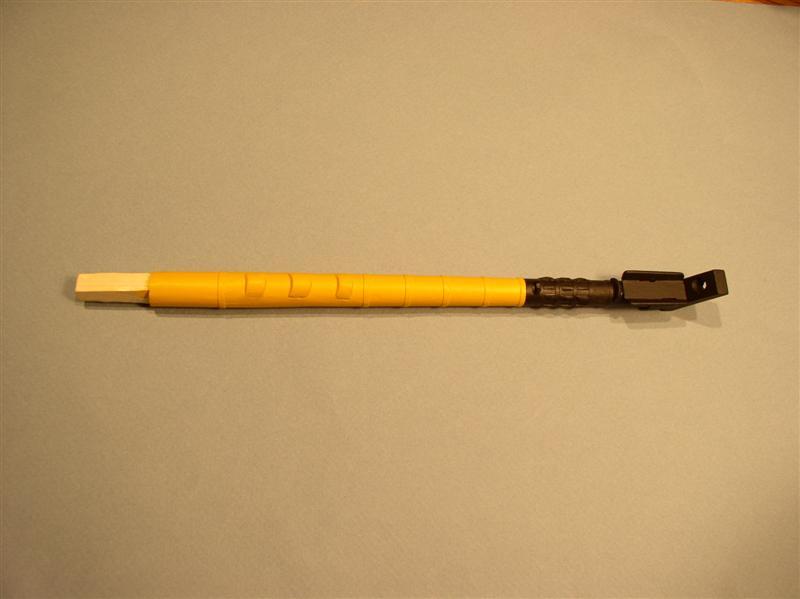
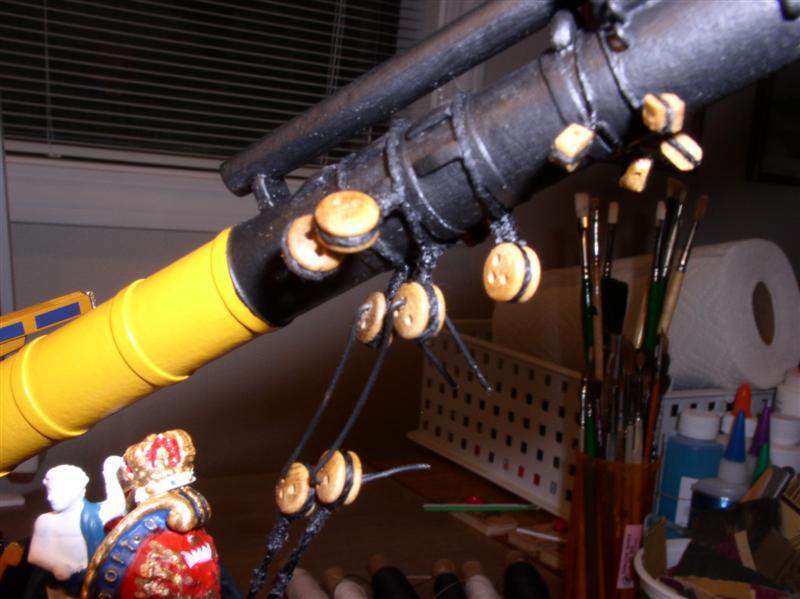
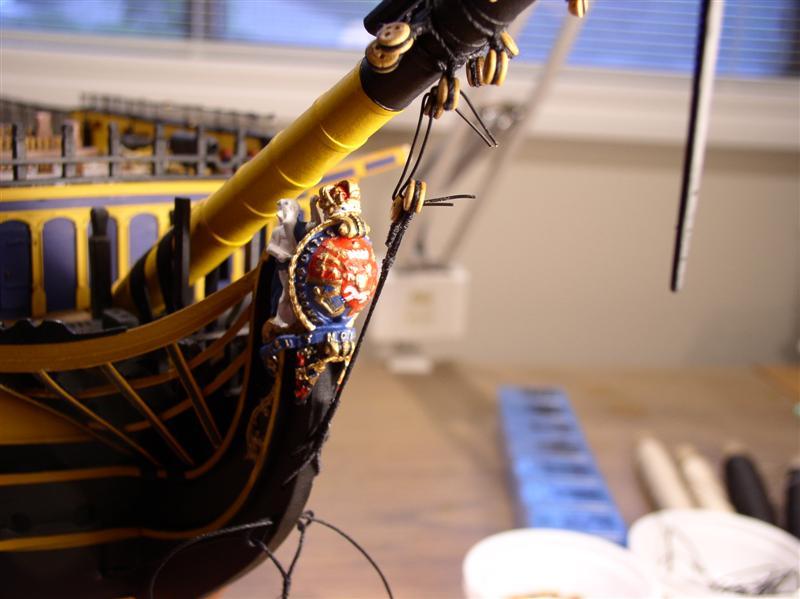
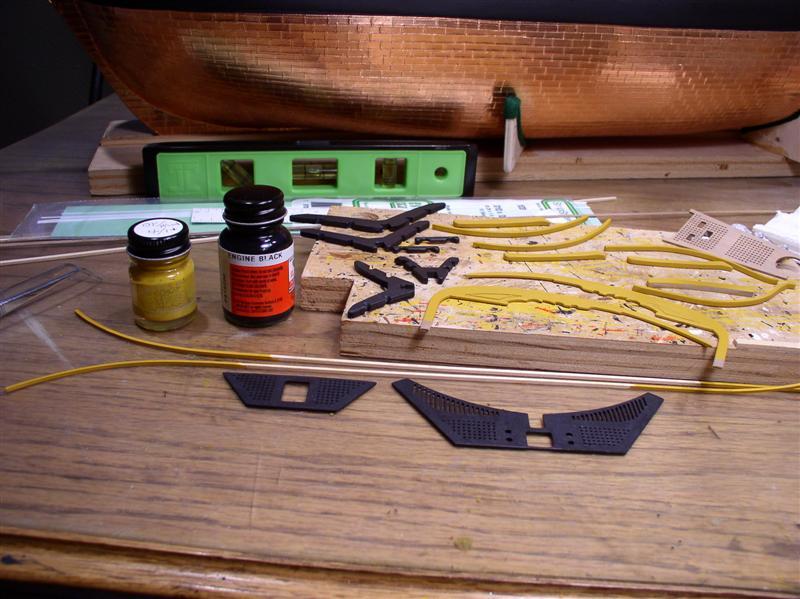
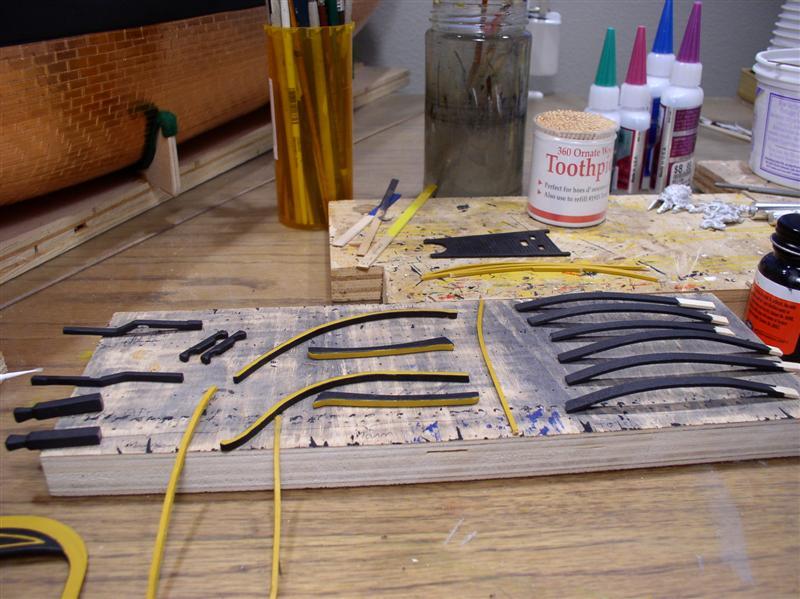
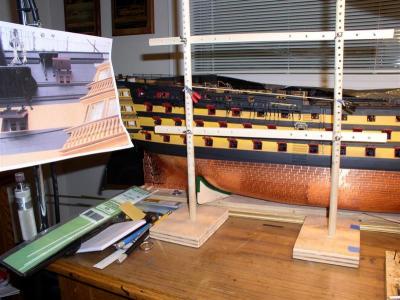
18. RUNNING RIGGING Finally the running rigging. This will bring the build log up to date, with a few new photos at the end. There are still a number of small details to add on the ship such as boomkins (deferred in order not to knock them off), lanterns, etc. and much more running rigging so I'll probably be busy for another year. Work on our real boat begins in March to prepare it for summer cruising, so priorities will change. Grant (gdale) will pass me by and I'll get to study his rigging before making mistakes. It's a relief to have the build log back in place and to see others taking shape. MSW is alive and well, and our sincere thanks to all the moderators who have suffered through the trials. Our inconvenience is but a fraction of their increased work load, dedication and frustration. Thanks you!!! On with the rigging. On the right, the initial square jeer block. Center: sanded and stained with "English Oak" Lower and upper jeer blocks. Indentations for double stropping. These massive blocks were 26" long on the real ship. Experimenting with yard lift and battens (styrene) at central yerd Battens and iron bands Double stropped jeer blocks (served) Warps of rope to support jeer blocks Lower: Main yard with battens, iron bands and yard cleats. Next up: studing sail (stuns'l)) booms. Middle: Foremast yard, tapered by sanding with power drill lathe (ends to be cut off). Supplied stuns'l rings too large. Replaced by cut section of styrene tubing (5.5mm diameter) Rigging for yard lift, jeer blocks (double stropped), all served Supplied stuns'l boom rings and replacement Central yard, plus iron bands and yard cleats Yard cleats. "bolts" are .035" rivets. Fittings at end of yard Main yard Stuns'l boom rings. Stirrups for foot rope (horse) from 24g dark annealed wire with thread lashing around yard. Siezing around wire to simulate eye splice supporting foot rope Styrene and square brass rod for stuns'l boom support Yard rigged with yard sling,jeer blocks, yard lift blocks, horse and stirrups and Flemish horses at ends. Jeer blocks with lashing through eye splices from stropping Stuns'l booms added Brass wire to pin yard to mast (to stabilize yard for rigging) At last, the build log is up to date. The next few pictures are work done just before the crash and not yet posted. Cheers, Gil


- 755 replies
-
- 4
-

-
- finished
- caldercraft
- (and 1 more)
-
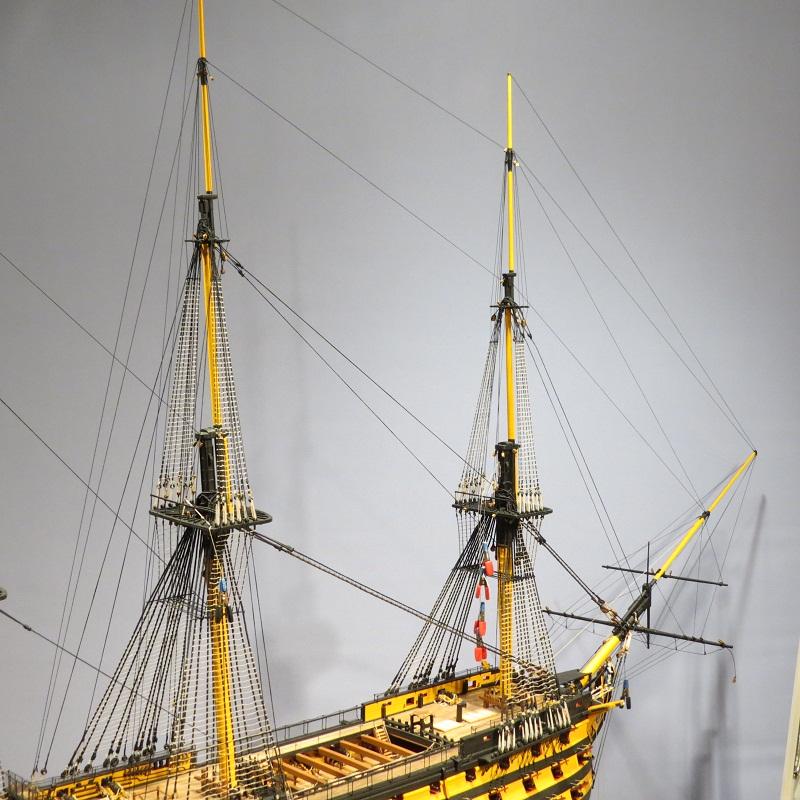
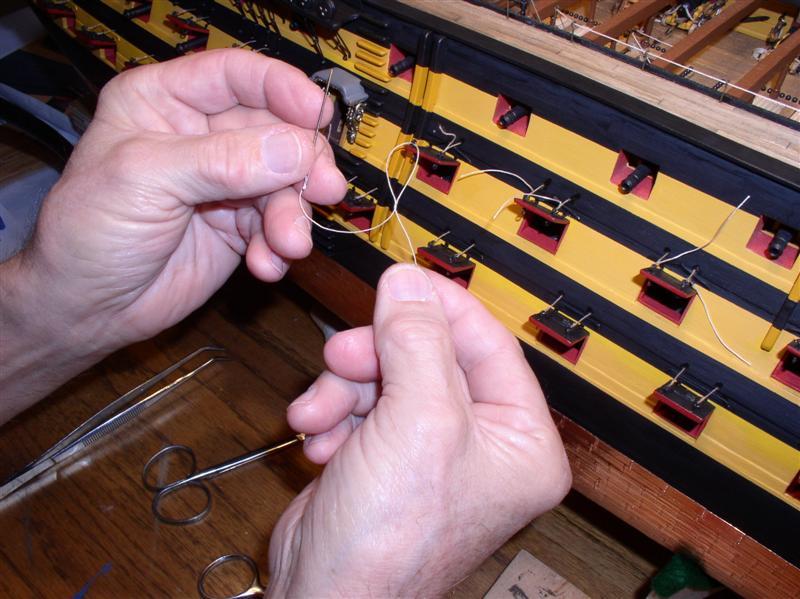
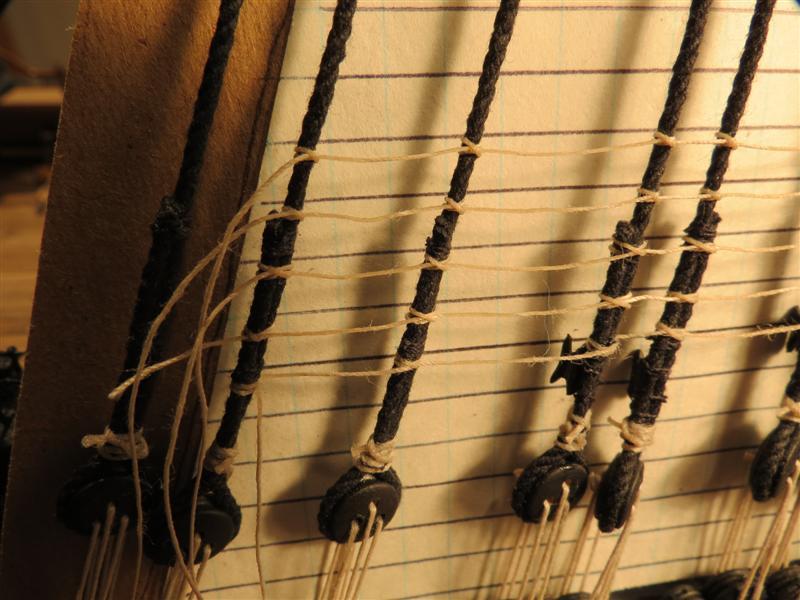
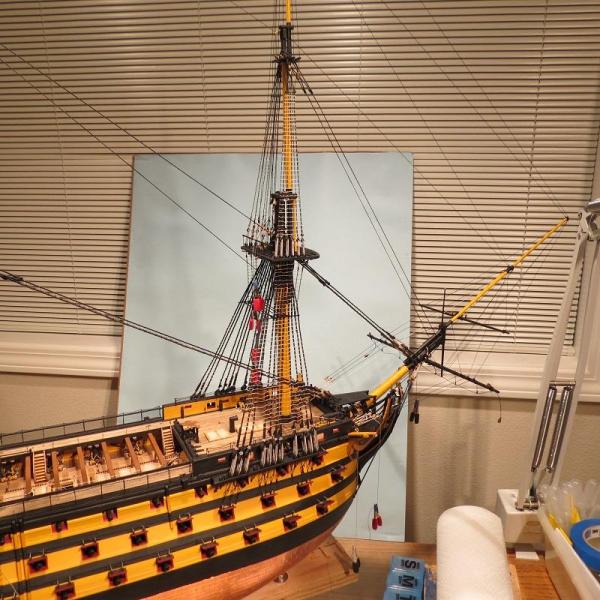
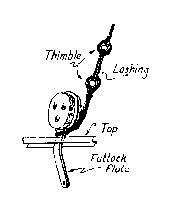
17. RATLINES My first thought on ratlines is to complete them prior to some of the standing rigging. Here the topgallant shrouds, lashed to bullseyes just inboard of the topmast shrouds, play havoc with tying the ratlines. The second thought is I rather wish I had gone with black thread. The natural thread contrasted with the black shrouds makes the ratlines appear almost white by comparison. The result is that one's attention is drawn to the ratlines rather than the more important rigging that supports them. I tried toning down the contrast by painting the ratlines with a "black wash" (very dilute black paint) with some success. Graph paper used to align the futtock stave and ratlines. The color contrast appears less intrusive with less intense lighting. I began with clove hitches but switched to overhand knots Overhand knots resulted in only one line around the dtay rather than two with the clove hitch Ratlines on main mast. On futtock shrouds Top mast shrouds Inboard view of top mast shrouds


-
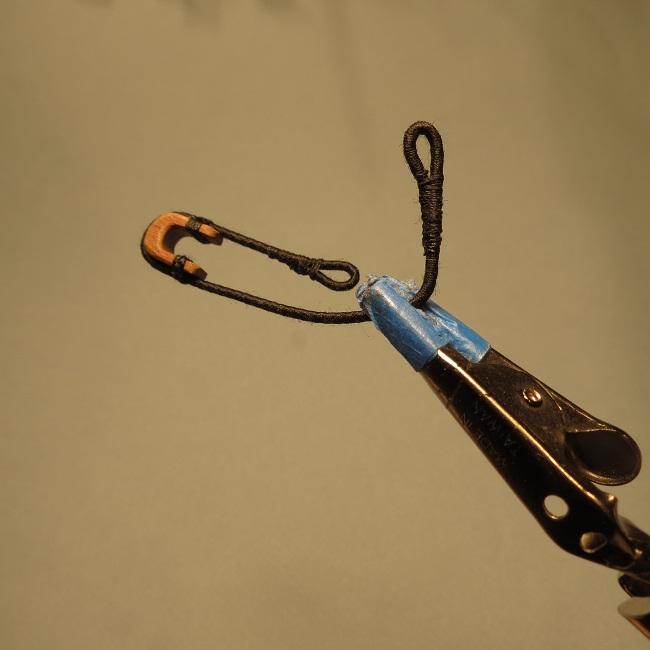
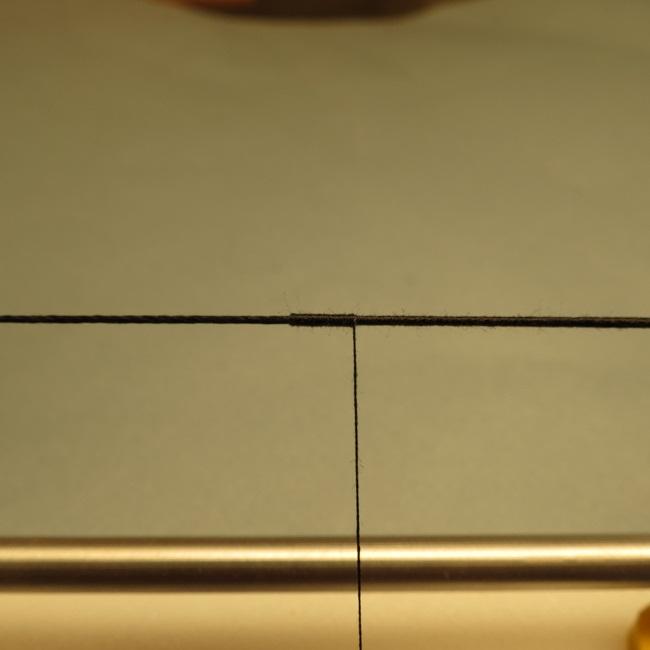
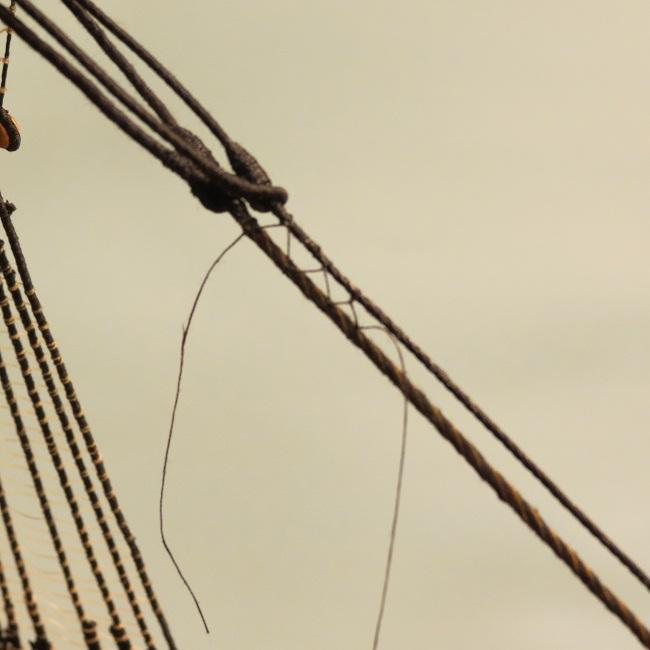
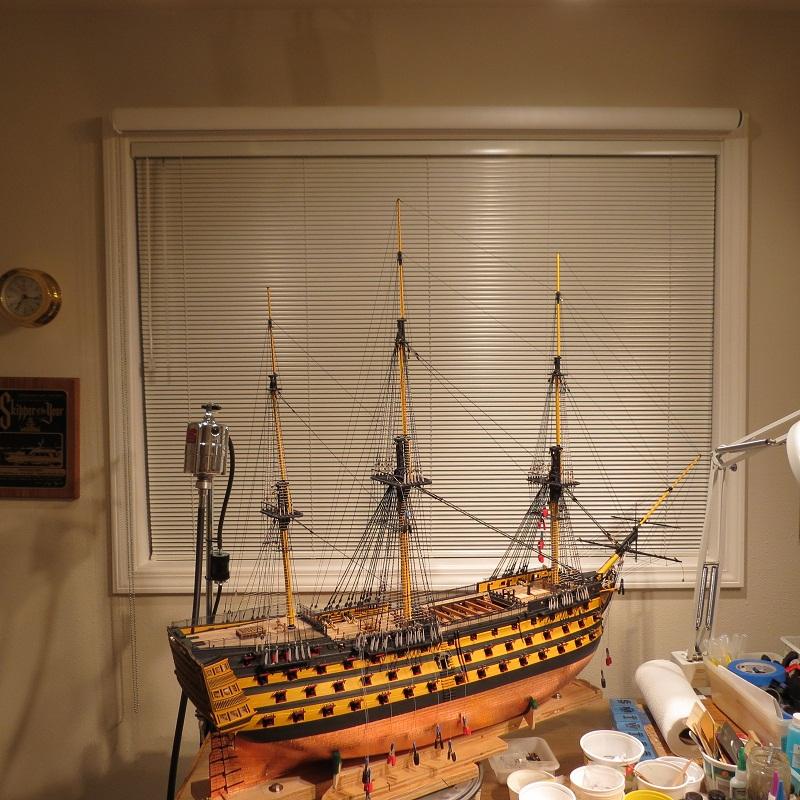
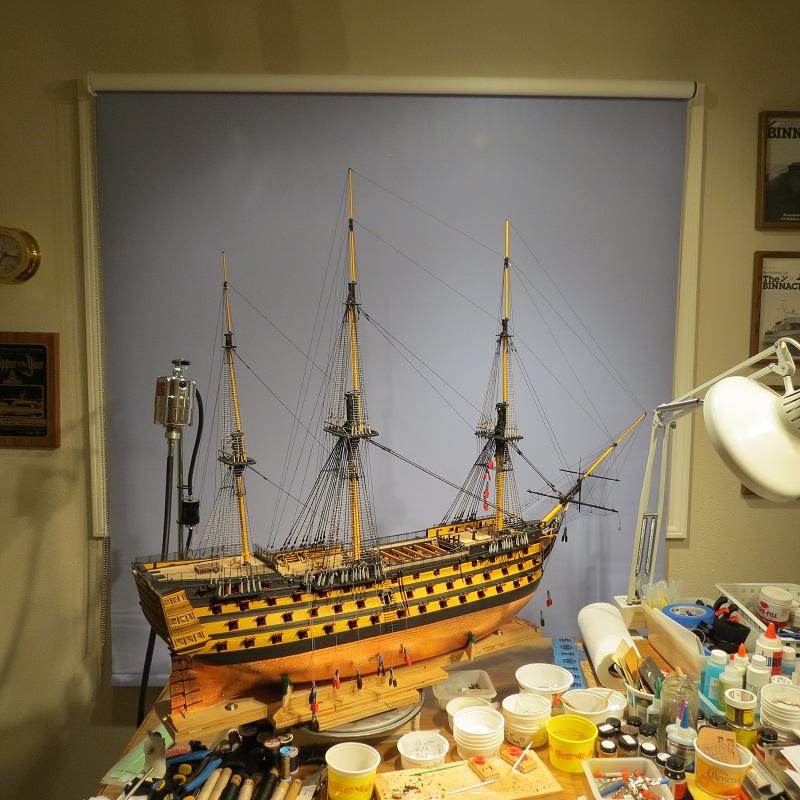
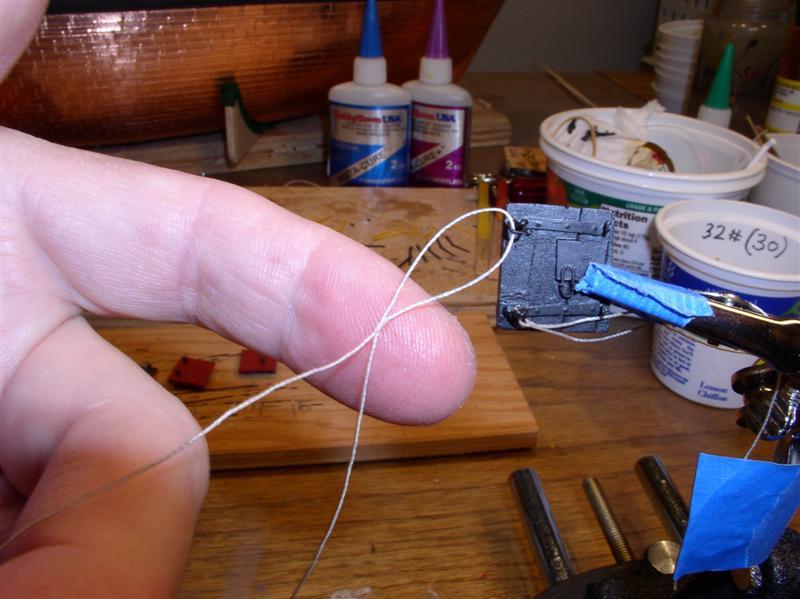
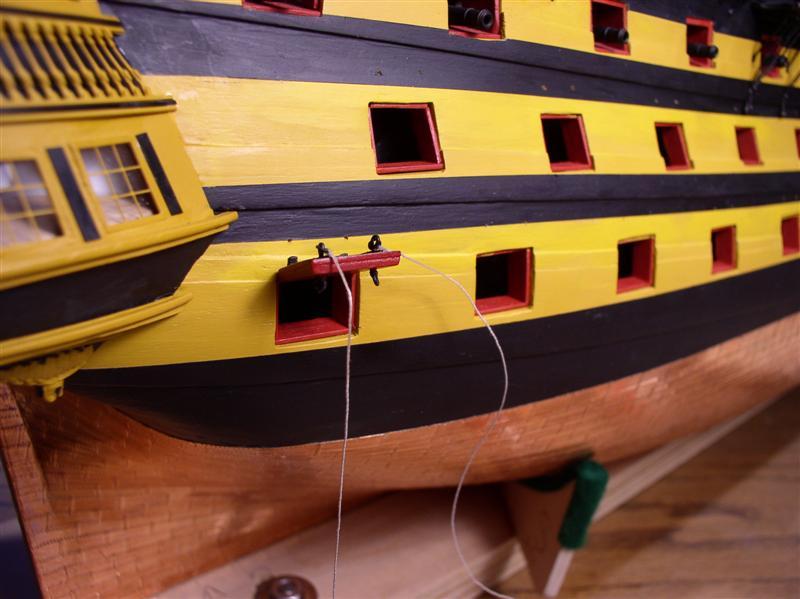
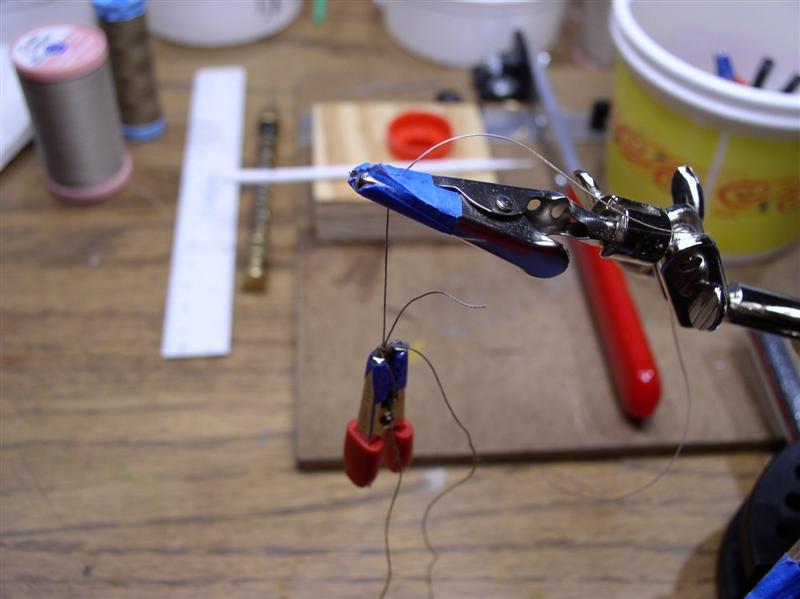
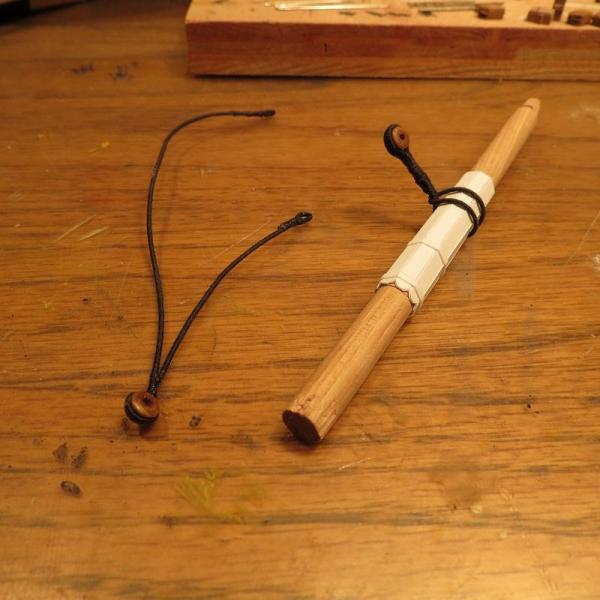
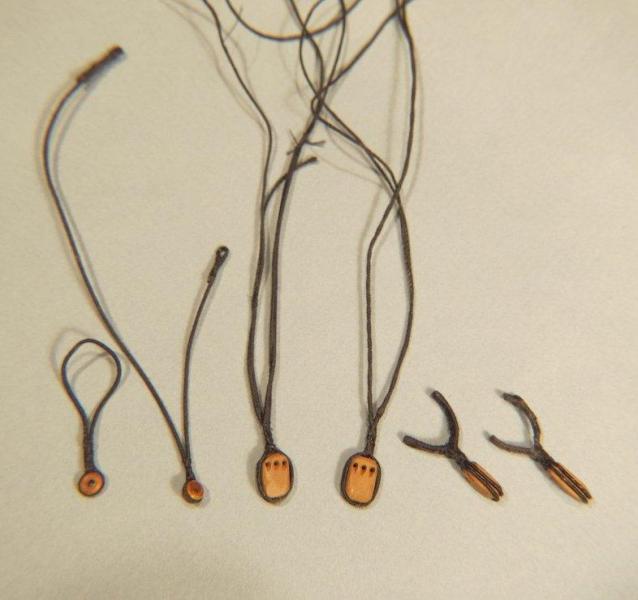
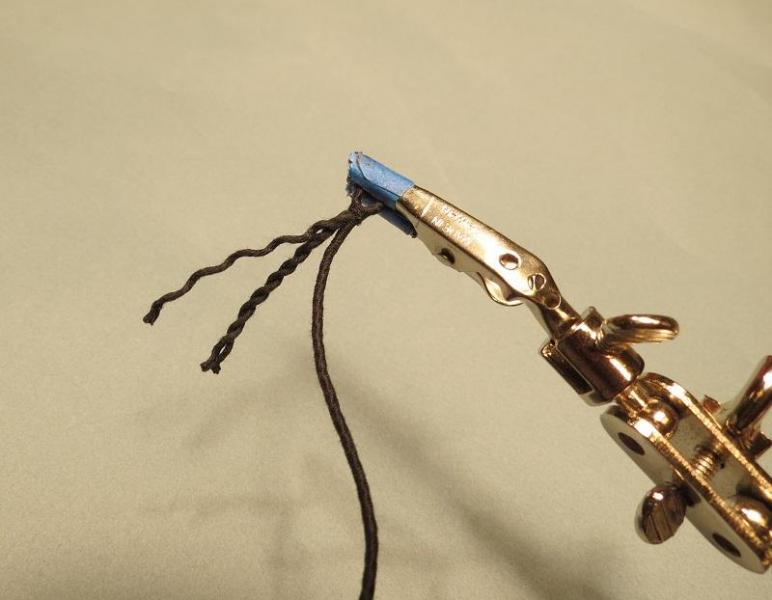
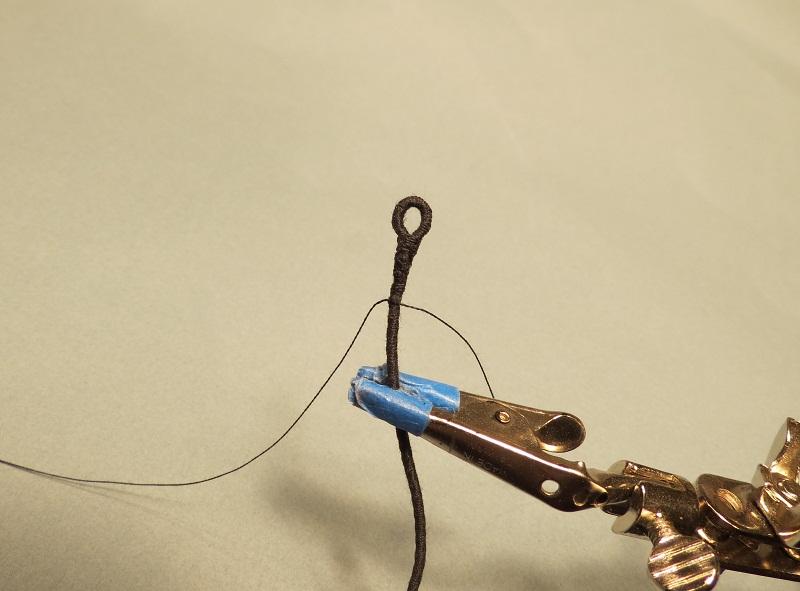
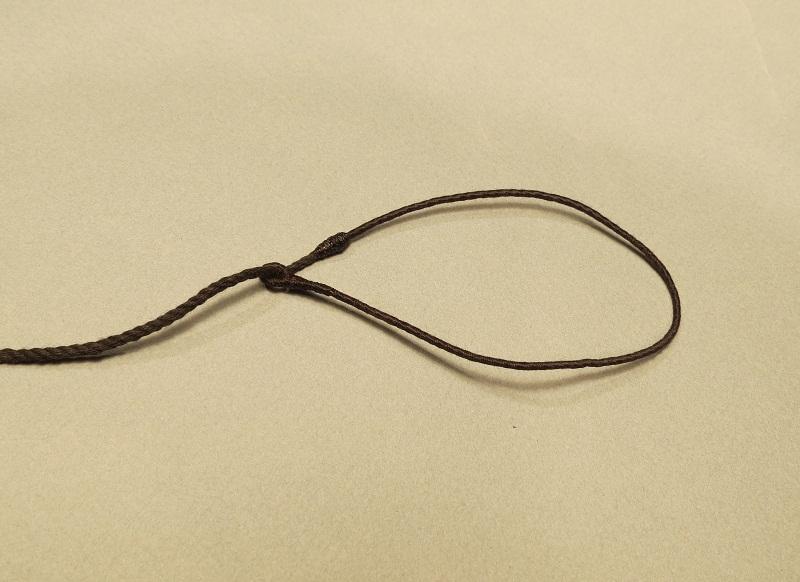
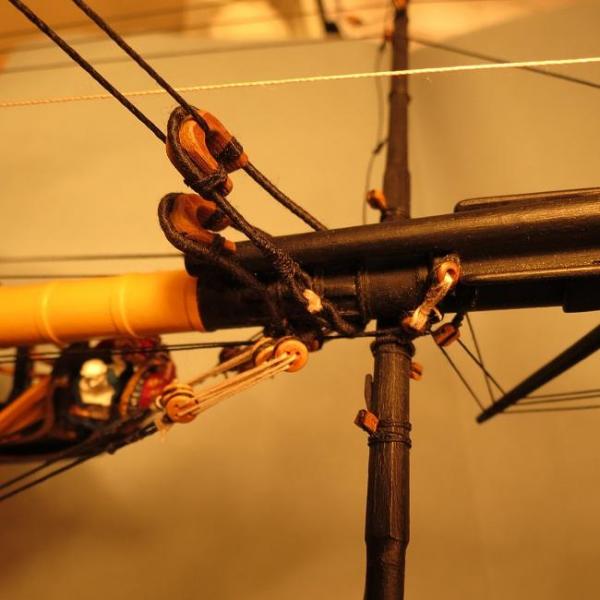
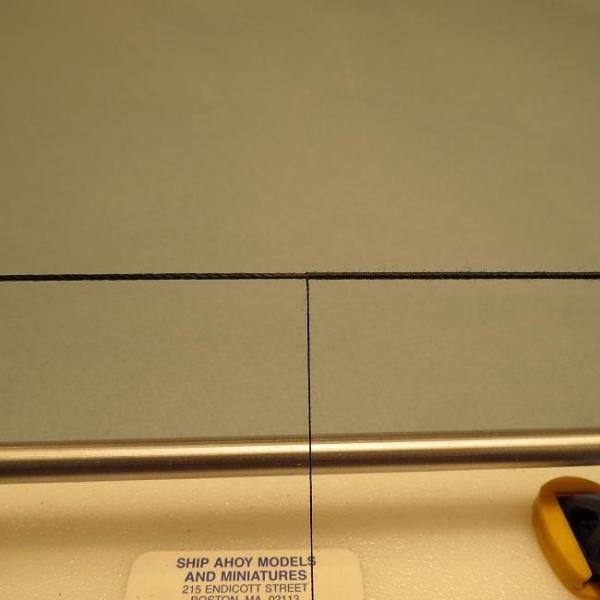
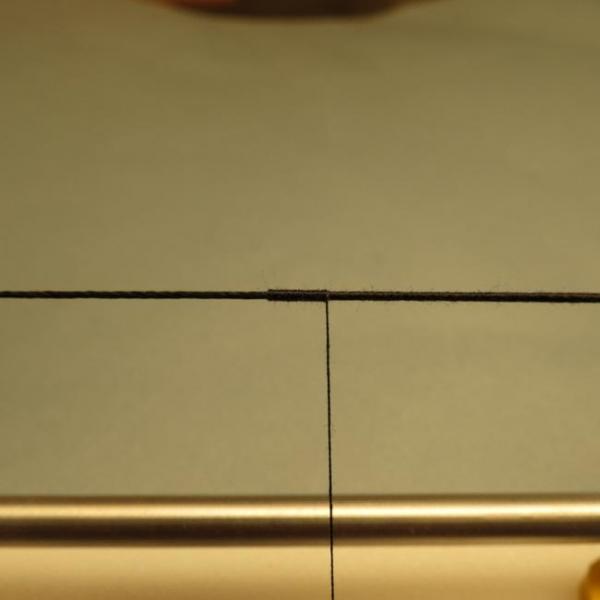
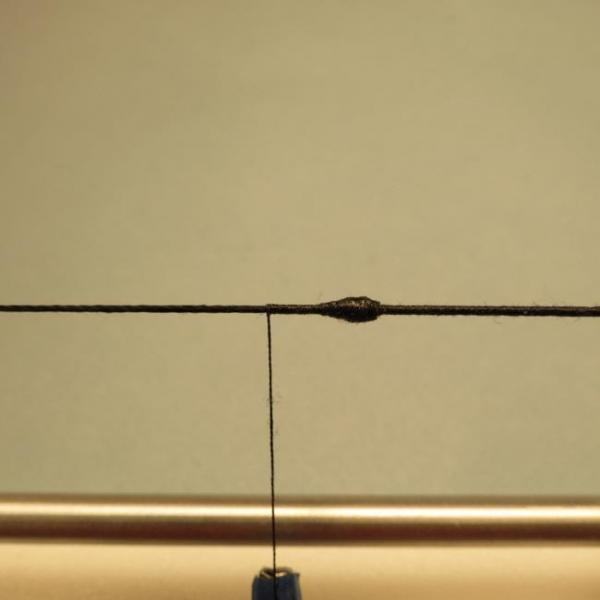
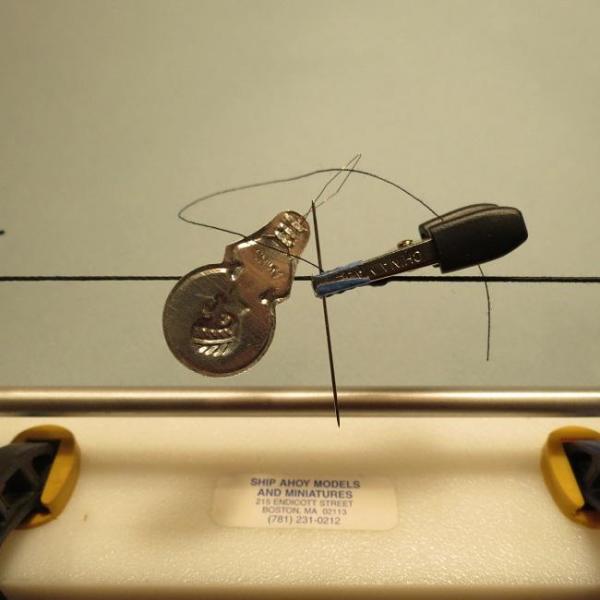
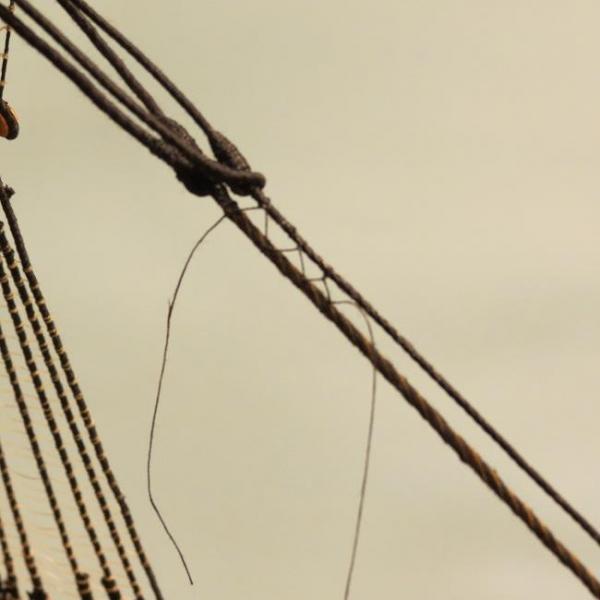
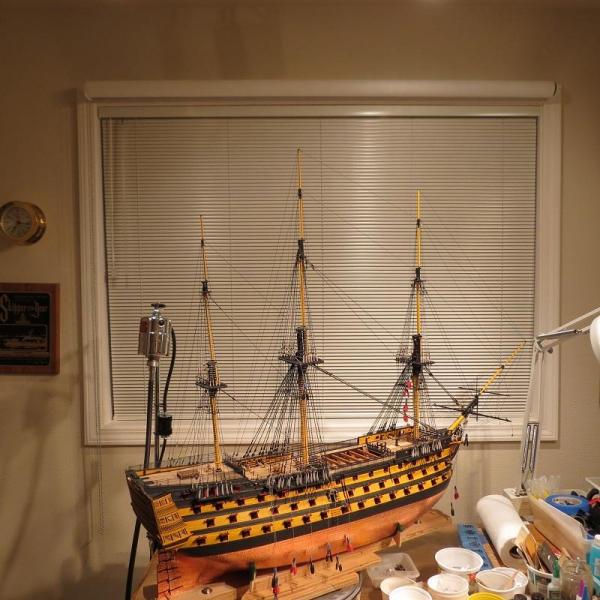
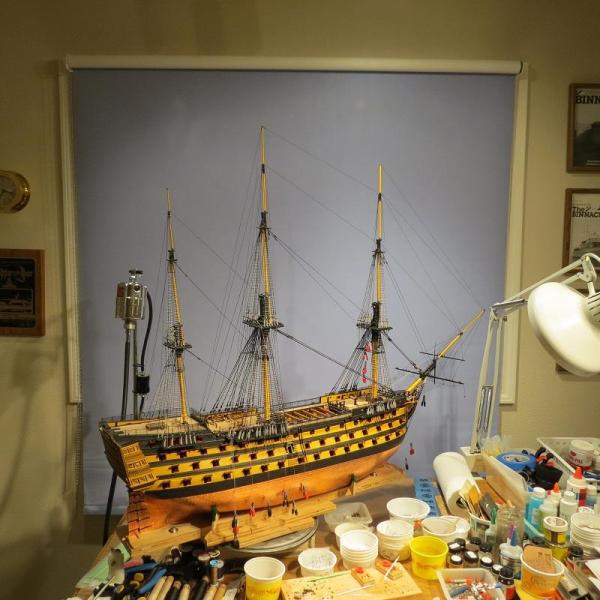
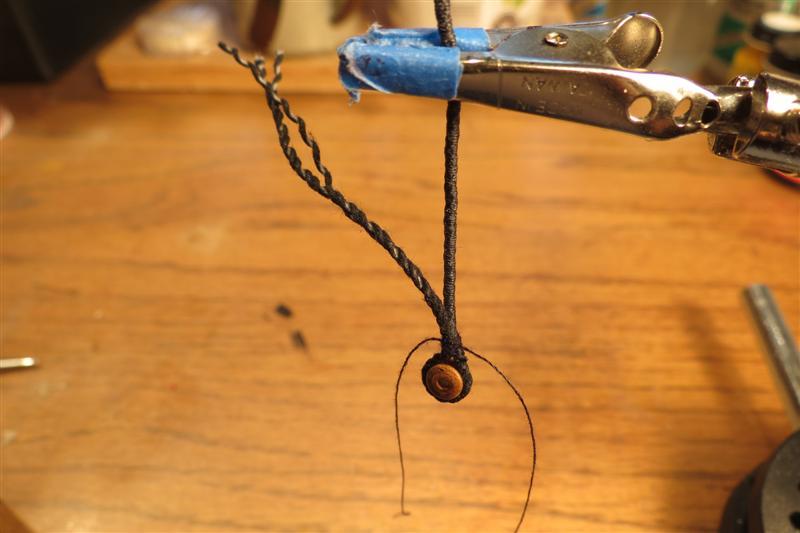
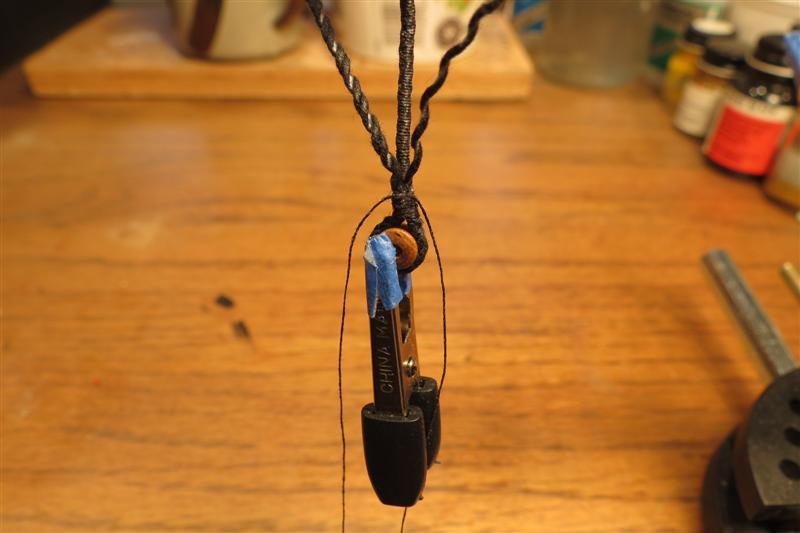
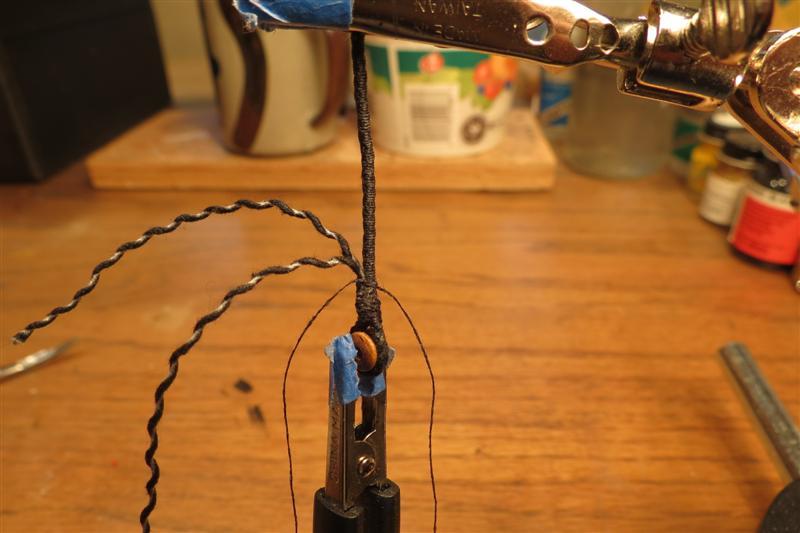
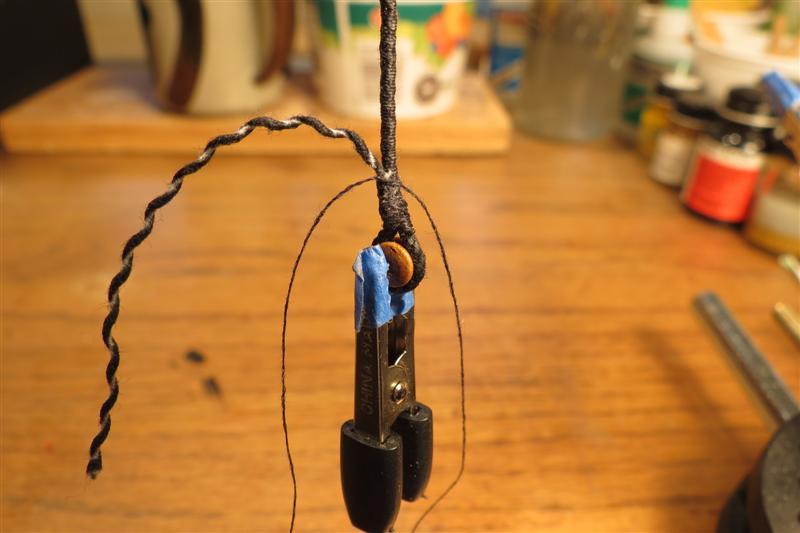
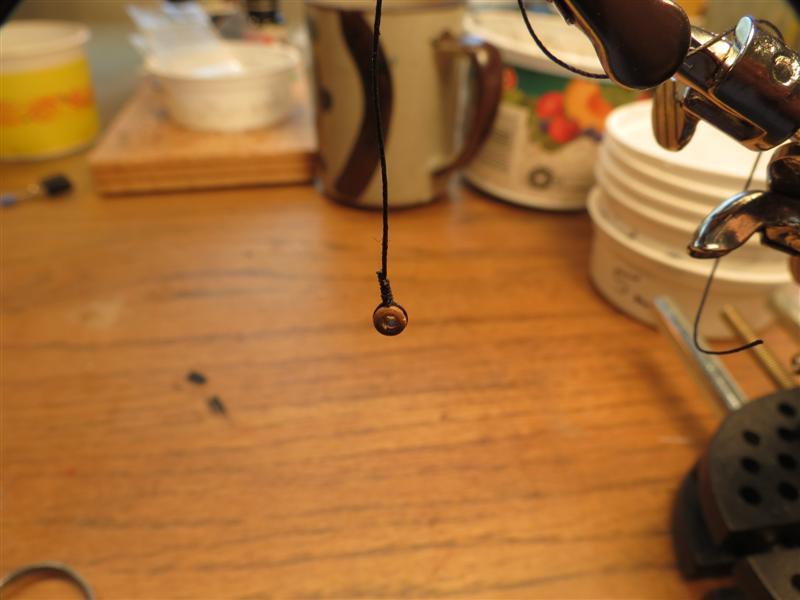
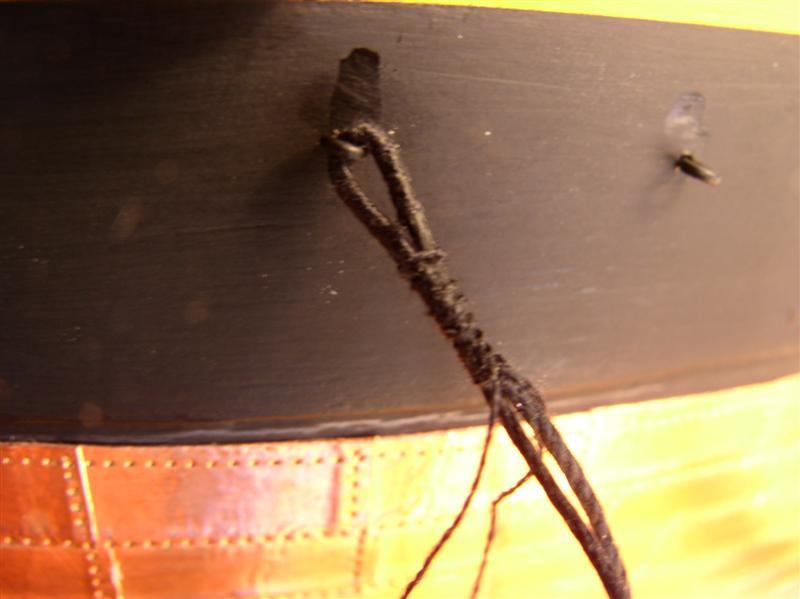
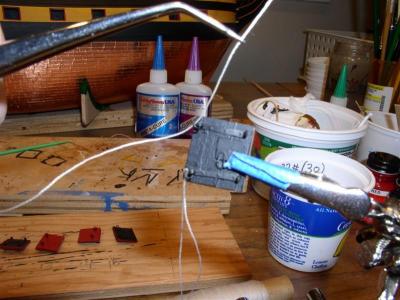
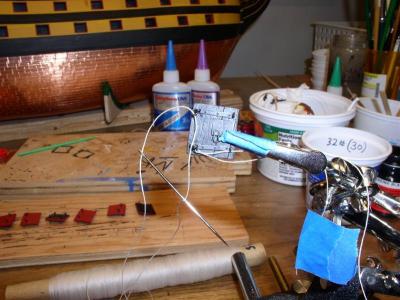
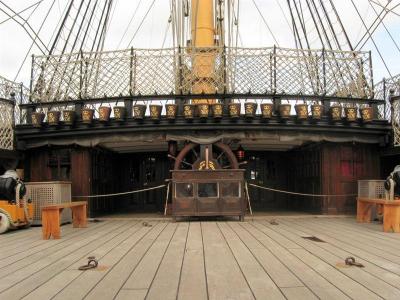
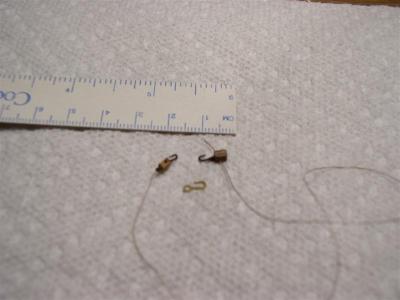
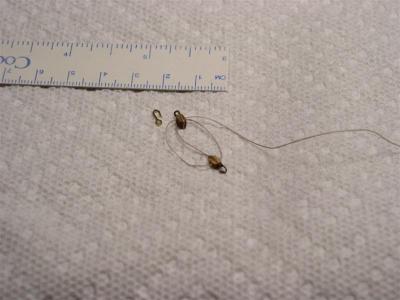
On with reloading the build site. RIGGING THE FORESTAYS AND PREVENTERS Experimenting with a mouse and eye for the forestay. Forming the eye with served line. Forming the mouse with extra winding. Mouse and eye Bow sprit collar (served) Attaching bow sprit collar with lashing between eyes The forestay and mainstay are served at the mast to just beyond the mouse, and wormed from there on. Serving the forestay. Backwinding to begin the mouse Winding to build the mouse. A little C/A helps build the trailing end and serving continues just beyond the mouse. Serving ended by passing thread through the stay. I did not glue and cut this worming line until the three worming lines were passed. It is nearly impossible to pass a needle through C/A treated line. Three strands passed through the stay to begin worming. Worming the forestay Served on right, Wormed on left. Mouse to be added. Forestay and preventer at fore top Mouse and eye (served). Starting lacing line between stay and preventer. Forestay and preventer Attached at bowsprit to served collars with lashings. Main stay and preventer at main top Attached to collars around the bow sprit Main top mast shroud and preventer At fore top To lashing at deck eye Mizzen top mast stay Mizzen stay and top mast stay Mizzen stay Main top mast stay and preventer Main sliding backstay Main breast backstay Foremast sliding backstay Foremast breast backstay All stays and backstays were left adjustable until final tensioning and alignment PHOTO BACKDROP About a year ago, Mike Graff gave our Puget Sound Ship Modellers (PSSM) group a superb well thought out presentation on improving our model photography. The need was obvious. Here, the Venetion blinds obscure the rigging details. I tried poster board which was totally inaddaquate. Finally, I obtained a "baby blue" pull down shade which should improve my posts from here on. Next up, Rat lines


- 755 replies
-
- 2
-
-
- finished
- caldercraft
- (and 1 more)
-
Hi Daniel, I am remiss in not keeping up with your log and others, however, I'm still learning how to use the new site and above all to restore the build site. It should be done in a day or so, when I can sit back and enjoy the work of our many friends on MSW. I'll even have a few new photos to post. David and Jim, It's nice to know someone actually reads all this stuff. I've certainly learned my share before "the crash of 2013," We're all learning from each other and it will be good to get back in stride. Cheers, Gil
-
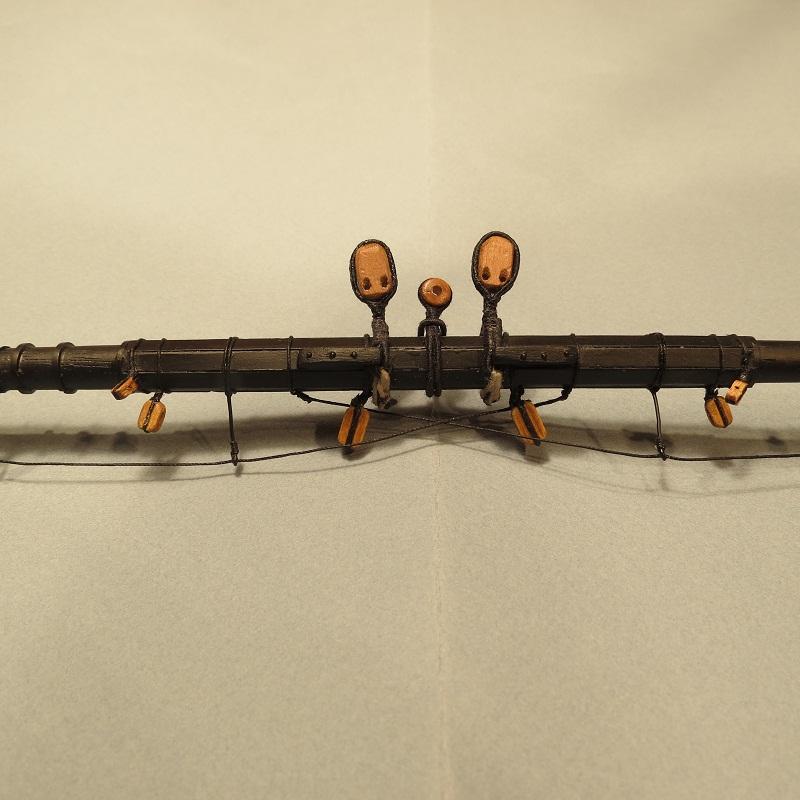
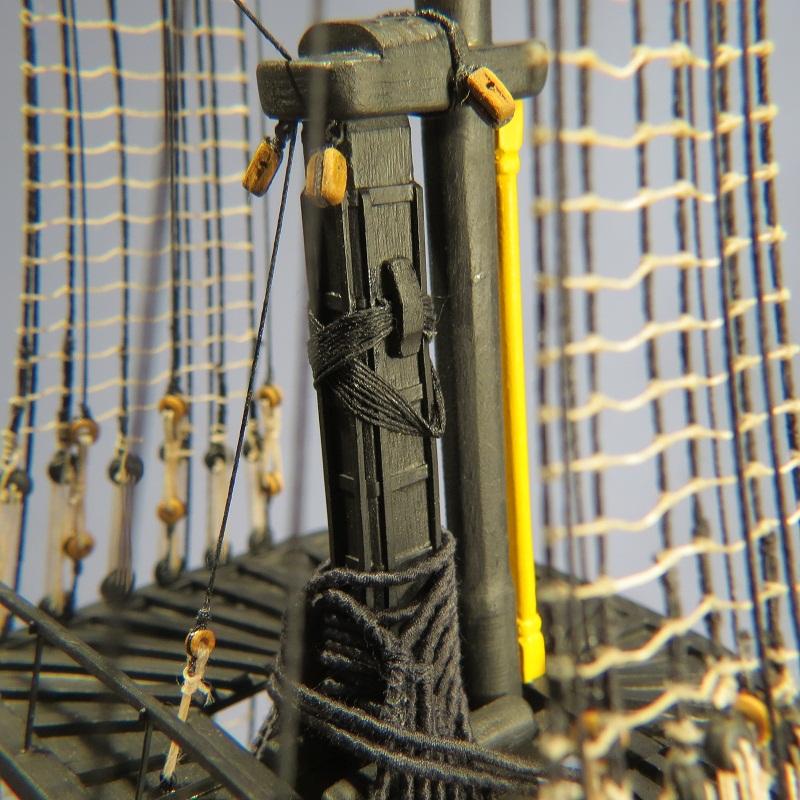
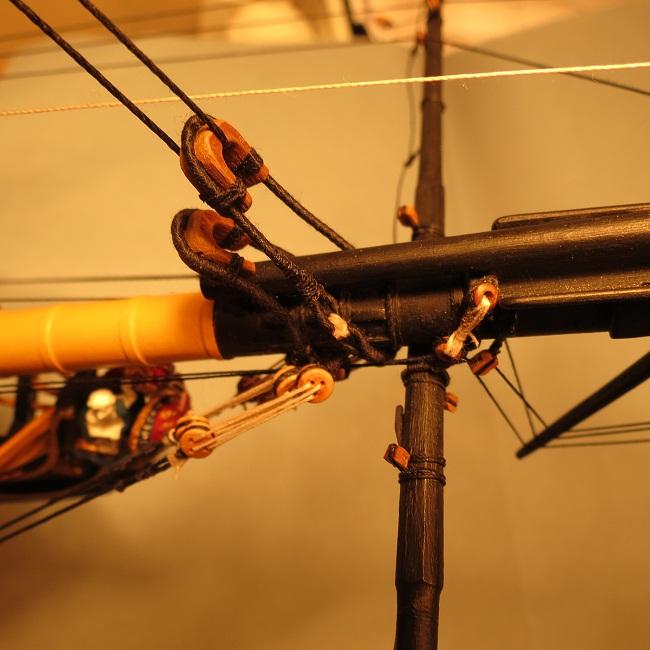
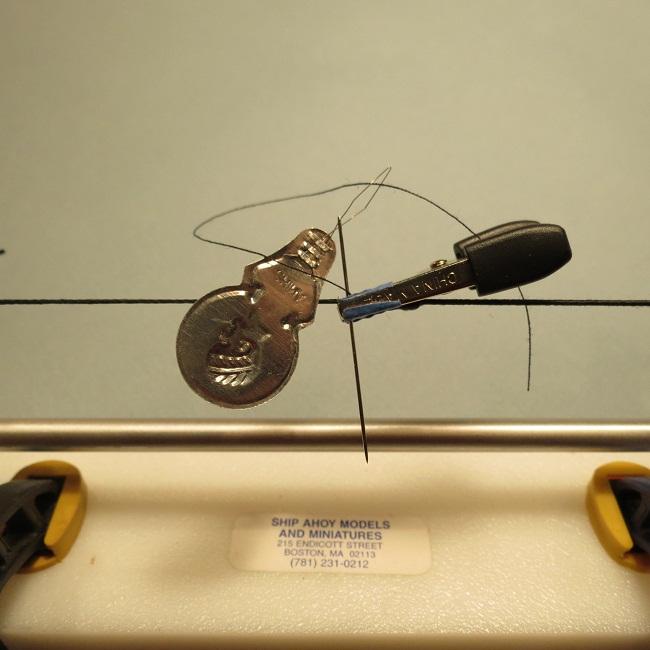
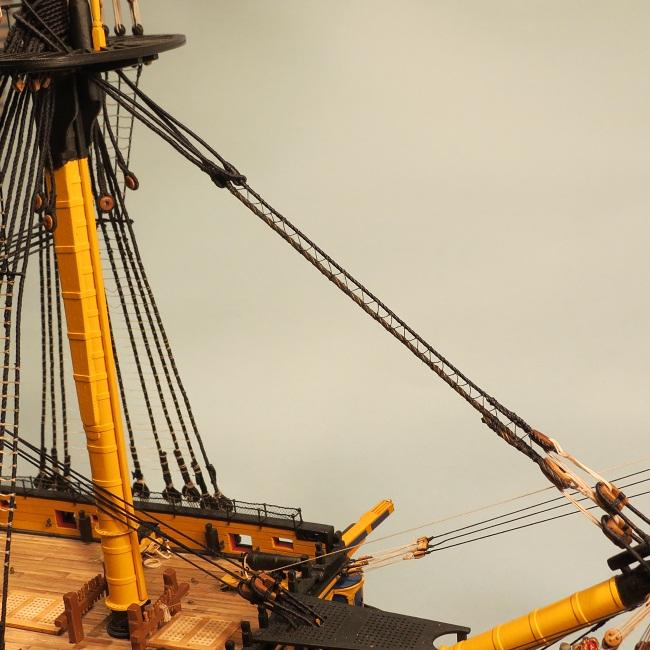
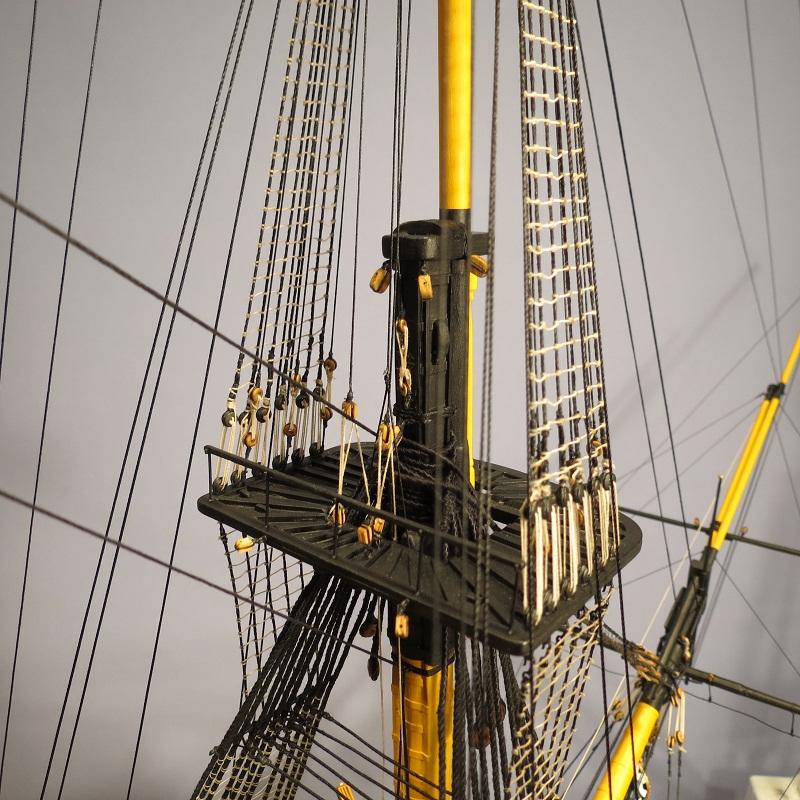
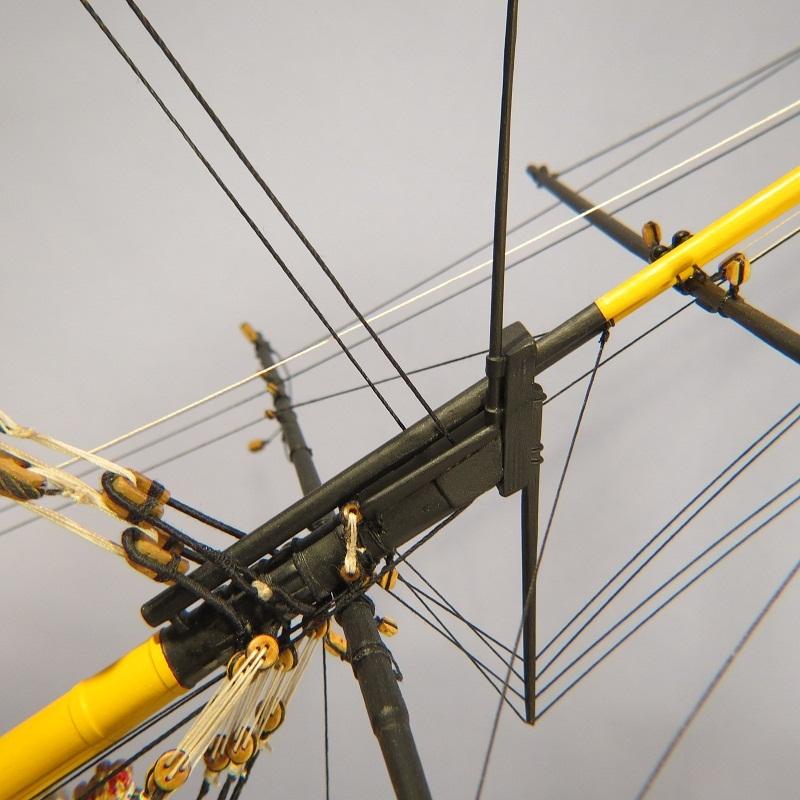
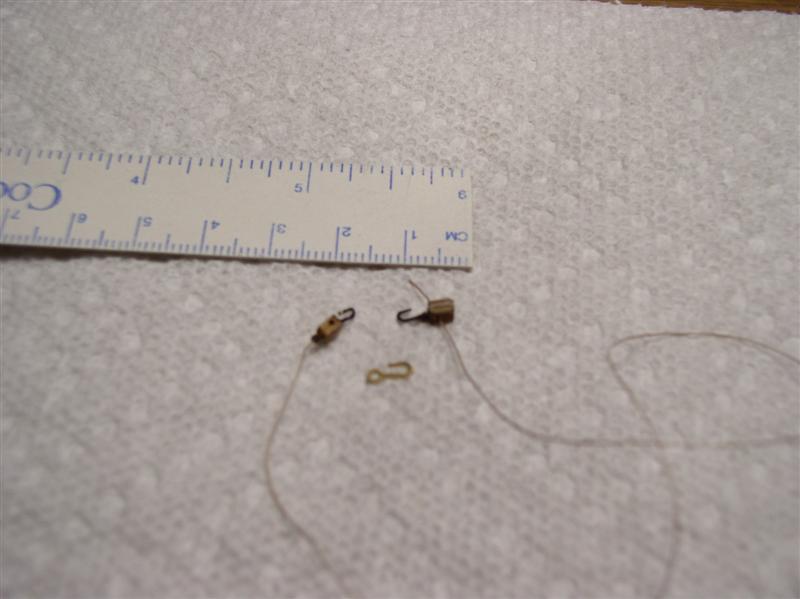
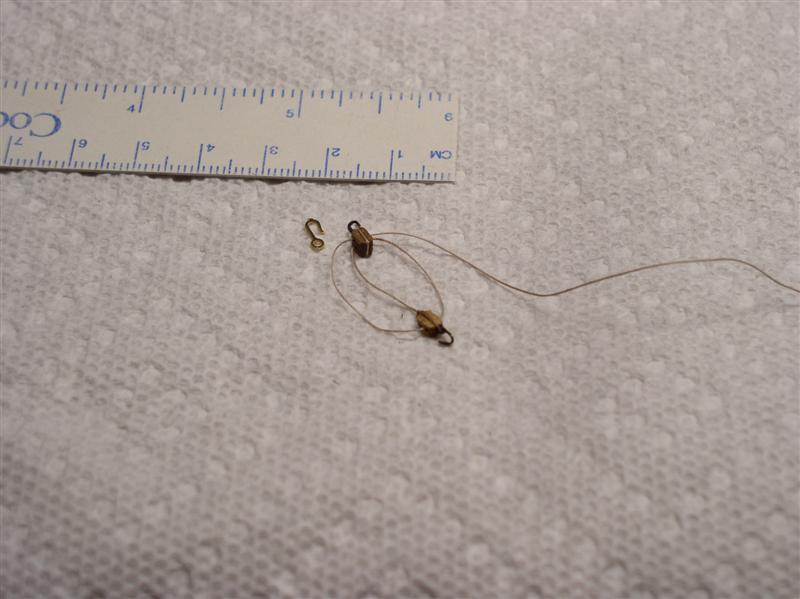
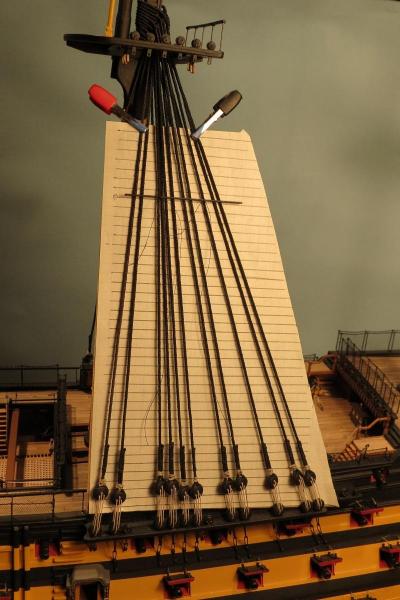
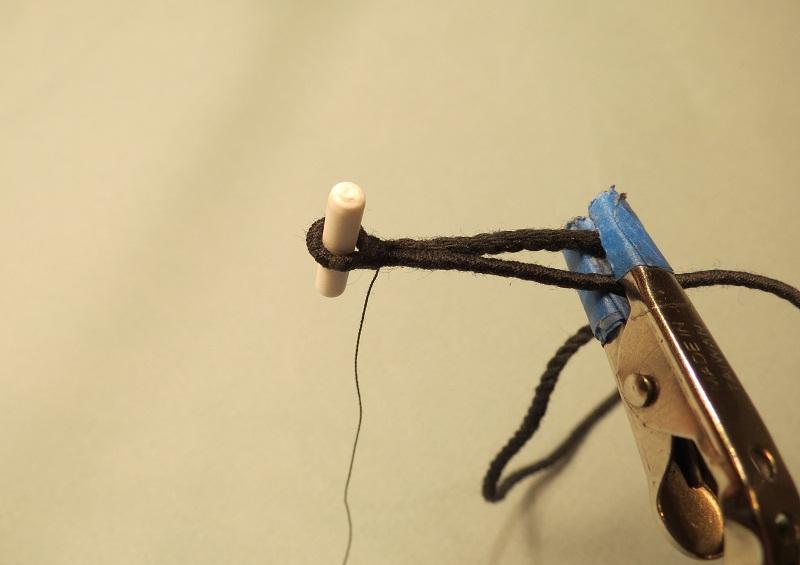
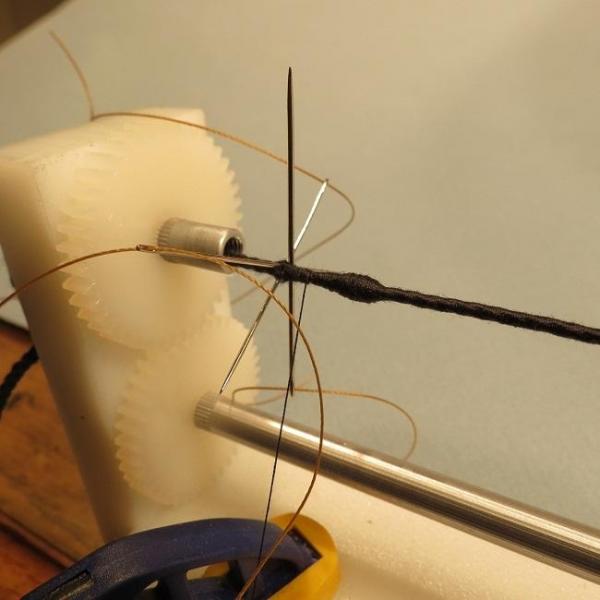
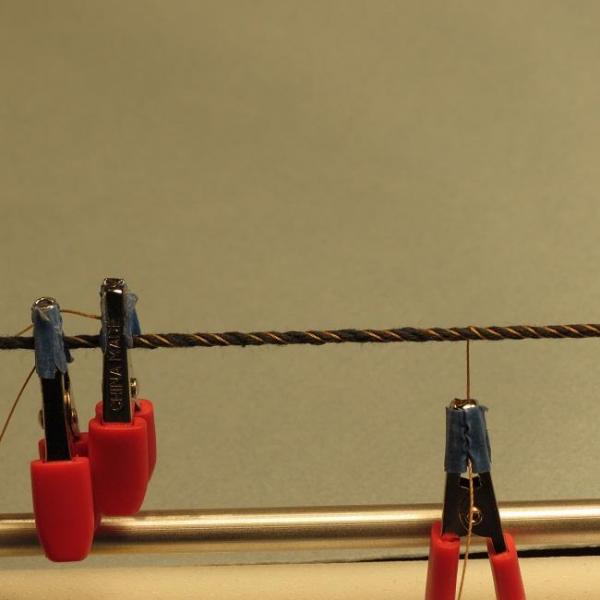
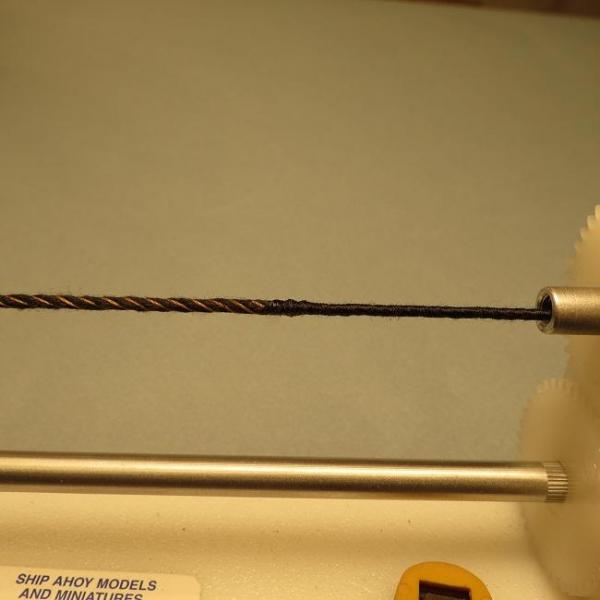
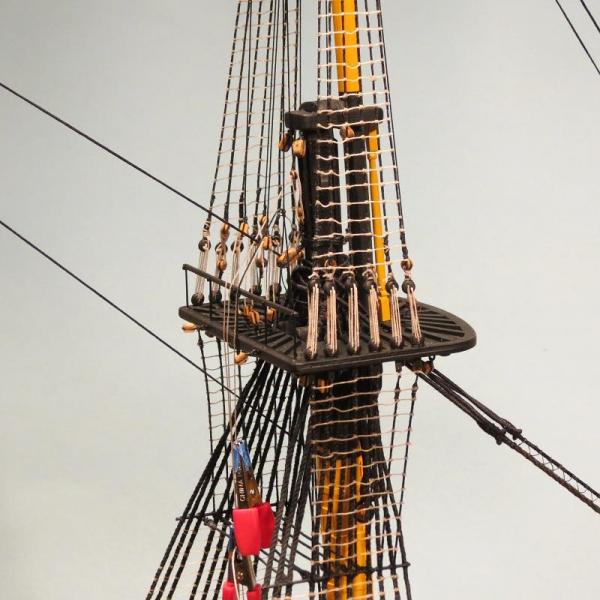
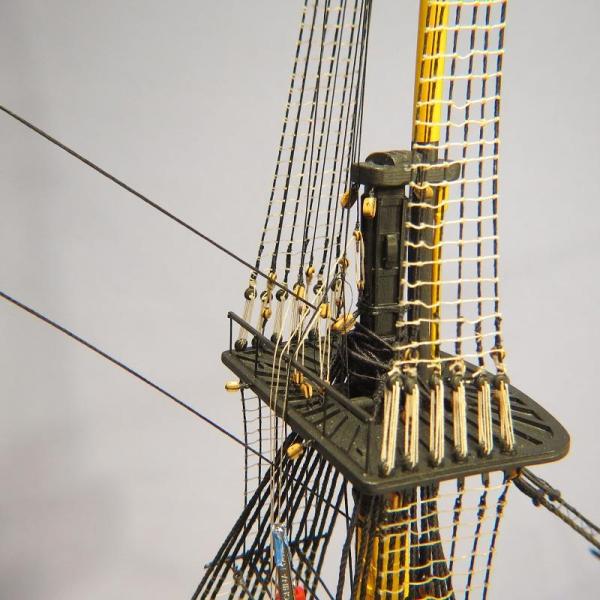
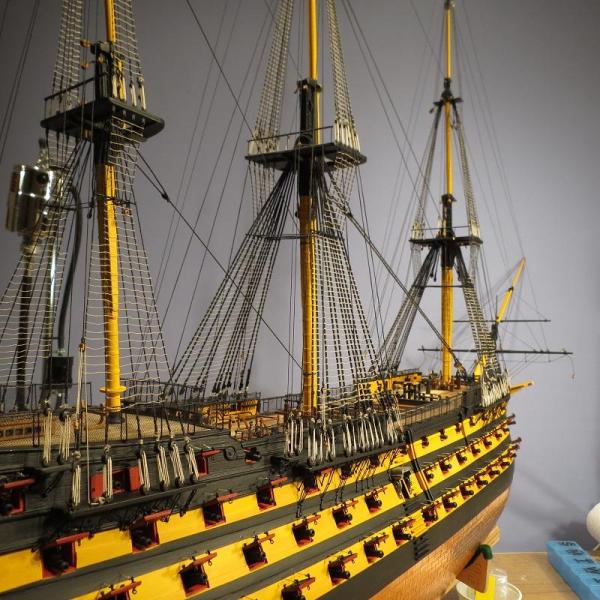
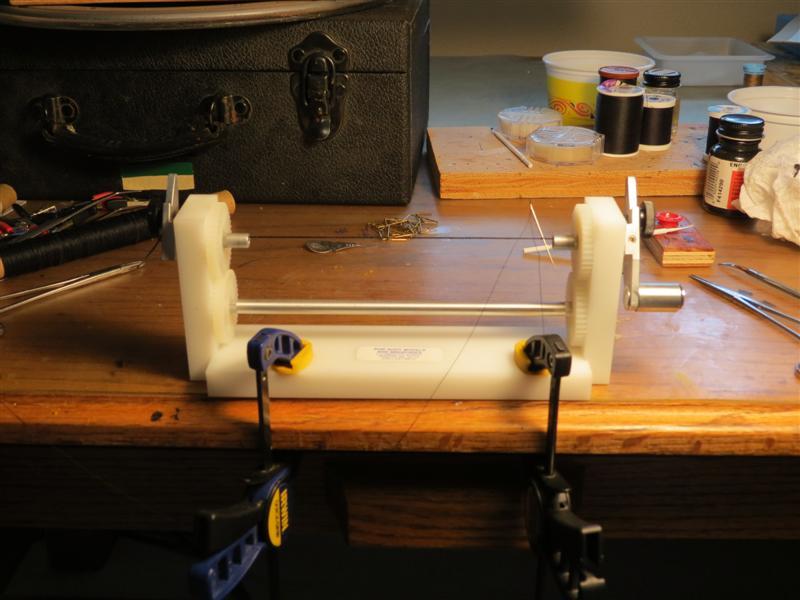
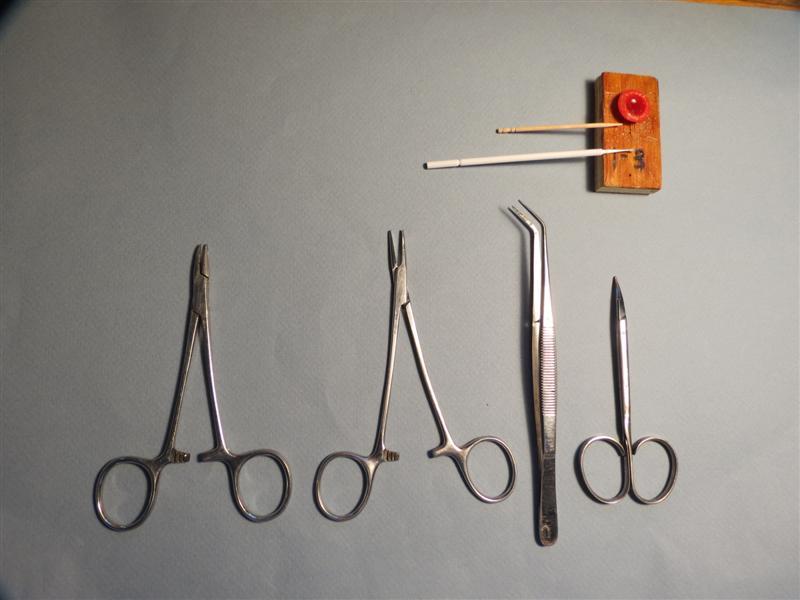
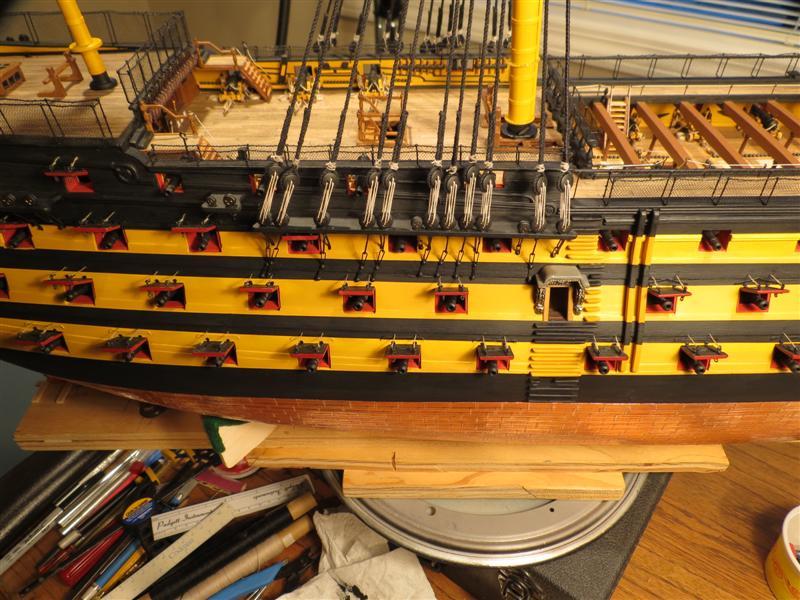
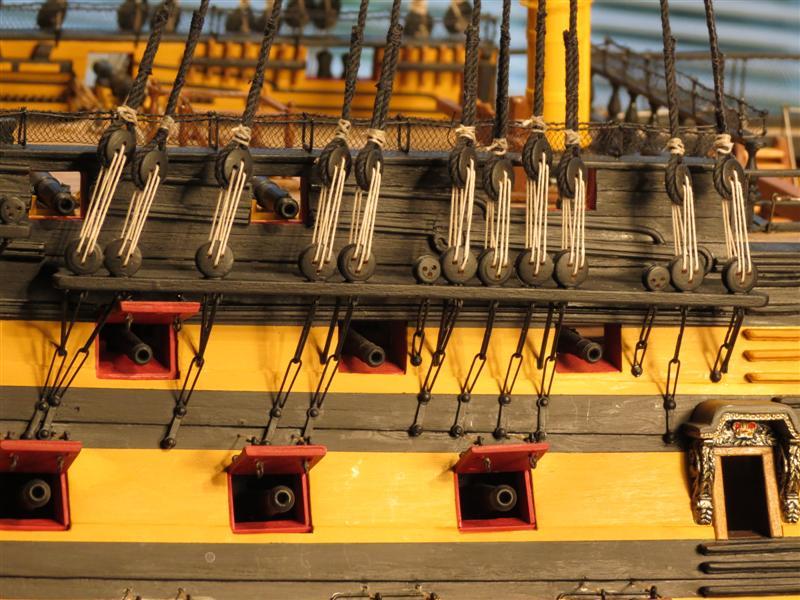
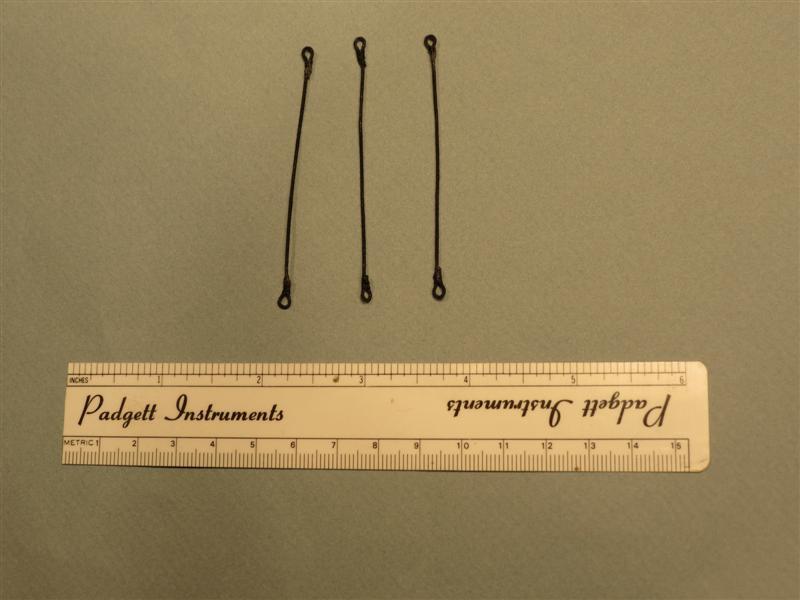
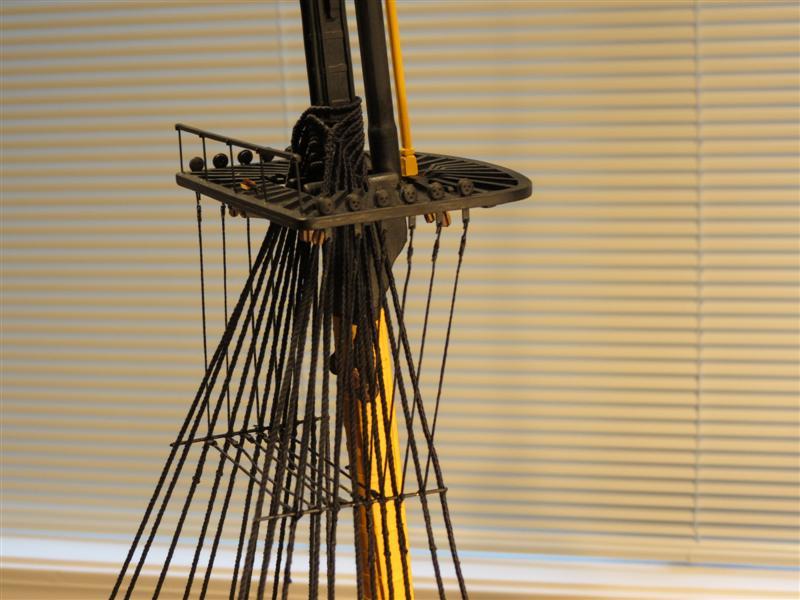
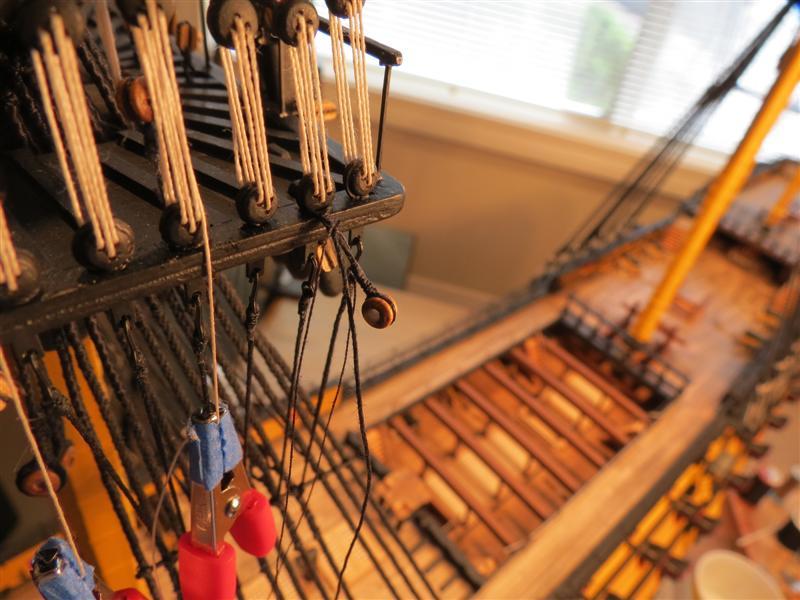
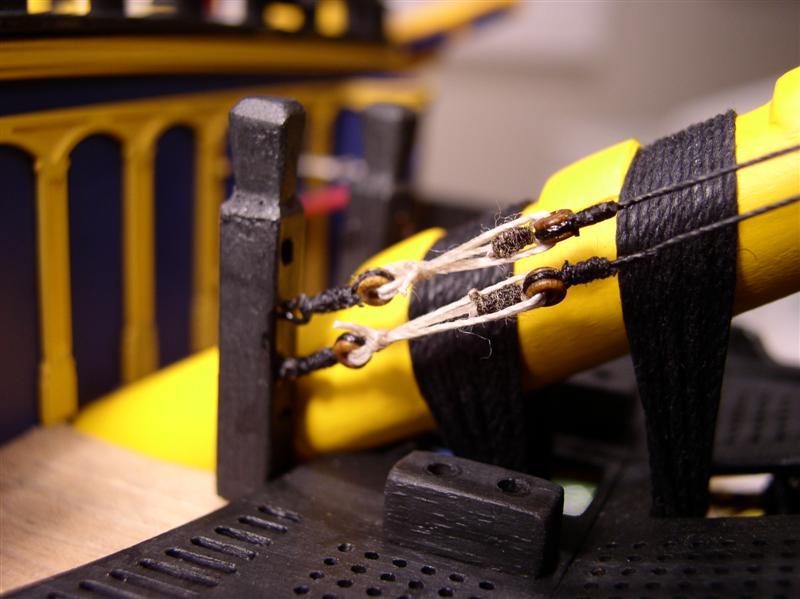
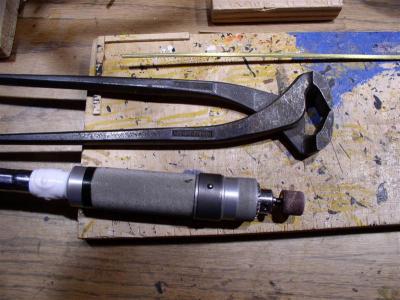
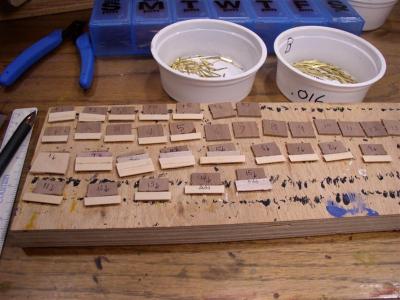
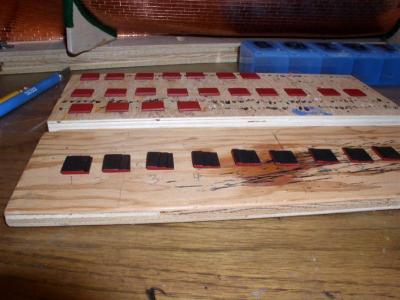
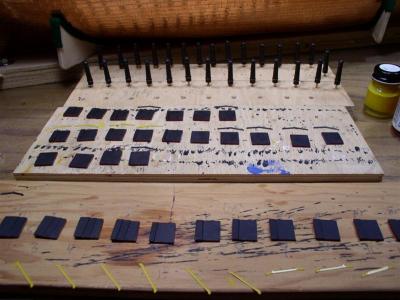
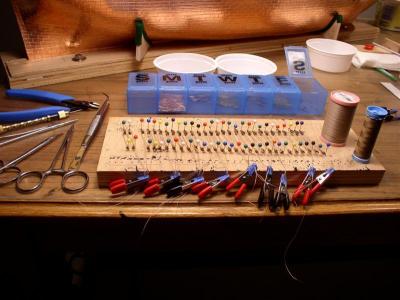
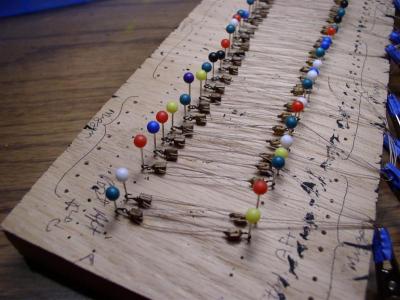
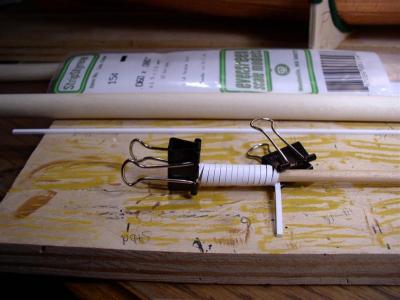
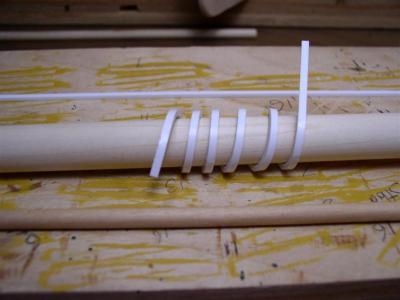
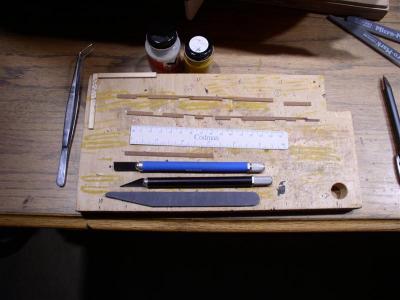
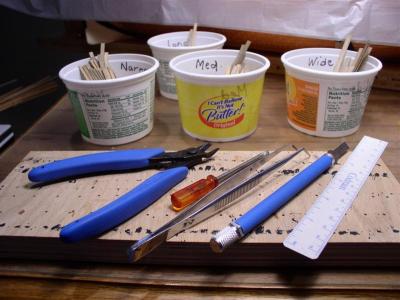
16. STANDING RIGGING For those who haven't yet rigged a full ship, a few thoughts might be in order. For those who have, my apologies for the redundancy. My most valuable aid in rigging is the Lazy Susan to swing the ship back and forth while installing and tensioning shrouds and stays. Another is a means of serving shrouds at the mast tops, the leading shroud at each mast and portions of the stays. This is a simple rig from "Ships Ahoy" models. Some form of third hand is virtually mandatory for complex splices, rigging blocks, adding a running line to blocks, etc. My instruments concist of a heavy duty needle driver with cross serrations in the jaws for grasping (left), a fine smooth jaw needle holder for fine instrument ties (2nd from left), angled forceps that can reach just about anywhere and sharp serrated scissors that will cut on the knot. One hears comments such as "I hate C/A" or "Of course one can't usa C/A in the rigging." I aggree with Ed Tosti, with his magnificent scratch built Victory, that there are rigging challenges that I could not do without it. Of course if it irritates one's nasal cavity or bronchi, better stick to white glue or work with an open window. I keep a tiny cup of fast C/A glued to a piece of wood (non-spill) with a small applicator or toothpick, rolling each on a paper towel after each application. These will last for an all day session. One can't have enough small clamps or alligator clips. With a bit of masking tape over the teeth, they will hold the smallest thread. Beginning with the shrouds, these were laid on following the JoTika plans and McGowan's book with McKay's drawings. Each shroud with deadeye measured and labelled. All shrouds served at mast. Shrouds attached alternating starboard to port to even tension. Deadeyes and lashing of shrouds Graph paper on cardboard to align the futtock stave and later for rat lines. Deadeyes at main mast Pendants made with served line around a bullseye and an eye splice. Good seamanship often favored a tapered splice. To simulate a tapered eye splice, sieze the bight with several turn (I prefer repeated half hitches, alternating the diredtion of the turn with each hitch). Follow by separating and cutting off one strand and sieze a few more turns. Cut another strand plus a few more turns Finally cutting the last strand plus siezing and one has the appearance of a tapered splice. Another advantage of C/A glue. If one is left with a protuding stump, a light clamping before the glue has cured will reshape it. Making the catharpins with eye splices at each end Catharpins can be seen lashed to the futtock staves Futtock shrouds in place Mizzen shrouds Top mast shrouds Lining up fore mast, main mast and mizzen while adjusting tension port and starboard. Shroud cleats in place Bullseye attached to base of topmast shroud deadeye, to be swung inboard to receive topgallant shroud Topgallant shroud after Longridge. Topgallant shrouds Topgallant shrouds pass inboard of staves in topmast shrouds Terminate with lashing to bullseye attached to base of deadeye Shrouds in place. Ratlines will be shown as a separate topic. I would suggest completing rat lines before tying down the topgallant shrouds, sliding backstay, breast backstay, etc. It's much easier to tie rat line without adjacent lines interfering. To be continued................


- 755 replies
-
- 5
-
-
- finished
- caldercraft
- (and 1 more)
-
Thanks Kevin and Joe. I know this is all old stuff and it takes a while to redo the build site. With any luck, I'll get to new photos in a few days. cheers, Gil
-
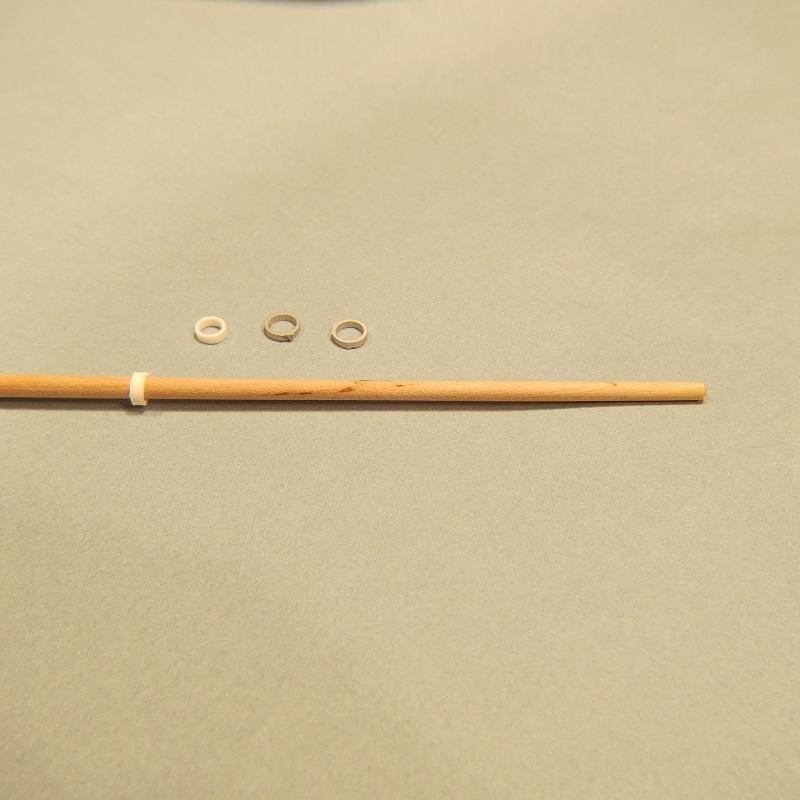
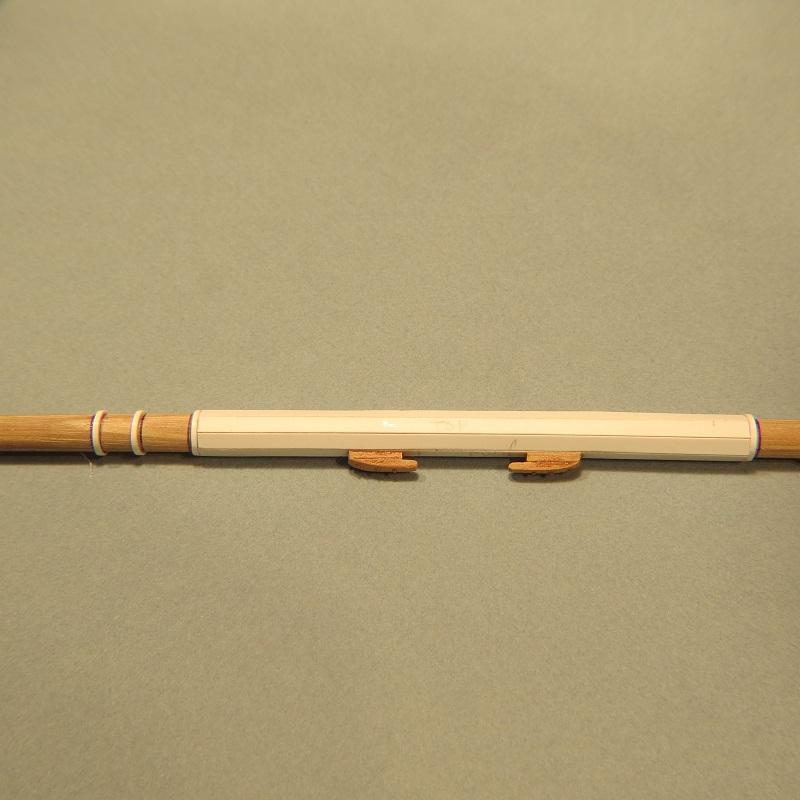
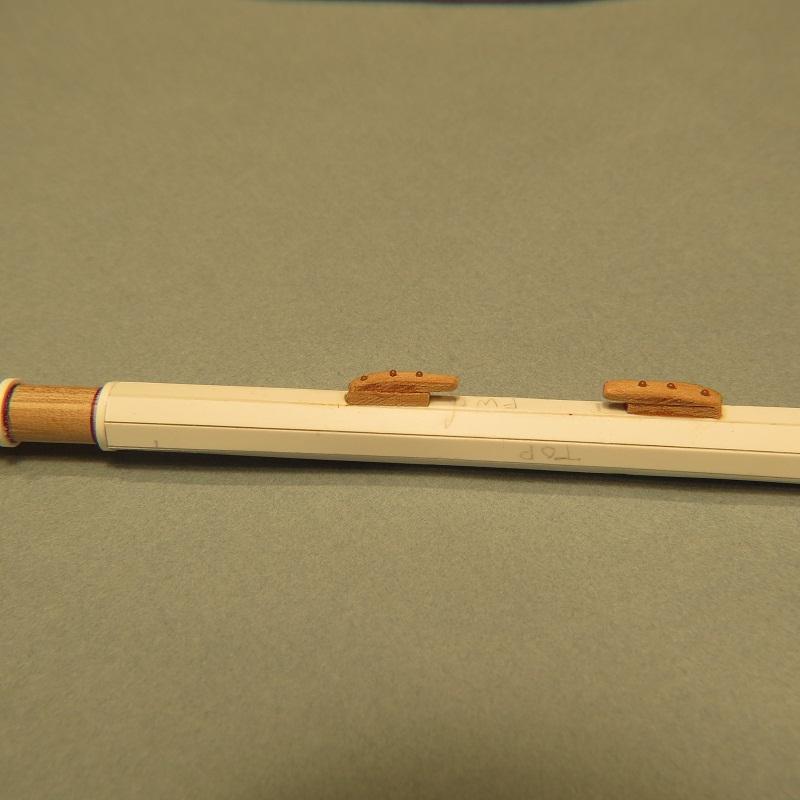
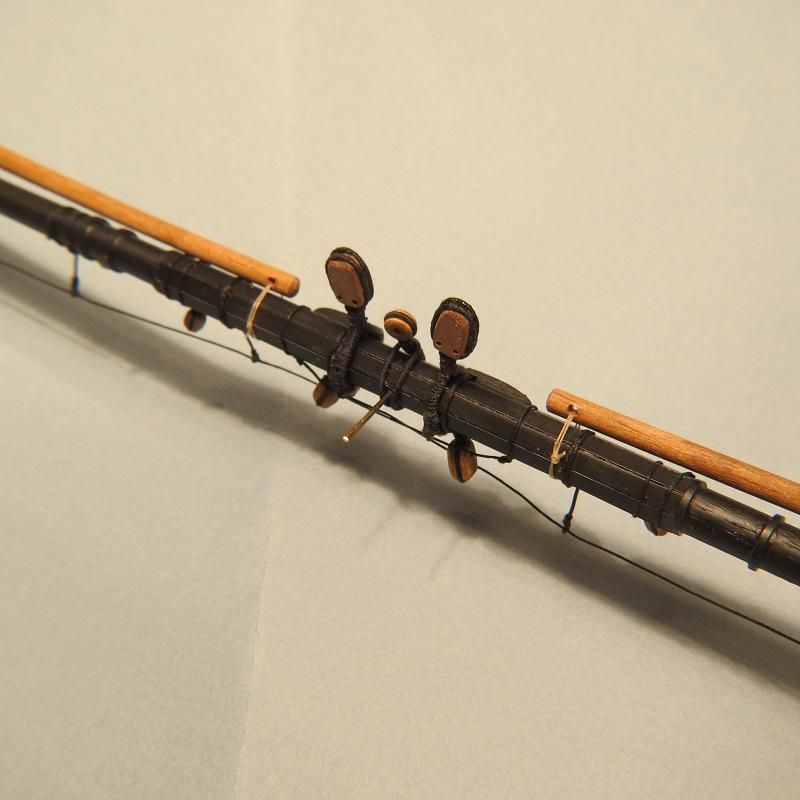
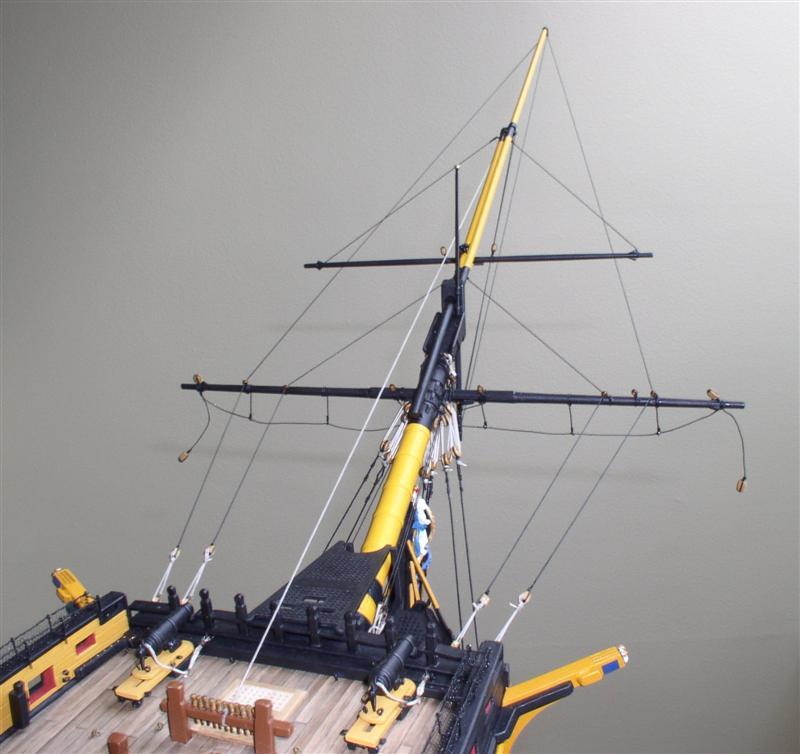
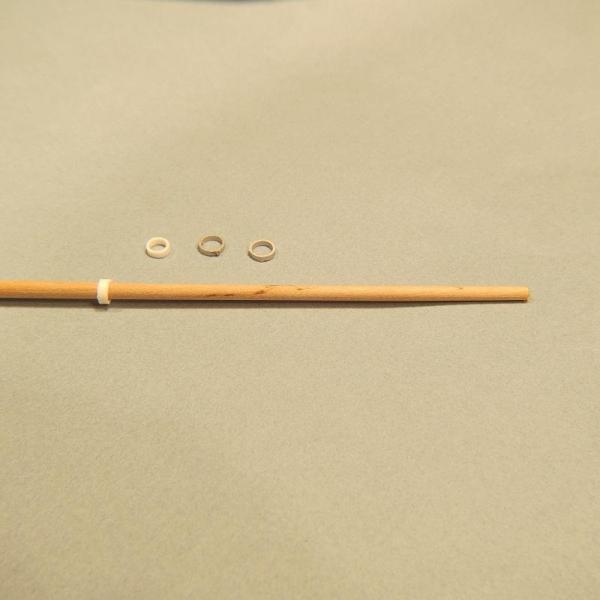
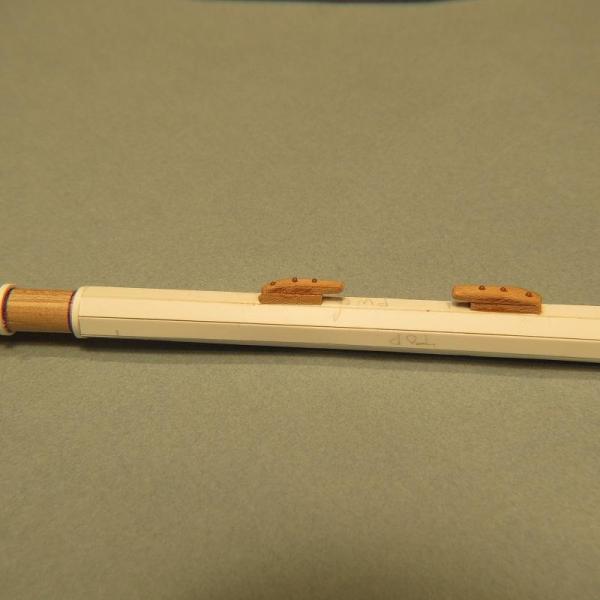
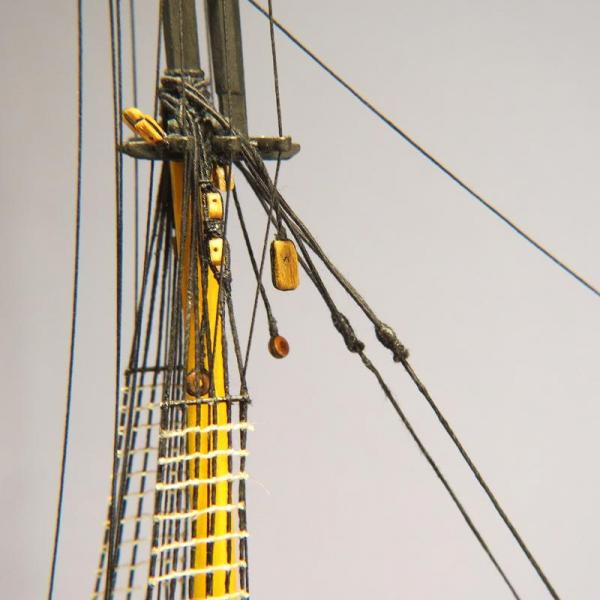
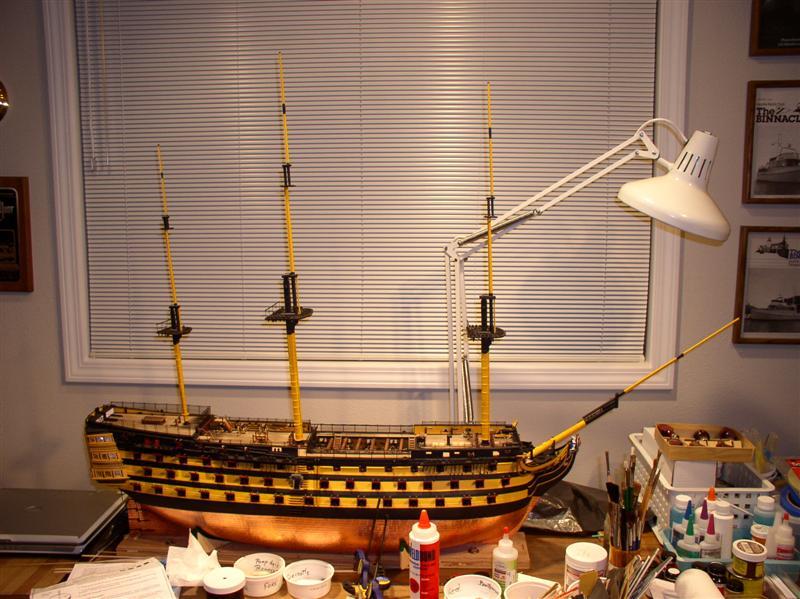
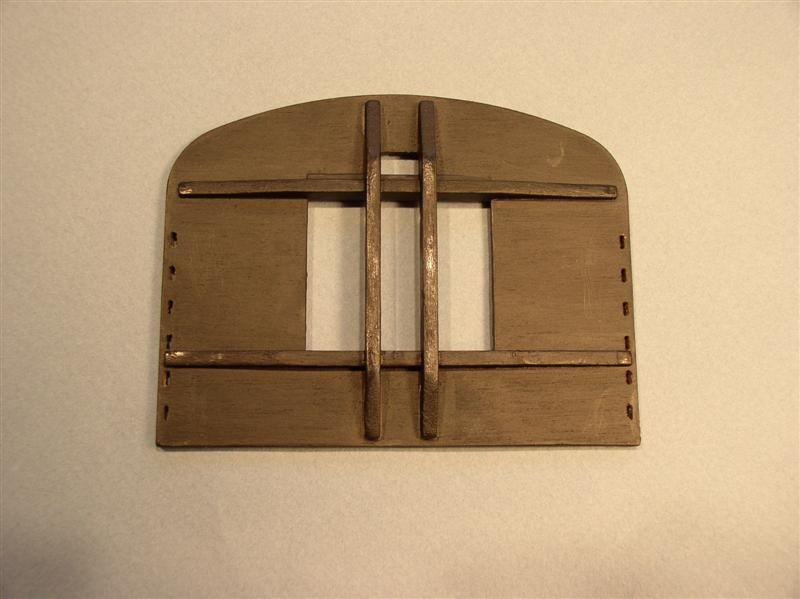
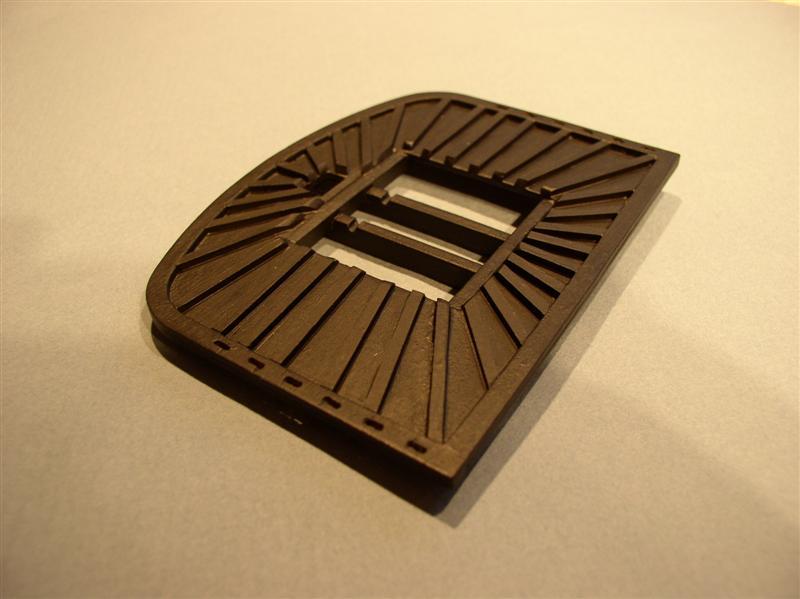
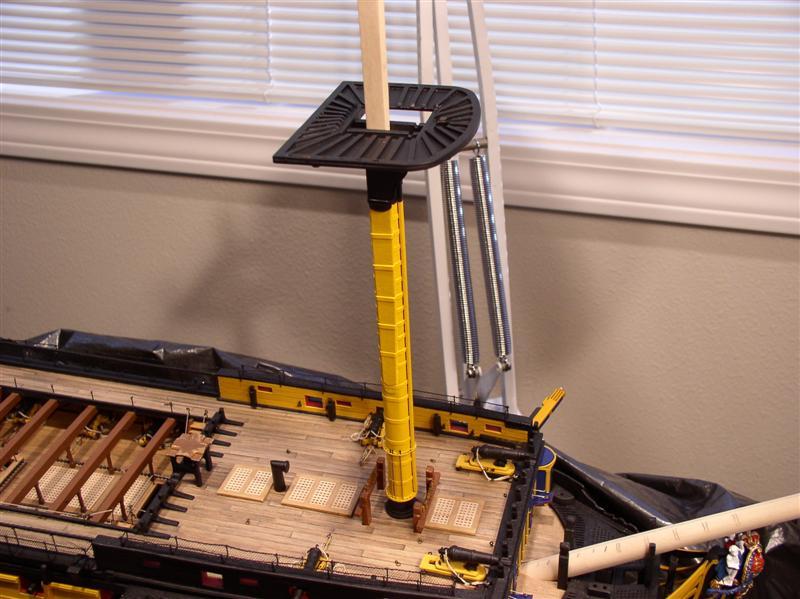
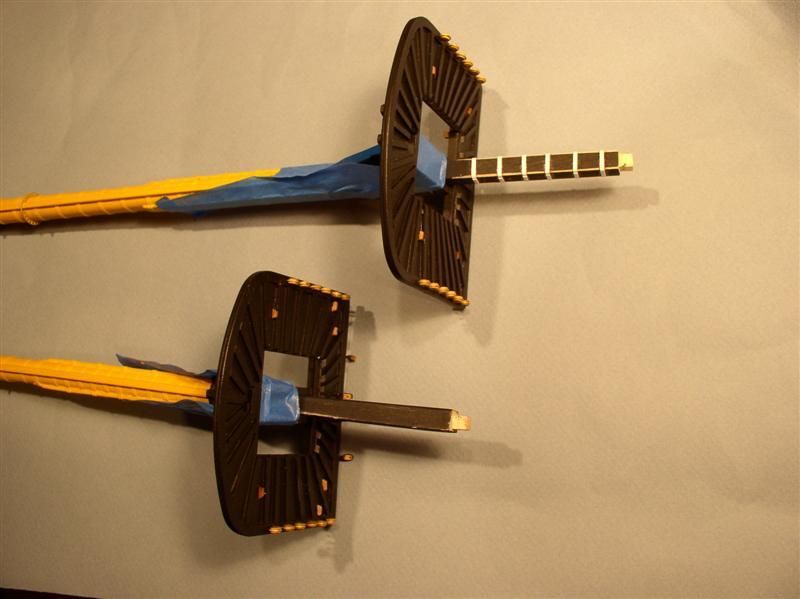
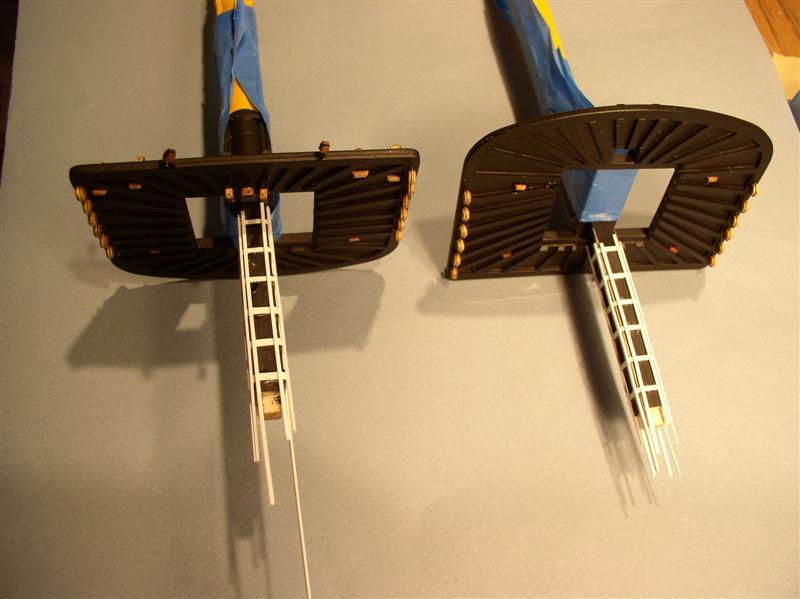
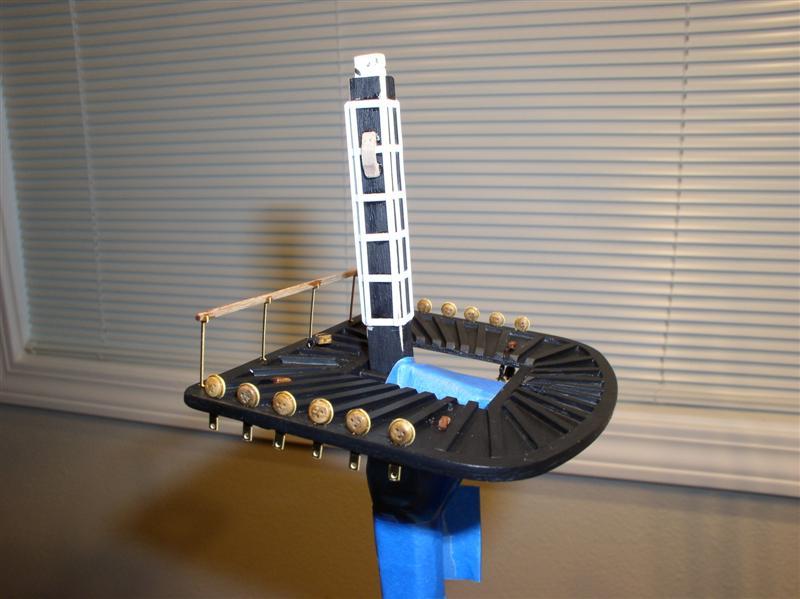
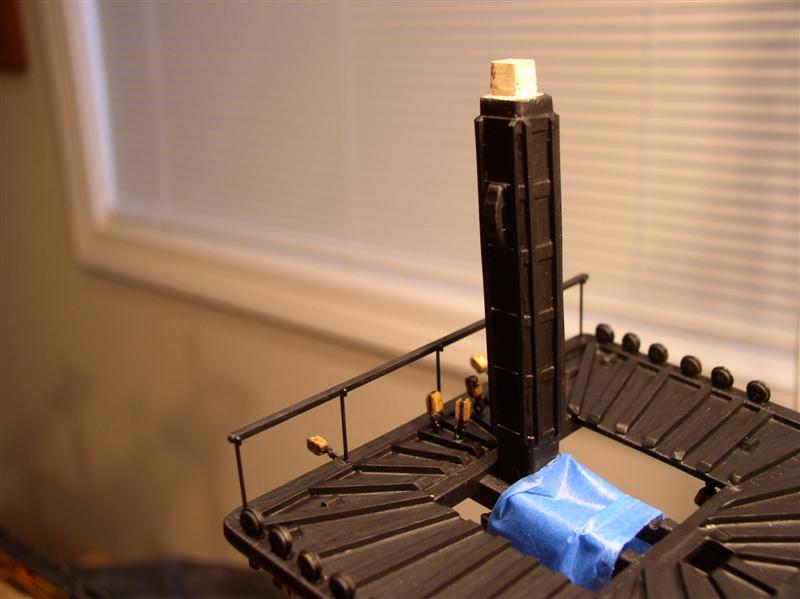
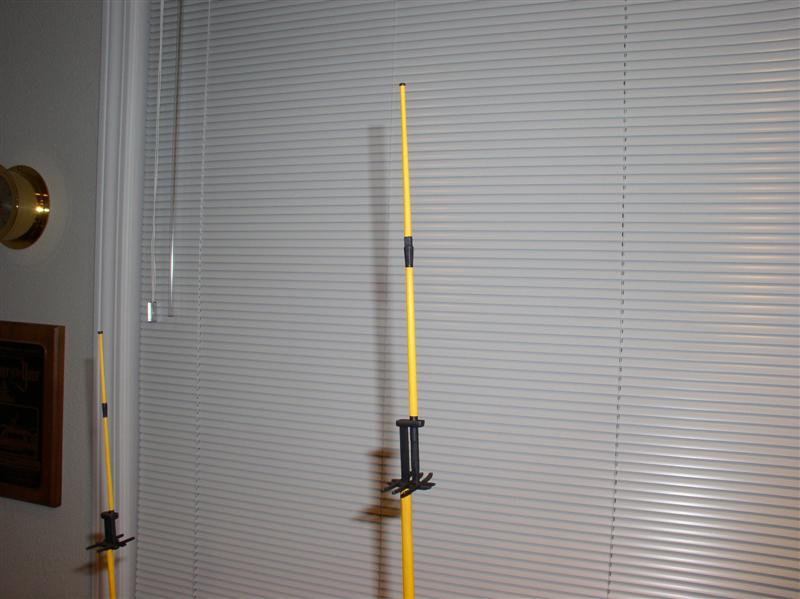
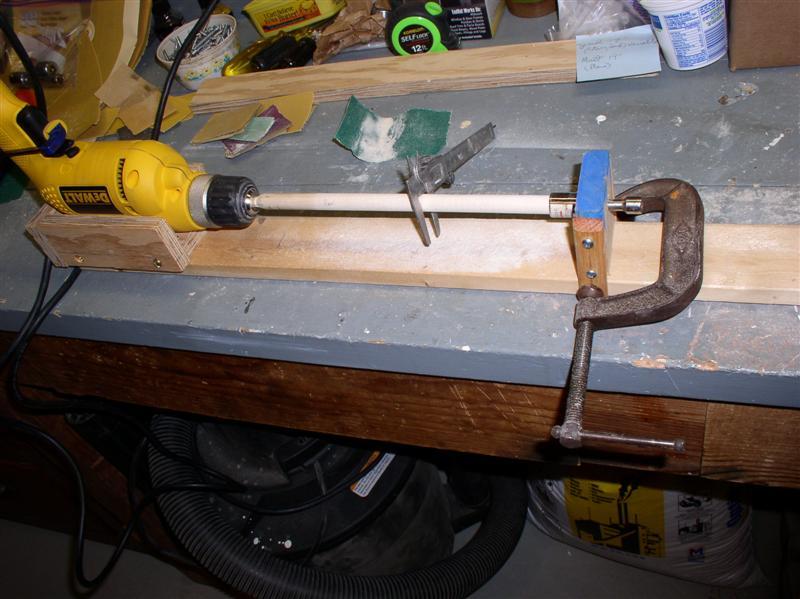
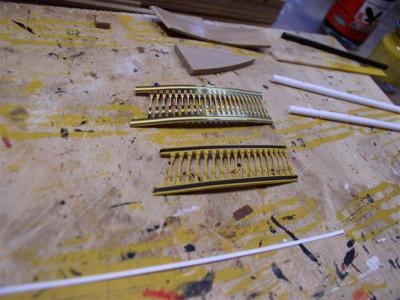
15. MASTS Rake of the masts. Foremast 0 degrees, Mainmast slight and Mizzen more. Lower masts are tapered athwartships but not fore and aft. This is a simple jig for shaping the masts. Dowel in the jig to progressively plane down the sides. Small Stanley plane at left. The nail glued through a hole in the near end simply prevents rotation and ensures the same parallel planing to the opposite side. Foremast narrowed side to side. "Iron bands" (styrene) placed with cheeks over. Squared top with tenon for mast cap. Preparing fore top with styrene strips. Side view of foremast and under side of fore top Top of foremast Foremast with cheeks Foremast. Additional "iron bands" over cheeks and vertcal batten along the forward side of the mast separating the lower yard from the mast. Side view of foremast. Dowel for main mast above Details of mast Fore top and main top. Actually black, however, flash photo changes color to brown Foremast with fore top Lower masts with tops. Adding battens and iron bands to squared end Battens and deadeyes. Adding top mast Top mast and topgallant mast Top mast, hand mast and bolsters for shrouds Topgallant mast to top mast. Eight sided portions by sanding block Blocks previously sanded, then stained "English Oak" Attaching blocks At top mast At topgallant mast Rigging a blumb bob to set the rake of the masts Ready at last for the standing rigging


- 755 replies
-
- 1
-
-
- finished
- caldercraft
- (and 1 more)
-
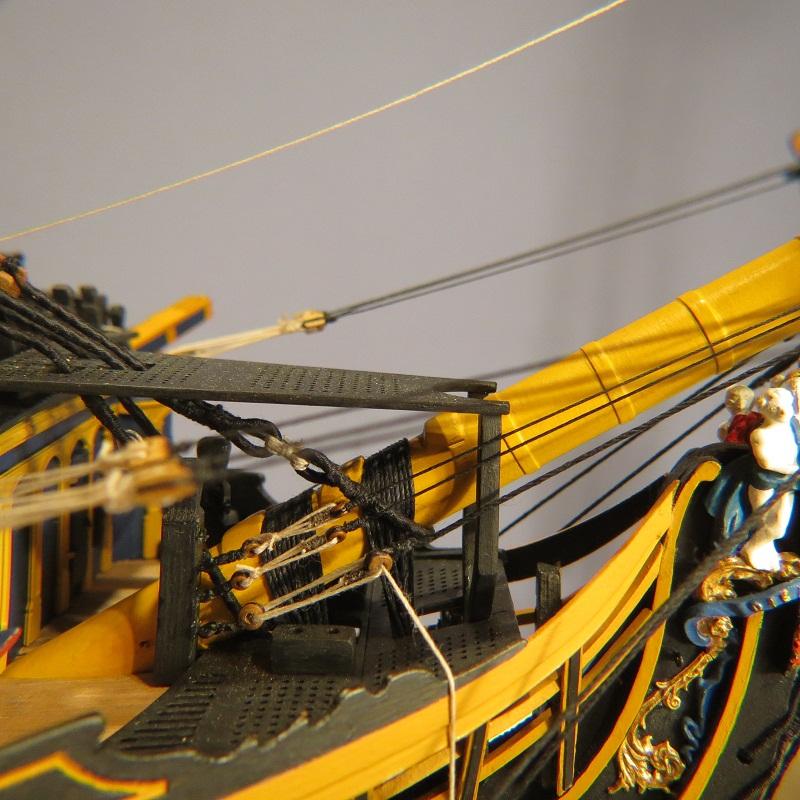
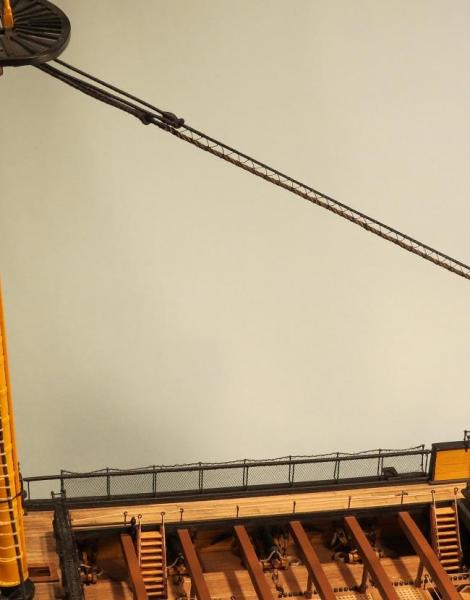
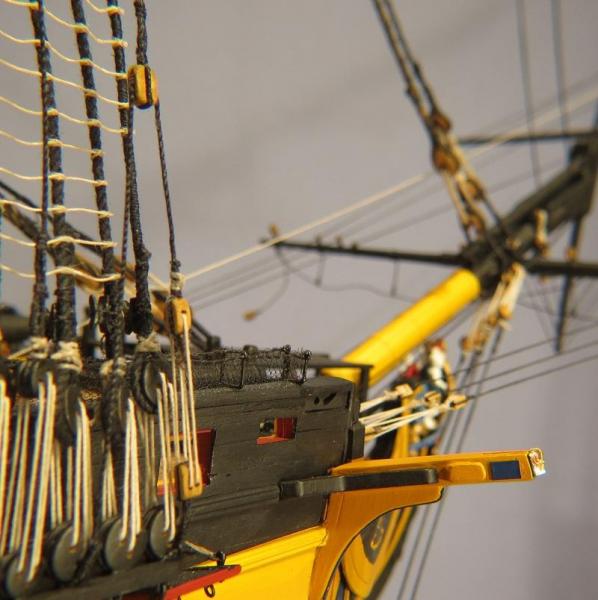
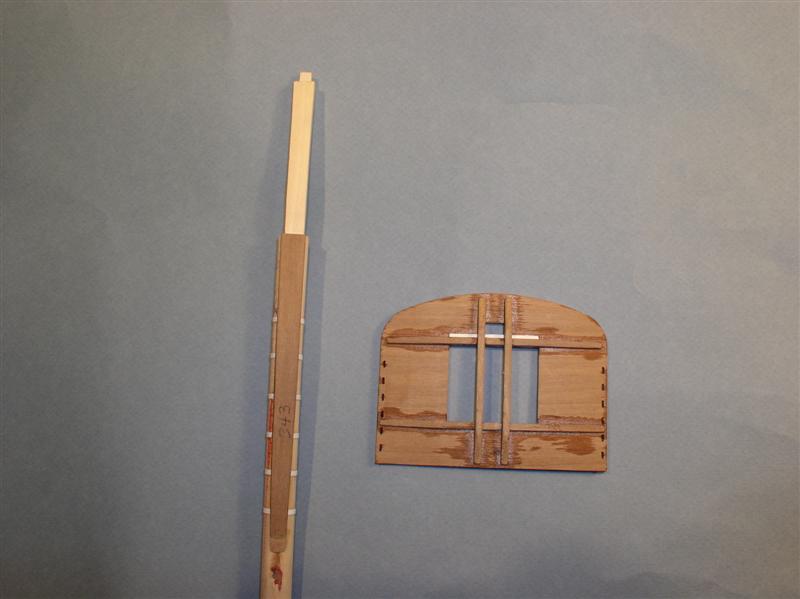
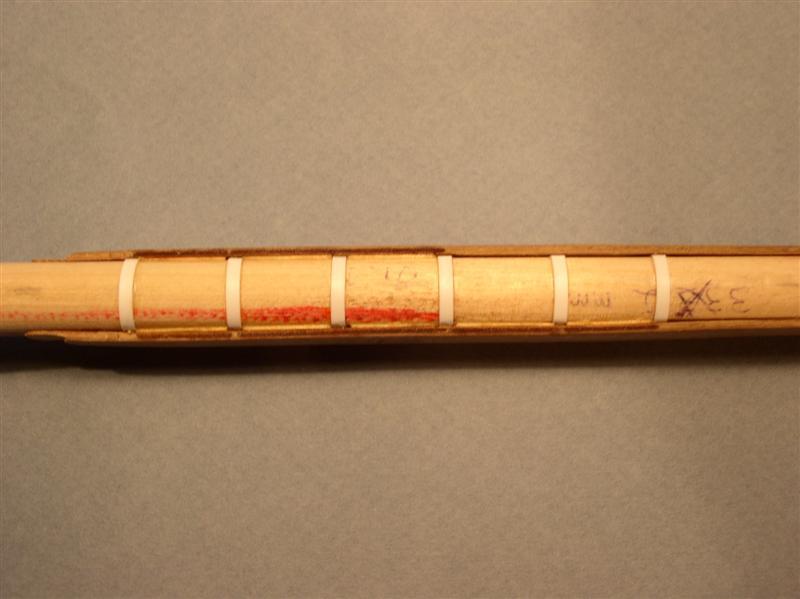
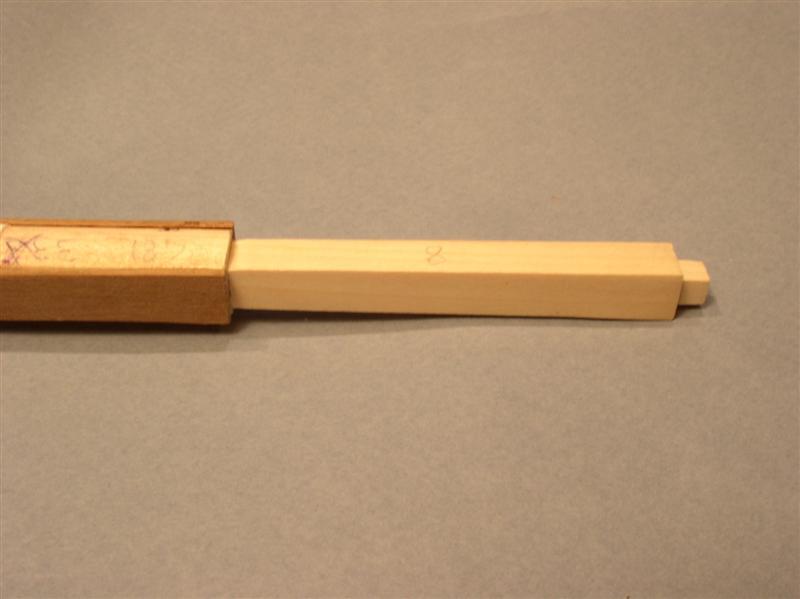
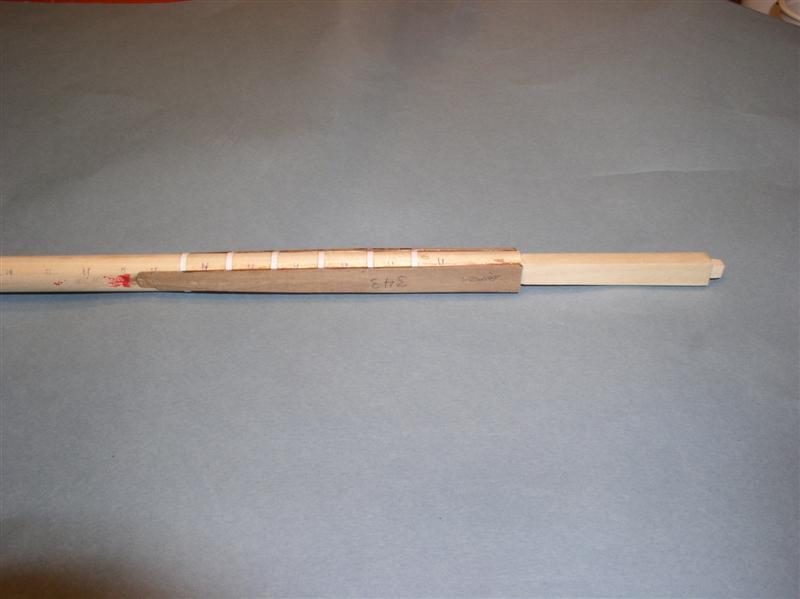
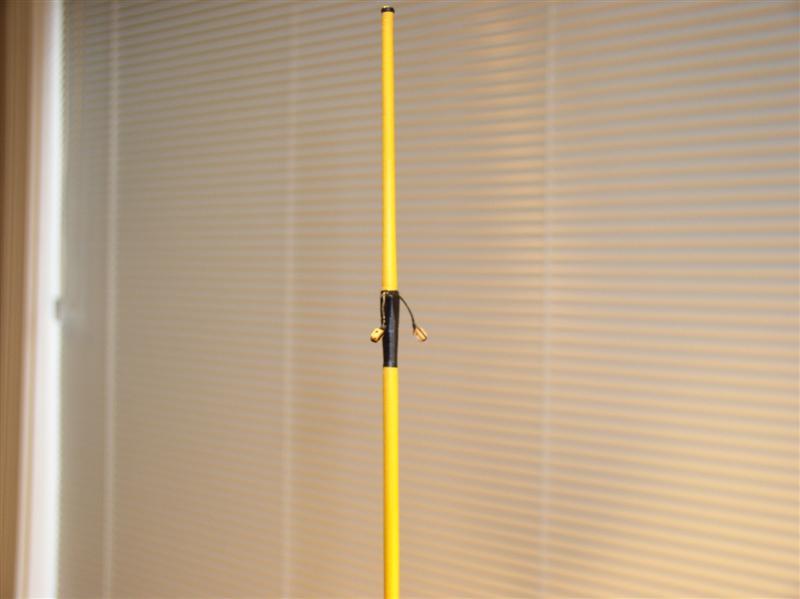
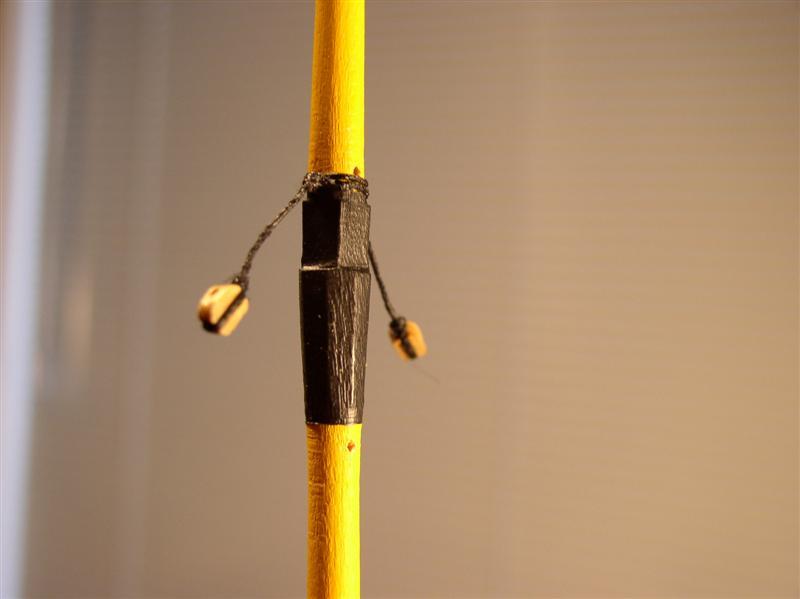
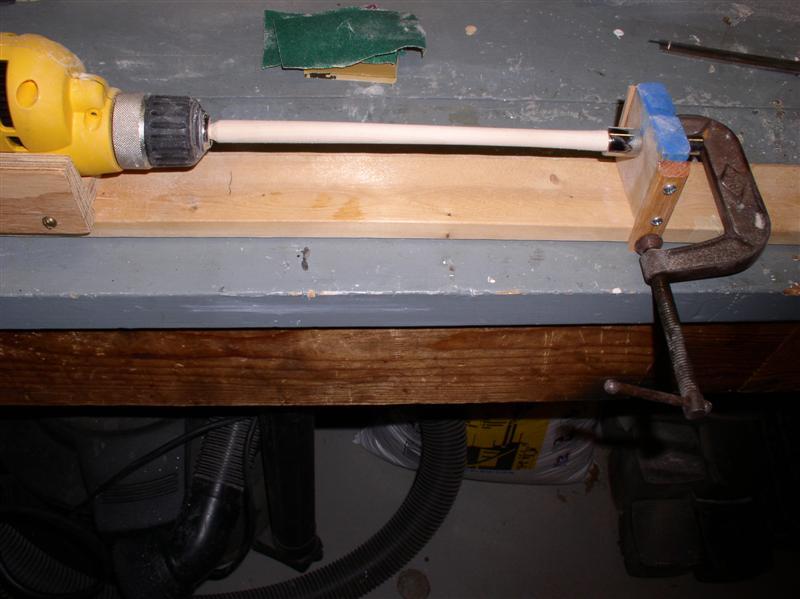
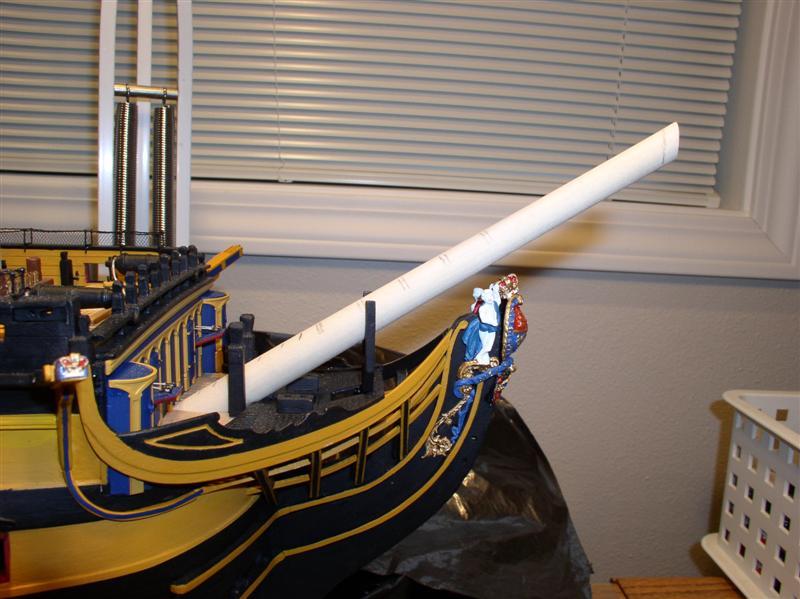
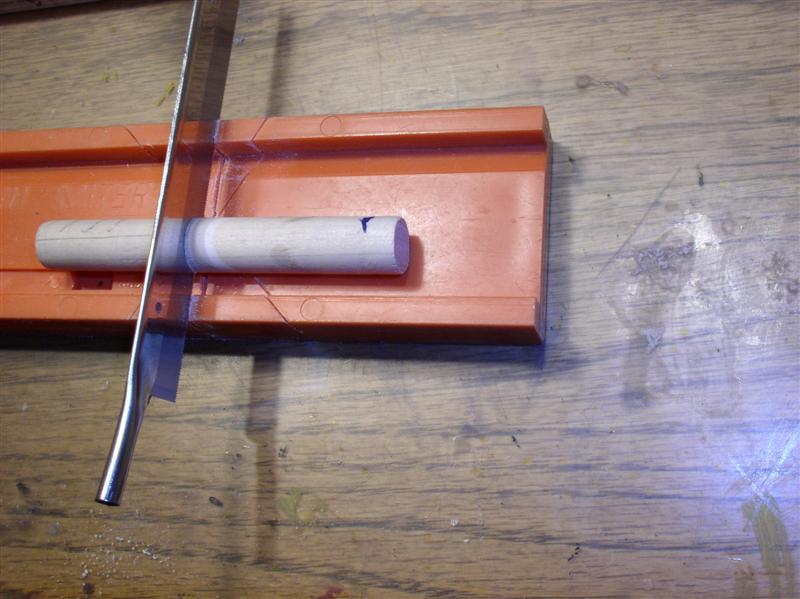
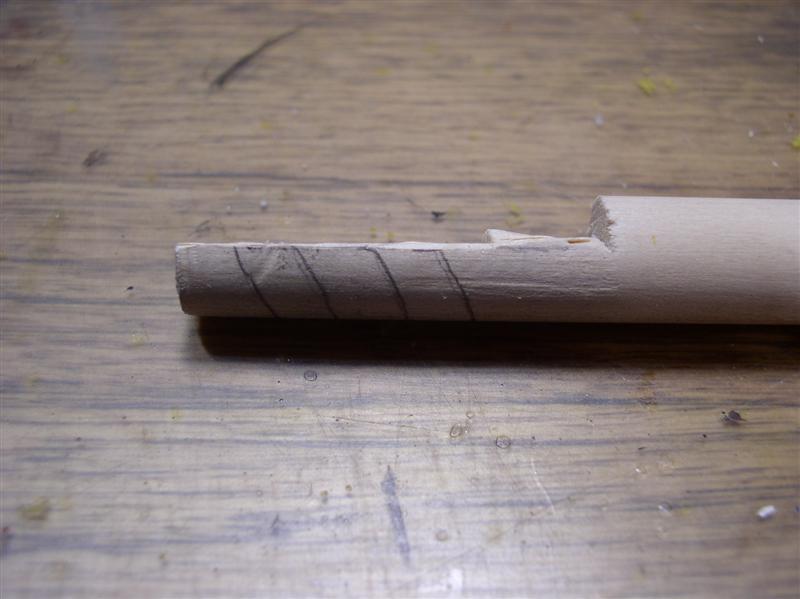
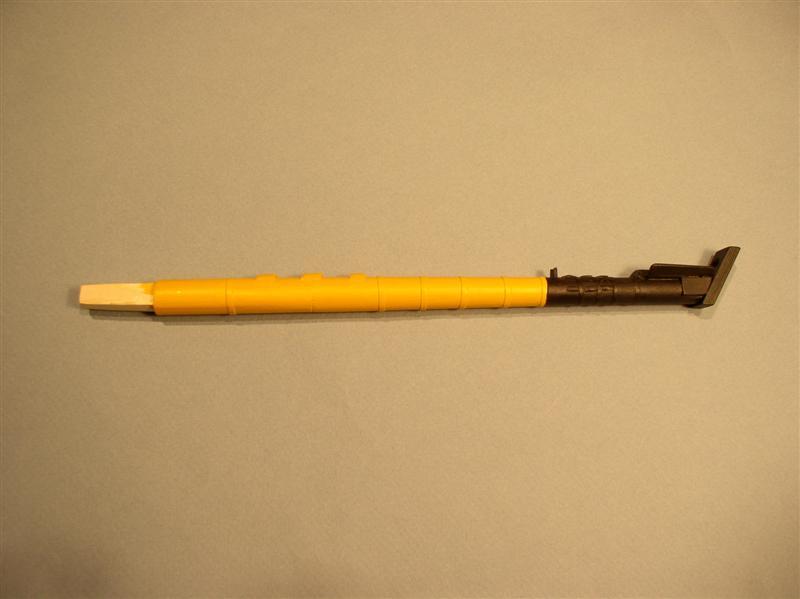
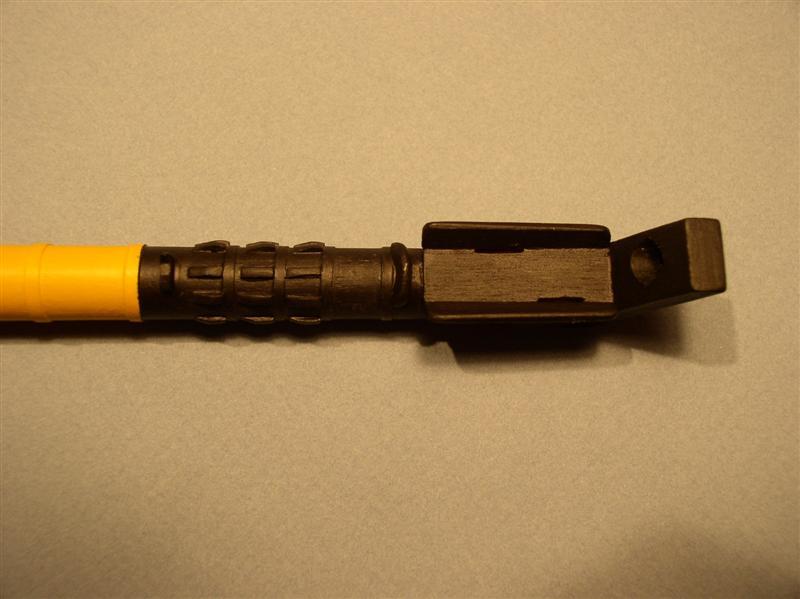
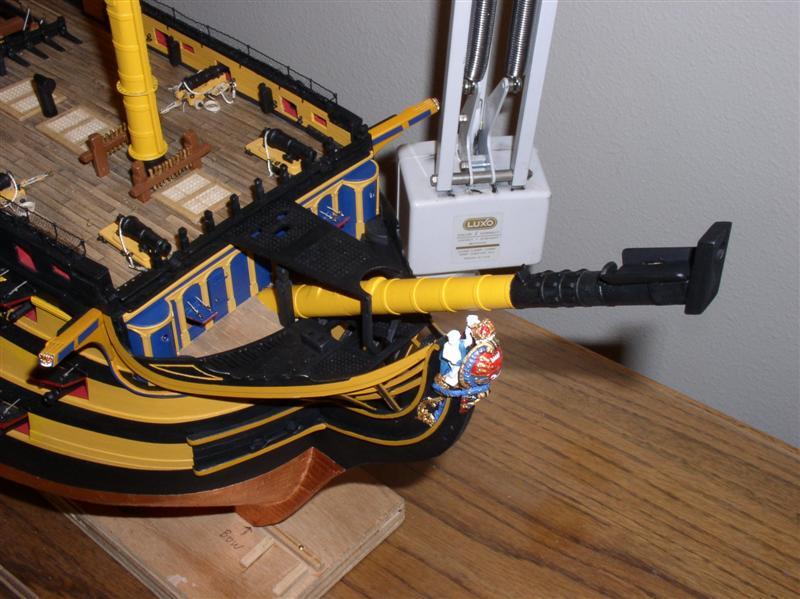
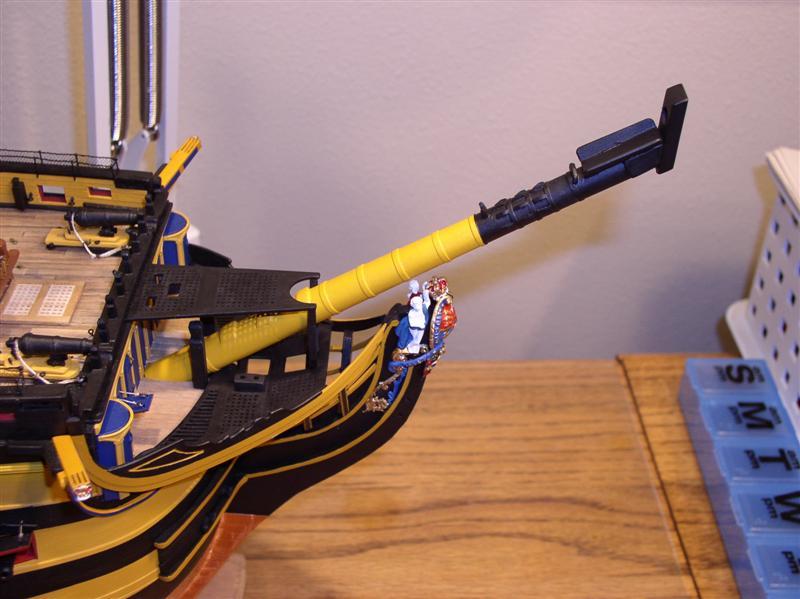
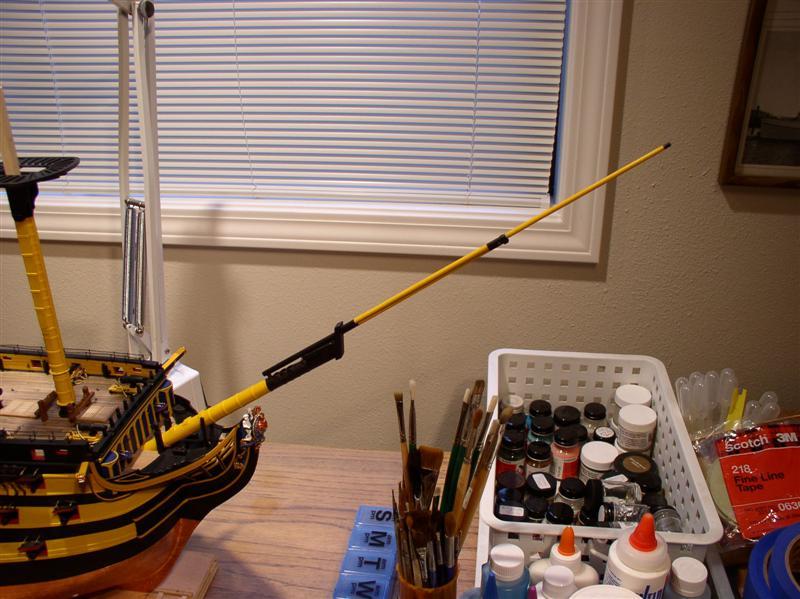
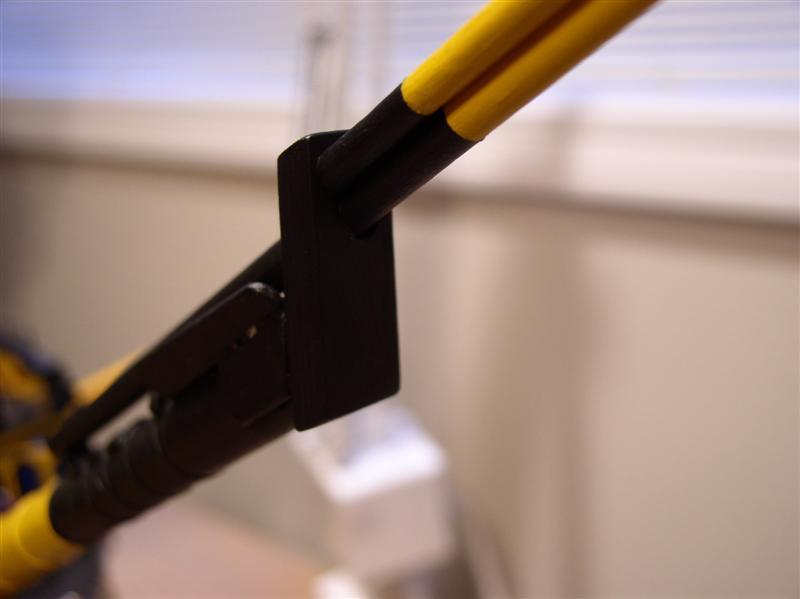
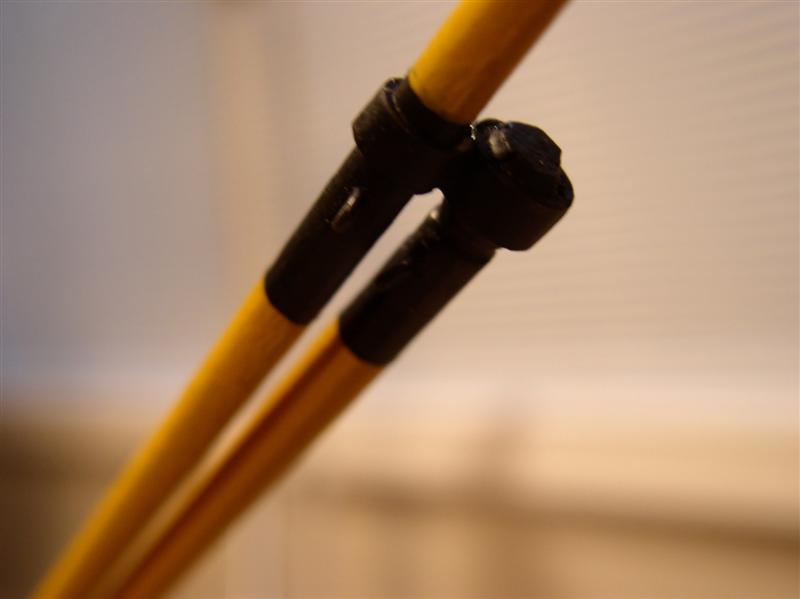
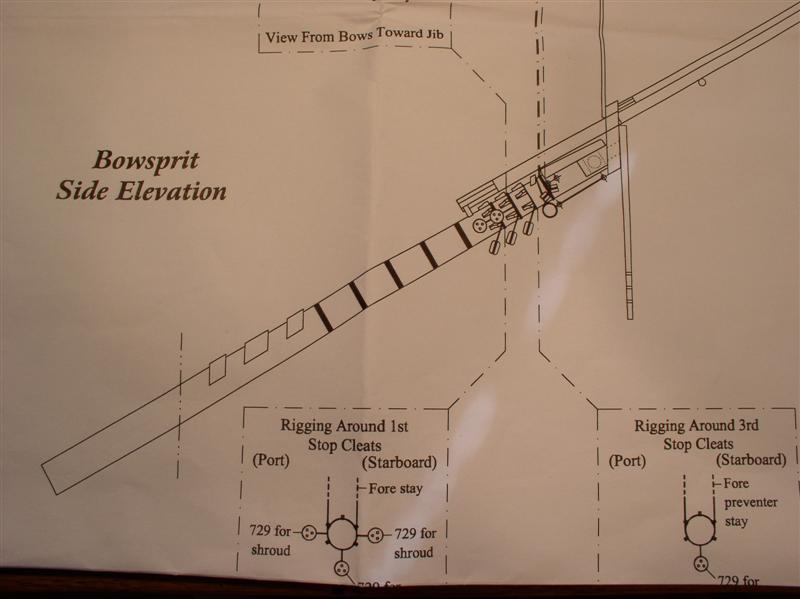
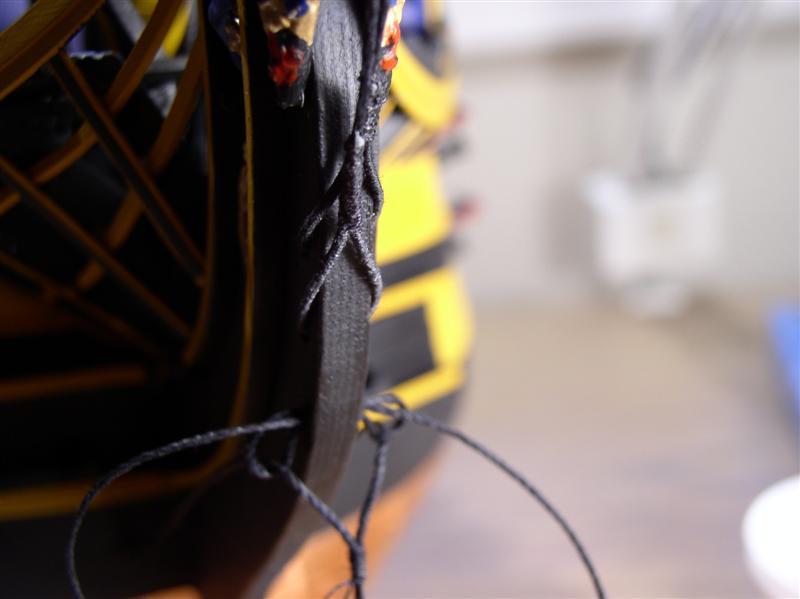
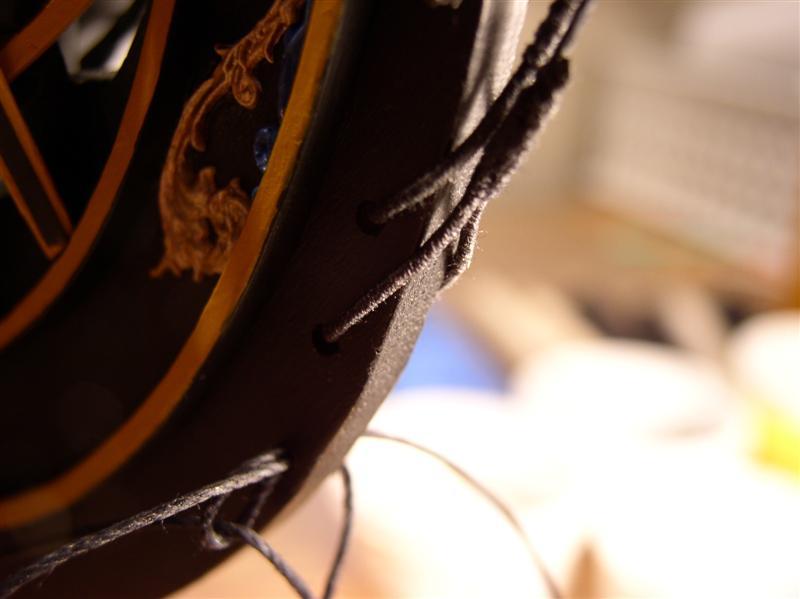
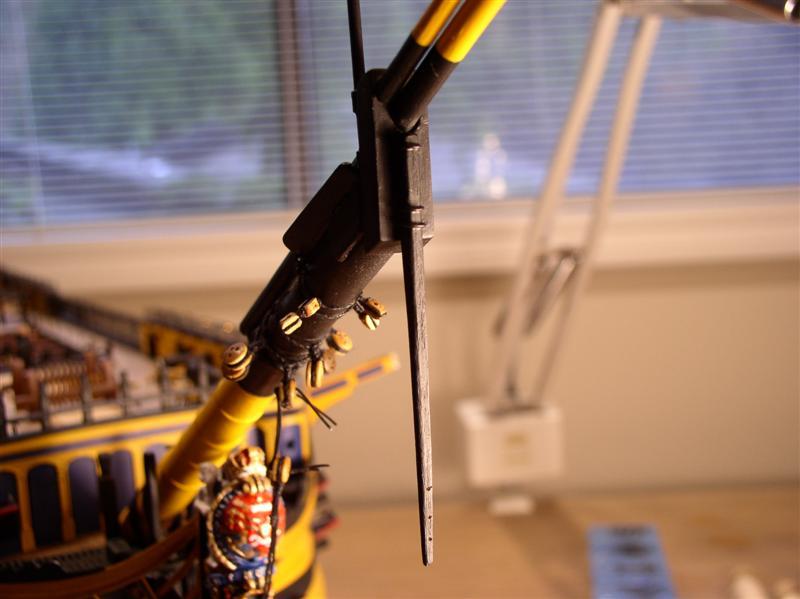
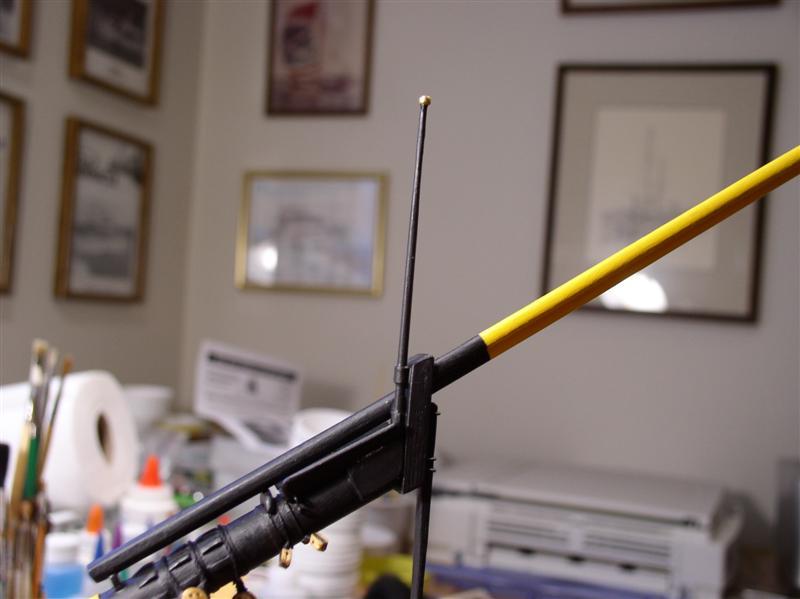
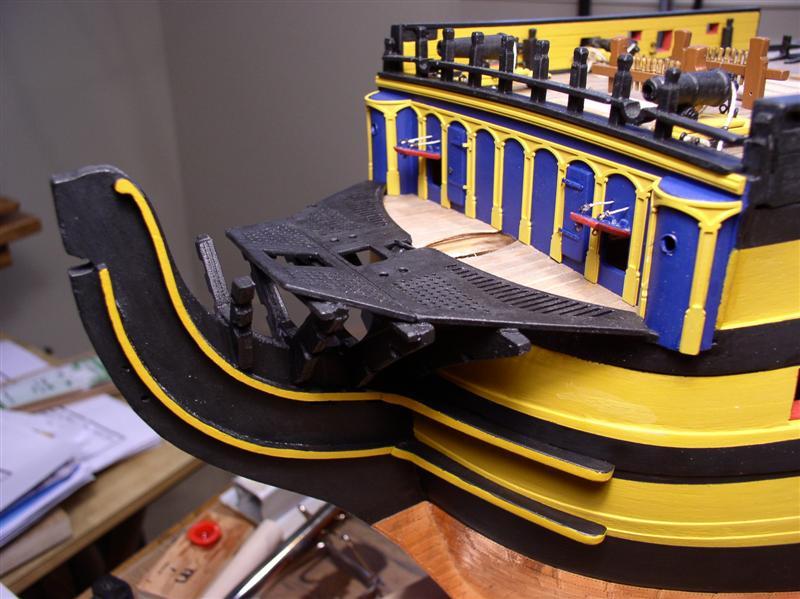
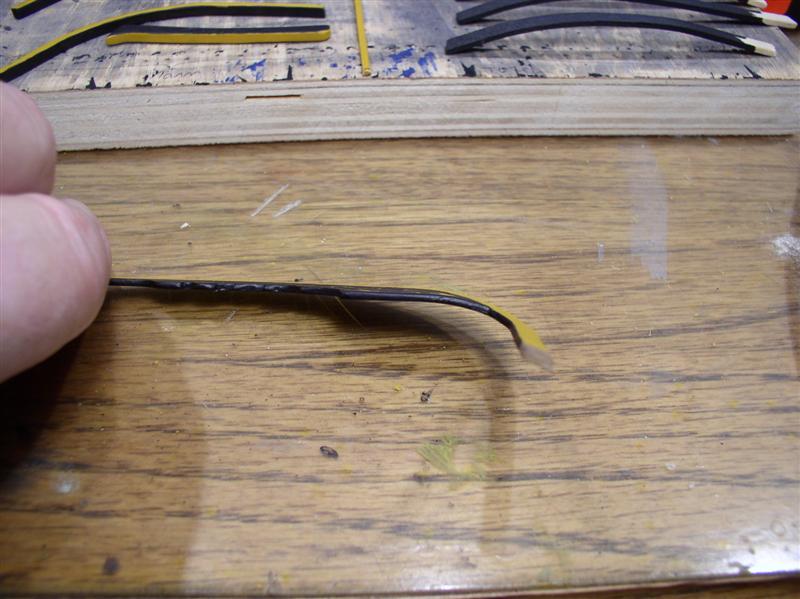
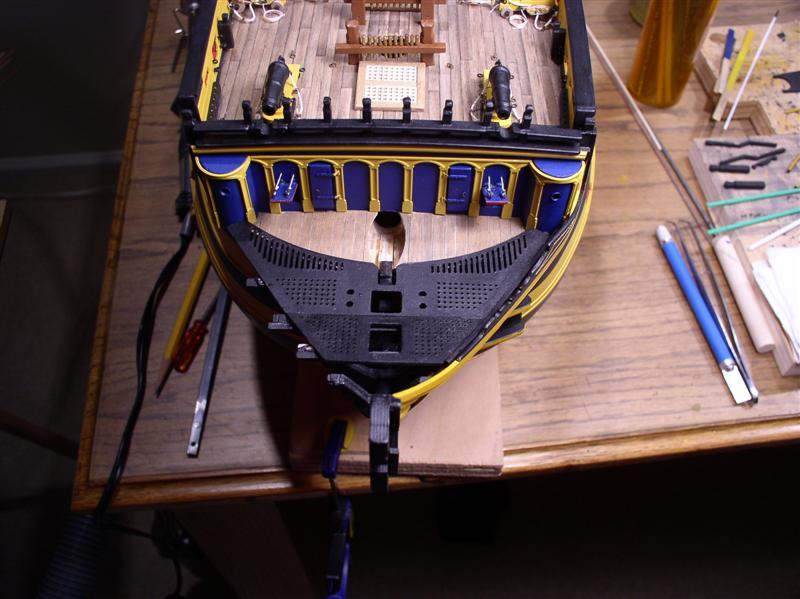
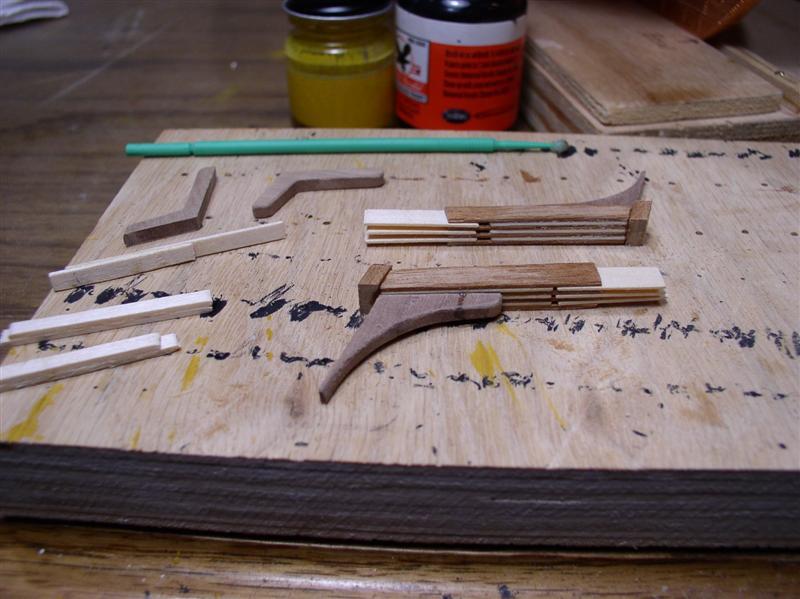
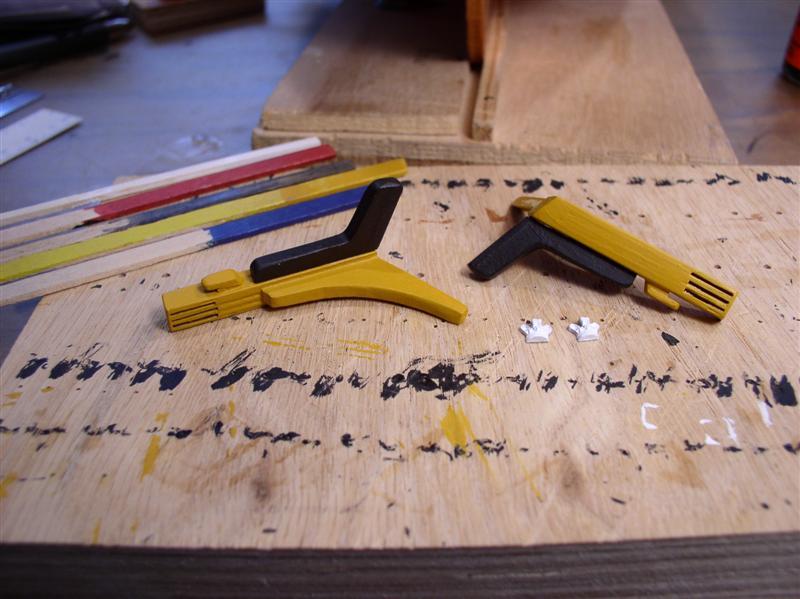
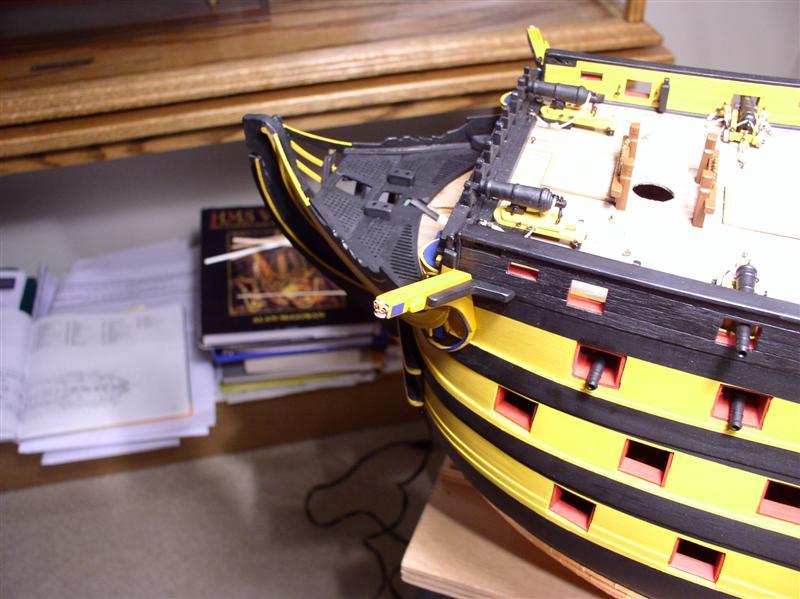
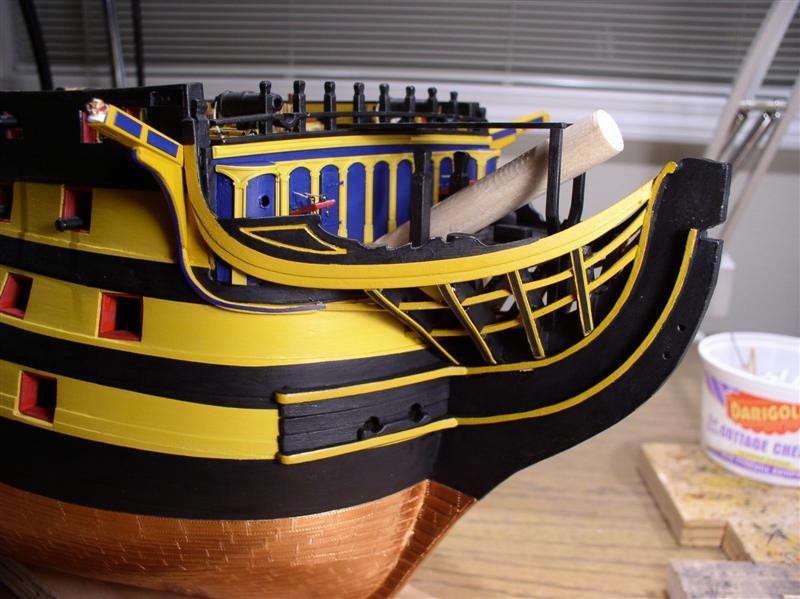
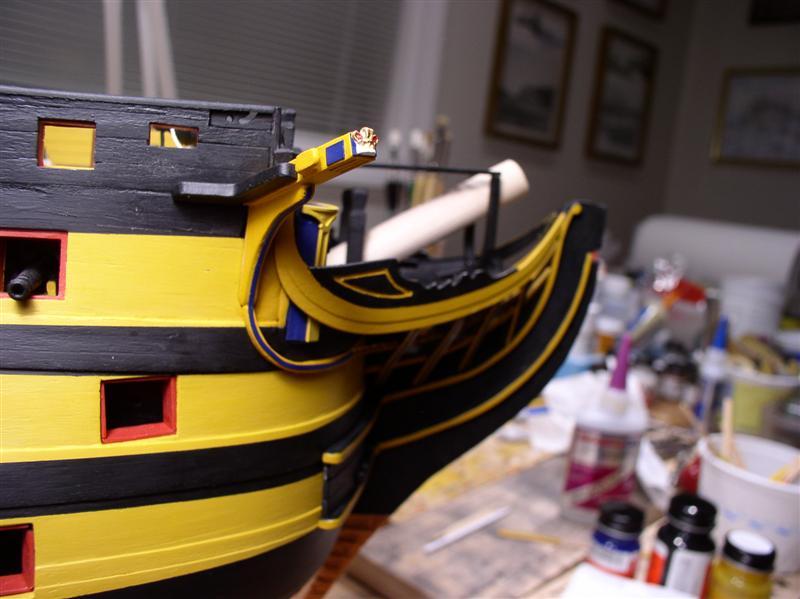
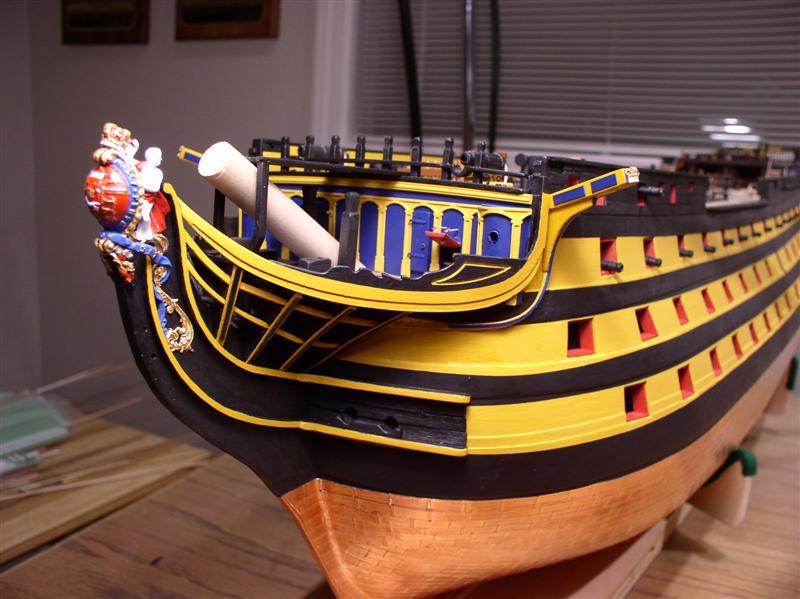
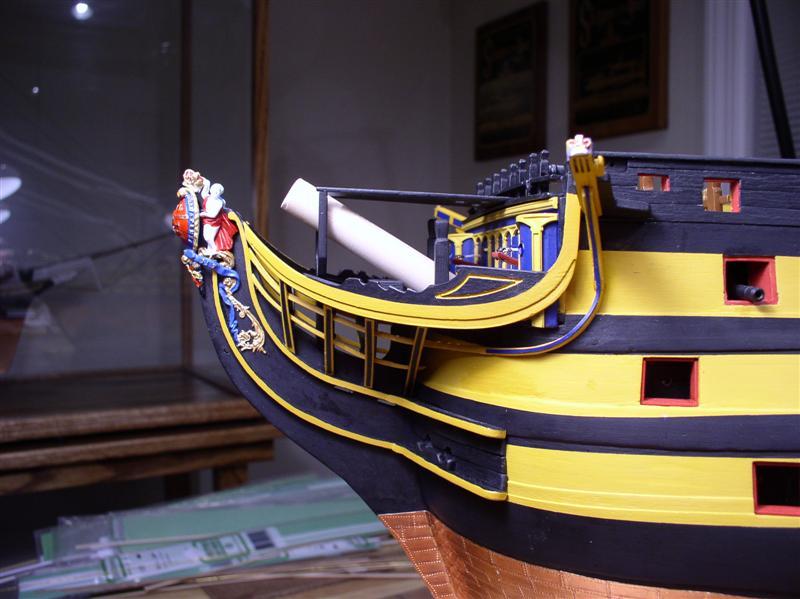
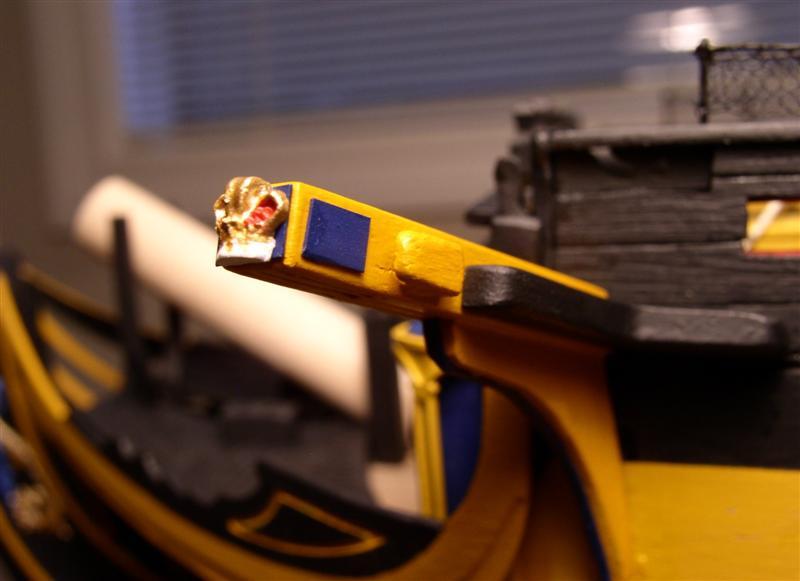
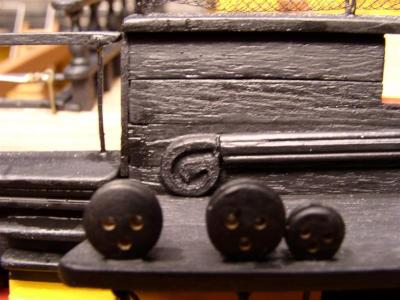
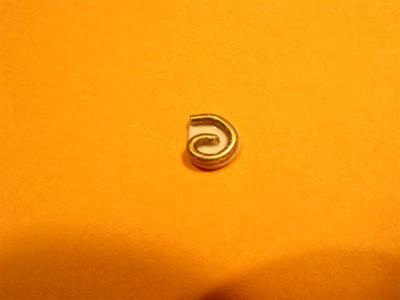
14. BOW SPRIT The bow sprit and its rigging is logged as one section. It required tapering along with the yards. The following is a simple rig for sanding and tapering a dowel (picked up from Donny. However, he has moved on to a much better lathe). Making the gammoning saddles. The dowel is cut half way through. Approximately, 1/2 of the dowel removed. Drawing angled cuts. Hollowing out the half dowel. Cutting on the angle. Glueing elevations to create saddles Tapered dowel, "iron" bands, and gammoning saddles. Tenon for cap Added stop cleats for rigging, bees and cap Bow Sprit, Jib boom and Flying jib boom. Jib boom at cap Flying jib boom bracket on jib boom Sorting out the congestion and somewhat confusing rigging on the bow sprit. (plans from JoTika) Fitting blocks and deadeyes to the bow sprit Rigging the bobstays Bobstays served and spliced through the stem Close up of bobstay attachment at stem (cutwater). Attaching shrouds to hull eyebolts. Shrouds served at bolts. Bobstays and shrouds at bow sprit. Gammoning the bow sprit. Inner, outer and flying martindales attached by lashing to eyebolt on knightheads. A trick to simpliy gammoning. Daniel (Dafi) would simply have one of his little men stationed in the bow timbers to pass the line through. Lacking the Lilipution crew, painting the gammoning line with C/A creates a long thread needle to pass the line through the bow timbers. Dolphin striker Flag staff Yard slung by served sling with lashing Forestay and preventer attached at bow sprit by served collars with lashings (details in rigging section) Forestay and preventer attached. Topmast stay and preventer passing through sheeves in the bees. Topmast stay and preventer terminate at lower lashings at the starboard and port knightheads. Overview of bowsprit and guys.


- 755 replies
-
- 3
-
-
- finished
- caldercraft
- (and 1 more)
-
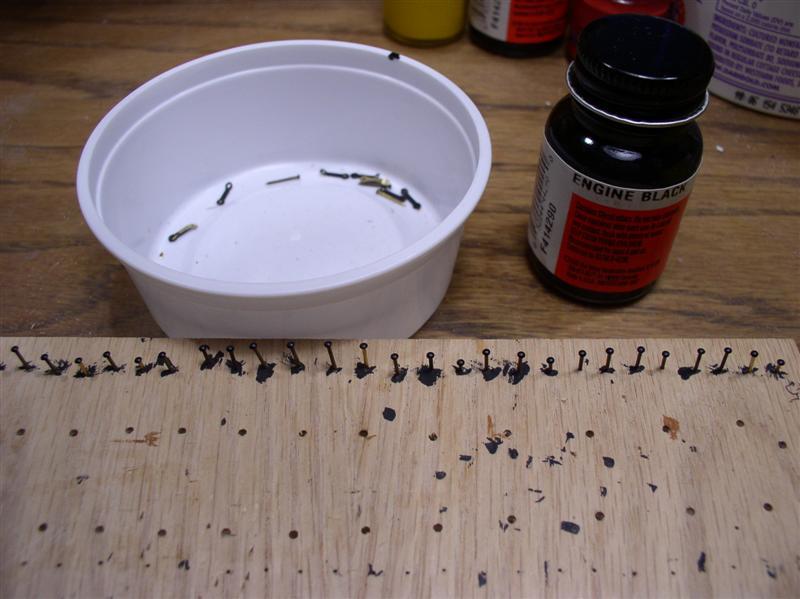
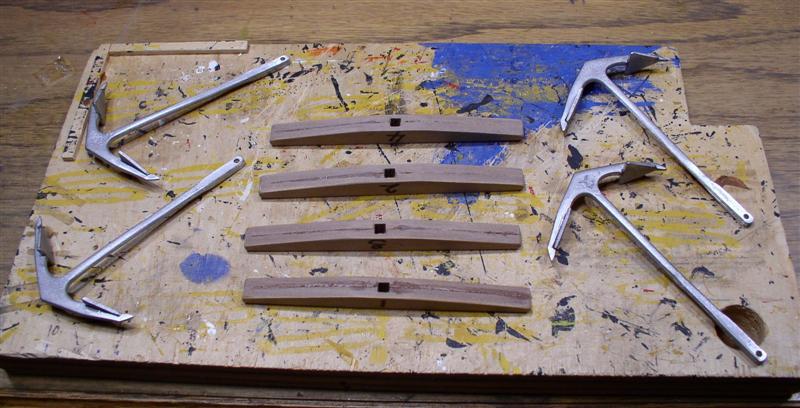
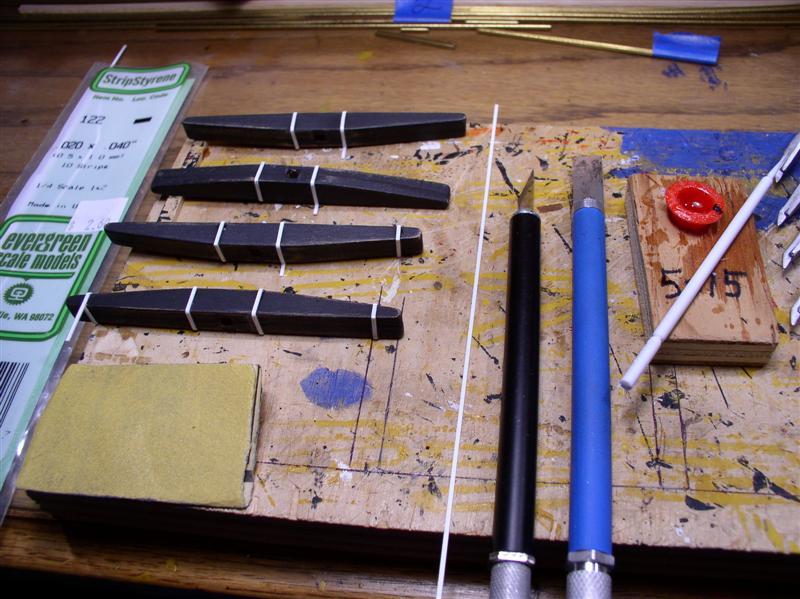
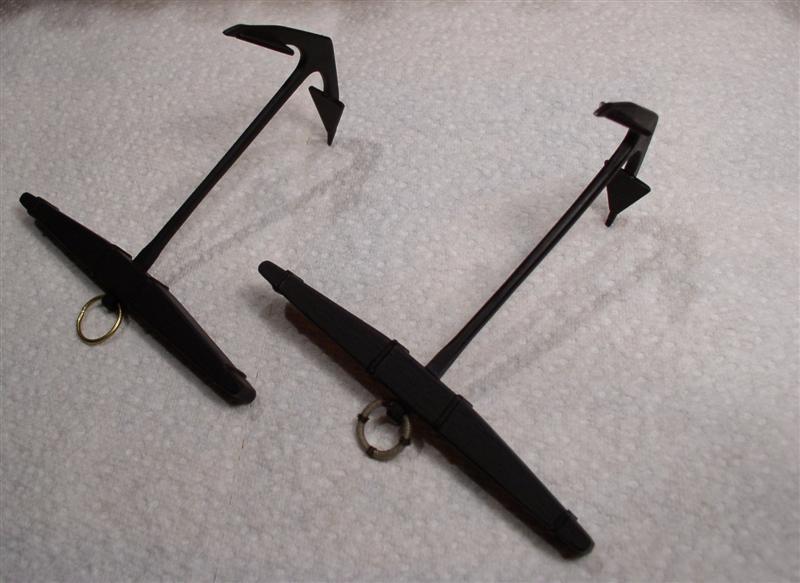
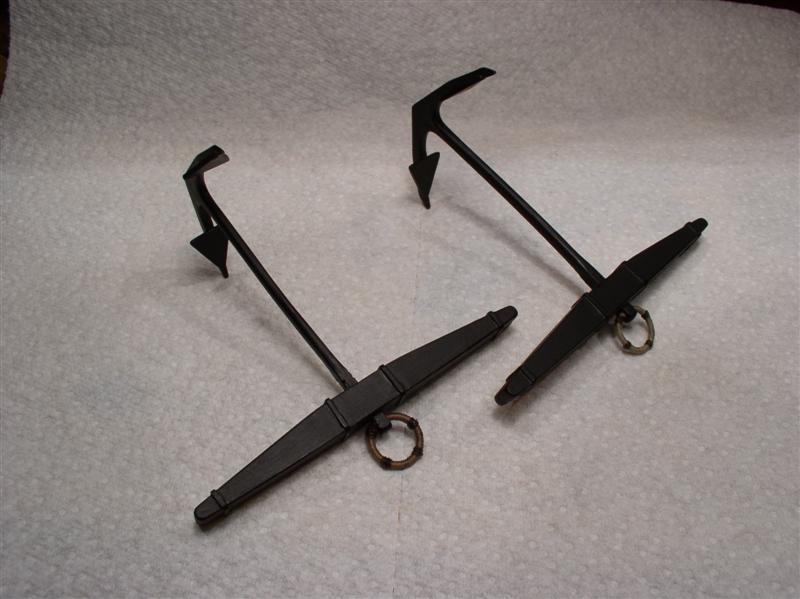
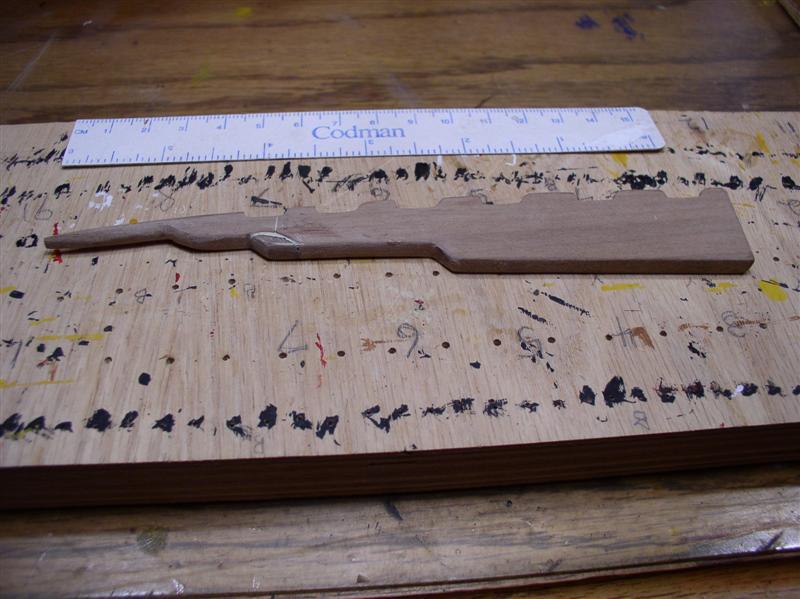
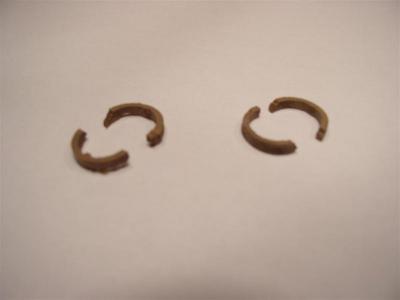
13. ANCHORS Preparing anchor components. adding iron bands and wrapping the anchor rings.


- 755 replies
-
- 2
-
-
- finished
- caldercraft
- (and 1 more)
-
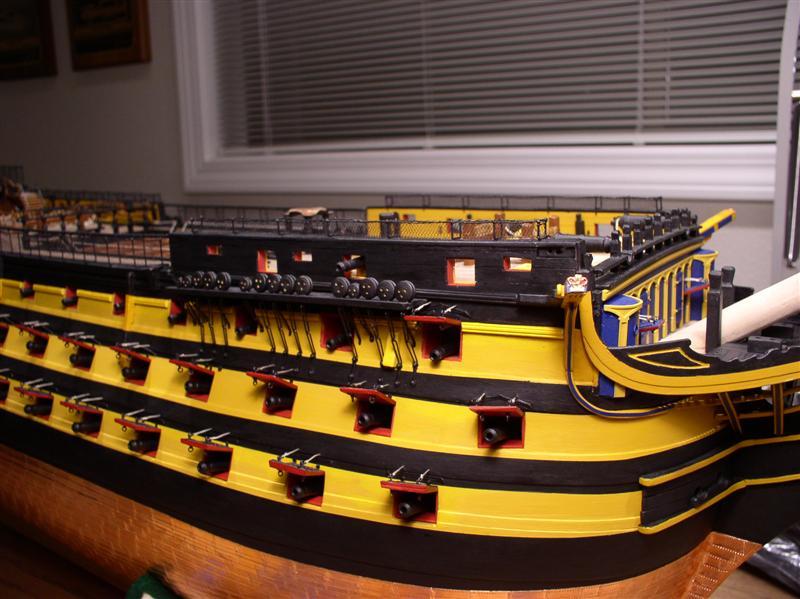
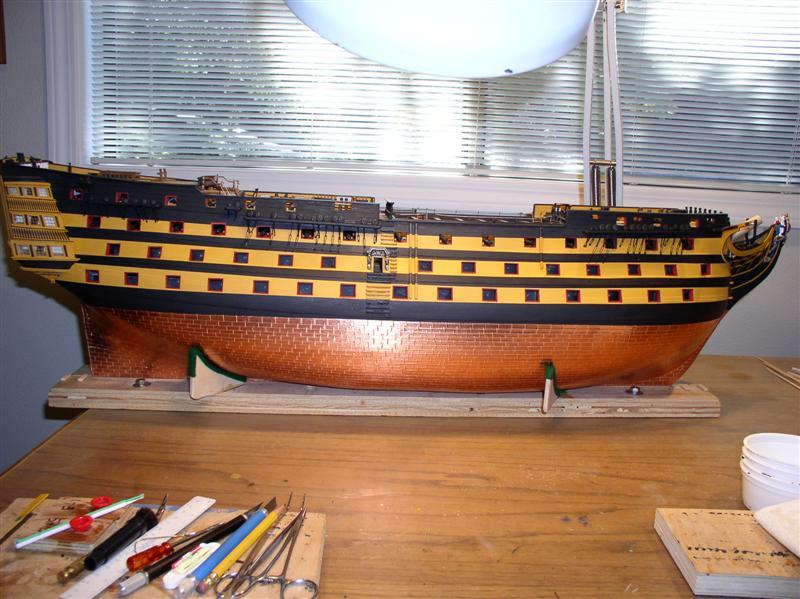
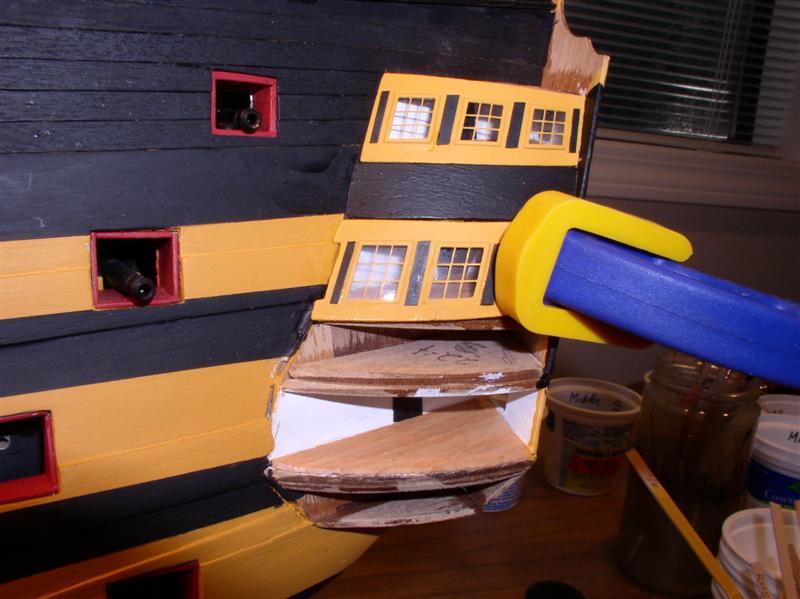
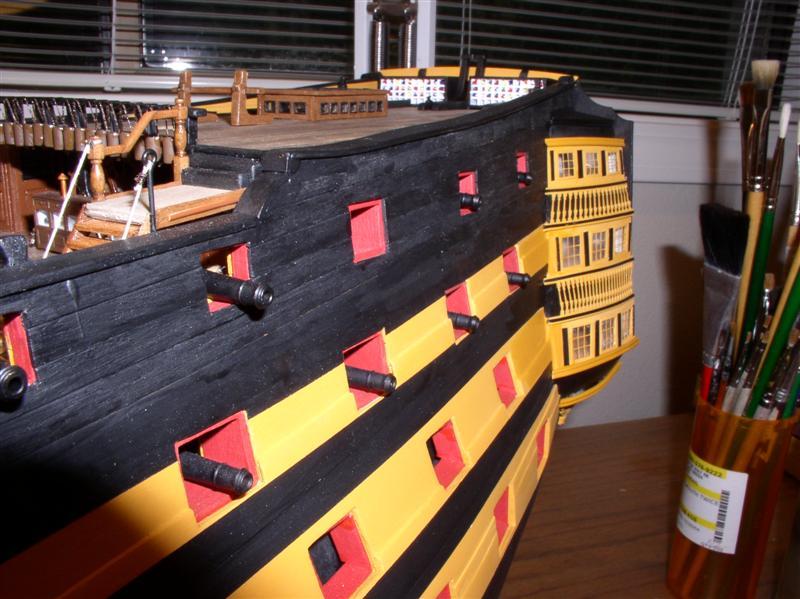
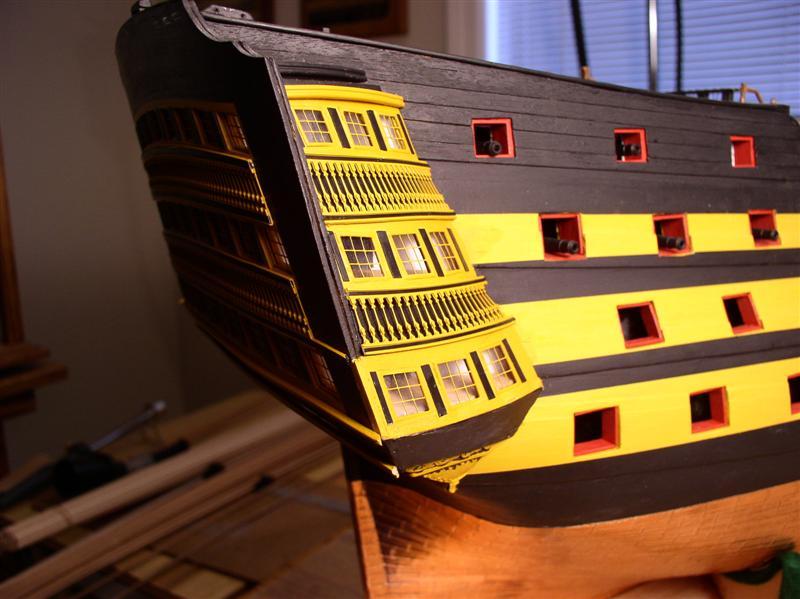
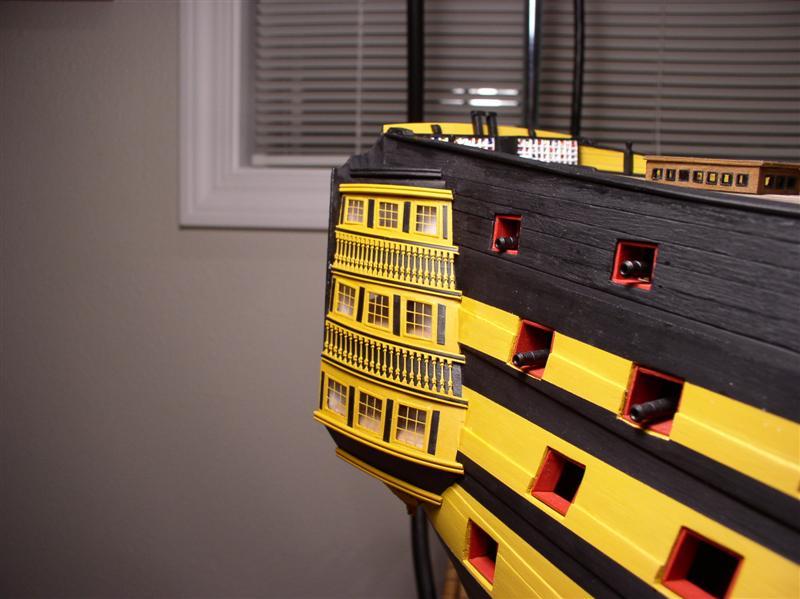
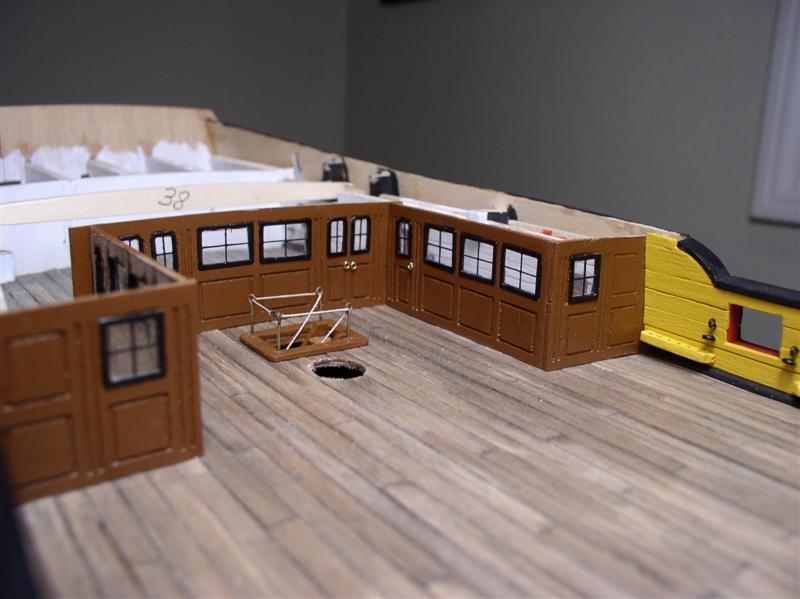
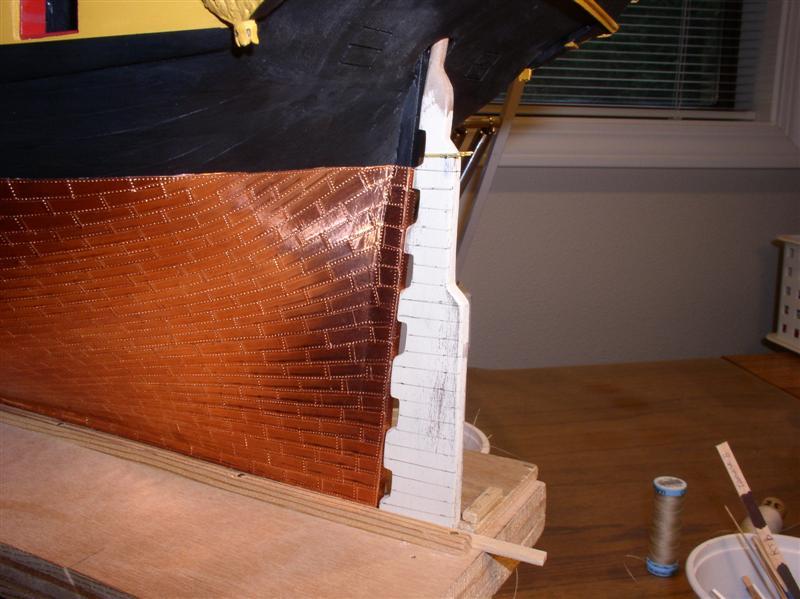
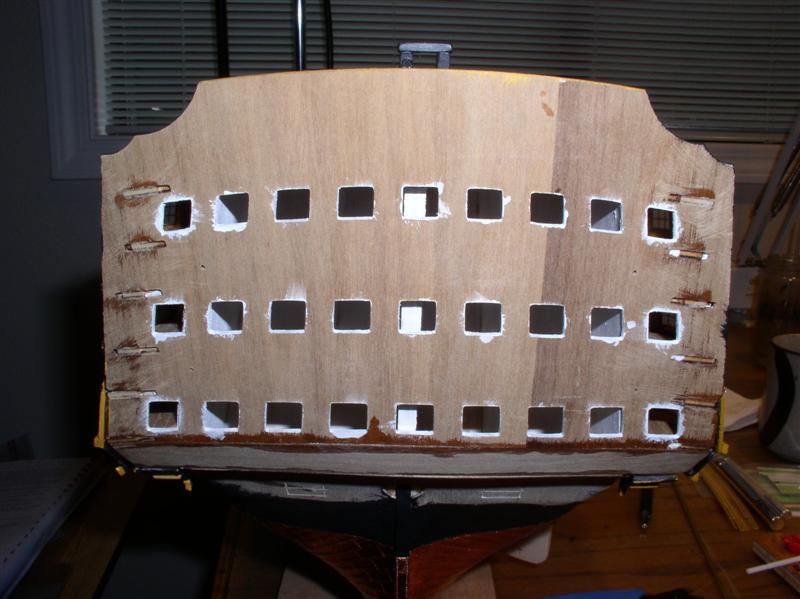
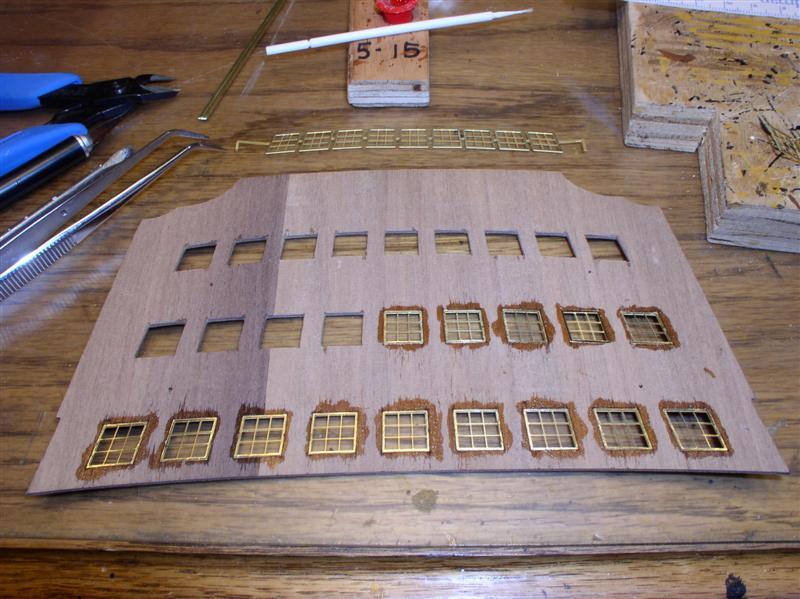
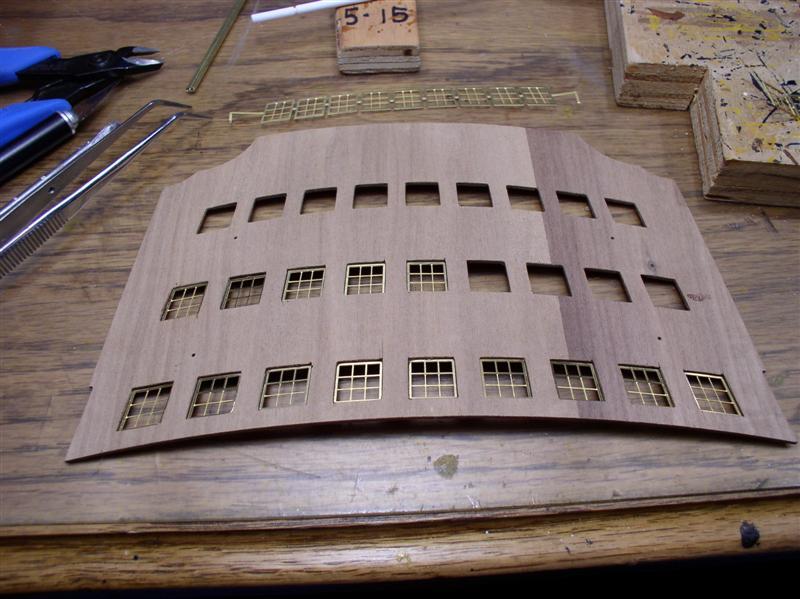
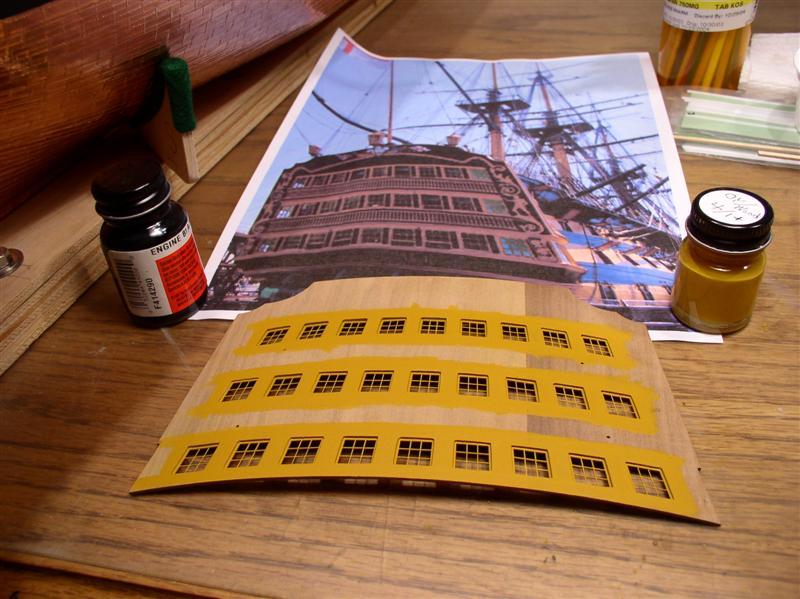
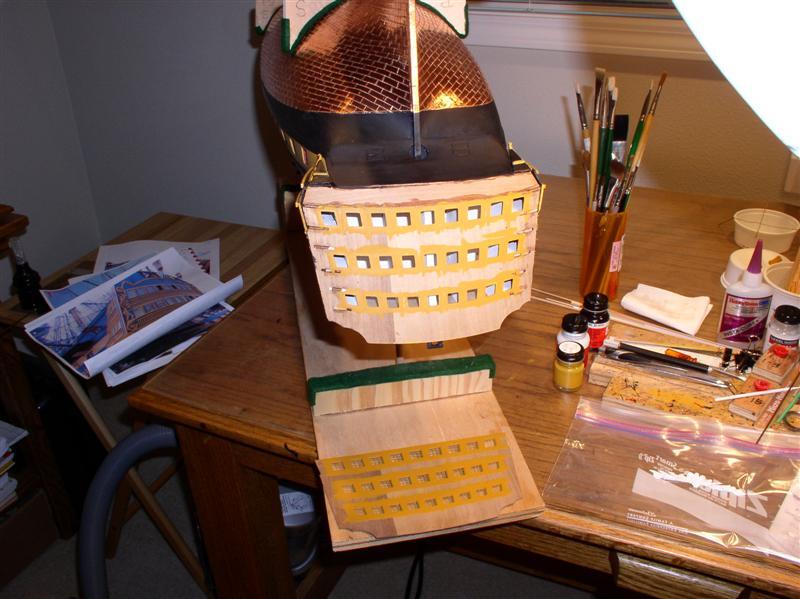
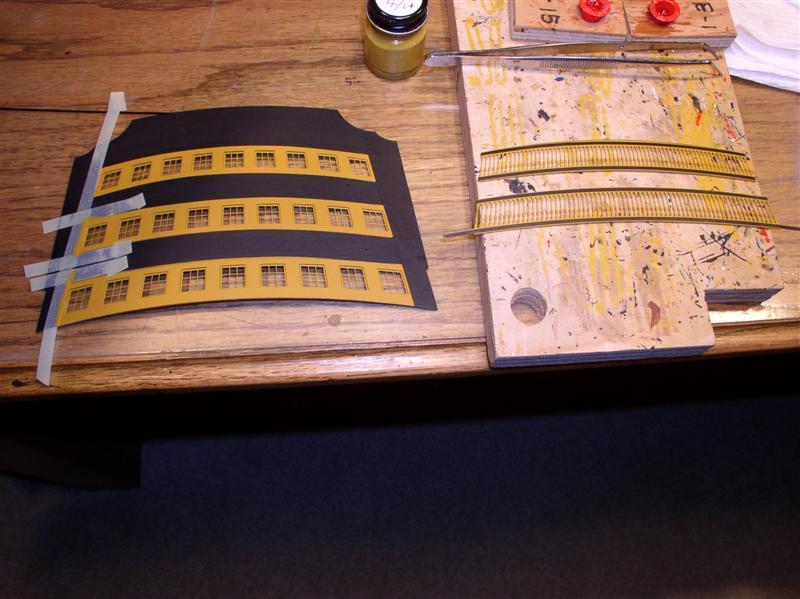
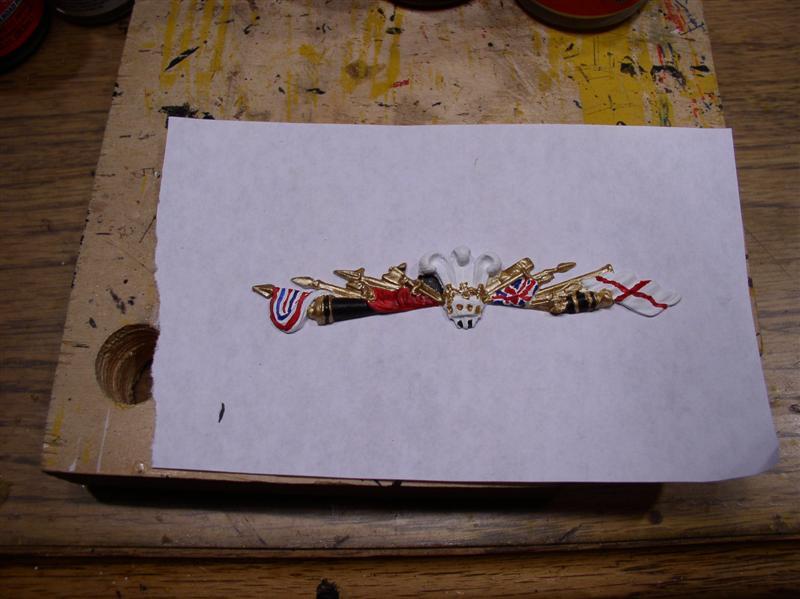
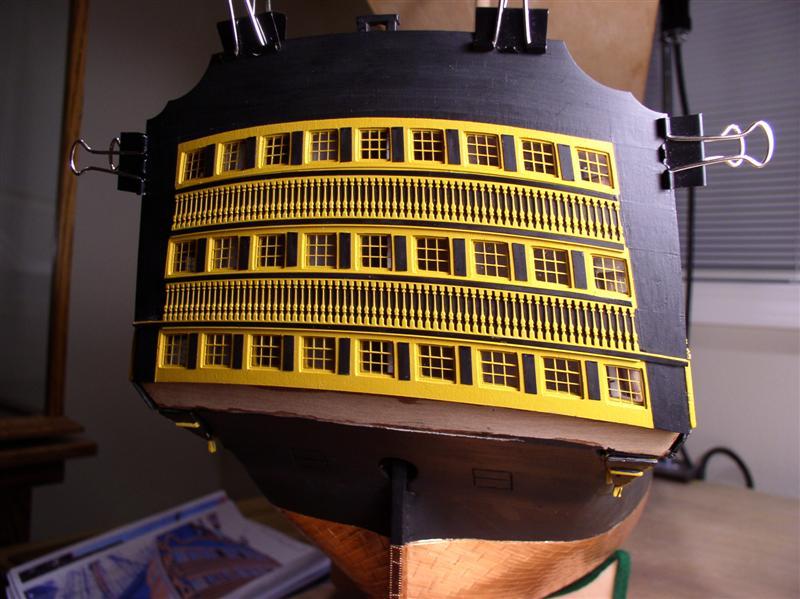
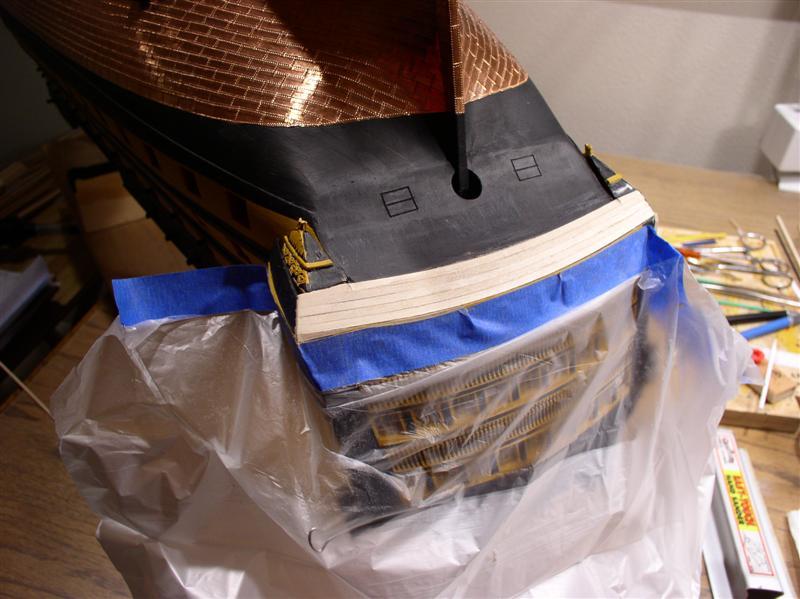
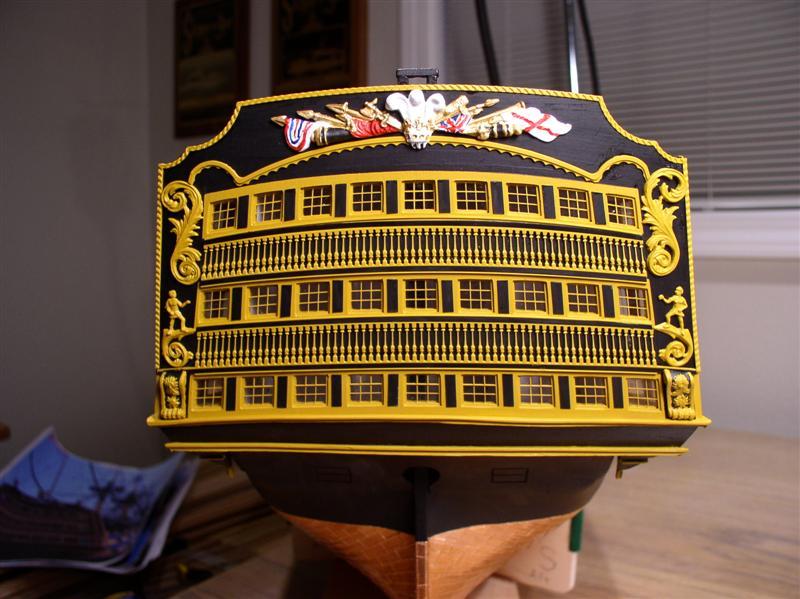
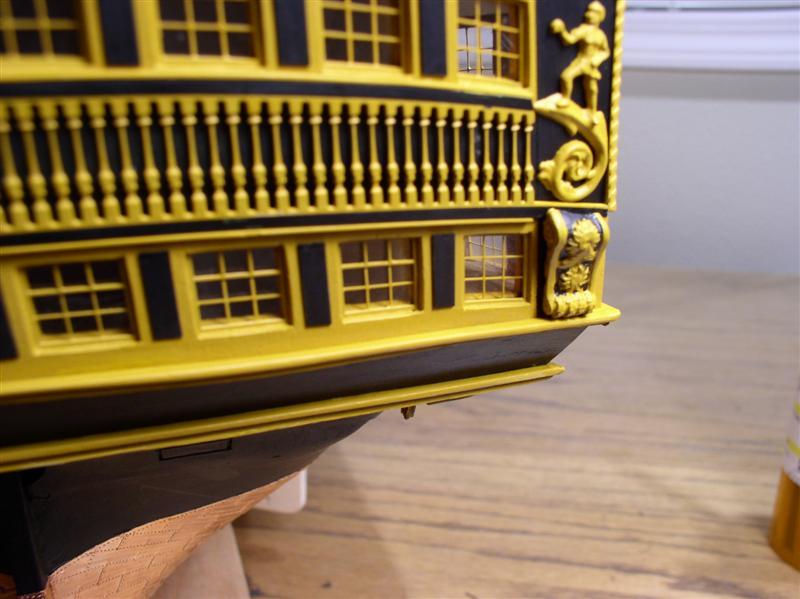
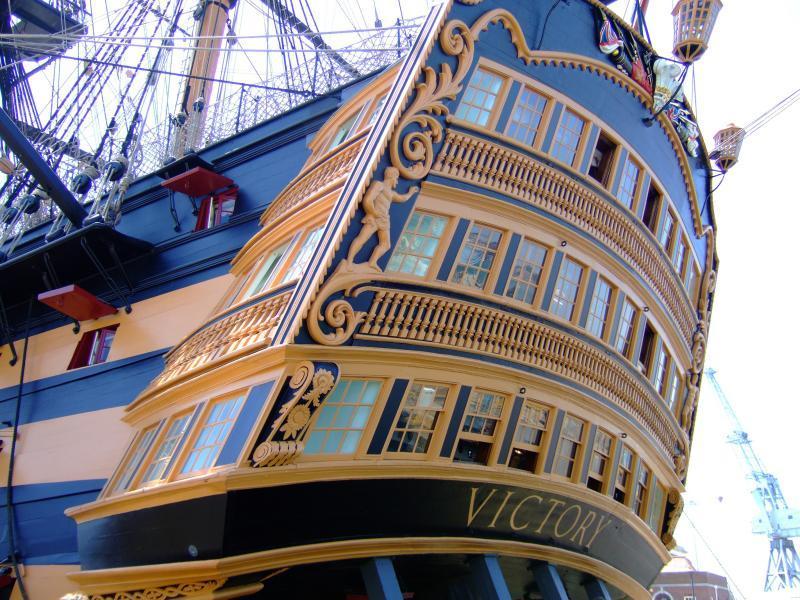
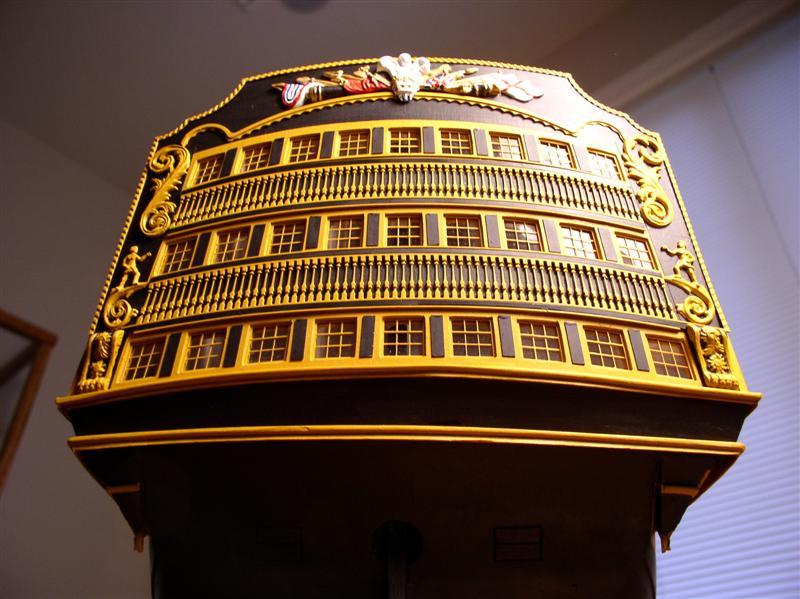
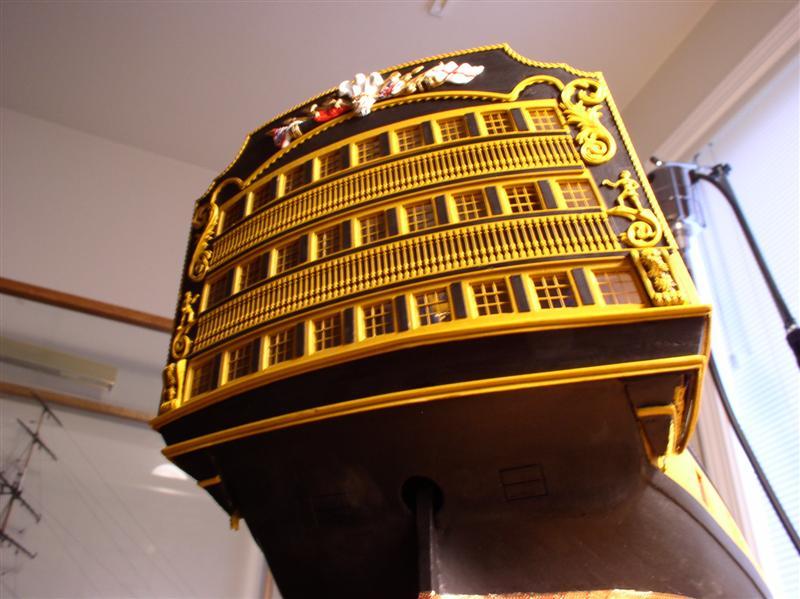
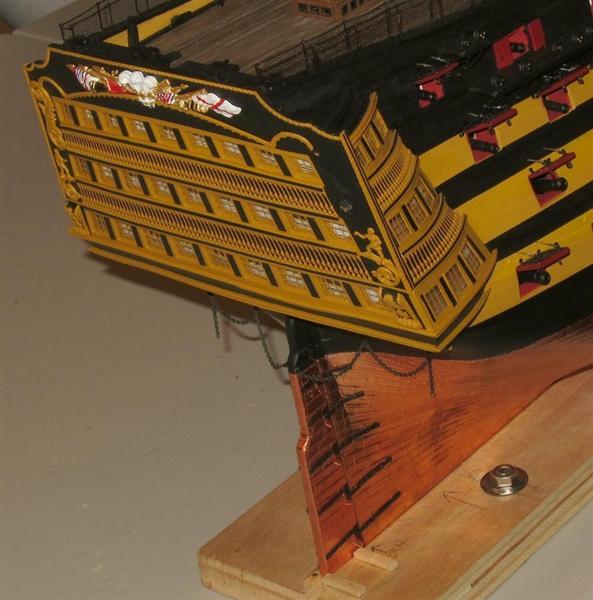
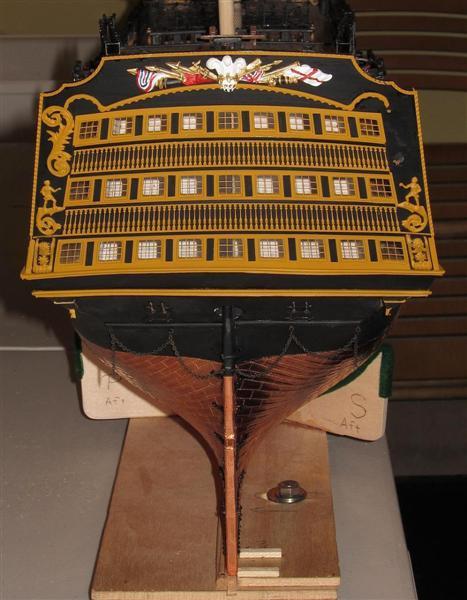
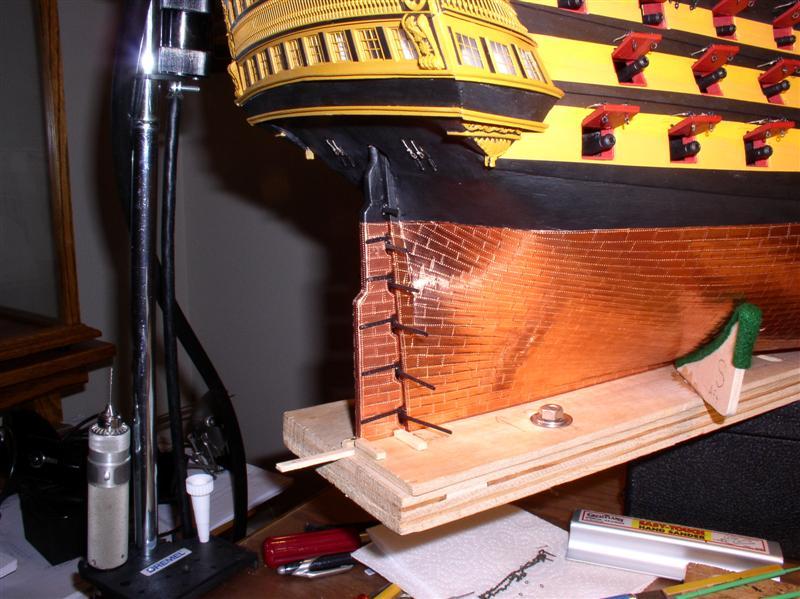
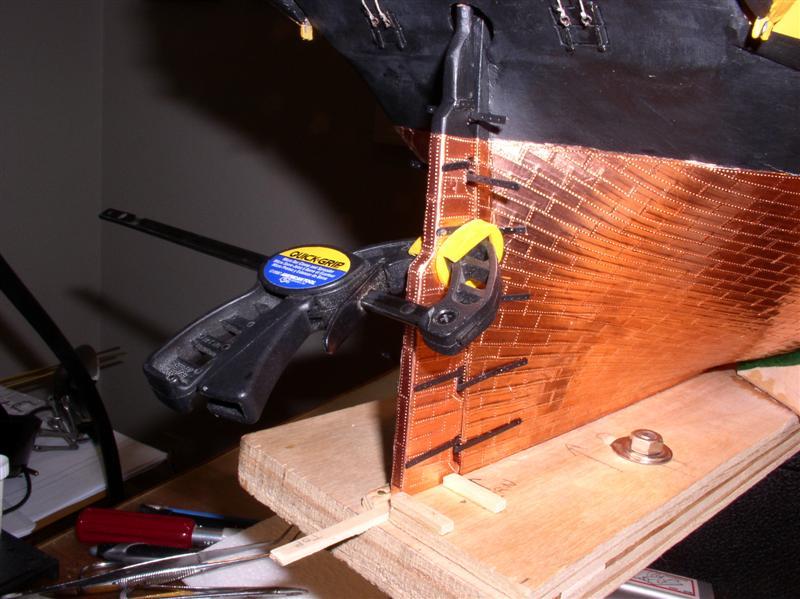
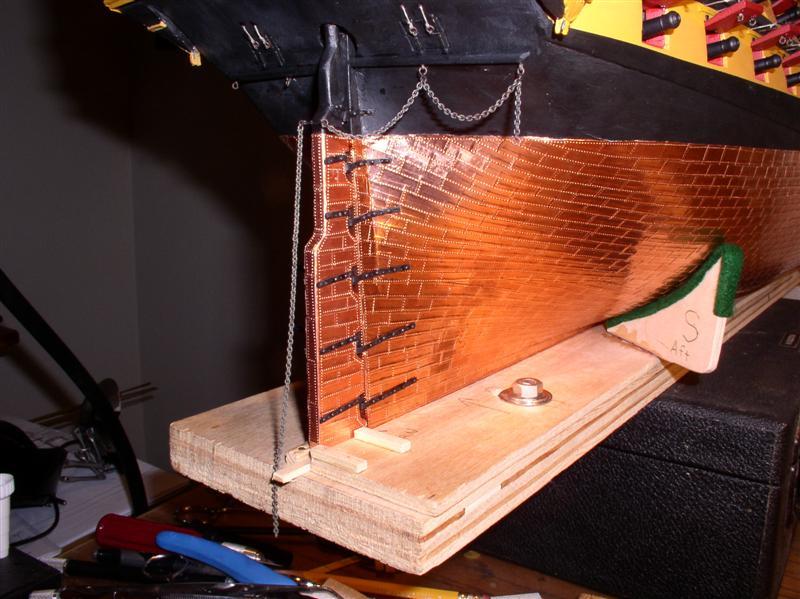
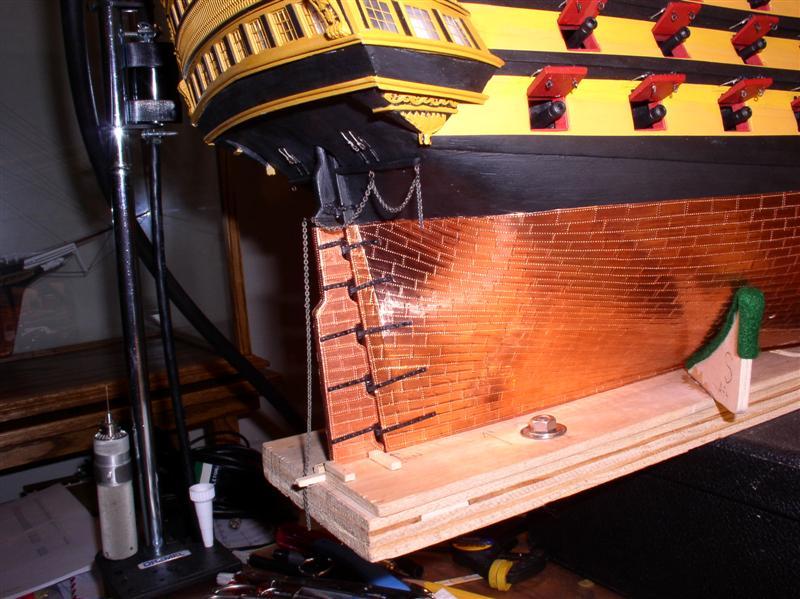
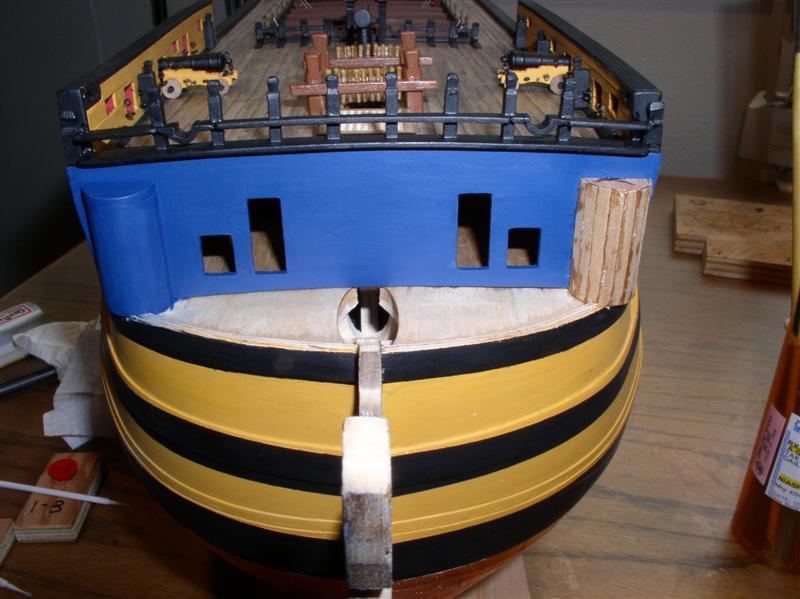
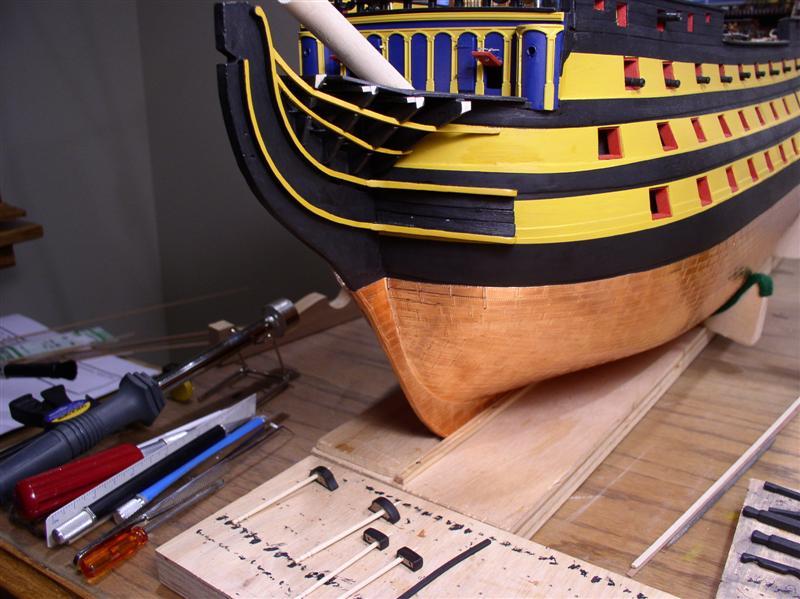
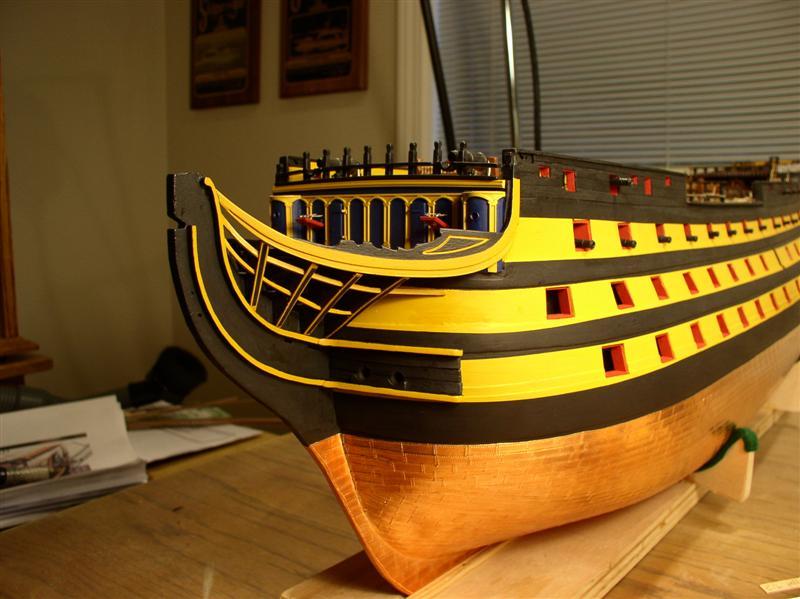
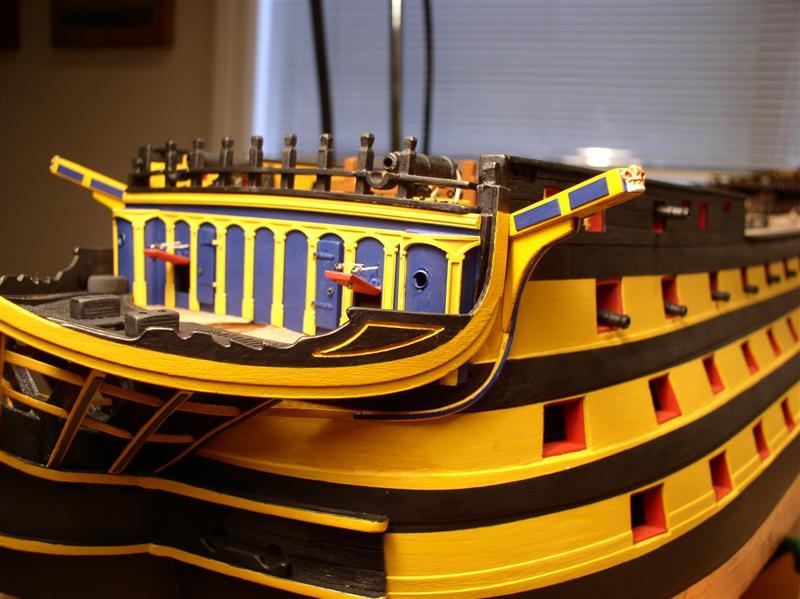
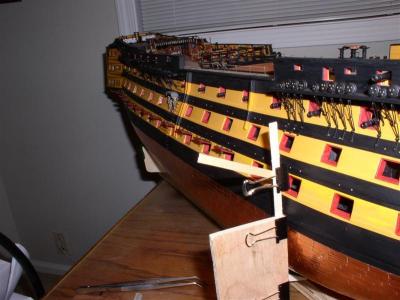
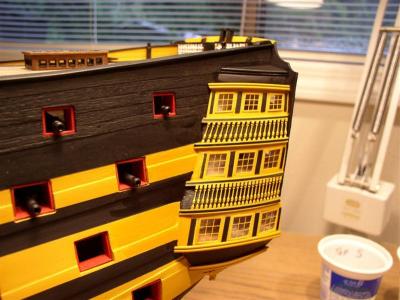
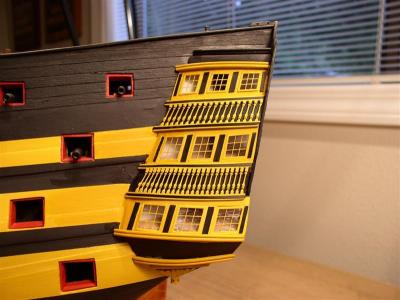
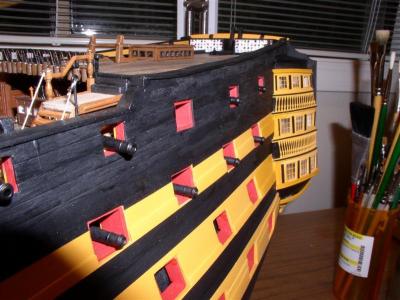
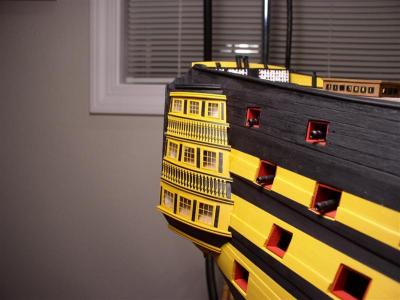
12. STERN When the stern details were added, my wife said "It's beginning to look like a real ship." A rewarding comment after four years. But on with the build. The inner layer of the stern fascia. Outboard windows are the quarter galleries. Inner openings were painted white to try to achieve an appearance of depth, while the central white board was then painted black. Back side of outer fascia. Experimenting. Placing the windows from behind (opposite from instructions) gave much better definition to windows. Initial painting. Deep fascia painted around the windows Black painted using fine line masking, then touch up with reverse masking. Ballisters painted yellow ochre before glueing in place.Horizontal black above and below windows is styrene strip painted black before glueing. Spacers between windows ; styrene, painted black. Painting stern decoration (was not on Victory at Trafalgar) Glueing stern fascia in place. Tying the fascia (transome) to the counter of the hull required cross planking. Details added. Camera angle made appearance of stern look square. See next photos. Real ship, quarter view Natural light photo Rudder. Small addition to trailing edge to raise chain attachment above the waterline. Preparing for copper plates "Nails" placed by ponce wheel Pintles and gudgeons. Pintles and gudgeons. "Bolts" are small rivets (0.035") placed in drill holes.


- 755 replies
-
- 2
-
-
- finished
- caldercraft
- (and 1 more)
-
Kevin, Your ship is looking beautiful. Your garage (heated?) is probably a better workshop site than my den. Cheers, Gil
- 1,319 replies
-
- 1
-
-
- caldercraft
- Victory
- (and 1 more)
-
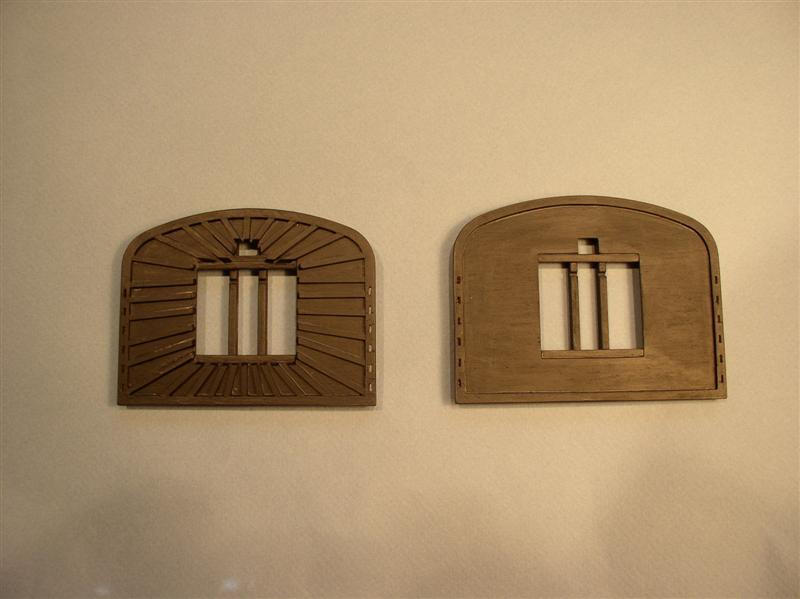
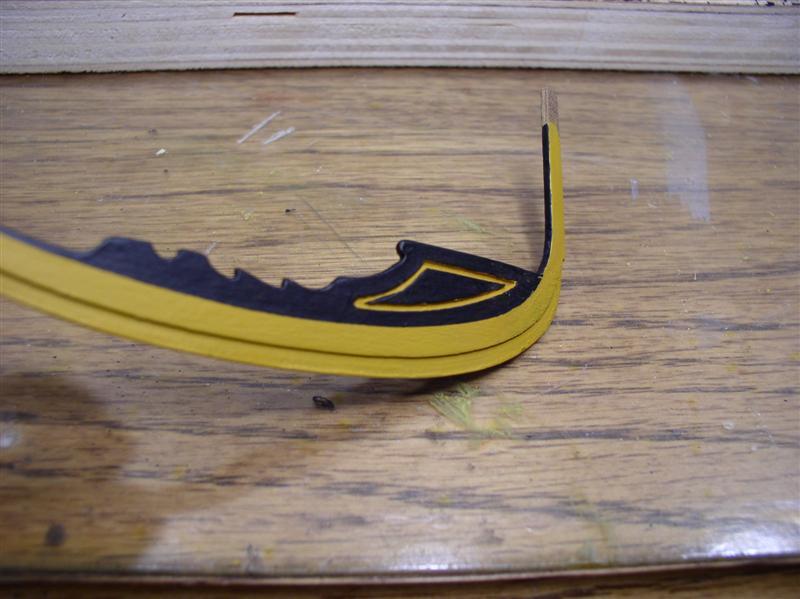
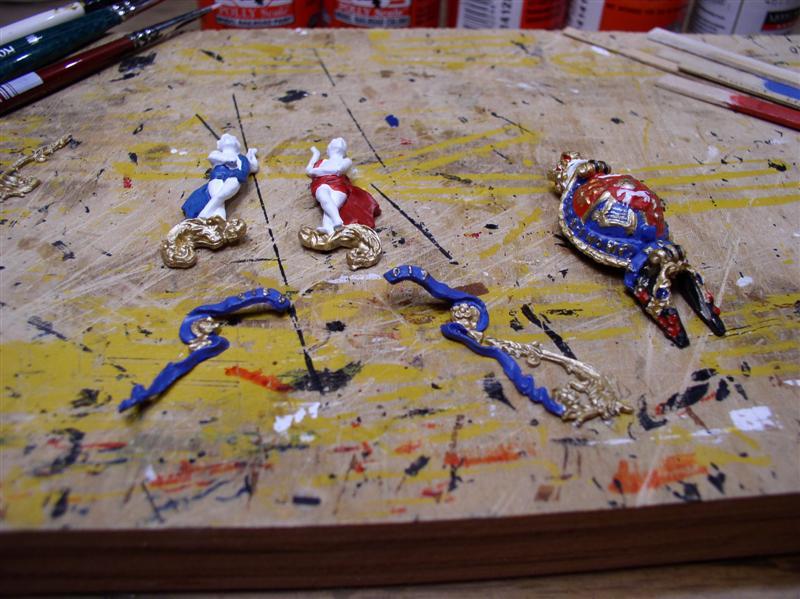
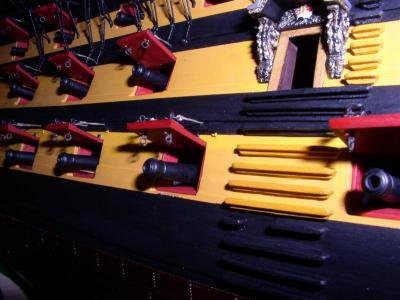
11. BOW Continuing in my attempt to recover the build log by arranging photographs for each area of the build. The bow has a striking beauty that was missing in the late 1800's and early 1900's. We've all seen pictures when the Victory's bow was boxed in creating a rather ugly entry to the water. The transmogrification with the restoration is what makes building the Victory (at Trafalgar) so much fun. Building the roundhouses. Vertical planks were glued and sanded. Starboard round house faired and painted. Once again, an example of the color change observed with flash photography. Attempting to drill the porthole, the round house was shattered. Rather like being hit by a 12 pounder. A small pilot hole followed by a rotating abrasive worked better. Fortunately, the ship's carpenter was at hand. Forward grating Head timbers placed Forming false rails, contoured by soldering iron and curved wood plank bender. Compound curve Building the Catheads. Base bevelled to the angle of the catheads. The three strips of lighter wood in each are temporary spacers for the sheeves. Horizontal supports glued in place. Figurehead. Parts were hand painted and look OK. To see what is possible, look at Daniel's log (Dafi) who made individual lions to place on the crest. More details on the bow will be added with the post on the Bow Sprit and rigging. Cheers, Gil


- 755 replies
-
- 2
-
-

-
- finished
- caldercraft
- (and 1 more)
-
Harvey, Popeye, Lawrence, Rosmarie and Grant. It's nice to hear from each of you and see the build logs coming back to life. There are still some wonderful logs that haven't reappeared, however, I'm only about half done sorting and posting, so perhaps most will reappear. Cheers, Gil
-
Hi Rosmarie, You've made wonderful progress since I last looked in (on the old site). Completing the bow and stern makes it look like a real ship. While you are having trouble recalling the English terms, I'm lucky if I can remember how I did things. I've enjoyed your log and look forward to many more posts. Cheers, Gil
-
Hi Harvey, Great to see the Constitution back on the bench. A lot of great progress since I last saw her. How do you manage so many different projects? My limit is one. Sorry I've missed so many PSSM get togethers. The Victory won't fit in the Explorer any more, but I'll come by to say hello. Chgeers, Gil
-
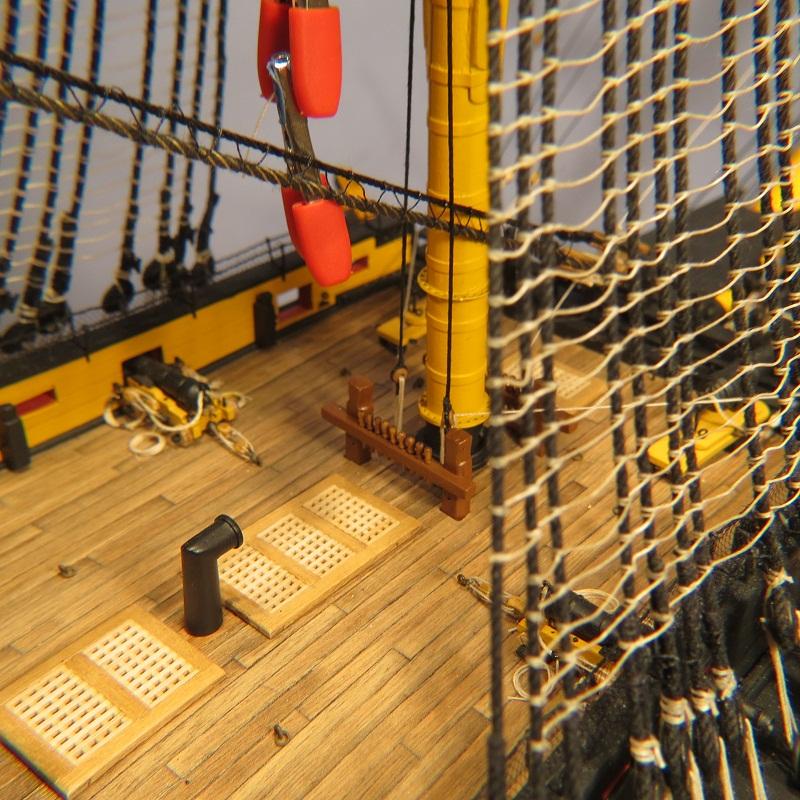
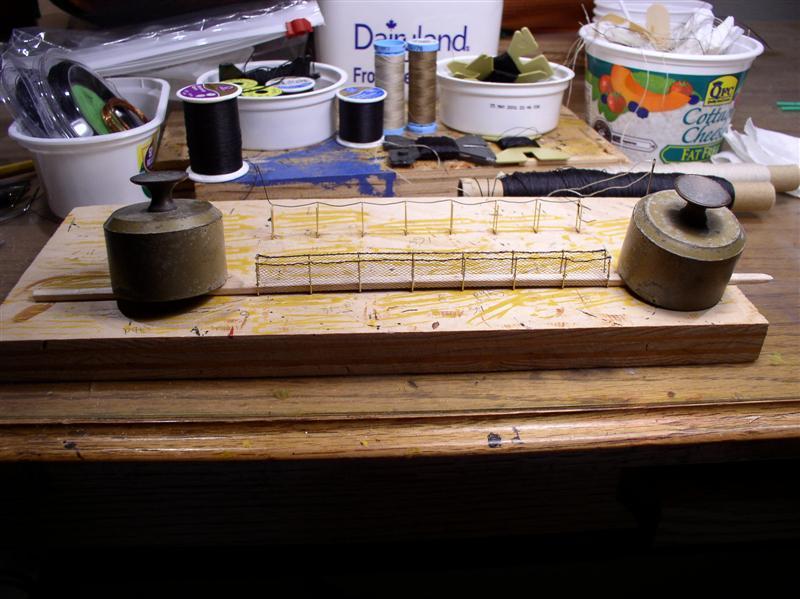
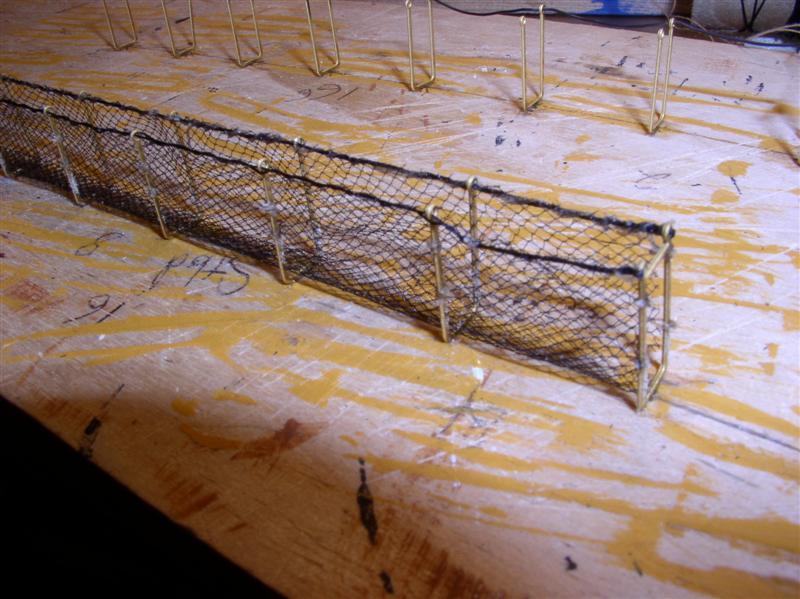
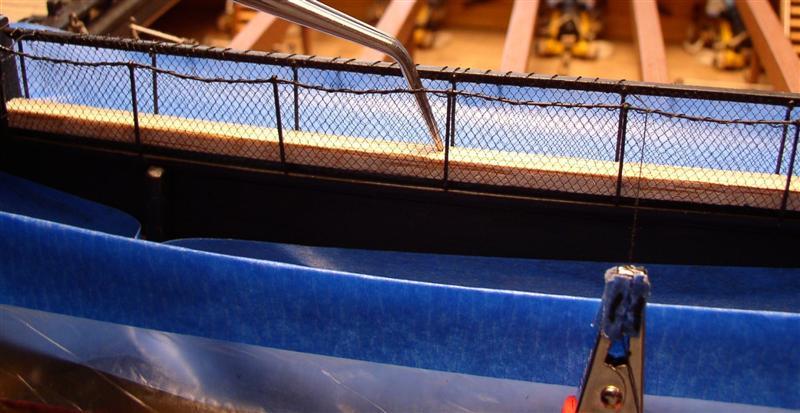
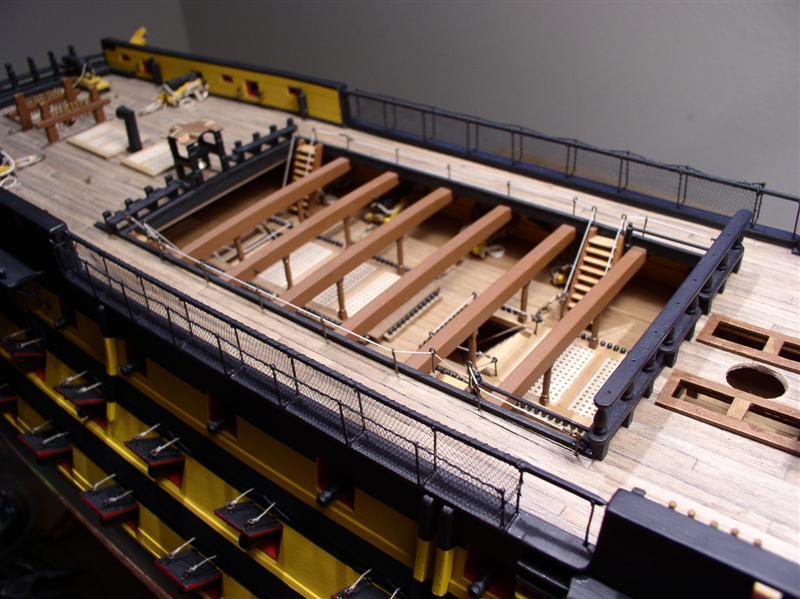
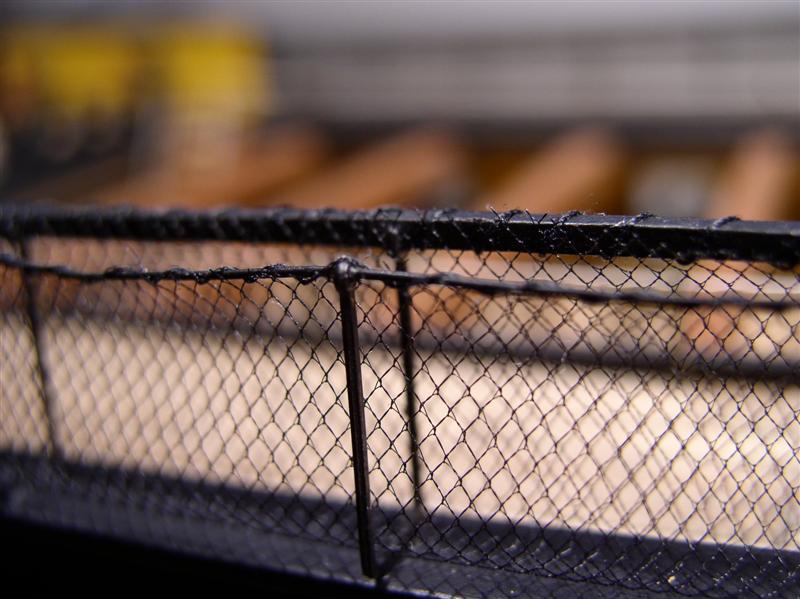
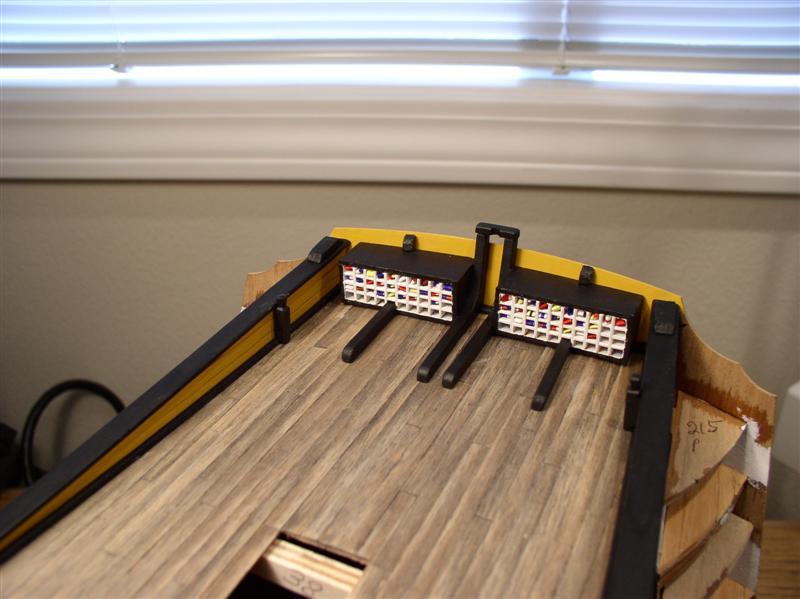
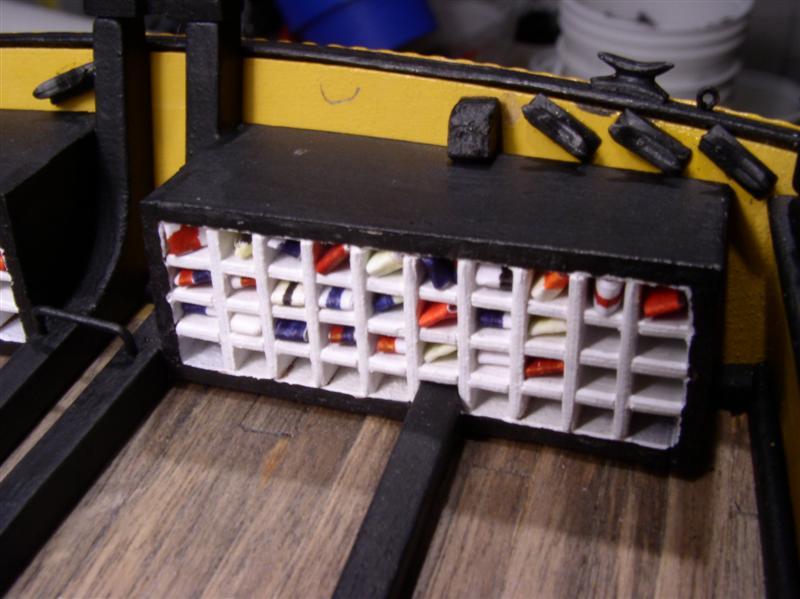
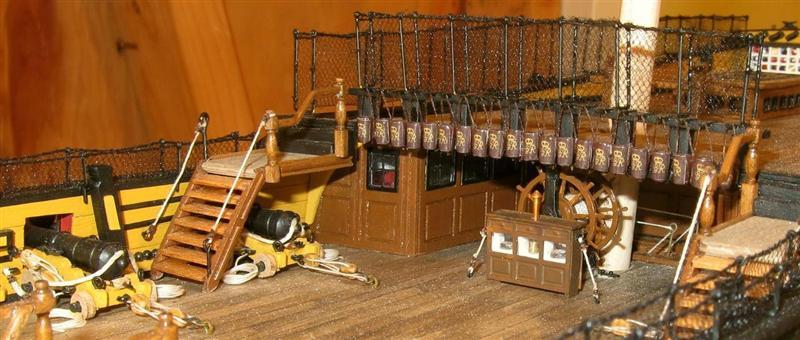
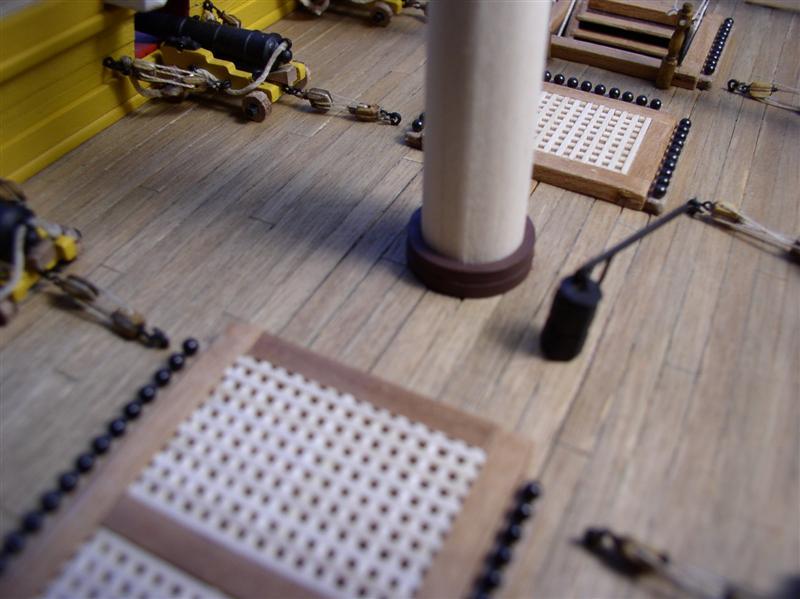
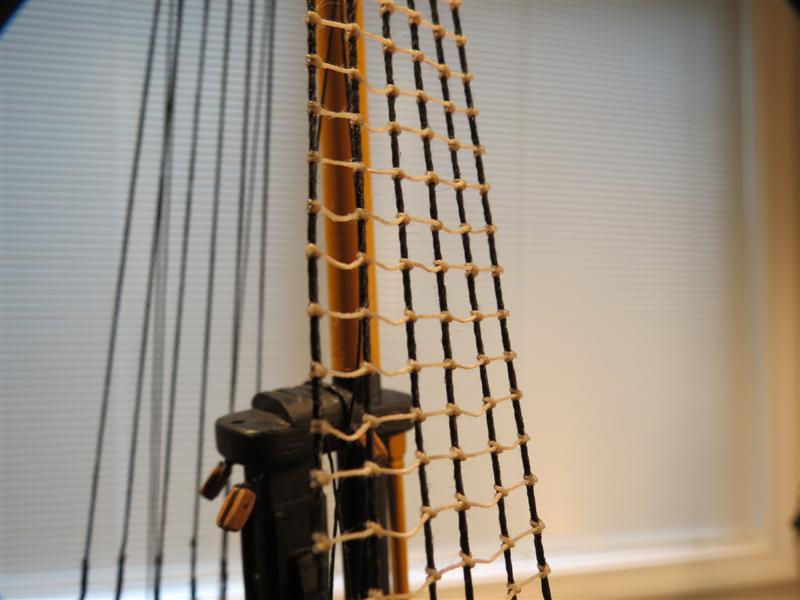
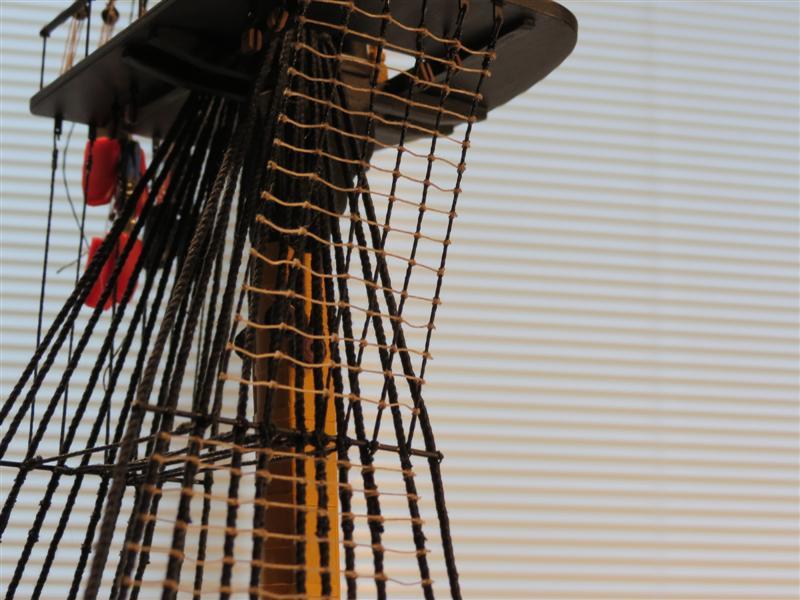
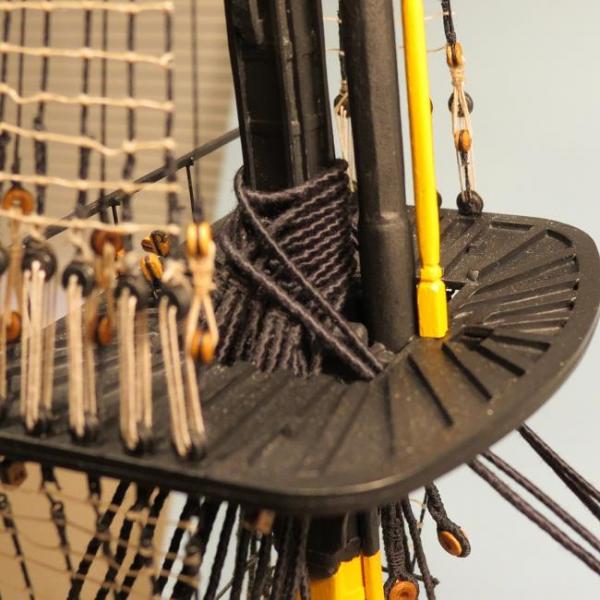
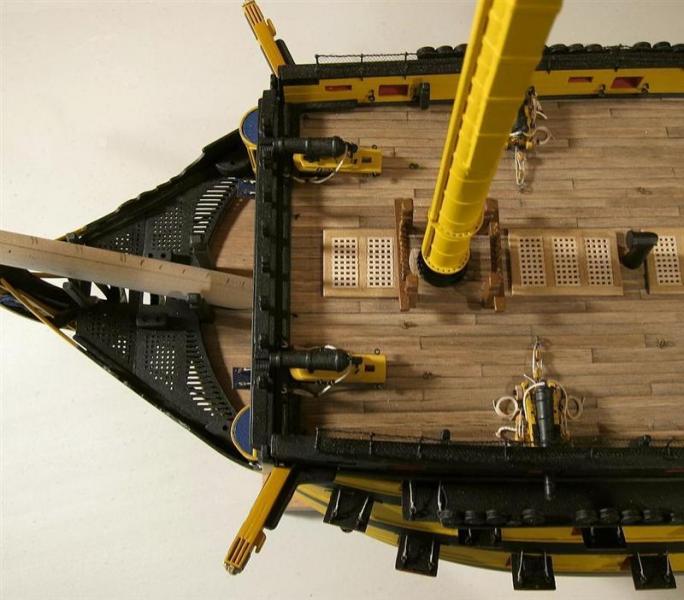
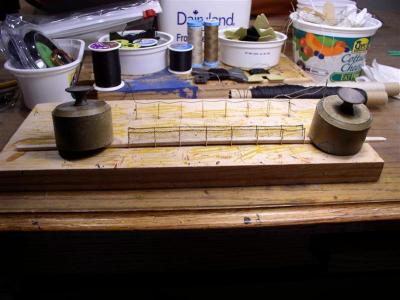
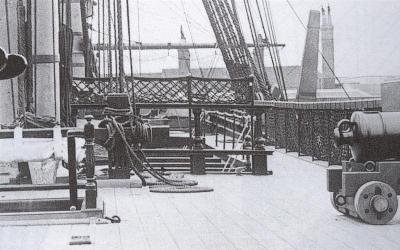
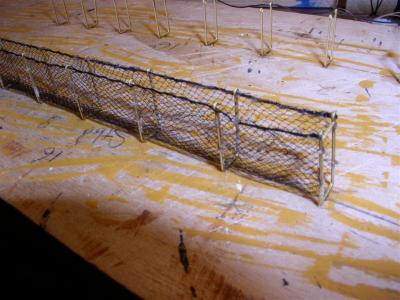
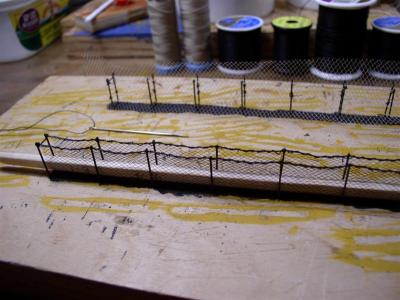
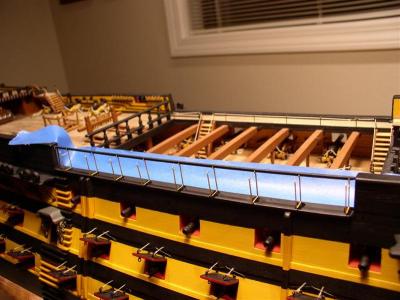
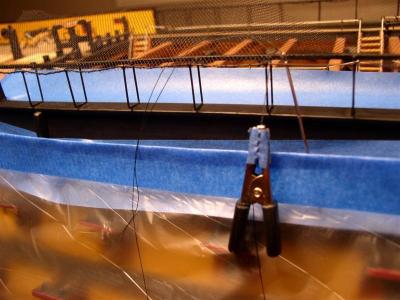
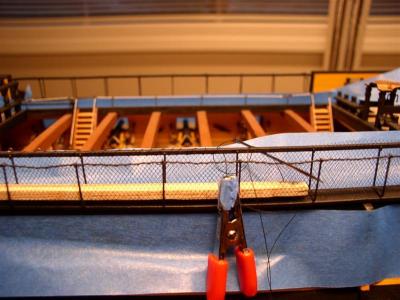
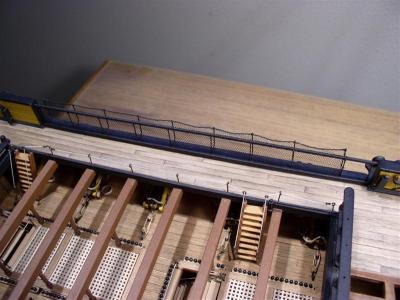
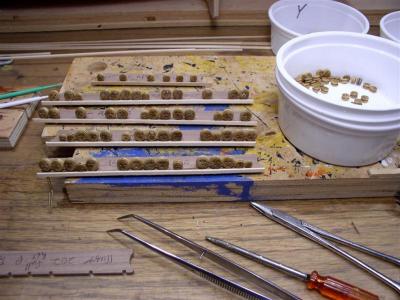
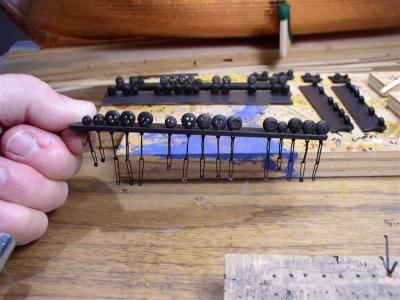
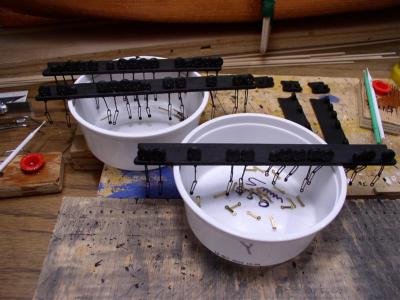
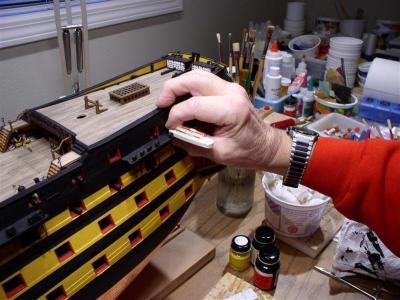
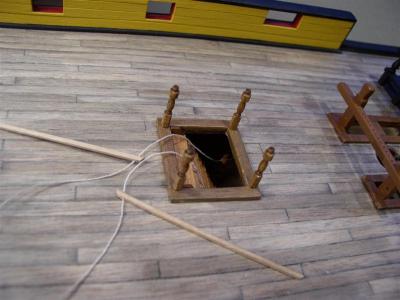
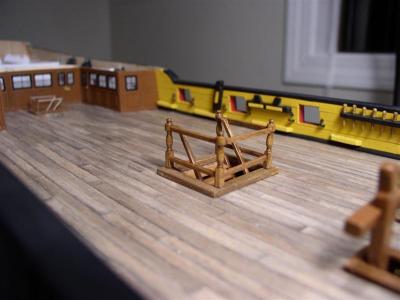
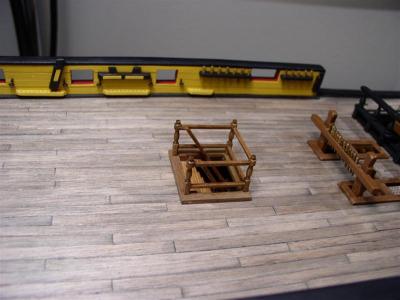
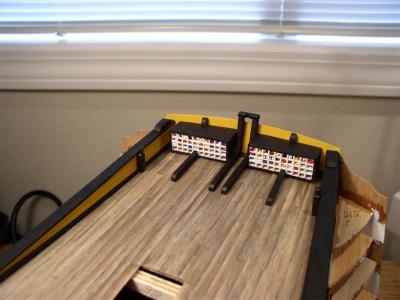
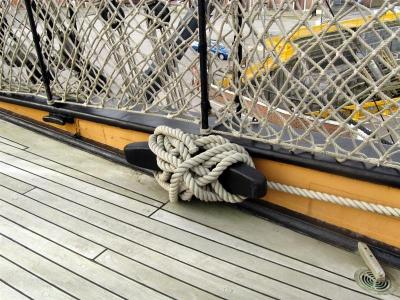
10. HAMMOCK NETS Experimenting with black Tulle, netting for ladies hats. Numerous trials with other colors were ineffective: White (not visible enough), Stained with tea or wood stain (inneffective), Biege (too pink). On the real ship, they have been white or black again depending on the time photos were taken.).jpg] Prototype. Rigging nets with small board to contour nets. Support ropes at top are dark annealed wire, in order to control shape with slight sag in the line. Lacing the netting to the "support rope" (wire), followed by lacing to the hand rail., Using the board to shape the net. Examples from midships, poop deck and fore deck.


- 755 replies
-
- 2
-
-
- finished
- caldercraft
- (and 1 more)
-
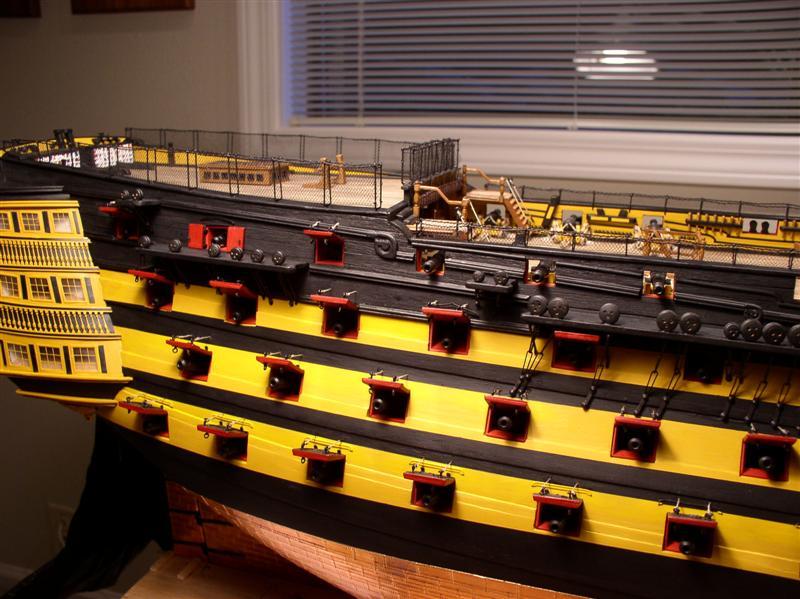
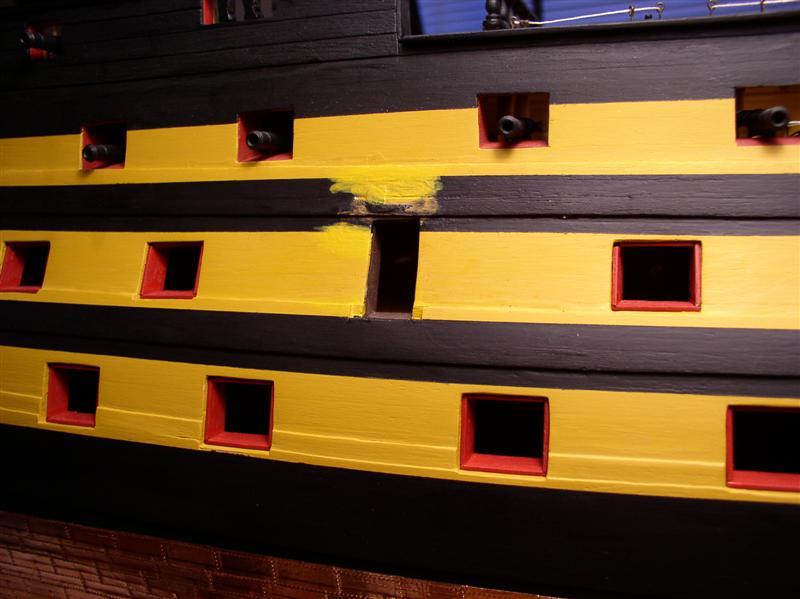
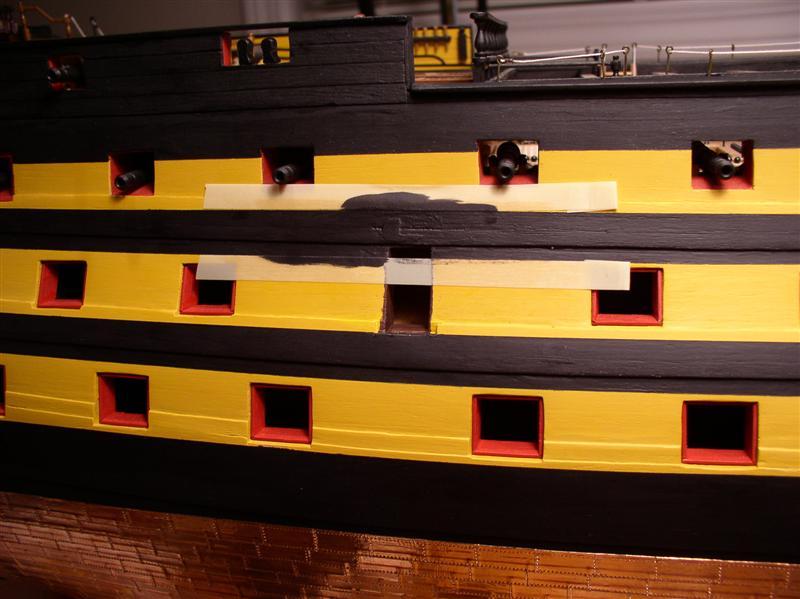
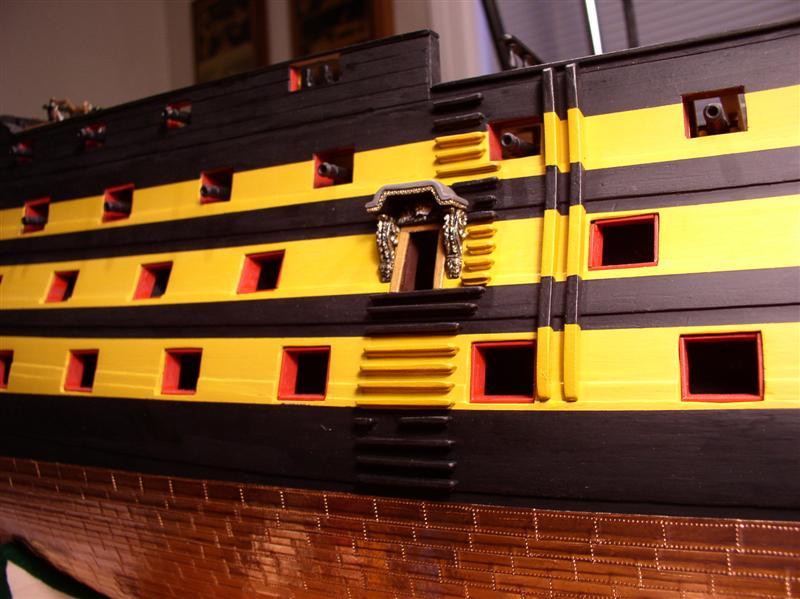
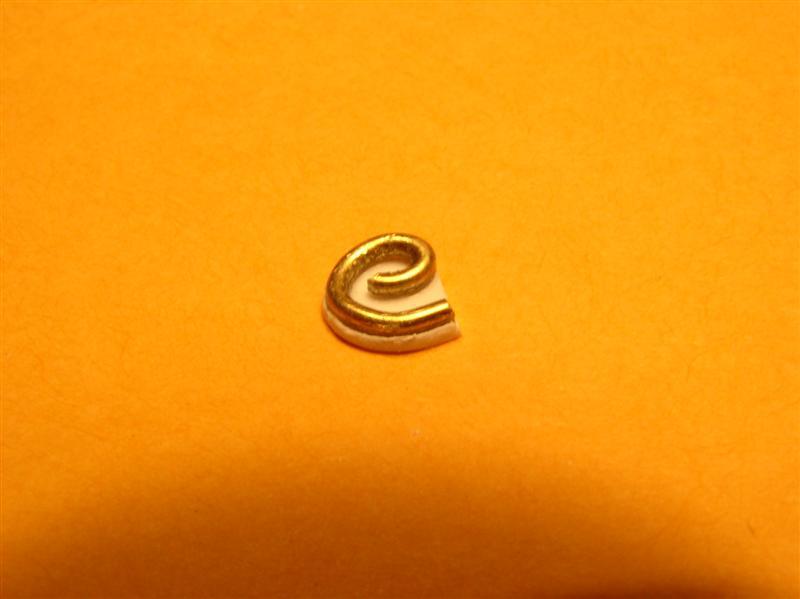
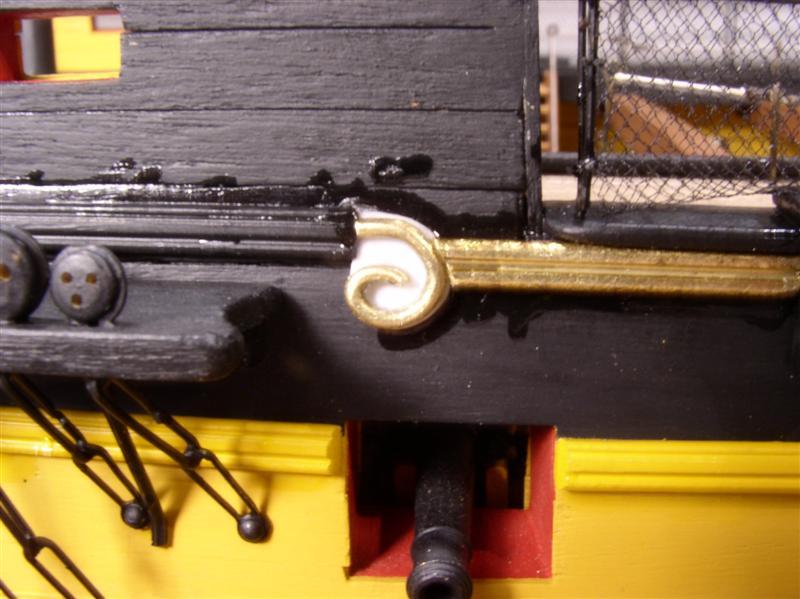
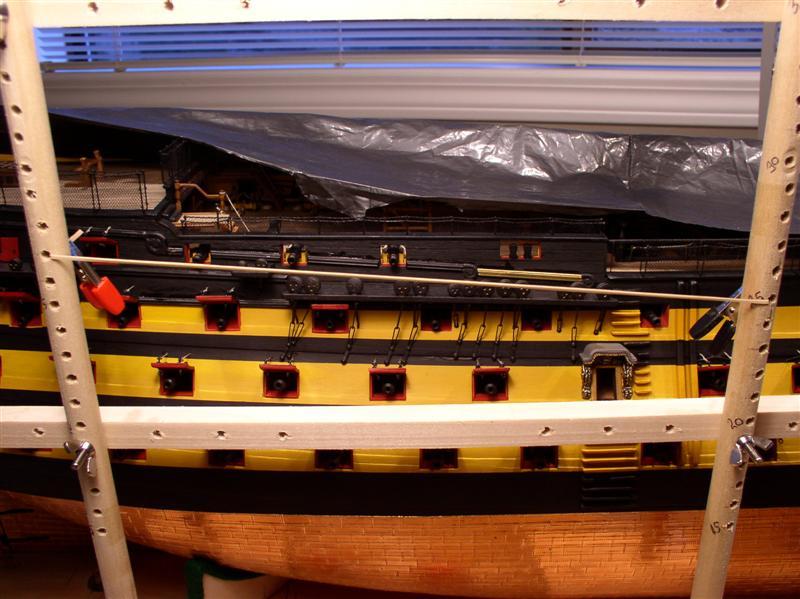
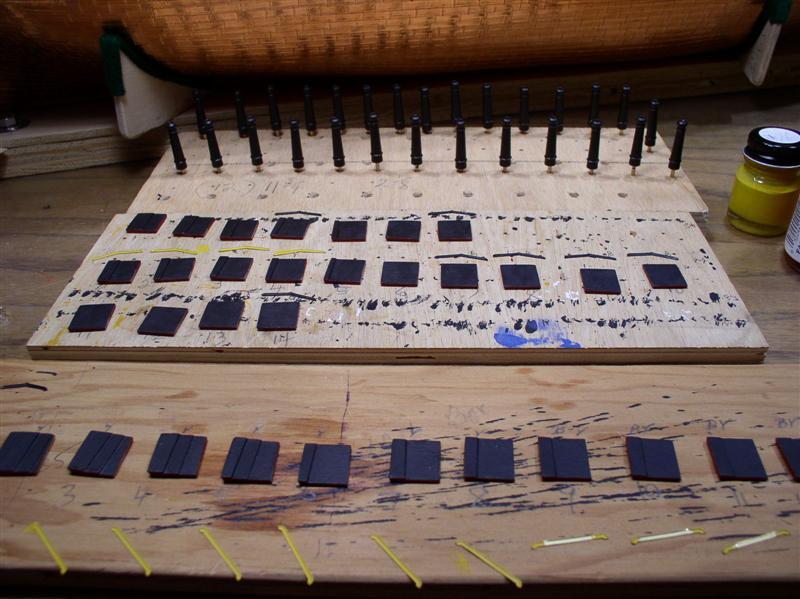
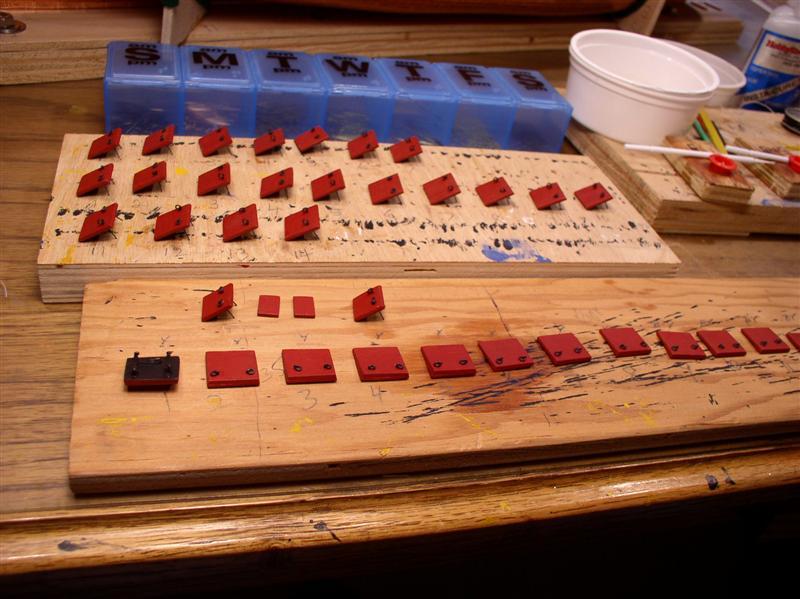
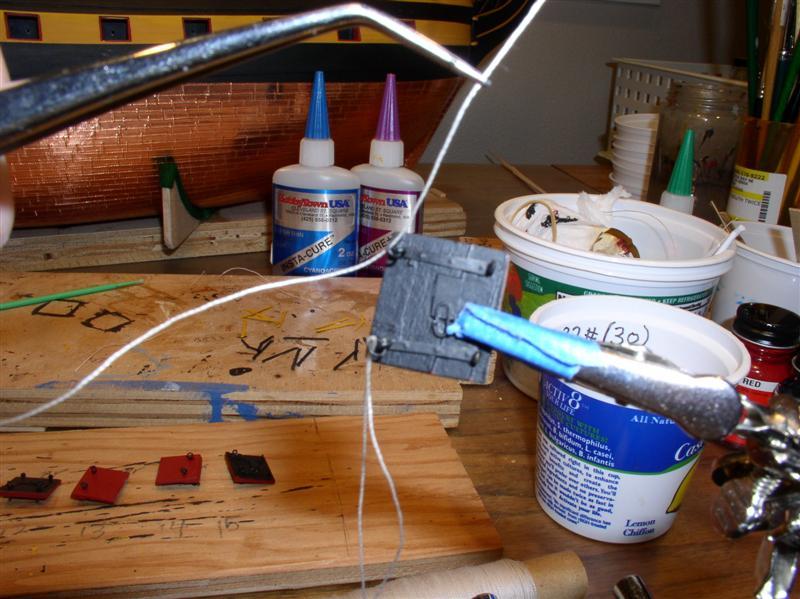
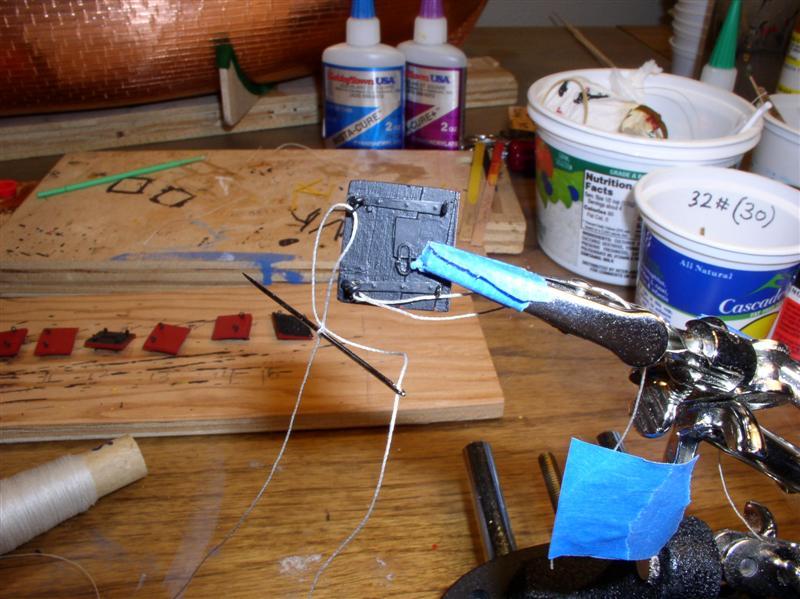
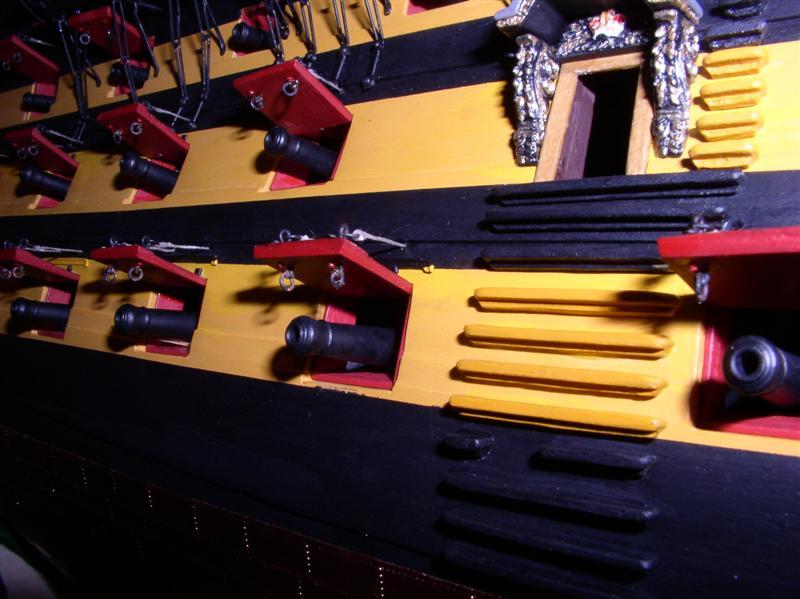
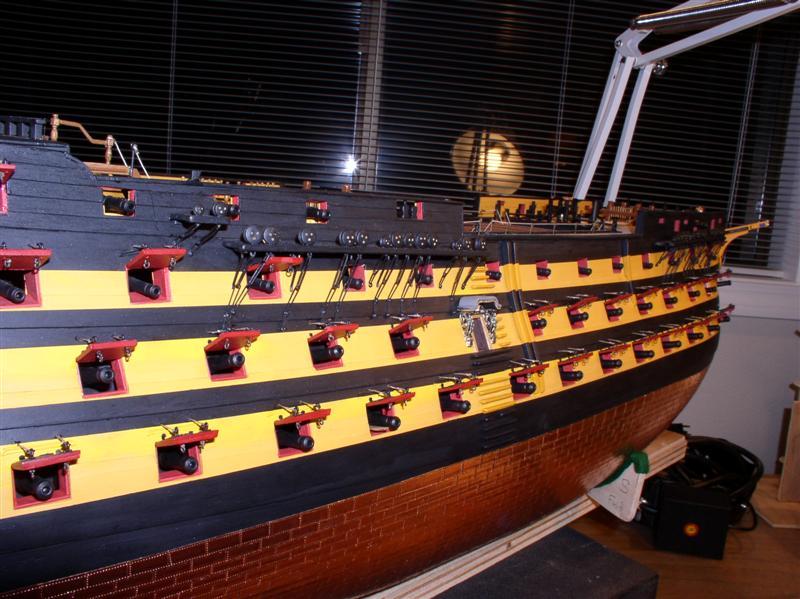
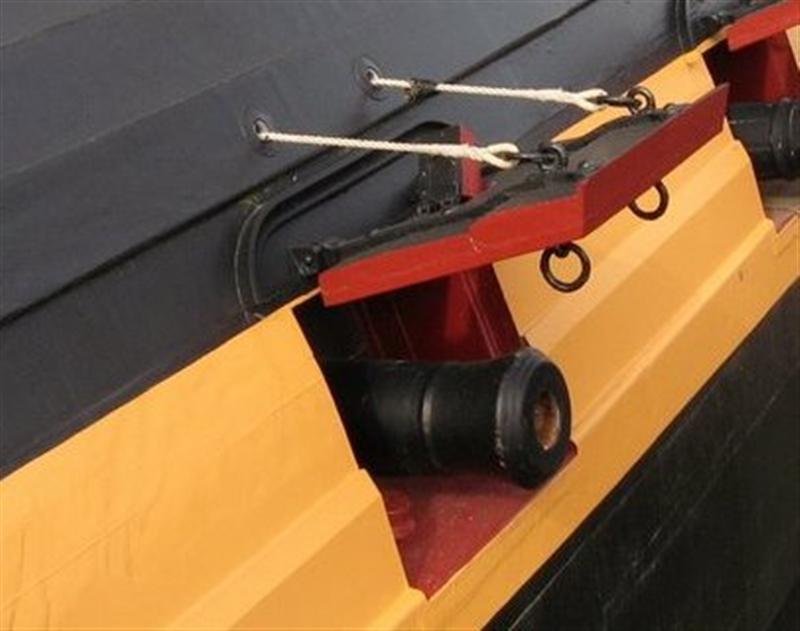
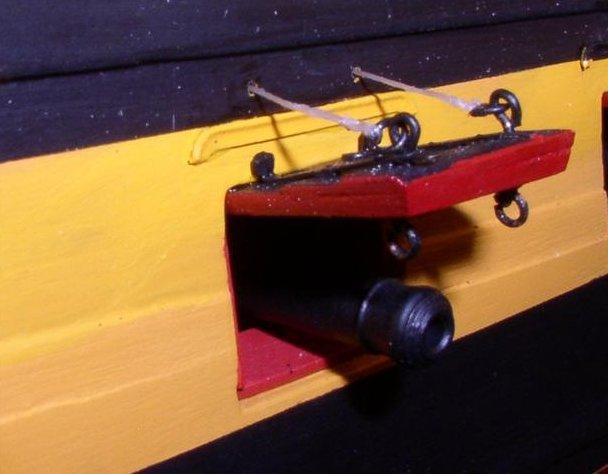
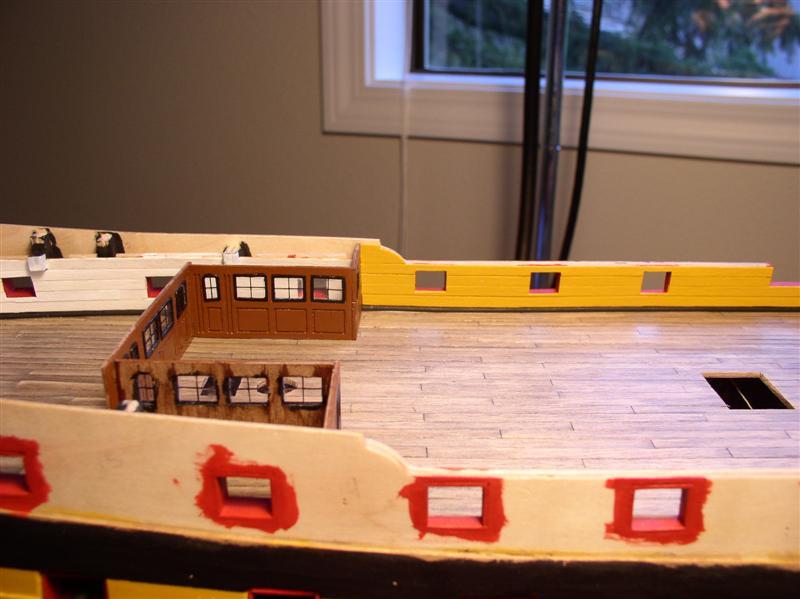
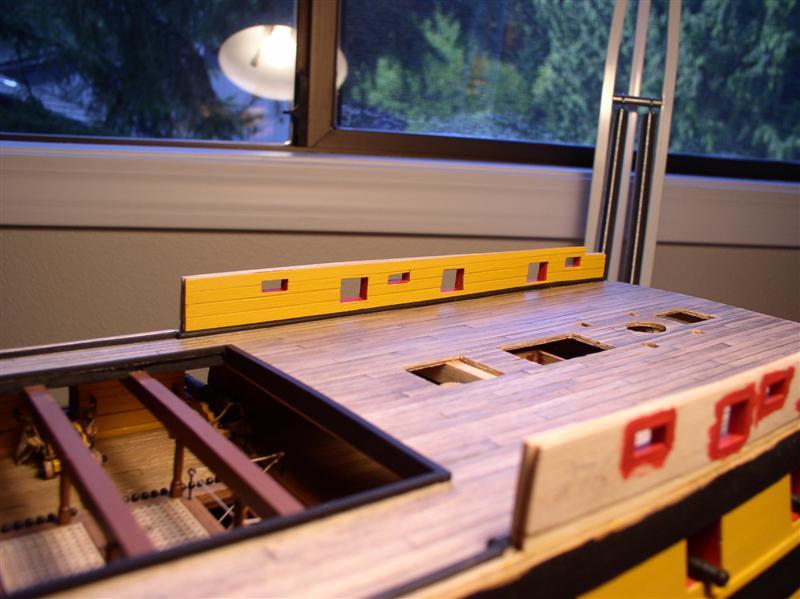
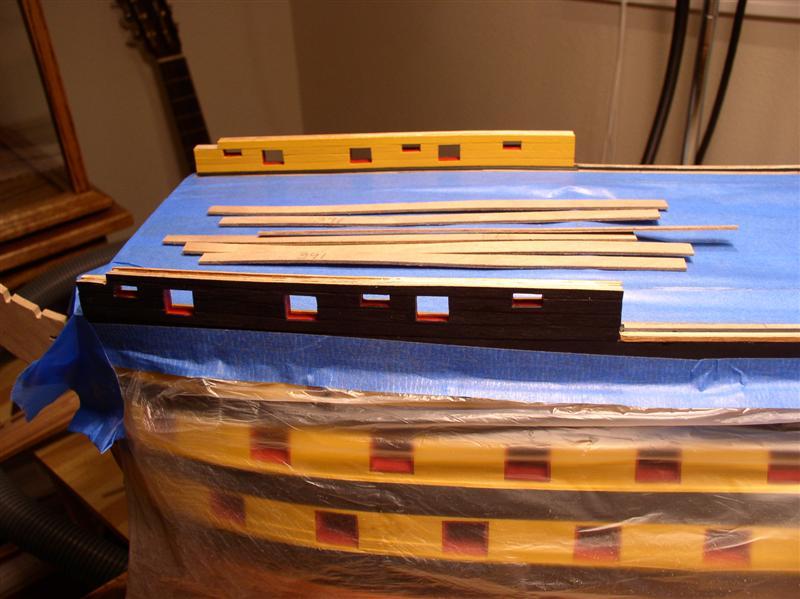
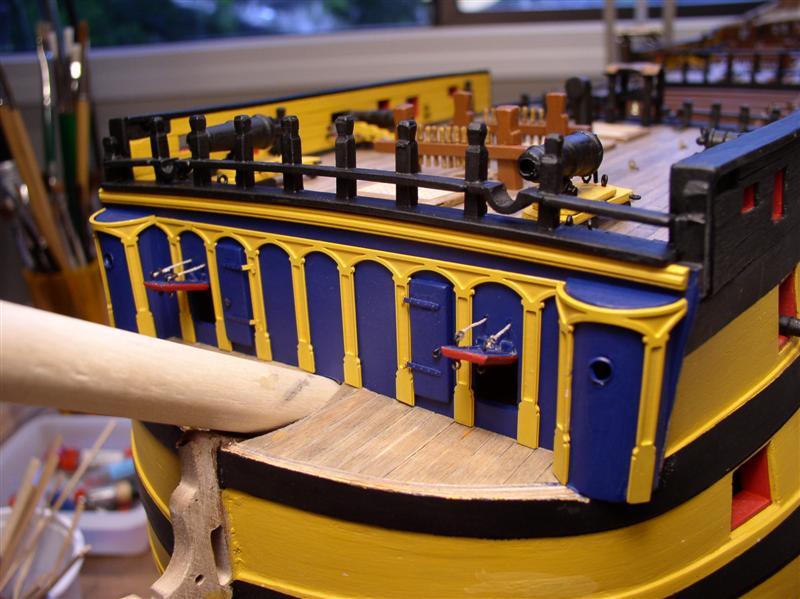
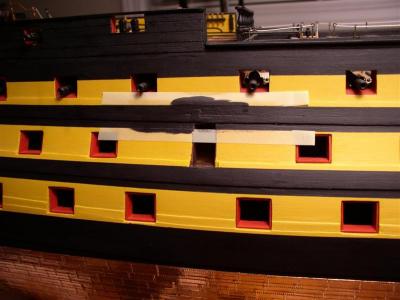
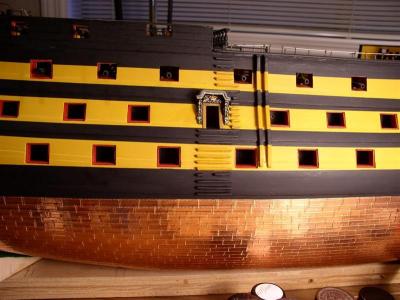
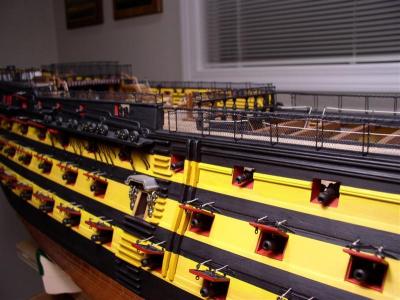
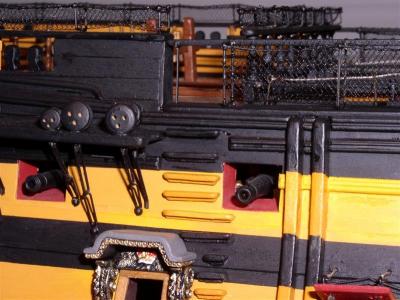
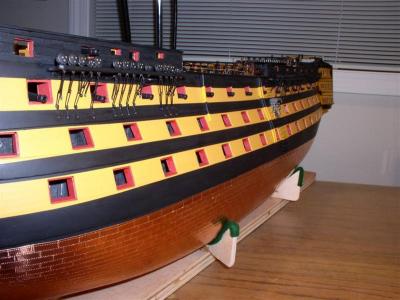
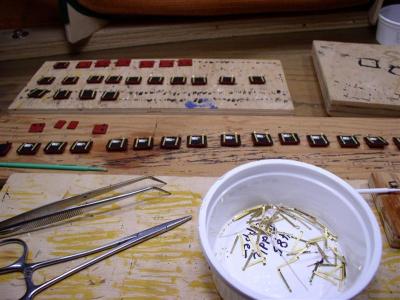
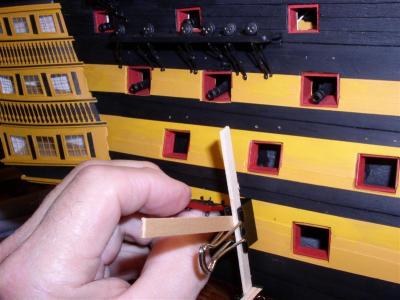
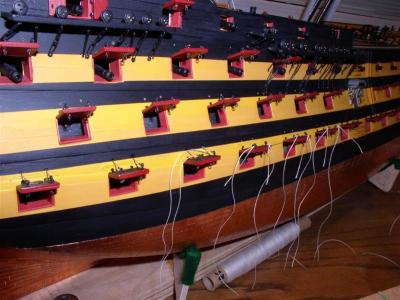
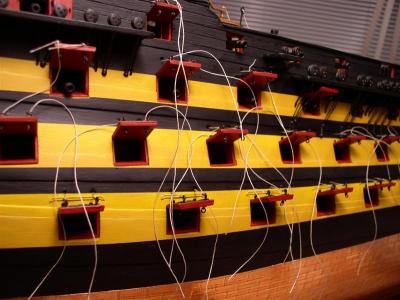
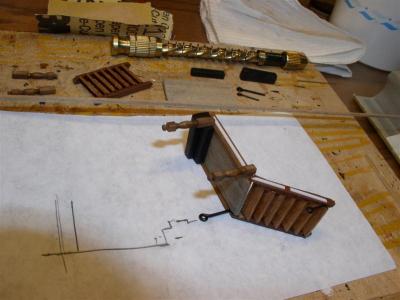
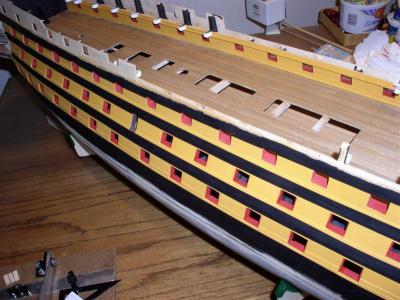
9. GUN PORT LIDS, SIDE ENTRANCE, DETAILS, CHANNELS AND CHAIN PLATES Side entry. A poor start with the wrong position of the canopy. Thank goodness for "Un-Cur." With patience, C/A can be disolved. Repairs were underway and preparations taken for the components including steps and fenders. Exterior trim. In this close up of the supplied wood scroll, sanding and painting did not produce a satisfying result. Brass wire was bent into a scroll and glued on a base of styrene, giving a much better result. A rubber band was rigged to align the exterior trim before and after the gun ports Horizontal trim fit to fenders and gun ports. Channels and chain plates. Placing the channel with a min-level for glueing Channel and chain plates. Chain were aligned with furture shrouds. Gun port lids. Wood strips were added to match the wales at each gun port lid, hence individual numbering. When closed, the contour of the wales is passed through each gun port lid. Wood strips trimmed. Interior, red ochre. Exterior, black. Contours to match the wales. Adding ring bolts, hinges and central hatch. Attaching lanyards by eye splice to ring bolts. Not original but simple. Passing the thread back through itself a couple times, pulling on the working end of the thread to close the bight and a touch of C/A. A simulated eye splice. Two lanyards attached. Small angled stick to align gun port lids Rigging lanyards Another splice Real ship gun port lid Model


- 755 replies
-
- 1
-
-
- finished
- caldercraft
- (and 1 more)
-
8. QUARTER GALLERIES Brass detail for the quarter galleries (above). Lower detail painted yellow ochre with styrene inserts painted black before glueing to obtain clean lines. Styrene spacers (painted black) between windows. Clamping and glueing. Each level planked for flooring. Quarter galleries. Some filling was required where galleries join the side planking.


-
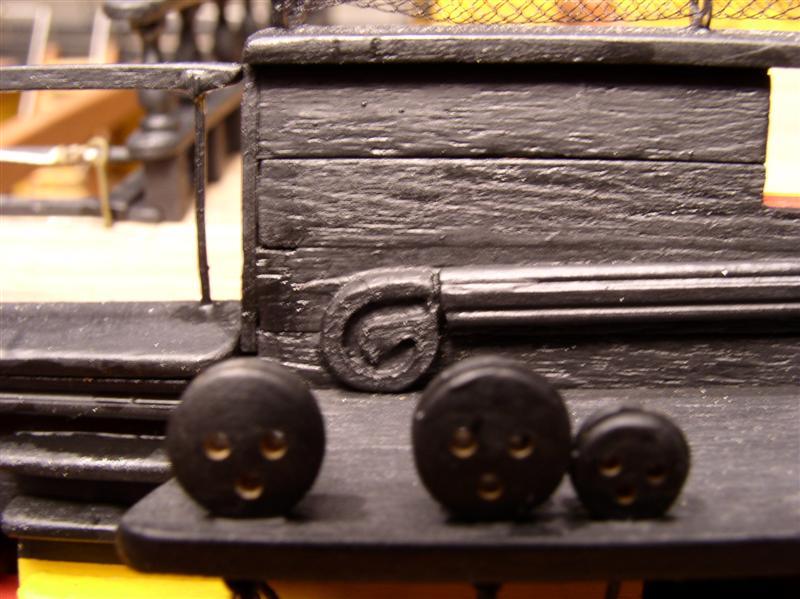
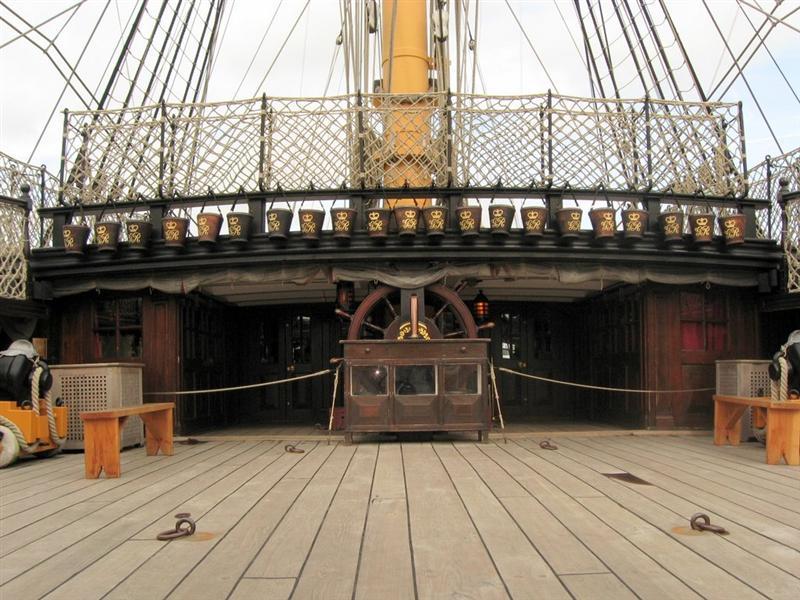
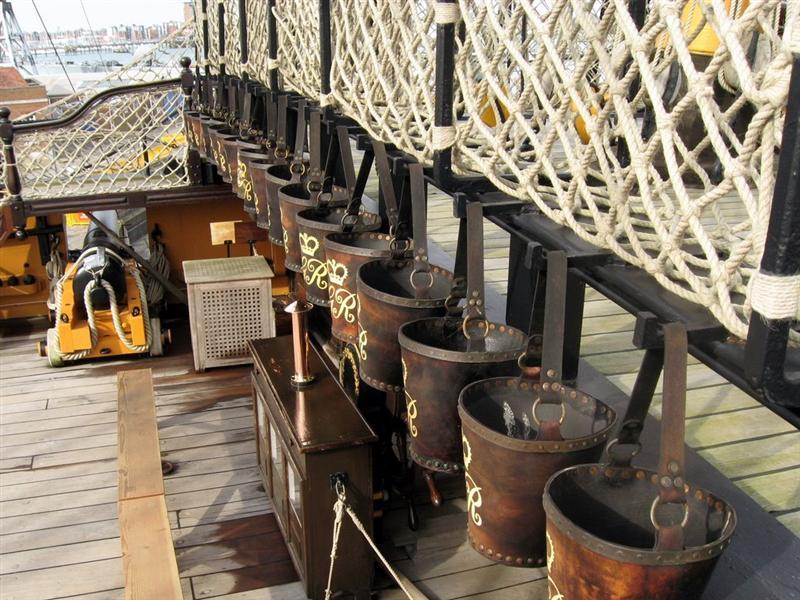
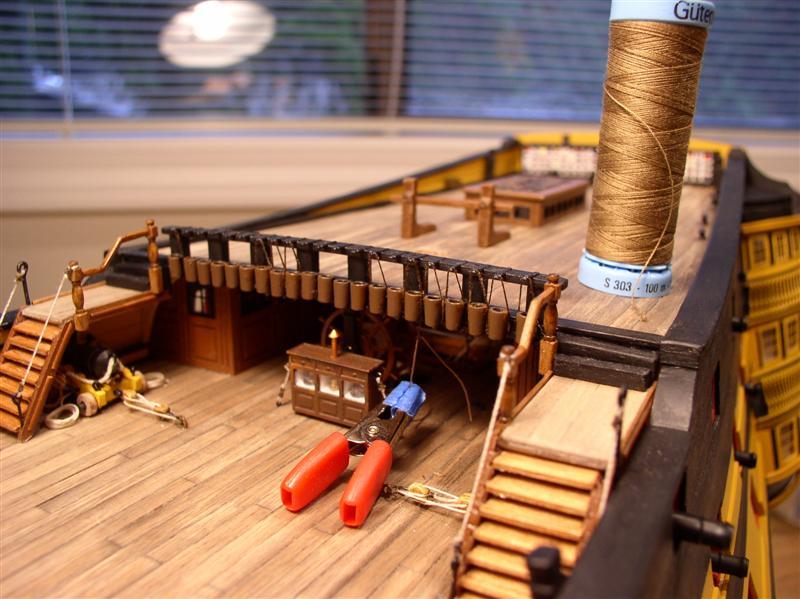
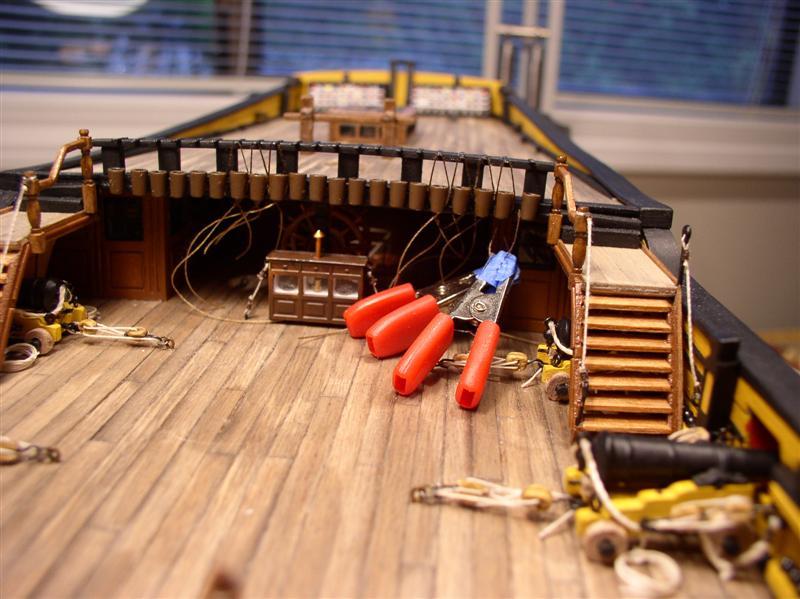
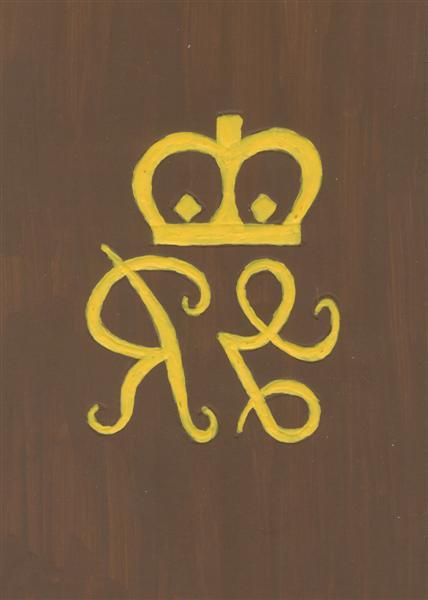
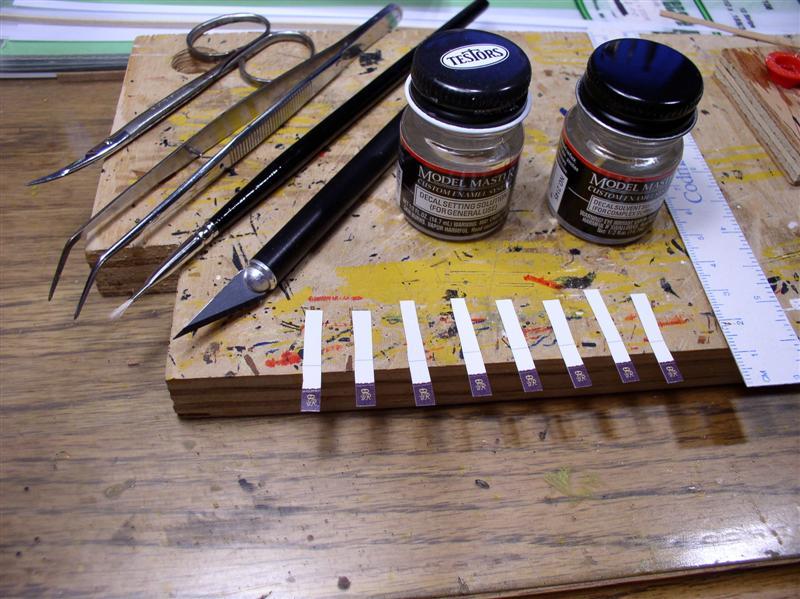
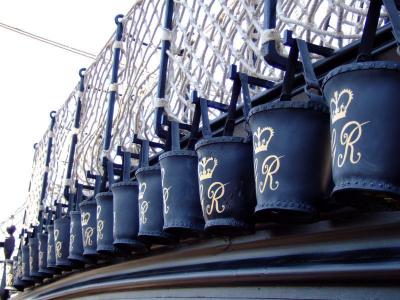
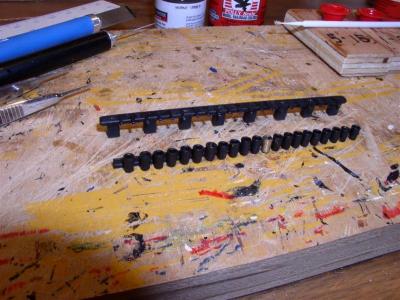
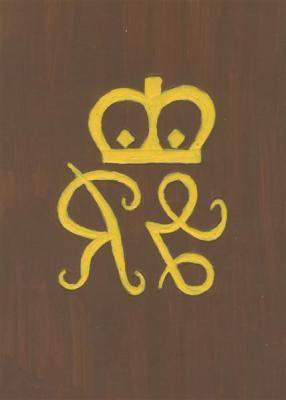
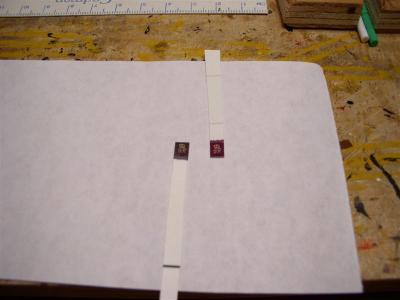
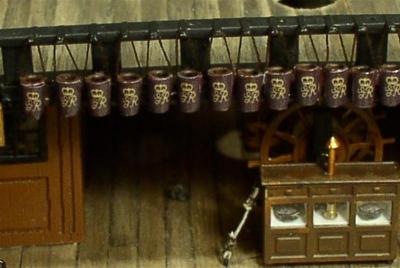
7. FIRE BUCKETS Water buckets on the real ship carried the royal logo on each bucket. They were black or brown depending on when the photos were taken. Rather than rigging individual buckets, they were glued and painted onto the decorative beam. Color changed to brown for more pleasing contrast. Rigging bucket straps. Hand drawn royal crest. A very simple drawing since it will be miniturized. Between the scanner, computer and printer, the color was corrupted from a brown background to a purple tint. After adjusting the color on the computer, a prototype was made. I experimentee with dry transfer technique, but the irregular surface was a problem. Eventually, used a wet transfer decal. The logos were printed on decal paper and tranfered to the fire buckets. Closer view. Two gimbled compasses with compass cards seen in binnacle.


- 755 replies
-
- 2
-
-
- finished
- caldercraft
- (and 1 more)
-
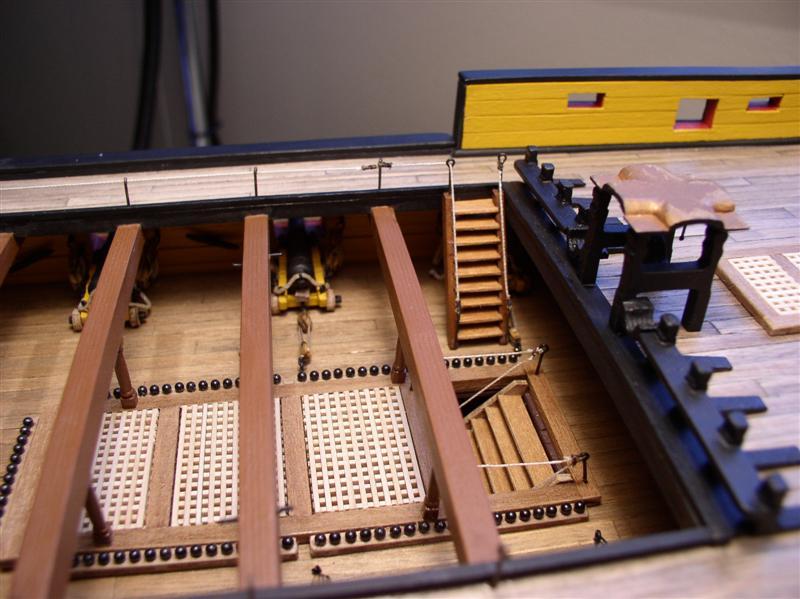
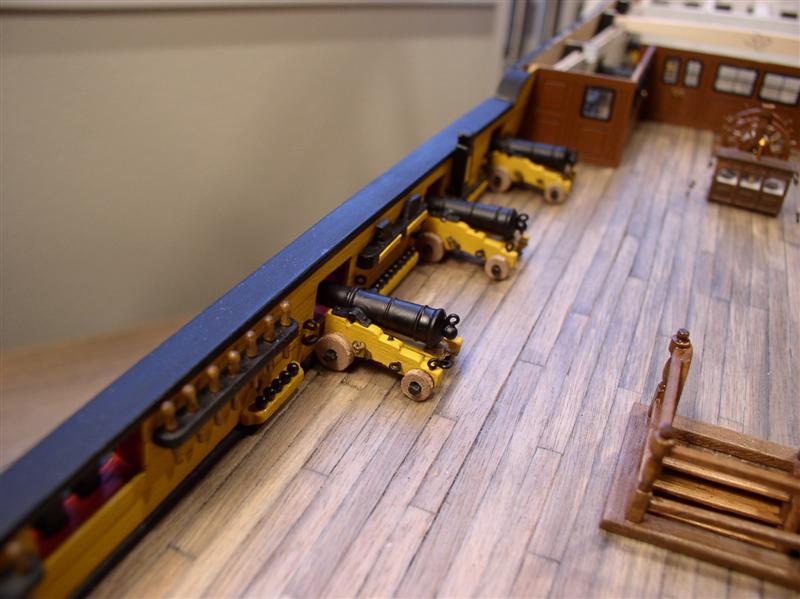
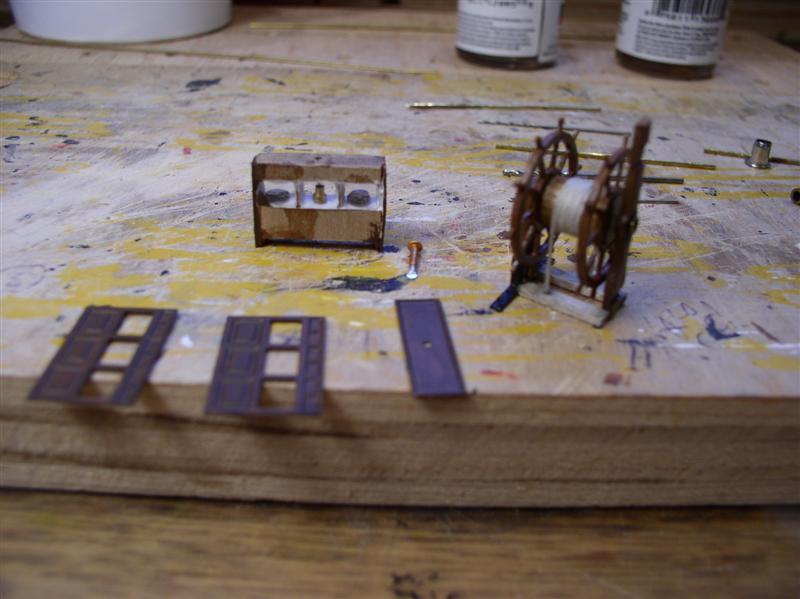
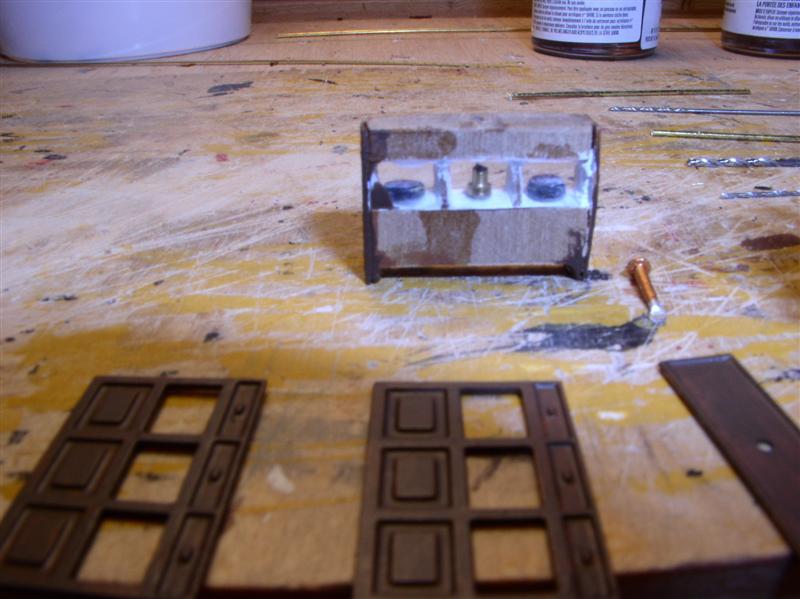
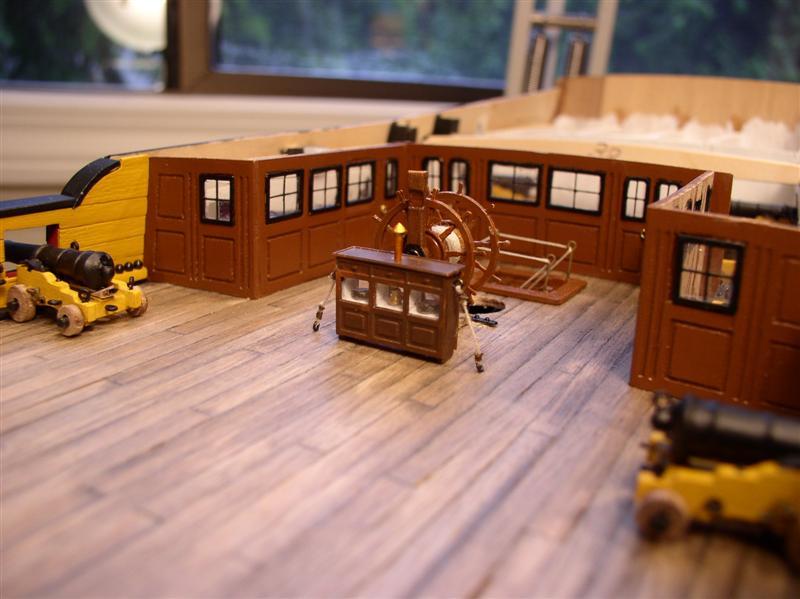
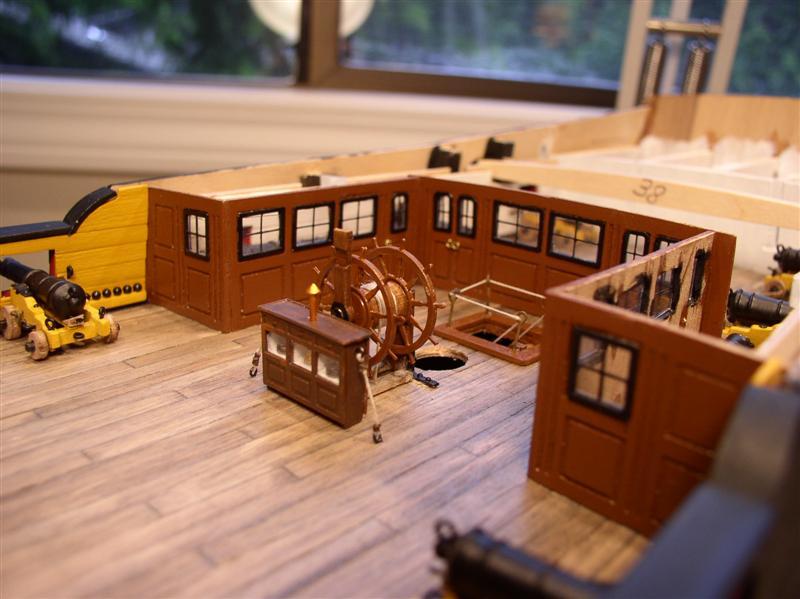
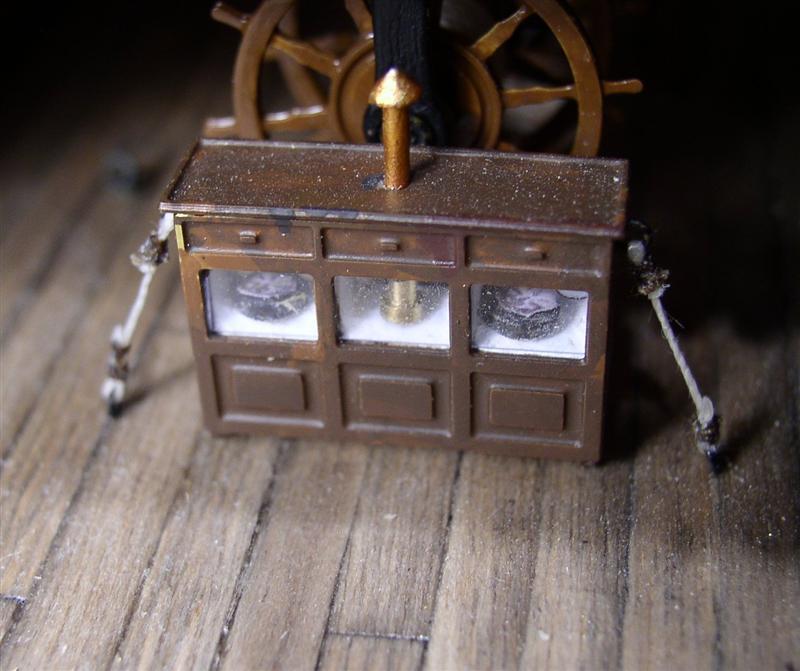
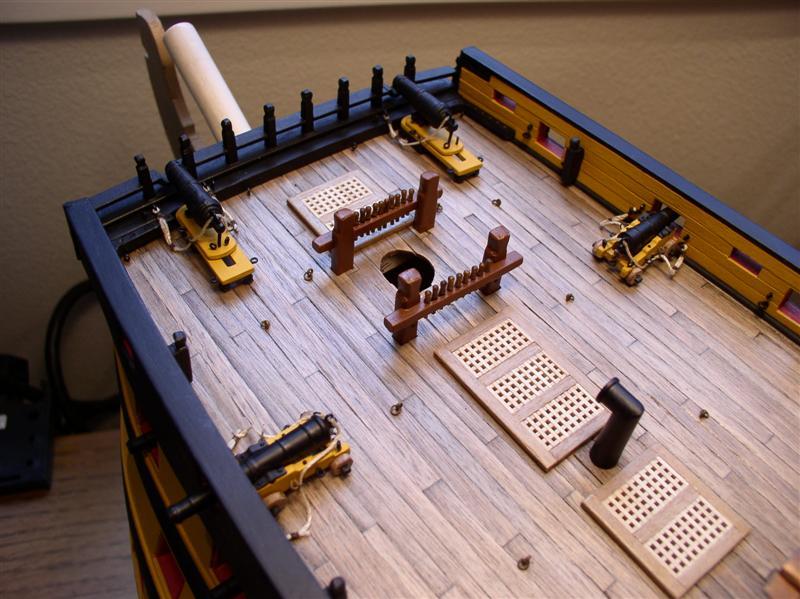
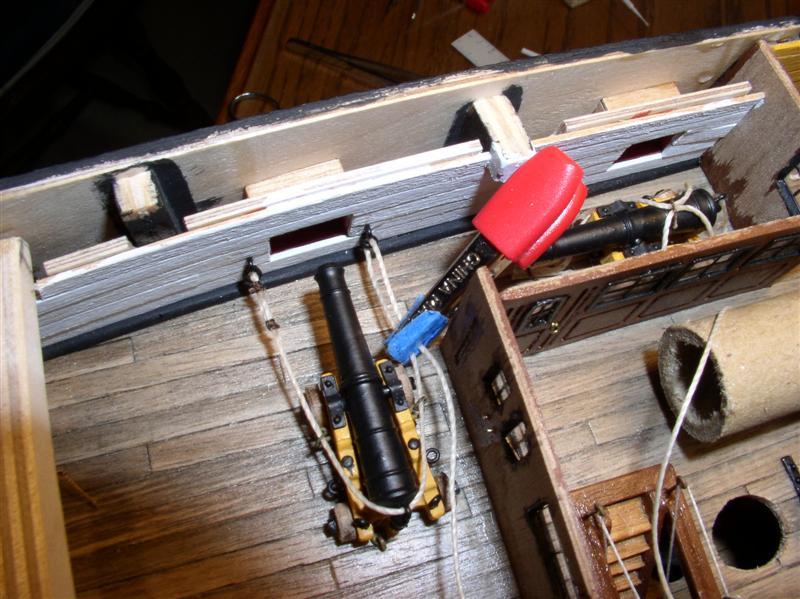
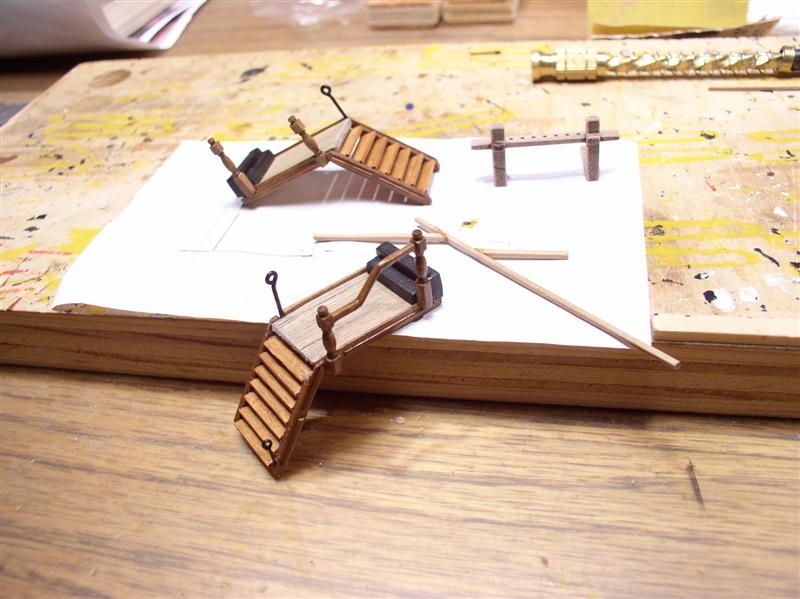
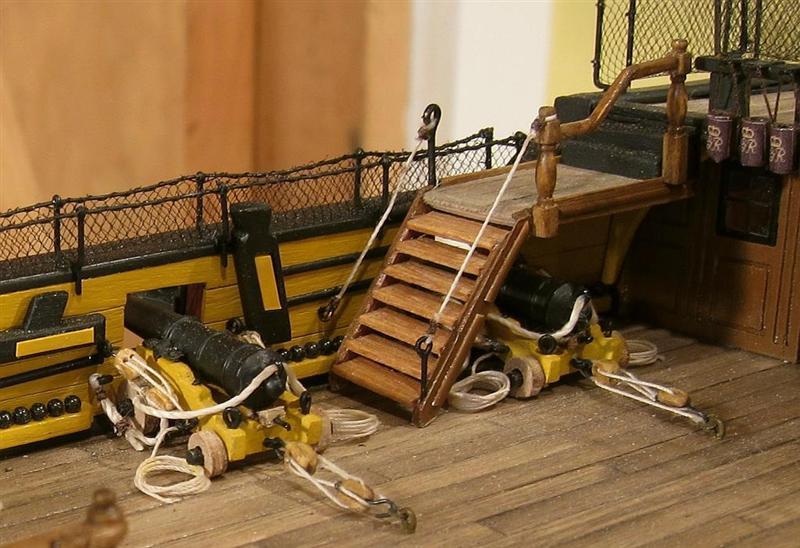
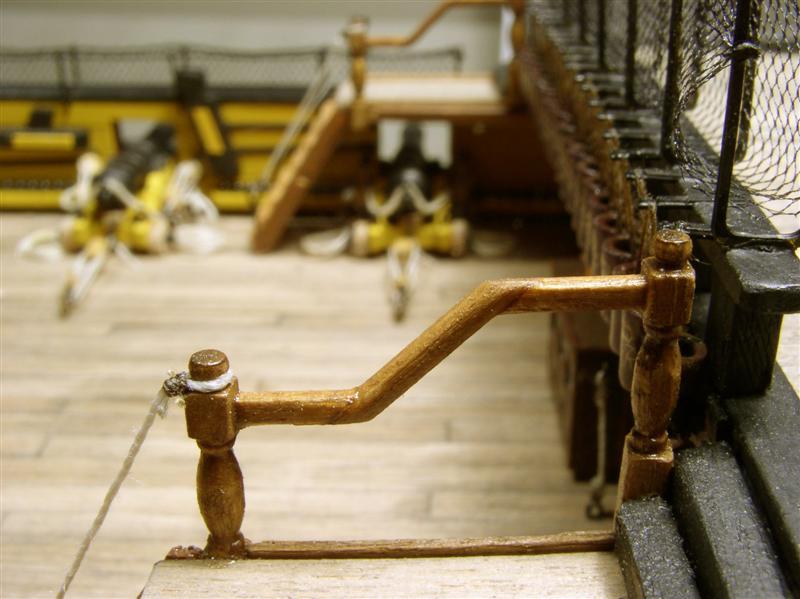
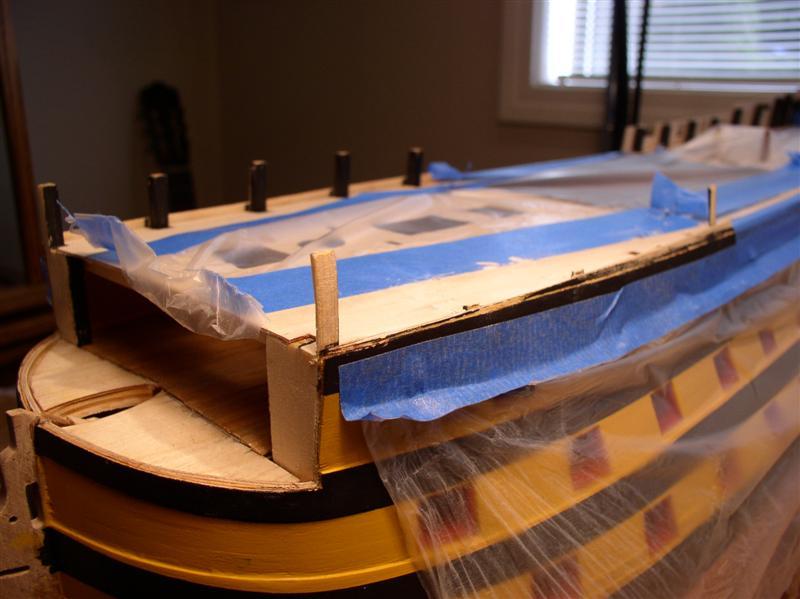
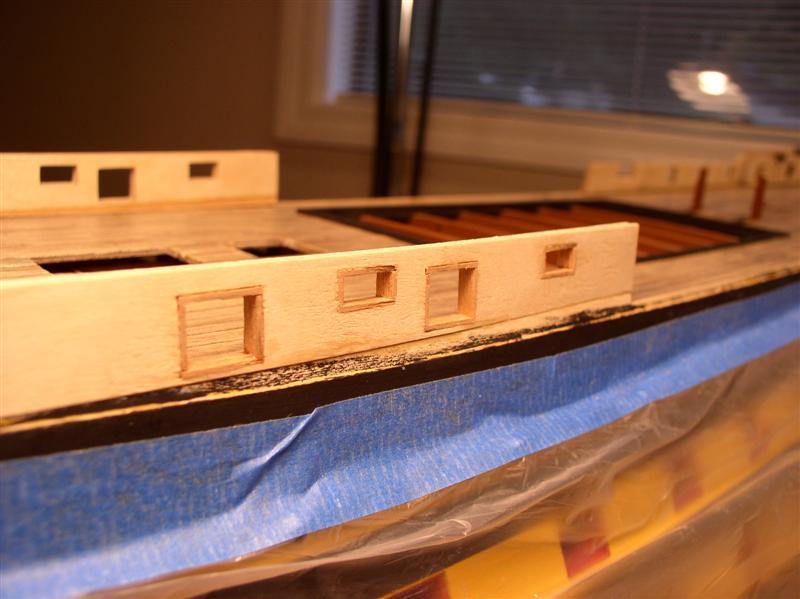
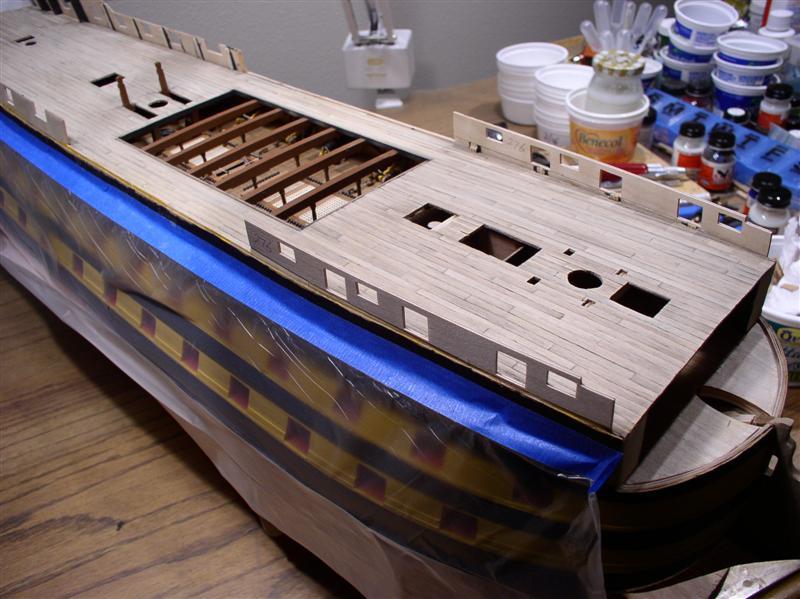
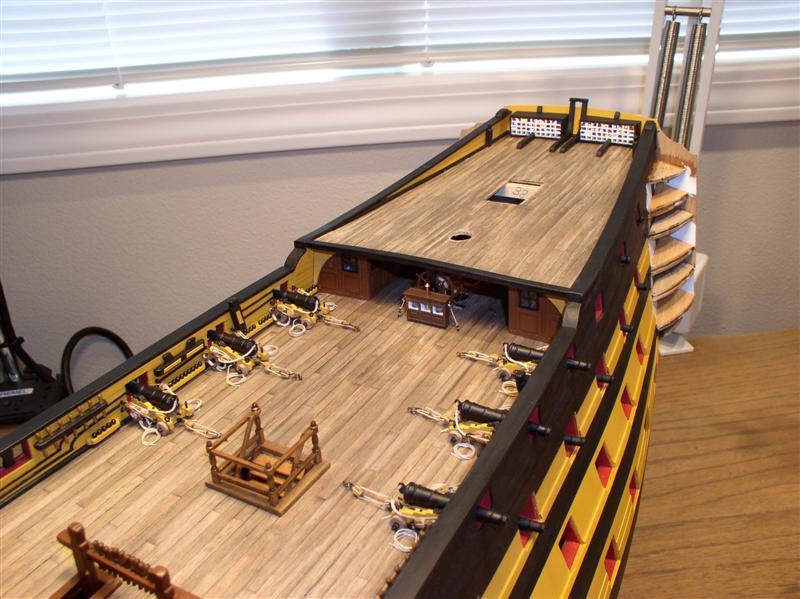
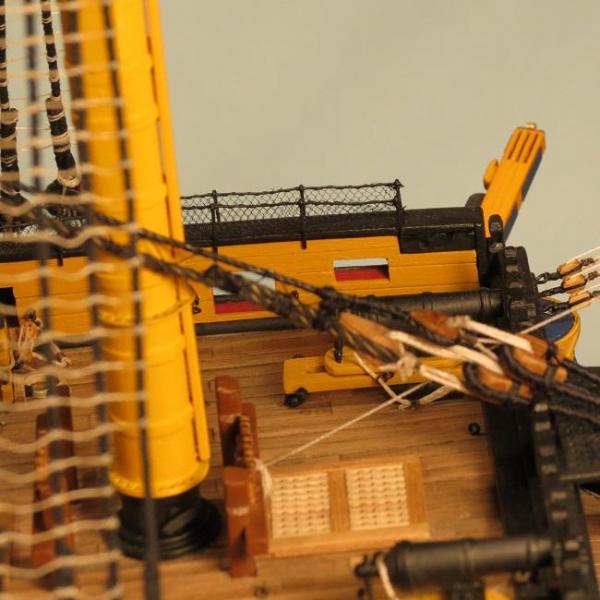
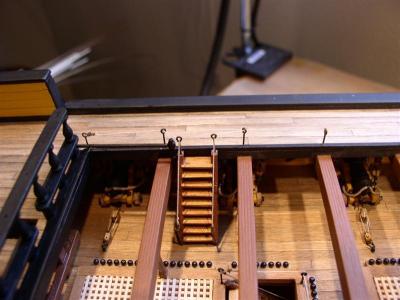
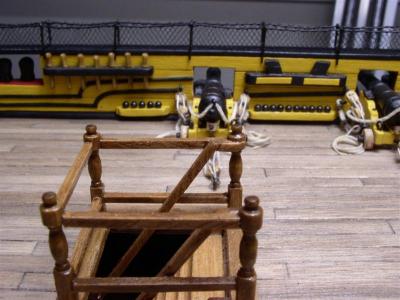
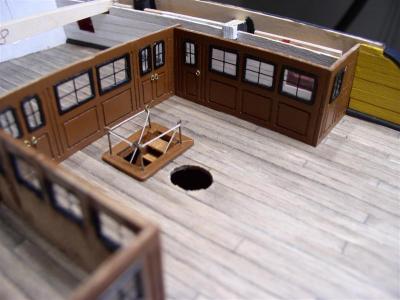
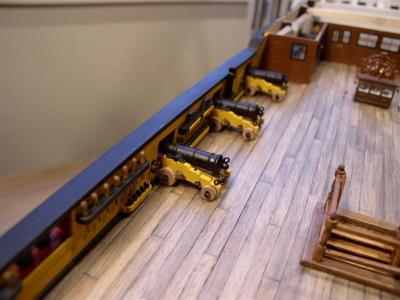
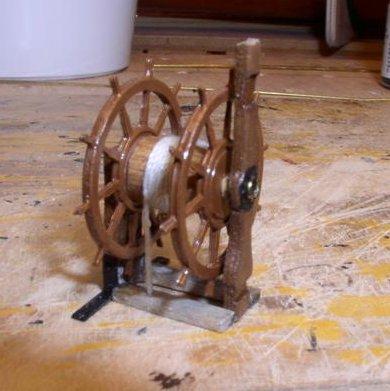
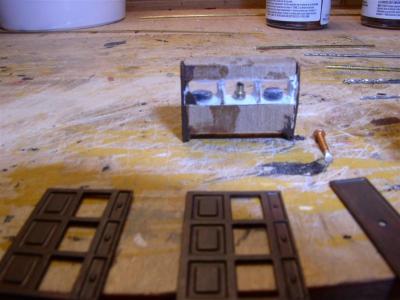
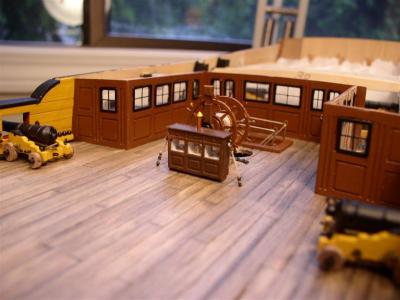
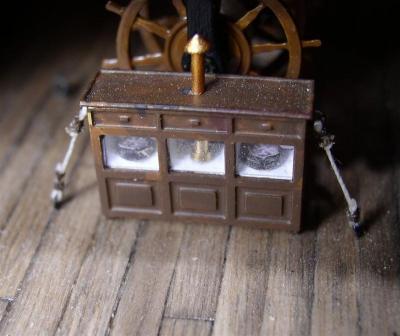
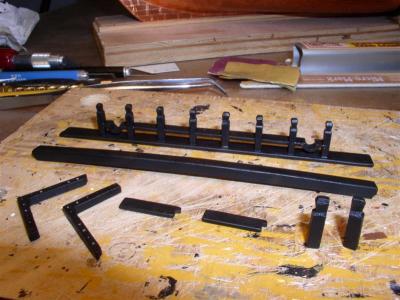
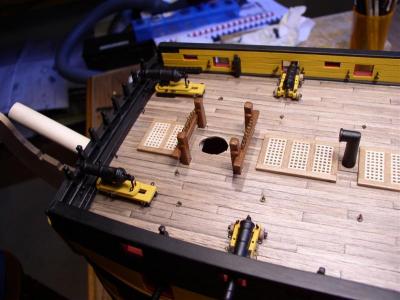
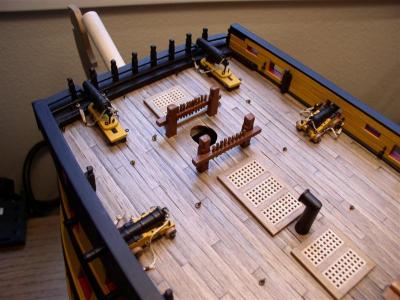
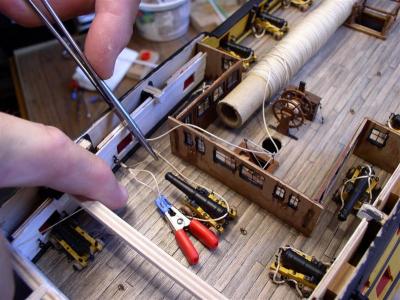
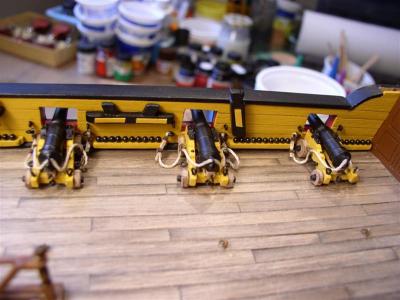
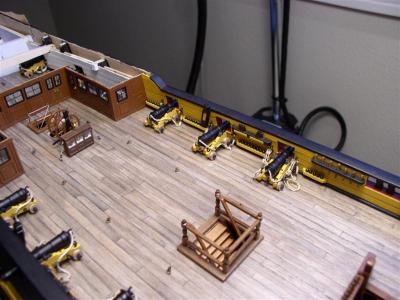
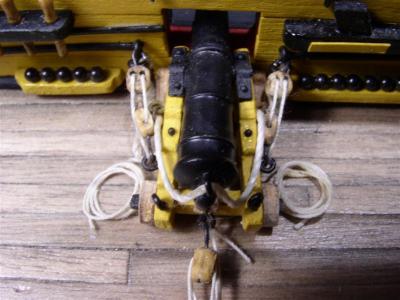
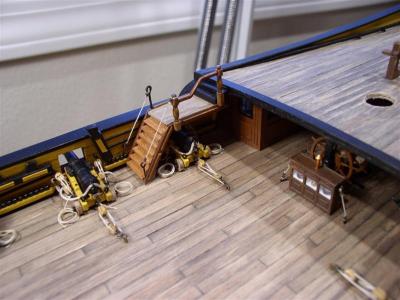
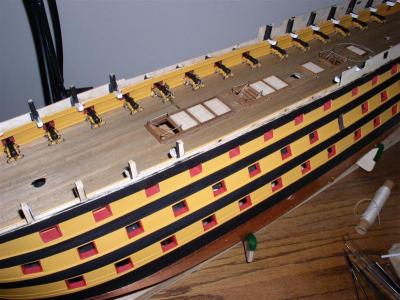
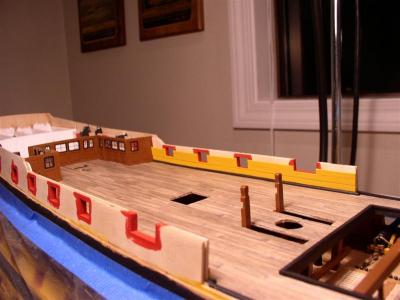
6. QUARTERDECK DETAILS Top of belfry painted to simulate weather stressed copper sheeting. Ladder between upper gun deck and quarterdeck. Line secured to stantion below deck before quarterdeck placed, to guide thehand rail to the lower stantion for glueing. Ring handles on doors. Quarterdeck cannons. Binnacle with 2 compasses and wheel with steering rope. Close up. One should dust before taking close ups. Note two gimbled compasses with compass cards in the binnacle. Forward bollards. Foredeck Rigging cannons. Aft cannons and prototype. Rope coils. Line wrapped around polyethyene (glue won't stick). Painted with very dilute white glue, about 1:10 with water, dried and removed, then crushed gently between thumb and index finger to appear more natural. Fully rigged. Poop deck. More detailing on the inboard bulworks. Flag locker. More artistic licence. Canvass would be over the flag locker but then that would hide all the pretty signal flags. Ladder to the poop deck and creating the angles in the hand rail


-
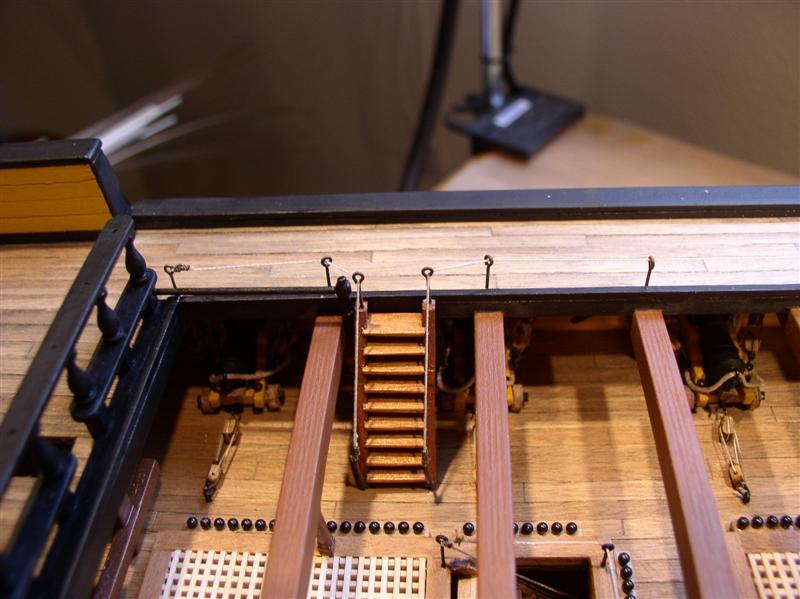
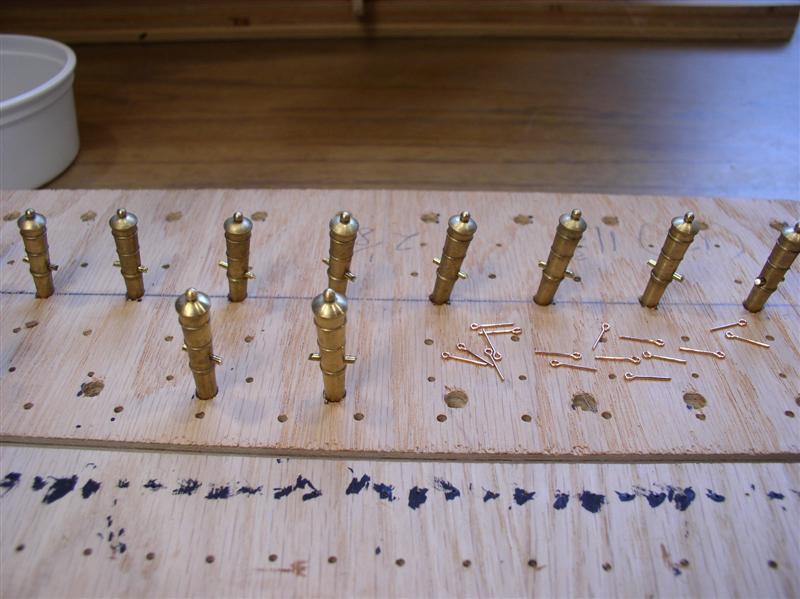
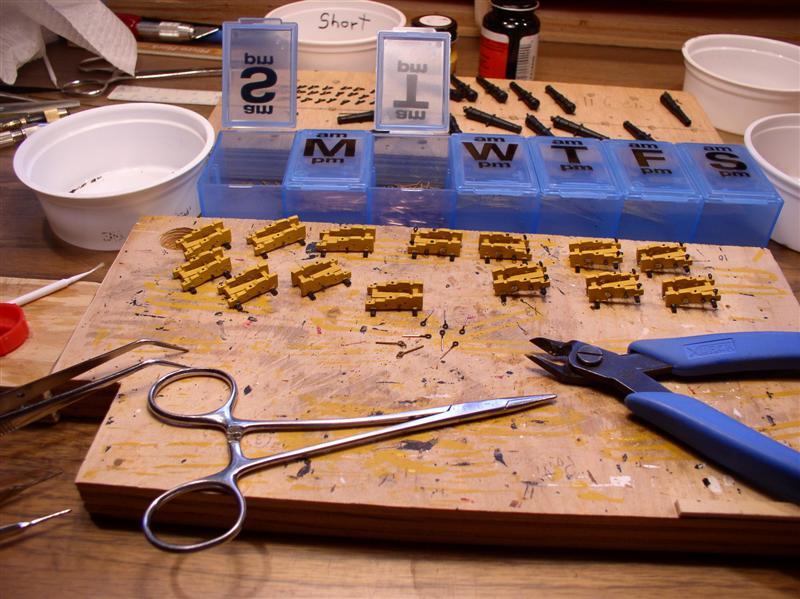
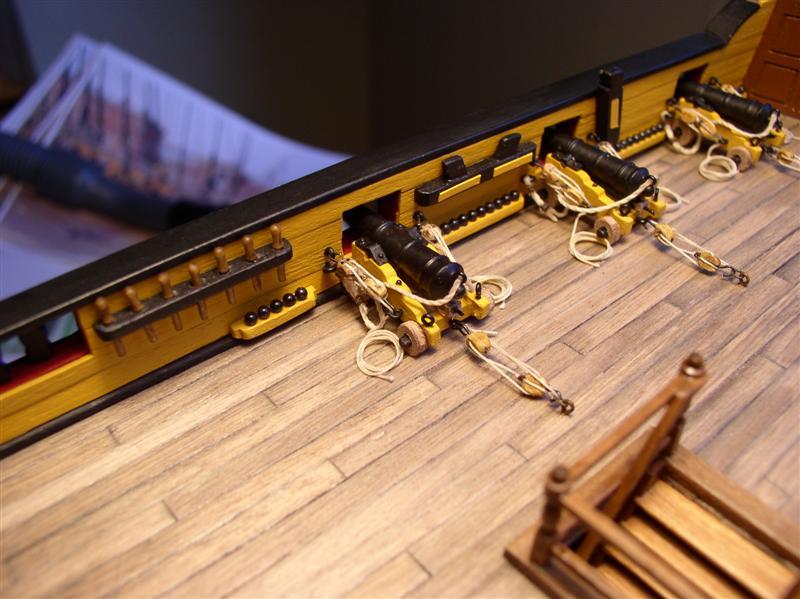
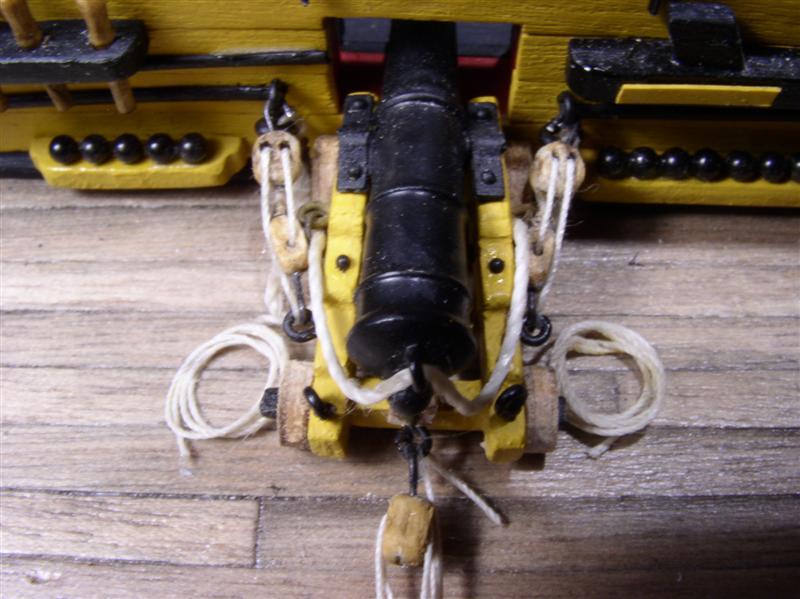
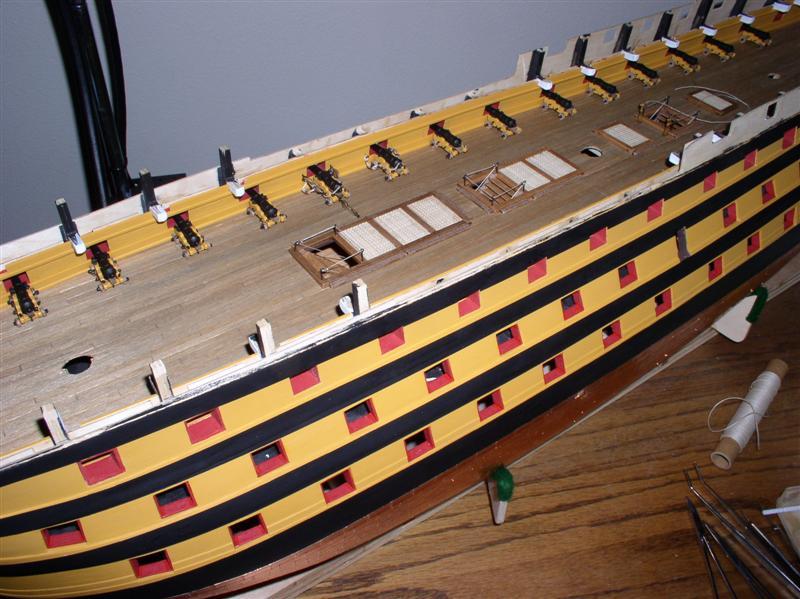
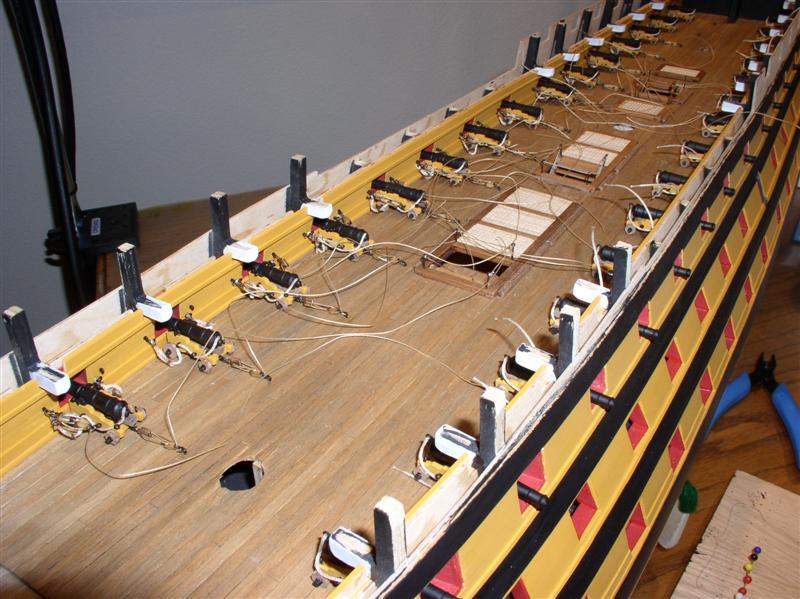
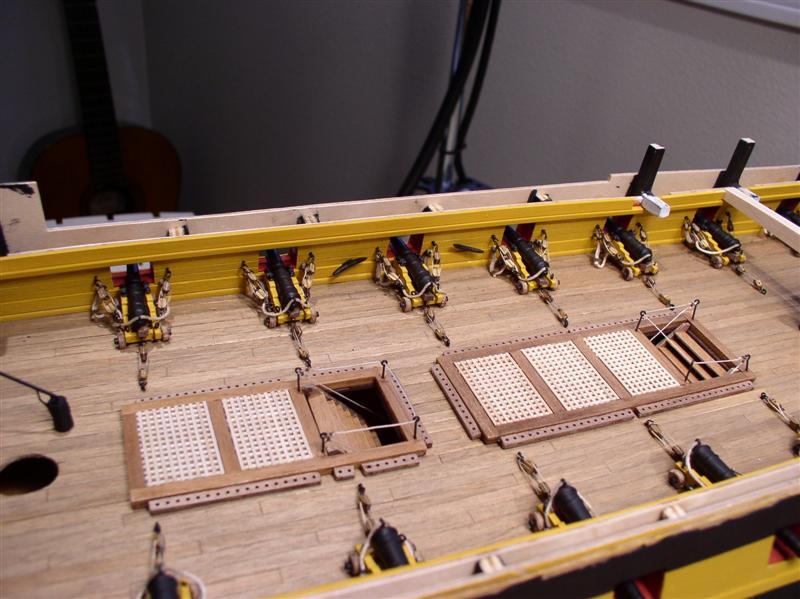
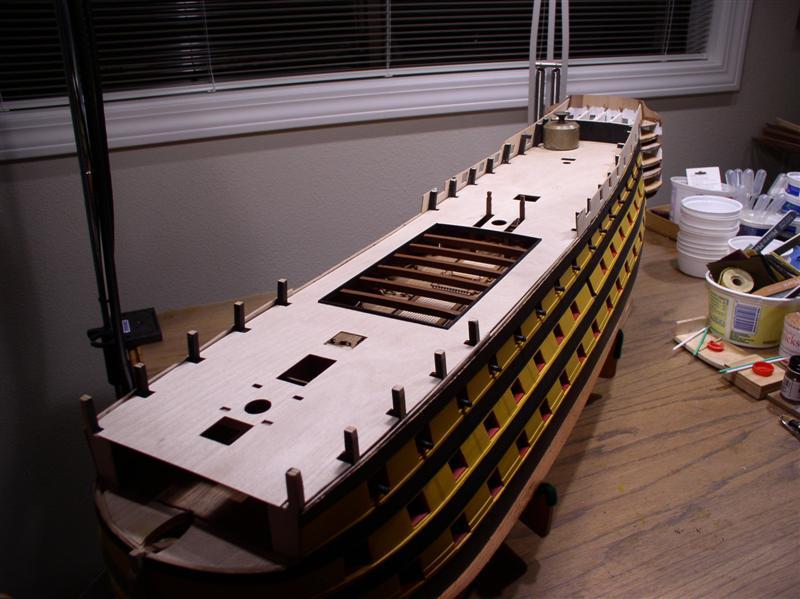
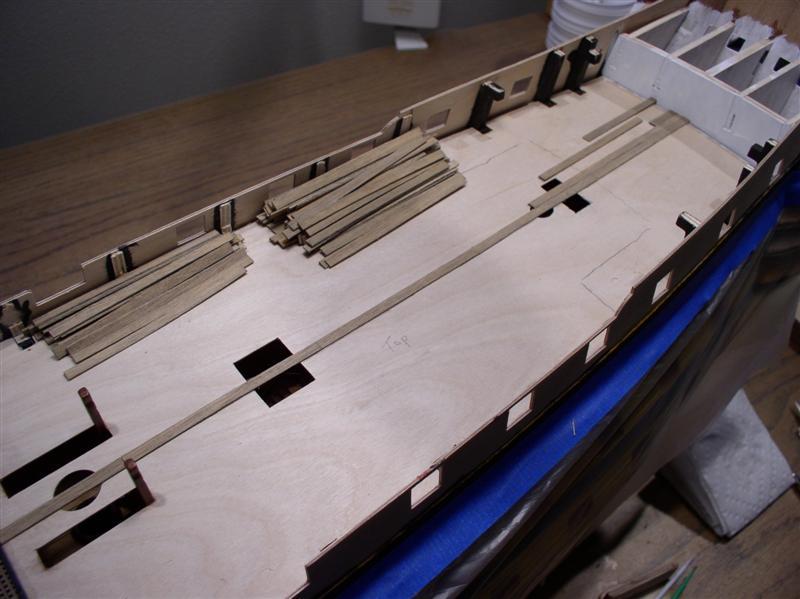
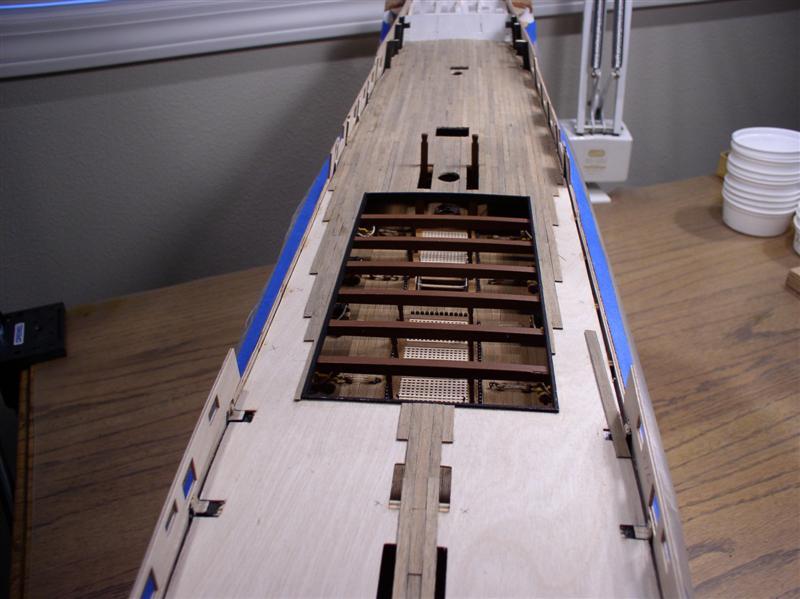
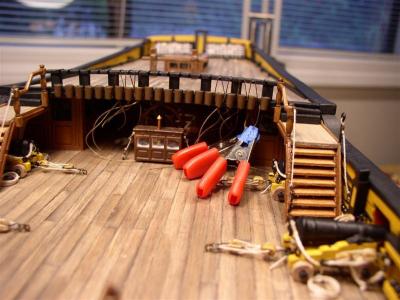
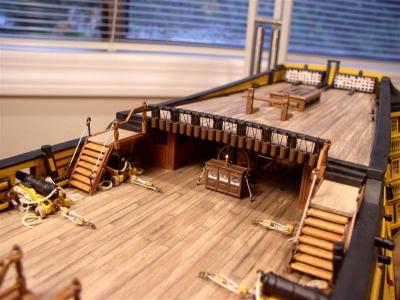
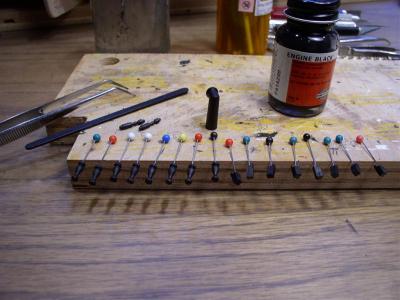
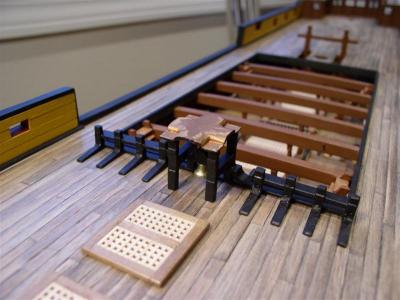
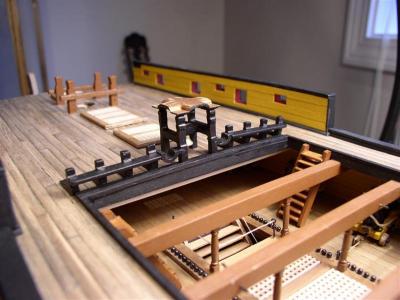
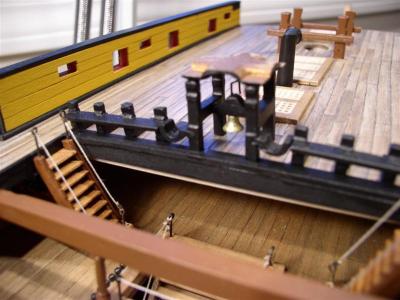
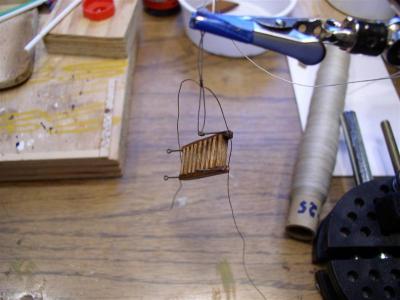
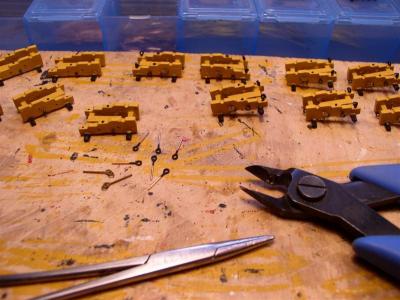
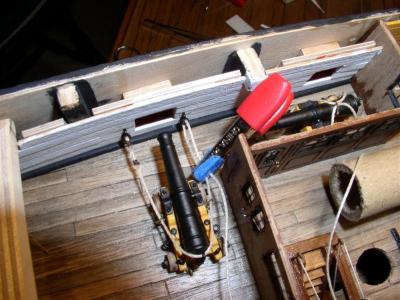
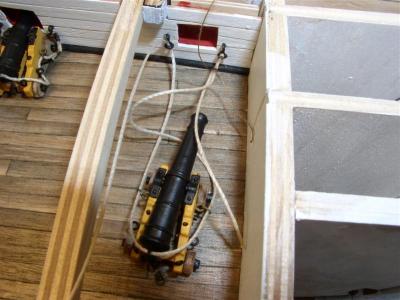
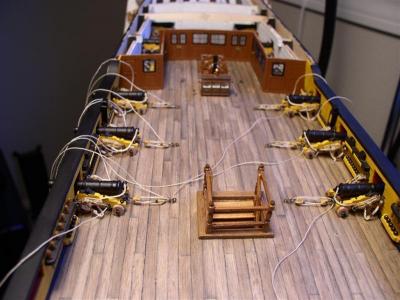
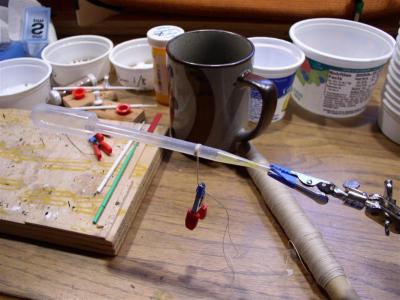
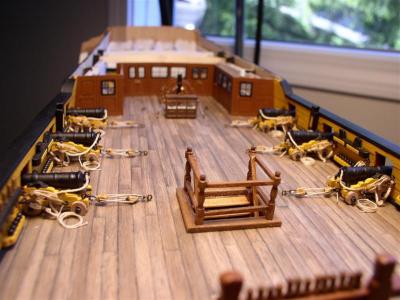
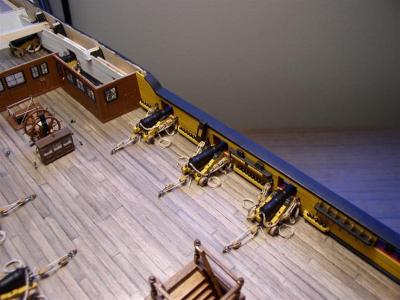
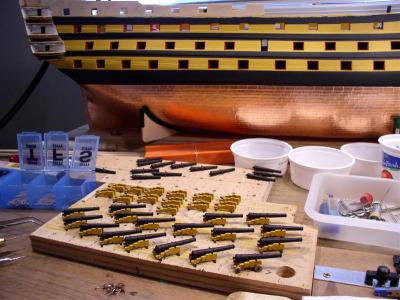
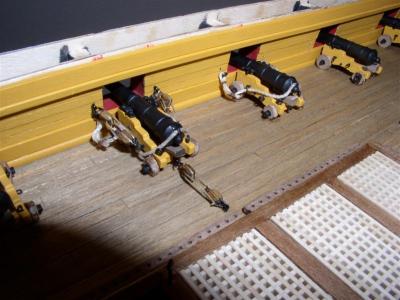
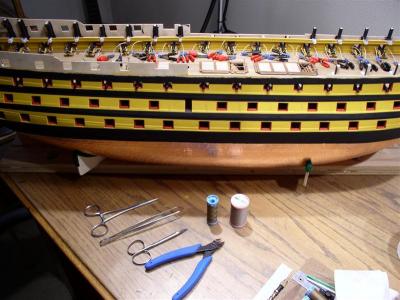
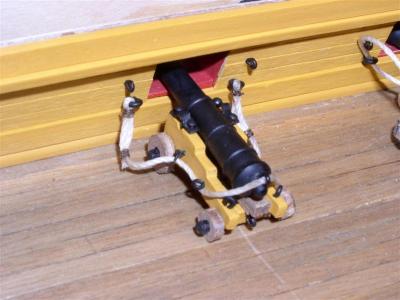
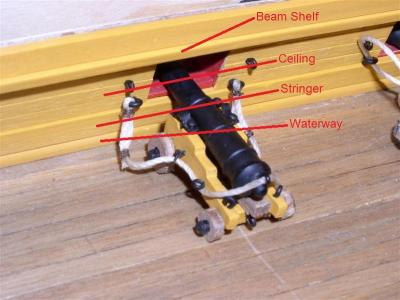
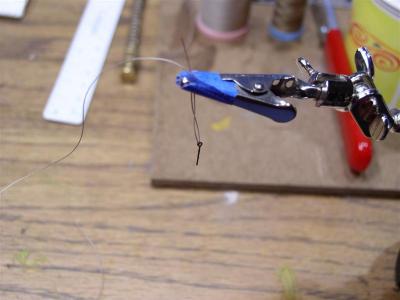
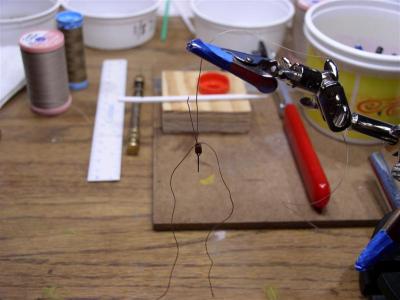
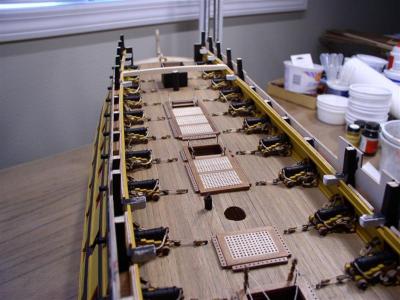
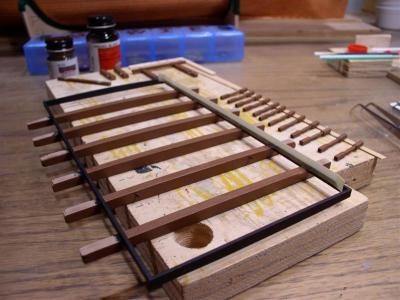
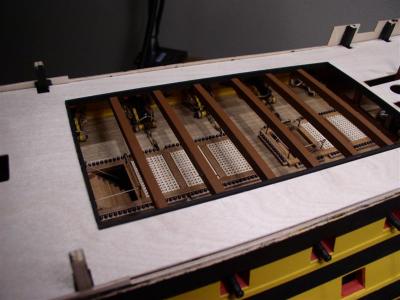
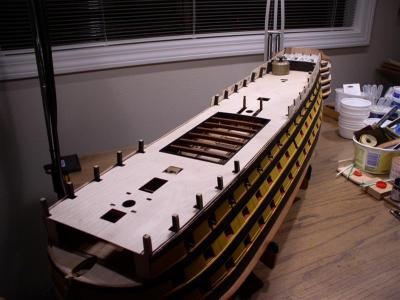
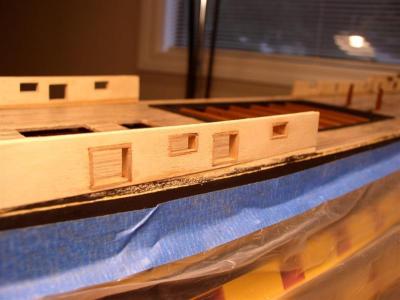
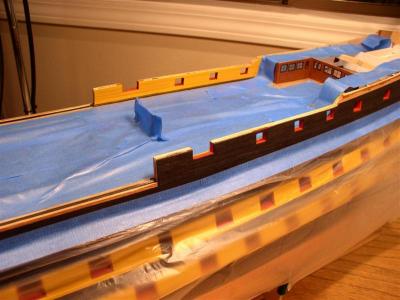
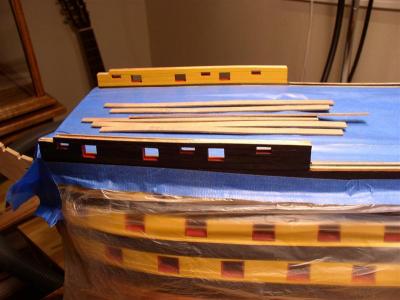
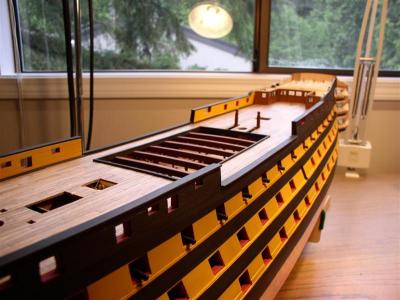
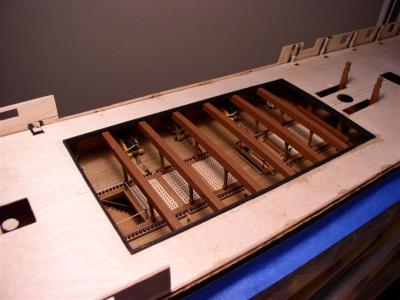
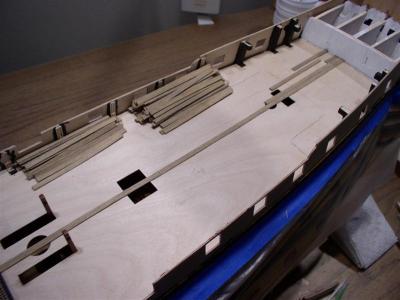
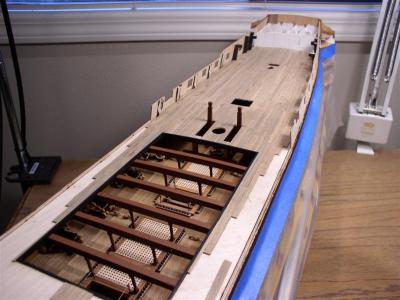
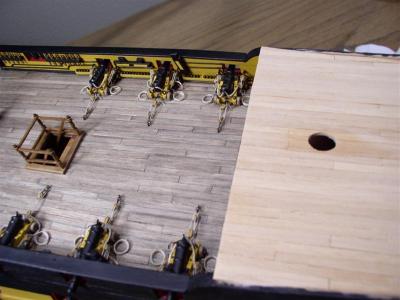
5. UPPER GUN DECK, RIGGING CANNONS Returning to the upper gun deck. The previous build log tended to jump around a bit, with whatever I was working on at the time. Perhaps another benefit of the new format is that one can organize the log in a more coherant path. One area at a time. Beginning with preparing cannons and carriages. Cannons lacked breech rings which were fashioned from wire islets. Beginning to rig tackle for the cannons Prototype. Note breech ring on cannon and side ring bolts on carriage. Rigging breech ropes for recoil Plans call for simply flat planking for the ceiling (inboard lining of the hull), while on the real ship, the inner lining concists of a waterway, stringer, ceiling and beam shelf. Making block and tackle.The stropping line encloses an eyelet (for the hook). Siezing the block in the bight ("splice") Tail left for tackle.Double block on right, stropped with only hook Hooks supplied seemed too large (center). Smaller hooks made from eye bolts or even smaller with dark annealed wire. Completed upper gun deck. I probably seems silly to rig all the guns when only a few will be visible. But we will know they are ready. . A beam placed forward Additional beams. Long plank used for alignment of beams following the sheer. Mast rings supplied were inadequate. They fractured at the cross grain with any attempt to sand or shape. Making mast rings with styrene strip. Suggest forming or bending styrene before glueing or painting. After, it becomes brittle and frequently cracks or breaks. In the third photo, left: residual circle. center: cut to fit the mast. right: ring completed with C/A glue. Fourth photo, two mast rings painted and in place. Painting skid beams Skid beams in place with deck before planking. Quarterdeck in place. (Not glued) Uprights trimmed and cut down leaving thin upright to support inner bulworks. Foredeck showing short uprights for bulwork support. Deck planking proceeding. Lining foredeck gun ports. Aft quarterdeck. Uprights trimmed at bulworks. Lining aft gun ports before inboard and outboard planking. Planking painted before glueing in place. Inboard planking aft Inboard planking foredeck, Inner planking foredeck Inboard and outboard planking aft., Completed planking. Cap rails


- 755 replies
-
- 1
-
-
- finished
- caldercraft
- (and 1 more)
-
Hi Mecheleir, Wack Wolf (Joe??) and Edward.Thanks for looking in. I haven't been following other logs yet, but look forward to that after I finish bringing this one up to date. Cheers, Gil
-
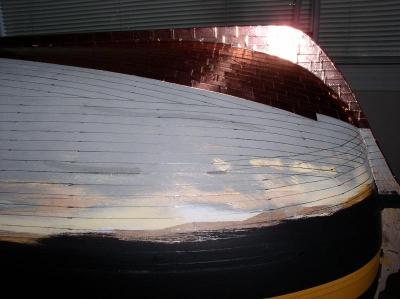
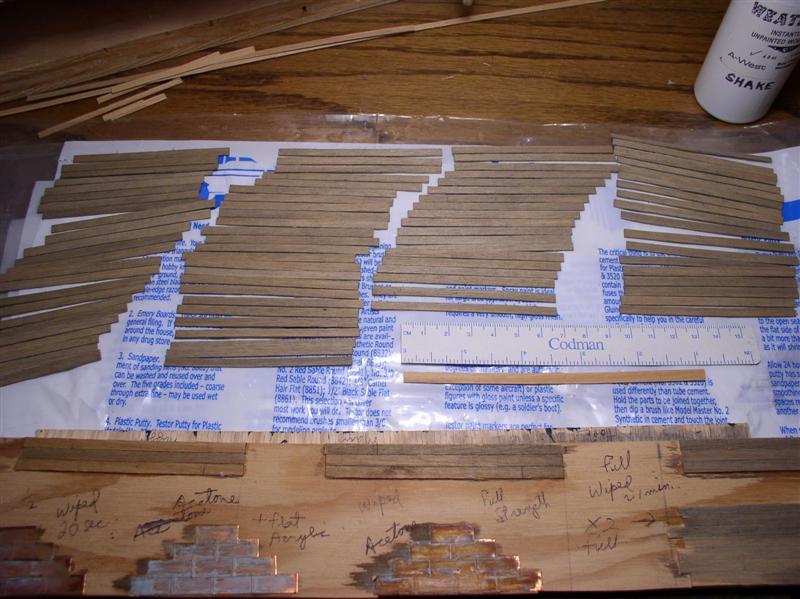
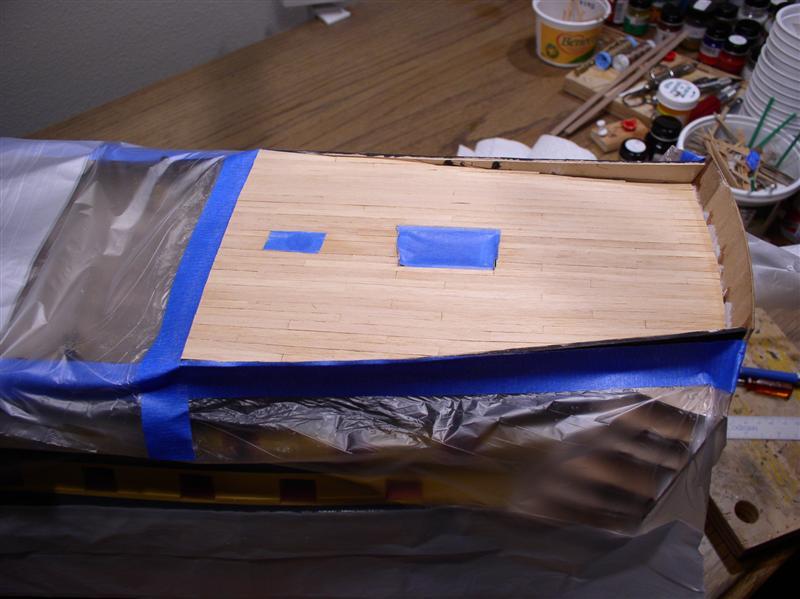
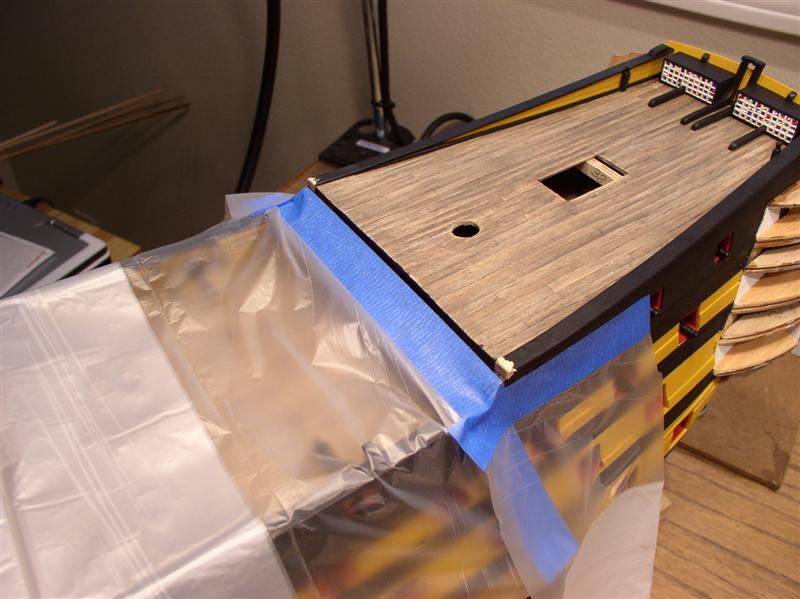
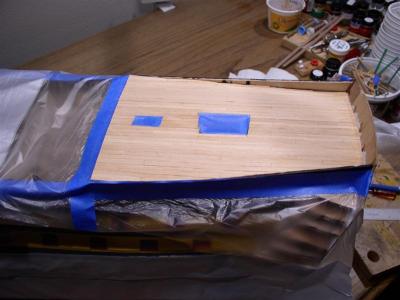
4. DECKING I chose to weather the decks, each slightly more weathered than the one below. "Weather-it" was used , experimenting with different concetrations and time of exposure. There are some beautiful decks on models with prominent trunl's (tree nails). They add a "wow" factor and make for a great presentation. However, they are really artistic license. Please don't jump on me. I love to see them and we all take artistic license from time to time since ship modelling is really three dimensional art. However, if one is trying to mimic reallity, trunl's would barely be seen except close up, or on a newly decked ship. The grain of the trunl is generally lined up with the grain of the plank, they weather the same from salt and sun and while they are visible, they usually don't stand out. The following is a photo from the real ship. I prefer individual planks rather than long strips of wood with scoring, in order to abtain the varigated appearance of differing texture and coloring between planks. Weathering of the upper gun deck (done with long planks since mostly hidden). I'll return to the upper gun deck but for now continue with decking on the quartdeck. Quarterdeck before decking. Individual planks for decking have been weathered. A strip of natural wood seen below the ruler. Bottom of photo, experimenting with time of exposure and dilution. Planks assorted according to width Beginning planking with center line reference plank. Finished planking. (no edge darkening was used) Polyacrylic coating on deck produced an unwanted sheen. This was followed by a coat of flat clear acrylic for better effect.(not shown) Marked difference seen between unweathered poop deck (planked before weathering) and weathered quarterdeck Masking for weathering. Quarterdeck and poop deck.


- 755 replies
-
- 2
-
-
- finished
- caldercraft
- (and 1 more)
-
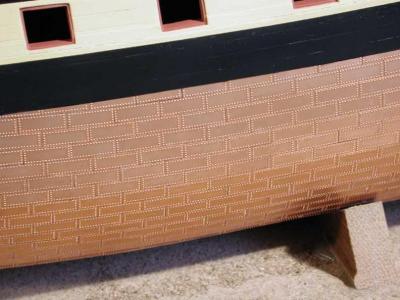
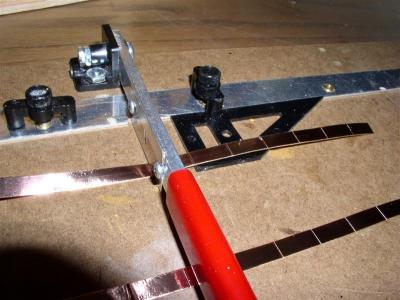
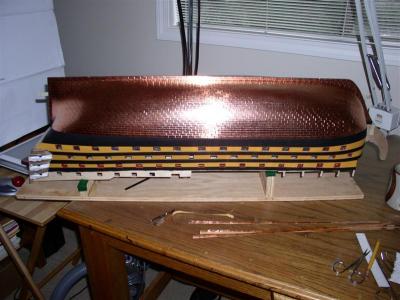
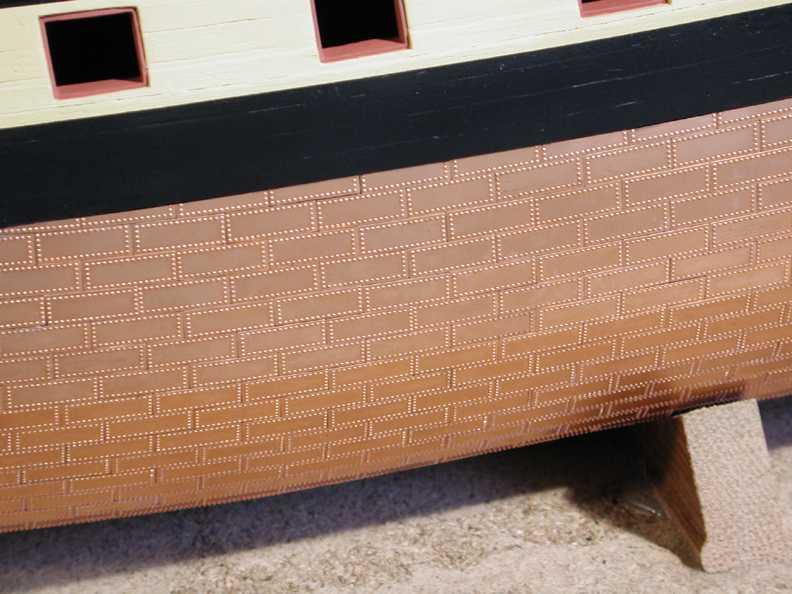
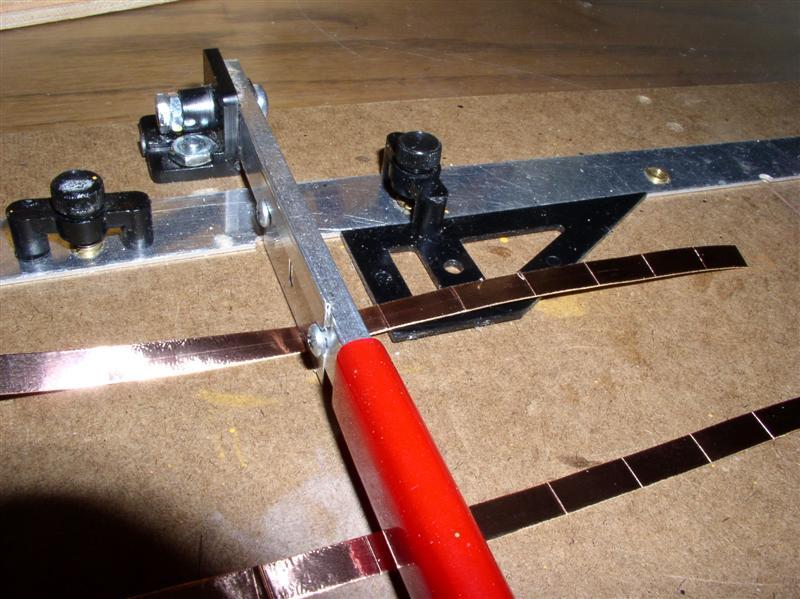
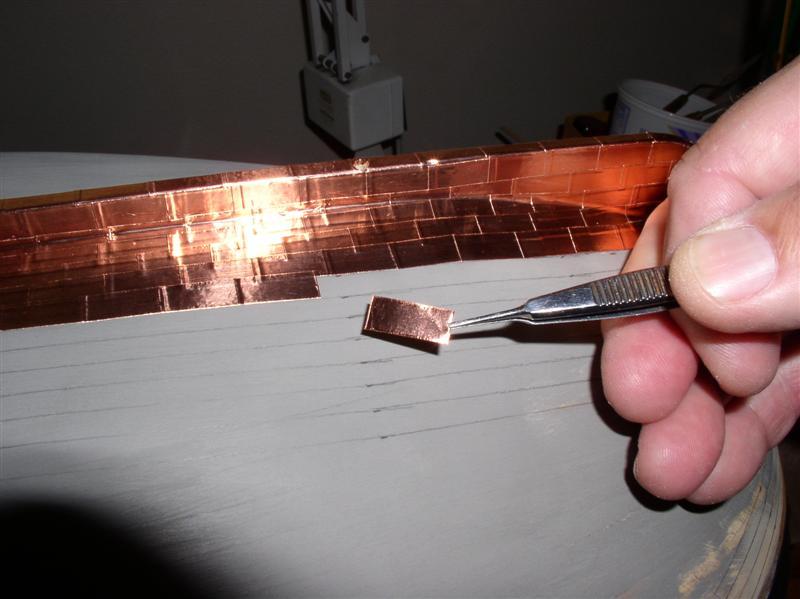
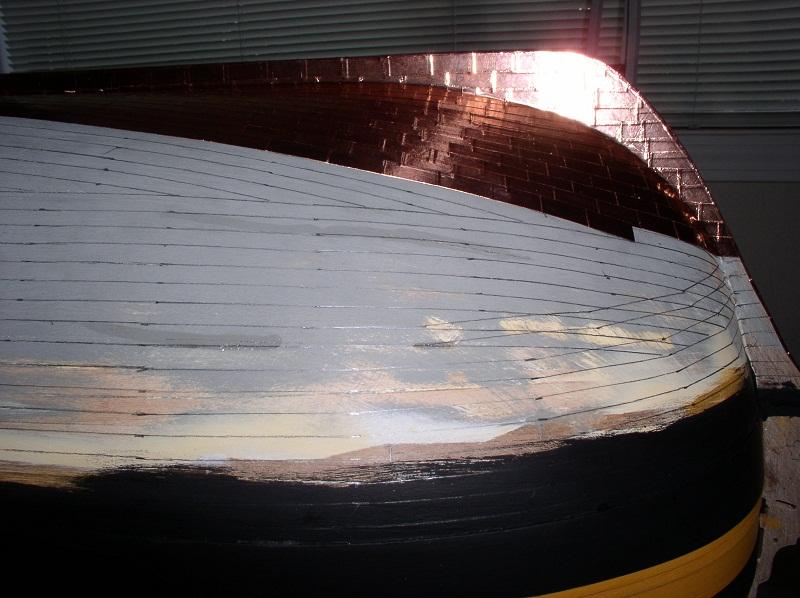
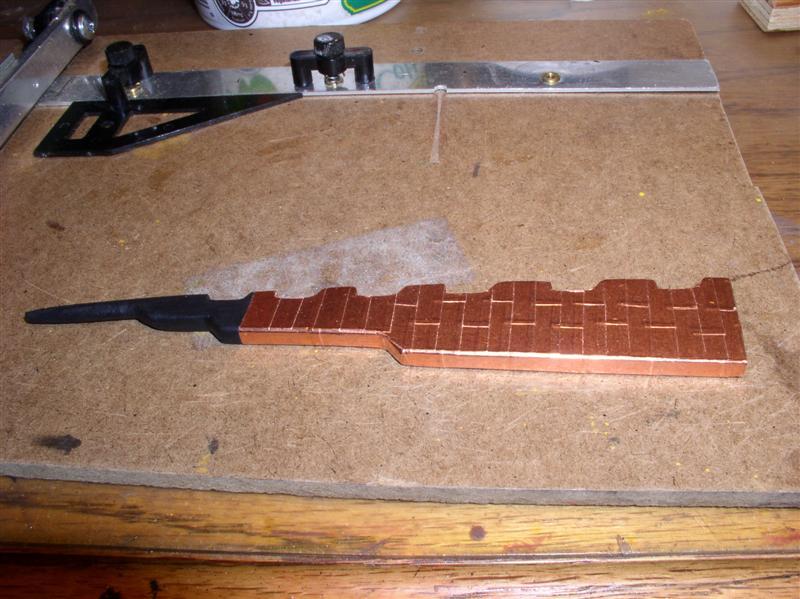
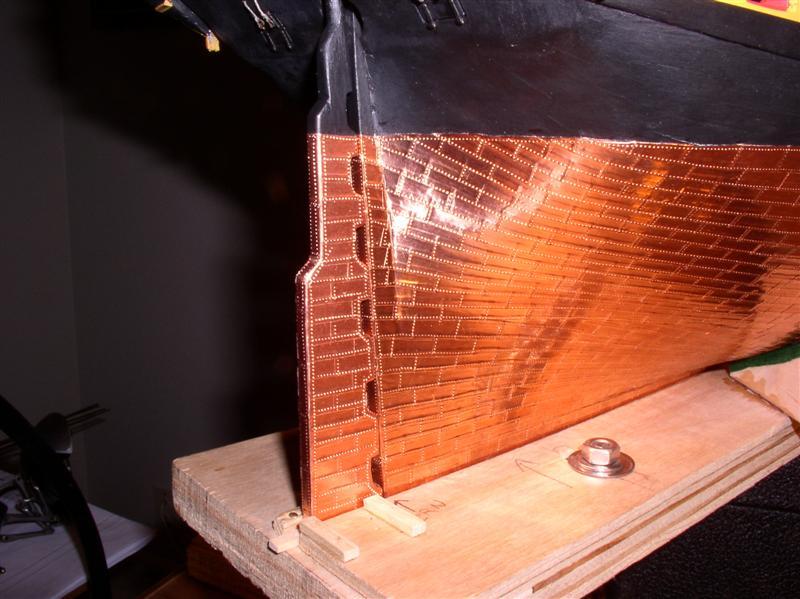
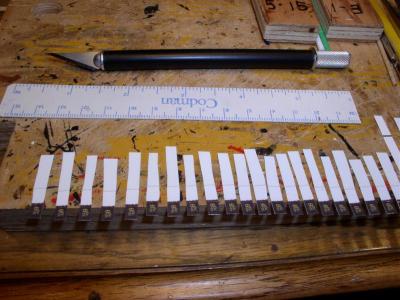
3. COPPERING JoTika provided individual copper plates with simulated nails on all four sides. The result when placed side to side was two rows of nails with a theoretical gap for invading toredos (ship worm). This photo is from the JoTika on line illustrations with the double nail rows. Originally, copper plates were introduced with iron nails until it was discovered that the more noble copper and less noble iron in a bath of salt water, set up elecrolysis, eating away the nails until the copper plates fell off. Hence copper nails. It is my understanding that the plates were overlapped with a single row of nails holding the plates. Hence, I used copper tape with adhesive backing, cut to equal length by the chopper, and placed on predrawn lines. Five or six rows of copper plates became a belt and these met with slight overlapping. When coppering was done, a ponce wheel was used to simulate the nails since elevations and depressions look remarkably similar to the naked eye. Using the chopper, very light pressure on the blade cut the copper but not the paper backing, leaving the plates attached to the paper backing. Then each plate could be removed for placement. Placing copper plate on predrawn line. Coppering completed Effect of ponce wheel to simulate nails