


Bob Cleek
-
Posts
3,360 -
Joined
-
Last visited
Content Type
Profiles
Forums
Gallery
Events
Everything posted by Bob Cleek
-
High torque, really low speed drill
Bob Cleek replied to Brinkman's topic in Modeling tools and Workshop Equipment
The relationship between speed and torque is a function of the motor design. Inexpensive motors can make up for their inherent lack of heavier (and more costly) construction by using speed to make up for a lack of torque. Hence, when their speed is reduced, so is their torque, often to the point where at lower speeds they stall out. A heavy-duty electric motor can be built to maintain torque at low speeds, but the construction costs more. These will generally be tools like the Foredom flex-shaft and belt-driven dental engines. -
I've owned several Dremel mototools and their equivalents over the decades and have always found them a very handy tool to have around. That said, for modeling purposes, as Roger noted above, it is not a tool for delicate work. It's major drawback in this respect is that it relies upon speed, rather than torque, to get the job done and the lower their speed, the lower their torque. High speed tools are difficult to control. In my experience, anybody who stays with miniature work for any length of time ends up acquiring a Foredom flex-shaft rotary tool or a bench-top belt-driven laboratory dental engine after being at it a while. These foot pedal controlled alternatives have much more torque, even at low speeds. As always, "the good stuff' costs more, but you get what you pay for and you only have to buy a good tool once in a lifetime (unless you make the mistake of loaning your tools!) Fortunately for modelers, the dental laboratory industry has been transitioning to "micro-motor" and air turbine-driven handpieces in recent years, so there are good condition used Foredom flex-shafts and dental lab engines to be had on the used market these days at a fraction of their original cost. This YouTube video is very informative:
-
Byrnes Saw Mini Sled
Bob Cleek replied to Roger Pellett's topic in Modeling tools and Workshop Equipment
Death is inevitable, but dying happy is not. -
Byrnes Saw Mini Sled
Bob Cleek replied to Roger Pellett's topic in Modeling tools and Workshop Equipment
Why, the prize is the satisfaction of victory, of course. That in itself is enough. This ain't Little League where everybody gets a trophy. -
Byrnes Saw Mini Sled
Bob Cleek replied to Roger Pellett's topic in Modeling tools and Workshop Equipment
I hear you, Roger! For your purposes, I'd do the same. Just remember, "He who dies with the most tools wins!" -
Byrnes Saw Mini Sled
Bob Cleek replied to Roger Pellett's topic in Modeling tools and Workshop Equipment
That looks like an excellent solution while you're waiting for her to ask what you want for your birthday. Byrnes Model Machines - Thickness Sander (The link says "Thickness Sander," but it takes you to "Table Saw" which includes the new sliding table accessory which is everything you would expect from Jim Byrnes. -
replacement X-ACTO blade #30
Bob Cleek replied to Peanut6's topic in Modeling tools and Workshop Equipment
Tasty. Bridge City Toolworks has some incredible stuff. However, Bridge City is usually God's way of telling me my eyes are bigger than my wallet, but this little gem is just inside my budget. I want one! I also have the Xacto plane and spokeshave from the same Xacto kit Peanut's got. I got mine over 40 years ago as a gift. I tried them when I got the set and I couldn't get either to work worth a darn. I think they are basically just toys. I have a Stanley #101 and a Kunz knockoff of the Stanley #100, which is the same as the #101 but with a squirrel tail, as well as a modern Stanley #12-101, the current version of the #101 with a folded sheet metal body. I prefer the feel of cast iron bodies, of course, but the cheapo folded sheet metal bodied one works just fine as well. The cast iron ones are to be found on eBay and at a garage sale near you, but the collectors have snapped a lot of them up. See:; The Supeirior Works - Stanley Blood & Gore: Planes #90 - #100 (supertool.com) (bottom of page) and The Superior Works - Patrick's Blood & Gore: Planes #90 - #100 (supertool.com) Stanley 12-101 Small Trimming Plane - Hand Planes - Amazon.com $12.00 Kunz Palm Plane with Handle | Hand Planes | Palm Planes (highlandwoodworking.com) $26.00 Some years ago, I found a set of these bronze modeler's spokeshaves on eBay. They were made in the U.S. by a guy working out of his garage in Chicago, I believe. Garret Wade sold them for a while, but apparently don't anymore. They work great, if you can find a set. -
Good deal on long tweezers.
Bob Cleek replied to Bob Cleek's topic in Modeling tools and Workshop Equipment
Definitely true and highly recommended. -
I picked up a set of three tweezers, 8", 10", and 12", from eBay the other day, They were an impulse buy prompted by my favorite 8" pair of dressing tweezers having "gone walkabout" and, of course, everybody swears they never touched them. The price was $8.35 with free shipping or "make an offer." I offered $6.75 to see what would happen and they accepted the offer. That comes to $3.25 a piece, which is a great deal. They came promptly and I found them to be of surprising quality, considering the price. These long-reach tweezers come in really handy for rigging work where they can get in close without hitting other delicate work. They are also very handy for retrieving little parts that are dropped and which, through some mysterious quirk of physics, are always drawn into an open hatch and into the hull below. 3 Pcs Tweezers Thumb Dressing Forceps Set ( 8",10", 12" ) | eBay
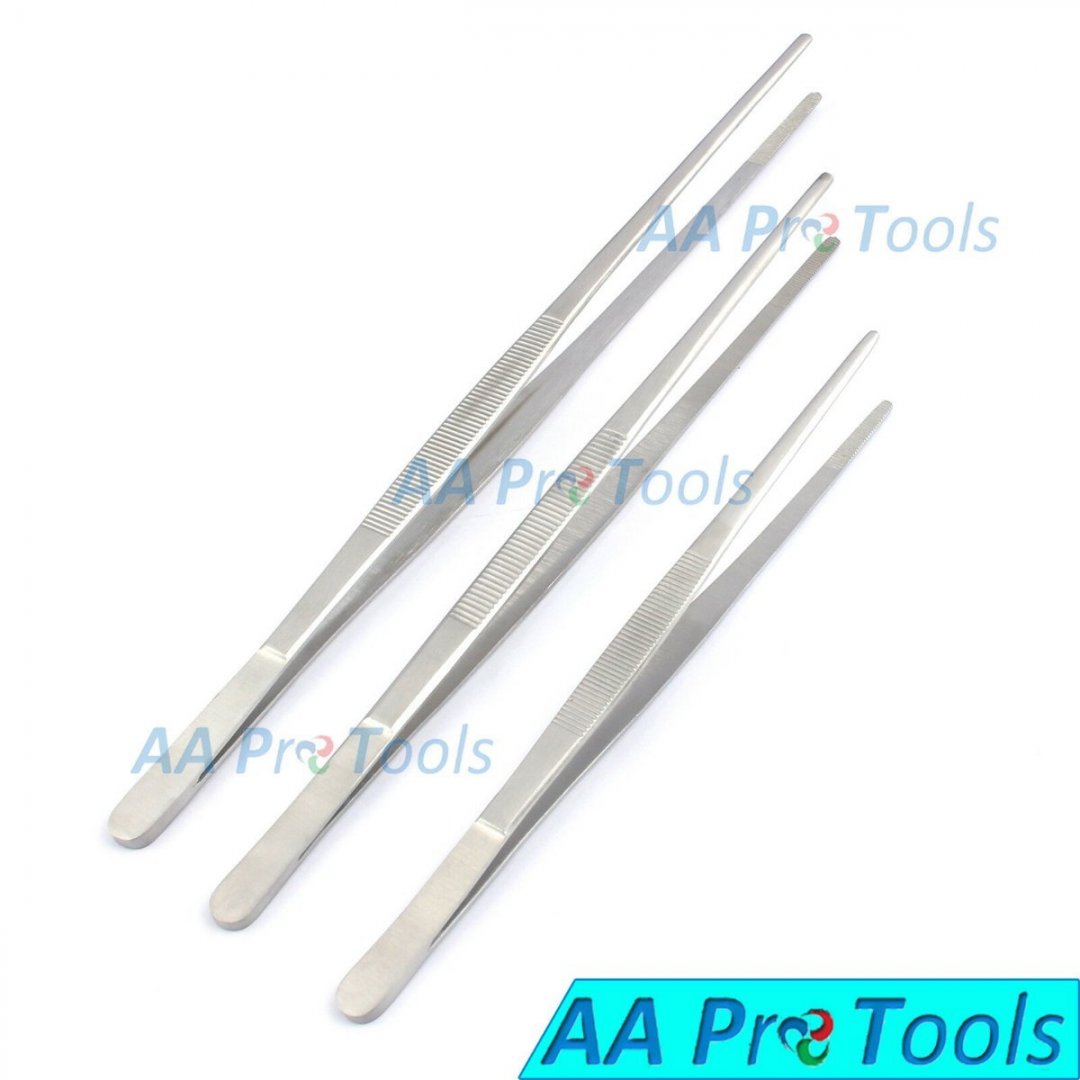
- 3 replies
-
- 11
-

-

-
Helping Hands recomendations in the uk
Bob Cleek replied to DaveBaxt's topic in Modeling tools and Workshop Equipment
The base plates are different sizes, but appear somewhat the same in their advertising pictures. One comes with four arms and has a 6"x 9" baseplate. The one with five arms has an 8" X 11" baseplate. The different length arms can be purchased separately, as well, but there doesn't seem to be any savings there, since they are more expensive when bought separately than together with a baseplate. https://www.quadhands.com/collections/all/products/quadhands-deluxe-workbench -
I think you are basically asking how to paint, because once basic painting is mastered, spray painting is just another way of putting the paint on the piece you want to paint. Total mastery of painting is a broad subject well beyond the scope of a single response on an internet forum. I'll just offer some general advice I've found helpful. No doubt others will chime in to disagree and then you'll be more confused than ever before! You have to learn to walk before you can run. Spray painting requires a command of basic painting techniques to do well. None of the common challenges and problems encountered spray painting can be overcome without a basic understanding of coatings and their applications. The most important thing to master with spray painting is control over the amount of paint you are applying to the surface. Too much paint will result in runs, sags, and "curtains," which will ruin the job, require wiping off the uncured coating with solvent and re-prepping the surface or waiting until the paint is fully cured and then resanding to perfect fairness. First, I would not advise that any serious modeler use rattle can spray paint for much of anything, except perhaps a sanding basecoat. The quality of the nozzles on rattle can paints, while remarkably good considering the manufacturing tolerances required, aren't good enough for the finish perfection scale modeling requires and are primarily designed for spraying large areas, not small ones. Besides, if you need just a small amount of paint, you're stuck buying the whole rattle can which, like as not, will "die on the shelf" before you get around to using it again. They are also an expensive way to buy paint. If you are interested in spraying paint, the sooner you acquire an airbrush and learn to operate it, the better. It's not rocket science and the cost of a basic quality airbrush and small compressor will be quickly amortized in paint cost savings. If you can't afford an air brush, then learn to paint with a quality bristle brush. An experienced painter can achieve the same results with either application method. (The airbrush is more forgiving in covering large surfaces, but others may have found otherwise.) It is essential to learn how to properly "condition" your paint to achieve perfect finishes. This is done with thinners, "retarders" (that slow drying and so permit brush strokes to "lay down"), and "accellerators" (which speed drying to prevent runs or "curtains.") There are also additives that will achieve the finish desired from high gloss to dead flat and anywhere in between. The consistency of the coating is a major determinative of the quality of the job. Learning to condition paint is a process of acquiring "hands on experience." If you know someone who knows how to paint, getting some one-on-one instruction would be helpful.) Learn how to work with the medium you choose, be it solvent/oil-based paint or water-based acrylics. Learn to use sealers (shellac, etc.), sanding base coats, and finish or "top" coats. Learn how to mix colors from a basic pallet. (Study the "color wheel.") There are hundreds of pre-mixed colors available in tiny bottles with high prices. Use these if you wish, but realize that tubed paste artists oils or acrylics are the basic building blocks of all those pre-mixed colors and if you "roll your own" you will save a lot of money and rarely find yourself running from hobby shop to hobby shop (often far and few between) or waiting days for the arrival of an internet purchase to find more of that particular color you just ran out of which may or may not be still available. Remember that painting anything is 90% preparation and 10% application. Especially in modeling, surfaces should be perfectly smooth (or textured as required) and perfectly clean before the paint is applied. And if you use brushes, learn how to clean and care for them so they don't become "dust applicators" that ruin what otherwise would have been a perfect job. Cleanliness is essential. Store masking tape in zip lock bags and never lay a roll of masking tape down on its side. The side of the tape roll will pick up every bit of dust it contacts and ruin the tape for producing the perfect razor-sharp lines sought in modeling. (Buy quality 3M "fine line" tape or Tamiya masking tape. These tapes will produce the sharp lines required for modeling. Household "painter's tape" is not suitable.) Use a "tack cloth" to remove sanding dust from a piece before painting it. Store your tack cloth in a zip lock plastic bag, too. Try to paint in a dust-free area. While often easier said than done, painting on a dusty workbench where you've just sanded the piece in a room with dust hanging in the air is not advisable. Unless you are completely familiar with the coating material you are using, (meaning you used it recently,) always, always, always test your materials and surfaces before committing to painting the workpiece. Paint can thicken or even lose its ability to "dry" while sitting on your shelf. (The modern synthetic coatings can be quite finicky in this respect.) Colors will often appear different when "dry" than when applied. Sometimes coatings are incompatible and disasters will result when they come in contact with each other. By making a test strip using the same surface, including undercoats, to be painted and the paint you want to apply to it, you can determine what the results will be. Failure to do so can result in a hull that is coated with a dirty, fingerprinted, sticky mess that refuses to dry and must be laboriously stripped off down to bare wood before another attempt can be made.
-
I would expect that it wouldn't be worth the effort. I think the spray paint filter is going to be much finer than would a sawdust filter and the sawdust would clog it up pretty quickly, meaning you'd be stopping all the time to clean the filter. The best sawdust collection device is a good vacuum attached to a sander that is intended to have a sanding vacuum attached, but in a small apartment that isn't always effective enough because the exhaust air has to be clean enough that it isn't just sucking up sawdust and just spraying fine sawdust all over everything.. Even with something like a shop vacuum, you'll still get a fair amount of airborne sanding dust in your work area. I have found the best approach is to sand outside whenever possible. A large fan directed over the working area blows must of the sawdust away. Working indoors on small projects, it's often quite effective to set up a fan that simply blows across the work area towards an open window. In terms of reducing the amount of sawdust, the less one can use powered saws and sanding machines, the less sawdust will end up in the shop or work area. If one uses a sharp knife as much as possible for cutting, a good scraper for fairing, and chisels for shaping, the resultant waste is shavings and chips, which, being larger, don't hang in the air, aren't inhaled, and are easy to clean up with a bench brush and pan. In the days before electric motorized sanders, grinders, and saws, there was a lot less dust in woodworking shops. Learning to sharpen good edge tools will eliminate a lot of sawdust and save on the purchase of a lot of sandpaper, too.
-
Great job! A real gem. Thanks for sharing!
-
Photo Reference Library
Bob Cleek replied to JSGerson's topic in How to use the MSW forum - **NO MODELING CONTENT**
It's an interesting idea, but the readily available search engines like Google, Bing, Duck Duck Go, and the rest all have an "images" toggle so all you have to do is search for, say, "USS Constitution" and hit "images" and you'll get a ton of them. To some extent, a data base of ship pictures would be redundant. On the other hand, if members were willing to supply it, there could be a database of "modeler's photos" that would be useful. If the shutterbugs were willing, it would be great for somebody to download a few hundred digital photos of a vessel like the Charles W. Morgan showing all sorts of details of the deck and rigging from a bunch of different angles, or close-ups of all the gun tackle on a cannon on Constitution. I have a book in my library, the title of which I can't remember, that is full of generic photographs for modelers to use as a reference when modeling. It's primarily for modern ships. I haven't looked at it in a while. If you could go and find a bunch of photos of deck winches from all angles and things like that, it would probably be useful. -
IMHO, shellac is an excellent option as a rigging "fixative." Shellac comes in a wide range of colors, generally shades of "garnet." It's not a good option for coloring line, though, because the pigment is carried in the alcohol solution, so the more shellac you apply, the darker the color will get if you are using unbleached shellac. That makes it somewhat difficult to get a consistent shade of color with it when applied here and there on a piece. The type to use has the color bleached out of it. It's called "clear" or "white" shellac. It's invisible when applied. Best to address the desired color to the underlying material and use clear shellac for securing knots. I expect fine furniture makers may have a reason for using flake shellac and mixing their own with alcohol, but I've never seen the point in messing with raw shellac in flake form when it can be so easily purchased already dissolved and ready to use.
-
Rare complete ship's curves set on eBay
Bob Cleek replied to Bob Cleek's topic in Modeling tools and Workshop Equipment
Yes, a lot of modelers use them and they are usually in high demand. Read this thread and learn as much as there probably is to know about drafting curves. "French curves" are only one type of drafting curve. Take a few pictures of your curves and their box and post them here. Somebody should be able to tell you what kind they are and what they can be used for. -
Poly rope - Which adhesive product?
Bob Cleek replied to LyleK1's topic in Masting, rigging and sails
Indeed. If it works for you, go for it! -
Poly rope - Which adhesive product?
Bob Cleek replied to LyleK1's topic in Masting, rigging and sails
I buy Zinsser Bullseye shellac by the quart at the hardware store. You can get it in pint cans, as well. (Don't buy the spray cans. That's just nuts.) When it suits my needs, I decant some into a small capped container. I collect baby food and spice jars for this purpose. I wouldn't advise storing shellac in a squeeze bottle. It's' very viscous and there really isn't any occasion to squeeze it onto anything and if you did, it would run all over everything. Once it's out in the air, the alcohol evaporates quickly. I apply it with a paint brush which I clean with alcohol in a small capped container. As the shellac is rinsed out of the brush, it dissolves in the alcohol. I use this alcohol with the shellac in it to mix with the shellac if it needs thinning. The can of shellac and a couple of small bottles is all I need. -
Sad news indeed. Nothing I can say will much matter. I can only imagine the pain you and yours are working through right now.
-
Work Table Recommendations ?
Bob Cleek replied to DanB's topic in Modeling tools and Workshop Equipment
A lot depends upon your individual preferences and the limitations of your location. Some of us have a lot of room to spread out and, most, it seems, don't. Then there's the size of the models you build, which dictates the amount of table top you need. My preference is for a relatively small primary work table and however many rolling tool carts I need to hold tools and materials. The more tools you can "have a place for and everything in its place," the less time is wasted looking for tools that "were just there a minute ago" on a cluttered workspace. I have a rolling Kennedy machinist's tool cart (expensive) and a tool cart from Harbor Freight (inexpensive) that serve me well. I can roll them next to my work table where they are easy to reach from my rolling secretary's chair which is also somewhat height adjustable. (The cheap ones at the office supply stores are great.) As for a table top, I would suggest the heavier the better for stability. A fire door (not a cheap luan doorskin hollow core interior door) on top of a couple of file cabinets works pretty well. A solid box than can be placed on top of it to raise the work surface to what I call "jeweler's bench height" at near eye level is very helpful for working on very small parts. (Jeweler's benches are very expensive, but a lot can be learned from checking them out in the online catalogs.) Adjustable ergonomic forearm rests are also quite handy for a lot of work, but the store bought ones aren't cheap and I've yet to get around to building a sufficiently adjustable one, so they are still on my bucket list. Arm rests provide stability when working on fine stuff "up in the air," like rigging. (see pic below.) I also have a couple of hard pressboard "semi-sacrificial" smaller table tops that sit on top of my work benches. I can cut them up and not mind if they get covered in paint and glue drips and other grunge. These have one inch rails across the back and sides to keep stuff from rolling off of them. They're very handy for keeping small parts corralled. I screw ferrous metal strips to the underside of the front edges of my benches where I do small work. I have a work apron into the hem of which I've sewn rare earth magnets. I stick the hem of my apron to the underside of the bench with the magnets when I sit down to work, creating a cloth "net" which often catches that little part that gets dropped and tries to disappear on the floor forever. It saves lots of time and aggravation! It also catches a lot of chips and junk that you'd otherwise be sweeping up at the end of a work session. Finally, I always install outlet strips on the front of work benches so that corded hand tools can be plugged in and used without the cords stretching over the table top from the wall behind the bench. That leaves the workspace clear and avoids disasters when the cord and the model collide. Below: Harbor Freight rolling tool chest. They come in various configurations. This is the cheapest model at a couple of hundred bucks or less on sale or with a coupon. I attach magnetic strip tool holders and magnetic paper towel holders to them as well. HF sells the paper towel holders for around fifteen bucks and the magnetic tool holders are five bucks a piece. https://www.harborfreight.com/tool-storage-organization/u-s-general-tool-storage/tool-carts/30-in-4-drawer-tech-cart-black-64818.html Adjustable ergonomic forearm supports. Costly at around $90 each. I'd love to have a couple for doing that close-in rigging work in the top hamper. For modeling, I'd be looking for ones that have more reach than the one pictured, though. https://www.ebay.com/itm/175132691344?chn=ps&norover=1&mkevt=1&mkrid=711-213727-13078-0&mkcid=2&itemid=175132691344&targetid=4581183927179149&device=c&mktype=&googleloc=&poi=&campaignid=418233787&mkgroupid=1241348861725295&rlsatarget=pla-4581183927179149&abcId=9300542&merchantid=51291&msclkid=c26ea7e8f632134640c7c56cabf27b90 -
Digital compass / dividers?
Bob Cleek replied to CPDDET's topic in Modeling tools and Workshop Equipment
Unfortunately, the photo I posted is all I have. If you enlarge the photo on your screen by holding down the "control" key and turning the wheel on your mouse, the picture can be enlarged sufficiently to read the fine print of the decimal equivalents. (You may have to open the picture separately on your screen to enlarge it sufficiently.) -
Digital compass / dividers?
Bob Cleek replied to CPDDET's topic in Modeling tools and Workshop Equipment
Here you go. These are the instructions for the preferred 'universal " decimally scaled Keuffel and Esser 10" proportional dividers. (Also sold by other firms such as Bowen, Post, and Dietzgen.) These dividers are scaled from 10 to 110. By setting the axis at the point on the scale corresponding to the three-place decimal equivalent of the proportion one wishes the dividers to yield the relative proportional distances will be found at the points. They are set by turning the knob which operates a rack and pinion adjustment mechanism which has a Vernier scale for the third digit of the three place scale settings. If you don't have a decimally scaled "universal" set of proportional dividers, you won't be able to set any fraction you want on your dividers using the scale etched on the instrument. The smaller proportional dividers have different scaling, usually showing "lines," and "circles" scales by proportion, such as 1:2, 1:3, 1:4, and so on. For anything else, you have to set them by guess and by golly, manually, by adjusting the axis to yield a measured distance at the points by trial and error using a scale. Less expensive proportional dividers will not have rack and pinion adjustment. They will just have a slip adjustment, which is very difficult to adjust for fine settings. Don't buy cheap brass Asian "decorator" knock-offs. They are next to useless. Measuring instruments are definitely a "you get what you pay for" kind of thing. This instruction sheet is all I have handy on my hard drive at the moment. (It can be enlarged to be readable by holding down your control button and turning the wheel on your mouse.) The newer K&E Paragon models come in a case which has a metal plate on the bottom with the table of settings on it. The older models have a folding card with the same information which fits inside the case. In the last years of production, the "Mark 1" line replaced the former top of the line "Paragon" models and they cut corners on the cases and just provided the below printed instruction sheet. The table of settings give you the decimal equivalents for various ratios, as well as the formula for converting any fraction to its decimal equivalent. It also give the settings for miscellaneous ratios such as the diameter of a circle to the side of a square of equal area, the volume of a sphere to the volume of a circumscribed cube, and for navigation and cartographic work, the setting for feet to meters, yards to meters, and miles to kilometers. There are also settings for dividing a line into a set number of equal parts, and dividing the circumference of a circle into a given number of parts which may be useful in modeling capstans and ships' wheels, I suppose. The Weems and Plath navigational proportional dividers are scaled for use in navigation for performing speed, time, and distance calculations on navigational charts. There are lots of these on the used market and are still produced by Weems and Plath. (There was a huge "dump" of Russian-made military surplus navigational proportional dividers onto the internet market following the fall of the Soviet Union.) These dividers operate exactly the same as all other proportional dividers mechanically, but are scaled with settings specific to navigation. They aren't as useful for model scaling purposes are "universal" or general purpose "lines and circles" proportional dividers which are scaled to to a myriad of functions such as converting scale measurements, determining the area of a circle, dividing distances, and on and on depending upon the settings chosen. Most navigational proportional dividers will also have a scale on one leg, usually numbered from one to ten, which can be used for setting for conversions of measured distances. As the navigationally scaled dividers function the same as all proportional dividers, they can always be manually set for any spatial conversion by moving the axis until the desired ration of distances between points is achieved. For example, to double the size of a line measured, or reduce it by half, set the axis to where the points on one end are one inch apart and the points on the other side are one half an inch apart.
-
Digital compass / dividers?
Bob Cleek replied to CPDDET's topic in Modeling tools and Workshop Equipment
There's a set of finestkind Keuffel and Esser Paragon Universal (decimally scaled) proportional dividers on eBay right now for a "buy it now" price of 76.00 including shipping, which is about what a "user" pair usually go for. I've not seen them for much less than that and I watch eBay fairly closely because I collect old manual drafting instruments. Keuffel Esser K&E #440 Divider 10" with instructions READ | eBay These are 10" long with rack and pinion Vernier adjustment, scaled in decimal equivalents so any scale can be accurately set without guesswork. You can get smaller rack and pinion adjustable proportional dividers for less, but they are not decimally scaled with Vernier adjustment and the distance they can pick up is limited by their reduced size. Look for the top end manufacturers. As a manual draftsman, you know who they are. The junk is not worth bothering with. Treat yourself! You'll be glad you did. I can't imagine building models without one, but everybody's mileage varies, I suppose. '' (This is not a picture of the ones offered on eBay now, but is identical. See photos of set for sale on the eBay link.) -
Poly rope - Which adhesive product?
Bob Cleek replied to LyleK1's topic in Masting, rigging and sails
It's properly referred to as "thin shellac," not "thinned shellac.") Most canned pre-mixed shellac (e.g. Zinsser's Bullseye brand) is, I believe "two pound cut," which means two pounds of shellac flakes dissolved per gallon of alcohol. (It will thicken in the can over time if you leave it opened and the alcohol evaporates. Just add more alcohol to thin it out again.) Thin it as you please. For setting knots, I just use it right out of the can and if it looks like it needs it, I'll add a bit of alcohol to the can. (You can purchase dried shellac flakes on line in different shades of colors. The "white" or clear shellac flakes are bleached. I've never bothered with them, but if you wish, just mix denatured alcohol with the flakes to suit your taste.) For thinning shellac and cleaning brushes, etc., use plain old denatured alcohol which I buy by the gallon at the hardware or paint store. (It's sold in smaller containers, of course, but it has an unlimited shelf life and buying in bulk yields a big savings and fewer trips to the store to buy more.) It's a stock item in my shop. I use it for lots of different things (e.g. in an alcohol lab lamp for burning fuzz off of rigging line or in marine alcohol cooking stoves. Canned pre-mixed shellac runs around $28 a quart (like everything, the price has gone up!) You can buy it in pints, too, and for modeling, a pint should be good for rigging a half dozen Victory models. You can also purchase it in a three pound cut, but that stuff is twice the price. I never saw the point, since if you want it thicker, just leave a bit out and let the alcohol evaporate, or put an additional coat of two pound cut on top of the first. There are uses for very thick shellac as an adhesive, electrical insulator, and molding medium, but most of these applications are now better served by modern materials. Prior to the invention of vinyl, 78 RPM phonograph records were made of shellac. If you have any old 78's you don't want, grind them up and dissolve them in alcohol and you're good to go, although the liquid shellac will be black! ) -
Poly rope - Which adhesive product?
Bob Cleek replied to LyleK1's topic in Masting, rigging and sails
Add my vote for clear shellac. I've used thinned PVA, which has a drying time longer than I prefer and is very difficult to undo once it's dried if a mistake is made in the rigging. I also used thinned nail polish, but it also is somewhat difficult to reverse if one wishes to do so. Thin CA spreads everywhere and is not easily undone once cured. It also can conflict with other coatings with which it comes in contact. I've found thinned white (clear) shellac has the following advantages over the other options: 1. Low cost and universal availability. 2. Also a universal sealer for wood which hardens the surface and permits sanding without bringing up any "fuzz" in softer woods (e.g. basswoood,) making it great for topcoats of both solvent and water-based varnish or paint. This means one less specialty product container on the shelf. 3. Non-toxic. Although prepared shellac is undoubtedly thinned with denatured alcohol, you're safe so long as you don't drink it. The alcohol fumes are nontoxic and less flammable than acetone fumes from nail polish. Shellac itself is actually edible and when produced in "food grade" form is used for imparting a shine to jelly beans, among other things. (Sorry if I spoiled anybody's love of jelly beans by revealing that they're coated with beetle excretion!) 4. Thinned shellac is very viscous and penetrates very well. When the alcohol evaporates, the shellac creates a hard matrix between the fibers of the thread that binds the knots and holds the shape intended. As the alcohol evaporates and the shellac "thickens," lines can be easily formed into any shape desired, which will take a hard set when the shellac is fully "dry." It takes a matter of a few minutes for the alcohol to entirely evaporate, so there's no inconvenient delay waiting for it to set, but enough working time to form shapes desired. 5. Thinned shellac does not leave a glossy finish. If a thick coat of shellac dries glossy, it is easily wiped down with alcohol to remove the glossy excess. 6. Shellac is easily reversed by liberal applications of alcohol blotted up with a bit of paper towel or a cotton swab. When softened with the alcohol, previously shellacked knots can be untied while the shellac is "wet" and soft if you wish to redo the work or adjust the tension on a line. 7. Shellac is very easily cleaned up with alcohol, so you can use whatever size brush suits your fancy and easily clean it. 8. Shellac has been proved over thousands of years to be archivally stable.


