Bob Cleek
-
Posts
3,342 -
Joined
-
Last visited
Content Type
Profiles
Forums
Gallery
Events
Everything posted by Bob Cleek
-
Agreed! A smaller lathe would be a more convenient option for doing a lot of small part modeling work, as I discussed in my post above, although the cost of buying and tooling up two different sized lathes which couldn't share at least some of their tooling may make a second lathe an unaffordable luxury. Unfortunately, in terms of the advantages of collets you mentioned, the 12" Atlas/Craftsman lathes do have a #3 Morse taper headstock spindle which of course will accept smaller MT sizes with an adapter sleeve, but the spindle won't handle anything larger than a 3AT collet or the equivalent in the collet chuck designed for it because the chuck draw bar that runs through the spindle is limited by the size of the spindle hole, so the far more common and much less expensive (for the "bargain models at least) 5C collets won't work in the 12" Atlas/Craftsman lathes. I suppose one could devise a collet chuck that screwed onto the spindle or could be mounted on a #3 or #2 MT, but if one were going to want to use a wide range of small diameter collets, my guess is that they could probably buy one of the Chinese made Sieg "7 bys" and a set of small Chinese made collets for it with the savings realized from not having to buy 3AT collets at $35 or $40 bucks a pop for the Atlas/Craftsman draw bar collet holder! Proprietary collets are very expensive. The Unimat has a screw-on collet chuck which takes hard to find collets. A "basic" set of perhaps a dozen collets and the chuck for the Unimat SL/DBs runs between $1,000 and $1,500 used on eBay if you can find one! I agree about turning wood on a metal working lathe. When I have occasion to do so, which isn't often, I wrap my Atlas/Craftsman (and my Unimat, for that matter) up tightly as you describes with aluminum foil and masking tape. I do the same when I am working with any sort of abrasives such as my tool post grinder. It's not a big job to "gift wrap" it, considering how much work it is to break it down for a thorough cleaning when it's full of solidly packed oil soaked sawdust!
-
Note that Sherline is selling these chucks with back plates to fit Unimat DB/SL spindles that are 12mm in diameter x 1mm threading (or 14mm x 1mm for the Unimat 3) or "1/2" by 20 TPI for "old 6" Sears lathes." Sears sold lathes in a variety of sizes. The smallest was a 6" lathe (capable of handling material up to 6" in diameter,) there was a 9" model, and the 12" model made by Atlas. I've never seen a 6" Craftsman lathe in the flesh, but the 9" Craftsman lathe was a nice little lathe. Back in the day, "Craftsman" was Sears' middle of the line "house brand" for tools while "Craftsman Professional" or "Craftsman Industrial" were the top of the line and "Dunlop" was Sears' lowest quality - lowest priced line of tools (which were later called "Sears," then "Companion," and are now called "Evolv.") It's only been in recent decades as Sears began its long decline into oblivion that Craftsman tools began to be sold anywhere other than in Sears stores or mail order from their catalog. Stanley-Black and Decker bought the Craftsman brand in 2017 with Sears holding a license to use the Craftsman brand name without paying royalties to Stanley-Black and Decker for 15 years, so now you can buy Craftsman tools at a Sears store (if you can still find one, there's only 13 Sears stores left) or one of the many other stores now supplied by Stanley-Black and Decker. The various old Craftsman stationary power tools were made by leading U.S. stationary power tool manufacturers of the day such as Atlas Press, Co. (in later years bought out by Clausing lathe company), King-Seeley, and Double A Products. These Craftsman tools were identical to the models made and sold by their manufacturers, save for the "Craftsman" label badges and model numbers attached to the tools made for sale by Sears, Roebuck, and Co. This was basically the same business model as Costco uses today with its "Kirkland" house brand. (Interestingly, the "Dunlop" line was named in honor of the man who was Sears' West Coast hardware manager who, in 1937, came up with the idea of making the Craftsman line of hand tools polished chrome plated and rust proof which resulted in a six-fold increase in sales the following year.) The 12" Atlas Craftsman lathes have a spindle with an outside diameter of an inch and a half with eight threads per inch. This is a fairly standard spindle size and threading and there are all sorts of chucks that can be purchased with backing plates that have an inside diameter of 1.5" X 8 TPI, so you should have no problem finding a chuck in the size you desire. In passing, I'll mention that you may want to give some thought to investing in a four-jaw chuck instead of a three-jaw one since the four-jaw chuck is more versatile and accurate than the three-jaw. Four-jaw chucks come in "self-centering" and "independently adjustable jaw" types. For modeling work, you won't need the "watchmaker" tolerances of a Sherline chuck. One of the half-way decent Chinese imports will probably serve just fine. Here's a YouTube video from Mr.Pete22 / "Tubal Cain" on the 12" Atlas Craftsman headstock and spindle that you might find helpful.
-
I couldn't say offhand, but, as I recall, the Atlas/Craftsman 12" lathe has a standard 1.5" spindle with a standard thread, so a whole lot of chucks should fit it and there's no trouble finding one. That spindle is a lot larger than the Sherline lathes would have, so I'd be surprised if Sherline were selling chucks with spindle sizes that large. However, the way lathe chucks are often sold, the chuck itself is a "one size fits all" sort of item in different chuck sizes. The chucks are sold with "backing plates" which are bolted to the back of the chuck itself. The backing plates have differently sized threaded "necks" on them to fit a wide range of spindle sizes. It is possible that Sherline is selling a small three-jaw chuck and that chuck manufacturer (which isn't necessarily Sherline) also offers a 1.5" backing plate that will fit on the Atlas/Craftsman spindle.
-
Yes, what you have there is an Atlas, or an "Atlas/Craftsman" (Atlas badged by Sear, Roebuck, and Co.) 12"X42"16-speed Standard model machinist's lathe. That model was, as near as I can tell from the photo, the introduced in 1939 and continued in production throughout the War and up to the late '40's or early '50's. (You can look up the serial number online someplace and get the actual manufacture date.) There were reportedly a very large number of them manufactured during the War to be used for "piecework" war parts production by home shop machinists. There are still many around in the various configurations in which they were made. Early Craftsman Metalcraft & Metalmaster 9" and 12" Lathes and Atlas - 12-inch Lathe (Late Models including the Craftsman) Manual & Data Pack | store.lathes.co.uk at Lathes.co.uk . I have a Unimat DB modeling lathe, a 1950 Craftsman wood lathe, and one of the Craftsman/Atlas 12"X42" machinist's lathes (which I believe were also made in a 36" bed version.) The metal lathes are fine for turning wood. Tool rests which mount on the cross-slide of metal lathes for wood turning are common accessories for metal lathes. I use my metal lathes interchangeably for wood and metal work and they handle it just as well as my woodworking lathe. The woodworking lathe does have the advantages of being less complicated, handling larger work pieces for the price, and being a lot less expensive to buy over the machinist's lathes, but it won't turn metal and it isn't capable of the high accuracy tolerances the machinist's lathes are. The one drawback with using a machinist's lathe for wood turning, is that unless care is taken to cover the lathe machinery as well as possible when turning wood, the huge amount of sawdust and shavings created by turning wood will end up clogging everything on the oil-covered machinery of the machinist's lathes and require serious cleaning and re-lubrication on a regular basis if they are used primarily for turning wood. I find liberal amounts of tinfoil and masking tape greatly minimizes the problem. The little Unimat is good for turning small parts, drilling, and milling. It's easily moved around and can be operated sitting down at a table. It was given to me for nothing, and I rebuilt it, but just about had to take out a second mortgage to pay for the parts and proprietary tooling necessary to do basic turning and milling work on it. There's an active second-hand parts and accessories market for all things Unimat, primarily on eBay, since they've developed a cult following, but the various attachments and accessories for which the Unimats are so famous are now high-priced collectables. The Unimat SL1000/DB200 (same machine, different model numbers) and Unimat 3 are excellent little machines, but only capable of relatively light weight work in softer metals, plastics, and wood. There are a multitude of YouTube videos and websites dedicated to the Unimat machines. For all their "charisma," I have to say without hesitation that anyone looking for a very small light duty lathe today would be far better off in terms of both price and parts and tooling availability buying a Sherline or Taig mini-lathe or, actually, one of the ubiquitous Chinese Sieg-manufactured "7"by" mini-lathes, making sure it came from one of the top of the line retailers such as Grizzly, who import those machines manufactured to the highest quality control standards. (This is why there is such a large difference between what Grizzly or MicroMark charge for the "7 bys" and what Harbor Freight sells them for.) The "7bys" are very common, their numbers support a huge after-market tooling selection as well as keeping prices low, they are sufficiently powerful to handle machining iron and steel easily, and they have the greatest weight by far of all the small lathes. The single most determinative factor in any machine tool's accuracy is its mass or weight. It's certainly a matter of opinion, but I think it's better to opt for the largest and most powerful lathe one can afford because, as mentioned above already, how much you can do with a lathe is only limited by its weight, working capacity, and power. Within reason, a large lathe can make small stuff, but a small lathe can't make big stuff. As has been said about other tools, when it comes to lathes "size matters." (See: Emco Unimat lathes) BELOW: Very nice Unimat DB200 with basic turning, drilling, and milling tooling, upgraded variable speed continuous duty motor, and table saw and scroll saw accessories at a very reasonable price. A decent basic lathe without tooling and the original intermittent duty motor will run around US $750.00. Vintage Unimat SL miniature/jewelers lathe DB 200 w/case, attachments Austria | eBay Several years ago, I was very fortunate to be able to obtain an Atlas/Craftsman 12"X42" lathe very similar to the one pictured in the post above, in very good shape, along with a huge number of attachments and tooling, from a retired master machinist's widow. It had been her husband's personal home machine, and he'd pampered it since it was new in the early 'fifties. It does not have the "quick change gearbox" attachment evident on some later models, so in order to cut any thread known to man or beast requires manually configuring the gear ratios, but that's a minor consideration unless you plan to do a lot of specialty threading of obscure thread types and sizes. It does have an aftermarket reverse rotation switch which is very handy for threading, but which can be a mixed blessing, since an inadvertent change in the rotation direction can cause a 20 pound-plus chuck to unscrew itself from the headstock spindle at speed! These Atlas/Craftsman lathes are highly desirable for home hobby use and there is a fair amount of aftermarket parts and accessory manufacturing ongoing even though the machines are long out of production. As happens with popular models of old machine tools these days, when one wears out, it inevitably is cannibalized by the used parts cottage industry and ends up for sale in bits and pieces on eBay, so you can pretty much find any part you need there. (See: Craftsman Atlas 12" lathe for sale | eBay) As with so much "old 'arn," these Atlas/Craftsman lathes are "oldies but goodies." Mind you, they are somewhat light weight for their capacity, but that's a relative concept and they aren't slouches in the power department. They get some criticism for their flat ways vis-a-vis rigidity, but I've never had any problems with that. If I had the option of a South Bend in the same size category with all the tooling I've got for the Atlas/Craftsman, sure, I'd take the South Bend which was the "Cadillac" to Atlas' "Chevy," but there are a lot more Atlas/Craftsman lathes out there and they're still "takin' a lickin' and keepin' on tickin'." My lathe certainly can do a whole lot more than I'll ever figure out how to do on it, so I'm not complaining. The internet is full of information on the Atlas/Craftsman 12" lathes. All of the original manufacturer's literature is still available, such as maintenance and operation instruction manuals as well as a ton of after-market publications. YouTube is full of videos on the subject. The well-known YouTube retired shop teacher and machining instructor "Tubal Cain" AKA "Mrpete222" has many very helpful videos on these lathes specifically, as well as on machinist work generally and is a very valuable resource. (See (12) Mr. Pete 222 + atlas lathes - YouTube) Hell yes! Your Atlas/Craftsman 12"X42" lathe is worth restoring! It's a real gem that a lot of guys would give their back teeth for. From your description, I'd say it probably needs routine maintenance rather than "restoration." The threading dial gears apparently wear out and are regularly available on eBay. (See: Atlas Craftsman 10" 12" Lathe Thread Dial Indicator 9-63 | eBay ) You should check out your spindle bearings if you have play in the spindle. There are two types of spindle bearings on the Atlas 12's, old school poured babbit bearings and modern Timkin roller bearings. If your babbit spindle bearings are worn (which I've read does occur, but I'm no expert on the subject) you'll have to pour new babbit bearings and that's something I'd find some old school machinist to show you how to do, or perhaps, if possible, you can retrofit your lathe to use the Timkin roller bearings, which are readily available generic parts. It is indeed unfortunate that you didn't have your father-in-law work it over for you before he passed away. I think most of us have one of those sorts of stories in our past! I hope you have a lot of tooling with your lathe. If not, fortunately unlike the Unimats and a lot of other lathes, there's plenty of Atlas/Craftsman 12" tooling around as well as lots of generic tooling that will fit it perfectly since it's all standard U.S. threading and Imperial measurements. The cost of tooling is always a big consideration in choosing a lathe. The rule of thumb is that basic tooling alone will run about as much as the cost of the basic lathe when new. If you have a lathe that can use the inexpensive tooling that's imported from China and India and you don't need the close tolerances of the super-expensive highly accurate U.S. and European tooling, you can save a bundle. There are a few specialty attachments you may want to acquire for your Atlas/Craftsman 12" when you have some "mad money." I would consider a decent collet holder and collet set and the proprietary Atlas 12" milling attachment that permits using your lathe as a milling machine as near "must haves," with the Atlas 12" tapering attachment bringing up a close second. Your Atlas 12" is a "medium" sized lathe that will allow you to do anything you would want to do on any of the smaller lathes while at the same time permit you to do anything larger up to what would fit into its theoretical "capacity envelope" of a 12" by 42" cylinder shape. It's definitely a "keeper" unless for some as yet undiagnosed reason it has some fatal defect that renders it unusable and is too expensive to make repair worthwhile. Should that occur, you probably will have little problem "parting it out" and making enough selling the parts on eBay to buy a new Sherline!

-
Funny coincidence. I happened to see this book listed in the WoodenBoat Store book section: Crash Boat published in 2021. It apparently recounts the exploits of the ASR's in the South Pacific. I thought it might be of interest to you if you haven't come across it in your research as yet. See: Crash Boat: Rescue and Peril in the Pacific During World War II: Jepson, George D.: 9781493059232: Amazon.com: Books (Shop around, it may be available for less elsewhere. Apparently available in both hardcover and paperback.)
-
Excellent advice about powered modeling tools! To this in fourth place after the above mentioned three, I'd add a quality stationary disk sander and I'd say move heaven and earth to buy one of the new Byrnes 4" variable speed disk sanders. There are lots of cheaper alternatives on the market, but the mass of the disk and the variable speed set the Byrnes variable speed model light years ahead of the rest. If that's just too costly, you should at least get the regular Byrnes 5" fixed speed disk sanders. Nobody I know of makes a better fence and table system on a disk sander than Byrnes.
-
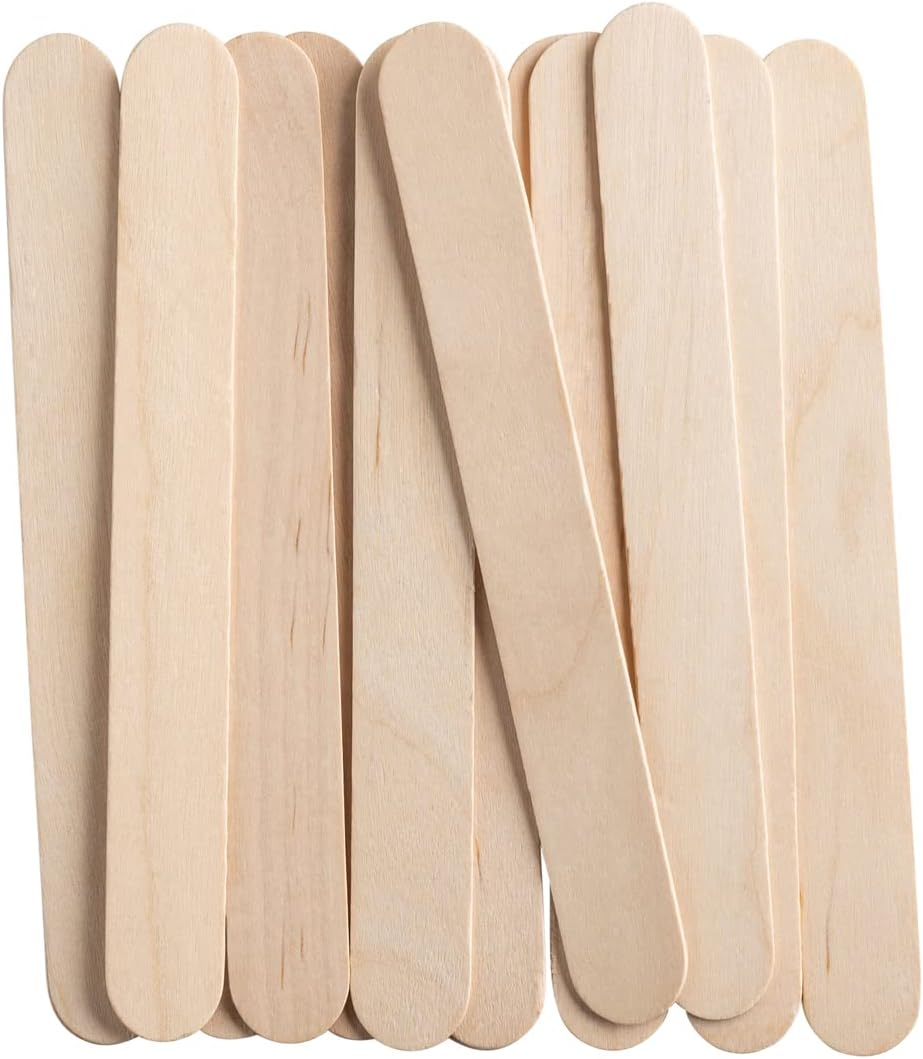
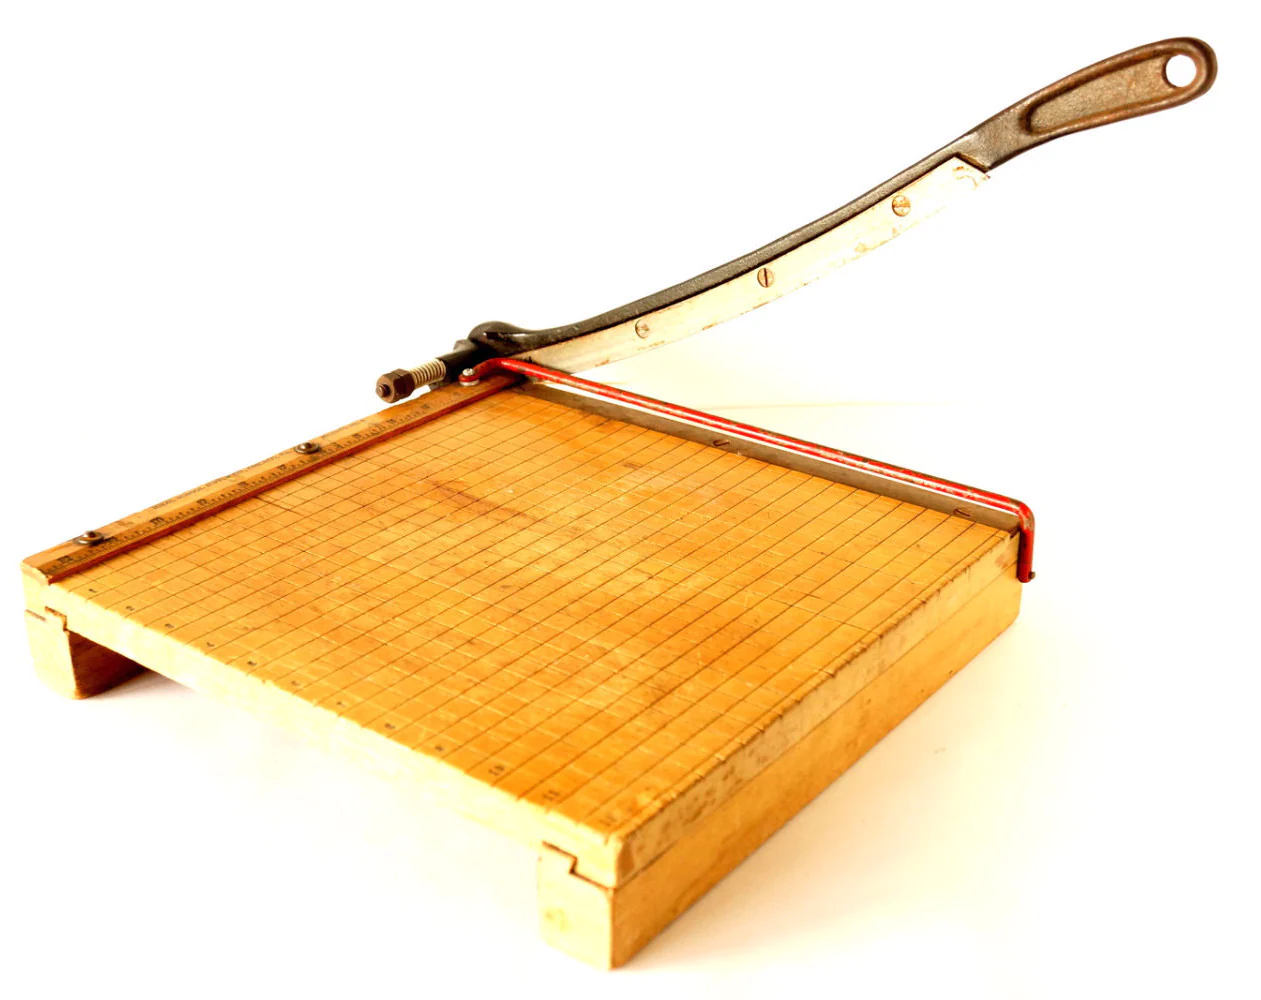
Easier still is a method I've used with satisfaction: Laminate "Hahn style" frame shapes (and whatever else desired) with PVA glue using birch tongue depressors sold in quantity dirt cheap at craft supply stores. These can be neatly "chopped" at angles using a standard "classroom" paper cutter, which, BTW, is also a very handy ship modeling tool.
-
Before anybody buys an airbrushing rig, I strongly suggest they read the thread linked below. Pay particular attention to Kurt Van Dahm's comments at post #7. Kurt is MSW's airbrushing expert, as far as I'm concerned. (And it appears the Badger airbrush company shares my opinion!) I expect if you send Kurt a PM, he will be able to recommend something that best meets your needs at your chosen price-point. Note also that I believe the MSW sponsor, USA AIRBRUSH SUPPLY, offers discounts to MSW members. Your 85' ASR build looks like it's coming along very well. I have a bit of first-hand familiarity with this family of "crash boat" vessels. There were several around San Francisco Bay "back when" and at least one of the 85 footers is still afloat and operational on the S.F. Bay and Delta waters. See: Testimonials (homesteadcloud.com) They were quite popular with the Sea Scouts, who apparently were at one time able to get them for nothing as government surplus. A friend of mine's father skippered the Air Force ASR stationed at Hamilton AFB in Novato, CA on S.F. Bay as recently as the late 'sixties or early 'seventies. The widespread misconception that the hulls of the PT's, ASR's, and similar small craft built in WWII were built of plywood deserves to be dispelled. Plywood was used in the construction of flat surfaces in these boats, such as decks and bulkheads, but not in their curved hull surfaces because their hull forms contained compound curves (where curves go in more than one direction at a time in the same piece of material.) Because the plies of plywood are laid in different directions, plywood can only be bent in one direction and is not suitable for developing compound curved shapes. The wooden hulls of the WWII production small craft in question were built with multiple layers of traditionally spiled planking fastened together with glue and mechanical fasteners, the compound curved shapes being developed in the lay-up of the planking layers. This is a much more involved construction process than simply nailing sheets of prefabricated plywood to a frame. All of the 85 foot ASR's were double-planked with a layer of canvas laid in waterproof adhesive between the planking layers. The inner cedar planking was hung at 45 degrees to the diagonal, 1/2" thick below the chine and 7/16" thick above the chine. The Honduras mahogany outer planking was hung horizontally and was 3/4" thick below the chine and 9/16" thick above the chine. The inner planking was fastened to the longitudinal timbers with bronze screws and to the frames with copper nails. The outer planking was fastened through the inner planking into the frames with bronze screws. The inner planking was then fastened to the outer planking with bronze screws from the inside. The decks were 3/4" fir plywood, fastened with Monel ring-necked nails to the deck beams and with bronze screws to the shelf and clamp. The decks were canvas laid over white lead paste. The 85 footers were decidedly not planked with plywood because their hull shapes included compound curves which are not possible to develop. The planking was finished "fair" (smooth) as might be expected, so planking and filling your model hull with a sanding filler and then painting will permit you to use wider planking stock as you have used on the bottom, but I would expect that the graceful curves of the bows will be more easily developed with narrower planks than you were able to use below the chine. If you haven't come across it already, you will find the "U.S. Crash Boats" website a goldmine of information on the entire "crash boat" and "Air-Sea Rescue" class with specific information on the 85' ASR's. This site provides more information than I've ever seen on this type of site. It has PDF's of all the applicable manuals, design and construction details, and even extensive crew lists for all of the crash boats. See: 85 ft. Army Air Force Rescue Boat (uscrashboats.org) See also for a large number of interior and exterior detail photos highly useful for scratch modeling: Boats: Crash Boat, Aviation | Flickr .
-
Growing up, we lived in a house with hardwood floors that required regular waxing with one of those "iron holystones," too. When I got old enough, that job fell to me. I was greatly relieved when Bissell came out with an electric floor waxer for home use! I have no idea whatever happened to that old hand buffer that I had to swing back and forth. It'd be good for a "What is this tool?" contest these days.
-
For the Beginner Modeler
Bob Cleek replied to kgstakes's topic in Modeling tools and Workshop Equipment
True that, but the great models we see from the 17th and 18th centuries were built with human powered tools. They certainly had lathes and perhaps even pedal-pedal powered scroll saws. The Egyptians were using human-powered wood turning lathes in 1,300 BCE and fret saw blades were in use from the early 1500's. My comments regarding the POW bone models were in response to an assertion that, "Prisoners used to make accurate models of square riggers from bone with no tools at all." -
For the Beginner Modeler
Bob Cleek replied to kgstakes's topic in Modeling tools and Workshop Equipment
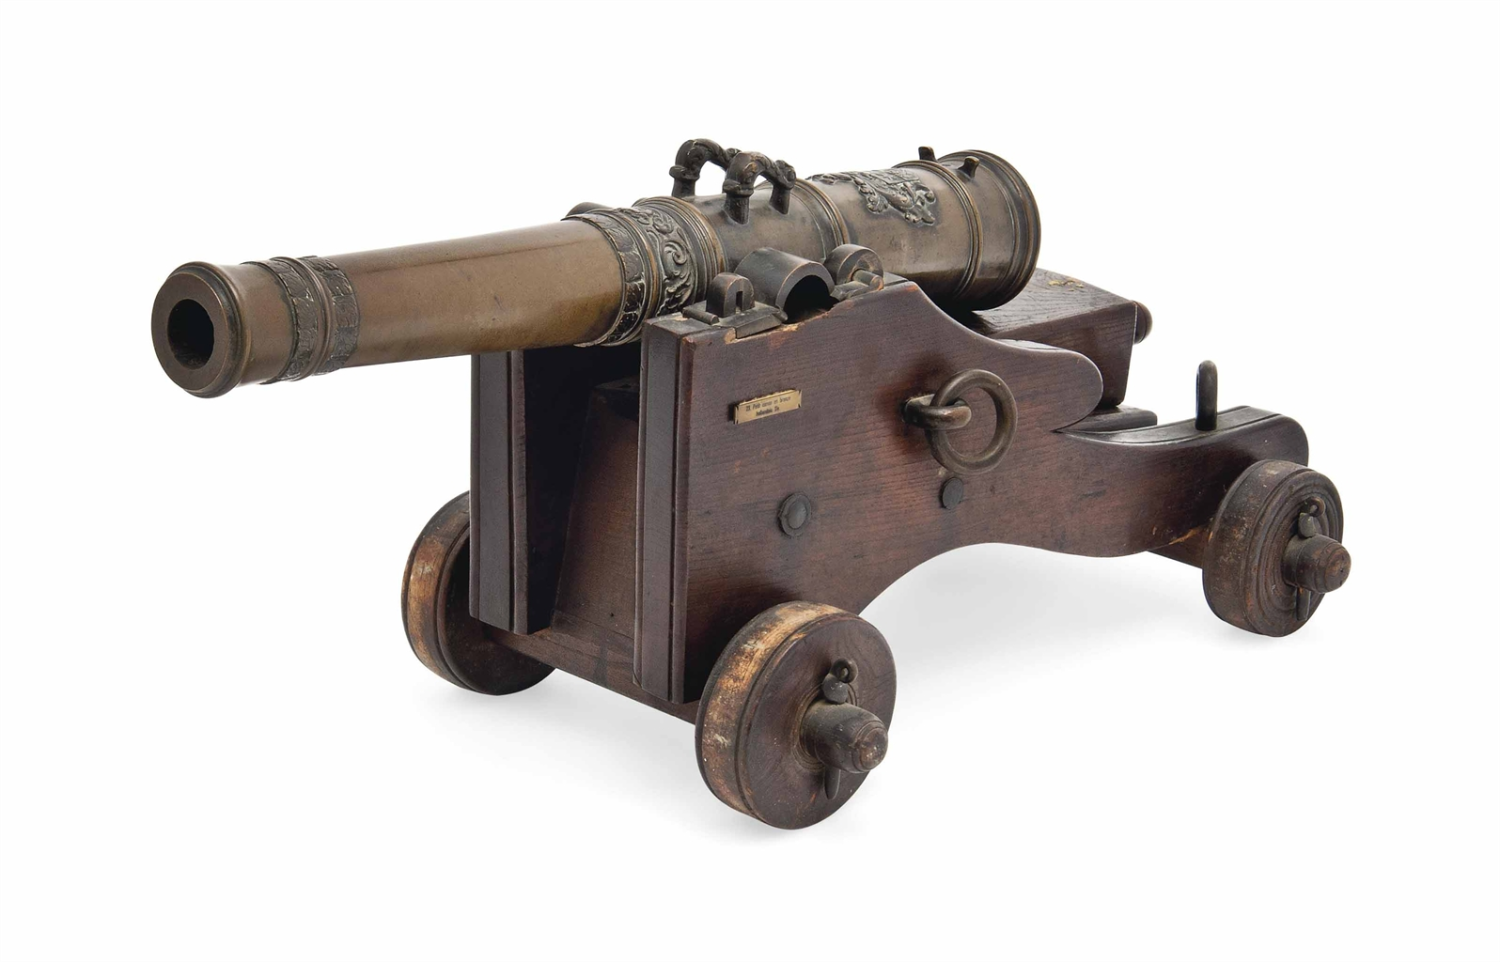
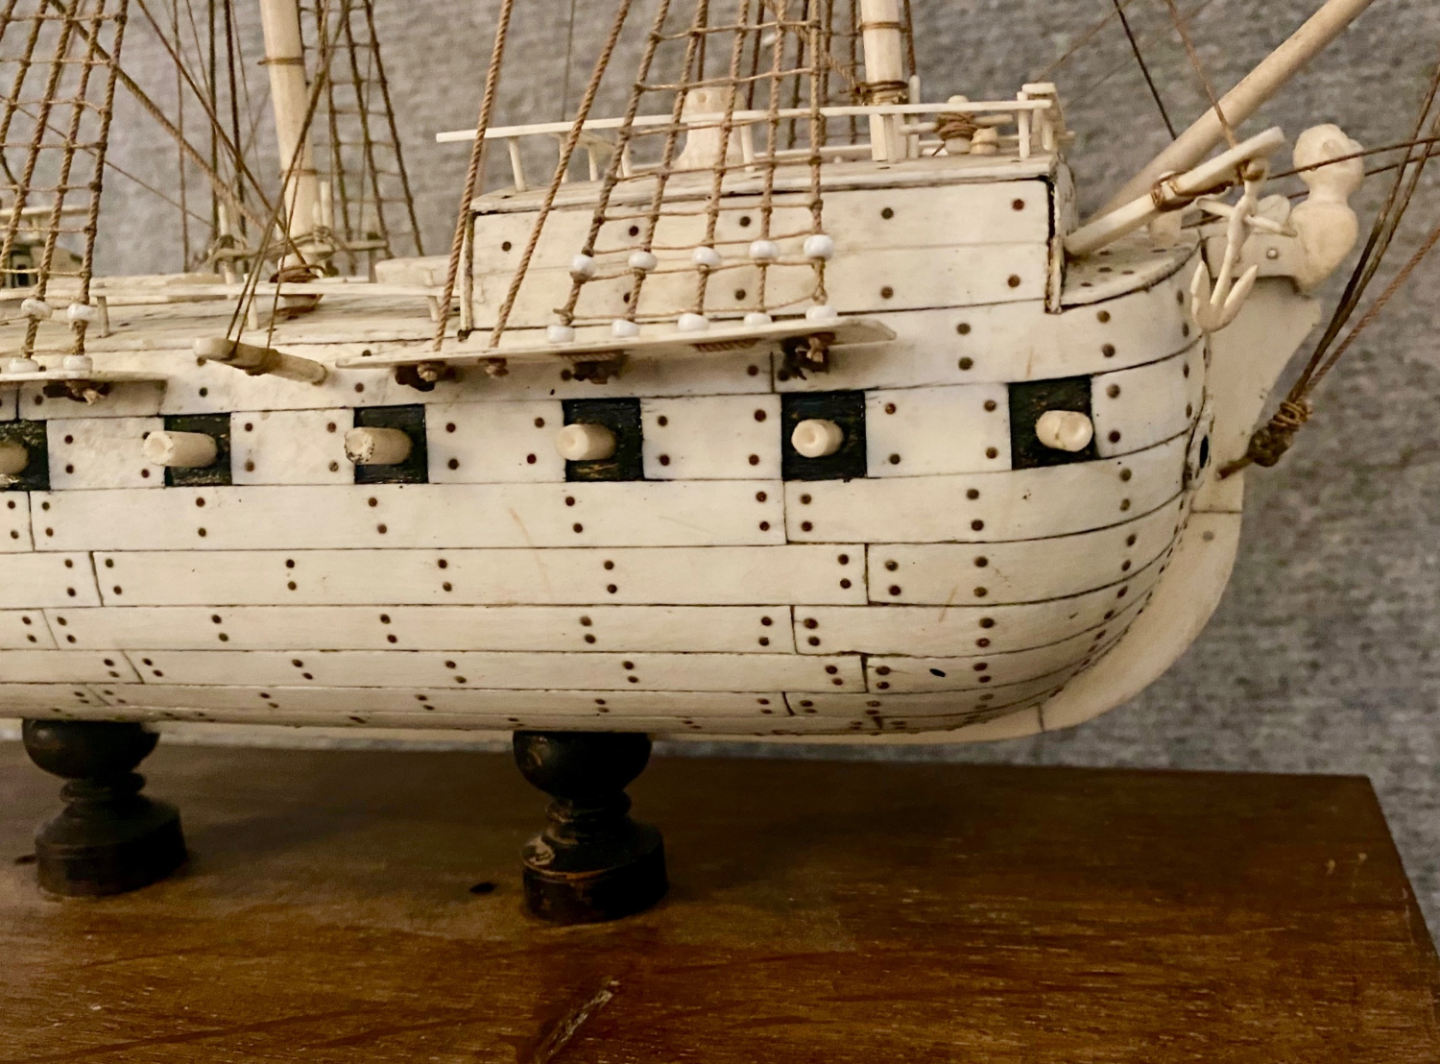
I believe so. I pulled the photos off of Google images, but they look like the POW bone models I've examined in various museums and these were made of bone, bovine, I believe. That would include the cannon and whatever other material is colored white. The rigging is sometimes made of horse hair, or so I've read. -
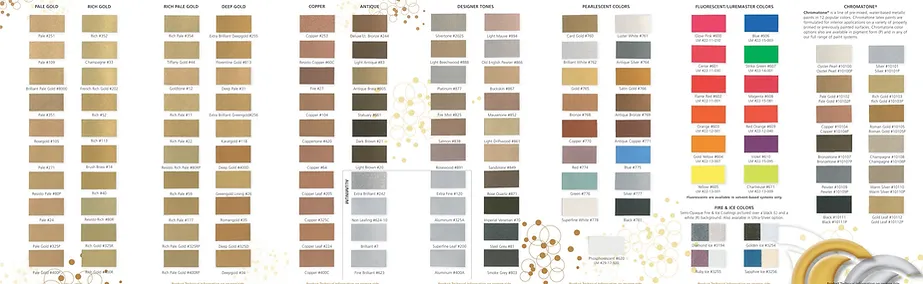
Ah, but which color "bronze?" Crescent Bronze, a leading powder-coating manufacturer, has a good bronze color chip card that is worth adding to one's collection of color chips: Crescent Bronze - Color Card Request The standard option for obtaining painted metallic effects is the "real deal," actual colored bronze metal pigment-ground powder sold for the purpose of producing a bronze, brass, copper, gold, or silver metallic finish for painting. (I'm don't know exactly why they use bronze for all these other metals, except that perhaps bronze is easiest to manipulate the color by adjusting the alloy formula.) Schmincke Pigments is the leading manufacturer of ground metallic pigments which are sold in most all artists' supplies stores. They come in a range of shades, colors, and finishes as raw pigment (sold as "oil bronze"), as well as premixed in an oil base and tubed like artist's oil paint. They can be used like any pigment, either mixed in a carrier, e.g., clear varnish, to make a paint, or dusted onto a tacky surface after a sizing is applied and lightly burnished with a cotton ball after the sizing dries, in the same method used for gold leafing. The base metallic color can be thereafter "weathered" to tone it down to a desired appearance in the usual fashion if necessary. See: Schmincke's website for detailed information on their "oil bronze" product line: Bronzes: Schmincke Künstlerfarben (They also sell lines of premixed colored bronze powders in an acrylic medium and powders for use with watercolors. I've never used either of these, so you're on your own there.) Of course, a lot depends upon what appearance you are seeking. In some instances, metallic colors wouldn't be required because standard colors would serve to produce the desired effect. This video below demonstrates an easy and very effective way to create a convincing faux bronze patina finish using metallic bronze powder which is rubbed on using carnauba wax as the "carrier." The tone of the finish can be adjusted by modifying the background color from black to a flat "penny brown." "Verdigris (green)" weathering powders can thereafter be applied to achieve a very convincing weathered bronze patina appearance. This method can also be used to create a very convincing representation of a copper sheathed hull over a base of scale thickness paper "copper plates."


-
For the Beginner Modeler
Bob Cleek replied to kgstakes's topic in Modeling tools and Workshop Equipment
So the story goes and I suppose stranger things have happened, but the fact of the matter was that the Eighteenth-Century prisoner of war handicrafts, including ship models, were in many instances a rather finely organized production operation with all the contemporary tools suited to the task available to the prisoners building the models. It's been written that many, if not most, of the prisoner of war ship models, bone and otherwise, were built on a "piecework" and "assembly line" basis in much the same fashion as are today's commercially built ship models from Vietnam and Madagascar. (See: Model ship workshop „Le Village“ - MADAMAGAZINE and " Sail into the World of Handmade Model Ships" – OMHVN (vietnamshipmodels.com) ) It behooved the captors to supply the prisoners with the tools and to some extent the materials to fabricate items for sale to the general public because the proceeds of their endeavors provided the prisoners with an income with which they could to some extent support themselves, thereby reducing the cost of their keep which otherwise would have had to have been paid by their captors. This was and is a long-established prison industry business model still practiced today. (See e.g., : About » CALPIA Website ) Although some remarkably accurate POW bone models have survived from the Napoleonic period, in general, the term "accurate" as applied to them remains a relative concept. They presented quite a range in terms of visual and historical accuracy, although all are true folk art treasures today. Many were entirely fanciful... and then some!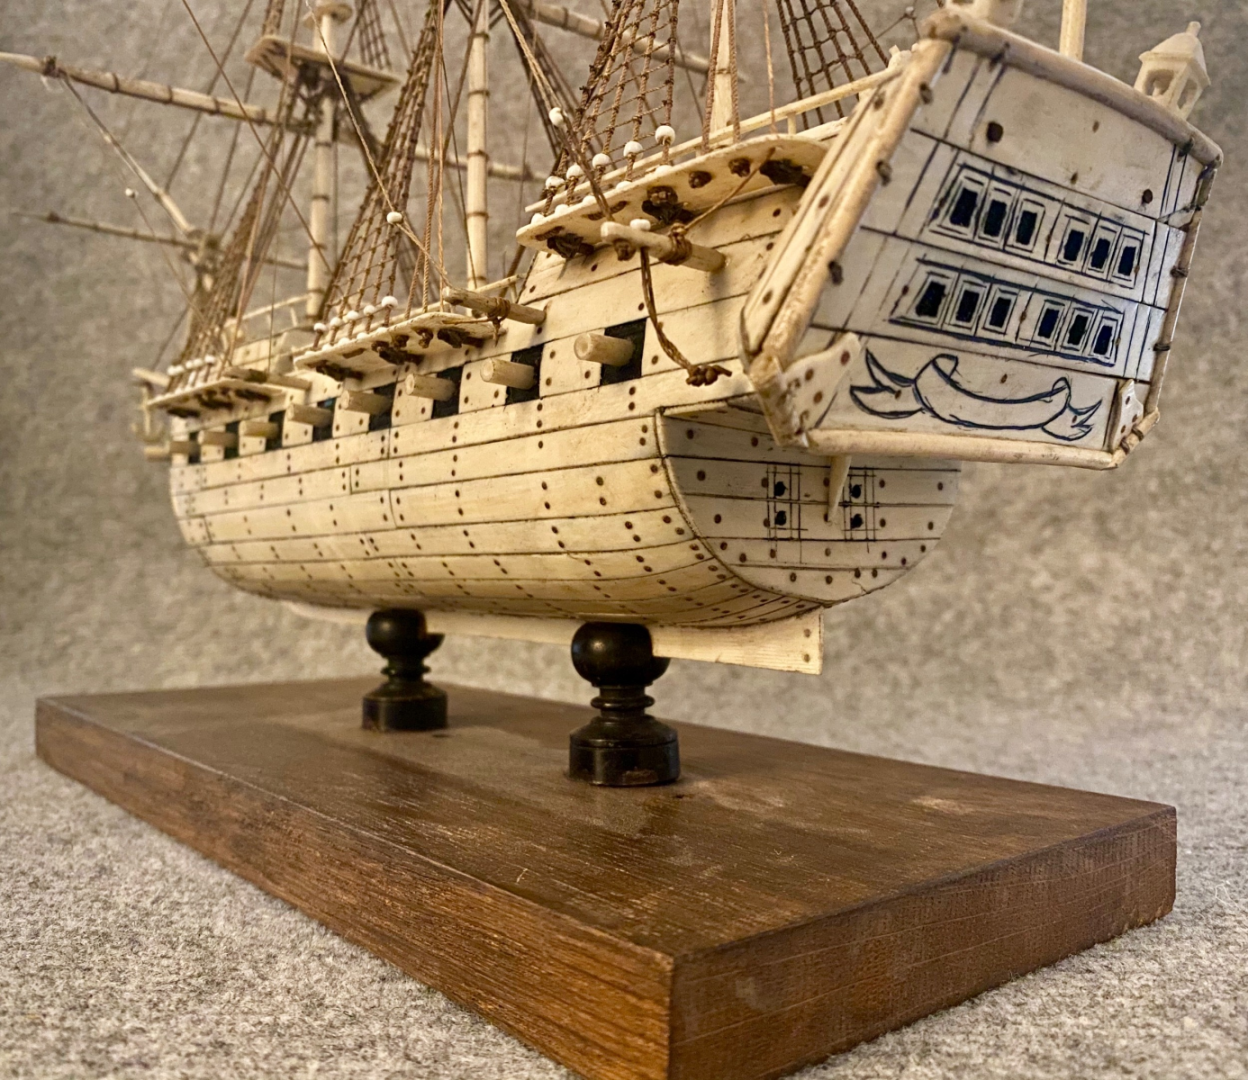


-
Thanks for the video! These certainly look like quality tools. They aren't inexpensive, but money spent on a good tool is money well spent. I doubt that there is anything better than these on the market today that isn't electrically powered, and the powered tools are often overkill for the needs of many modelers.
-
Byrnes Model Machines recently came out with an adjustable speed 4" disk sander with variable speed settings between 200 and 2,000 RPM and it also features reversible disk rotation. Byrnes Model Machines - Variable Speed Disc Sander It is otherwise similar to the earlier Byrnes 5" disk sander. Getting rave reviews. It's not shipping at the moment due to Jim Byrnes' sad passing, but I expect they will be up and running in due course. The price isn't listed on this unit at the moment, but, as one might expect, it's not inexpensive. That said, all of the Model Machines products are monuments to the principle that "you get what you pay for." They are the finest of their kind to be had anywhere. I'm not comparing the Byrnes disk sander to the Ultimation sander, of course. The Ultimation products are less expensive, being hand-powered, but still have earned an excellent reputation for quality.
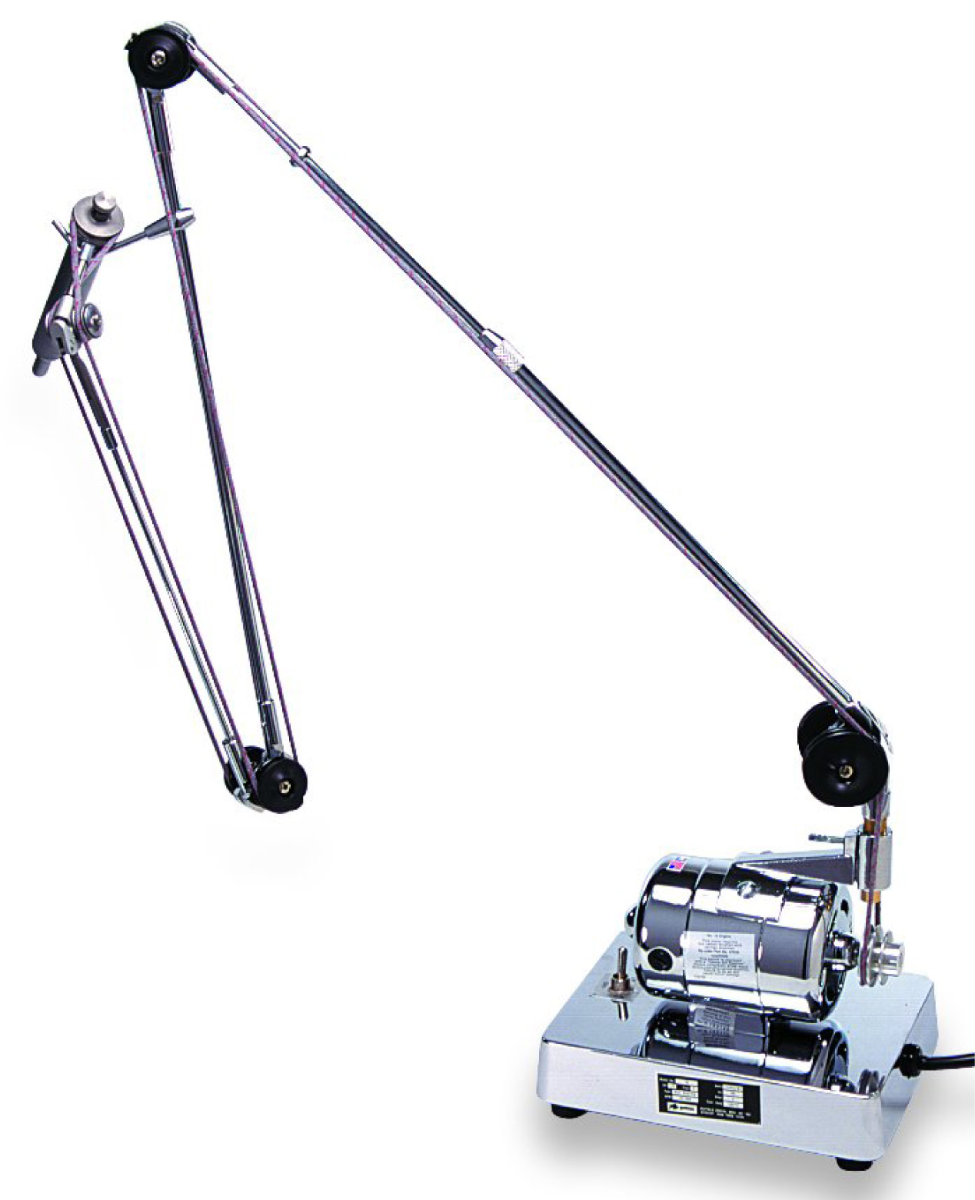
-
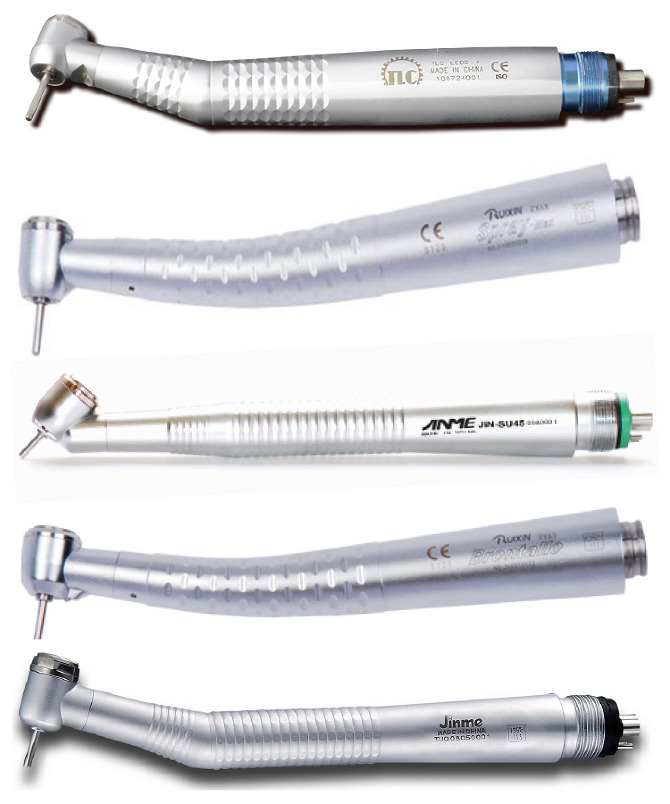
There are lots of 45 degree dental engine handpieces in different styles, as well as other angles. Take a look at Paul Budzig's YouTube video above. He explains how an air turbine dental drill can be run off of a shop air compressor, which was news to me. The turbine drills are high speed / low torque, of course, so they are available at much lower price points than the heavy-duty bench engines used for making bridges and dentures, etc. There's also now a whole generation of "micro-motor" motorized handpiece technology on the market now. The older-style belt-driven "dental engines," which are still used for lab work, can really put out the torque at slower speeds which is best for micro-carving with shaky old hands. I scored my Buffalo Dental engine (picture below) on eBay for seventy-five bucks. Heavy Duty Bench Engines - Buffalo Dental Manufacturing Co. Inc. It was described as "not running," but it looked brand new and it came with a handpiece that I knew was worth about $250, so I took a chance that it was something I might be able to fix. I checked it out when it arrived and, BINGO!, The motor brushes were gone and it was otherwise brand new! A phone call to the manufacturer and a new set of brushes and a drive belt arrived in the mail and it was good to go. My guess was that it was in stock in a large production dental lab and somebody's engine needed brushes and none were in stock, so they just cannibalized this new machine in the supply room to get the brushes and forgot to order replacements for the ones they took. I got lucky on that one. Must be my clean living. I just checked eBay out of curiosity, and somebody's got one listed as "buy it now" for $138.00 + $25.00 shipping. BUFFALO DENTAL BENCH ENGINE NO 10 JEWELRY HOBBY POLISHER GRINDER ARTICULATED ARM | eBay Below is what my Model 16 looks like. It has a 1/5 HP motor. The one for sale on eBay is a Model 10 and has a 1/10 HP motor. The Model 16 which is currently in production retails for $800.00. The interchangeable handpieces are separately priced and retail for around $200.00 and up, but there's lots of them on the used market, as well. These are expensive, very high quality tools and because of changes in the dental lab technology these days (3D printing of custom dental prostheses) they are showing up on the second hand market with some regularity. If you can find a used one in decent shape, you can score a great modeling tool at really great savings.

-
drilling hole through wire
Bob Cleek replied to BETAQDAVE's topic in Metal Work, Soldering and Metal Fittings
It's been my understanding that the 1/8" shaft "plastic collared" micro-bits are designed for drill presses and break very easily when used in a pin vise. I must confess that I have never used them, though. Brass comes in different hardnesses, and some alloys are easier to work than others. Have you tried annealing the brass you're working on? Sometimes that helps the bit "bite" into the metal better. Just thoughts, for what they are worth. -
Greater specificity would be helpful, but based on a guess as to what you want to accomplish with a "miniature angle drill / drill adapter," I'd say you won't find much of anything that will do the job other than an inexpensive dental drill. You can go with a relatively inexpensive air-turbine model or a more substantial and more costly (although not on the used market) belt-driven dental lab "dental engine" and handpieces. They come in many different angles and styles. The burrs (bitts) come in many configurations, as well. Dremel makes a right angle attachment, but it is generally too large for "getting in close" in modeling applications. Amazon.com : dremel right angle attachment These videos may help to answer your question.
-
Fascinating post! I think you've really hit on an interesting thing here with the perception of lions in various cultures. I wonder why, as well. You've got the makings of a great "coffee table" picture book or a TV travel documentary. The similarities between various cultures are really surprising and yet they don't really look like lions at all. Just to drive you really, really, crazy if you haven't been there before, have you checked out Chinese lions? Particularly the "lion dancers" in the Chinese New Years parades. Some of the Chinese lions look a lot like your "wide" Russian lions. I wonder if the Russians got their stylized lions from the Chinese, or did the Chinese get theirs from the Russians or the Byzantines. The interesting thing is that there are no native lions in China. See: Lunar New Year: Lions aren’t native to China, so where did the traditional lion dance come from? | South China Morning Post (scmp.com) \ And the Chinese also use lions in their architecture. There is a Chinese custom, as it seems there is the world over, of placing "guardian lion" statues at the entrances of buildings. Here again, the Chinese "guardian lions" have the same sort of look as the Russian lions you've been studying. Perhaps it's some primal impression in the human DNA that goes back to when we all were lion food. A Jungian anthropologist would have a lot of fun musing about this subject. Somebody could probably write a doctoral dissertation on it.


-
Zinsser's Bulls Eye prepared shellac is definitely what everybody seems to use here in the U.S. unless they are mixing their own shellac with flakes and alcohol. HOWEVER, what is shown above is amber shellac. Shellac comes in a range of colors on the "honey brown" or "amber" spectrum. Amber shellac is "amber colored." A single coat of Bulls Eye amber shellac will color the shellacked surface with a transparent film that has an "amber colored" or "light orange/brown" cast. Additional coats of amber shellac will add additional layers of this coloration to the point where a half-dozen or so coats will result in a very dark brown color. If this coloration is undesirable on your model (and I've never seen an application where I would have desired it on a model at all) Zinsser's Bulls Eye Clear Shellac should be used. The amber shellac is shellac's natural color. The clear shellac is bleached so that the shellac adds no coloration to the surface to which it's applied. For the purposes of sealing wood in modeling applications, I would strongly recommend that clear shellac be used. If a change in the appearance of the wood is desired, a thinned stain or dye should be used, followed by a coat of thinned shellac to seal the surface. Other than for finishing large flat areas without surface detail, such as bright finished hulls, model bases and cases, and the like, I would not recommend the use of any "wipe on" finish such as an oil commonly used to finish furniture. Such oils, unless greatly thinned, are thick and tend to collect in the nooks, crannies, and details of a model and are very difficult to apply in a sufficiently thin coating. Application of oils is also very difficult because they cannot be "rubbed" very effectively and rubbing always risks accidentally doing damage to small detail parts applied to the surface. Finally, most rubbed oils take time to fully polymerize and so tend to attract and collect dust and dirt that are very difficult, if not impossible, to remove. Finishing scale models well requires a "scale" finish coating. The thicker the coating, the more the thickness of the coating impairs the crispness of scale detail that is to be desired. This means that paints should be of high quality with a relatively high content of finely ground pigment. High quality commercially bottled "scale model paint" is made to meet this requirement, as are quality "tubed" artists' oils and acrylics which can be suitably thinned by the user for bristle brush or airbrush application. Thinned clear shellac ("2 pound cut" or less) provides an advantage in this respect as a clear finish or sealer over opaque paints, stains, and dyes in that it provides an extremely thin coating which soaks into the wood surface and is virtually invisible when the alcohol solvent quickly evaporates. (Shellac is also an excellent fixative for rigging knots and "starching" rigging line to shape catenary curves in the line. Thicker "cuts" of shellac, which can be obtained from pre-mixed shellac by simply allowing a sufficient amount of the alcohol solvent to evaporate, is also suitable for use as an adhesive which, where the occasion demands it and can be easily dissolved and removed with the application of alcohol. Where bare wood is to be portrayed on a model, such as is frequently the case with decks, and the wood species used fails to provide the required scale appearance of bare wood, which is often the case, I would recommend the use of a thinned stain or a dye. Achieving the effect desired from the application of a stain or dye can be tricky and testing and experimentation is essential before application to be sure the effect one wishes will be achieved. If one isn't familiar with working with mixing finishes, they should find that one of the bottled premixed stains offered by the model paint manufacturers will provide a more certain outcome than mixing their own. Finally, the necessity of testing all finishes and finish combinations on a model before application to the model cannot be stressed enough. Frequently, correction of a "disaster" in the finishing process is near impossible to accomplish. Due consideration must be given to the compatibility of finish materials is critical. While shellac somewhat uniquely can be considered a "universal" sealer that "plays well" with any subsequent coating applied to it, dissimilar coating products often are not compatible with each other and the application of one over the other can result in disastrous consequences. Particularly, oil-based finishes and water-based finishes (e.g., acrylics) should never be presumed to be compatible with each other without testing. Even similar types of coatings from different manufacturers must be tested for compatibility with each other. Notably, some acrylic paints are thinned with water, others with alcohol, and still others, according to their manufacturers, are thinned with proprietary thinners. As the saying goes, "For best results, follow the manufacturer's instructions!
-
drilling hole through wire
Bob Cleek replied to BETAQDAVE's topic in Metal Work, Soldering and Metal Fittings
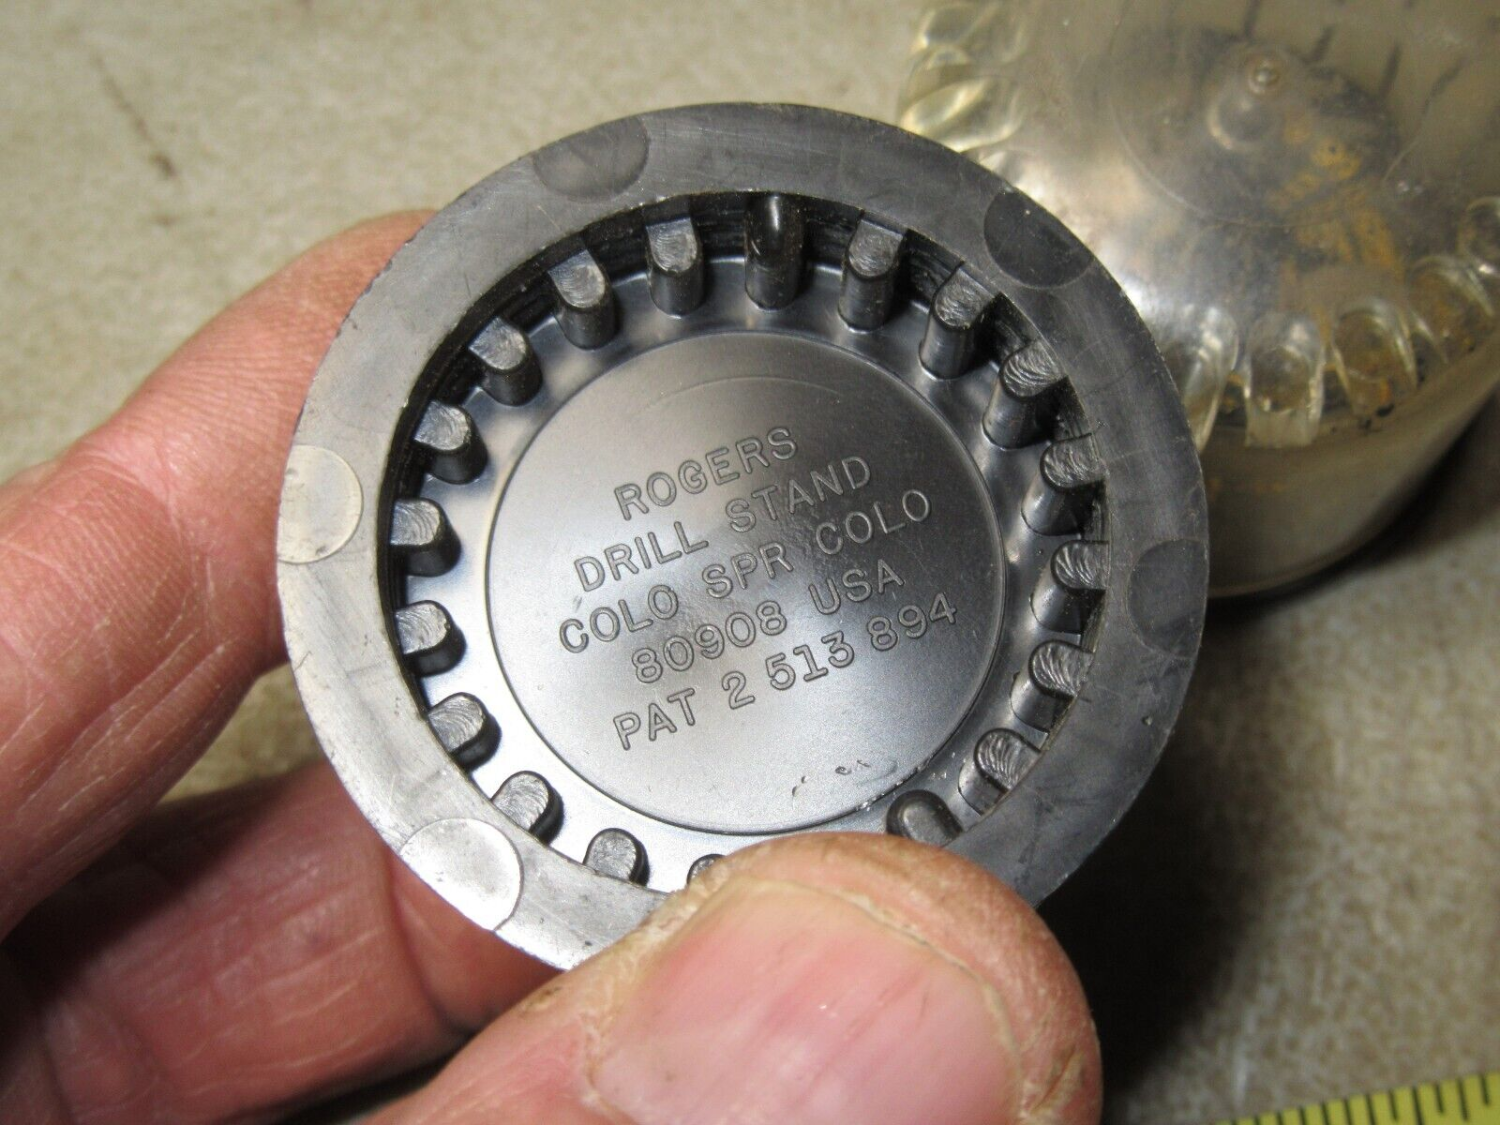
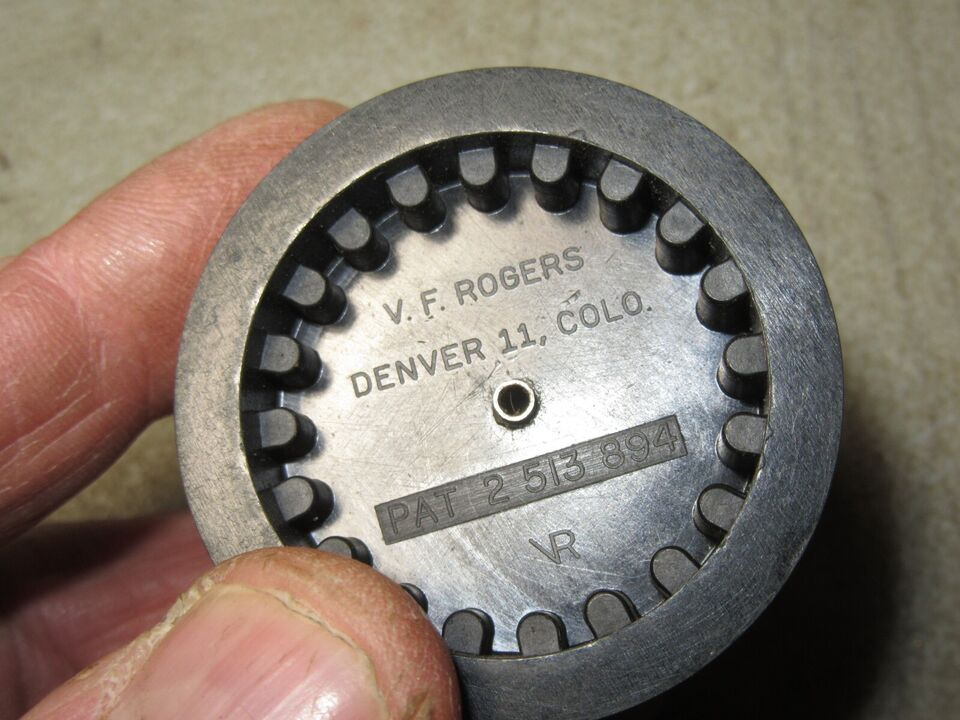
Right you are. Gyros is another Chinese pirate product. The "real deal" original is the U.S. made V.F. Rogers Drill Bit Set - #61 to #80. However, V.F.Rogers, the original manufacturer, doesn't seem to be in business anymore. MicroMark is selling the Rogers Drill Bit Set which they say they get from Excel hobby knives company. Excel's catalog says they are made in the U.S.A., but I don't know if Excel is now making them or just wholesaling them or what. They've been around for a long time. Another mystery thanks to the world of "offshoring" and Chinese import tool clones. $30 from MicroMark. The Rogers Drill Bit Set, #61 - #80 (Set Of 20), 20 drill bits from #61 to #80, Includes an indexed drill bit stand, Ultra-sharp high-speed drill bits (micromark.com) $30.00 USD from MicroMark. $53.51 USD from Excel Hobby Blade Corporation, which makes or wholesales them these days. 20 Piece Drill Dome Set – Excel Blades You can get individual wire gauge bits from McMaster-Carr, but they aren't cheap! drill bits | McMaster-Carr. MicroMark sometimes sells little plastic tubes with ten or a dozen wire gauge bits of the same size at dramatically reduced prices as "loss leaders" when they have their big annual sales. I bought the whole range of 20 bits for the Rogers' stand in tubes of ten from MicroMark some time ago. So far, they seem to work fine. Buying them singly to replace broken bits in the drill stand can get painful quickly. McMaster-Carr wants $5.54 USD apiece for an 80 ga. 3/4" long uncoated HSS bit and $1.39 USD for a 60 ga. 1 5/8" one. I don't doubt that the McMaster-Carr bits will cut better and be better all-around in terms of quality control, but I have no idea if they break any less than the cheaper (and probably Chinese made) bits from the hobby outlets. There's a break-even point there somewhere, but I have no idea whether paying top dollar for U.S. made commercial quality bits is worth the money for general modeling use. Original V.F. Rogers Drill Bit Set. Note "Drill Stand" embossed on top of base center, not "Gyros" letter "G." Original Rogers drill stand bottoms: Manufacturer's ID and patent number: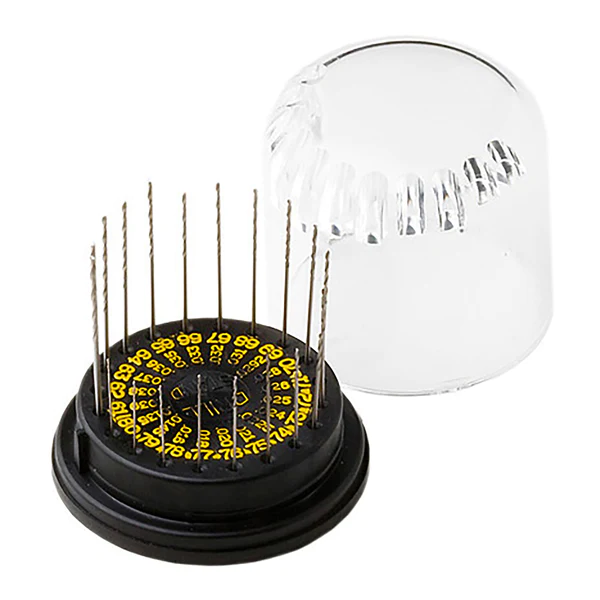

-
drilling hole through wire
Bob Cleek replied to BETAQDAVE's topic in Metal Work, Soldering and Metal Fittings
You might want to check out Model Building with Brass by Ken Foran. Model Building with Brass book by Ken Foran (thriftbooks.com) This relatively new book contains a wealth of information on the subject. There are surely those with far more experience that I who will weigh in, so for what little it may be worth, if it is the "fork on a rod with a hole drilled in a thick spot just above the neck of the fork" in the diagram that you want to make, you might want to "do the math" first. While I can't tell from the drawing whether the hole is to be drilled through a "flattened" section of the rod or through a round sectioned "swelled" or "ball" section of the rod, either way, I don't think you can fabricate a 1.70 MM flat (or "ball") with a .50 MM (or slightly larger) hole on a length of 1.15 MM brass rod without adding material to the 1.15 MM rod stock. There doesn't seem to be enough "meat" there to work the available material do it. I don't know if you have a suitable lathe, which would make the task relatively easy, but even without a lathe, the task is possible, but will take more care and time. Simply put, the fork, neck, and "ball with a hole in it" is formed from square bar machinable brass and the 1.15 MM wire stock is silver-soldered into a hole in the end of the "ball with a hole in it. As the part looks like it's not the only one on the model, machining it as explained below makes the uniform fabrication of a number of the same part a lot easier "on an assembly line" basis. You can modify the following suggestion to suit the tools you have available if necessary. 1.) Cut a section of solid machinable square brass bar stock of the exact square section size as the forks and as long as the distance between the open end of the fork and the "ball with a hole in it, plus a suitable length to permit drilling a tailstock center and parting off at the end of the "ball with a hole in it." If the forks are not square in section, use square stock the same size as the widest dimension of the fork. If you can't find square bar stock exactly the size of the fork's (widest) outside dimension, use square bar stock of the least-oversized bar stock available. 2.) Using machinist's "Prussian blue" or alcohol soluble permanent marker ink, carefully layout the placement of the two holes necessary the shape of the fork ends, the "notch" in the solid square bar to be removed to form the two sides of the fork, the shape of the ends of the fork sides, the "neck" of the fork, and the diameter of the "ball" section. If you must use bar stock that is oversized and/or the fork is rectangular in section, layout the amount of waste to be removed to reduce the fork to the proper outside dimensions taking care that the amounts to be removed are equal on both sides of the stock retained in order to retain the concentricity of the forks, the "neck" and the "ball with a hole in it. Also mark the dead centers of each end of the section of bar stock. 3.) Preferably using a drill press or mill/drill (preferably with an x-y table) to ensure perpendicularity, drill two holes of the required diameter(s) entirely through the flat-sided solid bar stock in the appropriate locations, one to form the eyes of the fork and one to form the hole in the "rod." (These two holes are drilled parallel to each other through the centerline of the bar stock.) Carefully drill a suitably sized center hole in the "ball with a hole in it" end of the bar stock to accommodate the lathe tailstock center, which would preferably be a live center if one is available. 4.) Chuck the fork end of bar stock into the lathe headstock and mount the tailstock center into the other end of the bar. Turn the shapes of the fork shoulders, "neck" between the fork shoulders and the "ball with a hole in it," and the "ball" itself following the layout forming the "shoulders and neck" of the fork and the "ball" shape as per the layout and the detail of the part shape as you've laid it out. (The .50 MM hole will end up exactly in the middle of the "ball" section if your layout and drilling was accurate.) Turning the "ball" shape can be done using a file to shape it by eye (and template), by a custom half-round cutting tool, or a template and "duplicating" attachment on the lathe, or even a "ball turner" if one is available. However, the shape of the end of the ball where the hole will be drilled to insert the 1.15 MM wire must be decided first. If it is to have a "sharp" transition, the end of the ball can be perfectly round. If it is to appear to transition gradually to the diameter of the 1.15 MM wire, the curved transition will have to be formed when turning the ball. The completion of the forming of the end of the ball, however, is best done by parting off the surplus end of the bar and doing the shaping "in the open" free of the tailstock center. When the "ball with the hole in it has been parted, but the "bottom end" not completely turned, leaving the workpiece in the headstock chuck, place a tailstock chuck holding a 1.15 MM drill bit in the tailstock and, using the tailstock advance, drill through the center of the end of the ball end and through to hole in the ball. Then finish the turning of the ball end. If a curved shoulder transition between the ball and the 1.15 MM wire is desired, a short piece of the 1.15 MM wire can be inserted and the "shoulder" between the ball and the wire worked right up to the wire to turn a seamless transition. Note, however, that there isn't a lot of "meat" in the "ball" to hold the 1.15 MM wire. The larger you can make the "ball," the more space there will be for the 1.15 MM hole. By your measurements, there will only be .275 MM on either side of the 1.15 MM hole into the 1.70 MM ball. This won't matter once a good silver-soldered joint is making it all one piece, but the size of the hole will impact the appearance of the ball and you may have to do some drawing and planning of the shape of the ball so the appearance of a "swelled ball on a 1.15 MM shaft" is achieved. An experimental "dry run" on the wire to ball connection is probably indicated and it may be necessary to turn down the diameter of the 1.15 MM wire to provide a "peg" at the end to be soldered into a smaller hole in the "ball." + 5.) Remove the workpiece from the lathe. If the fork is smaller than the bar stock on two or four sides, carefully remove the excess material to yield the proper dimensions of the fork. This is a piece of cake if you have mill or even a drill press with an x-y table as it is light work. Otherwise, a flat belt or disk sander or file should do the trick. With the dimensions of the fork established, shape the ends of the fork (simultaneously) using whatever tools are available. (They appear to be half-rounded.) 6.) After forming the ends of the fork sides, using a mill if you have one, or a jeweler's saw and files if you don't, remove the waste center of the solid bar to form the space between the two fork sides. This is tricky If not using a mill. Using hand tools demands that care be taken to cut sufficiently "wide of the line" to permit accurate filing or using abrasive tape to ensure straight and perpendicular faces of the jaws on either side of the open space between them. The "slot" between the fork sides has to be accurately machined if the resulting fork is to look good. Accurate layout is essential. If the slot cannot be milled, a drill press (preferably with an accurate x-y table) can be used to drill a series of suitably sized holes through the square stock to remove most of the waste between the fork sides. Assuming the "waste removal" holes are accurately drilled, they can provide a valuable index for hand-shaping. The bulk of the waste can be roughly removed by sawing with a jeweler's saw to "connect the holes" and files can rough out the rest, taking care not to remove any material deeper than the edge of the drilled holes. Once "roughed out," machinist's "Prussian blue" or an alcohol-soluble permanent marker can be used to mark the faces of the exactly drilled "waste removal" holes. Thus marked, final shaping can be completed very accurately using the "bluing" to indicate the desired "flat" to be formed. 7.) Polish the part as required. Clean the part well as per standard silver-soldering procedure paying particular attention to the inside of the 1.15 MM hole in the end of the "ball with the hole in it. Insert a suitable length of 1.15 MM wire in the hole in the end of the ball to a depth which is not less than the inside edge of the drilled hole inside end of the 1.15 MM hole. This is essential to provide as much of a contact surface between the two parts as possible for the solder joint as discussed above. Silver-solder the two pieces together. Using a drill and/or a round jeweler's file, remove the end portion of the 1.15 MM wire inside the hole in the "ball with a hole in it" so that the inside of the hole is smooth all around. Remove any excess solder from the face of the piece. The silver-solder joint on the face of the "ball" and inside the hole in the ball, should be invisible if you are better at it than I usually am. As usual, it's easier done than said. Hope this helps. -
Excellent point for newer modelers contemplating modeling sails to consider! It's not enough to just pick a few sails to attach flying because you like how they look. To achieve the desired illusion of reality in miniature the sails must be set and drawing as they woud have been if the ship were on a particular point of sail in a particular weather condition. Square rigged ships rarely, if ever, flew all their sails at the same time. Consulting photographs (not necessarily paintings or drawings, which can contain errors due to "artistic license") of similarly rigged ships under sail is an excellent resource. Google Images is your friend!
- 1,503 replies
-
- 2
-

-
- Le Soleil Royal
- Heller
- (and 1 more)