Glenn-UK
-
Posts
3,175 -
Joined
-
Last visited
Content Type
Profiles
Forums
Gallery
Events
Everything posted by Glenn-UK
-
 The nightmare which has become the foremast shrouds / deadeye continues as I have decided that my take 2 attempt did not pass muster. The distance I have set between the channel and shroud deadeyes is approx. 20mm. I am happy with the first two dead pairs both port and starboard. As I started to tighten up the lanyards on all the shroud lines it became apparent the distance between the channel and shroud deadeyes was getting greater towards the stern. I could have lived with 1 or 2 mm difference that was not the case as there was a significant upward slope with the position of the shroud deadeyes toward the stern. Time for a tea break and a rethink before I start again - third time lucky?
- 476 replies
-
- 3
-

-
- sphinx
- vanguard models
- (and 1 more)
-
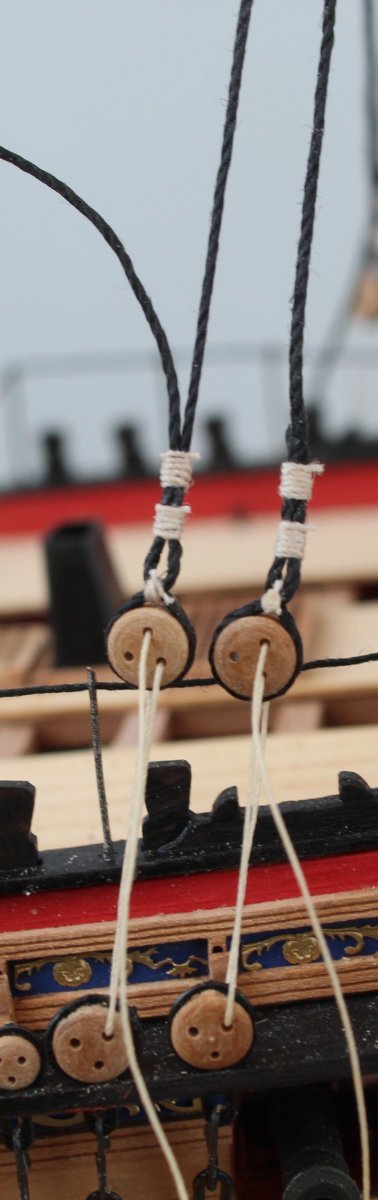
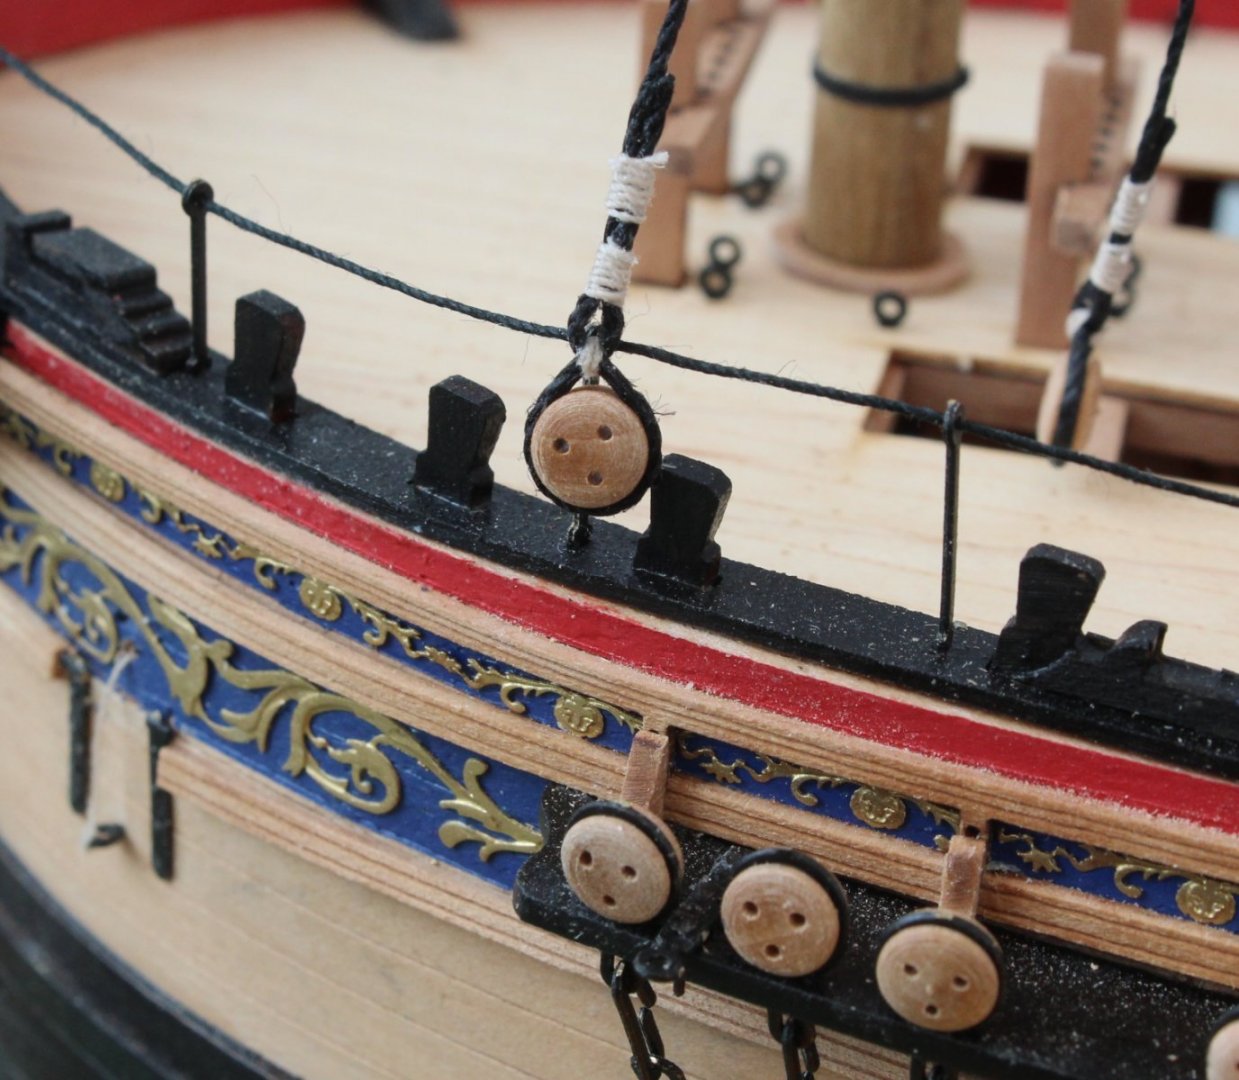
For clarity the deadeyes can rotate in the loops so the holes will be properly aligned when the lanyards are rigged.
- 476 replies
-
- 2
-
-
- sphinx
- vanguard models
- (and 1 more)
-
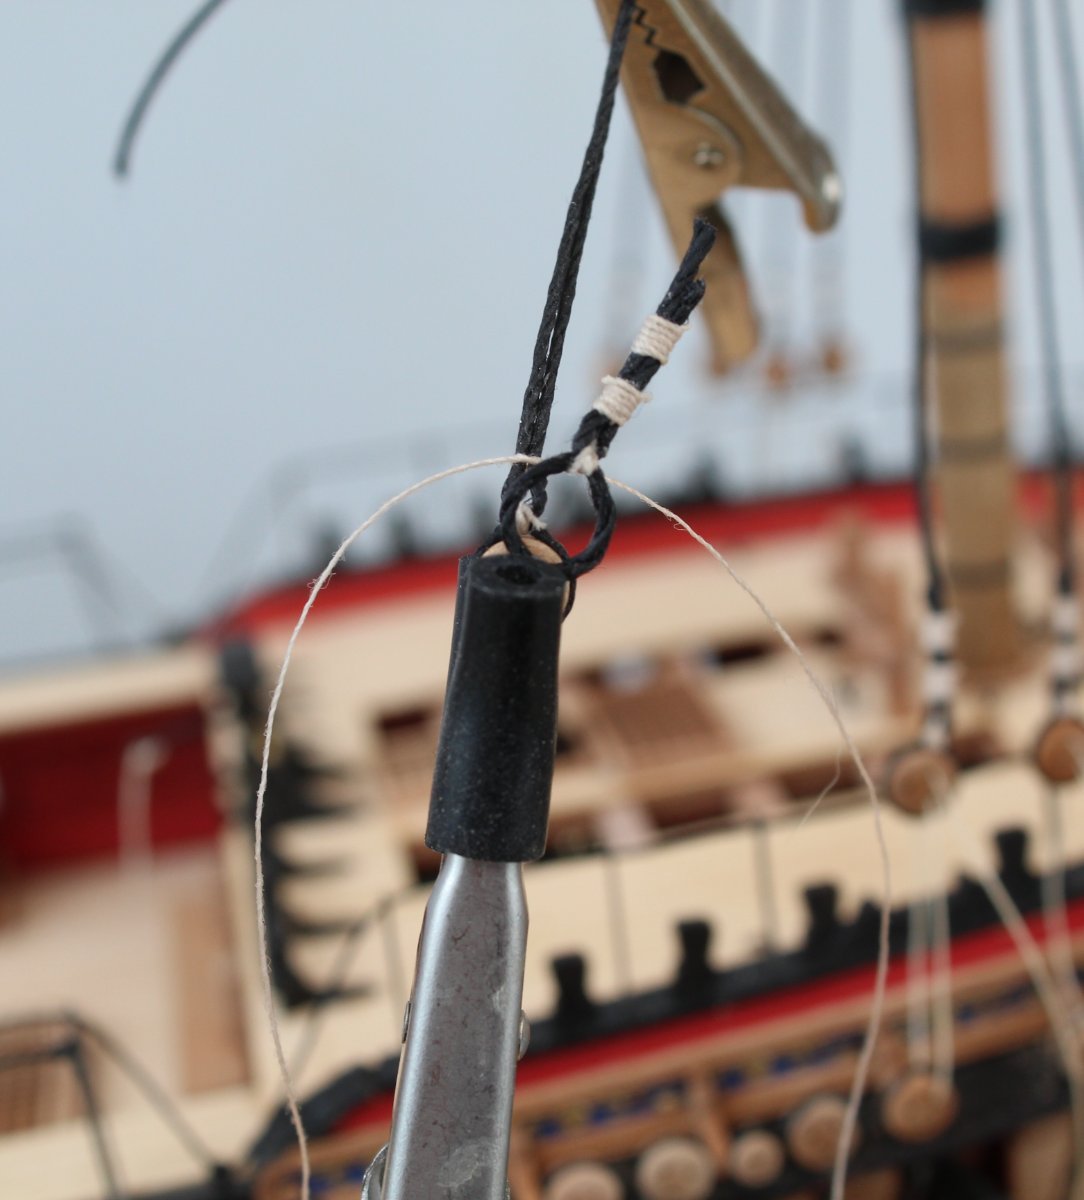
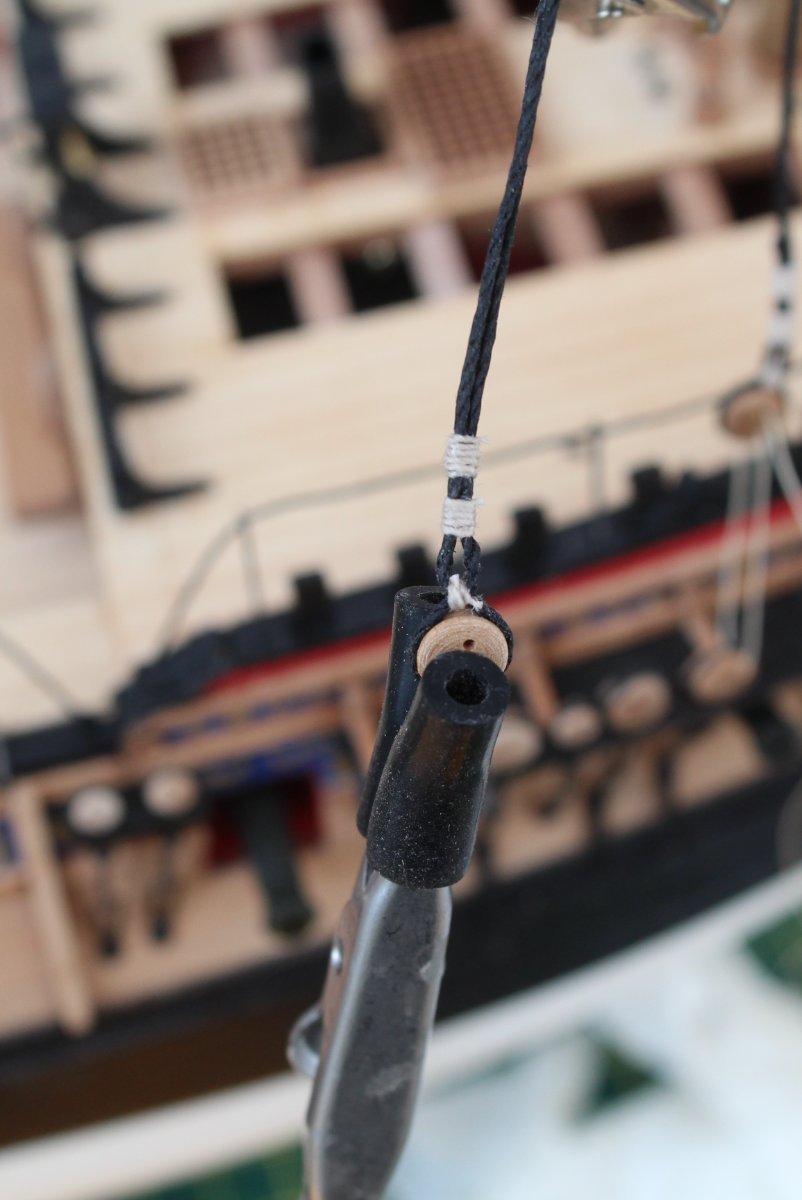
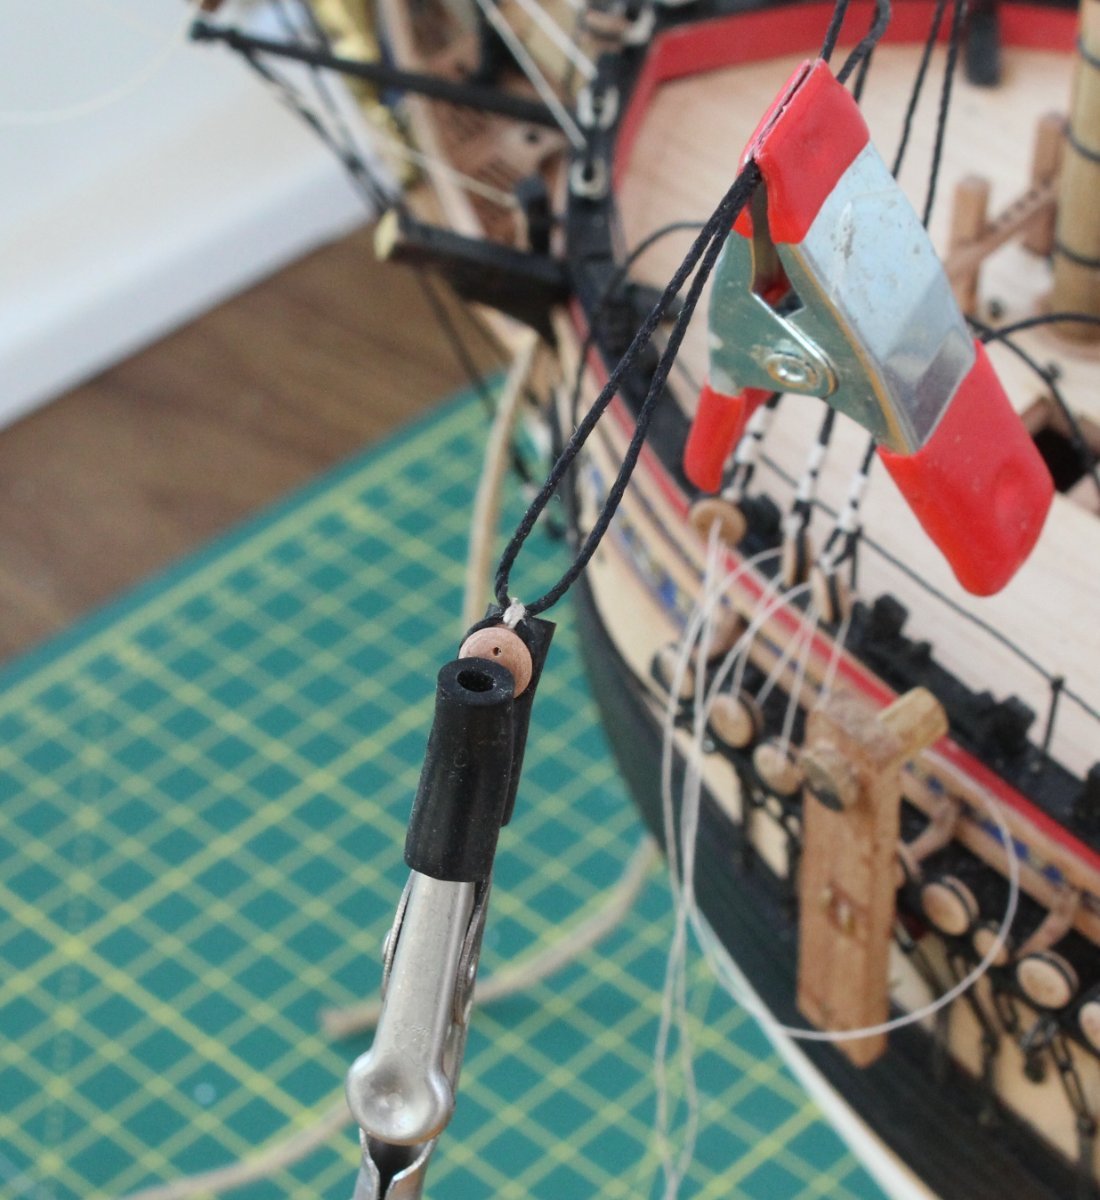
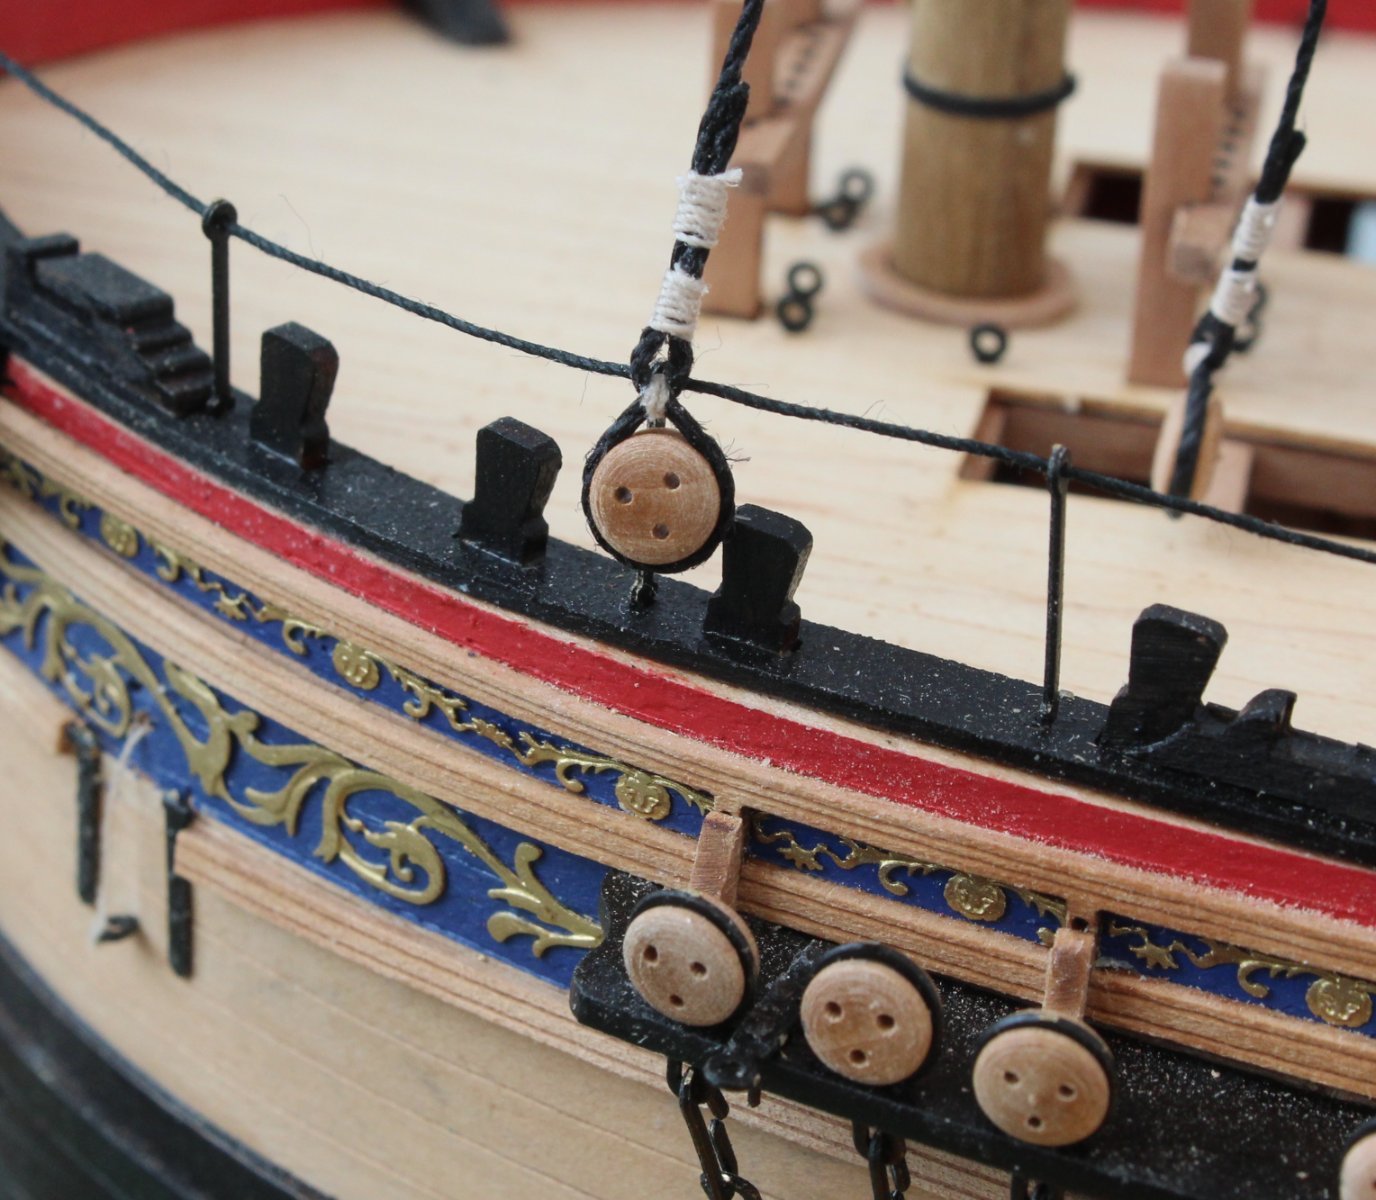
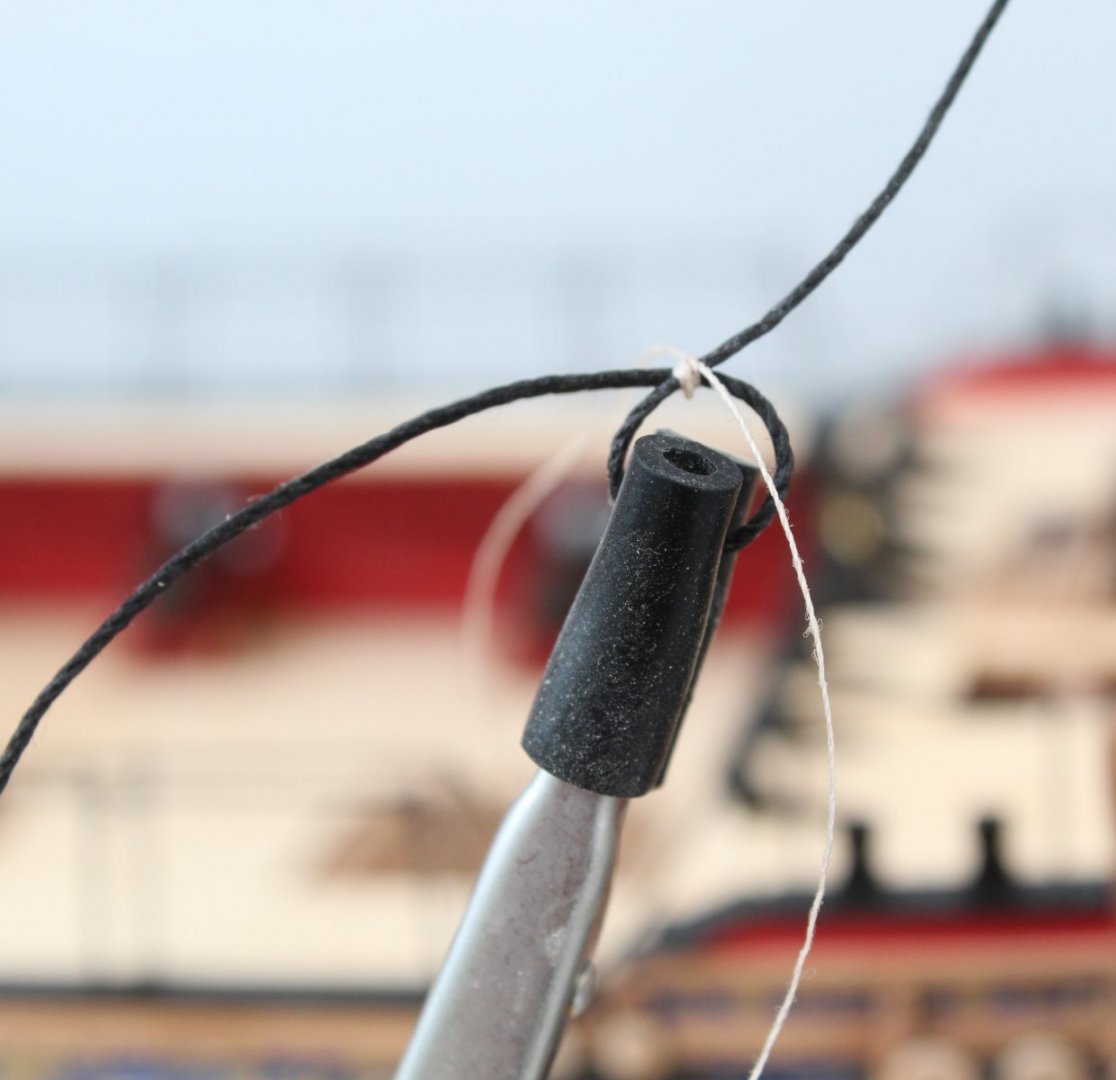
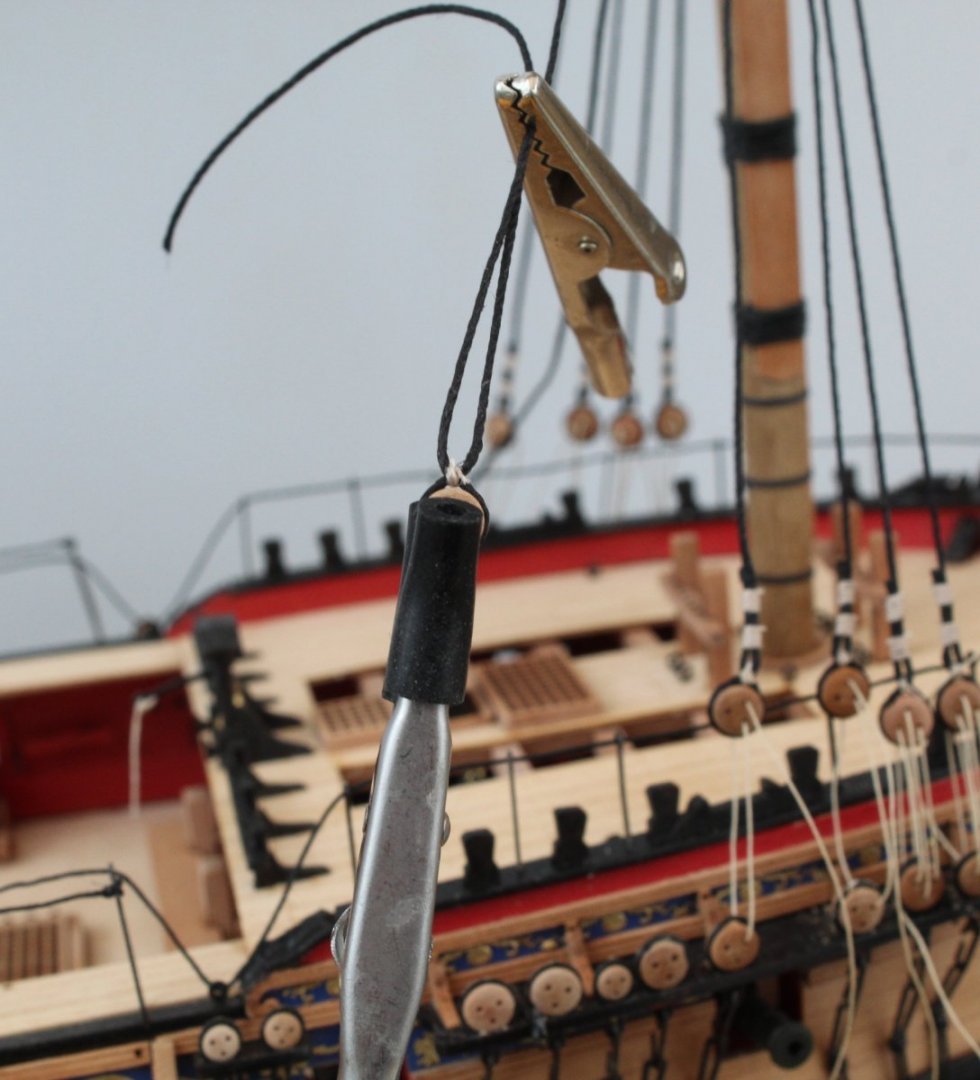
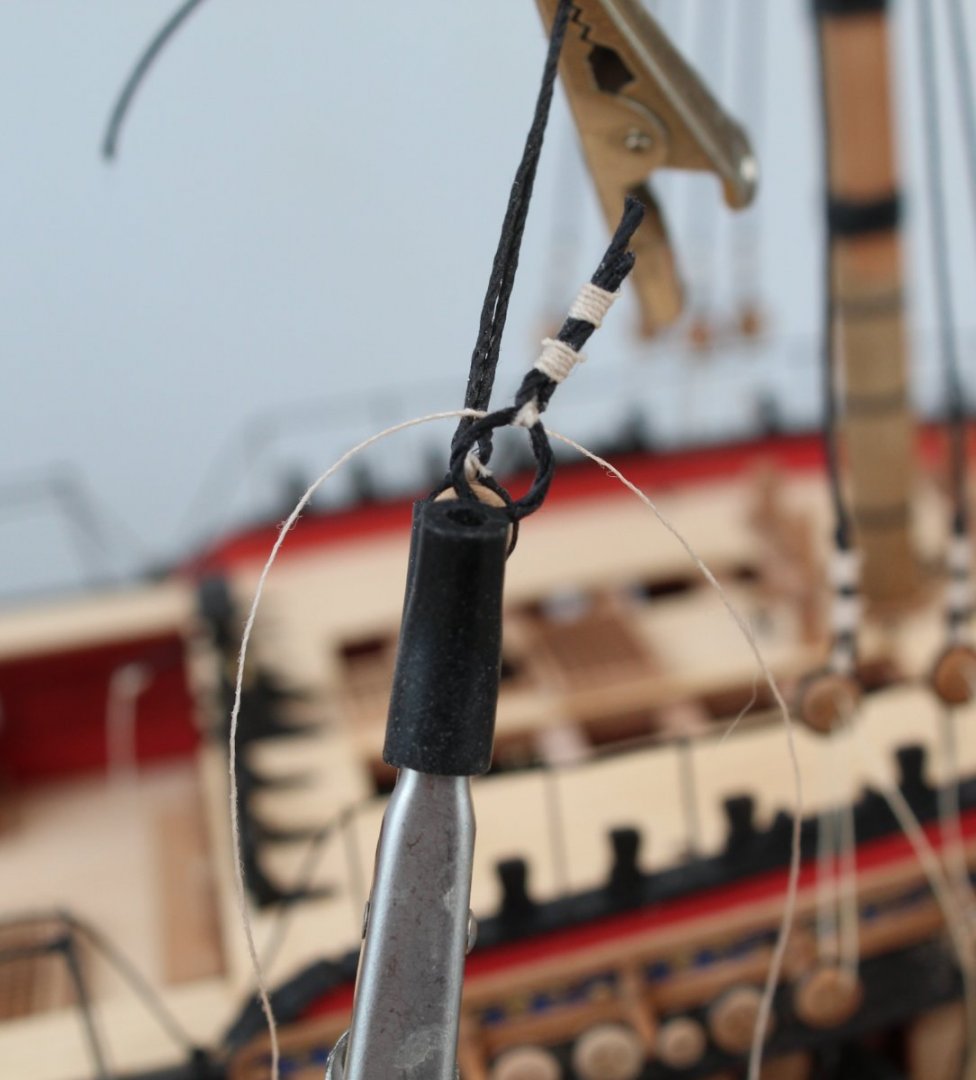
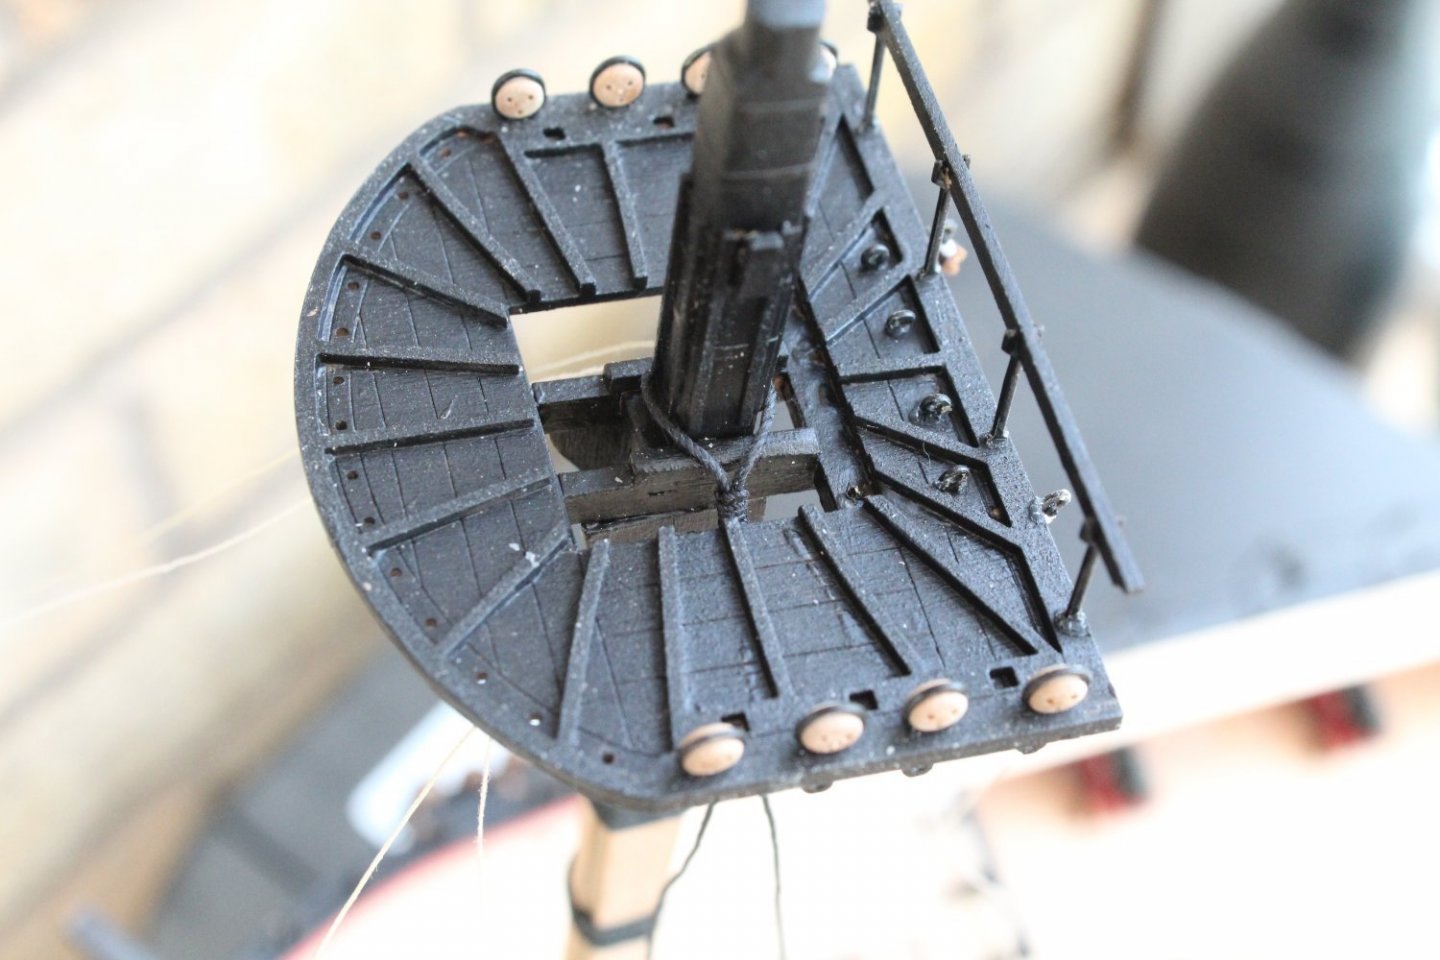
Adding Deadeyes to Shrouds I thought I would detail the method I am currently using to add the deadeyes to the foremast shrouds. The process detailed below takes me around 15 minutes per shroud line to complete which is not to bad. I am now working on adding the shroud lines pair 1/2 to the starboard side, then pair 3/4 to the port side, 5/6 pair to starboard, etc. Step 1 - Creating the loop With my jig added to the channel deadeye the shroud line is wrapped around the dowel and, using some reverse action tweezers, is held in place under a bit of tension. A length of seizing thread is then carefully fed under the shroud crossing point. A simple half hitch knot is used to create the loop. The tweezers are then released and the shroud carefully removed from the jig and positioned in to my quad hands where I complete the initial seizing by adding three half hitches to the top. Step 2 - Checking the deadeye position The deadeye is now inserted into the loop which is closed up tight by pulling the free end. It is still possible to adjust the length of the shroud so the deadeye is at the same level as the other deadeyes as the cross seizing has not, as yet, been secured with ca. Once I am happy with the initial deadeye alignment a length of thread is cut for the lanyard and the deadeye is partially rigged so I can check the alignment when the shroud has been slightly tensioned. Step 3 - Completing the seizing Once I'm happy with the deadeye alignment a touch as ca is used to secure the crossing seizing knots and the excess thread is also trimmed. The shroud line is then returned to the quadhands for the next phase. The shroud line ends are pulled tight and a crocodile clip is used to hold the threads in place. The shroud line is now ready for the next seizing's. The first seizing is started and I check it's position with a template seizing jig. Each seizing comprises 5 bottom and 5 top half hitch knots. It does not take very long to complete this aspect. With the work almost complete it is time to recheck the alignment of the shroud with a partially rigged lanyard. The excess shroud thread is then trimmed and the job is now complete.


- 476 replies
-
- 7
-
-
- sphinx
- vanguard models
- (and 1 more)
-
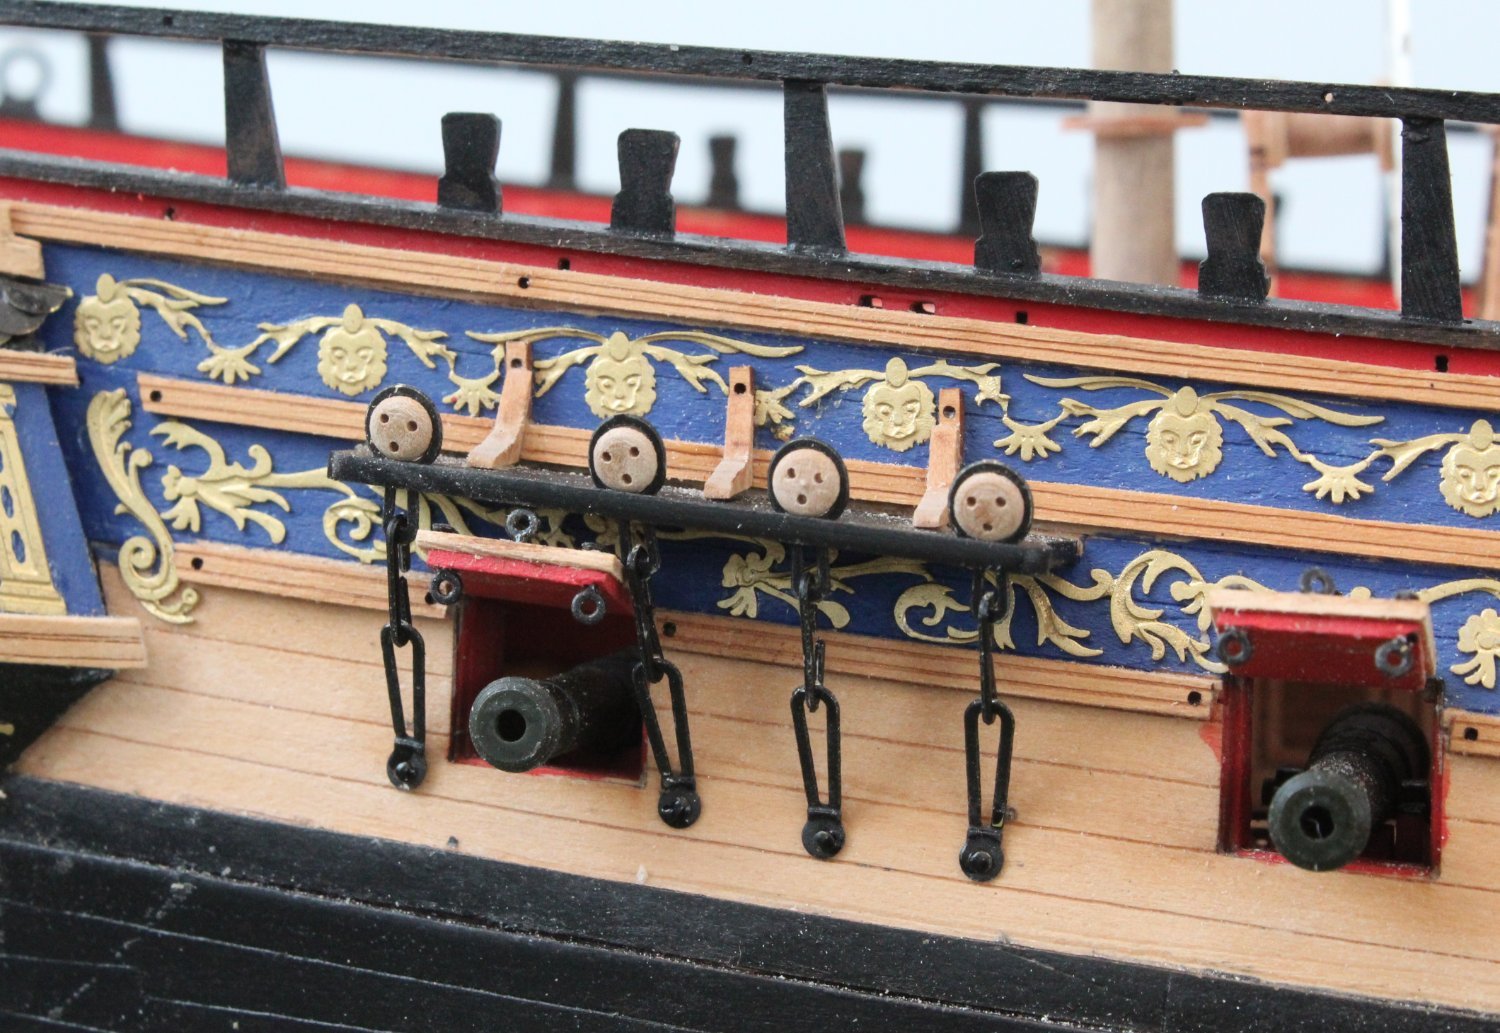
I did install all the shrouds on my first attempt and then added all the port side deadeyes and lanyards which I've done on all my previous builds. On take 2 I decided it would be better to rig each shroud pair in turn as it may help seat the shrouds better at the foremast platform.
- 476 replies
-
- 1
-
-
- sphinx
- vanguard models
- (and 1 more)
-
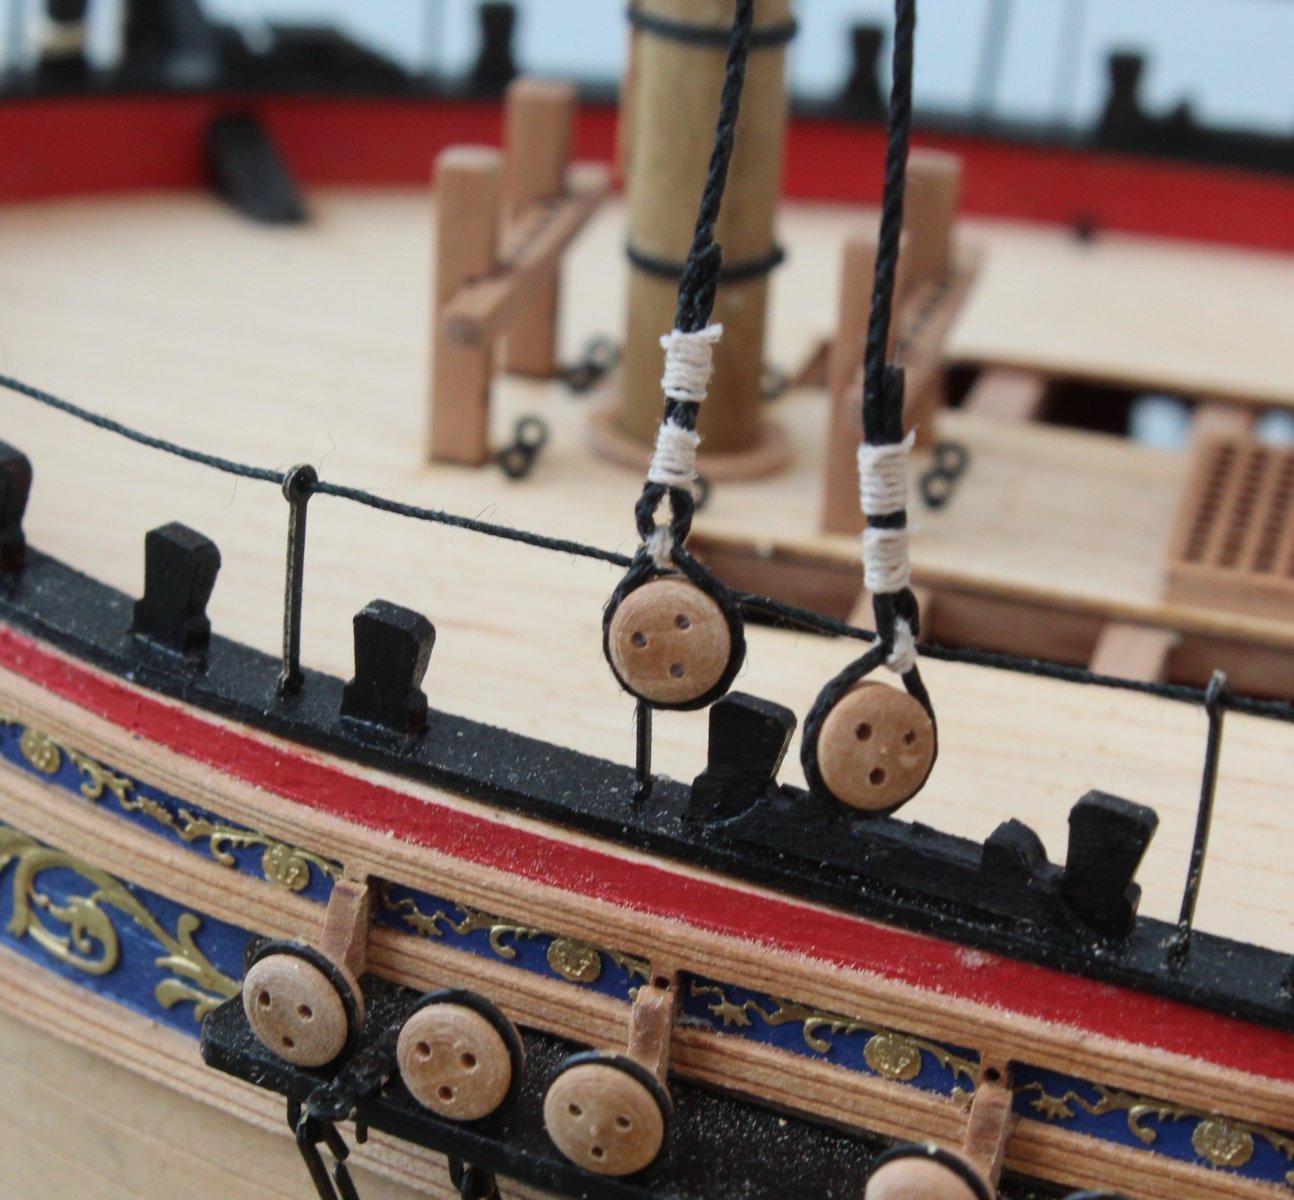
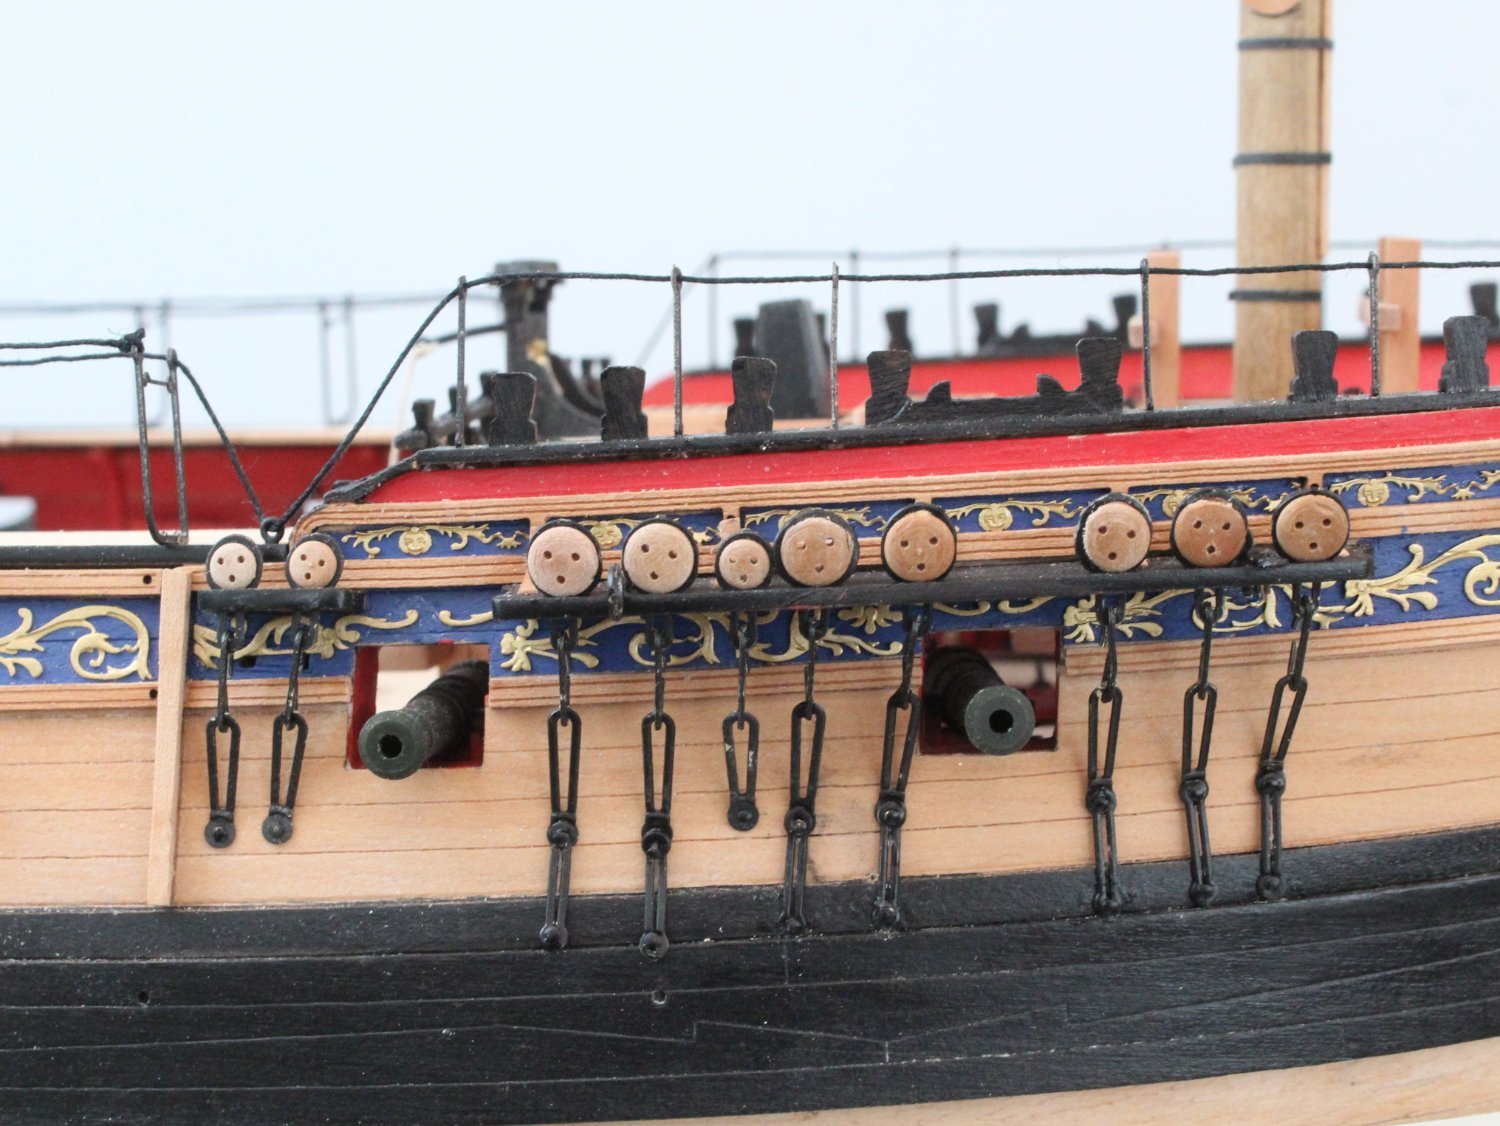
I am working on each shroud pair. Pair 1/2 port side has now been installed. Pair 3/4 is currently WIP on starboard side, 3 has been rigged and 4 will be done when I next visit the shipyard. The mast was glued in place prior to starting work on the shrouds.
-
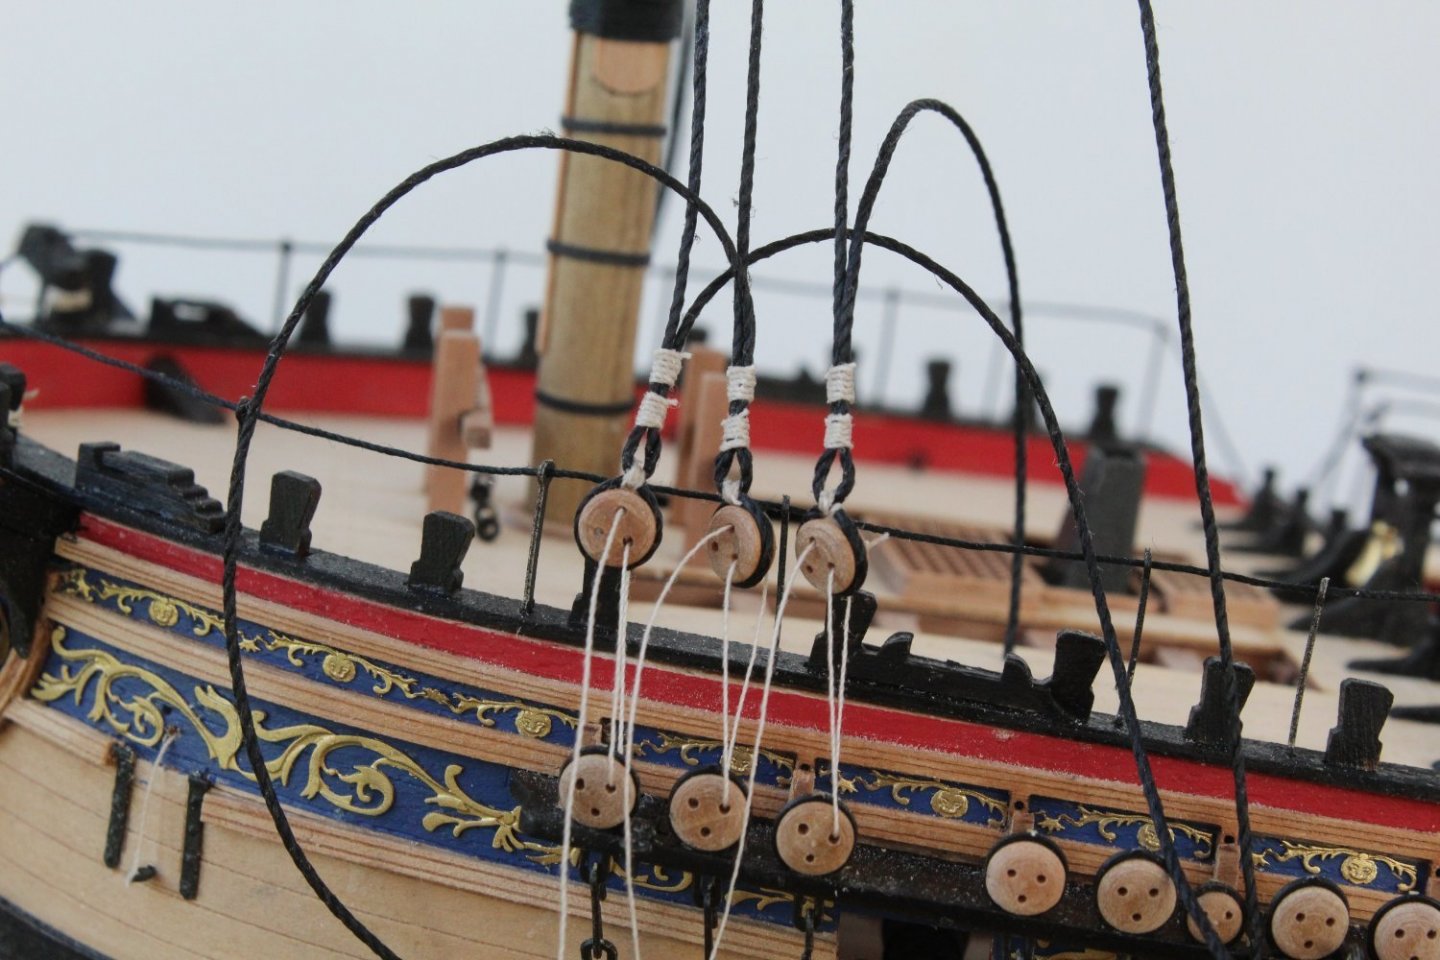
I have not tied off the lanyard just yet. It has been fed through the back of gap at the top of the deadeye strop and will then looped around the shroud a couple of times. I want to get the next deadeye in place so I can adjust the tension of the shroud line pair before I do this
- 476 replies
-
- 1
-
-
- sphinx
- vanguard models
- (and 1 more)
-
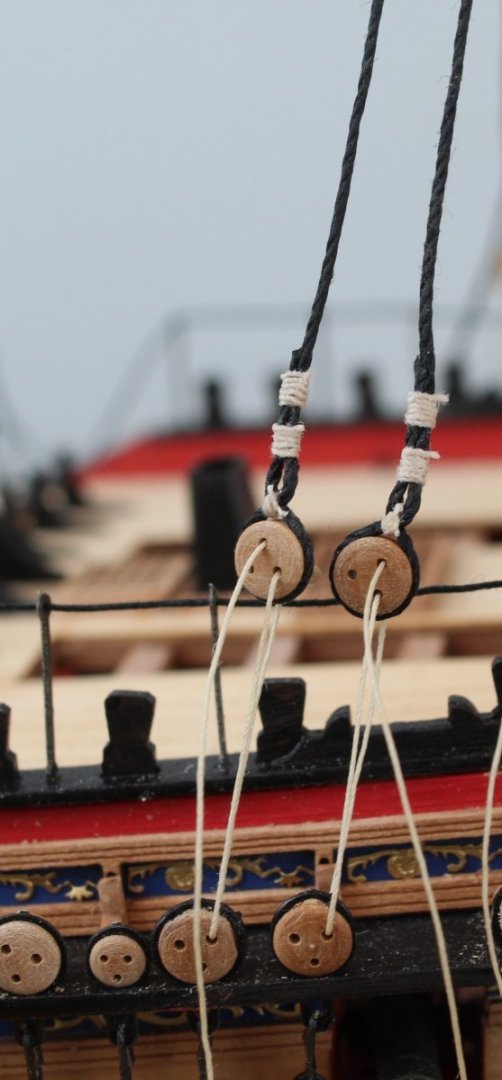
Portside Shrouds, deadeyes and lanyards I have taken the bull by the horns and decided to start again. As pointed out by @Blue Ensign the lanyards were rigged with the wrong sized thread in my previous attempt. I have now slightly refined my method when adding the deadeye to the shroud (and seizing's) which I hope will means all the deadeyes will be bit more even this time around. The first deadeye looks good to my eye. There is a nice amount of tension of the shroud line. Fingers crossed I can get the others to match this one.
- 476 replies
-
- 8
-
-
- sphinx
- vanguard models
- (and 1 more)
-
I did remove the seizing on a couple of shroud lines and readjusted before I trimmed the 1mm thread end as I went along, it is not possible now the ends have been trimmed. I have already remade the shroud lines which didn't take long. You are right I should have used 0.25mm natural thread for the lanyards, 0.1mm is for the 3mm mizzen mast lanyards. I'm still unsure about the position of the first seizing above the shroud deadeye. I think it needs to be nearer the deadeye.
- 476 replies
-
- 1
-
-
- sphinx
- vanguard models
- (and 1 more)
-
Hello Maurice I am using 1mm black thread as per the plan sheets for the foremast shrouds. I am using 0.1mm natural thread for the seizing's. Do you think I should remove the shrouds and start again to see if I can make it better? Also do you think the first shroud seizing needs to be positioned closer to the deadeye? Thanks Glenn
- 476 replies
-
- 1
-
-
- sphinx
- vanguard models
- (and 1 more)
-
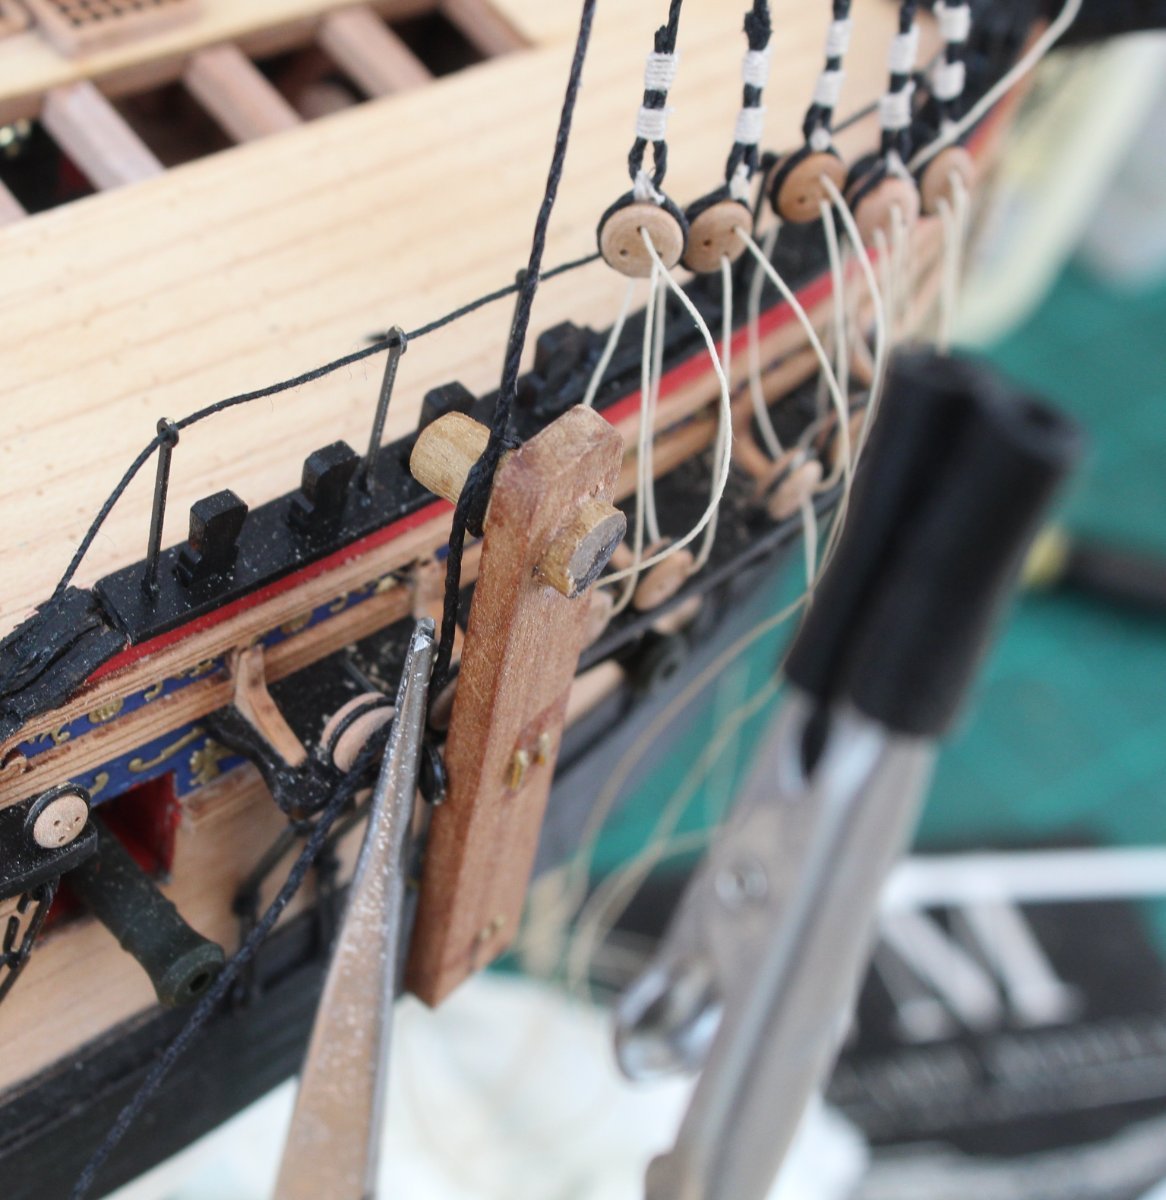
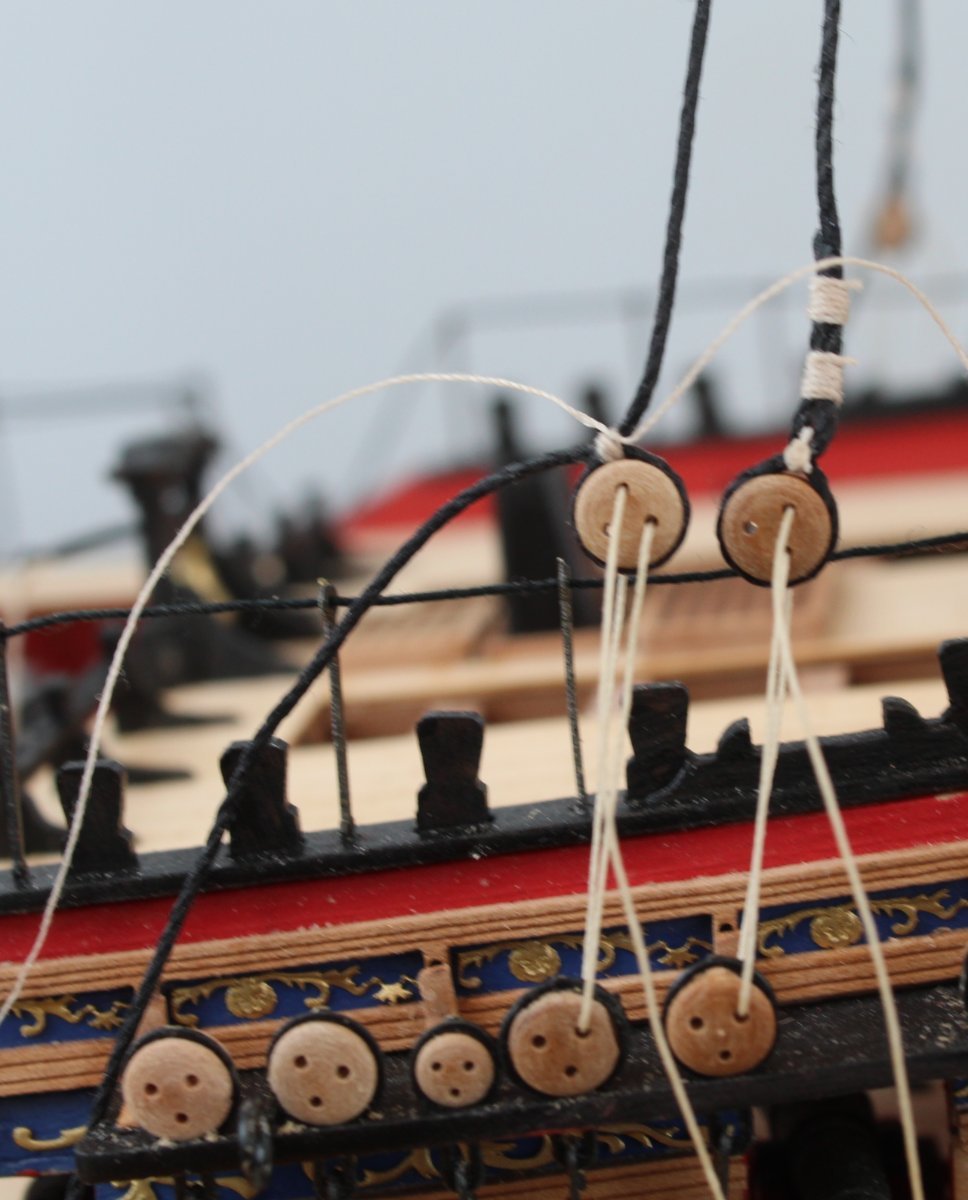
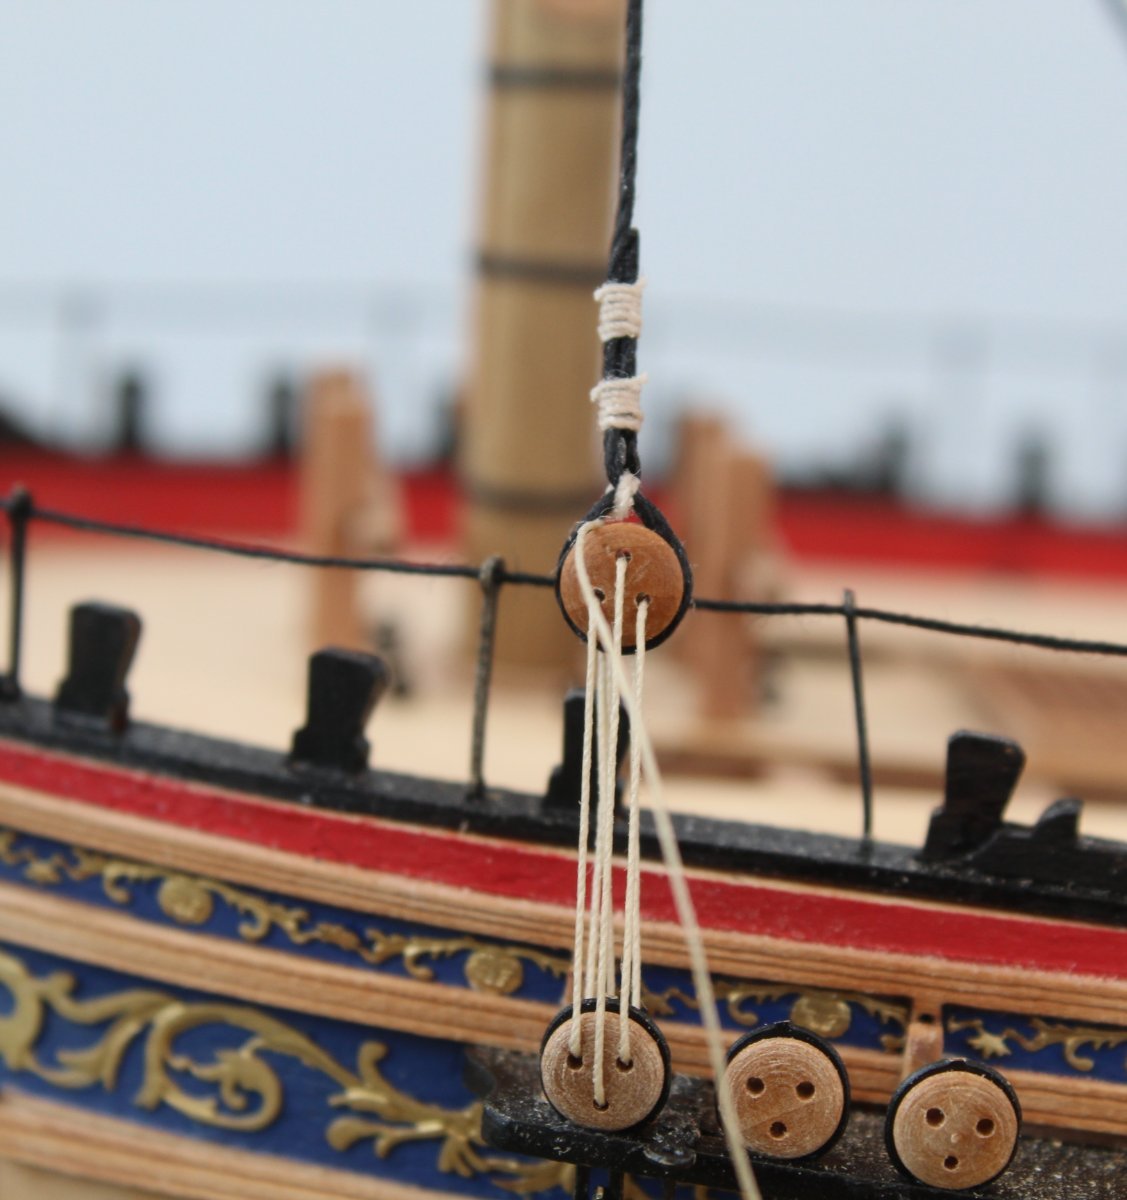
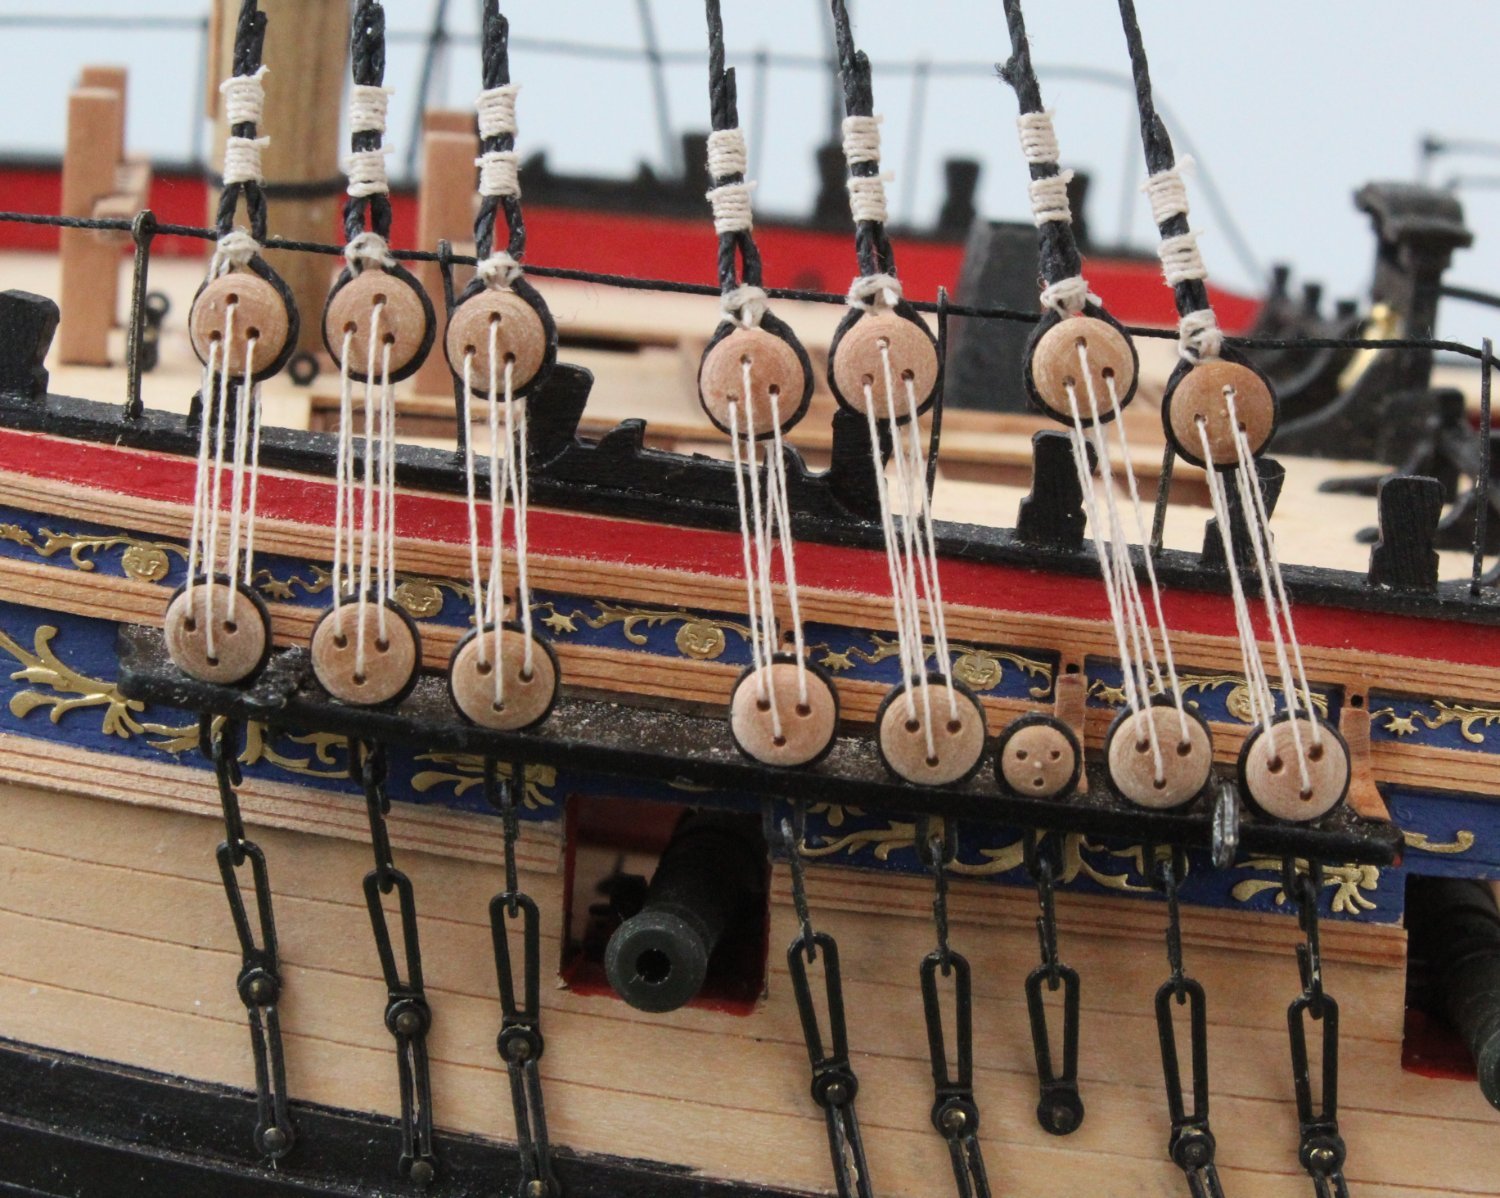
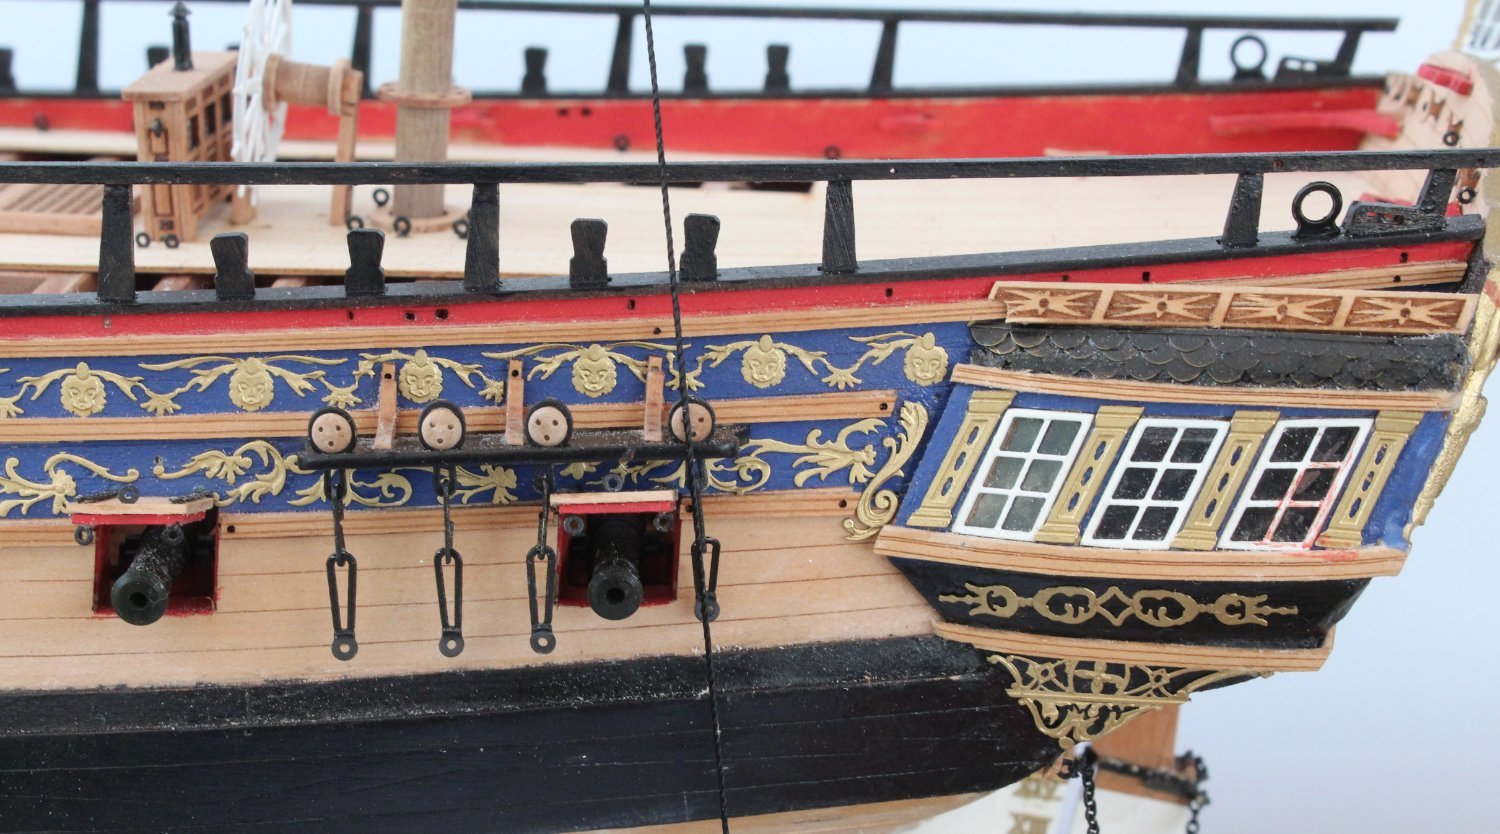
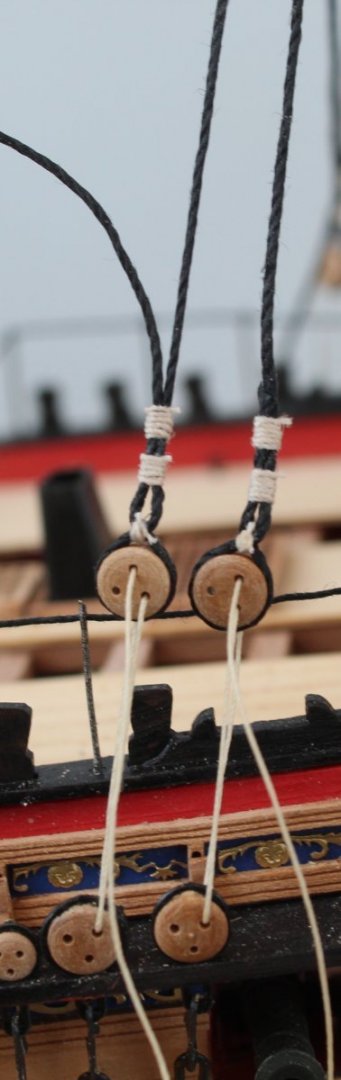
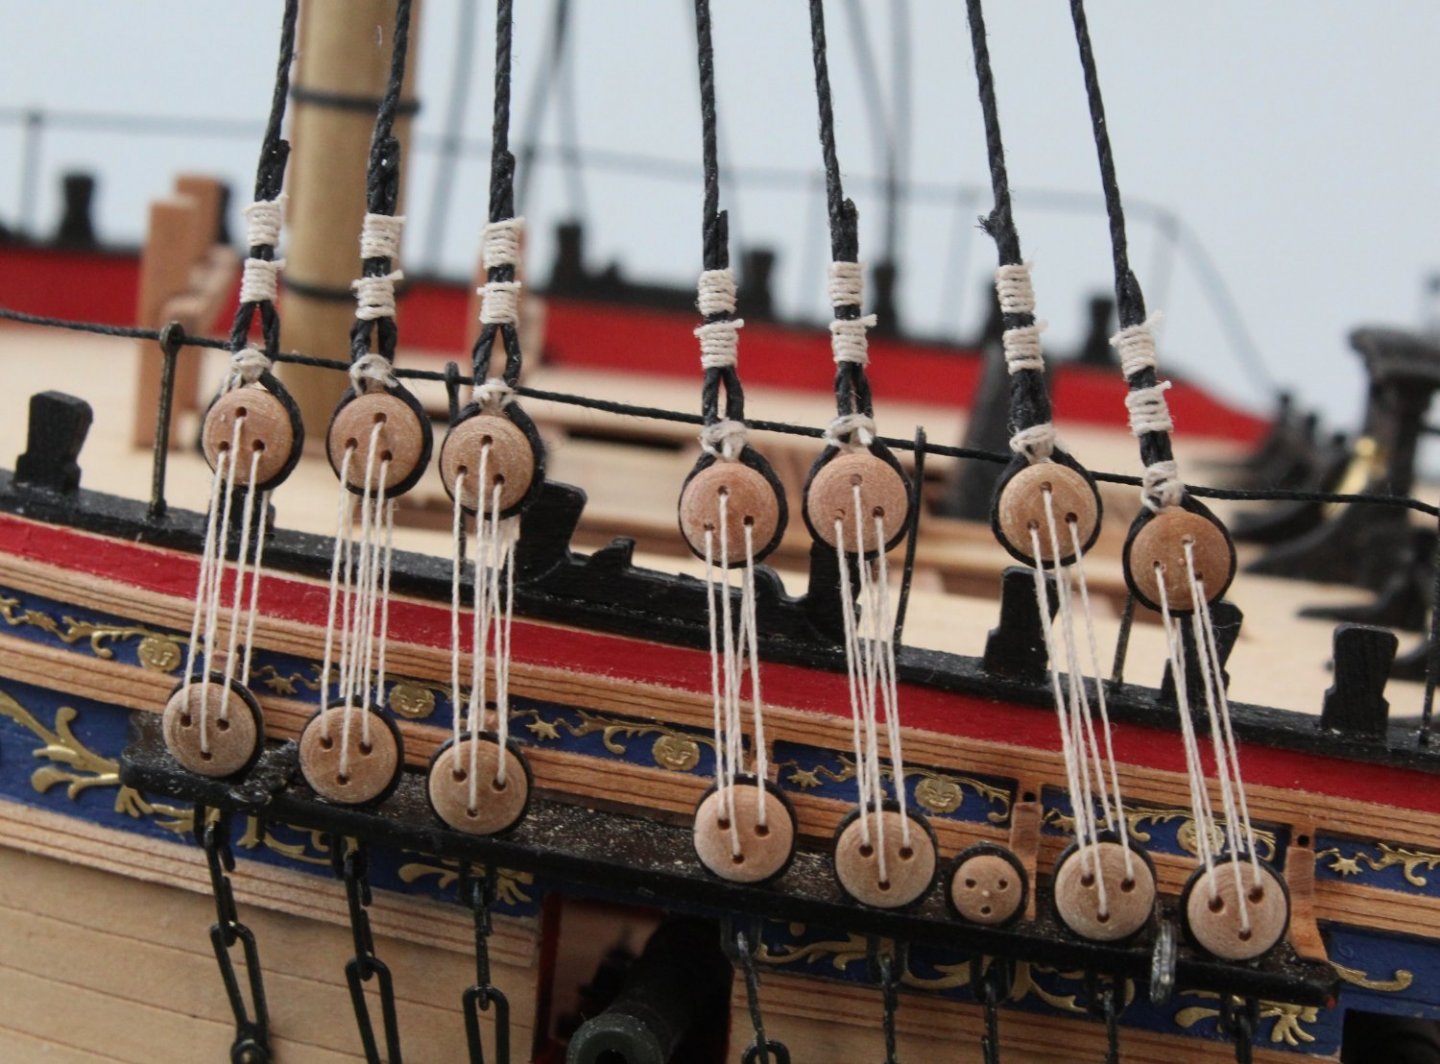
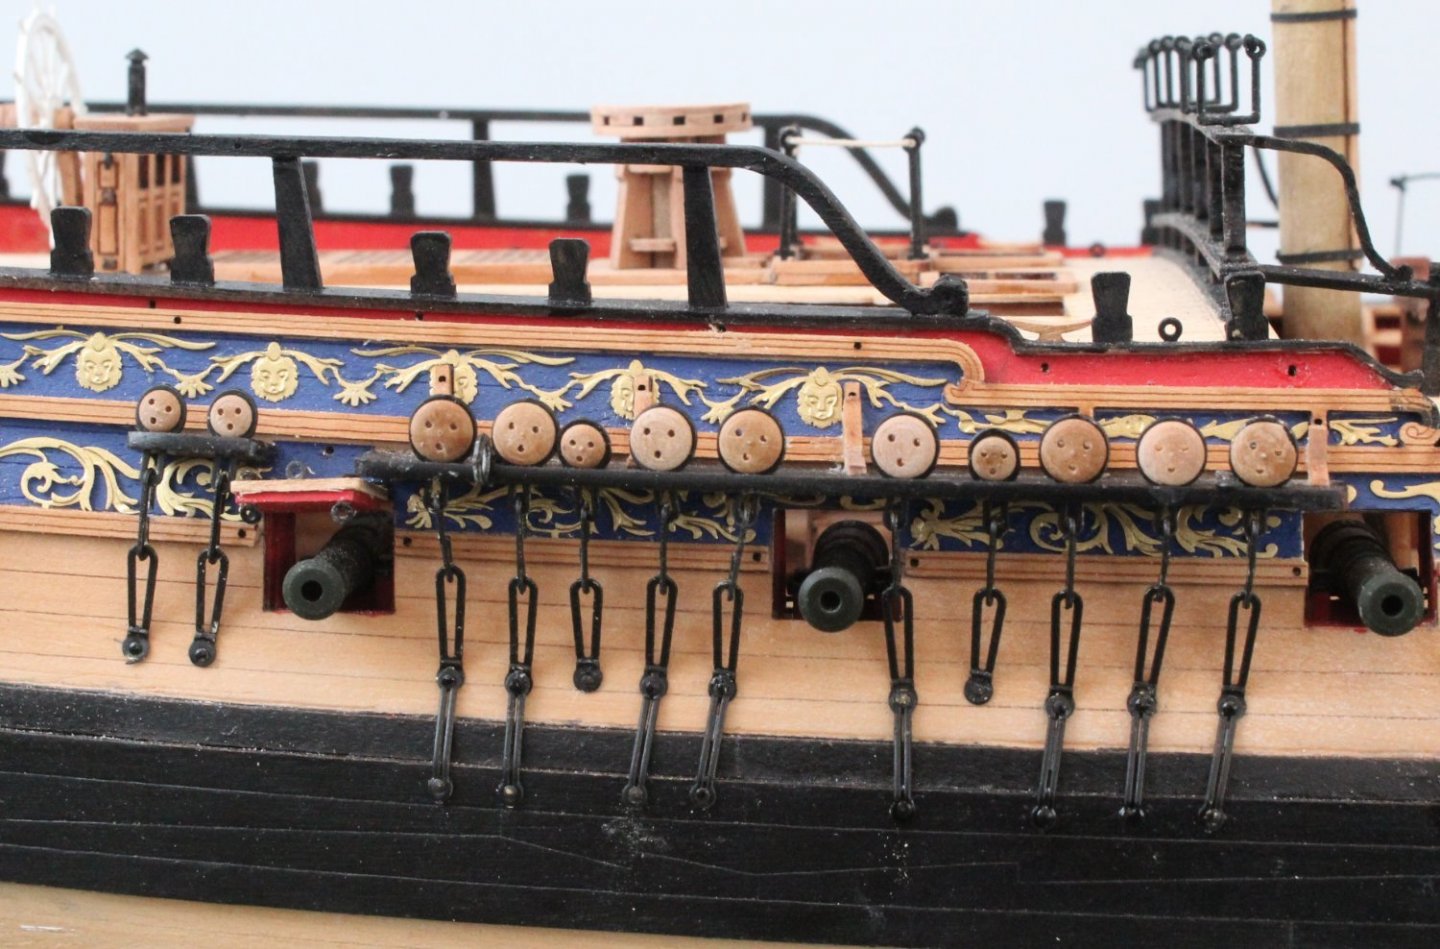
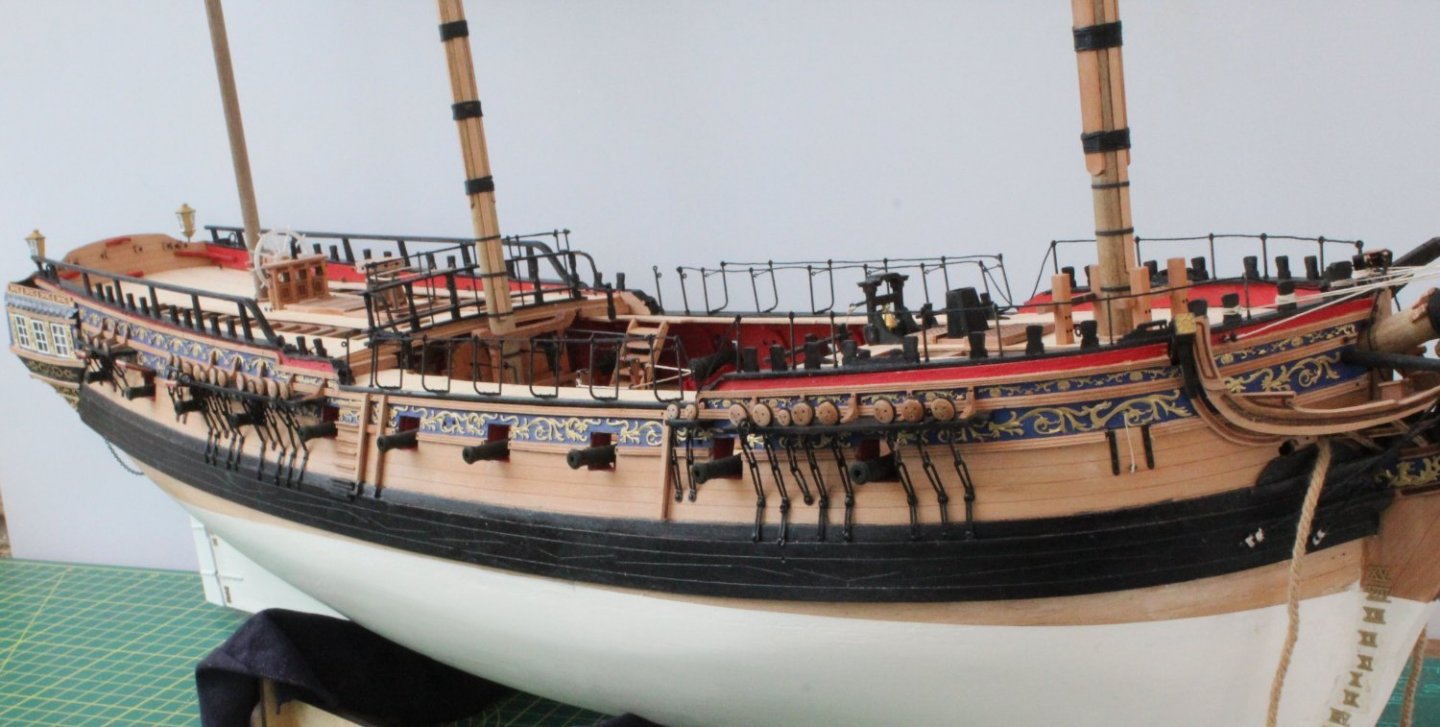
Foremast Portside Lanyards I will start this post with saying this is the best I have ever done a set of shrouds with deadeyes and lanyards. The method I used certainly helped me improve my technique. When looking at the attached the two photos the first 3 shroud lines (nearest the bow) are not too bad and look reasonably even. The next 4 shroud lines however not so good, especially the last one. I am now in a quandary as they have not turned out quite as I hoped. Can I accept this standard of workmanship and move on as there is a marked improvement compared with my previous builds. This is what I would have done in the past without a moments thought. The new me is now thinking I can do so much better and I am now very tempted cut my losses and start over, refining the method slightly to get even better results. The shroud deadeyes tend not to be at an even level on a real ship which is another consideration. I would welcome some comments before I finally take the plunge and start over. With regards to the seizing above the shroud deadeye, does the first one need to be nearer to the deadeye? I used a some 2mm tape to to set the same distance for each line. I think it would have been better if I had used 1mm tape.

- 476 replies
-
- 8
-
-
- sphinx
- vanguard models
- (and 1 more)
-
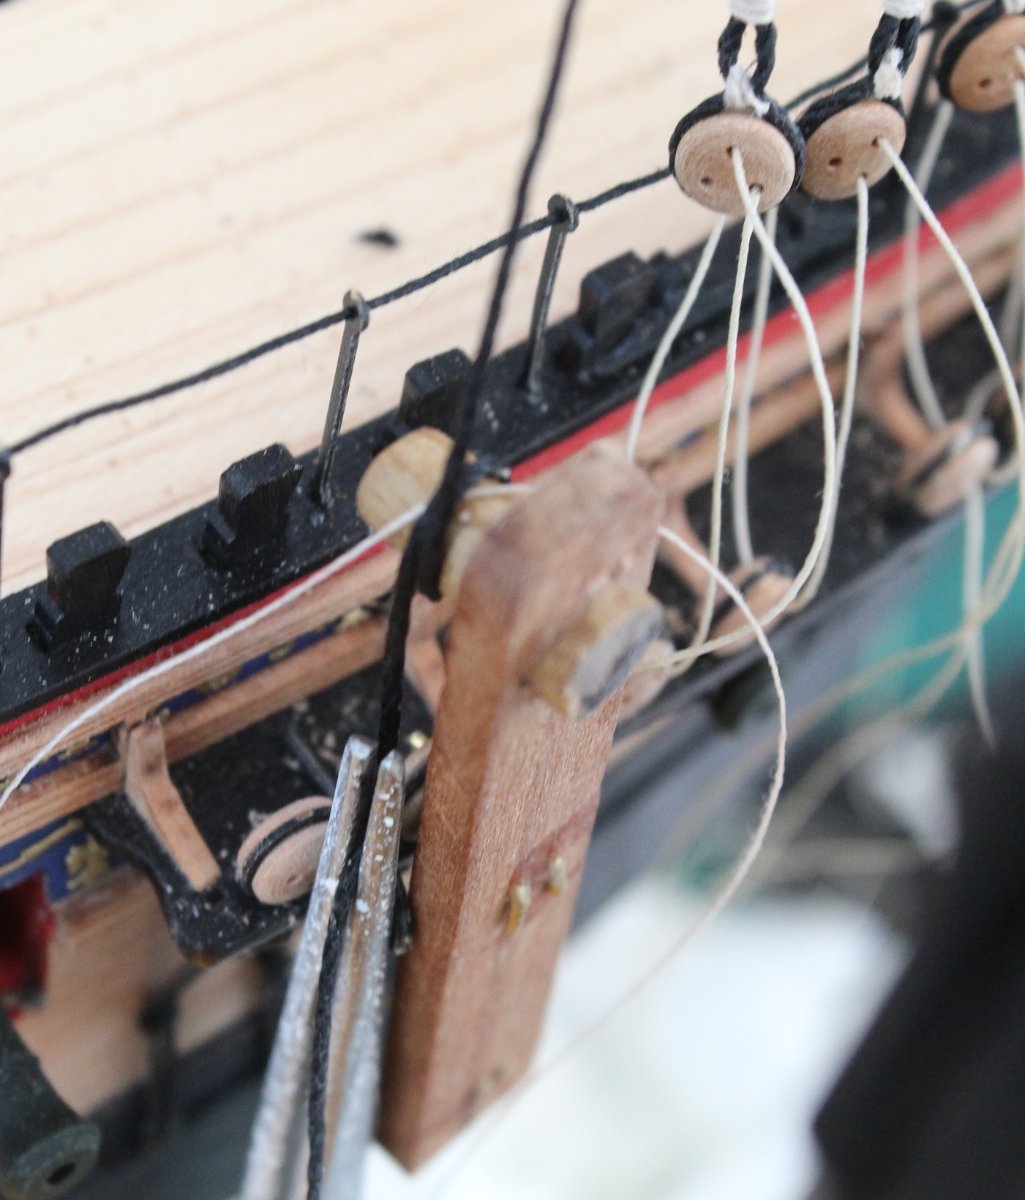
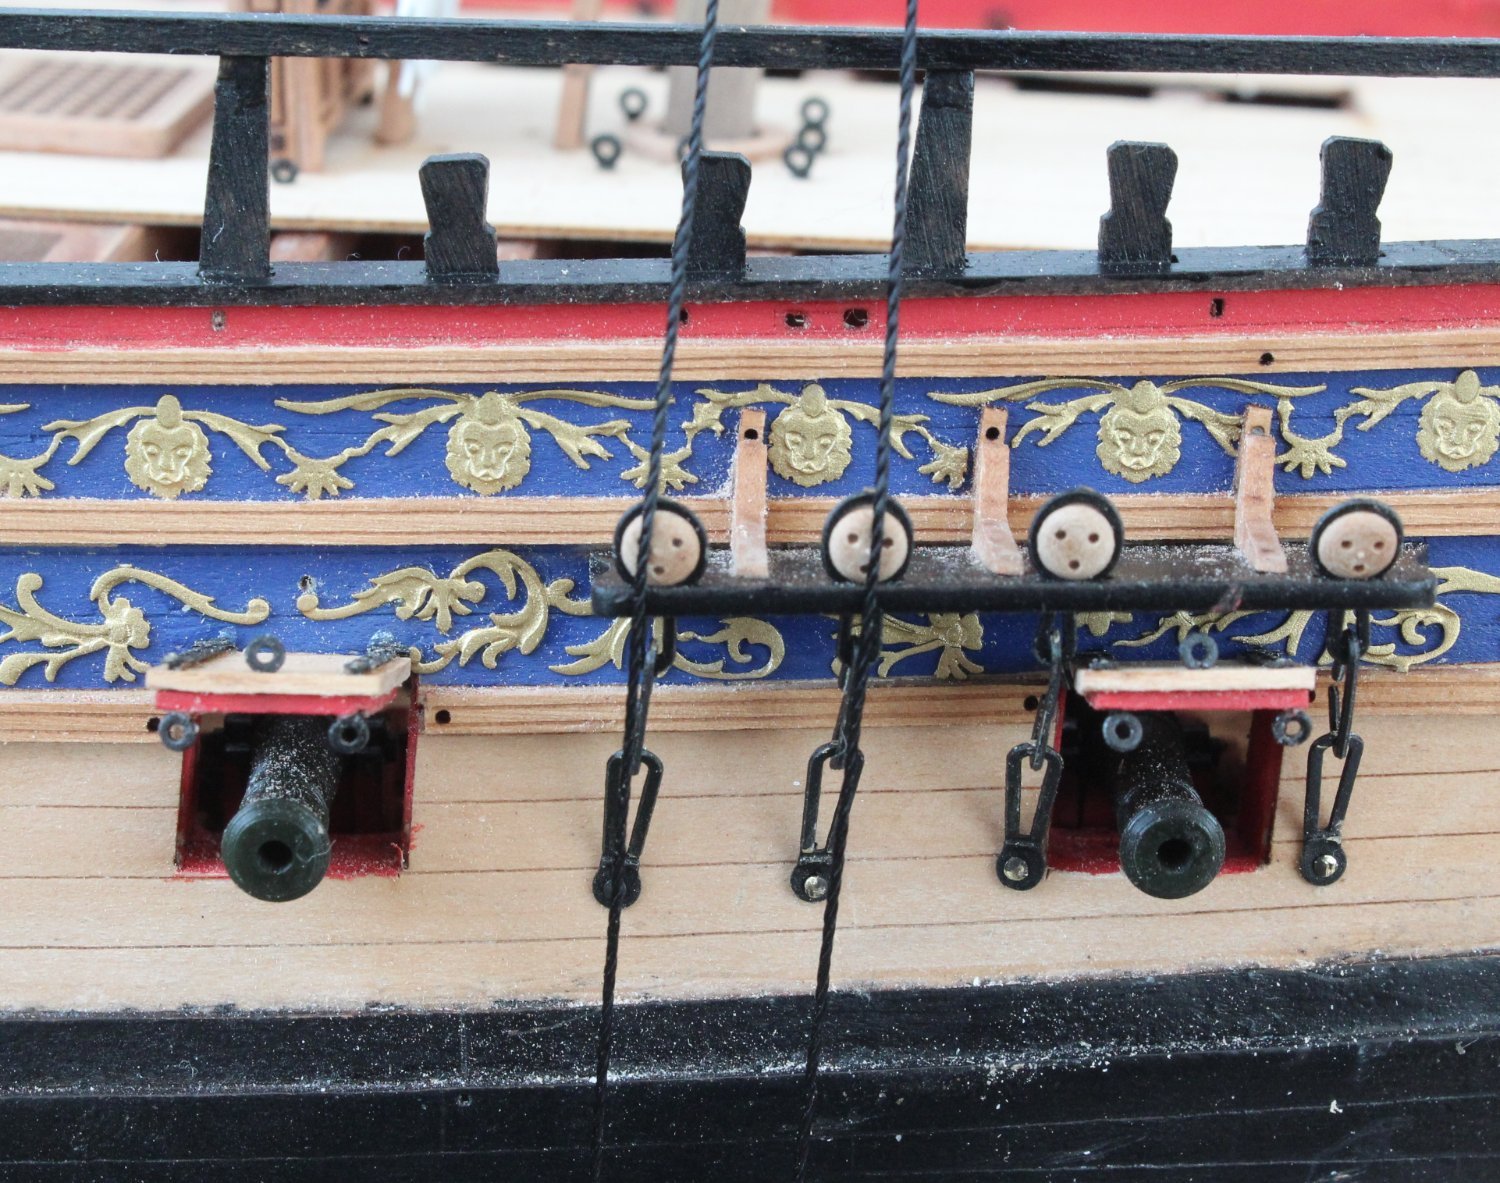
Foremast Shrouds - Port Side Start After the false start yesterday with adding the deadeyes to the foremast shroud lines I have been able to refine my method which seems to be working well so far. I must admit I do not enjoy the task of adding deadeyes to the shrouds, but it does become slightly less onerous now I have my refined method to a set of repeatable steps. I am still using my jig to form the loop for the deadeye, but I have discovered the position of loop can be adjusted. Once I am happy a touch of ca gel is applied to the loop seizing and the excess thread trimmed. The shroud line is then held in one of the quad hands,. A clamp is used to hold the thread in place, as shown in the photo below. It is an easy job to then add the seizing's. Each seizing consists of 5 bottom and 5 top half hitch knots. I then add some test lanyards to the first pair of shroud lines. With the partially rigged lanyards held under a bit of tension the deadeyes are reasonably level. I am not going to worry too much if there they are slightly uneven once then proper lanyards are rigged, as that is normally the case for the actual ships. The picture below is shows the first three deadeyes in position with a bit of tension applied to the test lanyards. The second shroud line is now complete, and looks good when a test lanyard is added and held under tension. I have one more pair shroud line and one single shroud line to add to the port side foremast before I will repeat the process for the starboard foremast shrouds. It should be noted that the starboard shrouds lines are being added to the foremast in turn, as per the instructions in the rigging plan sheets. I will continue to take my time with this aspect until all the lower shroud lines have been added for the three masts. I will post some more pictures as I progress with this task.


- 476 replies
-
- 10
-
-
- sphinx
- vanguard models
- (and 1 more)
-
I have tried the deadeye claw before before moving on to the jig I made with two pins and dowel which has served me well for my last three boat builds. I could never fully get to grips with the deadeye claw method. I modified it by replacing the top pins with a dowel. I am going to experiment with a few different ideas.
- 476 replies
-
- 3
-
-
- sphinx
- vanguard models
- (and 1 more)
-
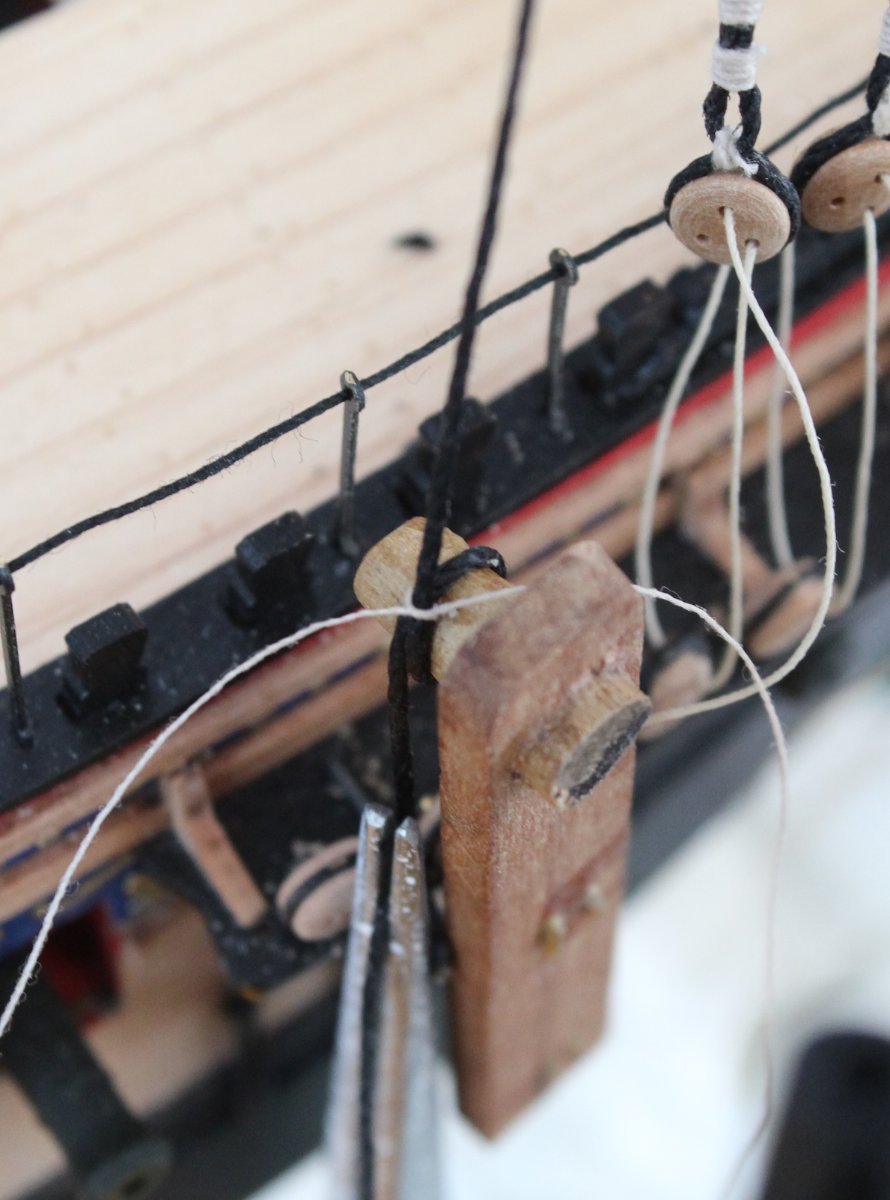
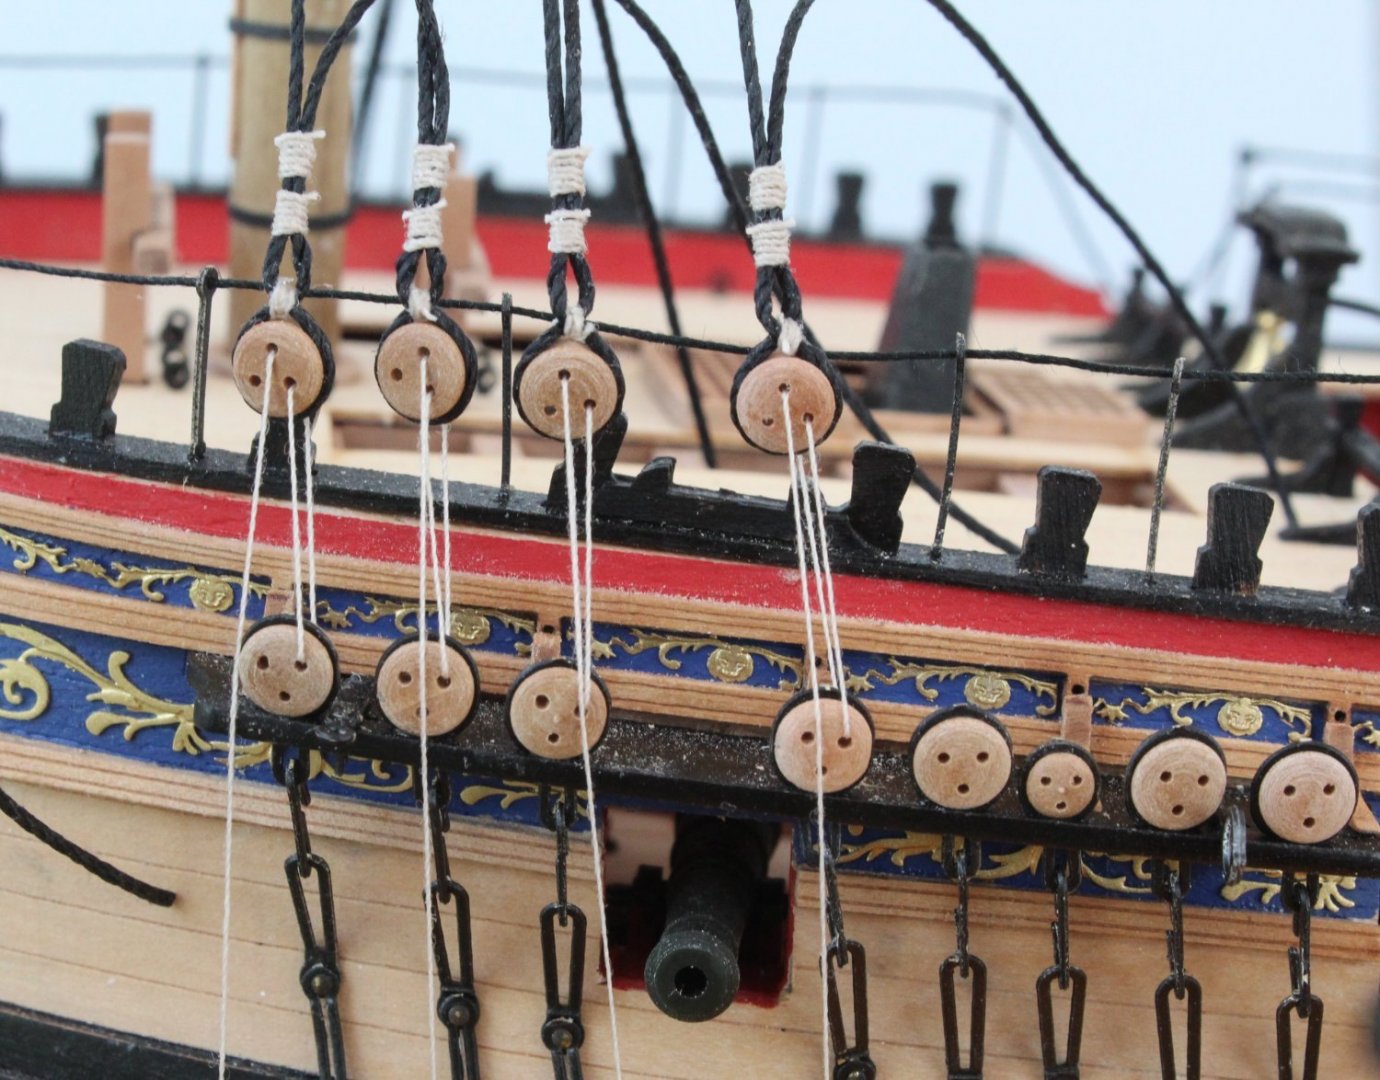
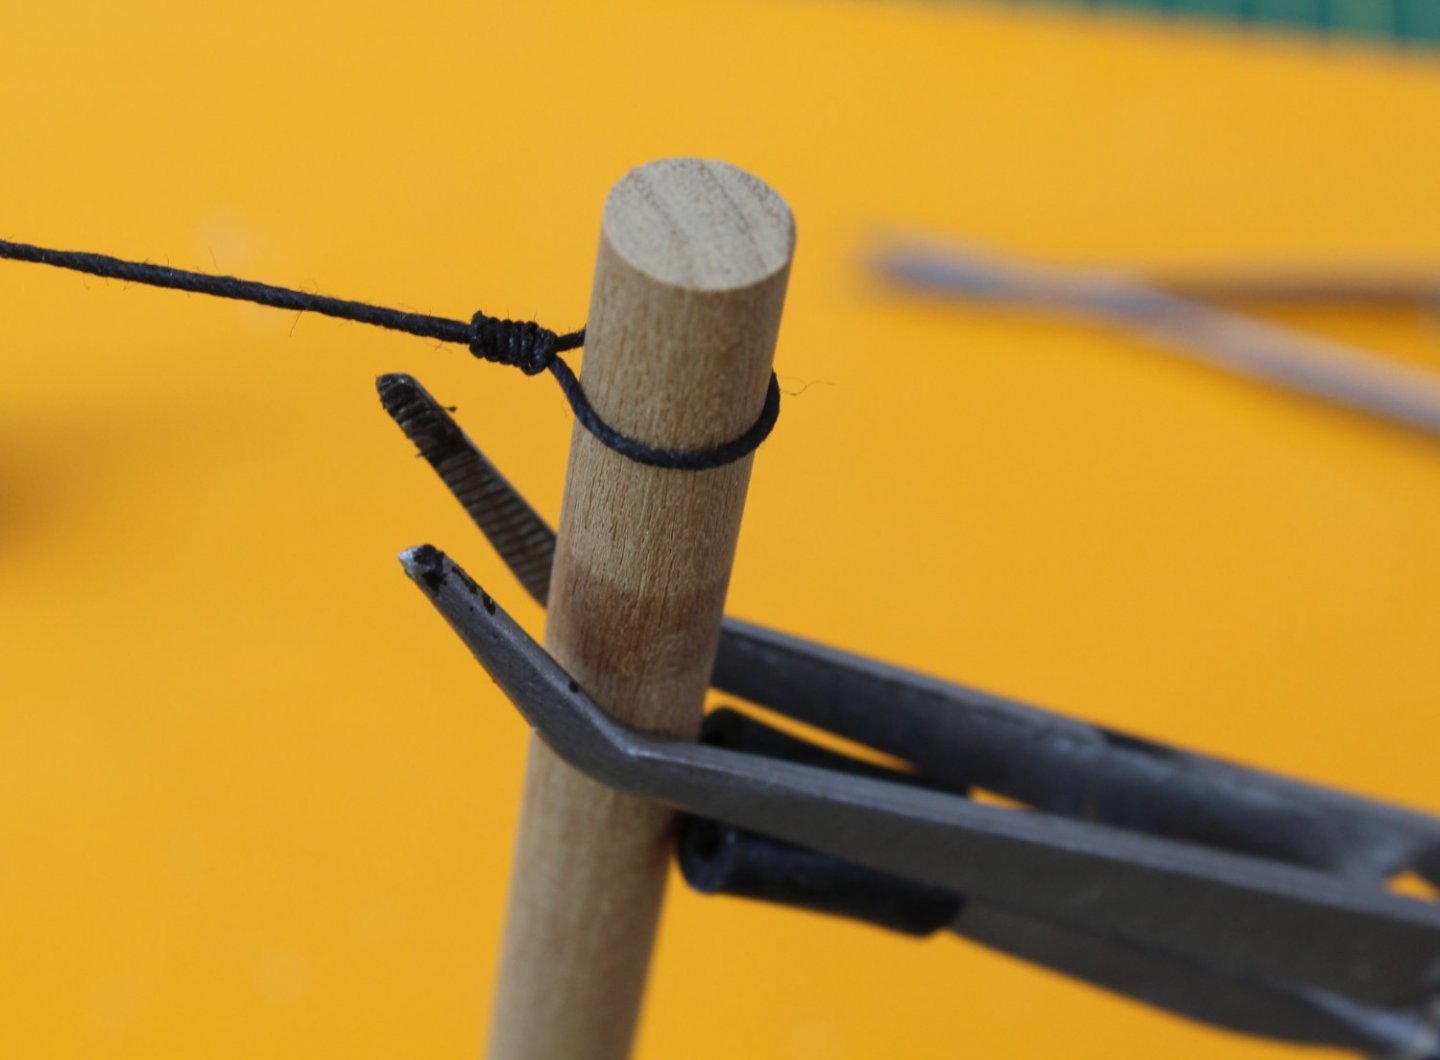
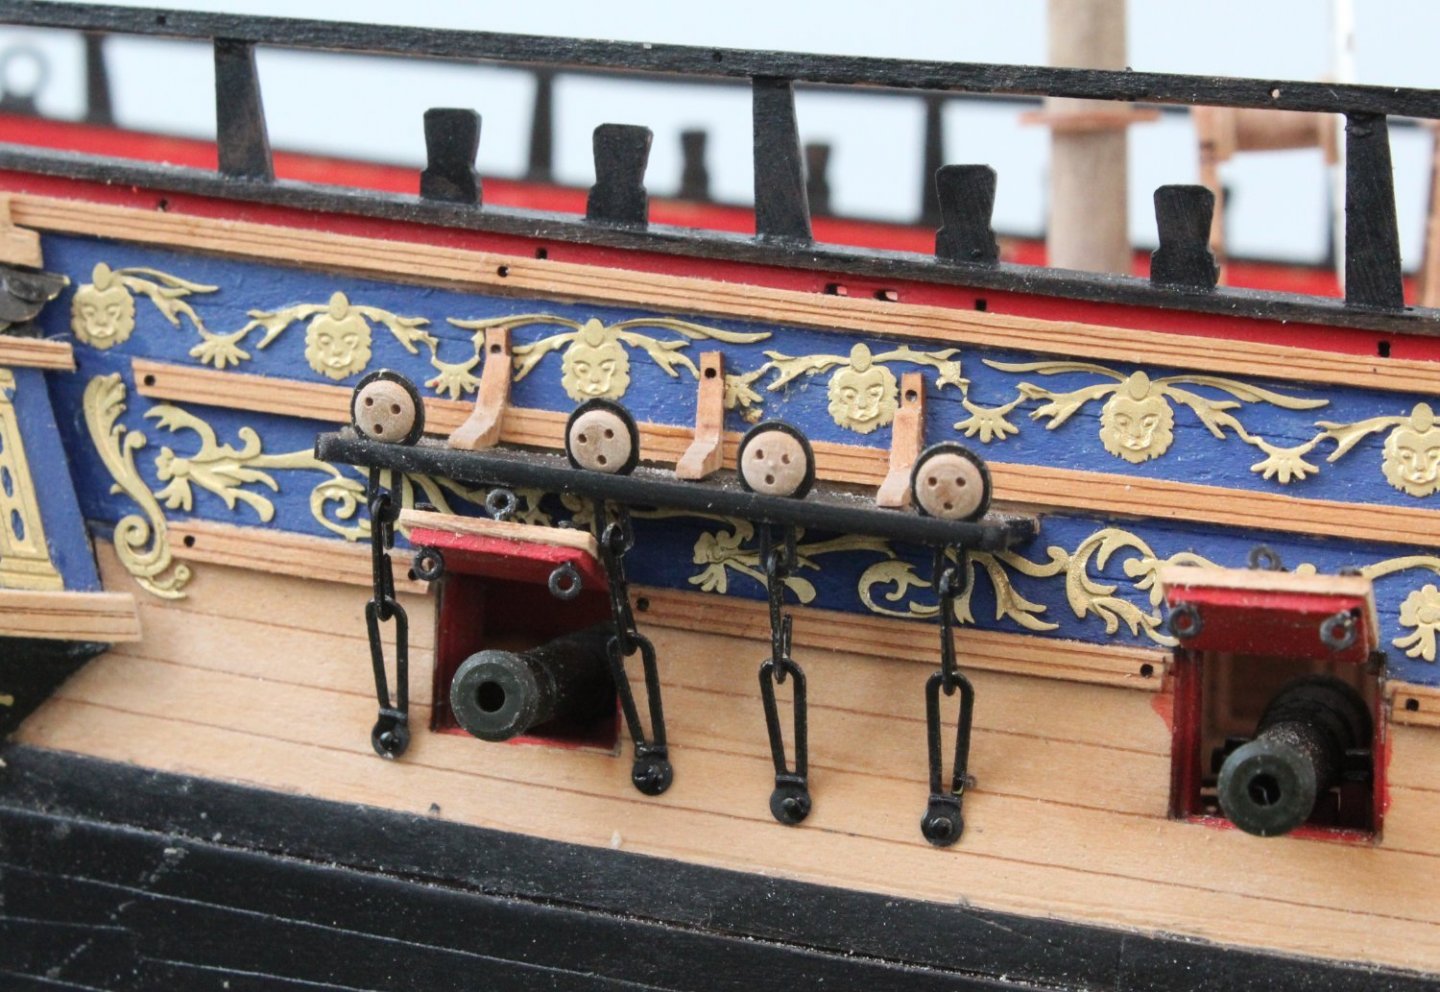
Start of Shrouds - Fail The good thing about this log is that I will detail my progress and methods which other builders may find helpful. I also receive some great advice from other builders, Jim and Chris. I also like include some of my failures in this build log. This post details one such failure when adding deadeyes to the foremast port side shroud lines. All the foremast shroud lines were all prepared, using the same method as detailed in my last post for the burton pendants, no problems so far. I have a jig, which I have used on my previous builds, to help me position the deadeyes in the shrouds so they are all at the same level. The photo below shows the jig in place. Two prongs on the jig are pushed in to the channel deadeye. The shroud line is then wrapped around the dowel on the jig and the loop is secured with three half hitch knots. Once the jig is removed a 5mm deadeye can be inserted in the resultant loop. It is then a simple process to add the two further seizing's. The shroud deadeye is free to be rotated to the correct orientation before the lanyards are added. So far so good as can be seen in the photo below. Full of confidence that the method was working fine I added the deadeye to the second shroud line. I took care to ensure all the seizing's on the second shroud line matched the seizing's on the first line. I was reasonably happy with how the second line looked. However when I compared the first two lines there was a major problem, as is clearly seen in the photo below. I can only assume that the shroud line moved as I was securing the loop, resulting in the two shroud deadeyes not being positioned evenly. I seem to recall that @DelF used a drill bit to form the deadeye loop at the end of the shroud line and then, using a needle, secured the loop by passing the seizing thread through the shroud lines, which locks it in place and prevents slippage. I need to rethink my method and experiment to find a method which will produce repeatable results, without unwanted slippage.

- 476 replies
-
- 7
-
-
- sphinx
- vanguard models
- (and 1 more)
-
Many thanks for your kind comments. I agree Vanguard Model kits are all of the highest quality.
- 476 replies
-
- 2
-
-
- sphinx
- vanguard models
- (and 1 more)
-
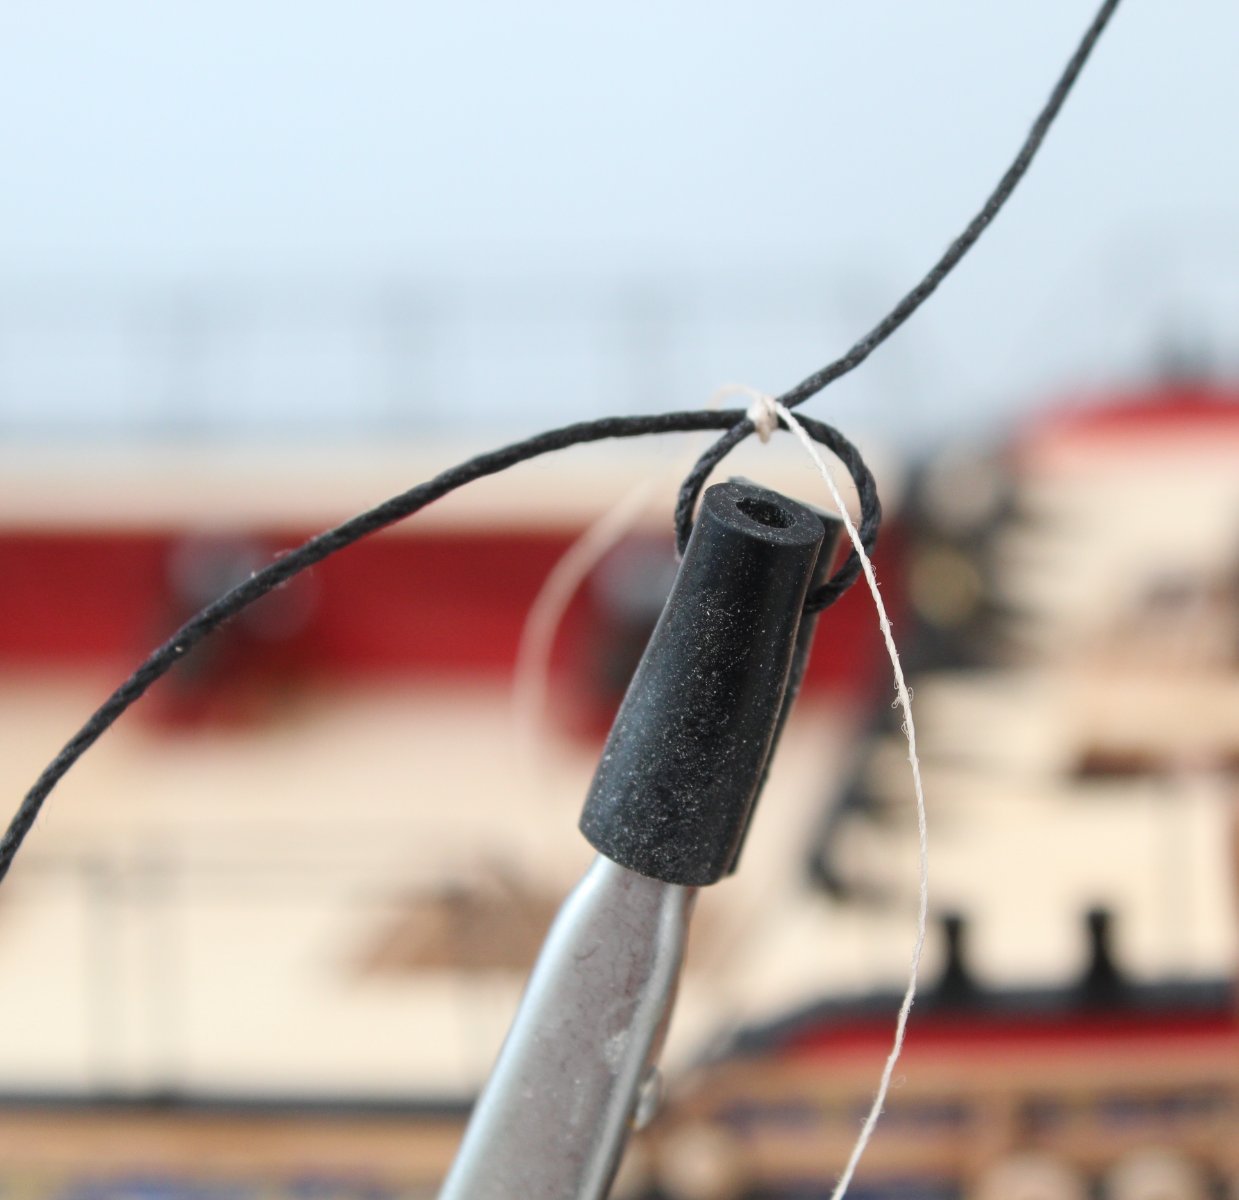
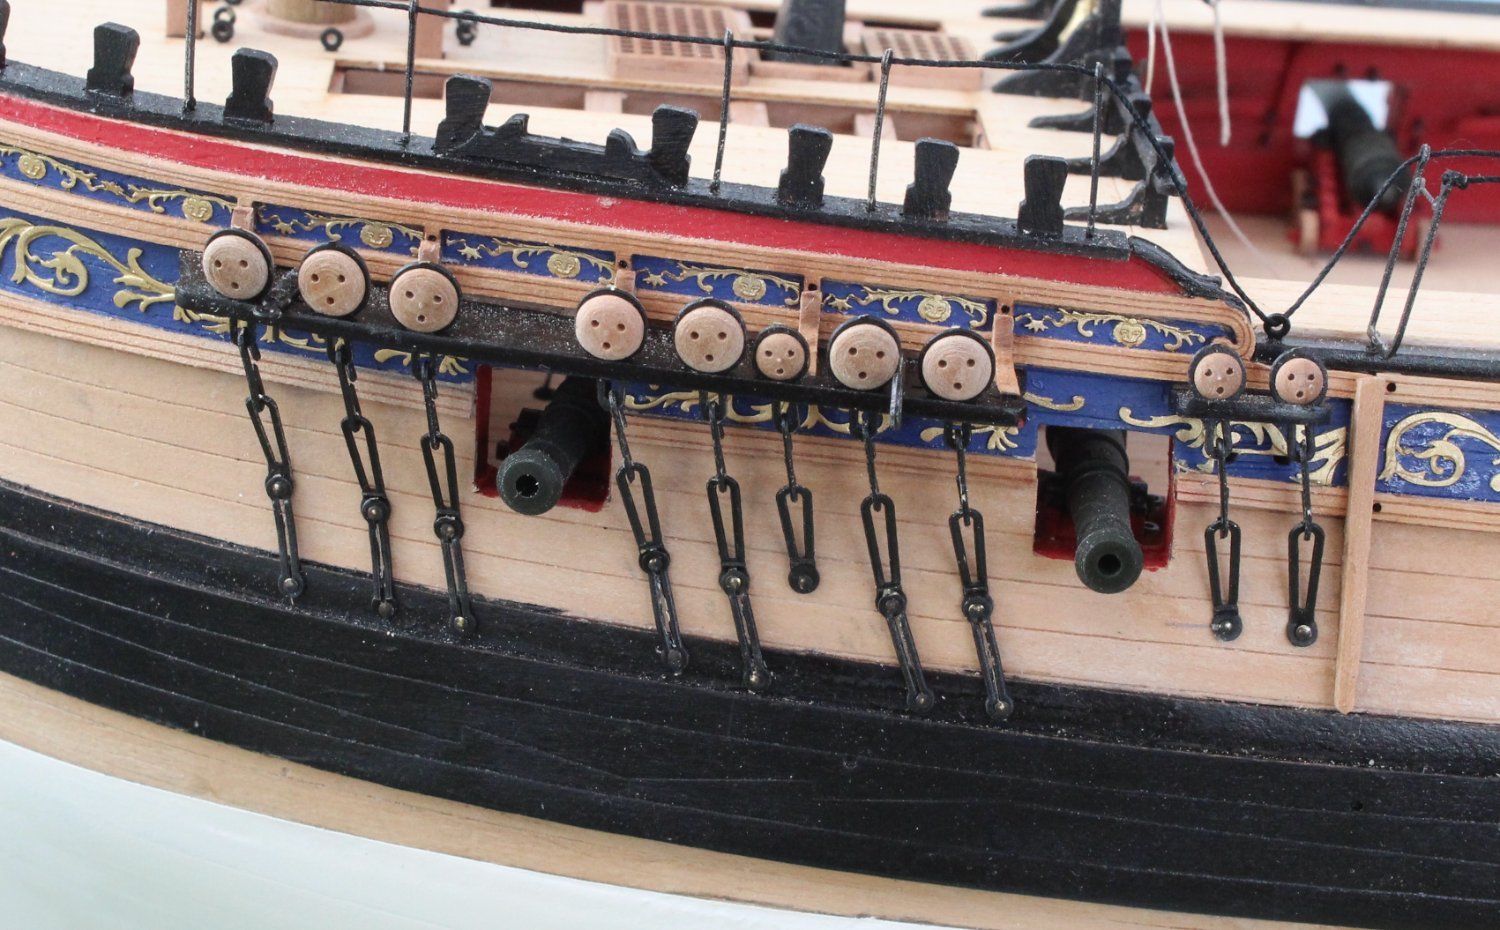
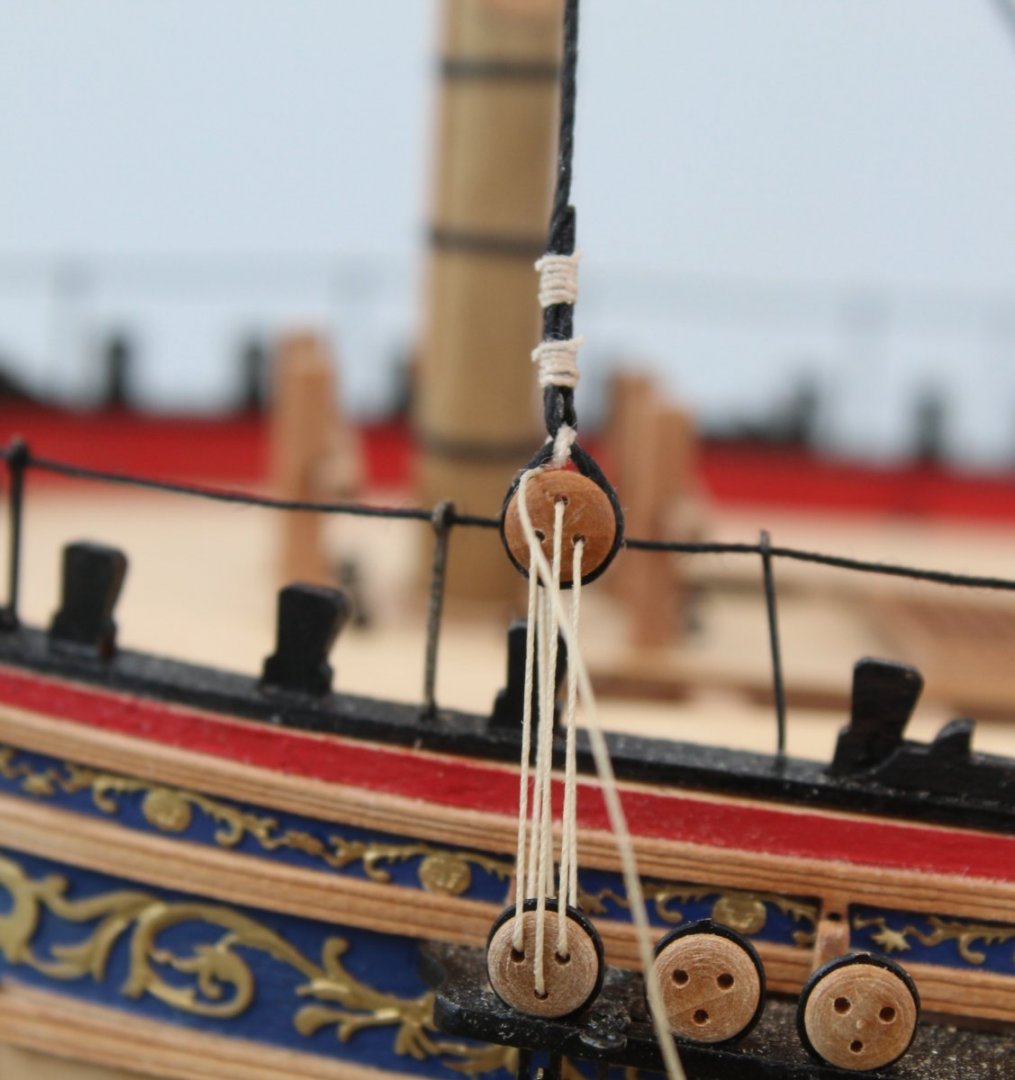
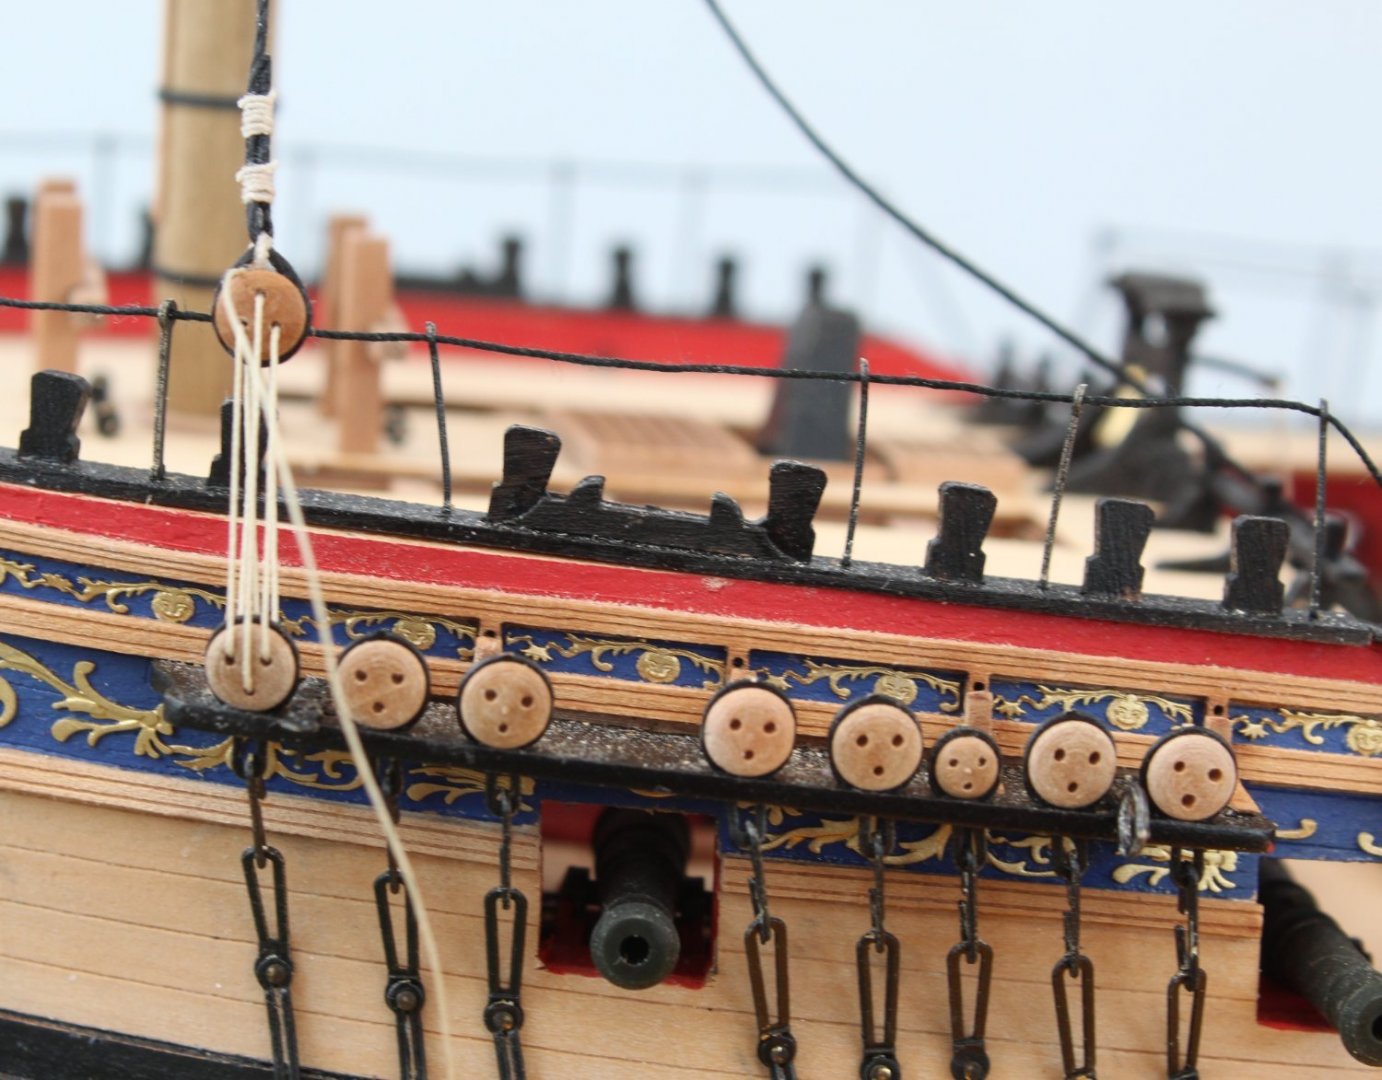
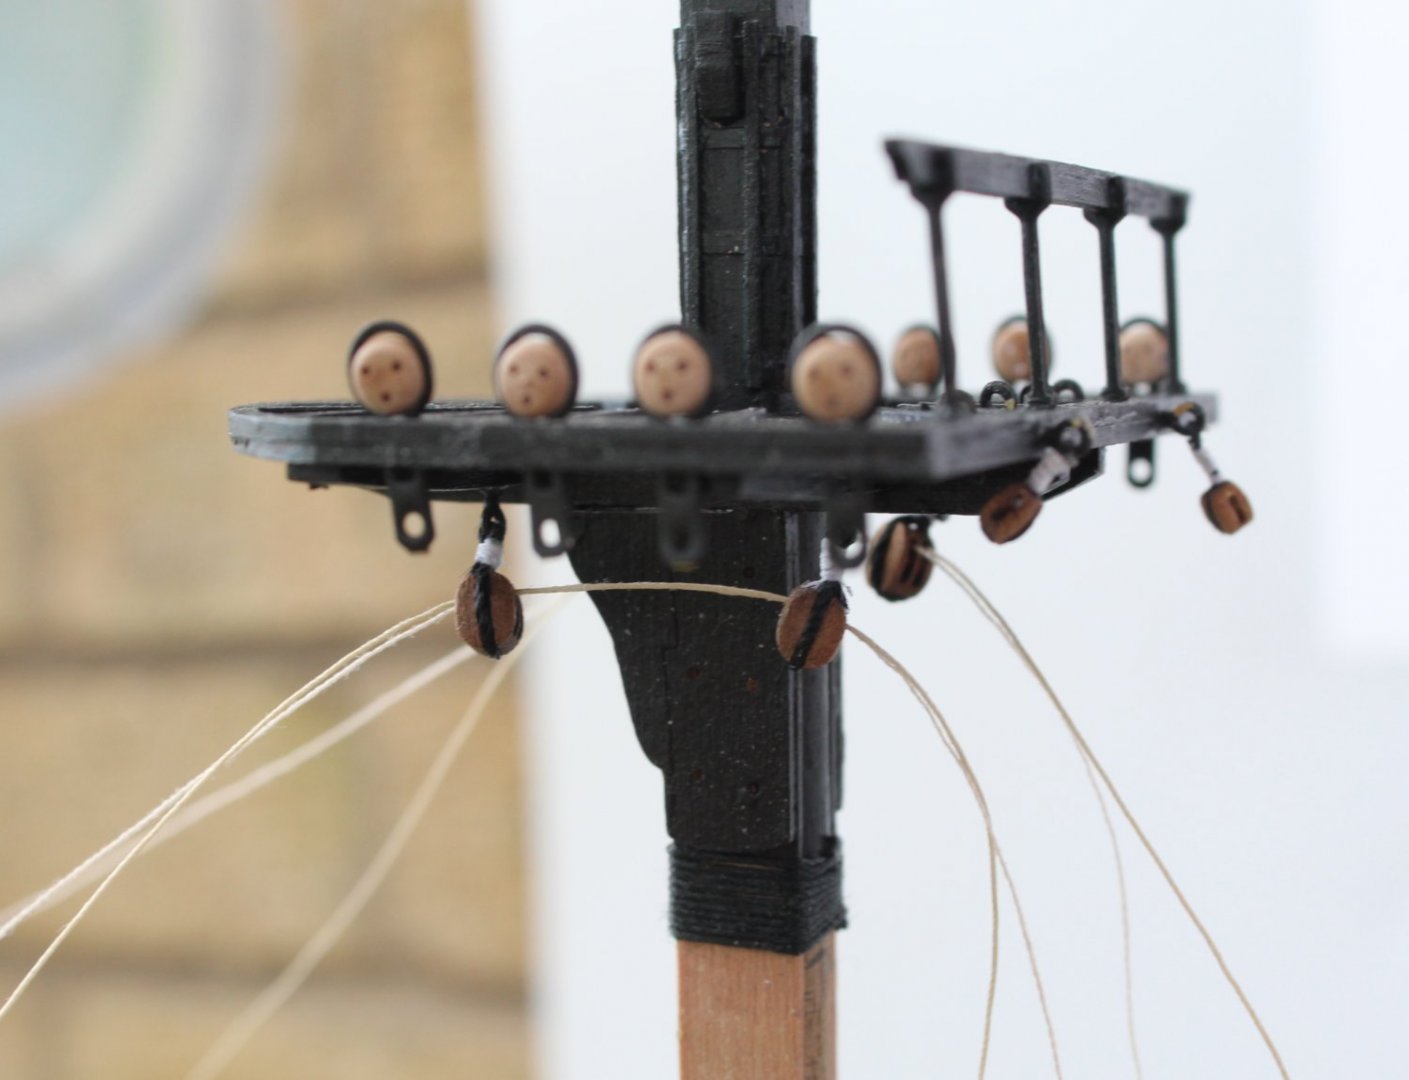
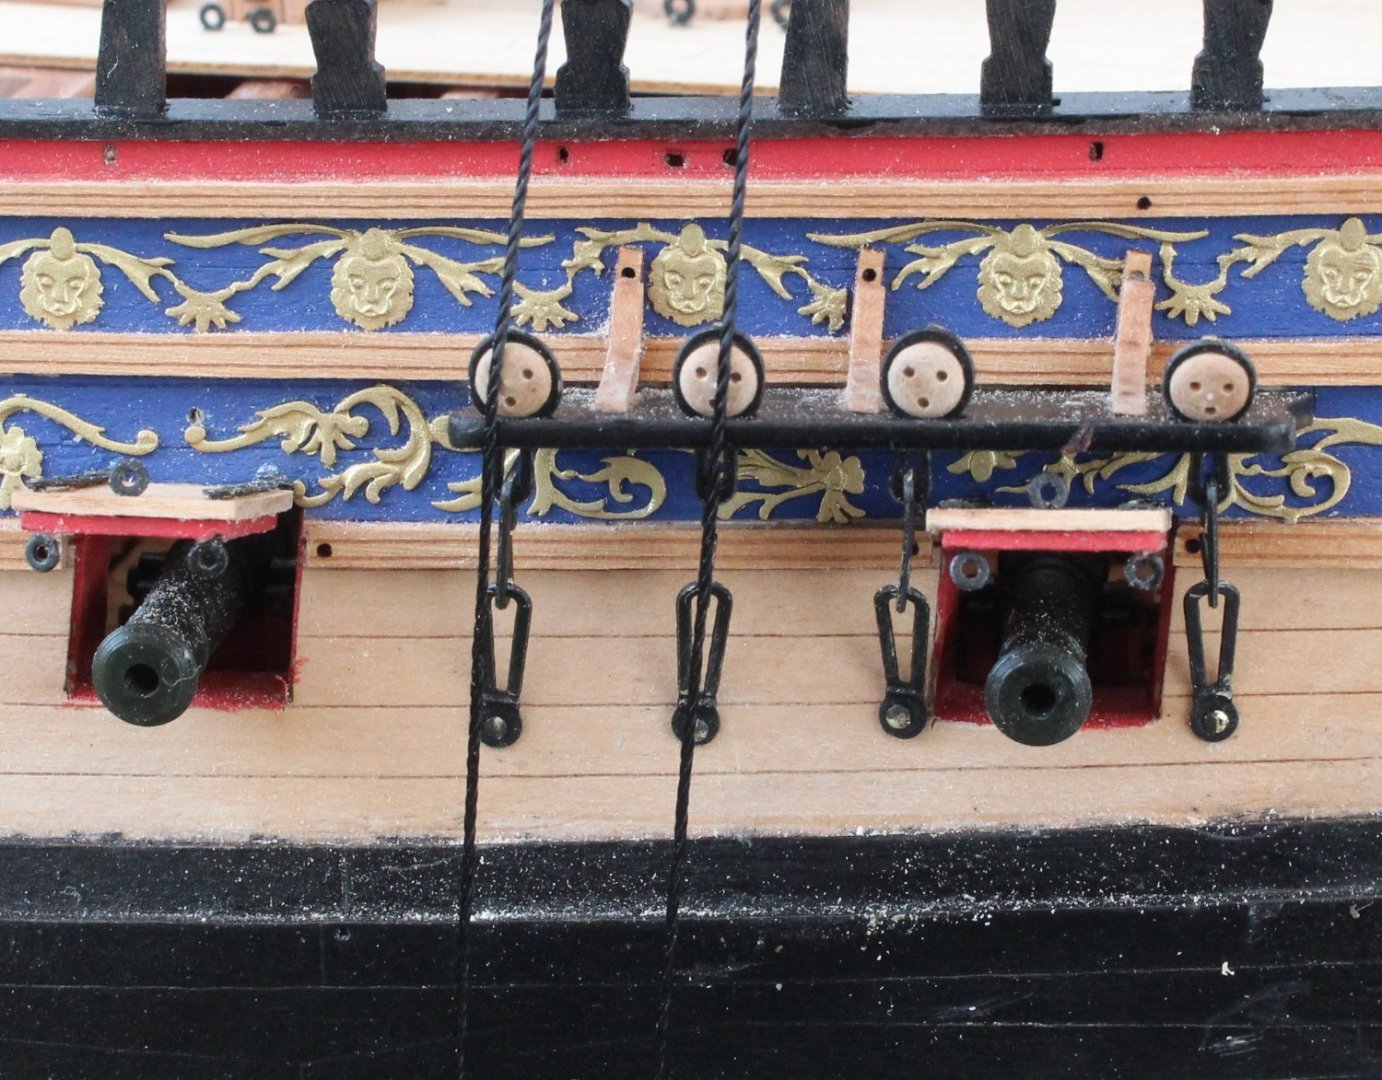
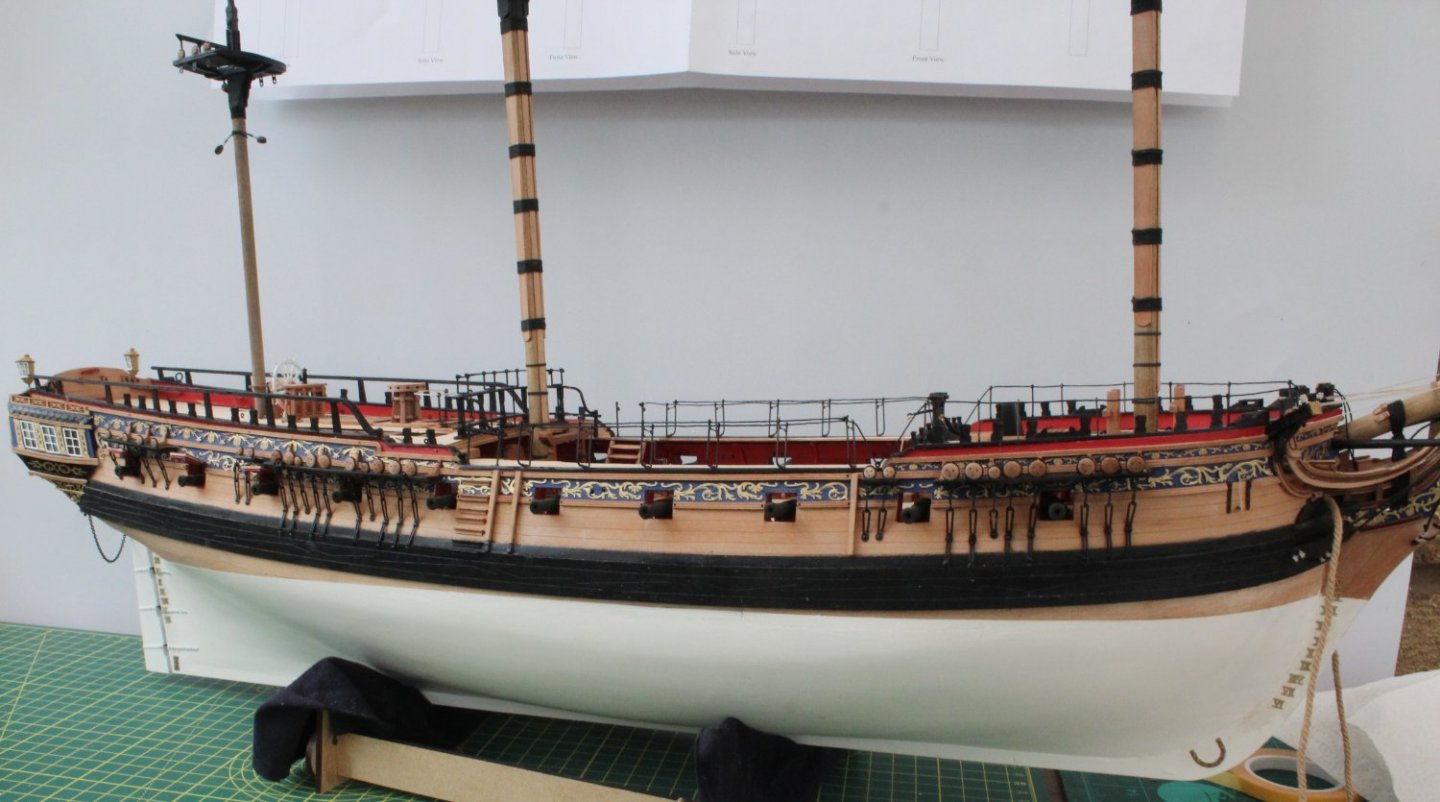
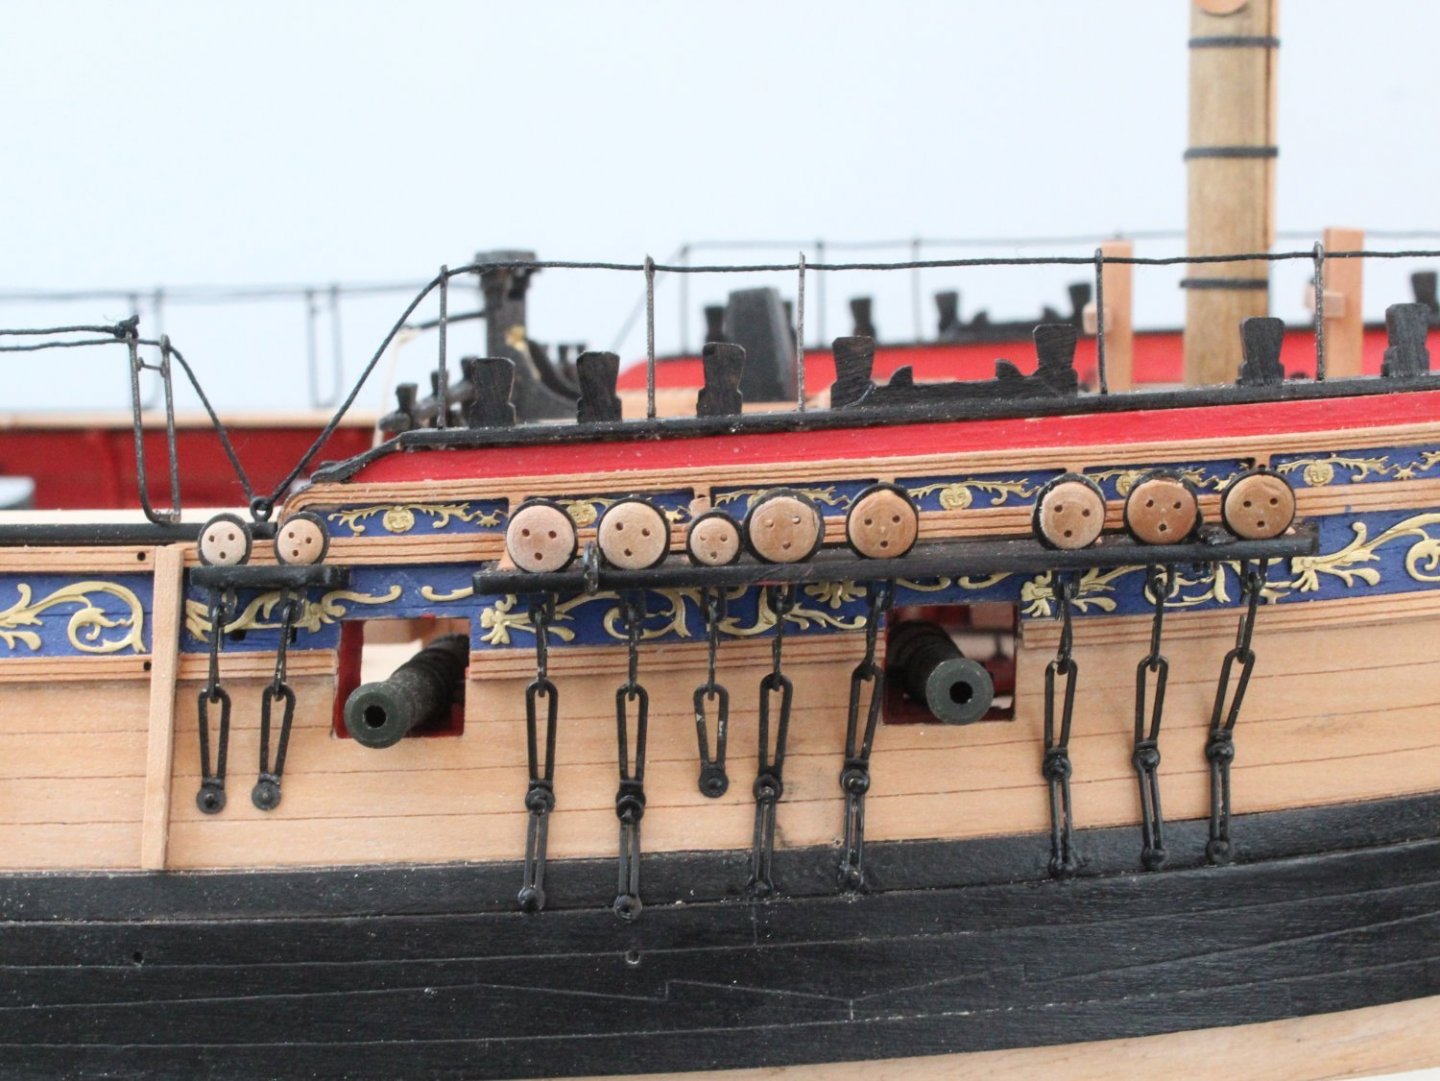
Chainplates Port Side. Spritsail Braces and Burton Pendant I have now completed adding the chainplates to the port side. As shown in my previous post, following the sound advice from Glenn (USA) and Chris Watton, I used some threads secured to the masts so the chainplates would follow the line of the shrouds. Foremast Mainmast Mizzenmast Before moving on to the shrouds and burton pendants I decided to run the threads required for the two spritsail yard braces as these run through the double blocks located beneath the foremast platform and will be hidden by the shroud lines so to some extent makes access a bit more difficult. These brace threads will be secured to the spritsail yards and belaying points later on in the rigging process. I can always remove these threads if they become a hindrance when rigging the shrouds. The first items to be added to the masts are the burton pendants. A length of 0.75mm black thread was seized with 0.25mm black thread. I used a piece of 8mm dowel (Fore and Main masts) and applied 6 half hitches top and bottom. The end result is shown in the photo below. The pendant thread was then placed over the foremast so I can check the position where I need to add the thimbles. I would welcome some feedback if the seizing looks Ok as I am not sure if I need to make it tighter or looser around the foremast. It looks OK to me but it is an area I have no real idea what is right or wrong. I plan to use the same method for the shroud lines so I would like to get it right from the get go.


- 476 replies
-
- 10
-
-
- sphinx
- vanguard models
- (and 1 more)
-
For a kit that may take 2+ years to build a £1000+ price tag is very good value for the Indy. I will be tempted to build one of the smaller fishing boats in tandem and maybe one such as Saucy Jack after my Sphinx is complete and before Indy is released.😃
-
I go for quality over cost every time. I am lucky that I am now in a position to buy these fantastic kits regardless of the price.
-
Mizzen Mast Chainplates As indicated by @chris watton and @glbarlow the chainplates should run along the same path as the shrouds. Therefore I have taken their very helpful advice onboard as I start work on adding the chainplates to the port side. A temporary shroud line is attached to the mizzen mast and the first chainplate is aligned to follow the shroud line path, as can be seen in the picture below. I then continued with the same process and completed the installation of the mizzen mast chainplates. It would appear that the left hand chainplate is misaligned in the first photo below. This is not the case when you seen the second photo which is taken at a slightly different angle, and the other chainplate now looks misaligned.


- 476 replies
-
- 11
-
-
- sphinx
- vanguard models
- (and 1 more)
-
Thanks Chris. I was aware the correct angle required for the chain plates should be same as the shrouds but it is a bit difficult to work out without the shrouds. I generally tried to position the chain plates as shown on the plan sheets. I am not overly worried if they do not match the shroud angles when complete as I don't think my family members will pick up on the error as they will be the only ones looking at the completed model.
- 476 replies
-
- 3
-
-
- sphinx
- vanguard models
- (and 1 more)
-
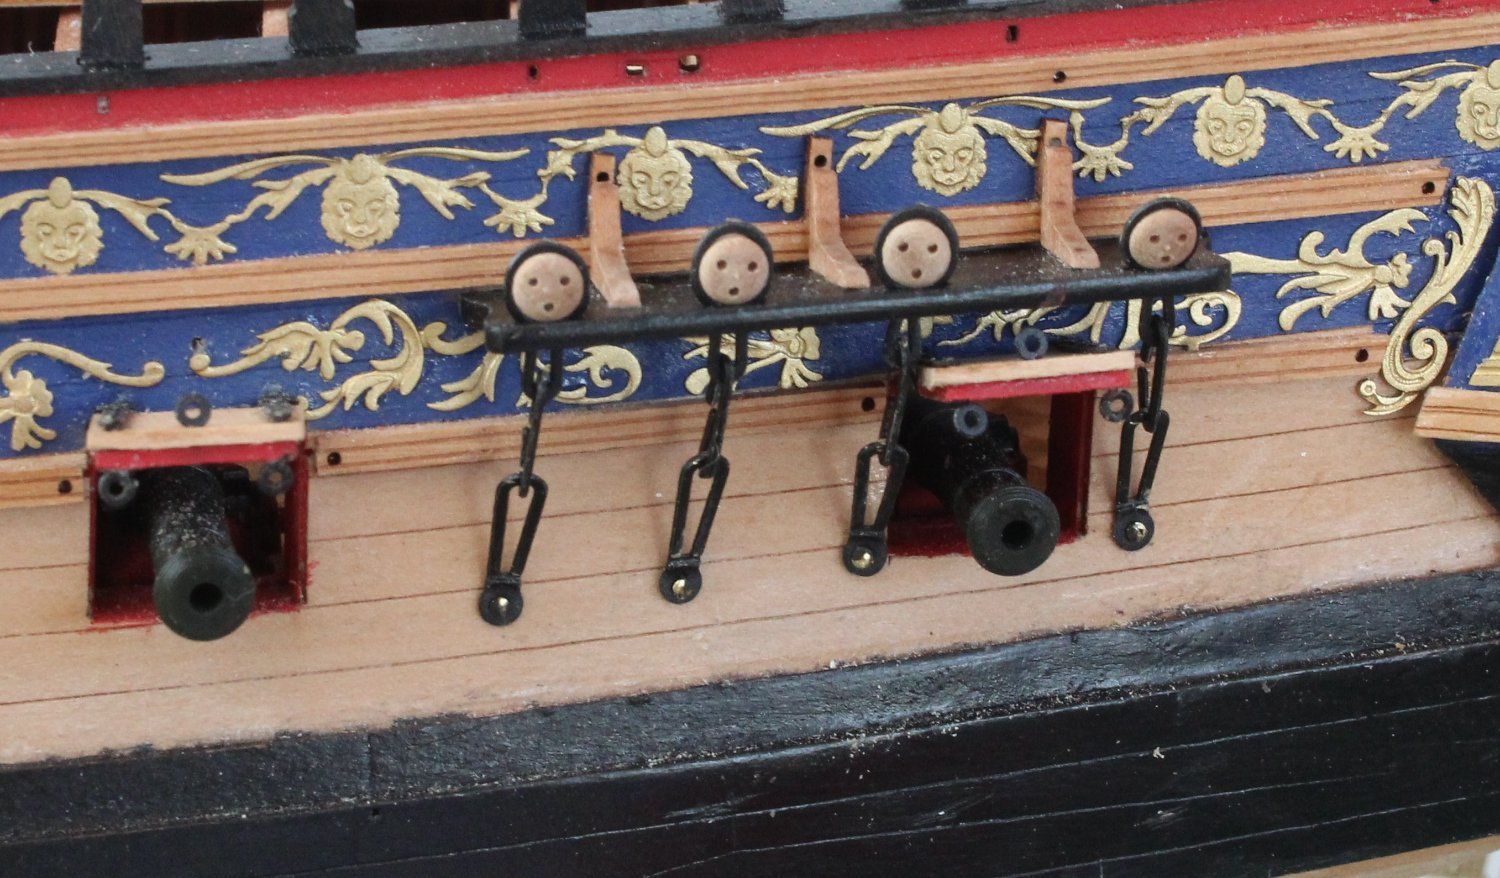
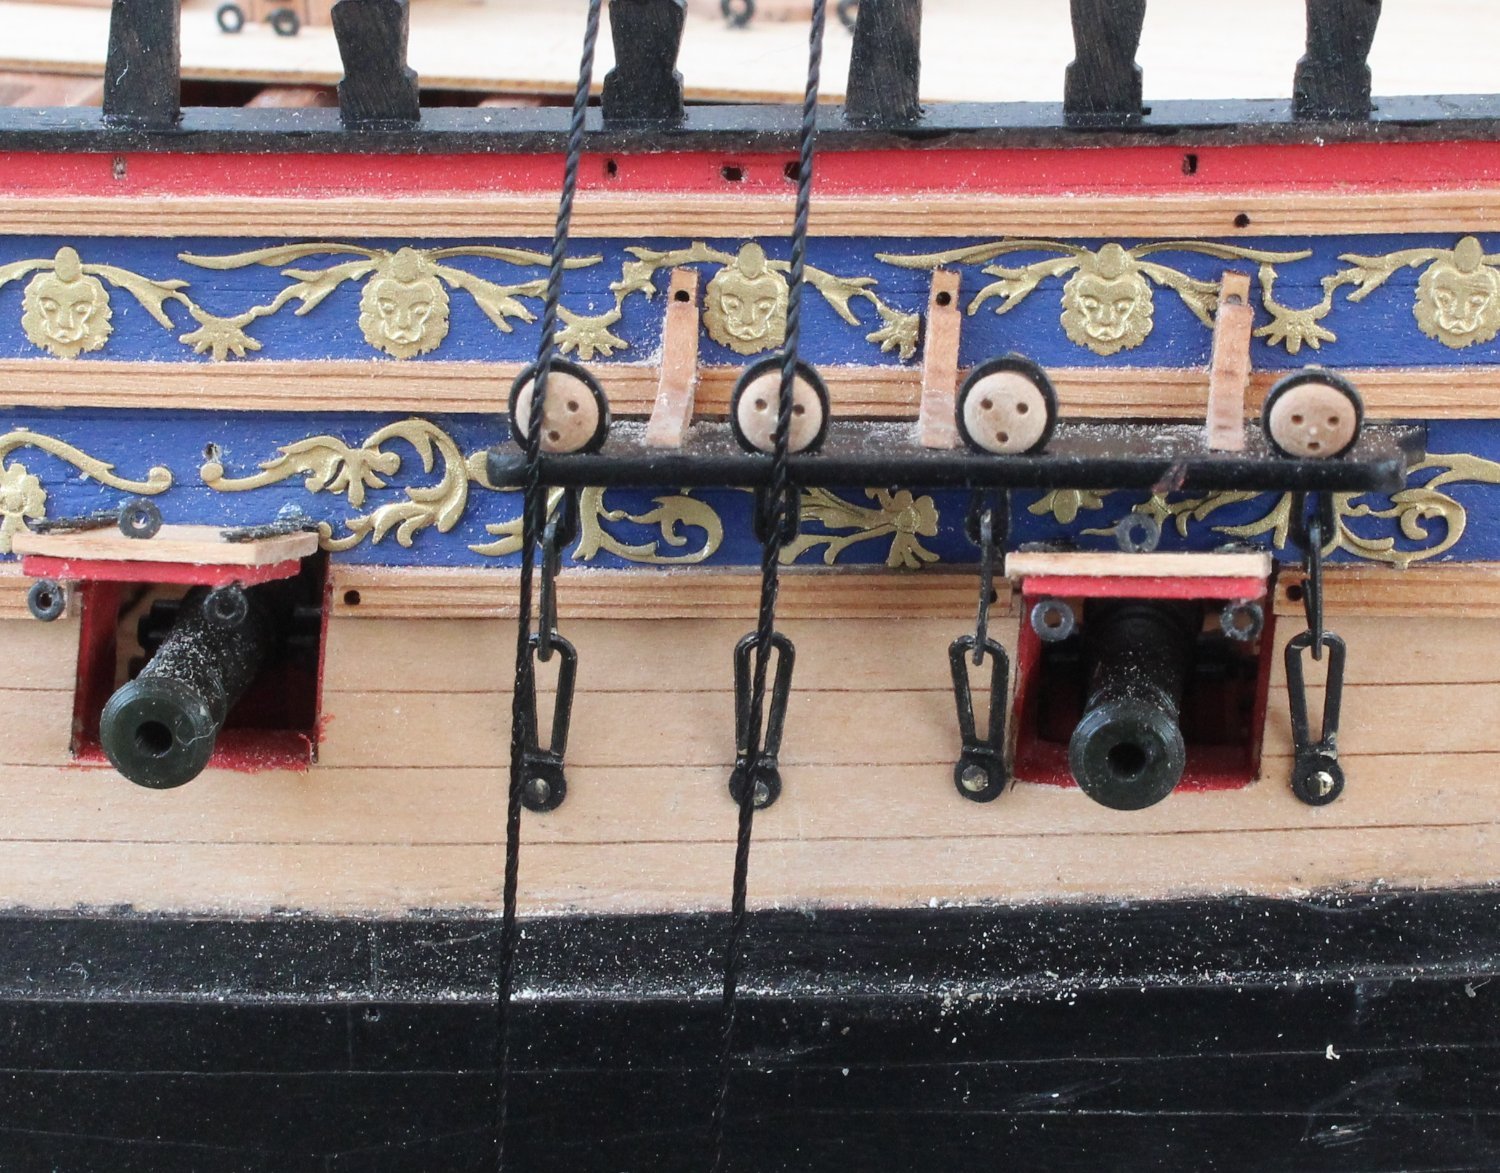
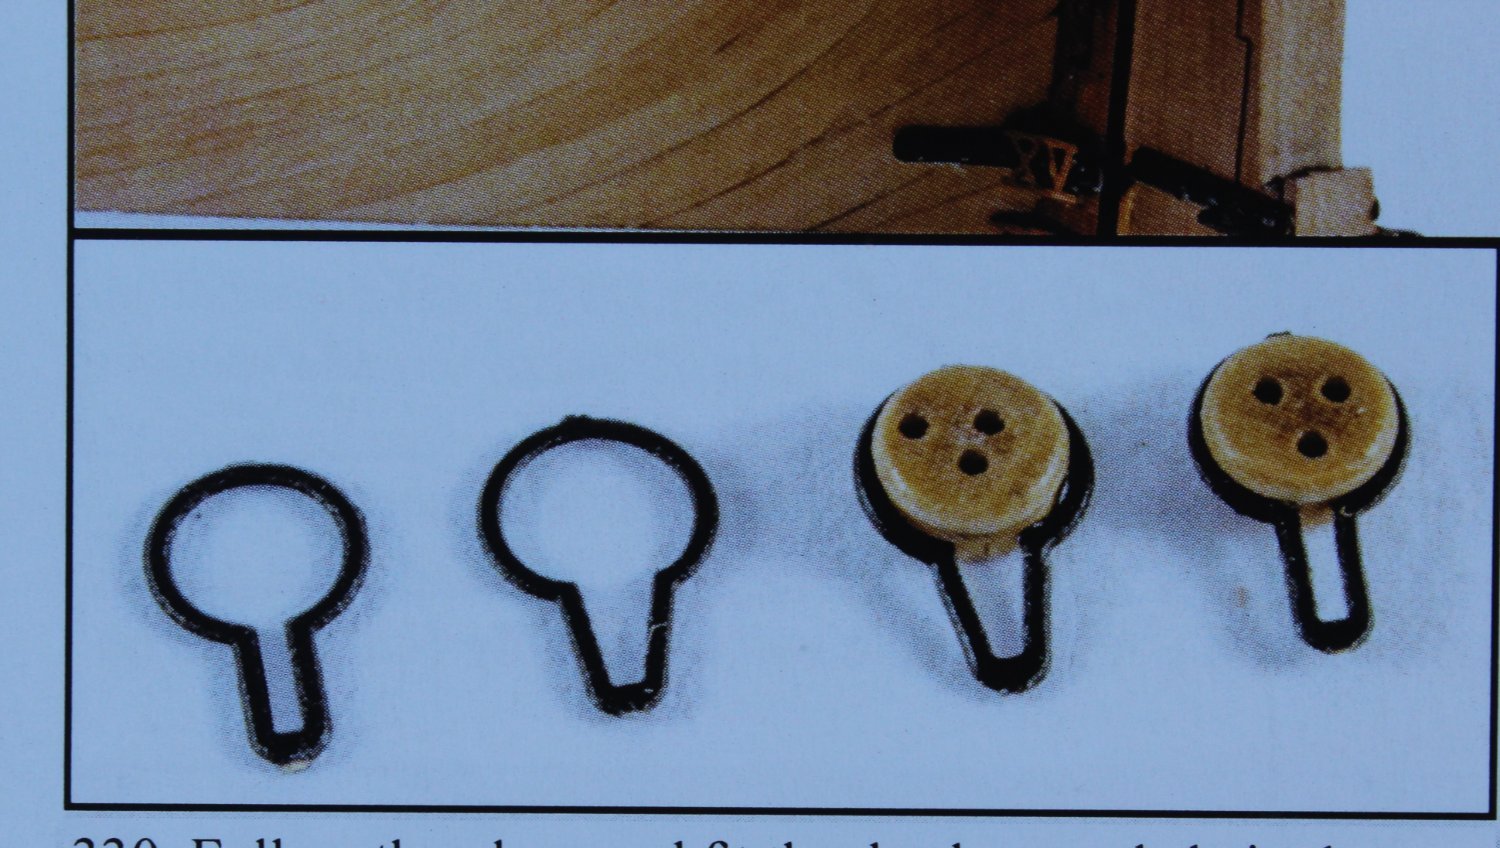
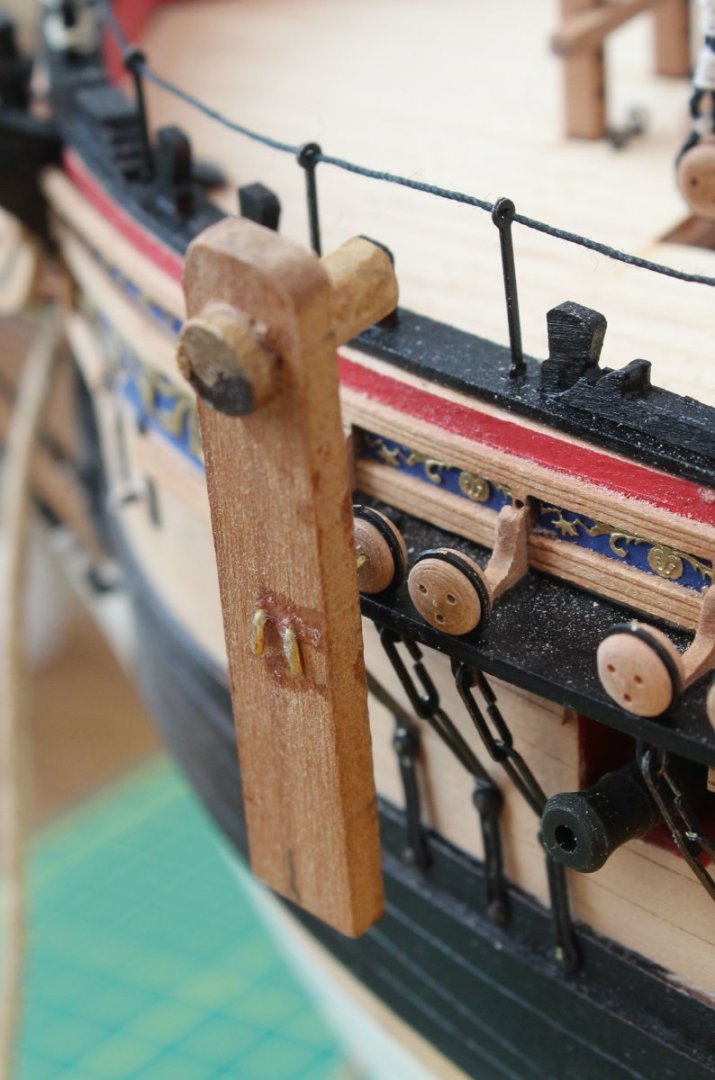
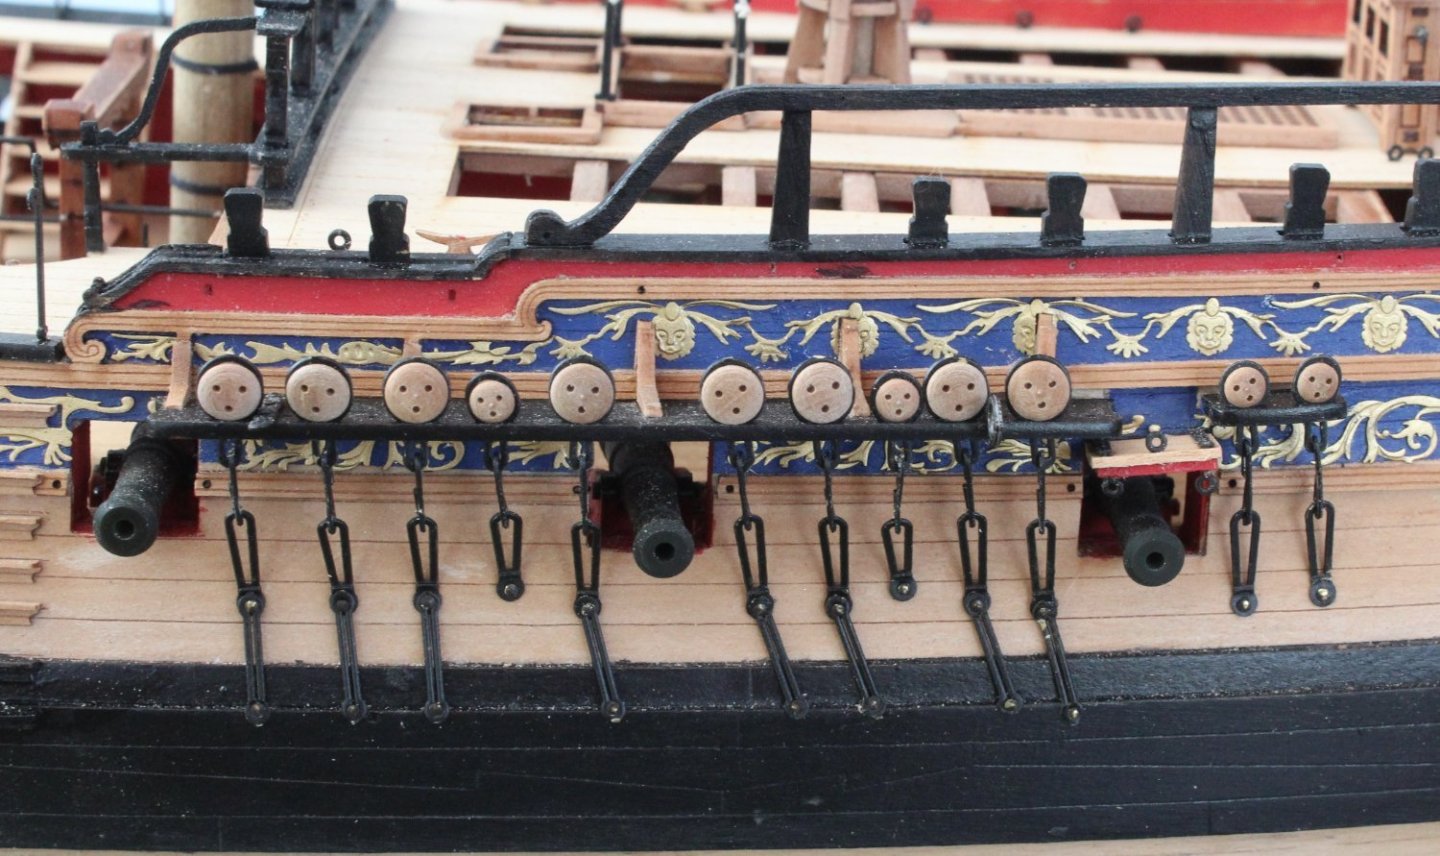
Chain plates and links - Starboard Side I indicated in my last post that I found it difficult to fit the 5mm deadeyes to their respective strops. This morning, when browsing the build manual, I found the following photo. I noted the bottom section, which fits through the channel is also opened up which is something I was not doing. As I was not doing this I thought I should give it a try as I still had 22 x 5mm deadeyes to fit to strops. Using my round nose pliers I opened up the strop as shown in the photo below. The fitting of the deadeye in the strop was much easier and neater. Lesson learnt! With all the deadeyes fitted to the strops it was then a case of adding the links and chain plates. The design of the links and chain plates made this a relatively straightforward task. I used a pencil to mark through the upper chain link and drilled a hole. A blackened pin was then inserted to secure the upper and lower chain plate links. A second pin was added to the lower chain plate link. It was a bit repetitive but after a couple of hours the starboard side was completed. Foremast channels Mainmast channels Mizzen mast channel

- 476 replies
-
- 7
-
-
- sphinx
- vanguard models
- (and 1 more)
-
Whatever the cost it will be money well spent. I will certainly add it to my Vanguard Models fleet.