

woodrat
-
Posts
779 -
Joined
-
Last visited
Reputation Activity
-

 woodrat got a reaction from GrandpaPhil in Le Gros Ventre 1767 by woodrat - Scale 1:48 - POF - French exploration vessel
I have installed the waterways both sides.
Cheers
Dick
-
 woodrat got a reaction from KARAVOKIRIS in Le Gros Ventre 1767 by woodrat - Scale 1:48 - POF - French exploration vessel
I have installed the waterways both sides.
Cheers
Dick
-
 woodrat got a reaction from Mark Pearse in Le Gros Ventre 1767 by woodrat - Scale 1:48 - POF - French exploration vessel
I have installed the waterways both sides.
Cheers
Dick
-
 woodrat got a reaction from mtaylor in Le Gros Ventre 1767 by woodrat - Scale 1:48 - POF - French exploration vessel
I have installed the waterways both sides.
Cheers
Dick
-
 woodrat got a reaction from CiscoH in Le Gros Ventre 1767 by woodrat - Scale 1:48 - POF - French exploration vessel
I have installed the waterways both sides.
Cheers
Dick
-
 woodrat got a reaction from scrubbyj427 in Le Gros Ventre 1767 by woodrat - Scale 1:48 - POF - French exploration vessel
I have installed the waterways both sides.
Cheers
Dick
-
 woodrat got a reaction from JacquesCousteau in Le Gros Ventre 1767 by woodrat - Scale 1:48 - POF - French exploration vessel
I have installed the waterways both sides.
Cheers
Dick
-

 woodrat reacted to No Idea in Le Rochefort by No Idea - 1/24th Scale - First POF Build
Thanks Jeremy 🙂
Right I'm back from the hospital and I've been repaired but apparently it's no work for me for a few weeks. So completely ignoring their requests I decided to get on with a bit of ship building to keep me sane 😜
Picking up where I left off my next jobs are to make the ships stove and the small office. Both of these parts require a bit of deck for a base so I did this first. I made these parts of the deck as they should be underneath them rather than just placing a bit of wood for them to stand on. The deck under the stove has a layer of metal on top I guess to keep the heat away from the wood.
The stove starts with a pretty simple wooden box with 4 legs that go through the base.
I then lined 3 of sides with bricks that I bought online at 1/24 scale - I never realised that building ships also involves brick laying! The only tricky part of this job was the small corner 45 degree bricks. To get the 12 that I needed cost me about 40 bricks!
I never really know how much detail people want but next I needed to cut the brass strips for the iron cage that fits inside. These strips were cut from 0.25mm thick brass and are 1.2mm wide. To do this I use double sided tape to hold the brass on a sacrificial piece of wood. It's dead simple but the clean up of the saw takes about 30 minutes as the sawn tape just sticks to everything inside of it.
I wanted the cage to be half decent so I opted to use a plug to try and get a good fit. It's a nice snug fit inside which does not allow for the brass cage.
I then marked out and milled the cage to be made - The inside cuts are 0.5mm deep and the outside cuts are 0.25mm deep. It's not perfect but it's good enough.
Next was to solder the pre-cut brass strips into the plug.
This can then be pushed into place and the brass can be easily folded over the edges of the stove without loosing any of its intended shape.
The result turned out quite nice
Finally the brass was blackened; the bottom bricks installed; the feet cut to a 5 degree angle to suit the deck; lifting eyes made and my favourite - the grill bars were installed. I've not explained how the grill bars were fitted as this caused me some thinking as they are sunk into the bricks - so how do you think this was done??
I'm very pleased with this little stove which I guess took 10 - 12 hours to make as there are many elements to its construction. It's a bit glossy on the inside at the moment but I'll sort that out before it's finally installed. I have 2 more parts to make for it which help firmly fix it to the deck. Other than that I'll make a start on the small office next.
Cheers Mark
-
woodrat reacted to No Idea in Le Rochefort by No Idea - 1/24th Scale - First POF Build
Some more work done on the windlass and this time I've made the Carrick piece (the larger part) and the cheek. But before I made them I wanted to make the big locking bolts that run completely through them. To do this I first had to drill a 0.68mm hole (the smallest end mill that I have) through a 1.5mm diameter brass rod. Here's a close up of the drilling which makes it look like I'm running a 6mm drill through a 10mm bar 😜
A bit of perspective
These were the beginning of the bolts which were then cut to size and a tapered 0.8mm pin put through and soldered in place. I then chemically blacked them and here's the result.
I haven't taken any pictures of the making of the Carrick piece or the cheek as it's very straight forward. I did however take one of the drilling of the holes for the bolts. I temporarily glued the two halves together and ran the drill straight through. This worked great and was very easy to do and once again a little IPA separated the parts.
The finished parts with the bolts in place.
Finally here are parts all dry fitted into the hull. Nothing is glued in at the minute including the beams but it all fits quite nicely.
So thats it for a couple of weeks as I'm in for a quick surgery (nothing major) which they have told me will restrict my lifting and moving. As soon as I'm fit I'll be back on it.
Cheers Mark
-
woodrat reacted to No Idea in Le Rochefort by No Idea - 1/24th Scale - First POF Build
Thank you Vladimir 👍
Hi Dave thanks for your nice comments. I work to the dimensions on Gerards drawings as best I can - so if I measure a piece to be 5.8mm I try and make it that size rather than rounding up to 6mm. I have found that I get very little cumulative error by doing this BTW have a really great holiday you lucky fella 👍
Okay - the windlass 😍 what a lovely piece this is to make on this ship. Although I've not strictly adhered to Gerards drawings as it should be slightly barrel shaped I have enjoyed making this.
So first of all I had a bit of play to work out the indexing on my rotary table which you can see standing on the mill slide. Once sorted I shaped a hexagonal piece which was again made by gluing two bits together. Its dimensions are just over 18mm wide it's quite a chuck of wood.
Looking at the drawings there is a 3 degree angle to be cut on the length of the windlass and also the pawl cut outs are set 12 degrees back from the hexagonal facets.
So I set the 3 degree angle and cut the taper and also rough cut the pawl locations.
Once that was done I revised the pawl cuts and milled them to their final size. This is easy to do as long as you do not accidentally reset your mill dials.
Then I drilled out the holes for the windlass lever which are set a 90 degrees to each other and go all of the way through too. I also cut the windlass bearings.
So now I've ended up with a piece looking like this - Now anyone that does machining knows that my biggest problem is turning the windlass around in the chuck. I cannot grip on the tapered surface with the 4 jaw chuck.
So to solve this problem I made some tapered inserts that I glued on using PVA knowing that I can remove them later using IPA.
I then turned the windlass around in the chuck and repeated the same processes to the other end.
Now the chances of me hitting exactly the same angle with such a Heath Robinson solution was slim. The windlass did not come out entirely symmetrical but it looks ok to me. If I made it again I expect that I would get the same result so upwards and forwards.
The next stage was to make the round holes square for the lever which I intend to make later. I'm sorry but I forgot to take any pictures of this process - Its time consuming to get the square hole completely through but the end result is well worth it.
Finally there are 2 iron bands that fit around each end of the windlass. These are hard to make and get a correct fit being hexagonal - my advice is just keep at it until you get it right. Due to my taper/angle discrepancy the ends of my windlass differ by 1mm so each one had to be custom made.
So here's the final result all cleaned up with blackened iron bands - I've never used brass black before but its very easy to use and the results are lovely.
So next I need to make the windlass supports - Thanks everyone for the likes and support with my build
Mark
-
woodrat reacted to No Idea in Le Rochefort by No Idea - 1/24th Scale - First POF Build
More done this time it's the forecastle deck waterways. As with the main deck these are tricky to make and get a good fit.
Here I'm just pretty much roughing out the shape to get a good fit on the hull and beams. I learn't from last time to leave loads of extra material on until the final shaping.
This is what the final piece looks like - It varies in thickness, angle and profile. I haven't put any of the making pictures up as its a replica of the process that I followed before.
Just dry clamped in place to check that all is ok.
It's all still a bit scruffy and needs cleaning up and pencil marks removed but on the whole they fit nicely and now I know that everything lines up.
So I can now put these parts away until later as I want to make the windlass, stove and office that sit between these decks. Once they are made and installed I'll finally fit all of these pieces too.
Mark
-
woodrat reacted to No Idea in Le Rochefort by No Idea - 1/24th Scale - First POF Build
More done on the beams to get them just about completed.
Firstly I made the deck shelves (this ship doesn't have knees under the ends of the beams) and also cut the dovetails in the clamps and beams. I actually got a nice fit this time on these parts.
There were also a few more notches that needed to be cut into the beams and also a slanted hatch for above the kitchen stove. I couldn't quite see the details for the carlings in the drawings so I made them like the other hatches on the ship. This is pretty much a 50/50 notch into the beam and a similar one into the carling. The hatch sits at an angle of 74 degrees as best that I could measure it.
The beams in place and also at the correct overall height. They sit flush with the highest breast hook for the planking to run over.
So next I'm going to make the waterway for this deck. Its thickness and angles vary quite a lot so should be quite a challenge. I also want to make some detailed parts rather than just structural ones. So to shake my build up a bit I've decided to pretty much finish this end of the ship. I'll be making the stove, office and windlass along with several hatches. I just think it will be nice to add some details before getting on with the planking on the starboard side.
Mark
-
woodrat got a reaction from GrandpaPhil in Le Gros Ventre 1767 by woodrat - Scale 1:48 - POF - French exploration vessel
I have installed the main deck beams and hanging knees as well as installing the bitts and all mast partners. The plan is to leave the deck largely onplanked so as to be able to see the lower cabins and the false deck.
Dick
-
woodrat got a reaction from GrandpaPhil in Le Gros Ventre 1767 by woodrat - Scale 1:48 - POF - French exploration vessel
This vessel did not have lodging knees but lodging planking, this would save money. Knees are made from grown compass timber ( this grain follows the shape of the knee) and for a humble merchant vessel would be expensive overkill. Hanging knees however were used and presumably grown.
Dick
-
 woodrat got a reaction from druxey in Le Gros Ventre 1767 by woodrat - Scale 1:48 - POF - French exploration vessel
I have installed the main deck beams and hanging knees as well as installing the bitts and all mast partners. The plan is to leave the deck largely onplanked so as to be able to see the lower cabins and the false deck.
Dick
-
woodrat got a reaction from KARAVOKIRIS in Le Gros Ventre 1767 by woodrat - Scale 1:48 - POF - French exploration vessel
This vessel did not have lodging knees but lodging planking, this would save money. Knees are made from grown compass timber ( this grain follows the shape of the knee) and for a humble merchant vessel would be expensive overkill. Hanging knees however were used and presumably grown.
Dick
-
woodrat got a reaction from Mark Pearse in Le Gros Ventre 1767 by woodrat - Scale 1:48 - POF - French exploration vessel
This vessel did not have lodging knees but lodging planking, this would save money. Knees are made from grown compass timber ( this grain follows the shape of the knee) and for a humble merchant vessel would be expensive overkill. Hanging knees however were used and presumably grown.
Dick
-
 woodrat got a reaction from yvesvidal in Le Gros Ventre 1767 by woodrat - Scale 1:48 - POF - French exploration vessel
Beams for the false deck below the main deck are installed as well as some main deck beams. The pump housing and forward bulkhead for the water storage hold are also installed temporarily.
the ladder inside the housing allows access to the cannonball storage around the base of the mast
Note the sliding access port to the housing
Dick
-
woodrat got a reaction from CiscoH in Le Gros Ventre 1767 by woodrat - Scale 1:48 - POF - French exploration vessel
This vessel did not have lodging knees but lodging planking, this would save money. Knees are made from grown compass timber ( this grain follows the shape of the knee) and for a humble merchant vessel would be expensive overkill. Hanging knees however were used and presumably grown.
Dick
-
woodrat got a reaction from mtaylor in Le Gros Ventre 1767 by woodrat - Scale 1:48 - POF - French exploration vessel
This vessel did not have lodging knees but lodging planking, this would save money. Knees are made from grown compass timber ( this grain follows the shape of the knee) and for a humble merchant vessel would be expensive overkill. Hanging knees however were used and presumably grown.
Dick
-
 woodrat got a reaction from native one in Le Gros Ventre 1767 by woodrat - Scale 1:48 - POF - French exploration vessel
This vessel did not have lodging knees but lodging planking, this would save money. Knees are made from grown compass timber ( this grain follows the shape of the knee) and for a humble merchant vessel would be expensive overkill. Hanging knees however were used and presumably grown.
Dick
-
 woodrat got a reaction from Stavanger in Le Gros Ventre 1767 by woodrat - Scale 1:48 - POF - French exploration vessel
This vessel did not have lodging knees but lodging planking, this would save money. Knees are made from grown compass timber ( this grain follows the shape of the knee) and for a humble merchant vessel would be expensive overkill. Hanging knees however were used and presumably grown.
Dick
-
 woodrat got a reaction from davyboy in Le Gros Ventre 1767 by woodrat - Scale 1:48 - POF - French exploration vessel
This vessel did not have lodging knees but lodging planking, this would save money. Knees are made from grown compass timber ( this grain follows the shape of the knee) and for a humble merchant vessel would be expensive overkill. Hanging knees however were used and presumably grown.
Dick
-
woodrat reacted to Louie da fly in Golden City by Louie da fly - Scale 1:50 and 1:25 - solid hull - Paddlewheeler
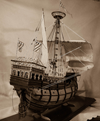
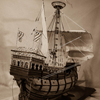
I'm starting on a model of the Golden City, a paddlewheeler which operates on Ballarat's Lake Wendouree, run by volunteers and taking passengers for trips around the lake every summer Sunday (weather permitting). It is a replica of one of the paddlesteamers which did the same thing back around the turn of the 20th century (unfortunately destroyed by fire some years ago).
It will be a Solid model, and I'm first making one at 1:50 to iron out the bugs. After that I'll be making another at 1:25 to present to the people who run her, who also run a museum dedicated to the vessel itself and its history.
I've spoken to one of the organisers who's very keen on the idea - apart from anything else, visitors to the museum get disappointed when they can't see the vessel if she's out on the lake, so a decent sized model (68 cm or 27 inches long) would be a great help.
I've actually started on both models already, and if it all works out I'll simplify the design and make multiple 1:50 models to sell to visitors, as a fund-raiser for both the museum and for the Men's Shed where I make stuff (and which has so many wonderful boys' toys, like bandsaws, lathes, bench saws etc etc).
Here are some photos of her
And some I took close up while she was in her boatshed.
Plus photos of the plans which the museum kindly got out for me, and which I then redrew to make the model.
And here are the smaller and larger models so far. As you can see in the first and second photos the deck overlaps the hull considerably.
Upside down, showing the overlap.
And with 'paddleboxes' - just cut from a bit of 20mm wood with a hole saw and cut in half.
Comparative sizes - 1:50 in front and 1:25 behind.
The two together with paddleboxes. The bit in front is the roof awning, which fortunately is flat. And another shot of the two together. (The phone camera reduces the size contrast in the first photo and exaggerates it in the second.)
I think the most difficult bit for me will be the posts that hold up the awning and the railings. I can't see any way to make them except out of wire, and I'm currently rubbish at soldering. Well, another skill I'll need to learn . . .
Steven
-
woodrat reacted to liteflight in Golden City by Louie da fly - Scale 1:50 and 1:25 - solid hull - Paddlewheeler
Wire will make the strongest, especially if you use steel wire. I’m not sure of the diameter of the stanchions and rails but at the scale I would guess they would be in the 1 to 1,5 mm region,
You could consider different materials like plastruct extruded sections ( ABS material ) which can be joined by solvent welding, but they might not be strong enough take even light handling.
Brass is easy to cut, solder and finish.
If you use steel wire - do not use the wire available in model shops, as this is Piano wire ( music wire to our US cousins) which is high-carbon, very hard and stiff and therefore quite difficult to cut to identical lengths, bend to repeatable curvatures, etc. Engineers would say it is almost glass-hard.
Soft iron wire is probably too soft, but is easy to work, bend and solder*. Samples are florists wire and some fence wire. Bunnings do big hanks of garden wire - might be worth a look.
Piano wire can easily be tempered back to a useful hardness - same as your Uhfbert sword, but much faster ‘cos of its thinness. Heat to dull red and allow to cool in air will produce very soft temper
*With the correct flux!
Sorry, I have rabbitted on too much.
soldering easily learned - especially when shown the method.
Probably Pat’s resistance soldering setup is readily controllable and he might share his wisdom about it
4 secrets** of good soldering:
Cleanliness
Cleanliness
Right Flux
Cleanliness
Enough Heat!
**. Like the Garden of Five Surprises