


Beef Wellington
-
Posts
2,245 -
Joined
-
Last visited
Content Type
Profiles
Forums
Gallery
Events
Posts posted by Beef Wellington
-
-
Jim, I have not coppered the bottom. I was going put in a false keel as described in some AOTS books I've been referencing (mainly HMS Pandora). Still figuring out what and how.
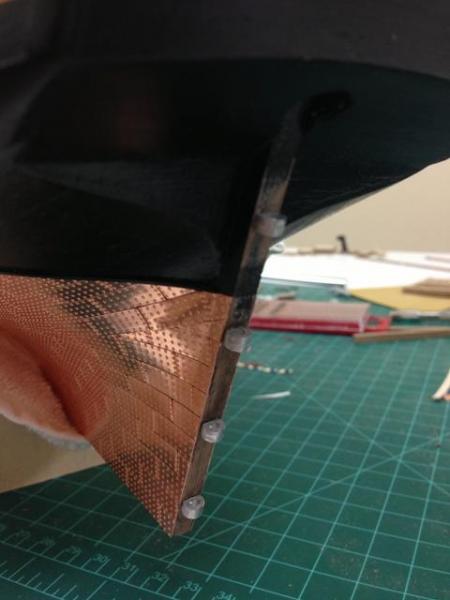
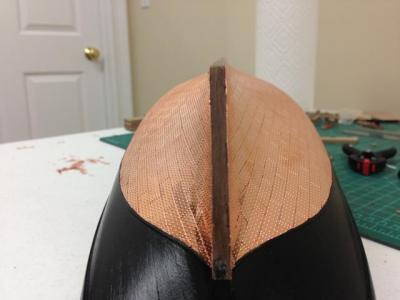
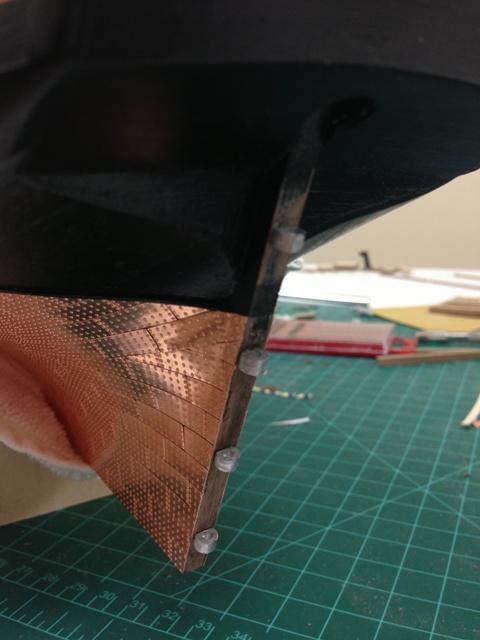
For the plates on the front of the bow and the rear edge of the rudder I simply glued them on vertically as they are. The thickness of the wood and the previously mounted plates were only very slightly narrower than the width of the copper plate. I then just took a small file and carefully filed away the edge at a 45 degree angle help them meet the side plates to smooth it (the plates tend to bend back a little in this process which makes for an even more seamless result). Hard to describe, but simple, and turned out a lot better than I had dared hope.
Hope that helps.
-
Echo that, very nice Jim, all looks very familiar :-)
-
Hi Stergios, welcome to the coppering club! Looks like a nice startm you've made. If I may make a suggestion, I bought some CA glue debonder in case of emergencies, it does a really nice job of removing CA glue if you get the odd smear on the plates and is very easy to use. It also does a nice job cleaning up finger tips!
I just added to my log answering your question on the cleaner. After I finished the coppering I did use a metal cleaner for copper to clean off the fingerprints as these had already started to tarnish. It was a simple procedure, dulled the copper a bit and returned it to the more pinkish colour. I did this before posting my final picture so you can see the effect is not dramatic, but I took comfort knowing that it should oxidize more evenly which is the look that I want.
-
Blue Ensign - appreciate you stopping by, please feel free to make any comments or suggestions anytime. The Snake instructions are totally silent on the matter, its one of their older offerings and the instructions are very rudimentary compared to the newer kits, but you're right, copper paint is the way to go.
Jim, Stergios - hope its useful, I did for get to add the comment that I wasn't 100% sure that the waterline at the stern was in the right place. Despite many repeated measurements earlier in the process it looks like copper upper edge at the rudder is maybe 5mm too low. Nothing I can do about it now, it looks fine to me, but your results may vary slightly.
I also decided to wipe over the copper plates with a metal cleaner - because it took me so long to do the coppering I had a lot of fingerprints from handling the hull and the oxidation was accelerated in these areas. It worked nicely, bringing the copper back to a slightly duller hue (it wasn't a polish) and slightly more 'pink'. Results were not dramatic, and you can see (or not!) the result in the middle picture in the post above. I will leave the copper to gradually tarnish and hopefully this will be a little bit more even now.
-
Ray, after your fantastic Pegasus build very keen to see more of this build, she really is a beauty...something I'm aspiring to. I've just finished coppering my Snake build, I felt a little wary with the Caldercraft copper plates as well as I've seen them criticized in this forum, however I was pleasantly surprised with the overall effect once complete as it was not as 'in your face' as I had feared, but just my humble opinion. Best of luck and eagerly waiting to see more!
- Burroak and nightwisher
-
 2
2
-
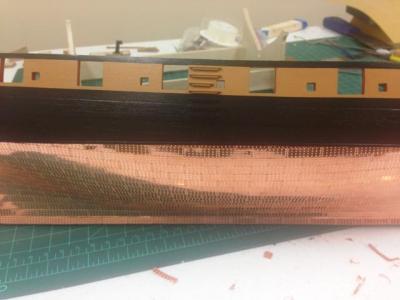
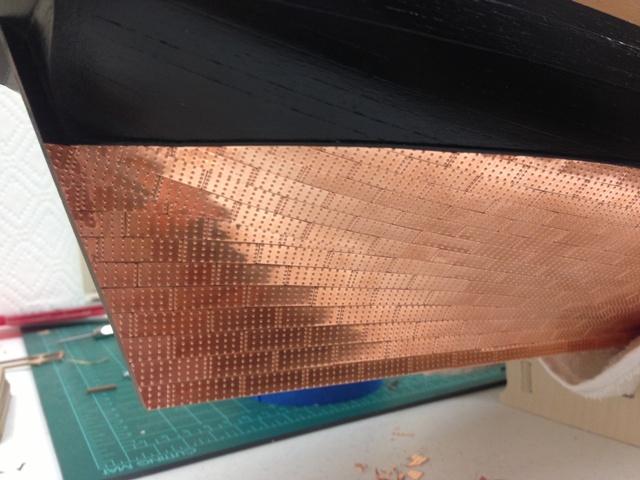
Once work on the mounting hardware was done, moved onto the coppering (of course) and other finishings aspects. I did not bother to copper the sternpost or the front side of the rudder as these cannot really be seen, and simply painted these copper. Coppering the rudder was definitely a challenge due to the rudder mounting recesses.
Overall pretty happy, and just the mounting straps to go before being able to move back to the deck with conviction.

-
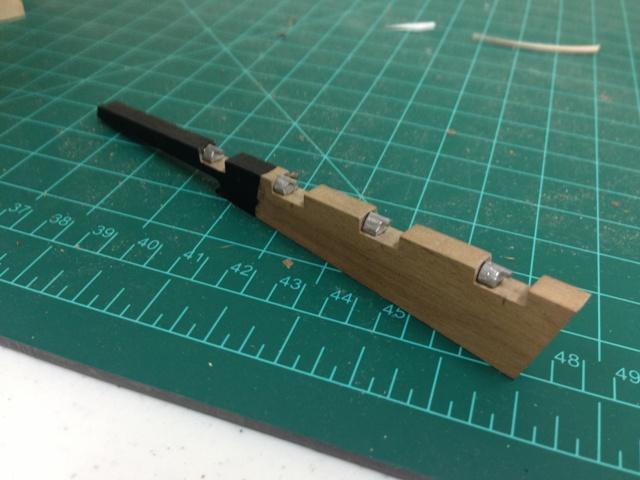
After completing the hull coppering, moved onto the rudder. This felt a bit like the last 385 yards at the end of the 26 mile marathon! Had to file down the rudder openings and the pintles so they were fully square, square needle file a flat needle file did this easily enough with a bit of patience. Care is needed to make sure the gudgeons are installed in the right spot, I decide to first get the rudder positioned correctly and install the top gudgeon first and use this as a basis for the others to ensure all are supporting the rudder. Simple matter with thick CA glue.
Small holes are needed to be drilled in the sternpost to accomodate the cast 'nail' on the gudgeons, care is definitely needed with these, the last one broke off while dryfitting. Hopefully I won't regret this, but I simply glued this to the sternpost as the others should bear a lot of the strain.
-
Nice Jim, keep at it! I kept trying to force myself to look at the big picture, if you obsess over every plate it just isn't fun. I noticed you've painted the pintles black, I know for authenticity the straps should be painted copper and was going to do the gudgeons/pintels copper as well in the absence of a reference. Did you find anything to suggest which way to go?
Cheers
-
And again, welcome back Stergios! In case you didn't figure it out yet, hit the "More Reply Options" button. I think the photos load the opposite way to the way they used to, so you want to load the first picture you want to see first. She looking very nice by the way with the black painted.
-
-
Think the majority would be either red ochre or black...think its just a personal choice, but I would like to have at least a bit of real wood showing. I had looked over a lot of the old build logs and seems most have taken this approach.
-
Thanks for that Jason.
Got bored of coppering and put the Capstan together and that got me thinking that it looked a little plain and I wanted to bring out some colour but without actually staining.
I will purchase some satin and give that a go, and see how it looks.
On the subject of coppering. For some of the 'stealers' and gaps did you physically overlap tiles or did you just cut to shape?
If overlapping, I will need to remove some plates to lay the pieces to be overlaid. Just figured cutting to shape will take forever and might result in little gaps.
Hi Jim, fully appreciate your coppering boredom! One thing I'm conscious of with the wood is that some of the pieces are solid and some are laminated. Unfortunately I don't think the laminated bits look that good just varnished but maybe I'm being picky, I'll probably paint these items but haven't decided yet.
As for the coppering, I agree with you. I thought I would get a better result by overlapping, the copper plates seem to curl up when being cut very thin which just adds to the difficulty. I tackled it by cutting to stealers to the approximate shape and then dry fitting the plate over the top to see what would be overlapped. I then used the edge of a needle file to flatten the protruding nail heads to try and keep the top plate as flush as possible....if that makes sense. I also took this approach at the waterline in many places.
-
Daniel, you never cease to amaze me with the detail you put in. I'll be watching again now build log 2.0 is back up and running. Very impressive!
-
Hi. It was to protect the paint on the outside of the hull as I figure it will be subject to bumps and scrapes during the rest I the build.
As an aside what sort of finishes work best for walnut deck fittings etc?
As Carl points out, there seem to be a multitude of options, and there was a lot of opinions on the old site! (Carl I think I saw people had used both linseed oil on decks (boiled or regular!) as well as tung oil (sp.?) I decided to stick with simple polyurethane (mainly to reduce the chance of screwing up!). My experience showed with the brands I had available (water based) the matt finish seems to leave the wood looking almost untreated, the satin finish brings out a bit more of the colour. I'm probably going to use a satin finish to bring out the colour and then give a coat of matt (I'm not planning to use wood stains)
-
Very nice build Sjors, it now somehow easier to find the great build logs now that there are fewer of them (I had missed yours before). Will definitely be following closely.
-
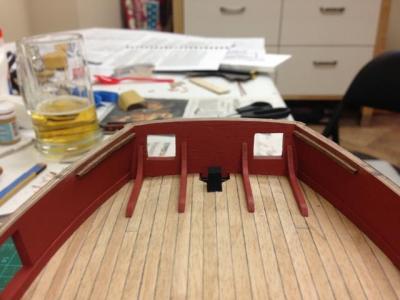
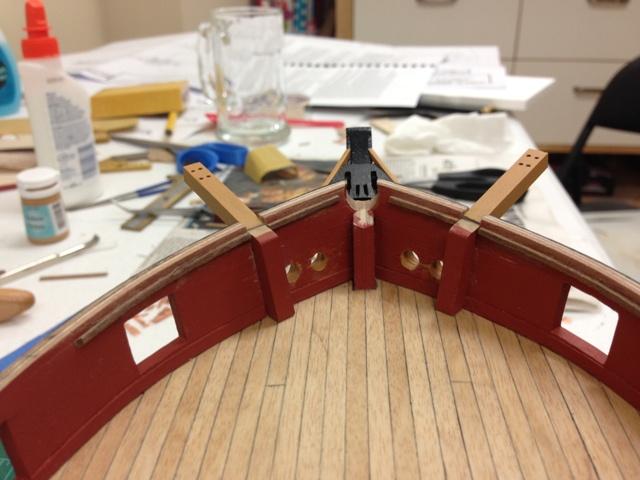
Installed the small ledges need to support the fore and aft platforms. Also added in the catheads as these need to go in ahead of the platforms, even though they are not mentioned in the instructions.
I am deviating from the order described in the instructions, and am somewhat glad that I am as I'm finding it a little easier. I do forsee some questions coming up on the bow area, as I think it may be necessary to shape the bowsprit and ensure this can be fitted properly before the fore platform and fore-bits/bowsprit brakcet are installed. I would like to install the false deck ply first and then plank in situ rather than doing in advance.
You can see that I needed to file back the elbow of the cathead so it is flush with the platform ledges and doesn't interfere with the fore platform fitting. Also will need to do some paint touch up in this area, even though I don't think it will be very visible.


-
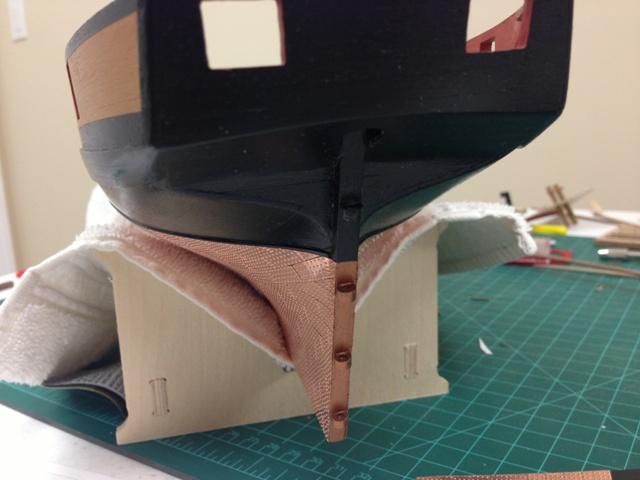
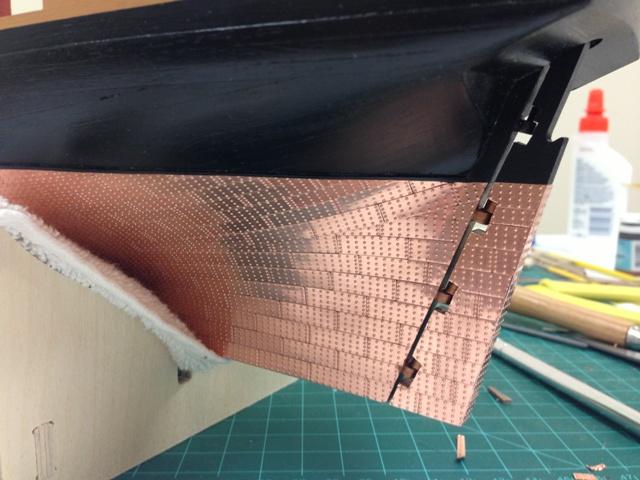
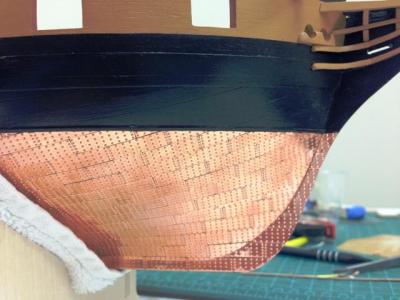
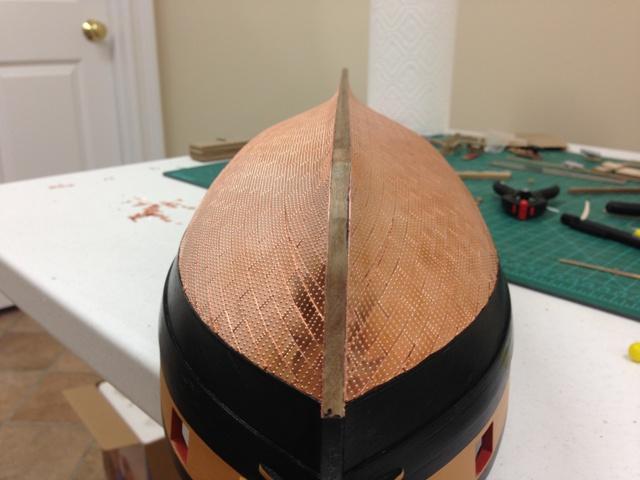
Finally...pretty much completed the coppering on the hull. Only have the leading edge of the bow to go and I want to think about how to approach that, no urgency and should be relatively easy to do. I followed the coppering pattern as shown in the HMS Pandora AOTS book as there seems to be so little information around on how this was done. Result came out pretty close.
Only other coppering to be done is the rudder, but this should be straight forward now, but I need to deal with the gudgeons and pintles first. I'm also running worryingly low on copper plates, my numerous "re-dos" have caught up with me but still glad I did. I've ordered some more just in case to avoid any work stoppage.


-
Glad you are back Andy, had been following your old log closely and will be looking forward to more updates!
-
Ray, thank you so much for recreating your build log, it is a real wealth of knowledge on the basic techniques that are invaluable to learn from others by 'seeing'. A really beautiful build!
-
Hi Jason and welcome back.
Want to ask you, have you applied any kind of varnish onto the black painted hull?
Thanks
Stergios
Good to hear from you Stergios! I think the question you asked Jim was a little different, but to answer this, no I didn't use an additional finish on top of the paint. Personally, I like the look of the Admiralty paint finish. Looking forward to more updates from you.
-
Hi Robert, I too had missed your build before, shes looking very nice indeed, simply beautiful! If it weren't too much trouble, could you share the technique you used to build the waterways and tackle the scarf joints and which tools. Not sure I would know where to even start!
-
Hi Jason,
I was actually posting a reply to your build log in the first iteration of the new MSW, just as The Great Crash hit! I hit "post" and everything seemed to freeze up, and that was the last time I was able to access MSW until all was restored.
I wanted to tell you that your model of Snake is looking great! Your workmanship all around is so crisp and clean, and your paint job is very nicely done!
I am also working on an earlier Caldercraft offering, and I'm taking a similar approach of revising and adding things with reference to NMM plans. I am interested in replacing the bulbous little belaying pins that came with the kit, and recall that you had obtained some nice looking ones. Could you give me the info on those?
Thanks,
Robert
Robert, appreciate the kind words. Heres a photo below of the comparison (as supplied on the left, new on the right), couldn't quite figure out where to put it in the "rebuilt log". I got the replacement pins from Jotika/Caldercraft via their online site www.shipwrightshop.com. The improved pins are 9.75mm long and 1.5mm wide (although they are closer to 1.2mm when drilling out the pin-rail holes)
-
NOTICE: Build log from here is current progress, all prior what I was (incompletely) able to recover/re-create.
My sincere thanks to Jim_Smits for sending me what he luckily had saved in his cached history from my prior log!
-
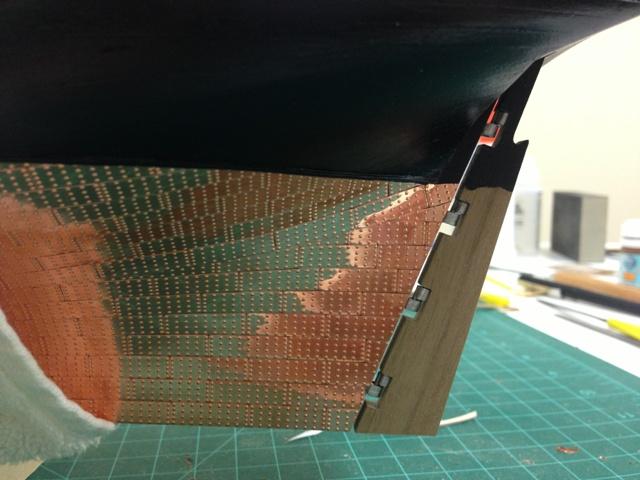
Coppering update - boy, this seems to go on and on! Wanted to post a couple of progress pictures which show how I handled what proved to be the more challenging areas. The good news is that I feel much more proficient after much fumbling a rework. Overall, I'm pretty happy, but still have not completed one side yet.
Key lessons I've learned:
- The plates are definitely most easily cut with good scissors
- If you make a mistake, plates are pretty easy to pop-off even when well glued pretty well
- Some very slight overlap is necessary along the edges to avoid gaps, even witht the small scale, rectangles just don't fit perfectly on a curved surface!
- I'm using the thick Pro CA glue for Caldercraft, and it seems to work well with 3 SMALL drops of glue evenly spread
- Where 'steelers' are needed in the tricky bow and stern areas, I decided to overlap the plate above as I think it gives a a better look. I found that using a sharp metal edge to flatten the nail heads makes this much easier and makes the overlap hard to see.The coppering will continue....


HMS Snake by Beef Wellington - FINISHED - Caldercraft - Scale 1: 64 - First wooden ship build
in - Kit build logs for subjects built from 1751 - 1800
Posted
Mort, Sjors - thanks for kind words
Carl - maybe an excuse to put tools down for a bit!
Stergios - At the stern I have 7 uninterupted plates before needing a stealer, at the bow I could only go with 5 because of the difference in the hull shape. I would definitely do some dryfitting to ensure this works for you as I suspect small changes in hull shape could make you want to adjust.