


Beef Wellington
-
Posts
2,245 -
Joined
-
Last visited
Content Type
Profiles
Forums
Gallery
Events
Posts posted by Beef Wellington
-
-
Just been able to catch up on your build, echoing Roberts coments, all very nicely done indeed. Looking forward to seeing more.
-
Bring on the pictures Jim! I spent a lot of time trying to figure out the placement of the the wales as well, however, that was a long time ago when I was still assuming the plans were highly accurate (like the pirates code, I'm taking these as being more of a 'guideline')...nothing can be done about it at this point anyhow so fingers crossed.
-
it is not a complex or anything, i just wanted to know how much i have spent (kit and consumable used) and time taken, i spreadsheet it with date, time spent, what im working on and items bought, lol (making myself sound so sad) so i know what cost per hour i am getting
I'd love to see stats that split the building/thinking time - I do spend a lot of time fiddling and staring without tangible progress...but that's part of the fun. Luckily I don't have a launch date scheduled.
-
All looking good Kevin, sure you'll be happy when you get the touchup done. Just curious, do you have a timer that you're using to measure "time on build"?

-
Yves, Jim - cheers!
Kevin - you're not the only one to wonder, and the aft most carronades aren't even fitted yet which adds yet more congestion (Jim has a nice picture in his log of this). Every square inch of deck space seems to be being put to use. I'm still perplexed by the port openings in the stern fascia, I had initially assumed that these were for stern chasers, but there just doesn't seem to be enough room but for even the smallest gun to be worked.
-
Robert, appreciate the support.
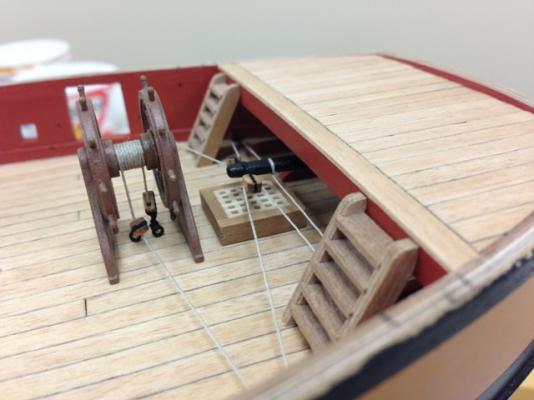
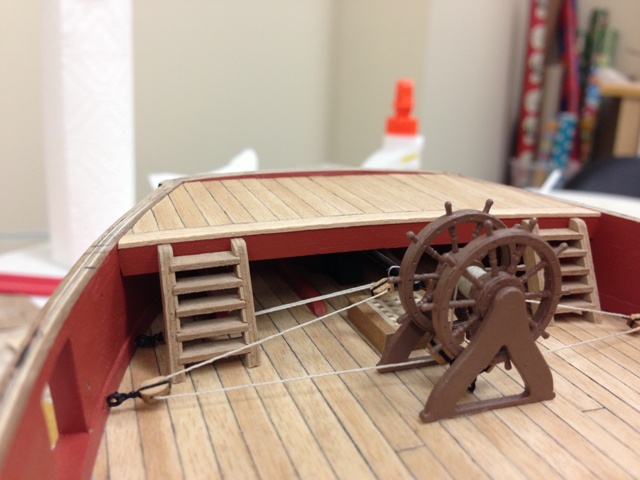
Installed the rear platform and added the deck material. The extra tanganika wood I'd ordered caused a lot of headache as it didn't quite match that supplied originally. I had hoped to use what I had remaining and add the new stuff in randomly. What I found was that the dimensions were ever so slightly different even though they were both 4x1mm and mixing would be too problematic. I resorted to using all new wood on the aft platform so that was consistent, however, it does have a slightly different look to it. Nothing I can really do at this point..
Dry fitted the aft ladders, the rear platforms needed to be reduced in height by one step to fit correctly with rear platform height. Its a tight fit with the tiller ropes, but this is consistent with the NMM model and the plans - glad I had built ladders up prior to help determine tiller rope positioning otherwise could have had an unpleasant surprise.
Again, I deviated from the instructions which called for a 14mm wide step which just looked too wide, and estimated dimensions from the NMM model ending up going with a step 10mm wide (the plans are really no help in this area, scale is way off). Shaped the bottom to account for the camber of the deck so ladders are vertical, and shaped the top to give it a more realistic look. Overall pretty happy, so onto the fore platform...
- Ferit and Blue Ensign
-
 2
2
-
Bit of a progress update, I'd mentioned earlier that I'd essentially run out of Tanganyika wood (not enough acceptable/useable left over to complete the platforms. I'd ordered some more from Cornwall Model boats along with some other supplies, and I ordered plenty and glad I did. The issue stems from the wood not necessarily matching in either colour or dimension, so I've been going through applying the varnish on a sample basis to determine which match best and are similar enough in width...finally identified the viable strips and have started on planking the rear platforms.
I did go back and revisit the companionway cover, something was bothering me about the height of the lip I had on the sliding top, so off it came along with the doors fascias, a bit of cutting and realignment to make the doors higher...et voila, something I'm much happier with.
-
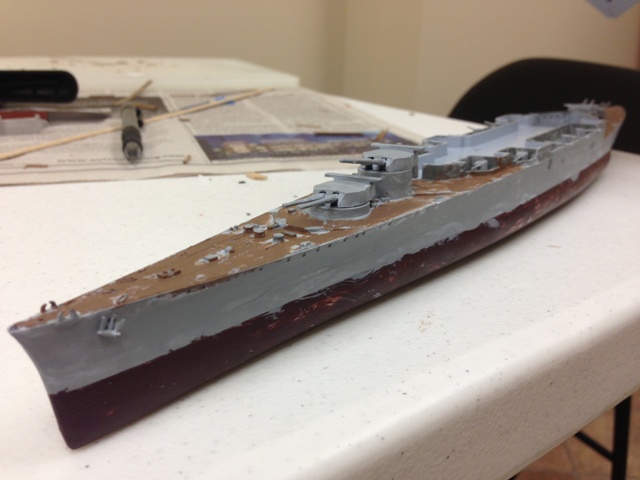
I hope your son keeps up with the modeling. I tried to get my son to have a go at it, but it didn't take. We have other shared interests, just not ship building. Oh, well! Oh, and I loved building in 1/700 back in the day.
Long way to go yet Chris, but I'm trying! I keep chuckling, he is very grown up in some ways, in that he's already identified his next build, the Bismark! I'm pretty excited because we're heading back to the UK over the summer and I have blocked a day to visit Victory (I've managed to get him fascinated with Nelson), Warrior and Mary Rose, as well as Belfast in London (with the Bismark and hence Hood connection). Doing my best to instill the tradition of the Royal Navy into him.
-
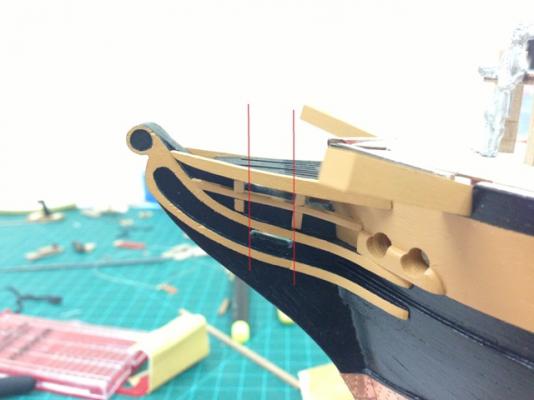
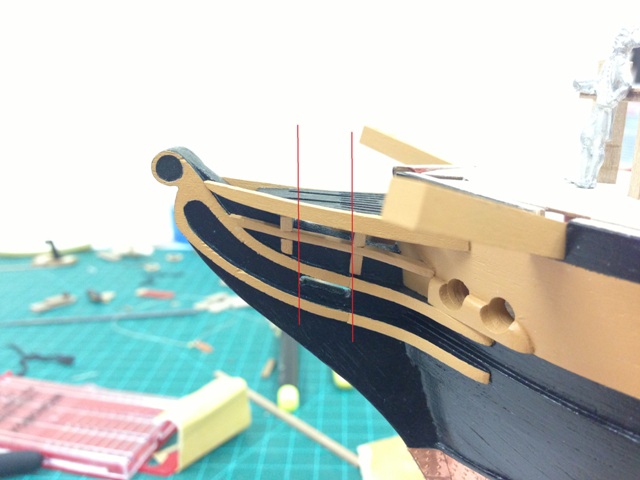
Hi Jason, I'm still have'nt understood why you did extend the slots of the gammoning.
The gammoning ropes will need to pass vertically through the slot in the beak, and also through the two slots in the bow grating - so the slots in the bow grating need to align vertically with the slots otherwise the gammoning will be restricted. Hopefully the picture below illustrates this, look at the red lines I added. You can see that the front part of the slots sits too far forward (this isn't really an issue), but the aft part of the slots need to be extended backwards to align with the rear of the gammoning slot in the beak. Hope that helps.
-
Did you use the polish on all the tiles? Whatever you do it's probably best to do across all the surface as that will get rid on inconsistencies. I know I used the cleaner even on areas that didn't really need it just ensure the fish was consistent.
-
Nice Jim, glad I'm now firmly in your wake :-) One thing I noticed aftert doing the tiller rope and the aft platform was that I just can't see how you could reasonably work even the smallest stern-chaser from the rear ports, just seems far too constricted.
-
Do you have any photos Stergios so we can see what you are seeing?
-
Trying to read the price...739 Euros (?) , ~$960 (US) or GBP 630 - definitely a higher end kit, but looks very nice.
-
I'm eagerly waiting to see this released as well - I wonder if its more a question of scale and resourcing rather than funds. Maybe they don't want to overstretch themselves right now and compromise quality/service.
-
Norman, Jim, Robert, Ian, Mort, Stergios - appreciate the encouragement!
JPett and all - Henry got a real kick from seeing your comments, will post more in due course.
Sjors - yes, first bit of rigging done to get some practice
BE - appreciate the comments as always, and you're absolutely right, never too early to start.
-
Norman, Jim and Robert - appreciate the encouragement
Ian - I think if you do a search in some of the forums you can find a few topics posted on this already. Everyone seems to have their own preferences and look they are going for. As far as coppering goes, again there are lots of thoughts on this, and down to personal preference. I'm taking the approach of letting the copper patina naturally, but I've read others using chemicals to speed up the process or sealing the new shiny copper surface so its preserved. Personally, I've nothing against the weathering as it can look very striking, I have my hands full enough building this as it is and for me its as much about learning how things turn out and getting ideas about how I might do it differently next time.
-
-
BE, Carl, appreciate you checking in.
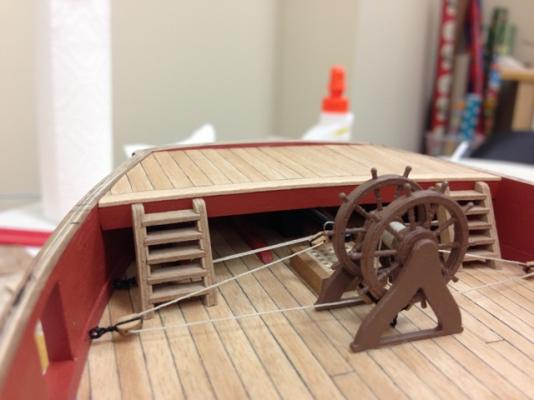
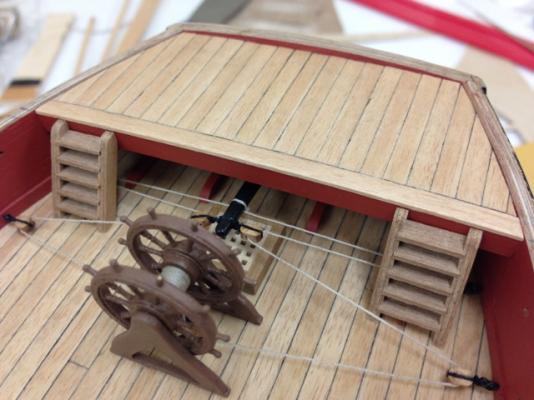
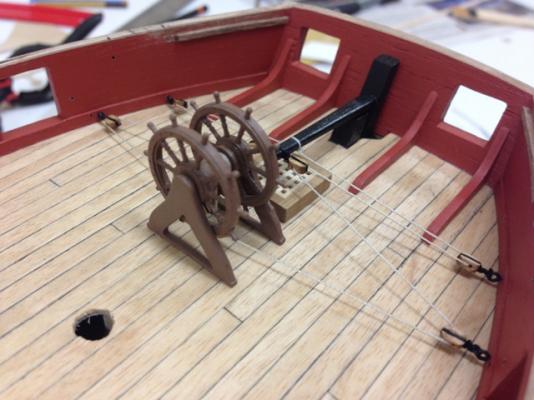
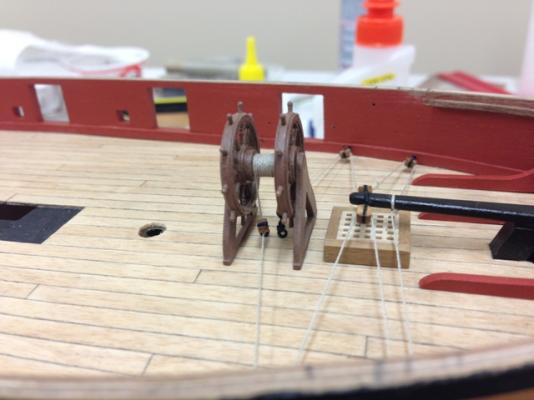
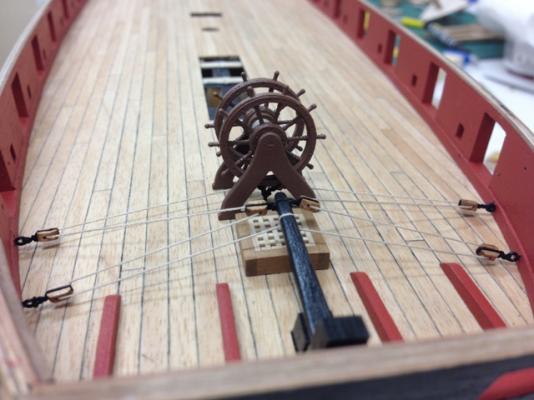
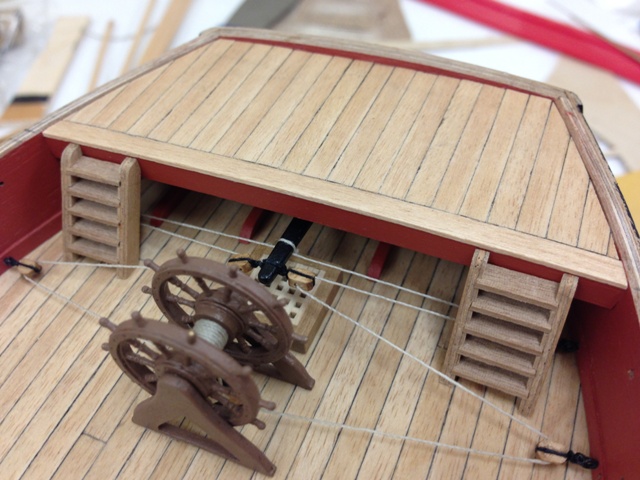
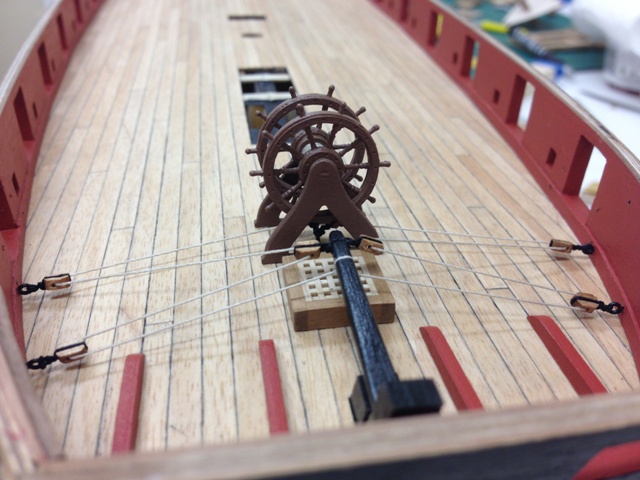
Little bit of progress to get the tiller arm mounted and rigged. Unfortunately I had a bit of an accident with the kit part arm and had to make another, no big problem. I used a bull dog clip and some spare limewood as protection to keep the rudder straight while installing the tiller arm.
The wheel is the after market Caldercraft offering which I had built up a while ago. I toyed with the idea of making a new wheel support, but decided just to go with the kit offering but mounted the wheel inside as this seems a little more authentic.
As mentioned earlier, the placement of the spirketting blocks took a bit of figuring out to make sure the tiller rope doesn't interfere with the ladders yet to be installed. Rigging the rope proved a little challenging, I took it in stages and first wound the rope around the wheel and secured with dilute PVA, and when dry then took each block in turn ensuring that the tension was appropriate and used dilute PVA to keep the shape. I found this approach gave a more natural flow of the rope around the blocks without having to have a ridiculous amount of tension.
- Bluto 1790 and Ferit
-
2
-
Does anyone have any tips on how to ensure that the appropriate tension is set on rigging lines? I'm doing some rigging for the first time using Jotika hemp thread and it seems a balance needs to be reached between making the line look realistic (especially around blocks), but balanced with it not being too tight that could cause problems down the road. I was thinking of wetting the line and then using some diluted PVA in areas where there are sharp direction changes.
Any other thoughts, suggestions would be appreciated.
-
Have to agree with Mort, looks lovely. Its a shame that the top deck covers up the gun deck given the fantastic planking job you did, maybe you can see more in person than the photo's suggest (?)
I'm curious how you are finding the Diana kit, is she really a larger Pegasus, or is there a higher skill level needed do you think? Not that I'm suggesting for one moment that Pegasus does not require skill, I'm more slowly noodling on my possible next build, and Diana and Pegasus are definitley at the top of that list, but I want something 'manangeable' after my Snake.
-
When adding the photos I put them in the correct order, but in looking at my post they are all over the place. I have no idea why.
 msw203.jpgThis one seemed to get lost in the shuffle.
Bob - once you load the pictures you want , you should click the 'add' button next to the file name, it will add the picture name into text, that way you can control how and where the photos show.
Will watch your build with interest now I've found it, she has lovely lines and you're doing a great job. Just out of interest, how does the 'crystal clear' work?
-
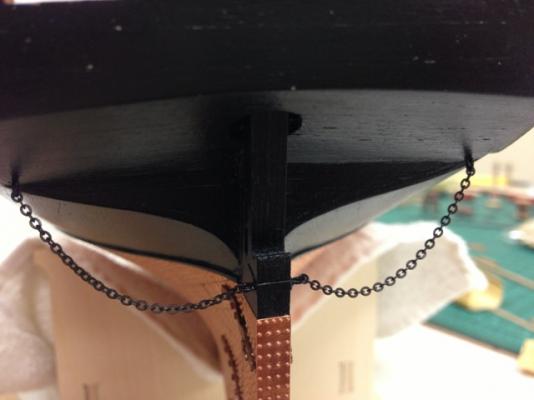
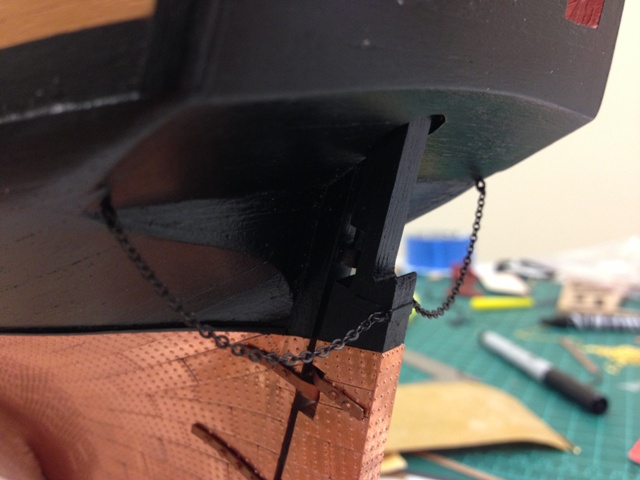
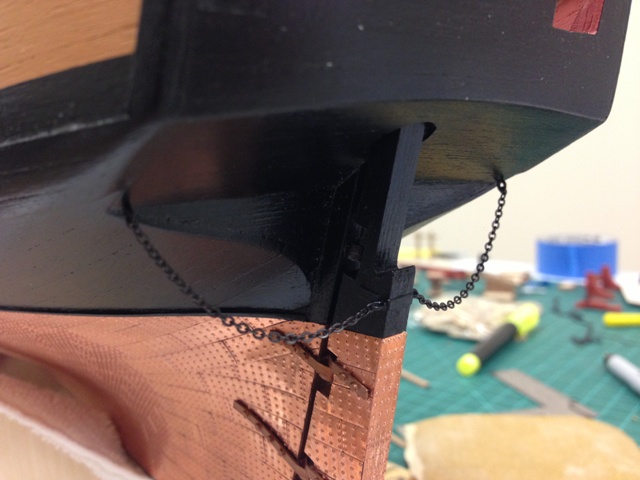
My new chain arrived. After trying the 15 link per inch and not being convinced it wasn't too large, I ordered some more at 21 links per inch which in my opinion looks better. Took the plunge and blackened it chemically which hopefully will work out OK in the morning...I used thin card for the spectacle plate and attached using diluted PVA glue, its hard to see but I suppose I know its there...
Attached the chain using the supplied ring bolts by prising them open and reclosing after cutting the chain to length, very fiddly indeed.
I'm sure no-one else will notice its there, but its another evenings work and can now move forward to the steering apparatus. Sorry the photos aren't that great.


- Bluto 1790 and hopeful
-
2
-
Mort, Timmo, Hamilton, Robert - thanks fro checking in, definitely appreciate the encouragement!
Edwin - you had me wistfully reminiscing - I lived in Seattle for 13yrs before moving to Connecticut so definitely appreciate the beautiful area you live in. And yes, a good Beef Wellington is hard to come by!
BE - I think I cheated on the gratings, I glued the coamings to the grates when assembling which really helped keep them neat.
Sjors - always welcome to look over the shoulder, I probably will use a matt finish on the compmanionway cover, there are some other wood fittings and would like it to "fit in" and not be the center of attention.
-
She looks very impressive outside Kevin, looks like you had a rough sea knocking a few copper plates off, hope they're not lost!


CALDERCRAFT ADMIRALTY PAINTS - WHERE TO BUY IN USA
in Modeling tools and Workshop Equipment
Posted
Sam,
I've bought directly from Jotika (http://www.shipwrightshop.com/) with no issue importing as they are acrylic (enamel not sold anymore). Corwall model boats in the the UK (http://www.cornwallmodelboats.co.uk/) also stocks these and I've again had no issues shipping items to the US.