


Beef Wellington
-
Posts
2,247 -
Joined
-
Last visited
Reputation Activity
-

 Beef Wellington got a reaction from dafi in HMS Snake by Beef Wellington - FINISHED - Caldercraft - Scale 1: 64 - First wooden ship build
Timmo, Ferit - cheers!
Pete - have done nothing at all to the pins
Alistair - thanks for the detailed guidance, I love the suggestion, I think BE also took a similar approach to what you describe and now after re-reading its all making a bit more sense - learn by doing I suppose. Your picture is really tremendous, a work of art in of itself! What kind of line are you using, it looks so much better than anything I've seen elsewhere - on my next kit if I get that far I definitely want to upgrade the thread. I'm going to ponder the cannon rigging question for a bit, mainly because I'm not going to have time do anything in near future, but definitely think that your suggestion is the way to go. I've also been quietly checking out your Fly (that sounds bad!), you've got a wonderful build going there that I'm certainly learning from.
Managed to finish off one of the carronades after much experimentation. Far from perfect, but pretty pleased with how it turned out compared to the look I was going for. Would have been nice to have had smaller blocks as they are definitely a little overscale, but I can live with it. No more updates until I'm done with carronade rigging!
-
 Beef Wellington got a reaction from maddog33 in HMS Snake by Beef Wellington - FINISHED - Caldercraft - Scale 1: 64 - First wooden ship build
Robert, John - thanks for kind words
Hamilton - interesting you say that, even though the cost is not trivial, I'm taking the view that I'm spending longer building this kit by doing these things and therefore saving the expense of buying another kit so therefore cost neutral....I think that logic works
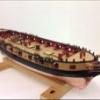
Anyway, I seem to have got myself into a bit of pickle. After finally managing to get one of the bow chaser cannons installed, I decided to have a quick check to see how these could be rigged. The problem is that the eyebolts that I believe the tackles are attached to are not far enough away from the bulwark to prevent the blocks touching (I'm using 3mm singles to be consistent with what I'm using on the carronades). After a few choice words I thought that maybe these could be attached to the eyebolts attached to the far end of the carriage (although I have no idea what these were actually used for). At least then I can keep some consistency and I'm not too sure that it looks significantly different from more than a few inches away. I'm also not sure what my options would be as the carriage is now firmly attached to be deck....
-
Beef Wellington got a reaction from dafi in HMS Snake by Beef Wellington - FINISHED - Caldercraft - Scale 1: 64 - First wooden ship build
Norman - although I found them to be the devil to assemble and paint, I'm glad I tried. Next ship I'd like to do a few more cannons which I enjoyed making up quite a bit more.
Stergios - the deck blocks were the first thing I glued, sliding beds were then attached to these (with supplied painted brass wire and CA glue).
Little bit of progress on carronades, prob won't post more until I've made some progress on slide tackles. Planking under capstan is made from walnut strips rather than the ply part supplied. Mizzen pinrails still need a fair amount of tidying up and not fixed. Not much deck space left at the stern!
-
 Beef Wellington got a reaction from drtrap in HMS Snake by Beef Wellington - FINISHED - Caldercraft - Scale 1: 64 - First wooden ship build
Robert, John - thanks for kind words
Hamilton - interesting you say that, even though the cost is not trivial, I'm taking the view that I'm spending longer building this kit by doing these things and therefore saving the expense of buying another kit so therefore cost neutral....I think that logic works
Anyway, I seem to have got myself into a bit of pickle. After finally managing to get one of the bow chaser cannons installed, I decided to have a quick check to see how these could be rigged. The problem is that the eyebolts that I believe the tackles are attached to are not far enough away from the bulwark to prevent the blocks touching (I'm using 3mm singles to be consistent with what I'm using on the carronades). After a few choice words I thought that maybe these could be attached to the eyebolts attached to the far end of the carriage (although I have no idea what these were actually used for). At least then I can keep some consistency and I'm not too sure that it looks significantly different from more than a few inches away. I'm also not sure what my options would be as the carriage is now firmly attached to be deck....
-
 Beef Wellington reacted to PMG in HMS AGAMEMNON by PMG - Caldercraft
Here is a picture of the complete collection of 9 pdrs and 18 pdrs gun barrels and carriages.
I forgot the eyebolts in "the North", and I am so obliged to wait next week to complete the assembly.
Otherwise, wheels and other accessories are also ready.
Regards
Pierre
-
Beef Wellington reacted to PMG in HMS AGAMEMNON by PMG - Caldercraft
Here is a picture of my two first finished carronades.
They just need some varnish and of course rigging.
The question will then be where to place them. Probably on the forecastle.
I am now painting the twelve 9 pdrs carriages.
Regards,
Pierre
-
Beef Wellington reacted to The Sailor in HM Schooner Pickle by The Sailor - FINISHED - Caldercraft - Scale 1:64
Thanks, Tim!
A little progress...
-
Beef Wellington reacted to Sjors in Le Mirage by Sjors - FINISHED - Corel - Wood - 1:75
Yes it is update time !
I have finished the starboard side of ratlines…...
Now I have to go to the mizzen mast but I don't want to do it today.
Maybe I'll make a start at wednesday.
First I have to make the lanyards for the 3rd time
Pictures !!!!!!!
-
Beef Wellington got a reaction from drtrap in HMS Snake by Beef Wellington - FINISHED - Caldercraft - Scale 1: 64 - First wooden ship build
Sjors, the hook and tackle department is working hard to meet the challenge...
-
 Beef Wellington got a reaction from Dubz in HMS Snake by Beef Wellington - FINISHED - Caldercraft - Scale 1: 64 - First wooden ship build
Norman - although I found them to be the devil to assemble and paint, I'm glad I tried. Next ship I'd like to do a few more cannons which I enjoyed making up quite a bit more.
Stergios - the deck blocks were the first thing I glued, sliding beds were then attached to these (with supplied painted brass wire and CA glue).
Little bit of progress on carronades, prob won't post more until I've made some progress on slide tackles. Planking under capstan is made from walnut strips rather than the ply part supplied. Mizzen pinrails still need a fair amount of tidying up and not fixed. Not much deck space left at the stern!
-
Beef Wellington got a reaction from dafi in HMS Snake by Beef Wellington - FINISHED - Caldercraft - Scale 1: 64 - First wooden ship build
A little bit of info on the technique I'm using on the breech rope, I'm using the Victory carronade photo below as reference.
1) One end of the breech rope is knotted to eyebolt and seized (I believe a 'half-hitch'). 1.0mm Amati line was used for breech rope (purchased separately) and 0.1mm Caldercraft line was used for the seizing. Used the Amati line because the supplied 1.0mm line just did not look good (flat and loosely wound). The seizing looks a bit overscale in the photos but I'm happy with how it looks in person. Dilute PVA was used to secure before trimming.
2) Threaded the unfinished end through the various ring bolts.
3) Used a spare bed as a jig and drilled holes in same place as on the ship to get correct length at 'fully recoiled' position. Note why I had spares' below.
4) Knoted and seized the unfinished end and its ready for installation. Photos below show ends both finished and untrimmed
The height of the elevation screws has also been reduced as these seemed to be too high as supplied. This needed to be done after installation as screw thread gets ruined.
Other side note for those considering the aftermarket CC carronades. I encountered some problems with the screw thread not being drilled correctly which resulted in a stripped elevation screw. Only solution was to buy replacement barrels/screws. Next problem was the supplied barrels were missing the screws, so had to buy yet another replacement as it was pretty hard to determine who was at fault. (These were purchased through Cornwall Model boats as there is no US supplier which means high shipping costs for trivial items)
-
 Beef Wellington got a reaction from jim_smits in HMS Snake by jim_smits - Caldercraft - First Build
Jim, you've made some amazing progress in such a short space of time, really starting to look like a ship now! Shes looking great.
-
 Beef Wellington got a reaction from hamilton in HMS Snake by Beef Wellington - FINISHED - Caldercraft - Scale 1: 64 - First wooden ship build
Norman - although I found them to be the devil to assemble and paint, I'm glad I tried. Next ship I'd like to do a few more cannons which I enjoyed making up quite a bit more.
Stergios - the deck blocks were the first thing I glued, sliding beds were then attached to these (with supplied painted brass wire and CA glue).
Little bit of progress on carronades, prob won't post more until I've made some progress on slide tackles. Planking under capstan is made from walnut strips rather than the ply part supplied. Mizzen pinrails still need a fair amount of tidying up and not fixed. Not much deck space left at the stern!
-
Beef Wellington reacted to jim_smits in HMS Snake by jim_smits - Caldercraft - First Build
Remaining work so far this weekend has been to start adding the foremast stays.
Cut a length of 1mm black thread and added a loop halfway along by lashing with 0.5mm thread. Fitted the loop over the main mast and threaded the ends down through the platform.
Lashed deadeyes onto each end of the thread. The length to lash to was determined by using a 15mm spacer between the deadeye to be fitted to the stay and the deadeye fitted to the channels. I found lashing the deadeye to the stay really tricky. Best method I have found is to form a loop around the deadeye and the tie a single lash using thinner thread to secure the loop tight to the deadeye. A second lash secures the end of the stay against itself. I have purchased some GS Hypo cement, and used this to glue the threads permanently in place. Once dry the ends were trimmed back.
Added the first two pairs of stays to the Foremast and added deadeyes as above. Then added the first lanyards. Followed the threading directions as per plans and a copy of 'Rigging Period Ship Models'. The final lashing around the stay was glued in place and trimmed back once dry.
-
 Beef Wellington got a reaction from Ferit in HMS Snake by Beef Wellington - FINISHED - Caldercraft - Scale 1: 64 - First wooden ship build
Norman - although I found them to be the devil to assemble and paint, I'm glad I tried. Next ship I'd like to do a few more cannons which I enjoyed making up quite a bit more.
Stergios - the deck blocks were the first thing I glued, sliding beds were then attached to these (with supplied painted brass wire and CA glue).
Little bit of progress on carronades, prob won't post more until I've made some progress on slide tackles. Planking under capstan is made from walnut strips rather than the ply part supplied. Mizzen pinrails still need a fair amount of tidying up and not fixed. Not much deck space left at the stern!
-
 Beef Wellington got a reaction from Dfell in HMS Snake by Beef Wellington - FINISHED - Caldercraft - Scale 1: 64 - First wooden ship build
Norman - although I found them to be the devil to assemble and paint, I'm glad I tried. Next ship I'd like to do a few more cannons which I enjoyed making up quite a bit more.
Stergios - the deck blocks were the first thing I glued, sliding beds were then attached to these (with supplied painted brass wire and CA glue).
Little bit of progress on carronades, prob won't post more until I've made some progress on slide tackles. Planking under capstan is made from walnut strips rather than the ply part supplied. Mizzen pinrails still need a fair amount of tidying up and not fixed. Not much deck space left at the stern!
-
 Beef Wellington got a reaction from ModelBoatMaker in HMS Snake by Beef Wellington - FINISHED - Caldercraft - Scale 1: 64 - First wooden ship build
Norman - although I found them to be the devil to assemble and paint, I'm glad I tried. Next ship I'd like to do a few more cannons which I enjoyed making up quite a bit more.
Stergios - the deck blocks were the first thing I glued, sliding beds were then attached to these (with supplied painted brass wire and CA glue).
Little bit of progress on carronades, prob won't post more until I've made some progress on slide tackles. Planking under capstan is made from walnut strips rather than the ply part supplied. Mizzen pinrails still need a fair amount of tidying up and not fixed. Not much deck space left at the stern!
-
 Beef Wellington got a reaction from Blue Ensign in HMS Snake by Beef Wellington - FINISHED - Caldercraft - Scale 1: 64 - First wooden ship build
Norman - although I found them to be the devil to assemble and paint, I'm glad I tried. Next ship I'd like to do a few more cannons which I enjoyed making up quite a bit more.
Stergios - the deck blocks were the first thing I glued, sliding beds were then attached to these (with supplied painted brass wire and CA glue).
Little bit of progress on carronades, prob won't post more until I've made some progress on slide tackles. Planking under capstan is made from walnut strips rather than the ply part supplied. Mizzen pinrails still need a fair amount of tidying up and not fixed. Not much deck space left at the stern!
-
 Beef Wellington got a reaction from The Sailor in HMS Snake by Beef Wellington - FINISHED - Caldercraft - Scale 1: 64 - First wooden ship build
Norman - although I found them to be the devil to assemble and paint, I'm glad I tried. Next ship I'd like to do a few more cannons which I enjoyed making up quite a bit more.
Stergios - the deck blocks were the first thing I glued, sliding beds were then attached to these (with supplied painted brass wire and CA glue).
Little bit of progress on carronades, prob won't post more until I've made some progress on slide tackles. Planking under capstan is made from walnut strips rather than the ply part supplied. Mizzen pinrails still need a fair amount of tidying up and not fixed. Not much deck space left at the stern!
-
Beef Wellington got a reaction from dafi in HMS Snake by Beef Wellington - FINISHED - Caldercraft - Scale 1: 64 - First wooden ship build
Sjors, the hook and tackle department is working hard to meet the challenge...
-
Beef Wellington reacted to Timmo in HM Bomb Vessel Granado 1756 by Timmo - FINISHED - Caldercraft - Scale 1:64
Alec, My own fault for bringing the work into the lounge to rather than building alone like a hermit in the garage.
Anyway, the taffrail was soaked and bent to shape. The kit suggests 4mm walnut but I thinned it down to about 3mm for aesthetics. The lower profile rail was also added from some leftover strip from the capping rails rather than using the brass in the kit. The rail was fattened up by laminating to a 3mm-ish thick piece of walnut. The tape on the stern windows protect them from fogging by the CA glue needed to fix this hard to bend piece quickly. This needed some sanding along the underside and edges with these painted over.
Finished result with taffrail painted and decorative rails added. Some of the carvings need a touch up and The side figures will be left until the rest of the hull fittings are finished as they will take a battering when I grapple with the headrails etc. I'm still a fan of holding the Granado between the knees for work on bow and stern.
-
 Beef Wellington got a reaction from Timmo in HMS Snake by Beef Wellington - FINISHED - Caldercraft - Scale 1: 64 - First wooden ship build
Norman - although I found them to be the devil to assemble and paint, I'm glad I tried. Next ship I'd like to do a few more cannons which I enjoyed making up quite a bit more.
Stergios - the deck blocks were the first thing I glued, sliding beds were then attached to these (with supplied painted brass wire and CA glue).
Little bit of progress on carronades, prob won't post more until I've made some progress on slide tackles. Planking under capstan is made from walnut strips rather than the ply part supplied. Mizzen pinrails still need a fair amount of tidying up and not fixed. Not much deck space left at the stern!
-
 Beef Wellington got a reaction from Sjors in HMS Snake by Beef Wellington - FINISHED - Caldercraft - Scale 1: 64 - First wooden ship build
Norman - although I found them to be the devil to assemble and paint, I'm glad I tried. Next ship I'd like to do a few more cannons which I enjoyed making up quite a bit more.
Stergios - the deck blocks were the first thing I glued, sliding beds were then attached to these (with supplied painted brass wire and CA glue).
Little bit of progress on carronades, prob won't post more until I've made some progress on slide tackles. Planking under capstan is made from walnut strips rather than the ply part supplied. Mizzen pinrails still need a fair amount of tidying up and not fixed. Not much deck space left at the stern!
-
Beef Wellington got a reaction from hamilton in HMS Snake by Beef Wellington - FINISHED - Caldercraft - Scale 1: 64 - First wooden ship build
A little bit of info on the technique I'm using on the breech rope, I'm using the Victory carronade photo below as reference.
1) One end of the breech rope is knotted to eyebolt and seized (I believe a 'half-hitch'). 1.0mm Amati line was used for breech rope (purchased separately) and 0.1mm Caldercraft line was used for the seizing. Used the Amati line because the supplied 1.0mm line just did not look good (flat and loosely wound). The seizing looks a bit overscale in the photos but I'm happy with how it looks in person. Dilute PVA was used to secure before trimming.
2) Threaded the unfinished end through the various ring bolts.
3) Used a spare bed as a jig and drilled holes in same place as on the ship to get correct length at 'fully recoiled' position. Note why I had spares' below.
4) Knoted and seized the unfinished end and its ready for installation. Photos below show ends both finished and untrimmed
The height of the elevation screws has also been reduced as these seemed to be too high as supplied. This needed to be done after installation as screw thread gets ruined.
Other side note for those considering the aftermarket CC carronades. I encountered some problems with the screw thread not being drilled correctly which resulted in a stripped elevation screw. Only solution was to buy replacement barrels/screws. Next problem was the supplied barrels were missing the screws, so had to buy yet another replacement as it was pretty hard to determine who was at fault. (These were purchased through Cornwall Model boats as there is no US supplier which means high shipping costs for trivial items)
-
Beef Wellington got a reaction from drtrap in HMS Snake by Beef Wellington - FINISHED - Caldercraft - Scale 1: 64 - First wooden ship build
A little bit of info on the technique I'm using on the breech rope, I'm using the Victory carronade photo below as reference.
1) One end of the breech rope is knotted to eyebolt and seized (I believe a 'half-hitch'). 1.0mm Amati line was used for breech rope (purchased separately) and 0.1mm Caldercraft line was used for the seizing. Used the Amati line because the supplied 1.0mm line just did not look good (flat and loosely wound). The seizing looks a bit overscale in the photos but I'm happy with how it looks in person. Dilute PVA was used to secure before trimming.
2) Threaded the unfinished end through the various ring bolts.
3) Used a spare bed as a jig and drilled holes in same place as on the ship to get correct length at 'fully recoiled' position. Note why I had spares' below.
4) Knoted and seized the unfinished end and its ready for installation. Photos below show ends both finished and untrimmed
The height of the elevation screws has also been reduced as these seemed to be too high as supplied. This needed to be done after installation as screw thread gets ruined.
Other side note for those considering the aftermarket CC carronades. I encountered some problems with the screw thread not being drilled correctly which resulted in a stripped elevation screw. Only solution was to buy replacement barrels/screws. Next problem was the supplied barrels were missing the screws, so had to buy yet another replacement as it was pretty hard to determine who was at fault. (These were purchased through Cornwall Model boats as there is no US supplier which means high shipping costs for trivial items)