HOLIDAY DONATION DRIVE - SUPPORT MSW - DO YOUR PART TO KEEP THIS GREAT FORUM GOING! (Only 20 donations so far - C'mon guys!)
×


ziled68
-
Posts
158 -
Joined
-
Last visited
Content Type
Profiles
Forums
Gallery
Events
Everything posted by ziled68
-
 Hola Mija, I am so sorry for the slight accident with the nails and scalpel, it's one of the drawbacks to this hobby. But I must say the compartment looks great and I really like the way you fixed the cabin area with the details on the columns and beam (Eres un verdadera artista). I look forward to more updates.
 -
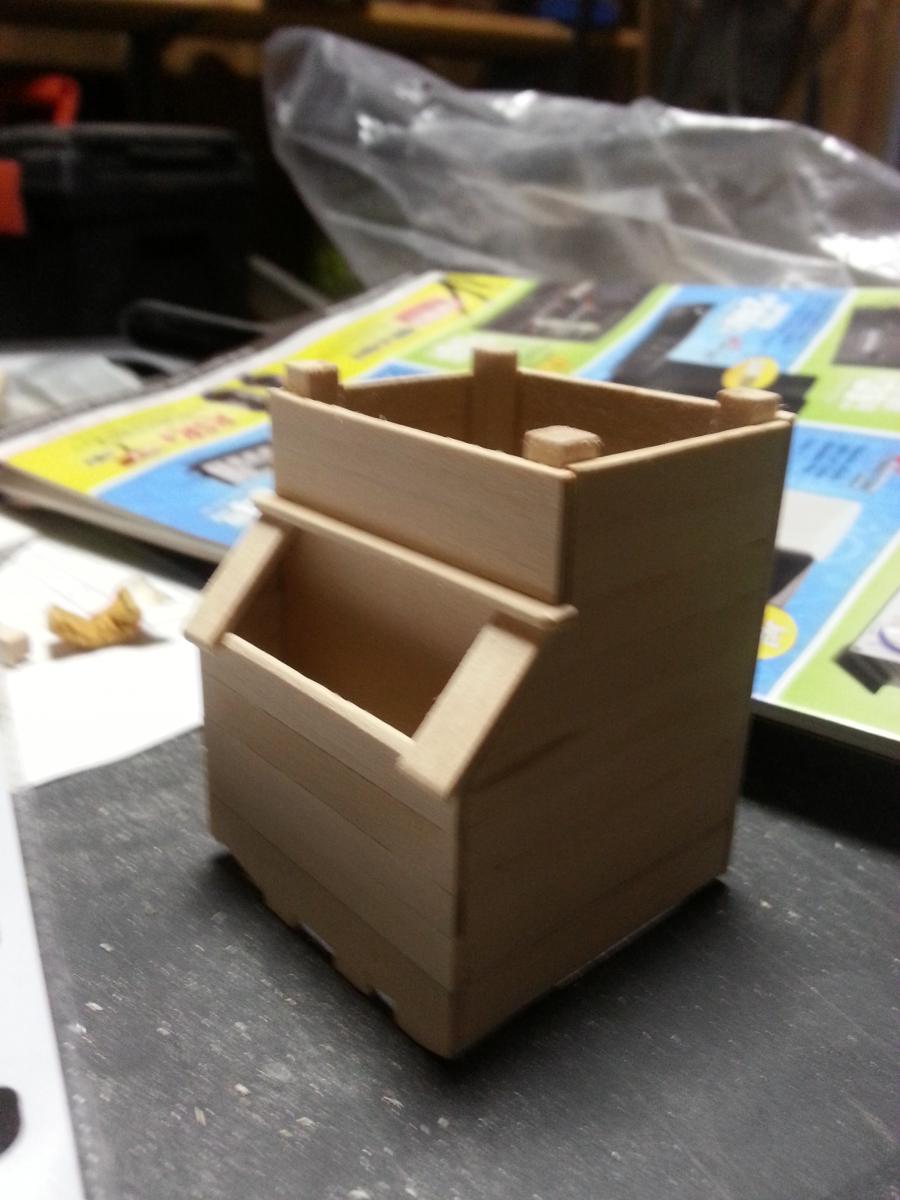
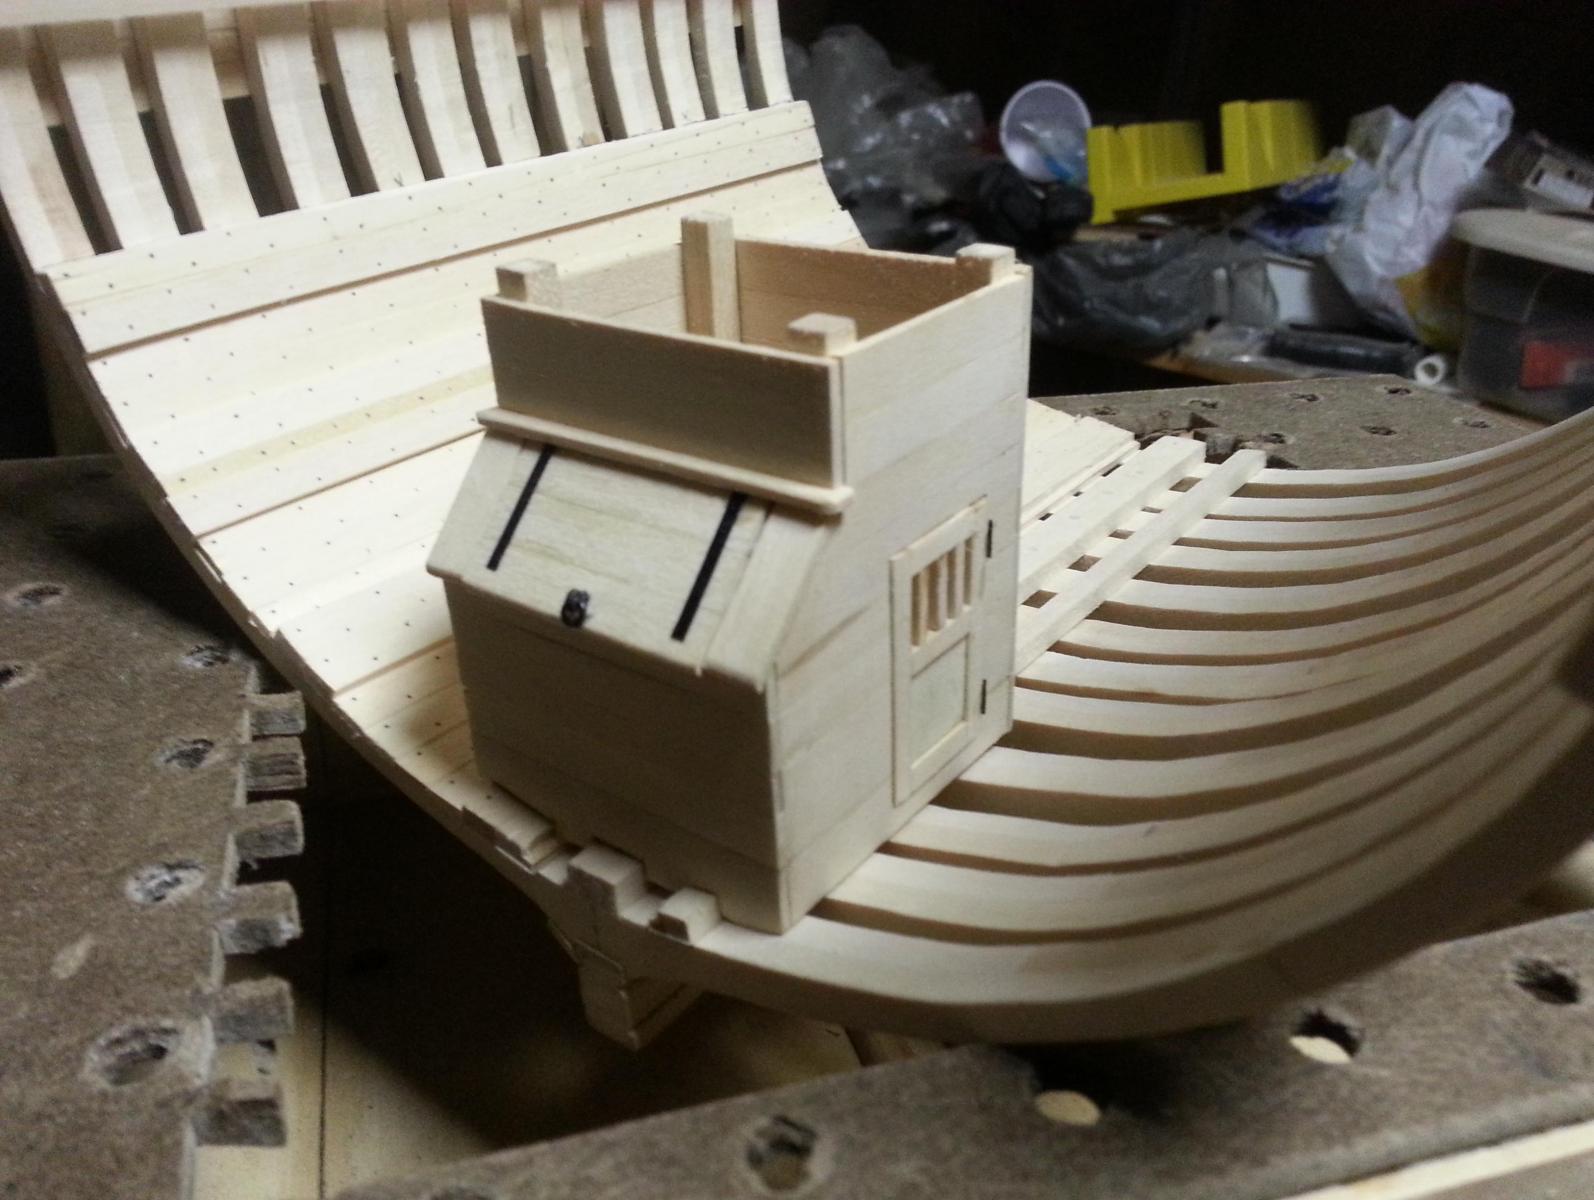
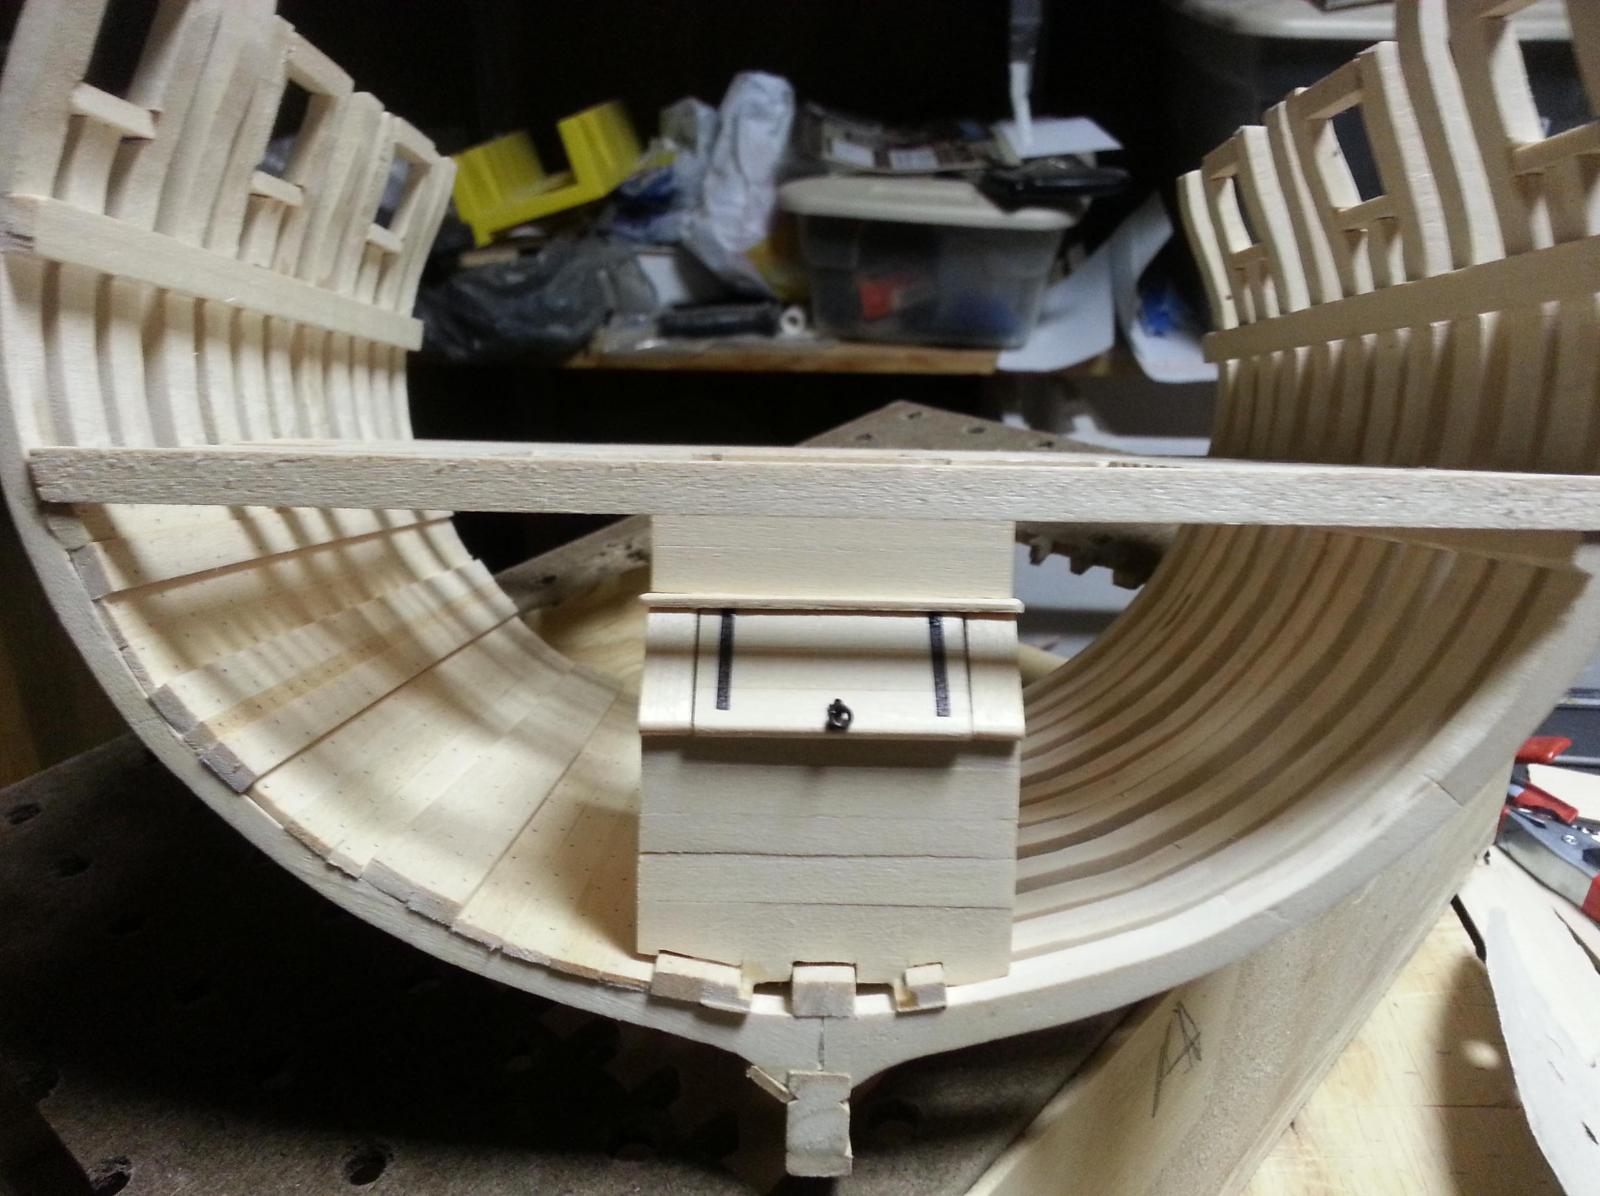
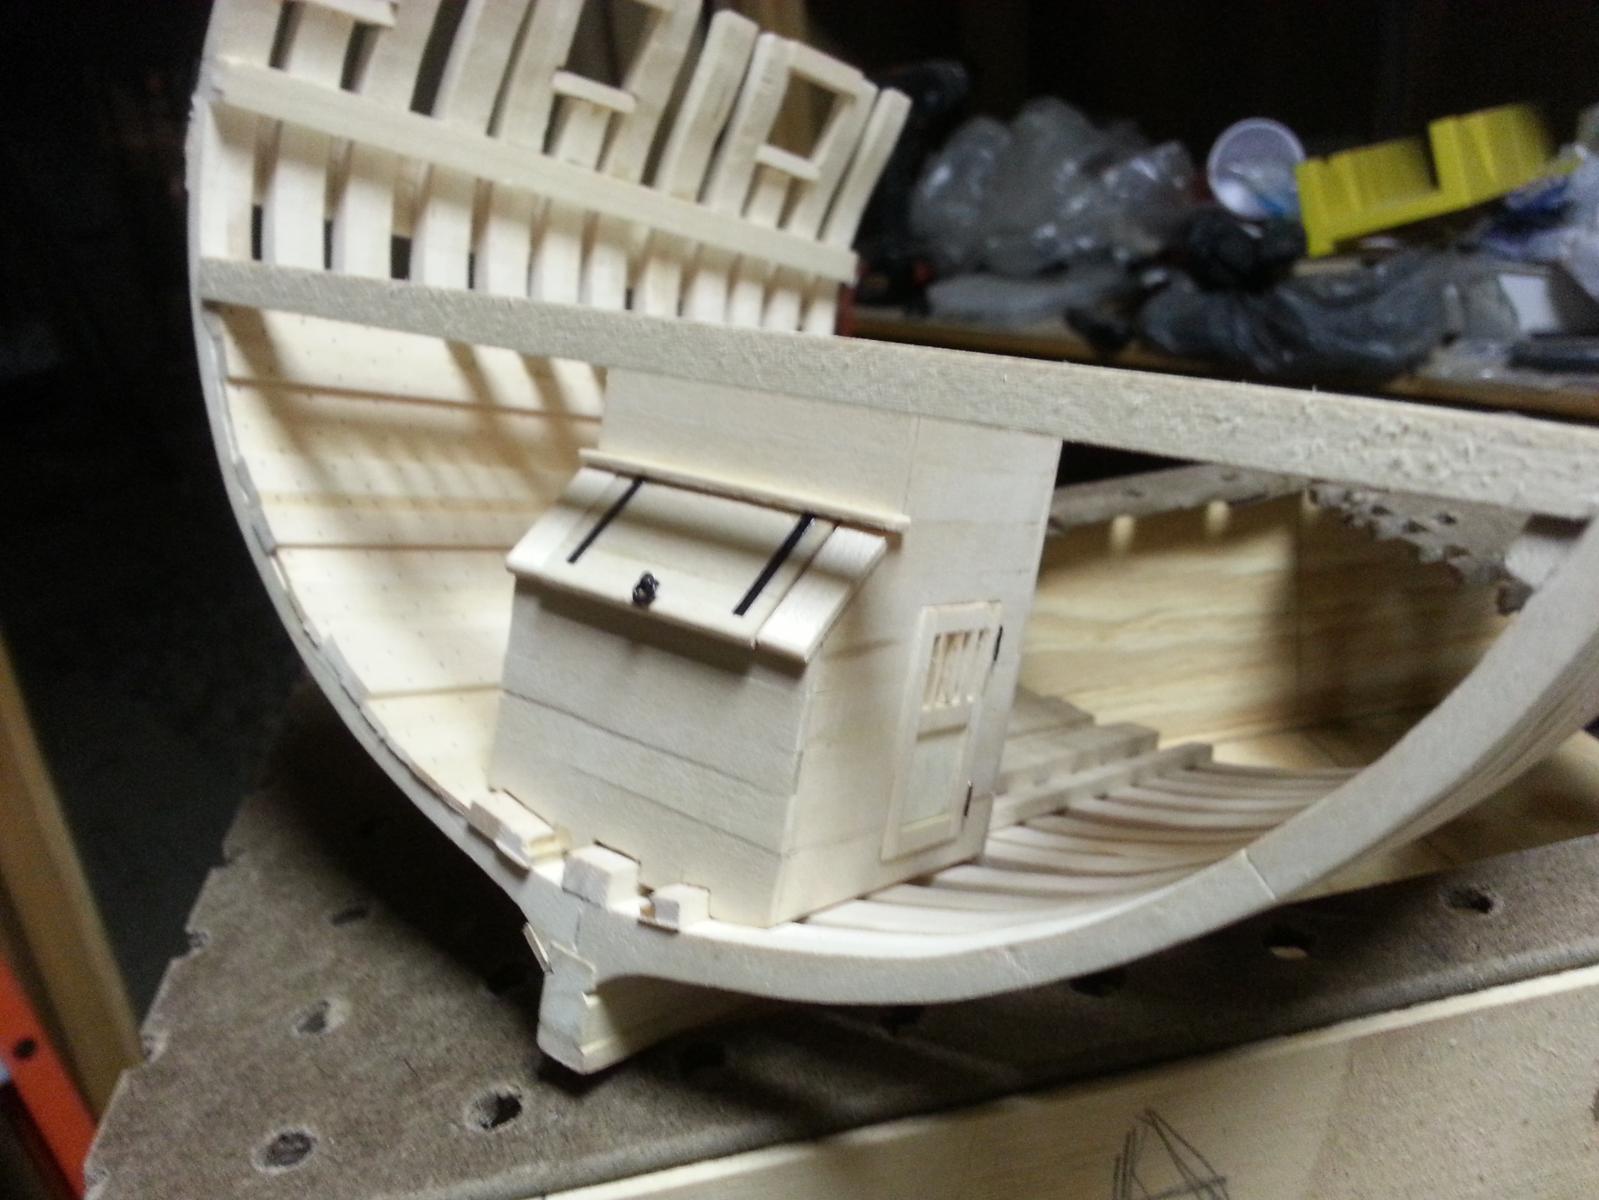
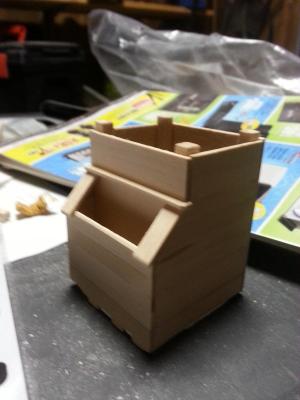
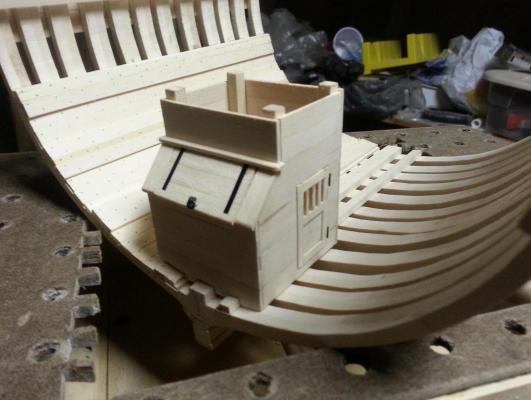
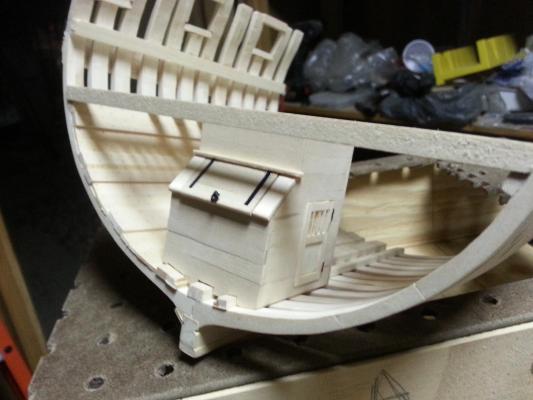
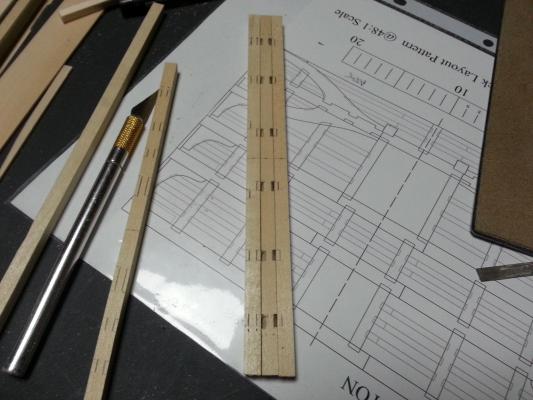
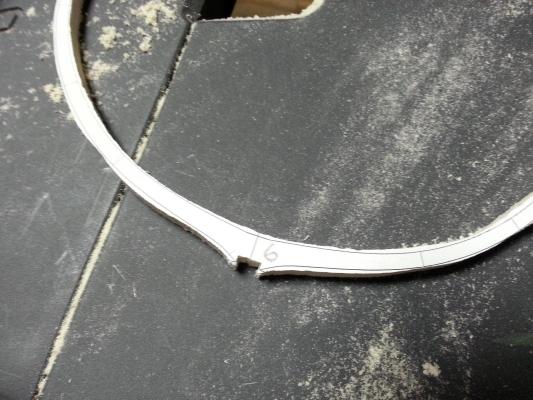
Pete, I got information from "Anatomy of the Ship: H.M.S. Bellona", in regards to pump wells and tubes but it was really sketchy as to the actual shot locker. What I then did was review forums on this site and MSB and came up with my own measurements for the shot locker. Now the door was a little pain in the butt seeing how its only 3/4" wide and 1 1/4" tall but I think I was able to pull it off.
-
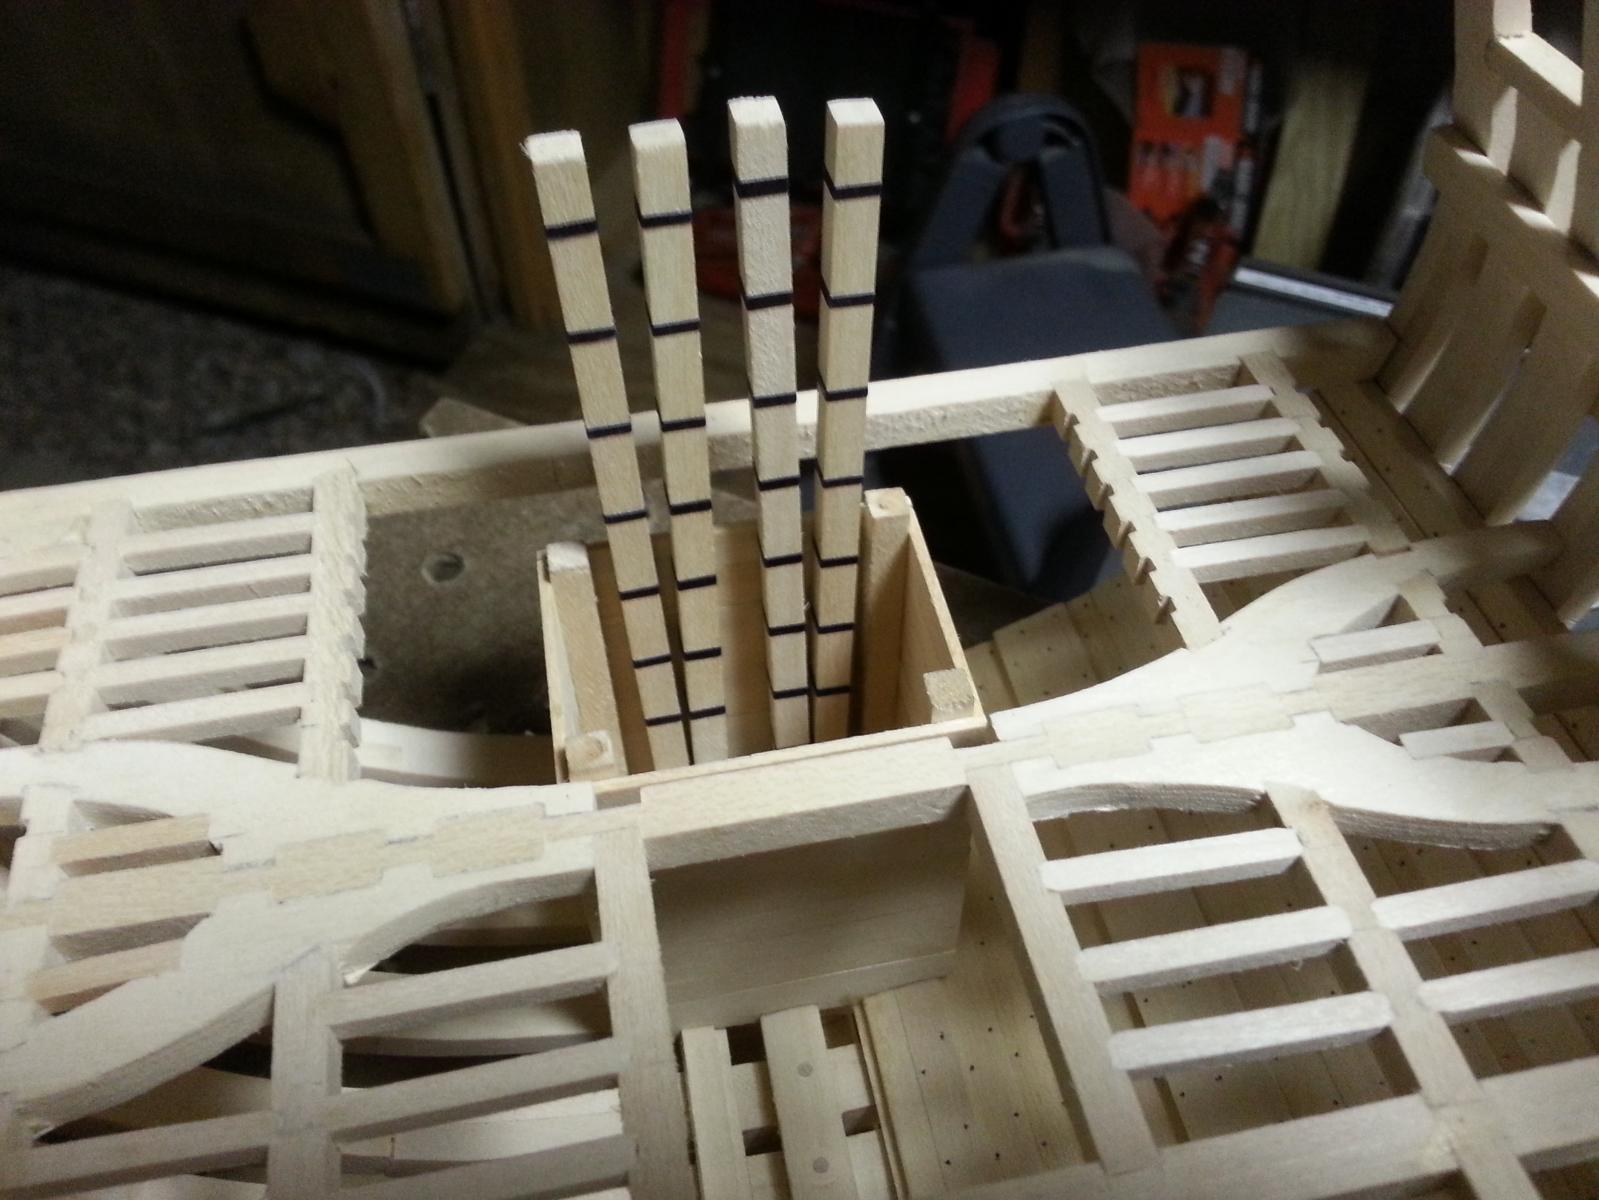
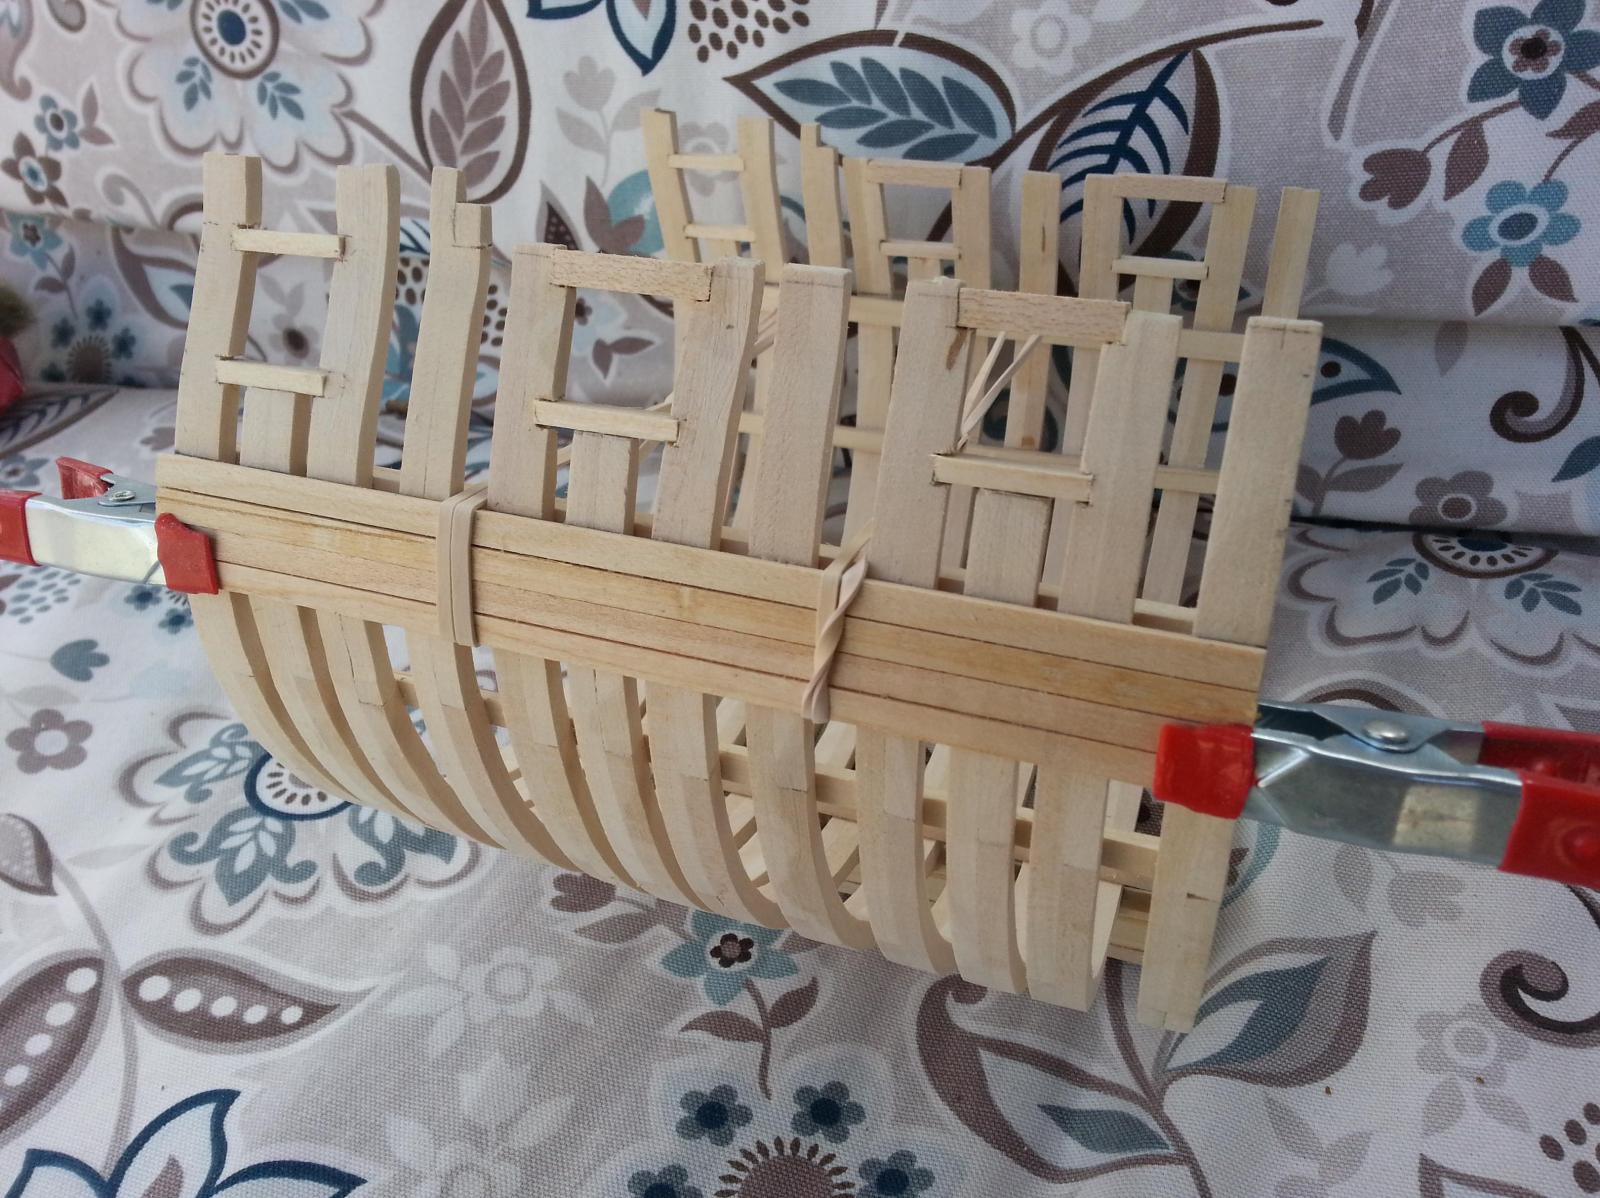
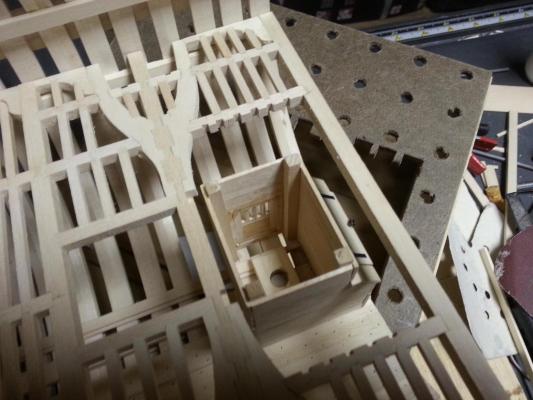
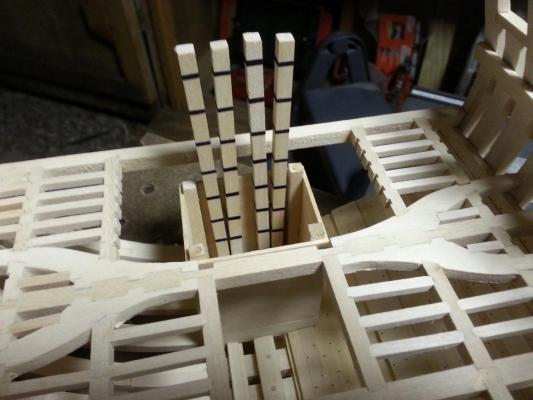
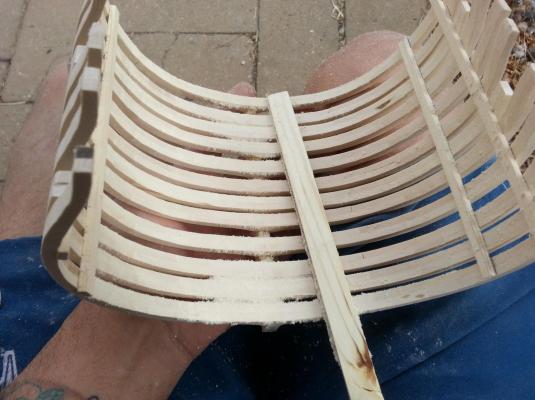
Greetings to all, Please excuse the fact that I have not posted anything new recently. The fact of the matter is that I’ve been pretty busy at work and other side projects. Speaking of side projects, a Buddy of mine wanted me to help him enclose the back porch of his house to which I was thinking of doing for free but he insisted that I charge him something for my work. What I then did was tell him that I was looking at Model Shipways New Bedford Whaleboat on eBay. If he truly wanted to pay me for my work then I’d take that as payment. So, I’ll give you a guess as to what my next future project is. Well back to the subject at hand. I have only been working on the Triton at least an hour a day sometimes two. As per the general consensus, I decided to plank the port side of the Triton and have added the ceiling up to the lower deck beam clamps. I’ve also completed the lower portion of the well with shot locker. I’ll be honest with all of you, looking at it outside of the Triton, I can’t help but think it looks like an ice-machine found at any hotel. I also added the shot locker’s door and door entrance to the lower well. I also made the chain pump casings for the well and just dry fitted them inside the lower well to see how they look. Not too shabby if I do say so myself. I hope to finish the lower deck in order to commence work on the gun deck sometime this week.


-
Hola Mija, The progress on your Red Dragon looks amazing. I look forward to your next edition showing all of us what the bulkhead compartment below decks looks like. Take your time and enjoy.
-
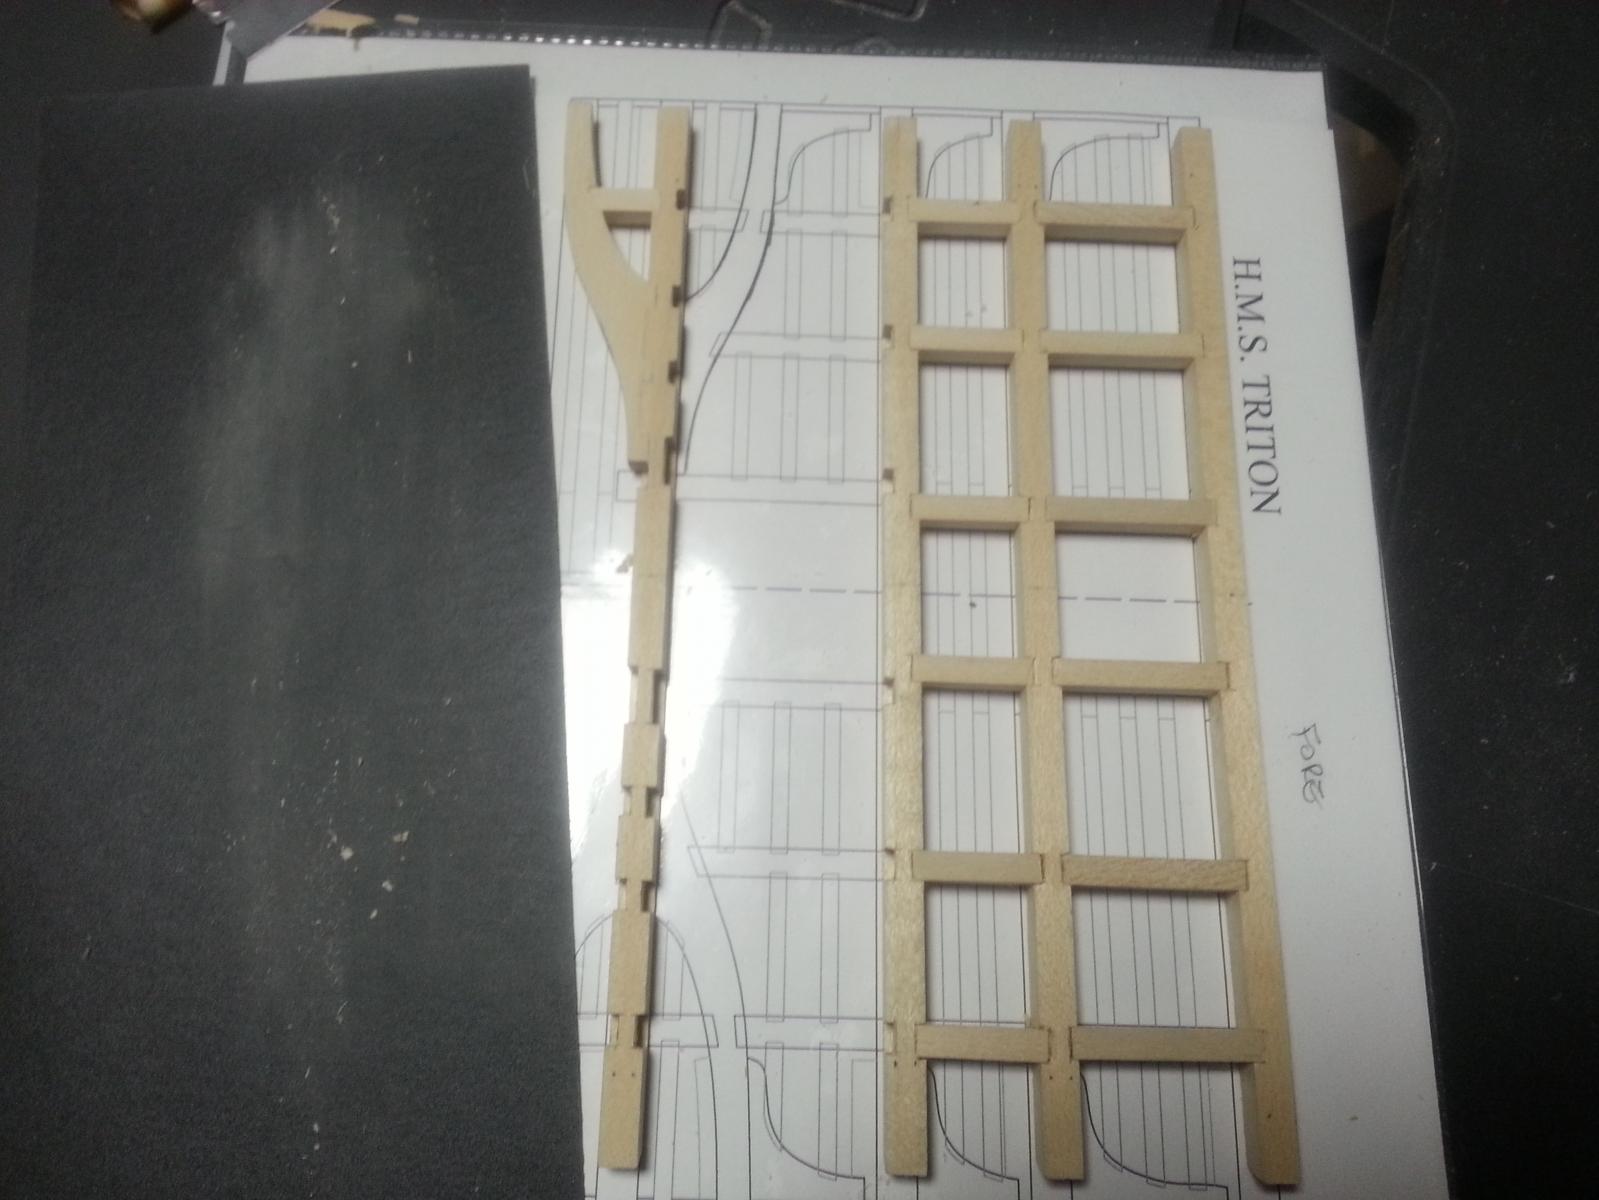
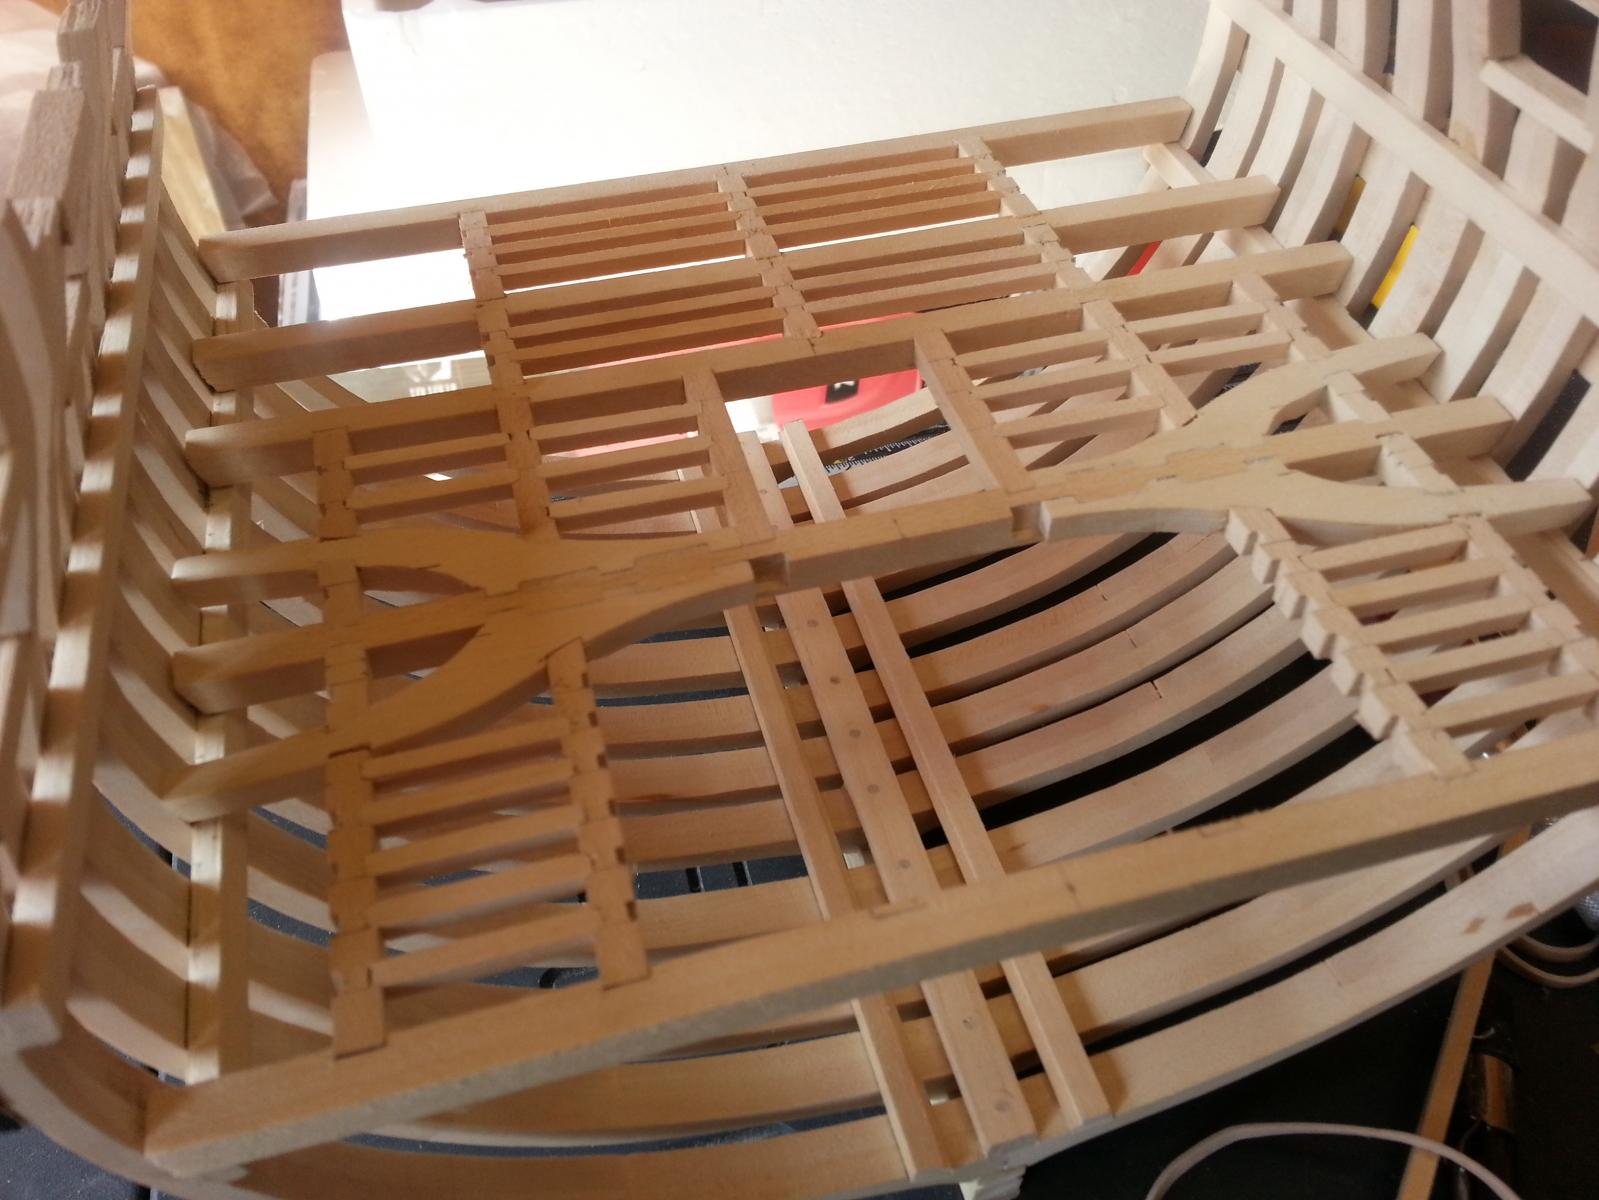
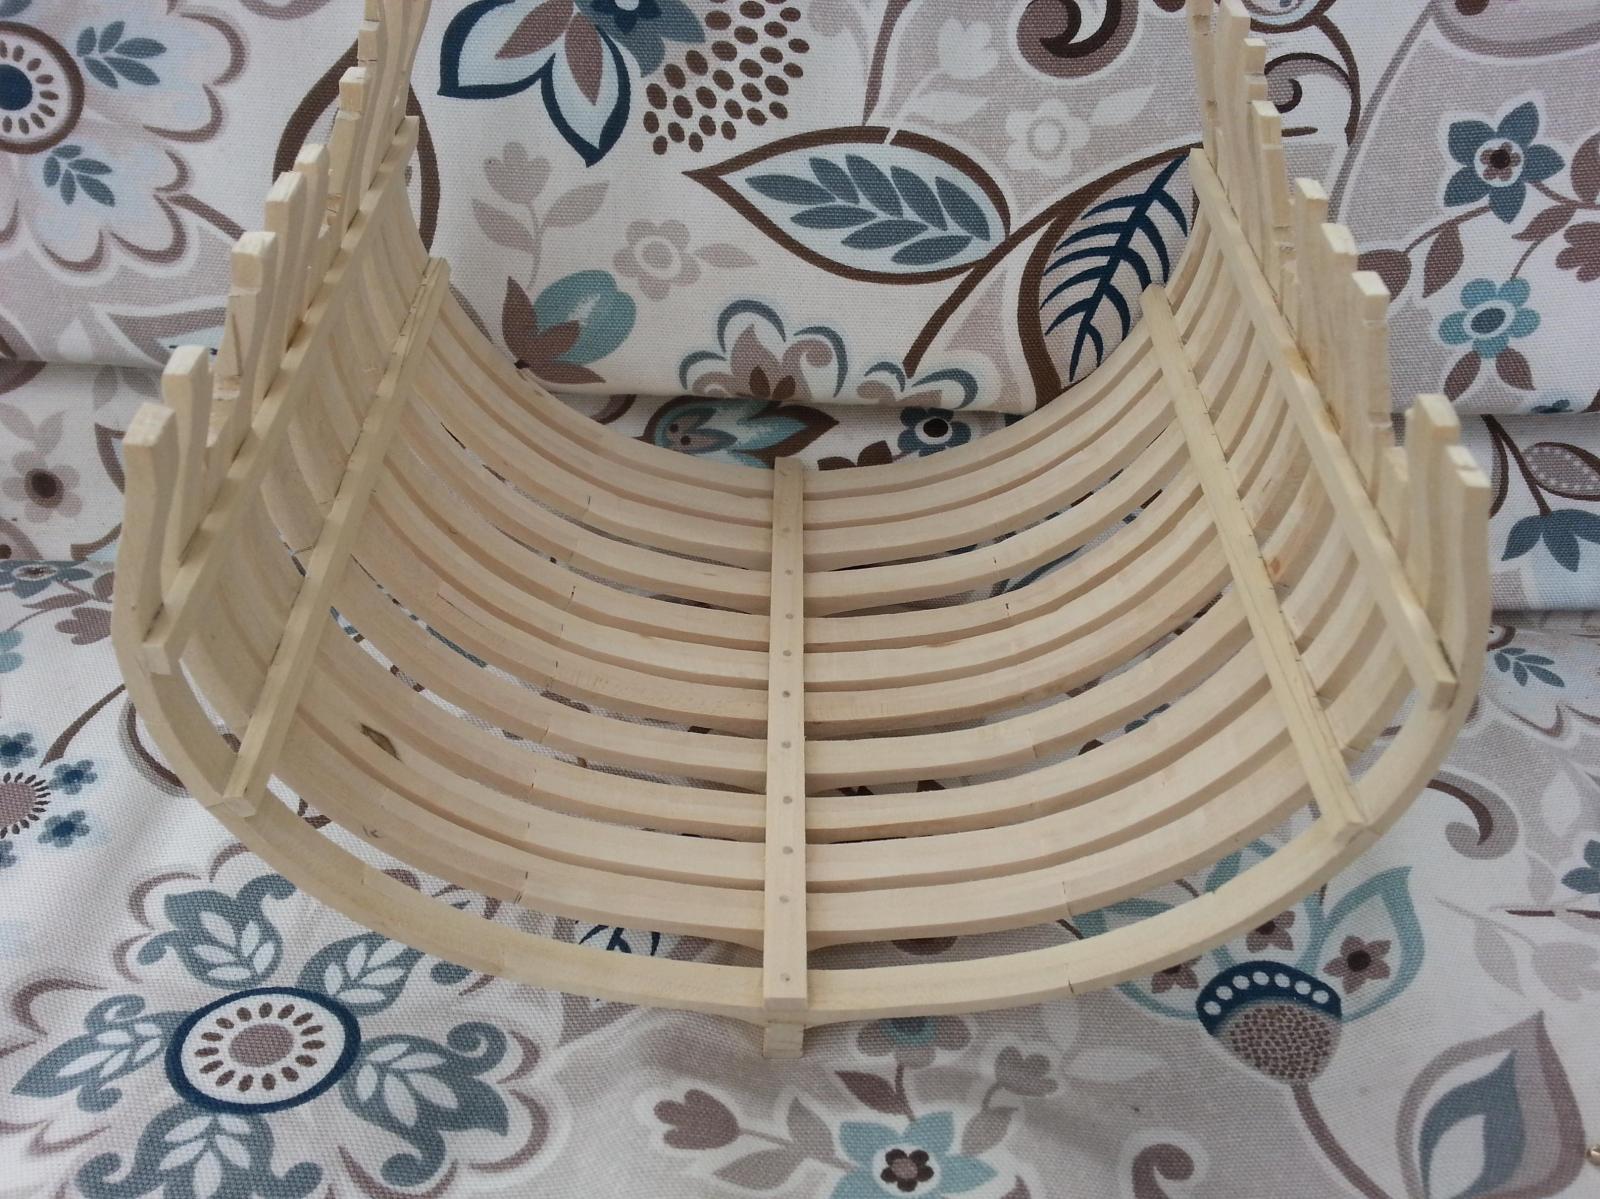
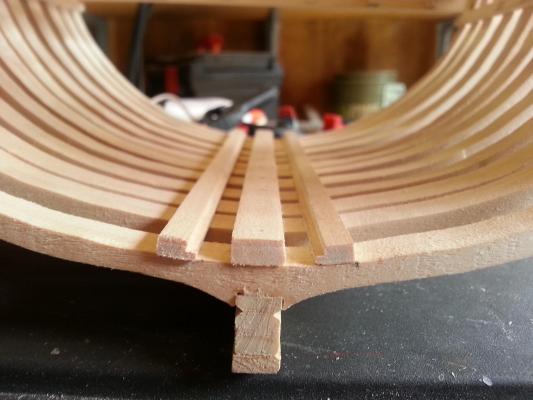
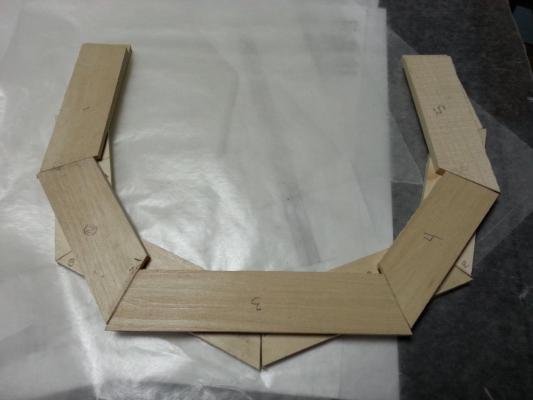
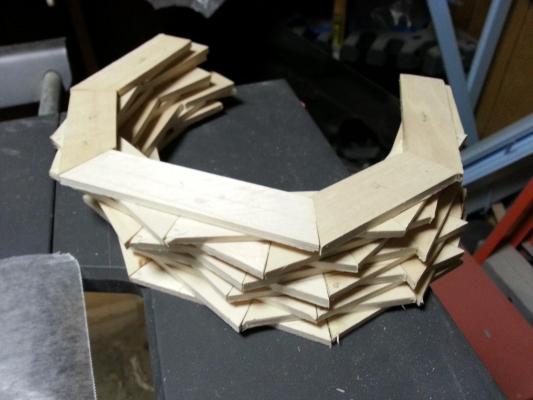
Greetings to all, Here’s the latest update of my H.M.S. Triton cross-section. I went ahead and started working on the lower deck taking measurements from the frames and transferring them to my timber. When I had completed four of the five deck beams, I realized that I was in fact following the gun deck plans rather than the lower deck plans (way to go Murphy). What I then did was put aside the work I had thus far and got new timber to work on the lower deck with I might add, the correct plans. I then cut the new deck beams and carlings and glued them in place on top of the plans which was inside of a document protector so as not to get the plans glued to the bottom of my deck. After the deck was dry, I proceeded to cut the ledges one at a time and gluing them on the carlings after I slightly sanded the corners for a snugger fit. After everything was glued and dry, I slid the deck onto the deck beam clamps to see how she was starting to look and was quite pleased at the result. I was actually contemplating if I should go ahead and plank the frames but decided against it because I really like the way everything is coming along. What I will do is place a minimal amount of planking material on the outside frames starting two or three planks below the wales and working my way up. The following pictures will show you what I have so far.


-
Many thanks Daniel, I hope to be finished with the lower deck frame by Friday, if not then at least over the week-end.
-
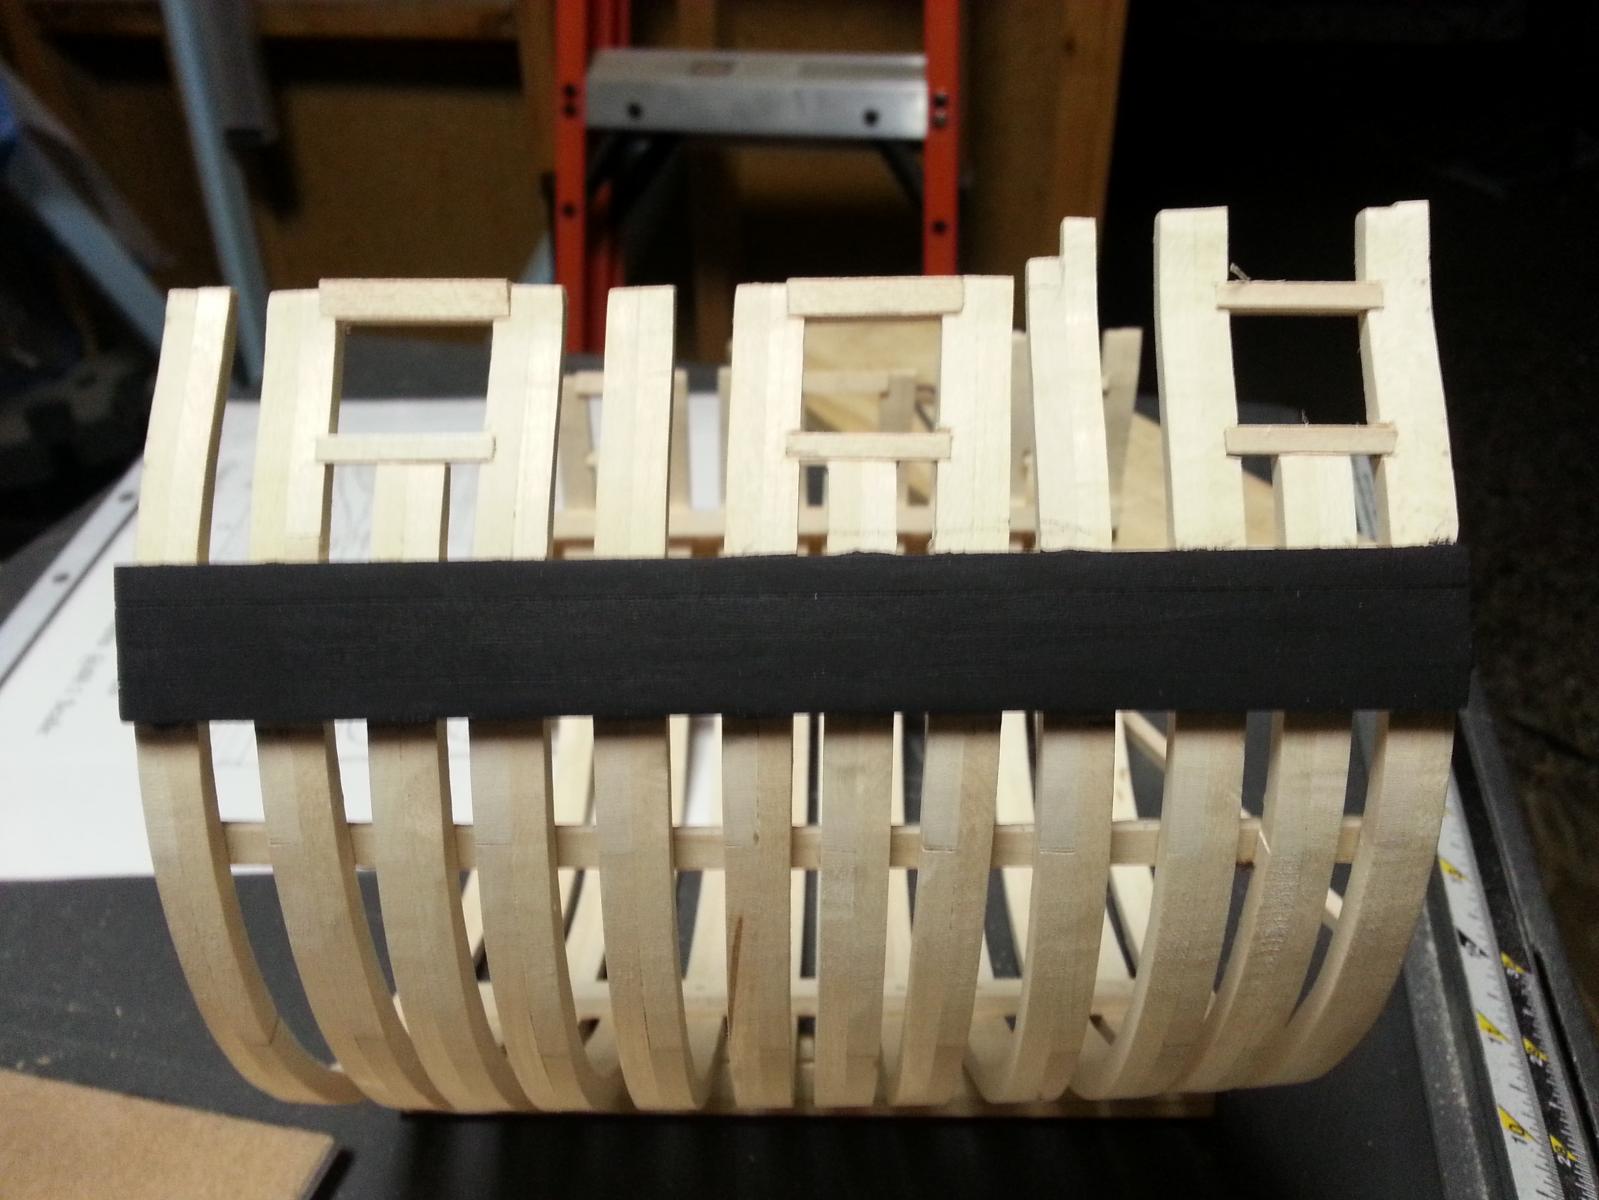
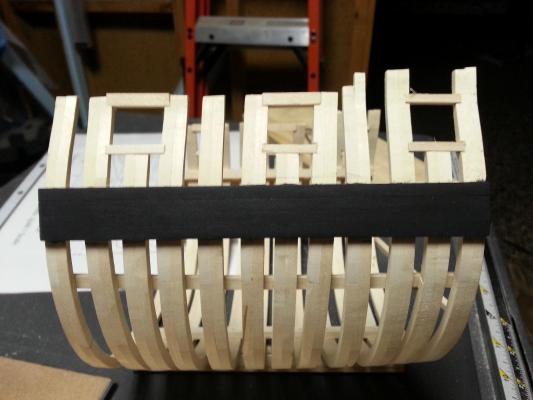
Greetings to all, Sadly there isn't much progress to report, but that only means that there is a little bit to report. I've managed to paint the wales black and am pretty glad at how the weight is evenly distributed along the cross section. If you notice the second picture, you can see that she is balancing herself on her keel. The last picture will show you the start of the lower deck being worked on. I've only just started filing away at the deck beam to accept the carlings.
-
Thanks to everyone for your kind words. Matrim, The sanding sticks was just something I thought would help me fair the hulls and it only made sense to use something round to fair the inside. Of course there are different possibilities. Mij, Just think of me as a Rat-Terrier. Once I get a hold of something I won't be happy until she's done. Daniel, It was a warm day out in Arizona with temperatures getting up to 87 degrees farenheit (30 degrees celcius). Once you start sanding it seems the temperature gets higher.
-
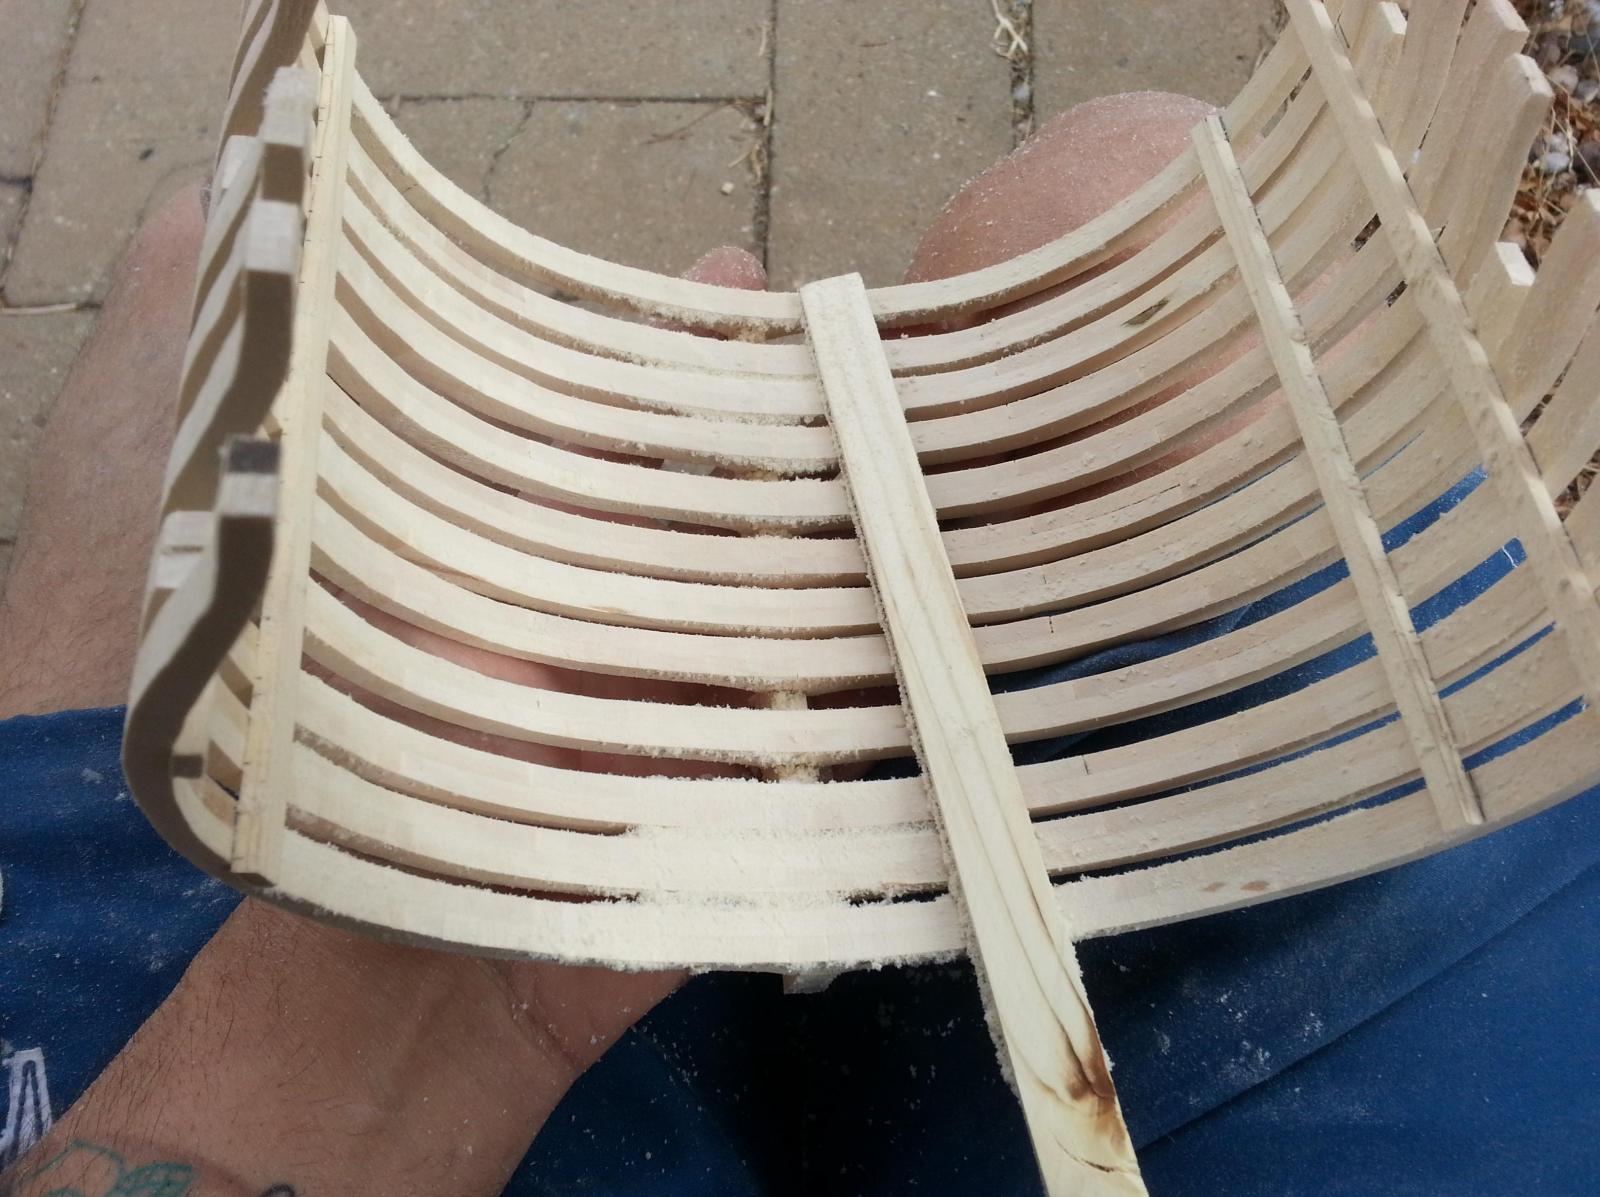
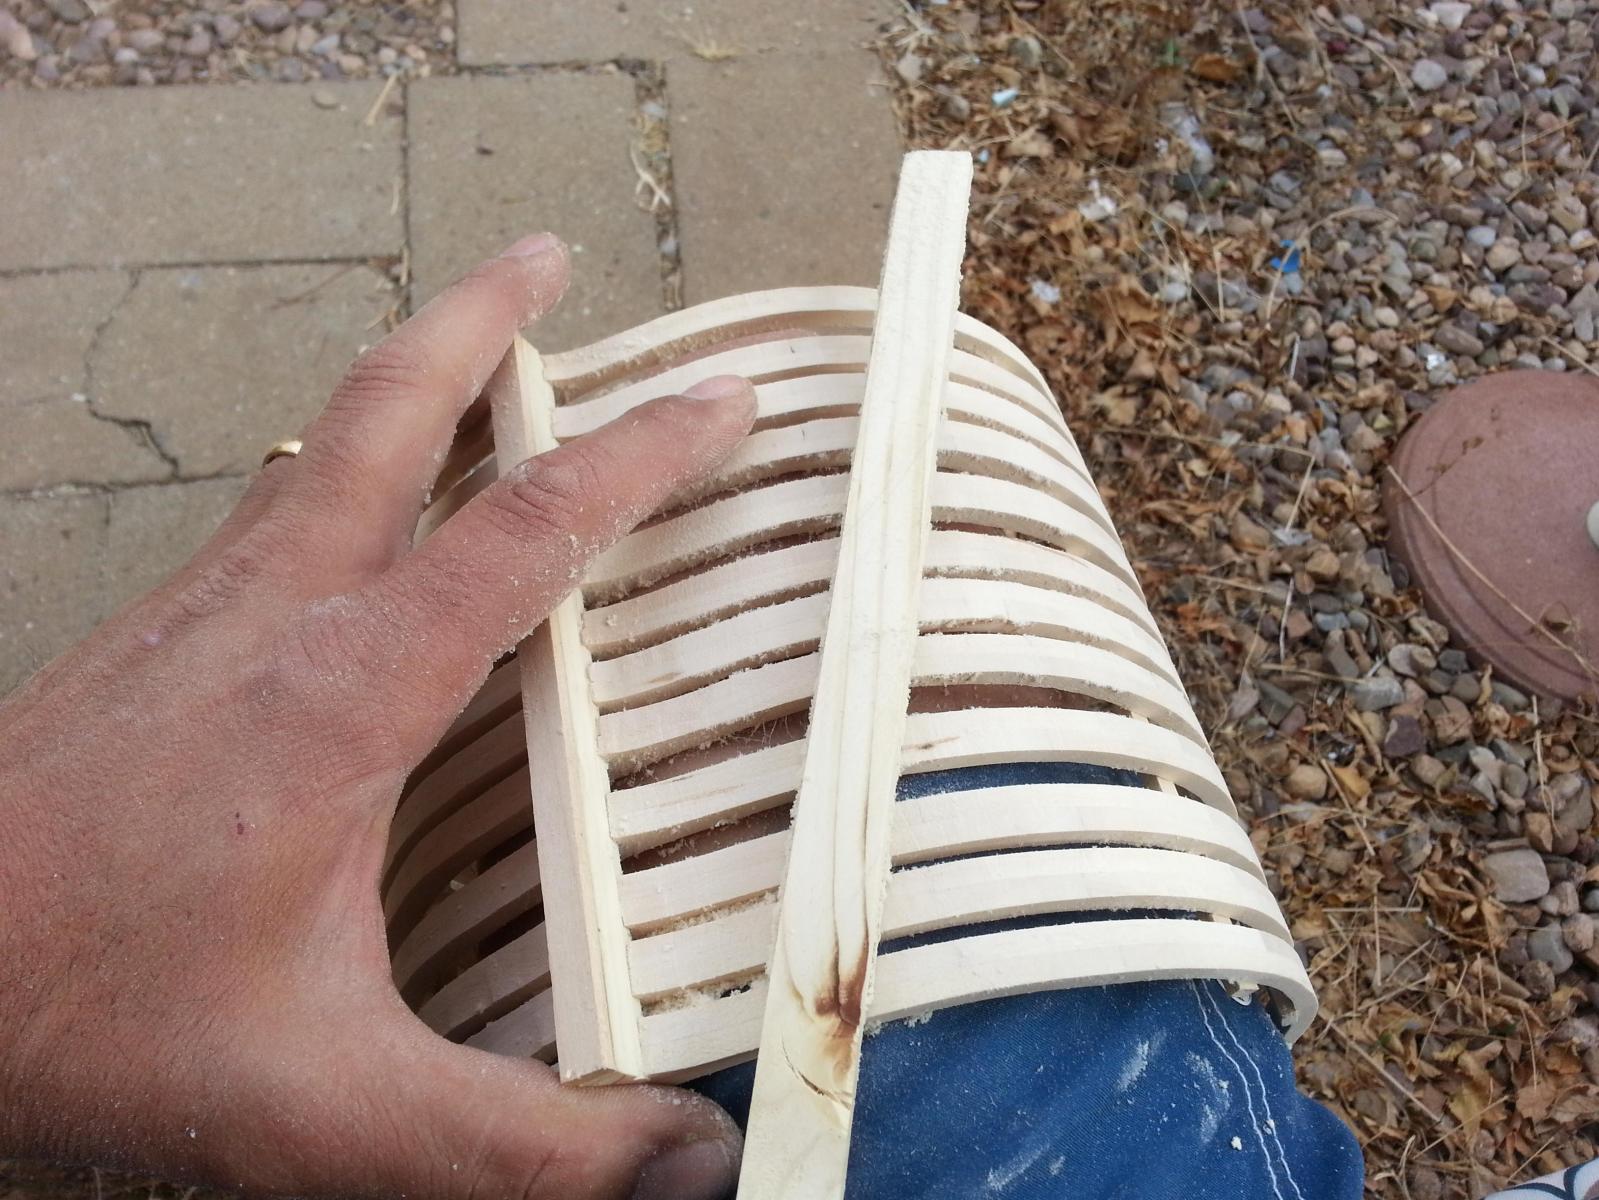
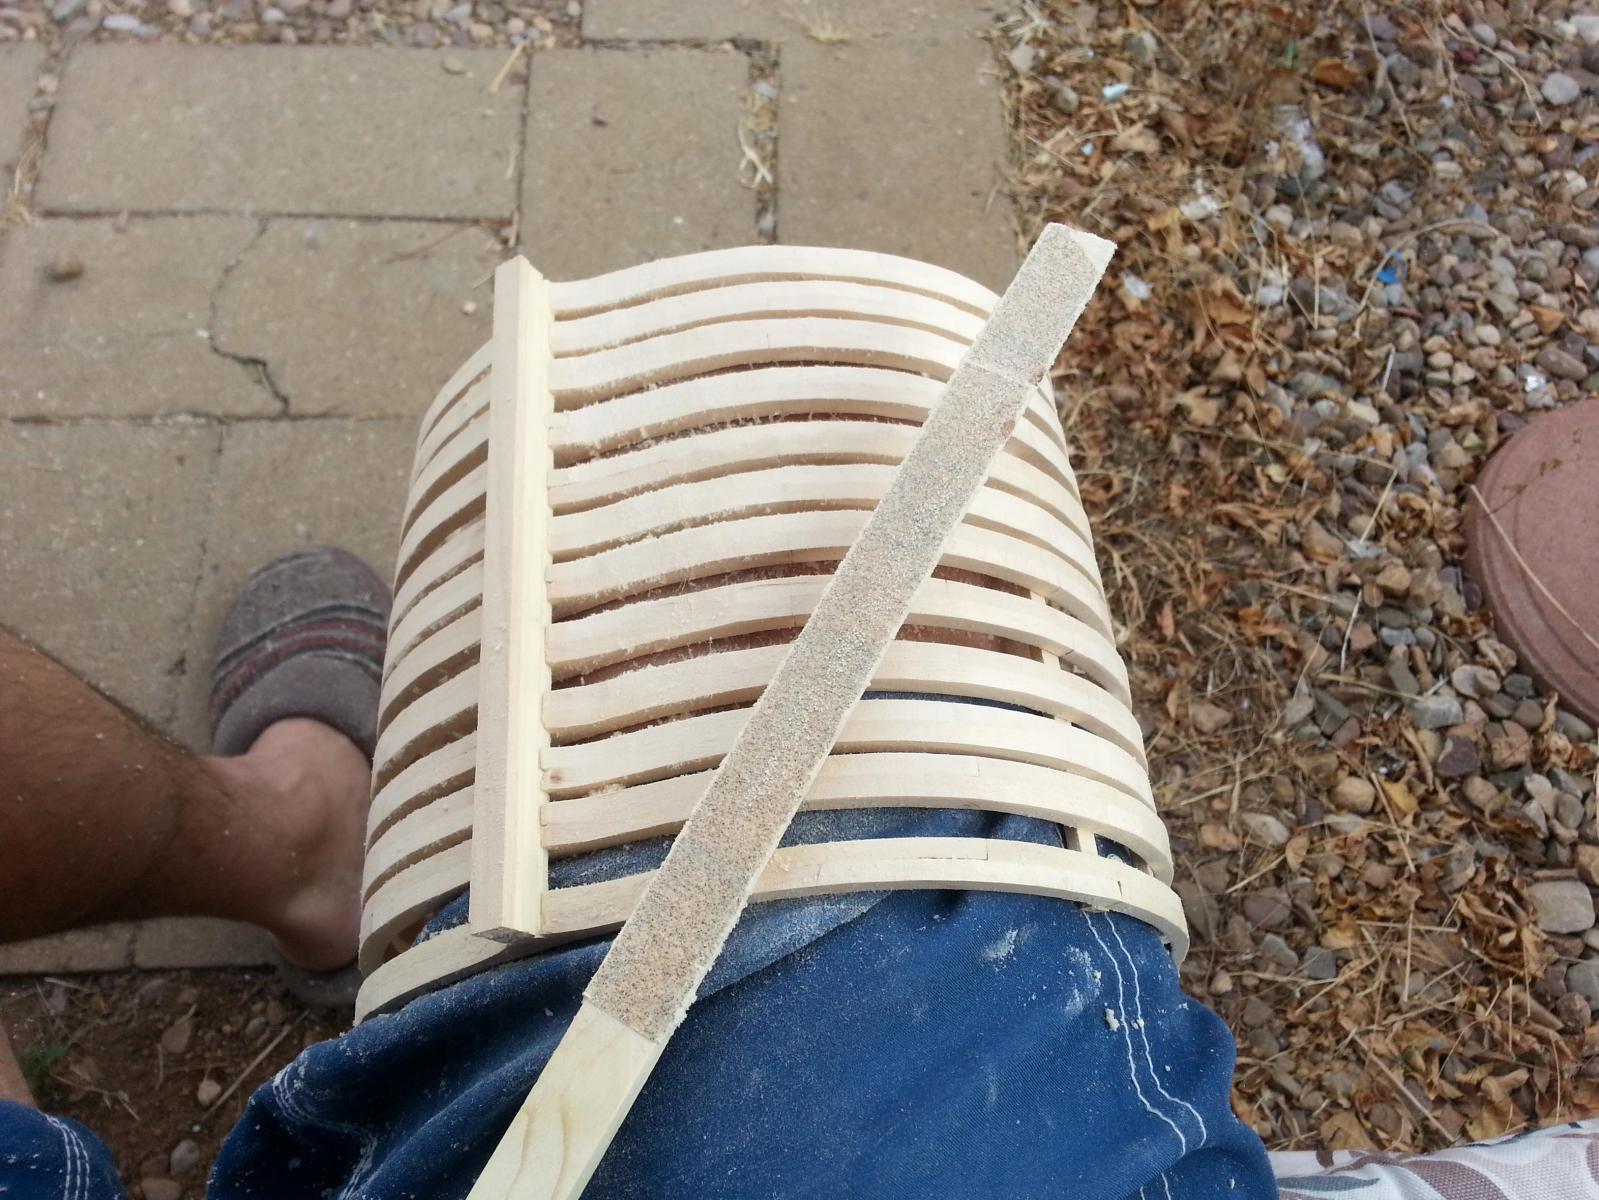
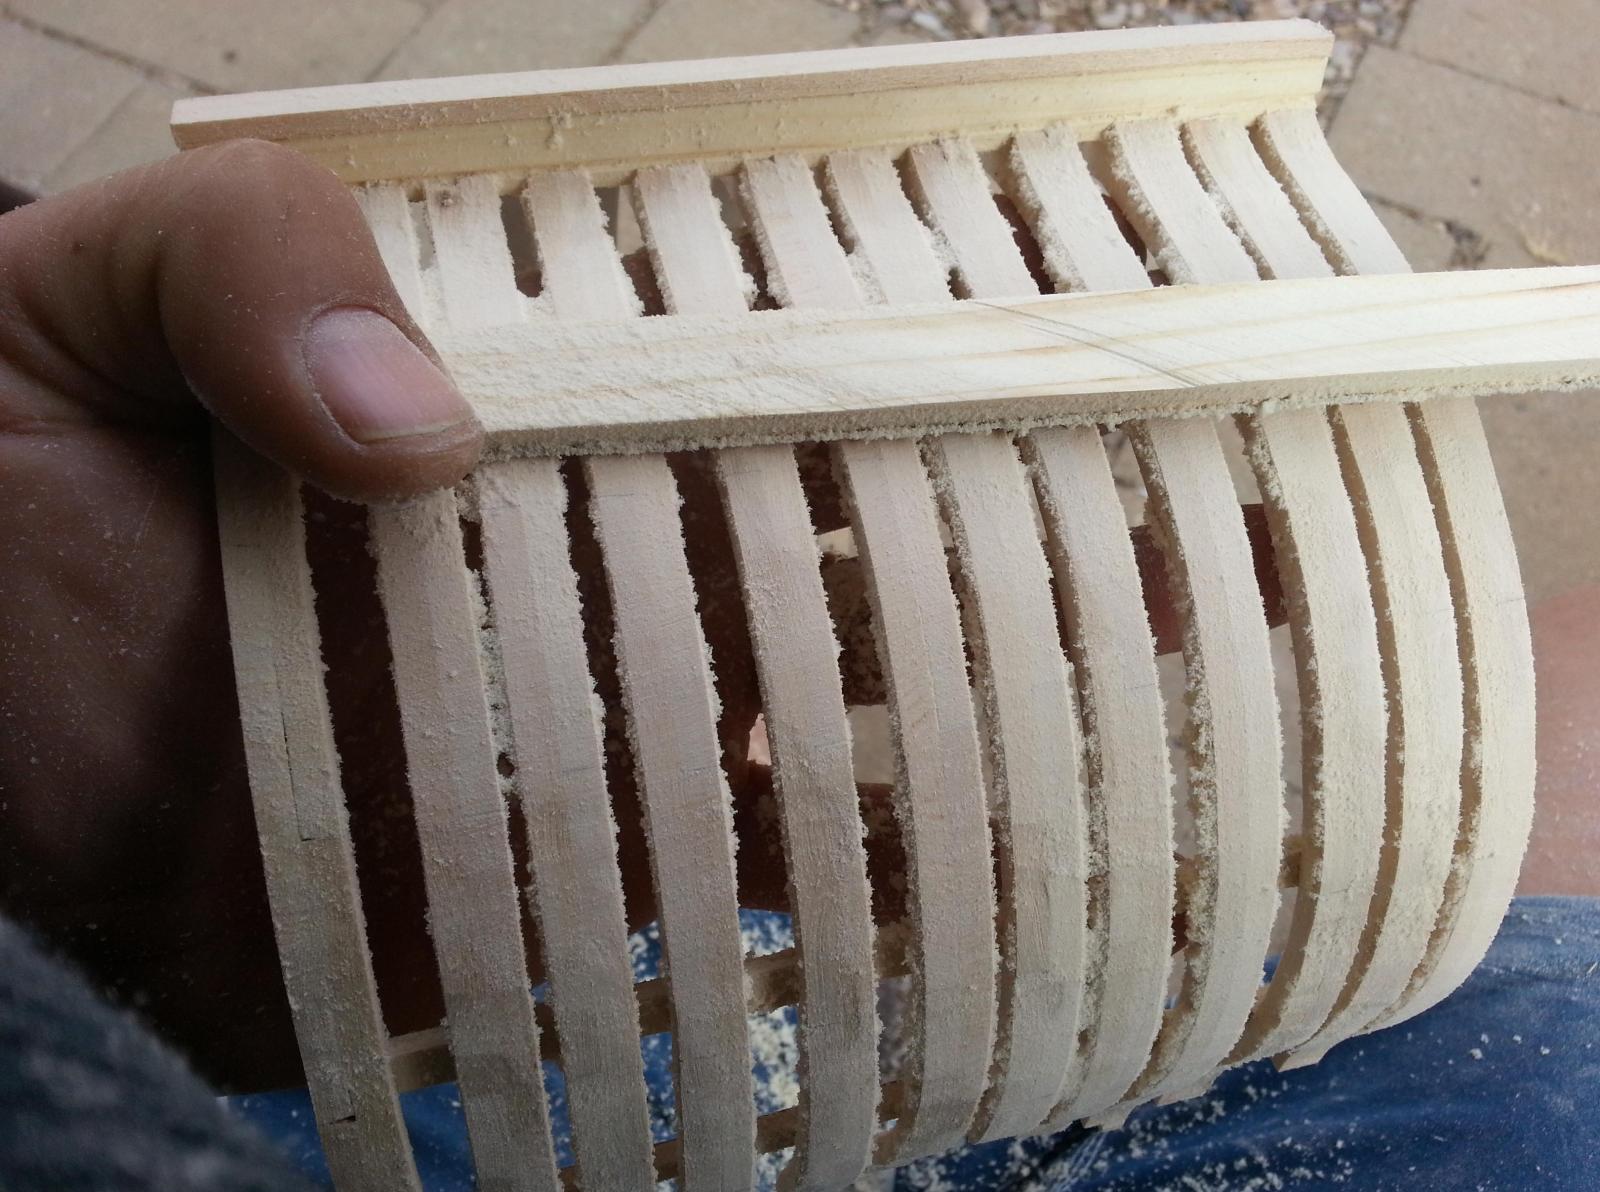
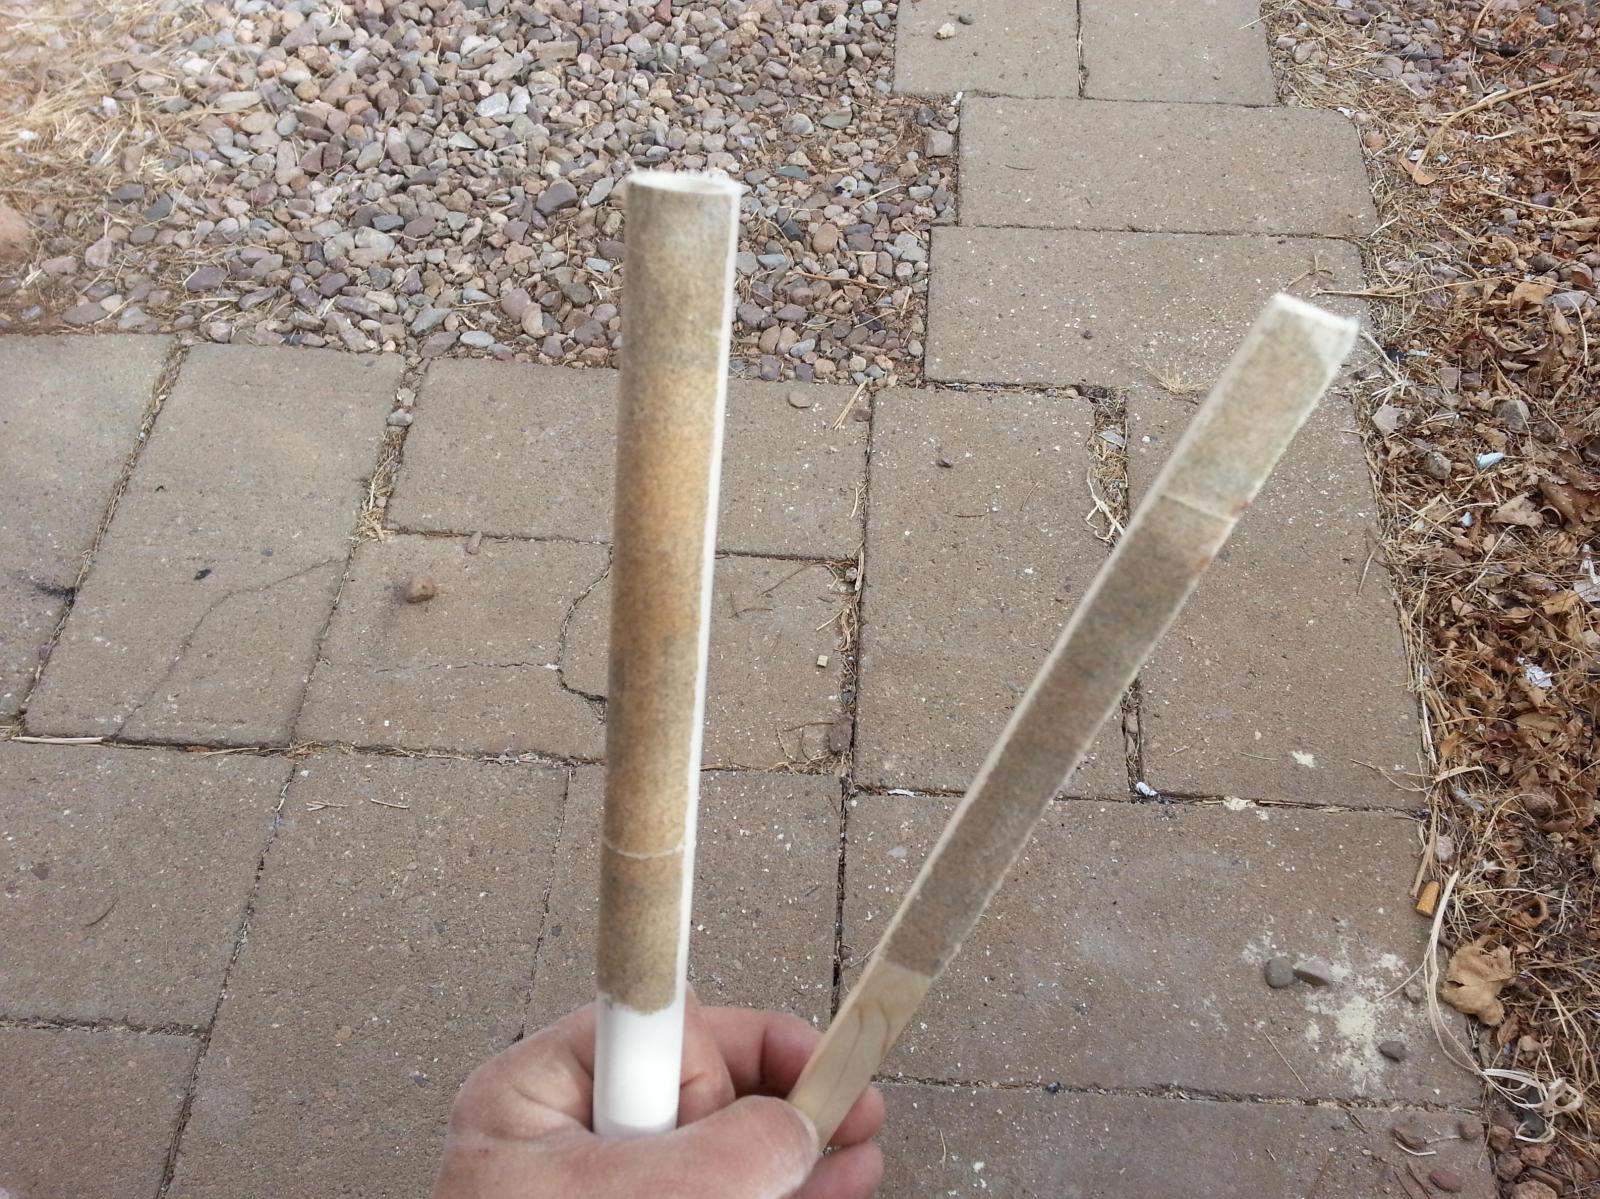
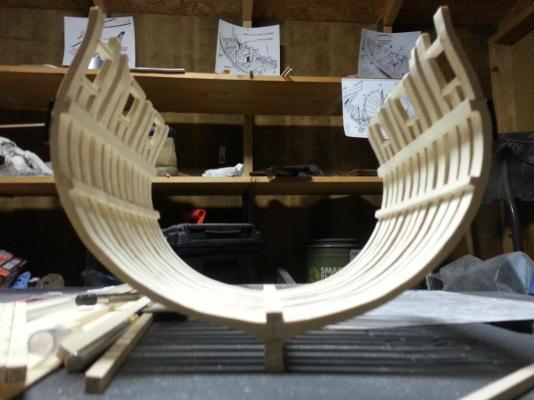
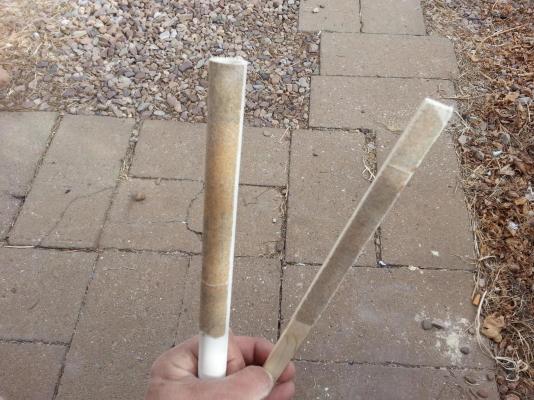
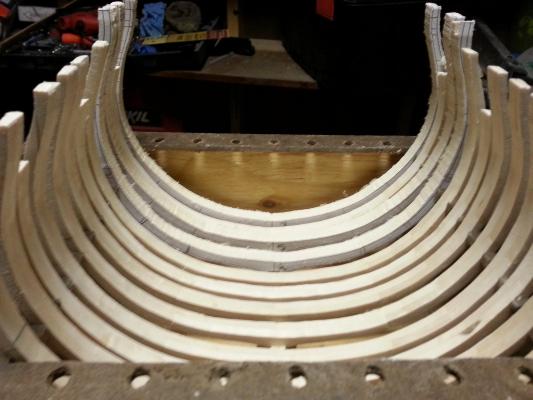
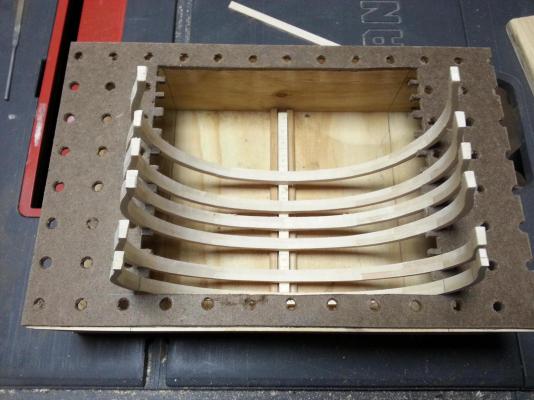
Today I’ve managed to take the Triton out of its jig in order to start sanding the inside and outside. I used a sanding stick to work on the outside hull and was quite pleased at how quickly it faired the outside. When I turned my attention to the inside hull, I realized that the straight edge of my sanding stick was causing it to leave gouge marks. I then decided to make a new sanding stick with a ½” PVC pipe I had left over from a plumbing job I did at the house. I’ve come to the conclusion that a straight edge sanding stick is good for the outside moving it fore to aft, and the PVC pipe sanding stick is good for the inside moving it port to starboard along the frames. I’ve also managed to place and treenail the keelson down, add the gun port’s sill and trestle, and am currently working on the wales. The following pictures will show you how she’s coming along.


-
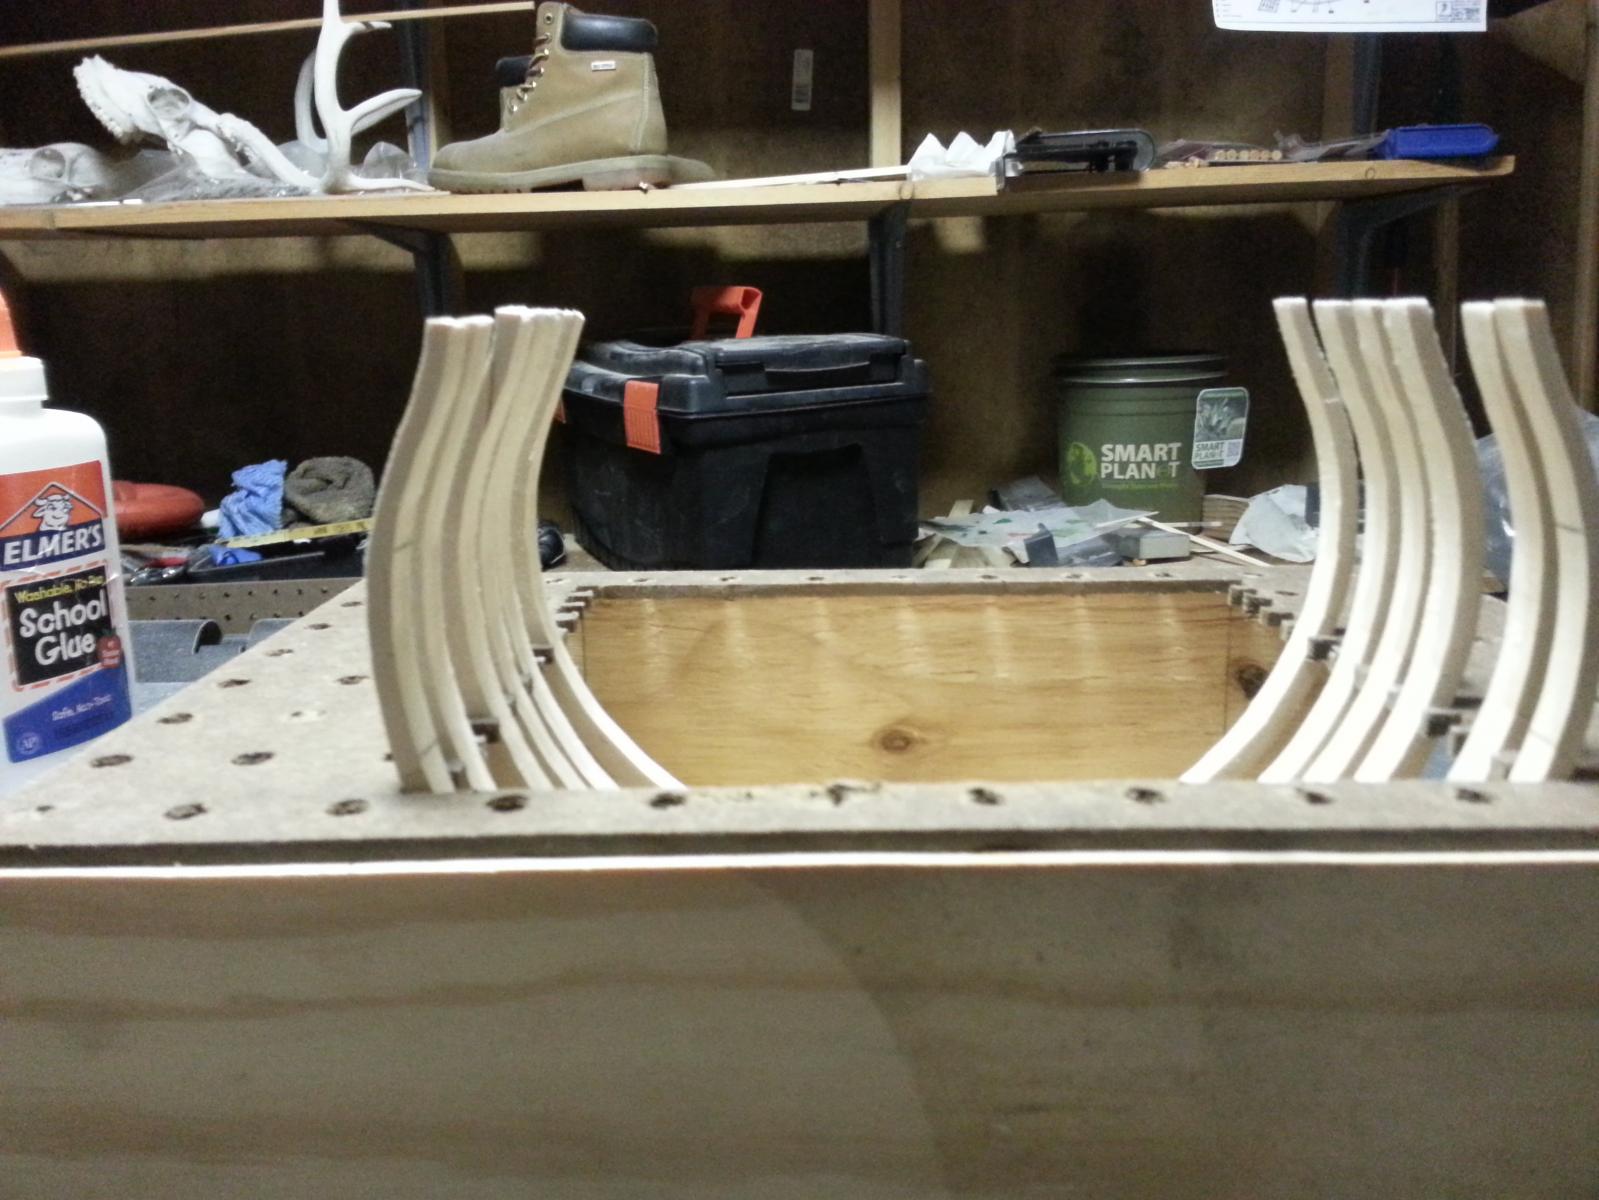
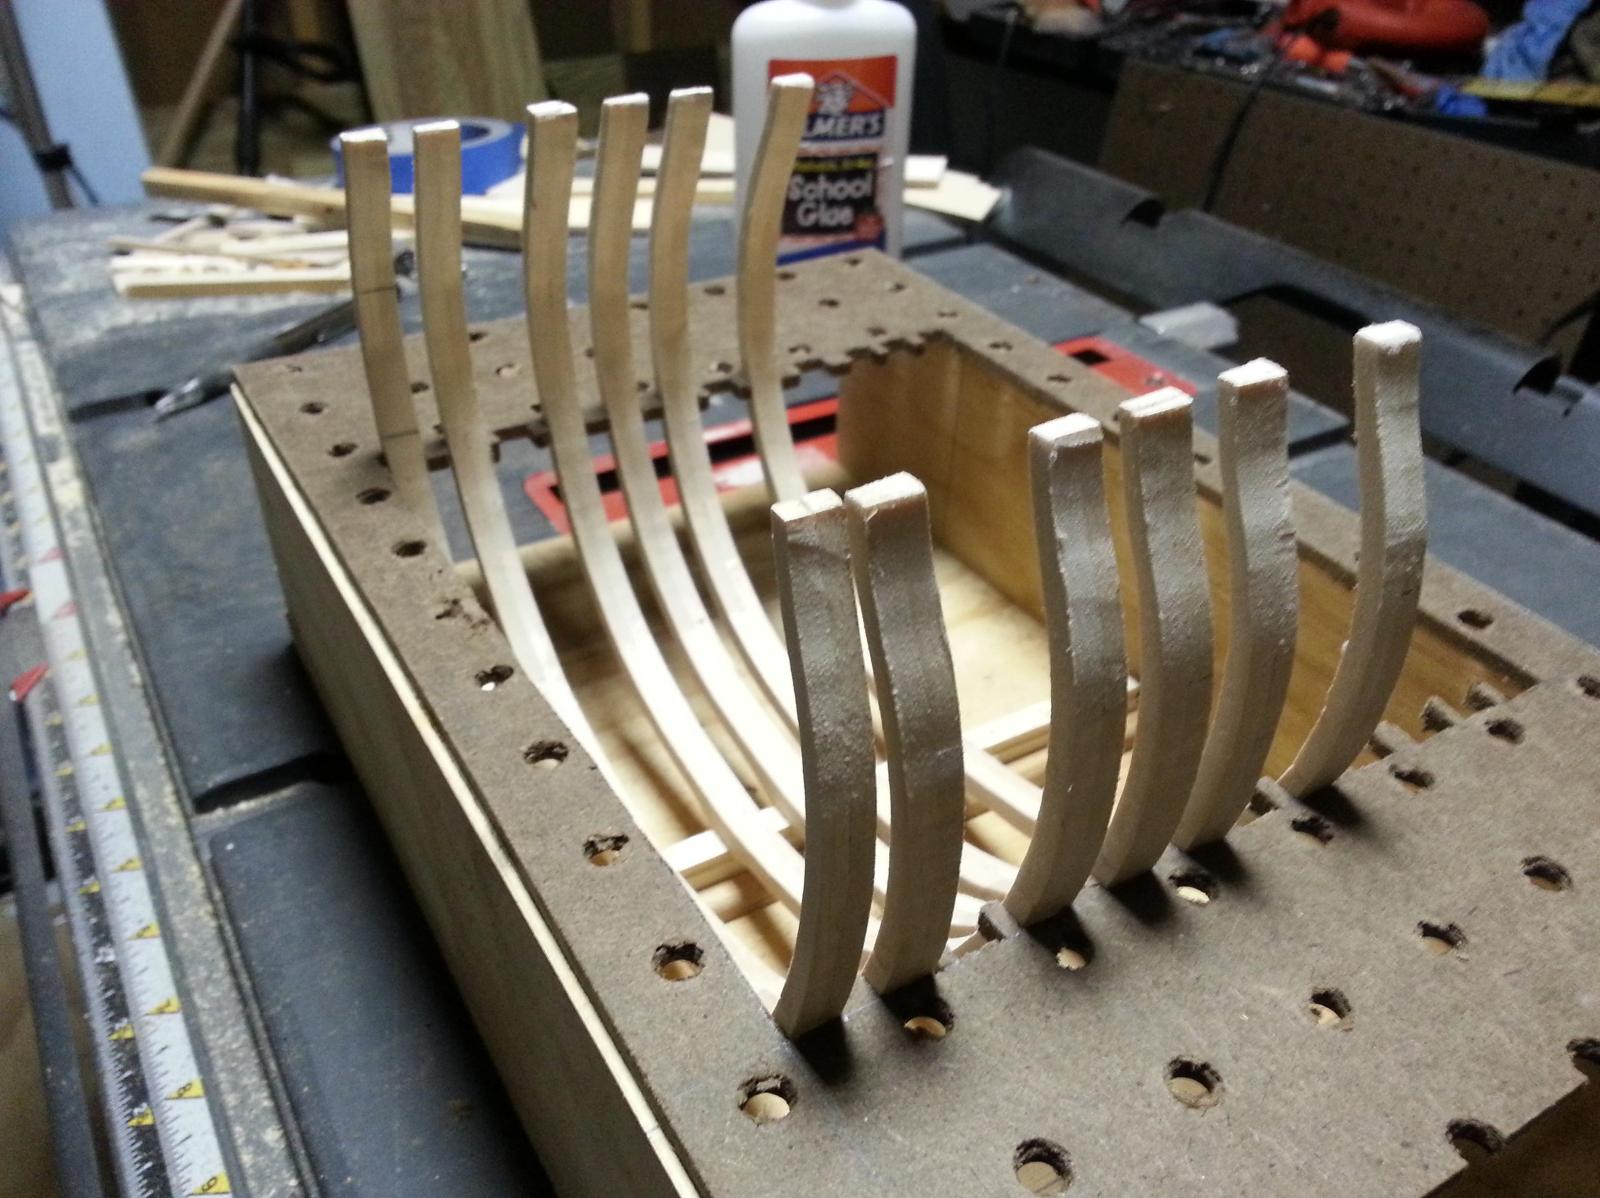
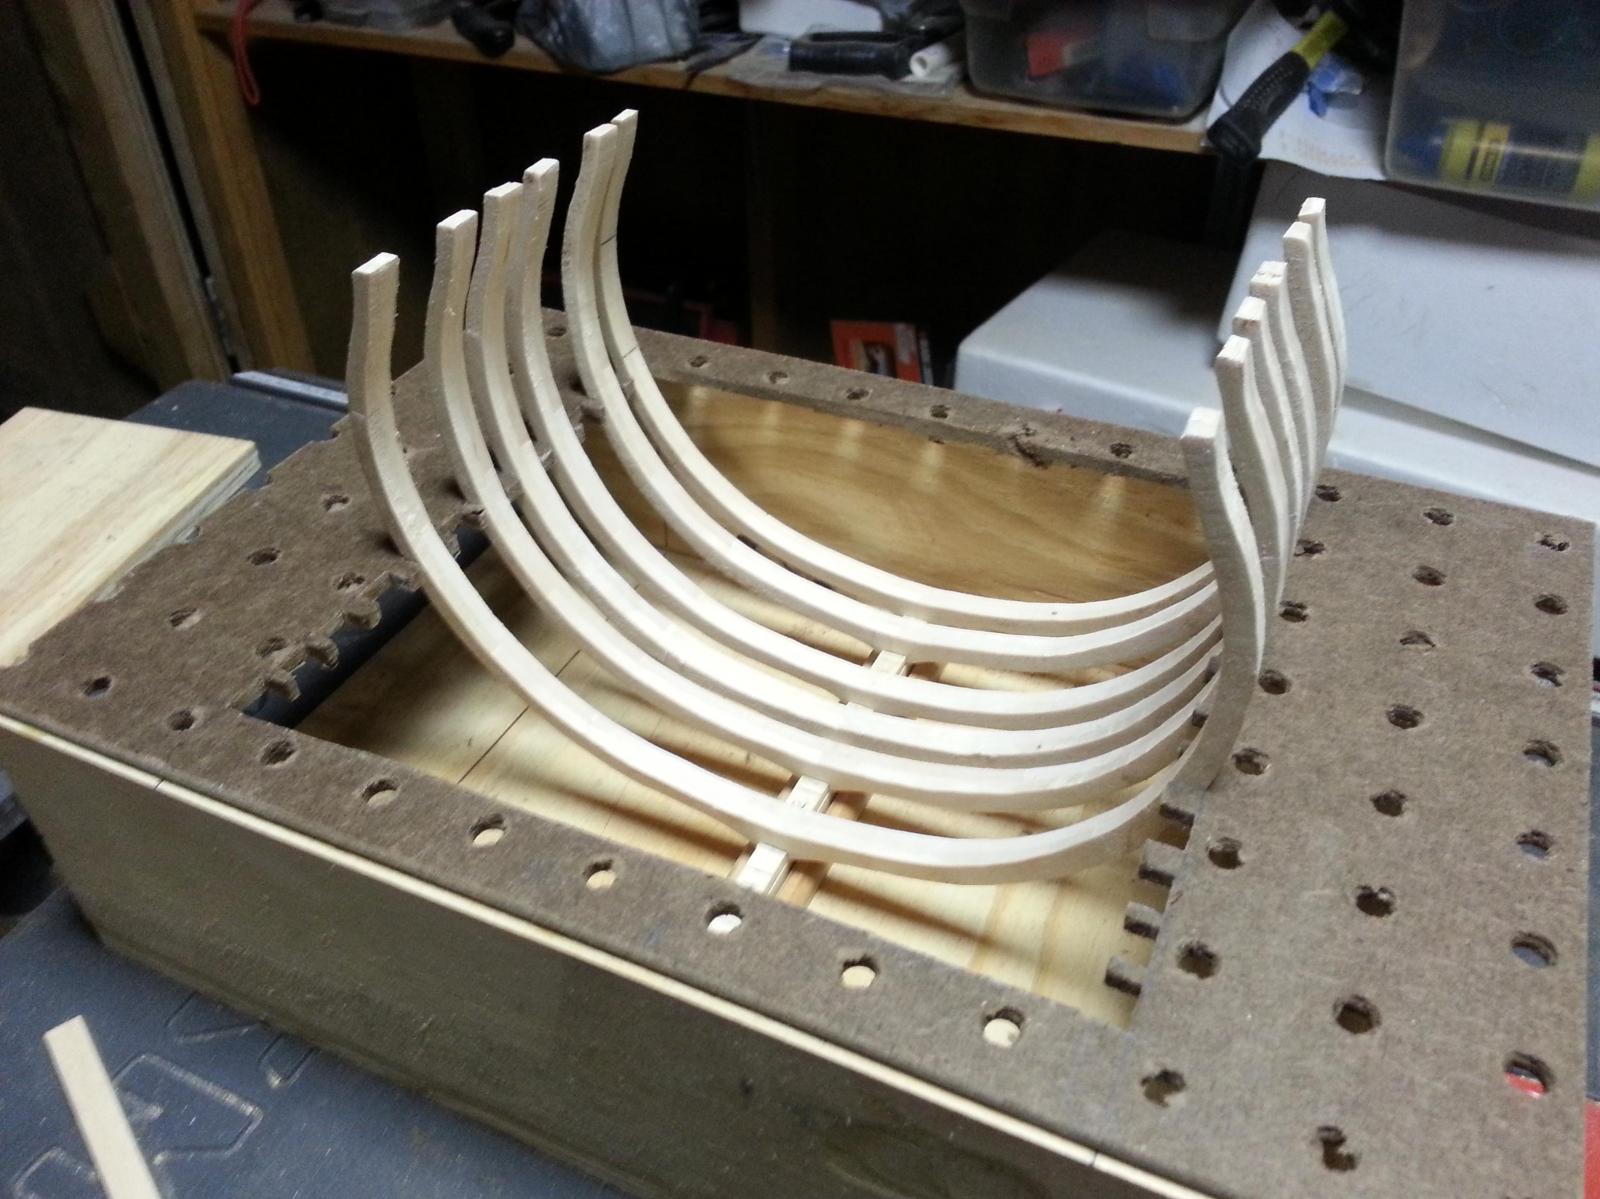
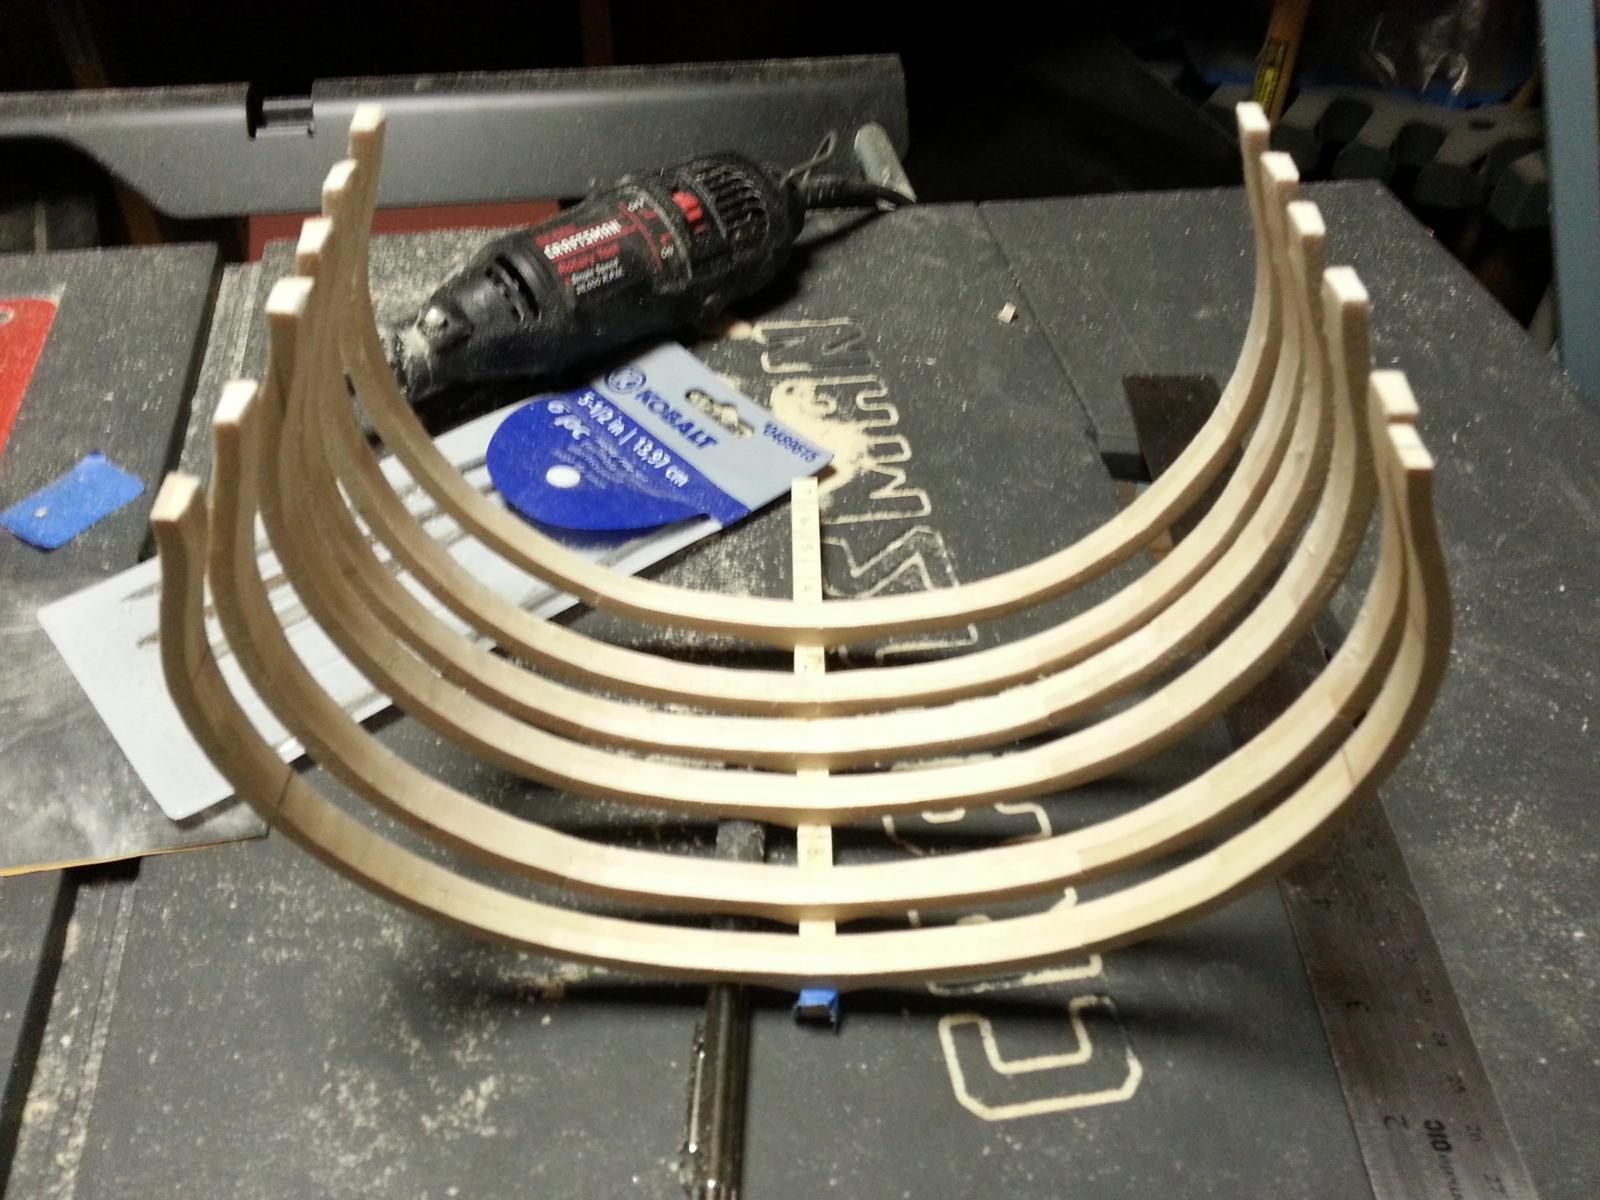
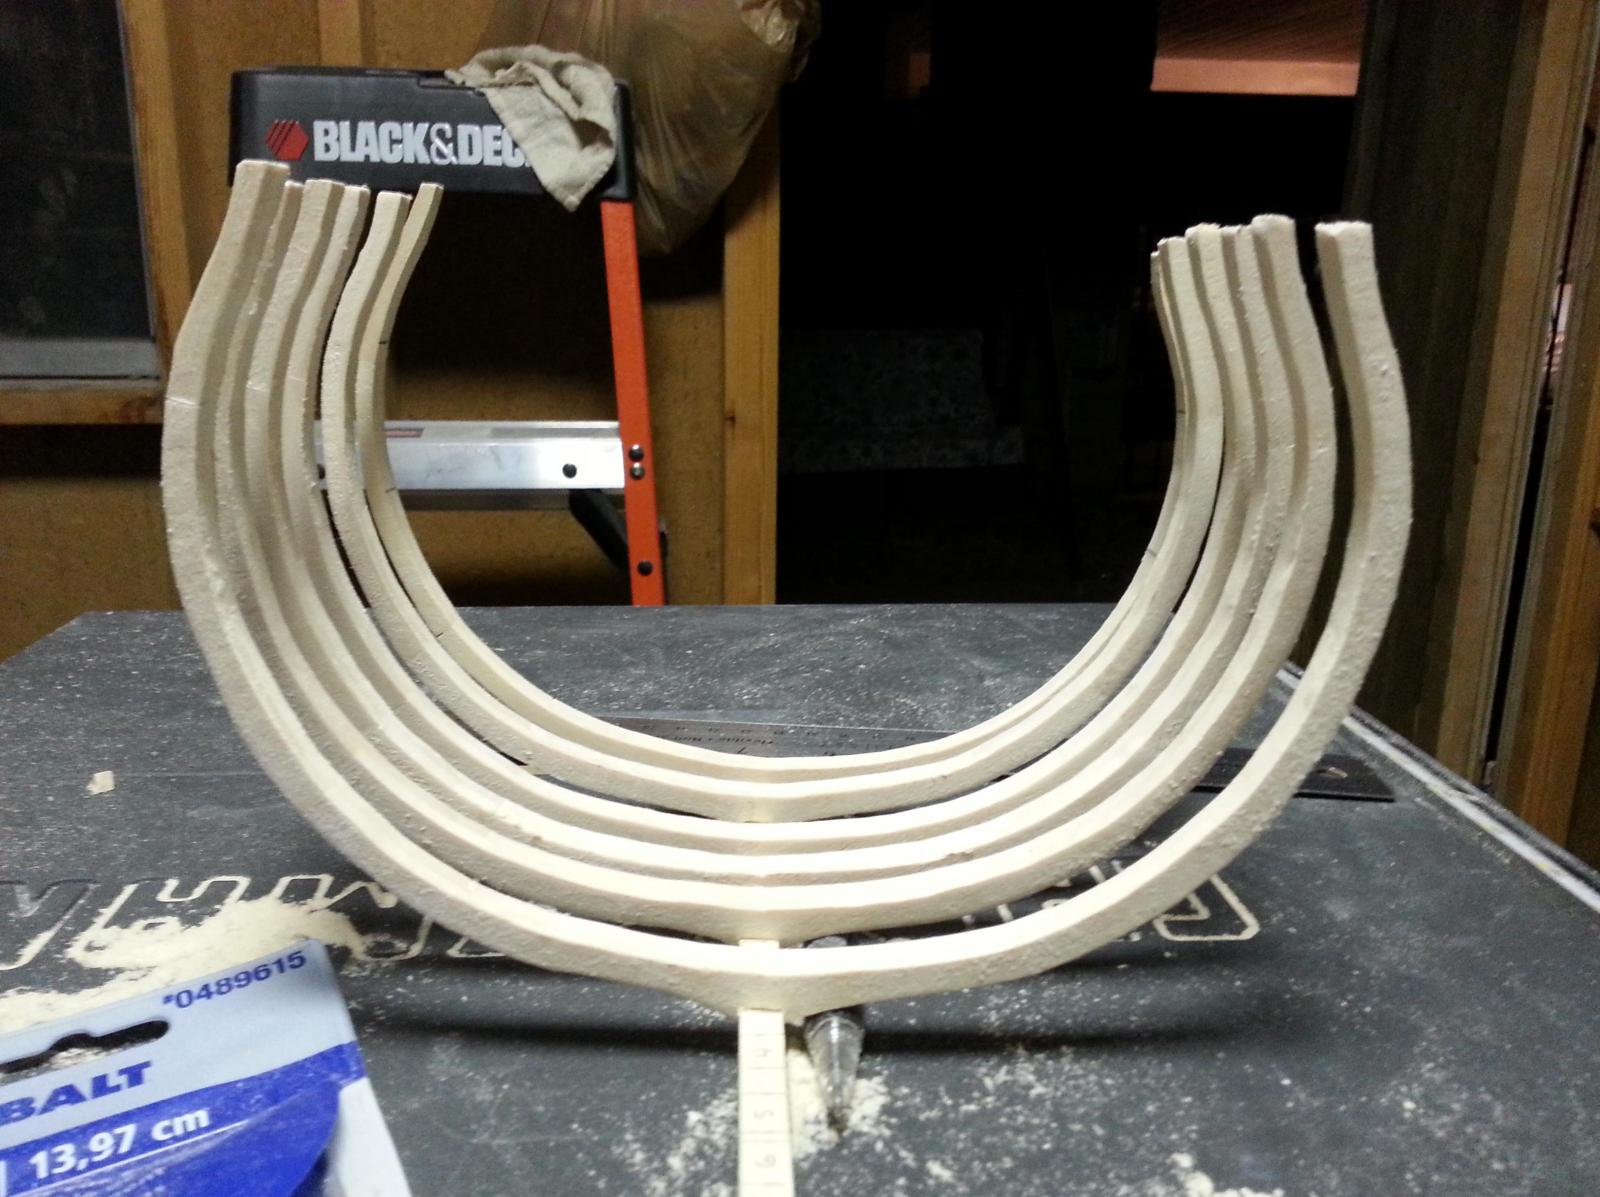
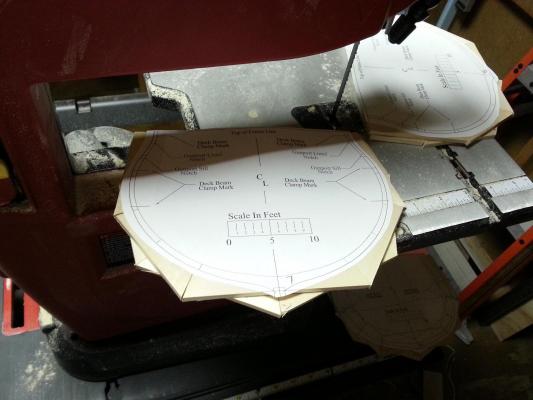
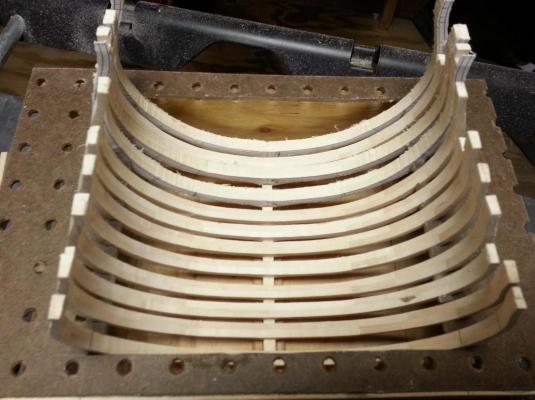
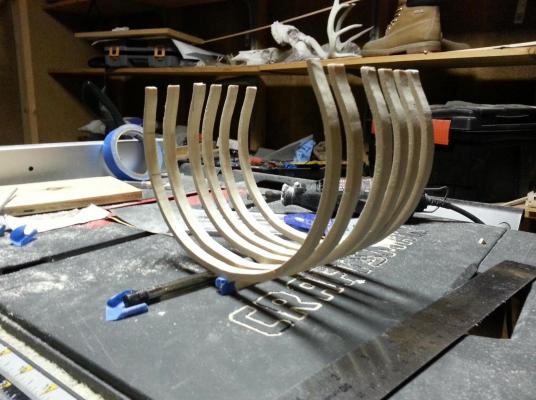
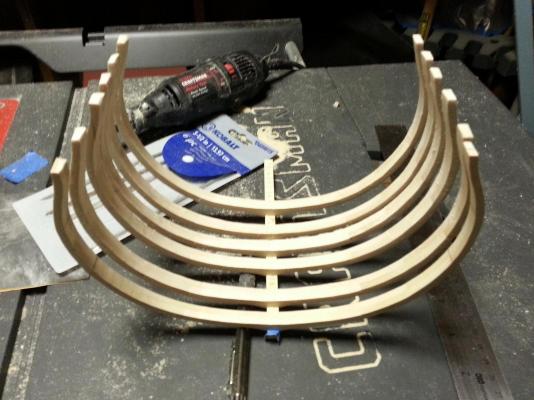
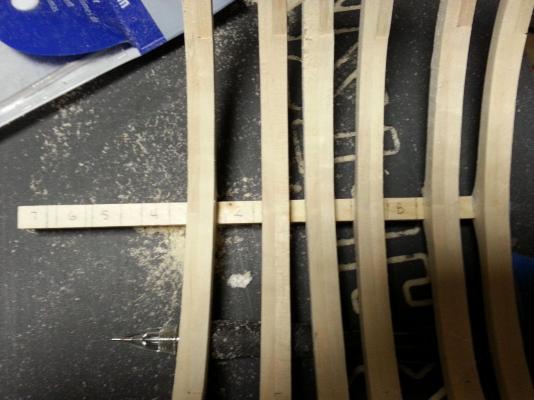
I was able to complete the stack set up for my remaining frames, apply the pattern to them, and cut them on my band saw. I then roughly sanded them with my rotary tool just barely getting to the line so that I can truly fare them once they are together. I dry fitted them them on the keel within my jig to see how they look. If you notice, I still have to give frames 4, 5, and 7 its preliminary sanding before I can procede to treenail them.

-
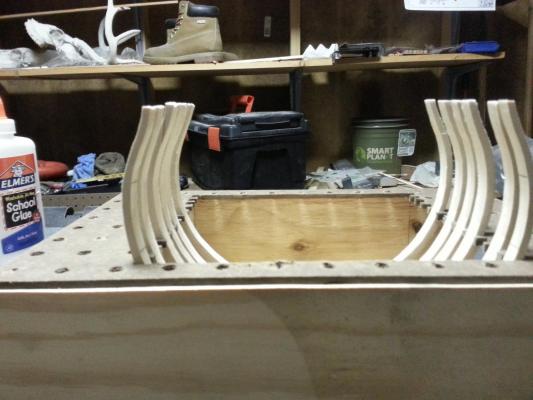
Greetings to all, Since I had to work today I was not able to get much done on the Triton. I was able to buy more timber and finish my jig for her reusing materials for the jig I made for my Vietnamese Junk. Since she is only a cross section, the jig seems small in comparison to jigs other people use while conducting full builds. The following photos will show you what it looks like and how the Triton fits within it.


-
Hola Mija, I've just seen the video you posted and it is a shame that the art of Chinese Junk building is slowly dying. Anxiously awaiting further progress on your current build.
-
Hola Daniel, I've just followed your log from start to finish and I must say, "Bravo Maestro". If you do not mind, I'd like to take a few ideas from your log and keep them for future reference on other builds.
-
Hola Daniel, I could not help but smile at your response. I was able to picture you singing the last part. I've been pretty busy this morning at work but when I get more frames done I will document how I work on each frame.
-
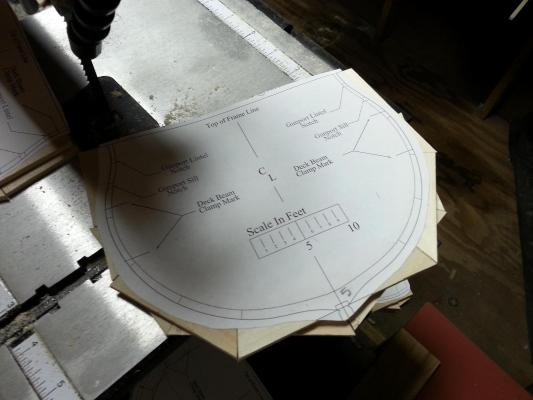
I sincerely wish no one takes it to heart what I think necessary to get off my chest. When I first came across MSW, I thought it would be great to join a community that shared the love of model ship building like I do. When I came across the H.M.S. Triton I thought it would be fun and decided to give it a whirl, not so much for other people’s approval, but for the love of model ship building. As the adage goes, “There is more than one way to skin a cat”. Keeping this in mind, I decided to build my model the way I felt comfortable doing it and decided to share my work with people that had similar interests as I do. No sooner had I posted my day’s work, when someone decided to judge me (and my methods) and leave me feeling disappointed, angry, and a sense that people were looking down their noses at me. I decided that I would not finish the Triton, but the love of model ship building was too great and it overcame my anger and disappointment. Seeing how she was coming to life before my eyes, I thought, “I’ll build you the way I want” all the while singing Elvis Presley’s, “I did it my way”. Now that being said, I was able to get five more frames done and upon dry fitting them to the keel, I was not able to help but smile to myself at how great she was starting to look. I still have to get more timber in order to complete the last six frames necessary in order to get started on the inside. I’ve downloaded, “Anatomy of the Ship, The 74-gun ship Bellona” and am currently referencing the items I want to incorporate into my build such as the mast step, shot lockers, pump well, pumps, and quarterdeck rail just to mention a few items. Since I will soon get the other frames completed, I will start on the jig that will support my build. Below are a few photos showing what I have so far.

-
Thanks Mark, I really appreciate the tactful explanation you've provided. It's just with the big mitts I have, it's harder to control/grasp smaller pieces and figured with a larger piece to handle it would be easier. Once again, thank you.
-
Russ, I thought I'd experiment and try something new in order to see if it would work. It is only my first frame and if it seems to cause more problems than it is worth, then I'll cut the individual pieces and and glue them together.
-
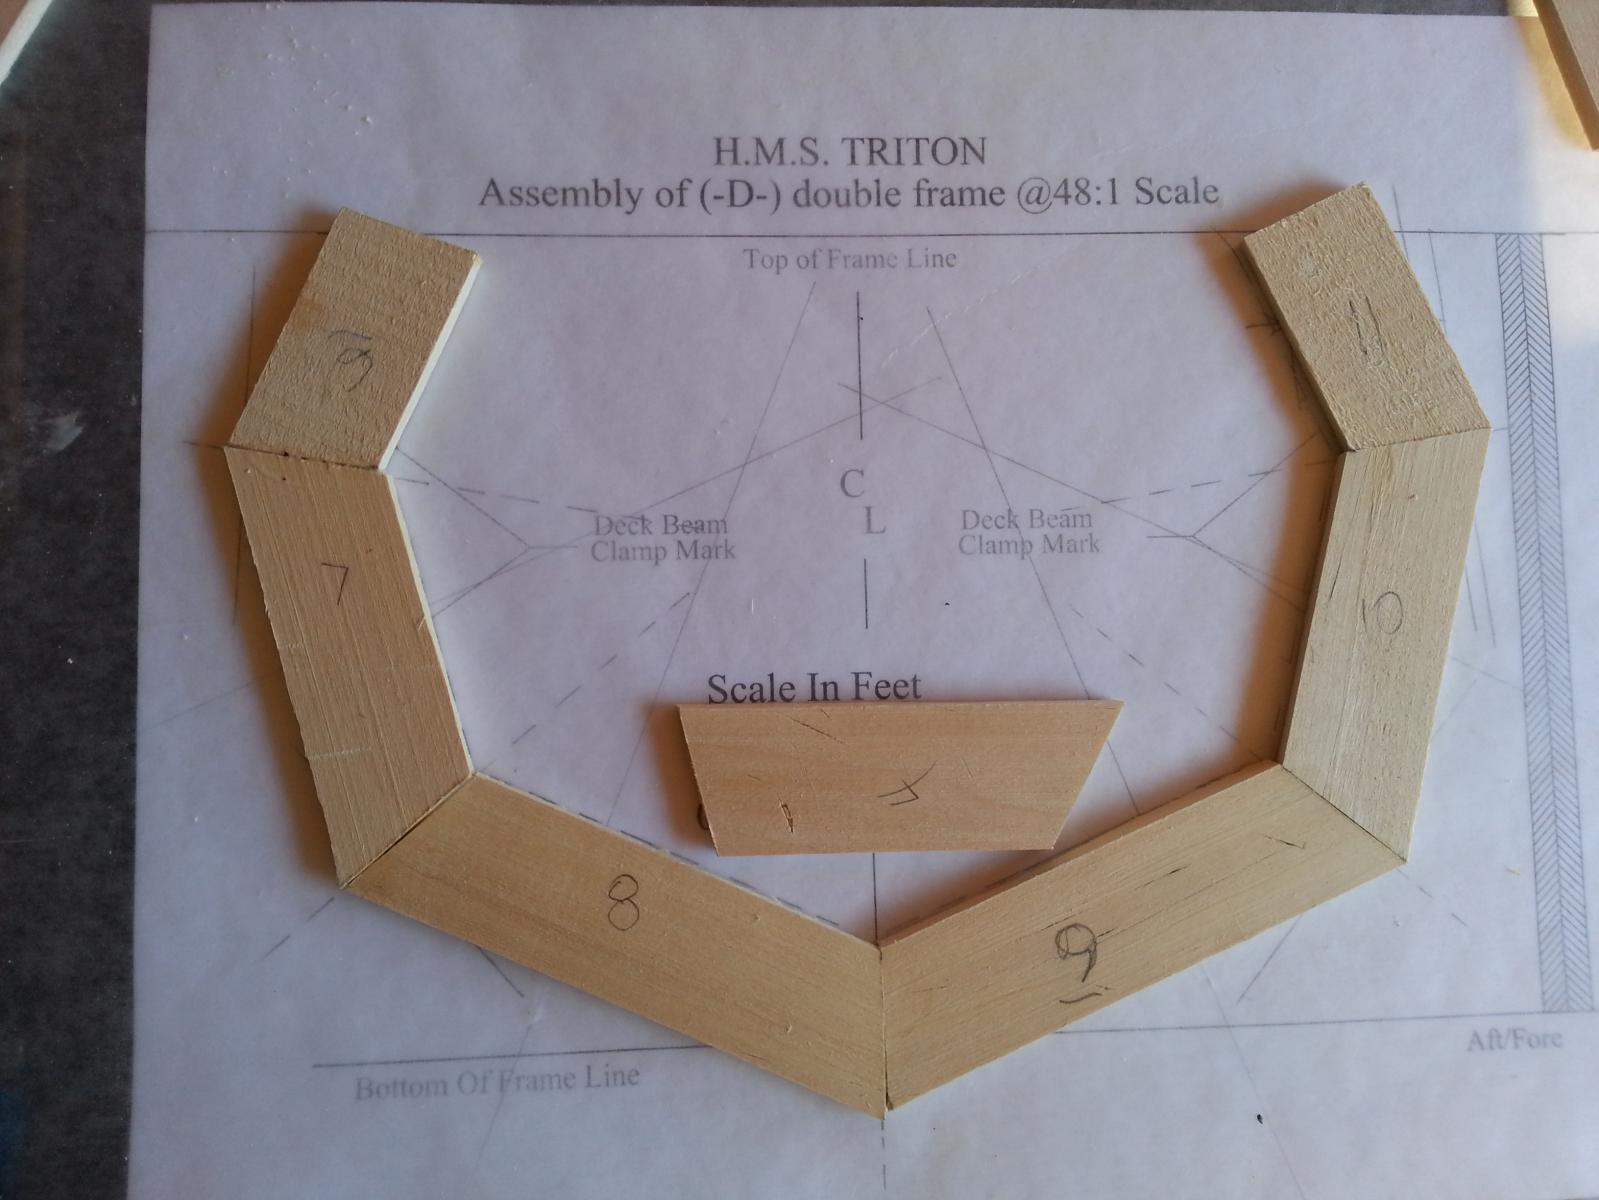
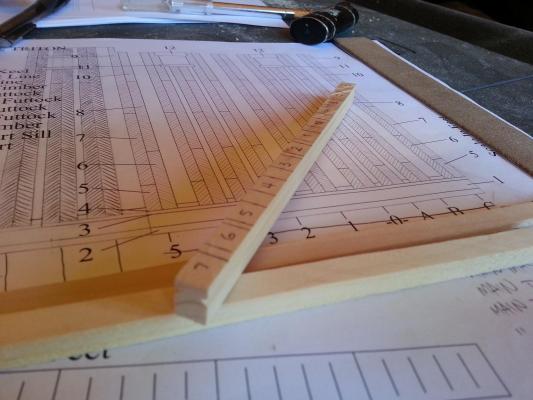
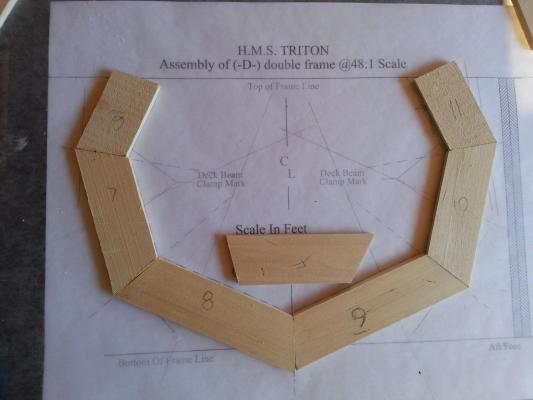
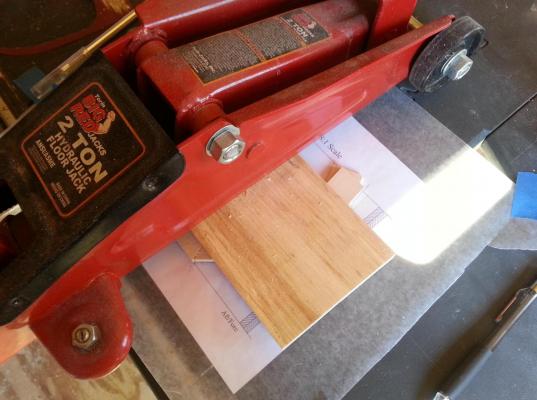
Hello to all, I’ve made a little progress today on the Triton. I remade the keel, false keel, and keelson at the new correct scale and also made them longer to incorporate the additional three frames necessary to add the main mast. Upon completing the keel, I marked the areas that will receive the frames to ensure everything was on the up and up. I decided to experiment making my first frame by following Gene’s explanation on the Eagle and it really seems straight forward. After cutting the 3/16 basswood to size, I marked my working sheet in order to get the correct angles needed to follow the frames contour. Once all the pieces were cut, I laid wax paper on my drawing and placed futtocks 1, 3, and the top timber followed by the floor timber and futtocks 2 and 4. After everything was glued and in place, I placed a board on top of the frame and a car jack to compress everything and hold it in place (please don’t judge me, that’s all I had on hand). I’ve decided that what I will do is cut patterns with correct angles of all futtocks from card stock and go to town and knock out the other 11 frames.


-
Mark, I really appreciate it, thanks.
-
Many thanks for the clarification Mark. Out of curiousity, would you be able to rename my title to 1:48 rather than 1:24?
-
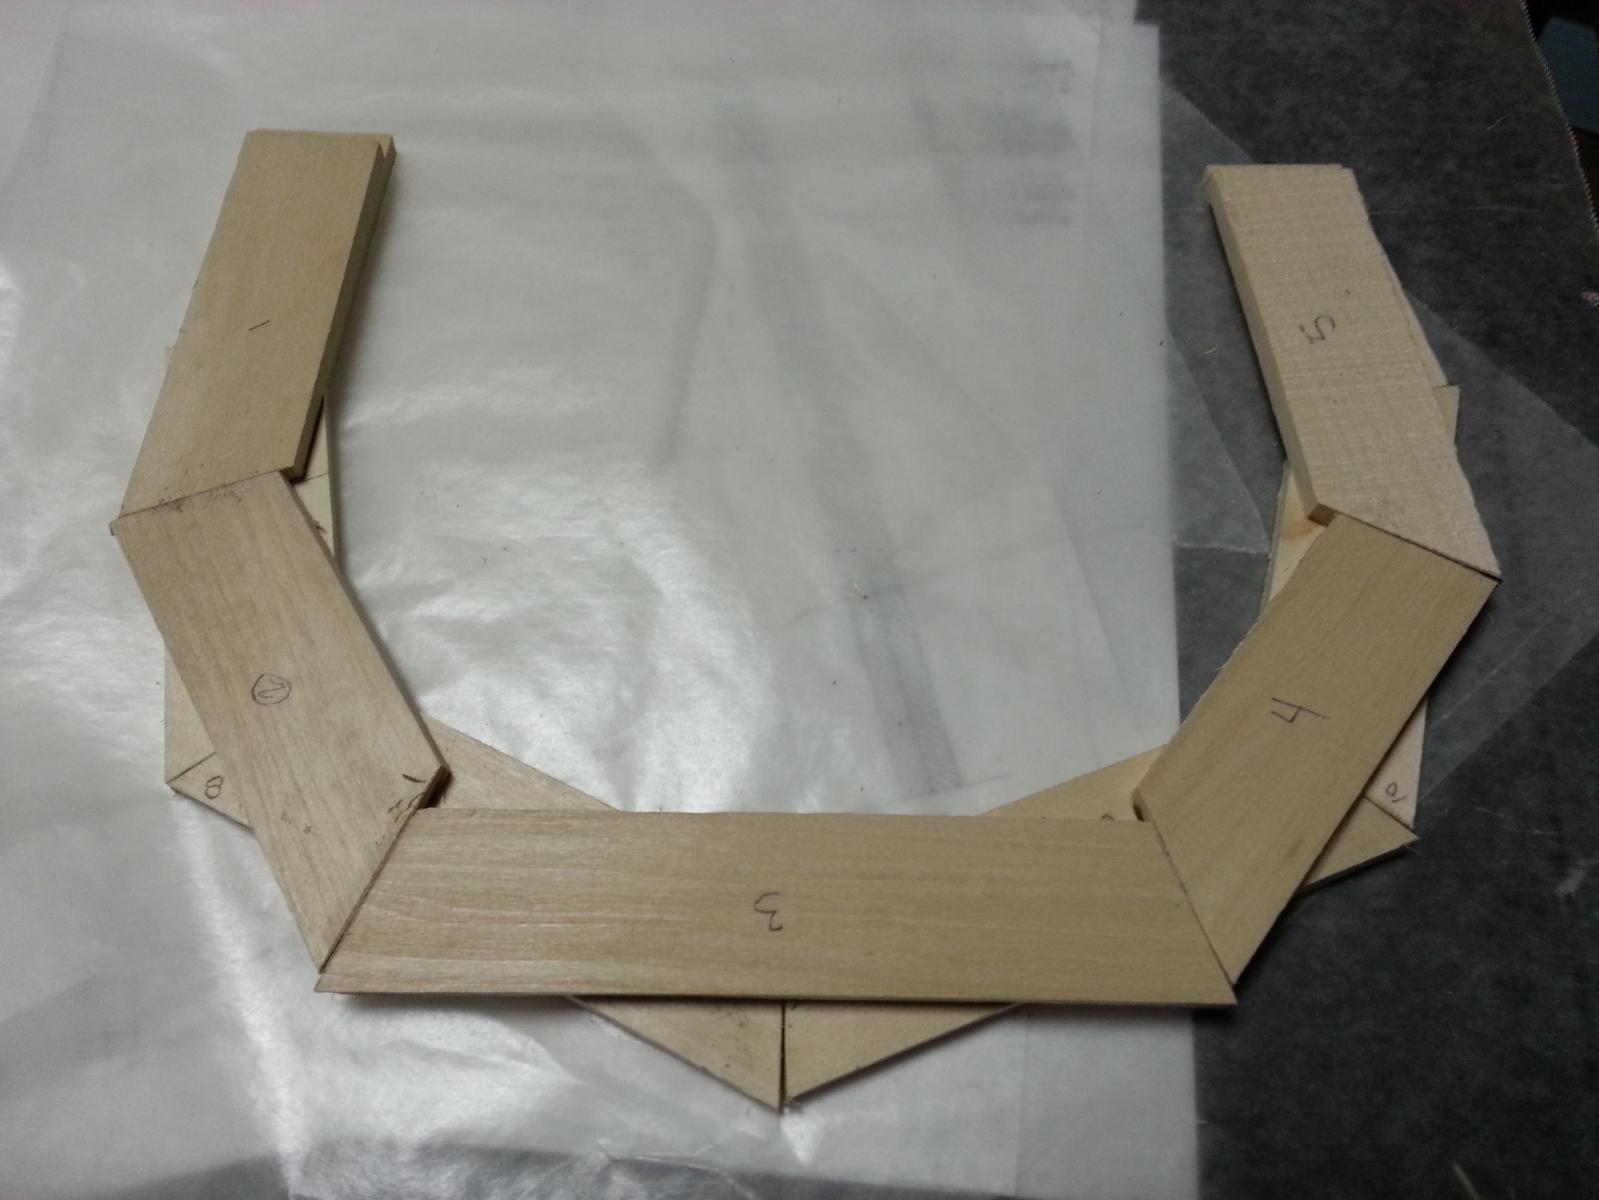
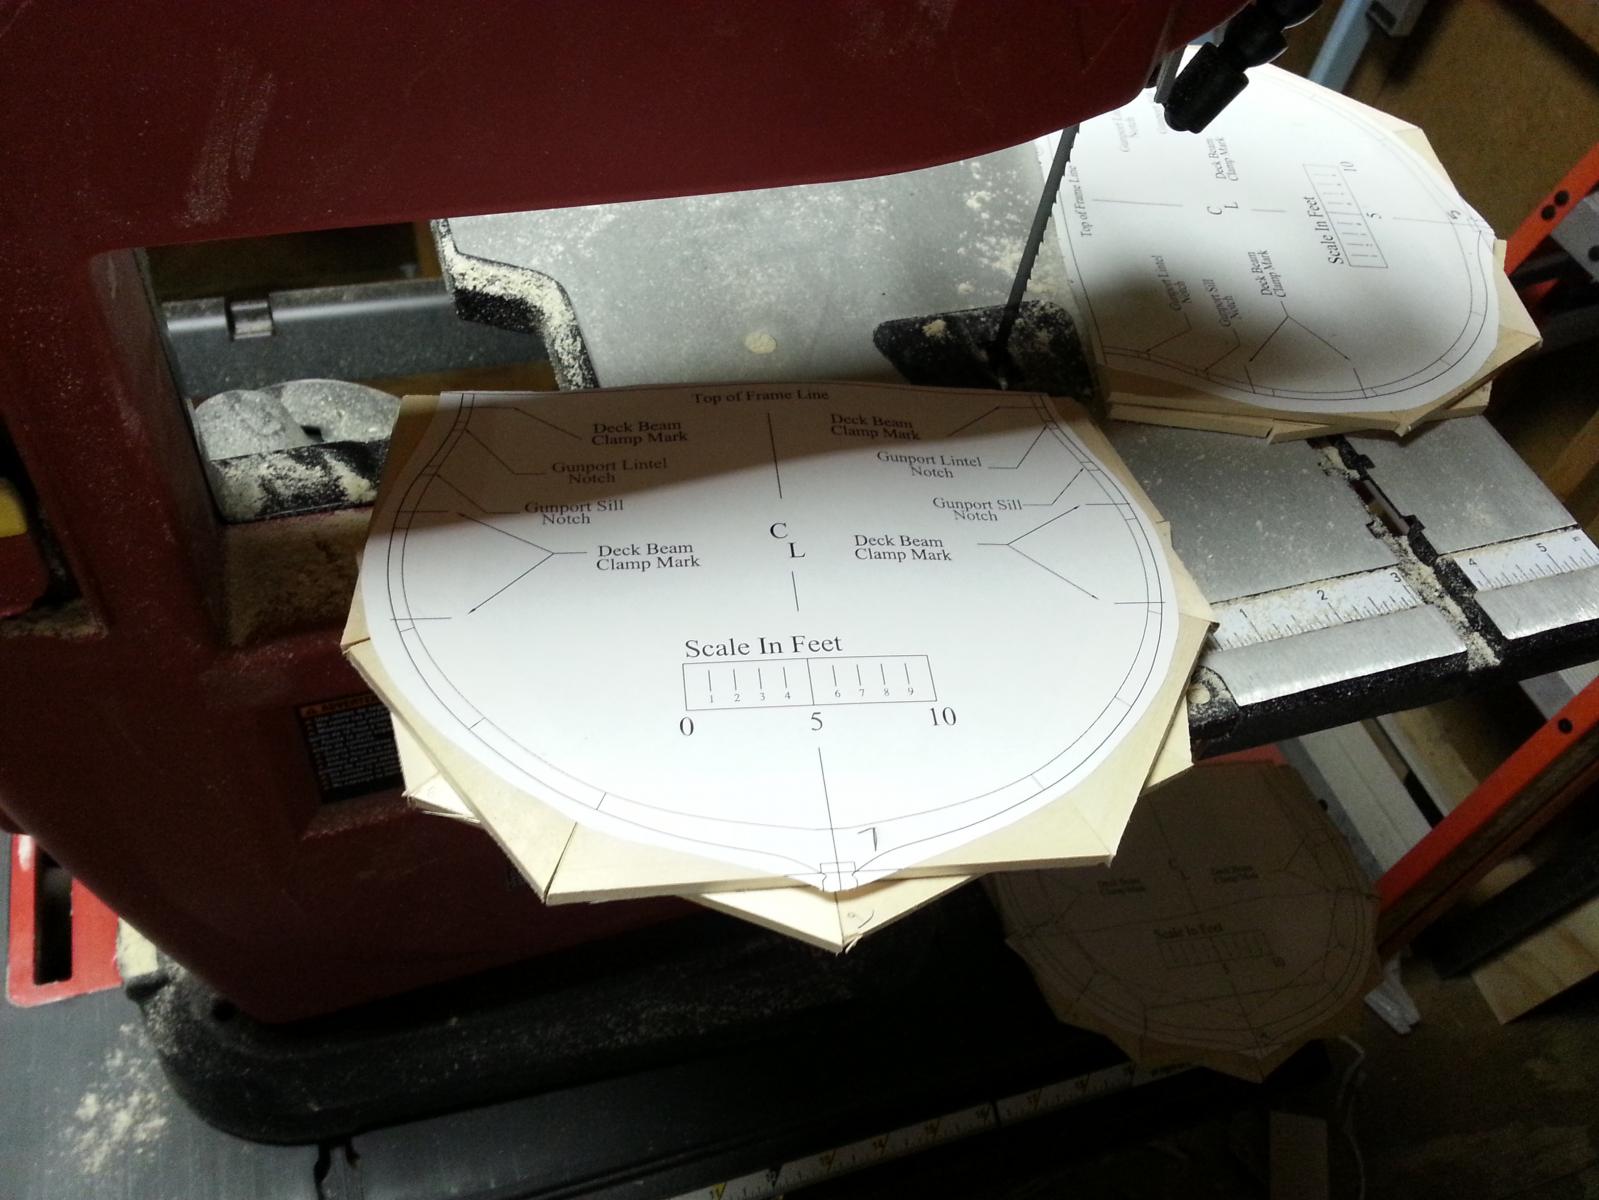
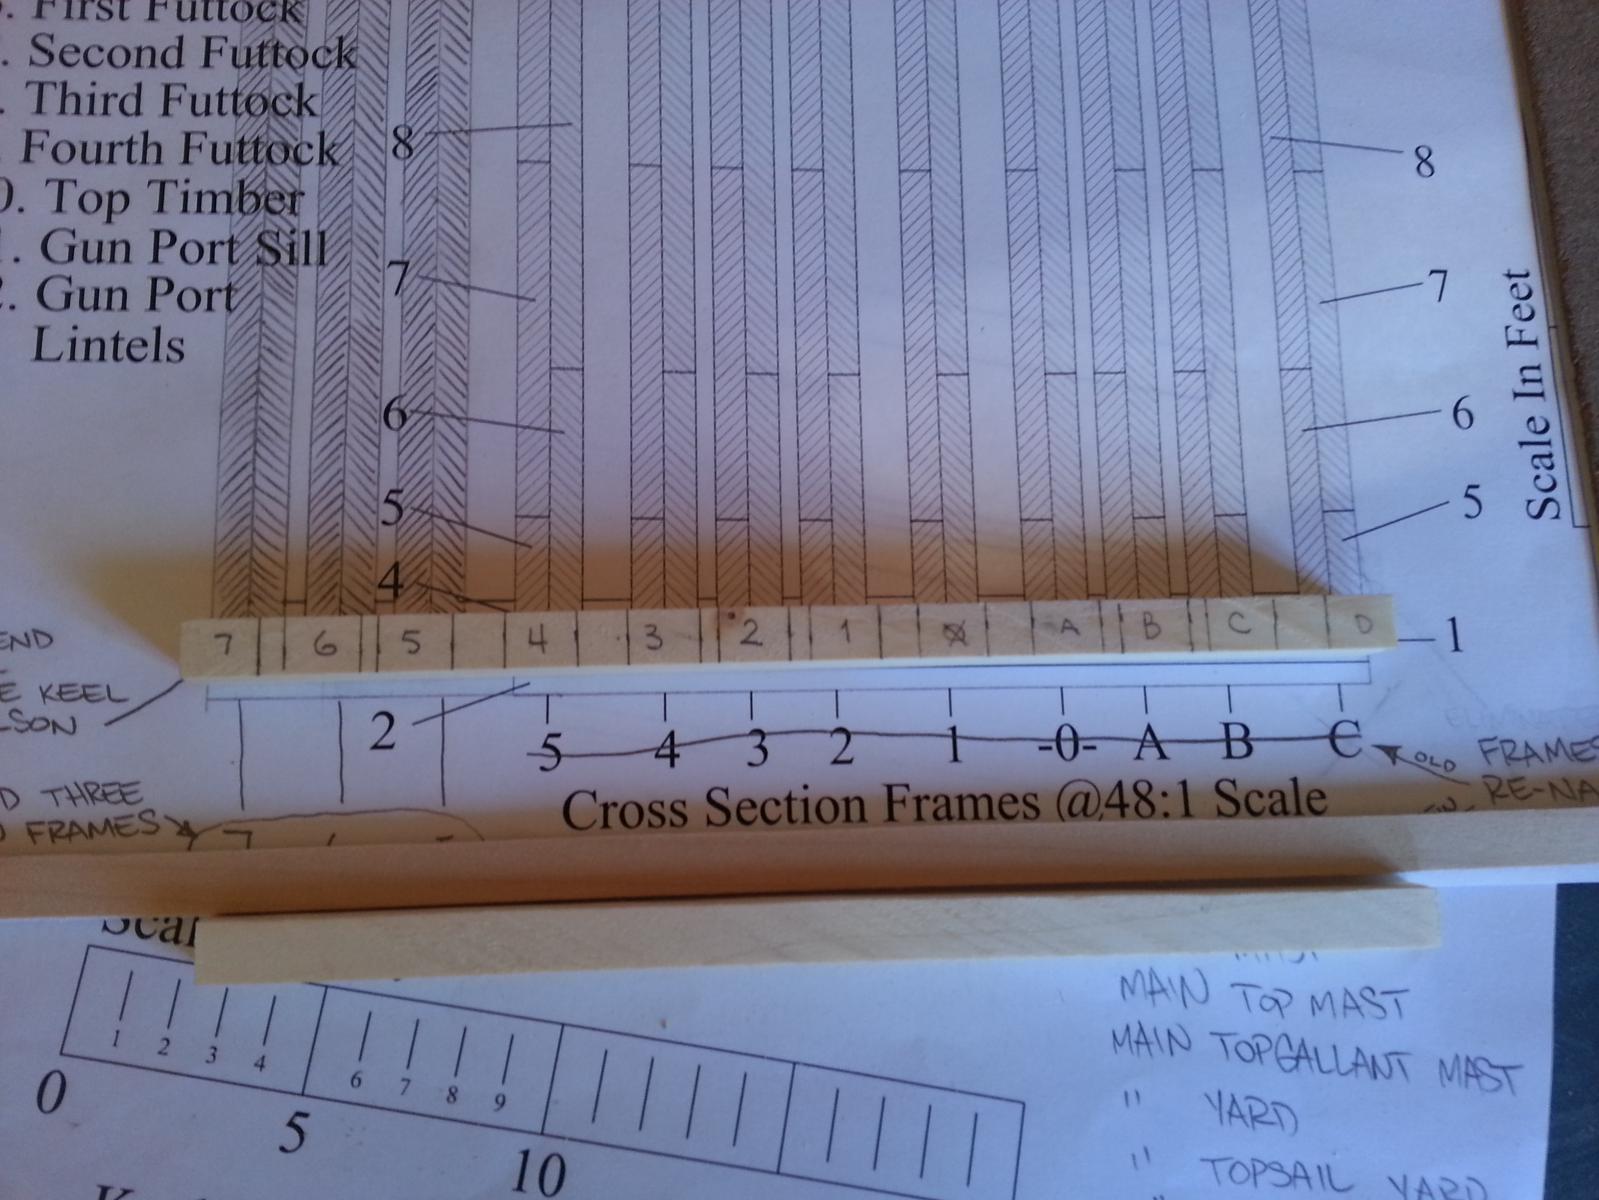
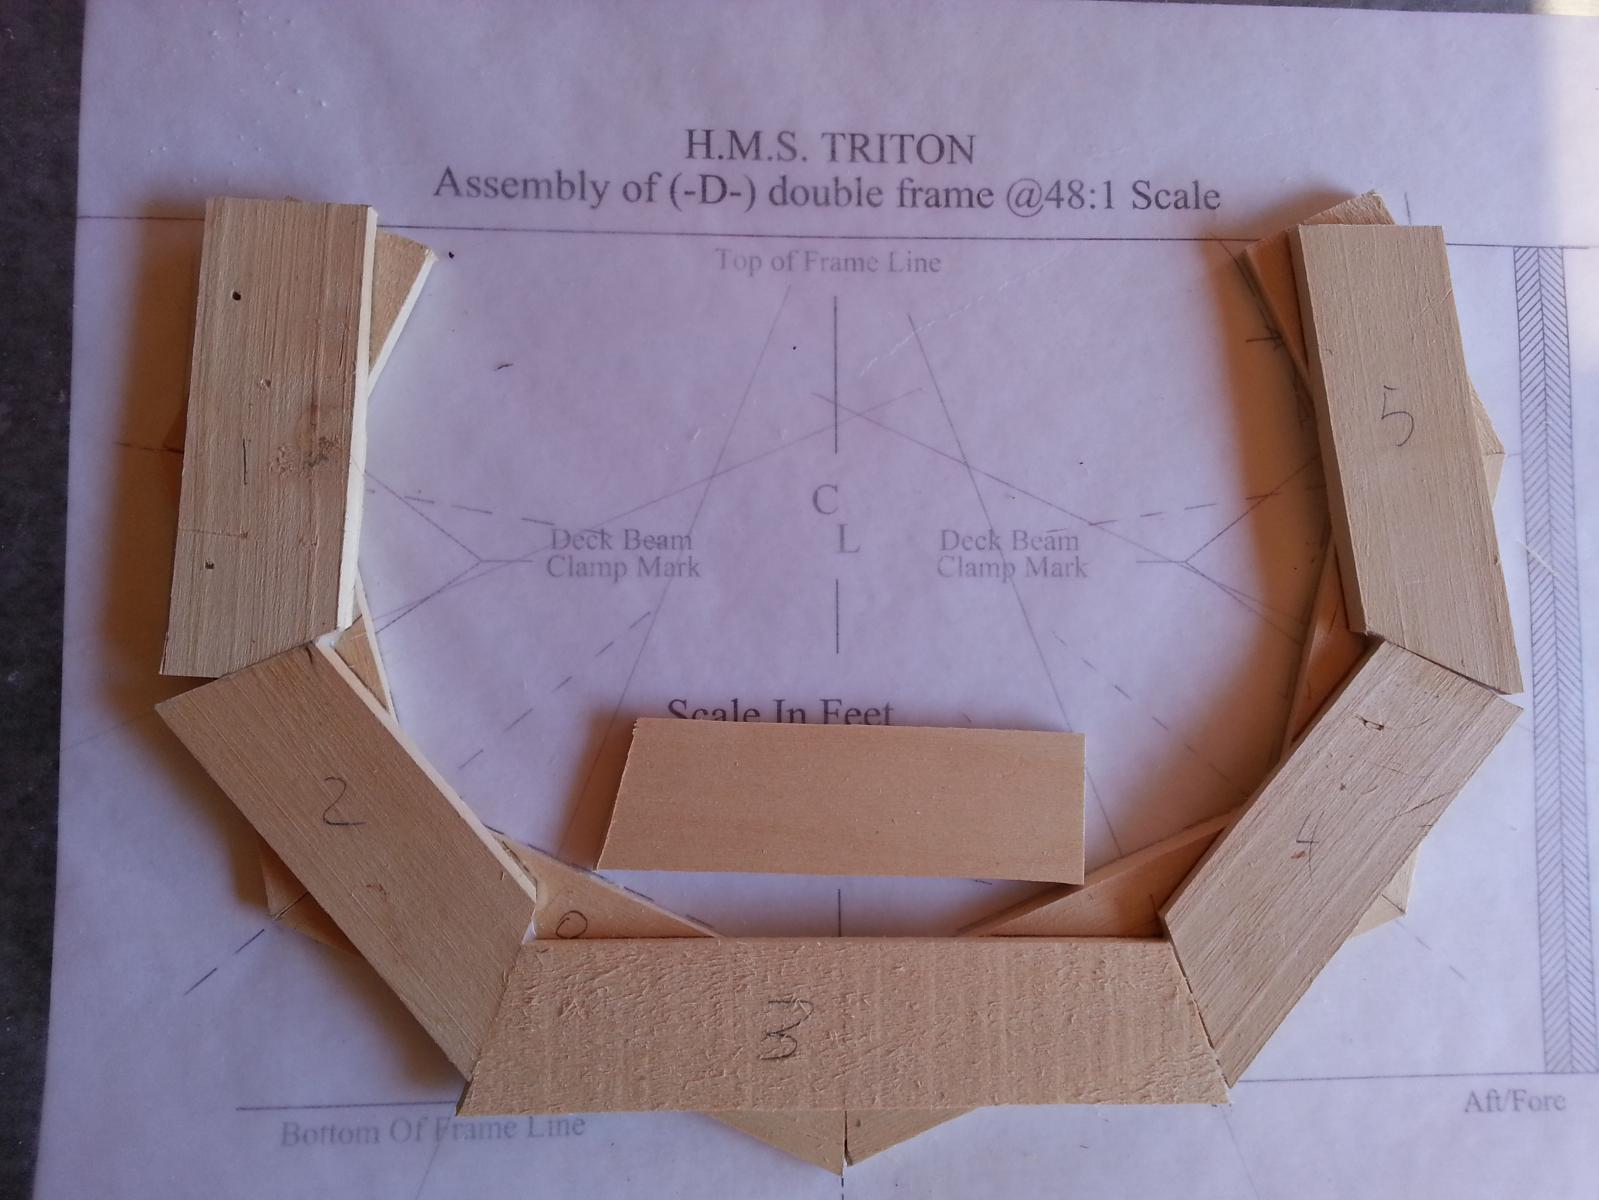
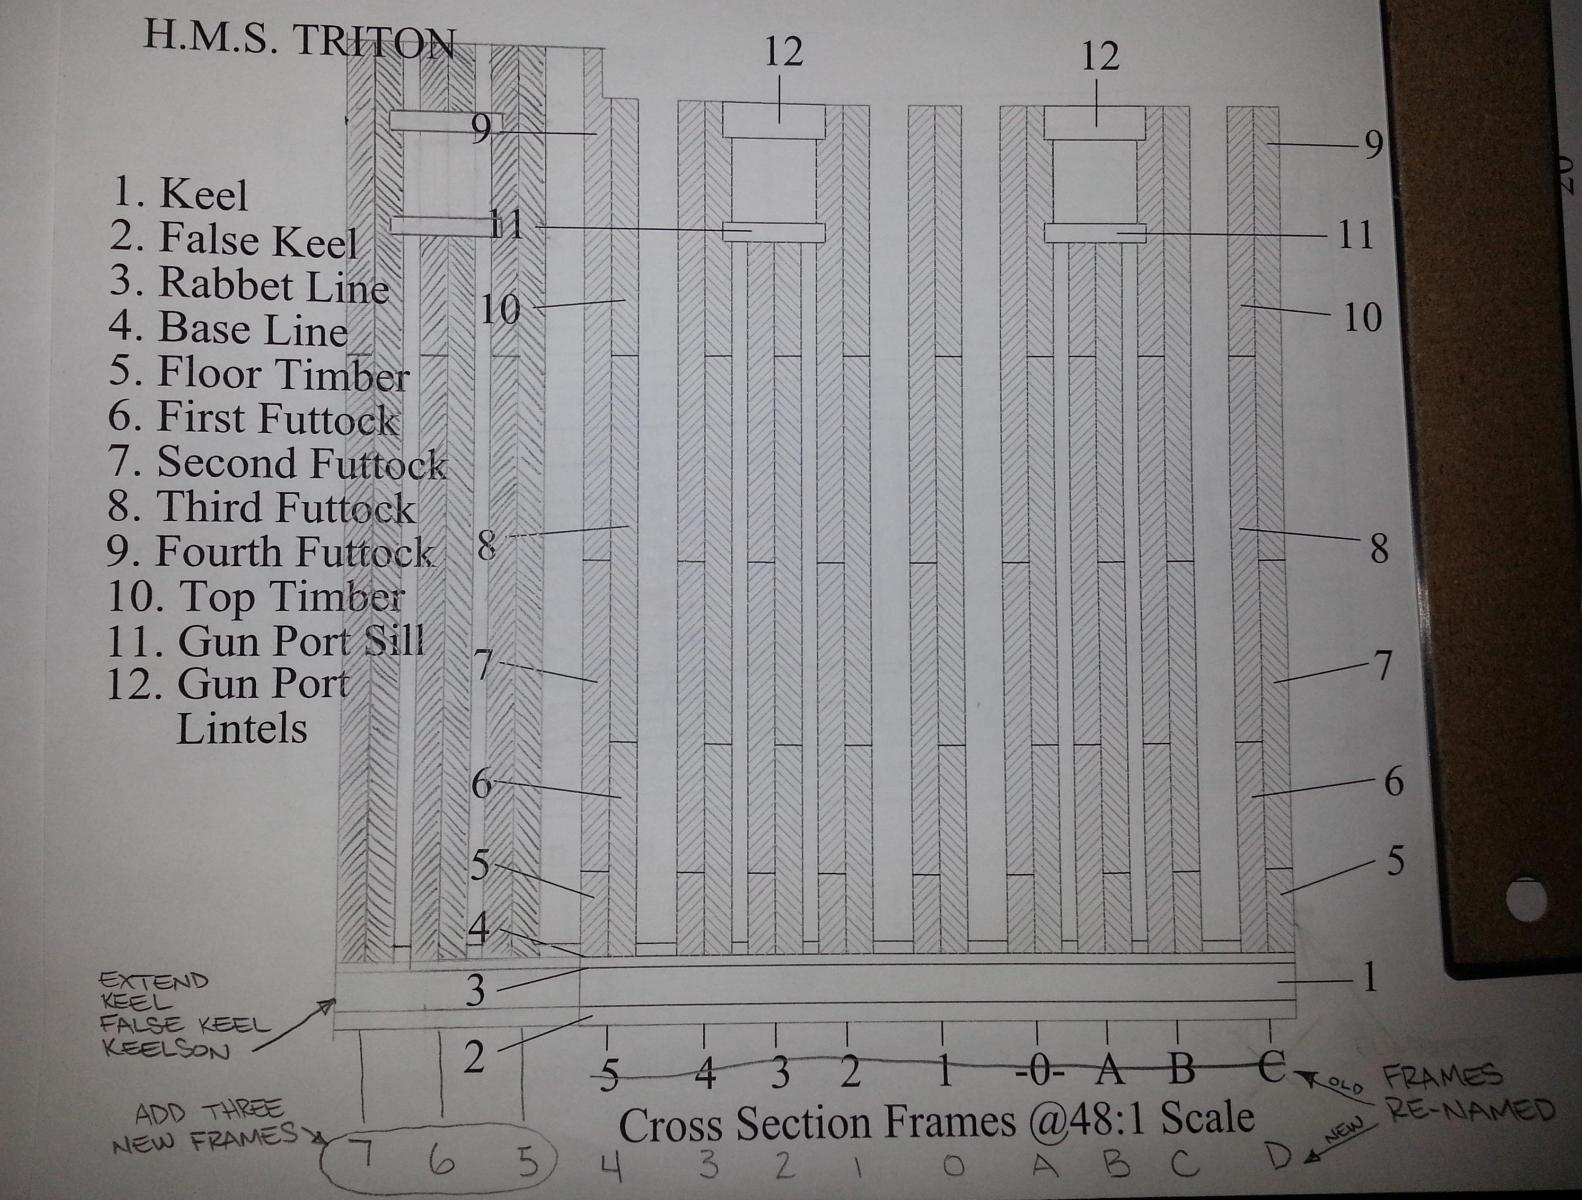
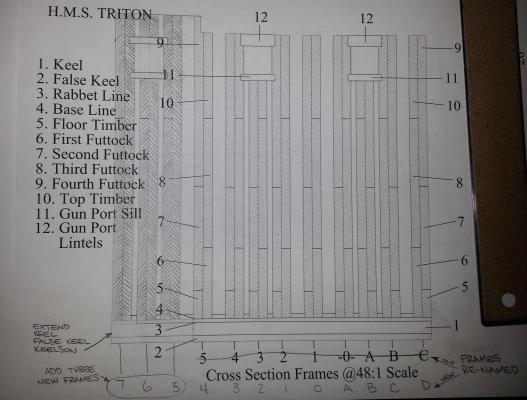
Greetings to all, I've just taken a preliminary look at the plans and if you've already done so than you know it is quite extensive. As I was mulling everything over, I noticed the cross section does not coincide with the full build version. I only mention this is because the first time I saw a cross section back in '86, I fell in love with the idea of either owning one or making one. One of the appeals that did it for me was the main mast, main top mast, and main topgallant mast along with their main yard, main topsail yard, main topgallant yard, and main royal yardnot to mention its standing rigging. As such, I've taken the liberty to tweak the cross section plans by first, renaming the frames and second, adding three more frames aft of of the current drawing. Since I am going the route of adding the mast, I am forced to go down in scale and build it at 1:48 scale rather than the 1:24 I originally planned. Attached you will see the alteration to the plans I made so far and I would appreciate it if someone much more knowledgeable then me can tell me if I hit the nail on the head or totally missed the mark. On a side note, does anyone know if there are detailed drawings for the masts? Anxiously awaiting any and all information regarding this request.
-
Mark, Thanks for the info, I looked over the list of plans and boy, is it overwelming. But I'll just dive right in, "Sink or Swim" I'll go down kicking and screaming.
-
Many thanks for the warm welcome Anthony. I will start conducting research until I get access to the plans as to the ship's inventories for this time frame. This way, when it comes time for the extra details I won't have to wait.
-
Thanks Mark. I look forward to seeing them and getting started on my build.
-
Never mind Tim, I just read your other post on MSB. Thanks.