

Mike 41
-
Posts
439 -
Joined
-
Last visited
Reputation Activity
-

 Mike 41 got a reaction from CiscoH in HMY Fubbs 1682 by Mike 41 - FINISHED - Weasel Works – Stern Section – 1:24
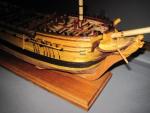
The Stern Framing continued.
These photos show the planking of the stern and finished framing.
-
Mike 41 got a reaction from CiscoH in HMY Fubbs 1682 by Mike 41 - FINISHED - Weasel Works – Stern Section – 1:24
The Stern Framing continued.
This is a few more progress photos of the stern.
-
Mike 41 got a reaction from CiscoH in HMY Fubbs 1682 by Mike 41 - FINISHED - Weasel Works – Stern Section – 1:24
Kellson & Waterway Limber Boards.
The keelson was soaked in hot water and bent to fit the curvature of the frames. I used glue and brass wire pins to secure the keelson to the frames. The limber boards were soaked in hot water and clamped to the keelson to dry. When dry I used spacers between them and the keelson and glued and pined them in place.
-
 Mike 41 got a reaction from DocBlake in HMY Fubbs 1682 by Mike 41 - FINISHED - Weasel Works – Stern Section – 1:24
Kellson & Waterway Limber Boards.
The keelson was soaked in hot water and bent to fit the curvature of the frames. I used glue and brass wire pins to secure the keelson to the frames. The limber boards were soaked in hot water and clamped to the keelson to dry. When dry I used spacers between them and the keelson and glued and pined them in place.
-
 Mike 41 reacted to DocBlake in HMY Fubbs 1682 by Mike 41 - FINISHED - Weasel Works – Stern Section – 1:24
Looking good, Mike!
-
 Mike 41 got a reaction from Archi in HMY Fubbs 1682 by Mike 41 - FINISHED - Weasel Works – Stern Section – 1:24
The Stern Framing continued.
These photos show the planking of the stern and finished framing.
-
 Mike 41 got a reaction from gjdale in HMY Fubbs 1682 by Mike 41 - FINISHED - Weasel Works – Stern Section – 1:24
The Stern Framing continued.
These photos show the planking of the stern and finished framing.
-
Mike 41 got a reaction from Archi in HMY Fubbs 1682 by Mike 41 - FINISHED - Weasel Works – Stern Section – 1:24
The Stern Framing continued.
This is a few more progress photos of the stern.
-
Mike 41 got a reaction from DocBlake in HMY Fubbs 1682 by Mike 41 - FINISHED - Weasel Works – Stern Section – 1:24
The Stern Framing continued.
These photos show the planking of the stern and finished framing.
-
 Mike 41 got a reaction from bruce d in HMY Fubbs 1682 by Mike 41 - FINISHED - Weasel Works – Stern Section – 1:24
The Stern Framing continued.
These photos show the planking of the stern and finished framing.
-
 Mike 41 got a reaction from ccoyle in HMY Fubbs 1682 by Mike 41 - FINISHED - Weasel Works – Stern Section – 1:24
The Stern Framing continued.
These photos show the planking of the stern and finished framing.
-
Mike 41 got a reaction from DocBlake in HMY Fubbs 1682 by Mike 41 - FINISHED - Weasel Works – Stern Section – 1:24
The Stern Framing continued.
This is a few more progress photos of the stern.
-
 Mike 41 got a reaction from GrandpaPhil in HMY Fubbs 1682 by Mike 41 - FINISHED - Weasel Works – Stern Section – 1:24
The hull:
After the frames were assembled, I glued them in place on the keel using a string line to keep the frames centered, clamps to align the internal bevels and a small level on top of the spacers.
The bottom of the frames required trimming at the start of the dead wood, it is easy to do by measuring and trimming each frame before gluing it in place.
After the basic hull was complete, I removed the top spacers and used a hand grinder with a flapper wheel to even out the frames.
Progress photos:
-
Mike 41 got a reaction from GrandpaPhil in HMY Fubbs 1682 by Mike 41 - FINISHED - Weasel Works – Stern Section – 1:24
The Stern Framing continued.
This is a few more progress photos of the stern.
-
 Mike 41 got a reaction from JpR62 in HMY Fubbs 1682 by Mike 41 - FINISHED - Weasel Works – Stern Section – 1:24
The Stern Framing continued.
This is a few more progress photos of the stern.
-
 Mike 41 got a reaction from Chuck in HMY Fubbs 1682 by Mike 41 - FINISHED - Weasel Works – Stern Section – 1:24
The Stern Framing continued.
This is a few more progress photos of the stern.
-
 Mike 41 got a reaction from Beckmann in HMY Fubbs 1682 by Mike 41 - FINISHED - Weasel Works – Stern Section – 1:24
The Stern Framing continued.
This is a few more progress photos of the stern.
-
Mike 41 got a reaction from Archi in HMY Fubbs 1682 by Mike 41 - FINISHED - Weasel Works – Stern Section – 1:24
The hull:
After the frames were assembled, I glued them in place on the keel using a string line to keep the frames centered, clamps to align the internal bevels and a small level on top of the spacers.
The bottom of the frames required trimming at the start of the dead wood, it is easy to do by measuring and trimming each frame before gluing it in place.
After the basic hull was complete, I removed the top spacers and used a hand grinder with a flapper wheel to even out the frames.
Progress photos:
-
Mike 41 got a reaction from Archi in HMY Fubbs 1682 by Mike 41 - FINISHED - Weasel Works – Stern Section – 1:24
Frames continued:
When Mike Shanks assembled the hull, he used a vertical stacking system. He described ever step with detailed photos and easy to understand instructions. The prototype went together quite well, all the frames are square and level.
That being said, I am more comfortable with a horizontal build using a jig I have used for many years. I made a vertical stack as a dry run to check the bevels and general alignment. Everything looked good.
I left the keel open ended. There is no space between the frames, and it is hot and humid in Myrtle Beach which adds to the expansion / contraction problem. It is easier to trim the keel than rework the frames.
I added spacers at the top of the frames, with centerlines to help with the frame alignment with a string line, level and square as each frame is added.
A few words about the jig I am using. I designed and built this one in 2012 and have used it for many models. If anyone is interested in the jig, I will post a PDF file here.
Thanks for looking in on the build log, any comments are welcome.
Mike
Progress photos:
-
Mike 41 got a reaction from CiscoH in HMY Fubbs 1682 by Mike 41 - FINISHED - Weasel Works – Stern Section – 1:24
The hull:
After the frames were assembled, I glued them in place on the keel using a string line to keep the frames centered, clamps to align the internal bevels and a small level on top of the spacers.
The bottom of the frames required trimming at the start of the dead wood, it is easy to do by measuring and trimming each frame before gluing it in place.
After the basic hull was complete, I removed the top spacers and used a hand grinder with a flapper wheel to even out the frames.
Progress photos:
-
Mike 41 got a reaction from CiscoH in HMY Fubbs 1682 by Mike 41 - FINISHED - Weasel Works – Stern Section – 1:24
Frames continued:
When Mike Shanks assembled the hull, he used a vertical stacking system. He described ever step with detailed photos and easy to understand instructions. The prototype went together quite well, all the frames are square and level.
That being said, I am more comfortable with a horizontal build using a jig I have used for many years. I made a vertical stack as a dry run to check the bevels and general alignment. Everything looked good.
I left the keel open ended. There is no space between the frames, and it is hot and humid in Myrtle Beach which adds to the expansion / contraction problem. It is easier to trim the keel than rework the frames.
I added spacers at the top of the frames, with centerlines to help with the frame alignment with a string line, level and square as each frame is added.
A few words about the jig I am using. I designed and built this one in 2012 and have used it for many models. If anyone is interested in the jig, I will post a PDF file here.
Thanks for looking in on the build log, any comments are welcome.
Mike
Progress photos:
-
Mike 41 got a reaction from CiscoH in HMY Fubbs 1682 by Mike 41 - FINISHED - Weasel Works – Stern Section – 1:24
Frames:
It has been a while since I built a kit and the first time, I used laser cut frames. The large scale 1:24 made the parts easy to handle the eight pieces are joined with lap joints Making them very easy to assemble, with the exception of frame #25 the forward frame. It was cut using a CNC machine and uses scarph joints that fit perfectly together.
After removing the frames from the shipping box, I sorted the frames. Each part has the frame number etched on the aft side of the frame making the orientation easy to maintain. The bevel lines were also etched into the frame parts also. After sorting the parts I bundled them by frame number and divided them into five stacks. Divide & Conquer LOL.
Removing the char was not too bad using a spindle sander, but using the port on the machine for the vacuum left a lot of dust in the air so I clamped the hose about a quarter inch off the spindle that removed almost all the dust.
I assembled the frames by placing the frame drawing on a sheet metal plate and using magnets to hold the parts in place while the glue dried.
When the glue dried, I formed a vertical stack to check the bevels.
Progress photos:
-
Mike 41 got a reaction from Chuck in HMY Fubbs 1682 by Mike 41 - FINISHED - Weasel Works – Stern Section – 1:24
The hull:
After the frames were assembled, I glued them in place on the keel using a string line to keep the frames centered, clamps to align the internal bevels and a small level on top of the spacers.
The bottom of the frames required trimming at the start of the dead wood, it is easy to do by measuring and trimming each frame before gluing it in place.
After the basic hull was complete, I removed the top spacers and used a hand grinder with a flapper wheel to even out the frames.
Progress photos:
-
.thumb.jpg.6d6ee4bdbfaac2c58ecc77e7b80ae374.jpg) Mike 41 got a reaction from Matt D in HMY Fubbs 1682 by Mike 41 - FINISHED - Weasel Works – Stern Section – 1:24
Mike 41 got a reaction from Matt D in HMY Fubbs 1682 by Mike 41 - FINISHED - Weasel Works – Stern Section – 1:24
Hi Grant, this is a copy of the jig (Building Board) I am using.
Mike
Building Board.pdf
-
Mike 41 reacted to DocBlake in Royal Yacht HMY Fubbs 1682 by DocBlake – 1:24 Scale - Stern Section
Royal Yacht HMY Fubbs (1682-1781) – 1:24 Scale Stern Section by DocBlake
This will be my build log for a 1:24 scale stern section of the HMY Fubbs. Fubbs was one of many Royal Yachts commissioned by King Charles II of England during the Stuart Restoration. The name derives from a nickname Charles had for his mistress, the Duchess of Portsmouth. Details of her history and drawings of the kit plans and contents can be found elsewhere. The reader is directed to build logs by Mike41 (https://modelshipworld.com/topic/34926-hmy-fubbs-1682-by-mike-41-weasel-works-%E2%80%93-stern-section-%E2%80%93-124/#comment-996763
The model will be built as a limited edition kit produced by Weasel Works. In all there were 10 kits and Mike Shanks' prototype produced. There are over 900 parts in each kit, with some options for personalizing the builds (such as choice of timber for framing, etc.) Even with all the frame parts removed from their billets to save shipping costs, my kit weighed in at 13 pounds!
Weasel Works a group of modelers with different interests and skills We are not a business at all. We are exploring what modern technology can bring to the table in model ship building.
There are ten kits produced, as well as Mike Shank's prototype. We have no plans to sell or produce any more.
Our goal is to produce an attractive model that's fun to build. We are not historians nor naval architects, and accordingly, have allowed ourselves some artistic license. Although based on the 1682 version of Fubbs, details from other points in her history have been incorporated into the model, and her framing is not historically accurate, but does reflect well her hull's shape. Although the Great Cabin's floor cover was most probably painted canvas, we felt the parquet floor was a nice addition to the model, so we kept it in. The transom/taffrail design is from later in her career.
My frames are hard maple, cut out by CNC. Advantage: No laser char. Disadvantage: bevel lines not etched for the bevel, so each piece requires a template to be carefully cut out and rubber cemented to the frame piece, then bevelled then cleaned of residual paper and cement. Mind numbing. There are over 100 frame parts.