MORE HANDBOOKS ARE ON THEIR WAY! We will let you know when they get here.
×


JerryTodd
-
Posts
873 -
Joined
-
Last visited
Content Type
Profiles
Forums
Gallery
Events
Everything posted by JerryTodd
-
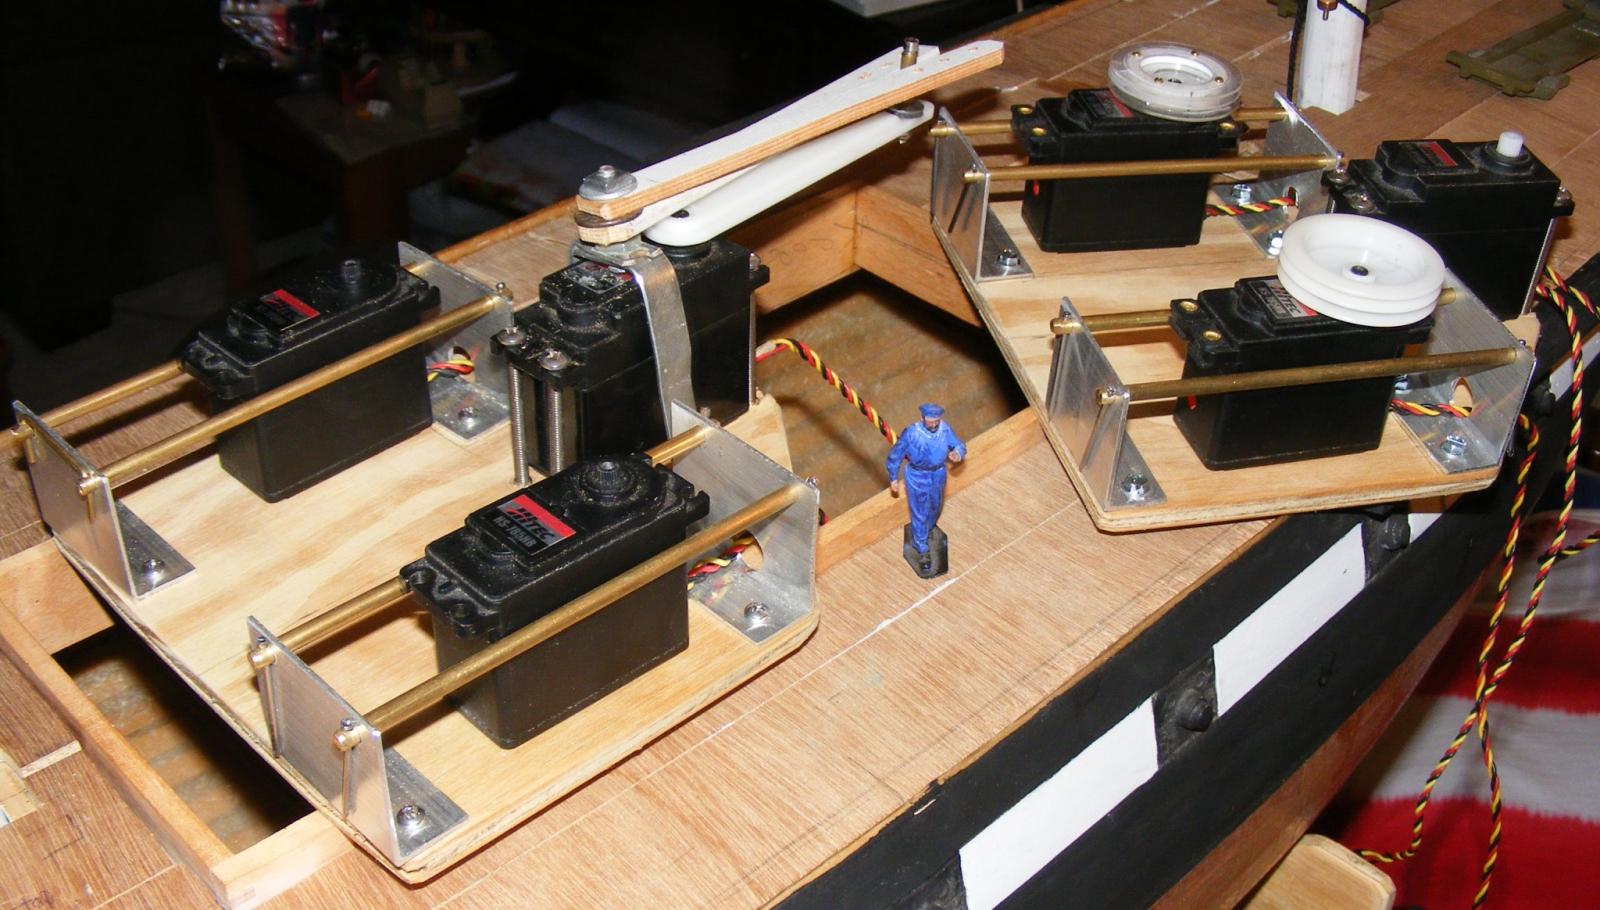
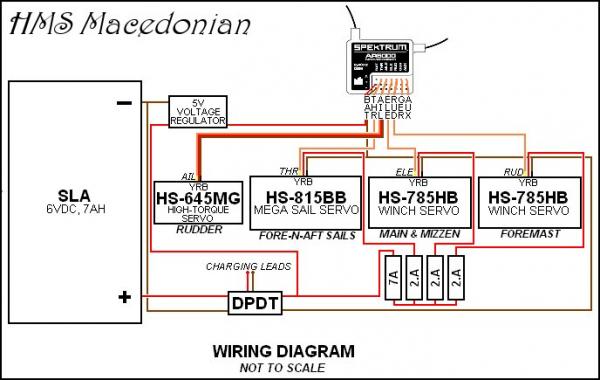
 Added the fairlead plates Friday. They're made from the same aluminum angle the end brackets were cut from. They're attached to the Delrin slide block on one end of the servo with 2 #4 x 1/2" panhead screws, nipped off to 1/4" (In the diagram you may have noticed the winch servos are reversed, that is the spindle is closer to one end of the servo than the other, and in the drawing it's shown at the wrong end, not making the best use of the space available - they are mounted correctly on the actualy unit.) BTW: For those of you on Facebook, there's a Scale Sail RC group for Facebookers interested in the scale modeling aspects of RC sailing.
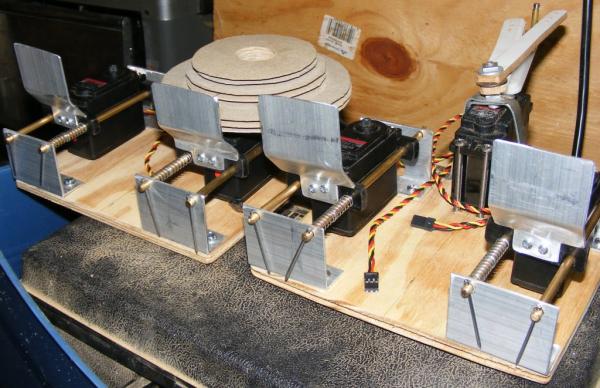
- 553 replies
-
- 4
-

-
- sloop of war
- constellation
- (and 3 more)
-
I wonder what it would cost at 1:36 scale
-
Most of the models I've seen on this site are of scales so small that the finest stitching looks like 1" rope forced through heavy burlap a foot apart. I draw my seams, fabric glue tabling, reinforcements, etc, and the only sewing I do is the bolt-rope - which can only be done by hand - because a machine sewn zig-zag stitch LOOKS like a machine sewn zig-zag stitch. real boat model boat
-
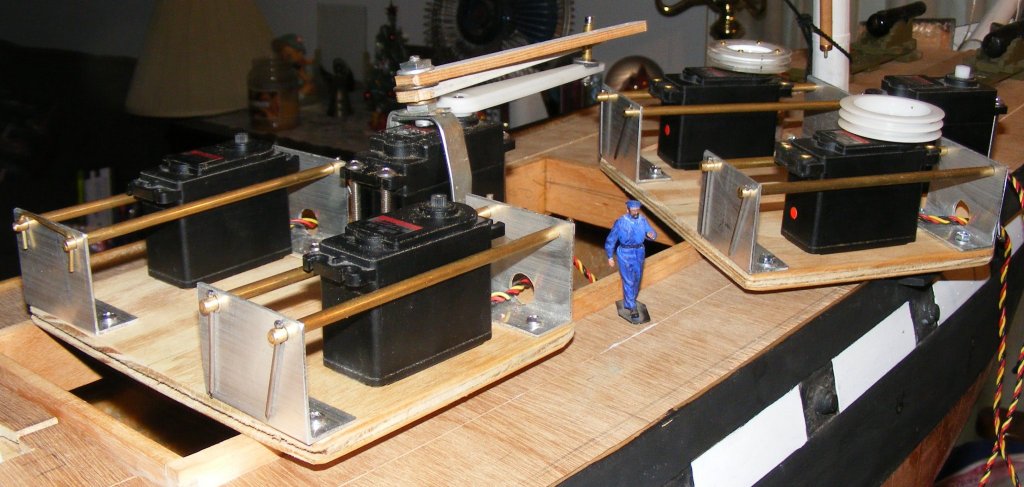
Mac's winches got mounting blocks and springs today, as did Constellation's. The drum seen on the winch servo won't be used. Mac will get a set of custom drums like Constellation's to handle the main and mizzen on one winch, and the fore mast on the other.
- 97 replies
-
- 5
-
-
- macedonian
- frigate
- (and 2 more)
-
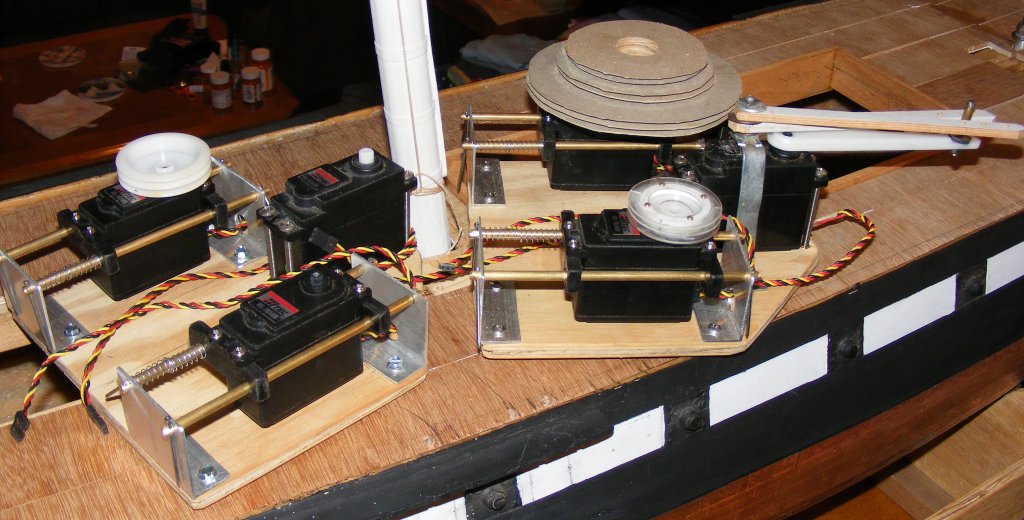
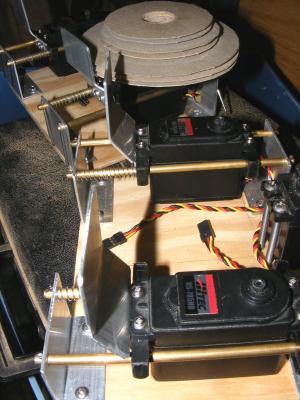
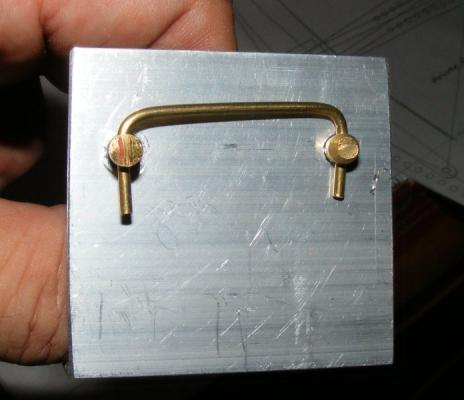
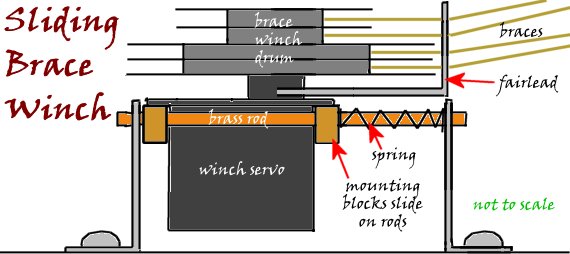
My initial plan for operating the sails wa back in post #16. The plan's generally the same except that the winches that will control the braces will slide fore-n-aft against springs to maintain tension on the braces, and these mechanisms will be mounted side-by-side instead of in tandem. The original plan had the braces going to springs mounted on posts forward to get tension. Today the Delrin plastic arrived and I got right down to making the mounting blocks for the winch servos. My shop's still a shambles and I haven't a clue where all my clamps got off to, but I finally got 8 of the little beggars made, plus two screw-ups. If you opt to try this system, make a jig for drilling the holes, precision makes a big difference with this, any thing that rubs and doesn't slide effortlessly will be a big problem under sail. The springs I was initially going to use felt too hard, enough to bow the yard, or even possibly break it, so I opted for two much weaker but shorter springs. I only had 8 of these, so I only put them on one side of each winch slide. We'll see when I get to testing how this will work out. Next up I'll make the fairleads for each servo, which looks like it'll mount to one of the mounting blocks and lean out slightly to clear the end of the winch drum, which is the diameter of a compact disc.

- 553 replies
-
- 6
-
-
- sloop of war
- constellation
- (and 3 more)
-
This one uses a thimble in the eye. As for making the strop grommet, I just pass the line around the block and cross it at the end where the eye will be. Lash it with some thread, or a drop of CA place your nail/pin/toothpick or whatever will hold the eye open for you. Turn the line around the nail to make the eye, crossing it again between the block and the eye where it crossed before. seize it good and tight, trim the ends close and you're done - no need to unlay line the size of sewing thread.
-
Two control units taking shape, one for Macedonian, the other for Constellation.

- 97 replies
-
- 6
-
-
- macedonian
- frigate
- (and 2 more)
-
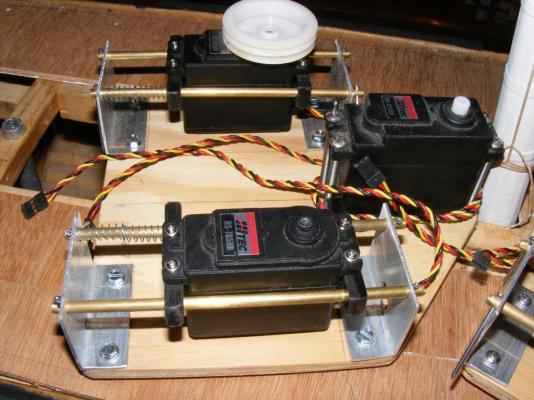
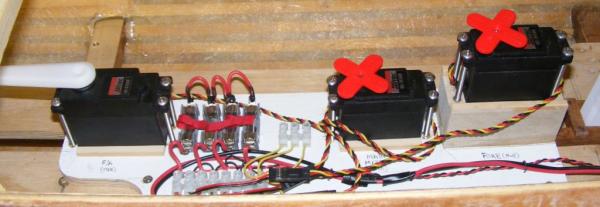
The two control units with 2 sliding winches and a sail-arm servo each. Ivan reveals how massive these thing actually were! Still waiting for the Delrin to make the mounting blocks, and I have yet to make the fairleads for the winches.

- 553 replies
-
- 2
-
-
- sloop of war
- constellation
- (and 3 more)
-
On real blocks the strop is a long-spliced loop of line. The seizing that tightens the strop around the block also pinches off the eyes/beckets. The upper block in your image would have a becket at either end, the lower block would have a single becket and get attached to the traveler via a shackle or ring. The upper block would be lashed to the boom and there would usually be a couple of cleats on the boom to keep it in place. When I make beckets, cringles, etc; I hold the eye open with a round toothpick, dowell, etc, depending on the size of the eye, and seize between the block and becket(s) with enough turns to make everything snug.
-
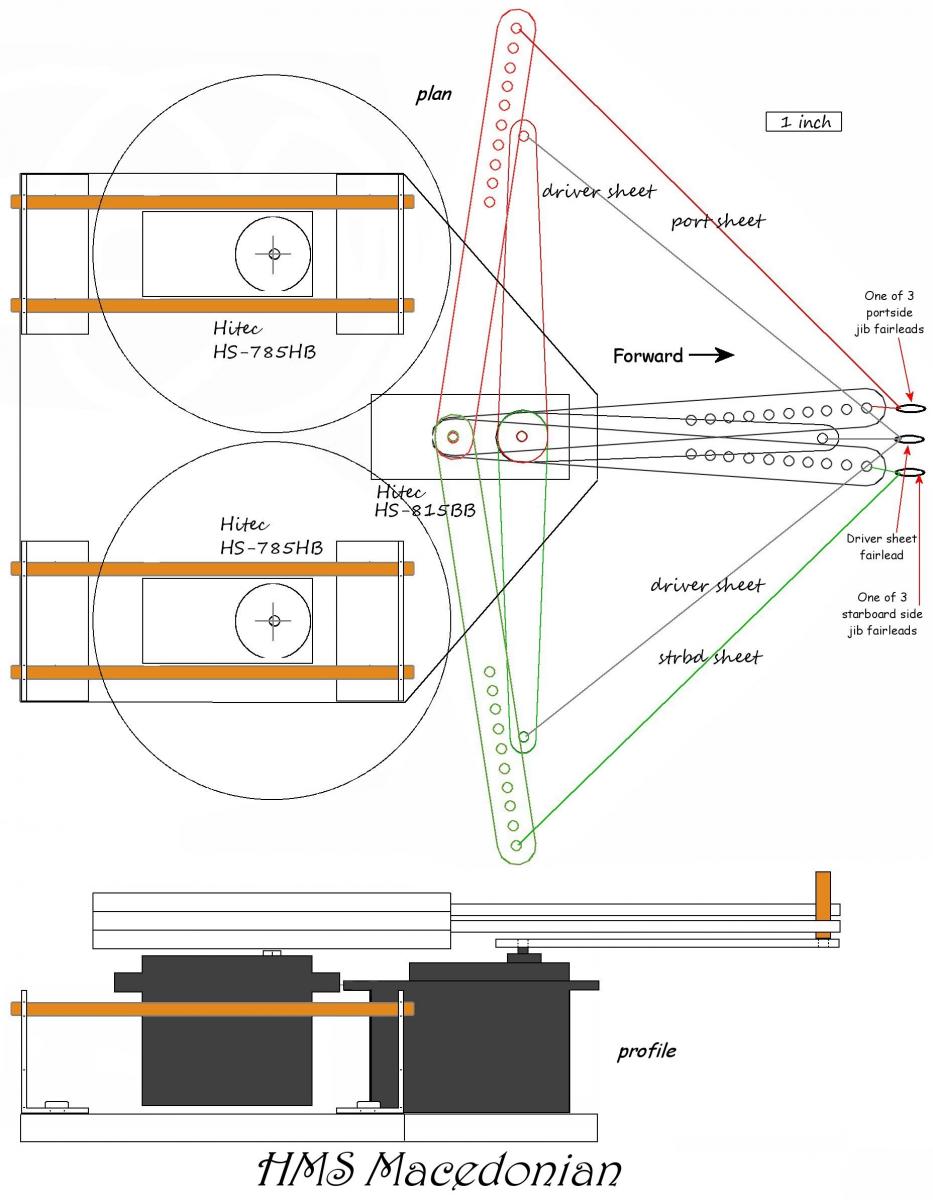
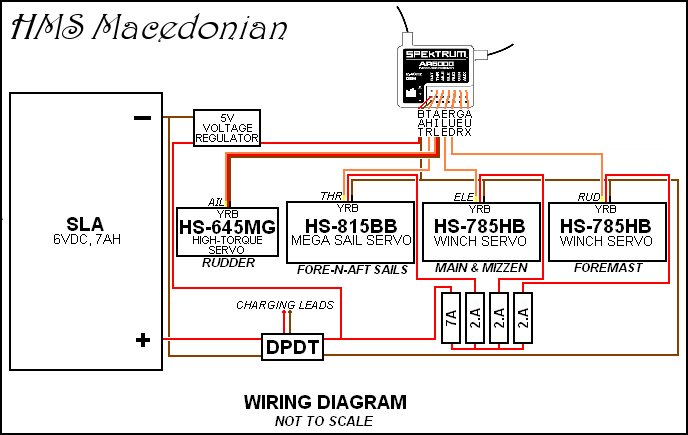
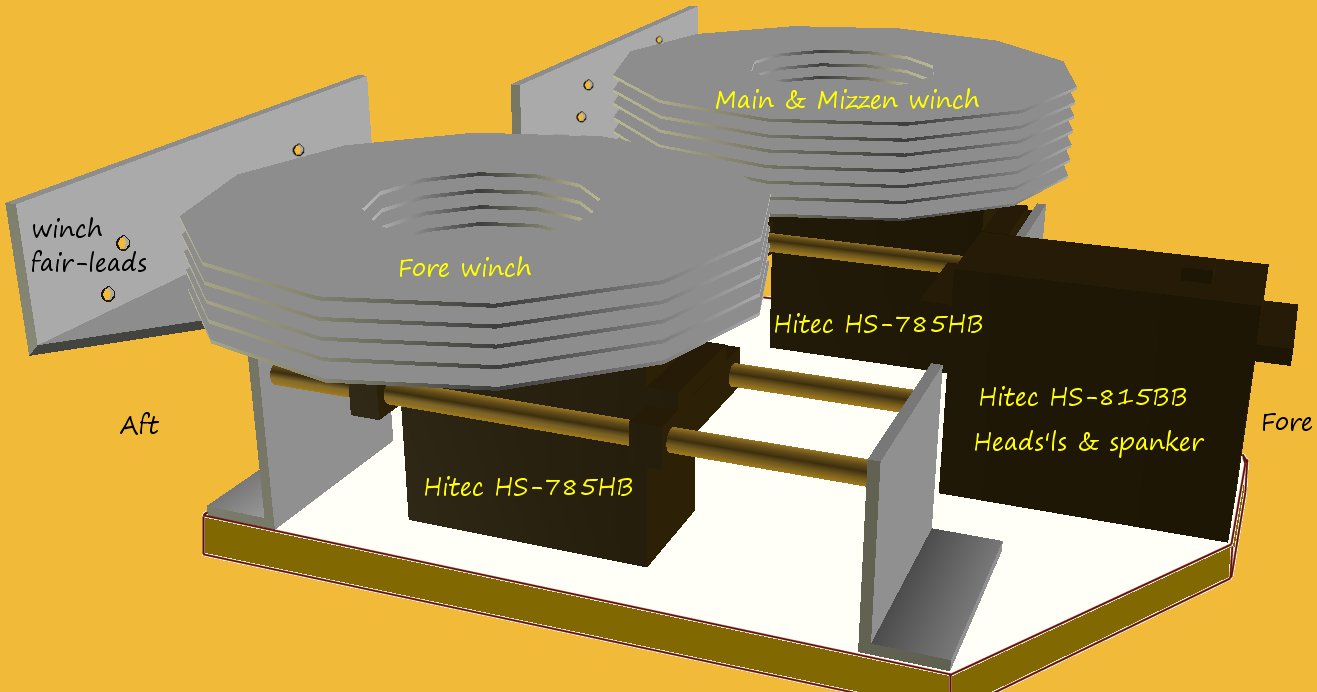
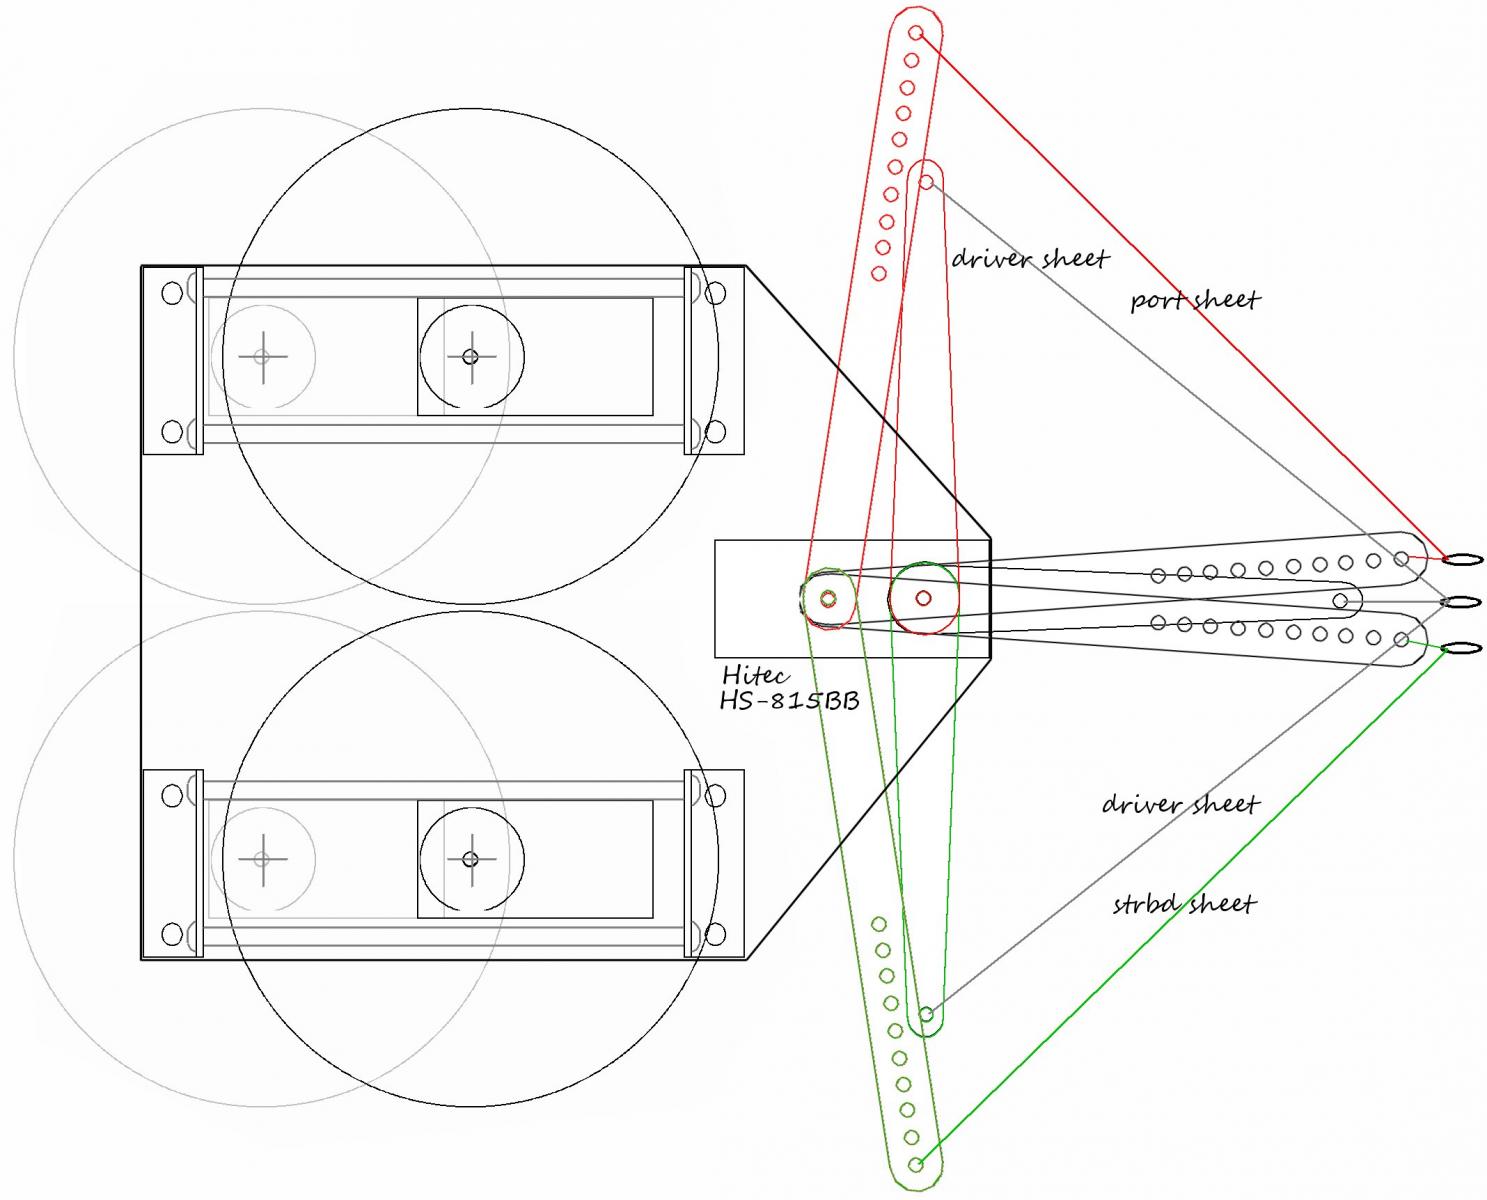
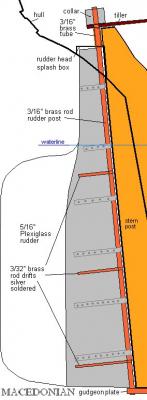
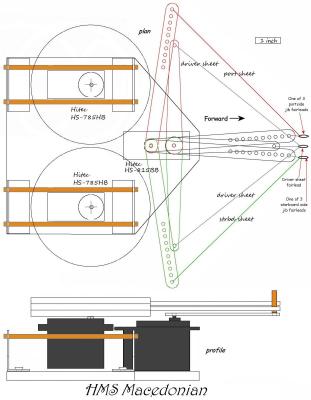
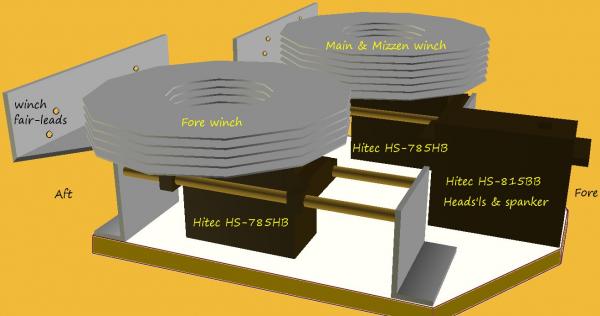
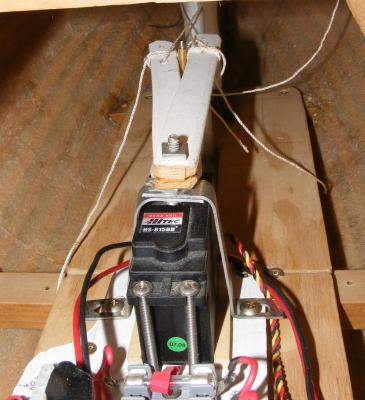
If you've been following my Constellation log, you'll recognize the servo tray set-up that Macedonian will carry. Two Hitec HS-785HB winch servos will slide on rods with springs mounted to maintain tension in the yard braces. One servo will operate the main and mizzen mast yards, the other will operate the fore mast yards. The Hitec HS-815BB sail-arm servo will operate the heads'ls and driver. The tray is 7" wide and 8" long, and will easily fit through Macedonian's main hatch. A Hitec HS-645MG high-torque servo will handle the rudder. which will be constructed in a similar manner as Constellation's
- 97 replies
-
- 7
-
-
- macedonian
- frigate
- (and 2 more)
-
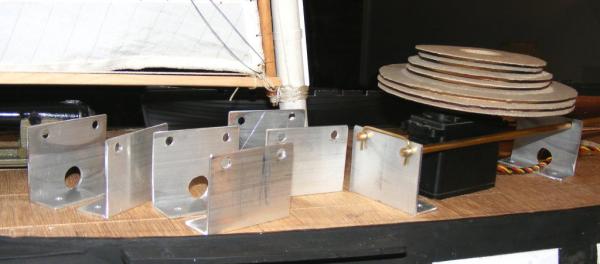
I cut the angle aluminum into pieces about 2-1/8" wide, 1-5/8" tall, with a foot about 3/4". Half of them got a 1/2" hole for the servo plug/cord to pass through. All of them got a pair of 3/16" holes 1-3/8" apart and 1-3/8" up for the rods. A pair of holes were drilled in the foot for the mounting screws. The rods will be retained between the brackets with a pin. I tried to find some small hitch pins, but they didn't have any small enough, so I'll use a bit of 1/16" rod or cotter pins. All this plus the sail-arm servo and it's semaphore arms will get mounted on a plywood "tray" 3/8" thick and 7" x 8". The brackets will be about 5" apart with the mounting foot on the inside. Two of these trays will be made, the other one will be for Macedonian. This will easily fit in through either model's main hatch and is much more compact and self-contained than my original set-up. Right now, I'm waiting for the Delrin plastic to arrive to make the blocks that slide on the rods. I also need to make the fair-leads that guide the braces onto their section of the winch drums. The braces lead aft, out of the winches since they come through the deck at, or aft of the main mast. This tray will be mounted right in front of the main mast.
- 553 replies
-
- 4
-
-
- sloop of war
- constellation
- (and 3 more)
-
You have to sand down all semblance of plank edges before any filler will do any good. The danger is sanding through the plank. You might consider actually plating her in metal. A roll of aluminum duct tape, peel and stick aluminum sheet runs about $20 US and you get some like 20 yards of the stuff 4 inch wide. Sand the hull, fill it and sand some more, seal it, prime it, and sheet it. Nothing looks like metal quite like metal does.
-
Qwerty didn't give us any photos of constructing his hull, but he generally used the same method I did on my three hulls (links in my signature). One of them is the boat he's based his model on which will give you some notion of where he's headed with Byzantium.
-
I just saw someone mentioned somewhere mast steps being brass tubes with a RC car suspension spring dropped inside. The mast is pressed in and all the shrouds are hooked, the spring pushes up on the mast keeping tension on the rigging. To remove, press the mast down against the spring, unhook the rigging, and it's lose.
-
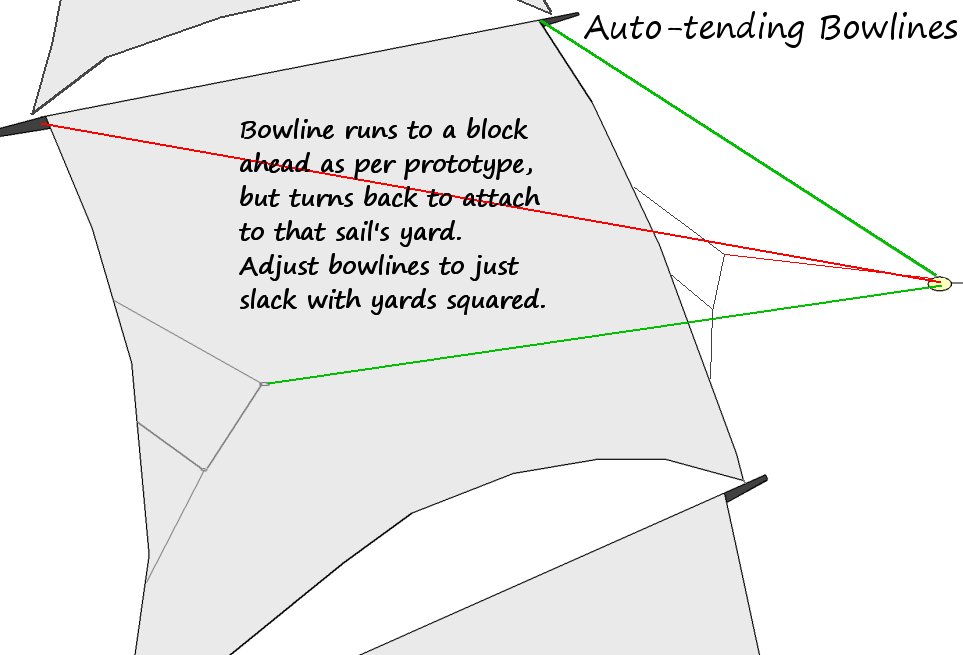
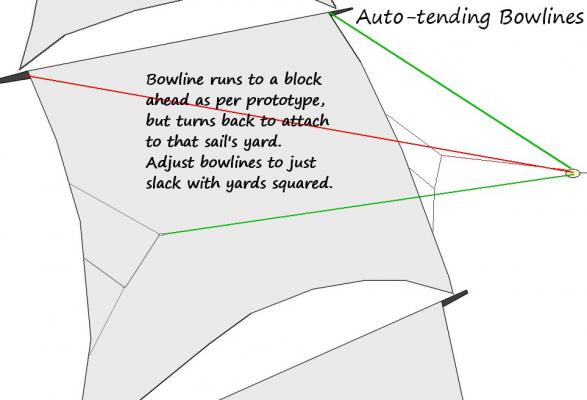
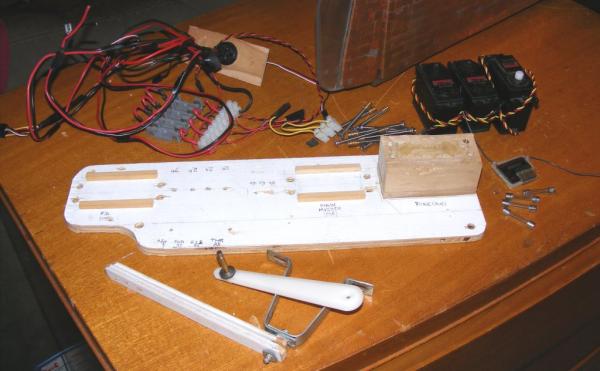
The servo tray was dismantled and parts like screw inserts salvaged from it today in prep for making a new one to support the sliding brace winches and semaphore arm heads'l sheeter. The new assembly will fit easily through the main hatch and be easier to access, adjust, and maintain than the previous set-up as the new one doesn't extend up under the deck. The two winches "face" aft because all the braces come through the deck aft of the mainmast. Plan for new servo tray set-up 3D model of new set-up The old servo tray. disassembled. The electronics; fuses, connectors, etc; actually won't change at all, all I have to do is attached the existing wiring harness to the new servo tray. I'll actually be making two of these, Macedonian will be getting exactly the same thing. Another experiment I tried today was self-tending bowlines. These couple of sail trials showed that bowlines would probably add a a lot to the models upwind ability. I was trying to figure out how to operate them when, just for giggles I gave this idea a try on the model. The bowlines attach to the sail in the normal manner and are run to a block forward. Instead of going to a pin on deck, the line turns back and attaches to the yard's opposite end, ie starboard bowline attaches to the yard on the port side, The yard then pulls the bowline as it's braced. The line is adjusted to be just slack with the yards squared. The geometry of the thing causes the line to tighten on the windward side as the looard side remains slack. These will be relatively thin light colored lines, so while they'll add to the complexity of the rig's appearance, it won't be so obvious to the casual observer that something is not quite prototypical.
- 553 replies
-
- 7
-
-
- sloop of war
- constellation
- (and 3 more)
-
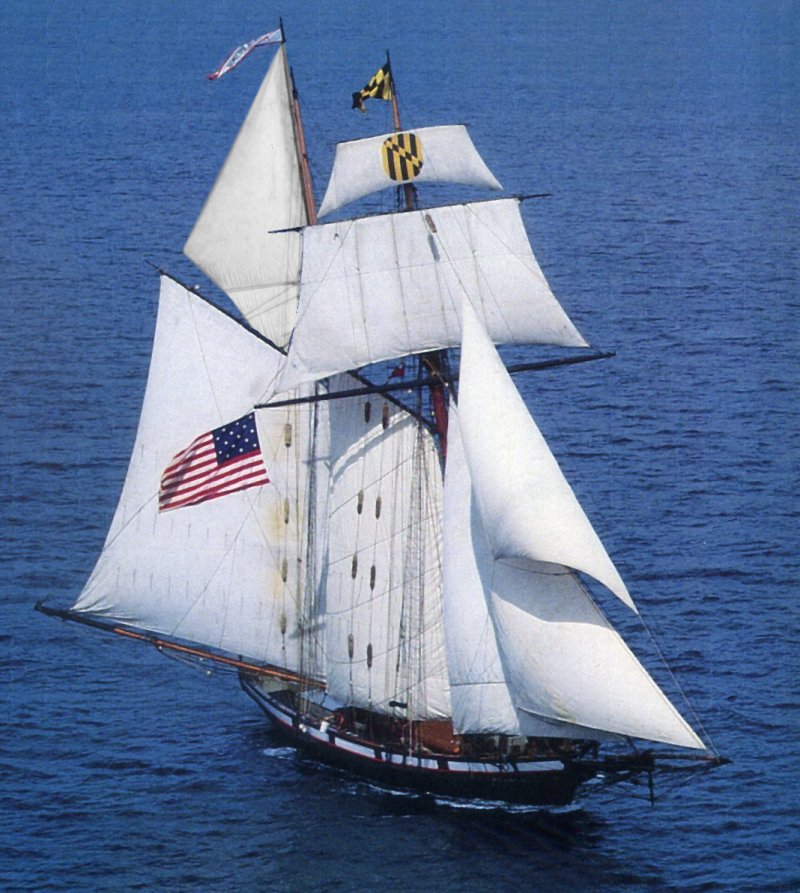
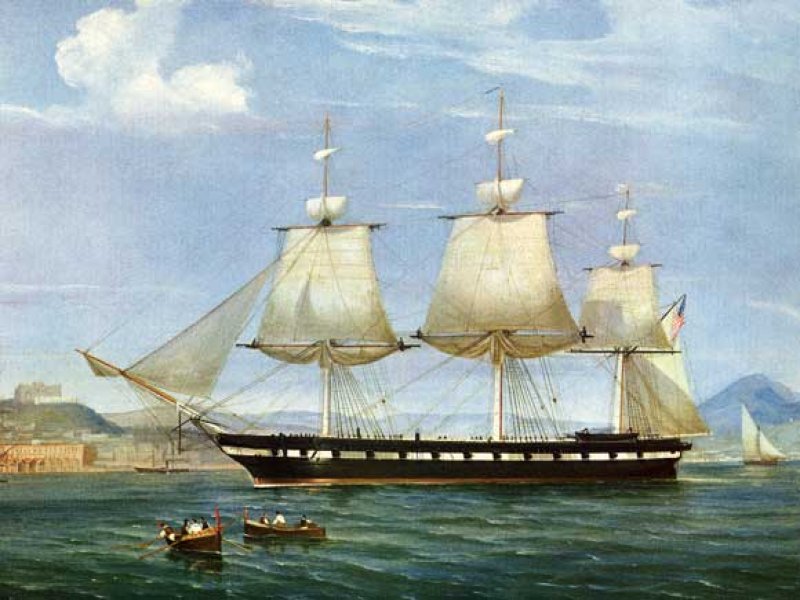
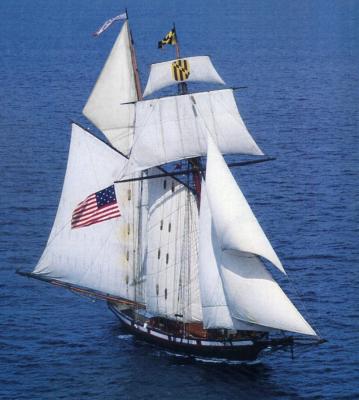
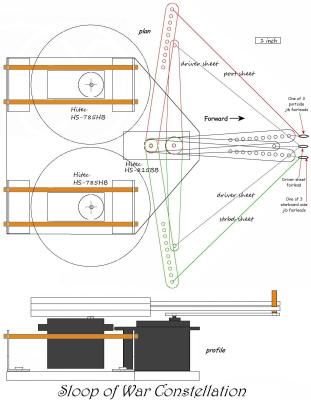
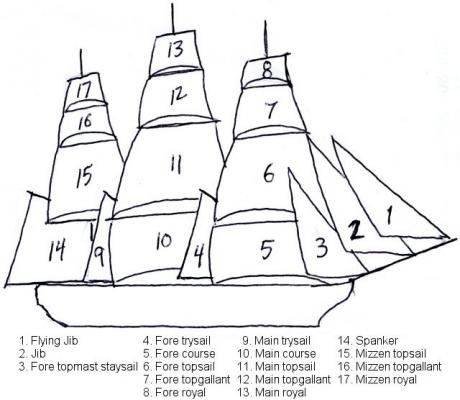
The very first post in this thread contains the model's sail plan; she'll carry some 17 sails. Many sails can be removed, brailed up, and even furled depending on the conditions. Stuns'l yards will be fitted, but I don't plan to include the sails. Her sails and their names are listed in this diagram: Her "test rig" is her maneuvering suit, or her battle sails and based a bit on this image of her by De Simone in 1862: BTW: The winches will directly control the braces of the fore course and tops'l yards; the main course and tops'l yards, and the crossjack. The mizzen tops'l yard will be slaved to the crossjack. The rest of the yards will be pulled by the tension of their sails' leeches and their braces will simple run free

- 553 replies
-
- 2
-
-
- sloop of war
- constellation
- (and 3 more)
-
Actually Our nick name for Gazela Primeiro WAS Godzilla Primeval - though she was always my favorite. Here's a vid of Dan testing the sliding servo out. (seems he deleted them from YouTube, so I edited them out here) He has the system installed on his Syren and Tim Bowman (who printed my guns for Macedonian) is using it in his brig Scorpion. I'll be installing these in Constellation first, but the arm thing's going into Pride sooner - I'm eager to get that in operation in case another "expo" comes up.
- 553 replies
-
- 4
-
-
- sloop of war
- constellation
- (and 3 more)
-
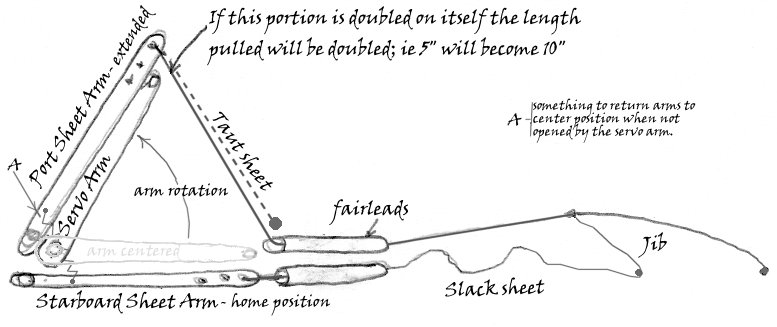
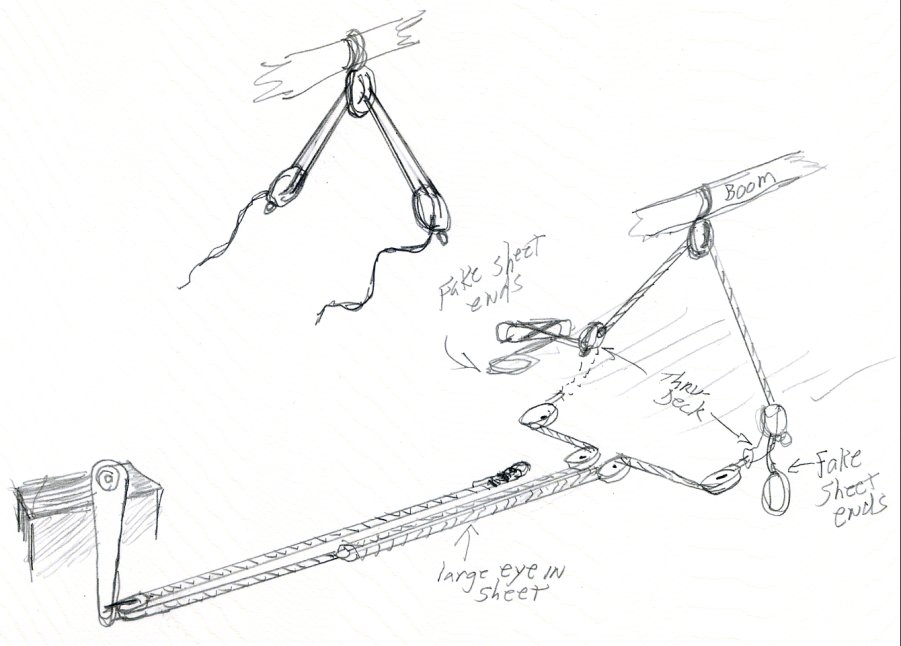
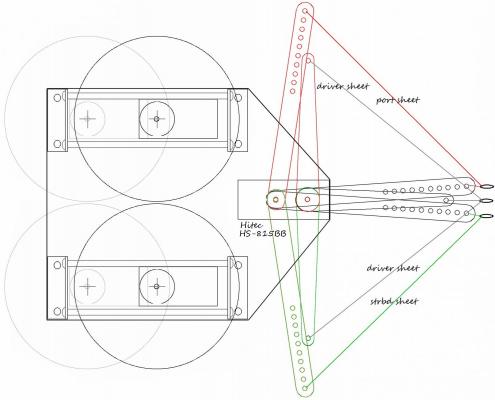
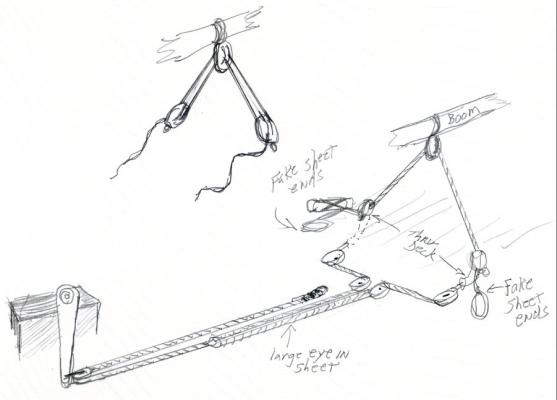
A couple of design developments will be incorporated into Constellation, and the other models regarding sail control. The sheet on the driver/spanker is normally run to quarter-blocks in the waterways, to give that appearance the sheet will be done as shown below: The equipment tray with the servos and electronics mounted on it will be reworked to incorporate sliding brace winch servos. These servos will slide on rods against spring to maintain the tension required on the braces while allowing for the changing geometry. With tension control and fair-leads mounted in a compact unit, the spring posts and other separate line controls won't be needed. It will also make servicing and adjustment easier. Constellation's three heads'ls all have to travel over stays. The below set-up will allow slacking the lee sheet before hauling the other sheet over, much how it's actually done, and using only one servo/channel. The arm that actuates the port and starboard sheet-arms of the heads'ls will itself control the driver sheet directly. Providing it works this will be my standard set-up in all three models and Gazela.

- 553 replies
-
- 5
-
-
- sloop of war
- constellation
- (and 3 more)
-
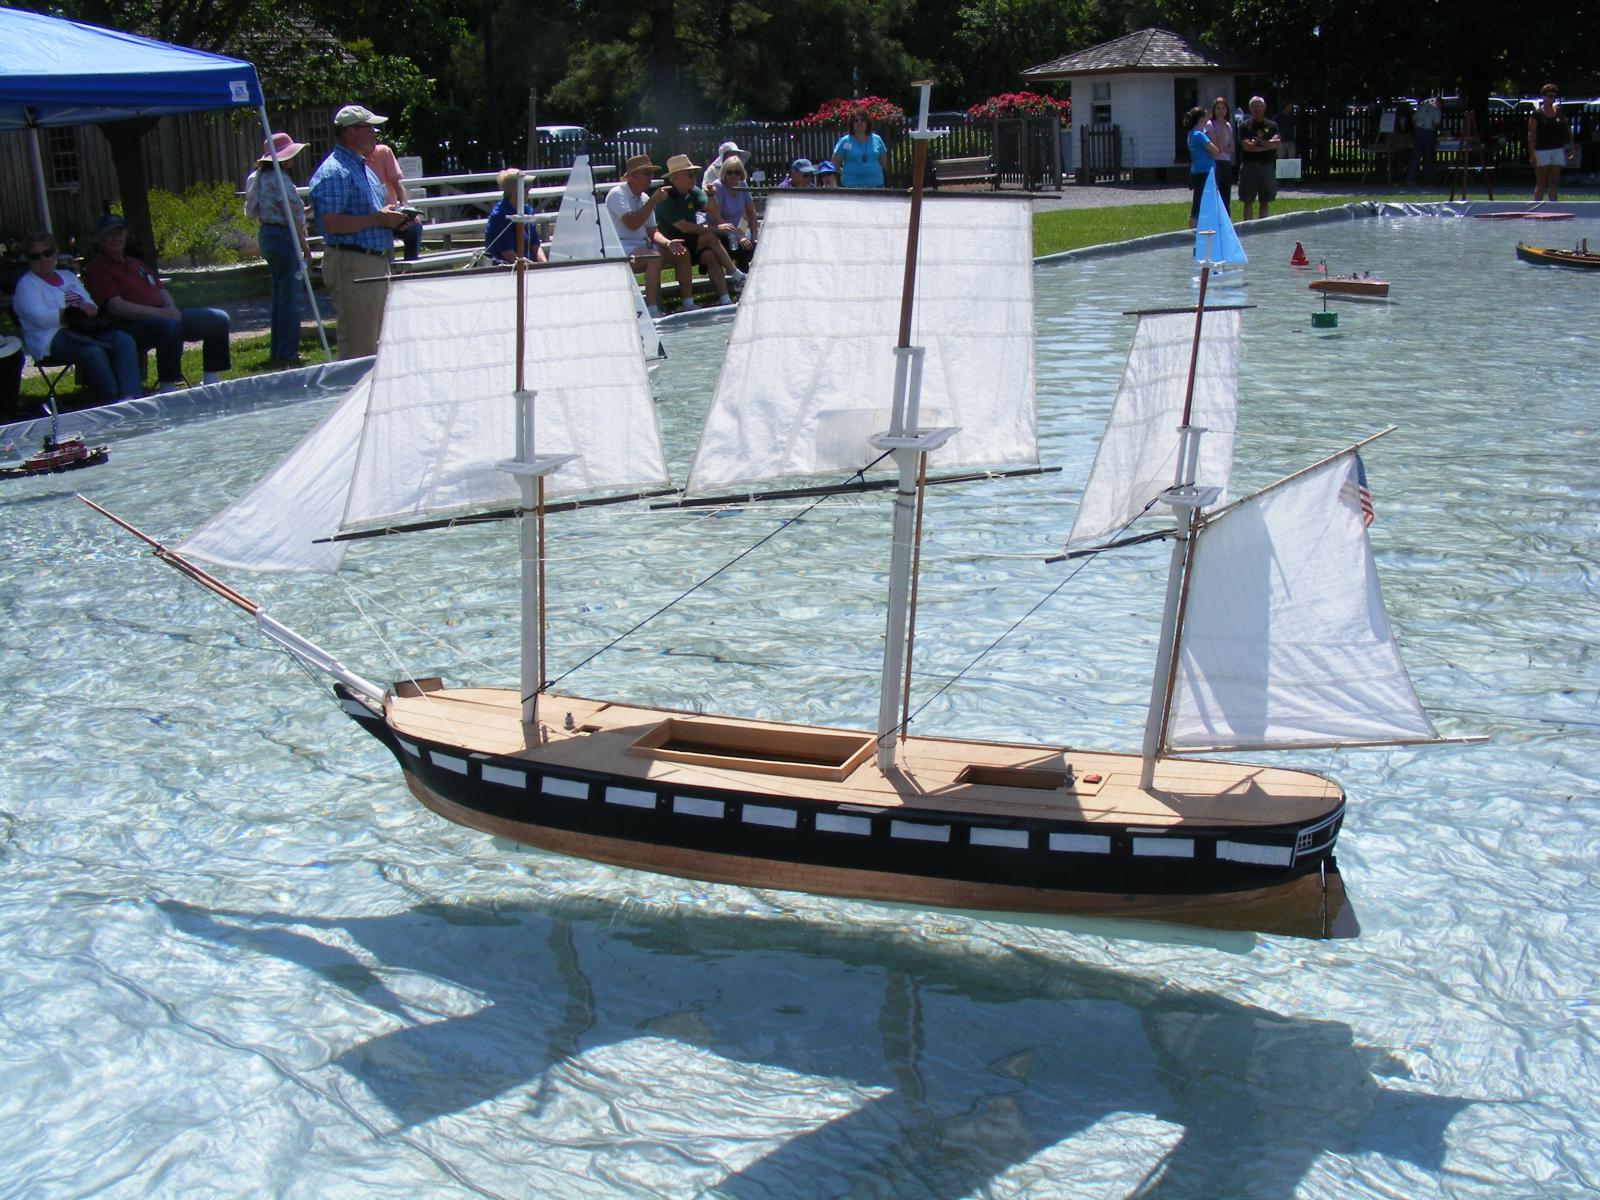
Macedonian got out of the house for a bit along with Pride and Constellation, being displayed at the Chesapeake Bay Maritime Museum's Model Expo. She got a lot of attention for an unfinished hull. A lot of comments about her size, but most were about her construction. It seemed to surprise a lot of folks that she was scratch-built from common materials obtainable from most hardware/lumber stores.
- 97 replies
-
- 8
-
-
- macedonian
- frigate
- (and 2 more)
-
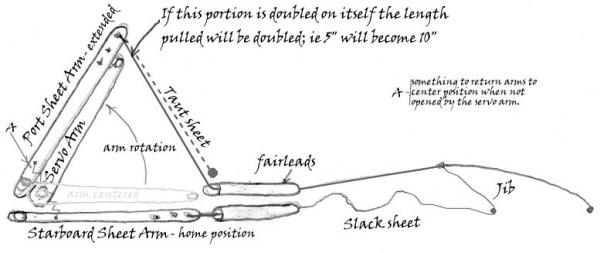
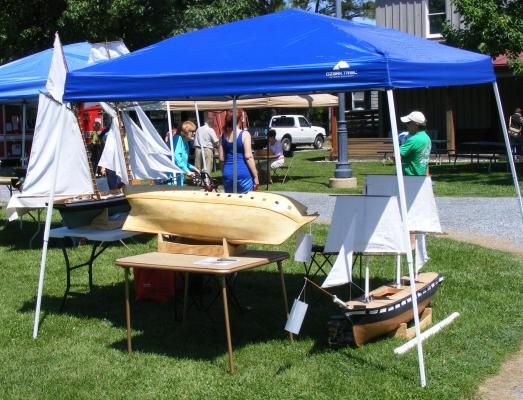
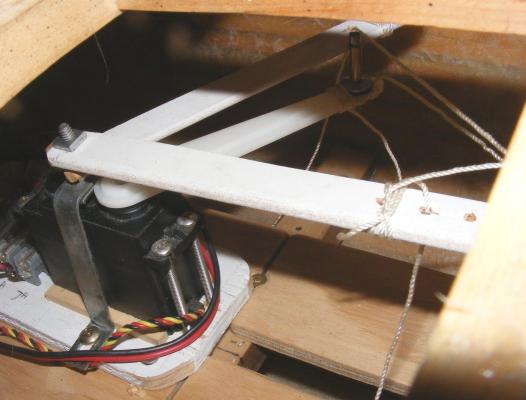
Pride got out of the house for a bit, being displayed at the Chesapeake Bay Maritime Museum's Model Expo. This got me wanting to get something done on her so maybe next time she can actually sail. One job is finally figuring out how to handle all those over-lapping sails. For the expo I installed a test set-up in Constellation which, though it needs some adjustment, looks like it'll work. I'm using a large "sail-arm" servo for the main sheet, which will be rigged as shown below to look more prototypical. This arm will also move a pair of sheet arms that will handle the rest of the fore-n-aft sails. When the sail-arm is centered, every thing is sheeted out. Moving port or starboard will sheet in the main either way, but will only move one sheet-arm, sheeting those sails to that side while leaving the other sheets slack. Here's the test rig installed in Constellation I haven't decided if I'll use an arm or winch servo to handle the squares, but I'm leaning towards a winch, mainly because I have a couple of spares. I'm also considering putting the main sheet on a separate servo for better balance and control. I may put all the running stays on that servo as well.


- 79 replies
-
- 11
-
-
- pride of baltimore
- privateer
- (and 3 more)
-
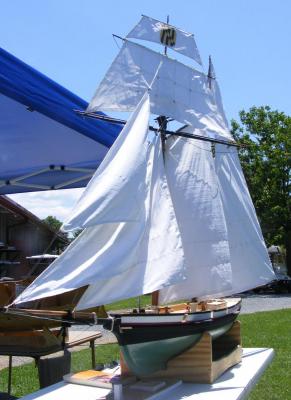
Pools are nice and safe, but Constellation was meant for more open water. It's her third time sailing and I've yet to get a nice steady breeze and the room to see her really sail.

- 553 replies
-
- 3
-
-
- sloop of war
- constellation
- (and 3 more)
-
I've found that whenever possible, run lines through something; a hole in the end of an arm, center of a winch drum, etc; to a cleat where you can make adjustments much easier. Trying to deal with small fittings in tight places inside of hatches will drive you to the evening news - as one of tonight's stories.
-
I'm imagining seeing my Macedonian in these pictures.