-
Posts
355 -
Joined
-
Last visited
Content Type
Profiles
Forums
Gallery
Events
Everything posted by jhearl
-

Model Shipways Willie L. Bennett Questions
jhearl replied to FlounderFillet5's topic in Wood ship model kits
I wish it was this simple. A while back I was building Bluejacket's Nantucket kit, which includes a lot of etched-brass parts. There was a brass grating meant to go on top of the pilot house and it was fully 1/4" wider than the plans. The choice was to make the pilot house wider to fit the grating or cut the grating down to match the plans. I chose the latter and proceeded with the build. Some time later, I realized that the etched brass railings meant to go around the pilot house were also too long and because they are one piece and have to fit in a specific way, couldn't simply be cut shorter. They were correct for the original grating but, of course, didn't match the plans or the pilot house I'd already built. Fortunately, BJ sent me a new sheet of etched brass parts and I rebuilt the pilot house to match the parts, not the plans. Strangely, they were unconcerned about the discrepancy. I even visited BJ in person last May and brought it up again and they just didn't care at all. To them, it's an older kit and they have no interest in correcting the problem. I guess it happens with all kit manufacturers and there's no single answer that works every time. Cheers - John -

Model Shipways Willie L. Bennett Questions
jhearl replied to FlounderFillet5's topic in Wood ship model kits
This probably won't be of much help to you because my kit is from 1984. Back then, there were no laser-cut parts - you had to cut the keel out of a 3/8" thick board with a bandsaw or whatever you had. That said, if you don't have the tools to make your own to exactly match the plans, then I'd consider using the laser-cut parts as is. The only area you'd want to watch is whether it affects the height of the molds at the deck. If it makes the mold too high in one spot, it could throw off where the deck line winds up. For the underside, you can just make the skeg a bit deeper in that spot to fit the keel piece. I wouldn't think it would make a lot of visual difference one way or the other. Cheers - John -

Preac Thickness Sander Sleeves
jhearl replied to Maury S's topic in Modeling tools and Workshop Equipment
The sleeve size is 3"x3". Here's one online source - http://www.woodworkingshop.com/category.aspx?id=24&f1=3%22+X+3%22 Cheers - John -

Preac Drill press with X-Y table
jhearl replied to Nirvana's topic in Modeling tools and Workshop Equipment
Preac is long-since out of business. The owner is dead. So if you ever found one, it would be used. If you really want to spend that kind of money on a drill press (unnecessary IMHO) check out jewelers precision drill presses such as this one - http://www.ottofrei.com/Store/Drill-Presses_2/Precision-Micro-Drill-Press.html If it's just an expensive X-Y table you're looking for, Sherline makes one for about $725 - https://www.sherlinedirect.com/index.cfm?fuseaction=product.display&product_id=1239&CFID=101121073&CFTOKEN=41016624 but I think before I bought one of those, I'd just buy an entire vertical mill. That would be way more useful I think. The Proxxon X-Y table for about $100 really isn't bad. It is limited in its movement though. Cheers - John- 2 replies
-
- Preac
- Drill Press
-
(and 2 more)
Tagged with:
-

Problems brass blackening using Jax Pewter Black
jhearl replied to mrmdpc's topic in Metal Work, Soldering and Metal Fittings
I haven't tried Sparex. If I understand its use correctly, it needs to be warm. Jewelers often keep a small crock pot on their bench with pickling in it, heated all day. But my work on brass parts is so sporadic, I would need to heat up the crock pot every time I wanted to pickle something and that would take too much time. The wire brush is very effective in cleaning parts and quick to use, so it suits my style of working best. -

Problems brass blackening using Jax Pewter Black
jhearl replied to mrmdpc's topic in Metal Work, Soldering and Metal Fittings
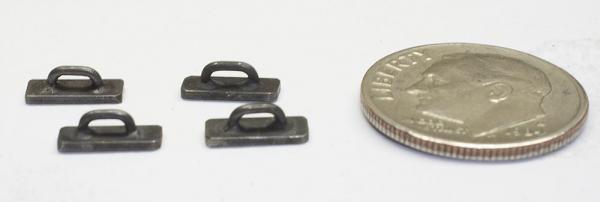
I just started using JAX recently and I have found that using the product full strength, painted on with a brush, gives me the best results. I have tried dunking alone and the blackness often comes right off after rinsing and drying. But when I apply it with a brush, using the brush to rub the liquid around on the part, I get much better results. I have sometimes done multiple coats to get the look I want or to fill in spots that I missed the first time. My process of late has been to clean the brass with a wire brush (on a Dremel) before blackening. I used to soak parts in muriatic acid or vinegar before blackening but even that wouldn't get all the residue from soldering off them. I can get it all with the wire brush (I brush it until it looks almost like gold - bright and shiny). So I make a part, clean it with the wire brush, then paint on the JAX. That's it. (Of course, I wash the part after it's blackened.) Here's a pic of some small bails I just made yesterday. I like the fact that they aren't totally black. They look more realistic to me. I used two applications of JAX on these. Cheers - John -
If you decide on the AL kit, be aware that it is not at all accurate. The hull shape is wrong and many of the deck fittings are wrong. It's an OK beginner's kit because you can learn how to build a model but you won't wind up with a model of Bluenose II in case that matters to you. Cheers - John
-

how to create rope of different thickness?
jhearl replied to Soren's topic in Masting, rigging and sails
I use different sizes and quantities of threads to make different sizes of ropes. I prefer DMC crochet thread - http://www.dmc-usa.com/Products/Needlework-Threads/Crochet-Threads/Cordonnet.aspx I might use 3, 6, or even 9 threads to make a rope. When I was first figuring it all out, I made a bunch of ropes of varying sizes then kept a sample of each with details of their thread size and count so I could reproduce them as needed. Cheers - John -

Looking for a Bench Top Drill Press
jhearl replied to FlounderFillet5's topic in Modeling tools and Workshop Equipment
I've had the Micro Mark 3-speed drill press for years now. 13, 14 years maybe. I wouldn't be without it. It has served me faithfully all those years. In order to change speeds, I seem to recall you have to take off the top and switch the belt to different pulley positions but I've never done it. I use it at one speed all the time. I'd buy one again if this one went belly up. Cheers - John- 31 replies
-
- Drill Press
- Microlux
-
(and 1 more)
Tagged with:
-

A2Z Quick Change Tool Post Review
jhearl replied to jhearl's topic in Modeling tools and Workshop Equipment
Bizbilder - thanks for the info on shimming. I see your point about the rotation. The original bottom of the tool post is also pretty slick (hard anodized) and in the instructions, they say that if the tool post rotates when you lock and unlock it, you should put a piece of copier paper between it and the table. "The paper shim engages the pores in the surfaces and locks the post in place eliminating the issue." I did, by the way, super glue the shim to the bottom of the tool post so there won't be any additional mating surfaces that could slide against each other. Also, while I could have shimmed the tool, there was still the original issue of not being able to tighten the tool post on the table without either adding a couple of fat washers under the head of the cap screw or maybe cutting the cap screw down to a shorter length. For me, shimming under the tool post seemed to be the best option to solve both problems at once. Definitely no ratchet wheel on this tool post and as you say, not likely to be found on small lathes but I suspect the forces aren't so large as to require it either. I'm not intending to cut steel with it - just brass and wood. The Sherline tool post has a T-nut and angle bracket to lock down the tool post in addition to the screw through the center to stop any rotation. We'll see if it becomes an issue when I start to use it. I confess I haven't even tried to cut anything yet with the new tool post in place. Cheers - John -

A2Z Quick Change Tool Post Review
jhearl replied to jhearl's topic in Modeling tools and Workshop Equipment
Two reason's I didn't buy Sherline's version. First was price. They want $260 for their set with just three tool holders. And, if you have any 3/8" cutting tools, you'd have to buy an additional holder for $65. Second, they don't offer any sort of holder that I could modify for the wood tool rest. -

A2Z Quick Change Tool Post Review
jhearl replied to jhearl's topic in Modeling tools and Workshop Equipment
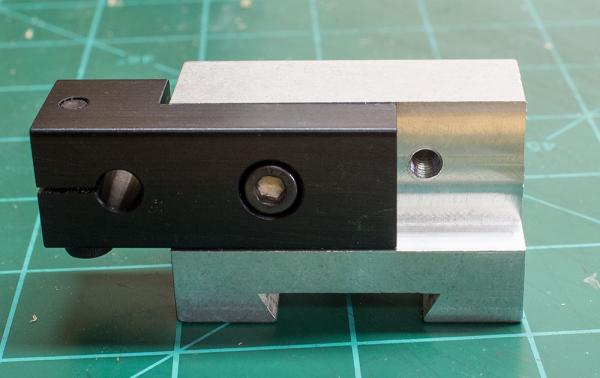
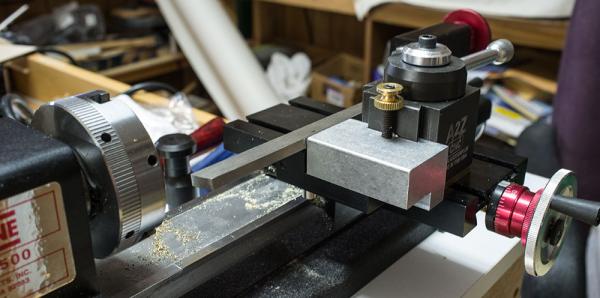
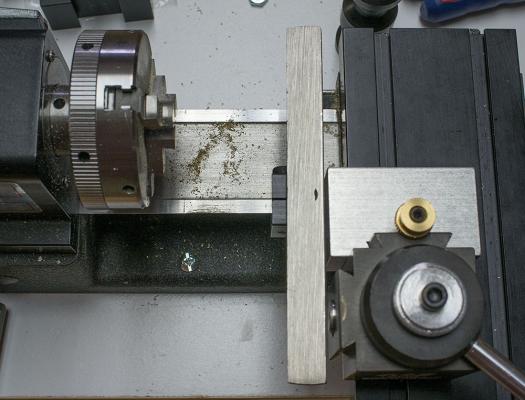
I just thought I'd follow up since I figured out how to mount the holder for the wood turning tool rest to an A2Z holder. First, I milled a slot in the bottom of the A2Z holder the thickness of the Sherline part. Then I drilled and tapped two 10-32 holes so I could mount the Sherline part to the A2Z holder (it needs to be switched from one side to the other depending if you want the holder parallel to the stock you're turning or perpendicular for end turning). The tool rest slides down into the Sherline part, which is resting on the cross slide table. Here, you can see the Sherline part attached to the right side of the A2Z part for turning parallel to the stock: To face turn, you have to unscrew the Sherline part, move it to the left side of the A2Z holder, then mount the A2Z holder on the back side of the tool post. If you need to face turn a very small object, you might be able to simply rotate the tool post 90 degrees and move it to the back of the cross slide with the wood tool rest set up for side turning but the tool post would mostly be in the way of your turning tool. Still, unscrewing the Sherline part only takes a couple seconds, so it's no big deal. I have found that I really like using a metal cutting tool bit to round off wood stock but then want to switch over to a wood turning tool for shaping, so this QCTP makes that very easy. I've also found that wood turning tools can be used on brass, so it's nice to be able to turn the brass to the desired diameter then switch to a wood tool to do curves. I think I'm going to be very happy with this setup. Cheers - John -
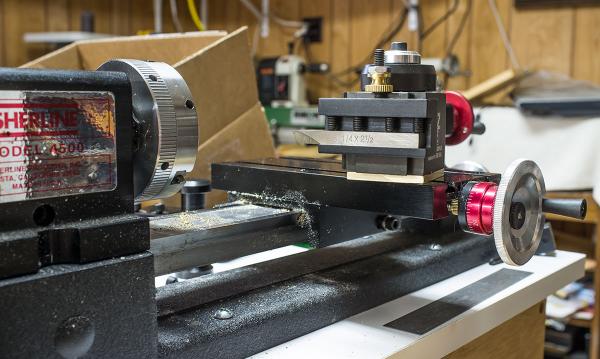
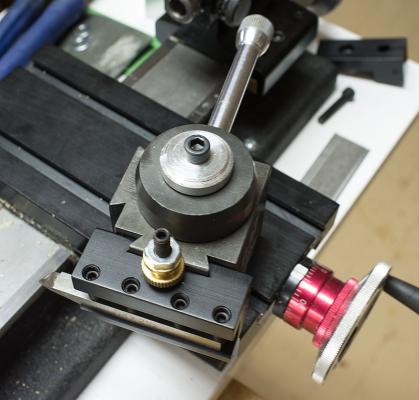
I recently purchased an A2Z quick change tool post (QCTP) set from Little Machine Shop for my Sherline lathe. The package arrived this week and I got around to installing it last nite. Installing it is straight forward - simply remove the extra-long T-nut from the Sherline tool post and use it with the new QCTP. I ran into a problem right away, however. The tool post (held in place with a long cap screw through the center of the post) would not tighten down on the cross slide table. I wound up having to put two fat washers under the head of the cap screw to make it tight. Next, I mounted a 1/4" square cutting tool in one of the holders provided. The holder is designed to hold tools from 1/4" to 1/2". (Note, the website says that although you can get a 1/2" tool in the holder, it may not go low enough to allow it to be centered on the work. I don't have a half-inch cutting tool, but it appears that it would work just fine.) I put the tool holder on the tool post and, using Sherline's height gauge, attempted to adjust the height of the tool. Unfortunately, it would not come up high enough. It was about 1mm shy. At that point, I began suspecting that the tool post was simply too short so I initiated a series of emails with Little Machine Shop. I got a prompt reply from Roger Proffitt who said he hadn't heard of this happening before. I asked him for the dimensions of the tool post so I could check to see if my had been milled too short. He measured another tool post he had in stock and mine was the same size. In the end, the best he could offer was for me to shim the tool post or the cutting tool or return it for a refund. I like the tool post and wanted to keep it, so I decided to make a shim to go under the tool post itself. I had a piece of 5/32" brass plate I was able to cut down to size and drill a hole through it. I glued it to the bottom of the tool post with super glue and now the tool post sits tight on the table and I can adjust all the tools as needed. It's a bit disappointing to have to modify something that is supposed to be made specifically for your lathe, but it is what it is and it will work just fine now. In this picture, you can see the brass shim under the tool post: And here is a view from a different angle: As for the tool post itself, I like it a lot. It is designed so that the tool holders have a dovetail slot that fits over a dovetail on the tool post. Rotating the arm on top of the post pushes a pin outward that then pushes the tool holder against the dovetail. For a small lathe like the Sherline, it seems solid enough to me. Changing tool holders is, indeed, quick and easy. There is a dovetail on the left side of the tool post and one on the "back" (that is the side away from the operator). To angle the tool post on the table, you loosen the cap screw and turn the whole tool post. Each tool holder has an adjustment knob that raises and lowers the tool holder on the dovetail. Once you set the height for a tool, you can lock the adjustment knob so you don't have to re-set it unless you were to grind the tool or replace the cutter. The set comes with 4 tool holders - two for standard, square cutting tools, one for a 1/2" parting tool, and one for a 3/8" shank boring tool. Additional tool holders are available. I also bought a blank tool holder ($13.95) that can be milled in any way you like. My idea is to make a holder for the tool rest used with wood turning tools. Although I looked at it a while this morning, I have yet to figure out how to make it work. Clearly it's going to take a bit more thought. The QCTP with a set of four tool holders sells for around $100 and it was worth the price to me. There are sets available for other mini-lathes as well. It took about a week to arrive and shipping was $12.76. Making the shim was no big deal and the tool post works great. Standard disclaimer - I have no connection to Little Machine Shop other than being a satisfied customer. Here's a link to the page for the Sherline version - http://littlemachineshop.com/products/product_view.php?ProductID=2477&category=-419988835 Cheers - John
-
If you own a recently purchased Dremel 8050 Rotary Tool, you'll want to know about a recall on it. Turns out it can melt. There is a specific date code range, all of which is explained on this page - http://www.cpsc.gov/en/Recalls/2015/Robert-Bosch-Tool-Recalls-Dremel-Rotary-Tool/ If you bought it new for yourself you may already received a notice, but just in case it was a gift or you got it in some other way you may not have seen the recall. Cheers - John
-

3D printer at Home Depot
jhearl replied to twintrow's topic in CAD and 3D Modelling/Drafting Plans with Software
I recently had to make a gear for the anchor windlass on the model of Alma I'm building. No way to buy a ready-made gear that would look anything like the real one. I had to buy a plastic gear for an RC car, cut out the middle, and fashion, as best I could, a representation of the spokes and hub. It sort of, kind of looks like the original but it's far from a perfect replica. If I had a 3D printer and the skill to design the part, you can bet I would have done so in a heartbeat. I still love working with wood and I can't see that I'd ever want to build an entire model using a 3D printer, but for some specialized applications like that gear, it sure would be nice. Cheers - John -
I'd be interested in knowing a bit more about how you do this. I'd love to be able to mill the 8- and 16-sided sections on a bowsprit but there a couple of problems I've not been able to get around. First, I tend to work at larger scales (1:48 & 1:32) so something like a bowsprit or mast is typically going to be longer than the travel available in the Y direction (5 inches on my mill if I recall correctly). Of course, you could mill part then maybe move the stock to mill the rest but that brings into play the other problem, which is that masts and spars are typically tapered, so you can't just mount the stock flat on the table. Maybe some sort of jig would work that would allow you to clamp the stock in the jig at an angle and then move the whole jig? I can see that if you were just milling the 8-sided section in the center of a yard, it wouldn't be so difficult. I've you've come up with a workable jig, I'd like to see how you do it. Cheers - John
-
First off - let me say that I've never used or owned the Vanda-Lay mill although I do own a Proxxon mill. So I'll offer my two cents for what it's worth. I think the utility of the Vanda-Lay and Proxxon mills is limited. You can only use 1/8"-shank tools to begin with. I'm not sure Dremels are really the best choice for milling operations - although they may be just fine for some operations. The bigger limitation is lack of accessories. As I mentioned in my original post, I didn't really use my Proxxon all that much, but since getting the Sherline with the angle table and rotary table, I have used it much, much more. Plus, the larger size of the Sherline mill is very helpful. There were some things that just wouldn't fit in the Proxxon mill. Holding work to the table could be problematic - they mention using double-sided tape. Unlike some, I rarely use my mill for drilling because I just find it too slow to crank up and down (and I don't have a sensitive drilling attachment). I much prefer the small drill press I own for drilling holes. The exception would be if I needed a series of holes spaced a specific distance apart, but I can't recall a time when I've ever needed that. Note, on the Acra-mill, that there is no handwheel for the Y direction or the Z direction, so that also limits its usefulness or at least its accuracy. Apparently you can add a drill press handle to it - otherwise I can't tell how you're supposed to move it in the Z direction. It looks like you have to slide it up and down and then lock it in place. Seems the same with the Y direction. I see that they sell a separate Y table as well as a separate Z adjuster but then you've added another $100+ to the cost. And in the end, you're still left with a small machine that uses a Dremel. For me, the Acra-mill would be a waste of money and, to be honest, I've wasted plenty of money on things I've wound up not using. Of course, a Sherline mill is much, much more expensive. The rotary table alone costs more than the basic Acra-mill! But the Sherline mill definitely does not fall into the wasted money category for me. I keep finding more and more uses for it and this thread has been really interesting to see how others use theirs. Cheers - John
-
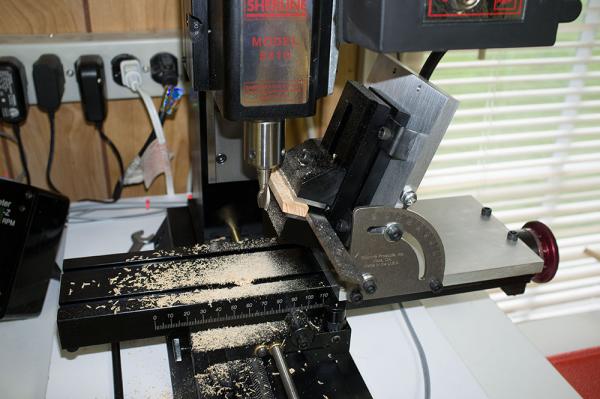
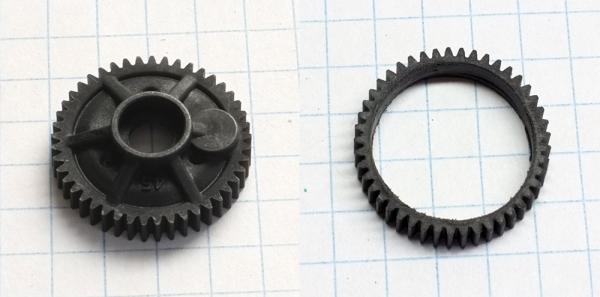
For a few years, I owned a Proxxon mill, but didn't wind up using it all that much. I didn't have many accessories for it. But a couple months ago, I bought a Sherline mill and there are three accessories that have proven to be very useful indeed. One is the rotating base for the mill vise. Very useful if you need to mill a slot or edge at an angle. The second is the right-angle plate. It can be adjusted from 0-90 degrees and will hold the vise or the rotary table. Here's an instance where I needed to mill a specific angle on the edge of a piece of wood. My Preac table saw won't cut at an angle and it would have been too small anyway. If I'd started with longer, wider stock, I probably could have done it on the 10" table saw or even on the band saw. But the mill did such a nice job of it and it didn't even need to be sanded when I was done and setup was pretty quick for this one. The other accessory I bought was the rotary table. Boy, do I love that thing! I'm working on making the anchor windlass for my current model and I needed a couple of gears for it. Now, I don't have a gear cutter so I didn't want to tackle making them from scratch but I found a plastic gear for an RC car that was the right diameter and had about the right number of teeth. Problem was, the center was nothing like what I needed. So I mounted the gear on the rotary table and milled out the center in no time. Here's a before and after pic: I'm not real sure how I would have done it without the mill. There is also a smaller gear and I found one made of steel that was the right diameter and pitch but it was too wide. Once again, the mill came to the rescue and I was able to mill off half of it to make it the right thickness. I don't honestly think I could have done that with a hacksaw. I also used the rotary table and a Dremel bit to cut the pawl plates for the drums on the windlass. And I'll be using the rotary table when I get around to making the steering wheel. I'd say the one drawback to a mill is that setup can take quite a long time. You can easily spend more time getting set up to mill something than it actually takes to mill the piece. But I love the thing and I am very happy that I bought it! I also got the DRO with mine and I'm glad I did although I don't use/need it for every operation. Cheers - John
-
I happen to enjoy making my own rope and built a simple rope-making machine many years ago that has served me well. There are a couple of reasons I'm happy to make my own - one is to get the exact size I want. On the last model I built, if I recall correctly, I needed 11 different sizes and they simply weren't all available commercially. Of course, I'll admit it can be hard to tell the difference between close sizes and it's not likely anyone would notice on a finished model. I just like knowing for my personal satisfaction that I made and used accurate sizes. The other reason is if I was relying on commercial rope, it would require me to plan correctly to assure I have what I need when I need it and that might be asking a bit much. I'd hate to be in the middle of rigging and discover I was out of a size I needed. If I can make my own rope, it's easy and quick to do - no need to wait on the mail man. Measuring the difference between .018 rope and .021 rope is actually pretty easy. Wrap the line around a dowel for a measured distance (say 1/2" or 1" depending on the thickness of the rope), count the number of turns and divide into the length. For example, if you're measuring .018 line over 1/2 inch, you would have about 27 or 28 turns. If you're measuring .021 line over 1/2 inch, you should have about 24 turns. There is some variability depending on how tightly you wrap the line (you don't want it stretched or too loose) but you can get pretty close. Trying to measure a piece of rope with calipers is more problematic because it's too easy to compress the rope as you're measuring. Cheers - John
-

Tiny fake nails/nail heads
jhearl replied to Landlocked123's topic in Metal Work, Soldering and Metal Fittings
I often use lill pins to simulate bolt heads. They're also known as sequin pins and can be found at sewing/fabric stores and online sources. I like the ones that are 1/2" in length. They are typically nickle-plated steel. Much less expensive than what you can get from Scale Hardware if the size is right for your application. Cheers - John -

Domanoff serving machine 2.0 or 2.5
jhearl replied to CPT_D's topic in Modeling tools and Workshop Equipment
I have a home-built serving machine that is powered by a sewing machine motor with a foot-pedal control. No question in my mind that powered is better for me. I typically want both hands close to the point of serving. It would seem very awkward to have to turn a crank with one hand while guiding the serving thread with the other. That said, I do, from time to time, have to back up and "un-serve" a bit because I screwed up somehow and in that instance, I have to turn the thing by hand since the motor doesn't reverse. But that's only for a short distance. I can serve about 18 inches at a time and with that amount of length, it's nice to have the motor power. Of course, this doesn't mean that a hand-powered unit won't work. It's like the difference between drilling a hole with a pin vise versus a Dremel. They'll both get the job done eventually. Cheers - John -
-

Micro Drills, Revisited.
jhearl replied to Modeler12's topic in Modeling tools and Workshop Equipment
I will gladly concede that drill bits are inaccurate. But that's not really the point here. Consider this scenario. I'm working on a project and decide, regardless of the hole size or accuracy required, that for whatever reason I want to use a #75 drill bit. I'm happily drilling away and manage to break the bit. So I go to the box where I keep my spares, open the packet of #75s and see there's only one left. "I'd better order some more," I think to myself. So I place the order and a week later, a packet of drills arrives. It's labeled #75 but when I measure them, I discover they are really #76s. As it happens, I already have a dozen #76s in the spare box. I don't need more #76s - I need more #75s. All I'm saying is, if I order #75s, I expect to get #75s. I don't want to have to order #74s and hope they are really #75s. A while back, I ordered some drills from MicroMark and one of them was actually 2 sizes smaller than what the package said they were. If I were to order a pair of pants with a 36" waist and the company sent pants with a 34" waist, I'd be a bit disappointed! I might be able to squeeze into a 35" waist but I wouldn't wear them to a big dinner. 34" waist - no way. Cheers - John
About us
Modelshipworld - Advancing Ship Modeling through Research
SSL Secured
Your security is important for us so this Website is SSL-Secured
NRG Mailing Address
Nautical Research Guild
237 South Lincoln Street
Westmont IL, 60559-1917
Model Ship World ® and the MSW logo are Registered Trademarks, and belong to the Nautical Research Guild (United States Patent and Trademark Office: No. 6,929,264 & No. 6,929,274, registered Dec. 20, 2022)
Helpful Links
About the NRG
If you enjoy building ship models that are historically accurate as well as beautiful, then The Nautical Research Guild (NRG) is just right for you.
The Guild is a non-profit educational organization whose mission is to “Advance Ship Modeling Through Research”. We provide support to our members in their efforts to raise the quality of their model ships.
The Nautical Research Guild has published our world-renowned quarterly magazine, The Nautical Research Journal, since 1955. The pages of the Journal are full of articles by accomplished ship modelers who show you how they create those exquisite details on their models, and by maritime historians who show you the correct details to build. The Journal is available in both print and digital editions. Go to the NRG web site (www.thenrg.org) to download a complimentary digital copy of the Journal. The NRG also publishes plan sets, books and compilations of back issues of the Journal and the former Ships in Scale and Model Ship Builder magazines.


