jhearl
-
Posts
355 -
Joined
-
Last visited
Content Type
Profiles
Forums
Gallery
Events
Everything posted by jhearl
-
Micro Drills, Revisited.
jhearl replied to Modeler12's topic in Modeling tools and Workshop Equipment
I am sad to report that I received the drills from Drills America last nite and measured them. Every one is undersized. No better than the less expensive drills I bought from Drills and Cutters. I began to get suspicious of my measuring tools and techniques, so I took a piece of .020 brass rod and a piece of .028 brass rod from brand new, unopened packages and measured them with both the drill gauge and digital calipers. They measured the exact size. So it's not me or my tools. I contacted Mr. DeWitt and his reply was: "John, I have no argument with you because the customer is always right. It's just one of those unexplained phenomena like Stonehenge, the statues of Easter Island or Donald Trump. Please return the drills at your convenience and we will refund all your money. Thank you for giving us a try and best of luck in the future." So, indeed, I will be returning the drills. I guess I'll just go back to Drills and Cutters because they are less expensive and order drills that are labeled as one size larger than I need in hopes that I'll get some that are right. Very disappointing. -
Micro Drills, Revisited.
jhearl replied to Modeler12's topic in Modeling tools and Workshop Equipment
I don't typically use a pin vise - more likely a drill press for precise work. But, let's say you want to put a piece of .025 brass rod into a piece of sheet brass and you plan to silver solder it. When you silver solder, the parts need to touch to get a good solder joint (in this case, all the way around the rod). So, if you choose a #71 drill, the hole may be too large (.026) and you'll wind up with a weak joint. If you choose a #73 drill, the hole will be too small (.024) and the rod won't go into the hole at all. Your best choice is a #72 drill (.025), which is just the right size. Of course, if you're putting a piece of brass rod into a piece of wood and you're planning to epoxy it in place, then, yes, such precision is unneeded.And, in fact, you'd want a hole that's larger than the rod to allow room for the glue. If you want to use thin CA to glue in that rod, you'll want a snug fit since thin CA doesn't fill gaps (kind of like silver solder). But, again, no matter what the number on the drill or the application for the hole it will produce, when you decide you need to order a particular size drill, you want to know that you're going to get the size you order. Cheers - John -
Micro Drills, Revisited.
jhearl replied to Modeler12's topic in Modeling tools and Workshop Equipment
https://www.drillamerica.com/product-categories/drills/jobber-drills/standard-118-point-jobber-drills/ In the area where it says "Narrow Your Selection" find the size you want in the "Size (diameter) pull down. You'll see all the numbered drills listed there. -
Micro Drills, Revisited.
jhearl replied to Modeler12's topic in Modeling tools and Workshop Equipment
Just wanted to add that if you go to Drills America's website (the real one) the pricing is a bit confusing. In the description of each drill, it says "Package Qty.: 12" and the price is listed as, for example, $2.72 for a #72 drill. That price is for EACH drill and they only sell the small drills in packs of 12. So if you order 1, you will be ordering a single drill and it will show the price as $2.72 in your cart, but I'm not sure the order would go through since they don't sell less than 12. I mentioned this to Mr. DeWitt and he agreed it needs to be changed. In any case, I just told him what drills I wanted over the phone, gave him my CC number, and he put the order together for me. He also told me he opened each package that I ordered and mic'd one drill from each and they were spot on for sizing. So, a very helpful guy. Wholesale price on the #72s was $1.31 each, by the way. So if you call to order, be sure to mention the forum and ask for the wholesale price. Cheers - John -
Micro Drills, Revisited.
jhearl replied to Modeler12's topic in Modeling tools and Workshop Equipment
I just had a phone conversation with Michael DeWitt, who is president of Drill America - https://www.drillamerica.com/ It turns out that the owners of Drills and Cutters are cousins who split from his business about 15 years ago. They have created their own packages for drills that they obtain from China. The packages are similar to but different than the real thing from Drill America, who gets their drills from Precision Twist Drill in Crystal Lake, Illinois. His business is a small one and short of bringing an expensive lawsuit, he is unable to stop Drills and Cutters from their deceptive practices. His prices are certainly more expensive, but he guarantees they are American made and accurately sized. His primary business is wholesale but they do a small amount of retail business through their web site. Michael offered to sell me the bits I need at wholesale prices, which I thought was very nice of him indeed. He said if anyone on the forum called, he'd do the same for them. Be aware that there is also a drillamerica.net website, which is also fake. The drills they sell are not produced by Drill America or made in the US. Cheers - John -
Micro Drills, Revisited.
jhearl replied to Modeler12's topic in Modeling tools and Workshop Equipment
I do the same plus I use a drill gauge and find that even easier. I keep one of each size drill in a block of wood that has holes with numbers to tell me what I'm picking up. The thing is though, when you need to order more drills, you can't be sure of what size to order if you can't rely on getting what they say it is. If I need a #72, do I order a #71? What if the #71s turn out to be #73s? What if it actually turns out to be a #71? It took a week to get the original order from Drills and Cutters and another week to get the replacements, and I still don't have the drills I need. I'm in the middle of an email conversation with the president of Drill America about the problem since it was his drills that I bought. He tells me the drills are not actually made by them but rather by another firm in Cleavland if I recall correctly. He was upset that I got the wrong size drills in his packaging and is trying to get to the bottom of it. Their prices are much cheaper than Drills and Cutters so if he can guarantee I'll get the right thing, I'll place an order with his company. He told me he personally went into the warehouse, opened up a package of drills and mic'd them and they were right on. So no telling what's going on with Drills and Cutters. I'll report back anything I learn of value. Drills and Cutters did refund my money in full, including the shipping charges, and did so before I'd even sent the drills back They also arranged to have UPS pick up the drills at no charge to me. So I'm happy with that. But I'm not happy with getting the wrong size drills. Cheers - John -
Micro Drills, Revisited.
jhearl replied to Modeler12's topic in Modeling tools and Workshop Equipment
I've had bad luck finding inexpensive numbered drills that are accurately sized. I recently ordered some from an online company called Drills & Cutters. Every one of them was undersized. For example, all the drills in the package of #71s were actually #72s (.025 instead of .026). I'd ordered 6 different sizes and all exhibited the same problem. The drills, by the way, are actually made by Drill America, which has their own website. I contacted Drills & Cutters about the problem and they sent replacements without charge and didn't ask for the bad ones back. Sadly, the replacements were just the same - every one undersized. I suppose you could take a chance and order one size larger of each to maybe get what you need, but I've asked for a full refund and intend to send them all back. I just don't want to deal with them any more. I'd ordered some from MicroMark as well before that and saw the same issue - some were even two sizes smaller than they should have been. Of course, companies like MSC Direct and Harvey's have drills that are probably accurately sized, but the price! Geez - around $10 apiece. That's a bit much for my pocket book. The ones from Drills & Cutters were all under $1 apiece. I guess you get what you pay for. -
Danny - you may be right about letting the pieces soak too long in the Jax. I was just looking at them as they blackened and deciding when to pull them. I prefer a blacker look to my parts, so that's what I was going for. Still, as I say, painting the product on full-strength seems to work very well for me so I'll probably stick with that method. Franks - thanks for the tip on the brass & copper cleaner. I'll give it a look. Cheers - John
-
I wanted to report back that thanks to Frank's suggestion to paint on the product instead of immersing the parts, it works! I don't know why it makes a difference, but it most certainly does. I looks very much like Casey's. I tried a freshly-cleaned piece (sanded and wire brushed) and another cleaned piece that I'd soaked in vinegar for 10 minutes. Both look pretty much the same to me. On the uncleaned side, the one soaked in vinegar did darken a bit but it was still kind of splotchy. On the one that was not soaked, it didn't do much at all to the uncleaned side. So as with any brass blackening solution, thorough cleaning is a must. Just for grins, I tried it on a piece of pot metal (some cast metal fitting in the scrap box) and solder. Both blackened perfectly. One thing to be sure of is that the solder is clean. I had some badly oxidized Stay-Brite (which doesn't, in fact, stay bright, by the way) and where it was oxidized, the blackener had no effect but on the bit that I filed clean, it turned black as night. I tried one other experiment. I inserted a small-diameter brass rod in some basswood, which I sanded flush so just the end of the rod was showing. I've done this sort of thing to simulate iron nails in the past. Back then, I used gun bluing on steel wire because the gun blue was clear and wouldn't stain the wood. But Casey's Brass Black is blue and will stain the wood. I dabbed a bit of the Jax on the brass and it turned black right away. There is no visible discoloration of the wood itself. The only thing with that technique is I don't see a good way to flush it with water without raising the grain on the wood. So there could be problems with the brass over time. I just can't say. Anyway - again - thanks to Frank for the suggestion. I'm very happy that it worked! Cheers - John
-
justsayrow - definitely not brass plated. It's a piece of K&S brass strip. Frank - I did not try painting it on with a brush. I'll give it a try tonite - thanks for the suggestion. I've written to Jax directly to see if they have any suggestions as well. I'm hoping I'll hear something today.
-
Well, I didn't realize Jax made a brass black as well as a pewter black. Somehow I got it in my head that pewter black was the right product. And, of course, their label comfirms that it is supposed to work on brass and many other metals. I did not try distilled water, so there could be something in my well water that causes it not to work although the instructions on the label say nothing about diluting the product and my results with the full-strength product were just as bad. I guess I'll be sticking with Casey's. I'm not going to spend another $25 to get a bottle of brass black. Thanks to all for the thoughts and ideas.
-
I received some Jax Pewter Black on Friday. I wanted to give it a try to see if it was better than Birchwood Casey Brass Black. So I did an experiment this afternoon and I'm pretty horrified by the results. Maybe I'm doing something wrong. Here's what I did - I cut some small strips of brass. On one side, I sanded them, then wire brushed them to make sure they were absolutely clean. I left the other side uncleaned to see if it made a difference. Then I soaked half of the pieces in white vinegar and the other half in diluted muriatic acid for 10, 5, & 1 minute plus I left two control pieces that were not soaked in any acid. When I put some of the pieces in the Jax (full strength) they turned brown rather than black. After about 2 minutes, I removed them and rinsed them with tap water. The brown coating flaked right off! So I put them back in for 5 minutes. When I took them out and rinsed them again, there were a few spots that had some of the brown sticking to them but the pieces looked very splotchy - both on the sanded and unsanded side. I could never use those parts on a model. I also decided to try the Jax diluted 50-50 with water and left the pieces in for 10 minutes. Equally bad results. Splotchy, brown, & ugly. They looked more like copper than iron. The acid used appears to make no difference and I can't see that the soak time does either. Diluting the Jax didn't seem to have any effect one way or the other. I'm very disappointed and this stuff was not cheap ($25). I'd be glad to have any tips on how I might do something different to achieve better results. For now, I'll be going back to Birchwood Casey, but it's a shame to have to toss out this expensive bottle of stuff since it seems to work for others. Like I say, maybe I'm doing something wrong but I can't think what it would be. Thanks - John
-
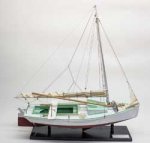
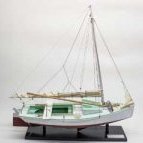
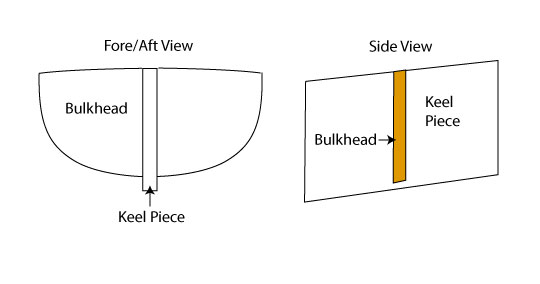
When you're putting a false deck on a plank-on-bulkhead (POB) model, you need to be aware of multiple curves and angles and the way the bulkheads fit to the keel piece. I can't tell for sure on this model from the photo, but on most ships, the deck curves from side to side (that is, it is higher in the center than at the edges) and it also curves from fore to aft. When you sand the tops of the bulkheads in preparation for attaching the false deck, you need to make sure you are aware of these curves. The illustration below may help visualize this: Note how the top of the bulkhead (in the side view) is angled to match the angle of the keel piece. (The sides will eventually be angled as well when you prepare the hull for planking. That process is called "fairing" the hull. It is necessary so that the planks will lie flat on the edges of the bulkheads.) As you sand the angle on top of the bulkheads, you want to be aware of the side-to-side curve as well - you want to maintain that curve - not sand it away. Try using a small block of wood (maybe 1-inch by 3-inches) with sandpaper glued on to it to sand the tops of the bulkheads. Take your time and once you think you have it right, put the model down and go do something else until the next day. Then come back and look at it again and you're almost guaranteed to see something that could be improved. As with a house, you are building the foundation of the ship. If the foundation is bad, you'll have more problems down the road, so it's best to get it right in the first place. Cheers - John
-
I own a 10" table saw and a Preac modeler's saw (precursor to the Byrne's saw). I use the Preac a thousand times more frequently than I use the 10" saw. The 10" saw is useful for cutting strips from large stock such as a 6" wide board that is 3/4" thick. The Preac wouldn't cut that at all. But if I want to take a 3/16" thick piece of basswood sheet that is 3" wide and make 1/8" strips from it, the Preac is the saw of choice. Last night, for example, I needed some strips that were 2mm wide by 1mm thick, each of which had to be 30mm long. Easy on the Preac - impossible on the 10" saw. I use slitting saw blades on the Preac, by the way. So, I'd go for the Proxxon over a large saw any day - it will be far more useful than a large saw. Cheers - John
-
After looking at both kits online, I'd go for the Pinta. It is overall a simpler ship and the rigging, especially, would be easier than the Halifax. And, as others have suggested, start a build log so you can ask for help when you need it. Cheers - John
-
Vinyl Stick-on Letters
jhearl replied to wq3296's topic in Painting, finishing and weathering products and techniques
I'm wondering if you mean dry-transfer letters rather than vinyl stick-on letters? If so, check Amazon or do a Google search for Woodland Scenics. Cheers - John -
Proxxon EF vs. Dremel 7700
jhearl replied to rtropp's topic in Modeling tools and Workshop Equipment
I have any number of Dremel tools including the one pictured immediately above. They each have their benefits. There are two things that bother me about the 8050 - the speed always resets to the middle value when you turn it off, (which is too fast for my needs) and while the lights seem like they would be useful, if you have the drill pointing towards you, they make it hard to see what you're doing because they shine in your eyes. I had to cover mine with tape. I used to have one called the MiniMite, which was my go-to drill until the batteries died. I replaced it with a model 7000, which uses four AA batteries. I have a couple of sets of Eneloop batteries that I use with it. Eneloops are great because they hold a charge for a long time when they aren't being used. The 7000 is smaller than the 8050. It has just two speeds, which are normally all I need, and no annoying lights. Cheers - John -
How would you improve your Byrnes tools?
jhearl replied to Keith_W's topic in Modeling tools and Workshop Equipment
I'm at work at the moment so I can't take a pic (will be glad to later if you want). I probably wasn't clear with the term "depth stop." What I mean is a length stop. There's a metal bar that slides along the front edge/top of the sliding table. There's a tab on the right end of the bar. Shove your stock up to the tab and it sets the length of the piece you want to cut so you can make identical pieces over and over. A couple of thumb screws allow you to move it or remove it. Depth of cut is controlled by blade height, of course. I agree that setting blade height on the Preac is one of it's less-well-thought-out features. They did sell an accessory blade-height adjuster, which is a sort of bracket that fits under the blade arbor and by turning a thumb screw (by hand), you can raise and lower the blade quite precisely. It's a bit finicky but without it, it's very difficult to set blade height. Cheers - John -
How would you improve your Byrnes tools?
jhearl replied to Keith_W's topic in Modeling tools and Workshop Equipment
The thing I'd most like to see for the Byrnes saw is a sliding table. I have one on my Preac saw that has a built-in adjustable depth stop and I would be lost without it. I know you can use the miter gauge and work around the depth stop issues on the Byrnes saw but the sliding table is just SO convenient. I have a miter gauge for my Preac - somewhere - it's in a drawer, I think. Haven't looked for it in a long time. The Preac still works fine but I know it may die some day and it does have its quirks, so I've considered buying a Byrnes saw, but the lack of a sliding table has stopped me so far. I tried contacting Mr. Byrnes both through email and a PM here to see if he'd make one for me, but got no reply, so I guess he isn't interested. And, yes, I could make one of my own out of wood, but I'd be willing to pay for a professionally made metal version that was equal in quality to the saw and replicated what I have with the Preac. -
Threads on miniature nuts & bolts
jhearl replied to jhearl's topic in Metal Work, Soldering and Metal Fittings
That's a great idea for making square nuts! and bolts with square heads Never thought of using square tubing. They look really great. Thanks for sharing the picture. I suspect I will use this technique before I'm done with this model. Cheers - John -
Threads on miniature nuts & bolts
jhearl replied to jhearl's topic in Metal Work, Soldering and Metal Fittings
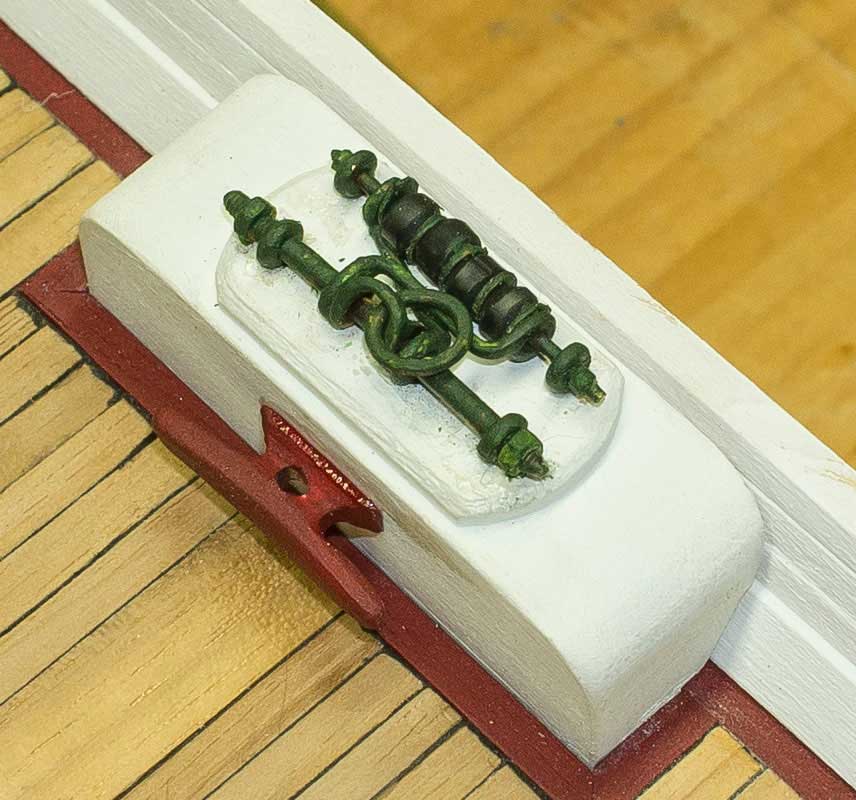
Just wanted to report back. I decided that .6mm was too small for my project but 1mm and 1.6mm would work well. I ordered a set of UNM miniature taps & dies from Amazon and some nuts from Scale Hardware. Using the 1.6mm die wasn't hard but the 1mm die was pretty tricky. Teeny, tiny! One thing I determined is that using half-hard, non-annealed brass rod seems to be the way to go. I bought some silver-plated copper wire (18 guage) and it turned out to be too soft - it twisted as I tried to turn the die and eventually broke off before I could finish threading. I also tried annealing the 1.6mm brass rod and it too twisted as I turned the die. So using the brass rod just the way it comes from K&S seems to provide the best results. When I ordered the nuts, I made a mistake and ordered stainless steel 1mm nuts instead of brass. Didn't really matter since I planned to paint the finished assembly anyway. But the 1mm nuts seem smaller proportionally, than the 1.6mm nuts. In other words, I wish the outside dimension as a little larger. Nevertheless, they worked on the threads I created. Here's a picture of the final assembly. This is a main sheet horse for the scow schooner Alma. The rod in the front is the 1.6mm rod. The one in the back is the 1mm rod. It does have the 1mm nuts on it but, as you can see, they look small compared to the 1.6mm nuts. Still, I'm happy with the results.
-
You're probably already aware of this, but just in case -- Sherline sells a wood tool rest for their lathes. It's simple to use. https://www.sherlinedirect.com/index.cfm?fuseaction=product.display&Product_ID=61&CFID=63140255&CFTOKEN=19584344 Cheers - John
- 831 replies
-
- 1
-

-
- Armed Virginia Sloop
- Model Shipways
- (and 1 more)
-
Using taper jig on Byrnes table saw
jhearl replied to Landlubber Mike's topic in Modeling tools and Workshop Equipment
Although I don't own this particular saw, I have and use a tapering jig for my old Preac. Note the lip on the end of the jig against which the stock sits. That in itself helps to push the stock through the blade. I normally stand on the right of the saw and with my right-hand fingers or a push stick held in my right hand (depending on the width of the stock) press the stock against that lip and into the taper jig while pushing the jig toward the blade with my left hand making sure the jig stays tight against the rip fence. Cheers - John -
Threads on miniature nuts & bolts
jhearl replied to jhearl's topic in Metal Work, Soldering and Metal Fittings
Just as a follow-up, Otto Frei replied after a couple of days but they only said they couldn't find any information about the thread pitch of the taps and dies they sell (which are Swiss made). My belief is that it would be different from that used by Scale Hardware. The gentleman from Scale Hardware subsequently told me that his metric nuts and bolts use the Unified National Miniature (UNM) standard. Taps and dies from 1mm up are readily and inexpensively available for that standard. I've decided I can get away with 1mm as the smallest size for this project so I've ordered some nuts from Scale Hardware and a set of taps and dies elsewhere. Whether or not I'll be successful at threading with them is another story! Thanks - John -
Joggle plank
jhearl replied to jdbradford's topic in Building, Framing, Planking and plating a ships hull and deck
It's not clear to me exactly what problem you're having. Splitting the wood seems to be one of them and that can be avoided by not cutting into the grain of the wood. For example, looking at your second photo, if you were cutting out the top edge of the plank, you'd want to be cutting from the right side to the left side. If you are cutting the bottom, you want to cut from the left side to the right side. Apart from that, I'm confused by the shape of your plank. It's wider at the left end than at the right. (Again, looking at picture 2.) It should be narrower at the left end. The whole point of this type plank is that it tapes to a point where it's too narrow (less than half its full width) and must then be continued with two planks. You might want to go back to the page on the site with planking tutorials and take a closer look at the one on "Planking a Bluff Bow" by Collin Lloyd and the Primer on Planking by David Antscherl. Take a look at the 2nd & 4th drawings on page 2 of the latter document.Those should illustrate what I'm talking about. If this didn't address the problems you're having, please post more details. Cheers - John