jhearl
-
Posts
355 -
Joined
-
Last visited
Content Type
Profiles
Forums
Gallery
Events
Everything posted by jhearl
-
Need advice - what should I build after the AVS?
jhearl replied to pdx_matthew's topic in Wood ship model kits
Be aware that with the Bluejacket kit, you won't be building frames. They start with a solid hull and slice it like a loaf of bread to make the "frames" that you will get in the kit. Take a look at their video of the Jefferson Davis kit and you'll see how they do the frames. You might consider Hannah from The Lumberyard - http://dlumberyard.com/shipkits.html It uses the Hahn style of making frames, which is different from something like the Echo cross section, but still quite challenging. I started Hannah many years ago and never finished it, but there are some pictures on my website that show what I accomplished and what it's like to build using the Hahn method. http://modelboatyard.com/hannah.html Cheers - John -
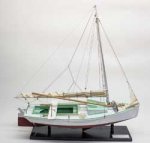
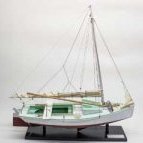
I built a pinky earlier this year using Glad Tidings as a base but modified the deck layout a good bit. I wanted more of a work boat than a yacht. You can see pictures of mine on my website - http://modelboatyard.com/pinky.html I really enjoyed building the model. It's not an especially difficult build and is, I think, a good learning model. The planking isn't too difficult, the rigging is relatively simple, and there are lots of interesting details. It took me just shy of four months to build mine, so it's something you can complete in a reasonable amount of time. The scale is large, which helps too. Cheers - John
-
Weathering Aluminum tubing
jhearl replied to b dylan's topic in Metal Work, Soldering and Metal Fittings
I worked with some sheet aluminum on a model a while back and I sanded it with 400-grit sandpaper to take the shine off. That suited my purposes. If you need it to look even dirtier, you might try adding a thin wash of gray or brown after sanding and then spray it with a matte finish to protect the wash. Cheers - John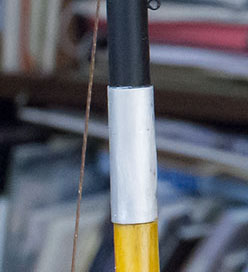
-
As Mark Twain said, more or less, the rumors or my demise have been greatly exaggerated! Still alive and kicking although a bit more slowly every year. I retired in September of last year and have been enjoying lots more time to work on models. I still maintain the website and am currently working on a scratch build of a Chesapeake Bay buyboat. Doug - looks like your BN2 is coming along well. Cheers - John
-
Mini Mill recommendations
jhearl replied to StebbinsTim's topic in Modeling tools and Workshop Equipment
The end mills that came with my Sherline go up to 3/8" (9.525mm) and I have, indeed, used that largest size. The smallest end mill is 1/8" (3.175mm) and that one gets a lot more use. However, I never found a use for a 1mm cutter in my work. I don't mean to say anything bad about Proxxon tools. I have a couple of them in addition to the mill, including the planer, which I find extremely useful. I know many people are very happy with the Proxxon mill. It would be more accurate to say that for my uses, it simply wasn't suitable and the Sherline has proven to be far more useful and versatile. I should note, too, that I mill brass and even plastic from time to time, not just wood. Also, tkay11 mentioned the speed comparison between the two. So far, I haven't run into any difficulties milling anything with the slower (2,800 RPM) Sherline. Seems to work just fine on all the woods I've tried so far. Sherline does make a 10,000 RPM pulley set for the mill, but I haven't seen a need for it to this point. Cheers - John -
Mini Mill recommendations
jhearl replied to StebbinsTim's topic in Modeling tools and Workshop Equipment
I started out with a Proxxon mill. I didn't really use it much because it is small and there are few accessories available. Last year, I bought a Sherline mill and I have used it even more than I thought I would. With the Proxxon, you can only use very small cutters, which break easily. The X-Y travel is pretty limited besides. I bought the rotary table with it as well and in addition to being very small, it's hard do do anything accurately. The table has degree markings, but no gear mechanism to move it - you just rotate it by hand, hoping you get it aligned with the degree marking closely. With the Sherline rotary table, there is a crank that allows you to turn it precisely (or you could go whole-hog and get a CNC-controlled table) and the chuck is a separate part, so you can move between the mill and the lathe by moving the chuck rather than the part. That also means you can use a 3-jaw or 4-jaw chuck as needed. With Sherline, you can get a vise base that rotates as well as a tilting table - both useful. I bought the digital readout with the mill and have found it VERY useful. In short, I wish I'd never wasted my money on the Proxxon. Now, it's just taking up space in my attic. Yes, the Sherline is considerably more expensive, but you get what you pay for. If you're considering a mill, then you're probably in the hobby for the long haul. A few years down the road you won't even remember the additional expense and you'll have a far more useful tool. Although you may not be considering a lathe, I'll mention one thing if you are. Sherline makes an 8" and a 17" lathe. I thought I'd have no need for the longer lathe so went for the smaller one for $100 less. Mistake. I could upgrade it now, but it would cost about $300 to buy the needed parts. -
The now discontinued Midwest kits had very good instructions. Model Shipways kits tend to have very good instructions. Bluejacket kits are a mixed bag. If the kit is one that Bluejacket got when it acquired Laughing Whale, the instructions can be pretty bad. (Look for KLW in the kit part number to indicate it's a Laughing Whale kit). Bluejacket's own kits tend to have good instructions. Unfortunately, none of those may be readily available where you live.
-
nails brand
jhearl replied to michael101's topic in Building, Framing, Planking and plating a ships hull and deck
No problem. The nails will be useful in any case. I looked at probably the same item of 500 nails but someone asked a question about the thickness of the nails and someone responded that they were 2mm. I doubt that's really the case - in the picture, they certainly don't look that thick. But the ones I got will be plenty for a long time to come. Cheers - John -
nails brand
jhearl replied to michael101's topic in Building, Framing, Planking and plating a ships hull and deck
I ordered these nails and they came in today. The quantity looked a lot less than 500 to me so I decided to count them. There were 238 in my package, two of which were bent and one was not well blackened. The listing does not mention a quantity - only a weight, so I can't blame the seller. I like the black coating well enough. The nails appear to be steel as I expected since, when you cut off the end, you can see silver. Just wanted folks to be aware that you probably won't get any more than I did since they're sold by weight. If you need a lot of these, you may be better off doing a web search for "PECO PEC-SL14" One site I clicked on had the same package for $2.49. I don't know what they charge for shipping. The price on Amazon is $5.88 with free shipping. Cheers - John -
nails brand
jhearl replied to michael101's topic in Building, Framing, Planking and plating a ships hull and deck
Good deal - thanks! -
nails brand
jhearl replied to michael101's topic in Building, Framing, Planking and plating a ships hull and deck
I doubt you counted these, but any guess as to how many were in the package? The listing doesn't say. Thanks - John -
I don't think it makes any difference. Any model you build should help to improve your skills. I'd suggest building the one that really excites you at the moment. I'm betting that's the cross section since you just acquired it. Cheers - John
-
You might want to try silver solder paste. It is available in different melting temperature and the flux and solder are mixed together. I just use Medium. It can be applied to small joints in very small amounts using a toothpick (cocktail stick). One source is Rio Grande They say it's best used within 6 months of purchase, but I've had mine for over a year and it's still working just fine. I use a butane torch (Blazer GB2001) to heat the metal. There are a few advantages to using silver solder. It can be blackened. You can apply tiny amounts so there's no build-up of extra solder that has to be cleaned off. It's very strong. It does take a while to get used to soldering this way, but once you get the hang of it, it's pretty easy. One key is that the parts to be soldered must touch each other and the solder will stick only where the parts actually touch. Silver solder does not fill gaps like regular solder does. The other thing to be careful of is that you can easily melt small brass pieces with the torch. That's where the practice comes in. I recently made some small shackles and on my website I show how I soldered them. In the third image, you can just barely see the solder on the joints before heating with the torch. You can't see the solder at all once they are finished. I don't think I could have done these with an iron. Because silver solder paste comes in different melting temperatures, in theory you can solder one joint with hard, then an adjacent joint with medium or easy without melting the first joint. I say in theory because I've never tried it myself. I suspect that would take even more practice. All of that said, I also use Staybright sometimes. If you're soldering a larger joint, you can cut off small pieces of the Staybright and lay them against the fluxed joint. It melts quickly and flows nicely. I still use a torch in that case. I don't use an iron at all any more. The torch provides instant heat. I also have a resistance soldering unit and there are a few times when I find it useful but I likely wouldn't buy it again if I had it to do over. It's pretty expensive. Cheers - John
- 250 replies
-
- 5
-

-
- willie l bennett
- model shipways
- (and 1 more)
-
Little Machine Shop 2" Quick Vise Review
jhearl replied to jhearl's topic in Modeling tools and Workshop Equipment
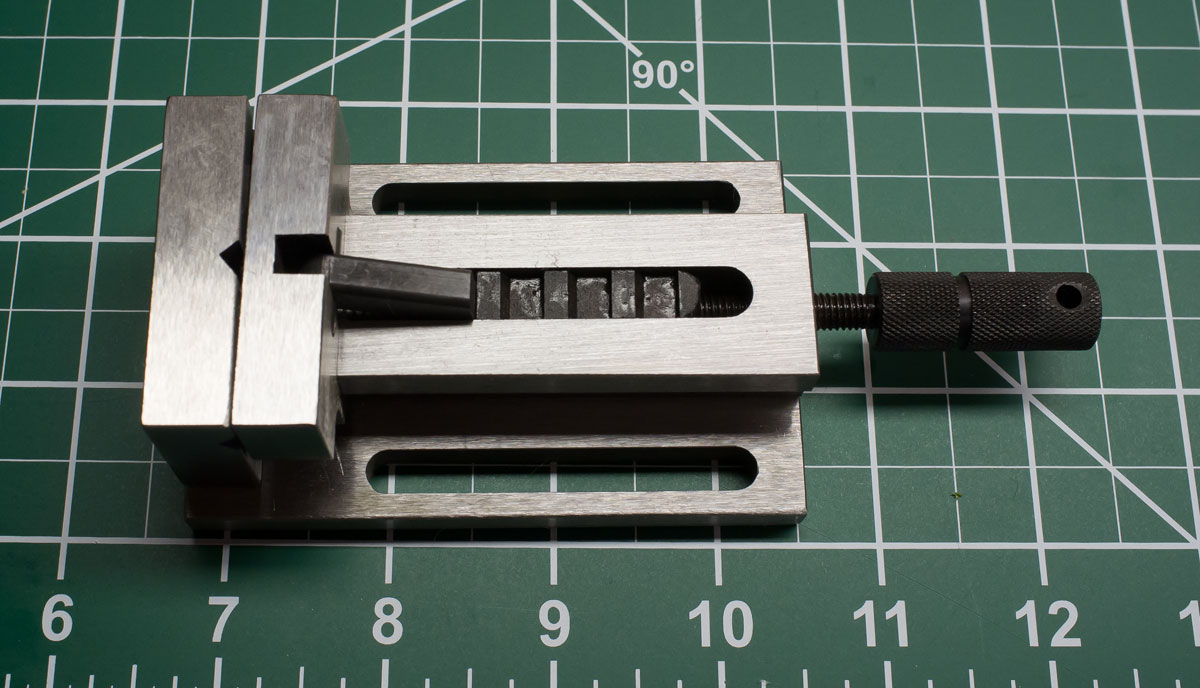
Just wanted to follow up that I contacted Little Machine Shop to let them know how unhappy I was with this vise. I got a nice reply from them as seen below: That particular vise is about the smallest and cheapest vise we sell and we make no claims on its accuracy. On the product page what we have listed in the description is the product dimensions and the sentences: “This is our smallest vise. The ratchet device makes it quick to adjust.” That’s about all we could come up with to say about this little vise. This small vise is adequate enough for some to put it to use and be quite happy with it. That said we want you to be happy with your purchases from us. You are more welcome to send the vise back for a full refund, including your original shipping charges. You should be able to put it in a USPS regional rate A box for around $12. Or, if you cover the shipping to send it back to us we will upgrade you to a 2” screwless vise (item 1591) and ship it out to you upon receipt of the 1276 vise at no extra charge. Please let me know if you would like to proceed with one of these options. I still feel like they should stop selling this thing, but that's their business. -
Little Machine Shop 2" Quick Vise Review
jhearl replied to jhearl's topic in Modeling tools and Workshop Equipment
I don't think the product is defective in the sense that getting another one like would be any better. It's just a poorly designed and poorly made piece of junk. Believe me - it looks a lot better in the pictures than it is in reality. If you tried to slide the jaw back and forth, you'd see how bad it is. I have a screwless vise for my mill, but I wanted a vise for the bench that is easier to adjust with a handle rather than always trying to find the hex wrench. This is not the answer. I have one of the cheap Microlux/Proxxon vises and it's a lot better than this thing. -
Little Machine Shop 2" Quick Vise Review
jhearl replied to jhearl's topic in Modeling tools and Workshop Equipment
You're right - the vise is not designed to allow the jaw to be retracted with the screw and I admit I didn't understand that when I bought it. If I had, I wouldn't have bought it in the first place. Of course, some preservative is necessary, but having to completely disassemble the vise before even being able to use it is a bit of an annoyance and strikes me as a good deal more preservative than really necessary. I was lucky I had metric hex wrenches. A bit of emery paper would not save this thing - not with the jaw being as loose on the base as it is. It wouldn't be worth my time to even try. I made a mistake in buying the thing - I just want to warn others not to do the same. I wouldn't even use it if someone had given it to me, let alone having thrown good money into it. -
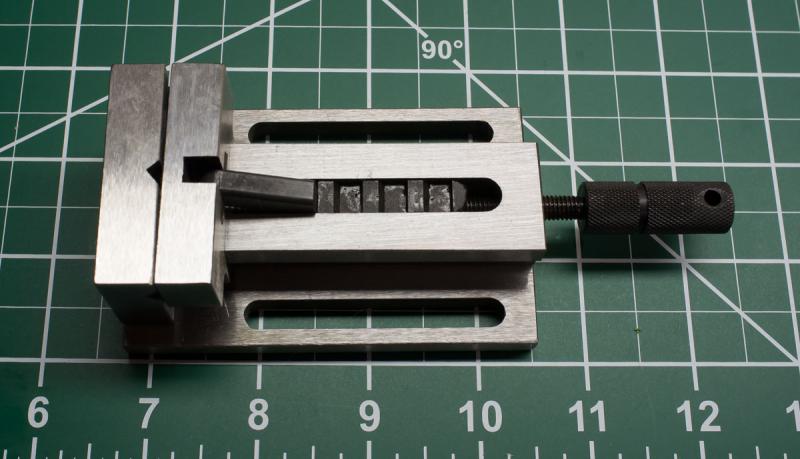
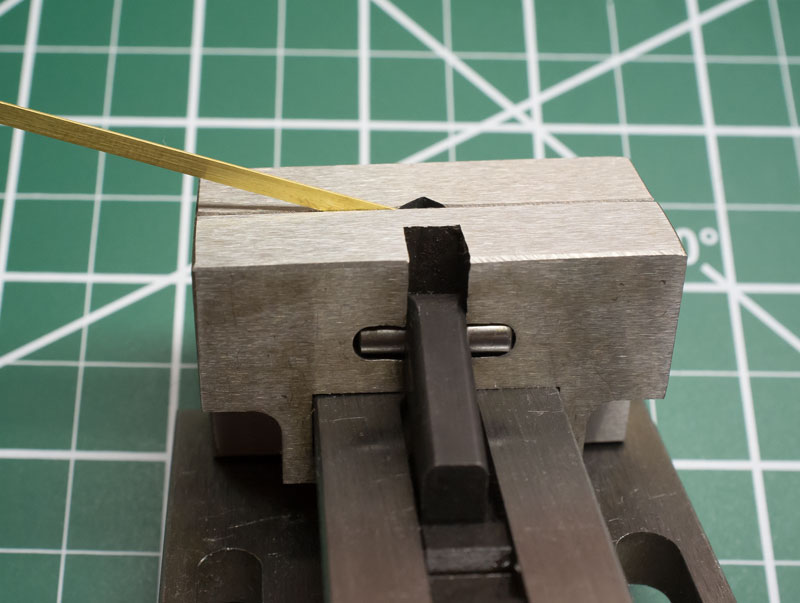
I recently purchased the 2" Quick Vise, #1276 from Little Machine Shop. Thought I'd give a quick review. Here's the "executive summary" - DO NOT WASTE YOUR MONEY!! The vise arrived coated with a thick, sticky preservative. I had to completely disassemble the vise to clean it, which required two sizes of metric hex wrenches. In the middle of the vise, there is a sliding part that has to move backwards and forwards to allow you to tighten the moveable jaw. That sliding part is meant to move backwards, pushed by a small, weak spring, when you turn the handle counter clockwise. Because of the preservative, that slide wouldn't move at all. Hence the need for disassembly. The handle itself is not even attached to the sliding part - it just fits into a hole in the end of it. Before I cleaned the vise, the handle completely unscrewed from the body of the vise and I thought it was broken until I realized how it is meant to work. As can be seen in the picture below, there is a lever on the back of the moveable jaw. It is meant to sit in one of several slots in the sliding piece, allowing for quick widening. Unfortunately, there is no connection between the jaw and the adjusting screw, so when you want to open the vise, the jaw has to be moved back by hand. The machining on the vise is terrible. Neither the sliding piece or the moveable jaw move freely because they are so rough. I'm guessing the vise is made to the lowest possible standards in China although there is no marking of any kind on the vise. As well, the handle is quite thin, making it hard to tighten the vise. The worst part of the vise is that the moveable jaw machining is so sloppy, if you just snug it up to the fixed jaw, you can open a 1/16" wide gap at the opposite end of the jaws. (Should be visible in the picture above.) That alone makes it pretty much worthless, but on top of that, it appears that the jaws aren't even machined flat. I clamped a piece of brass bar stock in the vise such that one end was right next to the V in the moveable jaw and the bar stock was fully clamped in the left side of the vise. I tightened the jaw as hard as I could and I was able to easily lift up the left end of the bar stock with my finger. It only clamped in the center so that the bar stock pivoted on the tiny spot where it was clamped. If a vise can't even hold the piece you are working on, it has no value. So, bottom line, this is a useless piece of junk. The vise costs $39.95 and on top of that is $12.40 shipping. Little Machine Shop's return policy is that if you return it, you get to pay the return shipping and don't get a refund on the original shipping. So if I returned it, I'd be out $25 anyway. Hardly worth the effort for what would amount to a $15 refund. Some time back, I bought an A2Z quick-change tool post for my Sherline lathe and once I modified it to fit, I've been quite satisfied with it. But I definitely am not happy with this vise and would advise anyone to steer well clear of this one. I think Little Machine Shop is doing disservice to their customers and to their business by selling this. Cheers - John
-
Do a Google image search on "mast hoops" and look to see how mast hoops are attached on real boats. Then you can decide for yourself what size and color thread would be appropriate. I can tell you in advance it will be thin. As for the seams, they are often sewn on model sails despite the fact that they are typically out of scale. If, for example, your sewing machine has a stitch length of 1/16" and the scale of the boat is 1:24, that means there would be 8 stitches per foot on the real boat. Very much out of scale. But many modelers like the look anyway. It's a matter of personal taste. Cheers - John
- 1 reply
-
- 2
-
-
The planking booklet that brought it all together for me is "Planking the Built-Up Ship Model" by Jim Roberts, available from Model Expo http://www.modelexpo-online.com/product.asp?ITEMNO=MSB113 I read the book several times and confess I didn't really understand it until I got a small plank-on-bulkhead hull and planked it using the techniques in the book. For some reason, the "doing" versus just the "reading" made it all understandable. Cheers - John
-
If you have a computer and a scanner you can scan parts of the original plans, print what you scanned (flip it if necessary), and cut out what you need to put onto the wood or simply use as a reference. For something like a rabbet on a false keel, you can put some carbon paper under the printout to transfer the lines to the false keel. Or use a pin to prick a series of holes along the line in the drawing and then draw between the pin pricks on the false keel with a fine pencil. I often will take the scanned printout of some part and rubber-cement it to a piece of wood to get the size/shape I need. Cheers - John
-
Something I've used is Mod Podge (available in craft stores and even in "dollar" stores. Comes in a gloss finish. It's a white liquid in the bottle but dries clear. It does tend to shrink as it dries, so you may have to apply twice and it takes a good 24 hours or more to dry.
-
Airbrush
jhearl replied to Mike Dowling's topic in Painting, finishing and weathering products and techniques
You might want to take a look at this site - Don's Airbrush Tips - I found it quite helpful. Earlier this year, I bought an Iwata Medea Neo TRN-1. It comes with a ,35mm tip and I found it to be too small for me. I really like the design but the coverage was just too narrow and it tended to clog easily. I wound up changing it to a .50 tip and now it works like a dream, but that was not a cheap thing to do. The TRN-2 comes with a .50 tip to begin with so it might be a consideration. With the .50 tip, I can spray Vallejo Model Air and Testor's Model Master acrylics right out of the bottle. I just find it easier to use this style gun as opposed to the style with a trigger on top. Cheers - John -
Another very good book on fishing schooners in general is "The American Fishing Schooners 1825-1935" by Howard I. Chapelle. It is available on Amazon but it is not cheap - $43 new - and even used copies are not inexpensive. It is full of incredible detail in its 690 pages. Perhaps a book that is only useful to those who have a real love for this type boat. Back when I was building Bluejacket's Smuggler, I found it to be invaluable and well worth the cost. Cheers - John
- 24 replies
-
- 2
-
-
- three sisters
- schooner
- (and 1 more)
-
Determining thread size by model scale
jhearl replied to David Goulden's topic in Masting, rigging and sails
Yes - you are correct - the blocks on the real BN2 are internally stropped. The goal of the practicum was to help novice builders put together a specific kit (and Ships in Scale elected the model, I didn't). About the only option for model-size internally stropped blocks are the pot-metal ones available at Bluejacket and they would add a good bit to the cost of the kit. So I used the blocks that were included with the kit and stropped them the way AL says to - with wire. Rope stropping would not be any more accurate and would certainly be more difficult for many. On the pinky I'm building currently, I'll be rope stropping blocks from Syren. Those blocks are far superior to the normal kit blocks and rope stropping would be appropriate for a boat of that type. Cheers - John -
Determining thread size by model scale
jhearl replied to David Goulden's topic in Masting, rigging and sails
The AL Bluenose 2 kit is at 1:75, so it’s reasonably close to your schooner. That kit uses only a few sizes of lines. Most of the standing rigging is 0.5mm (diameter). A couple of exceptions are the deadeye lanyards (they call for 0.25mm) and the ratlines (again, they call for 0.25mm but I think button thread works well here). Most of the halyards and other running rigging calls for 0.15mm line. It wouldn’t hurt if the main sheet was a bit thicker. The shrouds on the real BN2 were wire rope, so you’ll want to serve the shrouds where they loop around the mast head and also at the deadeyes. If it would be of any help, you are welcome to take a look at the last part of my practicum on building the AL BN2 kit - http://modelboatyard.com/Bluenose2_Articles/Bluenose2-Part-8.pdf I go into a bit more detail there. Cheers - John