mtbediz Posted February 20, 2019 Share #121 Posted February 20, 2019 Hello Caroline, you did a great job with San Francisco, congratulations. Have you completed this model? If so, can you put a picture of her? Quote Mustafa Current Build, USS Constitution 1:76 Scratch https://modelshipworld.com/topic/34741-uss-constitution-by-mtbediz-176/#comment-991858 Finished, HM Cutter Alert 1777. Scratch https://modelshipworld.com/topic/31859-hm-naval-cutter-alert-by-mtbediz-finished-136-scale/#comment-902949 Finished, USF Essex, Scratch https://modelshipworld.com/topic/25954-usf-essex-by-mtbediz-150/ Finished, Santa Maria, Mantua Kit https://modelshipworld.com/topic/23113-santa-maria-by-mtbediz-finished-mantua-150/?tab=comments#comment-683297 Finished, HMS Pickle (Scratch) https://modelshipworld.com/topic/21684-hms-pickle-by-mtbediz-140-finished/?tab=comments#comment-651070 Finished, Santa Maria https://modelshipworld.com/index.php?/topic/15541-santa-maria-by-mtbediz-handmade-kit-by-a-friend/&do=findComment&comment=483052 Finished, San Francisco II, AL Kit https://modelshipworld.com/topic/17344-san-francisco-ii-by-mtbediz-finished/ Link to comment Share on other sites More sharing options...
vulcanbomber Posted March 11, 2019 Author Share #122 Posted March 11, 2019 (edited) On 2/20/2019 at 7:20 PM, mtbediz said: Hello Caroline, you did a great job with San Francisco, congratulations. Have you completed this model? If so, can you put a picture of her? Hello mtbediz, I hadn't actually realised I hadn't completed the restoration on my San Fran build log. I will try and complete it so all the information I had is replaced. I left it previously with how I attached the bridles and bowlines to the sails, I don't think these were in the kit plans. It has been a while since I completed the ship, so I will do my best to remember what I did. The bridles and bow lines were attached to the main sail and top sail on both the main and fore mast. This is the bridle on the main mast topsail This sail has the most parts to make the bridle. 1. First make four small loops at the edge of the sail, the upper most one about a third of the way up the sail. 2. Next attach some line to the top loop, take it through the middle of a small bead and attach the other end to the second loop, do the same with the bottom two loops. 3. Then take another length of line and attach one end to the top bead (I tied it through the hole), then take the other end, thread it through another bead and then attach to the bottom bead. Attach the bowline to the last bead (shown in red) 1. 2.3. Repeat on the other side of the sail. The other three sails are done in a similar way, the only difference is the number of loops and beads used for each bridle. 4.The main sail on the main mast and the top sail on the fore mast has 3 loops on the sail edge and 2 beads. 5.But the bottom sail on the fore mast only has two loops on the sail edge and one bead: 4.5. Now the bridles are attached to the sails, we can deal with the bowlines (shown in red in the diagrams above). The bowline from the topsail on the main mast went to a double block attached to the stay, then down to a belaying pin on the fore deck, as can be seen below. The bowline from the main sail went to a single block attached to the edge of the shrouds on the fore mast, then down to a belaying pin: The bowline from the fore top sail went to a double block attached to the stay then down to a belaying point in the beak: The bowline from the lower sail on the fore mast went to another double block attached to the stay (a bit below the one for the top sail) taken under it's sail and belayed at a point by the fore mast rack (I didn't have room to belay it in the beak). That is how I did the bridles and bow lines. Edited March 11, 2019 by vulcanbomber src and mtbediz 2 Quote First Completed Build: San Francisco (Original Version) Current build: Victory Models HMS Pegasus Cross Stitch Project (Finished): Battle Of Agamemnon and Ca Ira Cross Stitch Project : Victory & Temeraire Link to comment Share on other sites More sharing options...
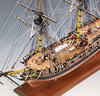
vulcanbomber Posted March 11, 2019 Author Share #123 Posted March 11, 2019 Next was the tack and sheet lines from the lower sail on the fore mast and the main sail on the main mast. The tacks from the sail on the fore mast went under the beak and through the small piece I had attached there earlier before going to a belaying point on the rack in the bow. The sheet line was attached to an eyebolt on the side of the hull, passed through a block attached to the sail and belayed in the waist (highlighted in blue). The tack line from the main sail went through the fairlead I made in the hull and to the belaying point next to it. The sheet line was attached to an eyebolt on the side of the hull at the stern, passed through a block attached to the sail and belayed on the quarter deck. (highlighted in blue) I think that is all the extra's I put on the ship, the rest of the rigging was on the plans. (as far as I can remember, it was about 8 years ago!!) The finished ship GrandpaPhil, john2013, mtbediz and 1 other 4 Quote First Completed Build: San Francisco (Original Version) Current build: Victory Models HMS Pegasus Cross Stitch Project (Finished): Battle Of Agamemnon and Ca Ira Cross Stitch Project : Victory & Temeraire Link to comment Share on other sites More sharing options...

Recommended Posts
Join the conversation
You can post now and register later. If you have an account, sign in now to post with your account.